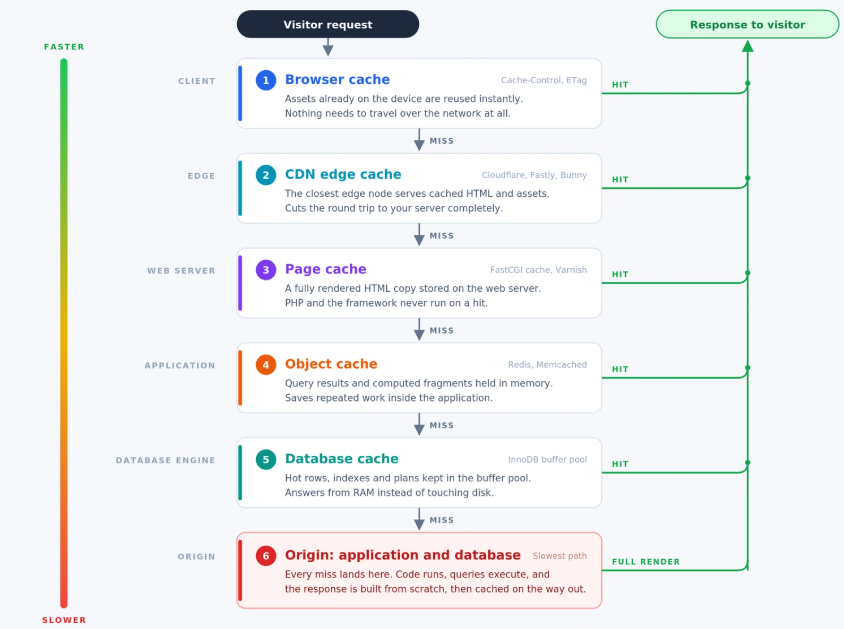
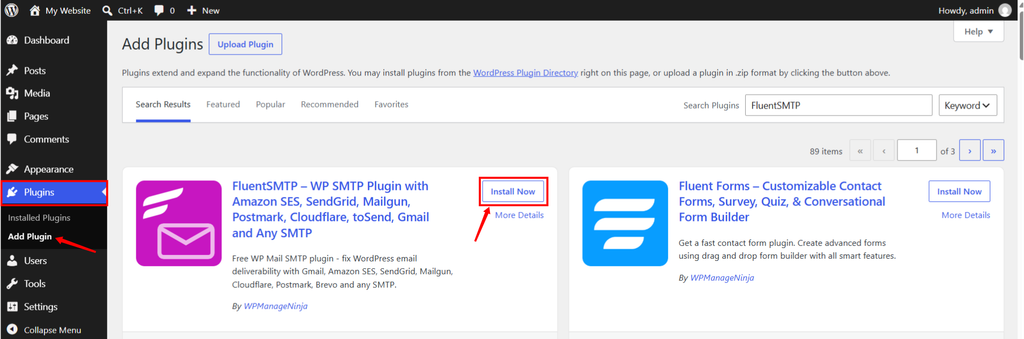
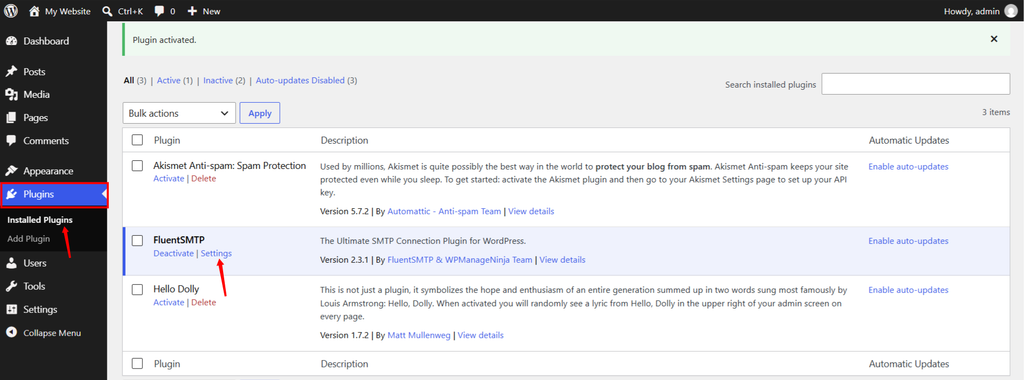
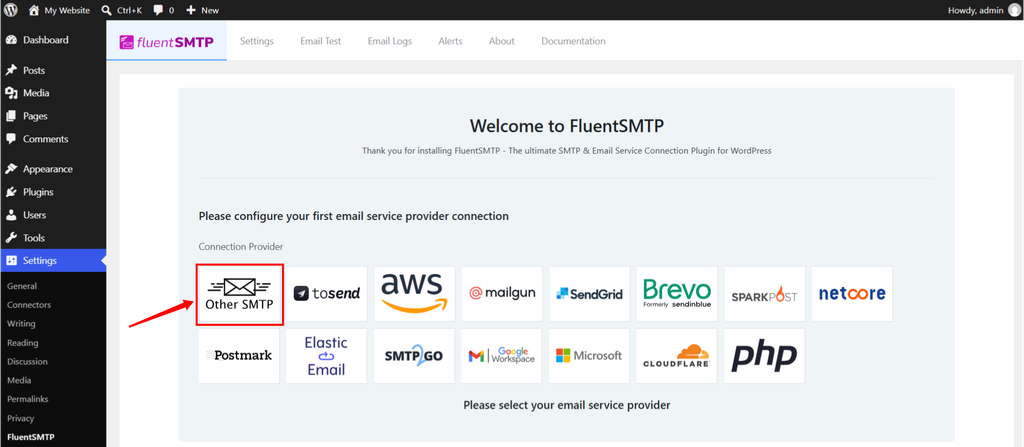
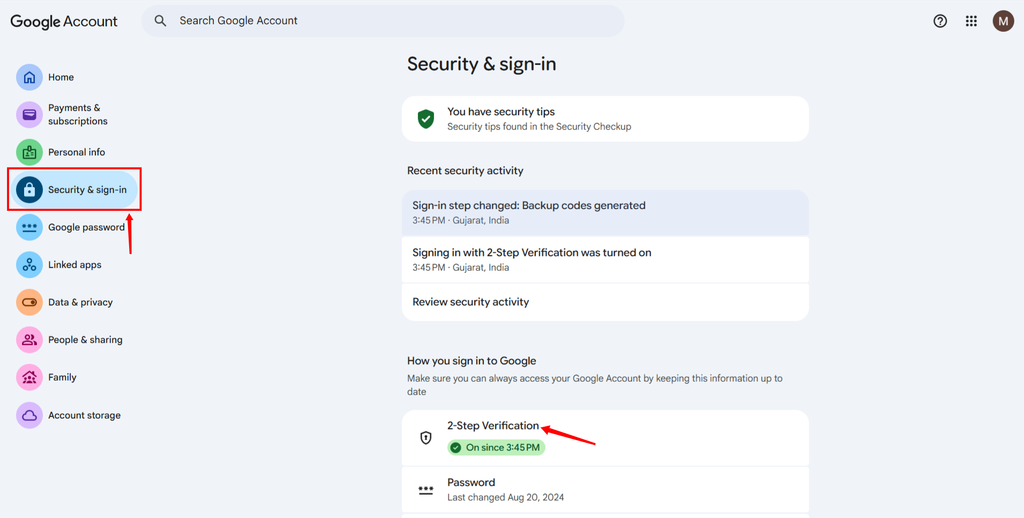
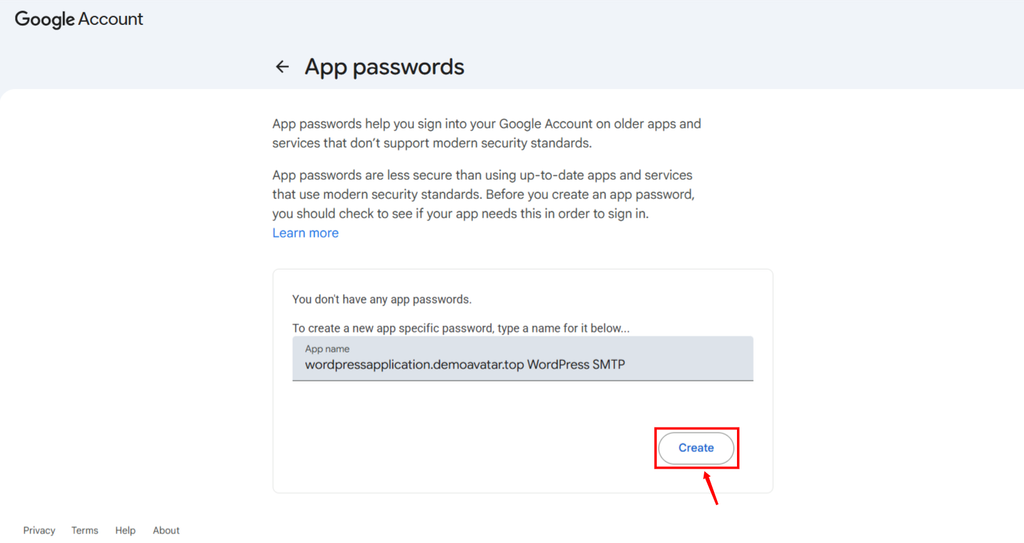
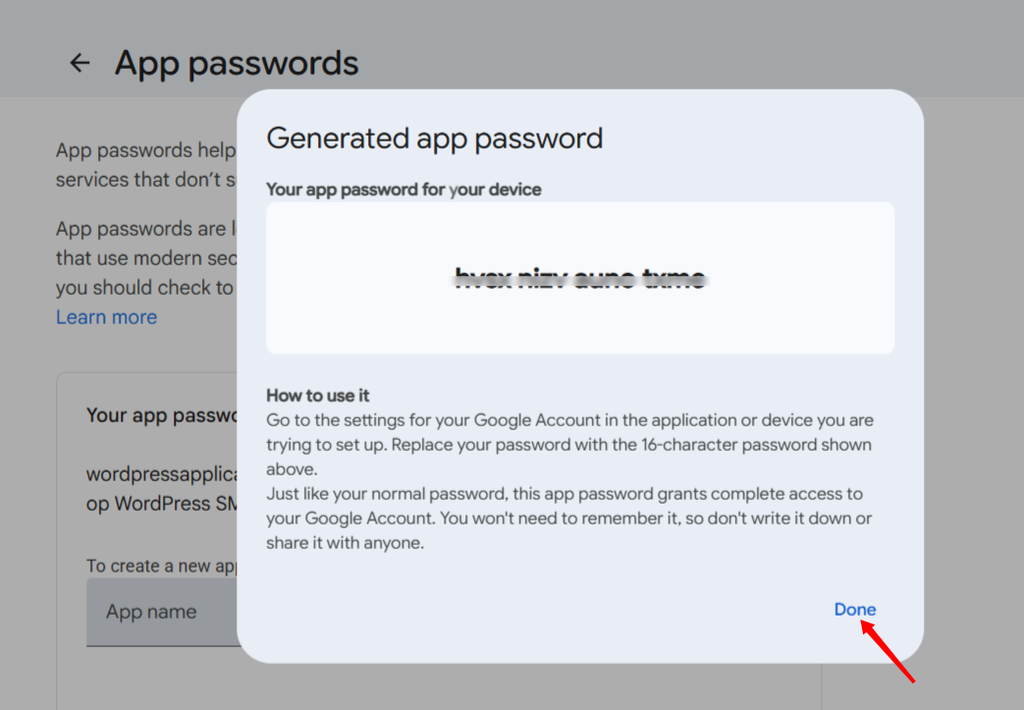
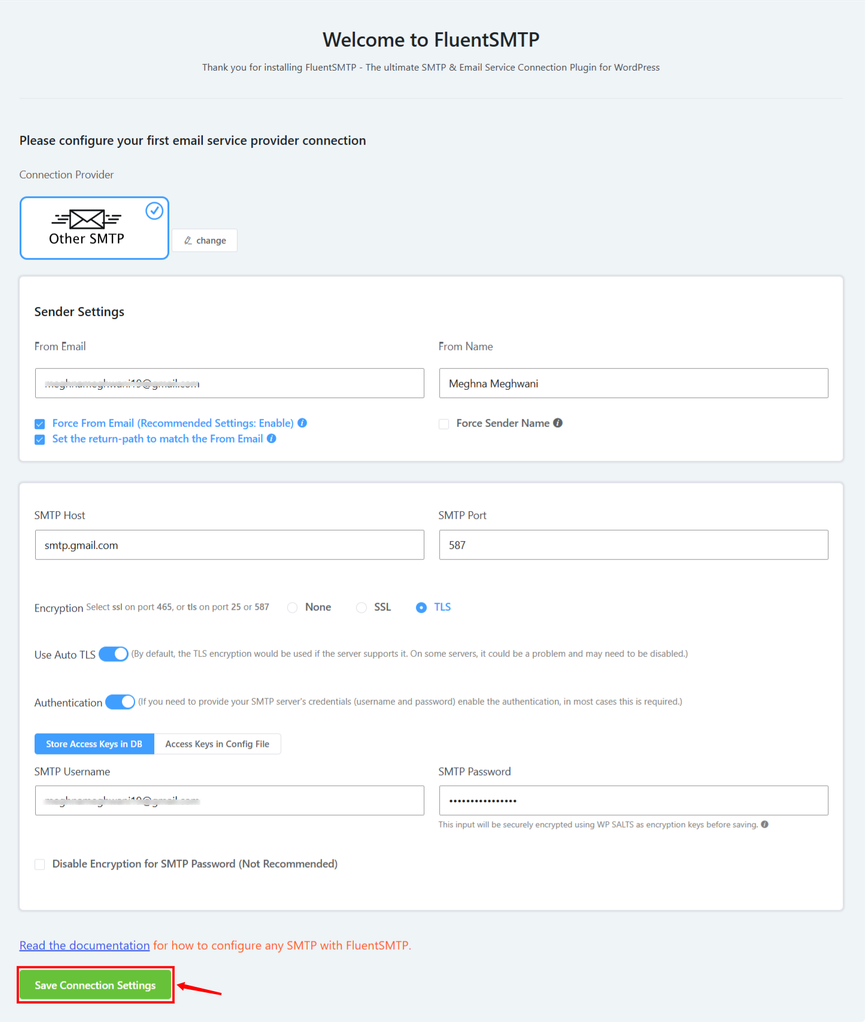
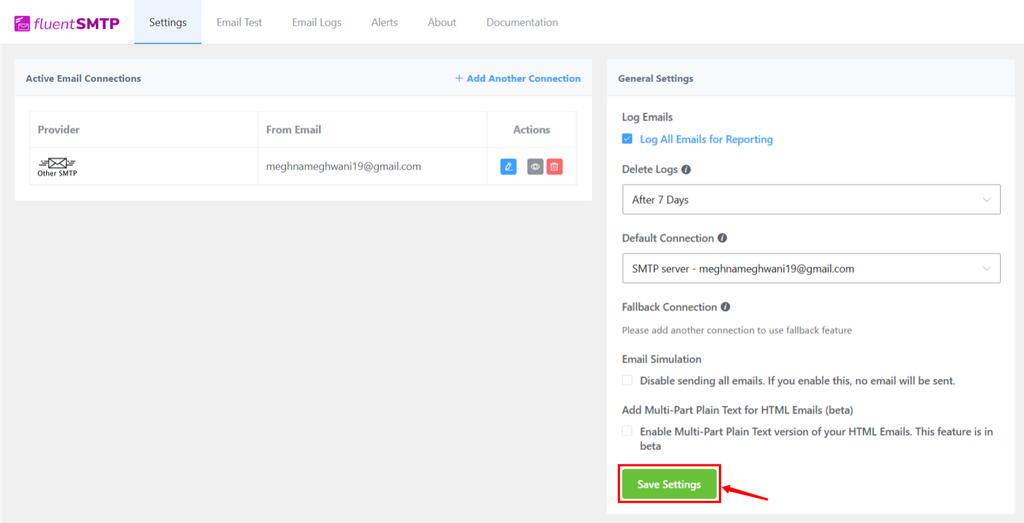
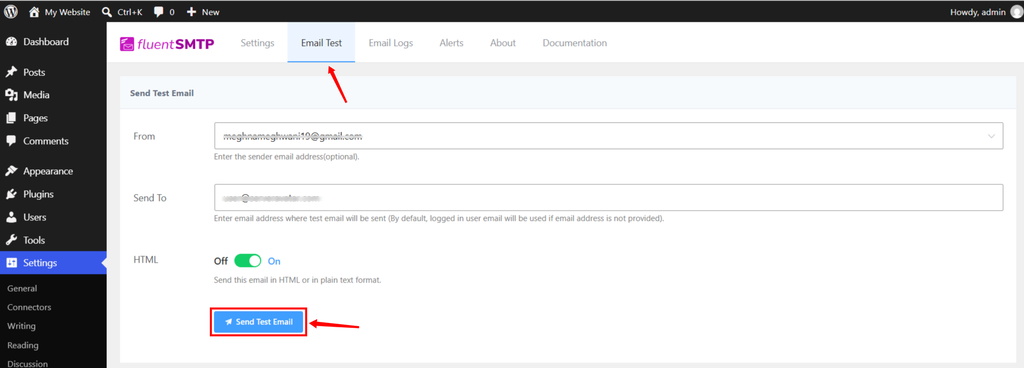
Generated by All in One SEO Pro v5.0.1.1, this is an llms-full.txt file, used by LLMs to index the site. # ServerAvatar The first, Fully Hybrid Cloud Hosting Solution. ## Posts ### [Blog](https://serveravatar.com/blog/) **Published:** February 7, 2025 **Author:** Gorakh Sirsikar --- ### [tar vs ZIP in Linux: Which Compression Format Should You Use?](https://serveravatar.com/tar-vs-zip/) **Published:** September 5, 2026 **Author:** Meghna Meghwani **Content:** [![Blog banner - ServerAvatar - tar vs ZIP](https://serveravatar.com/wp-content/uploads/2025/09/728_90-Banner-3-1024x127.png)](https://serveravatar.com/?ref=blog)If you have ever downloaded a Linux backup ending in `.tar.gz` and wondered why it was not simply a `.zip`, you are not alone. The tar vs ZIP comparison matters because both formats can bundle a directory into one convenient file, reduce storage use, and are easy to extract. That makes the choice look less important than it really is. The practical difference appears when the archive contains Linux permissions, symbolic links, many small files, or data that needs to move to Windows or macOS. Pick the wrong format and the archive may still open, but it may not restore exactly the way you expected. I compared tar vs ZIP in Linux with a small reproducible test instead of relying only on feature lists. In this guide, I will explain what each tool actually does, show the commands I use, share the test results, and give you a direct recommendation for backups, file transfers, website files, and cross-platform sharing. ## TL;DR - Use .tar.gz for Linux server backups, application directories, deployment packages, permissions, and symbolic links. - Use .zip when the archive will be opened by people on Windows, macOS, and Linux, especially for ordinary documents or media. - A plain .tar file is an archive, not a compressed archive. Add gzip (.tar.gz) when you also want compression. - ZIP compresses files individually. Tar usually combines the files first, and gzip compresses the combined stream. - Neither format replaces a proper backup plan. Always test extraction and keep copies away from the source server. ## TAR.GZ vs ZIP: Choosing the Right Format For day-to-day Linux server work, .tar.gz is my default. It fits the way Linux stores directory structures and metadata, it handles symbolic links properly, and it is available on practically every Linux server I work with. ZIP is still the better choice in one common situation: I am sending files to someone who should be able to open them without thinking about Linux tools. A ZIP attachment containing PDFs, images, or exported reports is easy for almost anyone to use. Here is the decision in one table: **Requirement****Better choice****Why****Linux server backup**.tar.gzBetter fit for permissions, ownership details, links, and directory trees**Website or application files**.tar.gzPreserves the Linux-oriented structure more reliably**Sharing with Windows users**.zipBuilt-in support and familiar workflow**Opening one file without extracting everything**.zipFiles are compressed separately, which makes random access easier**Compressing many similar text files**Often .tar.gzgzip can find repetition across the combined tar stream**Already-compressed photos or videos**EitherExtra compression is usually small**Append files to an uncompressed archive**.tarTar can update a plain archive; compressed tar archives are different**My rule is simple:** if the archive will return to a Linux server, I use tar. If it is mainly for people to download and open on different desktop systems, I use ZIP. ## tar is an archive format, not a compression method Here most of the confusion occurs. The name tar comes from “tape archive.” Its basic job is to collect multiple files and directories into one archive while recording information about those entries. A file named project.tar is usually not compressed. It is just one archive containing the project files. The GNU tar format can record file modes, user and group information, modification time, directories, symbolic links, and other file types. The [GNU tar format documentation](https://www.gnu.org/software/tar/manual/html_node/Standard.html?ref=serveravatar.com) describes these fields in detail. Compression is normally added as a second step, although the tar command can perform both operations in one command: ``` tar -czf project.tar.gz project/ ``` ``` tar -czf project.tar.gz project/ ``` **The options mean:** - **-c:** create a new archive - **-z:** pass the archive through gzip compression - **-f:** use the following archive filename That produces a gzip-compressed tar archive, commonly written as .tar.gz or .tgz. The structure is essentially: ``` files and directories -> tar archive -> gzip compression -> project.tar.gz ``` ``` files and directories -> tar archive -> gzip compression -> project.tar.gz ``` I find it helpful to keep these two jobs separate in my head. Tar handles the collection and metadata; gzip handles the compression. Once that clicks, filenames such as .tar.bz2 and .tar.xz also make more sense: tar is still creating the archive, but another compressor is reducing its size. **Creating, listing, and extracting a tar archive** - Create a gzip-compressed archive: ``` tar -czf website-files.tar.gz /var/www/example.com ``` ``` tar -czf website-files.tar.gz /var/www/example.com ``` - List its contents without extracting: ``` tar -tzf website-files.tar.gz ``` ``` tar -tzf website-files.tar.gz ``` - Extract it into a specific directory: ``` mkdir -p /tmp/website-restore tar -xzf website-files.tar.gz -C /tmp/website-restore ``` ``` mkdir -p /tmp/website-restore tar -xzf website-files.tar.gz -C /tmp/website-restore ``` Before extracting an unfamiliar archive, I normally list it first. It takes a few seconds and lets me catch unexpected absolute paths or an extra top-level directory before files land in the wrong place. ## ZIP combines archiving and compression in one format ZIP takes a different approach. It stores multiple entries in one container and normally compresses each file separately. You do not need to pair it with gzip or another compression tool. - On Ubuntu, the command-line packages may need to be installed first: ``` sudo apt update sudo apt install zip unzip ``` ``` sudo apt update sudo apt install zip unzip ``` - Create a ZIP archive recursively: ``` zip -r website-files.zip website-files/ ``` ``` zip -r website-files.zip website-files/ ``` - List the contents: ``` unzip -l website-files.zip ``` ``` unzip -l website-files.zip ``` - Extract into a chosen directory: ``` mkdir -p /tmp/website-restore unzip website-files.zip -d /tmp/website-restore ``` ``` mkdir -p /tmp/website-restore unzip website-files.zip -d /tmp/website-restore ``` The -r matters. Without it, zip will not recursively include everything inside nested directories. This is a small detail, but it is exactly the kind of mistake that creates an archive which looks valid until restore time. **ZIP’s individual-file design has a useful advantage:** An extraction tool can reach one member without processing one long compressed stream from the beginning. That is convenient when someone only needs a single file from a large collection. Compatibility is the other big win. Current Linux desktops, Windows, and macOS can all work with ZIP files easily. For a folder of invoices, screenshots, or reports, I personally would not complicate the handoff with .tar.gz unless Linux metadata mattered. ## tar vs ZIP in Linux: the differences that actually matter The extensions are not the interesting part. What matters is what happens to your files during compression and restoration. ### Compression behavior and archive size With .tar.gz, tar first creates one continuous stream from the directory, then gzip compresses that stream. If hundreds of text or configuration files contain similar strings, gzip can potentially use repeated patterns across those file boundaries. ZIP generally compresses every file as a separate entry. That makes individual access easier, but it can miss some repetition that exists across a collection of small, similar files. This does not mean .tar.gz will always be smaller. A directory full of JPEG, MP4, PDF, or other already-compressed data may barely shrink in either format. Compression level, tool version, file sizes, and the actual content all matter. ### Permissions, ownership, and symbolic links For Linux backups, metadata is often more important than saving another megabyte. Executable scripts need their execute bit. Private configuration files may need restrictive modes. Symbolic links should still be links after restoration, rather than becoming copied files. Tar was designed around this sort of filesystem information. In my test, the .tar.gz extraction restored the symbolic link as a symbolic link. With the default zip -r command, ZIP followed that link and stored the target content instead. Info-ZIP offers -y on Unix to store symbolic links as links, but a recipient’s extraction tool and operating system still affect the result. ZIP can store some Unix metadata, and Linux ZIP tools can preserve more than people sometimes assume. Still, I would not make an ordinary ZIP workflow my first choice for a faithful Linux server restore. Cross-platform extraction tools do not all interpret Unix-specific metadata in the same way. After extraction, verify rather than assume: ``` find /tmp/website-restore -maxdepth 2 -type l -ls stat /tmp/website-restore/path/to/script.sh ``` ``` find /tmp/website-restore -maxdepth 2 -type l -ls stat /tmp/website-restore/path/to/script.sh ``` If ownership is important, remember that restoring the original owner may require root privileges. An archive can contain ownership information without the current user having permission to apply it. ### Portability and ease of use ZIP wins for casual cross-platform sharing. A non-technical recipient can usually double-click it and extract the files. .tar.gz support is also common now, but ZIP remains the safer assumption when you do not control the recipient’s system. On Linux servers, the balance shifts. Tar is commonly installed by default, its options are familiar to administrators, and .tar.gz is standard across source packages, deployment bundles, and backups. I checked the workflow from both sides, and this is the distinction I would use: - Machine-to-machine or server-to-server: .tar.gz - Server-to-person across mixed desktop systems: .zip ### Updating and accessing archive contents A plain tar archive can be updated with operations such as appending another file: ``` tar -rf logs.tar latest.log ``` ``` tar -rf logs.tar latest.log ``` If ownership is important, remember that restoring the original owner may require root privileges. An archive can contain ownership information without the current user having permission to apply it. That does not work the same way with a gzip-compressed .tar.gz, because the archive is wrapped in one compressed stream. In practice, I usually rebuild a compressed tar archive instead of trying to modify it in place. ZIP is friendlier when entries need to be added or replaced: ``` zip reports.zip september-report.csv ``` ``` zip reports.zip september-report.csv ``` ZIP is also more convenient for extracting a single known member: ``` unzip reports.zip september-report.csv ``` ``` unzip reports.zip september-report.csv ``` You can extract a selected member from a tar archive too: ``` tar -xzf website-files.tar.gz website-files/config/app.conf ``` ``` tar -xzf website-files.tar.gz website-files/config/app.conf ``` The practical distinction is that gzip compression is stream-oriented, whereas ZIP keeps a directory of individually compressed entries. For routine full restores, that difference may not matter. For repeated access to individual files inside a large archive, it can. ## Which format should you use for common Linux tasks? There is no need to turn every archive decision into a benchmark. The intended use usually gives the answer. ### Linux server and website backups Choose .tar.gz for a filesystem backup of website code, uploaded files, deployment scripts, or server configuration. It is the more natural Linux format and is less likely to surprise you around links and permission bits. For a typical website archive, I would use: ``` tar -czf example.com-files-2026-09-05.tar.gz /var/www/example.com ``` ``` tar -czf example.com-files-2026-09-05.tar.gz /var/www/example.com ``` Do not treat that command as a complete live-website backup. A database-backed application also needs a consistent database dump, and files that are changing during the archive process can produce an inconsistent recovery point. Store backups outside the server and test a restore periodically. ### Deployment packages and configuration directories Choose .tar.gz when a deployment bundle contains shell scripts, executable files, symlinks, or Linux-specific configuration. I also prefer it when moving an application directory between two Linux hosts because the intent is restoration, not merely sharing. One caution: avoid archiving secrets into a deployment package just because the command makes it easy. Check for .env files, private keys, backup credentials, and application-generated cache directories. Exclude what should not travel: ``` tar -czf release.tar.gz \ --exclude='.env' \ --exclude='storage/logs/*' \ --exclude='node_modules' \ my-application/ ``` ``` tar -czf release.tar.gz \ --exclude='.env' \ --exclude='storage/logs/*' \ --exclude='node_modules' \ my-application/ ``` I like to list the finished archive immediately afterward: ``` tar -tzf release.tar.gz | less ``` ``` tar -tzf release.tar.gz | less ``` That quick check catches accidental paths before the package leaves the server. ### Documents, images, and files for clients Choose ZIP for ordinary downloads and client hand-offs. If the recipient only needs documents, exported data, images, or other regular files, Linux ownership and symbolic links are irrelevant. Ease of opening the archive matters more. For example: ``` zip -r client-assets.zip client-assets/ ``` ``` zip -r client-assets.zip client-assets/ ``` If the folder mostly contains JPEG images and MP4 videos, do not expect a dramatic size reduction. Those formats are already compressed. ZIP still adds value by putting everything into one downloadable file. ### Large sets of similar text files Try .tar.gz first for logs, source code, CSV exports, and configuration collections. Because gzip sees the combined tar stream, it can take advantage of repetition across files. My test directory was deliberately mixed, yet .tar.gz still came out a little smaller than ZIP. If storage cost or transfer time matters at scale, repeat the comparison with real production-like data and several runs. A tiny synthetic test should guide a question, not settle it forever. ### When no compression is useful Sometimes plain .tar is the right answer. On a fast local network, you may care more about low CPU use than reducing bytes. A plain tar stream is also useful in pipelines: ``` tar -cf - application/ | ssh user@backup-server 'tar -xf - -C /backups/application' ``` ``` tar -cf - application/ | ssh user@backup-server 'tar -xf - -C /backups/application' ``` This streams the archive over SSH without first creating a local archive file. The connection is encrypted, but the data is not compressed by this command. Depending on your data and network, you can add compression deliberately rather than automatically. ## Safe commands I would keep nearby **Task****tar** **ZIP****Create**tar -czf archive.tar.gz directory/zip -r archive.zip directory/**List**tar -tzf archive.tar.gzunzip -l archive.zip**Extract**tar -xzf archive.tar.gzunzip archive.zip**Extract elsewhere**tar -xzf archive.tar.gz -C /targetunzip archive.zip -d /target**Test/read archive**tar -tzf archive.tar.gz > /dev/nullunzip -t archive.zip**Exclude a path**tar -czf archive.tar.gz –exclude=’cache’ directory/zip -r archive.zip directory/ -x ‘\*/cache/\*’Be careful with archive filenames and source paths. A typo can place the archive inside the directory being archived, or extract files into your current working directory when you expected a new folder. For untrusted archives, I use a new empty directory, inspect the member list, and extract as an unprivileged user. Do not casually run sudo tar -x… on an archive you did not create or verify. [![Blog banner - ServerAvatar](https://serveravatar.com/wp-content/uploads/2025/09/728_90-Banner-1-1024x127.png)](https://serveravatar.com/?ref=blog)## Common mistakes I see with tar and ZIP **Calling `.tar` a compressed file** A plain tar archive may be slightly larger than the source directory because it adds headers and block padding. If size reduction is the goal, use `.tar.gz` rather than `.tar`. **Forgetting recursive mode with ZIP** Use `zip -r` for a directory. Then run `unzip -l archive.zip` and confirm the nested content is present. **Trusting the extension instead of testing the archive** A filename can be wrong or a transfer can be incomplete. Test the actual archive: ``` tar -tzf archive.tar.gz > /dev/null && echo "tar archive is readable" unzip -t archive.zip ``` ``` tar -tzf archive.tar.gz > /dev/null && echo "tar archive is readable" unzip -t archive.zip ``` These checks confirm that the tools can read the archive. For important backups, go further and perform a test restoration. **Expecting compression to protect sensitive data** Compression is not encryption. A `.tar.gz` archive has no built-in password layer. Traditional ZIP password protection also has compatibility and security caveats, depending on the encryption method and tool used. For confidential server data, use a properly designed encryption workflow and manage keys separately. Do not assume an unfamiliar extension makes an archive private. **Ignoring free disk space during extraction** The compressed size is not the restored size. Check the destination filesystem before extraction: ``` df -h /target/path ``` ``` df -h /target/path ``` This matters when an archive contains large logs or database exports that compress unusually well. A 2 GB archive can expand far beyond 2 GB. ## Key takeaways - Tar archives files; gzip commonly compresses the resulting tar stream. - .tar.gz is usually the better default for Linux server files and metadata. - ZIP is usually easier for cross-platform sharing and individual-file access. - Compression results depend heavily on the data, so test representative files when size matters. - A backup is only trustworthy after you have tested its restoration. ## Conclusion After comparing the structure, commands, metadata handling, compatibility, and a real mixed-file test, I would use .tar.gz for most Linux-native work. It is the sensible default for server directories, website files, deployments, and recoverable backups. I would choose ZIP when convenience for the recipient matters more than preserving Linux-specific details. That includes client downloads, exported reports, images, and documents meant for mixed operating systems. The important detail is not which format “wins.” It is whether the restored result matches what you need. If executable permissions and symbolic links matter, test them. If cross-platform opening matters, test that too. ## FAQs ### Is tar better than ZIP in Linux? Tar with gzip is usually better for Linux-native backups and application directories because it handles Unix filesystem structure and metadata more naturally. ZIP is better when easy sharing across Windows, macOS, and Linux is the main requirement. ### Does tar compress files more than ZIP? Not by itself. Plain tar does not compress. A .tar.gz archive uses gzip, and it may compress collections of similar small files more effectively because gzip processes the combined tar stream. Actual results depend on the content and settings. ### What is the difference between .tar and .tar.gz? .tar is an uncompressed archive containing one or more files. .tar.gz is that tar archive compressed with gzip. Use .tar when bundling or streaming is enough; use .tar.gz when you also want to reduce the size. ### Can Windows open .tar.gz files? Current Windows environments and many third-party archive tools can open .tar.gz, but ZIP remains the more familiar choice for broad desktop sharing. If you do not control the recipient’s setup, ZIP usually creates less friction. ### Which format should I use for a website backup? Use .tar.gz for the website’s Linux filesystem content, particularly when permissions and symbolic links matter. Back up the database consistently as well, store copies off the source server, and test a full restore rather than only checking that the archive exists. If you manage several websites and servers and want a simpler way to handle application backups, deployments, SSL, security, and routine server operations, [ServerAvatar](https://serveravatar.com/) can bring those tasks into one dashboard without hiding the Linux fundamentals behind them. ### About the Author Meghna Meghwani is a technical writer focused on Linux, Ubuntu, VPS hosting, server management, WordPress, PHP, Node.js, cloud hosting, and DevOps. She creates beginner-friendly tutorials, practical hosting guides, troubleshooting articles, and server security content designed to help developers and businesses manage applications and servers more efficiently. **Categories:** Blog, Guide, Linux, Others, Ubuntu **Tags:** compress files in Linux, DevOps, extract files in Linux, Linux archive formats, Linux compression, Linux file compression, Linux Tutorial, tar command, tar vs ZIP, tar.gz --- ### [How to Reduce Cache Misses and Improve Application Performance](https://serveravatar.com/reduce-cache-misses-application-performance/) **Published:** September 4, 2026 **Author:** Meghna Meghwani **Content:** [![Blog banner - ServerAvatar - reduce cache misses ](https://serveravatar.com/wp-content/uploads/2025/09/728_90-Banner-3-1024x127.png)](https://serveravatar.com/?ref=blog)A cache is supposed to remove work. Yet an application can have Redis installed, a CDN enabled, and a page-cache plugin active while still rebuilding the same responses again and again. To reduce cache misses, you must ensure the application can consistently reuse cached data. The problem usually isn’t a missing cache, it’s a cache that the application can’t reuse effectively. Learning how to reduce cache misses starts with finding out *why* a lookup failed. A short lifetime, an unstable key, an undersized memory limit, and an intentional bypass can all increase the miss counter, but they require very different fixes. Increasing memory won’t repair a key that changes on every request. A longer TTL won’t help when authenticated traffic bypasses the page cache by design. This guide is for developers, WordPress administrators, and teams running PHP, Laravel, or Node.js applications on a VPS. You’ll learn how to read the right metrics, classify misses, improve cache reuse safely, and verify that the changes reduce real response time rather than merely producing a prettier hit-rate percentage. ## TL;DR - Measure hit rate, misses, evictions, latency, memory, and origin work together. - Separate expected cold or bypassed requests from avoidable misses before tuning anything. - Normalize cache keys so equivalent requests map to the same entry. - Assign TTLs according to the cost and volatility of each data type, not one global number. - Prevent cache stampedes with request coalescing, locks, early refresh, or stale-while-revalidate. - Invalidate the smallest affected cache area after a write; avoid routine full-cache flushes. - Confirm improvements with p95 response time, database load, and field Core Web Vitals. ## Why a Cache Miss Is Only the Beginning A cache hit occurs when the requested value is present, valid, and reusable. A miss means the application has to obtain or compute that value elsewhere. The fallback might be a database query, an API call, a rendered HTML page, or an expensive calculation. ![reduce cache misses](https://serveravatar.com/wp-content/uploads/2026/09/image-9.png) **The basic hit-rate formula is:** ``` Cache hit rate = hits / (hits + misses) × 100 ``` ``` Cache hit rate = hits / (hits + misses) × 100 ``` If a cache records 72,000 hits and 18,000 misses, its hit rate is 80%. That number is useful, but it isn’t a verdict. A cache protecting a slow third-party API may deliver major savings at 80%, while an edge cache for versioned CSS files should normally reuse far more requests. Context matters. You also need to distinguish the layer being measured. Browser cache, CDN cache, NGINX page cache, PHP OPcache, Redis object cache, and an application-level memoization cache do different jobs. Combining their counters into one ratio hides the bottleneck. The practical question is not “How do I make the hit rate 100%?” It is: Which expensive operations are repeated, and why can’t the existing cache answer them? That framing prevents two common mistakes: caching data that should remain dynamic and optimizing cheap lookups while a slow database query remains untouched. ## Classify the Cache Miss Before Changing Configuration Most application cache misses fit one of five operational categories. Identify the category first; then choose the remedy. **Miss pattern****What it looks like****Likely cause****Useful response****Cold miss**Spike after deploy, restart, or purgeEntry has never been createdWarm only critical keys or accept the brief cold period**Expired miss**Entries disappear on a predictable scheduleTTL ends before the next reuseRevisit TTL by data type and add jitter**Capacity miss**Evictions rise as memory fillsWorking set is larger than available cacheRemove low-value entries, tune policy, or add capacity**Key-fragmentation miss**Similar requests create many near-duplicate keysIDs, parameters, locale, or ordering aren’t normalizedRedesign and version the key format**Intentional miss**Logged-in, checkout, preview, or personalized requests bypass cacheSafety rule or application requirementKeep the bypass and optimize the underlying pathA sixth pattern deserves special attention: invalidation churn. Here the cache is populated correctly but broad purge events remove useful entries too often. Publishing one article should not force every unrelated page, tenant, or product to become cold. ### Start with one slow request path Don’t begin with server-wide tuning. Pick one route that is both frequent and expensive, such as a product category page, an API endpoint, a dashboard widget, or a WordPress archive. Record: - p50 and p95 response time - requests per minute - cache status or application cache outcome - database query count or duration - upstream API time - CPU and memory during the same interval Then compare the same route for a cold request and a repeated request. If both take roughly the same time, either the response isn’t cacheable, the key changes, the write fails, or a bypass rule is active. ## Measure Cache Behavior Without Disturbing Production Redis provides cumulative counters that are safer for routine diagnosis than streaming every command in real time. Start with: ``` redis-cli INFO stats | grep -E 'keyspace_hits|keyspace_misses|evicted_keys|expired_keys' ``` ``` redis-cli INFO stats | grep -E 'keyspace_hits|keyspace_misses|evicted_keys|expired_keys' ``` ``` redis-cli INFO memory | grep -E 'used_memory_human|maxmemory_human|maxmemory_policy|mem_fragmentation_ratio' ``` ``` redis-cli INFO memory | grep -E 'used_memory_human|maxmemory_human|maxmemory_policy|mem_fragmentation_ratio' ``` If authentication is enabled, avoid placing the password directly in shell history. Use the connection method already configured for your application or an appropriately protected Redis CLI configuration. Capture the hit and miss counters, wait through a representative traffic window, and capture them again. Calculate the rate from the difference between the two samples. Using lifetime totals can conceal a problem that began after the last deployment. For HTTP caches, expose a cache-status response header in a non-sensitive environment or inspect the header your CDN already provides. For example, an NGINX FastCGI configuration can return its cache result during testing: ``` add_header X-Cache-Status $upstream_cache_status always; ``` ``` add_header X-Cache-Status $upstream_cache_status always; ``` Typical values include HIT, MISS, BYPASS, EXPIRED, and UPDATING. Remove or restrict diagnostic headers if they reveal details you don’t want to expose publicly. Avoid running redis-cli MONITOR casually on a busy production server. It streams every command and can create unnecessary overhead as well as expose sensitive values. Likewise, FLUSHALL is not a troubleshooting shortcut. On a multi-application server, it can empty unrelated databases and create a synchronized burst of expensive regeneration. ### Read related metrics as a group A rising hit rate is good only when the rest of the system improves. Watch these signals together: - **Evicted keys:** rising evictions suggest memory pressure or a poor eviction policy. - **Expired keys:** high expiration volume may be normal, but synchronized expiration can trigger load spikes. - **Redis latency:** a remote or overloaded cache can cost more than a cheap computation. - **Origin response time:** p95 and p99 reveal tail latency hidden by averages. - **Database load:** query time and connection pressure should fall for paths protected by object caching. - **Error rate:** timeouts and connection errors can make a healthy cache appear ineffective. ## Make Equivalent Requests Share the Same Cache Key Key design is often the highest-leverage fix because a fragmented keyspace wastes both memory and compute. Two requests that should return the same data must resolve to the same canonical key. **Suppose an endpoint accepts these URLs:** ``` /api/products?category=shoes&page=1 ``` ``` /api/products?category=shoes&page=1 ``` ``` /api/products?page=1&category=shoes ``` ``` /api/products?page=1&category=shoes ``` ``` /api/products?category=shoes&page=01&utm_source=email ``` ``` /api/products?category=shoes&page=01&utm_source=email ``` If parameter order, number formatting, or tracking parameters are included naively, the application may store three entries for one response. Normalize the request before hashing it: - Keep only parameters that change the response. - Sort parameter names. - Normalize case, Unicode, booleans, and numeric formats. - Include tenant, locale, currency, role, or permission scope only when each changes the result. - Add a schema or deployment version so incompatible entries can be retired safely. **A practical key might look like:** catalog:v3:tenant\_42:locale\_en-IN:category\_shoes:page\_1 Never include secrets, full authorization tokens, or raw personal data in cache keys. Even when values aren’t returned to users, keys can appear in logs, dashboards, and debugging output. ### Don’t over-personalize the key Including a user ID in every key eliminates reuse between users. Sometimes that isolation is required, for example, account balances or private dashboards. Public product data, country-level tax tables, and shared feature configuration may instead be cached by the smallest safe audience segment. The rule is simple: vary the key on everything that changes the response, but nothing else. Underspecifying a key can leak or serve incorrect data. Overspecifying it creates avoidable misses. ## A Practical Framework for Choosing TTLs A time to live (TTL) is a freshness decision, not simply a performance setting. Set it too short and useful entries expire before reuse. Set it too long without a reliable invalidation path, and users may see stale data. **Use three questions for each cache family:** - **How expensive is regeneration?** A 400 ms database aggregate deserves more protection than a 1 ms lookup. - **How often does the source change?** Configuration may remain stable for hours; inventory can change within seconds. - **What is the cost of staleness?** A stale blog archive is inconvenient. Stale authorization data can be dangerous. **This produces a policy rather than one global TTL:** **Data type****Starting approach****Invalidation trigger****Versioned static asset**Long browser/CDN lifetimeNew filename or content hash**Public article or documentation page**Moderate page-cache lifetimePublish or update event**Expensive shared query**Moderate object-cache lifetimeModel or record change**Product availability**Short lifetime or event-driven updateInventory write**Permission or security decision**Very short lifetime or no cacheRole, session, or policy change**Empty or missing result**Brief negative-cache lifetimeCreation event or short expiryTreat these as policy categories, not universal durations. Your correct numbers depend on traffic, update frequency, and acceptable staleness. ### Add jitter to avoid synchronized expiry If thousands of keys receive the same 15-minute TTL during a deployment, they may expire together 15 minutes later. **Add a small random offset so regeneration is spread over time:** ``` $baseTtl = 900;              // 15 minutes $jitter  = random_int(0, 120); $cache->put($key, $value, $baseTtl + $jitter); ``` ``` $baseTtl = 900;              // 15 minutes $jitter  = random_int(0, 120); $cache->put($key, $value, $baseTtl + $jitter); ``` Jitter doesn’t reduce the total amount of future work. It prevents that work from landing on the database in one sharp burst. ### Cache “not found” briefly Repeated requests for a missing record can bypass a cache if the application treats null as “no cached value.” Use a distinct sentinel and a short TTL for negative results. That helps absorb bot traffic, typo-heavy searches, and repeated checks for unavailable resources without preserving absence for too long. ## Stop One Miss from Becoming a Traffic Spike When a popular entry expires, many workers can miss it at the same moment. Each worker then performs the same expensive query or API request. This is a cache stampede, and it can overload the origin even when the cache is healthy most of the day. **Four patterns are useful:** **Request coalescing** Allow one worker to regenerate the value while the others wait briefly for that result. A distributed lock must have a short expiry and a unique owner token so a crashed worker can’t hold it forever or release another worker’s lock. ``` value = cache.get(key) if value exists:     return value if lock.acquire("lock:" + key, ttl=10 seconds):     try:         value = cache.get(key)      # check again after acquiring lock         if value is missing:             value = origin.load()             cache.set(key, value, ttl_with_jitter)         return value     finally:         lock.release_if_owner() wait briefly, then retry cache ``` ``` value = cache.get(key) if value exists:     return value if lock.acquire("lock:" + key, ttl=10 seconds):     try:         value = cache.get(key)      # check again after acquiring lock         if value is missing:             value = origin.load()             cache.set(key, value, ttl_with_jitter)         return value     finally:         lock.release_if_owner() wait briefly, then retry cache ``` The second lookup inside the lock matters. Another worker may have populated the value while this worker was waiting. **Stale-while-revalidate** Serve a slightly stale response for a bounded period while one background task refreshes it. This works well for public content and shared API responses where brief staleness is acceptable. It is usually unsuitable for authorization checks or data that must be current. **Early refresh** Refresh a hot entry shortly before it expires. Trigger refresh based on remaining lifetime, request frequency, or a scheduled job. Use this selectively; warming every possible key merely shifts load and stores data nobody requests. **Graceful fallback** Decide what happens if Redis or the CDN is unavailable. The application might query the origin, return a last-known value, shed nonessential work, or apply a short circuit breaker. A cache should improve resilience, not become a mandatory single point of failure unless the architecture explicitly accepts that tradeoff. ## Invalidate Precisely Instead of Purging Everything Cache invalidation is where performance and correctness meet. The safest design links a source-data change to the smallest predictable group of affected keys. **For example, changing one product may require invalidating:** - that product’s detail entry - category pages containing the product - a price or inventory fragment - selected API representations It probably doesn’t require clearing user sessions, unrelated article pages, or every object stored by another application. Useful techniques include namespace versioning, cache tags, dependency maps, and event-driven invalidation. Namespace versioning is especially simple: increment catalog:v3 to catalog:v4 after a format change and let older keys expire naturally. This avoids a blocking scan-and-delete operation during deployment. After a write, decide whether to use delete-on-write or update-on-write. Deleting is simpler and lets the next reader rebuild from the source of truth. Updating can avoid the next miss but introduces more paths where cached and canonical data can diverge. Whatever you choose, make invalidation observable. Log the event type, namespace or tags affected, number of entries removed, and duration. If the miss rate jumps every time an editor publishes a post, the purge scope is probably too broad. ## Match the Technique to the Application Layer Cache tuning is most effective when each layer has a clear responsibility. ### WordPress: separate page caching from object caching A page cache stores rendered HTML for reusable public requests. An object cache stores reusable results such as options, query results, and computed objects. One doesn’t replace the other. Logged-in sessions, carts, checkout pages, previews, and personalized fragments commonly bypass full-page caching to preserve correctness. Treat those bypasses as expected. Optimize their database work with a persistent object cache, better queries, and PHP OPcache rather than trying to force every response into the page cache. WordPress’s official [caching overview](https://developer.wordpress.org/advanced-administration/performance/cache?ref=serveravatar.com) distinguishes browser, object, and server caching and notes that cached data should be replaceable and regenerable. ServerAvatar users can follow the existing [Redis Object Cache setup guide](https://serveravatar.com/install-redis-object-cache-plugin-wordpress/); Redis is already installed and configured on newly connected ServerAvatar servers, while the WordPress plugin and application credentials still need to be connected correctly. Use a different Redis database or a reliable key prefix for each site where supported. Avoid a server-wide flush. After plugin, theme, or schema changes, purge only the cache the change invalidates and verify both a logged-out and logged-in request. ### Laravel: cache the expensive boundary, not the whole controller Laravel’s cache-aside pattern is useful for shared queries: ``` use Illuminate\Support\Facades\Cache; $key = "product-summary:v2:{$storeId}:{$categoryId}"; $summary = Cache::remember( $key, now()->addMinutes(10), fn () => $service->buildCategorySummary($storeId, $categoryId); ``` ``` use Illuminate\Support\Facades\Cache; $key = "product-summary:v2:{$storeId}:{$categoryId}"; $summary = Cache::remember( $key, now()->addMinutes(10), fn () => $service->buildCategorySummary($storeId, $categoryId); ``` The hard part isn’t Cache::remember; it’s invalidation. When a product affecting the summary changes, remove or version the relevant key. For high-concurrency regeneration, use Laravel’s atomic locks with an expiry and handle lock timeouts rather than allowing every PHP-FPM worker to rebuild the same result. Don’t cache an entire authenticated controller response unless the key includes every permission and personalization dimension. Caching the expensive shared service result is usually easier to reason about. ### Node.js: don’t let per-process memory fragment the cache An in-memory Map can be effective inside one process, but multiple Node.js workers each build a separate cache. After a restart or scale-out, every worker begins cold. Use a shared cache such as Redis for entries that must be reused across processes, while keeping tiny process-local caches only where duplication is acceptable. Normalize keys before serialization, avoid unbounded Maps, and make concurrent promise coalescing part of the loader. Also measure event-loop delay. A higher hit rate won’t rescue an application that blocks the event loop while serializing very large values. ## Fix Cache Waste Before Adding Memory Adding RAM can reduce capacity misses, but it should follow key and value cleanup. First check: - Are duplicate key variants storing the same response? - Are values much larger than the data actually read? - Are one-off results cached despite never being reused? - Are abandoned namespaces lingering after deployments? - Is the cache sharing memory with queues, sessions, or another workload? Then choose an eviction policy that matches the role of the Redis instance. A cache-only instance can evict data under pressure; an instance containing sessions, queues, or durable-looking state requires much more careful separation and policy selection. Don’t assume every Redis key is disposable simply because Redis is being used “as a cache.” Large values also have hidden costs: serialization time, network transfer, allocator overhead, and longer blocking operations. Caching a smaller projection often improves latency and effective capacity more than adding memory. ## Use a Safe Test Plan for Every Cache Change A cache adjustment should be treated like an application change because it can affect correctness, privacy, and load. - Record a baseline. Capture route-level latency, hit and miss deltas, evictions, database time, CPU, memory, and errors. - Change one cache family. Adjust one key pattern, TTL policy, invalidation event, or memory setting at a time. - Test correctness. Check anonymous, authenticated, privileged, localized, and personalized requests where applicable. - Test cold behavior. Restart or invalidate the chosen test namespace and observe regeneration under controlled load. - Test failure behavior. Confirm the application has an acceptable response when the cache is slow or unavailable. - Compare the same traffic window. Look for improvement in p95 response time and origin load, not only hit rate. - Keep a rollback. Preserve the previous configuration and document the namespace or setting changed. For public web pages, also measure field data after deployment. Google says its systems aim to reward helpful, reliable, people-first content and an overall good page experience, not a single isolated metric. Its current Core Web Vitals guidance defines “good” as LCP within 2.5 seconds, INP below 200 ms, and CLS below 0.1 at the 75th percentile. See Google’s [Core Web Vitals guidance](https://developers.google.com/search/docs/appearance/core-web-vitals?ref=serveravatar.com). Caching can improve server response time and reduce work feeding into LCP and INP, but it doesn’t automatically fix render-blocking CSS, large images, JavaScript execution, or layout shifts. Validate those separately with PageSpeed Insights and Search Console field data. [![Blog banner - ServerAvatar](https://serveravatar.com/wp-content/uploads/2025/09/728_90-Banner-1-1024x127.png)](https://serveravatar.com/?ref=blog)## A Practical Cache-Miss Troubleshooting Checklist Work through this sequence when the miss rate rises unexpectedly: - Confirm which cache layer produced the metric. - Limit analysis to a route, key family, tenant, or application. - Compare counter deltas over a representative period. - Separate MISS, BYPASS, EXPIRED, and cache errors. - Check whether a deploy, restart, purge, or content update preceded the change. - Inspect key cardinality and normalization. - Compare TTL with actual reuse intervals. - Check evictions, maximum memory, and eviction policy. - Look for synchronized expiry and concurrent regeneration. - Review invalidation scope after writes. - Verify that cache reads and writes use the same key, prefix, database, and serialization format. - Test anonymous and personalized paths independently. - Confirm lower p95 latency, database time, and CPU after the fix. If the hit rate remains low but origin cost and response time are already small, caching that path may not be worthwhile. Removing a low-value cache can simplify the system and eliminate invalidation risk. ## Key Takeaways - A cache miss counter tells you what happened, not why it happened. - Stable, correctly scoped keys usually matter more than a blanket TTL increase. - TTLs should reflect regeneration cost, update frequency, and the risk of stale data. - Locks, coalescing, early refresh, and stale-while-revalidate prevent popular keys from overwhelming the origin. - Precise invalidation preserves useful entries and avoids post-publish traffic spikes. - Hit rate must be evaluated beside tail latency, database work, evictions, errors, and user-facing performance. ## Conclusion The best cache isn’t the one with the biggest number on a dashboard. It’s the one that removes meaningful work while keeping responses correct. Begin with a single expensive route. Measure it, classify its misses, then fix the narrowest cause, key design, TTL, invalidation, memory pressure, or regeneration concurrency. Once the result is visible in p95 latency and origin load, apply the same method to the next route. If you manage WordPress, Laravel, PHP, or Node.js applications across VPS instances, [ServerAvatar](https://serveravatar.com/) can simplify deployment and ongoing server management. Its application dashboards, file access, Redis-ready server stack, and Log Monitoring Suite give you a practical place to operate and observe the systems around your cache without turning this article into a product pitch. ## FAQs ### What is a good cache hit rate for an application? There is no universal target. A good rate depends on the cache layer, request mix, data volatility, and cost of a miss. Evaluate hit rate beside p95 latency, origin load, evictions, and correctness. A lower rate on highly dynamic traffic may be healthy, while frequent misses for versioned static assets indicate a configuration problem. ### How do I reduce Redis cache misses? Measure keyspace\_hits, keyspace\_misses, expirations, evictions, latency, and memory over the same traffic window. Then normalize keys, remove low-value entries, tune TTLs by data type, narrow invalidation, and prevent concurrent regeneration. Add memory only when the useful working set genuinely exceeds available capacity. ### Can increasing the cache TTL cause stale data? Yes. A longer TTL improves the chance of reuse but extends the period in which old data may be served. Pair longer TTLs with precise invalidation for data that changes, and keep security-sensitive or rapidly changing values on short lifetimes or out of the cache. ### Why does my cache hit rate drop after a deployment? A restart may clear process-local caches, while a new namespace or full purge makes shared caches cold. Key-format changes can also make old entries unreachable. Version keys deliberately, warm only critical paths, add TTL jitter, and monitor regeneration load during deployment. ### Do cache misses directly hurt Google rankings? Google doesn’t publish cache hit rate as a ranking factor. Cache misses matter indirectly when they make real pages slower or less reliable. Google recommends a good overall page experience and currently uses LCP, INP, and CLS to describe loading, responsiveness, and visual stability. Optimize caching for users and application health, then confirm the effect with field performance data. ### Explore Related Guides - [How To Use Redis Full-Page Caching To Speed Up WordPress](https://serveravatar.com/redis-full-page-caching-wordpress/) - [Install Redis Object Cache Plugin into WordPress](https://serveravatar.com/install-redis-object-cache-plugin-wordpress/) - [How to speed up a WordPress website: 12 performance optimization methods](https://serveravatar.com/speed-up-a-wordpress-website-performance/) ### About the Author Meghna Meghwani is a technical writer focused on Linux, Ubuntu, VPS hosting, server management, WordPress, PHP, Node.js, cloud hosting, and DevOps. She creates beginner-friendly tutorials, practical hosting guides, troubleshooting articles, and server security content designed to help developers and businesses manage applications and servers more efficiently. **Categories:** Blog, Guide, Linux, Optimisation, Others, Tutorials, Ubuntu **Tags:** Application Caching, Application Performance, Cache Hit Rate, Cache Optimization, CDN Optimization, Redis Caching, Reduce Cache Misses, Web Performance --- ### [How to Send Emails From WordPress Using Gmail SMTP for Free](https://serveravatar.com/wordpress-gmail-smtp/) **Published:** September 3, 2026 **Author:** Meghna Meghwani **Content:** [![Blog banner - ServerAvatar](https://serveravatar.com/wp-content/uploads/2025/09/728_90-Banner-3-1024x127.png)](https://serveravatar.com/?ref=blog)WordPress may show a reassuring “message sent” notice even when no email reaches the recipient. That gap is frustrating when the missing message is a password reset, contact-form notification, new-account email, or order receipt. WordPress Gmail SMTP provides a reliable way to send emails through Email’s SMTP server instead of relying on your web host’s default mail function. You can send emails from WordPress using Gmail SMTP without paying for a separate email service. The setup in this guide uses FluentSMTP, a free WordPress plugin, and a Google App Password. It is suitable for personal sites, portfolios, staging sites, and small websites that send a modest number of transactional messages. This isn’t a newsletter solution, and it won’t guarantee inbox placement. What it will do is replace the server’s often-unreliable default mail path with an authenticated connection to Gmail. You’ll learn how to decide whether Gmail is appropriate, prepare the account safely, configure WordPress, verify more than a green success message, and diagnose the failures that usually trip people up. ## TL;DR - Install the free FluentSMTP plugin and select Other SMTP. - Use smtp.gmail.com, TLS encryption, and port 587. - Turn on Google 2-Step Verification and create a dedicated App Password. - Keep the WordPress From Email identical to the Gmail account used for authentication. - Send a test, inspect the email log, and check the received message headers. - Use Gmail only for low-volume transactional messages, not newsletters or bulk campaigns. - Prefer OAuth when your chosen plugin offers a practical Gmail integration; Google recommends it over App Passwords. ## First, Understand What This Setup Changes WordPress applications commonly call the [wp\_mail() function](https://developer.wordpress.org/reference/functions/wp_mail?ref=serveravatar.com) when they need to send a message. By itself, wp\_mail() is only an interface. It passes the message to the configured mailer; it does not provide a reputation system or an email-delivery network. On many VPSs, WordPress hands mail to PHP’s local mail function. That route can fail because the server has no mail transfer agent, outbound SMTP ports are restricted, the sending IP has a poor reputation, or the message lacks authentication that receiving providers expect. An SMTP plugin changes the transport. Instead of asking the web server to deliver the message directly, WordPress authenticates with Gmail and asks Google to send it. **Component****Its job in this setup****WordPress or a plugin**Creates the email and recipient details**FluentSMTP**Intercepts WordPress mail and applies the configured connection**Gmail SMTP**Authenticates the request and submits the message**Receiving mail server**Accepts, filters, rejects, or places the message**Email log**Records what WordPress attempted and any returned errorThis distinction matters during troubleshooting. A successful plugin log means Gmail accepted the submission. It does not prove that the recipient’s provider placed the message in the inbox. Email reliability is only one part of WordPress performance; if your site also has slow server response times, see our [**WordPress TTFB optimization guide**](https://serveravatar.com/wordpress-ttfb-optimization). ## Is Free Gmail SMTP the Right Choice for Your WordPress Site? Gmail SMTP is useful when the site sends occasional operational emails. Think of a portfolio contact form, a small membership site, an internal staging environment, or a low-traffic blog where password resets are the main concern. **It is a poor fit for:** - Marketing newsletters - Large membership communities - Busy WooCommerce stores - Applications with bursts of notifications - Sites that need delivery analytics, bounce processing, suppression lists, or guaranteed support Google enforces sending and recipient limits, and the thresholds vary by account type and sending method. See Google’s [](https://support.google.com/mail/answer/22839)[Gmail sending limits](https://support.google.com/mail/answer/22839?ref=serveravatar.com) for the current restrictions. Google’s consumer help page warns that sending may be suspended temporarily when limits are reached, while Google Workspace publishes separate limits for paid organizational accounts. Treat those limits as ceilings, not daily targets. They can change, and anti-abuse systems can restrict suspicious sending before a published maximum is reached. If your site sends only a few dozen transactional messages on a normal day, Gmail can be a sensible free starting point. If email is tied directly to revenue or customer access, use a transactional provider designed for application mail. ### Gmail SMTP settings at a glance **Setting****Recommended value****SMTP host**smtp.gmail.com**Encryption**TLS / STARTTLS**Port**587**Authentication**Enabled**Username**Your complete Gmail or Google Workspace address**Password**A 16-character Google App Password, not your normal password**From Email**The authenticated Google address, unless a verified alias is configuredPort 465 with SSL is also supported by many mail clients, but this tutorial uses port 587 with STARTTLS. Choosing one complete pair avoids the common mistake of combining TLS with the SSL port. ## What You Need Before Changing WordPress Do a short preflight check before installing anything. It prevents most configuration loops. **You need:** - Administrator access to WordPress. - A Gmail or Google Workspace account that you control. - 2-Step Verification enabled for that Google account. - Permission to create an App Password. - A WordPress site using HTTPS. - A recipient address on another provider for meaningful testing, if possible. Google only exposes App Passwords after [2-Step Verification](https://support.google.com/accounts/answer/10956730?ref=serveravatar.com) is enabled. The option may still be unavailable when the account is enrolled in Advanced Protection, uses security-key-only 2-Step Verification, or is controlled by an organization that blocks App Passwords. Google also states that App Passwords are not its preferred connection method. When a plugin supports “Sign in with Google” or a native Gmail OAuth connection, OAuth is the better long-term choice because the site does not store a reusable mail password. We’re using an App Password here because it provides a direct, free SMTP configuration and is widely supported. > **Security note:** Never paste the App Password into a support ticket, screenshot, shared document, or chat. Anyone who obtains it may be able to use the authorized Gmail connection until you revoke it. ## Configure WordPress to Send Through Gmail SMTP The following workflow uses [FluentSMTP](https://wordpress.org/plugins/fluent-smtp?ref=serveravatar.com). It is available in the WordPress plugin directory, supports standard SMTP, provides email logs, and does not require a paid upgrade for the settings used here. **1. Install FluentSMTP and open its connection screen** - In WordPress admin dashboard, go to Plugins section >> Add Plugin. - Search for FluentSMTP, install it, and activate it. ![install FluentSMTP plugin - WordPress Gmail SMTP](https://serveravatar.com/wp-content/uploads/2026/09/image-1024x339.png) - Go to the Installed Plugins section, and click on the Settings for FluentSMTP plugin. ![go to settings - WordPress Gmail SMTP](https://serveravatar.com/wp-content/uploads/2026/09/image-1-1024x380.png) - In a setup screen, choose Other SMTP rather than a provider-specific API connection. “Other SMTP” lets you enter Email’s host, encryption, port, and App Password directly. ![select other SMTP - WordPress Gmail SMTP](https://serveravatar.com/wp-content/uploads/2026/09/image-2-1024x447.png) - Avoid running two SMTP plugins at the same time. Two plugins can both hook into wp\_mail(), producing inconsistent From addresses, duplicate logging, or a connection that changes depending on load order. - Deactivate any previous SMTP plugin if using, before using FluentSMTP. **2. Create a dedicated Google App Password** For security, you should not use your regular Gmail password directly into the plugin. Instead, create a Google **App Password**, a unique 16-character code that allows a specific app or device to securely access your Google Account without revealing your main password. - Open the Google account that will send the site’s emails. - Go to Security and confirm that 2-Step Verification is active. ![security & sign-in - WordPress Gmail SMTP](https://serveravatar.com/wp-content/uploads/2026/09/image-3-1024x518.png) - Then open the [App Passwords page](https://myaccount.google.com/apppasswords?pli=1&rapt=AEjHL4PPteB0qevPoioL0dBZURoPtfw2doCIZ-6BV2kAqO3nveMGAQUcwSTfb-vUsqyHYgSV_0gUXD9pGrXkfErw9V-7KDwuTp1rlO136LMwmXFa2b9otv4). - Create a new entry with a App name that identifies both the site and its purpose, such as: example.com WordPress SMTP - Click on Create button. ![create app password - WordPress Gmail SMTP](https://serveravatar.com/wp-content/uploads/2026/09/image-4-1024x543.png) - Google displays a 16-character App Password once. - Copy it immediately. - The spaces shown on screen are for readability; if the plugin rejects the value, paste it without spaces. ![password created ](https://serveravatar.com/wp-content/uploads/2026/09/image-5-1024x710.png) - Using a site-specific label pays off later. If that website is retired, migrated, or compromised, you can revoke only its credential without disrupting other applications. Do not enter your ordinary Google account password in WordPress. Google ended support for basic “less secure app” sign-ins, and using the normal password also exposes a far more valuable credential than necessary. **3. Enter the SMTP connection details** Return to the FluentSMTP connection screen and enter these values: - **From Email**: the Gmail or Google Workspace address you are authenticating - **From Name:** the website or business name recipients should recognize - **SMTP Host:** smtp.gmail.com - **SMTP Port:** 587 - **Encryption:** TLS or STARTTLS - **Authentication:** enabled - **SMTP Username:** the full Google email address - **SMTP Password:** the App Password created for this site - Save the connection. ![save connection settings ](https://serveravatar.com/wp-content/uploads/2026/09/image-6-868x1024.png) The password field may appear blank or masked afterward; that is normal behavior for a secret value. **4. Update the General Settings** - Enable the “Log All Emails for Reporting” option to keep a record of sent emails for reporting and troubleshooting purposes. - Set how long email logs should be retained. - Select the primary email connection used to send emails. As here, an **SMTP server connected to a Gmail account** is selected. - Enable “Email Simulation” option when you want to prevent emails from actually being sent. This is useful when testing email functionality. - Enable the “Add Multi-Part Plain Text for HTML Emails” beta option to include a plain-text version alongside HTML emails, improving compatibility with email clients that don’t properly render HTML. - Click Save Settings after making changes to apply the updated email configuration. ![save settings ](https://serveravatar.com/wp-content/uploads/2026/09/image-7-1024x523.png) For additional configuration details, see the [official FluentSMTP Gmail and Google Workspace setup guide](https://docs.fluentsmtp.com/connect-gmail-or-google-workspace-with-fluentsmtp?ref=serveravatar.com). ## Test the Entire Delivery Path Clicking Send Test Email is necessary, but it isn’t the complete test. Verify the message at three different layers ![email test ](https://serveravatar.com/wp-content/uploads/2026/09/image-8-1024x368.png) **Layer 1: WordPress submission** Open FluentSMTP’s email test tool and send a plain-text message to an address you can inspect. A successful result confirms that WordPress reached Gmail and Gmail accepted the submission at that moment. If it fails, copy the exact error before changing settings. Authentication errors, connection timeouts, and rejected sender addresses require different fixes. **Layer 2: Recipient placement** Check the inbox, spam folder, promotions tab, and any server-side quarantine. Test at least one address outside the sending Google account. Sending from Gmail back to the same inbox can hide routing and filtering problems that real recipients will face. **Layer 3: Message identity** Open the received email’s original source or “Show original” view. Confirm that: - The visible From address is the one you configured. - The Reply-To address is correct for form notifications. - Authentication results do not show an obvious failure. - The message timestamp and subject match the test. Then trigger a real WordPress workflow: request a password reset or submit the contact form. A plugin test proves the transport works; a real workflow proves the application is creating the email correctly. ## Fix Common Gmail SMTP Problems in WordPress Use the error message and symptoms to choose a fix. Randomly switching ports or reinstalling the plugin usually wastes time. **Symptom or error****Likely cause****What to check****Username or password rejected**Normal password used, App Password mistyped, or credential revokedCreate a fresh App Password and confirm the full email username**App Password option missing**2-Step Verification is off or account policy blocks App PasswordsReview Google account security and Workspace administrator policies**Connection timed out**Hosting provider or firewall blocks outbound SMTPTest outbound access to smtp.gmail.com:587 and ask the host about restrictions**Test succeeds, form mail fails**Form plugin has an invalid From address or is not generating mailMatch the From Email and inspect the email log**Message goes to spam**Content, sender reputation, recipient filtering, or identity mismatchInspect headers, simplify the message, and use a consistent sender**Mail stops after a password change**Google revokes App Passwords after account password changesGenerate a new site-specific App Password**Daily limit error**Too many messages or recipientsStop retries, wait for the restriction to clear, and move to a transactional provider**Duplicate messages**Two SMTP plugins or duplicate application triggersKeep one mailer active and check form/automation rules**Authentication fails even with the correct address** Generate a new App Password rather than trying your normal password. Confirm that the username includes the full domain, such as name@gmail.com, and paste the App Password without accidental leading or trailing spaces. If the Google password was changed after the App Password was created, replace the stored SMTP credential. Google revokes App Passwords following a password change. **WordPress cannot connect to port 587** A timeout usually points below WordPress. Some hosting networks restrict outbound mail ports to reduce abuse. > If the SMTP issue is accompanied by a broader WordPress server error, see our guide on [**how to fix the WordPress 500 Internal Server Error**](https://serveravatar.com/fix-wordpress-500-internal-server-error/). If you have SSH access, you can perform a non-destructive connectivity check: ``` openssl s_client -starttls smtp -connect smtp.gmail.com:587 -crlf ``` ``` openssl s_client -starttls smtp -connect smtp.gmail.com:587 -crlf ``` A successful TLS handshake shows that the server can reach Gmail on port 587. Exit with Ctrl+C. This command does not validate your username or send a message. If the connection times out, check the server firewall and hosting provider’s outbound-email policy. Do not open inbound port 587; WordPress is making an outbound connection. **The test works, but contact-form notifications do not** Open the [FluentSMTP email log](https://docs.fluentsmtp.com/fluentsmtp-email-logs-feature?ref=serveravatar.com) immediately after submitting the form. - No new log entry usually means the form did not call WordPress mail. Check conditional rules, recipient fields, and anti-spam behavior in the form plugin. - A failed log entry points to a mailer or message error. Read the detailed response. - A successful entry means Gmail accepted it. Continue checking the recipient’s spam, filtering, and headers. Also confirm that the form uses the site-controlled Gmail address as From and the visitor’s email as Reply-To. **Emails arrive, but they land in spam** SMTP authentication improves the sending path; it cannot guarantee inbox placement. Filters also evaluate message content, links, recipient engagement, sending patterns, and sender history. For cleaner transactional mail: - Use a consistent From name and address. - Avoid URL shorteners and unnecessary attachments. - Keep password-reset and notification templates focused on one purpose. - Never send purchased lists or promotional blasts through this connection. - Ask recipients to allowlist the address only when appropriate; do not treat that as the main fix. If you send from a business domain through Google Workspace, review the domain’s SPF, DKIM, and DMARC configuration. Those controls deserve their own setup and validation rather than being pasted blindly into DNS. [![Blog banner - ServerAvatar](https://serveravatar.com/wp-content/uploads/2025/09/728_90-Banner-1-1024x127.png)](https://serveravatar.com/?ref=blog)## Keep the Connection Secure and Reliable Email configuration is not a one-time checkbox. Add it to normal WordPress maintenance. **Use one credential per site** Name each App Password after its website. Separate credentials make revocation precise and reduce the impact of a leaked secret. **Restrict administrator access** Anyone who can change plugin settings may be able to replace or misuse the mail connection. Use individual WordPress accounts, strong passwords, 2FA, and the minimum role each team member needs. **Limit email-log retention** Logs may contain recipient addresses, subjects, reset links, or form content. Keep them only as long as they are operationally useful, restrict access, and avoid logging sensitive message bodies when the plugin allows that choice. **Test after relevant changes** Send a test after migrating the site, restoring a backup, changing the Google account password, replacing an SMTP plugin, or modifying outbound firewall rules. Also test the real contact or password-reset workflow, not only the plugin’s diagnostic email. If an interrupted WordPress update leaves your site unavailable, see our guide on [**how to fix WordPress stuck in maintenance mode**](https://serveravatar.com/fix-wordpress-stuck-in-maintenance-mode) **Monitor failures instead of assuming delivery** Review failed-message logs periodically. A site can continue operating normally while every outgoing email fails. For business-critical workflows, use monitoring or a transactional provider that supplies bounce events and delivery reporting. If your WordPress dashboard itself is becoming slow during routine maintenance, see our guide on [**why WordPress Admin is slow and how to fix it**](https://serveravatar.com/fix-slow-wordpress-admin/). ## When to Move Beyond Gmail There is no magic daily number that fits every site. Move away from Gmail when the consequences of delayed or missing mail become more expensive than a dedicated service. Strong migration signals include: - Order receipts or account emails are business-critical. - Normal traffic creates sudden bursts of messages. - You need bounce and complaint handling. - Multiple sites share one sending account. - You are approaching Google’s limits. - Support staff need searchable delivery events. - You want to authenticate and report on a business domain properly. Transactional email providers are designed for application-generated mail and typically expose delivery events, domain authentication, suppression management, and scalable limits. Gmail remains useful for a small site; it should not become hidden infrastructure for a growing platform. ## Key Takeaways - Gmail SMTP replaces the web server’s default mail path with authenticated submission through Google. - FluentSMTP can configure the connection without a paid plugin. - Use TLS on port 587, a dedicated App Password, and a matching From Email. - Put a contact-form visitor’s address in Reply-To, not From. - Verify the plugin log, recipient placement, message headers, and a real WordPress workflow. - Switch to a transactional provider when volume, reporting, or business risk grows. ## Conclusion For a small WordPress site, Gmail SMTP is a practical way to make password resets, contact-form alerts, and routine notifications more dependable without adding a monthly email bill. Start with one controlled test: create a site-specific App Password, configure FluentSMTP with smtp.gmail.com and TLS on port 587, then test both the mailer and the WordPress feature that matters most. Keep the sender address consistent and review the log if anything fails. The moment email becomes revenue-critical or high-volume, graduate to purpose-built transactional delivery. The free route is valuable because it solves a modest problem cleanly, not because it should be stretched indefinitely. ## FAQs ### Can WordPress send email through Gmail for free? Yes. A low-volume WordPress site can use Email’s SMTP server with a free SMTP plugin and an eligible Google account. You still need to follow Google’s account and sending limits, and free SMTP does not guarantee inbox placement. ### What are the Gmail SMTP settings for WordPress? Use smtp.gmail.com as the host, port 587 with TLS/STARTTLS, authentication enabled, your complete Gmail address as the username, and a Google App Password as the password. ### Why can’t I use my normal Gmail password in WordPress? Google no longer supports basic sign-in through “less secure apps.” For a standard SMTP connection, use a dedicated App Password after enabling 2-Step Verification. If your plugin offers a native Google OAuth connection, Google recommends that approach because it does not share a reusable password with the plugin. ### Why is the Google App Password option missing? The option may be missing because 2-Step Verification is disabled, the account is enrolled in Advanced Protection, 2-Step Verification uses security keys only, or a Google Workspace administrator has restricted App Passwords. ### Why does FluentSMTP say the email was sent when it never arrived? “Sent” usually means Gmail accepted the submission. The recipient server can still filter, quarantine, defer, or reject the message later. Check spam and quarantine, inspect the received headers when available, verify the recipient address, and review the FluentSMTP log for the exact event. ### Manage the WordPress Server Behind Your Email Workflow Reliable mail is only one part of a healthy WordPress setup. The application also depends on secure server access, updated software, SSL, firewall rules, backups, and useful logs. If you want a simpler way to handle those operational tasks on your own cloud server, [ServerAvatar](https://serveravatar.com) provides a central panel for deploying and managing servers and PHP and Node.js applications without turning every maintenance job into a manual command-line session. ### About the Author Meghna Meghwani is a technical writer focused on Linux, Ubuntu, VPS hosting, server management, WordPress, PHP, Node.js, cloud hosting, and DevOps. She creates beginner-friendly tutorials, practical hosting guides, troubleshooting articles, and server security content designed to help developers and businesses manage applications and servers more efficiently. **Categories:** Blog, Guide, Others, Tutorials, WordPress **Tags:** Gmail SMTP, Gmail SMTP Setup, Send WordPress Emails, SMTP for WordPress, Wordpress, WordPress Email, WordPress Email Delivery, WordPress Email SMTP, WordPress Gmail SMTP, WordPress SMTP --- ### [How to Fix “Cannot Use Import Statement Outside a Module” in JavaScript](https://serveravatar.com/fix-cannot-use-import-statement-outside-module/) **Published:** August 29, 2026 **Author:** Meghna Meghwani **Content:** [![Blog banner - ServerAvatar](https://serveravatar.com/wp-content/uploads/2025/09/728_90-Banner-3-1024x127.png)](https://serveravatar.com/?ref=blog)You run a JavaScript file that looks perfectly valid, yet the process stops before the first useful line executes: Cannot Use Import Statement Outside a Module. ``` SyntaxError: Cannot use import statement outside a module ``` ``` SyntaxError: Cannot use import statement outside a module ``` The wording makes the `import` statement look guilty. Usually, it isn’t. The real problem is that your runtime and your source file disagree about the file’s module format. This guide shows you how to identify that disagreement before changing project settings. You’ll learn how to fix the error in Node.js, a browser, TypeScript, and common development tools without creating a second module problem elsewhere. It is written for developers who want a reliable diagnosis, not a list of unrelated commands to try. ## TL;DR - First identify which program is executing the file: Node.js, a browser, a test runner, or a TypeScript tool. - In Node.js, choose one module system for the relevant package: ESM with `"type": "module"` or `.mjs`, or CommonJS with `require()` and `.cjs`. - In a browser, load an entry file with ` ``` ``` doctype html> Module example ``` > For more details on JavaScript modules, including `import`, `export`, and ``, see MDN’s [JavaScript modules guide](https://developer.mozilla.org/en-US/docs/Web/JavaScript/Guide/Modules?ref=serveravatar.com). Then import using a URL the browser can resolve: ``` // /assets/app.js import { showStatus } from "./status.js"; showStatus("Application loaded"); ``` ``` // /assets/app.js import { showStatus } from "./status.js"; showStatus("Application loaded"); ``` ``` // /assets/status.js export function showStatus(message) { document.body.textContent = message; } ``` ``` // /assets/status.js export function showStatus(message) { document.body.textContent = message; } ``` Static imports such as `import React from "react"` use a **bare specifier**. Browsers do not resolve npm package names by searching `node_modules`. Use a build tool, an import map, or a browser-compatible URL strategy for that use case. ### Don’t test modules by double-clicking the HTML file Opening `index.html` through a `file://` URL can trigger origin and module-loading restrictions. Serve the directory over HTTP instead: ``` npx serve . ``` ``` npx serve . ``` Open the local URL printed by the command and check the Network panel. Every imported file should return a successful status and a JavaScript-compatible MIME type. ### If `type="module"` is present but the page still fails Look for the next error rather than repeatedly editing the script tag: - **404 response:** The relative import path is wrong. Remember that it resolves from the importing file, not from the HTML file. - **MIME type error:** The server returned HTML, plain text, or another content type for a JavaScript module. - **CORS error:** A cross-origin module response lacks an acceptable CORS header. - **Bare specifier error:** The browser cannot map a package name such as `lodash` to a URL. - **Import inside a function:** Static `import` declarations must stay at module top level; use `import()` for conditional loading. ## Fix the Error in TypeScript Projects TypeScript adds a compiler between the source code and the runtime. Four pieces need to agree: - The module syntax in the `.ts` source. - The `module` and `moduleResolution` behavior in `tsconfig.json`. - The package type applied to emitted `.js` files. - The command or loader that executes the source or output. > TypeScript’s [`module` compiler option](https://www.typescriptlang.org/tsconfig/module.html?ref=serveravatar.com) controls how module syntax is emitted and is an important part of keeping the compiler output aligned with Node.js. For a Node.js ESM project, a practical configuration is: ``` // package.json { "type": "module", "scripts": { "build": "tsc", "start": "node dist/index.js" } } ``` ``` // package.json { "type": "module", "scripts": { "build": "tsc", "start": "node dist/index.js" } } ``` ``` // tsconfig.json { "compilerOptions": { "target": "ES2022", "module": "NodeNext", "moduleResolution": "NodeNext", "rootDir": "src", "outDir": "dist", "strict": true }, "include": ["src/**/*.ts"] } ``` ``` // tsconfig.json { "compilerOptions": { "target": "ES2022", "module": "NodeNext", "moduleResolution": "NodeNext", "rootDir": "src", "outDir": "dist", "strict": true }, "include": ["src/**/*.ts"] } ``` With Node-aware module resolution, write relative imports so the emitted path will be valid: ``` // src/index.ts import { buildMessage } from "./message.js"; console.log(buildMessage("ready")); ``` ``` // src/index.ts import { buildMessage } from "./message.js"; console.log(buildMessage("ready")); ``` The `.js` suffix in a TypeScript source file can look odd at first. It describes the runtime file that will exist after compilation. Build and inspect the emitted entry point: ``` npm run build sed -n '1,40p' dist/index.js npm start ``` ``` npm run build sed -n '1,40p' dist/index.js npm start ``` If the compiler preserves `import` statements but Node treats `dist/index.js` as CommonJS, the error remains. If the compiler emits `require()` while the package marks `.js` as ESM, you get the opposite mismatch. TypeScript provides `.mts` and `.cts` source extensions for explicitly marking ESM and CommonJS. Under Node-aware module modes such as `NodeNext`, `.mts` files emit `.mjs` files and `.cts` files emit `.cjs` files, respectively. Tool compatibility still varies, so package-level configuration is often easier to maintain across editors, test runners, and production builds. ## When the Error Comes from a Test Runner or Config File If production code starts correctly but tests fail, isolate the failing layer: ``` node src/index.js npm test ``` ``` node src/index.js npm test ``` That comparison tells you whether Node can load the application outside the test environment. Next, inspect what the test command actually runs: ``` npm pkg get scripts.test ``` ``` npm pkg get scripts.test ``` Test runners may execute files in a sandbox, transform syntax, or load configuration before the application package. Use the runner’s current ESM instructions and version-specific configuration. Avoid copying an old `--experimental` flag from a forum post without checking whether your installed version still requires it. Configuration files deserve special attention. A project may use ESM application code while a build tool expects its config in CommonJS. In that case, an explicit `.cjs` config can be cleaner than changing the entire repository. Likewise, some tools recognize an `.mjs` config name for ESM. The same rule applies to process managers and deployment panels: confirm the configured startup file after renaming `index.js` to `index.mjs`, and verify that the working directory contains the expected `package.json`. ![node app.js vs npm test - Cannot Use Import Statement Outside a Module.](https://serveravatar.com/wp-content/uploads/2026/08/image-150.png) ## Common Fixes That Create New Problems **1. Adding** `"type": "module"` **without checking the rest of the package** This changes how Node interprets every applicable `.js` file under that package boundary. Search for CommonJS features first: ``` grep -R --line-number --include='*.js' \ -E 'require\(|module\.exports|exports\.|__dirname|__filename' . \ --exclude-dir=node_modules ``` ``` grep -R --line-number --include='*.js' \ -E 'require\(|module\.exports|exports\.|__dirname|__filename' . \ --exclude-dir=node_modules ``` If results include configuration or maintenance scripts, convert them or give them a `.cjs` extension. **2. Renaming a file but not its references** After changing `.js` to `.mjs`, update imports, npm scripts, service definitions, deployment commands, and process-manager configuration. A production service still pointing to the old entry file will fail differently, often with `MODULE_NOT_FOUND`. **3. Installing Babel as the first response** A transpiler is useful when you genuinely need syntax transformation or older-runtime support. It also adds configuration, dependencies, source maps, and another place for module settings to disagree. Native ESM support is usually simpler for a current Node.js project. **4. Mixing static** `import` **and** `require()` **casually** They differ in loading behavior and available globals. Decide where the interoperability boundary belongs, document it, and keep it small. **5. Treating every import failure as the same error** Once the parser recognizes ESM, the message may change to an export mismatch, missing extension, unsupported directory import, or package export restriction. That’s progress: the runtime has moved to the next validation stage. Diagnose the new message on its own terms. ## Verify the Fix Before You Deploy Don’t stop when one development command runs. Use a small verification sequence: ``` # 1. Confirm the runtime used locally node --version # 2. Run the same entry point production will use node src/index.js # 3. Run the project scripts npm test npm run build # 4. Check the production dependency tree npm ls --omit=dev ``` ``` # 1. Confirm the runtime used locally node --version # 2. Run the same entry point production will use node src/index.js # 3. Run the project scripts npm test npm run build # 4. Check the production dependency tree npm ls --omit=dev ``` **Adjust the entry path for your project. Then verify these items:** - The startup command points to the correct extension and directory. - The deployed package includes the `package.json` that defines the intended type. - Relative ESM imports include valid file extensions. - The Node.js version on the server matches the version you tested. - Build output, rather than raw TypeScript source, is launched unless a supported loader is intentionally configured. - Environment-specific config files use the format expected by their tool. Commit `package.json`, any required lockfile changes, renamed files, and module-configuration updates together so the deployment receives a consistent module setup. If only part of the module migration reaches the server, the deployed project may behave differently from your local checkout. For a Node.js application hosted on a VPS, keep the startup command and runtime version documented alongside the deployment configuration. ## Prevent the Error in Future Projects Choose the module format when the project is created and make the choice explicit. Even for CommonJS, an explicit package type communicates intent: ``` { "type": "commonjs" } ``` ``` { "type": "commonjs" } ``` > Explicitly declaring the package type makes the intended behavior clearer to Node.js and other tooling. Current Node documentation actually recommends package authors explicitly specify `"type"` even for CommonJS packages. Then add a continuous integration check that runs the actual entry point or build output. A linter can catch some mixed syntax, but execution catches package boundaries, missing extensions, and loader differences that a syntax rule may miss. **For teams, document four facts in the README:** - Supported Node.js version. - Module format: ESM or CommonJS. - Development command. - Production build and startup commands. Keep application code and tool configuration separate when they follow different module conventions. Explicit `.mjs` and `.cjs` extensions make those exceptions visible during code review. [![Blog banner - ServerAvatar](https://serveravatar.com/wp-content/uploads/2025/09/728_90-Banner-1-1024x127.png)](https://serveravatar.com/?ref=blog)## Final Deployment Checks Before deploying your Node.js application, verify that the runtime, package type, build process, and startup command are aligned. **Package Type****Node.js Version****Build Command****Startup Command****ESM (`"type": "module"`)**Supported LTS`npm run build``npm start`**ESM (`.mjs`)**Supported LTS`npm run build``node dist/index.mjs`**CommonJS (`"type": "commonjs"`)**Supported LTS`npm run build``npm start`**CommonJS (`.cjs`)**Supported LTS`npm run build``node dist/index.cjs`**TypeScript + NodeNext (ESM)**Supported LTS`npm run build``node dist/index.js`> Use the Node.js version required by your framework and dependencies, and prefer a currently supported LTS release for production. > **Note:** The commands and Node.js version shown above are examples. Always use the version required by your application and framework. Your `package.json` scripts should be treated as the source of truth for the build and startup commands. **Pre-Deployment Checklist** - Confirm the **Node.js version** used in production. - Confirm whether the application uses **ESM or CommonJS**. - Verify the `type` field in `package.json`. - Check whether the entry file uses `.js`, `.mjs`, or `.cjs`. - Run the production **build command** locally. - Verify that the build output contains the expected module format. - Confirm the **startup command** points to the correct entry file. - Make sure all relative ESM imports use the correct file extensions. - Include the required `package.json` and lockfile in the deployment. - Verify that production uses the same Node.js version tested locally. - Test the deployed application after startup. **Example Deployment Configuration** For a typical TypeScript + Node.js ESM application: ``` { "type": "module", "scripts": { "build": "tsc", "start": "node dist/index.js" } } ``` ``` { "type": "module", "scripts": { "build": "tsc", "start": "node dist/index.js" } } ``` **Setting****Value**Package typeESMNode.jsSupported LTSBuild command`npm run build`Startup command`npm start`Output directory`dist/`Entry point`dist/index.js`## Key Takeaways - The error means the file is being parsed in a context that does not allow the static `import` syntax you wrote. - Identify the executor and nearest package boundary before editing code. - Use `"type": "module"` or `.mjs` for ESM; use `require()` or `.cjs` for CommonJS. - Browser modules need `type="module"`, resolvable URLs, correct MIME types, and valid cross-origin responses. - TypeScript source, compiler output, package type, and launch command must agree. - Verify the same build and startup path that production will use. ## Conclusion The fastest reliable fix is not “add one setting everywhere.” It is to establish how the failing file is being executed, decide whether that file should be ESM or CommonJS, and make the surrounding configuration agree. Start by running the file directly and checking the nearest `package.json`. Apply the smallest consistent change, then run the build, tests, and production entry command. That sequence fixes the current error while reducing the chance of replacing it with a harder deployment-only failure. If you’re looking for a simpler way to manage your servers, PHP and Node.js applications, domains, SSL certificates, and server configuration, and many more, use [ServerAvatar](https://serveravatar.com/) to deploy and manage everything from one platform. ## FAQs ### Why does Node.js say “Cannot use import statement outside a module”? Node.js shows this error when the file is being parsed in a non-ESM context even though it contains a static ESM `import` declaration. Mark the relevant package with `"type": "module"`, use an `.mjs` file, or keep the project in CommonJS and replace the import with `require()`. ### Should I use `"type": "module"` or rename the file to `.mjs`? Use `"type": "module"` when ESM is the default for the package. Use `.mjs` when only a specific file needs ESM or when changing the package default would disrupt existing CommonJS files. ### Why do I still get an error after adding `type="module"` in HTML? The browser may have moved past the original parser error and found another issue. Check DevTools for an incorrect relative URL, a 404 response, an invalid MIME type, a CORS restriction, or a bare package specifier the browser cannot resolve. ### How do I fix the error in TypeScript? Align the TypeScript compiler settings with the runtime. For Node.js ESM, use a compatible Node-aware module mode such as `NodeNext`, set the package to `"type": "module"`, compile the project, and run the emitted JavaScript using the intended Node.js version. ### Can I use `import` in a CommonJS file? You can use the asynchronous dynamic `import()` expression in CommonJS. A static top-level `import` declaration requires the file to be treated as ESM. Remember that dynamic import returns a Promise, so the calling code must handle the asynchronous result. ### About the Author Meghna Meghwani is a technical writer focused on Linux, Ubuntu, VPS hosting, server management, WordPress, PHP, Node.js, cloud hosting, and DevOps. She creates beginner-friendly tutorials, practical hosting guides, troubleshooting articles, and server security content designed to help developers and businesses manage applications and servers more efficiently.[](https://3.basecamp.com/5840738/buckets/41514807/boosts/new?boost%5Bboostable_gid%5D=Z2lkOi8vYmMzL1JlY29yZGluZy8xMDI1MTkzMDc4NQ) **Categories:** Blog, Guide, JavaScript, Optimisation, Others, Tutorials **Tags:** Cannot Use Import Statement Outside a Module, ES Modules, Import Export JavaScript, javascript, JavaScript Errors, JavaScript Import Error, JavaScript Import Statement, JavaScript Modules, JavaScript Troubleshooting, Node.js Modules --- ### [How to Use git reset to Revert to Previous Commit in Git](https://serveravatar.com/git-reset/) **Published:** August 27, 2026 **Author:** Meghna Meghwani **Content:** [![Blog banner - ServerAvatar](https://serveravatar.com/wp-content/uploads/2025/09/728_90-Banner-3-1024x127.png)](https://serveravatar.com/?ref=blog)Have you committed too early, included the wrong files, or taken a local branch in a direction you no longer want? Git Reset to Previous Commit lets you move that branch back to an earlier commit using `git reset`. The difficult part isn’t typing the command. It’s choosing what should happen to the changes that came after the target commit. This guide shows how to use `git reset` to revert to a previous commit while protecting the work you may still need. It is written for developers who are comfortable running basic Git commands but want a safer way to undo local commits. You’ll learn how Git’s three reset modes behave, practice them in a disposable repository, handle common scenarios, and recover when a reset goes farther than intended. > **Quick safety rule:** If the commits are already on a shared remote branch, pause before using `git reset`. In most team workflows, `git revert` is the safer choice because it preserves the published history. ## TL;DR - Use `git reset --soft HEAD~1` to remove the latest commit while keeping its changes staged. - Use `git reset HEAD~1` to remove the latest commit while keeping its changes unstaged. This is the default `--mixed` behavior. - Use `git reset --hard HEAD~1` only when you intentionally want to discard tracked changes as well as commits. - Inspect `git status`, `git log`, and `git diff` before and after resetting. - Prefer `git revert` for commits that teammates may already have pulled. - If you reset to the wrong place, use `git reflog` to locate the earlier branch position. ## Before You Reset: Decide Whether History May Be Rewritten The key question to ask first is not, “Which reset mode is right for me?” It is “Does anyone else depend on this branch history?” `git reset` changes where the current branch points. A commit can disappear from the visible path of that branch even though Git may retain the underlying object for some time. That is convenient on a private feature branch. On a shared branch such as `main`, however, rewriting the published sequence can leave another developer’s local history out of sync. **Use this decision table before running anything:** **Situation****Better starting choice****Why****The commit exists only on your machine**`git reset`You control the local history**You want to revise your latest local commit**`git reset --soft HEAD~1`The changes remain ready to recommit**You want to reorganize several local commits**`git reset --mixed `The file changes remain available but unstaged**The commit is already on a shared branch**`git revert `A new commit undoes the change without rewriting history**You only want an older version of one file**`git restore --source= -- `The branch pointer does not need to move> Git’s official documentation separates these jobs clearly: [`git reset`](https://git-scm.com/docs/git-reset?ref=serveravatar.com) moves a branch or updates the index, while [`git revert`](https://git-scm.com/docs/git-revert?ref=serveravatar.com) records a new commit that reverses an earlier commit. If your team deploys from Git, history changes can also affect the commit a server expects to fetch. Review the deployment pipeline before rewriting any branch used in production. ![Git Reset to Previous Commit](https://serveravatar.com/wp-content/uploads/2026/08/image-136.png) ## Understand What `git reset` Actually Changes **A Git project has three working layers that matter during a reset:** 1. **HEAD and the current branch:** `HEAD` normally refers to the branch you have checked out, and that branch points to a commit. 2. **The index:** Also called the staging area, it stores the snapshot prepared for the next commit. 3. **The working tree:** These are the files you can currently open and edit. When you run: ``` git reset ``` ``` git reset ``` Git moves the current branch to ``. The mode determines whether Git also changes the index and working tree. **Command****Branch moves?****Staging area****Working files****Typical use**`git reset --soft `YesKeptKeptRebuild or amend local commits`git reset --mixed `YesReset to targetKeptReview and selectively restage changes`git reset --hard `YesReset to targetReset to targetDeliberately discard later tracked workIf no mode is supplied, Git uses `--mixed`. Two details prevent common surprises: - `--hard` can overwrite modifications to tracked files. Commit, stash, or back up anything you may need first. - A hard reset does not generally remove ordinary untracked files. Removing untracked files is a separate operation, commonly handled with `git clean`, which is outside the reset itself. There are additional options such as `--merge` and `--keep`, but they solve narrower cases involving local changes and merge-like resets. For the everyday task of returning a private branch to an earlier commit, soft, mixed, and hard are the modes worth understanding first. ## Build a Disposable Repository and See the Difference The safest way to understand reset is to observe it somewhere that cannot harm a real project. > If you’re new to working with Git from the command line, you can first learn [how to use Git Bash](https://serveravatar.com/git-bash/) before following the examples below. The following mini-lab creates three commits in a temporary practice directory. > If Git is not installed on your Ubuntu system yet, follow our guide on [how to install Git on Ubuntu](https://serveravatar.com/install-git-ubuntu/) before starting. ``` mkdir git-reset-practice cd git-reset-practice git init git config user.name "Practice User" git config user.email "practice@example.com" printf "version 1\n" > app.txt git add app.txt git commit -m "Add version 1" printf "version 2\n" >> app.txt git add app.txt git commit -m "Add version 2" printf "version 3\n" >> app.txt git add app.txt git commit -m "Add version 3" ``` ``` mkdir git-reset-practice cd git-reset-practice git init git config user.name "Practice User" git config user.email "practice@example.com" printf "version 1\n" > app.txt git add app.txt git commit -m "Add version 1" printf "version 2\n" >> app.txt git add app.txt git commit -m "Add version 2" printf "version 3\n" >> app.txt git add app.txt git commit -m "Add version 3" ``` Now inspect the compact history: ``` git log --oneline --decorate -3 ``` ``` git log --oneline --decorate -3 ``` You can see the output as mentioned: ![git log - Git Reset to Previous Commit](https://serveravatar.com/wp-content/uploads/2026/08/image-137-1024x67.png) Your hashes will differ, but the output should resemble this: ``` 8c2de91 (HEAD -> main) Add version 3 431f7a0 Add version 2 bb7262e Add version 1 ``` ``` 8c2de91 (HEAD -> main) Add version 3 431f7a0 Add version 2 bb7262e Add version 1 ``` The name `HEAD~1` means the first parent of the current commit, in this example, “Add version 2.” `HEAD~2` means two first-parent steps back. Commit hashes are more explicit, while relative references are quicker when you know exactly how many recent commits you want to move past. Before testing a mode, create a recovery label: ``` git branch before-reset ``` ``` git branch before-reset ``` That branch gives the original tip a memorable name. In a real repository, a temporary backup branch is a simple precaution when you are uncertain. ### Try a soft reset ``` git reset --soft HEAD~1 git status git diff --staged ``` ``` git reset --soft HEAD~1 git status git diff --staged ``` The `Add version 3` commit is no longer the tip of `main`, but its file change remains staged. As mentioned below: ![soft reset - Git Reset to Previous Commit](https://serveravatar.com/wp-content/uploads/2026/08/image-138-1024x204.png) This is ideal when the content is correct but the commit itself needs a better message, additional files, or a cleaner split. To restore the lab before the next test: ``` git reset --hard before-reset ``` ``` git reset --hard before-reset ``` As you can see in the output mentioned below:[](https://storage.app.basecamp.com/5840738/blobs/fe12402c-a201-11f1-ad1d-0242ac120005/download/image.png) ![git reset - Git Reset to Previous Commit](https://serveravatar.com/wp-content/uploads/2026/08/image-139-1024x28.png) ### Try a mixed reset ``` git reset --mixed HEAD~1 git status git diff ``` ``` git reset --mixed HEAD~1 git status git diff ``` The same change is now present in `app.txt`, but it is not staged. As mentioned below: ![git reset mixed - Git Reset to Previous Commit](https://serveravatar.com/wp-content/uploads/2026/08/image-140-1024x253.png) This gives you room to edit it, discard part of it, or stage selected hunks with `git add -p`. Restore the starting point again: ``` git reset --hard before-reset ``` ``` git reset --hard before-reset ``` As you can see in the output mentioned below: ![git reset hard - Git Reset to Previous Commit](https://serveravatar.com/wp-content/uploads/2026/08/image-141-1024x30.png)### Try a hard reset ``` git reset --hard HEAD~1 git status cat app.txt ``` ``` git reset --hard HEAD~1 git status cat app.txt ``` The branch, index, and tracked file now match “Add version 2.” The line introduced by the third commit is no longer in the working tree. As mentioned below: ![git reset hard ](https://serveravatar.com/wp-content/uploads/2026/08/image-142-1024x104.png) This is why `--hard` deserves a deliberate check before you press Enter. You can return to the saved state with: ``` git reset --hard before-reset ``` ``` git reset --hard before-reset ``` As you can see in the output mentioned below: ![git reset ](https://serveravatar.com/wp-content/uploads/2026/08/image-143-1024x28.png) ## Use `git reset` Safely in a Real Repository Once the three-layer model makes sense, a real reset becomes a short, controlled operation. ### 1. Confirm the branch and current state Start by checking where you are and whether the working tree contains anything valuable: ``` git status git branch --show-current ``` ``` git status git branch --show-current ``` If `git status` shows uncommitted changes, choose one of these precautions: ``` # Option 1: commit a temporary checkpoint git add -A git commit -m "WIP: checkpoint before reset" # Option 2: stash tracked and untracked changes git stash push -u -m "Before resetting branch" ``` ``` # Option 1: commit a temporary checkpoint git add -A git commit -m "WIP: checkpoint before reset" # Option 2: stash tracked and untracked changes git stash push -u -m "Before resetting branch" ``` The `-u` flag includes untracked files in the stash. Do not assume the default stash contains them. ### 2. Identify the exact target commit Use a readable log rather than copying a hash from memory: ``` git log --oneline --decorate --graph -10 ``` ``` git log --oneline --decorate --graph -10 ``` If you want the parent of the latest commit, `HEAD~1` is sufficient. For an older target, copying the displayed hash is usually clearer: ``` git show --stat ``` ``` git show --stat ``` `git show --stat` confirms the commit message and affected files without changing the repository. As mentioned in the output below: ![git show ](https://serveravatar.com/wp-content/uploads/2026/08/image-144-1024x114.png) ### 3. Mark the current tip when the change is significant For a multi-commit reset, create a temporary branch: ``` git branch backup-before-reset ``` ``` git branch backup-before-reset ``` This isn’t required, but it turns recovery into an obvious command instead of a reflog investigation. Delete the backup branch later, after verifying the result. ### 4. Run the mode that matches your intended outcome Keep changes staged: ``` git reset --soft ``` ``` git reset --soft ``` Keep changes but unstage them: ``` git reset --mixed ``` ``` git reset --mixed ``` Discard later commits and tracked file changes: ``` git reset --hard ``` ``` git reset --hard ``` ### 5. Verify all three layers Do not stop at a successful command message. Check the new branch tip and remaining changes: ``` git log --oneline --decorate -5 git status git diff git diff --staged ``` ``` git log --oneline --decorate -5 git status git diff git diff --staged ``` - For a hard reset, both diff commands should normally be empty. - For a mixed reset, `git diff` should show the retained working-tree changes. - For a soft reset, `git diff --staged` should show the retained staged changes. Verification is especially important before a deployment. If the target branch triggers automatic releases, inspect the final commit and run the project’s tests before pushing. ## Choose the Right Reset for Common Git Mistakes The command becomes easier to remember when it is tied to an outcome rather than a definition. ### Undo the latest commit but keep everything staged Use this when the files are correct but the commit message is poor, a file was omitted, or the work should be recommitted as one revised snapshot: ``` git reset --soft HEAD~1 git status ``` ``` git reset --soft HEAD~1 git status ``` Make the needed adjustment, then commit again: ``` git add path/to/missed-file git commit -m "Describe the corrected change" ``` ``` git add path/to/missed-file git commit -m "Describe the corrected change" ``` If you only need to modify the most recent commit and it has not been shared, `git commit --amend` may be even more direct. Reset is more flexible when you want to split or substantially rebuild that commit. ### Undo several local commits and reorganize the work Suppose three quick commits contain mixed changes that should become two logical commits. Move the branch back three commits while leaving all file changes unstaged: ``` git branch backup-before-rework git reset --mixed HEAD~3 git status ``` ``` git branch backup-before-rework git reset --mixed HEAD~3 git status ``` Then stage intentionally: ``` git add -p git commit -m "Add validation for deployment settings" git add -A git commit -m "Update deployment interface" ``` ``` git add -p git commit -m "Add validation for deployment settings" git add -A git commit -m "Update deployment interface" ``` `git add -p` lets you stage individual change hunks. It is often more useful than staging whole files when unrelated edits ended up together. ### Return a private branch to a known good commit If later local work is genuinely unwanted and you have confirmed the target: ``` git branch backup-before-hard-reset git reset --hard ``` ``` git branch backup-before-hard-reset git reset --hard ``` Run the application’s test suite afterward. A clean Git status only proves that the working tree matches the selected commit; it does not prove that the commit is safe to deploy. ### Unstage a file without losing its edits Reset also has a path-oriented form. To remove a file from the index while keeping its working copy: ``` git reset -- path/to/file ``` ``` git reset -- path/to/file ``` Modern Git also offers a more explicit command: ``` git restore --staged path/to/file ``` ``` git restore --staged path/to/file ``` Neither command moves the current branch when used this way. The official [`git restore` reference](https://git-scm.com/docs/git-restore) documents how restoration can target the working tree, index, or a selected source commit. ## What to Do When the Commit Is Already on the Remote First fetch the current remote state and compare it with your local branch: ``` git fetch origin git status git log --oneline --left-right --graph HEAD...origin/main ``` ``` git fetch origin git status git log --oneline --left-right --graph HEAD...origin/main ``` If teammates may have based work on the commit, use `git revert`: ``` git revert ``` ``` git revert ``` Git creates a new commit that applies the inverse change. The original commit stays in the history, so everyone can pull the correction normally. If a private remote branch must be rewritten and your team process explicitly permits it, push with a lease: ``` git push --force-with-lease origin ``` ``` git push --force-with-lease origin ``` `--force-with-lease` is safer than an unconditional `--force` because it refuses to update the remote when its current value differs from what your local repository expects. It still rewrites history, so branch protection rules may block it, and that is often intentional. Never present a forced push as the automatic final step of every reset. Many resets are local cleanups that should be followed by new commits and a normal push. > If you’re still getting familiar with remote repositories and how GitHub fits into Git workflows, see our guide to [GitHub and how it works](https://serveravatar.com/what-is-github/). ## Recover from the Wrong Reset with `git reflog` A mistaken reset can feel final because the removed commits disappear from `git log`. The local reflog usually provides a way back. Run: ``` git reflog --date=local ``` ``` git reflog --date=local ``` You may see entries resembling: ``` 431f7a0 HEAD@{0}: reset: moving to 431f7a0 8c2de91 HEAD@{1}: commit: Add version 3 ``` ``` 431f7a0 HEAD@{0}: reset: moving to 431f7a0 8c2de91 HEAD@{1}: commit: Add version 3 ``` As mentioned in the output below: ![git reflog](https://serveravatar.com/wp-content/uploads/2026/08/image-145-1024x177.png) Here, `HEAD@{1}` represents the position before the reset. Inspect it first: ``` git show --stat HEAD@{1} ``` ``` git show --stat HEAD@{1} ``` As mentioned in the output below: ![git show](https://serveravatar.com/wp-content/uploads/2026/08/image-146-1024x114.png) Then create a recovery branch instead of immediately performing another destructive reset: ``` git branch recovered-work HEAD@{1} git log --oneline recovered-work -5 ``` ``` git branch recovered-work HEAD@{1} git log --oneline recovered-work -5 ``` As mentioned in the output below:[](https://storage.app.basecamp.com/5840738/blobs/69e3a938-a204-11f1-9a3a-0242ac120005/download/image.png) ![git log ](https://serveravatar.com/wp-content/uploads/2026/08/image-147-1024x66.png)If the recovered branch contains the missing commits, you can merge, cherry-pick, or reset to it after deciding what the final history should be. Reflogs are local records. A different clone does not automatically have your machine’s reflog, and old entries are eventually expired. Treat reflog as a recovery tool, not as a backup policy. > The official [`git reflog` documentation](https://git-scm.com/docs/git-reflog?ref=serveravatar.com) explains how Git records earlier values of branch tips and other references. [![Blog banner - ServerAvatar](https://serveravatar.com/wp-content/uploads/2025/09/728_90-Banner-1-1024x127.png)](https://serveravatar.com/?ref=blog)## Troubleshoot Unexpected Reset Results **1. `git reset --hard` did not delete an untracked file** That is expected. Reset updates tracked content. Check untracked files with: ``` git status --short ``` ``` git status --short ``` Do not casually run a cleanup command just to make the status empty. Review every untracked path and preserve anything important first. **2. The reset was blocked because local changes would be overwritten** Some reset modes, including `--keep`, are designed to stop rather than overwrite conflicting local changes. Commit or stash those changes, recheck the target, and try again with the appropriate mode. **3. The branch is behind the remote after a reset** That can be a normal consequence of moving the local branch backward. Do not pull or force-push reflexively. Decide whether the remote history must remain intact. If it must, restore your branch and use `git revert` instead. **4. A submodule still points to unexpected content** Submodules have their own repositories and checked-out commits. A reset of the parent repository does not always update every submodule working tree automatically. Review the recorded submodule commit and use the relevant submodule option only after confirming that local submodule work will not be lost. **5. `HEAD~1` selected the wrong commit after a merge** `HEAD~1` follows the first parent. Merge commits have more than one parent, so parent notation can be easy to misread. Inspect the graph and use an explicit hash when the history branches: ``` git log --graph --oneline --decorate --all ``` ``` git log --graph --oneline --decorate --all ``` ## Practical Safety Checklist **Before reset:** - Confirm the current branch with `git branch --show-current`. - Read `git status`; do not assume the working tree is clean. - Inspect the target with `git show --stat `. - Decide whether the commits have been shared. - Commit, stash, or copy work you may need. - Create a temporary backup branch for a significant reset. **After reset:** - Confirm the new tip with `git log --oneline --decorate`. - Inspect unstaged changes with `git diff`. - Inspect staged changes with `git diff --staged`. - Run the project’s tests or build. - Review deployment automation before pushing. - Use a normal push unless history rewriting is intentional and permitted. This workflow is slower by perhaps a minute and can save hours of recovery, especially when the branch is connected to a staging or production deployment. ## Conclusion Using `git reset` safely depends on the result you want. Use `--soft` to remove a commit while keeping its changes staged, `--mixed` to keep the changes unstaged for further editing, and `--hard` only when you are sure the changes can be discarded. It is best to practice these commands in a separate repository before using them on a real project. For live projects, always create a backup or recovery point before resetting. If changes have already been shared, `git revert` is usually safer because it preserves the existing history. Server management platforms such as ServerAvatar can simplify deployment, backups, SSL, and application management, but Git rollback decisions should still be made carefully. ## Key Takeaways - A reset moves your current branch; the selected mode controls the index and working tree. - `--soft` keeps changes staged, `--mixed` keeps them unstaged, and `--hard` overwrites tracked working-tree changes. - When commits have already been shared, `git revert` is the safer choice because it preserves the existing history for everyone using the repository. - A backup branch and a careful verification pass make resets much less risky. - `git reflog` can recover committed work after many local reset mistakes, but it is not a substitute for backups. ## FAQs ### Does `git reset` permanently delete commits? It removes later commits from the visible history of the current branch, but the commits may remain reachable through another branch or the local reflog. Create a recovery branch as soon as possible if you reset too far, because unreachable objects are not retained forever. ### What is the safest way to undo the latest local commit? Use `git reset --soft HEAD~1` when you want to keep all changes staged, or `git reset --mixed HEAD~1` when you want to review them as unstaged changes. Check `git status` and the relevant diff before recommitting. ### Should I use `git reset` or `git revert` on `main`? Use `git revert` when `main` is shared or its commits have been published. Revert adds a new corrective commit and preserves history. Reset is better suited to local or explicitly rewriteable branches. ### Can I recover after running `git reset --hard`? Often, yes, if the lost work existed in a commit. Use `git reflog`, inspect the earlier entry with `git show`, and create a recovery branch at that reference. Uncommitted tracked changes overwritten by a hard reset are much harder, and sometimes impossible, to recover through Git. ### Does `git reset --hard` remove untracked files? No, an ordinary hard reset does not generally remove untracked files. It resets the branch, index, and tracked files to the selected commit. Review untracked files separately with `git status --short`. ### About the Author Meghna Meghwani is a technical writer focused on Linux, Ubuntu, VPS hosting, server management, WordPress, PHP, Node.js, cloud hosting, and DevOps. She creates beginner-friendly tutorials, practical hosting guides, troubleshooting articles, and server security content designed to help developers and businesses manage applications and servers more efficiently. **Categories:** Blog, Guide, Linux, Others, Tutorials, Ubuntu, Uncategorized **Tags:** git, Git previous commit, Git reset, Git reset command, Git reset hard, Git reset mixed, Git reset soft, Git Reset to Previous Commit, Git tutorial, Git undo commit --- ### [How to Fix Error Establishing a Database Connection in WordPress](https://serveravatar.com/wordpress-database-connection-error/) **Published:** August 26, 2026 **Author:** Meghna Meghwani **Content:** [![Blog banner - ServerAvatar](https://serveravatar.com/wp-content/uploads/2025/09/728_90-Banner-3-1024x127.png)](https://serveravatar.com/?ref=blog)You’re working on your WordPress site. Everything looks fine one minute, and the next, a stark white page with a single line of text stares back at you: “Error Establishing a Database Connection”. This WordPress database connection error means your posts, pages, comments, user data, all of it lives inside that database. And WordPress is telling you it can’t reach it anymore. I’ve been there. More importantly, I’ve fixed this error on dozens of sites, my own, client projects, and staging environments that somehow got into a bad state overnight. The good news is this: it’s almost always solvable, and it usually doesn’t take long. This guide walks you through every real cause of this error and every real fix, ordered from the most common to the least common. I will explain what’s actually happening at each step, not just what to type, because understanding the “why” is what makes you faster the next time this happens. ## TL;DR Here’s the quick version before you dive in: - Most common cause: Wrong database credentials in wp-config.php - Second most common: Corrupted database tables from failed updates or plugin conflicts - Quickest test: Add WP\_ALLOW\_REPAIR to wp-config.php and visit the repair page - Always back up first, before touching anything - If multiple sites are down at once, it’s server issue, not a WordPress issue ## What Triggers This Error? Before reaching for fixes, it helps to understand the architecture. WordPress is a PHP application. Every time a visitor lands on your site, PHP code runs, asks your MySQL database for the content, and assembles a page to send back. When that handshake breaks, you get the error. Here’s what typically causes it: **1. Incorrect Database Credentials** WordPress stores four critical pieces of information in your wp-config.php file, the database name, the username, the password, and the hostname. If any one of those is wrong, the connection gets refused. This is the single most common cause, responsible for the majority of cases I see. **2. Corrupted Database Tables** Over time, database tables can become corrupted, especially after a plugin fails mid-update, a theme install gets interrupted, or the server loses power at the wrong moment. When the table structure breaks, WordPress can’t read the data it needs, even if the credentials are perfect. **3. Database User Loses Permissions** A database user can exist with the right password but without the right privileges. MySQL permissions are managed separately from login credentials. If something strips those permissions, a bad migration script, a one-click “optimization” tool, or a hosting control panel glitch, WordPress gets locked out despite having correct-looking credentials. **4. The MySQL Server Itself Is Unresponsive** Sometimes the problem isn’t WordPress or your config, it’s that the MySQL service has stopped, run out of memory, or is being overwhelmed. This is a server-level problem, and it requires server-level attention. **5. Sudden Traffic Spikes Overwhelming the Database** A single plugin that goes viral on Hacker News, a social media mention from an influencer, these can flood your server with simultaneous connection requests. MySQL has a limit on concurrent connections, and when that limit fills up, new requests get refused. **6. Corrupted WordPress Core Files** This is rarer, but if a core WordPress file that handles database communication gets damaged, from a failed auto-update, for example, it can produce this exact error even when everything else is fine. ## Step-by-Step: How to Fix the Error Follow these steps in order. Each one eliminates a common cause. If step one doesn’t solve it, move to step two. By the time you reach step seven, you’ll have ruled out almost everything. ### Step 1: Create a Backup Before Making Changes Before troubleshooting database problems, create a backup of your website. Ideally, your backup should include: - WordPress files - WordPress database - Important configuration files This gives you a recovery point if a repair operation or configuration change causes another problem. **Creating a Backup with ServerAvatar** If your WordPress website is managed through [ServerAvatar](https://serveravatar.com/), you can [create website backup](https://serveravatar.com/website-backup/) directly from the ServerAvatar dashboard. ServerAvatar supports application backups that include the application’s files and associated database. It also provides options for storing backups to ServerAvatar storage or to your own cloud-storage provider from available options. **Important:** Do not assume that a backup exists simply because backups were configured previously. Check that recent backups are actually available before proceeding. ### Step 2: Verify Your Database Credentials in wp-config.php This is one of the first things you should check. The `wp-config.php` file is normally located in the root directory of your WordPress installation. **Look for:** ``` /** The name of the database for WordPress */ define( 'DB_NAME', 'your_database_name' ); /** MySQL database username */ define( 'DB_USER', 'your_username' ); /** MySQL database password */ define( 'DB_PASSWORD', 'your_password' ); /** MySQL hostname */ define( 'DB_HOST', 'localhost' ); ``` ``` /** The name of the database for WordPress */ define( 'DB_NAME', 'your_database_name' ); /** MySQL database username */ define( 'DB_USER', 'your_username' ); /** MySQL database password */ define( 'DB_PASSWORD', 'your_password' ); /** MySQL hostname */ define( 'DB_HOST', 'localhost' ); ``` > For more information about the config file and its database-related settings, see the official [WordPress wp-config.php documentation](https://developer.wordpress.org/advanced-administration/wordpress/wp-config?ref=serveravatar.com) **Managing Database Details with ServerAvatar** If your server is managed through ServerAvatar, you can manage databases and database users through the ServerAvatar dashboard instead of relying entirely on command-line database administration. - Navigate to your server panel by clicking on the server dashboard icon. ![navigate to the server panel - WordPress database connection error](https://serveravatar.com/wp-content/uploads/2026/08/image-125-1024x219.png) - Go to the Application section, and click on your WordPress application dashboard icon. ![navigate to the application panel - WordPress database connection error](https://serveravatar.com/wp-content/uploads/2026/08/image-126-1024x287.png) - Navigate to the File Manager section from the left sidebar, and navigate to the public\_html folder. ![edit wp config from file manager - WordPress database connection error](https://serveravatar.com/wp-content/uploads/2026/08/image-127-1024x469.png) - Open the `wp-config.php` file. ![check and verify the details - WordPress database connection error](https://serveravatar.com/wp-content/uploads/2026/08/image-128-1024x494.png) **Check each mentioned value carefully:** - `DB_NAME` **:** Make sure the database exists and that the name matches the database assigned to your WordPress installation. - `DB_USER` **:** Confirm that the database user exists. - `DB_PASSWORD` **:** Make sure the password matches the password configured for that database user. - `DB_HOST` **:** `localhost` is common when the database is running on the same server, but the correct value depends on your server architecture. Do not automatically replace `DB_HOST` with `localhost` unless you know that the database is running locally. After confirming the correct credentials, make sure the values in `wp-config.php` match your database configuration. ### Step 3: Check Database User Permissions If the database credentials are correct but WordPress still cannot connect, check the database user’s permissions. The user must have the appropriate privileges required to work with the WordPress database. **If you recently:** - Changed the database password - Migrated your website - Created a new database user - Restored a database - Changed hosting providers then database permissions are worth checking carefully. **Check Database Users in ServerAvatar** ServerAvatar provides database-user management through the dashboard. You can edit a database user and configure its connection preference, including options such as: - Everywhere - Specific IP - Localhost Restricting database access to the appropriate source can also improve security. If you change the database password, remember to update the corresponding `DB_PASSWORD` value in `wp-config.php`. For example: ``` define( 'DB_PASSWORD', 'your_new_password' ); ``` ``` define( 'DB_PASSWORD', 'your_new_password' ); ``` Save the file and test your website again. ### Step 4: Repair the WordPress Database If your credentials and permissions are correct, corrupted database tables may be the problem. WordPress includes a built-in database repair feature that can help with certain database problems. **Enable the WordPress Database Repair Tool** - Open `wp-config.php` and add: ``` define( 'WP_ALLOW_REPAIR', true ); ``` ``` define( 'WP_ALLOW_REPAIR', true ); ``` - Place it before: ``` /* That's all, stop editing! Happy publishing. */ ``` ``` /* That's all, stop editing! Happy publishing. */ ``` - Save the file. ![Save the file - WordPress database connection error](https://serveravatar.com/wp-content/uploads/2026/08/image-129-1024x551.png) - Then visit: ``` https://example.com/wp-admin/maint/repair.php ``` ``` https://example.com/wp-admin/maint/repair.php ``` - Replace `example.com` with your actual domain. - WordPress will provide options to repair the database. - Choose **Repair Database** first. ![Repair Database](https://serveravatar.com/wp-content/uploads/2026/08/image-130-1024x571.png) - After completing the repair, remove the mentioned sentence from `wp-config.php`. ``` define( 'WP_ALLOW_REPAIR', true ); ``` ``` define( 'WP_ALLOW_REPAIR', true ); ``` **Why should you remove it?** The repair page does not require normal WordPress authentication in the same way as the WordPress admin dashboard. Leaving database repair enabled unnecessarily can therefore expose a potentially sensitive maintenance function. Remove the setting as soon as you’re finished. ### Step 5: Check Whether the Database Service Is Running If the configuration looks correct and the database is still unreachable, check the database service. On a VPS, MySQL or MariaDB may have stopped because of: - Memory exhaustion - CPU overload - Configuration errors - Database crashes - Server maintenance - Storage problems If you have multiple websites on the same server, check whether they are experiencing the same issue. **If Multiple Websites Are Down** Suppose five WordPress websites hosted on the same server suddenly display: > Error Establishing a Database Connection That points more strongly toward a server or database-service problem than five separate WordPress configuration problems. **Server-Level Troubleshooting with ServerAvatar** ServerAvatar provides a feature to check and manage services directly through the ServerAvatar platform, including service resource information and controls for service operations. ![Services section in ServerAvatar](https://serveravatar.com/wp-content/uploads/2026/08/image-131-1024x959.png) It also provides server-level log viewing and filtering tools that can help when troubleshooting application and infrastructure issues. ![Logs section in ServerAvatar](https://serveravatar.com/wp-content/uploads/2026/08/image-132-1024x610.png) This allows you to investigate the server environment without having to perform every routine management task from the command line. ### Step 6: Check Server Resources If MySQL or MariaDB is running but the website continues to experience database connection problems, check the server’s available resources. Pay attention to: - RAM usage - CPU usage - Disk usage - Database load - PHP processes - Number of concurrent requests A server running out of memory can cause database services or PHP processes to become unstable. If the problem occurs only during traffic spikes, resource constraints may be the underlying cause. **Don’t Immediately Accuse WordPress** A WordPress database problem does not always cause a database connection error. The complete request path looks roughly like this: ``` Visitor ↓ Web Server ↓ PHP / PHP-FPM ↓ WordPress ↓ MySQL / MariaDB ``` ``` Visitor ↓ Web Server ↓ PHP / PHP-FPM ↓ WordPress ↓ MySQL / MariaDB ``` A problem anywhere along this chain can affect the website. ### Step 7: Check PHP Configuration PHP configuration can also become relevant when a website is running resource-intensive operations. For example, a WordPress application may require more memory than the current PHP configuration allows. You can check or adjust values such as: ``` define( 'WP_MEMORY_LIMIT', '256M' ); ``` ``` define( 'WP_MEMORY_LIMIT', '256M' ); ``` However, increasing the WordPress memory constant does not automatically increase the server’s available RAM. The underlying PHP configuration and server resources still matter. **Managing PHP Settings with ServerAvatar** ServerAvatar allows PHP settings to be managed at the application level. Depending on the server and supported PHP versions, you can manage settings such as: - PHP version - `memory_limit` - `max_execution_time` - `upload_max_filesize` - `post_max_size` - `max_input_time` - `max_input_vars` ![PHP Settings ](https://serveravatar.com/wp-content/uploads/2026/08/image-133-1024x1020.png) This lets different applications on the same server use appropriate PHP configurations rather than forcing every site to use identical settings. ### Step 8: Replace Corrupted WordPress Core Files If the database is accessible, credentials are correct, permissions are correct, and the server is healthy, corrupted WordPress core files may be worth investigating. You can replace the WordPress core files without replacing your content. **General Process** - Download a fresh copy of WordPress. - Extract the downloaded package. - Do not overwrite your existing `wp-content` directory. - Do not replace your existing `wp-config.php`. - Upload the fresh WordPress core files. - Overwrite the existing core files. - Test the website. Your themes, plugins, media, and database should remain intact as long as you avoid replacing the appropriate application-specific files and directories. Always keep a backup before performing this operation. ### Step 9: Reduce Database Load with Caching If your database connection problems happen during traffic spikes, improving caching can reduce the number of requests that reach the database. Without effective caching, many page requests can require WordPress to execute PHP code and query the database. With caching, frequently requested content can sometimes be served more efficiently. **Redis with ServerAvatar** ServerAvatar supports Redis at the server level. Redis can be used by applications for caching and other performance-related workloads. ![Redis Settings section in ServerAvatar](https://serveravatar.com/wp-content/uploads/2026/08/image-134-1024x255.png) For WordPress, Redis-based object caching can reduce repeated database work for supported workloads. Check out our guide to see [Install Redis Object Cache Plugin into WordPress](https://serveravatar.com/install-redis-object-cache-plugin-wordpress/) > Check out and see [How To Use Redis Full-Page Caching To Speed Up WordPress](https://serveravatar.com/redis-full-page-caching-wordpress/) guide from ServerAvatar ### Step 10: Investigate Plugins and Themes A poorly coded or incompatible plugin can generate excessive database queries or modify database tables incorrectly. If the database connection error appeared immediately after installing or updating a plugin, investigate that plugin first. You can also temporarily disable plugins to determine whether one of them is contributing to the problem. If you cannot access the WordPress dashboard, plugins can be disabled through the filesystem or database, depending on your situation. **Use Staging Before Making Risky Changes** Rather than testing potentially disruptive changes directly on production, consider using a staging environment. ServerAvatar’s Staging Area feature can give you a separate environment where you can test updates, configuration changes, and other modifications without directly affecting the live site. Once testing is complete, supported changes can be directly deployed to production. ![Staging Area feature in ServerAvatar](https://serveravatar.com/wp-content/uploads/2026/08/image-135-1024x414.png) Check out our [Complete Guide to Setting Up a Staging Environment](https://serveravatar.com/setting-up-a-staging-environment/) directly from ServerAvatar. For WordPress site owners, this is particularly useful before: - Updating plugins - Updating themes - Changing PHP versions - Testing database-related changes - Changing application configuration ### Step 11: Consider Your Hosting Environment If database connection problems happen repeatedly, don’t treat every incident as an isolated WordPress problem. Your hosting environment may be the underlying issue. Shared hosting environments can place multiple websites on the same infrastructure and resources. A sudden spike in workload can impact application performance, depending on how the provider allocates resources and structures its infrastructure. A VPS gives you greater control over server resources and configuration. However, managing a VPS manually requires knowledge of: - Web servers - PHP - Databases - Security - Backups - Services - Server configuration - Monitoring - Updates This is where a server management platform such as [ServerAvatar](https://serveravatar.com/) can be useful. **Managing a VPS with ServerAvatar** ServerAvatar provides a management layer for cloud servers, allowing developers and website owners to manage applications, databases, services, system users, backups, PHP settings, security-related settings, and other server operations through a centralized dashboard. ServerAvatar can also help configure a server with common web stacks and services, including Apache, Nginx, OpenLiteSpeed, and Node Stack, PHP-FPM, MySQL, Redis, Git, and Composer. This doesn’t eliminate the need to understand your applications, but it can reduce the amount of routine server administration required. ## How ServerAvatar Helps Prevent WordPress Database Problems Fixing a database connection error is important, but preventing recurring problems is even better. ServerAvatar can help with several parts of the infrastructure that support a WordPress website. ### 1. Automated Backups ServerAvatar supports instant and scheduled backups for applications, files, and databases. You can configure backup schedules and connect supported cloud storage providers for storing your backups. This gives you a recovery option if a database becomes corrupted or an update causes unexpected problems. ### 2. Database Management Instead of managing every database operation manually through the command line, ServerAvatar provides database and database-user management from its dashboard. It supports MySQL and MariaDB along with database-user management and access configuration. ### 3. Application-Level PHP Management Different WordPress websites may have different PHP requirements. ServerAvatar allows PHP versions and several PHP directives to be configured at the application level, helping you manage multiple applications on the same server. ### 4. Redis Support Redis can be used to improve application performance and reduce repeated database work for appropriate workloads. ServerAvatar supports Redis. ### 5. Staging Environments Testing directly on a production WordPress website can be risky. ServerAvatar’s staging functionality allows you to create a testing area for your application and test changes separately before deploying them to production. ### 6. Server and Service Management When the problem is outside WordPress, you need visibility into the underlying server. ServerAvatar provides server and service management capabilities, including resource information and service controls, along with tools such as log viewing for troubleshooting. [![Blog banner - ServerAvatar](https://serveravatar.com/wp-content/uploads/2025/09/728_90-Banner-1-1024x127.png)](https://serveravatar.com/?ref=blog)## How to Prevent “Error Establishing a Database Connection” Once your website is working again, take a few preventive measures. ### Keep Automated Backups Enabled Don’t wait for a database problem before creating your first backup. Set up a regular backup schedule and periodically verify that backups are being created successfully. ### Keep WordPress Updated Keep WordPress core, themes, and plugins updated. However, test important updates on staging first when possible. ServerAvatar’s [WordPress Toolkit](https://serveravatar.com/wordpress-toolkit-serveravatar/) add-on allows you to update outdated WordPress core, plugins, and themes directly from the ServerAvatar dashboard. ### Avoid Untrusted Plugins and Themes Pirated or modified plugins and themes can introduce security vulnerabilities and unstable code. Download WordPress extensions from trusted sources and developers. ### Monitor Server Resources If your server frequently approaches its CPU, RAM, or disk limits, investigate before the problem becomes an outage. ### Use Appropriate Caching Caching can reduce unnecessary application and database workload. Consider page caching and object caching based on your site’s requirements. ### Use Staging for Major Changes Test significant WordPress, PHP, plugin, and configuration changes in a staging environment before applying them to production. ### Keep Your Database Access Secure Use strong database credentials and restrict database access where appropriate. ServerAvatar supports database-user connection preferences, including restricting access to localhost or specific IP addresses. ## Key Takeaways - The error means WordPress can’t reach its MySQL database, and the cause is usually straightforward - Start with wp-config.php credentials, wrong database name, username, password, or hostname accounts for most cases - Use WordPress’s built-in repair tool by adding `WP_ALLOW_REPAIR` to wp-config.php, it’s safe and effective for corrupted tables - Database user permissions are separate from login credentials, gcheck them if everything else looks right - Replace corrupted core files by uploading a fresh WordPress install (without touching wp-content) - Server issues (MySQL service down, resource exhaustion) require host-level intervention - Caching and hosting quality are the best long-term defenses against recurring errors ## Conclusion The “Error Establishing a Database Connection” message is alarming, but it’s almost never as bad as it looks. In the overwhelming majority of cases, the data is fine, the connection is just broken in one detectable, fixable way. Work through the steps above in order: back up first, check your credentials, repair the database if needed, verify user permissions, and escalate to your host if server infrastructure is the problem. Most cases resolve within an hour. If you find yourself dealing with this regularly, it’s worth investing in a better hosting and management setup, one where your MySQL instance isn’t competing with hundreds of other sites for the same resources. Platforms such as [**ServerAvatar**](https://serveravatar.com/) handle the server management, so you can focus on your site rather than fighting with infrastructure. ## FAQs ### Why does WordPress show this error suddenly when nothing changed on my end? This usually means something changed on the server side, a MySQL service restart, a memory limit being hit, or a host-level configuration update. It can also happen when a plugin runs a background task that modifies the database incorrectly while you’re asleep. ### Can I fix this error from my phone? Not reliably, You’ll need access to your hosting control panel, your `wp-config.php` file, and ideally phpMyAdmin or a similar database management tool. These are difficult to use on mobile screens. Use a desktop or laptop for this. ### Will changing my database password break my site? Only if you change it in MySQL but forget to update `wp-config.php`. As long as you update both places simultaneously, there’s no downtime. If you’ve already changed it in MySQL and now can’t log in to your site, update the `DB_PASSWORD` line in `wp-config.php` to match. ### Does this error mean my data is lost? Not at all. Your data is almost certainly intact inside the MySQL database. The error is about the *connection*, not the data itself. Fixing the connection restores access to everything. The only exception is if the database was physically corrupted, and even then, the WordPress repair tool recovers most corrupted tables. ### How do I prevent this from happening again? Regular automated backups, keeping your software updated, using reputable plugins only, and enabling server-level caching are the four most impactful preventive steps. If you’re on shared hosting and seeing this error repeatedly, consider migrating to a VPS for resource isolation. ### About the Author Meghna Meghwani is a technical writer focused on Linux, Ubuntu, VPS hosting, server management, WordPress, PHP, Node.js, cloud hosting, and DevOps. She creates beginner-friendly tutorials, practical hosting guides, troubleshooting articles, and server security content designed to help developers and businesses manage applications and servers more efficiently. **Categories:** Blog, Guide, Linux, Optimisation, Others, Tutorials, Ubuntu, WordPress **Tags:** Error Establishing a Database Connection, Fix WordPress Errors, WordPress Database, WordPress Database Connection Error, WordPress Database Error, Wordpress Errors, WordPress Hosting, WordPress performance, WordPress Troubleshooting --- ### [How to Secure PHP Web Application: Best Security Practices](https://serveravatar.com/secure-php-application/) **Published:** August 24, 2026 **Author:** Meghna Meghwani **Content:** [![Blog banner - ServerAvatar](https://serveravatar.com/wp-content/uploads/2025/09/728_90-Banner-3-1024x127.png)](https://serveravatar.com/?ref=blog)PHP remains one of the most widely used server-side technologies, powering around 70% of websites whose server-side programming language is known. That dominance also makes it a prime target. Every day, thousands of automated bots scan the web looking for vulnerable PHP applications, unpatched versions, insecure configurations, sloppy input handling. If you’re building or managing a PHP app today, learning how to secure PHP web application is essential to protect your application from potential security threats. This isn’t a scare tactic. It’s the reality of deploying software on the internet in 2026. The good news: PHP has matured significantly, and modern PHP (8.x) offers security primitives that match any other server-side language. The bad news: security still depends almost entirely on how you write, configure, and maintain your code. Language-level protections only go so far. This guide covers the essential layers of PHP application security, from php.ini hardening to SAST tooling, from SQL injection prevention to Content Security Policy headers. Whether you’re running a Laravel app, a WordPress site, or a custom PHP project, these practices apply. ![Flow for Secure PHP Web Application](https://serveravatar.com/wp-content/uploads/2026/08/image-122.png) ## TL;DR - Lock down `php.ini` before deploying, disable dangerous functions, hide PHP version headers, restrict file uploads - Use **PDO prepared statements** for every database query, no exceptions - Escape every variable at output time with context-aware encoding, `htmlspecialchars()` for HTML, `json_encode()` for JavaScript - Use **CSP headers** (Content Security Policy) to add an XSS defense layer beyond output encoding - Hash passwords with `PASSWORD_ARGON2ID` or `PASSWORD_BCRYPT` , never MD5 or SHA1, ever - Harden PHP sessions: `HttpOnly`, `Secure`, `SameSite=Lax`, strict mode, and session ID regeneration on login - Add CSRF tokens to every state-changing form using `hash_equals()` for timing-safe comparison - Run `composer audit` in CI on every push, dependency vulnerabilities are low-effort attack vectors - Integrate **SAST tools** (Psalm, PHPStan) into your development workflow to catch security issues before they reach production - Set HTTP security headers on every response: `X-Frame-Options`, `X-Content-Type-Options`, `Strict-Transport-Security`, and `Permissions-Policy` ## Why PHP Security Still Matters PHP has changed considerably over the years. Many security problems associated with older PHP releases came from outdated features, weak defaults, poor development practices, or obsolete libraries. Modern PHP applications can be highly secure when they are: - Properly configured - Regularly updated - Developed using secure coding practices - Protected by multiple security layers - Continuously monitored for vulnerabilities The bigger challenge is PHP’s enormous ecosystem. Attackers can automatically search the internet for applications containing: - Outdated WordPress components - Vulnerable Composer dependencies - Exposed `.env` files - Debug mode enabled in production - Weak authentication - Unsafe file upload functionality - Poorly validated input - Known vulnerable PHP versions ### Security Is Also a Business Issue A compromised application can cause more than technical problems. A successful attack may result in: - Customer data exposure - Account takeovers - Website defacement - Malware distribution - Search engine reputation problems - Loss of customer trust - Downtime - Regulatory or compliance problems - Financial losses The goal isn’t to make an application completely immune to attacks. Instead, build multiple security layers so that a single mistake doesn’t automatically become a successful compromise. Let’s get into the actual hardening steps. ## 1. Harden `php.ini` Before Deploying The `php.ini` configuration controls many aspects of PHP’s runtime behavior. Development-friendly defaults aren’t always appropriate for production environments. Before deploying a PHP application, review the following settings. ### Disable Unnecessary Dangerous Functions If your application doesn’t need operating-system command execution, consider disabling functions such as: ``` disable_functions = exec,passthru,shell_exec,system,proc_open,popen,curl_exec,curl_multi_exec,parse_ini_file,show_source ``` ``` disable_functions = exec,passthru,shell_exec,system,proc_open,popen,curl_exec,curl_multi_exec,parse_ini_file,show_source ``` These functions can provide access to operating-system operations. ### Recommended approach - Disable functions your application doesn’t require. - Review existing application dependencies before disabling anything. - Don’t enable dangerous functions simply because they are convenient. - Treat requirements for shell execution as an architectural security concern. - Test the application after changing the configuration. > For a deeper look at which PHP functions can increase your application’s attack surface and when to disable them, see our guide to [Top PHP Functions to Disable for Enhanced Server Security](https://serveravatar.com/disable-php-functions/). Here are the directives that matter most: ### Hide Your PHP Version Attackers use the `X-Powered-By` header to fingerprint your server stack and target known vulnerabilities for your specific PHP version: ``` expose_php = Off ``` ``` expose_php = Off ``` This alone won’t stop a determined attacker, but it removes you from the low-hanging-fruit category. ### Restrict Remote File Access Remote file inclusion is one of the most devastating attack classes. Disable it entirely unless your application has a documented, controlled need: ``` allow_url_include = Off allow_url_fopen = Off ``` ``` allow_url_include = Off allow_url_fopen = Off ``` ### Control Error Reporting Verbose error messages are a goldmine for attackers. They reveal file paths, database structure, and library versions. In production: ``` display_errors = Off log_errors = On error_log = /var/log/php_errors.log ``` ``` display_errors = Off log_errors = On error_log = /var/log/php_errors.log ``` Never let PHP spill errors onto the page that your users see. ### Limit File Uploads If your application accepts uploads, set strict limits: ``` file_uploads = On upload_max_filesize = 2M max_file_uploads = 5 ``` ``` file_uploads = On upload_max_filesize = 2M max_file_uploads = 5 ``` And always validate uploads server-side, client-side restrictions are purely cosmetic. > If your application needs larger uploads, see our guide on [how to increase `upload_max_filesize` in PHP](https://serveravatar.com/increase-upload-max-filesize-php/) while keeping related upload settings properly configured. ### Harden Session Configuration Sessions are a prime attack target. Set these in `php.ini` or at runtime: ``` session.cookie_httponly = 1 session.cookie_secure = 1 session.cookie_samesite = Lax session.use_strict_mode = 1 session.gc_maxlifetime = 1800 ``` ``` session.cookie_httponly = 1 session.cookie_secure = 1 session.cookie_samesite = Lax session.use_strict_mode = 1 session.gc_maxlifetime = 1800 ``` We’ll dig deeper into session security later in this guide. ## 2. Prevent SQL Injection with PDO Prepared Statements SQL injection has topped the OW ASP Top 10 for years running, and for good reason: it’s devastating and almost entirely preventable. The attack works by tricking your database query into executing attacker-supplied SQL instead of, or alongside, your intended query. The basic rule is simple: > **Never build SQL queries by directly concatenating user input.** **The Wrong Way** ``` // VULNERABLE, never do this $email = $_POST['email']; $query = "SELECT * FROM users WHERE email = '$email'"; $result = $pdo->query($query); ``` ``` // VULNERABLE, never do this $email = $_POST['email']; $query = "SELECT * FROM users WHERE email = '$email'"; $result = $pdo->query($query); ``` An attacker submits `' OR '1'='1` as the email. The query becomes `SELECT * FROM users WHERE email = '' OR '1'='1'`, and suddenly every user record is exposed. **The Right Way** ``` // SAFE, use prepared statements with bound parameters $stmt = $pdo->prepare('SELECT * FROM users WHERE email = :email'); $stmt->execute([':email' => $_POST['email']]); $user = $stmt->fetch(PDO::FETCH_ASSOC); ``` ``` // SAFE, use prepared statements with bound parameters $stmt = $pdo->prepare('SELECT * FROM users WHERE email = :email'); $stmt->execute([':email' => $_POST['email']]); $user = $stmt->fetch(PDO::FETCH_ASSOC); ``` The database driver handles escaping automatically. Parameter binding separates the query structure from the data, making injection impossible. ### Hardening PDO Further ``` $pdo = new PDO($dsn, $user, $pass, [ PDO::ATTR_ERRMODE => PDO::ERRMODE_EXCEPTION, PDO::ATTR_DEFAULT_FETCH_MODE => PDO::FETCH_ASSOC, PDO::ATTR_EMULATE_PREPARES => false, // use native database prepares ]); ``` ``` $pdo = new PDO($dsn, $user, $pass, [ PDO::ATTR_ERRMODE => PDO::ERRMODE_EXCEPTION, PDO::ATTR_DEFAULT_FETCH_MODE => PDO::FETCH_ASSOC, PDO::ATTR_EMULATE_PREPARES => false, // use native database prepares ]); ``` Setting `ATTR_EMULATE_PREPARES` to `false` forces the database driver to handle parameterization natively. Emulated mode has edge-case bypass vectors that native mode closes. ### SQL Injection Rules - Never concatenate `$_GET` into SQL. - Never concatenate `$_POST` into SQL. - Never trust HTTP headers. - Never trust cookies. - Use parameters for user-controlled values. - Validate data types before processing. - Apply authorization checks before returning sensitive records. ## 3. Escape Output to Prevent Cross-Site Scripting (XSS) Cross-site scripting occurs when your application renders user-controlled data without proper encoding. An attacker injects JavaScript into a page, and every visitor’s browser executes it silently. The consequences range from session hijacking to credential theft to malware distribution. XSS is the second-most-common vulnerability class after SQL injection. In 2026, it’s still everywhere, because output encoding is easy to get wrong or forget entirely. **The key principle is:** > Validate input when it enters your application and encode output according to where it is being used. ### HTML Context For anything rendered inside HTML tags or attributes: ``` // Unsafe echo $_GET['name']; // Safe, always specify encoding and flags echo htmlspecialchars($_GET['name'], ENT_QUOTES | ENT_HTML5, 'UTF-8'); ``` ``` // Unsafe echo $_GET['name']; // Safe, always specify encoding and flags echo htmlspecialchars($_GET['name'], ENT_QUOTES | ENT_HTML5, 'UTF-8'); ``` The `ENT_QUOTES` flag escapes both single and double quotes. `ENT_HTML5` ensures correct handling of HTML5 documents. Never omit the flags. ### HTML Attribute Context If you’re putting a variable inside an attribute value, the same rule applies: ``` // Safe, htmlspecialchars handles attribute boundaries correctly echo htmlspecialchars($value, ENT_QUOTES, 'UTF-8'); ``` ``` // Safe, htmlspecialchars handles attribute boundaries correctly echo htmlspecialchars($value, ENT_QUOTES, 'UTF-8'); ``` ### JavaScript Context Injecting variables into ` ``` ``` var username = ; ``` `JSON_HEX_TAG` converts `` to `\u003C` and `\u003E`. `JSON_HEX_AMP` converts `&` to `\u0026`. These prevent the JavaScript context from breaking out into HTML. ### Rich Text (When You Actually Need HTML) ![Rich text - Secure PHP Web Application](https://serveravatar.com/wp-content/uploads/2026/08/image-123.png) If your application needs to accept formatted text (a CMS, a comment system), use a whitelist library like HTML Purifier: ``` $config = HTMLPurifier_Config::createDefault(); $purifier = new HTMLPurifier($config); $clean_html = $purifier->purify($dirty_html); ``` ``` $config = HTMLPurifier_Config::createDefault(); $purifier = new HTMLPurifier($config); $clean_html = $purifier->purify($dirty_html); ``` Don’t try to sanitize HTML manually with regex, you will miss edge cases. ## 4. Add Content Security Policy (CSP) as an XSS Safety Net Output encoding stops XSS at the application layer. CSP stops it at the browser layer. Together, they provide defense-in-depth: even if a single output encoding slip slips through, CSP can prevent the injected script from executing. CSP is an HTTP response header that tells the browser which resources are allowed to load and execute on your page. It’s the most effective XSS mitigation available in 2026, and, according to ZeriFlow’s analysis of 12,400+ sites, 64% of sites don’t have one. ### A Baseline CSP for PHP Applications ``` header("Content-Security-Policy: " . implode('; ', [ "default-src 'self'", "script-src 'self'", "style-src 'self' 'unsafe-inline'", // Most PHP templates need inline styles "img-src 'self' data: https:", "font-src 'self'", "connect-src 'self'", "frame-ancestors 'none'", "form-action 'self'", "base-uri 'self'", ])); ``` ``` header("Content-Security-Policy: " . implode('; ', [ "default-src 'self'", "script-src 'self'", "style-src 'self' 'unsafe-inline'", // Most PHP templates need inline styles "img-src 'self' data: https:", "font-src 'self'", "connect-src 'self'", "frame-ancestors 'none'", "form-action 'self'", "base-uri 'self'", ])); ``` Start with `report-only` mode to catch violations without breaking functionality: ``` header("Content-Security-Policy-Report-Only: default-src 'self'; report-uri /csp-report"); ``` Then build a handler for CSP violation reports: ``` $report = json_decode(file_get_contents('php://input'), true); $violation = $report['csp-report'] ?? []; error_log(sprintf( 'CSP Violation: directive=%s, blocked=%s, page=%s', $violation['violated-directive'] ?? 'unknown', $violation['blocked-uri'] ?? 'unknown', $violation['document-uri'] ?? 'unknown' )); ``` ``` $report = json_decode(file_get_contents('php://input'), true); $violation = $report['csp-report'] ?? []; error_log(sprintf( 'CSP Violation: directive=%s, blocked=%s, page=%s', $violation['violated-directive'] ?? 'unknown', $violation['blocked-uri'] ?? 'unknown', $violation['document-uri'] ?? 'unknown' )); ``` Deploy CSP in report-only mode for at least a week before switching to enforce mode. You’ll be surprised what third-party scripts and inline code your templates actually rely on. ## 5. Store Passwords Using Strong Password Hashing Storing passwords is one of the most direct ways your application handles sensitive user data. If your database is breached and passwords are stored poorly, every account is immediately compromised, not just on your site, but everywhere your users reused that password. **The rules are straightforward:** - Never store passwords in plain text - Never use reversible encryption for passwords - Never use fast hashes like MD5 or SHA1 for passwords, they’re designed for speed, which makes brute-forcing trivial ### Use Built-In Functions PHP’s `password_hash()` and `password_verify()` handle this correctly: ``` // Hashing, PHP automatically uses a strong algorithm $hash = password_hash($password, PASSWORD_ARGON2ID); // preferred in 2026 // Or: $hash = password_hash($password, PASSWORD_BCRYPT); // still secure // Verification if (password_verify($input, $hash)) { // Authenticated, now check for rehash if (password_needs_rehash($hash, PASSWORD_ARGON2ID)) { $newHash = password_hash($input, PASSWORD_ARGON2ID); // Store $newHash } } ``` ``` // Hashing, PHP automatically uses a strong algorithm $hash = password_hash($password, PASSWORD_ARGON2ID); // preferred in 2026 // Or: $hash = password_hash($password, PASSWORD_BCRYPT); // still secure // Verification if (password_verify($input, $hash)) { // Authenticated, now check for rehash if (password_needs_rehash($hash, PASSWORD_ARGON2ID)) { $newHash = password_hash($input, PASSWORD_ARGON2ID); // Store $newHash } } ``` `PASSWORD_ARGON2ID` is the winner, it’s resistant to GPU brute-forcing and is the algorithm recommended by the Password Hashing Competition. `PASSWORD_BCRYPT` remains secure but Argon2id is the modern choice for new applications. > You can also review the [official PHP documentation for `password_hash()`](https://www.php.net/manual/en/function.password-hash.php?ref=serveravatar.com) for supported password-hashing algorithms and configuration details. ### Why Rehashing Matters PHP’s `PASSWORD_DEFAULT` constant evolves as PHP versions advance. If you stored a hash five years ago using the algorithm of that time, `password_needs_rehash()` tells you when it’s time to upgrade to the current standard without forcing users to change their passwords. ## 6. Harden PHP Sessions Sessions are how PHP tracks users across requests. Default session configuration leaves several attack surfaces open. Here’s what I always configure: ### Runtime Session Hardening ``` ini_set('session.cookie_httponly', 1); // Block JavaScript access to session cookie ini_set('session.cookie_secure', 1); // Only transmit over HTTPS ini_set('session.cookie_samesite', 'Lax'); // Mitigate CSRF ini_set('session.use_strict_mode', 1); // Reject uninitialized session IDs ini_set('session.gc_maxlifetime', 1800); // 30-minute idle timeout session_start(); ``` ``` ini_set('session.cookie_httponly', 1); // Block JavaScript access to session cookie ini_set('session.cookie_secure', 1); // Only transmit over HTTPS ini_set('session.cookie_samesite', 'Lax'); // Mitigate CSRF ini_set('session.use_strict_mode', 1); // Reject uninitialized session IDs ini_set('session.gc_maxlifetime', 1800); // 30-minute idle timeout session_start(); ``` ### Regenerate Session ID on Privilege Escalation Every time a user’s privilege level changes, login, role change, admin action, regenerate the session ID: ``` session_regenerate_id(true); // true = destroy the old session $_SESSION['user_id'] = $authenticated_user_id; $_SESSION['role'] = $user_role; ``` ``` session_regenerate_id(true); // true = destroy the old session $_SESSION['user_id'] = $authenticated_user_id; $_SESSION['role'] = $user_role; ``` ### Destroy Sessions on Logout Completely ``` $_SESSION = []; if (ini_get('session.use_cookies')) { $params = session_get_cookie_params(); setcookie(session_name(), '', time() - 42000, $params['path'], $params['domain'], $params['secure'], $params['httponly'] ); } session_destroy(); ``` ``` $_SESSION = []; if (ini_get('session.use_cookies')) { $params = session_get_cookie_params(); setcookie(session_name(), '', time() - 42000, $params['path'], $params['domain'], $params['secure'], $params['httponly'] ); } session_destroy(); ``` Failing to destroy the session on logout leaves it alive on the client side, a stolen cookie becomes a persistent backdoor. ## 7. Protect State-Changing Requests Against CSRF Cross-site request forgery (CSRF) tricks authenticated users into sending requests they didn’t intend, submitting a form, changing a password, transferring funds. The browser automatically sends cookies with every request, including forged ones from attacker-controlled pages. ### The Synchronizer Token Pattern Generate a token at session start and embed it in every state-changing form: ``` // Generate at session start if (empty($_SESSION['csrf_token'])) { $_SESSION['csrf_token'] = bin2hex(random_bytes(32)); } // Embed in form echo ''; ``` ``` // Generate at session start if (empty($_SESSION['csrf_token'])) { $_SESSION['csrf_token'] = bin2hex(random_bytes(32)); } // Embed in form echo ''; ``` ### Validate on Submission ``` function validate_csrf(string $token): bool { return isset($_SESSION['csrf_token']) && hash_equals($_SESSION['csrf_token'], $token); } if (!validate_csrf($_POST['csrf_token'] ?? '')) { http_response_code(403); exit('Invalid CSRF token'); } ``` ``` function validate_csrf(string $token): bool { return isset($_SESSION['csrf_token']) && hash_equals($_SESSION['csrf_token'], $token); } if (!validate_csrf($_POST['csrf_token'] ?? '')) { http_response_code(403); exit('Invalid CSRF token'); } ``` `hash_equals()` is timing-attack safe. PHP’s loose comparison operator `==` is vulnerable to timing attacks, which can leak the expected token value one character at a time. ![Protect State-Changing Requests Against CSRF - Secure PHP Web Application](https://serveravatar.com/wp-content/uploads/2026/08/image-124.png) ## 8. Audit Your Dependencies Modern PHP applications are built on Composer packages. Those packages have dependencies, which have dependencies, a chain that can run dozens deep. A vulnerability anywhere in that chain is a vulnerability in your application. Run `composer audit` regularly: ``` composer audit ``` ``` composer audit ``` > For command options and dependency-audit behavior, see the [Composer CLI documentation](https://getcomposer.org/doc/03-cli.md?ref=serveravatar.com). This checks your `composer.lock` against the PHP Security Advisories Database and fails the build on known CVEs. Add it to your CI pipeline on every push, it’s the lowest-effort, highest-impact security practice in the PHP ecosystem. For larger projects, dedicated SAST (Static Application Security Testing) tools go further: ``` # Psalm with taint analysis composer require --dev vimeo/psalm vendor/bin/psalm --taint-analysis src/ # PHPStan with security rules composer require --dev phpstan/phpstan-strict-rules vendor/bin/phpstan analyse src/ --level=8 ``` ``` # Psalm with taint analysis composer require --dev vimeo/psalm vendor/bin/psalm --taint-analysis src/ # PHPStan with security rules composer require --dev phpstan/phpstan-strict-rules vendor/bin/phpstan analyse src/ --level=8 ``` ### Add Dependency Checks to CI ``` Developer Push ↓ Composer Audit ↓ SAST ┌────┴────┐ Psalm PHPStan └────┬────┘ ↓ Automated Tests ↓ Deployment ``` ``` Developer Push ↓ Composer Audit ↓ SAST ┌────┴────┐ Psalm PHPStan └────┬────┘ ↓ Automated Tests ↓ Deployment ``` Run dependency security checks: - On pull requests - On every push where practical - During release builds - On a scheduled basis - After major dependency changes Also keep `composer.lock` under version control for applications where reproducible dependency versions are required. ## 9. Set HTTP Security Headers HTTP security headers are a fast, stateless defense layer. They don’t require application logic, set them once and they’re enforced by the browser on every response. Add these to your bootstrap file, front controller, or server configuration: ``` header('X-Content-Type-Options: nosniff'); header('X-Frame-Options: DENY'); header('X-XSS-Protection: 1; mode=block'); header('Referrer-Policy: strict-origin-when-cross-origin'); header('Permissions-Policy: geolocation=(), microphone=(), camera=()'); // HTTPS enforcement if (isset($_SERVER['HTTPS'])) { header('Strict-Transport-Security: max-age=31536000; includeSubDomains; preload'); } ``` **What each header does:** - `X-Content-Type-Options: nosniff` prevents the browser from guessing the MIME type, blocking drive-by downloads - `X-Frame-Options: DENY` prevents your site from being embedded in iframes, stopping clickjacking attacks - `Strict-Transport-Security` forces HTTPS for all connections, preventing protocol downgrade attacks - `Permissions-Policy` disables browser features your application doesn’t use (camera, microphone, location) ## 10. Validate and Sanitize All Input Input validation is the first line of defense. Before your code processes any data from the outside world, GET/POST parameters, headers, cookies, API request bodies, uploaded files, it must be validated against strict criteria. The core principle: **deny by default**. Define what valid input looks like and reject everything else. ``` $validated = filter_input_array(INPUT_POST, [ 'email' => FILTER_VALIDATE_EMAIL, 'age' => FILTER_VALIDATE_INT, 'website' => FILTER_VALIDATE_URL, ]); // For more complex validation function validateEmail(string $input): string { $email = filter_var($input, FILTER_VALIDATE_EMAIL); if ($email === false) { throw new ValidationException('Invalid email address'); } if (strlen($email) > 255) { throw new ValidationException('Email too long'); } return $email; } ``` ``` $validated = filter_input_array(INPUT_POST, [ 'email' => FILTER_VALIDATE_EMAIL, 'age' => FILTER_VALIDATE_INT, 'website' => FILTER_VALIDATE_URL, ]); // For more complex validation function validateEmail(string $input): string { $email = filter_var($input, FILTER_VALIDATE_EMAIL); if ($email === false) { throw new ValidationException('Invalid email address'); } if (strlen($email) > 255) { throw new ValidationException('Email too long'); } return $email; } ``` One common mistake: URL validation without checking the scheme. `filter_var($url, FILTER_VALIDATE_URL)` accepts `javascript://` URLs in some configurations. Always check: ``` $url = filter_var($input, FILTER_VALIDATE_URL); $scheme = parse_url($url, PHP_URL_SCHEME); if (!in_array($scheme, ['http', 'https'], true)) { throw new ValidationException('Invalid URL scheme'); } ``` ``` $url = filter_var($input, FILTER_VALIDATE_URL); $scheme = parse_url($url, PHP_URL_SCHEME); if (!in_array($scheme, ['http', 'https'], true)) { throw new ValidationException('Invalid URL scheme'); } ``` **Remember:** client-side validation (JavaScript) is a user experience improvement. Always validate server-side, JavaScript validation is trivially bypassed by anyone with a browser’s developer tools. ## 11. Stay on a Supported PHP Version Running an unsupported PHP release means security fixes may no longer be provided by the PHP project. Check the [PHP Supported Versions](https://www.php.net/supported-versions.php?ref=serveravatar.com) page regularly. The moment a minor version reaches end of life, treat it as an emergency, schedule the upgrade, even if it’s inconvenient. Before upgrading: - Check the official PHP support schedule. - Identify your current PHP version. - Review framework compatibility. - Check Composer dependencies. - Run your automated tests. - Review deprecated features. - Upgrade in a staging environment first. Avoid postponing upgrades indefinitely because of legacy code. > If you’re unsure which PHP release is appropriate for your application, read our guide on [How to Choose the Right PHP Version for Your Server](https://serveravatar.com/choose-the-right-php-version/). ### If an Upgrade Can’t Happen Immediately For legacy systems: - Isolate the application. - Restrict network access. - Place it behind appropriate security controls. - Monitor it closely. - Remove unnecessary services. - Create an upgrade plan. - Prioritize migration based on business risk. Isolation reduces exposure, but it does not make an unsupported PHP version secure. [![Blog banner - ServerAvatar](https://serveravatar.com/wp-content/uploads/2025/09/728_90-Banner-1-1024x127.png)](https://serveravatar.com/?ref=blog)## 12. Deployment and Server-Level Hardening Application security doesn’t end with code. How you deploy matters just as much. ### Never Commit Secrets to Version Control API keys, database passwords, encryption keys, and session secrets belong in environment variables, not in `.env` files that get committed to git. Use a secrets manager for production deployments. ``` // Good, reads from environment $db_password = getenv('DB_PASSWORD'); // Bad, hardcoded, ends up in version control $db_password = 'MySecretPassword123'; ``` ``` // Good, reads from environment $db_password = getenv('DB_PASSWORD'); // Bad, hardcoded, ends up in version control $db_password = 'MySecretPassword123'; ``` ### Separate Configuration from Code Keep environment-specific configuration (database credentials, API keys, debug flags) entirely outside your application code. This makes rotation easier and reduces the risk of accidental exposure. > If you’re [hosting multiple PHP applications on the same server, application isolation](https://serveravatar.com/host-multiple-php-sites-on-one-server-with-isolation/) is another important security layer to consider. ### Keep Logs, But Protect Them Log errors and suspicious activity. But ensure log directories are not publicly accessible, a publicly readable log file is an attacker’s reconnaissance goldmine. ## Key Takeaways - **Lock down** `php.ini` before deploying, disable dangerous functions, hide PHP version, restrict file uploads, control error reporting - **Use PDO prepared statements** for every database query, with `ATTR_EMULATE_PREPARES = false` - **Escape every variable at output time** with context-appropriate encoding, `htmlspecialchars()` for HTML, `json_encode()` for JavaScript - **Deploy a CSP header** in report-only mode first, then enforce once you’ve resolved violations - **Hash passwords** with `PASSWORD_ARGON2ID` and rehash when `password_needs_rehash()` returns true - **Harden sessions** with `HttpOnly`, `Secure`, `SameSite=Lax`, strict mode, and ID regeneration on privilege changes - **Add CSRF tokens** to every state-changing form, validated with `hash_equals()` - **Run** `composer audit` **in CI** on every push, dependency vulnerabilities are the path of least resistance for attackers - **Integrate SAST** (Psalm, PHPStan) into your development workflow to catch security issues before they reach production - **Set HTTP security headers** on every response: `X-Frame-Options`, `X-Content-Type-Options`, `Strict-Transport-Security` - **Stay on a supported PHP version**, treat end-of-life versions as security emergencies ## Conclusion Securing a PHP application requires consistent attention to code, configuration, dependencies, and infrastructure. Use prepared statements, validate input, protect sessions, hash passwords securely, configure security headers, and keep PHP and dependencies updated. Security isn’t a one-time task. Regular audits, testing, monitoring, and timely updates help protect your application from evolving threats and keep your users’ data safe. If you want a simpler way to manage your servers and applications, including php setting management, SSL certificates, firewall rules, and monitoring, platforms like [ServerAvatar](https://serveravatar.com/) can streamline everything from a single dashboard. ## FAQs ### What is the most common PHP security vulnerability in 2026? SQL injection and XSS remain the top two by a wide margin. Both are trivially preventable: SQL injection with PDO prepared statements, and XSS with consistent output encoding using `htmlspecialchars()` plus a CSP header. The hard part isn’t the fix, it’s the discipline of applying it everywhere, every time. ### Should I use mysqli or PDO? PDO is strongly preferred. It supports multiple database backends, enforces prepared statements more strictly with `ATTR_EMULATE_PREPARES = false`, and has a cleaner API. Avoid raw `mysql_*` functions, they were removed in PHP 7. ### How do I store passwords securely in PHP? Use `password_hash($password, PASSWORD_ARGON2ID)` to store and `password_verify()` to check. Never use MD5, SHA1, or any fast hash, they’re trivially brute-forced with modern GPU hardware. ### How often should I audit PHP dependencies? Run `composer audit` on every push in CI. For high-value applications, run penetration tests quarterly. SAST tools like Psalm with `--taint-analysis` should run on every pull request. ### Is open\_basedir worth setting? Yes, Setting `open_basedir` to your application’s root directory prevents PHP from reading arbitrary files on the server via path traversal vulnerabilities. It’s an additional hardening layer, not a substitute for fixing the underlying path traversal bugs. ### Do I need a WAF? A Web Application Firewall adds defense-in-depth but doesn’t replace secure code. Think of it as a safety net, not the primary defense. Use Cloudflare WAF or ModSecurity as an additional layer, especially for known attack pattern blocking. ### About the Author Meghna Meghwani is a technical writer focused on Linux, Ubuntu, VPS hosting, server management, WordPress, PHP, Node.js, cloud hosting, and DevOps. She creates beginner-friendly tutorials, practical hosting guides, troubleshooting articles, and server security content designed to help developers and businesses manage applications and servers more efficiently. **Categories:** Blog, Guide, Linux, Others, Php, Tutorials, Ubuntu **Tags:** PHP Application Security, PHP Security, PHP Security Best Practices, PHP Security Practices, PHP Vulnerabilities, PHP Web Application Security, PHP Website Security, Secure PHP Web Application, Web Application Security --- ### [GitHub Explained: What It Is, How It Works, and How to Use It](https://serveravatar.com/what-is-github/) **Published:** August 22, 2026 **Author:** Meghna Meghwani **Content:** [![Blog banner - ServerAvatar](https://serveravatar.com/wp-content/uploads/2025/09/728_90-Banner-3-1024x127.png)](https://serveravatar.com/?ref=blog)If you’ve ever joined a development team and felt lost when someone said “push to main,” “open a pull request,” or “what branch are you on,” you’re not alone. GitHub is one of those tools that developers take for granted, they assume everyone knows it, but the reality is that most newcomers stumble through it at first. This guide is for those people: anyone who wants to understand what GitHub actually is, why it matters, and how to put it to work when deploying web applications through a platform like ServerAvatar. We will cover everything from the raw concept of version control to actually connecting your GitHub account to ServerAvatar and getting your code live on a server without touching a command line. No prior experience needed. ## TL;DR - Git is a distributed version control system that tracks every change made to your project files - GitHub is a cloud platform that hosts Git repositories and makes collaboration practical - Branching lets you work on features in isolation; merging combines those changes back in - Pull requests create a formal review process before code is merged - ServerAvatar connects directly to GitHub and can clone, deploy, and auto-update your PHP and Node.js applications - For private repos, you’ll add an SSH key to GitHub; for public repos, a simple HTTPS URL works - Webhooks let GitHub notify ServerAvatar automatically whenever you push new code - Deployment scripts let you run framework commands (cache clears, migrations, builds) after every pull Before understanding GitHub, it helps to understand Git itself. ## What Is Git? [Git](https://git-scm.com/?ref=serveravatar.com) is a distributed version control platform introduced by Linus Torvalds in 2005 to help developers efficiently manage and track changes in their code. It records changes made to a project’s files, allowing developers to track, compare, restore, and collaborate on different versions of their code. ![GIt - GitHub](https://serveravatar.com/wp-content/uploads/2026/08/image-103-1024x480.png) ### What Git Does - **Tracks code changes:** Records what was added, modified, or removed. - **Maintains project history:** Keeps a detailed record of previous versions and commits. - **Creates restore points:** Lets you return to an earlier working version when something breaks. - **Supports experimentation:** Developers can work on new features without changing the stable version of the project. - **Works offline:** Git runs locally, so you can commit and manage changes without an internet connection. - **Supports collaboration:** Multiple developers can work on the same codebase and combine their changes. - **Keeps a complete project copy:** Every Git clone contains the repository’s files and history, reducing dependency on a single server. ### Git Is Distributed Git is called a **distributed** version control system because every developer who clones a repository gets a local copy of the project and its history. This means developers can: - Create commits without an internet connection. - Review previous commits locally. - Create and switch between branches. - Compare changes. - Continue working even when a remote Git server is unavailable. Once an internet connection is available, local changes can be pushed to a remote repository such as GitHub. ### Git Is Not GitHub Git and GitHub are closely related, but they are different: - **Git** is the version control software. - **GitHub** is an online platform that hosts Git repositories and provides collaboration tools. You can use Git without GitHub. GitHub simply makes it easier to store Git repositories remotely and work with other developers. > If Git isn’t installed on your Ubuntu system yet, follow our guide on [how to install Git on Ubuntu](https://serveravatar.com/install-git-ubuntu/) before using Git commands locally. ## What Is GitHub? [GitHub](https://github.com/?ref=serveravatar.com) is a web-based platform for hosting Git repositories and collaborating on software projects. It combines Git’s version control capabilities with tools for code review, project management, automation, and team collaboration. ![GitHub](https://serveravatar.com/wp-content/uploads/2026/08/image-104-1024x446.png) ### What You Can Do With GitHub - Host Git repositories online. - Browse source code through a web interface. - Review file and code changes between different versions. - Track bugs and feature requests using Issues. - Review proposed code changes through Pull Requests. - Manage project tasks and development workflows. - Collaborate with other developers on the same project. - Automate builds, testing, and deployment using GitHub Actions. - Contribute to open-source projects through forks and pull requests. - Maintain public or private repositories depending on your project’s requirements. ### GitHub as a Collaboration Platform GitHub goes beyond simply storing source code. It provides a complete environment where developers can: - Discuss proposed changes. - Review code before it reaches the main branch. - Assign tasks to team members. - Track bugs and feature requests. - Document project decisions. - Manage contributions from external developers. - Maintain a searchable history of project activity. GitHub is also widely used for open-source development. Developers can publish projects publicly, accept contributions, review community submissions, and maintain documentation in the same repository. GitHub is not limited to large development teams either. Students, freelancers, solo developers, technical writers, and hobbyists can use repositories to manage personal projects, documentation, portfolios, and websites. > If you’re comparing GitHub with other popular Git hosting platforms, see our [GitHub vs Bitbucket vs GitLab](https://serveravatar.com/github-vs-bitbucket-vs-gitlab/) comparison guide to understand the key differences. ## Git vs. GitHub Git and GitHub are related, but they are not the same thing. **Git****GitHub**Version control softwareOnline development and collaboration platformRuns on your computerHosted on the web, and Accessed through the web and Git toolsTracks changes and project historyHosts Git repositoriesCan work without internet accessRequires an online connection for its cloud-based featuresProvides branches, commits, and mergesAdds pull requests, issues, code reviews, and collaboration toolsCan work without GitHubUses Git repositories as its foundationGitHub simply provides an online platform that makes sharing and collaborating on Git repositories much easier. **A simple way to think about it is:** Git manages your project’s history. GitHub helps you store, share, and collaborate on that Git project online. ## Why Does Version Control Matter for Web Projects? As a web project grows, managing source code manually becomes increasingly difficult. Version control becomes increasingly valuable as a web project grows. Imagine maintaining multiple versions of a project using folders such as: ``` website-v1 website-v2 website-final website-final-new website-final-latest ``` ``` website-v1 website-v2 website-final website-final-new website-final-latest ``` It quickly becomes difficult to determine which version contains the latest changes or how two versions differ. Git and GitHub provide a structured alternative. ### GitHub Helps Solve Common Development Problems - **Track Changes:** Every commit provides a record of changes made to the project. - **Restore Previous Versions:** If a new change introduces a problem, Git history can help you identify and restore an earlier version. - **Work on Features Safely:** Developers can create separate branches for new features without directly modifying stable code. - **Collaborate With Teams:** Multiple developers can work on different branches and later combine their changes. - **Review Code Before Deployment:** Pull Requests provide a place to inspect and discuss changes before they become part of the main codebase. - **Automate Development Tasks:** GitHub Actions can automatically run tests, builds, and other workflows when code changes. - **Simplify Deployment:** GitHub repositories can be connected to deployment systems so that new code can be transferred to a server automatically. ### A Typical Web Development Workflow A Git-based workflow might look like this: - Developer creates or updates code locally. - Changes are committed to Git. - The changes are pushed to GitHub. - Another developer reviews the changes through a Pull Request. - Approved changes are merged into the main branch. - The server pulls the updated code. - Deployment scripts run required commands. - The updated website or application goes live. With a platform such as ServerAvatar, this process can be automated further using GitHub webhooks, allowing a Git push to trigger deployment without manually uploading files through FTP or logging into the server. ## GitHub Key Concepts To understand GitHub, you need to understand a few basic concepts: repositories, commits, branches, remote repositories, push, pull, merge, and Pull Requests. Having a clear understanding of these concepts provides a strong foundation for using GitHub efficiently and effectively. ### GitHub Repository A repository, or repo, is the main storage location for a project on GitHub. A repository can contain: - Source code - Configuration files - Documentation - Images and other project assets - Git history - Branches - Issues - Pull Requests - GitHub Actions workflows Repositories can be **public** or **private**. **Public Repository** Anyone can view a public repository, depending on the repository’s permissions and settings. Public repositories are commonly used for: - Open-source projects - Developer tools - Libraries - Documentation - Public portfolios **Private Repository** A private repository restricts access to authorized users. Private repositories are useful for: - Commercial applications. - Client projects. - Internal tools. - Proprietary source code. - Applications that aren’t ready for public release. ### Commits A commit is a recorded set of changes in a Git repository. You can think of a commit as a checkpoint in the project’s development history. For example: ``` git add . git commit -m "Add user authentication" ``` ``` git add . git commit -m "Add user authentication" ``` The commit message describes what was changed. **Good Commit Messages** Use clear messages such as: ``` Add user authentication Fix checkout validation Update Laravel dependencies Improve mobile navigation ``` ``` Add user authentication Fix checkout validation Update Laravel dependencies Improve mobile navigation ``` Avoid unclear messages like: ``` update changes fix test new ``` ``` update changes fix test new ``` Clear commit messages make project history much easier to understand later. ### Branches A branch is a separate development path within a Git repository. It allows you to work on changes without modifying the main codebase immediately. The primary branch is commonly called: ``` main ``` ``` main ``` Instead of making changes directly to `main`, developers can create branches for specific tasks. For example: ``` main ├── feature-login ├── feature-payment └── bugfix-header ``` ``` main ├── feature-login ├── feature-payment └── bugfix-header ``` A developer can work on `feature-login` while another works on `bugfix-sidebar`. Their changes remain isolated until they are ready to be reviewed and merged. **Why Use Branches?** - Develop new features independently. - Fix bugs without disturbing ongoing development. - Test experimental changes safely. - Allow multiple developers to work simultaneously. - Keep production-ready code separate from unfinished work. ### Push After making commits locally, developers can push those changes to GitHub. For example: ``` git push origin main ``` ``` git push origin main ``` This sends your local commits to the remote GitHub repository. A simplified workflow looks like: ``` Local Computer ↓ Git Commit ↓ Git Push ↓ GitHub Repository ``` ``` Local Computer ↓ Git Commit ↓ Git Push ↓ GitHub Repository ``` ### Pull A pull retrieves changes from a remote repository and incorporates them into your local project. For example: ``` git pull origin main ``` ``` git pull origin main ``` This is useful when other developers have pushed changes to GitHub and you need those updates on your local machine. ### Merging Merging combines changes from one branch into another. For example: ``` feature-login → main ``` ``` feature-login → main ``` When the login feature is complete and tested, its branch can be merged into `main`. Git automatically combines compatible changes. If two developers modify the same part of a file differently, Git may report a merge conflict, which must be resolved manually. ### Pull Requests A [Pull Request (PR)](https://docs.github.com/en/pull-requests?ref=serveravatar.com) is a formal proposal to merge changes into another branch on GitHub. **A typical pull request workflow includes:** - Developer pushes changes to a branch. - Developer opens a Pull Request. - Team members review the code. - Reviewers leave comments or request changes. - Developer makes any required updates. - The Pull Request is approved. - Changes are merged into the target branch. **Pull Requests provide a useful record of:** - What was changed. - Why the change was made. - Who reviewed it. - What feedback was provided. - When the change was merged. Even solo developers can use Pull Requests as an additional checkpoint before introducing significant changes into a stable project. ## Key GitHub Features You Should Know GitHub includes several features that go beyond basic repository hosting. ### Repositories Repositories are where your projects live on GitHub. They provide a central location for: - Source code. - Project history. - Branches. - Issues. - Pull Requests. - Documentation. - Automation workflows. ### Forks A [fork](https://docs.github.com/en/pull-requests/reference/forks?ref=serveravatar.com) is a copy of someone else’s repository under your own GitHub account. Forks are especially common in open-source development. A typical workflow is: - Find an open-source repository. - Fork it. - Clone your fork locally. - Make your changes. - Push your changes. - Open a Pull Request against the original repository. This allows you to contribute without needing direct write access to the original project. ### Issues GitHub Issues provide a way to track development tasks and problems. You can use Issues for: - Bug reports. - Feature requests. - Development tasks. - Questions. - Improvements. - Project discussions. For smaller projects, Issues can also act as a simple project to-do list. ### GitHub Actions [GitHub Actions](https://docs.github.com/en/actions?ref=serveravatar.com) is an integrated automation and CI/CD service within GitHub that enables developers to automate development, testing, and deployment workflows. You can configure workflows to run automatically when specific events occur. For example: ``` Code Push ↓ Run Tests ↓ Check Code ↓ Build Application ↓ Deploy ``` ``` Code Push ↓ Run Tests ↓ Check Code ↓ Build Application ↓ Deploy ``` GitHub Actions can be used for: - Automated testing. - Code quality checks. - Application builds. - Release automation. - Scheduled jobs. - Deployment workflows. ### Releases GitHub Releases allow developers to package and publish specific versions of a project. For example: ``` v1.0.0 v1.1.0 v1.2.0 v2.0.0 ``` ``` v1.0.0 v1.1.0 v1.2.0 v2.0.0 ``` Releases are particularly useful for software libraries, applications, and open-source projects. ## How to Use GitHub: A Basic Workflow Now that the core concepts are clear, let’s look at how you would actually use GitHub for a project. A basic workflow looks like: ``` Create Repository ↓ Clone Repository ↓ Create / Edit Files ↓ Git Add ↓ Git Commit ↓ Git Push ↓ Pull Request ↓ Code Review ↓ Merge ``` ``` Create Repository ↓ Clone Repository ↓ Create / Edit Files ↓ Git Add ↓ Git Commit ↓ Git Push ↓ Pull Request ↓ Code Review ↓ Merge ``` > If you’re using Windows and want to run Git commands from a terminal, learn [how to use Git Bash](https://serveravatar.com/git-bash/) before following the command-line workflow below. ### Step 1: Create a GitHub Repository Create a new repository on GitHub and configure: - Repository name - Description - Public or private visibility - Optional README - Optional `.gitignore` - License, if required - Create repository ![create repository in GitHub ](https://serveravatar.com/wp-content/uploads/2026/08/image-105-1024x563.png) Once created, GitHub provides the repository URL. ### Step 2: Clone the Repository Cloning downloads a copy of the repository to your computer so you can work with the project locally. > For more details, see the official [Git documentation on cloning repositories](https://git-scm.com/book/en/v2/Git-Basics-Getting-a-Git-Repository?ref=serveravatar.com). For example: ``` git clone https://github.com/username/project.git ``` ``` git clone https://github.com/username/project.git ``` As mentioned below: ![git clone - GitHub](https://serveravatar.com/wp-content/uploads/2026/08/image-106-1024x53.png) Move into the project directory: ``` cd project ``` ``` cd project ``` You have successfully created a local copy of the GitHub repository on your system. ### Step 3: Create or Modify Files Make your changes locally. For a web application, this might include: - PHP files - JavaScript files - CSS - HTML - Configuration files - Application dependencies ### Step 4: Check Your Changes Before committing, check which files have changed: ``` git status ``` ``` git status ``` You can also review the actual changes: ``` git diff ``` ``` git diff ``` This helps catch accidental modifications before they’re committed. ### Step 5: Commit Your Changes Add the files you want to commit: ``` git add . ``` ``` git add . ``` Then create a commit: ``` git commit -m "Add contact form" ``` ``` git commit -m "Add contact form" ``` Your changes are now recorded in the local Git history. ### Step 6: Push Changes to GitHub Send the commit to GitHub: ``` git push origin main ``` ``` git push origin main ``` The updated code is now available in the remote repository. > You can learn more about working with remote repositories, including `git push` and `git pull`, in the official [Git documentation on working with remotes](https://git-scm.com/book/en/v2/Git-Basics-Working-with-Remotes?ref=serveravatar.com). ### Step 7: Create a Pull Request For collaborative projects, you can create a separate branch instead of pushing directly to `main`. For example: ``` git checkout -b feature-contact-form ``` ``` git checkout -b feature-contact-form ``` After making and committing your changes: ``` git push origin feature-contact-form ``` ``` git push origin feature-contact-form ``` Once your changes are ready, you can open a Pull Request on GitHub to propose them for review and merging. ### Step 8: Review and Merge Once the Pull Request is created: - Review the code. - Run tests. - Address comments. - Make additional commits if required. - Approve the Pull Request. - Merge it into the target branch. After merging, the feature becomes part of the main project codebase. ## How GitHub-Based Deployment Works GitHub can also become part of your application deployment workflow. Without automation, a developer might need to: - Push code to GitHub. - Connect to the server. - Pull the latest code. - Install dependencies. - Run migrations. - Clear caches. - Restart services. Repeating this process manually can become inconvenient. A Git-based deployment workflow can automate many of these steps. ### Basic GitHub Deployment Workflow ``` Developer ↓ Update Code ↓ Git Commit ↓ Push to GitHub ↓ Code Review ↓ Merge ↓ Deployment Trigger ↓ Server ↓ Updated Application ``` ``` Developer ↓ Update Code ↓ Git Commit ↓ Push to GitHub ↓ Code Review ↓ Merge ↓ Deployment Trigger ↓ Server ↓ Updated Application ``` **With webhook-based deployment, the process can become:** ``` git push ↓ GitHub ↓ Webhook ↓ Deployment Platform ↓ Pull Latest Code ↓ Run Deployment Commands ↓ Live Application ``` ``` git push ↓ GitHub ↓ Webhook ↓ Deployment Platform ↓ Pull Latest Code ↓ Run Deployment Commands ↓ Live Application ``` This reduces the need for manual file uploads and makes deployments more repeatable. ## How to Connect GitHub to ServerAvatar ServerAvatar allows you to connect your GitHub account to deploy your **PHP and Node.js applications** directly from Git. You can connect your GitHub repository to an application managed through ServerAvatar and use Git to deploy updates to your server. ### Step 1: Connect Your GitHub Account - Log in to your ServerAvatar account. - Navigate to the **Integration** from the left-hand sidebar. ![go to integration - GitHub](https://serveravatar.com/wp-content/uploads/2026/08/image-107-1024x408.png) - In the Git section, click on the **Link** **GitHub** for GitHub section. ![Link Github - GitHub](https://serveravatar.com/wp-content/uploads/2026/08/image-108-1024x239.png) - ServerAvatar redirects you to GitHub’s authorization page. - Authorize ServerAvatar to access the required repositories. ![Authorize organization - GitHub](https://serveravatar.com/wp-content/uploads/2026/08/image-109-1024x653.png) Once authorization is complete, your GitHub account is connected to ServerAvatar. ### Step 2: Create an Application For creating an git application with ServerAvatar after connecting to GitHub: - Navigate to the server panel by clicking on the server dashboard icon. ![server dashboard - GitHub](https://serveravatar.com/wp-content/uploads/2026/08/image-110-1024x213.png) - Go to the **Applications** section and click **Create an Application**. ![create application - GitHub](https://serveravatar.com/wp-content/uploads/2026/08/image-111-1024x313.png) - Enter the required application details such as, - **Application name:** Name used to identify the application. - **Domain:** Select a primary domain or test domain provided by ServerAvatar. - **Domain Name:** Add a domain name for your application - **Deployment method:** Select **Git**. - **Service provider:** Select **GitHub**. ![create GitHub application](https://serveravatar.com/wp-content/uploads/2026/08/image-112-1024x719.png) ### Step 3: Connect Your Repository The repository setup depends on whether the repository is public or private. - **For a Public Repository** - Enter the repository’s **HTTP clone URL**. - Select the branch you want to deploy. - ServerAvatar can clone the repository directly. - **For a Private Repository** Private repositories require authentication before ServerAvatar can access them. The general process is: - Generate the SSH key provided during the application setup. - Copy the public SSH key. ![copy deployment key ](https://serveravatar.com/wp-content/uploads/2026/08/image-114-1024x268.png) - Open your GitHub account. - Go to **Settings >> SSH and GPG Keys**. - Click **New SSH Key**. > GitHub’s [SSH key documentation](https://docs.github.com/en/authentication/connecting-to-github-with-ssh?ref=serveravatar.com) explains how SSH keys are used for authentication. ![create new ssh key](https://serveravatar.com/wp-content/uploads/2026/08/image-115-1024x454.png) - Paste the key, and click Add SSH key. ![add ssh key](https://serveravatar.com/wp-content/uploads/2026/08/image-116-1024x454.png) - Select the required account, repository, and branch in ServerAvatar. **Add a Deployment Script if required:** - Pulling new code from GitHub doesn’t always complete the deployment. Applications may require additional commands after the repository is updated. - A deployment script could look like: ``` cd /home/user/your-app # Clear application cache {PHP83} artisan cache:clear # Run database migrations {PHP83} artisan migrate --force ``` ``` cd /home/user/your-app # Clear application cache {PHP83} artisan cache:clear # Run database migrations {PHP83} artisan migrate --force ``` - You can use deployment scripts for tasks such as: - Installing dependencies. - Clearing caches. - Running database migrations. - Building frontend assets. - Restarting application processes. - Generating optimized production files. ![select account and repository ](https://serveravatar.com/wp-content/uploads/2026/08/image-117-1024x461.png) This allows ServerAvatar to authenticate with GitHub without storing your GitHub password. ### Step 4: Configure the Webroot The **webroot** specifies the directory from which your web server should serve the application. - Click on Show Advance Options. - Enter Custom Webroot in the **Other Details** section. - Click on the **Create Application** button. ![create application](https://serveravatar.com/wp-content/uploads/2026/08/image-118-1024x543.png) For many PHP applications, the default directory may be: ``` /public_html ``` ``` /public_html ``` Frameworks can use a different public directory. For example, Laravel applications commonly use: ``` /public ``` ``` /public ``` **Why Does the Webroot Matter?** A wrong webroot can cause problems such as: - Application routes not working. - CSS and JavaScript assets failing to load. - Incorrect files being served. - Framework applications not starting correctly. Make sure the webroot matches the directory structure expected by your application. **The deployment process looks like:** ``` GitHub Repository ↓ Repository Clone ↓ Application Setup ↓ Deployment Script ↓ Live Application ``` ``` GitHub Repository ↓ Repository Clone ↓ Application Setup ↓ Deployment Script ↓ Live Application ``` ### Step 7: Pull New GitHub Changes Manually After the initial deployment, you can update the application when new code is available. ServerAvatar provides a manual Git pull option. **Go to:** Application Dashboard >> Git >> Pull Latest Changes ![pull latest charges ](https://serveravatar.com/wp-content/uploads/2026/08/image-119-1024x462.png) ServerAvatar retrieves the latest code from the configured repository and branch. If you’ve configured a deployment script, the required commands can run after the pull. **When Should You Use Manual Pull?** Manual deployment is useful when: - You want control over production releases. - You need to test changes before deploying. - You don’t want every Git push to update production. - Your application doesn’t need continuous deployment. ### Step 8: Enable Automatic Deployment With GitHub Webhooks If you frequently update your application, you can automate deployments using GitHub webhooks. > GitHub’s official [webhooks documentation](https://docs.github.com/en/webhooks?ref=serveravatar.com) explains how webhooks notify external systems when events occur in a repository. **Enable Auto Pull in ServerAvatar** - **Go to:** Application Dashboard >> Git >> Enable Auto Pull on Push - Copy the Webhook URL **Add the Webhook to GitHub** Next, configure the webhook in your repository: - Open your GitHub repository. - Go to **Settings >> Webhooks**. - Click **Add Webhook**. ![add webhooks](https://serveravatar.com/wp-content/uploads/2026/08/image-120-1024x414.png) - Paste the ServerAvatar Webhook URL into **Payload URL**. - Select **application/json** as the content type. - Select the **push** event. - Click **Add webhook**. ![add webhook](https://serveravatar.com/wp-content/uploads/2026/08/image-121-1024x595.png) After setup, pushing changes to the configured GitHub branch can trigger ServerAvatar to retrieve the latest code and run the deployment process. ### Step 9: Check Webhook Deliveries If automatic deployment doesn’t happen after a Git push, GitHub provides webhook delivery logs that can help identify the problem. **Go to:** GitHub Repository >> Settings >> Webhooks Select the ServerAvatar webhook and review recent deliveries and check: - Whether GitHub sent the webhook. - The response status. - Delivery details. - Request information. - Any returned errors. This helps determine whether the issue is with the GitHub webhook or the deployment configuration. [![Blog banner - ServerAvatar](https://serveravatar.com/wp-content/uploads/2025/09/728_90-Banner-1-1024x127.png)](https://serveravatar.com/?ref=blog)## Best Practices for Using GitHub Using GitHub effectively isn’t just about pushing code to a repository. A few practices can make your development and deployment workflow more reliable. **Use Clear Commit Messages** Write commit messages that explain the actual change: ``` Fix checkout validation Add user authentication Update payment API Improve mobile navigation ``` ``` Fix checkout validation Add user authentication Update payment API Improve mobile navigation ``` Clear commit messages make the project history easier to understand. **Use Feature Branches** Instead of making every change directly on `main`, create branches for individual features or fixes. For example: ``` main ├── feature-login ├── feature-payment └── bugfix-header ``` ``` main ├── feature-login ├── feature-payment └── bugfix-header ``` This keeps development work isolated and makes code review easier. **Review Changes Before Merging** Use Pull Requests to review important changes before merging them into the main branch. This gives teams an opportunity to: - Identify bugs. - Discuss implementation choices. - Improve code quality. - Run automated tests. - Catch problems before deployment. **Protect Sensitive Information** Never commit sensitive credentials directly to a repository. Avoid storing: - Database passwords. - API keys. - Access tokens. - Private keys. - Production credentials. Use environment variables and appropriate secret-management methods instead. **Keep Git and Backups Separate** Git is excellent for tracking source-code changes, but it isn’t a complete backup solution. A production application may also contain: - Databases. - User uploads. - Media files. - Configuration. - Application data. Maintain appropriate backups for these resources separately. **Test Before Production Deployment** Before deploying major changes, test them in an appropriate environment. Pay particular attention to: - Database migrations. - Dependency upgrades. - Framework updates. - PHP or Node.js version changes. - Authentication changes. - Major configuration changes. ## GitHub and ServerAvatar: Putting It All Together Once GitHub and ServerAvatar are configured, your workflow can look like this: ``` Developer ↓ Write / Update Code ↓ Git Commit ↓ Push to GitHub ↓ Pull Request ↓ Code Review ↓ Merge ↓ GitHub Webhook ↓ ServerAvatar ↓ Pull Latest Code ↓ Deployment Script ↓ Live Application ``` ``` Developer ↓ Write / Update Code ↓ Git Commit ↓ Push to GitHub ↓ Pull Request ↓ Code Review ↓ Merge ↓ GitHub Webhook ↓ ServerAvatar ↓ Pull Latest Code ↓ Deployment Script ↓ Live Application ``` This creates a clear path from writing code to deploying it on a live server. Git manages the project’s version history, GitHub provides repository hosting and collaboration, and ServerAvatar handles the server-side deployment and application management. ## Key Takeaways - GitHub is the world’s largest code-hosting platform, built on top of the Git version control system - Branching and merging are the core workflows that make collaborative development manageable - ServerAvatar integrates directly with GitHub, letting you deploy PHP and Node.js apps without manual server access - Private repositories require SSH key setup; public repositories work with a simple HTTPS URL - Auto-pull via webhooks keeps your live site in sync with your GitHub repository automatically - Deployment scripts add intelligence to updates, cache clears, migrations, and builds run automatically after every pull ## Conclusion GitHub can seem intimidating at first. The terminology alone, repositories, branches, forks, pull requests, commits, is enough to make anyone’s head spin. But once you understand the core idea (tracking changes, working in isolation, combining work intentionally), the rest falls into place surprisingly quickly. What makes GitHub genuinely powerful isn’t just the version control, it’s the ecosystem around it. Issue trackers, code reviews, CI/CD pipelines, and integrations with platforms like ServerAvatar transform it from a code storage locker into a complete development workflow engine. If you’re running web applications on servers and not using version control yet, you’re doing unnecessary manual work and taking on risk you don’t need to. ServerAvatar’s GitHub integration removes the hardest part of that transition: the server-side setup. Connect your repository, configure your deployment script, and every future update is a single push away. ## FAQs ### Can I use GitHub without knowing Git? You can perform some basic GitHub tasks through its web interface, but understanding fundamental Git concepts such as commits, branches, push, pull, and merge will make GitHub much easier to use. ### Can GitHub be used for website deployment? Yes, A GitHub repository can be connected to deployment tools and servers so that application code can be deployed whenever changes are pushed or merged. ### Can I deploy a private GitHub repository with ServerAvatar? Yes, Private repositories can be deployed by configuring the required SSH authentication between GitHub and ServerAvatar. ### Is Git a replacement for website backups? No. Git primarily tracks source-code changes. Production databases, uploaded files, and other application data should be backed up separately. ### Is GitHub free? Yes for public repositories. You can create unlimited public repositories on GitHub’s free plan. Private repositories are also free on personal accounts, though organizations with multiple collaborators may need a paid plan. ServerAvatar works with both free and paid GitHub accounts. ### About the Author Meghna Meghwani is a technical writer focused on Linux, Ubuntu, VPS hosting, server management, WordPress, PHP, Node.js, cloud hosting, and DevOps. She creates beginner-friendly tutorials, practical hosting guides, troubleshooting articles, and server security content designed to help developers and businesses manage applications and servers more efficiently. **Categories:** Application Deployments, Blog, Guide, Linux, Others, Tutorials, Ubuntu **Tags:** Developer tools, git, GitHub, GitHub Basics, GitHub for Beginners, GitHub Guide, GitHub Tutorial, How GitHub Works, Version Control, What Is GitHub --- ### [How to Fix HTTP 503 Service Unavailable Error (Complete 2026 Guide)](https://serveravatar.com/fix-http-503-service-unavailable-error/) **Published:** August 20, 2026 **Author:** Meghna Meghwani **Content:** [![Blog banner - ServerAvatar](https://serveravatar.com/wp-content/uploads/2025/09/728_90-Banner-3-1024x127.png)](https://serveravatar.com/?ref=blog)You refresh your website. Instead of loading, you get a blank white page with four words: HTTP 503 Service Unavailable Error. No explanation. No timeline. No next step. Whether you’re managing a WordPress site, an eCommerce store, or a web application, the HTTP 503 Service Unavailable Error can instantly make your website inaccessible to visitors and impact your business. I’ve been there. Not just as a user, but as someone responsible for the server when that message started appearing for hundreds of real visitors. The 503 error is frustrating because it tells you something is wrong but gives you almost nothing to work with. **Here’s the good news:** it almost always has a fixable cause, and you can usually identify it in under ten minutes if you know where to look. This guide walks through everything, what the error actually means, why it happens, how to diagnose it systematically, and how to fix it. Let’s get into it. ## TL;DR - HTTP 503 means your server can’t handle requests right now, temporarily or otherwise - The most frequent causes include server overload, scheduled maintenance, application process failures, incorrect firewall configurations, and DNS-related problems. - Diagnosis starts with checking server resource usage and reading logs - Most 503 errors clear within minutes; persistent ones usually need manual intervention - ServerAvatar’s dashboard gives you resource monitoring, process management, and log access in one place, no CLI required for most diagnoses ## What Is HTTP 503, Really? 503 is a status code in the 5xx range, which means something went wrong on the server side. Unlike 404 (not found) or 403 (forbidden), a 503 isn’t telling you the resource doesn’t exist; it’s telling you the server exists but can’t respond right now. Here’s the part most people skip: 503 is a signal, not a diagnosis. It doesn’t tell you why the server is unavailable. That ambiguity is what makes it tricky. The cause could be as simple as a background service that crashed or as complex as a database server running out of memory. ![HTTP 503 Service Unavailable Error](https://serveravatar.com/wp-content/uploads/2026/07/image-72-1024x335.png) On the user’s end, the only real option is to wait a bit and attempt it again later. From a developer or sysadmin perspective, you’ve got work to do. One important distinction: 503 can be temporary or permanent, depending on what’s causing it. A server under a DDoS attack might recover once traffic normalizes. A misconfigured firewall rule, on the other hand, will keep throwing 503 indefinitely until someone fixes it. ## HTTP 503 vs Other Common HTTP Errors HTTP StatusMeaningPrimary CauseCan Visitors Fix It?Typical Solution**503 Service Unavailable**Server is temporarily unable to process requestsServer overload, maintenance, backend service failureNoRestore services, free resources, or wait until maintenance finishes**500 Internal Server Error**Unexpected server-side application errorApplication bugs, PHP errors, configuration issuesNoReview application logs and fix the underlying error**502 Bad Gateway**Invalid response from an upstream serverReverse proxy, load balancer, or backend communication failureNoRestart upstream services and verify proxy configuration**504 Gateway Timeout**Upstream server took too long to respondSlow database, overloaded application server, network latencyNoOptimise application performance or increase timeout limits**404 Not Found**Requested resource doesn’t existMissing page or incorrect URLSometimesVerify the URL or restore the missing resource## Why 503 Errors Happen: The Real Causes Let me group these by where the problem originates, because that’s how you actually troubleshoot. ### 1. The Server Is Exhausted This is the most common culprit. Your server has finite resources, CPU, RAM, disk I/O, network bandwidth. When something consumes all of them, the web server (Nginx, Apache) can’t even spawn a process to acknowledge your request. What exhausts resources in practice: - A traffic spike from a viral post or unexpected campaign - A poorly optimized query hammering the database - A runaway PHP-FPM process that keeps forking - Cron jobs running simultaneously and piling up I have seen a single misconfigured WordPress plugin cause 100% CPU usage on a 4-core server within minutes. The site went from responsive to 503 in under five minutes. ### 2. The Server Is in Maintenance Mode If you’ve triggered a system update, OS patch, or panel upgrade, the server may intentionally return 503 during the process. Once the update completes, the server comes back online automatically. ### 3. A Backend Service Failed Your web server is often just a middleman. It forwards requests to PHP-FPM, a Node.js process, a Python app, or a proxy upstream. If any of those services are down, the web server can’t fulfill the request and throws 503. Common scenarios: - PHP-FPM crashed and didn’t restart automatically - A Node.js app ran out of memory and exited - The upstream server (e.g., a Docker container) isn’t running - A reverse proxy (Nginx to Apache, or Nginx to an application server) lost its connection ### 4. Firewall or Security Layer Misconfiguration Your firewall, whether it’s UFW, iptables, or a cloud layer like Cloudflare, decides what traffic is allowed. If a rule suddenly starts blocking legitimate requests (or if a rate limit kicks in too aggressively), the server responds to valid users with a 503. This happens more often than you’d think after server hardening. You might tighten security, block a few IPs, and accidentally catch real users in the net. ### 5. DNS Is Pointing Somewhere Wrong If your domain’s DNS records are misconfigured, visitors might be routed to the wrong server, one that doesn’t host your site at all. The result: 503 from a server that has no idea what you’re asking for. Recent DNS changes are a common trigger. If you switched hosting providers or updated your nameservers, propagation takes time, and during that window, you can get inconsistent 503 errors depending on which resolver a visitor’s ISP uses. ### 6. Database Connectivity Issues If your application relies on a database (and most WordPress, Laravel, and Node.js apps do) and the database becomes unreachable, the application often can’t render pages at all. Instead of a partial page load, you get a full 503. Common database culprits: - MySQL/MariaDB ran out of connections - The database server is down entirely - Credentials in `wp-config.php` or the app config are wrong - A connection timeout that’s too aggressive ## How to Diagnose a 503: Systematic Approach Before attempting a solution, it’s essential to properly identify the problem. Here’s the diagnostic flow I use. ### Quick Symptoms and What They Usually Mean SymptomMost Likely CauseCheck First**Website suddenly goes offline after traffic spike**CPU or memory exhaustionServer resource usage**Only dynamic pages return 503**PHP-FPM or application failureRunning processes**Entire site returns 503 after deployment**Maintenance mode or failed updateDeployment logs**Random visitors report intermittent outages**DNS propagation or firewall rulesDNS records and firewall configuration**Database-driven pages fail to load**Database connection issueMySQL service and application configuration### Step 1: Check Server Resource Usage Start by reviewing your server’s current resource consumption. High CPU usage, exhausted memory, or a full disk can prevent your web server from processing incoming requests. Pay close attention to: - CPU usage consistently above 80–90% - Memory (RAM) nearly exhausted - Disk storage reaching 100% capacity - Unusually high disk I/O activity If your server is running out of resources, the web server or application may temporarily stop accepting new requests, resulting in a 503 Service Unavailable error. If resources look fine, move to step 2. ### Step 2: Check Active Processes Next, verify that all essential services are running correctly. Before attempting a fix, you must first understand the exact problem you’re trying to solve: - NGINX or Apache - PHP-FPM - MySQL or MariaDB - Node.js - Python application services - Redis or other background services Watch for processes that: - Consume excessive CPU or memory - Repeatedly crash and restart - Become unresponsive - Stop running unexpectedly If you spot a problem process, that’s your culprit. Kill it or restart the related service. ### Step 3: Read the Server Logs and Application Logs Logs are often the quickest way to determine why a 503 error occurred. Check your web server’s error logs along with your application’s logs, focusing on entries generated around the time the error appeared. Look for entries around the timestamp of the 503. Common log patterns: - `"upstream prematurely closed connection"` – PHP-FPM or backend died - `"connect() failed"` – backend service unreachable - `"connection timed out"` – upstream slow or down - `"recv() failed"` – proxy lost connection to upstream If the logs are clean, check the access logs for an unusual spike in requests, that points to a DDoS or traffic spike. ### Step 4: Check the Application’s Status A healthy web server alone isn’t enough, your application must also be operational. Confirm that your application service is active, whether it’s: - PHP-FPM for WordPress, Laravel, or other PHP applications - Node.js processes - Python application servers - Java-based services - Containerised applications If the application process has stopped or crashed, restart it and investigate the underlying cause to prevent future interruptions. ### Step 5: Verify DNS If you recently modified your DNS settings, double-check that they route to the correct server IP. You can confirm this using utilities like `dig` and `nslookup`, or by testing through a web-based DNS lookup tool: - Your A record is correctly mapped to your server’s IP address. - Recent DNS changes have fully propagated. - There are no conflicting DNS records. Misconfigured DNS settings can cause traffic to be split between a functional server and an offline one, resulting in sporadic 503 Service Unavailable errors for some users. [![Blog banner - ServerAvatar](https://serveravatar.com/wp-content/uploads/2025/09/728_90-Banner-1-1024x127.png)](https://serveravatar.com/?ref=blog)### Diagnosing 503 Errors Faster with ServerAvatar If you manage your server using [**ServerAvatar**](https://serveravatar.com/), many of the above troubleshooting steps can be completed from a single dashboard instead of switching between SSH sessions, log files, and multiple monitoring tools. With ServerAvatar, you can: - Monitor real-time server health, including CPU, RAM, disk usage, and system load. - Monitor overall server health from a centralised interface, making it easier to identify resource bottlenecks before they affect your applications. - View running processes to identify applications consuming excessive resources. ![Server resources monitoring on ServerAvatar - HTTP 503 Service Unavailable Error ](https://serveravatar.com/wp-content/uploads/2026/07/image-73-1024x852.png) - Access server and application logs directly from the dashboard for faster troubleshooting.[](https://storage.app.basecamp.com/5840738/blobs/92532314-87fe-11f1-b6bd-0242ac120003/download/image.png) ![logs in ServerAvatar - HTTP 503 Service Unavailable Error](https://serveravatar.com/wp-content/uploads/2026/07/image-74-1024x421.png) - Restart services such as PHP-FPM, NGINX, or other supported services without using terminal commands. ![services in ServerAvatar - HTTP 503 Service Unavailable Error](https://serveravatar.com/wp-content/uploads/2026/07/image-75-1024x407.png) Having server metrics, processes, logs, and service management available in one place significantly reduces the time required to identify the root cause of a 503 Service Unavailable error, helping you restore your website or application more quickly. ## How to Fix HTTP 503 Error: Step by Step Now that you know where to look, here are the actual fixes. Each one corresponds to a cause above. ### Fix 1: Scale Resources or Kill Hungry Processes If you find resource exhaustion, you have two options: **Option A: Free up resources:** Find the offending process in the Processes section and terminate it. If it’s a cron job causing the load, disable it temporarily. **Option B: Scale up:** If you’re consistently hitting resource limits, vertically scale your server. This is the right call if you’re seeing resource exhaustion regularly. **Practical tip:** I’ve found that PHP-FPM is the usual suspect on shared or mid-tier VPS plans. Check the PHP-FPM process count, if you have 50+ PHP-FPM children all running at once, your server is likely swapping itself to death. ### Fix 2: Wait Out Maintenance or Complete a Stuck Update If your server is mid-update, give it 10–15 minutes. f the site remains inaccessible after this timeframe, the update likely didn’t go through successfully. Check the activity log for any failed tasks. You can also manually retry a failed operation. ### Fix 3: Restart Failed Backend Services Restarting clears stuck processes, resets memory leaks, and re-establishes connections. It’s the sysadmin equivalent of “turning it off and on again”, and it works more often than you’d expect. From ServerAvatar’s Services section, you can restart Nginx, PHP-FPM, MySQL, or any other service with one click. For WordPress specifically, I’ve seen PHP-FPM get into a state where it stops accepting new connections but doesn’t crash outright. A restart fixes this immediately. ### Fix 4: Review and Reset Firewall Rules **The quick reset approach:** Temporarily disable the most recent firewall rule and test. If the site comes back, you know that rule caused the problem. **For Cloudflare users:** check whether a firewall rule, challenge, or Under Attack mode is active. Cloudflare’s I’m Under Attack mode returns a 503 to all visitors regardless of your origin server. **For** **ServerAvatar’s users:** Navigate to the **Firewall** section. Review recent rule changes. If you added a rule that’s too broad (for example, blocking a whole port range), it can cause a 503 for everyone. ### Fix 5: Correct DNS Records If DNS is the issue, go to your DNS provider and verify: - The **A record** points to your server’s correct IP - The **AAAA record** (if using IPv6) is accurate - There are no conflicting CNAME records - TTL values aren’t causing stale lookups After correcting records, give it 5–10 minutes for local caches to clear, then test from an incognito window. If you’re unsure whether recent DNS changes have propagated worldwide, you can verify propagation across multiple geographic locations using an independent [DNS propagation checker](https://www.whatsmydns.net/?ref=serveravatar.com). ### Fix 6: Repair Database Connectivity For WordPress, open your `wp-config.php` and verify: ``` define('DB_NAME', 'your_database_name'); define('DB_USER', 'your_database_user'); define('DB_PASSWORD', 'your_database_password'); define('DB_HOST', 'localhost'); //or your DB server IP ``` ``` define('DB_NAME', 'your_database_name'); define('DB_USER', 'your_database_user'); define('DB_PASSWORD', 'your_database_password'); define('DB_HOST', 'localhost'); //or your DB server IP ``` A wrong `DB_HOST` value is surprisingly common after server migrations. It causes exactly this kind of silent failure. If MySQL itself is the issue, too many connections, you can view active MySQL connections and kill idle ones. If it’s a chronic problem, you may need to optimize your queries or increase the `max_connections` limit. You can easily increase the `max_connections` limit with the ServerAvatar dashboard. ## How to Prevent 503 Errors Fixing a 503 is one thing. Preventing it is another. Here’s what I would recommend based on what U have seen cause repeated outages: **Set up resource alerts.** ServerAvatar lets you configure alerts for Server Load, Memory Usage, and Disk Usage. I recommend Server Load alerts at 80% and Memory Usage at 85%. Catch the problem before it becomes a 503. **Use a process manager.** If your application keeps crashing, something like Supervisor or PM2 can automatically restart it. **Monitor your services.** Don’t wait for visitors to report a 503. Check your service status dashboard regularly, daily if you’re managing a production site. **Keep your stack updated, but do it carefully.** System updates are important, but test them on a staging environment first. A failed update on a production server is a surefire way to get a 503, and a stressful midnight debugging session. **Implement caching.** If your server is overloaded due to traffic spikes, a good caching layer can absorb many requests before they reach your application server. **Use a CDN.** Services like Cloudflare not only speed up delivery but can absorb DDoS traffic and serve cached content even when your origin server is struggling. ## ServerAvatar Makes This Easier If you’re managing your servers through [ServerAvatar](https://serveravatar.com/), a lot of the diagnostic work is already done for you. The dashboard consolidates resource monitoring, service controls, log viewing, etc. into one interface. Instead of SSHing in and running `top`, `htop`, or parsing log files manually, you can see what’s happening at a glance, and act on it without opening a terminal. For teams managing multiple client sites, this matters. You can check server health, restart services, and review logs without context-switching between tools. ## Key Takeaways - HTTP 503 is a server-side signal that the server can’t handle requests right now, not a user-side problem - The root causes usually fall into one of six categories: resource exhaustion, maintenance, failed backend services, firewall issues, DNS misconfiguration, or database problems - Diagnosis is systematic: check resources >> check processes >> read logs >> verify services >> check DNS - ServerAvatar’s dashboard centralizes most of this diagnostic work - Prevention is better than cure: set resource alerts, use process managers, keep software updated, and implement caching and CDNs - 503 errors can affect SEO if they persist, use `Retry-After` headers for planned maintenance ## Conclusion The HTTP 503 Service Unavailable error is intimidating because it tells you almost nothing directly. But with a systematic approach, check resources, read logs, verify services, you can usually identify the cause in under ten minutes. The fixes are rarely complex. It’s more about knowing where to look. ServerAvatar’s integrated dashboard removes a lot of the friction from that process, especially if you’re managing servers without wanting to live in the terminal all day. If you keep running into 503 errors despite fixing the immediate cause, it’s worth investigating the underlying trigger, a plugin eating CPU, a database that needs optimization, or a server that’s genuinely underpowered for your traffic. ## FAQs ### What’s the difference between HTTP 503 and HTTP 500? HTTP 500 (Internal Server Error) means something went wrong on the server while trying to fulfill the request, typically an application error. HTTP 503 means the server is not ready to accept requests at all, usually because it’s overloaded, undergoing maintenance, or a required service is down. 500 is about *how* the request was handled; 503 is about whether the server can handle it at all. ### Can a 503 error be caused by Cloudflare? Yes, Cloudflare’s “I’m Under Attack” mode, overly aggressive firewall rules, or rate limiting can return 503 to visitors even when your origin server is perfectly healthy. If Cloudflare is enabled and you encounter 503 errors, inspect your Cloudflare dashboard for any triggered security challenges or active firewall rules. ### What does “503 first byte timeout” mean? This is a specific type of 503 where the server didn’t respond within the expected time limit for the *first byte* of data (usually around 15–30 seconds). This typically happens when an upstream server is extremely slow or unresponsive, or when a CDN’s timeout is set too aggressively. Check your CDN configuration and your upstream service response times. ### How long does a 503 error last? It depends entirely on the cause. A temporary server overload may clear in seconds once traffic normalizes. A failed service that auto-restarts might be down for 30–60 seconds. A misconfigured firewall or DNS issue will persist indefinitely until someone fixes it. In my experience, the longest 503s come from failed PHP-FPM processes that don’t auto-restart. ### Is HTTP 503 related to SEO? Yes, and this is an underrated concern. Googlebot visits your site regularly. If it consistently hits 503 errors during crawl sessions, Google may interpret your site as unavailable and drop your rankings. If you’re doing planned maintenance, return a 503 with a `Retry-After` header so Google knows to come back later. Persistent 503s are a problem for more than just user experience. ### About the Author Meghna Meghwani is a technical writer focused on Linux, Ubuntu, VPS hosting, server management, WordPress, PHP, Node.js, cloud hosting, and DevOps. She creates beginner-friendly tutorials, practical hosting guides, troubleshooting articles, and server security content designed to help developers and businesses manage applications and servers more efficiently. **Categories:** Blog, Guide, Linux, Others, Tutorials, Ubuntu **Tags:** 503 Error, 503 Error Troubleshooting, 503 Service Unavailable, How to Fix 503 Error, HTTP 503 Error, HTTP 503 Service Unavailable Error, HTTP Error 503, Server Errors --- ### [How to Find Large Files and Directories in Linux](https://serveravatar.com/find-large-files-directories-linux/) **Published:** August 19, 2026 **Author:** Meghna Meghwani **Content:** [![Blog banner - ServerAvatar](https://serveravatar.com/wp-content/uploads/2025/09/728_90-Banner-3-1024x127.png)](https://serveravatar.com/?ref=blog)Disk space doesn’t vanish, it accumulates. One day your server is fine; the next, find large files and directories in Linux to uncover what filled your storage. This is one of the most common scenarios I encounter in day-to-day server management. And on Linux, unlike desktop operating systems, there’s no friendly animation telling you where space went. You have to find it yourself. The good news: Linux ships with powerful built-in tools for exactly this. And there are lightweight third-party utilities that make the process much less painful. I’ve used these tools across dozens of servers, development boxes, production VPS instances, and everything in between. Some of them have saved me hours of detective work. This guide walks you through how to find large files and directories in Linux, from quick one-liners to interactive analyzers, and explains the nuances that documentation rarely covers. ![disk usage warning - find large files and directories in Linux](https://serveravatar.com/wp-content/uploads/2026/08/image-95.png) ## Why Disk Space Management Matters on Linux Running out of disk space can affect much more than file storage. A nearly full filesystem can prevent applications from writing data, break database operations, interrupt deployments, and cause system services to fail. **Common sources of unexpected disk usage include:** - **Log files** that continuously grow because of application errors or verbose logging. > Learn more about Linux logging, common log locations, and how log files are used in our guide to [Linux logs](https://serveravatar.com/linux-logs/). - **Database backups and snapshots** that are never removed. - **Compressed backup archives** such as `.rar`, `.zip`, and `.tar` files can also consume significant storage when old copies are retained. > If you need to work with RAR archives on Linux, see our guide on [How to Open, Extract and Create RAR Files in Linux](https://serveravatar.com/rar-files-in-linux/). - **Container images and volumes** left behind after testing. - **CI/CD build artifacts** that accumulate over time. - **Package caches** containing outdated packages. - **Temporary files** created by applications and system processes. - **Old application releases** that are no longer required. - **Backup jobs** writing files to an unexpected location. ### Why regular disk checks are important A simple disk-space monitoring routine can help you: - Detect storage problems before they become critical. - Identify which filesystem is filling up. - Find unusually large directories and files. - Discover deleted files that are still consuming space. - Prevent applications from failing because of insufficient storage. - Keep production servers healthy and predictable. > **Tip:** Don’t wait until a filesystem reaches 100%. Investigate sustained usage above **80%** and treat **90%+** as a warning that requires attention. ## Check Overall Disk Usage First Before searching for individual files, determine which filesystem is consuming the most space. The `df` command provides a summary of disk usage for mounted filesystems. ``` df -h ``` ``` df -h ``` The `-h` flag gives you human-readable output, gigabytes and megabytes instead of raw block counts. ![check disk usage to find large files and directories in Linux](https://serveravatar.com/wp-content/uploads/2026/08/image-96-1024x113.png) > You can also review the official [GNU ‘df’ documentation](https://www.man7.org/linux/man-pages/man1/df.1.html?ref=serveravatar.com) for additional options such as `-i`, `-T`, and `-x`. Here’s what the output typically looks like: ``` Filesystem Size Used Avail Use% Mounted on /dev/sda1 100G 78G 22G 78% / /dev/sdb1 500G 450G 50G 90% /mnt/backup tmpfs 2.0G 0 2.0G 0% /tmp ``` ``` Filesystem Size Used Avail Use% Mounted on /dev/sda1 100G 78G 22G 78% / /dev/sdb1 500G 450G 50G 90% /mnt/backup tmpfs 2.0G 0 2.0G 0% /tmp ``` **Pay particular attention to:** - **Size:** Total filesystem capacity. - **Used:** Space currently occupied. - **Avail:** Remaining available space. - **Use%:** Percentage of the filesystem in use. - **Mounted on:** Location where the filesystem is accessible. In the example above, `/mnt/backup` is at **90%**, making it the first location to investigate. > For more details about `df`, `du`, and other filesystem utilities, see the [GNU Coreutils documentation](https://www.gnu.org/software/coreutils/manual/coreutils.html?ref=serveravatar.com). ### Check inode usage Disk space isn’t the only resource that can run out. Linux filesystems also have a finite number of inodes, which store metadata about files. Check inode consumption with: ``` df -i ``` ``` df -i ``` Here’s what the output typically looks like: ![check linode usage for find large files and directories in Linux](https://serveravatar.com/wp-content/uploads/2026/08/image-97-1024x116.png) Inode exhaustion can occur when a server contains millions of small files, even when plenty of disk capacity remains. For example: - A server may have 100 GB of free disk space. - But all available inodes may already be consumed. - Creating a new file can then fail despite the available storage. > For a deeper explanation of what an inode stores, see the Linux [‘inode(7)’ manual page](https://man7.org/linux/man-pages/man7/inode.7.html?ref=serveravatar.com). ## Understand How Linux Filesystems Use Disk Space The numbers reported by `df`, `du`, and `ls` don’t always match exactly. Understanding why makes disk investigations much easier. Linux filesystems generally allocate storage in fixed-size blocks. **For example,** with a 4 KB block size: - A 1-byte file can occupy approximately 4 KB. - A 4 KB file can occupy approximately 4 KB. - A 10 KB file may require approximately 12 KB of allocated space. This means logical file size and allocated disk space are not always identical. ### Filesystem-reserved space Some filesystems reserve a portion of available storage for system operations. This reserved capacity can help: - Keep critical system processes running. - Reduce fragmentation. - Allow administrators to recover a system when normal users consume most available space. As a result, the total reported by `df` may not exactly match the combined sizes shown by tools such as `du`. ### Hard links can affect calculations A hard link creates another directory entry pointing to the same underlying file data. Because multiple filenames can reference the same data: - Two filenames don’t necessarily mean two copies of the file. - Disk usage calculations can become confusing when manually comparing file listings. - `du` and `ls` may present information differently depending on how links are handled. ## Finding the Largest Directories The fastest way to get oriented inside a full partition is to see which subdirectories are the biggest. Navigate to the mount point and run: ``` du -sh * ``` ``` du -sh * ``` Here’s what the output typically looks like: ![finding the largest directory ](https://serveravatar.com/wp-content/uploads/2026/08/image-98-1024x254.png) This summarizes each item in the current directory, files and directories both, and sorts them by size. The `-s` flag means “summarize,” so you get one number per item instead of every subdirectory broken out individually. Pipe it through `sort` to get the largest ones at the top: ``` du -sh * | sort -rh ``` ``` du -sh * | sort -rh ``` Here’s what the output typically looks like: ![finding the largest directory ](https://serveravatar.com/wp-content/uploads/2026/08/image-99-1024x252.png) **Understanding the command** - **`du` :** Reports disk usage. - **`-s` :** Shows a summary for each item. - **`-h` :** Uses human-readable units. - **`sort` :** Sorts the output. - **`-r` :** Reverses the sort order. - **`-h` :** Understands values such as `500M` and `2G`. The `*` glob only matches items in the current directory. If you want to include hidden files (dotfiles), you need to explicitly handle those: ``` du -sh .[!.]* * | sort -rh ``` ``` du -sh .[!.]* * | sort -rh ``` This is a pattern I use often when auditing web server directories, hidden files like `.htaccess`, `.well-known`, or dotfiles from configuration management tools sometimes accumulate more than you’d expect. A variant that works from any location without changing directories: ``` du -sh --max-depth=1 /var ``` ``` du -sh --max-depth=1 /var ``` This is particularly useful for identifying whether `/var` is filling up because of: - `/var/log` - `/var/cache` - `/var/www` - `/var/lib` - Application-specific directories > **Note:** `--max-depth` is commonly available with GNU `du`. On some non-GNU systems, the syntax may differ. > The official [GNU ‘du’ documentation](https://www.gnu.org/savannah-checkouts/gnu/coreutils/manual/html_node/du-invocation.html?ref=serveravatar.com) explains how `du` estimates the space used by files and directories and documents options such as `--summarize` and `--threshold`. ## Find Large Individual Files After identifying a large directory, the next step is to locate the files responsible for the disk usage. The `find` command is one of the most useful tools for this task. ### Find Files Above a Specific Size **For example,** to find files larger than 500 MB under `/home`: ``` find /home -type f -size +500M ``` ``` find /home -type f -size +500M ``` You can adjust the size threshold depending on your requirements: ``` find /var -type f -size +1G ``` ``` find /var -type f -size +1G ``` **Common size units include:** - **`k` :** Kilobytes - **`M` :** Megabytes - **`G` :** Gigabytes ### Hide permission errors If you’re scanning directories containing restricted files, you may see permission-denied messages. You can suppress those messages: ``` find /home -type f -size +500M 2>/dev/null ``` ``` find /home -type f -size +500M 2>/dev/null ``` This only hides error output; it does not change what `find` searches. > If `find` repeatedly reports permission errors, understanding Linux ownership and file permissions can help you determine which files and directories you can safely inspect; see our guide to [Linux file permissions](https://serveravatar.com/linux-file-permissions/). ## Display File Sizes Alongside Names A filename alone doesn’t tell you exactly how much storage it consumes. Use: ``` find /home -type f -size +100M -exec ls -lh {} \; ``` ``` find /home -type f -size +100M -exec ls -lh {} \; ``` The output includes: - File permissions - Owner - Group - File size - Modification time - File path **For example:** ``` -rw-r--r-- 1 user user 1.4G Aug 19 10:20 /home/user/backup.tar ``` ``` -rw-r--r-- 1 user user 1.4G Aug 19 10:20 /home/user/backup.tar ``` ### Show only size and filename For a more compact result: ``` find /home -type f -size +100M -exec ls -lh {} \; 2>/dev/null | awk '{print $5, $NF}' ``` ``` find /home -type f -size +100M -exec ls -lh {} \; 2>/dev/null | awk '{print $5, $NF}' ``` This produces output similar to: ``` 1.4G /home/user/backup.tar 850M /home/user/database.sql 520M /home/user/archive.zip ``` ``` 1.4G /home/user/backup.tar 850M /home/user/database.sql 520M /home/user/archive.zip ``` ## Create a Quick Disk-Usage Shortcut If you frequently investigate disk usage, create a shell alias. Add this to `~/.bashrc`: ``` alias big='du -ah --max-depth=1 . | sort -rh | head -20' ``` ``` alias big='du -ah --max-depth=1 . | sort -rh | head -20' ``` Reload the shell configuration: ``` source ~/.bashrc ``` ``` source ~/.bashrc ``` Now run: ``` big ``` ``` big ``` This displays the largest items in the current directory. **Why this is useful** Instead of repeatedly typing a long pipeline, you can quickly check: - Which directories are growing. - Which files are unusually large. - Where to begin cleanup. ## Interactive Tools for Disk Usage Analysis The command-line tools above are powerful, but they require you to know what you’re looking for. When you’re exploring an unfamiliar server or a directory with deep nesting, interactive tools get you answers faster. ### ncdu: The Most Popular Interactive Analyzer `ncdu` (NCurses Disk Usage) scans a directory and presents the results in a navigable text interface. Install it on Debian/Ubuntu with: ``` sudo apt install ncdu ``` ``` sudo apt install ncdu ``` Then run it against any path: ``` ncdu /var ``` ``` ncdu /var ``` You can then navigate through the directory tree using the keyboard. Here’s what the output typically looks like: ![using ncdu](https://serveravatar.com/wp-content/uploads/2026/08/image-100-1024x221.png) **Useful features** - Interactive directory navigation. - Sorted disk usage information. - Percentage-based usage indicators. - Quick access to large directories. - Ability to delete selected files with confirmation. **Typical workflow:** ``` ncdu /var ↓ Select large directory ↓ Press Enter ↓ Inspect subdirectories ↓ Identify large files ↓ Clean up unnecessary data ``` ``` ncdu /var ↓ Select large directory ↓ Press Enter ↓ Inspect subdirectories ↓ Identify large files ↓ Clean up unnecessary data ``` > **Caution:** Be careful when using deletion options on production servers. Always confirm that a file or directory is safe to remove. ### gdu: Fast Scanner for Modern Systems `gdu` (Go Disk Usage) is a newer tool written in Go, which means it’s fast, noticeably faster than `ncdu` on large directories. It also renders a visual bar chart in the terminal. On Debian/Ubuntu: ``` sudo apt install gdu ``` ``` sudo apt install gdu ``` Run it with: ``` gdu /var ``` ``` gdu /var ``` Here’s what the output typically looks like: ![using gdu](https://serveravatar.com/wp-content/uploads/2026/08/image-101-1024x222.png) **Why use gdu?** - Fast directory scanning. - Interactive terminal interface. - Visual usage indicators. - Keyboard-based navigation. - Useful for large filesystems. ### godu: Simple and Straightforward `godu` is another Go-based disk usage tool. Download the binary for your architecture from its GitHub releases page, make it executable, and drop it in your PATH. ``` godu /var ``` ``` godu /var ``` Its interface focuses on keeping disk-usage information simple and easy to navigate. It can be useful when you want: - A lightweight disk analyzer. - Sorted file and directory sizes. - Keyboard navigation. - Minimal terminal output. ### dua: Aggregate Disk Usage Stats `dua` (Disk Usage Analyzer) has two modes. The default shows aggregate space for directories: ``` dua ``` ``` dua ``` Or specify a path: ``` dua /var/log ``` ``` dua /var/log ``` It also has an interactive mode: ``` dua interactive ``` ``` dua interactive ``` The interactive interface allows you to explore directories and identify potential cleanup candidates. **dua is useful for** - Directory-level disk analysis. - Fast storage reporting. - Interactive exploration. - Finding large directories before cleanup. ## Why `df`, `du`, and `ls` Can Show Different Numbers One of the most confusing parts of Linux disk management is seeing different numbers from different commands. **For example:** ``` df -h ``` ``` df -h ``` might show significantly more used space than: ``` du -sh / ``` ``` du -sh / ``` There are several possible explanations. ### Common causes include: - Filesystem metadata. - Reserved filesystem blocks. - Hard links. - Sparse files. - Deleted files still held open by running processes. - Differences between apparent size and allocated disk space. - Filesystem-specific behavior. Understanding these differences prevents unnecessary cleanup and helps you investigate the actual cause. ## Sparse Files: Large Files That Use Little Disk Space A sparse file contains regions that appear to contain data but don’t actually have corresponding disk blocks allocated. Create a 5 GB sparse file: ``` truncate -s 5G /tmp/sparse-test.img ``` ``` truncate -s 5G /tmp/sparse-test.img ``` Now compare its apparent size with its allocated size: ``` ls -lh /tmp/sparse-test.img ``` ``` ls -lh /tmp/sparse-test.img ``` You may see: ``` 5.0G ``` ``` 5.0G ``` But: ``` du -h /tmp/sparse-test.img ``` ``` du -h /tmp/sparse-test.img ``` may show: ``` 0 ``` ``` 0 ``` **Why does this happen?** `ls` reports the file’s apparent size, while `du` reports the amount of allocated filesystem space. Sparse files are commonly used for: - Virtual machine disk images. - Database storage. - Backup files. - Disk images. - Files that require preallocated logical space. So a file that appears to be 100 GB doesn’t necessarily consume 100 GB of physical disk space. ## Deleted Files Can Still Consume Disk Space Another common Linux disk-space problem occurs when a file has been deleted but is still open by a running process. **For example:** - An application writes to `application.log`. - The log becomes very large. - Someone deletes the file with `rm`. - The application still has the file open. - The filename disappears. - The disk blocks remain allocated. - `df` continues reporting the used space. This is commonly called a deleted-but-open file. ## Find Deleted Files That Are Still Open Use `lsof` to locate these files: ``` lsof +L1 ``` ``` lsof +L1 ``` The `+L1` option identifies open files whose link count has dropped below 1, which commonly indicates that the file has been deleted while a process still holds it open. Here’s what the output typically looks like: ![Find Deleted Files](https://serveravatar.com/wp-content/uploads/2026/08/image-102-1024x114.png) > For the complete list of `lsof` options, see the official [‘lsof’ manual page](https://man7.org/linux/man-pages/man8/lsof.8.html?ref=serveravatar.com). You can also filter the results: ``` lsof +L1 | grep username ``` ``` lsof +L1 | grep username ``` **Look for:** - Process name. - Process ID. - File descriptor. - File size. - Deleted file path. ### Common causes Deleted-but-open files frequently occur with: - Web servers. - Application servers. - Database services. - Java applications. - Logging services. - Long-running background processes. ## How to Free Space From Deleted-But-Open Files The safest solution is usually to restart the process, if doing so is acceptable. First identify the process: ``` lsof +L1 ``` ``` lsof +L1 ``` Then, if appropriate, gracefully terminate it: ``` kill -15 ``` ``` kill -15 ``` Once the process closes the file descriptor, the filesystem can reclaim the space. > Before stopping a process, you can identify and inspect active processes with tools such as `ps`, `top`, `htop`, and `atop`; see our guide on [checking running processes in Linux](https://serveravatar.com/check-running-processes-linux). > If you need to understand the available Linux process-management commands before terminating a process, see our guide on [How to Kill a Running Process in Linux](https://serveravatar.com/kill-a-running-process-in-linux/). ### Another option: truncate the open file In certain situations, you can release the space without restarting the application: ``` truncate -s 0 /proc//fd/ ``` ``` truncate -s 0 /proc//fd/ ``` However, this should be treated as an advanced operation. Before using it: - Confirm the correct process. - Confirm the correct file descriptor. - Understand what application owns the file. - Make sure removing its contents won’t cause data loss. - Prefer a proper application-level log rotation mechanism when available. > **Warning:** Never blindly truncate files belonging to databases or critical applications. An incorrect operation can cause data loss or application problems. ## Linux Disk Space Troubleshooting Workflow When a Linux server starts running out of storage, follow a structured process rather than randomly deleting files. **Step 1: Check filesystem usage** ``` df -h ``` ``` df -h ``` **Step 2: Check inode usage** ``` df -i ``` ``` df -i ``` **Step 3: Identify large directories** ``` du -sh * | sort -rh ``` ``` du -sh * | sort -rh ``` **Step 4: Investigate the largest directory** ``` du -h --max-depth=1 /var | sort -rh ``` ``` du -h --max-depth=1 /var | sort -rh ``` **Step 5: Find large files** ``` find /var -type f -size +500M -exec ls -lh {} \; ``` ``` find /var -type f -size +500M -exec ls -lh {} \; ``` **Step 6: Check for deleted-but-open files** ``` lsof +L1 ``` ``` lsof +L1 ``` **Step 7: Clean up safely** Consider removing or rotating: - Old logs. - Unnecessary backups. - Unused application releases. - Old package caches. - Unused container images. - Temporary files. - Obsolete build artifacts. > Found a directory that is consuming a large amount of storage? Before deleting it, verify its contents and review our guide on [how to delete large directories in Linux safely](https://serveravatar.com/delete-large-directories-in-linux/). > If the directory is no longer required, you can also learn how to [remove directories in Linux](https://serveravatar.com/delete-folder-linux/) using the appropriate command for empty and non-empty directories. **Step 8: Verify the result** After cleanup: ``` df -h ``` ``` df -h ``` Check that the expected amount of storage has been recovered. [![Blog banner - ServerAvatar](https://serveravatar.com/wp-content/uploads/2025/09/728_90-Banner-1-1024x127.png)](https://serveravatar.com/?ref=blog)## Quick Reference: Linux Disk Usage Commands at a Glance **Command****Purpose****Best Use**`df -h`Shows filesystem capacity and usageQuick storage health check`df -i`Shows inode consumptionFinding inode exhaustion`du -sh *`Summarizes items in a directoryFinding large directories`du -sh * | sort -rh`Sorts items by sizeQuickly locating space consumers`find -size +N`Finds files above a size thresholdLocating large files`ncdu`Interactive disk analyzerExploring directory trees`gdu`Fast interactive disk analyzerLarge directory scans`godu`Lightweight disk usage analyzerSimple interactive analysis`dua`Disk usage analyzerFast reporting and exploration`lsof +L1`Finds deleted files still held openInvestigating unexplained disk usage## Key Takeaways - Run `df -h` first, always know the big picture before diving into individual files - `du -sh * | sort -rh` from any directory gives you an instant ranking of the largest items - `find` with `-size` flags is the most flexible tool for locating files above any threshold - `ncdu` and `gdu` turn the terminal into a visual explorer, faster for complex directory trees - Filesystem block allocation means file sizes never add up exactly to `df` used space - Deleted-but-open files are a real cause of “mystery” disk usage, `lsof +L1` finds them every time - Build a regular disk-audit habit, especially on servers with multiple users or applications ## Conclusion Finding large files and directories in Linux becomes much easier when you use the right commands in the right order. Start with `df -h` to identify the filesystem with high usage, then use `du` and `find` to locate the directories and files consuming the most space. For faster and interactive analysis, tools like `ncdu`, `gdu`, and `dua` can also help you explore disk usage efficiently. Before deleting any files, always check whether they are required by the system, applications, backups, or logs. Issues such as deleted-but-open files, sparse files, and inode exhaustion can also cause unexpected disk usage. Regular disk-space checks, proper log management, and safe cleanup practices can help maintain sufficient storage and keep your Linux server stable and reliable. Want simpler server management with built-in disk monitoring, automatic alerts, and a browser-based file manager? Check out [ServerAvatar](https://serveravatar.com/) and see how it handles server health monitoring so you don’t have to. ## FAQs ### How do I find the largest file in a Linux directory? Use `find` with a size threshold set high enough to isolate only the largest files: `find /path -type f -size +1G -exec ls -lh {} \;`. This finds every file over 1GB and lists it with its size. To sort the results by size, pipe through `sort` as well. ### How can I identify the 10 largest directories on a Linux system? Navigate to the target directory and run `du -sh * | sort -rh | head -n 10`. This summarizes each subdirectory’s size, sorts them largest-first, and displays the top 10. Adjust `10` to however many results you want. ### Why is disk usage showing more used space than the files add up to? Filesystem block allocation is the main cause. Files are stored in fixed-size blocks (typically 4KB), so even small files consume full blocks. Additionally, most filesystems reserve 5% of space for root-only use. Deleted-but-open files can also contribute to this discrepancy. ### How can you locate deleted files that are still occupying disk space on Linux? Run `lsof +L1` , it helps identify deleted files whose disk blocks have not yet been released. The output can show the process using the file, its process ID, file descriptor, and the space that remains allocated. Once you identify the responsible process, restarting it gracefully will usually release the occupied storage. In specific situations, an open file can also be truncated through `/proc`, but this should only be done after confirming that doing so is safe. ### Which tool is best for analyzing disk usage interactively? `ncdu` is the most widely available and feature-complete interactive tool, it comes standard in most distro repositories and handles large directories well. `gdu` is faster on modern hardware and has a cleaner visual presentation. `dua` is excellent for aggregate reporting. Choose based on your specific need. ### About the Author Meghna Meghwani is a technical writer focused on Linux, Ubuntu, VPS hosting, server management, WordPress, PHP, Node.js, cloud hosting, and DevOps. She creates beginner-friendly tutorials, practical hosting guides, troubleshooting articles, and server security content designed to help developers and businesses manage applications and servers more efficiently. **Categories:** Blog, Guide, Linux, Others, Tutorials, Ubuntu **Tags:** du Command, find Command, Find Large Directories in Linux, Find Large Files in Linux, Linux, Linux commands, Linux Disk Usage, Linux Server Management, ncdu Linux, Ubuntu --- ### [What Is Laravel Octane? Benefits, Features & How to Use It](https://serveravatar.com/laravel-octane/) **Published:** August 18, 2026 **Author:** Meghna Meghwani **Content:** [![Blog banner - ServerAvatar](https://serveravatar.com/wp-content/uploads/2025/09/728_90-Banner-3-1024x127.png)](https://serveravatar.com/?ref=blog)If you’ve been working with Laravel Octane for a while, you’ve probably noticed something: every time a user hits your site, Laravel has to boot itself from scratch. Service providers load, the container registers, middleware fires, all for a single request that might take 50 milliseconds. Multiply that by a thousand concurrent users, and you’re asking PHP to do an enormous amount of repeated work. Laravel Octane addresses this bottleneck by keeping your application in memory between requests, reducing repeated bootstrapping and helping improve application performance. That’s the exact problem Laravel Octane was built to solve. In this guide, I’m going to walk you through what Laravel Octane is, how it changes the way your PHP application handles requests, which server options you have, and whether it’s worth adding to your stack. I’ve been running Laravel applications for a few years now, and I’ve tested Octane on both small side projects and production apps handling real traffic. I’ll share what actually matters, not just the marketing version. ## TL;DR - Laravel Octane keeps the framework booted in memory, eliminating 30–100ms of boot overhead on every request - Traditional Laravel handles 300–600 requests/second; Octane pushes 1,800–3,000+ requests/second on the same hardware - Choose RoadRunner for easy setup and broad compatibility, or Swoole for maximum performance and advanced features - Key features include persistent workers, concurrent task processing (Swoole), ticks/intervals (Swoole), Octane cache, and Octane tables - Requires PHP 8.0+ and a server where you control the PHP environment - Not suitable for shared hosting or teams unfamiliar with stateful PHP patterns - Test thoroughly before production deployment, particularly around memory usage and global state ## What Laravel Octane Actually Is [Laravel Octane](https://github.com/laravel/octane?ref=serveravatar.com) is an official Laravel package (created by Taylor Otwell) that dramatically speeds up your Laravel application by keeping the framework booted in memory between requests. Think of it like this: a traditional Laravel app is like a restaurant where the kitchen staff has to set up all their ingredients, turn on every burner, and prep every dish from zero every time someone orders. Laravel Octane is like a kitchen where everything stays hot and ready, you just plate and serve. Technically, Octane runs your Laravel app on top of a high-performance PHP server, either Swoole or RoadRunner, instead of the traditional PHP-FPM approach. This lets PHP hold the framework in memory across multiple requests, eliminating the boot-time overhead that happens on every single page load. **One important thing to know:** Octane requires PHP 8.0 or higher. If you’re on an older version, that’s the first thing to sort out before even thinking about Octane. ![Laravel Octane](https://serveravatar.com/wp-content/uploads/2026/08/image-94.png) ## The Performance Problem with Traditional Laravel Here’s what actually happens when a request hits a standard Laravel app running on Nginx and PHP-FPM: - PHP-FPM spins up a worker process - That worker loads your Laravel app - All service providers register themselves - The framework boots - Middleware runs - Your controller does its work - A response goes back - The worker sits idle or gets recycled This cycle repeats for every single request. On a low-traffic site, you won’t notice. But when you’re handling even a few hundred requests per second, you’re wasting server resources booting the same framework over and over instead of doing actual work. The numbers add up fast. A typical Laravel app spends 30–100ms just on framework boot, before your controller even runs. That’s a massive tax on every request. ### How Octane Fixes It Instead of booting fresh for each request, Octane boots the framework once and keeps it in memory. When a request comes in, a worker picks it up, runs it through the already-booted framework, and sends the response back, without ever re-booting. **The result?** Your application spends its CPU cycles on your code, not on Laravel’s boot process. For I/O-heavy applications, API endpoints hitting databases, external APIs, and queue workers, this is a game-changer. ## Understanding Stateful vs Stateless PHP This is where most developers get confused, so let me make it concrete. PHP is naturally stateless. Every request starts with a blank slate. The server does not retain information from previous requests, so each request starts with a fresh application state. That’s fine for most use cases, but it means PHP has to rebuild everything from scratch each time. Laravel Octane makes PHP partially stateful. The framework stays booted in memory, so subsequent requests don’t pay the boot tax. Your application code is still stateless in the sense that each request is independent, but the infrastructure around it isn’t constantly rebuilding itself. This is a meaningful shift in how you think about PHP applications. If you’re new to stateful programming, you’ll need to adjust how you write certain parts of your app. Global state that mutates between requests can cause subtle bugs in Octane if you’re not careful. ### A Simple Analogy Picture a library with a librarian who resets the entire library, shelves, card catalog, everything, every single time someone walks in to ask a question. That’s stateless PHP. The librarian spends more time resetting than answering questions. Now picture a library where the librarian keeps everything set up, remembers your name, and can answer follow-up questions immediately without resetting. That’s stateful PHP with Octane. The work of setting up only happens once; after that, everything is fast. ### Why This Matters for Laravel If you’ve ever looked at New Relic or Clockwork profiling data on a Laravel app, you know that framework boot time is often the single largest time sink. Cutting that out doesn’t just make individual requests faster, it means your server can handle significantly more traffic with the same resources. For a server, moving from 200 requests/second to 2,000 requests/second isn’t an exaggeration. That’s the difference between needing three servers and needing one. ## Laravel Octane vs Traditional Laravel: The Numbers I want to be honest about where these numbers come from. Laravel’s own benchmarks and community testing consistently show Octane outperforming traditional Laravel by a wide margin, but the exact numbers vary based on your application, server specs, and what you’re measuring. Here’s the general picture: **Metric****Traditional Laravel (PHP-FPM)****Laravel Octane****Requests per second**300–6001,800–3,000+**Memory per request**15–30 MB allocated~2 MB delta per request**Framework boot time**30–100ms0ms (booted once)**Cold start**Every requestOnce on startupThe key insight isn’t just raw speed, it’s consistency. Traditional Laravel has a wide variance in response times because some requests hit freshly-booted workers and others hit workers that have been sitting. Octane workers are always warm. **One caveat worth noting:** if your application makes heavy use of global mutable state or relies on PHP superglobals in non-standard ways, you may hit edge cases in Octane that you didn’t have with PHP-FPM. Test thoroughly before going to production. ## Swoole vs RoadRunner When you install Laravel Octane, you choose between two high-performance servers to power it. Neither is objectively “better”, the right choice depends on your setup, your team, and your needs. ``` Laravel Octane │ ┌──────────┴────────┐ ↓ ↓ Swoole RoadRunner PHP Extension Go Binary Maximum Speed Easier Setup Advanced Features Compatibility ``` ``` Laravel Octane │ ┌──────────┴────────┐ ↓ ↓ Swoole RoadRunner PHP Extension Go Binary Maximum Speed Easier Setup Advanced Features Compatibility ``` ### Swoole: Best For Maximum Performance [Swoole](https://laravel.com/docs/12.x/octane#swoole?ref=serveravatar.com) is a PHP extension, which means it compiles directly into your PHP binary. Once installed, it’s part of your PHP environment. **The upside:** Swoole is fast. Genuinely fast. It also adds some Laravel-specific features that RoadRunner doesn’t have, concurrent task processing, tick/interval timers, and an in-memory cache driver that can handle millions of operations per second. **The downside:** it’s a compiled extension, which means installation is more involved. You need to compile it or use a PHP build that includes it. It also doesn’t play well with Xdebug, which is the most widely-used PHP debugging tool. Some APM tools like New Relic and Datadog have compatibility issues with Swoole’s coroutine model. **Choose Swoole if you:** - Need the highest possible performance from Octane - Want concurrent task processing - Need ticks, intervals, or Octane tables - Have full control over your server and PHP environment - Are comfortable managing PHP extensions If you’re comfortable with server administration and want the maximum performance possible, Swoole is the choice. ### RoadRunner: Best For Simpler Deployment [RoadRunner](https://laravel.com/docs/12.x/octane#roadrunner?ref=serveravatar.com) is a high-performance application server written in Go that works alongside PHP. Unlike Swoole, it doesn’t compile directly into PHP. Instead, it runs as a separate process and communicates with your Laravel application. **The upside:** RoadRunner is easier to install and deploy. You don’t need to compile a PHP extension or modify your PHP build. You can install the RoadRunner binary, configure it for your application, and start using it with Laravel Octane. It also works well with standard PHP debugging tools and avoids many of the PHP extension compatibility concerns that can come with Swoole. **The downside:** RoadRunner doesn’t provide some of Swoole’s Octane-specific features, such as concurrent task processing, ticks and intervals, and Swoole-based in-memory features. While RoadRunner offers excellent performance, Swoole may be a better choice when you need the maximum performance or those additional capabilities. **Choose RoadRunner if you:** - Want an easier Octane installation and deployment - Prefer not to compile or manage additional PHP extensions - Need compatibility with your existing PHP debugging tools - Are getting started with Laravel Octane - Don’t need Swoole-specific features If you want the performance benefits of Laravel Octane without adding complexity to your PHP environment, RoadRunner is a practical choice. RoadRunner is what I’d recommend if you’re just getting started with Octane, if you’re on a shared or semi-managed server, or if you need maximum compatibility with your existing PHP tooling. ### Side-by-Side Comparison **Feature****Swoole****RoadRunner****Installation**PHP extension (compile required)Binary (drop-in)**Performance**HighestVery good**Xdebug compatibility**❌✅**APM tool compatibility**PartialFull**Concurrent tasks**✅❌**Ticks and intervals**✅❌**In-memory cache driver**✅❌**Learning curve**SteeperGentle### So, Which One Should You Choose? **If you’re still unsure, use this simple rule:** - Choose Swoole when performance and advanced Octane features are your priority. - hoose RoadRunner when simplicity, compatibility, and easier deployment matter more. For a typical Laravel application, you don’t need to overthink the decision. RoadRunner is a sensible starting point if you’re new to Octane. If your application has demanding performance requirements or you specifically need Swoole’s concurrency and in-memory features, Swoole is the better fit. **And remember:** the server you choose doesn’t replace good application optimization. Database queries, caching, external API calls, inefficient code, and insufficient server resources can still become bottlenecks even after moving to Octane. ## Key Features That Make Octane Worth It Beyond raw speed, Octane introduces some features that have no equivalent in traditional Laravel. Here’s what I find most useful in practice. ### Persistent Workers Instead of PHP-FPM spinning up a new worker per request (or per small pool), Octane lets you configure multiple workers that stay alive and handle requests continuously. You can specify how many workers to start based on your CPU cores: ``` php artisan octane:start --workers=4 ``` ``` php artisan octane:start --workers=4 ``` **The key benefit:** if one worker is busy processing a heavy request, other workers immediately start handling incoming traffic. No request queue backing up behind one slow operation. Under PHP-FPM, a single slow request could tie up a significant portion of your worker pool. **One thing I’ve learned the hard way:** more workers isn’t always better. Each worker uses memory. If your app is memory-heavy or you’re on a limited VPS, 2 workers might outperform 8. Test with your actual traffic patterns. ### Concurrent Tasks This one is Swoole-only, and it’s genuinely powerful. Laravel Octane lets you defer heavy operations to background task workers so your web workers stay free to handle incoming requests: ``` php artisan octane:start --workers=4 --task-workers=6 ``` ``` php artisan octane:start --workers=4 --task-workers=6 ``` Task workers are completely separate from web workers. You can push CPU-intensive or I/O-heavy work to them without blocking the request that triggered it. Think of it like a poor-man’s queue system without needing a separate Redis or RabbitMQ setup. I’ve used this for things like generating reports, processing file uploads, and calling third-party APIs that have slow response times. The web endpoint returns immediately, and the task runs in the background. ### Ticks and Intervals Also Swoole-only. Ticks let you run code on a recurring schedule, like a `setInterval` in JavaScript. This is useful for maintenance tasks that need to run in your application layer: ``` Octane::tick('cleanup-temp', fn () => TempFile::pruneOld()) ->seconds(60); ``` ``` Octane::tick('cleanup-temp', fn () => TempFile::pruneOld()) ->seconds(60); ``` The catch: there’s no built-in command to stop ticks at the time of writing. That means they’re tied to the worker lifecycle. In production, I’ve found ticks useful for lightweight scheduled work, but anything critical should still use proper cron or queue workers. ### Octane Cache Laravel Octane ships with a cache driver backed by Swoole’s in-memory table storage. It can handle up to 2 million read/write operations per second, far faster than file-based or even Redis-based caching for some use cases: ``` Cache::store('octane')->put('api-response', $data, 30); ``` ``` Cache::store('octane')->put('api-response', $data, 30); ``` **The trade-off:** this cache lives in worker memory. It wipes when the server restarts. For genuinely ephemeral data, rate limiting, session flags, temporary computation caches, this is excellent. For persistent data that needs to survive restarts, use [Redis or database-backed caching](https://laravel.com/docs/12.x/cache?ref=serveravatar.com). You can also set up cache intervals that automatically refresh: ``` Cache::store('octane')->interval('metrics', function () { return Metrics::pull(); }, seconds: 10); ``` ``` Cache::store('octane')->interval('metrics', function () { return Metrics::pull(); }, seconds: 10); ``` This is useful when you have expensive computations that need to be fast but refreshed regularly. ### Octane Tables Swoole tables are shared-memory data structures accessible by all workers simultaneously. They’re incredibly fast because there’s no inter-process communication overhead, every worker reads and writes to the same memory space: ``` Octane::table('sessions')->set($uuid, [ 'user_id' => $userId, 'last_active' => time(), ]); return Octane::table('sessions')->get($uuid); ``` ``` Octane::table('sessions')->set($uuid, [ 'user_id' => $userId, 'last_active' => time(), ]); return Octane::table('sessions')->get($uuid); ``` The column types supported are string, int, and float. Data is lost on restart, treat these as ephemeral scratch space, not persistent storage. I’ve used Octane tables for things like rate limiting counters and temporary session state that didn’t warrant a full database write. ## Is Laravel Octane Right for Your Project? Here’s my honest take, based on running it in production: **Use Octane if:** - Your Laravel app handles significant traffic, and you’re noticing slow response times - You’re running on a VPS or dedicated server where you control the PHP version - You’re comfortable troubleshooting PHP extension or binary deployment issues - Your application doesn’t rely heavily on global mutable state - You want meaningful performance gains without changing your application code **Probably skip Octane if:** - Your app runs on shared hosting without SSH access or custom PHP builds - You’re on an older PHP version, and upgrading isn’t straightforward - Your team isn’t familiar with stateful PHP programming and the transition would cause more problems than it solves - You have a small, low-traffic site where the performance gains won’t matter The learning curve is real, but not steep. If you understand how Laravel’s service container works, you’ll figure out Octane’s nuances within a few days of testing. ## How to Install Laravel Octane (Step-by-Step) Installation is straightforward since Octane is just a Composer package. Here’s the workflow: **Step 1: Confirm PHP 8.0+** Check your PHP version before doing anything: ``` php -v ``` ``` php -v ``` If you’re below 8.0, upgrade PHP first. On Ubuntu, that’s typically: ``` sudo apt update && sudo apt upgrade php ``` ``` sudo apt update && sudo apt upgrade php ``` **Step 2: Install the package** Use the command below to install the Laravel Octane package: ``` composer require laravel/octane ``` ``` composer require laravel/octane ``` **Step 3: Install Octane** Use the command below to install Octane: ``` php artisan octane:install ``` ``` php artisan octane:install ``` This creates a configuration file at `config/octane.php` where you control server settings. **Step 4: Choose your server** Open `config/octane.php` and set your server preference. For RoadRunner (easier setup): ``` 'server' => 'roadrunner', ``` ``` 'server' => 'roadrunner', ``` Then install the RoadRunner binary via Composer: ``` composer require spiral/roadrunner ``` ``` composer require spiral/roadrunner ``` For Swoole (maximum performance): ``` pecl install swoole ``` ``` pecl install swoole ``` Swoole installation will ask about various compile-time options. Default values are fine for most use cases. **Step 5: Start Octane** ``` php artisan octane:start ``` ``` php artisan octane:start ``` By default, Octane runs on port 8000. You’ll need to point Nginx or another reverse proxy at it: ``` location / { proxy_pass http://127.0.0.1:8000; # ... standard proxy headers } ``` ``` location / { proxy_pass http://127.0.0.1:8000; # ... standard proxy headers } ``` **Step 6: Manage workers in production** For a production server, you’ll want a process manager to keep Octane running. RoadRunner ships with its own process manager. For Swoole, you might use Supervisor or systemd to ensure the process stays up and restarts on failure. [![Blog banner - ServerAvatar - Laravel Octane](https://serveravatar.com/wp-content/uploads/2025/09/728_90-Banner-1-1024x127.png)](https://serveravatar.com/?ref=blog)## Common Pitfalls and How to Avoid Them After running Octane in a few different environments, here are the mistakes I see most often: **1. Forgetting that state persists between requests** Global variables, static properties, and singleton bindings that mutate can cause hard-to-debug issues. If you have a singleton that stores user-specific data, that data could leak between requests in Octane. Audit your service providers and avoid storing request-specific data in shared state. **2. Memory leaks** Since the framework stays booted, any memory your app allocates per request stays allocated unless you explicitly release it. Watch for things like event listeners that accumulate, logger buffers, or cache stores that grow unbounded. Use `php artisan octane:status` to monitor worker memory in production. **3. Not testing with realistic traffic** Octane’s benefits only show up under load. A single-user local test won’t tell you much. Use tools like `wrk` or `k6` to simulate concurrent traffic and see the actual difference. **4. Ignoring worker configuration** Starting 10 workers on a 2GB RAM VPS will swap your server to death. Start conservatively (1–2 workers), measure memory usage, and scale up gradually. ## Key Takeaways - Laravel Octane is an official package that keeps your Laravel framework booted in memory, dramatically reducing per-request overhead - It runs on top of Swoole or RoadRunner, high-performance servers that replace PHP-FPM for Laravel applications - Octane can handle 3–10x more requests per second than traditional Laravel on the same server - RoadRunner is easier to install and broadly compatible; Swoole is faster and has more features but requires a PHP extension - Key features include persistent workers, concurrent tasks (Swoole), ticks/intervals (Swoole), Octane cache, and Octane tables - Not a fit for shared hosting or projects where you can’t upgrade to PHP 8.0+ - Thoroughly test your application, especially around global state and memory usage, before going to production ## Conclusion Laravel Octane can significantly improve Laravel performance by keeping the framework booted in memory and reducing repeated startup overhead. With Swoole or RoadRunner, persistent workers, and features like caching and concurrent tasks, it can help applications handle more traffic efficiently. However, Octane also requires careful attention to memory usage, global state, and worker configuration. If your Laravel application is running on a VPS or dedicated server and needs better performance, Octane is worth testing before moving it into production. ## FAQs ### Does Laravel Octane replace PHP-FPM completely? Yes, in the sense that Octane runs your Laravel app without PHP-FPM. However, you’ll still need a web server (Nginx or Apache) as a reverse proxy to handle things like SSL termination and static file serving. Octane replaces the PHP-FPM layer for dynamic request handling. ### Can I use Octane on shared hosting? Probably not, Octane requires either compiling a PHP extension (Swoole) or running a custom binary (RoadRunner), and it needs SSH access to manage the server process. Most shared hosting environments don’t allow either. VPS or dedicated servers are the practical choice. ### How much faster is Laravel Octane in real-world use? Community benchmarks and Laravel’s own testing show 3–10x throughput improvements depending on application complexity. Applications with heavier framework boot times see the biggest gains. The improvement is most noticeable under concurrent load, a single-request test won’t show much difference. ### Is Laravel Octane production-ready? Yes, many Laravel applications run Octane in production today. That said, it introduces complexity around worker management, memory monitoring, and debugging that PHP-FPM doesn’t have. Make sure your team is comfortable with the operational requirements before deploying. ### Do all Laravel packages work with Octane? Most do, but not all. Packages that rely on PHP superglobals in unusual ways, or that expect the request lifecycle to fully reset between calls, may behave unexpectedly. The Laravel Octane documentation maintains a list of known incompatible packages. Always test your specific stack. ### Next Steps If you found this guide useful, you might also find these helpful: - [Laravel for Beginners: Easy Explanation You Can Understand](https://serveravatar.com/what-is-laravel/) - [How to Check Installed Laravel Version](https://serveravatar.com/check-installed-laravel-version/) - [What Is Laravel Livewire? Complete Beginner’s Guide for 2026](https://serveravatar.com/laravel-livewire/) - [Top 7 Best Laravel Hosting Providers in 2025](https://serveravatar.com/best-laravel-hosting/) - [How to Optimize Laravel Performance in 2026 (Complete Guide)](https://serveravatar.com/laravel-performance-optimization/) ### About the Author Meghna Meghwani is a technical writer focused on Linux, Ubuntu, VPS hosting, server management, WordPress, PHP, Node.js, cloud hosting, and DevOps. She creates beginner-friendly tutorials, practical hosting guides, troubleshooting articles, and server security content designed to help developers and businesses manage applications and servers more efficiently. **Categories:** Blog, Guide, Laravel, Linux, Others, Tutorials, Ubuntu **Tags:** Laravel application performance, Laravel framework, Laravel Octane, Laravel Optimization, Laravel Performance, Laravel scalability, Laravel server management, Laravel web development, PHP performance --- ### [How to Open, Extract and Create RAR Files in Linux](https://serveravatar.com/rar-files-in-linux/) **Published:** August 17, 2026 **Author:** Meghna Meghwani **Content:** [![Blog banner - ServerAvatar](https://serveravatar.com/wp-content/uploads/2025/09/728_90-Banner-3-1024x127.png)](https://serveravatar.com/?ref=blog)Picture this: You’ve been handed SSH access to a client’s production server. Your job is to pull logs, create RAR Files in Linux, and bring them for analysis. Simple enough, until you realize the directory you need to archive contains hundreds of files, and the upload limit on the client’s portal only accepts archives under 50 MB. You could zip everything. But the logs total 200 MB uncompressed, and you need the archive to split cleanly into parts so each chunk uploads independently. That’s when someone on the team says: “Just use RAR”. If you’ve heard of RAR but never quite understood when or why you’d reach for it on a Linux server, this guide is for you. We’re going to walk through everything from what the RAR format actually is, to extracting your first archive, creating password-protected archives, splitting large files, and knowing when RAR is the right tool versus when something like ZIP or tar would serve you better. By the end, you’ll be comfortable working with RAR files on any Linux machine, and more importantly, you’ll know when to reach for a different tool altogether. ## TL;DR - RAR is a compressed archive format that handles large file splitting and optional encryption well - On Ubuntu/Debian, install with `sudo apt-get install unrar rar` - Extract with `unrar x archive.rar` or `unrar x archive.rar /destination/` - Create with `rar a archive_name.rar files_or_folder` - Add `-p` flag for password protection; use `-v[size]` to split archives - Test archives before sharing with `unrar t archive.rar` - For most Linux use, ZIP and tar.gz are more widely compatible, but RAR wins for split archives and Windows cross-compatibility ## What Is the RAR Format? Why Does It Still Exist? RAR stands for Roshal Archive, named after its original developer Eugene Roshal. It is a compressed archive format used to store one or more files in a single archive. It first appeared in the early 1990s as a Windows-native format designed to compress files more efficiently than the prevailing options at the time. The format gained massive popularity on Windows through WinRAR, the de facto tool for handling **.rar** files on that platform. Even today, you’ll frequently encounter RAR archives when downloading software, game mods, or shared project files from the internet. It’s everywhere, which is precisely why Linux server administrators need to know how to handle them. Over time, RAR developed several capabilities that set it apart: - **Solid compression:** RAR groups similar files together during compression, which can produce smaller archive sizes compared to compressing the same files individually. - **Recovery records:** Optional built-in error recovery data lets RAR reconstruct minor archive corruptions. - **Split archives:** You can break a large archive into multiple smaller files (like `archive.part1.rar`, `archive.part2.rar`, etc.), which is genuinely useful for circumventing upload size limits or fitting files onto smaller storage media. - **Password protection:** AES-256 encryption is available, keeping archive contents private. For technical details about RAR’s encryption, recovery records, and archive structure, see the [official RAR 5.0 format documentation](https://www.rarlab.com/technote.htm?ref=serveravatar.com). That said, RAR is a proprietary format. The official tools (`rar` and `unrar`) are closed-source, which matters in some enterprise or open-source-first environments. This is one reason you will see many Linux admins defaulting to ZIP or tar.gz instead. You can learn more about the [RAR file format it’s work](https://www.rarlab.com/rar_file.htm?ref=serveravatar.com) from RARLAB. ## A Quick Comparison With ZIP and tar.gz Before we go further, let’s look at how RAR stacks up against the two most common alternatives you’re likely to encounter on Linux. **Feature****RAR****ZIP****tar.gz****Open source tools**No (proprietary)Yes (InfoZIP)Yes (GNU tar + gzip)**Compression ratio**HighModerateModerate to high**Split archives**NativeNo (needs zip -s)No**Password protection**AES-256AES-256With 7z or tar –encrypt**Windows compatibility**Native (WinRAR)NativeNeeds software**Linux default**NoPartialYes**Recovery records**YesZIP 1.22+NoRAR tends to squeeze out a bit more size reduction than ZIP, especially with mixed file types. Its split archive feature is genuinely harder to replicate with ZIP without a workaround. That said, if you’re working in a purely Linux environment, tar.gz is far more integrated, you’ll find it in cron jobs, backup scripts, and system tooling across virtually every distribution. ## Before You Start: Installing the RAR Utilities Here’s something that trips up a lot of beginners: Linux doesn’t ship with RAR support out of the box. Ubuntu, Debian, and most other distributions don’t include these tools in the base installation, you have to add them yourself. The good news? It’s a quick install from the default repositories. ``` sudo apt-get update sudo apt-get install unrar rar ``` ``` sudo apt-get update sudo apt-get install unrar rar ``` That’s it. Two commands and you’re ready. If you need the official RAR package for Linux, you can also find it on the [RARLAB download page](https://www.rarlab.com/download.htm?ref=serveravatar.com). ### Which Package Do You Actually Need? It helps to understand what each tool does before you install them, or skip one: - `unrar` : This is the extraction-only tool. Use it when you only need to open and read RAR archives, not create them. It has a smaller footprint and fewer dependencies. - `rar` : This is the full suite. It creates RAR archives, extracts them, and includes additional utilities for testing and repair. If you need to do anything beyond opening an archive, install `rar`. In practice, most people install both. The disk space cost is negligible, and you’ll save yourself confusion later when you instinctively try to run `rar` on a system that only has `unrar`. You can verify the version using the command: ``` unrar --version rar --version ``` ``` unrar --version rar --version ``` **One more thing worth noting:** the `--version` option is not supported by every `rar` or `unrar` build, so commands such as `unrar --version` may return an `Unknown option` error. Instead, you can simply run the command without any options to confirm that the tool is installed: ``` unrar rar ``` ``` unrar rar ``` As mentioned below: For unrar: ![unrar version - RAR Files in Linux](https://serveravatar.com/wp-content/uploads/2026/08/image-90-1024x95.png) For rar: ![rar version - RAR Files in Linux](https://serveravatar.com/wp-content/uploads/2026/08/image-91-1024x69.png) ## How to Extract (Open) a RAR File in Linux This is the most common operation. Someone sends you an archive, you need to get the files out. Let’s walk through the scenarios you’ll encounter most often. ### Extract to the Current Directory If the RAR file is sitting in your current working directory and you want the contents extracted right there, run: ``` unrar x archive_name.rar ``` ``` unrar x archive_name.rar ``` The `x` option extracts the files while preserving the directory structure stored inside the archive. - **Extracts files:** Unpacks all files from the RAR archive. - **Preserves folders:** Maintains the original folder hierarchy from the archive. - **Keeps file paths:** For example, `project/src/config.php` will be extracted to the same relative path. - **Uses the current directory:** Files are extracted directly where you run the command. - **Displays progress:** The terminal shows the extraction process and any relevant messages. - **Reports issues:** If errors or warnings occur, `unrar` displays them during the extraction process. ### Extract to a Specific Folder More often than you’d think, you don’t want files spilling into your current directory. Maybe you’re working in a staging area and want everything neatly contained. ``` unrar x archive_name.rar /path/to/destination/ ``` ``` unrar x archive_name.rar /path/to/destination/ ``` Using a dedicated destination directory helps keep your files organized and prevents the archive contents from being mixed with other files. **Important points:** - **Specify the destination:** Replace `/path/to/destination/` with the directory where you want to extract the files. - **Preserve the folder structure:** The `x` option keeps the directory hierarchy stored in the archive. - **Create the directory first:** Make sure the destination directory already exists before running the extraction command. - **Use** `mkdir -p`**:** This command creates the required directory, including any missing parent directories. - **Check the path:** A typo or incorrect destination path can cause the extraction to fail. - **Avoid clutter:** Extracting to a dedicated folder makes it easier to manage and locate the archive contents. If the destination directory doesn’t exist, create it first: ``` mkdir -p /path/to/destination/ unrar x archive_name.rar /path/to/destination/ ``` ``` mkdir -p /path/to/destination/ unrar x archive_name.rar /path/to/destination/ ``` ### Verify Without Extracting: The Test Command Before you extract an archive you’ve downloaded from the internet (or received from a client), it’s good practice to verify its integrity first. Running `unrar t` performs an integrity check without writing any files to disk: ``` unrar t archive_name.rar ``` ``` unrar t archive_name.rar ``` The `t` option tells `unrar` to test the archive instead of extracting i**t**. Key benefits: - **Checks archive integrity:** Verifies that the archive data can be read correctly. - **Validates file contents:** Checks the CRC values stored for the archived files. - **Detects corruption:** Helps identify damaged or incomplete archives before extraction. - **Does not extract files:** The test runs without writing the archive contents to your disk. - **Useful for downloaded archives:** Especially helpful for large files or archives transferred over unreliable connections. - **Saves troubleshooting time:** Detecting problems before extraction can prevent issues later. If the archive passes the test, `unrar` will report that the files are OK. If it detects corruption or missing data, the command will display an error so you can address the problem before attempting to use the extracted files. ## How to Create a RAR Archive in Linux Creating RAR archives is where the `rar` tool comes into its own. Whether you’re compressing a single config file or archiving an entire project directory, the approach is straightforward. ### Compress a Single File You can use the `rar` command to package an individual file into a RAR archive: ``` rar a project_config.rar config/application.yml ``` ``` rar a project_config.rar config/application.yml ``` Here, `a` means **add**, which tells `rar` to add the specified file to an archive. **Key points:** - **Create a new archive:** If `project_config.rar` doesn’t exist, `rar` creates it automatically. - **Update an existing archive:** If the archive already exists, the specified file is added to it. - **Preserve the original file:** Creating the archive does not remove or modify the source file. - **Use the current directory:** The RAR file is created in your current working directory unless you provide another path. - **Skip the extension:** You can omit `.rar` from the archive name because `rar` adds it automatically. **For example:** ``` rar a project_config config/application.yml ``` ``` rar a project_config config/application.yml ``` **This creates:** ``` project_config.rar ``` ``` project_config.rar ``` in the current directory and stores `config/application.yml` inside the archive. ### Compress an Entire Directory When you need to archive an entire directory and everything inside it, use the `-r` option with `rar`: ``` rar a -r project_backup.rar /var/www/myproject/ ``` ``` rar a -r project_backup.rar /var/www/myproject/ ``` The `-r` option enables **recursive compression**, allowing `rar` to include files from subdirectories as well. ### What this command does - `a` : Adds files to a RAR archive. - `-r` : Recursively includes files from subdirectories. - `project_backup.rar` : Name of the archive. - `/var/www/myproject/` : Directory to compress. - The original files remain unchanged. - The resulting archive is created in the current working directory unless a different output path is specified. ### Compress Everything in One Go With Wildcards On busy servers, you’ll often want to quickly archive all files of a certain type, for instance, all log files in a directory: ``` rar a logs_backup.rar *.log ``` ``` rar a logs_backup.rar *.log ``` This grabs every `.log` file in the current directory and bundles them into `logs_backup.rar`. No need to specify each file by name. The wildcard `*` handles it. You can get more specific if needed: ``` rar a error_logs.rar error*.log ``` ``` rar a error_logs.rar error*.log ``` This targets only files starting with `error` and ending with `.log` useful when you have log rotation schemes generating files like `error-2026-08-01.log`, `error-2026-08-02.log`, and so on. ## How to Password-Protect a RAR Archive If you’re archiving anything sensitive, client data, server configurations, credentials, you should password-protect the archive. RAR makes this straightforward, with one caveat I’ll mention below. ### Creating an Encrypted Archive Use the `-p` flag when creating the archive: ``` rar a -p sensitive_backup.rar /var/www/myproject/ ``` ``` rar a -p sensitive_backup.rar /var/www/myproject/ ``` When you press Enter, `rar` will prompt you twice: ``` Enter password (will not be echoed): Re-enter password: ``` ``` Enter password (will not be echoed): Re-enter password: ``` **Note that** the password characters are **not displayed on screen** as you type, not even as asterisks. This is intentional; it prevents someone from reading your password over your shoulder. Just type it blind and press Enter. One critical thing I want to stress: **there is no password recovery for RAR archives.** If you lose the password, the archive contents are effectively gone. There’s no backdoor, no forgot-password flow. Write your passwords down and store them somewhere safe if there’s any chance you might forget them. ### Extracting a Password-Protected Archive When you try to extract a protected archive, `unrar` will ask for the password: ``` unrar x protected_archive.rar ``` ``` unrar x protected_archive.rar ``` It will prompt: ``` Enter password for protected_archive.rar: ``` ``` Enter password for protected_archive.rar: ``` Type your password and press Enter. If the password is correct, extraction proceeds normally. If it’s wrong, `unrar` will tell you the CRC check failed, which in plain English means the file couldn’t be decompressed with the password you provided. **One practical note:** if an encrypted archive contains multiple files and you enter the wrong password, `unrar` won’t automatically retry. You’ll see an error for each file. If you’re certain you have the right password but it’s failing, double-check your keyboard layout, a surprising number of password issues come from an accidental Num Lock or a different input method. ## Splitting Large RAR Archives Into Parts This is where RAR genuinely shines and why many server admins reach for it over ZIP in specific situations. When you have a file that’s too large to upload, share via email attachment limits, or fit onto a USB drive, splitting it into smaller parts is the solution. ### How the Size Splitting Works in Practice The `-v` flag lets you specify the maximum size for each part. You can use `k` for kilobytes, `m` for megabytes, or `g` for gigabytes: ``` rar a -v10m large_backup.rar /path/to/large_directory/ ``` ``` rar a -v10m large_backup.rar /path/to/large_directory/ ``` This creates archive parts of approximately 10 MB each, such as: ``` large_backup.part1.rar large_backup.part2.rar large_backup.part3.rar ``` ``` large_backup.part1.rar large_backup.part2.rar large_backup.part3.rar ``` **Supported size units** **Unit****Meaning**`k`Kilobytes`m`Megabytes`g`GigabytesA few practical notes from experience: - **Always keep parts together.** Moving split archives to different locations can break the extraction if the parts can’t find each other. - **Test the first extraction on the intended target.** If you’re splitting an archive to upload to a cloud service, download and test extraction there before declaring the job done. - **Parts must be extracted in order.** If even one part gets corrupted during transfer, you may lose data from that chunk onward. This is where the recovery record feature (`-rr` flag) becomes valuable for important archives. ## Listing Contents and Testing Archive Integrity Two operations that don’t get enough attention: listing archive contents and running integrity checks. Both are quick and can save you from unpleasant surprises. ### Listing What’s Inside Without Extracting Before extracting an archive, you may want to see what files it contains. Use: ``` unrar l archive_name.rar ``` ``` unrar l archive_name.rar ``` The `l` command (short for “list”) outputs a table with each file’s name, size, date, and permissions as stored in the archive. No files are written to disk. I use this constantly when I’m handed an archive and need to figure out if it contains a flat list of files or a nested directory structure. It tells me exactly where everything will end up when I extract it. ### Verifying Archive Integrity As mentioned earlier, the `t` flag tests an archive without extracting: ``` unrar t archive_name.rar ``` ``` unrar t archive_name.rar ``` The `t` option tests the archive and checks whether its contents can be read correctly. This is the equivalent of a checksum verification. Every file inside the archive has a CRC (cyclic redundancy check) value stored during creation. When you run `unrar t`, it recalculates the CRC for each file and compares it against the stored value. A mismatch means the file was corrupted somewhere along the way. ### Adding Files to an Existing Archive If you’ve already created an archive and need to add more files to it later, you don’t need to recreate the whole thing from scratch. Use the `a` command with the existing archive name: ``` rar a existing_archive.rar new_file.txt ``` ``` rar a existing_archive.rar new_file.txt ``` `rar` will open the existing archive and append the new file. This is useful for ongoing backup scenarios where you’re incrementally adding data to an archive over time. ## RAR vs ZIP vs tar.gz: Which Should You Actually Use? This is a question I get asked a lot, and the honest answer is: it depends on your environment and what you’re trying to achieve. Each archive format has different strengths. Right choice depends on requirements. **Format****Best For****Main Advantage****RAR**Large archives, split volumes, cross-platform sharingAdvanced archive features**ZIP**General file sharingExcellent compatibility**tar.gz**Linux and Unix systemsNative Linux tooling and scripting**Use RAR when:** - You need to split a large archive into smaller parts for transfer or storage - You’re working with Windows users who will need to open the archive on their machines - You want built-in recovery records for important archives - Maximum compression ratio is a priority over open-source tooling **Use ZIP when:** - You need broad compatibility across platforms with zero additional software - You want to work with open-source tools only - You need to create password-protected archives but prefer a non-proprietary format **Use tar.gz when:** - You’re working in a Linux-only or Unix environment - You want the compression integrated into system scripts and cron jobs - You’re archiving files that will be extracted on other Linux servers - You need speed over maximum compression **Practical recommendation:** For Linux-to-Linux server backups, `tar.gz` is often the simplest choice. RAR can be useful when you specifically need its archive features or compatibility with an existing RAR-based workflow. [![Blog banner - ServerAvatar](https://serveravatar.com/wp-content/uploads/2025/09/728_90-Banner-1-1024x127.png)](https://serveravatar.com/?ref=blog)## Common Issues and How to Fix Them Over the years, a handful of RAR problems come up repeatedly. Here are the ones I’ve encountered most frequently and how to resolve them. **1. “Command Not Found” After Installation** If you see: ``` bash: unrar: command not found ``` ``` bash: unrar: command not found ``` the `unrar` command may not be installed or may not be available in your `PATH`. Try: ``` sudo apt-get install unrar rar ``` ``` sudo apt-get install unrar rar ``` Then verify the installation: ``` which unrarwhich rar ``` ``` which unrarwhich rar ``` as mentioned below: ![common issue - RAR Files in Linux](https://serveravatar.com/wp-content/uploads/2026/08/image-92-1024x55.png) You can also check the installed packages: ``` dpkg -L unrar | grep bin ``` ``` dpkg -L unrar | grep bin ``` as mentioned below: ![common issue - RAR Files in Linux](https://serveravatar.com/wp-content/uploads/2026/08/image-93-1024x40.png) **Possible causes:** - `unrar` was not installed. - The installation failed. - The executable isn’t available through your current `PATH`. **2. CRC or Corrupted Archive Errors** If this command: ``` unrar t archive_name.rar ``` ``` unrar t archive_name.rar ``` reports CRC errors, the archive may be corrupted. **Possible solutions** - Download the archive again. - Verify that the download completed successfully. - Check all parts of a split archive. - Confirm that no archive volume is missing. - Ask the sender to recreate or resend the archive if necessary. For split archives, one damaged or missing volume can prevent successful extraction. **3. Files Extract to the Wrong Location** If you run: ``` unrar x archive.rar ``` ``` unrar x archive.rar ``` without specifying a destination, the contents are extracted into the current directory. Before extracting, check your location: ``` pwd ``` ``` pwd ``` You can also list the archive contents first: ``` unrar l archive.rar ``` ``` unrar l archive.rar ``` To extract into a dedicated directory: ``` mkdir -p /path/to/destination/ unrar x archive.rar /path/to/destination/ ``` ``` mkdir -p /path/to/destination/ unrar x archive.rar /path/to/destination/ ``` **Tip:** Always verify the destination before extracting a large archive. Avoid using broad commands such as `rm -rf *` as a cleanup method unless you are completely certain you are in the correct directory. **4. Permission Denied** If extraction fails with a permission-related error, check the archive and destination permissions: ``` ls -l archive.rar ``` ``` ls -l archive.rar ``` Check your current user: ``` id ``` ``` id ``` If the destination requires elevated privileges, you may need: ``` sudo unrar x archive.rar /destination/ ``` ``` sudo unrar x archive.rar /destination/ ``` **Be careful when using** `sudo` Extracting files as `root` can result in files being owned by `root`, which may prevent your regular user from modifying them later. Before using `sudo`, consider: - Whether you actually need elevated privileges. - Whether the destination directory is writable by your user. - Whether the extracted files should belong to your regular account. ## Conclusion RAR provides a practical way to create, extract, inspect, test, password-protect, and split archives in Linux. With commands such as `rar`, `unrar`, and options like `-r`, `-p`, and `-v`, you can handle everything from individual files to large server backups directly from the terminal. Understanding these commands makes archive management faster and more convenient, especially when working with remote servers. Before using an archive in a production environment, it’s a good practice to check its contents and verify its integrity with commands such as `unrar l` and `unrar t`. For Linux-focused workflows, `tar.gz` may often be the simpler choice, while RAR is useful when you need features such as split volumes or compatibility with existing RAR-based workflows. With the right commands and a few basic precautions, managing RAR files on Linux becomes straightforward. ## FAQs ### Can Linux extract RAR files created on Windows? Yes, As long as you have `unrar` installed on your Linux system, you can extract any standard RAR archive regardless of the operating system it was created on. The RAR format is platform-independent. ### Is RAR free to use on Linux? The `unrar` tool is free for basic extraction. The `rar` tool (needed for creating archives) is technically shareware, it displays a prompt on first use but is functional for personal and evaluation purposes. For commercial deployment, you’d typically purchase a license, though the practical enforcement varies. ### How is RAR different from ZIP in terms of compression? RAR generally achieves slightly better compression ratios than ZIP, particularly with mixed file types, because it uses solid compression, grouping similar files together before compressing them as a unit. The practical difference is usually in the range of 5–15% smaller file sizes. ### Can I recover data from a partially corrupted RAR archive? RAR’s recovery record feature (enabled with the `-rr` flag when creating) can repair minor corruptions. However, this only works if the recovery data was added during archive creation. Without it, a corrupted RAR archive is typically unrecoverable. Always add `-rr` when archiving important data. ### What is the difference between `unrar x` and `unrar e`? `unrar x` extracts files while preserving the full directory structure stored in the archive. `unrar e` extracts all files to the current directory without creating any subdirectories. Use `x` when you want the original structure intact; use `e` when you just want all the files in one flat location. ### Next Steps If you found this guide useful, you might also find these helpful: - [How to Delete Large Directories in Linux Quickly](https://serveravatar.com/delete-large-directories-in-linux/) - [Linux File Permissions Explained: Read, Write, and Change Permissions](https://serveravatar.com/linux-file-permissions/) - [How to Kill a Running Process in Linux](https://serveravatar.com/kill-a-running-process-in-linux/) - [What is Linux Server Hardening: Step-by-Step Security Guide](https://serveravatar.com/linux-server-hardening/) ### About the Author Meghna Meghwani is a technical writer focused on Linux, Ubuntu, VPS hosting, server management, WordPress, PHP, Node.js, cloud hosting, and DevOps. She creates beginner-friendly tutorials, practical hosting guides, troubleshooting articles, and server security content designed to help developers and businesses manage applications and servers more efficiently. **Categories:** Blog, Guide, Linux, Others, Tutorials, Ubuntu **Tags:** Create RAR Archives Linux, Extract RAR Files Linux, Linux Archive Management, Linux RAR Commands, Open RAR Files Linux, RAR Command Linux, RAR Files in Linux, Ubuntu RAR Files, Unrar Linux --- ### [How to Fix Too Many Authentication Failures Error in SSH](https://serveravatar.com/fix-too-many-authentication-failures-ssh/) **Published:** August 14, 2026 **Author:** Meghna Meghwani **Content:** [![Blog banner - ServerAvatar](https://serveravatar.com/wp-content/uploads/2025/09/728_90-Banner-3-1024x127.png)](https://serveravatar.com/?ref=blog)Picture this: you’re in the middle of a deployment, and suddenly your SSH connection refuses to connect. The server returns a Too Many Authentication Failures error like: ``` Received disconnect from host: 2: Too many authentication failures for root ``` ``` Received disconnect from host: 2: Too many authentication failures for root ``` You have entered the correct password. You have the correct SSH key. Nothing appears to be wrong with your credentials, yet the connection keeps failing. This error can be confusing because **“Too many authentication failures”** doesn’t necessarily mean that you entered the wrong password too many times. One of the most common causes is that your SSH client is offering multiple identities, often from your SSH agent, before it gets to the correct key. The server reaches its `MaxAuthTries` limit and closes the connection before successful authentication can occur. In this guide, we will explain why this happens, how to diagnose the exact cause, and several ways to fix it, from the quickest command-line solution to a permanent SSH configuration. We will also cover how to prevent the problem in CI/CD environments and some additional SSH security practices. Let’s dig in. ## TL;DR - A common cause of “Too many authentication failures” is that the SSH client offers multiple identities before successful authentication. - OpenSSH’s `MaxAuthTries` controls how many authentication attempts are permitted per connection. Its default is commonly 6. - Having many keys loaded into `ssh-agent` does not automatically mean there is a problem. The important question is which identities SSH actually offers during the connection. - Quick fix: Specify the correct key and use `IdentitiesOnly=yes`: ``` ssh -o IdentitiesOnly=yes -i ~/.ssh/your_specific_key user@hostname ``` ``` ssh -o IdentitiesOnly=yes -i ~/.ssh/your_specific_key user@hostname ``` - Recommended long-term fix: Configure `IdentitiesOnly yes` and `IdentityFile` for the host in `~/.ssh/config`. - Increasing `MaxAuthTries` can be useful in specific environments, but it should generally be a last resort. - For automation and CI/CD, explicitly specify the intended SSH identity instead of allowing the client to try multiple keys. ``` SSH Client │ ├── Work Key ├── GitHub Key ├── AWS Key ├── Old Key └── Correct Server Key │ ▼ SSH Server │ MaxAuthTries = 6 │ ▼ Too many authentication failures ``` ``` SSH Client │ ├── Work Key ├── GitHub Key ├── AWS Key ├── Old Key └── Correct Server Key │ ▼ SSH Server │ MaxAuthTries = 6 │ ▼ Too many authentication failures ``` ## What Does “Too Many Authentication Failures” Actually Mean? The error message can make it sound like you’ve simply entered an incorrect password too many times. That’s not necessarily what happened. A common scenario looks like this: - Your SSH client has multiple identities available. - Some of those identities may come from `ssh-agent`. - SSH offers identities to the server during authentication. - The server rejects identities that aren’t authorized for the target account. - The number of authentication attempts reaches the server’s `MaxAuthTries` limit. - The server terminates the connection before the correct identity is successfully used. OpenSSH’s `MaxAuthTries` setting controls the maximum number of authentication attempts permitted per connection. The default is commonly 6. The exact value can be changed by the server administrator. You can refer to the [OpenSSH `sshd_config` documentation](https://man.openbsd.org/sshd_config.5?ref=serveravatar.com) for the current behavior and default values. For example, imagine your SSH agent contains several keys: ``` work-key github-key aws-key old-project-key personal-key server-key ``` ``` work-key github-key aws-key old-project-key personal-key server-key ``` Your intended `server-key` may be valid for the destination server, but if SSH offers several other identities first, the server may reach its authentication-attempt limit before the correct key gets a chance to authenticate. This is why you can have a perfectly valid SSH key and still receive: ``` Too many authentication failures ``` > **Important clarification:** Having more than six keys in your SSH agent does not automatically mean you will get this error. The important thing is how many authentication attempts are actually made during the connection and how your SSH client and server are configured. That’s why checking the verbose SSH output is important before changing server-side settings. **Why this matters for your fix:** Most quick fixes just tell you to specify the key with `-i`. That’s not wrong, but it’s incomplete. The real fix is telling SSH to stop offering other keys entirely, which is what `IdentitiesOnly yes` does. ## How SSH Agent Can Contribute to the Problem An SSH agent such as `ssh-agent` can store multiple private-key identities so you don’t have to repeatedly enter passphrases. You can check which keys are currently loaded with: ``` ssh-add -l ``` ``` ssh-add -l ``` You might see something like: ``` 256 SHA256:xxxx work-key (ED25519) 256 SHA256:xxxx github-key (ED25519) 256 SHA256:xxxx aws-key (ED25519) 256 SHA256:xxxx old-project-key (ED25519) 256 SHA256:xxxx personal-key (ED25519) ``` ``` 256 SHA256:xxxx work-key (ED25519) 256 SHA256:xxxx github-key (ED25519) 256 SHA256:xxxx aws-key (ED25519) 256 SHA256:xxxx old-project-key (ED25519) 256 SHA256:xxxx personal-key (ED25519) ``` Having multiple keys isn’t inherently bad. The problem occurs when SSH offers identities that aren’t appropriate for the target server and consumes the server’s available authentication attempts before the correct identity succeeds. This is one reason `IdentitiesOnly yes` is so useful. It allows you to tell SSH to use only the identity I explicitly configured for this host. [OpenSSH documents](https://man.openbsd.org/OpenBSD-current/man/ssh_config?ref=serveravatar.com) `IdentitiesOnly` specifically for situations where `ssh-agent` offers multiple identities. ## How to Diagnose the Problem Before changing your server configuration, it’s better to determine exactly what’s happening. ### Step 1: Check Your SSH Agent Run this on your local machine: ``` ssh-add -l ``` ``` ssh-add -l ``` If you have many keys loaded, they could be contributing to the problem. However, don’t assume that the number of keys alone proves the cause. The next step is more useful. ### Step 2: Use Verbose SSH Output Run: ``` ssh -vvv user@hostname ``` ``` ssh -vvv user@hostname ``` The `-vvv` option enables detailed SSH debugging information. Look for lines similar to: ``` debug1: Offering public key: /home/user/.ssh/id_ed25519_work debug1: Offering public key: /home/user/.ssh/id_ed25519_github debug1: Offering public key: /home/user/.ssh/id_ed25519_aws ``` ``` debug1: Offering public key: /home/user/.ssh/id_ed25519_work debug1: Offering public key: /home/user/.ssh/id_ed25519_github debug1: Offering public key: /home/user/.ssh/id_ed25519_aws ``` You may also see: ``` debug1: Authentications that can continue: publickey,password ``` ``` debug1: Authentications that can continue: publickey,password ``` The `Offering public key` messages can help you identify which identities the SSH client is attempting. If several identities are being offered before the connection is terminated, that’s a strong indication that identity selection is contributing to the problem. ### Step 3: Check Your Effective SSH Configuration SSH configuration can come from multiple places, including: - `~/.ssh/config` - `/etc/ssh/ssh_config` - command-line options - SSH agent configuration You can inspect the effective client configuration for a host with: ``` ssh -G user@hostname | grep -i identity ``` ``` ssh -G user@hostname | grep -i identity ``` This can help reveal which identity files SSH is configured to consider. ### Step 4: Identify the Correct SSH Key You need to determine which public key is actually authorized on the server. If you have console access, another administrative account, or another out-of-band access method, inspect the target user’s `authorized_keys` file: ``` cat ~/.ssh/authorized_keys ``` ``` cat ~/.ssh/authorized_keys ``` as mentioned below: ![check ssh configuration - Too Many Authentication Failures](https://serveravatar.com/wp-content/uploads/2026/08/image-88-1024x54.png) On your local machine, you can ``` ssh-keygen -lf ~/.ssh/id_ed25519.pub ``` ``` ssh-keygen -lf ~/.ssh/id_ed25519.pub ``` Compare the fingerprint with the authorized key on the server. If you don’t have SSH access to the server, use your hosting provider’s console or another available out-of-band access method to inspect the configuration. ### Step 5: Check the Server’s `MaxAuthTries` Setting If you have administrative access to the server, check the SSH daemon configuration: ``` sudo sshd -T | grp -i maxauthtries ``` ``` sudo sshd -T | grp -i maxauthtries ``` This is often more useful than simply searching the configuration file because `sshd -T` displays the effective configuration. You can also check `/etc/ssh/sshd_config` directly: ``` grep -i MaxAuthTries /etc/ssh/sshd_config ``` ``` grep -i MaxAuthTries /etc/ssh/sshd_config ``` You may see: ``` #MaxAuthTries 6 ``` ``` #MaxAuthTries 6 ``` as mentioned below: ![maxauthtries - Too Many Authentication Failures](https://serveravatar.com/wp-content/uploads/2026/08/image-89-1024x42.png) A commented-out setting generally means the default value is being used, unless another configuration file or included configuration overrides it. **Is my IP address banned after hitting** `MaxAuthTries`**?** Normally, no. `MaxAuthTries` limits authentication attempts for an individual SSH connection. Reaching the limit normally causes that connection to be terminated. If your IP address is actually being blocked, another security mechanism may be responsible, such as: - Fail2ban - firewall rules - intrusion-prevention software - cloud security controls - other server-side security tooling If you suspect an IP block, investigate those systems separately. ## How to Fix “Too Many Authentication Failures” in SSH Now that you understand why SSH can trigger the **“Too many authentication failures”** error, let’s look at the practical ways to resolve it. The following fixes start with the quickest client-side solution and progress to permanent SSH configuration changes and server-side options when necessary. ### Fix 1: Use `IdentitiesOnly` With the Correct Key For most users, this is the quickest and safest solution. Specify the exact private key you want to use and tell SSH not to use other identities from the agent: ``` ssh -o IdentitiesOnly=yes -i ~/.ssh/id_ed25519_server1 user@hostname ``` ``` ssh -o IdentitiesOnly=yes -i ~/.ssh/id_ed25519_server1 user@hostname ``` For example: ``` ssh -o IdentitiesOnly=yes -i ~/.ssh/id_ed25519_server1 ubuntu@203.0.113.50 ``` ``` ssh -o IdentitiesOnly=yes -i ~/.ssh/id_ed25519_server1 ubuntu@203.0.113.50 ``` **What does this command do?** `-i` specifies the identity file: ``` -i ~/.ssh/id_ed25519_server1 ``` ``` -i ~/.ssh/id_ed25519_server1 ``` `IdentitiesOnly=yes` tells the SSH client to use only the explicitly configured identity files and certificates for authentication rather than freely using identities offered by the agent. This combination is especially useful when your SSH agent contains multiple keys. **Why isn’t** `-i` **alone always enough?** Many users assume this: ``` ssh -i ~/.ssh/id_ed25519_server1 user@hostname ``` ``` ssh -i ~/.ssh/id_ed25519_server1 user@hostname ``` means SSH will use only that key. However, SSH can also consider identities available through the agent depending on the configuration. Using: ``` -o IdentitiesOnly=yes ``` ``` -o IdentitiesOnly=yes ``` makes the intended identity selection explicit. **Quick fix:** If you’re currently locked out because the client is offering too many identities, try: ``` ssh -o IdentitiesOnly=yes -i ~/.ssh/id_ed25519_server1 user@hostname ``` ``` ssh -o IdentitiesOnly=yes -i ~/.ssh/id_ed25519_server1 user@hostname ``` If the specified key is authorized for that account, this can immediately resolve the problem. ### Fix 2: Configure SSH for a Permanent Per-Host Solution If you regularly manage multiple servers, typing the full command every time isn’t ideal. A better approach is to configure SSH per host. Open or create your SSH configuration file: ``` nano ~/.ssh/config ``` ``` nano ~/.ssh/config ``` Add an entry like this: ``` Host server1 HostName 203.0.113.50 User ubuntu IdentityFile ~/.ssh/id_ed25519_server1 IdentitiesOnly yes ``` ``` Host server1 HostName 203.0.113.50 User ubuntu IdentityFile ~/.ssh/id_ed25519_server1 IdentitiesOnly yes ``` For another server: ``` Host server2 HostName server2.example.com User admin IdentityFile ~/.ssh/id_ed25519_server2 IdentitiesOnly yes ``` ``` Host server2 HostName server2.example.com User admin IdentityFile ~/.ssh/id_ed25519_server2 IdentitiesOnly yes ``` Now you can simply run: ``` ssh server1 ``` ``` ssh server1 ``` SSH automatically knows: - which hostname to connect to - which user to use - which identity to use - which identities should be considered This is one of the cleanest ways to prevent authentication failures caused by unintended identity selection. **Why** `IdentitiesOnly yes` **Matters** The important line is: ``` IdentitiesOnly yes ``` ``` IdentitiesOnly yes ``` Without it, SSH may consider identities available through the agent in addition to the identity files configured for the host. With it, you’re explicitly limiting the identities used for that host. This is particularly helpful if you manage multiple servers, projects, clients, or cloud accounts from the same workstation. **SSH Config Permissions** It’s good practice to protect your SSH configuration and private keys. For example: ``` chmod 700 ~/.ssh chmod 600 ~/.ssh/config chmod 600 ~/.ssh/id_ed25519_server1 chmod 644 ~/.ssh/id_ed25519_server1.pub ``` ``` chmod 700 ~/.ssh chmod 600 ~/.ssh/config chmod 600 ~/.ssh/id_ed25519_server1 chmod 644 ~/.ssh/id_ed25519_server1.pub ``` A private key should normally be readable only by its owner. The exact permission requirements can vary by operating system and SSH implementation, but restrictive permissions such as `600` are a safe standard choice for private keys. ### Fix 3: Increase `MaxAuthTries` on the Server Increasing `MaxAuthTries` is technically valid, but it should generally be considered a **last resort**. If your SSH client is unnecessarily offering multiple identities, increasing the server limit doesn’t solve the underlying problem. It simply allows more authentication attempts before the server terminates the connection. **When might increasing it make sense?** There may be legitimate environments where multiple authentication attempts are expected. For example, certain automated systems or specialized authentication setups may legitimately require several attempts. If you’ve verified your client configuration and still need additional authentication attempts, you can consider increasing the value conservatively. **Step 1: Back Up the SSH Configuration** Before making changes: ``` sudo cp /etc/ssh/sshd_config /etc/ssh/sshd_config.backup ``` ``` sudo cp /etc/ssh/sshd_config /etc/ssh/sshd_config.backup ``` **Step 2: Edit** `sshd_config` Open the configuration file: ``` sudo nano /etc/ssh/sshd_config ``` ``` sudo nano /etc/ssh/sshd_config ``` Find: ``` #MaxAuthTries 6 ``` ``` #MaxAuthTries 6 ``` You could change it to a higher value, for example: ``` MaxAuthTries 10 ``` ``` MaxAuthTries 10 ``` Don’t blindly choose a value for production. Use a value appropriate for your environment and security requirements. Allowing more authentication attempts can increase the opportunity for password or authentication guessing, so avoid increasing the value unnecessarily. **Step 3: Validate the SSH Configuration** Before restarting SSH, validate the configuration: ``` sudo sshd -t ``` ``` sudo sshd -t ``` If the command returns no output, the configuration syntax is generally valid. Do not skip this step. A configuration error can prevent the SSH daemon from restarting correctly. **Step 4: Restart SSH** Based on the Linux distribution, the service may be named differently, `sshd` or `ssh`. For systems using `sshd`: ``` sudo systemctl restart sshd ``` ``` sudo systemctl restart sshd ``` For systems using `ssh`: ``` sudo systemctl restart ssh ``` ``` sudo systemctl restart ssh ``` **Important safety tip:** Don’t close your only working SSH session while changing SSH configuration. **If possible:** - Keep your existing SSH session open. - Validate the configuration. - Restart SSH. - Open a separate terminal. - Test a new SSH connection. That way, if something goes wrong, you still have your existing session available for troubleshooting. **What About** `MaxStartups`**?** You may come across another SSH setting called: ``` MaxStartups ``` ``` MaxStartups ``` It’s important not to confuse it with `MaxAuthTries`. They control different things. `MaxAuthTries` **:** Controls the number of authentication attempts allowed **per connection**. `MaxStartups` **:** Controls the number of concurrent unauthenticated connections the SSH daemon allows. **For example:** ``` MaxStartups 10:30:100 ``` ``` MaxStartups 10:30:100 ``` This is related to limiting concurrent unauthenticated connections, not the number of authentication attempts within a single connection. Therefore, changing `MaxStartups` is **not a replacement for fixing an identity-selection problem** that causes `Too many authentication failures`. [![Blog banner - ServerAvatar](https://serveravatar.com/wp-content/uploads/2025/09/728_90-Banner-1-1024x127.png)](https://serveravatar.com/?ref=blog)## How to Prevent the Error From Coming Back Once you’ve fixed the immediate problem, it’s worth preventing it from happening again. **1. Configure One Appropriate Identity Per Host** The most important practice is not necessarily “one key per server.” **Instead:** > Configure SSH so that each host receives only the identity it actually needs. **For example:** ``` Host production HostName 203.0.113.50 User ubuntu IdentityFile ~/.ssh/id_ed25519_production IdentitiesOnly yes ``` ``` Host production HostName 203.0.113.50 User ubuntu IdentityFile ~/.ssh/id_ed25519_production IdentitiesOnly yes ``` This prevents unrelated identities from being offered to the server. Using separate keys for different servers, clients, or environments can also be a good security practice depending on your setup. **2. Keep Your SSH Agent Clean** You can list keys currently loaded in your agent: ``` ssh-add -l ``` ``` ssh-add -l ``` To remove a specific key: ``` ssh-add -d ~/.ssh/old_key ``` ``` ssh-add -d ~/.ssh/old_key ``` To remove all keys: ``` ssh-add -D ``` ``` ssh-add -D ``` Then add only the keys you currently need: ``` ssh-add ~/.ssh/id_ed25519_server1 ssh-add ~/.ssh/id_ed25519_server2 ``` ``` ssh-add ~/.ssh/id_ed25519_server1 ssh-add ~/.ssh/id_ed25519_server2 ``` Don’t remove keys blindly if they’re required by other active workflows. **3. Use Ed25519 for New SSH Keys** When generating a new SSH key, Ed25519 is a good modern choice supported by current OpenSSH versions. For example: ``` ssh-keygen -t ed25519 -f ~/.ssh/id_ed25519_server1 -C "Production server 1" ``` ``` ssh-keygen -t ed25519 -f ~/.ssh/id_ed25519_server1 -C "Production server 1" ``` Notice that the filename matches the key type: ``` id_ed25519_server1 ``` ``` id_ed25519_server1 ``` rather than using an `id_rsa` filename for an Ed25519 key. **4. Use SSH Agent for Passphrase-Protected Keys** If your private key has a passphrase, using an SSH agent can make authentication more convenient. The goal isn’t to avoid using an SSH agent. The goal is to control which identities SSH uses for each host. For example: ``` Host production IdentityFile ~/.ssh/id_ed25519_production IdentitiesOnly yes ``` ``` Host production IdentityFile ~/.ssh/id_ed25519_production IdentitiesOnly yes ``` This lets you continue benefiting from an SSH agent without allowing every loaded identity to be tried against every server. **5. Configure CI/CD Deployments Explicitly** This error can also appear in automated environments such as: - GitHub Actions - GitLab CI/CD - Jenkins - deployment scripts - automation servers - infrastructure management tools For automation, avoid relying on whichever keys happen to be loaded in an SSH agent. Instead, explicitly specify the deployment key: ``` ssh -o IdentitiesOnly=yes -i /path/to/deploy_key user@hostname ``` ``` ssh -o IdentitiesOnly=yes -i /path/to/deploy_key user@hostname ``` For example: ``` ssh \ -o IdentitiesOnly=yes \ -o PasswordAuthentication=no \ -i /path/to/deploy_key \ deploy@hostname ``` ``` ssh \ -o IdentitiesOnly=yes \ -o PasswordAuthentication=no \ -i /path/to/deploy_key \ deploy@hostname ``` Here, `IdentitiesOnly=yes` ensures the intended identity is selected, while `PasswordAuthentication=no` prevents the SSH client from falling back to password authentication. The important option for this particular problem is: ``` IdentitiesOnly=yes ``` ``` IdentitiesOnly=yes ``` ## Common Mistakes That Make This Problem Worse **Adding More Keys** When SSH authentication fails, it’s tempting to add another key to the agent. That can make the problem worse. Instead of continually adding identities, determine which key belongs to the server and explicitly configure SSH to use it. **Forgetting** `IdentitiesOnly` You may correctly specify: ``` IdentityFile ~/.ssh/id_ed25519_server1 ``` ``` IdentityFile ~/.ssh/id_ed25519_server1 ``` but still experience identity-selection problems if your agent contains many other identities. For hosts where you want strict identity selection, use: ``` IdentitiesOnly yes ``` ``` IdentitiesOnly yes ``` **Assuming the Password Is Wrong** The error doesn’t necessarily mean the password is incorrect. If you’re using public-key authentication, the failure can happen before SSH ever gets to the authentication method you expected. Use: ``` ssh -vvv user@hostname ``` ``` ssh -vvv user@hostname ``` to see what the client is actually doing. **Changing** `MaxAuthTries` **First** Increasing the server’s authentication-attempt limit may make the error disappear, but it doesn’t address the underlying client configuration. First try: ``` ssh -o IdentitiesOnly=yes -i ~/.ssh/correct_key user@hostname ``` ``` ssh -o IdentitiesOnly=yes -i ~/.ssh/correct_key user@hostname ``` If that works, configure the host permanently in `~/.ssh/config`. **Restarting SSH Without Testing the Configuration** Never make changes to `/etc/ssh/sshd_config` and immediately restart SSH without validating the configuration. First run: ``` sudo sshd -t ``` ``` sudo sshd -t ``` And whenever possible, keep an existing SSH session open while testing the new configuration. **Additional SSH Hardening Steps** Fixing `Too many authentication failures` is only one part of securing SSH. Once your authentication configuration is working, consider additional hardening appropriate for your environment. **Disable Direct Root Login** If your environment doesn’t require direct root SSH access: ``` PermitRootLogin no ``` ``` PermitRootLogin no ``` Instead, use a regular administrative user and elevate privileges with `sudo`. Make sure you have tested the alternative administrative access before disabling root login. **Disable Password Authentication When Appropriate** If your environment is configured for SSH keys only, you can consider: ``` PasswordAuthentication no KbdInteractiveAuthentication no ``` ``` PasswordAuthentication no KbdInteractiveAuthentication no ``` This prevents password and keyboard-interactive authentication methods from being used. However, don’t apply these settings blindly. Verify that your key-based authentication works first, or you could lock yourself out. **Consider Changing the SSH Port** Moving SSH away from the default port 22 can reduce automated scanning and login noise. For example: ``` Port 2222 ``` ``` Port 2222 ``` However, changing the port is not a substitute for proper SSH security. Strong authentication, least privilege, firewall rules, monitoring, and timely security updates remain much more important. **Consider SSH Certificates for Larger Environments** If you’re managing a larger infrastructure, SSH certificates can simplify centralized user and host authentication. Instead of distributing individual public keys everywhere, an organization can use a trusted SSH certificate authority to issue certificates. This can make access management easier at scale, but it introduces additional infrastructure and operational complexity. For a small number of servers, traditional SSH public-key authentication with a well-managed `~/.ssh/config` is often sufficient. ## Key Takeaways - The “Too many authentication failures” error doesn’t necessarily mean your password or SSH key is incorrect. - A common cause is that the SSH client offers multiple identities before reaching the correct key. - OpenSSH’s `MaxAuthTries` setting limits the number of authentication attempts allowed per connection. - Use `IdentitiesOnly=yes` with the correct private key to prevent SSH from unnecessarily trying other identities. - Configure `IdentityFile` and `IdentitiesOnly yes` in `~/.ssh/config` for a permanent, per-server solution. - Increasing `MaxAuthTries` can help in specific cases, but it should generally be a last resort rather than the first fix. - For CI/CD and automation, explicitly specify the deployment key to avoid authentication failures caused by multiple identities. - Regularly review your SSH agent and remove keys that are no longer needed. If you’re setting up a new VPS for application hosting, you can also [connect a self-managed server](https://serveravatar.com/docs/server-management/installation/direct-method/) from any cloud provider to ServerAvatar and manage it through the ServerAvatar panel. ## Conclusion The “Too many authentication failures” error can be frustrating because it often occurs even when you have the correct SSH credentials. In many cases, the problem isn’t the key itself but the number of identities your SSH client attempts during authentication. By using verbose SSH output to identify the identities being offered and specifying the correct key with `IdentitiesOnly=yes`, you can usually resolve the issue without making changes to the server. For a long-term solution, configure each server in your `~/.ssh/config` with the appropriate `IdentityFile` and `IdentitiesOnly yes` settings. Avoid increasing `MaxAuthTries` unless your environment genuinely requires additional authentication attempts. With proper SSH identity management and host-specific configuration, you can prevent this error from recurring while maintaining a secure and reliable SSH setup. ## FAQs ### Why am I getting “Too many authentication failures” in SSH? This error commonly occurs when your SSH client offers multiple identities during authentication and the server reaches its `MaxAuthTries` limit before the correct key is accepted. It doesn’t necessarily mean that your password or SSH key is incorrect. ### How do I fix “Too many authentication failures” in SSH? The quickest solution is to specify the correct private key and use `IdentitiesOnly=yes`: `ssh -o IdentitiesOnly=yes -i ~/.ssh/your_key user@hostname` This prevents SSH from unnecessarily trying other identities from your SSH agent. ### What does `IdentitiesOnly yes` do in SSH? `IdentitiesOnly yes` tells the SSH client to use only the identities explicitly configured for the connection instead of freely using additional identities offered by the SSH agent. It’s particularly useful when you manage multiple SSH keys. ### How can I permanently prevent this SSH error? Add the server to your `~/.ssh/config` file and specify the correct identity: `Host myserver HostName 203.0.113.50 User ubuntu IdentityFile ~/.ssh/id_ed25519_myserver IdentitiesOnly yes` You can then connect using: `ssh myserver` ### Should I increase `MaxAuthTries` to fix the problem? Increasing `MaxAuthTries` can be appropriate in specific environments, but it shouldn’t be your first solution. If the client is offering unnecessary SSH keys, it’s better to fix the client-side identity configuration with `IdentitiesOnly=yes`. ### How can I check which SSH keys are being offered? Run SSH with verbose output: `ssh -vvv user@hostname` Look for messages such as: `Offering public key:` These messages show which identities the SSH client is attempting during authentication. If you’re managing multiple Linux servers, a server management platform such as [ServerAvatar](https://serveravatar.com/) can simplify many routine server-management tasks ### About the Author Meghna Meghwani is a technical writer focused on Linux, Ubuntu, VPS hosting, server management, WordPress, PHP, Node.js, cloud hosting, and DevOps. She creates beginner-friendly tutorials, practical hosting guides, troubleshooting articles, and server security content designed to help developers and businesses manage applications and servers more efficiently. **Categories:** Blog, Guide, Linux, Others, Tutorials, Ubuntu **Tags:** Fix SSH Errors, SSH Authentication, SSH Connection Error, SSH Errors, SSH Key Authentication, SSH Login Issues, SSH Troubleshooting, Too Many Authentication Failures, Too Many Authentication Failures Error --- ### [How to Set Up Amazon Lightsail Server with ServerAvatar](https://serveravatar.com/set-up-amazon-lightsail-server-with-serveravatar/) **Published:** August 13, 2026 **Author:** Meghna Meghwani **Content:** [![Blog banner - ServerAvatar](https://serveravatar.com/wp-content/uploads/2025/09/728_90-Banner-3-1024x127.png)](https://serveravatar.com/?ref=blog)If you have been poking around AWS to host a website or web application, you’ve probably heard of Amazon Lightsail. An Amazon Lightsail Server is AWS’s simplified VPS offering, the short version of EC2 that strips away the most confusing parts while still giving you the reliability of Amazon’s infrastructure. **But here’s the catch:** AWS itself isn’t simple. Even with Lightsail being the “easy” entry point, connecting it to a server management panel like [ServerAvatar](https://serveravatar.com) and actually getting a working server takes a few steps. You have to set up IAM permissions, create API credentials, navigate two dashboards, and then figure out what on earth to do during the installation process. That’s exactly what this guide is for. I have walked through this process a few times, both on Amazon Lightsail and ServerAvatar. The AWS IAM setup is the part that trips most people up. Not because it’s complicated, but because the documentation assumes you already know what IAM is and why you’re creating a separate user instead of using your root account. Let me walk you through it step-by-step. By the end of this guide, you’ll have a fully configured Amazon Lightsail server managed through ServerAvatar, ready to host your PHP or Node.js application. ## TL;DR **Stage****What to Do****Set Up AWS Access**Create an IAM policy that grants the required Amazon Lightsail permissions, then create an IAM user and generate its access keys.**Connect AWS to ServerAvatar**Add the generated AWS credentials in ServerAvatar >> Integration >> Cloud Platforms to link your Lightsail account.**Deploy Your Server**From the ServerAvatar dashboard, select your AWS account, server name, web server stack, operating system, and preferred region, then start the deployment.**Automatic Configuration**ServerAvatar automatically installs and configures the selected server environment, including Nginx, Apache, or OpenLiteSpeed, PHP, PHP-FPM, MySQL, Redis, etc.**Ready for Production**The complete setup typically takes around 5–15 minutes, taking you from a newly created Lightsail instance to a configured VPS ready for application deployment.## What is Amazon Lightsail, and Why Use It with ServerAvatar? [Amazon Lightsail](https://aws.amazon.com/free/compute/lightsail/?trk=f98ad22d-ca32-4cc9-ba9d-95115af2aa0e&sc_channel=ps&trk=66f5e660-0166-4017-a39f-75ed68150e2c&sc_channel=ps&ef_id=CjwKCAjw1vXTBhB-EiwAEKr_k-hzpmgx2IN8jMeAAGGnPPdE8I1lJ40lGXwIPT3k9hfTqVFmhG4SWxoCIWkQAvD_BwE:G:s&s_kwcid=AL!4422!3!808712786796!e!!g!!amazon%20lightsail!23846236466!198027713162&gad_campaignid=23846236466&gbraid=0AAAAADjHtp-4gWkjMqnxE3heb9hmXN3gv&gclid=CjwKCAjw1vXTBhB-EiwAEKr_k-hzpmgx2IN8jMeAAGGnPPdE8I1lJ40lGXwIPT3k9hfTqVFmhG4SWxoCIWkQAvD_BwE?ref=serveravatar.com) is a simplified cloud hosting service from AWS that makes it easier to launch and manage virtual private servers without dealing with the complexity of a full AWS infrastructure setup. It is well suited for developers, agencies, small businesses, and teams that need a straightforward VPS environment. ### Why Choose Amazon Lightsail? Lightsail provides a simpler way to get started with AWS while still benefiting from its underlying cloud infrastructure. - **Simple VPS deployment:** Launch a server with minimal configuration. - **Predictable pricing:** Plans include compute, SSD storage, and data transfer. - **Flexible resources:** Choose a server size based on your workload. - **AWS infrastructure:** Benefit from AWS’s cloud infrastructure and ecosystem. - **Multiple use cases:** Suitable for WordPress, PHP applications, APIs, and websites. ### Where ServerAvatar Fits In Lightsail provides the server, but server administration can still require SSH and command-line knowledge. ServerAvatar adds a graphical management layer that simplifies everyday tasks. **With ServerAvatar, you can:** - Deploy and manage multiple websites. - Install and switch between PHP versions. - Create and manage databases. - Configure SSL certificates. - Manage Nginx, Apache, and OpenLiteSpeed. - Monitor server performance. - Manage cron jobs and backups. - Handle common server tasks from a centralized dashboard. ### Why Combine Amazon Lightsail with ServerAvatar? Using both services brings together the infrastructure capabilities of AWS with a more user-friendly server management experience. Lightsail provides the VPS and cloud infrastructure. ServerAvatar handles server and website management. **Result:** less command-line work and an easier way to manage production websites and applications. ## Why Create an IAM User Instead of Using the Root Account? Using your AWS root account for API access can create unnecessary security risks. The root account has unrestricted access to your AWS environment, so its credentials should be protected and used only when absolutely necessary. ### Why Use a Dedicated IAM User? Create a separate IAM (Identity and Access Management) user for ServerAvatar and grant it only the permissions required to manage your Lightsail resources. - **Limits access:** Give the user only the permissions needed for Amazon Lightsail. - **Protects the root account:** Avoid exposing root credentials to third-party platforms or applications. - **Reduces security risks:** If the IAM credentials are compromised, the potential impact is more limited than exposing root credentials. - **Easy to revoke:** You can disable or delete the IAM user’s access without affecting your main AWS account. - **Better team management:** Keep ServerAvatar’s credentials separate from those used by other developers or administrators. - **Improves accountability:** Dedicated credentials make it easier to identify which access belongs to ServerAvatar. - **Safer third-party integration:** ServerAvatar can connect using dedicated credentials instead of your unrestricted AWS root account. Use the AWS root account for account-level administration, and create a dedicated IAM user with the required Lightsail permissions for ServerAvatar. ## How to Connect Amazon Lightsail with ServerAvatar: Step-by-Step Guide The steps below walk you through the complete process, from creating the IAM user to deploying your Lightsail server through ServerAvatar. ### Step 1: Create an IAM Policy on AWS The first step is to create an IAM policy that defines the permissions ServerAvatar will use to manage your Amazon Lightsail resources. - Sign in to the **AWS Management Console** and open the **IAM Dashboard**. ![Amazon Lightsail Server iam dashboard](https://serveravatar.com/wp-content/uploads/2026/08/image-64.png) - Select **Policies** from the left-hand sidebar. - Click **Create policy**. ![create policy - Amazon Lightsail Server](https://serveravatar.com/wp-content/uploads/2026/08/image-65.png) - From the Permission section, select **Lightsail** as the service. - Under **Actions**, choose **All Lightsail actions**. ![allow actions - Amazon Lightsail Server](https://serveravatar.com/wp-content/uploads/2026/08/image-66.png) - Under **Resources**, select **All**. - Click the **Next** button. ![allow resources - Amazon Lightsail Server](https://serveravatar.com/wp-content/uploads/2026/08/image-67.png) - Continue to the review screen. - Give the policy a clear name, such as `ServerAvatar-Lightsail-Access` - Review the permissions and click **Create policy**. ![policy name - Amazon Lightsail Server](https://serveravatar.com/wp-content/uploads/2026/08/image-68.png) > **Why all Lightsail actions?** > ServerAvatar needs different Lightsail permissions during deployment, including creating instances, managing networking, and handling IP-related resources. Restricting permissions too aggressively may cause deployment or management errors. ### Step 2: Create an IAM User and Generate Access Keys After creating the policy, create a dedicated IAM user. This keeps your root account credentials separate and makes the integration easier to manage or revoke later. **Create the IAM User** - Open the **IAM Dashboard** and navigate to the **IAM Users** section from the left-hand sidebar. ![iam user - Amazon Lightsail Server](https://serveravatar.com/wp-content/uploads/2026/08/image-69.png) - Click **Create user**. ![create user - Amazon Lightsail Server](https://serveravatar.com/wp-content/uploads/2026/08/image-70.png) - Enter username, such as `serveravatar-user` and click on the Next button. ![user name - Amazon Lightsail Server](https://serveravatar.com/wp-content/uploads/2026/08/image-71.png) - In the permissions section, select **Attach policies directly**. - Find and select the policy that we created before. - Click on the Next button. ![attach policy - Amazon Lightsail Server](https://serveravatar.com/wp-content/uploads/2026/08/image-72.png) - Review the configuration and click on the **Create user** button. ![create user ](https://serveravatar.com/wp-content/uploads/2026/08/image-73.png) **Generate the Access Key** - Once the user has been created, open the newly created IAM user. ![generate access key](https://serveravatar.com/wp-content/uploads/2026/08/image-74.png) - Go to the **Security credentials** tab. ![security credentials ](https://serveravatar.com/wp-content/uploads/2026/08/image-75.png) - Find **Access keys** and click **Create access key**. ![create access key](https://serveravatar.com/wp-content/uploads/2026/08/image-76.png) - Select **Third-party service** as the use case. - Confirm the required acknowledgment and click on the **Next** button. ![third party service](https://serveravatar.com/wp-content/uploads/2026/08/image-77.png) - Add an optional description, such as `ServerAvatar Integration`. - Click **Create access key**. ![create access key](https://serveravatar.com/wp-content/uploads/2026/08/image-78.png) - Save the **Access Key ID** and **Secret Access Key** both securely. - Click on the **Done** button. ![generated access key](https://serveravatar.com/wp-content/uploads/2026/08/image-79.png) > **Important:** Keep the Secret Access Key secure. AWS displays it when the key is created, so save it in a secure password manager or credential vault. If it is lost, you will need to create a new access key. ### Step 3: Connect Amazon Lightsail to ServerAvatar With your AWS credentials ready, you can now connect the Lightsail account to ServerAvatar. - Log in to your **ServerAvatar dashboard**. - Navigate to the **Integration** from the sidebar. ![inegrate lightsail with ServerAvatar](https://serveravatar.com/wp-content/uploads/2026/08/image-80.png) - Go to the **Cloud Platforms** section. - Click on the **Link Amazon Lightsail** button under the Amazon Lightsail section. ![link amazon lightsail ](https://serveravatar.com/wp-content/uploads/2026/08/image-81.png) - Enter the **Name**, **Access Key ID**, and **Secret Access Key** - Click **Save**. ![inegrate lightsail ](https://serveravatar.com/wp-content/uploads/2026/08/image-82.png) ServerAvatar will verify the credentials and connect your AWS account. > **Tip:** Use descriptive labels when managing multiple AWS accounts. This makes it easier to select the correct account during deployment. ### Step 4: Deploy an Amazon Lightsail Server Once your AWS account is connected, you can create the Lightsail server directly from ServerAvatar. **Start the Deployment** - In the ServerAvatar dashboard, navigate to the Servers section from the left sidebar. - Click **Create >> Server**. ![create server](https://serveravatar.com/wp-content/uploads/2026/08/image-83.png) - Select **Amazon Lightsail** from the Cloud Provider option. ![select amazon lightsail ](https://serveravatar.com/wp-content/uploads/2026/08/image-84.png) - Select your integrated Amazon Lightsail account and continue to the server configuration. > If your Lightsail account is not already connected, you can use the **Link Amazon Lightsail Account** option to add it before continuing. **Choose the settings that match your application:** - **Server Name:** Use a descriptive name that makes the server easy to identify. - **Application Framework:** Select the application you want to deploy, and ServerAvatar will suggest the right setup. (optional) ![server name](https://serveravatar.com/wp-content/uploads/2026/08/image-85.png) - **Tech Stack:** Choose Nginx, Apache, or OpenLiteSpeed based on your requirements. - **Operating System:** Select one of the available OS images. - **Database:** Choose MySQL or MariaDB, or skip database installation if your application does not require one. - **Install Node.js:** Enable the Node.js option when your application requires it. - **Install Yarn along with Node:** Enable Yarn if your Node.js workflow depends on it. (available in Node Stack only) **ServerAvatar provides options for configuring SSH access:** - **Generate a new key:** Let ServerAvatar generate an SSH key pair for the server. - **Add a public key:** Use an existing SSH public key that you already manage. > If you already maintain SSH keys for your infrastructure, using your existing public key can keep access management centralized. ![select configuration ](https://serveravatar.com/wp-content/uploads/2026/08/image-86.png) **Select the Server Location and Size** Your Lightsail configuration also determines the server’s performance and network location. - **Region:** Select a location close to your primary users to help reduce network latency. - **Server Size:** Choose CPU, RAM, storage, and bandwidth based on your application’s expected workload. - **Availability Zone:** Select the appropriate zone within your chosen region. For multiple-server environments, distributing workloads can provide additional resilience. **Deploy the Server** After reviewing all settings, click the **Deploy Server** button. ![deploy server](https://serveravatar.com/wp-content/uploads/2026/08/image-87.png) ServerAvatar will communicate with AWS and provision the Lightsail instance. Monitor the installation progress from the deployment screen. Wait for the **Installation Complete** message. [![Blog banner - ServerAvatar](https://serveravatar.com/wp-content/uploads/2025/09/728_90-Banner-1-1024x127.png)](https://serveravatar.com/?ref=blog)## What ServerAvatar Installs During Deployment Here’s the part that used to require hours of terminal work, and now happens automatically: - **Web server** (Nginx, Apache, or OpenLiteSpeed, depending on your stack selection) - **PHP and all supported versions** (7.2 through 8.4) - **PHP-FPM** configured and optimized - **MySQL** database server - **Redis** for object caching - **SWAP memory file** (helpful if you run into RAM limits) - **Basic virtual host files** ready for your applications - **Git and Composer** installed and ready The entire process typically takes 5 to 15 minutes. You don’t need to do anything, just watch the log and wait for the “Installation Complete” confirmation. Once done, your server appears in the ServerAvatar dashboard, and you can start creating applications, databases, and SSL certificates from the panel without touching SSH. ## Key Takeaways - Create a dedicated IAM user on AWS with Lightsail permissions, never use your root account for API keys. - The AWS IAM policy needs all Lightsail actions and all resources selected for full functionality. - ServerAvatar links to AWS via Integration >> Cloud Platforms, not the server creation wizard. - During server deployment, you choose the tech stack, OS, database, SSH key, region, and instance size. - Installation runs automatically and takes 5–15 minutes, Nginx/Apache, PHP, MySQL, Redis, Git, and Composer included. ## Conclusion Setting up an Amazon Lightsail server with ServerAvatar gives you a practical combination of AWS cloud infrastructure and simplified server management. The process starts with creating a dedicated IAM policy and user, connecting your AWS credentials to ServerAvatar, and configuring the server based on your application’s requirements. Once the deployment begins, ServerAvatar handles much of the server configuration automatically, including the web server, PHP, PHP-FPM, database, Redis, Git, and Composer. In most cases, the setup takes around 5–15 minutes, after which you can manage websites, databases, SSL certificates, and other server tasks through the ServerAvatar dashboard instead of relying entirely on the command line. ## FAQs ### Why should I use an IAM user instead of the AWS root account? A dedicated IAM user helps keep your root account credentials protected and allows you to provide ServerAvatar with only the permissions required for Lightsail management. ### What permissions does ServerAvatar need for Amazon Lightsail? The guide uses an IAM policy with All Lightsail actions and All resources selected. These permissions allow ServerAvatar to perform the Lightsail operations required during server deployment and management. ### Can I connect my Amazon Lightsail account directly to ServerAvatar? Yes. After creating the required AWS credentials, you can connect Lightsail from ServerAvatar >> Integration >> Cloud Platforms >> Link Amazon Lightsail by providing the required credentials. ### How long does it take to deploy a Lightsail server through ServerAvatar? The installation typically takes around 5–15 minutes. ServerAvatar automatically configures the selected server environment and displays the installation progress until the setup is complete. ### What does ServerAvatar install during the deployment? Depending on your selected configuration, ServerAvatar can set up Nginx, Apache, or OpenLiteSpeed, PHP, PHP-FPM, MySQL, Redis, SWAP, Git, Composer, and basic virtual host configurations. ### About the Author Meghna Meghwani is a technical writer focused on Linux, Ubuntu, VPS hosting, server management, WordPress, PHP, Node.js, cloud hosting, and DevOps. She creates beginner-friendly tutorials, practical hosting guides, troubleshooting articles, and server security content designed to help developers and businesses manage applications and servers more efficiently. **Categories:** Blog, Cloud Platforms, Guide, Linux, Others, Tutorials, Ubuntu **Tags:** Amazon Lightsail, Amazon Lightsail Server, Amazon Lightsail Setup, aws lightsail, AWS VPS, Lightsail Server Management, Lightsail Server Setup, Lightsail VPS, ServerAvatar --- ### [Website Load Testing Guide: Test Performance at Scale](https://serveravatar.com/website-load-testing/) **Published:** August 12, 2026 **Author:** Meghna Meghwani **Content:** [![Blog banner - ServerAvatar](https://serveravatar.com/wp-content/uploads/2025/09/728_90-Banner-3-1024x127.png)](https://serveravatar.com/?ref=blog)If you’ve managed web servers or applications for any length of time, you’ve probably seen this happen: a new feature or campaign goes live, traffic suddenly spikes, and Website Load Testing becomes critical when your website starts returning 503 errors at exactly the moment you need it to perform. What happens next is usually a scramble, SSH into a server you haven’t checked in months, inspect running processes, restart services, and make infrastructure changes based on guesswork. Eventually, the traffic settles, the site recovers, and the immediate crisis is over. But that kind of incident is often preventable. Load testing helps you find your website’s limits before your users do. In this guide, we will cover what load testing is, why it matters at every scale, how to run your first test using loader.io (the most accessible free tool available), what your results actually mean, how to find and fix bottlenecks, and how to make load testing a normal part of how you ship software. ## TL;DR - Load testing answers one critical question: how many concurrent users can your server handle before it falls over? - Without it, you’re guessing about capacity, and guessing wrong right when it matters most - loader.io is the simplest free tool to get started: no install, browser-based, generous free tier - Your three essential numbers: concurrent user target, response time threshold, and peak traffic window - Run load tests before every major deployment, not after your site goes down ## What Load Testing Actually Is Let me clear up some confusion first, because “load testing” gets thrown around interchangeably with a few related terms that mean different things. **Load testing** is specifically about simulating concurrent users hitting your site and measuring how your server behaves under a expected load. You’re asking: “When 500 people are on this site at the same time, what happens?” **Stress testing** pushes beyond that, you keep adding users until something breaks, then you figure out exactly where the ceiling is. Soak testing holds a sustained load over hours or days to catch memory leaks or database connection pool exhaustion that only shows up over time. Most small teams skip all of this and call it “load testing” when they open the site in three different browsers and hit refresh a few times. That’s not load testing. That’s optimism. This distinction is important because each testing approach is designed to answer a specific performance question: - **Load test:** “Can the website reliably handle its expected peak traffic?” - **Stress test:** “At what point does this fall over, and what breaks first?” - **Soak test:** “Can the system maintain stable performance during prolonged, normal traffic without gradual degradation?” A complete performance testing strategy should consider load, stress, and soak testing. For this guide, we’ll focus on load and stress testing since those are where most teams see the biggest gap in understanding. ### Why Most Teams Skip It I get it. Load testing feels like a luxury. You have a small server, modest traffic, and a product that’s still finding its feet. Why simulate load when you barely have any real load to speak of? **Here’s the uncomfortable truth:** load testing is most valuable precisely when you can’t afford for things to go wrong. A startup that goes down during a product launch doesn’t get a second impression. A growing SaaS that crashes right when a customer is about to upgrade has just handed that customer a reason to reconsider. The teams that skip load testing aren’t avoiding work, they’re accumulating risk. VPS that handles your blog fine today might handle 10x traffic fine too, or it might fall over at 3x. You genuinely don’t know until you test. **What load testing gives you that nothing else can:** - **A real number for capacity.** Not a guess. Not a “probably fine.” An actual number of concurrent users your setup can handle before performance degrades past an acceptable threshold. - **The location of your bottleneck.** Is it the database? The application code? The web server config? The network? A load test with proper instrumentation tells you where things back up. - **A baseline before you change anything.** If you optimize your database queries and then run a load test, you have before-and-after data. - **Confidence to scale.** When you know your current ceiling, you know exactly when to provision more resources, and you can do it before an incident, not during one. ### Setting Your Performance Targets: The Three Numbers That Matter Before you run any test, you need to define what “passing” looks like. This is where a lot of teams get stuck, they run a load test and get a wall of graphs and don’t know what any of it means. **Here’s what you’re actually looking for:** **1. Your concurrent user target** This is the number of simultaneous active users your site needs to handle at peak. Not total daily visitors, active users. Someone who has the page open and is interacting with it. A practical way to estimate this: take your peak hour’s pageviews, divide by 60 to get per-minute, then multiply by your average session duration in minutes. If you get 6,000 pageviews in your busiest hour and sessions average 3 minutes, that’s roughly 300 concurrent users at peak. If you don’t have analytics that can give you this, err on the side of 2x what you’ve seen. You can always calibrate after your first real test. **2. Your response time threshold** What response time is acceptable for your application? Define it in milliseconds and be specific. For a static blog, 3 seconds might be perfectly fine. For a SaaS dashboard where users are actively working, anything over 1 second feels sluggish. For an e-commerce checkout flow, 2 seconds is a reasonable ceiling. For an API, you might need sub-200ms. Write this number down before you test. It becomes your pass/fail criterion. Without it, any result can be interpreted as either a pass or a failure depending on your mood that day. **3. Your peak traffic windows** Map when your traffic actually spikes. Email campaigns, social posts, scheduled jobs, and API batch processes create load patterns. A test that runs at 3 AM when traffic is low tells you nothing about your morning peak. Once you know these three things, your concurrent user target, your response time threshold, and your peak windows, you have a test brief. Everything else is execution. ## Why loader.io Is the Best Starting Point There are a dozen load testing tools. k6, Apache Benchmark, Locust, JMeter, Gatling, Blitz, each has strengths. For teams getting started, loader.io is the right choice for one reason: friction. It runs in a browser. There’s nothing to install. You don’t need a separate machine, a command-line interface, or a paid subscription to get meaningful results. That’s the free tier has limits: enough to establish your baseline, not enough for daily regression testing in production. For that, you would eventually have to move to another tool or paid plan. But as a starting point, loader.io removes every excuse to not test. Now that we understand what load testing is and why it matters, let’s put it into practice. In the following steps, we’ll use loader.io to create a test, configure realistic traffic, run the test, and analyze the results to understand how your website performs under load. ## How to Perform a Website Load Test Now that you know the fundamentals of website load testing, it’s time to test your own application. Let’s walk through the process step by step. ### Step 1: Create Your loader.io Account Start by creating an account on [loader.io](https://loader.io/?ref=serveravatar.com) - Visit the [loader.io](https://loader.io/?ref=serveravatar.com) website and select Sign Up Now. - Enter the required information, such as: - Company name - Email address - Password - Complete the registration process. - Check your inbox for the verification email. - Click on the Verify link in your inbox to activate your account. - Once your email is verified, log in to access the loader.io dashboard. > **Note:** Email verification is required before you can create and run load tests. ### Step 2: Add the Website You Want to Test Before generating traffic, loader.io needs to know which website or application should receive the test requests. In loader.io: - Open the dashboard. - Click “**+ New Host**“. ![add website to test - Website Load Testing](https://serveravatar.com/wp-content/uploads/2026/08/image-55-1024x408.png) - Enter the domain you want to test. - Use the exact domain or subdomain you want to evaluate. For example: ``` yourdomain.com ``` ``` yourdomain.com ``` or: ``` blog.yourdomain.com ``` ``` blog.yourdomain.com ``` **Before adding a host, keep these points in mind:** - Test only websites or servers that you own or are authorized to test. - Make sure the domain is accessible over the internet. - Choose the specific application or subdomain you want to measure. - Domain ownership verification is required before traffic testing can begin. ![verify the site - Website Load Testing](https://serveravatar.com/wp-content/uploads/2026/08/image-56-1024x339.png) This verification process helps prevent unauthorized load testing against third-party websites. ### Step 3: Verify Domain Ownership loader.io provides domain verification methods that confirm you have permission to test the selected website. The two common approaches are: - **HTTP verification** - **DNS verification** **1. HTTP Verification** HTTP verification is generally straightforward for website owners. The process typically involves: - Create or add your host in loader.io. - Download or copy the verification file provided by loader.io. - Upload the file to your website’s document root. - Make sure the file is publicly accessible. - Return to loader.io and select Verify. For example, the verification file may look similar to: ``` loaderio-abc123def456.txt ``` ``` loaderio-abc123def456.txt ``` For a WordPress website, the file usually needs to be placed in the directory containing: ``` wp-admin wp-content wp-includes ``` ``` wp-admin wp-content wp-includes ``` **If Your Website Is Hosted on** [**ServerAvatar**](https://serveravatar.com/) You can upload the verification file through your application’s file management tools: - Log in and open your **ServerAvatar** dashboard. - Navigate to your server panel by clicking on the server dashboard icon. ![navigate to server panel in ServerAvatar Dashboard ](https://serveravatar.com/wp-content/uploads/2026/08/image-57-1024x196.png) - Navigate to the Application panel and click on the application dashboard icon for your relevant application. ![application dashboard - Website Load Testing](https://serveravatar.com/wp-content/uploads/2026/08/image-58-1024x335.png) - Navigate to the **File Manager** section. Navigate to the application’s root directory. - Upload the loader.io verification file using the Upload button. ![go to file manager - Website Load Testing](https://serveravatar.com/wp-content/uploads/2026/08/image-59-1024x471.png) - Return to loader.io and complete the verification. ![verify the domain ownership - Website Load Testing](https://serveravatar.com/wp-content/uploads/2026/08/image-60-1024x419.png) **2. DNS Verification** If you don’t want to upload a file, DNS verification is another option. - Open your domain’s DNS management panel. - Add the TXT record provided by loader.io. - Save the DNS changes. - Return to loader.io. - Complete the verification process. Once loader.io confirms ownership, the host becomes available for load testing. ![start test - Website Load Testing](https://serveravatar.com/wp-content/uploads/2026/08/image-61-1024x487.png) ### Step 4: Configure Your First Load Test After verifying your host, create your first test by selecting **New Test** from the loader.io dashboard. You’ll need to configure several parameters. **Important Test Settings:** - **Test Name:** Use a descriptive name that makes future comparisons easier. - Example: `Homepage Baseline - 300 Users` - **Test type:** Select Clients per test. - This means Loader.io will use a total of 300 clients during the test. - **Clients:** 300 - **Duration:** 1 Min. - **Client Request** - **Method:** `GET` - **Protocol:** `HTTP` - **Host:** `wordpressapp.satemp.top` - Leave other variable fields empty unless your application specifically requires them. - Click **Run test**. ![run test - Website Load Testing](https://serveravatar.com/wp-content/uploads/2026/08/image-62-1024x734.png) **Example Baseline Configuration** **Field****What to enter (**Example**)****Name**`Homepage Baseline - 300 Users`**Test type**`Clients per test`**Clients**`300`**Duration**`1`**Duration unit**`Min`**Method**`GET`**Protocol**`HTTP`**Host**`wordpressapp.satemp.top`**Path**`/`### Why Start Small? Don’t immediately test your server at extreme traffic levels. A gradual approach is safer: - Establish a baseline. - Test your expected traffic level. - Increase the load progressively. - Monitor response times and errors. - Stop increasing traffic when you identify a performance limit. This approach makes it easier to determine where a bottleneck begins. ### Step 5: Analyze the Load Test Results The test results are more useful when you look at multiple metrics together rather than focusing on a single number. ![load test result](https://serveravatar.com/wp-content/uploads/2026/08/image-63-1024x931.png) **1. Response Time** Response time shows how long your application takes to respond to requests. The graph shows that response time remained around 1 second for most of the test, but increased sharply near the end, reaching more than 3 seconds and with a recorded maximum of 4.287 seconds. This suggests that the application was reasonably consistent initially, but response performance degraded as the load increased. **2. Error Rate** A low error rate is an important indicator of application stability. The test produced an error rate of 0.0%, which is a positive result. The response counts show: **Metric****Result****Successful responses**287**Timeout**0**Network errors**0**HTTP 400 errors**0**HTTP 500 errors**0**Error rate**0.0%This means there were no reported HTTP 4xx/5xx errors, connection timeouts, or network errors during the test. Therefore, the application remained stable under this particular 300-client, 1-minute test. **3. Performance Degradation** During most of the test, the average response time stayed close to 1,000–1,200 ms. Toward the end of the one-minute test, response time increased substantially. This gives the following interpretation: - **Initially:** Response time was relatively stable at around 1 second. - **As load increased:** Response time began fluctuating. - **Near the end:** Response time increased sharply, reaching several seconds. - **Maximum:** A response time of **4,287 ms** was recorded. - **Errors:** No errors appeared despite the increase in response time. **Example Interpretation** **Result from Test****Possible Interpretation****Average response time: 1,173 ms**Application response time is around 1.17 seconds on average**Min: 772 ms**Fastest observed response was approximately 0.77 seconds**Max: 4,287 ms**Some requests became significantly slower**0.0% errors**No HTTP, timeout, or network errors were reported**287 successful responses**287 successful responses were recorded during the 1-minute test**≈4.8 responses/sec**Approximate throughput based on 287 responses over 60 seconds**Response time rises near test end**Possible resource/concurrency pressure**No 400/500 errors**Application remained functionally stable during the test**19.06 MB received**Approximately 19 MB of response data was transferred**34.57 KB sent**Approximately 34.57 KB of request data was sent**Overall Interpretation** The 300-client baseline test completed successfully with a 0.0% error rate, which indicates good basic stability. However, the average response time of 1.173 seconds and especially the 4.287-second maximum response time show that performance was not completely consistent. The most important observation is the sharp increase in response time near the end of the test. Before increasing server resources, it would be useful to monitor CPU, memory, PHP workers, database performance, and web-server limits during another load test to determine what is causing the slowdown. ## Finding Your Performance Bottleneck: A Practical Debugging Sequence A load test tells you that something is slow. It doesn’t automatically tell you why. For that, you need server diagnostics during the test. Here’s the sequence I use when a load test reveals a problem: **1. Check CPU and memory during the test** SSH into your server while the load test is running and watch resource usage. On Ubuntu: ``` htop ``` ``` htop ``` Look for CPU utilization, Memory consumption, Swap usage, PHP processes, Web server processes, and processes consuming unusually high resources **If CPU usage is consistently high;** **Possible causes include:** - Inefficient application code - Expensive PHP operations - Database queries - Insufficient CPU resources - Too many concurrent processes **If memory usage is high;** **Investigate:** - PHP worker count - PHP memory limits - OPcache configuration - Database memory usage - Swap activity **2. Check your PHP-FPM configuration** For WordPress and PHP applications, PHP-FPM is the most common source of load testing failures. Its process pool has hard limits, and those limits are often set conservatively by default. The key settings in `/etc/php/8.x/fpm/pool.d/www.conf`: ``` pm.max_children = 10 # Maximum number of child processes pm.start_servers = 2 # Processes created at startup pm.min_spare_servers = 1 # Minimum idle processes pm.max_requests = 500 # Recycle children after this many requests ``` ``` pm.max_children = 10 # Maximum number of child processes pm.start_servers = 2 # Processes created at startup pm.min_spare_servers = 1 # Minimum idle processes pm.max_requests = 500 # Recycle children after this many requests ``` If `pm.max_children` is set to 10 while traffic reaches 300 concurrent users, requests may queue or fail. Increasing the limit can improve concurrency, but make sure your server has enough RAM to handle the additional PHP processes. **3. Check your Nginx worker connections** In `/etc/nginx/nginx.conf`: ``` worker_connections 1024; worker_processes auto; ``` ``` worker_connections 1024; worker_processes auto; ``` Each Nginx worker can handle the number of connections set by `worker_connections`. With `worker_connections 1024` and `worker_processes auto`, Nginx can handle a large number of concurrent connections. However, setting `worker_processes` too low on a multi-core server can limit performance and leave available CPU capacity unused. **4. Check database connections** If your load test errors include database connection timeouts, your database is the bottleneck. Check your MySQL/MariaDB `max_connections` setting: ``` SHOW VARIABLES LIKE 'max_connections'; ``` ``` SHOW VARIABLES LIKE 'max_connections'; ``` The default database connection limit is often around 151, but PHP-FPM workers can quickly consume available connections. If too many requests arrive at once, the database may reach its limit, causing new connections to queue or fail. **5. Check your disk I/O** On servers with slower storage, heavy database activity can saturate disk I/O before CPU or RAM becomes a bottleneck. High I/O wait with low CPU usage is a common sign. Solutions include upgrading to NVMe storage, increasing RAM, optimizing database queries, or using read replicas for heavy workloads. ## Running Tests That Actually Tell You Something I’ve watched teams run load tests that generated impressive dashboards and taught them nothing. Here’s what separates useful tests from decorative ones. **Test your actual peak pages, not just the homepage** A homepage may handle high traffic easily, while database-heavy pages such as `/product/search` can slow down under much lower traffic. Focus your load tests on the pages and endpoints that are most critical to your users and business. **Run tests from a location close to your users** Run load tests from regions close to your primary users to get more realistic results. If your users are mainly in Europe, testing from a distant region may add unnecessary network latency. Choose test locations based on your actual traffic distribution whenever possible. **Always have a before measurement** A single load test only shows performance at one point in time. Run a baseline before major changes such as upgrading PHP, switching web servers, adding a CDN, or modifying database settings. Test again afterward and compare the results to measure whether the change actually improved performance. **Test at realistic times** Running a load test against a server that’s also processing a database migration, a log rotation, or a backup job gives you contaminated data. Close the loop on background jobs before you test. ## Integrating Load Testing Into Your Deployment Workflow The worst time to discover a performance regression is right after you’ve shipped. The best time is in your CI/CD pipeline, before the code ever reaches production. The practical integration doesn’t need to be complex. Here’s a lightweight approach: ### For teams using GitHub Actions and loader.io: You can integrate loader.io into your CI/CD workflow to run performance tests automatically. Generate an API token from your loader.io account, store it securely as a GitHub repository secret, and configure a GitHub Actions workflow to trigger tests and review the results. ``` name: Load Test on: push: branches: [main] workflow_dispatch: jobs: load-test: runs-on: ubuntu-latest steps: - name: Trigger loader.io test run: | curl -X POST https://api.loader.io/v3/tests/${{ secrets.LOADER_TEST_ID }}/run \ -H "Authorization: Token ${{ secrets.LOADER_API_TOKEN }}" \ -H "Content-Type: application/json" - name: Wait and check results run: sleep 90 && curl https://api.loader.io/v3/tests/${{ secrets.LOADER_TEST_ID }}/results/latest \ -H "Authorization: Token ${{ secrets.LOADER_API_TOKEN }}" ``` ``` name: Load Test on: push: branches: [main] workflow_dispatch: jobs: load-test: runs-on: ubuntu-latest steps: - name: Trigger loader.io test run: | curl -X POST https://api.loader.io/v3/tests/${{ secrets.LOADER_TEST_ID }}/run \ -H "Authorization: Token ${{ secrets.LOADER_API_TOKEN }}" \ -H "Content-Type: application/json" - name: Wait and check results run: sleep 90 && curl https://api.loader.io/v3/tests/${{ secrets.LOADER_TEST_ID }}/results/latest \ -H "Authorization: Token ${{ secrets.LOADER_API_TOKEN }}" ``` ### For teams without CI/CD: Even without a CI/CD pipeline, you can maintain consistent performance monitoring by running manual load tests at regular intervals, such as once a week. Record the key results after each test and compare them over time to identify performance improvements, regressions, or capacity issues. Reviewing the data monthly can also help you understand how infrastructure or application changes affect overall performance. Load Test Tracking Spreadsheet as mentioned below: **Date****Test Name****Clients/Min****Duration****p95 (ms)****Error Rate****Notes****12-Aug-2026**Homepage Baseline3001 min6500%Initial test**19-Aug-2026**Homepage Baseline3001 min5800%Cache optimized**26-Aug-2026**Homepage Baseline5002 min7200.5%Increased traffic## When loader.io Isn’t Enough: Other Tools Worth Knowing loader.io is the right tool for your first load tests and for most ongoing baseline testing. But as your application grows, you’ll hit the edges of what a browser-based tool can do. **[k6 (Grafana k6)](https://k6.io/?ref=serveravatar.com):** k6 is an open-source load-testing tool that uses JavaScript to create flexible test scenarios. It works well for API testing, realistic user flows, CI/CD automation, and performance monitoring through Grafana. A basic k6 script looks like this: ``` import http from 'k6/http'; import { check, sleep } from 'k6'; export const options = { vus: 300, duration: '2m', thresholds: { http_req_duration: ['p(95) **Categories:** Blog, Guide, Others, Tutorials **Tags:** Load Testing, Load Testing Tools, Performance Testing, Website Load Testing, Website Performance, website performance testing, Website Scalability Testing, Website Speed Testing, Website Stress Testing --- ### [How to Create Website Backups with ServerAvatar for Disaster Recovery](https://serveravatar.com/website-backup/) **Published:** August 11, 2026 **Author:** Meghna Meghwani **Content:** [![Blog banner - ServerAvatar](https://serveravatar.com/wp-content/uploads/2025/09/728_90-Banner-3-1024x127.png)](https://serveravatar.com/?ref=blog) You have heard that Website Backup is important multiple times. And yet, talking to developers and sysadmins even years into their careers, the story is almost always the same: backups were set up once, never tested, and when something broke, the restore either didn’t work or nobody knew how to trigger it in the first place. A server update goes wrong. A misconfigured cron job overwrites a database. A client accidentally deletes their WordPress plugin folder. In every one of these cases, the difference between a five-minute restore and a full-day rebuild is whether you actually have a working backup strategy in place. This guide is about [ServerAvatar](https://serveravatar.com/)‘s backup system, but more importantly, it’s about thinking through your disaster recovery approach before you are staring at a broken site at two in the morning. We will cover the three backup types ServerAvatar offers, how to actually use them in practice, what restore looks like, and the operational habits that make backups reliable rather than just theoretically existent. If you’re running applications on ServerAvatar and haven’t touched the backup system yet, this is the guide that will get you set up properly. ## TL;DR - ServerAvatar offers three distinct backup types: File System, Application, and Database - Instant Backups are for right-now; Scheduled Backups handle recurring protection automatically - Archive Backups let you recover backups from applications you have deleted - Cross-server restore is available, you can pull a backup from one server and spin it up on another - Cloud storage integration (Google Drive, Amazon S3, S3 Compatible Storage, Wasabi) keeps your backups off-server - Retention policies determine how long backups live, set these consciously, not at the default - Test your restores. A backup you haven’t verified is a liability, not an asset ## Why Website Backups Should Be Part of Your Disaster Recovery Plan A backup is simply a copy of your data. Disaster recovery is the larger process of using that copy to recover your website after an incident. That distinction matters. Imagine a WordPress application loses its database after an unexpected server problem. Having a backup from three months ago technically means the site has a backup, but it may not be sufficient to recover recent orders and customer information. **Similarly, having hundreds of backup files doesn’t help much if:** - The newest backup is incomplete. - The database wasn’t included. - Backup copies stored on the same server hosting the website. - Nobody knows which backup should be restored. - The restoration process has never been tested. - Backup retention is too short. - The backup exists but cannot be accessed during an outage. **A useful disaster recovery strategy therefore needs to answer three questions:** - What needs to be backed up? - How often should it be backed up? - How quickly can the website be restored? These questions form the foundation of a reliable backup plan. ## Understanding Backup Types in ServerAvatar Before you create your first backup, it helps to understand what you’re actually backing up. ServerAvatar separates backups into three types, and choosing the right one depends on your recovery goal. ### File System Backup This captures only the files belonging to your application, your code, uploads, configuration files, everything sitting in the application directory. No database is included. You’d reach for this when you know your application database is safe but something happened to the files themselves, maybe a deployment went sideways and overwrote the wrong directory, or a malicious script got dropped into your uploads folder. ### Application Backup This is the comprehensive option. It backs up your application files *and* the associated database together as a unit. If you want one backup that represents the complete state of your site at a given moment, this is the choice. For most WordPress, Laravel, or Node.js sites in production, Application backup is what you default to. ### Database Backup Some workloads change files frequently but keep databases relatively stable. Others modify the database constantly but rarely touch files. Database-only backup lets you capture just the database on its own schedule, separate from how often you snapshot the file system. You might run database backups hourly while file system backups run daily. That’s a valid and sensible approach. ### Choosing the Right Backup Type The best backup type depends on what you need to recover: - Need to restore application files? Use a File System Backup. - Need files and database together? Use an Application Backup. - Need to protect frequently changing database data? Use a Database Backup. - Need different backup schedules for files and databases? Use separate File System and Database Backups. ### Understanding Backup File Formats Server backups can contain different types of data, so the format used for the backup also matters. Common formats include: - `.tar` – Creates an archive containing multiple files without compression. - `.tar.gz` – Creates a compressed archive, reducing the amount of storage required for application files. - `.sql` – Stores a database dump as plain SQL statements. - `.sql.gz` – Stores a compressed SQL database dump, making it smaller and easier to transfer. For most website backup scenarios: - Use `.tar.gz` for application or file backups. - Use `.sql.gz` for database backups. ### Why Compression Matters Compression can make a noticeable difference when you are storing or transferring backups. Compressed backups can: - Require less disk space - Reduce storage costs - Take less time to transfer - Make remote backup storage more efficient - Reduce the amount of data that needs to move between your server and backup destination Combining the right backup type, schedule, and file format helps create a reliable disaster recovery plan, rather than simply storing backups without a clear recovery strategy. ## Storage: Where Your Backups Actually Live Creating a backup is only half the job. You also need to decide where those backup files should be stored and how easily you can access them during recovery. ServerAvatar lets you store backups using its built-in storage or connect an external cloud storage provider. ### ServerAvatar’s Built-In Storage If you want to start backing up without configuring another storage service, ServerAvatar’s built-in storage provides a straightforward option. According to the provided ServerAvatar information: - Backup storage is available directly from ServerAvatar. - The monthly backup price is $0.07/GB. - It includes 20 free backups. - The free backup size can be up to 150 MB. - You can manage the stored backups from the ServerAvatar dashboard. **Best suited for:** - Getting started with backups - Smaller websites and applications - Users who prefer minimal configuration - Situations where you don’t want to create a separate cloud-storage account **Important:** Built-in storage should not be your only consideration for disaster recovery. If your server or hosting infrastructure becomes unavailable, having another copy stored separately can provide an additional recovery option. ### External Cloud Storage Providers You can connect an external storage provider and keep backup copies to your integrated storage. ServerAvatar supports several external storage options, including: - [**Amazon S3**](https://serveravatar.com/docs/integrations/cloud-storage/amazon-s3/)**:** Suitable for scalable object storage and production workloads. - [**Google Drive**](https://serveravatar.com/docs/integrations/cloud-storage/google-drive/)**:** Convenient for teams already using Google’s ecosystem. - [**Wasabi**](https://serveravatar.com/docs/integrations/cloud-storage/wasabi/)**:** An option for storing larger backup volumes where storage and data-transfer costs matter. - [**S3-Compatible Storage**](https://serveravatar.com/docs/integrations/cloud-storage/s3-compatible-storage/)**:** Supports services such as Backblaze B2, DigitalOcean Spaces, MinIO, and other platforms using the S3-compatible API. Integrating an external storage provider takes a few minutes and you only need to do it once. The setup involves creating credentials with your chosen provider and connecting them in ServerAvatar’s dashboard. Once connected, that storage account becomes available as a destination for any backup you create. ## Creating Your First Instant Backup An [Instant Backup](https://serveravatar.com/docs/backups/instant-backup/) is exactly what they sound like, you trigger one right now and ServerAvatar takes a snapshot immediately. This is useful before risky operations like major plugin updates, server config changes, or anything that touches the database. ### Steps to Create an Instant Backup - Log into your ServerAvatar dashboard and open the **Backups** section from the left sidebar.[](https://storage.app.basecamp.com/5840738/blobs/d1d432a8-9573-11f1-8391-0242ac120003/download/image.png) ![go to backups section - Website Backup](https://serveravatar.com/wp-content/uploads/2026/08/image-45-1024x364.png) - Navigate to **Instant Backups**, then click **Create**. - Give the backup a **descriptive name**, something that tells you what this snapshot contains. - Choose your **Backup Type,** File System, Application, or Database. - Select your **File Type** (.tar or .tar.gz) and **Database File Type** (.sql or .sql.gz) as applicable. - Pick the **Server** and **Application** (or Database) you want to back up. - Choose your **Storage Provider** and the **Provider Account** to use. - Set a **Retention Period**, this controls how long ServerAvatar keeps the backup before auto-deleting it. - Click **Create an Instant Backup**. ![create instant backup - Website Backup](https://serveravatar.com/wp-content/uploads/2026/08/image-46-1024x798.png) Once the process starts, you can monitor the backup from the **Instant Backup >> Backups** section. The backup list provides information such as its provider, application, database, status, backup type, price, and creation time. ![check backup - Website Backup](https://serveravatar.com/wp-content/uploads/2026/08/image-47-1024x215.png) ### Use a Consistent Backup Naming Convention Good naming makes it much easier to identify the correct recovery point later. **Instead of generic names such as:** - `Backup-1` - `New Backup` - `Website Backup` **Use names that describe:** - Website or application - Environment - Date - Reason for the backup **For example:** `client-site-prod-2026-08-11-before-plugin-update` This becomes especially useful when you’re managing multiple websites, servers, staging environments, or production applications. ## Automating Backups with Scheduled Backups Manual backups are useful before specific changes, but they shouldn’t be your only backup strategy. [Scheduled Backup](https://serveravatar.com/docs/backups/schedule-backup/)s allow ServerAvatar to create backups automatically according to a defined schedule. When creating a scheduled backup, you can configure settings such as: - Backup type - Storage provider - Backup retention - Backup frequency - Application or database - Whether the first backup should start immediately You can also enable Start Now when you want the first backup to run as soon as the schedule is created. ### Steps to Create a Scheduled Backup - Log into your ServerAvatar dashboard and open the **Backups** section from the left sidebar. ![go to backups section - Website Backup](https://serveravatar.com/wp-content/uploads/2026/08/image-48-1024x364.png) - Navigate to **Schedule Backups**, then click **Create**. - Choose your Backup Type, File System, Application, or Database. - Select your **File Type** (.tar or .tar.gz) and **Database File Type** (.sql or .sql.gz) as applicable. - Select the **Server**, **Application,** and **Database** you want to back up. - Choose your **Storage Provider** and the **Provider Account** to use. - Make sure the selected storage destination has enough capacity for your expected backups. - Specify how frequently ServerAvatar should create the backup. Depending on your requirements, you can configure the schedule for intervals such as Hourly, Daily, Weekly, and Other available scheduling intervals. - Set the **Retention Period** to determine how long ServerAvatar should keep each backup. - If you want the backup process to begin immediately after creating the schedule, select the checkbox “**Start immediately after creation**“ - Click **Create a Schedule**. ![create schedule backup - Website Backup](https://serveravatar.com/wp-content/uploads/2026/08/image-49-1024x841.png) ### Managing Scheduled Backup Schedules After creating a schedule, you can manage it from the **Schedule Backups >> Schedules** section. The schedules list provides information such as its provider, application, database, schedule, retention period, status, total backups, last backup at, and next backup at. ![check scheduled backup - Website Backup](https://serveravatar.com/wp-content/uploads/2026/08/image-50-1024x185.png) ### Actions You Can Perform You can control an existing schedule directly from the schedule list: - **Pause/Start:** Use the Start/Pause Schedule Backup control to temporarily stop or resume the schedule. - **Edit:** Modify the existing backup configuration or schedule. - **Delete:** Remove the backup schedule when it is no longer required. ![actions for backup - Website Backup](https://serveravatar.com/wp-content/uploads/2026/08/image-51-1024x185.png) Regularly reviewing this list helps you confirm that scheduled backups are running as expected. ### Viewing Backups Created by a Schedule You can also review the individual backups generated through your schedules. From the **Schedule Backups >> Schedules** section, you can monitor your schedules and access the backups created by them. The scheduled backup list provides information such as its provider, application, database, status, type, price, created at, and actions. ![list all scheduled backups - Website Backup](https://serveravatar.com/wp-content/uploads/2026/08/image-52-1024x217.png) ### How Often Should You Schedule Backups? There is no single backup frequency that works for every website. Consider: - **High-traffic stores or applications:** More frequent database backups may be appropriate. - **Frequently updated websites:** Daily or more frequent backups can reduce potential data loss. - **Low-activity websites:** Daily backups may provide sufficient coverage. - **Frequently changing databases:** Consider a shorter interval between database backups. **The key question is:** > How much recent data could you afford to lose if something goes wrong? Your answer should guide the backup frequency. ### Don’t Ignore Retention Backup frequency and retention should be planned together. For example: - Backups every 6 hours + 2-day retention = up to around 8 backup points. - Backups every 24 hours + 2-day retention = only around 2 backup points. A longer retention period gives you more historical recovery points, which can be valuable if a problem isn’t discovered immediately. ServerAvatar’s scheduled backup view also lets you monitor: - Backup frequency - Retention period - Current status - Total backup count - Last execution - Next scheduled run You can also pause, edit, or delete a backup schedule when needed. ## Managing Your Backup List Once you start using instant and scheduled backups, the Backups section becomes the central place to manage your recovery points. The most useful actions include: [**Download**](https://serveravatar.com/docs/backups/download-backup/)**:** You can pull a backup file down to your local machine at any time. This is useful for offline archives, moving to a different infrastructure, or keeping a personal copy outside your cloud storage. [**Restore**](https://serveravatar.com/docs/backups/restore-backup/)**:** The core operation. ServerAvatar lets you restore any completed backup directly to the original server, or to a different server in your account. This cross-server restore capability is one of the more practical features for teams running multiple environments. [**Delete**](https://serveravatar.com/docs/backups/delete-backup/)**:** Backups you no longer need should be removed. They consume storage space and keeping unnecessary backups adds cost and clutter. One exception: backups stored on ServerAvatar’s own storage have automatic retention-based deletion and cannot be manually removed. **One habit worth building:** review your backup list monthly. Check for failed backups (they’ll show a failed status), verify that schedules are still running on their expected cadence, and confirm that retention periods are set to what you actually intended. This takes five minutes and catches problems before they become crises. ## Restoring a Backup Across Servers One useful recovery scenario is moving a backup from one ServerAvatar-managed server to another. For example, you might: - Test changes on a staging server. - Create a backup after confirming everything works. - Restore that backup to a production server. The same approach can work in reverse if a production environment fails and you have a clean recovery point on another server. ### How to Restore a Backup to Another Server - Open the **Instant** or **Scheduled Backups** list. Locate the backup you want to recover. - Click the **Restore** icon. - Select the option to **restore to another server**. Choose the destination server. ![restore backup to another server](https://serveravatar.com/wp-content/uploads/2026/08/image-53-1024x386.png) - Review the selected server details. Click **Yes, I’m Sure** to confirm the restoration. > The ServerAvatar backup **cannot be restored to a Node Stack Server from another server**. ## Archive Backups: Recovering Backups After Deleting an Application Deleting an application does not necessarily mean that its existing backups are immediately lost. ServerAvatar moves backups associated with deleted applications to the [Archive Backups](https://serveravatar.com/docs/backups/archive-backup/) section, where you can access and download them later. ![archive backups](https://serveravatar.com/wp-content/uploads/2026/08/image-54-1024x270.png) This can be useful when: - An application was deleted accidentally. - A completed project needs to be recovered later. - You need files or database data from an older application. - The original application dashboard is no longer available. - You need a backup before rebuilding the application elsewhere. ### How Archive Backups Work When you delete an application: - The application’s dashboard is no longer available. - Application-specific backups are moved to Archive Backups. - The archived backups remain available for recovery or download. - You can filter archived backups to locate the required recovery point. - Available backup types include application, file system, and database. - Archived backups can be downloaded when required. This makes Archive Backups useful as a recovery location for backups that are no longer associated with an active application. ## Manual Restore: Recovering an Application After Losing the Server Losing access to your server can make a normal backup restoration impossible. If the server has been disconnected or deleted from ServerAvatar, you may need to use the manual restoration process instead. ServerAvatar’s [Manual Backup Restore](https://serveravatar.com/docs/backups/manual-restore-backup/) document allows you to use available backups from Archive Backups to rebuild your application on a new server. With the required backup files available, you can set up the application on a new server and restore its data manually. [![Blog banner - ServerAvatar](https://serveravatar.com/wp-content/uploads/2025/09/728_90-Banner-1-1024x127.png)](https://serveravatar.com/?ref=blog)## Disaster Recovery Best Practices Backing up is only half the picture. A disaster recovery strategy that’s actually effective requires habits and decisions beyond just clicking “Create Instant Backup.” ### Choose the Right Backup Type for Each Scenario Store backups on a different provider or at least a different region than your server. A backup sitting on the same disk array as your production server isn’t a backup, it’s a convenience copy. ### Keep Backups in a Separate Location A backup stored only alongside your production environment may not be enough when dealing with a major infrastructure failure. External storage can help protect your backups if the original server becomes unavailable or needs to be rebuilt. ### Set a Practical Retention Policy Retention determines how long your backups live. Set it based on how quickly you can detect a problem. If your team reviews logs weekly, a two-week retention might catch most issues. If you have monthly review cycles, you’ll want longer retention, or you might miss a silent corruption that happened three weeks ago. ### Test Your Backups by Performing Restores This is the one most people skip. Pick a recent backup, restore it to a test environment, and verify the site loads correctly. This catches corrupt backup files, missing database tables, and broken file permissions before you’re in a crisis. If you discover the restore is broken while you’re actually in a crisis, you’ve lost both your original problem and your recovery path. ### Document the Recovery Process For any application that matters, write down the restore steps. Not just “restore from backup”, actually document which backup to use, which server to restore to, and what the expected outcome is. When you’re stressed and working fast at 3 AM, documentation prevents mistakes. ### Monitor Backup Health Set up notifications for failed backups. A failed backup that nobody notices is the same as having no backup. Check your scheduled backup status periodically, not just when you need to restore something. ### Keep More Than One Recovery Point A single recent backup may not always be the best recovery option. A problem can exist for days before someone notices it. Maintaining multiple recovery points gives you more flexibility to choose a known-good version. ### Review Your Disaster Recovery Strategy Regularly Your backup requirements can change as your website grows. Review your strategy whenever you Launch a new application, Move to a different server, Start receiving significantly more traffic, etc. A backup strategy should evolve with your infrastructure instead of remaining unchanged after the initial setup. ### The Goal: A Backup You Can Actually Recover From The purpose of disaster recovery is not simply to accumulate backup files. The real objective is to have a reliable and repeatable way to restore your application when something goes wrong. **A practical strategy combines:** - The right backup type - Appropriate backup frequency - Off-site storage - Sensible retention - Regular restore testing - Recovery documentation - Backup monitoring - Multiple recovery points Together, these practices turn backups into a dependable disaster recovery system rather than simply another scheduled server task. ## Key Takeaways - ServerAvatar offers three backup types, File System, Application, and Database, each suited for different recovery scenarios - Cloud storage integration (S3, Google Drive, Wasabi, S3-compatible) keeps your backups off-server; ServerAvatar’s built-in storage is also available for simpler setups - Scheduled backups automate protection on your defined frequency; instant backups handle immediate, on-demand snapshots - Cross-server restore is available, but Node Stack Servers are excluded from this capability - Archive Backups preserves snapshots from deleted applications, review and clean it periodically - Manual restore is the recovery path when a server no longer exists in your dashboard - Retention and frequency must be designed together as a system, not picked independently - Test your restores. A backup you haven’t verified is a risk, not an asset ## Conclusion A reliable backup strategy is about more than creating backup files, it is about being able to recover when something goes wrong. ServerAvatar gives you flexible backup types, automated schedules, cloud storage, and multiple restore options to protect your applications. For stronger disaster recovery, choose the right backup frequency, keep important backups off-server, review retention settings, and regularly test your restores. A backup you can successfully restore is the one that truly protects your website. ## FAQs ### What types of backups does ServerAvatar provide? ServerAvatar provides three main backup types: - **File System Backup:** Backs up application files. - **Application Backup:** Backs up the application files and associated database together. - **Database Backup:** Backs up the selected database separately. The appropriate option depends on what you need to protect and recover. ### What is the difference between an Instant Backup and a Scheduled Backup in ServerAvatar? An Instant Backup is created manually whenever you need an immediate recovery point, such as before a major update or configuration change. A Scheduled Backup runs automatically according to the frequency you configure, making it useful for ongoing protection. ### Can ServerAvatar restore a backup to another server? Yes, ServerAvatar supports restoring a completed backup to another server within your account. This can be useful when migrating an application or recovering an application on alternative infrastructure. However, backups cannot be restored to a Node Stack Server from another server. ### What happens to backups when an application is deleted? Backups associated with a deleted application are moved to Archive Backups. From there, you can locate and download the available Application, File System, or Database backups. This provides a way to access backup data even after the original application is no longer available. ### What should I do if the original server is no longer available? If the server has been disconnected or deleted, you may need to use ServerAvatar’s Manual Restore process. Available backups can be retrieved from Archive Backups and used to rebuild the application on a new server. ### About the Author Meghna Meghwani is a technical writer focused on Linux, Ubuntu, VPS hosting, server management, WordPress, PHP, Node.js, cloud hosting, and DevOps. She creates beginner-friendly tutorials, practical hosting guides, troubleshooting articles, and server security content designed to help developers and businesses manage applications and servers more efficiently. **Categories:** Blog, Guide, Linux, Others, Tutorials, Ubuntu **Tags:** Automated Website Backups, Backup and Restore, Scheduled Website Backups, ServerAvatar, Website Backup, Website Backup and Recovery, Website Backup Solutions, Website Backups, Website Data Backup, Website Recovery --- ### [How to Check Installed Laravel Version](https://serveravatar.com/check-installed-laravel-version/) **Published:** August 9, 2026 **Author:** Meghna Meghwani **Content:** [![Blog banner - ServerAvatar](https://serveravatar.com/wp-content/uploads/2025/09/728_90-Banner-3-1024x127.png)](https://serveravatar.com/?ref=blog)Picture this: you’re debugging a production issue, a dependency broke your deployment, and you need to check installed Laravel version because you can’t remember whether your project is running Laravel 9 or Laravel 10. It happens more often than you’d think. Knowing how to check your installed Laravel version via the command line isn’t just a trivia question, it directly affects how you troubleshoot, upgrade, and maintain your applications. The wrong version assumption can lead you to incompatible package versions, mismatched documentation, and hours of wasted debugging. This guide walks you through every reliable way to pull your Laravel version from the terminal. I’ll cover the quickest one-liners, methods that work when you only have file access, and the ones you’d use when you need the full picture. By the end, you’ll know exactly which command fits which situation. One thing to note upfront: Laravel follows semantic versioning. That means `8.0`, `9.0`, `10.0` are major releases. Patch versions (like `10.5.1`) contain bug fixes. Minor versions (like `10.6`) add features. Knowing this helps you interpret what you’re seeing when you run these commands. ## TL;DR - Run `php artisan --version` from your project root, the fastest method - Open `composer.json` and look under `require["laravel/framework"]` for the locked version - Use `composer show laravel/framework` for detailed version info across all packages - Call `app()->version()` inside Laravel Tinker for the application-level version - Create a temporary web route returning `app()->version()` only when CLI isn’t accessible - Never leave the debug route active, remove it immediately after checking ## Why Knowing Your Laravel Version Matters More Than You Think Before we get into the commands, let’s talk about why this matters in practice. I’ve seen developers lose half a day chasing a bug that only existed because they were reading Laravel 11 documentation while running a Laravel 9 application. The version mismatch made every recommendation irrelevant. Here’s where version awareness pays off: **Package compatibility.** Some Composer packages declare version constraints like `"laravel/framework": "^9.0"`. If you’re running Laravel 8, those packages simply won’t install. Checking your version before adding a new dependency saves you from cryptic Composer errors that don’t immediately point to the real problem. **Upgrade planning.** If you’re moving from Laravel 9 to Laravel 10, you need to know your starting point. Every major upgrade has a dedicated upgrade path, and skipping versions (going from 8 straight to 10, for example) is a recipe for broken applications. **Server environment issues.** When your local machine runs a different PHP version than your server, Laravel automatically uses different code paths. Knowing your Laravel version helps you understand why something works locally but fails on production. **Security.** Laravel releases security patches for actively supported versions. If you’re using an older Laravel release that has reached end-of-life, you may no longer receive important security updates. You can check [Laravel’s official release notes and support policy](https://laravel.com/docs/12.x/releases?ref=serveravatar.com) to see the current support status for each version. Version awareness is the first step toward keeping your application secure. ## Method 1: The Quickest Way – `php artisan --version` If you need the answer right now and you have terminal access, this is the command you want. Open your terminal, navigate to the root directory of your Laravel project, and execute the following command: ``` php artisan --version ``` ``` php artisan --version ``` What you’ll get back is something like `Laravel Framework 10.48.0`. The first number `10` is the major version. The rest tells you the minor and patch release. ![php artisan - Check Installed Laravel Version](https://serveravatar.com/wp-content/uploads/2026/07/image-112-1024x29.png) This works because Laravel registers an Artisan command internally that reads the framework version directly from the installed vendor files. No guessing, no file hunting. You can explore more Laravel command-line features in the official [Laravel Artisan documentation](https://laravel.com/docs/10.x/artisan?ref=serveravatar.com). **One thing worth mentioning:** this command uses your system’s PHP. If you have multiple PHP versions installed (say, PHP 8.1 and 8.3), make sure you’re running the version that matches your server’s PHP. Use `php -v` first if you’re unsure. Also, `php artisan` won’t run if you’re inside a directory that isn’t a Laravel project. If you get an error about Artisan not being found, double-check that you’re in the right directory. Running `ls` and confirming you see `artisan`, `composer.json`, and a `vendor/` folder is a quick sanity check. ## Method 2: Reading `composer.json` – When You Only Have File Access Sometimes you’re on a server where SSH access is limited, or you want to check the version before pulling code. That’s when opening `composer.json` becomes the most practical option. Navigate to your project’s root directory and open `composer.json` in any text editor. Look for the `require` section: ``` "require": { "php": "^8.1", "laravel/framework": "^10.0", ... } ``` ``` "require": { "php": "^8.1", "laravel/framework": "^10.0", ... } ``` The `laravel/framework` line tells you the version constraint that Composer used when installing. The `^10.0` notation means Composer installed the highest available version in the 10.x series that was compatible when you ran `composer install`. If you want to see the exact installed version rather than the constraint, look for `composer.lock` in the same directory and search for `"laravel/framework"` inside it. The `lock` file records the exact version that was resolved and installed. From the command line, you can pull this information even faster with: ``` grep '"laravel/framework"' composer.lock ``` ``` grep '"laravel/framework"' composer.lock ``` This saves you from opening the file and scanning manually.[](https://storage.app.basecamp.com/5840738/blobs/204a8ade-8cde-11f1-941f-0242ac120004/download/image.png) ![check laravel framework - Check Installed Laravel Version](https://serveravatar.com/wp-content/uploads/2026/07/image-113-1024x77.png) It’s especially useful when you’re connected to a server via SSH and want a one-liner answer. ## Method 3: `composer show` – When You Need the Full Picture The `php artisan --version` command tells you the framework version. But Laravel is a collection of packages, and sometimes you want to see all of them at once. Run this from your project root: ``` composer show laravel/framework ``` ``` composer show laravel/framework ``` What you get is a comprehensive output that includes the installed version, the Laravel release channel (stable, dev, etc.), and the date it was installed. Here’s a sample of what that looks like in practice: ``` name : laravel/framework version : v10.48.0 source : [git] dist : [zip] type : library license : MIT ... ``` ``` name : laravel/framework version : v10.48.0 source : [git] dist : [zip] type : library license : MIT ... ``` The version line is what you’re after. But the rest is useful too, if you’re debugging a deployment, knowing the exact installation date from the `installed` field can help you confirm whether a recent update happened. ![check laravel version using composer show - Check Installed Laravel Version](https://serveravatar.com/wp-content/uploads/2026/07/image-114-1024x116.png) **One practical scenario:** imagine a package stopped working after your colleague ran `composer update`. If the package targets a specific Laravel version and the update pulled a newer Laravel version, `composer show laravel/framework` immediately tells you what changed. For an even more concise output, use: ``` composer show laravel/framework --format=json | grep '"version"' ``` ``` composer show laravel/framework --format=json | grep '"version"' ``` This is handy when you’re scripting or logging version info programmatically. ## Method 4: Laravel Tinker – For the Application-Level Version Most of the time, the framework version from `php artisan --version` is exactly what you need. But Laravel also exposes a version at the application level through `app()->version()`. These are usually the same, but understanding the distinction matters when you’re working in edge cases. To enter Tinker, run: ``` php artisan tinker ``` ``` php artisan tinker ``` Once inside the Tinker console, type: ``` app()->version(); ``` ``` app()->version(); ``` Press Enter, and you’ll see the version printed back.[](https://storage.app.basecamp.com/5840738/blobs/50cf0892-8cde-11f1-9d5d-0242ac120004/download/image.png) ![check laravel version using tinker - Check Installed Laravel Version](https://serveravatar.com/wp-content/uploads/2026/07/image-115-1024x72.png) Tinker is Laravel’s interactive REPL, a live PHP shell where you can execute code within the context of your application. The `app()` helper gives you the Laravel application instance, and `version()` is a method on that instance that returns the framework version string. **Why does this distinction exist?** In most cases, it doesn’t matter. But if you’ve ever worked with Laravel Octane or a customized Laravel installation where the framework version is swapped or stubbed, the application-level version might differ. For 99% of projects, both commands return the same number. If you’re new to Tinker, here’s a practical tip: it’s incredibly useful for debugging beyond just version checks. You can inspect configuration values, test helper functions, and explore your application’s service container, all without modifying any files. ## Method 5: The Web Route – When CLI Access Isn’t an Option There are situations where you can’t SSH into a server and the terminal isn’t accessible. Maybe you’re on a shared hosting plan, or you’re debugging an application that’s deployed through a platform with limited shell access. In those cases, checking the version through the browser is your fallback. Open your `routes/web.php` file and add this at the bottom: ``` Route::get('/check-laravel-version', function () { return 'Laravel Version: ' . app()->version(); }); ``` ``` Route::get('/check-laravel-version', function () { return 'Laravel Version: ' . app()->version(); }); ``` Save the file, then visit `http://your-domain.com/check-laravel-version` in your browser. The page will display your Laravel version as plain text. **Here’s the critical part:** remove this route immediately after you’ve checked the version. Exposing your framework version publicly gives attackers valuable information about which known vulnerabilities might apply to your setup. This isn’t theoretical, version disclosure is a low-effort recon step that automated scanning tools use to identify vulnerable targets. A better practice for ongoing debugging on production is to protect the route with middleware that only allows internal IP access, or to use Laravel’s built-in debugging tools that already handle access control properly. But for a quick one-time check? The route method works, just don’t leave it lying around. ## Quick Reference: All Methods at a Glance Here’s a comparison table for the five methods we’ve covered. Use it as a cheat sheet when you need to pick the right approach fast. MethodCommand / ActionWorks RemotelyShows Exact VersionBest For**Artisan command**`php artisan --version`Yes (SSH)YesQuick CLI check, any Laravel project**composer.json**Open file or `grep`Yes (SSH/File Manager)Constraint onlyQuick file-level check, no terminal needed**composer.lock**`grep` or open fileYesYesExact version when composer.json shows constraint**Composer show**`composer show laravel/framework`Yes (SSH)YesDetailed package info, debugging updates**Laravel Tinker**`php artisan tinker` then `app()->version()`Yes (SSH)YesIn-app context, application-level version**Web route**Browser access to `/check-laravel-version`YesYesWhen CLI/SSH is unavailable## Common Version-Related Issues and How to Handle Them Over the years, I have run into several situations where the version check itself becomes part of a bigger problem. Here’s what tends to go wrong and how to handle it. `php artisan` **command not found.** This usually means you’re not in a Laravel project directory, or PHP isn’t in your system PATH. Check your current directory with `pwd`. If you’re in the right place, verify PHP is installed with `php -v`. If that works but `artisan` doesn’t, try calling it directly with `php artisan`. **Version mismatch between local and server.** This is one of the most common sources of “it works on my machine” bugs. If `php artisan --version` returns different numbers locally versus on your server, your `composer.lock` files are out of sync. Run `composer install --no-dev` on your server to match the locked versions from your local setup. **Outdated Laravel with no easy upgrade path.** If you’re running Laravel 8 or below, you’re on versions that no longer receive security patches. Upgrading from those versions requires working through [Laravel’s upgrade guide](https://laravel.com/docs/13.x/upgrade?ref=serveravatar.com) and testing your application thoroughly. **Multiple PHP versions confusing the results.** On systems with multiple PHP versions installed, the `php` command might point to a different version than what your web server uses. Run `which php` to see which binary is being called. For web-based checks, create a PHP info file (``) in your web root to see exactly which PHP version Apache or Nginx is using. [![Blog banner - ServerAvatar](https://serveravatar.com/wp-content/uploads/2025/09/728_90-Banner-1-1024x127.png)](https://serveravatar.com/?ref=blog)## Understanding Laravel’s Version Numbering System Laravel uses semantic versioning, and understanding how this works helps you interpret what you see when you check your version. The format is `MAJOR.MINOR.PATCH`. Here’s what each part means in plain terms: **MAJOR** versions, like going from Laravel 9 to Laravel 10, introduce breaking changes. Code that worked before might need modifications. These are the upgrades that require reading the upgrade guide before proceeding. **MINOR** versions, like going from 10.0 to 10.6, add new features while keeping everything backward compatible. You can usually upgrade these without rewrites. **PATCH** versions, like going from 10.5.0 to 10.5.1, are bug fixes and security patches. These are low-risk updates you should apply promptly. As of mid-2026, Laravel 10 is the most widely deployed LTS-style version, with Laravel 11 being the current latest stable release. If you’re on anything below Laravel 10, it’s worth planning an upgrade soon, not just for features, but for the security patches that older versions no longer receive. ## Key Takeaways - `php artisan --version` is the go-to command for quick, reliable version checks - `composer.json` and `composer.lock` give you version info even without CLI access - `composer show laravel/framework` provides detailed package-level information - Laravel Tinker (`app()->version()`) returns the application-level version in a live context - Web route checks are a valid fallback when CLI isn’t available, but remove them after use - Never leave debug routes exposed publicly; version disclosure aids reconnaissance attacks - Laravel’s semantic versioning tells you whether an update is safe, feature-adding, or breaking - Staying on actively supported Laravel versions is a security requirement, not a preference If you’re managing multiple Laravel applications across different servers and want a simpler way to handle deployments, version tracking, and server configuration without living in the terminal all day, exploring [ServerAvatar](https://serveravatar.com/) is worth your time. ## Conclusion Checking your Laravel version from the command line isn’t complicated, but doing it the right way for your specific situation saves time and prevents confusion. Whether you’re on a local development machine with full SSH access, a remote server with limited shell privileges, or a shared hosting plan where you only have file manager access, there’s a method that fits. Start with `php artisan --version` for most situations. Fall back to `composer.json` when you need file-level access, and use `composer show` when you want the complete picture. Tinker is there for in-context checks, and the web route method exists for those rare moments when the terminal isn’t an option. The bigger lesson here is that version awareness is part of running a healthy Laravel application. Before you add a package, plan an upgrade, or debug a production issue, know where you stand. ## FAQs ### What’s the fastest way to check Laravel version? Run `php artisan --version` from your project root. It returns the framework version in under a second and works on any system with PHP and Artisan available. ### How do I check Laravel version without SSH? Open your `composer.json` file and look for the `laravel/framework` entry in the `require` section. This shows the version constraint Composer used. Alternatively, if you have file manager access, open `composer.lock` and search for the same entry to see the exact installed version. ### Can I check Laravel version on shared hosting? Yes. If your hosting provider gives you a file manager or file editing access, upload a small PHP script containing `` (wrapped in the appropriate Laravel bootstrap context), or use the web route method described above. Note that most shared hosting panels also display Composer version information in their UI. ### Why does `php artisan --version` show a different version than `composer.json`? The `composer.json` shows the version *constraint* (what range Composer was allowed to install), while `php artisan --version` shows the *actual installed version*. For example, `composer.json` might say `^10.0` but the exact installed version is `10.48.0`. The lock file is what records the exact resolved version. ### How do I check which PHP version Laravel needs? Laravel’s `composer.json` lists the PHP requirement under the `require` section as `"php": "^8.1"` or similar. Laravel 11 requires PHP 8.2 or higher. Run `php -v` to see your current PHP version and compare it against what Laravel requires. ### Related Articles - [Laravel for Beginners: Easy Explanation You Can Understand](https://serveravatar.com/what-is-laravel/) - [Laravel API Tutorial: Create RESTful APIs with Ease](https://serveravatar.com/laravel-rest-api-tutorial/) - [Laravel API Versioning: Why It Matters and How to Do It Right](https://serveravatar.com/laravel-api-versioning) - [What Is Laravel Livewire? Complete Beginner’s Guide for 2026](https://serveravatar.com/laravel-livewire) ### About the Author Meghna Meghwani is a technical writer focused on Linux, Ubuntu, VPS hosting, server management, WordPress, PHP, Node.js, cloud hosting, and DevOps. She creates beginner-friendly tutorials, practical hosting guides, troubleshooting articles, and server security content designed to help developers and businesses manage applications and servers more efficiently. **Categories:** Blog, Guide, Laravel, Linux, Others, Tutorials, Ubuntu **Tags:** Check Installed Laravel Version, Check Laravel Version, laravel, Laravel CLI, Laravel Composer, Laravel Framework Version, Laravel Tinker, Laravel Tutorial, Laravel Version Using CMD, PHP Artisan --- ### [How to Change or Reset MySQL Root Password on Ubuntu Linux](https://serveravatar.com/change-reset-mysql-root-password/) **Published:** August 8, 2026 **Author:** Meghna Meghwani **Content:** [![Blog banner - ServerAvatar](https://serveravatar.com/wp-content/uploads/2025/09/728_90-Banner-3-1024x127.png)](https://serveravatar.com/?ref=blog) You’re SSH’d into your Ubuntu server. You run `mysql -u root -p`, type your password, and hit Enter. The response: **Access denied**. You try again. Same result. You check your notes, your password manager, that config file you saved somewhere, nothing works. Now you’re locked out of your own database and need to recover your MySQL Root Password. **Sound familiar?** You’re not alone. Forgetting the MySQL root password is one of those things that happens to almost every developer or sysadmin at some point. The database is running, the data is there, but you cannot get in. **The good news:** resetting it is straightforward, even if it feels intimidating the first time. You don’t need to reinstall anything. You don’t need to lose data. What you need is about 10 minutes, a handful of commands, and a clear sequence of steps. This guide walks you through every scenario, changing a password you know, resetting one you’ve forgotten, handling the `--skip-grant-tables` method properly, and updating your applications afterward so nothing breaks. I’ve tested these steps on Ubuntu 22.04 and Ubuntu 24.04, and the process is similar on both versions. ## TL;DR - You can reset a forgotten MySQL root password by starting MySQL with `--skip-grant-tables`, then running SQL password commands - You can change an existing password with a single `ALTER USER` statement while normally logged in - Always stop websites/applications pointing to the database before resetting, they will lose connection during the process - After resetting, update any application config files that store the old MySQL password - For a server management experience that takes care of these automatically, explore [ServerAvatar](https://serveravatar.com/) - If your server is managed through [ServerAvatar](https://serveravatar.com/), you can update the database root password directly from the panel. ## Understanding MySQL Root Access on Ubuntu Before changing anything, it’s important to know what the MySQL root account actually is and how it differs from the Linux root user. > Before proceeding, make sure your server is actually running MySQL rather than MariaDB. Although the two database systems are closely related, there are important differences in features, compatibility, and administration. See our [MariaDB vs MySQL comparison](https://serveravatar.com/mariadb-vs-mysql) for a detailed breakdown. **MySQL root vs. Linux root:** The MySQL `root` account is a database administrator account, separate from the Linux system `root` user. **MySQL** root is a separate database-level administrator with full control over all databases, users, and permissions on your MySQL instance. ### MySQL Authentication on Ubuntu Ubuntu uses a plugin-based authentication system for MySQL. The authentication method configured for the `root` account determines how you can log in and reset its password. Common authentication methods include: - `auth_socket` - Links MySQL authentication to your Linux system user. - You can log in as MySQL `root` only when you’re already the Linux `root` user. - `mysql_native_password` - Uses a stored password hash for authentication. - A password is required to access the MySQL `root` account. - `caching_sha2_password` - Also relies on a stored password hash. - Authentication requires the MySQL `root` password. MySQL supports multiple [authentication plugins](https://dev.mysql.com/doc/refman/8.4/en/caching-sha2-pluggable-authentication.html?ref=serveravatar.com), which determine how credentials are verified when a user connects. ### Check the Current Authentication Method To find out which authentication method your MySQL `root` account is currently using, run: ``` SELECT user, host, plugin FROM mysql.user WHERE user = 'root'; ``` ``` SELECT user, host, plugin FROM mysql.user WHERE user = 'root'; ``` The result will show the authentication plugin configured for the `root` user: - `auth_socket` – You need `sudo` to log in as MySQL root from Linux. - `caching_sha2_password` – You need the MySQL root password. - `mysql_native_password` – You need the MySQL root password. Knowing the authentication method is important because it determines how you access MySQL and how you reset the root password. ![MySQL Root Password Access](https://serveravatar.com/wp-content/uploads/2026/08/image-34-1024x341.png) ### MySQL Authentication Methods Compared **Authentication Method****Password Required?****Typical Use****Security / Compatibility****Recommended?**`auth_socket`No for local socket authenticationLocal server administrationTies MySQL access to the operating-system userGood for local administration`caching_sha2_password`YesModern MySQL installationsStronger modern password authentication; default in MySQL 8.xYes`mysql_native_password`YesOlder applications and MySQL setupsLegacy authentication with broader old-client compatibilityAvoid for new setups## Changing Your MySQL Password When You Know It If you can already access MySQL and simply want to replace the current root password, you can change it without stopping or restarting the MySQL server. **1. Log In to MySQL** Open the MySQL prompt as the root user: ``` sudo mysql -u root ``` ``` sudo mysql -u root ``` **2. Change the Root Password** At the MySQL prompt, run: ``` ALTER USER 'root'@'localhost' IDENTIFIED BY 'YourNewPassword123!'; FLUSH PRIVILEGES; EXIT; ``` ``` ALTER USER 'root'@'localhost' IDENTIFIED BY 'YourNewPassword123!'; FLUSH PRIVILEGES; EXIT; ``` This updates the password and exits the MySQL prompt. - **`ALTER USER` –** Changes the password for the MySQL `root` account. - **`FLUSH PRIVILEGES` –** Reloads the privilege information so the changes are applied immediately. - **`EXIT` –** Closes the MySQL session. **Password and Authentication Notes** The exact authentication setup depends on the MySQL authentication plugin: - **`caching_sha2_password` –** The default authentication method in MySQL 8.0+ works with the command above. - **`mysql_native_password` –** Older MySQL installations may use this method, and the same `ALTER USER` syntax applies. Use a strong password for the MySQL root account. Use a long, unique password for the MySQL root account. If password validation is enabled, your server may enforce additional length and complexity requirements. **3. Test the New Password** Immediately verify that the new password works: ``` mysql -u root -p ``` ``` mysql -u root -p ``` Enter the new password when prompted. - **Successful login –** The password change worked. - **Login fails –** Check the configured authentication plugin and verify that you’re using the correct credentials. ### When Should You Change the Password? Common situations include: - Rotating credentials during a security audit - Setting up a new server - Replacing a password that has been shared with team members - Restricting access to the MySQL root account ## Resetting a Forgotten MySQL Root Password This is the situation where most people need a password reset. If you’ve forgotten your MySQL root password, repeatedly trying different passwords won’t help. The good news is that you can recover access if you still have root access to the Ubuntu server. The basic idea is straightforward: - MySQL stores user credentials in its internal `mysql.user` table. - MySQL can be started without loading its privilege system. - In this mode, password checks are bypassed. - You can then update the root user’s password and restart MySQL normally. Ubuntu uses `systemd` to manage the MySQL service, so the process below relies on `systemctl` commands. **Step 1: Plan for Downtime** Before starting, remember that applications and websites connected to this MySQL server will temporarily lose database access. This can affect: - WordPress websites - Laravel applications - Other services connected to the database During the reset, these applications may show database connection errors until MySQL is running normally again. For a smoother reset: - Perform the work during a maintenance window. - Choose a period with low traffic. - Make sure no critical database jobs are running. - Inform your team about the expected outage if required. - Create a recent backup if important data has changed recently. > If you’re unsure whether MySQL is currently processing long-running or resource-intensive operations, you can first [**identify and kill MySQL queries**](https://serveravatar.com/kill-mysql-queries) before starting the maintenance process. Password resets are generally straightforward, but having a backup is essential when modifying authentication settings. **Step 2: Stop the MySQL Service** Connect to your Ubuntu server through SSH and stop the MySQL service with `systemd`: > If you can’t connect to the server over SSH, troubleshoot and [fix the SSH connection refused error](https://serveravatar.com/ssh-connection-refused) before continuing with the MySQL password reset. ``` sudo systemctl stop mysql ``` ``` sudo systemctl stop mysql ``` Then confirm that the service has stopped: ``` sudo systemctl status mysql ``` ``` sudo systemctl status mysql ``` The status should indicate that MySQL is **inactive**. - **`systemctl stop mysql` –** Stops the MySQL service. - **`systemctl status mysql` –** Shows the current service state. `systemctl` provides a quick way to confirm whether the MySQL service is running or stopped. ![check status - MySQL Root Password](https://serveravatar.com/wp-content/uploads/2026/08/image-35-1024x143.png) **Step 3: Start MySQL in Safe Mode Without Password Checking** The actual reset begins by starting MySQL with the `--skip-grant-tables` option. This option starts MySQL without loading its user privilege tables, which means: - Password authentication is bypassed. - Users can connect without normal privilege checks. - The MySQL root account can be accessed without its password. - The server is temporarily left in a highly open state. > **Security note:** Starting MySQL with `--skip-grant-tables` temporarily bypasses normal authentication and privilege checks. Keep the recovery session local and ensure network access is disabled while performing the reset. Start MySQL in safe mode: ``` sudo mysqld_safe --skip-grant-tables & ``` ``` sudo mysqld_safe --skip-grant-tables & ``` The `&` lets the command execute independently in the background while leaving the terminal available for other tasks. MySQL’s official [root password reset documentation](https://dev.mysql.com/doc/refman/8.4/en/resetting-permissions.html?ref=serveravatar.com) also describes the `--skip-grant-tables` recovery method for regaining administrative access. **Important:** Keep this terminal session open until the password reset is finished. > **Note for MySQL 8.0+** > > With MySQL 8.0 or newer, `--skip-grant-tables` may not behave as expected with `mysqld_safe`. In that situation, use it together with `--skip-networking`: > > ``` > sudo mysqld_safe --skip-grant-tables --skip-networking & > ``` > > ``` > sudo mysqld_safe --skip-grant-tables --skip-networking & > ``` > > > > The `--skip-networking` option: > > - Restricts MySQL to local access. > - Prevents network connections during the reset. > - Adds an extra security layer while password checking is disabled. **Step 4: Connect to MySQL Without a Password** Once MySQL is running without privilege checks, connect as root: ``` mysql -u root ``` ``` mysql -u root ``` You should be taken directly to the MySQL prompt: ``` mysql> ``` ``` mysql> ``` You should **not** receive a password prompt. - **MySQL prompt appears** – The server started correctly in safe mode. - **Password prompt appears** – MySQL may not have started with `--skip-grant-tables` correctly; stop and restart it. ![Connect to MySQL Without a Password - MySQL Root Password](https://serveravatar.com/wp-content/uploads/2026/08/image-36-1024x166.png) **Step 5: Reset the Root Password** Once you’re inside MySQL, you can set a new password for the root account. **For MySQL 8.0 and newer:** ``` FLUSH PRIVILEGES; ALTER USER 'root'@'localhost' IDENTIFIED BY 'YourStrongNewPassword123!'; ``` ``` FLUSH PRIVILEGES; ALTER USER 'root'@'localhost' IDENTIFIED BY 'YourStrongNewPassword123!'; ``` **For MySQL 5.7 and older:** ``` FLUSH PRIVILEGES; SET PASSWORD FOR 'root'@'localhost' = PASSWORD('YourStrongNewPassword123!'); ``` ``` FLUSH PRIVILEGES; SET PASSWORD FOR 'root'@'localhost' = PASSWORD('YourStrongNewPassword123!'); ``` Both approaches replace the existing stored password hash with one generated from your new password. ![flush privileges - MySQL Root Password](https://serveravatar.com/wp-content/uploads/2026/08/image-37-1024x70.png) - `FLUSH PRIVILEGES` – Reloads the grant tables so privilege changes can take effect. - `ALTER USER` – Sets a new password for the root account on newer MySQL versions. - `SET PASSWORD` – Provides the password-reset method used with older MySQL versions. If MySQL says `FLUSH PRIVILEGES` cannot run while the grant tables are disabled, the issue is caused by `--skip-grant-tables`. In that situation: - Run the password-change command without `FLUSH PRIVILEGES`. - Restart MySQL normally afterward. **Step 6: Stop and Restart MySQL Normally** After setting the new password, leave the MySQL prompt: ``` EXIT; ``` ``` EXIT; ``` You can also press `Ctrl+D`. Because MySQL was started through `mysqld_safe`, stop that process with: ``` sudo pkill mysqld ``` ``` sudo pkill mysqld ``` Wait a few seconds, then start MySQL normally: ``` sudo systemctl start mysql ``` ``` sudo systemctl start mysql ``` Finally, verify that the service is running: ``` sudo systemctl status mysql ``` ``` sudo systemctl status mysql ``` The service should now show as active and running, as shown in the image below. ![Check MySQL Status ](https://serveravatar.com/wp-content/uploads/2026/08/image-38-1024x176.png) **Step 7: Test Your New Password** The final step is to confirm that the new password works: ``` mysql -u root -p ``` ``` mysql -u root -p ``` When prompted, enter the new password. - **Login succeeds** – The password reset is complete. - **Login fails** – Recheck the password and MySQL authentication configuration. ![MySQL Login](https://serveravatar.com/wp-content/uploads/2026/08/image-39-1024x192.png) ## What If `--skip-grant-tables` Doesn’t Work? In some situations, especially with certain MySQL 8.0 configurations or customized MySQL installations, the `--skip-grant-tables` method may not work as expected. You may encounter issues such as: - MySQL refusing to start. - MySQL restarting automatically before you can connect. - `mysqld_safe` behaving differently because of a customized server setup. In these cases, you can use a temporary **systemd override** to start MySQL with the required options. ### Method: Start MySQL with `--skip-grant-tables` Using a `systemctl` Override Ubuntu’s `systemd` service configuration for MySQL can be temporarily overridden to include the `--skip-grant-tables` option. This approach: - Keeps MySQL under `systemd` management. - Avoids starting `mysqld_safe` directly. - Lets you temporarily add the required startup options. **Step 1: Create a Temporary Override** Open the MySQL service override editor: ``` sudo systemctl edit mysql ``` ``` sudo systemctl edit mysql ``` Add the following configuration: ``` [Service] ExecStart= ExecStart=/usr/sbin/mysqld --skip-grant-tables --skip-networking ``` ``` [Service] ExecStart= ExecStart=/usr/sbin/mysqld --skip-grant-tables --skip-networking ``` The two `ExecStart` lines have different purposes: - **First** `ExecStart=` – Clears the existing startup command. - **Second** `ExecStart=` – Starts MySQL with `--skip-grant-tables` and `--skip-networking`. Save and exit the editor using `Ctrl+O`, then `Ctrl+X`. **Step 2: Reload systemd and Start MySQL** Apply the updated service configuration: ``` sudo systemctl daemon-reload sudo systemctl start mysql ``` ``` sudo systemctl daemon-reload sudo systemctl start mysql ``` **Step 3: Connect Without a Password** With MySQL running without normal privilege checks, connect as root: ``` mysql -u root ``` ``` mysql -u root ``` You should be able to access MySQL without entering the root password. **Step 4: Set a New Root Password** From the MySQL prompt, run: ``` FLUSH PRIVILEGES; ALTER USER 'root'@'localhost' IDENTIFIED BY 'YourStrongNewPassword123!'; ``` ``` FLUSH PRIVILEGES; ALTER USER 'root'@'localhost' IDENTIFIED BY 'YourStrongNewPassword123!'; ``` This reloads the privilege information and sets the new root password. **Step 5: Remove the Temporary Override** Once the password has been changed, restore the original MySQL service configuration: ``` sudo systemctl revert mysql sudo systemctl daemon-reload sudo systemctl restart mysql ``` ``` sudo systemctl revert mysql sudo systemctl daemon-reload sudo systemctl restart mysql ``` This removes the temporary override and starts MySQL using its normal configuration. **Step 6: Test the New Password** Finally, verify that the new password works: ``` mysql -u root -p ``` ``` mysql -u root -p ``` Enter the new password when prompted. This `systemd` override method can be useful when `mysqld_safe` does not behave as expected, particularly on customized server environments. ## Updating Application Configurations After a Password Change Changing the MySQL password only updates the database account. Any application still using the old password will lose database access until its configuration is updated. ### Where to Update the New Password Common locations include: - **WordPress:** Update `DB_PASSWORD` in `wp-config.php`. - **Laravel:** Update `DB_PASSWORD` in the `.env` file. - **Custom PHP applications:** Check `.env`, `config.php`, or `database.php`. - **Other CMS platforms:** Look for the database credentials in the application’s settings or configuration panel. A typical configuration entry may look like: ``` define('DB_PASSWORD', 'old_password_here'); ``` ``` define('DB_PASSWORD', 'old_password_here'); ``` Replace `'old_password_here'` with the new MySQL password. ### Restart the Relevant Web Service After updating the application configuration, restart the web server: ``` sudo systemctl restart nginx ``` ``` sudo systemctl restart nginx ``` Or, if you’re using Apache: ``` sudo systemctl restart apache2 ``` ``` sudo systemctl restart apache2 ``` If you’re using another web server, restart the relevant service instead. Then verify that the application can connect to MySQL correctly. > **Tip:** If several applications on the same server use the MySQL database: > > - Update the database password in all application configuration files. > - Make sure every application has the new credentials. > - Restart the relevant web services after updating the configurations. This helps prevent partial outages where one application reconnects successfully while another continues using the old password. ## When MySQL Doesn’t Need a Password (`auth_socket`) Some Ubuntu installations, particularly servers configured through control panels such as RunCloud, ServerAvatar, or similar platforms, may use the `auth_socket` authentication plugin for the MySQL root account. With this setup: - MySQL root authentication is linked to the Linux user. - `sudo` privileges are required to access MySQL root. - A MySQL root password is not required for the local login. - `mysql -u root -p` may not work as expected. ### Access MySQL Root with `auth_socket` If your root account uses `auth_socket`, connect with: ``` sudo mysql -u root ``` ``` sudo mysql -u root ``` Then change the password with: ``` ALTER USER 'root'@'localhost' IDENTIFIED BY 'YourNewPassword123!'; FLUSH PRIVILEGES; ``` ``` ALTER USER 'root'@'localhost' IDENTIFIED BY 'YourNewPassword123!'; FLUSH PRIVILEGES; ``` ### Switch to Password-Based Authentication If you want `mysql -u root -p` to work using password authentication, change the authentication plugin: ``` ALTER USER 'root'@'localhost' IDENTIFIED WITH caching_sha2_password BY 'YourNewPassword123!'; FLUSH PRIVILEGES; ``` ``` ALTER USER 'root'@'localhost' IDENTIFIED WITH caching_sha2_password BY 'YourNewPassword123!'; FLUSH PRIVILEGES; ``` The important distinction is that `auth_socket` authenticates the Linux user rather than asking for a MySQL password. Once you understand which authentication method your server uses, the expected login behavior becomes much clearer. For details about client compatibility and secure connections, see the official MySQL documentation for [`caching_sha2_password` authentication](https://dev.mysql.com/doc/refman/8.4/en/caching-sha2-pluggable-authentication.html). ![auth_socket and caching_sha2_password - MySQL Root Password](https://serveravatar.com/wp-content/uploads/2026/08/image-40.png) ## Change the MySQL Root Password Using ServerAvatar If your Ubuntu server is managed through ServerAvatar, you don’t have to manually stop MySQL, start it with `--skip-grant-tables`, or edit systemd configurations to change the database root password. [ServerAvatar](https://serveravatar.com/) provides a dedicated option in the server panel to update the root password for supported databases. ### Steps to Update the Database Root Password - Log in to your ServerAvatar account. - Navigate to the **server** panel by clicking on the server dashboard icon. ![navigate to server panel by dashboard icon - MySQL Root Password](https://serveravatar.com/wp-content/uploads/2026/08/image-41-1024x214.png) - From the server’s left sidebar, select **Settings**. ![navigate to the Settings section](https://serveravatar.com/wp-content/uploads/2026/08/image-43-1024x424.png) - Navigate to the **Security** section and find the **Update Database Root Password** section. - Enter the **New Password** and the same password in **Confirm Password**, and click **Update**. ![change the MySQL Root Password](https://serveravatar.com/wp-content/uploads/2026/08/image-44-1024x385.png) The new database root password takes effect immediately after the update. ### Why Use ServerAvatar? For servers managed through ServerAvatar, the panel-based approach can be more convenient than manually performing a password reset through SSH. It gives you a dedicated interface for updating the database root password without going through the multi-step `--skip-grant-tables` procedure. > **Note:** If your application uses the database root credentials, remember to update the corresponding password in your application’s configuration after changing it. ## Preventing Future Password Lockouts Getting locked out of MySQL can be frustrating, but a few practical habits can help prevent it. **1. Store MySQL Credentials Securely** Avoid keeping MySQL passwords in random text files or on your desktop. Instead: - Use a password manager. - Use a secure secrets manager such as HashiCorp Vault for server-side credentials. - For application credentials, environment variables and `.env` files can be used. - Keep `.env` files outside the web root whenever possible. **2. Use a Separate MySQL User for Each Application** Avoid using the MySQL `root` account for every application. Create a dedicated database user for each application and grant only the permissions it requires. This approach: - Limits the impact if one set of credentials is compromised. - Makes password rotation easier. - Prevents applications from having unnecessary root-level access. **3. Document Your Database Setup** Keep a secure private record containing important database details, such as: - MySQL root credentials - Server IP address - Applications connected to each database - Database and user relationships Good documentation becomes especially important when the person who originally configured the server is no longer available. **4. Test Your Backups** Having a backup is not enough, you should also confirm that it can actually be restored. - Periodically test MySQL backups. - Perform restore tests in a non-production environment. - Schedule a recurring reminder to test restores at least once every quarter. A backup that cannot be restored can create a false sense of security. **5. Consider a Managed Database Solution** For business-critical applications, consider using a managed MySQL service or platform to reduce the operational work involved in managing databases. Options include Amazon RDS and Google Cloud SQL. These solutions can reduce the burden of Password rotation, Backups, Access management, and database administration. You still retain control of your data while reducing the amount of database maintenance you need to handle yourself. If you prefer managing servers and applications, look over databases, SSL certificates, backups, and services from a single control panel instead of handling every task manually over SSH, [**ServerAvatar**](https://serveravatar.com/) **simplifies server management** while still giving you control over your infrastructure. [![Blog banner - ServerAvatar](https://serveravatar.com/wp-content/uploads/2025/09/728_90-Banner-1-1024x127.png)](https://serveravatar.com/?ref=blog)## MySQL Root Password Reset Commands: Quick Reference **Task****Command****Check MySQL status**`sudo systemctl status mysql`**Access MySQL with sudo**`sudo mysql -u root`**Log in using a password**`mysql -u root -p`**Stop MySQL**`sudo systemctl stop mysql`**Start MySQL**`sudo systemctl start mysql`**Restart MySQL**`sudo systemctl restart mysql`**Start without grant tables**`sudo mysqld_safe --skip-grant-tables --skip-networking &`**Reload privileges**`FLUSH PRIVILEGES;`**Change root password**`ALTER USER 'root'@'localhost' IDENTIFIED BY 'NewPassword';`**Check root authentication**`SELECT user, host, plugin FROM mysql.user WHERE user = 'root';`## Key Takeaways - MySQL `root` is a database administrator account and is separate from the Linux `root` user. - Check the MySQL authentication plugin before changing or resetting the root password. - If you know the current password, use `ALTER USER` to change it without stopping MySQL. - A forgotten MySQL root password can be reset using `--skip-grant-tables` when you have Linux root access. - Always plan for downtime before resetting the password because connected applications will temporarily lose database access. - Use `--skip-networking` with `--skip-grant-tables` to limit network access during the reset process. - Restart MySQL normally after changing the password and verify that the new credentials work. - Update the MySQL password in every application configuration that uses the changed credentials. - If your server uses `auth_socket`, MySQL root access may rely on Linux `sudo` instead of a MySQL password. - If you manage your server through ServerAvatar, you can update the database root password directly from the ServerAvatar panel. - Use dedicated MySQL users, secure credential storage, documentation, and tested backups to reduce future access problems. ## Conclusion Changing or resetting the MySQL root password on Ubuntu does not require reinstalling MySQL or risking your database data. If you know the existing password, `ALTER USER` provides a simple way to update it. If you’ve forgotten it, you can regain access by temporarily starting MySQL without its normal privilege checks, changing the root password, and then returning the service to its standard configuration. The important part is to handle the process carefully. Plan for application downtime, keep a recent backup, protect the temporary password-free MySQL session, and verify the new credentials before considering the job complete. Afterward, update every application that uses the old password and follow good credential-management practices to make future MySQL lockouts less likely. ## FAQs ### How do I change the MySQL root password on Ubuntu? If you can access MySQL, log in with `sudo mysql -u root` and use the `ALTER USER` statement to set a new password. You can then test it with `mysql -u root -p`. ### How can I reset a forgotten MySQL root password? If you’ve forgotten the password but have Linux root access, you can temporarily start MySQL with `--skip-grant-tables`, connect without a password, set a new root password, and restart MySQL normally. ### Will resetting the MySQL root password delete my databases? No, changing or resetting the MySQL root password does not delete your databases or their data. However, creating a recent backup before making authentication changes is strongly recommended. ### Why does `mysql -u root -p` fail even though MySQL is working? Your MySQL root account may be configured with the `auth_socket` authentication plugin. In that case, local root access can use Linux `sudo` authentication instead of a MySQL password. You can check the configured plugin using the `mysql.user` table. ### Do I need to update my applications after changing the MySQL password? Yes, Applications that store the old MySQL credentials will no longer be able to connect after the password changes. Update the database password in files such as WordPress’s `wp-config.php`, Laravel’s `.env`, or other application configuration files. ### What should I do after resetting the MySQL root password? Restart MySQL normally, verify that the new password works, update any applications using the old credentials, and confirm that those applications can connect to the database. Also, remove any temporary `--skip-grant-tables` configuration used during the reset.[](https://3.basecamp.com/5840738/buckets/41514807/boosts/new?boost%5Bboostable_gid%5D=Z2lkOi8vYmMzL1JlY29yZGluZy8xMDE4Mzc0MDk5Mw) ### About the Author Meghna Meghwani is a technical writer focused on Linux, Ubuntu, VPS hosting, server management, WordPress, PHP, Node.js, cloud hosting, and DevOps. She creates beginner-friendly tutorials, practical hosting guides, troubleshooting articles, and server security content designed to help developers and businesses manage applications and servers more efficiently. **Categories:** Blog, Guide, Linux, Others, Tutorials, Ubuntu **Tags:** Change MySQL Root Password, Linux, MySQL, MySQL Authentication, MySQL Password Reset, MySQL Password Ubuntu, MySQL Root Password, MySQL Root User, Reset MySQL Password Ubuntu, Reset MySQL Root Password, Ubuntu --- ### [CentOS vs Ubuntu: Which Linux Distribution Should You Choose?](https://serveravatar.com/centos-vs-ubuntu/) **Published:** July 23, 2026 **Author:** Meghna Meghwani **Content:** [![Blog banner - ServerAvatar](https://serveravatar.com/wp-content/uploads/2025/09/728_90-Banner-3-1024x127.png)](https://serveravatar.com/?ref=blog)CentOS vs Ubuntu is one of the most common comparisons for anyone researching Linux servers. If you’ve spent any time exploring hosting environments or choosing an operating system, you’ve probably hit the same question most people do: CentOS or Ubuntu? It’s one of the most asked questions in the Linux world, and rightfully so. The operating system you choose affects everything, how you install software, how often you update, how stable your server stays, and what happens when something breaks at any time. Here’s the thing though: this isn’t a settled debate with one winner. It never was. The right answer depends entirely on what you’re building, whom you are building it with, and how much hand-holding you need when things go sideways. In this guide, I’m going to break down both distributions honestly, where they shine, where they fall short, and which one actually makes sense for your situation. No fluff, just what I have learned from working with both in real server environments. ## TL;DR - CentOS is no longer actively developed, if you’re starting fresh today, Ubuntu is the practical choice - Ubuntu wins on community size, software availability, and predictable release cycles - CentOS (now replaced by CentOS Stream) still matters for legacy RHEL-aligned deployments - For new projects, Ubuntu LTS is the safest bet - If you need RHEL compatibility, look at Rocky Linux or AlmaLinux instead ## Understanding the Foundation: What These Distros Actually Are Before diving into the comparison, it helps to know what you’re actually choosing between. Linux distributions are built in layers. At the core, there’s the Linux kernel, the thing that talks to your hardware. Around that kernel sits a collection of system tools, libraries, package managers, and desktop environments that together make up a complete operating system. **The key insight:** different distributions make different trade-offs. Some prioritize cutting-edge features. Others prioritize stability above all else. Some are backed by companies with deep pockets. Others rely entirely on volunteer work. CentOS and Ubuntu represent two fundamentally different philosophies, even though both run on the Linux kernel. Understanding that philosophy is more useful than memorizing feature lists. ## What Is CentOS? [CentOS](https://www.centos.org/) stands for **Community Enterprise Operating System**. It’s derived from the same source code that [Red Hat](https://www.redhat.com/) uses for [Red Hat Enterprise Linux](https://www.redhat.com/en/technologies/linux-platforms/enterprise-linux) (RHEL). ![CentOS - CentOS vs Ubuntu](https://serveravatar.com/wp-content/uploads/2026/07/image-69-1024x482.png) **Think of it this way:** Red Hat writes a lot of enterprise software, tests it rigorously, and then releases the underlying code under an open-source license. CentOS takes that code, repackages it without the Red Hat branding, and offers it completely free. For years, this was a fantastic deal. You got enterprise-grade stability without the enterprise price tag. **Here’s the catch that trips people up:** CentOS Linux as you knew it is gone. In 2020, Red Hat announced it was [discontinuing CentOS Linux](https://www.centos.org/centos-linux-eol/) in favor of CentOS Stream, which is a rolling-release upstream development platform, not the stable downstream distribution CentOS users trusted. **What this means practically:** if you are running CentOS Linux today, you are on a system that no longer receives official updates or security patches. That’s not a hypothetical risk, it’s the current reality. ### Who CentOS Was Built For CentOS made sense for organizations that: - Needed binary compatibility with RHEL without paying for RHEL subscriptions - Ran stable, long-lived server workloads (internal tools, databases, web servers) - Had sysadmins comfortable with RHEL-style tooling If that sounds like your use case, the answer isn’t “choose CentOS” anymore, it’s to look at [Rocky Linux](https://rockylinux.org/) or [AlmaLinux](https://almalinux.org/), which are community-driven rebuilds of RHEL designed to fill exactly the gap CentOS left behind. ## What Is Ubuntu? [Ubuntu](https://ubuntu.com/) is a distribution built on top of Debian, one of the oldest and most respected Linux distributions still active. Ubuntu is developed and supported by Canonical, a company headquartered in the United Kingdom that oversees and finances its ongoing development. ![Ubuntu - CentOS vs Ubuntu](https://serveravatar.com/wp-content/uploads/2026/07/image-70-1024x513.png) **What Ubuntu did differently from the start:** it made Linux accessible. While other server-focused distros expected you to be comfortable compiling software from source or configuring everything by hand, Ubuntu shipped with sensible defaults, a readable package ecosystem, and documentation that actually helped. Ubuntu releases new versions on a strict six-month schedule. Every two years, one of those releases is an LTS (Long Term Support) version, these get five years of free security updates (ten years with Ubuntu Pro), making them predictable and stable for production servers. ### Why Ubuntu Became the Default Choice There’s a reason Ubuntu is what most hosting platforms, cloud providers, and tutorials default to: - **Massive community:** if you have a problem, someone has already solved it and posted the fix - **Vast software repository:** thousands of packages available via `apt` - **Predictable release cycle:** you know exactly when new versions drop - **LTS stability:** the 5-to-10 year support window is perfect for servers you don’t want to rebuild every six months - **Canonical behind it:** commercial backing means dedicated security teams and infrastructure **The trade-off?** Ubuntu pushes updates more aggressively than CentOS ever did. If you want the absolute newest packages, that’s great. If you want a system that stays frozen for five years, you need to stick to LTS and be deliberate about which packages you update. ## Deep Comparison: CentOS vs Ubuntu Let’s get into the specifics that actually matter when you’re running a server day-to-day. ### Package Management: The Day-to-Day Difference This is one of the most practical differences you’ll notice immediately. **CentOS uses DNF (Dandified Yum)** The modern evolution of the older YUM tool. Functionally, it’s similar: ``` sudo dnf install nginx ``` ``` sudo dnf install nginx ``` But the package availability is narrower. CentOS’s repository are conservative, they prioritize matching RHEL’s versions, which means you often get older versions of software than you’d find on Ubuntu. **Ubuntu uses APT (Advanced Package Tool)** Installing software looks like: ``` sudo apt update sudo apt install nginx ``` ``` sudo apt update sudo apt install nginx ``` The repository is massive. Want to run Node.js, Python, PHP, a database, a caching server? All in the official repository, all one command away. Configuration files go in predictable places, and the system handles dependencies automatically. For popular web software, CentOS is usually fine, but if you need the latest version of something specific, you might find yourself adding third-party repository or building from source. ### Stability Philosophy: Two Different Bets CentOS and Ubuntu have opposite definitions of “stable”. **CentOS (in its original form) bet on point-in-time stability**, you pick a version, it stays exactly as-is for its entire supported life. No surprises, no unexpected behavior changes from updates. The downside of CentOS is you’re running software that’s increasingly old by the time the support cycle ends. **Ubuntu’s LTS bet is rolling security stability**, the base system is frozen, but security patches and critical bug fixes are backported continuously. You get the same kernel and core libraries for five years, but with actual security fixes applied. For most server workloads, this is the better deal. ### Release Cadence and Planning If you hate surprises, this matters: - **CentOS** had no new versions in its traditional sense since Linux EOL. CentOS Stream updates continuously, but it’s a rolling release, meaning your system changes over time rather than staying frozen. - **Ubuntu non-LTS releases** come every six months and are supported for nine months. These are for desktop users who want the latest features or developers testing against new software. - **Ubuntu LTS releases** come every two years and are supported for five years (ten with Ubuntu Pro). These are what you want for servers. For servers, the predictability of Ubuntu LTS is hard to beat. You know your support window from day one. CentOS Linux gave you that too, but again, it’s gone. ### Security and Patching Both distributions take security seriously, but the delivery differs. - **CentOS** backported security fixes to its specific versions. If a vulnerability affected CentOS 7, the patch was written specifically for CentOS 7’s version of that software. This is thorough but can sometimes result in patches that feel slow. - **Ubuntu** has a dedicated security team that publishes updates through its security repository. For LTS versions, these patches apply to the current state of the software without changing its behavior in other ways, you get fixes without feature changes. Ubuntu also has Ubuntu Pro, a paid add-on that expands security maintenance to wider portions of the system. For regulated industries or businesses with compliance requirements, this can be worth it. ### Commercial Support Options If something breaks and you need someone to call: - **CentOS Linux:** No commercial support option, full stop. You’re on your own or relying on community forums. - **Ubuntu:** Canonical offers paid support plans at various tiers. For businesses that need a vendor to be accountable, this is a real option. - Additionally, RHEL and Rocky Linux/AlmaLinux both have or can have commercial support contracts if you need them. For production environments where downtime has real cost, having a commercial relationship with your OS vendor isn’t a luxury, it’s risk management. ### Ecosystem and Community - **CentOS’s** community was strong too, but smaller, and many resources redirected to RHEL documentation rather than CentOS-specific guides. - **Ubuntu’s** community is enormous. Documentation is thorough. Stack Overflow has answers for almost everything. Forums, tutorials, and blog posts all assume Ubuntu as the default. **In practical terms:** if you’re learning and will frequently Google errors or follow tutorials, Ubuntu is going to be a smoother experience. ### Default Configurations and Ease of Use Both are server-grade operating systems, neither is “easy” in the sense of holding your hand. But Ubuntu’s defaults are generally more forgiving. - **On CentOS,** you might find yourself configuring firewalld or iptables directly. - **On Ubuntu,** firewall setup with UFW is straightforward. Ubuntu’s SSH configuration out of the box is reasonably secure. Both require you to harden things yourself, but Ubuntu’s ecosystem has more tooling and guides for doing it cleanly. ## Feature Comparison Table FeatureCentOSUbuntu**Base**RHEL source codeDebian base**Package Manager**DNF/YUMAPT**Current Status**EOL (Linux), Stream is rolling releaseActively developed**Release Cadence**N/A (discontinued)6 months (interim), 2 years (LTS)**LTS Support Window**N/A5 years free, 10 years with Pro**Software Availability**Conservative, older packagesVast, up-to-date packages**Commercial Support**None (Linux)Canonical paid support**Community Size**Smaller, shifted to alternativesMassive, dominant in tutorials**Security Model**RHEL-derived, SELinux enabledAppArmor + traditional sec**Best For**RHEL-aligned legacy workloadsNew projects, web servers, cloud## When to Choose CentOS (or Its Alternatives) Here’s where it gets nuanced. CentOS Linux itself isn’t a choice anymore for new projects. But the philosophy CentOS represented, enterprise stability without enterprise pricing, lives on. Rocky Linux and AlmaLinux are both community-driven distros built to be binary-compatible with RHEL, just like CentOS used to be. If your requirements are: - You need RHEL compatibility - You want a stable, frozen base that doesn’t change unexpectedly - You have existing CentOS muscle memory Then Rocky Linux or AlmaLinux is what you’d actually deploy today, not CentOS. It is perfect if you are on a fast-moving development team. The six-month support window on interim releases means frequent upgrades, or you’ll find yourself on an unsupported system fast. ## When Ubuntu Makes Sense Ubuntu makes sense when: - You’re starting a new project today: LTS versions give you a clean, stable foundation with five or more years of support without surprises - You want the biggest software library: `apt` repos have almost everything, and if they don’t, PPAs and Snap packages fill the gaps - You’re learning: the community size means tutorials, guides, and solutions are everywhere - You need predictable support windows: you know exactly when Ubuntu 24.04 LTS stops getting updates, and that’s a date you can plan around - You want cloud-friendly: AWS, GCP, Azure, and DigitalOcean all have Ubuntu images ready to go, often with optimized kernels and cloud-init built in For most people starting a web project, a SaaS application, or a business tool, Ubuntu is the answer. **The honest reality:** For the vast majority of new projects, Ubuntu LTS is still the better choice simply because of ecosystem, community, and ongoing development. But if you have a specific reason to need RHEL compatibility, certain software vendors only certify for RHEL, internal tooling that depends on RHEL versions, then an AlmaLinux or Rocky deployment makes real sense. [![Blog banner - ServerAvatar](https://serveravatar.com/wp-content/uploads/2025/09/728_90-Banner-1-1024x127.png)](https://serveravatar.com/?ref=blog)## My Honest Take After working with both distributions in production environments, here’s what I’d tell you: **If you’re starting fresh, go with Ubuntu LTS.** The ecosystem is alive, the support windows are predictable, the community is huge, and you won’t find yourself stuck on an unmaintained system in three years. **CentOS taught us something important:** “free” and “community-supported” has limits. When Red Hat pulled the plug, CentOS Linux users had a scramble. Ubuntu’s commercial backing by Canonical, even with the freemium model, means there’s an entity with a financial incentive to keep the project healthy. **The one exception:** if your organization is already deeply invested in the RHEL ecosystem, or you need binary compatibility with certified RHEL software, then look seriously at Rocky Linux or AlmaLinux instead. They carry the torch CentOS dropped, and they do it well. But for everyone else? Ubuntu LTS is the default for a reason. ## Key Takeaways - CentOS Linux is discontinued, don’t start new projects on it - Ubuntu is the practical default, large community, vast repos, predictable LTS releases - CentOS Stream is a rolling release, not the stable CentOS people remember - Rocky Linux and AlmaLinux have emerged as leading replacements for CentOS Linux, offering compatibility with RHEL-based environments. - For most modern web applications, SaaS platforms, and cloud-based servers, Ubuntu LTS is generally the preferred choice. - DNF/YUM vs APT is a real day-to-day difference, Ubuntu’s package ecosystem is larger - Commercial support is available for Ubuntu via Canonical; CentOS Linux had none ## Conclusion The CentOS vs Ubuntu debate used to be a genuine fork in the road. Today, one of those paths has a “road closed” sign on it. For most developers and teams building new projects, Ubuntu LTS is the right default choice. You get stability without stagnation, a massive software ecosystem, and a community that has solved almost every problem you’re likely to encounter. If you’re coming from a CentOS background and mourning the loss of that stable, predictable server experience, the good news is that Rocky Linux and AlmaLinux have picked up that torch faithfully. But for everyone else, Ubuntu remains the workhorse that just works. Pick Ubuntu, start building, and don’t look back. ## FAQs ### Is CentOS still supported? No. CentOS Linux reached end of life. While CentOS Stream continues as a rolling release, it’s not the same stable distribution that CentOS Linux was. For server workloads, this matters significantly. ### Is Ubuntu good for servers? Yes, Ubuntu LTS (Long Term Support) versions are specifically designed for servers. They’re stable, get security patches for five to ten years, and have massive community support. The vast majority of web hosting companies, cloud providers, and server tutorials assume Ubuntu as the default. ### What’s the difference between CentOS and Ubuntu? CentOS was based on RHEL and prioritized stability through frozen versions. Ubuntu is based on Debian and prioritizes stability through continuously patched LTS releases. CentOS is discontinued; Ubuntu is actively developed. ### Can I switch from CentOS to Ubuntu without reinstalling? Technically possible with some effort (using migration tools or rebuilding), but in practice, a fresh installation of Ubuntu on a new server is cleaner and more reliable than attempting an in-place conversion. ### What are the best alternatives to CentOS today? Rocky Linux and AlmaLinux are the two most prominent community-driven alternatives built to be binary-compatible with RHEL. Ubuntu is the more common choice for new projects that don’t require RHEL compatibility. ### Does Ubuntu require a subscription? No. Ubuntu itself is completely free. Canonical offers paid plans (Ubuntu Pro) for extended security maintenance and commercial support, but the base LTS is free to use indefinitely on your own servers. ### About the Author Meghna Meghwani is a technical writer focused on Linux, Ubuntu, VPS hosting, server management, WordPress, PHP, Node.js, cloud hosting, and DevOps. She creates beginner-friendly tutorials, practical hosting guides, troubleshooting articles, and server security content designed to help developers and businesses manage applications and servers more efficiently. **Categories:** Blog, Guide, Linux, Others, Php, Ubuntu **Tags:** CentOS, CentOS Server, CentOS vs Ubuntu, DevOps, Linux, Linux Administrator, Linux Comparison, Linux Distribution, Linux Server, Ubuntu, Ubuntu Server --- ### [Best Facebook Groups for SysAdmins and Developers](https://serveravatar.com/facebook-groups-sysadmins-developers/) **Published:** August 7, 2026 **Author:** Meghna Meghwani **Content:** [![Blog banner - ServerAvatar](https://serveravatar.com/wp-content/uploads/2025/09/728_90-Banner-3-1024x127.png)](https://serveravatar.com/?ref=blog)Here’s what no one tells you when you first start running servers or building production software: the toughest problems rarely come with documentation. You run into a networking rule that nobody warns you about, your database starts behaving strangely at 2 AM, or a deployment script that worked perfectly for six months suddenly breaks down, and the official documentation simply… doesn’t have a solution for it. That’s where Facebook Groups for SysAdmins and Developers can help. That’s when you need people who have been there. Not a search engine. Not a Stack Overflow thread from 2014. Actual humans who remember the time they made the same mistake you just made, and know exactly how to fix it without making you feel stupid for asking. Facebook groups are one of the best places to find those humans. They’re informal, fast, and packed with practitioners, not spectators. The trick is knowing which ones are worth your time, and which ones are just echo chambers full of self-promotion and recycled content. This isn’t another generic roundup. I have spent time in these communities. Some I have lurked in for months before posting. Some I have gotten real answers from. A few I have actively avoided. What follows is the breakdown of the groups that actually deliver value if you are a system administrator or developer trying to level up, written from actual experience, not a listicle rewritten from a competitor’s listicle. ## TL;DR - Facebook groups can still be useful in 2026 when you find communities with genuine technical discussions. - The right group depends on your area of interest, from Linux and DevOps to software development and cloud technologies. - Active moderation and knowledgeable members generally matter more than raw member counts. - Smaller, specialized communities can sometimes provide more useful conversations than huge general-purpose groups. - Before posting a question, search the group’s previous discussions. Someone may have already solved the same problem. ## Why SysAdmins and Developers Still Need Facebook Groups in 2026 With thriving communities on Reddit, Discord, Slack, GitHub Discussions, and Stack Overflow, it’s easy to assume Facebook Groups have become outdated. However, for system administrators, DevOps engineers, cloud architects, and software developers, many Facebook Groups continue to provide value that other platforms don’t always offer. Rather than competing with modern communities, Facebook Groups complement them by bringing together experienced professionals, long-form discussions, and practical advice based on real production environments. ### Why They Still Matter **1. Experienced Professionals Lead the Conversations** One of the biggest advantages of established Facebook Groups is the quality of their members. Unlike many public forums that attract a large number of beginners, these communities often consist of professionals responsible for managing production infrastructure and business-critical applications. You’ll regularly find discussions involving: - Senior System Administrators - DevOps Engineers - Cloud Architects - Infrastructure Engineers - IT Consultants - MSP (Managed Service Provider) owners - Cybersecurity specialists - Software developers building production applications This creates an environment where technical discussions are based on practical experience rather than theory. **2. Higher Quality Answers for Real Production Problems** When you’re troubleshooting a server outage or deployment issue, generic documentation isn’t always enough. Active Facebook Groups frequently provide responses from professionals who have already encountered similar challenges in production. Instead of receiving only documentation links, members often share: - Step-by-step troubleshooting methods - PowerShell and Bash scripts - Infrastructure recommendations - Performance optimization techniques - Deployment best practices - Security improvements - Lessons learned from previous incidents The result is a much higher signal-to-noise ratio than many open communities. **3. Practical Knowledge Beyond Official Documentation** Vendor documentation explains how products are designed to work. Community discussions explain what happens when things don’t go as planned. Members commonly discuss real-world issues involving: - Windows Server administration - Linux server management - Active Directory replication - Microsoft 365 migrations - VMware and Hyper-V virtualization - Kubernetes and Docker deployments - AWS, Azure, and Google Cloud - Backup and disaster recovery - Server monitoring and automation These conversations often include practical workarounds, implementation tips, and deployment experiences that official documentation may not cover. **4. Better Visibility in Google Search** Another reason Facebook Groups remain valuable is their strong search presence. Searching Google for a specific error message or configuration problem frequently leads to Facebook discussions where experienced professionals have already documented the issue and shared possible solutions. These discussions often include: - Complete error messages - Log excerpts - Configuration examples - Multiple troubleshooting approaches - Community feedback on successful fixes - Updates from the original poster after resolving the issue This makes Facebook Groups a useful knowledge base for solving uncommon or difficult technical problems. **5. Communities That Have Proven Their Value** Not every Facebook Group is worth joining, but the communities that remain active in 2026 have generally earned their reputation over many years. Most low-quality groups filled with spam and inactive members have gradually disappeared, leaving behind communities that continue to deliver meaningful technical discussions. Well-managed groups typically offer: - Active moderation - Minimal spam and promotional content - Helpful and knowledgeable contributors - Consistent technical discussions - Strong community engagement - Experienced IT professionals willing to help For working system administrators and developers, these communities continue to be reliable places for learning, troubleshooting, networking, and staying current with evolving technologies. Facebook Groups may no longer be the newest destination for technical discussions, but they remain one of the few platforms where experienced practitioners openly share production knowledge, review architectural decisions, and help peers solve complex infrastructure challenges. ## How I Evaluated These Groups Before diving in, here’s the criteria I used, so you know this isn’t just a random list pulled from Google: - **Active moderation:** No spam, no self-promotional spam threads, no low-effort content flooding the feed - **Real engagement:** Questions get answers, not just reactions - **On-topic focus:** Communities that stay relevant to sysadmins and developers, not everything-and-the-kitchen-sink groups - **Practitioner presence:** The membership should skew toward people who actually do the work, not managers, not onlookers - **Accessibility:** Groups a working professional can join and get value from without wading through 10 years of off-topic posts These standards ruled out some popular-sounding groups that are technically “large” but practically dead or unmoderated. Size means nothing if nobody’s actually talking. ### Why Group Size Wasn’t a Ranking Factor A Facebook Group with hundreds of thousands of members isn’t automatically better than one with only a few thousand. Many large communities become inactive over time or are overwhelmed by spam, repetitive questions, and promotional content. Throughout this list, community quality mattered far more than membership numbers. The groups included here continue to stand out because they encourage meaningful discussions, maintain active moderation, and provide practical insights from professionals working with real-world infrastructure every day. ## The Best Facebook Groups for SysAdmins and Developers ### [ServerAvatar Community](https://www.facebook.com/groups/783718778726665) For ServerAvatar users and professionals interested in server management, a ServerAvatar focused community can be useful for discussing server administration, hosting, deployment, and related infrastructure topics. ![ServerAvatar Community - Facebook Groups](https://serveravatar.com/wp-content/uploads/2026/08/image-22-1024x491.png) **Detail****Information****Members**2.0K members**Group Type**PrivateA community centered around the platform gives users a place to exchange practical experiences and discuss challenges they encounter while managing servers and applications. **Why this group stands out** A platform-specific community can be particularly helpful when you’re looking for practical advice from people working with similar infrastructure. It’s also useful for learning how other developers and system administrators approach common hosting and server-management challenges. **Popular discussion topics include:** - Server setup and configuration - Application deployment workflows - Linux administration - Web hosting environments - PHP version and configuration management - Apache, Nginx, and OLS - Server security practices - DevOps workflows and automation - Backup strategies - Server monitoring - Website hosting challenges **Best suited for:** - Server administrators - Developers managing their own infrastructure - DevOps professionals - Hosting providers - WordPress professionals - ServerAvatar users **Where it shines** - Managing multiple servers from one place - Handling day-to-day infrastructure tasks - Finding practical solutions to server issues - Supporting developers managing their own servers - Improving website and application reliability - Learning from hosting and infrastructure - Discussing real-world server management challenges - Managing production hosting environments - Exploring efficient server administration workflows - Getting practical insights beyond basic documentation ### [Unix DevOps](https://www.facebook.com/groups/unix.devops?ref=serveravatar.com) Unix DevOps is focused on Unix and Unix-like operating systems and related technologies. ![Unix DevOps - Facebook Groups](https://serveravatar.com/wp-content/uploads/2026/08/image-23-1024x535.png) **Detail****Information****Members**8.5K members**Group Type**PrivateThe community covers a range of platforms and systems, including Linux and several Unix variants. That makes it particularly interesting for administrators who work with Unix-based infrastructure or want to learn from people with experience managing these environments. **Areas of interest include:** - Linux - BSD - AIX - HP-UX - Solaris - IRIX - Tru64 - Darwin - Minix The group is particularly relevant to professionals interested in traditional Unix administration as well as Linux-based infrastructure. Because communities focused on older Unix platforms can be harder to find, this type of group can provide an interesting place to exchange knowledge and discuss administration challenges. **Best suited for:** - Unix administrators - Linux SysAdmins - Infrastructure engineers - DevOps professionals - Professionals working with legacy Unix environments **Where it shines:** - Unix administration - Linux - BSD - System troubleshooting - Cross-platform Unix knowledge ### [Sysadmin | Cloud | DevOps](https://www.facebook.com/groups/1916230385068522/about?ref=serveravatar.com) If your work involves Linux, Windows, cloud infrastructure, databases, virtualization, or DevOps, this community is directly relevant to your field. ![Sysadmin | Cloud | DevOps - Facebook Groups](https://serveravatar.com/wp-content/uploads/2026/08/image-24-1024x525.png) **Detail****Information****Members**107.0K members**Group Type**PublicThe group covers a broad range of infrastructure technologies, making it useful for system administrators and engineers who regularly work across different parts of an IT environment. **Topics commonly associated with this type of community include:** - Linux administration - Windows administration - Cloud computing - Databases - VMware - Virtualization - DevOps - Infrastructure management - Technical tutorials - Industry news Because the group covers several infrastructure disciplines, it can be useful when you’re dealing with problems that cross technology boundaries. For example, a deployment issue might involve Linux configuration, cloud infrastructure, networking, and application behavior at the same time. **Best suited for:** - System administrators - DevOps engineers - Cloud engineers - Infrastructure professionals - Database administrators - IT professionals **Where it shines:** - Cloud infrastructure - Linux and Windows administration - Virtualization - DevOps - Infrastructure troubleshooting ### [Full Stack Developers / DevOps / Software Designers and Architects](https://www.facebook.com/groups/fullstackdevelopersnetwork?ref=serveravatar.com) This community brings together professionals working across software development, DevOps, design, and software architecture. ![Full Stack Developers / DevOps / Software Designers and Architects - Facebook Groups](https://serveravatar.com/wp-content/uploads/2026/08/image-25-1024x551.png) **Detail****Information****Members**27.3K members**Group Type**PrivateIts broad scope makes it useful for developers who aren’t limited to one layer of the technology stack. You may encounter discussions around: - Full-stack development - DevOps - Software architecture - Application development - Troubleshooting - Development resources - Industry news - Career opportunities - Learning resources One of the biggest advantages of a community covering both development and DevOps is that members can see problems from different perspectives. A developer might view an issue from the application perspective, while a DevOps engineer may concentrate on deployment, infrastructure, or system reliability. **Why this group can be useful** If you’re working across application development and infrastructure, discussions that combine these areas can help you understand how architectural and deployment decisions affect one another. **Best suited for:** - Full-stack developers - DevOps engineers - Software architects - Software designers - Developers interested in infrastructure ### [Black (WPT) Web Developers, Programmers, Engineers & Techs](https://www.facebook.com/groups/blackwpt?ref=serveravatar.com) This community brings together web developers, programmers, engineers, and technology professionals. ![Black (WPT) Web Developers, Programmers, Engineers & Techs - Facebook Groups](https://serveravatar.com/wp-content/uploads/2026/08/image-26-1024x559.png) [](https://storage.app.basecamp.com/5840738/blobs/3c6625aa-924e-11f1-a78a-0242ac120004/download/image.png) **Detail****Information****Members**5.2K members**Group Type**PrivateThe group has a broader professional focus than a community dedicated to one programming language or platform, making it relevant to people working across different areas of software and technology. **Topics and discussions can include:** - Software development - Programming - Web development - Technology trends - Professional experiences - Industry discussions - Technical questions - Collaboration and networking One of the useful aspects of a community like this is the opportunity to interact with professionals from different technical backgrounds. The group is particularly relevant if you’re looking for discussions that connect software development with broader technology and professional topics. **Best suited for:** - Web developers - Programmers - Software engineers - Technology professionals - Developers looking to network with other professionals ### [Software Development Mastery](https://www.facebook.com/groups/softwaredevelopmentmastery/?ref=br_rs?ref=serveravatar.com) Software Development Mastery is aimed at developers who want to improve their software development skills and solve practical programming problems. ![Software Development Mastery - Facebook Groups](https://serveravatar.com/wp-content/uploads/2026/08/image-27-1024x533.png) **Detail****Information****Members**58.8K members**Group Type**PrivateThe community has a strong software-development focus, making it more relevant to developers than groups centered primarily around server administration or infrastructure. **Topics you may find include:** - Software development - Programming problems - Development practices - Technical questions - Learning resources - Career development - Improving programming skills One of the benefits of a focused software-development community is that discussions can stay centered around the actual process of becoming a better developer. Instead of jumping between unrelated IT topics, developers can focus on programming challenges, development concepts, and practical ways to improve their skills. **Best suited for:** - Software developers - Programmers - Developers building their skills - People transitioning into software development - Developers looking for peer discussions **Where it shines:** - Software development - Programming problems - Developer learning - Practical development discussions ### [JavaFX Software Developers & Engineers](https://www.facebook.com/groups/javafxdevgroup/about?ref=serveravatar.com) JavaFX Software Developers & Engineers is a specialized community for developers working with JavaFX and desktop Java applications. ![JavaFX Software Developers & Engineers - Facebook Groups](https://serveravatar.com/wp-content/uploads/2026/08/image-28-1024x527.png) **Detail****Information****Members**3.4K members**Group Type**PublicUnlike broader programming communities, this group focuses on a specific technology, which can make it particularly valuable when you’re dealing with a JavaFX-specific problem. **Topics may include:** - JavaFX development - Java applications - Thick-client applications - Java programming - Technical troubleshooting - Development questions Specialized groups like this can be useful because members are more likely to understand the specific technology you’re working with. If you’re facing a problem that isn’t easily solved through general Java discussions, a community dedicated to JavaFX may provide more relevant perspectives. **Best suited for:** - Java developers - JavaFX developers - Desktop application developers - Software engineers working with Java **Where it shines:** - JavaFX - Desktop Java development - Java programming - Technology-specific troubleshooting ### [DevOps | Knowledge Sharing & Jobs](https://www.facebook.com/groups/1729270327378979/about?ref=serveravatar.com) If you’re interested in both DevOps knowledge and career opportunities, this community offers a combination of technical and professional content. ![DevOps | Knowledge Sharing & Jobs - Facebook Groups](https://serveravatar.com/wp-content/uploads/2026/08/image-29-1024x536.png) **Detail****Information****Members**4.0K members**Group Type**Public The group is particularly relevant to people who want to keep up with DevOps-related opportunities while also finding learning resources. **You may find discussions involving:** - DevOps jobs - Hiring opportunities - Training - Workshops - Boot camps - Technical resources - Industry information - Professional development A major benefit of this type of community is that it combines learning with career development. For someone actively looking for a DevOps position, keeping an eye on job-related discussions can provide insight into the technologies employers are looking for. **Best suited for:** - DevOps engineers - System administrators - Cloud engineers - Developers moving into DevOps - IT professionals looking for DevOps opportunities **Where it shines:** - DevOps jobs - Training opportunities - Professional networking - Industry resources ### [Docker Vietnam](https://www.facebook.com/groups/containervietnam?ref=serveravatar.com) ![Docker Vietnam - Facebook Groups](https://serveravatar.com/wp-content/uploads/2026/08/image-30-1024x535.png) **Detail****Information****Members**46.5K members**Group Type**PublicDocker Vietnam is a community centered around Docker and related technologies, with a particular focus on Vietnamese developers and technology professionals. For Vietnamese-speaking developers, the regional focus can make the group especially useful for finding technical discussions, local opportunities, and community connections. **Topics may include:** - Docker - Containers - Development workflows - DevOps - Technical troubleshooting - Industry news - Jobs and hiring - Courses and learning resources The regional nature of the community is one of its biggest strengths. Instead of only discussing technology in a global context, members can also exchange information relevant to developers working in Vietnam. **Best suited for:** - Vietnamese developers - Docker users - DevOps professionals - Developers working with containers - Technology professionals in Vietnam If you don’t speak Vietnamese, this may not be the most useful group for you because much of the community interaction is likely to depend on the language used by its members. ### [Google Cloud Platform & Kubernetes](https://www.facebook.com/groups/153996481787947?ref=serveravatar.com) Cloud computing and container orchestration often go hand in hand, and this community brings those two areas together. ![Google Cloud Platform & Kubernetes ](https://serveravatar.com/wp-content/uploads/2026/08/image-31-1024x529.png) DetailInformation**Members**44.2K members**Group Type**Public The group focuses on Google Cloud Platform and Kubernetes while also allowing discussions around related technologies that interact with cloud and container infrastructure. **Topics can include:** - Google Cloud Platform - Kubernetes - Cloud infrastructure - Containers - AWS and related cloud technologies - DevOps - Technical articles - Industry news - Troubleshooting - Learning resources For developers and system administrators moving toward cloud-native infrastructure, this combination is particularly relevant. Kubernetes can introduce challenges involving networking, storage, deployments, scaling, monitoring, and security. A community focused on both Kubernetes and cloud infrastructure can provide useful perspectives across those areas. **Where it shines:** - Kubernetes - Google Cloud - Cloud infrastructure - Container orchestration - Cloud-native technologies - DevOps **Best suited for:** - Kubernetes engineers - Cloud engineers - DevOps professionals - System administrators - Developers working with cloud-native applications ### [I am a Software Engineer](https://www.facebook.com/groups/2650530458605463/about?ref=serveravatar.com) This group is focused specifically on software developers and engineers working with different programming languages and technologies.[](https://storage.app.basecamp.com/5840738/blobs/7a6773e4-924f-11f1-8702-0242ac120004/download/image.png) ![I am a Software Engineer ](https://serveravatar.com/wp-content/uploads/2026/08/image-32-1024x528.png) **Detail****Information****Members**7.0K members**Group Type**Public Because software development covers so many languages and frameworks, a broader developer community can be useful when you encounter a problem that isn’t tied to one particular technology. **Topics can include:** - C and C++ - C# - Java - Android development - PHP - JavaScript - MySQL - HTML - CSS - Bootstrap - jQuery - General programming The broad technology coverage makes this group suitable for developers who work with multiple languages or want to learn about technologies outside their current stack. **Why developers may find it useful** A problem that looks like a language-specific issue can sometimes involve databases, web technologies, frameworks, or deployment. Being part of a broader developer community gives you access to people with different technical backgrounds. **Best suited for:** - Software engineers - Web developers - Programmers - Backend developers - Full-stack developers - Developers learning new technologies ### [Computer Science/Software Engineering Conferences](https://www.facebook.com/groups/607337719352077?ref=serveravatar.com) Not every useful developer community needs to revolve around troubleshooting. ![Computer Science/Software Engineering Conferences ](https://serveravatar.com/wp-content/uploads/2026/08/image-33-1024x530.png) **Detail****Information****Members**50.5K members**Group Type**Public This group focuses on computer science and software engineering conferences, making it particularly useful for developers, researchers, students, and professionals who want to discover technical events and research opportunities. **You may find information about:** - Computer science conferences - Software engineering conferences - Research events - Academic opportunities - Technology topics - Papers and presentations - International conferences The variety of conference topics is one of the main advantages of this type of community. Events may cover areas ranging from artificial intelligence and robotics to software engineering, security, and emerging technologies. **Why you should consider joining** Keeping track of conferences can help developers and technical professionals stay aware of new research and developments outside their day-to-day work. It can also be useful for people pursuing advanced education, publishing research, or looking for opportunities to connect with other professionals and researchers. **Best suited for:** - Software engineers - Computer science students - Researchers - Developers interested in emerging technologies - Professionals looking for conferences and technical events ## How to Get the Most Value From Facebook Groups Joining the right communities is only the first step. How you participate determines how much value you get from them. ### Search Before You Post Before creating a new question, search the group. Technical communities accumulate years of discussions, and there’s a good chance someone has already experienced a similar problem. Searching first can also help you understand how the community prefers questions to be presented. ### Include Useful Technical Details Instead of posting: > “My server isn’t working. Can anyone help?” Give people enough information to understand the problem. Include details such as: - Operating system - Software versions - Relevant error messages - Logs - Configuration details - What you already tried - When the problem started The better your question, the easier it is for someone to provide a useful answer. ### Don’t Treat Community Advice as Absolute Even experienced professionals can make mistakes. Before applying a command or configuration change to production, understand what it does and verify that it makes sense for your environment. This is particularly important when someone recommends: - Firewall changes - Permission changes - Database modifications - Kernel settings - Security configurations - Production deployment commands Use community discussions as a source of experience, not as a replacement for testing and proper change management. ### Give Back to the Community If someone helps you solve a problem, consider returning the favor. Share what worked, explain the solution, or help another member with a problem you’ve already encountered. That’s how technical communities stay useful. [![Blog banner - ServerAvatar](https://serveravatar.com/wp-content/uploads/2025/09/728_90-Banner-1-1024x127.png)](https://serveravatar.com/?ref=blog)## Facebook Groups vs Other Developer Communities Facebook isn’t the only place where SysAdmins and developers can find technical communities. Depending on the problem, you may also want to use: - Reddit for community discussions and experiences - Stack Overflow for programming questions - GitHub Discussions for project-specific conversations - Discord for real-time technical communities - Slack communities for professional networking - Official vendor forums for product-specific issues - Documentation and knowledge bases for authoritative technical information The best approach isn’t necessarily choosing one platform. Use different communities for different purposes. For instance, official documentation can explain how a feature is supposed to work, while a Facebook discussion can show how someone handled an unusual problem in production. ## Key Takeaways - Facebook Groups can still be valuable communities for SysAdmins, developers, DevOps engineers, and cloud professionals. - The quality of a community matters more than its total member count. - Focused groups can offer more useful discussions than broader technology communities. - Facebook Groups can help with troubleshooting, knowledge sharing, networking, career opportunities, and discovering technical resources. - Always search existing discussions before posting a new technical question. - Community advice should be tested and verified before applying changes to a production environment. ## Conclusion The best Facebook Groups for SysAdmins and Developers aren’t necessarily the biggest ones. What matters is whether the community contains people who actively work with the technologies you’re interested in and are willing to share their experience. From Linux and Unix administration to DevOps, cloud computing, software development, Docker, Kubernetes, Java, and web development, the groups above cover a broad range of technical interests. The key is to choose communities that match your work and learning goals. Join a few relevant groups, spend some time observing the discussions, search existing conversations before asking questions, and contribute when you have something useful to share. Because when you’re staring at a production problem at 2 AM, having access to someone who’s already made, and survived, the same mistake can be worth far more than another page of documentation. ## FAQs ### Are Facebook Groups still useful for SysAdmins and developers? Yes, active Facebook Groups can provide practical advice, troubleshooting experience, technical discussions, networking opportunities, and career-related resources for SysAdmins and developers. ### How do I choose the best Facebook Group for my needs? Look for groups with active discussions, knowledgeable contributors, effective moderation, and a clear technical focus. Choose communities that match your area of work, such as Linux, DevOps, cloud computing, software development, or Kubernetes. ### Should I consider the number of members when choosing a Facebook Group? Not necessarily, a large membership doesn’t guarantee useful discussions. An active, specialized community with fewer members can provide more relevant conversations and better technical engagement. ### What should I include when asking a technical question in a Facebook Group? Include relevant details such as your operating system, software versions, error messages, logs, configuration details, troubleshooting steps you’ve already tried, and when the problem started. This gives other members enough context to provide useful answers. ### Can I rely completely on solutions shared in Facebook Groups? No, community advice can be useful, but it should be verified before being applied, especially in production environments. Test commands and configuration changes carefully before making changes to servers or applications. ### Are Facebook Groups the only communities SysAdmins and developers should use? No, depending on your needs, you can also use Reddit, Stack Overflow, GitHub Discussions, Discord, Slack communities, official vendor forums, and technical documentation. Using multiple sources can give you different perspectives and more reliable information. ### About the Author Meghna Meghwani is a technical writer focused on Linux, Ubuntu, VPS hosting, server management, WordPress, PHP, Node.js, cloud hosting, and DevOps. She creates beginner-friendly tutorials, practical hosting guides, troubleshooting articles, and server security content designed to help developers and businesses manage applications and servers more efficiently. **Categories:** Blog, Guide, Others **Tags:** Developer Communities, DevOps, DevOps Communities, Facebook Groups, Facebook Groups for Developers, Facebook Groups for SysAdmins, Linux Administration, Linux Communities, SysAdmin Communities, System Administration --- ### [Pipes vs xargs in Linux: Which Should You Use in Bash Scripts?](https://serveravatar.com/pipes-vs-xargs/) **Published:** August 6, 2026 **Author:** Meghna Meghwani **Content:** [![Blog banner - ServerAvatar](https://serveravatar.com/wp-content/uploads/2025/09/728_90-Banner-3-1024x127.png)](https://serveravatar.com/?ref=blog)Picture this: you’re looking at a directory with 40 log files, and you need to delete every one that contains the word “backup.” What do you do, type each filename by hand? Copy and paste 40 times? That’s where Pipes vs xargs comes in. That was me in my first year managing servers. I’d sit there manually typing out filenames, making typos, second-guessing myself. It was inefficient and, frankly, embarrassing. A senior admin walked past my desk one day, watched me do this for about 30 seconds, and said: “Just use xargs.” That was it. No elaboration. And honestly? That one line changed how I work with the terminal forever. The Linux terminal is built around connecting commands, where the output of one command becomes the input for the next. However, there’s one important detail: not every command accepts data in the same way. Understanding this difference is what separates clumsy workarounds from clean, efficient one-liners. In this guide, I’m going to break down pipes and xargs from the ground up. We’ll look at what makes them different, when each one shines, and a few xargs tricks that have saved me more times than I can count. ## TL;DR - Pipes stream data as **stdin** between commands; xargs converts data into **command-line arguments** - Use **pipes** when chaining filters, text processors, or any command that reads stdin - Use **xargs** when the target command only accepts arguments (not stdin), or when you need batching, placeholders, or confirmation prompts - Filenames with spaces or special characters? Use `find -print0` + `xargs -0` - Start with a pipe; upgrade to xargs when the pipe doesn’t work or you need more control ## What Pipes (`|`) Actually Do Pipes are one of the core features of Unix and Linux that make command-line workflows powerful and efficient. The **pipe operator (**`|`**)** connects the **standard output (stdout)** of one command directly to the **standard input (stdin)** of another command. Instead of saving output to a file first, data flows instantly from one command to the next. You can think of a pipe as a conveyor belt in a factory. Each command performs a specific task and then passes the result to the next command in the chain. This modular approach follows the [Unix philosophy](https://en.wikipedia.org/wiki/Unix_philosophy?ref=serveravatar.com) of **“do one thing, and do it well.”** ### **How Pipes Work** - The first command generates output. - The pipe transfers that output directly to the next command. - The receiving command processes the incoming data immediately. - No temporary files are created unless you explicitly save the output. - Data is streamed continuously, making pipelines both fast and memory-efficient. **Basic Syntax** ``` command1 | command2 ``` ``` command1 | command2 ``` **Here:** - `command1` produces the output. - `|` transfers the output. - `command2` reads that output as its input. **Simple Example** ``` ls | wc -l ``` ``` ls | wc -l ``` - `ls` lists all files and directories in the current location. - The output is sent through the pipe. - `wc -l` counts the number of lines it receives. - The final output is the total number of files and directories listed. ![pipes - Pipes vs xargs](https://serveravatar.com/wp-content/uploads/2026/08/image-16-1024x29.png) Instead of manually counting files, the pipe automates the entire process. ### **Chaining Multiple Commands** One of the biggest strengths of pipes is that you can connect multiple commands together. ``` find . -name "*.log" | grep -v "access" | sort | uniq ``` ``` find . -name "*.log" | grep -v "access" | sort | uniq ``` This pipeline performs several operations in sequence: - `find` searches for all `.log` files. - `grep -v "access"` excludes filenames containing the word **access**. - `sort` arranges the remaining filenames alphabetically. - `uniq` removes duplicate entries from the sorted list. Each command focuses on a single task, making the pipeline easier to understand, maintain, and modify. ### Why Pipes Are So Powerful Pipes are widely used because they allow you to: - Combine simple commands into powerful workflows. - Process large amounts of data without creating temporary files. - Reduce disk I/O by streaming data directly between commands. - Build readable command sequences where each command has a clear purpose. - Reuse standard Linux utilities instead of writing custom scripts. ### Understanding Streaming Data The most important concept behind pipes is streaming. Rather than waiting for the first command to finish completely, many commands begin processing data as soon as it starts arriving. This streaming behaviour offers several benefits: - Faster execution for large datasets. - Lower memory usage. - Real-time processing of command output. - Efficient handling of logs and continuously generated data. ### A Common Limitation Although pipes are incredibly versatile, not every Linux command is designed to read data from standard input (stdin). **Some commands expect:** - A filename as an argument. - Direct interaction with the terminal. - Input from specific sources instead of a data stream. When such commands are placed in a pipeline, they may ignore the incoming data or produce unexpected results. This is why a pipeline that appears perfectly valid can sometimes return no output at all. Understanding which commands support **streaming input** and which require **explicit file arguments** is essential for building reliable Linux command pipelines. ## What Does `xargs` Actually Do? While pipes (`|`) pass data as standard input (stdin), `xargs` works differently. Instead of streaming data directly to another command, **it reads the input, converts it into command-line arguments, and then executes the command.** This makes `xargs` incredibly useful because many Linux commands are designed to accept arguments, not input from `stdin`. **Think of it this way:** - A **pipe** passes information continuously from one command to another. - `xargs` gathers that information, organizes it into arguments, and then runs the target command using those arguments. In simple terms, `xargs` acts as a translator between commands that produce output and commands that expect filenames or other values as parameters. ### How `xargs` Works When `xargs` receives input, it performs the following steps: - Reads data from standard input (stdin). - Splits the input into separate items (usually based on spaces, tabs, or newlines). - Builds a command using those items as arguments. - Executes the command automatically. - Repeats the process if the argument list becomes too large for a single command execution. Unlike a pipe, `xargs` doesn’t simply forward data, it constructs an entirely new command. **Basic Syntax** ``` command1 | xargs command2 ``` ``` command1 | xargs command2 ``` **Here:** - `command1` generates the output. - `xargs` reads that output. - `command2` is executed using the received values as command-line arguments. **Example: Deleting Temporary Files** ``` find . -name "*.tmp" | xargs rm ``` ``` find . -name "*.tmp" | xargs rm ``` - `find` searches for every file ending with `.tmp`. - The list of matching filenames is sent to `xargs`. - `xargs` combines those filenames into a single command. - It executes something similar to: ``` rm file1.tmp file2.tmp file3.tmp ``` ``` rm file1.tmp file2.tmp file3.tmp ``` Instead of running `rm` separately for every file, `xargs` can process many files in one or more efficient command executions. ### Why `xargs` Is Needed Many common Linux commands do not read data from standard input. Instead, they expect information to be provided as command-line arguments. Examples include: - `rm` - `mv` - `cp` - `chmod` - `chown` - `echo` If you simply pipe data into these commands, they often ignore it because they aren’t designed to process streamed input. `xargs` solves this limitation by converting streamed input into the argument format these commands expect. ### Why `xargs` Is Useful `xargs` is commonly used because it: - Converts standard input into command-line arguments. - Allows commands that don’t support `stdin` to work with pipeline output. - Reduces the need for writing shell loops. - Executes commands more efficiently by processing multiple arguments at once. - Makes automation scripts shorter, cleaner, and easier to maintain. - Works seamlessly with commands like `find`, `grep`, `awk`, and `sort`. ## A Simple **Walkthrough** **Consider this command:** ``` ls | echo ``` ``` ls | echo ``` **The output will simply be:** ``` (blank line) ``` ``` (blank line) ``` **Why?** - `ls` successfully lists the files. - The list is sent through the pipe. - `echo` ignores the incoming stream because it only prints the arguments provided when it starts. ![echo - Pipes vs xargs](https://serveravatar.com/wp-content/uploads/2026/08/image-17-1024x41.png) **Now compare it with:** ``` ls | xargs echo ``` **Example output:** ``` file1.txt file2.txt images notes.md ``` ``` file1.txt file2.txt images notes.md ``` **This time:** - `ls` generates the filenames. - `xargs` collects them. - It executes something similar to: ``` echo file1.txt file2.txt images notes.md ``` ``` echo file1.txt file2.txt images notes.md ``` **as shown below:** ![echo command - Pipes vs xargs](https://serveravatar.com/wp-content/uploads/2026/08/image-18-1024x53.png) Since `echo` receives arguments instead of streamed input, it displays them correctly. ## Key Difference Between `pipes` and `xargs` Although pipes and xargs are frequently used together, each one is designed to solve a different problem. **Pipes (|)****xargs**Pass data as standard input (stdin)Converts input into command-line argumentsStreams data continuouslyCollects input before executing a commandRequires the receiving command to support stdinWorks with commands that expect argumentsBest for data processingBest for executing commands on lists of files or valuesUnderstanding this distinction is the key to mastering Linux command pipelines. Whenever a command doesn’t accept input from a pipe but does accept arguments, `xargs` is often the missing piece that makes the workflow possible. ## Why the Difference Matters: stdin vs Arguments The biggest concept behind understanding pipes (`|`) and `xargs` is knowing the difference between **standard input (stdin)** and **command-line arguments**. Although both are ways of passing data between commands, they work in completely different ways. ### stdin vs Arguments: The Core Difference **Standard Input (stdin)** `stdin` is a continuous stream of data sent to a running command. Commands that work with stdin process incoming data as it arrives instead of waiting for everything to be available first. Examples of commands that commonly read stdin: - `grep` - `wc` - `sed` - `awk` - `cat` - `sort` - `uniq` **Advantages of stdin-based processing:** - Processes data line by line. - Uses less memory because data does not need to be stored completely. - Works efficiently with large files and continuous data streams. - Ideal for filtering and transforming text. **Example:** ``` cat server.log | grep "ERROR" ``` ``` cat server.log | grep "ERROR" ``` - `cat` sends the log contents through stdin. - `grep` reads the incoming stream and filters matching lines. **Command-Line Arguments** Arguments are values provided when a command starts executing. Instead of receiving a stream of data, the program gets a list of values it should work with. Examples of commands that primarily use arguments: - `rm` - `mkdir` - `chmod` - `mv` - `cp` - `ln` **Example:** ``` mkdir project1 project2 project3 ``` ``` mkdir project1 project2 project3 ``` Here, directory names are passed as arguments directly when `mkdir` runs. ![mkdir - Pipes vs xargs](https://serveravatar.com/wp-content/uploads/2026/08/image-19-1024x40.png) **Arguments are useful when:** - A command expects specific parameters. - You need to perform an operation on files or objects. - The command does not process stdin. ### Why `xargs` Exists A common beginner mistake is assuming every Linux command can receive piped data. **Example:** ``` cat directories.txt | mkdir ``` ``` cat directories.txt | mkdir ``` This doesn’t work because `mkdir` doesn’t read directory names from standard input (stdin). `xargs` solves this problem by converting streamed input into command-line arguments. **Example:** ``` cat directories.txt | xargs mkdir ``` ``` cat directories.txt | xargs mkdir ``` - `cat` outputs directory names. - `xargs` collects those names. - `xargs` creates a command similar to: ``` mkdir folder1 folder2 folder3 ``` ``` mkdir folder1 folder2 folder3 ``` - `mkdir` receives the values exactly how it expects them. ### Commands That Support Both stdin and Arguments Some Linux utilities are flexible and can work in both ways. Examples: - `grep` - `sort` - `uniq` - `head` - `tail` **For example:** **Using stdin:** ``` cat file.txt | grep "error" ``` ``` cat file.txt | grep "error" ``` **Using arguments:** ``` grep "error" file.txt ``` ``` grep "error" file.txt ``` Both approaches work. Understanding how each command accepts input helps you decide whether to use a pipe or `xargs`. ## When to Use Pipes (`|`) Pipes should usually be your first choice when working with commands that support stdin. They are simple, readable, and perfect for creating data-processing workflows. ### **Use Pipes for Filtering Data** **Example:** ``` cat server.log | grep "ERROR" | grep -v "timeout" | sort | head -20 ``` ``` cat server.log | grep "ERROR" | grep -v "timeout" | sort | head -20 ``` **This pipeline:** - Reads the server log. - Finds error messages. - Removes timeout-related entries. - Sorts the results. - Displays the first 20 matches. Each command performs one specific task, making the workflow easy to understand. ### **Use Pipes for Data Transformation** **Example:** ``` ps aux | grep nginx | awk '{print $2}' ``` ``` ps aux | grep nginx | awk '{print $2}' ``` **Process:** - `ps aux` lists running processes. - `grep nginx` filters interrelated processes. - `awk` extracts the process ID. Pipes are ideal when each command modifies or filters the output of the previous command. ### **Use Pipes for Large Data Streams** Pipes are efficient because they process data as it moves. **Benefits:** - Lower memory usage. - Faster processing for large files. - No need to create temporary files. - Supports real-time data processing. However, pipes only work when every command in the chain understands stdin. If a command expects arguments instead, the pipeline may fail. ## When to Use `xargs` Use `xargs` when you need to convert input data into command arguments. It is especially useful for file operations and automation tasks. ### **Use** `xargs` **When Commands Don’t Read stdin** **Example:** ``` find . -name "*.bak" | xargs rm -rf ``` ``` find . -name "*.bak" | xargs rm -rf ``` **How it works:** - `find` searches for backup files. - `xargs` collects the filenames. - `rm` receives those filenames as arguments. Without `xargs`, `rm` would not know what files to remove. ### **Use** `xargs` **to Control Batch Size** **Example:** ``` find . -name "*.jpg" | xargs -n 5 ls -lh ``` ``` find . -name "*.jpg" | xargs -n 5 ls -lh ``` **The** `-n 5` **option tells** `xargs`**:** - Send only five files at a time. - Execute the command repeatedly until all files are processed. **Benefits:** - Prevents extremely long command lines. - Gives better control over execution. - Helps process thousands of files efficiently. ### Use `xargs` for Find-and-Execute Operations **Example:** ``` find . -type f -name "*.conf" | xargs cp -t /backup/configs/ ``` ``` find . -type f -name "*.conf" | xargs cp -t /backup/configs/ ``` **This:** - Finds all configuration files. - Passes them to `cp`. - Copies them into the backup directory. This pattern is extremely common in Linux administration. ### Use `xargs` Before Running Dangerous Commands Before executing commands like: - `rm` - `chmod` - `chown` Preview the generated command first: ``` find . -name "*.tmp" | xargs echo ``` ``` find . -name "*.tmp" | xargs echo ``` Review the output, then replace `echo` with the actual command. This simple habit helps prevent accidental changes or deletions. ![find and echo commad - Pipes vs xargs](https://serveravatar.com/wp-content/uploads/2026/08/image-20-1024x27.png) ## Advanced `xargs` Options ### Replace Arguments Anywhere Using `-I` Normally, `xargs` adds arguments at the end of a command. The `-I` option allows you to place the value anywhere. **Example:** ``` seq 1 10 | xargs -I {} touch /tmp/report_{}.pdf ``` ``` seq 1 10 | xargs -I {} touch /tmp/report_{}.pdf ``` **Result:** ``` report_1.pdf report_2.pdf report_3.pdf ... report_10.pdf ``` ``` report_1.pdf report_2.pdf report_3.pdf ... report_10.pdf ``` The `{}` placeholder is replaced with each input value. ### Handle Files With Spaces Using `-0` **Filenames can contain spaces or special characters:** ``` Q4 Report 2026.xlsx ``` ``` Q4 Report 2026.xlsx ``` Normal processing may break these filenames. **Use:** ``` find . -name "*report*" -print0 | xargs -0 rm ``` ``` find . -name "*report*" -print0 | xargs -0 rm ``` **How it works:** - `-print0` separates filenames using a null character. - `-0` tells `xargs` to read null-separated input. **This safely handles:** - Spaces. - Quotes. - Special characters. - User-uploaded files. ### Preview Commands Before Execution **For destructive operations:** ``` find . -name "*.log" | xargs echo ``` ``` find . -name "*.log" | xargs echo ``` Check the output first. ![find and echo command - Pipes vs xargs](https://serveravatar.com/wp-content/uploads/2026/08/image-21-1024x29.png) **Then run:** ``` find . -name "*.log" | xargs rm ``` ``` find . -name "*.log" | xargs rm ``` This is a simple but effective safety practice. ### Check Command Size Limits Large operations can hit system limits. **Use:** ``` xargs --show-limits ``` ``` xargs --show-limits ``` **This displays:** - Maximum command size. - Maximum argument length. - System limitations. Useful when processing thousands of files. ### Avoid Running Commands With Empty Input By default, `xargs` may execute a command even when no input exists. **Use:** ``` find . -name "missing-file" | xargs --no-run-if-empty rm ``` ``` find . -name "missing-file" | xargs --no-run-if-empty rm ``` **Now:** - If no files are found, the command will not execute. - Prevents accidental execution with empty input. ## Quick Rule to Remember - Use **pipes (**`|`**)** when the next command processes incoming data through stdin. - Use **`xargs`** when the next command needs data as arguments. Understanding this difference will help you build safer, faster, and more reliable Linux command-line workflows. ## Pipes vs `xargs`: Side-by-Side Comparison Both pipes (`|`) and `xargs` are powerful Linux command-line tools, but they solve different problems. The right choice depends on how the next command expects to receive data. **Feature****Pipes****xargs****Data transmission**Sends data as standard input (stdin)Converts input data into command-line arguments**Processing model**Processes data as a continuous streamCollects input and executes commands using batches of arguments**Works with**Commands that read from stdinCommands that accept values as arguments**Execution Behavior**Passes output directly to the next commandBuilds and runs a new command using received values**Memory Usage**Efficient for large streams because data is processed as it arrivesMay collect input before execution, depending on usage**Argument batching**Not supportedSupported via `-n`**Placeholder replacement**Not supportedSupported via `-I {}`**Confirmation prompts**Not supportedSupported via `-p`**Handles spaces in filenames**Requires extra careSafer with `find -print0` and `xargs -0`**Readability**Easy-to-read command chainsSlightly harder for beginners but more flexible**Default behavior on empty input**No data is passed to the next commandRuns the command by default unless `--no-run-if-empty` is used## Which One Should You Use? The easiest way to decide between a pipe and `xargs` is to understand how the next command accepts data. **Ask this question:** Does the command I am sending data to read from stdin? ### Use a Pipe (`|`) When: - The next command can process standard input. - You are filtering, searching, or transforming text. - You want a simple and readable command chain. **Examples:** ``` cat access.log | grep "404" ``` ``` cat access.log | grep "404" ``` ``` ps aux | grep nginx | awk '{print $2}' ``` ``` ps aux | grep nginx | awk '{print $2}' ``` **Common commands that work well with pipes:** - `grep` - `awk` - `sed` - `sort` - `cut` - `head` - `tail` - `wc` ### Use `xargs` When: - The command does not read stdin. - The command expects filenames or values as arguments. - You need to execute operations on multiple files. - You need control over batching or command execution. **Examples:** ``` find . -name "*.log" | xargs rm ``` ``` find . -name "*.log" | xargs rm ``` ``` find . -name "*.jpg" | xargs -n 5 ls -lh ``` ``` find . -name "*.jpg" | xargs -n 5 ls -lh ``` Common commands that often require `xargs`: - `rm` - `mkdir` - `chmod` - `mv` - `cp` - `echo` ## A Practical Decision Workflow When writing Linux commands or [bash scripts](https://www.gnu.org/software/bash?ref=serveravatar.com), follow this approach: - **Start with a pipe:** Try passing the output directly to the next command. - **Check if the command accepts stdin:** If it works, keep using the pipe. - **Switch to** `xargs` **if needed:** Use it when the command expects arguments instead of input streams. - **Handle filenames safely:** Use `find -print0` with `xargs -0` when filenames may contain spaces or special characters. - **Protect destructive operations:** Use `xargs -p` or preview commands with `echo` before executing. **Example:** Before: ``` find . -name "*.tmp" | xargs rm ``` ``` find . -name "*.tmp" | xargs rm ``` Safer testing: ``` find . -name "*.tmp" | xargs echo ``` ``` find . -name "*.tmp" | xargs echo ``` Review the output, then run the actual command. [![Blog banner - ServerAvatar](https://serveravatar.com/wp-content/uploads/2025/09/728_90-Banner-1-1024x127.png)](https://serveravatar.com/?ref=blog)## Common Beginner Mistakes to Avoid **Mistake 1: Assuming Every Command Reads stdin** Not every Linux command understands piped input. Commands like: - `echo` - `mkdir` - `rm` - `chmod` - `ln` expect arguments, not streams. Example: ``` ls | mkdir ``` ``` ls | mkdir ``` This does not create directories because `mkdir` is not reading filenames from stdin. Correct approach: ``` ls | xargs mkdir ``` ``` ls | xargs mkdir ``` **Mistake 2: Ignoring Spaces in Filenames** A filename like: ``` Project Backup.txt ``` ``` Project Backup.txt ``` can be interpreted as two separate arguments: ``` Project Backup.txt ``` ``` Project Backup.txt ``` when processed incorrectly. Use null-separated input for safe handling: ``` find . -name "*.txt" -print0 | xargs -0 rm ``` ``` find . -name "*.txt" -print0 | xargs -0 rm ``` This correctly handles: - Spaces. - Quotes. - Special characters. - User-generated filenames. **Mistake 3: Running Destructive Commands Without Testing** Commands involving: - `rm` - `chmod` - `chown` should always be tested first. Instead of: ``` find . -name "*.tmp" | xargs rm ``` ``` find . -name "*.tmp" | xargs rm ``` Preview first: ``` find . -name "*.tmp" | xargs echo ``` ``` find . -name "*.tmp" | xargs echo ``` This lets you verify exactly what will be executed. **Mistake 4: Using** `xargs` **When a Pipe Is Cleaner** Although `xargs` is powerful, it is not always the best choice. Example: Less readable: ``` cat file.txt | xargs grep "error" ``` ``` cat file.txt | xargs grep "error" ``` Better: ``` grep "error" file.txt ``` ``` grep "error" file.txt ``` or: ``` cat file.txt | grep "error" ``` ``` cat file.txt | grep "error" ``` Use the simplest tool that solves the problem. ## Key Takeaways - Pipes (`|`) send output as **standard input (stdin)**. - `xargs` converts input into **command-line arguments**. - Text-processing tools like `grep`, `awk`, `sed`, `sort`, and `wc` work well with pipes. - File-operation commands like `rm`, `mkdir`, `chmod`, and `cp` often need `xargs`. - Use `-n` to control argument batches. - Use `-I {}` when you need custom argument placement. - Use `-p` for confirmation before executing commands. - Use `find -print0` with `xargs -0` for safe filename handling. - Start with pipes and move to `xargs` when you need argument-based execution or additional control. - Always preview destructive commands before running them. ## Conclusion Pipes and xargs are not rivals, they’re two sides of the same coin. They both solve the problem of connecting commands together, just in different ways. Pipes are about flow; xargs is about batch. Pipes are about streaming; xargs is about packaging. Knowing which mode a command expects is the key to using both effectively. Once this clicked for me, my bash scripts became dramatically cleaner. I stopped fighting the terminal and started thinking in terms of data flow, what does this command output, what does the next command expect, and how do I bridge the two? Pipes and xargs are the bridges. If you’re managing servers and want to automate the repetitive command-line work without writing full scripts every time, these two tools alone will take you surprisingly far. ## FAQs ### What’s the main difference between pipes and xargs? Pipes send data as a continuous stream to a command’s standard input (stdin). xargs collects that data and passes it as command-line arguments instead. Most commands accept arguments; only some read stdin. ### Can I use pipes instead of xargs? Only if the target command reads stdin. If it doesn’t, like `rm`, `mkdir`, `echo`, `chmod` , pipes silently fail. In those cases, xargs is the solution. ### When should I use xargs over pipes? Use xargs when the receiving command only accepts arguments, when you need to batch arguments with `-n`, when you want placeholder replacement with `-I`, or when you’re handling filenames that contain spaces or special characters. ### How do I safely delete files using xargs? Always preview first. Replace the destructive command with `echo` to see what arguments xargs would generate: `find . -name "*.tmp" | xargs echo`. Once the output looks correct, replace `echo` with `rm`. For extra safety, use `xargs -p` to confirm each operation. ### Do pipes or xargs perform better? For streaming operations on large data sets, pipes are more memory-efficient because they process data incrementally. xargs collects all input before executing, which means slightly higher memory usage but enables batching and argument-based commands that pipes simply can’t handle. ## Related Articles - [How to Change the Hostname on Linux Easily](https://serveravatar.com/change-hostname-linux/) - [How to Check Running Processes in Linux Using ps, top, htop & atop](https://serveravatar.com/check-running-processes-linux/) - [20 Linux Commands Every Server Admin Must Know](https://serveravatar.com/linux-commands-for-server-admins/) - [How to Delete Large Directories in Linux Quickly](https://serveravatar.com/delete-large-directories-in-linux/) - [How to Kill a Running Process in Linux](https://serveravatar.com/kill-a-running-process-in-linux/) ### About the Author Meghna Meghwani is a technical writer focused on Linux, Ubuntu, VPS hosting, server management, WordPress, PHP, Node.js, cloud hosting, and DevOps. She creates beginner-friendly tutorials, practical hosting guides, troubleshooting articles, and server security content designed to help developers and businesses manage applications and servers more efficiently. **Categories:** Blog, Guide, Linux, Others, Tutorials, Ubuntu **Tags:** Bash commands, Bash scripting, DevOps, Linux Command Line, Linux commands, Linux pipes, Linux shell scripting, Linux Tutorial, Linux xargs, Pipes vs xargs --- ### [Best Chrome Privacy Extensions to Protect Your Data in 2026](https://serveravatar.com/chrome-privacy-extensions/) **Published:** August 5, 2026 **Author:** Meghna Meghwani **Content:** [![Top Banner](https://serveravatar.com/wp-content/uploads/2026/08/image-5-1024x127.png)](https://serveravatar.com/?ref=blog)Open Chrome. Now, open a new Incognito window. Feel private? You’re not. Chrome Privacy Extensions can help protect your browsing activity, but Google may still see your IP address, device fingerprint, and everything synced to your account. Incognito mode only prevents local cookies from being saved; it doesn’t make you invisible. That’s the misconception a lot of people are still running on in 2026. They have been told Incognito is “private browsing”, and they believe it. Meanwhile, advertisers, data brokers, and whoever else is paying attention have a surprisingly detailed picture of their browsing habits.beh The best solution is not to switch browser modes but to use trusted extensions that address Chrome’s privacy gaps. Since the [Manifest V3 transition](https://developer.chrome.com/docs/extensions/develop/migrate/what-is-mv3?ref=serveravatar.com) changed how many extensions work, some older privacy tools may now offer limited protection. If you installed an extension a few years ago, review its current features and update status. This guide cuts through the noise. I have tested the extensions that actually hold up in 2026’s browser environment, understand which categories matter most for different threat models, and can tell you exactly what to install and why. ## TL;DR - Incognito mode helps prevent browsing activity from being saved locally after the session ends, but it does not hide your IP address or make you anonymous online. - The Chrome MV3 migration killed many old extensions; several popular picks from 2022-2024 are now dead or broken - Five tool categories matter most in 2026: content blocking, tracker learning, VPN, password management, and email privacy - You don’t need ten extensions. Most people need five carefully chosen ones - uBlock Origin, Privacy Badger, NordVPN, Bitwarden, and PixelShield make a tight, effective stack ## Why Chrome Privacy in 2026 Is a Different Problem Chrome has improved its built-in privacy tools with features like Tracking Protection, HTTPS-only mode, and Privacy Sandbox. However, these controls may not provide complete protection, especially as Google’s advertising ecosystem relies heavily on user data. Modern tracking has also become more advanced. Techniques such as browser fingerprinting, email pixels, and cross-site identity tracking may continue monitoring users even when third-party cookies are disabled. For stronger privacy, Chrome users should consider reliable extensions that address these gaps and remain compatible with the Manifest V3 extension model. **What this means practically:** you need extensions that cover the gaps Chrome leaves, and you need to know which extensions are actually still alive and working in 2026’s MV3 extension model. ## Understanding What Privacy Extensions Actually Do Before picking tools, it helps to understand the actual threat categories. Privacy is not one problem, it’s several distinct ones that need different solutions. ![Five categories of browser privacy threats](https://serveravatar.com/wp-content/uploads/2026/08/image-6.png) **Cross-site tracking** is the most familiar. Third-party scripts on sites you visit collect data about your behaviour, build profiles, and sell or share those profiles with other parties. This is what ad blockers target, and what tracking protection in browsers partially addresses. **IP and traffic exposure** is what your ISP, public Wi-Fi operators, and network-level observers can see when you’re not using encryption. This is what VPNs solve. Incognito doesn’t touch this at all. **Email surveillance** is the one most people forget. Marketing emails, newsletters, and even internal corporate emails routinely embed invisible tracking pixels that report back when you opened the message, how long you spent on it, and often your approximate location. This requires a dedicated email tracker blocker. **Credential compromise** from password reuse remains one of the most common attack vectors. If you use the same password across five sites and one of them gets breached, all five accounts are exposed. Chrome’s built-in autofill doesn’t help here, it just saves your passwords in Google’s ecosystem. **URL tracking parameters**, the `utm_source`, `fbclid`, `gclid` strings appended to links, follow you around the web and let trackers link your sessions across sites. These can be stripped without breaking page functionality. ## Quick Comparison of the Chrome Privacy Extensions Before exploring each extension in detail, use this comparison table to understand its main purpose, key privacy benefit, and the type of user it may suit best. **Chrome Extension****Main Purpose****Key Privacy Benefit****Best For****uBlock Origin**Blocks ads and unwanted contentHelps reduce trackers, intrusive ads, and potentially harmful domainsEveryday users**Privacy Badger**Limits online trackingDetects and restricts trackers based on their behaviourUsers who want additional tracker protection**NordVPN Chrome Extension**Protects browser trafficHelps mask your IP address and secure browser trafficRemote workers and public Wi-Fi users**Bitwarden**Manages passwordsCreates and stores strong, unique passwordsUsers managing multiple online accounts**Digital Shield**Blocks trackers and manages tabsHelps reduce tracking while improving tab managementUsers who want additional browsing controls**URL Cleaner**Removes tracking parametersCleans unnecessary tracking information from linksUsers who frequently open shared or marketing links**WebMark**Highlights and saves web contentHelps keep saved highlights under user controlResearchers and privacy-conscious readers**Grammar Checker**Checks writing and grammarSupports safer writing when its data practices are reviewedUsers writing emails, documents, or online content> **Note:** Extension features, permissions, availability, and privacy practices may change over time. Always review the latest information on the official Chrome Web Store page and the developer’s website before installing an extension. This table fits your blog well because it improves readability, helps users compare the tools quickly, and adds practical value without repeating the detailed sections. ## The Extensions That Actually Hold Up in 2026 ### 1. uBlock Origin: Your Foundation Layer [uBlock Origin](https://chromewebstore.google.com/detail/ublock/epcnnfbjfcgphgdmggkamkmgojdagdnn?ref=serveravatar.com) remains one of the most reliable content-blocking extensions for improving privacy and creating a cleaner browsing experience. ![uBlock Origin ](https://serveravatar.com/wp-content/uploads/2026/08/image-7-1024x659.png) Although Chrome’s Manifest V3 update changed how extensions handle network requests, uBlock Origin adapted with [uBlock Origin Lite](https://chromewebstore.google.com/detail/ublock-origin-lite/ddkjiahejlhfcafbddmgiahcphecmpfh?ref=serveravatar.com), which is designed to work within Chrome’s newer extension framework. **What uBlock Origin Helps Block** - Display advertisements and intrusive pop-ups - Online tracking scripts and third-party trackers - Malicious domains that may distribute harmful content - Browser fingerprinting resources - Cryptocurrency mining scripts - Social media tracking widgets embedded on websites **Manifest V3 and uBlock Origin Lite** Chrome’s Manifest V3 limits how extensions can monitor and filter network activity. As a result, uBlock Origin Lite uses Chrome’s updated extension APIs while continuing to provide effective ad and tracker blocking. For most users, the differences are minimal. However, some advanced features, such as highly customized filtering rules and detailed per-site controls, may be more limited than in the original version. **Recommended Settings** - Keep the default filter lists enabled, including popular ad and privacy filters. - Avoid enabling overly aggressive blocking rules unless necessary. - Use balanced or medium-level filtering to reduce ads and trackers without causing websites to malfunction. - Review blocked content if a website does not load or work correctly. uBlock Origin is lightweight, efficient, and effective for everyday browsing. If you plan to install only one privacy-focused Chrome extension, it is a strong starting point. ### 2. Privacy Badger: The Smart Tracker Learner [Privacy Badger](https://chromewebstore.google.com/detail/privacy-badger/pkehgijcmpdhfbdbbnkijodmdjhbjlgp?ref=serveravatar.com) is a privacy extension developed by the Electronic Frontier Foundation (EFF). ![Privacy Badger - Chrome Privacy Extensions](https://serveravatar.com/wp-content/uploads/2026/08/image-8-1024x502.png) Unlike traditional blockers that mainly depend on predefined filter lists, Privacy Badger identifies potential trackers by analyzing how third-party domains behave while you browse. **How Privacy Badger Works** - Monitors third-party domains across the websites you visit - Detects domains that appear to track users across multiple sites - Limits or blocks suspicious tracking activity automatically - Helps identify newer or less common trackers that may not yet appear on standard block lists - Focuses on reducing unwanted tracking rather than blocking all advertisements **Privacy Badger vs. Traditional Ad Blockers** Privacy Badger is not designed to be a conventional ad blocker. Its primary purpose is to reduce cross-site tracking and improve browsing privacy. Because some advertisements rely on tracking scripts, certain ads may disappear automatically. However, ad removal is a secondary effect rather than its main function. **Why Use It with uBlock Origin?** Privacy Badger works well alongside uBlock Origin because both tools serve different purposes: - **uBlock Origin:** Uses filter lists to block known ads, trackers, and unwanted content - **Privacy Badger:** Detects and limits trackers based on their behaviour across websites - **Combined:** Provides broader protection against both known and emerging tracking methods Using both extensions can help create a stronger privacy layer without relying on a single tracking-blocking approach. ### 3. NordVPN Chrome Extension: Closing the Traffic Exposure Gap The [NordVPN](https://chromewebstore.google.com/detail/vpn-for-chrome-nordvpn-pr/fjoaledfpmneenckfbpdfhkmimnjocfa?ref=serveravatar.com) Chrome extension adds an extra privacy layer by routing your browser traffic through a secure VPN server. This helps hide your IP address from websites and reduces exposure to network-level monitoring. ![NordVPN - Chrome Privacy Extensions](https://serveravatar.com/wp-content/uploads/2026/08/image-9-1024x499.png) Unlike ad blockers, a VPN extension does not remove advertisements or block every tracking script. Its main purpose is to protect your connection and control how your browser traffic is routed. **What the NordVPN Chrome Extension Does** - Encrypts traffic generated through the Chrome browser - Masks your real IP address from websites - Helps protect browsing activity on public Wi-Fi networks - Routes browser traffic through a remote VPN server - Allows you to manage VPN protection directly from Chrome - Provides more control over which browser activity uses the VPN connection **Browser Extension vs. Desktop VPN App** The Chrome extension protects only browser-related traffic, while the NordVPN desktop application can secure internet traffic across the entire device. **NordVPN Chrome Extension****NordVPN Desktop App**Protects Chrome browser trafficProtects traffic from the entire deviceUseful for browser-specific privacyProvides system-wide VPN protectionOffers convenient browser-level controlsCovers apps, background services, and browsersCan be managed directly from ChromeRuns independently in the operating system**Threat Protection Lite** NordVPN also includes [Threat Protection Lite](https://nordvpn.com/next-gen-antivirus?ref=serveravatar.com), which adds another layer of browser security by: - Blocking access to known malicious websites - Helping prevent harmful domains from loading - Reducing exposure to certain online threats - Providing protection alongside the VPN connection It is not a replacement for a dedicated ad or tracker blocker, but it can complement tools such as uBlock Origin and Privacy Badger. **Important Privacy Considerations** The effectiveness of any VPN extension depends on the provider’s infrastructure, security practices, and privacy policy. Before choosing a VPN, consider the following: - Review the provider’s privacy and logging policies - Check whether its privacy claims have been independently audited - Avoid unknown or unverified free VPN extensions - Review the permissions requested by the extension - Choose a trusted provider with clear security and privacy practices **The honest caveat:** a VPN extension only works as well as the VPN provider’s infrastructure and privacy policy. NordVPN’s no-log policy has been independently audited, which matters. A “free VPN” Chrome extension from an unknown vendor is often worse than using nothing, those tools have to monetize somehow, and your traffic data is the obvious product. ### 4. Bitwarden: Password Management That Doesn’t Nickel-and-Dime You [Bitwarden](https://chromewebstore.google.com/detail/bitwarden-password-manage/nngceckbapebfimnlniiiahkandclblb?ref=serveravatar.com) is a popular password manager that offers strong security features and a useful free plan. It stores passwords in an encrypted vault, making it easier to manage login details without relying on weak or repeated passwords. ![Bitwarden - Chrome Privacy Extensions](https://serveravatar.com/wp-content/uploads/2026/08/image-10-1024x500.png) Reusing the same password across multiple accounts can put all of them at risk. If one website experiences a data breach, attackers may use the leaked credentials to access other accounts with the same login details. A password manager helps reduce this risk by creating and storing unique passwords for every account. **Key Features of Bitwarden** - Stores unlimited passwords in an encrypted vault - Generates strong and unique passwords - Autofills login credentials in Chrome - Syncs passwords securely across supported devices - Stores secure notes, recovery codes, and license information - Supports two-factor authentication (2FA) features - Offers both free and premium plans **How Bitwarden Protects Your Data** - Uses end-to-end encryption to secure stored information - Encrypts sensitive data on your device before it is synchronized - Keeps passwords protected from unauthorized access - Allows users to manage and control their password vault securely **Why Use Bitwarden Instead of Reusing Passwords?** Using Bitwarden helps you: - Create a different password for every account - Avoid remembering multiple complex passwords - Reduce the impact of credential leaks - Improve account security with stronger login credentials - Access passwords conveniently across devices Bitwarden is also open-source and regularly reviewed through independent security assessments. Its combination of strong encryption, useful features, and an accessible free plan makes it a practical password manager for everyday users. > **Security Tip:** Protect your Bitwarden account with a strong, unique master password and enable two-factor authentication for additional security. ### 5. Digital Shield: Tracker Blocking and Smarter Tab Management [Digital Shield](https://chromewebstore.google.com/detail/digital-shield-tab-suspen/pkonihncnkmbejhhjadaognganhinnhc?ref=serveravatar.com) combines privacy protection with tab management to help improve both browsing security and browser performance. It can help limit unwanted tracking while suspending inactive tabs to reduce unnecessary system resource usage. ![Digital Shield - Chrome Privacy Extensions](https://serveravatar.com/wp-content/uploads/2026/08/image-11-1024x501.png) **Key Features of Digital Shield** - Helps block trackers and unwanted third-party activity - Suspends inactive tabs to reduce memory and CPU usage - Improves browser performance when many tabs are open - Helps create a cleaner and more privacy-focused browsing experience - Allows users to manage active and inactive tabs more efficiently **Why Tracker Blocking Matters** Many websites use third-party trackers to collect information about browsing behaviour. A tracker-blocking extension can help reduce unnecessary data collection and provide greater control over online privacy. **Why Tab Suspension Is Useful** Keeping many browser tabs open can increase Chrome’s memory and CPU usage. Suspending inactive tabs may help: - Reduce memory consumption - Improve browser responsiveness - Lower unnecessary background activity - Keep the browser running smoothly with multiple open tabs > **Privacy Tip:** Review the extension’s permissions and privacy policy before installing it. Only use trusted extensions that are actively maintained and receive regular updates. Digital Shield can be a useful addition to a privacy-focused Chrome setup, especially for users who want tracker protection along with better tab and resource management. ### 6. URL Cleaner: Remove Tracking Parameters from Links [URL Cleaner](https://chromewebstore.google.com/detail/url-cleaner/dffbjiomnajbmlhjelpipfldgkijdemn?ref=serveravatar.com) helps remove unnecessary tracking information from supported links, allowing you to open cleaner URLs while reducing the amount of referral and campaign data shared with websites. ![URL Cleaner - Chrome Privacy Extensions](https://serveravatar.com/wp-content/uploads/2026/08/image-12-1024x503.png) Many links shared through newsletters, social media platforms, advertisements, and marketing campaigns contain extra tracking parameters. These may include tags such as `utm_source`, `utm_medium`, `utm_campaign`, or `fbclid`. **How URL Cleaner Helps** - Removes common tracking parameters from URLs - Cleans links shared through emails, social media, and marketing campaigns - Helps reduce unnecessary tracking information - Keeps URLs shorter and easier to share - Allows the main webpage to load without unnecessary tracking tags - Works automatically in the background after installation **Why Cleaning URLs Matters** Tracking parameters are commonly used to: - Identify where website visitors come from - Measure marketing campaign performance - Track clicks from emails, advertisements, or social media - Support website analytics and advertising activities Removing unnecessary parameters can help limit the browsing-related information included in links. > **Privacy Tip:** Some URL parameters are required for specific website features, such as login sessions, search filters, or page settings. If a link does not work correctly, temporarily disable the extension or add the website to its allowlist. URL Cleaner is a simple, low-maintenance privacy tool that helps keep links clean and reduces unnecessary tracking during everyday browsing. ### 7. WebMark: Private Highlighting Without the Data Harvesting [WebMark](https://chromewebstore.google.com/detail/webmark/glndcakmiiajcodokfkhehnholffmhbn?ref=serveravatar.com) is a browser-based highlighting and annotation tool designed for users who want to save important information without relying heavily on cloud storage. ![WebMark - Chrome Privacy Extensions](https://serveravatar.com/wp-content/uploads/2026/08/image-13-1024x503.png) It allows you to highlight content, add notes, and organize useful information while keeping privacy in focus. **Key Features of WebMark** - Highlight text directly on webpages - Use different colors to organize important information - Add notes to selected content - Search and review saved highlights - Use the extension without creating an account - Keep highlights stored locally instead of automatically uploading them to external servers **Why Local Storage Matters** Many web-highlighting tools store saved content on cloud servers. While cloud syncing is convenient, it may not be suitable for users working with private or sensitive information. Local storage can be useful when reviewing: - Confidential business information - Legal documents - Private research material - Internal reports - Sensitive online content > **Privacy Tip:** Before using any browser extension, review its permissions and privacy policy. If you work with sensitive information, choose tools that clearly explain where your data is stored and whether it is shared with third parties. WebMark can be a useful option for users who want a simple way to highlight and organize web content while maintaining greater control over their saved data. ### 8. Grammar Checker: Improve Writing While Browsing [Grammar Checker](https://chromewebstore.google.com/detail/grammar-checker/mpeepmfabickbdbckcejbflkpfamgcon?ref=serveravatar.com) helps users identify common writing mistakes and improve the clarity of their content while working in Chrome. It can be useful for writing emails, blog posts, social media content, documents, and other online text. ![Grammar Checker - Chrome Privacy Extensions](https://serveravatar.com/wp-content/uploads/2026/08/image-14-1024x502.png) **Key Features** - Detects common grammar and spelling mistakes - Suggests corrections to improve writing clarity - Helps identify punctuation and sentence errors - Supports writing across compatible websites - Provides quick suggestions while typing - Makes proofreading faster and more convenient **Why Use a Grammar Extension?** A grammar-checking extension can help you: - Reduce spelling and grammar errors - Improve sentence clarity and readability - Proofread content more efficiently - Create more professional emails and documents - Review content before publishing or sending it **Privacy Considerations** Grammar tools may process the text you enter to provide suggestions. Before installing an extension, review its privacy policy and check: - Whether your text is processed locally or on external servers - What information the extension collects - Whether typed content is stored or shared - Which websites and text fields the extension can access - Whether the extension is actively maintained and regularly updated > **Privacy Tip:** Avoid entering highly sensitive information into third-party grammar tools unless you understand how your text is processed and protected. Grammar Checker can be a helpful addition to your Chrome setup for improving everyday writing. For privacy-sensitive content, always review the extension’s data-handling practices before using it. ## The MV3 Reality Check: Are Your Old Extensions Still Working? Chrome’s shift from [Manifest V2 (MV2)](https://developer.chrome.com/docs/extensions/mv2?ref=serveravatar.com) to [Manifest V3 (MV3)](https://developer.chrome.com/docs/extensions/develop/migrate/what-is-mv3?ref=serveravatar.com) changed how browser extensions access and manage network activity. As a result, many older privacy and security extensions needed major updates to remain compatible with Chrome. **How Manifest V3 Affects Extensions** - Limits how extensions monitor and modify network requests - Introduces newer extension APIs with stricter security controls - Reduces access to certain real-time network filtering features - Requires developers to redesign or update some privacy tools - May limit advanced features in extensions built for Manifest V2 **Why Some Older Extensions May No Longer Work** Extensions that were not updated for Manifest V3 may: - Stop working completely - Offer limited functionality - Lose important privacy or filtering features - Become incompatible with newer Chrome versions - Remain listed in the Chrome Web Store despite being outdated **How to Review Your Chrome Extensions** Before installing or continuing to use an extension, check: ![Review of Chrome Extension](https://serveravatar.com/wp-content/uploads/2026/08/image-15-1024x543.png) - **Last updated date:** Prefer extensions that receive regular updates - **Manifest V3 compatibility:** Confirm that the extension supports Chrome’s current framework - **Developer information:** Use extensions from trusted and verified developers - **User reviews:** Look for recent feedback about functionality and reliability - **Permissions:** Avoid extensions requesting access that is unrelated to their purpose - **Privacy policy:** Review how the extension collects, processes, and stores data **Important Security Tip** An outdated extension may contain unpatched security issues or become vulnerable if it is no longer actively maintained. In some cases, inactive extensions may also change ownership, which can introduce new privacy or security risks. > **Best Practice:** Review your installed Chrome extensions regularly and remove any tools you no longer use. Keep only trusted, actively maintained extensions with clear privacy practices. Manifest V3 does not automatically make every privacy extension less effective. However, it makes regular extension reviews more important to ensure your privacy tools remain compatible, secure, and functional. ## Common Mistakes That Quietly Undermine Your Privacy Setup Installing extensions is the easy part. Here are the patterns I see most often that quietly undo the protection people thought they had. **1. Installing Too Many Content Blockers** Using several ad and tracker blockers at the same time does not always provide better protection. Multiple extensions may conflict with each other and cause websites to load incorrectly. Best practice: - Use one trusted content blocker - Add a separate privacy tool only when it provides a different function - Avoid installing multiple extensions with the same purpose - Remove duplicate or unnecessary blockers **2. Ignoring Extension Permissions** Some extensions request permission to read and change data on all websites. This level of access may be necessary for certain tools, but it also gives an extension broad access to your browsing activity. Before installing an extension: - Review the permissions carefully - Check whether the requested access matches its purpose - Avoid extensions that request unnecessary permissions - Remove extensions you no longer trust or use **3. Using Unknown Free VPN Extensions** A VPN extension may process or route your browsing traffic, so choosing a trusted provider is important. Unknown free VPN tools may have unclear privacy practices or collect browsing data. Before choosing a VPN extension: - Review the provider’s privacy and logging policies - Check for independent security audits - Verify the company and developer information - Avoid extensions with unclear ownership or privacy policies - Consider reputable providers that offer transparent free plans **4. Installing Extensions and Never Reviewing Them** Browser extensions require regular checks to remain secure and useful. An outdated or abandoned extension may stop working correctly or contain unresolved security issues. Review your extensions regularly: - Remove tools you no longer use - Check whether extensions are actively maintained - Review recent updates and user feedback - Confirm that permissions are still appropriate - Replace unsupported extensions with trusted alternatives > **Best Practice:** Keep your browser extension setup simple. A small number of trusted, actively maintained tools is often safer and more effective than installing many overlapping extensions. Regularly reviewing your extensions can help maintain a cleaner, faster, and more secure browsing experience. [![Blog banner - ServerAvatar](https://serveravatar.com/wp-content/uploads/2025/09/728_90-Banner-1-1024x127.png)](https://serveravatar.com/?ref=blog)## Who Needs What: A Practical Extension Stack by Use Case Not everyone needs every tool. Choose extensions based on your browsing habits, security needs, and the type of information you handle. Here’s a quick framework: **1. Casual Users** For everyday browsing on a home or personal network, start with: - **uBlock Origin:** Blocks ads, trackers, and unwanted content - **URL Cleaner:** Removes unnecessary tracking parameters from links - **Bitwarden:** Creates and stores strong, unique passwords **Recommended:** Enable Chrome’s built-in HTTPS-First Mode for an additional layer of browsing security. **2. Remote Workers and Freelancers** Users who work from cafés, coworking spaces, or public Wi-Fi networks may benefit from: - **uBlock Origin:** Reduces ads and online tracking - **Bitwarden:** Protects work and personal login credentials - **NordVPN Chrome Extension:** Adds privacy protection to browser traffic - **Grammar Checker:** Helps improve emails, documents, and online content **Best practice:** Use separate Chrome profiles for work and personal browsing. This helps keep accounts, extensions, bookmarks, and browsing activity organized and separated. **3. Users Handling Sensitive Information** If you work with confidential business data, legal documents, financial information, or private research, consider adding: - **Privacy Badger:** Helps limit cross-site tracking - **Digital Shield:** Adds tracker-blocking and tab-management features - **WebMark:** Helps highlight and organize web content - **Bitwarden:** Secures sensitive login credentials **Important:** Review each extension’s permissions and privacy policy before using it with confidential information. **4. Power Users** Users who want broader privacy coverage can combine tools that serve different purposes: - **uBlock Origin:** Ad and content blocking - **Privacy Badger:** Behavioral tracker protection - **NordVPN Chrome Extension:** Browser-level VPN protection - **Bitwarden:** Password management - **Digital Shield:** Tracker blocking and tab management - **URL Cleaner:** Removes tracking parameters from links - **WebMark:** Private web highlighting and notes - **Grammar Checker:** Writing and proofreading support > **Best Practice:** Avoid installing multiple extensions that perform the same task. A small, well-maintained set of trusted extensions is usually more effective than a large collection of overlapping tools. Choose only the tools that match your needs, review their permissions regularly, and remove extensions you no longer use. ## Key Takeaways - Incognito mode does not make you private. Chrome still logs your session, and your IP, ISP, and network observers can still see your traffic - Chrome’s transition to Manifest V3 affected several previously popular extensions, including PixelBlock and Ugly Email. Verify that your installed extensions are still actively updated and supported. - A tight stack of five to seven well-chosen extensions is more effective than fifteen loosely selected ones - uBlock Origin remains the foundation for content and tracker blocking - A reputable paid VPN is worth the cost for anyone on public networks - Bitwarden handles password security without the data-collection concerns of Chrome’s built-in manager - Audit your extensions monthly and remove anything that’s been abandoned ## Conclusion Protecting your privacy in Chrome requires more than simply using Incognito mode. The best Chrome privacy extensions can help reduce online tracking, block unwanted content, secure browser traffic, protect passwords, and give you greater control over the data you share while browsing. Tools such as uBlock Origin, Privacy Badger, NordVPN, Bitwarden, and other privacy-focused extensions can provide stronger protection when each tool is chosen for a specific purpose. However, installing many extensions does not automatically improve privacy. A small, trusted, and regularly updated extension setup is often safer and more effective than using multiple tools with overlapping features. Review extension permissions, confirm Manifest V3 compatibility, check privacy policies, and remove extensions you no longer use. By choosing reliable tools and reviewing them regularly, you can build a more private, secure, and controlled Chrome browsing experience in 2026. ## FAQs ### Does Incognito mode actually protect my privacy? No, not in the way most people think. Incognito mode only prevents Chrome from saving your browsing history, cookies, and form data locally on your device. Your IP address is still visible to the sites you visit and your ISP. Google still logs your activity associated with your account. If you’re on a shared network, other devices on that network can still see your traffic. For actual privacy, you need a VPN and tracker-blocking extensions, Incognito is not a substitute. ### How do I check if a Chrome extension is safe to install? Look at three things before installing any extension. First, the update date, if it hasn’t been updated since 2022, assume it’s abandoned and potentially compromised. Second, the permission request, if an extension asks for full site access and its purpose doesn’t logically require it, skip it. Third, the developer reputation, well-known names with public identities and audited codebases are safer than anonymous developers with generic tool names. ### Can Chrome extensions see my passwords? Yes, any extension with permission to “Read and change all your data on all websites” can, in theory, capture passwords you type into forms. This is why you should audit your extensions and remove any you don’t actively need or trust. Use a dedicated password manager (like Bitwarden) instead of Chrome’s autofill for sensitive accounts, and only grant full-site access to extensions where you have a specific, justified reason. ### What’s the Manifest V3 change I keep hearing about? Manifest V3 is Chrome’s extension framework that sets the rules for how browser extensions operate. Google’s 2025–2026 transition to MV3 restricted how extensions can intercept network requests, which broke several privacy extensions and forced developers to rebuild their products. Some extensions didn’t survive. uBlock Origin adapted with Lite, and most major privacy tools have MV3 versions, but older extensions like PixelBlock and Ugly Email are now non-functional. Always verify that your installed extensions have been updated for MV3. ### Do I need a VPN if I use Chrome’s built-in privacy features? Chrome’s built-in privacy features handle some tracking locally, but they don’t encrypt your traffic or hide your IP address from network observers. If you use public Wi-Fi, work with sensitive data, or want to prevent your ISP from logging your browsing activity, a VPN is still necessary. Chrome’s HTTPS-only mode ensures you connect to sites over encrypted connections, but it doesn’t change who can see that you’re connecting to those sites. ### About the Author Meghna Meghwani is a technical writer focused on Linux, Ubuntu, VPS hosting, server management, WordPress, PHP, Node.js, cloud hosting, and DevOps. She creates beginner-friendly tutorials, practical hosting guides, troubleshooting articles, and server security content designed to help developers and businesses manage applications and servers more efficiently. **Categories:** Blog, Guide, Others **Tags:** Best Chrome Privacy Extensions, Block Online Trackers, Browser Privacy, Chrome Data Protection, Chrome Privacy Settings, Chrome Privacy Tools, Chrome Security Extensions, Online Privacy, Secure Browsing --- ### [CI vs CD: Understanding Continuous Integration and Continuous Deployment](https://serveravatar.com/ci-vs-cd/) **Published:** August 3, 2026 **Author:** Meghna Meghwani **Content:** [![Blog banner - ServerAvatar](https://serveravatar.com/wp-content/uploads/2025/09/728_90-Banner-3-1024x127.png)](https://serveravatar.com/?ref=blog)There’s a moment every developer eventually runs into: you’ve been working on a feature for a few days, the code makes sense on your machine, you push it to production, and something breaks. CI vs CD becomes especially important when changes from other team members create conflicts that remain unnoticed until deployment, even when your code works locally. Continuous Integration helps teams integrate changes frequently, run automated checks, and detect issues before they reach production. The terms get conflated constantly. People say “CI/CD” like it’s a single thing, but CI and CD are two distinct practices solving two distinct problems. Let’s break it all down. **In simple terms:** Continuous Integration (CI) automatically builds and tests code changes. Continuous delivery keeps validated code ready for release but requires approval before production. Continuous deployment automatically releases eligible changes to production. ## TL;DR - **Continuous Integration (CI)** helps developers frequently integrate code changes into a shared repository while automatically building, testing, and validating those changes. - **Continuous Deployment** automatically releases validated code to production once it meets the required deployment conditions. - **Continuous Delivery** sits between CI and continuous deployment. Code is automatically built, tested, and kept ready for release, but a person approves or triggers the production deployment. - CI improves code quality and developer collaboration, while continuous delivery and continuous deployment make software releases faster and more consistent. - Start with CI. Add continuous delivery or continuous deployment when your testing, monitoring, and rollback processes are reliable. - Tools such as GitHub Actions, GitLab CI/CD, Jenkins, and CircleCI can help automate these workflows. ## What Actually Happens When You Don’t Use CI or CD Before we talk about what these practices are, it helps to understand what life looks like without them, because most small teams and solo developers are living it right now. **Here’s the typical scenario:** Without CI/CD, developers often test code locally and manually transfer it to the server using FTP, SFTP, or shared repositories. These manual workflows can be slow, inconsistent, and more prone to errors. **The problems stack up fast:** - Bugs slip through because there’s no automated check between “I wrote this” and “it runs in production” - Deployments may be slower or more error-prone because the release process depends on manual steps and can vary between team members. - Rollbacks can be slower or more difficult when there is no documented and automated recovery process. - Bottlenecks form around whoever “owns” the deployment process. - Fear builds up around releases. The longer you go between deployments, the more changes pile up, and the bigger the risk surface when you finally push. **Sound familiar?** Most teams operate in this mode for way too long because it “works fine” until it doesn’t. The real cost isn’t the occasional outage, it’s the slow drip of developer energy spent on anxiety and manual busywork instead of building. That’s where CI and CD come in. ## Continuous Integration Continuous Integration (CI) is the practice of frequently integrating code changes into a shared repository and automatically building, testing, and validating those changes. Its goal is to identify integration issues early and keep the shared codebase stable. ![Continuous Integration - CI vs CD](https://serveravatar.com/wp-content/uploads/2026/08/image-3.png) When a developer pushes a commit, a CI pipeline kicks in. The code gets pulled, built, and run through a suite of tests, everything from unit tests to integration tests to linting. If something fails, the team gets an immediate alert. If it passes, the code is cleared to move forward. ### Why Frequent Merges Matter Keeping code in a branch for too long can make integration more difficult as the main codebase continues to change. Frequent merges help teams: - Reduce the risk of large and complex merge conflicts - Identify integration issues earlier - Keep code changes smaller and easier to review - Resolve problems before they become harder to fix - Maintain better alignment with the main codebase CI supports frequent integration by automatically running checks when configured events, such as pushes, pull requests, or merges occur. This gives developers faster feedback and helps catch issues early. ### What a CI Pipeline Actually Does A typical CI workflow may include the following steps: - A developer submits code or creates a pull request. - The CI platform starts a workflow based on the repository’s configured triggers. - The workflow installs dependencies and prepares an isolated build environment. - It builds the application and runs automated checks, such as: - Unit tests - Integration tests - Linting - Code-quality checks - Security or dependency scans - The pipeline indicates whether the automated checks were successful or unsuccessful. - When branch protection is active, changes may need a successful pipeline check before they can be merged into the main branch. CI jobs can run on cloud-hosted or self-hosted runners. These isolated environments help create consistent builds instead of relying on each developer’s local computer setup. ### What CI Doesn’t Do CI focuses mainly on integrating and validating code. It can also: - Build application artifacts - Generate test reports - Run code-quality checks - Prepare software for release However, CI does not automatically deploy code to production by default. Production deployment requires a separate delivery or deployment workflow, which may include: - Manual approval - Automated release checks - Fully automated deployment ## Continuous Deployment Continuous deployment (CD) extends a reliable CI workflow by automatically releasing eligible code changes to production after they pass the required automated checks. ![Continuous Deployment - CI vs CD](https://serveravatar.com/wp-content/uploads/2026/08/image-4.png) Depending on the deployment strategy, the code may first move through staging, canary, or other verification environments. Some teams deploy directly to production after validation. The defining feature is that production deployment does not require a manual approval step for every eligible change. ### The Key Shift in Thinking Continuous deployment is not just a technical decision, it requires trust in your automated processes. Before adopting it, consider: - Are your automated tests reliable? - Can your pipeline detect issues before production? - Do you have monitoring and alerts in place? - Can you quickly roll back a failed deployment? Manual deployments can also introduce errors because they depend on people following the same steps consistently. The key question is not “Should deployment be manual or automated?” It is: “Are our testing and deployment processes reliable enough to support automation?” ### What Continuous Deployment Requires If you want CD to work without terrifying your on-call team, a few things need to be true: - Your test suite is comprehensive. Not perfect, nothing ever is. But good enough that you’re confident most bugs will be caught before production. - Rollbacks are fast. If something slips through and you need to undo it, you should be able to do it in minutes, not hours. - Production monitoring is active. Automated releases should be supported by application monitoring, error tracking, health checks, and alerts. Teams should be able to identify deployment-related problems quickly and respond using a tested rollback or mitigation process. - Your team is comfortable with small, frequent changes. CD works best when the changes are small. Big, infrequent releases are exactly what CD is designed to prevent. ### What CD Doesn’t Do Continuous deployment does not mean skipping important checks. Before deployment, teams should complete: - Code reviews - Automated testing - Security checks - Deployment and release validations Once a change meets the required conditions, it is automatically deployed to production without needing manual approval for each release. ## CI vs CD: The Direct Comparison Here’s the core difference is actually very simple. **Feature****Continuous Integration****Continuous Deployment****Main purpose**Integrate and validate code changesAutomatically release validated code**Automated builds**YesYes**Automated testing**YesYes**Production deployment**Not included by defaultAutomatically deployed when requirements are met**Manual approval before production**Depends on the workflowNo approval for each eligible release**Main benefit**Early feedback and stable integrationFaster and more consistent releases**Relationship**Provides the automated validation foundationUsually builds on a reliable CI process**Who it helps**DevelopersEnd users (and developers)**When does it end?**Code is validated and mergedCode is live in productionCI is generally the foundation for continuous deployment. A reliable automated validation process helps teams reduce the risk of releasing untested or incompatible changes. However, teams can use CI without implementing continuous deployment. ## The Third Mode: Continuous Delivery Continuous delivery extends CI by automatically building, testing, and preparing validated code for release. The software is kept in a deployable state, but a person or business process decides when to release it to production. This approach gives teams many of the benefits of automation while keeping control over the timing of production releases. **Feature****Continuous Integration****Continuous Delivery****Continuous Deployment****Automatically builds code**YesYesYes**Runs automated tests**YesYesYes**Keeps code ready for release**Not alwaysYesYes**Can deploy to staging**OptionalCommonCommon**Requires approval before production**Depends on the workflowUsually yesNo**Automatically deploys to production**NoNoYes**Main focus**Code integration and validationRelease readinessAutomated production releases## How Continuous Integration, Continuous Delivery, and Continuous Deployment Work Together CI helps developers integrate and validate code changes early. Continuous delivery builds on CI by keeping validated software ready for release. Continuous deployment extends the process further by automatically releasing eligible changes to production. These practices support one another. As teams improve their automated tests, deployment checks, monitoring, and rollback processes, they can safely automate more of the software delivery lifecycle. **A simple workflow:** ``` Developer Pushes Code │ ▼ CI Builds the Application & Runs Automated Tests │ ▼ Code Is Reviewed & Approved │ ▼ Changes Are Merged to the Main Branch │ ▼ Application Is Prepared or Deployed to a Testing Environment │ ▼ ┌──────────────────────────────┐ │ How Will the Application Be │ │ Released to Production? │ └──────────────────────────────┘ │ ┌─────────────┴─────────────┐ │ │ ▼ ▼ Manual Approval Automatic Deployment (Continuous Delivery) (Continuous Deployment) │ │ ▼ ▼ Production Deployment Is Production Deployment Manually Approved Happens Automatically │ │ ▼ ▼ Application Is Deployed Application Is Deployed to Production to Production ``` ``` Developer Pushes Code │ ▼ CI Builds the Application & Runs Automated Tests │ ▼ Code Is Reviewed & Approved │ ▼ Changes Are Merged to the Main Branch │ ▼ Application Is Prepared or Deployed to a Testing Environment │ ▼ ┌──────────────────────────────┐ │ How Will the Application Be │ │ Released to Production? │ └──────────────────────────────┘ │ ┌─────────────┴─────────────┐ │ │ ▼ ▼ Manual Approval Automatic Deployment (Continuous Delivery) (Continuous Deployment) │ │ ▼ ▼ Production Deployment Is Production Deployment Manually Approved Happens Automatically │ │ ▼ ▼ Application Is Deployed Application Is Deployed to Production to Production ``` ### So Should You Use Both? Start with Continuous Integration to automate builds, testing, linting, and code-quality checks. Once your Continuous Integration pipeline is reliable, consider Continuous Delivery or Continuous Deployment. Consider continuous deployment when your team has: - Reliable automated tests - Strong production monitoring and alerts - Fast and tested rollback procedures - Small, frequent code changes - Clear deployment health checks - Confidence in automated release workflows The goal is not to automate every step immediately. The goal is to automate the steps your team can operate reliably. ## Common Mistakes Teams Make With CI and CD After looking at how many teams approach this, a few patterns repeat themselves constantly: **Treating CI as optional.** If your team ignores the CI pipeline because “it’s just a suggestion,” you’ve already lost. CI only works if everyone respects the signal it sends. **Treating automated tests as an afterthought.** A CI pipeline is only as useful as the checks it runs. Add relevant tests and quality checks while developing features instead of waiting until just before release. **Skipping monitoring in CD.** Automated deployments can introduce issues in production. Use monitoring and alerts to detect problems quickly instead of relying on users to report them. **Making deployments large and infrequent.** CD supports smaller, more frequent releases, but teams must build this practice into their workflow. Avoid batching too many changes into a single deployment. **Not documenting the pipeline.** CI/CD is infrastructure. It has behavior, it has failure modes, and it needs to be understood by more than one person on your team. Documentation isn’t optional. ## Implementing CI/CD for WordPress: A Realistic Walkthrough CI/CD can also improve WordPress development, especially when teams build custom themes, plugins, or managed WordPress applications. A WordPress CI/CD workflow may include: - Running PHP linting and coding-standard checks - Running PHPUnit or other automated tests - Checking JavaScript and CSS quality - Building frontend assets - Scanning dependencies for known security issues - Creating a deployable build artifact - Deploying changes to a staging environment - Running smoke or health checks - Releasing to production through manual approval or automated deployment The exact workflow depends on the project. A small content-focused WordPress site may not need the same level of automation as a custom plugin, WooCommerce store, or multi-site application. ### Example: A Simple CI/CD Workflow Imagine a developer updates a Laravel application: 1. The developer opens a pull request. 2. The CI workflow runs PHP linting, automated tests, and code-quality checks. 3. A team member reviews the code. 4. The changes are merged into the main branch. 5. The application is automatically deployed to staging. 6. The team reviews the staging environment. **At this point:** - The automated build and testing process is Continuous Integration. - If the application is ready for production but requires someone to approve the release, it uses Continuous Delivery. - If the application is automatically deployed to production after passing the required checks, it uses Continuous Deployment. [![Blog banner - ServerAvatar](https://serveravatar.com/wp-content/uploads/2025/09/728_90-Banner-1-1024x127.png)](https://serveravatar.com/?ref=blog)## Popular CI/CD Tools - **GitHub Actions:** Integrated with GitHub and suitable for automating builds, tests, and deployments. - **GitLab CI/CD:** Built into GitLab and designed for creating repository-based pipelines. - **Jenkins:** Highly customizable and extensible but usually requires more setup and maintenance. Jenkins provides [extensive documentation](https://www.jenkins.io/doc?ref=serveravatar.com) for creating and managing automated pipelines - **CircleCI:** A cloud-based CI/CD platform with configurable workflows and integrations. [CircleCI guides](https://support.circleci.com/hc/en-us/articles/36230897769499-What-are-the-basics-of-CircleCI?ref=serveravatar.com) pipelines, workflows, jobs, and CI/CD configuration The right tool depends on where your code is hosted, your team’s workflow, your infrastructure, and how much CI/CD infrastructure you want to manage. ## Key Takeaways - **CI** automatically builds and tests code, helping teams catch integration issues early. - **Continuous delivery** keeps validated code ready for release but requires approval before production. - **Continuous deployment** automatically releases eligible code to production without manual approval. - **CI improves code quality and team confidence, while CD enables faster and more reliable releases.** - Start with CI and add more automation as your testing, monitoring, and rollback processes mature. - **CI/CD also benefits WordPress** projects, including custom themes, plugins, and multi-site environments. ## Conclusion CI, Continuous Delivery, and Continuous Deployment support different stages of software delivery. CI validates code changes, Continuous Delivery keeps them ready for release, and Continuous Deployment automatically moves eligible changes to production. Start by building a reliable CI pipeline, then gradually introduce delivery and deployment automation as your workflow matures. Strong automated testing, monitoring, deployment checks, and rollback processes help teams release updates faster, reduce manual effort, and maintain greater confidence in every deployment. ## FAQs ### Is CI the same as CI/CD? No. CI focuses on integrating and validating code changes. CI/CD is a broader term that describes CI together with automated delivery or deployment workflows. ### How does continuous delivery differ from continuous deployment? Continuous delivery keeps validated software ready for release but requires a person or business process to trigger production deployment. Continuous deployment automatically releases eligible changes to production. ### Can you use CI without CD? Yes. Many teams use CI for automated builds and testing while managing production deployments manually. ### Is continuous deployment safe? Continuous deployment can be reliable when supported by strong automated testing, deployment checks, monitoring, alerts, and fast rollback procedures. The appropriate level of automation depends on the application and the team’s operational maturity. ### Do small teams need CI/CD? Small teams can benefit from CI because automated checks provide fast feedback and reduce manual testing. Full continuous deployment may not be necessary for every project. ### Which CI/CD tool is best for beginners? The best tool often depends on where your code is hosted. GitHub Actions is a convenient option for GitHub repositories, while GitLab CI/CD integrates closely with GitLab projects.[](https://3.basecamp.com/5840738/buckets/41514807/boosts/new?boost%5Bboostable_gid%5D=Z2lkOi8vYmMzL1JlY29yZGluZy8xMDE1ODcyNTA1Mw) **Categories:** Blog, Guide, Others **Tags:** Automated Deployment, Automated Testing, CI vs CD, CI/CD Automation, CI/CD Pipeline, Continuous Delivery, Continuous Deployment, Continuous Integration, DevOps, Software Development --- ### [What Are Linux Logs? Understanding Log Files and Their Uses](https://serveravatar.com/linux-logs/) **Published:** August 1, 2026 **Author:** Meghna Meghwani **Content:** [![Blog banner - ServerAvatar](https://serveravatar.com/wp-content/uploads/2025/09/728_90-Banner-3-1024x127.png)](https://serveravatar.com/?ref=blog)Your server is busy. Every second, processes are starting and stopping, users are logging in, databases are fielding queries, and HTTP requests are hitting your web server. Most of this happens without you noticing, until something goes wrong. And something always goes wrong eventually. Maybe your site returns a blank white screen. Maybe SSH refuses your password even though you’re sure it’s correct. Maybe your database connection keeps timing out. When that moment hits, the first question any experienced admin asks is: **what do the logs say?** That’s what this post is about. Not just what Linux logs are, but how to read them and use them. We will cover the types of logs captured, how to read log entries, and how ServerAvatar makes the whole process much easier because most of us don’t want to live inside a terminal. If you are just getting started with server management, this is one of those skills that separates people who spend hours Googling error messages from people who open a log file and know exactly where to look. ## TL;DR - Linux logs are plain-text files that record everything happening on your server, from a user logging in to a package update failing - They are your primary source of truth when something breaks, and the fastest path to figuring out what went wrong - Logs live mostly in `/var/log/`, but you don’t have to dig through the terminal every time, ServerAvatar lets you fetch, filter, and read them from a dashboard - This guide covers what logs actually are, why they matter more than most beginners realize, the different types you’ll encounter, and how to read them efficiently ## What Exactly Is a Linux Log? A **Linux log** is a record of events and activities that occur within a Linux system. These logs are created by the Linux kernel, system services, applications, and other processes running on the server. ![linux log](https://serveravatar.com/wp-content/uploads/2026/08/image.png) Logs help you understand what happened on your system instead of relying on guesswork. They can provide details about: - User login and logout activity - Successful and failed connection attempts - Application errors and warnings - Service startup, shutdown, and failure events - System and kernel messages - Unexpected shutdowns or system issues - Security-related activity Most Linux log files are stored in the following directory: ``` /var/log/ ``` ``` /var/log/ ``` Many logs are plain-text files that you can view using commands such as `cat`, `less`, or `tail`. Some logs use a binary format and require specific tools to read. Linux logs are essential for troubleshooting issues, monitoring system activity, and identifying potential security problems. For a detailed guide to server management, you may also find our guide on [What Is Server Management? Key Practices and Benefits](https://serveravatar.com/what-is-server-management) helpful. ## Why Logs Matter More Than Most People Think Linux logs are useful for more than major system failures. They can help you understand everyday server activity and identify issues before they become more serious. For example, logs can help you: - Check whether a cron job ran successfully - Verify if a user attempted to access a service - Investigate slow server performance - Identify processes that may be using excessive resources - Find errors related to applications or system services Instead of guessing what caused an issue, logs provide records that help you understand what happened on your server. Although log files may initially look confusing, learning how to read and filter them makes troubleshooting much easier. It is also important to ensure that the services you rely on are generating logs. Most Linux services enable logging by default, but some may limit or disable logging to reduce disk usage or improve performance. For production servers, verify that important services are recording the information you may need for monitoring and troubleshooting. ## The Four Categories of Linux Logs Most Linux log files fall into one of four broad categories. Knowing which category you are dealing with helps you find the right file faster. **Application Logs:** Record activity related to installed applications, such as databases, mail servers, and scheduled tasks. These logs are often the first place to check when an application-related issue occurs. **System Logs:** Store information about the Linux kernel and core system processes, including system startup, hardware detection, power events, and kernel warnings. **Service Logs:** Track background services that support system operations, such as authentication services, cron jobs, and DNS services. They can help identify why a service failed or stopped working. **Event logs** are specialized records that track specific kinds of activity. Failed login attempts, security events, audit records, these fall here. On a production server, event logs are often the most security-sensitive. Knowing whether an issue is related to an application, the system, a background service, or a security event can help you decide which log to check first. ## What Your Server Is Actually Recording Let’s talk about what kind of information you will find inside these log files. This is where most beginners get lost, not because the content is complicated, but because they don’t know what they’re looking at. **A typical log entry has a few standard components:** a timestamp, a hostname, the name of the service or process that generated the entry, and the actual message. Some logs also include a process ID, a log level (like INFO, WARNING, ERROR), and sometimes a priority value. **Here’s a real example from an authentication log:** ``` Jul 31 04:22:15 server sshd[4821]: Failed password for invalid user admin from 203.0.113.42 port 44322 ssh2 ``` ``` Jul 31 04:22:15 server sshd[4821]: Failed password for invalid user admin from 203.0.113.42 port 44322 ssh2 ``` That entry tells you the exact time, the server hostname, the service (sshd), the process ID, what happened (failed password), which account was targeted (invalid user “admin”), the IP address making the attempt, and the port and protocol used. Now imagine you’re looking at that entry and you recognize the IP. Is it a legitimate user who forgot their password? Or someone probing your server? With context, and a few more entries, you can tell the difference. Logs make it possible. Most log files follow a similar pattern, even if the exact format varies. Once you’re comfortable reading one type of auth log, you’ll find MySQL logs, Apache logs, and kernel logs follow comparable structures. ## Common Linux Log Files and Their Uses The following table provides a quick overview of common Linux logs and the information they contain: **Log Type****Common Location or Command****Main Purpose****Authentication Logs**`/var/log/auth.log` or `/var/log/secure`Login attempts, SSH activity, and `sudo` events**MySQL Logs**Varies by configurationDatabase errors, connections, and service activity**Kernel Logs**`dmesg` or `/var/log/kern.log`Hardware, drivers, and kernel-level events**Web Server Logs**`/var/log/nginx/`, `/var/log/httpd/`, or server-specific pathsHTTP requests and web server errors**Mail Logs**`/var/log/mail.log` or `/var/log/maillog`Email delivery and mail-server activity**Cron Logs**Distribution-dependentScheduled task and cron-job activity**Boot Logs**`/var/log/boot.log`System startup and service-loading events## The Log Files You Should Know About Linux systems can generate many different log files, but you do not need to memorize all of them. Knowing the purpose of the most commonly used logs can help you find and troubleshoot issues faster. **Authentication Logs** located at `/var/log/auth.log` on Debian and Ubuntu or `/var/log/secure` on RHEL and CentOS systems. These logs record login attempts, SSH activity, `sudo` commands, and other authentication-related events. If you are troubleshooting SSH login issues, check our guide on [How to Fix SSH Connection Refused Error](https://serveravatar.com/ssh-connection-refused/) **MySQL Logs** record database activity, including connections, errors, startup and shutdown events, and other database-related information. They can help diagnose database connection issues or MySQL service failures. **Kernel Logs** available through `dmesg` or `/var/log/kern.log`. These logs contain information about hardware detection, device drivers, network interfaces, and low-level system errors. **Web server logs** web servers such as Apache, Nginx, and OpenLiteSpeed maintain their own logs. They usually include: - **Access logs:** Record incoming requests and server activity. - **Error logs:** Record server errors and issues that occur while processing requests. **Mail logs** usually stored in `/var/log/maillog` or `/var/log/mail.log`. These logs record email delivery activity, SMTP transactions, spam filtering events, and mail server errors. **Cron logs** track scheduled tasks and cron job activity. They can help verify whether a scheduled job ran and identify problems related to its execution. To learn more about creating and managing scheduled tasks, see our guide on [How to Schedule Tasks with cron in Linux](https://serveravatar.com/schedule-tasks-cron-linux/). **Boot logs** commonly stored in `/var/log/boot.log`. These logs record system startup activity, including services that started successfully or failed during the boot process. You rarely need to check every log file. When an issue occurs, identify whether it is related to authentication, an application, a service, the system, or another component, then review the most relevant log first. ## How to Read Log Files Without Losing Your Mind Large log files can contain thousands of entries, so opening them with `cat` may make them difficult to read. Instead, use Linux commands that help you view, search, and monitor logs more efficiently. - Monitor logs in real time with `tail -f` This command displays the latest log entries and automatically shows new entries as they are added. It is useful when reproducing an issue and monitoring what the system records. - **Use** `grep` **to search for specific information** You can search for an error message, IP address, failed login, or other keywords. You can also use: - `grep -i` for case-insensitive searches - `grep -v` to exclude matching lines - **Use** `less` **to read large log files** The `less` command allows you to scroll through a log file, search for specific text, and navigate without loading the entire file into memory. When reviewing logs, avoid treating every `ERROR` entry as a critical issue. Some messages may be harmless or informational. Check the surrounding entries, how often the error appears, and whether the same message is repeated. Over time, you will become more comfortable identifying important patterns and separating useful information from routine log activity. For more advanced log filtering and system-journal queries, refer to the official [`journalctl` documentation](https://www.freedesktop.org/software/systemd/man/255/journalctl.html?ref=serveravatar.com) [![Blog banner - ServerAvatar](https://serveravatar.com/wp-content/uploads/2025/09/728_90-Banner-1-1024x127.png)](https://serveravatar.com/?ref=blog)## A Practical Example: Debugging a “Site Is Down” Scenario Let’s walk through a realistic scenario so you can see how this works in practice. Suppose a website is not loading. Instead of checking every log file, work backward from the problem and review the most relevant logs step by step. **1. Check the web server error logs** Look for issues such as: - HTTP 500 errors - PHP fatal errors - Connection failures - A sudden increase in errors at a specific time **2. Review the MySQL logs** If the web server logs do not reveal the cause, check whether the database is working correctly. Look for: - MySQL service crashes - Failed database connections - Incorrect database credentials - Resource-related errors **3. Check the system logs** If the web server and database appear to be working normally, review the system logs for signs of resource exhaustion. For example, the server may have run out of memory, causing the Linux OOM killer to stop a process. By checking the logs in a logical order, you can narrow down the possible causes and identify the actual issue more efficiently. This approach helps you troubleshoot based on evidence instead of guessing. And here’s the thing, this whole process is much easier when you don’t have to SSH in and manually open each file. Which brings us to [ServerAvatar](https://serveravatar.com/). ## How ServerAvatar Makes Log Management Actually Usable Managing logs through the command line can be time-consuming. You need to know the correct log file paths, use commands to search or filter entries, and review information across multiple files. ServerAvatar takes a different approach. Instead of digging through directories on the command line, you can fetch, view, filter, and download [server logs](https://serveravatar.com/docs/server/logs) directly from the ServerAvatar dashboard. With ServerAvatar, you can: - View logs without manually navigating through server directories - Access authentication, MySQL, kernel, mail, Let’s Encrypt SSL, system error, event log, web server logs, and PHP FPM logs from one place - Fetch recent log entries or retrieve the complete log file - Search and filter log information more easily - Copy important log entries or download logs for further analysis ServerAvatar also makes web server logs easier to access. Just navigate to the Logs section from the server panel and select a log file. It also provides an option to fetch entries of a log for a required number of lines. ![server log - linux log](https://serveravatar.com/wp-content/uploads/2026/08/image-1-1024x615.png) For [application-level troubleshooting](https://serveravatar.com/docs/application/application-logs/), ServerAvatar provides access to: - **Access logs:** Record requests received by your application - **Error logs:** Capture failed requests, HTTP errors such as `404` and `500`, and application-related issues You can fetch all log entries, view the latest lines, select a specific line range, or search for a particular term using the Find option. ![application log - linux log](https://serveravatar.com/wp-content/uploads/2026/08/image-2-1024x378.png) ServerAvatar does not replace the need to understand Linux logs, but it makes log management more accessible. By reducing the need to memorize log paths and command-line options, it helps you investigate server and application issues more efficiently. It’s no substitute for understanding how to read logs, a skill that’s still essential. But it removes the friction that makes beginners avoid logs in the first place. ## Key Takeaways - Linux logs are plain-text records of everything happening on your server, the first place to look when something breaks - Most important logs live in `/var/log/` and fall into four categories: application, system, service, and event logs - Common files you’ll use often: auth logs, MySQL logs, kernel logs, web server logs, mail logs, and cron logs - Learn `tail -f`, `grep`, and `less` , these three commands handle 90% of what you’ll ever need to do with log files - Not every ERROR is a crisis; look at frequency, pattern, and context before concluding something is actually broken - ServerAvatar gives you a cleaner way to access and manage server and application logs without memorizing file paths or command-line syntax ## Conclusion Logs are one of those things that beginners tend to avoid and experienced admins swear by. The gap between those two groups isn’t talent, it’s familiarity. Once you understand what logs are recording, why they matter, and how to find what you’re looking for, server troubleshooting stops being a guessing game and starts being a process. You don’t have to memorize every log file on your system. Start with the ones that matter most for your setup, learn to read them efficiently, and build the habit of checking logs when things go wrong. That habit alone will save you hours of frustration. And if you want a simpler way to keep track of what’s happening across your servers, without switching between terminals and log files, ServerAvatar’s built-in log management is worth exploring. It won’t teach you how to debug, but it removes enough friction that you can focus on the actual problem instead of hunting for the right file. ## FAQs ### How do I find a specific error in a Linux log file? Use `grep` to search for the error text. For example, `grep "ERROR" /var/log/syslog` will find all lines containing “ERROR” in the syslog file. You can combine it with flags like `-i` for case-insensitive matching or `-B 3` to include three lines before the error for context. ### How often should I check my server logs? You don’t need to read them daily if nothing is broken. The practical approach is to check logs when something goes wrong, and to review auth logs periodically for suspicious activity, especially if your server is publicly accessible over SSH. ### Can I delete old log files to free up disk space? You can, but be careful. Never delete log files directly while a service is running, it can cause issues. Use [`logrotate`](https://linux.die.net/man/8/logrotate?ref=serveravatar.com) to automatically rotate, compress, archive, and remove old log files. ServerAvatar also has disk usage monitoring that can alert you when logs are consuming too much space. ### What’s the difference between system logs and application logs? System logs record events from the Linux kernel and core operating system, things like boot sequences, hardware detection, and kernel warnings. Application logs record activity from specific software running on your server, your web server, database, mail server, or custom applications. ### Does ServerAvatar support all types of Linux logs? ServerAvatar provides direct access to the most commonly used server logs from its dashboard, including authentication, MySQL, kernel, Let’s Encrypt, mail, and web server logs. For application-specific logs, the Application Logs feature lets you access access and error logs for each application you have deployed. ### About the Author Meghna Meghwani is a technical writer focused on Linux, Ubuntu, VPS hosting, server management, WordPress, PHP, Node.js, cloud hosting, and DevOps. She creates beginner-friendly tutorials, practical hosting guides, troubleshooting articles, and server security content designed to help developers and businesses manage applications and servers more efficiently. **Categories:** Blog, Guide, Linux, Others, Tutorials, Ubuntu **Tags:** DevOps, Linux, linux log, Linux Log Files, linux logs, Linux System Administration, Linux System Logs, Linux Troubleshooting, Linux Tutorials, What Are Linux Logs --- ### [How to List Users and Groups in Ubuntu Using Command Line](https://serveravatar.com/list-users-and-groups-in-ubuntu/) **Published:** July 30, 2026 **Author:** Meghna Meghwani **Content:** [![Blog banner - ServerAvatar](https://serveravatar.com/wp-content/uploads/2025/09/728_90-Banner-3-1024x127.png)](https://serveravatar.com/?ref=blog) If you’ve been working with Ubuntu for any length of time, you’ve likely encountered situations where you need to list users and groups in Ubuntu, check which user accounts exist on the system, or find out which groups a specific user belongs to. Maybe you’re onboarding a new team member and need to grant them access to a specific directory. Maybe you’re debugging a permission error and can’t understand why a user can’t reach a file they should have access to. Or maybe you’re inheriting a server from someone else and need to audit who’s on it. That’s exactly what we’re covering today. This guide walks you through everything you need to know about listing users and groups in Ubuntu using the command line. We’ll look at the files that store this information, the commands that query them, and some practical scenarios where this knowledge actually matters. ## TL;DR - Ubuntu stores user data in `/etc/passwd` and group data in `/etc/group` - Use `getent passwd` or `cat /etc/passwd` to list all users - Use `getent group` or `cat /etc/group` to list all groups - The `id` command shows a user’s UID, GID, and group memberships in one shot - The `who` and `w` commands reveal who’s currently logged into your system - Group membership determines what files and resources a user can access ## Understanding How Ubuntu Tracks Users and Groups Before we dive into commands, it helps to understand the underlying system. Ubuntu, like most Linux distributions, stores account information in plain-text files that live in the `/etc` directory. For additional guidance on managing Ubuntu accounts and permissions, refer to the [official Ubuntu user-management documentation](https://ubuntu.com/server/docs/how-to/security/user-management?ref=serveravatar.com). **The three key files are:** - **`/etc/passwd` :** holds user account information - **`/etc/shadow` :** stores password hashes and password-aging information. It is normally accessible only to the root user or privileged system processes. - **`/etc/group` :** stores group definitions You can open and read all three of these files right now. They follow a predictable format, and once you understand that format, you’ll have much more control over how Ubuntu manages access to your system. ## How Ubuntu Defines a User Account Every user on an Ubuntu system has a corresponding line in `/etc/passwd`. Here’s an example of a typical entry: ``` LOGINNAME:x:1001:1001:FULLNAME,,,:/home/DIRECTORY:/bin/bash ``` ``` LOGINNAME:x:1001:1001:FULLNAME,,,:/home/DIRECTORY:/bin/bash ``` That’s one line. Let me break it down field by field: ValueWhat It Means`LOGINNAME`the login name`x`Password marker, actual password hash lives in `/etc/shadow``1001`UID, the user’s numerical ID`1001`GID, the user’s primary group ID`FULLNAME,,,,`GECOS field, full name and optional info`/home/DIRECTORY`Your home directory path`/bin/bash`Default shell**The UID (User ID)** is what Ubuntu actually uses internally to track users, not the username. Root always has UID 0. System services get UIDs in the 1–999 range typically, while regular users start from 1000 onwards. **The GID (Group ID)** tells you which primary group the user belongs to. But here’s something that trips up many beginners: a user can belong to multiple groups. The primary group is just the one that’s assigned by default when creating files. ## How to List All Users in Ubuntu There are several ways to pull a user list. I’ll show you the most practical approaches, from quick one-liners to more targeted queries. If you are unsure which release is installed on your server or desktop, first [check your Ubuntu version using the command line or GUI](https://serveravatar.com/check-ubuntu-version/). ### The Straightforward Approach: `cat /etc/passwd` The most direct method is simply reading the passwd file: ``` cat /etc/passwd ``` ``` cat /etc/passwd ``` This dumps every user account on the system. System accounts, service accounts, regular users , all of them. ![list user - List Users and Groups](https://serveravatar.com/wp-content/uploads/2026/07/image-93-1024x77.png) The output is readable, but it includes a lot of system users you’ll probably never interact with (things like `daemon`, `nobody`, `www-data`). For a cleaner view focused only on human users, you might want to filter by UID range: ``` awk -F: '$3 >= 1000 && $3 != 65534 { print $1 }' /etc/passwd ``` ``` awk -F: '$3 >= 1000 && $3 != 65534 { print $1 }' /etc/passwd ``` This prints only usernames where the UID is 1000 or higher, which is the pattern for regular user accounts on Ubuntu. ![list user - List Users and Groups](https://serveravatar.com/wp-content/uploads/2026/07/image-94-1024x90.png) ### The Query Command: `getent passwd` `getent` queries the system’s Name Service Switch (NSS) databases, which means it pulls from the same sources as system lookups, including LDAP if your organization uses it. It’s more comprehensive than directly reading `/etc/passwd` in environments with multiple authentication backends. ``` getent passwd ``` ``` getent passwd ``` The output looks identical to `cat /etc/passwd`, but the underlying mechanism is different. In most standalone Ubuntu systems, they’ll produce the same results. In networked environments, `getent` is the more reliable choice. This is particularly useful when Ubuntu is configured to retrieve identities from [LDAP or another centralized directory](https://ubuntu.com/server/docs/how-to/openldap/users-and-groups?ref=serveravatar.com) service. ![getnet - List Users and Groups](https://serveravatar.com/wp-content/uploads/2026/07/image-95-1024x79.png) ### Pulling Just the Usernames: `awk` If you only need usernames, not the full account details, you can extract just the first field: ``` getent passwd | awk -F: '{ print $1 }' ``` ``` getent passwd | awk -F: '{ print $1 }' ``` As shown below: ![using username: awk - List Users and Groups](https://serveravatar.com/wp-content/uploads/2026/07/image-96-1024x136.png) Or equivalently: ``` awk -F: '{ print $1 }' /etc/passwd ``` ``` awk -F: '{ print $1 }' /etc/passwd ``` As shown below: ![using awk -F - List Users and Groups](https://serveravatar.com/wp-content/uploads/2026/07/image-97-1024x140.png) this is useful when you’re piping the output into another command, like checking if a specific user exists: ``` getent passwd | awk -F: '{ print $1 }' | grep -w "USERNAME" ``` ``` getent passwd | awk -F: '{ print $1 }' | grep -w "USERNAME" ``` As shown below: ![getnet - List Users and Groups](https://serveravatar.com/wp-content/uploads/2026/07/image-98-1024x31.png) ### Finding a Specific User To check whether a particular user exists and see their full record: ``` getent passwd username ``` ``` getent passwd username ``` Replace `username` with whatever you’re looking for. If the user exists, you’ll get their full passwd line. If not, you’ll get no output. ![finding specific user - List Users and Groups](https://serveravatar.com/wp-content/uploads/2026/07/image-99-1024x31.png) ### Checking Who Has Root Access A quick audit to see which users can run sudo commands: ``` getent group sudo ``` ``` getent group sudo ``` Or ``` getent group root ``` ``` getent group root ``` However, this does not indicate who has root privileges. The `root` group is simply the primary group associated with the root account. ![checking who has root access - List Users and Groups](https://serveravatar.com/wp-content/uploads/2026/07/image-100-1024x55.png) ## How to List All Groups in Ubuntu Groups in Ubuntu work as logical containers for users. Instead of managing permissions one user at a time, you assign permissions to a group and add or remove users from it. This makes bulk permission changes much simpler. Group information lives in `/etc/group`. Each line follows this format: ``` group_name:password_marker:GID:member1,member2,... ``` ``` group_name:password_marker:GID:member1,member2,... ``` Here’s a real example: ``` sudo:x:27:USERNAME,adminuser ``` ``` sudo:x:27:USERNAME,adminuser ``` - **`sudo` :** the group name - **`x` :** password marker (usually ignored; permissions come from group membership) - **`27` :** the GID - **`USERNAME,adminuser` :** users who belong to this group ### Listing Groups with `cat /etc/group` The simplest approach: ``` cat /etc/group ``` ``` cat /etc/group ``` This shows every group on the system, including ones you probably didn’t know existed (like `video`, `audio`, `bluetooth`). ![listing groups - List Users and Groups](https://serveravatar.com/wp-content/uploads/2026/07/image-101-1024x152.png) ### Listing Groups with `getent group` For the same reason as with user accounts, `getent` is preferable in environments with multiple authentication sources: ``` getent group ``` ``` getent group ``` As shown below: ![listing groups with getnet - List Users and Groups](https://serveravatar.com/wp-content/uploads/2026/07/image-102-1024x152.png) ### Extracting Just Group Names Need just the group names, one per line? ``` cut -d: -f1 /etc/group ``` ``` cut -d: -f1 /etc/group ``` As shown below: ![extracting group names - List Users and Groups](https://serveravatar.com/wp-content/uploads/2026/07/image-103-1024x137.png) Or: ``` getent group | cut -d: -f1 ``` ``` getent group | cut -d: -f1 ``` As shown below:[](https://storage.app.basecamp.com/5840738/blobs/aa7f2b9c-8bfd-11f1-b65d-0242ac120003/download/image.png) ![listing group names - List Users and Groups](https://serveravatar.com/wp-content/uploads/2026/07/image-104-1024x152.png) ### Checking a Specific Group’s Members To see who belongs to a particular group: ``` getent group groupname ``` ``` getent group groupname ``` For example: ``` getent group sudo ``` ``` getent group sudo ``` As shown below: ![checking group's members - List Users and Groups](https://serveravatar.com/wp-content/uploads/2026/07/image-105-1024x29.png) This tells you exactly which users can perform administrative tasks on your system. It’s one of the first things I check when auditing a new server. ## Checking a User’s Groups with the `id` Command The `id` command is probably the most useful single command in this entire guide. Give it a username, and it tells you that user’s UID, primary GID, and all supplementary group memberships in one clean output. ``` id ``` ``` id ``` As shown below: ![checking user's groups with id - List Users and Groups](https://serveravatar.com/wp-content/uploads/2026/07/image-106-1024x31.png) Running `id` without arguments shows information about the current user. Running it with a username shows that user’s details: ``` id USERNAME ``` ``` id USERNAME ``` Typical output looks like: ``` uid=1001(USERID) gid=1001(GROUPID) groups=1001(USERNAME),27(sudo),1002(developers),1003(project-alpha) ``` ``` uid=1001(USERID) gid=1001(GROUPID) groups=1001(USERNAME),27(sudo),1002(developers),1003(project-alpha) ``` As shown below: ![checking user's group with id - List Users and Groups](https://serveravatar.com/wp-content/uploads/2026/07/image-107-1024x29.png) This tells you immediately: - **UID:** 1001 - **Primary GID:** 1001 (the USERNAME group) - **Other groups:** sudo (administrative access), developers, project-alpha If you’re debugging a permission problem, this is usually the first command I run. It takes two seconds and gives you everything you need to understand what a user can actually access. ### The `groups` Command Running `groups` without an argument displays the groups of the current user: ``` groups ``` ``` groups ``` As shown below: ![groups command - List Users and Groups](https://serveravatar.com/wp-content/uploads/2026/07/image-108-1024x29.png) To check the `groups` of another user, specify the username: ``` groups username ``` ``` groups username ``` As shown below:[](https://storage.app.basecamp.com/5840738/blobs/4d5cfcfc-8c00-11f1-9f07-0242ac120003/download/image.png) ![groups username command - List Users and Groups](https://serveravatar.com/wp-content/uploads/2026/07/image-109-1024x31.png) The output is simpler than `id` because it lists group names without displaying the user’s UID or GID. ## Who’s Currently Logged In? Sometimes you need to know who’s on the system right now, not just what accounts exist. That’s what `who` and `w` are for. ### The `who` Command ``` who ``` ``` who ``` Shows which users are currently logged in, along with their terminal, login time, and (if applicable) their remote IP address. Clean and simple. Sample output: ``` username tty2 2026-07-30 08:45 admin pts/0 2026-07-30 09:12 192.168.1.50 ``` ``` username tty2 2026-07-30 08:45 admin pts/0 2026-07-30 09:12 192.168.1.50 ``` As shown below:[](https://storage.app.basecamp.com/5840738/blobs/f77bb034-8c00-11f1-a786-0242ac120004/download/image.png) ![who command - List Users and Groups](https://serveravatar.com/wp-content/uploads/2026/07/image-110-1024x28.png) ### The `w` Command ``` w ``` ``` w ``` The `w` command provides more detail than `who`, including: - Users currently logged in - System uptime and load averages - Login time and idle time - JCPU and PCPU usage - The command each user is currently running This is particularly useful on shared servers where you want to see if someone’s running something resource-intensive. ![w command - List Users and Groups](https://serveravatar.com/wp-content/uploads/2026/07/image-111-1024x53.png) ## Quick Reference Table **What You Want****Command****List all users**`getent passwd`**List all usernames only**`getent passwd | awk -F: '{ print $1 }'`**List all groups**`getent group`**List all group names only**`cut -d: -f1 /etc/group`**Check a specific user’s details**`id username`**Check a user’s groups only**`groups username`**Check group members**`getent group groupname`**See who’s logged in now**`who`**See who’s logged in with activity**`w`**Find a specific user**`getent passwd username`## Common Scenarios Where This Comes Up Here are a few real situations where knowing these commands actually matters: **1. Permission Errors When Accessing Files:** You created a file in `/var/www/html` , but your web server can’t read it. Running `id www-data` tells the web server user belongs to which groups. Running `ls -la` on the file shows you who owns it and what permissions are set. From there, it’s usually obvious what’s wrong. **2. Adding a User to a Project Group:** A new team member joins and needs access to the `analytics` directory. You add them to the `analytics` group with `usermod -aG analytics username`, and suddenly they can access the files. This only works if the files are owned by that group and have group-read or group-write permissions set. If the required user or group does not exist yet, Ubuntu provides the [`adduser` and `addgroup` utilities](https://manpages.ubuntu.com/manpages/noble/man8/adduser.8.html?ref=serveravatar.com) for creating and managing them. **3. Auditing a Shared Server:** You inherited a VPS with five other people’s accounts on it and no documentation. Running `getent passwd | awk -F: '$3 >= 1000 { print $1 }'` gives you a clean list of human users. Cross-referencing that with `sudo getent group sudo` tells you who has admin access. Within two minutes, you have a full picture. **4. Verifying SSH Key Deployment:** If you’ve set up key-based SSH authentication, the `who` command shows you who’s actively connected. This helps confirm that deployments are working and users are getting access as expected. If a user cannot connect to the server, follow our guide to [troubleshoot the SSH Connection Refused error](https://serveravatar.com/ssh-connection-refused/). [![Blog banner - ServerAvatar](https://serveravatar.com/wp-content/uploads/2025/09/728_90-Banner-1-1024x127.png)](https://serveravatar.com/?ref=blog)## Security Considerations Worth Keeping in Mind A few things I always keep in mind when working with user and group management: **1. System accounts are off-limits.** The `www-data`, `nobody`, `daemon` accounts exist to run services. Don’t modify them, don’t add files to their home directories, and don’t grant them sudo access unless you have an extremely specific reason. **2. UID 0 (root) is the nuclear option.** Any account with UID 0 has unrestricted access to the system. The only default account with UID 0 is root. If you see additional accounts with UID 0, that’s a serious security red flag. **3. The** `sudo` **group is your primary admin group.** On Ubuntu, this is how most users get elevated privileges. Keep track of who belongs to it. Regularly auditing this group takes thirty seconds and could prevent a lot of problems. **4. Group permissions inherit down.** When a user creates a new file, that file gets assigned their primary GID. If you want files created in a shared directory to be accessible to the whole team, you need to set the directory’s setgid bit, otherwise each file will be locked to the creator’s group only. ## Key Takeaways - Ubuntu stores user data in `/etc/passwd` and group data in `/etc/group`, both human-readable files - `getent passwd` and `getent group` are the most reliable commands for listing users and groups - The `id` command is the quickest way to see a user’s UID, GID, and all group memberships at once - `who` and `w` tell you who’s actively logged in, not just what accounts exist - Regular users typically have UIDs starting at 1000; system services use 1–999 - Group membership controls file access, understanding it is essential for debugging permission issues - Regularly auditing `sudo` group membership is a basic but important security practice ## Conclusion Understanding how to list and audit users and groups in Ubuntu is a fundamental system administration skill that helps with security, troubleshooting, and user management. Whether you’re debugging a permission error, onboarding a new team member, or doing a security audit on an unfamiliar server, the commands in this guide will get you there quickly. **The good news:** Ubuntu makes this information readily accessible. You don’t need special tools or root access for most of what we covered. Open a terminal, run a command, and you have answers. Practice these commands until they become second nature, especially `id`, `getent`, and `who`. They’ll save you time and frustration more often than you’d expect. ## FAQs ### How do I find all users on my Ubuntu system? Use `getent passwd` or `cat /etc/passwd`. To filter for regular (human) users only, run `awk -F: '$3 >= 1000 { print $1 }' /etc/passwd`. ### How do I check which groups a specific user belongs to? Run `id username` for full details including UID, GID, and all group memberships. Run `groups username` for a simplified list of just the group names. ### What is the difference between UID and GID? UID (User ID) is a unique number assigned to each user account. GID (Group ID) is a unique number assigned to each group. Every file and directory is owned by both a UID and a GID. ### Why do I see system users like `www-data` in my user list? System users are created automatically during Ubuntu installation. They’re used by services and background processes, not by human operators. The `www-data` user, for example, is what Apache and Nginx run as on Ubuntu. ### How do I see who’s currently logged into my Ubuntu system? Run `who` to see logged-in users and their terminals. Run `w` for a more detailed view that includes what each user is currently doing and their CPU usage. ### What’s the difference between `cat /etc/passwd` and `getent passwd`? Both display the same information on a standalone Ubuntu system. `getent` queries the system’s Name Service Switch (NSS), which means it can also pull from LDAP or other directory services in networked environments. `cat` only reads the local file directly. ### Why should I avoid modifying system accounts like `daemon` or `nobody`? These accounts exist to run specific services with limited privileges. Modifying them can break those services or create security vulnerabilities. System services should run with the minimum privileges they need, and those accounts are intentionally restricted. ### About the Author Meghna Meghwani is a technical writer focused on Linux, Ubuntu, VPS hosting, server management, WordPress, PHP, Node.js, cloud hosting, and DevOps. She creates beginner-friendly tutorials, practical hosting guides, troubleshooting articles, and server security content designed to help developers and businesses manage applications and servers more efficiently. **Categories:** Blog, Guide, Linux, Others, Tutorials, Ubuntu **Tags:** DevOps, Linux, Linux Groups, Linux Tutorial, Linux User Management, List Groups in Ubuntu, List Users in Ubuntu, Ubuntu, Ubuntu Groups, Ubuntu Users --- ### [GitHub vs Bitbucket vs GitLab: Complete Comparison Guide](https://serveravatar.com/github-vs-bitbucket-vs-gitlab/) **Published:** July 29, 2026 **Author:** Meghna Meghwani **Content:** [![Blog banner - ServerAvatar](https://serveravatar.com/wp-content/uploads/2025/09/728_90-Banner-3-1024x127.png)](https://serveravatar.com/?ref=blog)GitHub vs Bitbucket vs GitLab is one of the most common comparisons developers make when choosing a Git hosting platform. If you’ve spent time developing software, you’ve heard all three names thrown around. GitHub, Bitbucket, and GitLab all store code, support version control, and play a key role in nearly every developer’s workflow. But picking the wrong one for your team can create real friction. Maybe your CI/CD pipeline ends up overcomplicated because your platform’s built-in tools aren’t great. Maybe your security team is drowning in compliance reports because the platform doesn’t have the controls you need. Or maybe you’re just leaving money on the table by paying for features you never use. This guide cuts through the noise. We’re going to compare these three platforms honestly, what’s genuinely good about each, where each one falls short, and which situations suit each one best. By the end, you’ll know exactly which platform fits your team. ## TL;DR - **GitHub** remains the largest developer community with unmatched integrations, GitHub Copilot AI features, and a massive marketplace. Best for open-source projects, developer portfolios, and teams that prioritize community and ecosystem. - **Bitbucket** works best for teams already deep in the Atlassian ecosystem, Jira, Confluence, and the rest. Less compelling if you’re not already using Atlassian tools. - **GitLab** is an all-in-one DevOps platform with built-in CI/CD, security scanning, and compliance tools. Best for teams that want everything under one roof and don’t want to stitch together separate tools. - The right choice depends on your team size, workflow, budget, and whether you need built-in CI/CD or prefer to bring your own. ## What These Platforms Actually Are and Why the Distinction Matters Let’s level-set quickly. All three platforms are built on Git, the distributed version control system that tracks changes to your code over time. Without getting into the Git internals, what you need to know is that these platforms take Git and wrap it with features that make collaboration, code review, automation, and security easier at scale. Nowadays, they’ve all evolved well beyond just being “places to store code”. - GitHub has GitHub Copilot and a massive Actions marketplace. - Bitbucket is the glue that holds Atlassian’s ecosystem together. - GitLab positions itself as a complete DevOps platform with security and compliance baked in. ## Platform Overview: Where Each One Stands ### GitHub [GitHub](https://github.com/?ref=serveravatar.com) remains one of the most widely used platforms for version control and collaborative software development. Its massive developer community, extensive integrations, and AI-powered tools make it a preferred choice for both individual developers and large enterprises. ![github - GitHub vs Bitbucket vs GitLab](https://serveravatar.com/wp-content/uploads/2026/07/image-90-1024x494.png) During my evaluation, GitHub was the quickest platform to get started with. Creating repositories, configuring branch protection, and enabling GitHub Actions required minimal setup, making it especially approachable for developers who want to move from code to deployment quickly. Its polished interface and extensive documentation also reduced the learning curve compared to the other platforms. #### Key Features of GitHub - **Massive Developer Community** - Trusted by over 100 million developers worldwide. - Hosts 400+ million repositories, making it the largest code hosting platform. - The go-to platform for most open-source projects and community collaboration. - **AI-Powered Development** - GitHub Copilot assists with code completion, code suggestions, and productivity. - Helps automate pull request reviews, issue management, and documentation generation. - Speeds up development while reducing repetitive coding tasks. - **Integrated CI/CD with GitHub Actions** - Automate testing, building, and deployment directly from your repository. - Access a marketplace with 20,000+ reusable actions and workflows. - Supports seamless DevOps automation without relying on third-party services. - **Browser-Based Development** - GitHub Codespaces lets developers create a complete cloud-based development environment. - No local setup required, simply open a browser and start coding. - **Enterprise-Ready Security** - Offers enterprise features such as SAML Single Sign-On (SSO), custom roles, and audit logs. - Built to meet the security and compliance needs of large organisations. - Backed by Microsoft’s ongoing investment in infrastructure and AI innovation. - **Generous Free Plan** - Includes unlimited private repositories with unlimited collaborators. - Ideal for personal projects, freelancers, and small development teams. - Upgrade to paid plans only if you need advanced security, secret scanning, or organisation-level management features. #### Advantages of GitHub - Largest Developer Community - Excellent Collaboration Tools - Powerful AI Features - Built-in CI/CD - Cloud Development - Robust Security - Generous Free Plan - Extensive Integrations #### Disadvantages of GitHub - Advanced Features Require Paid Plans - Learning Curve for Beginners - Limited Self-Hosting - AI Features Can Increase Costs - Resource Limits on Free CI/CD - Public Repository Risks - Dependent on GitHub Ecosystem - Occasional Service Outages This version is easier to scan, improves readability, and is well-suited for SEO-focused blog content while avoiding close similarity to the original text. ### Bitbucket [Bitbucket](https://bitbucket.org/product/) is a Git-based version control platform developed by Atlassian. It is designed primarily for teams that already use Atlassian products such as Jira and Confluence, offering seamless collaboration, issue tracking, and code management within a connected development ecosystem. ![bitbucket - GitHub vs Bitbucket vs GitLab](https://serveravatar.com/wp-content/uploads/2026/07/image-91-1024x481.png) #### Key Features of Bitbucket - **Native Atlassian Integration** - Integrates seamlessly with Jira Software and Confluence. - Automatically links commits, branches, and pull requests to Jira issues. - Improves project tracking and team collaboration. - **Git Repository Hosting** - Provides secure cloud and self-hosted Git repository management. - Supports branch permissions, merge checks, and pull request workflows. - **Bitbucket Pipelines** - Built-in CI/CD solution for automating builds, tests, and deployments. - Uses a YAML configuration file for workflow automation. - Supports integration with Docker and cloud deployment services. - **Code Collaboration** - Enables pull requests, inline code comments, approvals, and code reviews. - Helps teams maintain code quality through structured review processes. - **Security and Access Control** - Supports secure collaboration across development teams. - **Cloud and Self-Managed Deployment** - Available as Bitbucket Cloud and Bitbucket Data Center for organisations with different infrastructure requirements. - **Developer Integrations** - Connects with popular Atlassian tools and supports integrations with third-party development and deployment platforms. #### Advantages of Bitbucket - Excellent Atlassian Ecosystem Integration - Strong Collaboration Features - Built-in CI/CD - Enterprise Security - Flexible Hosting Options - Ideal for Agile Development #### Disadvantages of Bitbucket - Smaller Developer Community - Limited Free Plan - CI/CD Is Less Feature-Rich - Best Suited for Atlassian Users - Fewer Marketplace Extensions - Less Popular for Open-Source Projects ### GitLab [GitLab](https://about.gitlab.com/?ref=serveravatar.com) is a comprehensive DevOps platform that combines version control, CI/CD, security, compliance, and deployment capabilities in a single application. Instead of relying on multiple third-party tools, teams can manage the entire software development lifecycle from one unified platform. ![gitlab - GitHub vs Bitbucket vs GitLab](https://serveravatar.com/wp-content/uploads/2026/07/image-92-1024x514.png) While testing GitLab, I found that its biggest advantage is how many DevOps capabilities are available without relying on additional services. CI/CD pipelines, security scanning, and deployment workflows all live within the same platform. The trade-off is that new users may need more time to become comfortable with the interface because there are significantly more built-in features to explore. #### Key Features of GitLab - **Complete DevOps Platform** - Integrates source code management, CI/CD, security, monitoring, and project planning. - Enables teams to manage development, testing, and deployment from one place. - **Built-in CI/CD Pipelines** - Uses the `.gitlab-ci.yml` file to define automated workflows. - Supports parallel execution, Docker integration, caching, and auto-scaling runners. - Eliminates the need for separate CI/CD tools in many projects. - **Advanced Security Scanning** - Includes **SAST**, **DAST**, dependency scanning, container scanning, and licence compliance checks. - Helps detect vulnerabilities throughout the development lifecycle. - **GitLab Duo AI** - Offers AI-powered assistance for code suggestions, merge request summaries, and security insights. - Improves developer productivity and streamlines code reviews. - **Compliance and Governance** - Provides compliance dashboards, audit reports, and policy management tools. - Helps organisations meet regulatory and security requirements. - **Kubernetes and Cloud-Native Support** - Includes native Kubernetes integration and deployment automation. - Simplifies container orchestration and cloud application management. - **Enterprise Collaboration** - Supports issue tracking, merge requests, milestones, wikis, and project planning tools within the same platform. #### Advantages of GitLab - All-in-One DevOps Solution - Powerful Native CI/CD - Strong Security Features - Excellent Compliance Tools - Flexible Deployment Options - AI-Powered Development - Scalable for Large Teams #### Disadvantages of GitLab - Steep Learning Curve - Complex User Interface - Higher Resource Requirements - Advanced Features Require Paid Plans - Longer Initial Setup - May Be Overkill for Small Projects ## Feature-by-Feature Comparison Here’s how the three platforms stack up across the features that matter most: **Feature****GitHub****Bitbucket****GitLab****Free private repositories**Unlimited collaboratorsUp to 5 usersUnlimited**Free public repositories**YesYesYes**Built-in CI/CD**GitHub ActionsBitbucket PipelinesGitLab CI**AI features**GitHub Copilot (paid)Atlassian AI (across suite)GitLab Duo (paid tiers)**Security scanning**Advanced (paid plans)LimitedCore (free) + Advanced**Compliance controls**EnterpriseEnterpriseCore + Enterprise**Open-source contribution**Massive ecosystemDecliningStrong**Integrations**20,000+Atlassian ecosystem onlyExtensive**Syntax highlighting**YesYesYes**Git Large File Storage**YesYesYes**Issue tracking**YesYes (linked to Jira)Yes**Merge/pull request templates**YesNoYes**Self-hosted option**GitHub Enterprise ServerBitbucket Data CenterGitLab Self-Managed## CI/CD Capabilities Continuous Integration and Continuous Deployment (CI/CD) are essential for automating software testing, building, and deployment. While GitHub, Bitbucket, and GitLab all provide CI/CD capabilities, they differ significantly in terms of integration, flexibility, and scalability. During testing, GitHub Actions proved to be the fastest to configure for simple application deployments thanks to its extensive marketplace of reusable workflows. Bitbucket Pipelines handled standard build and deployment tasks reliably but felt most effective when combined with Jira-based project management. GitLab offered the most comprehensive built-in pipeline management and security integration, making it well suited for complex DevOps workflows. ### GitHub Actions - Built-in CI/CD platform integrated with GitHub repositories. - Large marketplace with thousands of pre-built actions and reusable workflows. - Uses simple YAML-based workflow configuration. - Supports matrix builds, caching, Docker, cloud deployments, and third-party integrations. - Ideal for teams that want a flexible automation platform with minimal setup. - Suitable for most production workloads without requiring external CI/CD tools. ### Bitbucket Pipelines - Native CI/CD solution integrated with Bitbucket repositories. - Uses YAML configuration for workflow automation. - Supports automated builds, testing, and deployments. - Integrates well with Jira and other Atlassian products. - Better suited for teams with moderate CI/CD requirements rather than large-scale automation. ### GitLab CI/CD - Fully integrated into the GitLab platform with no additional setup required. - Uses the `.gitlab-ci.yml` file to define build, test, and deployment pipelines. - Supports parallel jobs, caching, Docker, Kubernetes, and auto-scaling runners. - Pipelines, merge requests, issues, and deployments are managed from a single interface. - Well-suited for organisations adopting DevOps or DevSecOps practices. - Excellent choice for teams managing large or complex CI/CD workflows. ### Quick Comparison **Platform****CI/CD** **Strength****Best For****GitHub**Flexible workflows with a vast marketplace of reusable actionsTeams looking for customisable automation and extensive integrations**Bitbucket**Basic built-in CI/CD with Atlassian integrationTeams using Confluence, Jira, and other Atlassian tool**GitLab**Fully integrated, enterprise-grade CI/CD with advanced DevOps capabilitiesOrganisations requiring an end-to-end DevOps platform## AI Features: How These Platforms Stand Apart Artificial Intelligence (AI) has become a major factor when choosing a version control platform. GitHub, Bitbucket, and GitLab all offer AI-powered capabilities, but their focus, maturity, and integration differ significantly. For everyday development tasks, GitHub Copilot consistently provided the strongest code completion and inline suggestions during our evaluation. Bitbucket’s AI capabilities focused more on improving collaboration across Jira and Confluence rather than acting as a dedicated coding assistant. GitLab Duo stood out by extending AI beyond coding into security findings, merge request summaries, and pipeline troubleshooting. ### GitHub AI (GitHub Copilot) - Powered by GitHub Copilot, one of the most widely used AI coding assistants. - Provides intelligent code completion and code suggestions. - Assists with pull request reviews, issue summaries, and documentation generation. - Includes Copilot Chat for interactive coding assistance. - Integrates seamlessly with popular IDEs such as Visual Studio Code. - Available as a paid subscription with plans for individuals and businesses. ### Bitbucket AI (Atlassian Intelligence) - AI features are powered by Atlassian Intelligence. - Integrates across Bitbucket, Jira, and Confluence. - Assists with issue summaries, documentation, and project collaboration. - Provides productivity improvements within the Atlassian ecosystem. - Offers fewer code-specific AI capabilities compared to GitHub Copilot and GitLab Duo. - Ideal for teams already relying on Atlassian products. ### GitLab AI (GitLab Duo) - GitLab Duo delivers AI features throughout the DevOps lifecycle. - Generates code suggestions and merge request summaries. - Helps explain security vulnerabilities and pipeline failures. - Assists with debugging, documentation, and workflow automation. - AI capabilities are included with selected GitLab Premium and Ultimate plans. - Best suited for organisations using GitLab as their end-to-end DevOps platform. ### Quick Comparison **Platform****AI Focus****Best For****GitHub**Advanced AI coding assistance, code generation, PR reviews, and documentationIndividual developers, open-source contributors, and development teams**Bitbucket**AI-powered collaboration across the Atlassian ecosystemTeams using Jira, Confluence, and other Atlassian tools**GitLab**AI across the complete DevOps lifecycle, including security and CI/CDEnterprises and DevOps-focused organisations## Security & Compliance Security and compliance are critical factors when selecting a version control platform. While GitHub, Bitbucket, and GitLab all provide security features, they differ in terms of built-in protection, compliance support, and enterprise capabilities. ### GitHub - Provides advanced security tools, especially for users on paid plans. - Secret Scanning helps identify accidentally exposed credentials and sensitive data in repositories. - Code Scanning powered by CodeQL detects potential vulnerabilities within source code. - Dependency Review highlights security risks in third-party packages before code changes are merged. - Offers an extensive security advisories database to help developers identify known vulnerabilities. - Includes enterprise security features such as audit logs, custom roles, and SAML Single Sign-On (SSO). - Supports enterprise compliance requirements with standards such as SOC 2 Type II and GDPR. ### Bitbucket - Provides essential security controls for managing repositories and team access. - Includes branch permissions, merge checks, and access management features. - Works closely with Atlassian security tools and integrations. - Suitable for teams with basic security and collaboration requirements. - May require additional third-party security solutions for advanced enterprise-level protection. ### GitLab - Provides one of the most complete built-in security solutions among modern DevOps platforms. - Includes SAST, DAST, dependency scanning, container scanning, and licence compliance capabilities. - Makes security testing available directly within the development workflow. - Offers compliance management features such as audit events, compliance pipelines, and security framework templates. - Supports compliance standards including SOC 2, GDPR, and HIPAA. - Helps organisations implement DevSecOps practices without relying heavily on additional security tools. ### Quick Comparison PlatformSecurity StrengthBest For**GitHub**Advanced security features with strong enterprise capabilitiesTeams requiring mature security tools and a large ecosystem**Bitbucket**Basic security with strong Atlassian integrationTeams already using Jira and Confluence**GitLab**Comprehensive built-in security and compliance featuresOrganisations focused on DevSecOps and regulatory requirements## Pricing Comparison While comparing pricing, I found that subscription costs only tell part of the story. Teams should also consider the cost of additional CI/CD services, security tools, repository hosting, and developer productivity. A platform with a higher subscription cost may still reduce overall operational expenses if it replaces several third-party tools. ### GitHub - **Free:** Unlimited private repos, unlimited collaborators, 2,000 Actions minutes/month (public repos), 500MB packages storage - **Team:** $4 per user/month, includes 3,000 Actions minutes/month, 2GB packages, protected branches, merge queue - **Enterprise:** $21 per user/month, everything in Team plus SAML SSO, audit log, 50,000 Actions minutes/month, 50GB packages ### Bitbucket - **Free:** Up to 5 users, unlimited private repos, 1GB LFS storage, 50 build minutes for Pipelines - **Standard:** $3.65 per user/month, unlimited users, 2,500 build minutes, IP allowlisting - **Premium:** $7.25 per user/month, everything in Standard plus SAML SSO, audit logs, 3,500 build minutes ### GitLab - **Free:** Unlimited private repos, 400 compute minutes for CI/CD (free tier), core security features - **Premium:** Talk to them for pricing, 10,000 compute minutes, priority support, advanced security - **Ultimate:** Need to contact for custom pricing, everything in Premium plus compliance, portfolio management, DAST in pipeline The most cost-effective starting point is GitHub’s free tier for small teams. Bitbucket’s free tier is the most limiting, which reflects Atlassian’s strategy of pushing teams toward paid Jira plans. GitLab’s free tier is generous if you need built-in security scanning. ## Integrations & Ecosystem My noticeable difference during evaluation was the amount of configuration required. GitHub generally connected to third-party services with minimal effort. Bitbucket provided the smoothest experience for organisations already standardised on Atlassian products, while GitLab encouraged using its built-in ecosystem rather than external tools. **GitHub’s** ecosystem is unmatched. With over 20,000 integrations in the GitHub Marketplace and deep API support, you can connect GitHub to virtually any tool your team uses, CI/CD platforms, project management tools, security scanners, deployment services, monitoring tools. **Bitbucket** integrates seamlessly with Atlassian tools, Jira, Confluence, Bamboo, and Opsgenie. Outside the Atlassian ecosystem, its integration story is weaker. If you’re not using Jira, Bitbucket loses a significant portion of its value. **GitLab’s** integrations are extensive, but the platform’s philosophy encourages using its built-in features over third-party alternatives. If you want a “batteries included” experience, this works well. If you prefer to mix and match specific tools, GitLab’s opinionated approach can sometimes get in the way. ## Which Platform Should You Choose? After comparing these platforms across collaboration, automation, security, AI capabilities, pricing, and day-to-day workflows, I found that none is objectively “better” than the others. Instead, each platform excels for a different type of team: ### Choose GitHub if - You’re working on open-source projects or want to build a developer portfolio - You want the largest ecosystem of integrations and Actions - Your team values GitHub Copilot for AI-assisted development - You need flexibility in CI/CD tools and don’t want to be locked into one platform’s pipeline system - You’re a startup or small team that wants a generous free tier to start ### Choose Bitbucket if - Your team already lives in Jira and Confluence - You’re an Atlassian shop and want tight integration between your version control and project management - Your organization is already paying for Atlassian tools and you want to maximize that investment - You don’t need cutting-edge AI features and your CI/CD needs are moderate ### Choose GitLab if - You want built-in CI/CD without configuring separate infrastructure - Your team needs security scanning baked into the development workflow - You’re in a regulated industry with compliance requirements - You prefer having everything, code, issues, pipelines, security, in one platform - You’re willing to trade some flexibility for a more integrated experience ## Common Mistakes A few patterns I see repeatedly when teams pick a version control platform: **Choosing based on what everyone else uses.** GitHub is popular, but popularity doesn’t always equal fit. A team that needs deep compliance controls might be better served by GitLab even if GitHub has more stars on GitHub. **Ignoring CI/CD costs.** Pipelines seem like an afterthought until you’re paying $500/month in build minutes. GitLab’s free tier compute limits and Bitbucket’s pipeline build minute caps are real constraints for active teams. **Underestimating the Atlassian lock-in.** Bitbucket is genuinely excellent when you’re fully in the Atlassian ecosystem. But moving away from it later is painful. Make sure you’re comfortable with that dependency before committing. **Paying for features you don’t use.** GitLab’s Premium and Ultimate tiers are expensive. If you don’t need compliance dashboards or advanced security scanning, GitLab’s free tier or GitHub’s Team plan might be all you actually need. [![Blog banner - ServerAvatar](https://serveravatar.com/wp-content/uploads/2025/09/728_90-Banner-1-1024x127.png)](https://serveravatar.com/?ref=blog)## Real-World Recommendations **Scenario 1: You’re launching a startup** **My recommendation:** GitHub **Why?** Fast setup, generous free tier, huge community, and excellent third-party integrations. **Scenario 2: You’re building enterprise software** **My recommendation:** GitLab **Why?** Integrated security, compliance features, and enterprise-grade CI/CD reduce dependence on multiple external tools. **Scenario 3: Your company already uses Jira** **My recommendation:** Bitbucket **Why?** Native Jira integration simplifies issue tracking, code reviews, and release management. **Scenario 4: You contribute to open source** **My recommendation:** GitHub **Why?** The largest developer community makes collaboration and project discovery significantly easier. ## Key Takeaways - GitHub is the largest developer community with the best ecosystem and AI tools. Best for open-source, portfolios, and flexible CI/CD. - Bitbucket is the best choice for Atlassian shops where Jira integration is a priority. Less compelling outside that ecosystem. - GitLab is an all-in-one DevOps platform with the strongest built-in CI/CD and security features. Best for teams that want integration over flexibility. - All three are built on Git and handle the basics well. The real differences show up in CI/CD, security, pricing tiers, and AI features. - Free tiers have improved significantly. GitHub’s is the most generous, followed by GitLab’s core plan. - AI features are now a meaningful differentiator, GitHub Copilot leads, Bitbucket relies on broader Atlassian AI, and GitLab Duo is competitive. ## Conclusion After evaluating GitHub, Bitbucket, and GitLab across everyday development workflows, deployment automation, collaboration, security, AI features, and integrations, one conclusion became clear: there isn’t a universal winner. The right platform depends on your team’s workflow, existing toolchain, and long-term development strategy. Choosing the platform that aligns with your processes today can save significant migration effort in the future. The good news is that all three are solid platforms. Whichever you choose, you’re not making a catastrophic mistake. The real cost is in switching later, so spend a bit of time upfront thinking about where your team is in 3 years, not just today. If you want a simpler way to manage deployments, SSL certificates, firewalls, and applications on your VPS without getting deep into CI/CD configuration, [ServerAvatar](https://serveravatar.com/) handles a lot of this out of the box. ## FAQs ### Which is best for small teams or solo developers? GitHub’s free tier is the most generous for small teams and individuals. Unlimited private repositories with unlimited collaborators means you can start a project without worrying about costs. GitLab’s free tier is also strong if you need built-in CI/CD, but GitHub’s ecosystem is larger and more mature. ### Can I migrate my repositories between platforms? Yes, all three platforms support importing repositories from each other. GitHub has a dedicated import tool that handles GitLab and Bitbucket repositories. GitLab and Bitbucket have similar import functionality. A full migration typically takes under an hour for a standard repository. ### Does the platform’s CI/CD matter if I already use Jenkins or CircleCI? It depends on your workflow. If you already have a mature CI/CD setup that works well, you probably don’t need another built-in pipeline tool. However, built-in CI/CD can simplify your architecture, fewer tools to maintain, fewer credentials to manage, fewer places for things to break. ### Which platform is best for enterprise teams? GitHub Enterprise and GitLab Ultimate are both solid enterprise choices. GitLab has an edge if you need built-in compliance controls and security scanning without expensive add-ons. GitHub has an edge if ecosystem size and Copilot integration matter more to your organization. ### Is Bitbucket still worth using in 2026? Yes, if you’re already in the Atlassian ecosystem. The Jira integration alone makes Bitbucket valuable for teams that track everything in Jira and want commit-level traceability. Outside of Atlassian tools, GitHub and GitLab offer stronger value propositions. ### About the Author Meghna Meghwani is a technical writer focused on Linux, Ubuntu, VPS hosting, server management, WordPress, PHP, Node.js, cloud hosting, and DevOps. She creates beginner-friendly tutorials, practical hosting guides, troubleshooting articles, and server security content designed to help developers and businesses manage applications and servers more efficiently. **Categories:** Blog, Guide, JavaScript, Laravel, Linux, Node.js, Others, Ubuntu, Uncategorized **Tags:** Best Git repository hosting platform, Bitbucket, CI/CD platforms, Code hosting platforms comparison, DevOps, Git hosting services, Git repository hosting, Git repository management tools, GitHub, GitHub Bitbucket GitLab comparison, GitHub vs Bitbucket vs GitLab, GitLab --- ### [How to Check and Upgrade WordPress Version Safely](https://serveravatar.com/upgrade-wordpress-version/) **Published:** July 28, 2026 **Author:** Meghna Meghwani **Content:** [![Blog banner - ServerAvatar](https://serveravatar.com/wp-content/uploads/2025/09/728_90-Banner-3-1024x127.png)](https://serveravatar.com/?ref=blog)Let me be direct: if you’re running an outdated version of WordPress right now, your site is a liability. I’m not trying to sound dramatic, but I’ve seen what happens when a critical vulnerability is discovered while someone is still using an older WordPress release. It isn’t pretty, hacked redirects, injected malware, and SEO rankings disappearing overnight. That’s why it’s essential to upgrade WordPress version regularly. Keeping your site up to date is one of the simplest and most effective ways to protect its security, performance, and stability. The good news is that checking and upgrading your WordPress version is not complicated. There are multiple ways to do it, from a point-and-click dashboard to command-line tools for the automation-inclined. The method you choose doesn’t matter as much as the habit itself. What matters is that you actually do it. This guide walks you through every way to check your current WordPress version and every way to upgrade it, including the ServerAvatar WordPress Toolkit for those who prefer not to touch code at all. I will also walk you through what to do before you upgrade, because skipping that step is the mistake most people make. ## TL;DR - Why it matters: Outdated WordPress is the #1 entry point for site hacks - Check your version: Dashboard footer, source code, `version.php` file, WP-CLI, or ServerAvatar WordPress Toolkit - Upgrade options: One-click WordPress admin dashboard, WP-CLI, or ServerAvatar WordPress Toolkit - Never upgrade without a backup first - Test on staging before touching production ## Why WordPress Version Updates Matter WordPress ships major releases roughly three to four times a year, with security patches dropping even more frequently. Nowadays, the threat landscape has only intensified; automated exploit kits now actively scan for known vulnerabilities in outdated WordPress installations within hours of a patch being released. If you’re not updating, you’re leaving the door open. But it’s not just about security. Newer WordPress versions bring meaningful performance improvements. WordPress 6.4 and 6.5 introduced significant query optimization and reduced database overhead. Staying current means your site runs faster without you having to do anything else. New block editor features, improved media handling, and accessibility improvements all stack up over time. There’s also the compatibility angle. Plugin and theme developers follow WordPress core releases closely. The moment a popular plugin drops support for an older version, you either update WordPress or you lose access to that plugin’s updates, a forced choice nobody wants to make under pressure. ## How to Check Your Current WordPress Version You would think this is obvious, but I have worked with site owners who had no idea they were running WordPress 5.8 on a 2026 server. Here are the ways to check, from easiest to most technical. ### 1. Check from the WordPress Dashboard This is the fastest method and requires no tools beyond your browser. - Log in to your WordPress admin panel. - Scroll to the Home section in the WordPress admin dashboard. You can see the version in the “At a Glance” widget. - It looks subtle, but that’s your answer. ![check current version from WordPress admin dashboard - Upgrade WordPress Version ](https://serveravatar.com/wp-content/uploads/2026/07/image-80-1024x484.png) **Best for:** Anyone with admin access to WordPress who wants a five-second check. ### 2. Check the Page Source in Your Browser If you don’t have WordPress admin access but can view the site, you can still find the version number in the HTML source. - Right-click anywhere on the page and click on the **View page source** (or use `Ctrl+U` / `Cmd+Option+U`). - In the source code, search for the word “generator”, you are looking for a line that looks like this: ``` ``` ``` ``` - That `content` attribute tells you exactly which version that site is running. ![check current version from page source - Upgrade WordPress Version](https://serveravatar.com/wp-content/uploads/2026/07/image-81-1024x61.png) > **Note that** on some hardened WordPress installations, this meta tag is intentionally removed for security reasons. If you don’t see it, that doesn’t mean the site isn’t WordPress, it just means they have hidden the version number, which is actually a smart security practice. **Best for:** Quick version checks on any WordPress site you can visit but don’t have admin access to. ### 3. Check the `wp-includes/version.php` File This is the most reliable method when you have file-level access. The WordPress version is stored in a dedicated PHP file at `wp-includes/version.php` You can access this via your hosting panel’s file manager, or via SSH: ``` grep "wp_version" /path/to/your/wordpress/wp-includes/version.php ``` ``` grep "wp_version" /path/to/your/wordpress/wp-includes/version.php ``` This outputs something like: ``` $wp_version = '6.9.5'; ``` ``` $wp_version = '6.9.5'; ``` The file also contains `$wp_db_version` and `$required_php_version` , useful context if you’re troubleshooting compatibility issues at the same time. ![check current version from file - Upgrade WordPress Version](https://serveravatar.com/wp-content/uploads/2026/07/image-82-1024x259.png) **Best for:** Developers and sysadmins who have SSH or FTP access and want exact, unambiguous version data. ### 4. Check Using WP-CLI If you have SSH access to your server and WP-CLI is installed, checking the WordPress version takes one command. Navigate to your WordPress root directory, the one containing `wp-config.php` , and run: ``` wp core version ``` ``` wp core version ``` That’s it. WP-CLI will return the version number in plain text. If you’re managing multiple WordPress sites, you can check all of them quickly by scripting this across your server’s web directories.[](https://storage.app.basecamp.com/5840738/blobs/7e34e72e-8a5a-11f1-9fa0-0242ac120003/download/image.png) ![check current version using wp cli - Upgrade WordPress Version](https://serveravatar.com/wp-content/uploads/2026/07/image-83-1024x29.png) To verify WP-CLI is available on your system: ``` wp --info ``` ``` wp --info ``` This shows the WP-CLI version, PHP version, and operating system information, useful context when you’re diagnosing why an update might behave differently than expected. **Best for:** Developers and sysadmins managing WordPress via the command line, especially those with multiple installations. ### 5. Check Using ServerAvatar WordPress Toolkit If your WordPress site is managed through [ServerAvatar](https://serveravatar.com/), checking the version is even more streamlined. Open the **WordPress Toolkit** from your ServerAvatar panel. You can easily see the WordPress version. - Navigate to the application panel and click on the WP Toolkit section from the left sidebar. ![WordPress Toolkit - Upgrade WordPress Version](https://serveravatar.com/wp-content/uploads/2026/07/image-84-1024x457.png) - You can see the current WordPress version in the Overview Tab; it also shows a new version if available. ![current version in WP Toolkit dashboard - Upgrade WordPress Version](https://serveravatar.com/wp-content/uploads/2026/07/image-85-1024x391.png) - You can also see the current WordPress version in the Updates tab. It also shows you the current WordPress installed version, whether a new version is available, and what version number you’re running at a glance. ![checking current version form WP Toolkit update section - Upgrade WordPress Version](https://serveravatar.com/wp-content/uploads/2026/07/image-86-1024x421.png) - There’s no hunting around for meta tags or digging through files. The panel gives you the full picture: core version, plugin update count, theme update count, and database update all on one screen. This is particularly useful when you manage multiple WordPress sites. Instead of checking each one individually. **Best for:** ServerAvatar users who want a unified dashboard view of all their WordPress sites’ update status. ## How to Upgrade Your WordPress Version Now that you know what you are running, let’s talk about getting the current version. I have organized these methods from simplest to most hands-on, so you can pick the approach that matches your comfort level. ### Method 1: Upgrade from the WordPress Dashboard (One-Click) The built-in automatic update is the simplest path. - Log into your WordPress admin panel and click **Updates** in the left sidebar. - If a new version is available, you’ll see a prominent message to **Update**. ![update version from admin dashboard - Upgrade WordPress Version](https://serveravatar.com/wp-content/uploads/2026/07/image-87-1024x325.png) - WordPress will download the new version, apply it, and redirect you back to the dashboard. Depending on your hosting environment and connection speed, the whole process takes two to five minutes. Don’t close the browser tab or navigate away until it completes. **Best for:** Single-site owners with no staging requirements and low risk tolerance. ### Method 2: Upgrade Using WP-CLI WP-CLI gives you much more control over the upgrade process. If you’re comfortable with the command line, these commands let you handle everything from basic updates to very specific version targeting. **Standard upgrade to latest version:** ``` wp core update ``` ``` wp core update ``` This fetches the latest stable WordPress release from [wordpress.org](https://wordpress.org/?ref=serveravatar.com) and applies it. **Upgrade to the latest minor version only:** Sometimes you don’t want a major release, you just want to patch to the latest minor version within your current major line. For example, updating from WordPress 6.4 to 6.4.4 rather than jumping to 6.5. ``` wp core update --minor ``` ``` wp core update --minor ``` This is useful when you’re in a period right after a major release and want to wait a few weeks before adopting the new major version. **Specify a particular version:** ``` wp core update --version=6.4 ``` ``` wp core update --version=6.4 ``` You can pin to any specific WordPress version. Passing `--version=nightly` pulls the absolute latest development build, not something I’d recommend for production sites, but occasionally useful for testing compatibility ahead of a new release. **Downgrade (force update to an older version):** If you need to go backward, say, a plugin broke after a major upgrade, and you need to revert quickly, use the `--force` flag: ``` wp core update --version=6.3.2 --force ``` ``` wp core update --version=6.3.2 --force ``` WordPress will resist this command if the requested version is older than the installed version, so `--force` overrides that safety check. I have used this in emergencies when a client needed to get their site functional while the plugin developer pushed out a compatibility fix. **Update with a local zip file:** If you’re updating from a zip you’ve already downloaded (rather than WP-CLI fetching from wordpress.org): ``` wp core update wordpress-6.5.3.zip ``` ``` wp core update wordpress-6.5.3.zip ``` This method installs the ZIP file directly without requiring you to download first. **Change language during upgrade:** WordPress ships in English by default. If you need to install or switch to a different locale during the upgrade, add the `--locale` flag: ``` wp core update --locale=fr_FR ``` ``` wp core update --locale=fr_FR ``` The `fr_FR` part is the locale code, you can find the right code for your language on [wordpress.org’s language page](https://translate.wordpress.org/?ref=serveravatar.com). **One common issue:** If you see the error “Error: Another update is currently in progress”, WordPress has left a lock flag in the database. You can clear it with: ``` wp option delete core_updater.lock ``` ``` wp option delete core_updater.lock ``` Just make sure another update isn’t actually running before you delete that lock, clearing it while a real update is in progress mid-file-write can leave your site in a corrupted state. **Best for:** Developers and sysadmins who want speed, precision, and the ability to script updates across multiple sites. ### Method 3: Update Using ServerAvatar WordPress Toolkit For users who prefer a visual interface over the command line, or who manage multiple WordPress sites, ServerAvatar’s [WordPress Toolkit](https://app.serveravatar.com/add-ons/wp-toolkit) offers the most streamlined upgrade path. - From your WordPress application panel, navigate to the WordPress Toolkit by clicking on the WP Toolkit from the left sidebar. ![navigate to the WP Toolkit- Upgrade WordPress Version](https://serveravatar.com/wp-content/uploads/2026/07/image-88.png) - Navigate to the **Updates** tab. The WordPress Core section displays your current WordPress core version alongside any available update. - You’ll see the **Update Core** button right there, clicking it triggers the core update without you having to log into WordPress admin at all. ![Update core version from WP Toolkit - Upgrade WordPress Version](https://serveravatar.com/wp-content/uploads/2026/07/image-89-1024x424.png) **What’s useful here is the visibility:** the Updates tab shows you not just the core WordPress version, but the status of your plugins and themes at the same time. You can handle core updates, plugin updates, and theme updates from one place. While the [WordPress Toolkit](https://serveravatar.com/docs/add-on/wordpress-toolkit/purchase/) makes updates easier, ServerAvatar’s [Staging feature](https://serveravatar.com/docs/application/staging-area/) lets you test WordPress core, plugin, and theme updates on a separate copy of your site before deploying them to production. For WordPress environments, this approach removes the friction that makes people delay updates in the first place. If you’re new to staging, check out our [**Complete Guide to Setting Up a Staging Environment**](https://serveravatar.com/setting-up-a-staging-environment/). To explore everything included in the toolkit, read [**WordPress Toolkit for WordPress Management in ServerAvatar**](https://serveravatar.com/wordpress-toolkit-serveravatar). If you frequently deploy similar WordPress sites, learn how [**How to Create WordPress Blueprints Easily in ServerAvatar**](https://serveravatar.com/create-wordpress-blueprint-serveravatar/) can help you standardise and speed up your deployments. **Best for:** ServerAvatar users managing one or more servers and WordPress sites who want a centralized, visual update management panel. ## Which WordPress Upgrade Method Should You Choose? There isn’t a single “best” way to upgrade WordPress. The right method depends on your technical experience, the number of websites you manage, and whether you prefer a graphical interface or command-line tools. The comparison below can help you decide which approach best fits your workflow before following the step-by-step instructions. **Method****Ease of Use****Speed****Automation****Best For****WordPress Dashboard**EasyFastLimitedBeginners, single-site owners**WP-CLI**AdvancedVery FastExcellentDevelopers, system administrators, automation**ServerAvatar WordPress Toolkit**EasyFastExcellentManaging multiple WordPress sites from one dashboard## Post-Upgrade Checklist: What to Do After Updating WordPress Updating WordPress is only half the job. Before you consider the process complete, take a few minutes to verify that your website is functioning as expected. A quick post-update check can help you catch compatibility issues early and prevent small problems from affecting visitors. **1. Clear Your Website Cache** Clear all cached content after the update. Cached files may continue serving older assets or pages, making it appear as though the update didn’t apply correctly. **2. Test the Login Area** Sign out and log back into the WordPress admin dashboard. Confirm that you can access important areas such as Posts, Pages, Plugins, Themes, and Settings without errors. **3. Verify Plugins and Themes** Open the Plugins and Themes pages to ensure everything is active and functioning normally. If any extensions were automatically disabled during the update, investigate the cause before re-enabling them. **4. Test Important Website Features** Visit your website as a regular visitor and test key functionality, including: - Contact forms - Search functionality - Navigation menus - Image galleries - User registration or login (if applicable) For eCommerce websites, place a test order to verify that the checkout process, payment gateway, and order confirmation emails are working correctly. **5. Review Error Logs** Check your PHP and web server error logs for any new warnings or fatal errors that appeared after the update. Even if the website appears to work normally, the logs can reveal hidden compatibility issues before they become larger problems. **6. Confirm Your Backup Completed Successfully** If you created a backup before upgrading, make sure it completed successfully and is available for restoration if needed. A backup is valuable only if you can successfully restore it when needed. **7. Monitor Your Website** Check your site’s performance, error logs, and user feedback. Some plugin conflicts or scheduled task issues only become noticeable after the website has been running for some time. [![Blog banner - ServerAvatar](https://serveravatar.com/wp-content/uploads/2025/09/728_90-Banner-1-1024x127.png)](https://serveravatar.com/?ref=blog)## Troubleshooting Common WordPress Update Issues Even with a perfect backup and a clean staging test, updates occasionally hiccup. Here are the issues I run into most often and how to handle them. **1. “Briefly unavailable for scheduled maintenance” message stuck.** WordPress drops a `.maintenance` file in your root directory during an update and is supposed to delete it when done. If the update is interrupted, connection drops, PHP times out, that file stays, and your site shows the maintenance message to everyone. Fix it by deleting the file via SSH or your file manager: ``` rm /path/to/your/wordpress/.maintenance ``` ``` rm /path/to/your/wordpress/.maintenance ``` Your site should come back immediately. Then re-run the update. **2. Error: “Another update is currently in progress.”** As mentioned earlier, clear the lock: ``` wp option delete core_updater.lock ``` ``` wp option delete core_updater.lock ``` Then retry the update. **3. White screen of death after upgrade.** This usually means a plugin or theme is incompatible with the new WordPress version. Boot into safe mode by renaming your `wp-content/plugins` folder to `wp-content/plugins-old` via SSH or file manager, this disables all plugins without modifying the database. If the site comes back, reactivate plugins one by one to identify the culprit. If it doesn’t, the issue is in your theme. Switch to a default theme like Twenty Twenty-Six to confirm. **4. Update fails mid-download.** Check your server’s available disk space, WordPress needs enough room to download the new version’s zip file before extracting it. Also verify your PHP `max_execution_time` isn’t too low, large WordPress downloads can time out on shared hosting with strict resource limits. ## Key Takeaways - Outdated WordPress is the leading cause of WordPress site compromises, update regularly - You can check your version via the dashboard footer, page source, `wp-includes/version.php`, WP-CLI, or ServerAvatar WordPress Toolkit - Back up before upgrading, always, without exception - WP-CLI offers the most control: minor-only updates, specific version targeting, locale switching, and force downgrades - ServerAvatar’s WordPress Toolkit brings all update management into a single visual panel - Test on staging before upgrading production, especially for major releases - After upgrading, monitor your site for the first 24 hours, plugin conflicts don’t always show up immediately ## Conclusion Checking and upgrading your WordPress version isn’t glamorous work, but it’s one of the highest-leverage things you can do for your site’s security and performance. The methods I’ve covered here give you options at every skill level, from the dashboard clicker to the WP-CLI power user to the ServerAvatar panel. Pick the method that fits your workflow, make updating a habit (I treat it like a monthly calendar reminder), and always back up first. If you’re managing multiple WordPress sites and want a cleaner way to handle updates, backups, and staging environments without juggling different tools, [ServerAvatar’s WordPress Toolkit](https://app.serveravatar.com/add-ons/wp-toolkit) is worth exploring. ## FAQs ### What happens if I don’t update WordPress? Outdated WordPress versions accumulate known vulnerabilities. Hackers use automated tools that scan for these gaps within hours of a public disclosure. Beyond security, you’ll eventually hit plugin and theme compatibility walls, developers drop support for older WordPress versions, leaving you stuck on old software or forced into a rushed upgrade under pressure. ### How often should I check for WordPress updates? At minimum, check monthly and after every major WordPress release announcement. If you’re on a managed host like ServerAvatar, the Updates tab makes this a five-second check. For high-traffic or high-value sites, subscribe to the [WordPress release announcements](https://wordpress.org/news?ref=serveravatar.com), they go out with every major and security release. ### Should I update plugins and themes at the same time as WordPress core? Yes, but do it one at a time. Update WordPress core first, verify your site works, then update plugins, then themes. Updating everything simultaneously makes troubleshooting a nightmare if something breaks, you won’t know which update caused the issue. ### Is it safe to update WordPress on a live site without staging? For minor version updates (e.g., 6.5.2 to 6.5.3), it’s generally safe on a well-maintained site with a recent backup. For major releases, always use a staging environment first. ServerAvatar’s one-click staging clone makes this practical even if you’re not a developer. ### What is the current latest stable WordPress version? WordPress 7.0.2 is the current major release as of mid-2026, with 6.5.x minor patches available. Check [wordpress.org/news](https://wordpress.org/news?ref=serveravatar.com) for the definitive latest version number. ### About the Author Meghna Meghwani is a technical writer focused on Linux, Ubuntu, VPS hosting, server management, WordPress, PHP, Node.js, cloud hosting, and DevOps. She creates beginner-friendly tutorials, practical hosting guides, troubleshooting articles, and server security content designed to help developers and businesses manage applications and servers more efficiently. **Categories:** Blog, Guide, Others, Tutorials, WordPress **Tags:** How to Upgrade WordPress, Update WordPress, Upgrade WordPress Version, Wordpress, WordPress Core Update, WordPress Guide, WordPress Tutorial, WordPress Update, WordPress Version Update --- ### [How to Fix SSH Connection Refused Error](https://serveravatar.com/ssh-connection-refused/) **Published:** July 27, 2026 **Author:** Meghna Meghwani **Content:** [![Blog banner - ServerAvatar](https://serveravatar.com/wp-content/uploads/2025/09/728_90-Banner-3-1024x127.png)](https://serveravatar.com/?ref=blog)You have typed your command, hit Enter, expecting to connect to your server. Instead, you’re greeted with the frustrating SSH Connection Refused error rather than a welcoming shell prompt. ``` ssh: connect to host your-server port 22: Connection refused ``` ``` ssh: connect to host your-server port 22: Connection refused ``` That flat, unhelpful line is one of the most frustrating messages in server management. No explanation. No suggested fix. Just a door slammed in your face. I have been there more times than I’d like to admit, particularly after spinning up new VPS instances where I’d forgotten to note the custom SSH port, or after a firewall rule I applied broader than intended cut off my own access. **The good news:** SSH Connection Refused is almost always fixable in minutes once you know what to check. This guide walks through every real cause I have encountered in practice, with the exact commands that diagnose and resolve each one. **What this guide covers:** the meaning behind the error, causes, step-by-step fixes, a prevention checklist, and the FAQs I actually hear from developers. **Who it’s for:** anyone managing a Linux server, whether it’s your first VPS or your hundredth. ## TL;DR - SSH Connection Refused means the server is actively rejecting your connection attempt - The most common causes: wrong port, service not running, firewall blocking, wrong credentials, and SSH not installed - Most fixes take under 5 minutes from your terminal - Always verify the fix by attempting to reconnect before assuming the problem is solved - **Prevention:** use non-default ports, configure fail2ban, and restrict SSH to specific IPs ## What Does “SSH Connection Refused” Actually Mean? Let’s be precise, because understanding the mechanics changes how you debug. “Connection Refused” is TCP’s way of saying: I heard you, but I’m not accepting this connection. The server received your SYN packet, processed it, and sent back a RST (reset) flag. This is fundamentally different from a timeout (where the server never responds at all) or an authentication failure (where the server accepts the connection but rejects your credentials). ![SSH Connection Refused Error](https://serveravatar.com/wp-content/uploads/2026/07/image-76-1024x50.png) In SSH terms, this means the SSH daemon, `sshd` , either isn’t listening on the port you are targeting, isn’t running at all, or something network-level is intercepting the request before it reaches the daemon. **The practical difference matters:** if you see “Connection Refused”, you at least know the server is reachable over the network. That’s useful diagnostic information. If you want to learn more about how SSH works internally, including its configuration options and authentication process, the [official OpenSSH documentation](https://www.openssh.org/manual.html?ref=serveravatar.com) provides detailed explanations. **Error Message****Meaning****Where to Start Troubleshooting****Connection Refused**Server rejected the connectionSSH service, port, firewall**Connection Timed Out**No response from serverNetwork, routing, firewall**Permission Denied**Authentication failedPasswords, SSH keys**No Route to Host**Server unreachableDNS, network, gateway## How to Diagnose SSH Connection Refused Before fixing anything, verify. The most common mistake I see is jumping to conclusions, changing the SSH port when the problem was the firewall, or reinstalling SSH when the service just needed a restart. Here’s the diagnostic sequence I follow, in order: **Step 1: Confirm the server is reachable at all** ``` ping -c 3 your-server-ip ``` ``` ping -c 3 your-server-ip ``` If ping fails, you have a network connectivity issue, possibly the server is down, or it’s on an unreachable network. That’s a different problem than Connection Refused. **Step 2: Check if the SSH port is reachable** ``` nc -zv your-server-ip 22 # or if the port is non-standard: nc -zv your-server-ip 2222 ``` ``` nc -zv your-server-ip 22 # or if the port is non-standard: nc -zv your-server-ip 2222 ``` If this shows “Connection refused”, you have confirmation the problem is at the SSH layer. **Step 3: Use SSH verbose mode for more detail** ``` ssh -v username@your-server-ip -p PORT ``` ``` ssh -v username@your-server-ip -p PORT ``` The `-v` flag (use `-vvv` for maximum verbosity) shows exactly where the connection attempt stalls. ![using ssh verbose mode for more details - SSH Connection Refused](https://serveravatar.com/wp-content/uploads/2026/07/image-78-1024x54.png) This alone often points you directly to the problem. ## The Six Real Causes And How to Fix Them This is the mental model I have built debugging real servers. ### Cause 1: The SSH Service Isn’t Running This sounds obvious, but it’s more common than people think. A server reboot, a failed upgrade, or an OOM (out-of-memory) kill can stop `sshd` without you noticing until you try to reconnect. **How to check (from a console/KVM session or a working connection):** ``` sudo systemctl status sshd ``` ``` sudo systemctl status sshd ``` If you see `Active: inactive (dead)` or the service is missing, that’s the problem. **Fix:** ``` sudo systemctl start sshd sudo systemctl enable sshd # so it starts on future reboots ``` ``` sudo systemctl start sshd sudo systemctl enable sshd # so it starts on future reboots ``` On Ubuntu/Debian the service is `ssh`; on RHEL/CentOS/AlmaLinux it’s `sshd`. This tripped me up the first time I managed a CentOS box after years on Ubuntu. **What to verify after:** run `sudo systemctl status sshd` again and confirm it shows `Active: running`. Then attempt your SSH connection again. ![verify status - SSH Connection Refused](https://serveravatar.com/wp-content/uploads/2026/07/image-79-1024x177.png) If the SSH service keeps stopping unexpectedly, it may indicate server resource exhaustion. [Monitoring CPU, RAM, and disk usage](https://serveravatar.com/check-cpu-ram-disk-usage-linux-vps/) can help identify the root cause. ### Cause 2: You are Connecting to the Wrong Port SSH defaults to port 22, but many server administrators, and most cloud providers, change this as a basic security measure. If you are connecting to a non-standard port and don’t specify it, you will get Connection Refused every time. This caught me off guard repeatedly when managing multiple servers from different providers. Each had its own default port, and `ssh your-server` always assumed 22. **How to check:** ``` sudo grep "^Port" /etc/ssh/sshd_config ``` ``` sudo grep "^Port" /etc/ssh/sshd_config ``` If that line is commented out or shows a different number (say, `Port 2222`), that’s the issue. **Fix:** Specify the port explicitly in your SSH command: ``` ssh username@your-server-ip -p 2222 ``` ``` ssh username@your-server-ip -p 2222 ``` Or permanently, by editing your local `~/.ssh/config`: ``` Host my-server HostName your-server-ip User username Port 2222 ``` ``` Host my-server HostName your-server-ip User username Port 2222 ``` I keep a `~/.ssh/config` file for every server I manage now. It’s saved me from this particular frustration more times than I can count. ### Cause 3: The Firewall Is Blocking Your Connection Firewalls are the most common culprit I see in cloud environments. Ubuntu’s UFW, RHEL’s firewalld, or cloud security groups, any of them can block port 22 (or your custom SSH port) and produce “Connection Refused”. **What makes this tricky:** the firewall might have been configured automatically by a control panel, or updated by a system security patch, without you realizing. **How to check on the server:** ``` # For UFW (Ubuntu/Debian) sudo ufw status # For firewalld (RHEL/CentOS/AlmaLinux) sudo firewall-cmd --list-all ``` ``` # For UFW (Ubuntu/Debian) sudo ufw status # For firewalld (RHEL/CentOS/AlmaLinux) sudo firewall-cmd --list-all ``` If the SSH port isn’t listed in the rules, it’s being blocked. **Fix: UFW** ``` sudo ufw allow 22/tcp # or for a custom port: sudo ufw allow 2222/tcp sudo ufw reload ``` ``` sudo ufw allow 22/tcp # or for a custom port: sudo ufw allow 2222/tcp sudo ufw reload ``` If you are new to Ubuntu’s firewall, the [official UFW documentation](https://help.ubuntu.com/community/UFW?ref=serveravatar.com) covers everything from allowing ports to creating advanced firewall rules. **Fix: firewalld** ``` sudo firewall-cmd --permanent --add-service=ssh # or for a custom port: sudo firewall-cmd --permanent --add-port=2222/tcp sudo firewall-cmd --reload ``` ``` sudo firewall-cmd --permanent --add-service=ssh # or for a custom port: sudo firewall-cmd --permanent --add-port=2222/tcp sudo firewall-cmd --reload ``` For Red Hat-based distributions, the [official firewalld documentation](https://firewalld.org/documentation?ref=serveravatar.com) provides a detailed reference for the firewall. For cloud providers (AWS, DigitalOcean, Hetzner, etc.), the firewall is often at the cloud platform level, not on the server itself. Check your cloud console’s security groups or network firewall rules. I once spent 20 minutes debugging an SSH issue on a new server before remembering I’d configured the cloud firewall but forgotten to add the SSH rule. If you’re using Ubuntu, [understanding UFW setup](https://serveravatar.com/ufw-firewall-ubuntu/) can prevent accidental SSH lockouts. ### Cause 4: SSH Isn’t Installed This happens, particularly with minimal OS images or Docker-based server templates where the SSH server isn’t included by default. **How to check:** ``` which sshd # or dpkg -l | grep openssh-server # Debian/Ubuntu rpm -qa | grep openssh-server # RHEL/CentOS ``` ``` which sshd # or dpkg -l | grep openssh-server # Debian/Ubuntu rpm -qa | grep openssh-server # RHEL/CentOS ``` If nothing comes back, OpenSSH Server isn’t installed. **Fix: Ubuntu/Debian** ``` sudo apt-get update sudo apt-get install openssh-server ``` ``` sudo apt-get update sudo apt-get install openssh-server ``` **Fix: RHEL/CentOS/AlmaLinux** ``` sudo yum install openssh-server # or sudo dnf install openssh-server ``` ``` sudo yum install openssh-server # or sudo dnf install openssh-server ``` After installing, start and enable the service: ``` sudo systemctl start sshd sudo systemctl enable sshd ``` ``` sudo systemctl start sshd sudo systemctl enable sshd ``` ### Cause 5: The SSH Daemon Is Bound to a Different IP This one is less common but worth knowing. If `sshd` is configured to listen only on a specific IP address (using the `ListenAddress` directive in `/etc/ssh/sshd_config`), and you try connecting to a different IP on the server, you’ll get Connection Refused. **How to check:** ``` sudo grep "^ListenAddress" /etc/ssh/sshd_config ``` ``` sudo grep "^ListenAddress" /etc/ssh/sshd_config ``` If it shows `ListenAddress 0.0.0.0`, SSH is listening on all interfaces. If it shows a specific IP like `ListenAddress 192.168.1.100` and you’re trying to connect to the public IP, the daemon won’t respond. **Fix:** Edit `/etc/ssh/sshd_config` and set `ListenAddress 0.0.0.0` (or `::`), then restart the daemon: ``` sudo systemctl restart sshd ``` ``` sudo systemctl restart sshd ``` ### Cause 6: SELinux or AppArmor Is Blocking SSH On RHEL-based systems with SELinux in enforcing mode, incorrect SELinux contexts can prevent `sshd` from binding to the correct port. Similarly, on Ubuntu with AppArmor, misconfigured profiles can block SSH. **How to check: SELinux** ``` sudo getenforce # shows Enforcing, Permissive, or Disabled sudo semanage port -l | grep ssh ``` ``` sudo getenforce # shows Enforcing, Permissive, or Disabled sudo semanage port -l | grep ssh ``` If SELinux is running but the SSH port isn’t in the allowed list, you’ll see a denial in `/var/log/audit/audit.log` with “avc: denied.” **Fix: SELinux** ``` sudo semanage port -a -t ssh_port_t -p tcp 2222 sudo systemctl restart sshd ``` ``` sudo semanage port -a -t ssh_port_t -p tcp 2222 sudo systemctl restart sshd ``` **Fix: AppArmor** ``` sudo aa-status | grep sshd sudo apparmor_parser -r /etc/apparmor.d/usr.sbin.sshd ``` ``` sudo aa-status | grep sshd sudo apparmor_parser -r /etc/apparmor.d/usr.sbin.sshd ``` ## Preventing SSH Connection Refused in Production Fixing the error is one thing. Preventing it is where experience really matters. Here’s what I do on every server I manage: **1. Use a custom SSH port:** not 22. Brute-force bots scan port 22 constantly; moving to a high port like 2222 or 3456 reduces noise dramatically. Update `/etc/ssh/sshd_config` and remember to update your local `~/.ssh/config` too. **2. Configure fail2ban:** this automatically blocks IPs that fail too many authentication attempts. On Ubuntu: ``` sudo apt-get install fail2ban sudo systemctl enable fail2ban sudo systemctl start fail2ban ``` ``` sudo apt-get install fail2ban sudo systemctl enable fail2ban sudo systemctl start fail2ban ``` I once left a test server exposed without fail2ban and woke up to 40,000 brute-force attempts overnight. fail2ban would have blocked that entirely. **3. Restrict SSH access by IP:** if your office or home has a static IP, restrict SSH connections to that IP in your firewall rules. Cloud security groups make this particularly easy. **4. Keep SSH config local, not memorized:** always use `~/.ssh/config` with named hosts, custom ports, and identity files. This eliminates the “wrong port” problem almost entirely. **5. Test your SSH connection after any firewall change:** open a second terminal session before modifying firewall rules. This way, if you lock yourself out, you still have the original session open. I’ve used this saved-me approach more than once. **6. Use a control panel such as ServerAvatar:** if you’re managing multiple servers, a control panel can handle SSH configuration, firewall rules, and fail2ban from a dashboard, reducing the surface area for these errors. ## Common Mistakes to Avoid **1. Don’t assume port 22 is correct.** I’ve wasted an embarrassing amount of time on this. Always verify. **2. Don’t restart sshd without a backup session open.** If you’re connecting via SSH to fix an SSH problem, keep your current session alive while you test changes in a new session. One wrong `sshd` config can boot you off permanently. **3. Don’t disable the firewall to test it.** If a firewall rule is causing the problem, disabling the firewall fixes the test but leaves you wide open. Instead, add the SSH rule first, then test. **4. Don’t ignore the error message entirely.** “Connection Refused” tells you something specific, the port isn’t accepting connections. “Connection Timed Out” tells you something different (network-level issue). Read the error. [![Blog banner - ServerAvatar](https://serveravatar.com/wp-content/uploads/2025/09/728_90-Banner-1-1024x127.png)](https://serveravatar.com/?ref=blog)## Why “Connection Refused” vs. Other SSH Errors Matters Understanding the difference accelerates debugging: **Error****What it means****Where to look****Server Reachable?****Authentication Started?**`Connection Refused`Port reached, daemon said noSSH service, port number, firewall✅ Yes❌ No`Connection Timed Out`Port never respondedNetwork route, firewall, server offline❌ No❌ No`Permission Denied`Connection made, auth failedCredentials, SSH keys, `authorized_keys`✅ Yes✅ Yes`No Route to Host`Can’t find the serverDNS, network configuration❌ No❌ NoThis distinction has saved me hours of debugging over the years. ## Key Takeaways - SSH Connection Refused means the SSH daemon isn’t accepting connections on the port you’re targeting - The most common causes are: service not running, wrong port, firewall blocking, SSH not installed, wrong bind address, and security modules blocking access - Always diagnose before fixing, use verbose SSH mode and ping first - Keep a backup SSH session open when modifying SSH configuration on a remote server - Prevention: custom port, fail2ban, IP restriction, and `~/.ssh/config` for every server - Cloud firewall rules are separate from server firewalls, check both ## Conclusion SSH Connection Refused is one of those errors that feels alarming the first few times but becomes routine once you understand the mechanics. The server is telling you exactly what the problem is, there’s no tunnel, no daemon, or something in between is saying no. The fix is almost always one to three commands away. The real skill is diagnosing which of the six causes is at play, in the right order, without making things worse. If you’re managing multiple servers and want a simpler way to handle SSH configuration, firewall rules, and server monitoring from a single dashboard, platforms like [ServerAvatar](https://serveravatar.com/) are worth [exploring](https://serveravatar.com/docs). They won’t prevent all SSH errors, but they make the debugging process considerably less stressful. ## FAQs ### Why does SSH say “Connection Refused” even when the server is online? The server being online (responding to ping) doesn’t mean SSH is accepting connections. The SSH daemon might not be running, or a firewall might be blocking the SSH port specifically. Check `systemctl status sshd` and firewall rules first. ### Can a wrong password cause “Connection Refused”? No. A wrong password produces “Permission Denied,” not “Connection Refused.” Connection Refused happens before authentication, it’s a network-layer issue. If you’re seeing Permission Denied, the SSH service is running and reachable; focus on credentials instead. ### How do I fix “Connection Refused” on Ubuntu? Start by checking if the SSH service is running: `sudo systemctl status ssh`. If it’s not, `sudo systemctl start ssh`. If it is running, check your firewall with `sudo ufw status` and ensure port 22 (or your custom port) is allowed. Also verify the port number in `/etc/ssh/sshd_config` matches what you’re connecting to. ### Does “Connection Refused” mean the server is down? Not necessarily. The server can be running and responding to network traffic but still refuse SSH connections if the daemon isn’t running or the port is blocked by a firewall. “Connection Timed Out” or “No Route to Host” are closer to “server is down” signals. ### How do I prevent SSH Connection Refused errors? Use a custom SSH port (not 22), install and configure fail2ban, restrict SSH access to specific IP addresses via firewall rules, always maintain a `~/.ssh/config` file with correct port settings per server, and test SSH connectivity from a second terminal before making changes to firewall or SSH configuration on a production server. ### About the Author Meghna Meghwani is a technical writer focused on Linux, Ubuntu, VPS hosting, server management, WordPress, PHP, Node.js, cloud hosting, and DevOps. She creates beginner-friendly tutorials, practical hosting guides, troubleshooting articles, and server security content designed to help developers and businesses manage applications and servers more efficiently. **Categories:** Blog, Guide, Linux, Others, Tutorials, Ubuntu **Tags:** Fix SSH Connection Refused Error, Linux SSH, SSH Connection, SSH Connection Failed, SSH Connection Refused, SSH Connection Refused Error, SSH Port 22, SSH Server Error, SSH Troubleshooting, Ubuntu SSH --- ### [Linux File Permissions Explained: Read, Write, and Change Permissions](https://serveravatar.com/linux-file-permissions/) **Published:** July 24, 2026 **Author:** Meghna Meghwani **Content:** [![Blog banner - ServerAvatar](https://serveravatar.com/wp-content/uploads/2025/09/728_90-Banner-3-1024x127.png)](https://serveravatar.com/?ref=blog)Linux file permissions are one of the first concepts every Linux user and system administrator needs to master. Every sysadmin has been burned by a permissions mistake at least once. Uploaded a script that won’t run. Moved a file you couldn’t overwrite. Set up a deployment hook that silently failed because the user running it didn’t have write access to the log directory. These aren’t exotic edge cases, they’re the daily friction of working on a Linux system. Linux file permissions are the gatekeepers of everything that runs on your server. Get them right, and your applications work smoothly, your users can access what they need, and your server stays reasonably secure. Get them wrong, and you’re either locked out of your own files or handing out access like candy. This guide cuts through the noise. You’ll learn exactly how Linux permission bits work, what each one actually does when you’re logged in, how to read the cryptic output of `ls -l`, and how to change permissions the right way using both symbolic and numeric `chmod`. Everything here is written from the perspective of someone who’s spent real hours on actual servers, not just quoting man pages. ## TL;DR - Linux has three permission types: **Read (r)**, **Write (w)**, and **Execute (x)** - Permissions apply to three categories of users: **Owner (u)**, **Group (g)**, and **Others (o)** - The `ls -l` command shows permissions in a 10-character string like `-rw-r--r--` - Use `chmod` to change permissions, symbolic mode (`u+x`) or numeric mode (`755`) - Use `chown` and `chgrp` to change ownership - Common pitfalls: execute bit on directories, wrong group ownership, restrictive umask in production ## Why Linux Permissions Matter More Than You Think On a single-user laptop, permissions feel academic. On a server running multiple services, serving web traffic, and handling multiple users? Permissions are load-bearing infrastructure. When a web server like Nginx runs, it typically operates under its own user, `www-data` on Ubuntu. The user account must have read permissions for the web root directory in order to serve website files. Your deployment script, running as a deploy user, needs write access to certain directories and execute access to deployment hooks. Your backup cron job, running as root, needs read access to everything but write access only to the backup volume. Getting any one of these wrong breaks something silently. I’ve seen a Node.js app that kept crashing every night because a cron job was deleting its log directory, and the app didn’t have permission to recreate it. Permissions weren’t on anyone’s radar until the app started failing. Understanding permissions also matters for security. The difference between `chmod 777` and `chmod 644` on a configuration file could be the difference between a server that’s yours and a server that’s been compromised. That’s not hyperbole, misconfigured permissions are a documented entry point for a wide range of attacks. ## The Three Layers: Owner, Group, Others Before you can understand what a permission means, you need to know who it’s being applied to. Linux splits access into three layers: ![three layers - Linux File Permissions](https://serveravatar.com/wp-content/uploads/2026/07/image-71.png) ### Owner (u) The user who created the file. On a shared server, each user has their own home directory with files they own. The owner can change permissions on their own files, or take them away from themselves, which is a fun way to lock yourself out of something. ### Group (g) A group is a named collection of users. Instead of granting the same permission to five individual users one by one, you put them in a group and set permissions once. This is how most team-based server access works in practice. ### Others (o) Everyone else, users who aren’t the owner and aren’t in the owning group. “Others” permissions are your last line of defense. They’re what the world gets when someone with no account on your server tries to access your files. ## The Three Permission Types Explained ### Read (r or 4) Read permission lets a user view a file’s contents. For a directory, read means listing the directory’s contents, you can see what files and subdirectories exist inside it, but you can’t enter it or access any of those files without additional permissions. In practice, read on a directory is the permission that `ls` checks. Without it, `ls` returns a permission denied error even if you already know the directory exists. ### Write (w or 2) Write permission lets a user modify a file’s contents, add data, truncate it, rewrite it entirely. On a directory, write means you can create, delete, and rename files inside that directory. **Here’s the part that catches people:** you need write permission on the directory itself to delete a file, not write permission on the file. ### Execute (x or 1) Execute permission is what makes a file run as a program or script. Without it, trying to run `./script.sh` gives you a “permission denied” error, even if you own the file and have full read/write access. **For directories, execute has a different meaning:** it allows access to the directory’s metadata and file contents. Without execute on a directory, you can’t `cd` into it or access any file inside it, even if you have read permission on those individual files. ## How to Read Output Once you know the player roles, the notation starts making sense. **Here’s a real-world example:** ``` -rw-r--r-- 1 www-data www-data 4096 Jul 24 06:00 index.php ``` ``` -rw-r--r-- 1 www-data www-data 4096 Jul 24 06:00 index.php ``` Let’s break it down character by character. **File Type:** The very first character tells you what kind of object this is: CharacterMeaning`-`Regular file`d`Directory`l`Symbolic linkIn our example, `-` means this is a regular file. **Permission Bits:** The next nine characters are three groups of three, representing the permission bits for the owner, the group, and others, in that order. ``` rw- r-- r-- owner group others ``` ``` rw- r-- r-- owner group others ``` **For** `index.php`**:** - **Owner (www-data):** `rw-` read and write, but no execute - **Group (www-data):** `r--` read only - **Others:** `r--` read only Each `-` is a missing permission. If execute were present, you’d see an `x` in that slot. **A few more examples to make the pattern stick:** ``` -rwxr-xr-x → Owner: rwx, Group: r-x, Others: r-x (755) -rw------- → Owner: rw-, Group: ---, Others: --- (600) -rw-rw---- → Owner: rw-, Group: rw-, Others: --- (660) lrwxrwxrwx → Symbolic link, all permissions (777, but symlinks handle this differently) ``` ``` -rwxr-xr-x → Owner: rwx, Group: r-x, Others: r-x (755) -rw------- → Owner: rw-, Group: ---, Others: --- (600) -rw-rw---- → Owner: rw-, Group: rw-, Others: --- (660) lrwxrwxrwx → Symbolic link, all permissions (777, but symlinks handle this differently) ``` The trailing dot or plus sign you’ll sometimes see after the nine bits, like `-rw-r--r--.` or `-rw-r--r--+` indicates extended attributes. The `.` means SELinux context is present. The `+` means there’s an ACL (Access Control List) overriding the standard permission bits. In most managed VPS environments, you won’t deal with these daily, but they exist. ## Changing Permissions with chmod The `chmod` command is your primary tool for modifying permission bits. You need to be the file’s owner, or root, to use it. Two modes are available, symbolic and numeric. Both get the job done; you will develop a preference over time. ### Symbolic Mode Symbolic mode uses letters to describe what you want to change: which user class, what operation, and which permission. ``` chmod [ugoa] [+-=] [rwx] filename ``` ``` chmod [ugoa] [+-=] [rwx] filename ``` **User classes:** - `u` – owner (user) - `g` – group - `o` – others - `a` – all (equivalent to `ugo`) **Operations:** - `+` – add a permission - `-` – remove a permission - `=` – set exactly these permissions (remove any not listed) **Some common examples:** ``` # Add execute permission for the owner chmod u+x deploy.sh # Remove write permission from group and others chmod go-w sensitive.conf # Set owner to read+write, group to read, others to nothing chmod u=rw,g=r,o= deploy.sh # Add execute to everyone (common for scripts) chmod +x script.sh ``` ``` # Add execute permission for the owner chmod u+x deploy.sh # Remove write permission from group and others chmod go-w sensitive.conf # Set owner to read+write, group to read, others to nothing chmod u=rw,g=r,o= deploy.sh # Add execute to everyone (common for scripts) chmod +x script.sh ``` The last one, `chmod +x` , is probably the most used in practice. It’s shorthand for “add execute to all three classes.” When you download a script and need to run it, this is usually the fix. A practical caution: never `chmod +x` on a file you downloaded from the internet without at least glancing at its contents. You’re telling your shell to execute whatever is in that file. Downloaded scripts with execute bits are a known malware delivery vector. ### Numeric Mode Numeric mode represents permissions as three digits. Each digit is the sum of the permission bits you want for that class: NumberPermissionsSum0Nothing–**1**Execute1**2**Write2**3**Execute + Write1+2**4**Read4**5**Read + Execute4+1**6**Read + Write4+2**7**Full (rwx)4+2+1The order is always **owner, group, others**. So `chmod 754` means: - Owner: 7 (rwx) - Group: 5 (r-x) - Others: 4 (r–) **Common chmod values in practice:** ``` # 644 standard for regular files (owner rw, everyone else r) chmod 644 index.php # 755 standard for scripts and executables (owner rwx, everyone r-x) chmod 755 deploy.sh # 600 private file, owner only chmod 600 .env # 700 private directory, owner only chmod 700 /root/backups # 775 group-writable shared directory chmod 775 /var/www/shared # 664 group-writable files in a shared project directory chmod 664 project files/*.js ``` ``` # 644 standard for regular files (owner rw, everyone else r) chmod 644 index.php # 755 standard for scripts and executables (owner rwx, everyone r-x) chmod 755 deploy.sh # 600 private file, owner only chmod 600 .env # 700 private directory, owner only chmod 700 /root/backups # 775 group-writable shared directory chmod 775 /var/www/shared # 664 group-writable files in a shared project directory chmod 664 project files/*.js ``` The distinction between `644` and `755` on scripts comes up constantly in deployment workflows. If you `chmod 644` a shell script, it won’t run when you try to execute it. If you `chmod 755` a sensitive config file, you’re giving more access than necessary. The numbers become intuitive after a few deployments. ## Changing Ownership with chown and chgrp Permissions control what users can do with a file. Ownership controls who the file “belongs” to, and ownership itself changes what the owner permission bits apply to. ``` # Change the owner of a file chown deployuser:deploygroup application.jar # Change only the owner chown www-data /var/www/html/index.php # Change only the group chgrp www-data /var/www/html/index.php # Recursively change ownership of a directory and everything inside chown -R nginx:nginx /var/www/myapp ``` ``` # Change the owner of a file chown deployuser:deploygroup application.jar # Change only the owner chown www-data /var/www/html/index.php # Change only the group chgrp www-data /var/www/html/index.php # Recursively change ownership of a directory and everything inside chown -R nginx:nginx /var/www/myapp ``` The `-R` flag is recursive. Use it carefully, running `chown -R` on a large directory tree takes time, and the operation is not instant. On production servers with high I/O load, I’ve seen this command compete with application I/O and cause noticeable slowdowns. Consider running it during low-traffic windows. **A real scenario:** when you install Nginx from Ubuntu’s package manager, it creates its document root at `/var/www/html` and sets ownership to `root:root`. Your web application, running as `www-data`, can’t write to that directory. The standard fix is `chown -R www-data:www-data /var/www/html` , but you’ll often want to set a more specific directory structure than that. ## The umask: Your Default Permissions Filter Every new file or directory created on a Linux system gets a set of default permissions. These aren’t random, they’re filtered through something called the **umask**, which subtracts permissions from the system default. **On most Linux systems:** - The default permission for a new **file** is `666` (rw-rw-rw-), filtered by umask - The default permission for a new **directory** is `777` (rwxrwxrwx), filtered by umask A umask of `022` is common on servers. That means: - Files get `666 - 022 = 644` (owner rw, group and others r) - Directories get `777 - 022 = 755` (owner rwx, group and others rx) A restrictive umask like `077` creates files with `600` (owner only) and directories with `700` (owner only). Some security-conscious environments use this. Check your current umask: ``` umask ``` ``` umask ``` Set a new umask (session-level): ``` umask 022 ``` ``` umask 022 ``` Make it permanent, add it to your shell’s profile file (`~/.bashrc` or `~/.profile`): ``` echo "umask 022" >> ~/.bashrc ``` ``` echo "umask 022" >> ~/.bashrc ``` One thing to note: executables don’t get the execute bit automatically. A script you create with `touch script.sh && chmod +x script.sh` works fine. But if you compile a binary or generate a file some other way, you may need to explicitly add the execute bit. ## Special Permission Bits Worth Knowing Beyond the basic rwx bits, Linux has two special permission types that come up in server administration. ### Setuid When set on an executable, setuid causes the program to run with the permissions of the file’s owner, not the user who executed it. The classic example is the `passwd` command, it needs to modify `/etc/shadow`, which regular users can’t write to. `passwd` is owned by root and has the setuid bit set. ``` -rwsr-xr-x 1 root root 40K Jun 12 06:00 /usr/bin/passwd ``` ``` -rwsr-xr-x 1 root root 40K Jun 12 06:00 /usr/bin/passwd ``` Notice the `s` in the owner’s execute position instead of `x`. That’s the setuid indicator. Setuid is powerful and dangerous. A poorly configured setuid binary is a privilege escalation risk. Most production environments restrict which binaries can have setuid set, and Ubuntu’s default kernel configuration ignores setuid on scripts entirely (this was added specifically to close a security hole). ### Setgid Setgid works similarly but applies to the group. When set on a directory, any file created inside that directory inherits the directory’s group ownership rather than the creating user’s primary group. ``` drwxrwsr-x 2 root developer shared-workspace ``` ``` drwxrwsr-x 2 root developer shared-workspace ``` This is how shared group directories work in team environments. Every file created in `shared-workspace` gets `developer` as its group, so everyone in the developer group can read and write to it, regardless of their individual primary group settings. ### The Sticky Bit On a directory, the sticky bit restricts deletion: only the owner of a file (or root) can delete files inside the directory. The classic example is `/tmp`: ``` drwxrwxrwt 10 root root 4.0K Jul 24 06:00 /tmp ``` ``` drwxrwxrwt 10 root root 4.0K Jul 24 06:00 /tmp ``` The `t` at the end of the others execute slot means the sticky bit is set. Every user can create files in `/tmp`, but nobody can delete anyone else’s files. Without it, one user could wipe out another user’s session data or temporary files. ## Common Mistakes and How to Fix Them These are the permission problems I see most often on actual servers. ### 1. “Permission Denied” on a Web Application File Web servers run under a specific user, `www-data` on Ubuntu, `nginx` on some setups, `apache` on older systems. That user needs read access to your web root and execute access to any CGI scripts or server-side handlers. If your application writes files (uploads, caches, logs), it needs write access too. Fix: Set the web root owner to the web server user, or use group permissions if multiple services need access. ``` chown -R www-data:www-data /var/www/myapp chmod -R 755 /var/www/myapp # directories chmod -R 644 /var/www/myapp/* # files ``` ``` chown -R www-data:www-data /var/www/myapp chmod -R 755 /var/www/myapp # directories chmod -R 644 /var/www/myapp/* # files ``` ### 2. Accidentally Using chmod 777 Every sysadmin does this at least once, usually at 2 AM, under pressure, when nothing else seems to work. `chmod 777` does work, but it opens the file to the world. On a shared server or a containerized environment, this is a security incident waiting to happen. **The right approach:** figure out exactly which user needs access and set permissions for that user (or their group) specifically. If you’re on a shared host and you need web application access, `chmod 755` on directories and `chmod 644` on files is almost always the correct starting point. ### 3. Losing SSH Access After Editing sudoers Editing `/etc/sudoers` or files in `/etc/sudoers.d/` with a syntax error locks you out of sudo. Unlike most config files, sudoers doesn’t give you a graceful fallback, a broken syntax file causes sudo to refuse to start. Always use `visudo` to edit sudoers files. It validates the syntax before saving and prevents you from overwriting a working configuration with a broken one. ### 4. Files Created by Root That Your User Can’t Modify When root creates files (during a package install, for example), those files are owned by root. If your application runs as a non-root user, it can’t write to those files. Fix ownership explicitly after installing packages if you need non-root access: ``` chown -R deployuser:deploygroup /opt/myapp ``` ``` chown -R deployuser:deploygroup /opt/myapp ``` ### 5. Removing the Execute Bit from a Script You Need to Run If you set `chmod 644` on a script and then try to run it, you get “permission denied.” The fix is one command: ``` chmod +x script.sh ``` [![Blog banner - ServerAvatar](https://serveravatar.com/wp-content/uploads/2025/09/728_90-Banner-1-1024x127.png)](https://serveravatar.com/?ref=blog)## How Permissions Interact with Application Deployment When you deploy an application on a VPS, whether it’s a Node.js app, a Python service, or a PHP website, permission handling is part of the deployment checklist, not an afterthought. Here is what a realistic permission setup looks like for a web application: ``` # Web root: readable by web server, writable by application chown -R www-data:www-data /var/www/myapp chmod 755 /var/www/myapp # directories: rwx for owner, rx for group/others chmod 644 /var/www/myapp/* # files: rw for owner, r for group/others # Upload directory: writable by web server chown www-data:www-data /var/www/myapp/uploads chmod 755 /var/www/myapp/uploads # Deployment script: executable by deploy user chown deploy:deploy /opt/myapp/deploy.sh chmod 750 /opt/myapp/deploy.sh # rwx for owner, r-x for group, nothing for others # Environment file: owner only chmod 600 /var/www/myapp/.env chown www-data:www-data /var/www/myapp/.env ``` ``` # Web root: readable by web server, writable by application chown -R www-data:www-data /var/www/myapp chmod 755 /var/www/myapp # directories: rwx for owner, rx for group/others chmod 644 /var/www/myapp/* # files: rw for owner, r for group/others # Upload directory: writable by web server chown www-data:www-data /var/www/myapp/uploads chmod 755 /var/www/myapp/uploads # Deployment script: executable by deploy user chown deploy:deploy /opt/myapp/deploy.sh chmod 750 /opt/myapp/deploy.sh # rwx for owner, r-x for group, nothing for others # Environment file: owner only chmod 600 /var/www/myapp/.env chown www-data:www-data /var/www/myapp/.env ``` **The principle here is** **least privilege:** give each component exactly the access it needs and nothing more. Your web server reads files. Your application writes to specific directories. Your deployment user runs deployment scripts. Your backup user reads everything and writes to backup volumes. ## Key Takeaways - Linux permissions operate on three categories, **owner, group, and others**, and three permission types: **read, write, execute** - The `ls -l` output shows permissions in a 10-character string; read it left to right as file type, then three groups of rwx for owner, group, and others - Use `chmod symbolic` (e.g., `u+x`) for surgical changes and `chmod numeric` (e.g., `755`) for bulk settings - Use `chown` to change file ownership and `chgrp` to change group ownership - The umask filters default permissions for newly created files, know what yours is - Special bits, setuid, setgid, and sticky, exist for specific multi-user scenarios - Always apply the principle of least privilege: give each user and process exactly the access it needs For a simpler way to manage server configurations, application permissions, and deployments without memorizing every chmod combination, tools like [ServerAvatar](https://serveravatar.com/) can handle a lot of this infrastructure work for you. ## Conclusion Understanding Linux file permissions is a fundamental skill for anyone managing servers, hosting websites, or deploying applications. Once you know how to read permission strings, assign the correct access levels, and use commands like **chmod**, **chown**, and **chgrp** effectively, you’ll be able to prevent common permission errors while keeping your Linux system secure. Following the principle of least privilege ensures that every user and application has only the access it needs, reducing both security risks and troubleshooting time. Mastering Linux file permissions isn’t about memorizing every permission combination, it’s about knowing when and why to apply them. Whether you’re a beginner learning the basics or a system administrator managing production servers, applying the right read, write, and execute permissions will help you build a more stable, secure, and reliable Linux environment. As you gain hands-on experience, permission management will become second nature, making server administration faster, safer, and far more efficient. ## FAQs ### What is the difference between chmod 755 and chmod 644? `chmod 755` gives the owner full read, write, and execute permissions (rwx) while giving the group and others read and execute (r-x). `chmod 644` gives the owner read and write (rw-) while giving everyone else read-only access (r–). Use 755 for scripts and directories, and 644 for regular files. ### How do I fix “Permission Denied” errors on Linux? First, identify which user is hitting the error. Then check ownership (`ls -l`) and permissions on the target file or directory. The most common fix is `chown` to give the correct user ownership, or `chmod` to add the missing permission bit. For web applications, the user is typically `www-data` or `nginx`. ### What does chmod +x do? `chmod +x` adds the execute permission to a file for all three user classes (owner, group, others). It’s the standard way to make a script runnable after you create or download it. ### What is the difference between chmod 777 and chmod 755? `chmod 777` gives every user on the system full read, write, and execute access to the file or directory, a serious security risk. `chmod 755` gives full access to the owner and read/execute to everyone else, which is appropriate for most shared files and directories. ### How do I change file permissions recursively? Use the `-R` flag: `chmod -R 755 /path/to/directory`. Note that this sets the same permissions on every file and subdirectory. For most web applications, you’ll want directories at `755` and regular files at `644` , which requires two separate commands. ### About the Author Meghna Meghwani is a technical writer focused on Linux, Ubuntu, VPS hosting, server management, WordPress, PHP, Node.js, cloud hosting, and DevOps. She creates beginner-friendly tutorials, practical hosting guides, troubleshooting articles, and server security content designed to help developers and businesses manage applications and servers more efficiently. **Categories:** Blog, Guide, Linux, Others, Ubuntu **Tags:** chmod Command, chown Command, Linux Administration, Linux chmod, Linux File Ownership, Linux File Permissions, Linux Permissions, Linux Security, Read Write Execute Permissions --- ### [How to Upload Image File in Laravel: Step-by-Step Guide](https://serveravatar.com/laravel-image-upload/) **Published:** July 22, 2026 **Author:** Meghna Meghwani **Content:** [![Blog banner - ServerAvatar](https://serveravatar.com/wp-content/uploads/2025/09/728_90-Banner-3-1024x127.png)](https://serveravatar.com/?ref=blog)Every Laravel project I’ve worked on, whether it’s a client portal, a content management system, or an e-commerce setup, eventually needs one thing: upload image functionality. User avatars, product photos, blog thumbnails, and document attachments all rely on a reliable image upload system. The requirement shows up predictably, yet every time I reach for the documentation, I find myself piecing together bits from half a dozen sources. Most tutorials cover the happy path. They show you the `store()` method, they mention `enctype="multipart/form-data"`, and they call it done. **But what about the messy parts?** What happens when a user uploads a 12MB file and your server chokes? What if the validation rule passes locally but fails on your production VPS because of a misconfigured `php.ini`? And does your application actually handle filename collisions gracefully, or is it quietly overwriting files? This guide is the tutorial I wish existed when I first needed to build robust image upload functionality in Laravel. We are going to cover the full picture, from setting up your database schema for image metadata, to building a form with client-side preview, to handling validation edge cases that tutorials skip, to the security considerations that actually matter in production. ## TL;DR - Laravel handles image uploads through its filesystem layer, no extra packages needed for basic uploads - Store metadata (not just files) in your database: filename, path, MIME type, size, dimensions - Always validate on the server AND (for UX) on the client, server-side validation is non-negotiable - The `storage:link` command is still essential for serving files from the public web - Production concerns, PHP limits, disk permissions, filename collisions, are where most tutorials fall short - ServerAvatar’s built-in server management removes the permission and PHP config headaches from your deployment workflow ## How Laravel’s File Storage Actually Works Before we write a single line of code, it helps to understand what actually happens when a file upload reaches a Laravel application. This model will save you hours of debugging later. When a user submits a multipart form, Laravel wraps the uploaded file in an `UploadedFile` object. This isn’t just the file data, it carries metadata: original filename, MIME type, file size, temporary path on disk, and more. [Laravel’s official documentation](https://laravel.com/docs/13.x/filesystem?ref=serveravatar.com) provides a detailed overview of uploaded files, storage disks, and filesystem operations if you want to explore advanced storage features. ![Upload image in Laravel work flow](https://serveravatar.com/wp-content/uploads/2026/07/image-63-936x1024.png) Laravel then hands this object to the filesystem layer, which decides where to put the file based on your `config/filesystems.php` configuration. The two most relevant disks for image uploads are: - `public` – Files land in `storage/app/public`. These are accessible directly from the web, but only if you’ve run `php artisan storage:link` to create a symlink from `public/storage` to `storage/app/public`. This is the standard path for user-uploaded content you want publicly served. - `local` – Files land in `storage/app`. These are not web-accessible by default, which makes them suitable for files you want to control access to, think documents behind a paywall, or images served through a signed URL. For most image upload use cases, profile photos, product images, gallery uploads, you will use `public` with the `storage:link` symlink. I will focus on that path in this guide. ## Database Design: Storing Image Metadata the Right Way Here’s a mistake I see constantly: they store the uploaded image path as a plain string column on the user or product table, and call it a day. This works until you need to display the image’s dimensions, filter by file size, or track which uploads are causing storage bloat. ![Database Design - Upload image ](https://serveravatar.com/wp-content/uploads/2026/07/image-64.png) Separate your concerns. Create a dedicated `images` table and use a polymorphic relationship. This way, any model in your application can have images, a user, a product, a blog post, without cluttering your main tables. ``` Schema::create('images', function (Blueprint $table) { $table->id(); $table->morphs('imageable'); // adds imageable_type and imageable_id $table->string('filename'); $table->string('path'); $table->string('mime_type'); $table->unsignedInteger('size'); // in bytes $table->unsignedSmallInteger('width')->nullable(); $table->unsignedSmallInteger('height')->nullable(); $table->timestamps(); }); ``` ``` Schema::create('images', function (Blueprint $table) { $table->id(); $table->morphs('imageable'); // adds imageable_type and imageable_id $table->string('filename'); $table->string('path'); $table->string('mime_type'); $table->unsignedInteger('size'); // in bytes $table->unsignedSmallInteger('width')->nullable(); $table->unsignedSmallInteger('height')->nullable(); $table->timestamps(); }); ``` Storing image `width` and `height` can be useful for generating responsive images, validating aspect ratios, and creating thumbnails. You can easily retrieve these values during upload using PHP’s `getimagesize()` function. **The corresponding Eloquent model is straightforward:** ``` class Image extends Model { protected $fillable = [ 'filename', 'path', 'mime_type', 'size', 'width', 'height' ]; public function imageable() { return $this->morphTo(); } public function url(): string { return asset('storage/' . $this->path . '/' . $this->filename); } } ``` ``` class Image extends Model { protected $fillable = [ 'filename', 'path', 'mime_type', 'size', 'width', 'height' ]; public function imageable() { return $this->morphTo(); } public function url(): string { return asset('storage/' . $this->path . '/' . $this->filename); } } ``` What this gives you that a plain string column doesn’t: you can query images by size, filter by dimensions, eager-load them efficiently, and swap storage backends without touching your application code. ## One-Time Server Setup Before your application can handle uploads, two server-level things need to be in place. **1. Run the storage symlink.** If you’ve already done this on your local machine, remember it needs to be run on every server you deploy to, including production. ``` php artisan storage:link ``` ``` php artisan storage:link ``` This creates a symbolic link at `public/storage` pointing to `storage/app/public`. Without it, `asset()` URLs pointing to `storage/` will return 404s in production. **2. Check your PHP upload limits.** This is where I’ve seen the most unexpected failures in production. PHP imposes two directives that directly affect file uploads: - `upload_max_filesize` – maximum size of an individual uploaded file - `post_max_size` – maximum size of a POST request (must be larger than `upload_max_filesize`) On a typical shared or cloud VPS, these might be set to `8M` or even `2M`. If your users need to upload 5MB photos, a 2MB limit will silently fail with a generic error. On [ServerAvatar](https://serveravatar.com/), you can adjust these values directly from the ServerAvatar dashboard without SSHing into the server. ![php settings - Upload image](https://serveravatar.com/wp-content/uploads/2026/07/image-65-1024x884.png) If you’re on a bare VPS, edit `/etc/php/{version}/apache2/php.ini` or `/etc/php/{version}/fpm/php.ini` depending on your setup, then restart PHP-FPM or Apache. **A practical tip I follow:** set your PHP `upload_max_filesize` to `10M` (or higher), set `post_max_size` slightly higher (for example `12M`), and use Laravel’s `max:10240` validation rule. This keeps your server and application limits aligned while ensuring Laravel, not PHP’s POST size limit, handles validation whenever possible. ## Create the Laravel Image Upload Form The HTML form for file uploads is straightforward, but there are a few things worth getting right from the start rather than patching them later. ``` @csrf Upload Image @error('image') {{ $message }} @enderror Upload ``` ``` @csrf Upload Image @error('image') {{ $message }} @enderror Upload ``` The `accept="image/*"` attribute is a client-side hint that narrows the file picker to image types. It’s not a security measure, users can bypass it, but it improves UX by filtering out non-image files before submission. Always pair it with server-side validation. ![Upload image form](https://serveravatar.com/wp-content/uploads/2026/07/image-66.png) > **For the UX-conscious developer:** Add a JavaScript preview so users can see what they’re uploading before hitting submit. I’ve found this reduces failed uploads significantly because users correct wrong files early rather than after a round-trip. If you prefer a reactive approach without writing much JavaScript, [Laravel Livewire](https://serveravatar.com/laravel-livewire/) makes it easy to build real-time image previews and uploads with minimal code. ``` ``` ``` ``` The `FileReader` API gives you a data URL that you can assign to an `` src. This happens entirely in the browser, no server request, no upload. The file isn’t actually uploaded until the form is submitted. ## The Controller: Where the Real Work Happens The controller is responsible for validating the uploaded file, storing it in the configured location, and recording its metadata in the database. Let me walk through each phase. If you’re building an API instead of a traditional Blade application, our[ Laravel API Tutorial](https://serveravatar.com/laravel-rest-api-tutorial/) shows how to return uploaded image paths as JSON responses for frontend or mobile applications. ### Validation Server-side validation is your first and most important line of defense. **Here’s what I validate and why:** ``` public function store(Request $request) { $validated = $request->validate([ 'image' => [ 'required', 'file', 'image', 'mimes:jpeg,png,gif,webp', 'max:10240', // 10MB in kilobytes 'dimensions:min_width=100,min_height=100', ], ]); ``` ``` public function store(Request $request) { $validated = $request->validate([ 'image' => [ 'required', 'file', 'image', 'mimes:jpeg,png,gif,webp', 'max:10240', // 10MB in kilobytes 'dimensions:min_width=100,min_height=100', ], ]); ``` Use the array syntax to keep validation rules organized and easy to extend. While the `mimes` rule checks allowed file types, Laravel’s `image` rule also verifies that the uploaded file is a valid image. Adding the `dimensions` rule helps reject extremely small images, such as 1×1 pixel files, by enforcing a minimum width and height. You can also explore [Laravel’s official validation documentation](https://laravel.com/docs/13.x/validation?ref=serveravatar.com) to understand additional rules such as dimensions, image, and custom validation logic. ### Storing the File **After validation, store the file:** ``` $file = $request->file('image'); // Get image dimensions using PHP's built-in function [$width, $height] = getimagesize($file->getRealPath()); // Generate a unique filename to avoid collisions $filename = Str::uuid() . '.' . $file->getClientOriginalExtension(); // Store the file $path = $file->storeAs('images', $filename, 'public'); // Save metadata to database $image = Image::create([ 'filename' => $filename, 'path' => 'images', 'mime_type'=> $file->getMimeType(), 'size' => $file->getSize(), 'width' => $width, 'height' => $height, ]); return redirect()->back()->with('success', 'Image uploaded successfully.'); } ``` ``` $file = $request->file('image'); // Get image dimensions using PHP's built-in function [$width, $height] = getimagesize($file->getRealPath()); // Generate a unique filename to avoid collisions $filename = Str::uuid() . '.' . $file->getClientOriginalExtension(); // Store the file $path = $file->storeAs('images', $filename, 'public'); // Save metadata to database $image = Image::create([ 'filename' => $filename, 'path' => 'images', 'mime_type'=> $file->getMimeType(), 'size' => $file->getSize(), 'width' => $width, 'height' => $height, ]); return redirect()->back()->with('success', 'Image uploaded successfully.'); } ``` **A few things worth highlighting here:** - **UUID filenames.** The original filename a user uploads (`my-vacation-photo.jpg`) is unreliable, it might contain special characters, spaces, or duplicate names across users. Using a UUID (`f47ac10b-58cc-4372-a567-0e02b2c3d479.jpg`) sidesteps collision issues entirely. You store the original name separately in the database if you need it for display purposes. - **The** `storeAs` **method.** It takes the directory, the filename, and the disk. By passing `'public'` as the disk, the file lands in `storage/app/public/images`. Combined with the `storage:link` symlink we created earlier, it’s accessible at `yourdomain.com/storage/images/uuid.jpg`. - **The metadata.** Storing width, height, and MIME type in the database is cheap and pays off later. When you need to generate a srcset for responsive images, you already have the dimensions. When you’re debugging why a particular image won’t display, the MIME type gives you a clue. ## Displaying Images Correctly **Displaying a stored image is simple in theory:** ``` ``` ``` ``` But if you’re building anything serious, you’ll want more than a raw `` tag. ### Responsive Images with Srcset If your application displays images at multiple sizes (thumbnail, medium, full), build a srcset attribute so the browser downloads the right size for the user’s viewport: ``` ``` ``` ``` Generating those resized variants is a topic of its own, but the principle is important: don’t make mobile users download a 2400px photograph to display a 300px thumbnail. The bandwidth difference is real, and Google has confirmed page speed (specifically Core Web Vitals like LCP) affects rankings. If you’re building an admin panel, displaying uploaded images alongside searchable records becomes much easier with [Laravel Yajra DataTables](https://serveravatar.com/master-yajra-datatables-laravel-tutorial/). ### Cache-Busting Browsers cache images aggressively. If a user uploads a new avatar and you overwrite the file at the same URL, some visitors will keep seeing the old photo for days. Append a version parameter derived from the model’s `updated_at` timestamp: ``` ``` ``` ``` This is a cheap trick that forces the browser to treat the URL as fresh when the timestamp changes. No server round-trip, no caching headers to configure. ## Security: What Most Skip Most cover validation. Very few cover the real security risks. Here’s what actually matters. **1. File Type Validation is Not Enough** Use Laravel’s `image` validation instead of relying only on file extensions or MIME types, as it verifies the file is a real image. For stronger security, store uploads outside the web root whenever possible and never allow uploaded files to be executed. Even when using `storage/app/public`, it’s a good practice to disable PHP execution in the upload directory as an extra layer of protection. **On an Apache server, add this to your** `.htaccess` **inside** `storage/app/public/images`**:** ``` Deny from all ``` ``` Deny from all ``` **On Nginx, in your site configuration:** ``` location /storage/images/ { location ~ \.php$ { deny all; } } ``` ``` location /storage/images/ { location ~ \.php$ { deny all; } } ``` **2. Filename Sanitization** Even with UUID filenames on disk, always sanitize the original filename when you display it or store it alongside the file. The original filename can contain path traversal attempts (`../../etc/passwd`) or XSS payloads. Use `Str::slug()` or `pathinfo()` to extract only the safe parts: ``` $originalName = pathinfo($file->getClientOriginalName(), PATHINFO_FILENAME); $sanitizedName = Str::slug($originalName, '-'); ``` ``` $originalName = pathinfo($file->getClientOriginalName(), PATHINFO_FILENAME); $sanitizedName = Str::slug($originalName, '-'); ``` **3. Limit Upload Frequency** If your application allows authenticated uploads, consider rate-limiting the upload endpoint. Laravel makes this trivial with middleware: ``` Route::post('/images', [ImageController::class, 'store']) ->middleware(['auth', 'throttle:uploads']); ``` ``` Route::post('/images', [ImageController::class, 'store']) ->middleware(['auth', 'throttle:uploads']); ``` The `throttle:uploads` middleware (configured in `app/Providers/RouteServiceProvider.php`) limits how many requests an authenticated user can make to upload endpoints in a given time window. This won’t stop a determined abuser, but it raises the cost of abuse significantly. If your upload endpoint is accessible through an API, make sure it is properly protected using [Laravel API Authentication](https://serveravatar.com/laravel-api-authentication/) to prevent unauthorized uploads. [![Blog banner - ServerAvatar](https://serveravatar.com/wp-content/uploads/2025/09/728_90-Banner-1-1024x127.png)](https://serveravatar.com/?ref=blog)## Deployment Considerations When you move from local development to a live server, image upload functionality faces challenges that don’t exist locally. ### 1. Permissions Your web server (typically `www-data` on Ubuntu/Debian, `apache` on CentOS/RHEL) needs write access to `storage/app/public`. On a fresh server, these directories are often owned by root. Running `chown -R www-data:www-data storage/` fixes this. On ServerAvatar, the “Fix Permission” button in the server management panel handles this in one click, I use it every time I make changes in a server. ![fix permission - Upload image](https://serveravatar.com/wp-content/uploads/2026/07/image-68-1024x452.png) ### 2. Serving Files in a Load-Balanced Environment In a load-balanced setup, local storage can cause missing files because uploads exist only on the server that received them. For scalable applications, use a shared storage solution like Amazon S3 or Google Cloud Storage. Laravel’s filesystem abstraction makes switching storage drivers simple, so planning for cloud storage early can save a complex migration later. ### 3. Monitoring Upload Failures in Production I’ve learned to treat upload failures as a first-class monitoring concern. A silent failure (the upload appears to succeed from the user’s perspective but the file never reaches storage) is worse than a visible error. Log every failed upload with context: ``` use Illuminate\Support\Facades\Log; try { // ... upload logic } catch (\Exception $e) { Log::error('Image upload failed', [ 'user_id' => auth()->id(), 'file_size' => $request->file('image')?->getSize(), 'error' => $e->getMessage(), ]); return redirect()->back()->with('error', 'Upload failed. Please try again.'); } ``` ``` use Illuminate\Support\Facades\Log; try { // ... upload logic } catch (\Exception $e) { Log::error('Image upload failed', [ 'user_id' => auth()->id(), 'file_size' => $request->file('image')?->getSize(), 'error' => $e->getMessage(), ]); return redirect()->back()->with('error', 'Upload failed. Please try again.'); } ``` This gives you a fighting chance of diagnosing what went wrong when a user reports an issue. ## Key Takeaways - **Design your database for images:** a dedicated `images` table with a polymorphic relationship scales better than attaching file paths to every model - **Server-side validation is non-negotiable:** client-side `accept="image/*"` improves UX but provides zero security - **Use UUID filenames:** they eliminate collision headaches and prevent information leakage from original filenames - **Store metadata:** width, height, MIME type, and size are cheap to capture and invaluable to have later - **Don’t skip the security hardening:** disable PHP execution in upload directories, sanitize filenames, and rate-limit upload endpoints - **Plan for horizontal scaling early:** abstract your storage disk in `config/filesystems.php` so switching to S3 later doesn’t require rewriting your upload logic - **Test your error paths:** configure PHP limits, test permission errors locally, and log failures in production ## Conclusion A secure, reliable image upload system requires more than just saving files. By combining proper validation, unique filenames, thoughtful storage, and basic security practices, you can build an upload workflow that’s ready for production and easy to maintain. As your application grows, Laravel’s filesystem abstraction and flexible architecture make it simple to scale from local storage to cloud services with minimal code changes. Planning for these best practices early helps avoid costly changes later. ## FAQs ### How do I validate image dimensions in Laravel? Laravel’s validation system has a built-in `dimensions` rule that lets you specify minimum, maximum, and exact dimension constraints. For example, `dimensions:min_width=200,min_height=200,max_width=4000,max_height=4000` ensures uploaded images fall within a usable range. This is useful for avatar uploads where you want to prevent both tiny and excessively large images. ### Can I upload images without a database? Yes, if you only need to store the file and don’t need to track metadata, you can upload directly using `$request->file('image')->store('images', 'public')` and save the generated path. However, you lose the ability to query images by size, dimensions, or type, and handling filename collisions becomes your responsibility. ### How do I display uploaded images in a Blade template? Use the `asset()` helper pointing to the storage symlink path. If your file is stored at `storage/app/public/images/uuid.jpg`, display it with ``. For a cleaner model interface, add a `url()` method to your Image model that constructs this path automatically. ### What is the maximum file size for image uploads in Laravel? Laravel’s validation `max` rule accepts kilobytes, so `max:5120` means 5MB. However, your PHP configuration (`upload_max_filesize` and `post_max_size`) also imposes hard limits at the server level. Set both to consistent values, I recommend at least 10MB at both layers for modern use cases. ### How do I handle filename conflicts when uploading? Laravel’s `store()` and `storeAs()` methods generate random filenames automatically. Using `storeAs('images', $filename, 'public')` with a UUID-based `$filename` eliminates the risk of two users uploading `avatar.jpg` and one overwriting the other. ### About the Author Meghna Meghwani is a technical writer focused on Linux, Ubuntu, VPS hosting, server management, WordPress, PHP, Node.js, cloud hosting, and DevOps. She creates beginner-friendly tutorials, practical hosting guides, troubleshooting articles, and server security content designed to help developers and businesses manage applications and servers more efficiently. **Categories:** Blog, Guide, Laravel, Linux, Others, Php, Tutorials, Ubuntu **Tags:** Image Upload Tutorial, laravel, Laravel File Upload, Laravel Filesystem, Laravel Image Upload, Laravel Tutorial, Laravel Validation, php, Upload Image --- ### [How to Copy and Overwrite Files in Linux Without Confirmation](https://serveravatar.com/copy-overwrite-files-in-linux/) **Published:** July 21, 2026 **Author:** Meghna Meghwani **Content:** [![Blog banner - ServerAvatar](https://serveravatar.com/wp-content/uploads/2025/09/728_90-Banner-3-1024x127.png)](https://serveravatar.com/?ref=blog)There is a moment every Linux user runs into when trying to copy and overwrite files in Linux without confirmation. You have a script ready, everything is automated, and then a single confirmation prompt breaks the whole pipeline. You did not plan for it. The script hangs, waiting for a y that will never come. That frustration is exactly what this guide aims to address. When you copy files in Linux, the `cp` command does not always behave the same way twice. On some systems, it overwrites without asking. On others, it stops and waits for input. Sometimes it refuses to touch a file at all. If you are automating anything, deployment scripts, backup routines, container image builds, these inconsistencies can quietly derail your workflow. This is a practical guide for people who need to copy and overwrite files in Linux without confirmation. We will walk through the default behavior, every relevant flag, how shell aliases interfere, and how to write scripts that never stop mid-execution waiting for human input. ## TL;DR - The `cp` command’s default behavior depends on your shell environment - `-f` forces overwrites; `-n` prevents them entirely - Shell aliases like `cp='cp -i'` can silently change behavior - Backslash prefix (`\cp`) bypasses aliases temporarily - The `noclobber` shell option provides another safety layer - Piping `yes` to `cp` automates all confirmation responses - All of this is scriptable and automation-friendly ## Quick Comparison of `cp` Overwrite Options Before choosing an overwrite option, it helps to understand what each `cp` flag does. The table below summarizes the most commonly used options so you can quickly pick the right command for your use case. **Command****What It Does****Best Used For**`cp -f`Forces the destination file to be overwritten without prompting (unless an interactive alias interferes).Automated scripts, deployments, configuration updates`cp -n`Never overwrites an existing file. Existing files are skipped silently.Protecting existing backups or configuration files`cp -u`Copies a file only if the source is newer or the destination does not exist.Incremental backups and synchronization`\cp`Bypasses shell aliases such as `cp -i` and runs the original `cp` command.Reliable automation across different Linux systems`yes | cp`Automatically answers **yes** to every overwrite prompt.Bulk copy operations that still trigger interactive prompts## Understanding How `cp` Behaves by Default Before diving into flags, it helps to understand what `cp` actually does when you run it on a typical Linux system. The basic syntax is straightforward: ``` cp [OPTIONS] SOURCE DESTINATION ``` ``` cp [OPTIONS] SOURCE DESTINATION ``` You can specify a single source file, multiple files, or an entire directory. The last argument is always treated as the destination, everything before it is the source. ![cp - Copy and Overwrite Files](https://serveravatar.com/wp-content/uploads/2026/07/image-58-1024x36.png) Example: ``` cp file.txt /home/user/Documents/ ``` ``` cp file.txt /home/user/Documents/ ``` Explanation: - `file.txt` – Source file to copy - `/home/user/Documents/` – Destination directory - This copies `file.txt` into the `Documents` folder. ## Why Your `cp` Might Ask Before Overwriting The same `cp` command may overwrite files on one system but ask for confirmation on another because of a shell alias. An alias is a shell shortcut that automatically adds predefined options to a command before it runs. Some distributions define this in their default shell configuration: ``` alias cp='cp -i' ``` ``` alias cp='cp -i' ``` The `-i` option enables **interactive mode**, prompting for confirmation before overwriting existing files. With this alias enabled, every `cp` command automatically runs as `cp -i`. While this is helpful for manual use, it can interrupt automated scripts and deployments. Example: ``` cp file.txt /home/user/Documents/ ``` ``` cp file.txt /home/user/Documents/ ``` Explanation: - If there is already a same name file, it will prompt for confirmation before overwriting an existing `file.txt` in the backup folder. ### The `-f` Flag: Force the Overwrite The `-f` (force) option tells `cp` to overwrite the destination file without prompting for confirmation. ``` cp -f SOURCE DESTINATION ``` ``` cp -f SOURCE DESTINATION ``` In most cases, it replaces the existing file automatically by opening it for writing and copying the source file over it. Example: ``` cp -f file.txt /home/user/Documents/ ``` ``` cp -f file.txt /home/user/Documents/ ``` Explanation: - It copies `file.txt` into the `/home/user/Documents/` directory and overwrites the file if it already exists. - The `-f` option forces the copy operation without asking for confirmation. > **There is a catch:** If your shell uses the `alias cp='cp -i'`, running `cp -f` may still prompt for confirmation. This happens because the alias is applied first, causing the command to run as `cp -i -f` on some systems. **When You Should Avoid Using** `cp -f` It replaces existing files without asking for confirmation; using it carelessly can permanently overwrite important data. Avoid using `cp -f` in situations such as: - Copying critical production configuration files that have not been backed up. - Performing one-time migrations where you want to verify every overwrite. - Working as the root user on system directories like `/etc` or `/boot`. - Copying files when you are unsure whether the destination already contains important data. - Running commands manually on production servers without first confirming the destination path. ### The `-n` Flag: The Opposite Approach The `-n` option prevents `cp` from overwriting existing files. If the destination file already exists, it is skipped, and the copy operation continues. ``` cp -n SOURCE DESTINATION ``` ``` cp -n SOURCE DESTINATION ``` This is useful when copying multiple files, and you want to protect existing data from being replaced. Example: ``` cp -n file.txt /home/user/Documents/ ``` ``` cp -n file.txt /home/user/Documents/ ``` Explanation: - This command copies `file.txt` to the `/home/user/Documents/` directory only if a file with the same name does not already exist. - The `-n` option prevents overwriting existing files during the copy operation. No error, no prompt, it just does not overwrite. > You can also combine `-n` with `-f` to get more nuanced behavior, for example, forcing an overwrite only when the source is newer, which brings us to the next flag. ### The `-u` Flag: Copy Only When Source Is Newer The `-u` (update) flag makes `cp` copy a file only if the source has been modified more recently than the destination or if no destination file exists. ``` cp -u SOURCE DESTINATION ``` ``` cp -u SOURCE DESTINATION ``` This makes it ideal for syncing directories and backups, as it copies only updated files and skips unchanged ones. Example: ``` cp -u /var/www/html/* /backups/html/ ``` ``` cp -u /var/www/html/* /backups/html/ ``` Explanation: - This command copies updated files from `/var/www/html/` to `/backups/html/` only if the source files are newer or missing in the backup folder. - The `-u` option performs an update copy and avoids replacing newer destination files. If you combine this with `-f` as `cp -uf`, you get forced overwrites of only the changed files: ``` cp -uf source.txt destination.txt ``` ``` cp -uf source.txt destination.txt ``` > **This means:** using `-u` with `-f` copies files only when the source is newer or the destination file is missing. This reduces unnecessary copying while ensuring the destination stays up to date. ### Using `yes` to Automate All Confirmations The `yes` command automatically sends `y` to every confirmation prompt, allowing `cp` to continue without user input. ``` yes | cp -v SOURCE DESTINATION ``` ``` yes | cp -v SOURCE DESTINATION ``` Combined with the `-v` option, it also displays each file as it is copied. This is especially useful when copying large directories that may trigger multiple overwrite prompts. Example: ``` yes | cp -v source.txt destination.txt ``` ``` yes | cp -v source.txt destination.txt ``` Explanation: - This command automatically confirms prompts (using `yes`) and copies `source.txt` to `destination.txt` while displaying the copy process. - The `-v` option shows detailed output of the copied file operation. > **One thing to keep in mind:** Using `yes` with `cp` automatically confirms every prompt, including warnings related to permissions or links. Use it carefully and verify the files being copied before automating confirmations. ### Bypassing Shell Aliases with a Backslash Aliases are a common reason why `cp` behaves differently than expected. To bypass an alias for a single command, prefix `cp` with a backslash (`\cp`). ``` \cp SOURCE DESTINATION ``` ``` \cp SOURCE DESTINATION ``` This runs the original `cp` command directly without applying any alias-defined options. Example: ``` \cp source.txt destination.txt ``` ``` \cp source.txt destination.txt ``` Explanation: - This command copies `source.txt` to `destination.txt` while bypassing any `cp` alias settings (such as `alias cp='cp -i'`). - The `\` before `cp` runs the original `cp` command directly without confirmation prompts from aliases. If you’re new to creating and managing aliases, our [**Boost Your Productivity with Bash Aliases**](https://serveravatar.com/bash-aliases-guide/) guide explains how aliases work and how to customize them safely for everyday Linux administration. ### The `noclobber` Shell Option Bash includes a `noclobber` option that prevents overwriting files when using `>` redirection. It is separate from `cp` but can affect file operations involving shell redirection. To check the `noclobber` status: ``` set -o | grep noclobber ``` ``` set -o | grep noclobber ``` - This command checks whether the `noclobber` shell option is enabled or disabled, which controls overwriting existing files using `>` redirection. ![noclobber - Copy and Overwrite Files](https://serveravatar.com/wp-content/uploads/2026/07/image-59-1024x43.png) If it is on, you will see `noclobber` set. To disable it for the current session: ``` set +o noclobber ``` ``` set +o noclobber ``` - This command disables the `noclobber` option, allowing existing files to be overwritten using `>` output redirection. To make this permanent, add it to your `~/.bashrc` or `~/.bash_profile`. ## Writing Automation Scripts That Never Prompt Now let us bring this together into something practical. If you are writing a bash script that copies files as part of an automated workflow, you want to be deliberate about which flags you use and why. **Here is a pattern I use regularly:** ``` #!/bin/bash # Force overwrite all files from source to destination # No prompts, no aliases, no interruptions \cp -f /app/config/*.conf /etc/app/ \cp -rf /app/templates/* /var/www/html/ echo "Deployment files copied successfully." ``` ``` #!/bin/bash # Force overwrite all files from source to destination # No prompts, no aliases, no interruptions \cp -f /app/config/*.conf /etc/app/ \cp -rf /app/templates/* /var/www/html/ echo "Deployment files copied successfully." ``` This copies all `.conf` files from `/app/config/` to `/etc/app/` - `\cp` bypasses any `cp` alias (such as `alias cp='cp -i'`) - `-f` forces overwriting of existing files - `-rf` recursively copies directories - `*.conf` matches all configuration files - `echo` displays a success message after the copy operations complete **Another pattern for conditional syncing:** ``` #!/bin/bash # Copy only newer files, force overwrite, skip existing unchanged files \cp -uf /data/app/* /backup/app/ if [ $? -eq 0 ]; then echo "Backup sync complete." else echo "Backup sync encountered errors." fi ``` ``` #!/bin/bash # Copy only newer files, force overwrite, skip existing unchanged files \cp -uf /data/app/* /backup/app/ if [ $? -eq 0 ]; then echo "Backup sync complete." else echo "Backup sync encountered errors." fi ``` This copies files from `/data/app/` to `/backup/app/` - `\cp` bypasses any `cp` alias (such as `alias cp='cp -i'`) - `-u` copies only files that are newer than the destination files or files that do not exist - `-f` forces overwriting of existing destination files - `*` selects all files inside `/data/app/` - `$?` stores the result of the last command - `0` means the command completed successfully - `echo` displays a message after the operations execution > The `$? -eq 0` checks the exit status of the last command. If `cp` succeeded, the script continues cleanly. If something went wrong, you get an error message instead of silent failure. If you’re learning Bash scripting, our [**Introduction to Bash For Loops: A Beginner’s Guide**](https://serveravatar.com/introduction-to-bash-for-loops/) covers loops that can automate repetitive file operations such as copying, renaming, and processing multiple files. ### Best Practices for Using `cp` in Automation When working with deployment scripts or server automation, consistency is often more important than saving a few keystrokes. A command that behaves differently across systems can interrupt automated workflows and cause unexpected deployment failures. A practical approach is to bypass shell aliases with `\cp`, use the appropriate overwrite option (`-f` or `-u`), and verify the results after the copy operation completes. This reduces the chances of interactive prompts stopping your scripts and makes your automation more predictable across different Linux distributions. If you’re deploying applications to multiple servers, consider testing your copy commands in a staging environment before running them in production. A quick verification step can help prevent accidental overwrites and configuration issues. ## Verifying Your Copy Operations After copying important files, you often want to confirm the operation worked correctly. **A quick way to verify is to compare file sizes or checksums:** ``` diff **Categories:** Blog, Guide, Linux, Others, Tutorials, Ubuntu **Tags:** Copy and Overwrite Files in Linux Without Confirmation, cp -f Command, Linux Command Line, Linux Copy File Without Confirmation, Linux cp Command, Linux File Copy, Linux File Management, Linux Force Overwrite Files, Linux Terminal Commands, Overwrite Files in Linux --- ### [How to Fix WordPress Stuck in Maintenance Mode](https://serveravatar.com/fix-wordpress-stuck-in-maintenance-mode/) **Published:** July 20, 2026 **Author:** Meghna Meghwani **Content:** [![Blog banner - ServerAvatar](https://serveravatar.com/wp-content/uploads/2025/09/728_90-Banner-3-1024x127.png)](https://serveravatar.com/?ref=blog)You just clicked “Update Now” on a plugin. Thirty seconds later, your WordPress stuck in maintenance mode and shows a white screen that says: “Briefly unavailable for scheduled maintenance. Check back in a minute.” That minute passes. Then ten. Then an hour. You refresh. Still the same message. ![WordPress stuck in maintenance mode error ](https://serveravatar.com/wp-content/uploads/2026/07/image-54-1024x656.png) If you’ve been there, and plenty of WordPress users have, you already know the sinking feeling. You are locked out of your own website, and your visitors are seeing the same thing. You start wondering if you broke the internet, lost months of content, or need to restore from a backup. Take a breath. You almost certainly didn’t break anything. Getting WordPress unstuck from maintenance mode is usually a simple fix, and you don’t need to be a server admin to do it. This guide walks you through exactly what’s happening, why it happened, and how to get your site back right now. I will also walk you through the best practices to prevent this issue from returning. By the time you finish reading, you’ll know how to diagnose the issue, fix it yourself, and harden your setup so interruptions don’t leave you stranded again. ## TL;DR **Aspect**Details**What’s happening**WordPress creates a hidden `.maintenance` file during updates to block access temporarily. Normally gone in seconds.**Why it gets stuck**Interrupted updates (closed browser, dropped connection), low PHP memory, plugin/theme conflicts, file permission issues, or forgotten manual maintenance mode.**How to confirm**Refresh your website to see if the maintenance notice persists, confirm that `/wp-admin` redirects to the maintenance page, and check whether the `.maintenance` file exists in the root folder.**Step 1: Access files**Use ServerAvatar File Manager, FTP/SFTP, SSH, or hosting control panel. Enable “show hidden files.”**Step 2: Delete the file**Remove `.maintenance` from WordPress root (or run `rm .maintenance` via SSH). Refresh site.**Step 3: Clear cache**Hard refresh (Ctrl+F5 / Cmd+Shift+R) or test in incognito mode.**Step 4: If still stuck**Disable WP-Cron temporarily >> delete file again; deactivate all plugins and re-enable one by one; run `wp core verify-checksums`; check PHP/server error logs.**Prevention tips**Update plugins one at a time, test on staging first, monitor PHP memory limits, use server-side cron instead of WP-Cron, use a maintenance plugin with auto-timeout, check logs weekly.**Data safety**No data loss, it’s an access lock only, not a database/content issue.## What Is WordPress Maintenance Mode, Exactly? When WordPress runs an update, whether it’s a plugin, a theme, or the core itself, it needs a moment where nothing else touches the site while files are being swapped out. If a visitor tried to load a page mid-update, they could end up with a half-written file or corrupted database entry. So WordPress puts the site into a brief holding state. It drops a small file called `.maintenance` in your root directory, and every visitor, including you, sees that “Briefly unavailable” message instead of your actual content. If you’re new to WP-CLI, the official [**WP-CLI documentation**](https://wordpress.org/documentation?ref=serveravatar.com) explains its available commands and how to use them for managing WordPress from the command line. Under normal circumstances, this is invisible. The update finishes, WordPress deletes the `.maintenance` file, and everything goes back to normal within seconds. The problem starts when something interrupts the update process before WordPress can clean up. Maybe your browser tab closed mid-upload. Maybe your internet dropped. Maybe your server ran out of memory and killed the process. When that happens, the `.maintenance` file stays right where it is, and your site stays locked. I’ve seen this happen on everything from small personal blogs to agency-managed client sites. The good news is that the fix is almost always the same: find that file and remove it. ## How to Tell If Your WordPress Site Is Actually Stuck Not every slow update means your site is stuck. Sometimes WordPress really is just taking a minute to process a large plugin update. Here’s how to know the difference. - **The message is the first clue.** If your site displays “Briefly unavailable for scheduled maintenance. When the maintenance message stays visible for several minutes instead of disappearing, it’s usually a sign that WordPress is stuck in maintenance mode and requires manual intervention. - **You can’t reach the admin dashboard.** If you cannot access your WordPress admin dashboard and visiting `/wp-admin` redirects you back to the maintenance screen, your site is likely stuck in maintenance mode rather than simply taking longer to update. - **The message persists after refreshing.** Give it a few refreshes over the course of a minute or two. If it never resolves, something has interrupted the process. - **You can confirm it by checking your files.** You can verify the issue by checking your WordPress root directory for a `.maintenance` file using your hosting file manager, FTP, or SSH. If the file exists after several minutes of an update, it is likely causing the maintenance mode lock. > **A useful side note:** if you see the maintenance message but never initiated an update yourself, that’s actually a red flag. Someone may have triggered an update on your site without you knowing, or a plugin auto-updated itself. Either way, the fix is the same. ## What Actually Causes WordPress to Get Stuck? Understanding why this happens helps you fix it faster and avoid it in the future. Here are the most common culprits I’ve encountered in practice. - **Interrupted updates** are the most common reason WordPress gets stuck in maintenance mode. If an update is stopped due to a closed browser, lost connection, or system sleep, the `.maintenance` file may remain and keep the site locked. - **Server resource limits** can also cause maintenance mode issues. On shared hosting, low PHP memory limits or execution timeouts may interrupt plugin updates, especially when updating multiple plugins or handling large update files. - **Plugin and theme conflicts** can also interrupt updates. Incompatible plugins, outdated themes, or resource conflicts may cause the update process to fail and leave WordPress stuck in maintenance mode. - **File permission problems** can also prevent WordPress from exiting maintenance mode. If WordPress lacks proper write access to manage the `.maintenance` file, it may remain even after a successful update. - **Running multiple updates** at the same time can create conflicts, especially on multi-user sites. These overlapping processes may leave the `.maintenance` file behind and keep WordPress stuck in maintenance mode. - **Manual maintenance mode activation** can also be the cause. If a site owner or developer enables maintenance mode through `wp-config.php` or a plugin and forgets to disable it, the `.maintenance` file may remain and keep the site inaccessible. ## How to Fix WordPress Stuck in Maintenance Mode Here’s the step-by-step process I use every time. These steps work regardless of which hosting platform you’re on, though the exact interface will differ slightly. ### Step 1: Access Your WordPress Files Before making any changes, you need access to your WordPress Files. #### Option 1: Using ServerAvatar (Recommended) - Log in to your **ServerAvatar** dashboard. Navigate to the **Server panel** where your website is hosted. - Go to the **Applications section**, and click on your application dashboard icon to navigate to your WordPress application panel. ![application panel - WordPress stuck in maintenance mode](https://serveravatar.com/wp-content/uploads/2026/07/image-55-1024x302.png) - Open the **File Manager**. Go to your WordPress root directory, generally **public\_html** (the folder containing **wp-admin**, **wp-content**, and **wp-includes**). - Enable the toggle to **Show Hidden Files** so hidden files such as `.maintenance` become visible. #### Option 2: Using FTP or SFTP If your hosting provider doesn’t include a built-in file manager: - Connect using an FTP/SFTP client such as **FileZilla**, **WinSCP**, or **Cyberduck**. - Log in using your server hostname, username, password, and port (22 for SFTP or 21 for FTP). - Navigate to your WordPress root directory. - Enable **Show Hidden Files** in your FTP client if the `.maintenance` file is not visible. #### Option 3: Using SSH If you have SSH access: - Connect to your server via SSH. - Access your WordPress root directory by navigating to it with the `cd` command. - Verify that hidden files are visible before proceeding. #### Option 4: Using Your Hosting Control Panel Most hosting providers offer a File Manager through their control panel. - Open your hosting dashboard. - Launch the **File Manager**. - Navigate to your WordPress root directory. - Enable hidden files if necessary. > **Tip:** Before modifying any files, create a backup of your website. This allows you to restore your site if something unexpected happens. ### Step 2: Delete the `.maintenance` File The `.maintenance` file tells WordPress to display the maintenance mode page. Removing it usually restores your website immediately. #### Option 1: Using ServerAvatar - Open **File Manager**. - Navigate to your WordPress root directory. - Locate the hidden `.maintenance` file. - Delete the file. - Wait a few seconds and refresh your website. ![delete file - WordPress stuck in maintenance mode](https://serveravatar.com/wp-content/uploads/2026/07/image-56-1024x401.png) #### Option 2: **Using FTP or Hosting File Manager** - Locate the `.maintenance` file inside the WordPress root directory. - Delete it using the Delete option. #### Option 3: **Using SSH** Run the following command from your WordPress root directory: ``` rm .maintenance ``` After deleting the file, refresh your website. In most cases, the maintenance mode message disappears immediately ### Step 3: Clear Your Browser Cache If your website still displays the maintenance page after deleting the file, your browser may simply be showing a cached version. - Refresh the page using **Ctrl + F5** (Windows/Linux) or **Cmd + Shift + R** (macOS). - If the issue remains, clear your browser cache. - Alternatively, open the website in an Incognito or Private window to verify whether the issue is cache-related. If the website loads correctly in a private window, simply clear your browser cache and reload the site normally. ### Step 4: Perform Advanced Troubleshooting (If the Issue Persists) If deleting the `.maintenance` file doesn’t solve the issue, or the file keeps reappearing, follow the checks below. #### A. Check for a Stuck WordPress Cron Job A failed scheduled task can recreate the `.maintenance` file repeatedly. - Edit the `wp-config.php` file. - Temporarily add the following line: ``` define('DISABLE_WP_CRON', true); ``` ``` define('DISABLE_WP_CRON', true); ``` - Delete the `.maintenance` file again. - Refresh your website. - If the issue is resolved, investigate the cron job or configure a proper server cron. - Remove the above line after troubleshooting unless you intentionally want WP-Cron disabled. - To better understand how scheduled tasks work, refer to the official [**WordPress Cron documentation**](https://developer.wordpress.org/plugins/cron?ref=serveravatar.com). #### B. Disable Plugins Run the command below to deactivate all plugins: ``` wp plugin deactivate --all ``` ``` wp plugin deactivate --all ``` - Once the website becomes accessible, reactivate plugins one at a time from the WordPress dashboard to identify the problematic plugin. > **Note:** If you are using [ServerAvatar](https://serveravatar.com/) and had [**WP Toolkit**](https://app.serveravatar.com/add-ons/wp-toolkit) enabled, you can easily manage plugins and other WordPress settings. You can quickly deactivate all plugins without using the command line. #### C. Verify WordPress Core Files Corrupted WordPress core files can also prevent updates from completing successfully. Using **ServerAvatar Terminal** or SSH, run: ``` wp core verify-checksums ``` ``` wp core verify-checksums ``` If corrupted files are detected, reinstall the core files with: ``` wp core update --force ``` ``` wp core update --force ``` This replaces only the WordPress core files without affecting your themes, plugins, or media. [![Blog banner - ServerAvatar](https://serveravatar.com/wp-content/uploads/2025/09/728_90-Banner-1-1024x127.png)](https://serveravatar.com/?ref=blog)#### D. Review Error Logs If the problem still exists, inspect your server logs. **Using ServerAvatar** - Open your server panel in ServerAvatar. - Navigate to the Logs section. Select the Log file from the given options. - Review the PHP and web server logs. ![fetch logs - WordPress stuck in maintenance mode](https://serveravatar.com/wp-content/uploads/2026/07/image-57-1024x439.png) - Look for errors generated around the time maintenance mode appeared. **Other Hosting Providers** - Open your hosting control panel. - Access the PHP or server error logs. - Identify any plugin, theme, PHP, or server-related errors that may have interrupted the update process. The error logs often reveal the exact cause, making it much easier to fix the underlying problem instead of repeatedly deleting the `.maintenance` file. ## Preventing WordPress Maintenance Mode Issues Getting unstuck is one thing. Preventing it from happening again is where a little planning goes a long way. - **Never run multiple updates at once.** When you update plugins one at a time, WordPress can focus its resources on that single task. Updating five plugins simultaneously increases the chance that something gets interrupted, especially on resource-constrained hosting. - **Test updates on a staging site first.** Always test updates on a staging site before applying them to your live website. A staging environment helps identify plugin, theme, or compatibility issues safely without affecting your production site. Before applying updates to your live website, it’s always a good idea to test them in a staging environment. Read our [Complete Guide to Setting Up a Staging Environment](https://serveravatar.com/setting-up-a-staging-environment/) to safely test updates and changes. - **Keep an eye on your PHP memory limits.** Monitor your PHP memory limits regularly, as low available memory can interrupt WordPress updates. If your site frequently reaches its limit, optimize resource usage or consider upgrading to a hosting plan with higher capacity. - **Set up server-side cron instead of WordPress cron.** Use a server-side cron job instead of relying on WP-Cron. Unlike WP-Cron, which depends on site traffic, server cron runs at scheduled intervals and provides more reliable task execution with better resource control. If you don’t know about cron job, read our detailed guide on [**Cronjob in Linux: A Complete Guide to Task Automation**](https://serveravatar.com/cronjob-in-linux-guide/) for a step-by-step walkthrough. - **Use a maintenance mode plugin with a timeout feature.** Use a maintenance mode plugin with an automatic timeout option. This ensures maintenance mode is disabled after a set period, preventing accidental lockouts when manual deactivation is forgotten. - **Monitor your error logs regularly.** A weekly check of your error logs can catch problems before they become full outages. Many hosting panels provide this out of the box, and it’s one of the simplest preventative habits you can build. ## Key Takeaways - WordPress maintenance mode is triggered by a `.maintenance` file in your root directory, delete it to restore access - Browser caching can make it look like your site is still stuck even after you’ve fixed it, always clear your cache - Server resource limits and interrupted updates are the most common root causes - WP-CLI gives you powerful troubleshooting tools when you can’t access the admin panel - Staging environments and server-side cron jobs are your best long-term prevention tools - Your site data is never at risk during a maintenance mode lock, only access is affected If you’re managing multiple WordPress sites and want a simpler way to handle updates, backups, and server configuration from a single dashboard, [ServerAvatar](https://serveravatar.com/) offers a platform designed for exactly that, managing WordPress deployments and maintenance without needing to dig through server configs every time. ## Conclusion WordPress getting stuck in maintenance mode feels dramatic, but it’s almost always a minor issue with a quick fix. In most cases, you’re looking at deleting a single file and clearing your browser cache. Even when the simple fix doesn’t work, WP-CLI and your server’s error logs give you enough information to pinpoint exactly what went wrong. The real lesson isn’t just about fixing it, it’s about building habits that prevent it. Running updates one at a time, testing on staging first, keeping an eye on your PHP memory usage, and knowing how to access your site files without the admin panel are all skills that pay off well beyond this specific problem. ## FAQs ### How long should WordPress maintenance mode actually last? Normally, less than a minute. The entire process of updating a plugin or theme is designed to complete in seconds. If your site is still showing the maintenance message after two or three minutes, something has gone wrong. Start troubleshooting. ### Will I lose data if my site is stuck in maintenance mode? No. Maintenance mode is a temporary access lock, it doesn’t affect your database or files. Your content, posts, settings, and uploaded media are all safe. The issue is purely about access, not data loss. ### Can I access my site while it’s stuck in maintenance mode? Usually not. WordPress redirects both visitors and administrators to the maintenance page. However, if you can access your server files directly, you can fix the issue without needing admin access at all. ### What if deleting the .maintenance file doesn’t work? If the file keeps reappearing after you delete it, a stuck WP-Cron job is the most likely cause. Try disabling WP-Cron temporarily in `wp-config.php`, delete the file again, and see if it stays gone. You should also check your error logs for PHP fatal errors that might be triggering the condition. ### Is there a command to force WordPress out of maintenance mode? From the terminal, you can delete the `.maintenance` file directly with `rm .maintenance` from your WordPress root directory. If you have WP-CLI installed, you can also run `wp maintenance-mode deactivate` if a maintenance mode plugin is handling the lock, though in most cases, simply removing the file is enough. ### About the Author Meghna Meghwani is a technical writer focused on Linux, Ubuntu, VPS hosting, server management, WordPress, PHP, Node.js, cloud hosting, and DevOps. She creates beginner-friendly tutorials, practical hosting guides, troubleshooting articles, and server security content designed to help developers and businesses manage applications and servers more efficiently. **Categories:** Blog, Guide, Optimisation, Others, Tutorials, WordPress **Tags:** Fix WordPress Stuck in Maintenance Mode, Wordpress, Wordpress Errors, WordPress Fixes, WordPress maintenance, WordPress performance, WordPress Stuck in Maintenance Mode, WordPress Troubleshooting, WordPress Update --- ### [Hostname vs Domain Name: Key Differences Explained](https://serveravatar.com/hostname-vs-domain-name/) **Published:** July 18, 2026 **Author:** Meghna Meghwani **Content:** [![Blog banner - ServerAvatar](https://serveravatar.com/wp-content/uploads/2025/09/728_90-Banner-3-1024x127.png)](https://serveravatar.com/?ref=blog)If you have ever configured a website, managed a VPS, or set up a server, you have probably encountered the terms Hostname vs Domain Name. Although hostname and domain name are often mentioned together, they don’t mean the same thing. Understanding Hostname vs Domain Name is essential for managing websites, configuring servers, and troubleshooting DNS-related issues effectively. This confusion is common because both are used to identify systems on a network, and in many cases they appear together in web addresses. It’s easy to assume they are interchangeable, but understanding the difference becomes important when you’re configuring DNS records, setting up email, installing SSL certificates, or deploying applications. For example, if you are hosting a website on your own server, you’ll typically assign a hostname to the machine while pointing a registered domain name to its IP address. Knowing which one serves which purpose helps avoid configuration mistakes and makes troubleshooting much easier. In this guide, you will learn what hostnames and domain names are, how they differ, how they work together, where each is used, and which one matters in different real-world scenarios. ## TL;DR - A hostname identifies a specific device or service on a network. - A domain name identifies an internet namespace that users can access. - A hostname can exist without a public domain. - A domain can contain multiple hostnames. - Websites commonly use both together, such as “blog.example.com”. - Understanding the difference helps with DNS management, server administration, email configuration, and website hosting. ## Hostname vs Domain Name: Quick Comparison If you’re short on time, here’s the simplest way to understand the difference between a hostname and a domain name. While hostnames and domain names often appear together, they solve different problems. A hostname identifies a specific system or service, whereas a domain name provides a memorable internet address that groups related services under one identity. **Feature****Hostname****Domain Name****Purpose**Identifies a specific device, server, or serviceIdentifies a website or internet namespace**Scope**Usually local or internal, but can also be publicGlobally unique on the internet**Registration**No registration requiredMust be registered through a domain registrar**Uniqueness**Needs to be unique within its network or domainMust be globally unique**Changes**Can usually be changed by the system administratorCan be changed, but ownership remains with the registered domain**DNS Requirement**May or may not require DNSRelies on DNS for internet access**Typical Examples**`web01`, `mail`, `db-prod`, `server-east``example.com`, `mycompany.io`, `myblog.org`**Primary Users**System administrators, DevOps engineers, IT teamsBusinesses, website owners, developers, individuals**Used for Websites**Only as part of a complete addressYes**Can Exist Without the Other?**YesYes## What Is a Hostname? A hostname is the name assigned to a specific device, server, virtual machine, or network resource. Instead of identifying a machine by its numerical IP address, people can use a hostname that’s much easier to recognize and remember. Think of a hostname as the label attached to an individual computer. For instance, imagine a company with several servers: - Application Server - Database Server - Backup Server - Monitoring Server Each server needs its own identity, even if they’re all part of the same infrastructure. Instead of referring to them by IP addresses like `192.168.10.25`, administrators assign meaningful names such as: - app-server - db-server - backup-node - monitor-01 These names simplify server management, documentation, monitoring, and troubleshooting. Hostnames are commonly used inside private networks and don’t always need to be publicly accessible. ### Where Are Hostnames Used? You will encounter hostnames in many environments, including: - Linux servers - Windows systems - Cloud virtual machines - Docker containers - Kubernetes nodes - NAS devices - Routers and firewalls - Internal enterprise networks Whenever a new server is created, assigning a descriptive hostname is considered a best practice because it makes infrastructure easier to understand as it grows. Need to rename a server? Follow our step-by-step guide on [How to Change the Hostname on Linux Easily](https://serveravatar.com/change-hostname-linux) to update your system hostname safely. ### Why Hostnames Matter Although a hostname may seem like a simple label, it plays an important role in daily system administration. A clear naming convention can help administrators: - Identify servers quickly - Reduce deployment mistakes - Simplify monitoring dashboards - Improve log analysis - Organize infrastructure across multiple environments **For example, compare these two server names:** “server01” vs. “production-api-us-east” The second hostname immediately tells you what the server does and where it’s located. Small improvements like this become increasingly valuable as your infrastructure scales from a handful of servers to dozens, or even hundreds. ### How to Check Your System Hostname in Linux If you’re using Linux, you can quickly view your system’s hostname using the command line. This is useful when managing servers, troubleshooting network issues, or verifying your system configuration. **Display the Current Hostname** ``` hostname ``` ``` hostname ``` This command prints the hostname currently assigned to your system. **Example output:** ``` web-server ``` ``` web-server ``` **View Detailed Hostname Information** To display additional details, including the static hostname, operating system, kernel version, and hardware information, run: ``` hostnamectl ``` ``` hostnamectl ``` **Example output:** ``` Static hostname: web-server Operating System: Ubuntu 24.04 LTS Kernel: Linux 6.x Architecture: x86-64 ``` ``` Static hostname: web-server Operating System: Ubuntu 24.04 LTS Kernel: Linux 6.x Architecture: x86-64 ``` **Display the Fully Qualified Domain Name (FQDN)** If your server is configured with DNS, you can display its Fully Qualified Domain Name (FQDN) using: ``` hostname -f ``` ``` hostname -f ``` **Example output:** ``` web-server.example.com ``` ``` web-server.example.com ``` > **Note:** The `hostname -f` command works only when your system’s hostname is properly configured in DNS or the `/etc/hosts` file. ## What Is a Domain Name? A domain name is the human-friendly address people use to reach websites and internet services. Rather than remembering a server’s IP address, users simply type a recognizable name into their browser. For example: - example.com - mybusiness.net - myportfolio.dev When someone enters a domain name, the Domain Name System (DNS) translates it into the IP address of the server hosting the website. This lookup happens in the background and usually completes in milliseconds. ![DNS working flow - Hostname vs Domain Name](https://serveravatar.com/wp-content/uploads/2026/07/image-51.png) If you’d like to understand what happens behind the scenes during this process, check out our guide on [How DNS Works: Step-by-Step Resolution Process](https://serveravatar.com/how-dns-works), which explains how DNS queries travel from your browser to the correct server. Unlike a hostname, a domain name isn’t tied to a single machine. Instead, it acts as an internet identity that can point to one or many services depending on how its DNS records are configured. For example, the same domain can direct users to: - a company website - an online store - an email service - a customer portal - an API - a blog This flexibility makes domain names the foundation of almost every public-facing online service. ### Why Domain Names Are Important Without domain names, every website visitor would need to remember numerical IP addresses, a task that’s both impractical and error-prone. A domain name also offers benefits beyond accessibility. It helps establish a recognizable online identity, supports professional email addresses, and allows businesses to move websites between hosting providers without changing the address users visit. If you’re still using a free email service for your business, learn why a [Professional Domain Email Address](https://serveravatar.com/professional-domain-email-benefits/) improves your brand image, credibility, and customer trust. Because ownership is managed through domain registrars, a registered domain becomes a unique online asset that can represent a business, personal brand, application, or organization for years. ## Hostname vs Domain Name: The Core Difference At first glance, both seem to identify something on the internet, but they serve different purposes. - A hostname identifies an individual device or service. - A domain name identifies an internet namespace that can contain one or many services. ![diferrence - Hostname vs Domain Name](https://serveravatar.com/wp-content/uploads/2026/07/image-52.png) **You can think of it this way:** Imagine a corporate office building. - The building’s street address is like the domain name. - The individual rooms inside the building are like hostnames. Visitors first arrive at the building using its address. Once inside, they locate the specific room they need. **Networking works in much the same way:** A domain provides the overall identity, while hostnames distinguish the individual services operating under that domain. ## How Hostnames and Domain Names Work Together The easiest way to understand their relationship is to look at a website URL. **Consider the address:** ``` https://blog.example.com ``` ``` https://blog.example.com ``` This address contains multiple parts. **Part****Meaning****https**Protocol**blog**Hostname (or subdomain used to identify a service)**example.com**Registered domain name**In this example:** - **example.com** represents the registered domain. - **blog** identifies a particular service running under that domain. The same domain can host several independent services: **URL****Purpose****www.example.com**Main website**blog.example.com**Blog**shop.example.com**Online store**api.example.com**Backend API**mail.example.com**Mail server**docs.example.com**DocumentationAlthough each service has a different hostname, they all belong to the same domain. This structure keeps services organized while maintaining a consistent brand identity. If you’re troubleshooting network issues on a Linux server, it can also be helpful to [Find Your DNS Server IP Address in Linux](https://serveravatar.com/find-dns-server-ip-address/) to verify that your system is using the correct DNS resolver. ## Understanding Fully Qualified Domain Names (FQDN) One of the concepts that often confuses is the Fully Qualified Domain Name (FQDN). An FQDN specifies the complete location of a host within the DNS hierarchy. **For example:** ``` api.example.com ``` ``` api.example.com ``` **Breaking it down:** - **api** – Hostname - **example** – Second-level domain - **com** – Top-level domain (TLD) ![fqdn break down - Hostname vs Domain Name](https://serveravatar.com/wp-content/uploads/2026/07/image-53.png) Together, they uniquely identify a single host on the internet. Think of an FQDN as providing the “full address” instead of just the street name. Because it’s complete, DNS can resolve it directly to the correct IP address. **You’ll commonly encounter FQDNs when:** - Configuring web servers - Generating SSL certificates - Setting up reverse proxies - Connecting applications to APIs - Creating DNS records - Deploying services in cloud environments ## Real-World Examples Let’s look at a few practical scenarios. ### Example 1: Hosting a Business Website Suppose you register: ``` myagency.com ``` ``` myagency.com ``` This is your domain. You then create: ``` www.myagency.com ``` ``` www.myagency.com ``` to serve your homepage. Later, you launch a blog: ``` blog.myagency.com ``` ``` blog.myagency.com ``` and a customer portal: ``` portal.myagency.com ``` ``` portal.myagency.com ``` Here: - **myagency.com** is the domain. - **www**, **blog**, and **portal** identify different services hosted under the same domain. ### Example 2: Internal Company Network Many organizations operate private networks that aren’t accessible from the public internet., Servers might have hostnames such as: ``` finance-server hr-system storage-node backup01 ``` ``` finance-server hr-system storage-node backup01 ``` Employees can use these names internally without needing a publicly registered domain. This simplifies communication between systems while keeping the infrastructure private. ### Example 3: Cloud Infrastructure Imagine deploying an application on a VPS. You might assign the server a hostname such as: ``` production-app ``` ``` production-app ``` Then, after configuring DNS, visitors access the application using: ``` app.company.com ``` ``` app.company.com ``` Internally, administrators identify the server by its hostname, while customers interact with the domain name. This separation makes server management more organized without affecting the user experience. ## Common Misconceptions Many beginners mix up these terms because they often appear together. Let’s clear up some of the most common misunderstandings. ### Misconception 1: A Hostname and Domain Name Are the Same Not quite. A hostname identifies an individual machine or service, and a domain name identifies an internet namespace. One complements the other, they don’t replace each other. ### Misconception 2: Every Hostname Is Public False. Many hostnames exist only inside private networks and are never exposed to the internet. Examples include: - Internal file servers - Development environments - Test servers - Local databases ### Misconception 3: A Website Uses Only a Domain Name Behind every public website is at least one server with its own hostname. Visitors typically interact only with the domain, while administrators manage the underlying systems using hostnames. ### Misconception 4: Buying a Domain Includes Hosting Purchasing a domain simply reserves your chosen web address. To make a website accessible, you’ll also need: - A hosting provider or VPS - A web server - DNS configuration - Your website files or application Without hosting, the domain exists but doesn’t serve web content. ## Common Mistakes When Using Hostnames and Domain Names When configuring servers, DNS, or web hosting, it’s easy to confuse hostnames and domain names. Avoiding the following mistakes can save time and prevent common configuration issues. ### Assuming a Domain Name Is the Same as a Hostname A domain name represents your internet identity, while a hostname identifies a specific device or service within that domain. For example, in **blog.example.com**, **example.com** is the domain name and **blog** is the hostname. ### Believing That Buying a Domain Includes Web Hosting A domain registration only secures your website’s address on the internet. To make a website accessible, you still need web hosting or a VPS, a web server such as Apache or Nginx, and properly configured DNS records. ### Using Generic Hostnames Hostnames like **server1**, **server2**, or **test** may seem convenient initially, but they quickly become difficult to manage as your infrastructure grows. Using descriptive names such as **web-prod**, **db-primary**, or **backup-node** makes server administration much easier. ### Forgetting to Configure DNS Records Registering a domain alone does not make a website available online. DNS records such as **A**, **AAAA**, or **CNAME** records must point your domain or hostname to the correct server. ### Ignoring the Fully Qualified Domain Name (FQDN) Many services, including SSL certificates, reverse proxies, mail servers, and enterprise applications, rely on a Fully Qualified Domain Name (FQDN). Using only a hostname where an FQDN is required can lead to connection or certificate errors. ### Not Following a Consistent Naming Convention As your infrastructure expands, inconsistent hostname naming can make monitoring, automation, and troubleshooting more difficult. Adopting a clear naming convention helps teams identify systems quickly and reduces operational errors. ## When Should You Use a Hostname? You’ll typically work with hostnames when you’re managing infrastructure rather than browsing websites. Common situations include: - Naming Linux servers - Configuring virtual machines - Managing Kubernetes clusters - Setting up Docker containers - Identifying database servers - Organizing monitoring systems - Creating development or staging environments Choosing descriptive hostnames helps teams quickly identify the purpose of each system, especially in larger environments. [![Blog banner - ServerAvatar](https://serveravatar.com/wp-content/uploads/2025/09/728_90-Banner-1-1024x127.png)](https://serveravatar.com/?ref=blog)## When Should You Use a Domain Name? Domain names come into play whenever users need to access your services over the internet. Typical use cases include: - Launching a website - Creating professional email addresses - Hosting an API - Publishing documentation - Running an online store - Providing customer portals - Building a personal portfolio A well-chosen domain is also valuable for branding, trust, and long-term recognition. ## Best Practices Whether you’re naming servers or registering domains, a few habits can save time later. ### For Hostnames - Use clear, descriptive names. - Follow a consistent naming convention. - Avoid generic labels like `server1` whenever possible. - Include environment or location if helpful (for example, `prod-api-us` or `staging-db`). - Keep names concise and easy to recognize. ### For Domain Names - Choose a short, memorable name. - Prefer well-known TLDs when appropriate. - Enable domain privacy and registrar security features. - Renew your domain before it expires. - Configure DNS records carefully to avoid service interruptions. ## Conclusion Although the terms hostname and domain name are frequently used together, they serve different purposes in networking and web hosting. A hostname gives an identity to a specific device or service, making systems easier to organize and manage. A domain name, on the other hand, provides a memorable public address that allows users to access websites and online services without remembering numerical IP addresses. Once you understand how these two concepts fit together, tasks such as configuring DNS, deploying applications, setting up email, and managing servers become much easier. Whether you’re launching your first website or maintaining a growing infrastructure, knowing the role of each helps you make better decisions and troubleshoot with confidence. ## FAQs ### Is a hostname the same as a domain name? No, A hostname identifies a specific device or service within a network, while a domain name identifies an internet namespace. They often work together, for example, in `mail.example.com`, **mail** is the hostname, and **example.com** is the domain name. ### Can I have a hostname without a domain name? Yes, Many private networks use hostnames without owning or registering a public domain name. For instance, an internal development server can simply be named `dev-server` and still be accessible within the local network. ### Can a domain name exist without hosting? Absolutely, Registering a domain reserves the web address, but it doesn’t automatically host a website. You can purchase a domain today and connect it to a hosting server later. ### What is the difference between a hostname and a subdomain? A subdomain is a DNS entry created under a registered domain, such as `blog.example.com`. In many web hosting scenarios, the subdomain also functions as the hostname for a particular service. However, the term “hostname” has a broader meaning, as it refers to any named device or service on a network, whether public or private. ### Is `www` a hostname? Yes. Technically, `www` is a hostname (and commonly implemented as a subdomain) under a registered domain. While many websites can be accessed with or without `www`, they can be configured differently depending on DNS and web server settings. ### Why do servers need hostnames? Hostnames make infrastructure easier to manage. Instead of remembering IP addresses, administrators can identify servers by descriptive names, simplifying monitoring, troubleshooting, automation, and documentation. ## Key Takeaways - A hostname identifies an individual device, server, or network service. - A domain name identifies your presence on the internet and is registered through a domain registrar. - Multiple hostnames can exist under a single domain. - DNS connects hostnames and domain names to their corresponding IP addresses. - Understanding the distinction helps when configuring servers, DNS records, SSL certificates, email services, and web applications. - Using descriptive hostnames and a memorable domain improves infrastructure management and user experience. ## Simplify Server and Website Management with ServerAvatar Understanding networking concepts like hostnames and domain names is only one part of managing a server. You’ll also need to configure web servers, install SSL certificates, manage applications, monitor resources, and keep your infrastructure secure. If you prefer spending less time on repetitive server administration and more time building your projects, [**ServerAvatar**](https://serveravatar.com/) provides a straightforward way to manage servers and applications from a single dashboard. You can deploy PHP applications, WordPress websites, Node.js apps, Git applications, and other workloads while handling common server management tasks through an intuitive interface, without losing the flexibility of your preferred cloud provider. ### About the Author Meghna Meghwani is a technical writer focused on Linux, Ubuntu, VPS hosting, server management, WordPress, PHP, Node.js, cloud hosting, and DevOps. She creates beginner-friendly tutorials, practical hosting guides, troubleshooting articles, and server security content designed to help developers and businesses manage applications and servers more efficiently. **Categories:** Blog, Guide, Linux, Others, Tutorials, Ubuntu **Tags:** DNS, Domain Name, Domain Name System, FQDN, Fully Qualified Domain Name, Hostname, Hostname vs Domain Name, Linux Server, Server Management, Vps hosting, Web Hosting --- ### [How to Check Running Processes in Linux Using ps, top, htop & atop](https://serveravatar.com/check-running-processes-linux/) **Published:** July 17, 2026 **Author:** Meghna Meghwani **Content:** [![Blog banner - ServerAvatar](https://serveravatar.com/wp-content/uploads/2025/09/728_90-Banner-3-1024x127.png)](https://serveravatar.com/?ref=blog)Managing a Linux server involves more than installing applications and keeping the system updated. To check running processes activity effectively, it’s important to understand how Linux manages every service, from a web server and database to scheduled jobs and background scripts. When a website becomes slow, CPU usage suddenly spikes, or memory starts disappearing, the first place to investigate is the list of running processes. Linux offers several built-in and advanced tools for monitoring what’s happening inside your system. Some provide a quick snapshot of active processes, while others continuously update resource usage in real time or record historical performance data for deeper analysis. If you’re new to Linux administration, choosing between commands like **ps**, **top**, **htop**, and **atop** can be confusing because they all display process information in different ways. Knowing when to use each one can save time during troubleshooting and help you identify performance bottlenecks much faster. In this guide, you’ll learn what each tool does and how to use it effectively with practical examples. ## TL;DR - Linux processes are running instances of applications or system services. - The **ps** command provides a snapshot of currently running processes. - **top** displays live CPU, memory, and process activity directly in the terminal. - **htop** offers an interactive, user-friendly interface with easier navigation and process management. - **atop** records system activity over time, making it useful for diagnosing performance issues that occurred earlier. - Each tool serves a different purpose, and many administrators use them together for a more complete view of system performance. ## Why Process Monitoring Matters in Linux Every application running on your Linux server consumes system resources such as CPU time, memory, storage, or network bandwidth. Unexpected events like a runaway script, an overloaded web application, or a failing service can quickly affect overall system performance. Regularly monitoring running processes helps you: - Identify applications consuming excessive CPU or memory. - Detect unresponsive or stuck processes. - Troubleshoot slow server performance. - Verify that essential services are running correctly. - Monitor applications after deployments or configuration changes. - Discover unusual resource usage before it impacts users. Whether you’re managing a personal VPS or multiple production servers, understanding your system’s active processes makes troubleshooting significantly easier. > **Tip:** Process monitoring isn’t only for fixing problems. It’s equally useful for validating that a server is operating as expected after updates, deployments, or maintenance. ## What Is a Linux Process? > A **process** is simply a program that is currently running on your Linux system. Every time you execute a command, start a service, or launch an application, Linux creates one or more processes to perform the required tasks. For example: - Starting the Apache or Nginx web server creates server processes. - Connecting to a server over SSH starts a user session process. - Running a backup script creates a temporary process until the job finishes. - Database servers like MySQL or PostgreSQL continuously run multiple background processes to handle queries and maintenance tasks. Each process is assigned a unique **Process ID (PID)**, which allows the operating system to manage it independently. > Understanding these basics makes it much easier to interpret the output of process monitoring tools later in this guide. All utilities display process information, they solve different problems. Choosing the right one depends on whether you need a quick snapshot, continuous monitoring, easier navigation, or historical performance records. ToolBest ForLive MonitoringInteractiveHistorical Data**ps**Viewing a snapshot of running processes❌❌❌**top**Monitoring processes in real time✅Basic❌**htop**Interactive process management✅✅❌**atop**Performance analysis and long-term monitoring✅✅✅> ## When Should You Use Each Tool? There’s no single “best” command for every situation. Instead, each utility fits a specific workflow. ScenarioRecommended Tool**Check whether a process is running**ps**Watch CPU and memory usage live**top**Search, filter, and manage processes interactively**htop**Investigate performance issues from earlier in the day**atop**Diagnose high server load**top or htop**Analyze long-running resource trends**atopChoosing the appropriate tool not only speeds up troubleshooting but also gives you more relevant information without unnecessary complexity. ## Checking Running Processes with the `ps` Command If you only need to verify whether a process is running or want a quick overview of active processes, the `ps` command is usually the best place to start. This makes it ideal for quick checks, scripting, and troubleshooting tasks where you need accurate process information without continuously monitoring the system. ### What Is the `ps` Command? The `ps` (Process Status) command is a built-in Linux utility that displays information about running processes. It displays: - Process IDs (PIDs) - Parent process IDs (PPIDs) - Process owner - CPU and memory usage - Running time - Terminal association - Current process state - The command used to start the process Since `ps` only displays the current state of the system, running it again later may produce different results if processes have started or stopped. **Basic Syntax** ``` ps [options] ``` ``` ps [options] ``` **You will see output as mentioned below:** ![ps output - Check Running Processes](https://serveravatar.com/wp-content/uploads/2026/07/image-45-1024x103.png) **Without any options:** ``` ps ``` ``` ps ``` **Example Output** ``` PID TTY TIME CMD 2184 pts/0 00:00:00 bash 2671 pts/0 00:00:00 ps ``` ``` PID TTY TIME CMD 2184 pts/0 00:00:00 bash 2671 pts/0 00:00:00 ps ``` ![ps output - Check Running Processes](https://serveravatar.com/wp-content/uploads/2026/07/image-46-1024x67.png) **What This Means** ColumnDescription**PID**Unique Process ID assigned by Linux**TTY**Terminal associated with the process**TIME**Total CPU time consumed**CMD**Command that started the processBy default, this output is limited to processes running in your current terminal session. ### Viewing Every Running Process For most server management tasks, you’ll need to view every running process on the system rather than only those associated with your current terminal session. **Use:** ``` ps -e ``` ``` ps -e ``` **or** ``` ps -A ``` ``` ps -A ``` Both commands display every running process on the system. This is especially useful when: - Verifying background services - Checking application status - Confirming daemon processes are active - Looking for unexpected programs ### Display More Process Details The default output is intentionally brief. To include additional information such as the parent process, owner, and startup details, use: ``` ps -ef ``` ``` ps -ef ``` **Sample Output** ``` UID PID PPID C STIME TTY TIME CMD root 1 0 0 Jul16 ? 00:00:03 systemd root 728 1 0 Jul16 ? 00:00:01 sshd mysql 1458 1 1 Jul16 ? 00:00:12 mysqld ``` ``` UID PID PPID C STIME TTY TIME CMD root 1 0 0 Jul16 ? 00:00:03 systemd root 728 1 0 Jul16 ? 00:00:01 sshd mysql 1458 1 1 Jul16 ? 00:00:12 mysqld ``` This format is commonly used when troubleshooting production servers because it provides much more context than the default view. ### Finding a Specific Process Instead of scanning hundreds of running processes manually, you can search for a particular application. **For example, to locate Nginx processes:** ``` ps -ef | grep nginx ``` ``` ps -ef | grep nginx ``` **Example output:** ``` root 1024 1 0 09:30 ? 00:00:00 nginx: master process www-data 1051 1024 0 09:30 ? 00:00:00 nginx: worker process ``` ``` root 1024 1 0 09:30 ? 00:00:00 nginx: master process www-data 1051 1024 0 09:30 ? 00:00:00 nginx: worker process ``` **Similarly, you can search for:** ``` ps -ef | grep apache2 ps -ef | grep apache2 ps -ef | grep mysql ``` ``` ps -ef | grep apache2 ps -ef | grep apache2 ps -ef | grep mysql ``` or any other service running on your server. > **Tip:** If the only result you see is the `grep` command itself, the target process is likely not running. ### Show Processes for a Particular User When multiple users share the same Linux server, filtering processes by username can make the output much easier to read. ``` ps -u username ``` ``` ps -u username ``` **Example:** ``` ps -u ubuntu ``` ``` ps -u ubuntu ``` This displays only the processes owned by the `ubuntu` user. Common use cases include: - Shared hosting environments - Multi-user development servers - Investigating resource usage for a specific account ### Display Information for a Specific Process ID If you already know the Process ID (PID), you can retrieve information about that process directly. ``` ps -p 1842 ``` ``` ps -p 1842 ``` **To display additional columns:** ``` ps -fp 1842 ``` ``` ps -fp 1842 ``` This is particularly useful when documentation or log files reference a specific PID during troubleshooting. **Customize the Output** One of the strengths of the `ps` command is its flexibility. Instead of displaying every available column, you can choose exactly what information you need. **For example:** ``` ps -eo pid,user,%cpu,%mem,cmd ``` ``` ps -eo pid,user,%cpu,%mem,cmd ``` **Possible output:** ``` PID USER %CPU %MEM COMMAND 1024 root 0.0 0.3 nginx 1458 mysql 4.2 6.8 mysqld 2083 ubuntu 0.1 1.2 node server.js ``` ``` PID USER %CPU %MEM COMMAND 1024 root 0.0 0.3 nginx 1458 mysql 4.2 6.8 mysqld 2083 ubuntu 0.1 1.2 node server.js ``` **Sort by Memory Usage** ``` ps -eo pid,user,%mem,cmd --sort=-%mem ``` ``` ps -eo pid,user,%mem,cmd --sort=-%mem ``` These commands place the busiest processes at the top of the list, making it much faster to identify potential bottlenecks. ### Practical Examples **Check if the SSH service is running** ``` ps -ef | grep sshd ``` ``` ps -ef | grep sshd ``` **Find the PID of a Node.js application** ``` ps -ef | grep node ``` ``` ps -ef | grep node ``` **List only process IDs** ``` ps -eo pid ``` ``` ps -eo pid ``` **Show CPU and memory usage together** ``` ps -eo pid,user,%cpu,%mem,cmd ``` ``` ps -eo pid,user,%cpu,%mem,cmd ``` **Identify the highest CPU-consuming process** ``` ps -eo pid,%cpu,cmd --sort=-%cpu | head ``` ``` ps -eo pid,%cpu,cmd --sort=-%cpu | head ``` Adding `head` limits the output to the top entries, making the results easier to review. ### Common Mistakes Beginners Make Learning to use `ps` is straightforward, but a few common mistakes can lead to confusion. MistakeBetter Approach**Assuming `ps` updates automatically**Run the command again or use `top`/`htop` for live monitoring.**Searching manually through long output**Use `grep` or customized output columns to narrow results.**Forgetting that `ps` is only a snapshot**Remember that processes may change immediately after the command runs.**Using default output for troubleshooting**Use options like `-ef` or `-eo` to view more useful details.### When Should You Choose `ps`? The `ps` command is an excellent choice when you need quick, accurate information without launching an interactive monitoring session. Use it when you want to: - Confirm that an application or service is running. - Retrieve a process ID before sending a signal. - Generate process reports in shell scripts. - Inspect running services during troubleshooting. - Create custom process lists for automation. If you need to watch processes continuously as CPU and memory usage change in real time, however, `ps` is no longer the ideal tool. In the next section, we’ll explore `top`, which provides a live, continuously updating view of your system and is often the first utility administrators use when diagnosing performance issues. If you need to stop a misbehaving process after identifying it, check out our detailed guide on [**How to Kill a Running Process in Linux**](https://serveravatar.com/kill-a-running-process-in-linux/). ## Monitoring Linux Processes in Real Time with `top` The `ps` command shows the current state of running processes, but its output is static and doesn’t refresh automatically. When you need to monitor CPU usage, memory consumption, or system load as they change, the `top` command is the better choice. ### What Is the `top` Command? The `top` command is a built-in Linux monitoring tool that displays a live, continuously updating view of system performance and active processes, making it ideal for troubleshooting performance issues in real time. It’s particularly useful for: - Diagnosing slow server performance - Identifying CPU-intensive applications - Finding memory-hungry processes - Monitoring services after deployments - Troubleshooting unexpected load spikes Because the display refreshes automatically, you can observe how processes behave over time instead of relying on a single snapshot. ### Launching `top` **Open your terminal and run:** ``` top ``` ``` top ``` Within a few seconds, your terminal transforms into a live monitoring interface. ![top output - Check Running Processes](https://serveravatar.com/wp-content/uploads/2026/07/image-47-1024x493.png) ### Understanding the `top` Interface Although the screen may appear busy at first, it’s organized into two primary sections. **System Summary** The top portion provides an overview of your server’s health, including: - Current system uptime - Number of logged-in users - Load averages - CPU utilization - Physical memory usage - Swap memory usage - Total running and sleeping processes This information gives you an immediate sense of whether the system is under normal load or experiencing resource pressure. **Process List** The lower section displays active processes. Some of the most useful columns include: ColumnMeaning**PID**Process ID**USER**Owner of the process**PR**Scheduling priority**NI**Nice value**VIRT**Total virtual memory allocated**RES**Physical RAM currently in use**SHR**Shared memory**S**Current process state**%CPU**CPU utilization**%MEM**Percentage of memory used**TIME+**Total CPU time consumed**COMMAND**Program or service nameThese values update automatically, making it easy to spot changing resource usage. Although running `top` without options is enough in most situations, several command-line options make it even more useful. ### **Monitor a Specific User** **To display only the processes owned by a particular user:** ``` top -u username ``` ``` top -u username ``` **Example:** ``` top -u ubuntu ``` ``` top -u ubuntu ``` This reduces clutter when multiple users share the same server. ### Watch Specific Processes If you already know a process ID, monitor only that process. ``` top -p 2458 ``` ``` top -p 2458 ``` This is especially useful while testing an application or observing resource usage after restarting a service. ### Display Full Command Lines I**nstead of showing only executable names:** ``` top -c ``` ``` top -c ``` This displays the complete command used to launch each process, making it easier to distinguish between similar applications. ![top -c output - Check Running Processes](https://serveravatar.com/wp-content/uploads/2026/07/image-48-1024x495.png) ### Run in Batch Mode **Sometimes you need to save monitoring output for later analysis:** ``` top -b -n 5 ``` ``` top -b -n 5 ``` This captures five updates before exiting. **You can also redirect the output into a file:** ``` top -b -n 5 > process_report.txt ``` ``` top -b -n 5 > process_report.txt ``` Batch mode is commonly used in automation scripts and scheduled diagnostics. ### Useful Interactive Shortcuts Once `top` is running, you can adjust many settings directly from the interface without restarting the command. Several keyboard shortcuts let you adjust the display instantly. KeyAction**P**Sort by CPU usage**M**Sort by memory usage**T**Sort by running time**c**Toggle full command display**u**Filter by user**k**Kill a process**h**Show help**q**Exit `top`Learning just a few of these shortcuts can significantly improve your workflow. ### When Is `top` the Right Choice? The `top` command shines when you need to observe how a server behaves over time. Typical scenarios include: - A website becomes slow during peak traffic. - CPU usage suddenly reaches 100%. - Memory consumption keeps increasing. - You suspect a process has entered an infinite loop. - You want to verify resource usage immediately after deployment. Since the display refreshes continuously, you can watch changes as they happen instead of repeatedly rerunning commands. ### Limitations of `top` Although `top` is extremely useful, it isn’t perfect. Some common limitations include: - The interface can feel overwhelming for beginners. - Navigation relies entirely on keyboard shortcuts. - Finding a specific process among hundreds can take time. - Colors and layout vary between Linux distributions. - Historical performance data isn’t retained. For many administrators, these limitations lead them to an enhanced alternative: `htop`. ## Why Many Linux Users Prefer `htop` If you find `top` difficult to navigate, `htop` offers a more user-friendly alternative. It provides the same core process information in a cleaner, color-coded interface with features like search, filtering, tree view, and easier process management. For many Linux administrators, `htop` is the preferred tool for everyday system monitoring. ### Installing `htop` Unlike `ps` and `top`, `htop` isn’t installed by default on many Linux distributions. **Ubuntu and Debian** ``` sudo apt update sudo apt install htop ``` ``` sudo apt update sudo apt install htop ``` **RHEL, AlmaLinux, Rocky Linux, and CentOS** ``` sudo dnf install htop ``` ``` sudo dnf install htop ``` **Older CentOS versions may use:** ``` sudo yum install htop ``` ``` sudo yum install htop ``` ### Launch `htop` **Once installed, start it by running:** ``` htop ``` ``` htop ``` You’ll immediately notice a cleaner interface compared to `top`. ![htop - Check Running Processes](https://serveravatar.com/wp-content/uploads/2026/07/image-49-1024x513.png) ### What Makes `htop` Different? Instead of presenting a wall of constantly changing text, `htop` organizes information in a more user-friendly way. Some improvements include: - Color-coded CPU, memory, and swap usage - Vertical and horizontal scrolling - Easy process searching - Interactive filtering - Tree view for parent-child processes - Mouse support in supported terminals - Function-key shortcuts displayed on screen These features make `htop` easier to learn and use, especially for those new to Linux administration. ### Useful Keyboard Shortcuts KeyFunction**F3**Search for a process**F4**Filter process list**F5**Tree view**F6**Choose sorting method**F9**Terminate selected process**F10**Exit**Space**Tag a processUnlike `top`, many common actions are visible directly on the screen, making navigation much easier. ### Common Use Cases for `htop` `htop` is particularly helpful when you need to: - Search for a specific application quickly - Sort processes by memory or CPU usage - Kill misbehaving processes interactively - Understand parent-child process relationships - Monitor multiple applications during deployments Because of its intuitive interface, it’s often recommended for developers and system administrators who spend a lot of time managing Linux servers. ## `top` vs `htop` Featuretophtop**Installed by default**✅❌**Live monitoring**✅✅**Search processes**Limited✅**Mouse support**❌✅**Tree view**❌✅**Easier navigation**BasicExcellent**Color interface**MinimalRich and readableIf `top` gives you the information you need, there’s no requirement to switch. However, if you frequently troubleshoot servers, `htop` can make the process considerably faster and more comfortable. ## Looking Beyond Real-Time Monitoring with `atop` Both `top` and `htop` are great for monitoring what’s happening right now, but they can’t show what happened before you logged in. That’s where `atop` is different. It records system activity over time, allowing you to review historical CPU, memory, disk, and process usage. This makes it especially useful for investigating intermittent performance issues and identifying resource bottlenecks that are no longer active. ### Using `atop` for Advanced Linux Process Monitoring The `atop` command combines real-time monitoring with historical performance logging, giving you a more complete view of your system’s behavior. It’s particularly valuable on production servers, where occasional CPU spikes, memory pressure, or disk I/O issues may occur outside your monitoring window. By reviewing past activity, `atop` helps you diagnose problems that live monitoring tools might miss. ### Installing `atop` Most Linux distributions don’t install `atop` by default, so you’ll need to add it manually. **Ubuntu and Debian** ``` sudo apt update sudo apt install atop ``` ``` sudo apt update sudo apt install atop ``` **RHEL, AlmaLinux, Rocky Linux, and CentOS** ``` sudo dnf install atop ``` ``` sudo dnf install atop ``` **Older CentOS releases may require:** ``` sudo yum install atop ``` ``` sudo yum install atop ``` After installation, some distributions automatically enable the logging service, while others may require you to start or enable it manually. ### Starting `atop` **Launch the interactive interface with:** ``` atop ``` ``` atop ``` Like `top`, you’ll see continuously updating statistics, but `atop` provides additional information about system resources and supports reviewing previously recorded data. ![atop output - Check Running Processes](https://serveravatar.com/wp-content/uploads/2026/07/image-50-1024x517.png) ### What Information Does `atop` Display? `atop` combines system-wide metrics with process-level statistics. **System Overview** You’ll typically find information about: - CPU utilization - Memory and swap usage - Disk activity - Network throughput - System uptime - Load averages **Process Details** Each running process can display information such as: FieldDescription**PID**Process ID**USER**Process owner**CPU**CPU time consumed**MEM**Memory usage**DISK**Disk read/write activity**NET**Network usage (where supported)**CMD**Executable or command nameThis combination makes `atop` one of the most comprehensive monitoring tools available from the command line. ### **Helpful Keyboard Shortcuts** While `atop` is running, these shortcuts make navigation easier. KeyPurpose**c**CPU statistics**m**Memory statistics**d**Disk activity**n**Network activity**P**Sort by CPU usage**M**Sort by memory usage**D**Sort by disk usage**z**Hide inactive processes**q**ExitSwitching between these views allows you to focus on the resource that’s currently causing performance issues. ### When Should You Use `atop`? `atop` becomes especially valuable when you’re troubleshooting issues that don’t happen consistently. Common examples include: - A server becomes slow during overnight backup jobs. - CPU usage spikes only during scheduled tasks. - Memory usage gradually increases over several hours. - Disk I/O occasionally becomes saturated. - Performance complaints occur before administrators are available to investigate. Because historical data is available, you can often identify the root cause without reproducing the problem. ## Choosing the Right Linux Process Monitoring Tool Each command covered in this guide has its own strengths. Rather than replacing one another, they’re often used together depending on the task. RequirementRecommended ToolWhy It Fits**Check whether a process is running**`ps`Fast snapshot of active processes**Monitor CPU and memory live**`top`Continuously updates resource usage**Search, filter, and manage processes easily**`htop`Interactive interface with built-in tools**Investigate past performance issues**`atop`Historical monitoring and detailed resource trackingA practical workflow might look like this: 1. Use `ps` to verify that a service is running. 2. Switch to `top` if you notice high resource usage. 3. Open `htop` for easier navigation and process management. 4. Review `atop` logs if the issue happened earlier and you need historical data. Selecting the right monitoring tool for the task can help you identify and resolve Linux server issues more efficiently. ## Best Practices for Monitoring Linux Processes Regardless of which utility you use, following a few good habits can make troubleshooting more efficient. **Monitor Before Making Changes** Check current resource usage before restarting services or applying updates. Having a baseline makes it easier to determine whether a change improved or worsened performance. **Watch Trends Instead of Single Readings** A brief spike in CPU or memory usage isn’t always a problem. Look for sustained patterns before taking action. **Identify the Root Cause** Avoid terminating processes simply because they’re consuming resources. A busy process may be performing legitimate work, such as handling web traffic or database queries. **Combine Multiple Tools** No single command provides every answer. Using `ps`, `top`, `htop`, and `atop` together often gives a more complete understanding of what’s happening on your server. **Keep Monitoring Utilities Updated** Newer package versions may include bug fixes, improved compatibility, and additional features that enhance monitoring accuracy. [![Blog banner - ServerAvatar](https://serveravatar.com/wp-content/uploads/2025/09/728_90-Banner-1-1024x127.png)](https://serveravatar.com/?ref=blog)## Common Process Monitoring Problems and Solutions ProblemPossible CauseSuggested Approach**CPU usage remains high**Resource-intensive applicationSort processes by CPU usage using `top` or `htop`.**Server feels slow despite low CPU usage**Memory pressure or disk bottlenecksReview memory and disk activity using `htop` or `atop`.**A service appears unavailable**Process has stopped unexpectedlyVerify the process using `ps` and restart the service if necessary.**Performance issue already disappeared**Temporary workload spikeReview historical data with `atop` if logging is enabled.**Multiple similar processes are running**Expected worker processes or misconfigurationCheck the parent process and application configuration before making changes.## Conclusion Understanding what’s happening inside a Linux system is an essential skill for anyone responsible for servers, applications, or development environments. Whether you’re confirming that a service is running, investigating high CPU usage, or analyzing performance trends over time, the right monitoring tool can help you reach answers much faster. Instead of relying on a single utility, become comfortable switching between `ps`, `top`, `htop`, and `atop` based on the situation. Each command offers a different perspective, and together they provide a well-rounded toolkit for diagnosing performance issues and keeping Linux systems running smoothly. As your infrastructure grows, consistent process monitoring becomes an important part of proactive server management rather than just a troubleshooting step. ## FAQs ### Is `htop` better than `top`? Neither tool is universally better. `htop` provides a cleaner, more interactive interface with features like search, filtering, and mouse support, whereas `top` is pre-installed on most Linux distributions. > > ### Which command is best for checking running processes in Linux? It depends on what you’re trying to accomplish. Use `ps` for a quick snapshot, `top` for live monitoring, `htop` for an easier interactive experience, and `atop` when historical performance data is important. ### Can I install `htop` and `atop` on any Linux distribution? Most modern Linux distributions provide both packages through their default repositories, although the installation command may differ depending on the package manager. > ### Which tool uses the least system resources? The `ps` command typically has the smallest overhead because it only collects information once and then exits. Interactive tools continuously refresh their displays and therefore consume slightly more resources. > ### Do I need root privileges to monitor processes? Many process details are visible to regular users. However, viewing information about system-wide services or managing processes owned by other users may require elevated privileges. ## Key Takeaways - Linux provides multiple tools for monitoring running processes, each designed for different scenarios. - `ps` is ideal for quick process lookups and scripting. - `top` provides a continuously updated view of system activity. - `htop` simplifies process monitoring with an interactive interface and built-in management features. - `atop` adds historical performance tracking, making it easier to diagnose intermittent issues. - Choosing the right tool depends on whether you need a snapshot, live monitoring, or historical analysis. ## Manage Your Linux Servers More Efficiently with ServerAvatar Command-line tools are invaluable for inspecting processes and diagnosing performance issues, but day-to-day server administration often involves much more than monitoring resource usage. Tasks like deploying applications, configuring web servers, managing PHP versions, securing websites with SSL, scheduling backups, and overseeing multiple servers can quickly become time-consuming. If you’re looking for a simpler way to manage Linux servers without giving up flexibility, [**ServerAvatar**](https://serveravatar.com/) provides a centralized dashboard for handling these routine administration tasks. It complements your command-line workflow, allowing you to spend less time on repetitive management and more time building and maintaining your applications. ### About the Author Meghna Meghwani is a technical writer focused on Linux, Ubuntu, VPS hosting, server management, WordPress, PHP, Node.js, cloud hosting, and DevOps. She creates beginner-friendly tutorials, practical hosting guides, troubleshooting articles, and server security content designed to help developers and businesses manage applications and servers more efficiently.[](https://3.basecamp.com/5840738/buckets/41514807/boosts/new?boost%5Bboostable_gid%5D=Z2lkOi8vYmMzL1JlY29yZGluZy8xMDEwMTUwMDE4Nw) **Categories:** Blog, Guide, Linux, Others, Tutorials, Ubuntu **Tags:** atop Command, Check Running Process, htop Command, Linux commands, Linux Process Monitoring, Linux System Monitoring, Monitor Linux Processes, ps Command, Running Processes in Linux, top Command --- ### [Paperclip AI Guide: Best Use Cases for Automating Business Operations](https://serveravatar.com/paperclip-ai-use-cases/) **Published:** July 16, 2026 **Author:** Meghna Meghwani **Content:** [![Blog banner - ServerAvatar](https://serveravatar.com/wp-content/uploads/2025/09/728_90-Banner-3-1024x127.png)](https://serveravatar.com/?ref=blog)There is a moment every founder, CTO, or operations lead hits. You have stripped everything down to the essentials. You have automated what you can with scripts, webhooks, and no-code tools. And still, there is a feeling that you are manually stitching together a set of tools that should, by now, work like a team. Paperclip AI is designed to solve exactly this challenge by helping AI agents work together in structured, goal-driven business workflows instead of isolated automations. That feeling is not wrong. Most automation today solves individual tasks. It does not solve coordination. Sending a Slack message when a form is filled out is useful, but it is not the same as having someone who knows why that form matters, who to hand it off to, and what to do if the next step fails. Paperclip is built around a different idea. Instead of automating a single process, it lets you automate an entire operation, with structure, accountability, and costs that scale predictably. This guide is not a feature list. It is a practical look at what that actually means for your business, and which use cases tend to deliver real value first. ## TL;DR **Category****Summary****What it is**Paperclip is an open-source platform that runs AI agents as a structured organization instead of standalone bots**Core value**Adds governance, cost tracking, and auditability to AI systems at scale**Best use cases**Development workflows, content pipelines, customer support, market research, and multi-project management**Compatibility**Works with any AI runtime such as Claude, GPT, Gemini, or custom agents**Deployment**Requires self-hosting on a VPS, though managed server platforms can reduce infrastructure overhead**Key limitation**Still requires human oversight for strategy, quality control, and handling edge cases## The Mental Model That Changes Everything Most people approach AI agents like smart scripts. Enter your prompt, receive a response, and continue with the next task. Paperclip works better when you stop thinking that way and start thinking about agents like employees. Not metaphorically, structurally. Each agent has a role, a budget, a reporting line, and access to the full context of why it is doing something, not just what it was asked to do. That distinction sounds small. It is not. A marketing agent that understands a blog post is part of a broader objective, such as reaching 10,000 quarterly signups, can make more informed decisions than one who only receives a simple instruction like, *“Write a 500-word article about Paperclip.*” Context drives alignment. And alignment is what separates AI agents that produce noise from those that produce progress. This is the mental model that makes Paperclip different from Zapier, Make, or any workflow tool you have tried before. Those tools automate a process. Paperclip automates a department. ## What Paperclip Actually Is [Paperclip](https://paperclip.ing?ref=serveravatar.com) is a Node.js application with a React dashboard. You install it on a server, define your organizational structure, assign AI agents to roles, and let them work. Under the hood, it gives you: - **Org charts:** define who reports to whom - **Ticketing:** every task is a structured ticket with owner, status, and thread - **Per-agent budgets:** set spending limits so one agent cannot burn through your entire API quota - **Immutable audit log:** every decision, tool call, and API request is recorded - **Multi-company isolation:** run completely separate operations from one deployment It is open source, self-hosted, and does not send your data anywhere. If you care about where your business data lives, that matters. > **Deployment Note:** You’ll need to install PostgreSQL, configure the required environment variables, and deploy the application manually. To simplify the process, follow our **[step-by-step guide on deploying Paperclip on a VPS with ServerAvatar](https://serveravatar.com/deploy-paperclip-on-vps/)**. ## Paperclip vs Traditional AI Automation **Feature****Traditional AI Automation****Paperclip****Workflow**Individual tasksEnd-to-end business operations**Context**Task-specificOrganization-wide**AI Roles**Single assistantMultiple specialized agents**Cost Control**LimitedPer-agent budgets**Audit Trail**BasicComplete activity history**Multi-Project Support**LimitedFull workspace isolation**Self-Hosted**DependsYesThis comparison highlights how Paperclip differs from traditional AI automation platforms by offering structured agent management, governance, auditability, and scalable business operations instead of isolated task automation. ## Why Most AI Automation Fails at Scale Many AI automation projects work well at first but struggle as they grow. The most common reasons include: - **Loss of context:** As the number of tasks increases, AI agents can lose track of priorities, constraints, and the overall business objective. - **Unclear costs:** Without proper tracking, it’s difficult to identify which workflows consume the most resources, leading to unexpected API expenses. - **Limited fault recovery:** If an AI agent fails during a critical process, many systems provide no way to inspect, resume, or recover the task. ## How Paperclip Solves These Challenges Paperclip is built to overcome these limitations by providing: - **Goal-aware agents** that retain the full context of every task. - **Atomic budget controls** to monitor and limit AI spending. - **Persistent task tracking** with a ticketing system makes it easy to inspect, recover, and continue interrupted workflows. ### Use Case 1: Automating Software Development Sprints Paperclip helps development teams streamline software delivery by assigning tasks to specialized AI agents instead of relying on a single assistant. **How the Workflow Works** - **CTO Agent:** Converts feature requirements into actionable development tasks. - **Engineer Agents:** Write and implement the required code. - **QA Agent:** Reviews code quality, identifies issues, and validates outputs. - **Documentation Agent:** Creates or updates technical documentation and highlights missing details. **Key Benefits** - **Better debugging:** Easily identify which AI agent generated a specific piece of code. - **Complete traceability:** Review each agent’s context, decisions, and assigned constraints. - **Faster issue resolution:** Simplifies troubleshooting during feature iterations and releases. - **Improved team productivity:** Automates repetitive development tasks while allowing developers to focus on complex work. - **Dedicated execution environment:** Integrates with existing CI/CD pipelines so AI agents can run independently without impacting production infrastructure. ### Use Case 2: Running a Content Production Pipeline Without Hiring Paperclip helps businesses build an AI-powered content workflow by assigning specialized agents to every stage of content creation. **Workflow** - **Research Agent:** Collects market insights, keywords, and competitor data. - **Writer Agent:** Creates articles from content briefs. - **Editor Agent:** Improves readability, grammar, and SEO. - **Social Media Agent:** Repurposes blogs into platform-specific posts. - **CMO Agent:** Oversees the entire workflow and escalates tasks when human review is needed. **Benefits** - Consistent content publishing without increasing headcount. - Complete visibility from campaign planning to published content. - Direct publishing to WordPress with fewer manual steps and version conflicts. ### Use Case 3: Customer Support That Does Not Fall Apart at Scale Paperclip automates routine support tasks while ensuring complex issues reach the right people. **Workflow** - **Triage Agent:** Classifies and routes incoming tickets. - **Support Agent:** Resolves common customer questions using your documentation. - **Escalation Agent:** Sends billing issues, cancellations, and complex requests to human agents. **Benefits** - Faster response times for common queries. - Full audit trail for every customer interaction. - Reduced support workload without sacrificing service quality. - Human intervention whenever AI confidence is low. ### Use Case 4: Competitive Intelligence That Runs in the Background Instead of performing occasional market research, Paperclip continuously monitors competitors and industry trends. **Workflow** - **Research Agents:** Track competitor websites, pricing, product updates, and industry news. - **Analysis Agent:** Converts collected data into structured reports. - **Strategy Agent:** Recommends business actions based on insights. **Benefits** - Real-time competitive monitoring. - Actionable reports instead of raw data. - Better content planning based on emerging market trends. - Highly accurate insights through well-defined monitoring tasks. ### Use Case 5: Per-Agent Cost Controls That Actually Work Paperclip helps organizations prevent unexpected AI expenses by monitoring costs at the agent level. **Features** - Set monthly spending limits for individual AI agents. - Automatically stop agents when budget limits are reached. - Track token usage by project, task, or agent. - Eliminate hidden API costs caused by inefficient prompts or retry loops. **Benefits** - Predictable AI operating costs. - Better budget planning for production workloads. - Greater transparency into resource usage. ### Use Case 6: Multi-Project Management Without Mixing Data Paperclip enables agencies and businesses to manage multiple clients or projects without sharing data between environments. **Features** - Separate workspaces for every client or organization. - Independent AI agents, budgets, workflows, and audit logs. - Strong data isolation across all projects. **Benefits** - Protects sensitive client information. - Simplifies management of multiple AI deployments. - Ideal for agencies, consultants, SaaS providers, and enterprise teams. - Safe demo environments for prospects without exposing existing client data. [![Blog banner - ServerAvatar](https://serveravatar.com/wp-content/uploads/2025/09/728_90-Banner-1-1024x127.png)](https://serveravatar.com/?ref=blog)## What Paperclip Is Not While Paperclip is a powerful AI automation platform, it’s important to understand its limitations before using it in production. ### Keep These Points in Mind - **Not a replacement for human decision-making:** AI agents execute the goals you define. Poor instructions or strategies will still produce poor outcomes. - **Not fully autonomous:** It works best for structured, repeatable workflows, not complex business decisions that require human judgment. - **Requires technical knowledge:** Deployment involves server setup and command-line tools. Using managed hosting can simplify infrastructure, but workflow design still requires planning. - **Needs proper agent planning:** Clearly defined roles, responsibilities, and hierarchies are essential for reliable automation. - **API costs require monitoring:** AI usage can increase quickly, so track token consumption and adjust spending limits based on actual usage. - **Not a “set it and forget it” solution:** Regular monitoring, optimization, and budget management help maintain efficient and cost-effective AI operations. Follow our **[step-by-step guide on deploying Paperclip on a VPS with ServerAvatar](https://serveravatar.com/deploy-paperclip-on-vps/)**. ## Conclusion Paperclip helps businesses move beyond simple task automation by enabling AI agents to work together in structured, goal-driven workflows. From software development and content creation to customer support and multi-project management, it provides the tools needed to automate business operations with greater efficiency, visibility, and cost control. Since Paperclip is self-hosted, choosing the right server environment is just as important as designing your workflows. [ServerAvatar](https://serveravatar.com) simplifies server and application management, provides free SSL with automatic renewals, and reduces the day-to-day operational overhead of managing your VPS. You’ll just need to install PostgreSQL and deploy Paperclip manually, but ServerAvatar lets you focus more on building AI-powered automation than maintaining server infrastructure. ## FAQs ### How is Paperclip different from CrewAI or AutoGen? CrewAI and AutoGen focus on agent pipelines, chaining agents together for specific workflows. Paperclip is built around organizational structure, with reporting lines, per-agent budgets, and audit trails that make it suitable for ongoing business operations rather than one-off tasks. ### What server specs are needed? Node.js and PostgreSQL are the core requirements. For a basic deployment, 2 GB RAM is workable. For production with multiple active agents, more is recommended. If you do not want to manage server infrastructure yourself, a managed server platform handles provisioning, security, and maintenance. ### Can I use Paperclip with workflow automation tools like n8n? Yes, Paperclip and n8n serve complementary purposes. n8n handles event-driven workflows like webhooks and API integrations. Paperclip handles goal-driven agent coordination. Many teams run both on the same server for a layered automation architecture. ### How does Paperclip handle data security? Paperclip is self-hosted. All agent communications, decisions, and outputs stay in your own PostgreSQL database. No data is sent to external servers. An append-only audit log provides an immutable record of everything that happens. ### Can multiple teams use one Paperclip deployment? Yes, through multi-company isolation. Each company has completely separate org charts, agents, budgets, and audit logs. There is no data mixing between isolated company environments on the same deployment. ## Key Takeaways - Paperclip works best when you think of AI agents as employees with roles, budgets, and reporting lines, not as smart scripts - The highest-value use cases for small teams are development sprints, content production, and customer support triage - Per-agent budget enforcement is essential for controlling AI costs at scale - Self-hosting means your data never leaves your infrastructure, which matters for regulated industries - Multi-company isolation makes it practical for agencies and consultants managing multiple client environments - Human oversight is not optional, it is the layer that prevents well-intentioned agents from producing confidently wrong output ### About the Author Meghna Meghwani is a technical writer focused on Linux, Ubuntu, VPS hosting, server management, WordPress, PHP, Node.js, cloud hosting, and DevOps. She creates beginner-friendly tutorials, practical hosting guides, troubleshooting articles, and server security content designed to help developers and businesses manage applications and servers more efficiently. **Categories:** Blog, Guide, Linux, Others, Ubuntu **Tags:** AI, AI Agents, AI Automation, AI Workflow, Business Automation, Business Operations, Open Source, Paperclip AI, Self-Hosted, workflow automation --- ### [How to Deploy Paperclip on a VPS with ServerAvatar](https://serveravatar.com/deploy-paperclip-on-vps/) **Published:** July 15, 2026 **Author:** Meghna Meghwani **Content:** [![Blog banner - ServerAvatar](https://serveravatar.com/wp-content/uploads/2025/09/728_90-Banner-3-1024x127.png)](https://serveravatar.com/?ref=blog)If you’re looking to deploy Paperclip for your team, a VPS gives you full control over your AI infrastructure. Paperclip is an open-source platform that lets you create AI agents, define goals, and connect LLM providers like Anthropic Claude and OpenAI, all from a clean dashboard. The catch is that the hosted version stores your data in Paperclip’s cloud. For companies with strict data privacy requirements, or teams that simply want complete ownership of their infrastructure, self-hosting is the better choice. In this guide, you’ll learn how to deploy Paperclip on a VPS quickly and securely using ServerAvatar. This guide walks you through deploying Paperclip on a VPS running Ubuntu, behind a custom domain, with HTTPS, a proper PostgreSQL database, and authentication required for every user. ServerAvatar handles the heavy lifting on server provisioning, application deployment, and SSL certificate management, so you can focus on the setup itself rather than wrestling with DNS records and firewall rules. ## TL;DR - Paperclip is an open-source AI agent management platform with a web UI - Self-hosting gives you full data ownership and keeps agent data on your own infrastructure - ServerAvatar simplifies VPS provisioning, application deployment, and SSL management - PostgreSQL 17 is required, Paperclip’s Drizzle ORM doesn’t support MySQL or MariaDB - Paperclip listens on `127.0.0.1:3100` only, Apache handles all public traffic through a reverse proxy - A clean install on a fresh Ubuntu VPS takes roughly 15–20 minutes ## What is Paperclip? [Paperclip](https://paperclip.ing/?ref=serveravatar.com) is an open-source platform that gives teams a web-based control panel for AI agents. You can define agents, assign them goals, manage workloads, and connect your own LLM API keys, without having to build your own tooling from scratch. Explore the hosted version at [paperclip.ing](https://paperclip.ing/?ref=serveravatar.com), and access the [official documentation](https://docs.paperclip.ing/?ref=serveravatar.com) and [GitHub repository](https://github.com/paperclipai/paperclip?ref=serveravatar.com) to learn more. Going the self-hosted route changes the picture significantly: Feature**Paperclip Cloud****Self-Hosted****Data storage**Paperclip’s serversYour VPS**Cost**Subscription-basedYour server costs**Custom domain**LimitedFull control**Authentication**Managed for youYou configure who has access**Updates**AutomaticYou decide when to update**Database**Managed by PaperclipSelf-managed PostgreSQLThe self-hosted approach makes the most sense when data residency, internal privacy policies, or avoiding another SaaS dependency are driving your decisions. If any of those resonate, keep reading. **Who this guide is for:** Teams that need full control over agent management data, companies with compliance requirements, and developers comfortable on the command line. Budget about 15–20 minutes for a clean install on a fresh VPS. ## Architecture Overview Before diving into the steps, it helps to understand how everything connects. ``` ┌──────────────────────────────────────────────┐ │ Your VPS │ │ │ │ │ Internet ─────────────── Apache :443 (SSL) ─────┼──────► Paperclip :3100 (https://paperclip.example.com) │ │ │ │ Apache :80──┘ │ │ │ │ PostgreSQL :5432 │ └──────────────────────────────────────────────┘ ``` ``` ┌──────────────────────────────────────────────┐ │ Your VPS │ │ │ │ │ Internet ─────────────── Apache :443 (SSL) ─────┼──────► Paperclip :3100 (https://paperclip.example.com) │ │ │ │ Apache :80──┘ │ │ │ │ PostgreSQL :5432 │ └──────────────────────────────────────────────┘ ``` Here’s what each piece does: - **Apache (443)** – Terminates SSL, handles Let’s Encrypt certificates, receives all public traffic - **Apache (80) –** Catches plain HTTP requests and redirects them to HTTPS - **Paperclip (3100) –** The agent management UI that is tied exclusively to localhost, and never directly exposed to the internet - **PostgreSQL (5432) –** Stores all agent data, configurations, and user information, also localhost-only **Traffic always flows:** `Client >> Apache (SSL) >> Paperclip (localhost) >> PostgreSQL (localhost)`. Nothing is directly reachable from the internet except Apache on ports 80 and 443. ### Why this design matters Paperclip is intentionally designed to sit behind a reverse proxy. It binds to `127.0.0.1:3100`, which means it cannot be reached directly from the internet under any misconfiguration. Apache handles all SSL complexity. PostgreSQL is on localhost too, so you don’t need to open firewall rules for the database. “systemd” takes care of restarts if the process crashes or the server reboots. This layered approach means you get a production-ready setup where each component only communicates with the ones it actually needs to. ## Step 1: Create Your Server with ServerAvatar Log into your ServerAvatar account and create a new server. If you already have a server, [ServerAvatar](https://serveravatar.com/) makes the process straightforward, you can connect your server from any cloud provider with ServerAvatar using the [Direct Method installation guide](https://serveravatar.com/docs/server-management/installation/direct-method/). You can also connect your cloud provider account from [DigitalOcean](https://serveravatar.com/docs/server-management/installation/digitalocean/), [Vultr](https://serveravatar.com/docs/server-management/installation/vultr/), [Linode](https://serveravatar.com/docs/server-management/installation/linode/), [Hetzner](https://serveravatar.com/docs/server-management/installation/hetzner/), and [Amazon Lightsail](https://serveravatar.com/docs/server-management/installation/amazon-lightsail/) to directly deploy a server using ServerAvatar. During the server creation workflow, you’ll see an option to **Install Node.js**, enable this toggle. Paperclip runs on Node.js, and having ServerAvatar install it during provisioning saves you a manual step afterward. ![create server - Deploy Paperclip](https://serveravatar.com/wp-content/uploads/2026/07/image-25-834x1024.png) ## Step 2: Create the Application in ServerAvatar After your server is live, create a new application in ServerAvatar. - Open the server panel by clicking on the server dashboard icon. - Navigate to the Application section from the left sidebar. - Click on the Create an Application button. ![create application - Deploy Paperclip](https://serveravatar.com/wp-content/uploads/2026/07/image-26-1024x383.png) - Enter your application name. - Select your domain from Primary and Test. ServerAvatar lets you deploy applications on a **temporary test domain** first, useful for verifying your setup before pointing production traffic at it. - Enter your domain name. - Choose **Custom PHP Application** as the deployment method. ![custom application - Deploy Paperclip](https://serveravatar.com/wp-content/uploads/2026/07/image-27.png) - Click on Show Advance Options. Enter New User and give Username and Password. - Select your PHP Version as 8.2 - Click on Create Application. ![create application - Deploy Paperclip](https://serveravatar.com/wp-content/uploads/2026/07/image-28.png) ServerAvatar will create the application structure and set a document root. You’ll deploy Paperclip into this environment. Refer to the [custom PHP deployment guide](https://serveravatar.com/docs/application/deploy-custom-php/) for further details. ## Step 3: Enable SSH and Sudo Access for Your Application User By default, the application user has limited permissions. For Paperclip, you’ll need full SSH and sudo access. - Go to the **Application Users** section from the left sidebar. Enable the following toggles: - **SFTP/SSH Access:** so you can SSH in as this user - **Sudo Access:** so you can install packages and run system-level commands ![enable sudo access - Deploy Paperclip](https://serveravatar.com/wp-content/uploads/2026/07/image-29-1024x252.png) Without sudo access, every `apt install` command will fail with a permission error, and you’ll be stuck. ## Step 4: Install Node.js (If You Skipped It During Server Creation) If you didn’t enable the Node.js toggle when creating the server, install it now after the server is deployed. - Navigate to the Settings section from the left sidebar, and click on the Node.js section. - Click on the Install button to install Node.js; if it is already installed, it shows the installed Node version. - If you have already installed Node.js while connecting server with ServerAvatar, skip this step. ![install node.js - Deploy Paperclip](https://serveravatar.com/wp-content/uploads/2026/07/image-30-1024x249.png) ## Step 5: Install SSL Certificate - Navigate to your application panel by clicking on the dashboard icon next to your application. - Click on the SSL Certificate section from the left sidebar. - ServerAvatar provides automatic free SSL with auto-renewal; you can install automatic SSL using the [Automatic Installation](https://serveravatar.com/docs/application/automatic-installation/) button. ![install SSL certificate - Deploy Paperclip](https://serveravatar.com/wp-content/uploads/2026/07/image-31-1024x779.png) - Enable the toggle button to force HTTP to HTTPS ![http to https - Deploy Paperclip](https://serveravatar.com/wp-content/uploads/2026/07/image-32-1024x574.png) - If you already have an SSL Certificate or if you generated an SSL Certificate from somewhere else, you can add your SSL Certificate using the [Custom Installation](https://serveravatar.com/docs/application/custom-installation/) option. ## Step 6: Install PostgreSQL 17 Ubuntu 24.04 ships PostgreSQL 16 by default. Paperclip uses Drizzle ORM, which supports only PostgreSQL, MySQL and MariaDB are not compatible. - Open Terminal and connect to your server using the application user and password that we set while creating the application. - **Add the official PostgreSQL apt repository** ``` sudo sh -c 'echo "deb http://apt.postgresql.org/pub/repos/apt $(lsb_release -cs)-pgdg main" > /etc/apt/sources.list.d/pgdg.list' wget -qO- https://www.postgresql.org/media/keys/ACCC4CF8.asc | sudo gpg --dearmor -o /etc/apt/trusted.gpg.d/postgresql.gpg ``` ``` sudo sh -c 'echo "deb http://apt.postgresql.org/pub/repos/apt $(lsb_release -cs)-pgdg main" > /etc/apt/sources.list.d/pgdg.list' wget -qO- https://www.postgresql.org/media/keys/ACCC4CF8.asc | sudo gpg --dearmor -o /etc/apt/trusted.gpg.d/postgresql.gpg ``` - **Install PostgreSQL** ``` sudo apt update sudo apt install -y postgresql ``` ``` sudo apt update sudo apt install -y postgresql ``` - **Start and enable PostgreSQL** ``` sudo systemctl enable --now postgresql ``` ``` sudo systemctl enable --now postgresql ``` - **Check the version** ``` psql --version ``` ``` psql --version ``` **The output should show PostgreSQL version.** ![PostgreSQL version - Deploy Paperclip](https://serveravatar.com/wp-content/uploads/2026/07/image-33-1024x42.png) **Note:** If the output shows **PostgreSQL 16.x**, it usually means your system is using Ubuntu’s default PostgreSQL repository instead of the PostgreSQL (PGDG) repository, or the PGDG repository hasn’t been updated successfully. **Follow these steps to resolve the issue:** - Update the package index ``` sudo apt update ``` ``` sudo apt update ``` - If you see an error such as “Mirror sync in progress” or “File has unexpected size”, wait 10–30 minutes and run the following commands ``` sudo apt clean sudo rm -rf /var/lib/apt/lists/* sudo apt update ``` ``` sudo apt clean sudo rm -rf /var/lib/apt/lists/* sudo apt update ``` - Verify that PostgreSQL 17 is available ``` apt-cache policy postgresql-17 ``` ``` apt-cache policy postgresql-17 ``` - If a Candidate version is displayed, the repository is working correctly. - Install PostgreSQL 17 ``` sudo apt install postgresql-17 ``` ``` sudo apt install postgresql-17 ``` - Confirm the installed version ``` psql --version ``` ``` psql --version ``` - The output should now display **PostgreSQL 17.x**. ### PostgreSQL 17 vs PGlite: Which One to Use? OptionBest ForNotes**PGlite (embedded)**Solo development, evaluationSingle-process, not designed for production workloads**PostgreSQL 17 (external)**Production, teamsFull database server with backup and replication support## Step 7: Create the Paperclip Database and User **Switch to the postgres superuser and create a dedicated database and user for Paperclip** ``` sudo -u postgres psql **Important:** If `PAPERCLIP_AUTH_PUBLIC_BASE_URL` is not set before the onboard wizard runs, Paperclip will refuse to start in authenticated + public mode with the error: `auth.publicBaseUrl is required`. Set the env file first, then run the wizard. ## Step 9: Initialise Paperclip **Switch to your ServerAvatar application user** ``` sudo -iu paperclipuser ``` ``` sudo -iu paperclipuser ``` **Go to application directory** ``` cd /home/paperclipuser/paperclipapp/public_html ``` ``` cd /home/paperclipuser/paperclipapp/public_html ``` **Run Paperclip onboarding** ``` npx paperclipai onboard --yes ``` ``` npx paperclipai onboard --yes ``` **This creates a configuration file in the location** ``` /home/paperclipuser/.paperclip/instances/default/config.json ``` ``` /home/paperclipuser/.paperclip/instances/default/config.json ``` **Important:** Paperclip stores its configuration in the user’s home directory. **Do not keep the config inside** ``` /home/paperclipuser/paperclipapp/public_html/.paperclip ``` ``` /home/paperclipuser/paperclipapp/public_html/.paperclip ``` **The correct location is** ``` /home/paperclipuser/.paperclip ``` ``` /home/paperclipuser/.paperclip ``` > **Note:** The exact flags for the onboard command (`--yes` for accepting defaults) are based on the official Paperclip documentation. If you encounter unexpected behavior, run `npx paperclipai onboard --help` to confirm the available options for your version. The wizard will create an initial configuration using the environment variables from the previous step. You’ll see output similar to: ![deploy paperclip - Deploy Paperclip](https://serveravatar.com/wp-content/uploads/2026/07/image-35-1024x490.png)Press `Ctrl+C` to stop the server. In the next step, we’ll replace the default config with a production-ready one that uses PostgreSQL and enforces authenticated access. ## Step 10: Update Paperclip Production Configuration The onboard wizard generates a config optimized for local development. Update it for production with your PostgreSQL database and strict authentication settings. **Run the command below to edit the configuration file** ``` nano /home/paperclipuser/.paperclip/instances/default/config.json ``` ``` nano /home/paperclipuser/.paperclip/instances/default/config.json ``` Replace the file content with below mentioned configurations. Replace “YourStrongPassword123” with your PostgreSQL password, and add your application URL in “allowedHostnames”, and “publicBaseUrl” ``` { "$meta": { "version": 1, "updatedAt": "2026-07-14T00:00:00.000Z", "source": "configure" }, "database": { "mode": "postgres", "connectionString": "postgresql://paperclip:YourStrongPassword123@localhost:5432/paperclip", "backup": { "enabled": true, "intervalMinutes": 60, "retentionDays": 30, "dir": "/home/paperclipuser/.paperclip/instances/default/data/backups" } }, "logging": { "mode": "file", "logDir": "/home/paperclipuser/.paperclip/instances/default/logs" }, "server": { "deploymentMode": "authenticated", "exposure": "public", "bind": "loopback", "host": "127.0.0.1", "port": 3100, "allowedHostnames": [ "paperclipapp.saavatar.top" ], "serveUi": true }, "auth": { "baseUrlMode": "explicit", "publicBaseUrl": "https://paperclipapp.saavatar.top", "disableSignUp": false }, "telemetry": { "enabled": true }, "storage": { "provider": "local_disk", "localDisk": { "baseDir": "/home/paperclipuser/.paperclip/instances/default/data/storage" }, "s3": { "bucket": "paperclip", "region": "us-east-1", "prefix": "", "forcePathStyle": false } }, "secrets": { "provider": "local_encrypted", "strictMode": false, "localEncrypted": { "keyFilePath": "/home/paperclipuser/.paperclip/instances/default/secrets/master.key" } } } ``` ``` { "$meta": { "version": 1, "updatedAt": "2026-07-14T00:00:00.000Z", "source": "configure" }, "database": { "mode": "postgres", "connectionString": "postgresql://paperclip:YourStrongPassword123@localhost:5432/paperclip", "backup": { "enabled": true, "intervalMinutes": 60, "retentionDays": 30, "dir": "/home/paperclipuser/.paperclip/instances/default/data/backups" } }, "logging": { "mode": "file", "logDir": "/home/paperclipuser/.paperclip/instances/default/logs" }, "server": { "deploymentMode": "authenticated", "exposure": "public", "bind": "loopback", "host": "127.0.0.1", "port": 3100, "allowedHostnames": [ "paperclipapp.saavatar.top" ], "serveUi": true }, "auth": { "baseUrlMode": "explicit", "publicBaseUrl": "https://paperclipapp.saavatar.top", "disableSignUp": false }, "telemetry": { "enabled": true }, "storage": { "provider": "local_disk", "localDisk": { "baseDir": "/home/paperclipuser/.paperclip/instances/default/data/storage" }, "s3": { "bucket": "paperclip", "region": "us-east-1", "prefix": "", "forcePathStyle": false } }, "secrets": { "provider": "local_encrypted", "strictMode": false, "localEncrypted": { "keyFilePath": "/home/paperclipuser/.paperclip/instances/default/secrets/master.key" } } } ``` **Set ownership** ``` chown -R paperclipuser:paperclipuser /home/paperclipuser/.paperclip chmod -R 700 /home/paperclipuser/.paperclip ``` ``` chown -R paperclipuser:paperclipuser /home/paperclipuser/.paperclip chmod -R 700 /home/paperclipuser/.paperclip ``` **Key fields and why they matter:** FieldValueWhy it matters`database.mode``postgres`Switches from embedded PGlite to your real PostgreSQL server`database.connectionString``postgresql://...`Full path to your PostgreSQL instance`server.deploymentMode``authenticated`Every user needs to log in, no anonymous access`server.exposure``public`Internet-facing, not a private LAN deployment`server.bind``loopback`Only listens on 127.0.0.1, Apache is the only entry point`server.port``3100`Paperclip’s default port`auth.baseUrlMode``explicit`Uses the explicit publicBaseUrl as the canonical auth URL`auth.publicBaseUrl``https://paperclip.example.com`The URL your users actually visit## Step 11: Set Up systemd Service systemd is what keeps Paperclip running reliably, it auto-starts on boot and restarts the process after crashes. **Create service file** ``` sudo nano /etc/systemd/system/paperclip.service ``` ``` sudo nano /etc/systemd/system/paperclip.service ``` **Add mentioned configuration** ``` [Unit] Description=Paperclip AI Agent Platform After=network.target postgresql.service [Service] Type=simple User=paperclipuser Group=paperclipuser WorkingDirectory=/home/paperclipuser/paperclipapp/public_html EnvironmentFile=/home/paperclipuser/paperclipapp/public_html/paperclip.env ExecStart=/usr/bin/npx paperclipai run Restart=on-failure RestartSec=5 StandardOutput=journal StandardError=journal [Install] WantedBy=multi-user.target ``` ``` [Unit] Description=Paperclip AI Agent Platform After=network.target postgresql.service [Service] Type=simple User=paperclipuser Group=paperclipuser WorkingDirectory=/home/paperclipuser/paperclipapp/public_html EnvironmentFile=/home/paperclipuser/paperclipapp/public_html/paperclip.env ExecStart=/usr/bin/npx paperclipai run Restart=on-failure RestartSec=5 StandardOutput=journal StandardError=journal [Install] WantedBy=multi-user.target ``` **Reload systemd** ``` sudo systemctl daemon-reload ``` ``` sudo systemctl daemon-reload ``` **Enable and start** ``` sudo systemctl enable --now paperclip ``` ``` sudo systemctl enable --now paperclip ``` **Check the paperclip application status** ``` sudo systemctl status paperclip ``` ``` sudo systemctl status paperclip ``` **Expected** ``` Active: active (running) ``` ``` Active: active (running) ``` ![](https://serveravatar.com/wp-content/uploads/2026/07/image-44-1024x300.png) If it fails, something went wrong. Check the logs using below command: ``` sudo journalctl -u paperclip -n 50 --no-pager ``` ``` sudo journalctl -u paperclip -n 50 --no-pager ``` ## Step 12: Configure Apache as a Reverse Proxy Now let’s set up Apache. Paperclip is running on localhost port 3100. Apache will accept all public traffic and forward it, handling SSL termination in the process. **Enable Required Apache Modules** ``` sudo a2enmod proxy proxy_http headers proxy_wstunnel rewrite ``` ``` sudo a2enmod proxy proxy_http headers proxy_wstunnel rewrite ``` **Check Apache status** ``` sudo apachectl configtest ``` ``` sudo apachectl configtest ``` If `apachectl configtest` reports a syntax error, fix it before reloading. **Reload apache** ``` sudo systemctl reload apache2 ``` ``` sudo systemctl reload apache2 ``` ![reload apache - Deploy Paperclip](https://serveravatar.com/wp-content/uploads/2026/07/image-36-1024x212.png) ## Step 13: Create the HTTPS Virtual Host (Port 443) with SSL - Navigate to the application panel of your paperclip application in ServerAvatar. Click on the File Manager from the left sidebar. - Navigate to the “**Conf”** folder, and then “**apache”** folder. - Click on the **New File** button to create a file. ![create config - Deploy Paperclip](https://serveravatar.com/wp-content/uploads/2026/07/image-37-1024x411.png)- Enter the file name as “extra.conf” - Add below mentioned configuration in the file. ``` # Reverse proxy to Paperclip ProxyPreserveHost On ProxyRequests Off ProxyTimeout 300 ProxyPass / http://127.0.0.1:3100/ ProxyPassReverse / http://127.0.0.1:3100/ # WebSocket support (required for real-time UI features) RewriteEngine On RewriteCond %{HTTP:Upgrade} =websocket [NC] RewriteCond %{HTTP:Connection} upgrade [NC] RewriteRule ^/?(.*) "ws://127.0.0.1:3100/$1" [P,L] # Pass real client IP to Paperclip RequestHeader set X-Forwarded-Proto "https" RequestHeader set X-Forwarded-For "%{REMOTE_ADDR}s" RequestHeader set Host "%{HTTP_HOST}s" ``` ``` # Reverse proxy to Paperclip ProxyPreserveHost On ProxyRequests Off ProxyTimeout 300 ProxyPass / http://127.0.0.1:3100/ ProxyPassReverse / http://127.0.0.1:3100/ # WebSocket support (required for real-time UI features) RewriteEngine On RewriteCond %{HTTP:Upgrade} =websocket [NC] RewriteCond %{HTTP:Connection} upgrade [NC] RewriteRule ^/?(.*) "ws://127.0.0.1:3100/$1" [P,L] # Pass real client IP to Paperclip RequestHeader set X-Forwarded-Proto "https" RequestHeader set X-Forwarded-For "%{REMOTE_ADDR}s" RequestHeader set Host "%{HTTP_HOST}s" ``` - Click on the **Save Changes** button. ![save config - Deploy Paperclip](https://serveravatar.com/wp-content/uploads/2026/07/image-38-1024x773.png) - Run the mentioned command to test Apache configuration. It will return with “Syntax OK” message. ``` sudo apachectl configtest ``` ``` sudo apachectl configtest ``` ![check syntax - Deploy Paperclip](https://serveravatar.com/wp-content/uploads/2026/07/image-39-1024x50.png) - Reload the Apache service. ``` sudo systemctl reload apache2 ``` ``` sudo systemctl reload apache2 ``` > **Note:** If you don’t yet have SSL certificates, you can enable the HTTP vHost first and get certificates later through ServerAvatar’s SSL panel or via certbot. The HTTPS vHost won’t start without valid certificates, but the HTTP redirect will still work. ## Step 14: Configure TRUST\_PROXY When Paperclip sits behind a reverse proxy, it needs to trust the `X-Forwarded-For` header, otherwise, it sees Apache’s IP as the client IP, which breaks rate limiting and authentication. **Add** `TRUST_PROXY=1` **to your environment file** ``` nano /home/paperclipuser/paperclipapp/public_html/paperclip.env ``` ``` nano /home/paperclipuser/paperclipapp/public_html/paperclip.env ``` **Add the below-mentioned at the end** ``` TRUST_PROXY=1 ``` ``` TRUST_PROXY=1 ``` ValueMeaning`true`Trust proxy headers unconditionally, safe when only Apache reaches Paperclip`1`Trust one proxy hop`loopback,linklocal`Trust specific source types only**Restart the service** ``` sudo systemctl restart paperclip ``` ``` sudo systemctl restart paperclip ``` ## Step 15: Create First Admin Account Paperclip requires an invite link to create the first user. **Let’s generate the admin invite** ``` sudo -iu paperclip cd /home/paperclipuser/paperclipapp/public_html npx paperclipai auth bootstrap-ceo ``` ``` sudo -iu paperclip cd /home/paperclipuser/paperclipapp/public_html npx paperclipai auth bootstrap-ceo ``` > **Note:** The exact command (`bootstrap-ceo`) and its behavior are based on the official Paperclip documentation. If the command isn’t recognized in your version, check `npx paperclipai auth --help` for the correct syntax. Invites are single-use and expire after a set period, generate a new one if the link stops working. **You will see output like** ``` Created bootstrap CEO invite. Invite URL: https://paperclip.example.com/invite/pcp_bootstrap_... Expires: 2026-07-15T12:00:00.000Z ``` ``` Created bootstrap CEO invite. Invite URL: https://paperclip.example.com/invite/pcp_bootstrap_... Expires: 2026-07-15T12:00:00.000Z ``` ![invite url - Deploy Paperclip](https://serveravatar.com/wp-content/uploads/2026/07/image-40-1024x101.png) Open that URL in your browser and register your admin account. ![create admin account - You will see output like](https://serveravatar.com/wp-content/uploads/2026/07/image-41-1024x592.png) **After registration, verify with below command** ``` psql -U paperclip -d paperclip -h localhost ``` ``` psql -U paperclip -d paperclip -h localhost ``` **Run the below command** ``` SELECT * FROM "user"; SELECT * FROM instance_user_roles; ``` ``` SELECT * FROM "user"; SELECT * FROM instance_user_roles; ``` **You will see** ``` role = instance_admin ``` ``` role = instance_admin ``` ![](https://serveravatar.com/wp-content/uploads/2026/07/image-42-1024x259.png) Your Paperclip installation is now production-ready behind ServerAvatar + Apache reverse proxy + PostgreSQL. ![paperclip dashboard - You will see output like](https://serveravatar.com/wp-content/uploads/2026/07/image-43-1024x506.png) ## To Verify Everything Works Run through these checks to confirm every layer is working correctly: **1. Paperclip responds locally** ``` curl -I http://127.0.0.1:3100 # Expected: HTTP/1.1 200 OK ``` ``` curl -I http://127.0.0.1:3100 # Expected: HTTP/1.1 200 OK ``` **2. Apache proxies to Paperclip over HTTPS** ``` curl -Ik https://paperclip.example.com # Expected: HTTP/2 200 or 307 redirect ``` ``` curl -Ik https://paperclip.example.com # Expected: HTTP/2 200 or 307 redirect ``` **3. All three services are running** ``` sudo systemctl is-active paperclip # → active sudo systemctl is-active apache2 # → active sudo systemctl is-active postgresql # → active ``` ``` sudo systemctl is-active paperclip # → active sudo systemctl is-active apache2 # → active sudo systemctl is-active postgresql # → active ``` **4. PostgreSQL tables were created by migrations** ``` sudo -u postgres psql -h localhost -U paperclip -d paperclip -c "\dt" # Expected: a list of tables (migrations ran automatically on first startup) ``` ``` sudo -u postgres psql -h localhost -U paperclip -d paperclip -c "\dt" # Expected: a list of tables (migrations ran automatically on first startup) ``` All four checks should pass. If Apache returns a 502, double-check that the `proxy_http` module is enabled and that Paperclip is actually running. ## Updating Paperclip Paperclip releases updates regularly. To update to a new version: ``` # Update the CLI globally sudo -iu paperclip npm install -g paperclipai # Restart the service sudo systemctl restart paperclip ``` ``` # Update the CLI globally sudo -iu paperclip npm install -g paperclipai # Restart the service sudo systemctl restart paperclip ``` Migrations run automatically on startup, there’s no manual migration step needed. That said, check the [Paperclip GitHub repository](https://github.com/paperclipai/paperclip) release notes before updating in production, particularly around breaking changes to the config schema. ## Backup Strategy Paperclip has a built-in backup feature already configured in your `config.json`: ``` "backup": { "enabled": true, "intervalMinutes": 60, "retentionDays": 30, "dir": "/home/paperclip/.paperclip/instances/default/data/backups" } ``` ``` "backup": { "enabled": true, "intervalMinutes": 60, "retentionDays": 30, "dir": "/home/paperclip/.paperclip/instances/default/data/backups" } ``` Backups run every hour, are retained for 30 days, and are stored at `/home/paperclip/.paperclip/instances/default/data/backups`. The built-in backup handles the basics well. For anything that matters beyond a personal project, layer in additional backup strategies: - **PostgreSQL native dumps:** Run `pg_dump paperclip > backup.sql` via a cron job for point-in-time recovery capability - **Off-server copies:** Sync the backup directory to remote storage (S3, rsync to another machine), a VPS disk failure wipes local backups just as easily as the data itself - **S3 storage backend:** Configure Paperclip’s S3 storage provider in `config.json` for durable external storage that survives server-level failures [![Blog banner - ServerAvatar](https://serveravatar.com/wp-content/uploads/2025/09/728_90-Banner-1-1024x127.png)](https://serveravatar.com/?ref=blog)## Common Errors and How to Fix Them ### 1. “authenticated public deployments require DATABASE\_URL” **Cause:** The config still has `mode: embedded-postgres` (the onboard default). Paperclip refuses to use the embedded database for public-facing deployments. **Fix:** Update `config.json` to set `database.mode: "postgres"` and add your `connectionString`. Restart Paperclip, migrations run automatically. ### 2. “auth.publicBaseUrl is required” **Cause:** `PAPERCLIP_AUTH_PUBLIC_BASE_URL` wasn’t set before running the onboard wizard, so Paperclip doesn’t know what URL to redirect to after login. **Fix:** In `config.json`, set `auth.baseUrlMode: "explicit"` and `auth.publicBaseUrl: "https://paperclip.example.com"`. Restart Paperclip. ### 3. Server returns 502 via Apache **Cause:** Either the `proxy_http` module isn’t enabled, or Paperclip isn’t running at all. **Fix:** ``` sudo a2enmod proxy_http sudo systemctl restart apache2 sudo systemctl status paperclip ``` ``` sudo a2enmod proxy_http sudo systemctl restart apache2 sudo systemctl status paperclip ``` If Paperclip isn’t running, check logs with `sudo journalctl -u paperclip -n 50 --no-pager`. ### 4. Bootstrap invite expired **Cause:** Invite links are single-use and expire after a few days. **Fix:** Generate a new one: ``` sudo -iu paperclip npx paperclipai auth bootstrap-ceo ``` ``` sudo -iu paperclip npx paperclipai auth bootstrap-ceo ``` ### 5. Paperclip crashes immediately on start **Cause:** Almost always a config validation error or a failed database connection. **Fix:** Check the logs: ``` sudo journalctl -u paperclip -n 50 --no-pager ``` ``` sudo journalctl -u paperclip -n 50 --no-pager ``` Look for errors about missing keys, invalid JSON, or connection refused on port 5432. ## Service Commands Reference ``` # Paperclip sudo systemctl restart paperclip sudo systemctl stop paperclip sudo systemctl status paperclip sudo journalctl -u paperclip -f # live logs sudo journalctl -u paperclip -n 50 --no-pager # last 50 lines # Apache sudo systemctl reload apache2 sudo systemctl restart apache2 sudo apachectl configtest # validate config before restarting # PostgreSQL sudo systemctl restart postgresql sudo systemctl status postgresql sudo -u postgres psql # interactive SQL shell # Check which ports are listening ss -tlnp | grep -E '3100|5432|80|443' ``` ``` # Paperclip sudo systemctl restart paperclip sudo systemctl stop paperclip sudo systemctl status paperclip sudo journalctl -u paperclip -f # live logs sudo journalctl -u paperclip -n 50 --no-pager # last 50 lines # Apache sudo systemctl reload apache2 sudo systemctl restart apache2 sudo apachectl configtest # validate config before restarting # PostgreSQL sudo systemctl restart postgresql sudo systemctl status postgresql sudo -u postgres psql # interactive SQL shell # Check which ports are listening ss -tlnp | grep -E '3100|5432|80|443' ``` ## File Locations Reference FilePath**systemd service**`/etc/systemd/system/paperclip.service`**Environment variables**`/home/paperclip/paperclip.env`**Paperclip config**`/home/paperclip/.paperclip/instances/default/config.json`**Secrets master key**`/home/paperclip/.paperclip/instances/default/secrets/master.key`**Paperclip logs**`/home/paperclip/.paperclip/instances/default/logs`**Backups**`/home/paperclip/.paperclip/instances/default/data/backups`**Local storage**`/home/paperclip/.paperclip/instances/default/data/storage`**PostgreSQL data**`/var/lib/postgresql/17/main/`**Apache HTTP vHost**`/etc/apache2/sites-available/paperclip.conf`**Apache SSL vHost**`/etc/apache2/sites-available/paperclip-le-ssl.conf`**SSL certificates**`/etc/letsencrypt/live/paperclip/`## Uninstalling Paperclip If you need to tear everything down cleanly: ``` # Stop and disable the service sudo systemctl stop paperclip sudo systemctl disable paperclip sudo rm /etc/systemd/system/paperclip.service sudo systemctl daemon-reload # Drop the database sudo -u postgres psql -c "DROP DATABASE paperclip;" sudo -u postgres psql -c "DROP USER paperclip;" # Remove the Paperclip user sudo userdel -r paperclip # Remove Apache configs sudo a2dissite paperclip.conf sudo a2dissite paperclip-le-ssl.conf sudo systemctl reload apache2 ``` ``` # Stop and disable the service sudo systemctl stop paperclip sudo systemctl disable paperclip sudo rm /etc/systemd/system/paperclip.service sudo systemctl daemon-reload # Drop the database sudo -u postgres psql -c "DROP DATABASE paperclip;" sudo -u postgres psql -c "DROP USER paperclip;" # Remove the Paperclip user sudo userdel -r paperclip # Remove Apache configs sudo a2dissite paperclip.conf sudo a2dissite paperclip-le-ssl.conf sudo systemctl reload apache2 ``` ## Conclusion Deploying Paperclip on your own VPS gives you complete control over your AI agent platform, allowing you to manage data securely while avoiding the limitations of hosted services. With [ServerAvatar](https://serveravatar.com/) simplifying server provisioning, SSL management, and application deployment, setting up a production-ready Paperclip instance becomes much more straightforward, even if you’re managing your own infrastructure. By following this guide, you’ve built a secure and scalable Paperclip deployment powered by PostgreSQL, protected with HTTPS, and configured behind an Apache reverse proxy. As your AI workflows grow, you can confidently maintain, update, and back up your environment while retaining full ownership of your data and deployment. Whether you’re deploying for a personal project or an organization, this self-hosted setup provides a solid foundation for long-term reliability and flexibility. ## FAQs ### Can I use MySQL or MariaDB instead of PostgreSQL with Paperclip? No. Paperclip uses Drizzle ORM, which supports only PostgreSQL. MySQL and MariaDB are not compatible with Paperclip’s data layer. ### Why does Paperclip bind to localhost instead of all network interfaces? Paperclip is designed to sit behind a reverse proxy. Binding to `127.0.0.1` means it can’t be reached directly from the internet, all traffic must flow through Apache or another proxy that handles SSL termination. This is a security design, not a limitation. ### How do I add more users after setting up the first admin account? Once your admin account is registered, you can invite additional users from within the Paperclip admin panel. Each invite generates a unique URL that’s single-use and expires after a set period. You can disable public signups entirely by setting `disableSignUp: true` in `config.json`. ### Does Paperclip support WebSocket connections? Yes, and they’re required for real-time features in the web UI. The Apache configuration in this guide enables `proxy_wstunnel` and includes the WebSocket upgrade rewrite rules needed to forward WebSocket connections to Paperclip on port 3100. ### How do I migrate from PGlite to PostgreSQL after initial setup? Update the `database` section in `/home/paperclip/.paperclip/instances/default/config.json`, change `mode` to `"postgres"` and add your `connectionString`. Restart Paperclip with `sudo systemctl restart paperclip`. Migrations run automatically on startup. ## Key Takeaways - Paperclip is an open-source AI agent management platform that runs entirely on your own VPS - PostgreSQL 17 is required, the embedded PGlite option isn’t suitable for production - Paperclip listens on `127.0.0.1:3100`, Apache handles all public traffic through a reverse proxy, so Paperclip is never directly internet-facing - Environment variables in `/home/paperclip/paperclip.env` control deployment mode, auth settings, and the database connection string - The bootstrap invite command (`npx paperclipai auth bootstrap-ceo`) creates your first admin account, keep that URL safe and use it promptly - Built-in backups run every hour with 30-day retention; add off-server backups for anything beyond experiments - ServerAvatar simplifies server provisioning, PHP/Node.js application deployment, and SSL certificate management across major cloud providers ### About the Author Meghna Meghwani is a technical writer focused on Linux, Ubuntu, VPS hosting, server management, WordPress, PHP, Node.js, cloud hosting, and DevOps. She creates beginner-friendly tutorials, practical hosting guides, troubleshooting articles, and server security content designed to help developers and businesses manage applications and servers more efficiently. **Categories:** Application Deployments, Blog, Guide, Linux, Others, Tutorials, Ubuntu **Tags:** AI Agent Platform, Deploy Paperclip, Install Paperclip, Linux, Paperclip, Paperclip Deployment, Paperclip Installation Guide, Paperclip VPS, Self Host Paperclip, Self-Hosted AI, Ubuntu, Vps hosting --- ### [How to Reduce HTTP Requests in WordPress to Improve Site Speed](https://serveravatar.com/improve-wordpress-site-speed/) **Published:** July 14, 2026 **Author:** Meghna Meghwani **Content:** [![Blog banner - ServerAvatar](https://serveravatar.com/wp-content/uploads/2025/09/728_90-Banner-3-1024x127.png)](https://serveravatar.com/?ref=blog)Every time someone visits your WordPress site, their browser has to do many things. To reduce HTTP requests, it first has a list of files it needs before it can show a single pixel. CSS files. JavaScript files. Images. Fonts. Tracking pixels. Font icons. Video embeds. Each item on that list is one HTTP request. And here’s the thing most people don’t realize until they actually look: that list is usually way longer than it needs to be. I remember opening GTmetrix for a client’s WordPress site for the first time a couple of months ago and seeing 94 requests for a simple blog page. The site was loading four separate JavaScript files from a plugin the client had forgotten they even installed. Just disabling that one plugin brought it down to 71 requests and dropped the load time by nearly two seconds. That’s the kind of gap we’re talking about here. In this guide, I’m going to walk you through how HTTP requests actually work in WordPress, how to measure them properly, and, more importantly, which optimizations actually move the needle. ## TL;DR - Every file your browser fetches is a separate HTTP request, more requests mean a slower site - The biggest culprits are heavy plugins, unoptimized fonts, external tracking scripts, and oversized images - You can cut requests dramatically by auditing what loads, hosting assets locally, deferring non-critical scripts, and using modern formats ## What Actually Are HTTP Requests Think of your browser like a customer in a restaurant where every ingredient needed for a dish comes from a different supplier. Each supplier call represents an HTTP request. The browser makes these requests over a network (not a phone line, but the idea is similar), and every single request introduces a small delay or latency before the page can fully load. ![Visual diagram of a browser sending HTTP requests - reduce HTTP requests](https://serveravatar.com/wp-content/uploads/2026/07/image-6.png) ### How This Works in WordPress - Every WordPress page is built using multiple assets that the browser must load before displaying the page. - These assets include CSS stylesheets, JavaScript files, fonts, images, and other supporting resources. - The browser sends a separate request to the server for each asset. - It waits for the server to respond before downloading the requested file. - Once the file is received, the browser continues requesting the remaining assets. - This sequence is repeated until every required resource has been downloaded and processed. - The more assets a page contains, the more requests the browser needs to make before the page is fully rendered. Every resource that your browser downloads requires its own HTTP request. Understanding which assets generate requests helps you identify where optimization efforts will have the biggest impact. The table below highlights the most common asset types found on WordPress websites and the best ways to optimize them. **Asset Type****Example****Creates HTTP Request?****Best Optimization****CSS**style.cssYesMinify and remove unused CSS**JavaScript**app.jsYesDefer or delay non-critical scripts**Images**hero.webpYesCompress and lazy load**Fonts**Open SansYesHost locally and preload**Videos**YouTube EmbedYesUse click-to-load embeds**Third-party Scripts**Google AnalyticsYesDelay or remove unnecessary scripts### Why This Becomes a Problem - Every file request takes time, even on a fast internet connection. - Requests to a local server are typically faster, while external resources introduce additional delay. - Third-party services, such as analytics, advertising scripts, or embedded widgets, often take the longest to respond. - A typical WordPress page can generate 80 to 100 or more individual requests. - As these requests add up, the browser spends more time waiting for resources to load. - The extra waiting time delays page rendering and interactivity. - This results in slower page load speeds, a poorer user experience, and can negatively affect website performance. ### Impact on Performance & SEO - Slow page loading affects more than just the visitor experience. - Search engines consider page speed as one of the signals when evaluating website quality and rankings. - Excessive network requests can slow down the delivery of important page content. - [Google Core Web Vitals](https://web.dev/explore/learn-core-web-vitals?ref=serveravatar.com) are directly impacts important performance metrics, including Largest Contentful Paint (LCP). - Delayed loading of scripts and resources can also affect Interaction to Next Paint (INP) by making the page less responsive. - The more requests a page makes, the longer it takes to load and become interactive. - Reducing unnecessary requests can improve performance scores, user satisfaction, and overall SEO. I’ll skip the surface-level advice and focus on the changes that genuinely speed up a live site. If you want a broader view, I’ve written a complete guide to [speeding up WordPress with optimization methods](https://serveravatar.com/speed-up-a-wordpress-website-performance) that covers everything from caching to image optimization. ## Why Reducing Requests Matters More Than You Think I’ve seen developers spend days optimizing database queries when the real bottleneck was twenty JavaScript files loading synchronously on every single page. The database was fine. The theme was fine. The plugins were the problem. When you cut down HTTP requests, three things happen: **First**, the browser has less work to do. It downloads fewer files, parses less code, and renders the page faster. For your visitors, this means a noticeably snappier experience, especially on mobile, where network conditions are less predictable. **Second**, your server handles less work. Each request consumes CPU and memory on the server side. Fewer requests means your server can serve more visitors simultaneously without breaking a sweat. For growing sites, this is the difference between a server that scales and one that falls over during a traffic spike. If your server response time is already slow, start with my [TTFB optimization guide](https://serveravatar.com/wordpress-ttfb-optimization) first. **Third**, your Core Web Vitals improve. Google measures how quickly your page becomes interactive. Fewer requests means faster LCP, lower INP, and better CLS scores. That directly translates to better rankings. ![Bar chart comparing WordPress site performance before and after reduce HTTP requests](https://serveravatar.com/wp-content/uploads/2026/07/image-7.png) **The good news:** you don’t need to overhaul your entire site. A handful of targeted fixes usually handles the bulk of the problem. ## Measuring What Your Site Is Actually Loading Before you start changing things, you need to know what you’re working with. This is where waterfall analysis comes in, it’s the single most useful diagnostic tool for HTTP request problems. ### Tools to Analyze Requests [**GTmetrix**](https://gtmetrix.com/?ref=serveravatar.com) - Provides a detailed waterfall chart showing every request made during page loading. - Clearly identifies whether a resource is served from your server, a CDN, or a third-party service. - Displays important details such as file size, loading time, and request order. - The waterfall chart is especially useful for identifying bottlenecks and slow-loading resources. ![GTmetrix waterfall chart showing HTTP requests in a WordPress site - reduce HTTP requests](https://serveravatar.com/wp-content/uploads/2026/07/image-8-1024x727.png)**Chrome DevTools (Network Tab)** - Open your browser’s Developer Tools by pressing **F12** and navigate to the **Network** tab. - Refresh the page to capture all network requests in real time. - Filter and sort requests by file type, size, loading time, or status. - Makes it easier to identify large files, slow resources, and unnecessary requests. ![Chrome DevTools Network tab showing WordPress HTTP requests - reduce HTTP requests ](https://serveravatar.com/wp-content/uploads/2026/07/image-9-1024x487.png)### What You Should Look For - Multiple CSS and JavaScript files loaded by the same theme or plugin. - Large images that have not been compressed or optimized. - Requests to external services such as Google Fonts, analytics platforms, advertising networks, or embedded social media widgets. - Resources that take significantly longer than others to load. - Long bars in the waterfall view, which often indicate slow or render-blocking requests. - Unused or duplicate assets that increase the total number of HTTP requests without adding value. ## Common Issue Found in Real Sites - Many WordPress plugins load their CSS and JavaScript files across the entire website by default. - As a result, assets are downloaded even on pages where the related feature is never used. - For example, a contact form plugin may load its JavaScript on the homepage, despite the form existing only on the Contact page. - These unnecessary requests increase the number of files the browser must download. - Reducing or preventing unused assets from loading is often one of the quickest ways to improve website performance. Not every HTTP request is necessary. In many WordPress websites, unnecessary requests come from plugins, themes, fonts, and third-party services that load assets globally. Identifying these common causes makes it much easier to prioritize performance improvements. **Cause****Impact****Recommended Solution****Too many plugins**Loads extra CSS & JSRemove unused plugins or load assets conditionally**Heavy themes**Unnecessary files on every pageUse lightweight themes**External fonts**Additional DNS lookupsHost fonts locally**Third-party scripts**Higher latencyDelay or remove non-essential scripts**Large images**Slower loadingConvert to WebP or AVIF**WordPress default assets**Extra requestsDisable Emoji & oEmbed scripts## Fix 1: Audit and Replace What Loads Too Much The biggest source of unnecessary HTTP requests on most WordPress websites is plugins. While plugins are essential for adding features, many of them load scripts and styles on every page, even when those assets are not actually needed. This creates avoidable overhead and slows down the overall page load. The first step is to identify these patterns and reduce unnecessary loading wherever possible. ### What to check: - Review your website’s waterfall chart using tools like GTmetrix or your browser’s Network tab. - Check for multiple CSS and JavaScript files being loaded by the same plugin or theme. - Identify assets that are loaded across every page, even when they are only needed on specific pages. - Pay special attention to plugins that load scripts and styles globally instead of only where their functionality is used. ### How to fix it: - Use WordPress conditional loading to prevent unnecessary assets from loading on pages where they are not required. - Remove unused scripts with the `wp_dequeue_script()` function when they are not needed. - Remove unnecessary stylesheets with the `wp_dequeue_style()` function on pages where they serve no purpose. - Load plugin and theme assets only on the pages that actually require them to reduce HTTP requests and improve page performance. ### Example scenario: Here’s a simple example that stops a fictional contact form plugin’s assets from loading anywhere except the contact page: ``` add_action( 'wp_enqueue_scripts', 'stop_plugin_assets_globally', 100 ); function stop_plugin_assets_globally() { if ( ! is_page( 'contact' ) ) { wp_dequeue_script( 'contact-form-plugin' ); wp_dequeue_style( 'contact-form-plugin' ); } } ``` ``` add_action( 'wp_enqueue_scripts', 'stop_plugin_assets_globally', 100 ); function stop_plugin_assets_globally() { if ( ! is_page( 'contact' ) ) { wp_dequeue_script( 'contact-form-plugin' ); wp_dequeue_style( 'contact-form-plugin' ); } } ``` ### No-code options: - [Perfmatters plugin](https://wordpress.org/plugins/sync-cache-spinupwp-perfmatters?ref=serveravatar.com) - [Asset CleanUp plugin](https://wordpress.org/plugins/wp-asset-clean-up?ref=serveravatar.com) - Allows per-page script/style control ### Additional improvements: - Replace heavy plugins with lightweight alternatives - Avoid bloated or outdated themes that load unnecessary assets ## Fix 2: Take Control of Your Fonts Fonts are the most ignored source of HTTP request. When using Google Fonts in the default way, the browser first loads a stylesheet and then downloads multiple font files from external servers. Each font weight or style creates extra requests, which can slow down the overall page loading process. ### Issues caused by default font loading: - Multiple external requests to Google servers - Each font weight increases load time - Slower text rendering on initial page load ### How to optimize: - Check whether your website loads fonts from external services such as Google Fonts. - Hosting fonts locally eliminates additional requests to third-party servers. - Local fonts can improve page load speed and provide more consistent performance. - They also reduce dependency on external services, helping pages render more reliably. - If you use WordPress, plugins such as [**OMGF**](https://wordpress.org/plugins/host-webfonts-local/) **(Optimize My Google Fonts)** can automatically download and serve Google Fonts from your own server. - After making changes, test your website to ensure fonts load correctly and performance has improved. ### Advanced improvements: What I recommend for most WordPress sites: - **Host fonts locally** download your Google Fonts and serve them from your own server. This eliminates the external requests entirely. A plugin like [OMGF](https://wordpress.org/plugins/host-webfonts-local?ref=serveravatar.com) (Optimize My Google Fonts) can handle this automatically. You point it at your site, it finds your Google Fonts, downloads them, and reconfigures your theme to serve them locally. From your server’s perspective, this is a significant speed win. - **Subset your fonts** most font files include hundreds of characters you never use. Latin alphabet fonts that include extended Cyrillic characters, for instance. Subsetting removes everything except the characters you actually need. A font that was 200KB can drop to 40KB this way. - **Use** `font-display: swap` add this to your `@font-face` CSS [declaration](https://developer.mozilla.org/en-US/docs/Web/CSS/Reference/At-rules/@font-face/font-display?ref=serveravatar.com). It tells the browser to show a system fallback font immediately while the custom font is loading. Without it, you get Flash of Invisible Text (FOIT), the page sits there with blank text until the font downloads. With it, content appears right away and swaps to your custom font once it’s ready. ``` @font-face { font-family: 'MyFont'; src: url('/wp-content/fonts/myfont.woff2') format('woff2'); font-display: swap; } ``` ``` @font-face { font-family: 'MyFont'; src: url('/wp-content/fonts/myfont.woff2') format('woff2'); font-display: swap; } ``` - **Preload critical fonts** for the one or two fonts that render your above-the-fold content (the headline font, for example), add a preload link in your ``. This tells the browser to download those fonts as a high priority before it would normally discover them. ``` ``` ``` ``` The combination of local hosting, subsetting, and `font-display: swap` alone can eliminate four to six external requests on a typical WordPress site. ## Fix 3: Deal With External Requests Proactively Every third-party service adds additional HTTP requests that you do not fully control. These include analytics tools, chat widgets, ad scripts, and embedded media. Apart from the request itself, they also involve DNS lookup, connection setup, and security handshakes, all of which add latency. ### Common external sources: - Google Analytics - Chat widgets - Heatmaps - Social media embeds - Ad networks ### What to do: The approach I take is practical: - Audit all external domains in waterfall analysis - Remove non-essential services Look at your waterfall chart and identify every domain that isn’t your own server. **For each one, ask:** is this service worth its performance cost? Does its functionality justify the latency it introduces? ### Optimization strategies: - Review all third-party scripts to determine whether they are essential for every visitor. - Self-host scripts whenever possible to reduce reliance on external servers and improve loading performance. - Delay non-critical scripts so they load only after the page becomes interactive. - Trigger certain scripts only when a visitor scrolls, clicks, or moves the mouse. - Prioritize loading critical content first and defer secondary scripts until they are actually needed. - Regularly remove outdated or unused third-party scripts to reduce unnecessary HTTP requests and improve page speed. ### For video embeds: - Avoid loading full player on page load - Use thumbnail preview + click-to-load method ## Fix 4: Optimize Images the Right Way Images are usually the largest contributor to page size and HTTP requests. However, the issue is not only file size but also the number of images being loaded simultaneously. When images are not properly optimized, they can noticeably increase page load time and make the website feel slower. Here’s what actually works: - **Switch to modern image formats:** WebP and AVIF files are significantly smaller than JPEG or PNG equivalents at the same quality level. Most WordPress hosts, including ServerAvatar, handle automatic image conversion now when you enable it. If your host doesn’t, a plugin like [ShortPixel](https://wordpress.org/plugins/shortpixel-image-optimiser?ref=serveravatar.com) or [Imagify](https://wordpress.org/plugins/imagify?ref=serveravatar.com) can handle it site-wide. A 200KB JPEG can become a 45KB WebP with no visible quality loss. - **Lazy load everything below the fold:** Images that are outside the viewport shouldn’t load until the visitor scrolls to them. WordPress 5.5 and later has native lazy loading for images built in, just make sure your theme isn’t overriding it with its own image handling. For more control, plugins such as [Smush](https://wordpress.org/plugins/wp-smushit?ref=serveravatar.com) or [ShortPixel](https://wordpress.org/plugins/shortpixel-image-optimiser?ref=serveravatar.com) allow you to customize lazy loading settings, including the option to exclude certain images, such as the hero image above the fold, so they load immediately for better initial rendering. - **Use SVGs for icons and simple graphics:** If your site loads icon fonts or individual PNG icons for UI elements, switch to SVG. A set of twenty icons that would be 80KB across twenty separate PNG files can become a single 12KB SVG sprite. SVGs are resolution-independent, meaning they look sharp on every screen size, and they load as a single request. ## Fix 5: Minify and Combine Files, But Know When It Helps Minification removes unnecessary characters from code, making files smaller. Combining merges multiple files into one, reducing HTTP requests. However, their effectiveness depends heavily on the server protocol being used. ### How HTTP Versions Affect File Loading Whether combining CSS and JavaScript files improves performance depends on the HTTP protocol your server uses. Modern protocols like HTTP/2 and HTTP/3 can download multiple assets simultaneously, reducing the need to merge files into a single bundle. Protocol**How It Handles Requests****Combining Strategy****HTTP/1.1**One file per connection, serial**Yes**, combine files into fewer bundles**HTTP/2**Multiple files per connection, parallel**Test both ways**, often better to leave separate**HTTP/3**Parallel over QUIC, no head-of-line blocking**Test both ways**, multiple small files often win### When it helps: - File combination is generally more beneficial on servers that still use **HTTP/1.1**, where reducing the number of requests can improve loading performance. ### When it may not help: - Websites running **HTTP/2** or **HTTP/3** can download multiple files simultaneously, making file combination less important. - Combining too many files on modern servers can sometimes delay the loading of critical resources and slow the initial page render. ### Best practice: - Popular WordPress caching plugins such as **WP Rocket**, **LiteSpeed Cache**, and **W3 Total Cache** provide options for minification and file optimization. - Enable CSS and JavaScript minification to reduce file sizes without affecting functionality. - Test your website before and after enabling file combination to verify whether it improves performance. - Measure the impact using performance testing tools instead of assuming file combination will always help. - Popular WordPress caching plugins such as **WP Rocket**, **LiteSpeed Cache**, and **W3 Total Cache** provide options for minification and file optimization. ## Fix 6: Use resource hints to know and speed up upcoming requests Resource hints are HTML directives you can place in your `` that tell the browser what it’s going to need soon, so it can start working on those requests early. They’re a small addition with a meaningful impact because they shave off the DNS lookup and connection time from critical resources. The ones I use most often: Resource HintWhat It DoesWhen to Use It`dns-prefetch`Resolves DNS in backgroundExternal services like Google Fonts or analytics`preconnect`DNS + TCP + TLS handshakeCritical third-party domains (font files, CDN)`preload`Downloads file now at high priorityYour own critical CSS, fonts, or LCP image- `dns-prefetch` resolves the DNS for a third-party domain in the background. Useful for services like Google Fonts or analytics providers where you know the browser will need to connect, but don’t need the connection established immediately. ``` ``` ``` ``` - `preconnect` goes further, it does the DNS lookup, TCP handshake, and TLS negotiation in advance. Use this for third-party domains that are critical to your page rendering, like a font stylesheet URL or a CDN. ``` ``` ``` ``` - `preload` tells the browser to fetch a specific file right now with high priority. Use this for your most important CSS file or your primary font, the files needed to render above-the-fold content before the browser would normally discover them through parsing. ``` ``` ``` ``` **One caution:** don’t overuse these. Preloading everything defeats the purpose. For a deeper dive into preloading specifically, see my guide on [improving WordPress performance with preloading tricks](https://serveravatar.com/improve-wordpress-performance-with-preloading-tricks). ## Fix 7: Disable What WordPress Loads By Default WordPress includes some default features that are not required for every site but still load scripts globally. These add unnecessary HTTP requests and can be safely disabled in many cases. - WordPress includes a small JavaScript file (`wp-emoji-release.min.js`) that converts text emoticons into emoji characters. - If your content doesn’t rely on this conversion, which most modern sites don’t, since visitors’ devices render emoji natively, this script is pure overhead. - WordPress loads oEmbed scripts that allow you to embed YouTube videos, tweets, and other content by just pasting a URL. - If you’re not using oEmbed functionality in your content, these scripts are wasting requests. - You can disable both with a lightweight plugin like [Asset CleanUp](https://wordpress.org/plugins/wp-asset-clean-up?ref=serveravatar.com), which has toggles for these features. If you prefer a code-based approach, add this to your theme’s `functions.php`: ``` // Disable emoji scripts remove_action( 'wp_head', 'print_emoji_detection_script', 7 ); remove_action( 'wp_print_styles', 'print_emoji_styles' ); // Disable oEmbed scripts remove_action( 'wp_head', 'wp_oembed_add_discovery_links' ); remove_action( 'wp_head', 'wp_oembed_add_host_js' ); ``` ``` // Disable emoji scripts remove_action( 'wp_head', 'print_emoji_detection_script', 7 ); remove_action( 'wp_print_styles', 'print_emoji_styles' ); // Disable oEmbed scripts remove_action( 'wp_head', 'wp_oembed_add_discovery_links' ); remove_action( 'wp_head', 'wp_oembed_add_host_js' ); ``` These lines eliminates two individual JavaScript request on page load. It takes five minutes to implement and the impact is immediate. [![Blog banner - ServerAvatar](https://serveravatar.com/wp-content/uploads/2025/09/728_90-Banner-1-1024x127.png)](https://serveravatar.com/?ref=blog)## Fix 8: Implement Critical CSS and Defer Non-Critical JavaScript By default, CSS and JavaScript files block rendering until they are fully downloaded and processed. This delays the time it takes for users to see meaningful content on the page. **Critical CSS** - Load only the CSS needed for above-the-fold content first. - Inline Critical CSS to render the page immediately. - Load the remaining stylesheet asynchronously. - [WP Rocket](https://wp-rocket.me/) can generate Critical CSS automatically. ### Defer JavaScript - Use the `defer` attribute for non-critical JavaScript files. - Download scripts in the background while the HTML loads. - Execute scripts only after the HTML is fully parsed. - Defer analytics, chat widgets, and social sharing scripts whenever possible to improve initial page rendering. You can add `defer` to enqueued scripts programmatically: ``` add_filter( 'script_loader_tag', 'add_defer_to_non_critical_scripts', 10, 2 ); function add_defer_to_non_critical_scripts( $tag, $handle ) { // Add defer to all scripts except those that must run immediately if ( is_admin() ) return $tag; return str_replace( ' src', ' defer src', $tag ); } ``` ``` add_filter( 'script_loader_tag', 'add_defer_to_non_critical_scripts', 10, 2 ); function add_defer_to_non_critical_scripts( $tag, $handle ) { // Add defer to all scripts except those that must run immediately if ( is_admin() ) return $tag; return str_replace( ' src', ' defer src', $tag ); } ``` Or you can use a plugin to manage which scripts load where and with what attributes. ## Why Your Hosting Environment Also Matters Reducing HTTP requests is one part of improving WordPress performance, but your hosting stack also plays a significant role. Modern web servers, built-in caching, PHP optimization, and CDN support help browsers fetch assets more efficiently. Platforms like [**ServerAvatar**](https://serveravatar.com/) make it easy to configure these performance features without manually managing complex server configurations. While optimizing your WordPress assets is essential, pairing those optimizations with a properly configured server helps you achieve the best possible loading speeds. ## Conclusion Reducing HTTP requests is one of the most effective ways to improve your WordPress site’s loading speed, but the goal isn’t simply to achieve the lowest request count. Instead, focus on eliminating unnecessary assets, optimizing the files that matter, and ensuring every request contributes to a better user experience. Regularly auditing your website, optimizing images and fonts, limiting third-party scripts, and loading resources only when needed can significantly improve performance and Core Web Vitals. Website optimization is ongoing process, not one-time task. As your site grows and new plugins or features are added, revisit your performance regularly to identify new optimization opportunities. Combined with reliable hosting, proper caching, and modern technologies like HTTP/2 and HTTP/3, reducing unnecessary HTTP requests helps create a faster, more responsive WordPress website that benefits both your visitors and your long-term search visibility. ## FAQs ### How do I see how many HTTP requests my WordPress site is making? Use GTmetrix or the Network tab in Chrome DevTools (F12). Both show a waterfall chart of every request. GTmetrix gives you a cleaner overview with grades and recommendations; DevTools gives you raw timing data. ### Will reducing HTTP requests fix my Core Web Vitals scores? It can significantly improve LCP (Largest Contentful Paint) and INP (Interaction to Next Paint), both of which are Google ranking factors. Fewer requests means faster rendering and less blocking, which directly affects how quickly your page becomes interactive and visually complete. ### Is combining CSS and JavaScript files always a good idea? Not on HTTP/2 or HTTP/3 servers. On modern protocols, multiple small files load in parallel more efficiently than one large combined file. Enable combination on HTTP/1.1 servers, but test both ways on HTTP/2 or HTTP/3, sometimes the combined file is worth it for your specific setup, sometimes it isn’t. ### What’s the fastest way to reduce external requests? Self-hosting Google Analytics is the quickest win, it eliminates at least one external DNS lookup and connection on every page view. Disabling WordPress emojis and embeds is a close second. Both take minutes to implement with a plugin. ### Do CDN services reduce HTTP requests? A CDN doesn’t reduce the number of requests, but it dramatically reduces how long each request takes by serving files from a server geographically close to the visitor. Combined with HTTP/3 (which handles many small parallel requests efficiently), this makes request-heavy sites feel much faster. ## Key Takeaways - Every file your browser fetches is an HTTP request, the goal is fewer, smaller, smarter requests - Your biggest wins come from auditing plugins, hosting fonts locally, and eliminating unused default WordPress features - Modern image formats (WebP/AVIF), lazy loading, and SVG icons dramatically cut image-related requests - Resource hints (preload, preconnect, dns-prefetch) help the browser get ahead on critical files - HTTP/2 and HTTP/3 change how you approach file combination, test both ways ### About the Author Meghna Meghwani is a technical writer focused on Linux, Ubuntu, VPS hosting, server management, WordPress, PHP, Node.js, cloud hosting, and DevOps. She creates beginner-friendly tutorials, practical hosting guides, troubleshooting articles, and server security content designed to help developers and businesses manage applications and servers more efficiently **Categories:** Blog, Guide, Optimisation, Others, Tutorials, WordPress **Tags:** Core Web Vitals, HTTP Requests, Page Speed Optimization, Reduce HTTP Requests, Website Speed, Wordpress, WordPress optimization, WordPress performance, WordPress speed optimization --- ### [How to Add Expires Headers in WordPress](https://serveravatar.com/add-expires-headers-wordpress/) **Published:** July 13, 2026 **Author:** Meghna Meghwani **Content:** [![Blog banner - ServerAvatar](https://serveravatar.com/wp-content/uploads/2025/09/728_90-Banner-3-1024x127.png)](https://serveravatar.com/?ref=blog)If you want to add expires headers in WordPress, it’s important to understand how browsers handle your website’s static files. Every time a visitor lands on your WordPress site, their browser downloads images, stylesheets, fonts, scripts, and other assets. If your server doesn’t instruct the browser to store these files locally for a certain period, it has to download them all over again on the next visit. This increases page load times, consumes more bandwidth, and negatively impacts your site’s performance. The “Add Expires Headers” warning shows up in tools like [Google PageSpeed Insights](https://pagespeed.web.dev/?ref=serveravatar.com) and [GTmetrix](https://gtmetrix.com/?ref=serveravatar.com) precisely because it has a measurable impact on page speed. Beyond the audit score, slow-loading assets eat bandwidth, hurt your SEO, and create a poor experience, especially for returning visitors. This guide walks you through exactly how to fix it. You’ll learn what Expires Headers actually do, how they differ from Cache-Control, which file types should be cached for how long, and most importantly, how to set everything up on your server without breaking your site. ## TL;DR - Expires Headers tell browsers how long to keep cached files before asking the server again - They directly improve load speed for returning visitors and reduce server bandwidth - CSS, JS, images, and fonts should be cached for extended periods; HTML should not - NGINX uses `expires` directives inside `location` blocks; Apache uses `mod_expires` in .htaccess - Clear your site cache after making changes, and always test before going live ## What Are Expires Headers, Exactly? When a browser requests a file from your server, the server responds with the file along with HTTP headers. These headers are invisible to visitors but carry instructions that browsers follow. An Expires Header tells the browser: “Keep this file in your local cache until this specific date and time. Don’t bother asking me for it again until then.” Without it, the browser has no persistent instruction. It may still cache files temporarily based on its internal heuristics, but it will frequently revalidate with your server, adding latency to every page load. **What this looks like in practice:** a first-time visitor downloads your entire page design. A returning visitor three days later should theoretically load everything from their local cache. But without Expires Headers, the browser checks with your server anyway, waiting for confirmation that the files haven’t changed. For a text-heavy page with multiple assets, those round-trips add up fast. ![How browser caching works with and without Expires Headers set on the server - Expires Headers in WordPress](https://serveravatar.com/wp-content/uploads/2026/07/image-22-1024x448.png) ## Expires vs. Cache-Control: Why You Need to Know Both These two get confused constantly, and for good reason, they do essentially the same job. But they go about it differently. Feature**Expires****Cache-Control****Caching method**Uses a fixed date and time when the resource expires.Uses a relative duration (e.g., `max-age`) to define how long the resource can be cached.**Example**`Expires: Tue, 13 Jul 2027 00:00:00 GMT``Cache-Control: max-age=31536000`**Standard**Older HTTP caching header.Modern and recommended HTTP caching header.**Flexibility**Requires updating the expiration date manually.Automatically calculates the cache lifetime based on the response time.**Browser support**Supported by all browsers, including older ones.Supported by all modern browsers.**Priority**Ignored if `Cache-Control` is also present.Takes precedence over `Expires` when both headers exist.**Recommended usage**Mainly for backward compatibility.Best choice for modern caching strategies.**Here’s the practical detail that trips people up:** if both headers are present, Cache-Control wins. Browsers prioritize the newer standard and ignore the older Expires date when both exist. Mozilla’s [MDN documentation on HTTP caching](https://developer.mozilla.org/en-US/docs/Web/HTTP/Caching?ref=serveravatar.com) is a solid reference if you want to go deeper on how these headers interact. ### Which One Should You Use? Most servers today default to Cache-Control because it’s cleaner and more precise. But if you’re manually configuring headers, there’s no harm in setting both, you just need to make sure they don’t contradict each other, or the Expires header becomes meaningless noise. ## How Long Should Each File Type Be Cached? Not every asset on your site deserves the same caching treatment. Getting this right is where a lot of people go wrong, either over-caching things that change often, or under-caching things that never change. **Here’s the logic:** - **Files that rarely change**, like images, stylesheets, JavaScript, and fonts, are ideal candidates for long-term caching. You set them once, and browsers hold onto them for months. The performance gain is substantial because these are typically the heaviest files on any page. - **Files that change frequently**, like your HTML documents, should get short or zero caching. Your HTML is where new content lives. If a visitor’s browser caches your homepage for a year, they’ll never see your latest blog post. It kills content freshness and makes your site feel broken. - **Third-party files**, like Google Analytics scripts or Facebook Pixels, are outside your control. You can’t set headers on files you don’t host, so don’t worry about those in your configuration. ### General guidelines based on file type: **File Type**Recommended Cache DurationReason**HTML Pages**5 minutes – 1 hourEnsures visitors receive updated content while reducing server load.**CSS Files**1 month – 1 yearStylesheets change infrequently and can use long-term browser caching.**JavaScript (JS)**1 month – 1 yearImproves page load speed by minimizing repeat downloads.**Images (JPG, PNG, WebP, SVG, GIF, ICO)**6 months – 1 yearImages rarely change and benefit from long cache lifetimes.**Fonts (WOFF, WOFF2, TTF, OTF)**1 yearFont files are typically versioned and ideal for long-term caching.**PDF & Documents**1 month – 1 yearStatic documents rarely change after publishing.**Audio Files (MP3, WAV, OGG)**1 yearLarge static files benefit significantly from browser caching.**Video Files (MP4, WebM, MOV)**1 yearReduces bandwidth usage and improves repeat visits.**XML Files**1 hour – 24 hoursSitemap and feed updates should be reflected relatively quickly.**JSON/API Responses**5 minutes – 1 hourFrequently updated data should have shorter cache durations.**Favicon**1 weekYou want occasional updates to show through**Third-party scripts**Not applicableYou can’t control external headersThe “1 year” figure is common because it’s long enough to genuinely reduce repeat visits while being manageable via cache busting when you actually need to push updates. If you want a broader view of WordPress performance optimization techniques beyond just caching headers, I’ve covered [12 ways to speed up a WordPress website](https://serveravatar.com/speed-up-a-wordpress-website-performance/) that work well alongside this setup. ### Step 1: Verify Your Current Header Situation Before changing anything, check what’s already happening on your site. You don’t want to add headers that conflict with existing rules, and some hosts or caching plugins set them automatically. **Here’s a quick way to check manually:** - Open your site in Chrome or Firefox, right-click anywhere, and choose Inspect. - Switch to the Network tab. Refresh the page. Click on any asset file, an image, a CSS file, anything non-HTML. - Scroll down in the right panel to Response Headers. - Look for `Cache-Control` or `Expires`. - If either is present, your server is already sending caching instructions. If neither is there, nothing is configured. ![Checking response headers in Chrome DevTools Network tab - Expires Headers in WordPress](https://serveravatar.com/wp-content/uploads/2026/07/image-23-1024x439.png) This step takes 30 seconds and prevents you from accidentally doubling up on rules that might conflict.[](https://storage.app.basecamp.com/5840738/blobs/5a00ef60-7ea2-11f1-ab07-0242ac120003/download/image.png) ### Step 2: Adding Expires Headers on NGINX NGINX handles headers through configuration blocks inside your site config. If you’re using a managed hosting platform, this might be abstracted into a dashboard, but if you are on a VPS or unmanaged server, you’ll be editing config files directly. > **The key thing to know:** NGINX checks its configuration on startup and reload. You write your rules, test them, then reload the service. The reload is non-disruptive, active connections keep using the old config while new ones pick up the changes. **The basic pattern looks like this:** ``` location ~* \.(jpg|jpeg|png|gif|ico|svg|webp|avif)$ { expires 365d; add_header Cache-Control "public, no-transform"; access_log off; } ``` ``` location ~* \.(jpg|jpeg|png|gif|ico|svg|webp|avif)$ { expires 365d; add_header Cache-Control "public, no-transform"; access_log off; } ``` **Breaking this down:** - `location ~* \.(...)$` matches file types by extension (case-insensitive) - `expires 365d` sets the expiration to 365 days from now - `add_header Cache-Control "public, no-transform"` adds a modern header alongside it - `access_log off` is optional, it stops logging requests for these static files, which reduces I/O on busy sites **For CSS and JavaScript:** ``` location ~* \.(css|js)$ { expires 365d; add_header Cache-Control "public, no-transform"; access_log off; } ``` ``` location ~* \.(css|js)$ { expires 365d; add_header Cache-Control "public, no-transform"; access_log off; } ``` **For fonts:** ``` location ~* \.(woff2|woff|ttf|otf|eot)$ { expires 365d; add_header Cache-Control "public, no-transform"; access_log off; } ``` ``` location ~* \.(woff2|woff|ttf|otf|eot)$ { expires 365d; add_header Cache-Control "public, no-transform"; access_log off; } ``` Notice the pattern, you define separate `location` blocks for each group. This matters because you may want different settings for different file types later on. **Always test before reloading:** ``` sudo nginx -t ``` ``` sudo nginx -t ``` This checks your configuration for syntax errors without applying anything. **If it passes, reload with:** ``` sudo service nginx reload ``` ``` sudo service nginx reload ``` > **One thing worth noting:** if your site sits behind a reverse proxy or CDN, the CDN might strip or override your server headers. More on that in the troubleshooting section below. ### Step 3: Adding Expires Headers on Apache Apache gives you a more accessible way to manage headers, you can do it through the `.htaccess` file, which lives in your WordPress root directory. You don’t need root server access for this; file-level access through your host’s File Manager or FTP is enough. **What you need before starting:** - Access to your WordPress root directory (where `wp-config.php` lives) - The `mod_expires` module enabled on your server (most Apache installs have this) - A backup of your current `.htaccess` file, this is critical If you’ve never touched `.htaccess` before, WordPress itself may have already added some rewrite rules in there. That’s fine. Don’t delete those. Add your new configuration above or below them, keeping everything intact. **The basic configuration:** ``` ExpiresActive On ExpiresDefault "access plus 1 month" # Images ExpiresByType image/jpg "access plus 1 year" ExpiresByType image/jpeg "access plus 1 year" ExpiresByType image/gif "access plus 1 year" ExpiresByType image/png "access plus 1 year" ExpiresByType image/svg "access plus 1 year" ExpiresByType image/webp "access plus 1 year" # CSS and JavaScript ExpiresByType text/css "access plus 1 year" ExpiresByType text/javascript "access plus 1 year" ExpiresByType application/javascript "access plus 1 year" ExpiresByType application/x-javascript "access plus 1 year" # Fonts ExpiresByType font/woff2 "access plus 1 year" ExpiresByType font/ttf "access plus 1 year" ExpiresByType font/otf "access plus 1 year" ExpiresByType application/font-woff "access plus 1 year" ExpiresByType application/font-woff2 "access plus 1 year" # Favicon ExpiresByType image/x-icon "access plus 1 week" ``` ``` ExpiresActive On ExpiresDefault "access plus 1 month" # Images ExpiresByType image/jpg "access plus 1 year" ExpiresByType image/jpeg "access plus 1 year" ExpiresByType image/gif "access plus 1 year" ExpiresByType image/png "access plus 1 year" ExpiresByType image/svg "access plus 1 year" ExpiresByType image/webp "access plus 1 year" # CSS and JavaScript ExpiresByType text/css "access plus 1 year" ExpiresByType text/javascript "access plus 1 year" ExpiresByType application/javascript "access plus 1 year" ExpiresByType application/x-javascript "access plus 1 year" # Fonts ExpiresByType font/woff2 "access plus 1 year" ExpiresByType font/ttf "access plus 1 year" ExpiresByType font/otf "access plus 1 year" ExpiresByType application/font-woff "access plus 1 year" ExpiresByType application/font-woff2 "access plus 1 year" # Favicon ExpiresByType image/x-icon "access plus 1 week" ``` **Where to put this:** Scroll to the very top of your `.htaccess` file and paste this block. The `` wrapper is a safety net, if `mod_expires` isn’t enabled on your server, Apache simply ignores the block instead of throwing an error. You can easily do it with [ServerAvatar](https://serveravatar.com/) by navigating to your application panel >> file manager and editing .htaccess file as shown in the below image. ![Locating and editing the .htaccess file in WordPress root directory via File Manager - Expires Headers in WordPress](https://serveravatar.com/wp-content/uploads/2026/07/image-24-1024x512.png) **After saving:** Visit your site and refresh. If everything loads normally, your headers are live. If you see a “500 Internal Server Error,” delete the block, re-upload your backup `.htaccess`, and check with your host that `mod_expires` is enabled. [![Blog banner - ServerAvatar](https://serveravatar.com/wp-content/uploads/2025/09/728_90-Banner-1-1024x127.png)](https://serveravatar.com/?ref=blog)## Troubleshooting Expires Headers That Aren’t Working You added the code. You reloaded the server. But your browser, or PageSpeed Insights, still shows the warning. Here’s how to systematically track down what’s going wrong. ### 1. The Headers Simply Aren’t Showing Up Start with the basics: - Did you reload the server after making changes? NGINX requires an explicit `reload` or `restart`. Changes don’t apply until you do. - Is `mod_expires` actually enabled on Apache? Ask your host, or check with a PHP info page or `phpinfo()`. - Is a caching plugin overriding your headers? WordPress caching plugins like [LiteSpeed Cache](https://wordpress.org/plugins/litespeed-cache?ref=serveravatar.com), [WP Rocket](https://wp-rocket.me/?ref=serveravatar.com), or [W3 Total Cache](https://wordpress.org/plugins/w3-total-cache?ref=serveravatar.com) often set their own headers. Clear the plugin’s cache completely after making server-level changes. You can explore my guide on [12 Best Caching Plugins to Speed Up WordPress](https://serveravatar.com/wordpress-caching-plugins) website. - Are you checking the right URL? Some assets might be served from a CDN subdomain or a separate asset domain that has its own header configuration. ### 2. Cache-Control Is Taking Priority Over Expires This is expected behavior, not a bug. If you’ve set both headers and they’re contradicting each other, browsers will follow Cache-Control and ignore Expires. The fix is straightforward: remove the Expires directive and only use Cache-Control, or ensure both headers point to the same expiration window. For NGINX, you can skip the `expires` directive and only use `add_header Cache-Control`: ``` add_header Cache-Control "max-age=31536000, public"; ``` ``` add_header Cache-Control "max-age=31536000, public"; ``` For Apache, use the `CacheControl` module instead of `mod_expires` if you want to exclusively use the modern approach. ### 3. Your CDN Is Stripping or Overwriting Headers If you’re using Cloudflare, BunnyCDN, or any other CDN, the CDN sits between your server and your visitors. Your server headers reach the CDN, but the CDN then applies its own caching rules before forwarding responses to browsers. Many CDNs have a default behavior of stripping or overriding browser cache settings. Check your CDN dashboard for a **“Browser Cache TTL”** or **“Cache Rules”** section. This is usually where you align the CDN’s behavior with your server’s settings. If your server says one year but your CDN says one hour, the one hour wins. Some CDNs also strip the `Vary: Accept-Encoding` header, which can cause issues with compressed and uncompressed versions of the same file being served incorrectly. ### 4. Files Don’t Update After You Deploy Changes This is the most common operational headache with long-term caching. You pushed a CSS update, but visitors are still seeing the old design. That’s because their browsers are loading the old cached file and never checking with your server. The standard solution is called cache busting, changing the file’s URL when its content changes. The browser sees a “new” file and downloads it fresh, bypassing the cache entirely. **The simplest way:** Instead of linking to `style.css`, you link to `style.css?ver=1.0.1`. When you update the file, you change the query string to `style.css?ver=1.0.2`. Modern WordPress themes and page builders handle this automatically using file hashes or version numbers. If your site isn’t doing this automatically, you’ll need to update the version parameter in your theme’s `wp_enqueue_style` and `wp_enqueue_script` calls: ``` wp_enqueue_style('my-theme', get_template_directory_uri() . '/style.css', array(), '1.0.2'); ``` ``` wp_enqueue_style('my-theme', get_template_directory_uri() . '/style.css', array(), '1.0.2'); ``` The `'``1.0.2``'` is the version parameter, change it each time you update the file. ### What About Third-Party Scripts? Google Analytics, Facebook Pixel, Hotjar, Intercom widgets, all of these load from external servers, not yours. You cannot set Expires Headers on files you don’t host, and these third-party providers set their own caching policies. PageSpeed Insights will often flag these. **The honest answer is:** there’s nothing you can do about it. These scripts represent a real but small performance trade-off of using analytics and marketing tools. The standard advice is to be selective about which third-party scripts you include, audit them periodically, and remove any that aren’t actively needed. ## Why This Matters Beyond PageSpeed Scores The audit warning is the symptom. The actual problem is slower page loads and higher bandwidth bills. On a site with decent traffic, returning visitors loading cached CSS, images, and fonts from their browser instead of your server is the difference between a 400ms page load and a 1.8s one. That gap affects bounce rate, time on site, and conversion rate, metrics that don’t show up in an audit tool but show up in your analytics. For sites on metered or bandwidth-limited hosting plans, reducing repeat file downloads also reduces bandwidth consumption, which can translate to lower hosting costs. ## Conclusion Adding Expires Headers in WordPress is a simple optimization that can make a noticeable difference in your website’s performance. By instructing browsers to cache static assets such as images, CSS, JavaScript, and fonts, you can reduce page load times, lower server load, and provide a faster browsing experience for returning visitors. When combined with Cache-Control headers and proper cache durations, browser caching becomes an essential part of a well-optimized WordPress website. Whether your site runs on Apache or NGINX, following the best practices covered in this guide will help you fix the “Add Expires Headers” warning and improve your Core Web Vitals. Remember to test your configuration after making changes, clear any existing caches, and use cache busting whenever you update static files. With the right caching strategy in place, your WordPress site will be faster, more efficient, and better positioned to deliver a great user experience while supporting improved SEO performance. ## FAQs ### What’s the difference between Expires and Cache-Control headers? Expires uses a specific calendar date to define when a cached file expires. Cache-Control uses a time duration (max-age) to define how long a file should be cached from the moment it’s downloaded. Cache-Control is the modern standard, and browsers will use it over Expires when both are present. ### How long should I cache CSS, JavaScript, and images on WordPress? One year is the standard recommendation for these file types. They rarely change individually, and any updates are handled through cache busting, adding a version parameter to the file URL so the browser treats it as a new file. ### I added the headers but PageSpeed still shows the warning. Why? Your server may not have reloaded the configuration after the change. Check that NGINX was reloaded or Apache’s .htaccess was saved correctly. Also verify that a CDN or caching plugin isn’t overriding your settings. Finally, ensure you’re testing the correct file types, HTML files typically should not carry long cache durations. ### Can I set Expires Headers for Google Fonts? Only if you host the font files on your own server. Fonts loaded directly from Google’s servers have their own caching policy, which you cannot control. Downloading and self-hosting fonts gives you full control over caching duration. ### Should I set both Expires and Cache-Control headers? You can. There’s no harm in including both, browsers will use Cache-Control and fall back to Expires for older browsers that don’t support the modern standard. Just make sure both headers point to the same or compatible expiration durations to avoid conflicts. ## Key Takeaways - Expires Headers tell browsers to keep local copies of static files, dramatically speeding up return visits - Cache-Control (max-age) is the modern standard; Expires is the legacy fallback, use both for maximum compatibility - Cache images, CSS, JS, and fonts for 1 year; keep HTML caching short - Always use cache busting (version parameters) when updating cached files - CDNs can override your server’s header settings, check your CDN dashboard - Clear your site’s caching plugin after making server-level header changes - Test with browser DevTools, not just audit tools If managing servers and applications manually isn’t how you want to spend your time, platforms like [ServerAvatar](https://serveravatar.com/) handle it. ### About the Author Meghna Meghwani is a technical writer focused on Linux, Ubuntu, VPS hosting, server management, WordPress, PHP, Node.js, cloud hosting, and DevOps. She creates beginner-friendly tutorials, practical hosting guides, troubleshooting articles, and server security content designed to help developers and businesses manage applications and servers more efficiently. **Categories:** Blog, Guide, Optimisation, Others, Tutorials, WordPress **Tags:** Add Expires Headers in WordPress, Browser Caching, Expires Headers WordPress, Improve WordPress Speed, Wordpress, WordPress Browser Caching, WordPress optimization, WordPress performance, WordPress speed optimization --- ### [How to Remove WordPress Default Image Sizes: Step-by-Step Guide](https://serveravatar.com/remove-wordpress-default-image-sizes/) **Published:** July 11, 2026 **Author:** Meghna Meghwani **Content:** [![Blog banner - ServerAvatar](https://serveravatar.com/wp-content/uploads/2025/09/728_90-Banner-3-1024x127.png)](https://serveravatar.com/?ref=blog)If you’ve uploaded images to WordPress, you’ve probably noticed your `wp-content/uploads` folder filling up with multiple copies of the same image. That’s because WordPress Default Image Sizes automatically generate several resized versions of every uploaded image, even if your website never uses them. Over time, these extra files can consume valuable server storage, clutter your media library, and make backups larger than necessary. Over time, these extra files waste storage, increase upload processing, and add unnecessary server load. While WordPress lets you change image dimensions, it doesn’t provide a built-in option to disable image size generation completely. In this guide, you’ll learn how to stop WordPress from creating unused image sizes using a plugin or code, and how to clean up the extra images already stored in your media library. ## TL;DR - WordPress creates thumbnail, medium, and large versions of every image you upload by default - These extra files consume server storage and increase upload processing time - You can stop this behavior using a plugin or by adding a filter to your theme’s functions.php file - Existing images need a separate cleanup step to remove previously generated sizes - Choose the method that matches your comfort level with code ## What WordPress Does Behind Every Image Upload Uploading an image to the WordPress Media Library does more than simply save the original file. During every upload, WordPress automatically creates multiple resized versions of that image for use across different areas of your website. By default, WordPress generates: - **Thumbnail:** 150 × 150 px (cropped square), commonly used for galleries and widgets. - **Medium:** Maximum 300 px on the longest side. - **Large:** Maximum 1024 px on the longest side. - **Full Size:** The original uploaded image (unchanged). **Image Size****Default Dimensions****Common Use Cases****Thumbnail**150 × 150 px (cropped square)Widgets, comment avatars, gallery grids**Medium**Max 300 px on longest sideIn-content images needing something smaller than full size**Large**Max 1024 px on longest sideFull-width content images, detailed displays**Full Size**Original upload (unchanged)The source file WordPress never modifies### Custom Image Sizes The default sizes are only part of the story. Many themes and plugins register their own image dimensions, including: - Page builders - Gallery plugins - Slider plugins - WooCommerce - Custom WordPress themes As a result, uploading **one image** can generate **5–10+ files** depending on your site’s configuration. ### Why It Becomes a Problem If your website stores hundreds or thousands of images, these additional copies consume a significant amount of server resources. Common drawbacks include: - Increased disk usage - Slower image uploads - Longer backup times - Higher storage costs - Extra CPU usage during image processing - Larger media libraries to maintain **Example** - 500 original images × 2 MB each = **1 GB** - If WordPress creates five additional sizes per image, total storage can easily exceed **5 GB**, even when many of those files are never used. **Original Images****Avg File Size****Sizes Generated Per Image****Total Storage Used****100**2 MB5~1 GB**500**2 MB5~5 GB**1,000**2 MB5~10 GBIf your theme never displays certain image sizes, generating them simply wastes storage and processing power. ## Two Ways to Control WordPress Image Size Generation You have two solid paths to stop WordPress from generating image sizes you don’t need. - The plugin route is the most approachable, it gives you a settings interface and doesn’t require touching any code. - The code route is more precise and doesn’t add another plugin to your site, but it does mean working with your theme’s functions.php file. Neither approach is wrong. Pick based on what you’re comfortable with. ### Method 1: Using a Plugin (Beginner-Friendly) A plugin provides a simple interface for disabling unwanted image sizes without editing any code. One popular option is **[EWWW Image Optimizer](https://wordpress.org/plugins/ewww-image-optimizer?ref=serveravatar.com)**, which includes controls for preventing WordPress from generating selected image sizes. Here’s how to use it: **Step 1: Install and activate the plugin** - Go to Plugins >> Add New. - Search for “EWWW Image Optimizer” - Click Install Now, then Activate it. ![install image optimizer plugin - WordPress Default Image Sizes](https://serveravatar.com/wp-content/uploads/2026/07/image-1-1024x306.png) **Step 2: Navigate to the Resize settings** - Navigate to the **Plugins** section, and click on the **EWWW Image Optimizer >> Settings**. - While setting up, you will see the recommended settings section; configure it as per your requirements and click on the “Save Settings” button. ![save settings of plugin - WordPress Default Image Sizes](https://serveravatar.com/wp-content/uploads/2026/07/image-2-1024x442.png) - Navigate to **Resize** section, and review all image size. - Uncheck the sizes your website doesn’t require. - Save the settings. - Upload a new image to verify that fewer image files are created. **Before Disabling Sizes** Don’t disable every size blindly. First, confirm which sizes your theme actually uses. A good approach is to: - Check your theme documentation. - Inspect your templates. - Test uploads on a staging site before applying changes to production. Many modern themes rely on their own custom image sizes, allowing you to disable the default **Thumbnail**, **Medium**, and **Large** sizes without affecting the site’s appearance. ### Other Helpful Plugins - **[ThumbPress](https://wordpress.org/plugins/image-sizes?ref=serveravatar.com):** Offers thumbnail management along with cleanup tools for existing image sizes. - **[Regenerate Thumbnails Advanced](https://wordpress.org/plugins/regenerate-thumbnails-advanced?ref=serveravatar.com):** Helps you rebuild or remove unused image sizes after changing settings. - **[Disable Generate Thumbnails](https://wordpress.org/plugins/disable-generate-thumbnails?ref=serveravatar.com):** Lightweight plugin focused only on thumbnail generation. - **[Media Cleaner](https://wordpress.org/plugins/media-cleaner?ref=serveravatar.com):** Scans and removes unused media files to keep your uploads folder optimized. The advantage of the plugin method is that it is fully reversible. Re-enable a size whenever needed, and WordPress will generate it again for future uploads. ### Method 2: Using Code (More Targeted) If you prefer not to install another plugin, WordPress allows you to prevent image generation by using a simple filter in your **functions.php** file. The filter removes selected image sizes before WordPress begins processing uploaded images. Here’s the code: ``` function sv_stop_generating_default_image_sizes( $sizes ) { unset( $sizes['thumbnail'] ); // Disables the 150×150 thumbnail unset( $sizes['medium'] ); // Disables the medium size unset( $sizes['large'] ); // Disables the large size return $sizes; } add_filter( 'intermediate_image_sizes_advanced', 'sv_stop_generating_default_image_sizes' ); ``` ``` function sv_stop_generating_default_image_sizes( $sizes ) { unset( $sizes['thumbnail'] ); // Disables the 150×150 thumbnail unset( $sizes['medium'] ); // Disables the medium size unset( $sizes['large'] ); // Disables the large size return $sizes; } add_filter( 'intermediate_image_sizes_advanced', 'sv_stop_generating_default_image_sizes' ); ``` Let’s break this down. - The `intermediate_image_sizes_advanced` filter runs during WordPress’s image processing workflow, just before resized image files are generated and saved. - It receives the `$sizes` array, which lists all the registered image sizes that WordPress is preparing to create. - Using `unset()` allows you to remove specific image sizes from the array, preventing WordPress from generating those versions. - Once the modified `$sizes` array is returned, WordPress generates only the image sizes that remain in the array. **What This Code Does** - Stops generating the default **Thumbnail** size. - Prevents creation of the **Medium** image. - Disables the default **Large** version. - Keeps the original uploaded image intact. You can remove any individual `unset()` line if you’d like to keep a specific size. **Where to Add the Code** There are two safe places to put this snippet, and one place to avoid. **Use a child theme’s functions.php (recommended):** If your theme has a child theme, and it should, if it’s a custom or commercial theme, add the code there. This ensures your change survives theme updates, which overwrite the parent theme’s files. To access it; - Go to Appearance >> Theme File Editor in your WordPress admin. - Select your child theme from the dropdown at the top right - Click on Theme Functions (functions.php). - Add the snippet at the bottom of the file, then click Update File. - Avoid adding this to the parent theme’s functions.php. Your changes will be wiped out the next time the theme updates. **Use a code snippets plugin (convenient alternative):** Plugins like Code Snippets let you add PHP code through the WordPress admin without touching any files. This is handy if you don’t have FTP access or aren’t comfortable editing theme files directly. **Before You Start** Always create a backup before editing PHP files. A small syntax mistake can make your website inaccessible until the error is corrected ## What About the Images You Already Have? The changes we made only apply to **new uploads**. Existing images in your Media Library still contain all previously generated sizes. Disabling image sizes now will **not remove old files automatically**. You have two practical ways to clean them up: ### Option 1: Regenerate Thumbnails (Recommended) The easiest method is to regenerate your media library using a dedicated tool. A common choice is the **[Regenerate Thumbnails](https://wordpress.org/plugins/regenerate-thumbnails?ref=serveravatar.com)** plugin. **How it works:** - Scans your existing media library - Removes sizes you’ve disabled - Regenerates only the required image versions (if needed) **Steps:** - Install and activate **Regenerate Thumbnails** ![install regenerate thumbnails plugin - WordPress Default Image Sizes](https://serveravatar.com/wp-content/uploads/2026/07/image-3-1024x304.png) - Go to **Tools >> Regenerate Thumbnails** - Choose your required option and click Regenerate Thumbnails - Start the process and wait for completion **Important notes:** - Processing can take time on large libraries - Uses server CPU and memory during execution - Shared hosting may slow down or throttle the process - For large sites, run in batches if supported ### Option 2: Manually Remove Unused Image Files If you prefer full control, you can delete unused image sizes manually. **How to do it:** - Access your site via **FTP or SSH** - Go to: `wp-content/uploads` - Look for files like: - `image-name-150x150.jpg` - `image-name-300x300.jpg` **Be careful:** - Deleting active image sizes can break layouts - Always verify what your theme actually uses first - Check for custom sizes before removing anything You can inspect registered sizes using tools like **What The File** or by reviewing `add_image_size()` calls in your theme files. [![Blog banner - ServerAvatar](https://serveravatar.com/wp-content/uploads/2025/09/728_90-Banner-1-1024x127.png)](https://serveravatar.com/?ref=blog)## Key Things to Do After Disabling Image Sizes ### 1. Check Your Theme’s Registered Sizes Themes often define custom image sizes that are separate from WordPress defaults. You can list them using: ``` global $_wp_additional_image_sizes; print_r( $_wp_additional_image_sizes ); ``` ``` global $_wp_additional_image_sizes; print_r( $_wp_additional_image_sizes ); ``` **What this shows:** - All custom sizes added by themes or plugins - Their exact dimensions - Which sizes may still be in use Temporarily add this to your child theme and check the output in your page source or debug tools. ### 2. Test Your Website Thoroughly After making changes, review key pages such as: - Homepage - Blog posts - Product or service pages - Galleries or portfolios **What to look for:** - Broken or missing images - Blurry or stretched visuals - Layout shifts in grids or sliders - Incorrect featured image sizes ### 3. Watch Your Upload Dimensions Disabling sizes does not resize original uploads. So make sure: - You upload images close to required display dimensions - Avoid overly large or overly small originals - Match your theme’s layout requirements Otherwise, images may appear blurry or stretched. ### 4. Monitor Plugin Behavior New plugins can silently add image sizes. Common sources: - Page builders - Sliders - Gallery plugins - E-commerce tools **Best practice:** - Check registered image sizes after installing new plugins - Keep track of changes periodically - Review media behavior after major updates ### 5. Reversibility (Nothing is Permanent) You can always undo changes: **If using a plugin:** - Re-enable sizes from settings - Save changes **If using code:** - Remove or comment out `unset()` lines - Or delete the filter entirely WordPress will resume generating those sizes for new uploads. ### 6. Front-End Uploads Are Also Affected If your site allows: - User profile images - Guest uploads - Product submissions Then those uploads follow the same image rules. **What to check:** - Whether required sizes are still being generated - Whether forms rely on specific dimensions Always test upload forms after making changes. ### 7. Is It Safe to Disable All Default Sizes? In many modern setups, yes. You can usually disable: - Thumbnail - Medium - Large **But only if:** - Your theme uses custom image sizes - You’ve confirmed layouts still display correctly - No templates rely on default WordPress sizes Older themes may still depend on medium or large, so always verify before removing everything. ## Conclusion Managing what image sizes WordPress generates is one of those small details that makes a real difference as your site scales. You don’t need to be a developer to take control of it, the plugin route handles it cleanly for most people. And if you’re comfortable with a few lines of PHP, the code approach gives you precise control without adding overhead. The bigger habit to build is auditing your media setup periodically. Every new theme or plugin has the potential to register new image sizes. Making it a point to check what gets registered when you add something new saves you from slowly accumulating image bloat over months and years. ## FAQs ### Will removing default image sizes break my existing posts? No, both methods covered in this guide only affect new uploads going forward. Your existing images and their generated sizes stay exactly as they are until you manually regenerate or delete them using the Regenerate Thumbnails plugin. ### Can I prevent plugins from creating their own image sizes? Some plugins let you configure or disable their image size registration in their settings. For others, the Disable Generate Thumbnails plugin gives you a UI to uncheck sizes registered by any source, including plugins, so you can manage everything in one place without writing code. ### Will this reduce my existing storage usage? Not automatically, the changes only prevent new sizes from being created going forward. To reclaim storage from images you’ve already uploaded, you need to run a thumbnail regeneration process or manually delete the old size files from your server. ### Is it safe to disable all three default sizes? It depends on your theme. Many modern themes rely on custom image sizes and don’t reference WordPress defaults at all, making it safe to disable all three. Some older or simpler themes may still pull medium or large sizes in certain templates. Auditing your theme first is the safe play. ### How do I restore a size I’ve disabled? With the plugin method, re-check the box for that size in the settings and save. With the code method, either remove the corresponding `unset()` line or delete the entire filter block from your functions.php file. ## Key Takeaways - WordPress creates thumbnail, medium, and large copies of every image you upload, even if your theme never uses them - These extra files waste server storage and add processing overhead on every upload - You can block new size generation using a plugin or a PHP filter in functions.php - Existing images need to be cleaned up separately using a regeneration tool - Always audit your theme’s registered image sizes before disabling anything - Both methods are fully reversible, you can re-enable sizes anytime - Test your site thoroughly after making changes to ensure no broken images appear ## Related Articles - **[How to Speed Up WordPress Website With Object Cache Pro](https://serveravatar.com/speed-up-wordpress-with-object-cache-pro):** Caching and image optimization go hand in hand when it comes to WordPress performance. - **[Optimize WordPress Performance with Rewrite Rules & Cache](https://serveravatar.com/optimize-wordpress-performance):** Rewrite rules and cache management are key to keeping your WordPress site fast. - **[Improve WordPress Performance with Preloading Tricks](https://serveravatar.com/improve-wordpress-performance-with-preloading-tricks):** Preloading helps your server anticipate what users need before they ask for it. - **[Reduce Server Response Time in WordPress (TTFB Optimization Guide](https://serveravatar.com/wordpress-ttfb-optimization)):** If you’re working on reducing server resource usage, TTFB optimization is the next logical step after managing image sizes. - **[How to Fix WordPress 500 Internal Server Error in 2026](https://serveravatar.com/fix-wordpress-500-internal-server-error):** A useful companion guide for troubleshooting issues that can arise after making changes to your WordPress site. ### About the Author Meghna Meghwani is a technical writer focused on Linux, Ubuntu, VPS hosting, server management, WordPress, PHP, Node.js, cloud hosting, and DevOps. She creates beginner-friendly tutorials, practical hosting guides, troubleshooting articles, and server security content designed to help developers and businesses manage applications and servers more efficiently. **Categories:** Blog, Guide, Optimisation, Others, Tutorials, WordPress **Tags:** Default Image Sizes, Wordpress, WordPress Default Image Sizes, WordPress Image Sizes, WordPress Images, WordPress Media Library, WordPress optimization, WordPress performance, WordPress Tips --- ### [How to Fix "ERR_NAME_NOT_RESOLVED" Error](https://serveravatar.com/fix-err-name-not-resolved-error/) **Published:** July 10, 2026 **Author:** Meghna Meghwani **Content:** [![Blog banner - ServerAvatar](https://serveravatar.com/wp-content/uploads/2025/09/728_90-Banner-3-1024x127.png)](https://serveravatar.com/?ref=blog)You open your browser, type a web address, hit Enter, and instead of the website you wanted, you’re staring at a cold error message: `ERR_NAME_NOT_RESOLVED`. Your first instinct might be to panic, refresh, or blame your internet connection. The truth is, this error is one of the most common issues on the web, and in most cases, it’s solvable in under ten minutes once you know what you’re dealing with. The tricky part? The error message tells you what went wrong but not why or how to fix it. That’s exactly what this guide is for. I will walk you through what triggers the error, how to isolate the cause, and precisely how to resolve it depending on where the problem lives; your browser, your machine, your network, or the website itself. Let’s dig in. ## TL;DR **Topic****Summary****What the error means**The ERR\_NAME\_NOT\_RESOLVED error appears when your browser cannot convert a website’s domain name into its corresponding IP address because the DNS lookup was unsuccessful.**Common causes**The issue may stem from your device or network (such as browser settings, operating system, router, or internet provider) or from the website itself, including expired domains or incorrect DNS configuration.**How to fix it**In most situations, the problem can be resolved by flushing the DNS cache, using a reliable public DNS service, or rebooting your router to refresh the network connection.**Possible security concern**In less common cases, malware may interfere with DNS settings or alter the hosts file, preventing websites from resolving correctly.**Advice for website owners**If you manage a website, first verify that the domain registration is active and that all DNS records are correctly configured to avoid resolution issues.## Quick Troubleshooting Checklist Before diving into the detailed fixes below, use this quick reference table to identify the most likely cause of the **ERR\_NAME\_NOT\_RESOLVED** error and the recommended solution. ProblemRecommended FixDifficultyTime Required**Incorrect website address**Double-check the URLEasyLess than 1 minute**Router DNS cache issue**Restart your router and modemEasy2–3 minutes**Corrupted DNS cache**Flush the DNS cacheEasy1 minute**ISP DNS problems**Switch to Google or Cloudflare DNSEasy3–5 minutes**VPN or Proxy conflict**Disconnect the VPN or Proxy temporarilyEasy1 minute**Firewall or Antivirus blocking DNS**Temporarily disable and whitelist the websiteMedium2–5 minutes**Modified Hosts file**Remove incorrect entries from the hosts fileMedium5 minutes**Domain or DNS misconfiguration**Verify domain registration and DNS recordsMedium5–10 minutesNow that you have an overview of the possible fixes, let’s understand what this error actually means and why it happens. ## What Does ERR\_NAME\_NOT\_RESOLVED Actually Mean? When you visit a website, your browser doesn’t store the IP addresses of every site on the internet. Instead, it asks a DNS resolver, essentially the internet’s phonebook, to translate a human-readable domain like `example.com` into a numeric IP address like `192.0.2.1`. That process is called a DNS lookup. `ERR_NAME_NOT_RESOLVED` is what your browser displays when that lookup failed. The resolver was asked for an address it couldn’t find, couldn’t reach, or didn’t have in its records. It’s worth noting this is different from `DNS_PROBE_FINISHED_NXDOMAIN`. The latter specifically means the DNS server was reached and definitively said “this domain doesn’t exist.” `ERR_NAME_NOT_RESOLVED` is broader, it covers lookup failures for any reason, including network connectivity issues, timeouts, or misconfigured settings on your side. ![ERR_NAME_NOT_RESOLVED error display](https://serveravatar.com/wp-content/uploads/2026/07/image-17.png) ### ERR\_NAME\_NOT\_RESOLVED vs Other Common Browser Errors Many browser errors look similar but point to different underlying issues. Understanding the difference can help you choose the correct troubleshooting steps more quickly. ErrorMeaningMost Common Cause**ERR\_NAME\_NOT\_RESOLVED**DNS lookup failedDNS cache, DNS server, or network issue**DNS\_PROBE\_FINISHED\_NXDOMAIN**Domain does not existExpired or incorrect domain**ERR\_CONNECTION\_TIMED\_OUT**Server didn’t respondNetwork congestion or server downtime**ERR\_CONNECTION\_REFUSED**Server rejected the connectionWeb server or firewall configuration**ERR\_SSL\_PROTOCOL\_ERROR**SSL/TLS handshake failedInvalid SSL certificate or HTTPS configurationNow that you know what **ERR\_NAME\_NOT\_RESOLVED** means and how it differs from other browser errors, let’s start fixing it step by step. ## Step 1: Retry and Check the URL: The Fastest Possible Fix Before diving into settings and command lines, do two quick things: - **First, look at the URL bar:** Did you type the address correctly? A single wrong character, `gogle.com` instead of `google.com`, or `exmaple.com` instead of `example.com` , will produce this exact error. This sounds obvious, but it’s responsible for more error reports than most people admit. - **Second, try a different browser or an Incognito/Private window:** Browser extensions, particularly ad blockers, privacy tools, or security plugins, can interfere with DNS resolution for specific domains. A clean browser session rules this out quickly. If neither of those works, move to the next step. ## Step 2: Restart Your Router and Modem I know this sounds like the classic “have you tried turning it off and on again?” But in this case, there’s a real technical reason it works. Your router runs a local DNS caching process. Over time, this cache can accumulate stale or corrupted entries. A simple power cycle clears it entirely, forcing the router to perform fresh DNS lookups from scratch on the next request. Here’s the correct way to do it: - Unplug your modem and router from power - Wait **60 seconds**. The residual charge needs time to drain - Plug the modem back in and wait for all indicator lights to stabilize (usually 60–90 seconds) - Plug the router back in and wait for it to fully boot - Try the website again This resolves roughly 15–20% of ERR\_NAME\_NOT\_RESOLVED cases in my experience, especially on networks that haven’t been restarted in weeks or months. If it works, great, you are done. If not, we need to go deeper. ## Step 3: Flush Your DNS Cache: The Most Common Fix This is the step that fixes the majority of cases. Your operating system maintains a local DNS cache, a short-term memory of domain-to-IP mappings. If that cache holds an outdated or incorrect entry, your browser will use the bad data instead of performing a fresh lookup. Flushing the cache forces your OS to discard all stored mappings and ask the DNS resolver from scratch. ### DNS Flush Commands by Operating System The commands used to clear the DNS cache differ depending on your operating system. Here’s a quick reference before following the detailed instructions. Operating SystemCommand**Windows**`ipconfig /flushdns`**macOS**`sudo dscacheutil -flushcache; sudo killall -HUP mDNSResponder`**Ubuntu (systemd)**`sudo resolvectl flush-caches`**Older Linux systems**`sudo systemd-resolve --flush-caches`Follow the instructions below for your operating system to clear the DNS cache successfully. ### On Windows: Open Command Prompt as Administrator (right-click on Terminal >> Run as administrator): ``` ipconfig /flushdns ``` ``` ipconfig /flushdns ``` You’ll see a confirmation message such as: “Successfully flushed the DNS Resolver Cache.” ![flush dns command - ERR_NAME_NOT_RESOLVED](https://serveravatar.com/wp-content/uploads/2026/07/image-18-1024x436.png) ### On macOS (Ventura, Sonoma, Sequoia): Open Terminal (Applications >> Utilities >> Terminal) and run: ``` sudo dscacheutil -flushcache; sudo killall -HUP mDNSResponder ``` ``` sudo dscacheutil -flushcache; sudo killall -HUP mDNSResponder ``` Enter your admin password when prompted. There’s no confirmation message on macOS, no news is good news. ### On Linux (Ubuntu and most systemd-based distributions): ``` sudo systemd-resolve --flush-caches ``` ``` sudo systemd-resolve --flush-caches ``` Or, on newer systems: ``` sudo resolvectl flush-caches ``` ``` sudo resolvectl flush-caches ``` After flushing, try loading the website again. In most cases, this is where the error disappears. ## Step 4: Switch to a Public DNS Server If flushing the cache didn’t help, the problem might be that your ISP’s DNS resolver itself is slow, overloaded, or temporarily unavailable. Rather than waiting for them to fix it, you can bypass their DNS entirely by switching to a public DNS service. Two reliable options: - **Google Public DNS:** `8.8.8.8` and `8.8.4.4` - **Cloudflare DNS:** `1.1.1.1` and `1.0.0.1` Cloudflare’s DNS is generally faster for most users, but Google’s has massive global infrastructure. Either is a significant upgrade over most ISP defaults. ### Popular Public DNS Servers If your ISP’s DNS server is unreliable, switching to a trusted public DNS provider can improve both reliability and browsing performance. DNS ProviderPrimary DNSSecondary DNSBest For**Cloudflare DNS**1.1.1.11.0.0.1Speed and privacy**Google Public DNS**8.8.8.88.8.4.4Reliability and global coverage**Quad9**9.9.9.9149.112.112.112Security-focused DNS**OpenDNS**208.67.222.222208.67.220.220Family filtering and business useThe steps below explain how to configure these DNS servers on Windows, macOS, and Ubuntu. ### Changing DNS on Windows: - Open Settings >> Network & Internet >> Advanced network settings - Click your active connection (Wi-Fi or Ethernet) >> Additional properties - Click Edit under “IP settings” - Change the dropdown to Manual and toggle **IPv4** to ON - Enter `8.8.8.8` as Preferred DNS and `8.8.4.4` as Alternate DNS - Save and restart your browser ![dns configuration - ERR_NAME_NOT_RESOLVED](https://serveravatar.com/wp-content/uploads/2026/07/image-19-1024x836.png) ### Changing DNS on macOS: - Open System Settings >> Network - Select your active connection >> Details - Go to the DNS tab - Click the “+” button and add `1.1.1.1`, then add `1.0.0.1` - Click OK and restart your browser ### Changing DNS on Ubuntu - Open Terminal. - Identify your active network connection: ``` nmcli connection show ``` ``` nmcli connection show ``` - Set Google Public DNS: ``` sudo nmcli connection modify "" ipv4.dns "8.8.8.8 8.8.4.4" sudo nmcli connection modify "" ipv4.ignore-auto-dns yes ``` ``` sudo nmcli connection modify "" ipv4.dns "8.8.8.8 8.8.4.4" sudo nmcli connection modify "" ipv4.ignore-auto-dns yes ``` - Or use Cloudflare DNS: ``` sudo nmcli connection modify "" ipv4.dns "1.1.1.1 1.0.0.1" sudo nmcli connection modify "" ipv4.ignore-auto-dns yes ``` ``` sudo nmcli connection modify "" ipv4.dns "1.1.1.1 1.0.0.1" sudo nmcli connection modify "" ipv4.ignore-auto-dns yes ``` > Replace `` with the name of your active connection (for example, `Wired connection 1` or `Home Wi-Fi`). - Restart the connection to apply the changes: ``` sudo nmcli connection down "" sudo nmcli connection up "" ``` ``` sudo nmcli connection down "" sudo nmcli connection up "" ``` - Verify the configured DNS servers: ``` resolvectl status ``` ``` resolvectl status ``` The output should list the DNS servers you configured. Once the new settings are active, restart your browser and try accessing the website again. > This approach works on Ubuntu 20.04, 22.04, and 24.04 using NetworkManager. If your server uses Netplan instead, the commands are different. This step resolves persistent DNS lookup failures that nothing else on this list can touch. It’s also a permanent improvement, public DNS servers tend to be faster and more reliable than ISP defaults. ## Step 5: Check Your Firewall and Antivirus: Security Software Can Block DNS Too Security software is designed to monitor network traffic. Sometimes, it intercepts DNS requests and redirects them through its own filtered channel. If that channel fails or the software flags the domain incorrectly, you’ll get `ERR_NAME_NOT_RESOLVED`. This doesn’t mean your antivirus or firewall is bad, it just means it made a false positive decision for a specific domain on your specific machine. **To test:** - Temporarily disable your third-party firewall or antivirus protection (not Windows Defender, which is integrated differently) - Visit the website again - If it loads, re-enable the software and add the domain to your security software’s allowlist or exceptions list Most antivirus and security tools provide an allowlist option within their settings. Depending on the software, this feature may appear under names such as **Web Shield exclusions**, **URL filtering exceptions**, **Trusted websites**, or similar security settings. Adding the domain there lets your security software resume normal protection while allowing the DNS lookup to complete. > **One practical note:** Only disable the firewall/antivirus for testing. Don’t browse the internet with it off for extended periods. ## Step 6: Check Your VPN or Proxy Settings VPNs and proxy servers route your internet traffic through their own servers and use their own DNS resolvers. If the VPN server you’re connected to has DNS issues, or if the VPN drops and leaves your traffic in an undefined state, DNS lookups will fail, and you’ll see `ERR_NAME_NOT_RESOLVED`. **Quick test:** disconnect your VPN and try the website again. If it loads after disconnecting, your VPN is the culprit. This could be because: - The VPN’s DNS resolver is blocked or down for that specific domain - The VPN connection is unstable, and the DNS request never reached the resolver - The VPN’s DNS was configured incorrectly Try switching to a different VPN server location. If the issue persists, contact your VPN provider’s support and report the specific domain that’s failing. If you’re using a corporate VPN, it may be blocking certain domains at the DNS level, check with your IT team. ## Step 7: Inspect Your Hosts File: A Sneaky Cause The hosts file is one of the oldest mechanisms on your computer for mapping hostnames to IP addresses. It predates DNS entirely. When your computer tries to resolve a domain, it checks the hosts file before asking any DNS server. If it finds a matching entry, it uses that, regardless of what the actual DNS records say. Malware often exploits this. It adds entries to your hosts file that redirect legitimate domains to `127.0.0.1` (your own machine) or to malicious IP addresses, effectively blocking those sites. ### How to check on Windows: - Open Notepad as Administrator (right-click Notepad >> Run as administrator) - Open `C:\Windows\System32\drivers\etc\hosts` - Look for any lines mentioning the domain you’re trying to reach that don’t start with `#` - If you find an entry like `127.0.0.1 example.com`, add a `#` at the beginning to comment it out - Save the file ![host file - ERR_NAME_NOT_RESOLVED](https://serveravatar.com/wp-content/uploads/2026/07/image-20-1024x489.png) ### How to check on macOS/Linux: - Open Terminal - Run: - **MacOS**: `sudo nano /private/etc/hosts` - **Linux:** `sudo nano /etc/hosts` - Look for suspicious entries as described above - Comment them out by adding **`#`** at the start - Save with `Ctrl + X`, then `Y`, then `Enter` If you’re comfortable doing this, it’s a good habit to check your hosts file periodically anyway, especially if you notice certain sites working while others consistently fail despite everything else being correct. ## Step 8: Update Your Network Adapter Driver: A Less Common Culprit If you’ve tried everything above and the error persists, your network adapter’s driver could be outdated or corrupted. This is uncommon but real, particularly on Windows systems that haven’t received driver updates in a long time. ### On Windows: - Navigate to Device Manager - Expand **Network adapters** - Locate the network adapter that is currently in use. It may be labeled as Wi-Fi, Wireless, Ethernet, or identified by the name of its manufacturer, such as Intel, Realtek, or Broadcom. - Right-click it >> **Update driver** >> Search automatically for updated driver software ![driver update - ERR_NAME_NOT_RESOLVED](https://serveravatar.com/wp-content/uploads/2026/07/image-21.png) If Windows finds nothing, visit your computer manufacturer’s support page or the network adapter manufacturer’s page and download the latest driver manually. This step is worth trying if you’re on an older Windows installation that hasn’t been updated in a while. Driver issues can cause intermittent DNS resolution failures that are otherwise hard to diagnose. [![Blog banner - ServerAvatar](https://serveravatar.com/wp-content/uploads/2025/09/728_90-Banner-1-1024x127.png)](https://serveravatar.com/?ref=blog)## For Website Owners: Diagnosing the Problem on Your End If visitors report seeing `ERR_NAME_NOT_RESOLVED` when trying to reach your website, the problem is almost certainly one of three things: - your domain has expired - your DNS records are misconfigured - there’s a connectivity issue with your hosting provider. Here’s how to diagnose and fix each: ### Is Your Domain Expired? An expired domain stops resolving entirely. It’s the digital equivalent of a disconnected phone number, the name still exists in the registrar’s database, but it no longer points anywhere. Use a WHOIS lookup tool at [who.is](https://who.is/?ref=serveravatar.com) or [ICANN Lookup](https://lookup.icann.org/?ref=serveravatar.com) to check your domain’s status. Pay attention to: - **Expiration date:** if it’s passed, your domain has expired - **Registrar Status:** “pending renewal,” “redemption period,” or “client hold” all indicate a problem If your domain has expired, renew it immediately through your registrar. After renewal, propagation can take anywhere from a few minutes to 48 hours. ### Are Your DNS Records Pointing Correctly? This is the most common cause of `ERR_NAME_NOT_RESOLVED` for website owners. Your DNS records tell the internet where to find your server. A single typo in an A record or CNAME record breaks everything. Log in to your domain registrar or DNS provider and verify: - Your **A record** points to the correct server IP address - Your **CNAME record** for the `www` subdomain points to your root domain (or the correct destination) - There are no stray records pointing to old or decommissioned IP addresses If you’re managing DNS records manually across a registrar and a hosting provider, it’s easy to miss a digit or forget to update a record after a server migration. A tool like [DNSChecker.org](https://dnschecker.org/?ref=serveravatar.com) lets you see what DNS records are currently visible from different global locations, useful for confirming your changes have propagated. ### Is Your Hosting Provider Experiencing a Network Issue? If your domain is active and your DNS records look correct, the issue might be on your hosting provider’s infrastructure, their DNS servers could be experiencing an outage, or a network firewall might be misconfigured. Create a support request with your hosting provider and include the following information: - The exact error message the visitor sees - The domain name affected - Confirmation that your domain is active and DNS records are correct This context helps their team diagnose faster. If it’s a provider-side DNS outage, you’ll need to wait for them to resolve it, but at least you’ll know what’s happening. ## Conclusion `ERR_NAME_NOT_RESOLVED` is frustrating, but it’s almost never permanent. The vast majority of cases come down to stale DNS cache data, ISP DNS failures, or simple network glitches, all of which you can fix in minutes. Work through the steps in order; restart your router, flush your DNS cache, switch to a public DNS server, check your security software and VPN, and inspect your hosts file if needed. By the time you’ve finished that list, you’ll have covered the causes responsible for roughly 95% of cases. If you’re a website owner and visitors are hitting this error on your domain, start with your domain’s expiration date and DNS record configuration, that’s where the problem lives 99% of the time. ## FAQs ### Why does ERR\_NAME\_NOT\_RESOLVED happen on only one website? This almost always means the issue is specific to that domain and not your internet connection. The website’s server could be down, your DNS cache might hold a bad entry for that specific domain, or your hosts file could have a redirect for it. Try flushing your DNS cache first, that resolves the majority of single-site cases. ### Can malware cause ERR\_NAME\_NOT\_RESOLVED? Yes. Certain malware modifies your hosts file or changes your DNS settings to redirect traffic away from legitimate sites. Running a full system scan with reputable antivirus software is a good idea if you suspect infection. After cleaning the malware, check your hosts file and restore any altered DNS settings. ### What’s the difference between ERR\_NAME\_NOT\_RESOLVED and DNS\_PROBE\_FINISHED\_NXDOMAIN? `ERR_NAME_NOT_RESOLVED` is a general DNS lookup failure, the browser couldn’t complete the lookup for reasons that could include network issues, timeouts, or misconfigurations. `DNS_PROBE_FINISHED_NXDOMAIN` is more specific: the DNS server was reached and confirmed the domain does not exist (NXDOMAIN = Non-Existent Domain). If you’re getting NXDOMAIN, the domain genuinely doesn’t exist or isn’t registered anymore. ### Should I change my DNS server permanently? Switching to a public DNS server like Cloudflare (`1.1.1.1`) or Google (`8.8.8.8`) is generally a good idea. They’re faster, more reliable, and more private than most ISP defaults. Once you configure them, they stay in place until you change them again. ### How long does it take for DNS changes to propagate? DNS propagation can take anywhere from **a few minutes to 48 hours**, depending on your DNS provider’s TTL (Time to Live) settings and the ISP’s cache refresh rate. Most changes are visible within 15–30 minutes. You can track propagation status using tools like [DNSChecker.org](https://dnschecker.org/?ref=serveravatar.com). ## Key Takeaways - `ERR_NAME_NOT_RESOLVED` means your browser couldn’t find the IP address for a domain, the DNS lookup failed - Most cases are fixed by flushing the DNS cache or switching to a public DNS server like Cloudflare (`1.1.1.1`) - Restarting your router clears corrupted router-level DNS cache, simple but effective - Malware can modify your hosts file to block or redirect domains, always worth checking if all else fails - As a website owner, always verify domain expiration and DNS record accuracy before assuming the problem is on the visitor’s side - If you’re managing DNS across multiple services, consider using a [unified server management platform](https://serveravatar.com/) to reduce configuration errors *Explore more practical tips and in-depth guides on the* [*ServerAvatar*](https://serveravatar.com/blog/)[ *blog*](https://serveravatar.com/blog/)*. If you would like to simplify server management,* [*register*](https://app.serveravatar.com/register) *for* [*ServerAvatar*](https://serveravatar.com/) *to experience its features and refer to the step-by-step setup* [*documentation*](https://serveravatar.com/docs) *to get started quickly.* ### About the Author Meghna Meghwani is a technical writer focused on Linux, Ubuntu, VPS hosting, server management, WordPress, PHP, Node.js, cloud hosting, and DevOps. She creates beginner-friendly tutorials, practical hosting guides, troubleshooting articles, and server security content designed to help developers and businesses manage applications and servers more efficiently. **Categories:** Blog, Guide, Linux, Others, Tutorials, Ubuntu **Tags:** Browser Errors, DNS Error, DNS Resolution, DNS Troubleshooting, ERR_NAME_NOT_RESOLVED, ERR_NAME_NOT_RESOLVED Error, Fix ERR_NAME_NOT_RESOLVED, Google Chrome Errors, Website Not Loading --- ### [Best reCAPTCHA Alternatives to protect website from Spam](https://serveravatar.com/recaptcha-alternatives/) **Published:** July 9, 2026 **Author:** Meghna Meghwani **Content:** [![Blog banner - ServerAvatar](https://serveravatar.com/wp-content/uploads/2025/09/728_90-Banner-3-1024x127.png)](https://serveravatar.com/?ref=blog)If you’ve ever abandoned a form mid-submission because a blurry CAPTCHA nearly broke your patience, you’re not alone. Every year, millions of legitimate users churn away from websites thanks to CAPTCHAs, those “prove you’re human” challenges that were supposed to make the web safer but often just make it more frustrating. For developers and website owners, finding reliable reCAPTCHA alternatives has become a practical priority: bot protection without destroying user experience is possible, and you have more options than ever. Google’s reCAPTCHA is the most widely deployed solution on the internet, and while it’s free and reasonably effective, it’s not always the right fit. Some teams have privacy concerns with Google’s data practices. Others find reCAPTCHA’s UX too intrusive for their audience. In this blog, we will see alternatives to reCAPTCHA. ## Why reCAPTCHA Isn’t Always the Answer reCAPTCHA does a decent job at stopping bots. The problem is that it’s built by Google, and that comes with baggage. Google’s tracking infrastructure is woven into reCAPTCHA by design. When you embed a reCAPTCHA widget, you’re loading scripts that can fingerprint users across Google’s ecosystem. For privacy-conscious businesses, especially EU-based companies navigating GDPR, this is a real liability. A CAPTCHA that tracks users defeats the purpose of protecting their data. Beyond privacy, there’s the experience problem. reCAPTCHA’s image challenges are notoriously difficult on mobile. Audio challenges, meant as an accessibility bridge, are often incomprehensible. Finally, reCAPTCHA isn’t free for high-traffic sites. Google’s free tier is generous for small projects, but as your traffic scales, you start inching toward paid territory, and at that point, you’re paying for something you might not even love. ## Invisible Alternatives: No Puzzles, No Images, No Friction The cleanest CAPTCHA alternative is the one your users never see. Several services now use background signals, browser behavior, proof-of-work computations, device fingerprints, to separate bots from humans without presenting any challenge at all. ### **Cloudflare Turnstile: A Free and Privacy-Focused CAPTCHA Solution** [Cloudflare Turnstile](https://www.cloudflare.com/products/turnstile/) is one of the most popular alternatives to Google reCAPTCHA. It verifies legitimate users using browser and network signals in the background, allowing most visitors to pass without solving image or text-based challenges. This creates a smoother browsing experience while helping websites block automated bots. ![Cloudflare Turnstile - reCAPTCHA Alternatives](https://serveravatar.com/wp-content/uploads/2026/07/image-10.png) #### **Advantages** - **Invisible verification:** Most users are verified automatically without completing visual CAPTCHA challenges, resulting in a frictionless experience. - **Easy integration:** Implementation is straightforward with a simple JavaScript snippet and site key configuration, making deployment quick for developers. - **Privacy-focused:** Unlike traditional CAPTCHA solutions, Turnstile is designed to minimize user tracking and does not rely on advertising-related data collection. - **Accessibility support:** The platform is built with accessibility in mind and complies with WCAG 2.1 Level AA standards, making it more user-friendly for people with disabilities. - **Free for many websites:** The free plan supports up to 10 widgets, which is sufficient for most personal websites, blogs, and small to medium-sized applications. - **Developer-friendly:** Minimal backend configuration and clear documentation simplify implementation and maintenance. #### **Disadvantages** - **Enterprise pricing is not transparent:** Organizations requiring more than the free widget limit must upgrade to an Enterprise plan, where pricing is available only through Cloudflare’s sales team. - **Limited free-tier scalability:** Businesses managing multiple websites or large-scale applications may outgrow the free plan and need a paid subscription. - **Cloudflare ecosystem dependency:** Although Turnstile can be used independently, organizations heavily invested in other security platforms may need to evaluate compatibility with their existing infrastructure. #### **Best For** - Small to medium-sized websites - Privacy-conscious businesses - Organizations targeting GDPR compliance - Developers looking for a simple and quick CAPTCHA implementation - Websites that want to improve user experience by reducing CAPTCHA friction ### **ALTCHA: Open-Source and Self-Hosted CAPTCHA Solution** [ALTCHA](https://altcha.org/) is an open-source CAPTCHA solution designed for organizations that want complete control over their bot protection infrastructure. Released under the **MIT License**, it can be self-hosted, customized, and audited, eliminating the need to rely on third-party CAPTCHA providers. Its proof-of-work approach helps distinguish legitimate users from bots while keeping all verification within your own environment. ![ALTCHA - reCAPTCHA Alternatives](https://serveravatar.com/wp-content/uploads/2026/07/image-11.png) #### **Advantages** - **Completely open-source:** Available under the MIT License, allowing organizations to inspect, modify, and customize the source code based on their requirements. - **Self-hosted deployment:** All verification occurs on your own servers, ensuring complete control over your CAPTCHA infrastructure. - **Enhanced privacy:** Since no data is sent to external services, ALTCHA helps organizations meet strict privacy, compliance, and data sovereignty requirements. - **Proof-of-work verification:** Uses lightweight cryptographic challenges instead of behavioral tracking or image-based CAPTCHAs, providing a smoother user experience. - **Machine-to-machine (M2M) support:** Supports verification for trusted automated systems such as APIs, CI/CD pipelines, internal services, and legitimate bots without treating them as malicious traffic. - **Accessibility compliant:** Meets WCAG 2.2 Level AA standards, making it accessible for users with disabilities. - **No vendor lock-in:** Organizations retain full ownership of their infrastructure and are not dependent on a third-party CAPTCHA provider. - **No recurring licensing fees:** The software is free to use, making it a cost-effective solution for organizations with the resources to self-host. #### **Disadvantages** - **Requires self-hosting:** Unlike managed CAPTCHA services, deployment and hosting must be handled internally. - **Higher implementation effort:** Initial setup is more complex and may require DevOps or system administration expertise. - **Not ideal for non-technical teams:** Businesses without technical resources may find managed CAPTCHA solutions easier to deploy and maintain. #### **Best For** - Organizations with strict data privacy and sovereignty requirements - Enterprises that prefer self-hosted security solutions - Development teams looking for a customizable open-source CAPTCHA - Businesses that want to avoid third-party dependencies - Companies with dedicated DevOps or infrastructure teams - API-driven platforms requiring machine-to-machine (M2M) verification support ### Friendly Captcha: Proof-of-Work, Invisibly [Friendly Captcha](https://friendlycaptcha.com/) is a modern CAPTCHA solution that uses a proof-of-work verification method instead of traditional image challenges or behavioral tracking. Rather than analyzing user activity, it performs a lightweight cryptographic computation in the visitor’s browser to distinguish legitimate users from bots. This approach provides effective bot protection while maintaining user privacy and delivering a seamless browsing experience. ![Friendly Captccha - reCAPTCHA Alternatives](https://serveravatar.com/wp-content/uploads/2026/07/image-12.png) #### **Advantages** - **Privacy-first verification:** Uses cryptographic proof-of-work instead of cookies, browser fingerprinting, or behavioral tracking. - **GDPR-friendly:** Since no personal data is collected during the verification process, it helps organizations meet strict privacy and data protection requirements. - **Invisible user experience:** Verification happens in the background, with only a small loading indicator visible to users and no interactive CAPTCHA challenges. - **Effective bot protection:** The lightweight computational task is quick for legitimate users but becomes resource-intensive for bots attempting large-scale automated attacks. - **Simple integration:** Easy to implement using a lightweight JavaScript widget with native support for React, Vue, and Node.js. - **Clear documentation:** Well-organized documentation makes implementation and maintenance straightforward for developers. #### **Disadvantages** - **Increased CPU usage:** The proof-of-work process consumes a small amount of processing power, which may slightly impact device performance. - **Battery consumption on mobile:** Mobile devices may experience marginally higher battery usage due to the background computation. - **Performance testing recommended:** Websites with compute-heavy applications or primarily mobile audiences should evaluate performance before full deployment. - **Commercial use requires a paid plan:** Businesses must subscribe to a paid plan for production environments beyond the non-commercial free tier. #### **Best For** - Privacy-conscious organizations - Businesses requiring GDPR-compliant bot protection - Websites seeking an invisible CAPTCHA experience - Developers using React, Vue, or Node.js - Organizations that prefer transparent and predictable pricing - Websites looking to avoid user tracking while maintaining strong bot protection ### hCaptcha: Privacy-First CAPTCHA with Generous Free Tier [hCaptcha](https://www.hcaptcha.com/) is a privacy-focused CAPTCHA alternative developed by Intuition Machines. Unlike reCAPTCHA, which is tied to Google’s advertising ecosystem, hCaptcha was built specifically around user privacy. It collects zero personally identifiable information and automatically satisfies GDPR, CCPA, and HIPAA compliance requirements, making it a strong choice for organizations that handle sensitive user data or operate in regulated industries. ![hCaptcha - reCAPTCHA Alternatives](https://serveravatar.com/wp-content/uploads/2026/07/image-13.png) #### **Advantages** - **Zero personal data collection:** hCaptcha does not collect or store any personally identifiable information, eliminating privacy risks associated with user tracking. - **Regulatory compliance built-in:** Automatically GDPR and CCPA requirements. For HIPAA-regulated environments, evaluate whether CAPTCHA alone meets your compliance obligations. - **Generous free tier:** The free plan covers up to one million requests per month, suitable for small to medium-sized websites. - **Invisible option available:** Offers an invisible CAPTCHA mode that verifies users in the background without presenting interactive challenges. - **Self-hosted option:** Enterprise customers can opt for self-hosted deployment for complete data sovereignty and infrastructure control. #### **Disadvantages** - **Not fully invisible:** The standard mode displays visual challenges that some users find intrusive, unlike truly invisible alternatives. - **No self-hosted free option:** While a self-hosted version is available, it requires an enterprise license, limiting options for budget-conscious teams. - **Not open-source:** The source code is not publicly available for independent audit, which may concern organizations requiring full transparency. - **Slower challenge resolution:** Some users report that hCaptcha challenges take longer to solve compared to alternatives like Turnstile. #### **Best For** - Organizations requiring GDPR, CCPA, or HIPAA compliance - Privacy-conscious businesses wanting zero user tracking - High-traffic websites needing a generous free tier - Businesses that handle sensitive user data - Teams that prefer a proven, widely-deployed CAPTCHA solution ### Private Captcha: EU-Only, Cookie-Free Verification [Private Captcha](https://privatecaptcha.com/) is a privacy-first CAPTCHA solution designed for organizations that prioritize data sovereignty and minimal user tracking. Running exclusively on EU-based servers, it avoids sending any user data outside European jurisdiction. The service does not use cookies for verification, which simplifies cookie compliance obligations and reduces the tracking footprint on your website. ![Private Captcha - reCAPTCHA Alternatives](https://serveravatar.com/wp-content/uploads/2026/07/image-14.png) #### Advantages - **EU-only infrastructure:** All data processing occurs on servers located within the European Union, ensuring compliance with EU data protection regulations. - **No cookies required:** Verification does not rely on cookies, eliminating cookie consent banners for CAPTCHA-related tracking and simplifying your cookie compliance workflow. - **Privacy by design:** Does not collect, store, or share any personal user data during the verification process. - **Official WordPress plugin:** Offers a dedicated WordPress plugin for straightforward integration with WordPress sites without custom code. - **Transparent pricing:** Annual subscription model with clear pricing, making it easy to budget for bot protection costs. - **GDPR compliant:** Designed from the ground up to meet European privacy standards without requiring additional configuration. #### Disadvantages - **No free tier for production:** Only a 14-day trial is available; production use requires a paid subscription. - **Limited global presence:** EU-only servers may result in slightly higher latency for users outside Europe. - **Not open-source:** The source code is not publicly available, limiting independent security audits. - **Smaller market share:** Less widely deployed than hCaptcha or Cloudflare Turnstile, which may mean less real-world testing data. - **Annual billing only:** Pricing is only available as an annual subscription at €108 per year, which may not suit teams preferring monthly billing. #### Best For - EU-based organizations subject to GDPR compliance - Businesses that want to eliminate cookie-based tracking - WordPress users seeking a dedicated plugin solution - Teams that prefer predictable annual pricing - Organizations wanting EU data sovereignty without self-hosting ## Customizable and Enterprise Options: Control at Scale Sometimes you need more than a widget. For teams running on specific cloud infrastructure or requiring deep integration with existing security tooling, these options offer more control. ### GeeTest Adaptive CAPTCHA: Flexible Challenges, Global Reach [GeeTest Adaptive CAPTCHA](https://www.geetest.com/en/adaptive-captcha) is an advanced CAPTCHA solution that uses risk-based verification to determine the most appropriate challenge for each visitor. Instead of presenting the same CAPTCHA to every user, it dynamically adjusts the challenge type and difficulty based on the user’s behavior and risk level. With support for multiple challenge formats, extensive customization, and multilingual capabilities, it is well-suited for organizations serving a global audience. ![GeeTest Adaptive CAPTCHA - reCAPTCHA Alternatives](https://serveravatar.com/wp-content/uploads/2026/07/image-15.png) #### **Advantages** - **Adaptive risk-based verification:** Dynamically adjusts CAPTCHA difficulty based on the visitor’s risk profile, helping reduce unnecessary challenges for legitimate users. - **Multiple challenge types:** Supports interactive verification methods such as slider puzzles, icon selection, and other engaging challenges instead of relying solely on traditional image CAPTCHAs. - **Improved user experience:** Low-risk users can often pass verification with little or no interaction, while additional challenges are shown only when suspicious activity is detected. - **Global language support:** Offers support for 78 languages, making it suitable for international websites and multilingual applications. - **Strong accessibility support:** Compatible with popular screen readers, including ChromeVox, VoiceOver, NVDA, and JAWS, improving usability for users with disabilities. - **Enterprise-ready features:** Suitable for businesses requiring scalable CAPTCHA protection with advanced security controls. #### **Disadvantages** - **No public pricing:** Pricing information is not available on the official website, requiring businesses to contact the sales team for a quote. - **Sales-led onboarding:** Organizations must typically request a demo or free trial before receiving pricing and deployment details, which may slow evaluation for smaller teams. - **Potentially more complex implementation:** The advanced customization and adaptive features may require additional configuration compared to simpler CAPTCHA solutions. - **May exceed the needs of small websites:** Organizations with basic bot protection requirements may not need its extensive enterprise-focused capabilities. #### **Best For** - Global businesses serving multilingual audiences - Enterprise websites requiring adaptive bot protection - Organizations seeking customizable CAPTCHA experiences - Websites that prioritize accessibility and inclusive design - Businesses looking to minimize user friction through risk-based verification - Large organizations that require enterprise support and scalable security ### AWS WAF Captcha: Built Into Your AWS Stack [AWS WAF CAPTCHA](https://docs.aws.amazon.com/waf/latest/developerguide/waf-js-captcha-api.html) is a CAPTCHA solution built into AWS Web Application Firewall (WAF), making it an excellent choice for organizations already running their applications on AWS. Instead of integrating a separate CAPTCHA provider, businesses can configure CAPTCHA rules directly within their existing AWS security infrastructure to protect websites, APIs, and web applications from automated attacks. ![AWS WAF Captcha - reCAPTCHA Alternatives](https://serveravatar.com/wp-content/uploads/2026/07/image-16.png) #### **Advantages** - **Native AWS integration:** Works seamlessly with Application Load Balancer (ALB), Amazon API Gateway, AWS AppSync, and other AWS services, simplifying security management. - **Centralized security management:** CAPTCHA rules can be configured alongside existing AWS WAF rules, reducing the need for additional third-party security tools. - **Customizable CAPTCHA settings:** Administrators can adjust challenge difficulty, expiration time, retry limits, and visual appearance to match different security requirements. - **Selective CAPTCHA enforcement:** Integrates with AWS WAF Bot Control and Amazon IP Reputation Lists to display CAPTCHA challenges only for suspicious traffic, reducing friction for legitimate users. - **Accessibility support:** Includes audio CAPTCHA options and complies with accessibility standards, making it more usable for a wider range of visitors. - **Scalable infrastructure:** Designed to handle enterprise-scale workloads while integrating with AWS’s global cloud infrastructure. #### **Disadvantages** - **Best suited for AWS users:** Organizations hosting applications outside the AWS ecosystem may not benefit from its tight integration and could face unnecessary implementation complexity. - **Usage-based pricing:** Costs are based on the number of CAPTCHA attempts verified and challenges presented, which can increase significantly for high-traffic websites. - **Requires AWS expertise:** Effective configuration often requires familiarity with AWS WAF, security rules, and cloud networking. - **Not a standalone solution:** AWS WAF CAPTCHA is intended to work within the AWS ecosystem rather than as an independent CAPTCHA service. #### **Best For** - Organizations hosting applications on AWS - Enterprise websites and APIs requiring integrated security - Businesses already using AWS WAF for web application protection - Teams looking to combine CAPTCHA with advanced bot detection and threat intelligence - High-traffic applications that need flexible, rule-based CAPTCHA deployment [![Blog banner - ServerAvatar](https://serveravatar.com/wp-content/uploads/2025/09/728_90-Banner-1-1024x127.png)](https://serveravatar.com/?ref=blog)## Quick Comparison: How the Alternatives Stack Up Quick Comparison: How the Alternatives Stack Up FeatureCloudflare TurnstileFriendly CaptchaALTCHAhCaptchaPrivate CaptchaAWS WAF CaptchaGeeTest**Invisible option**YesYesYesNoYesYesYes**Privacy-focused**YesYesYesYesYesModerateModerate**Self-hosted option**NoNoYesNoYesNoNo**Free tier**Up to 10 widgetsNon-commercial onlyUnlimited1M req/mo14-day trialUsage-basedTrial only**WCAG compliant**2.1 AAWCAG2.2 AA2.1 AANot statedWCAGWCAG**GDPR compliant**YesYesYesYesYesYesYesIf you’re using WordPress, don’t miss our [**How to Add CAPTCHA in WordPress (Best Plugins + Easy Setup Guide)**](https://serveravatar.com/wordpress-captcha-setup/) to learn how to protect contact forms, login pages, and registration forms from spam using popular CAPTCHA solutions. ## Conclusion Choosing the right reCAPTCHA alternative depends on your website’s priorities. If you want a free and user-friendly solution, Cloudflare Turnstile is an excellent choice. Privacy-focused organizations may prefer ALTCHA, Friendly Captcha, or Private Captcha, while enterprises can benefit from advanced options like GeeTest or AWS WAF CAPTCHA. The key is to balance security, user experience, privacy, and ease of implementation based on your specific requirements. Remember that CAPTCHA is just one layer of website security. For the best protection against spam and automated attacks, combine it with server-side validation, rate limiting, honeypot fields, and continuous monitoring. ## FAQs ### Which reCAPTCHA alternative is best for privacy? hCaptcha and Private Captcha are built specifically around privacy. hCaptcha collects zero personally identifiable information and automatically satisfies GDPR, CCPA, and HIPAA. Private Captcha runs EU-only endpoints and doesn’t use cookies for verification, simplifying your cookie compliance obligations. ### Are invisible CAPTCHAs as effective as image-based ones? Generally, yes, for most use cases. Invisible alternatives like Cloudflare Turnstile, Friendly Captcha, and ALTCHA use background signals (browser behavior, proof-of-work computations) to detect bots without user interaction. They can be as effective as image challenges while providing a much better user experience. The one exception: high-security environments where you want maximum control over what constitutes a “passed” challenge may benefit from visible puzzles. ### Can I use these alternatives on WordPress sites? Most of the services covered here have WordPress plugins or easy JavaScript integration. Private Captcha has an official WordPress plugin. hCaptcha and Cloudflare Turnstile can be integrated via plugin or custom code without much difficulty. For custom or headless setups, all of them offer JavaScript widgets that work regardless of your CMS. ### Do CAPTCHA alternatives affect website performance? The best alternatives load asynchronously and don’t block page render. Services like Cloudflare Turnstile and Friendly Captcha are specifically designed to run in the background without impacting Core Web Vitals. That said, always test with your specific setup, heavy third-party scripts on already-slow hosting can compound load time issues. ### What’s the cheapest reCAPTCHA alternative? ALTCHA is free and open-source under the MIT license, with no request limits. If you need a managed service, hCaptcha’s free tier covers up to one million requests per month. Cloudflare Turnstile is also free for up to 10 widgets. For paid options with premium support, Friendly Captcha starts at €9 per month and Private Captcha at €108 per year. ## Key Takeaways - Invisible CAPTCHA alternatives like Cloudflare Turnstile and Friendly Captcha offer the best user experience, most users never see a challenge. - If privacy compliance is your primary concern, hCaptcha, Private Captcha, and ALTCHA are all strong choices, with ALTCHA offering the most control through self-hosting. - For teams already on AWS, AWS WAF Captcha integrates natively with your existing firewall rules and can be paired with bot detection managed rules. - Pricing models vary significantly, ALTCHA is free, managed services have free tiers, and enterprise options require sales conversations. Run the numbers against your traffic before deciding. - No CAPTCHA is perfect. Bot protection with different security practices such as server-side validation, rate limiting form honeypots, monitoring for unusual traffic patterns really helps. **Need help managing the servers and applications behind your website?** [ServerAvatar](https://serveravatar.com/) simplifies server management, deployment, and monitoring without the overhead. ### About the Author Meghna Meghwani is a technical writer focused on Linux, Ubuntu, VPS hosting, server management, WordPress, PHP, Node.js, cloud hosting, and DevOps. She creates beginner-friendly tutorials, practical hosting guides, troubleshooting articles, and server security content designed to help developers and businesses manage applications and servers more efficiently. **Categories:** Blog, Guide, Optimisation, Others **Tags:** Anti-Spam Tools, Bot Protection, CAPTCHA Alternatives, CAPTCHA Solutions, Google reCAPTCHA Alternatives, reCAPTCHA Alternatives, Spam Prevention, website security, Website Spam Protection --- ### [How to Identify and Kill MySQL Queries Using Command Line](https://serveravatar.com/kill-mysql-queries/) **Published:** July 4, 2026 **Author:** Meghna Meghwani **Content:** [![Blog banner - ServerAvatar](https://serveravatar.com/wp-content/uploads/2025/09/728_90-Banner-3-1024x127.png)](https://serveravatar.com/?ref=blog)There comes a moment, usually at the worst possible time, when your application suddenly crawls. Pages take forever to load, API calls time out, and users start complaining. Knowing how to kill MySQL queries quickly can help restore performance and get your application back on track. In my experience, the culprit behind most sudden MySQL slowdowns isn’t the server running out of memory or CPU, it’s almost always one or two queries that have gone rogue. A missing index on a frequently queried table. A bulk UPDATE running during peak traffic. A cron job that got stuck in a join it can’t finish. When that happens, you need to get in, find the problem fast, and fix it, without panicking. The MySQL command-line client gives you everything you need to do exactly that. No third-party tools, no elaborate setup. Just SSH in and you’re already diagnosing. In this guide, I’m going to walk you through the entire workflow: spotting slow queries, understanding why they’re slow, safely terminating them, and putting safeguards in place so the same problem doesn’t come back an hour later. Sound good? Let’s get into it. ## TL;DR **Key Takeaway****Summary****Common causes of slow queries**Slow MySQL queries are often caused by missing indexes, inefficient SQL statements, or long-running transactions that consume database resources.**Monitor active database activity**Use `SHOW FULL PROCESSLIST` to view all active MySQL connections and identify the queries currently being executed.**Prioritize by execution time**The **Time** column helps you quickly spot queries that have been running the longest and may require attention.**Analyze before taking action**Run `EXPLAIN` to understand the execution plan of a slow query before deciding whether it should be terminated or optimized.**Use the appropriate kill command**Start with `KILL QUERY` to stop only the running SQL statement. Use `KILL CONNECTION` only if ending the entire session is necessary.**Confirm successful termination**After stopping a query or connection, execute `SHOW FULL PROCESSLIST` again to verify that the thread has been removed.**Prevent future performance issues**Configure `max_execution_time` to automatically stop queries that exceed a defined execution time limit, helping protect server performance.**Be aware of transaction rollback**Terminating a query can roll back any uncommitted transactions, so always verify the session status and ensure the database remains in the expected state afterward.## Why Do MySQL Queries Slow Down or Get Stuck? Before we dive into the command-line tools, it helps to know what you’re actually looking at. Most query performance problems fall into a few predictable categories. - **Missing or unused indexes** are the number one cause in my experience. When MySQL has to scan every row in a table to find a match, queries that should take milliseconds suddenly take minutes. This is especially common on tables that grow quickly, say, a logging table that wasn’t indexed on the timestamp column. - **Large result sets** are another frequent offender. A query like “`SELECT * FROM orders WHERE status = 'pending'`” looks harmless until that table hits a million rows. MySQL will happily try to return all of them, locking rows along the way. - **Lock contention** happens when two queries try to modify the same row at the same time. InnoDB handles this with row-level locking, but if one transaction holds a lock too long, others queue up behind it. In my testing, I found that a single `UPDATE` running without an index can lock an entire table for 30 seconds or more under moderate load. - **Poorly written SQL**, nested subqueries, SELECT \* in joins, missing WHERE clauses, can also drag a server down. These don’t always show up in development because test data is small. They reveal themselves in production. **The point is:** slow queries aren’t random. They follow patterns. Your job at the command line is to spot those patterns quickly. ## Connecting to MySQL via Command Line The first step is getting into MySQL. You’ll need shell access to your server and a MySQL user with the appropriate privileges. For most admin tasks, the MySQL root user is what I reach for, it has full visibility into every connection on the server. Open your terminal and connect: ``` mysql -u root -p ``` ``` mysql -u root -p ``` Here’s what each part means: - `mysql` : the MySQL command-line client - `-u root` : log in as the MySQL root user (swap in a different user if needed) - `-p` : prompt for the password interactively (never type the password directly in the command, that’s a security risk) Once you enter your password and hit Enter, you’ll see the MySQL monitor prompt: ``` mysql> ``` ``` mysql> ``` As shown below: ![login to mysql - Kill MySQL Queries](https://serveravatar.com/wp-content/uploads/2026/07/image-4-1024x197.png) You’re in. Everything from here runs at this prompt. To exit at any time, just type `exit` or press Ctrl+C. One thing I always double-check before proceeding: **am I connected to the right database server?** If you’re managing multiple MySQL instances (say, a primary and a replica), it’s worth confirming which one you’re on with: ``` SELECT @@hostname; ``` ``` SELECT @@hostname; ``` Small step, but it saves you from killing a query on the wrong server, a mistake I’d rather not make twice. ### Viewing Running Processes: SHOW FULL PROCESSLIST Now that you’re in, the first real diagnostic command is “SHOW FULL PROCESSLIST”. This is your window into everything currently happening inside MySQL. Run it like this: ``` SHOW FULL PROCESSLIST; ``` ``` SHOW FULL PROCESSLIST; ``` The “`FULL`” keyword is important; without it, MySQL truncates long queries in the output. You want to see the complete SQL statement, so you know exactly what you’re looking at. The official [MySQL documentation](https://dev.mysql.com/doc/refman/8.4/en/show-processlist.html?ref=serveravatar.com) covers all the details if you need a reference. ![mysql processlist - Kill MySQL Queries](https://serveravatar.com/wp-content/uploads/2026/07/image-5-1024x228.png)Let me break down the response you will get and why it matters while troubleshooting: ColumnWhat it tells youWhy it matters**Id**The thread’s unique ID numberUsed as target when it is needed to kill the query**User**MySQL username behind the connectionHelps identify if a query comes from your app, a cron job, or something else**Host**Client hostname/IP and portNarrows down which application server is running the query**DB**The default database for this connectionShows which database is affected; NULL means none specified**Command**What the thread is currently doing (Query, Sleep, Binlog Dump, etc.)Query = actively running SQL; Sleep = idle waiting for new command**Time**Seconds the thread has been in its current stateYour fastest filter, high values are red flags**State**Granular current state of the threadReveals bottlenecks: locks, network writes, table metadata waits**Info**The actual SQL query being executedCopy this to analyze or kill it- **Id:** the thread ID. This is what you’ll use if you decide to kill the query. - **User:** the MySQL username behind the connection. This helps you figure out whether a query is coming from your application, a cron job, or something else entirely. - In my testing, I often see “`app_user`” connections spiking while system threads stay quiet, that’s a useful signal. - **Host:** the hostname or IP address and port of the client. This is particularly helpful when you have multiple application servers. - If one specific IP is generating dozens of stuck threads, you’ve narrowed your suspect list considerably. - **DB:** the default database for this connection. If it’s NULL, the query isn’t using any database specifically, or it’s a system-level command. - **Command:** what the thread is currently doing. - `Query` means it’s actively executing SQL. - `Sleep` means it’s waiting for a new command. - `Binlog Dump` means it’s feeding data to a replica. - You generally care about `Query` and sometimes `Connect`. - **Time:** this is the column I look at first. It shows how many seconds the thread has been in its current state. - A query running for 300 seconds is almost certainly a problem. - A query in `Sleep` for 300 seconds is a different problem, an idle connection that should probably be closed. - **State:** gives more detail on what MySQL is doing right now. - Some states are harmless (`starting`, `checking permissions`). - Others are red flags: - `System lock` – the query is waiting for a lock held by another thread. This is the most common cause of application hangs I’ve seen in practice. - `Sending data` – MySQL is processing rows and sending them back to the client. If this persists for a long time, the query might be returning a massive result set. - `Writing to net` – Similar to sending data, but specifically network write activity. - `Waiting for table metadata lock` – This one is particularly nasty. It usually means a long-running query is holding a lock that other queries need. Everything queues up behind it. - **Info:** the actual SQL query. This is what you’ll copy when you want to analyze or kill it. ### Filtering the Process List On a busy server, the full output can be overwhelming. There are two ways to narrow it down. **Option 1: Use the command directly** ``` SHOW FULL PROCESSLIST WHERE Time > 60; ``` ``` SHOW FULL PROCESSLIST WHERE Time > 60; ``` This shows only threads older than 60 seconds. In my experience, anything over 60 seconds is almost always either stuck or runaway, worth investigating immediately. **Option 2: Query information\_schema.PROCESSLIST directly** ``` SELECT id, user, host, db, command, time, state, info FROM information_schema.PROCESSLIST WHERE command = 'Query' ORDER BY time DESC; ``` ``` SELECT id, user, host, db, command, time, state, info FROM information_schema.PROCESSLIST WHERE command = 'Query' ORDER BY time DESC; ``` I use this one often because it lets me sort and filter like a proper SQL query. **Want threads from a specific user?** Add `AND user = 'app_user'`. **Want only threads touching a specific database?** `AND db = 'myapp'`. The flexibility is useful when you’re narrowing down a live incident. **One thing to keep in mind:** SHOW FULL PROCESSLIST shows you a snapshot. If a query finishes between the time you run the command and the time you read the output, it won’t appear. For fast-moving incidents, I usually run it twice a few seconds apart to make sure I’m looking at the right picture. ## Analyzing the Query Before You Kill It Here’s a step that many admins skip but I think is critical: understand why the query is slow before you kill it. Killing a query solves the immediate problem, but if you don’t know what caused it, it’ll come back. The tool for this is **EXPLAIN**. It shows you MySQL’s execution plan for a query, in other words, how MySQL plans to run your query, not how it’s actually running right now. This distinction matters. To use it, copy the full query from the `Info` column and run: ``` EXPLAIN ; ``` ``` EXPLAIN ; ``` What you’re looking for depends on the query, but there are a few patterns I watch for constantly. EXPLAIN FieldWhat it meansRed flag signal**type: ALL**Full table scan, every row readAlmost always needs an index**key: NULL**No index used at allQuery is scanning everything**rows: \[high number\]**Estimated rows examinedHigh row count + ALL type = major problem**Using filesort**MySQL is sorting results in memoryWarning sign for large result sets**Using temporary**MySQL created a temp table for this queryCan be expensive on large datasets**filtered: 100**Every touched row was usedLower = more rows discarded, possible indexing issue- **type: ALL** means MySQL is doing a full table scan, reading every single row in the table. If you see this on a large table, you almost certainly need an index. - In my testing, adding a single missing index on a WHERE clause column dropped query time from 45 seconds to under 100 milliseconds on a table with 2 million rows. - **key: NULL** with a high `rows` count means no index was used at all. The optimizer looked at the query and decided to just scan everything. That’s a red flag. - **Using filesort** or **Using temporary** in the Extra column means MySQL is building a temporary table or sorting results in memory. Fine for small result sets, but a warning sign for large ones. - **filtered: 100** means MySQL is examining every row it touches. Lower percentages mean MySQL is discarding many rows as it goes, a sign that the query logic or indexing could be improved. Here’s a practical example. Let’s say you pull this from the process list: ``` SELECT * FROM posts WHERE author_id = 42 ORDER BY created_at DESC; ``` ``` SELECT * FROM posts WHERE author_id = 42 ORDER BY created_at DESC; ``` You run EXPLAIN and see: ``` type: ALL key: NULL rows: 480000 Extra: Using filesort ``` ``` type: ALL key: NULL rows: 480000 Extra: Using filesort ``` That tells you: - full table scan - no index used - half a million rows examined - it’s sorting in memory This query needs an index on `author_id` (and possibly `created_at` for the ORDER BY). Killing it buys you time, but adding that index solves it permanently. **What about queries that look fine in EXPLAIN but still run slow?** That’s usually a sign of outdated statistics. Running `ANALYZE TABLE ;` refreshes the statistics MySQL uses to choose an execution plan. In some cases, this alone fixes a suddenly slow query. ## Killing a Problematic Query: KILL QUERY vs KILL CONNECTION Once you’ve identified the problem query and understand what it’s doing, it’s time to terminate it. MySQL gives you two options, and choosing the right one matters. CommandWhat it doesWhen to use it**KILL QUERY**Terminates only the executing SQL statement; connection stays openFirst choice for most situations**KILL CONNECTION**Terminates the statement AND drops the client connectionUse when KILL QUERY fails or you need to free the connection slot### KILL QUERY (Use This First) ``` KILL QUERY ; ``` ``` KILL QUERY ; ``` This is the surgical option. - Stops only the currently executing SQL statement. - Keeps the database connection active, allowing the client to continue using the same session. - Prevents the need to reconnect or re-authenticate after the query is terminated. - Minimizes disruption to applications compared to ending the entire connection. - Best used as the first approach when dealing with slow or stuck queries. - The query may not stop immediately if MySQL is completing a disk write or transaction commit. - In such cases, the thread may remain visible for a few seconds until MySQL reaches a safe interruption point. This behavior is expected. In my experience, this is almost always the right first move. It’s less disruptive; the application doesn’t have to re-establish a connection, re-authenticate, or deal with a sudden unexpected connection drop. ### KILL CONNECTION (Use When Necessary) ``` KILL CONNECTION ; ``` ``` KILL CONNECTION ; ``` This is the brute-force option. - It terminates both the query *and* the entire client connection. - The client will get a “Lost connection to MySQL server” error and will need to reconnect. I reach for KILL CONNECTION when: - KILL QUERY didn’t work (the thread persists) - The connection is in a state where it can’t accept new commands - I need to free up the connection slot immediately (e.g., during a “Too many connections” crisis) The downside is that the application may not handle an unexpected connection drop gracefully. In the worst case, you trade a slow query problem for an application error. ### What About KILL (Without a Suffix)? MySQL also accepts just `KILL ` without QUERY or CONNECTION. In most MySQL versions, `KILL` behaves the same as `KILL CONNECTION`, though the behavior can vary slightly by version. The official [MySQL KILL command](https://dev.mysql.com/doc/refman/9.7/en/kill.html?ref=serveravatar.com) documentation has the full syntax reference. > To be explicit and avoid ambiguity, I always specify QUERY or CONNECTION explicitly. ## Verifying the Kill After you issue either KILL command, always run SHOW FULL PROCESSLIST again to confirm the thread is gone. ``` SHOW FULL PROCESSLIST; ``` ``` SHOW FULL PROCESSLIST; ``` What you’re looking for: - the process ID you just killed should either: - Disappear entirely from the list, or - Still appear briefly with `Killed` in the `Command` column If you see `Killed`, don’t panic. This means MySQL has registered your kill request but is still cleaning up. The thread will disappear within seconds. If it persists for more than 30 seconds or so, there might be a deeper issue (like a transaction rollback in progress on a large dataset). If the thread is completely gone, you’re done. Move on to fixing the root cause. **One more thing:** if you killed a query that was part of an uncommitted transaction, InnoDB will roll back that transaction automatically. - This is good, it means your data stays consistent. But it also means any changes that transaction made are undone. ## What NOT to Kill: System Threads This is important enough to call out separately. When you’re scanning the process list, you’ll see threads from system users. **Do not kill these.** I cannot stress this enough. Look for threads with: - `User` = `system user` - `User` = `event_scheduler` - `User` = your replication user (often `repl` or similar) Killing the event\_scheduler disrupts scheduled tasks. Killing a replication thread breaks replication, if you’re running a primary-replica setup, this can cause replication lag or complete desync. **The rule I follow:** - If I don’t recognize the user and it’s not my application user, I don’t touch it. - When in doubt, check the `Host` column. System threads typically have `Host` values like `localhost` or `127.0.0.1` with no meaningful client IP behind them. [![Blog banner - ServerAvatar](https://serveravatar.com/wp-content/uploads/2025/09/728_90-Banner-1-1024x127.png)](https://serveravatar.com/?ref=blog)## Preventing the Problem: Proactive Safeguards Killing queries is firefighting. Here’s how to reduce the frequency of fires. ### 1. Set max\_execution\_time MySQL’s `max_execution_time` variable sets a maximum duration (in milliseconds) for read-only queries. Any query exceeding this limit is automatically terminated by MySQL, no manual intervention needed. ``` SET GLOBAL max_execution_time = 30000; -- 30 seconds ``` ``` SET GLOBAL max_execution_time = 30000; -- 30 seconds ``` This provides an extra layer of protection for production servers and can also be configured on a per-session basis for specific connections. **One caveat:** this only applies to read queries by default. Writes have a separate `lock_wait_timeout`. ### 2. Add Missing Indexes After analyzing a slow query with EXPLAIN, you’ll often find that adding an index fixes the problem at its root. For the query we looked at earlier: ``` ALTER TABLE posts ADD INDEX idx_author_id (author_id); ``` ``` ALTER TABLE posts ADD INDEX idx_author_id (author_id); ``` > In my testing on a table with millions of rows, adding a single missing index dropped query time by 99%+. It’s usually the highest-ROI optimization you can make. ### 3. Optimize Queries with EXPLAIN Even for queries that aren’t currently slow, running EXPLAIN periodically is good hygiene. Look for full table scans (type: ALL), missing indexes (key: NULL), and filesort operations. Fix the worst offenders before they become incidents. ### 4. Use Connection Pooling Idle connections sitting around with no query running still consume a connection slot. If your application opens too many connections and leaves them idle, you’ll hit “Too many connections” even when no queries are actually running. Connection pooling (via your application or a proxy like ProxySQL) helps manage this. ## Conclusion Being able to identify and terminate problematic MySQL queries from the command line is an essential skill for maintaining database performance. When slow or stuck queries impact your application, quickly inspecting the process list, analyzing the query, and stopping it when necessary can help restore normal operations with minimal downtime. However, stopping a query is only a short-term solution. To prevent recurring issues, investigate the root cause by reviewing the execution plan with `EXPLAIN`, optimizing SQL statements, adding appropriate indexes, and configuring query execution time limits. If you’re managing multiple servers and want a visual dashboard for managing and monitoring servers, applications, and databases, spotting queries, a platform like [ServerAvatar](https://serveravatar.com/) can handle a lot of that heavy lifting for you. But even with the best tools, understanding what’s happening under the hood at the command line makes you a far more effective administrator. ## FAQs ### How do I find queries running longer than a specific time? Query the `information_schema.PROCESSLIST` table directly: `SELECT id, user, time, state, info ` `FROM information_schema.PROCESSLIST ` `WHERE command = 'Query' AND time > 60 ` `ORDER BY time DESC;` This returns all active queries older than 60 seconds, sorted so the longest-running query appears first. Adjust the `60` threshold based on your needs. ### What is the difference between `KILL QUERY` and `KILL CONNECTION`? `KILL QUERY` terminates only the currently executing SQL statement, the client connection stays open, and the client can send a new query. `KILL CONNECTION` drops the entire client connection, forcing the client to reconnect. Always try `KILL QUERY` first; use `KILL CONNECTION` as a fallback when `KILL QUERY` doesn’t work or you need to free the connection slot immediately. ### Can killing a query cause data loss? Generally no, if you’re using InnoDB (the default storage engine), killing a query mid-execution causes the current transaction to roll back. Your committed data stays safe. However, any uncommitted changes within the killed transaction are undone. Always verify the thread status with `SHOW FULL PROCESSLIST` after killing to confirm the rollback completed. ### My query shows “Killed” in the process list, but it is still there. What do I do? Wait, MySQL needs time to roll back uncommitted transactions and release resources. On large datasets, this can take 30 seconds or more. If the thread persists beyond a minute, try escalating to `KILL CONNECTION ` instead. If it still doesn’t clear, there may be a deeper issue with the storage engine or lock manager that requires further investigation. ### Is SHOW PROCESSLIST safe to run on a production server? Yes, it’s a read-only diagnostic command that doesn’t acquire locks or modify any data. The only minor consideration is that on extremely busy servers with thousands of connections, the output can be lengthy. Use `WHERE` clauses or query `information_schema.PROCESSLIST` directly to filter results without scanning everything. ## Key Takeaways - **SHOW FULL PROCESSLIST** is your real-time window into MySQL, use it to spot slow or stuck queries instantly - The **Time** column is your fastest filter, queries with high Time values need immediate attention - Always run **EXPLAIN** on a problematic query to understand *why* it’s slow before killing it - Use **KILL QUERY** first, it’s the safer option that doesn’t drop the client connection - Escalate to **KILL CONNECTION** only when KILL QUERY doesn’t work or you need to free the connection slot entirely - After killing, **verify with SHOW FULL PROCESSLIST** again, look for the thread disappearing or showing `Killed` temporarily - **Never kill system threads** (event\_scheduler, replication users), the consequences can be severe - Set **max\_execution\_time** as an automatic safety net so runaway queries can’t monopolize resources - **Root cause analysis matters**, killing buys time, but fixing the query (indexes, query structure) solves it permanently **Want simpler server management without switching between the terminals?** Sign up and start a free trial to explore how [ServerAvatar](https://serveravatar.com/) simplifies server management and monitoring, making it easy to configure settings, manage services, and perform routine administrative tasks from a user-friendly dashboard. ### About the Author Meghna Meghwani is a technical writer focused on Linux, Ubuntu, VPS hosting, server management, WordPress, PHP, Node.js, cloud hosting, and DevOps. She creates beginner-friendly tutorials, practical hosting guides, troubleshooting articles, and server security content designed to help developers and businesses manage applications and servers more efficiently.[](https://3.basecamp.com/5840738/buckets/41514807/boosts/new?boost%5Bboostable_gid%5D=Z2lkOi8vYmMzL1JlY29yZGluZy8xMDA2MjgxNjYwOA) **Categories:** Blog, Guide, Linux, Others, Tutorials, Ubuntu **Tags:** Kill MySQL Queries, Kill Running MySQL Queries, MySQL, MySQL Command Line, MySQL KILL Command, MySQL Optimization, MySQL Performance, MySQL Process List, SHOW PROCESSLIST --- ### [What Is Laravel Livewire? Complete Beginner’s Guide for 2026](https://serveravatar.com/laravel-livewire/) **Published:** July 2, 2026 **Author:** Meghna Meghwani **Content:** [![Blog banner - ServerAvatar](https://serveravatar.com/wp-content/uploads/2025/09/728_90-Banner-3-1024x127.png)](https://serveravatar.com/?ref=blog)If you’ve been working with Laravel for a while, you’ve probably hit that familiar wall. You need to add some interactivity, a live search, a dynamic form, or a counter that updates without a page reload. Your options often seem limited: build API endpoints, handle CORS and frontend state management with React or Vue, or stick with plain PHP and accept full page reloads. Laravel Livewire offers a simpler approach by letting you build dynamic, interactive interfaces using Laravel and Blade without the complexity of a separate JavaScript framework. That’s the gap Laravel Livewire was built to fill. Livewire is a framework for Laravel that lets you build dynamic, reactive interfaces using nothing but PHP. You remain in Laravel ecosystem, write PHP, and Livewire will handle JavaScript behind the scenes. No separate frontend build step. No context switching. No API design for internal use cases. In this guide, I will guide you with Laravel Livewire, its working, when it makes sense to use it, and what its honest limitations are. By the end, you’ll have a clear picture of whether Livewire is the right tool for your next project. ## What Is Laravel Livewire? Laravel Livewire is an open-source PHP framework that integrates directly with Laravel. It lets you build interactive, reactive frontend components using PHP classes and Blade templates, without writing a single line of JavaScript. A Livewire component combines a PHP class with a Blade view. When users interact with the page, Livewire sends the request to the server, executes the PHP logic, and updates only the changed HTML, allowing the page to refresh dynamically without a full reload. You get the reactivity of a JavaScript single-page application, but the logic lives entirely in your Laravel backend. If you know Laravel and Blade, you’re already halfway there. ![Laravel Livewire flow](https://serveravatar.com/wp-content/uploads/2026/07/image.png) ### How Does Laravel Livewire Work? Here’s the mental model that makes everything click. A Livewire component is made of two parts: 1. **A PHP class** holds the component’s state (properties) and its behaviour (methods) 2. **A Blade template** renders the UI and binds to the component’s properties and methods When a user interacts with a Livewire component, Livewire sends the current state to the server, runs the required PHP logic, and re-renders the updated view. Only the changed HTML is returned and updated on the page, creating a smooth, app-like experience. Since every interaction involves a server request, Livewire works well for most web applications but may not be ideal for highly real-time or latency-sensitive interfaces. ## Core Concepts Every Beginner Should Know Before you start building, a few concepts will help everything else click faster. ### Properties Properties in a Livewire class are the **state** of your component. You define them as class properties, and they automatically sync with the template. ``` class SearchUsers extends Component { public string $query = ''; public array $results = []; public function updatedQuery() { $this->results = User::where('name', 'like', "%{$this->query}%")->get(); } } ``` ``` class SearchUsers extends Component { public string $query = ''; public array $results = []; public function updatedQuery() { $this->results = User::where('name', 'like', "%{$this->query}%")->get(); } } ``` In the Blade template, `$query` is referenced directly, no Vue-style binding syntax, no JavaScript. Just `wire:model="query"` and Livewire handles the rest. ### Actions Actions are **public methods** on your component class. You trigger them from the template using `wire:click`, `wire:submit`, or `wire:change`. ``` public function increment() { $this->count++; } public function submitForm() { $this->validate([ 'email' => 'required|email', ]); // Process the form... } ``` ``` public function increment() { $this->count++; } public function submitForm() { $this->validate([ 'email' => 'required|email', ]); // Process the form... } ``` From the template: `Add`. ### Lifecycle Hooks Livewire gives you hooks that run at specific moments in a component’s lifecycle: - `mount()` – runs once when the component is first created - `updated($name, $value)` – runs after any property is updated - `render()` – runs every time the component needs to re-render These let you hook into the component lifecycle to run logic at exactly the right moment. ### Directives Livewire adds a few Blade directives that power the magic: - `wire:model` – binds an input to a property, syncing bidirectionally - `wire:click` – calls a component method on click - `wire:submit` – handles form submission via Livewire - `wire:poll` – re-renders the component on a timed interval - `wire:init` – runs a method once when the component first mounts These directives work as a bridge between HTML and PHP. ## A Practical Example: Building a Real-Time Search Let’s make this concrete. Here’s a live user search component built entirely in PHP and Blade. ### The PHP Class: ``` use App\Models\User; use Livewire\Component; class SearchUsers extends Component { public string $query = ''; public Collection $users; public function mount() { $this->users = collect(); } public function updatedQuery() { if (strlen($this->query) < 2) { $this->users = collect(); return; } $this->users = User::where('name', 'like', "%{$this->query}%") ->orWhere('email', 'like', "%{$this->query}%") ->limit(10) ->get(); } public function render() { return view('livewire.search-users'); } } ``` ``` use App\Models\User; use Livewire\Component; class SearchUsers extends Component { public string $query = ''; public Collection $users; public function mount() { $this->users = collect(); } public function updatedQuery() { if (strlen($this->query) < 2) { $this->users = collect(); return; } $this->users = User::where('name', 'like', "%{$this->query}%") ->orWhere('email', 'like', "%{$this->query}%") ->limit(10) ->get(); } public function render() { return view('livewire.search-users'); } } ``` ### The Blade Template: ``` @if($users->count()) @foreach($users as $user) {{ $user->name }} — {{ $user->email }} @endforeach @elseif(strlen($query) >= 2) No users found matching "{{ $query }}" @endif ``` ``` @if($users->count()) @foreach($users as $user) {{ $user->name }} — {{ $user->email }} @endforeach @elseif(strlen($query) >= 2) No users found matching "{{ $query }}" @endif ``` No JavaScript. No API route. No fetch call. The `wire:model="query"` directive handles the input sync, and `updatedQuery()` fires automatically when the property changes. ## When Laravel Livewire Makes Sense Livewire shines brightest in a few specific scenarios. - **Admin Panels and Dashboards:** Build data-driven dashboards with sorting, filtering, and pagination quickly using Laravel and PHP. - **Dynamic CRUD Forms:** Create interactive forms with real-time validation, conditional fields, and multi-step workflows with minimal effort. - **Search and Filtering:** Implement responsive search and filter features without page reloads or custom JavaScript requests. - **Business Applications:** Keep form processing, validation, and business logic in PHP, making development faster and easier to maintain. - **Laravel-First Projects:** Add interactive functionality without learning or managing a separate JavaScript framework. ## When Laravel Livewire Isn’t the Right Tool Being honest about limitations is part of giving you a useful guide. - **Real-Time Applications:** Livewire is not ideal for chat apps, collaborative tools, or rapidly updating dashboards that require instant, real-time communication. - **Advanced UI Interactions:** Features like complex animations, drag-and-drop interfaces, and canvas-based graphics are better handled with JavaScript frameworks. - **High-Traffic Pages:** Since every interaction triggers a server request, Livewire may increase server load and costs on heavily visited pages. - **Existing JavaScript Projects:** If your application already relies heavily on React or Vue, adding Livewire can introduce unnecessary complexity. ## Livewire vs Alternatives: A Quick Comparison Here’s how Livewire stacks up against the most common alternatives. **Feature****Laravel Livewire****React / Vue (Inertia)****Vue / React standalone****Language**PHPJavaScriptJavaScript**Learning curve**Low for Laravel devsModerate to highHigh**Setup complexity**MinimalModerateHigh**State management**Server-sideClient-sideClient-side**JavaScript required**No (optional)YesYes**Best for**CRUD, dashboards, formsComplex reactive UIsFull SPAs**Performance (simple UI)**ExcellentGoodGood**Performance (complex UI)**ModerateExcellentExcellentIf your project is a Laravel application with moderate interactivity needs, [Livewire](https://livewire.laravel.com/docs) will get you there faster. If you’re building a complex, highly interactive, frontend-heavy application, a dedicated JavaScript framework is still the more appropriate choice. [![Blog banner - ServerAvatar](https://serveravatar.com/wp-content/uploads/2025/09/728_90-Banner-1-1024x127.png)](https://serveravatar.com/?ref=blog)## Laravel Livewire in 2026: What’s Changed Livewire has been around for a few years now, and the 2026 ecosystem looks meaningfully different from the early days. ### Recent Improvements in Livewire - **Robust Ecosystem:** Larger community and better documentation, more packages, and easier access to support, and solutions. - **Laravel Volt:** Volt simplifies development by keeping component logic and templates together in a single file. - **Better File Uploads:** Livewire now includes built-in support for drag-and-drop uploads and upload progress indicators. - **Improved Testing:** Components can be tested directly with Laravel’s testing tools, without requiring JavaScript-based testing frameworks. - **Framework:** Livewire is stable, widely used solution in 2026 for creating Laravel application. ### Deploying a Livewire Application - **Use HTTPS:** Secure connections are essential for reliable Livewire requests and browser compatibility. - **Configure Sessions Properly:** For multi-server deployments, use shared session storage such as Redis or a database. - **Check PHP Compatibility:** Livewire 3 requires PHP 8.1 or newer, so ensure your server meets the requirement. ## Pros and Cons ### What Livewire gets right - **Rapid prototype:** Get a fully functional, interactive interface up and running in just minutes. - **Familiar ecosystem:** Stay in Laravel, use Blade, write PHP. No new language to master - **Strong testing workflow:** Test components the same way you would test a controller. - **Smaller codebase:** No separate frontend repo, no build pipeline, no npm dependencies for basic features ### Where it falls short - **Every interaction is a server round-trip:** this is the fundamental trade-off - **Not built for real-time:** polling is a workaround, not a solution - **Mental model takes adjustment:** developers used to pure JavaScript frameworks sometimes struggle with the “it’s all PHP” approach initially Understanding both sides helps you make better decisions for your specific project. ## Key Takeaways - Laravel Livewire lets you build **reactive, dynamic interfaces using pure PHP**, no JavaScript framework required - It work by **sending AJAX request** from browser to Laravel backend and updating only HTML that changed - Best suited for **CRUD interfaces, dashboards, search/filter UIs, and form-heavy applications** - Not ideal for **real-time apps, complex animations, or high-traffic pages** where server round-trips become a bottleneck - Requires **PHP 8.1+, HTTPS**, and a compatible Laravel version (Laravel 10 or 11 for Livewire 3) - The ecosystem is **mature and well-supported in 2026**, with good community packages and documentation - Deploys on **any Laravel-compatible hosting,** no special configuration needed beyond standard HTTPS and session setup ## Official Laravel Livewire Resources Here are the official docs to bookmark as you learn Livewire: - [Laravel Livewire Documentation](https://livewire.laravel.com/docs) – Quick start guide, component reference, and examples - [Laravel Official Documentation](https://laravel.com/docs) – Framework docs, Blade templates, and ecosystem overview - [Livewire GitHub Repository](https://github.com/livewire/livewire) – Report issues, check releases, follow development ## Conclusion Laravel Livewire isn’t designed to replace JavaScript frameworks, it aims to simplify development for Laravel developers by allowing them to work entirely within the Laravel ecosystem. For a specific class of applications, data-driven, form-heavy, internal tools and dashboards, it genuinely does that job extremely well. If you’re building a CRUD interface, an admin panel, or a dynamic Laravel application and you want to move fast without learning a separate frontend framework, Livewire is one of the best choices available in 2026. If you’re building a real-time collaborative tool or a highly interactive consumer app, look elsewhere. ## FAQs ### Is Laravel Livewire a replacement for Vue or React? No, Livewire is built for Laravel developers who want interactive features like forms, filters, and live search without using a separate JavaScript framework ### Does Livewire require a server to work? Yes, every interaction sends a request to the server, so you need a PHP-compatible hosting environment with HTTPS enabled. ### Can I use Livewire alongside Vue or React? Yes, but combining multiple frontend approaches can increase complexity. For most projects, it’s better to choose one primary framework. ### Is Livewire good for production applications? Yes, Livewire 3 is stable, widely used, and well-suited for production Laravel applications. ### Does Livewire work with Laravel Sanctum or Fortify for authentication? Yes, Livewire integrates smoothly with both Laravel Sanctum and Fortify, making authentication easy to manage. ## Continue Reading - [Core PHP vs Laravel: Which One Is Best for Your Project?](https://serveravatar.com/php-vs-laravel) - [Best PHP Testing Tools to Ensure Error-Free Web Development](https://serveravatar.com/php-testing-tools) - [Best PHP CMS Platforms for Developers in 2026](https://serveravatar.com/tag/best-php-cms-platforms/) ***Ready to deploy your Laravel application?*** [*ServerAvatar*](https://serveravatar.com/) *lets you deploy and manage Laravel apps on your VPS without touching the command line, from SSL setup to security configuration, all in one dashboard.* ### About the Author Meghna Meghwani is a technical writer focused on Linux, Ubuntu, VPS hosting, server management, WordPress, PHP, Node.js, cloud hosting, and DevOps. She creates beginner-friendly tutorials, practical hosting guides, troubleshooting articles, and server security content designed to help developers and businesses manage applications and servers more efficiently. **Categories:** Blog, Guide, Laravel, Others, Php, Tutorials **Tags:** laravel, Laravel for Beginners, Laravel Livewire, Laravel Livewire Guide, Laravel Livewire Tutorial, PHP framework, Web Development, What is Laravel Livewire --- ### [Reduce Server Response Time in WordPress (TTFB Optimization Guide)](https://serveravatar.com/wordpress-ttfb-optimization/) **Published:** June 26, 2026 **Author:** Meghna Meghwani **Content:** [![Blog banner - ServerAvatar](https://serveravatar.com/wp-content/uploads/2025/09/728_90-Banner-3-1024x127.png)](https://serveravatar.com/?ref=blog)You run a PageSpeed test on your WordPress site. Everything looks fine, images are compressed, CSS is minified, and JavaScript isn’t blocking. Then you scroll down and see it: “Reduce initial server response time.” This warning usually points to poor WordPress TTFB (Time to First Byte), meaning your server is taking too long to deliver the first byte of data to visitors. That’s your TTFB (Time to First Byte) talking. It measures how long your server takes to start sending data after a browser asks for it. And unlike image compression or code minification, you can’t fix TTFB by tweaking your theme. You have to go deeper. Here’s the uncomfortable truth: TTFB isn’t really a WordPress problem. It’s a server problem. And fixing it means understanding what your server is doing, and why it’s slow. This guide is for you if you run a WordPress site and want to understand the causes of slow server response times. We’ll cover what TTFB really measures, why WordPress is particularly vulnerable to it, and the concrete steps that actually move the needle. No vague advice. No generic tips. Just the practical stuff. ## TL;DR **Key Takeaway****Summary****What is TTFB?**TTFB (Time to First Byte) measures how long your server takes to send the first byte of data, not your website’s overall loading speed.**Why is WordPress slow?**WordPress generates pages dynamically for every request, which can increase server response time without optimization.**Best ways to reduce TTFB**Enable page caching, upgrade to the latest PHP version, optimize your database, and use object caching for the biggest performance gains.**Server Infrastructure Matters**A fast server and quality hosting are essential. Plugin optimizations can’t fully compensate for slow or underpowered infrastructure.**Faster VPS Management**Platforms such as ServerAvatar help optimize PHP, caching, and server management, making it easier to achieve lower TTFB without manual server administration.## What TTFB Actually Means (And Why It Matters) Let’s start with the basics. When someone types your domain into a browser, a chain of events kicks off: - **DNS lookup:** the browser finds your server’s address - **Connection setup:** the browser connects to your server - **Server processing:** your server builds the page (runs PHP, queries the database) - **Data transfer:** the first byte of content travels back to the browser TTFB is step three. It’s the gap between the browser finishing the handshake and receiving the first byte of actual content. Everything else, rendering, image loading, and scripts running, happens after that first byte arrives. Google calls 800 milliseconds or less “Good”. Most performance experts worth listening to say you should aim for under 200ms if you want a genuinely fast site. If your TTFB is sitting at 1.5 seconds, no amount of image optimization is going to fix it. **TTFB Value****Performance Rating****What It Means****Under 200ms**ExcellentFast server response and well-optimized infrastructure.**200–500ms**GoodSuitable for most WordPress websites.**500–800ms**Needs ImprovementSome optimization opportunities exist.**800ms–1.5s**PoorServer response time is affecting page performance.**Above 1.5s**CriticalIndicates significant server or application bottlenecks.Why does this matter so much for WordPress specifically? Because WordPress doesn’t serve static files. Every page is constructed fresh when someone visits. Your server runs PHP code, pulls content from a MySQL database, combines it with your theme, and builds HTML, all before the first byte leaves. That’s fundamentally different from serving a static HTML file, and it’s why WordPress TTFB is usually higher than static sites. ![WordPress TTFB Flow](https://serveravatar.com/wp-content/uploads/2026/06/image-19.png) ## Why WordPress Struggles With Server Response Time WordPress has a scaling problem disguised as a performance problem. Out of the box, a standard WordPress site does the following for every single page request: - Load the core WordPress files - Load all active plugins - Load your theme - Connect to the MySQL database - Run queries to fetch posts and settings - Build the page HTML - Send it to the browser This entire process repeats on every single visit, even if the content hasn’t changed in months. This is fine when you have ten visitors a day. It falls apart when you have a few hundred simultaneous visitors, or when your database has accumulated years of bloat, or when your server simply doesn’t have enough RAM to handle the PHP workers needed to process all those requests simultaneously. The real issue isn’t WordPress itself. WordPress is a content management system doing exactly what it was designed to do. The problem is the environment it runs in, an underpowered server, an unoptimized database, missing cache layers, and misconfigured PHP settings. > **Did You Know?** > Many WordPress performance issues attributed to plugins are actually caused by inefficient server configurations. Proper PHP tuning, caching, and resource allocation often deliver larger TTFB improvements than adding more optimization plugins. In a real-world WordPress environment, server response time depends largely on whether the page is cached. - Uncached pages typically take 1,000–3,000 ms to generate because WordPress builds each page dynamically by running PHP code and database queries. - This is expected behavior, not a WordPress issue or bug. - With page caching (server-level or plugin-based), the server delivers a pre-built HTML page instead of generating it on every request. - As a result, the same page can often be served in 20–100 ms, significantly reducing TTFB. - Dynamic page generation cannot be completely eliminated for uncached requests. - The best way to improve performance is to reduce the amount of processing required through caching, database optimization, efficient PHP execution, and high-performance hosting. - A well-optimized server stack combined with caching provides the biggest improvements in WordPress response time. ## How to Measure TTFB Accurately Before you start making changes, measure properly. This matters more than you think, because if you measure wrong, you’ll optimize the wrong thing. There are two types of data: - **Lab data** comes from controlled tests. Tools like Google’s PageSpeed Insights or GTmetrix simulate a page load and give you metrics. This is useful, but it’s artificial, it’s one visit, one location, one moment in time. - **Field data** is real user data collected over days or weeks. PageSpeed Insights shows this alongside lab data, look for the “Field Data” section. This tells you what your actual visitors experience, not a synthetic test. For diagnosing TTFB (Time to First Byte) issues, using the right testing tools helps identify the actual bottleneck. - GTmetrix is useful for detailed TTFB analysis because it provides a waterfall breakdown of the entire loading process. - The waterfall report helps you identify where delays happen, such as: - DNS lookup time - Server connection time - TLS/SSL negotiation - Backend processing time - Actual server response delay - This breakdown makes it easier to determine whether the issue is with your server, website configuration, or network latency. - Tools like KeyCDN TTFB Test are helpful because they measure response time from multiple locations worldwide. Example: - **150ms TTFB from New York:** your server is responding quickly nearby. - **1,200ms TTFB from Sydney:** the delay is likely caused by physical distance, not server performance. - If TTFB varies heavily by location, the solution is usually: - Use a CDN - Enable edge caching - Serve content closer to visitors - If TTFB is consistently high everywhere, focus on: - Server resources - PHP optimization - Database performance - WordPress caching ![WordPress TTFB example](https://serveravatar.com/wp-content/uploads/2026/06/image-20.png) ## The Eight Fixes That Actually Reduce TTFB Let’s get into the practical part. These are the changes that produce real, measurable improvements, ordered roughly by impact. **Optimization Technique****Difficulty****Expected Impact on TTFB****Full-Page Caching**EasyVery High**Upgrade to PHP 8.x**EasyHigh**Redis Object Cache**MediumHigh**Database Optimization**EasyMedium**Replace WP-Cron**MediumMedium**CDN with Edge Caching**MediumHigh**Optimize Web Server Stack**AdvancedHigh**Audit Heavy Plugins**EasyMedium### 1. Enable Full-Page Caching Full-page caching is one of the most effective ways to reduce WordPress TTFB and improve overall website speed. **Without caching:** - Every visitor request runs the complete WordPress process. - PHP executes scripts. - The database processes queries. - WordPress generates the page dynamically before sending a response. **With full-page caching:** - The server saves a ready-to-use HTML version of the page. - Future visitors receive the stored version instantly. - PHP processing and database queries are reduced significantly. **Performance impact:** - Cached pages can load in around 20–80ms on a properly optimized server. - Uncached pages may take 800ms+ on the same setup. - The improvement can be several times faster, especially for content-heavy websites. **Plugin caching vs server-level caching:** - Caching plugins can help, but server-level caching is usually faster. - Server-side caching works before WordPress loads, reducing unnecessary processing. - Tools like FastCGI cache store pages at the server layer instead of relying on PHP-based caching. **When full-page caching works best:** - Blog websites - Documentation sites - Portfolio websites - Landing pages - Static business websites **When additional caching is needed:** - Online stores - User dashboards - Membership websites - Personalized pages **Dynamic pages often require extra layers such as:** - Object caching - Database optimization - CDN caching - Application-level optimization **Recommended action:** - Enable server-level page caching if your hosting panel supports it. - If using shared hosting, consider trusted caching solutions such as LiteSpeed Cache or W3 Total Cache. - Review cache settings regularly to ensure pages are being served efficiently. > If you’re hosting WordPress on a VPS, ServerAvatar lets you configure high-performance server stacks and server-level caching without manually editing web server configurations. This makes it much easier to deliver cached pages with consistently low TTFB. ### 2. Upgrade Your PHP Version PHP is the core technology that powers WordPress, and the version you use directly affects website speed, security, and TTFB performance. - Older PHP versions process requests slower compared to newer releases. - Modern PHP versions include performance improvements that help WordPress execute code faster. - Moving from PHP 7.4 to PHP 8.x can significantly reduce PHP execution time on the same server setup. **Why PHP version affects TTFB:** **WordPress relies on PHP to:** - Load themes and plugins - Execute functions - Process database requests - Generate page output **Faster PHP execution means:** - Less server processing time - Faster first-byte response - Better overall page performance **Common upgrade challenges:** - Some older plugins or themes may not work properly with newer PHP versions. - Many websites avoid upgrades because they fear compatibility issues. - Without testing, it can be difficult to identify outdated code. **Best practices before upgrading:** - Check your current PHP version - Test the upgrade on a staging site first - Update WordPress, themes, and plugins before switching versions - Remove outdated plugins that are no longer maintained - Keep a backup before making changes **Recommended action:** - If your site runs on PHP 7.4 or an older version, plan an upgrade to a supported PHP 8.x release. - Use a hosting platform that allows switching PHP versions easily per application. - Test compatibility after upgrading and monitor your site’s performance. > ServerAvatar makes [PHP version management](https://serveravatar.com/docs/application/php-settings/) simple by allowing you to switch PHP versions for individual applications, helping you test compatibility and adopt newer PHP releases that improve WordPress performance. Keeping PHP updated is one of the simplest ways to improve WordPress speed, security, and server response time. ### 3. Switch to Redis Object Caching Full-page caching improves performance for regular visitors, but it does not help much with dynamic pages. **Pages that usually bypass full-page caching:** - Logged-in user areas - WooCommerce stores - Membership websites - Personalized dashboards These requests still depend heavily on database queries. **How Redis helps:** - Redis stores frequently used database results in server memory (RAM). - Instead of running the same database queries repeatedly, WordPress retrieves saved data instantly. - This reduces: - Database workload - PHP processing time - Server response delays **Performance benefits:** - Complex pages with dozens or hundreds of database queries can become much faster. - Dynamic content benefits the most from Redis caching. - Static pages usually see smaller improvements once full-page caching is active. **Setup recommendations:** - Enable Redis from your hosting/server dashboard if available. - Connect WordPress using a Redis Object Cache plugin. - Monitor TTFB before and after enabling Redis. Redis is especially valuable for websites where visitors interact with database-heavy features. ### 4. Clean Up Your Database Over time, WordPress databases collect unnecessary data that can slow down queries. **Common database clutter includes:** - Old post revisions - Deleted posts and comments - Expired temporary data (transients) - Unused plugin entries - Excessive autoloaded options **Why the wp\_options table matters:** - WordPress loads data from this table on almost every page request. - Poorly coded plugins may leave behind large amounts of unnecessary data. - Too much autoloaded content increases processing time. **Database optimization helps by:** - Removing unused records - Reducing query execution time - Improving server response speed - Keeping database tables efficient **Recommended cleanup steps:** - Use tools like WP-Optimize or database management tools. - Review large autoloaded entries. - Remove unused plugins completely. - Schedule regular database maintenance. For active websites, quarterly cleanup is a good practice. Less frequently updated sites may need cleanup only occasionally. ### 5. Replace WordPress Cron With Real Server Cron WordPress uses a built-in scheduler called WP-Cron to handle background tasks. **It manages:** - Scheduled posts - Plugin updates - Backup tasks - Automated maintenance jobs **The problem with WP-Cron:** - It runs whenever someone visits your website. - A normal page request may trigger background tasks. - This creates unexpected CPU usage and slower response times. A better approach is to use a real server cron job. The benefits include: - Runs at fixed intervals - Separates background tasks from visitor requests - Creates more predictable server performance - Reduces random TTFB spikes **Setup:** - Disable WordPress’s default cron system. - Create a server-level cron schedule. - Run scheduled tasks every few minutes or hours, depending on your needs. This keeps visitor requests focused only on delivering pages. ### 6. Use a CDN With Edge Caching Server optimization improves processing speed, but network distance also affects TTFB. **For Example:** - A visitor far away from your server location will experience extra delay. - Even a fast server cannot eliminate physical network distance. **A CDN solves this by:** - Storing copies of your website content globally. - Serving files from locations closer to visitors. - Reducing network travel time. **Traditional CDNs mainly cache:** - Images - CSS files - JavaScript files **For better TTFB improvements, use CDN solutions that support:** - HTML caching - Edge caching - Full-page delivery **Benefits:** - Faster global response times - Lower latency - Better experience for international visitors **Recommended action:** - Check where your visitors are located. - If users are far from your server, consider a CDN with edge page caching. ### 7. Choose the Right Web Server Stack Your web server handles incoming requests before WordPress starts processing them. Common options include: - Nginx - Apache - OpenLiteSpeed **Nginx:** - Fast and lightweight - Handles many simultaneous connections efficiently - Uses fewer resources **Apache:** - Highly flexible - Supports many legacy configurations - Can require more server resources **OpenLiteSpeed:** - Built with performance in mind - Works especially well with WordPress - Includes powerful caching features **Choosing the right stack:** - For maximum WordPress speed, OpenLiteSpeed is often worth testing. - If caching and optimization are already done but TTFB remains high, changing server stack can help. Always choose the setup that matches your website requirements and traffic level. ### 8. Audit Resource-Heavy Plugins Plugins can significantly affect WordPress performance. Every active plugin may: - Execute PHP code - Run database queries - Load additional scripts - Increase server processing time **Common performance-heavy plugins:** - Security scanners - Backup tools - Analytics plugins - Large page builders - Poorly optimized extensions **How to improve plugin performance:** - Review all installed plugins. - Remove unused plugins. - Replace heavy plugins with lightweight alternatives. - Avoid running unnecessary tools on every page request. **Optimization tip:** Ask: - Does this plugin need to run on every page? - Is this feature used frequently? - Is there a simpler alternative? Reducing plugin overhead can significantly improve TTFB, especially on resource-limited servers. [![Blog banner - ServerAvatar](https://serveravatar.com/wp-content/uploads/2025/09/728_90-Banner-1-1024x127.png)](https://serveravatar.com/?ref=blog)## How Your Hosting Sets the TTFB Ceiling Your WordPress optimizations can only go so far if your hosting environment lacks sufficient resources. The server you choose creates the foundation for your website’s response time. ### Why hosting affects TTFB: Your server handles: - PHP execution - Database queries - Plugin processing - Page generation - Visitor requests Limited server resources increase processing time and delay the first response byte. ### Shared hosting limitations: Multiple websites run on the same server. Resources like below are shared between many users: - CPU - RAM - PHP workers - Disk performance If another website on the same server experiences heavy traffic: - - Server load increases - Your website slows down - TTFB can rise unexpectedly No plugin or configuration tweak can fully solve resource limitations caused by shared infrastructure. ### Why VPS hosting improves TTFB: Moving to a VPS provides dedicated resources. Benefits include: - Dedicated CPU allocation - Dedicated memory - More control over server configuration - Consistent PHP performance - Better handling of traffic spikes Even a basic VPS can outperform heavily loaded shared hosting because your resources are isolated. ### Why Server Management Matters Just As Much Moving to a VPS is only part of the solution. The server still needs to be configured correctly to achieve consistently low TTFB. For example, performance depends on settings such as: - PHP-FPM settings - PHP versions - Server-level caching - SSL configuration - Database optimization - Web server stack (Nginx or OpenLiteSpeed) Configuring these manually can be time-consuming, especially for users who don’t manage Linux servers every day. Platforms like [ServerAvatar](https://serveravatar.com/) simplify VPS management by providing an intuitive control panel that helps you deploy WordPress, manage PHP versions, configure server services, and maintain an optimized hosting environment without relying on complex command-line administration. This allows developers and agencies to focus more on WordPress optimization while reducing the operational overhead of server management. ### Managed server solutions: Platforms like ServerAvatar simplify VPS management by handling complex server tasks. They help manage: - PHP-FPM configuration - Caching setup - Firewall rules - Database optimization - Server performance tuning You still get control over your server while reducing the chances of misconfiguration. ### Recommended action: If your TTFB remains high after the mentioned, your hosting environment may be the bottleneck: - Enabling caching - Optimizing WordPress - Cleaning the database - Reducing plugin overhead Consider upgrading from shared hosting to a VPS for a long-term performance improvement. A faster server is not just a minor upgrade, it changes the performance limits your WordPress site can achieve. ## Conclusion Reducing server response time in WordPress isn’t about applying a single optimization, it’s about improving every layer that contributes to TTFB. From enabling full-page caching and upgrading PHP to optimizing your database, using Redis, and choosing the right web server stack, each improvement helps your server respond faster and deliver a better experience for your visitors. If you’ve optimized WordPress but still see high TTFB, it’s worth looking beyond the application itself. Your hosting environment and server configuration play a major role in determining performance. Running WordPress on a well-configured VPS and managing it with a platform like ServerAvatar can simplify server optimization, helping you build a faster, more reliable website with consistently lower server response times. ## FAQs ### What is a good TTFB for WordPress? Under 200ms is excellent. Under 500ms is generally acceptable for most sites. Above 800ms, Google considers it “needs improvement”, and above 1 second, it’s noticeable to real users. The goal should be as low as your infrastructure allows. ### Does TTFB affect SEO? Yes, indirectly. TTFB feeds into Core Web Vitals metrics like Largest Contentful Paint (LCP). Poor TTFB slows down LCP, which is a confirmed Google ranking factor. Slow TTFB also increases bounce rates because users literally see a blank page for longer. ### My TTFB is high even with a caching plugin. Why? A caching plugin helps, but server-level caching is faster. Also check: is your database bloated? Are resource-heavy plugins loading on every page? Is your PHP version outdated? Is your server underpowered for your traffic? Caching is necessary but rarely sufficient on its own. ### Will a CDN fix my TTFB? It depends on why your TTFB is high. If your server is well-optimized but geographically distant from many visitors, a CDN with edge caching will help significantly. If your TTFB is high because of poor server performance or unoptimized PHP, a CDN alone won’t fix it. ### How often should I optimize my WordPress database? For frequently updated sites (daily posts, active community), quarterly is reasonable. For mostly static sites, twice a year is sufficient. After major plugin removals or theme changes, run a cleanup. ## Key Takeaways - TTFB measures server processing time, not total page load time, treat it separately - WordPress’s dynamic nature makes TTFB optimization more critical than for static sites - Full-page caching is the single highest-impact change for most WordPress sites - PHP 8.3 is significantly faster than older versions, upgrade if you haven’t - Redis object caching dramatically improves dynamic page TTFB - Database bloat silently hurts performance, clean it regularly - Replacing wp-cron with real server cron removes unpredictable load spikes - A CDN with edge HTML caching solves the geography problem - OpenLiteSpeed stack outperforms Nginx and Apache for WordPress TTFB specifically - Plugin quality matters, one bad plugin can ruin your TTFB despite everything else being optimized - Dedicated VPS hosting sets a higher performance ceiling than shared hosting *For more practical tips and guides on managing your VPS, browse* [*ServerAvatar’s*](https://serveravatar.com/blog/)[ *blogs*](https://serveravatar.com/blog/)*, server management guides, and step-by-step setup* [*documentation*](https://serveravatar.com/docs)*.* ### About the Author Meghna Meghwani is a technical writer focused on Linux, Ubuntu, VPS hosting, server management, WordPress, PHP, Node.js, cloud hosting, and DevOps. She creates beginner-friendly tutorials, practical hosting guides, troubleshooting articles, and server security content designed to help developers and businesses manage applications and servers more efficiently. **Categories:** Blog, Guide, Optimisation, Others, Tutorials, WordPress **Tags:** Server Response Time, Time to First Byte, TTFB Optimization, Wordpress, WordPress performance, WordPress performance tips, WordPress speed optimization, WordPress TTFB --- ### [How to Use n8n for eCommerce, SaaS & Agencies: Top Automation Use Cases](https://serveravatar.com/n8n-for-ecommerce-saas-agencies/) **Published:** June 25, 2026 **Author:** Meghna Meghwani **Content:** [![Blog banner - ServerAvatar](https://serveravatar.com/wp-content/uploads/2025/09/728_90-Banner-3-1024x127.png)](https://serveravatar.com/?ref=blog)If you run an eCommerce store, a SaaS product, or a client services agency, you’ve likely felt how quickly repetitive work starts piling up. Tasks like syncing orders across platforms, sending onboarding emails, preparing monthly client reports, or following up with trial users can take up a lot of valuable time. This is where n8n helps by allowing you to automate these routine workflows, so you can focus more on growth instead of manual operations. That’s where workflow automation tools come in. And among the options available today, n8n has carved out a loyal following because it’s open-source, flexible, and gives you control without locking you into a proprietary platform. This guide walks through the most practical ways eCommerce businesses, SaaS companies, and agencies can put n8n to work. We’ll look at real automation patterns, not just theoretical possibilities, along with some notes on getting started. ## TL;DR **Key Takeaway****Summary****What is n8n?**A flexible workflow automation platform that connects apps and services with minimal or no coding.**For eCommerce**Automates order processing, inventory synchronization, and customer notifications.**For SaaS**Streamlines user onboarding, subscription management, and analytics alerts.**For Agencies**Simplifies client reporting, lead distribution, and project setup workflows.**Deployment**Get n8n running in minutes on your VPS. ServerAvatar’s one-click installer handles setup, Nginx configuration, and process management automatically.## What is n8n? [n8n](https://n8n.io?ref=serveravatar.com) is a workflow automation platform that lets you connect different apps and services into automated sequences. You can think of it as a visual glue layer: it listens for events in one tool, processes the data, and triggers actions in another, without you having to write integration code from scratch. Unlike some automation platforms that keep you on their infrastructure, n8n can be self-hosted. That means you run it on your own server, retain full control, and avoid per-task pricing that can balloon as your workflows scale. The interface uses a node-based visual editor. Each node represents an app or an action, “when this happens, do this.” Connecting nodes builds a workflow that runs on triggers you define: a webhook, a schedule, a database change, an incoming email, and much more. That flexibility is part of why n8n has built a solid following among developers and technical teams. You can start with something simple and grow into more complex logic as your needs expand. ## Why eCommerce, SaaS, and Agencies Are a Natural Fit These three verticals share a common characteristic: they all deal with high-volume, event-driven workflows. Every order placed, every user signed up, every client onboarded, these are triggers that demand a chain of follow-up actions. Automating those chains is where n8n shines. The other reason is integration sprawl. eCommerce stores juggle payment processors, shipping providers, inventory systems, and email platforms. SaaS products need to sync user data across CRMs, billing tools, analytics dashboards, and support desks. Agencies coordinate clients, contractors, project management tools, and reporting pipelines. n8n’s 400+ native integrations make it a natural hub for all of these setups. ## Top n8n Automation Use Cases for eCommerce Running an online store means managing a constant flow of data between platforms that don’t always talk to each other natively. Here are the workflows that store owners and developers find themselves rebuilding (or wishing they had) most often. ### 1. Automate Order Processing and Fulfilment Managing orders often involves multiple manual steps, including payment verification, inventory updates, shipping coordination, customer notifications, and record management. Handling these tasks across different platforms can be time-consuming and prone to errors. With n8n, you can automate the entire order fulfilment workflow: - Trigger workflows when a new order is placed. - Verify payments automatically through payment gateways. - Update inventory levels in real time. - Notify fulfilment teams via Slack or other communication tools. - Send order confirmation emails to customers. - Synchronize order data across connected systems. By standardizing every step, businesses can reduce manual effort, improve accuracy, and deliver a more reliable customer experience. ### 2. Automate Abandoned Cart Recovery Cart abandonment can lead to significant revenue loss, but n8n helps you re-engage potential customers automatically. - Detect abandoned carts using APIs or webhooks. - Track customer inactivity and cart status. - Send personalized recovery emails automatically. - Offer targeted discounts or incentives to encourage purchases. - Test different email timings, messaging, and promotions. By automating follow-ups, businesses can recover lost sales while reducing manual marketing efforts. ### 3. Synchronize Inventory Across Sales Channels Managing inventory across multiple platforms can quickly become complex and error-prone. With n8n, you can: - Sync inventory between your website, marketplaces, and social commerce channels. - Update stock levels automatically across all connected platforms. - Maintain accurate inventory data in real time. - Reduce the risk of overselling products. - Improve inventory visibility and operational efficiency. This ensures customers always see accurate stock availability, regardless of where they shop. ### 4. Automate Product Review Requests Customer reviews play a critical role in building trust and increasing conversions. n8n can automate the entire review collection process: - Send review requests automatically after product delivery. - Include direct links to review pages for convenience. - Record review requests in your CRM. - Identify customers who have not responded. - Route positive feedback to testimonial systems. - Flag negative reviews for immediate follow-up. This helps generate more reviews while minimizing manual outreach. ### 5. Refund and Return Processing Handling returns and refunds manually can be time-consuming and prone to mistakes. n8n can automate key steps, including: - Verify return requests and eligibility. - Process refunds through payment gateways. - Restore returned inventory automatically. - Notify customers about refund status updates. - Route complex cases to support teams for review. - Maintain accurate records across connected systems. Automating refund workflows improves efficiency, reduces delays, and enhances customer trust. ## Top n8n Automation Use Cases for SaaS SaaS products live and die by user experience. The moments between sign-up and first “aha” are critical, and automating them well is what separates products that scale gracefully from those that collapse under their own support ticket load. ### 1. Automate User Onboarding A smooth onboarding process helps new users quickly realize the value of your product. With n8n, you can: - Trigger workflows when a new user signs up. - Create customer profiles in your CRM automatically. - Send personalized welcome emails and onboarding guides. - Assign onboarding tasks to internal teams. - Notify customer success managers about high-value accounts. - Deliver different onboarding journeys for free, trial, and paid users. This improves user engagement while reducing manual onboarding work. ### 2. Subscription Renewal Alerts Reduce preventable churn by keeping customers informed about upcoming renewals. n8n can: - Monitor subscription renewal and expiration dates. - Send automated reminders at predefined intervals. - Deliver notifications via email, in-app messages, or Slack. - Alert account managers about important renewals. - Encourage timely renewals and reduce missed payments. ### 3. Usage-Based Billing Automation Managing usage-based pricing can be complex without automation. n8n helps by: - Collecting usage data from multiple sources. - Calculating charges based on pricing plans. - Generating invoices automatically. - Syncing billing information with payment platforms. - Reducing manual billing errors and delays. ### 4. Trial-to-Paid Conversion Workflows Increase conversions by engaging trial users at the right time. With n8n, you can: - Track user activity throughout the trial period. - Identify inactive or disengaged users. - Trigger automated re-engagement campaigns. - Send upgrade reminders and promotional offers. - Notify sales teams about highly engaged prospects. This helps convert more trial users into paying customers. ### 5. Customer Health Monitoring Early detection of declining engagement can help prevent customer churn. n8n can: - Monitor user activity and product usage trends. - Compare current engagement against historical patterns. - Identify accounts showing signs of disengagement. - Create CRM tasks for follow-up actions. - Notify customer success teams through Slack or email. This enables proactive customer retention efforts. ## Top n8n Automation Use Cases for Agencies Agencies juggle multiple client accounts, each with their own tool stack, reporting cadence, and communication preferences. Automation helps agencies deliver consistent quality without having to scale headcount at the same rate as client load. ### 1. Automate Client Reporting Generating client reports manually can consume valuable agency time. n8n can: - Collect data from analytics, advertising, and CRM platforms. - Consolidate metrics into predefined templates. - Generate reports automatically on schedule. - Ensure consistent reporting across all clients. - Reduce repetitive reporting tasks. ### 2. Lead Routing and Follow-Up Responding quickly to new leads can significantly improve conversion rates. With n8n, you can: - Capture leads from forms, social platforms, and CRM systems. - Qualify leads based on predefined criteria. - Assign leads to the appropriate team members. - Send instant acknowledgement emails. - Notify sales teams through Slack or other communication tools. ### 3. Client Onboarding Automation Streamline project setup and deliver a professional onboarding experience. n8n workflows can: - Trigger when a contract is signed. - Create folders and project workspaces automatically. - Send welcome emails and onboarding materials. - Assign internal team members to the project. - Record client details in CRM systems. This ensures a consistent and efficient onboarding process. ### 4. Social Media Content Scheduling Managing content across multiple platforms becomes easier with automation. n8n can: - Pull content from Google Sheets, Notion, or other content hubs. - Schedule posts across multiple social networks. - Route content through approval workflows. - Publish approved content automatically. - Maintain a consistent posting schedule. ### 5. Invoice Generation and Payment Follow-Ups Improve cash flow by reducing manual invoicing tasks. With n8n, you can: - Generate invoices automatically from project data. - Track payment due dates. - Send payment reminders before and after deadlines. - Escalate overdue invoices for manual review. - Sync financial records with accounting software. This reduces administrative overhead and helps ensure timely payments. ## n8n vs Zapier: Which One Should You Use? The n8n vs Zapier comparison comes up often when teams start evaluating automation tools. Both platforms connect apps and run workflows, but they serve somewhat different audiences and use cases. Zapier is easier to get started with and has a larger integration library, but n8n gives you more control, flexibility, and predictable costs as you scale. **Feature****n8n****Zapier****Pricing**Self-hosted (free) or cloud plansPer-task pricing (costs rise with volume)**Open source**YesNo**Host it yourself**YesNo**Custom code**Yes, JavaScript and PythonLimited**Integrations**500+6,000+**Learning curve**ModerateLow**Best suited for**Technical teams, growing businessesNon-technical users, quick automations**When to choose n8n:** You want full control over your data and infrastructure. You’re comfortable with a bit of a learning curve. Your automation volume is significant enough that per-task pricing would get expensive. You need custom logic that goes beyond what pre-built connectors offer. **When to choose Zapier:** You need to connect two popular apps quickly and don’t want to touch code. Your team has no server experience and prefers a fully managed SaaS experience. Your automation volumes are low and predictable. The honest truth is that n8n has closed the integration gap significantly, and its open-source model makes it far more cost-effective at scale. If you’re a growing business or a technical team, n8n is the stronger long-term choice. ## Self-Hosting n8n Made Simple, Without the Setup Headaches One of n8n’s biggest advantages is the ability to self-host, giving you complete control over your data, infrastructure, and workflow execution without usage-based costs. However, a traditional n8n installation typically requires: - Server provisioning and configuration - Installing Node.js and n8n - Setting up Nginx as a reverse proxy - Configuring SSL certificates - Managing processes with tools like PM2. - Handling updates and ongoing maintenance. ### Simplify n8n Deployment with ServerAvatar [ServerAvatar](https://serveravatar.com) removes all complexity by allowing you to deploy n8n on your own VPS using a one-click installer. With ServerAvatar, you can: - Deploy n8n with a [one-click application installer](https://serveravatar.com/docs/node-application/one-click-installer/n8n?ref=serveravatar.com) - Install n8n without manual server configuration - Automatically configure Nginx and [automatic free SSL](https://serveravatar.com/docs/application/automatic-installation?ref=serveravatar.com) - Manage application processes without PM2 commands - Update n8n directly from the dashboard - Configure environment variables easily - Monitor application logs from a single interface - Manage deployments without switching between multiple tools ### Why Choose This Approach? This setup is ideal for users who want the benefits of self-hosting without spending hours configuring infrastructure. Key benefits include: - Full ownership of your data - Faster deployment and setup - Simplified maintenance and updates - Centralized application management - More time to focus on building workflows instead of managing servers. [![Blog banner - ServerAvatar](https://serveravatar.com/wp-content/uploads/2025/09/728_90-Banner-1-1024x127.png)](https://serveravatar.com/?ref=blog)### Getting Started with n8n When starting with n8n, begin with a simple workflow: - Choose a trigger such as a webhook or form submission - Connect it to a single action, such as sending an email - Test the workflow and verify the results - Expand it gradually with additional automation steps You can also accelerate [n8n implementation](https://docs.n8n.io?ref=serveravatar.com) by using n8n’s extensive collection of pre-built workflow templates, allowing you to automate common business processes without starting from scratch. ## Conclusion n8n makes it easy to automate repetitive business processes without investing in complex enterprise automation tools. From eCommerce and SaaS operations to agency workflows, it helps teams save time, reduce manual work, and improve efficiency. By automating routine tasks, businesses can focus more on growth and customer experience. With ServerAvatar’s one-click n8n installation, you can deploy and manage your own self-hosted instance quickly, without the hassle of manual server configuration. Start with a single workflow, refine it over time, and gradually build an automation system that scales with your business. ## FAQs ### Do I need coding skills to use n8n? Not necessarily, n8n’s visual node-based editor allows you to create automations without coding. Basic knowledge of APIs and JSON can be helpful for advanced workflows. ### Is n8n free to use? Yes, n8n is open-source and can be self-hosted for free. It also offers a cloud-hosted version with paid plans for users who prefer a managed service. ### How does n8n differ from other automation tools like Zapier or Make? n8n stands out by offering self-hosting, greater customization, and lower costs for large-scale automation. Unlike Zapier and Make, it gives you full control over your workflows and infrastructure. For a detailed comparison, check out our guide: [n8n vs Make vs Zapier: Pick the Right Automation Tool](https://serveravatar.com/n8n-vs-make-vs-zapier-automation-tool?ref=serveravatar.com) ### Can n8n handle high-volume workflows? Yes, n8n can process thousands of workflow executions daily, provided your server has adequate resources and is properly configured. ### What happens if n8n makes a mistake in a workflow? n8n allows you to build error-handling and notification steps into your workflows, helping you detect, manage, and troubleshoot failures effectively. ### Can n8n integrate with custom APIs or internal tools? Absolutely, n8n supports REST and GraphQL APIs through its HTTP Request node and can be extended with custom integrations when needed. ## Key Takeaways - n8n is a flexible, open-source automation platform that connects your tools through visual workflows - eCommerce businesses save the most time on order processing, abandoned cart recovery, and inventory sync - SaaS companies benefit most from automating user onboarding, subscription alerts, and health score monitoring - Agencies use n8n heavily for client reporting, lead routing, project setup, and invoice workflows - n8n can be self-hosted, giving you full control and no per-task costs - ServerAvatar’s one-click installer handles n8n setup, Nginx config, and process management, no terminal required for installation - Start simple: build one workflow, test it thoroughly, then expand as you see results ### About the Author Meghna Meghwani is a technical writer focused on Linux, Ubuntu, VPS hosting, server management, WordPress, PHP, Node.js, cloud hosting, and DevOps. She creates beginner-friendly tutorials, practical hosting guides, troubleshooting articles, and server security content designed to help developers and businesses manage applications and servers more efficiently. **Categories:** Blog, Guide, Node.js, Others **Tags:** AgencyAutomation, AutomationTools, DevOps, eCommerceAutomation, n8n, n8nAutomation, n8nUseCases, NoCodeAutomation, SaaSAutomation, WorkflowAutomation --- ### [Why Traditional WordPress Security Is No Longer Enough to Protect Your Website](https://serveravatar.com/traditional-wordpress-security/) **Published:** June 24, 2026 **Author:** Meghna Meghwani **Content:** [![Blog banner - ServerAvatar](https://serveravatar.com/wp-content/uploads/2025/09/728_90-Banner-3-1024x127.png)](https://serveravatar.com/?ref=blog)If you own a WordPress website, you have probably heard some version of this advice: install a security plugin, set up a firewall, run malware scans, use strong passwords, and take regular backups. This checklist has been part of WordPress Security best practices for years, and for a long time it worked reasonably well. The problem is that the checklist has not changed much, but the threats hitting WordPress sites have changed completely. In this blog, we are going to talk about why the conventional approach to WordPress security is no longer sufficient, what the actual gaps are in current setup, and what a modern layered security approach looks like in practice. Whether you manage a single WordPress site or dozens for clients, this one is worth reading carefully. ## TL;DR - Traditional WordPress security (plugins, firewalls, malware scanners) was built for a slower, simpler threat landscape - Modern attackers use AI to weaponize vulnerabilities in hours, often before a patch even exists - The biggest gaps: disclosure-to-patch window, application-layer blind spots, reactive-only malware detection, abandoned plugins, and authentication-bypass vulnerabilities that bypass passwords entirely - A modern approach combines server hardening, site isolation, real-time vulnerability intelligence, and virtual patching - ServerAvatar provides built-in features, including a WordPress Toolkit add-on to help close these gaps without requiring security expertise ## Traditional Security vs Modern WordPress Security **Traditional Approach****Modern Security Approach**Relies mainly on malware scanning after an attackFocuses on preventing attacks before they succeedDepends on manual plugin and theme updatesContinuously monitors newly disclosed vulnerabilitiesUses a firewall as the primary defenseCombines virtual patching, monitoring, and server hardeningCreates backups but rarely verifies themUses automated backups with regular restoration testingProtects the website only at the application levelSecures the server, operating system, and WordPress installation togetherReacts after suspicious activity is detectedIdentifies and blocks threats before they reach the website> **Key takeaway:** Traditional WordPress security practices still matter, but they are no longer sufficient on their own. Modern attacks move much faster, making a layered security strategy essential for reducing risk and minimizing downtime. ## The Threat Landscape Has Fundamentally Changed ### Bots Have Always Been There Automated bots have been targeting vulnerable WordPress websites for years. They continuously scan login pages, outdated plugins, and known security flaws to find easy targets. Today, the biggest change is how quickly these attacks happen: - AI-powered tools can generate and modify exploit code within hours instead of weeks. - Newly discovered vulnerabilities can be weaponized almost immediately. - Attackers no longer need long development cycles to launch large-scale campaigns. - Millions of WordPress sites are scanned automatically, making every outdated installation a potential target. - Many website owners are exposed before they even realize a security flaw exists. Security researchers have observed this trend in real-world attacks, showing that AI is significantly accelerating the speed of WordPress exploitation. ### The Numbers Tell the Story Here are some figures worth sitting with: - According to Patchstack’s State of WordPress Security 2026 report, 11,334 new WordPress vulnerabilities were disclosed across the WordPress ecosystem in 2025 - Approximately 91% of those vulnerabilities were found in plugins; a smaller percentage in themes; only a handful in WordPress core itself - According to Patchstack’s H1 2025 data, 41.5% of newly disclosed WordPress vulnerabilities were exploitable without any authentication - In real-world observed cases, the average time from a vulnerability becoming publicly known to active exploitation was found to be as short as a few hours in documented incidents - According to Mandiant’s M-Trends 2026 report highlighted that exploitation was, on average, happening before the official patch was even available, a full week before, in some cases ### Who Is Being Targeted? One of the most common misconceptions is that small, low-traffic WordPress sites are not worth targeting. This is exactly backwards. These are not targeted attacks where someone chooses a site because of its traffic or importance. They are automated campaigns that scan every WordPress site on the internet, simultaneously, continuously, looking for any installation running a vulnerable plugin or theme. Your visitor count does not factor into the calculation. If you are running something exploitable and nothing is watching for it, you are in scope. ### Why Traditional WordPress Security Falls Short Traditional WordPress security setups were designed for a very different threat landscape. Most hosting providers and tutorials still recommend a stack that became standard between 2013 and 2017: - Web Application Firewall (WAF) - Security plugin with malware scanning - SSL certificates - SFTP/SSH access controls - Login protection (2FA, CAPTCHA, rate limiting) - Daily backups **While these measures remain important, they were built on one key assumption:** - Security patches would be released before attackers could exploit newly discovered vulnerabilities. **Today’s threat landscape has changed dramatically:** - AI-powered attackers can create and adapt exploits within hours. - Plugin vulnerabilities are discovered and targeted at a much faster pace. - Large-scale automated bots continuously scan WordPress sites for weaknesses. - Zero-day and newly disclosed vulnerabilities are often exploited before many site owners can update. **Traditional security tools still block a significant amount of basic attacks, but they have limitations:** - They primarily defend against known threats. - They cannot eliminate vulnerabilities inside outdated plugins or themes. - They offer limited protection when exploitation begins immediately after disclosure. As a result, the attacks causing the most damage today are evolving faster than the conventional WordPress security checklist was designed to handle. ## How a Modern WordPress Attack Unfolds Modern WordPress attacks rarely involve someone manually selecting a website and trying to break in. Instead, they follow an automated process that can move from public disclosure to active exploitation in a matter of hours. StageWhat Happens**1. Vulnerability Discovered**A security flaw is identified in a WordPress plugin, theme, or component.**2. Public Disclosure**Details become available through security advisories or vulnerability databases.**3. Automated Scanning Begins**Bots immediately start searching thousands of WordPress websites for affected versions.**4. Vulnerable Sites Are Identified**Websites running outdated software become potential targets.**5. Exploitation Attempts Start**Automated tools attempt to exploit the vulnerability before many site owners are aware of it.**6. Security Update Is Released**Developers publish a patch, but many websites remain unpatched for days or weeks.**7. Layered Security Makes the Difference**Sites with proactive monitoring, virtual patching, and server hardening can reduce exposure even before every update is applied.**Key takeaway:** Modern WordPress attacks move much faster than traditional maintenance cycles. That’s why relying only on updates, malware scanners, or strong passwords is no longer enough to provide comprehensive protection. ## Five Critical Gaps in Traditional WordPress Security Let us look at the five specific places where conventional WordPress security leaves your site exposed. If you recognize some of these in your current setup, you are not alone, these are among the most common gaps seen across WordPress environments. ### The Disclosure-to-Patch Window When a security researcher discovers a vulnerability in a WordPress plugin, the developer is usually given time to release a fix before the details become public. However, this process often leaves websites exposed. **Here’s why:** - Many plugin developers take weeks or even months to release a security patch. - Some abandoned or poorly maintained plugins never receive a fix. - During this period, there is no update available for automatic updates to install. - Malware scanners typically detect malicious code, not an undisclosed vulnerability that hasn’t been exploited yet. - Traditional security plugins cannot patch the vulnerable code themselves. **This creates a dangerous disclosure-to-patch window, where:** - Attackers know about the vulnerability. - Automated bots begin scanning for affected websites. - Site owners have no official fix to apply. Security researchers have documented cases where newly disclosed WordPress vulnerabilities were exploited within hours of becoming public, leaving many websites vulnerable before a patch is released. This gap is one of the biggest weaknesses of the traditional WordPress security model and a risk that many website owners overlook. ### Network-Layer Tools Cannot See Application-Layer Threats Edge firewalls and network-level security tools are designed to identify and block known attack patterns. They are highly effective against common threats such as: - SQL injection attempts with recognizable signatures - Requests from known malicious IP addresses - DDoS and traffic flood attacks - Basic brute-force login attempts - Other generic network-level attacks **However, they have important limitations:** - They cannot understand the internal logic of individual WordPress plugins. - They cannot determine whether a plugin’s REST API request is legitimate or malicious. - They often treat privilege escalation, CSRF, and similar application-layer exploits as normal WordPress traffic. - As a result, sophisticated attacks can pass through without triggering any alerts. Security testing has demonstrated that traditional hosting-layer defenses can miss a large percentage of real-world WordPress exploit attempts. The attacks most likely to succeed are those that target vulnerabilities inside plugins and themes, areas that require application-level awareness rather than simple traffic filtering. This is why relying solely on edge firewalls is no longer enough to protect modern WordPress websites. ### Malware Scanners Detect Damage That Has Already Happened Malware scanners are valuable, but they work after malicious code has already reached your website. Instead of preventing an attack, they focus on detecting known threats. **By the time a scanner raises an alert, attackers may have already:** - Gained unauthorized access to the server - Created hidden administrator accounts - Uploaded webshells or backdoor scripts - Placed malicious files in obscure directories - Established multiple ways to regain access even after cleanup **Another overlooked risk is that attackers with server-level access can interfere with security tools by:** - Disabling malware scanning services - Adding exclusions that hide malicious files - Modifying security settings to avoid future detection This means a compromised scanner can no longer be trusted to accurately report threats. A malware scanner is an important layer of defense, but it should not be your only one. Finding malware after an attacker is already inside is incident response, not attack prevention. ### Strong Passwords Do Not Block Authentication Bypass Strong passwords and two-factor authentication (2FA) are essential security practices, but they only protect the login process. They cannot defend against every type of WordPress vulnerability. **Many successful attacks exploit flaws such as:** - Broken access control - Cross-Site Request Forgery (CSRF) - Authentication bypass vulnerabilities - Improper permission validation in plugins **These vulnerabilities work differently because they:** - Do not require a password or login attempt - Exploit insecure plugin functionality instead of user credentials - Allow unauthorized actions through specially crafted requests or links - Can provide elevated privileges or even administrator access without accessing the login page **As a result:** - A complex password cannot stop a vulnerable plugin from executing unauthorized actions. - Two-factor authentication offers no protection if the attack completely bypasses the authentication process. - Securing user accounts is important, but securing the application layer is equally critical. Strong credentials remain a best practice, but they are only one layer of a comprehensive WordPress security strategy. ### Abandoned Plugins and Themes Keep Running Removing a plugin from the WordPress repository does not remove it from websites that already have it installed. As a result, outdated and unsupported code can continue running for years. **Key risks include:** - Thousands of plugins have been removed from the WordPress plugin directory due to security concerns or lack of maintenance. - Existing installations continue to function unless the site owner manually removes or replaces them. - WordPress cannot automatically update a plugin that is no longer available in the official repository. - Many security tools focus on known malware and may not warn you about abandoned or unsupported plugins. **This creates a long-term security problem:** - Vulnerable code remains active on the server. - Attackers continue scanning for known exploits that still work. - Older websites often accumulate unused or forgotten plugins over time. - Site owners may not realize a plugin is no longer maintained until it becomes the source of a compromise. Regularly auditing and removing inactive or abandoned plugins and themes is an essential part of maintaining a secure WordPress website. ## What a Modern, Layered WordPress Security Approach Looks Like This does not mean the traditional tools are useless. A web application firewall still blocks enormous amounts of generic noise. SSL certificates are non-negotiable. Malware scanners catch things. Login protection stops opportunistic attacks. The solution is not to replace these tools but to add the layers they cannot provide. A modern WordPress security approach works by combining several complementary layers, each handling a gap the others cannot cover. ### Server-Level Hardening Server-level security adds an extra layer of protection by securing the underlying infrastructure, making it much harder for attackers to gain or maintain access. **Key hardening practices include:** - Configure Fail2Ban or similar tools to block repeated brute-force login attempts. - Run each website under an isolated system user to prevent cross-site compromise. - Restrict SFTP/SSH access and enforce strong credential management. - Automate SSL certificate renewal to avoid security risks caused by expired certificates. - Apply the principle of least privilege so users and services have only the permissions they need. - Keep the operating system and server packages updated with the latest security patches. These infrastructure-level controls significantly reduce the attack surface and make common WordPress attacks far more difficult to execute. **Want to strengthen your server security even further?** Check out our [What is Linux Server Hardening: Step-by-Step Security Guide](https://serveravatar.com/linux-server-hardening/) to learn practical techniques for securing your server against common threats and unauthorized access. ### Application-Layer Site Isolation If one WordPress site is compromised, the attack should not spread to every website on the same server. Proper isolation minimizes the impact of a security incident. **Best practices include:** - Run each website under its own system user. - Use separate document roots and file permissions. - Restrict cross-site access at the server level. - Prevent lateral movement between hosted applications. - Add an extra layer of protection for agencies and servers hosting multiple client websites. ### Edge Protection An edge Web Application Firewall (WAF) helps filter malicious traffic before it reaches your server, reducing unnecessary load and blocking common threats. **It can effectively:** - Block requests from known malicious IP addresses. - Reduce automated bot traffic. - Mitigate DDoS attacks. - Stop common attack patterns such as brute-force attempts and generic exploits. - Improve overall server performance by filtering unwanted traffic. While an edge WAF cannot stop every application-specific WordPress exploit, it significantly reduces the volume of attacks targeting your infrastructure. ### Real-Time Vulnerability Intelligence Many WordPress websites know about vulnerabilities only after they have been exploited. Real-time vulnerability monitoring helps you stay ahead of emerging threats. **It enables you to:** - Receive alerts when installed plugins or themes have newly disclosed vulnerabilities. - Identify actively exploited security issues quickly. - Prioritize updates based on actual risk. - Take action even before malware appears on your website. Unlike traditional malware scanners, vulnerability intelligence focuses on known weaknesses in your installed software, not just malicious files. ### Virtual Patching for Unpatched Vulnerabilities Sometimes a vulnerability becomes public before a security update is available. Virtual patching provides protection during this critical window. **Benefits include:** - Blocks exploit attempts before they reach vulnerable code. - Protects websites even when no official patch exists. - Requires no modification to plugin or theme files. - Reduces the risk of zero-day and newly disclosed vulnerabilities. By closing the gap between vulnerability disclosure and patch release, virtual patching adds one of the most valuable security layers for modern WordPress websites. ### Recovery-Ready Backups and Active Monitoring Backups help you recover from incidents, but they are only effective if they are regularly tested and monitored. **A reliable strategy should include:** - Off-site and encrypted backups - Automated backup schedules - Periodic restore testing to verify data integrity - File integrity monitoring for unauthorized changes - Login anomaly detection - Traffic and activity monitoring for suspicious behavior Combining tested backups with continuous monitoring allows you to detect threats early and recover quickly if an incident occurs. ## How ServerAvatar Approaches WordPress Security ServerAvatar builds WordPress security directly into its platform instead of depending on other tools or plugins. Here is what that looks like in practice. ### WordPress Toolkit ServerAvatar’s [WordPress Toolkit](https://app.serveravatar.com/add-ons/wp-toolkit) add-on lets you manage multiple WordPress websites from a single dashboard without logging into each wp-admin panel. With WordPress Toolkit, you can: - Check the installed WordPress core version and available updates, then apply updates directly from the panel - Install, update, activate, deactivate, or remove plugins - Manage themes from the same centralized interface - Keep all WordPress components updated to reduce security risks Keeping WordPress core, plugins, and themes up to date is one of the most effective ways to minimize the vulnerability window. A centralized management panel makes regular maintenance faster, easier, and less likely to be overlooked. **Want to manage WordPress site from a single dashboard?** Explore [WordPress Toolkit for WordPress Management in ServerAvatar](https://serveravatar.com/wordpress-toolkit-serveravatar/) guide to learn how to simplify website administration and improve security. ### Built-In Security Features ServerAvatar includes several server-level security controls as part of its managed hosting platform: - **Free SSL certificates**with one-click setup and automatic renewal, ensuring your certificates stay active without manual intervention. - **Firewall rules** configurable from the panel, giving you control over what traffic is allowed to reach your sites - **SFTP and SSH access management**, with the ability to create a user per site or per application - **Per-site isolation**, each application runs in its own environment, helping prevent a compromise on one site from spreading to others These are foundational controls that do not require security expertise to configure. They are built into how ServerAvatar manages the server environment by default. ### WordPress Toolkit Security Section The Security section of WordPress Toolkit provides additional controls to harden your WordPress installation. - **Block XML-RPC** disables the XML-RPC endpoint, which is a common vector for brute-force attacks and pingback abuse - **Block PHP execution in uploads**, preventing malicious PHP scripts from running even if an attacker manages to upload one to your uploads directory - **Verify checksums**, compare core WordPress files against known-good checksums from WordPress.org to detect unauthorized modifications - **Debug mode management**, toggle debug mode and debug log on and off safely, without manually editing files These application-level protections help address security gaps that traditional firewalls and malware scanners may not detect. ### Staging Environment for Safe Testing Applying updates directly to a live website can introduce unexpected issues. A staging environment lets you test changes safely before deploying them. With ServerAvatar Staging Area feature, you can: - Clone your live WordPress website - Test plugin and theme updates safely - Verify WordPress core updates before deployment - Experiment with new features without affecting visitors - Push tested changes to production with confidence [Setting up a staging environment](https://serveravatar.com/setting-up-a-staging-environment/) reduces downtime and helps ensure updates do not break your live application. [![Blog banner - ServerAvatar](https://serveravatar.com/wp-content/uploads/2025/09/728_90-Banner-1-1024x127.png)](https://serveravatar.com/?ref=blog)## A 30-Day Action Plan to Strengthen Your WordPress Security Reading about these gaps is useful. Doing something about them is better. If this blog has left you wanting to tighten up your own setup, here is a practical four-week plan to work through. ### Week 1: Audit Your Plugins and Themes Begin by identifying exactly what components and software are currently running on your site. - List every plugin and theme across all your WordPress installations - Identify any plugins that have not received an update in over a year - Check whether any of your installed plugins have been removed from the WordPress.org directory, this is a red flag for abandonment - Cross-reference your installed stack against a known vulnerability database to flag any currently unpatched issues - Remove anything you are not actively using, every unnecessary plugin is an unnecessary attack surface ### Week 2: Harden Authentication and Access Take a hard look at who has access and how: - Enable two-factor authentication on every admin account - Go through your user list and remove any accounts that should not exist or that belong to former team members - If you are still using FTP anywhere, stop, migrate to SFTP or SSH immediately - Add `define('DISALLOW_FILE_EDIT', true);` to your wp-config.php file to disable the WordPress file editor, which prevents attackers from modifying plugin and theme files through the dashboard even if they gain access ### Week 3: Add the Vulnerability Intelligence Layer This is the most important step most WordPress operators skip: - Set up real-time vulnerability monitoring tied directly to your installed plugins and themes, not just a generic scanner - Implement virtual patching for any vulnerabilities that are publicly known but unpatched - If your hosting platform does not provide this layer natively, research options like Patchstack or similar services that monitor your specific stack against active CVE data This step closes the gap that no firewall or malware scanner can address. It is the single highest-impact change most WordPress site owners can make. ### Week 4: Test Backups and Document Your Response Plan Backups only help if they actually work: - Restore a backup to your staging environment and confirm the process succeeds end to end - Verify that your backup includes all critical data, database, uploads, configurations - Write a simple one-page incident response guide: whom do you contact, where are the backups stored, what is the rollback procedure - Set up login alerts and file integrity monitoring if your current setup does not include them ## Conclusion The conventional WordPress security advice, install a plugin, set up a firewall, use a strong password, is not wrong. It is just incomplete. The threat landscape has evolved in ways that make yesterday’s checklist insufficient for today’s attacks. None of this means you need to become a security expert. What it means is that a layered approach, where server hardening, site isolation, vulnerability intelligence, and virtual patching work alongside your existing tools, is what actually keeps WordPress sites safe. If you are looking for a hosting platform that builds several of these layers into its default configuration, with management tools that make updates, isolation, and monitoring accessible without a dedicated DevOps team, [ServerAvatar](https://serveravatar.com/) is worth exploring. Security is not about having one tool that solves everything. It is about having the right layers in place so that when one control fails or has a gap, the others hold. ## FAQs ### Are security plugins enough on their own? No. Security plugins protect against many common threats, but they cannot stop every vulnerability. For better protection, combine them with server hardening, regular updates, site isolation, and proactive vulnerability monitoring. ### How do I know if my plugins have known vulnerabilities? You can track WordPress vulnerabilities through platforms like WPScan and Patchstack or subscribe to security alerts. Some hosting platforms, including ServerAvatar, also provide vulnerability insights directly in their dashboards for easier monitoring. ### What is virtual patching and do I need it? Virtual patching blocks attacks targeting known vulnerabilities before an official fix is available. It adds an extra layer of protection during the disclosure-to-patch window and is especially valuable for websites that rely on third-party plugins and themes. ### How often should I test my backups? Test your backups at least once every three months and after major website changes. A backup is only reliable if you’ve verified that it can be successfully restored. ### Does having a small or low-traffic site mean I am not a target? No. Automated bots scan all publicly accessible WordPress sites for vulnerabilities, regardless of size or traffic. If your site runs outdated or vulnerable code, it can become a target. ## Key Takeaways - Traditional WordPress security still catches a lot of basic noise, but it was not designed to stop modern AI-assisted exploitation that moves in hours - The biggest gaps are the disclosure-to-patch window, application-layer blind spots, reactive-only malware detection, authentication bypass vulnerabilities, and abandoned unmaintained plugins - A modern approach combines server hardening, site isolation, edge protection, real-time vulnerability intelligence, virtual patching, and tested backups with active monitoring - ServerAvatar provides built-in tools, including WordPress Toolkit for centralized update management, free SSL with auto-renewal, per-site isolation, and a staging area, addressing multiple layers without requiring security expertise - Security is not a product you buy once. It is an ongoing practice that requires knowing what is running on your site and staying on top of what is vulnerable ### About the Author Meghna Meghwani is a technical writer focused on Linux, Ubuntu, VPS hosting, server management, WordPress, PHP, Node.js, cloud hosting, and DevOps. She creates beginner-friendly tutorials, practical hosting guides, troubleshooting articles, and server security content designed to help developers and businesses manage applications and servers more efficiently. **Categories:** Blog, Guide, Others, WordPress **Tags:** Secure WordPress site, security, website security, Wordpress, WordPress Protection, WordPress Security, WordPress security best practices --- ### [How to Fix WordPress 500 Internal Server Error in 2026](https://serveravatar.com/fix-wordpress-500-internal-server-error/) **Published:** June 23, 2026 **Author:** Meghna Meghwani **Content:** [![Blog banner - ServerAvatar](https://serveravatar.com/wp-content/uploads/2025/09/728_90-Banner-3-1024x127.png)](https://serveravatar.com/?ref=blog)You refresh your WordPress site. Instead of your homepage, you get something along the lines of a WordPress 500 Internal Server Error. No explanation. No clue. Just a dead end. It happens to almost every WordPress site owner at some point, and the frustrating part is that the error tells you nothing specific. The server knows something broke, but it isn’t sharing. Here’s the good news: it’s almost always fixable. I’ve run into this error on development environments, client sites, and production servers more times than I’d like to admit. In most cases, the root cause is one of a handful of predictable issues, and once you know where to look, you can track it down in minutes. This guide walks you through every proven method to diagnose and fix the WordPress 500 Internal Server Error. We’ll go from the quickest checks to deeper troubleshooting steps, and I’ll tell you which ones tend to solve the problem most often based on real experience. ## TL;DR - Learn the most common reasons behind WordPress 500 errors and how to identify the actual issue. - Clear your site and browser cache to quickly remove temporary error-related problems. - Fix a corrupted `.htaccess` file to restore normal website functionality. - Increase the PHP memory limit to prevent crashes caused by resource-heavy scripts. - Disable plugins one by one to find and fix the one causing the error. - Switch to a default WordPress theme to check for theme-related conflicts. - Re-upload WordPress core files to replace missing or damaged system files. - Enable WordPress debug mode to uncover the exact cause of the error. - Follow simple maintenance practices to reduce the chances of future 500 errors. ## Quick Troubleshooting Flow If you’re not sure where to start, follow this troubleshooting sequence. Most WordPress 500 Internal Server Errors are resolved within the first few steps. **Steps**What to Check**Step 1**Clear browser and WordPress cache**Step 2**Repair the `.htaccess` file**Step 3**Increase the PHP memory limit**Step 4**Deactivate all plugins**Step 5**Switch to a default WordPress theme**Step 6**Re-upload WordPress core files**Step 7**Enable WordPress debug mode**Step 8**Check file and folder permissions**Step 9**Contact your hosting provider> **Tip:** Start with the first step and move down the list. There’s no need to try advanced fixes until you’ve ruled out the common causes. ## What Is the WordPress 500 Internal Server Error? The 500 Internal Server Error is an HTTP status code that means the web server encountered something unexpected and couldn’t fulfill your request. Unlike a 404 (page not found) or a 403 (forbidden), which tell you exactly where the problem is, a 500 error is deliberately vague. Your server is essentially saying: *“Something went wrong on my end, and I don’t have a specific error code to describe it.”* ![WordPress 500 Internal Server Error](https://serveravatar.com/wp-content/uploads/2026/06/image-12.png) This error isn’t unique to WordPress, any website running on any platform can throw a 500 error. But in the WordPress context, it almost always means something in your PHP code, server configuration, or WordPress installation triggered a failure that the server couldn’t handle gracefully. ### What Causes the WordPress 500 Internal Server Error? Before jumping into fixes, it helps to understand what’s actually happening. The 500 error in WordPress is typically triggered by one of these issues: - **A corrupt or misconfigured .htaccess file:** This is far and away the most common cause. The .htaccess file tells Apache how to handle redirects, permalinks, and security rules. Even a small syntax error in that file can bring your entire site down. - **Exhausted PHP memory limit:** WordPress runs on PHP, and every script has a ceiling for how much memory it can use. If a plugin, theme, or custom script pushes past that limit, the server kills the process and throws a 500 error. - **Problematic plugins or plugin conflicts:** Some plugins are poorly coded, and others just don’t play well together. A single bad plugin, or a combination of two that clash, is a frequent trigger. - **Corrupt WordPress theme:** Themes contain PHP code too. If the active theme has a fatal error in its functions.php or another core theme file, the site can crash with a 500 error. - **Corrupt WordPress core files:** Sometimes file transfer issues during updates, migrations, or manual edits can corrupt the core WordPress files in wp-admin or wp-includes. - **Incorrect file or folder permissions:** WordPress needs certain files to be readable and certain folders to be writable. If permissions get changed accidentally (say, during a server tweak or an FTP batch operation), things break. - **Server-side issues:** In some cases, the problem originates on the server itself: a misconfigured php.ini, a PHP version conflict, or a timeout setting that’s too aggressive. On managed hosting platforms like ServerAvatar, many of these server-level settings can be adjusted from the control panel without touching configuration files directly, which saves a lot of time when you’re debugging under pressure. ## Common Causes of the WordPress 500 Internal Server Error **Causes**DifficultyEstimated Fix Time**Corrupt `.htaccess` file**Easy2–5 minutes**Browser or WordPress cache**Easy1–2 minutes**PHP memory limit exhausted**Easy2–5 minutes**Plugin conflict**Medium5–10 minutes**Theme conflict**Medium5–10 minutes**Corrupt WordPress core files**Medium10–15 minutes**Incorrect file permissions**Medium5–10 minutes**Server configuration issues**AdvancedDepends on hosting provider> Most WordPress 500 Internal Server Errors are caused by a corrupted `.htaccess` file, exhausted PHP memory, or a plugin conflict. That’s why this guide starts with those fixes before moving to advanced troubleshooting. ## Fixing the WordPress 500 Internal Server Error: Step-by-Step Work through these steps in order. Most of the time, one of the first few fixes resolves the issue. ### Step 1: Clear Your Browser and WordPress Cache Before touching any files, rule out the simplest explanation: your browser or a caching layer might be serving a cached error page. **Method 1: Clear Browser Cache** - Open browser settings (e.g., Chrome >> Settings >> Privacy & Security) - Click on **Clear browsing data** - Remove cached images and files - Reload your website **Method 2: Clear WordPress Cache** - Log in to your WordPress dashboard - Open your caching plugin (if installed), such as: - WP Super Cache - W3 Total Cache - LiteSpeed Cache - Click on **“Clear Cache”** or **“Purge All Cache”** **Method 3: Clear Cache Using ServerAvatar** If you want a faster option, you can clear the cache directly from ServerAvatar’s dashboard using the WordPress Toolkit: - Open your application panel in ServerAvatar dashboard. - Navigate to **WordPress Toolkit** for your application from the sidebar. - Go to the **Performance** section. - Click **Flush Cache**. ![flush cache - WordPress 500 Internal Server Error](https://serveravatar.com/wp-content/uploads/2026/06/image-13-1024x326.png) This clears the server-side cache without needing to log into WordPress at all, useful when the admin area is inaccessible due to the 500 error itself. **After Clearing Cache** - Deactivate plugins one by one until you identify the plugin causing the problem. - If the site loads normally, the problem is likely cached data ### Step 2: Repair a Corrupt .htaccess File This is the fix that resolves the problem roughly half the time in my experience. The `.htaccess` file is a hidden server configuration file that WordPress uses to handle permalinks, redirects, and security rules. **Method 1: Regenerate .htaccess from WordPress admin** If you can access the WordPress admin area, the fastest fix is to have WordPress regenerate the file automatically: - Go to **Settings >> Permalinks** in your WordPress dashboard. - Don’t change anything, just click **Save Changes**. - WordPress will overwrite your .htaccess file with a clean, correct version. Check your site. If it’s back up, you’re done. **Method 2: Using FTP** - Connect to your server using an FTP client (like FileZilla). - Navigate to your site’s root directory. - Rename `.htaccess` to `.htaccess_old`. - Create a new empty file named `.htaccess`. - Paste in the rewrite rules above and upload. **Method 3: Using ServerAvatar File Manager** If you can’t access the admin area, you can fix this over FTP or directly from your ServerAvatar dashboard. - Open your WordPress application panel from ServerAvatar dashboard. - Navigate to the File Manager from left sidebar of the application panel, this opens file manager right inside ServerAvatar, no FTP client needed. - Enable the toggle button to show hidden files - Navigate to the `public_html` >> `.htaccess` , rename it to `.htaccess_old` - Create a new file by clicking on the New File button ![repair .htaccess file - WordPress 500 Internal Server Error](https://serveravatar.com/wp-content/uploads/2026/06/image-14-1024x449.png) - Name it `.htaccess` and open it for editing. - Paste in the default WordPress rewrite rules, as mentioned below: ``` # BEGIN WordPress RewriteEngine On RewriteBase / RewriteRule ^index.php$ - [L] RewriteCond %{REQUEST_FILENAME} !-f RewriteCond %{REQUEST_FILENAME} !-d RewriteRule . /index.php [L] # END WordPress ``` ``` # BEGIN WordPress RewriteEngine On RewriteBase / RewriteRule ^index.php$ - [L] RewriteCond %{REQUEST_FILENAME} !-f RewriteCond %{REQUEST_FILENAME} !-d RewriteRule . /index.php [L] # END WordPress ``` - Save the file and close it. Visit your site. If the 500 error is gone, the old `.htaccess` was the culprit. ### Step 3: Increase the PHP Memory Limit If repairing .htaccess didn’t solve it, the next most common cause is WordPress hitting its PHP memory ceiling. When a PHP script consumes more memory than allowed, the server terminates it and serves a 500 error instead of your site. **Method 1: Increase the PHP memory limit using wp-config.php (Manual Method):** - Connect to your server via FTP or the File Manager. - Find the `wp-config.php` file in your WordPress root directory, it’s in the same folder as `.htaccess`. - Download a copy of it as a backup. - Open wp-config.php for editing and look for a line near the bottom that says something like `/* That's all, stop editing! Happy publishing. */`. - Add this line **just above** that comment: ``` define( 'WP_MEMORY_LIMIT', '256M' ); ``` ``` define( 'WP_MEMORY_LIMIT', '256M' ); ``` - Save the file and re-upload it if needed. - Refresh your site. In many cases, this is enough to bring the site back. - If you’re still seeing the error, try bumping it to 512M: ``` define( 'WP_MEMORY_LIMIT', '512M' ); ``` ``` define( 'WP_MEMORY_LIMIT', '512M' ); ``` **Method 2: Increase the PHP memory limit using ServerAvatar (Recommended, No File Editing Required)** If you are using ServerAvatar, you can increase the PHP memory limit directly from the dashboard without touching any files: - Log in to your **ServerAvatar dashboard**, and open your WordPress application panel. - Click **PHP Settings** section from the left sidebar. - Find the **Memory Limit** option and increase it to `256M` or `512M`. - Click **Update Settings**. ![php settings - WordPress 500 Internal Server Error](https://serveravatar.com/wp-content/uploads/2026/06/image-15-1024x893.png) This takes effect immediately, no file editing, no FTP, no downtime. **A note from my experience:** if increasing the memory limit fixes the problem, you’ve addressed the symptom, not the cause. Something in your setup is consuming more memory than it should, almost always a plugin. Disable plugins individually to identify the one consuming excessive resources before it causes the error again. ### Step 4: Deactivate All Plugins If increasing the memory limit didn’t help, or if the error comes back shortly after fixing it, a plugin is almost certainly the problem. The tricky part is that you might not know which one. **Method 1: If you can access the WordPress admin area:** - Go to Plugins >> Installed Plugins. - Select all plugins using the checkbox at the top. - From the “Bulk Actions” dropdown, choose Deactivate and click Apply. - Your site should come back if a plugin was to blame. - Now reactivate plugins one at a time, refreshing the site after each one. - When the 500 error reappears, you’ve found the culprit. - Leave that plugin off and check whether it has an update, if it does, update it. If it doesn’t, consider replacing it with an alternative. **Method 2: Using FTP (Alternative Method)** - Connect to your server via FTP or File Manager. - Navigate to `/wp-content/`. - Find the `plugins` folder and rename it to `plugins.deactivated`. - WordPress will look for its plugins folder and, not finding it, will automatically deactivate everything. Your site should come back up. - Once the site is working, rename the folder back to `plugins` , your plugins will be restored but remain deactivated. Then reactivate them one by one through the WordPress admin as described above. This approach has saved me more times than I can count, especially on client sites where someone installed a plugin from an unreliable source. **Method 3: Using ServerAvatar WordPress Toolkit (Recommended, No Admin Access Needed)** ServerAvatar’s WordPress Toolkit lets you deactivate plugins directly from the dashboard: - Log in to the **ServerAvatar dashboard**, navigate to your WordPress application panel. - Click **WordPress Toolkit** from left sidebar. - Go to the **Plugins** section, you’ll see a list of all installed plugins with their names, versions, and status. - Click **Deactivate** next to each plugin, one by one, refreshing your site after each deactivation to identify the problematic one. You can also use the **Search** bar to quickly find a specific plugin, and use the status filter to show only active plugins. ![deactivate plugin - WordPress 500 Internal Server Error](https://serveravatar.com/wp-content/uploads/2026/06/image-16-1024x464.png) ### Step 5: Switch to a Default WordPress Theme In some cases, the issue may be caused by your theme rather than a plugin. This is less common, but it happens, especially after a theme update that introduced a bug or a custom code change that went wrong. **Method 1: If you can access the WordPress admin area:** - Go to **Appearance >> Themes**. - If you have a default WordPress theme installed (like Twenty Twenty-Six, Twenty Twenty-Five, or similar), click **Activate** on it. - If you don’t have a default theme installed, click **Add New** and install one, WordPress’s default themes are free and reliable. Check your site. If the error is gone, your previous theme was the problem. **Method 2: Using FTP (Alternative Method):** - Connect to your server via FTP. - Navigate to `/wp-content/themes/`. - Download your current theme folder to your computer as a backup. - **Delete** the theme folder from the server (the backup is on your computer, so nothing is lost). - WordPress will automatically fall back to a default theme if one is available on the server, or you can download a default theme from `wordpress.org/themes`, unzip it, and upload it to `/wp-content/themes/`. - Once the site is back up, you can investigate what went wrong with your previous theme. - Often it’s a conflict in the theme’s `functions.php` file, sometimes from custom code someone added. **Method 3: Using ServerAvatar WordPress Toolkit (No Admin Access Needed)** If you can’t access the WordPress admin area, ServerAvatar’s WordPress Toolkit lets you switch themes directly from the dashboard: - Log in to the **ServerAvatar account**, and navigate to your WordPress application panel. - Click **WordPress Toolkit** from left sidebar. - Go to the **Themes** section, you’ll see a list of all installed themes with preview images, names, and versions. - Find a default WordPress theme (like Twenty Twenty-Six) and click **Activate**. - If no default theme is installed, click **Install Theme**, search for a default theme, and install it first. - Refresh your site to check if the error is resolved. ![activate default theme - WordPress 500 Internal Server Error](https://serveravatar.com/wp-content/uploads/2026/06/image-17-1024x405.png) ### Step 6: Re-Upload WordPress Core Files If none of the above steps worked, the WordPress core files themselves might be corrupted. This can happen after a failed update, an interrupted file transfer, or a migration that didn’t complete properly. This step is safe, it will **not** touch your content, posts, pages, plugins, or themes. It only replaces the default WordPress system files. - Download the latest WordPress from [wordpress.org](https://wordpress.org/download?ref=serveravatar.com), click “Download WordPress” and save the zip file to your system. **Method 1: Using FTP (Manual Method)** - Unzip the downloaded file. Inside, you’ll see a `wordpress` folder. - Connect to your server via FTP. - Navigate to your site’s root directory. - Upload all files from the `wordpress` folder, choosing **Overwrite** for all existing files. - Let the upload complete fully. This step replaces files in `wp-admin` and `wp-includes` but leaves `wp-content` entirely alone, your plugins, themes, uploads, and content are untouched. **Method 2: Using ServerAvatar File Manager (Recommended)** - Log in to your ServerAvatar account, and navigate to your WordPress application panel. - Click on the **File Manager** from the left sidebar. - Navigate to your site’s root directory. - First, take a backup. Then navigate to `wp-admin/` and `wp-includes/` and delete the files inside those folders only. **Do not delete the** `wp-content/` **folder**, that contains your themes, plugins, and uploads. - Upload the zip file that we have downloaded from WordPress using the Upload button. - Once uploaded, uncompress the ZIP file by entering the root directory. Once done, refresh your site. If core file corruption was the issue, the site should come back online. ### Step 7: Enable Debug Mode to Find the Exact Cause At this point, if the error is still there, you need more information. WordPress has a built-in debugging system that writes detailed error logs, these logs tell you exactly which file and which line is causing the problem. **Method 1: Using wp-config.php (Manual Method)** - Connect to your server via FTP or File Manager. - Open `wp-config.php` in your site’s root directory. - Find the section where you added the `WP_MEMORY_LIMIT` line earlier. - Add below given lines above the `/* That's all, stop editing! */` comment: ``` define( 'WP_DEBUG', true ); define( 'WP_DEBUG_LOG', true ); define( 'WP_DEBUG_DISPLAY', false ); ``` ``` define( 'WP_DEBUG', true ); define( 'WP_DEBUG_LOG', true ); define( 'WP_DEBUG_DISPLAY', false ); ``` Here’s what each line does: - `WP_DEBUG`, true – turns on WordPress’s internal error reporting. - `WP_DEBUG_LOG`, true – writes errors to a log file at/wp-content/debug.log`. - `WP_DEBUG_DISPLAY`, false – hides error messages from visitors (you don’t want your users seeing PHP errors). - Save and re-upload the file if needed. - Refresh your site, the 500 error may persist, but the log file is being written. Now check the log file: - Connect to your server via FTP. - Navigate to `/wp-content/`. - Open the file named `debug.log`. **Method 2: Enable WordPress debug mode using ServerAvatar WordPress Toolkit (Easiest Method)** ServerAvatar lets you enable WordPress debug mode directly from the dashboard with toggle switches, no file editing required: - Log in to the **ServerAvatar dashboard**, and navigate to your WordPress application panel. - Navigate to the **WordPress Toolkit** section from the left sidebar. - Go to the **Debug** section. - Toggle the following options: - **Debug Mode:** **On** (turns on WordPress internal error reporting) - **Debug Log:** **On** (writes errors to `/wp-content/debug.log`) - **Display Errors: Off** (hides PHP errors from visitors) That’s it, the settings take effect immediately without editing any files. - To view the debug log, - go to **File Manager** - Navigate to `/wp-content/` - Open `debug.log` ![enable debug - WordPress 500 Internal Server Error](https://serveravatar.com/wp-content/uploads/2026/06/image-18-1024x432.png) **Reading the Debug Log** - In ServerAvatar, open **File Manager** and navigate to `/wp-content/`. - Open the file named `debug.log` The log shows the specific PHP error: which file, which function, and which line caused the crash. With that information, you can search for a targeted fix or share it with a developer. Once you’ve identified and fixed the problem, go back to the WordPress Toolkit **Debug** tab and toggle **Debug Mode** to **Off**, or remove the three lines from `wp-config.php`. If the errors point to a specific plugin or theme file, deactivate or replace that component. If the errors are in WordPress core files, re-upload the core files as described. ### Step 8: Check File and Folder Permissions Incorrect file permissions are an underappreciated cause of 500 errors. WordPress needs certain files to be readable and certain directories to be writable. If permissions get changed, say, during a server migration or a bulk chmod, things can break in non-obvious ways. The standard, safe permission settings for WordPress are: **File/Folder**Recommended Permission**wp-config.php**440 or 400 (read-only for owner/group)**.htaccess**644**wp-content/**755**wp-admin/**755**wp-includes/**755**All PHP files in wp-admin and wp-includes**644**Individual plugin and theme folders**755To check and change permissions in most FTP clients, right-click a file or folder and look for “Permissions” or “CHMOD” In ServerAvatar File Manager, just select the file and use “Change Permissions” button given in the menu. > **Be cautious with wp-config.php:** setting it to 777 (fully readable and writable by everyone) is a security risk and can actually cause errors. Stick to 440 or 400. ### Step 9: Contact Hosting Provider If you’ve worked through all the steps above and the site is still showing a 500 error, it’s time to loop in your hosting provider. There may be a server-level issue that’s outside what WordPress can control. Before you reach out, collect a few things that will help their support team: - Your debug.log contents - The approximate time the error started - Any recent changes you made to the site (plugin update, theme change, manual edits, server changes) A good hosting provider will check server error logs, PHP configuration, and any server-side issues that might be invisible from inside WordPress. **ServerAvatar Support** ServerAvatar offers **24/7 support** via live chat, ticketing system directly from [support panel](http://support.serveravatar.com/). If your site is hosted on ServerAvatar and you’re stuck at this step, reach out anytime, the team can inspect server-level PHP-FPM logs, Apache/Nginx error logs, and resource usage metrics to pinpoint issues that WordPress debug mode alone can’t reveal. [![Blog banner - ServerAvatar](https://serveravatar.com/wp-content/uploads/2025/09/728_90-Banner-1-1024x127.png)](https://serveravatar.com/?ref=blog)## Preventing the WordPress 500 Internal Server Error Once you’ve got the site back, a little maintenance discipline goes a long way toward keeping the 500 error from coming back. - **Keep WordPress, plugins, and themes updated:** Most updates include bug fixes and compatibility improvements. Before updating anything on a production site, test it on a staging environment first. This is one of the handiest features of platforms like [ServerAvatar’s staging environment](https://serveravatar.com/docs/application/staging-area/), which lets you clone your site and test changes before pushing them live. - **Only install plugins from trusted sources:** The WordPress plugin repository is moderated, and premium plugins from established developers tend to be better maintained. Avoid plugins that haven’t been updated in over a year or that have poor reviews. - **Set a reasonable PHP memory limit:** Don’t set it artificially low, but also don’t set it absurdly high. 256M is a good baseline for most WordPress sites. If you routinely hit the ceiling, that’s a sign something is wrong with a plugin or theme, address the root cause, not just the symptom. - **Monitor your error logs:** Enable WordPress debug mode briefly every few months, check the debug.log, and close it again. Even if nothing is broken, glancing at the log once in a while surfaces warnings that might become problems later. ## Conclusion The WordPress 500 Internal Server Error is intimidating at first because of how little it tells you. But as you’ve seen in this guide, the actual causes are almost always one of a small set of predictable issues, and every single one has a fix. Start with the quick wins, move through the systematic steps, and if all else fails, let the debug log show you exactly where the problem is. You don’t need to be a server administrator to work through this, you just need to know which file to look at next. If you’d rather skip the manual troubleshooting and want a hosting environment that handles PHP configuration, server-level error logs, staging environments, and one-click application management for you, [ServerAvatar](https://serveravatar.com/) is worth exploring. ## FAQs ### Can a 500 error fix itself? A 500 error usually doesn’t fix itself. It may temporarily disappear if caused by server overload or caching, but the real issue still exists. ### Will fixing the 500 error delete my content? No, fixing a 500 error does not remove any content. Your posts, pages, themes, and plugins stay safe. ### I increased the PHP memory limit and the site works now, but the error came back. What’s happening? If increasing PHP memory works but the error returns, the real cause is still there. Most likely, a plugin or theme is using too many resources. ### Should I give WordPress debug mode a permanent place in my setup? No, Debug mode should not stay on a live site. It can expose errors and affect performance. Use it only for troubleshooting. ### My site shows a 500 error only in the WordPress admin area, but the frontend works fine. What should I do? If the error appears only in the admin area, it’s usually due to a plugin or theme conflict. Try disabling plugins or switching the theme. ## Key Takeaways - The WordPress 500 Internal Server Error is almost always caused by one of a few common issues: a corrupt .htaccess file, exhausted PHP memory, a bad plugin, or a theme conflict. - Start with the quickest fixes, clearing cache and regenerating `.htaccess`, before moving to deeper troubleshooting. - If you increase the PHP memory limit and it works, keep looking for the real cause: usually a plugin consuming too many resources. - Enable WordPress debug mode to get specific error details instead of guessing. - Prevention is simpler than cure: keep everything updated, use trusted plugins, and use a hosting environment that handles server-level configuration for you. - Managed hosting platforms like ServerAvatar give you server logs, PHP configuration, staging environments, and one-click debugging tools that make diagnosing 500 errors significantly faster. ## Related Articles - [Common WordPress Errors and How to Fix Them](https://serveravatar.com/common-wordpress-errors/) - [Complete Guide to Setting Up a Staging Environment](https://serveravatar.com/setting-up-a-staging-environment/) - [Optimize WordPress Performance with Rewrite Rules & Cache](https://serveravatar.com/optimize-wordpress-performance/) - [How to Enable Debug Mode, Debug Logs, and Display Errors in WordPress](https://serveravatar.com/wordpress-debug-mode/) ### About the Author Meghna Meghwani is a technical writer focused on Linux, Ubuntu, VPS hosting, server management, WordPress, PHP, Node.js, cloud hosting, and DevOps. She creates beginner-friendly tutorials, practical hosting guides, troubleshooting articles, and server security content designed to help developers and businesses manage applications and servers more efficiently.[](https://3.basecamp.com/5840738/buckets/41514807/boosts/new?boost%5Bboostable_gid%5D=Z2lkOi8vYmMzL1JlY29yZGluZy8xMDAyMzY4OTAzMA) **Categories:** Blog, Guide, Optimisation, Others, Tutorials, WordPress **Tags:** Fix WordPress 500 Error, Internal Server Error, Wordpress, WordPress 500 Error, WordPress 500 Internal Server Error, WordPress Error Fix, WordPress performance, WordPress Troubleshooting --- ### [What Is npm (Node Package Manager)? A Beginner’s Guide for Developers](https://serveravatar.com/what-is-npm/) **Published:** June 22, 2026 **Author:** Meghna Meghwani **Content:** [![Blog banner - ServerAvatar](https://serveravatar.com/wp-content/uploads/2025/09/728_90-Banner-3-1024x127.png)](https://serveravatar.com/?ref=blog)If you’ve started learning JavaScript or Node.js, you may be wondering what is npm and why developers use it so often. From installing packages to managing project dependencies, npm is an essential tool that simplifies modern JavaScript development. Here’s the thing: modern JavaScript development is built on reusable packages. Instead of writing every feature from scratch, developers pull in code that others have already built, tested, and published. npm is what makes that possible. It’s the bridge between your project and a massive library of pre-built code. This guide is for you if you are new to Node.js and want to understand what npm is, how it works, and how to use it without feeling overwhelmed. I will walk you through the concepts and commands you can understand and will use as a developer. ## TL;DR (Too Long; Didn’t Read) - npm stands for Node Package Manager. It’s the default tool for managing JavaScript code packages in Node.js projects - It comes automatically when you install Node.js, so you don’t need a separate setup - npm gives you access to a massive online registry where thousands of developers publish reusable code libraries - The core workflow involves installing packages with **`npm install`**, managing dependencies in `package.json`, and running scripts from the terminal - Understanding a few essential commands is enough to be productive, you don’t need to memorize the entire CLI reference ## What is npm? npm is short for **Node Package Manager**. It’s the default package manager for Node.js, and it’s been around since 2010. In plain terms, npm is a tool that helps you find, install, and manage small pieces of reusable code, called **packages** or **modules**, that other developers have published for anyone to use. The npm registry is hosted at [npmjs.com](https://npmjs.com?ref=serveravatar.com) and contains over two million packages. These range from tiny utility libraries that handle specific tasks (like formatting dates or generating random IDs) to full frameworks like Express.js for building web servers or React for building user interfaces. **npm itself has three main components:** - **The Registry:** the online database that stores all published packages - **The CLI (Command Line Interface):** the terminal tool you use to interact with the registry - **The Website:** where you can search for packages, read documentation, and manage your account ### Why Does npm Exist? Before package managers were common, JavaScript developers had to manually download library files, manage file paths, and figure out which versions worked together. You want to update library, you manually download the new version with hoping nothing broke. npm automated all of that. It handles downloading, version tracking, dependency resolution, and updates, things that used to take hours of manual work. ## How does npm work? A Simple Breakdown Understanding npm becomes much easier once you see how its pieces fit together. Let’s break it down. ![what is npm and its working](https://serveravatar.com/wp-content/uploads/2026/06/image-11.png) ### The npm Registry The npm registry is essentially a cloud storage system for JavaScript code packages. It serves as a central place where developers publish, share, and reuse code for JavaScript projects. Each package on npm, Inc. (npmjs.com) typically includes: - Official documentation and usage instructions - Version history and release updates - Download and usage statistics - Dependency details showing what the package relies on When you run an npm install command, - The npm CLI connects directly to the registry - It locates the requested package - It downloads and installs it into your project automatically This process removes the need to manually search or download packages from the website, as everything is handled through the command line. ### The npm CLI The Command Line Interface is the tool you use in your terminal to work with npm. Every command starts with `npm`, followed by an action like `install`, `update`, or `run`. Here’s a simple example. Say you want to add a popular date library called `moment` to your project. You’d open your terminal, navigate to your project folder, and run: ``` npm install moment ``` ``` npm install moment ``` npm connects to the registry, downloads `moment`, and places it inside a folder called `node_modules` in your project directory. That’s it. ### The node\_modules Folder When you install packages, npm creates a `node_modules` folder in your project directory. This folder contains the code for every package your project depends on. Key points: - It contains the actual code of installed packages - It is fully managed by npm A good practice is to add `node_modules` to your `.gitignore` file so it doesn’t get committed to version control. Because this folder can get large, and since npm can regenerate it from your configuration files, there’s no need to store it in your repository. ## Understanding package.json One of the most important files in any Node.js project is `package.json`. This file lives in your project root and acts as a manifest for your project. It stores information like: - Your project’s name and version - A description of your project - The packages your project depends on - The packages your project needs for development only (dev dependencies) - Scripts you can run (like starting a server or running tests) - The version of Node.js your project supports When you run `npm install` without specifying a package name, npm looks at your `package.json` file and installs all the packages listed there. ### Creating a package.json The easiest way to create a `package.json` file is to run: ``` npm init ``` ``` npm init ``` This starts an interactive prompt that asks you a few questions about your project, name, version, description, entry point, and so on. If you want to skip the prompts and use sensible defaults, you can add the `-y` flag: ``` npm init -y ``` ``` npm init -y ``` This generates a `package.json` with default values that you can edit later. ### Installing Packages and Saving Dependencies When you install a package, you can choose where it gets listed in your `package.json`: - **Regular dependencies:** packages your application needs to run. Installed with: ``` npm install ``` ``` npm install ``` - **Development dependencies:** packages only needed while you’re writing and testing code. Installed with: ``` npm install --save-dev ``` ``` npm install --save-dev ``` The distinction matters when you deploy your project. If you run `npm install --production`, only regular dependencies are installed. Dev dependencies like testing frameworks or build tools are skipped, keeping your production environment lean. ## What is package-lock.json? You might notice a second file in your project: `package-lock.json`. This file is automatically generated by npm and it locks the exact versions of every installed package, including the sub-dependencies (dependencies of your dependencies). ### Why is it important - When installing packages, version ranges like `^4.0.0` may allow updates within a range. - Over time, newer compatible versions might get installed during future installs. - `package-lock.json` prevents this by locking the exact versions used. ### Key benefits - Ensures consistent installations across all environments - Keeps development, testing, and production setups identical - Helps avoid unexpected bugs caused by version differences - Eliminates the common issue: “it works on my machine” ## Essential npm Commands You Need to Know The npm CLI has dozens of commands, but as a beginner, you only need to learn a handful. Here’s a practical breakdown. ### Installing Packages To install a package and add it to your dependencies. ``` npm install ``` ``` npm install ``` To install everything listed in `package.json` , without package name. ``` npm install ``` ``` npm install ``` To install only production dependencies, skipping dev dependencies. ``` npm install --production ``` ``` npm install --production ``` ### Removing Packages Removing a package from your project and updates `package.json`. ``` npm uninstall ``` ``` npm uninstall ``` ### Updating Packages Updating a package to the latest version allowed by your `package.json` . Without a package name, it updates all packages. ``` npm update ``` ``` npm update ``` ### Running Scripts Your `package.json` can define custom scripts. To run them: ``` npm run ``` ``` npm run ``` There’s also a shortcut for common scripts. If your `package.json` has a `start` script, you can run it with: ``` npm start ``` ``` npm start ``` And for test scripts: ``` npm test ``` ``` npm test ``` ### Checking for Security Issues ``` npm audit ``` ``` npm audit ``` This scans your installed packages for known security vulnerabilities and reports what needs fixing. It’s a good habit to run this regularly, especially before deploying. ``` npm audit fix ``` ``` npm audit fix ``` This automatically applies security patches where available. ### Listing Installed Packages ``` npm list ``` ``` npm list ``` Shows you every package currently installed in your project, along with their versions. ## How to Install npm (And Node.js) Here’s some good news: when you install Node.js, npm comes bundled with it automatically. You don’t need to install them separately. To get started: 1. Go to [nodejs.org](https://nodejs.org?ref=serveravatar.com) 2. Download installer for Windows, macOS, or Linux as per your operating system 3. Run the installer; it handles everything, including npm You’ll see two versions available: - **LTS** (Long Term Support): recommended for most users because it prioritizes stability - **Current**: It has the latest features but may update more frequently. Once installed, open your terminal and verify: ``` node --version npm --version ``` ``` node --version npm --version ``` Both commands should return version numbers, confirming that everything is set up correctly. ### Updating npm npm updates regularly. To make sure you’re on the latest version: ``` npm install npm@latest ``` ``` npm install npm@latest ``` ## Install Node.js and npm automatically with ServerAvatar If you’re deploying applications on a VPS or cloud server, [ServerAvatar](https://serveravatar.com/) simplifies the entire setup process. Instead of setting up Node.js and npm manually, ServerAvatar automatically handles the setup, so you can deploy your Node.js applications quickly. It also offers **one-click installation** for popular Node.js applications, including: - **n8n:** Workflow automation platform - **Node-RED:** Visual programming and IoT automation tool - **Uptime Kuma:** Self-hosted uptime monitoring solution - **NodeBB:** Modern community forum software Managing your applications is just as simple. ServerAvatar provides one-click updates for npm and node, making it easy to keep your Node.js applications and their environments up to date without manual server maintenance or complex deployment steps. ServerAvatar enables developers and teams to deploy and manage Node.js applications faster and more efficiently. ## Understanding Semantic Versioning When you look at your `package.json`, you’ll notice version numbers like `^4.18.2` or `~1.0.4`. These follow a system called **semantic versioning** (or SemVer). A version number has three parts: `MAJOR.MINOR.PATCH` - **MAJOR:** incompatible changes in the API - **MINOR:** new functionality that stays backwards compatible - **PATCH:** bug fixes that stay backwards compatible The symbols in front of the version number tell npm how flexible to be when installing: - **`^ `(caret):** allows minor and patch updates. `^1.0.0` accepts `1.x.x` - **`~ `(tilde):** allows only patch updates. `~1.0.0` accepts `1.0.x` - **No symbol:** locks to exactly that version Using `^ `is common for most projects because it lets you get bug fixes and new features without major breaking changes. ## npm vs other package managers npm comes with Node.js by default, but it it’s the only available package manager. Two popular alternatives are **Yarn** and **pnpm**. **Feature****npm****Yarn****pnpm****Installation speed**StandardFasterFastest**Disk space usage**HigherHigherEfficient**Lockfile**package-lock.jsonyarn.lockpnpm-lock.yaml**Adoption**Most widely usedPopularGrowing**Native Node.js support**YesNo (needs extra deps)YesFor beginners, starting with npm is the right choice. It’s everywhere, well-documented, and you won’t run into compatibility issues. As you grow more comfortable, exploring alternatives like Yarn or pnpm is worth doing, but npm will serve you well for a long time. ## Troubleshooting Common npm Issues **Permission Errors on Linux/macOS** If you see errors like `EACCES: permission denied`, avoid using **`sudo `**with npm. Instead, fix npm’s default directory permissions. This is a safer approach that doesn’t compromise your system security. **node\_modules Is Too Large** This is normal for mature projects. Use `.gitignore` to exclude `node_modules` from version control. If you need to free up space, deleting the folder and running `npm install` regenerates everything from your configuration. **Package Not Found** If npm can’t find a package, double-check the spelling and that the package actually exists on the npm registry. You can search directly at [npmjs.com](https://npmjs.com?ref=serveravatar.com). **Outdated Dependencies** Run `npm outdated` to see which packages have newer versions available. Then decide which ones to update based on your project’s stability needs. ## Best Practices for Using npm A few habits that will save you trouble down the road: - **Always use a** `package.json` in every project. It tracks your dependencies and makes collaboration easier. - **Lock your production environment** by using**` npm ci`** instead of `npm install` in CI/CD pipelines. It installs exact versions from `package-lock.json`. - **Audit regularly.** Run `npm audit` before deploying to production. - **Read package documentation** before installing a package, skim its page on npmjs.com to understand what it does and what permissions it requires. - **Don’t install random packages**, be intentional, every package is potential technical debt or a security risk. ## Conclusion npm is one of those tools that becomes invisible once you understand it, you stop thinking about the mechanics and just use it naturally. That’s exactly what you want as a developer. The goal isn’t to memorize every npm command or understand every internals. The goal is to understand the core concepts well enough to be productive. You now know what npm is, how the registry and CLI work together, what `package.json` does, and which commands you’ll reach for most often. That’s a solid foundation. As you build more projects, your familiarity with npm will grow naturally, and you’ll find yourself exploring more advanced features when the need arises. If you’re deploying Node.js applications and want a simpler way to manage servers, SSL certificates, firewalls, and applications on your VPS, [ServerAvatar](https://serveravatar.com/) can help streamline many of these tasks. ## FAQs ### Does npm cost money? No, npm is free for public packages, including installing and publishing open-source code. A paid plan (npm Pro) is available for private packages and extra team features, but basic usage is free for most developers. ### Is npm required to be installed separately from Node.js? No, when you install Node.js from nodejs.org, npm is included automatically. ### What is the difference between `npm install` and `npm ci`? `npm install` reads from `package.json` and may update versions within your allowed range. `npm ci` ignores `package.json` entirely and installs exact versions from `package-lock.json`. Use `npm ci` in production and automated environments for reproducible builds. ### Is it safe to delete the `node_modules` folder? Yes, `node_modules` is completely generated by npm. Deleting it and running `npm install` restores everything based on your configuration files. That’s exactly why it should be in your `.gitignore`. ### Can I publish my own package to npm? Absolutely, create a free account at npmjs.com, log in with the CLI using `npm login`, and run `npm publish` from your project directory. Make sure your `package.json` is properly configured first. ### What is the difference between dependencies and devDependencies? `dependencies` are packages required for your application to run in production. `devDependencies` are only needed during development (like testing frameworks or build tools). Use `npm install --save-dev` to add a dev dependency. ## Key Takeaways - npm (Node Package Manager) is the standard package manager that comes with Node.js, used for installing, managing, and sharing reusable JavaScript packages - npm comes bundled with Node.js, so a single installer sets up both - The `package.json` file tracks your project name, version, dependencies, and scripts; `package-lock.json` locks exact versions for consistency - A handful of commands (`install`, `uninstall`, `update`, `run`, `audit`) cover most of what you’ll do daily - The `node_modules` folder is managed automatically, never edit it manually, and keep it out of version control - Run `npm audit` regularly, especially before deploying to production - Semantic versioning (SemVer) uses the format `MAJOR.MINOR.PATCH` to communicate what kind of changes a package update contains ### Want to learn more about deploying Node.js applications? Check out how you can easily host and manage your Node.js apps using [ServerAvatar Managed Node.js Cloud Hosting](https://serveravatar.com/managed-nodejs-cloud-hosting) for a simple and reliable deployment experience. ### About the Author Meghna Meghwani is a technical writer focused on Linux, Ubuntu, VPS hosting, server management, WordPress, PHP, Node.js, cloud hosting, and DevOps. She creates beginner-friendly tutorials, practical hosting guides, troubleshooting articles, and server security content designed to help developers and businesses manage applications and servers more efficiently. **Categories:** Blog, Guide, JavaScript, Node.js, Others, Tutorials **Tags:** javascript, node package manager, Node.js, node.js packages, npm, npm dependencies, npm for beginners, npm install, npm tutorial, what is npm --- ### [Why Is WordPress Admin Slow? Causes and 8 Proven Fixes to Speed It Up](https://serveravatar.com/fix-slow-wordpress-admin/) **Published:** June 20, 2026 **Author:** Meghna Meghwani **Content:** [![Blog banner - ServerAvatar](https://serveravatar.com/wp-content/uploads/2025/09/728_90-Banner-3-1024x127.png)](https://serveravatar.com/?ref=blog)You have probably seen this happen: your WordPress website loads in under a second for visitors, yet your WordPress Admin Slow issue keeps getting worse. Every time you open the dashboard, you are staring at a loading spinner, wondering if something broke. It is one of the most common complaints among WordPress users, and it is genuinely frustrating because it feels backwards. As your site grows, these backend operations become more demanding and can impact dashboard performance. In this guide, we’ll explore practical ways to speed up the WordPress admin area, from optimizing PHP and databases to improving caching, cron jobs, and server resources. We’ll also show how ServerAvatar makes many of these optimizations easier to manage. ## TL;DR - WordPress admin is slower than the frontend because it bypasses page caching and processes everything dynamically. - Increase PHP memory to 256M–512M to prevent performance bottlenecks. - Upgrade to PHP 8.2 or higher for better speed, efficiency, and security. - Audit plugins regularly and remove or replace resource-heavy plugins. - Clean your database by removing old revisions, expired transients, and spam data. - Reduce Heartbeat API frequency to lower unnecessary background requests. - Use a server with at least 2 CPU cores, 2GB RAM, and SSD/NVMe storage. - Replace WP-Cron with a real server cron job for more reliable task execution. - Enable Redis Object Caching to dramatically reduce database queries and improve admin responsiveness. - Apply optimizations gradually and measure results to identify the most impactful fixes for your site. ## Why WordPress Admin Loads Differently Than Your Public Site When a visitor lands on your homepage, the web server checks if a cached HTML version exists. If it does, the server serves that file directly, no PHP involved, no database query needed. Now compare that to what happens when you open the WordPress admin panel: - You authenticate, so page caching is bypassed intentionally. - WordPress boots the full application stack for every single page request. - PHP processes the request, loading your theme, active plugins, and core files. - The database gets queried, often 30 to 80 times per page load, depending on your setup. - Plugin hooks fire, some running additional database writes or external API calls. For a site with light traffic and minimal plugins, this is manageable. But the moment you add a few plugins, enable e-commerce functionality, or increase content volume, the backend starts feeling the weight. The fixes below target each bottleneck specifically. ## 1. Increase the PHP Memory Limit ### Why It Matters WordPress relies on PHP memory to process admin requests. When the available memory is too low, the dashboard can become sluggish, especially on sites using: - Multiple plugins - Page builders - WooCommerce - Security and backup tools **Common signs of a low PHP memory limit:** - Slow-loading admin pages - Incomplete page loads - Memory-related warnings or errors - Poor performance during plugin updates or media uploads ### **Increase PHP Memory in ServerAvatar** On ServerAvatar, you can adjust the PHP memory limit directly from the dashboard without touching configuration files: - Log into your ServerAvatar account. - Go to your server panel and the Applications section. Click on the dashboard icon for your application to open application panel. ![application dashboard - WordPress Admin Slow](https://serveravatar.com/wp-content/uploads/2026/06/image-7-1024x339.png) - Go to **PHP Settings** from the left sidebar. - Find the `memory_limit` field and change it to `256M`. For WooCommerce or other heavy e-commerce setups, `512M` is a safer bet. - Click on **Update Settings** button. ![php memory limit - WordPress Admin Slow](https://serveravatar.com/wp-content/uploads/2026/06/image-8-1024x393.png) **Manual Method** Add the following line to your `wp-config.php` file before the “That’s all, stop editing!” comment: ``` define('WP_MEMORY_LIMIT', '256M'); ``` ``` define('WP_MEMORY_LIMIT', '256M'); ``` ### What Happens Next After increasing the PHP memory limit, WordPress admin pages should load more smoothly and reliably. Resource-heavy sections like WooCommerce orders, the Plugins page, and the Media Library often perform better, with fewer slowdowns, incomplete loads, or memory-related errors. ## 2. Upgrade to PHP 8.2 or higher ### Why It Matters Older PHP versions can limit WordPress performance and expose your server to security risks. **Benefits of upgrading to PHP 8.2 or higher version** - Faster PHP execution and request processing - Improved resource efficiency - Better compatibility with modern WordPress plugins and themes - Ongoing security updates and bug fixes ### How to Fix It Upgrading PHP with ServerAvatar takes a few clicks: - Go to your WordPress application panel from the ServerAvatar dashboard. - Navigate to **PHP Settings** from the left sidebar. - Change the version to **PHP 8.2** or Higher **PHP version** (whichever is available and compatible with your theme and plugins, always test in staging first), and update the settings. ![php version - WordPress Admin Slow](https://serveravatar.com/wp-content/uploads/2026/06/image-9-1024x393.png) ### What Happens Next Upgrading to PHP 8.2 or higher PHP version can significantly improve WordPress admin speed. The improvement is most noticeable on resource-heavy screens like Plugins, Themes, and pages that load multiple plugin files at once. ## 3. Audit and Reduce Plugin Bloat ### Why It Matters Not all plugins are optimized efficiently. Some plugins: - Load CSS and JavaScript on every admin page - Run unnecessary database queries - Consume excessive PHP memory - Perform background tasks and API requests Over time, this can significantly slow down the WordPress dashboard. ### How to Fix It Start by identifying the worst offenders. Install the free [Query Monitor](https://wordpress.org/plugins/query-monitor/) plugin and activate it. Then analyze: - Slow-loading plugins - Excessive database queries - High memory usage - Performance bottlenecks Once you know which plugins are heaviest, you have options: **For asset control**, use tools like Asset CleanUp or Perfmatters to disable unnecessary CSS and JavaScript on specific admin pages. This prevents plugins from loading files where they aren’t needed. **For unused plugins**, it’s best to remove them entirely. If a plugin isn’t essential or actively used, especially those running background tasks or analytics, deactivating and deleting it is the cleanest performance fix. ### What Happens Next After cleaning up unnecessary plugins, most users notice a smoother and more responsive WordPress admin. Navigation between dashboard sections becomes faster, and key screens like the Plugins page load more efficiently due to reduced system overhead. ## 4. Clean Your WordPress Database ### Why It Matters As your site grows, the database collects unnecessary data such as: - Old post revisions - Expired transients - Orphaned metadata - Spam comments - Trashed content This extra data increases query times and slows down admin pages. ### How to Fix It A simple way to clean your database is by using a plugin like [WP-Optimize](https://wordpress.org/plugins/wp-optimize/). It lets you remove post revisions, spam comments, transient data, and unused metadata directly from a user-friendly dashboard, without needing to access the database manually. **The WP-CLI approach** (for users comfortable in the terminal): ``` # Clear expired transients wp transient delete --expired # Delete transients (safe if plugins handle them) wp transient delete --all # Remove post revisions wp post delete $(wp post list --post_type=revision --format=ids) ``` ``` # Clear expired transients wp transient delete --expired # Delete transients (safe if plugins handle them) wp transient delete --all # Remove post revisions wp post delete $(wp post list --post_type=revision --format=ids) ``` ### What Happens Next A clean database often leads to a clear performance boost, especially on websites that have been active for years or publish content regularly. After optimization, pages like Posts, Pages, and the Media Library load more quickly and feel more responsive. ## 5. Throttle the WordPress Heartbeat API ### Why It Matters The Heartbeat API powers features such as: - Autosave - Session management - Real-time notifications By default, it sends frequent requests to the server, which can create unnecessary load. ### How to Fix It You can choose between two methods: a code snippet or a plugin. **The snippet approach** Add to your theme’s `functions.php` or a code snippets plugin: ``` add_filter('heartbeat_settings', function($settings) { $settings['interval'] = 60; // Fires every 60 seconds instead of 15 return $settings; }); ``` ``` add_filter('heartbeat_settings', function($settings) { $settings['interval'] = 60; // Fires every 60 seconds instead of 15 return $settings; }); ``` This pushes the Heartbeat interval from 15 seconds to 60 seconds, which is perfectly adequate for autosave and session monitoring without the constant polling. **The plugin approach** Install the free [Heartbeat Controller](https://wordpress.org/plugins/heartbeat-controller/) plugin. Once activated, navigate to Heartbeat Controller and set the interval to 60 seconds for the WordPress Dashboard, Post Editor, and Frontend. ### What Happens Next After applying these changes, the WordPress admin should feel noticeably more responsive, especially in the post editor where most users spend their time. You may also notice fewer real-time plugin updates, which is a fair trade-off for improved overall performance. ## 6. Right-Size Your Server Resources ### Why It Matters WordPress admin relies heavily on PHP and database processing. Even a perfectly optimized site can feel slow on an underpowered server. The Recommended Minimum Resources are 2 CPU cores, 2GB RAM, SSD or NVMe storage. **Consider upgrading if you are experiencing:** - Consistent admin lag - High CPU usage - Slow page loads during peak traffic - Delays when multiple users are logged in If you are on a 1-core VPS and are noticing consistent sluggishness in the admin area, upgrading your server specifications is often the most direct fix. ### What Happens Next On a properly sized server, admin page load times become significantly more consistent. You should not see the dramatic slowdowns that happen when multiple users or background processes hit the server simultaneously. ## 7. Replace WordPress Cron With a Real Server Cron Job ### Why It Matters WP-Cron runs scheduled tasks when pages are loaded instead of using the server’s scheduler. This can lead to: - Slower admin pages - Delayed scheduled tasks - Unnecessary resource usage ### How to Fix It **Step 1: Disable the built-in WordPress cron.** Open `wp-config.php` and add this line: ``` define('DISABLE_WP_CRON', true); ``` ``` define('DISABLE_WP_CRON', true); ``` This prevents WordPress from running cron on page visits. **Step 2: Set up a real server-side cron job.** - Select the server, go to **Cron Jobs**. - Add a new cron job with the following command: ``` wp cron event run --due-now --path=/var/www/your-site.com/public_html ``` ``` wp cron event run --due-now --path=/var/www/your-site.com/public_html ``` ### Switch from WP-Cron to Server Cron with One Click Use ServerAvatar’s [WordPress Toolkit](https://app.serveravatar.com/add-ons/wp-toolkit) to change WP-Cron to a server-level cron job for more reliable scheduling and improved WordPress performance. ![wp toolkit cron section - WordPress Admin Slow](https://serveravatar.com/wp-content/uploads/2026/06/image-10-1024x611.png) ### What Happens Next This leads to more stable and consistent dashboard performance, even on busy websites. It also ensures scheduled actions like posts and backups execute on time without relying on user traffic. [![Blog banner - ServerAvatar](https://serveravatar.com/wp-content/uploads/2025/09/728_90-Banner-1-1024x127.png)](https://serveravatar.com/?ref=blog)## 8. Enable Redis Object Caching ### The Cause Without object caching, WordPress repeatedly queries the database for frequently requested data. Redis stores this data in memory, reducing database load and speeding up page generation. ### How to Fix It Setting up Redis manually involves installing a Redis server, configuring it, installing a Redis PHP extension, and then configuring a WordPress drop-in plugin. To set this up, you will need: - A Redis server running on your VPS - The `php-redis` extension installed You can easily [install and set up the Redis Object Cache Plugin into WordPress](https://serveravatar.com/install-redis-object-cache-plugin-wordpress/) with ServerAvatar. ### What Happens Next Redis object caching typically produces the most dramatic improvement for WordPress admin speed. On a typical site, it can reduce database queries per admin page from 30–80 down to just a handful. ## Conclusion A slow WordPress admin is usually caused by server, PHP, database, or caching bottlenecks—not WordPress itself. By applying the optimizations covered in this guide, such as increasing PHP memory, upgrading PHP, optimizing your database, and enabling Redis caching, you can significantly improve dashboard performance. Start with the changes that best match your site’s needs and measure the results as you go. ## FAQs ### Why is my WordPress admin slow even though my public site loads fast? Your website’s frontend can use page caching, but the WordPress admin cannot. Every admin request must run PHP code, query the database, and load plugins in real time, making it more resource-intensive. ### Does installing more caching plugins speed up the WordPress admin? Usually not. Traditional caching plugins only speed up public pages. For admin performance, object caching (Redis), OPcache, and proper server optimization are far more effective. ### How do I know if my PHP memory limit is too low? Common signs include slow admin pages, failed updates, media upload issues, and memory-related errors such as “Allowed memory size exhausted”. ### Can a slow WordPress admin affect my site’s SEO? Not directly, but a sluggish dashboard can make site maintenance harder. Delayed updates, content publishing, and plugin management can indirectly impact SEO over time. ### Is WooCommerce admin slower than a regular WordPress admin? Yes, WooCommerce handles products, orders, inventory, and analytics, which require more database queries and server resources than a standard WordPress site. ## Key Takeaways - WordPress admin is slower because it doesn’t use page caching like the frontend. - Increase PHP memory to 256M–512M for smoother dashboard performance. - Upgrade to PHP 8.2 or higher version for better speed and security. - Remove or optimize resource-heavy plugins. - Clean your database regularly to reduce query load. - Throttle the Heartbeat API to minimize background requests. - Ensure your server has adequate CPU, RAM, and SSD/NVMe storage. - Replace WP-Cron with a real server cron job. - Enable Redis Object Caching for faster admin page loads. **Ready to simplify WordPress performance management?** With [ServerAvatar](https://serveravatar.com/), you can configure PHP settings, Redis object caching, cron jobs, and other key optimizations from a single dashboard. ### About the Author Meghna Meghwani is a technical writer focused on Linux, Ubuntu, VPS hosting, server management, WordPress, PHP, Node.js, cloud hosting, and DevOps. She creates beginner-friendly tutorials, practical hosting guides, troubleshooting articles, and server security content designed to help developers and businesses manage applications and servers more efficiently. **Categories:** Blog, Guide, Optimisation, Others, Tutorials, WordPress **Tags:** Fix Slow WordPress Dashboard, Slow WordPress Admin, Speed Up WordPress Admin, Wordpress, WordPress Admin Performance, WordPress Admin Slow, WordPress Backend Slow, WordPress speed optimization --- ### [Configure Essential WordPress Site Settings Easily with ServerAvatar](https://serveravatar.com/configure-wordpress-site-settings/) **Published:** June 19, 2026 **Author:** Meghna Meghwani **Content:** [![Blog banner - ServerAvatar](https://serveravatar.com/wp-content/uploads/2025/09/728_90-Banner-3-1024x127.png)](https://serveravatar.com/?ref=blog)When you spin up a new WordPress site, configuring the right WordPress Site Settings is one of the first steps you should take. The default settings aren’t always what your project actually needs. Your language might be set to English by default even if you’re building for a multilingual audience. Your permalink structure might be stuck on “Plain”, which is fine for reading, but terrible for SEO. And if you forget to toggle search engine visibility before launch, you could find your half-built site indexed by Google overnight. These settings live under **Settings >> General** in wp-admin, which means you traditionally had to log in, navigate there, and hope nothing broke if you changed something sensitive. ServerAvatar’s **WordPress Toolkit** changes that workflow entirely. From a single dashboard, without touching wp-admin, you can configure every essential site setting: language, timezone, date/time formats, permalink structure, and search engine visibility. Everything happens in one place, tied to your server context, which is especially useful if you’re managing multiple WordPress sites for clients or projects. This guide walks through every setting of the WordPress Toolkit, explains why each one matters, and shows you exactly how to update them without logging into wp-admin. ## TL;DR - ServerAvatar’s WordPress Toolkit lets you configure essential WordPress site settings from a single dashboard, no wp-admin required - Site Preferences covers language, timezone, date format, time format, and memory limit - Permalink Structure controls how your post and page URLs look (and affects SEO) - Search Engine Visibility lets you quickly hide your site from search engines while it’s under development - Always click Update to save any changes you make - The Settings tab is the fastest way to handle foundational WordPress configuration across multiple sites ## What Is the WordPress Toolkit in ServerAvatar? Before diving into the settings themselves, let’s clarify what you’re working with. The **WordPress Toolkit** is a built-in management layer within ServerAvatar that gives you centralized control over WordPress applications on your server. ServerAvatar’s WP Toolkit include sections of Plugins, Themes, Performance, Cron, Debug, Security, Search & Replace, Updates, and Settings. The **Settings tab** is where foundational site configuration lives. Think of it as the WordPress General Settings page, but accessible from your ServerAvatar panel. ## Accessing the Settings Section - Log in to your ServerAvatar account and navigate to the server panel. - Go to **Applications**, then click on your dashboard icon for your WordPress application. ![application panel - WordPress Site Settings](https://serveravatar.com/wp-content/uploads/2026/06/image-5.png) - Open **WP Toolkit** from left sidebar and go to the **Settings** section. ![Settings section - WordPress Site Settings](https://serveravatar.com/wp-content/uploads/2026/06/image-6.png) - You’ll see below-mentioned configuration areas on this page: - **Site Preferences:** core site-level settings - **Permalink Structure:** URL format configuration - **Search Engine Visibility** toggle lets you control whether search engines can crawl your site. ## Configuring Site Preferences The Site Preferences section handles the foundational details about how WordPress operates your site. Here’s what each option controls. ### Site Language WordPress supports a wide range of languages. The default installation typically sets this to English (United States), but if your audience, client, or project targets a different region, you’ll need to change this here. To change the site language in ServerAvatar: - In the Settings section, find the **Site Language** dropdown, select your desired language - Click **Update** at the bottom right of the page The change takes effect immediately across your WordPress installation. ### Timezone WordPress defaults to a UTC-based timezone. The timezone setting controls how WordPress displays dates and times throughout your site, including post publish times, scheduled publish times, comment timestamps, and event date displays. To update the timezone: - In the Settings section, find the **Site Language** dropdown, select your city or region (WordPress lists these as UTC offsets, e.g., UTC+05:30) - Click **Update** Once saved, all time-sensitive features in WordPress will reflect the new timezone. ### Date Format and Time Format WordPress gives you control over how it displays dates and times in two separate settings: - **Date Format:** controls how dates appear (e.g., `F j, Y` renders as “June 18, 2026”) - **Time Format:** controls how times appear (e.g., `g:i a` renders as “6:18 am”) WordPress offers several predefined format options for each. You can see the current selection in the dropdowns and choose the one that matches your site’s style. To update Date and Time format: - Choose your preferred option from the **Date Format** or **Time Format** dropdown - Click **Update** These formats affect how dates appear in post bylines, comment sections, and any theme templates that use WordPress’s date display functions. ### Memory Limit WordPress has a default PHP memory limit that can become a bottleneck when you’re running heavy plugins, working with large media files, or running resource-intensive themes. The **Memory Limit** setting in Site Preferences lets you increase this threshold directly from the toolkit. You can choose memory limit values based on your site’s needs, raising it unnecessarily can mask performance problems rather than solve them. To adjust the memory limit: - Add the desired value to **WP Memory Limit** and **WP Max Memory Limit** - Click **Update** Keep in mind that this setting adjusts WordPress’s allowed PHP memory, not the server’s actual RAM. Make sure your server has enough resources before pushing this value very high. ![Site Preferences - WordPress Site Settings](https://serveravatar.com/wp-content/uploads/2026/06/sitepref.gif) ## Configuring Permalink Structure The **Permalink Structure** is one of the most important settings on any WordPress site, and it has direct implications for both user experience and SEO. By default, WordPress sets new installations to **Plain** permalinks, meaning URLs look like `https://example.com/?p=123`. These are technically functional but offer no readability for humans and provide zero context to search engines. A better permalink structure makes URLs descriptive. For example: - **`https://example.com/2026/06/my-wordpress-post/`** – tells you the date and topic at a glance - `https://example.com/sample-page/` – clean and memorable - **`https://example.com/2543/`** – short but opaque The available options in the ServerAvatar WordPress Toolkit are: Permalink StructureExample URLBest For**Plain**`/?p=123`Debugging only**Day and name**`/2026/06/18/sample-post/`News sites, blogs with heavy date context**Month and name**`/2026/06/sample-post/`Content archives, smaller blogs**Numeric**`/2543/`Short URLs, ID-based sites**Post name**`/sample-post/`Most general-purpose sites, clean, readable, SEO-friendly**Custom**User-defined structureAdvanced users with specific URL requirementsFor most websites, business sites, blogs, portfolios, marketing pages, **Post name** is the recommended choice. It’s clean, human-readable, and includes your target keywords naturally in the URL. ### How to Change Permalink Structure - From the WordPress Toolkit **Settings** section, find the **Permalink Structure** - Select your desired structure (or choose **Custom** to define your own using WordPress’s supported tags like `%year%`, `%postname%`, **`%category%`**) - Click **Update** WordPress will automatically flush the rewrite rules so your new URL structure takes effect immediately across all posts and pages. ![Permalink Structure - WordPress Site Settings](https://serveravatar.com/wp-content/uploads/2026/06/permalink.gif) ## Search Engine Visibility The **Search Engine Visibility** is a quick-access control that tells search engines whether to index your site. When enabled, WordPress adds a `noindex` Meta tag to your site’s HTML, signaling to Google, Bing, and other crawlers to stay away. This is not the same as password-protecting your site or taking it offline, it’s specifically a request to search engines. Determined bots can still visit, but legitimate search engine crawlers will respect the directive. - In the Settings section, find the **Search Engine Visibility** option - Check or uncheck the box based on your site’s current status and your preferences - Click **Update** ![Search Engine Visibility - WordPress Site Settings](https://serveravatar.com/wp-content/uploads/2026/06/searchenginevisibility.gif) This setting corresponds directly to the **Discourage search engines from indexing this site** checkbox in WordPress’s built-in Reading Settings page. ### When to Disable Search Engine Visibility - **During initial setup**, especially if your site is in the public domain before launch - **For staging or development sites**, you rarely want a staging environment indexed - **For client review**, before a site goes live, you don’t want search engines picking it up ### When to Keep It Enabled (Default) - **Production sites**, you want search engines to index your content as soon as possible [![Blog banner - ServerAvatar](https://serveravatar.com/wp-content/uploads/2025/09/728_90-Banner-1-1024x127.png)](https://serveravatar.com/?ref=blog)## Why Use the WordPress Toolkit Instead of wp-admin? You might be wondering, why go through ServerAvatar when I can just open wp-admin and click Settings? That’s a fair question. Here’s the practical reality: - **Managing multiple sites:** if you’re overseeing multiple WordPress installations, bouncing in and out of different wp-admin panels is inefficient. The WP Toolkit gives you a single panel for all management for your wp site. - **No login required:** wp-admin access can be restricted, lost, or locked out. ServerAvatar’s toolkit is in serveravatar panel, so you don’t need WordPress credentials to fix critical settings. - **Faster configuration:** especially for recurring tasks like setting permalink structure or enabling search visibility across multiple environments (dev, staging, production). - **Client-facing workflows:** if you’re an agency, you can delegate site configuration without handing over wp-admin credentials. The Toolkit doesn’t replace wp-admin entirely, complex plugin configurations, content editing, and user management still happen inside WordPress. But for foundational server-level settings, it’s faster and more centralized. ## Key Takeaways - The **Settings tab** in ServerAvatar’s WordPress Toolkit covers all essential WordPress site settings in one place - **Site Preferences** includes language, timezone, date format, time format, and PHP memory limit - **Permalink Structure** should almost always be set to **Post name** for readability and SEO - The **Search Engine Visibility** toggle prevents search engines from indexing sites under development - Always click **Update** to save any changes, they take effect immediately - Use the WordPress Toolkit when managing multiple sites or when you need to configure settings without wp-admin access ## Conclusion Getting your WordPress site’s foundational settings right from the start saves you from headaches down the road, whether that’s dealing with indexing issues on a half-built site, confusing timestamps in your editorial calendar, or ugly URLs that hurt your SEO before you’ve even launched. ServerAvatar’s WordPress Toolkit **Settings** section gives you a direct, efficient path to all of this. No wp-admin, no switching between tabs, no credentials to remember. Just pick your application, open Settings, make your changes, and click Update. This approach makes ServerAvatar worth considering for your workflow. ## FAQs ### Does changing the permalink structure break existing links? Yes, it can cause 404 errors and break existing URLs. To avoid this, choose your permalink structure before publishing or set up 301 redirects to send visitors from old links to the new ones. ### Will changing the timezone affect my existing post timestamps? Changing the timezone in WordPress only affects how dates and times are shown. The original UTC timestamps stay the same, so content remains unchanged while displayed times update to match the new timezone. ### What permalink structure is best for SEO? **Post name** (`/%postname%/`) is usually the best SEO-friendly option because it creates short, clear, and keyword-focused URLs. Date-based URLs are longer and can make content seem outdated, while plain permalinks offer little SEO value. ### How do I revert changes made in the WordPress Toolkit? Simply return to the Settings tab, adjust the option back to its previous value, and click Update. All changes are immediate and reversible. ### Does the Search Engine Visibility toggle fully hide my site? No, it only adds a **noindex** tag that search engines typically follow, but it does not secure or hide your site. Visitors and bots can still access it. For complete protection during development, use a staging site or server-level access controls. ### Can I configure custom permalink structures? Yes, choose **Custom** in the Permalink Structure settings and use tags such as **%postname%**, **%category%**, **%year%**, or **%monthnum%** to create your own URL format, for example: **/%category%/%postname%/**. ## Next Steps Managing WordPress sites on a VPS becomes much easier when theme updates, server management, SSL, backups, and application controls are available from one dashboard. [ServerAvatar](https://serveravatar.com/) helps simplify those everyday tasks without adding extra complexity. You should also read: - [WordPress Toolkit for WordPress Management in ServerAvatar](https://serveravatar.com/wordpress-toolkit-serveravatar) - [How to Create WordPress Blueprints Easily in ServerAvatar](https://serveravatar.com/create-wordpress-blueprint-serveravatar) - [WordPress Security Essentials: XML-RPC, PHP Blocking & Checksums](https://serveravatar.com/wordpress-security-essentials/) *Ready to streamline your WordPress workflow? Explore* [*ServerAvatar’s WordPress Toolkit*](https://app.serveravatar.com/add-ons/wp-toolkit) *for complete website management from ServerAvatar dashboard.* ### About the Author Meghna Meghwani is a technical writer focused on Linux, Ubuntu, VPS hosting, server management, WordPress, PHP, Node.js, cloud hosting, and DevOps. She creates beginner-friendly tutorials, practical hosting guides, troubleshooting articles, and server security content designed to help developers and businesses manage applications and servers more efficiently. **Categories:** Blog, Guide, Optimisation, Tutorials, WordPress **Tags:** Configure WordPress, Essential WordPress Settings, Wordpress, WordPress Beginner Guide, WordPress Configuration, WordPress Settings, WordPress Site Settings, WordPress Tutorials --- ### [How to Use WordPress Search & Replace (Safely with Dry Run Preview)](https://serveravatar.com/wordpress-search-and-replace/) **Published:** June 18, 2026 **Author:** Meghna Meghwani **Content:** [![Blog banner - ServerAvatar](https://serveravatar.com/wp-content/uploads/2025/09/728_90-Banner-3-1024x127.png)](https://serveravatar.com/?ref=blog)Managing a WordPress site often requires updating multiple database entries at once. Whether you’re changing URLs, updating brand names, or fixing outdated content, WordPress Search & Replace helps you make these changes quickly and accurately without editing each entry manually. This is where WordPress Search & Replace becomes incredibly useful. However, database-wide replacements can also be risky. A single mistake may affect hundreds or even thousands of records. That’s why it’s important to preview changes before applying them. You can easily search through your WordPress database, review matching entries with Dry Run option, execute replacement after confirming everything is correct using Search & Replace feature in ServerAvatar WordPress Toolkit. In this guide, you will learn how to use ServerAvatar’s WordPress Toolkit Search & Replace feature, common use cases, and best practices to avoid accidental database modifications. ## TL;DR - WordPress Search & Replace helps update text across the entire database. - Commonly used during site migrations, URL changes, and rebranding. - ServerAvatar includes a built-in Search & Replace tool in its WordPress Toolkit. - The Dry Run Preview feature allows you to review matches before making changes. - Always verify results before running a live replacement. - Taking a backup before performing large database changes is highly recommended. ## What Is WordPress Search & Replace? WordPress stores much of its content and configuration inside a MySQL database. This includes: - Posts - Pages - URLs - Widget settings - Theme options - Plugin configurations - Internal links - Custom fields When information needs to be updated globally, editing records one by one is inefficient. Search & Replace feature allows you to: - Search for a specific text string - Replace it with new content - Apply changes across all WordPress database tables For example: Search ForReplace Witholddomain.comnewdomain.comHTTP URLsHTTPS URLsOld Company NameNew Company NameOld Email AddressNew Email AddressNo need to manually edit multiple entries, WordPress Toolkit’s Search & Replace feature did this task within few minutes. ### When Should You Use Search & Replace? Search & Replace feature is useful in situations such as: **1. Website Migration** After moving a WordPress website to a new domain, internal URLs still point to previous domain. Example: **Search:** ``` https://oldsite.com ``` ``` https://oldsite.com ``` **Replace:** ``` https://newsite.com ``` ``` https://newsite.com ``` **2. HTTPS Migration** When enabling SSL, older HTTP URLs may still exist in the database. Example: **Search:** ``` http://example.com ``` ``` http://example.com ``` **Replace:** ``` https://example.com ``` ``` https://example.com ``` **3. Company Rebranding** If business change its name, logo reference, or contact informations, Search & Replace feature quickly update content across the site. **4. Updating Contact Information** Phone numbers, email addresses, and company addresses can be updated globally without editing each page individually. **5. Cleaning Development URLs** Websites moved from staging environments often contain temporary URLs that need replacement before going live. ### Why Use Dry Run Before Making Changes? One of the biggest mistakes WordPress administrators make is applying replacements without reviewing the results first. A replacement operation may affect: - Content - Plugin settings - Widget configurations - Custom fields - Theme data Replacing the wrong text can create broken links, incorrect content, or configuration issues. The Dry Run feature in ServerAvatar helps prevent these problems by: - Scanning the database - Finding all matching entries - Showing what would be modified - Making no actual changes This allows you to verify everything before committing the update. Think of it as a safety checkpoint before modifying your database. ## Prerequisites Before starting: - A WordPress website should already be installed through ServerAvatar. - You should have access to the WordPress Toolkit. - Identify the exact text you want to search for. - Create a [database backup](https://serveravatar.com/docs/backups/getting-started/) before making large-scale replacements. > **Best Practice:** Dry Run helps to prevent mistakes, but maintaining a latest backup provides recovery option if unexpected error occur. ## How to Use Search & Replace Feature in ServerAvatar ServerAvatar provides a simple interface for performing database-wide replacements directly from the WordPress Toolkit. - Log in to your ServerAvatar account and navigate to your server panel by clicking on the server dashboard icon. - Navigate to the Applications section and click on the application dashboard icon for your WordPress application. ![application panel - WordPress Search & Replace](https://serveravatar.com/wp-content/uploads/2026/06/image-4-1-1024x245.png)- Navigate to the WP Toolkit section from the left sidebar and go to the Search & Replace section. You will see Search & Replace interface. ![WordPress Search & Replace](https://serveravatar.com/wp-content/uploads/2026/06/searchandreplace.gif)- Inside the **Search** field, enter the text you want to locate. Be precise when entering search values to avoid unintended matches. Examples: - https://oldsite.com - Old Company Name - old-email@example.com In the **Replace** field, enter the new value. ServerAvatar WP Toolkit will replace matching occurrences across database tables. Example: **Search** ``` https://oldsite.com ``` ``` https://oldsite.com ``` **Replace** ``` https://newsite.com ``` ``` https://newsite.com ``` ### Enable Dry Run Before proceeding, ensure the **Dry Run** option remains enabled. Dry Run allows ServerAvatar to: - Scan the database - Identify matching records - Preview potential replacements - Avoid modifying any data This is the safest way to validate your search query. ### Preview Changes Click the Preview button. ServerAvatar will generate a report showing: - Matching entries - Number of occurrences found - Records that would be modified - Replacement summary Review the results carefully. If the matches look incorrect, adjust your search criteria and run another preview. ### Understanding the Dry Run Preview Output When you run a dry run, you’re looking at a structured report. Here’s what each part means. **Database Table Matches** The preview breaks down results by table. You’ll see entries like: - **wp\_posts:** post content, titles, excerpts - **wp\_postmeta:** custom fields and post metadata - **wp\_options:** site settings, plugin configurations - **wp\_comments:** comment text and author URLs - **wp\_terms:** category and tag names Each table entry shows how many matches were found and previews the actual replacement. ### Verify the Results Before applying changes, confirm: - Only intended records appear - No unrelated content is matched - URLs are correct - Replacement values are accurate - Plugin and theme settings will not be affected unintentionally Taking a few minutes to verify results can prevent significant cleanup work later. ### Run the Replacement Once you are satisfied with the preview, click on the Run Replacement button. ServerAvatar will update the matching database entries. ![Run Replacement - WordPress Search & Replace](https://serveravatar.com/wp-content/uploads/2026/06/runsearchandreplace.gif)After completion, test your website to ensure everything works as expected. **Example: Updating a Domain After Migration** Suppose you’ve migrated a WordPress site, you can: FieldValue**Search**https://oldsite.com**Replace**https://newsite.com**Dry Run**Enabled**Action**PreviewReview the preview results. If everything looks correct run the replacement. This updates internal links, references, and stored URLs throughout the database. ## Common Mistakes to Avoid **1. Skipping Dry Run** Applying replacements immediately increases the risk of unwanted changes. Always preview first. **2. Using Generic Search Terms** Searching for common words may affect unrelated content. Specific search values reduce accidental replacements. For example: Bad Search: ``` shop ``` ``` shop ``` Better Search: ``` https://shop.example.com ``` ``` https://shop.example.com ``` **3. Forgetting Backups** Even successful replacements should be performed with a backup available. Database changes can be difficult to reverse manually. **4. Not Testing After Changes** After completing a replacement: - Open multiple pages - Test forms - Check menus - Verify internal links - Confirm plugin functionality A quick review helps catch issues early. ## Best Practices for Search & Replace Operations Best PracticeWhy It Matters**Take backups**Provides recovery options**Use exact search strings**Reduces incorrect matches**Run Dry Run first**Prevents accidental changes**Review preview results**Validates replacement scope**Test website afterward**Confirms successful changes**Perform changes during low traffic periods**Minimizes user impact## Why Use ServerAvatar for WordPress Database Changes? Many WordPress users rely on plugins or direct database access method for search-and-replace process. ServerAvatar simplifies the process by integrating the functionality directly into the WordPress Toolkit. Benefits include: - Centralized WordPress management - Built-in database search and replace - Dry Run preview functionality - Reduced risk of accidental modifications - Faster maintenance workflows - No need for additional plugins This makes routine WordPress maintenance significantly easier and safer. [![Blog banner - ServerAvatar](https://serveravatar.com/wp-content/uploads/2025/09/728_90-Banner-1-1024x127.png)](https://serveravatar.com/?ref=blog)## Why ServerAvatar’s Toolkit Is the Right Choice There are several ways to do WordPress search and replace; SQL queries, WP-CLI, plugins, and phpMyAdmin. Here’s how ServerAvatar’s approach compares. FeatureServerAvatar ToolkitWP-CLIphpMyAdmin SQLSearch Replace Plugins**Dry run preview**✅ Built-in⚠️ `--dry-run` flag❌ No✅ Most have it**Handles serialized data**✅ Yes✅ Yes❌ Breaks it✅ Yes**No Technical knowledge needed**✅ Yes❌ Requires SSH/CLI❌ Requires SQL knowledge✅ Yes**Works from hosting dashboard**✅ Yes❌ Separate access❌ Separate tool⚠️ Plugin install**Auto scans all tables**✅ Yes⚠️ All tables flag❌ Manual table-by-table✅ Yes**Beginner friendly**✅ Very⚠️ Moderate❌ Difficult✅ YesServerAvatar’s toolkit wins on simplicity. You don’t need to install a plugin, run SSH commands, or learn SQL syntax. Everything is in your hosting dashboard, the interface is clean, and the dry run preview is built into the workflow by design. ## Key Takeaways - Search & Replace feature helps to modify content across entire database. - ServerAvatar includes this functionality directly within its WordPress Toolkit. - Dry Run Preview allows you to verify changes safely before applying them. - Backups should always be created before large-scale database updates. - Accurate search values reduce the risk of unintended modifications. - Testing the website after replacement ensures everything continues working correctly. ## Conclusion Search & Replace feature is most useful tool for handling entire database updates. Whether you’re migrating domains, enabling HTTPS, updating branding, or replacing outdated information, it can save hours of manual work. The challenge is ensuring those changes are made safely. ServerAvatar’s WordPress Toolkit Search & Replace feature addresses this by providing a Dry Run Preview option that lets you review all potential modifications before anything is written to the database. This extra verification step dramatically reduces the risk of mistakes while making WordPress maintenance faster and more reliable. ## FAQs ### Does Search & Replace modify all WordPress database tables? Yes, the feature scans WordPress database tables and updates matching entries where applicable. ### What does Dry Run do? Dry Run previews all potential replacements without making actual database changes. ### Can I undo a Search & Replace operation? The safest rollback method is restoring a database backup created before the replacement. ### Is Search & Replace useful for WordPress migrations? Yes, it is commonly used to update URLs after moving a website to a new domain or server. ### Should I always use Dry Run first? Absolutely, reviewing matches before making database changes is considered a best practice. ## Next Steps Managing WordPress websites involves more than publishing content. From performance optimization and security hardening to database maintenance and application management, keeping everything running smoothly requires the right tools. [ServerAvatar’s WordPress Toolkit](https://app.serveravatar.com/add-ons/wp-toolkit) brings these management features into a single dashboard, helping you handle updates, caching, cron jobs, security settings, search-and-replace operations, and more without relying on multiple plugins or complex server commands. You should also read: - [WordPress Toolkit for WordPress Management in ServerAvatar](https://serveravatar.com/wordpress-toolkit-serveravatar) - [How to Create WordPress Blueprints Easily in ServerAvatar](https://serveravatar.com/create-wordpress-blueprint-serveravatar) - [How to Manage WordPress Cron Jobs with ServerAvatar](https://serveravatar.com/manage-wordpress-cron-jobs/) ### About the Author Meghna Meghwani is a technical writer focused on Linux, Ubuntu, VPS hosting, server management, WordPress, PHP, Node.js, cloud hosting, and DevOps. She creates beginner-friendly tutorials, practical hosting guides, troubleshooting articles, and server security content designed to help developers and businesses manage applications and servers more efficiently.[](https://3.basecamp.com/5840738/buckets/41514807/boosts/new?boost%5Bboostable_gid%5D=Z2lkOi8vYmMzL1JlY29yZGluZy8xMDAwMTA5NDA5MA) **Categories:** Blog, Guide, Others, Tutorials, WordPress **Tags:** Search and Replace, Wordpress, WordPress Administration, WordPress Database Management, WordPress maintenance, WordPress Search & Replace, WordPress Search and Replace, WordPress Tips, WordPress URL Migration --- ### [WordPress Security Essentials: XML-RPC, PHP Blocking & Checksums](https://serveravatar.com/wordpress-security-essentials/) **Published:** June 17, 2026 **Author:** Meghna Meghwani **Content:** [![Blog banner - ServerAvatar](https://serveravatar.com/wp-content/uploads/2025/09/728_90-Banner-3-1024x127.png)](https://serveravatar.com/?ref=blog)Your WordPress site may be more exposed than you realize. Strong WordPress Security isn’t just about passwords and updates, features like XML-RPC, PHP execution, and file integrity can also create risks if left unchecked. Securing these areas helps protect your website from common threats. I have lost count of how many times I have seen a fresh WordPress install get compromised within days of going live. Not because the owner was careless, but because the defaults are built for convenience, not security. ServerAvatar’s WordPress Toolkit puts three powerful security controls right in front of you, no config files, no command line, no guesswork. Block XML-RPC requests, stop PHP from running in your uploads directory, and verify your core files against WordPress.org’s checksums. This guide walks through all three. I will explain what each one does, why it matters, and when you’d actually flip the switch on or off. Let’s get into it. ## TL;DR - Block XML-RPC if you’re not using the WordPress mobile app or Jetpack - Block PHP execution in uploads, this stops the most common attack path for uploaded malware - Verify checksums to catch any core files that have been modified without you knowing - All three are in ServerAvatar’s WordPress Toolkit Security section, no config files needed - These are layered defenses, one alone isn’t enough, but all three together make a real difference ## Why WordPress Security Deserves Your Attention WordPress runs over 40% of websites, which makes it a constant target. Attackers don’t need new tricks, they reuse the same known entry points across many sites. Most hacks usually happen in a few ways: - Brute-force login attempts (often via `xmlrpc.php`) - Malicious files were uploaded and later executed - Core WordPress files are being modified through a vulnerability These mentioned settings lowers the risk by shutting the main entry points that attackers typically target. ## Block XML-RPC Requests ### What is XML-RPC? XML-RPC (`xmlrpc.php`) is a WordPress feature that allows external apps like the mobile app, Jetpack, and other tools to connect and interact with your site. The concern is that attackers can also take advantage of it. It includes a method called `system.multicall`, which allows multiple password attempts in a single request, making brute-force attacks faster and harder to detect than normal login attempts. If you notice POST requests to `xmlrpc.php` in your logs, it’s often a sign of automated login attacks targeting this endpoint. ### How to Block XML-RPC in ServerAvatar’s WordPress Toolkit[](https://storage.app.basecamp.com/5840738/blobs/a1338ef2-6952-11f1-90af-0242ac120002/download/image.png) Here’s how you can disable it using ServerAvatar: - Log in to your ServerAvatar account and navigate to the server panel. - Go to **Applications**, then click on your dashboard icon for your WordPress application.[](https://storage.app.basecamp.com/5840738/blobs/a1338ef2-6952-11f1-90af-0242ac120002/download/image.png) ![application panel - WordPress Security](https://serveravatar.com/wp-content/uploads/2026/06/image-4-1024x246.png) - Open **WP Toolkit** from left sidebar and go to the **Security** section. - Find the **“Block XML-RPC Requests”** ![Block XML RPC requests - WordPress Security](https://serveravatar.com/wp-content/uploads/2026/06/Block-XML-RPC.gif) - Once enabled, the status will change from **Allowed** to **Blocked**, meaning XML-RPC requests, pingbacks, and remote access calls will no longer work on your site. ### What to Consider Before You Block It This setting breaks a few things: - **WordPress mobile app** won’t be able to publish or manage content remotely - **Jetpack** needs xmlrpc.php to connect to WordPress.com - **Some pingback/trackback systems** still exist, but in reality, pingbacks have largely become noise at this stage. If you’re using the mobile app or Jetpack, you can keep XML-RPC enabled, but make sure your site is well protected with a strong password, two-factor authentication, and Jetpack’s brute-force protection. If you don’t need these features, disabling XML-RPC is an easy improvement that can quickly reduce a large number of unwanted login attempts. ## Block PHP Execution in Uploads ### Why Uploads Are a Security Risk When you upload files in WordPress, they are stored in `/wp-content/uploads/`. By default, if a PHP file ends up there, it may still be executed if accessed directly. This becomes dangerous if an attacker uploads a malicious script through a vulnerable plugin, form, or compromised account. That file isn’t just stored, it can run on your server with your site’s permissions. This is one of the most common WordPress attack patterns. But it’s easy to prevent, you can simply block PHP execution inside the uploads folder so any uploaded scripts can’t run at all. ### How to Block PHP Execution in Uploads ServerAvatar’s WordPress Toolkit makes this straightforward: - In the **Security** section of the WordPress Toolkit, find **Block PHP Execution in Uploads** option, which is allowed by default. Simply enable the toggle button. ![BLock PHP execution in uploads - WordPress Security](https://serveravatar.com/wp-content/uploads/2026/06/Block-PHP-Execution.gif) - Once enabled, any PHP file uploaded to your uploads folder will display as plain text instead of running. The file gets stored, but it can’t do any damage. ### A Key Note to Keep in Mind Some plugins may require uploading and running PHP files, especially those handling file uploads or server-side media processing. This is rare because most well-designed plugins depend on JavaScript or WordPress’s media handling system rather than executing uploaded code. If enabling this setting causes issues, it can be turned off again. In most cases, WordPress sites run smoothly with it enabled. When a plugin does break, it’s worth reviewing closely, as needing to execute uploaded PHP can be a potential security concern. ## Verify Checksums ### What Are Checksums and Why They Matter? Each WordPress core file has a checksum, a unique digital signature based on its contents. WordPress.org provides these for every release. If even a single change occurs in a file, whether from corruption, a failed update, or malicious tampering, the checksum will no longer match. Checking these values is like auditing your core files to ensure nothing has been altered. Issues can easily go unnoticed until this verification reveals them. In some cases, compromised core files may continue working normally for a long time because the injected code only runs under specific conditions. A checksum check would detect such hidden changes right away. ### How to Run Checksum Verification In ServerAvatar’s WordPress Toolkit: - In the **Security** section of the WordPress Toolkit, find **Verify Checksums** option. - Click the **Verify Checksums** button ![Verify Checksum - WordPress Security](https://serveravatar.com/wp-content/uploads/2026/06/Verify-Checksum.gif) - ServerAvatar will compare every WordPress core file against the official checksums published by WordPress.org. - If anything’s been modified, added, or deleted without matching the official release, it’ll show up in the results. ### What to Do If Checksums Fail If checksum shows mismatched files, respond it promptly: 1. **Check what changed:** the report will show you which files don’t match 2. **Restore from a known good backup:** if you have clean backups (and you should), restore the affected files 3. **Update WordPress core:** a fresh WordPress installation will replace all core files with verified copies 4. **Audit your plugins and themes:** if WordPress core was modified, there’s usually a way in through a plugin or theme. Find it before you just patch over the damage Checksums failing is a real signal, not a false alarm. Treat it as evidence that something happened, even if you can’t immediately identify what, and investigate before assuming it’s nothing. ## All Three Together: How They Layer Each of these three controls targets a different type of attack. Used together, they form a layered security approach that improves overall protection. **Security Feature****What It Blocks****Attack Vector It Addresses****Block XML-RPC**External apps from connecting via XML-RPCBrute force attacks through xmlrpc.php**Block PHP in Uploads**PHP files in uploads folder from executingUploaded malware execution**Verify Checksums**Catches modified core files against WordPress.orgSilent core file tamperingEach control is useful on its own. With multiple layers in place, an attacker who bypasses one still faces others. The idea of layered security isn’t to make a system unbreakable, but to raise the cost and effort of an attack so it’s no longer worth it. [![Blog banner - ServerAvatar](https://serveravatar.com/wp-content/uploads/2025/09/728_90-Banner-1-1024x127.png)](https://serveravatar.com/?ref=blog)## Key Takeaways - Block XML-RPC if you don’t use the WordPress mobile app or Jetpack, it’s one of the easiest ways to stop brute force attacks - Block PHP execution in uploads, this neutralizes the most common path for uploaded malware - Run checksum verification regularly, it’s the only way to catch core files that have been silently modified - All these three setting is in ServerAvatar’s WordPress Toolkit Security section, no config files or command line required - These are layered defenses, use all three together for the best protection **Managing WordPress security across multiple sites?** ServerAvatar’s [WordPress Toolkit](https://app.serveravatar.com/add-ons/wp-toolkit) puts all three of these controls, and more, in a single dashboard, so you’re not jumping between different tools to keep your sites secure. ## Conclusion Security doesn’t have to be complex. You don’t need advanced server expertise to get started. ServerAvatar’s WordPress Toolkit brings practical security controls into one place, and setting them up takes only a few minutes. Disable XML-RPC if it isn’t required, block PHP execution in upload directories, and run periodic checksum checks. These simple steps each reduce real attack risks and together provide meaningful protection without disrupting your workflow. In practice, many WordPress compromises happen through XML-RPC brute-force attempts or malicious file uploads. These are not just theoretical issues, they’re actively exploited. The encouraging part is that they’re also easy to prevent. ## FAQs ### Will blocking XML-RPC break my WordPress site? It only affects you if you use tools like the WordPress mobile app, Jetpack, or other external services that rely on XML-RPC. If you don’t use them, blocking it has no impact. If you do, keep it enabled but secure your login with a strong password and two-factor authentication. ### How do I know if my site was already compromised before I enabled these settings? Perform a checksum verification to identify any modified core files. Also review the uploads folder for unknown PHP files and check server logs for unusual XML-RPC activity. If anything looks suspicious, restore from a clean backup before continuing. ### Can I unblock PHP execution in uploads if a plugin stops working? Yes, you can toggle it off anytime. If a plugin stops working after enabling this, it may be poorly designed and worth reviewing. Most legitimate plugins don’t require executing PHP from uploads. You can disable it temporarily if required. ### How often should I verify WordPress core checksums? For most sites, once a month is enough. Websites with heavy traffic or critical business functions can benefit from being checked on a weekly basis. You can also automate the process, but regular manual checks are still effective. ### Does enabling these settings affect my site’s performance? No, there’s no noticeable performance impact. XML-RPC blocking simply rejects unwanted requests, while PHP blocking and checksum checks only run occasionally and don’t affect daily site speed. ### About the Author Meghna Meghwani is a technical writer with hands-on experience in Ubuntu, VPS hosting, PHP, Laravel, Node.js, and cloud deployments. She writes practical tutorials, troubleshooting guides, and informative articles that help developers and businesses better understand server management, web hosting, security, trending technologies, and modern deployment workflows. **Categories:** Blog, Guide, Linux, Others, Tutorials, Ubuntu, WordPress **Tags:** Checksum Verification, PHP Execution Blocking, Secure WordPress Website, Wordpress, WordPress Hardening, WordPress Security, WordPress security best practices, WordPress Security Essentials, XML-RPC Security --- ### [How to Manage WordPress Cron Jobs with ServerAvatar](https://serveravatar.com/manage-wordpress-cron-jobs/) **Published:** June 16, 2026 **Author:** Meghna Meghwani **Content:** [![Blog banner - ServerAvatar](https://serveravatar.com/wp-content/uploads/2025/09/728_90-Banner-3-1024x127.png)](https://serveravatar.com/?ref=blog)A successful WordPress website requires more than just publishing content. Behind the scenes, WordPress uses WP-Cron to handle automated tasks like publishing scheduled posts, sending emails, checking updates, and running plugin-related actions. Learning how to manage WordPress Cron Jobs effectively helps ensure smooth website performance and reliable automation. While WP-Cron works well for many websites, it is not always the most reliable option. Since it depends on website traffic to trigger scheduled jobs, tasks can be delayed on low-traffic websites or become inefficient on busy websites. This is where ServerAvatar’s WordPress Toolkit simplifies cron management. Instead of setting up cron jobs manually through the server terminal, you can control WordPress cron execution using an easy-to-use dashboard. You can switch between WP-Cron and Server-Side Cron, trigger pending events manually, and ensure your scheduled tasks run exactly when they should. In this guide, you will learn how WordPress cron jobs work and how to manage them efficiently using ServerAvatar’s WordPress Toolkit. ## TL;DR - WordPress uses WP-Cron to run scheduled tasks. - WP-Cron depends on website visits to trigger jobs. - Server-Side Cron offers more reliable scheduling. - ServerAvatar lets you switch between WP-Cron and Server-Side Cron from the WordPress Toolkit. - You can manually run pending cron events for testing and troubleshooting. - No command-line configuration is required. ## What Are WordPress Cron Jobs? A cron job is simply a scheduled task that runs automatically at specific intervals. In traditional Linux servers, cron jobs are managed by the operating system. WordPress uses its own scheduling system called WP-Cron. WP-Cron handles tasks such as: - Publishing scheduled posts - Checking for WordPress updates - Sending scheduled emails - Clearing temporary data - Running WooCommerce scheduled actions - Generating backups - Syncing external services Without a properly functioning cron system, these automated tasks may not execute on time. ### How WP-Cron Works Unlike a traditional server cron job, WP-Cron is triggered whenever someone visits your website. Here’s the simplified workflow: - A visitor loads your website. - WordPress checks for pending scheduled tasks. - If a task is due, WP-Cron executes it. - The visitor receives the page response. This approach eliminates the need for server-level cron configuration, but it comes with limitations. ## Common Problems with WP-Cron Although WP-Cron is convenient, many website owners eventually encounter issues. ProblemImpact**Low website traffic**Scheduled tasks may run late**High website traffic**Additional processing overhead**Missed cron events**Backups, emails, or updates fail**WooCommerce delays**Orders and subscriptions may not process on time**Resource consumption**Unnecessary cron checks on every page visitFor business websites, membership sites, WooCommerce stores, and high-performance WordPress applications, relying solely on WP-Cron isn’t always ideal. ## WP-Cron vs Server-Side Cron FeatureWP-CronServer-Side Cron**Trigger Method**Website visitsServer scheduler**Reliability**Depends on trafficHighly reliable**Performance**Additional checks on page loadsMore efficient**Accuracy**Can be delayedRuns on schedule**Recommended For**Small websitesProduction websitesIn most production environments, server-side cron jobs are preferred because they execute on a fixed schedule regardless of visitor activity. ## Managing WordPress Cron Jobs with ServerAvatar ServerAvatar’s WordPress Toolkit provides a dedicated **Cron** section that allows administrators to control how scheduled tasks are executed. Instead of editing server configurations manually, everything can be managed through a simple interface. ### Accessing the Cron Section Follow these steps: - Log in to your ServerAvatar account. Navigate to the server panel by clicking on the server dashboard icon. - Navigate to the Applications section and click on the dashboard icon for your WordPress Application. ![application panel - WordPress Cron Jobs](https://serveravatar.com/wp-content/uploads/2026/06/image-3-1024x245.png) - Click on the WP Toolkit from the left sidebar and navigate to the Cron section. You will now see the **Cron Execution Method** panel and the **WP Cron Actions** section.[](https://storage.app.basecamp.com/5840738/blobs/a6caf9b8-664b-11f1-b01f-0242ac120004/download/cronsec.gif) ![cron section in WP Toolkit - WordPress Cron Jobs](https://serveravatar.com/wp-content/uploads/2026/06/cronsec.gif) ## Understanding Cron Execution Methods Inside the Cron dashboard, ServerAvatar provides two execution methods: ### Option 1: WP-Cron This is the default WordPress behavior.[](https://storage.app.basecamp.com/5840738/blobs/c7d84cb4-664b-11f1-8961-0242ac120003/download/image.png) ![WP Cron - WordPress Cron Jobs](https://serveravatar.com/wp-content/uploads/2026/06/image-1-1-1024x314.png) **How It Works** - Tasks are executed when visitors access the website. - No server cron configuration is required. - Suitable for websites with consistent traffic. **When to Use WP-Cron** WP-Cron is suitable when: - Running a personal blog - Managing a low-maintenance website - No mission-critical automation exists - Simplicity is preferred **How to Enable WP-Cron** - Open the Cron section - Select **WP Cron** - Click on the **Save** button The system will continue using WordPress’s built-in scheduler. ### Option 2: Server-Side Cron Server-Side Cron uses the actual server scheduler rather than relying on visitors.[](https://storage.app.basecamp.com/5840738/blobs/db913040-664b-11f1-8e80-0242ac120002/download/image.png) ![Server Side Cron - WordPress Cron Jobs](https://serveravatar.com/wp-content/uploads/2026/06/image-2-1-1024x303.png) **Benefits** - Better scheduling accuracy - Improved reliability - Reduced WP-Cron overhead - Ideal for WooCommerce stores - Suitable for membership websites - Better performance under heavy w, **How to Enable Server-Side Cron** - Open the Cron section - Select **Server Side Cron** - Click on the **Save** button ServerAvatar automatically handles the required cron configuration in the background. No manual SSH commands or cron syntax are needed. ## Running WordPress Cron Events Sometimes you may need to trigger cron events manually. Examples include: - Testing scheduled tasks - Verifying plugin functionality - Troubleshooting delayed actions - Running pending updates ServerAvatar provides a built-in Run WP Cron Events feature. ### Trigger Due Events Inside the WP Cron Actions section: - Navigate to the Cron in the WordPress Toolkit section - Click on the **Run Now** button ![Trigger Due Events - WordPress Cron Jobs](https://serveravatar.com/wp-content/uploads/2026/06/triggerdue.gif) ### Run All Events Inside the WP Cron Actions section: - Navigate to the Cron in the WordPress Toolkit section - Select the checkbox for Run all events, and click on the **Run Now** button[](https://storage.app.basecamp.com/5840738/blobs/46e9beac-664c-11f1-9e7f-0242ac120003/download/runall.gif) ![Run All Events - WordPress Cron Jobs](https://serveravatar.com/wp-content/uploads/2026/06/runall.gif) ServerAvatar immediately executes all cron events whose scheduled time has already arrived. This is useful when troubleshooting delayed jobs. > **Important Note:** Avoid using this option on production websites unless necessary for troubleshooting. Forcing all events to execute can trigger plugin actions earlier than intended. [![Blog banner - ServerAvatar](https://serveravatar.com/wp-content/uploads/2025/09/728_90-Banner-1-1024x127.png)](https://serveravatar.com/?ref=blog)## Practical Use Cases **1. WooCommerce Websites** Server-side cron improves: - Subscription processing - Order management - Email notifications - Inventory synchronization **2. Membership Websites** Reliable cron execution helps with: - Membership renewals - Account expirations - Automated notifications **3. Content Publishing** Perfect for: - Scheduled blog posts - Content workflows - Editorial automation **4. Backup Automation** - Ensures scheduled backups run consistently - Ensures Disaster recovery points remain updated ## Best Practices for WordPress Cron Management **1. Use Server-Side Cron for Production Sites** For business-critical websites, server-side cron is generally the preferred option. **2. Monitor Scheduled Tasks** Periodically verify: - Scheduled posts - WooCommerce actions - Backup jobs - Email notifications **3. Test After Plugin Installation** Some plugins create their own cron events. Always verify new plugins are functioning correctly. **4. Avoid Excessive Cron Frequency** Overly aggressive scheduling can increase server load. Only schedule tasks as frequently as necessary. **5. Keep WordPress Updated** Cron-related improvements and bug fixes are often included in updates. ## Conclusion WordPress cron jobs play a crucial role in keeping your website running smoothly. From publishing scheduled posts and processing WooCommerce actions to generating backups and sending emails, many important operations depend on timely cron execution. While WP-Cron works well for basic websites, growing businesses often need a more reliable solution. ServerAvatar’s WordPress Toolkit makes it easy to choose the right cron execution method, switch to server-side scheduling when needed, and manually trigger events for troubleshooting. Instead of dealing with command-line cron configurations, you can manage everything from a single dashboard and keep your WordPress automation running exactly as expected. ## FAQs ### 1. What is WP-Cron in WordPress? WP-Cron is WordPress’s built-in scheduling system that automatically runs tasks such as scheduled posts, updates, emails, and plugin automation. ### 2. Is Server-Side Cron better than WP-Cron? Server-Side Cron is generally more reliable because it runs on a fixed schedule and does not depend on website traffic. ### 3. Can I switch between WP-Cron and Server-Side Cron in ServerAvatar? Yes, ServerAvatar allows you to switch between both methods directly from the WordPress Toolkit Cron section. ### 4. When should I use Server-Side Cron? Server-Side Cron is recommended for WooCommerce stores, membership websites, business websites, and any WordPress site that relies on scheduled automation. ### 5. Can I manually run cron jobs in ServerAvatar? Yes, the Run WP Cron Events feature allows you to manually trigger pending scheduled tasks directly from the dashboard. ## Key Takeaways - WordPress relies on cron jobs to automate important background tasks. - WP-Cron depends on visitor traffic and may delay scheduled actions. - Server-Side Cron provides more reliable task execution. - ServerAvatar makes cron management simple through its WordPress Toolkit. - Switching cron methods requires only a few clicks. - Manual cron execution tools help with testing and troubleshooting. - Reliable cron scheduling improves WordPress performance and automation. ## Next Steps Managing WordPress sites on a VPS becomes much easier when theme updates, server management, SSL, backups, and application controls are available from one dashboard. [ServerAvatar](https://serveravatar.com/) helps simplify those everyday tasks without adding extra complexity. You should also read: - [WordPress Toolkit for WordPress Management in ServerAvatar](https://serveravatar.com/wordpress-toolkit-serveravatar) - [How to Create WordPress Blueprints Easily in ServerAvatar](https://serveravatar.com/create-wordpress-blueprint-serveravatar) - [How to Optimize WordPress Performance with Rewrite Rules & Cache](https://serveravatar.com/optimize-wordpress-performance/) ### About the Author Meghna Meghwani is a technical writer focused on Linux, Ubuntu, VPS hosting, server management, WordPress, PHP, Node.js, cloud hosting, and DevOps. She creates beginner-friendly tutorials, practical hosting guides, troubleshooting articles, and server security content designed to help developers and businesses manage applications and servers more efficiently. **Categories:** Blog, Guide, Linux, Others, Tutorials, Ubuntu, WordPress **Tags:** Cron Job Management, Cron Jobs, Manage WordPress Cron Jobs, Wordpress, WordPress Cron Jobs, WordPress performance, WordPress Scheduled Tasks, WP-Cron --- ### [How to Speed Up WordPress Website With Object Cache Pro](https://serveravatar.com/speed-up-wordpress-with-object-cache-pro/) **Published:** June 15, 2026 **Author:** Meghna Meghwani **Content:** [![Blog banner - ServerAvatar](https://serveravatar.com/wp-content/uploads/2025/09/728_90-Banner-3-1024x127.png)](https://serveravatar.com/?ref=blog)WordPress performance often becomes a challenge as websites grow. More plugins, traffic, and dynamic content can increase server load and slow down page delivery. While page caching helps with static content, it does not reduce database queries. This is where Object Cache Pro helps by storing frequently accessed data in memory, reducing database load, and improving WordPress performance. Object Cache Pro uses Redis to store frequently accessed database query results in memory, allowing WordPress to retrieve data instantly instead of repeatedly querying the database. The result is lower server load, faster response times, and improved scalability. In this guide, I’ll walk you through how Object Cache Pro works as part of ServerAvatar’s WordPress Toolkit, how to set it up in under five minutes, what kind of performance improvements you can actually expect, and how it fits into your broader WordPress caching strategy. ## TL;DR - Object Cache Pro stores database query results in Redis memory. - It reduces repetitive database requests. - Dynamic WordPress websites benefit the most. - ServerAvatar includes Object Cache Pro integration inside WordPress Toolkit. - Simply add your Object Cache Pro license key and enable the feature. - It can improve backend performance and reduce server resource usage. ## What Is Object Cache Pro? Object Cache Pro is a premium Redis-powered object caching solution designed specifically for WordPress. Unlike page caching, which stores complete HTML pages, object caching stores individual database query results and PHP objects in memory. When WordPress requests the same data again, the information is served directly from Redis instead of making another database query. This significantly reduces: - Database workload - Query execution time - CPU usage - Response latency Object Cache Pro is widely used on: - WooCommerce stores - Membership websites - Learning Management Systems (LMS) - Community platforms - High-traffic blogs - Dynamic business websites ### How Object Cache Pro Works Without object caching, WordPress follows this process: - Visitor requests a page. - WordPress runs multiple database queries. - MySQL returns results. - PHP processes the data. - The page is generated. With Object Cache Pro enabled: - Visitor requests a page. - WordPress checks Redis first. - Cached query results are found. - Data is returned immediately. - Fewer database queries are executed. This reduces the amount of work required to generate pages. ## Page Cache vs Object Cache Many users confuse page caching with object caching. Here’s a quick comparison: FeaturePage CacheObject Cache Pro**Stores HTML Pages**YesNo**Stores Database Queries**NoYes**Uses Redis**OptionalYes**Helps Dynamic Content**LimitedExcellent**Reduces Database Load**NoYes**Improves Admin Dashboard Speed**MinimalSignificantThe best results usually come from using both together. ## Prerequisites Before Enabling Object Cache Pro Before enabling Object Cache Pro through ServerAvatar: **1. Redis Must Be Installed:** Object Cache Pro relies on Redis for storing cached objects. **2. WordPress Must Be Managed Through ServerAvatar:** To enable Object Cache Pro from WordPress Toolkit, your WordPress application must be deployed with ServerAvatar, and the WordPress Toolkit add-on must be enabled. **3. Valid Object Cache Pro License:** A valid Object Cache Pro license key is required. ## How to Enable Object Cache Pro Using ServerAvatar WordPress Toolkit ServerAvatar simplifies the setup process by providing a dedicated Object Cache Pro section within the WordPress Toolkit. - Log in to your ServerAvatar account and navigate to your server panel by clicking on the server dashboard icon. - Navigate to the Applications section and click on the application dashboard icon for your WordPress application. ![Application panel - Object Cache Pro](https://serveravatar.com/wp-content/uploads/2026/06/image-2-1024x246.png) - Navigate to the WP Toolkit section from the left sidebar and go to the Object Cache Pro section. You will see a screen similar to the following: ![wordpress toolkit - Object Cache Pro](https://serveravatar.com/wp-content/uploads/2026/06/objectcachepro.gif) - Turn on the toggle button to enable the Object Cache Pro. This activates Object Cache Pro support for the selected application. - Enter the valid Object Cache Pro **License Key** from your [Object Cache Pro account](https://objectcache.pro/), in the given field and click on the Enable button. ![enable Object Cache Pro ](https://serveravatar.com/wp-content/uploads/2026/06/enableobjectcachepro-ezgif.com-censor-1.gif) > ServerAvatar does not sell or supply Object Cache Pro license key. - Once enabled, ServerAvatar will configure Object Cache Pro for your WordPress application. The integration process typically takes a few seconds. - Object Cache Pro will connect to Redis. - WordPress will begin storing objects in memory. - Cached queries will start serving faster responses. - You can verify functionality through: - WordPress admin - Object Cache Pro dashboard - Performance monitoring tools ### How to Confirm Object Cache Pro Is Working After activation, you should verify the cache is functioning correctly. Look for: - **Cache Hits:** A growing number of cache hits indicates Redis is serving requests successfully. - **Reduced Database Queries:** Monitoring tools should show fewer database requests. - **Improved Response Times:** Pages and admin screens should load more quickly. ## Benefits of Using Object Cache Pro in WordPress - **Faster WordPress Performance:** Frequently accessed database queries are stored in memory, allowing WordPress to respond faster. - **Lower Database Load:** MySQL receives fewer repetitive requests, reducing overall server strain. - **Better WooCommerce Performance:** WooCommerce generates many database queries for: - Products - Inventory - Orders - Customer sessions - Object Cache Pro helps reduce query execution time. - **Improved Scalability:** As traffic grows, object caching helps maintain performance without immediately requiring server upgrades. - **Faster Admin Dashboard:** Large WordPress sites often experience slow admin areas. Object Cache Pro can improve: - Post editing - Product management - Dashboard navigation - Plugin operations ## When Should You Use Object Cache Pro? Object Cache Pro is especially useful if your website: - Receives moderate to high traffic - Uses WooCommerce - Has a large database - Uses membership plugins - Runs dynamic content - Experiences high database usage It may not provide significant benefits for: - Small brochure websites - Low-traffic blogs - Very simple landing pages ## Best Practices for Object Cache Pro - **Use Redis on Production Servers:** Redis delivers the best performance when installed directly on the server. - **Combine with Page Caching:** Object caching and page caching solve different performance problems. Using both provides the best results. - **Monitor Cache Usage:** Occasionally review: - Redis memory usage - Cache hit ratio - Server resource utilization - **Keep WordPress Updated:** Updated WordPress versions often include performance improvements that work well alongside object caching. - **Test Before and After:** Measure performance before enabling Object Cache Pro and compare results afterward. Useful metrics include: - TTFB (Time to First Byte) - Query count - CPU usage - Response time [![Blog banner - ServerAvatar](https://serveravatar.com/wp-content/uploads/2025/09/728_90-Banner-1-1024x127.png)](https://serveravatar.com/?ref=blog)## Why ServerAvatar Makes Object Cache Pro Easier Configuring Redis and Object Cache Pro manually often involves: - SSH access - Redis installation - WordPress configuration - Plugin setup - Server-level tuning ServerAvatar simplifies this workflow by integrating Object Cache Pro directly into the WordPress Toolkit. Instead of managing multiple tools and command-line configurations, you can enable and manage object caching from a single dashboard. This is especially useful for agencies, developers, and businesses managing multiple WordPress applications. ## Key Takeaways - Object Cache Pro uses Redis to store WordPress objects in memory. - It reduces repetitive database queries. - Dynamic websites benefit the most. - WooCommerce stores often see noticeable improvements. - ServerAvatar WordPress Toolkit simplifies setup and management. - Combining page caching and object caching delivers the best performance. ## Conclusion As WordPress websites grow, database performance becomes increasingly important. While page caching remains essential, it doesn’t eliminate the cost of repeated database queries happening behind the scenes. Object Cache Pro addresses this challenge by storing frequently accessed data in Redis memory, allowing WordPress to retrieve information much faster and reducing pressure on your database server. With ServerAvatar’s WordPress Toolkit, enabling Object Cache Pro becomes a straightforward process that takes only a few minutes. Once configured, your website can handle dynamic content more efficiently, improve response times, and scale more comfortably as traffic increases. ## FAQs ### What is Object Cache Pro in WordPress? Object Cache Pro is a Redis-based object caching solution that stores database query results in memory to improve WordPress performance. ### Does Object Cache Pro replace page caching? No, Object Cache Pro complements page caching by reducing database queries rather than caching full HTML pages. ### Is Redis required for Object Cache Pro? Yes, Redis is the underlying storage engine used by Object Cache Pro. ### Can Object Cache Pro improve WooCommerce performance? Yes, WooCommerce websites often benefit significantly because of their database-heavy operations. ### Do I need technical knowledge to enable Object Cache Pro in ServerAvatar? No, ServerAvatar provides a simple interface where you can activate Object Cache Pro by entering your license key and enabling the feature. ## Next Steps Managing WordPress sites on a VPS becomes much easier when theme updates, server management, SSL, backups, and application controls are available from one dashboard. [ServerAvatar](https://serveravatar.com/) helps simplify those everyday tasks without adding extra complexity. You should also read: - [WordPress Toolkit for WordPress Management in ServerAvatar](https://serveravatar.com/wordpress-toolkit-serveravatar) - [How to Create WordPress Blueprints Easily in ServerAvatar](https://serveravatar.com/create-wordpress-blueprint-serveravatar) - [How to Update WordPress Core, Plugins, Themes, and Database from One Place](https://serveravatar.com/update-wordpress-core-plugins-themes-database/) ### About the Author Meghna Meghwani is a technical writer focused on Linux, Ubuntu, VPS hosting, server management, WordPress, PHP, Node.js, cloud hosting, and DevOps. She creates beginner-friendly tutorials, practical hosting guides, troubleshooting articles, and server security content designed to help developers and businesses manage applications and servers more efficiently. **Categories:** Blog, Guide, Optimisation, Others, Tutorials, WordPress **Tags:** Object Cache Pro, Wordpress, WordPress Caching, WordPress optimization, WordPress performance, WordPress Speed, WordPress Toolkit --- ### [WordPress Toolkit for WordPress Management in ServerAvatar](https://serveravatar.com/wordpress-toolkit-serveravatar/) **Published:** May 20, 2026 **Author:** Meghna Meghwani **Content:** If you are manage one or more WordPress website, you know how time-consuming it can be to handle updates, debug errors, manage plugins, and keep everything secure, all from different places. That’s exactly what [ServerAvatar](https://serveravatar.com/)’s WordPress Toolkit solves. [WordPress Toolkit](https://app.serveravatar.com/add-ons/wp-toolkit) is powerful, all-in-one add-on built into ServerAvatar, gives you complete control over your WordPress applications. From single dashboard, you can: - Check WordPress site details - Manage plugins and themes - Improve performance - Tighten security - Fix database issues everything without touching the WordPress admin panel. ## Who Is WordPress Toolkit For? WordPress Toolkit is designed for anyone that wants a faster and easier way to manage WordPress websites from one dashboard. It is most useful for: - Developers working on multiple client sites - WordPress agencies with multiple projects - Business owners who manage their own websites - Freelancers working on client applications - Beginners that want simpler WordPress management - Teams that wanting centralised website control WordPress Toolkit makes daily management simple whether you are managing one website or dozens of WordPress installs, WordPress Toolkit simplify daily management tasks. ## Activating WordPress Toolkit To start using [WordPress Toolkit](https://app.serveravatar.com/add-ons/wp-toolkit), you need to activate it on your ServerAvatar account. Here’s how: - From your ServerAvatar account panel, access the Billing Dashboard. - Head to the left sidebar and look for the **add-ons** section. - You’ll spot WordPress Toolkit listed there among the available options. - Hit **Buy Now** and go through the payment and checkout flow. ![purchase WordPress Toolkit](https://serveravatar.com/wp-content/uploads/2026/05/image-39-1024x373.png) Once your purchase is complete, WordPress Toolkit is activated and ready to use. You can then access it from any of your WordPress applications through the ServerAvatar dashboard. ## Overview: Your WordPress Application’s Toolkit summary Every time you log into ServerAvatar and open WordPress Toolkit, the first thing you land on is the Overview page. Think of it as your site’s report card, everything important shows up right there, no digging required. ![Overview - WordPress Toolkit](https://serveravatar.com/wp-content/uploads/2026/05/image-40-1024x368.png) **You can see the following details at the top of the page** - Current WordPress version - Total number of installed plugins, including both active and inactive plugins, along with the plugins that have updates available - Total number of themes, including inactive, and the update status of themes - Total number of users, including the number of users with Administrator and Editor roles. - Additionally, you can also see the SSL Certificate status for your application. This gives you a clean snapshot of your site’s current state without opening multiple screens. Further down, there are two simple toggles: ### Maintenance Mode Use this before making changes to your site. Go ahead and turn maintenance mode on before you start making changes to your site. Here’s why it makes sense: - Visitors see a clean “under construction” page instead of a broken site - Your live site stays protected while you’re working - Users won’t run into broken layouts or weird temporary glitches[](https://storage.3.basecamp.com/5840738/blobs/4267d91c-534c-11f1-853e-0242ac120003/download/CPT2605191200-1792x588.gif) ![Maintenance Mode - WordPress Toolkit](https://serveravatar.com/wp-content/uploads/2026/05/CPT2605191200-1792x588-1-2.gif) ### Cron Scheduler This one saves you time. It gives you a quick overview of how your scheduled WordPress tasks are running, no need to dig into the dedicated Cron section every time. You can view: - Current cron execution method being used - Number of due scheduled events - Total registered cron events - Quick access to manage cron settings The **Manage Cron** button provides direct access to the full Cron management section. ![Manage Cron - WordPress Toolkit](https://serveravatar.com/wp-content/uploads/2026/05/CPT2605191211-1783x615-1.gif) ### Active Theme Information At the bottom of the Overview page, you’ll see which theme is currently active on your site, and a quick access to view all themes, and customize the theme. ![Active Theme - WordPress Toolkit](https://serveravatar.com/wp-content/uploads/2026/05/image-3-1-1024x334.png) **Why This Is Useful** Instead of jumping between multiple areas to check things, everything comes together in one place. The layout is clean, you get the full picture, and managing, monitoring become actually manageable. ## Debug: Fix Issues Before They Become Problems When something goes wrong on your WordPress site, debugging is usually the first thing you have to do. The debug process can get messy fast, digging through log files, editing config values, and trying to remember previous changes. WordPress Toolkit simplifies the entire process. ![Debug - WordPress Toolkit](https://serveravatar.com/wp-content/uploads/2026/05/CPT2605191246-2059x748-1.gif) Inside the **Debug section**, you’ll find three toggles that control how WordPress handles errors and warnings: ### Debug Mode Flip this on or off to control whether WordPress logs and captures runtime issues. Once enabled, WordPress starts collecting: - PHP errors - Notices - Warnings This helps you identify exactly what’s going wrong. ![Debug Mode - WordPress Toolkit](https://serveravatar.com/wp-content/uploads/2026/05/CPT2605181227-1575x623-1.gif) ### Debug Log Instead of showing errors on the screen, WordPress writes them into a log file on your server. That’s really useful on live sites where you don’t want visitors seeing technical error messages. ![Debug Log - WordPress Toolkit](https://serveravatar.com/wp-content/uploads/2026/05/CPT2605181230-1573x625-1.gif) ### Display Errors Displays Errors shows errors directly on the website page. This is incredibly useful for: - Local testing - Development environments - Quick troubleshooting on the fly ![Display Errors - WordPress Toolkit](https://serveravatar.com/wp-content/uploads/2026/05/CPT2605181231-1566x626-1.gif) **One important note:** Keep this disabled on live websites. Because error pages can end up exposing sensitive information about your server setup, not something you want floating around publicly. **Why This Is Useful** Everything’s centralized. No file editing, no digging through your hosting control panel. Just toggle things on, see what happens, turn them back off once you’ve fixed the issue. ## Updates: Everything in One Place Keeping WordPress, plugins, and themes updated is one of the most important habits for keeping a site healthy and secure. But, it can be hassle as you have to; - Logging into wp-admin - Checking multiple sections - Updating items one by one WordPress Toolkit simplifies this entire workflow. The Updates section gives you a complete overview of every update that’s available on your site. ![Updates - WordPress Toolkit](https://serveravatar.com/wp-content/uploads/2026/05/CPT2605191319-2054x794-2.gif) ### WordPress Core At the top of the section, you’ll see: - The current WordPress version - An update status badge - Any available core updates - Button to check for the Updates[](https://storage.3.basecamp.com/5840738/blobs/5e011450-5288-11f1-ba0e-0242ac120002/download/image.png) ![WordPress cCore Version - WordPress Toolkit](https://serveravatar.com/wp-content/uploads/2026/05/image-41-1024x161.png) ### Plugin Updates The Plugins section shows: - Total number of installed plugins - Plugins need updates - Available version upgrades for plugins You can: - **Update** plugins individually - Use **Update All** button to update everything at once ![Plugin Update - WordPress Toolkit](https://serveravatar.com/wp-content/uploads/2026/05/CPT2605181245-1567x226-1.gif) ### Theme Updates The Themes section works the same way. The Themes section gives you a snapshot of: - Total number of installed themes - Any pending updates - Available version upgrades You’ve got options here too, update themes one by one, or just hit **Update All** and let it roll through everything at once.[](https://storage.3.basecamp.com/5840738/blobs/c8fccaf4-528a-11f1-8e3b-0242ac120004/download/CPT2605181253-1561x227.gif) ![Theme Update - WordPress Toolkit](https://serveravatar.com/wp-content/uploads/2026/05/CPT2605181253-1561x227-1.gif) ### Database Updates Keep your WordPress database schema synchronized after core or plugin updates directly from the WP Toolkit dashboard. - Check pending database updates - Apply database migration routines safely - Avoid compatibility and update-related issues - Monitor database status in one place ![Database Update - WordPress Toolkit](https://serveravatar.com/wp-content/uploads/2026/05/image-42-1024x153.png) **Why This Is Useful** Instead of bouncing between different areas, you handle WordPress core, plugin, and theme updates from one single spot. No more repeatedly logging into wp-admin just to check for updates. ## Plugins: Full Control Over Your Extensions Plugins are what make WordPress actually powerful. But managing many plugins can quickly become messy, especially when you have a lot of them. [](https://storage.3.basecamp.com/5840738/blobs/cfca6594-5357-11f1-8097-0242ac120002/download/CPT2605191322-2033x604.gif) ![Plugins - WordPress Toolkit](https://serveravatar.com/wp-content/uploads/2026/05/CPT2605191322-2033x604-1.gif) The Plugins section in WordPress Toolkit gives you a clean, organized overview of every plugin on your site. **At the top, you’ll see:** - Total number of plugins - Number of active plugins - Number of inactive plugins - Number of plugins with pending updates Search for any plugin from the list, filter it by status, and refresh it to pull the latest information. ![Search for Plugin - WordPress Toolkit](https://serveravatar.com/wp-content/uploads/2026/05/CPT2605181314-1585x509-2.gif) If you want to add a new plugin, there is an “Install Plugin” button at the top that opens the installation flow directly. You can also search for specific plugin to install it. ![Install Plugin - WordPress Toolkit](https://serveravatar.com/wp-content/uploads/2026/05/CPT2605181321-1591x643-2.gif)Below, you can see a full list of every plugin with it’s name, current version, update availability, and an action buttons for each plugin. You can easily; - Activate a plugin (if it’s currently inactive) - Deactivate a plugin if not required - Directly update plugin, if an update is available - Uninstall it if you no longer need it ![Actions - WordPress Toolkit](https://serveravatar.com/wp-content/uploads/2026/05/CPT2605181335-1592x586-1.gif) All without navigating to the wp-admin at all. It’s a refreshingly simple way to manage your site’s functionality without switching between different screens. **Why This Is Useful** No more jumping between different admin pages just to handle plugins. You can install, update, activate, deactivate, or remove them in just a few clicks, right from where you already are. ## Themes: Manage Your Site’s Look Your WordPress theme is what defines how your site looks to visitors. The Themes section in WordPress Toolkit makes it easy to see everything at a glance and make changes without touching code. ![Themes - WordPress Toolkit](https://serveravatar.com/wp-content/uploads/2026/05/CPT2605191327-2043x581-2.gif) **At the top, you’ll see quick stats for:** - Total number of installed themes - Active theme name - Number of total Inactive themes - number of themes with updates available Below section is showing each theme with its preview image, name, and version. You can easily: - Switch themes by clicking on the “Activate” button on whichever theme you want to use - Update a theme by given “Update” option next to particular theme - Remove a theme entirely with “Uninstall” button next to theme - You can search for particular theme from the search bar ![Actions - WordPress Toolkit](https://serveravatar.com/wp-content/uploads/2026/05/CPT2605181444-1585x601-1.gif) If you want to add a new Theme, there is an “Install Theme” button at the right corner that opens the installation flow directly. You can also search for specific Theme to install it. ![Install Theme - WordPress Toolkit](https://serveravatar.com/wp-content/uploads/2026/05/CPT2605181456-1585x796-1.gif) Everything is visual, straightforward, and takes just seconds to do. **Why This Is Useful** You can quickly switch, update, search, or remove themes without manually navigating through the WordPress admin dashboard. ## Performance: Speed Up Your Site The Performance section in WordPress Toolkit takes care of the important WordPress maintenance and optimization stuff directly from your ServerAvatar dashboard. No extra steps, no switching between tools. ![Performance - WordPress Toolkit](https://serveravatar.com/wp-content/uploads/2026/05/CPT2605191331-2040x541-1.gif) Instead of manually dealing with rewrite rules, clearing cache through the wp-admin, or running server commands, you handle all of it from one centralized interface. Less hassle, less back-and-forth. ### Rewrite Rules Rewrite rules control how WordPress handles your website URLs and permalink routing. Over time, things like plugin installations, permalink changes, or config updates can cause: - Broken URLs - 404 errors - Routing conflicts - Incorrect permalink behavior The **Flush Rewrite** option regenerates your WordPress rewrite rules without you having to manually dig into permalink settings inside wp-admin.[](https://storage.3.basecamp.com/5840738/blobs/75895956-52b1-11f1-bef7-0242ac120002/download/CPT2605181732-1760x217.gif) ![Rewrite Rules - WordPress Toolkit](https://serveravatar.com/wp-content/uploads/2026/05/CPT2605181732-1760x217-1.gif) This restores proper URL handling and gets your permalinks working correctly again, just a few clicks, that’s it. ### Cache Management Caching is great for speed, it stores temporary copies of your website content so pages load faster. Sometimes those cached files hang onto old content, and you won’t see your recent changes show up properly. The **Flush Cache** option clears out that stored application cache and forces your site to pull fresh, updated content. ![Cache Management - WordPress Toolkit](https://serveravatar.com/wp-content/uploads/2026/05/CPT2605191332-1791x216-1.gif) This comes in handy if you update plugins or themes, make design changes, update website content, troubleshoot display issues, or run into cache conflicts Clearing the cache ensures visitors always see the latest version of your site, not a stale one. **Why This Is Useful** The Performance section bundles important optimization and maintenance controls into one dashboard. No terminal, no digging through settings, just straightforward controls when you need them. ## Cron: Manage WordPress Scheduled Tasks WordPress leans on scheduled background tasks to handle a lot of important stuff automatically, things like publishing posts on schedule, checking for updates, sending email notifications, and more. ![Cron - WordPress Toolkit](https://serveravatar.com/wp-content/uploads/2026/05/CPT2605191334-2046x555-1.gif) The Cron section in WordPress Toolkit gives you centralized control over how these scheduled tasks run on your WordPress application directly from the ServerAvatar dashboard. ### Cron Execution Method WordPress uses scheduled tasks to handle important background operations. The Performance section allows you to choose how these scheduled WordPress tasks should run. **Available Cron Methods** - **WP-Cron** is WordPress’s default scheduling system. It kicks in whenever your website gets a visitor, and it’s a solid fit for: - Small to medium WordPress sites - Sites with regular traffic - Standard WordPress installations - **Server-Side Cron** uses an actual server cron job instead of relying on visits. Go with this option for: - High-traffic websites - Production applications - Sites with critical scheduled tasks - Situations where reliability is a must ![Cron Execution - WordPress Toolkit](https://serveravatar.com/wp-content/uploads/2026/05/CPT2605181724-1763x322-1.gif) The big benefit? Server-side cron keeps your scheduled jobs running consistently, even during those quiet periods when traffic dips, no missed tasks, no surprises. ### WP Cron Actions The WP Cron Actions section lets you manually trigger WordPress cron events whenever you need to, no waiting around. **Available Actions** - **Run All Events:** Forces WordPress to run every registered cron event immediately, even if their scheduled time hasn’t arrived yet. This is mainly useful for: - Development environments - Troubleshooting issues - Testing scheduled events - **Trigger Due Events:** Only runs cron events whose scheduled time has already passed. This lets you safely work through pending tasks without accidentally triggering anything premature or unexpected.[](https://storage.3.basecamp.com/5840738/blobs/03ad81a4-52b1-11f1-8b92-0242ac120004/download/CPT2605181728-1754x277.gif) ![](https://serveravatar.com/wp-content/uploads/2026/05/CPT2605181728-1754x277-1.gif) ## Security: Protect Your Site Keeping your WordPress site secure matters just as much as keeping it updated. Security section helps you to secure your WordPress application against common vulnerabilities, no need to manually edit server files or configuration settings. ![Security - WordPress Toolkit](https://serveravatar.com/wp-content/uploads/2026/05/CPT2605191337-2043x573-1.gif) Available security options include: ### Block XML RPC requests XML-RPC is a WordPress feature that lets external tools talk to your site remotely. The problem is, it’s also a common target for: - Brute-force attacks - Spam attacks - Pingback abuse - Remote login attempts The **Block XML-RPC Requests** option lets you easily shut this down when you don’t actually need it. ![Block XMLRPC - WordPress Toolkit](https://serveravatar.com/wp-content/uploads/2026/05/CPT2605181511-1591x244-1.gif) **Disabling XML-RPC can help** - Cuts down unwanted login attempts - Prevents spam-based attacks - Improves overall WordPress security - Minimizes unnecessary remote access points If your site doesn’t rely on external WordPress integrations, turning this off is generally the safer call. ### Block PHP Execution in Uploads The uploads directory in WordPress is normally used for storing: - Images - Videos - Documents - Media files By default, PHP files should never execute from this folder. If attackers manage to upload malicious PHP scripts, they could potentially run harmful code directly from the uploads directory. The **Block PHP Execution in Uploads** feature helps prevent this risk. ![Block PHP Execution - WordPress Toolkit](https://serveravatar.com/wp-content/uploads/2026/05/CPT2605181514-1563x214-2.gif) **Blocking PHP execution in uploads helps** - Prevent malware execution - Reduce security vulnerabilities - Protect against malicious file uploads - Improve server-level security In most cases, this should remain enabled unless a specific plugin explicitly requires PHP execution inside the uploads folder. ### Verify Checksums Checksums are like a fingerprint for your files. This feature compares your WordPress core files against the official WordPress.org checksums to make sure nothing’s been modified unexpectedly. Just hit the **Verify Checksums** button and it’ll scan your WordPress installation. The toolkit checks whether your files match the official release, any mismatches will show up right away. ![Verify Checksums - WordPress Toolkit](https://serveravatar.com/wp-content/uploads/2026/05/CPT2605181544-1565x269-2.gif) **This feature helps you:** - Detecting unauthorized changes - Monitoring WordPress file integrity - Identifying possible malware infections - Improving overall website security It’s a quick, reliable way to confirm your WordPress installation is still clean and unmodified. ## Search & Replace: Update Content Across Your WordPress Database Making changes across a WordPress website can sometimes be time-consuming, especially when the same text, URL, or value appears in multiple places throughout the database. The Search & Replace feature in WordPress Toolkit helps simplify this process by allowing you to quickly find and replace text across your entire WordPress database from a single interface. It scans your WordPress database and replaces matched content automatically. ![Search and Replace - WordPress Toolkit](https://serveravatar.com/wp-content/uploads/2026/05/CPT2605191433-2039x576-1.gif) Whether you’re updating old URLs, replacing branding, or fixing repeated content, this tool makes bulk changes much faster and safer. Instead of manually editing, you can make changes globally in just a few clicks. **Search Field:** The Search field allows you to enter the text or value you want to locate inside the database. **Replace Field:** The Replace field is where you enter the new value that should replace the matched content. **The Search & Replace tool is especially helpful for:** - Website migrations - Domain name changes - Rebranding projects - Bulk content updates - Fixing incorrect URLs - Updating repeated text across the site **Dry Run:** When enabled, WordPress Toolkit will scan the database, find matching entries, generate a preview report, show what will change without actually modifying the database. **Dry Run helps you:** - Avoid accidental replacements - Review changes before applying them - Prevent database mistakes - Safely test replacements It’s especially useful when performing large database updates or domain migrations. **Preview:** After entering your search and replacement values, click the Preview button to generate a detailed report of all matching entries. **The preview helps you verify:** - Which values will change - How many matches were found - Whether the replacement is correct This extra verification step helps reduce errors and gives you better control over database modifications. ![Preview - WordPress Toolkit](https://serveravatar.com/wp-content/uploads/2026/05/CPT2605181553-1566x796-2.gif) Instead of manually editing database records, WordPress Toolkit allows you to handle everything safely from one centralized dashboard. ## Settings: Set Up Your Site Your Way The Settings section in WordPress Toolkit gives you a centralized place to manage important WordPress configuration options without navigating through multiple admin pages. ![Settings - WordPress Toolkit](https://serveravatar.com/wp-content/uploads/2026/05/CPT2605191437-2047x555-2.gif) From language preferences to permalink structures, everything is organized in a clean and easy-to-use interface that helps simplify WordPress management. ### Site Preferences The Site Preferences section lets you manage the basic settings and behaviour of your WordPress website. From one screen, you can manage: - **Site language:** It allows you to select the default language used throughout your WordPress dashboard and system interface. - **Timezone:** This setting controls the time reference used across your WordPress site. - **Date format:** You can choose the date format for your WordPress website. - **Time format:** You can also configure how time is displayed. ![Change Settings - WordPress Toolkit](https://serveravatar.com/wp-content/uploads/2026/05/CPT2605181636-1747x949-2-2.gif) This helps ensure your website displays content correctly based on your preferred regional and formatting settings. ### Permalink Structure: Control Your URL Format The Permalink Structure section allows you to define how your website URLs are generated. WordPress Toolkit provides several permalink options, including: - Plain - Day and name - Month and name - Numeric - Post name - Custom structure [](https://storage.3.basecamp.com/5840738/blobs/43fb885c-52aa-11f1-adfe-0242ac120002/download/CPT2605181635-1760x949.gif) ![Permalink - WordPress Toolkit](https://serveravatar.com/wp-content/uploads/2026/05/CPT2605181635-1760x949-1.gif) Clean permalink structures help improve, website readability, user experience, SEO optimization, search engine indexing. ### Search Engine Visibility Selecting the “Discourage search engines from indexing this site” checkbox tells search engines not to index your website. ![Search Engine Visibility - WordPress Toolkit](https://serveravatar.com/wp-content/uploads/2026/05/CPT2605181646-1765x951-2.gif) It helps prevent unfinished or private websites from appearing in search engine results before they are ready for public access. However, the checkbox should not be selected for live production websites that you want indexed by Google and other search engines. The Settings section helps centralize important WordPress configuration options in one place directly from the ServerAvatar dashboard. ## Key Benefits of WordPress Toolkit WordPress Toolkit helps simplify day-to-day WordPress management by bringing multiple tools together into one centralized dashboard. **With WordPress Toolkit, you can:** - Manage WordPress websites faster - Reduce time spent on repetitive tasks - Update plugins and themes easily - Troubleshoot issues without editing files - Improve WordPress security - Optimize website performance - Manage multiple websites more efficiently - Perform database updates safely - Configure WordPress settings from one place Instead of switching between multiple tools and dashboards, WordPress Toolkit gives you a cleaner and more organized workflow. ## Why Use WordPress Toolkit? Managing WordPress websites normally involves switching between multiple tools, dashboards, and server panels. You often need to move between: - WordPress wp-admin - Hosting dashboards - File managers - Database tools - Security plugins - Cache plugins - Server configurations WordPress Toolkit simplifies all of this by bringing everything into a single centralized dashboard inside ServerAvatar. **It helps you:** - Save time on routine WordPress management - Reduce manual work and repetitive tasks - Improve website security - Manage plugins and themes more efficiently - Troubleshoot issues faster - Handle updates from one place - Maintain multiple websites more easily - Simplify WordPress administration for teams and agencies Whether you’re a beginner managing your first WordPress website or a developer handling multiple production applications, WordPress Toolkit provides a cleaner and more efficient management experience. ## Conclusion Managing WordPress websites becomes much easier when everything is available in one place. ServerAvatar’s WordPress Toolkit helps simplify daily WordPress management by combining updates, debugging, plugin management, theme management, security controls, performance optimization, database tools, and WordPress settings into a single centralized dashboard. Instead of switching between wp-admin, server configurations, file managers, and third-party plugins, you can handle everything directly from ServerAvatar with a cleaner and more organized workflow. ## FAQs ### Do I need to access wp-admin to manage my WordPress site? WordPress Toolkit allows you to perform many common WordPress management tasks directly from the ServerAvatar dashboard without logging into wp-admin. ### Can I manage multiple WordPress websites with WordPress Toolkit? Yes, WordPress Toolkit is especially useful for developers, agencies, freelancers, and businesses managing multiple WordPress applications. ### Can beginners use WordPress Toolkit? Absolutely, WordPress Toolkit is designed with a simple and user-friendly interface, making WordPress management easier for both beginners and advanced users. ### Is Display Errors safe to use on live websites? No, Display Errors should generally remain disabled on production websites because it can expose sensitive technical information to visitors. ### Do I need technical knowledge to use WordPress Toolkit? No, WordPress Toolkit is designed with a user-friendly interface that simplifies WordPress management for both beginners and experienced users. **Categories:** Blog, Guide, Others, ServerAvatar Updates, Tutorials, WordPress **Tags:** maintenance, manage WordPress sites, ServerAvatar update, WordPress admin tools, WordPress maintenance, WordPress management, WordPress management tools, WordPress performance optimization, WordPress Security --- ### [How to Create WordPress Blueprints Easily in ServerAvatar](https://serveravatar.com/create-wordpress-blueprint-serveravatar/) **Published:** May 21, 2026 **Author:** Meghna Meghwani **Content:** If you manage more than one WordPress site, you already know the drill. Every time you spin up a new project, you’re installing the same plugins, tweaking the same settings, choosing the same permalink structure, and removing the same sample pages. It’s not hard, but it is tiresome. And the more sites you run, the more time it eats up. That’s exactly the problem **WordPress Blueprints** in ServerAvatar solves. In this guide, I’m going to walk you through exactly how WordPress Blueprints work, how to create one from scratch, and how to use it the moment you’re ready to deploy a new WordPress site. Whether you’re running one blog or managing a dozen client installations, this feature is worth setting up properly. ## What Are WordPress Blueprints in ServerAvatar? A [WordPress Blueprint](https://app.serveravatar.com/wp-toolkit/blueprints) is a reusable configuration template that lets you pre-define everything, the themes you want installed, the plugins you rely on, your preferred site preferences, etc. Once you create a Blueprint, you can directly apply it to any new WordPress application you deploy through [ServerAvatar](https://serveravatar.com). Just one click, and your new site lands exactly the way you configured it. Think of a WordPress Blueprint as a checklist that ServerAvatar reads when you’re creating a new WordPress site. Instead of manually configuring each option after WordPress is installed, you define your ideal setup once from the Blueprint. Every time you spin up a new WordPress application, you simply select your Blueprint from a dropdown, and ServerAvatar handles the rest. ### Why You Should Use WordPress Blueprints Let me be direct, if you’re only running one WordPress site and you don’t plan to add more, Blueprints might feel like overkill. But the moment you’re managing two or more sites, the value becomes obvious fast. - Consistency Across Every Deployment - Serious Time Savings - Perfect for Client Projects - Easy to Standardize Your Workflow ## How to Create a WordPress Blueprint in ServerAvatar Here’s the step-by-step process for creating your first Blueprint. - Log in to your [ServerAvatar](https://serveravatar.com) account, and click on the “WordPress Blueprints” section from the left sidebar.[](https://storage.3.basecamp.com/5840738/blobs/7c6ca3ba-5377-11f1-8e29-0242ac120003/download/image.png) ![WordPress Blueprints](https://serveravatar.com/wp-content/uploads/2026/05/CPT2605211642-1888x631-1.gif) - Click on the “Create Blueprint” button in the top right corner. ![Create WordPress Blueprints](https://serveravatar.com/wp-content/uploads/2026/05/CPT2605211745-1623x768-1.gif) - Let’s now create a Blueprint. Here’s what you can configure inside a Blueprint: - **Blueprint Name:** Enter a name for your blueprint so you can identify it later (e.g., “Client Blog Starter,” “E-commerce Setup”) - **Themes:** Click on the “Add” button next to Themes and choose which themes get installed automatically when the WordPress application is deployed. - **Plugins:** Select the plugins you want pre-installed and active by clicking on the “Add” button next to Plugins. - **Custom Themes/Plugins:** Add any custom theme or plugin via a direct download URL if it’s not in the standard repository, and enable the toggle button to activate it after deploying the site. ![ Add details for WordPress Blueprints](https://serveravatar.com/wp-content/uploads/2026/05/image-54-1024x513.png) - **Site Preferences:** Here, you define your standard WordPress behavior: - **Site Language:** Set your default dashboard language - **Timezone:** Choose the timezone your site operates in (important for scheduled posts and cron events) - **Date Format and Time Format:** Pick how dates and times display on your site - **Disable Search Engine Indexing:** Enable this if you want new sites to stay hidden from search engines until they’re ready - **Organize Upload Folders:** WordPress will automatically organize media uploads by year and month - **Permalink Structure:** Choose your default URL format. “Post name” (/sample-post/) is the most readable and SEO-friendly option. You can also set a Custom Structure using tags like %year%, %postname%, %category%, and more ![Site Preferences - WordPress Blueprints](https://serveravatar.com/wp-content/uploads/2026/05/image-55-1024x442.png) - **Cleanup:** Decide which default WordPress content gets removed on setup - Remove “Hello World” Post - Remove Sample Page - Delete All Existing Themes: Select only if you’re installing a specific theme via the Blueprint - Delete All Existing Plugins: Select only if you’re installing a specific plugin via the Blueprint - Delete Unneeded Core Files: Removes unnecessary WordPress template files you won’t use - **Debug Settings:** Here, you can set your default debug behavior: - **Debug Mode:** Enables WordPress core debugging - **Debug Log:** Writes errors to a server-side log file (safer for production) - **Display Errors:** Shows errors directly on the page (keep OFF for live sites, useful for development) - Once you fill in all details, click on the “Create Blueprint” button[](https://storage.3.basecamp.com/5840738/blobs/1b7aa416-5378-11f1-be48-0242ac120003/download/image.png) ![Create WordPress Blueprints](https://serveravatar.com/wp-content/uploads/2026/05/image-56-1024x286.png) Once created, your Blueprint is listed in the “WordPress Blueprints” section of your ServerAvatar account. ![WordPress Blueprints list](https://serveravatar.com/wp-content/uploads/2026/05/image-57-1024x341.png) You can edit or delete your WordPress Blueprints anytime. Additionally, when you create a new WordPress application, you will see the dropdown option to select a blueprint for your application, completely optional, but incredibly handy when you do. ## How to Use a WordPress Blueprint When Deploying a New Site This is where the magic happens. Creating the Blueprint is a one-time work. Using it takes seconds. **Step 1: Deploy a New WordPress Application** - Log in to your ServerAvatar account and navigate to your server panel by clicking on the server dashboard icon. ![Server Dashboard - WordPress Blueprints](https://serveravatar.com/wp-content/uploads/2026/05/CPT2605211658-1886x416-1.gif) - Navigate to the Application section from the left sidebar, and click on the Create an Application button. ![Create Application - WordPress Blueprints](https://serveravatar.com/wp-content/uploads/2026/05/CPT2605211702-1812x487-1.gif) - Fill in the basic details; - Application Name: Enter your application name - Domain Type: Choose your domain type from Primary or Test. ServerAvatar provides test domains for website testing purposes, and enter your domain name. - Select the “Secure your application with SSL certificate” checkbox if you want to install an SSL Certificate. - Select Deployment Method as a “One Click”, and “WordPress” as an application. - Enter your admin credentials, such as username, email, and password (ServerAvatar even has a **Generate** button so you don’t have to come up with a secure password yourself) ![Create application - WordPress Blueprints](https://serveravatar.com/wp-content/uploads/2026/05/image-58-1024x811.png)**Step 2: Select Your Blueprint** - After the “Admin Information” section, you will find a **WordPress Blueprint** section with a dropdown. - WordPress Blueprint is completely optional, but if you have a relevant Blueprint created, this is where you apply it. - Open the dropdown and select the Blueprint that matches your application’s needs. - If you don’t see the right Blueprint in the list, you can create a new one by clicking on the “**Add Blueprint**” button right there next to the WordPress Blueprint section - You can easily create a new Blueprint on the spot without leaving the application setup page. **Step 3: Deploy** - Complete the rest of the setup, such as selecting the checkbox for Installing Log Monitoring Suite. - Once all the setup details are filled in, click on the “Create Application” button to deploy the application. ![Create WordPress Application - WordPress Blueprints](https://serveravatar.com/wp-content/uploads/2026/05/CPT2605211710-1538x806-1.gif) - ServerAvatar will spin up your new WordPress application with every setting from your Blueprint already applied, themes installed, plugins active, permalinks configured, and default content cleaned up. - The entire setup process may take approximately 2–3 minutes. That’s it! - You can check all the configurations based on your selected blueprint by navigating to the “[WP Toolkit](https://app.serveravatar.com/add-ons/wp-toolkit)” section from the left sidebar of your application panel. ![WP Toolkit - WordPress Blueprints](https://serveravatar.com/wp-content/uploads/2026/05/CPT2605211722-1805x763-1.gif) - You can find all the plugins, themes, site Preferences, and further details as per your selected blueprint in the WP Toolkit section, where you can further modify them as needed. WP Toolkit gives you complete control over your WordPress site management after deployment, including plugin management, theme control, debugging tools, security options, staging, updates, and more. If you want a detailed walkthrough of all WP Toolkit features and capabilities, check out our [complete guide on WP Toolkit](https://serveravatar.com/manage-wordpress-toolkit/) in ServerAvatar: [https://serveravatar.com/manage-wordpress-toolkit](https://serveravatar.com/manage-wordpress-toolkit/) ## Tips for Getting the Most Out of WordPress Blueprints After setting up a few Blueprints for different project types, here’s what I’ve learned: **Build Multiple Blueprints for Different Project Types** Don’t try to stuff everything into one Blueprint. I keep three: one for standard blogs (minimal plugins, clean setup), one for e-commerce sites (Cache plugin, specific e-commerce theme), and one for client staging environments (debug enabled, search indexing off). One size does not fit all here. **Double-Check Your Permalink Structure** This is the setting I see most people overlook. A clean permalink structure like “Post name” (/sample-post/) is readable, user-friendly, and great for SEO. Make sure your Blueprint has this set correctly so you don’t end up with messy URLs on client sites. **Remember to Disable Debug Settings Before Going Live** If you enable Display Errors in your Blueprint, make sure you turn it off in the actual site settings before it goes live. Errors showing directly on the page on a production site is not a good look, and it can expose server information. **Keep Your Blueprints Updated** When you find a better plugin, switch to a faster theme, or change your preferred permalink structure, update the Blueprint. That way, every future deployment gets the improved version automatically. **Custom Plugins and Themes Via URL Are a Time Saver** If you have a premium theme or a plugin you trust that isn’t in the WordPress repository, you can add it via a direct download URL in the Custom Themes/Plugins section. One less step every time you deploy. ## Who Should Use WordPress Blueprints? WordPress Blueprints are useful for anyone who deploys WordPress websites regularly and wants a faster, more consistent setup process. This feature is especially helpful for: **Agencies Managing Multiple Client Websites** If your agency creates multiple WordPress websites every month, Blueprints help standardize deployments and reduce repetitive setup work across projects. **Freelancers Building WordPress Sites** Freelancers often reuse the same plugins, themes, and site settings for different clients. Blueprints make it possible to deploy those preferred configurations instantly. **Developers Creating Staging Environments** For developers who frequently create testing or staging websites, Blueprints provide a quick way to launch pre-configured environments with debugging and development tools already enabled. **WooCommerce Store Owners** If you regularly launch online stores, you can create a WooCommerce-specific Blueprint with your preferred plugins, payment tools, and performance settings already configured. **Teams That Want Consistent Workflows** Blueprints help teams maintain consistency across WordPress deployments by ensuring every site follows the same setup standards from the beginning. Even if you’re only managing a few WordPress sites, Blueprints can still save time and help you avoid repetitive manual configuration work. ## Conclusion WordPress Blueprints in ServerAvatar is one of those features that feel simple on the surface but save you an excessive amount of time once they’re part of your workflow. You spend a few minutes setting up a Blueprint once, and every new WordPress site you deploy after that lands exactly the way you want it, no repetitive setup, no forgotten steps, no inconsistencies between projects. The best part? You can create as many Blueprints as you need for different project types. Whether you’re an agency delivering multiple client sites per month, a freelancer who spins up test environments frequently, or just someone who wants a cleaner starting point for every new WordPress project, Blueprints are worth integrating into your process. ## FAQs ### Are WordPress Blueprints available on all ServerAvatar plans? WordPress Blueprints are part of the WordPress Toolkit add-on in ServerAvatar. You will need to activate WordPress Toolkit first from the Add-ons section in the Billing Dashboard to access this feature. ### Can I use a Blueprint on an existing WordPress site? No, Blueprints only work when deploying a new WordPress application. For existing deployed sites, you can use WP Toolkit directly. ### Can I edit a Blueprint after creating it? Yes, go to Tools >> WordPress Blueprints in your ServerAvatar dashboard, find the blueprint in the list, and click the edit icon. ### What happens if I delete a Blueprint that’s already been used? Deleting a Blueprint only removes it from the dashboard and the dropdown selection. Any sites that were deployed using that Blueprint are completely unaffected. ### Is the Blueprint selection mandatory when creating a new WordPress site? No, the Blueprint is completely optional. You can deploy a new WordPress site without selecting any Blueprint. **Categories:** Blog, Guide, Others, ServerAvatar Updates, Tutorials, WordPress **Tags:** Reusable WordPress Setup, ServerAvatar, WordPress Automation, WordPress Blueprints, WordPress Deployment, WordPress Hosting, WordPress Workflow --- ### [How to Enable Debug Mode, Debug Logs, and Display Errors in WordPress](https://serveravatar.com/wordpress-debug-mode/) **Published:** May 23, 2026 **Author:** Meghna Meghwani **Content:** [![Blog banner - ServerAvatar](https://serveravatar.com/wp-content/uploads/2025/09/728_90-Banner-3-1024x127.png)](https://serveravatar.com/?ref=blog)If you have ever faced a white screen of death or unexplained WordPress errors, you know how difficult troubleshooting can be. Learning how to Enable Debug Mode in WordPress helps you identify errors, generate debug logs, and fix issues faster. WordPress Debug Mode fixes that. It switches on error reporting, saves detailed logs to your server, and actually tells you what went wrong, where, and why. Most beginners either don’t know it exists or accidentally leave it running after troubleshooting, which creates its own problems. In this guide, I’ll walk you through every Debug setting inside ServerAvatar’s WordPress Toolkit, what each one does, when to turn it on, when to turn it off, and how to make sense of the logs when something breaks. Whether you’re a developer chasing a plugin conflict or a site owner wondering why your contact form stopped working, this guide has you covered. ## TL;DR - Debug Mode + Debug Log = production troubleshooting setup - Display Errors = local/staging only, never on a live site - Logs live at /wp-content/debug.log on your server - WordPress Toolkit = point-and-click toggles, no file editing or FTP needed - Always disable debug settings after fixing the problem ## What Is WordPress Debug Mode? WordPress Debug Mode is a built-in troubleshooting feature. It catches PHP errors, plugin conflicts, theme issues, deprecated functions, and fatal errors, then logs them to a file or displays them on screen during development. By default, WordPress suppresses all PHP errors, which is fine for a live site, but absolutely maddening when you’re trying to figure out why something isn’t working. When Debug Mode is enabled, you’ll see messages like: - “Fatal error: Uncaught Error: Call to undefined function…” = a function that doesn’t exist - “Warning: Cannot modify header information, headers already sent” = whitespace or output before a redirect - Notices about deprecated functions = useful before upgrading PHP versions Without Debug Mode, those messages disappear, and you’re left guessing. With it on, you get the exact file path, line number, and full error message. That’s the difference between 10 minutes of debugging and 10 hours. ## Quick Comparison: Debug Mode vs Debug Log vs Display Errors in WordPress Most WordPress users think Debug Mode, Debug Log, and Display Errors are the same thing. They’re not. Each one controls a different part of the debugging process, and mixing them up on a live site can expose errors to everyone who visits. **Setting****What It Does****Recommended Usage****Safe on Production?****Debug Mode (`WP_DEBUG`)**Enables WordPress debugging and error trackingTurn on temporarily while troubleshootingTemporarily**Debug Log (`WP_DEBUG_LOG`)**Saves PHP errors and warnings to **`/wp-content/debug.log`**Recommended for production troubleshootingYes**Display Errors (`WP_DEBUG_DISPLAY`)**Displays PHP errors directly on webpagesUse only on local or staging environmentsNo**Debug Mode + Debug Log**Logs errors privately without showing them to visitorsBest practice for live websitesYes**Debug Mode + Display Errors**Errors Shows errors instantly in the browserUseful during local developmentNo## Debug Mode, Debug Log, and Display Errors in WordPress ServerAvatar’s WordPress Toolkit gives you three options in the Debug section. Each one works differently. ### 1. Debug Mode: The Main Switch Debug Mode is the master switch. Turn this on, and WordPress switches PHP from silent mode to verbose mode, tracking everything that goes wrong. **What it does:** - Turns on error tracking in WordPress - Writes errors to **debug.log** in your **/wp-content/** folder - Does NOT show errors on screen, that’s a separate toggle **When to use it:** - Anytime you’re actively troubleshooting something. - Enable it, reproduce the issue, check the logs, fix the problem, then disable it. **When to leave it off:** - Any live production site. Leaving it on exposes your file structure to visitors. ### 2. Debug Log: The Error Journal Debug Log is where WordPress writes every error, warning, and notice it encounters. This is the file you actually want to read when something breaks. It captures every error, warning, and notice, even ones that happened hours ago while nobody was watching. What it does: - Writes PHP errors to **/wp-content/debug.log** on your server - Keeps a running record until you clear it - Catches errors from scheduled tasks, API calls, and background processes **Why this matters:** Most errors happen when no one’s looking, during cron jobs, background updates, or API requests. Debug Log catches them retroactively, even if the error completely crashes your site. The file is still there waiting for you. **What I like about this approach in ServerAvatar:** The log lives on the server, not in your browser. Even if the error crashes your site completely, the log file is still there waiting for you. You don’t need the site to load to see what went wrong. ### 3. Display Errors: Show Errors on Screen Display Errors is exactly what it sounds like, instead of logging errors silently, WordPress prints them directly on the webpage. Visitors see them too. This is the most dangerous setting of the three if left enabled on a production site. You’ll see PHP warnings and fatal errors rendered right in the browser, sometimes exposing file paths, database query details, and code snippets. **When to use it:** - Local development environments where you want errors visible immediately - Staging sites where you have full control over who’s visiting - When you need instant feedback without switching to the terminal **When to turn it off and keep it off:** - Any live, production website. Displaying PHP errors publicly is a security risk and looks unprofessional to your visitors. **The best practice:** Use Debug Mode + Debug Log for production troubleshooting. Use Display Errors only on local or staging environments where no visitors will ever see it. ## How to Enable Debug Mode in WordPress Using ServerAvatar Here’s the exact process for turning on Debug Mode using the WordPress Toolkit in ServerAvatar, no touching wp-admin, no editing files manually, no uploading via FTP. **Step 1: Open WordPress Toolkit** - Log in to your ServerAvatar account and navigate to your WordPress application panel by clicking the dashboard icon for the WordPress site you want to debug . ![go to the application panel - Enable Debug Mode](https://serveravatar.com/wp-content/uploads/2026/05/CPT2605221622-1823x645-2.gif) - From the left sidebar, click on **WordPress Toolkit**. This opens the WordPress management panel. ![wordpress toolkit - Enable Debug Mode](https://serveravatar.com/wp-content/uploads/2026/05/CPT2605221617-1828x736-1.gif) **Step 2: Go to the Debug Tab** - Click on the **Debug** section from the left side bar of the WordPress Toolkit, ![debug section - Enable Debug Mode](https://serveravatar.com/wp-content/uploads/2026/05/CPT2605221558-1823x720-1.gif) **Step 3: Enable Debug Mode** You’ll see three sections with toggle buttons: - **Debug Mode:** turn this ON - **Debug Log:** turn this ON (recommended alongside Debug Mode) - **Display Errors:** turn this ON only if you’re on a staging or local environment ![enable debug options - Enable Debug Mode](https://serveravatar.com/wp-content/uploads/2026/05/CPT2605221602-1535x586-1.gif) For most troubleshooting scenarios, especially on a live site, enable Debug Mode and Debug Log, but leave Display Errors OFF. This captures all errors in the log file without exposing anything to your visitors. **Step 4: Reproduce the Issue** Now that debug logging is active: - Visit your WordPress site and do whatever you were doing when the problem occurred - Click the button, load the page, submit the form, whatever triggers the error - WordPress will write every error to **debug.log** **Step 5: Read the Log** - Access it from the file manager: navigate to “public\_html/wp-content/debug.log” ![file manager - Enable Debug Mode](https://serveravatar.com/wp-content/uploads/2026/05/CPT2605221615-1838x791-1.gif) - **Each log entry gives you:** - Timestamp - Error type (Fatal, Warning, Notice) - Full error message - Exact file path and line number - Each log entry looks something like this: ``` [20-May-2026 14:32:01] PHP Fatal Error: Uncaught Error: Call to undefined function wp_cache_get() in /var/www/html/wp-content/plugins/my-plugin/my-plugin.php on line 42 ``` ``` [20-May-2026 14:32:01] PHP Fatal Error: Uncaught Error: Call to undefined function wp_cache_get() in /var/www/html/wp-content/plugins/my-plugin/my-plugin.php on line 42 ``` - That’s everything you need to isolate the problem. **Step 6: Fix the Problem and Disable Debug Mode** Go back to the Debug tab and turn Debug Mode OFF - Turn Debug Log OFF too, unless you’re actively troubleshooting something else - No reason to keep logging errors on a healthy, functioning production site ## How to Enable WordPress Debug Mode Manually If you prefer enabling WordPress debugging manually, you can configure it directly inside the wp-config.php file without using a control panel or WordPress Toolkit. This method works on any WordPress hosting environment and gives you full control over how WordPress handles debugging and PHP error logging. **Step 1: Open the wp-config.php File** Connect to your server using: - FTP/SFTP - SSH - Your hosting file manager Go to root directory of WordPress application and find the **wp-config.php** file. **Step 2: Add the Debug Constants** - Find this line inside the file: ``` /* That's all, stop editing! Happy publishing. */ ``` ``` /* That's all, stop editing! Happy publishing. */ ``` - Add the following code directly above it: ``` define('WP_DEBUG', true); define('WP_DEBUG_LOG', true); define('WP_DEBUG_DISPLAY', false); ``` ``` define('WP_DEBUG', true); define('WP_DEBUG_LOG', true); define('WP_DEBUG_DISPLAY', false); ``` **What These Constants Do:** **Constant****Purpose****WP\_DEBUG**Enables WordPress debugging mode**WP\_DEBUG\_LOG**Saves PHP errors to “`/wp-content/debug.log`“**WP\_DEBUG\_DISPLAY**Prevents errors from being displayed publicly This configuration is considered the safest setup for troubleshooting problems on a live WordPress website because errors are logged privately instead of being shown to visitors. **Step 3: Save the File and Reproduce the Issue** - Save the wp-config.php file - Revisit the action that caused the issue on your website - WordPress will automatically begin writing errors, warnings, and notices to: ``` /wp-content/debug.log ``` ``` /wp-content/debug.log ``` **Step 4: Disable Debug Mode After Troubleshooting** - Once you have fixed the problems, change values to previous: ``` define('WP_DEBUG', false); define('WP_DEBUG_LOG', false); define('WP_DEBUG_DISPLAY', false); ``` ``` define('WP_DEBUG', false); define('WP_DEBUG_LOG', false); define('WP_DEBUG_DISPLAY', false); ``` - Why you shouldn’t leave debugging on: - Exposes sensitive server information - Increases log file size over time - Slightly impacts performance under heavy traffic ## Manual Method vs WordPress Toolkit While manually editing wp-config.php works perfectly fine for developers comfortable with server access, ServerAvatar’s WordPress Toolkit simplifies the process into a few clicks without requiring: - FTP access - SSH access - file editing - manual configuration changes This is especially useful when managing multiple WordPress websites or troubleshooting client sites quickly. ## How to Read a WordPress Debug Log A debug log is only useful if you know how to read it. Here is a quick format breakdown. **Understanding the format:** ``` [Date Time] PHP Error Type: Error Message in /path/to/file.php on line LineNumber ``` ## Common error types you will see - **PHP Fatal Error:** A serious problem that stops the script entirely. This is usually a missing plugin, a syntax error, or a PHP version incompatibility. - **PHP Warning:** Something went wrong but WordPress kept running. Often a deprecated function or a missing file. - **PHP Notice:** Minor things like undefined variables. Usually not breaking, but worth fixing. - **WordPress Error:** A WordPress-level error, such as a failed cron job or a REST API failure. ## What to do when you find an error 1. Note the file path and line number, this is your exact location 2. Identify which plugin, theme, or core file is involved 3. If it’s a plugin, check if the plugin was recently updated, or if it’s incompatible with your PHP version 4. If it’s a core WordPress file, you may have a corrupted installation or a PHP version mismatch 5. Search the error message online, almost every common WordPress error has a known fix ## Common Problems That Require WordPress Debug Mode Here are some of the most common situations where enabling WordPress debugging helps: - **Plugin Conflicts:** Outdated or poorly coded plugins trigger fatal errors and deprecated warnings. Debug logs show you exactly which plugin file caused it. - **Theme Errors:** Custom or heavily modified themes can break layouts with missing functions or template issues. Debug Mode pins down the problematic file fast. - **White Screen of Death (WSOD):** Site loads completely blank with no error message. Debug Mode reveals the fatal PHP error behind the crash. - **PHP Version Compatibility Issues:** Upgrading PHP reveals deprecated functions used in older plugins and themes. Debug logs show you exactly what needs updating. - **REST API and AJAX Failures:** Background processes fail silently. Debug Mode catches the authentication errors, callback failures, or plugin conflicts behind them. - **Cron Job and Scheduled Task Errors:** Backups, WooCommerce actions, and automated tasks fail without obvious symptoms. The debug log is only place that shows actual error up. - **Memory Limit Exhaustion:** Large imports, backups, or poorly optimized scripts crash by exceeding PHP memory limits. Debug logs record the exhaustion error so you know when to adjust server resources. [![Blog banner - ServerAvatar](https://serveravatar.com/wp-content/uploads/2025/09/728_90-Banner-1-1024x127.png)](https://serveravatar.com/?ref=blog)## Best Practices for WordPress Debugging After working with WordPress sites for a while, here are the habits that actually help: - **Enable only when troubleshooting:** Turn it on, find the problem, turn it off. There’s no benefit to running Debug Mode on a healthy site, just unnecessary server load. - **Always use Debug Log on production:** It captures everything server-side without showing visitors anything. If something breaks at 2am, the log tells you what happened by morning. - **Rotate your logs:** After resolving an issue, clear the file or delete it. WordPress creates a fresh one automatically. Keeps the next debugging session clean. - **Test in staging first:** Make code changes or update plugins on a staging environment with Debug Mode on. Catch errors there before they hit your live site. - **Correlate timestamps:** Match log timestamps to when the problem occurred. WordPress logs in server time. Chasing old, unrelated errors wastes time. - **Check for multiple errors:** One user action can trigger several errors in sequence. The first one is usually the real culprit; the rest are knock-on effects. Read the full log from bottom to top to trace the chain. ## Why Use ServerAvatar’s WordPress Toolkit for Debugging? The traditional way means editing wp-config.php, uploading via FTP/SFTP, and hoping you remember to switch everything off afterward. It works, but it’s easy to miss a line or accidentally leave debugging on. **ServerAvatar’s WordPress Toolkit fixes that:** - Point-and-click workflow, no file editing, no FTP - Debug Mode, Debug Log, and Display Errors are clearly labeled - Everything is managed from a single dashboard - Enable or disable in seconds **What this means for you:** - No need for FTP or SSH access to debug a site - Fewer configuration mistakes during troubleshooting - Especially useful for agencies managing multiple WordPress sites or debugging client websites on shared hosting ## FAQs ### Is it safe to keep Debug Mode enabled on a live WordPress site? No, keeping Debug Mode enabled on a production site is a security risk. Error messages can expose your file structure, plugin names, and database details to anyone who visits. ### Where the WordPress debug log file located? The debug log is stored at “/wp-content/debug.log” in your WordPress installation directory on the server. ### Can I use Display Errors on a live site? You should not. Display Errors shows PHP errors directly on your webpages, which means visitors see them too. It also exposes sensitive server information. ### Does enabling Debug Mode slow down my WordPress site? Yes, slightly. Debug Mode adds a small amount of overhead because WordPress is actively tracking and logging errors. On a production site, you won’t notice it for a single visitor, but under high traffic it can add up. Always disable it after troubleshooting. ### I enabled Debug Mode but don’t see any errors in the log. What’s wrong? First, make sure Debug Log is also enabled, Debug Mode and Debug Log are two separate toggles, and both need to be on for errors to write to the file. Also, check that the “/wp-content/” directory is writable by your web server. ## Key Takeaways - **Debug Mode, Debug Log, and Display Errors** are three separate toggles, enable Mode + Log for production; use Display Errors only on local or staging - **Debug Log** writes to /wp-content/debug.log, catches errors even if your site is completely crashed - **Display Errors** exposes everything to visitors, never leave it on a live site - **WordPress Toolkit** makes enabling and disabling these a two-click operation, no file editing, no FTP - **Always disable** after troubleshooting, there’s no benefit to keeping them running on a healthy site ## Next Steps Now you know how to use WordPress Debug Mode effectively. If you’re managing multiple WordPress sites, enable Debug Log on each one, that way you have historical data the moment something breaks. **Explore more:** - [Complete guide to WordPress Toolkit in ServerAvatar](https://serveravatar.com/wordpress-toolkit-serveravatar) - [Step-by-step guide to create and use WordPress Blueprints](https://serveravatar.com/create-wordpress-blueprint-serveravatar) **About the Author:** Meghna Meghwani is a technical writer focused on Linux, Ubuntu, VPS hosting, server management, WordPress, PHP, Node.js, cloud hosting, and DevOps. She creates beginner-friendly tutorials, practical hosting guides, troubleshooting articles, and server security content designed to help developers and businesses manage applications and servers more efficiently. **Categories:** Blog, Guide, Tutorials, WordPress **Tags:** Display Errors in WordPress, Enable Debug Mode, Wordpress, WordPress Debug Logs, WordPress Debug Mode, WordPress Error Logs, WordPress Troubleshooting, WP_DEBUG --- ### [How to Update WordPress Core, Plugins, Themes, and Database from One Place](https://serveravatar.com/update-wordpress-core-plugins-themes-database/) **Published:** June 1, 2026 **Author:** Meghna Meghwani **Content:** [![Blog banner - ServerAvatar](https://serveravatar.com/wp-content/uploads/2025/09/728_90-Banner-3-1024x127.png)](https://serveravatar.com/?ref=blog)Managing multiple WordPress sites often means jumping between WordPress admin dashboards, updating plugins one by one, checking theme compatibility, and hoping nothing breaks on a live site. If you need to update WordPress core, plugins, themes, and database files more efficiently, [**ServerAvatar**](https://serveravatar.com/)**‘s** [**WordPress Toolkit**](https://serveravatar.com/wordpress-toolkit-serveravatar) simplifies that workflow by bringing everything into one centralized dashboard, without logging into wp-admin. In this guide, I’ll walk you through every tab, show you exactly how to update WordPress safely, and share practical tips I’ve picked up managing WordPress environments for over three years. Whether you handle one site or dozens, you’ll have a cleaner workflow by the end of this. ## TL;DR - WordPress Toolkit lets you update WordPress core, plugins, themes, and your database, all from a single ServerAvatar dashboard - No need to log into wp-admin to check for or apply updates - WordPress Core updates show the current version, available updates, and a status badge - Plugin and theme updates can be applied individually or all at once with “Update All” - Database updates are handled directly inside the Toolkit to keep your schema synchronized after major releases - Maintenance Mode toggle protects your live site while you’re working through updates - The entire workflow happens without ever touching the WordPress admin panel ## Why Managing WordPress Updates from One Dashboard Matters? ### The WP-Admin Problem The default WordPress update process isn’t built for scale. Here’s what managing updates the traditional way looks like when you have five sites: - Log into Site A >> check updates >> update plugins individually >> update theme >> done - Log into Site B >> repeat… - Log into Site C >> repeat… The problem isn’t just the time it takes, it’s the mental overhead of switching contexts, the risk of missing an update on one of your sites, and the fact that wp-admin gives you no unified view of your update status across all sites. There’s also the issue of updates breaking sites. If you update a plugin and it conflicts with your theme or WordPress version, you often won’t know until your site goes down. And by then, you’re in reactive mode, trying to diagnose and fix the problem rather than preventing it in the first place. ### The WordPress Toolkit Advantage With the WordPress Toolkit inside ServerAvatar, you get: - **Centralized view** of all your WordPress update status across every site - **One-click update options** for core, plugins, and themes - **Security hardening** built in, run it after every update - **Cache management** to prevent stale-content issues after updates - **Database management** without needing phpMyAdmin - **Staging-ready workflow** so you can test before pushing to production What I appreciate most is that the Toolkit surfaces things you might miss in wp-admin, like whether Debug Mode is still enabled on a live site, or whether your cron jobs are actually running on schedule. ## Access the WordPress Updates Section in ServerAvatar - Once WordPress Toolkit is [activated on your ServerAvatar account](https://app.serveravatar.com/add-ons/wp-toolkit), you can access it from any WordPress application in your ServerAvatar dashboard. - Navigate to the Application section from the left sidebar and open your WordPress application panel by clicking on the dashboard icon for your application. ![navigate to application panel - Update WordPress](https://serveravatar.com/wp-content/uploads/2026/05/CPT2605251429-1811x544-1.gif) - Navigate to the **WordPress Toolkit** section. Click the **Updates** tab ![go to update section - Update WordPress](https://serveravatar.com/wp-content/uploads/2026/05/CPT2605251532-1828x737-1.gif) - You’ll land on a page that surfaces every update available across your entire WordPress installation, core, plugins, themes, and database, all at once. - Each category shows the available updated version. ![update overview - Update WordPress](https://serveravatar.com/wp-content/uploads/2026/05/image-7-2-1024x773.png) - The Updates tab gives you a clean, unified view of what’s out of date. You don’t have to guess or dig through wp-admin to find which plugins need attention, it’s all right there. ## How to Update WordPress Core The top of the Updates section shows your current WordPress version alongside a status badge that tells you whether an update is available. ### What the Core Section Shows - **Current WordPress version:** the exact release running on your site right now - **Update status badge:** green when you’re current, yellow or red when a new version is available - **Available core updates:** any newer WordPress release waiting to be installed - **Check for Updates button:** manually refreshes update status if something didn’t pull through ## Step-by-Step WordPress Core Update - Open the **Updates** section from the left sidebar inside WordPress Toolkit - Look at the **WordPress Core** card at the top - If an update is available, you’ll see a badge and an **Update Core** button - Click **Update Core** to apply the new WordPress version ![wordpress core update - Update WordPress](https://serveravatar.com/wp-content/uploads/2026/05/CPT2605251543-1812x547-1.gif) - Once complete, the card refreshes to show your new current version ### Why You Shouldn’t Ignore Core Updates WordPress core updates include important security patches, performance improvements, and bug fixes. Keeping WordPress updated helps protect your site from known vulnerabilities and improves overall stability. > **One thing to keep in mind:** Before applying a core update, it’s a good idea to enable **Maintenance Mode** from the Overview tab. This keeps visitors from seeing a partially updated or broken page while the update is running. After the core update finishes, review the **Database Update** section as well. Major WordPress releases often include database changes that need to be applied separately. ## How to Update WordPress Plugins Plugins are where update neglect hits hardest. A popular plugin might push several updates a month, some for features, others for critical security fixes. If you’re managing multiple client sites, checking each one manually becomes a full-time job. ### What the Plugins Section Shows The Plugins section in the Toolkit gives you a clean inventory of every plugin on your site. At the top, you’ll see: - Total number of installed plugins - Number of plugins with pending updates - Available version upgrades - The plugin is listed with its name, current version, update status, and action buttons. ## Updating Plugins: One by One or All at Once You have two paths here, and both are fast. ### Update individually: - Click the **Update** button next to the plugin - The Toolkit pulls the latest version and applies it directly ![update plugin - Update WordPress](https://serveravatar.com/wp-content/uploads/2026/05/CPT2605251556-1805x592-2.gif) ### Update everything at once: - Hit the **Update All** button at the top of the Plugins section - Every plugin with a pending update gets processed in sequence - You can watch the status update in real time ![update all plugin - Update WordPress](https://serveravatar.com/wp-content/uploads/2026/05/CPT2605251558-1807x599-1.gif) In a typical WP-Admin workflow, you would navigate to the Plugins screen, tick checkboxes for each outdated plugin, select “Update” from the bulk actions dropdown, and confirm. That’s 4 steps minimum. Here it’s one click. ### What to Watch Out For After updating plugins, take a quick look through your site. Sometimes updates can affect layouts, shortcodes, or plugin settings without showing an obvious error. If something doesn’t look right, use the **Debug** tab in WordPress Toolkit to enable logs and check the issue. You can follow our guide on [**How to Enable Debug Mode, Debug Logs, and Display Errors in WordPress**](https://serveravatar.com/wordpress-debug-mode/) for a full walkthrough. ## How to Update WordPress Themes Themes follow the same pattern as plugins, they need updates too, and for the same reasons: security patches, performance improvements, and compatibility fixes. **What the Themes Section Shows** - **Total number of installed themes**, including inactive ones - **Pending updates**, themes that have a newer version available - **Available version upgrades**, shown next to each theme in the list This visual layout makes it much easier to identify themes quickly, especially on sites with multiple installed themes. ## Updating Themes: One by One or All at Once Like plugins, you can update themes one at a time or roll through all of them at once. ### Update individually - Locate the theme you want to update, and click the **Update** button ![update theme - Update WordPress](https://serveravatar.com/wp-content/uploads/2026/05/CPT2605251605-1806x571-1.gif) ### Update all at once - Click **Update All** in the Themes section - All themes with pending updates are processed together ![update all theme - Update WordPress](https://serveravatar.com/wp-content/uploads/2026/05/CPT2605251605-1806x571-1-1.gif) > **Note:** When updating your active theme, be aware that some theme updates can change how your site looks if the update includes template or style modifications. Always verify the site appearance after applying major theme updates. ## How to Update WordPress Database Updates Database updates are one of those WordPress maintenance tasks that are easy to miss because they usually happen in the background. But after a core update or certain plugin upgrades, WordPress may need to update database tables, indexes, or internal schema rules before everything works correctly. That’s why WordPress Toolkit includes a dedicated **Database Update** panel inside the Updates tab. ### What the Database Update Section Shows Inside this panel, you’ll see: - **Update available** status when database changes are pending - **Dry run** option to review what would change before applying anything - **Preview Changes** button when Dry run is enabled - **Update Database** button to apply the pending database updates The layout is straightforward, so you can quickly check whether an update is available for the WordPress application. ### Preview Database Changes Before Updating Before running database updates on a production site, it’s a good idea to check what WordPress plans to update. - Select the **Dry run** checkbox, then click **Preview Changes**. ![Dry Run - Update WordPress](https://serveravatar.com/wp-content/uploads/2026/05/CPT2605251635-1788x758-1.gif) This compares your current database version with the required version and shows which update routines would run, without making any actual changes. Preview is useful when: - WordPress core was recently upgraded - A plugin introduced database changes - You’re managing a live client site and want to verify everything first - You want to catch update requirements before applying them In real-world WordPress maintenance, this small check can save a lot of troubleshooting later, especially on sites with many plugins or custom functionality. ### Apply Database Updates Once you’ve reviewed the changes, or if you already know the update is safe, disable Dry run and click **Update Database**. [](https://storage.3.basecamp.com/5840738/blobs/5db94ac4-582a-11f1-b332-0242ac120004/download/CPT2605251638-1777x761.gif) ![Update Database - Update WordPress](https://serveravatar.com/wp-content/uploads/2026/05/CPT2605251638-1777x761-1.gif) WordPress Toolkit will apply the pending database updates directly from the ServerAvatar dashboard. No need to: - log into wp-admin - open phpMyAdmin - Run manual SQL commands - Trigger database upgrades from the admin dashboard Everything happens from the same Updates page. Once complete, the Database Update card refreshes and confirms there are no pending database updates left. ### Why Database Updates Matter Skipping database updates doesn’t always break a site immediately. That’s what makes them easy to ignore. But over time, an outdated database schema can cause issues like: - Plugin settings are not saving correctly - Admin notices appearing unexpectedly - New WordPress features are behaving inconsistently - compatibility issues after core upgrades - missing data or update errors inside plugins Keeping the database updated alongside WordPress core, plugins, and themes helps everything stay aligned and reduces the chance of hard-to-diagnose issues later. ## Recommended Workflow That Ties It All Together Here is the workflow of how to use the Updates section. It’s not complicated, but there’s a logical order that makes things smoother. **Step 1: Enable Maintenance Mode** Open the **Overview** tab inside WordPress Toolkit and toggle on Maintenance Mode. This protects your live site while you’re working through updates. **Step 2: Review what’s available** Open the **Updates** tab and scan all four cards: Core, Plugins, Themes, Database. Get a full picture before touching anything. **Step 3: Apply core updates first** Start with WordPress core. It’s the foundation, everything else depends on it. **Step 4: Run database updates** Right after a core update, check the Database section and apply any pending migrations before moving on. **Step 5: Update plugins** Apply all plugin updates. Use **Update All** button to update all the pending plugins, or update individually to review each of them. **Step 6: Update themes** Once plugins are stable, handle theme updates. **Step 7: Verify the site** Briefly open your site publicly and confirm nothing is broken or displaying incorrectly. **Step 8: Disable Maintenance Mode** Go back to the Overview tab and turn Maintenance Mode off. Your site goes live again with everything current. This sequence isn’t enforced, you can work in any order, but it’s the order that minimizes conflicts and keeps your site stable throughout the process. ## WordPress Toolkit vs WP-Admin for WordPress Updates If you manage only one WordPress site, the default WordPress admin dashboard may feel manageable. But once you start handling multiple websites, or want faster access to updates, maintenance tools, and troubleshooting, switching between WP-Admin screens quickly becomes repetitive. That’s where WordPress Toolkit creates a smooth workflow. Here’s a practical comparison: **Task****WordPress Toolkit in ServerAvatar****WordPress Admin (wp-admin)****WordPress core updates**Available from one centralized dashboardRequires logging into each site**Plugin updates**Update individual plugins or use Update AllRequires visiting the Plugins page**Theme updates**Update one or all themes from the same pageRequires opening Appearance >> Themes**Database updates**Built into the Updates tabUsually triggered separately after updates**Maintenance mode**Available directly from the ToolkitRequires plugin or manual setup**Debugging after update**Debug tools available in the same ToolkitRequires wp-config.php changes or plugins**Multiple site workflow**Easier to manage from one dashboardRepetitive when managing several sites**Overall update visibility**Core, plugins, themes, and database are shown togetherInformation is spread across multiple sectionsThat centralized view is especially helpful after major WordPress releases, where core updates, plugin compatibility, and database changes often need to be reviewed together before a site is considered fully updated. ## Common WordPress Update Issues and How to Fix Them Even with a good workflow, things can go wrong. Here’s how to handle the most common issues I’ve encountered. **1. Update Failed, What to Do** If an update shows as failed in the Toolkit: - **Check your internet connection:** If the connection drops mid-update, WordPress may be left in a partial state - **Check disk space:** Running out of disk space is a surprisingly common cause of update failures - **Check file permissions:** WordPress needs write access to the filesystem to update itself - **Try again:** Most transient failures resolve on retry - **Check the Debug tab:** Enable Debug Mode and check the debug log for specific error messages **2. Site Breaks After Update, Rollback Steps** If your site goes down or behaves erratically after an update: - **Restore your backup immediately.** This is the fastest way to get the site back to a working state - **Deactivate all plugins** via phpMyAdmin or file manager (rename the plugins folder to plugins.old) - **Revert to the default WordPress theme** by renaming your active theme’s folder - **Investigate the specific cause,** check Debug Log for error messages - **Test updates on staging** before re-applying to production The most important thing here is speed, the moment you notice something is wrong, restore from backup before trying to diagnose. You can always investigate after your site is back online. ## Conclusion Managing WordPress updates across four different areas in the wp-admin isn’t hard, it’s just scattered. And scattered routines are the ones that get skipped. What ServerAvatar’s WordPress Toolkit does with the Updates section is straightforward: it puts everything in one place so updating WordPress core, plugins, themes, and your database stops being a multi-step chore and becomes a single, fast workflow. If you want a simpler way to manage WordPress across all your sites, without juggling multiple logins or losing track of what’s pending, [WordPress Toolkit in ServerAvatar](https://app.serveravatar.com/add-ons/wp-toolkit) is worth exploring. It handles updates, debugging, security, performance, and more from the same dashboard where you already manage your server and applications. ## FAQs ### Does WordPress Toolkit automatically update WordPress? No, WordPress Toolkit gives you full visibility and control over all available updates, but the actual update actions are manual. You choose when to apply each update. ### Can I update WordPress plugins without logging into wp-admin? Yes, you can update plugins and themes independently of WordPress core. However, some plugin updates require a minimum WordPress version to function properly. Checking the core first is the safer approach, especially if you manage multiple sites and want a consistent baseline. ### Should I run WordPress database updates after a core update? Skipping database updates can lead to compatibility issues between WordPress and your database schema. This might cause features to break silently, post saves failing, plugin settings not persisting, or admin errors appearing. It’s best to apply database updates immediately after any core upgrade. ### Is WordPress maintenance mode required before updates? No, you need to enable Maintenance Mode manually from the Overview tab before you start making updates. The Toolkit doesn’t force this for you, but it’s strongly recommended, especially when applying multiple updates at once. ### Can I bulk update WordPress plugins and themes in ServerAvatar? Both options are available. You can update a single plugin by clicking the Update button next to that specific plugin in the list. Alternatively, you can use the Update All button to apply all pending plugin updates in one batch. The same flexibility applies to themes. ## Key Takeaways - WordPress Toolkit’s Updates section brings WordPress core, plugins, themes, and database updates into a single, unified dashboard - WordPress Core updates show the current version and available releases, with a direct Update button - Plugin and theme updates can be applied individually or all at once using the Update All button - Database updates must be run after WordPress core upgrades to keep the schema synchronized - Enabling Maintenance Mode before running updates protects your live site from displaying broken content during the process - The entire workflow requires no access to WP-Admin; everything happens inside ServerAvatar - Checking for and applying all pending updates takes less than five minutes with this centralized approach ## Next Steps If you’re managing WordPress with ServerAvatar, these guides can help you get even more from WordPress Toolkit: - [**WordPress Toolkit for WordPress Management in ServerAvatar**](https://serveravatar.com/wordpress-toolkit-serveravatar/)**:** Get a complete overview of the Toolkit and explore all WordPress management features available in one place. - [**How to Create WordPress Blueprints Easily in ServerAvatar**](https://serveravatar.com/create-wordpress-blueprint-serveravatar/)**:** Save your preferred WordPress setup as a blueprint and launch new sites faster with the same plugins, themes, and settings. - [**How to Enable Debug Mode, Debug Logs, and Display Errors in WordPress**](https://serveravatar.com/wordpress-debug-mode)**:** Turn on WordPress debugging and review error logs when something breaks after an update. Explore [ServerAvatar’s WordPress Toolkit](https://serveravatar.com/wordpress-toolkit-serveravatar/) to manage WordPress core, plugin, theme, and database updates from one dashboard without switching between multiple WordPress admin panels. ### About the Author Meghna Meghwani is a technical writer focused on Linux, Ubuntu, VPS hosting, server management, WordPress, PHP, Node.js, cloud hosting, and DevOps. She writes beginner-friendly tutorials, practical hosting guides, troubleshooting documentation, and server security content based on real-world hosting and application management workflows. Her goal is to make server and WordPress management easier for developers, agencies, and businesses running production websites and applications. **Categories:** Blog, Guide, Tutorials, WordPress **Tags:** Update WordPress, Wordpress, WordPress Core Update, WordPress Database Update, WordPress management, WordPress Plugin Update, WordPress Theme Update, WordPress Updates --- ### [How to Manage WordPress Plugins Easily with ServerAvatar](https://serveravatar.com/manage-wordpress-plugins/) **Published:** June 2, 2026 **Author:** Meghna Meghwani **Content:** If you’ve ever spent 20 minutes clicking through wp-admin just to manage WordPress plugins, only to find out which of your 14 plugins needs an update, you know how frustrating WordPress plugin management can get. The default plugin screen works, but it can feel slow and cluttered, and when you’re managing multiple WordPress sites, that extra time adds up quickly. That’s exactly the problem WordPress Toolkit solves. ServerAvatar’s WordPress Toolkit puts plugin management inside your hosting dashboard, a real-time view of every plugin, one-click updates, search and filter tools, and the ability to act without ever touching wp-admin. Whether you’re running one blog or handling 30 client sites, this changes how you work. In this guide, I will walk you through everything you can do with the Plugins tab in WordPress Toolkit. By the end, you’ll know exactly how to install, update, activate, deactivate, and remove plugins without leaving ServerAvatar. ## TL;DR - WordPress Toolkit gives you a centralized dashboard to manage plugins without opening the wp-admin - You can install, activate, deactivate, update, and uninstall plugins, all from the ServerAvatar Dashboard - Search and filter plugins by status, update availability, or name - Suitable for both single-site owners and agencies managing multiple client websites ## What Is WordPress Toolkit? Before diving into plugins specifically, [WordPress Toolkit](https://app.serveravatar.com/add-ons/wp-toolkit) is an add-on of [ServerAvatar](https://serveravatar.com/) that gives you centralized management for WordPress sites. It covers updates, debugging, performance, security, cron jobs, search-and-replace, and site preferences, all from one panel. The Plugins tab is the control center for everything plugin-related on any WordPress site connected to your ServerAvatar account. ## Why Plugin Management Gets Messy Most WordPress sites end up with plugin sprawl. You install something for a client project, forget about it, and six months later, you’re dealing with a compatibility issue or an outdated plugin that became a security risk. The core problems are: - **No central view:** wp-admin shows one site at a time. If you’re managing five or fifty, that’s five or fifty different WP-Admin logins. - **Update exhaustion:** plugins update frequently. Doing it manually per site is tedious and easy to skip. - **No status context:** wp-admin doesn’t tell you at a glance which plugins are pending for update, which have known conflicts, or which are sitting inactive. WordPress Toolkit addresses all three. It gives you the full picture for each WordPress site at a time, lets you act in bulk for updating plugins for each site, and keeps your workflow inside your hosting dashboard. ## Accessing the Plugins Tab in WordPress Toolkit Here’s how to get there: - Log in to your ServerAvatar account, navigate to your server panel by clicking on the server dashboard icon for the particular server in which your WordPress site is deployed. ![server panel - manage WordPress plugins](https://serveravatar.com/wp-content/uploads/2026/06/serverdashboard.gif) - Navigate to the Applications section from the left sidebar, and click on the application dashboard icon for your WordPress application ![application panel - manage WordPress plugins](https://serveravatar.com/wp-content/uploads/2026/06/applicationdashboard.gif) - Click **WordPress Toolkit** in the sidebar, and navigate to the **Plugins** section ![wp toolkit - manage WordPress plugins](https://serveravatar.com/wp-content/uploads/2026/06/plugins-1.gif) - You’ll find: ![overview - manage WordPress plugins](https://serveravatar.com/wp-content/uploads/2026/06/image.png) - **Plugin Summary Cards** at the top showing: - Number of total plugins - Number of active plugins - Number of inactive plugins - Number of plugins with available updates - **Search and Filter Tools** to quickly locate plugins by name, status, or update availability - **Install Plugin Button** for adding new plugins directly from the dashboard. - **A table listing every plugin installed on that site. The columns show:** - Plugin name - Status (active/inactive) - Current Version - Update indicator (Whether an update is available and the version of the plugin update) - Action (to Activate/Deactivate/Uninstall the plugin) ## Installing a New Plugin Need a new plugin? You don’t have to go hunting for it in the WordPress repository. ServerAvatar has an “Install Plugin” button right inside the Plugins tab. Here’s what the process looks like: - Click **“Install Plugin”** at the top of the Plugins tab - A search prompt appears, type the plugin name you’re looking for - ServerAvatar connects to the WordPress plugin directory and shows matching results - Click **Install** **Now** to install the plugin you want - Once installed, it appears in your plugins list, where you can activate it immediately ![install plugin - manage WordPress plugins](https://serveravatar.com/wp-content/uploads/2026/06/installplugin.gif) What I like about this: the search is fast, results come back instantly, and the plugin installs in the background without you needing to leave the page. After installing, activate it using a single click from the Plugins action tab, no WP-Admin required. ## Activating and Deactivating Plugins Every plugin in your list has action buttons. Activating or deactivating takes one click, the status updates immediately in the table. Just click on the **Activate** button to activate the plugin, and the **Deactivate** button to deactivate the plugin. ![activate plugin - manage WordPress plugins](https://serveravatar.com/wp-content/uploads/2026/06/activate-deactivate-plugin.gif) ### Why deactivate instead of uninstall? Sometimes you need to troubleshoot. If a plugin is causing a conflict or a white screen, deactivating is the fastest way to isolate the problem, without deleting the plugin entirely. You can reactivate just as quickly once you’ve resolved the issue. For staging environments or during development, keeping a plugin installed but inactive is a clean way to test without removing configuration or data. This is something I reach for often when debugging, deactivating, checking if the issue resolves, and reactivating one by one to narrow down the culprit. ## Updating Plugins Outdated plugins are one of the most common entry points for security issues on WordPress sites. WordPress Toolkit makes updates straightforward. In the Plugins section, each plugin with an available update shows an **“Update”** button with the version mentioned on it. One click and the update runs, and once updated, the update button disappears until the next release. ![update plugin - manage WordPress plugins](https://serveravatar.com/wp-content/uploads/2026/06/update-plugin.gif) ## Searching and Filtering Plugins The Plugins tab has a **search bar** at the top and **status filters**. These sound simple, but when you are managing a site with 20+ plugins, they save real time. **Filter options include:** - **All:** shows every plugin - **Active:** only currently enabled plugins - **Inactive:** plugins installed but not running - **Update Available:** plugins with pending updates This is particularly useful in a few scenarios, such as: - **During troubleshooting:** filter to inactive plugins and check if disabling something resolves an issue - **Before an update session:** filter to “Update Available” to see exactly what needs attention - **For auditing:** filter to inactive plugins and ask yourself whether each one is still needed (unused plugins are unnecessary attack surface) ## Uninstalling Plugins When a plugin is no longer needed, uninstalling it from the Plugins section removes it entirely from your WordPress website. Just simply click on the **Uninstall** button next to the specific plugin. ![uninstall plugin - manage WordPress plugins](https://serveravatar.com/wp-content/uploads/2026/06/uninstall-plugin.gif) A few notes on uninstalling: - **Always deactivate first:** Plugins register their uninstall routine when deactivated, so deactivate before you uninstall, this ensures cleanup routines run properly. - **Check for data:** If you’re replacing a plugin with an alternative, make sure the old plugin’s data is not something you need to keep. - **Test after removal:** Particularly for plugins that handle critical functions (caching, security, SEO), remove one at a time and verify the site still works correctly. ## Real-World Use Cases ### Managing Multiple Client Sites Managing multiple WordPress sites is simpler with a unified plugins interface that keeps actions like activate, update, and uninstall consistent across all installations, avoiding the need to switch between dashboards. ### Security Maintenance Routine Regular plugin audits help quickly identify outdated, inactive, or risky plugins before they cause issues, saving time by removing the need to log into each site separately. - Which plugins haven’t been updated in over 6 months? - Are there inactive plugins that could be removed? - Do any plugins show known compatibility warnings? Running this from ServerAvatar instead of logging into each wp-admin separately saves significant time if you’re managing more than three or four sites. ### Staging and Development Workflows In staging environments, managing plugin activation and testing from a single interface speeds up development and reduces repetitive work during frequent changes. ## Conclusion Plugin management shouldn’t take more time than it needs to. WordPress Toolkit’s Plugins tab in ServerAvatar removes the friction of jumping between wp-admin tabs, hunting for updates, and managing one site at a time. Whether you’re handling your own blog or overseeing 30 client WordPress installs, the centralized view and bulk actions make a real difference in day-to-day workflow. If you haven’t explored WordPress Toolkit yet, the Plugins tab alone is worth the add-on, especially if you manage multiple WordPress sites regularly. For more on what else WordPress Toolkit can do, explore our complete guide to [ServerAvatar WordPress Toolkit](https://serveravatar.com/wordpress-toolkit-serveravatar). ## FAQs ### Does WordPress Toolkit support premium or paid plugins? Yes, if the premium plugin is installed in your WordPress site, it will appear in the Plugins tab. Updates for premium plugins depend on the plugin developer, if the plugin has an update available in the WordPress repository or its own update mechanism, Toolkit will surface it. Some premium plugins require license activation within their own settings panel for updates to work. ### What happens if a plugin update breaks my site? If an update causes a conflict or white screen, you can immediately deactivate the plugin from the Plugins tab in ServerAvatar. If the site is completely inaccessible, contact your hosting provider, ServerAvatar’s support team can help restore functionality. Always run a backup before updating plugins on a live site, especially when doing bulk updates. ### Can I manage plugins across multiple WordPress sites from one ServerAvatar account? Yes. Each WordPress application in your ServerAvatar dashboard has its own Plugins tab. You can manage plugins for every WordPress site you have connected to ServerAvatar through their respective application panels. ### How is this different from managing plugins in wp-admin? The main difference is centralization and speed. wp-admin gives you the same actions, install, activate, deactivate, update, uninstall, but only for one site at a time. WordPress Toolkit lets you manage plugins across multiple sites from your ServerAvatar dashboard without logging into each wp-admin separately. It also surfaces update availability and plugin status at a glance, which wp-admin doesn’t do as clearly. ### Is WordPress Toolkit free? No. WordPress Toolkit is a paid add-on for ServerAvatar. You can purchase it from the **Add-ons** section in ServerAvatar’s Billing Dashboard. Once activated, it’s accessible from any WordPress application in your ServerAvatar panel. ## Key Takeaways - WordPress Toolkit’s Plugins tab replaces the wp-admin plugin management workflow with a faster, centralized dashboard - Install, activate, deactivate, update, and uninstall, all without leaving ServerAvatar - Search and filter tools make it easy to audit and manage large plugin inventories - One “Update All” button keeps sites current in seconds - Works for single site owners, freelancers, and agencies managing multiple WordPress installs - Deactivate before uninstalling to ensure cleanup routines run properly ### About the Author Meghna Meghwani is a technical writer focused on Linux, Ubuntu, VPS hosting, server management, WordPress, PHP, Node.js, cloud hosting, and DevOps. She writes beginner-friendly tutorials, practical hosting guides, troubleshooting documentation, and server security content based on real-world hosting and application management workflows. Her goal is to make server and WordPress management easier for developers, agencies, and businesses running production websites and applications. **Categories:** Blog, Guide, Others, Tutorials, WordPress **Tags:** Activate WordPress Plugins, Install WordPress Plugins, Manage Plugins Without wp-admin, Manage WordPress Plugins, update WordPress plugins, Wordpress, WordPress Plugin Management, WordPress Plugins, WordPress Toolkit --- ### [How to Manage WordPress Themes Easily with ServerAvatar](https://serveravatar.com/manage-wordpress-themes/) **Published:** June 3, 2026 **Author:** Meghna Meghwani **Content:** Managing WordPress themes sounds simple until you need to manage WordPress themes across more than one website. A client asks for a design change. An inactive theme needs to be removed. Another site needs a new theme installed. Suddenly, you are logging into multiple WordPress dashboards, opening Appearance >> Themes again and again, and repeating the same steps. That workflow gets time-consuming very quickly. ServerAvatar’s WordPress Toolkit makes theme management easier by bringing theme controls directly into your server dashboard. You can install, activate, update, and remove WordPress themes without switching to the WP-Admin. If you manage WordPress websites on a VPS, whether for your own projects, client websites, or agency work, this guide walks through exactly how the Themes section in ServerAvatar’s WordPress Toolkit works and how to use it safely. ## TL;DR - ServerAvatar lets you manage WordPress themes from one dashboard. - You can install, activate, update, and delete themes without logging into WP-Admin. - Theme updates are easier when managing multiple websites. - Removing unused themes improves security and keeps WordPress cleaner. ## Why WordPress Theme Management Matters A WordPress theme controls website layout, typography, styling, templates, header and footer structure, blog page appearance, and design consistency. So even a small theme change can affect homepage layout, mobile responsiveness, plugin compatibility, page speed, SEO structure, and customer experience. That’s why theme management isn’t just “design work”. It also affects maintenance and stability. A few common situations: - **Updating an outdated theme:** Older themes may include compatibility issues with newer WordPress versions. - **Activating a staging theme:** Useful before redesigning a website. - **Cleaning inactive themes:** Inactive themes still remain on the server and should be reviewed regularly. - **Managing multiple websites:** Without a central dashboard, theme maintenance becomes repetitive. ServerAvatar helps simplify that workflow. ## Where to Find the Themes Section in ServerAvatar - Log in to your ServerAvatar account, and navigate to the server panel by clicking on the server dashboard icon. ![server dashboard - manage WordPress themes](https://serveravatar.com/wp-content/uploads/2026/06/serverdashboardbutton.gif) - Click on the Applications section, and navigate to your application panel by clicking on the dashboard icon. ![application panel - manage WordPress themes](https://serveravatar.com/wp-content/uploads/2026/06/applicationpanelwp.gif) - Click on the WordPress Toolkit section from the left sidebar. ![wp toolkit - manage WordPress themes](https://serveravatar.com/wp-content/uploads/2026/06/wptoolkitwp.gif) - Navigate to the Themes section. ![themes section - manage WordPress themes](https://serveravatar.com/wp-content/uploads/2026/06/wptoolkitwpthemes-1.gif) From there, you’ll see theme management options for the selected WordPress installation. ## Install a New WordPress Theme Using ServerAvatar Sometimes you launch a new site and need a fresh design. Other times, you’re migrating an existing WordPress website and want to install a theme before going live. Inside the Themes section, you can install themes without opening the WP-Admin. - Inside the Themes section, click on the Install Theme button. - Search for the Theme you want to install, and click on the Install Now button for your preferred theme. - ServerAvatar handles installation directly for the selected WordPress site. - Once it is installed, it will be visible in the themes table. ![overview - manage WordPress themes](https://serveravatar.com/wp-content/uploads/2026/06/installtheme.gif) ## Activate a Different Theme Changing themes is easy. Doing it safely matters more. Inside ServerAvatar’s WordPress Toolkit section: - Inside the Themes section, choose your preferred installed theme, and click on the activate button. - Click on the “Activate” button for confirmation. ![activate theme - manage WordPress themes](https://serveravatar.com/wp-content/uploads/2026/06/activatetheme.gif) - Once activated, check the homepage layout, menu structure, widgets, customizer settings, blog page, mobile view, and plugin styling. A quick review helps catch layout issues immediately. - Example: A page builder theme may behave differently from a lightweight blogging theme. So activation should always include a visual check. ## Update WordPress Themes Without Logging Into wp-admin This is one of the most practical parts of the Themes section. Instead of updating themes via the WP-Admin repeatedly on multiple websites, you can manage updates directly from ServerAvatar. That saves time when handling multiple WordPress applications. - Navigate to the Themes section of WordPress Toolkit, and check for the theme which requires update, and click on the update button. ![update theme - manage WordPress themes](https://serveravatar.com/wp-content/uploads/2026/06/updatetheme.gif) - Once the theme is updated, you can see latest version of theme has been installed. - After updating, check the homepage, test forms, check product pages, test responsive layout, and confirm no CSS breaks - Small checks now save bigger troubleshooting later. ## Remove Unused Themes Many WordPress websites keep old inactive themes for months. That usually creates clutter. Unused themes can take space, create confusion, increase maintenance, become outdated, and create avoidable security exposure. - Inside the Themes section of WordPress Toolkit, choose the theme you want to remove and click on the uninstall button. - Click on the Uninstall button for the confirmation to remove the theme. ![remove themes - manage WordPress themes](https://serveravatar.com/wp-content/uploads/2026/06/uninstalltheme.gif) Please take a look and do not remove: - currently active theme - child theme connected to active theme - temporary fallback theme you intentionally keep A clean theme list makes long-term management easier. ## Best Practices for Managing WordPress Themes on a VPS Here are practical habits that help. - Always check the themes before activating, updating, or deleting, especially on production websites. - Use staging feature while redesigning to check out the layout, CSS, plugins, and checkout flow, then move to production. You can also use [ServerAvatar’s staging area](https://serveravatar.com/docs/application/staging-area) feature for the same. - Too many unused themes create clutter. Keep only what you need, such as an active theme, a child theme, an optional emergency fallback, and remove the rest. - Update regularly, avoid delaying theme updates too long. Regular, smaller updates are easier than fixing large compatibility issues later. - Always check the plugin compatibility, as themes with plugin conflicts are common. Especially with page builders, WooCommerce, caching plugins, and membership plugins. ## Theme Management: wp-admin vs ServerAvatar Taskwp-adminServerAvatarInstall themeYesYesActivate themeYesYesUpdate themesYesYesRemove themeYesYesMultiple website workflowrepetitiveeasierVPS + WordPress management in one placenoyesFor teams managing WordPress on VPS servers, ServerAvatar keeps everything more centralized. ## Key Takeaways - WordPress themes affect design and site functionality. - ServerAvatar simplifies theme management from one dashboard. - Installing and activating themes is faster. - Theme updates are easier across multiple websites. - Removing unused themes improves maintenance. ## Conclusion Managing WordPress themes doesn’t need to feel repetitive. Once you start handling several websites, jumping between WordPress dashboards takes more time than expected. ServerAvatar’s WordPress Toolkit keeps theme management in one place. You can install a new theme, activate a redesign, update existing themes, and clean unused ones without leaving your server dashboard. That makes daily WordPress maintenance smoother, especially when you manage multiple VPS-hosted websites. ## FAQs ### Can I manage themes without opening WordPress admin? Yes, ServerAvatar’s WordPress Toolkit lets you manage themes directly from the dashboard. ### Will changing a theme affect content? Usually, posts and pages stay intact, but layout, styling, widgets, and menus may change. Always verify after switching. ### Should I delete inactive themes? Generally, yes. Keep only the ones you actually use. It keeps maintenance cleaner. ### Should I update themes immediately? Usually yes, but check, changelog, compatibility, and then proceed. ### Can changing a WordPress theme affect my website? Yes. Your posts, pages, and media stay the same, but the website layout, menus, widgets, and styling may look different. It’s always best to take a backup and review key pages after switching themes. ## Next Steps You may also want to read: - [WordPress Toolkit for WordPress Management in ServerAvatar](https://serveravatar.com/wordpress-toolkit-serveravatar) - [How to Create WordPress Blueprints Easily in ServerAvatar](https://serveravatar.com/create-wordpress-blueprint-serveravatar) - [How to Enable Debug Mode, Debug Logs, and Display Errors in WordPress](https://serveravatar.com/wordpress-debug-mode) Managing WordPress sites on a VPS becomes much easier when theme updates, server management, SSL, backups, and application controls are available from one dashboard. [ServerAvatar ](https://serveravatar.com)helps simplify those everyday tasks without adding extra complexity. ### About the Author Meghna Meghwani is a technical writer focused on Linux, Ubuntu, VPS hosting, server management, WordPress, PHP, Node.js, cloud hosting, and DevOps. She creates beginner-friendly tutorials, practical hosting guides, troubleshooting articles, and server security content designed to help developers and businesses manage applications and servers more efficiently.[](https://3.basecamp.com/5840738/buckets/41514807/boosts/new?boost%5Bboostable_gid%5D=Z2lkOi8vYmMzL1JlY29yZGluZy85OTQ3NTQ3Nzgy) **Categories:** Blog, Guide, Others, Tutorials, WordPress **Tags:** Activate WordPress Themes, Install WordPress Themes, Manage Themes, Manage WordPress Themes, Update WordPress Themes, Wordpress, WordPress Theme Management, WordPress Themes, WordPress Toolkit --- ### [Optimize WordPress Performance with Rewrite Rules & Cache](https://serveravatar.com/optimize-wordpress-performance/) **Published:** June 10, 2026 **Author:** Meghna Meghwani **Content:** [![Blog banner - ServerAvatar](https://serveravatar.com/wp-content/uploads/2025/09/728_90-Banner-3-1024x127.png)](https://serveravatar.com/?ref=blog)When your WordPress site starts feeling slow, the first instinct is to blame your server or add another plugin. But more often than not, the real culprit is simpler, stale cache and broken rewrite rules that silently degrade WordPress Performance. These two issues are behind a surprisingly large share of WordPress performance problems. Pages loading slowly for no obvious reason, 404 errors on posts that clearly exist, updates not showing up after you’ve published them, all of these point back to cache and URL routing issues. If you’re managing your WordPress site through ServerAvatar, you don’t need a separate plugin for either problem. The **Performance section** inside the WordPress Toolkit handles flushing your cache, resetting your rewrite rules, and getting your site back to full speed in seconds. This guide walks you through exactly what each tool does, when to use it, and what happens when you don’t. ## TL;DR - Cache stores your rendered pages so WordPress doesn’t rebuild them on every visit - Rewrite rules map clean URLs to actual pages on your server - Stale cache makes visitors see old content even after you have updated your site - Broken rewrite rules cause 404 errors and redirect failures on pages that exist - Both are fixed instantly from the Performance section in ServerAvatar’s WordPress Toolkit - Flushing cache after any content, theme, or plugin update keeps your site fast and accurate ## How WordPress Serves a Page: A Quick Backdrop Every time someone visits your WordPress site, WordPress typically: - Receives the request on the server - Load core WordPress files and connect it to database - Runs plugin hooks and loads the active theme template - Builds the page and sends the HTML to the visitor’s browser Without caching, this entire process runs on every page request. As your site grows with more content, plugins, and database queries, page generation can take longer. ### Why Rewrite Rules Matter Rewrite rules are responsible for mapping clean URLs to the correct WordPress content. For example: - `yoursite.com/guides/ubuntu-server-setup` Rewrite rules ensure that URL loads the correct page behind the scenes. If they break: - Visitors may see 404 errors - Search engines may not reach your content - Existing pages can become inaccessible even though they still exist in WordPress ### How Caching Helps Caching speeds things up by: - Storing a pre-generated HTML version of the page - Reducing database queries and PHP processing - Serving repeat visitors the cached version instantly - Lowering server load and improving response times ## The Performance Section in WordPress Toolkit Every WordPress application in ServerAvatar includes a **Performance** tab within the **WordPress Toolkit**. From this section, you can manage performance-related tasks without: - Logging into WordPress Admin (`wp-admin`) - Accessing the file manager - Running terminal commands ### Available Features - **Rewrite Rules** - Flushes and regenerates WordPress URL routing - Helps resolve broken permalinks and 404 errors - **Cache Management** - Clears stored page caches - Ensures visitors see the latest version of your content ### Why Use It? - Fixes common WordPress routing and caching issues - Requires only a few clicks - Typically completes in just a few seconds ## Rewrite Rules: What They Do and When They Break WordPress uses clean URLs such as: - `yoursite.com/best-ubuntu-server-setup-tools` These URLs don’t correspond to actual folders on your server. Instead, WordPress uses **rewrite rules** to map them to the correct content. ### What Rewrite Rules Do - Translate clean URLs into WordPress page requests - Enable custom permalink structures - Help WordPress route visitors to the correct content - Are typically stored in the `.htaccess` file on Apache servers ### How to Flush Rewrite Rules - Inside the ServerAvatar server panel, navigate to the Applications section and to your WordPress application panel by clicking on the dashboard icon ![application panel - WordPress Performance](https://serveravatar.com/wp-content/uploads/2026/06/CPT2606101537-1823x577-1.gif) - Click WordPress Toolkit from the left sidebar - Navigate to the Performance section, click on the Flush Rewrite button ![WordPress Toolkit - WordPress Performance](https://serveravatar.com/wp-content/uploads/2026/06/CPT2606101542-1804x765-1.gif) This regenerates WordPress URL routing and usually resolves permalink-related issues within seconds. ### After Flushing Verify that: - Posts load correctly - Pages open without errors - Category and archive URLs work as expected ## Cache Management: What It Does and When to Use It When WordPress generates a page, it: - Runs PHP code - Queries the database - Builds the page HTML Caching stores completed HTML so future visitors receive the page instantly without repeating the entire process. ### Benefits of Caching - Faster page loads - Lower server usage - Better visitor experience - Improved scalability ### When Cache Becomes a Problem Cached pages can become outdated after: - Editing posts or pages - Updating themes - Installing or removing plugins - Changing menus or widgets - Uploading new media - Running content imports or migrations Visitors may continue seeing old content until the cache is cleared. ### How to Flush Cache - Inside the Performance section of the WordPress Toolkit - Click on the Flush Cache button ![Flush rewrite rules - WordPress Performance](https://serveravatar.com/wp-content/uploads/2026/06/CPT2606101546-1833x576-1.gif) This immediately removes stored page versions and forces WordPress to generate fresh content on the next visit. ### Flush Cache After - Publishing or updating content - Theme changes - Plugin updates - Menu or widget modifications - Media uploads - Site migrations - Data imports Making this a habit means your visitors always see current content, and your performance stays consistent even as your site grows and changes. ![flush cache - WordPress Performance](https://serveravatar.com/wp-content/uploads/2026/06/CPT2606101546-1833x576-2.gif)## Why Flush Cache and Flush Rewrite Together After migrations, restores, or major updates, both issues often occur simultaneously. For Example, after moving to a new domain: - Rewrite rules may still point incorrectly, causing 404 errors - Cached pages may contain old URLs and outdated content ### Best Practice Run both actions: - **Flush Rewrite:** Fixes URL routing and page accessibility - **Flush Cache:** Removes outdated page renders This ensures visitors see the correct content and all URLs function properly. ## What Happens When You Don’t Flush The consequences differ depending on the problem: ### If You Don’t Flush Rewrite Rules You may experience: - 404 errors on valid pages - Broken internal links - Crawling issues for search engines - Reduced SEO performance ### If You Don’t Flush Cache Visitors may see: - Outdated page content - Old navigation links - Expired promotions - Incorrect media or design changes For eCommerce stores, this can lead to: - Incorrect pricing - Outdated inventory information - Expired promotional banners ## Quick Reference: When to Use What **Situation****Action****Published or edited a post**Flush Cache**Updated theme or design**Flush Cache**Installed or updated a plugin**Flush Cache**Changed menus, widgets, or site-wide content**Flush Cache**Migrated site to new domain**Flush Rewrite + Flush Cache**Restored a backup**Flush Rewrite + Flush Cache**Pages returning 404 but content exists**Flush Rewrite**Inner pages and archives not loading**Flush Rewrite**Moved WordPress to a different directory**Flush Rewrite + Flush Cache## Conclusion Rewrite Rules and Cache are the two most overlooked performance tools in WordPress, and the two most likely to cause sudden problems when they’re neglected. The good news is that fixing both is trivial when you have the right dashboard. The Performance section in ServerAvatar’s WordPress Toolkit puts both tools in one place, labelled clearly, and ready to use in seconds. Make it a habit to flush rewrite rules any time pages stop loading after a change, and flush the cache after every content update. And after every migration or restore, run both. ## FAQs ### How often should I flush cache? Flush cache whenever you update content, change your theme, modify menus, or install/update plugins. ### Can stale cache affect SEO? Yes, Outdated cached pages may cause search engines and visitors to see old content, which can negatively impact user experience and SEO. ### Why am I getting 404 errors after migrating my site? This usually happens when rewrite rules haven’t been updated. Flushing rewrite rules often resolves the issue. ### Should I flush cache after updating images? If the updated images appear on cached pages and the changes aren’t visible, flush the cache to load the latest versions. ### Is it safe to flush cache on a live website? Yes, Flushing cache only removes temporary stored files and does not affect your posts, media, settings, or database. ## Key Takeaways - The Performance section in ServerAvatar’s WordPress Toolkit handles both cache flushing and rewrite rule resetting - Flush Cache clears stored pages so visitors see your latest content - Flush Rewrite regenerates URL routing when pages return 404 after a migration or change - Run both after site migrations, restores, and major updates - Flush cache after every content update, theme change, or plugin install to keep performance consistent ## Next Steps You may also want to read: - [WordPress Toolkit for WordPress Management in ServerAvatar](https://serveravatar.com/wordpress-toolkit-serveravatar) - [How to Create WordPress Blueprints Easily in ServerAvatar](https://serveravatar.com/create-wordpress-blueprint-serveravatar) - [How to Enable Debug Mode, Debug Logs, and Display Errors in WordPress](https://serveravatar.com/wordpress-debug-mode) If you’re managing your WordPress sites through [ServerAvatar](https://serveravatar.com/), the WordPress Toolkit’s Performance section already has everything you need to keep your sites fast. ### About the Author Meghna Meghwani is a technical writer focused on Linux, Ubuntu, VPS hosting, server management, WordPress, PHP, Node.js, cloud hosting, and DevOps. She creates beginner-friendly tutorials, practical hosting guides, troubleshooting articles, and server security content designed to help developers and businesses manage applications and servers more efficiently. **Categories:** Blog, Guide, Optimisation, Others, Tutorials, WordPress **Tags:** Cache Optimization, Rewrite Rules WordPress, Wordpress, WordPress Caching, WordPress optimization, WordPress performance, WordPress speed optimization --- ### [Free Online API Console for Testing REST APIs](https://serveravatar.com/free-online-api-console/) **Published:** June 3, 2026 **Author:** Dipali Radadiya **Content:** Working with APIs almost always involves some testing. Before you connect an API to your application, you want to send a request, check the response, and make sure everything works the way the documentation describes. Most developers use a tool like Postman for this. It works well, but it also means installing software, setting up a workspace, and configuring each request before you can send anything. When you only need to check a single endpoint, that can feel like more effort than the task is worth. An online API console offers a simpler option. It’s a request builder that runs entirely in your browser. You enter an endpoint, choose an HTTP method, add an authentication token if the API requires one, and click Run. The response, status code, and a copyable cURL command appear instantly, with nothing to install or set up. ServerAvatar has a free one built right into its docs. You can try it here: [ServerAvatar API Console](https://serveravatar.com/api-docs/api-console.html) **We don’t store your data.** Your API credentials, request payloads, and responses are never saved on our servers. Everything runs live in your browser. ![](https://serveravatar.com/wp-content/uploads/2026/06/image-1.png)*The ServerAvatar API Console runs right in your browser, no setup needed.* ## Why use it? - No software to install - Works straight from your browser - Send GET, POST, PUT, PATCH, and DELETE requests - Set a Base URL and add a Bearer token for authentication - Send JSON request bodies - See responses and status codes instantly - Copy a ready-made cURL command for your code ## A quick example Say you want to list the organizations on your ServerAvatar account. Here’s the whole flow: 1. Choose the **GET** method. 2. Enter the path `/organizations`. 3. Paste your token in the Authorization field, usually in the form `Bearer YOUR_TOKEN`. 4. Click **Run**. That’s it. The response shows up below right away, along with a status code that tells you if it worked. You can then switch to the **Curl** tab to copy the exact command for your own scripts, or check the **Headers** tab to see what was sent and received. ## Understanding the HTTP methods Each method does a specific job, and picking the right one matters: - **GET** reads data without changing anything (listing your servers, for example) - **POST** creates something new - **PUT** and **PATCH** update existing data (PUT replaces, PATCH changes part of it) - **DELETE** removes something If you’re new to APIs, GET is the safest one to experiment with, since it only reads and never changes your data. ## Test any REST API The console isn’t tied to one platform. You can test Laravel APIs, WordPress REST APIs, SaaS APIs, internal company APIs, or any custom REST API. You enter the endpoint in one of two ways: - **Just the path.** Type something short like `/organizations`. The console adds it to the Base URL for you, so the request actually goes to `https://api.serveravatar.com/organizations`. This is the quick way to test ServerAvatar’s own API. - **A full URL.** Paste the whole address, like `https://api.example.com/users`. The Base URL is then ignored and the console calls exactly what you pasted. Use this for any other API. A “path” is just the part after the domain, and it always starts with a slash. The console shows a Resolved URL preview so you can see the full address before you send anything. Once it looks right, click **Run**. One honest caveat: if you test an external API and get a **CORS error**, that API has to allow requests from the docs domain, or you’ll need a proxy. It’s a browser security rule, not a fault in the console. ## A note on your token Your API token is like a password. Anyone who has it can act on your account, so only paste it into consoles you trust, and never share a screenshot that shows it. When you’re done testing, it’s good practice to revoke any token you no longer need. ## Why it helps Testing an API before you write your code lets you confirm the important things first: - Authentication works - Endpoints return the data you expect - Your JSON payload is valid - Responses contain the right information Sorting these out early means you’re not hunting for the same problems later, buried deep in your application where they’re harder to find. ## Common uses - **Learning APIs** without writing any code - **Testing integrations** before connecting them to your app - **Debugging** auth, payload, or endpoint issues - **Trying documentation examples** right in the browser ## Conclusion A free online API console is the fastest way to test REST APIs from your browser. No install, no setup, just send a request and read the response. Whether you’re learning, debugging, or validating an integration, it puts everything you need in one screen. Try it here: [ServerAvatar API Console](https://serveravatar.com/api-docs/api-console.html) ## FAQs ### Do I need to install anything? No. It runs entirely in your browser, so there’s nothing to download or set up. ### Can I test APIs other than ServerAvatar’s? Yes. Just paste a full URL like `https://api.example.com/users` instead of a path. Keep in mind that some external APIs block browser requests with a CORS rule, in which case you’ll need a proxy. ### Do you store my API token or request data? No. ServerAvatar does not store your API token, request bodies, or response data. All requests are sent directly from your browser to the target API, nothing is logged or retained on our servers. ### Which HTTP methods are supported? GET, POST, PUT, PATCH, and DELETE, which covers reading, creating, updating, and deleting data. ### How do I authenticate my requests? Add your token in the Authorization field, usually in the form `Bearer YOUR_TOKEN`. Treat that token like a password and don’t share it. ### Can I use the requests in my own code? Yes. After you run a request, open the Curl tab and copy the ready-made cURL command straight into your scripts. ## Run your apps on ServerAvatar ServerAvatar does more than API testing. It’s a server management platform that makes deploying and running your apps simple, and it’s trusted by over 12,000+ users. Want to host WordPress, Laravel, PHP, Node.js, or any custom app? It’s all supported. Connect a server from any cloud provider, deploy your app, and ServerAvatar handles the setup, security, and ongoing management. [Get started for free](https://serveravatar.com/) **Categories:** Blog, Guide **Tags:** API Development, Developer tools --- ### [What Is Coming Next at ServerAvatar and How We Are Building for the AI Era](https://serveravatar.com/what-is-coming-next-at-serveravatar-and-how-we-are-building-for-the-ai-era/) **Published:** May 18, 2026 **Author:** Adarsh Sojitra **Content:** ServerAvatar has been building quietly for a while. Here is a clear update on what is coming next, what it means for you, and how we are thinking about the road ahead. This post covers three things: 1. Our WordPress Toolkit and Blueprints launching this Wednesday (20 May 2026) 2. How we are thinking about the AI era and where ServerAvatar goes from here 3. How we are going to price the things we build so there are no surprises Let us start. ## WordPress Toolkit: Launching This Wednesday (20 May 2026) We are launching WordPress Toolkit on 20 May 2026. It is a complete WordPress control panel built directly into ServerAvatar. If you manage WordPress sites, this is going to change how you work. This is not a shallow plugin manager. It is a full-featured WordPress management interface that touches every part of your WordPress installation. Here is everything that will be available from day one. ### Site Overview ![](https://serveravatar.com/wp-content/uploads/2026/05/image-36-1024x392.png) Everything about your WordPress site in one place: - WordPress version - Number of plugins installed and how many are active - Number of themes and their status - User count and roles You see it all without opening a single tab. ### Theme Management ![](https://serveravatar.com/wp-content/uploads/2026/05/image-8-1-1024x600.png)Install new themes. Activate them. Deactivate them. Uninstall them. Update them. Search through your installed themes. All of it from ServerAvatar without touching the WordPress admin area, FTP, or WP-CLI. ### Plugin Management ![](https://serveravatar.com/wp-content/uploads/2026/05/image-9-1-1024x451.png)The same full control over plugins: - Activate, deactivate, install, uninstall, update - See which plugins are drop-ins and manage those separately Whether you are running five plugins or fifty, you handle them all from the same place. ### WordPress Updates ![](https://serveravatar.com/wp-content/uploads/2026/05/image-10-1-1024x598.png)WordPress Core, plugins, themes, and the database are all available in one view. - Check for updates individually - Run bulk updates across all plugins and themes at once - Database upgrades run automatically when needed Basically, Everything you can do with CLI or WordPress admin. ### Debug Mode ![](https://serveravatar.com/wp-content/uploads/2026/05/image-11-1-1024x416.png)Three controls in one place: - **Debug Mode**: switches on runtime warnings, notices, and PHP errors - **Debug Log**: writes everything to a server-side file so error details stay private on production sites - **Display Errors**: controls whether errors show directly on pages or stay hidden You diagnose issues without editing wp-config.php, opening FTP, or running a single command. ### WP-Cron & Server Cron ![](https://serveravatar.com/wp-content/uploads/2026/05/image-37-1024x356.png) WordPress has its own internal job scheduler and it is often misunderstood. With WP-Cron inside WordPress Toolkit you see exactly how many events are scheduled. - Run all events at once - Trigger only the events that are due right now - Disable WP-Cron entirely and use a real server cron job instead The choice is yours and the control is complete. **Update:** We have also added one-click server level cronjob setup for WordPress. So, You can simply disable default WP Cron and set up Server level cron with just a few switch buttons. ### Cache and Rewrite Management ![](https://serveravatar.com/wp-content/uploads/2026/05/image-38-1024x245.png) Flush your application cache without logging into the server. Flush rewrite rules to regenerate permalink routing: - **Soft flush**: touches only the database - **Full flush**: rewrites your .htaccess file No command line, no guessing which option you need. ### Security Hardening ![](https://serveravatar.com/wp-content/uploads/2026/05/image-13-1-1024x546.png)Three protections built in: - **Block XMLRPC**: prevents spam and brute force attacks (disable if you need it for mobile apps or Jetpack) - **Block PHP in uploads**: stops most WordPress malware from running even if an attacker uploads a malicious file - **Checksum verification**: verifies WordPress core files against official WordPress.org checksums Previously, any of it was not possible with ServerAvatar without technical know-how. Now, these are just a few options in WordPress Toolkit. ### Database Tools ![](https://serveravatar.com/wp-content/uploads/2026/05/image-14-1-1024x503.png)Search and replace text across your entire WordPress database: - Preview every match before a single change is written - Use dry run mode to see exactly which tables and fields will be affected This is the kind of tool most developers reach for a plugin to do. But now it is built-in with the toolkit. Migrations and domain changes are now even more easier. ### WordPress Settings ![](https://serveravatar.com/wp-content/uploads/2026/05/image-15-1-1024x677.png)Change these from ServerAvatar without opening wp-admin: - Language, timezone, date format, time format - Permalink structure - Search engine visibility If you manage multiple WordPress sites and need to standardize settings across all of them, this is where you do it. ## Blueprints (Part of the same Toolkit): For Agencies, Freelancers, and Repeat Deployments Blueprints are where this gets interesting for anyone who sets up WordPress sites regularly. A Blueprint is a reusable template of a WordPress setup. You decide: - Which themes should be pre-installed and activated - Which plugins get installed - Site preferences: language, timezone, permalink structure, search engine indexing - Cleanup rules: skip the Hello World post, sample page, unnecessary core files - Debug options pre-set When you deploy a new WordPress site from a Blueprint, everything you configured is applied automatically. You get a fully configured WordPress installation in seconds, not an hour of manual setup. ![](https://serveravatar.com/wp-content/uploads/2026/05/image-16-1-793x1024.png)**WordPress Toolkit and Blueprints are launching Wednesday (20th May 2026). This is Version 1. We will add more features quickly.** ## How We Are Navigating the AI Era The world is changing. We are adapting with it. ### We Are Going 5x Faster AI is not a buzzword in our roadmap. It is inside our development workflow right now. Not just for writing documentation or brainstorming feature ideas. AI is in our code reviews, our testing pipeline, our deployment process, and our debugging loop. The result is simple: we ship more, we ship faster. You will see updates arrive at a pace you have not seen from ServerAvatar before. WordPress Toolkit itself is a product of that speed. ### WordPress Toolkit Is Phase 1 We are not stopping at WordPress. This toolkit is the first phase of something much larger. We are building the same depth of toolkit for other popular frameworks like Node.js, Laravel and other things that help you manage your hosting environments. Email management is coming up soon. Fully managed email setup and email hygiene tools built into ServerAvatar. Malware scanning is coming as well: automatic and on-demand scanning for every application you host with us. Each toolkit will be built with the same level of detail as WordPress Toolkit. Not a checklist of features. A real control panel that replaces the most common tasks you do across your stack. This is a roadmap, not a one-time release. More toolkits will follow. ## ServerAvatar Is Going Agentic: v8.0 Here is where things get serious. We are building ServerAvatar to be agentic. **This means you type what you want in plain language and our agent does it. Securely.** This is planned for ServerAvatar v8.0. The current version development must conclude first. There is no ETA yet. We will share more when the time is right. We are not rushing this. When it is ready, the agent will be able to: - Deploy a new application from scratch on your server - Read logs, identify issues, suggest fixes, and apply them - Troubleshoot server performance or downtime based on what you describe - Change configurations across your servers and sites as you describe - Help you troubleshoot the issues at lightning speed with AI scanning logs and fixing issues for you. It will do everything the ServerAvatar dashboard can do today. The difference is that instead of clicking through menus and navigating the UI, you just describe what you want. In addition to that, It will also be able to manage workflows at you regularly use as it will remember your preferences on ServerAvatar. Security is not an afterthought here: - The agent operates within strict, defined permissions - Every action it takes is logged - You stay in full control at all times This is not a wildcard AI running loose on our infrastructure. It is an agent we authorize, constrain, and monitor. ## How Updates and New Features Will Be Priced We are building a lot. Each thing we build costs differently to develop and differently to run. I want to be straightforward about how pricing works before any release, so there are no surprises. ### Type 1: One-Time or Lifetime Deal Some products cost us a significant amount to build but once they are built, they do not cost us anything to maintain or manage. These will be available as one-time purchases or lifetime deals. You pay once, you own it forever. **WordPress Toolkit falls in this category.** ### Type 2: Recurring Billing Some products cost us to build and also cost us money to run every single day. - AI compute is not free - Servers are not free - Real-time malware scanning and active monitoring are not free When a product has ongoing operational costs alongside its development costs, it will be priced as a recurring subscription. We will always be clear about what the price covers and why it is recurring. No hidden costs. **High Availability setups and Premium Support falls in this category.** ### Type 3: Server Management Features & Incremental Updates: Always Free Any update that improves something we have already released is free: - Bug fixes - Performance improvements - New options inside existing features - UI refinements - Generic server management features that are not application specific (For example, FastCGI Cache, Varnish, SSH Vault, New Auto-installers). Incremental updates and generic new features are free regardless of how often they arrive or how significant they are. If you already use a product, you get every update for it without paying anything extra. **Ghost and some other auto-installers coming up next falls in this category.** ## Conclusion This is just the start. WordPress Toolkit and Blueprints go live and we immediately move to what is next: - Email management toolkit - Framework toolkits - Malware scanning - Eventually, the agentic version of ServerAvatar We are building seriously. We are moving fast. If you manage servers or WordPress sites, this is the right time to pay attention to what we are doing. Stay tuned. **Categories:** Blog --- ### [OpenClaw vs Paperclip vs Hermes (2026): Complete AI Agent Platform Comparison](https://serveravatar.com/openclaw-vs-paperclip-vs-hermes/) **Published:** May 6, 2026 **Author:** Meghna Meghwani **Content:** [![Blog banner - ServerAvatar](https://serveravatar.com/wp-content/uploads/2025/09/728_90-Banner-3-1024x127.png)](https://serveravatar.com/?ref=blog)The AI agent tooling space exploded in early 2026. If you’re comparing OpenClaw vs Paperclip vs Hermes, you’re likely trying to figure out which AI agent platform is actually worth your time. These three open-source projects launched within weeks of each other, but each takes a very different approach to building and running AI agents. This guide cuts through that noise. We’re going hands-on with all three platforms, looking at their actual architectures, where they excel, where they trip up, and which one fits different use cases. Whether you’re running a lean startup’s infrastructure or managing a growing engineering team, by the end, you’ll know exactly which tool deserves your time. Let’s be honest: the AI agent framework landscape circa early 2026 is a bit of a mess. Projects are shipping fast, features are changing weekly, and every benchmark sheet you find is either outdated or promotional. We wanted to cut through that. We put these three platforms through their paces in contexts that actually matter: self-hosted deployments, API integrations, memory management, and long-term maintainability. This isn’t a “which one is best” post with a winner crowned in the final paragraph. It’s a “here’s what each platform actually does well, and here’s how to think about choosing between them.” ## What Is OpenClaw? [OpenClaw](https://openclaw.ai/) is an open-source AI agent framework built around the concept of modular, composable tool systems. It emerged from the desktop-agent space but has grown significantly into server and infrastructure automation use cases. ![OpenClaw - OpenClaw vs Paperclip vs Hermes](https://serveravatar.com/wp-content/uploads/2026/05/image-32-1024x581.png) The key distinction with OpenClaw: it’s built around a skill-based plugin architecture. You compose agents from discrete, reusable skills, things like file management, shell execution, web browsing, messaging, and more specialized tools. Each skill is a self-contained unit with its own tooling, prompts, and capabilities. **Key Features** - ClawHub marketplace enables one-command installation of community-built skills - Multi-session memory stores context across logs, long-term memory, and transcripts - Channel abstraction allows deployment across Discord, Slack, Telegram, and terminal - Subagent spawning enables parallel task execution with consolidated outputs - Built-in browser and TUI automation supports real server and web interactions **Pros** - Strong plugin ecosystem - Extensive community support - Well-designed CLI tools - Suitable for self-hosted environments - Pre-configured option: - [ClawVPS](https://clawvps.ai/) comes with OpenClaw pre-installed - No manual setup required **Cons** - Overkill for simple tasks - Skill system adds some learning curve - Fast updates can introduce breaking changes **Best Use Cases** - Server monitoring and automation - Cross-channel bot implementations - Complex multi-step workflows requiring modular tools - Teams wanting community-supported plugin ecosystems ## What Is Paperclip? [Paperclip](https://paperclip.ing/) launched in March 2026 and hit 38,000 GitHub stars in under four weeks, an unusually fast adoption curve for developer tooling. Its pitch is straightforward: AI agents made simple. ![Paperclip - OpenClaw vs Paperclip vs Hermes](https://serveravatar.com/wp-content/uploads/2026/05/image-33-1024x547.png) Where OpenClaw is modular and Hermes is architectural, Paperclip is opinionated. It makes decisions for you about how an agent should be structured, what tools it has access to, and how it handles context. The result is something that’s much faster to get running, but less flexible when your needs diverge from the default assumptions. **Key Features** - Single-file deployment allows agents to run from one configuration file - Minimal dependencies enable execution without Docker using Python or Node - Quick-start templates provide ready setups for common agent use cases - Opinionated defaults simplify development by predefining agent structure - Rapid community growth is expanding templates, plugins, and integrations **Pros** - Fastest setup time - Ideal for prototypes and demos - Easy version control (single file) - Minimal infrastructure needs **Cons** - Limited flexibility - Extensibility is not core - Smaller ecosystem - Documentation gaps for advanced use **Best Use Cases** - Rapid prototyping and demos - Simple automation tasks (one agent, one job) - Lean teams without dedicated infrastructure expertise - Jumpstarting agent development before committing to a more complex framework ## What Is Hermes Agent? [Hermes Agent](https://hermes-agent.nousresearch.com/) came from Nous Research and made a distinctive entrance in February 2026. Its defining characteristic is a persistent learning architecture, Hermes agents don’t just execute tasks; they remember interactions, refine their approaches, and build on prior experience across sessions. ![Hermes Agent - OpenClaw vs Paperclip vs Hermes ](https://serveravatar.com/wp-content/uploads/2026/05/image-34-1024x562.png) Where OpenClaw composes from discrete skills, Hermes is built around a memory-augmented reasoning loop. The agent maintains a persistent context that evolves over time, which sounds like a small thing but fundamentally changes how you interact with it for long-running projects. **Key Features** - Persistent memory graph stores and retrieves structured context across sessions - Learning-based execution enables agents to improve using past interactions - Tool-use reasoning selects and sequences tools before execution intelligently - Nous ecosystem integration provides access to ongoing research improvements - Open-source foundation supports active development and community contributions **Pros** - Ideal for long-term workflows - Strong contextual understanding - Predictable behavior in complex tasks **Cons** - Higher resource requirements - More complex setup - Harder to “reset” learned behavior - Requires ongoing maintenance **Best Use Cases** - Long-running research and analysis workflows - Complex codebases requiring persistent project context - Agents that need to learn and adapt over time - Tasks where reasoning quality matters more than speed ## Quick Comparison[](https://storage.3.basecamp.com/5840738/blobs/4c0f4ee4-493a-11f1-858d-0242ac120004/download/image.png) **Feature****OpenClaw****Paperclip****Hermes Agent******Primary Focus****Desktop & server-native agentsLightweight deploymentLearning-based autonomous agents**Architecture Style**Modular tool systemSingle-file deployablePersistent memory + learning loop****Self-hosting****Full controlMinimal dependenciesFull control, heavier footprint****Learning Curve****ModerateGentleSteeper****Best For****Automation, power users, server mgmtPrototyping, lean teamsComplex multi-step reasoning, long-term learning****Ease of Use****MediumEasyHard****Flexibility****HighLowMedium**Memory**LayeredMinimalPersistent**Deployment**VPS-friendlyLightweightHeavy****Maintenance Overhead****Low–moderateVery lowModerate–high## Feature Breakdown: Where Each Platform Excels ### Tool Ecosystem **OpenClaw** wins here by a significant margin. ClawHub gives you access to hundreds of community skills, and the skill authoring experience is well-documented. If you need to connect to something, any external service, API, or tool, OpenClaw’s ecosystem has the highest chance of an existing solution. **Paperclip** is early-stage here. Templates exist for common patterns, but the tool library is thin compared to OpenClaw **Hermes** has a growing tool set but the emphasis is on depth over breadth. Its tools are well-integrated with its memory architecture, but you’re more likely to need custom implementation for niche connectors. ### Memory and Context **OpenClaw** offers a capable multi-layer memory system (daily logs, curated long-term memory, session context) but requires you to actively manage what gets saved and how it’s organized. It’s powerful in the hands of someone who understands it, but it doesn’t self-organize. **Paperclip** keeps context lightweight. Simple sessions work well; complex, evolving contexts require more manual management. **Hermes** dominates. Its persistent memory graph means the agent genuinely learns and adapts. For long-running projects, this is a fundamental difference in capability. ### Self-Hosting and Deployment **OpenClaw** is the most deployment-friendly for server management use cases. well-documented, works cleanly on VPS and dedicated server setups. If you’re running infrastructure and want an agent that lives on your own servers, OpenClaw is purpose-built for that. **Paperclip** is the lightest. Single-file deployment means you can run it on minimal infrastructure, even devices with constrained resources. Great for edge deployment or lightweight automation without a full server. **Hermes** is self-hostable but heavier. You’ll want reasonable compute resources and a clear plan for managing the memory graph over time. Not a good fit for a $5/month VPS. ### Developer Experience **OpenClaw** has the best CLI tooling and the clearest documentation for complex use cases. The skill system is intuitive for anyone who’s worked with plugin architectures before. **Paperclip** wins for beginners. Get an agent running in 10 minutes, no training required. But as complexity grows, the developer experience degrades faster than the other two. **Hermes** has a steeper learning curve, especially around its memory architecture. But for developers willing to invest the time, it’s well worth it for the capability unlocked. ### Cost Analysis All three platforms are open-source and free to self-host. But “free” is only part of the cost story, here’s what you’re actually spending: **OpenClaw** - **Software cost:** $0 (open-source) - **Infrastructure:** typically 1–2GB RAM minimum. Runs well on a $10–20/month VPS for personal use; production workloads may need more. - **Skill marketplace:** Free for community skills; some premium skills exist in ClawHub. - **Maintenance:** Moderate, regular updates, skill management, occasional breaking changes between versions. - **Managed option:** Claw VPS handles the server-side setup with OpenClaw pre-installed, no manual configuration, no command-line setup. Worth considering if you want to focus on your agent, not your infrastructure. Price starts from $18/month **Paperclip** - **Software cost:** $0 (open-source) - **Infrastructure:** Very light. Can run on a $5/month VPS or even a Raspberry Pi for basic tasks. - **Templates:** Mix of free community templates and paid/premium templates. - **Maintenance:** Very low. Simple architecture means minimal ongoing upkeep. **Hermes Agent** - **Software cost:** $0 (open-source) - **Infrastructure:** Heavier footprint, recommend 4GB+ RAM minimum for comfortable operation. Memory graph management may require periodic cleanup jobs. - **Ecosystem:** Growing but still maturing; some tools require custom integration. - **Maintenance:** Moderate to high, the learning architecture requires ongoing attention, especially for agents with months of accumulated memory. For teams that don’t want to manage infrastructure at all, managed VPS options like ServerAvatar’s Claw VPS remove the server setup entirely, OpenClaw comes pre-installed, SSL and backups are handled, and you can deploy your first working agent in minutes rather than hours. ## Common Mistakes When Choosing an AI Agent Platform After working with all three platforms, here’s what we see go wrong: **Mistake 1: Picking Based on Reviews** It’s tempting to measure quality by popularity. A platform with a smaller community that’s architecturally right for your use case will outperform a more popular option that’s a poor match. Evaluate based on: your specific use case, your team’s technical background, your deployment constraints, and the actual feature fit. **Mistake 2: Underestimating Maintenance Overhead** Hermes’s learning architecture is genuinely powerful, but it requires maintenance. Teams that adopt it expecting a “set it and forget it” experience get burned. If you don’t have time to monitor and manage the memory graph, Hermes will accumulate cruft and eventually underperform. OpenClaw and Paperclip have lower maintenance floors, but they still require attention. Budget time for upkeep, not just initial setup. **Mistake 3: Building on an Agent Framework Before Understanding What You Actually Need** We’ve seen teams spend weeks building a sophisticated OpenClaw setup for a task that could have been a simple Paperclip script. Before committing to a platform’s architecture, map out your actual requirements. Simple, recurring automations with clear inputs and outputs don’t need a modular skill system. Prototyping with Paperclip first isn’t a bad strategy, you can always migrate to OpenClaw if your requirements grow. **Mistake 4: Ignoring Self-Hosting Constraints** If you’re planning to run your agent on infrastructure you control, which matters for data privacy, latency, and cost control, make sure the platform fits your server setup. OpenClaw works on any VPS. Hermes wants more resources. Paperclip is the most flexible, but has less infrastructure tooling built in. **Mistake 5: Not Planning for Skill/Tool Ecosystem Growth** Your first use case might be simple. Your tenth might be complex. Choose a platform that grows with you. OpenClaw’s skill ecosystem means you’re not starting from scratch when you need new capabilities. Hermes’s memory architecture means an agent that’s useful today becomes more useful over time. Paperclip’s simplicity might mean rebuilding if your requirements expand significantly. [![Blog banner - ServerAvatar](https://serveravatar.com/wp-content/uploads/2025/09/728_90-Banner-1-1024x127.png)](https://serveravatar.com/?ref=blog)## Which One Should You Choose? If you want a quick answer before diving into the full comparison, here’s how these three AI agent platforms stack up based on real-world use cases: - **Choose OpenClaw** if you need flexibility, a strong plugin ecosystem, and full control over self-hosted infrastructure. It’s best suited for complex automation, server management, and multi-step workflows. - **Choose Paperclip** if your priority is speed and simplicity. It’s ideal for rapid prototyping, lightweight automation, and teams that want to launch an AI agent in minutes without dealing with complex setup. - **Choose Hermes Agent** if your use case involves long-running tasks where memory, learning, and reasoning improve results over time. It’s best for research workflows, evolving systems, and context-heavy projects. ## Conclusion There’s no universal winner, each platform solves a different problem. OpenClaw gives you the most flexibility and the strongest tool ecosystem, making it the best fit for server management automation and teams that want community-supported extensibility. Paperclip gets you from zero to a working agent fastest, but trades flexibility for simplicity as your needs grow. Hermes Agent is built for long-running projects where an agent that learns and remembers over time actually adds value. For those who want OpenClaw without the server setup overhead, ClawVPS by ServerAvatar has it pre-installed and managed, focus on your agent, not your infrastructure. Match the tool to the job, not the hype to the trend. ## Continue Reading Looking to simplify your server setup or explore more comparison guides? Here are some related articles from ServerAvatar’s blog: - [Launch Your OpenClaw AI Assistant in Minutes with ClawVPS by ServerAvatar](https://serveravatar.com/deploy-openclaw-ai-clawvps-serveravatar/): Step-by-step guide to deploying OpenClaw on ClawVPS with no manual configuration required. - [Core PHP vs Laravel: Which One Is Best for Your Project?](https://serveravatar.com/php-vs-laravel/): If you’re evaluating frameworks for your next project, this comparison breaks down fit, performance, and long-term maintainability. - [Adminer vs phpMyAdmin: Security, Speed & Usability Compared](https://serveravatar.com/adminer-vs-phpmyadmin/): A similar comparison format for database management tools, useful if you’re working with data-heavy AI workflows. Explore more guides in ServerAvatar’s [Blog](https://serveravatar.com/blog/) and [App Deployment](https://serveravatar.com/category/deployments/) sections. **Disclosure:** ServerAvatar is a platform to simplify the hosting and management of servers and applications. It simplifies the process of deploying and managing PHP and Node.js based web applications. For more guides on server management, automation, and infrastructure best practices, explore our blog. ## About the Author Meghna Meghwani is part of the ServerAvatar team. This comparison was put together after hands-on testing with all three platforms in real self-hosted and managed deployment scenarios, not from press releases or marketing pages. ## FAQ ### 1. Which platform is easiest to get started with? Paperclip. The single-file model and quick-start templates get you from zero to a working agent in under 15 minutes. OpenClaw requires more setup but offers more depth. Hermes requires the most investment upfront. ### 2. Which platform is best for server management automation? OpenClaw’s deployment, skill ecosystem, and channel abstraction make it purpose-built for server and infrastructure tasks. You can deploy it on any VPS, connect it to your server management workflows, and maintain full control over your data. ### 3. Can I self-host all three platforms? Yes, all three are fully open-source and self-hostable. OpenClaw and Paperclip are the most flexible for self-hosted deployment. Hermes has higher infrastructure requirements, but it is manageable with adequate resources. ### 4. How do these platforms handle privacy and data control? All three can be run entirely on your own infrastructure, meaning no data leaves your environment. This makes them suitable for workflows where data privacy is a concern. The key variable is how you configure them, default settings vary, so review your agent’s configuration to ensure it matches your privacy requirements. ### 5. Do these platforms work with existing server management tools? OpenClaw has the strongest ecosystem for tool integrations, including shell execution, file management, and API integrations that map well to server management workflows. Hermes and Paperclip can integrate with external tools but typically require more custom configuration. **Categories:** Blog, Guide, Others **Tags:** AI agent comparison, AI agent platforms, best AI agent platform, Hermes AI, open source AI agents, OpenClaw, OpenClaw vs Paperclip vs Hermes, Paperclip AI --- ### [Ultimate Guide to Stress Testing WordPress Websites (Easy for Beginners)](https://serveravatar.com/how-to-stress-test-a-wordpress-website/) **Published:** May 6, 2026 **Author:** Meghna Meghwani **Content:** [![Blog banner - ServerAvatar](https://serveravatar.com/wp-content/uploads/2025/09/728_90-Banner-3-1024x127.png)](https://serveravatar.com/?ref=blog)Have you ever clicked on a link only to land on a blank screen or a slow-loading page? If you run a WordPress website, that’s more than an inconvenience, it’s lost visitors, potential revenue, and search ranking points. This is where stress testing WordPress websites becomes essential. The good news? Most of those scenarios are preventable. The secret is knowing your website’s limits before the traffic actually arrives. That’s exactly what stress testing does. In this guide, you’ll learn what stress testing means for a WordPress site, why it matters, and exactly how to do it step by step, even if you’ve never run a technical test before. By the end, you’ll know how to identify where your site starts to struggle and what to do about it before a single extra visitor lands on your page. ## What Is a Stress Test? A stress test is a controlled way of sending simulated traffic to your website to see how it holds up under pressure. Think of it like a fire drill for your site, you create a controlled surge of visitors on purpose, watch how your server responds, and use what you find to fix weak spots before they become real problems. ![ stress testing WordPress websites](https://serveravatar.com/wp-content/uploads/2026/05/image-19.png) Just like testing a parachute before skydiving, stress testing gives you the data you need to make confident decisions about your hosting, your site configuration, and your scaling strategy. The goal is simple: find out exactly where your website starts to slow down or break, and then fix those points before they cause real damage. ## Why Should You Stress Test a WordPress Website? Running a stress test on your WordPress site isn’t just for developers or technical teams. Here’s why it matters for anyone running a website: ### 1. Know Your Server’s Actual Capacity Your web hosting is the engine that powers your entire website. Stress testing shows you whether that engine can handle the number of visitors you expect, or more. Without this data, you’re essentially guessing. And guessing wrong about server capacity is what leads to crashed pages during your biggest traffic moments. ### 2. Understand Real User Experience Under Load A fast website during normal traffic can become painfully slow when things get busy. Stress testing helps you see exactly when that slowdown starts and how severe it gets. You don’t want to find out during a product launch or a flash sale that your site can’t keep up. ### 3. Make Informed Decisions About Server Scaling Should you upgrade your hosting plan? Add more RAM? Move to a different server type? Stress testing gives you real performance data to base that decision on, rather than guessing or reacting after a crash. ### 4. Find and Fix Hidden Resource Bottlenecks Stress testing often reveals resources that aren’t being used efficiently, or are being pushed beyond their limits in ways that aren’t visible during normal traffic. Once you know where the bottlenecks are, you can optimize accordingly. ### 5. Prepare for Unexpected Traffic Surges Going viral, being featured on social media, running a limited-time promotion, these moments send sudden bursts of traffic to your site. Without knowing your site’s limit, you can’t prepare for them. Stress testing lets you know exactly how much your site can handle, and when to scale up before a surge hits. ## How to Stress Test a WordPress Website Now that you know why it matters, let’s get into how to actually do it. The tool we’ll use here is Loader.io, a free and beginner-friendly online stress testing platform. It lets you simulate hundreds or thousands of virtual visitors hitting your site simultaneously, without needing to write a single line of code. Here’s the step-by-step process: **Step 1: Create Your Loader.io Account** - Start by heading to [Loader.io](https://loader.io/) and signing up for a free account. ![select free plan - stress testing WordPress websites](https://serveravatar.com/wp-content/uploads/2026/05/image-20-1024x600.png) - The process is straightforward; fill in your basic details, verify your email, and you’re in. No credit card is required to get started. ![Signup - stress testing WordPress websites](https://serveravatar.com/wp-content/uploads/2026/05/image-21-1024x633.png) - Once your account is active, log in, and you’ll land on your dashboard. From here, you’ll be able to create new tests, view past results, and manage your targets. **Step 2: Add Your Website and Verify Domain Ownership** - After logging in, click the “**New Host**” button on your dashboard. ![add website - stress testing WordPress websites](https://serveravatar.com/wp-content/uploads/2026/05/image-22-1024x497.png) - Enter the full domain name of your WordPress site, for example, yourwebsite.com, and click **Next: Verify**. ![Verify Domain - stress testing WordPress websites](https://serveravatar.com/wp-content/uploads/2026/05/image-23-1024x537.png) Loader.io needs to confirm that you own or control the domain before it can run tests against it. - To do this, it will ask you to download a small verification file and upload it to your website’s root directory. - Once the file is in place, go back to the Loader.io verification page and click **Verify**. **How to upload the file:** - **If you are using ServerAvatar:** Log in to your ServerAvatar panel, open the File Manager, navigate to your domain’s root folder (usually public\_html), and upload the file there. ![ServerAvatar File manager - stress testing WordPress websites](https://serveravatar.com/wp-content/uploads/2026/05/image-24-1024x393.png) - **If you are managing your server manually:** Use any SFTP client like FileZilla, connect to your server, navigate to the root directory, and upload the file If everything checks out, your domain will be confirmed as an approved target host, and you can move to the next step. **Step 3: Create Your First Stress Tests** With your domain verified, it’s time to run the actual tests. The approach that works best is to test in stages, starting light and ramping up gradually. This gives you a clear picture of how your site performs at each level. ![new test - stress testing WordPress websites](https://serveravatar.com/wp-content/uploads/2026/05/image-25-1024x468.png) ### Test 1: Low Load Test Start with a light warm-up test. Set the number of virtual clients to **100** and run the test for **1 minute**. This gives you a baseline performance reading for your site under normal to slightly-above-normal conditions. ![low load test - stress testing WordPress websites](https://serveravatar.com/wp-content/uploads/2026/05/image-26-1024x672.png) Think about it as you are establishing a performance baseline here, a benchmark to compare everything else against. ![low load test result - stress testing WordPress websites](https://serveravatar.com/wp-content/uploads/2026/05/image-27-1024x899.png) ### Test 2: Medium Load Test Now increase the pressure. Set the number of clients to **250** and run for **1 minute**. This simulates a moderately busy period, like a busy afternoon on your site with several dozen people browsing at the same time. ![medium load test - stress testing WordPress websites](https://serveravatar.com/wp-content/uploads/2026/05/image-28-1024x714.png) Watch how your site’s response time changes compared to the low-load test. Any significant slowdown at this stage tells you something meaningful about where your site’s second gear starts to strain. ![medium load test result - stress testing WordPress websites](https://serveravatar.com/wp-content/uploads/2026/05/image-29-1024x918.png) ### Test 3: High Load Test Time to push it closer to the limit. Set the clients to **500 to 1,000** and run for **1 minute**. This simulates a high-traffic scenario, something like a popular blog post being shared on social media or the peak of a promotional campaign. ![high load test - stress testing WordPress websites](https://serveravatar.com/wp-content/uploads/2026/05/image-30-1024x742.png) This is where most sites start to show their breaking point. Pay close attention to how your server handles this level of demand. ![High load test result - stress testing WordPress websites](https://serveravatar.com/wp-content/uploads/2026/05/image-31-1024x918.png) After each test, Loader.io will generate a detailed report. Note the results before moving to the next test; you’ll want to compare them. ## How to Read and Understand Your Stress Test Results Once the tests are complete, you can see the full results on the Loader.io dashboard. Here’s what to focus on and what each metric means: ### Response Time This tells you how quickly your server responded to each request during the test. The lower the response time, the better. You’re looking for consistent, fast responses across all three test levels. **What to look for:** If response time jumps significantly from low-load to high-load, your server is working harder to keep up under pressure. A large jump tells you that your current hosting plan has a clear ceiling. ### Error Rate The error rate shows what percentage of total requests resulted in server errors (like 503 or 500 errors) during the test. An error rate above 0% is a red flag, even a small percentage means some visitors are seeing broken pages. **What to look for:** If errors start appearing even at the medium-load test, your site is already struggling within a realistic traffic range. A 0% error rate at all levels is the ideal result and tells you your hosting is genuinely reliable. ### Throughput Throughput measures how much data your server transferred during the test, usually shown in megabytes or gigabytes processed per minute. Higher throughput means your server is handling more content delivery efficiently. **What to look for:** A healthy site should show consistent throughput even as load increases. If throughput drops significantly under high load, it could mean your server’s resources are being maxed out. ### What to Do With This Data These three metrics together give you a complete picture. High response times with low throughput and rising errors at medium load means it’s time to optimize or upgrade. A clean, low response time with high throughput and zero errors across all three tests means your hosting can handle whatever you throw at it. Use these insights to make decisions about your hosting plan. If your current plan shows strain at medium load, you know a more powerful plan or a managed WordPress hosting solution with better resources is worth exploring before you hit high traffic. ## Tips for Running an Effective WordPress Stress Test Before you start, keep these tips in mind to make sure your results are useful and accurate: **Start with a clear goal:** Know what you’re trying to find out before you run the first test. Are you checking if your current hosting plan is sufficient? Testing a new configuration? Planning for a product launch? Your goal shapes which metrics matter most. **Simulate real-world conditions:** Set up your tests to mirror actual visitor behavior as closely as possible. Think about which pages are most likely to be visited during high traffic, and test against those, not just your homepage. **Test in gradual stages:** Always start with a low-load baseline before ramping up. Jumping straight to 1,000 clients won’t give you the progressive data you need to understand where your site’s limit actually begins. **Monitor server resources during the test:** Keep an eye on your hosting panel while the test is running. High CPU usage, memory exhaustion, or disk I/O saturation during the test will tell you exactly where the bottleneck is occurring on the server side. **Test multiple pages, not just one:** Don’t test only your homepage. Run tests against your key pages, product pages, checkout flow, contact form, or your most popular blog posts. Each may perform differently under load. **Run each test multiple times:** A single test result isn’t enough to make a decision on. Run the same test three to five times and look at the average. One off result can be misleading. **Use realistic data:** If you’re testing authenticated pages or dynamic content, use realistic data that matches your actual user patterns. Testing with unrealistic content can skew results in ways that don’t reflect what real visitors will experience. [![Blog banner - ServerAvatar](https://serveravatar.com/wp-content/uploads/2025/09/728_90-Banner-1-1024x127.png)](https://serveravatar.com/?ref=blog)## Making the Most of Your Results Stress testing is only as useful as what you do with the data. Once you have your results, here’s how to put them to work: **Identify your site’s breaking point:** The load level where response times spike sharply or errors start appearing, is your site’s practical ceiling. Use that number as your guide when planning promotions, email campaigns, or any event that might drive traffic. **Know when to upgrade your hosting:** If your site struggles at 250 clients, it will definitely fail at 500. Use the test results to have a factual conversation with your hosting provider about what plan level you actually need. **Optimize before scaling:** Sometimes the issue isn’t raw server power, it’s inefficient configuration. High response times can often be improved by enabling caching, optimizing your database, or cleaning up heavy plugins before spending money on a bigger plan. **Plan for scaling ahead of time:** Once you know your site’s ceiling, set up an auto-scaling plan or choose a hosting provider with flexible resource allocation so you’re never caught off guard when traffic grows. **Disclosure:** ServerAvatar is a server and application hosting and management platform that we recommend for developers and teams managing PHP and Node.js applications, including WordPress sites that need reliable performance and easy management. ## Final Thoughts Stress testing your WordPress website isn’t just a technical exercise, it’s one of the most practical things you can do to protect your site, your visitors, and your peace of mind. You don’t need to be a developer or have technical expertise to do it. Tools like Loader.io make it accessible for anyone willing to spend twenty minutes running a few controlled tests. **The goal is simple:** know your limits before your visitors test them for you. Once you know where your site starts to struggle, you can fix those weak points, make smart decisions about your hosting, and be genuinely prepared for whatever traffic comes your way. If you’re running a WordPress site and want hosting that’s built to handle real demand, with the management features, ServerAvatar offers server and application hosting and management platform for WordPress and all the PHP and nodejs based applications. You can explore the options and get your site set up in minutes. ## About the Author Writes practical guides on web hosting, server management, and getting the most out of your WordPress site, from people who manage hosting infrastructure every day. ## FAQs ### 1. What is the difference between a stress test and a load test? A stress test pushes your site beyond normal limits to find where it breaks. A load test checks if your site handles expected traffic levels. For most WordPress users, stress testing gives more useful data, it shows your actual ceiling. ### 2. Do I need technical skills to run a WordPress stress test? No, Loader.io is beginner-friendly; you don’t need to write code or run terminal commands. If you can sign up for an account and upload a file, you can run the test. ### 3. Is it safe to stress test my own website? Yes, you’re sending simulated traffic to your own server. It won’t affect your real visitors. Stop the test anytime by closing the page, that’s the only risk. ### 4. How many visitors can my WordPress site handle? There’s no universal number, it depends entirely on your hosting plan, server resources, and site configuration. Stress testing is the only way to find your actual limit. A well-configured managed WordPress host typically handles 50 to 500 concurrent visitors before showing strain. ### 5. How often should I run a stress test on my WordPress site? Run a test before any major traffic event, a product launch, viral post, or promotion. Also test after changing hosting plans or adding significant plugins. Quarterly tests are a good baseline for ongoing monitoring. **Categories:** Blog, Guide, Others, Tutorials, WordPress **Tags:** how to stress test WordPress, stress testing, stress testing WordPress websites, Wordpress, WordPress load testing, WordPress performance testing, WordPress speed optimization --- ### [Best PHP CMS Platforms for Developers in 2026](https://serveravatar.com/best-php-cms/) **Published:** May 4, 2026 **Author:** Meghna Meghwani **Content:** [![Blog banner - ServerAvatar](https://serveravatar.com/wp-content/uploads/2025/09/728_90-Banner-3-1024x127.png)](https://serveravatar.com/?ref=blog)PHP CMS platforms don’t get simpler with age, they get more numerous. In 2026, the best PHP CMS platforms range from WordPress to purpose-built options like Craft CMS and October CMS. The challenge isn’t finding options. It’s knowing which one actually fits the project you’re working on. This guide is for developers who are evaluating CMS options right now. I’ll walk through the platforms that genuinely matter, what each one does well, where it costs you, and how to match a platform to a project without wasting time on the wrong choice. **What you will learn:** - Which PHP CMS platforms genuinely matter in 2026 - Where each platform excels and where it costs you - How to match a platform to a specific project without over-engineering the decision - Common CMS selection mistakes and how to avoid them **Who this is for:** Developers and technical leads evaluating a CMS for their next project. If you’re a developer weighing options for a client project and want honest trade-offs rather than vendor marketing, this is for you. ## What Is a PHP CMS and Why Does It Matter for Developers? A PHP CMS is a content management system that lets you build and manage websites without rebuilding the same infrastructure from scratch on every project. You get a database-backed content layer, an admin interface for content editors, and a templating system for front-end presentation. The CMS you choose affects three things directly: - **How fast you can ship:** Some platforms get you to a working site in hours. Others take weeks to configure properly. - **How much you fight the platform:** A well-matched CMS stays out of your way. A poor match means fighting it on every custom requirement. - **How the project ages:** A CMS that seems fine at launch can become a maintenance burden at month six. Most PHP CMS platforms are open-source, which means you can host them on your own servers. ServerAvatar supports all the platforms in this guide, you can deploy and manage them without dealing with the usual server configuration overhead. ## The PHP CMS Market in 2026: A Quick View Before diving in, here’s the practical reality: - WordPress holds the dominant share of the PHP CMS market, its plugin ecosystem and developer pool remain unmatched. - Joomla and Drupal are both mature and capable, their smaller market share reflects deliberate choices by their communities, not a lack of capability. - Craft CMS, October CMS, Contao, and others make up the rest. Individually small, but each has a loyal developer base for specific use cases. Market share matters most when you need to hire help or find hosting support. For everything else, the right platform for your project matters more than its market position. ## 1. WordPress: The Standard That Earns Its Position ![WordPress - best PHP CMS](https://serveravatar.com/wp-content/uploads/2026/05/image-11-1024x486.png) [WordPress](https://wordpress.org/) turns 23 in 2026. In that time it’s evolved from a blogging tool into a full-featured CMS that runs everything from five-page business sites to enterprise e-commerce platforms. **Why it works:** WordPress’s biggest advantage is the ecosystem. Over 60,000 plugins cover most requirements out of the box. The community is enormous, any problem you hit has been hit and solved before. Hiring WordPress developers is straightforward because WordPress skills are widely held. For content-heavy sites where clients need to manage their own content, blogs, business sites, small e-commerce, WordPress remains the practical default. **Where it costs you:** Plugin quality is uneven. The ecosystem’s size is a strength until it becomes a liability: poorly maintained plugins, conflicts after updates, and sites that accumulate bloat over time are real problems I’ve dealt with on maintenance projects. On a maintenance project, I inherited a WordPress site where the previous developer had stopped updating plugins because one had broken the theme on update. The site was three months behind on updates, and playing catch-up took two days of careful testing before I could safely bring it current. The moment a plugin update gets deferred, the debt starts building. **Best for:** Content sites, blogs, small e-commerce, projects where clients need to manage their own content, projects with tight timelines. ## 2. Drupal: The Platform That Handles Enterprise Complexity ![Drupal - best PHP CMS](https://serveravatar.com/wp-content/uploads/2026/05/image-12-1024x481.png) [Drupal](https://new.drupal.org/home) calls itself a content management framework rather than a CMS, and that distinction is accurate. Drupal is built for organizations where content complexity, security, and long-term stability are real requirements. **Why it works:** Drupal’s content modeling is genuinely powerful. You can define complex content types, relationships, and taxonomies with a precision that WordPress can’t match without significant customization. If you’re building a site with hundreds of content types and intricate relationships between them, Drupal handles it without flinching. Security is a first-class concern. Drupal has a dedicated security team, a fast patch cycle, and a strong track record, it runs the White House, NASA, and numerous Fortune 500 sites. For organizations with compliance requirements, this is meaningful. The API-first approach makes Drupal excellent for headless or decoupled architectures. JSON:API support is built in. If your front-end is a separate application consuming a CMS, Drupal gives you a clean content API without plugins. **Where it costs you:** The learning curve is real and steep. The module ecosystem is extensive but doesn’t have WordPress’s breadth. On a university site I maintained, a Drupal upgrade that should have taken a day took a week because two modules hadn’t been updated for the new version. The patch dependencies were a puzzle nobody had solved publicly. With WordPress, I’d have found ten Stack Overflow answers before I finished reading the error. **Best for:** Government institutions, large universities, healthcare organizations, enterprise sites with complex content requirements, sites with strict security and compliance needs. ## 3. Joomla: The Mid-Tier Platform That Deserves More Attention ![Joomla - best PHP CMS](https://serveravatar.com/wp-content/uploads/2026/05/image-13-1024x534.png) [Joomla](https://www.joomla.org/) sits between WordPress and Drupal, more powerful than WordPress out of the box, less complex than Drupal to configure. It doesn’t get as much attention as it deserves. **Why it works:** Joomla’s built-in multilingual support is excellent. If you’re building a site that needs to serve content in multiple languages without significant plugin configuration, Joomla handles this better than WordPress, which matters for international businesses and organizations. The Access Control List (ACL) system is more granular than WordPress’s. For sites with complex user roles and permissions, membership sites, community portals, internal tools, this is a genuine advantage that doesn’t require additional plugins. Joomla has been stable since 2005. It’s mature, proven at scale, and major brands including IKEA and eBay have used it for large deployments. **Where it costs you:** The learning curve sits awkwardly between WordPress and Drupal, harder than WordPress to learn well, less powerful than Drupal for complex cases. The extension library is smaller and the community is vocal but not large. I built a Joomla site for a client who later wanted a redesign, and finding a quality template that wasn’t outdated took longer than I’d like to admit. The ecosystem is there but it’s not as curated, you have to vet templates more carefully than you would in WordPress. **Best for:** Mid-size projects requiring multilingual support, membership sites, community portals, business sites that need more complexity than WordPress handles cleanly. ## 4. October CMS: Laravel Developers’ Native CMS[](https://storage.3.basecamp.com/5840738/blobs/57c6061a-460b-11f1-b012-0242ac120004/download/image.png) ![October CMS - best PHP CMS](https://serveravatar.com/wp-content/uploads/2026/05/image-14-1024x546.png)[October CMS](https://octobercms.com/) is built on Laravel, and if you’re already working in the Laravel ecosystem, that matters immediately. You use Blade templates, Composer packages, and the same patterns you already know. **Why it works:** The developer experience is the cleanest of any CMS on this list for Laravel developers. Themes and plugins are written in Blade. File-based configuration integrates cleanly with Git. The component system lets you build reusable functionality without fighting the platform. The component system is where October CMS genuinely shines. You build a page by composing components, a navigation component, a blog posts component, a contact form component. Each component encapsulates its own PHP logic, Twig template, and assets. The reusability is real, not theoretical. October CMS stays lightweight by default. Unlike WordPress, which accumulates overhead as you add plugins, October stays lean unless you deliberately add complexity. Performance is good out of the box because the platform doesn’t carry the weight of legacy decisions. **Where it costs you:** October CMS uses a freemium licensing model. The core platform is open-source. A paid license is required to run it in production, which gives you access to the Update Gateway, Marketplace ecosystem, and support. Pro features like multi-site management, additional field types, and advanced user management require a license. If you need a specific feature and no plugin exists, you’re building it yourself. This is fine if your team has the capacity, but it’s a different commitment than reaching for a pre-built WordPress plugin. The community is smaller. Documentation is good but not as extensive as WordPress’s. Advanced use cases sometimes require digging into source code or navigating GitHub issues rather than finding a documented answer. **Best for:** Laravel developers building custom applications, projects where the client needs a clean back-end without WordPress’s bloat, medium-sized custom builds where the code needs to be maintainable long-term by people who know Laravel. ## 5. Craft CMS: The Premium Developer Experience ![Craft CMS - best PHP CMS](https://serveravatar.com/wp-content/uploads/2026/05/image-15-1024x518.png) [Craft CMS](https://craftcms.com/) is commercial software, you pay for a license and get a platform designed by developers who were tired of fighting CMS platforms. The license fee buys you something real: a codebase that respects your time and doesn’t make compromises to satisfy a mass market. **Why it works:** Craft CMS has the cleanest developer experience I’ve worked with. The template system is flexible, you write PHP-powered templates that give you complete control over output. Content modeling is precise, you define exactly the fields you need and nothing else. The platform gets out of your way when you need to build something custom: no bloat, no legacy decisions to fight, no conventions that exist because “that’s how it’s always been done.” The approach to content is different from WordPress. Instead of forcing your content into a post-based model, Craft CMS lets you define arbitrary content types. A blog post, a product page, a case study, a team member, each is its own content type with its own field set. The flexibility is significant for projects where content structure doesn’t fit a standard blog model. Localization and multi-site support are handled with unusual care. If you’re managing content across multiple sites or languages, Craft makes this genuinely manageable, not as an afterthought, but as a first-class feature that was clearly designed with intent. The site-switching interface alone saves time when you’re managing content for multiple brands or regions. The control panel is one of the cleanest available. Clients consistently find it more intuitive than WordPress, the editing experience is focused, the fields are clearly labeled, and there’s none of the visual noise that WordPress accumulates with every added plugin. **Where it costs you:** Craft CMS uses a tiered licensing model. Solo, the free edition, is available for self-hosted single-user projects. Team and Pro editions unlock multi-user access, unlimited user accounts, and advanced features with different prices. The license cost scales with the edition and number of sites. For clients on tight budgets, this is a hard conversation to have. The honest answer is that Craft CMS is not for every project, and that’s fine. The ecosystem is smaller. Plugin options are good but not comprehensive. If you need a specific feature, say, a particular e-commerce integration or a niche marketing tool, and Craft doesn’t have it, you’re building it. That’s a developer commitment, not a client-friendly one. When a client’s preferred developer left mid-project, finding a replacement Craft CMS developer took six weeks. With WordPress, I could have found three options in a day. The Craft community is growing but the talent pool is still thin. **Best for:** Premium client sites where budget supports the license, projects demanding precision content modeling and multi-site management, builds where long-term code quality and maintainability are priorities over plugin breadth. ## 6. PyroCMS: Laravel’s Modular Architecture Option ![PyroCMS - best PHP CMS](https://serveravatar.com/wp-content/uploads/2026/05/image-16-1024x499.png) [PyroCMS](https://pyrocms.com/) is another Laravel-native CMS, built with a modular architecture. It shares October CMS’s Laravel roots but takes a more traditional CMS structure, more conventions, more pre-built modules, less blank canvas. **Why it works:** The module system in PyroCMS is genuinely flexible. Need a blog? There’s a module for that. Need a form builder? Module. User management, static pages, tags, modules integrate cleanly with the core and are independently installable and updatable. The streams platform underlying PyroCMS is the real engine here: it’s an application development platform underneath the CMS layer, which means the flexibility is structural rather than bolted on. PyroCMS has been around since 2012, first on CodeIgniter and then migrated to Laravel. That maturity shows in the documentation, the stability of the core, and the coherence of the overall platform. It’s not a project that’s still finding itself, it’s a mature product with clear patterns. The admin interface is clean and functional. Content editors get what they need without visual clutter. The permission system handles complex user roles without requiring third-party plugins. **Where it costs you:** The community is smaller than October CMS’s. The plugin ecosystem is more limited, and some of the better modules are paid. If you’re building something that needs extensive functionality out of the box, expect to build more of it yourself than you would with WordPress or even October CMS. Documentation is solid for core functionality but thinner for advanced cases. When you hit edge cases, you’re often in GitHub issues rather than Stack Overflow. **Best for:** Laravel developers who need a modular CMS and October CMS’s subscription licensing model is a blocker, teams that want more structure than a blank-canvas CMS provides, projects where the built-in modules cover enough of the requirements that custom development is minimal. ## 7. Contao: The Accessibility-Focused Professional CMS ![Contao - best PHP CMS](https://serveravatar.com/wp-content/uploads/2026/05/image-17-1024x450.png) [Contao](https://contao.org/en/) is a German-born CMS that flies under most English-language discussions, but it’s worth knowing about. Built on Symfony, it focuses on accessibility and is favored by professional web agencies in Europe, particularly Germany and Austria, where it has a strong market presence that doesn’t show up in English-language market share discussions. **Why it works:** Contao’s commitment to web accessibility is genuine. It produces clean, semantic HTML5 output by default, which sounds basic but is rarer than it should be across CMS platforms. Many CMS platforms output div soup and rely on you to fix it with CSS. Contao starts with proper semantic markup, heading hierarchies that make sense, form fields with associated labels, ARIA attributes where appropriate. For projects where accessibility is a compliance requirement, this matters in a real, audit-able way. The back-end is intuitive for editors. The permission system is granular enough for complex organizational structures, you can set permissions at the page level, not just at the module level, which is meaningful for sites with many content editors and strict role separation between who can edit what. Security and stability have been consistently maintained over years. Contao has a dedicated security team, releases patches promptly, and the codebase reflects the kind of discipline you expect from a platform that’s been in active development for over a decade without major security incidents. **Where it costs you:** The community is primarily German-speaking. English-language documentation, tutorials, and community resources are thinner than for other platforms. Finding English-speaking Contao developers is genuinely difficult outside of Europe, which creates a practical risk for international projects. If you need help, the English-language answers are sparse. The theme and extension ecosystem is smaller, concentrated largely in Europe. Most quality themes and extensions are paid rather than free, which shifts the cost equation. If you’re used to WordPress’s abundance of free options, the Contao ecosystem feels different. **Best for:** European agencies with accessibility requirements, projects where semantic HTML5 and standards compliance are explicit priorities, clients who operate within the European professional web agency ecosystem and value long-term stability over feature breadth. ## 8. Magento: When E-Commerce Is the Point ![Magento - best PHP CMS](https://serveravatar.com/wp-content/uploads/2026/05/image-18-1024x461.png) [Magento](https://www.magento-opensource.com/) deserves its own category because it’s not trying to be a general CMS, it’s built specifically for e-commerce, and it does e-commerce as well as any PHP platform available. If you’re building a store, this is where the conversation starts. **Why it works:** Magento’s e-commerce feature set is unmatched for PHP. Product catalog management with unlimited attributes, sophisticated pricing rules, tier pricing, customer group pricing, promotional rules that stack, full customer account management, order management workflows, payment processing integration, shipping integration across carriers. It’s all there, deeply functional, and built to handle high-volume retail. Security is taken seriously, Magento has a dedicated security team, active patch management, and a strong track record. For e-commerce sites handling payment data and customer information, this is non-negotiable. PCI compliance support is built into the platform’s approach to data handling. The marketplace has thousands of extensions covering most common requirements. From SEO tools to shipping integrations to accounting software connections, if you need a feature, there’s a good chance an extension exists. The ecosystem is large enough that “there’s a module for that” is frequently true. **Where it costs you:** Magento requires significant server resources and careful hosting configuration. It’s not a platform you spin up and forget, performance optimization is an ongoing commitment, and proper hosting is not cheap. SSD storage, adequate RAM, Redis for caching, a properly configured CDN, these are not optional extras, they’re the baseline for a healthy Magento install. The learning curve and development cost are high. Magento developers are specialists, and their rates reflect that. For small to mid-size stores, say, a hundred products and straightforward shipping, the overhead rarely makes sense. You’re paying for Magento’s enterprise feature set even when you don’t need it. The platform is resource-intensive by default. Page load times on poorly configured Magento setups are a known problem in the industry. Getting Magento to perform well requires proper hosting, full-page caching, Redis session and cache management, Elasticsearch for catalog search, and index management, all of which add operational overhead that smaller platforms handle automatically. **Best for:** Large-scale e-commerce operations with complex product catalogs, multi-store setups where one Magento installation manages multiple storefronts under different brands, businesses with the infrastructure budget for proper hosting and access to experienced Magento developers. ## Quick-Reference Comparison **Platform****Best For****Learning Curve****Plugin Ecosystem****Hosting Complexity****WordPress**Blogs, small e-commerceLowHugeLow**Drupal**Enterprise, gov, complex contentHighModerateHigh**Joomla**Membership, multilingualMediumModerateMedium**October CMS**Laravel custom buildsMediumLimitedMedium**Craft CMS**Premium content-focused sitesMediumModerateMedium**PyroCMS**Modular Laravel appsMediumLimitedMedium**Contao**Accessibility-first sitesMediumLimitedMedium**Magento**Large e-commerceHighLargeHigh## How to Choose: A Practical Decision Framework The CMS decision is usually not about finding the “best” platform, it’s about finding the right platform for a specific project. Here’s how to narrow it down without overthinking it. **Start with the client and the content, not the platform’s features.** Who will manage the content? Non-technical editors who need an intuitive back-end point toward WordPress, October CMS, or Craft CMS. Developers who need full control point toward October CMS, Craft CMS, or a headless setup with a custom front-end. How complex is the content model? Simple pages and blog posts work fine on any platform. Complex content types with intricate relationships between them, that points toward Drupal or Craft CMS. E-commerce with thousands of products and custom pricing rules points toward Magento. What’s the traffic expectation? Low to medium traffic works on any modern CMS. High traffic with performance requirements changes the calculus significantly, Magento needs proper infrastructure; WordPress needs good caching; Drupal handles traffic well when properly configured. **Factor in long-term maintenance honestly.** Every CMS you install is a CMS you maintain. The question is not “can we build this on WordPress” but “can we maintain this WordPress installation in two years without it becoming a liability”. Plugin updates, security patches, theme updates, PHP version compatibility, this maintenance work is real, ongoing, and costs money. A platform that’s cheap to launch and expensive to maintain is not actually cheap. **Don’t choose free over appropriate.** WordPress is free. Craft CMS costs money. But spending developer hours fighting WordPress to do something it wasn’t designed for is not free, it’s expensive in a different way. A Craft CMS license for the right project is frequently cheaper than the workarounds required to make WordPress do something it wasn’t built for. **Disclosure:** This article references ServerAvatar, a server management platform. I include it because it’s relevant to the hosting and deployment discussion in the guide. All opinions are my own. [![Blog banner - ServerAvatar](https://serveravatar.com/wp-content/uploads/2025/09/728_90-Banner-1-1024x127.png)](https://serveravatar.com/?ref=blog)## Common Mistakes When Choosing a CMS **Choosing based on community size instead of fit.** WordPress has the biggest community, but that doesn’t make it right for every project. The PHP CMS market is mature enough that “most popular” and “best for my project” are frequently different things. A smaller platform that fits your project is always better than a popular platform that fights it. **Underestimating long-term maintenance.** The CMS you build on is the CMS you maintain. A WordPress site with thirty plugins and poor update hygiene becomes a security and maintenance nightmare in under a year. The platform that seems fastest to build is sometimes the slowest to maintain. Factor in what the platform looks like in two years, not just at launch. **Ignoring the client’s actual skill level.** If your client needs to update content daily and you give them a developer-focused back-end they can’t navigate, you’ve failed, regardless of how elegant the code is underneath. A CMS is only as good as the content editors can use it. The best CMS in the world is the wrong CMS if your client can’t comfortably use it. **Forgetting about hosting.** Some CMS platforms are finicky about hosting environment. Drupal and Magento especially need proper server configuration. WordPress accumulates performance issues without proper caching and PHP version management. Managed hosting that supports your CMS out of the box, like ServerAvatar, removes an entire category of problems before they start. Don’t treat hosting as an afterthought. **Choosing complexity over simplicity.** The urge to build on the most powerful platform is understandable but often wrong. If your project is a ten-page business site, WordPress is probably enough. Drupal’s power is real, but it’s power you pay for in learning curve and maintenance burden. Start simple and scale up when you have to, not before. ## Conclusion PHP CMS platforms in 2026 cover a wide enough range that there’s a right choice for almost any project. WordPress handles most standard projects well and remains the practical default, the ecosystem depth, hosting support, and community size are genuinely unmatched. When requirements go beyond the ordinary, custom architecture, complex content modeling, Laravel integration, enterprise security, large-scale e-commerce, the other platforms on this list are stronger than they’ve ever been. My recommendation: start with the simplest platform that fits your project and scale up only when you have to. WordPress handles more than people give it credit for. But when it doesn’t, the alternatives are worth knowing about, and the time you spend evaluating them before you need them is never wasted. ## About the Author This guide is based on years of building and maintaining sites across different platforms, from WordPress for small businesses to Craft CMS for premium clients, Drupal for enterprise organizations, and Magento for e-commerce builds at scale. Every platform here is one I’ve actually deployed, configured, and maintained on real projects, not a features list pulled from a vendor’s marketing page. ## FAQs ### 1. Which PHP CMS is best for a custom web application? October CMS or Craft CMS, both are Laravel-native and designed for developers who need custom functionality without fighting the platform. WordPress is the wrong choice for custom applications. ### 2. Is WordPress still a good choice in 2026? Yes, for the right project. It excels at content sites, blogs, and small e-commerce. It stops being right when requirements go significantly beyond its plugin ecosystem, or when the project is fundamentally a custom application. ### 3. How do I choose between Drupal and WordPress? WordPress is right for most projects. Drupal is right for large, complex, enterprise-grade projects where security, scalability, and content modeling precision are non-negotiable, and where you have the budget for experienced Drupal developers. ### 4. Which PHP CMS is fastest? Performance depends more on hosting, caching, and configuration than the CMS itself. Craft CMS and October CMS are lightweight by default and perform well without extensive optimization. Magento is the slowest out of the box. ### 5. What about headless CMS options? Headless CMS platforms like Sanity, Contentful, and Strapi offer a content API with a separate front-end. Great for developers who want full control over the front-end stack. Less ideal when clients need a polished back-end editing experience. **Categories:** Blog, Guide, Linux, Others, Php, Ubuntu, WordPress **Tags:** best PHP CMS platforms, CMS, CMS comparison, open source CMS PHP, php, PHP CMS, PHP CMS for developers, PHP content management systems, Wordpress --- ### [Best PHP Testing Tools to Ensure Error-Free Web Development](https://serveravatar.com/php-testing-tools/) **Published:** May 2, 2026 **Author:** Meghna Meghwani **Content:** [![Blog banner - ServerAvatar](https://serveravatar.com/wp-content/uploads/2025/09/728_90-Banner-3-1024x127.png)](https://serveravatar.com/?ref=blog)Ever launched a website only to find something broke the moment users arrived? It’s frustrating and entirely avoidable with the right PHP testing tools in your workflow. Whether you’re a solo developer or managing a team, testing catches mistakes before your users ever see them. In this guide, we’ll walk through the best PHP testing tools available today, with honest takes on which ones are worth your time, which ones are overkill, and how to pick the right combination for your project. ## Why PHP Testing Matters Writing flawless code on the first attempt is nearly impossible. Even small mistakes, a missed validation, an unhandled edge case, an API that changed without notice, can lead to big issues in production. PHP testing helps you catch problems early, before they become expensive to fix. Testing helps you: - **Detect errors before deployment:** identify bugs while they’re still cheap to fix - **Improve code quality:** writing testable code forces better structure and cleaner design - **Save time on debugging:** a failing test tells you exactly where something broke, often before you even open a debugging tool - **Build user trust:** a well-tested app delivers a smoother, more reliable experience I’ve been burned enough times by skipping tests to know: the hour you spend writing tests is always less than the afternoon you spend firefighting a production bug. ## Types of PHP Testing Explained **Unit Testing:** Tests individual functions or methods in isolation, no database, no API calls, no file system. Unit tests catch bugs in your logic. They don’t catch the bug that surfaces when your function talks to something else. Keep them fast and focused; a slow unit test is a sign that something is wrong with the test, not the code. **Integration Testing:** Tests how multiple components work together, database connections, API calls, file handling. This is where most real bugs hide, the code is correct in isolation and breaks when pieces connect. Integration tests are slower than unit tests and harder to debug, but they’re essential for catching the bugs unit tests can’t. **Functional Testing:** Tests specific features from the user’s perspective, clicking buttons, filling forms, and navigating pages. Does the login form actually log the user in? This is testing behavior, not code. Functional tests are valuable because they catch bugs in the actual user experience, not just the logic underneath. Does the login form actually log the user in? This is testing behavior, not code. **Acceptance Testing:** Tests whether the application meets real-world requirements. Often the final gate before deployment, did we build what the user actually asked for? Acceptance tests are usually written by or with product managers and QA, not just developers. They’re the broadest level of testing and the closest to “does this work the way it’s supposed to. You don’t need all four for every project. But knowing what each one does helps you choose the right tools. ## PHPUnit: The Industry Standard PHPUnit is the default starting point for most PHP developers, and for good reason. It’s mature, stable, and backed by years of community trust. If you’re only going to use one testing tool, make it PHPUnit. That said, PHPUnit has a learning curve. The syntax can feel verbose when you’re starting out, and the configuration options are extensive enough to overwhelm a beginner. But once it clicks, it becomes the backbone of everything else. **My take:** I still reach for PHPUnit on every project, even when newer tools offer flashier syntax. The stability and community support are worth the verbosity. ## PHP Testing Tools for Web Development Below are the tools that help identify bugs, automate testing, and ensure everything works as expected before deployment. ### 1. Codeception: All-in-One Testing Framework ![Codeception - PHP Testing Tools](https://serveravatar.com/wp-content/uploads/2026/05/image-3-1024x432.png) [Codeception](https://codeception.com/) wraps unit, functional, and acceptance testing into a single tool with a consistent interface. What I like: you can write a functional test that clicks through your web app and a unit test for your API in the same project, using the same syntax. **The trade-off:** Codeception adds an abstraction layer. When something goes wrong in your test setup, debugging through that layer takes extra time. **Best for:** Developers who need functional and acceptance testing without managing multiple tools. ### 2. Behat: Behavior-Driven Testing Made Easy ![Behat - PHP Testing Tools](https://serveravatar.com/wp-content/uploads/2026/05/image-4-1024x400.png) [Behat](https://docs.behat.org/en/latest) Behat takes a different approach. Instead of writing tests in PHP, you write scenarios in plain English: ``` Given I am logged in When I click "Delete Post" Then I should see a confirmation message ``` ``` Given I am logged in When I click "Delete Post" Then I should see a confirmation message ``` This is immediately intuitive for non-developers. I’ve used Behat on projects where product managers and QA engineers write acceptance criteria directly in Gherkin, it genuinely bridges the communication gap. **Best for:** Teams with mixed technical, non-technical stakeholders. ### 3. PHPSpec: Test-Driven Development Tool ![PHPSpec - PHP Testing Tools](https://serveravatar.com/wp-content/uploads/2026/05/image-5-1024x544.png) [PHPSpec](https://phpspec.net/en/stable) encourages you to write specifications first and let the tool generate the scaffold. If you’re the kind of developer who sketches out your classes before typing them out, PHPSpec feels natural. One genuine strength: On a project where I migrated a poorly structured payment module, PHPSpec’s requirement to define object behavior before writing code forced me to rewrite it cleaner than I would have otherwise. The refactor took half a day but the module has needed zero changes in eighteen months. It leads to genuinely cleaner architecture on projects where long-term maintainability matters. **Best for:** Developers committed to TDD who want testing to drive their design process. ### 4. Kahlan: Modern Testing Framework ![Kahlan - PHP Testing Tools](https://serveravatar.com/wp-content/uploads/2026/05/image-6-1024x311.png) [Kahlan](https://github.com/kahlan) is the tool I’d point to if you want something that feels modern without the legacy weight of PHPUnit. It uses a describe/it syntax that’s clean and fast. What stands out: I used Kahlan on a small internal API project where the team was new to testing. The describe/it syntax lowered the barrier enough that the team wrote tests before features, which hadn’t happened with PHPUnit. The readable output made code reviews faster because non-test code was easier to isolate. For projects where you’re writing a lot of tests, readable test output matters more than you’d think. The catch: smaller community. Documentation is adequate, but you’re more likely to need to dig into source code than find a quick Stack Overflow answer. **Best for:** Developers who want a modern syntax and are comfortable with a smaller community ecosystem. ### 5. Pest: Elegant and Simple Testing ![Pest - PHP Testing Tools](https://serveravatar.com/wp-content/uploads/2026/05/image-7-1024x548.png) [Pest](https://pestphp.com/) is built on top of PHPUnit, you get all of PHPUnit’s stability, but with cleaner syntax. The test(), expect(), and it() functions replace PHPUnit’s verbose public function testSomething() class methods. What I find valuable: Pest’s plugin system. You can add coverage analysis, parallel execution, and other features without fighting with PHPUnit’s configuration files. The honest caveat: Pest is still relatively young. If you’re on a large team where everyone knows PHPUnit, Pest’s differences can create friction. **Best for:** Solo developers and small teams who want cleaner test code without leaving PHPUnit’s ecosystem. ### 6. Selenium: Browser Automation Testing ![Selenium - PHP Testing Tools](https://serveravatar.com/wp-content/uploads/2026/05/image-8-1024x499.png) [Selenium](https://www.selenium.dev/) fills a gap none of the other tools touch: it tests your application in a real browser. Nothing else simulates what a user actually experiences, clicking buttons, filling forms, navigating pages. The trade-off is always speed. On an e-commerce project, we used Selenium for checkout flow tests, clicking through the full purchase path, including payment. It caught a PayPal redirect bug that no unit test would have surfaced. The suite took 40 minutes to run, so we limited it to the final pre-deploy check, not the regular TDD loop. I treat Selenium tests as a final check, not a first line of defense. **Best for:** Applications with complex frontend behavior, cross-browser compatibility requirements, and teams with dedicated QA infrastructure. ### 7. Mockery: Mock Objects in PHP ![Mockery - PHP Testing Tools](https://serveravatar.com/wp-content/uploads/2026/05/image-9-1024x278.png) [Mockery](https://docs.mockery.io/en/latest) isn’t a testing framework, it’s a mocking library that works alongside PHPUnit. Its job is to simulate a dependency so you can test a unit in isolation without hitting the actual database, API, or external service. On a project testing a notification service that depended on an external SMS API, Mockery let me test the service without hitting the API during development. The mock returned the exact response structure the API would send, so when the API vendor changed their payload format, the test caught it before we went live. Once you’re used to it, though, it reads almost like English. **Best for:** Any project where unit tests need to isolate components without real dependencies. Pair it with PHPUnit. ### 8. Paratest: Speed Up Testing ![Paratest - PHP Testing Tools](https://serveravatar.com/wp-content/uploads/2026/05/image-10-1024x326.png) [Paratest](https://github.com/paratestphp) solves a specific problem: your test suite is slow because it’s running sequentially. If you have hundreds of tests, they add up. Paratest runs your PHPUnit tests in parallel using multiple processor cores. This one is already experience-based. Keep it as-is. For teams using CI/CD, that difference directly affects deployment speed. **Best for:** Large projects with slow test suites, especially those with CI/CD pipelines. ## Choosing the Right PHP Testing Tool Here’s a practical way to think about it: **Start with PHPUnit:** it’s the foundation that everything else builds on. If you only learn one tool, make it this one. Then expand based on your needs: - **Need functional/acceptance tests?** Add Codeception - **Have non-technical stakeholders?** Add Behat - **Want cleaner syntax?** Try Pest (still uses PHPUnit underneath) - **Running a large suite that’s slow?** Add Paratest - **Need browser automation?** Add Selenium - **Writing isolated unit tests?** Add Mockery Most professional PHP projects end up using PHPUnit + Mockery at minimum, with one or two additional tools depending on the project’s needs. ## Common Mistakes to Avoid After years of working with testing tools, and making most of these mistakes myself: **Skipping tests due to time pressure:** The most common mistake. I once spent an entire Friday afternoon debugging a production data inconsistency that a twenty-minute integration test on the Friday before would have caught. The test didn’t exist because we were moving fast. The afternoon fixing production was more expensive than the twenty minutes would have been. **Writing overly complex tests:** If your test setup is more complicated than the code it’s testing, something is wrong. Tests should be simple and focused. If a test fails, you should immediately understand why. **Ignoring failing tests:** On a project I inherited, the test suite had been red for three months before I arrived. Nobody fixed it because nobody knew how long it would take to fix or whether the failures were real bugs. The answer turned out to be both, there were real bugs, and the test setup had also rotted. Cleaning it up took a week. If one person had fixed it when it first went red, it would have been an hour. **Not updating tests when code changes:** After a significant API change in a payment module, tests kept passing while production payments silently failed. The tests were testing the old response format. We didn’t update the tests because the CI pipeline was green, and that green pipeline gave us false confidence that everything worked. It took a customer complaint to surface the problem. **Treating test coverage as a goal:** 100% coverage is not the point. Useful tests that catch real bugs is the point. Coverage is a metric, not a destination. [![Blog banner - ServerAvatar](https://serveravatar.com/wp-content/uploads/2025/09/728_90-Banner-1-1024x127.png)](https://serveravatar.com/?ref=blog)## Best Practices for PHP Testing A few principles that have held up across every project I’ve worked on: **Write tests during development, not after:** TDD isn’t dogma, but writing tests after the fact means you’re testing what you already know works, not what you might have broken elsewhere. **Name tests descriptively:** testUserCannotLoginWithInvalidPassword tells you more than testLogin4. When a test fails in a large suite, descriptive names save hours of investigation. **Keep tests independent:** Each test should be able to run on its own, in any order. Tests that depend on each other’s state create a house of cards. **Automate testing in your CI/CD pipeline:** If running tests requires a manual step, they won’t get run consistently. Every code push should trigger the test suite automatically. **Run tests regularly during development:** not just at deployment. The sooner a bug is caught, the cheaper it is to fix. **Disclosure:** This article includes a brief mention of ServerAvatar, a server management platform. I link to it because I find it relevant to the deployment workflow discussed here. ## Final Verdict on PHP Testing Tools There is no single perfect testing tool, and any blog post that tells you there is is probably selling you something. PHPUnit is the standard for a reason, but the ecosystem around it has grown to serve different needs. My recommendation: start with PHPUnit, add Mockery for dependency isolation, and let your project’s specific needs guide which of the other tools you add. The testing discipline matters more than the specific tool. A developer who writes focused, reliable tests with PHPUnit will always outperform one who has every tool installed and runs none of them. If you’re serious about PHP development, testing isn’t optional. It’s the difference between shipping code you’re confident in and crossing your fingers every time you deploy. ## About the Author This guide is based on years of building and maintaining PHP applications, from small client projects to production systems handling real users and real money. Every tool recommendation here reflects something I’ve actually used in a real development environment, not a feature comparison I pulled from documentation. ## FAQs ### 1. Which PHP testing tool should I start with as a beginner? Start with PHPUnit. It has the largest community, the best documentation, and every other PHP testing tool builds on its concepts. Once you’re comfortable writing unit tests, add tools based on what your projects actually need. ### 2. Is PHP testing necessary for small projects? Yes, even one or two tests on your most critical functions is enough to catch bugs that would otherwise reach production. The setup time is under an hour. The alternative is debugging a live bug that could’ve been caught in five minutes. ### 3. Can I use multiple PHP testing tools in one project? Yes, Most professional projects use PHPUnit with Mockery as a foundation, then add tools like Behat or Codeception based on project needs. ### 4. How often should I run tests during development? Run the full suite before every commit and before every deployment. The more often you run tests, the cheaper it is to fix whatever they catch. Consistency matters more than exact frequency, build the habit. ### 5. How does automated testing fit into CI/CD pipelines? The pipeline runs your full test suite automatically on every push. If any test fails, the deployment stops. GitHub Actions, GitLab CI, and Jenkins all support PHPUnit out of the box, your test suite becomes a gatekeeper, not a manual step. **Categories:** Blog, Guide, Others, Php **Tags:** best PHP testing tools, php, PHP testing frameworks, PHP testing tools, PHP Unit Testing, Software Testing Tools, Web Development Testing --- ### [Core PHP vs Laravel: Which One Is Best for Your Project?](https://serveravatar.com/php-vs-laravel/) **Published:** May 1, 2026 **Author:** Meghna Meghwani **Content:** [![Blog banner - ServerAvatar](https://serveravatar.com/wp-content/uploads/2025/09/728_90-Banner-3-1024x127.png)](https://serveravatar.com/?ref=blog)If you’re starting a PHP project today, one question comes up almost immediately: should you use Core PHP or go with a modern framework like Laravel? The Core PHP vs Laravel decision isn’t a simple either; it depends entirely on the scale, complexity, and long-term plans for what you’re building. At first glance, both options can get the job done. But the difference becomes clear as your project grows. What feels simple in the beginning can quickly turn complex, harder to manage, and time-consuming. In recent years, modern PHP development has increasingly shifted toward frameworks like Laravel due to their efficiency and built-in features. The truth is, choosing between Core PHP and Laravel is not about which one is “better”. It’s about choosing what fits your project today and what will still work for you tomorrow. In this guide, you’ll get a clear, practical comparison grounded in real development scenarios, not just feature lists, so you can make the right call without guesswork. ## What Is Core PHP? [Core PHP](https://www.php.net/) refers to using plain PHP without any frameworks. You write everything from scratch, including routing, database queries, authentication, and business logic. This gives you full control over how your application works. But it also means you’re responsible for everything. ![CorePHP - Core PHP vs Laravel ](https://serveravatar.com/wp-content/uploads/2026/05/image-1024x569.png) **Key Characteristics of Core PHP:** - No framework overhead, lightweight and fast execution out of the box - Full control over code structure and logic, with no conventions imposed on you - Compatible with nearly all hosting environments, including minimal shared hosting - Easy to get started if you already know basic PHP - Completely flexible for building custom solutions from the ground up **Advantages of Core PHP:** - High performance due to minimal abstraction between your code and the server - Complete control over every aspect of how the application behaves - No dependency on framework release cycles or updating conventions - Ideal for small, focused applications where you know exactly what you’re building - Lower barrier to entry for developers with basic PHP knowledge **Disadvantages of Core PHP:** - No built-in security layer, SQL injection, XSS, and CSRF must be handled manually - Repetitive coding patterns by default, reusable components have to be built from scratch - Maintenance becomes significantly harder as the codebase grows - No standardized project structure, which makes team collaboration tricky - Development velocity drops noticeably on anything beyond small-scale projects **Best For:** Small projects, simple websites, and developers who need full control without framework conventions, or who are working in highly constrained server environments. ## What Is Laravel? [Laravel](https://laravel.com/) is a modern PHP framework designed to simplify and speed up development. It comes with built-in tools, a clean architecture, and follows best practices out of the box. Instead of building everything from scratch, Laravel gives you a structured foundation to build on. ![Laravel - Core PHP vs Laravel](https://serveravatar.com/wp-content/uploads/2026/05/image-1-1024x539.png) **Key Features of Laravel:** - MVC (Model-View-Controller) architecture that separates concerns cleanly - Built-in authentication and authorization systems that are production-ready - Eloquent ORM for intuitive database management without raw SQL everywhere - Blade templating engine for reusable, composable views - Built-in protection against common threats: CSRF, XSS, and SQL injection - Artisan CLI for automating repetitive development tasks **Advantages of Laravel:** - Clean and structured codebase that new developers can navigate quickly - Faster development cycles thanks to pre-built, tested components - Strong security features enabled by default rather than bolted on - A large ecosystem of official packages and community-driven tools - Designed for scalability, adding features doesn’t mean rewriting the foundational applications **Disadvantages of Laravel:** - Slightly slower performance than bare Core PHP due to framework layers - A steeper learning curve for developers unfamiliar with MVC and PHP namespaces - Higher server resource requirements, especially for memory-intensive applications - Framework updates occasionally introduce breaking changes that require migration work - Can be excessive overhead for very small, single-purpose projects **Best For:** Medium to large applications, scalable projects, and teams that want modern tooling, structured code, and faster delivery without reinventing common components. ## Quick Comparison Table While comparing Core PHP and Laravel, it helps to see their differences side by side. This quick comparison gives you a clear view to help you decide which one suits your workflow better. **Feature****Core PHP****Laravel****Type**Raw PHP, no frameworkFull PHP framework**Learning Curve**Easy for beginnersModerate, requires MVC familiarity**Performance**Faster, no overheadSlightly slower due to framework layers**Development Speed**Slower, everything built from scratchFaster, pre-built components available**Code Structure**No fixed structureFollows MVC architecture**Security**Manual implementation requiredBuilt-in CSRF, XSS, SQL injection protection**Database Handling**Manual MySQLi/PDO queriesEloquent ORM with query builder**Scalability**Difficult at scaleDesigned for growth**Maintenance**Harder as codebase expandsCleaner, more maintainable long-term**Built-in Features**MinimalRich: auth, routing, caching, queues, and more**Community Support**General PHP communityLarge, active Laravel-specific ecosystem**Best Use Case**Small, simple, single-purpose projectsMedium-to-large, feature-rich applications## Key Differences Between Core PHP and Laravel ### 1. Ease of Development **Core PHP:** - You start from absolute zero, no routing, no session handling, no structure - Every component needs to be wired up manually, even basic ones **Laravel:** - Pre-built components for authentication, routing, validation, and more available immediately - A new Laravel project can have a working API in hours, not days **In practice:** Once a project has more than a few pages or any user authentication, Laravel’s built-in tools save days of work. ### 2. Performance **Core PHP:** No framework overhead, fastest possible execution. **Laravel:** Slight overhead, but Laravel’s caching (Redis, file-based) makes real-world performance very competitive. **In practice:** The performance gap is real but rarely the deciding factor. ### 3. Security **Core PHP:** You handle every security decision manually. **Laravel:** CSRF, XSS, SQL injection protected by default; bcrypt/argon2 password hashing built in. **In practice:** Core PHP *can* be just as secure, but Laravel makes the secure path the default path. ### 4. Scalability **Core PHP:** Custom code, custom caching, custom session management all required to scale. **Laravel:** Built-in query optimization, caching, queue workers, and clean architecture handle growth. **In practice:** Laravel scales with less engineering effort. ### 5. Learning Curve **Core PHP:** Accessible to anyone with basic PHP knowledge. **Laravel:** MVC, Eloquent, Blade, Artisan, expect 1-3 weeks to feel comfortable. **In practice:** Core PHP is easier to start. Laravel is easier to maintain long-term. ### 6. Development Time **Core PHP:** Every feature costs more code; repetitive patterns have to be built fresh each time. **Laravel:** Reusable components, Composer packages, and Artisan automation cut development time dramatically. **In practice:** For anything beyond a five-page site, Laravel is significantly faster. ### 7. Maintenance **Core PHP:** Code written months later or by different developers varies widely, debugging is hard. **Laravel:** Conventions make any Laravel codebase navigable by any Laravel developer. **In practice:** Core PHP projects often become unmaintainable as they grow. Laravel projects stay navigable. ## Use Cases: When to Choose Core PHP vs Laravel Choosing between Core PHP and Laravel often comes down to the type of project you’re building and how complex your requirements are. Both have genuine strengths, but they belong to different problem spaces. ### When Core PHP Makes Sense Core PHP works well when you need simplicity, speed, and full control over your code. It’s a good fit for projects where adding a full framework would only increase complexity without meaningful benefit. - Small business websites or static sites with no dynamic user features - Simple web applications with a limited, fixed set of features - Custom scripts or lightweight tools that run as single-purpose processes - Projects with strict performance requirements where every millisecond matters - Learning environments where understanding PHP fundamentals matters more than productivity - Applications deployed to highly constrained server environments with no Composer support Core PHP is the right choice when the project scope is genuinely small and unlikely to grow significantly. ### When Laravel Makes Sense Laravel is designed for modern web applications that require structure, scalability, and faster development. It shines when you’re building something that will evolve over time or needs robust features from the start. - Large or complex web applications with multiple features and user roles - SaaS platforms and subscription-based products with recurring billing and user management - E-commerce platforms with product catalogs, cart systems, and payment processing - REST APIs and backend services that power mobile apps or third-party integrations - Projects requiring authentication, role-based access control, and audit logging - Applications that need long-term maintenance and multi-developer collaboration Laravel reduces friction by providing production-ready solutions for problems that Core PHP leaves entirely to you. ## When Should You Choose Core PHP? - **Small, simple websites:** A five-page site with no database and no user accounts? Core PHP is fine - **One-time scripts or tools:** Internal tools that won’t be maintained long-term don’t need framework overhead - **Extremely tight performance constraints:** High-frequency API endpoints at scale may genuinely benefit from Core PHP’s raw speed - **Complete control requirements:** If the project has non-standard architecture that a framework would fight against, go Core PHP You need strong coding discipline and security awareness to keep a Core PHP project healthy as it grows. ## When Should You Choose Laravel? - **SaaS platforms:** User management, billing, teams, and subscriptions are all built in - **Web applications with authentication:** Login, registration, password reset, email verification, all handled - **APIs and backend services:** Laravel’s API scaffolding, resource controllers, and rate limiting are designed for this - **E-commerce platforms:** Inventory, orders, payments, and reporting need the structure Laravel provides - **Projects that need to scale:** If the application will grow in users, features, or team size, Laravel scales with it If you care about development velocity, security defaults, and long-term maintainability, Laravel is the more reliable choice for most modern PHP projects. ## A Real-World Perspective Developers often start with Core PHP because it feels lighter and more honest, you’re not depending on someone else’s code. That instinct is valid. Building from scratch is one of the best ways to understand how the web actually works. But the limitation becomes apparent quickly. Authentication that seemed simple in theory has dozens of edge cases. The custom routing code you wrote in an afternoon starts conflicting with new features. Database queries that worked at 100 users start struggling at 1,000. Laravel doesn’t eliminate these challenges, it gives you battle-tested solutions so you’re not solving solved problems. Instead of writing authentication from scratch, you configure it. Instead of building a queue system, you use Laravel’s. Most professional PHP developers who build significant applications eventually settle on Laravel not because they couldn’t do it in Core PHP, but because their time is better spent building features than maintaining foundations. ## Which One Should You Choose Based on Your Role? **For Beginners:** Start with Core PHP to understand how PHP actually works underneath. Then move to Laravel, you’ll understand what the framework is doing for you, which makes you better at both. **For Freelancers:** Laravel lets you deliver more to clients in less time. Pre-built auth, payments, and admin panels mean realistic project timelines instead of months of foundation work. **For Startups and Businesses:** Laravel helps you launch quickly and scale efficiently. Framework overhead is almost always cheaper than rebuilding Core PHP structure when projects inevitably grow. **For Experienced Developers:** Even if you prefer Core PHP’s purity, Laravel improves team productivity and keeps projects organized. Enforced conventions beat individual preference in team environments. ## Technical Considerations: PHP Version and Hosting Environment PHP 8.x brought named arguments, match expressions, union types, and attributes, relevant to both Core PHP and Laravel developers. Laravel 11 requires PHP 8.2+ and is a significant simplification over earlier versions. **Hosting environment matters:** - **Core PHP** runs on virtually any PHP-enabled server, including minimal shared hosting with no SSH access - **Laravel** requires SSH for Composer and Artisan, needs VPS, cloud hosting, or a properly configured shared host If you’re deploying to an environment you don’t control, Core PHP’s portability is a real advantage. [![Blog banner - ServerAvatar](https://serveravatar.com/wp-content/uploads/2025/09/728_90-Banner-1-1024x127.png)](https://serveravatar.com/?ref=blog)**Disclosure:** [ServerAvatar](https://serveravatar.com/) is referenced here as a hosting management tool. This is not a sponsored section, and ServerAvatar helps streamline running Core PHP or Laravel projects. ## Conclusion Choosing between Core PHP and Laravel comes down to how you plan to build and grow your project. Core PHP offers flexibility and control, but requires more manual effort as complexity increases, and complexity almost always increases. Laravel provides a structured, efficient, and security-conscious foundation. Its conventions, built-in tools, and ecosystem mean you spend time solving real problems instead of rebuilding common components. If you’re building something small that genuinely won’t grow, a simple site, a one-off tool, Core PHP is valid. But if you’re building anything that matters, anything that will expand, anything with users or a team, Laravel is the more reliable choice. **This guide was last reviewed and updated in May 2026, reflecting PHP 8.x and Laravel 11.** ## About the Author This comparison is based on years of building and maintaining both Core PHP applications and Laravel projects of varying scales, from small client sites to production SaaS platforms handling thousands of users. The goal is to give you a practical decision framework, not a feature comparison you could read anywhere else. ## FAQs ### 1. Do I need a framework for every PHP project? Not necessarily. For small or simple projects, using Core PHP is often enough. Frameworks like Laravel are more beneficial for complex or long-term projects. ### 2. Can beginners start with Laravel directly? Yes, but it may take time to understand concepts like MVC and routing. Many beginners prefer starting with Core PHP before moving to Laravel. ### 3. Is Core PHP outdated? No, Core PHP is not outdated. It is still widely used, especially for simple applications and custom scripts, but frameworks like Laravel are more popular for larger projects. ### 4. Which is faster: Core PHP or Laravel? Core PHP is slightly faster in raw performance since it has no framework overhead. However, Laravel can be optimized to perform efficiently in real-world applications. ### 5. Is Laravel suitable for large-scale applications? Yes, Laravel is designed for scalability and is commonly used to build large, complex applications such as SaaS platforms and APIs. **Categories:** Blog, Guide, Laravel, Php **Tags:** core php, core php vs laravel, laravel, laravel vs core php, laravel vs php performance, php, php development comparison, php framework comparison --- ### [Ubuntu 26.04: Changes You Need to Know About](https://serveravatar.com/ubuntu-26-04/) **Published:** April 29, 2026 **Author:** Meghna Meghwani **Content:** [![Blog banner - ServerAvatar](https://serveravatar.com/wp-content/uploads/2025/09/728_90-Banner-3-1024x127.png)](https://serveravatar.com/?ref=blog)Ubuntu 26.04 LTS, “Resolute Raccoon” codenamed, was released on 23 April, 2026. It is the latest long-term support version of Ubuntu. As with every LTS release, it brings a mix of stability, updated software, and platform-level changes that matter for both desktop users and server administrators. If you’re currently using Ubuntu 24.04 or planning a fresh deployment, you likely have questions about upgrading, compatibility, and whether it’s the right time to switch. Here is a clear, honest breakdown that answers the most important questions about Ubuntu 26.04 in a clear and practical way. ## What Makes Ubuntu 26.04 LTS Important? Ubuntu 26.04 LTS is a long-term support release built for stability and extended use. It’s designed to power production systems with consistent updates and security fixes over several years. This makes it a reliable choice for both businesses and developers. - Release date: April 23, 2026 - Standard support: 5 years (until April 2031) - Extended security maintenance: Available via Ubuntu Pro LTS versions are commonly used in production servers, business environments, and long-term projects, making this release particularly relevant for developers and system administrators. ## What Are the System Requirements? Before installing Ubuntu 26.04, it’s important to ensure your system can handle it smoothly. Having adequate CPU power, memory, and storage will help avoid performance issues. Meeting recommended specs ensures a better overall experience. To run Ubuntu 26.04 smoothly, your system should meet at least the following: - CPU: 2 GHz dual-core processor - RAM: Minimum 4 GB (6 GB or more recommended) - Storage: 25 GB available space (50 GB+ recommended for practical usage) For server environments, the requirements depend heavily on your application workload, traffic, and services. ## How to Upgrade to Ubuntu 26.04? Upgrade path depends on your current version. Not all versions support direct upgrades, so you may need to follow a specific upgrade path. Planning ahead helps avoid complications during the process. **Supported upgrade paths:** Certain Ubuntu versions allow a direct upgrade to 26.04 without intermediate steps. These paths are officially supported and designed to make the transition easier. Following them ensures a smoother and safer upgrade process. - From Ubuntu 24.04 to Ubuntu 26.04 - From Ubuntu 25.10 to Ubuntu 26.04 **Indirect upgrade path:** Older Ubuntu versions may require step-by-step upgrades instead of a direct jump. This approach ensures compatibility and reduces the risk of system issues. While it takes more time, it’s the safer route for legacy systems. - From Ubuntu 22.04 to 24.04 to 26.04 Ubuntu does not support skipping LTS versions directly, so intermediate upgrades are required in older setups. ## Should You Upgrade Right Away? Upgrading immediately after release may not always be the best decision. While new features are tempting, early versions can include minor bugs. Evaluating your use case helps determine the right timing. **Upgrade now if:** If you’re starting fresh or working in a development environment, upgrading early can be beneficial. It gives you access to the latest features and improvements. It’s also useful for testing and experimentation. - You want the latest features and improvements - You’re setting up a new system - You’re testing or working in a development environment **Consider waiting if:** If your system runs critical workloads, waiting is often the safer option. Early updates may introduce unexpected issues or compatibility problems. Delaying the upgrade allows time for stability improvements. - You manage production or business-critical servers - Your stack depends on specific software versions - Stability is your top priority A common best practice is to wait for the first point release (26.04.1), which includes early bug fixes and stability improvements. ## What is Better: an Upgrade or a Fresh Install? Choosing between upgrading and a fresh install depends on your priorities. One focuses on convenience, while the other emphasizes performance and cleanliness. Understanding both helps you make the right decision. **Upgrade (In-place)** - Keeps your existing data and configuration - Faster and more convenient - May carry over unused packages or conflicts **Fresh Install** - Clean and optimized environment - Better long-term stability - Requires manual setup and backup restoration For servers and critical workloads, a fresh install is generally the safer and cleaner approach. ## What’s Changing in Ubuntu 26.04? Ubuntu 26.04 introduces several updates that impact performance, usability, and compatibility. Some changes are subtle, while others affect how applications behave. Understanding these updates helps you prepare better. ### Move Toward Wayland Ubuntu 26.04 continues the transition toward Wayland as the default display server. - GNOME 50 is built around Wayland - Xorg support is being reduced or removed in many setups - Some older applications may face compatibility issues This change improves security and performance but may require adjustments if you rely on legacy GUI applications. ## What Ubuntu Flavors Are Available? Ubuntu comes in multiple flavors, each offering a different desktop experience. Despite the differences, they all share the same core system: - [Kubuntu](https://kubuntu.org/?ref=serveravatar.com) (KDE Plasma) - [Xubuntu](https://xubuntu.org/?ref=serveravatar.com) (Xfce) - [Lubuntu](https://lubuntu.me/?ref=serveravatar.com) (LXQt) These options allow you to choose a user interface that fits your workflow, while the underlying system remains Ubuntu. ## How Do You Install Ubuntu 26.04? Installing Ubuntu 26.04 follows a straightforward process that most users are already familiar with. With the right setup, you can get started quickly. Whether it’s a fresh install or dual boot, the steps are simple: 1. [Download](https://ubuntu.com/download/desktop?ref=serveravatar.com) the Ubuntu 26.04 ISO file 2. Create a bootable USB drive 3. Boot your system using the USB 4. Follow the installation wizard 5. Choose between a clean install or dual boot For servers, automated or minimal installations are often preferred depending on the deployment setup. Even though Ubuntu upgrades are generally reliable, creating a backup is always recommended. Unexpected issues are rare but possible, and having a backup ensures your data is safe. You can use tools or simply copy important files to external storage. ## Install KDE or Another Desktop Environment on Ubuntu 26.04 Ubuntu gives you the flexibility to install different desktop environments like KDE, Xfce, or others. However, if you’re starting fresh, it’s usually better to install the official flavor (such as Kubuntu for KDE) to avoid potential conflicts between desktop components. ## Are There Any Risks or Limitations? Like any major upgrade, Ubuntu 26.04 comes with certain risks. Compatibility issues, bugs, or missing features may appear initially. Being aware of these helps you avoid unexpected problems. - There is no direct downgrade after upgrading - Some third-party tools may not yet support Ubuntu 26.04 - Early versions may contain bugs or stability issues - Wayland transition may affect certain applications Taking a full backup before upgrading is strongly recommended. [![Blog banner - ServerAvatar](https://serveravatar.com/wp-content/uploads/2025/09/728_90-Banner-1-1024x127.png)](https://serveravatar.com/?ref=blog)## Managing Ubuntu 26.04 Servers Efficiently If you’re deploying Ubuntu 26.04 on a server, manual management can quickly become complex, especially when handling multiple applications, updates, and configurations. Using a platform like ServerAvatar can simplify this process by allowing you to: - Deploy and manage servers without manual setup - Monitor logs, performance, and resources in real time - Manage applications, databases, and SSL certificates easily - Reduce the need for deep system administration knowledge This helps you focus more on your projects rather than server maintenance. ## Final Thoughts Ubuntu 26.04 LTS is a well-rounded release that focuses on long-term reliability while introducing meaningful changes like the shift toward Wayland. Whether you choose to upgrade immediately or wait for a more stable point release, the decision should depend on your specific needs and environment. For new deployments, it provides a strong and modern foundation, while existing users should plan their upgrade carefully to avoid compatibility issues. With the right preparation and tools, transitioning to Ubuntu 26.04 can be smooth and beneficial in the long run. ## FAQs ### 1. Can I download Ubuntu 26.04 using a torrent? Yes, Ubuntu 26.04 is available via torrent download. This method is useful if you have an unstable internet connection, as it allows you to resume downloads and often improves reliability. ### 2. Why don’t I see the Ubuntu 26.04 upgrade option yet? Upgrade notifications are rolled out gradually. If you don’t see it yet, ensure your system is fully updated and wait for it to become available. Advanced users can manually check for upgrades, but this is not recommended for production systems. ### 3. Can I downgrade after upgrading to Ubuntu 26.04? No, Ubuntu does not support downgrading to a previous version. If you need to go back, you’ll have to perform a fresh installation of the older version. ### 4. Is Wayland mandatory in Ubuntu 26.04? Wayland is now the default display system, especially with newer GNOME versions. While it offers better performance and security, some older applications may not fully support it. ### 5. How can I check if my hardware is compatible? You can test compatibility by running Ubuntu 26.04 in a live USB session. This allows you to verify WiFi, graphics, and other hardware before installing the system. ### 6. Is Ubuntu 26.04 suitable for production servers? Yes, as an LTS release, it is designed for long-term use in production environments. However, many users prefer to wait for the first point release to ensure maximum stability. **Categories:** Blog, Guide, Linux, Others, Ubuntu **Tags:** Ubuntu, Ubuntu 26.04, Ubuntu 26.04 changes, Ubuntu 26.04 features list, Ubuntu 26.04 LTS, Ubuntu 26.04 new features, Ubuntu 26.04 release, what’s new in Ubuntu 26.04 --- ### [Adminer vs phpMyAdmin: Security, Speed & Usability Compared](https://serveravatar.com/adminer-vs-phpmyadmin/) **Published:** April 24, 2026 **Author:** Meghna Meghwani **Content:** [![Blog banner - ServerAvatar](https://serveravatar.com/wp-content/uploads/2025/09/728_90-Banner-3-1024x127.png)](https://serveravatar.com/?ref=blog)If you’ve ever worked with databases, chances are you’ve come across tools that make managing them easier. But here’s the big question in the Adminer vs phpMyAdmin debate: which one should you actually use? Think of it like choosing between a lightweight multitool and a fully equipped toolbox, both get the job done, but the experience can feel very different. In this guide, we will break everything down in simple terms, no confusing jargon, no unnecessary complexity. Whether you’re a beginner or someone with a bit of experience, this comparison will help you decide what fits your workflow best. ## What is Adminer? [Adminer ](https://www.adminer.org/)is a simple and lightweight database management tool that runs using a single PHP file. It allows you to manage databases quickly without complex installation or setup. You just upload the file, open it in your browser, and start working, making it perfect for quick and efficient database tasks. Adminer focuses on speed and simplicity, offering essential database features without unnecessary complexity. ![adminer - Adminer vs phpMyAdmin](https://serveravatar.com/wp-content/uploads/2026/04/image-138.png) **Key Features** - Single-file deployment (no installation needed) - Supports multiple databases (MySQL, PostgreSQL, SQLite, etc.) - Clean and minimal user interface - Built-in import and export functionality - Secure login system - Plugin support for extended features **Advantages** - Extremely lightweight and fast - Easy to set up and use - Supports multiple database types - Lower resource usage - Portable and convenient for temporary access **Disadvantages** - Limited advanced GUI features - Interface may feel too basic for beginners - Fewer built-in visual tools compared to alternatives **Best For:** Quick database access, developers, and users who prefer a lightweight tool. **Why Should Use Adminer?** Adminer is a great choice when you want a fast, no-fuss way to manage databases without dealing with heavy software. It saves time, reduces complexity, and works well for both quick fixes and everyday database tasks. If you value speed and simplicity, Adminer is definitely worth using. ## What is phpMyAdmin? [phpMyAdmin](https://www.phpmyadmin.net/) is a widely used web-based database management tool that provides a full set of features for managing MySQL and MariaDB databases. It is commonly included in hosting control panels and is trusted by millions of users. Its graphical interface makes database management easier, especially for beginners. phpMyAdmin offers a feature-rich interface designed for detailed database management and control. ![phpmyadmin - Adminer vs phpMyAdmin](https://serveravatar.com/wp-content/uploads/2026/04/image-139-1024x590.png) **Key Features** - Web-based graphical interface - Advanced SQL query execution - User and permission management - Import and export in multiple formats - Table editing and database optimization tools - Integration with hosting control panels **Advantages** - Feature-rich and powerful - Beginner-friendly interface - Widely supported and documented - Ideal for complex database operations - Easily available in most hosting environments **Disadvantages** - Heavier and slower compared to lightweight tools - Requires proper configuration for security - Can feel overwhelming due to many options **Best For:** Users who need advanced features and prefer a visual interface for database management. **Why Should Use phpMyAdmin?** phpMyAdmin is a solid choice if you want a complete database management solution with powerful features and a user-friendly interface. It simplifies complex tasks and gives you full control over your database, making it ideal for both beginners and advanced users working on larger projects. ## Similarities Between Adminer and phpMyAdmin Both Adminer and phpMyAdmin are designed to make database management easier through a web browser, eliminating the need for command-line work. While they differ in size and complexity, they share several core functionalities that help users handle databases efficiently. Whether you’re a beginner or an experienced developer, both tools provide reliable ways to interact with your data. **Key Similarities** - Both are web-based database management tools that run on a server and are accessed through a browser - Allow users to execute SQL queries directly without needing terminal access - Support database creation, deletion, and modification - Provide options to import and export databases in multiple formats like SQL - Enable users to manage tables, columns, and records easily - Offer authentication systems to control database access - Allow editing of data directly from the interface - Help in backup and restore operations for databases - Compatible with MySQL/MariaDB databases - Designed to simplify database tasks for both developers and non-technical users This shared foundation is why both tools remain popular choices, even though they cater to slightly different user preferences. ## Adminer vs phpMyAdmin: Quick Comparison When comparing Adminer and phpMyAdmin, it helps to see their differences side by side. Both tools serve the same purpose but vary in speed, features, and ease of use. This quick comparison gives you a clear snapshot to help you decide which one suits your workflow better. Let’s quickly compare both: **Feature****Adminer****phpMyAdmin****File Size**Very smallLarge**Setup**SimpleComplex**Speed**FastModerate**Features**Basic to advancedVery extensive**UI**MinimalFeature-rich## Key Differences Between PHP and JavaScript PHP and JavaScript are both widely used in web development, but they serve different roles and work in different environments. While PHP mainly handles server-side operations, JavaScript is known for making websites interactive on the client side. Understanding how they differ can help you choose the right tool for your project. Below are the major differences explained in a simple and easy-to-understand way. ### Security Comparison Security is one of the most important factors when choosing a database tool. Even a small mistake can expose sensitive data, so it’s worth understanding how both tools handle safety. **Adminer Security** Adminer keeps things simple, which naturally reduces potential security risks when managed properly. - Single file reduces attack surface - Easy to remove after use - Less commonly targeted by attackers **phpMyAdmin Security** phpMyAdmin offers strong security features, but it requires careful setup and regular maintenance. - Widely used as more targeted by attackers - Requires regular updates - Needs proper configuration **Verdict:** Adminer feels safer due to its simplicity and smaller footprint. However, phpMyAdmin can be equally secure if properly configured and regularly updated. ### Speed & Performance Speed plays a big role in productivity, especially when working with large databases. A faster tool can save you time and reduce frustration. **Adminer** Lightweight design ensures faster loading and smoother performance. - Loads quickly - Lightweight interface - Faster execution **phpMyAdmin** A heavier interface can slow things down, especially with large databases. - Slower due to heavy UI - More features are equal to more load time **Verdict:** Adminer clearly wins in terms of speed, while phpMyAdmin trades performance for additional features. ### Ease of Use A tool made your work easy, not difficult and complicated. Ease of use becomes especially important for beginners. **Adminer** Straightforward and minimal, making it easy for quick tasks. - Clean and simple - Less clutter - Great for quick tasks **phpMyAdmin** Feature-rich but may feel complex for new users. - More options = more confusion (especially for beginners) - Takes time to learn **Verdict:** Adminer is easier for quick and simple tasks, while phpMyAdmin is better suited for users who need more control and don’t mind a learning curve. ### Installation & Setup Getting started should be quick and hassle-free, especially if you just want to manage a database without wasting time on setup. **Adminer** Setup is quick and effortless with just a single file. - Download one file - Upload it - Open in browser **phpMyAdmin** Requires installation and configuration before use. - Requires installation - Configuration needed - Often pre-installed in hosting panels **Verdict:** Adminer is incredibly easy to set up, making it perfect for instant use without technical hassle. ### Features Comparison Features determine how much control and flexibility you have while managing databases. **Adminer** Covers essential features needed for everyday database tasks. - Database management - Table editing - Query execution - Export/import **phpMyAdmin** Offers advanced tools for deeper database management. - Advanced query builder - User permissions - Visual tools - Extensive export options **Verdict:** phpMyAdmin stands out with a wider range of advanced features and tools. ### User Interface Experience The interface affects how comfortable and efficient you feel while working with the tool. **Adminer** Clean and distraction-free interface for focused work. - Minimal - Clean - No distractions **phpMyAdmin UI** Detailed interface with more tools but slightly crowded. - Feature-rich - Slightly overwhelming - More visual tools **Verdict:** Adminer offers a distraction-free experience, while phpMyAdmin provides a more detailed but slightly crowded interface. ### Compatibility & Database Support Not all tools support every database type, so compatibility can be a deciding factor. **Adminer** Supports multiple database systems beyond just MySQL. - MySQL - PostgreSQL - SQLite - Oracle (via plugins) **phpMyAdmin** Primarily designed for MySQL and MariaDB environments. - Mainly focused on MySQL/MariaDB **Verdict:** Adminer is more flexible with broader database support, while phpMyAdmin is more specialized. ### Learning Curve Every tool takes some time to learn, but some are easier to pick up than others. **Adminer** Easy to learn due to its simple and minimal design. - Simple layout makes it easy to understand - Minimal features reduce confusion **phpMyAdmin** Takes more time to learn because of its wide feature set. - More features require more learning - May feel complex at the beginning **Verdict:** Adminer is easier to learn quickly, while phpMyAdmin requires more time but offers deeper control once mastered. ### Use Cases: Who Should Use What? Different users have different needs, so choosing the right tool depends on your workflow. **Use Adminer if:** - You want quick access - You need a lightweight tool - You manage multiple database types **Use phpMyAdmin if:** - You need advanced features - You prefer visual tools - You’re working in shared hosting [![Blog banner - ServerAvatar](https://serveravatar.com/wp-content/uploads/2025/09/728_90-Banner-1-1024x127.png)](https://serveravatar.com/?ref=blog)## When to Choose Adminer Choose Adminer when: - You want speed and simplicity - You need a temporary database tool - You prefer minimal setup ## When to Choose phpMyAdmin Choose phpMyAdmin when: - You need advanced database control - You rely on GUI-based management - You’re using shared hosting environments **So, Adminer vs phpMyAdmin, which one wins?** Honestly, there’s no one-size-fits-all answer. - **Adminer** is perfect for speed, simplicity, and flexibility - **phpMyAdmin** is ideal for advanced features and detailed control If you’re someone who values efficiency and minimalism, Adminer will feel like a breath of fresh air. But if you want a complete toolkit, phpMyAdmin is still a solid choice. ## Managing Databases Easily with ServerAvatar If you’re looking for a simpler way to manage your databases without dealing with manual setup or complex configurations, ServerAvatar makes the process much smoother. Instead of installing and configuring database tools yourself, ServerAvatar provides a one-click installer and direct access button for phpMyAdmin, allowing you to start managing your databases in just a few seconds. [ServerAvatar](https://serveravatar.com/) is a platform to simplify the hosting and management of servers and applications. It simplifies the process of deploying and managing PHP and Node.js based web applications on servers. ![ServerAvatar Dashboard - Adminer vs phpMyAdmin](https://serveravatar.com/wp-content/uploads/2026/04/image-140.png) With built-in support for phpMyAdmin, ServerAvatar ensures that you get a secure, fully configured, and ready-to-use database management interface without the usual setup hassle. This is especially helpful for developers, agencies, and beginners who want a reliable tool without spending time on server-level configurations. ### Why Use ServerAvatar for phpMyAdmin - Pre-integrated and optimized for performance - Easy one-click installation from the dashboard - Secure configuration handled automatically - Perfect for managing MySQL and MariaDB databases - No need for manual deployment or maintenance Unlike lightweight tools like Adminer, ServerAvatar focuses on providing a feature-rich and stable environment, which is why it supports phpMyAdmin as the default database management solution. ### When Using ServerAvatar Makes More Sense If you’re already managing servers or applications, using ServerAvatar with phpMyAdmin gives you: - A centralized dashboard for server and database management - Less manual work and fewer configuration errors - A smoother workflow, especially for production environments In short, if you want powerful database management without complexity, ServerAvatar combined with phpMyAdmin is a practical and efficient choice. ## Conclusion Choosing between Adminer and phpMyAdmin ultimately comes down to how you prefer to work with your databases. If your priority is speed, simplicity, and minimal setup, Adminer offers a clean and efficient experience for quick tasks. On the other hand, phpMyAdmin provides a more complete set of tools, making it better suited for users who need deeper control and advanced features. For those who want the power of phpMyAdmin without the hassle of manual setup, platforms like ServerAvatar simplify the process by offering a ready-to-use, secure environment with one-click access. In the end, the right choice isn’t about which tool is better overall, but which one fits your workflow and project requirements. ## FAQs ### 1. Is phpMyAdmin suitable for beginners? phpMyAdmin is beginner-friendly thanks to its graphical interface, although it may take some time to explore all its features. ### 2. Why do many platforms prefer phpMyAdmin over Adminer? phpMyAdmin offers a wider range of features, better documentation, and strong community support, making it a reliable choice for production environments. ### 3. How does ServerAvatar simplify database management? ServerAvatar provides a one-click installation and direct access to phpMyAdmin, eliminating the need for manual setup while ensuring a secure and optimized environment. ### 4. Is phpMyAdmin secure to use? Yes, phpMyAdmin is secure when properly configured, regularly updated, and used with strong authentication practices. ### 5. When should I choose Adminer over phpMyAdmin? You should choose Adminer when you need a fast, lightweight tool for quick database access without additional complexity. ### 6. When is phpMyAdmin the better choice? phpMyAdmin is the better option when you require advanced features, visual tools, and detailed control over your databases. **Categories:** Blog, Guide, Linux, Others, Php, Tutorials, Ubuntu **Tags:** adminer, adminer vs phpmyadmin, database gui tools, Database Management, database management tools, mysql tools, php database tools, phpMyAdmin --- ### [Launch Your OpenClaw AI Assistant in Minutes with ClawVPS by ServerAvatar](https://serveravatar.com/deploy-openclaw-ai-clawvps-serveravatar/) **Published:** April 23, 2026 **Author:** Meghna Meghwani **Content:** [![Blog banner - ServerAvatar](https://serveravatar.com/wp-content/uploads/2025/09/728_90-Banner-3-1024x127.png)](https://serveravatar.com/?ref=blog) What if launching your own AI assistant was as easy as setting up a social media account? No complicated installations, no complex commands, no confusing configurations, just a few clicks and you’re ready to go. If you’ve ever wanted to deploy OpenClaw AI without the usual technical hurdles, that idea might sound too good to be true, but it’s exactly what we set out to achieve. Nine years ago, ServerAvatar was built out of a simple frustration, server management was far more complicated than it needed to be. Today, it helps thousands of developers manage servers with ease. But in late 2025, the same problem faced again, this time with AI. AI was rapidly becoming essential for developers, businesses, and creators. Tools like OpenClaw opened up incredible possibilities for automation and productivity. But deploying AI agents? That started to feel just like server management used to, complex, time-consuming, and filled with technical barriers. That’s where **ClawVPS by ServerAvatar** comes in, a simple way to launch your OpenClaw AI assistant in minutes, without the usual complexity. ClawVPS is built to remove the complexity of AI deployment completely. No setup headaches, no technical hurdles, just a simple, fast, and ready-to-use environment for your OpenClaw AI assistant. Let’s explore how you can launch your OpenClaw AI assistant in minutes, without breaking a sweat. ## What is ClawVPS by ServerAvatar? [ClawVPS](https://clawvps.ai/) is a next-generation, fully managed VPS platform designed specifically for hosting [OpenClaw](https://openclaw.ai/) AI assistants for AI workloads. Unlike traditional VPS providers, where you get a blank server and figure out everything else yourself, ClawVPS ships with OpenClaw pre-installed, SSL configured, and your gateway token pre-generated. ![clawvps - Deploy OpenClaw AI](https://serveravatar.com/wp-content/uploads/2026/04/image-120-1024x734.png) You don’t need to install dependencies, configure environments, deal with complex commands, or worry about compatibility, everything is ready right out of the box. **Key Features** When exploring ClawVPS, the first thing that stands out is how thoughtfully it’s designed for AI users. Instead of giving you a blank server, it provides a ready-to-use environment that removes setup friction and speeds up your workflow. Here are the core features that make ClawVPS powerful and practical: - Pre-installed OpenClaw AI for instant usage - Elevated Mode for running advanced AI operations - One-click upgrade resources without downtime - Factory reset option to quickly restart your environment - Pre-configured browser setup (Chrome) for easy access - Models & Channels integration for flexible AI workflows - Free AI credits to help you begin without upfront cost **Advantages** ClawVPS is built to simplify AI deployment, and its benefits clearly reflect that goal. Whether you’re a beginner or someone experienced, these advantages make the platform easy to adopt and efficient to use in real scenarios. - Fast deployment, launch your AI assistant in minutes - No technical setup required, making it beginner-friendly - Saves time by eliminating manual configuration steps - Optimized specifically for AI workloads - Flexible scaling to match your growing needs - Cost-effective with included free credits - Ideal for both experimentation and production use ## Understanding OpenClaw AI Assistant [OpenClaw](https://openclaw.ai/) AI is an intelligent AI agent designed to perform tasks, automate workflows, and assist users in real-time. It is designed to act like a smart digital assistant that can think, respond, and perform tasks on your behalf. It helps reduce manual effort by automating repetitive work and assisting in real-time decisions. In simple terms, it brings AI power closer to everyday users without complexity. **It can handle:** - **Task automation:** Handles repetitive tasks automatically to save time and effort - **Smart responses:** Provides intelligent and context-aware replies instantly - **Workflow execution:** Manages and completes multi-step processes efficiently - **AI-powered decision-making:** Assists in making faster and smarter decisions ## Why Traditional AI Setup is Difficult Setting up AI the traditional way can feel overwhelming, especially if you’re not from a technical background. It involves multiple steps, tools, and configurations that can easily become confusing. This complexity often discourages people from even trying. You often need to: - **Configure servers:** Requires manual setup and technical knowledge - **Install dependencies:** Needs the correct tools and libraries to be installed properly - **Manage GPU/CPU resources:** Involves balancing performance and cost - **Handle updates and errors:** Ongoing maintenance can be time-consuming ## How ClawVPS Simplifies AI Deployment ClawVPS removes the usual barriers that come with AI setup and makes the process smooth and quick. Instead of dealing with technical steps, you get a ready-to-use environment. It allows you to focus on using AI rather than setting it up. - **Launch a VPS with OpenClaw pre-installed:** Start with everything already configured - **Access your AI assistant instantly:** No waiting or complex login steps - **Start using it within minutes:** Go from setup to usage in very little time ### Key Features of ClawVPS ClawVPS is packed with features that are designed to make AI deployment easy and efficient. These features help users save time, improve performance, and get more value from their AI assistant. - **Pre-installed OpenClaw AI:** No setup required, your AI assistant is ready from day one. - **Elevated Mode:** Run advanced AI tasks with enhanced permissions and performance. - **Factory Reset:** Start fresh anytime with a single click. - **One-Click Scaling:** Need more power? Upgrade instantly without downtime. - **Free AI Credits:** Get started without worrying about initial costs. - **Browser Setup:** Pre-configured Chrome environment for seamless access. - **Models & Channels Integration:** Easily manage AI models and communication channels. - **MMR (Persistent Memory):** Your AI remembers context, making interactions smarter over time. ### What Makes ClawVPS Different? Most VPS providers give you a blank server. ClawVPS gives you a ready-to-use AI environment. It’s not just hosting, it’s a complete AI solution designed for speed, simplicity, and performance. ## Step-by-Step: Launch ClawVPS in Minutes Getting started with ClawVPS is straightforward and user-friendly. The process is designed so that anyone can launch their AI assistant without technical hurdles. From signup to customization, everything is guided and simple. **Step 1: Sign Up** - Click on Get Started from top right corner of ClawVPS website. ![get started - Deploy OpenClaw AI](https://serveravatar.com/wp-content/uploads/2026/04/image-122-1024x472.png) - Fill in the required details to create an account, such as your name, email address, and password. - Click on the Create Account button. ![create account - Deploy OpenClaw AI](https://serveravatar.com/wp-content/uploads/2026/04/image-123-1024x496.png) - Once you create an account, verify your email from the verification link in your inbox. **Step 2: Create an instance** - Create your instance with OpenClaw pre-installed. Click on “Create Your First Instance” or “New Instance” option from dashboard. ![create instance - Deploy OpenClaw AI](https://serveravatar.com/wp-content/uploads/2026/04/image-124-1024x735.png) - If you have not set up your Billing Details or you are creating your first instance, it is required to set up the Billing Details first. - Click on the Save & Create Instance after filling in the details.[](https://storage.3.basecamp.com/5840738/blobs/22b73c24-3e35-11f1-bf8b-0242ac120003/download/image.png) ![billing details - Deploy OpenClaw AI](https://serveravatar.com/wp-content/uploads/2026/04/image-125-1024x927.png) **Step 3: Choose Your Plan** - Enter your instance name, and select a plan based on your requirements. - Complete the payment. ![select plan - Deploy OpenClaw AI](https://serveravatar.com/wp-content/uploads/2026/04/image-126-1024x985.png) - The process will take some time to complete, as it involves several initial steps such as payment verification, deploying OpenClaw, setting up the domain and DNS, and creating the instance. ![create instance - Deploy OpenClaw AI](https://serveravatar.com/wp-content/uploads/2026/04/image-127-1024x717.png) **Step 4: Access Dashboard** - You can now seamlessly interact with your AI assistant. The dashboard provides all the key information you need, including gateway details, quick access links, instance information, and server health status.[](https://storage.3.basecamp.com/5840738/blobs/60e038fe-3e3d-11f1-882f-0242ac120002/download/image.png) **Step 5: Customize & Scale** - Adjust settings, add nodes, add models, integrate channels and models, upgrade plan anytime directly from the dashboard. That’s it. No coding required. **Step 6: Connect to OpenClaw Control UI** - To start interacting with your AI assistant, you need to connect your instance to the OpenClaw interface. - Click on “Open Control UI (Main Chat)” from the dashboard. This will open the chat interface in a new browser tab. ![open control ui - Deploy OpenClaw AI](https://serveravatar.com/wp-content/uploads/2026/04/image-128-1024x771.png) - When opened in browser it will ask for the gateway token, copy the **Gateway Token** from your ClawVPS dashboard and paste it into the Control UI. Then click **Connect** to pair your instance. ![connect token - Deploy OpenClaw AI](https://serveravatar.com/wp-content/uploads/2026/04/image-129.png) - Once connected, your session will be linked to your gateway securely. **Step 7: Approve Node Pairing** - After clicking on Connect, your device will send a pairing request. - Go to the **Nodes (Pairing)** section in your dashboard, where you’ll see the pending request. - Approve it to authorize your device. - Once approved, your device will be listed under paired nodes, allowing secure communication between your browser and the AI instance. - All the approved nodes are listed in the same section. ![approve nodes - Deploy OpenClaw AI](https://serveravatar.com/wp-content/uploads/2026/04/image-130-1024x732.png) **Step 8: Start Chatting with Your AI Assistant** - After successful pairing, the OpenClaw chat interface becomes fully active. - You can now start interacting with your AI assistant directly from your browser. - This is your main workspace where conversations, commands, and tasks are executed in real time. ![openclaw ui - Deploy OpenClaw AI](https://serveravatar.com/wp-content/uploads/2026/04/image-131-1024x526.png) **Step 9: Configure Your First AI Model** - ClawVPS makes it easy to get started by providing pre-configured API access and free AI credits with every instance. - Head to the **Models** section: - Add or select your preferred models - Set a default model for your assistant ![add model - Deploy OpenClaw AI](https://serveravatar.com/wp-content/uploads/2026/04/image-132-1024x629.png) - Once configured, your AI assistant will use your selected model for all interactions. **Step 10: Configure Your Providers** - You can also connect your own providers for more flexibility. - Go to the **Providers** section - Add your API keys (such as OpenAI, Anthropic, Google, OpenRouter, etc.) - Choose from a wide range of supported providers (40+ options available) - Add your selected provider ![add provider - Deploy OpenClaw AI](https://serveravatar.com/wp-content/uploads/2026/04/image-133-1024x765.png) **Step 11: Connect Messaging Channels** - ClawVPS allows you to extend your AI assistant beyond the browser. - In the **Channels** section, you can integrate platforms like: - Discord - Telegram - Slack - Simply click Connect, follow the setup instructions, and link your account. ![connect channel - Deploy OpenClaw AI](https://serveravatar.com/wp-content/uploads/2026/04/image-134-1024x759.png) - Once connected, your AI assistant can communicate and respond directly on these platforms, making it accessible wherever your users are. **Step 11: Manage Settings and Advanced Features** - The Settings section gives you control over how your AI assistant behaves. - Here you can: - Enable or disable the Webchat UI - Turn on Elevated Mode for advanced capabilities like executing commands, managing files, and accessing system-level operations - Elevated Mode is powerful, so it should only be enabled when you understand the potential risks and need advanced control. - Monitor and install OpenClaw updates to keep your instance up to date ![setting - Deploy OpenClaw AI](https://serveravatar.com/wp-content/uploads/2026/04/image-135-1024x1021.png) **Step 12: Use Raw Configuration for Deep Customization** - For advanced users, the Raw Config section provides direct access to your instance configuration in JSON format. - This allows you to: - Fine-tune AI behavior - Customize memory, tools, and integrations - Modify system-level settings [](https://storage.3.basecamp.com/5840738/blobs/8548bef2-3e4a-11f1-962d-0242ac120003/download/image.png) ![raw config - Deploy OpenClaw AI](https://serveravatar.com/wp-content/uploads/2026/04/image-136-1024x728.png) - Since this involves manual editing, it’s recommended to proceed carefully and always keep a backup before making changes. **Step 13: Manage Backups and Factory Reset** - Inside the Danger Zone, you’ll find critical management options for your instance. - Available Backups: A list of saved configurations is available for quick recovery if needed. - Restore from Backup: You can restore your gateway using previously saved backups. This replaces your current configuration with a selected backup version. - Factory Reset: This option completely resets your OpenClaw instance to its original state. - Important things to know: - All configurations will be permanently deleted - Chat history and sessions will be erased - Stored memory and learned context will be lost - Custom settings will be reset ![backups - Deploy OpenClaw AI](https://serveravatar.com/wp-content/uploads/2026/04/image-137-1024x970.png) - After the reset, OpenClaw will be reinstalled, and you’ll need to set everything up again from scratch. ## Real-World Use Cases of OpenClaw OpenClaw AI is universal and can be used in many practical scenarios across different industries. Whether you want to automate tasks or build smart applications, it adapts to your needs. - **Automate business workflows:** Reduce manual work by handling routine operations - **Build AI-powered chatbots:** Creates interactive bots for customer engagement - **Manage customer support:** Provides quick and accurate responses to users - **Generate content:** Helps create text, ideas, and creative outputs - **Run AI experiments:** Allows testing and exploring new AI use cases It’s like having a multi-tool, but for AI tasks. ## Benefits of Using ClawVPS ClawVPS offers several advantages that make it a practical choice for both beginners and professionals. It focuses on saving time, reducing complexity, and improving overall efficiency. - **Saves Time:** No setup means you can focus on using AI instead of configuring it. - **Beginner-Friendly:** Even non-technical users can get started - **Cost-Effective:** Free credits and optimized infrastructure reduce costs. - **High Performance:** Optimized for AI workloads. - **Scalable:** Grow your AI assistant as your needs expand. ## ClawVPS vs Traditional VPS Choosing between ClawVPS and a traditional VPS depends on your needs, but the difference is quite noticeable. ClawVPS is built specifically for AI, while traditional VPS requires manual effort. **Feature****ClawVPS****Traditional VPS** **AI Pre-installed**YesNo**Setup Time**MinutesHours/Days**Ease of Use**Beginner-friendlyTechnical**Scaling**One-clickManual**AI Optimization**Built-inRequires setupThe difference is clear, ClawVPS is built for the future. ## Performance and Scalability Explained When working with AI, performance and scalability play a crucial role in delivering smooth results. ClawVPS ensures both by offering optimized infrastructure and flexible resource management. - **Optimized hardware:** Designed specifically for AI processing needs - **Fast processing speeds:** Ensures quick execution of tasks - **Seamless scaling:** Allows easy upgrades without downtime ## Security and Reliability Security and reliability are essential when dealing with AI systems and data. ClawVPS provides a stable and protected environment so users can focus on building without concerns. - **Secure environments:** Protects data and system access - **Reliable uptime:** Ensures consistent availability - **Safe data handling:** Maintains privacy and integrity of information ## Who Should Use ClawVPS? ClawVPS is designed for a wide range of users who want to explore or implement AI without complications. It removes technical barriers and makes AI accessible to everyone. - **Developers:** Great for building and testing AI applications - **Startups:** Helps launch AI-driven products quickly - **Businesses:** Useful for automating workflows and operations - **Content creators:** Supports AI-assisted content generation - **Beginners:** Ideal for those new to AI If you’ve ever thought, “I wish AI was easier”, this is for you. ## Tips to Get the Most Out of Your AI Assistant To fully benefit from your AI assistant, it’s important to use it strategically. Small improvements in how you use it can lead to much better results over time. - **Start simple:** Begin with basic tasks and expand gradually - **Experiment with models:** Find what works best for your needs - **Monitor performance:** Track and optimize usage regularly - **Use scaling options:** Upgrade resources as your workload grows Treat your AI assistant like a team member, it gets better with time. ## Future of AI Agents with ClawVPS AI agents are becoming more powerful and accessible with time. Platforms like ClawVPS are playing a key role in making AI easier to deploy and use for everyone. - **AI becomes accessible:** More people can use AI without technical barriers - **Instant deployment:** Launching AI becomes quick and effortless - **Faster innovation:** Enables quicker experimentation and development ## Conclusion Launching an AI assistant no longer needs to be complicated or time-consuming. With ClawVPS by ServerAvatar, what once required deep technical knowledge and hours of setup can now be done in just a few minutes. By combining a fully managed VPS with a pre-configured OpenClaw environment, ClawVPS removes the barriers that used to slow people down. Whether you’re building, automating, or simply exploring AI, it gives you a simple and reliable starting point. As AI continues to grow, platforms like ClawVPS make it easier for anyone to turn ideas into real, working solutions without getting stuck in setup. ## FAQs ### 1. What is ClawVPS used for? ClawVPS is used to quickly deploy and run OpenClaw AI assistants without needing manual setup or advanced technical knowledge. ### 2. Do I need coding skills to use ClawVPS? ClawVPS is designed to be beginner-friendly, so you can launch and use your AI assistant without writing code. ### 3. How fast can I launch an OpenClaw AI assistant? You can set up and start using your AI assistant within a few minutes after creating your instance. ### 4. Can I upgrade my server resources later? ClawVPS offers one-click scaling, allowing you to increase resources anytime as your requirements grow. ### 5. Is ClawVPS suitable for businesses and production use? It is suitable for both individual users and businesses looking to automate workflows, build AI tools, or scale AI-powered applications. **Categories:** Application Deployments, Blog, Guide, Others, Tutorials **Tags:** AI VPS Hosting, clawvps, Deploy OpenClaw AI, Launch AI Assistant, Managed VPS for AI, OpenClaw, OpenClaw AI Assistant, OpenClaw AI Deployment, OpenClaw AI Setup --- ### [PHP vs JavaScript? Which Is better for Your Project](https://serveravatar.com/php-vs-javascript/) **Published:** April 21, 2026 **Author:** Meghna Meghwani **Content:** [![Blog banner - ServerAvatar](https://serveravatar.com/wp-content/uploads/2025/09/728_90-Banner-3-1024x127.png)](https://serveravatar.com/?ref=blog)Choosing the right programming language can feel a bit like picking the perfect tool from a toolbox. The same idea applies when deciding between PHP vs JavaScript. Both are powerful, widely used, and capable of building amazing things, but they serve different purposes. If you’re planning to build a website, web app, or even a startup idea, you might be wondering: Which one is better for your project? The answer isn’t as straightforward as you might hope, but don’t worry, by the end of this article, you’ll have a clear direction. ## What is PHP? [PHP](https://www.php.net/) (Hypertext Preprocessor) is a server-side scripting language designed to build dynamic and data-driven websites. It works behind the scenes on the server, handling tasks like processing forms, managing databases, and generating content before it is sent to the user’s browser. PHP is widely used for developing content-heavy websites such as blogs, e-commerce platforms, and business portals. ![PHP - PHP vs JavaScript](https://serveravatar.com/wp-content/uploads/2026/04/image-117-1024x623.png) **Key Features** - Open-source and free to use - Designed specifically for web development - Easily integrates with databases like MySQL - Compatible with most web servers (Apache, Nginx) - Supports multiple frameworks like Laravel and CodeIgniter - Cross-platform support (Windows, Linux, macOS) - Large ecosystem of CMS platforms like WordPress **Advantages** - Easy to learn for beginners - Fast development for simple and medium-sized projects - Strong community support and extensive documentation - Cost-effective due to open-source nature - Reliable for server-side scripting and database operations - Widely supported by hosting providers **Disadvantages** - Less suitable for building modern interactive user interfaces - Can become messy if not structured properly - Performance may lag in large-scale, real-time applications - Inconsistent syntax in some areas - Requires additional technologies for frontend interactivity **Best For:** Best for building server-side websites, CMS platforms, and database-driven applications quickly and efficiently. **Why Should Use PHP?** PHP is a practical choice when you want to develop websites without unnecessary complexity. It allows you to quickly turn ideas into working applications, especially if your project relies heavily on backend logic and database interaction. Its wide hosting support and large ecosystem also make deployment and maintenance easier. ## What is JavaScript? [JavaScript](https://www.javascript.com/) is a versatile programming language primarily used to create interactive and dynamic elements on websites. It runs directly in the browser, allowing real-time updates, animations, and user interactions without reloading the page. With the introduction of Node.js, JavaScript can now also be used for backend development, making it a full-stack solution. ![JavaScript - PHP vs JavaScript](https://serveravatar.com/wp-content/uploads/2026/04/image-118-1024x415.png) **Key Features** - Runs directly in the web browser - Enables dynamic and interactive user interfaces - Supports asynchronous programming (callbacks, promises, async/await) - We can use it for frontend and backend as Node.js both - Works seamlessly with HTML and CSS - Rich ecosystem with frameworks like React, Angular, and Vue - Event-driven programming model **Advantages** - Essential for modern web development - Allows real-time updates and smooth user experience - Can be used across the entire stack (frontend + backend) - Huge community and frequent updates - Compatible with all modern browsers - Ideal for building single-page applications (SPAs) **Disadvantages** - Browser compatibility issues may arise in some cases - Can be complex for beginners due to asynchronous behavior - Security risks when handling sensitive data on the client side - Performance depends on the user’s device and browser - Rapid ecosystem changes can make it hard to keep up **Best For:** Best for creating interactive web interfaces, real-time applications, and full-stack modern web apps. **Why Should You Use JavaScript?** JavaScript is the backbone of modern web experiences, helping you build fast, responsive, and interactive applications. If your project needs real-time updates or a seamless user interface, JavaScript provides the flexibility to handle both frontend and backend development in one ecosystem. ## Similarities Between PHP and JavaScript While PHP and JavaScript are often compared as opposites, backend vs frontend, they actually share several important similarities. Understanding these common points can help you see how both languages complement each other and why they are often used together in real-world projects. **Key Similarities** - **Designed for Web Development:** Both PHP and JavaScript are widely used to build and power websites and web applications. - **Open-Source and Free:** Both languages are free to use, making them accessible for developers, startups, and businesses of all sizes. - **Cross-Platform Compatibility:** PHP and JavaScript can run on multiple operating systems like Windows, Linux, and macOS, without major issues. - **Strong Community Support:** Each language has a large global community, offering tutorials, frameworks, and solutions for almost any problem. - **Support for Frameworks and Libraries:** Both have rich ecosystems, PHP with frameworks like Laravel, and JavaScript with React, Angular, and Vue. - **Database Interaction:** PHP directly interacts with databases, while JavaScript (via Node.js) can also handle database operations effectively. - **Continuous Evolution:** Both languages are regularly updated with new features, improvements, and security enhancements. ## PHP vs JavaScript: Quick Comparison Before diving deeper into detailed explanations, here’s a quick side-by-side comparison to help you understand the core differences at a glance. This table simplifies key aspects so you can quickly decide which language fits your project needs. **Feature****PHP****JavaScript****Type**Server-side scripting languageClient-side (and server-side with Node.js)**Execution**Runs on the server before page loadsRuns in the browser after page loads**Primary Use**Backend developmentrontend + Backend (full-stack)**Performance**Strong for database and server tasksExcellent for real-time and UI interactions**Ease of Learning**Beginner-friendlySlightly complex but versatile**Use Cases**Websites, blogs, e-commerceWeb apps, SPAs, real-time apps**Scalability**Good for traditional appsBetter for modern, scalable apps**Community Support**Mature and stableLarge and rapidly evolving**Integration**Works well with traditional stacksStrong with modern tools and APIs**Development Speed**Faster for simple backend projectsEfficient for full-stack development**Best For**Backend-heavy applicationsInteractive and dynamic applications## Key Differences Between PHP and JavaScript Understanding how PHP and JavaScript differ is essential when choosing the right technology for your project. Both languages serve different purposes in web development, and each has its own strengths depending on what you are trying to build. Below are the major differences explained in a simple and practical way. ### Core Differences - **PHP:** A server-side language used to process data on the server before sending it to the browser. - **JavaScript:** A client-side language that runs in the browser, and can also work on the server using Node.js. **Execution** - **PHP:** Executes on the server before the webpage is displayed. - **JavaScript:** Executes in the browser after the page loads to handle user interactions. **Purpose** - **PHP:** Focuses on backend logic like database operations and server processing. - **JavaScript:** Focuses on frontend behavior such as animations, events, and real-time updates. ### Performance Comparison Performance can directly impact user experience, so it’s important to understand where each language performs best. PHP and JavaScript are optimized for different types of tasks, which makes them strong in their respective areas. - **PHP:** Performs efficiently for backend operations like database queries, form handling, and content generation. - **JavaScript:** Excels in real-time interactions, dynamic content updates, and smooth UI rendering. JavaScript can also deliver strong backend performance, especially for real-time applications like chat systems. **Verdict:** PHP is better for traditional server-side processing, while JavaScript is the winner for real-time and interactive applications. **Why it matters:** Faster performance means better user experience and improved SEO rankings. ### Ease of Learning The ease of learning a language can influence how quickly you can start building your project. PHP is generally more beginner-friendly, while JavaScript requires a bit more effort but offers greater flexibility. - **PHP:** Easier to understand and ideal for beginners starting with backend development. - **JavaScript:** Slightly more complex due to concepts like asynchronous programming, but more powerful overall. **Verdict:** PHP is easier to start with, but JavaScript offers more long-term flexibility once mastered. **Why it matters:** The easier a language is to learn, the faster you can start building and reduce development delays, especially if you’re a beginner or working with a small team. ### Frontend vs Backend Capabilities This is one of the biggest differences between the two languages and often influences the final decision. - **PHP:** Primarily used for backend development with limited frontend capabilities - **JavaScript:** Strong in frontend development and can also handle backend using Node.js **Verdict:** JavaScript is more versatile as a full-stack solution, while PHP remains focused on backend tasks. **Why it matters:** Knowing where a language performs best helps you choose the right tech stack and avoid unnecessary complexity in your project architecture. ### Community and Support A strong developer community makes learning, troubleshooting, and scaling much easier. - **PHP:** Has a long-established and stable community with extensive documentation - **JavaScript:** Has a rapidly growing and highly active ecosystem with frequent updates **Verdict:** Both have strong support, but JavaScript evolves faster with modern trends. **Why it matters:** A strong community ensures you can quickly find solutions, learn faster, and get help when you run into issues during development. ### Security Considerations Security depends more on how the code is written rather than the language itself, but each has its own considerations. - **PHP:** Offers improved security features with modern frameworks - **JavaScript:** Requires careful handling of client-side data and browser-based vulnerabilities **Verdict:** Both can be secure if best practices are followed, but developers must be cautious with implementation. **Why it matters:** Better security practices protect your application from vulnerabilities, keeping user data safe and maintaining trust in your platform. ### Scalability and Flexibility As your project grows, scalability becomes a key factor in choosing the right technology. - **PHP:** Works well for traditional and structured applications - **JavaScript:** Better suited for scalable, real-time, and high-performance applications **Verdict:** JavaScript is more flexible for scaling modern applications, while PHP is reliable for standard projects. **Why it matters:** Choosing a scalable technology ensures your application can grow smoothly without needing major changes as your user base increases. ### Cost and Development Time Budget and timelines often play a crucial role in decision-making. - **PHP:** Faster to develop and generally more cost-effective for smaller projects - **JavaScript:** May take more time initially but saves effort in full-stack development **Verdict:** PHP is ideal for quick and budget-friendly projects, while JavaScript is better for long-term scalability. **Why it matters:** The right choice can save both time and money, helping you launch faster while staying within your budget. ### Compatibility with Modern Tools and Technologies In today’s development landscape, how well a language works with other tools and technologies can significantly impact your workflow. Both PHP and JavaScript integrate with various systems, but their ecosystems differ in flexibility and modern usage. - **PHP:** Integrates smoothly with traditional web technologies, databases, and CMS platforms, making it reliable for standard web development. - **JavaScript:** Offers seamless integration with modern frameworks, APIs, cloud services, and frontend libraries, creating a highly connected development environment. **Verdict:** PHP is dependable for traditional setups, while JavaScript stands out for modern, technology-rich ecosystems. **Why it matters:** Better integration means faster development, easier scaling, and the ability to use modern tools without limitations. #### Maintenance and Future Sustainability Building a project is just the beginning, keeping it updated and running smoothly over time is equally important. Long-term maintenance depends on how well a language adapts to changes and supports ongoing development. - **PHP:** Stable and consistent, with long-term support through frameworks and widespread hosting compatibility. - **JavaScript:** Continuously evolving with frequent updates, offering modern solutions but sometimes requiring regular adjustments. **Verdict:** PHP provides stability for long-term maintenance, while JavaScript offers adaptability for projects that evolve quickly. **Why it matters:** Choosing the right technology ensures your project remains maintainable, secure, and relevant in the long run. ### Skill Requirements and Developer Experience The level of expertise required can influence development speed, hiring decisions, and overall project success. Both languages differ in how easy they are to learn and master. - **PHP:** Easier to pick up, especially for beginners focusing on backend development. - **JavaScript:** Requires deeper understanding due to advanced concepts, but offers greater versatility across the stack. **Verdict:** PHP is ideal for quick onboarding and simpler projects, while JavaScript is better suited for developers aiming for full-stack capabilities. **Why it matters:** The right choice can reduce learning time, improve productivity, and help you build a more efficient development team. ### Use Cases of PHP PHP is widely used for building stable and content-driven platforms where backend functionality plays a major role. - **Best For:** CMS platforms, blogs, and database-driven websites - Common uses include WordPress sites, business websites, and e-commerce platforms **Verdict:** Choose PHP when your project is backend-focused and requires quick, reliable development. **Examples:** - WordPress websites - Online stores - Business websites PHP is perfect when you need something stable and straightforward. ### Use Cases of JavaScript JavaScript is essential for creating modern, interactive, and dynamic applications that require real-time user engagement. - **Best For:** Interactive web apps, real-time systems, and single-page applications - Common uses include social media platforms, dashboards, and modern web apps **Verdict:** Choose JavaScript when your project requires interactivity, speed, and a modern user experience. **Examples:** - Social media platforms - Live dashboards - Web apps like Gmail JavaScript is your go-to for modern, dynamic experiences. ## When to Choose PHP Choose PHP if: - You are building a blog, CMS, or content-based website - You want faster development with lower cost - You are working with platforms like WordPress PHP is the right choice for simple, backend-heavy, and cost-effective projects. [![Blog banner - ServerAvatar](https://serveravatar.com/wp-content/uploads/2025/09/728_90-Banner-1-1024x127.png)](https://serveravatar.com/?ref=blog)## When to Choose JavaScript Choose JavaScript if: - You need a highly interactive user interface - You are building modern web or SaaS applications - You want a single language for both frontend and backend JavaScript is the best choice for dynamic, scalable, and feature-rich applications. ## Manage Your PHP and JavaScript Projects Effortlessly with ServerAvatar Building your application with PHP or JavaScript is just one part of the journey, managing your server shouldn’t slow you down. ServerAvatar is designed to simplify everything so developers and businesses can focus more on building and less on handling complex infrastructure. ![ServerAvatar Dashboard - PHP vs JavaScript](https://serveravatar.com/wp-content/uploads/2026/04/image-119.png) [ServerAvatar](https://serveravatar.com/) is a platform to simplify the hosting and management of servers and applications. It simplifies the process of deploying and managing PHP and Node.js based web applications on servers. Whether you’re deploying a PHP-based website like WordPress or running a JavaScript-powered application, ServerAvatar provides an intuitive platform to manage everything in one place. From setting up servers to deploying applications and monitoring performance, it removes the technical barriers that often come with server management. With its clean dashboard and automation features, ServerAvatar makes it easy to launch and maintain projects without needing deep system administration knowledge. This means faster deployments, fewer errors, and a smoother overall workflow, no matter which technology you choose. **Key Features of ServerAvatar** - **Instant Application Deployment:** Quickly deploy PHP or JavaScript applications without manual configuration. - **Managed and Self-Managed Server Infrastructure:** Use fully managed servers directly provided by ServerAvatar, and connect your own custom self-managed servers from any cloud provider. - **User-Friendly Dashboard:** Control everything from a simple and intuitive interface. - **Built-in Security Tools:** Includes Firewall, Fail2ban, SSL management, AI Bot Blocker, 8G Firewall, and many more security features to keep your server protected. - **Automated Backups:** Create Instant backup and Schedule backups to ensure your data is always safe and recoverable. - **Performance Monitoring:** Track server health, resource usage, and application performance in real time. - **File Manager & Database Access:** Easily manage files and databases without relying on external tools. - **Log Monitoring:** View and analyze server and application logs to troubleshoot issues quickly. - **Team Collaboration:** Add team members and manage access with role-based permissions. ## Conclusion When it comes to choosing between PHP and JavaScript, there is no universal winner, it all depends on what you want to build. PHP is a great choice for stable, backend-driven applications, while JavaScript shines in creating modern, interactive, and real-time experiences. In many cases, using both together can give you the best of both worlds. No matter which path you choose, having the right server management platform like ServerAvatar can make your development process smoother, faster, and far more efficient. ## FAQs ### 1. Is PHP still relevant in modern web development? PHP is still widely used and powers many websites, especially CMS platforms like WordPress. ### 2. Can JavaScript handle backend development? With Node.js, JavaScript can be used for backend development as well as frontend. ### 3. Which is better for beginners: PHP or JavaScript? PHP is generally easier for beginners, while JavaScript offers more flexibility once you gain experience. ### 4. Can PHP and JavaScript be used together in one project? Many applications use PHP for backend processing and JavaScript for frontend interactivity. ### 5. How does ServerAvatar help in managing web applications? ServerAvatar simplifies server setup, deployment, and monitoring, allowing you to manage your applications without dealing with complex server configurations. **Categories:** Blog, Guide, JavaScript, Php **Tags:** difference between PHP and JavaScript, javascript, JavaScript vs PHP, laravel, Node.js, php, PHP vs JavaScript, PHP vs JavaScript comparison, react, Web Development --- ### [How to Optimize Laravel Performance in 2026 (Complete Guide)](https://serveravatar.com/laravel-performance-optimization/) **Published:** April 20, 2026 **Author:** Meghna Meghwani **Content:** [![Blog banner - ServerAvatar](https://serveravatar.com/wp-content/uploads/2025/09/728_90-Banner-3-1024x127.png)](https://serveravatar.com/?ref=blog)Have you ever visited a slow website and left within seconds? You’re not alone. If you’re using Laravel, one of the most popular PHP frameworks, optimizing its performance can make a huge difference in user experience and business growth. Laravel performance is a critical factor in ensuring your application runs smoothly and efficiently. Your Laravel application may already be powerful, but without proper optimization, it can struggle to deliver consistent speed and efficiency. A well-optimized Laravel application ensures faster response times, smoother interactions, and better handling of concurrent users. When your application performs efficiently, users are more likely to stay engaged and complete desired actions. Even small delays, however, can negatively impact user retention and overall satisfaction. In this complete guide, you will learn how to optimize Laravel performance using simple, practical techniques, even if you’re not a hardcore developer. ## What is Laravel? Laravel is a modern, open-source PHP framework used to build websites and web applications in a clean and structured way. Instead of writing everything from scratch, Laravel gives developers a ready-made foundation with built-in tools for common tasks like routing, authentication, database management, and more. Think of Laravel like a well-organized toolbox. Instead of searching for individual tools every time you build something, everything you need is already arranged and easy to use. This helps developers save time, reduce errors, and focus on creating better applications. One of the reasons Laravel is so popular is its simplicity. Even complex features can be implemented with relatively simple code. It follows the MVC (Model-View-Controller) pattern, which keeps your code organized and easier to manage as your project grows. ![Laravel performance](https://serveravatar.com/wp-content/uploads/2026/04/image-115.png) Laravel also comes with powerful features such as: - **Eloquent ORM** for working with databases easily - **Blade templating engine** for creating dynamic user interfaces - **Built-in security features** to protect applications - **Queue system** for handling background tasks efficiently Whether you’re building a small website or a large-scale business application, Laravel provides the flexibility and performance needed to get the job done efficiently. ### Understanding Laravel Performance Basics Before optimizing your Laravel application, it’s important to understand what actually affects its speed and efficiency. Performance depends on multiple factors working together, from server setup to how your code and database are structured. Knowing these basics helps you make smarter optimization decisions. **Key factors include:** - **Server speed:** A faster server processes requests quicker, reducing overall response time. - **Database efficiency:** Well-optimized queries and indexing ensure data is fetched without delays. - **Code quality:** Clean and efficient code reduces unnecessary processing and improves execution speed. - **Caching:** Storing frequently used data avoids repeated processing and speeds up responses. **Why it matters?** If your app takes more than 3 seconds to load, users will likely leave. That’s lost traffic, lost engagement, and lost revenue. ### Why Laravel Performance Matters for Businesses Laravel isn’t just used for simple websites, it powers many business-critical applications like dashboards, admin panels, and internal tools. These systems often support real-time decisions, so performance directly impacts how efficiently a business operates. If your application is slow, it doesn’t just frustrate users, it can delay decisions, reduce productivity, and even affect revenue. Even a well-built Laravel app can be improved further. Performance optimization ensures your application runs smoothly, scales easily, and delivers a better experience for everyone using it. **Key Benefits of Optimizing Laravel Performance** - **Faster Business Growth:** A quicker application keeps users engaged. When your platform performs smoothly, visitors are more likely to stay, interact, and convert, helping your business grow naturally. - **Better Development Efficiency:** An optimized Laravel setup makes development easier. Developers spend less time fixing slow queries or debugging performance issues and more time building useful features. - **Improved Traffic Handling:** As your app grows, traffic increases. With proper optimization (like queues and caching), your Laravel application can handle spikes without slowing down. ## Methods to Optimize Laravel Performance Optimizing Laravel performance involves improving different parts of your application, from server configuration to code execution. Each method plays a specific role in making your app faster, more efficient, and scalable. Let’s break down the most effective techniques. ### 1. Choose the Right Hosting Environment Your hosting directly affects how fast your Laravel application responds to users. A reliable server with good resources ensures smooth handling of requests and consistent uptime. **Best practices:** - Use cloud providers like AWS, DigitalOcean, or Vultr - Prefer SSD storage - Ensure enough RAM and CPU **Pro Tip:** Managed platforms like ServerAvatar can simplify server optimization without deep technical knowledge. **Why it works:** Better infrastructure reduces delays in processing and improves overall speed. ### 2. Recommended Tech Stack for Laravel Performance To get the best results, your Laravel application should run on a modern and well-balanced stack. Here’s a reliable setup you can follow: - **Laravel:** Latest stable version - **PHP:** PHP 8.2 or above - **Database:** MariaDB or MySQL - **Server:** Cloud-based VPS or managed hosting **Why it works:** It takes care of configurations, updates, and performance tuning so you can focus more on building your application instead of managing infrastructure. ### 3. Enable Laravel Caching Mechanisms Caching stores frequently used data so Laravel doesn’t have to process the same request repeatedly. This reduces the workload on your server and speeds up responses. **Types of caching in Laravel:** - **Route Cache:** Stores route definitions to speed up request routing. - **Config Cache:** Combines all configuration files into one for faster loading. - **View Cache:** Precompiles Blade templates to reduce rendering time. **Commands:** ``` php artisan config:cache php artisan route:cache php artisan view:cache ``` ``` php artisan config:cache php artisan route:cache php artisan view:cache ``` **Why it works:** Pre-stored data eliminates repeated computation, making your app faster. ### 4. Optimize Configuration and Routes Laravel loads configuration files and routes on every request, which can slow things down if not optimized. Caching and organizing them properly reduces unnecessary processing. **Solution:** - Cache config files - Combine routes into one file **Benefit:** Faster request handling and reduced server load. **Why it works:** Fewer files to load means quicker request execution. ### 5. Use Efficient Database Queries Database operations are often the slowest part of an application if not handled properly. Writing optimized queries ensures faster data retrieval and better performance. **Best practices:** - Use Eloquent eager loading - Avoid N+1 query problems - Index your database columns **Example:** ``` User::with('posts')->get(); ``` ``` User::with('posts')->get(); ``` **Analogy:** Think of database queries like shopping, buy everything in one trip instead of going back again and again. **Why it works:** Efficient queries reduce database load and return results faster. ### 6. Implement Queue Workers Tasks like sending emails or processing files can slow down your app if handled instantly. Queues allow these tasks to run in the background without affecting user experience. **Use queues for:** - **Sending emails:** Processes emails in the background without delaying user requests. - **Processing uploads:** Handles file operations asynchronously for smoother performance. - **Notifications:** Sends alerts without blocking the main application flow. **Tools:** - **Redis:** A fast in-memory data store for efficient queue management. - **Database queues:** Uses your database to manage queued jobs when Redis isn’t available. **Result:** Faster response times for users. **Why it works:** Background processing keeps the main application fast and responsive. ### 7. Optimize Assets and Frontend Large CSS, JavaScript, and images can increase page load time. Optimizing these assets ensures faster rendering on the user’s browser. **Tips:** - Minify CSS & JavaScript - Use lazy loading for images - Optimize images **Tools:** - **Laravel Mix:** Simplifies compiling and bundling frontend assets. - **Vite:** Provides faster asset building and modern development workflow. **Why it works:** Smaller files load quicker, improving overall page speed. ### 8. Use Latest PHP Version New PHP versions come with performance improvements and better memory handling. Running Laravel on the latest version ensures maximum efficiency. **Why upgrade?** - Faster execution - Better memory usage - Improved security **Why it works:** Updated engines execute code faster and more efficiently. ### 9. Reduce Unnecessary Packages Every installed package adds extra code that needs to be loaded and executed. Removing unused ones keeps your application lightweight and faster. **What to do:** - Remove unused packages - Audit dependencies regularly **Tip:** Every package adds weight, keep your app lean. **Why it works:** Less code means fewer processes, leading to better performance. ### 10. Enable OPcache OPcache stores compiled PHP scripts in memory, so they don’t need to be recompiled on every request. This significantly improves execution speed. **Benefits:** - Faster execution - Reduced CPU usage **How to enable:** Edit your php.ini file: ``` opcache.enable=1 ``` ``` opcache.enable=1 ``` **Why it works:** Cached compiled code reduces processing time for each request. ### 11. Use CDN for Static Files CDN distribute your files across servers worldwide. Users receive content from the nearest server, reducing load time. **Examples:** - Cloudflare - AWS CloudFront **Why it works:** Shorter distance between server and user speeds up content delivery. ### 12. Optimize Autoloading Laravel uses Composer to load classes, and optimizing this process ensures faster file loading. This reduces delays when your app starts or handles requests. **Command:** ``` composer install --optimize-autoloader --no-dev ``` ``` composer install --optimize-autoloader --no-dev ``` **Why it works:** Efficient class loading minimizes unnecessary file lookups. ### 13. Monitor Performance Regularly Tracking your application’s performance helps you identify slow areas and fix them quickly. Regular monitoring ensures your app stays optimized over time. **Tools:** - **Laravel Telescope:** Monitors requests, queries, and application activity. - **New Relic:** Provides deep performance insights and analytics. - **Blackfire:** Profiles code to detect inefficiencies. **Track:** - **Response time:** Measures how quickly your app responds to users. - **Query performance:** Identifies slow database operations. - **Errors:** Helps detect issues affecting performance. **Why it works:** Continuous insights allow you to detect and resolve issues early. ### 14. Use Laravel Octane for Speed Laravel Octane keeps your application in memory instead of reloading it for every request. This improves speed and handles more users efficiently. **Supported servers:** - **Swoole:** High-performance server for handling concurrent requests. - **RoadRunner:** Fast PHP application server with persistent workers. **Benefits:** - Handles more requests per second - Reduces boot time **Why it works:** Eliminating repeated bootstrapping reduces response time significant ### 15. Remove Unused Services Laravel loads many service providers by default, even if they’re not needed. Disabling unused services reduces memory usage and improves performance. **Why it works:** Fewer loaded services mean faster application startup and execution. ## Benefits of Laravel Optimization Optimizing Laravel isn’t just about speed, it improves the entire lifecycle of your application. - **Faster Load Times:** By reducing unnecessary processing and optimizing resources, your app loads quicker, improving user satisfaction. - **Lower Server Costs:** Efficient applications use fewer resources, meaning you can handle more traffic without upgrading your server frequently. - **Better Scalability:** An optimized app can grow smoothly as your user base increases without breaking performance. - **Easier Maintenance:** When your app is clean and optimized, it becomes easier to debug, update, and maintain over time. ## Best Practices for Laravel Performance Optimization Optimizing Laravel is not just about applying a few commands, it’s about building good habits. Following the right practices from the beginning can save you from major performance issues later. - **Keep Your Code Clean and Organized:** Messy code slows everything down. Write simple, readable code and follow Laravel conventions. Clean code is easier to optimize and maintain. - **Use Caching Wherever Possible:** If something doesn’t change frequently, cache it. This reduces repeated processing and improves response time significantly. - **Optimize Database Structure:** Always use proper indexing and avoid unnecessary queries. A well-structured database is the backbone of a fast application. - **Avoid Overloading Controllers:** Keep your controllers lightweight. Move heavy logic into services or jobs to improve performance and readability. - **Test Performance Before Deployment:** Don’t wait for users to complain. Test your application under load conditions to identify bottlenecks early. [![Blog banner - ServerAvatar](https://serveravatar.com/wp-content/uploads/2025/09/728_90-Banner-1-1024x127.png)](https://serveravatar.com/?ref=blog)## Common Laravel Performance Issues Even experienced developers run into performance problems. The key is identifying them early and fixing them quickly. **1. N+1 Query Problem** **Issue:** Multiple unnecessary database queries **Fix:** Use eager loading (with()) to fetch related data in one go **2. Too Many Packages Installed** **Issue:** Extra packages increase load time **Fix:** Remove unused dependencies and keep your app lightweight **3. Missing Caching** **Issue:** Repeated processing slows down performance **Fix:** Enable config, route, and query caching **4. Slow Database Queries** **Issue:** Poorly written queries increase response time **Fix:** Add indexes, optimize queries, and avoid fetching unnecessary data **5. Not Using Queues** **Issue:** Heavy tasks block user requests **Fix:** Move tasks like emails and file processing to queues **6. Outdated PHP Version** **Issue:** Slower execution and security risks **Fix:** Always upgrade to the latest stable PHP version ## How ServerAvatar Improves Laravel Performance Managing a high-performing Laravel application is not just about writing optimized code, it also depends heavily on how your server is configured and maintained. This is where ServerAvatar comes into play. [ServerAvatar](https://serveravatar.com/) is a platform to simplify the hosting and management of servers and applications. It simplifies the process of deploying and managing PHP and Node.js based web applications on servers. [](https://storage.3.basecamp.com/5840738/blobs/ad0f0d66-3c9b-11f1-bde9-0242ac120004/download/serveravatardashboard.jpg) ![ServerAvatar Dashboard - Laravel performance](https://serveravatar.com/wp-content/uploads/2026/04/image-116.png) Instead of manually configuring web servers, databases, caching layers, and security settings, you get a streamlined environment that is already optimized for performance. With ServerAvatar, developers and businesses can: - Deploy Laravel applications quickly without complex setup - Manage PHP versions, databases, and services from a single dashboard - Enable performance features like caching, queue workers, and SSL with ease - Monitor server health and application performance in real-time - Scale resources as traffic grows without downtime This reduces the chances of misconfiguration, which is one of the most common reasons for slow applications. It also saves time, allowing you to focus more on building features rather than managing infrastructure. **Why it works:** A properly configured and continuously monitored server environment ensures that your Laravel application runs efficiently, handles traffic smoothly, and maintains consistent performance without manual intervention. ## Conclusion Optimizing a Laravel application is not a one-time task but an ongoing process that involves improving your server setup, refining your code, and making smart use of built-in features like caching and queues. By applying the techniques covered in this guide, you can significantly enhance your application’s speed, stability, and scalability. Whether you’re running a small project or a large business platform, consistent performance improvements lead to better user experiences, higher engagement, and more reliable growth. With the right approach and tools like ServerAvatar, managing and maintaining high performance becomes much simpler and more efficient. ## FAQs ### 1. What is the easiest way to speed up a Laravel application? Enabling caching (config, route, and view cache) is one of the quickest ways to improve performance, as it reduces repeated processing and speeds up response times. ### 2. How does caching improve Laravel performance? Caching stores frequently accessed data or configurations so the application doesn’t need to process the same request repeatedly, which reduces server load and improves speed. ### 3. Which PHP version is best for Laravel performance? Using the latest stable version of PHP (such as PHP 8.2 or above) is recommended because it offers better execution speed, memory handling, and security improvements. ### 4. How do queues help in Laravel optimization? Queues move time-consuming tasks like sending emails or processing files to the background, allowing the main application to respond to users quickly without delays. ### 5. Can server configuration affect Laravel performance? Yes, server configuration plays a major role. Properly configured servers with optimized resources, caching layers, and monitoring tools can significantly boost performance. ### 6. How does ServerAvatar help improve Laravel performance? ServerAvatar simplifies server management by handling configurations, monitoring, and optimization tasks, helping your Laravel application run faster and more efficiently without complex manual setup. **Categories:** Blog, Guide, Laravel, Linux, Optimisation, Php, Tutorials, Ubuntu **Tags:** Improve Laravel performance, laravel, Laravel Optimization, Laravel Performance, Laravel performance optimization, Laravel speed optimization, optimize Laravel app, php --- ### [Laravel vs Symfony: The Best Framework for Startups in 2026](https://serveravatar.com/laravel-vs-symfony/) **Published:** April 18, 2026 **Author:** Meghna Meghwani **Content:** [![Blog banner - ServerAvatar](https://serveravatar.com/wp-content/uploads/2025/09/728_90-Banner-3-1024x127.png)](https://serveravatar.com/?ref=blog)Starting a new business in 2026 is exciting, but it can also feel a little overwhelming, especially when it comes to picking the right technology stack. If you’re planning to build a web application, one of the key choices you’ll face is Laravel vs Symfony for startups. Think of it like choosing the perfect foundation for your startup; both are strong and reliable, but each is designed with a different style, pace, and purpose in mind. Laravel is often favored for its simplicity and rapid development capabilities, making it ideal for startups that want to move fast and launch quickly. Symfony, on the other hand, offers greater flexibility and is well-suited for complex, enterprise-level applications that require long-term scalability and customization. In this guide, we will break everything down in simple terms so you can confidently decide which one is the best fit for your startup. ## What is Laravel? [Laravel](https://laravel.com/) is a modern PHP framework designed to make web development simple and enjoyable. In simple words, Laravel is like a ready-made toolkit; you can start building right away without worrying about the basics. ![laravel - Laravel vs Symfony](https://serveravatar.com/wp-content/uploads/2026/04/image-112-1024x557.png) **Key Features** - Built-in authentication and routing system - Elegant and easy-to-read syntax - Blade templating engine for UI - Eloquent ORM for database handling - Strong ecosystem with ready-to-use tools **Pros** - Quick setup and faster development - Beginner-friendly and easy to learn - Large community and rich resources - Ideal for rapid prototyping - Cost-effective for startups **Cons** - Less flexible compared to Symfony - Can become heavy for very large applications - An opinionated structure may limit customization **Best For:** It is best for startups and MVPs that need fast development and easy scalability ## What is Symfony? [Symfony](https://symfony.com/) is another powerful PHP framework, but it focuses more on flexibility and structure. If Laravel is a ready-made toolkit, Symfony is more like a custom workshop, you build things your own way. ![symfony - Laravel vs Symfony](https://serveravatar.com/wp-content/uploads/2026/04/image-113-1024x442.png) **Key Features** - Modular component-based architecture - Highly flexible configuration system - Reusable PHP components - Advanced debugging and testing tools - Strong support for enterprise-level applications **Pros** - Extremely flexible and customizable - Better suited for complex applications - High performance for large-scale systems - Strong long-term maintainability - Reliable for enterprise use **Cons** - Steeper learning curve - Slower development process - Requires experienced developers - Higher development cost **Best For:** It is best for complex, enterprise-level applications requiring full control and customization ## Why Startups Need the Right Framework Picking the right framework is a critical decision for any startup. The wrong choice can slow down your progress, increase development costs, and make your product harder to manage. Startups need a solution that helps them move fast while staying efficient and scalable. - **Fast development:** Helps you launch your product quickly and stay ahead of competitors. - **Low cost:** Reduces development expenses, which is crucial for limited startup budgets. - **Scalability:** Ensures your application can grow smoothly as your user base increases. - **Easy maintenance:** Makes it simpler to fix issues and update features over time. The right framework acts like a strong foundation, letting you build and grow without unnecessary obstacles. ## Laravel vs Symfony: Quick Comparison **Feature****Laravel****Symfony****Ease of Use**Very EasyModerate**Development Speed**FastSlower**Flexibility**ModerateHigh**Performance**GoodExcellent**Cost**LowHigher**Best For**Startups & MVPsEnterprise Apps## Laravel vs Symfony: Detailed Comparison Between PHP Frameworks Choosing between Laravel and Symfony isn’t always straightforward, especially when both frameworks offer powerful capabilities. For startups and businesses, the decision often comes down to factors like development speed, cost, flexibility, and long-term goals. Making the right choice early can save both time and resources down the road. To simplify this process, it’s helpful to look at the key differences side by side. The comparison below highlights the most important aspects of both frameworks, giving you a clearer picture of which one aligns better with your project needs. This quick comparison will act as a practical guide, helping you make a confident and informed decision without overcomplicating things. ### Ease of Learning and Use When it comes to ease of use, Laravel clearly stands out, especially for beginners or small teams. It is designed to be simple, readable, and easy to understand, even if you’re just starting your coding journey. **Laravel** - **Simple syntax:** Uses clean and readable code that is easy to understand and write. - **Clear documentation:** Provides well-structured guides that help developers learn quickly. - **Beginner-friendly:** Makes it easy for new developers to start building applications. **Symfony** - **Steeper learning curve:** Requires more time and effort to fully understand. - **Requires deeper technical knowledge:** Better suited for developers with prior experience. If your team is small or just getting started, Laravel is usually the more comfortable option. ### Development Speed For startups, speed can make a huge difference between success and missed opportunities. A faster framework allows you to build, test, and launch your product without delays. **Laravel** - **Pre-built features:** Comes with ready-made tools that reduce development time. - **Faster setup:** Allows you to get started quickly without complex configuration. - **Less coding required:** Minimizes effort by handling many tasks automatically. **Symfony** - **Requires more configuration:** Needs additional setup before development begins. - **Takes longer to build from scratch:** Involves more manual work during development. If reaching the market quickly is your goal, Laravel is the better choice. ### Performance and Scalability As your startup grows, performance and scalability become more important. You need a framework that can handle increasing traffic and complexity without slowing down. **Laravel** - **Good performance:** Delivers reliable speed for most applications. - **Scalable with proper setup:** Can grow as your application expands. - **Slightly heavier due to built-in features:** Includes extra tools that may add some overhead. **Symfony** - **Highly optimized:** Designed for efficient performance in demanding applications. - **Better for large-scale applications:** Handles heavy workloads with ease. - **Handles complex systems efficiently:** Works well for advanced and layered architectures. Symfony has a slight advantage for very large systems, but Laravel performs well for most startup needs. ### Flexibility and Customization Flexibility matters when your application has unique or complex requirements. This is where Symfony stands out. **Laravel** - **Opinionated structure:** Follows a predefined way of building applications. - **Less flexible but easier to use:** Trades customization for simplicity and speed. **Symfony** - **Fully customizable:** Allows you to design your application exactly the way you want. - **Use only what you need:** Lets you include specific components instead of the full framework. - **Modular architecture:** Supports building applications in smaller, manageable parts. If you want complete control, Symfony is ideal. If you prefer simplicity, Laravel is a better fit. ### Community and Support Having access to a strong community can save time and reduce frustration during development. It helps you find solutions quickly when you get stuck. **Laravel** - **Huge and active community:** Offers strong support from developers worldwide. - **Tons of tutorials and resources:** Makes learning and troubleshooting easier. - **Frequent updates:** Keeps the framework modern and secure. **Symfony** - **Strong but more developer-focused community:** Provides support mainly for experienced users. - **Better for experienced users:** Offers advanced resources for complex problems. Laravel is generally more beginner-friendly when it comes to community support. ### Security Features Security is essential for protecting your application and user data. Both frameworks take this seriously and offer strong built-in protections. **Laravel** - **CSRF protection:** Prevents unauthorized actions from malicious sources. - **Authentication systems:** Provides ready-to-use user login and access control features. - **Encryption:** Secures sensitive data within your application. **Symfony** - **Advanced security components:** Offers powerful tools for handling complex security needs. - **More customizable security options:** Allows fine control over security settings. Both frameworks are secure, but Symfony gives more flexibility for advanced security requirements. ### Cost and Resource Efficiency Startups usually have limited budgets, so choosing a cost-effective framework is important. **Laravel** - **Faster development with lower cost:** Saves money by reducing development time. - **Requires fewer developers:** Can be managed by smaller teams. **Symfony** - **More development time:** Increases overall project cost. - **Needs experienced developers:** Requires skilled professionals, which can be expensive. Laravel is generally more budget-friendly for early-stage startups. ### Real-World Use Cases Different frameworks are better suited for different types of applications. **Laravel is commonly used for** - **SaaS applications:** Ideal for building subscription-based platforms quickly. - **E-commerce platforms:** Supports fast development of online stores. - **MVPs and startups:** Perfect for testing ideas with minimal investment. **Symfony is used for** - **Enterprise applications:** Handles large business systems efficiently. - **Complex systems:** Suitable for applications with advanced logic. - **Large-scale platforms:** Works well for high-traffic, high-demand projects. ## Which One is Better for MVPs? When building an MVP, the goal is to launch quickly and test your idea without spending too much time or money. - **Faster development:** Helps you bring your idea to market quickly. - **Lower cost:** Keeps your initial investment minimal. - **Easy to iterate:** Allows quick changes based on user feedback. Laravel is the clear winner for MVPs because it supports speed and simplicity. ## Which One is Better for Long-Term Growth? For long-term success, you need a framework that can handle growth and complexity. - **Symfony offers better structure and flexibility:** Makes it easier to manage large applications. - **It’s easier to maintain complex systems:** Helps keep code organized as the project grows. Laravel can also scale effectively with the right planning, so the final choice depends on your product’s future needs. ## Laravel vs Symfony: Which Framework Do High-Traffic Websites Prefer? When you look at modern, high-traffic websites, Symfony is often the preferred choice for handling complex and demanding applications. Its structure and flexibility make it well-suited for platforms that need to manage large volumes of users and data efficiently. That said, Laravel is far from limited. It remains a strong and reliable option, especially for small to mid-sized projects where speed and simplicity matter more than deep customization. The right choice ultimately depends on your project’s needs, not just its size. To make a smarter decision, it’s important to evaluate both frameworks based on a few key factors. [![Blog banner - ServerAvatar](https://serveravatar.com/wp-content/uploads/2025/09/728_90-Banner-1-1024x127.png)](https://serveravatar.com/?ref=blog)## Key Factors to Consider When Choosing Between Laravel and Symfony Selecting the right PHP framework isn’t just about popularity—it’s about aligning the framework with your business needs. Here are some important aspects to think about before making your choice: ### 1. Project Requirements Understanding your business model and application needs is the first step. Factors like your target audience, type of service, and core functionality help define what your project truly requires. A clear understanding of these requirements guides your development process and helps you pick the framework that fits best. ### 2. Project Size The scale of your project plays a major role in deciding the framework. Smaller applications usually benefit from Laravel’s simplicity and speed, while larger and more complex systems often perform better with Symfony’s structured approach. Choosing based on size ensures better performance and easier management as your project grows. ### 3. Business Goals Your short-term and long-term goals also influence the decision. If your focus is on launching quickly and testing ideas, Laravel is a great choice. On the other hand, if you’re planning to build a long-term, feature-rich platform, Symfony offers more flexibility for future expansion. Aligning the framework with your goals helps avoid limitations later. ### 4. Developer’s Skillset The experience level of your development team matters a lot. Laravel is easier to learn and works well for beginners or small teams. Symfony, however, requires a deeper understanding of advanced programming concepts and is better suited for experienced developers. Picking a framework that matches your team’s skills can save both time and effort. ### 5. Timeframe How quickly do you need to launch your product? If speed is a priority, Laravel allows faster development and quicker deployment. Symfony, while powerful, generally takes more time due to its detailed setup and customization options. Your timeline can significantly influence which framework is the better fit. ## How ServerAvatar simplifies getting started with PHP applications Choosing the right framework, like Laravel or Symfony, is only one part of building a successful web application. Once your application is ready, you also need a reliable way to deploy, manage, and scale it without getting stuck in complex server configurations. This is where a smart server management platform becomes essential.[](https://storage.3.basecamp.com/5840738/blobs/6e28e972-3b16-11f1-9143-0242ac120004/download/serveravatardashboard.jpg) ![ServerAvatar Dashboard - Laravel vs Symfony](https://serveravatar.com/wp-content/uploads/2026/04/image-114.png) [ServerAvatar](https://serveravatar.com/) is a platform to simplify the hosting and management of servers and applications. It simplifies the process of deploying and managing PHP and Node.js based web applications on servers. Whether you’re launching a fast MVP with Laravel or building a scalable system with Symfony, ServerAvatar provides a smooth and efficient environment to run your applications. **Key Features of ServerAvatar** - **Easy PHP application deployment:** Launch your PHP apps without complex setup and manual commands - **Managed and Self-Managed Server Infrastructure:** Use fully managed servers directly provided by ServerAvatar, and connect your own custom self-managed servers from any cloud provider. - **Automated Backups:** Keep your data safe with scheduled backups and quick restore options, ensuring your application is always protected. - **Advanced Monitoring & Logs:** Track server performance, monitor application activity, and debug issues with built-in log monitoring tools. - **Free SSL & Security Management:** Secure your applications with free SSL certificates and built-in security features to protect your data and users. - **File Manager & Database Access:** Manage files and databases directly from the dashboard without needing external tools or command-line access. - **Team Collaboration:** Invite team members and manage access controls, making it easier to work together on projects. ### Why ServerAvatar is Ideal for Startups Startups often need to move quickly while keeping costs and complexity low. ServerAvatar removes the technical barriers of server management, allowing teams to focus on development and innovation instead of infrastructure. - **Saves time** by automating server setup and deployment - **Reduces costs** by eliminating the need for dedicated DevOps resources - **Improves productivity** with an easy-to-use interface - **Scales easily** as your application grows ## Conclusion Choosing between Laravel and Symfony ultimately comes down to your startup’s priorities, technical needs, and long-term vision. Laravel is an excellent choice if you want to move fast, build efficiently, and launch your product with minimal complexity. Symfony, on the other hand, is better suited for projects that demand deep customization, structured architecture, and long-term scalability. Both frameworks are powerful in their own way, and the right decision depends on how you plan to build and grow your application. Alongside this, using a platform like ServerAvatar can further simplify deployment and server management, allowing you to focus more on development and less on infrastructure. By aligning your framework choice with the right tools, you can set a strong foundation for your startup’s success. ## FAQs ### 1. Is Laravel good for large-scale applications? Laravel can handle large-scale applications when properly optimized, although Symfony may offer more flexibility for highly complex systems. ### 2. Why do startups prefer Laravel over Symfony? Startups often choose Laravel because it enables faster development, reduces costs, and helps launch products quickly. ### **3. Can I switch from Laravel to Symfony later?** Switching frameworks is possible but can be time-consuming and costly. It’s best to choose the right framework based on your future goals from the start. ### 4. Do both Laravel and Symfony support secure web applications? Both frameworks offer strong built-in security features to protect applications and user data. ### 5. How does ServerAvatar help with Laravel and Symfony applications? ServerAvatar simplifies server and application deployment and management, making it easier to run both Laravel and Symfony applications without dealing with complex server setups. **Categories:** Blog, Guide, Laravel, Linux, Php, Ubuntu **Tags:** best PHP framework for startups, laravel, Laravel vs Symfony, Laravel vs Symfony comparison, Laravel vs Symfony for startups, php, PHP frameworks comparison, symfony --- ### [How to Start with PHP? A Simple Guide for Beginners](https://serveravatar.com/php-guide-for-beginner/) **Published:** April 17, 2026 **Author:** Meghna Meghwani **Content:** [![Blog banner - ServerAvatar](https://serveravatar.com/wp-content/uploads/2025/09/728_90-Banner-3-1024x127.png)](https://serveravatar.com/?ref=blog) You have heard about PHP and are curious, what exactly is it, and how do you even begin? If you want to start with PHP, don’t worry, you’re not alone. Starting something new, especially coding, can feel overwhelming at first. But here’s the good news: PHP is one of the easiest programming languages to get started with, even if you’ve never written a line of code before. Think of PHP as the engine behind many websites, as websites need something to process data and interact with users, and that’s where PHP comes in. In this guide, I will walk you through everything you need to know to get started with PHP in a simple, beginner-friendly way. ## What is PHP? [PHP](https://www.php.net/) (Hypertext Preprocessor) is a server-side scripting language used to build dynamic websites and web applications. ![Start with PHP](https://serveravatar.com/wp-content/uploads/2026/04/image-105-1024x599.png) In simple terms, PHP runs on a server and generates content that you see in your browser. For example, when you log into a website or fill out a form, PHP is often working behind the scenes. **Key Features** PHP comes with a range of powerful features that make it a popular choice for building dynamic websites and applications. Its flexibility, ease of use, and compatibility with different platforms make it ideal for beginners and professionals alike. - Open-source and free to use - Cross-platform compatibility (Windows, Linux, macOS) - Easily integrates with HTML - Supports multiple databases (MySQL, PostgreSQL, etc.) - Fast execution for web applications - Large community support and resources - Built-in support for sessions and cookies **Pros** PHP has remained popular for years because of its simplicity and practicality. It allows developers to quickly build functional websites without needing deep technical expertise. - Easy to learn and beginner-friendly - Huge community and documentation - Cost-effective (open-source) - Works well with most hosting providers - Flexible and versatile for different projects - Strong ecosystem with frameworks and tools **Cons** While PHP is powerful, it’s not perfect. Like any technology, it has some limitations that you should be aware of before choosing it for your projects. - Can lead to messy code if not structured properly - Slower compared to some modern languages in certain cases - Security issues if best practices are ignored - Inconsistent function naming conventions - Not ideal for very large or complex applications without frameworks ### Why Should You Learn PHP? Maybe you are thinking, “PHP is still worth learning?” This is one common question that comes in beginners mind. And the answer? Yes, if your goal is web development, PHP is still a solid choice. Here’s why: - Easy to learn for beginners - Widely used in web development - Huge community support - Works well with databases like MySQL Many popular websites still rely on PHP, so learning it opens doors to real-world opportunities. ### How PHP Works PHP might sound technical at first, but the way it works is actually quite simple once you break it down. It acts as a middle layer between your browser and the server, handling requests and generating the final webpage you see. Let’s break it down simply. ![Start with PHP working](https://serveravatar.com/wp-content/uploads/2026/04/image-106.png) When you open a website: - **Your browser sends a request:** When you open a website, your browser asks the server for that page - **The server runs PHP code:** The server processes the PHP scripts behind the scenes - **PHP processes the request:** It may fetch data, handle logic, or interact with a database - **The result is sent back as HTML:** The final output is converted into HTML and displayed in your browser ### Where PHP is Used in Real Life PHP isn’t just something you learn for practice, it’s actively used in real-world applications that millions of people interact with every day. From simple websites to complex platforms, PHP plays a key role behind the scenes. **Common use cases of PHP include** - Content Management Systems (CMS) - E-commerce platforms - Blogging websites - User login and authentication systems - APIs and backend services For example, platforms like WordPress run on PHP and power a huge portion of the internet. So when you learn PHP, you’re building skills that are practical and widely used, not just theoretical knowledge. ## Setting Up PHP on Your System Before you start writing PHP code, you need a proper environment where your code can run. Don’t worry, it’s easier than it sounds, especially with beginner-friendly tools available. **Easy Setup Options:** **Option 1: Use XAMPP** - Beginner-friendly and quick to install - Comes with Apache, MySQL, and PHP in one package **Option 2: Use WAMP or MAMP** - Works well on Windows (WAMP) and Mac (MAMP) - Simple setup with minimal configuration **Option 3: Online Editors** - No installation required - Perfect for quick practice and learning basics ### Writing Your First PHP Program Now comes the fun part, writing your first PHP code! **Here’s a simple example:** ``` ``` ``` ``` Save this file as index.php, run it in your browser, and you’ll see the output displayed on the screen. That one line of code is your first step into PHP. From here, you can start experimenting, modifying it, and gradually building more complex programs. ## Understanding PHP Syntax PHP syntax is simple and clean. - Starts with **** - Statements end with a semicolon ; **Example:** ``` ``` ``` ``` **Key Rules:** - Every statement ends with **;** - Code runs on the server - Output is sent to the browser PHP is designed to be simple, so you don’t need to memorize complex syntax at the beginning. ### Variables and Data Types Variables are like containers that store data. ``` ``` ``` ``` **Common Data Types** - **String:** “Hello” - **Integer:** 10 - **Float:** 10.5 - **Boolean:** true/false Think of variables like labeled boxes, you store something inside and use it later. ### Conditional Statements Conditions help your program make decisions. ``` ``` ``` ``` **Types of Conditional Statements** - If-else - Switch - Loops (for, while) These are the building blocks of logic in programming. ### Functions in PHP Made Simple Functions are blocks of code that you can reuse whenever needed. Instead of writing the same code again and again, you can create a function once and call it multiple times. ``` ``` ``` ``` Instead of repeating code, you just call the function again. It’s like having a shortcut for repetitive tasks. ## Loops in PHP Loops are used when you want to repeat a task multiple times without writing the same code again. ### For Loop A for loop runs a block of code a specific number of times. ``` ``` ``` ``` This loop starts at 1 and keeps running until it reaches 5. ### While Loop While loop continues running as its condition remains true. ``` ``` ``` ``` Here, the loop continues until the value of $i becomes greater than 5. ## Working with Forms PHP is often used to handle data submitted through forms on a website. ### HTML Form This is a simple form where users can enter their name: ``` ``` ``` ``` ### PHP Handling PHP collects the data entered by the user and processes it. ``` ``` ``` ``` Think of forms as a way for users to send information, and PHP as the tool that receives and uses that information. ## Connecting PHP with Databases PHP works great with databases like MySQL. Because it allows you to: - Store user data - Retrieve information - Build login systems **Example:** ``` ``` ``` ``` This is the foundation of dynamic web apps. This allows you to store and retrieve data. ## What is PHP Framework? As you start getting comfortable with PHP, you’ll eventually hear people talking about PHP frameworks. However, what they actually are, and whether you really need framework? Think of a framework like a ready-made structure or blueprint. Instead of building everything from scratch, you get a pre-built foundation that helps you create applications faster and more efficiently. ### Why Use a PHP Framework? When your project becomes bigger or more complex, writing everything manually can get messy and time-consuming. That’s where frameworks come in. Here’s what they help you with: - **Faster development:** No need to reinvent the wheel - **Better code structure:** Keeps your code organized - **Built-in features:** Like routing, authentication, and security - **Improved security:** Helps protect against common threats - **Scalability:** Makes it easier to grow your application ## Popular PHP Frameworks Here are some widely used PHP frameworks you might come across: - **Laravel:** Known for its clean syntax and powerful features, great for modern web apps - **Symfony:** Flexible and reliable; often used for large-scale applications - **CodeIgniter:** Lightweight and beginner-friendly; good for simple projects Each framework has its own strengths, so the choice depends on what you’re building. ### Laravel [Laravel](https://laravel.com/) is one of the most popular PHP frameworks today, and for good reason. It’s known for its clean syntax, modern features, and developer-friendly approach. ![laravel - Start with PHP](https://serveravatar.com/wp-content/uploads/2026/04/image-108-1024x550.png) If you’ve ever wished coding could feel more organized and less repetitive, Laravel is designed exactly for that. **Key Features** - Elegant and clean syntax - Built-in authentication and routing - Blade templating engine - Eloquent ORM for database handling - Artisan CLI for automation - Strong ecosystem and community **Pros** - Easy to write and maintain code - Speeds up development with built-in tools - Great for modern and scalable applications - Extensive documentation and support - Strong security features **Cons** - Steeper learning curve for beginners - Can feel heavy for small projects - Performance overhead compared to lightweight frameworks **Best for:** Building modern web applications, SaaS products, and large-scale projects. ### Symfony [Symfony](https://symfony.com/) is a highly flexible and robust PHP framework, often used for complex and enterprise-level applications. ![symfony - Start with PHP](https://serveravatar.com/wp-content/uploads/2026/04/image-109-1024x445.png) Unlike Laravel (which feels more beginner-friendly), Symfony gives you more control and customization, but it may require a bit more learning effort. **Key Features** - Component-based architecture - Highly flexible and customizable - Reusable PHP components - Advanced debugging and testing tools - Strong support for large applications **Pros** - Ideal for complex and enterprise-level projects - Highly stable and reliable - Scalable for long-term applications - Strong developer community **Cons** - More difficult to learn for beginners - Requires more configuration - Slower development speed compared to simpler frameworks **Best for:** Large, complex, and long-term projects where flexibility and scalability matter. ### CodeIgniter [CodeIgniter](https://www.codeigniter.com/) is a lightweight and simple PHP framework, perfect for beginners who want something easy to pick up. ![codeigniter - Start with PHP](https://serveravatar.com/wp-content/uploads/2026/04/image-110-1024x594.png) It doesn’t force strict rules, which means you can build applications quickly without too much setup. **Key Features** - Lightweight and fast - Minimal configuration required - Simple MVC architecture - Small footprint - Easy setup and installation **Pros** - Very beginner-friendly - Quick to build small applications - Fast performance - Minimal learning curve **Cons** - Limited built-in features - Less modern compared to Laravel - Smaller community compared to bigger frameworks - Not ideal for large-scale applications **Best for:** Simple web applications, quick prototypes, and developers who prefer a straightforward approach. ### Quick Tip If you’re just starting out, don’t rush into frameworks immediately. Learn core PHP first, then: - Start with **CodeIgniter** for simplicity - Move to **Laravel** for modern development - Explore **Symfony** when you need advanced control This way, you build your skills step by step without feeling overwhelmed. ### When Should You Start Using a Framework? If you’re just starting out, focus on learning core PHP first. Jumping into frameworks too early can feel overwhelming. A good time to explore frameworks is when: - You understand PHP basics well - You want to build larger or real-world projects - You need faster development with better structure ## Common PHP Errors and Fixes Making mistakes while learning PHP is completely normal, it’s actually part of the learning process. The key is not to avoid errors, but to understand them and fix them quickly. - **Missing semicolons:** Forgetting a semicolon at the end of a line can stop your code from running properly - **Wrong variable names:** Using incorrect or mismatched variable names can lead to unexpected results - **Syntax errors:** Small mistakes in code structure can cause PHP to fail to understand your instructions **Tip:** Always read error messages carefully, they often tell you exactly what went wrong and where to fix it. ## Best Practices for Beginners Writing good PHP code from the beginning helps you avoid problems later and makes your code easier to understand and manage. - **Keep your code clean:** Organize your code neatly so it’s easy to read and maintain - **Use meaningful variable names:** Choose names that clearly describe what the variable stores - **Comment your code:** Add simple explanations to help yourself and others understand your logic - **Avoid repeating code:** Reuse code using functions instead of writing the same logic again - **Practice regularly:** Consistent practice helps you improve faster and build confidence ## Tools and Resources to Learn PHP Learning PHP becomes much easier when you use the right tools and resources. They help you understand concepts faster and apply them in real scenarios. - **Online tutorials:** Step-by-step guides that explain concepts in a simple way - **Documentation:** Official references that provide detailed explanations of PHP functions - **Coding platforms:** Interactive environments where you can practice coding instantly - **Practice projects:** Real-world examples that help you apply what you’ve learned Start with small tasks and gradually move to bigger projects as your confidence grows. ## What to Do Next After Learning PHP Once you’ve learned the basics of PHP, the next step is to apply your knowledge in practical ways. This is where real learning begins. **Next steps to follow:** - **Build a simple website:** Create a basic project to understand how everything works together - **Learn frameworks like Laravel:** Use frameworks to build applications faster and more efficiently - **Explore APIs:** Learn how PHP communicates with other applications and services - **Work on real projects:** Gain hands-on experience by solving real-world problems The more you build and experiment, the stronger your PHP skills will become over time. ## Managing PHP Applications Made Easy with ServerAvatar Setting up PHP on your local system is a great way to start learning. But when it comes to running real websites or applications, things can quickly become complicated, especially when dealing with servers, security, and performance. This is where ServerAvatar makes your life much easier. ![ServerAvatar Dashboard - Start with PHP](https://serveravatar.com/wp-content/uploads/2026/04/image-111.png) [ServerAvatar](https://serveravatar.com/) is a platform to simplify the hosting and management of servers and applications. It simplifies the process of deploying and managing PHP and Node.js based web applications on servers. Instead of manually configuring everything, you get a clean dashboard to handle it all in just a few clicks. ### Why Use ServerAvatar for PHP? If you are planning to move from learning to building real projects, here’s how ServerAvatar helps: - **Easy PHP application deployment:** Launch your PHP apps without complex setup and manual commands - **Multiple PHP versions support:** Easily switch between different PHP versions - **Built-in server optimization:** Get better performance without manual tuning - **Automated backups:** Keep your data safe without extra effort - **Security features included:** SSL, firewall, fail2ban, AI bot blocker, 8g firewall, and other protection handled for you - **User-friendly dashboard:** No need to manage servers using command lines ### Key Features of ServerAvatar ServerAvatar offers a range of powerful features that simplify server and application management, making it easier for developers to focus on building rather than configuring. - **Managed and Self-Managed Server Infrastructure:** Use fully managed servers directly provided by ServerAvatar, and connect your own custom self-managed servers from any cloud provider. - **Automated Backups:** Schedule and manage backups to ensure your data is always safe and recoverable. - **Integrated Cloud Storage:** Connect cloud storages form given options such as Google Drive, Wasabi, etc for storing backups securely. - **Performance Optimization:** Pre-configured stack for better speed and smooth application performance. - **User-Friendly Dashboard:** Manage servers, applications, databases, and settings from a clean interface. - **Database Management:** Easily create, access, and manage databases without complex commands. - **File Manager Access:** Upload, edit, and organize files directly from the dashboard. - **Log Monitoring:** View and analyze server and application logs to troubleshoot issues quickly. - **Team Collaboration:** Add team members and manage access with role-based permissions. ### Perfect for Beginners and Developers Whether you’re just starting with PHP or building production-ready applications, ServerAvatar removes the complexity of server management so you can focus on what really matters, writing code and building great projects. ## Conclusion Getting started with PHP may seem confusing in the beginning, but once you understand the fundamentals, it becomes much more approachable and even enjoyable. From handling simple tasks like form submissions to building complete web applications, PHP gives you the flexibility to grow at your own pace. The key is to stay consistent, practice regularly, and gradually explore advanced concepts like frameworks and server management tools. With time and hands-on experience, you’ll be able to turn your ideas into fully functional websites with confidence. ## FAQs ### 1. Is PHP still relevant in 2026? PHP is still widely used in web development, powering many websites and platforms, making it a valuable skill to learn. ### 2. Do I need to learn HTML before PHP? It’s helpful to know basic HTML, as PHP is often used alongside it to create dynamic web pages. ### 3. Which PHP framework should I learn first? Beginners can start with CodeIgniter for simplicity, then move to Laravel for more advanced and modern development. ### 4. Can I build real-world projects using PHP? PHP is used to build websites, e-commerce platforms, APIs, and many real-world applications. ### 5. Do I need a server to run PHP? PHP runs on a server, but you can easily set up a local server using tools like XAMPP, WAMP, or MAMP. **Categories:** Blog, Guide, Laravel, Php **Tags:** beginner PHP guide, CodeIgniter, how to learn PHP, laravel, learn PHP, php, PHP basics, php for beginners, Start with PHP, symfony --- ### [PostgreSQL vs MySQL: Which Is Better for Your Application?](https://serveravatar.com/postgresql-vs-mysql/) **Published:** April 16, 2026 **Author:** Meghna Meghwani **Content:** [![Blog banner - ServerAvatar](https://serveravatar.com/wp-content/uploads/2025/09/728_90-Banner-3-1024x127.png)](https://serveravatar.com/?ref=blog)If you’re building a website or application, one big question often comes up: PostgreSQL vs MySQL, which one should you choose? It’s like choosing from two reliable options. Both will get you where you need to go, but the experience, flexibility, and features can vary quite a bit depending on your requirements. Databases are the backbone of modern applications. Whether you’re running a blog, an eCommerce store, or a complex SaaS platform, your choice of database can impact performance, scalability, and even future growth. In this guide, we’ll break everything down in simple terms so you can confidently decide which database fits your project best. ## What is PostgreSQL? [PostgreSQL](https://www.postgresql.org/) is an advanced, open-source database system known for its power, flexibility, and standards compliance. ![PostgreSQL - PostgreSQL vs MySQL](https://serveravatar.com/wp-content/uploads/2026/04/image-102-1024x522.png) Think of PostgreSQL as a multi-tool. It’s designed to handle complex queries, large datasets, and custom operations with ease. Developers love it because it supports advanced features like JSON, full-text search, and custom functions. In simple terms, PostgreSQL is built for complex and data-heavy applications. **Core Features** - Supports advanced data types like JSON, arrays, and custom objects - Fully ACID-compliant for reliable transactions - Powerful indexing methods for faster query performance - Supports complex queries and joins efficiently - Built-in full-text search capabilities - Highly extensible with custom functions and extensions - Strong support for concurrency (multiple users at once) - Open-source with regular updates and improvements **Benefits** - Excellent for handling complex and large datasets - High data accuracy and consistency - Flexible and customizable for different use cases - Strong security features like row-level access control - Ideal for analytics and data-heavy applications - Active community support and continuous development **Limitations** - Slightly more complex to learn for beginners - Setup and configuration can take more time - May consume more system resources - Not always the fastest for simple, read-heavy queries **Best For:** PostgreSQL is best for applications that require complex queries, high data integrity, and scalability. **Why Need PostgreSQL** - You need advanced database capabilities beyond basic CRUD operations - Your application handles large or complex datasets - Data accuracy and consistency are critical - You want flexibility to customize your database - Your project may scale significantly in the future ## What is MySQL? [MySQL](https://www.mysql.com/) is one of the most popular databases in the world, especially for web applications. ![MySQL - PostgreSQL vs MySQL](https://serveravatar.com/wp-content/uploads/2026/04/image-103-1024x585.png) It’s known for being fast, reliable, and easy to use. Many popular platforms (like WordPress) rely on MySQL because it’s simple to set up and works efficiently for most use cases. Think of MySQL as compact and efficient, easy to use, and well-suited for everyday tasks. **Core Features** - Easy-to-use relational database system - Fast performance for simple queries - Supports multiple storage engines (like InnoDB) - Wide compatibility with web hosting platforms - Replication support for better availability - Strong integration with popular web technologies - Open-source with enterprise options available **Benefits** - Beginner-friendly and quick to set up - Excellent performance for read-heavy workloads - Widely supported across hosting providers - Large community and extensive documentation - Works seamlessly with CMS platforms like WordPress **Limitations** - Less flexible compared to PostgreSQL - Limited support for advanced features - Not ideal for highly complex queries - Some advanced capabilities require workarounds **Best For:** MYSQL is best for simple, fast, and scalable web applications with straightforward database needs. **Why Need MYSQL** - You want a database that is easy to learn and manage - Your project involves simple or moderate data operations - You need fast performance for web-based applications - You’re using platforms like WordPress or Joomla - You prefer quick deployment with minimal setup ## Key Similarities Between PostgreSQL and MySQL Even though PostgreSQL and MySQL have their differences, they also share a strong foundation. After all, both are powerful relational databases designed to manage and organize data efficiently. Let’s look at what they have in common: - **Both Are Open-Source Databases:** PostgreSQL and MySQL are open-source, which means you can use them for free, modify them, and benefit from continuous improvements by global communities. - **Relational Database Systems:** Both follow the relational model, storing data in tables with rows and columns, making it easy to organize and query structured data. - **Support for SQL (Structured Query Language):** They both use SQL as their primary language, allowing you to perform operations like querying, updating, and managing data. - **ACID Compliance (Reliable Transactions):** Both databases support ACID properties (Atomicity, Consistency, Isolation, Durability), ensuring safe and reliable transactions. - **Cross-Platform Compatibility:** You can run both PostgreSQL and MySQL on major operating systems like Linux, Windows, and macOS without issues. - **Strong Community Support:** Each database has a large, active community, which means plenty of tutorials, documentation, and troubleshooting help is available. - **Scalability Options:** Both systems can scale as your application grows, whether through replication, clustering, or other scaling techniques. - **Security Features:** PostgreSQL and MySQL offer authentication, user roles, and access control to help secure your data. - **Widely Used in Web Development:** Both are commonly used in modern web applications, making them reliable choices for developers and businesses alike. ## Key Differences Between PostgreSQL and MySQL PostgreSQL and MySQL may serve the same purpose, but they are designed with different priorities in mind. One focuses on flexibility and advanced capabilities, while the other is built for simplicity and speed. Understanding these differences helps you choose the right database for your project. Let’s quickly compare the two: - PostgreSQL focuses on advanced features and flexibility - MySQL focuses on speed and simplicity - PostgreSQL supports more data types and customizations - MySQL is widely used for web-based applications In short: - PostgreSQL: Power + Flexibility, best suited for complex and scalable applications - MySQL: Speed + Simplicity, ideal for fast and straightforward projects ### Performance Comparison Performance isn’t about which database is universally faster, it depends on how you use it. Each database is optimized for different types of workloads, making them suitable for specific scenarios. - MySQL performs better for simple read-heavy applications like blogs or CMS platforms - PostgreSQL shines in complex queries and heavy data processing For example: - Running simple SELECT queries? - MySQL is fast, it delivers quick results for basic data retrieval tasks. - Handling analytics or large joins? - PostgreSQL performs better, it is built to manage complex data relationships and analysis. So, performance isn’t about which is faster; it’s about what kind of workload you have. ### System Design and Architecture The internal design of a database affects how it handles queries, data storage, and scalability. PostgreSQL and MySQL follow different architectural approaches, which impacts their performance and flexibility. - PostgreSQL: Uses a process-based architecture, allowing better handling of complex operations and concurrency. - MySQL: Uses a thread-based architecture, which is lightweight and efficient for simpler workloads. ### Supported Programming Languages Databases need to integrate smoothly with programming languages. Both options support multiple languages, making them versatile for developers. - PostgreSQL: Supports languages like Python, Java, C, and even allows custom procedural languages. - MySQL: Works well with popular languages such as PHP, Java, Python, and Node.js. ### User Experience and Interface A good user interface makes database management easier. While both databases rely on command-line tools, they also support graphical interfaces. - PostgreSQL: Primarily CLI-based but supports tools like pgAdmin for visual management. - MySQL: Offers an easy-to-use interface with tools like MySQL Workbench. ### Support and Maintenance Options Reliable support can make a big difference when managing databases. Both PostgreSQL and MySQL offer community and enterprise support, but their ecosystems vary slightly. - PostgreSQL: Backed by a strong open-source community with optional third-party enterprise support. - MySQL: Offers both community support and official enterprise support from Oracle. ### Data Security and Encryption Secure data transfer is essential for protecting sensitive information. Both databases provide encryption, but their implementation differs in flexibility. - PostgreSQL: Provides strong SSL/TLS encryption with advanced configuration options. - MySQL: Supports encrypted connections but with comparatively simpler configurations. ### User Experience and Interface A good user interface makes database management easier. While both databases rely on command-line tools, they also support graphical interfaces. - PostgreSQL: Primarily CLI-based but supports tools like pgAdmin for visual management. - MySQL: Offers an easy-to-use interface with tools like MySQL Workbench. ### Concurrency Handling (MVCC Support) Concurrency control ensures multiple users can access the database without conflicts. Both databases support MVCC, but their implementation varies. - PostgreSQL: Built with advanced MVCC support, ensuring smooth performance under heavy workloads. - MySQL: Supports MVCC through the InnoDB engine, suitable for most standard use cases. ### Table Deletion Behavior Deleting tables is a common operation, but how it’s handled can impact performance and data recovery. - PostgreSQL: Safely removes tables with strict dependency checks. - MySQL: Quickly deletes tables but may require manual handling of dependencies. ### Clearing Table Data Truncating a table removes all data efficiently. Both databases support this, but their internal handling differs slightly. - PostgreSQL: Fast and transactional, ensuring data safety. - MySQL: Very fast operation, especially for large tables. ### Graphical Management Tools GUI tools simplify database operations like querying and monitoring. Both PostgreSQL and MySQL offer tools to make management easier. - PostgreSQL: Uses pgAdmin and other third-party tools for graphical interaction. - MySQL: Uses MySQL Workbench for an intuitive and user-friendly experience. ### Replication and Clustering Capabilities Replication and clustering help improve availability and scalability. Both databases support these features but differ in complexity and flexibility. - PostgreSQL: Offers advanced replication and clustering options with high flexibility. - MySQL: Provides simpler replication setups that are easier to configure. ### Handling Large Number of Connections As applications grow, databases must handle more user connections. Efficient connection management is key to maintaining performance. - PostgreSQL: Handles connections well but may require connection pooling for optimization. - MySQL: Efficiently manages a large number of connections with lower overhead. ### Ease of Use and Learning Curve The ease of learning a database can make a big difference, especially for beginners. While one is more beginner-friendly, the other offers more control for those willing to invest time. - MySQL is beginner-friendly and easy to set up, it requires minimal effort to get started. - PostgreSQL has a steeper learning curve but offers more control, it takes time to learn but provides greater flexibility. If you’re just starting out, MySQL might feel more comfortable. But if you’re willing to learn, PostgreSQL gives you more power. ### Data Integrity and Reliability Data reliability is critical for any application. Both databases support safe transactions, but one is particularly known for maintaining accuracy in complex environments. - PostgreSQL strictly follows ACID compliance, which ensures every transaction is processed reliably. It ensures your data stays consistent even during failures. - MySQL also supports ACID (with InnoDB), which provides reliable transactions when using the right storage engine. ### Scalability and Flexibility As your application grows, your database should be able to grow with it. PostgreSQL and MySQL both support scaling, but they differ in how much flexibility they offer. - PostgreSQL supports advanced scaling and customization, it adapts easily to complex and growing systems. - MySQL scales well, but is more limited in flexibility, it handles growth, but with fewer customization options. ### Security Features Security is a major concern when dealing with user data. While both databases offer protection, one provides more advanced security controls. - PostgreSQL offers advanced security features like row-level security, it allows fine-grained control over who can access specific data. - MySQL provides basic security, but is less feature-rich, it covers essential protection but lacks deeper controls. If security is a top priority, PostgreSQL has the edge. ### Community Support and Ecosystem A strong community can make development much easier. Both PostgreSQL and MySQL have solid ecosystems, making them reliable choices for developers. - MySQL has massive adoption and widespread hosting support - PostgreSQL has a growing and highly active developer community You’ll find tutorials, forums, and tools for both, so support isn’t a major concern. ## Use Cases: When to Choose PostgreSQL PostgreSQL is best suited for applications that require advanced data handling and scalability. It is a strong choice when complexity and accuracy matter most. Choose PostgreSQL if you are building: - **Data analytics platforms:** Ideal for processing and analyzing large datasets. - **Financial applications:** Ensures accuracy and reliability for sensitive data. - **Large-scale enterprise systems:** Handle complex operations across big applications. - **Applications requiring complex queries:** Excels in handling advanced database logic. Basically, if your project is complex and data-heavy, PostgreSQL is a great choice. ## Use Cases: When to Choose MySQL MySQL works best for applications that need speed, simplicity, and quick deployment. It’s a practical choice for common web-based projects. Choose MySQL if you are building: - **Blogs or CMS (like WordPress):** Perfect for content-driven websites. - **Small to medium web apps:** Works well for moderately sized projects. - **eCommerce websites:** Handles transactions and product data efficiently. - **Projects needing quick setup:** Can be deployed and used quickly. If your goal is simplicity and speed, MySQL works perfectly. [![Blog banner - ServerAvatar](https://serveravatar.com/wp-content/uploads/2025/09/728_90-Banner-1-1024x127.png)](https://serveravatar.com/?ref=blog)## PostgreSQL vs MySQL: Quick Comparison A quick comparison helps you see the core differences at a glance. While both databases are reliable, their strengths lie in different areas. **Feature****PostgreSQL****MySQL****Ease of Use**ModerateEasy**Performance**Best for complex queriesBest for simple queries**Flexibility**HighLimited**Scalability**AdvancedModerate**Security**StrongBasic**Use Case**Complex appsWeb apps## Which One Should You Choose? There’s no one-size-fits-all answer when choosing between PostgreSQL and MySQL. The right choice depends on your project’s complexity, scalability needs, and long-term goals. Here’s the honest answer, it depends on your project. - **Want simplicity and quick setup?** - Go with MySQL, it’s easier to start and manage. - **Need advanced features and scalability?** - Choose PostgreSQL, it’s better for growing and complex applications. - **If you’re still unsure, ask yourself:** Will my application grow and become complex in the future? - If yes, PostgreSQL can help avoid future limitations. ## How ServerAvatar Simplifies Database Management While choosing between PostgreSQL and MySQL is important, managing your database efficiently is just as critical. If you decide to go with MySQL, ServerAvatar can make your entire workflow much simpler. ServerAvatar is designed to remove the complexity of server and database management. Since it is optimized for MySQL-based environments, it provides a smooth, reliable experience for developers who want speed, simplicity, and control without dealing with complex server setups. ![ServerAvatar Dashboard - PostgreSQL vs MySQL](https://serveravatar.com/wp-content/uploads/2026/04/image-104.png) [ServerAvatar](https://serveravatar.com/) is a platform to simplify the hosting and management of servers and applications. It simplifies the process of deploying and managing PHP and Node.js based web applications on servers. Instead of spending time manually configuring your server, you can focus on building and scaling your application. ### Key Benefits of Using ServerAvatar - **Optimized for MySQL Environments:** ServerAvatar is built to work seamlessly with MySQL, ensuring stable performance for web applications. - **One-Click Application Deployment:** Quickly deploy PHP applications that rely on MySQL without manual configuration. - **Automated Backups:** Easily create instant backups and schedule backups to protect your applications and MySQL databases and prevent data loss. - **Real-Time Server Monitoring:** Keep track of your server and database performance to identify issues early. - **Simple and Clean Dashboard:** Manage your databases, applications, and servers from an easy-to-use interface. - **Managed Server Option:** Use fully managed servers where everything, including MySQL setup, is handled for you. ### Why This Matters If your project leans toward MySQL, which is often the case for web applications like WordPress or eCommerce platforms, using ServerAvatar can significantly reduce your workload. It helps you: - Save time on setup and maintenance - Avoid configuration mistakes - Scale your application without stress In short, if you choose MySQL for its simplicity and speed, ServerAvatar enhances that experience by making server and database management smooth, efficient, and hassle-free. ## Conclusion Choosing between PostgreSQL and MySQL ultimately comes down to your project’s needs and future goals. If your application requires advanced features, complex queries, and high data integrity, PostgreSQL is a strong choice. On the other hand, if you prioritize simplicity, speed, and ease of setup, MySQL is often the better fit for web-based applications. Both databases are reliable and widely used, so you’re not making a wrong decision either way. The key is to match the database to your workload, and if you choose MySQL, using a platform like ServerAvatar can further simplify deployment, management, and scaling. ## FAQs ### 1. Is MySQL faster than PostgreSQL? MySQL is generally faster for simple, read-heavy operations, whereas PostgreSQL performs better when handling complex queries and large datasets. ### 2. Which database is easier for beginners? MySQL is considered more beginner-friendly because of its simple setup and ease of use, making it a popular choice for new developers. ### 3. Can I switch from MySQL to PostgreSQL later? Yes, it is possible to migrate between databases, but it may require effort in terms of data conversion, query adjustments, and application changes. ### 4. Which database is more secure? Both databases offer strong security features, but PostgreSQL provides more advanced options like row-level security and fine-grained access control. ### 5. Why should I use ServerAvatar with MySQL? ServerAvatar simplifies server and database management by offering features like one-click deployment, automated backups, monitoring, and an easy-to-use dashboard, helping you save time and reduce manual work. ### 6. Which database should I choose for a WordPress website? MySQL is the best choice for WordPress since it is fully compatible and widely supported across hosting platforms. **Categories:** Blog, Guide, Linux, Others, Ubuntu **Tags:** database comparison, database management systems, MySQL, MySQL database, open source databases, PostgreSQL, PostgreSQL database, PostgreSQL vs MySQL, PostgreSQL vs MySQL comparison --- ### [How to Fix 502 Bad Gateway in NGINX? Complete Troubleshooting Guide](https://serveravatar.com/fix-502-bad-gateway-nginx/) **Published:** April 15, 2026 **Author:** Meghna Meghwani **Content:** [![Blog banner - ServerAvatar](https://serveravatar.com/wp-content/uploads/2025/09/728_90-Banner-3-1024x127.png)](https://serveravatar.com/?ref=blog)Have you ever opened your website and suddenly been greeted by a “502 Bad Gateway” error? It’s frustrating, right? One moment, everything is working fine, and the next, your site feels completely broken. If you’re trying to fix 502 Bad Gateway in NGINX, it usually means something went wrong in the communication between servers. Think of it like one server sends a request to another but doesn’t receive a proper response in return. The request was made, but no valid response came back. The good news? You can fix it. In this guide, I will walk you through simple, practical steps to troubleshoot and fix the 502 Bad Gateway error in NGINX, even if you’re not a technical expert. ## What is a 502 Bad Gateway Error? A 502 Bad Gateway error occurs when NGINX, acting as a proxy server, does not receive a valid response from the backend (upstream) server. In simple terms, the request is sent successfully, but the response is either invalid or missing. This usually indicates a communication failure between servers. ![Fix 502 Bad Gateway](https://serveravatar.com/wp-content/uploads/2026/04/image-100.png) - **NGINX sends a request:** NGINX forwards the client request to the backend server. - **Backend server fails to respond properly:** The upstream server crashes, delays, or sends an invalid response. - **NGINX returns a 502 error:** NGINX shows the error because it cannot process the incomplete response. ### Why Does 502 Error Occur in NGINX? A 502 error doesn’t have a single cause; it can happen due to multiple issues in your server setup. It usually occurs when something breaks in the communication chain between NGINX and the backend service. Even a small misconfiguration can trigger this error. Common causes include: - **Backend server is down:** The upstream service is not running or has crashed. - **PHP-FPM is not running:** NGINX cannot process PHP requests without PHP-FPM. - **Wrong port or socket configuration:** Incorrect connection details prevent communication. - **Timeout issues:** The backend takes too long to respond. - **Firewall blocking requests:** Security rules block internal connections. - **DNS problems:** NGINX cannot resolve the backend hostname. - **Misconfigured NGINX settings:** Errors in configuration files break the request flow. ## Common Causes of 502 Bad Gateway Error Understanding the cause enables you to fix the issue quickly. Below are the most frequent reasons behind 502 errors in NGINX setups. ### 1. Backend Server is Down or Not Reachable NGINX works as a middle layer that forwards requests to backend services like PHP-FPM, Node.js, Apache, or containers. If that backend service is stopped, crashed, or unreachable, NGINX cannot complete the request, which results in a 502 error. ### 2. Wrong Upstream Configuration Even a minor mistake in configuration can break connectivity. If the port, socket path, or server details are incorrect, NGINX won’t be able to reach the backend. This usually happens when: - **Incorrect port number:** NGINX is pointing to the wrong port. - **Wrong socket path:** The defined socket file does not exist. - **Configuration typo:** A small syntax error breaks the setup. If NGINX points to a location that doesn’t exist, it simply fails to connect. ### 3. Slow Response from Backend (Timeout Issues) NGINX has default timeout limits. If your backend takes too long to respond, the connection is closed early. This often happens when: - **Heavy database queries:** Slow queries delay response time. - **Slow external APIs:** Third-party services take too long to respond. - **Application bottlenecks:** Inefficient code slows down processing. ### 4. PHP-FPM or App Server Problems PHP-FPM manages PHP requests, and if it’s misconfigured or overloaded, it can’t handle incoming traffic. This leads to failed responses and 502 errors. Issues can occur when: - **All workers are busy:** No free process is available to handle requests. - **Incorrect configuration:** Improper settings affect performance. - **User mismatch with NGINX:** Permission conflicts block communication. When PHP-FPM can’t handle new requests, NGINX ends up showing a 502 error. ### 5. Server Resource Limits Reached When your server runs out of resources, backend services may stop responding. High load conditions often lead to unstable performance and errors. - **Low memory (RAM):** The system cannot handle new processes. - **High CPU usage:** Processes become slow or unresponsive. - **Too many open files/processes:** System limits prevent new connections. When the server is overloaded, backend services fail to respond properly. ### 6. Firewall or Security Restrictions Security layers can sometimes block valid communication between NGINX and backend services. This happens even when everything else is configured correctly. - **Local firewall rules:** Tools like UFW or iptables block ports. - **Cloud firewall settings:** External rules deny traffic. - **SELinux restrictions:** Access to sockets or files is restricted. Even if everything else is correct, blocked access can still trigger a 502 error. ### 7. DNS Resolution Problems If NGINX relies on domain names instead of IP addresses, DNS issues can break connectivity. When the hostname cannot be resolved, the request fails. A 502 error can occur if: - **DNS not resolving:** The domain cannot be converted to an IP. - **Incorrect hostname:** The configured domain is wrong. - **Container/network DNS failure:** Internal service discovery fails. ## Steps to Diagnose 502 Errors Once you know the causes, the next step is identifying the exact issue. A structured approach makes troubleshooting much easier and faster. ### 1. Check NGINX Error Logs Logs provide direct insight into what went wrong and where the failure occurred. Start by reviewing logs: ``` sudo tail -n 50 /var/log/nginx/error.log ``` ``` sudo tail -n 50 /var/log/nginx/error.log ``` Look for clues like: - **connection refused:** Backend service is not accepting connections. - **upstream timed out:** Backend response is too slow. - **no live upstreams:** No available backend servers. These messages point directly to the root problem. ### 2. Confirm Backend Service is Running Make sure your backend service (PHP-FPM, Node.js, etc.) is active and properly configured: ``` sudo systemctl status php8.1-fpm ``` ``` sudo systemctl status php8.1-fpm ``` Also verify: - **Service is running:** Backend is active and available. - **Listening on correct port/socket:** Connection details match NGINX config. ### 3. Test Backend Directly Testing the backend separately helps isolate the issue. Try accessing the backend without NGINX: ``` curl -I http://127.0.0.1:9000 ``` ``` curl -I http://127.0.0.1:9000 ``` - **Successful response:** Backend is working correctly. - **No response:** Backend service is the issue. This helps you determine whether the issue is with NGINX or the backend itself. ### 4. Check Application Logs Backend logs often reveal errors not visible in NGINX logs. ``` sudo tail -n 50 /var/log/php8.1-fpm.log ``` ``` sudo tail -n 50 /var/log/php8.1-fpm.log ``` Look for: - **Fatal errors:** Application crashes during execution. - **Worker crashes:** Processes stop unexpectedly. - **Config issues:** Incorrect settings cause failures. ### 5. Monitor Server Resources System performance issues can directly impact backend response. Use commands like: ``` top htop free -m df -h ``` ``` top htop free -m df -h ``` Watch for: - **High CPU usage:** Processes are overloaded. - **Low memory:** System resources are exhausted. - **Load spikes:** Traffic exceeds server capacity. ## Effective Ways to Fix 502 Errors Once you identify the issue, applying the right fix becomes straightforward. Here are some proven solutions. ### 1. Restart Backend Services Restarting services can quickly resolve temporary crashes or unresponsive states. ``` sudo systemctl restart php8.1-fpm ``` ``` sudo systemctl restart php8.1-fpm ``` - **Service restart:** Resets the backend to a stable state. ### 2. Fix NGINX Proxy or FastCGI Settings Ensure NGINX is pointing to the correct backend location. ``` fastcgi_pass unix:/run/php/php8.1-fpm.sock; ``` ``` fastcgi_pass unix:/run/php/php8.1-fpm.sock; ``` - **Correct socket/port:** Ensures proper communication path. ### 3. Correct Socket Permissions Permission issues can block access between NGINX and backend services. ``` sudo chown www-data:www-data /run/php/php8.1-fpm.sock sudo chmod 660 /run/php/php8.1-fpm.sock ``` ``` sudo chown www-data:www-data /run/php/php8.1-fpm.sock sudo chmod 660 /run/php/php8.1-fpm.sock ``` - **Proper ownership and permissions:** Allows secure communication. ### 4. Increase Timeout Limits Increasing timeouts helps when backend responses are slow. ``` proxy_read_timeout 60s; proxy_connect_timeout 60s; ``` ``` proxy_read_timeout 60s; proxy_connect_timeout 60s; ``` - **Higher timeout values:** Prevents premature connection drops. ### 5. Clear NGINX Cache Clearing cache removes outdated or corrupted data that may cause issues. ``` sudo rm -rf /var/cache/nginx/* sudo systemctl restart nginx ``` ``` sudo rm -rf /var/cache/nginx/* sudo systemctl restart nginx ``` - **Cache cleanup:** Ensures fresh request handling. ## Best Practices to Prevent 502 Errors Preventing 502 Bad Gateway errors is always better than fixing them later. By following a few smart practices, you can keep your NGINX server stable and avoid unexpected downtime. These small but effective steps help ensure smooth communication between NGINX and your backend services. - **Keep backend services stable and monitored:** Regularly check your backend services to ensure they are running properly and not crashing under load. - **Always test NGINX configs before reloading:** Use configuration testing commands to catch errors before applying changes to your server. - **Set realistic timeout values:** Adjust timeout settings based on your application’s response time to avoid premature connection drops. - **Maintain proper socket permissions:** Ensure correct ownership and permissions so NGINX can communicate with backend services without issues. - **Enable detailed logging:** Turn on logs to quickly identify and troubleshoot issues when something goes wrong. - **Use caching to reduce backend load:** Implement caching to minimize repeated requests and improve overall performance. - **Optimize application performance:** Improve code and database queries to reduce response time and server strain. - **Avoid unnecessary restarts:** Frequent restarts can disrupt services; only restart when truly needed. - **Follow best practices for Docker/Kubernetes setups:** Ensure proper configuration, health checks, and service communication in containerized environments. - **Plan for traffic spikes and scalability:** Prepare your infrastructure to handle high traffic by scaling resources when needed. [![Blog banner - ServerAvatar](https://serveravatar.com/wp-content/uploads/2025/09/728_90-Banner-1-1024x127.png)](https://serveravatar.com/?ref=blog)## Common Mistakes That Lead to 502 Bad Gateway Errors When dealing with a 502 Bad Gateway error in NGINX, many issues are caused by simple oversights rather than complex problems. Avoiding these common mistakes can save you a lot of debugging time. - **Ignoring Error Logs:** One of the biggest mistakes is not checking error logs. Many users try random fixes without looking at what NGINX is actually reporting. Logs often give a clear indication of what’s going wrong. - **Using Incorrect Socket or Port:** Misconfiguring the socket path or port number is very common. If NGINX is pointing to the wrong location, it won’t be able to connect to the backend service. - **Forgetting to Restart Services After Changes:** After updating configurations, many users forget to restart or reload services. Without applying the changes, the issue will continue even if the configuration is correct. - **Setting Extremely Low Timeout Values:** If timeout settings are too short, NGINX may terminate the connection before the backend responds. This often leads to unnecessary 502 errors, especially for slow applications. - **Overlooking Permission Issues:** Incorrect permissions on sockets or files can block communication between NGINX and backend services. This is often missed because everything else appears to be configured correctly. - **Not Monitoring Server Resources:** High CPU or memory usage can cause backend services to slow down or crash. Ignoring system resource usage can make the problem worse over time. - **Making Changes Without Testing Configuration:** Editing NGINX configuration files without testing them using nginx -t can introduce new errors. A small syntax mistake can break the entire setup. - **Blocking Requests with Firewall Rules:** Sometimes, firewall or security settings unintentionally block internal communication. Many users forget to check these rules while troubleshooting. - **Relying Only on Restarts:** Restarting services may temporarily fix the issue, but it doesn’t solve the root cause. Relying only on restarts can lead to recurring problems. - **Ignoring Backend Application Errors:** Not all issues come from NGINX. Sometimes the backend application itself is failing, and ignoring its logs can delay proper diagnosis. ## Simplify 502 Error Troubleshooting with ServerAvatar Fixing a 502 Bad Gateway error manually can sometimes feel overwhelming, especially if you’re not comfortable working with server commands or digging through multiple log files. When several components like NGINX, PHP-FPM, and your application are involved, identifying the exact issue can take time. This is where ServerAvatar can make the process much simpler. [ServerAvatar](https://serveravatar.com/) is a platform to simplify the hosting and management of servers and applications. It simplifies the process of deploying and managing PHP and Node.js based web applications on servers. ![ServerAvatar Dashboard - Fix 502 Bad Gateway](https://serveravatar.com/wp-content/uploads/2026/04/image-101.png) Instead of handling everything through the command line, you get a clean dashboard to manage and monitor your server in one place. You can quickly check whether services are running, restart them when needed, and review logs without switching between tools. With ServerAvatar, you can: - Monitor server and service status in real time - Restart NGINX, PHP-FPM, or other services with a single click - Access error logs without using SSH - Manage your servers and applications through an easy-to-use dashboard For developers and website owners who want to save time and reduce complexity, using a server management tool like ServerAvatar can make troubleshooting errors like 502 much faster and more efficient. ## Conclusion A 502 Bad Gateway error in NGINX may seem confusing at first, but once you understand how the communication between NGINX and backend services works, it becomes much easier to troubleshoot. Most issues come down to misconfigurations, server overload, or unresponsive backend services. By following a structured approach, checking logs, verifying services, and applying the right fixes, you can quickly identify and resolve the problem. And if you want to simplify server management and reduce manual effort, using a tool like ServerAvatar can help you handle monitoring, troubleshooting, and maintenance more efficiently. ## FAQs ### 1. What does a 502 Bad Gateway error mean in NGINX? It means that NGINX was able to send a request, but it didn’t receive a valid response from the backend server, resulting in a failed connection. ### 2. What is the most common cause of a 502 error? The most common reason is a backend service (like PHP-FPM or Node.js) being down, unresponsive, or misconfigured. ### 3. How can I quickly fix a 502 Bad Gateway error? Start by checking NGINX error logs, ensure backend services are running, and restart services if needed. These steps often resolve the issue quickly. ### 4. Can high server load cause a 502 error? High CPU usage or low memory can slow down or crash backend services, preventing them from responding properly. ### 5. How do I know if the issue is with NGINX or the backend? You can test the backend directly using tools like curl. If the backend doesn’t respond, the issue lies there, not in NGINX. ### 6. Is ServerAvatar helpful for fixing 502 errors? It helps by providing an easy interface to monitor services, check logs, and manage servers without needing complex command-line operations. **Categories:** Blog, Guide, Others, Tutorials **Tags:** 502 bad gateway, 502 error, DevOps, fix 502 bad gateway, fix nginx errors, how to fix 502 bad gateway, Nginx, nginx 502 error troubleshooting, nginx error guide --- ### [Laravel vs CodeIgniter: Which PHP Framework Is Better](https://serveravatar.com/laravel-vs-codeigniter/) **Published:** April 14, 2026 **Author:** Meghna Meghwani **Content:** [![Blog banner - ServerAvatar](https://serveravatar.com/wp-content/uploads/2025/09/728_90-Banner-3-1024x127.png)](https://serveravatar.com/?ref=blog)If you’re planning to build a website or web application using PHP, you’ve probably come across two popular names: Laravel and CodeIgniter. When it comes to Laravel vs CodeIgniter, many developers find it confusing to decide which one is the better choice. And let’s be honest, it can feel overwhelming trying to pick between them, right? Think of it like choosing between two technologies, one is packed with advanced features, smooth design, and automation (Laravel), while the other is lightweight, fast, and easy to use (CodeIgniter). Both will get you to your destination, but the journey will feel very different. So, which one should you choose? In this guide, we will break down Laravel vs CodeIgniter in a simple, practical way so you can make the right decision, even if you’re not a tech expert. ## What is a PHP Framework? A PHP framework is a pre-built collection of tools, libraries, and guidelines that helps developers build web applications more efficiently. Instead of writing every piece of code from scratch, a framework provides a structured foundation with ready-to-use components for common tasks like routing, database interaction, authentication, and security. Think of it as a shortcut that simplifies development while keeping your code organized and maintainable. PHP frameworks follow standard coding practices and design patterns (like MVC), making it easier to manage, scale, and collaborate on projects. By using a PHP framework, developers can save time, reduce errors, and focus more on building features rather than handling repetitive tasks. Popular frameworks like Laravel and CodeIgniter are widely used because they make the development process faster, cleaner, and more reliable. ## What is Laravel? [Laravel](https://laravel.com/) is a modern PHP framework designed to make web development faster, cleaner, and more efficient. It provides developers with a well-structured environment where common tasks, like routing, authentication, and database management, are already handled with built-in tools. Instead of writing everything from scratch, you can focus more on building features that actually matter for your application. ![Laravel - Laravel vs CodeIgniter](https://serveravatar.com/wp-content/uploads/2026/04/image-97-1024x531.png) What makes Laravel stand out is its elegant syntax and developer-friendly approach. Even though it comes with advanced capabilities, it still manages to keep things organized and readable. Whether you’re building a small web app or a large-scale platform, Laravel gives you the flexibility and power to scale your project smoothly. **Key Features** - MVC (Model-View-Controller) architecture - Built-in authentication and authorization - Eloquent ORM for database management - Blade templating engine - RESTful routing system - Task scheduling and queue management - Strong security features (CSRF protection, hashing) - Artisan command-line tool **Advantages** - Clean and organized code structure - Rich set of built-in tools and features - Strong community support and documentation - Highly scalable for large applications - Enhanced security by default **Disadvantages** - Slightly slower due to heavy features - Steeper learning curve for beginners - Requires more server resources **Best For:** Laravel is best for building modern, scalable, and feature-rich web applications. **Why You Need Laravel** - Saves development time with built-in tools - Reduces repetitive coding tasks - Helps maintain clean and structured code - Supports large and complex projects - Improves application security ## What is CodeIgniter? [CodeIgniter](https://www.codeigniter.com/) is a lightweight and straightforward PHP framework that focuses on simplicity and speed. It’s designed for developers who want to build web applications quickly without dealing with complex configurations. With minimal setup required, you can start coding almost immediately, making it a great choice for beginners or small projects. ![CodeIgniter - Laravel vs CodeIgniter](https://serveravatar.com/wp-content/uploads/2026/04/image-98-1024x563.png) Unlike more feature-heavy frameworks, CodeIgniter keeps things minimal. It gives you the essential tools needed to build applications while allowing you to stay in control of how things work. If you prefer a fast, no-frills approach to development, CodeIgniter can be a practical and efficient option. **Key Features** - Lightweight and fast performance - Simple and easy installation - Minimal configuration required - Flexible MVC framework - Built-in libraries for common tasks - Good error handling and debugging - Compatible with most hosting environments **Advantages** - Easy to learn and use - Faster execution due to lightweight structure - Low server requirements - Quick setup and deployment - Ideal for small projects **Disadvantages** - Limited built-in features - Less suitable for large-scale applications - Smaller community compared to modern frameworks - Requires more manual coding for advanced features **Best For:** CodeIgniter is best for building lightweight, fast, and simple web applications. **Why You Need CodeIgniter** - Helps you start projects quickly - Reduces complexity in development - Works well on low-resource servers - Gives more control over coding structure - Ideal for beginners learning PHP frameworks ## Comparison Table of Laravel and CodeIgniter Below is the comparison table that highlights the key differences between Laravel and CodeIgniter in a clear and easy-to-understand format. **Feature****Laravel****CodeIgniter****Type**Modern PHP frameworkLightweight PHP framework**Architecture**Strict MVC patternFlexible MVC (not strictly enforced)**Learning Curve**Moderate to steepEasy and beginner-friendly**Performance**Slightly slower due to built-in featuresFaster due to lightweight nature**Built-in Features**Rich (authentication, routing, ORM, etc.)Limited (basic tools only)**Database Handling**Eloquent ORM (advanced and user-friendly)Simple database functions (no full ORM)**Security**Strong built-in security featuresBasic security, requires manual handling**Scalability**Highly scalable for large applicationsBetter suited for small to medium projects**Template Engine**Blade templating engineNo built-in templating engine**Community Support**Large and active communitySmaller but stable community**Development Speed**Faster for complex apps (due to tools)Faster for simple apps**Code Structure**Clean, modern, and organizedSimple but less structured**Customization**High flexibility with built-in toolsFlexible but requires manual effort**Modules & Libraries**Extensive ecosystem and packagesLimited libraries**Best Use Case**Complex, enterprise-level applicationsSmall, lightweight applications## Key Differences Between Laravel and CodeIgniter Laravel and CodeIgniter differ mainly in terms of features, complexity, and scalability, Laravel offers a modern, feature-rich environment, while CodeIgniter focuses on simplicity and speed. Your choice depends on whether you need advanced functionality or a lightweight framework for quick development. - **Laravel:** Feature-rich, modern, slightly complex - **CodeIgniter:** Lightweight, fast, beginner-friendly ### Ease of Learning and Use The ease of learning depends on how simple or structured you prefer your development process to be. Some developers prefer flexibility and quick setup, while others value a more organized and feature-rich approach. **Laravel:** Laravel has a steeper learning curve because of its advanced features and structure. Beginners may take some time to get comfortable. **CodeIgniter:** CodeIgniter is much easier to learn. You can start building applications quickly without deep knowledge. **Verdict** - **Beginners:** CodeIgniter - **Experienced developers:** Laravel ### Performance Comparison Performance varies based on how lightweight or feature-heavy the framework is. Simpler setups tend to run faster, while feature-rich environments may require optimization for better speed. **Laravel:** Laravel is slightly slower due to its heavy features, but performance can be optimized. **CodeIgniter:** CodeIgniter is faster because it’s lightweight and has fewer built-in features. **Verdict** If speed is your top priority, CodeIgniter wins. ### Features and Functionality The level of built-in features can greatly impact development speed and convenience. More features reduce manual work, while fewer features offer greater control and simplicity. **Laravel:** It is known for offering a wide range of built-in tools that streamline development. - Built-in authentication - Routing system - Blade templating engine - Task scheduling - RESTful API support **CodeIgniter:** It keeps things minimal by providing only the essential tools needed for development. - Basic routing - Lightweight libraries - Minimal built-in tools **Verdict** Laravel offers far more features out of the box. ### Templates Templating plays an important role in separating design from logic in web development. A good template system helps improve code readability, reusability, and overall development efficiency. **Laravel** - Uses a powerful and modern templating engine - Supports reusable layouts and components - Offers clean syntax for embedding logic in views - Helps maintain separation between design and backend code **CodeIgniter** - Does not include a built-in templating engine - Relies on basic PHP for designing views - Gives developers full control over HTML structure - Requires manual effort for reusable layouts **Verdict** - Laravel is better for structured and reusable templating - CodeIgniter is better for simple and direct view handling ### Overview of API Handling in Both Frameworks API handling determines how easily applications can communicate with external services or frontend systems. A structured approach can simplify building and managing APIs, while a minimal approach offers more control. **Laravel** - Provides built-in tools for creating RESTful APIs - Supports API authentication and middleware - Simplifies request and response handling - Ideal for modern API-driven applications **CodeIgniter** - Requires additional setup for API development - Offers basic tools for handling requests and responses - Gives flexibility but needs manual configuration - Suitable for simple API implementations **Verdict** - Laravel is better for advanced and scalable APIs - CodeIgniter is better for lightweight and basic APIs ### Authentication & Authorization Authentication and authorization define how users access and interact with an application. Built-in systems can speed up development, while manual setups allow for more customization. **Laravel** - Comes with built-in authentication system - Supports role-based access control - Includes ready-to-use login and registration features - Enhances security with minimal setup **CodeIgniter** - No default authentication system included - Requires manual implementation for user access control - Offers flexibility for custom authentication logic - Needs extra effort for secure setup **Verdict** - Laravel is better for ready-to-use and secure authentication systems - CodeIgniter is better for custom-built and flexible authentication setups ### HTTP Route Setup in Both Frameworks Routing controls how incoming requests are handled and directed within an application. A well-defined routing system improves organization, while a simpler setup allows quicker implementation. **Laravel** - Offers a clean and expressive routing system - Supports route grouping and middleware - Makes it easy to manage complex routes - Improves code organization **CodeIgniter** - Uses a simple and straightforward routing approach - Easy to configure for basic applications - Less structured compared to advanced systems - Suitable for smaller projects **Verdict** - Laravel is better for organized and complex routing - CodeIgniter is better for simple and quick routing ### Learning Curve The learning curve depends on how complex or feature-rich the framework is. Simpler systems are easier to pick up quickly, while advanced frameworks may require more time but offer greater capabilities. **Laravel** - Requires time to understand advanced features - Involves learning modern development concepts - Better suited for developers with some experience - Offers long-term benefits once mastered **CodeIgniter** - Easy to learn and beginner-friendly - Minimal configuration and setup required - Ideal for quick learning and rapid development - Suitable for developers new to PHP frameworks **Verdict** - Laravel is better for long-term growth and advanced skills - CodeIgniter is better for quick learning and simplicity ### Security Capabilities Security depends on the availability of built-in protections and how much needs to be handled manually. Strong default security can save time, while manual control allows customization. **Laravel:** Laravel includes strong security features, such as: - CSRF protection - Encryption - Password hashing **CodeIgniter:** CodeIgniter provides basic security features, but requires manual handling for advanced protection. **Verdict** Laravel is more secure by default. ### Database Handling Database interaction can range from simple query handling to advanced abstraction layers. The approach you choose affects both ease of use and development flexibility. **Laravel:** Uses Eloquent ORM, which makes database interaction simple and intuitive. **CodeIgniter:** Uses a simpler database system without full ORM capabilities. **Verdict** Laravel makes database management easier and more powerful. ### Community and Support Community size and activity influence how easily you can find help, tutorials, and updates. A larger community often means better long-term support and learning resources. **Laravel Community** - Huge global community - Extensive documentation - Regular updates **CodeIgniter Community** - Smaller but still active - Limited modern resources **Verdict** Laravel has better support and resources. [![Blog banner - ServerAvatar](https://serveravatar.com/wp-content/uploads/2025/09/728_90-Banner-1-1024x127.png)](https://serveravatar.com/?ref=blog)### Scalability and Flexibility Scalability depends on how well a framework can handle growth and increasing complexity. Flexibility determines how easily you can customize the application as your needs evolve. **Laravel:** Perfect for large-scale applications due to its structured architecture. **CodeIgniter:** Better suited for smaller projects. **Verdict** For scaling your app in the future, Laravel is the better choice. ### Use Cases: When to Choose Laravel This option is suitable when your project requires advanced features, structured development, and long-term scalability. It works best for applications that are expected to grow over time. **Choose Laravel if you want to:** - Build complex web applications - Create APIs - Develop enterprise-level projects - Use modern tools and architecture ### Use Cases: When to Choose CodeIgniter This option is ideal when you need a simple, fast, and lightweight solution. It fits well for smaller projects or situations where quick development is the priority. **Choose CodeIgniter if you want to:** - Build small projects quickly - Learn PHP frameworks - Develop lightweight applications - Work with limited server resources **So, which one is better, Laravel or CodeIgniter?** The better choice depends entirely on your project requirements and development goals. Each framework has its strengths, making it important to choose based on your specific needs rather than a one-size-fits-all answer. - If you want speed, simplicity, and quick setup, go with CodeIgniter. - If you want power, scalability, and modern features, choose Laravel. For most modern applications today and beyond, Laravel is often the preferred choice. But CodeIgniter still shines for lightweight and fast projects. ## Managing Laravel and CodeIgniter Projects Made Easy with ServerAvatar Choosing the right framework is only one part of the process. Once your application is ready, you also need a reliable way to deploy, manage, and maintain your server environment. This is where ServerAvatar can make a significant difference. [ServerAvatar](https://serveravatar.com/) is a platform to simplify the hosting and management of servers and applications. It simplifies the process of deploying and managing PHP and Node.js based web applications on servers. ![ServerAvatar Dashboard - Laravel vs CodeIgniter](https://serveravatar.com/wp-content/uploads/2026/04/image-99.png) Instead of dealing with complex server setups, manual configuration, and command-line operations, ServerAvatar provides a simplified dashboard to help you manage your PHP applications with ease. Whether you’re working with Laravel or CodeIgniter, you can deploy and manage your projects without worrying about the underlying infrastructure. **Key Features** - **Easy Application Deployment:** Deploy PHP applications quickly without going through complicated command-line configuration processes. - **Support for Multiple PHP Versions:** Easily switch between PHP versions based on your project requirements, whether it’s Laravel or CodeIgniter. - **Built-in Web Server Stack:** Optimized configuration ensures better performance and compatibility with modern, lightweight frameworks. - **Database Management Simplified:** Create and manage databases effortlessly without needing external tools or manual commands. - **SSL Certificate & Security Features:** Secure applications with free automatic SSL certificates with auto-renewal and built-in security features such as firewall, fail2ban, AI bot blocker, 8G firewall, and many more. - **File Manager & Access Control:** Manage files, update configurations, and control access directly from the dashboard. - **Ideal for Both Beginners and Developers:** Whether you’re just starting out or managing multiple servers, ServerAvatar removes the complexity of server management. ### Why Use ServerAvatar? Managing servers manually can slow down your development workflow and increase the chances of errors. ServerAvatar helps you focus on what really matters, building your application, while it takes care of the server-side complexity. No matter which framework you choose, having the right server management tool ensures your project runs smoothly, securely, and efficiently. ## Conclusion In the end, choosing between Laravel and CodeIgniter depends on what you want to achieve with your project. Laravel is a powerful, feature-rich framework that works best for building scalable and modern applications, while CodeIgniter is a lightweight and simple option ideal for quick development and smaller projects. Both have their strengths, so the right choice comes down to your experience level and project requirements. Along with selecting the right framework, using a platform like ServerAvatar can make deployment and server management much easier, helping you focus more on development and less on technical setup. ## FAQs ### 1. Is Laravel harder to learn than CodeIgniter? Laravel has a steeper learning curve due to its advanced features and structured approach. CodeIgniter is easier to learn and more beginner-friendly. ### 2. Which framework is faster, Laravel or CodeIgniter? CodeIgniter is generally faster because it is lightweight and has fewer built-in features. Laravel may be slightly slower, but it offers better functionality and scalability. ### 3. Is Laravel suitable for large-scale applications? Laravel is highly suitable for large-scale and enterprise-level applications due to its robust architecture, built-in tools, and scalability. ### 4. Can beginners use CodeIgniter? CodeIgniter is one of the best frameworks for beginners because of its simplicity, minimal configuration, and ease of use. ### 5. Does Laravel provide better security than CodeIgniter? Laravel offers stronger built-in security features like CSRF protection, encryption, and authentication, while CodeIgniter requires more manual setup for advanced security. ### 6. Do I need a server management tool for Laravel or CodeIgniter? While not mandatory, using ServerAvatar can make deployment, configuration, and maintenance much easier, especially if you want to avoid manual server setup. **Categories:** Blog, Guide, Laravel, Php **Tags:** CodeIgniter, laravel, Laravel vs CodeIgniter, Laravel vs CodeIgniter comparison, modern PHP frameworks, php, PHP framework, PHP frameworks comparison --- ### [Ultimate PHP Hosting Setup Checklist for Beginners](https://serveravatar.com/php-hosting-setup-checklist/) **Published:** April 13, 2026 **Author:** Meghna Meghwani **Content:** [![Blog banner - ServerAvatar](https://serveravatar.com/wp-content/uploads/2025/09/728_90-Banner-3-1024x127.png)](https://serveravatar.com/?ref=blog)You’ve decided to build a website using PHP, great choice! But now comes the tricky part: setting up your hosting environment. If you’re feeling overwhelmed, don’t worry, you’re not alone. This PHP hosting setup checklist will help you understand that hosting is more than just writing code, you also need the right tools, services, and configurations to keep everything running efficiently. Missing even one element can make the entire setup complicated and messy. This PHP hosting setup checklist is designed to walk you through everything step by step, no technical background required. By the end of this guide, you’ll have a solid foundation to launch your PHP website confidently. ## Understanding PHP Hosting Before diving into the setup, let’s get the basics clear. PHP hosting simply means a server environment that supports PHP scripts. Since PHP works behind the scenes, your server needs to be properly configured to execute it efficiently. ![PHP hosting setup checklist](https://serveravatar.com/wp-content/uploads/2026/04/image-82.png) **Key takeaway:** Without proper PHP hosting, your website simply won’t work. ## PHP Hosting Setup Checklist Setting up a PHP hosting environment involves multiple steps, and missing even one can lead to performance or security issues. To make things easier, we’ve put together a simple and beginner-friendly PHP hosting setup checklist. Here are the essential checklist points you should follow to get your PHP website up and running smoothly. ### Choosing the Right Hosting Type Selecting the right hosting type is the foundation of your PHP website. Different hosting options offer varying levels of performance, control, and scalability. Making the right choice early can save you from future limitations and unnecessary upgrades. - Shared Hosting: Perfect for beginners. It’s affordable, but resources are shared. - VPS Hosting: More control and better performance. - Cloud Hosting: Highly scalable and reliable. - Dedicated Hosting: Best for large websites with heavy traffic. **Why it matters:** - Affects your website speed and uptime - Determines how much control you have over the server - Impacts your ability to scale as traffic grows **Key features:** - Shared, VPS, Cloud, and Dedicated hosting options - Resource allocation (CPU, RAM, storage) - Scalability and flexibility If you’re just starting, cloud or managed hosting (such as ServerAvatar’s managed servers) gives you the best balance of simplicity and power. ### Selecting a Reliable Hosting Provider Your hosting provider plays a major role in your website’s overall performance and reliability. A trustworthy provider ensures your site stays online and runs smoothly without interruptions. **Why it matters:** - Reduces downtime and performance issues - Ensures better customer support when needed - Improves user experience and SEO rankings **Key features:** - High uptime guarantee - Responsive customer support - Easy scalability options ### Checking PHP Version Compatibility Not all PHP versions behave the same, and using the right one is crucial for your website. Compatibility ensures your application runs smoothly without errors or security risks. **Why it matters:** - Improves website performance and speed - Ensures compatibility with modern applications - Reduces security vulnerabilities **Key features:** - Support for PHP 8.x or latest versions - Ability to switch PHP versions - Backward compatibility options Always choose a host that supports PHP 8.x or above. Using outdated versions can expose your website to vulnerabilities and performance issues. ### Setting Up Your Domain Name Your domain name is your website’s identity on the internet. It should be simple, memorable, and relevant to your brand or purpose. **Why it matters:** - Helps users find and remember your site - Builds brand credibility - Impacts SEO and visibility **Key features:** - Easy domain registration and linking - Custom domain support - Domain management tools Keep it simple, memorable, and relevant to your niche. ### Configuring DNS Settings DNS setting connect your hosting server to your domain. Without proper configuration, your website won’t be accessible to users. **Why it matters:** - Ensures your domain points to the correct server - Affects website accessibility - Impacts loading time and reliability **Key features:** - Nameserver configuration - DNS record management (A, CNAME, etc.) - Fast propagation support It’s like telling the internet where your website lives. ### Setting Up an Ideal Web Stack A web stack is the combination of technologies that power your website. Choosing the right stack ensures better performance and compatibility. **Why it matters:** - Affects website speed and efficiency - Determines how well your app performs under load - Impacts server resource usage **Key features:** - LAMP or LEMP stack options - Support for PHP, databases, and web servers - Optimized configurations **Common choices:** - **LEMP** (Linux, NGINX, MySQL, PHP) - **LAMP** (Linux, Apache, MySQL, PHP) Both support PHP, but: - **Apache** is beginner-friendly - **Nginx** is faster for high traffic ### Setting Up Your Web Server Your web server handles incoming requests and delivers your website to users. Proper setup ensures fast and reliable performance. **Why it matters:** - Directly impacts page loading speed - Handles traffic efficiently - Ensures stable website delivery **Key features:** - Apache or NGINX support - Easy configuration options - Performance tuning capabilities **Popular choices:** - Apache - NGINX ### Configuring Database Databases store and manage your website’s data. A well-configured database ensures your dynamic content loads quickly and reliably. **Why it matters:** - Powers dynamic websites - Affects data retrieval speed - Impacts overall performance **Key features:** - MySQL or MariaDB support - Database creation and management - Optimization tools **Common options:** - MySQL - MariaDB Without a database, dynamic websites won’t work. A slow database is equal to a slow website. ### Managing Files and Deployment Efficient file management is essential for maintaining your website. A proper deployment process ensures smooth updates and organization. **Why it matters:** - Keeps your project organized - Simplifies updates and maintenance - Reduces errors during deployment **Key features:** - File manager access - FTP/SFTP support - Git-based deployment ### Configuring PHP Settings for Performance Optimizing how PHP processes requests can significantly improve performance. Tools like PHP-FPM help manage multiple requests efficiently. **Why it matters:** - Improves response time - Handles high traffic better - Enhances stability **Key features:** - PHP-FPM support - Process and memory tuning - Performance optimization options Even basic configuration can significantly boost performance. ### Installing SSL Certificate An SSL certificate secures data exchanged between users and your website. It’s essential for trust and modern web standards. **Why it matters:** - Protects sensitive information - Builds user trust - Improves SEO rankings **Key features:** - Free SSL (Let’s Encrypt) support - Custom SSL installation - Automatic renewal ### Optimizing PHP Settings Fine-tuning PHP settings helps your application run more efficiently. Even small changes can improve performance significantly. **Why it matters:** - Prevents resource overuse - Improves speed and execution - Reduces server load **Key features:** - Adjustable memory limits - Execution time settings - File upload limits **Important settings:** - memory\_limit - max\_execution\_time - upload\_max\_filesize ### Setting File Permissions Correct file permissions are essential for both security and functionality. Incorrect settings can expose your site or break features. **Why it matters:** - Protects files from unauthorized access - Ensures proper functionality - Prevents security risks **Key features:** - Standard permission settings (644, 755) - Access control management - Secure configuration options **Recommended settings** - Files: 644 - Folders: 755 This ensures security while keeping your site functional. ### Enabling Caching for Speed Caching stores ready-to-serve versions of your content, reducing load time. It’s one of the easiest ways to boost performance. **Why it matters:** - Speeds up website loading - Reduces server load - Improves user experience **Types of caching:** - Page caching - Object caching (Redis) - Opcode caching (OPcache) Enabling caching can dramatically improve loading speed and reduce server load. ### Securing Your PHP Application Security should be a priority from the start. Protecting your application helps prevent attacks and data breaches. **Why it matters:** - Safeguards user data - Prevents unauthorized access - Maintains website integrity **Key features:** - Firewalls and access controls - Secure login protection - Regular updates and patches A secure setup protects both your data and your users. ### Setting Up Backups and Recovery Backups ensure you can restore your website in case of failure or data loss. It’s your safety net against unexpected issues. **Why it matters:** - Prevents data loss - Enables quick recovery - Protects business continuity **Key features:** - Automated backups - Off-site storage options - Easy restoration process ### Monitoring and Logging Monitoring tools help you track performance and detect issues early. Logs provide detailed insights into what’s happening on your server. **Why it matters:** - Identifies problems quickly - Improves performance tracking - Enhances security monitoring **Key features:** - Real-time monitoring - Error and access logs - Alert systems Regular monitoring helps prevent major issues. ### Testing Your Website Testing ensures everything works as expected before going live. It helps you catch issues early and deliver a smooth user experience. **Why it matters:** - Prevents broken features - Improves user experience - Ensures reliability **Key features:** - Performance testing - Functionality checks - Error detection It’s like a final inspection before opening your store. [![Blog banner - ServerAvatar](https://serveravatar.com/wp-content/uploads/2025/09/728_90-Banner-1-1024x127.png)](https://serveravatar.com/?ref=blog)### Regular Maintenance Launching your website is just the beginning. Regular maintenance keeps everything updated, secure, and running efficiently. **Why it matters:** - Prevents performance issues - Keeps your site secure - Ensures long-term stability **Key features:** - Regular updates - Performance checks - Security monitoring Think of it as routine servicing to keep everything running smoothly. ### Staging Environment (Recommended Practice) A staging environment allows you to test changes, updates, or new features before applying them to your live website. It acts as a safe copy of your site where you can experiment without affecting real users. **Why it matters:** - Prevents breaking your live website - Helps test updates safely - Improves development workflow **Key features:** - Safe testing environment - Easy push from staging to live ## How ServerAvatar Simplifies PHP Hosting Setup Setting up a PHP hosting environment manually can feel overwhelming, especially for beginners. From configuring servers and installing web stacks to managing security and performance, each step requires time and technical knowledge. This is where ServerAvatar makes things much easier. [ServerAvatar](https://serveravatar.com/) is a platform to simplify the hosting and management of servers and applications. It simplifies the process of deploying and managing PHP and Node.js based web applications on servers. ![ServerAvatar Dashboard - PHP hosting setup checklist](https://serveravatar.com/wp-content/uploads/2026/04/image-83.png) Instead of handling everything manually, you can manage your entire server environment from a clean and intuitive dashboard. For beginners, this removes the confusion of server-level configurations. For developers, it saves time and improves efficiency. In short, ServerAvatar helps you focus more on building your PHP application while it handles the heavy lifting of server management in the background. ## How ServerAvatar Handles These Steps Managing all aspects of PHP hosting manually can be time-consuming. ServerAvatar simplifies most of these steps through an easy-to-use dashboard. Here’s how it helps you handle key parts of the setup: ### 1. Launching and Managing Servers ServerAvatar offers fully [managed servers](https://serveravatar.com/docs/managed-server/introduction/), so you don’t need to rely on a third-party cloud provider account. In addition, it also supports [self-managed servers](https://serveravatar.com/docs/server-management/installation/direct-method/), allowing you to connect and manage servers from any cloud provider with ease, without complex setup, making it ideal for beginners. ![launching and managing servers - PHP hosting setup checklist](https://serveravatar.com/wp-content/uploads/2026/04/image-84-1024x425.png) ### 2. Choosing the Optimized Web Stack ServerAvatar comes with pre-configured stacks like Apache, NGINX, and OpenLiteSpeed, all optimized for PHP applications using PHP-FPM. This eliminates the need for manual setup. You can also choose your preferred operating system and easily set up databases like MySQL or MariaDB through a simple interface. ![choosing web stack - PHP hosting setup checklist](https://serveravatar.com/wp-content/uploads/2026/04/image-85-1024x312.png) ### 3. Managing PHP Settings You can switch between multiple PHP versions and adjust [PHP settings](https://serveravatar.com/docs/application/php-settings/) with just a few clicks, without affecting your application. It also allows you to assign different PHP versions to individual applications for better flexibility. ![php settings - PHP hosting setup checklist](https://serveravatar.com/wp-content/uploads/2026/04/image-86-1024x809.png) ### 4. Domain Management Adding or updating a [domain](https://serveravatar.com/docs/application/manage-domains/) is straightforward with ServerAvatar. You can connect your domain to your application without dealing with complicated configurations. ![domain management - PHP hosting setup checklist](https://serveravatar.com/wp-content/uploads/2026/04/image-87-1024x497.png) ### 5. SSL Certificate Installation Secure your website easily by installing free SSL certificates [automatically](https://serveravatar.com/docs/application/automatic-installation/) or by adding a [custom](https://serveravatar.com/docs/application/custom-installation/) SSL certificate whenever needed. ![ssl certificate - PHP hosting setup checklist](https://serveravatar.com/wp-content/uploads/2026/04/image-88-1024x563.png) ### 6. File Management & Deployment [Manage](https://serveravatar.com/docs/application/file-manager/) your files effortlessly from a single dashboard. You can upload, download, copy, move, rename, delete files, set permissions, and even create new files or folders without hassle. ![file manager - PHP hosting setup checklist](https://serveravatar.com/wp-content/uploads/2026/04/image-89-1024x359.png) ### 7. Performance Optimization ServerAvatar includes optimized PHP configurations and supports performance-enhancing tools like [Redis](https://serveravatar.com/docs/server/redis-settings/) caching settings to improve your website’s speed and efficiency. ![performance optimization - PHP hosting setup checklist](https://serveravatar.com/wp-content/uploads/2026/04/image-90-1024x219.png) ### 8. Backups ServerAvatar makes it easy to protect your data by allowing you to [create backups](https://serveravatar.com/docs/backups/getting-started/) whenever needed or automate the process on a schedule. You can choose to store backups using your own connected storage provider or use the storage options available within ServerAvatar itself. ![backups - PHP hosting setup checklist](https://serveravatar.com/wp-content/uploads/2026/04/image-91-1024x567.png) ### 9. Monitoring and logs Keeping track of your server’s health is simple with real-time monitoring. It helps you stay aware of performance and ensures your system runs smoothly. ![monitoring - PHP hosting setup checklist](https://serveravatar.com/wp-content/uploads/2026/04/image-92-1024x759.png) You can also view access logs and error logs for both your server and applications directly from the dashboard. This makes troubleshooting faster and helps you quickly identify any issues. ![logs - PHP hosting setup checklist](https://serveravatar.com/wp-content/uploads/2026/04/image-93-1024x416.png) ### 10. Security Features ServerAvatar comes equipped with multiple built-in security layers, including a [Firewall](https://serveravatar.com/docs/server/firewall/), [Fail2Ban](https://serveravatar.com/docs/server/fail2ban/) protection, [AI bot blocker](https://serveravatar.com/docs/application/ai-bot-blocker/), and [8G firewall](https://serveravatar.com/docs/application/security/) rules. These tools work together to secure your server and applications without requiring manual setup. ![security features - PHP hosting setup checklist](https://serveravatar.com/wp-content/uploads/2026/04/image-94-1024x319.png) ![security features - PHP hosting setup checklist](https://serveravatar.com/wp-content/uploads/2026/04/image-95-1024x346.png) ### 11. Staging Environment ServerAvatar provides a [staging area](https://serveravatar.com/docs/application/staging-area/) feature that allows you to create a separate copy of your application for testing purposes. You can try out updates, changes, or new features without affecting your live website. Once you’re ready, you can push changes from staging to live or sync live data back to staging with just a few clicks. This reduces the chances of errors and makes deployment much safer. ![staging environment - PHP hosting setup checklist](https://serveravatar.com/wp-content/uploads/2026/04/image-96-1024x359.png) With ServerAvatar, you don’t have to manage every configuration step manually. It brings all essential tools together in one place, helping you set up and manage your PHP hosting environment quickly and without unnecessary complexity. ## Conclusion Building a PHP hosting setup may feel challenging in the beginning, but following a step-by-step approach makes the process much simpler. Each part of the setup, from choosing the right hosting to handling performance, security, and backups, contributes to the overall stability of your website. Instead of dealing with everything manually, using a platform like ServerAvatar can streamline the entire process. It allows you to focus more on your application while reducing the effort required to manage the server side efficiently. ## FAQs ### 1. What does PHP hosting mean? PHP hosting refers to a server setup that is designed to run websites and applications built using PHP. It includes all the necessary components required to process and execute PHP code properly. ### 2. Which hosting option is suitable for beginners? For beginners, shared hosting or managed cloud hosting is often the easiest choice. These options are user-friendly, require minimal technical knowledge, and offer a good starting point. ### 3. Why is selecting the correct PHP version important? Using the right PHP version helps your website perform better and stay secure. Newer versions are generally faster and safer, while older ones may lead to compatibility issues or risks. ### 4. What is staging environment? A staging environment is a test version of your website where you can safely experiment with changes before applying them to your live site. This helps avoid unexpected issues. ### 5. Is SSL necessary for a PHP website? SSL is important for securing user data and building trust. It also plays a role in improving your website’s visibility in search engines. ### 6. How often should website backups be taken? It depends on how frequently your website changes, but setting up daily or weekly backups is a good practice. Backups ensure you can recover your data anytime if anything goes wrong. **Categories:** Blog, Guide, Laravel, Linux, Others, Php, Tutorials, Ubuntu **Tags:** how to set up PHP hosting, php, PHP Hosting, PHP hosting for beginners, PHP hosting setup checklist, PHP server setup, PHP setup guide --- ### [How to Discourage Search Engines from Indexing Site](https://serveravatar.com/discourage-search-engines-from-indexing-this-site/) **Published:** April 11, 2026 **Author:** Meghna Meghwani **Content:** [![Blog banner - ServerAvatar](https://serveravatar.com/wp-content/uploads/2025/09/728_90-Banner-3-1024x127.png)](https://serveravatar.com/?ref=blog)Have you ever published a webpage and later wished it wasn’t visible on Google? You’re not alone. While most people focus on getting their website indexed, there are situations where you may want the opposite. If you’re looking to discourage search engines from indexing site content, it’s important to understand the right approach. Not every page on your website is meant for public visitors, right? Some areas are private, under construction, or simply not ready to be shown. In the same way, certain parts of your website shouldn’t be visible to search engines. In this guide, we’ll break down how, when, and why to discourage search engines from indexing your site, using simple language and practical examples you can actually use. ## What Does Indexing Mean? Before we go further, let’s keep things simple. Indexing is when search engines like Google store your webpage in their database so it can appear in search results. ![Discourage search engines from indexing site](https://serveravatar.com/wp-content/uploads/2026/04/image-76.png) No indexing means no visibility in search results. So, if a page is not indexed, it’s basically invisible to people searching online. ### Why You Might Want to Block Indexing Not every page on your website is meant to appear in search results. Blocking indexing helps you keep private, unfinished, or low-value pages hidden from search engines. This ensures only relevant and polished content reaches your audience. Here are some common reasons: - Private content (admin panels, dashboards) - Duplicate pages that hurt SEO - Under-construction pages - Testing environments - Thank you or confirmation pages Imagine inviting people to a party before setting it up, awkward, right? That’s exactly what happens when unfinished pages get indexed. ### When Should You Discourage Search Engines? You should discourage search engines when your website or specific pages are not ready for public visibility. This is especially useful during development, redesign, or testing phases. It helps prevent incomplete content from appearing in search results. You should block indexing when: - Your website is still being developed - You’re redesigning your site - Pages contain sensitive information - You’re running A/B tests - Content is not finalized **Pro tip:** Always double-check before launching your site live. Many developers forget to remove “noindex” tags, leading to zero traffic! ## How WordPress Handles Indexing Control If you’re using WordPress, managing indexing is quite simple. There’s a setting called **“Discourage search engines from indexing this site.”** When you enable it, WordPress automatically takes care of a couple of things behind the scenes. It updates your **robots.txt file**, which gives instructions to search engine bots about which parts of your site they should avoid. At the same time, it can add a **noindex meta tag** to your pages, signaling search engines not to include your content in search results. - Log in to your WordPress admin dashboard, and navigate to the **Settings >> Reading** section. - Find the **Search engine visibility** option and enable or disable it by selecting or deselecting the checkbox as per your requirement. ![Discourage search engines from indexing site in WordPress](https://serveravatar.com/wp-content/uploads/2026/04/image-77-1024x446.png) This is especially helpful when your site is under construction or when you want to keep it hidden temporarily. However, keep in mind that this is more of a request than a strict rule. Search engines may still choose to index your content in some cases, so it shouldn’t be used as a security measure. ### Better Alternatives to Blocking Indexing Sometimes, simply discouraging indexing isn’t enough to protect your content. Using more secure methods can give you better control over who can access your pages. These alternatives are especially useful for sensitive or private content. Here are a few better options: - **Use a staging environment:** With a staging environment, you can build and test your website privately before making it live. It acts as a safe space where changes can be made without affecting your public site. This prevents unfinished work from being indexed. - **Set pages to private:** Setting pages to private restricts access to selected users only. These pages won’t be visible to the general public or search engines. It’s a simple way to control content visibility within your website. - **Add password protection:** Password protection adds an extra layer of security to your pages. Only users with the correct credentials can access the content. This is ideal for sensitive or client-specific information. - **Meta Tags:** Meta tags are small pieces of code added to your webpage to communicate with search engines. They can instruct bots whether to index a page or not. This method is widely used for controlling search visibility. - **Blocking Search Engines via HTTP Headers:** HTTP headers provide another way to control indexing at the server level. They send instructions directly to search engine bots before the page is even rendered. This approach is useful for advanced control and non-HTML files. These methods give you stronger control, especially when dealing with confidential or unfinished content. ### Noindex vs Nofollow: What’s the Difference? These two terms often confuse beginners. Noindex and nofollow are directives used to control how search engines interact with your pages. They sound similar, but serve different purposes. Understanding both helps you manage visibility and link behavior effectively. **Noindex** - Noindex instructs search engines to not include a page in search results. The page can still be accessed directly but won’t appear on Google. It’s useful for hiding low-value or private pages. **Nofollow** - Nofollow tells search engines to not follow the links on a page. This means link authority won’t be passed to other pages. It’s commonly used for sponsored or untrusted links. **Example:** ``` ``` ``` ``` Use both when you want complete control over a page. ## Testing Whether Your Page Is Indexed Checking if your page is indexed helps you understand its visibility on search engines. Simple search queries or tools can confirm whether your content is listed. Regular checks ensure everything is working as expected. **Use this simple trick:** Type in Google: ``` site:yourwebsite.com/page-url ``` ``` site:yourwebsite.com/page-url ``` **If it shows up:** Indexed **If it not shows up:** Not indexed You can also use tools like Google Search Console for accurate results. ## SEO Impact of Blocking Pages Blocking pages can improve SEO when used correctly by focusing search engines on high-quality content. However, mistakes can lead to lost traffic or visibility. It’s important to apply indexing controls carefully. **Good impact:** - Improves content quality - Avoids duplicate penalties - Focuses ranking on important pages **Bad impact:** - Blocking important pages accidentally - Losing traffic It’s all about balance. ## How to Remove Already Indexed Pages If a page is already indexed, you can still remove it using specific methods. Adding noindex tags and requesting removal through search tools can help. Keep in mind that the process may take some time. Here’s what to do: - Add a noindex tag - Remove internal links - Use Google Search Console’s URL Removal Tool Removal isn’t instant, it may take a few days. ## Best Practices for Managing Indexing Managing indexing properly ensures your website stays organized and search-friendly. Regular audits and smart use of tags can improve overall SEO performance. It’s all about controlling what should and shouldn’t be visible. **Follow these tips:** - Audit your site regularly - Use noindex for low-value pages - Avoid duplicate content - Keep robots.txt simple - Test before publishing Think of indexing like gardening, trim what doesn’t belong. ## Common Mistakes Beginners Make Many beginners accidentally block important pages or forget to update indexing settings. These small mistakes can significantly impact website traffic. Being aware of them helps you avoid unnecessary SEO issues. - Blocking your entire website accidentally - Forgetting to remove noindex tags after launch - Using robots.txt incorrectly - Assuming blocking is equal to security, but it’s not! **Important:** Blocking indexing doesn’t mean your page is secure. Anyone with the link can still access it. [![Blog banner - ServerAvatar](https://serveravatar.com/wp-content/uploads/2025/09/728_90-Banner-1-1024x127.png)](https://serveravatar.com/?ref=blog)## Tools to Manage Search Engine Indexing Various tools are available to help you monitor and control how your site is indexed. They provide insights, error reports, and indexing status. Using these tools makes managing your website much easier and more efficient. Here are some helpful tools: - Google Search Console - SEO plugins (like Yoast SEO) - Website audit tools These tools help you: - Monitor indexing - Fix errors - Submit pages Think of them as your SEO control panel. ## How to Discourage Search Engines from Indexing Your Site Using ServerAvatar Managing search engine visibility becomes much easier when you’re using ServerAvatar. Whether you’re launching a new WordPress site or staging site for testing, ServerAvatar gives you the flexibility to control how your site appears in search engines. ![ServerAvatar Dashboard - Discourage search engines from indexing site](https://serveravatar.com/wp-content/uploads/2026/04/image-78.png) [ServerAvatar](https://serveravatar.com/) is a platform to simplify the hosting and management of servers and applications. It simplifies the process of deploying and managing PHP and Node.js based web applications on servers. ### Search Engine Visibility in ServerAvatar When deploying a WordPress application through ServerAvatar’s One-Click Installer, you have full control over your site’s setup, including how it interacts with search engines. For live websites, it’s generally recommended to keep indexing enabled so your site can appear in search results and attract traffic. However, if you’re working on a development or testing version, you may want to temporarily discourage search engines from indexing your site. With ServerAvatar, you can easily manage this while installing your WordPress site. **Steps to Discourage Search Engines from Indexing in ServerAvatar** - Log in to your **ServerAvatar dashboard**, and navigate to your server panel by clicking on the server dashboard icon.[](https://storage.3.basecamp.com/5840738/blobs/91f10d5c-3590-11f1-9b83-0242ac120004/download/image.png) ![server dashboard - Discourage search engines from indexing site](https://serveravatar.com/wp-content/uploads/2026/04/image-79-1024x238.png) - Navigate to the Application section from the left sidebar, and click on the Create Application button. ![create an application - Discourage search engines from indexing site](https://serveravatar.com/wp-content/uploads/2026/04/image-80-1024x266.png) - Fill in all details for your application - You can see the option of **WordPress Search Indexing** - Select the Checkbox to enable the search indexing for your WordPress site. - **Please note:** Enabling the search indexing is recommended for live sites and disable for staging or test sites. - Click on the Create Application button to create your WordPress application. ![create application - Discourage search engines from indexing site](https://serveravatar.com/wp-content/uploads/2026/04/image-81-975x1024.png) ### Take Control of Your Servers and Websites with ServerAvatar Controlling what search engines can and cannot index is an important part of managing any website. With ServerAvatar, you get a smooth and flexible environment to handle your WordPress applications efficiently. By using the right settings at the right time, you can protect unfinished content, improve your SEO strategy, and ensure that only the right pages are visible to your audience. ## Conclusion Managing search engine indexing is an essential part of maintaining a well-structured and professional website. By understanding when and how to discourage indexing, you can ensure that only valuable and fully prepared content appears in search results. Whether you’re working on a staging site, handling sensitive pages, or optimizing your SEO strategy, using the right methods makes all the difference. With tools and platforms like ServerAvatar, controlling your website’s visibility becomes simple, allowing you to focus on growth while keeping everything organized and secure. ## FAQs ### 1. What does it mean to discourage search engines from indexing a site? It means telling search engines not to include certain pages or your entire website in search results. This helps keep private or unfinished content hidden from public view. ### 2. Is blocking indexing the same as securing a page? Blocking indexing does not secure your page. It only prevents it from appearing in search results, but anyone with the direct link can still access it. ### 3. How long does it take to remove a page from Google? It usually takes a few days to a couple of weeks, depending on how often search engines crawl your site and the method you use for removal. ### 4. Can I re-enable indexing after blocking it? Yes, you can remove the noindex tag or update your settings to allow search engines to index your pages again at any time. ### 5. What is the safest way to hide a website during development? Using a staging environment or password protection is the safest option, as it completely restricts access rather than just hiding it from search engines. **Categories:** Blog, Guide, Others, Tutorials, WordPress **Tags:** block search engine indexing, disable search indexing, discourage search engines from indexing site, hide website from search engines, noindex tag, prevent indexing, robots.txt guide, stop Google indexing, Wordpress --- ### [7 Key Reasons Node.js Is the Best Choice for Web Development in 2026](https://serveravatar.com/key-reasons-to-choose-nodejs-for-web-development/) **Published:** April 10, 2026 **Author:** Meghna Meghwani **Content:** [![Blog banner - ServerAvatar](https://serveravatar.com/wp-content/uploads/2025/09/728_90-Banner-3-1024x127.png)](https://serveravatar.com/?ref=blog)Have you ever wondered why so many modern websites and apps feel incredibly fast and responsive? Whether you’re streaming videos, chatting in real time, or shopping online, there’s a good chance Node.js is working behind the scenes. This is exactly why Node.js for web development has become such a popular topic, as businesses and developers look for faster, more scalable ways to build modern applications. In 2026, web development has evolved dramatically. Users expect lightning-fast performance, seamless experiences, and real-time interactions. That’s exactly where Node.js shines. So, why is Node.js considered the best choice for web development today? Let’s understand it simply. ## What is Node.js? [Node.js](https://nodejs.org?ref=serveravatar.com) is an open-source runtime environment that allows developers to run JavaScript on the server side. In simple terms, it lets you use the same language (JavaScript) for both front-end and back-end development. ![Node.js for web development](https://serveravatar.com/wp-content/uploads/2026/04/image-67.png) Instead of switching between different programming languages, developers can build entire applications using just one. That’s a huge advantage in terms of speed and simplicity. ### Why Node.js is Popular in 2026 Node.js has grown from a niche tool to a mainstream technology. Today, it powers some of the biggest platforms and applications in the world. **Key reasons for its popularity:** - Fast execution speed - Real-time capabilities - Easy scalability - Developer-friendly ecosystem With businesses demanding faster and more interactive web apps, Node.js fits perfectly into modern development needs. ### Why Node.js Stands Out for Web Development in 2026 Choosing the right technology can feel overwhelming, especially with so many options available today. But if you’re looking for something fast, flexible, and future-ready, Node.js naturally comes to the top of the list. In 2026, web applications are no longer just about displaying content, they’re about delivering real-time, interactive experiences. Node.js is built exactly for that. Its non-blocking architecture allows apps to handle multiple users at once without slowing down, making it ideal for modern platforms. Another big advantage is developer efficiency. Since Node.js uses JavaScript on both the front-end and back-end, teams can work faster without constantly switching between languages. This not only saves time but also reduces errors and improves collaboration. On top of that, Node.js continues to evolve with new tools, frameworks, and updates. So when you choose Node.js, you’re not just picking a technology for today, you’re investing in something that will stay relevant for years to come. ## Reasons Node.js Is the Best Choice for Web Development in 2026 With evolving user expectations and modern development needs, choosing the right technology is more important than ever. Here are the key reasons why Node.js continues to stand out. ### Reason 1: High Performance and Speed One of the biggest reasons developers love Node.js is its incredible speed. Node.js uses a non-blocking, event-driven architecture, which means it can handle multiple requests at the same time without waiting for one to finish before starting another. ![high performance and speed - Node.js for web development](https://serveravatar.com/wp-content/uploads/2026/04/image-68.png) **Why this matters** - Faster loading websites - Better user experience - Reduced server load **Key Advantages** - Handles multiple requests at the same time without delays - Faster page load times improve user experience - Efficient use of server resources reduces overhead - Ideal for data-heavy and high-traffic applications - Built on a fast JavaScript engine for quick execution Imagine a waiter taking multiple orders at once instead of serving one table at a time, that’s exactly how Node.js works. ### Reason 2: Real-Time Capabilities In today’s world, users expect instant updates. Whether it’s messaging apps, live notifications, or online gaming, real-time functionality is essential. Node.js makes real-time communication simple and efficient. ![real-time capabilities - Node.js for web development](https://serveravatar.com/wp-content/uploads/2026/04/image-69.png) **Examples of real-time features** - Chat applications - Live streaming - Online collaboration tools **Key Advantages** - Enables instant data updates without refreshing the page - Perfect for chat apps, live tracking, and notifications - Supports smooth real-time communication between users - Reduces latency for better responsiveness - Enhances user engagement with dynamic content If your app needs to update instantly without refreshing the page, Node.js is a perfect fit. ### Reason 3: Scalability for Growing Apps As your application grows, handling more users becomes challenging. This is where Node.js truly stands out. It is designed to scale easily, both horizontally and vertically. ![scalability for growing apps - Node.js for web development](https://serveravatar.com/wp-content/uploads/2026/04/image-70.png) **Why This Matters** - Your application can handle more users as it grows - Prevents performance issues during traffic spikes - Supports business expansion without rebuilding systems **Key Advantages** - Easily scales horizontally by adding more servers - Works well with microservices architecture - Handles large volumes of concurrent connections - Flexible enough for both small and large projects - Supports cloud-based scaling environments Whether you’re building a small app or a global platform, Node.js grows with you. ### Reason 4: JavaScript Everywhere Using Node.js means you can write both frontend and backend code in JavaScript. This simplifies development and helps teams work faster and more efficiently. ![javascript everywhere - Node.js for web development](https://serveravatar.com/wp-content/uploads/2026/04/image-71.png) **Why is this important?** - No need to learn multiple languages - Faster development process - Easier team collaboration **Key Advantages** - Use single language for frontend and backend both - Reduces development time and complexity - Makes collaboration easier across teams - Simplifies code maintenance and debugging - Ideal for full-stack development Developers can write code for both client-side and server-side using the same language, making the entire workflow more efficient. ### Reason 5: Massive Ecosystem (NPM) Node.js offers access to a huge collection of ready-made packages through NPM. This helps developers build applications quickly without starting everything from scratch. ![massive ecosystem - Node.js for web development](https://serveravatar.com/wp-content/uploads/2026/04/image-72.png) **What does this mean for you?** - Ready-made solutions for common problems - Faster development time - Access to thousands of tools **Key Advantages** - Access to thousands of ready-to-use packages - Speeds up development by avoiding repetitive coding - Wide range of tools for almost any functionality - Regularly updated libraries for modern needs - Helps developers focus more on core features Instead of building everything from scratch, developers can simply use existing packages and save time. ### Reason 6: Strong Community Support A large and active community supports Node.js, making it easy to find help and resources. Regular updates and shared knowledge keep the ecosystem strong and reliable. ![strong community support - Node.js for web development](https://serveravatar.com/wp-content/uploads/2026/04/image-73.png) **Why this matters:** - Quick solutions to problems - Regular updates and improvements - Tons of tutorials and resources **Key Advantages** - Large global community for help and guidance - Plenty of tutorials, forums, and documentation - Frequent updates and improvements - Easy to find solutions to common problems - Continuous innovation driven by developers If you ever get stuck, chances are someone has already solved that problem and shared the solution online. ### Reason 7: Cost-Effective Development Node.js reduces development costs by speeding up the process and requiring fewer resources. It’s an efficient choice for businesses looking to build powerful applications within budget. ![cost effective development - Node.js for web development](https://serveravatar.com/wp-content/uploads/2026/04/image-74.png) **Why This Matters** - Reduces overall project cost and development time - Minimizes the need for large development teams - Faster delivery means quicker return on investment **Key Advantages** - Single-language development lowers hiring costs - Faster development cycles save time and money - Reusable code reduces effort and duplication - Efficient performance lowers infrastructure costs - Ideal for startups and budget-conscious projects Since developers can use JavaScript across the entire stack, companies save both time and resources. ## Node.js Compared to Other Technologies Before choosing any backend technology, it’s important to see how it compares with other popular options. This helps you understand where Node.js stands and whether it truly fits your project needs. **Node.js vs Traditional Servers:** - Node.js: Non-blocking, fast - Traditional: Blocking, slower **Node.js vs PHP/Python:** - Node.js excels in real-time apps - Others are better for specific use cases Here’s a simple comparison to help you see the differences clearly: **Feature****Node.js****PHP****Python (Django/Flask)****Java (Spring Boot)****Performance**Very fast (non-blocking)ModerateModerateHigh but resource-heavy**Scalability**ExcellentLimitedGoodExcellent**Real-Time Support**Built-in strengthWeakLimitedModerate**Learning Curve**Easy (JavaScript-based)EasyEasy to moderateComplex**Use Case**Real-time apps, APIsCMS, websitesData-driven appsEnterprise systems**What does this mean for you?** - If you need real-time features, Node.js is a clear winner - If you want fast development with a single language, Node.js makes life easier - If you’re building modern, scalable apps, Node.js is often the better choice That said, other technologies still have their place. But for speed, flexibility, and modern web needs, Node.js offers a strong edge. ## Use Cases of Node.js in 2026 Node.js is used across a wide range of modern applications, from startups to large-scale platforms. Let’s explore where it performs best and why developers prefer it for these use cases. **Popular use cases include:** - E-commerce platforms - Streaming services - Social media apps - APIs and microservices If your application needs speed and scalability, Node.js is a strong contender. ## Is Node.js Right for You? Not every technology is the perfect fit for every project. Asking the right questions can help you decide if Node.js aligns with your goals and development requirements. - Do you need real-time features? - Is performance a top priority? - Do you want faster development? If the answer is yes, Node.js is likely a great choice for your project. ## Common Challenges and Solutions Like any technology, Node.js comes with its own set of challenges. The good news is that most of these can be managed easily with the right approach and best practices. **Common issues:** - Not ideal for CPU-heavy tasks - Callback complexity - Managing large applications **Solutions:** - Use worker threads for heavy tasks - Adopt modern async/await syntax - Structure your app using best practices With the right approach, these challenges can be easily managed. ## Simplify Node.js Deployment and Management with ServerAvatar Building a Node.js application is one part of the journey, but deploying and managing it efficiently is where many developers face challenges. From server setup and configuration to handling updates and performance monitoring, the process can quickly become complex. This is where ServerAvatar makes things easier. ![ServerAvatar Dashboard - Node.js for web development](https://serveravatar.com/wp-content/uploads/2026/04/image-75.png) [ServerAvatar](https://serveravatar.com/) is a platform to simplify the hosting and management of servers and applications. It provides a simple and powerful platform to deploy and manage Node.js applications without dealing with complicated server-level tasks. With ServerAvatar, you can: - Deploy PHP and Node.js applications in just a few clicks - Manage servers and applications without deep DevOps knowledge - Monitor performance and logs from a single dashboard - Manage security features directly from the dashboard Instead of spending time on manual configurations, developers can focus more on building features and improving their applications. Whether you’re working on a small project or a production-level system, ServerAvatar helps streamline the entire deployment process. If you’re looking for a faster and more efficient way to manage Node.js applications, using ServerAvatar can significantly simplify your workflow. ## Node.js for Large-Scale Applications and Future-Ready Systems Node.js has evolved far beyond its early reputation as a tool mainly used by startups. Today, it plays a key role in powering large-scale, high-demand applications used by businesses around the world. This evolution highlights how stable, reliable, and production-ready the Node.js ecosystem has become over time. ### Why Enterprises Trust Node.js Today Modern applications require more than just speed. They need to be secure, scalable, and consistently reliable under heavy workloads. Node.js checks all these boxes, making it a strong choice for enterprise-level development. **Key reasons enterprises choose Node.js:** - **Long-Term Support (LTS):** Regular updates ensure stability, security, and long-term reliability - **Strong governance:** Backed by the OpenJS Foundation for structured and consistent development - **High scalability:** Handles increasing users and sudden traffic spikes with ease Because of these strengths, Node.js is widely trusted for applications where performance and uptime are critical. ### Future-Ready Architecture with Node.js As technology continues to evolve, applications must be flexible enough to adapt to new trends and infrastructure. Node.js is designed to support modern architectures that prioritize speed, efficiency, and scalability. **Here’s how Node.js supports next-generation systems:** - **Lightweight runtime:** Ideal for edge computing, allowing faster data processing closer to users - **Serverless compatibility:** Integrates smoothly with modern cloud and serverless platforms - **Quick startup time:** Reduces delays, especially in dynamic environments - **Simplified development:** Using JavaScript across services makes systems easier to build and maintain In short, Node.js helps developers create applications that are not only efficient today but also ready for future demands. ## Conclusion In today’s fast-paced digital world, building web applications that are quick, scalable, and responsive is no longer optional, it’s essential. Node.js stands out as a powerful solution that meets these expectations by enabling real-time functionality, efficient performance, and streamlined development using a single language. From startups to large enterprises, its flexibility and growing ecosystem make it a reliable choice for modern web development. When combined with the right deployment and management approach, Node.js not only simplifies development but also helps you build applications that are ready to scale and adapt in the future. ## Frequently Asked Questions ### 1. What makes Node.js different from other backend technologies? Node.js uses a non-blocking, event-driven architecture, which allows it to handle multiple requests simultaneously. This makes it faster and more efficient for real-time and high-traffic applications compared to traditional backend technologies. ### 2. Is Node.js suitable for large-scale applications? Node.js is widely used for large-scale and enterprise-level applications. Its scalability and performance make it ideal for handling high user loads and complex systems. ### 3. What are the common use cases of Node.js? Node.js is commonly used for real-time applications like chat apps, streaming platforms, APIs, eCommerce websites, and microservices-based architectures. ### 4. Is Node.js good for beginners? Node.js is beginner-friendly, especially for developers who already know JavaScript. Its large community and extensive documentation make it easier to learn and use. ### 5. What are the limitations of Node.js? Node.js may not be the best choice for CPU-intensive tasks, as it is optimized for handling asynchronous operations. However, these limitations can be managed using techniques like worker threads. ### 6. How can I deploy a Node.js application easily? Deploying a Node.js application can be simplified using platforms like ServerAvatar, which allow you to manage servers, deploy applications, and monitor performance without complex configurations. **Categories:** Application Deployments, Blog, Guide, Linux, Others, Ubuntu **Tags:** Node.js, Node.js benefits, Node.js for web development, Node.js performance, Node.js scalability, Node.js vs other technologies, why use Node.js --- ### [Best PHP eCommerce Templates and Themes for Online Stores](https://serveravatar.com/php-ecommerce-templates/) **Published:** April 9, 2026 **Author:** Meghna Meghwani **Content:** [![Blog banner - ServerAvatar](https://serveravatar.com/wp-content/uploads/2025/09/728_90-Banner-3-1024x127.png)](https://serveravatar.com/?ref=blog)Starting an online store today is easier than ever, but choosing the best PHP eCommerce templates? That’s where most people get stuck. Think of your eCommerce template like the foundation of a house. If it’s strong, flexible, and well-built, everything else becomes easier, from design to performance to sales. But if it’s weak? You’ll constantly struggle with slow speed, poor user experience, and lost customers. That’s why PHP eCommerce templates are so powerful. They give you a ready-made structure with built-in features like product pages, checkout systems, and mobile responsiveness, so you can focus on growing your business instead of building everything from scratch. In this guide, we’ll walk through the best PHP eCommerce templates and themes (inspired by real industry standards), along with how to choose the right one for your online store. ## What Are PHP eCommerce Templates? PHP eCommerce templates are ready-made website designs built using PHP that help you create an online store quickly. They include essential features like product pages, shopping carts, and checkout systems. Instead of building everything from scratch, you can simply customize these templates to match your business. This makes launching an online store faster, easier, and more cost-effective. ![Best PHP eCommerce Templates](https://serveravatar.com/wp-content/uploads/2026/04/image-59.png) They usually include: - Product pages - Shopping cart functionality - Checkout systems - Admin dashboards Instead of coding everything manually, you simply install and customize. According to industry insights, these templates are widely used because they reduce development time and simplify store creation. ### Why PHP is Still Popular for eCommerce PHP continues to be a strong choice for eCommerce because it is flexible, reliable, and widely supported. Being open-source, it reduces development costs and works seamlessly with platforms like WooCommerce, Magento, and Laravel. Its scalability allows businesses to grow without switching technologies. Plus, the large developer community ensures continuous improvements and easy access to support. Open-source and cost-effective - Supports major platforms like WooCommerce, Magento, Laravel - Flexible and scalable - Huge developer community In fact, PHP powers a large portion of websites globally, making it a reliable choice for eCommerce. ### Key Features to Look for in an eCommerce Template When choosing an eCommerce template, it’s important to focus on features that improve performance and usability. A good template should be responsive, fast-loading, and easy to customize. It should also support SEO-friendly structure and secure payment integration. These features ensure your store runs smoothly while providing a great shopping experience for users. Not every template will help your business grow. Look for these essential features: - Responsive design (mobile-friendly) - Fast loading speed - SEO-ready structure - Easy customization options - Secure checkout system A good template doesn’t just look nice, it performs. ### Benefits of Using Ready-Made Themes Ready-made themes simplify the process of building an online store by offering pre-designed layouts and built-in features. They save both time and money while ensuring a professional look and feel. Since these themes are already tested, they reduce the chances of errors. It’s like following a proven roadmap instead of figuring everything out on your own. **Key advantages:** - Saves time and development cost - Comes with tested features - Professional UI/UX - Regular updates and support It’s like using a GPS instead of guessing directions, you reach your destination faster. ## Best PHP eCommerce Templates and Themes Choosing the right PHP eCommerce template plays a crucial role in building a successful online store. The best templates combine performance, flexibility, and modern design to deliver a smooth shopping experience. Some of the most popular options are given below. ### 1. Flatsome: Best for High Conversions ![Flatsome - Best PHP eCommerce Templates](https://serveravatar.com/wp-content/uploads/2026/04/image-60-1024x529.png) [Flatsome](https://themeforest.net/item/flatsome-multipurpose-responsive-woocommerce-theme/5484319) is a highly popular WooCommerce theme known for its conversion-focused design and easy-to-use interface. It comes with a built-in UX builder that allows you to create professional online stores without coding. Its balance of design and performance makes it ideal for growing businesses. **Key Features:** - Drag-and-drop UX Builder for real-time editing - Pre-designed layouts and product page templates - Built-in AJAX cart and live search - Mobile-optimized and responsive design - Advanced product filtering and variation options **Advantages:** - Beginner-friendly interface - Strong focus on conversions - Highly customizable without coding - Regular updates and good support **Disadvantages:** - Slightly heavy if not optimized properly - Learning curve for advanced customization - Limited deep-level design flexibility in some areas **Best For:** Best for conversion-focused online stores and beginners. ### 2. Porto: Best All-Rounder Theme ![Porto - Best PHP eCommerce Templates](https://serveravatar.com/wp-content/uploads/2026/04/image-61-1024x427.png) [Porto](https://themeforest.net/item/porto-responsive-wordpress-ecommerce-theme/9207399?srsltid=AfmBOoqK4an_IHONRz6mKV4sQfsZKe6L_RG-Ret7Q2kWwD2QeeZATQQI) is a versatile and multipurpose eCommerce theme designed for various industries. It offers a wide range of demos and customization options, making it suitable for both beginners and advanced users. **Key Features:** - 100+ pre-built demos and layouts - Advanced mega menu and product grids - AJAX filtering and search functionality - Built-in performance optimization tools - Compatibility with Elementor and WPBakery **Advantages:** - Extremely flexible and scalable - Suitable for multiple niches - Good performance optimization features - Easy integration with page builders **Disadvantages:** - Too many features can feel overwhelming - Requires optimization for best speed - Some customization areas can be complex **Best For:** Best for businesses needing a flexible, all-in-one eCommerce solution. ### 3. WoodMart: Best for User Experience ![Woodmart - Best PHP eCommerce Templates](https://serveravatar.com/wp-content/uploads/2026/04/image-62-1024x452.png) [WoodMart](https://themeforest.net/item/woodmart-woocommerce-wordpress-theme/20264492) is a feature-rich WooCommerce theme designed to enhance the shopping experience. It focuses heavily on AJAX-powered features and smooth navigation, making browsing fast and interactive. **Key Features:** - AJAX filters, search, and cart updates - 80+ pre-built demo websites - Built-in header builder and sticky navigation - Advanced product filtering system - Performance optimization options **Advantages:** - Excellent user experience and navigation - Powerful product filtering system - Modern and clean design - Highly interactive features **Disadvantages:** - Can be resource-heavy - Requires good hosting for best performance - Setup may take time for beginners **Best For:** Best for stores focusing on smooth browsing and user experience. ### 4. Claue / Fastest Themes (Popular Choices) ![claue - Best PHP eCommerce Templates](https://serveravatar.com/wp-content/uploads/2026/04/image-63-1024x413.png) [Claue](https://themeforest.net/item/claue-clean-minimal-magento-2-theme/20155150) and similar “fastest” themes are built with performance and minimalism in mind. They offer clean layouts and fast loading speeds, making them ideal for modern, lightweight eCommerce stores. **Key Features:** - Minimal and clean design - Optimized for fast loading speed - Mobile-first responsive layout - Lightweight code structure - SEO-friendly architecture **Advantages:** - Very fast performance - Clean and modern UI - Great for SEO - Easy to maintain **Disadvantages:** - Limited built-in features - Less design flexibility compared to heavy themes - May require additional plugins **Best For:** Best for speed-focused and minimal eCommerce websites. ### 5. LivelyCart Pro ![livelycart - Best PHP eCommerce Templates](https://serveravatar.com/wp-content/uploads/2026/04/image-64-1024x395.png) [LivelyCart Pro](https://codecanyon.net/item/livelycart-pro-laravel-ecommerce-platform-shopping-cart/23546516) is a Laravel-based eCommerce solution designed for flexibility and scalability. It offers a structured backend and modern architecture, making it suitable for custom online stores. **Key Features:** - Built on Laravel framework - Structured admin panel for store management - Multi-language and localization support - Flexible product and order management system - Developer-friendly architecture **Advantages:** - Highly customizable for developers - Scalable for growing businesses - Clean and modern codebase - Suitable for custom features **Disadvantages:** - Not beginner-friendly - Requires technical knowledge - Smaller community compared to WooCommerce **Best For:** Best for developers building custom Laravel-based eCommerce stores. ### 6. GeniusCart ![Geniuscart - Best PHP eCommerce Templates](https://serveravatar.com/wp-content/uploads/2026/04/image-65-1024x507.png) [GeniusCart](https://codecanyon.net/item/geniuscart-single-or-multivendor-ecommerce-system-with-physical-and-digital-product-marketplace/24089099) is a complete PHP-based eCommerce solution designed for building multi-vendor marketplaces. It supports both physical and digital products, making it a flexible option for startups. **Key Features:** - Multi-vendor marketplace functionality - Support for digital and physical products - Built-in payment gateway integration - Easy product and order management - User-friendly admin dashboard **Advantages:** - Ideal for marketplace businesses - Beginner-friendly setup - Supports multiple vendors and commissions - Affordable compared to custom builds **Disadvantages:** - Limited advanced customization - UI design may feel basic - Performance depends on hosting **Best For:** Best for building multi-vendor marketplaces like Amazon or Flipkart. ## Importance of Mobile-Friendly Design With more people shopping on smartphones, having a mobile-friendly design is no longer optional. A responsive template ensures your website looks and works perfectly on all screen sizes. This improves user experience and keeps visitors engaged. It also plays a key role in improving your search engine rankings. A responsive template: - Improves user experience - Boosts SEO rankings - Increases conversions If your store isn’t mobile-friendly, you’re losing customers, simple as that. ## SEO Optimization in Templates SEO-friendly templates help your online store get discovered by search engines. They come with clean code, fast loading speed, and proper structure that improves visibility. Features like customizable meta tags and mobile optimization further enhance your rankings. A well-optimized template ensures your products reach the right audience. ## SEO-friendly templates include - Clean code - Fast loading speed - Mobile responsiveness - Meta tag customization These features help your store rank higher on Google. ## Speed and Performance Factors Website speed directly impacts user experience and sales in eCommerce. A slow-loading store can frustrate visitors and lead to higher bounce rates. Choosing a template with optimized code and performance features helps maintain fast loading times. **Look for:** - Lightweight code - Built-in caching - Optimized images - Minimal scripts ## Customization and Ease of Use Your online store should reflect your brand identity, and that’s where customization becomes important. A good template offers flexible design options and user-friendly tools to make changes easily. Features like drag-and-drop builders simplify the process, even for beginners. This allows you to create a unique and professional-looking store without technical complexity. **Best templates offer:** - Drag-and-drop builders - Pre-built demos - Flexible layouts - Custom color schemes ## Security Features You Shouldn’t Ignore Security is a critical part of any eCommerce website, as it involves handling sensitive customer data. A reliable template should support secure payment gateways and SSL encryption. Regular updates and protection against vulnerabilities are also essential. Strong security features build trust and protect both your business and customers. **Must-have features:** - SSL compatibility - Secure payment gateways - Regular updates - Protection from vulnerabilities ## Free vs Paid Templates Free templates are a good starting point for beginners with limited budgets, but they often come with fewer features and basic designs. Paid templates, on the other hand, offer advanced functionality, better customization, and dedicated support. Investing in a premium theme can provide long-term benefits. The choice is completely depend on your business needs. **Free Templates** - Budget-friendly - Limited features - Basic design **Paid Templates** - Advanced features - Better design - Dedicated support ## How to Choose the Right Template Selecting the right template requires more than just picking a good-looking design. You need to consider your business needs, budget, and scalability requirements. Testing demos and reading user reviews can help you make a better decision. The right template should align with your goals and support your growth over time. **Ask yourself:** - What’s my budget? - Do I need scalability? - Is it beginner-friendly? - Does it support my platform? **Quick tips:** - Define your business needs - Check demo versions - Read user reviews - Ensure regular updates - Test speed and responsiveness [![Blog banner - ServerAvatar](https://serveravatar.com/wp-content/uploads/2025/09/728_90-Banner-1-1024x127.png)](https://serveravatar.com/?ref=blog)## Best Practices for Using PHP eCommerce Templates Using a PHP eCommerce template effectively requires more than just installation. You should optimize performance, customize the design, and keep everything updated regularly. Testing your store before going live is also essential to avoid issues. Following best practices ensures your store runs smoothly and delivers a great user experience. **1. Choose a Lightweight and Fast Template** A heavy template might look attractive but can slow down your store. Always pick a theme that is optimized for performance. **2. Customize for Your Brand Identity** Don’t just install a template and leave it as it is. You can customize its fonts, colors, images, and layouts to matching your brands. Your store should feel unique, not like a copy of hundreds of others using the same theme. **3. Optimize Images and Media** Large images can slow down your website. Always compress images without losing quality and use modern formats where possible. This keeps your store fast and visually appealing. **4. Ensure Mobile Responsiveness** Most users browse and shop from their smartphones. Always test your template on different screen sizes to ensure a smooth mobile experience. **5. Use SEO-Friendly Settings** Make sure your template supports: - Custom meta titles and descriptions - Clean URLs - Proper heading structure This helps search engines understand your store better and improves visibility. **6. Keep the Template Updated** Outdated themes can cause security issues and compatibility problems. Always update your template and related plugins to the latest version. **7. Test Before Going Live** Before launching your store, test everything: - Checkout process - Payment gateways - Navigation - Page speed A small bug can lead to lost sales. **8. Integrate Essential Tools Only** Avoid installing too many plugins or features. Only use what you really need. Too many integrations can slow down your site and create conflicts. **9. Focus on User Experience (UX)** Keep navigation simple and intuitive. Make it easy for users to find products, add to cart, and complete purchases without confusion. **10. Use Secure Hosting and SSL** Even the best template won’t help if your hosting is weak. Always use reliable hosting and enable SSL for secure transactions. ## Common Issues with PHP eCommerce Templates (and How to Fix Them) Even well-designed templates can sometimes cause issues like slow speed, compatibility problems, or limited customization. Identifying these challenges early helps you fix them before they affect your business. Regular updates, proper optimization, and careful plugin usage can solve most problems. Being proactive ensures your store remains stable and efficient. **1. Slow Website Speed** **Problem:** Templates with too many features can slow down your site. **Solution:** - Use caching - Optimize images - Remove unnecessary scripts **2. Poor Mobile Optimization Problem:** Some templates don’t perform well on mobile devices. **Solution:** - Test responsiveness before buying - Use mobile optimization tools - Avoid cluttered layouts **3. Limited Customization Options** **Problem:** Some themes restrict design changes. **Solution:** - Choose flexible templates with builders - Check demo customization options before purchase **4. Compatibility Issues with Plugins** **Problem:** Templates may not work well with certain plugins or extensions. **Solution:** - Use well-supported themes - Avoid outdated plugins - Test integrations in staging environment **5. Security Vulnerabilities** **Problem:** Poorly coded templates can expose your site to risks. **Solution:** - Download templates from trusted sources - Keep everything updated - Use security plugins **6. Lack of Regular Updates Problem:** Some themes are abandoned by developers. **Solution:** - Check update history before buying - Choose themes with active support **7. Overloaded Features Problem:** Too many built-in features can confuse users and slow performance. **Solution:** - Disable unused features - Keep your store clean and focused **8. Poor SEO Structure Problem:** Some templates are not optimized for search engines. **Solution:** - Choose SEO-friendly themes - Optimize content manually - Use SEO tools/plugins **9. Difficult Navigation Problem:** Complex layouts can confuse visitors. **Solution:** - Keep menus simple - Use clear categories - Improve internal linking **10. Checkout Complications Problem:** Long or confusing checkout processes lead to cart abandonment. **Solution:** - Use one-page checkout - Minimize steps - Offer multiple payment options **Final Tip** Think of your PHP eCommerce template like a car. Even the best model won’t perform well if it’s not maintained properly. Regular updates, optimization, and testing are what keep your store running smoothly and profitably. ## Managing Your eCommerce Store with ServerAvatar Choosing the right PHP eCommerce template is just the first step. To ensure your online store runs smoothly, you also need a reliable server management solution. This is where ServerAvatar comes in. [ServerAvatar](https://serveravatar.com/) simplifies server and application management, allowing you to deploy and manage your servers, applications, and eCommerce store without dealing with complex server configurations. Whether you’re running a WooCommerce store or a Laravel-based eCommerce application, it helps you maintain performance, security, and scalability with ease. ![ServerAvatar Dashboard - Best PHP eCommerce Templates](https://serveravatar.com/wp-content/uploads/2026/04/image-66.png) Instead of spending time on server setup and maintenance, you can focus on growing your business while ServerAvatar handles the technical side. **Key Features** - **One-Click Application Deployment:** Easily deploy popular applications like WordPress, Mautic, N8n, UptimeKuma, and many more with one click application installer - **Managed Servers (No DevOps Needed):** Launch fully managed servers and self managed server easily without manually configuring infrastructure. - **Advanced Security Management:** Built-in Firewall, Fail2Ban, SSL certificates, AI bot blocker, 8G Firewall, and other security controls to protect your store. - **Automated Backups:** Take Instant and Schedule backups to ensure your data is always safe and recoverable. - **Performance Optimization:** Optimized stack with Apache, Nginx, OLS, and Node for faster load times. - **Staging Environment:** Test changes safely before pushing them live to your store. - **User-Friendly Dashboard:** Manage servers, applications, and databases from a clean and simple interface. - **Multi-Server & Team Management:** Handle multiple servers and applications and collaborate with your team efficiently. ### Why It Matters for eCommerce A fast and secure server plays a crucial role in your store’s success. Even the best template won’t perform well if your hosting is slow or unreliable. With ServerAvatar, you get a stable and optimized environment that ensures better speed, uptime, and overall user experience. ## Conclusion Building a successful online store goes beyond just choosing an attractive design—it requires the right combination of performance, usability, and scalability. PHP eCommerce templates make this process easier by providing a solid foundation with essential features, allowing you to launch faster and grow efficiently. However, to truly maximize your store’s potential, you also need a reliable server environment that ensures speed, security, and uptime. By selecting the right template and supporting it with proper optimization and tools like ServerAvatar, you can create a powerful, user-friendly eCommerce store that delivers consistent results and long-term growth. ## FAQs ### 1. What are PHP eCommerce templates? PHP eCommerce templates are pre-designed website layouts built using PHP that help you quickly create an online store with features like product pages, carts, and checkout systems. ### 2. Are PHP eCommerce templates suitable for beginners? Yes, many templates are beginner-friendly and come with drag-and-drop builders, pre-built layouts, and easy customization options that require little to no coding knowledge. ### 3. What is the difference between free and paid eCommerce templates? Free templates are budget-friendly but usually offer limited features and basic design, while paid templates provide advanced functionality, better performance, regular updates, and dedicated support. ### 4. How do I choose the best eCommerce template for my store? You should consider factors like speed, mobile responsiveness, SEO optimization, customization flexibility, and compatibility with your platform before making a decision. ### 5. Why is server management important for eCommerce websites? Server management ensures your website runs smoothly with good speed, security, and uptime. A well-managed server improves user experience and helps prevent downtime or performance issues. ### 6. Can I use ServerAvatar for managing my eCommerce store? Yes, ServerAvatar allows you to easily deploy, manage, and optimize your servers and applications without handling complex server configurations, making it ideal for both beginners and developers. **Categories:** Blog, Guide, Others, Php **Tags:** best PHP eCommerce templates, eCommerce website templates PHP, php, PHP eCommerce templates, PHP eCommerce themes, PHP online store templates, responsive PHP eCommerce templates --- ### [Complete Guide to Using Controllers and Middleware in Laravel](https://serveravatar.com/controllers-middleware-laravel/) **Published:** April 8, 2026 **Author:** Meghna Meghwani **Content:** [![Blog banner - ServerAvatar](https://serveravatar.com/wp-content/uploads/2025/09/728_90-Banner-3-1024x127.png)](https://serveravatar.com/?ref=blog) Have you ever wondered how modern web applications manage requests so smoothly? When you click a button, submit a form, or access a page, there’s a lot happening behind the scenes. Controllers and Middleware in Laravel play a crucial role in making this process clean, organized, and secure. These powerful tools help handle application logic efficiently while ensuring that every request is properly validated and processed. Think of your Laravel application like a restaurant. Controllers are the chefs preparing your food (handling logic), while middleware acts like the security guard or waiter, ensuring only the right requests get through and everything flows properly. In this guide, I will break down everything in a simple, beginner-friendly way. No complicated jargon, just clear explanations, practical examples, and useful tips. ## What is Laravel? Laravel is a popular PHP framework used to build web applications quickly and efficiently. It provides a clean structure and ready-made tools so developers don’t have to reinvent the wheel every time. ![Laravel - Controllers and Middleware in Laravel](https://serveravatar.com/wp-content/uploads/2026/04/image-54.png) If you’re building a website or app, Laravel helps you stay organized and write cleaner code. ### Understanding MVC Architecture Laravel is built on the MVC (Model-View-Controller) pattern, which helps organize your code into clear sections. This structure separates data handling, user interface, and application logic, making your project easier to manage. Instead of mixing everything together, MVC ensures each part has a specific responsibility. This not only improves clarity but also makes debugging and scaling your application much easier. ![MVC Architecture - Controllers and Middleware in Laravel](https://serveravatar.com/wp-content/uploads/2026/04/image-55.png) - **Model:** Handles all database-related operations and data management. - **View:** Displays the data to users through the interface. - **Controller:** Acts as a bridge, processing requests and returning responses. Controllers sit right in the middle, acting like a bridge between your data and what users see. ## What are Controllers in Laravel? Controllers in Laravel are responsible for handling the core logic of your application. Instead of writing all logic inside routes, controllers allow you to group related functionality in one place. This keeps your code structured and easy to understand as your application grows. Controllers also make it easier to reuse code and maintain consistency across your project. ![controllers - Controllers and Middleware in Laravel](https://serveravatar.com/wp-content/uploads/2026/04/image-56.png) **This improves:** - **Code readability:** Keeps your code clean and easy to follow. - **Maintainability:** Makes it easier to update and manage your application. - **Scalability:** Allows your application to grow without becoming messy. **For example:** - **Handling form submissions:** Processes user input from forms. - **Fetching data from the database:** Retrieves records when needed. - **Returning views or responses:** Sends data back to the user interface. In simple terms, controllers are like the brain of your application. ### Types of Controllers Laravel provides different types of controllers to suit different use cases. Each type is designed to handle specific tasks, helping you write more structured and reusable code. Choosing the right controller type can save time and reduce complexity in your application. **1. Basic Controllers** Used for simple tasks where you define custom methods based on your needs. **2. Resource Controllers** Designed for handling CRUD operations in a structured and standardized way. - **Create:** Adds new records to the database. - **Read:** Retrieves and displays data. - **Update:** Modifies existing records. - **Delete:** Removes records from the database. **3. Single Action Controllers** Used when a controller is focused on performing one specific task only. Each type helps you organize your code depending on the complexity of your application. ### Creating a Controller Creating a controller in Laravel is quick and straightforward using the Artisan command-line tool. With a single command, Laravel generates a ready-to-use controller file in the correct directory. This saves time and ensures consistency in your project structure. Once created, you can start adding your application logic inside it. Run the below command: ``` php artisan make:controller UserController ``` ``` php artisan make:controller UserController ``` This creates a file inside: ``` app/Http/Controllers/UserController.php ``` ``` app/Http/Controllers/UserController.php ``` Now you’re ready to start writing your logic. ### Resource Controllers Explained Resource controllers are built specifically to handle CRUD operations efficiently. Instead of writing separate methods manually, Laravel automatically generates them for you. This not only speeds up development but also keeps your code consistent across projects. You can create one using below command: ``` php artisan make:controller BookController --resource ``` ``` php artisan make:controller BookController --resource ``` You can even generate all related routes with a single line of code, making your workflow much smoother. - **index():** Displays a list of all records. - **create():** Shows a form to create new data. - **store():** Saves new data into the database. - **show():** Displays a single record. - **edit():** Shows a form to edit existing data. - **update():** Updates the selected record. - **destroy():** Deletes a record from the database. Laravel can also auto-generate routes using: ``` Route::resource('books', BookController::class); ``` ``` Route::resource('books', BookController::class); ``` This single line creates multiple routes automatically. ### Controller-Model Binding Controller-model binding is a powerful feature in Laravel that automatically connects route parameters to database records. Instead of writing manual queries, Laravel fetches the correct data for you. This reduces code repetition and improves efficiency. It also makes your code cleaner and easier to read, especially in larger applications. Instead of writing extra queries: ``` public function show($id) { $book = Book::where('id', $id)->get(); } ``` ``` public function show($id) { $book = Book::where('id', $id)->get(); } ``` You can simply write: ``` public function show(Book $book) { return view('book', compact('book')); } ``` ``` public function show(Book $book) { return view('book', compact('book')); } ``` Laravel automatically fetches the data for you, reducing code and improving efficiency. ### Controller Methods and Routing Controllers and routes work together to handle user requests efficiently. You define a route and link it to a specific controller method that performs the required action. This approach keeps your routes simple while moving the logic into controllers. As a result, your application becomes more organized and easier to maintain. Example: ``` Route::get('/users', [UserController::class, 'index']); ``` ``` Route::get('/users', [UserController::class, 'index']); ``` Here: - **/users:** Represents the URL endpoint accessed by users. - **index:** Refers to the method inside the controller that handles the request. This keeps your routes clean and your logic organized. ### Passing Data from Controller to View Controllers often pass data to views so it can be displayed to users. This allows dynamic content to appear on your web pages based on logic or database results. Laravel makes this process simple using built-in helper functions. It ensures smooth communication between backend logic and frontend display. Example: ``` public function index() { $users = ['John', 'Jane', 'Doe']; return view('users', compact('users')); } ``` ``` public function index() { $users = ['John', 'Jane', 'Doe']; return view('users', compact('users')); } ``` Now your view can display this data easily. ## What is Middleware in Laravel? Middleware acts as a layer between the incoming request and your application. It checks whether a request should proceed further or be blocked. This is useful for handling authentication, permissions, and request validation. In simple terms, middleware ensures that only valid requests reach your controllers. ![Middleware - Controllers and Middleware in Laravel](https://serveravatar.com/wp-content/uploads/2026/04/image-57.png) - **Checks requests before controller:** Ensures conditions are met before processing. - **Allows or blocks access:** Controls whether a user can proceed. - **Modifies requests:** Can change request data before passing it forward. - **Handles authentication:** Verifies if the user is logged in. - **Logs activity:** Tracks requests for monitoring or debugging. **For example:** - **Authentication:** Confirms whether a user is logged in. - **Authorization:** It checks permission to access a resource for user. ### How Middleware Works Middleware follows a simple flow that ensures every request is validated before processing. It acts as a checkpoint system that either allows the request to move forward or stops it. This helps maintain security and proper access control in your application. - **User sends a request:** A request is initiated by the user. - **Middleware checks it:** The request is validated against rules. - **If valid:** The request is passed to the controller. - **If not:** The request is blocked or redirected. **Laravel includes built-in middleware like:** - **auth:** Verifies user authentication. - **throttle:** Limits the number of requests to prevent abuse. ### Types of Middleware Laravel provides different types of middleware to handle various scenarios. Each type is designed for a specific level of control, whether it’s global or route-specific. Using the right type ensures efficient request handling. **1. Global Middleware** Runs automatically on every request in the application. **2. Route Middleware** Applied only to specific routes where needed. **3. Group Middleware** Used to apply middleware to a group of routes at once. Each type helps control access in different ways. ### Creating Middleware Creating middleware in Laravel is simple using the Artisan command. Laravel generates a dedicated file where you can define your custom logic. This allows you to control how requests are handled before reaching controllers. It’s especially useful for implementing rules like age checks, authentication, or logging. You can create middleware using: ``` php artisan make:middleware CheckAge ``` ``` php artisan make:middleware CheckAge ``` This creates a file in: ``` app/Http/Middleware/CheckAge.php ``` ``` app/Http/Middleware/CheckAge.php ``` Inside, you define the logic: ``` public function handle($request, Closure $next) { if ($request->age < 18) { return redirect('home'); } return $next($request); } ``` ``` public function handle($request, Closure $next) { if ($request->age < 18) { return redirect('home'); } return $next($request); } ``` ### Registering Middleware After creating middleware, you need to register it so Laravel can recognize and use it. This is done in the Kernel file, where all middleware are defined. Registration allows you to assign a short name (alias) to your middleware. This makes it easier to apply it across routes and controllers. Go to: ``` app/Http/Kernel.php ``` ``` app/Http/Kernel.php ``` Add your middleware: ``` protected $routeMiddleware = [ 'checkAge' => \App\Http\Middleware\CheckAge::class, ]; ``` ``` protected $routeMiddleware = [ 'checkAge' => \App\Http\Middleware\CheckAge::class, ]; ``` ### Applying Middleware to Routes Once middleware is registered, you can apply it to specific routes or controllers. This ensures only authorized requests can access certain parts of your application. Laravel provides flexible ways to apply middleware depending on your needs. This helps maintain both security and control over your application flow. To apply middleware to routes: ``` Route::get('/profile', function () { // })->middleware('checkAge'); ``` ``` Route::get('/profile', function () { // })->middleware('checkAge'); ``` Or to a controller: ``` public function __construct() { $this->middleware('checkAge'); } ``` ``` public function __construct() { $this->middleware('checkAge'); } ``` ### Middleware in Controllers Middleware can also be applied directly inside controllers using constructors. This ensures that all methods within the controller follow the same rules. It’s a clean and efficient way to secure multiple routes at once. Laravel also supports inline middleware, which is useful for small and quick tasks. ## Middleware vs Controllers Middleware and controllers serve different but complementary roles in Laravel. Middleware acts as a filter that checks requests before they are processed. Controllers, on the other hand, handle the actual business logic and return responses. Together, they create a structured and secure workflow. Let’s clear the confusion: **Feature****Controller****Middleware****Purpose**Handles logicFilters requests**Role**Processes dataControls access**Timing**After requestBefore/after request## Best Practices Following best practices helps you write clean, efficient, and scalable Laravel applications. Keeping your code organized ensures long-term maintainability and better performance. - **Keep controllers clean:** Avoid adding too much logic in one place. - **Use middleware for security checks:** Handle validation and access control separately. - **Follow naming conventions:** Maintain consistency across your project. - **Use resource controllers:** Simplify CRUD operations with standard methods. - **Avoid duplicating code:** Reuse logic wherever possible. Clean code is easier to maintain and scale. ## Common Mistakes to Avoid Avoiding common mistakes can save you time and prevent issues as your application grows. Poor structure and misuse of features can make your code difficult to manage. Staying mindful of these pitfalls helps maintain a clean and efficient codebase. - **Putting too much logic in routes:** Makes your code messy and hard to manage. - **Overloading controllers:** Reduces readability and maintainability. - **Misusing middleware:** Can lead to unnecessary complexity. - **Not organizing files properly:** Makes navigation and debugging difficult. Avoid these, and your Laravel app will stay smooth and manageable. [![Blog banner - ServerAvatar](https://serveravatar.com/wp-content/uploads/2025/09/728_90-Banner-1-1024x127.png)](https://serveravatar.com/?ref=blog)## Deploying Laravel Applications Made Easy with ServerAvatar While understanding controllers and middleware is essential for building a Laravel application, managing and deploying that application on a live server is equally important. This is where ServerAvatar simplifies the entire process. Once your Laravel application is ready, ServerAvatar makes it easy to deploy and manage it without worrying about server setup. ![ServerAvatar Dashboard - Controllers and Middleware in Laravel](https://serveravatar.com/wp-content/uploads/2026/04/image-58.png) [ServerAvatar](https://serveravatar.com/) is a powerful server and application deployment and management platform that allows developers to deploy and manage Laravel applications without dealing with complex server configurations. Instead of manually setting up your environment, you can launch and manage your Laravel projects with just a few clicks. With ServerAvatar, you can: - Deploy Laravel, PHP, and Node.js–based applications quickly without manual setup - Manage servers, applications, databases, security features, server services, and configurations from a single dashboard - Monitor logs and performance to debug issues efficiently - Use staging environments to test changes before going live This means you can focus more on writing clean controllers and middleware while ServerAvatar handles the server-side complexity. ## Conclusion Understanding how controllers and middleware work in Laravel gives you a strong foundation for building well-structured and secure web applications. Controllers help you organize your application logic, while middleware ensures that every request is properly validated before it reaches your core functionality. When used together, they create a clean and efficient workflow that improves both performance and maintainability. As your application grows, having the right tools for deployment also becomes essential, and platforms like ServerAvatar make it easier to manage, deploy, and scale your Laravel projects without dealing with complex server configurations. ## FAQs ### 1. What is the role of a controller in Laravel? A controller in Laravel handles the application logic by processing user requests, interacting with models, and returning responses such as views or data. ### 2. What is middleware in Laravel? Middleware acts as a filter between the request and the application, checking conditions like authentication, permissions, or request validity before allowing access. ### 3. What is the difference between controllers and middleware? Controllers manage the business logic of your application, while middleware handles request validation and filtering before the request reaches the controller. ### 4. When should I use middleware in Laravel? You should use middleware when you need to control access, validate requests, handle authentication, or apply rules before processing a request. ### 5. What are resource controllers in Laravel? Resource controllers provide a structured way to handle CRUD operations using predefined methods like index, create, store, show, update, and destroy. **Categories:** Application Deployments, Blog, Guide, Laravel, Linux, Others, Tutorials, Ubuntu **Tags:** Controllers in Laravel, laravel, Laravel basics, Laravel Controllers, Laravel Guide, Laravel Middleware, Laravel Tutorial, Middleware in Laravel --- ### [WordPress Post-Migration Troubleshooting Guide for SSL DNS and Email Fixes](https://serveravatar.com/wordpress-post-migration-checklist/) **Published:** April 4, 2026 **Author:** Meghna Meghwani **Content:** [![Blog banner - ServerAvatar](https://serveravatar.com/wp-content/uploads/2025/09/728_90-Banner-3-1024x127.png)](https://serveravatar.com/?ref=blog)Migrating a WordPress website is often necessary, but it can introduce unexpected technical issues. WordPress post-migration troubleshooting becomes essential when you start noticing SSL warnings, DNS misconfigurations, or email delivery failures. These issues can affect your website’s performance, security, and communication. WordPress is one of the most widely used content management systems, powering millions of websites worldwide. While migrating a WordPress website to a new server or hosting provider is common, even small configuration mistakes can lead to issues with SSL, DNS, or email functionality. The good news is that most post-migration problems follow predictable patterns and can be resolved with the right approach. In this guide, you’ll learn how to identify and fix SSL, DNS, and email-related issues step by step, without confusion or unnecessary complexity. ## Understanding Post-Migration Issues After migrating a WordPress website, several components must align correctly for everything to function as expected. These components include server configuration, domain settings, SSL certificates, and email services. ![WordPress post-migration troubleshooting](https://serveravatar.com/wp-content/uploads/2026/04/image-36.png) **Key areas impacted** - Security (SSL certificates) - Connectivity (DNS records) - Communication (email services) If any of these elements are misconfigured, your website may not behave as intended. ## SSL Errors After WordPress Migration SSL errors are among the most common issues encountered after migration. These errors typically appear as browser warnings indicating that the site is not secure. ![SSL Error - WordPress post-migration troubleshooting](https://serveravatar.com/wp-content/uploads/2026/04/image-37.png) ### Common causes - SSL certificate not installed on the new server - Incorrect domain configuration - Expired or invalid SSL certificate - Website still loading over HTTP ### Installing and Configuring SSL Setting up SSL correctly ensures your website is secure and accessible over HTTPS. Following the right steps helps eliminate browser warnings and protects user data, follow these steps: **1. Install SSL Certificate:** Ensure that a valid SSL certificate is installed on your hosting server. **2. Update Site URLs to HTTPS** - Navigate to **WordPress Dashboard >> Settings >> General** - Update both the **WordPress Address (URL)** and **Site Address (URL)** to HTTPS **3. Force HTTPS Redirection** Redirect all HTTP traffic to HTTPS using: - .htaccess rules, or - Server configuration settings **4. Fixing Mixed Content Issues:** Mixed content errors occur when secure pages (HTTPS) load resources over an insecure connection (HTTP). ### Typical symptoms SSL issues often show visible signs in the browser that indicate something is not configured properly. Recognizing these symptoms helps you quickly diagnose the problem**.** - Broken padlock icon in browser - Certain assets are not loading correctly ### How to fix These steps ensure all website content is securely delivered and properly configured. - Replace all HTTP URLs with HTTPS - Update database entries using search-and-replace tools - Review theme and plugin files for hardcoded HTTP links ### Step-by-Step SSL Error Troubleshooting If your SSL is not working, you can follow a structured troubleshooting process to identify the issue. To verify your SSL configuration in detail, you can use tools like [SSL Labs](https://www.ssllabs.com/ssltest?ref=serveravatar.com). This tool helps you: - Check certificate validity - Identify configuration issues - Detect security vulnerabilities Running a test can quickly reveal what’s causing SSL warnings on your site. Once your SSL is properly configured, the next step is to ensure your domain correctly points to your new server. This is where DNS configuration becomes critical. ## Common DNS Issues After WordPress Migration DNS settings control how your domain connects to your server. If these settings are not updated correctly, your website may not load from the new server. ![DNS Issues - WordPress post-migration troubleshooting](https://serveravatar.com/wp-content/uploads/2026/04/image-38.png) ### Common DNS issues These errors typically occur when DNS settings are not updated or fully propagated. - Domain pointing to old IP address - Incorrect DNS records - Missing essential entries ### How to fix **1. Updating DNS Records Correctly** Proper DNS configuration ensures your domain connects to the right server without interruptions. Making accurate updates is critical for website accessibility. - **Update A Record:** Point your domain to the correct server IP address. - **Verify Nameservers:** Ensure your domain uses the correct nameservers provided by your hosting provider. - **Check Essential Records:** Confirm the presence and accuracy of: - A Records - CNAME Records - MX Records (for email) **A Record vs Nameservers: Key Differences** When updating DNS settings, it’s important to understand the difference between modifying an A record and changing nameservers. **A Record:** - Directly points your domain to a specific server IP address - Used when keeping DNS management with your current provider **Nameservers:** - Transfer full DNS control to another provider - Manage all DNS records from a new hosting platform Choosing the correct method depends on how you want to manage your domain settings. **2. Domain Not Pointing to New Server** If your website is still loading from the old server, the issue is usually related to DNS propagation or incorrect configuration. **Steps to resolve:** - Verify updated DNS records - Wait for propagation to complete (up to 48 hours) - Clear local DNS cache **3. Understanding and Checking DNS Propagation** DNS propagation refers to the time it takes for updated domain settings to be recognized across different networks worldwide. When DNS records are modified, changes are not applied instantly. Instead, they gradually update across multiple servers. ### Best practices - Use DNS lookup tools - Check from multiple locations - Allow sufficient time for updates ### Typical timeframe - A few minutes in some cases - Up to 48 hours for full global updates During this period, different users may see different versions of your website depending on their network. ### Tools to Track DNS Changes in Real-Time To confirm whether your DNS changes have been applied globally, you can use online DNS lookup tools. These tools show how your domain is resolving from different locations around the world. Useful tools include: - [WhatsMyDNS](https://www.whatsmydns.net/?ref=serveravatar.com) - [DNSChecker](https://dnschecker.org/?ref=serveravatar.com) Simply enter your domain name and check if it is pointing to the correct server IP address. If different locations show different results, your DNS changes are still propagating. **4. Cache and CDN Troubleshooting** Cached data can cause outdated content or errors to persist even after fixes. **Clear the following:** - Browser cache - WordPress caching plugins - CDN cache (if applicable) ### Clearing Your Local DNS Cache Sometimes your system may still store outdated DNS information, even after changes are made. **To fix this, clear your local DNS cache:** - **Windows:** Use Command Prompt and run ipconfig /flushdns - **macOS:** Use Terminal with the appropriate flush command - **Browser:** Clear browsing data and restart This ensures your system fetches the latest DNS records instead of using old ones ## WordPress Email Issues After Migration Email functionality may stop working after migration due to incorrect configurations. ![Email Issues - WordPress post-migration troubleshooting](https://serveravatar.com/wp-content/uploads/2026/04/image-39.png) ### Common problems - Emails not sending - Contact forms failing - Emails landing in spam folders ### How to Fix WordPress Email Issues After Migration Email-related problems are very common after migrating a WordPress website. You may notice that emails are not being delivered, contact forms stop working, or messages are landing in spam folders. These issues usually happen due to incorrect mail configuration or DNS settings. **1. Identify the Email Issue First** Before applying any fix, it’s important to understand exactly what’s going wrong. Check the following: - Are emails being sent but not received? - Are emails going to the spam folder? - Are contact forms failing to send messages? You can also use email logs or testing tools to identify whether the issue is related to sending, receiving, or filtering. **2. Set Up SMTP for Reliable Email Delivery** By default, WordPress uses the PHP mail function, which is often unreliable on many servers. That’s why configuring SMTP (Simple Mail Transfer Protocol) is highly recommended. To set up SMTP: - Install and activate an SMTP plugin - Go to the plugin settings - Enter your “From Email” and “From Name” - Add your SMTP host, port, encryption type (TLS/SSL), and login credentials SMTP ensures that emails are sent through a trusted mail server, improving delivery success. **3. Choose the Right SMTP Option** You can configure SMTP in two main ways depending on your needs: **Option 1: Use Your Existing Email Provider** You can connect your current email service (such as your hosting email or business email provider). Typical configuration includes: - SMTP Host - Port number - Encryption (TLS or SSL) - Username and password Make sure to use secure authentication methods like app-specific passwords if required. **Option 2: Use Transactional Email Services** For better reliability and scalability, especially for high-traffic websites, you can use dedicated email services. Popular options include: - SendGrid - Mailgun - SendLayer - Amazon SES These services are designed specifically for sending large volumes of emails and provide better inbox delivery rates. **4. Fix Email Delivery Using MX Records** MX (Mail Exchange) records control how incoming emails are routed to your mail server. To fix issues: - Ensure your MX records match your email provider’s settings - Remove any outdated or duplicate entries - Verify that priority values are correctly configured Incorrect MX records can prevent you from receiving emails entirely. **5. Prevent Emails from Going to Spam (SPF & DKIM)** Even if emails are being sent, they may still land in spam without proper authentication. Configure these DNS records: - **SPF (Sender Policy Framework):** Defines which servers are allowed to send emails on behalf of your domain - **DKIM (DomainKeys Identified Mail):** Adds a digital signature to verify email authenticity Adding these records improves your email credibility and helps avoid spam filters. **6. Test Your Email Configuration** After completing the setup, always test your email functionality. You can also use tools like [Mail Tester](https://www.mail-tester.com/?ref=serveravatar.com) to check your email deliverability. These tools analyze your emails and provide insights on: - Spam score - Missing authentication records (SPF/DKIM) - Blacklisting issues This helps you ensure your emails reach the inbox instead of the spam folder. ### Common SMTP Issues to Watch For - Incorrect login credentials - Blocked SMTP ports on the server - Missing authentication settings - Wrong encryption type (TLS/SSL mismatch) ## Final Checklist After WordPress Migration After applying fixes, thorough testing is essential. **Checklist:** - Website loads securely over HTTPS - Pages and assets display correctly - Forms function as expected - Emails are delivered successfully - Internal links are working Managing all these configurations manually can be time-consuming and prone to errors, especially if you’re not familiar with server-level settings. This is where using a server management platform can significantly simplify the process. ## How ServerAvatar Can Help With Post-Migration **What is ServerAvatar?** [ServerAvatar](https://serveravatar.com/) is a server and application hosting and management platform that simplifies the process of hosting and managing servers and applications. It allows you to deploy and manage PHP and Node.js applications on cloud servers without needing advanced server administration skills. This reduces manual errors and speeds up post-migration troubleshooting significantly. ![ServerAvatar Dashboard - WordPress post-migration troubleshooting](https://serveravatar.com/wp-content/uploads/2026/04/image-40.png) With an easy-to-use dashboard, ServerAvatar helps you handle essential tasks such as SSL installation, security feature management, backups, server monitoring, etc., in one place. ### How ServerAvatar Helps After WordPress Migration After migrating a WordPress website, managing technical configurations like SSL, DNS, and email can be challenging, especially if you’re handling everything manually. This is where ServerAvatar can make the process much easier: - **Easy SSL Management:** Install a free automatic SSL Certificate with auto-renewal or custom SSL, and easily manage SSL certificates without manual server commands. - **Simplified Server Configuration:** No need to deal with complex server-level settings with manual commands. - **Centralized Dashboard:** Manage servers, applications, services, and other settings from one place. Using a platform like ServerAvatar helps you save time and reduces the chances of configuration errors. ## Safely Move a WordPress Site from Staging to Live Using ServerAvatar When working on a WordPress website, it’s always safer to test changes in a staging environment before applying them to your live site. A staging environment is a separate copy of your website where you can experiment without affecting real users. With ServerAvatar, creating and managing a staging site is simple and does not require manual file transfers or complex database handling. ### How Staging Works in ServerAvatar Instead of manually copying files or databases, ServerAvatar allows you to: - **Create a Staging Environment:** You can generate a complete copy of your live application, including files and database, in just a few steps. This staging site is isolated from your production environment. - Navigate to the server panel by clicking on the server dashboard icon. ![server dashboard - WordPress post-migration troubleshooting](https://serveravatar.com/wp-content/uploads/2026/04/image-41-1024x250.png) - Go to the Applications section and click on the application dashboard icon to navigate to the application panel. ![application dashboard - WordPress post-migration troubleshooting](https://serveravatar.com/wp-content/uploads/2026/04/image-42-1024x298.png) - Click on the Staging Area section from the left sidebar, enter your staging area name, and fill in the further details. - Click on the Create Staging Area button. ![create staging area - WordPress post-migration troubleshooting](https://serveravatar.com/wp-content/uploads/2026/04/image-43-1024x495.png) - You can see the staging area listed there once it is created. ![staging area - WordPress post-migration troubleshooting](https://serveravatar.com/wp-content/uploads/2026/04/image-44-1024x295.png) - **Test Changes Safely:** You can update plugins, modify themes, or test new features without impacting your live website. - **Deploy Changes When Ready:** Once your changes are tested, you can move them from staging to your live site. This process allows you to apply updates in a controlled way without affecting important live data. - Simply click on the “Deploy to Production: button, and you’re done. ![deploy to production - WordPress post-migration troubleshooting](https://serveravatar.com/wp-content/uploads/2026/04/image-45-1024x295.png) This approach reduces the risk of breaking your live site and helps ensure a smoother transition after migration. ### Why Staging-to-Production Requires a Careful Approach Moving changes from staging to production is not always as simple as copying everything over. In many cases, your live site continues to receive new data such as user activity, orders, or form submissions. If you overwrite your live site without considering these changes, you may lose important data. That’s why it’s important to carefully decide what should be updated and what should remain untouched. ### What You Should and Shouldn’t Move to Production Before syncing your staging changes, review what has changed on your live site. **Safe to Move from Staging:** - Theme and design updates - Plugin files and configurations - New pages, posts, or media added during testing - Layout or UI improvements **Avoid Overwriting on Live Site:** - User accounts and login data - Comments or user-generated content - eCommerce orders or transactions - Form submissions or leads - Any real-time data created after staging was set up Being selective during this process helps prevent accidental data loss and ensures your live website continues to function properly. ## Common Mistakes to Avoid After WordPress Migration Even small mistakes after migration can lead to major issues. Here are some common pitfalls you should avoid: - **Forgetting to update DNS records properly:** This can cause your domain to point to the old server. - **Installing SSL before DNS is fully propagated:** This often results in certificate errors or failed validation. - **Ignoring mixed content issues:** Your website may still load insecure resources even after SSL is installed. - **Overwriting live data during staging deployment:** Pushing full database changes can delete recent user activity or transactions. - **Relying on default PHP mail instead of SMTP:** This can lead to email delivery failures or messages going to spam. - **Not clearing cache after making changes:** Old cached data may prevent updates from appearing correctly. [![Blog banner - ServerAvatar](https://serveravatar.com/wp-content/uploads/2025/09/728_90-Banner-1-1024x127.png)](https://serveravatar.com/?ref=blog)## Best Practices for a Smooth Post-Migration Process Following best practices can help you avoid most post-migration issues and ensure your website runs smoothly. - **Always use a staging environment before going live:** Test all changes safely before applying them to your production site. - **Take a complete backup before making major changes:** This ensures you can restore your website if anything goes wrong. - **Verify DNS changes before configuring SSL:** Make sure your domain is pointing to the correct server. - **Use SMTP for reliable email delivery:** Avoid relying on default mail functions. - **Monitor your website after migration:** Check performance, security, and functionality regularly. - **Document important configurations:** Keep track of DNS, SSL, and email settings for future reference. Using a structured approach and the right tools can significantly reduce risks during and after migration. ## Conclusion Migrating a WordPress website doesn’t end once the files and database are moved. Post-migration issues related to SSL, DNS, and email are common but manageable with the right approach. By carefully checking configurations, allowing time for DNS propagation, and using reliable email setup methods like SMTP, you can ensure your website runs smoothly after migration. Using tools and platforms that simplify server management can further reduce complexity and help you maintain a stable and secure website environment. ## FAQs ### 1. Why is my website showing “Not Secure” after migration? This usually happens when the SSL certificate is not installed correctly or the site is still loading resources over HTTP. ### 2. How long does DNS propagation take after migration? DNS propagation can take anywhere from a few minutes to 48 hours depending on the network and DNS provider. ### 3. Why are my WordPress emails not working after migration? This is often due to missing SMTP configuration or incorrect DNS records like MX, SPF, or DKIM. ### 4. Should I use SMTP instead of PHP mail in WordPress? SMTP is more reliable and improves email deliverability compared to the default PHP mail function. ### 5. Can I fix post-migration issues without technical knowledge? Using managed platforms like ServerAvatar simplifies SSL, server, and application management without requiring advanced skills. **Categories:** Blog, Guide, Linux, Others, Tutorials, Ubuntu, WordPress **Tags:** DNS issues after migration, email issues after migration, fix SSL after migration, Wordpress, WordPress migration errors, WordPress migration issues, WordPress post-migration troubleshooting, WordPress SSL issues --- ### [How to Clear Website Cache and Resolve Common Problems Easily](https://serveravatar.com/how-to-clear-website-cache/) **Published:** April 7, 2026 **Author:** Meghna Meghwani **Content:** [![Blog banner - ServerAvatar](https://serveravatar.com/wp-content/uploads/2025/09/728_90-Banner-3-1024x127.png)](https://serveravatar.com/?ref=blog)Have you ever updated your website, only to find that nothing seems to change? Frustrating, right? You tweak a design, fix a bug, or publish new content, but your website still shows the old version. That’s where website cache comes into play. Think of cache like a “shortcut memory” your browser or server uses to load websites faster. It’s helpful, until it starts showing outdated content. The good news? Learning how to clear website cache is usually a quick and effective fix. In this guide, you’ll learn how to clear website cache and resolve common problems easily, even if you’re not tech-savvy. Let’s break it down step by step. ## What Is Website Cache? Website cache is stored data that helps your website load faster for visitors. Instead of loading everything from scratch, your browser or server saves copies of files like images, CSS, and HTML. ![website cache - clear website cache](https://serveravatar.com/wp-content/uploads/2026/04/image-46.png) **Imagine this:** It’s like keeping a screenshot of a page instead of reloading it every time. Faster? Yes. Always accurate? Not really. ### Why Cache Exists? And Why It Causes Problems Cache is created to make websites load faster by storing temporary versions of files. It reduces the need to reload everything repeatedly, improving performance. However, when updates are made, cached data may still show the old version, leading to confusion and issues. - It reduces loading time - Saves server resources - Improves user experience These benefits help improve speed, reduce server load, and create a smoother browsing experience. ### Common Issues Caused by Cache Cache can sometimes prevent your website from showing the latest updates, making it appear broken or outdated. This often leads to confusion when changes don’t reflect immediately. ![common issues - clear website cache](https://serveravatar.com/wp-content/uploads/2026/04/image-47.png) - Website not updating after changes - Broken layout or design glitches - Old images or content are still visible - Login or session issues - Slow loading despite optimization ### When Should You Clear Cache? Clearing cache is not something you need to do regularly, but it becomes important when your website doesn’t behave as expected. It’s often the first step to fix display or update-related problems. - You update website content or design - You install or update plugins/themes - Your website behaves strangely - Users report seeing outdated pages Cache should be cleared whenever changes are made or when your website shows unexpected or outdated results. ## Types of Website Cache Explained Before clearing cache, it helps to know there are different types: **1. Browser Cache** Browser cache is a storage system within your web browser that saves parts of websites, such as images, CSS, and JavaScript files. This helps websites load faster when you revisit them because the browser doesn’t need to download everything again. It improves browsing speed and reduces data usage. However, sometimes it keeps older versions of files, which can prevent new updates from appearing. This is why you may not see recent changes on a website. Clearing browser cache forces the browser to load fresh content. It is often the first step in fixing display-related issues. **2. Server Cache** Server cache stores ready-to-use versions of web pages on the hosting server. Instead of processing every request from scratch, the server quickly delivers cached content to users. This reduces server load and improves website performance, especially during high traffic. It plays a key role in speeding up dynamic websites. However, if the cache is not updated, it may serve outdated content. This can cause confusion when recent changes are not visible. Clearing server cache ensures that the latest version of the website is delivered to visitors. **3. CDN Cache** CDN cache stores copies of your website on multiple servers located in different regions around the world. When a user visits your site, content is delivered from the nearest server, reducing load time. This improves speed, performance, and reliability for global audiences. It helps to reduce load on your server. However, cached files on CDN servers may not update immediately after changes. This can result in users seeing older versions of your site. Clearing CDN cache ensures updated content is served everywhere. **4. Application Cache** Application cache is managed by software or platforms like WordPress to store frequently accessed data. It helps reduce database queries and speeds up the delivery of dynamic content. This type of cache is often controlled by plugins or built-in tools. It improves performance and enhances user experience. However, when updates are made, cached data may not refresh automatically. This can cause issues like outdated content or broken layouts. Clearing the application cache ensures your website reflects the latest changes correctly. Each type needs a different method to clear. ## Website Cache Types Comparison Table Here’s a quick comparison to help you understand different types of cache and when to clear them: **Cache Type****Where It Is Stored****Purpose****When to Clear****Browser Cache**User’s browserFaster page loadingWhen changes are not visible**Server Cache**Hosting serverReduce server processingAfter website updates**CDN Cache**Global CDN serversFaster delivery worldwideAfter content updates**Application Cache**CMS/Plugins (e.g. WordPress)Speed up dynamic contentAfter plugin/theme changes### How to Clear Browser Cache Clearing browser cache removes stored files from your device, allowing the browser to load the most recent version of a website. It’s the quickest way to fix display-related issues. - Click the three dots at the top right or navigate to the options for any browser ![browser cache - clear website cache](https://serveravatar.com/wp-content/uploads/2026/04/image-48-1024x504.png) - Go to Settings >> Privacy and Security - Click Clear browsing data ![clear browser cache - clear website cache](https://serveravatar.com/wp-content/uploads/2026/04/image-49-1024x498.png) - Look for the option to clear the cached images and files and pages - Click Clear data ![clear cache - clear website cache](https://serveravatar.com/wp-content/uploads/2026/04/image-50.png) **Shortcut:** Press Ctrl + Shift + Delete ### How to Clear Website Cache in WordPress In WordPress, cache is usually handled by plugins that store static versions of your site for better performance. Clearing it ensures your latest changes are visible. - Clear Cache - Purge Cache Simply click the clear or purge cache option in your plugin to instantly refresh cached data. These are some popular plugins that provide easy options to manage and clear cache with a single click. - WP Rocket - W3 Total Cache - LiteSpeed Cache **Clear Website Cache Using W3 Total Cache Plugin** - Log in to the WordPress admin dashboard, and navigate to the **Performance >> Dashboard** section of the W3 Total Cache plugin ![empty cache using plugin - clear website cache](https://serveravatar.com/wp-content/uploads/2026/04/image-51-1024x444.png) ### How to Clear Server Cache Server-level caching stores website data on the hosting server, which may still show old content even after other caches are cleared. Removing it ensures fresh data is served. You can easily clear the server-level cache by using your hosting panel or built-in tools. ## Managing Server Cache Made Easier with ServerAvatar If you’re managing servers manually, clearing cache and handling configurations can sometimes feel complicated. This is where ServerAvatar can make things much simpler. [ServerAvatar](https://serveravatar.com/) is designed to help you easily manage servers and deploy applications without dealing with complex server-level commands. ![ServerAvatar Dashboard - clear website cache](https://serveravatar.com/wp-content/uploads/2026/04/image-52.png) With ServerAvatar, you can handle PHP and Node.js applications, manage server settings, and integrate performance tools like Redis caching from a single dashboard. Instead of switching between multiple tools, everything is organized in one place, making server management more efficient and beginner-friendly. If you are using ServerAvatar, it supports Redis caching at the server level. You can enable this by configuring a Redis caching plugin on your WordPress website and connecting it with the server-side Redis service. Once integrated, Redis helps manage and clear cached data more efficiently. ![Redis cache - clear website cache](https://serveravatar.com/wp-content/uploads/2026/04/image-53-1024x480.png) For a complete step-by-step setup, you can refer to the guide: [**How to Install and Configure Redis Cache on Ubuntu**](https://serveravatar.com/install-redis-cache-ubuntu/) ### How to Clear CDN Cache A CDN stores cached content across multiple servers worldwide, which can sometimes deliver outdated versions of your site. Clearing it updates content globally. Clearing CDN cache is quick and easy, just log in to your CDN dashboard, go to the caching settings, and click on the Purge Cache or Clear All Cache option. That’s all you need to do. **Example:** Cloudflare users can clear cache with one click. ## Quick Fix Checklist for Cache Issues When facing website issues, following a checklist helps ensure no cache layer is missed. This approach resolves most problems quickly. Before you panic, try this checklist: - Clear browser cache - Clear website/plugin cache - Clear server cache - Clear CDN cache - Refresh using Ctrl + F5 This simple routine fixes 90% of cache-related issues. ## Tips to Prevent Cache Problems Preventing cache issues is easier than fixing them. Following simple practices helps keep your website running smoothly without unexpected errors. - Use cache versioning (automatically refresh files) - Set proper cache expiration rules - Clear cache after updates - Test your site in incognito mode - Use reliable caching plugins Think of it like cleaning your room regularly, it prevents bigger messes later. ## Tools That Help Manage Cache Easily Using the right tools can simplify cache management and save time. They allow you to monitor and control caching efficiently. - **Browser Dev Tools:** Inspect cached files - **Caching Plugins:** Automate cache clearing - **Hosting Dashboards:** One-click cache control - **CDN Tools:** Manage global cache These tools act like your “control panel” for performance. [![Blog banner - ServerAvatar](https://serveravatar.com/wp-content/uploads/2025/09/728_90-Banner-1-1024x127.png)](https://serveravatar.com/?ref=blog)## Beginner Mistakes to Avoid Many beginners make small mistakes that lead to ongoing cache issues. Understanding these helps avoid unnecessary frustration. - Clearing only browser cache (ignoring server/CDN) - Forgetting to clear cache after updates - Using too many caching plugins - Not testing changes properly - Ignoring mobile cache issues **Remember:** Cache exists in layers, clear all of them if needed. ## Conclusion Website cache plays an important role in improving speed and performance, but it can also be the reason behind many common website issues. From outdated content to broken layouts, most problems are often caused by cached data not updating properly. The good part is that these issues are usually easy to fix by clearing cache at different levels, browser, server, CDN, or application. By understanding how cache works and following the right steps, you can quickly troubleshoot problems and keep your website running smoothly. Remember, a simple cache clear can save you hours of frustration. ## FAQs ### 1. What happens when I clear website cache? Clearing website cache removes stored temporary files so your website loads the most recent version instead of outdated content. ### 2. Will clearing cache delete my website data? Clearing cache only removes temporary files and does not affect your actual website data, content, or database. ### 3. Why is my website not updating after making changes? This usually happens because cached data is still being displayed, so clearing browser, server, or CDN cache can resolve the issue. ### 4. How often should I clear website cache? You don’t need to clear it regularly, but it’s recommended after making updates or when your website behaves unexpectedly. ### 5. Do I need to clear all types of cache? In some cases clearing only browser cache is not enough, so it’s best to clear server, CDN, and application cache as well. **Categories:** Blog, Guide, Linux, Optimisation, Others, Tutorials, Ubuntu, WordPress **Tags:** cache, cache troubleshooting, clear website cache, fix cache problems, how to clear website cache, website cache clearing, website cache issue --- ### [Step-by-Step Guide to WordPress User Roles and Permissions Management](https://serveravatar.com/wordpress-user-roles/) **Published:** April 6, 2026 **Author:** Meghna Meghwani **Content:** [![Blog banner - ServerAvatar](https://serveravatar.com/wp-content/uploads/2025/09/728_90-Banner-3-1024x127.png)](https://serveravatar.com/?ref=blog)Have you ever shared access to your WordPress website and then wondered, What if someone accidentally breaks something? I have been there, and trust me, it’s not a great feeling. That’s exactly why understanding WordPress user roles and permissions is so important. When you assign the right roles to the right people, you protect your website, avoid mistakes, and keep everything running smoothly. In this guide, I will walk you through everything step by step in simple terms, with no technical headaches. By the end, you will feel confident managing users like a pro. ## What Are WordPress User Roles? Think of WordPress user roles as job titles for your website. Each role comes with specific permissions, what a user can and cannot do. ![WordPress user roles ](https://serveravatar.com/wp-content/uploads/2026/04/image-25.png) For example: - Some users can publish posts - Others can only write drafts - Some can manage the entire website This system helps you stay organized and secure. ### Why User Roles Matter for Your Website Let me ask you something, would you let a new intern handle your company’s finances on day one? Probably not. The same applies here. **User roles matter because they:** - Protect your website from accidental changes - Prevent unauthorized access - Keep workflows smooth and organized - Improve collaboration Without proper role management, your site can quickly become chaotic. ## Default WordPress User Roles Explained WordPress comes with some default user roles. Each one has its own level of access. Here’s a quick overview: - Super Admin - Administrator - Editor - Author - Contributor - Subscriber Let’s break them down one by one. ### 1. Super Admin Role: Network-Level Control (Multisite Only) If you’re using WordPress Multisite, there’s one role above Administrator called the Super Admin. Think of a Super Admin as the owner of an entire building, while Administrators are just managing individual apartments. **What a Super Admin can do:** - Manage all websites in the network - Install and control themes and plugins across the network - Add or remove sites - Manage network-wide settings - Assign or remove Administrators **What makes it different?** An Administrator only controls a single website, but a Super Admin controls the entire network of sites. **Important note:** This role doesn’t exist in a regular WordPress installation. You’ll only see it if Multisite is enabled. **Best practice:** Just like the Administrator role, keep Super Admin access extremely limited, ideally to yourself or a highly trusted developer. ### 2. Administrator Role: Full Control Administrator is the most powerful role. If you’re the site owner, this is usually your role. **What they can do:** - Install and delete plugins - Change themes - Add or remove users - Modify settings **Best practice:** Only give this role to people you fully trust. It’s like giving someone the master key. ### 3. Editor Role: Content Manager An Editor is like a content manager in a company. **What they can do:** - Edit and publish all posts - Manage other users’ content - Moderate comments They cannot: - Change website settings - Install plugins This role is perfect for someone managing your blog or content team. ### 4. Author Role: Content Creator Authors are your regular writers. **What they can do:** - Write, edit, and publish their own posts - Upload media files They cannot: - Edit others’ posts - Access site settings This keeps things controlled while allowing creativity. ### 5. Contributor Role: Limited Writer A Contributor is like a guest writer. **What they can do:** - Write posts - Submit them for review They cannot: - Publish posts - Upload media This is great when you want to review content before it goes live. ### 6. Subscriber Role: Basic Access Subscribers have the lowest level of access. **What they can do:** - Manage their profile - Read content (especially on membership sites) They cannot make any changes to your website. ## WordPress User Roles Comparison Table To make things easier to understand, here’s a quick comparison table of all WordPress user roles and what they can do. This will help you clearly see the differences in permissions at a glance. **Role****Access Level****Can Manage Site Settings****Can Publish Content****Can Edit Others’ Content****Can Install Plugins/Themes****Best For****Super Admin**Full Network AccessYes (Network-wide)YesYesYes (Network-wide)Multisite network owners**Administrator**Full Site AccessYesYesYesYesWebsite owners / admins**Editor**High (Content)NoYesYesNoContent managers**Author**MediumNoYes (Own only)NoNoRegular content writers**Contributor**LimitedNoNoNoNoGuest writers / contributors**Subscriber**Very LimitedNoNoNoNoBasic users / members## How to Add a New User in WordPress Adding a user is super simple. Here’s how I usually do it: - Go to the WordPress Dashboard, and the **Users** section from the left sidebar. - Click on the **Add User** option. ![add nw user - WordPress user roles](https://serveravatar.com/wp-content/uploads/2026/04/image-26-1024x322.png) - Now, enter username, email, first name, last name, and website. - Set a strong password. - Select the checkbox if you want to notify the user via email about the role creation. - Choose a user role as per your preferences - Click on the **Add User** button. ![add user - WordPress user roles](https://serveravatar.com/wp-content/uploads/2026/04/image-27-1024x406.png) That’s it! Just make sure you assign the correct role. ## How to Assign or Change User Roles Sometimes you need to update roles. Maybe a writer becomes an editor. Here’s how: - Go to the WordPress Dashboard, and the **Users** section from the left sidebar. - Click on the **All Users** section. - Find the user you want to assign or change the role for, and click on the **Edit** button. ![assign WordPress user roles](https://serveravatar.com/wp-content/uploads/2026/04/image-28-1024x369.png) - Navigate to the Role section, and select a new role you want to assign to that user. - Click on the **Update User**. ![change WordPress user roles](https://serveravatar.com/wp-content/uploads/2026/04/image-29-1019x1024.png) It takes less than a minute but can make a big difference. ### When It Makes Sense to Use Custom User Roles There are times when the default WordPress roles just don’t quite fit your needs. That’s when creating custom user roles becomes really useful. Think about it, every website is different. Maybe you run an online store, a membership site, or a multi-author blog. In these cases, you might need more control over what each user can access. **So, when should you consider custom roles?** - When existing roles give too much or too little access - When you want to limit specific actions (like editing only certain pages) - When you have a growing team with clearly defined responsibilities - When you need tighter security for sensitive areas **Why does this matter?** Because giving someone more access than they need can be risky, while giving too little can slow down your workflow. Custom roles help you strike the perfect balance. ## How to Create, Modify, or Remove User Roles in WordPress Managing user roles might sound technical, but it’s actually pretty straightforward, especially with the right tools. By default, WordPress doesn’t let you edit roles directly from the dashboard. But you can easily do this using plugins or manually. In this section, I’ll walk you through two simple ways to manage user roles in WordPress, one using a plugin (which is the easiest option) and the other using manual code for more advanced control. Both methods allow you to control who can access what on your website, helping you keep things organized and secure. ### Method 1: Managing Roles with a Plugin If you want a hassle-free experience, using a plugin is the best way to go. It simplifies everything by showing permissions in a clear and easy-to-understand format, reducing the chances of errors. There are several plugins available, such as [Members](https://wordpress.org/plugins/members?ref=serveravatar.com), [Advanced Access Manager](https://wordpress.org/plugins/advanced-access-manager?ref=serveravatar.com), [User Role Editor](https://wordpress.org/plugins/user-role-editor?ref=serveravatar.com), and [WP User Manager](https://wordpress.org/plugins/wp-user-manager?ref=serveravatar.com). In this guide, we’ll use ‘User Role Editor.’ Let’s get started. - Navigate to the **Plugins >> Add Plugin** - Search for the **User Role Editor** plugin - Install and activate the plugin ![install plugin - WordPress user roles](https://serveravatar.com/wp-content/uploads/2026/04/image-30-1024x513.png) You can access this plugin by navigating to the **Users >> User Role Editor** section. Once you’re inside, you can easily: - Create new roles - Duplicate existing roles - Add or remove specific permissions - Delete roles that are no longer needed The best part? Any changes you make are applied instantly, and you can always adjust them later if needed. This method works especially well if you’re managing client websites, working with a content team, or running a growing business. **How to Add a New User Role Using a Plugin** Creating a new role is helpful when the default roles don’t quite match your requirements. Here’s how you can do it: - Navigate to the **Users >> User Role Editor** section. - Click on **Add Role** button ![add WordPress user roles](https://serveravatar.com/wp-content/uploads/2026/04/image-31-1024x499.png) - Enter a unique role name and display name. - Choose an existing role to copy permissions from (this saves time and reduces errors) - Save your new role and fine-tune permissions if necessary ![adding WordPress user roles](https://serveravatar.com/wp-content/uploads/2026/04/image-32-1024x515.png) **Pro tip:** Starting with a copy of an existing role is much safer than building everything from scratch. **How to Remove a User Role Using a Plugin** Cleaning up unused roles helps keep your website organized and secure. To delete a role: - Navigate to the **Users >> User Role Editor** section. - Click on the **Delete Role** button ![delete WordPress user roles](https://serveravatar.com/wp-content/uploads/2026/04/image-33-1024x332.png) - Select the role you want to delete and click on the **Delete Role** button. ![deleting WordPress user roles](https://serveravatar.com/wp-content/uploads/2026/04/image-34.png) Before you delete anything, make sure that no users are currently assigned to that role. If they are, reassign them to another role first to avoid access issues. ### Method 2: Managing Roles Manually with Code (For Advanced Users) If you prefer full control, you can manage roles manually using code. However, this approach is best suited for developers or users comfortable working with PHP. These changes are typically made in the **functions.php** file of your theme or through a custom plugin. **Creating a User Role with Code** To create a new role manually, WordPress provides the **add\_role()** function. This allows you to define a role and assign specific permissions. While this method gives you complete flexibility, it also requires a good understanding of how WordPress capabilities work. **Important tip:** Always test your code on a staging site before applying it to your live website. **Editing or Removing Permissions via Code** You can also adjust permissions for existing roles using functions like: - **add\_cap()** to grant permissions - **remove\_cap()** to restrict permissions Even a small mistake here can cause serious issues, such as locking yourself out of the dashboard or exposing sensitive settings. **A Quick Word of Caution** When working with user roles, especially manually, remember that these changes directly affect real users. So always: - Test changes before going live - Keep proper backups - Document what you modify - Avoid experimenting on your live website Taking these precautions will save you from unnecessary headaches later. **Quick tip:** Always double-check permissions before saving changes. One small mistake can give users access you didn’t intend. ## Smart Ways to Manage User Roles and Permissions Over time, I’ve realized that good role management isn’t just about assigning permissions, it’s about maintaining control without creating confusion. Here are some tips that can make a difference: - **Give only necessary access:** Avoid the temptation to assign higher roles “just in case.” Keep permissions minimal. - **Review users regularly:** People join and leave teams. Make it a habit to check user roles every few months. - **Limit admin accounts:** Too many administrators increase the chances of accidental or harmful changes. - **Use reliable plugins:** If you’re customizing roles, stick to well-maintained plugins to avoid security issues. - **Keep backups ready:** Before making major changes, always have a backup. It’s your safety net. ## Using Plugins for Advanced Role Management Sometimes, default roles aren’t enough. That’s where plugins come in. **Popular options include:** - User Role Editor - Members plugin - Advanced Access Manager **With these tools, you can:** - Create custom roles - Modify permissions - Restrict specific actions It’s like upgrading from a basic lock to a smart security system. ## Common Mistakes to Avoid I’ve seen many people make these mistakes, and they can be costly. **1. Giving Admin Access Too Freely** Not everyone needs full control. **2. Ignoring User Cleanup** Old accounts can become security risks. **3. Not Using Role-Based Access** Everyone shouldn’t have the same permissions. **4. Skipping Backups Before Changes** Always have a safety net. ## Fixing Common Problems with WordPress User Roles Sometimes things don’t work the way you expect, and user roles are no exception. Here are some of the common problems and tips on how you can handle them: **1. Users can’t access what they should** This usually happens when permissions are too restricted. Double-check the assigned role. **2. Users have too much access** If someone can do more than they should, review and adjust their role immediately. **3. Changes not applying properly** This can be caused by plugin conflicts or caching. Try clearing cache or disabling plugins one by one. **4. Missing roles or broken permissions** Sometimes updates or plugins can affect roles. Re-saving settings or using a role editor plugin can fix this. **5. Login or access errors** If a user suddenly can’t log in or access certain areas, reset their role or password. **Pro tip:** Whenever something feels off, start by reviewing roles and permissions, it’s often the root of the problem. [![Blog banner - ServerAvatar](https://serveravatar.com/wp-content/uploads/2025/09/728_90-Banner-1-1024x127.png)](https://serveravatar.com/?ref=blog)## How to Audit and Monitor User Activity Want to know who did what on your site? You should. **Ways to monitor activity:** - Use activity log plugins - Track login attempts - Review content changes This helps you quickly spot suspicious behavior and take action. ## Managing Your WordPress Site Made Easier with ServerAvatar If you’re managing a WordPress website, handling users, permissions, backups, and overall server performance can quickly become overwhelming, especially as your website grows. That’s where ServerAvatar comes in. [ServerAvatar](https://serveravatar.com/) is a platform designed to simplify the hosting and management of servers and web applications. Whether you’re running a WordPress site, a PHP application, or even a Node.js project, it helps you handle everything from a single, easy-to-use dashboard without needing deep technical knowledge. ![](https://serveravatar.com/wp-content/uploads/2026/04/image-35.png) With ServerAvatar, you can: - Deploy and manage PHP and Node.js applications effortlessly - Deploy WordPress, Mautic, N8N, UptimeKuma, and many more popular applications with its [one-click application installer](https://serveravatar.com/docs/application/one-click-installer/getting-started/) - Monitor server performance in real-time - Set up automated backups to keep your data safe - Manage databases, files, and services without complex commands - Improve security with built-in features - Manage all your servers and applications from a single dashboard Instead of juggling between multiple tools and platforms or struggling with manual server management, ServerAvatar gives you a streamlined experience so you can focus more on your website and less on technical maintenance. ## Final Thoughts Managing user roles in WordPress isn’t just a technical task, it’s a smart way to protect your website, streamline teamwork, and avoid unnecessary risks. By assigning the right permissions to the right people, you create a secure and well-organized environment where everyone knows their responsibilities. Whether you’re using default roles, creating custom ones, or managing permissions with plugins or code, the key is to stay intentional and cautious. Combine proper role management with regular monitoring and backups, and you’ll have full control over your site without the stress of unexpected issues. ## FAQs ### 1. What is the most important WordPress user role? The Administrator role is the most powerful, as it has full control over the website. It should only be assigned to trusted users. ### 2. Can I create custom user roles in WordPress? You can create custom roles using plugins like User Role Editor or by adding code manually for more advanced control. ### 3. How do I change a user’s role in WordPress? Go to the Users section in your dashboard, edit the user, select a new role from the dropdown, and click “Update User.” ### 4. What happens if I assign the wrong user role? Assigning the wrong role can either restrict access too much or give users more control than needed, which can lead to errors or security risks. ### 5. Are plugins safe for managing user roles? As long as you use well-maintained and trusted plugins. They simplify role management and reduce the chances of mistakes. ### 6. How often should I review user roles? It’s a good practice to review user roles every few months or whenever there are changes in your team. **Categories:** Blog, Guide, Optimisation, Others, Tutorials, WordPress **Tags:** manage WordPress users, Wordpress, WordPress access control, WordPress permissions, WordPress roles explained, WordPress user management, WordPress user roles and permissions --- ### [How to Detect and Remove a WordPress Backdoor (Step-by-Step Guide)](https://serveravatar.com/wordpress-backdoor/) **Published:** April 3, 2026 **Author:** Meghna Meghwani **Content:** [![Blog banner - ServerAvatar](https://serveravatar.com/wp-content/uploads/2025/09/728_90-Banner-3-1024x127.png)](https://serveravatar.com/?ref=blog)Have you ever felt like something is off with your WordPress site, even though everything looks normal? Maybe your traffic suddenly drops, or strange users appear out of nowhere. I’ve been in that situation before, and trust me, it’s frustrating. One of the most dangerous reasons behind this is a WordPress backdoor. Hackers use backdoors to quietly access your website anytime they want, even after you “fix” the issue. In this guide, I’ll walk you through how to detect and remove a WordPress backdoor step by step, using simple language and practical tips you can actually follow. ## What is a WordPress Backdoor? A WordPress backdoor is a hidden method that allows hackers to access your website without logging in normally. Unlike regular hacks, backdoors are sneaky. Even if you remove malware, the hacker can still come back using the same hidden entry point. ![WordPress backdoor](https://serveravatar.com/wp-content/uploads/2026/04/image-12.png) Common examples include: - **Hidden PHP files:** These are secretly placed scripts that allow attackers to access your site without being noticed. - **Injected code in themes or plugins:** Hackers modify existing files to include malicious code that runs in the background. - **Fake admin accounts:** Unauthorized users are created with admin access so attackers can log in anytime. ## What is ServerAvatar, and how does it help secure your website Before we dive deeper into detecting and removing backdoors, it’s important to understand the role your server environment plays in website security. This is where ServerAvatar comes in. [ServerAvatar](https://serveravatar.com/) is a platform to simplify the hosting and management of servers and applications. It simplifies the process of deploying and managing PHP and Node.js based web applications on servers. ![ServerAvatar Dashboard - WordPress backdoor](https://serveravatar.com/wp-content/uploads/2026/04/image-13.png) From my experience, managing a server manually can be time-consuming and risky, especially when you’re dealing with security issues like malware or backdoors. ServerAvatar simplifies this by giving you direct access to important tools like file management, backups, and application settings, all in one place. Here’s how it helps when dealing with threats like backdoors: - **One-click backups:** You can instantly create backups before making any changes, so you always have a safe restore point. - **Easy file access:** The built-in File Manager lets you quickly inspect and remove suspicious files without needing external tools. - **Application-level isolation:** Each application runs in its own environment, reducing the risk of cross-site contamination. - **Built-in monitoring:** You can keep an eye on logs and activity to spot unusual behavior early. - **Secure configuration:** ServerAvatar handles server-level optimizations and security best practices, minimizing misconfiguration risks. In short, instead of struggling with technical complexities, you can focus on identifying and fixing issues quickly and safely. This becomes especially valuable when you’re dealing with something as sensitive as a WordPress backdoor. ## How Do Backdoors Get Into Your Site? You might be thinking, *“How did my site even get compromised?”* The truth is, most backdoors enter through small security gaps that are often overlooked. ![WordPress backdoor into site](https://serveravatar.com/wp-content/uploads/2026/04/image-14.png) - **Using outdated plugins or themes:** Old versions often have known vulnerabilities that hackers can easily exploit. - **Downloading nulled (pirated) themes:** These often come bundled with hidden malicious code. - **Weak passwords:** Simple passwords make it easy for attackers to guess and gain access. - **Poor hosting security:** Weak server protection can expose your entire website to threats. - **File upload vulnerabilities:** Improper file handling allows attackers to upload harmful scripts. I’ve personally seen sites hacked just because a plugin wasn’t updated for months. It’s that simple. ### Signs Your Website Has a Backdoor Backdoors usually don’t make obvious changes, which makes them harder to detect. But if you pay attention, there are subtle signs that something isn’t right. - **Unknown admin users:** New accounts appear that you didn’t create. - **Strange redirects:** Visitors are sent to unrelated or suspicious websites. - **Sudden traffic drop:** Your site loses visitors without a clear reason. - **Hosting warnings or suspension:** Your hosting provider flags your site for suspicious activity. - **Unexpected files in directories:** New or unfamiliar files show up in your server folders. If your site behaves weirdly, don’t ignore it. ### Why Backdoors Are Dangerous Backdoors are more serious than typical hacks because they give attackers ongoing access to your website. Even after fixing issues, the threat can still remain active. - **Hackers can return anytime:** They can access your site again without needing to hack it again. - **Your data can be stolen:** Sensitive information like user data or credentials can be compromised. - **Your site can be used for spam or phishing:** Attackers may misuse your site for illegal activities. - **SEO rankings can crash:** Search engines may penalize your site, reducing visibility. ## How to Detect and Remove a WordPress Backdoor Tracking down a WordPress backdoor by hand isn’t something you want to rush. It’s a sensitive process. One small mistake inside your server files can break your entire website. That’s why you need to move carefully and follow a clear step-by-step approach. **Step 1: Take a Complete Backup First** Before you touch anything, make sure you have a full backup of your website. Why is this so important? Because if you accidentally remove an important file while cleaning your site, you’ll need a way to restore everything quickly. **Here’s what you should back up:** - **Website files:** Use an FTP tool like FileZilla. Connect to your server, find the public\_html folder, and download everything to your computer. - **Database:** Open phpMyAdmin from your hosting panel, select your website database, and export it as an .sql file. If your hosting provider offers backup feature (like ServerAvatar or similar platforms), you can use that instead to save time. **If you are using ServerAvatar:** - Log in to your ServerAvatar account, and navigate to the [**Backups**](https://serveravatar.com/docs/backups/getting-started/) section from the sidebar. ![integration - WordPress backdoor](https://serveravatar.com/wp-content/uploads/2026/04/image-15.png) - You can easily take Instant Backup by navigating to the [**Instant Backups**](https://serveravatar.com/docs/backups/instant-backup/) **>> Create** section. - You can also schedule the backup by navigating to the [**Schedule Backups**](https://serveravatar.com/docs/backups/schedule-backup/) **>> Create** section. - ServerAvatar provides its own storage, or you can take a backup on your [own storage](https://serveravatar.com/docs/integrations/cloud-storage/getting-started/) by integrating it with ServerAvatar from the given options. - Create a backup. ![backups - WordPress backdoor](https://serveravatar.com/wp-content/uploads/2026/04/image-16.png) **Not using ServerAvatar:** If you prefer doing things manually, here’s how you can safely back up both your website files and database. You can do it by FTP. To download your website files, you’ll need an FTP client like FileZilla. **Steps to follow:** - Install and open your FTP client - Enter your server credentials (host, username, password, port) - Connect to your server - Navigate to the public\_html directory (or your website root folder) - Select all files and folders - Download them to your local computer This will give you a complete copy of your website’s files, including themes, plugins, and uploads. **Step 2: Check the Uploads Folder Carefully** The **wp-content/uploads** folder is meant only for media files like images, videos, and documents. It should never contain PHP files. Hackers love hiding backdoors here because most people don’t think to look inside this folder. **If you are using ServerAvatar:** - Navigate to the server panel by clicking on the server dashboard icon. ![server dashboard - WordPress backdoor](https://serveravatar.com/wp-content/uploads/2026/04/image-17.png) - Go to the Applications section from the left sidebar and click on the application dashboard icon to go to the application panel. ![application dashboard - WordPress backdoor](https://serveravatar.com/wp-content/uploads/2026/04/image-18-1024x329.png) - Go to the File Manager section from the left sidebar, and go to the public\_html directory >> wp-content >> uploads - Now, look for any .php files sitting among images. ![file manager - WordPress backdoor](https://serveravatar.com/wp-content/uploads/2026/04/image-19-1024x456.png) If you find one, that’s a red flag. Open the file and inspect it. If the code looks messy, scrambled, or unreadable, it’s likely malicious. In that case, delete it immediately. **Step 3: Look for Suspicious Code Inside Core Files** Sometimes attackers don’t create new files, they inject code into existing ones. They usually target important files like: - wp-config.php - functions.php (inside your theme) **Here’s a simple way to check:** - Download a clean version of WordPress from the official website - Compare your files with the original ones using a text editor Pay close attention to code added at the beginning or end of files. **Watch out for these functions:** - eval() - base64\_decode() - preg\_replace() These aren’t always harmful, but if they’re combined with long, random-looking strings, it’s a strong sign of a backdoor. ![code - WordPress backdoor](https://serveravatar.com/wp-content/uploads/2026/04/image-20-1024x561.png) If you find such code, carefully remove only the suspicious part and upload the cleaned file again. **Not using ServerAvatar:** - Open your FTP client and go to the uploads directory - Browse through folders organized by year and month - Look for any **.php** files sitting among images If you find one, that’s a red flag. Open the file and inspect it. If the code looks messy, scrambled, or unreadable, it’s likely malicious. In that case, delete it immediately. **Step 4: Find Fake Files That Look Legitimate** Hackers often try to blend in by creating files with names that look like real WordPress files. At first glance, they seem harmless, but they’re not. **Examples include:** - wp-options.php - wp-user.php - index-config.php These files don’t actually belong in a standard WordPress setup. **What to do:** - Check your root folder and wp-includes directory - Look for oddly named files that resemble core files - Delete them completely if they don’t belong **Step 5: Remove Hidden Admin Users from Database** Even if you clean all files, hackers can still access your site through hidden admin accounts stored in your database. **To fix this:** - Open phpMyAdmin from your hosting panel - Go to the wp\_users table - Look for unknown usernames or email addresses - Delete any suspicious entries Also, check the wp\_options table. Search for active\_plugins. Sometimes malicious plugins are injected directly into the database and won’t show up in your dashboard. If you find anything unfamiliar, remove it carefully. ## Why Manual Backdoor Removal Is Risky Now that you’ve seen the process, you might be thinking, it may seem doable at first, but in reality, it’s much more complicated. There are two major challenges. **1. The Obfuscation Challenge** Hackers don’t write clean, readable code. They intentionally scramble it using obfuscation techniques, turning it into long, confusing strings that are nearly impossible to understand. They might: - **Hide code inside legitimate files:** Malicious code is inserted into real files so it looks normal. - **Break it into multiple pieces:** The script is split across files to make detection harder. - **Use fake filenames to avoid detection:** Files are named to look like real WordPress system files. Because of this, manual scanning often misses hidden threats. Even one missed file can allow the backdoor to stay active. **2. The Risk of Breaking Your Site** Editing WordPress core files is not forgiving. If you: - **Delete the wrong line:** Removing important code can disrupt site functionality. - **Miss a bracket:** Even a tiny syntax error can cause major issues. - **Remove essential code:** Critical features may stop working instantly. Your site can crash instantly. You might end up with: - **Database connection error:** Your site fails to connect to the database. - **Blank white screen:** Your site becomes completely inaccessible. So while manual cleanup works, it requires precision and experience. ## How to Scan for Backdoors Using a Security Plugin Because manual removal is time-consuming and risky, most people prefer using security plugins. Tools like Wordfence or Sucuri can automatically scan your website and detect known malware patterns. Here’s how you can do it using Wordfence. **Step 1: Install and Activate the Plugin** - Log in to your WordPress admin dashboard - Navigate to the **Plugins** **>> Add Plugins** section - Search for **Wordfence Security** - Click **Install**, then **Activate**[](https://storage.3.basecamp.com/5840738/blobs/473c261c-2f4a-11f1-9713-0242ac120004/download/image.png) ![add plugin - WordPress backdoor](https://serveravatar.com/wp-content/uploads/2026/04/image-21-1024x326.png) **Step 2: Adjust Scan Settings** - Open the Wordfence menu from your dashboard - Go to the **Scan** section - You can see the scan type and Malware Signatures on the dashboard. - To get detailed information, you need to upgrade the **Wordfence Security** plugin to it’s premium version[](https://storage.3.basecamp.com/5840738/blobs/6a6b62dc-2f4b-11f1-a8c2-0242ac120004/download/image.png) ![scan - WordPress backdoor](https://serveravatar.com/wp-content/uploads/2026/04/image-22-1024x568.png) This setting makes the scan more thorough, although it may sometimes flag safe files as suspicious. **Step 3: Run the Scan and Analyze Results** - Click Start New Scan - Wait while it checks your files and database ![start scan - WordPress backdoor](https://serveravatar.com/wp-content/uploads/2026/04/image-23-1024x520.png) Once the scan is complete, you’ll see a list of flagged issues. You’ll usually get options to: - Repair the file (restore original version) - Delete the file ![detections - WordPress backdoor](https://serveravatar.com/wp-content/uploads/2026/04/image-24-1024x786.png) Go through the results carefully and take action where needed. ## Why Security Plugins Are Not Reliable While plugins are helpful, they’re not perfect. Hackers are well aware of how these tools work, and they design backdoors to avoid detection. Here’s why plugins can miss threats: **1. Limited Access to Server-Level Files** Plugins only scan within WordPress. If malware is placed outside your main directory or at the server level, the plugin won’t detect it. **2. Hidden or Encrypted Database Entries** Advanced backdoors may hide inside unusual database tables or use encryption. These can easily slip past standard scans. **3. Incomplete Scans Due to Server Limits** Deep scans require a lot of server resources. Sometimes, the scan stops midway due to memory or time limits. Hackers take advantage of this by hiding malware deep inside large folders. **4. Inability to Detect New Threats** Plugins rely on known malware signatures. If a hacker creates a completely new type of malicious code, the plugin may not recognize it at all. **Final Note** If there’s one thing I’ve learned, it’s this: no single method is enough. Manual checks help you dig deeper, while plugins save time and catch common threats. The best approach is to combine both, and always stay proactive about your site’s security. ## Common Mistakes to Avoid When dealing with a WordPress backdoor, it’s easy to panic and rush into fixing things. I’ve seen (and honestly made) some of these mistakes myself, and they can make the situation worse instead of better. So before you jump in, here are a few common pitfalls you should avoid. **1. Skipping the Backup Step** This is probably the biggest mistake. You might feel tempted to start cleaning files immediately, but without a backup, you’re taking a huge risk. If something goes wrong, like deleting the wrong file, your entire site could break with no way to recover it. Always create a full backup first. Think of it as your safety net. **2. Deleting Files Without Understanding Them** Not every unfamiliar file is malicious. Sometimes, people delete files just because they “look suspicious.” The problem is, WordPress themes and plugins can have complex structures, and removing the wrong file can crash your website. If you’re unsure, compare the file with a clean version before deleting anything. **3. Ignoring the Database** A lot of people focus only on files and completely forget about the database. But here’s the thing, hackers often hide backdoors in: - **Fake admin users:** Unauthorized accounts are stored directly in the database. - **Injected plugin entries:** Malicious plugins are added without appearing in the dashboard. - **Hidden scripts inside database tables:** Harmful code is embedded in database records. If you don’t clean the database, the attacker can still regain access. **4. Trusting Only Security Plugins** Security plugins are helpful, but they’re not magic tools. Relying only on a plugin scan can give you a false sense of security. Some advanced backdoors are designed to bypass these tools completely. It’s always better to combine automated scans with manual checks. **5. Not Updating After Cleanup** Cleaning your site is only half the job. If you don’t update your WordPress core, plugins, and themes afterward, the same vulnerability can be exploited again. It’s like fixing a broken lock but leaving the door weak, someone can easily break in again. **6. Keeping Unused Plugins and Themes** Unused plugins and themes might seem harmless, but they can become an easy entry point for hackers, especially if they’re outdated. If you’re not using something, just delete it. Don’t leave unnecessary doors open. **7. Using Weak Passwords** Even after cleaning a backdoor, weak passwords can undo all your hard work. Avoid simple passwords like “admin123” or “password.” Use strong, unique combinations for: - **Admin login:** A weak admin password makes it easy for attackers to gain control. - **Hosting account:** If compromised, attackers can access your entire server. - **Database access:** Weak database credentials can expose all your site data. A strong password is one of the simplest yet most effective security measures. **8. Ignoring File Permissions** Incorrect file permissions can make your website vulnerable. If your files are set to be writable by anyone, attackers can easily inject malicious code again. Make sure your permissions are properly configured after cleanup. **9. Rushing the Process** I get it, you want your site fixed as quickly as possible. But rushing can lead to missed backdoors or accidental mistakes. Take your time, double-check everything, and follow each step carefully. **10. Not Monitoring After Cleanup** Many people think once the site is clean, the job is done. But that’s not true. You should keep monitoring your site for: - **Unusual activity:** Watch for anything out of the ordinary in logs or behavior. - **New users:** Keep an eye on any newly created accounts. - **File changes:** Monitor files for unexpected modifications. Security is not a one-time task, it’s an ongoing process. [![Blog banner - ServerAvatar](https://serveravatar.com/wp-content/uploads/2025/09/728_90-Banner-1-1024x127.png)](https://serveravatar.com/?ref=blog)## Best Practices to Prevent Future Backdoors Preventing a backdoor is always easier than removing one. By following a few simple habits, you can significantly reduce the risk of future attacks. - **Avoid nulled themes/plugins:** Pirated resources often contain hidden malware. - **Use trusted sources only:** Download themes and plugins from reliable providers. - **Enable automatic updates:** Keep your site protected with the latest security patches. - **Regularly scan your website:** Frequent scans help detect issues early. - **Use strong hosting security:** A secure hosting environment adds an extra layer of protection. Also, if you want less hassle and better security, choosing managed hosting can give you peace of mind. ## Conclusion Dealing with a WordPress backdoor can feel overwhelming, especially when everything on the surface seems normal. But as you’ve seen, identifying the signs early and taking a careful, step-by-step approach can make a huge difference. Whether you choose to manually inspect files or rely on security plugins, the key is to stay patient and thorough. More importantly, don’t treat security as a one-time fix. Keeping your site updated, maintaining regular backups, and using a reliable server management platform can save you from future headaches. In the end, a secure website isn’t just about fixing problems, it’s about preventing them before they happen. ## FAQs ### 1. How can I prevent backdoors in the future? You can reduce risk by keeping your WordPress core, plugins, and themes updated, avoiding nulled software, using strong passwords, and regularly scanning your website. ### 2. How can I tell if my WordPress site has a backdoor? Common signs include unknown admin users, strange redirects, unexpected files on your server, sudden traffic drops, or warnings from your hosting provider. ### 3. Can I remove a WordPress backdoor manually? It requires careful inspection of files and databases. One small mistake can break your site, so always take a full backup before making any changes. ### 4. Are security plugins enough to detect backdoors? Security plugins are helpful, but they are not foolproof. Some advanced backdoors can bypass detection, which is why combining manual checks with automated scans is recommended. ### 5. Where do hackers usually hide backdoors? Backdoors are often hidden in the uploads folder, inside core files like wp-config.php, or disguised as legitimate-looking files in your WordPress directories. **Categories:** Blog, Guide, Others, Tutorials, WordPress **Tags:** hacked WordPress site, how to detect WordPress backdoor, how to remove WordPress backdoor, Wordpress, WordPress backdoor, WordPress malware removal, WordPress Security, WordPress security guide --- ### [Best PHP Frameworks for Powerful Web Development in 2026](https://serveravatar.com/best-php-frameworks/) **Published:** April 2, 2026 **Author:** Meghna Meghwani **Content:** [![Blog banner - ServerAvatar](https://serveravatar.com/wp-content/uploads/2025/09/728_90-Banner-3-1024x127.png)](https://serveravatar.com/?ref=blog)If you’ve ever tried building a website from scratch using plain PHP, you already know how quickly things can get messy. I’ve been there, writing repetitive code, struggling with structure, and wasting hours fixing avoidable bugs. That’s exactly where the best PHP frameworks come in, they bring structure, efficiency, and modern development practices to your workflow. In 2026, PHP is far from outdated. In fact, it’s evolving with powerful frameworks that make web development more efficient than ever. Whether you’re a beginner or someone building serious applications, choosing the right framework can make all the difference. Let’s dive in. ## Understanding PHP Frameworks A PHP framework is like a ready-made structure that helps you build web applications faster and in a more organized way. Instead of writing every single line of code from scratch, you get a set of tools, libraries, and guidelines that handle common tasks for you. ![Understanding Best PHP frameworks](https://serveravatar.com/wp-content/uploads/2026/04/image-11.png) I like to think of it as building a house. You could start with raw materials and design everything yourself, but that takes time and effort. A PHP framework gives you a blueprint, pre-built walls, and tools so you can focus on designing the interior instead of laying every brick. **In practical terms, a PHP framework helps you:** - Manage code in a clean and structured way - Avoid repetitive coding tasks - Improve security with built-in protections - Speed up development Most frameworks follow patterns like MVC (Model-View-Controller), which simply means separating logic, design, and data. This makes your code easier to maintain and scale as your project grows ### Why Use PHP Frameworks Let me be honest, writing everything from scratch is not just slow, it’s unnecessary. **PHP frameworks help you:** - Save time with pre-built modules - Improve code structure - Enhance security - Scale your applications easily In 2026, speed and performance matter more than ever. Users don’t wait, and neither should your code. ### What Makes a PHP Framework “Best”? Not all frameworks are created equal. When I evaluate a PHP framework, I look at: - **Performance:** Is it fast? - **Ease of use:** Can beginners pick it up? - **Community support:** Are there tutorials and help available? - **Scalability:** Can it handle growth? - **Security features:** Does it protect against common threats? The best framework is not always the most popular, it’s the one that fits your needs. ### Key Things to Look for Before Selecting a PHP Framework Choosing a PHP framework isn’t just about picking the most popular one. I’ve made that mistake before, and trust me, it doesn’t always work out. Here are some important things I always consider: **1. Project Requirements** Start with the basics, what are you building? A simple blog doesn’t need a heavy framework, while a large SaaS platform definitely does. Always match the tool to the job. **2. Learning Curve** Some frameworks are beginner-friendly, while others take time to understand. If you’re just starting out, go for something simple. If you’re experienced, you might prefer something more flexible and powerful. **3. Performance and Speed** Speed matters. Users expect fast-loading websites, and search engines care about it too. Look for frameworks that are optimized for performance and don’t overload your application. **4. Community and Support** This is something people often ignore. A strong community means: - More tutorials - Faster solutions to problems - Regular updates If you get stuck, you’ll want help available. **5. Security Features** Security should never be an afterthought. A good framework should protect against common threats like: - SQL injection - Cross-site scripting (XSS) - Cross-site request forgery (CSRF) **6. Scalability** Think long-term. Will your application grow? If yes, choose a framework that can handle increasing traffic and complexity without breaking down. **7. Ecosystem and Tools** Some frameworks come with built-in tools for testing, authentication, APIs, and more. These extras can save you a lot of time and effort. ## PHP Framework for Powerful Web Development Building modern web applications without a structured approach can quickly become overwhelming, and that’s exactly where PHP frameworks make a difference. Below are some of the best PHP frameworks that provide the tools, structure, and efficiency needed to create fast, secure, and scalable websites with less effort and better results. ### 1. Laravel: The Developer Favorite [Laravel](https://laravel.com/) is one of the most popular PHP frameworks, known for its clean syntax and developer-friendly approach. It simplifies complex tasks like authentication, routing, and caching, making development smoother and faster. ![Laravel - Best PHP frameworks](https://serveravatar.com/wp-content/uploads/2026/04/image-1024x509.png) **Key Features:** - Elegant MVC architecture - Built-in authentication system - Blade templating engine - Eloquent ORM - Large ecosystem and community **Advantages:** - Easy to learn and use - Strong community support - Rich built-in features - Excellent documentation **Disadvantages:** - Slightly heavier than micro frameworks - Performance can be slower for very large apps **Best for:** Rapid development of modern web applications. ### 2. Symfony: Built for Large Applications [Symfony](https://symfony.com/) is a powerful and flexible framework designed for complex, large-scale applications. It offers reusable components and gives developers full control over configuration. ![Symfony - Best PHP frameworks](https://serveravatar.com/wp-content/uploads/2026/04/image-1-1024x470.png) **Key Features:** - Modular component-based system - Highly customizable architecture - Built-in debugging tools - Strong testing support - Long-term support versions **Advantages:** - Highly scalable - Enterprise-ready - Flexible configuration - Reliable performance **Disadvantages:** - Steeper learning curve - More setup required **Best for:** Large, complex enterprise-level projects. ### 3. CodeIgniter: Lightweight and Fast [CodeIgniter](https://codeigniter.com/) is a simple and lightweight framework that focuses on speed and ease of use. It’s ideal for developers who want minimal setup and quick results. ![CodeIgniter - Best PHP frameworks](https://serveravatar.com/wp-content/uploads/2026/04/image-2-1024x519.png) **Key Features:** - Small footprint - Simple configuration - Fast execution - MVC support - Minimal dependencies **Advantages:** - Beginner-friendly - Very fast performance - Easy setup - Low resource usage **Disadvantages:** - Limited built-in features - Smaller ecosystem **Best for:** Small to medium-sized applications and beginners. ### 4. Yii: Performance-Oriented Framework [Yii](https://www.yiiframework.com/) is a high-performance PHP framework designed for speed and efficiency. It comes with powerful tools that help developers build secure and scalable applications quickly. ![Yii - Best PHP frameworks](https://serveravatar.com/wp-content/uploads/2026/04/image-3-1024x564.png) **Key Features:** - High-speed performance - Code generation tool (Gii) - Built-in caching support - Strong security features - MVC architecture **Advantages:** - Fast and efficient - Good security defaults - Reduces development time - Scalable **Disadvantages:** - Smaller community compared to Laravel - Slight learning curve **Best for:** High-performance applications with heavy traffic. ### 5. CakePHP: Convention Over Configuration [CakePHP](https://cakephp.org/) follows a structured approach where predefined conventions reduce the need for manual configuration. This helps developers build applications faster with less setup. ![CakePHP - Best PHP frameworks](https://serveravatar.com/wp-content/uploads/2026/04/image-4-1024x505.png) **Key Features:** - Convention-based structure - Built-in ORM - Validation tools - MVC architecture - Rapid scaffolding **Advantages:** - Faster development - Less configuration required - Consistent code structure - Good security features **Disadvantages:** - Less flexibility in some cases - Smaller community **Best for:** Rapid application development with structured coding. ### 6. Laminas: Enterprise-Level Flexibility [Laminas](https://getlaminas.org/) is a flexible and modular framework suited for enterprise-grade applications. It allows developers to use only the components they need. ![Laminas - Best PHP frameworks](https://serveravatar.com/wp-content/uploads/2026/04/image-5-1024x596.png) **Key Features:** - Modular architecture - Reusable components - Enterprise-level support - Flexible configuration - API-focused tools **Advantages:** - Highly customizable - Scalable for large systems - Strong enterprise support - Robust performance **Disadvantages:** - Complex for beginners - Requires more setup time **Best for:** Enterprise and large-scale custom applications. ### 7. Slim: Minimalist Micro Framework [Slim](https://www.slimframework.com/) is a lightweight micro framework designed for building simple applications and APIs. It focuses only on essential features without unnecessary complexity. ![Slim - Best PHP frameworks](https://serveravatar.com/wp-content/uploads/2026/04/image-6-1024x539.png) **Key Features:** - Minimal core structure - Fast routing system - Middleware support - PSR-7 compatibility - Easy API development **Advantages:** - Extremely lightweight - Fast performance - Easy to use for APIs - Flexible **Disadvantages:** - Limited built-in features - Requires external tools for full functionality **Best for:** APIs and microservices. ### 8. Phalcon: High-Speed Framework [Phalcon](https://phalcon.io/en-us) is a unique PHP framework written in C, which makes it exceptionally fast. It runs as a PHP extension, reducing overhead and boosting performance. ![Phalcon - Best PHP frameworks](https://serveravatar.com/wp-content/uploads/2026/04/image-7-1024x556.png) **Key Features:** - C-based architecture - High execution speed - Low memory usage - Full-stack framework - MVC support **Advantages:** - Extremely fast - Efficient resource usage - Strong performance - Stable **Disadvantages:** - Harder to install - Smaller community **Best for:** Performance-critical applications. ### 9. FuelPHP: Secure and Flexible [FuelPHP](https://fuelphp.com/) is a flexible framework that focuses heavily on security and modular design. It supports both MVC and HMVC patterns for better organization. ![FuelPHP - Best PHP frameworks](https://serveravatar.com/wp-content/uploads/2026/04/image-8.png) **Key Features:** - HMVC architecture - Built-in security features - Flexible structure - RESTful support - Modular design **Advantages:** - Strong security focus - Flexible architecture - Good for complex apps - Clean code structure **Disadvantages:** - Smaller community - Less frequent updates **Best for:** Secure and modular web applications. ### 10. FlightPHP: Simple and Minimalist [FlightPHP](https://docs.flightphp.com/en/v3/) is a simple and lightweight micro framework designed for developers who want minimalism and speed. It provides just the essentials to get applications up and running quickly. ![FlightPHP - Best PHP frameworks](https://serveravatar.com/wp-content/uploads/2026/04/image-9-1024x749.png) **Key Features:** - Minimalistic design - Fast routing - RESTful request handling - Easy setup - Lightweight core **Advantages:** - Very easy to learn - Fast and efficient - Minimal overhead - Flexible usage **Disadvantages:** - Very limited features - Not suitable for large applications **Best for:** Small projects and simple web apps. ## Quick Comparison of Top PHP Frameworks Choosing the right PHP framework can feel confusing when you have so many good options. To make things easier, here’s a side-by-side comparison that highlights the key differences so you can quickly find what fits your needs. **Framework****Best For****Difficulty Level****Performance****Key Strength****Laravel**Modern web appsEasyMediumDeveloper-friendly & rich features**Symfony**Enterprise applicationsHardHighFlexibility & scalability**CodeIgniter**Small projectsEasyHighLightweight & fast**Yii**High-performance appsMediumVery HighSpeed & efficiency**CakePHP**Rapid developmentMediumMediumConvention-based structure**Laminas**Enterprise systemsHardHighModular & customizable**Slim**APIs & microservicesEasyVery HighMinimal & fast**Phalcon**Performance-critical appsMediumExtremely HighC-based speed**FuelPHP**Secure applicationsMediumHighSecurity-focused**FlightPHP**Small apps & APIsEasyHighSimple & lightweight## How to Choose the Right PHP Framework Choosing a framework can feel overwhelming. I usually ask myself a few simple questions: - What type of project am I building? - How much time do I have? - Do I need scalability? - Am I working solo or in a team? **Quick tip:** - **Beginners >>** Laravel or CodeIgniter - **Large apps >>** Symfony or Laminas - **APIs >>** Slim Pick what aligns with your goals, not just trends. ## Powering Your PHP Applications with ServerAvatar Building a powerful PHP application using the right framework is only part of the journey. To truly get the best performance, security, and scalability, you also need a reliable hosting environment. That’s where ServerAvatar comes in. [ServerAvatar](https://serveravatar.com/) is a modern server management platform designed to simplify PHP application hosting. Whether you’re a developer, agency, or business owner, it allows you to deploy and manage PHP applications without dealing with complex server configurations. ![ServerAvatar Dashboard - Best PHP frameworks](https://serveravatar.com/wp-content/uploads/2026/04/image-10.png) Instead of spending hours setting up servers manually, you can focus on what really matters, building and improving your application. ### Key Features of ServerAvatar for PHP Hosting ServerAvatar provides everything you need to run PHP applications smoothly: - One-click application installer for WordPress, Mautic, Joomla, and many more popular applications to quickly launch - Easily install a Custom PHP Application without the commandline hassles - Centralized dashboard to manage servers and applications with ease - Built-in performance optimization for better speed and stability - Redis caching support to improve loading times and user experience - Strong security features such as free SSL with auto-renewal, firewall protection, fail2ban, AI bot blocker, 8G firewall, and many more - Scalable infrastructure that grows with your application traffic - Real-time monitoring to track server health, logs, and performance - Multi-server management from a single dashboard ### Why Use ServerAvatar for PHP Projects? When you combine a powerful PHP framework with a reliable hosting platform like ServerAvatar, you get: - Better performance - Stronger security - Easier scalability - Faster deployment In simple terms, frameworks help you build efficient applications, while ServerAvatar ensures they run smoothly and reliably in production. ## Future of PHP Frameworks PHP is not going anywhere. In fact, it’s becoming more modern with each update. What I see happening: - Better performance optimization - More integration with cloud tools - Increased focus on security - Simpler developer experience Frameworks will continue evolving to meet modern development needs. ## Best Practices for Better Results No matter which PHP framework you choose, how you use it matters just as much. Over time, I’ve learned that following a few simple practices can make a huge difference. **1. Keep Your Code Clean and Organized** Messy code might work at first, but it becomes a nightmare later. Stick to a consistent structure and naming convention. Future you will thank you. **2. Follow the Framework Guidelines** Every framework has its own way of doing things. Instead of fighting it, follow its conventions. That’s how you get the best performance and maintainability. **3. Use Built-in Features Instead of Reinventing the Wheel** Frameworks already provide solutions for common tasks. Avoid writing custom code for things that are already handled efficiently. **4. Prioritize Security from Day One** Don’t wait until something breaks. Use built-in security tools and always validate user input. Prevention is always better than fixing issues later. **5. Optimize for Performance** Simple steps can make a big difference: - Use caching - Minimize database queries - Optimize assets A faster app means a better user experience. **6. Write Reusable Code** Try to write code that you can reuse in multiple places. It saves time and keeps your project consistent. **7. Test Your Application Regularly** Testing is not optional. Even basic testing helps you catch bugs early and ensures your application runs smoothly. **8. Keep Everything Updated** Frameworks release updates for a reason, performance improvements and security fixes.Make it a habit to stay up to date. [![Blog banner - ServerAvatar](https://serveravatar.com/wp-content/uploads/2025/09/728_90-Banner-1-1024x127.png)](https://serveravatar.com/?ref=blog)## Common Mistakes to Avoid I’ve made these mistakes myself, so learn from them: - Choosing a framework just because it’s popular - Ignoring documentation - Overcomplicating simple projects - Not considering scalability Keep things simple and practical. ## Conclusion At the end of the day, PHP frameworks are what make modern web development faster, cleaner, and far more manageable. From my experience, the real difference isn’t just in picking a popular framework, but choosing one that actually fits your project’s needs. Whether you go with something beginner-friendly or performance-focused, the goal is to build applications that are secure, scalable, and easy to maintain. And once you pair the right framework with a reliable hosting platform like ServerAvatar, everything just works better, from development to deployment and beyond. ## FAQs ### 1. Which PHP framework is best for beginners? Laravel and CodeIgniter are great starting points because they are easy to learn, well-documented, and widely supported by the developer community. ### 2. Is PHP still a good choice for web development in 2026? PHP remains highly relevant, especially with modern frameworks that improve performance, security, and developer experience. ### 3. Which PHP framework offers the best performance? Phalcon and Yii are known for their high performance, especially for applications that require speed and efficient resource usage. ### 4. Can PHP frameworks be used to build APIs? Frameworks like Slim, Laravel, and FlightPHP are commonly used to build fast and scalable APIs. ### 5. Do I need a hosting platform for PHP frameworks? Once your application is ready, you need a reliable hosting platform. ServerAvatar helps simplify deployment, improve performance, and manage servers efficiently. **Categories:** Blog, Guide, Laravel, Optimisation, Php **Tags:** best PHP frameworks, laravel, modern PHP frameworks, php, PHP development tools, PHP Frameworks, top PHP frameworks --- ### [13 Must-Have WordPress AI Plugins for 2026](https://serveravatar.com/wordpress-ai-plugins/) **Published:** September 8, 2025 **Author:** Meghna Meghwani **Content:** [![Blog banner - ServerAvatar](https://serveravatar.com/wp-content/uploads/2025/09/728_90-Banner-3-1024x127.png)](https://serveravatar.com?ref=blog)You know what? AI is literally everywhere these days. And if you’ve got a WordPress site, trust me – you really gotta know about these awesome **WordPress AI** plugins. They honestly make your work way easier and help your website perform so much better. So I’m gonna tell you about 13 AI plugins that basically every WordPress user should definitely try in 2025. These tools will seriously save you tons of time and make your site look amazing. ## What Are AI Plugins Anyway? Think of AI plugins like having really smart helpers working on your website. They use artificial intelligence to handle stuff that used to eat up hours of your time. Now you can literally get things done in just a few minutes instead. These plugins can write content for you, fix your SEO, chat with visitors, and do loads of other cool stuff. The best part? You don’t need to be some tech genius to use them or anything. ## Why You Actually Need AI Plugins Now Here’s the deal – AI plugins are super important because: - They save you crazy amounts of time - Make your content way better than before - Help you rank higher on Google (which is huge) - Keep visitors actually happy on your site - Do all the boring repetitive stuff for you - Work around the clock without taking breaks Alright, now let’s dive into the best AI plugins you can actually get right now. ## 1. Jasper AI Writing Assistant ![WordPress AI plugins](https://serveravatar.com/wp-content/uploads/2025/09/image-3-1024x464.png)[Jasper AI Writing Assistant plugin](https://www.jasper.ai/) is honestly a game-changer for writing content fast. Jasper can whip up blog posts, product descriptions, and social media posts like nobody’s business. **What it actually does:** - Writes entire blog posts for you - Creates product descriptions that sell - Makes engaging social media content - Fixes those annoying grammar mistakes - Gives you fresh content ideas when you’re stuck **How it works:** You literally just tell Jasper what you wanna write about. Then boom – it creates content that actually sounds like a real person wrote it. The writing is genuinely good and makes total sense. **Why you should use it:** Let’s be real – writing takes forever. With Jasper, you can create a solid blog post in maybe 10 minutes instead of spending 2-3 hours on it. It’s perfect if you’re not great at writing or just need tons of content fast. The plugin runs about $29 per month, but honestly it’s totally worth it if you write a lot. ## 2. Bit Flows AI Automation & Workflow Builder ![](https://serveravatar.com/wp-content/uploads/2025/09/image-102-1024x447.png) [Bit Flows](https://bit-flows.com) is not just another AI plugin. It’s more like a complete automation system that connects your WordPress site with AI tools and other apps. You can build powerful workflows that run automatically without writing any code. **What it does:** - Automates repetitive tasks across your website - Connects with AI tools like OpenAI, Gemini, Claude, and more - Creates smart workflows using a drag-and-drop builder - Handles form submissions, emails, CRM updates, and more - Let’s you build AI Agents to process and act on data - Works with 320+ apps, including WooCommerce, Mailchimp, and HubSpot **How it works:** You create workflows using a simple visual builder. For example, when someone fills out a form, Bit Flows can send that data to an AI tool, generate a response, and then send an email or update your CRM automatically. **Why you should use it:** You can automate daily processes, use AI integrations to make smarter decisions, and scale your website operations easily. It’s perfect if you want to save time and build advanced AI-powered workflows without any complex setup. Generous free version available. The Pro version starts at $119/year or $189 for lifetime use. It’s one of the most affordable plugins in this category based on its features. Additionally, users can enjoy a 40% discount applicable to all yearly plans and Agency LTDs for Bit Flows. Use the coupon code “**sabitflows40**” to avail the offer. ## 3. Rank Math SEO with AI ![Rank Math SEO with AI - ServerAvatar](https://serveravatar.com/wp-content/uploads/2025/09/image-4-1024x465.png)[Rank Math](https://rankmath.com/) was already pretty awesome for SEO stuff. But now they’ve added AI features that make it even more incredible. This plugin basically helps your site actually show up on Google. **What it does for you:** - Checks your SEO score and tells you what’s wrong - Suggests way better keywords to use - Writes meta descriptions automatically - Creates solid content outlines - Fixes SEO problems you didn’t even know you had **How it works:** The AI actually looks at your content and tells you exactly how to make it better for search engines. It’s like having your own SEO expert helping you 24/7. **Why you need it:** SEO is honestly pretty confusing for most people. This plugin makes it super simple. Even complete beginners can improve their Google rankings with this thing. It’s got a free version that works really well. The pro version costs $59 per year, which is pretty reasonable. ## 4. Tidio Live Chat with AI Bot ![Tidio Live Chat with AI Bot - ServerAvatar](https://serveravatar.com/wp-content/uploads/2025/09/image-5-1024x464.png)[Tidio](https://www.tidio.com/) adds one of those chat boxes to your website. But here’s the cool part – it now has AI that can actually talk to your visitors when you’re not around. **What it does:** - Chats with website visitors automatically - Answers the most common questions people ask - Collects customer info for you - Books appointments without you doing anything - Only bothers you with the really tricky questions **How it works:** You basically set up common questions and answers once. The AI bot learns from these and gets better at helping visitors over time. It sounds pretty natural too, not like some weird robot. **Why you should use it:** Here’s the thing – visitors bail from websites super fast when they can’t find help. This bot keeps them happy and actually turns more visitors into paying customers. The basic plan is totally free. Paid plans start at $29 per month if you need more features. ## 5. WordLift AI for Content Organization ![WordLift AI for Content Organization - ServerAvatar](https://serveravatar.com/wp-content/uploads/2025/09/image-6-1024x459.png)[WordLift](https://wordlift.io/) helps organize all your content using AI magic. It makes your site way easier to understand for both regular people and search engines. **What it does:** - Connects related content automatically - Creates these cool content maps - Improves your overall site structure - Helps with voice search optimization - Makes your content way more discoverable **How it works:** The AI actually reads through all your content and finds connections between different posts and pages. Then it creates links and structures that help everything work better together. **Why you need it:** When your content is well-organized, people stick around your site way longer. This seriously helps with SEO and keeps visitors much happier. Plans start at $59 per month, but there’s a free trial you can check out first. ## 6. Chatfuel AI Messenger Bot ![Chatfuel AI Messenger Bot - ServerAvatar](https://serveravatar.com/wp-content/uploads/2025/09/image-7-1024x465.png)[Chatfuel AI](https://chatfuel.com/) plugin connects Facebook Messenger right to your WordPress site. The AI bot can handle customer questions through Messenger, which is pretty neat. **What it does:** - Responds to Facebook messages instantly - Qualifies leads automatically for you - Sends follow-up messages at the right time - Books appointments without your help - Promotes your products naturally **How it works:** When someone messages your Facebook page, the AI bot responds right away. It can handle most basic questions and only bugs you with the important stuff. **Why you should use it:** Tons of people actually prefer messaging over email these days. This bot helps you capture those leads and turn them into real customers. The basic plan is completely free for up to 1,000 subscribers, which is awesome. ## 7. MobileMonkey WordPress Chat ![MobileMonkey WordPress Chat - ServerAvatar](https://serveravatar.com/wp-content/uploads/2025/09/image-8-1024x465.png)[MobileMonkey](https://customers.ai/wp-chatbot/) creates chat experiences that work on your website AND social media. The AI handles conversations across different platforms, which is super convenient. **What it does:** - Manages chat from multiple platforms in one place - Qualifies leads automatically - Schedules appointments for you - Sends promotional messages at the right time - Tracks how well your conversations are working **How it works:** One dashboard controls chats from your website, Facebook, Instagram, and even SMS. The AI learns what questions people usually ask and gets better at answering them. **Why you need it:** People contact businesses in all sorts of different ways now. This plugin helps you manage all those conversations without going crazy. Free plan available, with paid plans starting at just $14.25 per month. ## 8. Copy.ai Content Generator ![Copy.ai Content Generator - ServerAvatar](https://serveravatar.com/wp-content/uploads/2025/09/image-9-1024x433.png)[Copy.ai](http://copy.ai/) is fantastic for creating different types of marketing content. It’s especially great for social media, emails, and product descriptions. **What it does:** - Creates engaging social media posts - Writes email subject lines that actually get opened - Makes product descriptions that sell - Generates ad copy that converts - Brainstorms fresh content ideas when you’re stuck **How it works:** You just choose what type of content you need, give it some basic info about your business, and boom – it creates multiple options for you to pick from. **Why you should use it:** Marketing copy is honestly pretty hard to write well. This tool makes it super easy to create content that actually works to get customers. Free plan gives you 2,000 words per month to test it out. Pro plan costs $49 per month. [![Blog banner - ServerAvatar](https://serveravatar.com/wp-content/uploads/2025/09/728_90-Banner-1-1024x127.png)](https://serveravatar.com?ref=blog)## 9. MonsterInsights with AI Insights ![MonsterInsights with AI Insights - ServerAvatar](https://serveravatar.com/wp-content/uploads/2025/09/image-10-1024x466.png)[MonsterInsights](https://www.monsterinsights.com/) connects Google Analytics to your WordPress dashboard. Now it’s got AI features that actually explain what all that confusing data means. **What it does:** - Shows your website traffic data clearly - Explains what all those numbers actually mean - Suggests specific improvements you can make - Tracks your most important goals - Creates reports that actually make sense **How it works:** Instead of staring at confusing charts and graphs, the AI tells you in plain English what’s actually happening with your website traffic. **Why you need it:** Data is only helpful if you can actually understand what it means. This plugin makes website analytics simple for regular people who aren’t data experts. Free version available to get started. Pro starts at $99.50 per year. ## 10. WP AI Assistant ![WP AI Assistant - ServerAvatar](https://serveravatar.com/wp-content/uploads/2025/09/image-11-1024x457.png)[AI Assistant](https://wordpress.org/plugins/zmp-ai-assistant/) is basically a general AI helper that adds smart features throughout your WordPress admin area. It helps with various tasks as you work on your site. **What it does:** - Suggests ways to improve your content - Helps write image alt text automatically - Creates category descriptions for you - Improves your page titles - Assists with confusing plugin settings **How it works:** As you work in WordPress, the AI notices what you’re doing and offers helpful suggestions. It’s honestly like having a smart assistant watching over your shoulder. **Why you should use it:** All those small improvements really add up over time. This plugin helps you make better decisions as you build and maintain your website. Plans start at $19 per month after a free trial period. ## 11. Botsify Customer Support Bot ![Botsify Customer Support Bot -ServerAvatar](https://serveravatar.com/wp-content/uploads/2025/09/image-12-1024x462.png)[Botsify](https://botsify.com/) specializes in customer support automation. The AI bot can actually solve common problems without any human help needed. **What it does:** - Answers support questions instantly - Guides users through step-by-step processes - Collects valuable feedback from customers - Escalates complex issues to real humans - Works in multiple languages (which is cool) **How it works:** You train the bot by giving it common questions and good answers. It gets smarter over time and can handle more complex conversations. **Why you need it:** Customer support honestly takes up tons of time. This bot handles all the easy stuff so you can focus on the harder problems that need human attention. Free plan for basic features. Paid plans start at just $10 per month. ## 12. Bertha AI Writing Tool ![Bertha AI Writing Tool - ServerAvatar](https://serveravatar.com/wp-content/uploads/2025/09/image-13-1024x456.png)[Bertha](https://wordpress.org/plugins/bertha-ai-free/) is made specifically for WordPress users. It helps create content right inside your WordPress editor, which is super convenient. **What it does:** - Writes blog post content on demand - Creates compelling page copy - Generates product descriptions that convert - Improves existing content you’ve already written - Suggests catchy headlines **How it works:** You just highlight text in your WordPress editor, click a button, and Bertha improves or expands what you wrote. Everything happens right where you’re already working. **Why you should use it:** You don’t have to leave WordPress to get AI help, which is honestly pretty awesome. Everything happens in the editor you already know how to use. Plans start at $20 per month with a free trial you can test out. ## 13. GetGenie AI SEO Content ![GetGenie AI SEO Content -ServerAvatar](https://serveravatar.com/wp-content/uploads/2025/09/image-14-1024x408.png)[GetGenie](https://getgenie.ai/) combines AI writing with SEO optimization. It creates content that ranks well on Google while still being interesting for real people to read. **What it does:** - Writes SEO-friendly content that actually works - Analyzes what your competitors are doing - Suggests better keywords to target - Creates detailed content outlines - Optimizes posts you’ve already published **How it works:** The AI looks at what’s currently ranking for your keywords, then creates content that’s better and more comprehensive than what’s already out there. **Why you need it:** Good content needs to work for both readers and search engines. This plugin does both things at the same time, which saves you tons of effort. Free version available to try. Pro plans start at $13.30 per month. ## How to Actually Choose the Right AI Plugin With so many options, how do you pick the right ones? Here are some simple tips that actually work: **Think about your biggest headaches:** - Need help with writing? Get a writing plugin first - Want more customers? Try a chatbot solution - Struggling with SEO? Get an SEO AI tool - Need better data insights? Use an analytics plugin **Consider what you can actually afford:** - Start with free versions to test things out - Only upgrade when you see real results - Don’t go crazy and buy everything at once - Focus on tools that save you the most time **Make sure stuff actually works:** - Check it works with your current theme - Read reviews from other real users - Always test the free version first - See if it slows down your site speed ## Tips for Actually Using AI Plugins Well Here are some ways to get the most bang for your buck with these tools: **Start slow and steady:** Don’t install 10 plugins all at once like some crazy person. Pick one or two that solve your biggest problems first. **Learn the basics properly:** Spend some real time learning how each plugin actually works. The better you understand it, the better results you’ll get. **Keep it sounding natural:** AI content should sound like a real human wrote it. Always review and edit what the AI creates before publishing. **Test everything carefully:** Make sure the plugins don’t slow down your website. Site speed is super important for both users and SEO. **Stay updated:** AI technology changes really fast these days. Keep your plugins updated to get new features and improvements. ## Common Problems and How to Fix Them **Problem: AI content sounds way too robotic** **Solution:** Always edit AI-generated content before publishing. Add your own voice and personality to make it sound natural and authentic. **Problem: Plugins are slowing down my site** **Solution:** Only keep plugins you actually use regularly. Remove ones you don’t need anymore to keep things running smooth. **Problem: AI keeps giving me wrong information** **Solution:** Always fact-check AI content, especially for important topics. AI can definitely make mistakes sometimes. **Problem: Everything costs too much money** **Solution:** Start with free versions to test things out. Only upgrade to paid versions after you see clear benefits. ## What’s Coming Next in AI Plugins AI technology keeps getting better and better. Here’s what to expect in 2025: - Way better understanding of context - More natural sounding conversations - Improved image and video creation tools - Better integration between different plugins - More affordable pricing across the board - Much easier setup and use for beginners ## FAQ ### **Q: Are AI plugins actually safe to use on my site?** Yeah, most AI plugins from reputable companies are totally safe. Just make sure to read reviews and stick with plugins that have good ratings. ### **Q**: **Will these AI plugins slow down my website?** Some might a little bit, but good plugins are optimized to be fast. Always test your site speed after installing anything new. ### **Q**: **Do I need to be tech-savvy to use AI plugins?** Nope, not really. Most modern AI plugins are made for regular people. They have simple interfaces that anyone can figure out. ### **Q: Can I use multiple AI plugins at the same time?** Yeah you can, but start with just one or two first. Make sure they don’t mess with each other or anything. ### **Q: Are free AI plugins as good as the paid ones?** Free versions are great for testing stuff out, but paid versions usually have way more features and better customer support. ## Conclusion AI plugins can honestly transform how your WordPress site performs. They save crazy amounts of time, improve your content quality, and help you serve customers way better. But remember – AI is a tool to help you, not replace you completely. The best websites still need that human creativity and personal touch that only you can provide. Start with one or two plugins that solve your biggest headaches right now. Learn how to use them really well, then maybe consider adding more later. The future of websites is definitely here, and it includes AI in a big way. Don’t get left behind – try some of these plugins and see how they can help your site actually grow. ## Stop Wasting Time on Servers. Start Building Instead. You didn’t start your project to babysit servers. Let **ServerAvatar** handle deployment, monitoring, and backups — so you can focus on growth. Deploy **WordPress, Laravel, N8N**, and more in minutes. No DevOps required. No command line. No stress. [ 🚀 Try Free ](https://app.serveravatar.com) [ 🌐 Learn More ](https://serveravatar.com/) Trusted by 10,000+ developers and growing. **Categories:** Blog, Guide, WordPress --- ### [Best Laravel Packages to Improve Security, Performance, and SEO](https://serveravatar.com/best-laravel-packages/) **Published:** March 31, 2026 **Author:** Meghna Meghwani **Content:** [![Blog banner - ServerAvatar](https://serveravatar.com/wp-content/uploads/2025/09/728_90-Banner-3-1024x127.png)](https://serveravatar.com/?ref=blog)If you’ve ever built a Laravel application, you already know how powerful and elegant it feels. But here’s the thing, no matter how good your code is, your app still needs the right tools to truly shine. That’s where the best Laravel packages come in, helping you enhance performance, strengthen security, and improve SEO with minimal effort. That’s exactly where Laravel packages come in. In this guide, we’ll walk through the best Laravel packages that help you secure your application, improve performance, and boost SEO, all without making your life complicated. ## What Are Laravel Packages? Laravel packages are reusable components that extend the framework’s functionality. Instead of building features from scratch, developers can integrate these packages to save time and maintain consistency across projects. ### Why Laravel Packages Matter Laravel packages are like plugins that extend your app’s capabilities without reinventing the wheel. Instead of writing everything from scratch, you can: - Save time - Reduce bugs - Follow best practices automatically Whether it’s security, speed, or SEO, packages give you ready-made solutions tested by thousands of developers. ### Laravel Package vs Bundle In Laravel, packages and bundles are often confused, but they serve slightly different purposes. Packages are external tools created by the community, while bundles are more closely tied to the framework itself. Understanding the difference helps you choose the right solution for your project. Although often confused: - **Packages:** Built by the community or third-party developers - **Bundles:** Built into Laravel itself This distinction matters when evaluating maintenance, support, and flexibility. ## Types of Laravel Packages Laravel packages come in different forms depending on how they are built and used. Some are designed specifically for Laravel, while others can work across multiple PHP frameworks. Knowing these types helps you pick tools that fit your development needs. Laravel packages generally fall into two categories: **1. Framework-Specific Packages:** Designed specifically for Laravel and tightly integrated with its ecosystem. **2. Framework-Independent Packages:** Can work across multiple PHP frameworks, not limited to Laravel. ## How to Choose the Right Packages With thousands of Laravel packages available, choosing the right one can feel overwhelming. The key is to focus on reliability, performance, and long-term support. A well-chosen package can save time, while a poor choice can create future issues. Here’s what to look for: - Active maintenance (recent updates) - Good documentation - High community usage - Compatibility with latest Laravel version **Ask yourself:** Does this package solve a real problem or just add complexity? ### Best Security Packages for Laravel Security is a critical part of any Laravel application, especially when handling user data. Using trusted security packages helps protect your app from common threats like unauthorized access and spam. These tools add an extra layer of protection without adding complexity. ![Security Packages - Best Laravel packages](https://serveravatar.com/wp-content/uploads/2026/03/image-270.png) **1. Laravel Security** A package designed to enhance your application’s protection against common vulnerabilities. **Key Features:** - Protection against common web attacks - Secure headers implementation - Input validation support **Why it matters:** Helps protect your application from common vulnerabilities and attacks. **Use case:** Securing forms, headers, and user inputs. **Example:** Preventing XSS attacks on a user registration form. **2. Laravel Permission** A flexible package to manage roles and permissions within your application. **Key Features:** - Role and permission management - Middleware integration - Supports multiple guards **Why it matters:** Ensures users only access features they are authorized for. **Use case:** Managing roles like admin, editor, and user. **Example:** Allowing only admins to access the dashboard. **3. Laravel Sanctum** A lightweight authentication system for APIs and single-page applications. **Key Features:** - Token-based authentication - SPA authentication support - Simple and secure API access **Why it matters:** Provides a simple way to secure APIs and user sessions. **Use case:** Authenticating SPA or mobile app users. **Example:** Generating API tokens for a React frontend. **4. Entrust** A role-based access control system for managing user permissions. **Key Features:** - Role-based permissions - User-role assignment - Access control handling **Why it matters:** Simplifies role-based access control implementation. **Use case:** Handling permissions in multi-user systems. **Example:** Restricting content editing to specific roles. **5. NoCaptcha** A package that integrates Google reCAPTCHA to prevent spam and bots. **Key Features:** - Bot protection for forms - Easy integration - Customizable CAPTCHA display **Why it matters:** Prevents spam and bot submissions. **Use case:** Protecting login and contact forms. **Example:** Adding reCAPTCHA to a signup page. ### Performance Optimization Packages Performance plays a major role in how users experience your application. Laravel performance packages help reduce load times, optimize queries, and handle resources efficiently. Using the right tools ensures your app runs smoothly even under heavy traffic. ![Optimization Packages - Best Laravel packages](https://serveravatar.com/wp-content/uploads/2026/03/image-271.png) **1. Laravel Debugbar** A debugging tool that shows real-time application performance data. **Key Features:** - Query and request tracking - Performance insights - Debugging toolbar **Why it matters:** Helps identify performance issues during development. **Use case:** Monitoring queries and execution time. **Example:** Detecting slow database queries in a page load. **2. Laravel Octane** It Boost application’s speed with running Laravel on servers with high-performance. **Key Features:** - Faster request handling - Supports Swoole and RoadRunner - Improved application performance **Why it matters:** Improves application speed and scalability. **Use case:** High-traffic applications. **Example:** Serving faster responses for an eCommerce site. ### Laravel Development Packages Development packages are designed to make coding faster and more efficient. They simplify common tasks, improve workflow, and reduce repetitive work. With the right set of tools, developers can focus more on building features rather than managing boilerplate code. ![Development Packages - Best Laravel packages](https://serveravatar.com/wp-content/uploads/2026/03/image-272.png) **1. Laravel Debugbar** Helps developers monitor and debug application behavior during development. **Key Features:** - Displays logs and queries - Tracks execution time - Debugging interface **Why it matters:** Makes debugging easier and faster. **Use case:** Tracking application behavior in development. **Example:** Viewing API request logs in real time. **2. Laravel User Verification** Simplifies email verification for new users. **Key Features:** - Email verification workflow - Customizable templates - Easy integration **Why it matters:** Ensures only verified users access your app. **Use case:** Email verification systems. **Example:** Sending verification links during registration. **3. Laravel Socialite** Provides simple authentication using social media platforms. **Key Features:** - Supports major providers - OAuth integration - Quick login setup **Why it matters:** Simplifies social login integration. **Use case:** Allowing users to sign in with Google or Facebook. **Example:** Logging in using a Google account. **4. Laravel Mix** Simplifies asset compilation for CSS and JavaScript. **Key Features:** - Webpack wrapper - Hot reload support - Easy configuration **Why it matters:** Streamlines frontend asset management. **Use case:** Compiling CSS and JavaScript files. **Example:** Bundling and minifying assets for production. **5. Eloquent Sluggable** Automatically creates SEO-friendly URLs from model data. **Key Features:** - Automatic slug generation - Custom rules - Clean URL structure **Why it matters:** Improves SEO with clean URLs. **Use case:** Generating slugs for blog posts. **Example:** Converting a title into a URL slug automatically. **6. Migrations Generator** Generates migration files from an existing database schema. **Key Features:** - Reverse-engineer database - Saves development time - Supports large schemas **Why it matters:** Saves time when working with existing databases. **Use case:** Converting database schema into migrations. **Example:** Generating migrations from a legacy database. **7. Laravel Backup** Automates backups of your application data. **Key Features:** - Scheduled backups - Cloud storage support - Easy restore options **Why it matters:** Protects data from loss or corruption. **Use case:** Regular database and file backups. **Example:** Automatically backing up a production server daily. **8. Laravel IDE Helper** Improves IDE auto-completion and developer experience. **Key Features:** - Better code suggestions - Type hinting support - Cleaner workflow **Why it matters:** Protects data from loss or corruption. **Use case:** Regular database and file backups. **Example:** Automatically backing up a production server daily. ### Laravel eCommerce Packages Building an online store from scratch can be complex and time-consuming. Laravel eCommerce packages provide ready-made solutions for product management, payments, and order handling. These tools help you launch and scale online stores more efficiently. ![eCommerce Packages - Best Laravel packages](https://serveravatar.com/wp-content/uploads/2026/03/image-273.png) **1. Bagisto** A full-featured Laravel eCommerce platform for building online stores. **Key Features:** - Multi-store support - Inventory management - Payment integration **Why it matters:** Provides a complete foundation for online stores. **Use case:** Building full-scale eCommerce platforms. **Example:** Creating a multi-vendor shopping website. **2. AvoRed** A customizable eCommerce solution built on Laravel. **Key Features:** - Product and order management - Mobile-friendly design - Modular architecture **Why it matters:** Simplifies building customizable eCommerce apps. **Use case:** Managing products and orders. **Example:** Setting up a small online shop. ### Laravel Admin Panel Packages Creating an admin dashboard manually can take significant effort. Admin panel packages offer pre-built interfaces and tools to manage data, users, and system settings. They help you set up a professional backend quickly without starting from zero. ![Admin Packages - Best Laravel packages](https://serveravatar.com/wp-content/uploads/2026/03/image-274.png) **1. Voyager** A ready-to-use admin panel for managing application data. **Key Features:** - Built-in admin dashboard - Media manager - Database tools **Why it matters:** Saves time by providing a ready-made admin panel. **Use case:** Managing application data via UI. **Example:** Editing database records from a dashboard. **2. LaraAdmin** An admin panel generator with advanced customization options. **Key Features:** - Role management - Dynamic modules - CRUD generator **Why it matters:** Helps generate admin panels quickly. **Use case:** Creating backend systems with minimal effort. **Example:** Building CRUD interfaces automatically. **3. Orchid** A powerful platform for building admin panels and dashboards. **Key Features:** - Flexible UI components - Data management tools - Scalable architecture **Why it matters:** Helps generate admin panels quickly. **Use case:** Creating backend systems with minimal effort. **Example:** Building CRUD interfaces automatically. ### Laravel SEO Packages SEO is essential for improving your application’s visibility on search engines. Laravel SEO packages help manage meta tags, structured data, and social sharing elements. These tools make it easier to optimize your app for better rankings and traffic. ![SEO Packages - Best Laravel packages](https://serveravatar.com/wp-content/uploads/2026/03/image-275.png) **1. Laravel Meta Manager** Helps manage meta tags across your application. **Key Features:** - Centralized meta handling - Open Graph support - SEO-friendly structure **Why it matters:** Keeps SEO metadata consistent across pages. **Use case:** Managing meta tags globally. **Example:** Setting default meta descriptions for pages. **2. SEOTools** A complete toolkit for managing SEO data in Laravel. **Key Features:** - Meta tags management - Social sharing optimization - Structured data support **Why it matters:** Improves search engine visibility. **Use case:** Managing SEO tags and social metadata. **Example:** Adding Open Graph tags for social sharing. **3. Laravel SEO** Provides tools to optimize content for search engines. **Key Features:** - Dynamic SEO data - Custom meta tags - Easy configuration **Why it matters:** Helps optimize content for better ranking. **Use case:** Customizing SEO elements dynamically. **Example:** Generating SEO tags for blog posts. ### Laravel Testing Packages Testing ensures your application works as expected before it reaches users. Laravel testing packages provide tools to automate tests and detect issues early. This leads to more reliable and stable applications over time. ![Testing Packages - Best Laravel packages](https://serveravatar.com/wp-content/uploads/2026/03/image-276.png) **1. Orchestral Testbench** A package designed to test Laravel applications and packages. **Key Features:** - Laravel testing environment - Package testing support - Simplified test setup **Why it matters:** Ensures your application works reliably. **Use case:** Testing Laravel packages and features. **Example:** Running unit tests for a custom package. ### Laravel Debugging and Monitoring Packages Understanding what happens inside your application is crucial for fixing issues. Debugging and monitoring packages give insights into errors, logs, and performance metrics. They help developers quickly identify and resolve problems. ![Debugging Packages - Best Laravel packages](https://serveravatar.com/wp-content/uploads/2026/03/image-277.png) **1. Laravel Telescope** A powerful tool for monitoring application activity and debugging issues. **Key Features:** - Request tracking - Error logging - Query monitoring **Why it matters:** Provides deep insight into application behavior. **Use case:** Monitoring requests and errors. **Example:** Tracking failed jobs in a queue system. ### Caching and Speed Boosting Tools Caching is one of the most effective ways to improve application speed. These tools store frequently accessed data, reducing the need for repeated processing. As a result, your application becomes faster and more responsive. ![Caching Packages - Best Laravel packages](https://serveravatar.com/wp-content/uploads/2026/03/image-278.png) **1. Laravel Response Cache** Caches full responses to improve application speed. **Key Features:** - Full-page caching - Faster response times - Cache invalidation support **Why it matters:** Reduces load time by caching responses. **Use case:** Speeding up frequently visited pages. **Example:** Caching homepage content for faster delivery. **2. Laravel Page Speed Optimization** Improves frontend performance and loading speed. **Key Features:** - Asset optimization - Minification support - Faster page load times **Why it matters:** Improves frontend loading performance. **Use case:** Optimizing assets and page rendering. **Example:** Minifying CSS and JavaScript files. ### Database Optimization Packages Efficient database handling is key to application performance. Database optimization packages help manage queries, indexing, and data structure more effectively. They ensure faster data retrieval and better scalability. ![Database Optimization Packages - Best Laravel packages](https://serveravatar.com/wp-content/uploads/2026/03/image-279.png) **1. Laravel Query Detector** Detects inefficient database queries like N+1 issues. **Key Features:** - Query monitoring - Performance alerts - Debugging support **Why it matters:** Identifies inefficient database queries. **Use case:** Detecting N+1 query issues. **Example:** Alerting when too many queries run on a page. **2. Laravel Migration Generator** Creates migration files from existing database structures. **Key Features:** - Reverse migration generation - Saves development time - Schema analysis **Why it matters:** Simplifies database migration creation. **Use case:** Reverse engineering database structure. **Example:** Generating migrations from an existing schema. ### URL & Sitemap Management Clean URLs and proper sitemaps are important for both users and search engines. These tools help structure your website links and generate sitemaps automatically. This improves navigation and enhances search engine indexing. ![URL Packages - Best Laravel packages](https://serveravatar.com/wp-content/uploads/2026/03/image-280.png) **1. Laravel Sitemap Generator** Automatically generates XML sitemaps for better indexing. **Key Features:** - Dynamic sitemap creation - SEO-friendly output - Search engine compatibility **Why it matters:** Helps search engines index your site properly. **Use case:** Creating XML sitemaps. **Example:** Generating sitemap for blog pages. **2. Laravel Sluggable** Creates clean, readable URLs for better SEO. **Key Features:** - Automatic slug generation - Customizable rules - SEO-friendly URLs **Why it matters:** Improves URL readability and SEO. **Use case:** Creating clean URLs. **Example:** Turning titles into SEO-friendly slugs. ### Authentication & Access Control Managing user access is essential for application security. These packages help handle login systems, roles, and permissions with ease. They ensure that users can only access what they are authorized to. ![Authentication Packages - Best Laravel packages](https://serveravatar.com/wp-content/uploads/2026/03/image-281.png) **1. Laravel Breeze / Jetstream** Starter kits for implementing authentication in Laravel applications. **Key Features:** - Login and registration - Password reset - Built-in authentication scaffolding **Why it matters:** Provides ready-to-use authentication systems. **Use case:** Setting up login and registration quickly. **Example:** Adding authentication to a new Laravel app. ### API Security & Rate Limiting APIs need protection against misuse and excessive requests. Security and rate limiting tools help control traffic and prevent abuse. This ensures your application remains stable and secure even under high demand. ![API Security Packages - Best Laravel packages](https://serveravatar.com/wp-content/uploads/2026/03/image-282.png) **1. Laravel Throttle** Controls the number of requests to prevent API abuse. **Key Features:** - Rate limiting - Request throttling - API protection **Why it matters:** Provides ready-to-use authentication systems. **Use case:** Setting up login and registration quickly. **Example:** Adding authentication to a new Laravel app. ## Combining Packages for Best Results Using a single package can solve a specific problem, but combining the right tools can significantly improve your application. When used together, packages for security, performance, and SEO can create a more balanced and efficient system. The goal is to build a stack that works seamlessly. ![Combine Packages - Best Laravel packages](https://serveravatar.com/wp-content/uploads/2026/03/image-283.png) For example: - **Security + Authentication:** safer user data - **Caching + Optimization:** blazing-fast performance - **SEO + Sitemap:** better rankings Think of it as building a strong ecosystem rather than relying on one tool. ## How to Choose the Right Laravel Packages Selecting Laravel packages isn’t just about popularity, it’s about suitability. You need to consider compatibility, maintenance, and how well the package fits your project requirements. Making thoughtful choices ensures better stability and scalability. - Active maintenance and updates - Strong community support - Compatibility with your Laravel version - Minimal performance overhead ## Best Practices When Using Laravel Packages Laravel packages can speed up development, but they need to be used wisely. Following best practices like keeping dependencies updated and avoiding unnecessary installations helps maintain performance. A clean and well-managed setup always performs better. - Avoid installing unnecessary packages - Regularly update dependencies - Test before deploying to production - Monitor security vulnerabilities [![Blog banner - ServerAvatar](https://serveravatar.com/wp-content/uploads/2025/09/728_90-Banner-1-1024x127.png)](https://serveravatar.com/?ref=blog)## Common Mistakes to Avoid While Laravel packages are helpful, misuse can lead to problems. Installing too many packages or relying on outdated ones can slow down your application and introduce security risks. Being mindful of these mistakes can save you from future headaches. Even experienced developers make these mistakes: - Installing too many packages - Ignoring updates - Not testing performance impact - Using outdated packages **Remember:** more packages do not equals to better performance ## Powering Your Laravel Application with ServerAvatar Building a great Laravel application is only half the job. To truly unlock its performance, security, and scalability, you also need a reliable hosting environment. This is where ServerAvatar comes in. ![ServerAvatar Dashboard - Security Packages - Best Laravel packages](https://serveravatar.com/wp-content/uploads/2026/03/image-284.png) [ServerAvatar](https://serveravatar.com/) is a modern server management platform designed to simplify Laravel hosting. Whether you’re a developer, agency, or business owner, it helps you deploy and manage Laravel applications without dealing with complex server configurations. Instead of spending hours setting up servers manually, ServerAvatar lets you focus on what really matters, building and growing your application. ### Key Features of ServerAvatar for Laravel Hosting ServerAvatar provides everything you need to run Laravel apps smoothly: - **One-click application installer** for WordPress and many other popular applications so you can launch sites faster - **Centralized dashboard** to manage servers and applications easily - **Built-in performance optimization** for better speed and stability - **Redis caching support** to improve loading times and user experience - **Strong security features**, including automatic free SSL with auto-renewals, firewall, fail2ban, AI bot blocker, 8g firewall, and many more - **Scalable infrastructure** that grows with your traffic - **Real-Time Monitoring:** Track server health, logs, and performance metrics easily. - **Multi-Server Management:** Manage multiple servers and applications from a single dashboard. ### Why Use ServerAvatar for Laravel Projects? When you combine the right Laravel packages with a powerful hosting platform like ServerAvatar, you get: - Better performance - Stronger security - Easier scalability - Faster deployment In short, packages enhance your application, while ServerAvatar ensures it runs flawlessly in production. ## Conclusion Laravel packages are more than just add-ons, they’re essential tools that help you build smarter, faster, and more secure applications. From strengthening security with tools like authentication and access control, to improving performance with caching and optimization, and boosting visibility through SEO packages, each category plays a unique role in your app’s success. The key is not to use as many packages as possible, but to choose the right combination that aligns with your project goals. When used thoughtfully, these packages can transform a good Laravel application into a highly efficient, scalable, and production-ready system. ## FAQs ### 1. What are Laravel packages? Laravel packages are reusable components that extend the functionality of the Laravel framework, allowing developers to add features without building everything from scratch. ### 2. Are Laravel packages safe to use? Most Laravel packages are safe if they are actively maintained, well-documented, and widely used by the community; always review updates and security practices before installing. ### 3. How do I choose the best Laravel packages for my project? Focus on packages that are regularly updated, compatible with your Laravel version, and solve a real problem without adding unnecessary complexity. ### 4. Can using too many Laravel packages affect performance? Installing too many packages can slow down your application and increase dependencies, so it’s important to use only what you truly need. ### 5. Which Laravel packages are best for improving SEO? Packages that manage meta tags, generate sitemaps, and create clean URLs are most effective for improving SEO in Laravel applications. ### 6. Do Laravel packages work with all Laravel versions? Not always; each package supports specific Laravel versions, so it’s important to check compatibility before installation. **Categories:** Application Deployments, Blog, Guide, Laravel, Others **Tags:** Best Laravel packages, Improve Laravel performance, laravel, Laravel Development, Laravel packages, Laravel performance optimization, Laravel security packages, Laravel SEO packages, Laravel speed optimization --- ### [Best Google Analytics Plugins to Simplify Data Tracking](https://serveravatar.com/google-analytics-wordpress-plugins/) **Published:** March 30, 2026 **Author:** Meghna Meghwani **Content:** [![Blog banner - ServerAvatar](https://serveravatar.com/wp-content/uploads/2025/09/728_90-Banner-3-1024x127.png)](https://serveravatar.com/?ref=blog)Opening Google Analytics for the first time can feel confusing rather than helpful. While it offers deep insights, the interface isn’t always easy to navigate, especially when you’re trying to manage everything from inside WordPress. That’s where Google Analytics plugins come in, making it easier to connect your site, track performance, and understand your data without dealing with complex setups. That’s where WordPress analytics plugins come into play. Instead of switching between platforms, these tools bring your website data directly into your dashboard, making tracking simpler and more accessible. However, not every plugin delivers the same experience. Some can affect your site speed, others present too much unnecessary data, and a few complicate tracking instead of simplifying it. In this guide, we’ll break down the most practical options available and help you choose the right one based on your needs. ## What is a Google Analytics Plugin? A Google Analytics plugin acts as a bridge between your WordPress site and your analytics account, allowing you to track visitor activity without manual setup. It handles the technical part, like adding tracking scripts, and displays key insights directly inside your WordPress dashboard. ![Google Analytics plugins](https://serveravatar.com/wp-content/uploads/2026/03/image-262.png) Instead of relying on external tools for every report, these plugins let you view essential data such as traffic trends, user behavior, and engagement metrics in a more convenient and simplified format. ### Why Use Google Analytics Plugins for WordPress? Although you can connect Google Analytics manually, plugins make the process far more efficient and user-friendly. They remove the need for technical configuration and bring valuable insights closer to where you manage your website. - **Quick setup process** without editing theme files or code - **Access important data inside WordPress** without switching tabs - **Improved tracking capabilities** like clicks, events, and user actions - **Saves time** by centralizing reporting and insights - **Encourages better decisions** with simplified data presentation ### Factors to Consider in a WordPress Analytics Plugin Not every analytics plugin is worth installing. Choosing the right one depends on a few practical factors that directly impact your workflow and website performance. - **Ease of use:** The interface should be simple enough to understand without technical knowledge - **Impact on performance:** Some plugins add extra load to your site, which can slow it down - **Accuracy of data:** Reliable tracking is essential for making the right decisions - **Essential features:** Look for options like: - Event tracking - eCommerce insights - Live visitor data - Custom reporting - **Compatibility:** It should work smoothly with your existing plugins, caching setup, and hosting environment ## Best Google Analytics Plugins for WordPress With so many plugins available, picking the right one can quickly become confusing. To save you time, here’s a carefully selected list based on usability, features, and real-world performance. ### 1. MonsterInsights [MonsterInsights](https://wordpress.org/plugins/google-analytics-for-wordpress/) is designed to make website data easier to understand by presenting Google Analytics reports directly inside WordPress in a simplified format. ![MonsterInsights - Google Analytics plugins](https://serveravatar.com/wp-content/uploads/2026/03/image-263-1024x521.png) **Key Features:** - Real-time stats - Page-level insights - Ecommerce tracking - Affiliate link tracking - Custom dimensions **Advantages:** - Beginner-friendly interface with clear reports - Quick and easy Google Analytics setup - Provides real-time stats and user behavior insights - Advanced tracking features like eCommerce and conversions **Disadvantages:** - Many advanced options require an upgrade - Can add extra load on smaller websites - Limited flexibility in the free version **What Stands Out:** It simplifies complex analytics data into a format that’s easier to understand and act on. **Best for:** Beginners and marketers who want simplified reporting **Potential Drawback:** Full functionality requires a premium plan ### 2. Site Kit by Google [Site Kit by Google](https://wordpress.org/plugins/google-site-kit/) is Google’s official WordPress plugin that connects your website with multiple Google services, offering a centralized view of your site’s performance. ![Site kit by Google - Google Analytics plugins](https://serveravatar.com/wp-content/uploads/2026/03/image-264-1024x517.png) **Key Features:** - Official Google integration - Simple dashboard reports - Search Console insights - Core Web Vitals data **Advantages:** - Official plugin built by Google - Integrates multiple services like Analytics and Search Console - Completely free to use - Simple and secure setup process **Disadvantages:** - Limited advanced reporting options - Interface may feel too basic for experienced users - Less customization compared to other plugins **What Stands Out:** A reliable and lightweight solution with direct Google integration. **Best for:** Beginners looking for a simple and official solution **Potential Drawback:** Lacks deeper analytics features ### 3. ExactMetrics [ExactMetrics](https://wordpress.org/plugins/google-analytics-dashboard-for-wp/) offers detailed analytics insights while maintaining a structured and easy-to-navigate dashboard experience. ![ExactMetrics - Google Analytics plugins](https://serveravatar.com/wp-content/uploads/2026/03/image-265-1024x517.png) **Key Features:** - Real-time analytics - User behavior tracking - File download tracking - Enhanced link tracking **Advantages:** - Detailed reports with actionable insights - Easy setup and integration with Google Analytics - Supports advanced tracking like affiliate links and downloads - Clean and organized dashboard **Disadvantages:** - Premium features require a paid plan - Interface may feel similar to other plugins without unique value - Can be overwhelming for beginners **What Stands Out:** A balanced mix of simplicity and detailed reporting. **Best for:** Users who want deeper insights without losing usability **Potential Drawback:** Full feature access requires upgrading ### 4. Analytify [Analytify](https://wordpress.org/plugins/wp-analytify/) focuses on presenting analytics data in a visually clean and easy-to-understand format, making it ideal for users who prefer simplified reports. ![Analytify - Google Analytics plugins](https://serveravatar.com/wp-content/uploads/2026/03/image-266-1024x517.png) **Key Features:** - Frontend stats view - Campaign tracking - Social media insights - Ecommerce reports **Advantages:** - Beautiful and easy-to-read visual reports - Beginner-friendly design - Frontend and backend analytics viewing options - Good for quick performance insights **Disadvantages:** - Advanced features are locked behind premium plans - Limited deep data analysis compared to competitors - Not ideal for highly technical users **What Stands Out:** Its visual approach makes analytics less intimidating and more accessible. **Best for:** Visual reporting lovers **Potential Drawback:** Can feel limited for advanced users. ### 5. WP Statistics [WP Statistics](https://wordpress.org/plugins/wp-statistics/) is a privacy-focused analytics plugin that stores all data directly on your server. It’s a good choice for users who want full control over their data. ![WP Statistics - Google Analytics plugins](https://serveravatar.com/wp-content/uploads/2026/03/image-267-1024x517.png) **Key Features:** - GDPR-friendly tracking - No external data sharing - Detailed visitor insights - Referrer tracking **Advantages:** - No dependency on external services like Google Analytics - Strong focus on user privacy - Data stored locally on your server - Simple setup without third-party accounts **Disadvantages:** - Can slow down your website if not optimized - Lacks advanced insights compared to Google Analytics tools - Limited scalability for large websites **What Stands Out:** Full control over your data. **Best for:** Privacy-focused websites **Potential Drawback:** Not as powerful or detailed as Google Analytics. ### 6. GA Google Analytics [GA Google Analytics](https://wordpress.org/plugins/ga-google-analytics/) is a lightweight plugin designed to add tracking code to your website quickly. It’s perfect for users who want a simple, no-frills solution. ![GA Google Analytics - Google Analytics plugins](https://serveravatar.com/wp-content/uploads/2026/03/image-268-1024x517.png) **Key Features:** - Minimal setup - Lightweight performance - No unnecessary bloat **Advantages:** - Extremely lightweight and fast - Easy to install and configure - No unnecessary features or clutter - Works well for basic tracking needs **Disadvantages:** - No built-in analytics dashboard - Requires manual use of Google Analytics for reports - Lacks advanced features and insights **What Stands Out:** Perfect if you prefer using Google Analytics directly. **Best for:** Developers who want a lightweight solution **Potential Drawback:** No dashboard insights inside WordPress. ## Quick Comparison of Google Analytics Plugins for WordPress Choosing between multiple plugins can get confusing, especially when many of them offer similar features. To make things easier, here’s a side-by-side comparison highlighting the key differences that actually matter. [](https://storage.3.basecamp.com/5840738/blobs/ec39cfc4-2c17-11f1-a5ef-0242ac120004/download/image.png) **Plugin****Ease of Use****Dashboard Reports****Advanced Tracking****Performance Impact****Best For****MonsterInsights**Very easy (beginner-friendly)Detailed & user-friendlyStrong (eCommerce, events, custom tracking)Moderate (can be heavy)Beginners, marketers**Site Kit by Google**EasyBasic but reliableLimitedLightweightBeginners, simple setups**ExactMetrics**Easy to moderateDetailed and structuredStrong (downloads, links, behavior)ModerateUsers needing more control**Analytify**Very easyVisually rich reportsModerateModerateUsers who prefer visual insights**WP Statistics**EasyBuilt-in local reportsLimited (no GA integration)Can be heavy (server load)Privacy-focused websites**GA Google Analytics**Very easyNone (external only)MinimalVery lightweightDevelopers, minimal setups## How to Choose the Right Plugin (Based on Your Needs) Choosing the best Google Analytics plugin WordPress users rely on depends on your goals. - **If you create content or run a blog:** Tools like MonsterInsights or Analytify make it much easier to understand your website data at a glance. - **For developers and agencies:** GA Google Analytics works well if you prefer a lightweight setup with complete control over tracking. - **For Beginners:** Start with **Site Kit by Google**, it’s simple and reliable. - **For Privacy-Conscious Websites:** Choose WP Statistics to avoid external tracking. ## Performance Matters More Than You Think Here’s something many guides ignore: analytics plugins can slow down your site. Every extra script affects loading speed, and speed directly impacts: - SEO rankings - User experience - Conversion rates That’s why it’s important to not just pick the right plugin, but also run your site on a high-performance setup. If you want deeper insights into optimizing speed, check out our internal guide on WordPress performance. And if you’re serious about keeping your site fast while tracking data: 👉 **Want faster analytics tracking without slowing down your WordPress site?** Manage your servers and optimize performance effortlessly with ServerAvatar. ## Simplify WordPress Performance & Management with ServerAvatar Choosing the right analytics plugin is important, but it’s only part of the bigger picture. Your website’s performance, server setup, and overall management play an equally critical role in how well your WordPress site actually runs. This is where [ServerAvatar](https://serveravatar.com/) steps in. It removes the complexity of server management and gives you a simple and easy way to deploy, manage, and optimize your server and applications including WordPress websites without needing deep technical expertise. ![ServerAvatar Dashboard - Google Analytics plugins](https://serveravatar.com/wp-content/uploads/2026/03/image-269.png) Instead of dealing with manual configurations, you get a centralized dashboard where everything from application deployment to performance tuning is handled efficiently. ### Why ServerAvatar fits perfectly with WordPress website - **One-click application installer** for WordPress and many other popular applications so you can launch sites faster - **Centralized dashboard** to manage servers and applications easily - **Built-in performance optimization** for better speed and stability - **Redis caching support** to improve loading times and user experience - **Strong security features**, including automatic free SSL with auto-renewals, firewall, fail2ban, ai bot blocker, 8g firewall, and many more - **Scalable infrastructure** that grows with your traffic For startups, agencies, and developers, this means less time spent on server maintenance and more time focusing on insights, growth, and user experience. If you’re using analytics to improve decisions, pairing it with a reliable hosting and management platform like ServerAvatar ensures your website performs just as well as your data suggests. ## Common Mistakes When Using WordPress Analytics Plugins Even with the right plugin, mistakes can ruin your data. - **Installing Multiple Analytics Plugins:** This can cause duplicate tracking and inaccurate data. - **Ignoring Data Sampling:** Some reports don’t show complete data, understanding this matters for accuracy. - **Not Setting Up Goals:** Tracking traffic is good. Tracking conversions is better. - **Overloading with Features:** More features do not equal better insights. Keep it focused. [![Blog banner - ServerAvatar](https://serveravatar.com/wp-content/uploads/2025/09/728_90-Banner-1-1024x127.png)](https://serveravatar.com/?ref=blog)## Tips to Get More Value from Your Analytics To truly benefit from WordPress analytics plugins: **1. Focus on Key Metrics** Don’t get lost in numbers. Track: - Traffic sources - Top-performing pages - Conversion rates **2. Use Data to Take Action** Analytics isn’t just for observation, it’s for improvement. **3. Combine Analytics with Performance Optimization** Tracking alone won’t improve your site. Speed and infrastructure matter just as much. 👉 Speed matters. Pair the right analytics plugin with a high-performance server setup using ServerAvatar. ## Conclusion Choosing the right Google Analytics plugin for WordPress ultimately comes down to finding a balance between simplicity, accuracy, and performance. The best plugin isn’t just the one with the most features, but the one that fits your workflow and helps you actually use your data to make better decisions. At the same time, analytics alone won’t improve your website, your hosting environment and overall performance setup matter just as much. By combining a reliable analytics plugin with a fast, well-optimized platform like ServerAvatar, you can ensure your site not only tracks data effectively but also delivers a smooth, high-performing experience that supports long-term growth. ## FAQs ### 1. Which plugin should you choose for Google Analytics in WordPress? MonsterInsights is widely considered the best for ease of use, while Site Kit is great for a free, official solution. ### 2. Do I need a plugin to use Google Analytics in WordPress? You can manually add the tracking code. But plugins simplify setup and provide dashboard insights. ### 3. Can analytics plugins slow down my website? Especially feature-heavy plugins. Choosing a lightweight option and optimized hosting helps avoid this. ### 4. Are WordPress analytics plugins GDPR compliant? Some are, but not all. Plugins like WP Statistics focus more on privacy compliance. ### 5. How do I track website traffic in WordPress easily? Using a plugin like MonsterInsights or Site Kit is the easiest way to track traffic without technical setup. **Categories:** Blog, Guide, Others, Tutorials, WordPress **Tags:** best Google Analytics plugins, Google Analytics plugins, Google Analytics plugins for WordPress, Google Analytics WordPress plugin, Wordpress, WordPress analytics plugins, WordPress Plugins --- ### [How to Configure wp-config.php for Your WordPress Site](https://serveravatar.com/setup-wp-config-for-wordpress/) **Published:** March 28, 2026 **Author:** Meghna Meghwani **Content:** [![Blog banner - ServerAvatar](https://serveravatar.com/wp-content/uploads/2025/09/728_90-Banner-3-1024x127.png)](https://serveravatar.com/?ref=blog)If WordPress were a house, then the wp-config.php file would be its control room. It’s not flashy, and most beginners never touch it, but behind the scenes, it quietly controls how your entire website behaves. If you want to configure wp-config.php, you’re essentially taking control of how your site connects, performs, and stays secure. Ever wondered how WordPress connects to your database? Or how developers boost performance and security without plugins? That’s where wp-config.php comes in. The good news? You do not have to be a developer to understand this. With a little guidance, you can confidently configure this file and unlock more control over your website. ## What is wp-config.php? Think of wp-config.php as the brain of your WordPress site. It’s a configuration file that tells WordPress how to connect to your database and how your site should behave. Without it, your site simply wouldn’t work. [](https://storage.3.basecamp.com/5840738/blobs/124be366-2a90-11f1-b8a4-0242ac120003/download/image.png) ![configure wp-config.php](https://serveravatar.com/wp-content/uploads/2026/03/image-254.png) ### Why wp-config.php is Important The wp-config.php file plays a critical role in how your WordPress site functions behind the scenes. It controls key settings that directly impact your site’s security, performance, and connection to the database. Understanding its importance helps you manage your website more effectively. - **Control database connections:** This file stores the credentials your site uses to communicate with its database, ensuring everything loads correctly. - **Improve security:** You can add extra protection layers like security keys and custom prefixes to reduce hacking risks. - **Enable debugging:** It allows you to detect and fix errors quickly when something goes wrong. - **Optimize performance:** You can fine-tune settings like memory limits to make your site run smoother. In short, it gives you more power without installing extra plugins. ### Where to Find wp-config.php You’ll usually find the wp-config.php file in your root directory, the same place where folders like wp-content and wp-admin are located. ## How to Edit wp-config.php File Before making any changes, you need to know how to access the wp-config.php file. There are two ways to do this, but the easiest and most beginner-friendly method is using a File Manager. ### 1. Using File Manager (via ServerAvatar panel) If you’re managing your server with ServerAvatar, editing your WordPress files becomes much simpler and faster. **What is ServerAvatar?** ServerAvatar is a platform designed to simplify the hosting and management of servers and applications. It makes it easy to deploy and manage PHP and Node.js-based web applications without dealing with complex server configurations. ![ServerAvatar Dashboard - configure wp-config.php](https://serveravatar.com/wp-content/uploads/2026/03/image-255.png) Instead of using external tools, ServerAvatar provides a built-in File Manager that allows you to access and edit your website files directly from your browser. **Steps to Edit wp-config.php Using ServerAvatar** Follow these simple steps: - Log in to your ServerAvatar account, and navigate to the server panel by clicking on the server dashboard icon. ![Server panel - configure wp-config.php](https://serveravatar.com/wp-content/uploads/2026/03/image-256-1024x213.png) - Navigate to the Applications section from the left sidebar, and click on the application dashboard icon of your wordpress application. ![application panel - configure wp-config.php](https://serveravatar.com/wp-content/uploads/2026/03/image-257-1024x298.png) - Navigate to the File Manager section from the left sidebar - Once inside, navigate to the **root directory** (usually public\_html) - Locate the file named **wp-config.php** ![file manager - configure wp-config.php](https://serveravatar.com/wp-content/uploads/2026/03/image-258-1024x495.png) > **Note:** Before editing or making any changes, always **download** as a backup of your wp-config.php file as even a small mistake can break your website. - Select the file and click on the **Download** button to download the **wp-config.php** file. ![download file - configure wp-config.php](https://serveravatar.com/wp-content/uploads/2026/03/image-259-1024x419.png) - Click on it to open the editor, and make your changes carefully - Once done, click the **Save Changes** button.[](https://storage.3.basecamp.com/5840738/blobs/b1725838-2a79-11f1-bf61-0242ac120004/download/image.png) ![save changes - configure wp-config.php](https://serveravatar.com/wp-content/uploads/2026/03/image-260-1024x589.png) That’s it, no FTP, no downloads, no extra tools required. **Why Use ServerAvatar File Manager?** Using ServerAvatar’s File Manager makes the process much smoother, especially if you’re not very technical: - No need for FTP tools like FileZilla - Edit files directly from the ServerAvatar panel - Beginner-friendly interface - Quick access to all files in one place It’s like having full control of your website files without the usual complexity. ### 2. FTP (using tools like FileZilla) If you prefer the traditional method, you can also access your files using FTP tools like FileZilla. - Connect your server using FTP credentials - Navigate to your website’s root directory - Download the wp-config.php file - Edit it locally and re-upload it However, compared to ServerAvatar, this method takes more time and requires additional setup. ## Understanding Basic Configuration At first glance, wp-config.php may look complex, but it’s actually quite structured and easy to follow. Once you understand the main sections, it becomes much easier to manage and edit safely. ![basic configure wp-config.php](https://serveravatar.com/wp-content/uploads/2026/03/image-261.png) You’ll mostly see: - **Database settings:** These define how your site connects to its database. - **Security keys:** Used to encrypt login sessions and protect user data. - **Debug options:** Help you identify and troubleshoot issues during development. Each section has a clear purpose, and you only need to tweak a few lines. ### Database Settings Explained The database settings in wp-config.php act like login credentials that allow your WordPress site to access and retrieve its data. Without these correct details, your website won’t be able to function properly. ``` define('DB_NAME', 'database_name'); define('DB_USER', 'username'); define('DB_PASSWORD', 'password'); define('DB_HOST', 'localhost'); ``` ``` define('DB_NAME', 'database_name'); define('DB_USER', 'username'); define('DB_PASSWORD', 'password'); define('DB_HOST', 'localhost'); ``` Think of this like login details for your website to access its data. - **DB\_NAME:** The name of your database where all site content is stored. - **DB\_USER:** The username used to access the database. - **DB\_PASSWORD:** The password for secure database access. - **DB\_HOST:** The server location of your database, usually “localhost”. > **Tip:** Never share this information publicly. ### Security Keys Security keys are special codes that encrypt user sessions and cookies, making it harder for attackers to misuse login information. They act as an additional safety layer for your website. Example: ``` define('AUTH_KEY', 'your-unique-key'); ``` ``` define('AUTH_KEY', 'your-unique-key'); ``` - Used to secure user login sessions and cookies. - Helps encrypt sensitive information. - Should be unique and randomly generated for better security. You can generate secure keys from the official WordPress API. > **Why it matters:** It protects your site from hacking attempts. ### Enabling Debug Mode Debug mode is a helpful feature that shows errors and warnings on your website, making it easier to identify issues. It’s especially useful during development or troubleshooting. Add this line: ``` define('WP_DEBUG', true); ``` ``` define('WP_DEBUG', true); ``` - Turns on debugging mode in WordPress. - Displays errors, warnings, and notices on your site. - Useful for troubleshooting issues during development. - Should be disabled (false) on live websites. This will show errors on your site. > **Important:** Turn it off after fixing issues to avoid exposing sensitive information. ### Changing WordPress Table Prefix The table prefix is used in your database to organize WordPress tables. Changing the default prefix adds an extra layer of protection against certain types of attacks. ``` $table_prefix = 'wp_'; ``` ``` $table_prefix = 'wp_'; ``` - Sets the default prefix for all WordPress database tables. - Example: wp\_posts, wp\_users. - Common and easy to recognize, which can be a security risk. Change it to something unique like: ``` $table_prefix = 'wpsecure_'; ``` ``` $table_prefix = 'wpsecure_'; ``` - Changes the default prefix to something unique. - Makes your database harder to target for attackers. - Adds an extra layer of security. > **Why?** It adds an extra layer of security against SQL injection attacks. ### Setting WordPress URLs Defining your site URL in wp-config.php ensures that WordPress always loads the correct address. This is especially helpful when fixing login or redirection problems. ``` define('WP_HOME', 'https://yourdomain.com'); define('WP_SITEURL', 'https://yourdomain.com'); ``` ``` define('WP_HOME', 'https://yourdomain.com'); define('WP_SITEURL', 'https://yourdomain.com'); ``` - **WP\_HOME:** Defines your website’s main homepage URL. - **WP\_SITEURL:** Sets the location of your WordPress core files. - Helps fix login, redirect, or URL issues. This is helpful if you’re facing login or redirect issues. ### Memory Limit Configuration Increasing the memory limit allows your website to handle more complex tasks without crashing. It’s useful for sites with heavy plugins or large traffic. ``` define('WP_MEMORY_LIMIT', '256M'); ``` ``` define('WP_MEMORY_LIMIT', '256M'); ``` - Increases the memory available to WordPress. - Helps prevent crashes or slow performance. - Useful for heavy plugins or large websites. Think of it like giving your website more “breathing space.” ### Disable File Editing Disabling file editing prevents users from modifying theme and plugin files directly from the WordPress dashboard. This reduces the risk of unauthorized changes. ``` define('DISALLOW_FILE_EDIT', true); ``` ``` define('DISALLOW_FILE_EDIT', true); ``` - Disables theme and plugin file editing from the WordPress dashboard. - Prevents unauthorized or accidental changes. - Improves overall site security. This is a must-have security setting. ### Automatic Updates Control This setting allows you to decide how WordPress updates are handled, giving you more control over your site’s stability. ``` define('WP_AUTO_UPDATE_CORE', false); ``` ``` define('WP_AUTO_UPDATE_CORE', false); ``` - Completely turns off automatic WordPress core updates. - Gives you full manual control over updates. - Useful if you want to test updates before applying them. Or enable only minor updates: ``` define('WP_AUTO_UPDATE_CORE', 'minor'); ``` ``` define('WP_AUTO_UPDATE_CORE', 'minor'); ``` - Allows only minor updates (security patches and bug fixes). - Prevents major updates that might break your site. - Keeps your site secure while maintaining stability. ## Best Practices for wp-config.php Following best practices ensures that your wp-config.php file remains secure and stable. Small precautions can prevent major issues later. - **Backup first:** Always keep a copy before making changes. - **Strong credentials:** Use secure database usernames and passwords. - **Disable debug mode:** Keep it off on live websites. - **Restrict permissions:** Limit who can access the file. - **Avoid unnecessary edits:** Only change what is required. Think of wp-config.php like a car engine, you don’t tweak it randomly unless you know what you’re doing. [![Blog banner - ServerAvatar](https://serveravatar.com/wp-content/uploads/2025/09/728_90-Banner-1-1024x127.png)](https://serveravatar.com/?ref=blog)## Common Mistakes to Avoid Even small mistakes in wp-config.php can break your entire website. Being aware of common errors helps you avoid unnecessary downtime. - **No backup:** Makes it difficult to recover from errors. - **Debug mode ON:** Can expose sensitive information publicly. - **Default prefix:** Makes your database easier to target. - **Sharing credentials:** Puts your site at serious risk. - **Syntax errors:** Missing semicolons or quotes can crash your site. Even a small mistake can break your site. ## Conclusion Configuring the wp-config.php file may seem technical at first, but once you understand its purpose, it becomes a powerful tool for managing your WordPress site. From improving security to optimizing performance and fixing common issues, this single file gives you greater control without relying on extra plugins. Whether you choose to edit it through ServerAvatar’s File Manager or via FTP, the key is to make changes carefully and always keep a backup. With the right approach, you can confidently handle your site’s core settings and keep everything running smoothly. ## FAQs ### 1. What is the wp-config.php file used for? The wp-config.php file is used to configure your WordPress site’s core settings, including database connection details, security keys, and performance-related options. ### 2. Is it safe to edit wp-config.php? It is safe as long as you take a backup before making changes and follow proper syntax. Even a small mistake can cause errors, so caution is important. ### 3. Can I edit wp-config.php without using FTP? Yes, you can easily edit it using a File Manager like the one provided by ServerAvatar, which allows you to make changes directly from your browser. ### 4. What should I do if my site breaks after editing wp-config.php? If your site stops working, you can restore the backup file or fix any syntax errors such as missing semicolons or incorrect values. ### 5. Do I need technical knowledge to configure wp-config.php? Not necessarily. Basic understanding is enough for common changes, and with step-by-step guidance, even beginners can safely configure it. **Categories:** Blog, Guide, Linux, Others, Tutorials, Ubuntu, WordPress **Tags:** configure wp-config.php, edit wp-config.php, Wordpress, WordPress config file, wp-config.php, wp-config.php configuration, wp-config.php settings, wp-config.php tutorial --- ### [9 Best WooCommerce Reporting & Analytics Plugins to Track Store Performance](https://serveravatar.com/woocommerce-reporting-analytics-plugins/) **Published:** March 27, 2026 **Author:** Meghna Meghwani **Content:** [![Blog banner - ServerAvatar](https://serveravatar.com/wp-content/uploads/2025/09/728_90-Banner-3-1024x127.png)](https://serveravatar.com/?ref=blog)Running an online store without tracking performance is like driving a car with your eyes closed—you might move forward, but you won’t know where you’re going or how fast. That’s exactly why WooCommerce reporting & analytics plugins are essential. These tools help you monitor your store’s performance, understand customer behavior, and make smarter decisions based on real data. These tools help you understand what’s working, what’s not, and where you should focus next. From sales trends to customer behavior, the right plugin can turn raw data into clear, actionable insights. In this guide, I will give you an overview of some of the WooCommerce reporting & analytics plugins that can help you to take smarter decisions and to grow store faster. ## What is Reporting & Analytics? Reporting and analytics is all about collecting, understanding, and using data to make better decisions. In a WooCommerce store, this means tracking things like sales, customer behavior, product performance, and traffic sources. ![woocommerce reporting & analytics plugins](https://serveravatar.com/wp-content/uploads/2026/03/image-252.png) Think of it like checking your business “scorecard.” Reports show you what has already happened, like how many sales you made last week, while analytics helps you understand *why* it happened and what you can improve next. Together, they give you a clear picture of your store’s health and direction. ### Why WooCommerce Analytics Matters Running a WooCommerce store without analytics is like trying to improve something you can’t see. You might be making sales, but you won’t know what’s driving them or what’s holding you back. Analytics helps you understand your customers, what they like, how they shop, and why they leave. It shows you which products perform well and which ones need attention. More importantly, it helps you make informed decisions instead of guessing. Whether it’s pricing, marketing, or product selection, analytics gives you the confidence to move in the right direction. Simply put, if you want to grow your store, you need to understand your data. ### Key Features to Look for in Analytics Plugins Not all analytics plugins are created equal. Some offer basic reports, while others provide deep insights. That’s why it’s important to know what features actually matter. Here are some key features you should look for: - **Real-time reporting:** Helps you track what’s happening in your store right now. - **Sales and revenue tracking:** Gives you a clear picture of how your store is performing financially. - **Customer insights:** Shows buying behavior, repeat purchases, and customer trends. - **Conversion tracking:** Helps you understand how many visitors turn into customers. - **Traffic source tracking:** Identifies where your visitors are coming from (Google, social media, ads, etc.). - **Easy-to-use dashboard:** Makes data easy to understand without technical knowledge. - **Integration with marketing tools:** Connects with platforms like Google Analytics, Facebook Ads, or email tools. Choosing a plugin with these features ensures you get meaningful insights instead of just raw numbers. ### How Analytics Improves Store Growth Analytics plays a major role in growing your WooCommerce store because it helps you make smarter decisions. Instead of guessing what might work, you rely on real data. For example, if analytics shows that a product is getting a lot of views but few sales, you can improve its pricing or description. If you notice most of your traffic comes from social media, you can invest more in that channel. It also helps you understand customer behavior. You can see what they like, when they buy, and what makes them leave. With this information, you can improve user experience and increase conversions. In simple terms, analytics turns your data into a growth strategy. The more you understand your store, the easier it becomes to scale it successfully. ## 9 Best WooCommerce Reporting & Analytics Plugins Here are some of the top WooCommerce reporting and analytics plugins that help you track, analyze, and improve your WooCommerce store performance with ease. ### 1. Metorik [Metorik](https://metorik.com/) is a dedicated WooCommerce analytics platform that goes beyond basic reporting. It helps store owners understand customer behavior, revenue trends, and retention patterns with detailed insights. It’s like having a smart dashboard that tells you exactly how your store is performing. ![metorik - woocommerce reporting & analytics plugins](https://serveravatar.com/wp-content/uploads/2026/03/image-243.png) **Key Features:** - Real-time reporting dashboard - Customer segmentation tools - Subscription and retention tracking - Automated email reports **Advantages:** - Deep and detailed analytics - Clean and user-friendly interface - Great for tracking long-term growth **Disadvantages:** - Requires a paid subscription - Needs external account setup **Best For:** Advanced WooCommerce store analytics and customer insights ### 2. MonsterInsights [MonsterInsights](https://www.monsterinsights.com/) makes Google Analytics easy to use within your WordPress dashboard. Instead of dealing with complex data, it shows simplified reports that help you understand your store’s performance quickly. ![monsterinsights - woocommerce reporting & analytics plugins](https://serveravatar.com/wp-content/uploads/2026/03/image-244-1024x529.png) **Key Features:** - Google Analytics integration - eCommerce tracking reports - Conversion tracking - Real-time stats **Advantages:** - Beginner-friendly setup - No coding required - Detailed yet simple reports **Disadvantages:** - Many features are premium-only - Can be costly for small businesses **Best For:** Beginners who want easy Google Analytics integration ### 3. Analytify [Analytify](https://analytify.io/add-ons/woocommerce/) turns complicated Google Analytics data into simple, visual reports inside WordPress. It is ideal for users want insight without being dazed by number. ![analytify - woocommerce reporting & analytics plugins](https://serveravatar.com/wp-content/uploads/2026/03/image-245-1024x567.png) **Key Features:** - In-dashboard analytics reports - Real-time visitor tracking - Campaign performance tracking - Social media stats **Advantages:** - Easy to understand interface - Quick setup process - Clean visual reports **Disadvantages:** - Limited features in free version - Not ideal for deep analytics **Best For:** Users prefer visual analytics and simple report ### 4. Putler [Putler](https://www.putler.com/integrations/woocommerce/) is robust reporting and analytics tool which combines data from different platform to one place. It allows you to track customers, sales and growth with detailed insight. ![putler - woocommerce reporting & analytics plugins](https://serveravatar.com/wp-content/uploads/2026/03/image-246-1024x636.png) **Key Features:** - Multi-channel analytics - Customer lifetime value tracking - Sales forecasting - Detailed reporting dashboard **Advantages:** - Advanced data analysis - Supports multiple platforms - Great for business growth tracking **Disadvantages:** - Steeper learning curve - Premium pricing **Best For:** Businesses needing advanced, multi-channel analytics ### 5. Conversios [Conversios](https://wordpress.org/plugins/enhanced-e-commerce-for-woocommerce-store/) is developed to connect WooCommerce store with marketing platform such as Facebook and Google Ads. It also helps to track and optimize conversions and ad performance. ![conversios - woocommerce reporting & analytics plugins](https://serveravatar.com/wp-content/uploads/2026/03/image-247-1024x502.png) **Key Features:** - Google Analytics and Ads integration - Facebook Pixel tracking - Conversion tracking - Automated data syncing **Advantages:** - Strong marketing integration - Helps improve ad performance - Easy tracking across platforms **Disadvantages:** - Setup can be complex - Advanced features require payment **Best For:** Store owners who focuses on ad tracking and marketing ### 6. WP Statistics [WP Statistics](https://wordpress.org/plugins/wp-statistics/) is a analytics plugin focuses on privacy and keep all data within your website. It’s best for users who do not want to rely on third-party services such as Google Analytics or any else. ![wp statistics - woocommerce reporting & analytics plugins](https://serveravatar.com/wp-content/uploads/2026/03/image-248-1024x502.png) **Key Features:** - Visitor tracking - Traffic source analysis - GDPR-friendly tracking - Real-time statistics **Advantages:** - No external data sharing - Completely free - Privacy-focused **Disadvantages:** - Limited WooCommerce-specific insights - Basic reporting features **Best For:** Privacy-conscious users who want local analytics ### 7. Beeketing [Beeketing](https://wordpress.org/plugins/beeketing-for-woocommerce/) focus on increasing sales via automating with offering useful analytics. It helps you to understand improve conversions and customer behaviors. ![beeketing - woocommerce reporting & analytics plugins](https://serveravatar.com/wp-content/uploads/2026/03/image-249-1024x474.png) **Key Features:** - Sales tracking tools - Customer behavior analysis - Marketing automation features - Conversion optimization tools **Advantages:** - Helps increase sales - Easy to use - Good automation features **Disadvantages:** - Limited deep analytics - Many features are paid **Best For:** Store owners focused on increasing conversions ### 8. Advanced Reporting & Statistics for WooCommerce [Advanced Reporting & Statistics for WooCommerce](https://wordpress.org/plugins/webd-woocommerce-advanced-reporting-statistics/) plugin enhances the default reports by adding better visual reports and filters. It allows you explore deeper into store data without requiring complex tools. ![advanced reporting & statistics for woocommerce - woocommerce reporting & analytics plugins](https://serveravatar.com/wp-content/uploads/2026/03/image-250-1024x506.png) **Key Features:** - Advanced filtering options - Detailed sales reports - Export data options - Visual charts and graphs **Advantages:** - Enhances built-in WooCommerce reports - Easy to use - Affordable solution **Disadvantages:** - Interface feels outdated - Limited integrations **Best For:** Users wanting better WooCommerce default reporting ### 9. HubSpot for WooCommerce [HubSpot for WooCommerce](https://www.hubspot.com/partners/wordpress/plugins/woocommerce-by-makewebbetter) connects CRM with analytics and other marketing tools. It allows you to track customer interactions, run marketing campaigns, and manage contacts, all from one platform. ![hubspot for woocommerce - woocommerce reporting & analytics plugins](https://serveravatar.com/wp-content/uploads/2026/03/image-251-1024x510.png) **Key Features:** - CRM integration - Customer tracking - Email marketing tools - Analytics dashboard **Advantages:** - All-in-one platform - Free plan available - Powerful customer insights **Disadvantages:** - Can be complex to set up - Advanced features are paid **Best For:** Users who needs analytics, CRM, and marketing all in one tool ## Quick Comparison of WooCommerce Analytics Plugins Selecting the right plugin can be difficult when these many options available. However, the below comparison table gives you quick overview to compare and find the best fit for your store. **Plugin****Ease of Use****Analytics Depth****Integrations******Best For******Metorik**EasyAdvancedMediumAdvanced analytics**MonsterInsights**Very EasyMediumHighBeginners**Analytify**EasyBasicMediumVisual reports**Putler**MediumAdvancedHighMulti-channel**Conversios**MediumMediumHighMarketing tracking**WP Statistics**EasyBasicLowPrivacy users**Beeketing**EasyMediumMediumConversion boosting**Advanced Reporting**MediumMediumLowBetter reports**HubSpot**MediumAdvancedHighCRM + analytics## How to Choose the Right Plugin Picking a WooCommerce analytics plugin isn’t about going for the one with the longest feature list. It’s more about finding something that actually makes sense for how you run your store. Before installing anything, take a step back and think about what you really need. Are you just trying to see how many sales you’re getting each day? Or do you want deeper insights like customer behavior, repeat purchases, and marketing performance? Your answer will narrow down your options quickly. It’s also worth thinking about how comfortable you are with data. Some tools are packed with advanced reports but can feel overwhelming, while others keep things simple and easy to follow. On top of that, check if the plugin fits your budget and works smoothly with the tools you already use. At the end of the day, the right plugin is the one that helps you make decisions faster, not one that leaves you staring at confusing charts. ## Tips to Maximize Your Analytics Insights Having access to data is great, but what really matters is how you use it. Many store owners collect tons of data but don’t actually turn it into action. Here are a few practical ways to make your analytics more useful: - **Pay attention to what truly matters:** Instead of tracking every number, focus on a few important ones like sales trends, conversion rate, and returning customers. - **Make it a habit, not a one-time task:** Checking your analytics once in a while won’t help much. Set aside time every week to review what’s happening in your store. - **Have a clear goal in mind:** Whether it’s increasing sales or improving engagement, knowing your goal makes your data easier to interpret. - **Break your audience into smaller groups:** Not all customers behave the same way. Looking at different segments can reveal patterns you might otherwise miss. - **Experiment and learn from results:** Try small changes, like adjusting pricing or product pages, and see how they affect your numbers. - **Keep things simple:** It’s easy to get lost in too many reports. Focus on insights that actually help you take action. ## Best Practices for Using Analytics To truly benefit from reporting and analytics, it’s important to follow some proven best practices: - **Track the right KPIs (Key Performance Indicators):** Focus on metrics that directly impact your business goals, such as sales growth and customer lifetime value. - **Ensure data accuracy:** Make sure your tracking tools are set up correctly. Wrong data leads to wrong decisions. - **Combine multiple data sources:** Use insights from different tools (like sales, traffic, and marketing platforms) for a complete picture. - **Turn insights into action:** Data is only useful if you act on it. Use your findings to improve products, pricing, or marketing strategies. - **Keep your dashboard clean and simple:** A cluttered dashboard can confuse you. Keep only the most important reports visible. - **Monitor trends, not just numbers:** Instead of focusing on one-day data, look at patterns over time to understand real growth. - **Stay consistent:** Regular tracking and analysis will give you better long-term insights than occasional checks. ## Conclusion In today’s competitive e-commerce world, relying on guesswork is no longer an option. WooCommerce reporting and analytics plugins give you the clarity you need to understand your store’s performance, customer behavior, and growth opportunities. Whether you choose a simple tool for basic insights or a powerful platform for advanced tracking, the key is to consistently use your data to make smarter decisions. When you start listening to what your analytics is telling you, improving conversions and scaling your store becomes much more achievable. ## FAQs ### 1. What is the best WooCommerce reporting and analytics plugin? The best plugin depends on your needs. Tools like Metorik and Putler are great for advanced insights, while MonsterInsights and Analytify are better for beginners. ### 2. Are free WooCommerce analytics plugins enough? Free plugins are useful for basic tracking, but premium tools offer deeper insights, automation, and better reporting features for growing stores. ### 3. How often should I check my WooCommerce analytics? It’s recommended to review your analytics at least once a week to track trends and make timely improvements. ### 4. Can analytics plugins help increase sales? Analytics plugins help you understand customer behavior and identify what works best, allowing you to optimize your store and improve conversions. ### 5. Do analytics plugins affect website performance? Most well-optimized plugins have minimal impact, but using too many heavy plugins at once can slow down your website. ## Stop Wasting Time on Servers. Start Building Instead. You didn’t start your project to babysit servers. Let **ServerAvatar** handle deployment, monitoring, and backups — so you can focus on growth. Deploy **WordPress, Laravel, N8N**, and more in minutes. No DevOps required. No command line. No stress. [ 🚀 Try Free ](https://app.serveravatar.com) [ 🌐 Learn More ](https://serveravatar.com/) Trusted by 10,000+ developers and growing. **Categories:** Blog, Guide, Others, WordPress **Tags:** WooCommerce, WooCommerce analytics plugins, WooCommerce analytics tools, WooCommerce Plugins, WooCommerce reporting & analytics plugins, WooCommerce reporting plugins --- ### [What Is Clickjacking? Real Attack Examples, Risks & How to Prevent It in WordPress](https://serveravatar.com/what-is-clickjacking/) **Published:** March 26, 2026 **Author:** Meghna Meghwani **Content:** [![Blog banner - ServerAvatar](https://serveravatar.com/wp-content/uploads/2025/09/728_90-Banner-3-1024x127.png)](https://serveravatar.com/?ref=blog)Imagine clicking a harmless “Play” button on a video… but instead, you unknowingly approve a payment or give access to your account. Sounds scary, right? That’s exactly how clickjacking works. If you’re wondering what is clickjacking, it’s a deceptive technique where users are tricked into clicking something different from what they see. Clickjacking is like a digital trap where what you see isn’t what you actually click. It manipulates users into taking actions they never intended. And if you run a WordPress website, this is something you simply can’t ignore. In this guide, we’ll break down what clickjacking is, show real-world examples, explain the risks, and most importantly, show you how to protect your site from it. ## What Is Clickjacking? Clickjacking, also known as “UI redressing”, is a cyberattack where users are tricked into clicking something different from what they perceive. Think of it like placing an invisible button on top of a visible one. You think you clicked on “Watch Video” button, however, you actually clicked on “Allow Access” or “Transfer Money” button. ![What is Clickjacking](https://serveravatar.com/wp-content/uploads/2026/03/image-236.png) **Key Point:** It manipulates user trust by hiding malicious actions behind legitimate-looking elements. ### How Clickjacking Works Clickjacking works by visually tricking users into clicking something different from what they think they’re interacting with. Attackers carefully design a fake page that hides the real action underneath, making it almost impossible for users to notice the deception. [](https://storage.3.basecamp.com/5840738/blobs/4835a528-2902-11f1-8f2c-0242ac120003/download/image.png) ![Clickjacking works](https://serveravatar.com/wp-content/uploads/2026/03/image-237.png) **Here’s a simple breakdown:** - A hacker creates a malicious webpage that looks normal or attractive to users - Hacker loads your website in invisible or transparent iframe - Fake buttons, videos, or links are placed on top of the hidden content - When a user clicks, they unknowingly perform a hidden action on the actual site **Key Features:** - Uses invisible layers (iframes) to hide real actions - Relies heavily on user trust and visual deception - Requires no malware installation to work - Can trigger actions like login approvals, payments, or permissions - Often goes unnoticed until damage is done **Analogy:** It’s like someone placing a glass door in front of a real door, you think you’re opening the right one, but you hit something invisible instead. ## Types of Clickjacking Attacks ### 1. Likejacking Likejacking is a social media-based attack where users are unknowingly forced to “like” or share content. The action happens in the background while the user thinks they are clicking something harmless. ![Likejacking - Clickjacking](https://serveravatar.com/wp-content/uploads/2026/03/image-238.png) **Key Features:** - Hidden social media buttons layered under visible content - Boosts fake engagement and page popularity - Often spreads quickly through viral content - Targets platforms like Facebook or Instagram ### 2. Cursorjacking Cursorjacking tricks users by visually shifting the cursor position. What you see is not where your click actually lands, leading to unintended actions. ![Cursorjacking - Clickjacking](https://serveravatar.com/wp-content/uploads/2026/03/image-239.png) **Key Features:** - Misaligned or invisible cursor positioning - Users click one thing but trigger another action - Exploits browser rendering behavior - Difficult for users to detect visually ### 3. File Download Clickjacking This type of attack silently initiates file downloads when users click on something that appears safe, like a button or link. ![File Download Clickjacking ](https://serveravatar.com/wp-content/uploads/2026/03/image-240.png) **Key Features:** - Triggers automatic or hidden downloads - Often installs malicious files or software - Disguised as legitimate buttons (e.g., “Play” or “Download”) - Can compromise system security quickly ### 4. Credential Theft In this attack, users are presented with fake login forms layered over real pages. When they enter their details, the information is captured by attackers. ![Credential theft - Clickjacking](https://serveravatar.com/wp-content/uploads/2026/03/image-241.png) **Key Features:** - Fake login forms that look real - Steals usernames, passwords, or sensitive data - Often targets banking or admin accounts - Can lead to account takeover ## Real-Life Clickjacking Examples ### Facebook Likejacking (Early 2010s) In this case, users were unknowingly clicking hidden “Like” buttons while interacting with normal-looking content. This helped attackers artificially grow page likes and reach. **Key Features:** - Invisible “Like” buttons placed under clickable elements - Rapid spread through user interactions - Increased fake engagement metrics - Exploited user trust in familiar interfaces ### Adobe Flash Exploit Users believed they were clicking to play a video, but instead they unknowingly allowed access to their webcam or microphone. **Key Features:** - Disguised permission prompts - Used outdated Flash technology vulnerabilities - Gained access to user hardware (camera/mic) - Took advantage of user curiosity ### PayPal Transfer Trick Attackers placed invisible payment authorization buttons under normal webpage elements. When users clicked, they unknowingly approved transactions. **Key Features:** - Hidden transaction approval buttons - Financial loss without user awareness - Targets online payment platforms - Extremely dangerous for e-commerce users **Lesson:** Even well-known platforms have faced clickjacking attacks in the past. This shows that no website is completely safe unless proper security measures are in place. **Key Takeaway:** - Every website is a potential target - Security must be proactive, not reactive - Users and site owners both share responsibility - Prevention is always easier than recovery ## Why Clickjacking Is Dangerous Clickjacking is more than just a minor security issue, it can lead to serious consequences without the user even realizing it. Since the attack happens behind the scenes, victims often don’t know what went wrong until it’s too late. - Exploits user trust through hidden actions - Works silently without obvious signs - Can cause financial and data loss - Damages credibility of websites - Hard to detect until harm is done **Here’s what can happen:** - Unauthorized transactions - Account hijacking - Malware installation - Data theft - Reputation damage A single incident can break user trust and impact your brand reputation almost instantly. ### Who Is at Risk? The simple answer is, almost everyone online. However, some platforms are more attractive targets because of the sensitive actions they handle. **Especially vulnerable:** - WordPress site owners - E-commerce websites - Membership platforms - Admin dashboards If your website includes buttons like “Login”, “Pay”, or “Submit”, attackers can try to exploit them through clickjacking. **Key Features:** - Targets sites with user interaction elements - Focuses on platforms handling sensitive data - Affects both users and administrators - No website is completely immune - Higher risk for sites with weak security settings ## Signs Your Site Might Be Vulnerable Clickjacking attacks are designed to stay hidden, but there are still some warning signs that something might be wrong. Paying attention to user feedback can help you spot issues early. - Often detected through user reports - No visible changes on the website itself - Requires technical checks to confirm - Linked to missing security protections - Early detection can prevent major damage **Common warning signs:** - Unusual user complaints - Reports of actions users didn’t perform - Suspicious iframe usage - Missing or misconfigured security headers If users start saying, “I didn’t click that”, it’s a strong signal that something needs immediate attention. ### How Clickjacking Affects WordPress Sites Since WordPress is one of the most widely used platforms, it naturally becomes a popular target for attackers. Without proper safeguards, attackers can exploit its interface and trick users into performing unintended actions. **Common risks include:** - Admin panel actions being triggered unknowingly - Plugin or theme settings being altered - Unauthorized content changes - Misuse of payment gateways If your site isn’t protected, it can be embedded into malicious pages and used as part of an attack without your knowledge. ## Key Security Headers Explained Security headers act like protective shields for your website. They tell browsers how your site should behave, helping block attacks like clickjacking before they even begin. **X-Frame-Options** The **X-Frame-Options** header prevents your website from being loaded inside an iframe on another site. This is one of the simplest and most effective ways to stop clickjacking attacks. **Options include:** - **DENY:** Completely blocks your site from being embedded anywhere - **SAMEORIGIN:** Allows embedding only within the same domain **Content Security Policy (CSP)** The Content Security Policy (CSP) is a more advanced security header that gives you greater control over how your website content is loaded and displayed. It allows you to define exactly which sources are allowed to interact with your site. **Example:** ``` Content-Security-Policy: frame-ancestors 'self'; ``` ``` Content-Security-Policy: frame-ancestors 'self'; ``` **Key Point:** Both headers work like a “Do Not Enter” sign for attackers. They stop malicious websites from framing your content and tricking users into unintended actions. ## How to Prevent Clickjacking in WordPress Protecting your WordPress site from clickjacking doesn’t have to be complicated. With a few smart configurations, you can block most attacks before they even start. ### 1. Enable X-Frame-Options This header prevents your website from being embedded inside unauthorized iframes, which is the main technique used in clickjacking. Add this to your server configuration: ``` Header always append X-Frame-Options SAMEORIGIN ``` ``` Header always append X-Frame-Options SAMEORIGIN ``` **Key Features:** - Blocks external websites from framing your content - Simple and quick to implement - Works on most servers - Ideal for login and admin pages ### 2. Use Content Security Policy CSP gives you more control by allowing only trusted domains to embed your site. Restrict iframe usage by adding below: ``` Header set Content-Security-Policy "frame-ancestors 'self';" ``` ``` Header set Content-Security-Policy "frame-ancestors 'self';" ``` **Key Features:** - Advanced protection against clickjacking - Restricts iframe usage to trusted sources - Helps prevent multiple types of attacks - Highly customizable ### 3. Keep WordPress Updated Running outdated versions of WordPress, themes, or plugins can expose your site to known vulnerabilities. **Key Features:** - Fixes known security issues - Improves overall site performance - Reduces risk of exploitation - Ensures compatibility with security tools ### 4. Use HTTPS HTTPS encrypts the data between your website and users, making it harder for attackers to manipulate interactions. **Key Features:** - Secures data transmission - Builds user trust - Prevents man-in-the-middle attacks - Essential for modern websites ## Use WordPress Plugins to Protect Against Clickjacking Attacks If your website runs on WordPress, you don’t need to handle everything manually to stay secure. Security plugins can add strong protection against clickjacking attacks without requiring deep technical knowledge. They simplify complex configurations and help you secure your site in just a few clicks. Here are some reliable plugins you can consider: ### 1. iThemes Security iThemes Security offers a wide range of tools designed to strengthen your website’s overall defense. It includes multiple security layers that protect your site from common vulnerabilities. One of its useful features is the ability to add X-Frame-Options headers, which helps block clickjacking attempts. It also provides additional hardening options to improve site security. **Key Features:** - Multiple security configurations in one plugin - Protection against unauthorized access - Easy setup for security headers - Login protection features - Regular security checks ### 2. Wordfence Security Wordfence is known for its powerful firewall and malware scanner. It actively blocks suspicious traffic and helps prevent malicious activities before they reach your site. For clickjacking protection, Wordfence supports implementing security headers and strengthening your website’s defense through its firewall settings. **Key Features:** - Advanced firewall protection - Real-time threat detection - Malware scanning and removal - Login security features - Traffic monitoring and blocking ### 3. Sucuri Security Sucuri is a widely trusted security solution that helps monitor and protect your website from different types of threats. It keeps track of site activity, scans for malware, and checks file integrity. When it comes to clickjacking, Sucuri allows you to configure important security headers like X-Frame-Options and Content Security Policy (CSP) directly from its dashboard, helping prevent unauthorized framing of your site. **Key Features:** - Security activity monitoring - Malware detection and cleanup - Easy implementation of security headers - Website firewall protection - Regular security alerts ### 4. BulletProof Security BulletProof Security provides a complete set of tools to secure your WordPress site, including database protection, firewall setup, and login security. It also allows you to add security headers that help defend against clickjacking attacks and other browser-based threats. **Key Features:** - Strong firewall protection - Database security tools - Login and file protection - Security header support - Automated security features ### 5. All In One WP Security & Firewall This plugin is a great option for beginners who want strong security without complexity. It offers a user-friendly interface and step-by-step guidance to improve your website’s protection. It also includes features that help prevent clickjacking by allowing you to apply security headers easily. **Key Features:** - Beginner-friendly dashboard - Security grading system - Easy header configuration - Firewall and login protection - Lightweight and efficient ## Manual Methods to Block Clickjacking For those who want full control, manual configuration is a reliable option. ### 1. Edit .htaccess File Add below: ``` Header always set X-Frame-Options "SAMEORIGIN" ``` ``` Header always set X-Frame-Options "SAMEORIGIN" ``` ### 2. Nginx Configuration ``` add_header X-Frame-Options "SAMEORIGIN"; ``` ``` add_header X-Frame-Options "SAMEORIGIN"; ``` ### 3. Use functions.php ``` header('X-Frame-Options: SAMEORIGIN'); ``` ``` header('X-Frame-Options: SAMEORIGIN'); ``` ## Testing Your Website for Clickjacking It’s important to verify whether your site is protected or not. **Method 1: Online Tools** You can use various online security testing tools to check for clickjacking vulnerabilities. **Method 2: Manual Test** Try embedding your site in an iframe: ``` ``` ``` ``` If your site loads successfully inside the iframe, it means protection is missing. ## Best Practices to Stay Secure Website security is a continuous process, not a one-time fix. Following best practices can significantly reduce your risk. **Follow these best practices:** - Regularly update WordPress core, themes, and plugins - Use strong admin passwords - Limit login attempts - Enable two-factor authentication - Monitor user activity - Use a web application firewall (WAF) **Pro Tip:** Think of website security like locking your house. You wouldn’t leave your doors and windows open, so don’t leave your website unprotected either. [![Blog banner - ServerAvatar](https://serveravatar.com/wp-content/uploads/2025/09/728_90-Banner-1-1024x127.png)](https://serveravatar.com/?ref=blog)## Stay Aware of Clickjacking Attacks Clickjacking attacks are designed to trick users into performing actions they never intended, like clicking hidden buttons, allowing permissions, or downloading harmful files. While these attacks can be dangerous, the good news is that they are preventable. By understanding how they work and using the right tools, you can protect both your website and your visitors. **Key Takeaway:** - Awareness is your first line of defense - Use security tools and best practices - Keep your website regularly updated - Always monitor unusual activity Staying informed and proactive will help you maintain a safe and secure online presence for your users. ## Conclusion Clickjacking may operate quietly in the background, but its impact can be serious for both users and website owners. From unauthorized actions to data theft, the risks are real, but the solution is well within your control. By understanding how clickjacking works and applying the right protections like security headers, trusted plugins, and regular updates, you can significantly reduce your exposure to such attacks. Pairing these practices with a reliable platform that simplifies server and WordPress management makes the process even smoother. In the end, staying informed and proactive is the key to building a secure and trustworthy website experience. ## FAQs ### 1. What is clickjacking in simple terms? Clickjacking is a technique where users are tricked into clicking something different from what they see, often leading to unintended actions like sharing data or approving requests. ### 2. How can I protect my WordPress site from clickjacking? You can protect your site by adding security headers like X-Frame-Options and Content Security Policy, using security plugins, and keeping your WordPress installation updated. ### 3. Is clickjacking still a threat today? Clickjacking is still relevant, especially for websites that handle logins, payments, or sensitive user actions. ### 4. Do I need technical knowledge to prevent clickjacking? Many WordPress security plugins make it easy to enable protection without coding, although manual methods are also available for advanced users. ### 5. How do I check if my website is vulnerable to clickjacking? You can test your site by trying to load it inside an iframe or by using online security testing tools to detect missing protection headers. **Categories:** Blog, Guide, Linux, Others, Tutorials, Ubuntu, WordPress **Tags:** clickjacking, clickjacking attack, clickjacking in WordPress, clickjacking protection, prevent clickjacking, What is clickjacking, Wordpress --- ### [WordPress vs Wix? How to Make the Right Choice for Your Website](https://serveravatar.com/wordpress-vs-wix/) **Published:** March 25, 2026 **Author:** Meghna Meghwani **Content:** [![Blog banner - ServerAvatar](https://serveravatar.com/wp-content/uploads/2025/09/728_90-Banner-3-1024x127.png)](https://serveravatar.com/?ref=blog)If you’re planning to build a website, chances are you’ve come across two popular names: WordPress and Wix. When it comes to the WordPress vs Wix debate, many users find it difficult to decide which platform is the right fit. And now you’re probably wondering, which one is better for you? Don’t worry, you’re not alone. Choosing between these two platforms is actually confusing. Both have their pros and cons, and the right choice depends on what you actually need. In this guide, we’ll break everything down in simple terms so you can confidently decide which platform fits your goals. ## What is WordPress? [WordPress](https://wordpress.org/) is an open-source content management system (CMS) that allows you to build and manage websites of almost any type, blogs, business sites, portfolios, and even large eCommerce stores. ![WordPress - WordPress vs Wix](https://serveravatar.com/wp-content/uploads/2026/03/image-233-1024x519.png) There are two versions: - **WordPress.com:** A hosted platform (simpler, but limited) - **WordPress.org:** Self-hosted (full control and flexibility) When people compare WordPress with Wix, they usually mean WordPress.org. The biggest strength of WordPress lies in its flexibility. You are not locked into a specific design or structure. You can customize everything, from layout to functionality, based on your needs. ### Key Features Here are some of the most important features that make WordPress so popular: - **Open-source platform:** Free to use with complete customization freedom - **Thousands of themes:** Wide range of design options for any niche - **Extensive plugins:** Easily add features like SEO, security, and forms - **Full data control:** You own and manage all your website content - **SEO-friendly structure:** Built to support better search engine rankings - **Versatile usage:** Suitable for blogs, business sites, and online stores - **Media management:** Easily upload and organize images and videos - **User roles system:** Assign different access levels to team members ### Advantages Why do so many people prefer WordPress? - **Complete flexibility:** Build and design your site exactly how you want - **Highly scalable:** Works for small websites as well as large platforms - **Strong SEO support:** Offers tools to improve search visibility - **Large community:** Plenty of guides, forums, and tutorials available - **Full ownership:** You have total control over your website data - **Easy integrations:** Connect with multiple third-party services ### Disadvantages Of course, WordPress isn’t perfect. Here are some downsides: - **Learning curve:** Takes time for beginners to understand - **Setup required:** Needs hosting and domain configuration - **Manual updates:** Plugins and themes must be updated regularly - **Security responsibility:** You need to manage protection measures - **Variable costs:** Expenses can increase with premium tools ## What is Wix? [Wix](https://www.wix.com/) is a cloud-based website builder designed for simplicity and ease of use. It allows users to create websites using a drag-and-drop editor without any technical knowledge. ![Wix - WordPress vs Wix](https://serveravatar.com/wp-content/uploads/2026/03/image-234-1024x513.png) Everything is handled in one place, hosting, design, security, and updates, so you don’t have to worry about technical tasks. Wix is especially popular among beginners, small business owners, and freelancers who want a quick online presence. ### Key Features Wix comes with several built-in features that make website creation simple: - **Drag-and-drop builder:** Create pages visually without coding - **Ready-made templates:** Professionally designed layouts for quick use - **Built-in hosting:** No need to buy separate hosting services - **App market:** Add extra features through Wix apps - **Mobile-friendly designs:** Websites adjust automatically to devices - **Basic SEO tools:** Helps improve visibility on search engines - **Marketing tools:** Includes analytics and promotional features - **Auto maintenance:** Updates and security handled automatically ### Advantages Here’s why many users choose Wix: - **Beginner-friendly:** Easy to use even with no technical skills - **Fast setup:** Launch a website in a short time - **All-in-one solution:** Everything is included in one platform - **No maintenance needed:** Wix handles updates and security - **Modern templates:** Attractive designs ready to use - **Customer support:** Access to direct help when needed ### Disadvantages However, Wix also has some limitations: - **Limited customization:** Less flexibility compared to WordPress - **Template restrictions:** Difficult to switch designs later - **Feature limitations:** Fewer advanced options available - **Not for complex sites:** Struggles with large or advanced projects - **Scalability issues:** Not ideal for long-term expansion - **Platform dependency:** Your site depends entirely on Wix ## WordPress vs Wix: Quick Comparison Choosing between WordPress and Wix often comes down to one simple question: do you want full control or complete convenience? Both platforms help you build a website, but they take very different approaches. **Feature****WordPress****Wix****Ease of Use**Moderate learning curveVery beginner-friendly**Setup Process**Requires hosting & installationReady-to-use platform**Customization**Highly flexible, full controlLimited but simple**Design Options**Thousands of themesPre-designed templates**SEO Capabilities**Advanced and powerfulBasic to moderate**Pricing**Varies (hosting + extras)Fixed monthly plans**Maintenance**Manual updates requiredFully managed**Performance**Depends on hostingOptimized by default**Scalability**Excellent for growthLimited for large sites**eCommerce**Powerful with pluginsGood for small stores**Ownership**Full control of dataPlatform-dependent**Support**Community-basedDedicated supportIf you are someone who likes flexibility and long-term growth, one option stands out. But if you prefer ease and speed, the other might be a better fit. ### Ease of Use: Which is Beginner-Friendly? When it comes to ease of use, the difference is quite clear. Wix focuses on simplicity, while WordPress offers more control but requires some learning. **Wix** - **Beginner-friendly interface:** Everything works with simple drag-and-drop - **No coding required:** You can build a site without technical knowledge - **Quick setup:** Just choose a template and publish **WordPress** - **Moderate learning curve:** Requires time to understand the dashboard - **Initial setup needed:** Hosting, themes, and plugins must be configured - **More control:** Once learned, you get full flexibility ### Design & Customization Options Design flexibility is where both platforms take very different approaches. **WordPress** - **Unlimited design freedom:** Customize every part of your website - **Thousands of themes:** Huge collection of free and paid designs - **Advanced customization:** Edit code for complete control **Wix** - **Pre-designed templates:** Ready-to-use professional layouts - **Easy editing:** Customize visually without effort - **Limited flexibility:** Changing structure or templates later is difficult ### Features and Flexibility Both platforms offer features, but the level of flexibility is quite different. **WordPress** - **Plugin ecosystem:** Add almost any feature you need - **Custom functionality:** Build advanced tools and systems - **Highly versatile:** Suitable for complex and dynamic websites **Wix** - **Built-in tools:** Includes essential features out of the box - **App marketplace:** Add limited extra functionality - **Restricted flexibility:** Features depend on Wix’s ecosystem ### SEO Capabilities SEO plays a major role in website growth, and both platforms handle it differently. **WordPress** - **Advanced SEO control:** Customize URLs, metadata, and structure - **SEO plugins:** Tools like Yoast help optimize content - **Better flexibility:** Ideal for long-term SEO strategies **Wix** - **Basic SEO tools:** Covers essential optimization needs - **Simple settings:** Easy to manage meta titles and descriptions - **Limited control:** Not as powerful as WordPress ### Pricing Comparison Pricing is always varies depend on about your choice to create a website. **Wix** - **Free plan available:** Includes Wix branding - **Fixed pricing:** Clear monthly or yearly plans - **All-in-one cost:** Hosting and features included **WordPress** - **Core software Free:** No cost for use of the platform - **Additional expenses:** Hosting, themes, and plugins required - **Flexible pricing:** Costs depend on your setup ### Performance and Speed Website speed can impact user experience and SEO. **WordPress** - **Depends on hosting:** Performance varies based on provider - **Requires optimization:** Caching and tuning needed - **High potential:** Can be extremely fast if optimized well **Wix** - **Managed performance:** Speed is handled automatically - **Built-in hosting:** No need for manual optimization - **Consistent results:** Reliable performance for most users ### Security and Maintenance Security and maintenance responsibilities differ significantly between the two. **Wix** - **Automatic updates:** No manual work required - **Built-in security:** Platform handles protection - **Low maintenance:** Fully managed environment **WordPress** - **Manual updates:** Themes and plugins need regular updates - **Security plugins:** Additional tools required for protection - **User responsibility:** You manage overall security ### E-commerce Capabilities When you are planning to sell anything online, e-commerce capabilities matters lot. **WordPress** - **WooCommerce support:** Powerful and customizable eCommerce solution - **Scalable platform:** Suitable for growing online stores - **Advanced features:** Full control over store functionality **Wix** - **Simple eCommerce tools:** Easy setup for small stores - **Beginner-friendly:** No technical setup needed - **Scalability Limited:** It is not ideal for complex or big stores ### Blogging Experience Content creating is smooth on some platforms. **WordPress** - **Built for blogging:** Strong content management system - **Advanced editor:** More control over posts and layout - **Better organization:** Categories, tags, and SEO structure **Wix** - **Basic blogging tools:** Suitable for simple content - **Easy to use:** Simple editor for beginners - **Limited features:** Less flexibility compared to WordPress ### Scalability: Future Growth Think long-term when choosing your platform. **WordPress** - **Highly scalable:** Grows with your website needs - **No major limits:** Suitable for any size project - **Future-ready:** Ideal for expanding businesses **Wix** - **Limited scalability:** Not designed for complex growth - **Restricted backend control:** Less flexibility for expansion - **Best for small projects:** Suitable for basic websites ### Customer Support Support is making a very big difference, such as for beginners. **Wix** - **24/7 customer support:** Direct help available - **Help center:** Guides and tutorials included - **Quick assistance:** Faster issue resolution **WordPress** - **Community support:** Forums and online discussions - **Self-help resources:** Tutorials and documentation - **No support:** The support is depended on hosting or any third-party service [![Blog banner - ServerAvatar](https://serveravatar.com/wp-content/uploads/2025/09/728_90-Banner-1-1024x127.png)](https://serveravatar.com/?ref=blog)### Definitive Verdict: Which One Should You Choose? Choosing from WordPress and Wix is completely depend on what you value more, simplicity or control. **Choose Wix if:** - You want a quick and easy website setup - You have no technical experience - You prefer an all-in-one solution **Choose WordPress if:** - You want full control and customization - You plan to grow your website long-term - You need advanced SEO and flexibility At the end, there is no one platform that fits all your needs. It’s about what works best for your goals. ## How ServerAvatar Simplifies WordPress Deployment & Management Hosting and managing a WordPress website gives you flexibility, but it is comes with responsibility like server setup, optimization, and ongoing support and maintenance. This is where ServerAvatar makes things much easier. **What is ServerAvatar?** [ServerAvatar](https://serveravatar.com/) is a server hosting and management platform designed to simplify how you deploy and manage web applications. It helps you run PHP and Node.js applications, including WordPress, without dealing with complex server configurations. ![ServerAvatar Dashboard - WordPress vs Wix](https://serveravatar.com/wp-content/uploads/2026/03/image-235.png) Instead of manually setting up the server and application environment, ServerAvatar gives you a clean and user-friendly dashboard where everything is organized in one place. With its one-click application installer, you can launch a full configured WordPress website within minutes. You do not need to worry about configuring services, installing dependencies, or handling technical setup manually. Beyond WordPress, ServerAvatar also supports popular applications like Moodle, Mautic, n8n, and Uptime Kuma, making it a flexible choice for developers, agencies, and business owners. ServerAvatar supports multiple cloud providers and gives you full control over your infrastructure, without requiring deep technical expertise. If you need any advanced setup, the ServerAvatar technical team can assist you with the process. **Key Benefits of Using ServerAvatar for WordPress** Here’s how ServerAvatar improves your WordPress experience: - **One-click application installer:** Launch WordPress and other applications instantly without manual setup - **Centralized dashboard:** Manage servers, applications, databases, and PHP versions from one place - **Performance optimization:** Easily manage services and improve website speed - **Redis caching support:** Built-in Redis integration helps boost WordPress performance - **Enhanced security:** Easily manage SSL, firewall, fail2ban, AI bot blocker, and secure access with ease - **Scalable infrastructure:** Upgrade server resources as your website grows ServerAvatar is great if you want the ability of server and application hosting and management without dealing with the complexity of server hosting and management. It allows users to focus on building and growing website instead of handling technical procedures. Whether you’re a developer, agency, or business owner, ServerAvatar helps you deploy, manage, and scale WordPress websites more efficiently. Explore ServerAvatar [documentation](https://serveravatar.com/docs/) to get started with WordPress deployment and management in just a few steps. ## Conclusion Deciding between WordPress and Wix isn’t about which platform is universally better, but which one fits your specific needs. Wix is ideal if you want a fast, simple, and hands-off way to launch a website without dealing with technical details. In contrast, WordPress is better suited for those who want full control, deeper customization, and the ability to scale over time. While WordPress may require more effort in the beginning, solutions like ServerAvatar can make managing servers and applications much easier. In the end, your choice should depend on how much flexibility, control, and long-term growth you expect from your website. ## FAQs ### 1. Is Wix easier to use than WordPress? Wix is easier for beginners because everything is built around a visual editor and managed environment. WordPress takes more time to learn but offers greater control once you get familiar with it. ### 2. Which platform is better for long-term website growth? For long-term scalability and flexibility, WordPress is a stronger choice. It allows you to expand your website’s features and handle more complex requirements compared to Wix. ### 3. Can I build a professional website without coding? Both WordPress and Wix allow you to create professional websites without coding. However, WordPress gives you the option to customize further if needed. ### 4. Does Wix limit customization options? Wix offers easy design tools, but it has certain limitations when it comes to advanced customization and flexibility. WordPress provides far more freedom in this area. ### 5. What are the ongoing responsibilities with WordPress? With WordPress, you need to handle updates, security, and performance optimization. These tasks can be simplified using tools like ServerAvatar. ### 6. Can I switch from Wix to WordPress later? It is possible to move from Wix to WordPress, but the process can take time and may require manual adjustments, especially for design and content structure. **Categories:** Blog, Guide, Tutorials, WordPress **Tags:** wix, Wix vs WordPress, Wix website builder, Wordpress, WordPress CMS, WordPress comparison, WordPress vs Wix, WordPress vs Wix comparison --- ### [How to Safely Update WordPress Plugins](https://serveravatar.com/update-wordpress-plugins/) **Published:** March 24, 2026 **Author:** Meghna Meghwani **Content:** [![Blog banner - ServerAvatar](https://serveravatar.com/wp-content/uploads/2025/09/728_90-Banner-3-1024x127.png)](https://serveravatar.com/?ref=blog)Updating WordPress plugins might seem like a simple click-and-done task. But if you’ve ever experienced a broken website after an update, you know it’s not always that easy. When you try to safely update WordPress plugins, it’s important to follow the right approach. So, how do you update plugins safely without risking your website? In this guide, I’ll walk you through everything you need to know in a simple, practical way, no technical background required. ## Why Updating WordPress Plugins is Important Plugins are the backbone of your WordPress website. They add features, improve functionality, and enhance user experience. ![Update WordPress Plugins](https://serveravatar.com/wp-content/uploads/2026/03/image-202.png) But outdated plugins can: - **Exposing your site to security risks:** Outdated plugins may contain vulnerabilities that hackers can easily exploit. - **Slow down performance:** Older versions may not be optimized, causing your website to load slower. - **Cause compatibility issues:** Plugins may stop working properly with updated themes or WordPress core. Developers regularly release updates to fix bugs and improve security. Ignoring them is like leaving your doors unlocked. ### Risks of Updating Plugins Without Precautions Updating plugins without preparation can sometimes do more harm than good. A simple update can unexpectedly disrupt your website if not handled carefully. That’s why it’s important to follow a safe process instead of rushing. - **Website crashes or white screen errors:** A faulty update can make your site completely inaccessible. - **Features stop working:** Certain functionalities may break if the update conflicts with other components. - **Theme conflicts:** Updated plugins might not align well with your current theme setup. - **Data loss in worst cases:** Critical data can be lost if something goes seriously wrong during the update. That’s why blindly clicking “Update All” is never a good idea. ### When Should You Update Plugins? Updating at the right time helps you avoid unnecessary risks. Planning your updates ensures minimal disruption to your visitors and business operations. **Best times to update:** - **During low traffic hours:** Fewer visitors mean less impact if something goes wrong. - **After checking compatibility:** Ensures the update won’t conflict with your setup. - **When backups are ready:** Gives you a fallback option if needed. **Avoid updating:** - **Right before a big campaign or launch:** Any issue can affect your results. - **Without testing:** Skipping testing increases the chances of unexpected problems. ## How Do You Know When Plugins Need an Update? WordPress does a great job of letting you know when your plugins are outdated. You don’t have to guess, it shows clear signals right inside your dashboard. Here’s what you’ll notice: - A **small notification badge** next to the Plugins menu in the sidebar ![when to Update WordPress Plugins](https://serveravatar.com/wp-content/uploads/2026/03/image-203-1024x515.png) - A reminder on the **Dashboard >> Updates** page ![update notification - Update WordPress Plugins](https://serveravatar.com/wp-content/uploads/2026/03/image-204-1024x415.png) - A **highlighted update message** below specific plugins in the Installed Plugins list ![update plugin - Update WordPress Plugins](https://serveravatar.com/wp-content/uploads/2026/03/image-205-1024x542.png) When you see any of these alerts, it means updates are available. But hold on, don’t rush to click “Update” immediately. Let’s go step by step and explore the safest ways to update your plugins based on your comfort level and website importance. ### Pre-Update Checklist Before updating plugins, it’s important to prepare your website properly. A quick checklist can help you avoid common issues and ensure a smooth update process. Think of it as your safety routine before making changes. - **Backup your website:** Ensures you can restore your site if anything goes wrong. - **Check plugin compatibility:** Confirms the plugin works with your current setup. - **Read update changelog:** Helps you understand what changes are included. - **Ensure WordPress core is updated:** Keeps everything aligned and compatible. - **Disable caching temporarily:** Prevents outdated content from showing after updates. Think of this as your safety gear before starting the process. ## Backup Your Website Before Updating Taking a backup before updating plugins is one of the smartest decisions you can make. It acts as a safety net, allowing you to restore your site quickly if something breaks. Without a backup, even a small issue can turn into a major problem. **What Should You Backup?** - **Website database:** Stores all your content, settings, and important data. - **WordPress files (themes, plugins, uploads):** Includes design, functionality, and media files. **ServerAvatar Users:** If you’re using ServerAvatar, taking a backup is quick and beginner-friendly: - Log in to your ServerAvatar account - Navigate to the Backups section ![backups - Update WordPress Plugins](https://serveravatar.com/wp-content/uploads/2026/03/image-207-1024x217.png) - Use the [**Instant Backup**](https://serveravatar.com/docs/backups/getting-started/) feature to take an instant backup of your application database and file system. - Fill in the details and create an instant backup in just one click. ![create instant backup - Update WordPress Plugins](https://serveravatar.com/wp-content/uploads/2026/03/image-208-1024x634.png) - This ensures your data is secure before making any changes. **Other Users:** If you’re not using ServerAvatar, there are still multiple ways to secure your data. These methods ensure you have a recovery option before making any changes. - Install plugins like: - UpdraftPlus: A popular plugin for easy scheduled backups. - Duplicator: Helps you create full website copies for restoration. - BackupBuddy: Provides complete backup and restore functionality. - Take manual backups: Allows you to download files and databases directly. ## What is ServerAvatar? Before we move ahead, let’s quickly understand ServerAvatar, especially if you’re new to it. ServerAvatar is a powerful platform that simplifies server and application management. It allows you to deploy and manage WordPress, PHP, and Node.js applications without needing deep technical knowledge. ![ServerAvatar Dashboard - Update WordPress Plugins](https://serveravatar.com/wp-content/uploads/2026/03/image-209.png) ## How ServerAvatar Simplifies WordPress Deployment & Management Building a website is one thing, but hosting and managing servers and applications can feel overwhelming. That’s where ServerAvatar helps. Instead of handling complex server setups, you get a clean and user-friendly dashboard where everything is managed in one place. **Key Benefits of ServerAvatar** - **One-click Application installation:** Launch popular applications such as WordPress, Mautic, Moodle, Uptimekuma, n8n, etc., quickly without manual setup. - **Centralized management dashboard:** Manage everything from one simple interface. - **Redis caching for speed:** Boost performance by storing frequently used data. - **Strong security features (SSL, firewall, Fail2Ban, AI Bot Blocker, etc):** Keep your website protected. - **Easy scalability as your site grows:** Upgrade resources with managed servers as your traffic increases. **Why It’s Useful for Plugin Updates** ServerAvatar provides tools that reduce risks and give you better control over your website. This ensures smoother updates without unnecessary stress. - **Providing easy backup options:** Lets you create backups quickly before updates. - **Offering file management tools:** Helps you manage and update plugin files easily. - **Supporting staging environments:** Allows you to test updates before going live. So even if something goes wrong, the ServerAvatar technical support team is available 24/7 to assist you and resolve your issues. ## Different Methods to Update Plugins There are multiple ways to update WordPress plugins depending on your comfort level and situation. Choosing the right method helps reduce risks and ensures better control over the process. Below mentioned are methods to update WordPress plugins. ### Method 1: Update Plugins Manually via WordPress Dashboard (Best for Beginners) This is the easiest and safest method for most website owners. **Follow these steps:** - Log in to your WordPress admin Dashboard - Go to **Plugins >> Installed Plugins** section - Check out for the plugins that show an update notification - Click on **“View version details”** to understand what’s changing - Hit the **“Update Now”** button ![installed plugin - Update WordPress Plugins](https://serveravatar.com/wp-content/uploads/2026/03/image-211-1024x510.png) - Wait until the update finishes successfully before moving to the next plugin **Why this method works best:** Updating plugins one at a time helps you quickly identify which plugin caused an issue (if anything goes wrong). **Pro Tip:** Always Take a Backup Before Updating. ### Method 2: Bulk Update WordPress Plugins (Quick but Risky) If you’re short on time, WordPress allows you to update multiple plugins at once. **Steps to bulk update plugins:** - Go to **Plugins >> Installed Plugins** - Select the plugins you want to update - From the **Bulk Actions** dropdown, choose **Update** ![plugins - Update WordPress Plugins](https://serveravatar.com/wp-content/uploads/2026/03/image-212-1024x517.png) - Click **Apply** button **Important note:** This method is faster but comes with a downside, if something breaks, it’s harder to identify which plugin caused the issue. Only use this approach if: - You’ve already created a backup - You trust the plugins you’re updating ### Method 3: Manually Update Plugins via FTP (Advanced Users) If your website becomes inaccessible due to a faulty plugin, you can update it manually using FTP (File Transfer Protocol). This method gives you full control but requires some technical knowledge. **Here’s how to do it:** - Download the latest version of the plugin as a **.zip** file from the official source. - For example, I’m downloading the Quiz and Survey Master (QSM) plugin as a **.zip file.** ![quiz and survey master - Update WordPress Plugins](https://serveravatar.com/wp-content/uploads/2026/03/image-213-1024x382.png) **ServerAvatar Users:** - Log in to your ServerAvatar account, and click on the server dashboard icon. ![server dashboard - Update WordPress Plugins](https://serveravatar.com/wp-content/uploads/2026/03/image-214-1024x217.png) - Navigate to the Applications section and click on your wordpress application dashboard icon. ![application dashboard - Update WordPress Plugins](https://serveravatar.com/wp-content/uploads/2026/03/image-215-1024x329.png) - Navigate to the File Manager section from the left sidebar. - Go to the **public\_html >> wp-content >> plugins** folder. - Find the plugin folder you want to update and delete it by selecting it and clicking on the **Delete** button. ![delete - Update WordPress Plugins](https://serveravatar.com/wp-content/uploads/2026/03/image-216-1024x390.png) - Now, upload the new plugin folder from your system to the same directory that we have previously downloaded. - Click on the **Upload** button, select the zip file, and upload it. ![upload - Update WordPress Plugins](https://serveravatar.com/wp-content/uploads/2026/03/image-217-1024x511.png) - Once it is uploaded, select the zip file and Uncompress it by using the given button. ![uncompress - Update WordPress Plugins](https://serveravatar.com/wp-content/uploads/2026/03/image-218-1024x572.png) - Enter the file path shown in the image below for the file you want to set, and click the Extract button. ![extract - Update WordPress Plugins](https://serveravatar.com/wp-content/uploads/2026/03/image-219.png) - Now, log in back to WordPress, navigate to the **Plugins >> Installed Plugins** section, and check for the plugin version as it is updated. ![installed plugins - Update WordPress Plugins](https://serveravatar.com/wp-content/uploads/2026/03/image-220-1024x476.png) - That’s it! Your plugin is updated. **Other Users:** - Download the latest version of the plugin as a **.zip** file from the official source - Extract the file on your computer - Now, connect it with your server using FTP client such as FileZilla - Navigate to the **public\_html >> wp-content >> plugins** directory - Locate the plugin folder you want to update and delete it - Upload the new plugin folder from your system to the same directory - Log back into WordPress and check if the plugin is working properly **When should you use this method?** Some update methods are designed for specific situations. Knowing when to use them can help you handle issues more effectively. - **When your dashboard is not accessible:** Use alternative methods like FTP or file manager. - **When a plugin update fails:** Manual updates can help fix incomplete updates. - **When a plugin causes a site crash:** Advanced methods help you regain control. ## Test Updates in a Staging Environment If you want to be extra safe, use a staging site. A staging site is like a clone of your website where you can test changes without affecting your live site. **ServerAvatar Users:** - Log in to your ServerAvatar account, and click on the server dashboard icon. ![server dashboard - Update WordPress Plugins](https://serveravatar.com/wp-content/uploads/2026/03/image-221-1024x217.png) - Navigate to the Applications section and click on your wordpress application dashboard icon. ![application dashboard - Update WordPress Plugins](https://serveravatar.com/wp-content/uploads/2026/03/image-222-1024x329.png) - Navigate to the **Staging Area** section from the left sidebar. - Fill up the details and Click on the [**Create** **Staging** **Area**](https://serveravatar.com/docs/application/staging-area/) button. ![staging area - Update WordPress Plugins](https://serveravatar.com/wp-content/uploads/2026/03/image-223-1024x498.png) **Other Users:** If you don’t have built-in staging tools, you can still create a safe testing environment. These methods allow you to experiment without affecting your live site. - **Use hosting staging tools:** Many hosting providers offer easy staging setups. - **Use plugins for staging:** Plugins can create a clone of your site for testing. - **Create a manual clone of your website:** Duplicate your site manually for safe testing. **Why it matters:** Using a staging environment can save you from major issues. It allow you to test changes before applying on live site. - **Detect issues before they go live:** Identify problems early without affecting users. - **Test compatibility:** Ensure plugins work well together. - **Avoid downtime:** Prevent your live site from breaking. ## How to Enable Automatic Plugin Updates WordPress also allows you to turn on auto-updates for plugins. **To enable auto-updates:** - Navigate to the **Plugins >> Installed Plugins** section - Click on the **Enable auto-updates** next to the plugin for the plugin you want to enable auto-updates. ![installed plugins - Update WordPress Plugins](https://serveravatar.com/wp-content/uploads/2026/03/image-224-1024x364.png) **To enable for multiple plugins:** - Select multiple plugins - Choose **Enable Auto-updates** from Bulk Actions - Click on the **Apply** ![enable auto update - Update WordPress Plugins](https://serveravatar.com/wp-content/uploads/2026/03/image-225-1024x462.png) **But Here’s the Catch…** Automatic updates may seem convenient, but they come with risks. They don’t check compatibility before applying changes, which can lead to unexpected issues. - **Updates go live instantly:** Changes are applied without manual review. - **No warning if something breaks:** Issues can appear suddenly. - **Recovery can be difficult:** Fixing problems may take extra time and effort. ## What to Do After Updating Plugins Once updates are complete, your job isn’t over yet. Testing ensures everything is working properly and your users don’t face any issues. - **Test your website thoroughly:** Check different pages and features. - **Check mobile responsiveness:** Ensure your site works well on all devices. - **Review key functionalities:** Verify forms, buttons, and important features. - **Monitor loading speed:** Make sure performance hasn’t dropped. ## How to Undo a Plugin Update (If Something Goes Wrong) Even with precautions, things can sometimes break. The good news? You can roll things back. ### Option 1: Use a Plugin Rollback Tool You can easily revert to a previous plugin version using a rollback plugin. **Steps:** - Install and activate a rollback plugin, as I’m using **WP Rollback Plugin** here. - Install and activate the plugin. ![install plugin - Update WordPress Plugins](https://serveravatar.com/wp-content/uploads/2026/03/image-226-1024x300.png) - Now, navigate to the **Plugins >> Installed Plugins** section, and click on the **Rollback** option under the affected plugin. ![installed plugin - Update WordPress Plugins](https://serveravatar.com/wp-content/uploads/2026/03/image-227-1024x400.png) - Select an earlier version and click on the **Rollback** button. ![wp rollback - Update WordPress Plugins](https://serveravatar.com/wp-content/uploads/2026/03/image-228-1024x704.png) - This option works best for plugins available in the official WordPress repository. ### Option 2: Deactivate the Problematic Plugin - Go to **Plugins > Installed Plugins** - Click **Deactivate** under the plugin that is causing issues ![plugins - Update WordPress Plugins](https://serveravatar.com/wp-content/uploads/2026/03/image-229-1024x406.png) - This immediately stops the problem and restores stability. ### Option 3: Disable Plugin via File - If you’re locked out of your dashboard: **ServerAvatar Users:** - Log in to your ServerAvatar account, and click on the server dashboard icon. ![server dashboard - Update WordPress Plugins](https://serveravatar.com/wp-content/uploads/2026/03/image-230-1024x217.png) - Navigate to the Applications section and click on your wordpress application dashboard icon. ![application dashboard - Update WordPress Plugins](https://serveravatar.com/wp-content/uploads/2026/03/image-231-1024x329.png) - Navigate to the File Manager section from the left sidebar. - Go to the **public\_html >> wp-content >> plugins** folder. - Select the plugin folder and rename it by clicking on the Rename button. (for example: plugin-name-disabled) ![rename - Update WordPress Plugins](https://serveravatar.com/wp-content/uploads/2026/03/image-232-1024x490.png) - This will automatically disable the plugin without needing dashboard access. **Other Users:** - Connect to your server via FTP - Navigate to the **public\_html >> wp-content >> plugins** directory - Rename the plugin folder (for example: plugin-name-disabled) - This automatically disables the plugin without needing dashboard access. ## How to Fix Issues After Plugin Update If something goes wrong after an update, don’t panic. There are simple steps you can take to fix the issue and restore your website. - **Restore backup:** Quickly bring your site back to its previous state. - **Deactivate the problematic plugin:** Stop the issue by disabling the plugin. - **Check error logs:** Identify the root cause of the problem. - **Contact plugin support:** Get help from the plugin developers. ## Best Practices for Safe Plugin Updates Following good habits can help you avoid most plugin-related issues. A consistent approach ensures your website stays secure and stable. - **Update regularly, not randomly:** Keep your site updated in a planned way. - **Keep plugins minimal:** Fewer plugins reduce the risk of conflicts. - **Delete unused plugins:** Remove unnecessary plugins to improve security. - **Use trusted plugins only:** Reliable plugins are less likely to cause issues. - **Enable automatic updates cautiously:** Use auto-updates only when appropriate. ## Common Mistakes to Avoid Many users make mistakes that lead to problems. Avoiding these can save you time and effort. - **Updating without backup:** Leaves you with no recovery option. - **Ignoring plugin compatibility:** Can cause conflicts and errors. - **Using too many plugins:** Increases complexity and risk. - **Updating everything at once:** Makes troubleshooting difficult. - **Not testing after update:** Problems may go unnoticed. [![Blog banner - ServerAvatar](https://serveravatar.com/wp-content/uploads/2025/09/728_90-Banner-1-1024x127.png)](https://serveravatar.com/?ref=blog)## Tools to Help You Manage Plugin Updates Using the right tools can make plugin management much easier. They help automate tasks and reduce manual effort. - **Backup plugins:** Ensure your data is always protected. - **Staging tools:** Allow safe testing before going live. - **Management dashboards:** Simplify overall website control. - **Security plugins:** Protect your site from vulnerabilities. ## Conclusion Updating WordPress plugins is more than just routine maintenance, it’s essential for keeping your website secure, fast, and fully functional. While updates can sometimes cause issues, following a careful approach, like taking backups, testing changes, and updating plugins one at a time, can help you avoid most problems. Whether you’re managing your site manually or using tools like ServerAvatar, staying consistent and cautious ensures your website runs smoothly without unexpected disruptions. ## FAQs ### 1. How often should I update WordPress plugins? You should check for plugin updates at least once a week and apply them after taking a backup and reviewing compatibility. ### 2. Is it safe to update all plugins at once? It’s not recommended, as updating all plugins together makes it difficult to identify which one caused an issue if something breaks. ### 3. What should I do if a plugin update breaks my website? You can restore your backup, deactivate the problematic plugin, or roll back to a previous version to fix the issue quickly. ### 4. Can outdated plugins affect my website’s security? Outdated plugins can contain vulnerabilities that hackers may exploit, making regular updates essential for security. ### 5. Should I enable automatic updates for plugins? Auto-updates can save time, but they should be used carefully since they don’t test compatibility before applying changes. **Categories:** Blog, Guide, Tutorials, WordPress **Tags:** safely update WordPress plugins, update WordPress plugins, update WordPress plugins safely, Wordpress, WordPress Best Practices, WordPress Plugins --- ### [Best WordPress Themes for Startups in 2026: Get Started Quickly](https://serveravatar.com/wordpress-themes-for-startups/) **Published:** March 23, 2026 **Author:** Meghna Meghwani **Content:** [![Blog banner - ServerAvatar](https://serveravatar.com/wp-content/uploads/2025/09/728_90-Banner-3-1024x127.png)](https://serveravatar.com/?ref=blog)Starting a business is exciting, but let’s be honest, it can also feel overwhelming. You’ve got ideas, goals, and maybe even a product ready to go. But when it comes to building your website, things can get confusing fast. Choosing the right WordPress Themes for Startups can make a huge difference, but how do you pick the best one without wasting time or money? In this guide, we’ll break it all down in simple terms. Whether you’re launching a SaaS product, an online store, or a personal brand, you’ll find themes that help you get started quickly, without needing to be a tech expert. ## What is WordPress Themes? A WordPress theme is a collection of design templates and files that control how your website looks and feels. It defines everything from layout and colors to fonts and overall styling, without changing your actual content. ![WordPress Themes for Startups](https://serveravatar.com/wp-content/uploads/2026/03/image-191.png) Theme doesn’t change what you sell, but it completely changes how people experience your business. With the right theme, you can create a professional website without needing to write a single line of code. ### Why Choosing the Right Theme Matters Your website is always the very first impression of your startup to people. And we all know how important first impressions are. A badly designed website make your business look unskilled and unprofessional. On the other hand, a clean, fast, and modern design builds trust instantly. ![Choosing right WordPress Themes for Startups matters](https://serveravatar.com/wp-content/uploads/2026/03/image-192.png) Think of your theme as your startup’s digital storefront. If it looks messy or loads slowly, visitors will leave before they even understand what you offer. ### Key Features Startups Should Look For Before choosing a theme, it’s important to understand what truly matters for your website. A good theme is not just about looks, it should support speed, usability, and growth. Picking the right features early can save you time, money, and frustration later. - **Speed and Performance:** A fast-loading website keeps visitors engaged and reduces bounce rates. - **Mobile Responsiveness:** Your site should automatically adjust to look perfect on phones, tablets, and desktops. - **Customization Options:** You should be able to edit layouts, colors, and content easily without coding. - **SEO-Friendly Structure:** A well-coded theme helps search engines understand and rank your site better. - **Compatibility with Plugins:** The theme should work smoothly with essential tools like page builders and SEO plugins. ## WordPress Themes for Startups When you’re building a startup, time and simplicity matter the most. You need a website that looks professional, loads fast, and is easy to manage, without spending weeks designing it from scratch. That’s where WordPress themes come in. They give you ready-made designs and features so you can launch your website quickly and focus more on growing your business. Below are some of the best WordPress themes for startups in 2026, carefully selected for their speed, flexibility, and ease of use. ### 1. Astra: Lightweight and Fast [Astra](https://wpastra.com/) is a popular WordPress theme known for its speed and simplicity. It’s designed to load quickly and work smoothly even on basic hosting. If you want a fast website without extra complexity, Astra is a solid choice. ![Astra - WordPress Themes for Startups](https://serveravatar.com/wp-content/uploads/2026/03/image-193.png) **Key Features** - Lightweight and performance-optimized - Pre-built starter templates - Works with Elementor, Gutenberg, and Beaver Builder - Highly customizable without coding - SEO-friendly structure **Advantages** - Extremely fast loading times - Beginner-friendly setup - Wide compatibility with plugins - Large community and support **Disadvantages** - Advanced features require paid version - Too many options can feel overwhelming at first **Best For:** Startups that want a fast, simple, and reliable website setup. **Why It’s Great for Startups** - Helps launch websites quickly using templates - Keeps performance high even with limited resources - Reduces development time and effort ### 2. Divi: All-in-One Builder [Divi](https://www.elegantthemes.com/gallery/divi) is not just theme, it’s a complete design system. It comes with a built-in visual builder that lets you create custom layouts without touching code. Perfect if you want full control over your website design. ![Divi - WordPress Themes for Startups](https://serveravatar.com/wp-content/uploads/2026/03/image-194.png) **Key Features** - Drag-and-drop visual builder - Real-time design editing - Large library of layouts and modules - Built-in A/B testing - Global design settings **Advantages** - Complete design flexibility - No need for third-party page builders - Great for unique and creative layouts - Regular updates and strong support **Disadvantages** - Can be slightly heavy and slower - Learning curve for beginners **Best For:** Startups that want complete control over design and branding. **Why It’s Great for Startups** - Allows custom branding without hiring a designer - Combines theme + builder in one tool - Saves long-term design costs ### 3. Kadence: Flexible and Modern [Kadence](https://www.kadencewp.com/) is a modern WordPress theme that focuses on clean design and flexibility. It’s easy to use but still powerful enough for growing businesses. It strikes a great balance between performance and customization. ![Kadence - WordPress Themes for Startups](https://serveravatar.com/wp-content/uploads/2026/03/image-195.png) **Key Features** - Drag-and-drop header and footer builder - Lightweight and fast - Pre-designed starter templates - Deep integration with Gutenberg - Global color and typography settings **Advantages** - Easy to customize - Modern and professional design - Good performance out of the box - Beginner-friendly interface **Disadvantages** - Some advanced features are premium-only - Smaller ecosystem compared to older themes **Best For:** Startups that want a modern look with easy customization. **Why It’s Great for Startups** - Quick setup with ready-made templates - Clean design builds trust instantly - Scales well as your business grows ### 4. OceanWP: Feature-Rich Starter [OceanWP](https://oceanwp.org/) is a flexible theme packed with features, making it ideal for different types of websites. Whether it’s a blog, business site, or eCommerce store, it offers plenty of tools to get started. ![OceanWP - WordPress Themes for Startups](https://serveravatar.com/wp-content/uploads/2026/03/image-196.png) **Key Features** - Extensive customization options - WooCommerce-ready - Multiple demo templates - Responsive design - Fast loading performance **Advantages** - Very versatile - Great for eCommerce websites - Wide range of extensions - Strong community support **Disadvantages** - Can feel bloated with too many features - Setup may take time for beginners **Best For:** Startups planning to build feature-rich or eCommerce websites. **Why It’s Great for Startups** - Supports business growth and scalability - Offers flexibility for multiple use cases - Eliminates need for multiple plugins ### 5. GeneratePress: Performance Focused [GeneratePress](https://generatepress.com/) is built with speed and stability in mind. It keeps things minimal while ensuring high performance. If your priority is SEO and fast loading, this theme is a strong contender. ![GeneratePress - WordPress Themes for Startups](https://serveravatar.com/wp-content/uploads/2026/03/image-197.png) **Key Features** - Lightweight core - Clean and secure code - Modular design system - SEO-friendly structure - Compatible with all major page builders **Advantages** - Extremely fast and stable - Reliable for long-term use - Minimal design clutter - Great for SEO **Disadvantages** - Basic design in free version - Requires customization for unique look **Best For:** Startups focused on performance, SEO, and long-term growth. **Why It’s Great for Startups** - Improves search engine visibility - Ensures fast user experience - Keeps website maintenance simple ### 6. Neve: Built for Speed [Neve](https://wordpress.org/themes/neve/) is a lightweight and mobile-first WordPress theme designed for speed. It’s perfect for startups that want a quick launch without compromising performance or design. ![Neve - WordPress Themes for Startups](https://serveravatar.com/wp-content/uploads/2026/03/image-198.png) **Key Features** - Fast loading and AMP-ready - Mobile-first design - One-click demo import - Compatible with page builders - SEO optimized **Advantages** - Quick setup process - Smooth performance on all devices - Clean and modern templates - Easy to use for beginners **Disadvantages** - Limited advanced design features - Some templates require premium access **Best For:** Startups that want to launch quickly with minimal effort. **Why It’s Great for Startups** - Speeds up website launch process - Ensures excellent mobile experience - Reduces technical complexity ### 7. Blocksy: Future-Ready Theme [Blocksy](https://creativethemes.com/blocksy) is a modern theme designed for the latest WordPress features. It works seamlessly with the block editor and offers advanced customization options in a lightweight package. ![Blocksy - WordPress Themes for Startups](https://serveravatar.com/wp-content/uploads/2026/03/image-199.png) **Key Features** - Gutenberg-optimized - Real-time customization - Advanced header builder - WooCommerce integration - Lightweight and fast **Advantages** - Future-proof design approach - Clean and responsive layout - Powerful customization tools - Regular updates **Disadvantages** - Newer theme with smaller community - Some advanced features locked behind premium **Best For:** Startups that want a modern, future-ready website. **Why It’s Great for Startups** - Keeps your site aligned with WordPress updates - Offers flexibility without complexity - Ideal for long-term scalability ### 8. Sydney: Perfect for Business Sites [Sydney](https://wordpress.org/themes/sydney/) is a professional WordPress theme built for businesses and agencies. It offers a clean design and essential features to create a strong online presence. ![Sydney - WordPress Themes for Startups](https://serveravatar.com/wp-content/uploads/2026/03/image-200.png) **Key Features** - Full-screen header options - Elementor compatibility - Custom blocks and sections - Responsive design - Easy customization **Advantages** - Professional business look - Simple to set up - Works well with Elementor - Ideal for service-based websites **Disadvantages** - Limited flexibility compared to advanced themes - Fewer modern design elements **Best For:** Service-based startups and agencies. **Why It’s Great for Startups** - Builds credibility with professional design - Quick setup for business websites - Helps showcase services clearly ## WordPress Themes Comparison Table To help you quickly compare and choose the right option, here’s a side-by-side overview of the best WordPress themes for startups: **Theme****Performance****Ease of Use****Customization****Best Feature****Best For****Astra**ExcellentVery EasyHighLightweight & fast loadingQuick startup websites**Divi**ModerateEasyVery HighBuilt-in visual builderDesign-focused startups**Kadence**ExcellentVery EasyHighModern design + flexibilityGrowing startups**OceanWP**GoodModerateVery HighFeature-rich ecosystemeCommerce & complex sites**GeneratePress**ExcellentEasyHighPerformance & clean codeSEO-focused startups**Neve**ExcellentVery EasyHighSpeed & mobile-first designFast website launches**Blocksy**GoodEasyVery HighGutenberg optimizationFuture-ready websites**Sydney**GoodVery EasyModerateBusiness-focused designService-based startups## How to Choose the Right Theme With so many options available, picking the right theme can feel confusing. The key is to focus on your specific needs instead of getting distracted by extra features. A simple and practical approach will help you make a confident decision. - **Define your goal:** Identify whether your site is for blogging, selling, or showcasing services. - **Set your budget:** Decide if you want to start with a free theme or invest in a premium one. - **Check demos:** Preview the theme to see how it looks and functions in real use. - **Read reviews:** Learn from other users’ experiences before making a decision. **Remember:** Choose a theme that matches your needs, not just one with the most features. ## Free vs Paid Themes Choosing between free and paid themes depends on your goals and budget. Free themes are great for getting started, but premium themes often offer more flexibility and support. If you plan to grow your startup, investing in a paid theme can be a smart move. **Free Themes** - **Good for beginners:** Ideal for those starting with limited resources. - **Limited customization:** Offers basic design options with fewer advanced features. - **No dedicated support:** You may have to rely on community forums for help. **Paid Themes** - **More features:** Provides advanced design and functionality options. - **Better support:** Access to professional customer support when needed. - **Frequent updates:** Provides compatibility with latest versions of WordPress. ## Common Mistakes to Avoid Many beginners make simple mistakes when choosing a theme, which can lead to problems later. Avoiding these common errors will help you build a better, more effective website from the start. - **Choosing based on looks only:** A visually appealing theme may lack performance or usability. - **Ignoring speed performance:** Slow websites can drive visitors away quickly. - **Installing too many plugins:** Too many plugins can slow down your site and cause conflicts. - **Not testing mobile responsiveness:** Failing to optimize for mobile can hurt user experience. A beautiful website that loads slowly is like a sports car stuck in traffic, it looks great but doesn’t perform when it matters. ## Tips to Launch Faster Getting your website live quickly is crucial for any startup. Instead of aiming for perfection, focus on building a functional site first and improving it over time. A simple approach can help you launch faster and start growing sooner. - **Use Pre-Built Templates:** Ready-made designs help you create a website in minutes instead of days. - **Keep It Simple:** A clean and simple layout improves user experience and saves time. - **Focus on Essentials:** Start with key pages like: - Homepage - About page - Contact page - **Optimize Later:** Launch quickly and improve design and features as your business grows. ## How ServerAvatar Simplifies WordPress Deployment & Management Building a website with the right theme is only half the job, the next step is getting it live and running smoothly. For many startups, server setup and website management can feel complicated and time-consuming. That’s where ServerAvatar makes a real difference. **What is ServerAvatar?** [ServerAvatar](https://serveravatar.com/) is a powerful platform designed to simplify server and application hosting and management. It helps you deploy and manage PHP and Node.js applications, including WordPress, without needing deep technical knowledge. ![ServerAvatar Dashboard - WordPress Themes for Startups](https://serveravatar.com/wp-content/uploads/2026/03/image-201.png) Instead of dealing with complex server configurations, you get a clean and easy-to-use dashboard where everything is managed in one place. ### Effortless WordPress Deployment ServerAvatar makes launching WordPress incredibly simple with its one-click application installer. You can set up a fully functional WordPress website in just a few minutes, no manual configuration required. It also supports other popular applications like Mautic, N8N, and UptimeKuma, making it a versatile solution for startups managing multiple tools. ServerAvatar supports multiple cloud providers and gives users full control over their infrastructure while eliminating the need for deep server administration knowledge. You can refer to the ServerAvatar [documentation](https://serveravatar.com/docs/application/one-click-installer/wordpress/) and the detailed [blog](https://serveravatar.com/install-wordpress-quickly-on-vps/) to [install WordPress](https://serveravatar.com/install-wordpress-apache-ubuntu/) effortlessly. > ServerAvatar does not directly provide WordPress Multisite, but our technical experts can help you set up a WordPress Multisite environment. > The ServerAvatar support team is available 24/7 to assist you with any issues or questions you may have. ### Key Benefits of Using ServerAvatar for WordPress - **One-click Application installer:** Deploy WordPress and many popular applications instantly without manual configuration. - **Unified management panel:** Manage servers and WordPress applications from a single dashboard. - **Performance optimization:** Easily configure services, PHP, and server resources. - **Redis caching support:** ServerAvatar comes with built-in Redis integration that helps speed up WordPress by storing frequently accessed data in memory. - **Enhanced security:** Includes firewall, SSL management, and secure access controls. - **Easy scalability:** Upgrade server resources as your WordPress site grows. [![Blog banner - ServerAvatar](https://serveravatar.com/wp-content/uploads/2025/09/728_90-Banner-1-1024x127.png)](https://serveravatar.com/?ref=blog)### Why Startups Should Consider ServerAvatar For startups, time is everything. Instead of spending hours configuring servers, you can focus on building your product and growing your business. ServerAvatar simplifies WordPress hosting by: - Automating server setup - Streamlining application management - Improving performance and security out of the box - And many more Whether you’re a developer, agency, or business owner, ServerAvatar helps you launch, manage, and scale WordPress websites with confidence. ## Conclusion Choosing the right WordPress theme is one of the most important steps in building a successful startup website. A fast, flexible, and user-friendly theme not only improves your site’s appearance but also enhances performance and user experience. When combined with the right tools like ServerAvatar for easy deployment and management, the entire process becomes much smoother. Instead of getting stuck in technical complexities, you can focus on what truly matters, growing your startup, reaching your audience, and turning your ideas into reality. ## FAQs ### 1. Which WordPress theme is best for startups in 2026? Themes like Astra, Kadence, and GeneratePress are excellent choices due to their speed, flexibility, and ease of use for beginners. ### 2. Do I need a paid WordPress theme for my startup? Not necessarily. Free themes are good for starting out, but paid themes offer more features, better customization, and dedicated support. ### 3. How important is website speed for a startup website? Website speed is crucial because it directly affects user experience, SEO rankings, and conversion rates. ### 4. Can I change my WordPress theme after launching my website? Yes, you can change your theme anytime, but it may affect your design and layout, so it’s better to choose carefully from the beginning. ### 5. How can I launch my WordPress website quickly without technical skills? You can use beginner-friendly themes along with platforms like ServerAvatar, which allow you to deploy and manage WordPress with minimal technical effort. **Categories:** Blog, Guide, WordPress **Tags:** Startup WordPress Themes, Wordpress, WordPress for Startups, WordPress Themes, WordPress Themes for Business, WordPress Themes for Startups --- ### [How to Change WordPress Admin Email (3 Easy Methods)](https://serveravatar.com/change-wordpress-admin-email/) **Published:** March 21, 2026 **Author:** Meghna Meghwani **Content:** [![Blog banner - ServerAvatar](https://serveravatar.com/wp-content/uploads/2025/09/728_90-Banner-3-1024x127.png)](https://serveravatar.com/?ref=blog)Have you ever tried to **change WordPress admin email** and felt stuck waiting for confirmation? Or maybe you lost access to the old email and now you’re locked out of important notifications? You’re not alone. Changing the admin email in WordPress might seem like a small task, but it plays a huge role in your website’s security, communication, and overall control. Think of it like updating your phone number at the bank, if it’s outdated, you risk missing critical alerts. In this guide, I’ll walk you through 3 easy methods to change your WordPress admin email. ## What Is WordPress Admin Email? The WordPress admin email is the main email address linked to your website for management and communication. It is used by WordPress to send important updates and notifications. - **Password reset links:** Helps you recover access if you forget your login details - **Security alerts:** Notifies you about suspicious activity or threats - **Plugin/theme notifications:** Updates you about changes or issues in plugins and themes - **System updates:** Informs you about core WordPress updates and maintenance In short, it’s the main communication channel between your website and you. ### Why You May Need to Change Admin Email There are multiple situations where updating your admin email becomes necessary for smooth website management and security. ![Change WordPress Admin Email](https://serveravatar.com/wp-content/uploads/2026/03/image-174.png) - **You no longer use the old email:** The previous email is inactive or inaccessible - **Your email provider changed:** You switched to a new email service - **You’re transferring website ownership:** Ownership is being handed over to someone else - **You want better security:** You prefer a more secure or private email - **You made a typo during setup:** The email entered initially was incorrect Imagine sending important letters to an old address, you’d never receive them. That’s exactly what happens when your admin email is outdated. ### Things to Know Before You Start Before updating your admin email, it’s important to take a few precautions to avoid any issues. - **Always backup your website:** Prevent data loss in case something goes wrong - **Make sure you have admin access:** Required to change settings successfully - **Use a valid and active email address:** Needed to receive confirmation emails - **Check your spam folder:** Important emails might land in spam or junk Taking these small precautions can save you from big headaches later. ## Method 1: Change WordPress Admin Email via Dashboard (Recommended) Let’s start with the easiest and most beginner-friendly method, using your WordPress dashboard. Before we begin, here’s something important: WordPress actually uses two different email addresses: - The **main site admin email** (for notifications) - Your **user profile email** (for login and password resets) To avoid confusion later, we’ll update both. ### Step-by-Step Guide for Dashboard Method **Step 1: Update the Main Website Admin Email** Follow these steps: - First, log in to your WordPress dashboard. - Go to **Settings >> General** section ![general settings - Change WordPress Admin Email](https://serveravatar.com/wp-content/uploads/2026/03/image-175.png) - Scroll down to **Administration Email Address** section. - Replace the old email address with your new one - Click on the **Save Changes** button ![save changes - Change WordPress Admin Email](https://serveravatar.com/wp-content/uploads/2026/03/image-176.png) Now here’s where many people get confused as WordPress does **not** change the email instantly. Instead, you’ll see a message saying there’s a pending change. This means WordPress is waiting for confirmation. So what should you do next? - Now, open your new email inbox - Checkout for the confirmation email from WordPress - Now, click the verification link - Once you confirm it, the new email becomes active. **Step 2: Update Your Admin User Email** Now let’s update your personal account email as well. - Go to the **Users >> All Users** section ![users - Change WordPress Admin Email](https://serveravatar.com/wp-content/uploads/2026/03/image-177.png) - Find your admin account and click on the given **Edit** option ![edit - Change WordPress Admin Email](https://serveravatar.com/wp-content/uploads/2026/03/image-178.png) - Scroll and find the **Email field** under Contact Info - Enter your new email address there ![update email - Change WordPress Admin Email](https://serveravatar.com/wp-content/uploads/2026/03/image-179.png) - Now, click **Update Profile** button. ![update profile - Change WordPress Admin Email](https://serveravatar.com/wp-content/uploads/2026/03/image-180.png) Just like before, you’ll receive a confirmation email. Click the link to finalize the update. **What If You Don’t Receive the Confirmation Email?** This happens more often than you’d think. Sometimes, WordPress emails don’t arrive because they use a basic sending method that email providers don’t trust. Here’s what you can try: - Check your spam or junk folder - Wait for a few minutes (delays happen) - Try resending the request - Set up SMTP for reliable email delivery **Quick Insight:** By default, WordPress uses a simple mail function that often gets flagged as spam. Setting up SMTP gives your emails proper authentication so they actually reach your inbox. If you don’t want to deal with email setup right now, don’t worry, the next method skips verification entirely. ## Method 2: Change Admin Email Without Verification (Using Plugin) If you’re stuck with a “pending email change” message or just want a faster way, this method is perfect. We’ll use a lightweight plugin that disables the confirmation requirement so you can update the email instantly. ### Step-by-Step Guide for Plugin Method **Step 1: Install the Plugin** - Navigate to the **Plugins** **>> Add Plugins** section. - Search for **Change Admin Email** - Install and activate the plugin ![change admin email - Change WordPress Admin Email](https://serveravatar.com/wp-content/uploads/2026/03/image-181.png) **Step 2: Update Email Instantly** - Now, navigate to the **Settings >> General** section ![general settings - Change WordPress Admin Email](https://serveravatar.com/wp-content/uploads/2026/03/image-182.png) - Find the **Administration Email Address** field - If there’s a pending change, click on the **Cancel** button - Now, enter your new email You’ll now notice something new: a **Test Email button**. ![test email - Change WordPress Admin Email](https://serveravatar.com/wp-content/uploads/2026/03/image-183.png) - Click on it to make sure everything is working properly. - Scroll down and click on the **Save Changes** button That’s it! The email will update immediately, no confirmation required. **Pro Tip:** Click on it to make sure everything is working properly. Scroll down and click on the **Save Changes** button That’s it! The email will update immediately, no confirmation required. **Pro Tip:** You can deactivate or delete the plugin once you are done. No need to keep it active. **Important Note:** This plugin only updates the main site admin email. If you also need to update your user profile email, and emails still aren’t working, you’ll need the next method. can deactivate or delete the plugin once you are done. No need to keep it active. **Important Note:** This plugin only updates the main site admin email. If you also need to update your user profile email, and emails still aren’t working, you’ll need the next method. ## Method 3: Change Your WordPress Admin Email via Database Using phpMyAdmin This is your ultimate backup method. If you: - Can’t access your email - Can’t receive confirmation links - Or are locked out completely Then editing the database directly is the way to go. Think of this like going straight to the engine of your website instead of using the dashboard controls. ### Step-by-Step Guide for Database Method **Step 1: Access Your Database via phpMyAdmin** You can easily access your phpMyAdmin with your Hosting Provider. You can access PHPMyAdmin directly from ServerAvatar. **What is ServerAvatar?** [ServerAvatar](https://serveravatar.com/) is a platform to simplify the hosting and management of servers and applications. It simplifies the process of deploying and managing PHP and Node.js based web applications on servers. ![serveravatar dashboard - Change WordPress Admin Email](https://serveravatar.com/wp-content/uploads/2026/03/image-190.png) ServerAvatar makes WordPress and other popular applications, such as Mautic, N8N, UptimeKuma, etc, deployment effortless with its one-click WordPress application installer, allowing you to launch a fully configured WordPress site in minutes. It removes the complexity of server setup by providing an intuitive dashboard to manage servers, applications, databases, PHP versions, SSL, and performance settings from one place. ServerAvatar supports multiple cloud providers and gives users full control over their infrastructure while eliminating the need for deep server administration knowledge. You can refer to the ServerAvatar [documentation](https://serveravatar.com/docs/application/one-click-installer/wordpress/) and the detailed [blog](https://serveravatar.com/install-wordpress-quickly-on-vps/) to [install WordPress](https://serveravatar.com/install-wordpress-apache-ubuntu/) effortlessly. > ServerAvatar does not directly provide WordPress Multisite, but our technical experts can help you set up a WordPress Multisite environment. > The ServerAvatar support team is available 24/7 to assist you with any issues or questions you may have. > > **Key Benefits of Using ServerAvatar for WordPress** > > - **One-click Application installer:** Deploy WordPress and many popular applications instantly without manual configuration. > - **Unified management panel:** Manage servers and WordPress applications from a single dashboard. > - **Performance optimization:** Easily configure services, PHP, and server resources. > - **Redis caching support:** ServerAvatar comes with built-in Redis integration that helps speed up WordPress by storing frequently accessed data in memory. > - **Enhanced security:** Includes firewall, SSL management, and secure access controls. > - **Easy scalability:** Upgrade server resources as your WordPress site grows. > > ServerAvatar is an ideal solution for users who want the power of cloud servers without the operational complexity. It simplifies WordPress hosting by automating server setup, streamlining application management, and providing performance and security optimizations out of the box. > > Whether you’re a developer, agency, or business owner, ServerAvatar allows you to deploy, manage, and scale WordPress websites confidently while focusing on growth instead of infrastructure management. > > **Access Your Database via phpMyAdmin** - Log in to your ServerAvatar account - Navigate to the server panel by clicking on the server dashboard icon. ![server panel - Change WordPress Admin Email](https://serveravatar.com/wp-content/uploads/2026/03/image-184.png) - Navigate to the Databases section and click on the Access phpMyAdmin button ![access phpmyadmin - Change WordPress Admin Email](https://serveravatar.com/wp-content/uploads/2026/03/image-185.png) - Log in to the PhpMyAdmin and select your WordPress database. **Step 2: Update Main Admin Email** - Find the table named **wp\_options** (Your prefix may be different) ![update admin email - Change WordPress Admin Email](https://serveravatar.com/wp-content/uploads/2026/03/image-187.png) - Look for the row called **admin\_email**, and click on the **Edit** button - Replace the old email with the new one - Now, click on the **Save** button ![change admin email - Change WordPress Admin Email](https://serveravatar.com/wp-content/uploads/2026/03/image-188.png) - Now, your main site email is updated instantly. **Step 3: Update User Profile Email** - Now, open the **wp\_users** table, and find your admin account - Now, click on the **Edit** button - Locate the **user\_email field** - Enter your new email, and update your email with the new one - Save changes ![update user profile - Change WordPress Admin Email](https://serveravatar.com/wp-content/uploads/2026/03/image-189.png) - Done! You’ve now updated both emails directly, no verification, no delays. ## Which Method Should You Choose? Choosing the right method depends on your current situation and access level. - **Use Dashboard Method:** Best when your site is working normally - **Use Plugin Method:** Ideal if emails are not being delivered - **Use Database Method:** Useful if you’re locked out or need full control ## Common Issues When Updating WordPress Admin Email (And How to Fix Them) Changing your WordPress admin email sounds simple, but sometimes things don’t go as expected. You click “Save Changes,” and suddenly… nothing happens. Or worse, you’re stuck with a “pending change” message forever. Don’t worry. These issues are quite common, and most of them have quick fixes. Let’s checkout the popular problems and how you can solve the problems. ### 1. Not Receiving the Confirmation Email This is the most common issue that users have face. You enter a new email, hit save, and wait… but the confirmation email never shows up. **Why it happens:** WordPress uses a basic email function that often gets flagged as spam or blocked entirely. **How to fix it:** - Check your spam or junk folder - Wait a few minutes (sometimes emails are delayed) - Try resending the request - Set up an **SMTP plugin** for reliable email delivery Think of SMTP like a verified courier service, it makes sure your message actually reaches the destination. ### 2. Stuck on “Pending Email Change” You may notice a message saying your email change is pending, but it never updates. **Why it happens:** The confirmation link hasn’t been clicked, or the email was never delivered. **How to fix it:** - Open your new email inbox and click the confirmation link - If you didn’t receive it, cancel the pending request and try again - Use the **plugin method** to skip verification if needed ### 3. Email Not Updating After Saving Changes Sometimes, even after following all steps, the email just doesn’t update. **Why it happens:** - Browser cache issues - Plugin conflicts - WordPress settings not refreshing properly **How to fix it:** - Clear your browser cache - Try a different browser - Temporarily disable plugins and test again ### 4. Unable to Access Old Email Address What if you no longer have access to the old email? This can feel like being locked out of your own house. **How to fix it:** - Use **phpMyAdmin (database method)** to update email directly - Or use the **plugin method** to bypass confirmation These methods don’t require access to your old inbox. ### 5. WordPress Emails Not Sending at All If your site isn’t sending any emails, not just admin changes, there’s likely a deeper issue. **Why it happens:** Your hosting server may not be configured properly for sending emails. **How to fix it:** - Install an SMTP plugin - Connect it with services like Gmail or Mailgun - Test email delivery after setup ### 6. White Screen or Error After Editing Files If you tried the **functions.php method** and your site breaks, don’t panic. **Why it happens:** A small coding mistake can cause errors. **How to fix it:** - Remove the added code immediately - Restore your backup if needed - Double-check syntax before saving ### 7. Changes Reverting Back Automatically In some cases, your email may revert to the old one. **Why it happens:** - Code still present in functions.php - Caching issues - Hosting-level overrides **How to fix it:** - Remove any temporary code - Clear website and server cache - Save changes again [![Blog banner - ServerAvatar](https://serveravatar.com/wp-content/uploads/2025/09/728_90-Banner-1-1024x127.png)](https://serveravatar.com/?ref=blog)## Tips to Keep Your Email Secure Your admin email is one of the most important parts of your website, so securing it is essential. - **Use a strong password:** Prevent unauthorized access - **Enable 2-factor authentication:** Add an extra layer of security - **Avoid public/shared emails:** Keep access limited and private - **Keep WordPress updated:** Reduce security vulnerabilities - **Use security plugins:** Monitor and protect your website Think of your admin email as the master key to your website, you wouldn’t leave it lying around, right? ## Conclusion Changing your WordPress admin email is more than just a simple update, it’s a key step in maintaining control, security, and smooth communication for your website. Whether you choose the dashboard method, a plugin, or the database approach, each option gives you flexibility based on your situation. By following the right steps and understanding common issues, you can avoid delays and ensure your website stays connected to the right email address. Keeping this information updated not only prevents future problems but also helps you manage your site with confidence and peace of mind. ## FAQs ### 1. How long does it take to change the WordPress admin email? It usually updates instantly after confirmation, but delays can happen if the email is not verified quickly. ### 2. What happens if I don’t confirm the new admin email? The email will remain unchanged, and WordPress will continue using the old address. ### 3. Can I change the admin email without access to the old one? You can use a plugin or database method to update it without needing the old email. ### 4. Why am I not receiving the confirmation email? This often happens due to spam filters or server email issues; using SMTP can fix it. ### 5. Is it necessary to update both admin and user email? Updating both ensures you receive notifications and can manage login-related actions properly. ### 6. Will changing the admin email affect my website? It won’t impact your site’s functionality, but it changes where you receive important notifications. ### 7. How can I make sure my new admin email is secure? Use a strong password, enable two-factor authentication, and avoid using shared or public email accounts. **Categories:** Blog, Guide, Others, Tutorials, WordPress **Tags:** change WordPress admin email, update WordPress admin email, Wordpress, WordPress tips and tricks, WordPress tutorial for beginners --- ### [Why Your Business Needs a Professional Domain Email Address (Benefits & Importance)](https://serveravatar.com/professional-domain-email-benefits/) **Published:** March 19, 2026 **Author:** Meghna Meghwani **Content:** [![Blog banner - ServerAvatar](https://serveravatar.com/wp-content/uploads/2025/09/728_90-Banner-3-1024x127.png)](https://serveravatar.com/?ref=blog)Imagine meeting someone for the first time and instead of introducing themselves professionally, they hand you a scribbled note with no name, no identity, just random words. That’s exactly how your business feels when you use a generic email like Gmail or Yahoo for professional communication. This is where professional domain email benefits become clear, helping you present your business in a more credible and trustworthy way right from the start. Nowadays, in the digital era, email address is the very first impression you can make. So, why risk looking unprofessional when you can stand out with something as simple as a domain-based email? Let’s explore why switching to a professional domain email isn’t just a good idea, it’s essential. ## What is a Professional Domain Email Address? A professional domain email address is an email that uses your business domain name instead of a generic provider. ![professional domain email address - Professional Domain Email](https://serveravatar.com/wp-content/uploads/2026/03/image-160.png) **Example:** - Generic: yourbusiness@gmail.com - Professional: hello@yourbusiness.com It may seem like a small change, but it carries a big impact. It tells people: “This is a real business.” ### Why do you need a Professional Domain Email Address? If you’re serious about your business, a professional domain email is no longer optional, it’s essential. Here’s why it matters: - **It makes your business look legitimate** Customers are more likely to trust a branded email than a generic one. - **It keeps your communication organized** You can create different email addresses for different purposes, making your workflow smoother. - **It gives you ownership and control** Unlike free services, your email system belongs to your business. - **It supports long-term growth** As your business expands, your email setup can easily grow with it. In simple terms, a domain email aligns your communication with your business goals. It helps you present yourself the way you want to be seen, professional, reliable, and ready to grow. ## Professional Domain Email vs Free Email Services At first glance, free email services like Gmail or Yahoo may seem convenient. They’re quick to set up and cost nothing. But when it comes to running a business, the difference between a free email and a professional domain email becomes very clear. **Feature****Professional Domain Email****Free Email Services****Email Address Format**Uses your business name (e.g., info@yourcompany.com)Uses provider’s domain (e.g., yourname@gmail.com)**Professional Appearance**Looks credible and business-focusedFeels casual and personal**Brand Visibility**Promotes your brand with every email sentPromotes the email provider instead of your brand**Customer Trust**Builds strong trust and confidenceMay raise doubts, especially for new customers**Ownership & Control**Fully controlled by your businessLimited control; provider manages accounts**Security Features**Advanced security options and customizationBasic security with limited control**Spam & Deliverability**Better chances of reaching inboxHigher risk of emails going to spam**Team Collaboration**Easy to create multiple team emails (support, sales, etc.)Not suitable for structured team communication**Scalability**Easily expands as your business growsNot designed for business scaling**Integration with Tools**Works smoothly with business tools (CRM, marketing, etc.)Limited compatibility with professional tools**Brand Consistency**Maintains consistent identity across platformsCan create inconsistency with your branding**Data Control**Business retains access and communication historyIndividual users control their accounts**Cost**Paid, but affordable and valuableFree to use**Long-Term Reliability**Stable and suitable for long-term business useMay not support long-term business needs effectivelyA free email address often looks casual and personal. It’s great for everyday use, but in a business setting, it can feel unpolished or even unreliable. On the other hand, a domain-based email reflects professionalism, structure, and brand identity. ## Reasons Why Your Business Should Use a Professional Domain Email Address ### 1. Creates a Strong First Impression Your email address is often the very first interaction someone has with your business. A professional domain email immediately signals that you are serious and established. It shows that you’ve invested in your brand, even before a conversation begins. In many cases, this small detail can influence whether someone chooses to respond or move on. ![creates a strong first impression - Professional Domain Email](https://serveravatar.com/wp-content/uploads/2026/03/image-161.png) Compare these two: - johnbusiness@gmail.com - john@premiumsolutions.com The second one instantly feels more reliable and professional. It shows effort, seriousness, and commitment. In business, that first impression can decide whether someone replies, or ignores you. ### 2. Builds Instant Trust with Customers ![builds instant trust with customers - Professional Domain Email](https://serveravatar.com/wp-content/uploads/2026/03/image-162.png) People today are cautious, and for good reason. With so many scams and fake emails around, users are more likely to trust messages that come from a proper business domain. A branded email reassures them that your business is legitimate. ### 3. Gives You Better Control Over Your Emails Using a domain email means your business stays in control of all communication. You can manage accounts, assign access, and ensure important data remains within your organization. This becomes especially useful when team members change or leave. It keeps your operations smooth and secure. ![gives you better control over your emails - Professional Domain Email](https://serveravatar.com/wp-content/uploads/2026/03/image-163.png) With a domain email, you can: - **Manage all accounts centrally:** Control every email account from one place. - **Remove or reassign access when needed:** Easily update access when roles change. - **Keep business data within your control:** Ensure all communication stays with your company. This becomes especially important when team members join or leave your company. ### 4. Keeps Your Brand Consistent Everywhere Your business identity should feel the same across all platforms, your website, social media, and email. When everything matches, people remember you more easily. A domain email reinforces your brand every time you send a message. It keeps things aligned and avoids confusion. ![keeps your brand consistent everywhere - Professional Domain Email](https://serveravatar.com/wp-content/uploads/2026/03/image-164.png) Imagine having a polished website but using a random email address. It breaks the experience, right? ### 5. Turns Every Email Into a Branding Opportunity Every email you send is a chance to remind people about your business. With a domain email, your brand name is always visible. Over time, this builds familiarity and recognition. ![turns every email into a branding opportunity - Professional Domain Email](https://serveravatar.com/wp-content/uploads/2026/03/image-165.png) Instead of promoting Gmail or Yahoo, you’re promoting your own business, without spending extra money. ### 6. Improves Email Delivery Rates Ever this happened, you sent an email but never got reply? Sometimes, it’s not the content, it’s where the email ends up. ![improves email delivery rates - Professional Domain Email](https://serveravatar.com/wp-content/uploads/2026/03/image-166.png) Domain emails are less likely to land in spam because they can be authenticated properly. This increases the chances that your emails actually reach the inbox. And if your emails don’t get delivered, nothing else really matters. ### 7. Helps You Meet Security and Compliance Needs Security is essential, especially when handling sensitive information. A domain email allows you to apply stronger protections and maintain proper records. It helps safeguard both your business and your customers. This is particularly important for industries that require strict data handling standards. ![helps you meet security and compliance needs - Professional Domain Email](https://serveravatar.com/wp-content/uploads/2026/03/image-167.png) A domain email allows you to: - **Add extra layers of protection:** Strengthen security with advanced safeguards. - **Secure customer data:** Keep sensitive information safe from threats. - **Maintain proper communication records:** Store and track emails for accountability. This is important not just for safety, but also for meeting industry standards and regulations. ### 8. Grows Along With Your Business When your business expand, communication need will be more complex. A domain email allows you to create dedicated addresses for different roles or departments. This makes your business look structured and professional. It also helps customers connect with the right team quickly. [](https://storage.3.basecamp.com/5840738/blobs/a3266120-238a-11f1-aa68-0242ac120003/download/image.png) ![grows along with your business - Professional Domain Email](https://serveravatar.com/wp-content/uploads/2026/03/image-168.png) A domain email allows you to create multiple addresses like: - support@yourcompany.com - sales@yourcompany.com - info@yourcompany.com This makes your business look organized and helps customers reach the right person quickly. ### 9. Works Smoothly with Business Tools Modern businesses rely on tools like CRM systems, marketing platforms, and collaboration software. ![works smoothly with business tools - Professional Domain Email](https://serveravatar.com/wp-content/uploads/2026/03/image-169.png) Domain emails integrate easily with these tools, making workflows smoother and more efficient. It helps your team stay productive and organized. ### 10. Helps You Stand Out from Competitors ![help you stand out from competitors - Professional Domain Email](https://serveravatar.com/wp-content/uploads/2026/03/image-170.png) In a crowded market, even small details can make a big difference. If two businesses offer similar services, people often choose the one that looks more professional. A domain email adds that extra layer of credibility that can tip the decision in your favor. ### 11. Gives You Full Ownership of Your Communication Free email services are convenient, but they come with limits. Accounts can be restricted, policies can change, and you don’t fully own the platform. ![gives you full ownership of your commucation - Professional Domain Email](https://serveravatar.com/wp-content/uploads/2026/03/image-171.png) With a domain email, you’re in charge. As long as your domain is active, your communication stays secure and accessible. ### 12. Keeps Employee Communication Organized Using personal emails for work can quickly create confusion. A domain email system keeps all communication structured and easy to manage. It also ensures that important conversations remain accessible within the company. This protects both your workflow and your client relationships. With domain emails: - **All communication stays within the company:** Keep all business emails centralized. - **Conversations can be tracked if needed:** Monitor communication when required. - **Work and personal life remain separate:** Maintain clear boundaries between personal and business use. It also ensures that important client conversations don’t disappear when someone leaves the team. At the end of the day, a professional domain email isn’t just about sending messages, it’s about how your business is perceived. It’s like upgrading from a casual introduction to a confident handshake. Simple, but powerful. ### 13. Supports Team Collaboration As your team grows, communication needs to stay organized. Domain emails allow you to create role-based addresses for different functions. This helps teams work together more efficiently. It also ensures that tasks and responsibilities are clearly defined. ![supports team collaboration - Professional Domain Email](https://serveravatar.com/wp-content/uploads/2026/03/image-172.png) With a domain email, you can create: - support@yourbusiness.com - sales@yourbusiness.com - info@yourbusiness.com This helps: - **Organize communication:** Structure emails based on roles or departments. - **Improve response time:** Direct queries to the right team quickly. - **Assign roles easily:** Create email accounts based on responsibilities. ### 14. Scales With Your Business A professional email system is designed to grow with you. Whether your team is small or large, you can easily expand your setup. There’s no need to switch systems as you grow. It provides long-term flexibility and stability. Whether you have: - 1 employee - 10 employees - 100 employees ![scale with your business - Professional Domain Email](https://serveravatar.com/wp-content/uploads/2026/03/image-173.png) You can easily manage and expand your email system. It’s built for growth, not limitations. ## Cost vs Value: Is It Worth It? While cost is always a consideration, the value of a domain email goes far beyond its price. It helps build trust, attract customers, and protect your reputation. Compared to the benefits, the investment is minimal. In reality, it’s a smart business decision, not just an expense. A professional email costs very little compared to: - **The trust it builds:** Creates confidence in your business. - **The clients it helps you win:** Increases chances of conversions. - **The reputation it protects:** Maintains a strong professional image. It’s not an expense, it’s an investment. ## Competitive Advantage in the Market Standing out in a crowded market is not easy. A professional email gives you a subtle but important advantage. It makes your business appear more reliable and up-to-date. This small detail can influence customer decisions in your favor. If you’re still using a generic email, you risk: - **Looking outdated:** Generic emails can make your business seem less modern. - **Losing credibility:** Lack of branding can reduce trust. - **Missing opportunities:** Unprofessional emails may cost you potential clients. A professional email gives you that extra edge. ## Easy to Set Up and Manage Many assume setting up a domain email is difficult, but it’s actually quite simple. With modern tools, the process is quick and user-friendly. Even beginners can get started without technical expertise. Within a short time, your business can have a fully functional email system. Today, setting up a domain email is: - **Quick:** Setup can be completed in minutes. - **Affordable:** Costs are low and manageable. - **Beginner-friendly:** No advanced skills required. With the right tools, you can have everything running in minutes. ## Professional Communication Culture Using a domain email encourages clear, respectful, and structured communication. It sets a professional standard across your team. Over time, this improves both internal and external interactions. Using a domain email encourages: - **Clear communication:** Messages are more structured and easy to understand. - **Professional behavior:** Encourages a formal and respectful tone. - **Better internal organization:** Keeps communication well-managed. It’s not just about emails, it’s about culture. ## Turn Every Email Into a Growth Opportunity Every message you send can help move your business forward. A domain email adds credibility and keeps your brand visible in every interaction. Over time, these small touchpoints build strong relationships. It’s a simple way to grow your presence without extra effort. A professional domain email helps you: - **Build trust instantly with clients and partners:** Create confidence from the first interaction. - **Strengthen your credibility in every interaction:** Reinforce professionalism in communication. - **Promote your brand naturally without extra effort:** Increase visibility with every email sent. When your email carries your business name, it leaves a lasting impression. Over time, this consistency builds familiarity, and familiarity leads to trust. It’s like planting seeds. Each email may seem small, but together, they help your business grow stronger and more recognizable. ## Best Practices for Using Professional Domain Email Using a professional email effectively requires a few simple habits. These practices ensure your communication remains clear, secure, and consistent. They also help you maintain a strong brand image. Following them can make a noticeable difference in how your business is perceived. Here are some simple best practices to follow: ### 1. Keep Email Names Clear and Simple Simple email names are easier to remember and look more professional. Avoid unnecessary words or numbers that may confuse recipients. A clean format improves clarity and communication. Use formats like: - name@yourbusiness.com - support@yourbusiness.com Clarity makes communication easier. ### 2. Maintain Consistent Branding Using the same domain across all emails strengthens your brand identity. It creates a uniform experience for anyone interacting with your business. Consistency builds recognition over time. ### 3. Use Professional Email Signatures A well-structured signature adds credibility to your emails. It provides essential information and makes it easier for recipients to contact you. It also reinforces your brand presence. Always include: - **Your name:** Clearly identify who is sending the email. - **Company name:** Reinforce your business identity. - **Contact details:** Provide easy ways to connect. - **Website link:** Direct users to your online presence. It adds credibility and makes it easier for people to reach you. ### 4. Enable Security Features Security should always be a priority when handling business communication. Strong protection helps prevent unauthorized access and data breaches. It ensures your email system remains safe. Protect your email accounts with: - **Strong passwords:** Prevent easy access by unauthorized users. - **Two-factor authentication:** Add an extra layer of security. - **Spam filters:** Block unwanted or harmful emails. Security should never be ignored. ### 5. Avoid Using Personal Emails for Business Mixing personal and business emails can lead to confusion and a lack of professionalism. Keeping them separate ensures better organization. It also protects your business identity. ### 6. Respond Promptly and Professionally Timely responses show that you value communication. A clear and polite tone reflects positively on your business. It helps build strong relationships with clients. ### 7. Regularly Review and Manage Accounts Keeping your email system updated is essential for security and efficiency. Removing unused accounts reduces risk. It also ensures your communication remains organized. A professional domain email is powerful, but only when used correctly. By following these simple practices, you can make sure every email you send strengthens your brand and builds lasting relationships. [![Blog banner - ServerAvatar](https://serveravatar.com/wp-content/uploads/2025/09/728_90-Banner-1-1024x127.png)](https://serveravatar.com/?ref=blog)## Common Mistakes to Avoid Even with a professional email, small mistakes can affect your image. Avoiding these common errors helps maintain a strong and consistent presence. Paying attention to details makes a big difference. Even when using a professional email, avoid these: - **Using complicated email names:** Keep addresses simple and easy to understand. - **Inconsistent branding:** Use the same domain across all communication. - **Ignoring security settings:** Always enable proper protection measures. - **Not setting up proper signatures:** Include essential details for credibility. ## Conclusion A professional domain email may seem like a small upgrade, but its impact on your business is anything but small. It shapes how people perceive you, builds trust from the very first interaction, and keeps your communication structured as you grow. In a world where credibility matters more than ever, using a branded email is a simple step that sets you apart from the crowd. If you want your business to look reliable, organized, and ready for growth, switching to a professional domain email is one of the smartest decisions you can make. ## FAQs ### 1. What is a professional domain email address? A professional domain email is an email that uses your business name as the domain (like name@yourcompany.com) instead of a free provider like Gmail or Yahoo. ### 2. Is a domain email really necessary for small businesses? Even small businesses benefit from it because it builds trust, improves brand image, and makes your business look more established. ### 3. How much does a professional domain email cost? The cost is usually low and depends on the provider, but it offers much greater value compared to free email services. ### 4. Can I use a domain email with my existing tools? Most domain emails easily integrate with business tools like CRM systems, marketing platforms, and collaboration apps. ### 5. How do I get started with a professional domain email? You need a domain name and an email hosting service. Once set up, you can create custom email addresses for your business in just a few steps. ## Stop Wasting Time on Servers. Start Building Instead. You didn’t start your project to babysit servers. Let **ServerAvatar** handle deployment, monitoring, and backups — so you can focus on growth. Deploy **WordPress, Laravel, N8N**, and more in minutes. No DevOps required. No command line. No stress. [ 🚀 Try Free ](https://app.serveravatar.com) [ 🌐 Learn More ](https://serveravatar.com/) Trusted by 10,000+ developers and growing. **Categories:** Blog, Guide, Others, Uncategorized **Tags:** Business Email Address, Custom Email Domain, Domain Email Benefits, Professional Domain Email, Professional Email for Business --- ### [How to Install and Configure OpenClaw on VPS](https://serveravatar.com/install-openclaw-vps/) **Published:** February 23, 2026 **Author:** Meghna Meghwani **Content:** [![Blog banner - ServerAvatar](https://serveravatar.com/wp-content/uploads/2025/09/728_90-Banner-3-1024x127.png)](https://serveravatar.com/?ref=blog)Installing and configuring **OpenClaw** might sound technical at first, but trust me, it’s much simpler than it looks. Think of OpenClaw like a smart remote control for your server. Instead of memorizing dozens of commands, you get a clean interface that helps you manage things with ease. Installing OpenClaw isn’t just about running a script and hoping for the best. It requires a properly structured environment, controlled permissions, secure server configuration, and careful handling of runtime variables. Every step in the setup process plays a crucial role. Skip one detail, and the entire configuration can behave unpredictably. ## What Is OpenClaw? ![OpenClaw](https://serveravatar.com/wp-content/uploads/2026/02/image-184-1024x561.png) [OpenClaw](https://openclaw.ai/) is a powerful AI-driven automation platform designed to integrate advanced AI capabilities with communication channels and digital workflows. When installed correctly, it acts as a bridge between AI models and user-facing platforms, allowing seamless interactions, automation handling, and centralized management through both CLI and Web UI interfaces. ### Why Use OpenClaw? People choose OpenClaw because it simplifies complex server and automation tasks into an experience that feels organized and approachable. Instead of working through confusing commands and scattered tools, OpenClaw brings everything together in one clear flow, helping users stay in control without feeling overwhelmed. - **Beginner-friendly interface:** OpenClaw is designed to be easy to understand, even for users who are just getting started. - **Saves time and effort:** Routine actions take fewer steps, allowing tasks to be completed faster and with less manual work. - **Reduces human errors:** Clear prompts and guided actions help avoid common mistakes caused by guesswork. - **Makes server management less scary:** OpenClaw turns intimidating server operations into manageable, predictable steps. ### Why Proper Installation Matters A proper installation ensures that OpenClaw runs smoothly without permission errors, broken services, or access issues. Skipping steps or changing configurations randomly can lead to unnecessary troubleshooting later. Following a clean setup path is like laying a strong foundation; it saves effort in the long run. ## Prerequisites Before Installing OpenClaw Before jumping into commands and configuration files, it’s important to understand what needs to be prepared. **Server Requirements:** - **Operating System:** Ubuntu 22.04 or 24.04 - **CPU:** 2 cores - **RAM:** 4 GB - **Disk Space:** 10 GB free **Software Requirements:** - **Sudo** (**root**) access - **Apache** web server is installed and running - **Node.js** v18+ installed - Package Manager: **npm** or **pnpm** - Database: **SQLite** That’s all! There are no hidden requirements or additional tools needed. ## What is ServerAvatar? [ServerAvatar](https://serveravatar.com/) is a platform to simplify the hosting and management of servers and applications. It simplifies the process of deploying and managing PHP and Node.js based web applications on servers. If you’re using **ServerAvatar** to manage your servers and applications, deploying and managing **OpenClaw** is incredibly simple. ![ServerAvatar Dashboard - OpenClaw](https://serveravatar.com/wp-content/uploads/2026/02/image-185.png) ## Deploying a Server Using ServerAvatar The first step is to deploy a server using **ServerAvatar**. This platform simplifies server provisioning and management, so you don’t have to deal with complex manual steps. - Let’s log in to the ServerAvatar account first. Navigate to the **Servers** section, and click on the **Create** button, and select **Server**. ![create server - OpenClaw](https://serveravatar.com/wp-content/uploads/2026/02/image-186-1024x275.png) - You can directly deploy a server provided by ServerAvatar using the **Managed** **Server** feature. > **Note:** If you are using a managed server provided by ServerAvatar, you can contact the [support](http://support.serveravatar.com/) team, and they will install OpenClaw for you. - Alternatively, you can use **ServerAvatar’s Self-Managed Server** feature to connect your own custom server from any cloud provider. - You can integrate your cloud provider account directly with ServerAvatar from the available options (Amazon Lightsail, DigitalOcean, Vultr, Linode, Hetzner) and create a server directly from the ServerAvatar Dashboard. - Alternatively, you can connect your own custom server from any cloud provider using ServerAvatar’s **custom server method** (as I’m doing here). - Enter your server name. - Select **Apache** as a Tech Stack, and select your preferred Database. - Enable the toggle button to **install Node.js**. > Please note that installing **OpenClaw requires** an **Apache** tech stack and **Node.js** to be set up on your server. - Click on the **Deploy** **Server** button. ![deploy server - OpenClaw](https://serveravatar.com/wp-content/uploads/2026/02/image-187-961x1024.png) ## Create OpenClaw Application Once your server is ready, the next step is installing OpenClaw. - Click on the server dashboard icon to navigate to the server panel. ![server dashboard - OpenClaw](https://serveravatar.com/wp-content/uploads/2026/02/image-188-1024x167.png) - Go to the **Applications** section from the left sidebar, and click on the **Create an Application** button. ![create application - OpenClaw](https://serveravatar.com/wp-content/uploads/2026/02/image-189-1024x305.png) Enter the required details such as, - Enter the application name. - Select Domain Type between: - **Primary Domain** - **Test Domain** (ServerAvatar provides a temporary domain for testing purposes) - Select the checkbox to automatically install the SSL Certificate to secure your application. Please note that this is an optional step; you can also install the SSL Certificate later. - Select **Custom** as a Deployment Method. - Select the checkbox to automatically install the Log Monitoring Suite to track logs to help you detect errors, issues, and unusual activity early. - Click on the **Show Advance Options**, create a new username such as openclaw, and a password as per your preference. - After filling out the details, click on the **Create** **Application** button. ![create OpenClaw application](https://serveravatar.com/wp-content/uploads/2026/02/image-190-1024x920.png) - After creating the application, assign **SFTP/SSH Access** and **sudo** **access** to the application user you just created for **OpenClaw**. - To do this, go to the **Server Panel** and select **Application Users** from the left sidebar. - Enable **SFTP/SSH Access** and **Sudo Access** for the application user you created during the application setup. ![SFTP/SSH Enable - OpenClaw](https://serveravatar.com/wp-content/uploads/2026/02/image-191-1024x309.png) - Enable **SFTP/SSH Access** and **Sudo Access** for the application user you created during the application setup. - Now, login to you server as a root user using **ssh** command. ``` ssh root@[ip address] ``` ``` ssh root@[ip address] ``` - Enter your server’s **IP address**, and you’ll be prompted to enter your **root password**. - After logging in as the root user, run the following command: ``` sudo vim /etc/sudoers.d/applicationusername ``` ``` sudo vim /etc/sudoers.d/applicationusername ``` - Replace **applicationusername** in the above command with your OpenClaw application username. - Add the following line to the file and save it: ``` Defaults:applicationuser !requiretty applicationuser ALL=(ALL) NOPASSWD: ALL ``` ``` Defaults:applicationuser !requiretty applicationuser ALL=(ALL) NOPASSWD: ALL ``` - (This configuration is required for passwordless sudo access) - Replace **applicationusername** in the above command with your **OpenClaw application username**. - After that run the below command to avoid the D-bus issue ``` sudo loginctl enable-linger applicationuser sudo systemctl start user@$(id -u applicationusername).service ``` ``` sudo loginctl enable-linger applicationuser sudo systemctl start user@$(id -u applicationusername).service ``` - Replace **applicationusername** in the above command with your **OpenClaw application username**. ## Installing OpenClaw on the Server Once the server and application user are ready, the next step is to install OpenClaw using the application user’s SSH access. This ensures OpenClaw runs in a controlled and secure environment instead of using the root account. **Step 1: Connect to the Server Using the OpenClaw User** - Start by connecting to your server via SSH using the OpenClaw application username. ``` ssh applicationusername@[ip address] ``` ``` ssh applicationusername@[ip address] ``` - Replace **applicationusername** with your OpenClaw app user (for example, openclaw) and **\[server\_ip\]** with your server’s IP address. - When prompted, enter the password for the application user. Logging in with the application user is important because OpenClaw stores its configuration and runtime files within this user’s environment. **Step 2: Set Up the Runtime Directory and Environment Variable** - OpenClaw relies on a runtime directory to manage background processes and user-level services. To avoid permission and session issues, this directory must be configured correctly. - Run the following commands: ``` export XDG_RUNTIME_DIR=/run/user/$(id -u) mkdir -p $XDG_RUNTIME_DIR echo 'export XDG_RUNTIME_DIR=/run/user/$(id -u)' >> ~/.bashrc ``` ``` export XDG_RUNTIME_DIR=/run/user/$(id -u) mkdir -p $XDG_RUNTIME_DIR echo 'export XDG_RUNTIME_DIR=/run/user/$(id -u)' >> ~/.bashrc ``` Here’s what this does: - Defines the runtime directory for the current user session - Creates the directory if it doesn’t already exist - Ensures the setting persists across future logins This step helps OpenClaw operate smoothly without interruptions. **Step 3: Install OpenClaw** - With the environment prepared, you can now install OpenClaw using the following installation command. ``` curl -fsSL https://openclaw.ai/install.sh | bash ``` ``` curl -fsSL https://openclaw.ai/install.sh | bash ``` ![install OpenClaw](https://serveravatar.com/wp-content/uploads/2026/02/image-192.png) - The script will download and install OpenClaw along with all required dependencies. - When prompted for confirmation, select **Yes** to continue with the installation. ![dependencies - OpenClaw](https://serveravatar.com/wp-content/uploads/2026/02/image-193.png) **Step 4: Choose the Onboarding Mode** - Select **Quickstart** as an onboarding method during the installation process. - This option provides a guided setup experience and is ideal for completing the initial configuration without manual adjustments. ![onboarding mode - OpenClaw](https://serveravatar.com/wp-content/uploads/2026/02/image-194.png) **Step 5: Select the AI Model Provider** - Next, select the AI provider based on your requirement. As I’m selecting the **OpenAI** here. - This selection determines which service OpenClaw will use to process AI requests. ![ai model provider - OpenClaw](https://serveravatar.com/wp-content/uploads/2026/02/image-195.png) **Step 6: Enter the OpenAI API Key** When prompted: - Select **OpenAI API Key** ![openai key - OpenClaw](https://serveravatar.com/wp-content/uploads/2026/02/image-196.png) - Paste your API key and confirm to proceed ![](https://serveravatar.com/wp-content/uploads/2026/02/image-276.png) Make sure the key is entered correctly, as this is required for OpenClaw to communicate with the AI model. **Step 7: Choose the Preferred Model** - After entering the API key, you’ll be asked to select a model. As I’m selecting **Mini 4.1** as the OpenAI model. - This defines how OpenClaw processes requests and responses. ![preferred model - OpenClaw](https://serveravatar.com/wp-content/uploads/2026/02/image-197.png) **Step 8: Select the Communication Channel** - Now select your preferred channel through which OpenClaw will interact, as i’m selecting **Telegram** here. - This allows OpenClaw to send and receive messages using a Telegram bot.[](https://storage.3.basecamp.com/5840738/blobs/efee1a58-10a6-11f1-896f-0242ac120004/download/image.png) ![communication channel - OpenClaw](https://serveravatar.com/wp-content/uploads/2026/02/image-198.png) **Step 9: Create a Telegram Bot** To connect OpenClaw with Telegram, you need a bot token from Telegram. Follow these steps: 1. Open Telegram 2. Search for **@BotFather** and start a chat 3. Run the command **/newbot** (or **/mybots**) 4. Follow the instructions and copy the generated token. The token will look something like: ``` 123456:ABCDEF... ``` ``` 123456:ABCDEF... ``` - Select a search engine as per your preference as i’m selecting Gemini (Google Search) here. ![](https://serveravatar.com/wp-content/uploads/2026/02/image-277.png) - Paste this token when OpenClaw asks for it. **Step 10: Install Skills (Optional)** - OpenClaw will ask whether you want to install additional skills. If you do not need them at this stage, select **Skip for now** as I’m doing here. - Skills can always be added later if required.[](https://storage.3.basecamp.com/5840738/blobs/428c6e4a-1020-11f1-8baa-0242ac120003/download/Screenshot%202026-02-23%20002512.png) ![install skills - OpenClaw](https://serveravatar.com/wp-content/uploads/2026/02/image-199.png) **Step 11: Select Hooks** - You’ll then be prompted to select hooks. Hooks help OpenClaw integrate properly with the selected channel and environment. ![select hooks - OpenClaw](https://serveravatar.com/wp-content/uploads/2026/02/image-200.png) - Use the **space key** to select the required hooks and press **Enter** to confirm.[](https://storage.3.basecamp.com/5840738/blobs/4e11e240-10a7-11f1-9e5d-0242ac120003/download/image.png) ![space key - OpenClaw](https://serveravatar.com/wp-content/uploads/2026/02/image-201.png) **Step 12: Fix the PATH using the following commands** ``` echo 'export PATH="/home/openclaw/.npm-global/bin:$PATH"' >> ~/.bashrc ``` ``` echo 'export PATH="/home/openclaw/.npm-global/bin:$PATH"' >> ~/.bashrc ``` ``` source ~/.bashrc ``` ``` source ~/.bashrc ``` ``` which openclaw ``` ``` which openclaw ``` ## Getting the OpenClaw Web UI After completing the OpenClaw CLI installation, the next step is to make the Web UI accessible through a browser. **Step 1: Enable Required Apache Modules** - Now, log in to the server as the **root user** and enable the Apache modules required for proxying and WebSocket communication. - Run the following commands one by one: ``` sudo a2enmod proxy sudo a2enmod proxy_http sudo a2enmod proxy_wstunnel sudo a2enmod rewrite sudo a2enmod headers sudo systemctl restart apache2 ``` ``` sudo a2enmod proxy sudo a2enmod proxy_http sudo a2enmod proxy_wstunnel sudo a2enmod rewrite sudo a2enmod headers sudo systemctl restart apache2 ``` These modules allow Apache to: - Forward traffic to the OpenClaw service - Handle WebSocket connections - Rewrite requests correctly - Add security-related HTTP headers Restarting Apache ensures all enabled modules are loaded properly. **Step 2: Configure Apache Settings** - After enabling the modules, navigate to the Apache configuration directory and locate the **conf/apache** folder. Inside this folder, create or edit the file named **proxy.conf**. - Add the following configuration to the file: ``` ProxyPreserveHost On ProxyRequests Off SSLProxyEngine On # WebSocket Support (required) RewriteEngine On RewriteCond %{HTTP:Upgrade} =websocket [NC] RewriteRule /(.*) ws://127.0.0.1:18789/$1 [P,L] ProxyPass http://127.0.0.1:18789/ ProxyPassReverse http://127.0.0.1:18789/ # Optional security headers Header always set X-Frame-Options SAMEORIGIN Header always set X-Content-Type-Options nosniff ``` ``` ProxyPreserveHost On ProxyRequests Off SSLProxyEngine On # WebSocket Support (required) RewriteEngine On RewriteCond %{HTTP:Upgrade} =websocket [NC] RewriteRule /(.*) ws://127.0.0.1:18789/$1 [P,L] ProxyPass http://127.0.0.1:18789/ ProxyPassReverse http://127.0.0.1:18789/ # Optional security headers Header always set X-Frame-Options SAMEORIGIN Header always set X-Content-Type-Options nosniff ``` **Step 3: Edit the openclaw.json file** - Run the below command for editing the file. ``` vim ~/.openclaw/openclaw.json ``` ``` vim ~/.openclaw/openclaw.json ``` - Now, add the following under the gateway section to add control UI as per your domain ``` "controlUi": { "allowedOrigins": [ "" ] }, ``` ``` "controlUi": { "allowedOrigins": [ "" ] }, ``` - Enter your domain name at the **DOMAIN-ADDRESS** Full block with the gateway section will look like the block below: ``` "gateway": { "port": 18789, "mode": "local", "bind": "loopback", "auth": { "mode": "token", "token": "4c788657fa83577d148" }, "controlUi": { "allowedOrigins": [ "https://abc.xyz.com" ] }, "tailscale": { "mode": "off", "resetOnExit": false }, ``` ``` "gateway": { "port": 18789, "mode": "local", "bind": "loopback", "auth": { "mode": "token", "token": "4c788657fa83577d148" }, "controlUi": { "allowedOrigins": [ "https://abc.xyz.com" ] }, "tailscale": { "mode": "off", "resetOnExit": false }, ``` ## Accessing the OpenClaw Web UI Once the Web UI environment is configured and Apache is running correctly, you can access the OpenClaw dashboard through your browser. This step links your browser session securely with the OpenClaw service running on the server. **Step 1: Access the Server as the OpenClaw User** - Start by connecting to your server using the **openclaw** application user via SSH. - After logging in, run the following command: ``` openclaw dashboard ``` ``` openclaw dashboard ``` - This command generates a secure, one-time authentication token for the Web UI session. **Step 2: Copy the Dashboard Token** - When the command runs, a token will be displayed in the terminal output. Carefully **copy the highlighted token** shown on the screen. ![copy token - OpenClaw](https://serveravatar.com/wp-content/uploads/2026/02/image-202.png) - This token is required to authenticate your browser and prevent unauthorized access to the dashboard. **Step 3: Open the Web UI in Your Browser** - Open your browser and enter your OpenClaw domain URL. - Paste the copied token **after the URL**, exactly as shown in the below image. ![web ui in browser - OpenClaw](https://serveravatar.com/wp-content/uploads/2026/02/image-203.png) - Once the token is added and the page loads, you will be redirected to the OpenClaw Web UI. ## Approving Devices and Completing the Web UI Setup - After successfully accessing the OpenClaw Web UI, the final step is to approve the device requesting access. - Device approval ensures that only authorized sessions can interact with OpenClaw through the dashboard. **Step 1: List Pending Device Requests** - Log in to the server again using the **openclaw** application user. - Run the following command: ``` openclaw devices list ``` ``` openclaw devices list ``` - This command displays all devices that are currently waiting for approval. Each request will appear with a unique **Device ID**, shown in the left column of the output. ![device list - OpenClaw](https://serveravatar.com/wp-content/uploads/2026/02/image-204.png) **Step 2: Approve the Device** - From the list, identify the Device ID that corresponds to your current Web UI session. - Copy that Device ID and approve it using the command below: ``` openclaw devices approve ``` ``` openclaw devices approve ``` - Replace **** with the actual Device ID you copied from the list.[](https://storage.3.basecamp.com/5840738/blobs/ea63ff50-10d6-11f1-8814-0242ac120002/download/image.png) ![device id - OpenClaw](https://serveravatar.com/wp-content/uploads/2026/02/image-205.png) - Once approved, the device gains permission to communicate with OpenClaw, and the Web UI session becomes fully active. [![Blog banner - ServerAvatar](https://serveravatar.com/wp-content/uploads/2025/09/728_90-Banner-1-1024x127.png)](https://serveravatar.com/?ref=blog)## Installation Completed with Web UI Access After approving the device, the OpenClaw installation and Web UI setup are complete. You now have full access to the OpenClaw dashboard and can manage interactions directly through the browser. ![web ui - OpenClaw](https://serveravatar.com/wp-content/uploads/2026/02/image-206.png) At this stage, OpenClaw is fully installed, authenticated, and ready for use. > **Note:** If you need any custom configuration for OpenClaw, you can contact the [ServerAvatar support](http://support.serveravatar.com/) team directly. Our team is available 24/7 to assist you with custom setup, configuration, and OpenClaw installation. ## Final Checks Before You Start Using OpenClaw Before wrapping up, it’s a good idea to quickly verify that everything is working as expected. Make sure the OpenClaw CLI responds correctly, the Web UI loads securely over HTTPS, and your device has been approved successfully. If the dashboard opens without errors and interactions work smoothly, your setup is complete. At this stage, OpenClaw is ready to be used for managing workflows and interactions through both the command line and the web interface. ## Conclusion Installing and configuring OpenClaw may involve multiple steps, but when done in the right order, the process becomes straightforward and predictable. From preparing the server and setting permissions to enabling the Web UI and approving devices, each step plays a specific role in building a stable and secure setup. By following this structured approach, you ensure that OpenClaw runs reliably, stays secure, and delivers a smooth experience through both CLI and Web UI. Once everything is in place, OpenClaw becomes a powerful yet approachable tool that simplifies automation without adding unnecessary complexity. ## FAQs ### 1. What is OpenClaw mainly used for? OpenClaw is used to connect AI models with communication channels and workflows through a centralized CLI and Web UI. ### 2. What should I do if the OpenClaw dashboard does not load in the browser? If the dashboard doesn’t load, check that Apache is running, required proxy modules are enabled, SSL is active, and the device has been approved from the server. ### 3. Can OpenClaw run without the Web UI? OpenClaw can be used entirely through the command line if web-based access is not needed. ### 4. Why is passwordless sudo access required for the OpenClaw user? Passwordless sudo allows OpenClaw to perform required system-level tasks without interruptions or permission errors. ### 5. What does device approval do in OpenClaw? Device approval ensures that only authorized browser sessions can access and interact with the OpenClaw Web UI. **Categories:** Blog, Guide, Linux, Tutorials, Ubuntu **Tags:** Configure OpenClaw, Install OpenClaw, Install OpenClaw on VPS, OpenClaw, OpenClaw setup, OpenClaw Web UI setup --- ### [What Is Remote Code Execution (RCE)? How It Works, Risks & Prevention Guide](https://serveravatar.com/what-is-rce/) **Published:** March 18, 2026 **Author:** Meghna Meghwani **Content:** [![Blog banner - ServerAvatar](https://serveravatar.com/wp-content/uploads/2025/09/728_90-Banner-3-1024x127.png)](https://serveravatar.com/?ref=blog)Imagine leaving your house door slightly open. You might think it’s harmless, until someone walks in uninvited and starts controlling everything inside. That’s exactly what Remote Code Execution (RCE) does to systems and applications. In simple terms, RCE is one of the most dangerous cybersecurity threats today. It allows attackers to run their own code on your server, website, or application, from anywhere in the world. Scary, right? But don’t worry. In this guide, we’ll break everything down in plain English, what RCE is, how it works, why it’s risky, and most importantly, how you can prevent it. ## What Is Remote Code Execution (RCE)? RCE (Remote Code Execution ) is critical vulnerability of cybersecurity in which attacker executes scripts on any target server or system directly from remote location. ![Remote Code Execution](https://serveravatar.com/wp-content/uploads/2026/03/image-148.png) Think of it as someone secretly taking control of your computer over the internet, without your permission. Unlike local attacks, RCE does not require physical access to the system, making it especially dangerous. **Key Point:** - RCE allows attackers to fully control a system remotely, including installing malware, stealing data, or disrupting services. - It can exploit vulnerabilities in software, plugins, web applications, or misconfigured servers. - RCE attacks can affect individual devices, enterprise systems, or even entire networks. - Attackers often use RCE to gain persistent access, escalating privileges to become system administrators. - RCE is a high-severity threat in cybersecurity, often ranked as one of the most critical vulnerabilities in CVE databases. - Preventing RCE requires timely software updates, proper input validation, and strong access control measures. - Common targets include web servers, CMS platforms (like WordPress), and network-connected devices (IoT). - RCE attacks can lead to ransomware infections, data breaches, and complete system compromise. ### Why RCE Is Considered Dangerous Remote Code Execution is one of the most critical security threats because it allows attackers to directly interact with your system. Once they gain access, they don’t just observe, they can control and manipulate everything. This level of access makes RCE far more dangerous than most other vulnerabilities. - **Steal sensitive data:** Attackers can access and extract confidential information like passwords or customer data. - **Install malware:** Malicious software can be silently added to damage or spy on your system. - **Modify or delete files:** Important files can be changed or completely removed without your permission. - **Take full control of your system:** Hackers can operate your system as if they own it. **In short:** It’s a complete system takeover. ### How Remote Code Execution Works RCE usually happens when a system fails to properly handle user input or has an unpatched flaw. Attackers take advantage of this weakness to send harmful code that the system mistakenly runs. It’s like giving instructions to a machine without realizing they’re dangerous. ![Remote Code Execution working](https://serveravatar.com/wp-content/uploads/2026/03/image-149.png) - **A system has a vulnerability:** There is a hidden flaw or weakness in the software. - **The attacker finds it:** Hackers scan systems to discover these weak points. - **They send malicious input (code):** Harmful code is delivered through inputs like forms or requests. - **The system unknowingly executes it:** The system runs the code, thinking it’s safe. It’s like tricking a machine into following harmful instructions. ## Common Types of RCE Attacks **1. Command Injection** ![Command Injection - Remote Code Execution](https://serveravatar.com/wp-content/uploads/2026/03/image-155.png) Attackers exploit input fields or forms to insert malicious system commands. These commands are executed by the server, allowing the attacker to manipulate or control the system remotely. **2. Deserialization Attacks** ![Deserialization Attacks - Remote Code Execution](https://serveravatar.com/wp-content/uploads/2026/03/image-156.png) Malicious data is crafted and sent to a system that automatically processes it as code. If the system fails to properly validate or sanitize this data, the attacker can execute arbitrary commands. **3. File Upload Exploits** ![File Upload Exploits - Remote Code Execution](https://serveravatar.com/wp-content/uploads/2026/03/image-157.png) Attackers upload harmful scripts disguised as legitimate files, such as images or documents. When executed by the server, these files can compromise the system and provide remote access. **4. Software Vulnerability Exploits** ![Software Vulnerability Exploits - Remote Code Execution](https://serveravatar.com/wp-content/uploads/2026/03/image-158.png) Outdated or poorly coded software often contains security flaws. Attackers target these vulnerabilities to run unauthorized code, gain system control, or escalate privileges. ### Real-World Examples of RCE Attacks RCE attacks are not just theoretical, they’ve caused serious damage in real life. Many well-known companies have faced security incidents due to such vulnerabilities. These examples highlight how widespread and impactful RCE can be. - **Log4Shell (2021):** A widely used logging tool vulnerability exposed millions of systems. - **Microsoft Exchange Hack:** Attackers gained unauthorized access to email servers. - **Apache Struts Vulnerability:** A major flaw led to large-scale data breaches. **Lesson:** No system is too big or too secure to be targeted. ### Key Vulnerabilities That Lead to RCE RCE attacks usually happen because of preventable issues in software or system configuration. These weaknesses make it easier for attackers to exploit systems. Most of the time, the problem is not fixing known issues on time. - **Outdated software:** Older versions often contain known security flaws. - **Unpatched vulnerabilities:** Missing updates leave systems exposed to attacks. - **Poor input validation:** Systems fail to properly check user-provided data. - **Weak security configurations:** Misconfigured settings create easy entry points. **Important:** Many RCE attacks succeed because basic security steps are ignored. ### Signs Your System May Be Compromised Detecting an RCE attack early can save you from serious damage. While some attacks are silent, there are still warning signs you can look for. Paying attention to unusual behavior is key. - **Unexpected system behavior:** Programs may act strangely or crash unexpectedly. - **Slow performance:** Your system may become unusually slow without reason. - **Unknown files or processes:** Suspicious files or background activities may appear. - **Unauthorized access logs:** Login attempts from unknown sources may be recorded. ## Risks and Impact of RCE Attacks The consequences of an RCE attack can be severe and long-lasting. From financial damage to loss of trust, the impact can affect both individuals and businesses. It’s not just a technical issue, it’s a business risk too. - **Data Theft:** Sensitive or personal data can be stolen and misused. - **Financial Loss:** Attacks can lead to direct or indirect monetary damage. - **Reputation Damage:** Customers may lose trust in your services. - **System Downtime:** Your website or application may stop working entirely ### Who Can be at Risk? RCE attacks don’t target just one group, they can affect anyone using internet-connected systems. Whether you’re running a business or a personal website, the risk is real. - **Website owners:** Sites can be hijacked or defaced. - **Businesses:** Critical systems and data can be compromised. - **Developers:** Applications with weak code can be exploited. - **Individual users:** Personal devices and data can also be targeted. ## How to Prevent Remote Code Execution The good news is that RCE attacks are largely preventable with the right approach. By following basic security practices, you can significantly reduce the chances of being targeted. Prevention is always easier than recovery. ### 1. Software Development Best Practices ![software development best practices - Remote Code Execution](https://serveravatar.com/wp-content/uploads/2026/03/image-150.png) Building secure applications from the start is one of the most effective ways to prevent RCE vulnerabilities. Developers should follow secure coding standards, avoid using unsafe functions, and regularly review code for potential flaws. Practices like input validation, proper error handling, and dependency checks help reduce the chances of introducing exploitable weaknesses. ### 2. System Hardening ![system hardening - Remote Code Execution](https://serveravatar.com/wp-content/uploads/2026/03/image-151.png) System hardening involves reducing the attack surface by disabling unnecessary services, ports, and features. The fewer entry points your system has, the harder it becomes for attackers to find a way in. Strengthening configurations, applying security patches, and removing unused applications are key steps in making your system more resilient against RCE attacks. ### 3. Network Security Measures ![network security measures - Remote Code Execution](https://serveravatar.com/wp-content/uploads/2026/03/image-152.png) A strong network setup adds another layer of protection against remote attacks. This includes using secure protocols, segmenting networks, and monitoring traffic for unusual activity. Implementing tools like intrusion detection systems (IDS) and intrusion prevention systems (IPS) can help identify and block potential RCE attempts before they cause harm. ### 4. Validate User Input ![validate user input - Remote Code Execution](https://serveravatar.com/wp-content/uploads/2026/03/image-153.png) One of the most common causes of RCE is improper handling of user input. Systems should never blindly trust data coming from users, forms, or APIs. By validating and sanitizing all inputs, you prevent malicious code from being injected and executed within your application. ### 5. Limit Permissions ![limit permission - Remote Code Execution](https://serveravatar.com/wp-content/uploads/2026/03/image-154.png) Not every user or process needs full access to your system. By following the principle of least privilege, granting only the permissions that are absolutely necessary, you minimize the potential damage if an attacker gains access. Restricted access ensures better control and containment. ## Best Security Practices to Follow Beyond basic prevention, adopting strong security habits can provide an extra layer of protection. These practices help you stay prepared against evolving threats. Security should always be treated as an ongoing process. - **Use strong authentication:** Secure login methods reduce unauthorized access. - **Regularly scan for vulnerabilities:** Frequent checks help detect issues early. - **Backup your data:** Backups ensure recovery in case of an attack. - **Monitor system activity:** Continuous monitoring helps spot suspicious behavior. Security isn’t a one-time task, it’s ongoing. ## Tools That Help Detect RCE Managing security manually can be difficult, especially as systems grow. That’s where security tools come in, they help automate detection and monitoring. Think of them as your system’s early warning system. - **Vulnerability scanners:** Identify weaknesses in your system. - **Intrusion detection system:** It detects activities that are suspicious in real time. - **Security monitoring tools:** Track and analyze system behavior continuously. ## RCE vs Other Cyber Attacks RCE stands out from other attacks because it allows direct system control. While other attacks may target specific areas, RCE gives attackers full access. This makes it one of the most powerful and dangerous attack types. **Attack Type****Description****RCE**Full system control remotely**SQL Injection**Targets databases**XSS**Affects users via browsers**Phishing**Tricks users into sharing dataRCE is more dangerous because it provides complete control over the system. ## Why Regular Updates Matter Ignoring updates might seem harmless, but it can leave your system vulnerable. Updates are often released to fix security flaws and improve stability. Skipping them is like leaving your system exposed to known threats. - **Security patches:** Fix known vulnerabilities that attackers may exploit. - **Bug fixes:** Resolve errors that could lead to security issues. - **Performance improvements:** Enhance system efficiency and stability. Skipping updates is like leaving your door unlocked. ## Key Takeaways on Staying Safe Remote Code Execution is a serious threat, but it can be managed with the right precautions. Staying proactive and aware is the best defense against such attacks. Small, consistent actions can make a big difference. Think of cybersecurity like protecting your home, the better your defenses, the safer you are. Stay updated, stay cautious, and always take security seriously. ## RCE Exploits: Guidelines for Responsible Disclosure ### Understanding Responsible Disclosure in Remote Code Execution When it comes to Remote Code Execution (RCE), discovering vulnerabilities is only half the job, the real responsibility lies in how you handle them. ![responsible disclosure in Remote Code Execution](https://serveravatar.com/wp-content/uploads/2026/03/image-159.png) Security professionals often use techniques like fuzzing, where random or unexpected data is sent into a program to uncover hidden weaknesses. Similarly, ethical hacking and penetration testing are used to simulate real-world attacks in a controlled and safe environment. These methods help identify security gaps before malicious attackers do. But here’s the key question: What should you do after finding a vulnerability? The correct and ethical approach is to report it directly to the software or server vendor. Providing a clear and detailed report allows them to fix the issue before it becomes a real threat. ### Why Responsible Disclosure Matters In cybersecurity, how you act matters just as much as what you find. Responsible disclosure means privately informing the affected company or developer about a vulnerability instead of exposing it publicly right away. This gives them time to investigate and release a fix. On the other hand, publicly sharing exploit details too early can be dangerous. It may unintentionally act as a guide for attackers, increasing the risk of widespread damage before a patch is available. **In simple terms,** Responsible disclosure protects users, businesses, and the internet as a whole. [![Blog banner - ServerAvatar](https://serveravatar.com/wp-content/uploads/2025/09/728_90-Banner-1-1024x127.png)](https://serveravatar.com/?ref=blog)### How Vulnerabilities Are Found and Reported Finding vulnerabilities requires a proactive and structured approach. Some commonly used methods include: - **Fuzzing:** Sending unexpected inputs to test how a system behaves - **Penetration Testing:** Simulating attacks to identify weak points - **Code Reviews:** Analyzing code for security flaws - **Ethical Hacking:** Testing systems with permission to improve security Once a vulnerability is discovered, it should be documented properly. A good report usually includes: - A clear explanation of the issue - Steps to reproduce it - Potential impact - Suggested fixes (if possible) This helps developers quickly understand and resolve the problem before it can be exploited. ### Legal Considerations in Vulnerability Disclosure Handling vulnerabilities isn’t just a technical matter, it can also involve legal considerations. In some regions, laws like the Digital Millennium Copyright Act (DMCA) may apply, especially when dealing with software systems. While responsible disclosure is widely encouraged, it’s important to stay within legal boundaries. If you’re unsure about the legal implications, it’s always a good idea to consult with a legal expert. This ensures that your actions remain ethical, lawful, and beneficial to the broader security community. ## Conclusion Remote Code Execution (RCE) is not just another technical vulnerability, it’s a serious threat that can give attackers complete control over your systems if left unaddressed. As we’ve seen, it often starts with small oversights like unpatched software or poor input validation, but the impact can be massive. The good news is that with the right security practices, such as regular updates, strong configurations, and proactive monitoring, you can significantly reduce your risk. Staying informed and taking consistent action is the key to keeping your systems safe in an increasingly connected world. ## FAQs ### 1. What is Remote Code Execution (RCE) in simple terms? Remote Code Execution (RCE) is a security vulnerability that allows attackers to run their own code on your system from a remote location without your permission. ### 2. Why is RCE considered a high-risk vulnerability? RCE is highly dangerous because it can give attackers full control over a system, allowing them to steal data, install malware, or disrupt services. ### 3. What are the common causes of RCE vulnerabilities? RCE vulnerabilities are usually caused by outdated software, unpatched security flaws, poor input validation, and weak system configurations. ### 4. How can I protect my system from RCE attacks? You can prevent RCE by keeping software updated, validating user inputs, limiting access permissions, and using proper security tools like firewalls and monitoring systems. ### 5. Who is most vulnerable to RCE attacks? Anyone using internet-connected systems, including businesses, developers, website owners, and individual users, can be at risk if proper security measures are not in place. ## Stop Wasting Time on Servers. Start Building Instead. You didn’t start your project to babysit servers. Let **ServerAvatar** handle deployment, monitoring, and backups — so you can focus on growth. Deploy **WordPress, Laravel, N8N**, and more in minutes. No DevOps required. No command line. No stress. [ 🚀 Try Free ](https://app.serveravatar.com) [ 🌐 Learn More ](https://serveravatar.com/) Trusted by 10,000+ developers and growing. **Categories:** Blog, Guide, Linux, Others, Ubuntu **Tags:** Cybersecurity threats, RCE, RCE Attack, RCE Vulnerability, Remote Code Execution, Remote Code Execution attack, Server Security, Web security --- ### [How to Add ChatGPT to Your WordPress Website (2026 Guide)](https://serveravatar.com/use-chatgpt-in-wordpress/) **Published:** March 17, 2026 **Author:** Meghna Meghwani **Content:** [![Blog banner - ServerAvatar](https://serveravatar.com/wp-content/uploads/2025/09/728_90-Banner-3-1024x127.png)](https://serveravatar.com/?ref=blog)Managing a website today is more than just publishing content. Visitors expect quick answers, smooth interactions, and a more personalized experience. Handling all of this manually can quickly become overwhelming. If you’re looking to add ChatGPT to WordPress, it can completely transform how your site interacts with users. By integrating ChatGPT into your WordPress website, you can automate conversations, assist users instantly, and improve engagement without constantly being online. In this guide, you’ll learn exactly how to add ChatGPT to your WordPress site using simple, practical methods, even if you’re not a developer. ## What is ChatGPT and Why Use It? [ChatGPT](https://chatgpt.com/overview) is an AI-powered chatbot that can understand questions and respond like a human. Think of it as a helpful assistant sitting on your website, ready to talk to your visitors anytime. ![chatgpt - Add ChatGPT to WordPress](https://serveravatar.com/wp-content/uploads/2026/03/image-142.png) Instead of forcing users to search through pages, ChatGPT allows them to ask questions and get instant answers. ### Why Add ChatGPT to WordPress? Adding ChatGPT to your WordPress site helps you handle user interactions more efficiently without constant manual effort. It improves response speed, engagement, and overall user experience. - **Provide 24/7 customer support:** Assist visitors anytime without needing a live support team. - **Respond instantly to common queries:** Answer frequently asked questions in real time. - **Improve user engagement and retention:** Keep users interested with interactive responses. - **Assist with content creation and updates:** Help generate and refine website content quickly. - **Generate leads through interactive conversations:** Capture user interest through guided interactions. It transforms your website from a static platform into an interactive experience. ## What Is WordPress? [WordPress](https://wordpress.org/) is the world’s most popular open-source content management system (CMS), used to build websites, blogs, and e-commerce stores. It offers flexibility through themes and plugins, making it suitable for beginners, developers, and businesses of all sizes. ## How ServerAvatar Simplifies WordPress Deployment & Management **What is ServerAvatar?** [ServerAvatar](https://serveravatar.com/) is a platform to simplify the hosting and management of servers and applications. It simplifies the process of deploying and managing PHP and Node.js based web applications on servers. ![ServerAvatar Dashboard - Add ChatGPT to WordPress](https://serveravatar.com/wp-content/uploads/2026/03/image-143.png) ServerAvatar makes WordPress and other popular applications, such as Mautic, N8N, UptimeKuma, etc, deployment effortless with its one-click WordPress application installer, allowing you to launch a fully configured WordPress site in minutes. It removes the complexity of server setup by providing an intuitive dashboard to manage servers, applications, databases, PHP versions, SSL, and performance settings from one place. ServerAvatar supports multiple cloud providers and gives users full control over their infrastructure while eliminating the need for deep server administration knowledge. You can refer to the ServerAvatar [documentation](https://serveravatar.com/docs/application/one-click-installer/wordpress/) and the detailed [blog](https://serveravatar.com/install-wordpress-quickly-on-vps/) to [install WordPress](https://serveravatar.com/install-wordpress-apache-ubuntu/) effortlessly. > ServerAvatar does not directly provide WordPress Multisite, but our technical experts can help you set up a WordPress Multisite environment. > The ServerAvatar support team is available 24/7 to assist you with any issues or questions you may have. **Key Benefits of Using ServerAvatar for WordPress** - **One-click Application installer:** Deploy WordPress and many popular applications instantly without manual configuration. - **Unified management panel:** Manage servers and WordPress applications from a single dashboard. - **Performance optimization:** Easily configure services, PHP, and server resources. - **Redis caching support:** ServerAvatar comes with built-in Redis integration that helps speed up WordPress by storing frequently accessed data in memory. - **Enhanced security:** Includes firewall, SSL management, and secure access controls. - **Easy scalability:** Upgrade server resources as your WordPress site grows. ServerAvatar is an ideal solution for users who want the power of cloud servers without the operational complexity. It simplifies WordPress hosting by automating server setup, streamlining application management, and providing performance and security optimizations out of the box. Whether you’re a developer, agency, or business owner, ServerAvatar allows you to deploy, manage, and scale WordPress websites confidently while focusing on growth instead of infrastructure management. ## What Does ChatGPT Integration in WordPress Really Mean? Adding ChatGPT to WordPress doesn’t mean handing over your website to AI. It simply means using ChatGPT as a support tool to reduce manual work. Your website still works the same way: - WordPress handles design, structure, and performance - ChatGPT helps with content, responses, and repetitive tasks ![chatgpt integration - Add ChatGPT to WordPress](https://serveravatar.com/wp-content/uploads/2026/03/image-144.png) Some integrations are visible, such as chatbots. Others work quietly in the background, such as content generation. Both are useful. ### What Can You Actually Do with ChatGPT in WordPress? ChatGPT can support a wide range of everyday tasks on your website, from content creation to user interaction. It helps simplify workflows and reduces the time spent on repetitive work. - **Write blog drafts and page content:** Quickly generate structured content for your site. - **Generate product descriptions:** Create engaging and informative product details. - **Add chatbots for customer queries:** Provide instant assistance to visitors. - **Create SEO meta descriptions and FAQs:** Improve content visibility and structure. - **Automate repetitive responses:** Save time by handling recurring queries automatically. - **Assist with small code snippets:** Get help with basic development tasks. You don’t need to use everything. Most websites benefit by starting with just one use case. ## Why Add ChatGPT to Your WordPress Site? As your website grows, managing content and user interactions becomes more demanding. ChatGPT helps you scale your efforts without increasing your workload. **Key Benefits** - **Faster content creation:** Produce content more quickly with AI assistance. - **Instant responses to users:** Provide real-time replies to visitor queries. - **Improved engagement:** Keep users active and interested on your site. - **Consistent output across pages:** Maintain a uniform tone and structure. - **Reduced manual workload:** Minimize repetitive tasks and save time. It doesn’t replace human input, it just gives you a better starting point. ## Different Ways to Add ChatGPT to WordPress There are multiple ways to integrate ChatGPT depending on your technical comfort and requirements. Each method provides different level of control and flexibility. - **Plugin-based (easy and quick):** Simple setup with minimal effort. - **API-based (flexible and powerful):** Greater control over functionality. - **Automation-based (workflow-focused):** Ideal for task automation. Let’s go through each method step by step. ### Method 1: Add ChatGPT Using a WordPress Plugin Plugins are the most accessible way to get started. They connect WordPress with ChatGPT in the background and allow you to work directly from the dashboard. **Basic Setup Steps:** - Navigate to the WordPress dashboard, and go to the **Plugins >> Add plugins** section. - Search for any compatible plugin as per your preference. **Popular ChatGPT Plugins:** Different plugins focus on different tasks. - **AI Power:** Covers multiple AI-based tasks - **WooCommerce AI plugins:** Assist with product-related content - **AI Engine:** Supports content and chatbot features - **WPForms with ChatGPT:** Helps with automated responses - **WP Chatbot:** Great for customer support - **ChatBot with GPT:** Simple setup and clean UI Choosing a plugin depends on what you want to simplify, not how many features it offers. - Install and activate the plugin ![install and activate plugin - Add ChatGPT to WordPress](https://serveravatar.com/wp-content/uploads/2026/03/image-145.png) - Add your API key and Configure where it should work, and test basic functionality.[](https://storage.3.basecamp.com/5840738/blobs/9c206554-21e8-11f1-89da-0242ac120004/download/image.png) ![ai engine - Add ChatGPT to WordPress](https://serveravatar.com/wp-content/uploads/2026/03/image-146.png) This method works well for users who want a quick and simple setup. **Advantages of Plugin-Based Integration** Plugin-based integration is the easiest way to connect ChatGPT with WordPress. It allows you to get started quickly without dealing with technical complexity. - **Quick and beginner-friendly setup:** Get started within minutes. - **No coding required:** Suitable for non-technical users. - **Built-in UI and customization options:** Easily manage settings from the dashboard. - **Works directly from WordPress dashboard:** No external setup needed. **Disadvantages** - **Limited customization compared to API:** Less flexibility for advanced needs. - **Some features may require paid versions:** Full functionality may not be free. - **Performance depends on plugin quality:** Poor plugins can slow your site. **Best Use Cases** - **Adding a chatbot to your website:** Provide instant visitor support. - **Assisting with content writing:** Generate and edit content easily. - **Automating simple user interactions:** Handle basic repetitive tasks. **Why Choose Plugin-Based Integration?** This method is ideal for users who want a fast and simple setup without technical complexity. It allows you to start using ChatGPT features directly from your dashboard with minimal effort. ### Method 2: Add ChatGPT Using OpenAI API If you want more control and flexibility, API integration is the better option. Instead of relying on a plugin, your website communicates directly with ChatGPT. **When Should You Use API Integration?** API integration is suitable when you need more flexibility and control over how ChatGPT works on your site. It is best for custom implementations and advanced use cases. - **You need custom workflows:** Build tailored solutions for your needs. - **Plugin features are too limited:** Go beyond standard plugin capabilities. - **You want full control over responses and logic:** Customize how ChatGPT behaves. **Step-by-Step API Integration Step 1: Get Your API Key** - **Sign up on OpenAI:** Create an account to access API services. - **Generate your API key:** Use it to connect your website with ChatGPT. **Step 2: Add Code to WordPress** - **Use functions.php or create a custom plugin:** Integrate API into your site. - **Store your API key securely:** Protect it from public access. **Step 3: Create a Chat Interface** - **Build a simple chatbox using HTML/CSS:** Design the frontend interface. - **Use JavaScript (AJAX) to send user input:** Connect user queries to the API. **Step 4: Process and Display Responses** - **Send request to ChatGPT:** Send user’s input to API. - **Receive response:** Get generated output. - **Display it in your chat interface:** Show results to users. **Step 5: Test Everything** - **Try different queries:** Check how the system responds. - **Fix formatting or response issues:** Improve output quality. **Advantages of Plugin-Based Integration** API integration gives you more control and flexibility compared to plugins. It is suitable for building customized and scalable solutions. - **Full customization:** Control every aspect of functionality. - **Better control over user experience:** Tailor interactions to your needs. - **More scalable for advanced projects:** Suitable for complex applications. **Disadvantages** - **Requires technical knowledge:** Not beginner-friendly. - **Takes more time to set up:** Needs development effort. **Best Use Cases** - **Custom chatbots:** Build unique interaction systems. - **Dynamic user interactions:** Respond based on real-time input. - **Advanced automation workflows:** Create complex logic-based tasks. **Why Choose API Integration?** - Full customization - Better control over user experience - More scalable for advanced projects ### Method 3: Automate Tasks with ChatGPT Automation tools allow you to connect ChatGPT with actions happening on your website. Instead of manual input, ChatGPT responds automatically based on triggers. - **Uncanny Automator:** Automate WordPress workflows easily. - **Zapier:** Connect apps and automate tasks. - **Make (formerly Integromat):** Build advanced automation scenarios. **Example Use Cases** - **Auto-generate blog summaries after publishing:** Save time on content updates. - **Respond to form submissions automatically:** Provide instant replies. - **Create email replies based on user input:** Automate communication. Automation is ideal for reducing repetitive work. **Real Examples** - Auto-generate blog outlines after publishing - Reply to form submissions instantly - Create email responses automatically Automation works best when tasks repeat regularly. ## Adding a ChatGPT Chatbot to WordPress A chatbot is very popular and most common use cases. It helps when users ask similar questions repeatedly. A chatbot becomes useful when similar queries appear frequently. It can be added through: - **Plugins:** Quick and simple chatbot setup. - **Automation tools:** Connect chatbot responses with workflows. Once configured, it responds based on predefined rules and prompts. ![adding chatgpt chatbot - Add ChatGPT to WordPress ](https://serveravatar.com/wp-content/uploads/2026/03/image-147.png) **When a Chatbot Makes Sense** - **Customer support websites:** Handle frequent user queries. - **eCommerce stores:** Assist customers with product questions. - **Membership platforms:** Guide users through services. **Tips for Better Chatbot Performance** - **Keep answers short and clear:** Improve readability and response quality. - **Define what it should handle:** Set clear boundaries for responses. - **Avoid overcomplicating conversations:** Keep interactions simple. - **Test regularly:** Continuously improve chatbot accuracy. A focused chatbot performs better than a complex one. ## Using ChatGPT for Content and SEO ChatGPT is especially useful for speeding up content creation and improving structure. It helps prepare content efficiently but still requires manual review. **Content Use Cases** - **Blog writing:** Generate draft content quickly. - **Page content creation:** Build structured web pages. - **Product descriptions:** Create engaging product details. **SEO Use Cases** - **Meta descriptions:** Write concise summaries for search engines. - **FAQ generation:** Improve content clarity and relevance. - **Content structuring:** Organize information effectively. ChatGPT helps with preparation, not final optimization. You still need to review everything before publishing. ## Performance and Cost Considerations Using ChatGPT involves API calls, which consume resources and may affect costs. Managing usage properly helps maintain performance. **Best Practices** - **Limit unnecessary API calls:** Avoid excessive requests. - **Use caching to reduce repeated requests:** Improve efficiency. - **Avoid real-time AI processing everywhere:** Use it only where needed. - **Monitor usage regularly:** Keep track of costs and performance. Planning ahead prevents performance issues later. ## Best Practices for Using ChatGPT The effectiveness of ChatGPT depends on how you use it. Clear input and proper monitoring lead to better results. - **Write clear and specific prompts:** Improve output quality. - **Keep instructions short and focused:** Avoid confusion. - **Review outputs before publishing:** Ensure accuracy. - **Monitor usage and performance:** Maintain efficiency. ## Common Mistakes to Avoid Some common mistakes can reduce the effectiveness of ChatGPT. Avoiding them helps maintain quality and performance. - **Publishing content without review:** Always verify output. - **Over-automating interactions:** Keep human control where needed. - **Ignoring performance impact:** Monitor system load. - **Not tracking API usage:** Avoid unexpected costs. Keeping control over the process ensures better results. ## Security and Privacy Considerations Security should always be a priority when using AI tools. Proper setup helps protect user data and maintain trust. - **Avoid sending sensitive data:** Protect user information. - **Use secure API connections:** Ensure safe communication. - **Be transparent with users:** Build trust and credibility. Most risks come from poor setup, not the tool itself. [![Blog banner - ServerAvatar](https://serveravatar.com/wp-content/uploads/2025/09/728_90-Banner-1-1024x127.png)](https://serveravatar.com/?ref=blog)## Use Cases for ChatGPT on WordPress ChatGPT can be applied in different ways depending on your website’s needs. It helps improve both functionality and user experience. - **Customer Support:** Answer FAQs instantly. - **Lead Generation:** Collect user information through interaction. - **Content Creation:** Assist in generating ideas and drafts. - **E-commerce Assistance:** Recommend products and guide users. ## Does ChatGPT Help SEO? ChatGPT does not directly impact search rankings, but it supports factors that improve SEO performance. It helps enhance user experience and content quality. - **Better user engagement:** Keep visitors active on your site. - **Longer session duration:** Encourage users to stay longer. - **Faster content creation:** Publish content more consistently. - **Improved content structure:** Make content easier to read and understand. Search engines reward useful and engaging content, regardless of how it’s created. ## Conclusion Adding ChatGPT to your WordPress website is a practical way to improve how you manage content, handle user queries, and scale your workflow. Whether you choose a simple plugin, a custom API setup, or automation tools, the goal is not to replace human effort but to make your work more efficient. By starting with the right approach and gradually expanding its use, you can create a faster, more interactive, and user-friendly website experience. ## FAQs ### 1. Do I need coding skills to add ChatGPT to WordPress? You can use plugins to integrate ChatGPT without any coding knowledge. API integration is only needed for advanced customization. ### 2. Which method is best for beginners? Plugin-based integration is the easiest and fastest way to get started. ### 3. Is ChatGPT free to use on a WordPress website? ChatGPT integration may be free through plugins, but API usage is usually billed based on how much you use it. ### 4. Will ChatGPT slow down my website? Not if implemented properly. Using caching and limiting unnecessary API calls helps maintain performance. ### 5. Can ChatGPT replace customer support completely? It can handle basic queries efficiently, but human support is still important for complex issues. **Categories:** Blog, Guide, Others, WordPress **Tags:** add chatgpt to wordpress, ai tools for wordpress, chatgpt, chatgpt wordpress integration, Wordpress, wordpress ai chatbot --- ### [How to Automate Your Work Using OpenClaw AI Assistant](https://serveravatar.com/automate-work-using-openclaw-ai/) **Published:** March 16, 2026 **Author:** Meghna Meghwani **Content:** [![Blog banner - ServerAvatar](https://serveravatar.com/wp-content/uploads/2025/09/728_90-Banner-3-1024x127.png)](https://serveravatar.com/?ref=blog)Work can often feel endless. One task leads to another, small jobs pile up, and before you know it, most of your day is gone. A big reason for this is repetition. The same type of writing, planning, sorting, and organizing keeps showing up again and again. That is why many people now look for ways to automate your work using OpenClaw AI Assistant. It helps make everyday tasks easier, faster, and more manageable. OpenClaw is more than just a chatbot or writing assistant. It is a personal AI assistant that can connect with tools, follow instructions, and help automate repeated work. Depending on how you configure it, OpenClaw can assist with content workflows, monitoring, summaries, task organization, internal operations, and routine digital work that usually eats up your time. In this blog, we will look at practical OpenClaw use cases, where automation fits best, and why hosting it on a VPS makes sense for long-term reliability. ## What Is OpenClaw and Why Are People Using It? [OpenClaw](https://openclaw.ai/) is an AI assistant designed to do more than generate text. It can be used to support workflows, process information, organize repeated tasks, and help users automate parts of their digital routine. That is a big reason why interest in tools like OpenClaw is growing. People do not just want answers anymore. They want help with the work itself.[](https://storage.3.basecamp.com/5840738/blobs/15ea93da-210a-11f1-a6fb-0242ac120002/download/image.png) ![openclaw - Automate Your Work Using OpenClaw AI](https://serveravatar.com/wp-content/uploads/2026/03/image-138.png) A personal AI assistant can reduce repetitive effort, assist with task flow, and handle the kinds of small digital jobs that often break concentration. Instead of jumping between tools again and again, users can create a more connected system where OpenClaw supports the process. This can include content tasks, summaries, monitoring, organization, planning, and more. The exact use case depends on how the assistant is configured, what tools it connects to, and how much control the user wants. ### Why Automation Is Becoming Important Many daily tasks follow the same pattern. The wording may change slightly, the format may look different, but the process remains similar. Over time, these repeated actions take up a large part of the day. That is why automation matters. ![importance of automation - Automate Your Work Using OpenClaw AI](https://serveravatar.com/wp-content/uploads/2026/03/image-139.png) Automation helps reduce repeated effort, improve speed, and create more consistency. Instead of spending your energy on the same low-value actions again and again, you can focus on tasks that require attention, creativity, and judgment. For many people, the problem is not only the amount of work. It is the number of small, repetitive tasks hidden inside that work. AI tools can help lighten that load. ### How AI Assistants Help With Daily Tasks AI assistants are useful because they support the flow of everyday work. They help turn rough input into a cleaner output. They can also make work feel less scattered. With OpenClaw AI Assistant, users can often get help with: - **Drafting text:** Helps create written content quickly from a simple idea or prompt. - **Rewriting content:** Improves existing text by changing its wording, tone, or clarity. - **Organizing information:** Arranges scattered details into a more structured and readable format. - **Creating summaries:** Condenses long content into shorter and easier-to-understand points. - **Building outlines:** Creates a clear structure before writing full content. - **Structuring step-by-step plans:** Breaks down a task or process into simple actionable steps. These tasks may seem simple on their own, but together they can consume a lot of time. AI assistance helps speed up these processes while keeping your workflow more manageable. ## Practical Tasks You Can Automate With OpenClaw There are many types of tasks that can be supported by OpenClaw AI Assistant. The easiest place to begin is with work that feels repetitive and time-consuming. Some examples of automation-friendly tasks include: ### 1. OpenClaw for Content Planning and Draft Creation One practical use of OpenClaw is helping with content creation workflows. Coming up with ideas, organizing outlines, and drafting rough content can take a surprising amount of time. OpenClaw can help simplify that early stage by turning broad ideas into more structured output. It can assist with: - **Topic brainstorming:** Generates fresh content or project ideas around a subject. - **Headline suggestions:** Provides title ideas that are clearer, catchier, or more relevant. - **Outline generation:** Builds a basic content framework to guide the writing process. - **First-draft support:** Helps create an initial version of content faster. - **Content structure planning:** Organizes sections and flow to make content more logical. This does not mean the final content should be published without review. But it does make the process faster. Instead of starting from a blank page, you begin with a framework that can be reviewed and improved. For teams that publish regularly, this kind of support helps reduce the time spent on repetitive writing preparation. ### 2. Using OpenClaw to Rewrite and Repurpose Content Creating one piece of content is only part of the work. In many workflows, the same core idea needs to be reshaped for different formats. That is another area where OpenClaw can help. It can take a longer piece of writing and help turn it into: - **Shorter summaries:** Converts detailed content into a compact version with key points. - **Social post drafts:** Adapts content into shorter formats for social media sharing. - **Email copy:** Rewrites the main message into an email-friendly format. - **Alternative wording versions:** Creates different ways to express the same idea. - **Simplified or more polished versions of the same message:** Makes the text either easier to understand or more refined. This makes OpenClaw useful for users who want to get more value from one piece of content without manually rewriting the same idea again and again. Repurposing content is often repetitive but necessary. AI support makes that process lighter. ### 3. Automating Summaries, Notes, and Information Sorting A lot of work today involves information overload. Notes, transcripts, rough drafts, reports, documentation, and internal text can quickly become difficult to manage. OpenClaw can support these workflows by helping organize, summarize, and clean up large pieces of information. Useful tasks may include: - **Turning long notes into short summaries:** Converts lengthy notes into quick and useful overviews. - **Extracting key points:** Pulls out the most important information from detailed content. - **Grouping similar information together:** Sorts related ideas into organized sections. - **Creating structured notes from messy input:** Turns scattered thoughts into clean, usable notes. - **Reducing long text into readable takeaways:** Makes long content easier to scan and understand. This is one of the most practical use cases because it supports many types of work without needing complex automation logic. When information becomes easier to digest, decision-making becomes easier too. ### 4. Using OpenClaw for Internal Task Organization OpenClaw can also support planning and organization. Many users struggle not with the work itself, but with the lack of structure around that work. A large task can feel overwhelming when it is not broken down properly. OpenClaw can help by turning broad goals into: - **Task lists:** Converts big goals into smaller actionable items. - **Step-by-step breakdowns:** Splits a process into a clear sequence of steps. - **Checklists:** Creates simple lists to track completion of tasks. - **Structured workflows:** Organizes tasks into a repeatable working process. - **Organized plans for repeated processes:** Builds reusable plans for tasks that happen regularly. This type of support is useful for solo users and teams alike. It reduces the friction of getting started and helps make workloads feel more manageable. In simple terms, it helps turn mental clutter into a clearer plan. ### 5. OpenClaw for Inbox and Communication Assistance Communication is another area filled with repetition. Messages often follow similar patterns. Questions repeat. Responses need rewriting. Follow-ups get delayed. OpenClaw can help reduce the amount of manual effort involved in these communication-heavy tasks. It can support work such as: - **Drafting replies:** Helps write responses quickly for messages or emails. - **Rewriting messages in a clearer tone:** Improves communication by making messages easier to understand. - **Summarizing long threads:** Shortens lengthy conversations into the main points. - **Creating response templates:** Builds reusable reply formats for common situations. - **Preparing follow-up drafts:** Creates ready-to-send follow-up messages to save time. This is useful because communication often feels small in the moment but adds up quickly across the day. By reducing repeated writing effort, OpenClaw helps save both time and attention. ### 6. Using OpenClaw for Monitoring and Alert-Based Workflows Another strong use case for OpenClaw is support around monitoring-based tasks. In many workflows, users need to stay aware of events, updates, or changes. That could include status checks, repeated observation tasks, or information that needs to be surfaced when it matters. In a server-based environment, OpenClaw can be part of workflows that focus on: - **Status monitoring:** Keeps track of system or service health and activity. - **Report generation:** Helps create structured reports from collected data or events. - **Alert-based summaries:** Summarizes important updates triggered by alerts or warnings. - **Log review support:** Assists in analyzing logs to identify useful patterns or issues. - **System-related notification handling:** Helps manage and organize system notifications more efficiently. This kind of automation works best when OpenClaw is hosted somewhere reliable, because monitoring loses value if the assistant itself is offline when it is needed. That is one more reason a VPS setup matters. ### 7. OpenClaw for Research and Structured Comparisons Research is useful, but it can also be messy and time-consuming. OpenClaw can help organize comparison-based work by turning scattered inputs into structured summaries. When users are reviewing tools, ideas, options, or categories, the assistant can help simplify the process. Possible support areas include: - **Comparison outlines:** Creates a structured format for comparing different options. - **Pros and cons formatting:** Arranges advantages and disadvantages in a simple readable way. - **Summary generation:** Produces concise overviews from larger information sets. - **Readable information grouping:** Organizes related details into easier-to-read sections. - **Turning rough notes into cleaner evaluations:** Refines unorganized notes into clearer assessments. This does not replace human judgment. It supports it. When the basic structure is handled for you, it becomes easier to review, compare, and decide. ### 8. How OpenClaw Reduces Repetitive Work At its core, the biggest value of OpenClaw is simple: **it reduces repetition**. A lot of digital work is not difficult because it is highly complex. It is difficult because it is repeated too often. Small actions, repeated over and over, slowly consume time and mental energy. That includes: - **Rewriting similar content:** Updates repeated content without having to rewrite it manually each time. - **Sorting repeated information:** Organizes recurring data into a cleaner format. - **Organizing common tasks:** Structures routine work so it is easier to manage. - **Drafting recurring responses:** Prepares repeated replies faster for common situations. - **Preparing structured outputs from unstructured input:** Turns rough or messy input into organized results. OpenClaw helps remove some of that weight. It does not replace human thinking, but it can take over the repetitive groundwork so the user can focus on higher-value work. ## How Automation Saves Time and Effort The biggest reason people use automation is simple: **it saves time**. But it also saves something else that matters just as much, mental energy. Repeated tasks can be draining, especially when they do not require deep thinking but still need attention. OpenClaw AI Assistant can help reduce that drain by handling the repetitive structure of a task. You then focus on reviewing, adjusting, and making decisions. That shift is important. It turns your role from doing every small step manually to guiding the process more intelligently. Over time, even small time savings can add up in a meaningful way. ## How to Get Better Results From AI Automation Using an AI assistant well is not about writing long instructions. It is about writing clear instructions. To get better results: - **Be specific about the task:** Clear instructions help the assistant produce more accurate results. - **Mention the tone you want:** Defining tone helps shape the response in the right style. - **Explain the format clearly:** Stating the format makes the output easier to use directly. - **Say what to include and what to avoid:** Adding boundaries improves relevance and accuracy. - **Review the result and refine the request if needed:** Checking and adjusting the prompt helps improve future outputs. A clear input usually leads to a better output. When instructions are too broad, the result may feel generic. The more direction you give, the more useful the response becomes. ## Important Safety Points Before You Automate More Automation is useful, but it should be handled carefully. The more access an AI assistant has, the more important it becomes to define limits clearly. If OpenClaw is connected to files, tools, or system-level functions, permissions should be managed with care. Some important safety practices include: - **Give only the permissions that are actually needed:** Limit access to reduce security risks. - **Review outputs before taking action:** Check results manually before trusting or using them. - **Avoid overly broad access:** Restrict unnecessary access to protect systems and data. - **Use controlled environments:** Test automation in safe setups before wider use. - **Monitor behavior and logs where possible:** Track activity to spot issues early and maintain control. Powerful automation should always be matched with responsible configuration. A helpful assistant should not become a risky one. ## Why OpenClaw Works Better on a VPS OpenClaw can be tested in different environments, but long-term automation usually works better on a VPS. Why? Because automation depends on availability. If your AI assistant needs to stay online, receive requests, process scheduled work, or support ongoing tasks, then it helps to run it in a server environment that is always available. A personal computer is fine for short experiments, but it is not ideal for dependable automation. A VPS offers several advantages: - **Always-on access:** Keeps your assistant available whenever needed. - **Better uptime for long-running workflows:** Supports automation tasks more reliably over time. - **More stable performance:** Provides a steadier environment for consistent operation. - **Dedicated resources:** Gives your setup its own computing power and storage. - **Better control over files, tools, and permissions:** Makes it easier to manage and secure your environment. This matters even more when OpenClaw is part of repeated or important workflows. If the system is meant to work consistently, the hosting environment should be consistent too. ## How ServerAvatar Simplifies OpenClaw Hosting Firstly, OpenClaw is running on a VPS; the next challenge is server hosting and management. That is where ServerAvatar can make the setup and management process easier. Instead of handling everything manually, ServerAvatar helps simplify the way you host and manage your VPS environment. It gives you a cleaner way to manage server-related tasks so you can spend less time dealing with infrastructure and more time focusing on your OpenClaw workflows. **What is ServerAvatar?** [ServerAvatar](https://serveravatar.com/) is a platform to simplify the hosting and management of servers and applications. It simplifies the process of deploying and managing PHP and Node.js based web applications on servers. ![ServerAvatar Dashboard - Automate Your Work Using OpenClaw AI](https://serveravatar.com/wp-content/uploads/2026/03/image-140.png) With ServerAvatar, users can manage their server environment more comfortably through a dashboard instead of relying only on manual system administration. This is especially useful for developers, agencies, founders, and users who want control without making server management harder than it needs to be. If you are still setting up OpenClaw, you can follow our step-by-step guide on how to [install and configure OpenClaw on a VPS](https://serveravatar.com/install-openclaw-vps/#what-is-openclaw). It covers the setup process clearly and helps you get started faster. ## Why Reliable Hosting Matters for AI Automation A personal AI assistant becomes much more useful when it is dependable. That is why hosting matters. If OpenClaw is going to support repeated workflows, summaries, monitoring, or structured tasks, it needs a hosting environment that stays available. Otherwise, automation becomes inconsistent, and inconsistent automation is hard to trust. ![hosting matters - Automate Your Work Using OpenClaw AI](https://serveravatar.com/wp-content/uploads/2026/03/image-141.png) Reliable hosting supports: - Stable task execution - Better uptime for long-running workflows - Improves reliability - A stronger foundation for future automation This is where pairing OpenClaw with a VPS and managing it through ServerAvatar creates a practical advantage. You get the flexibility of hosting your own AI assistant while also making server management simpler and more organized. ## Common Mistakes to Avoid with OpenClaw When users first start automating with OpenClaw, a few common mistakes usually appear. One is trying to automate too much too soon. Another is using vague instructions and expecting precise results. Some users also forget to review outputs, which can create avoidable errors. Common mistakes include: - **Starting with too many permissions:** Giving too much access too early can create unnecessary risks. - **Building workflows without testing them properly:** Untested workflows can lead to avoidable errors. - **Skipping review of generated outputs:** Not checking results can cause quality or accuracy issues. - **Trying advanced automation before mastering basic tasks:** Starting too complex can make setup harder and less reliable. - **Focusing on complexity instead of usefulness:** Simple, practical automation often works better than overly complicated setups. The best approach is usually the simplest one. Start with small, low-risk tasks and expand only when the results are stable and predictable. [![Blog banner - ServerAvatar](https://serveravatar.com/wp-content/uploads/2025/09/728_90-Banner-1-1024x127.png)](https://serveravatar.com/?ref=blog)## Why Human Review Still Matters AI can help speed up work, but it should not replace judgment. Human review remains important because people understand meaning, tone, purpose, and context in a deeper way. OpenClaw AI Assistant may help create structure, wording, or summaries, but you are still the one responsible for the final result. That is why the best way to use AI is as a helper. Let it handle the repeated groundwork. Then use your own thinking to review, improve, and finalize the output. This balance keeps the work both efficient and reliable. ## The Long-Term Value of AI-Assisted Work The value of AI automation goes beyond speed. It also improves the way work feels. When repetitive tasks become easier to manage, work becomes less exhausting. When planning becomes clearer, progress becomes easier to see. When writing starts with structure, the blank-page struggle becomes smaller. That is the long-term value of tools like OpenClaw AI Assistant. They do not just help you do more. They help you work in a way that feels more organized, less stressful, and more sustainable over time. ## Conclusion OpenClaw AI Assistant can make daily work easier by helping with content creation, summaries, planning, communication, monitoring, and other repetitive tasks. The real benefit of automation is not just doing things faster, but reducing mental load and creating a smoother workflow. When combined with ServerAvatar, reliable hosting, and a management platform, OpenClaw becomes even more practical for long-term use. Start with simple tasks, review results carefully, and expand your automation gradually as your workflow becomes more stable. ## FAQs ### 1. What is OpenClaw AI Assistant used for? OpenClaw AI Assistant is used to help automate repetitive digital tasks such as drafting, rewriting, summarizing, organizing information, planning workflows, and supporting monitoring-based tasks. ### 2. Can OpenClaw replace human work completely? OpenClaw is best used as a support tool. It can speed up repetitive tasks and create structured output, but human review is still important for accuracy, tone, and decision-making. ### 3. Why should I host OpenClaw on a VPS? A VPS provides better uptime, stability, and control. This makes it more suitable for long-running or always-available automation workflows. ### 4. Is OpenClaw useful for content creation? OpenClaw can help with brainstorming, outline generation, first drafts, rewriting, repurposing content, and summarizing long text. ### 5. How does ServerAvatar help with OpenClaw hosting? ServerAvatar helps simplify VPS and application hosting and management through a user-friendly dashboard, making it easier to host and manage OpenClaw without relying entirely on manual server administration. **Categories:** Blog, Guide, Linux, Others, Ubuntu **Tags:** AI productivity tools, automate your work, OpenClaw, OpenClaw AI Assistant, Task Automation, workflow automation --- ### [How to Stop Contact Form Spam in WordPress](https://serveravatar.com/contact-form-spam-in-wordpress/) **Published:** March 14, 2026 **Author:** Meghna Meghwani **Content:** [![Blog banner - ServerAvatar](https://serveravatar.com/wp-content/uploads/2025/09/728_90-Banner-3-1024x127.png)](https://serveravatar.com/?ref=blog)Running a website is exciting. You publish content, connect with visitors, and build relationships through features like contact forms. But if you’ve owned a website long enough, you’ve probably experienced a frustrating problem: spam messages flooding your WordPress contact form. Many website owners struggle to stop contact form spam in WordPress, as automated bots continuously submit fake messages, promotional links, or suspicious content. If left unchecked, these spam submissions can clutter your inbox and make it harder to find genuine inquiries from real visitors. One day your inbox contains genuine messages from customers, and the next day it’s filled with dozens, or even hundreds, of fake submissions. These spam messages are usually generated by automated bots trying to advertise shady products, send malicious links, or test vulnerabilities. The good news? Stopping spam in WordPress contact forms is easier than you think. With the right tools, settings, and best practices, you can drastically reduce or even eliminate spam submissions. In this guide, we’ll explore practical methods that anyone can implement, even if you’re not a technical expert. ## What Is Contact Form Spam in WordPress? Contact form spam happens when automated programs (bots) submit fake messages through your website forms. These messages often include: - Random text - Suspicious links - Promotional content - Malware attempts ![Stop Contact Form Spam](https://serveravatar.com/wp-content/uploads/2026/03/image-106.png) Bots scan thousands of websites looking for vulnerable forms they can exploit. Instead of a real person typing a message, a script automatically fills your form and submits it repeatedly. If your form lacks protection, it becomes an easy target. ### Why Spam Bots Target Contact Forms **You might wonder:** Why would anyone target my website? The truth is, spam bots don’t target specific websites, they target thousands at once. Below are common reasons bots attack contact forms: - **SEO manipulation:** Spammers try to place links to boost their own websites. - **Advertising scams:** Bots send promotional messages for fake products. - **Security testing:** Some bots test websites for vulnerabilities. - **Email harvesting:** Attackers try to collect email responses from site owners. Because WordPress powers a huge portion of the internet, it naturally becomes a prime target for bots. ### Signs Your WordPress Contact Form Is Receiving Spam Not sure if spam is affecting your website? Watch for these warning signs: - **Sudden increase in form submissions:** You start receiving dozens of emails daily. - **Messages with random text:** Spam often contains meaningless sentences. - **Links in messages:** Many spam messages include suspicious URLs. - **Repeated keywords or promotions:** Messages advertising SEO services, crypto, or adult sites. - **Submissions at unusual hours:** Bots can send messages every minute, even at midnight. If you notice these patterns, it’s time to strengthen your contact form security. ### Why You Need Form Spam Protection If you run a website, your contact form is one of the easiest ways for visitors to reach you. It helps customers ask questions, request services, or share feedback. However, without proper protection, that same form can quickly become a target for spam bots. ![stop Contact Form Spam and protection ](https://serveravatar.com/wp-content/uploads/2026/03/image-107.png) Form spam protection is important because it keeps your website communication clean, secure, and manageable. When bots start submitting fake messages, your inbox can get flooded with useless emails. This makes it harder to spot genuine inquiries from real users who actually need your help. Some spam messages include suspicious links or malicious content that may attempt to exploit vulnerabilities. Adding proper spam protection acts like a security filter for your website. It allows genuine visitors to contact you while automatically blocking bots and unwanted submissions. In simple terms, it keeps your contact form working the way it should, for real people, not automated spam scripts. ## Methods to Stop Contact Form Spam in WordPress There are several practical ways to reduce or completely stop spam submissions in WordPress contact forms. Some methods use hidden fields, while others rely on verification tools or plugins that automatically filter suspicious activity. The best part is that most of these methods protect your form without making it difficult for real visitors to use. Let’s explore the most reliable techniques you can implement today. ### Method 1: Add CAPTCHA Verification CAPTCHA verification helps distinguish between real visitors and automated scripts. While older CAPTCHA systems required users to solve puzzles or identify images, modern verification methods run quietly in the background. Invisible verification tools provide strong protection while keeping the user experience smooth. Two of the most commonly used CAPTCHA solutions are Cloudflare Turnstile and Google reCAPTCHA v3. **Option 1: Cloudflare Turnstile** Cloudflare Turnstile is a privacy-focused CAPTCHA alternative. Instead of asking visitors to solve challenges, it runs small background checks in the browser to verify that the visitor is human. The process happens automatically while the visitor interacts with the page, making it both user-friendly and highly effective against bots. **How to Add Cloudflare Turnstile to WordPress Forms** - Log in to your Cloudflare dashboard. - Create a new Turnstile key for your domain. - Copy the Site Key and Secret Key generated by Cloudflare.[](https://storage.3.basecamp.com/5840738/blobs/a24fbf94-1f93-11f1-8f34-0242ac120003/download/image.png) ![cloudflare turnstile - Stop Contact Form Spam](https://serveravatar.com/wp-content/uploads/2026/03/image-108.png) - Open your WordPress admin dashboard. - Navigate to your form plugin’s settings >> CAPTCHA. - Choose Turnstile as the verification method. - Paste the keys into the required fields. - Add the Turnstile field to the form and save the changes. [](https://storage.3.basecamp.com/5840738/blobs/b36dae12-1f93-11f1-92b2-0242ac120003/download/image.png) ![enable turnstile - Stop Contact Form Spam](https://serveravatar.com/wp-content/uploads/2026/03/image-109.png) - Now, navigate to the WPForms section and edit.[](https://storage.3.basecamp.com/5840738/blobs/c15fdd14-1f94-11f1-9b4b-0242ac120002/download/image.png) ![edit form - Stop Contact Form Spam](https://serveravatar.com/wp-content/uploads/2026/03/image-110.png) - Navigate to the Fields section and search for Turnstile, and add it by clicking on it. - Click on the OK button to enable it for the form. ![enabled turnstile - Stop Contact Form Spam](https://serveravatar.com/wp-content/uploads/2026/03/image-111.png) Once enabled, the system will automatically analyze visitor behavior and block suspicious submissions. Check out the detailed blog on [How to add CAPTCHA in WordPress](https://serveravatar.com/wordpress-captcha-setup/) by reviewing the following link: **Option 2: Google reCAPTCHA v3** Google reCAPTCHA v3 works differently from earlier versions. Instead of asking visitors to check a box or solve a puzzle, it evaluates their behavior on your website. Each visitor receives a risk score based on how they interact with your page. If the score indicates bot-like behavior, the form submission can be blocked or flagged. **Steps to Configure Google reCAPTCHA v3** - Visit the Google reCAPTCHA Admin Console and register your website. - Enter the Label you want to give, select Score based reCAPTCHA v3, and submit it. ![google recaptcha - Stop Contact Form Spam](https://serveravatar.com/wp-content/uploads/2026/03/image-112.png) - Copy the provided Site Key and Secret Key. ![copy key - Stop Contact Form Spam](https://serveravatar.com/wp-content/uploads/2026/03/image-113.png) - Go to your WordPress dashboard, and navigate to the WPForms >> Settings. - Navigate to the CAPTCHA integration section and select reCAPTCHA. - Select reCAPTCHA v3 as a type. - Paste your Site Key and Secret key copied before. - Click on the Save Settings button.[](https://storage.3.basecamp.com/5840738/blobs/56339f68-1f98-11f1-b8c1-0242ac120004/download/image.png) ![google recaptcha - Stop Contact Form Spam](https://serveravatar.com/wp-content/uploads/2026/03/image-115.png) - Now, enable reCAPTCHA on your contact form. - Navigate to the WPForms >> All Forms section and click on Edit. ![edit form - Stop Contact Form Spam](https://serveravatar.com/wp-content/uploads/2026/03/image-116.png) - Navigate to the Fields section and search for reCAPTCHA, and add it by clicking on it. - Click on the OK button to enable it for the form.[](https://storage.3.basecamp.com/5840738/blobs/eb4deaf4-1f98-11f1-a039-0242ac120003/download/image.png) ![enabled google recaptcha - Stop Contact Form Spam](https://serveravatar.com/wp-content/uploads/2026/03/image-117.png) This method protects your forms while remaining completely invisible to users. ### Method 2: Use Honeypot Fields The honeypot technique is one of the simplest yet most effective ways to stop spam bots. It works by placing a hidden field inside your form that normal visitors cannot see. Since automated bots scan the form code and try to fill every field they find, they often fill this hidden field as well. When that happens, the system instantly recognizes the submission as spam and blocks it. This approach works silently in the background, so users never have to solve puzzles or click images. **How to Enable Honeypot Protection (Using WPForms)** - Log in to your WordPress dashboard, and navigate to WPForms >> All Forms. ![wpforms - Stop Contact Form Spam](https://serveravatar.com/wp-content/uploads/2026/03/image-118.png) - Locate the form you want to protect and click Edit. ![edit form - Stop Contact Form Spam](https://serveravatar.com/wp-content/uploads/2026/03/image-119.png) - Inside the form builder, navigate to Settings and Select Spam Protection and Security. - Turn on Modern Anti-Spam Protection. - Save your changes. ![settings - Stop Contact Form Spam](https://serveravatar.com/wp-content/uploads/2026/03/image-120.png) If you use other form plugins like Gravity Forms or Contact Form 7, they usually include honeypot protection in their security or spam settings. ### Method 3: Set a Minimum Submission Time Spam bots submit forms extremely fast, often within milliseconds. Humans, on the other hand, need a few seconds to read the form fields and type their message. By setting a minimum time requirement, you can automatically block submissions that arrive too quickly. Any form sent before the required time limit is flagged as suspicious and rejected. **Steps to Enable Minimum Submission Time** - Log in to your WordPress dashboard, and navigate to WPForms >> All Forms. ![enable minimum submission time - Stop Contact Form Spam](https://serveravatar.com/wp-content/uploads/2026/03/image-121.png) - Locate the form you want to protect and click Edit. ![edit form - Stop Contact Form Spam](https://serveravatar.com/wp-content/uploads/2026/03/image-122.png) - Inside the form builder, navigate to Settings >> Spam Protection and Security. - Turn on Modern Anti-Spam Protection. - Enable the option Minimum Time to Submit, and set the time limit to 3–4 seconds. - Save the form. ![settings - Stop Contact Form Spam](https://serveravatar.com/wp-content/uploads/2026/03/image-123.png) Now, if a bot tries to submit the form instantly, the system will block the request before it gets stored in your database. ### Method 4: Block Disposable Email Addresses Spam bots frequently use temporary or disposable email services to bypass email validation. These email addresses are created quickly and discarded after use. Blocking these domains can significantly reduce fake form submissions. **Steps to Block Disposable Emails** - Navigate to your WordPress dashboard, and locate the form you want to protect and click Edit.[](https://storage.3.basecamp.com/5840738/blobs/806f79e2-1f92-11f1-9bd0-0242ac120002/download/image.png) ![edit form - Stop Contact Form Spam](https://serveravatar.com/wp-content/uploads/2026/03/image-124.png) - Navigate to the Field section and click on the **Email**. ![email settings - Stop Contact Form Spam](https://serveravatar.com/wp-content/uploads/2026/03/image-126.png) - Navigate to the **Advanced Settings** section. - Select the **Denylist** option. - Add disposable email domains such as: ``` *@mail.ru *@yopmail.com ``` ``` *@mail.ru *@yopmail.com ``` - Save your changes. ![save settings - edit form - Stop Contact Form Spam](https://serveravatar.com/wp-content/uploads/2026/03/image-127.png) Any submission using these domains will automatically fail validation and will not be accepted. ### Method 5: Install an Anti-Spam Plugin Basic form protections like honeypots and time limits are helpful, but they may not stop all advanced bots. A dedicated anti-spam plugin provides stronger protection by connecting your website to large databases that track spam activity across millions of websites. Incoming submissions are analyzed using these databases before reaching your site. Below are some widely used anti-spam plugins for WordPress. #### 1. Akismet Anti-Spam Akismet is one of the most popular spam filtering tools available for WordPress. It checks every submission against a global database of known spam patterns. If a message matches suspicious activity, it is automatically filtered or stored separately for review. **How to Set Up Akismet** - Navigate to **Plugins >> Add Plugin** section, and search for **Akismet**. - Install and activate the **Akismet plugin**.[](https://storage.3.basecamp.com/5840738/blobs/b456053e-1f9a-11f1-9bb9-0242ac120002/download/image.png) ![akismet anti spam - Stop Contact Form Spam](https://serveravatar.com/wp-content/uploads/2026/03/image-128.png) - Create or log in to your Akismet account, copy your API key from the Akismet dashboard. - Paste the API key into the plugin settings in WordPress. - Enable Akismet integration inside your contact form plugin. Once activated, Akismet continuously scans form submissions and blocks suspicious ones. #### 2. Anti-Spam by CleanTalk CleanTalk works by filtering spam traffic through an external service before it reaches your website. Instead of letting your server process every request, CleanTalk checks submissions remotely and blocks malicious traffic instantly. This approach reduces server load while improving spam detection. **Steps to Configure CleanTalk** - Navigate to **Plugins >> Add Plugin** section, and search for **Anti-Spam by CleanTalk**. - Install and activate the **Anti-Spam plugin.**[](https://storage.3.basecamp.com/5840738/blobs/58379208-1f9b-11f1-ac22-0242ac120003/download/image.png) ![antispam - Stop Contact Form Spam](https://serveravatar.com/wp-content/uploads/2026/03/image-129.png) - Navigate to the plugin settings from your WordPress dashboard, and click on the **Get Access Key** to generate your authentication key. ![configure antispam - Stop Contact Form Spam](https://serveravatar.com/wp-content/uploads/2026/03/image-130.png) - Confirm that protection is active across your forms, and save the settings. Once configured, CleanTalk starts filtering submissions automatically. #### 3. Antispam Bee Antispam Bee is another effective plugin that focuses on privacy. Unlike some spam filtering tools, it does not send visitor data to external servers. Instead, it analyzes submissions locally using factors like IP validation and submission behavior. **How to Configure Antispam Bee** - Navigate to **Plugins >> Add Plugin** section, and search for **Antispam Bee**. - Install and activate the **Antispam Bee.** ![antispam bee - Stop Contact Form Spam](https://serveravatar.com/wp-content/uploads/2026/03/image-131.png) - Enable filters such as **Trust Approved Commenters** and **Local Spam Database**. ![configure antispam bee - Stop Contact Form Spam](https://serveravatar.com/wp-content/uploads/2026/03/image-132.png) - Save the settings. - You can also configure advanced options like **automatic spam deletion** after a certain number of days. This plugin is especially useful for websites that must comply with strict privacy regulations. ### Method 6: Filter Spam Keywords Spam messages often contain certain keywords or promotional phrases. By blocking these words, you can prevent many spam submissions from ever reaching your inbox. WordPress includes a built-in moderation system that allows you to block specific words, URLs, or IP addresses. **How to Block Keywords in WordPress** - Go to **Settings >> Discussion** section in your WordPress dashboard.[](https://storage.3.basecamp.com/5840738/blobs/9b445c90-1f9e-11f1-bafd-0242ac120003/download/image.png) ![discussion - Stop Contact Form Spam](https://serveravatar.com/wp-content/uploads/2026/03/image-133.png) - Scroll to the **Disallowed Comment Keys** section. Enter words, URLs, or IP addresses you want to block. - Add each entry on a new line. - Save your changes once you have added. ![save discussion - Stop Contact Form Spam](https://serveravatar.com/wp-content/uploads/2026/03/image-134.png) Many form plugins also provide keyword filtering inside their spam protection settings. If you’re using WPForms, the keyword filtering feature is configured individually for each form, not across the entire site. Here’s how to set it up: - Click on the Edit for the form you want to edit and navigate to **Settings >> Spam Protection and Security**. - Turn on the **Keyword Filter** option (this feature requires the **Pro version**). - Enter the keywords you want to block, separating each word with a comma. - Click **Save** to apply the changes. ![keyword protection - Stop Contact Form Spam](https://serveravatar.com/wp-content/uploads/2026/03/image-136.png) Once enabled, any submissions containing those specified keywords will be automatically blocked. ## Additional Tips to Prevent WordPress Contact Form Spam Even after implementing the main spam protection methods, there are a few extra precautions that can help keep your forms secure. Small improvements in your website’s security setup can make a big difference in preventing automated bots from reaching your forms. Consider using a website firewall or security plugin that monitors incoming traffic and blocks suspicious requests before they reach your contact form. These tools work like a security guard for your website, identifying unusual activity and stopping it instantly. Another helpful practice is keeping your WordPress core, plugins, and themes updated. Updates often include security improvements that protect your website from newly discovered vulnerabilities. Finally, regularly review your form submissions and spam filters. Monitoring activity helps you detect unusual patterns early and adjust your spam protection settings when necessary. [![Blog banner - ServerAvatar](https://serveravatar.com/wp-content/uploads/2025/09/728_90-Banner-1-1024x127.png)](https://serveravatar.com/?ref=blog)## Best Practices for Managing WordPress Contact Forms A well-managed contact form not only prevents spam but also improves the overall communication experience for your visitors. Start by keeping your form simple and focused. Only ask for the information you truly need. Shorter forms are easier for real users to complete and less attractive to automated bots. You can also add clear validation rules, such as limiting the number of links allowed in a message or restricting certain file types in uploads. These small adjustments reduce the chances of spam slipping through. Additionally, make sure your contact form sends notifications to a monitored email address so you can respond to legitimate inquiries quickly. When real visitors receive timely replies, it strengthens trust and improves the credibility of your website. ## Conclusion Spam submissions in WordPress contact forms can quickly become frustrating, but the good news is that they are manageable with the right approach. By implementing techniques like CAPTCHA verification, honeypot fields, minimum submission time limits, keyword filtering, and reliable anti-spam plugins, you can significantly reduce unwanted messages. These methods work together to block automated bots while keeping the form simple and accessible for genuine visitors. With proper spam protection in place, your contact form will remain a useful communication tool that allows real users to reach you without the distraction of constant spam. ## FAQs ### 1. Why do WordPress contact forms receive so much spam? WordPress contact forms often receive spam because automated bots scan the internet looking for forms they can exploit to send promotional links, advertisements, or malicious content. ### 2. What is the easiest way to stop spam in WordPress contact forms? Adding CAPTCHA verification or enabling honeypot protection is one of the easiest and most effective ways to reduce spam submissions. ### 3. Do anti-spam plugins affect website performance? Most modern anti-spam plugins are optimized for performance and work in the background without significantly affecting website speed. ### 4. Can I completely eliminate contact form spam in WordPress? While it may not be possible to remove spam entirely, using multiple security methods together can drastically reduce spam submissions. ### 5. Is CAPTCHA necessary for every WordPress contact form? CAPTCHA is highly recommended because it helps verify whether the visitor is human, making it much harder for bots to submit spam messages. ## Stop Wasting Time on Servers. Start Building Instead. You didn’t start your project to babysit servers. Let **ServerAvatar** handle deployment, monitoring, and backups — so you can focus on growth. Deploy **WordPress, Laravel, N8N**, and more in minutes. No DevOps required. No command line. No stress. [ 🚀 Try Free ](https://app.serveravatar.com) [ 🌐 Learn More ](https://serveravatar.com/) Trusted by 10,000+ developers and growing. **Categories:** Blog, Guide, Others, Tutorials, WordPress **Tags:** Anti Spam, CAPTCHA, Cloudflare Turnstile, Contact Form, Spam Protection, Stop Contact Form Spam, website security, Wordpress, WordPress Plugins, WordPress Security --- ### [8 Powerful WooCommerce Inventory Management Plugins for Every Store](https://serveravatar.com/woocommerce-inventory-management/) **Published:** March 13, 2026 **Author:** Meghna Meghwani **Content:** [![Blog banner - ServerAvatar](https://serveravatar.com/wp-content/uploads/2025/09/728_90-Banner-3-1024x127.png)](https://serveravatar.com/?ref=blog)Running an online store can feel a lot like managing a busy warehouse. Products are constantly moving in and out, customers are placing orders, and stock levels keep changing. If you don’t keep track of everything properly, things can quickly turn messy. This is where WooCommerce inventory management becomes extremely important. Imagine owning a store where you never know which items are in stock or which ones are running out. Sounds stressful, right? Without proper tracking, you could end up overselling products, disappointing customers, or missing opportunities to restock popular items. Thankfully, WooCommerce inventory management plugins help store owners keep everything organized. They automate stock updates, send alerts when inventory runs low, and make managing products much easier. In this guide, we’ll explore eight powerful WooCommerce inventory management plugins that can help keep your store running smoothly. ## What is Inventory Management in WooCommerce? Inventory management in WooCommerce refers to the process of tracking, organizing, and controlling product stock within an online store. It helps store owners monitor how many items are available, update stock levels after every purchase, and receive alerts when products start running low. Proper inventory management ensures that customers only see products that are available, preventing overselling and order issues. [](https://storage.3.basecamp.com/5840738/blobs/f94504d6-1ecf-11f1-afbe-0242ac120004/download/image.png) ![WooCommerce Inventory Management](https://serveravatar.com/wp-content/uploads/2026/03/image-97.png) WooCommerce includes basic stock tracking features, but many store owners use additional plugins to automate updates, manage large product catalogs, and generate detailed inventory reports. By keeping inventory organized, businesses can maintain smooth operations and deliver a better shopping experience to customers. ### Why Inventory Management Matters in WooCommerce Inventory management is the backbone of every successful online store. When you manage inventory effectively, you can: - Avoid selling products that are out of stock - Know exactly when to reorder items - Reduce storage and inventory costs - Improve customer satisfaction Think of inventory management as the control center of your online store. Without it, you’re essentially flying blind. WooCommerce includes basic inventory features, but growing stores often need advanced tools to automate tasks and manage stock across multiple products. That’s where plugins come in. ### Key Features to Look for in Inventory Plugins Before installing any inventory plugin, it’s important to understand what features matter most. Here are a few essential ones: - **Real-time stock tracking:** Your inventory should update automatically whenever an order is placed. - **Low stock notifications:** Alerts help you restock products before they sell out. - **Bulk product editing:** Managing hundreds of products manually can take hours. - **Multi-warehouse management:** Useful if your store manages stock from multiple locations. - **Reports and analytics:** Detailed reports help you understand product performance. Choosing a plugin with these features can make your WooCommerce store much easier to manage. ## WooCommerce Inventory Management Plugins While WooCommerce includes basic stock management features, they may not be enough as your store begins to grow. This is where WooCommerce inventory management plugins become extremely helpful. Below are eight powerful WooCommerce inventory management plugins that can help simplify inventory tracking and improve the overall efficiency of your online store. ### 1. Smart Manager for WooCommerce [Smart Manager](https://wordpress.org/plugins/smart-manager-for-wp-e-commerce?ref=serveravatar.com) is a powerful WooCommerce plugin that simplifies inventory and store management through a spreadsheet-style interface. Instead of opening products individually, store owners can update multiple products, prices, and stock levels from one screen. This saves time and makes bulk product management much easier. ![Smart Manager for WooCommerce - WooCommerce Inventory Management](https://serveravatar.com/wp-content/uploads/2026/03/image-98.png) **Key Features** - Bulk edit products, prices, and stock - Spreadsheet-style product management - Advanced filtering options - Manage orders, customers, and coupons **Advantages** - Saves time with fast bulk editing - Easy-to-use spreadsheet layout - Works well for large product catalogs - Supports managing multiple store elements **Disadvantages** - Some advanced features require the premium version - May feel complex for beginners at first **Best for** Stores with large product catalogs that need quick bulk inventory updates. ### 2. ATUM Inventory Management for WooCommerce [ATUM](https://wordpress.org/plugins/atum-stock-manager-for-woocommerce?ref=serveravatar.com) is widely used inventory management plugins for WooCommerce. It offers a clean and organized dashboard that gives store owners a complete overview of stock levels, suppliers, and product performance. ![ATUM - WooCommerce Inventory Management](https://serveravatar.com/wp-content/uploads/2026/03/image-99.png) **Key Features** - Centralized inventory dashboard - Supplier management tools - Purchase order tracking - Detailed stock reports and analytics **Advantages** - Modern and user-friendly interface - Provides detailed inventory insights - Strong reporting and tracking tools - Regular updates and improvements **Disadvantages** - Advanced modules require paid add-ons - It can overwhelming for small stores with simple need **Best for** Store owners who want advanced inventory insights and supplier management tools. ### 3. WooCommerce Stock Manager [WooCommerce Stock Manager](https://wordpress.org/plugins/woocommerce-stock-manager?ref=serveravatar.com) is a straightforward plugin designed to simplify product stock management. It allows store owners to view and edit inventory for multiple products from a single dashboard. ![WooCommerce Stock Manager - WooCommerce Inventory Management](https://serveravatar.com/wp-content/uploads/2026/03/image-100.png) **Key Features** - Manage stock for simple and variable products - Bulk edit product quantities - Track stock history and updates - Filter and search products easily **Advantages** - Simple and easy to use - Lightweight plugin that runs smoothly - Allows fast bulk inventory updates - Suitable for small and medium stores **Disadvantages** - Limited advanced inventory features - Not ideal for complex inventory systems **Best for** Small to medium WooCommerce stores needing basic and easy stock management. ### 4. Stock Sync for WooCommerce [Stock Sync](https://wordpress.org/plugins/stock-sync-for-woocommerce?ref=serveravatar.com) for WooCommerce helps store owners automatically synchronize inventory data from external sources. It allows stock updates through CSV or XML files, making it ideal for businesses working with suppliers or dropshipping partners. ![Stock Sync for WooCommerce - WooCommerce Inventory Management](https://serveravatar.com/wp-content/uploads/2026/03/image-101.png) **Key Features** - Automatic inventory synchronization - CSV and XML file import support - Scheduled stock updates - Integration with external inventory systems **Advantages** - Reduces manual inventory updates - Saves time with automated synchronization - Works well with supplier inventory files - Useful for dropshipping businesses **Disadvantages** - Requires correct file formatting - Limited built-in analytics tools **Best for** Stores that import stock data from suppliers or external systems. ### 5. WP Inventory Manager [WP Inventory Manager](https://wordpress.org/plugins/wp-inventory-manager?ref=serveravatar.com) is a flexible inventory solution designed for businesses that need custom inventory tracking beyond typical WooCommerce products. It allows users to manage specialized items, equipment, or unique product categories. ![WP Inventory Manager - WooCommerce Inventory Management](https://serveravatar.com/wp-content/uploads/2026/03/image-102.png) **Key Features** - Custom inventory fields and attributes - Product category organization - Item tracking and management - Simple and flexible interface **Advantages** - Highly customizable inventory fields - Works for different types of inventory items - Easy product categorization - Flexible inventory setup **Disadvantages** - Limited WooCommerce-specific automation - May require configuration for advanced use cases **Best for** Businesses that need custom inventory tracking for unique products or assets. ### 6. Veeqo Inventory Management [Veeqo](https://wordpress.org/plugins/veeqo-for-woocommerce/) is an advanced inventory management platform designed for multi-channel eCommerce businesses. It connects WooCommerce with other marketplaces and keeps inventory synchronized across platforms while also simplifying order fulfillment. ![Veeqo Inventory Management - WooCommerce Inventory Management](https://serveravatar.com/wp-content/uploads/2026/03/image-103.png) **Key Features** - Multi-channel inventory synchronization - Shipping and order management tools - Advanced analytics and reports - Warehouse inventory tracking **Advantages** - Supports selling across multiple platforms - Combines inventory and shipping management - Provides powerful analytics - Improves order fulfillment efficiency **Disadvantages** - Can be complex for beginners - Pricing may be higher for small businesses **Best for** Large eCommerce stores selling on multiple platforms and managing high order volumes. ### 7. Multi Location Product & Inventory Management for WooCommerce [Multi Locations Inventory Management](https://wordpress.org/plugins/multi-location-product-and-inventory-management?ref=serveravatar.com) plugin helps WooCommerce stores manage stock across multiple warehouses or physical locations. Store owners can assign inventory quantities to different locations and track product availability separately for each one. ![Multi Location - WooCommerce Inventory Management](https://serveravatar.com/wp-content/uploads/2026/03/image-104.png) **Key Features** - Manage inventory across multiple locations - Assign stock to different warehouses - Location-based stock tracking - Easy inventory updates for each location **Advantages** - Ideal for businesses with multiple warehouses - Improves order fulfillment accuracy - Provides better stock visibility - Helps manage regional inventory distribution **Disadvantages** - Setup can take time for new users - Advanced features may require a paid version **Best for** Businesses managing inventory across multiple warehouses or storage locations. ### 8. Product Import Export for WooCommerce [Product Import Export](https://wordpress.org/plugins/product-import-export-for-woo/?ref=serveravatar.com) for WooCommerce allows store owners to import or export product data in bulk, including stock quantities. It simplifies inventory updates when dealing with large product catalogs or supplier data files. ![Product Import Export - WooCommerce Inventory Management](https://serveravatar.com/wp-content/uploads/2026/03/image-105.png) **Key Features** - Import and export product inventory using CSV files - Bulk update product stock and details - Scheduled product data imports - Easy migration between WooCommerce stores **Advantages** - Saves time with bulk product updates - Simplifies product migration and backups - Works well with supplier product files - Reduces manual data entry errors **Disadvantages** - Requires CSV knowledge for beginners - Not a full inventory management system on its own **Best for** Store owners who frequently update product data in bulk or import supplier inventory files. ## Quick Comparison of WooCommerce Inventory Management Plugins Choosing the right inventory plugin can make a big difference in how efficiently you manage your WooCommerce store. The table below provides a quick comparison of the plugins discussed in this guide to help you find the best option for your needs. **Plugin****Key Strength****Automation Level****Multi-Location Support****Best For****Smart Manager for WooCommerce**Spreadsheet-style bulk editingMediumNoStores with large product catalogs**ATUM Inventory Management**Advanced inventory dashboard and reportingHighYes (with add-ons)Stores needing detailed inventory insights**WooCommerce Stock Manager**Simple bulk stock editingLow–MediumNoSmall to medium stores**Stock Sync for WooCommerce**Automatic stock synchronization via filesHighLimitedDropshipping and supplier-based stores**WP Inventory Manager**Custom inventory trackingMediumLimitedBusinesses managing special inventory types**Veeqo Inventory Management**Multi-channel inventory and shipping managementVery HighYesLarge multi-channel eCommerce businesses**Multi Location Product & Inventory Management**Multi-warehouse inventory controlHighYesStores with multiple storage locations**Product Import Export for WooCommerce**Bulk product import/export via CSVMediumNoStores frequently updating inventory in bulk## How to Choose the Right Inventory Plugin Choosing the right inventory plugin is important for keeping your WooCommerce store organized and efficient. Since every online store has different needs, the best plugin will depend on factors like store size, sales channels, and the level of automation required. When choosing a WooCommerce inventory management plugin, consider: - **Store size:** Small stores may only need basic stock tracking. - **Sales channels:** If you sell on multiple platforms, choose a plugin with multi-channel support. - **Automation features:** Automation reduces manual work and errors. - **Scalability:** Your inventory needs may grow as your business expands. The best plugin is the one that matches your store’s workflow and growth plans. ## Tips to Improve WooCommerce Inventory Control Managing inventory effectively requires more than just installing a plugin. Store owners should also follow smart inventory practices to keep stock levels accurate and avoid operational issues. Here are some useful tips: - **Track inventory regularly:** Always monitor stock levels. - **Use low-stock alerts:** This helps prevent stockouts. - **Analyze sales data:** Identify fast-selling products. - **Avoid overstocking:** Too much inventory increases storage costs. - **Automate repetitive tasks:** Plugins can handle updates automatically. These small improvements can make a big difference in store efficiency. [![Blog banner - ServerAvatar](https://serveravatar.com/wp-content/uploads/2025/09/728_90-Banner-1-1024x127.png)](https://serveravatar.com/?ref=blog)## Common Inventory Mistakes Store Owners Make Inventory problems often happen because of small but common mistakes. When stock is not monitored properly or product data becomes disorganized, it can lead to order issues and lost sales. Here are a few common ones: - **Not tracking stock properly:** Manual tracking often leads to errors. - **Ignoring low stock alerts:** This can lead to lost sales. - **Poor product organization:** Messy product catalogs make management difficult. - **Using too many plugins:** Too many tools can slow down your store. Avoiding these mistakes can save time and improve customer experience. ## Conclusion Managing inventory is a crucial part of running a successful WooCommerce store. When stock levels are tracked properly, store owners can avoid overselling, maintain accurate product availability, and deliver a better shopping experience to customers. While WooCommerce offers basic inventory features, dedicated inventory management plugins provide more advanced tools such as automation, bulk updates, multi-location tracking, and detailed reporting. By choosing the right plugin and following good inventory practices, you can keep your store organized, reduce errors, and ensure your products are always ready for customers. ## FAQs ### 1. Does WooCommerce have built-in inventory management? WooCommerce includes basic inventory management features such as stock tracking, low-stock notifications, and product quantity management. However, many store owners install additional plugins to gain advanced features like bulk editing, automation, and detailed inventory reports. ### 2. Why should I use a WooCommerce inventory management plugin? Inventory plugins help automate stock updates, manage large product catalogs, and provide better visibility into product availability. They also reduce manual work and help prevent issues like overselling or stock shortages. ### 3. Which WooCommerce inventory plugin is best for beginners? Plugins like WooCommerce Stock Manager or Smart Manager for WooCommerce are often suitable for beginners because they offer simple interfaces and allow easy bulk updates for products and stock levels. ### 4. Can WooCommerce manage inventory across multiple warehouses? Certain plugins such as Multi Location Product & Inventory Management for WooCommerce allow store owners to track stock across multiple warehouses or storage locations, making it easier to manage inventory distribution. ### 5. How can I prevent running out of stock in WooCommerce? You can prevent stock shortages by enabling low-stock notifications, monitoring inventory regularly, analyzing sales trends, and using inventory plugins that automate stock tracking and alerts. ## Stop Wasting Time on Servers. Start Building Instead. You didn’t start your project to babysit servers. Let **ServerAvatar** handle deployment, monitoring, and backups — so you can focus on growth. Deploy **WordPress, Laravel, N8N**, and more in minutes. No DevOps required. No command line. No stress. [ 🚀 Try Free ](https://app.serveravatar.com) [ 🌐 Learn More ](https://serveravatar.com/) Trusted by 10,000+ developers and growing. **Categories:** Blog, Guide, Others, Tutorials, WordPress **Tags:** WooCommerce, WooCommerce Inventory Management, WooCommerce Inventory Management Plugins, WooCommerce Plugins, WooCommerce Stock Management, WooCommerce Store Management, Wordpress --- ### [Laravel Validation Rules: How to Create and Use Them](https://serveravatar.com/laravel-validation/) **Published:** March 12, 2026 **Author:** Meghna Meghwani **Content:** [![Blog banner - ServerAvatar](https://serveravatar.com/wp-content/uploads/2025/09/728_90-Banner-3-1024x127.png)](https://serveravatar.com/?ref=blog)Handling user input is a common part of building web applications. When users submit data through forms, APIs, or other interfaces, the application must ensure that the information meets specific requirements before processing it. This is where Laravel Validation becomes essential, as it helps verify that submitted data follows the expected rules before it is accepted by the system. If invalid data enters the system, it can lead to application errors, inconsistent records, or unexpected behavior. This is where Laravel Validation Rules play an important role. Validation rules allow developers to define the conditions that input data must satisfy before it is accepted by the application. Laravel provides a powerful and flexible validation system that makes it easy to enforce these rules. With only a few lines of code, developers can ensure that submitted data follows the expected format, length, or structure. In this guide, we will explore Laravel Validation Rules, how they work, how to create them, and how to use them effectively in Laravel applications. ## Understanding Laravel Validation Rules Laravel Validation Rules define the conditions that input data must meet before the application processes it. These rules ensure that the submitted data follows the expected format and structure. ![Laravel Validation rules](https://serveravatar.com/wp-content/uploads/2026/03/image-95.png) Laravel provides many built-in rules that can validate: - **Required fields:** Ensures that a specific field must be present in the request and cannot be left empty. - **Email format:** Checks whether the entered value follows the correct structure of an email address. - **Numeric values:** Verifies that the input contains only numbers and is treated as a numeric value. - **Minimum or maximum length:** Defines the allowed range for the length or value of the input data. - **Unique database values:** Confirms that the submitted value does not already exist in a specified database table. Developers can apply multiple validation rules to a single field to enforce strict data requirements. Example: ``` 'name' => 'required|string|max:255' ``` ``` 'name' => 'required|string|max:255' ``` This rule means: - The field must be present - The value must be a string - The value must not exceed 255 characters Laravel automatically evaluates these rules when the request is processed. ### Why Validation Is Important in Laravel Applications Validation is a critical part of application development because it ensures that only valid data is accepted by the system. Laravel includes a robust validation system that helps developers verify incoming data before it is processed or stored. By defining validation rules, developers can ensure that inputs follow specific requirements such as format, length, or structure. Without proper validation, applications may encounter issues such as: - **Application errors:** Incorrect data types or missing fields can cause logic failures in the application. - **Database inconsistencies:** Invalid data stored in the database can affect queries and system functionality. - **Security risks:** Unvalidated input may expose the application to malicious or unexpected data. - **Unreliable system behavior:** Applications depend on predictable data formats, and validation ensures consistency. By applying Laravel Validation Rules, developers maintain data quality and system reliability. ### How Laravel Validation Works Laravel validation typically follows a straightforward workflow. - A request containing input data is sent to the application - Validation rules are applied to the request data - Laravel checks whether the data satisfies the defined rules - If validation fails, the application returns error messages - If validation passes, the request proceeds to the next step ![Laravel Validation working](https://serveravatar.com/wp-content/uploads/2026/03/image-96.png) Laravel provides multiple methods for validating data, including: - **Controller validation:** Allows validation rules to be defined directly inside controller methods before processing the request. - **Validator facade:** Provides a flexible way to create validation instances and manually handle validation results. - **Form request validation:** Uses dedicated request classes to organize and manage validation rules separately from controllers. - **Custom validation rules:** Allows developers to create their own validation logic when built-in rules do not meet specific requirements. Each method allows developers to apply validation depending on the complexity of the application. ## Basic Laravel Validation Rules When building applications with Laravel, verifying user input is an essential development step. Laravel simplifies this process by providing a flexible validation system that allows developers to define rules for incoming data. These validation rules ensure that submitted values match the expected format or conditions before the application processes them. Developers can apply these rules directly in controllers, use dedicated Form Request classes, or define custom rule objects for more complex scenarios. Each approach allows validation logic to be implemented efficiently while keeping application code clean and structured. Laravel’s validation system supports a wide variety of rules designed to handle common input validation requirements. Some commonly used rules include: **Rule****Description****required**Ensures the field exists in the request data**numeric**Validates that the value is a number**email**Checks whether the value follows a valid email format**alpha**Allows only alphabetic characters**min**Defines the minimum value or minimum length**max**Defines the maximum allowed value or length**unique**Ensures that the value does not already exist in a database table**confirmed**Requires a matching confirmation field for validation**1) required:** Ensures the field exists and is not empty. ``` 'username' => 'required' ``` ``` 'username' => 'required' ``` **2) email:** Validates that the value follows the correct email format. ``` 'email' => 'required|email' ``` ``` 'email' => 'required|email' ``` **3) min:** Defines the minimum length or numeric value. ``` 'password' => 'required|min:8' ``` ``` 'password' => 'required|min:8' ``` **4) max:** Specifies the maximum allowed length. ``` 'title' => 'required|max:100' ``` ``` 'title' => 'required|max:100' ``` **5) numeric:** Ensures that the value contains only numbers. ``` 'age' => 'required|numeric' ``` ``` 'age' => 'required|numeric' ``` Multiple rules can be combined using the pipe (|) separator. ### Implementing Validation in Controllers **What Are Controllers in Laravel?** In Laravel, controllers are classes that handle the logic of incoming requests. They act as a middle layer between your application’s routes and the business logic, helping you organize code in a clean and reusable way. Instead of placing all logic in routes, controllers let you keep your application structured. For example, a UserController could manage user registration, login, and profile updates—all in a single, organized place. **Implementing Validation:** Laravel allows validation directly inside controller methods. This approach is simple and commonly used in smaller applications. Example: ``` public function store(Request $request) { $request->validate([ 'name' => 'required|max:255', 'email' => 'required|email', 'password' => 'required|min:8' ]); // Process request } ``` ``` public function store(Request $request) { $request->validate([ 'name' => 'required|max:255', 'email' => 'required|email', 'password' => 'required|min:8' ]); // Process request } ``` If validation fails: - Laravel automatically redirects the request - Error messages are returned to the session - The user can correct the input and resubmit the request This built-in mechanism simplifies input validation significantly. ### Implementing Validation Using the Validator Facade Another method for validation is using Laravel’s Validator facade. In Laravel, a facade is a class that provides a simple, static interface to a service in the framework’s service container. The Validator facade gives you access to Laravel’s powerful validation functionality without directly relying on controller methods. Using the Validator facade allows developers to: - Validate data anywhere in the application, not just in controllers - Handle validation manually, giving more flexibility over redirects and error messages - Apply complex or conditional validation logic Here’s an example of how to use the Validator facade to validate a request: ``` use Illuminate\Support\Facades\Validator; $validator = Validator::make($request->all(), [ 'title' => 'required|max:255', 'content' => 'required' ]); ``` ``` use Illuminate\Support\Facades\Validator; $validator = Validator::make($request->all(), [ 'title' => 'required|max:255', 'content' => 'required' ]); ``` After creating the validator instance, developers can check if validation fails. ``` if ($validator->fails()) { return redirect()->back()->withErrors($validator); } ``` ``` if ($validator->fails()) { return redirect()->back()->withErrors($validator); } ``` The Validator facade provides greater control over how validation errors are handled. ### Frequently Used Laravel Validation Rules Laravel includes many validation rules designed for specific scenarios. Some commonly used rules include: **1) unique:** Ensures the value does not already exist in a database table. ``` 'email' => 'unique:users' ``` ``` 'email' => 'unique:users' ``` **2) confirmed:** Validates that two fields contain the same value. ``` 'password' => 'confirmed' ``` ``` 'password' => 'confirmed' ``` This rule expects a corresponding field: ``` password_confirmation ``` ``` password_confirmation ``` **3) date:** Ensures the input is a valid date. ``` 'start_date' => 'date' ``` ``` 'start_date' => 'date' ``` **4) url:** Ensures the value is a properly formatted URL. ``` 'website' => 'url' ``` ``` 'website' => 'url' ``` These rules help maintain data accuracy within Laravel applications. ## Creating Custom Validation Rules Built-in validation rules handle many common cases, but some applications require additional validation logic. Laravel allows developers to create **custom validation rules** using the Artisan command: ``` php artisan make:rule CustomRule ``` ``` php artisan make:rule CustomRule ``` This command generates a rule class where custom validation logic can be defined. Example structure: ``` public function passes($attribute, $value) { return strlen($value) > 5; } ``` ``` public function passes($attribute, $value) { return strlen($value) > 5; } ``` Custom rules make it possible to implement validation requirements specific to an application. ## Form Request Validation in Laravel As Laravel applications grow, placing validation rules directly in controllers can make the code difficult to maintain. To solve this, Laravel provides Form Request Validation, which allows validation logic to be stored in dedicated classes. Form Request classes help centralize validation rules for specific HTTP requests. Instead of repeating validation logic across multiple controllers, developers can define the rules once in a request class and reuse them wherever needed. Laravel provides Form Request Validation to organize validation rules into dedicated request classes. ### Generating and Implementing Form Request Classes Laravel makes it simple to create Form Request classes using the Artisan command-line tool. **Step 1: Generate a Form Request Class** Run the following command: ``` php artisan make:request MyFormRequest ``` ``` php artisan make:request MyFormRequest ``` This command creates a new request class inside the **App\\Http\\Requests** directory. Inside the generated class, Laravel provides a **rules()** method where validation rules can be defined. **Example:** ``` public function rules() { return [ 'name' => 'required|string|max:255', 'email' => 'required|email|unique:users' ]; } ``` ``` public function rules() { return [ 'name' => 'required|string|max:255', 'email' => 'required|email|unique:users' ]; } ``` **Step 2: Use the Form Request in a Controller** Once the request class is created, it can be used directly in a controller method. ``` use App\Http\Requests\MyFormRequest; public function store(MyFormRequest $request) { // Validation has already been applied } ``` ``` use App\Http\Requests\MyFormRequest; public function store(MyFormRequest $request) { // Validation has already been applied } ``` Laravel automatically validates the request before the controller logic executes. ### Authorizing Requests in Form Request Classes Form Request classes also include an authorization mechanism that allows developers to determine whether a request should proceed. This logic is defined inside the **authorize()** method. **Example:** ``` public function authorize() { return true; } ``` ``` public function authorize() { return true; } ``` If the method returns false, Laravel automatically blocks the request and returns a 403 Forbidden response. This feature allows validation and authorization checks to be handled within the same request class. ## Handling Validation Error Messages Laravel automatically generates validation error messages when rules fail. These errors can be accessed in Blade templates. **Example:** ``` @error('email') {{ $message }} @enderror ``` ``` @error('email') {{ $message }} @enderror ``` **To display all errors:** ``` @if ($errors->any()) @foreach ($errors->all() as $error) {{ $error }} @endforeach @endif ``` ``` @if ($errors->any()) @foreach ($errors->all() as $error) {{ $error }} @endforeach @endif ``` Laravel also allows developers to define custom error messages for better clarity. ### Customizing Validation Error Messages Laravel automatically generates validation error messages when a rule fails. However, developers may want to define custom messages for better clarity. Form Request classes allow customization through the **messages()** method. **Example:** ``` public function messages() { return [ 'name.required' => 'The name field cannot be empty.', 'email.unique' => 'This email address already exists.' ]; } ``` ``` public function messages() { return [ 'name.required' => 'The name field cannot be empty.', 'email.unique' => 'This email address already exists.' ]; } ``` Custom messages help ensure that validation feedback remains clear and consistent. ## Handling Validation Failure and Redirect Behavior When validation fails in a Form Request, Laravel automatically redirects the request back to the previous page. During this process: - Validation errors are stored in the session - The previous input is preserved - Error messages become available in the view layer This automatic behavior simplifies error handling and allows the application to provide clear feedback without additional logic. ## Validating Files in Laravel Laravel provides specific validation rules for file uploads. Example: ``` 'file' => 'required|mimes:pdf,docx|max:2048' ``` ``` 'file' => 'required|mimes:pdf,docx|max:2048' ``` This rule checks: - A file must be present - Only specific file formats are allowed - File size must not exceed the defined limit File validation helps maintain application stability and ensures uploaded content follows defined constraints. ## Conditional Validation Rules Laravel supports conditional validation rules that apply only when certain conditions are met. Example: ``` 'discount_code' => 'required_if:status,active' ``` ``` 'discount_code' => 'required_if:status,active' ``` This means the field becomes required only if a specific condition is true. Other useful conditional rules include: - required\_with - required\_without - sometimes These rules allow developers to create flexible validation logic. ## Best Practices for Laravel Validation To implement validation effectively, developers should follow several best practices. - **Use Form Request classes:** They keep validation logic separate from controllers. - **Apply validation early:** Always validate input before processing data. - **Use built-in validation rules:** Laravel provides many reliable rules that cover most validation needs. - **Maintain clear validation structure:** Organized validation logic improves maintainability and readability. Following these practices helps maintain clean and stable Laravel applications. [![Blog banner - ServerAvatar](https://serveravatar.com/wp-content/uploads/2025/09/728_90-Banner-1-1024x127.png)](https://serveravatar.com/?ref=blog)## Common Validation Mistakes Several mistakes can affect the reliability of validation systems. - **Skipping validation:** Processing unvalidated input can lead to unpredictable behavior. - **Using overly complex rules:** Validation logic should remain simple and clear. - **Ignoring validation errors:** Applications should properly handle and display validation errors. - **Mixing validation with business logic:** Keeping validation separate improves code clarity and maintainability. Avoiding these mistakes helps maintain consistent validation behavior. ## Conclusion Laravel provides a structured and efficient way to validate incoming data through its built-in validation system. By defining validation rules, developers can ensure that submitted data follows the required format, structure, and constraints before it is processed by the application. Whether validation is implemented directly in controllers, through the Validator facade, or by using Form Request classes, Laravel offers flexible options that help keep code organized and maintainable. Features such as custom validation rules, conditional validation, and customizable error messages further enhance the ability to handle complex validation scenarios. By understanding and properly applying Laravel Validation Rules, developers can maintain clean data, improve application reliability, and build more stable and maintainable Laravel applications. ## FAQs ### 1. What are Laravel Validation Rules? Laravel Validation Rules are predefined or custom conditions that verify whether input data meets specific requirements before it is processed by the application. ### 2. Where can validation rules be defined in Laravel? Validation rules can be defined inside controllers, through the Validator facade, within Form Request classes, or by creating custom validation rule objects. ### 3. What is the purpose of Form Request Validation in Laravel? Form Request Validation helps organize validation logic in separate request classes, making controllers cleaner and the codebase easier to maintain. ### 4. Can developers create custom validation rules in Laravel? Laravel allows developers to generate custom validation rule classes using the Artisan command and implement specific validation logic when built-in rules are not sufficient. ### 5. What happens when validation fails in Laravel? When validation fails, Laravel automatically redirects the request back to the previous page and provides error messages that can be displayed in the application’s views. **Categories:** Blog, Guide, Laravel, Others, Php, Tutorials **Tags:** laravel, Laravel Form Validation, Laravel Guide, Laravel Input Validation, Laravel Tutorial, Laravel Validation, Laravel Validation Rules --- ### [How to Add CAPTCHA in WordPress (Best Plugins + Easy Setup Guide)](https://serveravatar.com/wordpress-captcha-setup/) **Published:** March 11, 2026 **Author:** Meghna Meghwani **Content:** [![Blog banner - ServerAvatar](https://serveravatar.com/wp-content/uploads/2025/09/728_90-Banner-3-1024x127.png)](https://serveravatar.com/?ref=blog)Managing a WordPress website involves more than publishing content. One common challenge website owners face is spam submissions and automated bot activity. Bots often target login pages, contact forms, and registration systems to submit fake data or attempt brute-force logins. To protect your website from these threats, it is important to add CAPTCHA in WordPress, which helps verify that the user interacting with your forms or login pages is a real person and not an automated script. To prevent this, websites use a verification system called CAPTCHA. CAPTCHA helps distinguish between human users and automated scripts by requiring a small verification step before a form is submitted. In this guide, you will learn how to add CAPTCHA in WordPress using the best plugins and a simple step-by-step setup process. ## What Is WordPress? [WordPress](https://wordpress.org/) is the world’s most popular open-source content management system (CMS), used to build websites, blogs, and e-commerce stores. It offers flexibility through themes and plugins, making it suitable for beginners, developers, and businesses of all sizes. ## How ServerAvatar Simplifies WordPress Deployment & Management **What is ServerAvatar?** [ServerAvatar](https://serveravatar.com/) is a platform to simplify the hosting and management of servers and applications. It simplifies the process of deploying and managing PHP and Node.js based web applications on servers. ![ServerAvatar Dashboard - Add CAPTCHA in WordPress](https://serveravatar.com/wp-content/uploads/2026/03/image-74.png) ServerAvatar makes WordPress and other popular applications, such as Mautic, N8N, UptimeKuma, etc, deployment effortless with its one-click WordPress application installer, allowing you to launch a fully configured WordPress site in minutes. It removes the complexity of server setup by providing an intuitive dashboard to manage servers, applications, databases, PHP versions, SSL, and performance settings from one place. ServerAvatar supports multiple cloud providers and gives users full control over their infrastructure while eliminating the need for deep server administration knowledge. You can refer to the ServerAvatar [documentation](https://serveravatar.com/docs/application/one-click-installer/wordpress/) and the detailed [blog](https://serveravatar.com/install-wordpress-quickly-on-vps/) to [install WordPress](https://serveravatar.com/install-wordpress-apache-ubuntu/) effortlessly. **Key Benefits of Using ServerAvatar for WordPress** - **One-click WordPress installer:** Deploy WordPress instantly without manual configuration. - **Unified management panel:** Manage servers and WordPress applications from a single dashboard. - **Performance optimization:** Easily configure services, PHP, and server resources. - **Redis caching support:** ServerAvatar comes with built-in Redis integration that helps speed up WordPress by storing frequently accessed data in memory. - **Enhanced security:** Includes firewall, SSL management, and secure access controls. - **Easy scalability:** Upgrade server resources as your WordPress site grows. ServerAvatar is an ideal solution for users who want the power of cloud servers without the operational complexity. ## What is CAPTCHA in WordPress CAPTCHA is a verification system designed to identify whether an action on a website is performed by a human user or an automated program. ![what is captcha - Add CAPTCHA in WordPress](https://serveravatar.com/wp-content/uploads/2026/03/image-75.png) In WordPress, CAPTCHA is typically added to areas where user input is allowed, such as forms or login pages. The system requires users to complete a small verification task before submitting information. **Common CAPTCHA formats include:** - **Checkbox verification:** Users confirm they are human by clicking a simple verification checkbox before submitting a form. - **Image selection challenges:** Visitors must choose images that match a specific instruction to prove they are not automated bots. - **Text recognition:** Users type characters shown in a distorted image to complete the verification process. - **Background verification systems:** These systems analyze user behavior silently without requiring visible interaction. These methods help block automated scripts from submitting forms or accessing protected areas of the website. ### Why You Should Add CAPTCHA in WordPress Spam and automated submissions can affect website performance and security. Adding CAPTCHA provides a simple solution to reduce these issues. - **Prevent Spam Submissions:** Automated scripts often target forms to submit large volumes of spam data. CAPTCHA blocks these automated submissions. - **Protect Login Pages:** Automated login attempts can try multiple password combinations. CAPTCHA helps reduce these attempts. - **Secure Contact Forms:** Without verification, contact forms can receive excessive automated messages. - **Protect User Registration:** CAPTCHA prevents automated creation of fake accounts on WordPress websites. - **Improve Overall Website Security:** By blocking automated bots, CAPTCHA adds an additional layer of protection to the website. ### Common Areas Where CAPTCHA Is Used CAPTCHA can be applied to several parts of a WordPress website. - **Login Forms:** Protects against automated login attempts. - **Registration Forms:** Prevents automated account creation. - **Comment Sections:** Blocks spam comments generated by bots. - **Contact Forms:** Prevents automated form submissions. - **Password Reset Forms:** Stops automated password reset requests. Applying CAPTCHA to these sections helps control automated traffic. ### Types of CAPTCHA Used in WordPress Different CAPTCHA systems are available depending on the verification method used. - **Text CAPTCHA:** Users enter characters displayed in an image to verify that the request is being made by a human. ![text captcha - Add CAPTCHA in WordPress](https://serveravatar.com/wp-content/uploads/2026/03/image-76.png) - **Image CAPTCHA:** Visitors select images that match given instructions as part of the verification process. ![image captcha - Add CAPTCHA in WordPress](https://serveravatar.com/wp-content/uploads/2026/03/image-77.png) - **Math CAPTCHA:** Users solve a simple arithmetic problem before a form can be submitted. ![math captcha - Add CAPTCHA in WordPress](https://serveravatar.com/wp-content/uploads/2026/03/image-78.png) - **Invisible CAPTCHA:** The verification process runs in the background and only triggers if suspicious activity is detected. ![invisible captcha - Add CAPTCHA in WordPress](https://serveravatar.com/wp-content/uploads/2026/03/image-79.png) - **Audio CAPTCHA:** Users listen to an audio clip and enter the spoken characters or numbers for verification. ![audio captcha - Add CAPTCHA in WordPress](https://serveravatar.com/wp-content/uploads/2026/03/image-80.png) - **Behavior-Based CAPTCHA:** The system studies interaction patterns such as mouse movement or typing behavior to detect bots. ![behaviour based captcha - Add CAPTCHA in WordPress](https://serveravatar.com/wp-content/uploads/2026/03/image-81.png) - **Honeypot Methods:** Hidden form fields are used to trap automated bots that attempt to fill every input field. ![honeypot method - Add CAPTCHA in WordPress](https://serveravatar.com/wp-content/uploads/2026/03/image-82.png) Each type offers different levels of security and user convenience. ### Understanding Google reCAPTCHA **Google reCAPTCHA** is one of the most widely used CAPTCHA systems for websites. It uses machine learning and behavior analysis to detect automated activity. There are three primary versions. ![google recaptcha - Add CAPTCHA in WordPress](https://serveravatar.com/wp-content/uploads/2026/03/image-83.png) - **reCAPTCHA v2:** Displays a verification checkbox or challenge. - **reCAPTCHA v2 Invisible:** Runs automatically and only shows verification if required. - **reCAPTCHA v3:** Operates entirely in the background and assigns a risk score based on user behavior. Most WordPress websites use **reCAPTCHA v2 or v3** because they are easy to integrate through plugins. ## Best WordPress CAPTCHA Plugins for WordPress Several plugins make it easy to add CAPTCHA functionality in WordPress. ### 1. Simple CAPTCHA Alternative with Cloudflare Turnstile ![simple captcha alternative with cloudflare turnstile - Add CAPTCHA in WordPress](https://serveravatar.com/wp-content/uploads/2026/03/image-84.png) [Simple CAPTCHA Alternative with Cloudflare Turnstile](https://wordpress.org/plugins/simple-cloudflare-turnstile/) integrates Cloudflare Turnstile CAPTCHA with WordPress forms to block automated spam submissions. It provides a privacy-focused verification system that works quietly without requiring users to solve puzzles. The plugin supports multiple WordPress forms and is easy to configure. **Key Features** - Cloudflare Turnstile integration - Supports login, registration, and comment forms - Lightweight and easy setup - Privacy-friendly CAPTCHA verification **Advantages** - Works without image puzzles or challenges - Simple configuration process - Minimal impact on website performance **Disadvantages** - Requires Cloudflare API keys - Limited customization options **Best for:** Websites looking for a modern CAPTCHA solution with a smoother user experience. ### 2. Advanced Google reCAPTCHA ![advanced google recaptcha - Add CAPTCHA in WordPress](https://serveravatar.com/wp-content/uploads/2026/03/image-85.png) [Advanced Google reCAPTCHA](https://wordpress.org/plugins/advanced-google-recaptcha/) is designed specifically to protect WordPress forms using Google’s CAPTCHA verification system. It allows administrators to enable CAPTCHA protection across different parts of the website. **Key Features** - Supports Google reCAPTCHA v2 and v3 - Protects login, registration, and comment forms - Simple configuration interface - Lightweight security plugin **Advantages** - Reliable CAPTCHA system from Google - Works with multiple WordPress forms - Easy to configure **Disadvantages** - Requires Google API keys - Google reCAPTCHA may affect user privacy concerns **Best for:** Websites that prefer Google reCAPTCHA integration for spam protection. ### 3. Really Simple CAPTCHA ![really simple captcha - Add CAPTCHA in WordPress](https://serveravatar.com/wp-content/uploads/2026/03/image-86.png) [Really Simple CAPTCHA](https://wordpress.org/plugins/really-simple-captcha/) is a lightweight verification plugin originally developed for Contact Form 7. It creates CAPTCHA images that users must enter before submitting a form. **Key Features** - Image-based CAPTCHA verification - Designed for Contact Form 7 integration - Lightweight and simple functionality - Basic configuration settings **Advantages** - Very lightweight plugin - Easy to integrate with compatible forms - No external API required **Disadvantages** - Limited functionality compared to modern CAPTCHA systems - Requires manual integration with some form plugins **Best for:** Websites that use Contact Form 7 and need simple CAPTCHA protection. ### 4. WP Armour ![wp armour - Add CAPTCHA in WordPress](https://serveravatar.com/wp-content/uploads/2026/03/image-87.png) [WP Armour](https://wordpress.org/plugins/honeypot/) uses a spam protection method called honeypot technology to block bots without requiring visible CAPTCHA challenges. It adds hidden fields to forms that automated bots often fill, allowing the system to detect spam automatically. **Key Features** - Honeypot spam protection method - Works without visible CAPTCHA - Compatible with multiple form plugins - Automatic spam detection **Advantages** - No user interaction required - Improves user experience - Lightweight and fast **Disadvantages** - May not stop advanced bots - Limited control compared to CAPTCHA systems **Best for:** Websites that want spam protection without displaying CAPTCHA challenges. ## Choosing the Right CAPTCHA Plugin Selecting the right CAPTCHA plugin depends on your website’s requirements and the type of forms you use. **Key factors to consider include:** - **Compatibility with existing form plugins:** Ensure the CAPTCHA plugin works smoothly with the form builders or contact form plugins already installed on your website. - **Ease of configuration:** Choose a plugin that offers simple setup and clear settings so it can be configured without complex technical steps. - **CAPTCHA type support:** The plugin should support modern CAPTCHA options such as reCAPTCHA, Turnstile, or invisible verification methods. - **Performance impact:** A good CAPTCHA plugin should run efficiently without slowing down your website or affecting page load times. - **Regular plugin updates:** Frequent updates indicate active development and help maintain compatibility with the latest WordPress versions. Plugins that are well-maintained, regularly updated, and supported by active developers are generally the most reliable choice for long-term website security. ## How to Add CAPTCHA to a WordPress site effective ways to prevent automated spam and bot attacks. Instead of using traditional image-based CAPTCHA systems, many website owners now prefer Cloudflare Turnstile because it offers a more privacy-friendly and seamless verification process. Cloudflare Turnstile works quietly in the background and verifies visitors without forcing them to solve puzzles or select images. Another advantage is that it is completely free and does not require your website to be hosted on Cloudflare. No matter whether you are using the default WordPress forms or custom form builders, the setup usually involves three main steps. **Step 1: Generate Your Cloudflare Turnstile API Keys** Before adding CAPTCHA to WordPress, your website needs to connect with the CAPTCHA provider using **API keys**. These keys allow the verification service to communicate securely with your website. Follow these steps to generate your keys: - Login to your **Cloudflare account** and if you don’t have already create a new account. - Navigate to **Application Security >> Turnstile** from the left sidebar. - Click on the **Add Widget** button. ![add widget for turnstile - Add CAPTCHA in WordPress](https://serveravatar.com/wp-content/uploads/2026/03/image-88.png) - Enter your website domain name in the **Widget name** section. - Add your Hostname. - Choose a **widget mode**. Cloudflare provides several widget modes. The **Managed mode (Recommended)** automatically determines how to verify users depending on their activity and risk level. - Click on the **Create** button. ![create widget - Add CAPTCHA in WordPress](https://serveravatar.com/wp-content/uploads/2026/03/image-89.png) Once the widget is created, Cloudflare will instantly generate two keys: - **Site Key:** The Site Key is added to your website to display the CAPTCHA challenge to visitors. - **Secret Key:** The Secret Key is used on the server to securely validate the CAPTCHA response submitted by users. ![add widget - Add CAPTCHA in WordPress](https://serveravatar.com/wp-content/uploads/2026/03/image-90.png) You will use these keys later to connect Turnstile with your WordPress website. **Step 2: Select a WordPress Integration Method** After generating the API keys, the next step is connecting them to your WordPress forms. The method you choose depends on how your forms are created. **Option 1: Default WordPress Forms** If your website uses the standard WordPress pages, such as: - WordPress login page (wp-login.php) - User registration page - Comment forms You will need a WordPress plugin that integrates Cloudflare Turnstile with these default forms. A commonly used option is the **Simple CAPTCHA Alternative with Cloudflare Turnstile** plugin available in the WordPress plugin repository. This plugin acts as a bridge between WordPress forms and the Turnstile verification system. - Navigate to the **Plugins >> Add Plugin** section from the left sidebar. - Search for the **Simple CAPTCHA Alternative with Cloudflare Turnstile** Plugin. - Click **Install Now**, then **Activate** the plugin. ![install plugin - Add CAPTCHA in WordPress](https://serveravatar.com/wp-content/uploads/2026/03/image-91.png) - Once installed, the plugin enables CAPTCHA protection for WordPress’s default forms without requiring any code changes. - After activation, navigate to the **Plugins >> Installed Plugin** section from the left sidebar. - Click on the **Settings option** for the **Simple CAPTCHA Alternative with Cloudflare Turnstile** plugin. ![settings - Add CAPTCHA in WordPress](https://serveravatar.com/wp-content/uploads/2026/03/image-92.png) - Enter the **Site Key** and **Secret Key** previously generated in Cloudflare. - Configure additional options such as **Theme** and **Language**. - In the **Advanced Settings**, you can also adjust options like: - Widget Size - Appearance Mode - Custom Error Message - Failsafe Mode - User or IP Address Whitelisting - Next, select where you want to enable **Turnstile verification**, such as: - WordPress Login - WordPress Registration - WordPress Password Reset - WordPress Comment Forms - Click on the **Save Changes** button to apply the settings. ![cloudflare turnstile - Add CAPTCHA in WordPress](https://serveravatar.com/wp-content/uploads/2026/03/image-93.png) That’s it! You have successfully configured the **Simple CAPTCHA Alternative with Cloudflare Turnstile** plugin on your WordPress site. **Option 2: Custom Form Builder Plugins** If your website uses form builder plugins such as: - **WPForms** - **Elementor Forms** - **Fluent Forms** Then you usually don’t need an extra plugin to integrate Cloudflare Turnstile. Many modern form builders already provide built-in support for Turnstile within their settings. All you need to do is add your API keys and enable CAPTCHA protection for your forms. In this example, we’ll use WPForms. - From your WordPress dashboard, go to **WPForms >> Settings** in the left sidebar. - Open the **CAPTCHA** tab. - Select **Turnstile** as your CAPTCHA option. - Enter the **Site Key** and **Secret Key** that you generated earlier in **Cloudflare**. - Configure additional options such as: - Fail Message - CAPTCHA Type - No-Conflict Mode - Once you have completed the configuration, click **Save Settings** to apply the changes. ![integrate turnstile - Add CAPTCHA in WordPress](https://serveravatar.com/wp-content/uploads/2026/03/image-94.png) After saving the settings, CAPTCHA verification will automatically appear on those forms. ## Testing CAPTCHA After Setup Testing is necessary to confirm that CAPTCHA is functioning correctly. Steps to test the configuration: - **Open the website in a private browser window:** This ensures the test is performed without cached data or active login sessions. - **Access the form where CAPTCHA was added:** Navigate to the login page, contact form, or comment section that contains the CAPTCHA. - **Attempt to submit the form:** Try completing the form normally to see if the CAPTCHA verification appears. - **Verify that the CAPTCHA verification appears:** Confirm that the system requests verification before allowing submission. Successful verification indicates that the setup is complete. ## Free CAPTCHA Plugin Enough for WordPress? Free CAPTCHA solutions such as Cloudflare Turnstile are highly effective for preventing spam submissions on website forms. They help ensure that only legitimate users can interact with your login pages, comment sections, and contact forms. However, it is important to understand that CAPTCHA only protects the form level of your website. It does not block automated traffic that directly targets your server. For websites with higher traffic, such as large blogs, business websites, or online stores, relying only on a CAPTCHA plugin may not be enough. Bots can still send large volumes of requests to your server even if they fail the CAPTCHA challenge. Because of this, many websites combine CAPTCHA with additional server-level security and traffic filtering tools to protect their infrastructure. ## Best Practices for Using CAPTCHA While CAPTCHA improves security, proper configuration is important. - **Enable CAPTCHA Only Where Necessary:** Adding CAPTCHA to every page can affect usability. - **Use Modern CAPTCHA Versions:** Newer CAPTCHA systems provide better security and performance. - **Keep Plugins Updated:** Updates ensure compatibility and security improvements. - **Combine with Other Security Tools:** CAPTCHA works best when combined with additional spam protection plugins. [![Blog banner - ServerAvatar](https://serveravatar.com/wp-content/uploads/2025/09/728_90-Banner-1-1024x127.png)](https://serveravatar.com/?ref=blog)## Common CAPTCHA Issues and Solutions Sometimes CAPTCHA may not work as expected. **1. CAPTCHA Not Displaying** Possible causes include: - **Incorrect API keys:** CAPTCHA may fail to load if the site key or secret key is entered incorrectly. - **Plugin conflicts:** Sometimes other WordPress plugins interfere with CAPTCHA functionality and cause display issues. - **Cache interference:** Website caching can prevent CAPTCHA scripts from loading properly on certain pages. Clearing the cache and verifying API keys usually resolves this issue. **2. Verification Errors** Repeated verification failures may occur if the domain configuration in the CAPTCHA provider settings is incorrect. **3. Plugin Conflicts** Temporarily disabling other plugins can help identify conflicts that affect CAPTCHA performance. ## Conclusion Adding CAPTCHA to your WordPress website is a simple yet effective way to protect your forms, login pages, and registration systems from automated spam and bot activity. By implementing CAPTCHA, you can significantly reduce fake submissions, improve website security, and maintain a cleaner user interaction environment. With modern solutions like Cloudflare Turnstile and easy-to-use WordPress plugins, integrating CAPTCHA no longer requires technical expertise. When combined with proper server management tools like ServerAvatar and additional security practices, CAPTCHA becomes an important part of maintaining a secure, reliable, and well-managed WordPress website. ## FAQs ### 1. Why should I add CAPTCHA to my WordPress website? Adding CAPTCHA helps prevent spam submissions, automated bot attacks, and fake registrations by verifying that the user interacting with your forms is a real person. ### 2. Which CAPTCHA plugin is best for WordPress? Popular options include Simple CAPTCHA Alternative with Cloudflare Turnstile, Advanced Google reCAPTCHA, Really Simple CAPTCHA, and WP Armour, depending on your website’s needs. ### 3. Can I add CAPTCHA to the WordPress login and registration forms? CAPTCHA can be easily added to login pages, registration forms, comment sections, and contact forms using WordPress plugins. ### 4. Do I need coding knowledge to add CAPTCHA in WordPress? Most CAPTCHA plugins provide a simple interface that allows you to configure and enable verification without writing any code. ### 5. Is a free CAPTCHA plugin enough for WordPress security? Free CAPTCHA tools are effective for stopping spam submissions, but combining them with additional security measures such as firewalls and server-level protection provides stronger website security. **Categories:** Blog, Guide, Others, Tutorials, WordPress **Tags:** Add CAPTCHA in WordPress, CAPTCHA, Google reCAPTCHA, Wordpress, WordPress CAPTCHA, WordPress CAPTCHA plugin, WordPress Security, WordPress spam protection --- ### [How to Add Google Translate Widget in WordPress](https://serveravatar.com/add-google-translate-to-wordpress/) **Published:** March 10, 2026 **Author:** Meghna Meghwani **Content:** [![Blog banner - ServerAvatar](https://serveravatar.com/wp-content/uploads/2025/09/728_90-Banner-3-1024x127.png)](https://serveravatar.com/?ref=blog) Imagine visiting a website written in a language you don’t understand. Frustrating, right? Now flip the situation, what if visitors arrive on your website but struggle to read the content because of language barriers? That’s where Google Translate To WordPress becomes incredibly useful. By adding the Google Translate widget to your WordPress website, you can instantly allow visitors to translate your content into their preferred language, making your site more accessible and welcoming to a global audience. WordPress powers millions of websites across the internet, and many of them attract visitors from different countries and language backgrounds. Adding a translation widget allows readers to instantly convert your content into their preferred language. It’s like placing a universal language switch on your website so anyone can understand your content with a single click. The best part? You don’t need advanced coding knowledge to add this feature. With just a few simple steps, you can enable automatic translation and make your website accessible to a much wider audience. In this guide, you’ll learn how to add a Google Translate widget in WordPress, why it matters, and how to configure it properly so visitors can easily switch between languages. ## What Is WordPress? [WordPress](https://wordpress.org/) is the world’s most popular open-source content management system (CMS), used to build websites, blogs, and e-commerce stores. It offers flexibility through themes and plugins, making it suitable for beginners, developers, and businesses of all sizes. ## How ServerAvatar Simplifies WordPress Deployment & Management **What is ServerAvatar?** [ServerAvatar](https://serveravatar.com/) is a platform to simplify the hosting and management of servers and applications. It simplifies the process of deploying and managing PHP and Node.js based web applications on servers. ![ServerAvatar Dashboard - Google Translate To WordPress](https://serveravatar.com/wp-content/uploads/2026/03/image-56.png) ServerAvatar makes WordPress and other popular applications, such as Mautic, N8N, UptimeKuma, etc, deployment effortless with its one-click WordPress application installer, allowing you to launch a fully configured WordPress site in minutes. It removes the complexity of server setup by providing an intuitive dashboard to manage servers, applications, databases, PHP versions, SSL, and performance settings from one place. ServerAvatar supports multiple cloud providers and gives users full control over their infrastructure while eliminating the need for deep server administration knowledge. You can refer to the ServerAvatar [documentation](https://serveravatar.com/docs/application/one-click-installer/wordpress/) and the detailed [blog](https://serveravatar.com/install-wordpress-quickly-on-vps/) to [install WordPress](https://serveravatar.com/install-wordpress-apache-ubuntu/) effortlessly. **Key Benefits of Using ServerAvatar for WordPress** - **One-click WordPress installer:** Deploy WordPress instantly without manual configuration. - **Unified management panel:** Manage servers and WordPress applications from a single dashboard. - **Performance optimization:** Easily configure services, PHP, and server resources. - **Redis caching support:** ServerAvatar comes with built-in Redis integration that helps speed up WordPress by storing frequently accessed data in memory. - **Enhanced security:** Includes firewall, SSL management, and secure access controls. - **Easy scalability:** Upgrade server resources as your WordPress site grows. ServerAvatar is an ideal solution for users who want the power of cloud servers without the operational complexity. ## What Is the Google Translate Widget The Google Translate widget is a small tool that allows visitors to translate website content into multiple languages instantly. Once installed, users can select their preferred language from a dropdown menu or language list. The widget automatically converts the visible text on the page. Instead of manually translating content into dozens of languages, the widget does the work automatically. ![google translate widget - Google Translate To WordPress](https://serveravatar.com/wp-content/uploads/2026/03/image-57.png) Think of it like a language remote control for your website. Visitors simply choose a language, and the page switches instantly. ### Why Add a Translation Widget to WordPress A website without translation options limits accessibility. Not every visitor speaks the same language, and that can create a barrier to understanding your content. Adding a translation widget solves this problem by allowing users to read the site in their own language. **Key reasons to add it include:** - **Improved accessibility:** A translation widget allows visitors to read your website in their preferred language, making the content easier for more people to understand. - **Better user experience:** When users can switch languages instantly, they can navigate and read your website more comfortably without confusion. - **Higher engagement:** Visitors are more likely to spend time on your site and interact with your content when they can clearly understand it. - **Global reach:** Translation tools help your website connect with audiences from different regions without needing separate language versions. - **Simplified content translation:** Instead of manually translating every page, the widget automatically converts your content into multiple languages with minimal effort. Even if your website is written in one language, the widget allows visitors to view it in dozens of other languages without needing separate versions of your content. ### How the Google Translate Widget Works The widget uses automated translation technology to convert webpage text into different languages. ![translate widget work - Google Translate To WordPress](https://serveravatar.com/wp-content/uploads/2026/03/image-58.png) Here’s how the process works: - A visitor arrives on your website. - They select a language from the widget. - The page reloads in the chosen language. - Text content appears translated. The translation happens dynamically, meaning the original content stays unchanged while visitors see the translated version. ### Benefits of Using Google Translate on a Website Adding translation functionality provides several advantages. - **Instant Multilingual Support:** Instead of creating separate pages for each language, the widget instantly translates content. - **Better User Engagement:** Visitors are more likely to stay on a website they can understand. - **Increased Accessibility:** The translation tool helps users access content without language limitations. - **Easy Implementation:** Adding the widget requires minimal setup and technical knowledge. - **Automatic Language Detection:** Some widgets automatically detect a user’s browser language and suggest translation. ## Methods to Add Google Translate Widget in WordPress There are two primary ways to add the widget. **Method 1: Using a WordPress plugin** This is the most beginner-friendly approach and requires no coding knowledge. **Method 2: Adding the Google Translate code manually** This method is suitable for advanced users who want to integrate the translation widget directly into theme files. Most website owners prefer the plugin method because it simplifies the setup process. ## Adding the Widget Using a WordPress Plugin Plugins make WordPress extremely flexible. They allow you to add new features without coding. A translation plugin automatically integrates the Google Translate widget into your website. **Steps generally include:** - Installing the plugin - Activating it - Adjusting settings - Placing the widget on your website Within minutes, your website can support multiple languages. ### Step-by-Step Guide to Add Google Translate to WordPress Adding the Google Translate widget in WordPress is a simple process that usually takes only a few minutes. The steps below walk you through the entire setup so you can enable translation on your website without technical complexity. **Step 1: Log in to Your WordPress Dashboard** - Start by accessing the administrative panel of your WordPress website. This is where all site settings, plugins, and themes are managed. **Step 2: Navigate to the Plugins Section** - Once logged in, navigate to the **Plugins** section from the left sidebar. - Go to the **Add Plugin** section. This allows you to search for and install new plugins that extend your website’s functionality. - In the plugin search bar, type **Google Language Translator**, and click on the Install Now button. - WordPress will download and install the plugin automatically. The process usually takes only a few seconds. ![install plugin - Google Translate To WordPress](https://serveravatar.com/wp-content/uploads/2026/03/image-59.png) **Step 3: Activate the Plugin** - After completing the installation, click on the **Activate** button to enable the plugin on your website. ![activate plugin - Google Translate To WordPress](https://serveravatar.com/wp-content/uploads/2026/03/image-60.png) - When activated, the plugin will add a new settings section in your WordPress dashboard. **Step 4: Open the Translation Plugin Settings** - Navigate to the **Plugins >> Installed Plugins** section. - Click on the **Settings** for the Google Language Translator plugin. ![plugin settings - Google Translate To WordPress](https://serveravatar.com/wp-content/uploads/2026/03/image-61.png) **Step 5: Configure the Plugin Settings** - After opening the plugin settings page, you will see several configuration options available. - These settings allow you to control how the translation feature behaves on your website and which languages are available to visitors. - You will also see different sections with checkboxes and dropdown menus for customization. **Enable the Plugin** - First, make sure to select the **checkbox** to activate the plugin. In most cases, this option is already turned on by default, but it is still recommended to verify it. - If the box is unchecked, simply enable it to make sure the translation functionality works properly on your website. - Next, confirm the **default language of your website**. - The plugin usually detects the website language automatically, but it is still important to double-check this setting. - If the wrong language is selected, the translations may not work correctly. ![google language translator settings - Google Translate To WordPress](https://serveravatar.com/wp-content/uploads/2026/03/image-62.png) **Step 6: Choose the Languages You Want to Offer** - Once the default language is set, scroll down to the section labeled **“What Languages Will Be Active?”** - Here you will see a long list of available languages with checkboxes next to each one. - You will also find two quick options: - **Select All:** Enables translation into every available language. - **Clear:** Removes all selected languages so you can choose them manually. - If you want to limit translation to specific languages, simply check the boxes next to the languages you want to enable. ![select languages - Google Translate To WordPress](https://serveravatar.com/wp-content/uploads/2026/03/image-63.png) - Selecting only the necessary languages helps keep the translation menu simple and easier for visitors to use. **Step 7: Display Language Flags** - Many translation plugins also allow you to display **country flags** alongside language names. - Enabling flags makes the translation menu more visual and easier to understand. - Visitors can quickly identify their preferred language without needing to read the full language name. ![flag settings - Google Translate To WordPress](https://serveravatar.com/wp-content/uploads/2026/03/image-64.png) **Step 8: Customize the Floating Translation Widget** - Next, the **Floating Widget Settings** section allows you to control how the translation widget appears on your website. - You can customize several aspects of the widget, including its style, position, and appearance. - Some of the available options include: - **Show Floating Translation Widget:** Enable or disable the floating translation button that appears on your website. - **Custom Text for the Floating Widget:** You can replace the default text with a custom label that suits your website. - **Allow Floating Widget Text to Translate:** This option allows the widget text itself to be translated when users switch languages. - **Floating Widget Position:** Choose where the widget should appear on your website. Common positions include: - Top left - Top center - Top right - Bottom corners - Select the location that is most visible but does not interfere with your website layout. - **Floating Widget Text Color:** Change the color of the widget text so it matches your website design. - **Floating Widget Background Color:** You can also customize the background color of the widget for better visual consistency. - After adjusting the settings, scroll down and click **Save Changes** to apply the configuration. ![save changes - Google Translate To WordPress](https://serveravatar.com/wp-content/uploads/2026/03/image-65.png) - As you can see, the option is visible on the WordPress website. ![translator in website - Google Translate To WordPress](https://serveravatar.com/wp-content/uploads/2026/03/image-66.png) - Switching the website’s language is now simple, just click on it and select your preferred language. - Below, you can see the website page translated into French language. ![translated website - Google Translate To WordPress](https://serveravatar.com/wp-content/uploads/2026/03/image-67.png) **Step 9: Add Google Translate to WordPress Navigation or Pages** - The Google Language Translator plugin allows you to place the translation widget in different areas of your WordPress website. - You can display it in: - Pages - Posts - Sidebars - Headers - Footers - Navigation menus - This flexibility allows you to position the translation option where visitors can easily find it. **Step 10: Add the Widget Using Shortcode** - One of the easiest ways to add the translation widget is by using a shortcode. - To do this: - Open the **page or post editor** where you want the translation tool to appear. - Insert the following shortcode in the editor: ``` [google-translator] ``` ``` [google-translator] ``` - Save or update the page. - Once the page is published, the Google Translate widget will appear in that location. ![add translator - Google Translate To WordPress](https://serveravatar.com/wp-content/uploads/2026/03/image-68.png) - As you can see, the option is visible on the WordPress website page: ![translator on website - Google Translate To WordPress](https://serveravatar.com/wp-content/uploads/2026/03/image-69.png) **Step 11: Add the Widget Using PHP Code (Optional)** - If you want to place the translation widget inside your website’s **header, footer, or template files**, you can use PHP code instead of a shortcode. - Add the following code to the appropriate template file in your theme: ``` ``` ``` ``` - This method is useful when you want the translation widget to appear automatically across multiple pages. **Step 12: Test the Translation Feature** - After completing the setup, it is important to test the translation feature on your website. - Visit your live website and check whether the Google Translate button appears correctly. Try selecting different languages to confirm that the translation works as expected. - Testing ensures that visitors can easily switch languages and view your content without issues. - For important pages, it can also be helpful to review the translated content carefully to ensure that the meaning remains clear and accurate. ## Improving User Experience with Translation Widgets A translation tool should enhance usability, not confuse visitors. To improve the experience: - **Place the widget where visitors expect it:** Headers and navigation areas work best. - **Avoid clutter:** Keep the design simple. - **Use clear language labels:** Visitors should easily recognize their language. Think of the translation widget like a doorway into your content. If it’s easy to find, visitors will use it without hesitation. ## SEO Considerations for Translation Widgets Translation widgets can improve accessibility but have limited impact on search engine indexing. Here are a few important points: - **Automatic translations are not always indexed:** Search engines usually index the original language. - **Quality translations matter:** Machine translation may not always capture context perfectly. - **Dedicated translated pages provide better SEO:** The widget still helps users access content more easily. ## Common Issues and Troubleshooting Sometimes, translation widgets may not work as expected. - **Widget not appearing:** Check widget placement and plugin activation. - **Translation not loading:** Clear cache and refresh the page. - **Design conflicts:** Some themes may require CSS adjustments. Most issues can be resolved quickly by checking plugin settings. ## Best Practices for Using Translation Widgets To get the most out of your translation widget, follow these best practices. - **Keep your content clear:** Simple sentences translate more accurately. - **Place the widget in a visible location:** Visitors should find it quickly. - **Limit excessive customization:** Over-designing the widget may reduce usability. - **Test the widget regularly:** Ensure translations load correctly. ## Alternative Plugins to Google Translate for WordPress While Google Translate is a popular option, WordPress also offers several other translation plugins that provide additional features and flexibility. Here are some commonly used alternatives. ### 1. Weglot [Weglot](https://www.weglot.com/) is a multilingual plugin that automatically translates website content and allows manual editing for better accuracy. ![Weglot - Google Translate To WordPress](https://serveravatar.com/wp-content/uploads/2026/03/image-70.png) **Key features include:** - Automatic translation - Language switcher widget - SEO-friendly translated pages - Easy integration with WordPress This plugin focuses on delivering a polished multilingual experience. ### 2. TranslatePress [TranslatePress](https://translatepress.com/) enables you to translate website directly from front end of the website. Instead of editing translations in a settings panel, you can click on page elements and translate them visually. ![TranslatePress - Google Translate To WordPress](https://serveravatar.com/wp-content/uploads/2026/03/image-71.png) **Key Features include:** - Visual translation editor - Support for multiple languages - Integration with translation services - Custom language switchers This method makes the translation process more interactive. ### 3. Polylang [Polylang](https://polylang.pro/) helps create multilingual websites by allowing you to write content in different languages manually. Unlike automatic translation tools, this plugin focuses on structured multilingual content management. ![Polylang - Google Translate To WordPress](https://serveravatar.com/wp-content/uploads/2026/03/image-72.png) **Key Features include:** - Separate language versions of pages - Language switcher widgets - Translation management tools - Compatibility with many WordPress themes ### 4. GTranslate [GTranslate](https://gtranslate.io/) integrates Google Translate but adds extra customization and multilingual options. It provides both automatic translation and advanced configuration features. ![GTranslate - Google Translate To WordPress](https://serveravatar.com/wp-content/uploads/2026/03/image-73.png) **Key Features include:** - Multiple translation styles - Floating language switcher - Language flags - Automatic language detection ### Difference Between Google Translate and Other Translation Plugins Choosing a translation solution depends on how you want your multilingual website to function. Some tools focus on automatic translation, while others allow deeper control over translated content. Here are the key differences: **1. Automatic vs Manual Translation** - Google Translate widgets rely primarily on automatic translation. The content is translated instantly without manual editing. - Other plugins may allow manual adjustments, giving you more control over translation quality. **2. Content Management** - Google Translate typically translates pages dynamically without creating separate versions of the content. - Some multilingual plugins create dedicated language versions of pages, making it easier to manage content for different audiences. **3. Customization Options** - Basic translation widgets offer limited design customization. - Alternative plugins may include: - Custom language switchers - Visual translation editors - Flexible layout settings - This allows better integration with website design. **4. SEO Capabilities** - Automatic translation widgets usually do not create separate indexed pages for translated content. - Some multilingual plugins generate search-engine-friendly translated pages, which can improve multilingual SEO. **5. Ease of Setup** - Google Translate widgets are generally easier to install and configure. - Other translation plugins may require additional setup steps but offer more advanced functionality. [![Blog banner - ServerAvatar](https://serveravatar.com/wp-content/uploads/2025/09/728_90-Banner-1-1024x127.png)](https://serveravatar.com/?ref=blog)## Difference Between Google Translate Widget and Multilingual Website When building a website that supports multiple languages, you will often come across two different approaches: using a **Google Translate widget** or **creating a multilingual website**. While both help users read content in different languages, they work in very different ways. Understanding the difference can help you decide which option is better for your website. ### Google Translate Widget The Google Translate widget is an automatic translation tool that allows visitors to convert your website content into other languages instantly. Once the widget is installed, users can simply select a language from the dropdown menu or language list. The page content is then translated automatically without creating separate versions of the page. **Key Characteristics** - Translates content automatically - No need to create separate language pages - Quick and easy to install - Supports many languages instantly - Works using machine translation This method is ideal if you want a fast and simple way to make your content understandable for global visitors without spending time managing multiple language versions. However, because the translation is automatic, it may not always perfectly capture the context of the original content. ### Multilingual Website A multilingual website is a website that provides separate versions of content in multiple languages. Instead of automatically translating pages, each language has its own dedicated content. This means that every page, post, or section is translated manually or professionally to ensure accuracy. **Key Characteristics** - Separate pages for each language - More control over translation quality - Content can be optimized individually for each language - Better structure for managing multilingual content - Often supported by multilingual plugins With this approach, visitors select their preferred language, and the website loads the specific version created for that language. ### Quick Difference Here is a quick comparison to help you understand the distinction between the two approaches. **Feature****Google Translate Widget****Multilingual Website****Translation Type**Automatic machine translationManual or professional translation**Setup Complexity**Very easy to installRequires more setup**Language Pages**Same page translated dynamicallySeparate pages for each language**Translation Accuracy**May varyUsually more accurate**Content Control**Limited controlFull control over translated content**SEO Potential**LimitedBetter multilingual SEO### Which Option Should You Choose? The right option depends on your website goals. If you want a quick and simple solution, the Google Translate widget is a convenient way to allow visitors to translate your website instantly. On the other hand, if you want complete control over translation quality and multilingual content, building a dedicated multilingual website may be a better long-term solution. You can think of the difference like this: A Google Translate widget acts like an instant translator, while a multilingual website works like having separate versions of the same book written in different languages. Both methods help remove language barriers, but they serve slightly different purposes depending on how you want to manage your website content. ## Conclusion Adding a Google Translate widget to your WordPress website is a simple yet effective way to make your content accessible to visitors from different language backgrounds. Instead of maintaining multiple translated versions of your pages, the widget allows users to instantly view your website in their preferred language with just a click. As shown in this guide, installing and configuring the widget takes only a few steps, especially when using a WordPress plugin. While automatic translation tools provide a quick solution for improving accessibility, websites that require precise language control may choose to build a fully multilingual setup. By implementing translation features on your WordPress site, you remove language barriers, improve user experience, and make your content easier to understand for a global audience. ## FAQs ### 1. What is the Google Translate widget in WordPress? The Google Translate widget is a tool that allows visitors to translate website content into multiple languages instantly. It provides a language selector that automatically converts page text into the user’s preferred language. ### 2. Do I need coding knowledge to add the Google Translate widget in WordPress? You do not need coding skills. Most WordPress users add the Google Translate widget by installing a plugin, configuring a few settings, and placing the widget on their website. ### 3. Can I choose specific languages for translation? Many translation plugins allow you to select only the languages you want to offer instead of enabling every available language. ### 4. Where should I place the Google Translate widget on my website? The widget is commonly placed in visible areas such as the website header, navigation menu, sidebar, or footer so visitors can easily switch languages. ### 5. Does the Google Translate widget affect SEO? Automatic translation widgets usually do not create separate indexed pages for translated content. They mainly improve accessibility and user experience rather than multilingual SEO rankings. **Categories:** Blog, Guide, Others, Tutorials, WordPress **Tags:** GoogleTranslate, MultilingualWebsite, WebsiteTranslation, Wordpress, WordPressPlugins, WordPressTutorial --- ### [How to Integrate Telegram to Get Real-Time Server Alerts](https://serveravatar.com/integrate-telegram-notification-channel/) **Published:** March 7, 2026 **Author:** Meghna Meghwani **Content:** [![Blog banner - ServerAvatar](https://serveravatar.com/wp-content/uploads/2025/09/728_90-Banner-3-1024x127.png)](https://serveravatar.com/?ref=blog)Server monitoring is an essential part of managing websites, applications, and cloud infrastructure. Servers constantly perform many operations such as handling traffic, running applications, executing background processes, and managing system resources. Because of this continuous activity, administrators need a reliable way to stay informed about important server events. One effective way to manage this is to integrate Telegram with your server monitoring system so that important alerts and updates can be delivered instantly through a messaging platform. Without a notification system, identifying issues can take longer than expected. System errors, failed deployments, or unusual server behavior may go unnoticed until someone manually checks logs or dashboards. This is why server alert notifications play a critical role in modern server management. One effective way to receive these alerts is by integrating Telegram with ServerAvatar. Telegram provides a fast and convenient messaging platform that can deliver notifications directly to your device. Once connected, it allows you to receive automated messages whenever specific server events occur. This guide explains how to integrate Telegram to get server alerts using ServerAvatar, including the setup process, required configurations, and best practices. ## What Is ServerAvatar? [ServerAvatar](https://serveravatar.com/) is a server and application hosting and management platform designed to make handling servers easier, cleaner, and more accessible. Instead of working directly with complex server commands, ServerAvatar provides a visual dashboard where you can manage server-related activities more comfortably. ![ServerAvatar Dashboard - Integrate Telegram](https://serveravatar.com/wp-content/uploads/2026/03/image-41.png) One of the features of ServerAvatar is its notification system. Notifications act as messengers that inform you whenever specific events occur within your server environment. These messages help you stay updated without manually monitoring every detail. ### Understanding Server Alert Notifications Server alert notifications are automated messages generated when specific events occur within a server environment. These alerts help administrators stay informed about system activities, operational changes, and potential issues. Notifications can be triggered by various conditions, such as: - Application deployment events - Backup completion or failure - Server status updates - System configuration changes - Resource usage thresholds By receiving these notifications automatically, administrators can monitor server activity without manually reviewing logs or dashboards. ## Understanding Notification Channels Think of notification channels as delivery routes. The message is the same, but the delivery method can change. ServerAvatar allows you to configure where notifications should be sent, and Telegram is selected as one such route. Once it is connected: - ServerAvatar detects an event - The notification system prepares a message - The message is delivered to notification channels The integration does not change how ServerAvatar detects events. It only changes **where** the information appears. ### Why This Matters This setup keeps the system flexible. You can add Telegram without affecting other notification methods. Everything works independently but stays organized under one system. ### How Notification Channels Work? ServerAvatar notifications are event-based. This means: - An event happens - A notification is triggered - The message is sent to a selected channel You get to decide where these notifications go from Slack, Discord, Telegram, and Pushover, as ServerAvatar provides these notification channels. Telegram is one such channel, and it’s particularly popular. Instead of being reactive, notifications help you stay aware. They quietly work in the background, making sure you’re never completely out of the loop. ## What is Telegram? [Telegram](https://telegram.org/) is a cloud-based messaging platform designed for fast, secure, and reliable communication. It allows users to send text messages, images, videos, documents, and other files across different devices. Telegram works on smartphones, tablets, desktops, and web browsers, which makes it accessible from almost anywhere. [](https://storage.3.basecamp.com/5840738/blobs/e7ba64d8-1a18-11f1-817e-0242ac120003/download/image.png) ![telegram - Integrate Telegram](https://serveravatar.com/wp-content/uploads/2026/03/image-42.png) One of the key features of Telegram is its support for automation through bots. Bots are special Telegram accounts that can send messages automatically, respond to commands, and connect with external applications or services. Because of this capability, many tools and platforms use Telegram to deliver automated notifications and alerts. ### How Telegram works? Telegram operates through a simple messaging system that allows users and applications to communicate quickly and efficiently. - **Messages are sent through chats:** Communication happens through private chats, groups, or channels where users and bots can exchange messages. - **Cloud-based synchronization:** Telegram stores messages in the cloud so conversations can be accessed and synced across multiple devices. - **Instant message delivery:** Messages and notifications appear quickly after they are sent, allowing users to receive updates without delay. - **Automated notifications from services:** External platforms can connect with Telegram bots to automatically send alerts and system updates to users. These features make Telegram a convenient platform for receiving automated notifications, including server alerts and system updates. ### Why Telegram Works Well for Notifications Telegram is well-suited for notifications because: - Messages appear in real time - Information stays organized - Alerts are easy to read and track Once Telegram is integrated, there’s no need to log in to ServerAvatar repeatedly just to check updates. In simple words, Telegram becomes a shared inbox for your server notifications. ### Why Telegram is Useful for Server Alerts Telegram is a widely used messaging platform that supports automated integrations through bots. This capability makes it suitable for delivering system notifications from monitoring tools and server management platforms. - **Instant message delivery:** Telegram delivers notifications quickly, ensuring that messages arrive without delay. - **Cross-platform accessibility:** Telegram works on multiple platforms including mobile devices, desktops, and web browsers. - **Bot automation support:** Telegram bots allow automated systems to send notifications directly to users. - **Group messaging capability:** Notifications can be delivered to individual chats or group conversations. Because of these features, Telegram provides a reliable channel for receiving server alert notifications. ## Telegram Notification Channel Integration with ServerAvatar ServerAvatar includes a Notification Channels feature that allows users to configure external messaging services for server alerts. Telegram can be added as one of these notification channels. After the integration is complete, ServerAvatar can automatically send alerts to Telegram whenever predefined events occur. Examples of events that can trigger alerts include: - Backup status updates - Deployment notifications - System alerts - Server status changes The integration allows administrators to receive alerts directly in their Telegram account without accessing the ServerAvatar dashboard. ### Requirements Before Setting Up Telegram Alerts Before integrating Telegram with ServerAvatar, a few prerequisites must be completed. - **Telegram account:** An active Telegram account is required to receive notifications. - **ServerAvatar account:** Access to the ServerAvatar dashboard is necessary to configure notification channels. - **Telegram bot:** A Telegram bot must be created to send automated messages from ServerAvatar. Once these requirements are prepared, the integration process can begin. ## Step-by-Step Guide to Telegram with ServerAvatar ServerAvatar lets you add Telegram as a notification channel directly from the dashboard. This process does not require changing any server settings or accessing sensitive configurations. You’re simply defining where ServerAvatar should send alerts. ### Creating a Telegram Bot for Notifications Telegram bots act as automated messengers that deliver alerts from external systems. Bots are created through a built-in Telegram service called BotFather. Let’s now create a Telegram bot: - Open your Telegram, navigate to the search bar, and search for **BotFather**. ![botfather - Integrate Telegram](https://serveravatar.com/wp-content/uploads/2026/03/image-43-1024x738.png)- Open the BotFather chat and click on the **Start** button from the top right corner. ![start - Integrate Telegram](https://serveravatar.com/wp-content/uploads/2026/03/image-44-1024x528.png)- Let’s now create a new bot by sending the following command: ``` /newbot ``` ``` /newbot ``` - Provide a descriptive name for your bot. - Now, set a bot username, and make sure the username must ends with **bot**. - Example format: ``` server_alerts_bot ``` ``` server_alerts_bot ``` - After completing these steps, BotFather will generate a **bot token**. ![bot token - Integrate Telegram](https://serveravatar.com/wp-content/uploads/2026/03/image-45-1024x686.png) ### Obtaining Telegram Bot Token - The **bot token** is a unique authentication key used to connect Telegram bots with external applications. - After creating the bot, BotFather provides a token similar to the following structure: ``` 123456789:ABCDEF123456example ``` ``` 123456789:ABCDEF123456example ``` - This token allows ServerAvatar to send messages through the Telegram bot. > **Important:** The bot token should always be kept private and stored securely. ### Get Telegram Group ID - To complete the Telegram integration with ServerAvatar, you need the Telegram Group ID (Chat ID). This is the unique identifier of the group where the bot will send notifications. **1. Add the Bot to a Telegram Group** First, you need to add the created bot to a Telegram group. - Open your Telegram group. - Click on **Add Members**. - Search for your bot using its **username** and add it to the group. If you do not already have a group, follow these steps: - Create a **new Telegram group**. - Add **at least one member**, as Telegram requires a minimum of two members to create a group. - Once the group is created, add your **Telegram bot** to the group. **2. Retrieve the Group ID** - To get the **Group ID**, you need to use the bot token generated earlier. - Open the following URL in your browser: ``` https://api.telegram.org/bot/getUpdates ``` ``` https://api.telegram.org/bot/getUpdates ``` - Replace **** with your actual bot token. - **Example:** ``` https://api.telegram.org/bot8786294158:AAEtXlJt4nRMw9N_tjlaniZrFyy6glwKqAw/getUpdates ``` ``` https://api.telegram.org/bot8786294158:AAEtXlJt4nRMw9N_tjlaniZrFyy6glwKqAw/getUpdates ``` **3. Check the API Response** - After opening the URL, you will receive a **JSON response** similar to the following: ``` { "ok": true, "result": [ { "update_id": 123456789, "message": { "chat": { "id": -5171172256, "title": "ServerAvatar Notification Group", "type": "group" } } } ] } ``` ``` { "ok": true, "result": [ { "update_id": 123456789, "message": { "chat": { "id": -5171172256, "title": "ServerAvatar Notification Group", "type": "group" } } } ] } ``` - **The important part is:** ``` "id": -5171172256 ``` ``` "id": -5171172256 ``` - This **negative number is your Telegram Group ID**. - Copy the Group ID as we have to add it in the ServerAvatar when we integrating telegram. ## Connecting Telegram with ServerAvatar Once the Telegram bot is created and the token is available, the next step is linking the bot with ServerAvatar. All notification channels are managed from the **Account Settings** section in the ServerAvatar dashboard. This is where you can configure different communication methods, including Telegram. - Let’s first log in to the ServerAvatar account and navigate to the **Account** Section from the top right corner. ![account - Integrate Telegram](https://serveravatar.com/wp-content/uploads/2026/03/image-46-1024x239.png) - Navigate to the **Notification Channel** section. Click on the **Create Channel** button.[](https://storage.3.basecamp.com/5840738/blobs/dd4de6e4-1a06-11f1-8fe3-0242ac120004/download/image.png) ![create channel - Integrate Telegram](https://serveravatar.com/wp-content/uploads/2026/03/image-47-1024x285.png) - Select **Telegram** as the notification channel, and enter the Label for your **Telegram** notification channel. - Enter the bot token generated by BotFather in the Bot Token section. - Enter the Group ID generated previously. - After entering the details, click on the **Create** button. ![create notification channel - Integrate Telegram](https://serveravatar.com/wp-content/uploads/2026/03/image-48.png) - After adding the Telegram notification channel, you can view the integrated notification channel displayed. ![integrated notification channel - Integrate Telegram](https://serveravatar.com/wp-content/uploads/2026/03/image-49.png) > It’s important to understand that adding Telegram as a notification channel from the Account Settings only enables notifications at the account level. > This means you will receive general account-related alerts, but server-specific activities will not be sent to Telegram automatically. ### How Account-Level Notifications Appear in Telegram Once Telegram is added as a notification channel at the account level, ServerAvatar starts sending account-related alerts directly to your Telegram. Each alert is displayed as a clear, readable Telegram message, making it easy to understand what action occurred and when it happened. **Examples of account-level notifications** ![account level examples - Integrate Telegram](https://serveravatar.com/wp-content/uploads/2026/03/image-50.png) > To receive alerts related to the server and particular applications in the server, the notification channel must be attached to the server. This step is commonly missed during setup, but without attaching the notification channel at the server level, Telegram will not receive server activity alerts. ### How to get Server-Level Notifications in Telegram Now, let’s attach the notification channel to the server to **get all the server-level notifications.** - Navigate to the server panel by clicking on the server dashboard icon. ![server dashboard - Integrate Telegram](https://serveravatar.com/wp-content/uploads/2026/03/image-51.png) - Go to the **Notification Channels** from the left sidebar and click on the **Attach** button. ![attach notification channel - Integrate Telegram](https://serveravatar.com/wp-content/uploads/2026/03/image-52.png) - Select your created **Notification Channel** from the dropdown and click on the **Attach** button. ![attach notification channel - Integrate Telegram](https://serveravatar.com/wp-content/uploads/2026/03/image-53.png) - You can see your notification channel listed, once your notification channel is connected to your server. ![notification channel - Integrate Telegram](https://serveravatar.com/wp-content/uploads/2026/03/image-54.png) By integrating Telegram with ServerAvatar and attaching the notification channel to your server, you get instant updates about server activities directly in your Telegram. This helps you keep track of your server easily without logging into ServerAvatar all the time. **Examples of server-level notifications** ![server-level notification - Integrate Telegram](https://serveravatar.com/wp-content/uploads/2026/03/image-55.png) ## Types of Alerts Sent to Telegram via ServerAvatar Once Telegram is integrated with ServerAvatar and the notification channel is properly attached, the system can send a wide range of alerts directly to your Telegram. ### Account-Level Alerts Account-level alerts are triggered by activities related to your ServerAvatar account, integrations, and organization settings. These notifications are sent as soon as the Telegram is added at the account level. **User-Level Alerts** These alerts help you stay informed about important security and account-related actions: - Whitelist IP added - Two-factor authentication (2FA) enabled or disabled - Wallet credit added **Integration-Level Alerts** These notifications inform you when third-party services are connected or removed from your account: - Cloud provider connected or removed - Git provider connected or removed - Storage provider connected or removed **Organization-Level Alerts** These alerts keep track of team and role management activities: - Organization member added or removed - Role created, updated, or deleted ### Server-Level Alerts Server-level alerts become active once the Telegram notification channel is **attached to a specific server**. These notifications cover server operations, services, applications, and security-related events. **Server Alerts** These alerts focus on core server activities and system-level changes: - Server created, deleted, or restarted - Server IP changed - Server shared - Server metrics updates - Disk usage checked - Memory usage checked - Server load checked - Disk cleaned - Swap updated **Cronjob Alerts** - Cronjob created, updated, or deleted - Cronjob enabled or disabled **PHP & Configuration Alerts** - PHP extension installed or removed - PHP-FPM configuration updated **Security Alerts** - Database root password updated - Redis settings updated - Fail2Ban enabled, disabled, or updated **Service Alerts** - Service started, stopped, restarted, or reloaded - Service monitoring enabled, disabled, or updated **Firewall Alerts** - Firewall enabled or disabled - Firewall rule created or deleted [![Blog banner - ServerAvatar](https://serveravatar.com/wp-content/uploads/2025/09/728_90-Banner-1-1024x127.png)](https://serveravatar.com/?ref=blog)## Troubleshooting Telegram Integration Issues If Telegram alerts do not appear after configuration, the following checks can help identify the issue. **Common problems** - **Incorrect bot token:** Ensure the token entered in ServerAvatar matches the one generated by BotFather. - **Invalid group ID:** Verify that the group ID corresponds to the correct Telegram conversation. - **Bot not activated:** Make sure the bot chat has been started within Telegram. ## Benefits of Telegram-Based Server Alerts Using Telegram for server alerts offers several advantages for system administrators and development teams. **Key benefits** - **Automated notification delivery:** Alerts are generated automatically based on server events. - **Accessible messaging platform:** Telegram provides easy access to notifications across multiple devices. - **Centralized alert monitoring:** All messages are stored within a single chat interface. - **Quick integration process:** Telegram bots allow straightforward integration with monitoring systems. These benefits make Telegram a practical notification channel for server management. ## Common Use Cases of Telegram Alerts This integration is useful for many types of users who want to stay updated without constant logins. It quietly works in the background while you focus on your actual work. **Common use cases:** - **Startup founders:** Keep an eye on production servers without technical overhead. - **DevOps teams:** Track server health and system events in real time. - **Agencies:** Manage and monitor multiple client servers from one place. - **Freelancers:** Stay informed without being logged in all day. It’s like having an assistant watching your servers. ## How This Integration Improves Productivity Telegram notifications help you work smarter, not harder. By reducing tool switching, you stay focused on what actually matters. **Productivity benefits:** - **Faster notifications:** Respond quickly before issues escalate. - **Less downtime:** Early alerts help prevent bigger problems. - **Better team collaboration:** Everyone sees the same updates instantly. - **Peace of mind:** You know your servers are being watched. It’s a small setup with a big impact. ## Conclusion Integrating Telegram with ServerAvatar provides a simple and efficient way to stay informed about important server activities without constantly monitoring the dashboard. By configuring Telegram as a notification channel, administrators can receive automated alerts for account events, server operations, security changes, and system updates directly within their Telegram chat. The setup process involves creating a Telegram bot, obtaining the bot token and group ID, and connecting the notification channel through the ServerAvatar dashboard. Once configured correctly and attached to the desired server, Telegram becomes a convenient communication channel for tracking system events and maintaining better visibility over server operations. ## FAQs ### 1. What is the purpose of integrating Telegram with ServerAvatar? Integrating Telegram with ServerAvatar allows users to receive automated notifications about account activities, server events, and system updates directly in their Telegram chat. ### 2. Do I need to create a Telegram bot to receive server alerts? A Telegram bot is required because it acts as the messenger that delivers automated notifications from ServerAvatar to your Telegram chat or group. ### 3. Why am I not receiving server alerts after adding Telegram as a notification channel? Server alerts will only appear after the notification channel is attached to a specific server. Adding Telegram at the account level only enables account-related notifications. ### 4. Can Telegram alerts be sent to a group instead of a personal chat? Telegram alerts can be sent to a group by adding the bot to the group and using the group’s chat ID when configuring the notification channel. ### 5. What types of alerts can ServerAvatar send to Telegram? ServerAvatar can send various alerts including account activity notifications, server status updates, deployment events, security changes, cronjob updates, and system service alerts. **Categories:** Blog, Guide, Linux, Others, Tutorials, Ubuntu **Tags:** DevOps, real time server alerts, server alerts, Server monitoring alerts, ServerAvatar Telegram integration, Telegram, telegram integration --- ### [Everything You Need to Know About Edge Page Caching](https://serveravatar.com/edge-page-caching/) **Published:** March 6, 2026 **Author:** Meghna Meghwani **Content:** [![Blog banner - ServerAvatar](https://serveravatar.com/wp-content/uploads/2025/09/728_90-Banner-3-1024x127.png)](https://serveravatar.com/?ref=blog)Have you ever visited a website that loads instantly, no matter where you are in the world? It almost feels like the page was waiting for you. That smooth and lightning-fast experience is often powered by Edge Page Caching. As websites grow and attract visitors from different countries, delivering content quickly becomes challenging. Every request going back to a central server can slow things down. This is where Edge Page Caching steps in. Instead of loading a page from the original server every time, the content is stored closer to the user, making it faster and more efficient. In this guide, I will break down everything you need to know about Edge Page Caching, including how it works, why it matters, and how it can significantly improve website performance. ## What Is Edge Page Caching? Edge Page Caching is a technique used to store copies of web pages on servers located closer to website visitors. These servers, known as edge servers, are part of a distributed network spread across different geographic locations. Instead of retrieving the page from the main server every time a user visits, the cached version is delivered from the nearest edge server. This significantly reduces loading time. ![Edge Page Caching](https://serveravatar.com/wp-content/uploads/2026/03/image-35.png) In simple terms, Edge Page Caching allows websites to serve content faster by shortening the distance between the user and the data. ### How Edge Page Caching Works Edge Page caching improves website performance by saving copies of your site’s content on servers that are located closer to visitors. These servers are part of a Content Delivery Network (CDN) that operates across multiple locations around the world. Instead of every request traveling to the main server, the CDN can serve content from a nearby edge server, which significantly reduces loading time. To understand the process better, let’s break it down step by step. ![Edge Page Caching works](https://serveravatar.com/wp-content/uploads/2026/03/image-36.png) **When a user visits a website:** **1. User Sends a Request** When someone opens your website, their browser requests the page along with related files like images, stylesheets, or scripts. Instead of going directly to your main hosting server, the request first reaches the CDN network. The CDN then directs the request to the closest edge server based on the visitor’s geographic location. **2. Edge Server Checks Its Cache** Once the request reaches the edge server, it checks whether the requested content is already stored in its cache. If the content is available and still valid, the edge server immediately sends it back to the user. Because the data is served from a nearby location, the page loads much faster, and the origin server does not need to process the request. **3. Request Is Sent to the Origin Server (If Necessary)** If the edge server does not have the requested content, or if the stored version has expired, the request is forwarded to the **origin server**, which is the main server where your website is hosted. The origin server then sends the latest version of the page or file back to the edge server. The edge server stores this copy so that future visitors requesting the same content can receive it directly from the cache. **4. Content Is Delivered to the User** After the edge server retrieves or confirms the cached content, it delivers the data to the user’s browser. Since the server is geographically closer to the visitor, the content travels a shorter distance across the internet. This results in lower latency and faster page loading times. **Example Scenario** Imagine your website is hosted on a server in New York, but a visitor is accessing it from Tokyo. Without edge caching, every request would need to travel across continents to reach the New York server and then return to the user. This extra distance increases the time it takes for the page to load. With edge caching enabled, the CDN may store a copy of your website’s content on an edge server located in Tokyo or nearby. When the visitor opens your site, the request is handled by that local edge server, allowing the page to load almost instantly. It’s similar to downloading a file once and then opening it locally instead of downloading it again every time. ## Why Website Speed Matters Website speed plays a crucial role in how users interact with your site. When pages take too long to load, visitors quickly lose patience and move to another website. A slow website not only frustrates users but also impacts business growth and overall online performance. Studies consistently show that slow websites lead to: - **Higher bounce rates:** Visitors leave the site quickly if pages take too long to load. - **Lower engagement:** Slow loading discourages users from exploring multiple pages. - **Reduced conversions:** Delays can cause potential customers to abandon purchases or sign-ups. - **Poor user experience:** Long loading times create frustration and reduce overall satisfaction. Even a delay of a few seconds can cause visitors to abandon a page. That’s why technologies like Edge Page Caching have become essential for modern websites. ## Edge Caching vs Traditional Caching Caching helps websites deliver content faster, but different caching methods work in different ways. **Traditional caching** typically happens at the browser or server level. The content is stored locally or on the main server. **Edge caching**, however, distributes cached content across multiple global servers so users can access it from a nearby location. This distributed approach significantly reduces loading time and improves website performance for users around the world. **Here’s a simple comparison:** **Feature****Traditional Caching****Edge Page Caching****Storage Location**Single serverMultiple global edge servers**Speed**ModerateVery fast**Scalability**LimitedHighly scalable**User Experience**Depends on locationConsistent globally## Benefits of Edge Page Caching Implementing Edge Page Caching provides several important advantages. - **Faster Page Loading:** Users receive content from nearby servers, which reduces latency. - **Reduced Server Load:** The origin server handles fewer requests because cached versions serve most visitors. - **Better User Experience:** Pages load quickly, improving satisfaction and engagement. - **Improved Website Stability:** Heavy traffic spikes are easier to manage when requests are distributed. - **Lower Infrastructure Costs:** Less traffic hitting the main server means fewer resources are needed. These benefits make edge caching a powerful tool for websites of all sizes. ## How Content Delivery Networks Support Edge Caching A Content Delivery Network (CDN) is the backbone of Edge Page Caching. Edge caching works because CDNs operate large global networks of edge servers distributed across different regions. These servers store commonly requested files such as HTML pages, images, CSS files, and JavaScript assets. Since these files usually do not change frequently, they can be safely cached and delivered quickly. Some types of content, particularly dynamic or personalized data, may not always be cached. Instead, they follow specific caching rules or are fetched directly from the origin server when needed. ![CDN support - Edge Page Caching](https://serveravatar.com/wp-content/uploads/2026/03/image-37.png) CDNs consist of thousands of edge servers placed in data centers around the world. When a website uses a CDN, its content is automatically replicated across these servers. When users visit the site, they are connected to the closest server instead of the original host. This process dramatically reduces the time it takes for data to travel across the internet. ## Types of Content That Can Be Cached Not every part of a website changes frequently. Some files remain the same for long periods, which makes them ideal for caching. By storing these files in cache, websites can deliver them much faster without repeatedly requesting them from the main server. Common cacheable content includes: - **HTML pages:** Cached page structures allow websites to load basic layouts quickly. - **Images:** Image files can be stored in cache so they don’t need to be downloaded repeatedly. - **CSS files:** Stylesheets that control the website design can be served faster from cached storage. - **JavaScript files:** Scripts used for website functionality can be cached to reduce loading delays. - **Videos:** Frequently accessed video files can be delivered faster when cached on edge servers. - **Fonts:** Custom fonts can be stored in cache so text appears instantly when pages load. These files usually remain unchanged for long periods, making them perfect candidates for caching. ### Dynamic vs Static Content in Edge Caching When using edge page caching, it is important to understand the difference between static and dynamic content. ![dynamic vs static content - Edge Page Caching](https://serveravatar.com/wp-content/uploads/2026/03/image-38.png) - **Static Content:** Files such as images, stylesheets, and scripts that remain the same for all users. - **Dynamic Content:** Pages like dashboards, profiles, and shopping carts that change based on user activity. Modern caching technologies allow websites to handle both types efficiently while still maintaining speed and accuracy. ## Cache Expiration and Invalidation Cached content cannot remain stored forever because websites are constantly updated. To make sure users see the latest version of a page, caching systems use expiration and invalidation techniques. These mechanisms control when cached content should be refreshed or replaced with updated data. - **Time-Based Expiration:** Cached content automatically refreshes after a defined period of time. - **Manual Invalidation:** Administrators manually clear cached files when major updates occur. Proper cache management ensures users always receive accurate and up-to-date information. ## Security Benefits of Edge Page Caching Edge page caching does more than improve speed; it also adds an extra layer of protection for websites. Since edge servers handle many incoming requests, they can filter harmful traffic before it reaches the main server. This helps strengthen overall website security and reliability. Edge caching helps protect websites from: - **Traffic floods:** Edge servers absorb large spikes in traffic to prevent server overload. - **Malicious bots:** Suspicious automated requests can be blocked before reaching the origin server. - **Large-scale attacks:** Distributed edge networks help reduce the impact of potential attacks. Because of this filtering capability, edge networks act like protective shields around websites. ## SEO Advantages of Faster Page Delivery Search engines give priority to websites which provides smooth and fast user experiences. When pages load quickly, visitors are more likely to stay longer and interact with the content. Edge page caching helps improve several performance factors that search engines consider when ranking websites. With edge caching, websites can achieve: - **Faster page load times:** Cached content reduces the time needed to deliver pages to users. - **Improved Core Web Vitals:** Faster loading improves important performance metrics used by search engines. - **Better search visibility:** Faster websites have a higher chance of ranking well in search results. - **Increased organic traffic:** Improved rankings can bring more visitors from search engines. Overall, faster page delivery contributes to better SEO performance and user satisfaction. ## Common Challenges with Edge Caching Although edge caching offers many advantages, it also comes with certain technical challenges. Proper configuration and monitoring are necessary to ensure that cached content remains accurate and up to date. Understanding these potential issues helps website owners manage caching more effectively. Some common challenges include: - **Cache Consistency:** Ensuring all edge servers update their cached content after changes are made. - **Dynamic Content Handling:** Preventing personalized data from being incorrectly cached. - **Cache Configuration:** Incorrect settings can cause outdated or incorrect content to appear. Modern CDN platforms offer tools that help manage these challenges efficiently. [![Blog banner - ServerAvatar](https://serveravatar.com/wp-content/uploads/2025/09/728_90-Banner-1-1024x127.png)](https://serveravatar.com/?ref=blog)## When Should You Use Edge Page Caching? Edge page caching is especially useful for websites that serve users across multiple regions or experience high traffic levels. It helps improve performance, reduce server workload, and ensure faster content delivery. Many modern websites rely on edge caching to maintain consistent performance worldwide. You should consider edge page caching if: - **Your audience is global:** Visitors from different countries benefit from nearby edge servers. - **Your site receives heavy traffic:** Cached content reduces the load on the main server. - **Speed is critical for user experience:** Faster pages keep visitors engaged. - **You run an e-commerce or content-heavy site:** Large amounts of media and pages benefit from caching. - **Your server struggles with peak traffic:** Edge servers help distribute traffic during busy periods. For growing websites and modern web applications, edge page caching often becomes an essential performance strategy. ## Implementing Edge Page Caching with ServerAvatar Setting up Edge Page Caching can sometimes be complicated, especially for users who manage their own cloud servers. Configuring web servers, adjusting cache headers, and integrating CDN services often requires technical knowledge and manual server management. This is where **ServerAvatar** can make the process much easier. **What is ServerAvatar?** [ServerAvatar](https://serveravatar.com/) is a platform to simplify the hosting and management of servers and applications. It simplifies the process of deploying and managing PHP and Node.js based web applications on servers. ![](https://serveravatar.com/wp-content/uploads/2026/03/image-39.png) It supports popular web servers like Apache, Nginx, OpenLiteSpeed, and Node Stack, allowing users to run high-performance websites with minimal setup. When using ServerAvatar, users can optimize their server environment for performance and integrate the Cloudflare CDN provider that supports Edge Page Caching. Proper server configuration, optimized caching headers, and efficient web server stacks ensure that edge caching systems work effectively. ![](https://serveravatar.com/wp-content/uploads/2026/03/image-40-1024x493.png) By simplifying server management tasks, ServerAvatar helps website owners focus on performance, scalability, and reliability while ensuring their infrastructure is ready to support advanced caching strategies like Edge Page Caching. > Edge Page Caching is commonly used with CDN platforms like Cloudflare and works best when paired with optimized origin servers managed through platforms such as ServerAvatar. ## Best Practices for Implementing Edge Page Caching To maximize the benefits of edge page caching, websites should follow certain best practices. Proper setup ensures that caching improves speed without causing content delivery issues. A well-configured caching strategy helps maintain both performance and reliability. Key best practices include: - **Define Clear Cache Rules:** Specify which pages and resources should be cached. - **Use Proper Cache Headers:** Headers help browsers and servers understand caching behavior. - **Set Reasonable Expiration Times:** Balance fast performance with timely content updates. - **Monitor Performance Regularly:** Track loading speeds and server responses to ensure optimal performance. - **Optimize Your Origin Server:** Even though edge servers handle most content delivery, the origin server still plays a critical role in performance. Server management platforms like **ServerAvatar** help streamline server optimization by allowing users to manage services, PHP versions and web server configurations efficiently from a single dashboard. Following these practices helps websites maintain efficient and reliable caching systems. ## Conclusion Edge Page Caching has become an essential technique for modern websites that want to deliver fast, reliable, and scalable user experiences. By storing copies of web pages on edge servers located closer to visitors, websites can significantly reduce loading times and decrease the workload on their main servers. This not only improves performance but also enhances user satisfaction, search engine rankings, and overall website stability. As internet users expect instant access to information, implementing Edge Page Caching can help websites stay competitive while ensuring smooth performance for audiences across the globe. When combined with a properly optimized origin server managed through ServerAvatar, edge caching can deliver even better performance and reliability for modern websites. ## FAQs ### 1. What is Edge Page Caching in simple terms? Edge Page Caching is a method that stores copies of website pages on servers located closer to users, allowing the content to load faster without always contacting the main server. ### 2. How is Edge Page Caching different from regular caching? Regular caching usually stores data in a browser or on the main server, while Edge Page Caching distributes cached content across multiple global servers to deliver it faster to users. ### 3. Does Edge Page Caching work for dynamic websites? Modern caching systems can handle dynamic websites using advanced rules and technologies that allow certain dynamic elements to remain personalized while still improving performance. ### 4. Can Edge Page Caching improve SEO? Faster page loading speeds improve user experience and help websites perform better in search engine rankings, which can lead to increased visibility and traffic. ### 5. Do all websites need Edge Page Caching? Not every website requires it, but sites with global audiences, high traffic, or large amounts of content can benefit greatly from implementing Edge Page Caching. **Categories:** Blog, Guide, Linux, Others, Tutorials, Ubuntu **Tags:** caching, Content Delivery Network, Edge Caching Explained, edge page caching, Improve Website Speed, Page Load Speed, Website Caching --- ### [Enhance Your Website Security with IP Whitelisting and Blacklisting](https://serveravatar.com/ip-whitelisting-and-blacklisting/) **Published:** March 5, 2026 **Author:** Meghna Meghwani **Content:** [![Blog banner - ServerAvatar](https://serveravatar.com/wp-content/uploads/2025/09/728_90-Banner-3-1024x127.png)](https://serveravatar.com/?ref=blog)Website security is a major concern for anyone running an online platform. Whether it is a small blog, a business website, or a large web application, protecting systems from unauthorized access is critical. Attackers, bots, and automated scripts continuously scan servers looking for weaknesses. Without proper protection, these threats can lead to data breaches, service interruptions, or compromised systems. One effective way to strengthen protection is by using IP Whitelisting and Blacklisting, which helps control who can access your server and who should be blocked before any damage can occur. One effective method for controlling access and reducing security risks is the use of IP whitelisting and blacklisting. These techniques allow administrators to define which IP addresses can interact with their systems and which should be blocked. Instead of allowing unrestricted traffic, servers can filter incoming connections and enforce access rules. In this guide, we will explore how IP whitelisting and blacklisting work, why they are important for website security, and how they can help strengthen server protection. ## Understanding Website Security Website security refers to the strategies and technologies used to protect servers, applications, and data from unauthorized access or malicious activity. A secure system prevents attackers from exploiting vulnerabilities while ensuring legitimate users can access services safely. ![Web Security - IP Whitelisting and Blacklisting](https://serveravatar.com/wp-content/uploads/2026/03/image-28.png) Modern website security depends on multiple defensive layers that work together to detect, prevent, and respond to potential threats. - **Network Firewalls:** Firewalls act as the first line of defense by filtering incoming and outgoing network traffic based on predefined security rules, preventing unauthorized connections from reaching the server. - **Authentication Systems:** Authentication mechanisms verify the identity of users before granting access, ensuring that only authorized individuals can interact with protected resources. - **Encryption Protocols:** Encryption technologies protect data while it is being transmitted across networks, preventing sensitive information from being intercepted or altered. - **Server Monitoring:** Continuous monitoring tools track server activity, system performance, and unusual behavior, helping administrators detect potential threats or irregular patterns early. - **Access Control Mechanisms:** Access control policies determine which users or systems can access specific resources, reducing the risk of unauthorized actions within the environment. Among these protective layers, IP filtering plays an important role. By controlling which IP addresses can connect to a system, administrators can limit potential threats and maintain better control over network traffic. ### What Is an IP Address An IP address (Internet Protocol address) is a numerical identifier assigned to devices connected to a network. It allows systems to communicate with each other and exchange data across the internet. ![IP Address - IP Whitelisting and Blacklisting](https://serveravatar.com/wp-content/uploads/2026/03/image-29.png) Each request sent to a website contains an IP address that identifies the source of the request. Servers can read this information and apply rules to determine whether the connection should be accepted or rejected. IP addresses typically exist in two formats: **1. IPv4** A traditional format using numbers separated by periods. **2. IPv6** A newer format designed to support a much larger number of internet-connected devices. By analyzing these addresses, systems can apply security rules such as whitelisting or blacklisting. ## What Is IP Whitelisting IP whitelisting is a security technique that allows access only to specific IP addresses that have been approved in advance. When a whitelist rule is applied, the system checks incoming connections against a list of authorized IP addresses. If the IP address is included in the list, the request is permitted. If it is not included, the connection is rejected. ![IP Whitelisting - IP Whitelisting and Blacklisting](https://serveravatar.com/wp-content/uploads/2026/03/image-30.png) This approach ensures that only trusted sources can interact with sensitive services or systems. IP whitelisting is often used to restrict access to critical systems by allowing only trusted IP addresses to connect. - **Administrative Dashboards:** Restricting access to admin panels helps prevent unauthorized users from attempting to manage or modify system configurations. - **Internal Applications:** Applications used within private infrastructure can be protected by allowing access only from approved network addresses. - **Server Management Interfaces:** Tools used for server administration can be secured by limiting connections to trusted IP addresses, reducing the risk of external access attempts. - **Private APIs:** APIs that handle sensitive operations or internal communication can be protected by allowing requests only from verified sources. ### Key Features of IP Whitelisting IP whitelisting focuses on allowing access only to trusted IP addresses while blocking all other connections by default. - **Restricted Access Control:** Only pre-approved IP addresses can access specific systems, applications, or services. - **Improved Security for Sensitive Areas:** Critical sections such as admin panels, APIs, and server management tools can be protected from unknown traffic. - **Customizable Access Rules:** Administrators can easily add or remove IP addresses depending on changing access requirements. - **Network-Level Protection:** Whitelisting can be applied through firewalls, servers, or cloud security settings to filter requests early. - **Reduced Attack Surface:** By allowing only trusted connections, the number of potential entry points for attackers is significantly minimized. ### How IP Whitelisting Works The process of IP whitelisting follows a straightforward filtering mechanism. - A connection request reaches the server. - The server identifies the IP address of the request. - The system compares the IP address with the whitelist database. - If the IP address matches an approved entry, access is granted. - If no match is found, the connection is denied. This method significantly reduces the number of potential attack sources because only predefined IP addresses are allowed to access the protected resource. ### Advantages of IP Whitelisting IP whitelisting offers several benefits when protecting sensitive services and applications. - **Strict Access Control:** Only approved IP addresses can connect to the system. This limits exposure to unknown or potentially harmful traffic. - **Reduced Attack Surface:** By restricting connections, the number of possible attack paths decreases significantly. - **Improved Administrative Security:** Administrative interfaces and server control panels become much harder to access without authorization. - **Lower Risk of Unauthorized Access:** Even if attackers discover login credentials, access may still be blocked if their IP address is not on the whitelist. - **Better Network Monitoring:** With fewer allowed connections, monitoring and analyzing traffic becomes easier and more efficient. ### When IP Whitelisting Should Be Used IP whitelisting is most effective when access needs to be tightly controlled. Typical use cases include: - **Administrative Systems:** Server administration panels and control interfaces benefit from restricted access policies. - **Private APIs:** Applications that interact with trusted services may require IP-based authorization. - **Internal Services:** Systems that should only be accessed by internal infrastructure can be protected using a whitelist. - **Server Management Tools:** Remote server management interfaces can be secured through IP restrictions. ## What Is IP Blacklisting IP blacklisting is a security method used to block specific IP addresses from accessing a system. Instead of defining which addresses are allowed, blacklisting identifies addresses that should be denied access due to suspicious or malicious activity. Once an IP address is added to a blacklist, the server automatically rejects any requests originating from that address.[](https://storage.3.basecamp.com/5840738/blobs/c2a8d2da-188b-11f1-ad2d-0242ac120004/download/image.png) ![IP Blacklisting - IP Whitelisting and Blacklisting](https://serveravatar.com/wp-content/uploads/2026/03/image-31.png) IP blacklisting helps block traffic that displays suspicious or potentially harmful behavior. - **Repeated Failed Login Attempts:** IP addresses generating multiple unsuccessful login attempts can be blocked to prevent brute-force access attempts. - **Automated Bots:** Bots that send automated requests to exploit vulnerabilities or overload systems can be restricted through blacklist rules. - **Suspicious Traffic Patterns:** Traffic that shows abnormal request patterns or irregular behavior can be blocked to reduce the risk of attacks. - **Known Malicious IP Sources:** IP addresses identified as sources of harmful activity can be denied access to protect system resources. ### Key Features of IP Blacklisting IP blacklisting works by identifying and blocking IP addresses that show suspicious or harmful activity. - **Targeted Blocking:** Specific IP addresses involved in malicious behavior can be denied access immediately. - **Automated Threat Filtering:** Security systems can automatically add suspicious IPs to a blacklist after repeated failed actions. - **Flexible Blocking Rules:** Administrators can block individual IPs, IP ranges, or locations depending on security needs. - **Integration with Security Tools:** Blacklisting often works alongside firewalls, monitoring systems, and intrusion detection tools. - **Traffic Control Mechanism:** Blocking unwanted traffic helps prevent servers from being overloaded with harmful requests. ### How IP Blacklisting Works IP blacklisting helps maintain system stability and security by preventing harmful traffic from reaching the application layer. When an incoming request is received: - Server checks IP address of the request. - The system checks the blacklist database. - If the IP address appears in the blacklist, the request is immediately rejected. - If the IP address is not listed, the request proceeds normally. This process filters out many types of automated attacks before they consume server resources. ### Advantages of IP Blacklisting IP blacklisting helps protect websites by stopping known malicious traffic before it can affect the system. - **Prevents Repeated Malicious Attempts:** Blocking problematic IP addresses stops attackers from continuing their activity. - **Improves Server Stability:** Removing harmful traffic reduces unnecessary load on server resources. - **Helps Mitigate Automated Attacks:** Bots and scripts that generate suspicious requests can be restricted effectively. - **Enhances Overall Security Layers:** Blacklisting adds another defense mechanism alongside firewalls and authentication systems. - **Easy to Implement and Maintain:** Most servers, hosting platforms, and security tools support IP blocking with simple configuration options. ### When IP Blacklisting Is Useful IP blacklisting is commonly used on publicly accessible platforms where traffic comes from many unknown sources. IP blacklisting strengthens system security by stopping harmful sources from continuing their activity. - **Repeated Malicious Requests:** Blocking IP addresses that repeatedly send suspicious requests prevents them from continuing to interact with the system. - **Automated Attack Scripts:** Attack scripts that attempt to exploit vulnerabilities can be restricted by blocking the IP addresses they originate from. - **High-Frequency Suspicious Connections:** IP addresses generating unusually high volumes of requests can be blocked to prevent service disruption or server overload. - **IP Addresses Linked to Security Incidents:** Addresses previously associated with malicious activities can be blacklisted to prevent further interaction with the system. Because blacklists focus on blocking harmful sources, they allow legitimate traffic to continue flowing normally. ## Key Differences Between IP Whitelisting and IP Blacklisting Although both methods manage network access, they function in different ways. **Feature****IP Whitelisting****IP Blacklisting****Access Strategy**Allow only approved IPsBlock known harmful IPs**Security Level**Highly restrictiveModerately restrictive**Traffic Handling**Denies all unknown IPsAllows most traffic except blocked IPs**Management Complexity**Requires careful configurationRequires ongoing monitoringIn many environments, these methods are used together to provide balanced protection. ## Security Threats Reduced by IP Filtering IP filtering plays a major role in mitigating several security risks. - **Brute Force Attacks:** Attackers repeatedly attempt login combinations to gain unauthorized access. Blocking suspicious IP addresses prevents further attempts. - **Automated Bot Traffic:** Bots may send excessive requests or attempt to exploit vulnerabilities. Blacklisting prevents these systems from interacting with the server. - **Unauthorized Server Access:** Unauthorized attempts to access server interfaces can be blocked through IP-based restrictions. - **Malicious Network Scanning:** Attackers frequently scan systems to identify open services or vulnerabilities. IP filtering can block these scanning attempts. ## Methods to Implement IP Whitelisting and Blacklisting Controlling which IP addresses can access your server is an important part of securing web infrastructure. IP filtering can be applied at different layers of the system, including the network firewall, web server configuration, cloud infrastructure, and application level. Implementing these controls ensures that unauthorized traffic is filtered before it reaches sensitive resources. Below are some of the most commonly used methods for implementing IP whitelisting and blacklisting. ### 1. Firewall Configuration A firewall is one of the most widely used tools for controlling network traffic. It operates at the network layer and allows administrators to define rules that determine which IP addresses are allowed to connect to the server. Firewall rules can be used to: - Allow connections only from trusted IP addresses - Block specific IP addresses or ranges - Restrict access to certain ports such as SSH, FTP, or database services - Prevent repeated connection attempts from suspicious sources Because firewall filtering happens before traffic reaches the server applications, it helps stop malicious requests early and reduces unnecessary server load. Most operating systems provide firewall tools such as UFW, iptables, or firewalld to manage these rules. ### 2. Web Server Configuration Web servers such as Apache and Nginx allow administrators to control access using IP-based rules directly within their configuration files. These rules operate at the web server level, meaning they filter requests before the application processes them. Web server IP filtering can be used to: - Restrict access to administrative panels - Protect sensitive directories or configuration files - Allow access to staging environments only from specific IPs - Block repeated requests from suspicious sources This approach provides an additional layer of protection on top of firewall rules. ### 3. Cloud Infrastructure Security Controls Many websites are hosted on cloud platforms. These environments usually include built-in network security tools that allow administrators to control incoming and outgoing traffic. Cloud infrastructure security controls typically allow administrators to: - Allow traffic from approved IP addresses - Block connections from suspicious IP ranges - Restrict access to certain services or ports - Protect internal services that should not be publicly accessible Applying IP restrictions at the infrastructure level ensures that unauthorized traffic is filtered before it reaches the server instance. ### 4. Application-Level Access Controls In some situations, IP filtering can also be implemented within the application itself. Many frameworks and platforms allow developers to restrict certain features or endpoints based on IP address. Application-level controls can be used to: - Restrict login pages to trusted IPs - Limit access to private APIs - Protect internal tools or dashboards - Prevent automated requests from unknown sources While this method can add an extra layer of protection, it is generally recommended to combine it with a firewall and server-level filtering for stronger security. ## Implementing IP Whitelisting and Blacklisting with ServerAvatar Managing IP access rules manually across different server layers can become complex, especially when working with multiple servers or applications. A centralized server management platform can simplify this process and make security configuration easier. ServerAvatar provides built-in tools that allow users to configure IP access rules directly from a graphical dashboard without needing to manually edit server configuration files. **What is ServerAvatar?** [ServerAvatar](https://serveravatar.com/) is a platform to simplify the hosting and management of servers and applications. It simplifies the process of deploying and managing PHP and Node.js based web applications on servers. ![ServerAvatar Dashboard - IP Whitelisting and Blacklisting](https://serveravatar.com/wp-content/uploads/2026/03/image-32.png) Below are two ways ServerAvatar helps manage IP-based security controls. ### 1. Managing Firewall IP Rules in ServerAvatar ServerAvatar allows users to configure firewall rules directly from the platform interface. Instead of using the command line, administrators can manage access policies through a simple dashboard. ![Firewall - IP Whitelisting and Blacklisting](https://serveravatar.com/wp-content/uploads/2026/03/image-33-1024x289.png) With ServerAvatar firewall controls, users can: - Allow trusted IP addresses to access the server - Block suspicious IP addresses using block rules - Control access to specific ports such as SSH or web services - Update firewall settings instantly across the server This simplified firewall management helps users maintain strong access control while reducing the risk of configuration errors. ### 2. Managing Web Server Security with ServerAvatar ServerAvatar also helps manage web server environments such as Apache and Nginx, allowing users to apply security configurations without manually editing configuration files using the built-in file manager feature directly from the platform interface. ![File Manager - IP Whitelisting and Blacklisting](https://serveravatar.com/wp-content/uploads/2026/03/image-34-1024x498.png) Through the ServerAvatar interface, users can: - Modify application files using the built-in File Manager - Manage configurations from a centralized dashboard - Apply security settings across multiple applications easily - Monitor server environments and maintain secure hosting setups By providing centralized server management, ServerAvatar makes it easier to maintain secure configurations while simplifying everyday server administration tasks. [![Blog banner - ServerAvatar](https://serveravatar.com/wp-content/uploads/2025/09/728_90-Banner-1-1024x127.png)](https://serveravatar.com/?ref=blog)## Best Practices for Managing IP Access Effective management of IP filtering rules requires careful planning and maintenance. - **Regularly Review IP Lists:** IP addresses should be periodically reviewed to remove outdated entries and maintain accurate access control. - **Monitor Server Logs:** Log analysis helps identify suspicious traffic patterns and potential threats that may require blocking. - **Use Layered Security:** IP filtering should be combined with firewalls, authentication systems, and monitoring tools for stronger protection. - **Automate Threat Detection:** Automated systems can detect repeated suspicious activity and update blacklists dynamically. - **Document Access Policies:** Clear documentation helps maintain consistent security policies across systems and teams. ## Common Mistakes To Avoid Improper configuration or poor management of IP filtering rules can reduce the effectiveness of security controls and may even block legitimate access. - **Blocking Your Own IP Address:** One of the most common mistakes is accidentally adding your own IP address to a blacklist or failing to include it in a whitelist, which can immediately prevent administrators from accessing the server. - **Failing to Update IP Lists Regularly:** IP addresses used by services, teams, or infrastructure may change over time. If the whitelist or blacklist is not updated regularly, legitimate users may lose access or outdated blocked addresses may remain ineffective. - **Over-Relying on Blacklisting Alone:** Blocking suspicious IPs can help stop known threats, but it cannot prevent new or unknown sources from attempting access. Relying only on blacklisting without other security measures leaves systems exposed. - **Ignoring IPv6 Addresses:** Many networks now support IPv6 alongside IPv4. If filtering rules are applied only to IPv4 addresses, traffic coming from IPv6 addresses may bypass the intended restrictions. - **Blocking Entire IP Ranges Without Verification:** Blocking large IP ranges without careful analysis may unintentionally restrict access for legitimate users who share the same network range. - **Not Monitoring Server Logs:** Server logs provide valuable insight into suspicious traffic and connection attempts. Without monitoring logs, administrators may miss patterns that indicate the need for new whitelist or blacklist rules. - **Using Static Rules in Dynamic Environments:** In environments where IP addresses frequently change, static filtering rules may become outdated quickly. Without regular review, these rules may no longer reflect the current access requirements. ## Conclusion IP whitelisting and blacklisting are important techniques for controlling network access and strengthening server security. By allowing only trusted IP addresses and blocking suspicious sources, administrators can reduce the risk of unauthorized access, automated attacks, and unnecessary server load. These methods help create a controlled environment where traffic can be filtered before it reaches sensitive systems or applications. When combined with other security layers such as firewalls, authentication systems, monitoring tools, and encryption protocols, IP filtering becomes an effective part of a comprehensive security strategy. ServerAvatar further simplifies this process by providing centralized features to manage firewall rules and server configurations, making it easier to maintain secure and well-managed server environments. ## FAQs ### 1. What is the difference between IP whitelisting and IP blacklisting? IP whitelisting allows only specific approved IP addresses to access a system, while IP blacklisting blocks particular IP addresses that are considered suspicious or harmful. ### 2. Is IP whitelisting more secure than IP blacklisting? IP whitelisting generally provides stricter security because it allows access only to known and trusted sources. Blacklisting focuses on blocking known threats while allowing other traffic. ### 3. Can IP whitelisting and blacklisting be used together? Many security setups combine both techniques. Whitelisting restricts access to trusted sources, while blacklisting blocks IP addresses that show suspicious behavior. ### 4. At which level can IP filtering be implemented? IP filtering can be implemented at multiple levels, including network firewalls, web server configurations, cloud infrastructure security controls, and application-level access policies. ### 5. Why is IP filtering important for server security? IP filtering helps reduce unauthorized access attempts, prevents repeated malicious requests, and limits unnecessary traffic reaching the server. ### 6. How does ServerAvatar help manage IP access rules? ServerAvatar provides a centralized dashboard where users can configure firewall rules, allow or block IP addresses, and manage server security settings without manually editing server configuration files. **Categories:** Blog, Guide, Linux, Others, Ubuntu **Tags:** IP Blacklisting, IP Filtering, IP Whitelisting, IP Whitelisting and Blacklisting, Network Security, Server Security, website security --- ### [Google Drive Integration for Easy Backups](https://serveravatar.com/google-drive-backup-integration/) **Published:** March 3, 2026 **Author:** Meghna Meghwani **Content:** [![Blog banner - ServerAvatar](https://serveravatar.com/wp-content/uploads/2025/09/728_90-Banner-3-1024x127.png)](https://serveravatar.com/?ref=blog)People do not think about taking backups until something goes wrong. A failed update, accidental file deletion, malware infection, or server crash can wipe out hours or even years of work in seconds. That’s why smart developers and site owners rely on Google Drive Integration to automate their backups and securely store them off-site without manual effort. Managing server backups is a fundamental part of any server administration workflow. Whether developing applications, hosting websites, or safeguarding databases, having reliable backups is essential. One efficient way to maintain off-site backups is to integrate with cloud storage services. It enables effortless storage of backups directly in cloud storage, giving users a secure, accessible way to safeguard their data without additional infrastructure or complex setups. If you’re using ServerAvatar to manage your cloud servers, integrating Google Drive for backups is one of the easiest and most reliable ways to protect your data. In this guide, we’ll explore why offsite backups matter, how Google Drive integration works in ServerAvatar, and how you can set it up for seamless, worry-free backups. ## What Is Google Drive? [Google Drive](https://workspace.google.com/products/drive) is a cloud-based storage service designed to store, organize, and manage digital data securely online. Instead of relying on local storage alone, it allows files and data to be saved in a remote environment that remains accessible whenever needed. ![Google Drive Integration](https://serveravatar.com/wp-content/uploads/2026/03/image-14.png) From a technical perspective, Google Drive acts as a centralized storage layer where data can be uploaded, maintained, and retrieved through secure authentication. It supports structured file organization and ensures data remains available even if the original system is no longer accessible. When used as a backup destination, Google Drive functions as an off-server storage location. This makes it suitable for storing automated and on-demand backups generated by server management platforms like ServerAvatar. Once connected, it serves as a reliable space where backup files can be preserved according to defined retention rules and accessed for restoration whenever required. ## What Is ServerAvatar? [ServerAvatar](https://serveravatar.com/) is a platform to simplify the hosting and management of servers and applications. It simplifies the process of deploying and managing PHP and Node.js based web applications on servers. ![ServerAvatar Dashboard](https://serveravatar.com/wp-content/uploads/2026/03/image-15.png) Instead of manually configuring backups via SSH, cron jobs, and custom scripts, ServerAvatar lets you: - **Instant and scheduled backups:** Create instant backups and backups at fixed intervals without manual effort or repetitive setup tasks. - **Manage multiple servers and applications:** manage and maintain multiple servers and applications from a single, unified dashboard. - **Monitor servers:** Keep track of server health, usage, and performance in real time. - **Restore sites easily:** Recover files or applications quickly using previously created backups. - **Integrate supported cloud storage:** Store backups securely in cloud storage for better availability and data safety. The Google Drive integration eliminates manual backup uploads and reduces operational risks. ## Why Offsite Backups Are Essential Keeping backups on the same server as your website defeats their purpose. If the server goes down, gets hacked, or becomes corrupted, your backups may disappear along with your site. Offsite backups provide: - **Data redundancy:** Your files are stored in a separate, secure location - **Protection from server failure:** Hardware crashes won’t impact stored backups - **Ransomware protection:** Even if your server is compromised, your backup remains safe - **Quick recovery:** Restore your site without rebuilding everything from scratch This is where cloud storage platforms like Google Drive become incredibly useful. ## What Is Google Drive Integration in ServerAvatar? Cloud storage integration allows ServerAvatar to connect with external storage so that backups can be stored outside the primary server environment. Among the supported services, Google Drive stands out for its ease of use and seamless accessibility. Once connected, ServerAvatar can push backups of your applications, files, and databases straight to your Google Drive storage space without manual uploads. ![Google Drive Integration with ServerAvatar](https://serveravatar.com/wp-content/uploads/2026/03/image-16.png) This integration simplifies data protection, adds redundancy, and ensures that backups are stored safely in a remote cloud space. ### Why Use Google Drive for Backups in ServerAvatar? Here are some key benefits of integrating Google Drive with ServerAvatar for backups: - **Cloud-level safety:** Backups are kept in cloud storage, protecting them from local server failures. - **Centralized storage:** All important backups are kept in one easily managed Google Drive account. - **Convenient access:** Backups can be downloaded or restored anytime from your cloud account. - **No additional tools needed:** Once linked, ServerAvatar handles backup uploads automatically without extra software. ### Benefits of Google Drive Integration in ServerAvatar - **Automated Backup Scheduling:** Set daily, weekly, or custom backup intervals. Once configured, backups run automatically. - **Secure Storage:** Your backups are stored in your own Google Drive account, protected by Google’s infrastructure and security protocols. - **Easy Restore Process:** Need to restore a backup of your site? Simply select a backup and restore it directly from the ServerAvatar dashboard. - **Reduced Server Load:** Backups are transferred to cloud storage, preventing your server disk from filling up. - **Peace of Mind:** You don’t need third-party scripts or complex configurations. Everything is handled within the ServerAvatar panel. ## Step-by-Step Guide to Integrate Google Drive With ServerAvatar Follow these detailed steps to connect your ServerAvatar dashboard with Google Drive. **Step 1: Log In to Your ServerAvatar Account** First, log in to your ServerAvatar account. **Step 2: Go to the Integration Section** Once logged in, navigate to the **Integration** section from the left sidebar. Click it to open the integrations panel. ![Google Drive Integration](https://serveravatar.com/wp-content/uploads/2026/03/image-17-1024x367.png) **Step 3: Access Cloud Storage Options** Inside the Integration section, you’ll see a list of supported integrations. Navigate to the **Cloud Storage** section, where supported cloud storage providers are listed. **Step 4: Click “Link Google Drive”** Under the Cloud Storage section, find the Google Drive option and click the **“Link Google Drive”** button. This initiates the authorization workflow to connect your Google account to ServerAvatar. ![link account - Google Drive Integration](https://serveravatar.com/wp-content/uploads/2026/03/image-18-1024x464.png) **Step 5: Authenticate With Your Google Account** If you’re not already logged into a Google account, a Google sign-in screen will appear. Enter your account details and complete the login process. **Step 6: Grant Authorization** After signing in, you will see a prompt asking for permission to allow ServerAvatar to access your Google Drive for backup storage. Review the permissions and click **Continue** to grant access. ![grant authorization - Google Drive Integration](https://serveravatar.com/wp-content/uploads/2026/03/image-19-1024x569.png) **Step 7: Integration Complete** Once permission is granted, ServerAvatar is successfully linked to your Google Drive account. From this point onwards, you can start saving backups directly to your Google Drive cloud storage. ![cloud storage - Google Drive Integration](https://serveravatar.com/wp-content/uploads/2026/03/image-20-1024x353.png) ### What Happens After Integration? When you connect your Google Drive account to ServerAvatar: - ServerAvatar generates backups of your application files and databases. - The backup is compressed into a secure archive. - The archive is automatically uploaded to your connected Google Drive account. - You can access, download, or restore backups anytime. Everything runs on schedule, without manual intervention. This streamlined flow significantly lowers the complexity of maintaining off-site backups and keeps your server environments safe and recoverable at all times. ## How to Take Backups in ServerAvatar After setting up Google Drive integration for backup storage, let’s now see how to take backups for your applications, database, or file systems. ServerAvatar provides flexible backup features that let you take **instant backups** on demand as well as automated **scheduled backups** for regular protection. ### Instant Backups: Protect Your Data When You Need It Instant Backups allow you to create a backup at any time with just a few clicks. This is useful when you want to secure your server’s files, databases, or entire applications before making changes or updates. Here’s how to take an instant backup in ServerAvatar: - Log in to your ServerAvatar account and navigate to the **Backups** section from the left sidebar. [](https://storage.3.basecamp.com/5840738/blobs/0e4326ca-16e1-11f1-96fd-0242ac120004/download/image.png) ![backups - Google Drive Integration](https://serveravatar.com/wp-content/uploads/2026/03/image-21-1024x368.png) - Click on the **Create** section under the **Instant Backups** section tab to start a new backup process. - **Fill in Backup Details:** - **Backup Name:** Give the backup a clear, memorable name. - **Backup Type:** Section what you want to back up: File System, Application, or Database. - **File Type:** Pick whether you want a standard **.tar** archive or a compressed **.tar.gz** file. - **Database File Type:** Pick whether you want a backup for the database file type in **.sql** or **.sql.gz** format. - **Storage Provider:** Select Google Drive where the backup will be stored. - **Retention Period:** Set how long the backup should be maintained. - Once all fields are filled, click on the **Create an Instant Backup** button to start the backup creation. ![create backup - Google Drive Integration](https://serveravatar.com/wp-content/uploads/2026/03/image-22-1024x609.png) - After the backup is created, it will be listed under the **Backups** **section**, where you can view details, download the file, or restore it later. ![instant backups - Google Drive Integration](https://serveravatar.com/wp-content/uploads/2026/03/image-23-1024x238.png) ### Scheduled Backups: Automate Your Backup Routine While instant backups are great for on-the-fly protection, **Scheduled Backups** let you automate the process so your data is backed up regularly without manual action. You can create schedules that run daily, weekly, or at any interval you choose. To schedule automatic backups: - Log in to your ServerAvatar account and navigate to the **Backups** section from the left sidebar. [](https://storage.3.basecamp.com/5840738/blobs/85923c2e-16e2-11f1-a6ad-0242ac120004/download/image.png) ![backups - Google Drive Integration](https://serveravatar.com/wp-content/uploads/2026/03/image-24-1024x368.png) - Click on the **Create** section under the **Schedule Backups** section tab to start a new backup process. - **Fill in Backup Details:** - **Backup Type:** Section what you want to back up: File System, Application, or Database. - **File Type:** Pick whether you want a standard **.tar** archive or a compressed **.tar.gz** file. - **Database File Type:** Pick whether you want a backup for the database file type in **.sql** or **.sql.gz** format. - **Storage Provider:** Select Google Drive where the backup will be stored. - **Retention Period:** Set how long the backup should be maintained. - **Set the Schedule:** Specify how often backups should occur, for example, Every Day, Every Week, or any other frequency that matches your needs. - **Start immediately after creation:** Select this option if you want the backup process to begin immediately instead of waiting for the scheduled time. - Once all fields are filled, click on the **Create a Schedule** button to start the backup creation. - Once scheduled, ServerAvatar will automatically take backups at the chosen times and store them in your connected Google Drive account storage. ![create schedule backup - Google Drive Integration](https://serveravatar.com/wp-content/uploads/2026/03/image-25-1024x642.png) - You can check out all your scheduled backups in the **Schedules** section. This list includes the actions such as, pause backup, edit, and delete. ![sheduled list - Google Drive Integration](https://serveravatar.com/wp-content/uploads/2026/03/image-26-1024x195.png) - Once the backup is created, it will be listed under the **Backups** **section**, where you can view details, download the file, or restore it later. ![schedule backups - Google Drive Integration](https://serveravatar.com/wp-content/uploads/2026/03/image-27-1024x246.png) ## Why Backups Matter Cyber threats are increasing, hosting environments are becoming more complex, and user expectations for uptime are higher than ever. Having a simple, reliable, automated backup system is no longer optional, it’s foundational. Whether you’re applying updates, migrating applications, or preparing for unexpected issues, having a fresh backup available can save time and prevent data loss. With both Instant and Scheduled Backups backed by your Google Drive integration, ServerAvatar delivers a complete and reliable backup solution for your server environments. Google Drive integration in ServerAvatar makes enterprise-level backup practices accessible even to small businesses and solo developers. [![Blog banner - ServerAvatar](https://serveravatar.com/wp-content/uploads/2025/09/728_90-Banner-1-1024x127.png)](https://serveravatar.com/?ref=blog)## Best Practices for Backup Management Even with automation, follow these best practices: - **Set a retention policy:** Avoid storing unnecessary old backups. - **Test restores periodically:** Ensure backups actually work. - **Monitor storage space:** Google Drive storage can fill up over time. - **Use strong account security:** Enable 2FA on your Google account. Backups are only valuable if they are reliable and restorable. ## Who Should Use Google Drive Integration? This integration is ideal for: - **Website owners:** Helps protect website data and simplify backup management without technical complexity. - **SaaS startups:** Support consistent data protection as applications grow and evolve. - **Agencies managing client sites:** Enables centralized backup control across multiple client projects. - **Freelance developers:** Make handling backups faster while managing several servers or applications. - **eCommerce store owners:** Ensures critical store data remains protected and recoverable. - **Anyone managing production websites:** Provides a reliable backup workflow for live and actively used environments. If downtime equals lost revenue, automated offsite backups are non-negotiable. ## Conclusion Reliable backups are no longer a secondary consideration in modern server management, they are a core requirement. By combining ServerAvatar with Google Drive, users gain a simple yet powerful way to protect applications, databases, and file systems through automated offsite backups. From seamless integration and flexible backup types to instant and scheduled backup options, this setup removes the complexity traditionally associated with backup management. With data securely stored in cloud storage and easily restorable when needed, ServerAvatar ensures that your server environments remain resilient, recoverable, and prepared for unexpected situations. ## FAQs ### 1. Does ServerAvatar support both instant and scheduled backups? Yes, ServerAvatar allows you to create instant backups on demand as well as scheduled backups that run automatically at defined intervals. ### 2. Can I choose Google Drive as the storage location for my backups? Yes, once Google Drive is integrated, it can be selected as the storage provider for both instant and scheduled backups. ### 3. What types of backups can I create in ServerAvatar? You can create backups for the file system, individual applications, or databases, depending on your requirements. ### 4. Are backups stored on the server or offsite? When Google Drive is selected, backups are stored offsite in your connected cloud storage account, not on the server itself. ### 5. Can I restore my application or data from a Google Drive backup? Yes, backups stored in Google Drive can be restored directly through the ServerAvatar dashboard using the standard restore process. ### 6. Is backup retention configurable in ServerAvatar? Yes, ServerAvatar allows you to define a retention period so backups are automatically kept or removed based on your preferences. **Categories:** Blog, Guide, Linux, Others, Tutorials, Ubuntu **Tags:** Automated Backups, backup, Backup and Recovery, Cloud Backup Solution, Google Drive Backups, Google Drive Integration, Offsite Server Backups --- ### [The Ultimate Digitalocean Droplet Guide for 2026](https://serveravatar.com/the-ultimate-digitalocean-droplet-guide/) **Published:** August 21, 2022 **Author:** Adarsh Sojitra **Content:** Digitalocean is one of the biggest players in the cloud computing market. It is one in the top 10 cloud hosting providers in the world. The only reason it is the case is, [Digitalocean](https://m.do.co/c/98cec63105f0) made cloud hosting easier to understand even for beginners. I am using Digitalocean droplets to host various type of sites on PHP since 2016. We just had one service called “Droplet” when Digitalocean started providing cloud services. And it was smooth! Right now, Digitalocean provides a lots of cloud services. And it serves lots of customers including many web hosting companies. Many of the customers are just getting started and just know Digitalocean as an easiest cloud hosting platform available. This is an In-depth guide. And, You can also call it a cheatsheet. In this guide, I will explain everything you need to know to host your sites effectively on Digitalocean. You can skip the topics and jump to the topic you want to read. First of all, Let’s get started with the basics. ## What is Digitalocean? As we discussed before, Digitalocean is a cloud service provider. Cloud is a broad topic and contains a lot of cloud services. It is the reason why beginners cannot understand the user interface of AWS EC2 as it provides a lot of cloud services. However, Digitalocean is simple. It provides less number of cloud services than AWS or GCP. And that is the reason why a beginner can get started with Digitalocean without much of a learning curve. If you open Digitalocean website and see the products menu from the main navigation bar, You will find many cloud services. However, Do not get intimidated by the technical terms. You will only need a “Droplet” to get started. Now, Let’s understand the meaning of a droplet and the use of a droplet. ### What is a Droplet? > Droplet is a server in Digitalocean dictionary. Server is any virual machine with public IP address, CPU, RAM, Storage and 24\*7 internet connectivity. Many types of servers like VPS, VM, Dedicated, Bare metal are same, except the hardware capabilities. > > For your Info Droplet is a server just like any other virtual server that other services provide. A droplet can be “Dedicated” or “Shared” or maybe “Memory optimised”. The only difference between these 3 types of droplets is the resource availability. Here are different types of droplets you can create in Digitalocean. 1. **Basic Droplets**: Basic droplets are best for hobby projects or low-priority projects. And they are designed to share computing power. It means that the resources (CPU time) is shared between droplets. You can host your app on the droplet as long as you do not want to use 100% of the CPU all the time. 2. **General Purpose:** General purpose droplets are good enough for most of the sites. You can host a website, API, or anything else in a general purpose droplet. A General Purpose droplet has a dedicated CPUs. So, You can host important or valuable sites on a droplet from this category. 3. **CPU Optimised**: CPU optimised droplets have a 2:1 ratio of memory to CPU. It’s easy to understand. In this category, You will find servers with 1 Dedicated vCPU for every 2 GB RAM. So, You can create a droplet with 2 vCPUs and 4GB RAM. Or a droplet withy 4 vCPUs and 8GB RAM. Use this droplet if your application is CPU intensive. 4. **Memory Optimised**: Memory optimised droplets have high memory and less number of CPUs. You can use a memory optimised droplet to host Queues and Databases. 5. **Storage Optimised**: A storage optimised droplets have high storage capabilities. The smallest droplet in this category has 300GB of storage. However, Many websites are not as big as we believe in GBs. You can host and process databases on this kind of droplets. Imagine having an awesome monitoring system for your business in a storage optimised droplet. There are two more types of droplets, Basic and Premium. The difference between a basic droplet and a premium droplet is the hardware. Premium droplets are powered by High quality physical CPUs and RAMs. You can create a basic or a premium droplet in any of the above listed categories. ### What are the use cases of a Droplet? Imagine you have a clean dedicated personal computer with a desired operating system. What kind of application can you host on that PC? Any, right? It’s the same for a droplet. You can host anything from a simple HTML page to a complex management and monitoring systems on a droplet. Are you a python programmer and want to host a Django project? You can do it. Same for PHP, Go, Javascript or a closed services like MySQL, MongoDB, Redis and other similar services. For instance, A server that can instantly support a WordPress site has all the required services installed and configured upon a Droplet with OS. However, PHP and specifically WordPress dominates the web. About 40% of the websites in top 1 million are WordPress sites. Around 80% sites hosted on droplets via ServerAvatar are WordPress sites, even though we support any PHP script. Javascript is also one of the most popular language of the web. Digitalocean allows you to perform many actions on your droplets. Imagine what would you do if you need a server with more resources. Migrating is the hard way. But Digitalocean allows you to scale the resources on your server in minutes. You can also temporarily upgrade the server. Which means, You can increase the computing power of your server even for a single surge in requirements. In this guide, You will learn all the thing you have to learn to efficiently host your websites on a droplet. Here is the list of topics we are going to cover in this guide. Note that all the topics are explained in detail. Many topics will have multiple sub-topics too. We will get started with the basics and then cover all the actions you can perform on your droplet from Digitalocean. 1. How to create a Droplet? 2. Monitor Droplet’s Resource Usage 3. Reserve an IP Address 4. Access the Console 5. Turn off or Restart a Droplet 6. Create and Manage a Firewall 7. Manage Droplet Backups and Snapshots 8. Resize a Droplet 9. Reset Root Password 10. View Droplet History 11. Re-install a Droplet 12. Destroy a Droplet 13. How to host websites on a Digitalocean Droplet? The 13th topic is very important, do not miss. Let’s get started with the first one. ## How to create a DigitalOcean Droplet? The first and the most important thing to learn is How to create a droplet correctly. There are lots of options in a droplet creation form. It is important to understand each option. So, We are going to create a droplet first. If you already have a droplet and you know how to create one, You can simply skip this topic of the guide. To create a droplet, log in to Digitalocean and click on the **Create -> Droplet** option from the top-right corner of the page. ![](https://serveravatar.com/wp-content/uploads/2022/08/Screenshot-2022-08-21T173847.852.png)Now you will see a Droplet creation wizard with multiple steps. The first step is to select the operating system for your droplet, just like the following image. ![](https://serveravatar.com/wp-content/uploads/2022/08/Screenshot-2022-08-21T174130.807-1024x327.png)> **Note**: If you are using ServerAvatar to manage sites on your droplet, Select **Ubuntu 18.04 x64** or **Ubuntu 20.04 x64** as an operating system. Once you have selected the operating system, you have to select a plan. There are multiple categories of droplets with various sizes. You can refer to the above given list to understand different types of droplets. Select the plan according to your requirements. ![](https://serveravatar.com/wp-content/uploads/2022/08/Screenshot-2022-08-21T174315.017-1024x447.png)Once done, scroll down a bit to discover two sections with heading **Add Block Storage** and **Droplet Datacenter Region**. If you want to add block storage to your droplet, click on the **Add Volume** button and select the size of the block storage you want to connect. Digitalocean has 10+ locations with multiple data centers in some regions. You can select the one that best fits your requirements. The general rule is to select the location close to the location from which you are receiving the most traffic. For example, If you are receving most of the traffic from India, You should select Bangalore as a data center region. Similar for other locations. ![](https://serveravatar.com/wp-content/uploads/2022/08/Screenshot-2022-08-21T174546.526-1024x455.png)The next option in the droplet creation wizard is to select a VPC network. If you do not know what is it, It simply allows your droplets to communicate via a local area network if your droplets are in the same datacenter. A default VPC network is selected by default, If you do not know what to do or what to select, keep it as it is. ![](https://serveravatar.com/wp-content/uploads/2022/08/Screenshot-2022-08-21T175226.596.png)After VPC network, You have to select the authentication method. As an authentication method, You can either select an SSH key or you can use a password. We recommend you to use an SSH key as it provides highest level of security. However, If you do not know how to work with SSH keys, You can select password authentication and set a very strong password. For this example, I am using password authentication. ![](https://serveravatar.com/wp-content/uploads/2022/08/Screenshot-2022-08-21T180054.060-1024x408.png)After authentication, You will see a list of additional options just like the following image. None of them are mandatory. You can select the options as per your requirements. I recommend you to enable Automated Backups if you are going to host important websites on the droplet. ![](https://serveravatar.com/wp-content/uploads/2022/08/Screenshot-2022-08-21T180159.423-1024x393.png)Once you have selected the addtional options, scroll down a bit to find the **Finalize and Create** section. It is the last section containing 4 different options just like the following image. ![](https://serveravatar.com/wp-content/uploads/2022/08/Screenshot-2022-08-21T181609.484-1024x523.png)First of all, select the number of droplets you want to create with identical configuration. By default, it is set to 1 droplet. But you can increase the number of droplets if you want to create multiple droplets at once. The second option is to select the hostname. Hostname is not much important and you can use the hostname for identification. You can set any name you want. The third option is to add tags to your droplet. Tags help you categorize your droplets if you are managing a lot of droplets in your Digitalocean account. The last option in the server creation wizard is to select the project. By default, you will have 1 project in your Digitalocean account. You can change the project if you want. **Finally,** click on the **Create Droplet** button given at the bottom of the server creation wizard to start the droplet creation process. It will take a minute or two for Digitalocean to get your droplet ready. Once it is ready, You can access the Droplet dashboard by clicking on the name of the droplet. So, this is how you can create a new droplet in Digitalocean. Now let’s understand how to manage and monitor your droplet from Digitalocean. ## Monitor Droplet Resources Once you have a droplet, You have to monitor just how much resources your sites are using. Your droplet has a limited resources. For example, If you are using a smallest CPU optimised droplet, You will have 2 vCPUs, 4GB RAM, 25GB SSD and 4TB bandwidth. If you have a typical WordPress site on it, and if the traffic is growing, You have to look for the spikes in the CPU usage chart if site becomes slow. So that you can upgrade your droplet or optimise your site to improve the resource usage. Digitalocean allows you to monitor the CPU usage, Bandwidth usage and Disk operations performed on the droplet. To access the graphs, You just have to click on the Droplet from the list of droplets given on the Digitalocean dashboard. You will see the charts of the resource usage, Just like the following image. ![](https://serveravatar.com/wp-content/uploads/2022/07/Screenshot-88.png)These three charts allow you to monitor everything that can be monitored at physical level. Let me explain each chart in detail. ### 1. Bandwidth Usage ![](https://serveravatar.com/wp-content/uploads/2022/07/Screenshot-88-1.png)The chart looks like a simple bandwidth usage chart. However, It tracks all different types of network usage metrics. Your Droplet is connected with 2 types of network all the time. They are: 1. **Private Network:** Private network is the local area network. It allows you to transfer data from your one droplet to another. Usually the data transferred in a private network is totally free of cost. So, You can transfer as much data as you want without using your bandwidth usage quota. 2. **Public Network:** Public network is the internet. Public network is all the data transferred between the droplet and the visitor’s browser. For example, If you have a 1MB homepage, and you receive 1000 visitors in a day, Your bandwidth usage will be 1000MB, which is close to 1GB per day. You get a specific amount of public bandwidth usage for free with a droplet. And you are charged per GB if you exceed the free usage limit. With each type of network, You have two types of traffic. Inbound and outbound. Here is the detailed explaination. 1. **Inbound traffic:** Inbound traffic is the data your droplet receives. Your droplet can receive data from private network as well as public network. For example, the form submission data will be in-bound public network data. 2. **Outbound traffic:** Outbound traffic is the data that a droplet sends to the browser or a remote server. A droplet can send data to private as well as public network. For example, A javascript file that animates a section of your website. In the bandwidth monitoring chart, You see 4 metrics. Each one represents the inbound and outbound traffic on both the types of networks. ### 2. CPU Usage ![](https://serveravatar.com/wp-content/uploads/2022/07/Screenshot-88-2-1.png)CPU usage is as simple as it sounds. It is the % of CPU your sites, users and system is using on the droplet. With shared CPU, You might or might not be able to use 100% of the CPU all the time. But if you have a dedicated droplet, You will have access to all the computing power your CPU cores has. This chart shows two lines. The “sys” line shows us the CPU used by the operating system. And the “user” line shows us the CPU used by all the users and other services that are installed after the operating system is installed. ### 3. Disk I/O ![](https://serveravatar.com/wp-content/uploads/2022/07/Screenshot-88-3.png)The Disk I/O chart has two metrics. It is related to all the operations happening in the hard drive or the SSD of the server. In any storage device, the two important metrics to monitor are read and write operations. 1. **Read operation:** Read operation reads the data stored previously in the device. For example, opening a file. 2. **Write operation:** Write operation adds or updates the data in the device. For example, Editing a file or creating a new file. This chart can be helpful to identify many on-going issues. In most cases, You will never have to refer this chart, but it’s good to know why it is there. ## Reserve an IP Address First question, Why do you want to reserve an IP address? By default, Your domain points to the IP address of your server via DNS. In case if you want to change a droplet for your website, You would have to update the IP address in DNS and wait for the DNS to resolve. However, If you have a reserved IP address, You can connect it with any droplet at any time. So, You do not have to update the IP address anywhere in DNS or any management panel you are using. > If you are a ServerAvatar user, You would not have to update IP address in ServerAvatar if you are using reserved IP address. After one-click migration or clone, You can simply assign a reserved IP address to a new droplet. Now let’s see how to create and manage Reserved IP address. First of all, go to the list of Droplets. Then click on the droplet name to open the droplet dashboard. After that, click on **Networking** option from the left sidebar. ![](https://serveravatar.com/wp-content/uploads/2022/08/Screenshot-2022-08-18T162612.193-1024x487.png)Once you are in the Networking section, You will see **Reserved IP** option under the Public Network section. Click on **Enable Now** link to create a new reserved IP address. It will redirect you to a page where you can reserve an IP address. It will look like the following image. ![](https://serveravatar.com/wp-content/uploads/2022/08/Screenshot-2022-08-18T162634.303-3-1024x490.png)Click on the **Assign Reserved IP** button to create a new reserved IP address. It will instantly create and assign a reserved IP address to your droplet. The whole process hardly takes 30 seconds. Once the process is done, You will see a screen just like the following image. ![](https://serveravatar.com/wp-content/uploads/2022/08/Screenshot-2022-08-18T162713.720-1-1024x375.png)Now the IP address is reserved for your account. You can re-assign, un-assign or delete this IP address whenever you want. We recommend you to use reserved IP address if you want to migrate your site in future to a new server. > **Note:** Reserved IP addresses are free if they are assigned to a droplet. If a specific reserved IP is not assigned to any droplet, It will incur charges of $5 per month per reserved IP address. ## Access the Console Console is a method to connect and interact with your droplet. When you create a fresh droplet, You either have to configure it with SSH or access the SSH to install any easy to use management panel. Console creates an SSH connection with your droplet. You can execute the commands to install or configure a package or a software. If you are not a technical person, It is going to be a steep learning curve. If you do not want to learn whole configuration, management, monitoring in linux, You can use ServerAvatar or any other server management panel. In any case, To create an SSH connection with your server directly from Digitalocean dashboard, You can follow the below given steps. First of all, access the list of droplets and click on a droplet to access it’s dashboard. On the droplet dashboard, You will find **Console** option in the information panel just like the following image. ![](https://serveravatar.com/wp-content/uploads/2022/08/Screenshot-2022-08-18T204901.308-1024x377.png)Once you click on console, a new window will appear. It will start authentication and start up process. Once fully authenticated, You will be connected with your droplet via SSH. **Alternatively** If you are a Linux or a MacOS user, You can use **Terminal** app to connect with your droplet via SSH. In case if you are a Windows user, You can download and install [Putty](https://www.putty.org/) software to connect with your server via SSH. **If you want to use ServerAvatar to manage your sites on the droplet,** execute the following commands in the console. ``` wget https://srvr.so/install chmod +x install ./install ``` The installation and configuration process will start immediately. It will take around 5-7 minutes for the full installation to complete. Once the installation is complete, You will be able to manage your sites on the droplet using ServerAvatar as a management panel. ## Turn off or Restart a Droplet It is a good practice to re-boot a server after specific updates or after a specific time. Similarly, sometimes we do not need a droplet active, but we do not want to lose the data or configuration, so we power off the droplet temporarily. You can restart or power off a droplet from the droplet from Digitalocean. Let’s first see how to do that. ### Power off a Droplet If you do not want a droplet temporarily, but you want it to be active in a minute whenever required, the best thing to do is power off a droplet. Another use case is, When you migrate a site from one server to another, You can power off the old droplet temporarily to make sure the migration is successfully done. Once sure, You can delete the droplet. To power off a droplet, Go to the list of droplets and click on the droplet you want to power off. From the list of options available on the left side of the droplet dashboard, click on the **Power** option. In that section, the first part is **Turn off Droplet** with a simple **Turn off** button. Click on that button to power off the droplet. ![](https://serveravatar.com/wp-content/uploads/2022/08/Screenshot-2022-08-18T210955.912-1-1024x418.png)Now let’s see how to restart a droplet. ### Restart or Reboot a Droplet To restart or reboot a droplet, Go to the **Power** section just like the **Step 1** given in the above image. Once there, scroll a bit to find **Power Cycle** option. It contains a bit of the information and a button to restart your droplet. Just like the following image. > **Note:** Use this method only when you cannot execute “sudo reboot” from the command line interface. If you are restarting from the ServerAvatar, it will be done safely using the command by default. ![](https://serveravatar.com/wp-content/uploads/2022/08/Screenshot-2022-08-19T011743.484.png)Click on the **Power Cycle** button to start the reboot process. It will take less than a minute for the process to complete. ## Create and Manage a Firewall Firewall at cloud platform is important. Luckily, Digitalocean allows you to create, manage and assign firewall to a specific droplet. We recommend you to create a firewall for all of your droplets. It creates a secure environment for your server by not allowing incoming requests on ports that are not in use. A Linux server has a 65535 ports used for/by various services to communicate over the internet or with other networks. Sometimes, You do not want to “Accept” the requests on specific ports like MySQL and many other sensitive services. To solve that, You can create a firewall for your droplet. Once the firewall is ready and attached with the droplet, it will only accept requests on specific ports. The following set of firewall rules is good enough for majority of the websites or apps. 1. Allow all Outgoing requests (default) 2. Deny all incoming requests (default) 3. Allow incoming requests on 22 (SSH) 4. Allow incoming requests on 80 (HTTP) 5. Allow incoming requests on 443 (HTTPS) If you want to allow remote connections for MySQL databases hosted on your server, You have to create a new firewall rule to “Allow incoming requests on 3306 (MySQL)”. **Similarly,** If you are using ServerAvatar to manage your droplet, You have to “Allow incoming requests on 43210 (ServerAvatar)”. **How to set and edit firewall rules?** To do that, Log in to your Digitalocean account and click on the “**Manage -> Networking**” option from the left sidebar. Now you will see many tabs like the following image. Click on the **Firewalls** tab to create new firewall or to see the list of active firewalls. ![](https://serveravatar.com/wp-content/uploads/2022/08/Screenshot-2022-08-19T014128.961.png)In the **Firewalls** section, You will find a **Create Firewall** button. Click on the button to see a firewall creation form just like the following image. ![](https://serveravatar.com/wp-content/uploads/2022/08/Screenshot-2022-08-19T015201.313-1024x528.png)On the firewall creation form, First enter the Name of the firewall (just for identification). Then, scroll down a bit to see two sections called **Inbound Rules** and **Outbound Rules**. 1. **Inbound Rules**: These rules affect incoming requests. That is, If someone is trying to access your site or any other service running on your server. By default, All in-bound requests are denied by the server if firewall is enabled. 2. **Outbound Rules**: These rules affect outgoing requests. That is, If your website is requesting data via API from any other application. By default, All outbound requests are allowed on any port. > **Note**: From the list of 5 firewall rules I mentioned above, the first 3 rules are already set when you go to the firewall creation form. You can edit them if you want. But the first 3 rules are very important for almost all cloud hosting requirements. Now we have to create two more rules manually to allow incoming requests on HTTP and HTTPs. For that, find **New rule** option under the Inbound Rules section of the firewall creation form. From the drop-down, select HTTP and HTTPS. Once you select HTTP or HTTPS, Digitalocean will fill up other details like Port, Protocol and Sources automatically for default values. Once done for both HTTP and HTTPS, the form should look like the following image. ![](https://serveravatar.com/wp-content/uploads/2022/08/Screenshot-2022-08-21T114956.255-1024x400.png)If you are using ServerAvatar to manage your sites and servers, You have to add one more rule. So, create a new rule with following information. 1. Type: Custom 2. Protocol: TCP 3. Port Range: 43210 4. Sources: All IPv4, All IPv6 Once done, You can start ServerAvatar installation on your server. You can execute the commands given on the [homepage](https://serveravatar.com/) to start the installation. In the **Outbound Rules** section, You just have to confirm if the following rules are present. ![](https://serveravatar.com/wp-content/uploads/2022/08/Screenshot-2022-08-21T121151.490-1024x404.png)If the rules are present, scroll down a bit to find the **Apply to Droplets** section. In that section, You will see a dropdown to select droplets. You can apply a single firewall to multiple droplets too. So, You can select 1 or more than 1 droplet. For this example, I am selecting **personalblog** droplet. After you have selected the droplets, click on the **Create Firewall** button to create the firewall and apply it to all the selected droplets. ![](https://serveravatar.com/wp-content/uploads/2022/08/Screenshot-2022-08-21T121455.373-1024x196.png)Once the firewall is created, You can modify rules, droplets or delete it. You can also apply the same firewall to the new droplets you create. Now, Let’s see how to create and manage backups of your droplet in Digitalocean. ## Manage Droplet Backups and Snapshots Backups are very important and highly recommended. When something goes south, backups save your life. Digitalocean allows you to create and manage backups and snapshots for your droplet to help you restore the droplet to previous version whenever required. There are two ways you can create and manage Droplet backups. They are: 1. Automated Droplet Backups 2. Droplet Snapshots Let’s understand both of them in detail. Let’s first understand Automated Backups. ### Automated Droplet Backups Digitalocean allows you to enable Automated Backups for your droplet. If you enable the option, Digitalocean will create weekly backups for you droplet on automation. You do not have to create backups manually. And it provides weekly backups only. To enable Automated Droplet Backups, Login to your Digitalocean account and click on the droplet name from the list of droplets available in your account. From the left sidebar of the Droplet dashboard, click on the **Backups** option. If automated backups are not enabled, You will see a screen just like the following image. ![](https://serveravatar.com/wp-content/uploads/2022/08/Screenshot-2022-08-21T130108.474-1024x459.png)Now, click on the **Enable Backups** to instantly enable automated backups for your droplet. Once it is enabled, Digitalocean will create and store a backup for your droplet every week. It will also show you the next date and time of the backup. Before enabling backups, do not forget to refer the pricing. The pricing will vary from droplet to droplet. But usually it is 20% of the value of the droplet. You can also disable automated backups. If the backup plan is enabled, You will see an option to disable backups and the list of available backups, just like the following image. ![](https://serveravatar.com/wp-content/uploads/2022/08/Screenshot-2022-08-21T130503.372-1024x394.png)To disable automated backups for your droplet, just click on the **Disable Backups** button under the Backups section. The automated backup plan will be disabled instantly. This is the automated backup plan in Digitialocean. However, We can also manually create backups using snapshots option. Let’s see how to do that. ### Droplet Snapshots Snapshots are the instant backups of your droplet. When you start creating a snapshot, Digitalocean will create an exact copy of the full droplet as it was at that time. Unlike automated backups, You can create snapshots any time. And you can create and delete as many snapshots as you want. To create and manage droplet snapshots, Go to the list of droplets and click on the droplet you want to backup using snapshots. On the droplet dashboard, find and click on the **Snapshots** option from the left sidebar. You will see two options in that section. The first option is to create a snapshot of a droplet now and the second one is the list to manage existing snapshots. ![](https://serveravatar.com/wp-content/uploads/2022/08/Screenshot-2022-08-21T131413.437-1024x462.png)To create a new snapshot, just enter the name of the snapshot for identification and then click on the **Take live snapshot** button to instantly start the snapshot creation process. > It is a good practice to put your sites in maintenance and power off your droplet before creating a snapshot. The reason is, If the data is updated on the droplet while the snapshot creation process is going on, The result will be inconsistent data when and if you restore a snapshot. Once the snapshot is ready, You will see it in the second section of the page. Just like the following image. ![](https://serveravatar.com/wp-content/uploads/2022/08/Screenshot-2022-08-21T132223.834.png)Now you can perform the following operations on a droplet snapshot. 1. **Rename:** This option allows you to rename your snapshots. 2. **Create Droplet**: Create a new droplet from the existing snapshot. 3. **Add to region:** Select the regions where you want the snapshot to create or restore droplets. 4. **Transfer Snapshot**: Transfer the snapshot to the team or via E-mail address to different Digitalocean account. 5. **Restore Droplet**: Restore the same droplet from the snapshot. So, this is how you can create and manage Snapshots for your Droplets. Snapshots are good when it comes to the website migration and change in location of the Droplet. They also help you create a basic templates for your droplets that you can copy over and over again to save time. Now let’s see How to upgrade and downgrade Digitalocean Droplets. ## Resize a Droplet When the traffic on your website grows or decreases substantially, You have to upgrade or downgrade your Droplet accordingly. If the traffic rises and the sites are slowing down, you have to upgrade your droplet. If the traffic drops, You have to downgrade. There are lots of scenarios that require you to change the configuration of your droplet. Digitalocean is a very special cloud platform in this case. It is because Digitalocean allows you to temporarily upgrade your server. Other cloud platforms will only allow you to upgrade your server permanently. Let’s understand How to upgrade or downgrade a droplet. There are two types of upgrades. They are: 1. Temporary Resize (CPU and RAM only) 2. Permanent Resize (CPU, RAM and Disk) We will learn about both of them in detail. Let’s get started with the temporary upgrade or resize. ### Temporary Droplet Resize If your site is going to receive a lot of traffic in upcoming days, You can temporarily resize your droplet so that you can downgrade it again when the traffic is gone. The only catch is, The disk on your server will stay the same. It means, If the disk size of your server was 50GB pre-resize, It will be the same after resize. To upgrade the CPU and RAM temporarily on your droplet, click on the Droplet name to access the Droplet dashboard and then click on the **Resize** option from the left sidebar. Once there, You will see two options just like the following image. By default, The temporary upgrade option will be selected. **Remember,** CPU and RAM only is the temporary upgrade. If you also want to upgrade disk, The change will be permanent. ![](https://serveravatar.com/wp-content/uploads/2022/08/Screenshot-2022-08-21T152929.392-1024x817.png)Now select a desired droplet based on your requirements. Finally, click on the **Resize** button given at the bottom of the form to start the temporary droplet resize. It will take a few minutes to apply changes. Once the resize process is complete, Your droplet will have more CPU and RAM, but same Disk. You can use the same process to downgrade your droplet. You just have to select the smaller droplet size and click on the **Resize** button to downgrade your droplet. Now let’s see how to permanently upgrade the droplet. ### Permanent Droplet Resize Permanent Droplet Resize is easier to understand. It is because you are upgrading your droplet with all it’s resources including the disk. The whole process is same as the temporary upgrade. But you have to select **DIsk, CPU and RAM** option on the Resize page just like the following image. ![](https://serveravatar.com/wp-content/uploads/2022/08/Screenshot-2022-08-21T154239.459-1024x831.png)First of all, Go to the Droplet dashboard and click on the **Resize** option from the left sidebar. Then select **Disk, CPU and RAM**. Now select the new size of the droplet. Once done, click on the **Resize** button given at the bottom to start the resize process instantly. It will take a few minutes for the process to complete. Once done, Your droplet will have new CPU, RAM and Disk including all the other resources. Only drawback of this method is, You cannot downgrade the droplet once it is permanently resized. If you need more Disk, Permanent upgrade is the way to go. Otherwise, Temporary upgrade is the best! ## Reset Root Password of a Droplet If you are a total beginner, Understand that a **root** user in Linux is the ultimate system user with all the permissions. There are no restrictions for a root user. If something goes wrong on the server, You most probably have to log in as a root to fix it. At that time, If you do not remember the root password that you have set while creating a droplet, You have to reset the root password. You can reset the root password of a droplet from Digitalocean itself. To do that, Log in to your Digitalocean account and from the list of droplets, click on the droplet you want to reset root password for. From the left sidebar of the Droplet dashboard, click on the **Access** option. You will see a new page with 3 sections just like the following image. ![](https://serveravatar.com/wp-content/uploads/2022/08/Screenshot-2022-08-21T161250.720-1024x609.png)Once you find the **Reset root password** section, You will find only one button in that section to reset the root password of your droplet. ![](https://serveravatar.com/wp-content/uploads/2022/08/Screenshot-2022-08-21T161332.877.png)Click on the button to start the process. It will shut down your droplet temporarily and will set random root password for your droplet. You will receive the new root password on your registered E-mail address within a few minutes. When you log in to your Droplet for the first time with a new root password, You have to reset the password once. > **Note**: If you are an experienced developer or a sysadmin, We recommend you to use SSH key over password for authentication. SSH keys are highly secure compared with plain passwords. ## View Droplet History Droplet history will provide you information about the actions happening on the droplet. This is specially helpful if more than one team member is managing the droplet. If multiple team member are managing the server, You can see the operations happening on the server from the Droplet history. To access droplet history, click on the droplet name from the droplet list. And you will see the full list of all the operations happened on the server, just like the following image. ![](https://serveravatar.com/wp-content/uploads/2022/08/Screenshot-2022-08-21T164020.797-1024x426.png)It is a small feature that tracks all the operations on the droplet. This list is very helpful to identify and correct mistakes in the droplet management. It also shows the execution time of a process if applicable. ## Re-install a Droplet **Re-install = Factory Reset.** When you factory reset a phone, All the data is removed and the operating system is installed again along with all the default apps. It’s exactly the same when you re-install a droplet. Re-install is not a function you will use on regular basis if you are not managing a lot of droplets. But there are some cases where you have to re-install a droplet. For example, If you are initially setting up everything on the droplet and something goes wrong beyond repair. What do you do? Re-install! Another example, If you are trying out different server management panels, You have to re-install the droplet when you want to change the server management panel. Why re-install the server when you can uninstall something? Re-install takes a minute or two. Uninstalling a software with a complete purge might take anywhere between 15 to 45 minutes or even more depending on the software. To re-install a droplet, go to the droplet list in Digitalocean and click on the droplet you want to re-install. Now, Find the **Destroy** option from the left sidebar just like the following image. On that page, you will see a **Rebuild Droplet** section just below the Destroy Droplet section. ![](https://serveravatar.com/wp-content/uploads/2022/08/Screenshot-2022-08-21T165552.060-1024x586.png)In the Rebuild Droplet section, Click on the **Select an image** dropdown to select an operating system. You can select any operating system you desire. Once selected, Click on the **Rebuild** button given on the right side. The process will start immediately and it might take anywhere between 30 seconds to 3 minutes to complete. Once completed, You will have a brand new droplet with fresh operating system. > **Note:** Do not re-install/rebuild a droplet if you are hosting websites on that droplet. Or, create a backup before re-installing a droplet. All the sites hosted on a droplet **WILL** go down. All the data will be wiped once the process is started! ## Destroy a Droplet Destroying a droplet is easiest to understand. If you do not need a specific droplet, You can destroy it. To do that, go to the list of droplets and click on the droplet you want to destroy. From the left sidebar of the droplet dashboard, click on the **Destroy** option just like we did while re-installing a droplet. On that page, you will see a section with the title **Destroy Droplet**. Refer to the following image if you are unable to find the option. ![](https://serveravatar.com/wp-content/uploads/2022/08/Screenshot-2022-08-21T171940.931-1024x336.png)Once you click on the **Destroy this Droplet** button, It will ask for the confirmation. Enter the name of the droplet to confirm and submit. The charges of a droplet are calculated on hourly basis. You will be charged for the number of hours you have used the droplet before destroying it. Now comes the most important and interesting part of this guide. ## How to host websites on a Digitalocean Droplet? If you are still reading, You have read more than 6000 words of content. You saw we explored almost all the options available in the Droplet dashboard. But none of them covers this topic. It is because Digitalocean allows you to manage servers, not sites. When you create a droplet, You will get a droplet as-is from Digitalocean. You will not find an option to add a new website. It is because managing websites on the droplet is not Digitalocean’s responsibility, it is yours. And it is the same for all the cloud platforms. So, How do you host your websites on Digitalocean without any technical knowledge of Linux? There are a few ways. They are: 1. Hire a system administrator to host and manage websites on a droplet. (Expensive) 2. Create a droplet with pre-installed application. (No Management capabilities) 3. Use a remote server management panel (Recommended). We will understand the pros and cons of all the methods. ### 1. Hire a System administrator In this case, Just after creating a droplet, You will hire a freelancer and ask them to configure your server and host your websites on it. A good system administrator will charge anywhere between $50-$100 for initial configuration and to host websites. The problems arise when you want to get help, want to host more sites, solve server errors and perform other tasks at server level. It is because first, they might be slow to respond (We can expect a few hours of delay in response for any human being). The second issue is, The system administrator might charge you every time you get help from them. As a human is working on your server, It is going to be expensive. Another thing is, You will be sharing root password of your server with a person you have never worked before. If you still want to go with this method, You can check out gigs on Fiverr or any other freelancing websites. ### 2. Create DigitalOcean Droplet with Pre-installed Application This is one way to go. Digitalocean provides pre-installed applications on droplets. At the technical level, imagine you have initially configured a droplet with website on it. Then you take a snapshot of it, and then you create a droplet every time with that snapshot, You will always get a website installed on the server. To find this option, Click on the **Create -> Droplets** option from the top-right corner of the dashboard, and in the first section where you select the OS, click on the Marketplace. Once you are there, You will see something like the following image. ![DigitalOcean Droplet ](https://serveravatar.com/wp-content/uploads/2022/08/Screenshot-2022-08-21T201327.589-1024x324.png)The problem with this set up is, You can only host 1 application on 1 droplet. And the server configuration is basic, in short, not optimised. Here you face one common problem with the first method. If something goes south and server errors arise, You will have to hire a system administrator to sort this out. The only difference between first and the second method is, in the second method, You do not pay system administrator to initially configure the server. After that, both methods have the same problem. It’s 2024, And you do not deserve that. To solve all the configuration, learning curve and support problems, We have the 3rd method. Note that this method was not viable before 6 years. ### 3. Use a remote server management panel Brace Yourself! A remote server management panel costs you 90% less than an initial configuration done by a system administrator. And here are some capabilities that any remote server management panel will provide. 1. Instant, Automated and Optimised configuration 2. Host multiple sites on a single droplet 3. Easy-to-use Web Application to manage sites on your server 4. No/Negligible learning curve required 5. Clone websites, Create Staging Areas, Create Demo Areas 6. Migrate sites automaticallly, instantly 7. File manager to manage files of your sites 8. Get support for server level errors In short, You do not have to hire a person to host your sites on a Digitalocean droplet. And it is as easy as managing websites on a shared hosting. Here are some screenshots of a ServerAvatar panel, that is, a remote server management panel. The following is an application management panel. Here you can manage domains for your sites, use Auto Deploy to auto-install applications, manage staging area, files, ssl certificates, PHP settings, backups and a lot of things. ![](https://sav72.serveravatartmp.com/wp-content/uploads/2022/08/Screenshot-2022-08-21T202811.458-1024x504.png)Application Management PanelThe following is a server management panel. It is where you manage and monitor your server. You can manage things like Applications/sites, Databases, Firewall, Server Alerts, migrations, and lot more. ![](https://sav72.serveravatartmp.com/wp-content/uploads/2022/08/Screenshot-2022-08-21T203208.222-1-1024x506.png)Server Management PanelYou can try it by yourself. It is free for 1 month. To get started, create a fresh Digitalocean droplet with Ubuntu 18.04, 20.04, or 22.04 operating system. Then execute the commands given below as a root user to download an inspect script which will check the server configuration and start the installation if the droplet is supported. ``` wget https://srvr.so/install chmod +x install ./install ``` It will ask you if you want to configure your server with Apache, Nginx or OpenLiteSpeed. You can select according to your requirements and hit enter. After that, It will check if server is ready for the installation. After the installation starts, It will provide you a link to your server management panel. The full initial configuration will be over in 6-7 minutes and you will be able to manage your servers and sites using a panel displayed in the above given images. ## Conclusion Digitalocean is always a recommended cloud platform. It was the first cloud platform we used to test ServerAvatar. And we still use it. Digitalocean made cloud easier to access for beginners. And people loved the cloud platform. If you are using VPS from any other company and want to migrate somewhere, I recommend Digitalocean. It’s same if you just want to get started with cloud. You will not face a huge learning curve. Cloud platforms like AWS and GCP are considered highly complicated for beginners or people with small cloud computing requirements. Note that even a thousand dollar bill every month is a small cloud computing requirement. Anyways, make sure you have not missed the last section of this guide. All of the above is useful if you can manage your sites on your server. Without an easy and fast method, You will face a huge learning curve. I tried to cover almost everything related to hosting websites on a Digitalocean droplet. However, If you have any questions, feel free to comment. I will keep updating this guide till 2024 ends. **Categories:** Uncategorized --- ### [The Ultimate Vultr Cloud Instance Guide for 2026](https://serveravatar.com/the-ultimate-vultr-cloud-instance-guide/) **Published:** September 7, 2022 **Author:** Adarsh Sojitra **Content:** [Vultr](https://vultr.grsm.io/saguide) is one of the most popular cloud platforms in 2025. ServerAvatar manages hundreds of WordPress or PHP-based sites across numerous Vultr cloud instances, with the demand for Vultr is growing rapidly. Currently, Vultr has more than 25 data center locations in different countries, including India. If your primary audience is from India, you can host your sites in either Mumbai or Bangalore data centers if you are using Vultr. I personally prefer Vultr for its outstanding performance. If you are looking for performance while selecting a cloud platform, Vultr is an excellent option. It also provides many features that you might not find in other cloud platforms. This guide covers everything you need to know about Vultr, making it easier for you to host your websites on the cloud and make changes in servers as required. We will cover all the important actions you can perform on your Vultr cloud instance in this guide. We will begin with the basics, considering you have no experience with cloud platforms. However, If you are an expert, you can jump to the topics or only read the topics that you desire. Here are the topics we will cover in this guide. ## What is Vultr? [Vultr](https://vultr.grsm.io/saguide) is a cloud platform just like AWS, GCP, and DigitalOcean. It simply provides cloud computing services on-demand. This allows you to quickly create or delete servers within minutes, as well as perform various server-level tasks such as reinstalling, restarting, or upgrading in minutes. Vultr provides multiple cloud computing services, including: 1. Cloud computing instances (servers) 2. Managed databases 3. Object storage instances 4. and many more. For this guide, we will focus on the first service: Cloud computing instances or servers. Cloud instances are the most fundamental cloud computing product. It comes with all the essential computing resources and operating systems. You can configure cloud instances however you like to host your projects. So, Let us first understand what exactly is a cloud instance or a server. You can skip the section if you are already familiar with cloud instances or servers. ### What is Vultr Cloud Instance or Server? At fundamentals, all the servers, VPS, dedicated, cloud instances, droplets, bare metals, etc are the same. Regardless of the type of server, the following components are common in all of them. 1. Dedicated IPv4 Address 2. vCPUs or CPUs 3. Memory or RAM 4. Storage space (usually SSD) 5. Specific Bandwidth Limit 6. GPUs (optional) By combining these configurations in various ways, we can create different types of servers. For example, a server having a dedicated vCPU is known as a dedicated server. It does not share its computing power with other servers. In case your vCPUs are shared, your server shares or gets a specific amount of CPU time for computing. With the combination of these six configurations, we can create many different types of cloud instances for different types of requirements. Let’s explore more about the different types of servers provided by Vultr. ### Types of cloud instances in Vultr As we discussed earlier, different types of instances are simply combinations of different types of hardware configurations like CPUs, Memory, Disk storage, GPUs, etc. There are four major categories, each with its own sub-categories of servers. The four major categories are: 1. Cloud Compute (Shared vCPUs) 2. Optimised Cloud Compute (Dedicated vCPUs) 3. Bare Metal Servers 4. Cloud GPUs Let’s take a closer look at each category and its sub-categories in detail. #### Cloud Compute (Shared vCPUs) These instances share cloud computing resources with other similar cloud instances, meaning you can’t always use 100% of the CPU all the time. As a result, these types of instances are ideal for small websites or applications with variable cloud computing requirements. Here are the different types of servers in this category. 1. **High Performance**: These servers are powered by NVMe SSDs and powerful Intel and AMD CPUs. 2. **High Frequency:** These servers have 3GHz+ Intel Xeon CPUs and NVMe SSD. 3. **Regular Performance:** These servers are powered by previous generation CPUs and regular SSD. Note that these servers have shared vCPUs. The hardware is high-performance, offering faster computing, but it is not possible to use all the computing power of all the vCPUs for your instance. #### Optimised Cloud Compute (Dedicated vCPUs) These instances provide dedicated computing power or vCPUs, meaning this type of cloud instance does not share any computing power with other instances in the same category or different categories. You have the right to access the entire computing power of your vCPUs. Usually, Optimized cloud computing is typically used to host important websites or systems that require a specific amount of resources, such as CPUs, RAM, storage, etc. Here are the different types of servers with dedicated vCPUs in Vultr. 1. **General Purpose**: These servers have balanced resources such as CPU, RAM, and Storage with dedicated computing power. If your website does not have particularly high CPU or memory requirements, you can select a server from this category to host your site. 2. **CPU Optimised**: These servers have a 1:2 CPU:RAM ratio. meaning you get 1 dedicated vCPU for every 2GB of RAM. CPU optimised servers are ideal for hosting applications with high CPU demand. 3. **Memory Optimised**: These servers offer a 1:8 CPU: RAM ratio, providing 8GB of RAM for every single vCPU you have on your server. Memory-optimized servers are good for tasks like running queues or memory-based caching systems. 4. **Storage Optimised:** Storage-optimized servers feature a 1:8 CPU:RAM ratio with very high storage capacity. The smallest instance in this category includes 4TB of storage space, making these servers ideal for hosting large databases. These are the various categories of cloud instances available in Vultr. Each category and sub-category offers multiple servers with different pricing and varying configurations. #### Bare Metal Servers Bare metal servers are the actual “**servers**” you have in your mind, hardware! It is the only category where you get your own hardware server to manage with the operating system. Cloud compute and Optimised cloud compute instances are virtual machines created from these physical servers. Bare metal servers are generally more expensive, and you have the full responsibility of the server. Obviously, you get access to all the computing power of the hardware. You can select a bare metal server based on the processor, RAM, and other available resources. This category does not have sub-categories. #### Cloud GPUs Cloud GPUs is a unique category that allows you to deploy instances with GPUs on-demand. These instances are ideal for running applications that require GPUs, such as Machine Learning or AI. In most cases, you don’t need GPUs to run your sites. But if needed you can easily create instances with GPUs on Vultr. You can see the pricing for all the different types of cloud instances on the [Vultr pricing page](https://vultr.com/pricing). Now, let’s see how to create a cloud instance or a server in **Vultr**. ## How to create a server in Vultr Creating a [Vultr](https://vultr.grsm.io/saguide) Instance is simple, and the process is the same for all the server types we discussed. To create a server, log in to your Vultr account or navigate to the “**Products**” section from the left sidebar. Next, hover over the “**Deploy +**” button and click on “**Deploy New Server**“, as shown in the image below. ![](https://serveravatar.com/wp-content/uploads/2022/09/0.png)**Step 1: Select Server Category** Selecting a server category depends on the specific needs of your website. You can select from options such as **Optimized Cloud Compute – Dedicated CPU, Cloud Compute – Shared CPU, Cloud GPU,** or **Bare Metal.** For more detailed information on these categories, refer to the previous topic “Types of Cloud Instances in Vultr”. ![](https://serveravatar.com/wp-content/uploads/2022/09/image-1.png)**Step 2:** **Select Server Location** Vultr offers over 25 locations to choose from. Select a location that is nearest to your audience to ensure low latency and improved user experience. Selecting the right server location for your server is crucial. Refer to our guide to learn how to select the [optimal location for your server](https://serveravatar.com/how-to-select-an-optimal-location-for-your-server/). ![](https://serveravatar.com/wp-content/uploads/2022/09/image-2.png)**Step 3:** **Select Server OS** Select a server image from the various provided options. Select the one you wish to deploy. If you want to use a control panel or want to configure the server manually, You can select the OS image only. From the Marketplace section, you can also select from different types of ready-to-use applications. Additionally, you can also select from any snapshots available in your account. You can learn more about snapshots in this guide later on. ![](https://serveravatar.com/wp-content/uploads/2022/09/image-3.png)**Note:** If you want to manage your Vultr server with **ServerAvatar**, select either the **Ubuntu** **20.04, 22.04** or **24.04** operating system. **Step 4: Select Server Plan** You can see sub-categories, and each category contains different server types. For example, under Cloud Compute, you will find categories like High Performance, High Frequency, and Regular Performance. In the Optimized Cloud Compute category, you will find **General** **Purpose**, **CPU** **Optimized**, **Memory** **Optimized**, and **Storage** **Optimized**. You can select from a range of server sizes based on your required vCPU, memory, and bandwidth. ![](https://serveravatar.com/wp-content/uploads/2022/09/image-4.png)**Step 5:** **Additional Features (optional)** It includes features like enabling Auto Backups, IPv6, DDOS Protection, Virtual Private Cloud network, and more. You can enable the features you want. **Automatic** **Backups** are recommended as you can quickly recover existing data to a new instance from a backup in case of disaster recovery. The cost of automatic backups is 20% of the monthly pricing of your server. **Note** **that** these options can also be activated after your server is created. So, it is not mandatory to select them now. ![](https://serveravatar.com/wp-content/uploads/2022/09/image-5.png)**Step 6: Add/Select SSH Key (optional)** SSH keys improve the security of your instance by acting like passwords, helping you control who can access the server. If you don’t have an SSH key or prefer not to use it, you can access your server with the root password. The root password of the server is automatically generated by Vultr. You can find the root password of your server from the server dashboard, once your server is ready. ![](https://serveravatar.com/wp-content/uploads/2022/09/image-6.png)**Step 7:** **Enter Server Hostname & Label** Enter your server Hostname and Label, so you can identify your server easily from the list of multiple created servers. ![](https://serveravatar.com/wp-content/uploads/2022/09/image-7-1024x135.png)**Step 8:** **Deploy** Click on the **Deploy Now** button at the bottom of the screen.[](https://storage.3.basecamp.com/5840738/blobs/e2ffa480-b853-11ef-85ce-1ab7a0b123c9/download/image.png) ![](https://serveravatar.com/wp-content/uploads/2022/09/image-8.png)You can also select the number of instances you want to create at once by selecting the desired quantity of instances in the bottom-left corner of the sticky bar given at the bottom of the screen. The deployment will begin immediately and will take around 1-2 minutes to fully deploy the server. Once the server is ready, you can start hosting your projects on it. If you want to manage your new Vultr server with ServerAvatar, below are the methods to automatically configure your server with **ServerAvatar**. **1. Connect a server using a direct method:** 1. [Login/Register](https://app.serveravatar.com/register) to ServerAvatar account, then click the **Create** button from the right side of the screen and select **Server** from the dropdown menu. 2. Select **Direct Method** for the server connection. 3. Enter your preferred **Server Name**. 4. Select a **Tech Stack** based on your needs **(Apache, Nginx, OpenLiteSpeed,** or **Node Stack)**. 5. Select a **Database: MySQL, MariaDB,** or **MongoDB.** 6. Enable the toggle if you want to **install the latest LTS version of node.js** on your server. 7. Click the **Connect Now** button. 8. You’ll see the command on your screen. Login to your server via SSH and **execute that command** as a root user. 9. The server connection process will begin in your ServerAvatar account after executing the command. 2**. Connect a server using commands:** Once you create a server as per your requirements, connect to your server using an SSH connection and execute the below three commands as a root user in your server console area. ``` wget https://srvr.so/install chmod +x install ./install ``` It will ask if you want to configure your server with **Apache, Nginx, or OpenLiteSpeed.** You can select according to your requirements and hit enter. After that, It will check if the server is ready for installation. After the installation starts, It will provide you with a link to your server management panel. The complete initial configuration will be over in 6-7 minutes, and you will be able to manage your servers and sites using a panel as displayed in the below image. ![](https://serveravatar.com/wp-content/uploads/2022/09/image-9-1024x517.png)## **Server Overview and Information** Once the server is ready, you will have full access to the server. You can log in as a root user to manage your server. To view the server overview in Vultr, go to the list of servers and click on the name of the server. It will take you to the server overview section, as you can see in the following image. ![](https://serveravatar.com/wp-content/uploads/2022/09/image-10-1024x474.png)On this page, You will find all the information you need about your server. In the first row, you can view the details such as bandwidth usage, and vCPU usage along with current charges. > **Note:** The charges are calculated on an hourly basis. Next, In the first column, you will find the information to “Access” your server. It contains location, public IPv4 Address, public IPv6 Address, Username, and Password. The username will always be “**root**“, as root is the default Linux user with ALL the privileges. In the second column, you will find details about the server’s resources, such as the number of vCPUs on the server, RAM, storage, and bandwidth. The third column displays the Operating System and the server label. ## Monitor Server Resource Usage Monitoring your server’s resource usage is very important. If your server runs out of resources like RAM or CPU, your site might slow down or your server might crash. It is essential to keep an eye on how much of your server’s resources have been used and how much is remaining. In Vultr, you can monitor the following metrics for your active server. 1. Bandwidth usage 2. vCPU usage 3. Disk operations 4. Network Monitoring These four metrics can help you understand valuable insights into your server’s performance and can help identify potential issues. Monitoring them also allows you to determine when it’s time to upgrade your server, ensuring it can handle the traffic spikes without slowing down your site or application. To access the monitoring data for your Vultr instance, simply go to the list of servers, click on your server’s name. and select “**Usage Graphs**” from the tabs given on the server dashboard as shown in the following image. ![](https://serveravatar.com/wp-content/uploads/2022/09/image-11-1024x568.png)Once you are there, you will find multiple charts and graphs displaying monitoring data of your server. Let’s go over each monitoring metric in detail. ### Bandwidth Monitoring Bandwidth monitoring is the first thing you will see after accessing the Usage graphs section along with important bandwidth usage information like total Inbound and outbound bandwidth usage. After that, you will find a chart displaying bandwidth usage information for the last 30 days. In this chart, you will see two bars for each day representing incoming and outgoing traffic for a particular day. If you are a beginner, here is a quick explanation of inbound and outbound bandwidth/traffic. 1. **Inbound:** Inbound bandwidth usage includes the data received by the server from the internet or users of the application. For example, if you’re downloading something on the server or lots of users submitting data to the server in some way. If you download 1GB on the server, your inbound bandwidth usage will be 1 GB. 2. **Outbound**: Outbound bandwidth usage includes the data sent by the server to the internet. For example, when we open a site for the first time, our browser will request all the files required to load the site. This is the data sent by the server. If your site’s homepage is 1MB and you are receiving 1000 unique hits on your homepage, you will use 1GB of outbound bandwidth. In Vultr, each server comes with a specific amount of free bandwidth. For the majority of websites, this allocated bandwidth is more than enough to function without any additional charges. **Note:** If your site or application is bandwidth intensive and your bandwidth usage exceeds the limit, it will cost you a specific amount per GB of usage. ### vCPU Usage vCPU usage represents the computing power being utilized by your server. You will find the vCPU usage chart under the “**Server Monitors**” section. This chart displays the vCPU usage as a percentage and displays it in an easy-to-understand chart. The vCPU usage monitor will appear as shown in the following image. ![](https://serveravatar.com/wp-content/uploads/2022/09/image-12.png)It is important to understand how vCPU usage is calculated. If you have a server with 1 core only, the chart will show you the exact percentage of usage, and the maximum you can reach is 100%. However, if you have two cores on your server, the upper limit for this chart is 200%. If you have a server with shared vCPUs, you may not always be able to utilize the full capacity. However, If you have a server with dedicated vCPUs, you will be able to use all the computing power. Note that 100% vCPU usage on this chart does not mean you need to upgrade, especially if your server has multiple cores in your server. > If you are a **ServerAvatar** user, you don’t have to manually calculate the actual CPU usage for multiple cores. ServerAvatar will automatically display the CPU usage percentage based on the number of cores you have on your server. ### Disk Operations Scroll down a bit from vCPU usage and you will find a chart for Disk operations. This chart contains two metrics called read and write. Both Vultr and other cloud platforms monitor these two metrics to help you understand disk operations. ![](https://serveravatar.com/wp-content/uploads/2022/09/Screenshot-2022-09-06T172225.350-1.png)Let’s understand the difference between read and write operations on disk: 1. **Read Operations:** A read operation occurs when you fetch something from the storage disk of your server. For example, when you open a file to see or edit its contents. 2. **Write Operations:** A write operation takes place when data is saved or updated something on the disk. For example, when you save a file after editing or when you create a whole new file on the disk. The chart displays the number of disk operations occurring on the server within a specific time period. Each command executed on the server triggers some read and write operations. This chart is useful for identifying any unusual activities that are happening on your disk. It can help you to detect potential intrusions or bugs in your application, depending on the situation. ### Network Do not confuse this chart with the bandwidth monitoring chart we discussed earlier. Bandwidth usage is network usage too. However, there is a subtle difference between these two charts. The bandwidth usage chart shows the total bandwidth used throughout the whole day, whereas the Network chart will show you network usage in bytes per second. The chart contains two metrics and looks like the following image. ![](https://serveravatar.com/wp-content/uploads/2022/09/image-13-1.png)Let us understand both the metrics tracked by this chart. 1. **Bps Received:** This metric shows the rate of data received by the server in bytes per second at a specific time. Imagine if you are downloading a file with size 1GB on the server and the download completes in 3 minutes. For these 3 minutes, the Bps received by the server will be very high! 2. **Bps sent:** This metric shows the rate at which the server is sending data in bytes per second at a specific moment. Imagine you are transferring a file of 1GB from your server to a remote location, the Bps sent will spike while the file is being transferred. To summarize, the key difference between the bandwidth usage chart and the network chart is that the bandwidth usage chart shows the total network usage in a whole day while the Network chart shows you the speed at which the server is sending or receiving the data. ## Access Server Console in Vultr You may have to access the console of your server for multiple reasons. Even if you are planning to set up a server control panel to manage sites on your server, You might have the console access to complete the installation of the control panel. There are two ways to access your server’s console. The first method is: In the **Products** tab, go to the list of servers and click on the **Three-dot** icon in the last row. You‘ll see all quick action options. Click on the **View Console** button to access the server console. **Alternatively,** you can access your server’s dashboard by clicking on it in the Products tab and then selecting the **View Console** option from the top-right corner of the server dashboard. ![](https://serveravatar.com/wp-content/uploads/2022/09/image-14.png)If you don’t want to access the web-based terminal or console, you can also access the server console using the following apps on your computer: 1. **Mac or Linux:** Terminal 2. **Windows:** PuTTY Simply open the respective application (terminal or PuTTY) and execute the following command to access your server via SSH. ``` ssh root@IPv4_ADDRESS ``` If you selected an SSH key while creating a server, the system will attempt to authenticate with SSH keys first. Alternatively, you can also access your server using the password provided by Vultr in the **server overview** section. ## Restart or Power-off a Server Sometimes you have to restart or power off your server. Vultr allows you to quickly restart or power off your server. Let’s first learn how to restart or reboot a Vultr server. ### Restart a Vultr Server There are two ways to restart a Vultr server: 1. In the **Products** tab, locate your server in the list and click on the **three-dot** icon in the last row. From the quick action options, select the “**Restart Server**” icon to reboot your Vultr server. 2. **Alternatively,** click on the specific server in the Products tab to access its dashboard, then use the **restart icon** as shown in the image below. ![](https://serveravatar.com/wp-content/uploads/2022/09/image-15.png)The restart process will take less than a minute. **Note** **that**, your sites will be temporarily down until the restart process is completed. Now, let’s see how to power off a Vultr server. > **Pro Tip:** It is good practice to restart your server periodically. You can restart your server once a week to maintain optimal performance. ### Power off a Vultr Server Powering off or turning off a server is as simple as restarting it. When you migrate your site from one server to another, you can turn off the old server for a day or two to make sure that the sites are successfully migrated. If the sites are not successfully migrated, your sites will face downtime once the old server is powered off. Anyways, to power off a server, simply click on the **Power off** button given on the server dashboard, as shown in the image below. ![](https://serveravatar.com/wp-content/uploads/2022/09/image-16-1024x474.png)The server will instantly power off. **Note that** it will still incur charges even if it is powered off. This is because the computing and storage resources are still allocated to that server. In case you do not want the server anymore, you can simply delete it. ## Scale your server(s) Scaling an instance on Vultr is a quick and simple process. The whole process is completed in a minute or two. Scaling refers to upgrading or downgrading your server. You can scale up (upgrade) your server or scale down (downgrade) your server depending on the resources you need for your site or application. Vultr only supports scaling up. It does not allow you to downgrade your server once it has been upgraded. **However**, if you are a ServerAvatar user, there is a method to downgrade your cloud resources on Vultr without disrupting your setup. Now, let’s first learn how to upgrade or scale up your Vultr instance. ### Upgrade a Vultr Instance There are several reasons you might need to upgrade your server. **Step 1:** To upgrade your server in Vultr, go to the **Products** section or the server list, and click on the server to access the server dashboard. **Step 2:** In the server overview, click on the **Settings** section. **Step 3:** In the left sidebar of the Settings section, click on the **Change Plan** option. ![](https://serveravatar.com/wp-content/uploads/2022/09/image-17-1024x647.png)**Step 4:** Select a new plan from the drop-down menu. You can upgrade your server from this panel. Vultr does not support downgrades. However, there is a method to downgrade, which will be covered in the next topic. **Step 5:** Select your preferred plan from the drop-down menu, and click the **Upgrade** button to complete the server upgrade. ![](https://serveravatar.com/wp-content/uploads/2022/09/image-18.png)**Note** **that** when you upgrade your server, it may restart once. If you have an application with a lot of active data, it’s recommended to put the site, app, or API into maintenance mode during the upgrade. The entire upgrade process usually takes less than 5 minutes to upgrade. > **Note:** If you are a **ServerAvatar** user, you can use the following method to downgrade your Vultr or any other cloud instance: > > 1\. Create a new smaller instance of desired size. > 2\. [Connect the new instance with ServerAvatar](https://serveravatar.com/docs/server-management/installation/direct-method). > 3\. Use ServerAvatar’s [automatic migration feature](https://serveravatar.com/docs/server/site-migration) to migrate your sites to the smaller instance. > 4\. Update the **DNS records** by **Changing** the **IP address** in the **A records** of your domains. > 5\. Delete the larger instance. ## Manage Server Backups Automated backups are highly recommended! You can choose to enable automated server backups when creating your server. You will be charged an additional **20%** of the server’s cost for creating and managing backups of your server automatically. If you want to enable backups, modify the backup schedule, or restore from any backup at any time, you can easily manage everything from the **Backups** section in the server dashboard. ![](https://serveravatar.com/wp-content/uploads/2022/09/image-19.png)In the backups section, you will see **three sub-sections** to manage your backups, schedule, and current status: 1. **Backup History:** This section displays a list of available backups. If you have just enabled automated backups, this section will be empty, as shown in the above image. 2. **Backup Schedule:** Here, you can set up a schedule to process automated backups for your server. We recommend selecting a time when your site traffic is lowest. You can select the frequency, day, and time for the backups. 3. **Backup Status:** From this section, you can enable or disable automated backups for your server. If backups are available, you can easily restore them to recover from the disaster. If you don’t need regularly scheduled backups, you can also create snapshots of your server and then restore them whenever you want. ## Manage Server Snapshots A Snapshot is a point-in-time image of the instance SSD. Technically, Instance Backups and Instance Snapshots are the same. The only difference is that backups are automated, while taking snapshots is a manual process. To create a snapshot of your server, follow the steps below. **Step 1:** On the **Products** page, select the **Server** from the list of active servers. **Step 2:** Now, navigate to the **Snapshots** section. Type the **Label** as per your wish, and then click the **Take Snapshot** button. ![](https://serveravatar.com/wp-content/uploads/2022/09/image-20.png)The process will start immediately. The time it takes to complete the process depends on the size of your server. ![](https://serveravatar.com/wp-content/uploads/2022/09/image-21.png)**Note** **that** a snapshot can only be restored to a disk of equal or larger size. Additionally, you can use snapshots from different servers to deploy new instances or servers. You can also **Upload Snapshots** from a remote machine. The maximum size to upload a snapshot is 150 GB. ## Create and Manage Firewalls After creating your server, don’t forget to create and apply a firewall to your server. A Firewall protects your server from unauthorized access to different ports and services on the server. If you have no previous experience with managing firewalls, let me briefly explain how it works. A Linux server has **65536 ports** and different services we install on the server run on different ports. For example, SSH runs on port 22, HTTP runs on port 80, and HTTPS on port 443. When you configure your server to host WordPress or PHP sites, you might not need a lot of open ports on your server. If the port is open and accessible from the internet, (i.e., your browser), anyone in the world can potentially access that port of your server. To protect your server from unauthorized access on different critical ports, you can isolate and secure them using a firewall. Luckily, Vultr provides free firewall service for your server. You can manage firewall rules and assign different firewall instances to different servers. Let’s go through the steps to set this up. First of all, we will create a firewall. Then we will assign it to a server. ### Create a Firewall in Vultr Creating a Firewall is very easy in Vultr. Follow the steps given below to create one now. **Step 1:** Log in to your Vultr account, then navigate to **Network >>** **Firewall** option as shown in the image below. ![](https://serveravatar.com/wp-content/uploads/2022/09/image-22-1024x380.png)**Step 2:** Click on the **Add Firewall Group** button on the Firewalls page. **Note:** If you already have a firewall group in your Vultr account, click on the “**+**” button in the top-right corner of the section to reveal the “**Add Firewall Group**” option, then click on it. ![](https://serveravatar.com/wp-content/uploads/2022/09/image-23-1024x268.png)**Step 3:** Enter a description for your firewall group and click on **Add**. **Step 4:** Add the required firewall rules to your firewall instance. If you are running a website or API on your server, It’s recommended you to allow incoming requests on the following ports, as all other ports will be disabled by default. 1. **22 (SSH):** Without this rule, you will not be able to access your server via **SSH** or **SFTP**. 2. **80 (HTTP)**: Without this rule, your site or API will not be accessible via **HTTP**. 3. **443 (HTTPS)**: Without this rule, your site or API will not be accessible via **HTTPS**. ![](https://serveravatar.com/wp-content/uploads/2022/09/image-24-1024x407.png)You can also allow incoming connections on other ports depending on your requirements. However, these three rules are crucial for basic server access and functionality. After creating all the required firewall rules, you can link the firewall instance with your server(s). ### Link the Firewall with Vultr Cloud Instance When you link a firewall instance to your Vultr server, the firewall rules defined in a firewall instance will be applied to your server. You can attach one firewall group or instance with one or more Vultr servers at once. If you are hosting the same type of website on multiple Vultr instances, you only need to create a firewall group once. After that, you can easily link that firewall to any new Vultr servers. Let’s go through the process of doing this. **Step 1:** Navigate to the **Settings** section of a particular server instance, and click on the **Firewalls** from the left-hand sidebar as shown in the below image. ![](https://serveravatar.com/wp-content/uploads/2022/09/image-25-1024x453.png)**Step 2:** Click on the **firewall** **group** or the **edit** **icon** next to the group name that you created in the previous topic. ![](https://serveravatar.com/wp-content/uploads/2022/09/image-26-1024x199.png)**Step 3:** In the firewall section, click on the **Linked Instance** option from the left sidebar. **Step 4:** From the dropdown menu, select the server instance you want to link to the firewall. **Step 5:** Click the “**+**” button to attach the firewall group to the selected server instance. ![](https://serveravatar.com/wp-content/uploads/2022/09/image-27-1024x290.png)Once you have linked the firewall, your server will appear in the **Linked Instances** list. If you do not want to use the firewall with that server anymore, you can simply unlink it from the list of linked instances. ![](https://serveravatar.com/wp-content/uploads/2022/09/image-28-1024x299.png)That’s how you can protect your Vultr server using a firewall. Firewall groups are totally free, and you can create and attach many different firewall groups to different instances as required. ## Re-install OS on Vultr Cloud **Instance** Sometimes you have to reinstall your server. Imagine you are configuring your server and something goes wrong beyond repair (Yeah, it happens when you are configuring your server by yourself). Even if it takes more time to repair the server, it is a wise decision to reinstall your server and get started from a fresh server rather than repairing the messed up system. If you are in a similar situation, you can reinstall the OS on your server. Here are the steps to follow. Reinstalling the server leads to deleting all files related to the server and reset the settings you have configured. You can reinstall your server in two different ways: **Method 1:** On the **Products Page**, click on the **three-dot** icon next to your server to access the **Server Reinstall option** as shown below. ![](https://serveravatar.com/wp-content/uploads/2022/09/image-29.png)**Method 2:** **Alternatively,** you can access the **Server Reinstall** icon directly from the server dashboard. ![](https://serveravatar.com/wp-content/uploads/2022/09/image-30.png)**Note** **that**, once you begin the reinstall process, all data on your server will be permanently lost. So, make sure twice that you are reinstalling the OS on the correct server. It will take a minute or two to re-install the OS on your server. Once the process is complete, you can start setting up your server again from scratch with a fresh OS installation. ## Change the Operating System on Server If you selected the wrong operating system when creating your server, or if you simply desire to change the operating system on your server, you can do it from **Vultr**. Vultr allows you to change the OS of your server after the server has been created. To reinstall your server with a different OS in Vultr, follow these steps: It’s straightforward to change the OS on your server. Click on the server where you want to change the operating system. Then, navigate to **Settings** and select the **Change OS** tab from the left sidebar in the settings section. ![](https://serveravatar.com/wp-content/uploads/2022/09/image-31.png)You can select a new operating system from the dropdown list. **Note** **that** it will **wipe all the data** on your server. Installing the new OS typically takes about 1-2 minutes to complete. ## Delete a Vultr Cloud Instance If you do not need a server anymore, you can delete a server instantly in Vultr. **Note that** the server deletion is not a reversible action. Make sure you do not need the server or the data on the server before deciding to delete a server. In case you might need data on the server later in the future, it’s a good idea to create a snapshot of the server before deleting the instance. If you are sure about deleting the server, you can delete your server by following these steps. **Method 1:** On the **Product page,** click on the **three dots** corresponding to the server you want to delete, and you can see the **Server Destroy** option, as shown in the image below. ![](https://serveravatar.com/wp-content/uploads/2022/09/image-32.png)**Method 2:** On the Server dashboard, you can see the **delete** option, as shown in the following image. ![](https://serveravatar.com/wp-content/uploads/2022/09/image-33.png)It will ask you for permission to delete your server. Select the “**Destroy Server**” option to finalize the delete process. Your server will be deleted in less than a minute, and you will only be charged for the hours you have used the server during the specific month. ## Manage Domains and DNS If you are hosting a website on a Vultr server, you will have to manage the DNS settings of your domain. You can use any DNS provider, as long as you are pointing the **A** record to the correct IP address, i.e. the IP address of your Vultr server. The best choice to manage DNS would be through Cloudflare. However, If you do not want to use Cloudflare or any other DNS provider, you can use Vultr’s DNS service to manage DNS records for your domains. **Note:** DNS management on Vultr is completely free. To start managing your DNS with Vultr, set the following nameservers in your domain name settings. - ns1.vultr.com - ns2.vultr.com - ns3.vultr.com - ns4.vultr.com Once you set these nameservers in your domain name, you can start managing your DNS records directly through Vultr. ### Add domain to Vultr DNS Managing DNS allows you to control how your domain name resolves to an IP address. It transfers your domain names into IP addresses which web browsers use to load web pages. You can transfer your domain to a new web host through DNS management. You can manage your domains by going to the **Network >> DNS** tab on the **Products** page. ![](https://serveravatar.com/wp-content/uploads/2022/09/image-34.png)Here you will see the list of all domains along with their creation date and time. You can add a new domain to DNS management by clicking on the **“Add Domain”** button at the top right corner or by clicking on the **Add Domain** option displayed on the page. [](https://storage.3.basecamp.com/5840738/blobs/bc2c19ee-b883-11ef-8a63-b2d1a80aa527/download/image.png) ![](https://serveravatar.com/wp-content/uploads/2022/09/image-35.png)After that, you will see a simple form as shown in the following image. [](https://storage.3.basecamp.com/5840738/blobs/db9b1758-b883-11ef-af96-0e12be5f970b/download/image.png) ![](https://serveravatar.com/wp-content/uploads/2022/09/image-36.png)Enter the domain name in the Domain field and select the Vultr instance you want to use for that domain name. Once you have selected both options, click on the **Add** button to add the new domain to Vultr DNS. ### Manage DNS records To manage DNS records for a specific domain managed with Vultr DNS, go to the **DNS** tab in the products section. Now you will see a list of domain names managed through Vultr DNS. Click the **Edit** icon next to the domain name you want to manage. Now, you will see a list of DNS records just like the following image. ![](https://serveravatar.com/wp-content/uploads/2022/09/image-37.png)Once you have the list of DNS records, you can perform the following actions on the records. 1. **Add new DNS Record:** To add a new DNS record, enter the DNS record information in the first row and click on the **“+”** button given in the last column of the first row. 2. **Edit an Existing DNS Record:** If you want to edit an existing record, you can click on the **Edit** icon next to the record you want to edit. Then update the DNS record according to your requirements and save it. 3. **Delete DNS Record:** To delete a DNS record, select the record(s) you want to remove from the first column, then click on **Delete Records** to instantly remove selected DNS records. This is how you can manage your domain’s DNS with Vultr. If you decide to manage the DNS of your domains via Vultr, you can also enable DDoS protection for your servers in Vultr. Finally, let’s see how to manage websites on your Vultr server or instance. ## Manage PHP or WordPress Websites on Vultr Instance/Server If you are still reading, you already know everything you need to know about Vultr servers or instances. We explored almost all the options available in the Vultr User Interface. But none of them covers this topic. That’s because Vultr allows you to manage servers, not websites. When you create a server, you will get a server from Vultr. You will not find an option to add a new website. It is because managing websites on the server is not Vultr’s responsibility, it is yours. This approach is the same across all cloud platforms. So, how can you host your websites on a Vultr server without needing any technical knowledge of Linux? There are a few options available: 1. Hire a system administrator to host and manage websites on a server. (Expensive) 2. Create a server with a pre-installed application. (No Management capabilities) 3. Use a remote server management panel (Recommended) Let’s explore the pros and cons of all the methods to help you select the best option for your requirements. ### 1. Hire a System Administrator In this case, after creating your server, you would hire a freelancer to configure the server and host your websites on it. A skilled system administrator typically charges between $50-$100 for the initial configuration and to host your websites. The problems arise when you want to get help, want to host more sites, solve server errors and perform other tasks at server level. It is because first, they might be slow to respond (We can expect a few hours of delay in response for any human being). The second issue is that the system administrator might charge you every time you need help from them. As a human is working on your server, this can become expensive. Additionally, you will need to share the root password of your server with a person you have never worked with before, which can lead to a security risk. If you still want to go with this method, you can explore gigs on Fiverr or other freelancing platforms. ### 2. Create a Server with Pre-installed Application This is one option to consider. Vultr provides pre-installed applications on servers through its Marketplace. At the technical level, imagine you have initially configured a server with the website on it. Then you can take a snapshot of it, and after that, every time you create a new server from that snapshot, you will always have a website automatically installed on the server. To find this option, select the **Deploy New Server** option from the top-right corner of the Vultr dashboard. In the section where you are asked to select a **Server Image**, click on the **Marketplace Apps**. Once you are there, you will see something like the image below. ![](https://serveravatar.com/wp-content/uploads/2022/09/image-38-1024x406.png)The problem with this setup is that you can only host one application per server, and the server configuration is basic, or say, might not be optimized. This creates a common problem similar to the first method: if something goes wrong and server errors occur, you will need to hire a system administrator to resolve this. The only difference between the first and the second method is that in the second method, you don’t need to pay a system administrator for the initial server setup. However, both methods have the same problem after that. It’s 2025, and you don’t have to settle for that anymore. To solve all the configuration, learning curve, and support problems, we have a third method. **Note that** this option was not viable before six years. ### 3. Use a remote server management panel Brace Yourself! A remote server management panel costs you up to 90% less than hiring a system administrator for the initial configuration of your server. Plus, here are some of the key features that any remote server management panel will provide. 1. Instant, Automated, and Optimized configuration 2. Host multiple sites on a single server 3. Easy-to-use web application for managing sites on your server 4. No learning curve required 5. Clone websites, create staging areas, and set up demo environments 6. Automatically and instantly migrate sites 7. File manager to manage files of your sites 8. Get support for server-level errors 9. **Get a Managed Hosting Experience with [Vultr Integration](https://serveravatar.com/docs/integrations/cloud-platform/vultr)** In short, you do not need to hire a person to host your sites on a Vultr server. It is as easy as managing websites on a managed hosting platform. Here are some screenshots of the ServerAvatar panel, which serves as a remote server management panel. The following is an application management panel, where you can manage domains for your sites, use Auto Deploy to automatically install applications, manage the staging area, files, SSL certificates, PHP settings, backups, and a lot of things. ![](https://serveravatar.com/wp-content/uploads/2022/09/image-40-1-1024x410.png)The below image is a server management panel where you can easily manage and monitor your server. You can handle various tasks such as managing applications/sites, databases, firewall settings, server alerts, migrations, and a lot more. [](https://storage.3.basecamp.com/5840738/blobs/5cd13e84-b90f-11ef-b8e2-e2462c7272c8/download/image.png) ![](https://serveravatar.com/wp-content/uploads/2022/09/image-41-1024x514.png)You can try ServerAvatar with the free plan. To get started with a fresh Vultr server with the **Ubuntu** **20.04**, **22.04**, or **24.04** operating system, follow the steps below to initiate the setup process for ServerAvatar. Here are the three ways to automatically configure your server with **ServerAvatar**. **1. Connect a server using a direct method:** 1. [Login/Register](https://app.serveravatar.com/register) to ServerAvatar account, then click the **Create** button from the right side of the screen and select **Server** from the dropdown menu. 2. Select **Direct Method** for the server connection. 3. Enter your preferred **Server Name**. 4. Select a **Tech Stack** based on your needs (**Apache, Nginx, OpenLiteSpeed,** or **Node Stack)**. 5. Select a **Database: MySQL, MariaDB,** or **MongoDB.** 6. Enable the toggle if you want to **install the latest LTS version of node.js** on your server. 7. Click on the **Connect Now** button. 8. You’ll see the command on your screen. Login to your server via SSH and **execute that command** as a root user. 9. The server connection process will begin in your ServerAvatar account after executing the command. **2. Connect a server using integration:** 1. [Login/Register](https://app.serveravatar.com/register) to your ServerAvatar account, navigate to the **Integration** tab from the sidebar of the panel and select **Cloud Platform** from the dropdown menu. 2. **Select a cloud platform** you want to link with ServerAvatar. 3. A popup form will appear, enter details to link your cloud provider account. 4. The [integration method](https://serveravatar.com/docs/integrations/cloud-platform/linode) is different based on the cloud provider you select. **3. Connect a server using commands:** Once you create a server as per your requirements, connect to your server using an SSH connection and execute the below three commands as a root user in your server console area. ``` wget https://srvr.so/install chmod +x install ./install ``` It will ask if you want to configure your server with **Apache, Nginx, or OpenLiteSpeed.** You can select according to your requirements and hit enter. After that, it will check if the server is ready for installation. After the installation starts, It will provide you with a link to your server management panel. The complete initial configuration will be over in 6-7 minutes, and you will be able to manage your servers and sites using a panel as displayed in the below image. ![](https://serveravatar.com/wp-content/uploads/2022/09/image-42-1024x514.png)**Quick Links:** 1. [Get Started with Vultr](https://vultr.grsm.io/saguide) 2. [Get Started with ServerAvatar](https://app.serveravatar.com/register) **Categories:** Cloud Platforms --- ### [The Ultimate Linode Cloud Instance Guide for 2026](https://serveravatar.com/the-ultimate-linode-cloud-instance-guide/) **Published:** February 15, 2023 **Author:** Adarsh Sojitra **Content:** According to Statista research, cloud computing generates around 400 billion in revenue in 2021, showing no signs of slowing down. So it is clear that the usage of cloud computing is continuously increasing over time. The cloud service market is mainly divided into three models, which are – 1. Encompassing infrastructure 2. Platforms 3. And Software The most demanding segment in cloud computing is Infrastructure-as-a-service (IaaS), providing access to a computing platform for application development. [Linode](https://www.linode.com/) is one of the most prominent IaaS providers available in the market. This guide covers everything you need to know about Linode as a cloud provider. This guide will make it easier to host websites on cloud and make changes in servers as required. We will cover all the important actions you can perform on your Linode cloud platform. Let’s start with the basics, considering you have no experience with cloud platforms. However, if you are an expert, you can jump to the topics or only read the topics you desire. ## What is Linode? Linode, a cloud hosting provider founded in 2003, provides **virtual private servers** (VPS), **storage**, and on-premise **networking** solutions. It is used by individuals and business owners, including developers, small businesses, and enterprise customers. Due to Linode’s infrastructure and flexible pricing, it is famous for those who need versatile and scalable cloud hosting solutions. Linode allows you to choose from various hardware configurations and operating systems to meet your specific needs. Linode pricing options are very flexible. It offers a “pay as you go” payment option, which means you only pay for the computing resources you use. Here is the Linode usage statistic graph showing the total number of sites in 1 million that use Linode. ![](https://serveravatar.com/wp-content/uploads/2023/02/Linode-Usage-Statistics.png)Linode has more than 10 data centres, and is trusted by 800,000 agencies all around the globe. ## Different types of Linode cloud instances Linode provides different types of cloud instances (Linodes types) that suit an individual’s business requirements. Here are the different types of Servers you can create in Linode. ### Dedicated CPU A dedicated CPU is recommended for a full-duty workload where consistent performance is essential. Dedicated CPUs do not share their computing power with other instances, allowing you to utilize their total computing power. However, we do not suggest using full computing power. You can set a CPU usage threshold limit of 50-60% to avoid any trouble during an instant traffic spike. In Linode, Choosing a dedicated CPU plan results in accessing server monitoring graphs that help you identify server-level issues and other security events. ### Shared CPU A shared CPU plan is an excellent and cost-effective option for small businesses and startups with light to average workloads and don’t require a dedicated server with its own massive dedicated processing power. With a shared CPU plan, users can access a shared pool of cores/vCPUs on the same server, providing them access to a level of power and performance that’s usually sufficient enough for their needs. For businesses looking to get the most out of their resources while not having to commit a large amount of funds that an individual or dedicated server would require, a shared CPU plan is a great option. It provides small businesses and startups with the capability for workloads that require a bit more processing power, without the need for investing in expensive or unnecessary server infrastructure. ### High Memory High Memory is optimized for in-memory databases and caches. If your business requires fast access to data by sorting it in system RAM instead of on disk, memory-optimised instances are a perfect choice. These instances are ideal when you need RAM without increasing storage and vCPUs, providing customized solutions for businesses. This plan uses dedicated CPU cores. ### GPU GPU (Graphics Processing Unit) is a plan designed for large data processing tasks that include rendering graphics and images. It uses parallel processing in which multiple cores run at the same time parallelly. ## How to Create a Server in Linode The process of creating a server on **Linod** is straightforward. All types of Linode servers are created under the same creation process. To create a high-performance SSD Linux server, log in to your Linode account, click the **Create** button at the top left of the screen, and select **Linode** from the dropdown menu. ![](https://serveravatar.com/wp-content/uploads/2023/02/image.png)You can now see the server creation wizard with multiple sections on your screen. Let’s understand each section step-by-step. ### Step 1. Select a Region It is recommended to select a location that is close to your users. It helps reduce latency time and positively impacts website loading time as well. ![](https://serveravatar.com/wp-content/uploads/2023/02/img1-1-1024x642.png)Use the [speedtest page](https://www.linode.com/speed-test/) to find the best location to host your Linode Compute instance. ### Step 2. Choose a Distribution (Distros) A Distribution can refer to the different versions of Linux-based operating systems that support various use cases. ![](https://serveravatar.com/wp-content/uploads/2023/02/img2.png)All distributions are built on Linux. One of the popular distributions is **Ubuntu**, the **preferred OS for Software development and deployment of code. Arch** is popular for **extensive customization and total control over your system**. Choose an image (Operating System) that is suitable for your needs. > **Note:** If you want to manage your Linode server with ServerAvatar, select Ubuntu 20.04 or 22.04 as your operating system. ### Step 3. Select Linode Plan Selecting a server Plan varies from one business to another. There are more than 25 plans to choose from. ![](https://serveravatar.com/wp-content/uploads/2023/02/image3-1-1024x542.png)Server Types include: #### Dedicated CPU 1. Recommended for hassle-free workloads and consistent performance 2. 4 GB – 512 GB memory, 2 – 64 Dedicated vCPUs, 80 GB – 7200 GB Storage 3. Starting at $30/month ($0.045/hour) #### Shared CPU 1. Good for medium-duty workloads, and are a good mix of resources and price 2. 1 GB – 192 GB memory, 1 – 32 Shared vCPU Core, 25 GB – 2840 GB Storage 3. Starting at $5/month ( $0.0075/hour) #### High Memory 1. Optimized for memory-intensive applications. Best for a memory in-caching system 2. 24 GB – 300 GB memory, 2 – 16 Dedicated vCPUs, 20 GB – 340 GB Storage 3. Starting at $60/month ($0.09/hour) #### GPU (Graphics Processing Unit) 1. Accelerate highly specific applications like machine learning, AI, and video transcoding 2. 32 GB – 128 GB memory, 8 – 24 Dedicated vCPUs, 640 GB – 2560 GB Storage 3. Starting at $1000/month ($1.50/hour) ### Step 4. Enter Linode Label and Tags **Adding Labels and tags helps identify your resources efficiently**. You can use them to group your resources and access and manage resources using the Linode Manager. It can also help track your Linode usage and performance. **Placement Groups:** This option lets you keep your Linodes close together by grouping them to improve performance, or distribute them for high-availability configurations. ![](https://serveravatar.com/wp-content/uploads/2023/02/image4.png)### Step 5. Enter Root Password A root password is an administrative password for your Linux server. It can be used to perform root-level tasks. ![](https://serveravatar.com/wp-content/uploads/2023/02/image5.png)### Step 6. Add an SSH Key SSH key is used for remote operating system access, remote file transfer, and network management. You can access the public key from your system using the **\[** `cat ~/.ssh/id_rsa.pub` **\]** command or [generate an ssh key](https://linuxhint.com/generate-ssh-keys-on-linux/) using a simple command. ![](https://serveravatar.com/wp-content/uploads/2023/02/image6-1024x200.png)### Step 7. Attach a VLAN (Virtual Local Area Network) VLANs are currently available in specific locations in Linode. It can be used to enable virtual private networks in the cloud. It helps to reduce latency for latency-sensitive applications and enables you to add two Linode servers on the same VLAN with extra security. ![](https://serveravatar.com/wp-content/uploads/2023/02/image7-1024x192.png)IPAM (IP Address Management) is a methodology to enable end-to-end planning, deploying, and managing IP address infrastructure. IPAM requires the use of the **IP/netmask** format, as shown in the above image. ### Step 8. Add-ons It is optional, but it is recommended to add a special add-on to your server to assist with management and organization. Add-ons include a backup of your server and provide plans for **Daily**, **Weekly**, **Biweekly**, and **Manual snapshots**. ![](https://serveravatar.com/wp-content/uploads/2023/02/image8-1024x157.png)Enabling a **Private IP** allows your server to communicate with other servers in the same data center in Linode. ### Step 9. Final Summary Check all the details that you filled up on the above sections. ![](https://serveravatar.com/wp-content/uploads/2023/02/image9-1024x175.png)Click the **Create Linode** button, and your instance (server) will be ready to rock in a minute. If you want to [manage your Linode effortlessly with ServerAvatar](https://serveravatar.com/docs/integrations/cloud-platform/linode), simply use the Direct Method to connect your server with ServerAvatar by following the steps below: 1. [Log in](https://app.serveravatar.com) to your ServerAvatar account and click on the **Create** button, then select **Server** from the dropdown. 2. Select the **Direct Method** for the server connection. 3. Enter your preferred **Server Name**. 4. Select a **Tech Stack** (Apache, Nginx, OpenLiteSpeed, or Node Stack). 5. Choose a **Database** (MySQL, MariaDB, or MongoDB). 6. Enable the toggle to install the latest LTS version of Node.js if desired. 7. Select a **Management plan** and click on **Connect Now**. 8. Copy the displayed command, then log in to your server via SSH and execute it as the root user. 9. The server connection process will begin in your **ServerAvatar** account after executing the command. ## Linode Overview and information Once you create your Linode, you will have total control over your Linode. The Linode summary section page shows a general overview and the current status of your Linode. To check the Linode Overview, navigate to the [Linode cloud manager](https://cloud.linode.com/) and click the Linode label link given in the first column of the Linode list. ![](https://serveravatar.com/wp-content/uploads/2023/02/image10-1024x190.png)As you can see in the below image, the Linode summary section helps you to easily manage and monitor the Linode. ![](https://serveravatar.com/wp-content/uploads/2023/02/image11-1024x258.png)It gives you information that is quickly accessed at a time of emergency. If you want to Reboot your Linode, you can easily do it using just one click. Additionally, it gives information about billings and server usage statistics. > **Note: The charges are calculated hourly.** It’s a central point of your account to access and manage your Linode actions without any hassle. Using statistics, you can plan for future usage, avoid unexpected charges, and streamline your experience. ## Linode Resource Usage Monitoring Server monitoring is a crucial part when it comes to detecting any performance issues before it affect the end user. It also helps to improve the efficiency of your server by checking the CPU or RAM usage currently and historically over time. Linode provides the following graphs to monitor your system-level matrices. 1. CPU Usage 2. Disc IO 3. Network-IPv4 4. Network-IPv6 The above four matrices help you identify your server resources using appropriate graphs. To access the Linode monitoring graph of your specific Linode (server), navigate to **Linode Cloud Manager** and click on the link for the particular **Compute Instance.** You’ll see the Linode summary section with a graph like the following image. ![](https://serveravatar.com/wp-content/uploads/2023/02/image12.png)### 1. CPU Usage (in %) CPU Usage is the actual computing power usage of your server. The CPU Usage graph allows administrators to monitor the usage of CPU used by system components and users, presented in a percentage format and an easy-to-understand interface. Each of your CPU cores is capable of 100% utilization. Let’s say you have two CPU cores; the total max utilization will be 200%. But only in some cases, which means a shared server does not allow you to use full computing power to show the same graph and utilizations as a dedicated server. The CPU usage graph looks like the following image. ![](https://serveravatar.com/wp-content/uploads/2023/02/ubuntu-test-Analytics-_-Linode-Manager.png)The **X-axis** represents the **time** depending upon the interval period you selected. **Y-axis** represents the **CPU in percentage.** **Note:** If you are a **ServerAvatar** user, you don’t need to manually calculate the CPU usage for multiple cores. ServerAvatar will automatically display the percentage of CPU usage based on the number of cores you have on your server. ### 2. IPv4 network traffic The IPv4 network traffic graph shows the amount of incoming and outgoing bandwidth/network traffic your server is using. ![](https://serveravatar.com/wp-content/uploads/2023/02/ubuntu-test-Analytics-_-Linode-Manager-1.png)As you can see in the above graph, the X-axis represents the Time, and the Y-axis represents the total amount of network traffic in bytes or bits per second. Let’s discuss four different aspects of IPv4 network traffic: 1. **Public in:** This shows the total number of incoming traffic from the internet to your public IPv4 address. For example, if someone visits your site hosted on the server, their device will send a request to the server using the public IPv4 address. 2. **Public out:** This shows the total number of outgoing traffic from the server via the public IPv4 address. In this case, the server responds to the request from the visitor’s device and sends website data. 3. **Private in:** This represents the total incoming traffic from private IP addresses associated with Linode. 4. **Private out:** This indicates the total outgoing traffic from private IP addresses associated with Linode. ### 3. IPv6 network traffic This is the latest protocol in use due to the growing number of devices on the internet. IPv6 uses 128-bit addresses. Similar to IPv4 network graphs, the IPv6 graph for **Inbound** and **Outbound** matrices displays the total amount of incoming and outgoing traffic for IPv6 addresses associated with Linode. ![](https://serveravatar.com/wp-content/uploads/2023/02/IPv6-graph.png)Both IPv4 and IPv6 network graphs are valuable for monitoring network traffic and also identifying potential issues happening on the server. ### 4. Disc I/O It refers to the process of reading data from the storage device (hard drive, SSD) or writing data to the storage device. The Disc I/O graph is measured in blocks per second, where a block is the data storage unit used to organize and store data on a hard drive or SSD-like storage device. ![](https://serveravatar.com/wp-content/uploads/2023/02/disc-IO.png)The two performance metrics in the Disc I/O graph are the following: 1. **I/O Rate:** I/O rate measured in input/output operations per second. It indicates the rate at which data is being transferred from and to the disc. A high I/O rate suggests that the disc is heavily used and needs to be optimized. 2. **Swap Rate:** The swap rate is measured in kilobytes per second (KB/s). The swap rate refers to the amount of data transferred between the disk’s swap space and the system’s RAM. Swap memory is the temporary memory stored on the disk that is used when a system’s memory (RAM) is full. ## How to use LISH console in Linode The **LISH** console (Linode shell) provides direct access to your Linode. You can use the LISH console for troubleshooting and recovery purposes. Both LISH console and SSH are methods for accessing a Linode remotely, although some key differences between LISH console and SSH are: 1. Unlike SSH, LISH is a web-based terminal access service that operates through a web browser. 2. LISH uses your Linode account credentials for login, while SSH uses SSH credentials. 3. LISH can be accessed directly from your cloud manager, while SSH can be accessed from anywhere using SSH credentials. 4. You can run any commands and programs on your VPS through SSH access, while LISH has some limited command capabilities. To access the Linode shell for your specific Linode, click on the three-dot icon next to your Linode and select the **Launch LISH Console** from the dropdown menu, as shown in the image below. ![](https://serveravatar.com/wp-content/uploads/2023/02/image13-1024x398.png)You will see the console area as shown in the image below. ![](https://serveravatar.com/wp-content/uploads/2023/02/image14-1024x759.png)You can log in to your console with the username “**root**“ and the password you set up while creating an account. It is not recommended to use the **LISH** console for regular purposes or for performing automated tasks. ## Access Linode via SSH Accessing your Linode via **SSH** provides a flexible and secure way to access the Linode internal shell. One of the main advantages of SSH compared to LISH is that you can access your Linode from anywhere. You can use SSH regularly or perform more advanced tasks like automating, transferring data, etc. To find the SSH credentials of your Linode, go to your [Linode cloud manager](https://cloud.linode.com/linodes) and select the appropriate Linode by clicking on the Linode label link. You’ll see the **SSH Access** credentials in the Linode summary section, as shown in the image below. ![](https://serveravatar.com/wp-content/uploads/2023/02/image15-1024x259.png)If you are using Linux or Mac, paste the command as shown in the above image into the terminal. If you are a Windows user, use PuTTY. You will be prompted to enter the password that you created during the Linode creation process. You can [reset the root password on your Linode](https://www.linode.com/docs/guides/reset-the-root-password-on-your-linode/) in case you forgot the password. ## Restart or Reboot a Linode It is not necessary to restart your Linode, but there are several reasons why you might consider doing so, including: 1. Software updates 2. Configuration changes 3. Security reasons 4. Troubleshooting 5. Performance improvement, etc. It is recommended to notify your users or customers about the planned restart and take a snapshot of your Linode before rebooting. Linode allows you to easily restart your server when it is required. The process is straightforward. You will see the list of Linodes on the screen. Click the **Three dot** icon next to the specific Linode instance and click on the **Reboot** option as shown in the image below. ![](https://serveravatar.com/wp-content/uploads/2023/02/image16-1024x402.png)Alternatively, you can find the Reboot link from the summary section, as shown in the image below. ![](https://serveravatar.com/wp-content/uploads/2023/02/image17-1024x281.png)> **Note:** Rebooting the server results stops all the running processes. > **Pro Tip:** It is recommended to restart your server periodically. You can restart your server every week too. It is good practice and helps to maintain optimal performance. ## Resize (Scale) a Linode server Resizing your Linode refers to upgrading or downgrading your Linode Plan and resources, which directly links to your usage capacity. It might be possible that you’re not using your Linode as much as you expected, and it is necessary to downgrade the Linode plan and pay only for the resources you actually use. Unlike other cloud hosting services, Linode allows for both temporary and permanent upgrades and downgrades. To resize your Linode, go to your cloud manager, click the **three-dot** icon next to your specific Linode, and select the **Resize** option from the dropdown menu. ![](https://serveravatar.com/wp-content/uploads/2023/02/image18-1024x359.png)On the next screen: 1. **Select a Linode plan** as per your requirements. 2. Enable the **Auto Upgrade Disc** option to avoid running out of storage space in the future. 3. **Enter your Linode name** to confirm the resizing process. ![](https://serveravatar.com/wp-content/uploads/2023/02/image19.png)Click the **Resize Linode** button once you have completed the fields. ## Create a Backup plan for Linode Server It is recommended to set up automatic backups for your Linode disc regularly to prevent unexpected disasters. Backup plans are charged separately and can be added to your monthly bills. You’ll be charged 20% of the cost of your Linode plan; for example, a $20 Linode plan takes an additional $5 monthly charge. To create a backup of your Linode, go to your Linode summary section, click on the **Backups** tab, and then click the **Enable Backup** button. You’ll see the screen as shown in the image below. ![](https://serveravatar.com/wp-content/uploads/2023/02/image20-1024x566.png)As you can see, there are two subcategories on this screen, including: 1. **Manual Snapshot/Backup:** Create a manual backup of your Linode by entering the Snapshot name in the **Name Snapshot** field. This manual backup will not be overwritten or affected by automatic backups. However, creating a new manual snapshot will remove any existing backups. 2. **Settings:** Automate your Linode backup process by selecting the **Day of the Week** and **Time of Day** in the appropriate fields. Note that this will overwrite the previous daily backup, and up to two weekly backups are saved. All the backups will be displayed on the screen, as shown in the previous image. If you cancel your backup plan, all the existing backups associated with this Linode will be deleted. ## Create Linode instance Snapshot Creating a backup of your Linode is essential to preventing event failure related to Linode instances. It is also beneficial for data protection, testing, and development purposes. A Linode snapshot can be used to create a backup of your Linode’s data and configuration. To create a snapshot, go to your [Linode cloud manager](https://cloud.linode.com/), select the Linode Instance from the list, and navigate to the **Backup** tab, as shown in the image below. ![](https://serveravatar.com/wp-content/uploads/2023/02/image21-1024x488.png)> **Note that:** Linode stores only one snapshot for a compute instance. Creating a new snapshot will overwrites the existing snapshot. Enter the snapshot name in the **Manual snapshot** field and click on the **Take Snapshot** button. It creates an instant snapshot of your Linode instance. ## Create and manage Firewalls for Linode Cloud Instance Firewall plays a vital role when it comes to the security of your network. It protects your Linode from malicious activities and prevents unauthorized users from accessing your private network. There are 65535 ports available on any Linux server, and various services on the internet that we install on our server operate on different ports. For example, SSH runs on port 22, DNS service runs on port 53, HTTPS runs on port 443, and many more. You need to open several necessary firewall rules to secure your website. Linode offers some of the most used predefined rules you can add to your cloud firewall with one click. It includes SSH(22), HTTP(80) and MySQL(3306) ports and more. ### Create Linode firewall rules To create Linode firewall rules, go to your Linode Cloud Manager and select **Firewalls** from the panel’s sidebar menu. ![](https://serveravatar.com/wp-content/uploads/2023/02/image22-1024x326.png)Rules are separated into two sections, which are: #### Inbound Rules Inbound rules define which IP addresses, ports, and protocols are allowed to connect to the Linode-protected network. It controls the incoming traffic that is allowed to reach the system. For example, setting up port 80 on your Linode results in allowing all incoming web traffic. To create an inbound firewall rule for your Linode, click the **Add an Inbound Rule** button. [](https://storage.3.basecamp.com/5840738/blobs/9d3e34f4-9b6e-11ef-87db-f23298c1267f/download/image.png) ![](https://serveravatar.com/wp-content/uploads/2023/02/image23-1024x402.png)You will see the form as displayed in the following image. [](https://storage.3.basecamp.com/5840738/blobs/cc99cbdc-9b6e-11ef-92e9-1ab7a0b123c9/download/image.png) ![](https://serveravatar.com/wp-content/uploads/2023/02/image24.png)1. **Preset:** Select a firewall rule from the useful predefined firewall rules (optional). 2. **Label:** Add a label as an identifier of your Linode firewall rule (optional). 3. **Description:** Enter a description for your Linode firewall rule (optional). 4. **Protocol:** Select a transport layer protocol for your firewall rule. **UDP is the recommended** choice for a transport layer protocol. 5. **Ports:** You can select from the list of common predefined ports or select the custom port range configuration option. Note that you can add up to 15 ports to a single cloud firewall rule, which is required only for TCP and UDP protocols. 6. **Sources:** Select from a list of available sources that limit incoming connections to specific IP address/addresses or to the selected internet protocol. 7. **Action:** You can allow or drop/deny traffic based on the firewall rule you create. For example, you can create a firewall rule with a **Drop** action that blocks incoming traffic from a specific IP address on port 80. #### Outbound rules Outbound rules control the outgoing traffic that is allowed to reach the external network. For example, XYZ company has set up outbound rules in its firewall that block outgoing traffic to the IP addresses of social media websites. ![](https://serveravatar.com/wp-content/uploads/2023/02/image25.png)As we select sources for the Inbound firewall rule, you can **Select Destinations** that limit the outgoing connection to specific IP address/addresses or the selected internet protocol. Additionally, you can edit your created firewall rule as required. ## Rebuild a Linode Server The process of Rebuilding a Linode creates a new Linode with the same configuration as an existing one. Many of us need clarification about what happens when rebuilding a Linode. Here are the points that help you understand the basics. 1. The existing Linode will be deleted with all your data, files, and installed software. 2. A new Linode will be created with the same configuration as the previous one, allowing you to retain the same Linode plan. 3. Backups of the previous original Linode will not be affected. 4. Rebuild a Linode to help update your server with the latest security patches. It can also help you resolve issues regarding updates. It can also be helpful if you want to change your operating system’s distribution (image) or version. For example, upgrade your operating system from Ubuntu 18.04 to Ubuntu 20.04. To rebuild a Linode, go to your Linode cloud manager and click the three-dot icon next to the Linode you wish to rebuild. ![](https://serveravatar.com/wp-content/uploads/2023/02/image26-1024x401.png)Now, complete the details to create a new Linode. You will need to provide the following information: 1. Select whether you want to deploy the Linode on a new image, or you can select community StackScript or an account StackScript. [StackScript](https://www.linode.com/docs/products/tools/stackscripts/) automates the process during the deployment of the new Linode. 2. Choose an image or StackScript from the dropdown menu. 3. Set the root password. 4. Add your SSH key and enter the name of your existing Linode. ![](https://serveravatar.com/wp-content/uploads/2023/02/image27-1024x517.png)Click the **Rebuild Linode** button and the new Linode will be deployed in a minute or two. ## Delete a Linode cloud instance If you don’t need your server anymore, you can delete it with just a few clicks. Before deleting the Linode, ensure that the data associated with the Linode you want to delete is not currently in use. In case you want that data, be sure to create a snapshot of your Linode before deleting it. To delete a Linode, navigate to the Linode cloud manager, click the **three-dot** dropdown icon, and click the **Delete** option. ![](https://serveravatar.com/wp-content/uploads/2023/02/image28-1024x377.png)It will finally ask you, “Are you sure you want to delete this server”. Click **OK** to finalize the deletion process. Your server will be deleted within seconds. ## How to Manage DNS for Domain in Linode If you plan to host a website on a Linode instance, you will need to manage the DNS of your domain. You can select any DNS provider as long as you are pointing the A record to the correct IP address, which is the IP address of your Linode server. The best choice to manage DNS would be through [Cloudflare](https://www.linode.com/docs/guides/how-to-set-up-cloudflare-with-linode/). However, if you do not want to use Cloudflare or any other DNS provider, you can manage your domain’s DNS records using Linode’s DNS service. **Note**: DNS management is free in Linode. To [start managing your DNS with Linode](https://www.linode.com/community/questions/19221/how-to-configure-a-domain-name-step-by-step-on-a-linode-server-platform), set the following nameservers in your domain name settings. 1. ns1.Linode.com 2. ns2.Linode.com 3. ns3.Linode.com 4. ns4.Linode.com 5. ns5.Linode.com Once you set these nameservers in your domain name, you can start managing your DNS records on Linode. ### Add domain to Linode DNS manager Managing DNS allows you to control how your domain name resolves. It transfers your domain names into IP addresses that web browsers use to access web pages. You can transfer your domain to a new web host through DNS management. You can manage your domains by going to the **Domains** tab from the [Linode cloud manager](https://cloud.linode.com/linodes). ![](https://serveravatar.com/wp-content/uploads/2023/02/image29-1024x294.png)Here you will see the list of all domains with created date and time. You can add a new domain to DNS management by clicking the **Create Domain** button. ![](https://serveravatar.com/wp-content/uploads/2023/02/image30.png)Here you have to provide the following information: **1) Zone Type:** The primary zone type is the authoritative source for a domain’s DNS record. Selecting the primary zone type allows you to create and manage all the necessary DNS records required for the domain to function properly. On the other hand, a Secondary zone is a read-only copy of a primary zone and is typically used for redundancy and load balancing. **2) Domain:** Enter your registered domain name. You can add **Domain** and **Subdomain**. ## Manage PHP/WordPress website on Linode server As you can see, we have discussed all the features provided by Linode to manage multiple types of servers. But how can you manage your PHP website on a Linode server? Let’s see how to host multiple PHP websites on your Linode server without technical knowledge of Linux. Here are a few options: 1. Hire a system administrator to host and manage websites on a server. (Expensive) 2. Create a server with a pre-installed application. (No Management capabilities) 3. Use a remote server management panel. (Easy and Recommended) Let’s understand the pros and cons of all the methods. ### 1. Hire a System administrator Once you create a server from any cloud service provider, you might hire a freelancer to configure your server and host applications on it. An experienced system administrator typically charges between $50-$100 for the initial configuration of your server. The real problem comes when you need assistance with server issues, want to host more sites, or make changes. The server administrator might charge every time you get help from them. And in the end, it will be a costly process. Additionally, you will have to share your server’s root password with someone you may not know well, which can be a security concern. ### 2. Create a Server with the Pre-installed Applications Linode provides a marketplace with various pre-configured applications that you can deploy within a minute. This marketplace includes popular open-source applications such as WordPress, and NextCloud, as well as DevOps tools such as Kubernetes, GitLab, Jenkins, and more. The marketplace makes it easy to start new applications without manually configuring and installing them from scratch. To find this option, click on the Create **Linode** option from the sidebar and navigate to the **Marketplace** tab, as shown in the image below. ![](https://serveravatar.com/wp-content/uploads/2023/02/image31-1024x593.png)The problem you face using marketplace applications is you may not have full control over the configuration, or it may not provide the level of customization that you need for your specific use cases. Apart from that, the cost associated with deploying pre-configured applications is unexpected. It is essential to carefully consider your specific needs and requirements before deploying the pre-configured applications. It’s 2025, and you shouldn’t have to settle for that. To address all the changes related to configuration, the learning curve, and support problems, we have a third method available. Note that this method was not feasible six years ago. ### 3. Use a remote server management panel A remote server management panel costs you 90% less than having a system administrator to perform the initial configuration. Here are some capabilities that any remote server management panel will provide. 1. Instant, Automated and Optimized configuration 2. Host multiple sites on a single server 3. Easy-to-use Web Application to manage sites on your server 4. No/Negligible learning curve required 5. Clone websites, Create Staging Areas, and set up Demo environments 6. Migrate sites automatically, instantly 7. File manager to manage files of your sites 8. Get support for server-level errors 9. Get Managed Hosting Experience with [Linode Integration](https://serveravatar.com/docs/integrations/cloud-platform/linode) In short, you do not have to hire a person to host your sites on a Linode server. It is as easy as managing websites on a managed hosting service. Here are some screenshots of a ServerAvatar panel, a remote server management panel. The below attached is an application management panel. Here you can manage domains for your sites, use Auto Deploy to auto-install applications, and manage staging areas, files, SSL certificates, PHP settings, backups, and much more. ![](https://serveravatar.com/wp-content/uploads/2023/02/testapp-1024x528.png)The below image is a server management panel where you can manage and monitor your server. You can manage things like Applications/sites, Databases, Firewall Settings, Server Alerts, migrations, and a lot more. ![](https://serveravatar.com/wp-content/uploads/2023/02/serverdahboard-1024x534.png)You can try ServerAvatar’s free plan. To get started with a fresh Linode server with the Ubuntu 20.04, 22.04, or 24.04 operating system, follow the steps below to initiate the setup process for ServerAvatar. Here are the three ways to automatically configure your server with **ServerAvatar**. #### **1. Connect a server using a direct method:** 1. [Login/Register](https://app.serveravatar.com/register) to ServerAvatar account, then click the **Create** button from the right side of the screen and select **Server** from the dropdown menu. 2. Select **Direct Method** for the server connection. 3. Enter your preferred **Server Name**. 4. Select a **Tech Stack** based on your needs (**Apache, Nginx, OpenLiteSpeed,** or **Node Stack)**. 5. Select a **Database: MySQL, MariaDB,** or **MongoDB.** 6. Enable the toggle if you want to **install the latest LTS version of node.js** on your server. 7. Select a **Management plan** and click the **Connect Now** button. 8. You’ll see the command on your screen. Login to your server via SSH and **execute that command** as a root user. 9. The server connection process will begin in your ServerAvatar account after executing the command. #### **2. Connect a server using integration:** 1. [Login/Register](https://app.serveravatar.com/register) to your ServerAvatar account, navigate to the **Integration** tab from the sidebar of the panel, and select **Cloud Platform** from the dropdown menu. 2. **Select a cloud platform** you want to link with ServerAvatar. 3. A popup form will appear, enter details to link your cloud provider account. 4. The [integration method](https://serveravatar.com/docs/integrations/cloud-platform/linode) is different based on the cloud provider you select. #### **3. Connect a server using commands:** Once you create a server as per your requirements, connect to your server using an SSH connection and execute the below three commands as a root user in your server console area. ``` wget https://srvr.so/install chmod +x install ./install ``` It will ask if you want to configure your server with **Apache, Nginx, or OpenLiteSpeed.** You can select according to your requirements and hit enter. After that, It will check if the server is ready for installation. After the installation starts, It will provide you with a link to your server management panel. The complete initial configuration will be over in 6-7 minutes, and you will be able to manage your servers and sites using a panel as displayed in the below image. ![](https://serveravatar.com/wp-content/uploads/2023/02/serverdahboard-1-1024x534.png)## FAQ ### What is Linode, and why should I choose it for my cloud hosting needs? Linode is a top cloud infrastructure provider, especially popular among developers for its ease of use, cost-effective pricing, and reliable performance. It allows you to host websites, manage applications, and customize your cloud server settings with flexibility. ### What are the benefits of using IaaS (Infrastructure-as-a-Service) on Linode? IaaS allows you to access virtualized computing resources on Linode for application development, hosting, and data storage. With Linode’s IaaS, you get full control over your server environment, which you can customize according to your project’s needs. ### How do I create a new Linode instance? To create a new Linode, go to the Linode Cloud Manager, select your preferred configuration, choose an image or StackScript, and set a root password. You can also add an SSH key for secure access. Click the “Create Linode” button, and your instance will be ready in minutes. ### What happens when I rebuild my Linode server? Rebuilding a Linode will delete all existing data and software on that instance, but it keeps the same configuration and plan. Rebuilding is useful when you need to update your OS version or install the latest security patches. ### How can I manage DNS for my domain on Linode? You can use Linode’s DNS Manager to set up and manage DNS records for your domains. To do this, add Linode’s nameservers to your domain settings. Alternatively, Cloudflare can be used if you prefer an external DNS provider. **Categories:** Cloud Platforms --- ### [9 Best Linux Distros to Use in 2026](https://serveravatar.com/9-best-linux-distros-to-use-in-2025/) **Published:** June 25, 2025 **Author:** Smit Pipaliya **Content:** [![Blog banner - ServerAvatar](https://serveravatar.com/wp-content/uploads/2025/09/728_90-Banner-3-1024x127.png)](https://serveravatar.com?ref=blog)The world of Linux distros continues to evolve rapidly, and 2025 brings exciting updates, refined user experiences, and powerful new features across the ecosystem. Whether you’re a complete beginner taking your first steps into the Linux world or an experienced user seeking the perfect balance of performance and customization, choosing the right distribution can make all the difference in your computing experience. With hundreds of Linux distributions available, the selection process can feel overwhelming. Each distribution, or “distro,” comes with its own philosophy, desktop environment, package management system, and target audience. This comprehensive guide will walk you through the 9 best Linux distributions for 2025, helping you make an informed decision based on your specific needs, technical expertise, and use case. ## 1. Ubuntu 24.04 LTS (Noble Numbat) – The Gold Standard for Beginners **Best For:** New users, developers, desktop Users, anyone looking for a great, stable system with unparalleled support. About Ubuntu:** Ubuntu is the world’s most popular Linux distribution, with over 20 million users worldwide. Based on the rock-solid Debian core, Ubuntu has established itself as the most user-friendly Linux distribution around, with a focus on continual improvement, regular release cycles and a commitment to providing the best possible experience for its users. The name “Ubuntu” is a traditional African concept meaning “humanity to others” and is also known as “I am what I am because of who we all are”. With a global community of over 25 million people, and a reputation for responsiveness and reliability, Ubuntu is the world’s favourite free operating system. For a good reason, ubuntu is the most preferred linux distro among desktop users. Courtesy of Canonical What’s developed by: Created by Canonical, Ubuntu has always offered a polished, user-friendly experience to ease the transition from Windows or MacOS as much as possible. ![Ubuntu](https://serveravatar.com/wp-content/uploads/2025/06/24.04-LTS-Noble-Numbat-Launch-Video-Thumbnail.jpg)**Key Features:** - **Long-term Support (LTS):** Ubuntu 24.04 LTS is supported for 5 years with security updates, guaranteeing your system a stable system Initiatives meta information - **GNOME Desktop Environment:** A modern and user-friendly environment with advanced touchscreen support and outstanding accessibility features - **Snap Package Management:** It’s simple to download and install software via the Ubuntu Software Centre (U.S.C) with gated applications segregated in a sandboxed environment. - **Broad Hardware Support:** Supports most modern hardware out-of-the-box such as graphics cards, WiFi adapters, printers, and more - **Massive Community:** The biggest Linux community – provides tons of tutorials, resources and third party support **System Requirements:** - **RAM:** 4GB minimum (8GB recommended) - **Storage:** 25GB minimum - **Processor:** 2GHz dual-core or better **Pros:** - Very friendly to beginners with easy to use setup process - Great Documentation and Community support - Stable, reliable LTS cycled every 2 years - Commercially Strong backing Inspires steady growth - Broad selection of software packages from several package sources **Cons:** - May be resource-heavy in contrast to lighter options - Some people hate the default Gnome UI. - Snap packages start slower than normal packages, tensions at 0.76 bar. - Limited customizations without coding knowledge ## Looking to Deploy Ubuntu Server? If you’re looking to deploy an Ubuntu server, ServerAvatar offers a simple and efficient solution. Through the ServerAvatar panel, you can easily set up and manage servers running different versions of Ubuntu, including Ubuntu 20.04 LTS, 22.04 LTS, and the latest 24.04 LTS. Whether you already have a server or want to purchase a new one, ServerAvatar gives you the flexibility to do both. You can connect your existing Ubuntu server to the platform or directly purchase a new server pre-configured with Ubuntu. ![Linux Distros](https://serveravatar.com/wp-content/uploads/2025/06/Screenshot-2025-06-24-at-7.49.02 PM.jpg)**News:** You can now purchase servers directly from the ServerAvatar panel. Check out how to [**purchase and connect our Manage Server**](https://serveravatar.com/docs/managed-server/installation) in one step via ServerAvatar. **Follow this documentation for**[ **connecting your server with ServerAvatar panel with custom method**](https://serveravatar.com/docs/server-management/installation/direct-method)**.** You can also follow the respective docs for connecting your servers from [**Amazon Lightsail**](https://serveravatar.com/docs/server-management/installation/amazon-lightsail)**,** [**Vultr**](https://serveravatar.com/docs/server-management/installation/vultr)**,** [**DigitalOcean**](https://serveravatar.com/docs/server-management/installation/digitalocean)**,** [**Hetzner**](https://serveravatar.com/docs/server-management/installation/hetzner)**, and** [**Linode**](https://serveravatar.com/docs/server-management/installation/linode)**.** ServerAvatar provides easy integration with all of them. ## 2. Linux Mint 21.3 (Virginia) – The Perfect Windows Alternative **Good For:** People new to Linux from Windows, desktop environment diehards, performance tweakers About Linux Mint:** Linux Mint was founded in 2006 by Clement Lefebvre with a desire for a more elegant, easy to use, and more up to date operating system. Based on Ubuntu, Mint has established its own identity by concentrating on ease of use, media support, and a relatively conservative approach to updates. *It just works* philosophy of it and how it respects traditional desktop paradigms that are seen to be more intuitive for many users than the more modern ones. Linux Mint is the Linux distro that is the most reminiscent of Windows, keeping the transition from Microsoft’s OS to a Linux OS as simple as possible. Based on the well-oiled Ubuntu base, Mint can lay claim to its own user-friendly and high gloss additions. ![Linuxmint](https://serveravatar.com/wp-content/uploads/2025/06/Screenshot-2025-06-24-at-7.51.09 PM.jpg)**Key Features:** - **Cinnamon Desktop Environment:** Mint’s featured desktop offers a classic feel with a configurable taskbar, start menu, and system tray - **Multimedia Codecs:** Its pre-installed multimedia codec allow you to play various audio and video formats. - **Software Manager:** Neat application browser with user ratings and brids-by-rating helped discovery of useful apps. - **Update Manager:** Conservative update policies with clear delineation of types of updates - **Timeshift:** System restore tool, similar to Windows System Restore **System Requirements:** - **Recommended:** @ Least 2 GB of RAM, but 4GB is recommended. - **Storage:** 20GB minimum - **Processor:** x86-64 compatible **Pros:** - Extremely stable and reliable - Familiar interface for Windows users - Excellent out-of-the-box experience with multimedia support - Conservative update policy reduces system breakage - Lower resource usage than Ubuntu **Cons:** - Less cutting-edge software compared to other distributions - Smaller community than Ubuntu - Limited official flavors (mainly Cinnamon, MATE, and Xfce) - Slower adoption of new technologies ## 3. Fedora 40 – The Cutting-Edge Developer’s Choice **Best For:** Developers, enthusiasts, Tech late adopters, Red Hat ecosystem’s user. About Fedora:** The Fedora Project is a community of people working together to build a free and open source software platform and to collaborate on and share user-focused technology. Fedora is sponsored by Red Hat, and the Fedora Project serves as a test bed for new technology from this: Red Hat$. It is also the upstream of the commercial product from Red Hat. About Fedora Since 2003, Fedora has been a community based open source project dedicated to creating an innovative platform for hardware, clouds, and containers that enables software developers and community members to build tailored solutions for their users. It is known for its slogan “Freedom, Friends, Features, First” (The Four Fs), which were the four core values they used as a guideline, promoting Free software, volunteer contributions and rapid development, and an out in front feature list (the ‘seen ahead of time’ feature plan). With Fedora’s short development cycle, you can try the latest features that will be included in Red Hat Enterprise Linux one year in advance, or for testing the upcoming release. Fedora is the free and open source community-supported distribution bearing the name of Red Hat publicly developed and produced by Fedora Project and sponsored by Red Hat, serving as a testbed for Red Hat Enterprise Linux. It is also an excellent choice for open-source devotees and developers who want to get their hands on the lastest technologies and contribute to them. ![Fedora 40](https://serveravatar.com/wp-content/uploads/2025/06/Screenshot-from-2024-04-21-16-42-00.jpg)**Key Features:** - **Latest Software Releases:** Enjoy the latest applications that the Free Software community has to offer with all of the latest programming languages, development tools, and libraries pre-installed! - **GNOME 46:** Introducing the new modern design cues and better performance to the latest GNOME desktop - **DNF Repositories:** Ultimate in installation, compile, upgrade, and use of packages - **DNF Utilization:** Easy, fast, maintenance-safe (but volatile) CLI package management tool transaction calculator for packages - **DNF Supports:** Easy maintainability through being parallelized, making it flexible in the administration of packages, and it has a relatively well-maintained codebase. - **Toolbox/Podman integration:** “A great developer workflow is the heart of an OS” **System Requirements:** - **RAM:** 2GB minimum (4GB recommended) - **Storage:** 20GB minimum - **Processor:** 1GHz or faster **Pros:** - State of the art software and technologies available for use - Great for programmers with recent developer’s tools - 6-month release schedule ensures system is kept up to date - Strong roots in enterprise Linux with Red Hat **Cons:** - Shorter support window (13 months) means you have to upgrade more often - May not be as stable for newer versions of software - There’s more of a learning curve to it than Ubuntu or Mint - It may also be the case that some proprietary software is simply not available ## 4. Debian 12 (Bookworm) – The Rock-Solid Foundation **Best For:** Servers, advanced users, users focused on stability and cutting edge features, privacy conscious users About Debian:** The Debian Project was founded in 1993 by Ian Murdock to be a truly free community project. The Debian Project, a group of people all over the world who have joined efforts to create an entirely free operating system. Debian’s careful engineering work in software packaging, testing, and QA has made it the underpinning of hundreds of other distributions (Ubuntu and Linux Mint are among the better-known). The project’s Social Contract and DFSG set the standard for Open Source as a community as a whole. Debian The Universal Operating System is a sentence (and slogan) associated to Debian, which supports more hardware architectures than any other Linux distribution. Debian is the granddaddy distribution of which you’re accustomed to seeing Ubuntu, Mint, and so many others spawn from. Famous for its rock-stable stability and adherence to free software ideals. [](https://storage.3.basecamp.com/5840738/blobs/3c6a924a-5107-11f0-b0be-0242ac120004/download/Debian-12-Bookworm-GNOME-Desktop.jpg.webp) ![Debian 12](https://serveravatar.com/wp-content/uploads/2025/06/Debian-12-Bookworm-GNOME-Desktop.jpg.webp)**Key Features:** - **Exceptional Stability:** Rigorous testing ensures rock-solid reliability - **Massive Software Repository:** Over 50,000 packages available - **Multiple Architecture Support:** Runs on various hardware architectures - **APT Package Manager:** Powerful and flexible package management system - **Strong Security Focus:** Regular security updates and conservative approach to changes **System Requirements:** - **RAM:** 1GB minimum (2GB recommended) - **Storage:** 10GB minimum - **Processor:** 1GHz or faster **Pros:** - Unmatched stability and reliability - Completely free and open-source - Excellent security track record - Vast software repository - Long-term support for stable releases **Cons:** - Outdated software packages in stable release - Steep learning curve for beginners - Minimal out-of-the-box multimedia support - Conservative approach can frustrate users wanting newer features ## 5. Arch Linux – The Ultimate Customization Platform **About Arch Linux:** Arch Linux was created in 2002 by Judd Vinet with a focus on simplicity, modernity, pragmatism, user centrality, and versatility. Not trying to be all things to all people, unlike distributions that imitate something for everybody and his uncle, Arch adopts a KISS (keep it simple, stupid) scaling up process approach to system theory with a small-base shell that the user extends to suit the user. A rolling release model of the distribution delivers all of the latest software. Arch is especially notable for its extensive wiki, which is considered the best documentation for Linux out of all the distros, as well as for its package manager, pacman, which is very powerful and fast. Arch Linux does not ship with a so called “default desktop”. It’s not for beginners, but the level of control and possibility to learn is unrivaled. ![Arch Linux](https://serveravatar.com/wp-content/uploads/2025/06/Arch_Linux_screenshot_12.06.2024-1024x576.jpg) **Key Features:** - **Rolling Release:** Get new software immediately, no waiting around. - **Fast, easy to use package manager** using AUR as its package source. - **Arch User Repository (AUR):** Thousands of additional packages are available in the AUR. - **No-Frills Initial Build:** Plop it together and add only what you want. - **Awesome documentation:** Arch Wiki is the best documentation for Linuxerequisites **System Requirements:** - **RAM:** 512MB minimum (2GB recommended) - **Storage:** 2GB minimum - **Processor:** x86-64 compatible **Pros:** - Complete control over system configuration - Always up-to-date with rolling releases - Excellent performance due to minimal bloat - Outstanding community documentation - Access to AUR provides virtually unlimited software **Cons:** - Extremely steep learning curve - Command-line installation process - Potential for system breakage with updates [![Blog banner - ServerAvatar](https://serveravatar.com/wp-content/uploads/2025/09/728_90-Banner-1-1024x127.png)](https://serveravatar.com?ref=blog)## 6. Pop!\_OS 22.04 LTS – The Gaming and Creative Powerhouse **Best For:** Gamers, content creators, NVIDIA GPU users, developers, users wanting Ubuntu without Snap **About Pop!\_OS:** Pop! Introduced in 2017, \_OS originated from System76, the Colorado-based computer maker known for its Linux-based hardware. The distribution was developed with the aim of creating a polished computing experience that could be properly maintained on System76’s hardware and eliminating many of the pain points common in the Linux desktop experience. Pop! \_OS proceeded to become very popular outside of System76 customers because of its dedication to gaming performance, support for NVIDIA GPUs and non-bloated UX. Distribution is based on Ubuntu, but it strips out Snap packages in its favor of Flatpak, offers customized power management profiles, and productivity features such as automatic window tiling. Developed by System76, Pop! OS is based on Ubuntu but with a heavier emphasis on gaming performance, creative workflows and good hardware compatibility, especially for NVIDIA graphics cards. ![Pop!_OS](https://serveravatar.com/wp-content/uploads/2025/06/pop-os-2204-upgrade.jpg.webp)**Key Features:** - **Excellent Gaming Support:** Steam, Proton, and gaming tools pre-installed - **NVIDIA ISO Option:** Separate ISO with NVIDIA drivers pre-installed - **Pop!\_Shop:** Clean, fast alternative to Ubuntu Software Center - **Tiling Window Manager:** Built-in auto-tiling functionality - **Flatpak Focus:** Prioritizes Flatpak over Snap packages **System Requirements:** - **RAM:** 4GB minimum (8GB recommended for gaming) - **Storage:** 32GB minimum - **Processor:** 64-bit processor **Pros:** - Outstanding gaming performance and compatibility - Excellent NVIDIA GPU support - Clean, modern GNOME-based interface - Strong focus on productivity features - No Snap packages by default **Cons:** - Smaller community compared to Ubuntu - Limited to GNOME desktop environment - Newer distribution with less long-term track record - Less customization options than some alternatives ## 7. openSUSE Tumbleweed – The Stable Rolling Release **Best For:** Advanced users who want cutting-edge software with stability, enterprise users, KDE enthusiasts About openSUSE:** openSUSE was spawned as the community version of the commercial SUSE Linux distribution in 2005, and reached more than 2 million downloads in 2018, becoming the oldest, credible distributions on the market that is also up to date. When Novell (then owner of SUSE) decided to open the development process to the community, the openSUSE project was launched in 2005. openSUSE is sponsored by SUSE Today and has two mainstream distributions: Leap (fixed) and Tumbleweed (rolling). El proyecto es famoso por sus herramientas de administración del sistema profesionales (especialmente YaST (Yet another Setup Tool)) y por ser pionero en el concepto de rolling releases automatizados y con control de calidad. Newbie with OS and life in general I say openSUSE Tumbleweed is a novel take on the concept of rolling releases that balances the very latest packages with stability to play nice with Fixed-release distributions. ![openSUSE Tumbleweed](https://serveravatar.com/wp-content/uploads/2025/06/screenshot20170322173942.png.webp)**Key Features:** - **Rolling Release with Stability:** Automated testing ensures updates don’t break the system - **Excellent KDE Implementation:** One of the best KDE Plasma experiences available - **YaST Configuration Tool:** Comprehensive system configuration utility - **Snapper Integration:** automatically create filesystem snapshots to rollback changes **System Requirements:** - **RAM:** 2GB minimum (4GB recommended) - **Storage:** 40GB minimum - **Processor:** Pentium 4 2.4GHz or higher **Pros:** - Rolling release model with exceptional stability - Excellent KDE Plasma desktop implementation - Professional-grade system administration tools - Automatic system snapshots for easy recovery - Strong enterprise backing **Cons:** - Steeper learning curve than beginner-friendly distributions - Less popular than Ubuntu-based distributions - Can be overwhelming for new users - Requires more system resources than lightweight alternatives ## 8. Elementary OS 7.1 (Horus) – The Beautiful macOS Alternative **Best For:** macOS converts, desktop users who are in it for the looks and general usage cases feeling it. For the amateur developer in your life. PERFORMANCE About Elementary OS:** Elementary OS was established in 2007 by Daniel Foré and Cassidy James Blaede with the vision of developing a Linux distribution that showcases great design and is simple to get started while delivering the technically solid infrastructure for personal and professional purpose – done with respecting user privacy. Based on macOS’s design principles, the project is designed to be easy to use whilst retaining full control of your privacy and security. Elementary OS is designed to be easy to understand and pick up as a new user. It uses a “pay-what-you-want” system where you can either download for free, or pay whatever you’d like to contribute to future development. Every piece of elementary OS was built from the ground up to work well together, possibly the most beautiful desktop that one will find. Elementary OS is a beautiful, consistent, and intuitive portable computer desktop that looks and feels like macOS, not Windows. Elementary OS is based on Ubuntu and inherits Ubuntu’s reliability and security. [](https://storage.3.basecamp.com/5840738/blobs/a0856e26-5107-11f0-a210-0242ac120004/download/Elementary_OS_7.1_informacion.png) ![Elementary OS](https://serveravatar.com/wp-content/uploads/2025/06/Elementary_OS_7.1_informacion.jpg)**Key Features:** - **Pantheon Desktop Environment:** Home-grown, highly customizable desktop with a Mac OS X like layout. - **AppCenter:** Handpicked Schop with free and paid apps - **Uniform Design:** All these applications are designed in the same style. - **Privacy First:** Privacy features are built-in and minimizes collected data - **The multitasking VIew:** Sophisticated workspace and window management **System Requirements:** - **RAM:** 4GB minimum - **Storage:** 32GB minimum - **Processor:** Intel i3 or equivalent dual-core 64-bit processor **Pros:** - Exquisite visual among other UI (user interface) - Intuitive for macOS users - Interesting mission on privacy and great product aspects of it. - Consistent application design - Stable Ubuntu base **Cons:** - Limited customization options - Smaller software repository - Some apps might not feel constrained - Not as flexible as others. - Longer release cycles ## 9. Zorin OS 17 – The Windows-to-Linux Bridge **Best For:** Windows users who are new to Linux, users who appreciate a good looking desktop, running business, and students **About Zorin OS:** Zorin OS was founded in 2008 by Artyom and Kyrill Zorin when they were in school to provide a more user-friendly alternative to people who were new to using computers or to Linux. The distribution has been developed using a unique approach to introduce Linux to the remains of the world that may still be using Windows or macOS, offering a seamless experience that should also be compatible with their already used workflow. Both free (Core) and paid (Pro) editions of Zorin OS are available, the latter with extra desktop layouts and premium support services, as well as the scope for more advanced users to run professional add-ons. Called polished and professional, it is noted for a workmanlike user interface and an emphasis on productivity, and is particularly popular in schools and business for those seeking to move away from proprietary operating systems. Zorin OS has been crafted so that the users who are migrating from Windows shouldn’t feel any different, thus comes with familiar layouts and hardware support. ![Zorin OS](https://serveravatar.com/wp-content/uploads/2025/06/desktop.jpg)**Key Features:** - **Multiple Desktop Layouts:** Choose from Windows, macOS, or traditional Linux layouts - **Zorin Appearance:** Easy desktop customization tool - **Software Compatibility:** Excellent support for Windows applications through Wine - **Professional Support:** Commercial support options available - **Educational Focus:** Special education edition available **System Requirements:** - **RAM:** 2GB minimum (4GB recommended) - **Storage:** 64GB minimum - **Processor:** 1GHz single-core 64-bit/32-bit processor **Pros:** - Extremely user-friendly for Windows refugees - Beautiful, polished interface - Excellent hardware compatibility - Good Windows software compatibility - Professional support available **Cons:** - Less frequent updates than some distributions - Smaller community than major distributions - Some advanced features require Pro version - Limited customization compared to other distributions ## Choosing the Right Distribution for Your Needs **For Complete Beginners:** Begin by using Ubuntu or Linux Mint. Both have great documentation, a large user base, and easy to use interfaces to ease the learning curve of Linux. **For Developers:** Bleeding edge development tools and technologies are available in Fedora, whereas good development support is available in Ubuntu. Arch Linux is suitable to developers who seek total control over their environment. **For Gaming:** Pop!\_OS has the best out-of-the-box gaming experience, while Ubuntu and Fedora have a little more configuration. **For Servers:** For server deployments, Debian and Ubuntu Server are good options providing stability, and long term support. **For Privacy-Conscious Users:** Debian and Fedora both provide good privacy protection, with no commercial tracking, and Elementary OS also cares much about users’ privacy when it comes to its design. **For the Customization Aficionados:** Arch has limitless customization options while Tumbleweed has moderate customization yet more stability. ## Final Recommendations The year is 2025, and Linus Torvalds has long since retired from working on Linux and spends most of his time playing the banjo, or something. It will come down to your own skills and use case, along with your personal preferences on desktop environments and software philosophies. For the Linux beginners, I would recommend you to go with Ubuntu or Linux Mint as they are a little bit more stable, have good hardware support, and total community resources. Zorin OS or Linux Mint should feel most comfortable if you have been using Windows. Developers and enthusiasts can opt for Fedora for access to cutting-edge tools, or Arch Linux for total control over one’s system. Gamers will find Pop!\_OS is a game in its own box. Don’t forget; the strength of Linux has always been its variety and choice. Don’t hesitate to try a few distributions here and there through virtual machines or live USBs before you commit. The Linux community is friendly and helpful, so ask questions and search for guidance while you delve into this new and exciting world of open-source computing. No matter which distribution you select, you will be part of a community of users who share freedom, privacy and the ability to innovate with others at the ends of the earth. Welcome to the Linux world! **Categories:** Blog **Tags:** Cloud Hosting, Debain, Linux Distros, PHP Hosting, Server Management, Ubuntu, Vps hosting --- ### [Best WordPress Security Plugins you must have (2026 list)](https://serveravatar.com/best-wordpress-security-plugins-2018/) **Published:** September 14, 2018 **Author:** Adarsh Sojitra **Content:** There are a lot of people who are still trying to find the answer of this Question, “My Website is not that much huge, neither we are a big MNC or something, Why should I secure my website?” Well, the answer is that the hackers do not only target huge websites. They may target a small website for stealing personal data, a backlink or even just for fun. There are a lot of ways using which you can secure your website, but one of the most common ones is by using a plugin. Today in this post, we would be covering Best WordPress Security Plugins to have in 2018. If that sounds interesting, let’s jump right into it. Should we? ## Best WordPress Security Plugin Before we get started, we wanna clear that this is not going to be a list of just free WordPress Security Plugin. We would be including some paid plugins in this post as well. Now, why should you invest in “paid” plugins? Think of your website as your brand new car. This is your asset and you wanna ensure that nothing goes wrong with it, Right? That’s why you get an insurance which is a further investment which gives you a sense of satisfaction. Similarly, with a “paid” worthy Security Plugin, you can ensure that your WordPress Website is safe and secure. ### WordFence Security ![WordPress Security Plugin](https://serveravatar.com/wp-content/uploads/2018/09/wordfence_security.png)WordFence Security is one of the most popular Security Plugins for WordPress out there. The plugin has over 2 Million Active installs. WordFence Security Plugin provides some of the great security features. For instance, this plugin can eliminate more than 44,000 known malware types from your website. Let us now take a look at some of the most important features of this Plugin. **Features:** 1. It comes with a Firewall which helps in failing the hacking attempts that might occur. 2. It has a One-Click Scan feature which scans the whole WordPress Website and warns the user about the threats and risks. 3. You can take a look at real-time information about the different traffic sources. WordFence Security offers a lot of other features as well, like multi-site security, two-factor authentication and more. The WordFence Security Plugin is available for Free. Though to unlock all the features of this WordPress Security Plugin, you would have to get the premium version. [Download WordFence Security](https://wordpress.org/plugins/wordfence/) ### iThemes Security ![](https://serveravatar.com/wp-content/uploads/2018/09/ithemes_security.png)If you are someone who is working on WordPress websites for a while now. Then, the chances are that you must have heard about the iThemes Security, formerly known as the Better WordPress Security Plugin. The plugin offers some great ways using which you can ensure that your WordPress Website is safe and secure. Let us now take a look at some of the most important features of this WordPress Security Plugin. **Features:** 1. It has a two-way authenticator which ensures security from spammers. 2. It has a regular malware scanning feature which helps in ensuring that there are no malwares on your WordPress Website. 3. With iThemes Security, users can protect their WordPress Website from Brute Force Attack. There are a lot of other features as well like wp-cli integration, automatic WordPress dashboard management and more. The Plugin is available for Free. Though to unlock all the features of this plugin, you would have to get the premium version. [Download iThemes Security](https://wordpress.org/plugins/better-wp-security/) ### All in One WP Security & Firewall ![](https://serveravatar.com/wp-content/uploads/2018/09/all_in_one_wp_security_and_firewall.png)All In One WP Security & Firewall is another great WordPress Security Plugin. Now, one of the best thing about this plugin is that it is completely free. You don’t need to spend any amount in order to install or use features of this plugin. So, if you are someone who is not willing to invest in a good security plugin for WordPress, then you should consider installing All In One WP Security & Firewall. Let us now take a look at some of the most important features of this Plugin. **Features:** 1. It monitors malicious login attempts. If there are some, then this plugin would provide you information like id/ password, date and time, and even the IP address of the user. 2. It supports scheduled backups and email notifications, so you can ensure that your website is safe every time. 3. The Plugin has the firewall and can prevent attacks like XSS, Crawlers etc. All In One WP Security & Firewall has a lot of other features as well. But since its free why don’t you install it and discover them on your own? [Download All in one WP Security & Firewall](https://wordpress.org/plugins/all-in-one-wp-security-and-firewall/) ### Sucuri Security ![WordPress Security Plugin](https://serveravatar.com/wp-content/uploads/2018/09/securi_security.jpg)Sucuri Security is another good WordPress Security Plugin. Sucuri Security is a complete package which protects your site from malware, brute force attacks, and other vulnerabilities. With that being said, let us now take a look at some of the most important features of this Plugin. **Features:** 1. It has an Activity Audit Logging feature which analyzes the changes done with the Website. 2. If offers File Integrity Monitoring and Malware Scanning to ensure that there are no threats or vulnerabilities. 3. A notification is sent to the Admin in case of any security issues. Sucuri Security is available for Free. Though to unlock all the features of this plugin like DoS/DDoS, Brute Force Attacks etc. You would have to get the premium version. [Download Sucuri Security](https://wordpress.org/plugins/sucuri-scanner/) **Conclusion:** Every WordPress security plugins have its pros and cons. And, every WordPress website is different when it comes to Vulnerabilities and type of attacks possible. So, out of these 4 plugins, you can select the one that fits your WordPress the best! If you have any question regarding this article or any of the plugins listed in this article, Feel free to comment down in the comment section. We will reply you with the solution or answer as soon as possible. **Categories:** WordPress --- ### [Best n8n Hosting Providers in 2026](https://serveravatar.com/best-n8n-hosting-providers/) **Published:** March 2, 2026 **Author:** Meghna Meghwani **Content:** [![Blog banner - ServerAvatar](https://serveravatar.com/wp-content/uploads/2025/09/728_90-Banner-3-1024x127.png)](https://serveravatar.com/?ref=blog)Automation is no longer a nice to have. It’s the quiet engine running behind countless digital tasks. If you’re using n8n, you already know how powerful workflow automation can be. But here’s the big question: where should you host it? Choosing the right **n8n Hosting** solution can directly impact your performance, security, scalability, and overall automation experience. Choosing the right n8n hosting provider is like picking a place for your automation. A shaky foundation leads to broken workflows, missed triggers, and endless frustration. A solid one? Smooth operations and peace of mind. In this guide, I will break everything down in simple terms, without buzzwords, hype, just clear guidance you can actually use. ## What Is n8n and Why Hosting Matters [n8n](https://n8n.io/) is a workflow automation tool that connects apps, services, and processes together. Think of it as a digital conductor, making sure every instrument plays at the right time. ![n8n Hosting](https://serveravatar.com/wp-content/uploads/2026/03/image-1024x515.png) But even the best conductor needs a proper stage. Hosting determines how fast, secure, and reliable your workflows are. Poor hosting can cause delays, failures, or downtime. Good hosting keeps everything running quietly in the background, just the way automation should. ### Understanding n8n Hosting in Simple Terms Choosing the right n8n hosting is not just about server space, it’s about long-term reliability and ease of use. The right hosting choice ensures your automation runs smoothly today and continues to scale as your needs grow. [](https://storage.3.basecamp.com/5840738/blobs/0e92bf02-162b-11f1-bbd6-0242ac120003/download/image.png) ![n8n Hosting](https://serveravatar.com/wp-content/uploads/2026/03/image-1.png) ## Key Factors to Consider When Choosing n8n Hosting Before picking any hosting provider, pause and ask yourself a few questions: - **How important is uptime?** Uptime determines whether your workflows run continuously or fail during critical moments. - **Do I want control or convenience?** This decides whether you manage technical details yourself or let the platform handle them. - **Will my workflows grow over time? Growth-ready hosting prevents future migration headaches as automation becomes more complex.** The best n8n hosting providers focus on stability, flexibility, and simplicity. They don’t just offer space on a server; they offer confidence that your automations won’t fail when you need them most. ### Performance and Reliability Automation must be fast and dependable to stay useful. Hosting performance directly affects how quickly workflows trigger, process data, and complete tasks without interruption. ![Performance and Reliability  - n8n Hosting](https://serveravatar.com/wp-content/uploads/2026/03/image-2.png) - **Consistent processing speed** Ensures workflows execute smoothly even during repeated or scheduled runs. - **Low response time** Reduces delays between triggers and actions across connected services. - **Minimal downtime** Keeps automation running continuously without unexpected failures. A reliable hosting setup ensures that even complex workflows don’t feel heavy or delayed. If automation is the engine, performance is the fuel quality. Cheap fuel leads to breakdowns. ### Scalability: Planning for Growth Without Stress You might start with a few simple workflows, but success often brings complexity. More triggers. More data. More actions. Scalable n8n hosting lets you grow without rebuilding everything. Whether it’s handling more tasks or running workflows more often, scalability ensures your automation grows alongside your needs, not against them. ### Security Essentials Automation often handles sensitive information, making security a top priority. Strong hosting security protects workflows from data leaks, misuse, and unauthorized access. - **Data isolation:** Keeps your automation data separate from other users on the same infrastructure. - **Secure access controls:** Ensure only authorized users can manage workflows and settings. - **Regular system updates:** Help protect against newly discovered security vulnerabilities. - **Encrypted communication:** Safeguards data while it moves between workflows and connected services. Think of security like locks on your doors. You may never notice them, but when something goes wrong, you’re glad they’re there. ### Ease of Setup and Daily Management Not everyone wants to manage servers daily, and hosting should respect that. A simple setup and clean management tools make automation easier to maintain long term. - **Quick setup:** Allows users to deploy n8n without long installation steps. - **Clear dashboards:** Makes monitoring servers and workflows straightforward. - **Simple workflow monitoring:** Helps track execution status without technical complexity. If managing hosting feels harder than building workflows, something’s off. ### Customization and Control Options Different users need different levels of flexibility. The best n8n hosting solutions offer control without overwhelming complexity. - **Adjusting resource limits:** Allows performance tuning based on workflow demand. - **Configuring environment settings:** Helps adapt hosting behavior to specific automation needs. - **Managing workflow execution rules:** Gives control over how and when workflows run. Control doesn’t mean complexity. It means freedom without chaos. ### Pricing Models and Cost Transparency Clear pricing builds trust and avoids surprises. In 2026, hosting costs should scale logically with usage. - **Clearly explains what you pay for:** Helps users understand charges without confusion. - **Scales cost with usage:** Ensures you only pay more when automation grows. - **Avoids hidden limits:** Prevents unexpected restrictions on workflows or resources. A good pricing model feels predictable, like a monthly utility bill, not a guessing game. ### Support and Documentation Quality Even reliable systems need support occasionally. Good documentation and responsive help reduce downtime and frustration. - **Clear documentation:** Helps users resolve common issues independently. - **Helpful support channels:** Provides access to assistance when needed. - **Timely responses:** Minimizes delays during critical automation issues. Good support doesn’t just fix problems. It prevents panic. ### Compliance and Data Handling Considerations Modern automation must respect data standards and handling practices. Hosting providers play a key role in ensuring responsible data management. - **Data storage policies:** Define how and where automation data is stored. - **Access logs:** Track activity for transparency and auditing. - **Backup practices:** Protect workflows and data from accidental loss. Even if you’re not a compliance expert, your hosting choice should respect modern data expectations. ## Top n8n Hosting Providers to Consider in 2026 Choosing the right hosting provider is a crucial step when running n8n workflows efficiently. Each hosting option comes with its own strengths, limitations, and pricing approach, which can directly affect performance, scalability, and ease of management. Below are some of the most reliable n8n hosting providers, breaking down what they offer so you can compare them easily and pick the one that best fits your automation needs. ### 1. ServerAvatar [ServerAvatar](https://serveravatar.com/) is a platform to simplify the hosting and management of servers and applications. It simplifies the process of deploying and managing PHP and Node.js based web applications on servers. ![ServerAvatar - n8n Hosting](https://serveravatar.com/wp-content/uploads/2026/03/image-3-1024x541.png) It is designed for reliable automation hosting with intuitive infrastructure management. It blends simplicity with performance, making it easy to run n8n workflows without deep server expertise. **Why ServerAvatar Stands Out for n8n Hosting** ServerAvatar stands out because it focuses on automation-first hosting rather than raw infrastructure. Instead of complex manual setup, it prioritizes speed, stability, and ease of use for workflow-driven tools like n8n. Its design removes common friction points that slow down automation deployment. **What Makes ServerAvatar Different for n8n Hosting** Unlike many hosting platforms that treat n8n as a generic application, ServerAvatar is structured to support automation use cases from the start. **Key differentiators include:** - One-click n8n application installer - User-friendly dashboard and controls - One-click setup for applications - Automated backups and security updates - Scalable resources on demand **Advantages:** - Fastest n8n setup among listed providers - Minimal technical setup required - Centralized server and application management - Resources can be adjusted easily - Built-in security defaults **Best For:** Users who want the easiest and most reliable way to deploy n8n without dealing with complex server setup. **Pricing:** - Fully Managed Pay-As-You-Go plans - Self-Managed Server plan starting at $69/month - No hidden installation or setup costs **Real World Performance:** - Fast and consistent workflow execution - Stable uptime across automation tasks - Easy resource scaling as automation grows **Why Use ServerAvatar for n8n** ServerAvatar is useful when your goal is to start automating quickly without spending time on server-level configuration. It allows users to focus on building workflows rather than maintaining infrastructure. **How ServerAvatar Compares to Other n8n Hosting Providers** Most other hosting providers emphasize flexibility and raw control, which often means: - Manual installations - Command-line configuration - Ongoing server maintenance ServerAvatar takes a simpler approach by: - Reducing setup steps - Offering a more guided hosting experience This makes it easier for non-experts while still supporting growth. **How to Install n8n Using ServerAvatar** - Log in to the ServerAvatar Dashboard - Deploy a new server or select a previous Server - Go to the server panel and click on the application sections - Click on the Create an Application button ![create application - n8n Hosting](https://serveravatar.com/wp-content/uploads/2026/03/image-4-1024x245.png) - Create a new application as a one-click application installer - Select n8n from the Application List and fill up basic details - Deploy n8n with One Click, and Access Your n8n Dashboard ![deploy n8n - n8n Hosting](https://serveravatar.com/wp-content/uploads/2026/03/image-6-1024x737.png) ### Why This Installation Method Matters Traditional n8n installations can involve multiple technical steps that slow down adoption. ServerAvatar’s one-click installation: - Reduces setup time significantly - Lowers the risk of configuration errors - Makes n8n accessible to non-technical users This simplicity is a key reason many users prefer managed automation hosting. ### 2. xCloud [xCloud](https://xcloud.host/) offers cloud-based hosting optimized for developer workflows and automation. It combines agile infrastructure with predictable performance metrics, ideal for continuous n8n operations. ![xcloud - n8n Hosting](https://serveravatar.com/wp-content/uploads/2026/03/image-7-1024x559.png) **Key Features:** - Cloud native architecture - API-based management tools - Global server footprint - Fine-grained resource control **Advantages:** - Flexible infrastructure options - Strong API integrations - Good connectivity across regions - Easy to automate deployments **Disadvantages:** - Cloud pricing can fluctuate - Setup may feel technical for new users - Support can vary by plan **Best For:** Users who prefer cloud flexibility and remote infrastructures. **Pricing:** - Compute and storage billed separately - Volume discounts available - Add-on services priced individually **Real World Performance:** - Fast response times in most zones - Scales well during peak load - Minimal latency for remote workflows - Consistently reliable **Why Use:** For cloud-centric automation needs with flexible control. ### 3. Kamatera [Kamatera](https://www.kamatera.com/) delivers high-performance virtual servers that can be tailored for n8n hosting. It provides raw computing power with customizable infrastructure stacks. ![Kamatera - n8n Hosting](https://serveravatar.com/wp-content/uploads/2026/03/image-8-1024x607.png) **Key Features:** - Fully customizable cloud servers - Choice of OS and stack config - High availability clusters - 24/7 support options **Advantages:** - Full server control - Excellent performance options - Supports a wide range of setups - Rapid provisioning **Disadvantages:** - More manual setup compared to managed hosts - Can be overwhelming for beginners - Monitoring and tuning are user’s responsibility **Best For:** Tech users who want full control over infrastructure. **Pricing:** - Hourly and monthly billing - Pay for specific compute, RAM, and storage - Add-ons for load balancers and backups **Real World Performance:** - Excellent throughput - High uptime reliability - Strong for heavy-duty workflows - Performance varies with chosen config **Why Use:** When you want complete control over your n8n hosting stack. ### 4. Hostinger [Hostinger](https://www.hostinger.com/) blends simplicity with value-focused cloud hosting, making it suitable for cost-conscious n8n users. It emphasizes speed and affordability while maintaining essential features. ![Hostinger - n8n Hosting](https://serveravatar.com/wp-content/uploads/2026/03/image-9.png) **Key Features:** - Intuitive control panel - Optimized server stack - Integrated cache and performance tools - Secure default settings **Advantages:** - Budget-friendly pricing - Easy setup for basic needs - Good support network - Built-in performance enhancements **Disadvantages:** - Not as flexible for complex automation - Resource limits on lower plans - Scaling can be incremental **Best For:** Small to medium n8n workflows on a budget. **Pricing:** - Affordable monthly tiers - Discounts for longer plans - Optional add-ons for backups and SSL **Real World Performance:** - Fast basic workflows - Good uptime history - Light-to-medium load handling - Performance efficient at entry tier **Why Use:** For cost-effective hosting with solid baseline performance. ### 5. IONOS [IONOS](https://www.ionos.com/) offers a blend of traditional hosting reliability and modern features. Its infrastructure is stable and predictable, supporting n8n workflows with consistent uptime. ![IONOS - n8n Hosting](https://serveravatar.com/wp-content/uploads/2026/03/image-10-1024x441.png) **Key Features:** - Dedicated and cloud server options - Integrated security suite - User-friendly control panel - Flexible resource allocation **Advantages:** - Strong track record for reliability - Scalable server options - Centralized security controls - 24/7 expert support **Disadvantages:** - Pricing can be rigid - Some tools feel legacy-oriented - Advanced features may require experience **Best For:** Users seeking reliable performance with scalable options. **Pricing:** - Tiered plans based on server size - Optional backup and security features - Discounts on long-term contracts **Real World Performance:** - Stable uptime and predictable responses - Minimal slowdowns under typical use - Resource upgrades improve throughput **Why Use:** For dependable infrastructure with flexible server plans. ### 6. HostArmada [HostArmada](https://hostarmada.com/) emphasizes performance-focused servers with managed support. It’s ideal if you want n8n hosting that feels hands-off yet responsive. ![Host Armada - n8n Hosting](https://serveravatar.com/wp-content/uploads/2026/03/image-11-1024x506.png) **Key Features:** - SSD cloud storage - Automatic backups - Managed performance monitoring - Easy setup wizard **Advantages:** - Fast storage and response times - Managed support eases maintenance - Strong uptime guarantees - Clear plan tiers **Disadvantages:** - Less raw control than VPS options - Price higher than basic shared hosts - Advanced customizations can require add-ons **Best For:** Users who want performance without deep admin burden. **Pricing:** - Fixed monthly plans - Optional resource upgrades - Performance add-ons available **Real World Performance:** - Quick workflow execution - High reliability under typical use - Smooth handling of moderate loads - Great baseline performance metrics **Why Use:** For managed hosting that prioritizes speed and uptime. ### 7. Contabo [Contabo](https://contabo.com/) is known for high resource allocations at competitive prices. It’s a favorite for users needing large server capacities on a budget. ![Contabo - n8n Hosting](https://serveravatar.com/wp-content/uploads/2026/03/image-12-1024x467.png) **Key Features:** - High RAM and storage options - Manual server control - Flexible OS choices - Affordable scalability **Advantages:** - Excellent value for resources - Customizable to use case - Strong performance for heavy workflows - Transparent pricing **Disadvantages:** - Setup is mostly self-managed - Support can be slower than premium hosts - Monitoring tools are basic **Best For:** Resource-intensive n8n workflows on a budget. **Pricing:** - Competitive flat fees - Tiered by resource size - Add-ons optional **Real World Performance:** - Strong throughput with large configs - Can support heavy workloads - Reliable uptime when properly configured - Performance scales with resource tier **Why Use:** For high-capacity hosting without high cost. ### 8. Scala Hosting [Scala Hosting](https://www.scalahosting.com/) combines managed support with scalable performance. It’s a balanced choice for users who want both power and convenience for n8n workflows. ![Scala Hosting - n8n Hosting](https://serveravatar.com/wp-content/uploads/2026/03/image-13-1024x460.png) **Key Features:** - Fully managed server options - Scalable cloud and VPS plans - Built-in security features - Professional support **Advantages:** - Strong performance with management support - Scales with workload demands - Secure configuration defaults - Good documentation **Disadvantages:** - Slightly higher cost than bare-bones hosts - Advanced features may need support help - Performance depends on chosen plan **Best For:** Users seeking a blend of power and manageability. **Pricing:** - Managed hosting tiers - Resource add-ons available - Optional security and backup bundles **Real World Performance:** - Consistent execution speeds - Low downtime streaks - Good handling of variable workflows - Scaling maintains performance **Why Use:** For balanced hosting with performance and support. ## n8n Hosting Comparison The table below compares key factors that matter most when hosting n8n. While many providers offer solid infrastructure, ease of deployment, automation readiness, and management simplicity are where the real differences appear. **Feature****ServerAvatar****xCloud****Kamatera****Hostinger****IONOS****HostArmada****Contabo****Scala** **Hosting****One-Click n8n Installer**YesNoNoNoNoNoNoNo**Setup Time**MinutesModerateLongModerateModerateModerateLongModerate**Ease of Use**⭐⭐⭐⭐⭐⭐⭐⭐⭐⭐⭐⭐⭐⭐⭐⭐⭐⭐⭐⭐⭐⭐⭐⭐⭐⭐⭐⭐⭐⭐**Server Management Effort**Very LowMediumHighMediumMediumLowHighLow**Scalability**Easy & GuidedFlexibleManualLimitedModerateModerateManualGuided**Best For n8n Beginners**✅ Yes✅ Yes❌ No✅ Yes❌ No✅ Yes❌ No✅ Yes## Common Hosting Mistakes to Avoid Many users choose hosting too quickly and regret it later. Avoiding mistakes can save time, and frustration. - **Choosing the cheapest option blindly:** Low cost often sacrifices performance and reliability. - **Ignoring scalability needs:** Leads to migration issues as automation grows. - **Overlooking security basics:** Puts sensitive workflow data at risk. Avoid these, and you’re already ahead of the curve. [![Blog banner - ServerAvatar](https://serveravatar.com/wp-content/uploads/2025/09/728_90-Banner-1-1024x127.png)](https://serveravatar.com/?ref=blog)## How to Match Hosting With Your Automation Goals **Ask yourself:** What do I want automation to do for me? Your hosting choice should align with what you expect automation to achieve. Different goals require different priorities. - **If your goal is reliability, prioritize uptime:** Ensures workflows run without interruption. - **If growth matters, focus on scalability:** Supports expanding automation needs. - **If simplicity is key, choose ease of management:** Reduces technical workload.. The best n8n hosting provider is the one that fits your goals, not someone else’s. ## Conclusion Choosing the right hosting for n8n is less about finding the most powerful server and more about finding the right balance between performance, reliability, scalability, and ease of use. As automation becomes a core part of daily digital operations, hosting plays a silent but critical role in keeping workflows fast, secure, and dependable. Whether you value quick setup, long-term scalability, cost transparency, or hands-off management, the best hosting choice is the one that aligns with your automation goals today while still supporting growth tomorrow. A solid hosting foundation ensures your workflows run smoothly in the background, exactly how automation should work. ## FAQs ### 1. What is the best type of hosting for n8n? The best hosting depends on your needs, but most users benefit from hosting that offers strong performance, easy setup, scalable resources, and built-in security for automation workflows. ### 2. Can n8n run reliably on budget hosting plans? Yes, n8n can run on budget-friendly hosting for small or moderate workflows, but long-term reliability improves with better performance guarantees and scalable infrastructure. ### 3. Why does uptime matter so much for n8n hosting? Uptime ensures your workflows run continuously without missed triggers or failed executions, which is critical for time-sensitive or recurring automations. ### 4. Is managed hosting better than self-managed hosting for n8n? Managed hosting is often better for users who want simplicity and less maintenance, while self-managed hosting suits users who prefer full control and customization. ### 5. How do I choose the right n8n hosting provider for my goals? Start by defining your priorities, speed, growth, simplicity, or control, then choose a hosting provider that aligns with those goals rather than focusing only on price. **Categories:** Blog, Guide, Linux, Node.js, Others, Tutorials, Ubuntu **Tags:** best n8n hosting providers, managed n8n hosting, n8n, n8n automation, n8n cloud hosting, n8n hosting, n8n hosting providers --- ### [How to Prevent DDoS Attacks? Key Strategies](https://serveravatar.com/prevent-ddos-attacks/) **Published:** February 28, 2026 **Author:** Meghna Meghwani **Content:** [![Blog banner - ServerAvatar](https://serveravatar.com/wp-content/uploads/2025/09/728_90-Banner-3-1024x127.png)](https://serveravatar.com/?ref=blog)DDoS attacks are one of the most common threats faced by websites and online services today, making it essential for organizations to prevent DDoS attacks before they impact availability. These attacks are designed to overwhelm systems with excessive requests, causing services to become slow, unstable, or completely unavailable. Because digital platforms depend on constant uptime, even a short disruption can lead to serious operational and business challenges. The good news is that DDoS attacks are preventable. With the right strategies, tools, and planning, systems can be prepared to handle abnormal traffic and reduce the impact of attacks. This guide explains how to prevent DDoS attacks using clear, simple language so anyone can understand and apply the concepts. ## What Is a DDoS Attack? A Distributed Denial-of-Service (DDoS) attack occurs when a system receives more requests than it can process. These requests come from multiple sources, making it difficult to block them individually. The main goal of a DDoS attack is to exhaust system resources and prevent normal users from accessing services. ![DDoS attacks](https://serveravatar.com/wp-content/uploads/2026/02/image-263.png) DDoS attacks do not focus on stealing information. Instead, they aim to disrupt availability and performance. ### How DDoS Attacks Work DDoS attacks work by sending repeated requests to a system until it cannot respond properly. Since the requests come from multiple sources, traditional blocking methods are often ineffective. The system becomes busy handling malicious traffic instead of serving legitimate requests. ![DDoS attacks work](https://serveravatar.com/wp-content/uploads/2026/02/image-264.png) ### Why DDoS Attacks Are a Serious Threat DDoS attacks pose a major risk because they directly impact system availability and performance. Any online service that depends on consistent access can be disrupted when traffic suddenly exceeds handling capacity. Key risks include: - **Service downtime:** Systems become unavailable, preventing users from accessing services. - **Poor user experience:** Slow loading and failures reduce user trust and satisfaction. - **Increased server load:** Excessive requests strain system resources beyond safe limits. - **Loss of system reliability:** Repeated attacks weaken overall platform stability. - **Long recovery times:** Restoring services after an attack can take significant time and effort. Because many services rely on constant connectivity, DDoS attacks can quickly escalate into major operational issues. ## Types of DDoS Attacks DDoS attacks occur in different forms, each targeting systems in a unique way. Understanding these types helps in choosing the most effective prevention techniques. **Volume-Based Attacks** These attacks overwhelm systems by sending extremely high amounts of traffic. - They consume available bandwidth and prevent normal data flow. **Protocol-Based Attacks** These attacks target weaknesses in communication protocols. - They exhaust system resources by misusing protocol-level functions. **Application-Layer Attacks** These attacks focus on specific application features. - They are difficult to detect because they resemble legitimate user activity. ## Identifying Early Signs of a DDoS Attack Recognizing early warning signs helps reduce damage and response time. Small performance issues often signal the beginning of a larger attack. Common warning signs include: - **Sudden traffic spikes:** Unexpected increases in requests without normal patterns. - **Slow system response:** Delays in processing legitimate requests. - **Frequent service timeouts:** Systems fail to respond within expected timeframes. - **Unusual request patterns:** Repeated or abnormal access behavior. Monitoring these indicators allows faster action before systems become overwhelmed. ## Key Strategies to Prevent DDoS Attacks Preventing DDoS attacks requires a layered security approach that focuses on controlling traffic, strengthening server defenses, and preparing systems for abnormal load. By combining network-level controls, application protection, monitoring, and response planning, organizations can significantly reduce the risk of service disruption. The following strategies explain the most effective ways to protect systems from DDoS attacks. ### 1. Network-Level DDoS Prevention Network-level protection aims to stop malicious traffic before it reaches core systems. These controls act as the first line of defense. ![network level DDoS attacks](https://serveravatar.com/wp-content/uploads/2026/02/image-266.png) Effective practices include: - **Filtering unwanted traffic:** Blocks suspicious or unnecessary data flows. - **Limiting unnecessary open ports:** Reduces entry points for attack traffic. - **Using traffic thresholds:** Automatically restricts traffic when limits are exceeded. These measures help prevent excessive requests from reaching internal services. ### 2. Application-Level Protection Application-level defenses focus on securing specific system functions and endpoints. These controls help identify and block harmful behavior early. ![application level DDoS attacks](https://serveravatar.com/wp-content/uploads/2026/02/image-267.png)Important techniques include: - **Validating incoming requests:** Ensures requests follow expected formats and rules. - **Blocking abnormal behavior:** Stops repeated or suspicious actions. - **Limiting repeated actions:** Prevents excessive requests from a single source. These controls reduce the risk of targeted application-layer attacks. ### 3. Using Rate Limiting to Control Traffic Rate limiting controls how frequently requests can be made within a defined period. This helps maintain system balance during high traffic situations. ![using rate limiting to control traffic - DDoS attacks](https://serveravatar.com/wp-content/uploads/2026/02/image-268.png) Benefits of rate limiting include: - **Preventing request flooding:** Stops excessive requests from overwhelming systems. - **Reducing server overload:** Preserves resources for legitimate users. - **Detecting automated traffic:** Helps identify non-human request patterns. Rate limiting is one of the simplest and most effective DDoS prevention methods. ### 4. Importance of Firewalls Firewalls act as a control layer between systems and incoming traffic. They enforce rules that determine which requests are allowed or blocked. ![firewall - DDoS attacks](https://serveravatar.com/wp-content/uploads/2026/02/image-269.png) Firewalls help by: - **Blocking suspicious requests:** Stops traffic that violates security rules. - **Filtering traffic based on rules:** Allows only approved data flows. - **Preventing unauthorized access:** Protects systems from direct exposure. Web-focused firewalls are especially useful for defending against application-layer attacks. ### 5. Traffic Monitoring and Analysis Monitoring tools provide visibility into traffic behavior and system activity. This visibility helps detect attacks early and respond efficiently. [](https://storage.3.basecamp.com/5840738/blobs/279e1354-148a-11f1-b920-0242ac120002/download/image.png) ![traffic monitoring - DDoS attacks](https://serveravatar.com/wp-content/uploads/2026/02/image-270.png) Key advantages include: - **Identifying traffic patterns:** Establishes a baseline for normal activity. - **Detecting anomalies:** Highlights unusual behavior quickly. - **Improving response time:** Enables faster mitigation during attacks. Consistent monitoring makes DDoS attacks easier to identify and manage. ### 6. Server Configuration and Hardening Proper server configuration improves resistance against high traffic and malicious activity. Secure systems are harder to overwhelm. ![server configuration - DDoS attacks](https://serveravatar.com/wp-content/uploads/2026/02/image-271.png) Server hardening steps include: - **Keeping software updated:** Fixes known vulnerabilities. - **Disabling unused services:** Reduces unnecessary attack surfaces. - **Applying secure access controls:** Limits system access to authorized users. These steps reduce attack surfaces and improve stability. ### 7. Load Distribution Techniques Load distribution spreads incoming traffic across multiple resources. This prevents any single component from becoming overloaded. ![load distribution - DDoS attacks](https://serveravatar.com/wp-content/uploads/2026/02/image-272.png)Advantages include: - **Improved performance:** Balances workload efficiently. - **Better availability:** Keeps services accessible during high demand. - **Increased fault tolerance:** Reduces impact if one resource fails. Load distribution helps systems remain responsive during high traffic events. ### 8. Incident Response Planning An incident response plan prepares teams to act quickly during an attack. Clear procedures reduce confusion and downtime. ![incident response - DDoS attacks](https://serveravatar.com/wp-content/uploads/2026/02/image-273.png) A strong plan includes: - **Defined roles:** Ensures responsibilities are clearly assigned. - **Clear response procedures:** Provides step-by-step actions to follow. - **Recovery steps:** Outlines how to restore normal operations. Prepared systems recover faster and experience less disruption. ### 9. Regular Security Maintenance Security requires ongoing attention to remain effective. Regular checks help maintain strong defenses. ![regular security maintenance - DDoS attacks](https://serveravatar.com/wp-content/uploads/2026/02/image-274.png) Regular maintenance should include: - **Reviewing security rules:** Ensures protections remain relevant. - **Updating system components:** Keeps defenses aligned with current threats. - **Testing protection mechanisms:** Confirms systems respond as expected. Consistent maintenance keeps defenses effective against evolving threats. [![Blog banner - ServerAvatar](https://serveravatar.com/wp-content/uploads/2025/09/728_90-Banner-1-1024x127.png)](https://serveravatar.com/?ref=blog)## Building a Long-Term DDoS Defense Strategy Long-term DDoS protection relies on multiple layers working together. A single solution is rarely sufficient. A strong strategy combines: - **Network controls:** Manages traffic at entry points. - **Application defenses:** Protects specific system functions. - **Monitoring and planning:** Enables early detection and faster response. Multiple layers ensure better protection and long-term stability. ## How ServerAvatar Helps Strengthen DDoS Protection Modern DDoS prevention goes beyond simply blocking traffic. It requires continuous visibility, precise control, and proactive server management. This is where ServerAvatar helps strengthen server-level defenses and improve overall system resilience. **What is ServerAvatar?** [ServerAvatar](https://serveravatar.com/) is a platform to simplify the hosting and management of servers and applications. It simplifies the process of deploying and managing PHP and Node.js based web applications on servers. ![ServerAvatar Dashboard](https://serveravatar.com/wp-content/uploads/2026/02/image-275.png) ServerAvatar provides a centralized server management platform designed to simplify security operations and maintain server stability during high-traffic situations. It enables administrators to monitor activity, optimize resources, and apply security best practices efficiently. ### Key ServerAvatar Features That Support DDoS Prevention - **Real-time server monitoring** Tracks server activity and resource usage to help identify unusual traffic patterns that may signal early-stage DDoS attacks. - **Detailed system insights** Provides clear visibility into CPU, memory, disk, server load, and process behavior, making it easier to detect abnormal load conditions. - **Advanced security protection** Provides a unified security layer that includes firewall management, Fail2Ban protection, AI-bot blocker, and advanced rule sets such as 8G Firewall. Together, these features help block malicious traffic, prevent abuse, and reduce exposure to DDoS-related threats. - **Service and process control** Enables users to manage running services and processes, ensuring system stability during unexpected traffic spikes. By combining visibility, control, and simplified server management, ServerAvatar helps businesses build a strong foundation for long-term DDoS resilience while maintaining performance, uptime, and operational stability. ## Strengthen Your DDoS Defense and Maintain Service Availability DDoS protection is not a one-time setup but an ongoing process that requires the right mix of technology, monitoring, and preparation. By applying layered defenses, maintaining secure server configurations, and continuously reviewing traffic behavior, businesses can reduce the risk of service disruption and ensure long-term stability. Using a structured approach and reliable server management tools helps transform DDoS prevention from a reactive task into a proactive security strategy. ## Conclusion DDoS attacks remain a serious threat to websites and online services because they directly target availability and performance. However, with proper planning and the right preventive measures, their impact can be significantly reduced. Strategies such as network-level filtering, application-layer protection, rate limiting, traffic monitoring, server hardening, and incident response planning work best when implemented together. A layered defense approach ensures systems remain resilient even during high traffic or attack scenarios. By combining consistent security maintenance with proactive server management solutions like ServerAvatar, organizations can strengthen their DDoS defenses while maintaining performance, uptime, and user trust. ## FAQs ### 1. What does the DDoS attack do? The primary goal of a DDoS attack is to overwhelm a system with excessive traffic, making websites or services slow, unstable, or completely unavailable to legitimate users. ### 2. Can DDoS attacks be completely prevented? While it may not be possible to eliminate DDoS attacks entirely, their impact can be greatly reduced through layered security measures, proper server configuration, and continuous traffic monitoring. ### 3. Why is a layered approach important for DDoS prevention? A layered approach ensures that if one defense mechanism is bypassed, other controls are still in place. Combining network, application, and server-level protections provides stronger and more reliable defense. ### 4. How does traffic monitoring help prevent DDoS attacks? Traffic monitoring helps establish normal usage patterns and quickly identify unusual behavior. Early detection allows faster response before systems become overwhelmed. ### 5. What role does server hardening play in DDoS protection? Server hardening reduces unnecessary services and vulnerabilities, making systems more stable and resistant to high traffic loads during an attack. ### 6. How does ServerAvatar support DDoS prevention? ServerAvatar simplifies server monitoring, security management, and resource control. Its features help detect abnormal traffic, manage services efficiently, and maintain server stability during traffic spikes. **Categories:** Blog, Guide, Linux, Others, Ubuntu **Tags:** cybersecurity best practices, DDoS, DDoS attacks, DDoS protection, prevent DDoS attacks, website security --- ### [Why SSL Certificate Matters for Your Website Security](https://serveravatar.com/why-ssl-certificate-matters/) **Published:** February 27, 2026 **Author:** Meghna Meghwani **Content:** [![Blog banner - ServerAvatar](https://serveravatar.com/wp-content/uploads/2025/09/728_90-Banner-3-1024x127.png)](https://serveravatar.com/?ref=blog)Website security is no longer optional. As more users interact with websites by submitting forms, creating accounts, and sharing sensitive information, protecting that data has become critical. One of the most important security elements for any website is an SSL certificate. An SSL certificate helps secure communication between a website and its visitors. Without it, data can be exposed, user trust can decline, and search engine visibility can suffer. In this guide, I will break down why an SSL certificate matters for your website security without any technical headaches. ## What Is an SSL Certificate? An SSL certificate is a digital security file that encrypts information exchanged between a website and its users. The URL of the SSL Certificate installed website starts with HTTPS rather than HTTP. SSL ensures that data such as login credentials, form submissions, and personal details remain private and protected from unauthorized access. ![SSL certificate](https://serveravatar.com/wp-content/uploads/2026/02/image-254.png) In simple terms, SSL tells visitors: This website is safe. You can trust it.Without SSL, data sent between a user and your website travels openly, making it easy for hackers to intercept. ### How SSL Certificates Work SSL certificates secure communication by encrypting data exchanged between a website and its visitors. This encryption ensures that information remains private and cannot be read by unauthorized parties. The process happens automatically in the background whenever a secure site is accessed. When someone visits your website: - **Browser checks your SSL certificate:** The browser verifies that the website is authentic and trusted. - **A secure connection is created:** A protected communication channel is established between the browser and server. - **All shared data is encrypted:** Information is converted into unreadable form during transfer. Think of it like speaking in a secret language only you and your friend understand. ## Why Website Security Matters Website security protects user information and maintains the reliability of a website. As online threats continue to grow, even basic security gaps can lead to serious consequences. A secure website helps prevent misuse of data and protects long-term credibility. Website security matters because: - **Users share sensitive data:** Visitors provide personal and private information that must be protected. - **Hackers look for easy targets:** Websites with weak security are more likely to be attacked. - **One breach can ruin your reputation:** A single security incident can damage trust permanently. SSL is one of the easiest and most effective security steps you can take. ### Role of SSL in Data Encryption SSL plays a critical role in encrypting data during transmission. Encryption ensures that even if data is intercepted, it cannot be understood or altered. This protection applies to all forms of sensitive communication on a website. ![SSL certificate data encryption](https://serveravatar.com/wp-content/uploads/2026/02/image-255.png) This applies to: - **Login details:** Usernames and passwords are kept private. - **Contact form data:** Information submitted through forms remains secure. - **Account information:** Personal account details are protected from exposure. - **Payment-related details:** Financial data is encrypted during transfer. Encryption is one of the core reasons SSL certificates are essential. Without SSL, it’s like leaving your front door wide open. ### Protecting User Data with SSL Protecting user data is essential for maintaining trust and compliance. SSL certificates help keep sensitive information confidential and prevent unauthorized access. Websites without proper protection risk losing user confidence. SSL certificates help: - **Build instant trust:** Visitors feel safer sharing information. - **Reduce bounce rates:** Users are less likely to leave due to security concerns. - **Increase conversions:** Secure websites encourage users to take action. That small padlock icon does a lot of heavy lifting for your credibility. Websites that fail to protect user data risk losing trust and facing compliance or reputation issues. ### How SSL Builds Website Trust SSL certificates visibly signal that a website is secure. This assurance helps users feel confident while browsing, signing up, or submitting information. Trust plays a major role in overall website engagement. When a website uses SSL: - **Browsers display a secure indicator:** Visitors can instantly recognize a protected site. - **Visitors feel safer interacting:** Security signals reduce hesitation. - **Engagement and confidence increase:** Users are more willing to stay and interact. SSL plays a direct role in improving how users perceive a website. ### SSL Certificate Benefits for SEO Search engines favor websites that provide a secure experience. SSL certificates support SEO by improving both technical security and user behavior signals. Secure websites are more likely to rank competitively. SSL contributes to SEO by: - **Acting as a ranking signal:** Secure sites receive preference in search results. - **Improving user experience:** Visitors feel safer navigating the site. - **Reducing bounce rates:** Users are less likely to exit immediately. Websites using HTTPS are more likely to perform better in search results compared to non-secure sites. ## How Browsers Treat Non-SSL Websites Modern browsers actively warn users when a website lacks SSL protection. These warnings can negatively affect traffic and credibility. SSL helps maintain a professional and trustworthy appearance. ![browsers treat non SSL certificate](https://serveravatar.com/wp-content/uploads/2026/02/image-256.png) Browser warnings can: - **Discourage visitors:** Users may avoid entering the site. - **Increase exit rates:** Visitors may leave without exploring content. - **Reduce conversions:** Fewer users complete actions due to fear of risk. Using an SSL certificate helps avoid these warnings and maintains a professional appearance. ### Importance of SSL for Forms and Logins Any website that collects user input must ensure secure data transmission. SSL protects information entered into forms and login fields from exposure during transfer. This includes: - **Contact forms:** Messages and details remain private. - **Registration pages:** User sign-up data stays protected. - **Login screens:** Credentials are encrypted during submission. SSL ensures that submitted data is protected during transmission. ### Preventing Cyber Attacks with SSL SSL reduces the risk of data being intercepted or modified during transmission. While not a complete security solution, it strengthens protection against common attack methods. ![prevent cyber attacks - SSL certificate](https://serveravatar.com/wp-content/uploads/2026/02/image-257.png) SSL helps prevent: - **Man-in-the-middle attacks:** Data cannot be altered during transfer. - **Data interception:** Encrypted data is unreadable to attackers. - **Session hijacking:** Active connections remain protected. It creates a secure tunnel that attackers can’t easily break into. ### SSL Certificates for Small and Medium Websites SSL certificates are important for websites of all sizes. Security threats target weaknesses, not website scale. Even smaller websites must protect user data and maintain trust. SSL is important because: - **Browsers apply the same rules to all sites:** Security warnings affect every website equally. - **User trust applies universally:** Visitors expect safety everywhere. - **Threats do not target only large platforms:** Any vulnerable site can be attacked. Hackers don’t care about size. They care about vulnerabilities. Even blogs and personal websites need SSL to protect visitors and maintain credibility. ## Types of SSL Certificates SSL certificates come in different types to match different needs. Each type provides encryption, with varying levels of verification and trust indicators. - **Domain Validation (DV):** Confirms domain ownership with basic security. - **Organization Validation (OV):** Verifies business identity along with encryption. - **Extended Validation (EV):** Provides the highest level of trust verification. All of them encrypt data, but higher levels add more trust signals. ### SSL and Website Performance SSL does not slow down websites. Modern browsers and technologies are optimized for secure connections, allowing performance and security to work together efficiently. In fact: - **HTTPS enables modern features:** Advanced web technologies require secure connections. - **Secure sites often load faster:** Optimized delivery improves speed. - **Browsers optimize HTTPS traffic:** Secure connections are prioritized. Security and performance can coexist effectively. ## Common Myths About SSL Misunderstandings about SSL often prevent proper adoption. Knowing the facts helps website owners make better security decisions. - **SSL is expensive:** Many reliable free options are available. - **Only eCommerce sites need SSL:** Any site handling data benefits from SSL. - **SSL guarantees full security:** It provides a strong base, not total protection. Understanding SSL correctly helps you use it effectively. ## How to Know If a Website Has SSL Checking SSL status is simple and quick. Browsers clearly display security indicators for protected websites. **You can check by:** - **Looking for HTTPS in the URL:** Secure websites use HTTPS. - **Checking the padlock icon:** A visible sign of encryption. - **Viewing certificate details:** Clicking the padlock shows security information. If it’s missing, the site isn’t secure. ## SSL Certificate with ServerAvatar Getting and managing SSL certificates can often feel complex, especially for users who are not deeply familiar with server-level configurations. ServerAvatar simplifies this process by offering built-in free and custom SSL certificate management directly from its control panel, allowing website owners to secure their applications without manual server intervention. **What is ServerAvatar?** [ServerAvatar](https://serveravatar.com/) is a platform to simplify the hosting and management of servers and applications. It simplifies the process of deploying and managing PHP and Node.js based web applications on servers. ![ServerAvatar Dashboard - SSL certificate](https://serveravatar.com/wp-content/uploads/2026/02/image-258.png) With ServerAvatar, users can easily install, manage, and renew SSL certificates efficiently while maintaining complete control over their website security setup. ### Automatic Installation of SSL Certificates in ServerAvatar ServerAvatar provides an [**automatic SSL certificate installation**](https://serveravatar.com/docs/application/automatic-installation/) feature that allows users to secure their websites with no effort. This option is ideal for users who want a fast and reliable way to enable HTTPS without handling technical configurations. ![install SSL certificate](https://serveravatar.com/wp-content/uploads/2026/02/image-259-1024x617.png) Once enabled, ServerAvatar automatically: - One Click SSL Certificate setup - Free SSL Certificate with auto-renewal - Issue the SSL certificate for the selected domain - Configures the server for secure HTTPS connections - Ensures proper certificate deployment for the application ![Automatic SSL certificate](https://serveravatar.com/wp-content/uploads/2026/02/image-260-1024x511.png) This automated approach helps reduce configuration errors and ensures that SSL protection is applied correctly across the website. ### Custom SSL Certificate Installation with ServerAvatar For users who require greater flexibility, ServerAvatar also supports [**custom SSL certificate installation**](https://serveravatar.com/docs/application/custom-installation/). This option is suitable for advanced users who prefer to use SSL certificates obtained from external providers or need custom security configurations. [](https://storage.3.basecamp.com/5840738/blobs/71b976d2-13d0-11f1-acad-0242ac120003/download/image.png) ![Install SSL certificate ](https://serveravatar.com/wp-content/uploads/2026/02/image-261-1024x781.png)Using the custom installation method, users can: - Upload their own SSL certificate files - Configure certificates for specific applications or domains - Maintain compatibility with third-party certificate authorities ![Custom SSL certificate](https://serveravatar.com/wp-content/uploads/2026/02/image-262-1024x619.png)This flexibility allows users to tailor SSL implementation based on their security or compliance requirements. ### Why Use ServerAvatar for SSL Certificate Management ServerAvatar combines ease of use with advanced control, making SSL management accessible to both beginners and experienced users. By integrating SSL features directly into the platform, ServerAvatar removes the need for manual server commands while still allowing customization when required. **Key advantages include:** - Simplified SSL setup from a centralized dashboard - Support for both automatic and custom SSL installations - Reduced risk of misconfiguration - Seamless HTTPS enablement for applications By handling SSL certificates efficiently, ServerAvatar helps website owners focus on performance, growth, and reliability without compromising security. [![Blog banner - ServerAvatar](https://serveravatar.com/wp-content/uploads/2025/09/728_90-Banner-1-1024x127.png)](https://serveravatar.com/?ref=blog)## Is SSL Mandatory for Modern Websites? While not legally required everywhere, SSL is essential for modern websites. User expectations, browser standards, and search engines all favor secure websites. **Without SSL:** - **Trust decreases:** Users hesitate to interact. - **Search visibility declines:** Rankings may drop. - **User engagement suffers:** Visitors leave sooner. SSL has become a standard requirement for modern websites. ## Conclusion SSL certificates have become a core requirement for maintaining website security, user trust, and search visibility. From encrypting sensitive data and protecting user interactions to improving SEO performance and browser compatibility, SSL plays a vital role in modern websites of every size. With platforms like ServerAvatar, managing SSL certificates becomes straightforward through automatic and custom installation options, reducing complexity while strengthening security. By implementing SSL correctly, website owners can ensure safer communication, better credibility, and long-term stability in an increasingly security-focused web environment. ## FAQs ### 1. Why is an SSL certificate important for website security? An SSL certificate encrypts data exchanged between users and a website, preventing unauthorized access and protecting sensitive information. ### 2. Does every website need an SSL certificate? All websites benefit from SSL, especially those that collect user data, display forms, or aim to build trust and credibility. ### 3. How does SSL affect SEO rankings? SSL is a ranking signal used by search engines, and secure websites are more likely to perform better in search results. ### 4. Can SSL certificates be managed easily on servers? Yes, with ServerAvatar, simplify SSL installation and management by offering automatic and custom SSL installation directly from the dashboard. ### 5. Is SSL alone enough to fully secure a website? No, SSL is a foundational security measure and should be combined with other protections such as firewalls, updates, and access controls. **Categories:** Blog, Guide, Linux, Others, Tutorials, Ubuntu **Tags:** Automatic SSL, Free SSL certificate, HTTPS encryption, Secure Website, SSL Certificate, SSL certificate for website security, SSL Installation, website security --- ### [Horizontal Scaling vs Vertical Scaling? Complete Guide](https://serveravatar.com/horizontal-scaling-vs-vertical-scaling/) **Published:** February 26, 2026 **Author:** Meghna Meghwani **Content:** [![Blog banner - ServerAvatar](https://serveravatar.com/wp-content/uploads/2025/09/728_90-Banner-3-1024x127.png)](https://serveravatar.com/?ref=blog)As applications and websites grow, they must handle increasing numbers of users, requests, and data without slowing down or failing. This is where scaling becomes essential. Scaling is the process of adjusting system resources so performance remains stable as demand increases. In this guide, I will explain horizontal scaling vs vertical scaling, how each approach works, and when to use them for reliable and scalable systems. ## What Is Scaling? Scaling is the process of increasing or adjusting system resources so an application can handle higher workloads without performance issues. It ensures the system continues to function efficiently as demand increases over time. ![Scaling - Horizontal Scaling vs Vertical Scaling](https://serveravatar.com/wp-content/uploads/2026/02/image-247.png) The primary goal of scaling is to maintain performance, reliability, and availability as demand grows. ### Why Scaling Is Important? Without proper scaling, systems may struggle under increased demand, leading to slow performance or service failures. Scaling helps applications remain stable and responsive as usage grows. Proper scaling helps ensure: - **Consistent performance:** Ensures stable response times under load - **Improved system stability:** Reduces the risk of crashes or failures - **Better user experience:** Maintains smooth and reliable interactions - **Efficient use of resources:** Prevents overuse or underutilization Scaling is not optional for growing systems; it is a fundamental requirement. ## Understanding Vertical Scaling Vertical scaling focuses on increasing the capacity of a single server or system. This is achieved by upgrading existing resources rather than changing the system structure. ![Vertical Scaling - Horizontal Scaling vs Vertical Scaling](https://serveravatar.com/wp-content/uploads/2026/02/image-248.png) Vertical scaling concentrates on improving the power of one unit instead of distributing tasks across multiple units. **Key Features of Vertical scaling:** Vertical scaling focuses on strengthening a single system by improving its internal resources without changing the overall structure. - **Single-system enhancement:** Resources are upgraded within one system - **Centralized workload handling:** All processing occurs in one place - **Minimal architectural change:** No redesign of system structure **Pros of Vertical scaling:** Vertical scaling offers a straightforward way to improve system performance with minimal complexity. - **Simple implementation:** Does not require changes to system architecture - **Easier management:** Monitoring is limited to one system - **Quick performance improvements:** Resource upgrades provide immediate benefits - **Lower complexity:** Suitable for early-stage or smaller systems **Cons of Vertical scaling:** Despite its simplicity, vertical scaling has inherent limitations that affect long-term growth. - **Hardware limits:** Resource upgrades have a fixed maximum - **Single point of failure:** One system supports all operations - **Possible downtime:** Upgrades may require system restarts - **Rising costs:** High-capacity systems become expensive These limitations make vertical scaling less suitable for long-term growth. ### How Vertical Scaling Works Vertical scaling works by increasing available system resources while keeping the application on the same system. - **Processing power:** Improves computation speed - **Memory capacity:** Allows handling of more data simultaneously - **Storage limits:** Supports larger data volumes The application continues to run on the same system, but with higher resource availability. This approach does not require changes to application architecture. ### When Vertical Scaling Is Suitable Vertical scaling works best in controlled and predictable environments. - **Small to medium systems:** Resource needs are manageable - **Predictable workloads:** Demand does not fluctuate heavily - **Simplicity is required:** Minimal operational complexity - **No architectural changes desired:** Existing structure is retained It is often used as an initial scaling approach. ## Understanding Horizontal Scaling Horizontal scaling involves increasing capacity by adding multiple systems that work together. Instead of increasing power within one system, workloads are distributed across several systems. ![Horizontal Scaling - Horizontal Scaling vs Vertical Scaling](https://serveravatar.com/wp-content/uploads/2026/02/image-249.png) This method emphasizes distribution rather than concentration of resources. **Key Features of Horizontal Scaling:** Horizontal scaling increases system capacity by distributing workloads across multiple systems. - **Multiple systems working together:** Several systems operate in parallel. - **Distributed workload handling:** Tasks are shared to balance resource usage. - **Scalable expansion:** Capacity grows by adding more systems as needed. **Pros of Horizontal Scaling:** Horizontal scaling is designed for environments with high or unpredictable demand. - **High availability:** System remains operational during partial failures - **Better fault tolerance:** Individual system issues have limited impact - **Scalable growth:** Capacity can be expanded gradually - **Improved performance under load:** Workload distribution reduces strain These features make horizontal scaling suitable for high-demand environments. **Cons of Horizontal Scaling:** While powerful, horizontal scaling introduces additional complexity. - **Higher complexity:** Requires careful system planning - **Data synchronization needs:** Consistency must be maintained across systems - **Increased management effort:** More components require monitoring - **Initial setup requirements:** Proper configuration is essential It is powerful but requires a well-structured approach. ### How Horizontal Scaling Works Horizontal scaling relies on distributing workloads across multiple systems. - **Multiple systems run the same application:** Ensures consistent functionality - **Incoming requests are distributed:** Load is balanced across systems - **Each system handles part of the workload:** Improves overall capacity This structure allows incremental growth and flexibility. ### When Horizontal Scaling Is Suitable Horizontal scaling is ideal for systems that must handle changing demand. - **Variable or growing demand:** Capacity can adjust dynamically - **High availability requirements:** System uptime is critical - **Minimal downtime tolerance:** Failures must not disrupt service - **Long-term scalability needs:** Growth is expected over time This approach supports sustained growth and reliability. ## Horizontal vs Vertical Scaling The primary difference between the two approaches is how capacity is increased. - **Vertical scaling:** Increases the capacity of a single system - **Horizontal scaling:** Increases the number of systems **Aspect****Horizontal Scaling****Vertical Scaling****Concept**Expanding system capacity by adding more servers or nodesExpanding system capacity by adding resources (CPU, RAM, storage) to an existing server**Performance Improvement**Improves performance by distributing workload across multiple serversImproves performance by boosting individual server capability**Scalability**Highly scalable, can add servers as needed, almost unlimitedLimited by hardware capacity, upgrades eventually hit a ceiling**Cost**Can be cost-effective with commodity hardware, but increases management complexityMay be expensive due to high-end hardware requirements**Reliability**High, failure of one server usually doesn’t affect the systemLow, if the server fails, the system may go down**Complexity**Higher, requires load balancing, replication, and distributed managementIdeal for variable traffic, web apps, cloud applications, and distributed databases**Downtime**Usually minimal downtime when adding new serversMay require downtime during hardware upgrades**Use Case**Upgrading the database server RAM/CPU, enhancing a high-performance serverIdeal for applications needing strong single-server performance, legacy apps, CPU/RAM-intensive apps**Examples**Adding nodes to a web server cluster, scaling cloud servicesUpgrading database server RAM/CPU, enhancing a high-performance serverVertical scaling prioritizes simplicity, while horizontal scaling prioritizes resilience and scalability. ## When to Choose Vertical Scaling Vertical scaling is suitable for improving performance quickly with minimal effort. - **Small or medium applications:** Limited resource demands - **Need for quick improvements:** Immediate performance gains - **Preference for simplicity:** Reduced operational overhead - **Limited budget and time:** Lower initial investment It’s often the first step before moving to something more advanced. ## When to Choose Horizontal Scaling Horizontal scaling is designed for systems that must remain available under all conditions. - **Unpredictable or rapid traffic growth:** Flexible capacity expansion - **Zero or minimal downtime tolerance:** High reliability required - **Need for high availability:** Continuous system operation - **Long-term growth plans:** Sustainable scalability If your system must stay online no matter what, horizontal scaling is usually the answer. ## How ServerAvatar Supports Horizontal and Vertical Scaling Implementing scaling becomes easier when infrastructure management is simplified. ServerAvatar provides managed servers that support both vertical and horizontal scaling, allowing users to adjust resources based on workload requirements. **What is ServerAvatar?** [ServerAvatar](https://serveravatar.com/) is a platform to simplify the hosting and management of servers and applications. It simplifies the process of deploying and managing PHP and Node.js based web applications on servers. ![ServerAvatar Dashboard - Horizontal Scaling vs Vertical Scaling](https://serveravatar.com/wp-content/uploads/2026/02/image-250.png) For vertical scaling, ServerAvatar offers a built-in server resize option that enables users to increase or decrease server resources as needed. This helps improve performance without requiring manual server reconfiguration or application-level changes. The resize process is designed to be controlled and predictable, making it suitable for systems with evolving resource demands. For horizontal scaling, ServerAvatar enables users to deploy and manage multiple servers from a centralized dashboard, making it easier to distribute workloads across instances. When combined with proper load balancing and application configuration, this supports horizontal scaling by allowing traffic to be distributed across multiple servers for improved availability and scalability. ### Server Resizing and Scaling Flexibility in ServerAvatar ServerAvatar’s managed server resize feature allows vertical scaling to be performed when resource requirements change. This capability helps ensure that applications continue to operate efficiently as demand increases or decreases. By combining resizing with multi-server management, ServerAvatar supports scalable infrastructure planning aligned with both short-term adjustments and long-term growth goals. ![Resize server - Horizontal Scaling vs Vertical Scaling](https://serveravatar.com/wp-content/uploads/2026/02/image-253-1024x642.png) ServerAvatar makes it easier to apply horizontal and vertical scaling strategies by offering managed servers with flexible resizing and multi-server management options. ## Common Myths About Scaling Let’s clear up a few misunderstandings: - **Myth:** Horizontal scaling is always better **Truth:** It depends on your needs - **Myth:** Vertical scaling is outdated **Truth:** It’s still useful and widely used - **Myth:** Scaling is only for big companies **Truth:** Even small projects need scaling plans Scaling isn’t about size; it’s about preparedness. [![Blog banner - ServerAvatar](https://serveravatar.com/wp-content/uploads/2025/09/728_90-Banner-1-1024x127.png)](https://serveravatar.com/?ref=blog)## Key Considerations Before Choosing a Scaling Method Selecting the right scaling approach requires evaluating both current and future needs. - **Expected growth patterns:** Anticipated increase in demand - **Budget constraints:** Cost of upgrades and maintenance - **Performance requirements:** Required response times and stability - **System architecture:** Compatibility with scaling methods - **Maintenance capabilities:** Ability to manage complexity Choosing the right scaling strategy depends on both current needs and future goals. ## Conclusion Understanding the difference between horizontal and vertical scaling is essential for building systems that can grow without performance or stability issues. Vertical scaling offers a simple way to improve capacity by enhancing a single server, while horizontal scaling focuses on distributing workloads across multiple servers for better resilience and long-term scalability. The right approach depends on workload patterns, availability requirements, and future growth plans. ServerAvatar make it easier to apply both scaling strategies by offering managed servers with flexible resizing and centralized multi-server management, helping teams adapt infrastructure efficiently as demands change. ## FAQs ### 1. What is the main difference between horizontal and vertical scaling? Vertical scaling increases the resources of a single server, while horizontal scaling increases capacity by adding more servers to share the workload. ### 2. Is vertical scaling suitable for long-term growth? Vertical scaling is effective for short- to medium-term needs, but it has hardware limits that can make it less suitable for long-term growth. ### 3. Why is horizontal scaling considered more reliable? Horizontal scaling improves reliability by distributing workloads, so system operations can continue even if one server experiences issues. ### 4. How do managed servers simplify scaling decisions? Managed servers reduce the technical effort involved in scaling by handling server maintenance, resource adjustments, and infrastructure management, allowing teams to focus on application performance rather than server complexity. ### 5. How does managed server infrastructure help with scaling? Managed server provided by the ServerAvatar platform simplifies scaling by handling server configuration and resource management, allowing scaling changes to be applied with minimal operational effort. **Categories:** Blog, Guide, Linux, Others, Ubuntu **Tags:** DevOps, Horizontal Scaling, Horizontal Scaling vs Vertical Scaling, Infrastructure Scaling, Scaling, Server Scaling, System Scalability, Vertical Scaling --- ### [Top 7 Node.js Hosting Platforms to Use in 2026](https://serveravatar.com/top-nodejs-hosting-platforms-2025/) **Published:** July 12, 2025 **Author:** Meghna Meghwani **Content:** **Node.js hosting** continues to be a top choice among developers for building fast, scalable applications from real-time tools and APIs to fully featured web apps. However, even the best code won’t shine unless it runs on a solid hosting platform. That makes selecting the right provider more important than ever. As we move through 2025, the hosting landscape has matured. New platforms have emerged, and established ones have stepped up their game. With so many options now available, finding the right fit can be confusing. In this guide, we’ll explore the 7 best Node.js hosting platforms for 2025, highlighting their features, pricing, and usability, so you can make an informed decision with ease. Before diving into the platforms, let’s quickly understand what makes a Node.js hosting service truly good. First off, it should support seamless deployment. Secondly, it must scale with your application’s growth. And lastly, it should give you great performance without making your wallet cry. Ready to find out which platforms made the list? ## 1. [ServerAvatar](https://serveravatar.com/) ServerAvatar is a managed cloud hosting provider that simplifies the deployment, management, and monitoring of servers and applications, no deep technical expertise required. With ServerAvatar, you can deploy servers directly on top-tier cloud providers like DigitalOcean, Vultr, Hetzner (with Linode coming soon), without requiring your own cloud provider account. You can effortlessly deploy and manage multiple applications such as **WordPress**, **Laravel**, **n8n**, custom **PHP**, or **Node.js** apps. From one-click deployments to advanced monitoring, automation, and built-in security features, ServerAvatar allows you to focus on growing your business while we handle the technical complexities. ![ServerAvatar](https://serveravatar.com/wp-content/uploads/2025/07/image-2025-09-20T150656.714-1024x516.png)**Pros:** - One-click server provisioning and app deployment - Support for major cloud providers (AWS, DigitalOcean, Linode, etc.) - Auto-installation and management of LAMP/LEMP stack - Free SSL installation with automatic renewal - Real-time server and application monitoring - Daily automated and manual backup system - Powerful log monitoring and analysis tools - Unlimited application hosting per server - Centralized dashboard for multiple server management - Role-based team access and collaboration - WordPress-specific tools (auto-installation, staging, cloning) - Git deployment and continuous integration support - Support for both Managed and Self-Managed servers - Easy migration tools and guided setup wizards - Firewall and security tools built-in - 24/7 support (for managed servers) - LiteSpeed and OpenLiteSpeed server support - Affordable pricing with scalable plans **Cons:** - Learning curve if you’re not familiar with servers **Pricing**: Basic droplets plan started (DigitalOcean) with $10/month, includes unlimited apps and website If you want flexibility, cost savings, and control over your cloud servers without the hassle of manual setup, **ServerAvatar is a solid choice for developers and agencies** ## 2. [Heroku](https://www.heroku.com/) Heroku has been a favorite among developers for years. Even in 2025, it holds a solid place in the Node.js hosting ecosystem. Why? Because it makes things ridiculously easy. If you’re someone who just wants to focus on building your app without worrying about infrastructure, Heroku is your go-to. ![Node.js hosting](https://serveravatar.com/wp-content/uploads/2025/07/heroku-1.png)**What makes Heroku special?** First of all, it’s incredibly beginner-friendly. You can deploy a Node.js app in minutes using just a few Git commands. Heroku handles all the background work, server management, scaling, monitoring, and more. Plus, it has a rich ecosystem of add-ons like databases, email services, caching tools, and so on. Heroku supports multiple Node.js versions, and you can easily set environment variables, enable automated deployments, and scale your app vertically or horizontally with just a few clicks. **Pros:** - Super easy to set up and use - Great documentation - Scalable and reliable - Wide range of integrations **Cons:** - Can get expensive as your app scales - Some performance limits on free plan **Pricing:-** Eco plans start at around $5 per month, which is pretty reasonable for Test ideas or run apps that see intermittent use. and Basic Plan starts from $7 per month for run small project and concepts. If you’re building a small to medium-sized app, or just want a reliable, no-fuss experience, Heroku is a solid choice. ## 3. [AWS Elastic Beanstalk](https://aws.amazon.com/elasticbeanstalk/) Amazon Web Services (AWS) is a giant in the cloud space. With **Elastic Beanstalk**, AWS tries to simplify the process of deploying applications, including Node.js ones, without making you handle all the cloud intricacies. ![AWS Elastic Beanstalk](https://serveravatar.com/wp-content/uploads/2025/07/image-2025-07-12T165705.128.jpg)Elastic Beanstalk supports Node.js out of the box. You just upload your app, and it handles the provisioning of servers (EC2), scaling, load balancing, and health monitoring. **What’s powerful about Elastic Beanstalk?** You get full control over your infrastructure if you want it, but you also have the option to let AWS automate everything for you. It’s a nice balance between managed and custom hosting. **Pros:** - Fully integrated with AWS services - Scalable and flexible - Great for enterprise-level apps - Powerful monitoring tools **Cons:** - Steeper learning curve than other options Pricing can be confusing **Pricing:** There’s no cost for Elastic Beanstalk itself, but you’ll pay for the AWS resources (EC2, RDS, etc.) it uses. That could start low, like $3–5/month for a small app, but can rise based on usage. If you’re expecting high traffic, need powerful customization, or are already in the AWS ecosystem, Elastic Beanstalk is a strong candidate. ## 4. [DigitalOcean App Platform](https://www.digitalocean.com/products/app-platform) DigitalOcean is well-known for its developer-friendly cloud infrastructure. Their **App Platform** makes things even easier by offering a fully managed platform-as-a-service (PaaS) solution for Node.js and other frameworks. ![DigitalOCean App Platform](https://serveravatar.com/wp-content/uploads/2025/07/image-2025-07-12T165803.001.jpg)In 2025, the App Platform offers automated deployments directly from GitHub or GitLab. You push your code, and DigitalOcean takes care of the rest, provisioning servers, setting up Docker containers, and even managing updates and rollbacks. **What’s great about DigitalOcean App Platform?** You get the power of DigitalOcean’s cloud with the simplicity of managed hosting. It supports scaling, custom domains, SSL, and background workers, all from a slick dashboard. **Pros:** - Affordable and scalable - Clean UI and easy setup - Backed by powerful infrastructure - Automatic SSL, deployments, and rollbacks **Cons:** - Less flexible than full cloud solutions like AWS - Advanced features may require moving to more expensive tiers **Pricing:** Starts with a free tier for static sites, but for Node.js apps you’ll likely start with the Basic plan at around $5/month. This is very affordable, especially for early-stage projects. For those who want performance and simplicity in one package, DigitalOcean’s App Platform is a smart pick. ## 5. [Vercel](https://vercel.com/) Vercel is another big name that’s gained huge traction over the past few years, especially among frontend developers. While it’s most commonly associated with React and Next.js, it also provides excellent support for Node.js backends and APIs. ![Vercel](https://serveravatar.com/wp-content/uploads/2025/07/image-2025-07-12T165959.170.jpg)In 2025, Vercel has expanded its offerings and optimized its platform for speed and simplicity. Deploying a Node.js function or app is as easy as connecting your GitHub repo and clicking deploy. Seriously, it takes less than five minutes. **What makes Vercel stand out?** It automatically handles performance optimization, CDN distribution, and caching. Your Node.js functions run as serverless functions, which means they scale instantly and only cost you when used. Vercel is perfect for modern apps that need to be fast, scalable, and globally available. It’s especially ideal if you’re building JAMstack or full-stack applications with a Node.js backend. **Pros:** - Fast and easy deployment - Global CDN out of the box - Great integration with modern frontend tools - Auto-scaling and low latency **Cons:** - Not ideal for long-running backend processes - May be overkill for simple apps **Pricing:** There’s a free tier with generous limits, and paid plans start at around $20/month for teams or advanced features. In short, if you want cutting-edge deployment with minimal effort, Vercel is a top-tier choice. ## 6. [Render](https://render.com/) Render is a rising star that has made a name for itself by offering the power of traditional cloud hosting with the ease of Heroku. And in 2025, it’s looking better than ever for Node.js developers. ![Render](https://serveravatar.com/wp-content/uploads/2025/07/image-2025-07-12T170200.253-1024x504.png)Render lets you deploy full-stack applications with minimal setup. You can host web services, static sites, background workers, and even cron jobs with just a few lines of configuration. **Why is Render gaining popularity?** Because it hits the sweet spot between power and simplicity. You don’t need to fiddle with infrastructure, but you still get detailed control when needed. It supports auto-deploy from GitHub, HTTPS out of the box, and automatic scaling. **Pros:** - Simple yet powerful - Great performance and scaling - Ideal for full-stack apps - Developer-friendly features **Cons:** - Still maturing compared to giants like AWS - Limited documentation in niche cases **Pricing:** Starts free, and paid plans are competitive, around $7/month for a web service. If you want something better than basic hosting but less complex than full cloud services, Render is a fantastic middle-ground. ## 7. [Railway](https://railway.com/) **Railway** is a developer-centric platform that has exploded in popularity thanks to its simplicity and speed. By 2025, it’s widely considered one of the smoothest ways to host Node.js applications. Whether you’re deploying a personal project or running a full production app, Railway makes the experience frictionless. ![Railway](https://serveravatar.com/wp-content/uploads/2025/07/image-2025-07-12T170305.506-1024x506.png)What makes Railway unique is its magical setup process. You just connect your GitHub repo, select your Node.js project, and it automatically detects everything. No Docker files, no complicated configurations—it just works. That’s a huge win for developers who don’t want to deal with infrastructure headaches. **Railway’s key strengths:** It focuses on productivity. With an intuitive interface and quick deployment flow, Railway minimizes the learning curve. It also provides built-in support for databases like PostgreSQL and MySQL, automatic builds and deployments, secret management, and real-time logs. **Pros:** - No config deployment - Extremely user-friendly interface - Perfect for small to mid-sized apps - Great for prototypes and MVPs **Cons:** - Limited customizability for advanced setups - Pricing can add up as you scale multiple services **Pricing:** The Hobby plan allows you to deploy small apps for testing or demos. Paid plans start at about $5 per project per month, which includes more CPU, memory, and persistent storage. If you want a hosting platform that feels like magic and helps you build faster without worrying about servers, Railway is a superb choice, especially for individual developers and startups. ## Conclusion In 2025, Node.js developers have a wealth of powerful hosting options. Whether you need simplicity, scalability, or enterprise-level performance, there’s a platform tailored for your project. From beginner-friendly solutions like **Heroku** and **Railway** to performance-driven platforms like **Vercel** and **Render**, the right choice depends on your goals, budget, and app size. Take time to evaluate each based on your specific needs and get building. ## FAQs ### **1. Which Node.js hosting is best for beginners?** Heroku and Railway are great for beginners due to their easy setup and user-friendly interfaces. ### **2. Is there any free hosting for Node.js in 2025?** Yes, platforms like Vercel, Heroku, Railway, and Glitch offer free tiers. ### **3. What’s the most scalable hosting for Node.js?** AWS Elastic Beanstalk and Vercel offer strong scalability options for growing apps. ### **4. Which platform is best for full-stack Node.js apps?** Render and DigitalOcean App Platform are excellent for full-stack applications. ### **5. Can I use GitHub to deploy my Node.js app?** Yes, most platforms like Vercel, Render, Railway, and DigitalOcean support GitHub-based deployments. ## Stop Wasting Time on Servers. Start Building Instead. You didn’t start your project to babysit servers. Let **ServerAvatar** handle deployment, monitoring, and backups — so you can focus on growth. Deploy **WordPress, Laravel, N8N**, and more in minutes. No DevOps required. No command line. No stress. [ 🚀 Try ServerAvatar Free – No Credit Card Needed ](https://app.serveravatar.com) Trusted by 10,000+ developers and growing. **Categories:** Blog, Guide, Node.js **Tags:** Best Node.js Hosting 2025, Fast Node.js Hosting, Node.js Deployment, Node.js Hosting, Scalable Hosting Platforms, top 7 node --- ### [16 Best CMS Platforms for Websites in 2026](https://serveravatar.com/best-cms-platforms/) **Published:** July 14, 2025 **Author:** Meghna Meghwani **Content:** [![Blog banner - ServerAvatar](https://serveravatar.com/wp-content/uploads/2025/09/728_90-Banner-3-1024x127.png)](https://serveravatar.com?ref=blog)When it comes to creating a website in 2025, choosing the **Best CMS Platforms** is more important than ever. Whether you’re a beginner launching your first blog, a business owner running an online store, or a developer building custom solutions, the right CMS can save you time, effort, and money. With many CMS platforms available, each with its own features, pros, and pricing, it’s easy to get overwhelmed. That’s why we’ve created a list of **16 best CMS platforms for websites in 2025**, to help you make the right choice for your needs. ## What is a CMS? A Content Management System (CMS) is tool that helps you create, manage, and publish content for websites without writing code. Think of it as engine behind your website that lets you add pages, upload images, organize content, and many more, all through user-friendly dashboard. Instead of writing HTML, CSS, or JavaScript, you use CMS dashboard to add images, format content, and structure your site. Popular examples are WordPress, Joomla, and Drupal. ## What is a Website Builder? A website builder is tool designed for beginners to create websites using simple drag-and-drop interface. It’s all-in-one solution where hosting, design, and content editing are combined into single platform. Examples include **Squarespace** and **Weebly**. These platforms are ideal for users who want to launch website quickly without dealing with code or external hosting. ## Difference Between CMS and Website Builder **Feature****CMS Platform****Website Builder****Flexibility**High – fully customizableLimited – mostly template-based**Ease of Use**Moderate – depends on platformVery easy – drag-and-drop**Hosting**Usually self-hostedHosting included**Control & Scalability**Full control, scalableLimited control, less scalable**Ideal For**Blogs, businesses, custom websitesPortfolios, small business, landing pages**Examples**WordPress, Joomla, DrupalWix, Squarespace, Weebly## Best CMS Platforms in 2025 (Comparison Table) **CMS Platform****Written In****Starting Price****WordPress**PHPFree (self-hosted)**Shopify**Ruby$1994/month**Wix**JavaScript$250/month**Joomla**PHPFree (self-hosted)**Drupal**PHPFree (self-hosted)**Webflow**JavaScript$18/month**Ghost**Node.js$11/month (self-hosted)**Squarespace**Javascript$25/month**Magento**PHPFree (self-hosted)**TYPO3**PHPFree (self-hosted)**Contentful**JavaScript/GoFree (self-hosted)**Strapi**Node.jsFree (self-hosted)**Blogger**PythonFree**Craft CMS**PHPFree (self-hosted)**Concrete CMS**PHPFree (self-hosted)**HubSpot CMS Hub**Java$890/month## 1. WordPress [WordPress](https://wordpress.com/) is most popular free CMS. It’s flexible, has many plugins, and is easy to use. You can create any site for blog, any business site, or an online store with it. Whether you are creating blog, business website, or online store, WordPress can handle it all with ease. It’s self-hosted, so you will need domain and hosting plan for it. ![Wordpress - ServerAvatar](https://serveravatar.com/wp-content/uploads/2025/07/image.png) **Best for:** creating blogs, for business websites, portfolios, and e-commerce websites **Why it stands out:** WordPress runs more than 40% of all websites. It’s open-source, highly customizable, and backed by massive community. With thousands of themes and plugins, you can easily create almost any type of websites. **With [ServerAvatar](https://serveravatar.com),** you can easily install [WordPress](https://serveravatar.com/docs/application/one-click-installer/wordpress) application by using [one-click installation](https://serveravatar.com/docs/application/one-click-installer/getting-started) feature. Additionally, you can use [Managed Server](https://serveravatar.com/docs/managed-server/installation) feature to create a server directly from ServerAvatar and [Self-Managed Server](https://serveravatar.com/docs/server-management/installation/direct-method) feature to connect your own VPS. **Pros:** - Free and open-source - Huge library of plugins and themes - Great for SEO and content marketing **Cons:** - Requires hosting and maintenance - It can be overwhelming for total beginners ## 2. Shopify [Shopify](https://www.shopify.com) CMS is fully hosted and specifically designed for e-commerce websites. It allows you to quickly build, customize, and manage an online store, even if you have no coding experience. With built-in payment gateways, shipping tools, and analytics, it’s perfect for online sellers. ![Shopify - ServerAvatar](https://serveravatar.com/wp-content/uploads/2025/07/image-1-1024x447.jpg) **Best for:** Online stores and e-commerce entrepreneurs. **Why it stands out:** Shopify is dedicated e-commerce CMS that simplifies online selling. It handles payments, shipping, product pages, and more, all in one place. **Pros:** - Fully hosted and secure - Beautiful store themes - Excellent customer support **Cons:** - Monthly fees - Limited customization outside Shopify ecosystem ## 3. Wix [Wix](https://www.wix.com) is website builder and CMS combined into one easy-to-use platform. It offers drag-and-drop editing, stylish templates, and built-in hosting. Ideal for beginners and small business owners who want to launch website quickly without any coding. ![Wix - ServerAvatar](https://serveravatar.com/wp-content/uploads/2025/07/image-1-2-1024x492.jpg) **Best for:** Small business owners and creatives. **Why it stands out:** Wix is website builder with drag-and-drop feature in it, that works as a CMS. It’s perfect for those who want beautiful site without coding. **Pros:** - Beginner-friendly - Built-in design tools and templates - Hosting included **Cons:** - Limited flexibility for complex sites - Slower loading time for larger websites ## 4. Joomla [Joomla](https://www.joomla.org/) is free, open-source CMS that gives more structure and flexibility than WordPress, making it ideal for complex websites. It has strong user access controls, multilingual support, and a loyal developer community. It’s best suited for users with some technical background. ![Joomla - ServerAvatar](https://serveravatar.com/wp-content/uploads/2025/07/image-1-4-1024x498.jpg) **Best for:** Advanced users and developers. **Why it stands out:** Joomla is known for its flexibility. It sits between WordPress and Drupal in terms of complexity and features. **With ServerAvatar,** you can easily install [Joomla](https://serveravatar.com/docs/application/one-click-installer/joomla) application by using [one-click installation](https://serveravatar.com/docs/application/one-click-installer/getting-started) feature. Additionally, you can use [**Managed Server**](https://serveravatar.com/docs/managed-server/installation) feature to create a server directly from ServerAvatar and [**Self-Managed Server**](https://serveravatar.com/docs/server-management/installation/direct-method) feature to connect your own VPS. **Pros:** - Great for multilingual sites - Strong user and content management - Free and open-source **Cons:** - Steeper learning curve - Smaller extension library than WordPress ## 5. Drupal [Drupal](https://new.drupal.org) is strong CMS made for developers and large websites that require high security, complex data handling, and customization. It’s open-source and highly scalable, making it favorite for enterprise, government, and educational institutions. **Best for:** It is best for complex and large websites and government sites. **Why it stands out:** Drupal is secure and customizable platform, and it is popular among enterprise-level users and developers. ![Drupal - ServerAvatar](https://serveravatar.com/wp-content/uploads/2025/07/image-1-5-1024x512.jpg) **Pros:** - Excellent for custom data structures - Highly secure and scalable - Flexible roles and permissions **Cons:** - Not beginner-friendly - Requires technical expertise ## 6. Webflow [Webflow](http://webflow.com) combines power of visual design with a full-featured CMS. It’s ideal for designers and front-end developers who want full control over website layout and interactions, while still managing content through clean, no-code interface. ![Webflow - ServerAvatar](https://serveravatar.com/wp-content/uploads/2025/07/image-1-1024x557.png) **Best for:** It is popular for designers and developers who want control on and clean code. **Why it stands out:** Webflow combines visual design with CMS features and outputs production-ready HTML/CSS. Great for high-end websites. **Pros:** - Clean, exportable code - Fully responsive designs - CMS + hosting in one **Cons:** - Higher pricing tiers - Learning curve for non-designers ## 7. Ghost [Ghost](http://ghost.org) is fast, simple CMS for bloggers and content creators. Built on Node.js, it focuses on performance and ease, with features like SEO, email newsletters, and distraction-free writing environment. ![Ghost - ServerAvatar](https://serveravatar.com/wp-content/uploads/2025/07/image-2-1-1024x557.jpg) **Best for:** Bloggers and content creators. **Why it stands out:** Ghost is lightweight CMS focused entirely on publishing. It’s fast, minimalist, and perfect for writers who value performance and simplicity. **Pros:** - Lightning-fast performance - Modern, distraction-free writing interface - SEO built-in **Cons:** - Limited to blogging and newsletters - Requires self-hosting unless using Ghost(Pro) ## 8. Squarespace [Squarespace](https://www.squarespace.com/) is an all-in-one website platform known for its sleek design templates and easy setup. It’s great for creatives, freelancers, and small businesses looking to build visually impressive websites without dealing with code or external hosting. ![Squarespace - ServerAvatar](https://serveravatar.com/wp-content/uploads/2025/07/image-2-3-1024x495.jpg) **Best for:** Artists, photographers, and creatives. **Why it stands out:** Squarespace is known for its gorgeous templates and all-in-one platform. It’s perfect for people who value aesthetics. **Pros:** - Stunning templates - Built-in analytics and marketing tools - Easy to use **Cons:** - Limited third-party integrations - Less flexible than open-source platforms ## 9. Magento (Adobe Commerce) [Magento](https://magento-opensource.com) is a robust eCommerce CMS platform owned by Adobe. It’s perfect for enterprise-level online stores that need complex features like a multi-store support, advanced product management, and large inventories. Best for developers and large businesses. ![Magento - ServerAvatar](https://serveravatar.com/wp-content/uploads/2025/07/image-2-4-1024x556.jpg) **Best for:** Large-scale eCommerce businesses. **Why it stands out:** Magento offers enterprise-level features for a stores with thousands of products and advanced business needs. **Pros:** - Highly scalable and customizable - Advanced product and customer management - Supports multiple stores/languages **Cons:** - Complex to set up and manage - Expensive for small businesses ## 10. TYPO3 [TYPO3](https://typo3.org/) is professional, enterprise-level CMS with features suited for large, multilingual, and multisite projects. It’s open-source, highly customizable, and ideal for organizations that require structured content management and long-term stability. ![TYPO3 - ServerAvatar](https://serveravatar.com/wp-content/uploads/2025/07/image-5-1024x519.png)**Best for:** Enterprise-grade websites and intranets. **Why it stands out:** TYPO3 is robust CMS used for complex digital ecosystems. It offers advanced features like workflow management and version control. **Pros:** - Enterprise features - Multisite and multilingual ready - Long-term stability **Cons:** - Not ideal for beginners - Requires technical knowledge [![Blog banner - ServerAvatar](https://serveravatar.com/wp-content/uploads/2025/09/728_90-Banner-1-1024x127.png)](https://serveravatar.com?ref=blog)## 11. Contentful [Contentful](https://www.contentful.com/) is a headless CMS designed for developers who want to deliver content across multiple platforms, websites, mobile apps, IoT, and more. It uses APIs to distribute a content and offers flexible, cloud-based architecture perfect for a modern web projects. ![Contentful - ServerAvatar](https://serveravatar.com/wp-content/uploads/2025/07/image-4-1024x547.jpg) **Best for:** Headless CMS use cases and developers. **Why it stands out:** Contentful is headless CMS, which means content is stored and delivered via APIs, allowing flexibility across web and mobile apps. **Pros:** - Great for JAMstack and omnichannel experiences - Scalable for enterprise use - Dev-friendly **Cons:** - Requires coding knowledge - Paid plans get expensive quickly ## 12. Strapi [Strapi](https://strapi.io) is an open-source, Node.js-based headless CMS that gives developers full control over content APIs. It’s self-hosted, fully customizable, and supports REST and GraphQL, making it a favorite among developers building JAMstack and API-first applications. ![Strapi - ServerAvatar](https://serveravatar.com/wp-content/uploads/2025/07/image-3-1024x587.png) **Best for**: Developers looking for self-hosted headless CMS. **Why it stands out**: Strapi is an open-source, Node.js-based CMS that lets you build flexible APIs while controlling your own infrastructure. **Pros:** - 100% customizable - REST and GraphQL APIs - Self-hosted and free **Cons:** - Needs backend knowledge - Not ideal for non-tech users ## 13. Blogger [Blogger](https://www.blogger.com) is free platform from Google. It’s simple, easy to use, and works well with other Google services. While it has basic design options, it’s great for beginners and a hobby bloggers who want to write and publish fast. ![Blogger - ServerAvatar](https://serveravatar.com/wp-content/uploads/2025/07/image-3-2-1024x519.jpg)**Best for:** Hobby bloggers and personal websites. **Why it stands out:** Blogger is a simple, Google-owned platform for blogging. While not as popular today, it still serves many casual bloggers. **Pros:** - Free and easy to use - Google integration - Hosting included **Cons:** - Limited customization - Outdated interface ## 14. Craft CMS [Craft CMS](https://craftcms.com) is a flexible and developer-friendly platform that focuses on custom design and structured content. It’s best for agencies and designers building tailored websites, offering complete control over content modeling and front-end rendering. ![Craft CMS - ServerAvatar](https://serveravatar.com/wp-content/uploads/2025/07/image-3-1-1024x595.jpg) **Best for:** Designers and agencies building custom websites. **Why it stands out:** Craft CMS is known for flexibility and clean architecture. It’s ideal for developers who want to build fully custom experiences. **With ServerAvatar,** you can easily install [Craft CMS](https://serveravatar.com/docs/application/one-click-installer/craft-cms) application by using [one-click installation](https://serveravatar.com/docs/application/one-click-installer/getting-started) feature. Additionally, you can use [Managed Server](https://serveravatar.com/docs/managed-server/installation) feature to create a server directly from ServerAvatar and [Self-Managed Server](https://serveravatar.com/docs/server-management/installation/direct-method) feature to connect your own VPS. **Pros:** - Powerful templating system - Content-first approach - High performance **Cons:** - Not free for commercial use - Requires coding skills ## 15. Concrete CMS [Concrete CMS](https://www.concretecms.com/) is an open-source platform that allows real-time, in-page content editing. It’s beginner-friendly yet powerful enough for developers, making it suitable for businesses that want control, ease of use, and solid content workflows. ![Concrete CMS - ServerAvatar](https://serveravatar.com/wp-content/uploads/2025/07/image-3-1024x631.jpg) **Best for:** Businesses that need easy editing and good control. **Why it stands out:** Concrete CMS offers in-context editing and easy layout building while still allowing deeper control. **Pros:** - Easy content editing - Built-in SEO tools - Open-source **Cons:** - Smaller community - Fewer third-party plugins ## 16. HubSpot CMS Hub [HubSpot CMS Hub](https://www.hubspot.com/) blends content management with powerful marketing and CRM tools. It’s great for businesses focused on growth, allowing you to create personalized experiences, automate marketing, and manage customer data, all from one platform. ![Best CMS Platforms](https://serveravatar.com/wp-content/uploads/2025/07/image-2-1024x511.png) **Best for:** Marketers and businesses focused on growth. **Why it stands out:** CMS Hub combines content management with CRM and marketing tools, making it great for inbound-focused websites. **Pros:** - Integrated with HubSpot CRM - Personalization and analytics - Great for marketers **Cons:** - Higher pricing tiers - Limited design flexibility compared to others ## How to Choose a CMS Platform Choosing a right CMS depends on what kind of website you want to build and how much control or customization you need. Here are some factors to consider: - **Ease of Use:** Pick CMS that matches your comfort level. If you’re beginner, choose something with a simple interface like WordPress, Wix, or Squarespace. - **Customization and Flexibility:** If you want full control over design and features, go for platforms like WordPress, Drupal, or Craft CMS. - **Budget:** Factor in hosting, plugins, themes, and add-ons. Some CMSs are free to use but may require paid hosting or extensions. - **SEO Capabilities:** Make sure a platform supports basic SEO features like metadata, URLs, sitemaps, and schema markup. - **Security:** Look for regular updates, strong user permissions, and ability to add security plugins or tools. ## Support & Community A large community or dedicated support team can help you when you’re stuck. WordPress, for example, has massive user base and countless tutorials. ## Questions to Ask Before Picking A CMS Before committing to any CMS, ask yourself these questions: 1. What type of website am I building? (Blog, portfolio, store, etc.) 2. How tech-savvy am I? 3. Do I want to self-host or use fully hosted solution? 4. Will my website need extra features later? 5. How important is design flexibility to me? 6. What’s my monthly or yearly budget? 7. Does CMS support SEO and performance optimization? 8. How many users will manage site? 9. Will I be selling products online? 10. Is mobile responsiveness included, or do I need to customize it? ## Conclusion In 2025, website building is more accessible than ever, but also more competitive. Picking right CMS can make or break your website. From all-in-one platforms like **Wix** and **Squarespace** to powerful open-source tools like **WordPress**, **Drupal**, and **Strapi**, there’s a CMS out there for every project and skill level. Take a time to evaluate your goals, budget, and technical skills. and explore features, test free versions, and match them with your goals before diving in. Once you pick a right platform, rest gets a whole lot easier. A good CMS can save you time, reduce costs, and make website management a breeze. Whether you’re building a personal blog, launching an eCommerce store, or managing a business website, there’s CMS platform that fits your goals. ## FAQs ### **Q1: What is the most popular CMS in 2025?** **A:** WordPress remains most popular CMS, powering over 40% of all websites globally. ### **Q2: Which CMS is best for eCommerce?** **A:** Shopify, WooCommerce (on WordPress), and Magento are top choices for online stores. ### **Q3: Can I switch CMS platforms later?** **A:** Yes, but it’s often time-consuming and may require professional help for content migration. ### **Q4: Is CMS necessary to build website?** **A:** No, but it simplifies website creation and management significantly, especially for non-coders. ### **Q5: What is best free CMS?** **A:** WordPress.org, Joomla, and Drupal are all powerful open-source CMS platforms that are free to use. [](https://3.basecamp.com/5840738/buckets/41514807/boosts/new?boost%5Bboostable_gid%5D=Z2lkOi8vYmMzL1JlY29yZGluZy84ODUxNTAyNDQw) **Categories:** Blog, Guide, JavaScript, Linux, Node.js, Php, Ubuntu, WordPress **Tags:** Best CMS, CMS, Node.js, php, Wordpress --- ### [5 Best WordPress File Manager Plugins (2026)](https://serveravatar.com/wordpress-file-manager-plugins/) **Published:** July 15, 2025 **Author:** Meghna Meghwani **Content:** I’ve been using WordPress for a long time now, and let me tell you dealing with files used to be really hard. You had to use weird programs, download files just to change one small thing, and hope you didn’t delete something important by mistake. But now, with a **WordPress file manager Plugins** , it’s so much easier to manage and edit your site files right from your browser. But things are much better now. There are some really good plugins that let you handle all your files right from inside WordPress. I’ve tried most of them, and today I want to show you the 5 best ones I’ve found. ## What is a WordPress File Manager Plugin? Think about how you look at files on your computer. You can see folders, open them, move files around, and delete stuff you don’t need. A WordPress file manager plugin does the same thing, but for your website. Instead of using hard programs or downloading files every time you want to change something, you can just go into WordPress and do everything from there. It’s so much easier once you try it. Here’s what you can do with these plugins: - Put files on your site - Change files without downloading them first - Make folders and keep things neat - Delete files you don’t want - Move stuff around easily - Get files from your site to your computer ## Why Use a File Manager Plugin? I know what you’re thinking. WordPress already has a place for pictures and videos, so why do you need something else? Well, here’s why I think it’s worth it: **Easy to Use**: You don’t have to switch between different programs. Everything is right there in WordPress. **Saves Time**: Need to fix a small mistake in a file? Just click, change it, save. That’s it. No downloading, fixing, uploading again. **Less Chance of Mistakes**: When things are simple, you mess up less. I know this from experience. **Better Organization**: You can actually see what files are on your site and keep them organized. **Quick Fixes**: When something goes wrong on your site, you can often fix it fast without waiting for other programs. Okay, let’s talk about the good stuff. These are the plugins I use myself and tell other people about. ## 1. WP File Manager ![WP File Manager](https://serveravatar.com/wp-content/uploads/2025/07/image-18-1024x450.png)[WP File Manager](https://wordpress.org/plugins/wp-file-manager/) is the one most people know about, and there’s a good reason for that. I’ve been using it for a few years now, and it just works well. **What I Like About It:** - It feels like using the file thing on your computer - You can change files right in your web browser - You can drag files around and it works - The free version has most things you need - It can handle zip files, which is nice **How It Works:** After you put it on your site, you’ll see a new “File Manager” button in your WordPress menu. Click it and you can see all your website files. You can double-click folders to open them, right-click for more options, and use it like any file program. **Advantages:** - Really easy to use, even if you’re new to this - Free version actually does useful things - Works with almost any web host - They keep updating it - Can handle big files without problems - Has quick buttons if you like those - Works okay on phones too **Disadvantages:** - Can get slow if you have tons of files - Looks a bit old - Some cool features cost money - Uses up some of your site’s power - Not great if you work with other people **Best For:** If you’re just starting out or want something that works without much trouble. **What It Costs:** Free version does most things. Paid version is about $25 per year. **Free vs Paid:** - **Free Version:** Basic file work, changing files, upload/download, folders, zip files - **Paid Version:** User permissions, front-end access, better support ## 2. FileBird ![File Bird](https://serveravatar.com/wp-content/uploads/2025/07/image-19-1024x466.png)[FileBird](https://wordpress.org/plugins/filebird/) is different. It’s not really a full file manager – it’s more about organizing your pictures and videos. But if you work with lots of images, it’s amazing. **What I Like About It:** - Makes organizing photos and videos so much easier - Works right with WordPress media library - Simple drag and drop - Great for cleaning up messy picture collections - Doesn’t change how WordPress normally works **How It Works:** [FileBird](https://wordpress.org/plugins/filebird/) adds folders to your WordPress media library. So instead of having all your images in one big mess, you can make folders like “Blog Photos,” “Product Pictures,” “Videos,” etc. It’s simple but really helpful. **Advantages:** - Perfect for organizing media files - Works smoothly with WordPress - Super easy to understand and use - Great for sites with lots of images - Doesn’t mess with how WordPress normally works - You can organize old files too - Works well with page builders **Disadvantages:** - Only works with pictures and videos, not other files - Free version only gives you 10 folders - You can’t change files directly - Useless for managing code files - Limited compared to full file managers - Paid version is expensive for what you get **Best For:** Bloggers, photographers, online stores, or anyone who deals with lots of pictures and videos. **What It Costs:** Free version lets you make 10 folders. Paid version is about $39 per year. **Free vs Paid:** - **Free Version:** Up to 10 folders for organizing media - **Paid Version:** Unlimited folders, better sorting, bulk actions, page builder connections ## 3. File Manager Advanced ![File Manager Advanced](https://serveravatar.com/wp-content/uploads/2025/07/image-20-1024x425.jpg)[File Manager Advanced](https://wordpress.org/plugins/file-manager-advanced/) is newer but I’m starting to like it more. It looks really clean and modern. **What I Like About It:** - Looks way newer than most others - Actually fast, even with lots of files - Good safety options built in - Works great on phones - The people who made it keep updating it **How It Works:** After you install it, you’ll find it in your WordPress menu. Everything looks clean and easy to understand. You can drag files right into your web browser to upload them. **Advantages:** - Modern look that doesn’t seem old - Fast even with huge amounts of files - Safety features are already there - Mobile experience is actually good - You can change how it looks - Support team answers questions - Doesn’t slow down your site **Disadvantages:** - Free version doesn’t have much - Still pretty new, so fewer people use it - Some web hosts don’t work well with all features - Might be too much for very basic users - Not many tutorials online yet **Best For:** If you want something that looks and feels modern, especially if you use phones and tablets a lot. **What It Costs:** Free version is okay. Paid version is about $30 per year. **Free vs Paid:** - **Free Version:** Basic file management, modern look, mobile support - **Paid Version:** Better security, cloud storage connections, priority support ## 4. WPIDE – File Manager & Code Editor ![WPIDE](https://serveravatar.com/wp-content/uploads/2025/07/image-20-1024x465.png)[WPIDE – File Manager & Code Editor](https://wordpress.org/plugins/wpide/) special because it combines file management with real code editing. If you need to make changes to your WordPress files and actually write code, this is the one to look at. **What I Like About It:** - Built-in code editor with all the good stuff - Highlights code so it’s easy to read - Can work with different types of files - Shows line numbers and helps spot mistakes - Has backup features built in - Actually made for developers but easy enough for others **How It Works:** WPIDE gives you a complete editing environment right in WordPress. You can browse your files like a normal file manager, but when you click to edit a file, you get a full code editor with syntax highlighting, line numbers, and all the features you’d expect from a real code editor. **Advantages:** - Really good code editor built in - Makes code easy to read with colors - Can edit any type of file on your site - Helps you find mistakes in your code - Built-in backup before you save changes - Good for both beginners and advanced users - Doesn’t need separate programs - Works with themes and plugins directly **Disadvantages:** - Can be overwhelming if you don’t write code - Takes up more space than simple file managers - Not great for just moving files around - Might be too much for basic users - Uses more server power than simple options - Learning curve if you’re new to code editing **Best For:** People who need to edit code files, developers, advanced users who want to customize their WordPress sites, or anyone who wants to learn more about how WordPress works. **What It Costs:** Free version available. Pro version costs about $29 per year. **Free vs Paid:** - **Free Version:** Basic code editing, file management, syntax highlighting - **Pro Version:** Advanced editing features, better backup options, priority support, more file types ## 5. File Manager Plugin ![WordPress file manager plugins](https://serveravatar.com/wp-content/uploads/2025/07/image-21-1024x448.png)[File Manager Plugin](https://wordpress.org/plugins/file-manager/) does exactly what it says. It’s basic, but sometimes that’s exactly what you need. **What I Like About It:** - Super simple to use - Doesn’t slow down your site - Just works without any problems - Completely free - Small file size **How It Works:** It adds a basic file manager to your WordPress admin. You can see files, upload new ones, do basic changes. Nothing fancy, but it gets the job done. **Advantages:** - Free forever (no hidden costs) - Very light and fast - Easy to learn - Works with almost any web host - Won’t fight with other plugins - Simple look that’s not confusing - Good for basic tasks **Disadvantages:** - Very basic features only - No advanced options at all - Plain-looking - Has trouble with really big files - No support (it’s free, so…) - Limited editing abilities - No team work features **Best For:** Small websites, beginners, or anyone who just needs basic file management without extra stuff. **What It Costs:** Completely free. **Free vs Paid:** - **Free Version:** This plugin is completely free forever with all basic features - **No Paid Version:** The people who made it don’t offer a premium version ## How to Choose the Right Plugin With all these choices, how do you decide? Here’s how I think about it: **What Do You Actually Need?**: Are you just managing basic files, or do you need advanced features like file sharing? **How Technical Are You?**: Some plugins are easier for beginners than others. **What’s Your Budget?**: Figure out if you need paid features or if free will work. **What Kind of Site Do You Have?**: A simple blog needs different features than an online store. ## Some Tips I’ve Learned the Hard Way **Always Backup First**: Before you change important files, make a copy. I learned this one the hard way. **Stay Organized**: Make folders for different types of files from the start. It saves headaches later. **Be Careful with System Files**: Don’t delete or change files unless you know what they do. Some files are really important for your site. **Keep Things Updated**: Update your plugins regularly for safety and performance. **Start Simple**: Learn the basic features first, then try advanced stuff as you get comfortable. ## Common Problems and Solutions **Plugin Won’t Install**: Usually means your WordPress needs updating. Old versions sometimes have problems with new plugins. **Can’t See Files**: Check plugin permissions. Sometimes you need to contact your web host. **Upload Fails**: Check file size limits. Most hosts have rules about how big files can be. **Site Gets Slow**: Some plugins are heavier than others. Try a lighter option if speed matters. ## Security Tips File managers are powerful, so here’s how to stay secure: **Use Strong Passwords**: Make sure your WordPress admin password is good. **Keep Everything Updated**: Old plugins can have safety problems. **Limit Access**: Only give file manager access to people you trust. **Regular Backups**: Always have recent backups of your site. **Check Permissions**: Make sure files have the right permissions set. ## Conclusion File manager plugins have made my WordPress life so much easier. Whether you need something simple or advanced, there’s definitely a good option out there. For most people, I’d recommend starting with [WP File Manager](https://wordpress.org/plugins/wp-file-manager/). It’s free, works well, and has everything most users need. If you work with lots of pictures, [FileBird](https://wordpress.org/plugins/filebird/) is worth trying. For advanced file sharing, [WPIDE – File Manager & Code Editor](https://wordpress.org/plugins/wpide/) is the way to go. The key is to pick something that matches your needs and skill level. Don’t feel like you need the most advanced plugin if you’re just doing basic file management. Remember to backup before making changes, and don’t be afraid to try different plugins until you find one that works for you. They’re all pretty easy to install and remove if they don’t work out. ## FAQ ### **Q: Are these plugins actually safe to use?** Yes, as long as you get them from the official WordPress plugin directory and keep them updated. I’ve been using them for years without problems. ### **Q: Can I accidentally break my site with these?** It’s possible if you delete important files, but most plugins have safety features. Just backup first and you’ll be fine. ### **Q**: **Do I need to know code to use these?** WP File Manager is probably your best bet. It’s easy to use but still has all the features most people need. ### **Q:** **Can I use multiple file manager plugins at once?** I wouldn’t recommend it. Having multiple plugins doing similar things can cause problems and slow down your site. ### **Q: How much should I expect to pay?** Many good options are free. Paid versions usually cost $25-40 per year if you need advanced features. ### **Q: Will these work with my theme?** Yes, file managers work in the admin area, so they don’t mess with your theme’s design. ### **Q: Can I edit files directly in the browser?** A: Most of these plugins let you change text files right in your browser. It’s really handy for quick changes. ## Stop Wasting Time on Servers. Start Building Instead. You didn’t start your project to babysit servers. Let **ServerAvatar** handle deployment, monitoring, and backups — so you can focus on growth. Deploy **WordPress, Laravel, N8N**, and more in minutes. No DevOps required. No command line. No stress. [ 🚀 Try ServerAvatar Free – No Credit Card Needed ](https://app.serveravatar.com) Trusted by 10,000+ developers and growing. **Categories:** Blog, Guide, WordPress **Tags:** file manager, file manager plugin, plugin, Wordpress, Wordpress Plugin --- ### [10 Best WordPress Ecommerce Themes for 2026 (Free and Paid)](https://serveravatar.com/best-wordpress-ecommerce-themes/) **Published:** July 18, 2025 **Author:** Meghna Meghwani **Content:** **Want to sell stuff online? WordPress Ecommerce Themes are the key to building a great-looking, easy-to-use store.** A theme is just how your website looks, it makes things pretty and simple to navigate. Not all themes work well for selling things. You need one that’s built for shopping carts, product displays, and payments. That’s what we call ecommerce themes. Here are 10 great WordPress ecommerce themes for 2025. Some are free, some cost money — but they all help you create a professional online store. ## What Makes a Good Ecommerce Theme? Before I tell you about the themes, let me explain what makes one good for selling stuff. First, it has to be fast. People hate slow websites. If your site takes too long to load, they’ll leave and buy somewhere else. Second, it should look good on phones. Most people shop on their phones now. Your theme better work on small screens. Third, it needs to work with WooCommerce. That’s what most people use to sell stuff on WordPress. If your theme doesn’t work with it, you’ll have problems. It should also be easy to change colors and fonts. You want your store to look different from everyone else. ## 1. Storefront ![Storefront](https://serveravatar.com/wp-content/uploads/2025/07/image-43-edited.png)The people who made WooCommerce also made [Storefront](https://wordpress.org/themes/storefront/). So it works really well with online stores. It’s super clean and simple. The design doesn’t get in the way of your products. People can focus on what you’re selling instead of fancy stuff. The theme loads fast and looks good on phones. You can change colors and fonts without much trouble. There are also lots of extras you can add later. The only bad thing is it looks pretty basic. If you want something fancier, you might need to pay for more stuff. ## 2. Astra ![Astra](https://serveravatar.com/wp-content/uploads/2025/07/image-46-1024x559.jpg)[Astra](https://wordpress.org/themes/astra/) is one of the most popular WordPress themes ever. It works great for online stores too. This theme is really fast. It’s also super easy to change. You can adjust almost everything without knowing how to code. Astra works with all the popular page builders like Elementor. So if you want to make fancy pages, you can do that easy. The free version gives you lots of options. But if you want more features, there’s a paid version too. ## 3. OceanWP ![Ocean WP](https://lh7-rt.googleusercontent.com/docsz/AD_4nXeXF4dszRYgc0IxcMgwp5OPojFEHhJggXGpYr5XLpag0rJdxCH7XmE10r5oErgdG0ODnKW0UdzBHZf2jiSAgy1DtrUWxqxr4w6rH_9_JOv7PqE8WNQfmmlSjG0IlNverUo_5dkE?key=Ph3vQphb3FhCGQEG558ZoA)[OceanWP](https://wordpress.org/themes/oceanwp/) is another free theme that’s perfect for online stores. It comes with special ecommerce features built in. You get nice product page layouts, shopping cart designs, and checkout pages that look professional. The theme also loads super fast. One cool thing about OceanWP is you can make your site look totally different with their demo imports. They have ready-made designs you can use with one click. The options for changing things are pretty good for a free theme. You can change colors, fonts, and layouts without any trouble. ## 4. Neve ![Neve](https://serveravatar.com/wp-content/uploads/2025/07/unnamed-1024x573.jpg)[Neve](https://wordpress.org/themes/neve/) is newer but already really popular. It’s built to be fast and work well with online stores. The design is clean and modern. It focuses on your products and makes shopping easy for customers. The theme works great on phones and tablets. Neve works well with WooCommerce and popular page builders. You can create custom product pages pretty easily. The free version has everything most people need. There’s also a paid version with more advanced stuff. ## 5. Zakra ![Zakra](https://serveravatar.com/wp-content/uploads/2025/07/image-46-1024x612.png)[Zakra](https://wordpress.org/themes/zakra/) is a theme that works really well for ecommerce sites. It’s fast, clean, and easy to change. The theme comes with several ready-made demos, including some just for online stores. You can import these and have a professional-looking site in minutes. Zakra works with all the major page builders and has good WooCommerce integration. The options for changing things are solid for a free theme. One thing I like about Zakra is it doesn’t try to do too much. It focuses on being fast and reliable, which is what you want for an online store. ## 6. Flatsome ![Flatsome](https://serveravatar.com/wp-content/uploads/2025/07/image-50-1-1024x370.jpg)[Flatsome](https://demos.flatsome.com/) is probably the most popular paid ecommerce theme. Thousands of online stores use it. The theme comes with a drag-and-drop page builder built right in. You can create custom product pages and shop layouts without any coding. Flatsome has tons of ready-made designs and layouts. You can make your store look like almost anything you want. The theme is also really fast and works on phones. The price is around $60, which is pretty good for what you get. Plus you get updates and support for a year. ## 7. Woodmart ![WordPress Ecommerce Themes](https://serveravatar.com/wp-content/uploads/2025/07/image-50-2-1024x389.jpg)[Woodmart](https://woodmart.xtemos.com/) is made just for online stores. It has everything you need to create a professional ecommerce site. The theme comes with over 60 ready-made demos. These cover different types of stores like fashion, electronics, furniture, and more. You can import any demo and change it to match your brand. Woodmart has advanced product page layouts, quick view options, and smooth shopping cart animations. It also loads really fast, which is important for keeping customers happy. The theme costs around $40 and includes lifetime updates. That’s a pretty good deal for such a feature-rich theme. ## 8. Porto ![Porto](https://serveravatar.com/wp-content/uploads/2025/07/image-50-3-1024x456.jpg)[Porto](https://www.portotheme.com/wordpress/porto_landing/) is a multipurpose theme that works great for ecommerce sites. It has a modern design and lots of options for changing things. The theme comes with over 300 ready-made demos. Many of these are made just for online stores. You can find demos for fashion stores, electronics shops, and more. Porto includes a powerful page builder and lots of ecommerce-specific features. The theme is also optimized for speed and mobile devices. At around $70, Porto is a bit more expensive than some other themes. But you get a lot of features and regular updates. ## 9. Electro ![electro](https://serveravatar.com/wp-content/uploads/2025/07/image-50-4-1024x420.jpg)[Electro](https://themeforest.net/item/electro-electronics-store-woocommerce-theme/15720624?srsltid=AfmBOoq4o7rkJt9xM1rkcrMaBZJIB062pi36UkxYxjsKVMTZkezdZ0Mm) is made for electronics stores, but it works well for other types of products too. The theme has a clean, modern design that shows products really well. It comes with custom product page layouts and advanced filtering options. Electro includes features like product comparison, wishlist functionality, and vendor management. These are great for larger stores with lots of products. The theme costs around $60 and includes one year of updates and support. It’s a good choice if you want something made for selling electronics. ## 10. XStore ![Xstore](https://serveravatar.com/wp-content/uploads/2025/07/image-50-5-1024x463.jpg)[XStore](https://xstore.8theme.com/) is a premium theme with over 90 ready-made demos. It’s designed to work with WooCommerce and has lots of ecommerce-specific features. The theme includes advanced product page layouts, quick view options, and smooth animations. It’s also really fast and works well on mobile devices. XStore comes with a powerful theme customizer and works with popular page builders. You can create custom layouts without any coding knowledge. The price is around $40, which is reasonable for such a feature-rich theme. You also get regular updates and good customer support. ## How to Choose the Right Theme for Your Store Picking a theme can be tricky, but here’s how to make it easier. First, choose between a free or paid theme. Free themes are good for small shops. Paid ones cost around $40–$80 and give more features and support. Think about what you sell. Some themes are made for certain products like clothes, electronics, or furniture. Look at the theme’s demo to see how your store might look. Make sure it works with tools like WooCommerce. Also, check if you can change things easily. If you want to fully control your store’s look, pick a theme with more options. ## Setting Up Your New Theme Once you pick a theme, start with its ready-made design it’s easier to build from there. Make your site fast by using smaller images and speed tools. Check that it looks good on phones and all screen sizes. Keep the design clean with simple colors and easy-to-read fonts. Test the full checkout process to be sure people can buy without any problems. ## Common Problems and How to Fix Them If your theme doesn’t work with an add-on, turn off add-ons one by one to find the issue. A slow site could mean big images, too many add-ons, or weak hosting fix this by using smaller images and removing extra add-ons. If your site looks bad on phones, check your theme’s mobile settings. If people can’t buy things, check your payment setup and test the whole checkout process yourself. ## Conclusion Choosing the right theme is important because it helps your store look good and work well. If you want a free option, Storefront is simple and easy. For paid themes, Flatsome is a great choice with lots of features. But really, any theme from the list can work. Just pick one and start. You can change it later if needed. Keep your site fast, mobile-friendly, and easy to use. Focus on your products and helping customers. The theme is just the beginning, what matters most is starting and learning as you go. ## FAQ ### **Q: Do I need a paid theme for my online store?** Not really. Free themes like Storefront and Astra work fine for many stores. Paid themes usually have more features and design options. ### **Q: Will these themes work with WooCommerce?** Yes, all the themes in this list work with WooCommerce. Some are made just for it. ### **Q: How hard is it to customize these themes?** Most modern themes are pretty easy to customize. You can usually change colors, fonts, and layouts without knowing code. ### **Q: Can I switch themes later?** Yes, but it can be tricky. You might need to redo some customizations and check that everything still works right. ### **Q: What’s the difference between free and paid themes?** Paid themes usually have more features, better support, and more design options. Free themes can work fine but might be more limited. ## Stop Wasting Time on Servers. Start Building Instead. You didn’t start your project to babysit servers. Let **ServerAvatar** handle deployment, monitoring, and backups — so you can focus on growth. Deploy **WordPress, Laravel, N8N**, and more in minutes. No DevOps required. No command line. No stress. [ 🚀 Try ServerAvatar Free – No Credit Card Needed ](https://app.serveravatar.com) Trusted by 10,000+ developers and growing. **Categories:** Blog, Guide, WordPress **Tags:** Best WordPress Themes 2025, Free WordPress Ecommerce Themes, Paid WordPress Themes, Trending WordPress Themes, WooCommerce Themes, WordPress Ecommerce Themes --- ### [Top 5 WordPress 2FA Plugins for Enhanced Security in 2026](https://serveravatar.com/wordpress-2fa-plugins/) **Published:** July 18, 2025 **Author:** Meghna Meghwani **Content:** Well, one of the best things you can do is use **WordPress 2FA plugins**. It’s like locking your door and then also adding a second lock. Even if someone knows your password, they still need a second thing (like a code or app) to get in. In this post, I’ll show you 5 of the best Two-Factor Authentication plugins for WordPress in 2025. These are the ones people are really using. They work well, and they are easy to set up, even if you’re not a tech expert. ## What is Two Factor Authentication? Two Factor Authentication, means you need two things to log in: - **Your password** - **Another code or device** (like a phone or app) So even if someone steals your password, they still can’t log in without the second thing. It’s like your ATM card. You need the card and your PIN to get money. Same idea here. ## Why You Need Two Factor Authentication for WordPress If you run a WordPress site, you know how many hackers are out there. They try to: - Guess passwords - Use stolen accounts - Break in and mess up your site With Two factor authentication, even if they guess your password, they can’t get in. Simple, right? ## Two Factor Authentication protects you from: - Brute force attacks - Stolen passwords - Unwanted logins - Lost admin control It’s like putting a seatbelt on your site. Better safe than sorry. ## How Does a Two Factor Authentication Plugin Work? These plugins do the Two factor authentication thing for your site. They work like this: - You install the plugin - You turn on Two factor authentication for your admin account - Next time you log in, it asks for your password and a special code - You get the code from an app or text Most plugins work with Google Authenticator or Authy. Some also let you get codes by email or text. Now let’s look at the top plugins you should try. ## 1. Wordfence Login Security ![WordPress 2FA plugins](https://serveravatar.com/wp-content/uploads/2025/07/image-50-6-1024x516.jpg)**What is this?** [Wordfence](https://wordpress.org/plugins/wordfence-login-security/) is a popular security plugin. It has a smaller plugin called Wordfence Login Security that’s just for Two factor authentication. **How it works** It adds Two factor authentication to your login page. You can use it with apps like: - Google Authenticator - FreeOTP - Authy **Why use it?** - It’s free - Easy to set up - You can set it for all users or just admins - Works with WooCommerce too - Keeps bots out **Good stuff** - No need for other tools - Strong login protection - Works well with other plugins **Not so great** - No text or email codes - Only supports app-based codes So if you want a free and simple Two Factor Authentication tool, this one is great. ## 2. ProfilePress 2FA ![ProfilePress 2FA](https://serveravatar.com/wp-content/uploads/2025/07/image-172-1024x364.png)**What is this?** [ProfilePress 2FA](https://profilepress.com/addons/2fa/) adds Two-Factor Authentication to your WordPress site, providing an extra layer of protection for your website login process. It’s built by the trusted ProfilePress team, known for secure membership and user management plugins. **How it works** After installing the 2FA add-on, users log in with their password and a time-based one-time password (TOTP) from an authenticator app, such as Google Authenticator or Authy. It includes backup recovery codes, and administrators can enforce two-factor authentication for specific roles. **Why use it?** - Adds strong security to your WordPress logins - Choose which users must enable Two-Factor Authentication - Works with ProfilePress custom login forms - Perfect for membership, eCommerce, or multi-author websites **Good stuff** - Clean and easy setup - Supports popular authenticator apps - Backup recovery codes included - Role-based enforcement for flexibility **Not so great** - Requires ProfilePress core plugin - No SMS-based authentication (app or recovery code only) Ideal if you want to add strong, app-based Two-Factor Authentication to WordPress. ## 3. Shield Security – Simple & Smart Protection ![Shield Security](https://serveravatar.com/wp-content/uploads/2025/07/image-50-1024x426.png)**What is this?** [Shield Security](https://wordpress.org/plugins/wp-simple-firewall/) is a WordPress plugin that helps keep your site safe. It has a lot of tools to protect your site, and one of them is two factor authentication (2FA). It’s good for beginners and also strong enough for advanced users. **How it works** After you install it, you can turn on Two factor authentication in the settings. Then, when you log in, it asks for: - Your password - A special code from an app on your phone (like Google Authenticator) You just enter the code, and you’re in. That’s it. **Why use it?** - Comes with many security tools - Two factor authentication is easy to turn on - Works with apps like Google Authenticator or Authy - You can set it for certain users only (like admins) - Helps block bad login attempts **Good stuff** - Easy for beginners - Also has other tools like login protection, firewall, and spam blockers - You don’t need to install many plugins—this one does a lot - The 2FA part is simple and works well **Not so great** - Some extra tools need the paid version - Lots of settings might look confusing at first - Not just for Two factor Authentication it does many things, which might feel like too much if you just want Two factor Authentication ## 4. WP 2FA ![WP 2FA](https://serveravatar.com/wp-content/uploads/2025/07/image-51-1024x585.png)**What is this?** [WP 2FA is a plugin](https://wordpress.org/plugins/wp-2fa/) made just for Two Factor Authentication. It’s easy to use and made by a trusted developer. **How it works** You can use: - Email codes - Authenticator apps - One-time codes It guides users to set up Two Factor Authentication with a wizard (step-by-step helper). It also reminds users who forget to set up Two Factor Authentication. **Why use it?** - Free for most features - Helps all users set up Two Factor Authentication - You can choose who needs Two Factor Authentication (admin, editor, etc.) - Great for business sites or blogs with many users **Good stuff** - Simple interface - Great user guide - Good support - Works well with login forms **Not so great** - Some advanced stuff needs the pro version - Can be too simple for power users So, this one is great if you want to add Two Factor Authentication to **all users** and keep it friendly and easy. ## 5. Two Factor Plugin (by WordPress.org Team) ![Two Factor Plugin](https://serveravatar.com/wp-content/uploads/2025/07/image-53-1024x471.png)**What is this?** [Two Factor](https://wordpress.org/plugins/two-factor/) Plugin is made by the same folks behind WordPress itself. It’s called just “Two Factor”. **How it works** You get these Two Factor Authentication choices: - Email codes - Time-based One-Time Password (TOTP) - Backup codes You can turn it on per user, and choose which method each person uses. **Why use it?** - Made by WordPress contributors - Super simple - Works right out of the box - Supports basic Two Factor Authentication needs **Good stuff** - Free and open source - No fluff, just works - No setup pain **Not so great** - No push notifications - No advanced features - Not great for big sites This one’s perfect if you want something light and clean for basic security. ## Quick Compare Table Plugin Name2FA MethodsEasy to UseBest ForWordfence Login SecurityApp-BasedYesAll UsersProfilePress 2FAApp-Based + Recovery CodesYesMembership, eCommerce & Multi-Author SitesGoogle AuthenticatorApp-BasedYesAdminsWP 2FAApp+EmailYesAll UsersTwo FactorApp+EmailYesSimple Setup## Things to Look for in a Two Factor Authentication Plugin When picking a Two Factor Authentication plugin, think about: - **How many users you have?** - **Do you want free or paid?** - **Do you need text or app codes?** - **Do you use WooCommerce or memberships?** Pick one that matches your needs. If you’re running a small blog, maybe the simple “Two Factor” is fine. For a shop or business, go for WP 2FA or miniOrange. ## What If I Lose My Phone or Two Factor Authentication Code? Don’t worry. All good Two Factor Authentication plugins have backup options. You can: - Use backup codes (saved when you set up Two Factor Authentication) - Get a code by email - Ask the admin to turn it off - Use a recovery link If you’re the only admin, always keep backup codes in a safe place (like a notebook or password manager). ## Benefits of Using a Two Factor Authentication Plugin Why even bother with all this? Because it keeps your site safe. Here’s what you get: - **Stronger login security** – Stops most attacks - **Peace of mind** – You know only you can log in - **Lower risk** – Even if your password is stolen - **Control** – Choose who uses Two Factor Authentication - **More trust** – Visitors feel safe using your site Hackers are always looking for weak spots. Two Factor Authentication closes one big door. ## Common Problems with Two Factor Authentication Plugins (and Fixes) Sometimes, stuff breaks. Here are some common Two Factor Authentication issues and what to do. **Can’t log in?** - Use backup codes - Use the “lost device” option - Contact support or your hosting provider **QR code won’t scan?** - Make sure your phone has a scanner app - Zoom in or refresh the QR code - Try typing the code manually **Plugin not working?** - Update the plugin - Check if another plugin is causing problems - Reinstall the plugin **Forgot to turn it on?** - Go to user settings - Find Two factor authentication settings - Turn it on anytime ## Can I Use Two Factor Authentication with WooCommerce or Membership Sites? Yes! Some plugins work really well with: - **WooCommerce stores** - **Membership plugins** - **Multi-user blogs** If your users log in to buy, comment, or post, you should protect them too. ## Do Two Factor Authentication Plugins Slow Down My Site? No, they don’t. These plugins only work during login. They don’t load on your main pages. But here’s a tip: - Don’t install too many plugins - Keep them updated - Use a good hosting provider ## Best Two Factor Authentication Plugin for Beginners If you’re just starting out, go with: - **ProfilePress 2FA** - **Two Factor (by WordPress)** - **WP 2FA (simple wizard)** These are easy, free, and don’t take long to set up. ## Best Two Factor Authentication Plugin for Business or eCommerce Running a store? You need more control. Go with: - ProfilePress 2FA - WP 2FA (Pro version) - Wordfence Login Security They let you: - Force Two Factor Authentication for customers - Pick which roles use it - Set more options ## Conclusion So there you have it. Two-factor authentication is one of the best ways to keep your WordPress site safe in 2025. It’s not hard to set up, and once it’s on, your site is way more secure. **Top picks:** - **ProfilePress 2FA** – Best for Membership, eCommerce & Multi-Author Sites - **Wordfence Login Security** – Best all-rounder - **WP 2FA** – Best for teams and user roles - **Two Factor** – Best for simple needs Pick the one that fits your site. Take a few minutes today, and you’ll thank yourself later. ## FAQs ### **Q: Is Two Factor Authentication free on WordPress?** Yes, many plugins offer free versions with Two factor authentication features. ### **What if I lose my phone?** Use backup codes or email codes to log in. ### **Can I use Two Factor Authentication with WooCommerce?** Yes, plugins like WP 2FA work well with WooCommerce. ### **Can I use Two Factor Authentication with WooCommerce?** Yes, plugins like WP 2FA work well with WooCommerce. ### **Will Two Factor Authentication stop all hacks?** No, but it stops most login hacks. It’s a big step in site security. ## Stop Wasting Time on Servers. Start Building Instead. You didn’t start your project to babysit servers. Let **ServerAvatar** handle deployment, monitoring, and backups — so you can focus on growth. Deploy **WordPress, Laravel, N8N**, and more in minutes. No DevOps required. No command line. No stress. [ 🚀 Try ServerAvatar Free – No Credit Card Needed ](https://app.serveravatar.com) Trusted by 10,000+ developers and growing. **Categories:** Blog, Guide, WordPress **Tags:** 2FA Plugins for WordPress, Two-Factor Authentication, WordPress 2FA Plugins, WordPress Login Security, WordPress Protection, WordPress Security --- ### [5 Best WordPress Image Optimization Plugins of 2026](https://serveravatar.com/wordpress-image-optimization-plugins/) **Published:** July 19, 2025 **Author:** Meghna Meghwani **Content:** **WordPress image optimization** is key if you want your website to load faster. Big images can slow your site down a lot. That’s where image plugins come in handy. They make your pictures smaller without making them look bad. Today we’ll look at the 5 best WordPress plugins that can help fix your image problems. These tools are easy to use and really work well. ## What Are Image Optimization Plugins? Think of these plugins like magic helpers for your pictures. They take your big, heavy images and make them smaller. But here’s the cool part – your pictures still look good after they shrink them. When people visit your website, smaller images load much faster. This makes visitors happy because they don’t have to wait around. Google also likes fast websites, so it can help your site show up better in search results. ## Why Your Website Needs Image Optimization Let’s be real – nobody likes waiting for slow websites. If your site takes too long to load, people just leave and go somewhere else. That’s bad for business. Here’s what happens when you don’t optimize your images: - Your website loads super slow - People get frustrated and leave - You lose visitors and customers - Google doesn’t rank your site well - Your web hosting costs more money But when you use these plugins, good things happen: - Your site loads way faster - More people stay on your website - Google likes your site better - You save money on web hosting - Your visitors have a better time ## How These Plugins Work Most image plugins work in similar ways. They use smart technology to remove extra data from your pictures that you don’t really need. Think of it like cleaning out your closet. You keep all the important stuff but throw away things you don’t need. The plugins do the same thing with your images. Some plugins work right when you upload new pictures. Others can go back and fix old images you already have on your site. Many of them can do both, which is pretty neat. ## 1. Smush ![Smush](https://serveravatar.com/wp-content/uploads/2025/07/image-59-1024x445.png)[Smush](https://wordpress.org/plugins/wp-smushit/) is one of the most popular image plugins out there. Lots of people use it because it’s really simple to set up and use. **What Makes Smush Great** This plugin can make your images up to 5 times smaller without making them look bad. It works on all kinds of image files like JPG, PNG, and GIF pictures. The best part? It does everything automatically. Once you install it, Smush starts working on new images right away. You don’t have to do anything else. **How Smush Works** When you upload a new image, Smush jumps into action. It looks at your picture and removes all the extra stuff that makes it heavy. Then it gives you back a smaller, lighter version. Smush can also go through your old images and fix them too. This is called “bulk optimization” and it’s really helpful if you already have lots of pictures on your site. **Good Things About Smush** - Very easy to use - Works automatically - Free version available - Can fix old and new images - Works with most image types **Not So Good Things** - Free version has limits - Can be slow with lots of images - Some features cost extra money ## 2. ShortPixel ![ShortPixel](https://serveravatar.com/wp-content/uploads/2025/07/image-60-1024x462.png)[ShortPixel](https://wordpress.org/plugins/shortpixel-image-optimiser/) is another really good plugin that lots of website owners love. It’s a bit more advanced than Smush but still easy to use. **What Makes ShortPixel Special** This plugin uses three different ways to make your images smaller. You can pick the one that works best for your needs: - Lossy: Makes images really small but might lose some quality - Glossy: Good balance between size and quality - Lossless: Keeps perfect quality but doesn’t shrink as much **How ShortPixel Helps Your Site** ShortPixel works really fast. It can handle lots of images at once without slowing down your website. This is great if you have a big site with thousands of pictures. The plugin also creates backup copies of your original images. So if something goes wrong, you can always get your old pictures back. **Good Things About ShortPixel** - Three different optimization levels - Very fast processing - Creates backup copies - Works with WebP format - Good customer support **Not So Good Things** - Can be confusing for beginners - Uses credits system for pricing - Some features need technical knowledge ## 3. TinyPNG ![TinyPNG](https://serveravatar.com/wp-content/uploads/2025/07/image-61-1024x452.png)[TinyPNG](https://wordpress.org/plugins/tiny-compress-images/) is famous for making PNG images smaller, but it also works great with JPG files. The plugin is super simple and gets the job done well. **What Makes TinyPNG Work** This plugin focuses on doing one thing really well – making your images smaller. It doesn’t have tons of fancy features, but what it does, it does perfectly. TinyPNG uses smart compression that keeps your images looking good while making them much smaller. Most people can’t even tell the difference after compression. **How TinyPNG Helps** The plugin works quietly in the background. When you upload images, it automatically makes them smaller. You don’t have to think about it or do anything special. TinyPNG also shows you how much space you’re saving. It’s pretty cool to see that you’ve saved hundreds of megabytes of storage space. **Good Things About TinyPNG** - Really simple to use - Excellent compression quality - Works automatically - Shows how much space you save - Reliable and stable **Not So Good Things** - Limited free compressions per month - Fewer features than other plugins - Only works with PNG and JPG files ## 4. Imagify ![WordPress Image Optimization](https://serveravatar.com/wp-content/uploads/2025/07/image-62-1024x466.png)[Imagify](https://wordpress.org/plugins/imagify/) comes from the same people who made WP Rocket, which is a popular speed plugin. So you know they understand how to make websites faster. **What Makes Imagify Stand Out** This plugin offers three optimization levels just like ShortPixel. But it also has some extra features that make it special. Imagify can convert your images to WebP format. This is a newer type of image file that’s even smaller than regular JPG or PNG files. Not all browsers support WebP yet, but most modern ones do. **How Imagify Works** The plugin is really easy to set up. You just install it, create an account, and it starts working right away. It can optimize images as you upload them and also fix your old pictures. Imagify also has a feature called “resize images.” This can make your pictures smaller in actual size, not just file size. This is helpful if people upload huge images that are way bigger than they need to be. **Good Things About Imagify** - Three optimization levels - Supports WebP format - Can resize large images - Easy to use interface - Good documentation **Not So Good Things** - Limited free monthly quota - Some features need paid plans - Can be slow with very large images ## 5. Optimole ![Optimole](https://serveravatar.com/wp-content/uploads/2025/07/image-63-1024x467.png)[Optimole](https://wordpress.org/plugins/optimole-wp/) is a bit different from the other plugins. Instead of optimizing images on your website, it does the work in the cloud. This means it doesn’t slow down your server. **What Makes Optimole Different** This plugin doesn’t actually change your original images. Instead, it serves optimized versions to your visitors automatically. It’s like having a smart helper that gives people the best version of each image. Optimole also does something cool called “adaptive optimization.” It looks at each visitor’s internet speed and device, then gives them the best image for their situation. **How Optimole Helps** The plugin works by replacing your images with optimized versions from their servers. This means your website doesn’t have to do any of the heavy work. Optimole also resizes images automatically based on where they appear on your site. So if you have a small thumbnail, it serves a small image. If you have a big hero image, it serves a larger version. **Good Things About Optimole** - Doesn’t slow down your server - Adaptive optimization - Automatic resizing - Works with all image formats - Good free plan **Not So Good Things** - Images load from external servers - Requires internet connection - Limited customization options - Some people don’t like external dependencies ## Which Plugin Should You Choose? Well, that really depends on what you need. Here’s how to pick the right one for your site: **Pick Smush if:** - You’re just starting with WordPress - You want something that’s easy to use - You don’t have tons of images - You like free stuff **Pick ShortPixel if:** - You have lots and lots of images - You want to control how things work - You’re okay with paying for good quality - You need something that works fast **Pick TinyPNG if:** - You want something really simple - You mostly use PNG and JPG files - You don’t need lots of extra features - You like tools that just work **Pick Imagify if:** - You want WebP format support - You need to make big images smaller - You like when setup is easy - You want good help guides **Pick Optimole if:** - Your server is kind of slow - You want smart optimization - You don’t mind using outside services - You need images to resize by themselves ## How to Install These Plugins Getting any of these plugins up and running is pretty easy. Here’s what you need to do: 1. Go to your WordPress dashboard 2. Click on “Plugins” then click “Add New” 3. Type in the plugin name in the search box 4. Click the “Install Now” button 5. When it’s done installing, click “Activate” 6. Just follow the setup steps it shows you Most of these plugins will ask you to make an account or get something called an API key. Don’t worry – this is totally normal and only takes a couple minutes. ## Tips for Better Image Optimization Here are some extra tips to make your images work even better: **Before you upload images:** - Make sure they’re not huge files - Use JPG for photos and PNG for graphics with text - Don’t upload images that are way bigger than you actually need **After you install a plugin:** - Run the bulk fix on your old images - Check how fast your site loads now - Keep an eye on how your images look - Watch your storage space **Good habits to follow:** - Give your image files good names - Add alt text so people know what the image shows - Don’t upload photos straight from your phone or camera - Think about using a CDN to make things load even faster ## Common Problems and How to Fix Them Sometimes you might have issues with image plugins. Here are the problems that happen most often and how to fix them: **Problem: My images look fuzzy after the plugin works on them** Fix: Try a different setting or switch to another plugin. Some plugins squish images more than others. **Problem: The plugin is taking forever to work** Fix: You might have too many images for it to handle at once. Try doing smaller groups of images. **Problem: My website is running out of space** Fix: Some plugins save copies of your original images. You can delete these backup copies if you’re happy with how the new ones look. **Problem: The plugin doesn’t work well with my other plugins** Fix: Turn off your other plugins one at a time to see which one is causing the trouble. ## How to See if It’s Working After you install an image plugin, you’ll want to check if it’s actually helping your site. Here are some ways to find out: **Test your site speed:** - Use Google PageSpeed Insights (it’s free) - Try GTmetrix or Pingdom tools - Test your site before and after you optimize images **Check how much space you’re saving:** - Look at your web hosting control panel - Check the plugin’s own reports - Keep track of your backup storage **See how visitors feel:** - Ask people if your site feels faster - Check if fewer people leave your site quickly - Watch how long pages take to load ## Conclusion Image plugins are really important for WordPress sites. They make your site faster and save you money. All five plugins we talked about work well. Smush is good for beginners, ShortPixel is fast and powerful, TinyPNG is simple, Imagify has nice features, and Optimole works in the cloud. Pick the one that fits what you need. But honestly, any of these is way better than doing nothing. Don’t wait too long to fix your images. Your visitors will notice, and Google will like your site more too. Fast websites win. These plugins are easy tools that really help. ## FAQ ### **Q: Will these plugins make my pictures look terrible?** Nope, the good ones keep your images looking nice while making the file sizes way smaller. ### **Q: Can I use two or three image plugins at the same time?** That’s not a good idea. They might fight with each other and mess things up on your site. ### **Q: Are the free versions good enough for what I need?** Free versions work okay for small sites, but if you have a big site with tons of images, you’ll probably need to pay for the extra features. ### **Q: How long will it take to fix all my old images?** Well, it really depends on how many you have. Most plugins can handle hundreds of images in just a few hours though. ## Stop Wasting Time on Servers. Start Building Instead. You didn’t start your project to babysit servers. Let **ServerAvatar** handle deployment, monitoring, and backups — so you can focus on growth. Deploy **WordPress, Laravel, N8N**, and more in minutes. No DevOps required. No command line. No stress. [ 🚀 Try ServerAvatar Free – No Credit Card Needed ](https://app.serveravatar.com) Trusted by 10,000+ developers and growing. **Categories:** Blog, Guide, WordPress **Tags:** Cloud Hosting, Image Compression, PHP Hosting, Server Management, Website Optimization, Website Speed, WordPress Plugins --- ### [7 Best WordPress Booking Plugins for Appointments in 2026](https://serveravatar.com/wordpress-booking-plugins/) **Published:** July 23, 2025 **Author:** Meghna Meghwani **Content:** If you run a business where people need to book time with you, like a salon, doctor’s office, or coaching service, **WordPress Booking Plugins** are essential. With the right plugin, your clients can book online anytime. No more phone calls or back-and-forth messages. Just set your hours, list your services, and let the plugin handle the rest. These tools are easy to use, help avoid missed bookings, and can even send reminders or take payments. Here are the 7 best booking plugins to try in 2025. ## Benefits of Using Booking Plugins in WordPress **1. 24/7 Online Booking** Your customers can book anytime day or night. Even if your shop is closed, your site is always open. **2. Saves You Time** You don’t need to write things down or answer booking calls. The plugin does all the work for you taking bookings, sending updates, and reminders. **3. Less Missed Appointments** Most plugins can send reminders by email or text. This way, people don’t forget their booking. **4. Easy for Your Visitors** People can book quickly on your site without trouble. It works on phones and looks good. **5. Take Payments Online** You don’t need to wait for payment on the day of the service. People can pay right when they book. These plugins work with PayPal, Stripe, and other popular ways to pay. **6. Manage Your Team and Services** If you have a team, you can set who is free on what days. You can also list different services and give each one its own time and price. You can even mark holidays when no one is working. **7. Sync with Google Calendar** Many plugins let you connect with Google Calendar. This way, your bookings show up right in your calendar, and you won’t miss anything or book the same time twice. **8. Set Your Own Booking Rules** You’re the boss. You can decide how early people can book, how much time is needed between appointments, and what days are off. This gives you full control. **9. Collect Customer Info** Want to know the client’s name, phone number, or any special request? You can ask for that in the form. This helps you prepare better for the appointment. **10. Makes You Look More Professional** Having an online booking system shows you’re serious about your work. It makes your site look modern, clean, and easy to use. People will trust your service more. ## 1. Amelia ![WordPress Booking Plugins](https://lh7-rt.googleusercontent.com/docsz/AD_4nXcCVN8s2HRKADPw7qm7tToPct26qzqzVRSjgOo1hAGte3ozna3rEjsOXxJVMlrnvJOSAxZfXzIveQGy40m6a1KDcsmSfQ6q6_zZgrRtGN3_idYqwJr8MhzRzNAYD3vn61v3j85E?key=i0q1Hk3QhvyKRF6lhzag0w)[Amelia](https://wpamelia.com/) is a full-featured booking tool that helps you run your business smoothly. If you offer services like haircuts, consultations, fitness classes, or medical visits, this plugin makes it easy for your clients to book online. It’s built to handle a lot of bookings, different services, and even multiple staff members. Everything looks clean and professional, and your visitors can pick a date and time, choose the service they want, and confirm their booking in just a few clicks. Amelia works well for both small teams and bigger businesses that need a simple but powerful system. **How it works** - You create services, staff, time slots. - Embed a booking form on your page. - Clients pick service, person, time, and pay. - They get email reminders and link to Google or Zoom. **Why use it?** - Very clean forms that look good - Handles big teams - Lets clients pick services, times, pay online - Syncs with calendars and video calls **Advantages:** - Very professional look - Works well for teams and events - Supports payments, reminders, Zoom, and calendar sync - Clean and modern design **Disadvantages**: - Free version is limited - Paid plan starts at $69/year ## 2. Bookly ![Bookly](https://serveravatar.com/wp-content/uploads/2025/07/image-68-1024x739.png)[Bookly](https://www.booking-wp-plugin.com/) is one of the most used booking plugins out there and for a good reason. It gives you everything you need to manage appointments right from your WordPress site. Whether you’re a solo expert or have a small team, Bookly helps your customers book a time slot, pick a service, and even pay online. It’s super flexible, and you can add new features if needed. With a clean design, automatic reminders, and support for many payment types, Bookly is great for any kind of service business that wants a modern and smooth booking system. **How it works** - Install plugin - Make services, staff, time table - Place booking widget on page via shortcode - Clients book, pay, get email/text alerts **Why use it?** - Lots of payment options - Clean backend interface - Many add‑ons as needed **Advantages:** - Strong free version with useful features - Supports SMS and email reminders - Many add-ons for custom features - Works with PayPal, Stripe, and more **Disadvantages:** - Add-ons cost extra - Can feel complicated during setup ## 3. BookingPress ![BookingPress](https://serveravatar.com/wp-content/uploads/2025/07/image-69-1024x545.png)[BookingPress](https://www.bookingpressplugin.com/) is a newer plugin that’s made to be easy and quick to set up. It’s a great choice for small businesses that want something clean and user-friendly. You don’t need to be a tech expert to use it. Once it’s set up, your clients can book appointments anytime, pay online, and even get reminders. It supports multiple staff members, different services, and has a simple dashboard where you can track all your bookings. If you’re just starting or want a simple way to manage online bookings, BookingPress is worth checking out. **How it works** - Set up services, staff, schedules - Use form editor to customize - Clients book via front‑end form - Get email, SMS, or WhatsApp alerts **Why use it?** - Clean form style - Many free payment ways - Separate dashboards for admin & staff - Has calendar sync **Advantages:** - User-friendly and modern UI - Free version has many features - Easy calendar and payment sync - Works well for small businesses **Disadvantages:** - Full features require paid version - Some tools may need premium add-ons ## 4. Simply Schedule Appointments ![Simply Schedule Appointments](https://serveravatar.com/wp-content/uploads/2025/07/image-70-1024x461.png)If you want a booking system that’s super simple, this plugin is for you. [Simply Schedule Appointments](https://simplyscheduleappointments.com/) is perfect for solo business owners, teachers, or anyone who wants to let people book a time slot fast and easy. The setup is quick, and it guides you through each step so you won’t feel lost. It works well with Google Calendar, Zoom, and payment systems like Stripe. The booking form looks clean and works great on phones, tablets, and desktops. It may look simple, but it’s powerful enough to handle most appointment needs. **How it works** - Go through setup wizard - Create appointment calendar(s) - Choose service time blocks - Add to page with block or shortcode - Clients book & get reminders - Works with Google Calendar, Zoom, Stripe **Why use it?** - Super easy to start - Free version still helpful - Integrates with zoom, payments, calendar - Clean and modern design **Advantages:** - Easy setup and clean interface - Great for solo professionals - Syncs with Zoom and Google Calendar - Works well on mobile too **Disadvantages:** - Free version is basic - Paid plan starts at $99/year ## 5. MotoPress Appointment Booking ![MotoPress Appointment Booking](https://serveravatar.com/wp-content/uploads/2025/07/image-71-1024x736.png)[MotoPress](https://motopress.com/products/appointment-booking/?srsltid=AfmBOooQujym3K7g204rhckDPXM_IFqYF2MeGo_AoeHAHPXRwPj6Mgbb) is designed for businesses that have many services, staff members, or even multiple locations. It helps you keep everything organized in one place. If you run a gym, spa, clinic, or wellness center, this plugin lets your customers pick a location, service, and staff member then book online in seconds. You can control your team’s schedules, add custom hours, and even block off holidays or break times. MotoPress makes it easy to accept payments, send reminders, and sync with your calendar, making your work life a whole lot easier. **How it works** - Create unlimited services, staff, locations - Set timing, buffer times, holidays - Clients pick service and staff then book - Works with PayPal, Stripe, Google Calendar - Includes automated emails/texts **Why use it?** - Works well for many locations or staff - Integrates with many calendar tools - Pay as you go online **Advantages:** - Good for many staff or locations - Supports PayPal and Stripe - Sends automatic email/text reminders - Flexible booking rules and options **Disadvantages:** - Design feels a bit outdated - Free version is limited ## 6. WooCommerce Bookings ![WooCommerce Bookings](https://serveravatar.com/wp-content/uploads/2025/07/image-72-1024x438.png)If you already use WooCommerce for your online store, then [WooCommerce Bookings](https://woocommerce.com/products/woocommerce-bookings/?utm_source=google&utm_medium=cpc&utm_campaign=marketplace_search_brand_row&utm_content=conversions&gad_source=1&gad_campaignid=20729659572&gbraid=0AAAAADRbz92myH9hwy2laMVX1_9v4Vlg3&gclid=Cj0KCQjwyvfDBhDYARIsAItzbZEFWwui9XAbSjntRdjKCh-9N35QDSSVT6NLh4ViBx6PBUcpLEQcdx0aAv_UEALw_wcB) is the best way to add booking features. You can turn any product or service into something people can book. For example, a hotel room, a rental item, or even a coaching session. You get full control over how your bookings work set the time slots, block out busy days, allow group bookings, and take payments all in one place. Since it works with WooCommerce, you get all the payment tools and add-ons too. It’s best for people who already use WooCommerce and want a full booking system. **How it works** - Turn a WooCommerce product into a bookable item - Set date/time options - Clients choose, pay via WooCommerce - You can manage stock, availability, and group bookings **Why use it?** - Good for rentals, hotel rooms, gear hire - Uses WooCommerce payment setup - Supports group bookings, deposits, etc. **Advantages:** - Built into WooCommerce (good for shops) - Supports product-based bookings - Works with many payment gateways - Good for rentals, events, and services **Disadvantages:** - No free version - High price ($249/year) ## 7. Easy Appointments ![Easy Appointments](https://serveravatar.com/wp-content/uploads/2025/07/image-73-1024x570.png)[Easy Appointments](http://easy-appointments.com/) is a flexible and free plugin that works great if you offer different services at different places or with different staff. It lets you create your own booking forms and set rules for each service or person. You can control working hours, holidays, and even add buffer times between appointments. It also works with Google Calendar, so your bookings stay organized. The plugin may not look super fancy, but it does the job well. If you want something lightweight, simple, and fully free, Easy Appointments is a smart choice. **How it works** - Define locations, services, staff - Map service‑staff‑location combos - Use shortcode to add form - Clients request time, gets email notices **Why use it?** - Fully free and flexible - Syncs with Google Calendar - Lets you combine services, staff, locations **Advantages:** - 100% free and flexible - Works well for services with staff and locations - Syncs with Google Calendar - Simple and light on resources **Disadvantages:** - Outdated design - May need custom styling for better look ## Quick Comparison Table **Plugin Name**Free Version?Best ForStarting Price**Amelia**Yes (Lite)Big teams, events, many servicesAbout $69 per year**Bookly**YesFlexible setup, extra add-onsAbout $89 with add-ons**BookingPress**Yes (Lite)Small teams, clean and modern designAbout $79 per year**Simply Schedule Appointments**YesSolo workers, new usersAbout $99 per year**MotoPress**Yes (Lite)Many staff, services, or locationsAbout $59 per year**WooCommerce Bookings**NoShops, rentals, product bookings$249 per year**Easy Appointments**Yes (Free)Simple service and staff bookingsFree## How to pick the right one? - **Just starting out?** Try **Simply Schedule** or **Easy Appointments** - **Have a small team?** Try **BookingPress**, **Bookly** - **Need a multi‑location or many staff?** Try **Amelia**, **MotoPress** - **Already using WooCommerce?** Try **WooCommerce Bookings** - **Want many add‑ons?** Bookly is best ## Tips for using any plugin - Start with free or lite version - Test booking form on mobile and desktop - Sync with Google or Outlook calendar - Add email/SMS reminders - Secure payments with SSL - Check speed after installing (plugins can slow site) ## Conclusion If you’re running a business where people need to book time with you, using a booking plugin is a smart move. It saves you time, keeps things organized, and gives your customers a better way to book without calling or waiting. You can accept payments online, send reminders, and even connect it with your calendar. Each of these 7 plugins is good in its own way. Some are perfect for small teams, others are great for big businesses or shops. Just think about what your business needs—like payment options, calendar sync, team setup, and pick the one that fits best. Start with a free version if you’re unsure, try it out, and upgrade only if you need more features. With the right plugin, your business will look more professional, and your booking process will be smooth and easy. ## FAQ ### Q: Can people pay online? Yes. Amelia, Bookly, BookingPress, MotoPress, WooCommerce all support PayPal/Stripe. Easy Appointments and Simply Schedule support deals. ### Q: Do they work on mobile? Yes, all these plugins have mobile‑friendly designs. ### Q: What about calendar sync? Most can sync with Google or Outlook calendar. WooCommerce uses its own booking calendar. ### Q: Can I manage staff schedules? Yes, Amelia, Bookly, BookingPress, MotoPress support multiple staff. ### Q: Easy to add to a page? Yes, just use shortcode or block from the plugin ## Stop Wasting Time on Servers. Start Building Instead. You didn’t start your project to babysit servers. Let **ServerAvatar** handle deployment, monitoring, and backups — so you can focus on growth. Deploy **WordPress, Laravel, N8N**, and more in minutes. No DevOps required. No command line. No stress. [ 🚀 Try ServerAvatar Free – No Credit Card Needed ](https://app.serveravatar.com) Trusted by 10,000+ developers and growing. **Categories:** Blog, Guide, WordPress **Tags:** Booking Plugin, Online Booking System, WordPress Booking Plugins, WP Appointment Scheduler --- ### [The 9 Best WordPress Form Plugins in 2026](https://serveravatar.com/wordpress-form-plugins/) **Published:** July 23, 2025 **Author:** Meghna Meghwani **Content:** **WordPress Form Plugins** are essential when building a WordPress site in 2025. A good form helps your visitors contact you, sign up for stuff, give feedback, or even place orders. But the big question is: which form plugin should you use? There are so many out there. Some are super easy, some are powerful, and some are just free and simple. It can be kinda hard to pick the right one. But don’t worry. I’ve made it easy for you. Here are the **9 best WordPress form plugins in 2025**. I’ll keep it simple and easy. I’ll show you what they do, how they work, and why they are good. We’ll also talk about the good stuff (pros) and the not-so-good stuff (cons) for each plugin. ## What is this? This post is about WordPress form plugins. A plugin is a tool you add to your site. A form plugin helps you make forms. You can use forms for: - Contact pages - Surveys - Signups - Feedback - Orders A great form plugin should be simple to set up, look clean on your site, and do the job without problems. ## Why Do You Need a Form Plugin? Here’s why every WordPress site needs one: - **Talk to visitors**: People can reach out to you - **Grow your email list**: Collect emails for updates - **Sell stuff or take bookings**: Accept orders or appointments - **Get feedback**: Hear what people think - **Look professional**: A clean form shows you mean business There are many form plugins out there, but not all are the same. Some are super easy. Some are made for big websites. Some are free. Others cost money. That’s why I made this list, to help you pick the best one for your site in 2025. ## 1. WPForms ![Wpforms](https://serveravatar.com/wp-content/uploads/2025/07/image-76-1024x415.png)[WPForms](https://wpforms.com/) is one of the easiest form plugins you can use. It has a simple drag-and-drop builder, so anyone can build a form in just a few minutes. It also comes with many templates to help you get started fast. It’s perfect for beginners who want something that works well right away. **How it works** - Use a drag-and-drop builder - Pick from templates or start from scratch - Add fields like name, email, phone **Why use it?** - Very simple for newbies - Fast form load speed - Integrates with email services - Spam protection **Advantages** - Beginner-friendly drag‑and‑drop interface - Huge library: over 2,000 templates (25 free in Lite - Spam protection (reCAPTCHA, hCaptcha, Turnstile, more) - Accept Stripe payments even in free version **Disadvantages** - Rich styling sometimes in premium only - Pro plans around $79/year[ ](https://www.reddit.com/r/Wordpress/comments/1em9rzf/is_gravity_forms_still_a_good_choice/?utm_source=chatgpt.com) **Price** The free version offers basic forms. The pro version starts around $79/year. ## 2. Gravity Forms ![Gravity Forms](https://serveravatar.com/wp-content/uploads/2025/07/image-77-1024x457.png)[Gravity Forms](https://www.gravityforms.com/) is a powerful plugin for people who need advanced features. It’s great for businesses or developers who want full control over how forms look and work. It doesn’t have a free version, but it offers lots of tools and custom options to build complex forms. **How it works** - Drag-and-drop form builder - More field types (file upload, date picker) - Conditional logic (show or hide fields) **Why use it?** - Great for complex forms - Lots of add-ons (payment, CRM, surveys) - Good support **Advantages** - Very customizable; ideal for developers[ ](https://www.reddit.com/r/Wordpress/comments/1e5k6st/wpforms_vs_gravity_forms/?utm_source=chatgpt.com) - Store form entries in custom tables (better than posts)[ ](https://www.reddit.com/r/Wordpress/comments/1em9rzf/is_gravity_forms_still_a_good_choice/?utm_source=chatgpt.com) - Tons of add-ons and hooks for custom logic **Disadvantages** - No free version - Interface can feel slower, less intuitive[ ](https://wpforms.com/gravity-forms-vs-fluent-forms-vs-wpforms/?utm_source=chatgpt.com) - Starts at $59/year, Elite is costly **Price** Starts at about $59/year. ## 3. Ninja Forms ![Ninja Forms](https://serveravatar.com/wp-content/uploads/2025/07/image-78-1024x568.png)[Ninja Forms](https://ninjaforms.com/) is a flexible plugin that works for both beginners and pros. You can start with the free version and add more features later by buying add-ons. It has a friendly interface and a good mix of free and paid tools, making it a nice choice for growing sites. **How it works** - Drag-and-drop form builder - Use free add-ons or buy what you need **Why use it?** - Good for basic to mid-level forms - Expandable - Free core plugin **Advantages** - Lightweight (~30 KB), extremely fast[ ](https://www.blogmarketingacademy.com/gravity-forms-wp-fluent-forms/?utm_source=chatgpt.com) - AI form builder with ChatGPT integration - Includes most features in core; lifetime plans available - Multi‑site options, rich spam protection[ ](https://typebot.io/blog/best-contact-form-plugins-for-wordpress?utm_source=chatgpt.com) **Disadvantages** - Fewer templates than WPForms - UI may need a short learning curve **Price** Core is free. Paid add-ons from $49/year. ## 4. Formidable Forms ![Formidable Forms](https://lh7-rt.googleusercontent.com/docsz/AD_4nXfq9jb4drB4zu0rG8PmoliLIRzhTyhkhHKkECAneIRQkxyXl4MwfyjLNp0R866puAFSvxgCymy7YTYvuqDXVg4WBFQDD1thounLv5cRLB5QYc3zIZIk3qhOg3f7JJgMUZSslhuoQA?key=zWAhvVE79eJ11K-CuWYbwA)[Formidable Forms](https://formidableforms.com/) is made for people who want to do more with their form data. It can create things like calculators, directories, and tables. It’s good for advanced users who need forms that not only collect data but also display it in smart ways. **How it works** - Drag-and-drop design - Display form data on site (like directories) - Views let you show data in tables or lists **Why use it?** - Good for listings, calculators, job boards - Lots of built-in tools **Advantages** - Advanced data handling (views, calculators, directories)[ ](https://starlitdevs.com/best-wordpress-form-plugin/?utm_source=chatgpt.com) - Free core version, paid starts around $99/year[ ](https://www.wpbeginner.com/plugins/5-best-contact-form-plugins-for-wordpress-compared/?utm_source=chatgpt.com) - Good for complex forms and custom data displays **Disadvantages** - Premium needed for deeper functionality - Custom CSS/HTML may need some coding **Price** Starts at around $99/year. ## 5. Fluent Forms ![Fluent Forms](https://serveravatar.com/wp-content/uploads/2025/07/image-79-1024x412.png)[Fluent Forms](https://fluentforms.com/) is fast and packed with features. It’s lightweight, easy to use, and offers great value even in the free version. If you want a quick, reliable form plugin that won’t slow down your site, Fluent Forms is a top choice. **How it works** - Drag-and-drop builder - Pre-made templates - Lightweight and fast **Why use it?** - Fast load times - Good value - Lots of integrations **Advantages** - Free core with many paid add‑ons - Easy drag-and-drop UI - Payment add‑ons available **Disadvantages** - Add-on pricing can get high ($99+ for bundles) **Price** Free core. Premium starts at $59/year. ## 6. Everest Forms ![Everest Forms](https://serveravatar.com/wp-content/uploads/2025/07/image-80-1024x397.png)[Everest Forms](https://everestforms.net/) is a neat and beginner-friendly plugin. It has a clean design and lets you create forms using simple drag-and-drop tools. It’s great for people who are just starting out and want something easy and clean. **How it works** - Simple drag-and-drop builder - Templates for common forms - Gutenberg block support **Why use it?** - Easy for starters - Clean and simple design - Free version covers basics **Advantages** - Clean interface, good for beginners - Free core supports basic forms - Gutenberg block and shortcode support **Disadvantages** - Fewer templates in free version - Advanced features locked behind paid add‑ons **Price** Free core. Paid add-ons from $49/year. ## 7. UserFeedback ![UserFeedback](https://serveravatar.com/wp-content/uploads/2025/07/image-81-1024x463.png)[UserFeedback](https://www.userfeedback.com/) is a form plugin made to help you get quick responses and feedback from your visitors. It’s simple, fast, and built to help you learn what your users are thinking. If you want to improve your site or know what people really want, this plugin is a great tool. **How it works** - Easy setup from your WordPress dashboard - Choose question types (like multiple choice, rating, or text) - Show the feedback form as a popup or on a page - Set when and where it should appear **Why use it?** - Great for getting real feedback from visitors - Helps improve your site, products, or services - You can ask short questions without making long forms - Works well on both desktop and mobile **Advantages** - Quick and simple to use - Designed to boost user engagement - Lets you set up multiple feedback forms - Comes with built-in reports to see what users say - Can increase signups or reduce bounce rates **Disadvantages** - Not made for long or detailed forms - Some features only in Pro version - Works best when used with other tools **Price** - Free version with basic tools - Pro starts around $49/year for more features ## 8. HappyForms ![HappyForms](https://serveravatar.com/wp-content/uploads/2025/07/image-82-1024x408.png)[HappyForms](https://happyforms.io/) is a simple and clean plugin. It’s made to help people build forms quickly using a live preview tool. It’s great for those who want a no-fuss form builder that looks nice and just works. **How it works** - Drag-and-drop builder - Live preview - Spam protection **Why use it?** - Easy to use - Clean interface - Free version is solid **Advantages** - Simple, clean UI - Live preview builder - Solid free version **Disadvantages** - Advanced features reserved for paid plans - Smaller user base => fewer tutorials/add‑ons **Price** Free core. Pro starts at $49/year. ## 9. Jetpack Forms ![WordPress Form Plugins](https://serveravatar.com/wp-content/uploads/2025/07/image-83-1024x465.png)[Jetpack Forms](https://jetpack.com/forms/) is part of the popular Jetpack plugin by WordPress.com. It lets you add simple contact forms right into your posts or pages using the block editor. If you’re already using Jetpack for stats or security, this form tool is easy to use and already built in. **How it works** - You install Jetpack and connect it to your WordPress.com account - Go to any post or page and click “Add Block” → choose “Form” - Pick the type of form (contact, feedback, RSVP, etc.) - Customize the fields you want (like name, email, message) - Publish the page and your form is ready **Why use it?** - Very easy to use inside the block editor - No need for extra plugins if you already have Jetpack - Great for basic forms like contact or feedback - Built by the WordPress.com team, so it’s safe and reliable **Advantages** - Comes with Jetpack—no need to install another form plugin - Works well with the block editor - Good for simple contact forms - Free with other Jetpack features **Disadvantages** - Not good for complex forms - Limited field types and design options - Needs a WordPress.com login to set up Jetpack **Price** - Included in the free Jetpack plan - Extra features come with Jetpack paid plans (start around $5/month) ## Comparison Overview[](https://storage.3.basecamp.com/5840738/blobs/e8d13c58-662b-11f0-9aef-0242ac120005/download/image.png) **Plugin****Free Core****Best For****Standout Features****Price (Basic)**WPForms✅ YesBeginners, tons of templatesAI builder, payments in core$79/yearGravity Forms❌ NoDevelopers, complex logicAdvanced fields, hooks$59/yearFluent Forms✅ YesPerformance, cost-effectiveAI builder, fast, lifetime$59/yearFormidable Forms✅ YesData display, directoriesViews, calculators$99/yearNinja Forms✅ YesModular features via add-onsTeam collaborationFrom $49/yearEverest Forms✅ YesSimple forms, easy useGutenberg supportFrom $49/yearUserFeedback✅ YesQuick feedback, popupsIn-page surveys, reportingFrom $49/yearHappyForms✅ YesEasy to use, live previewClean UI, spam protectionFrom $49/yearJetpack Forms✅ YesJetpack users, quick formsBlock-based forms, built-inFree (Jetpack plugin)## How to pick the right one **Think about these:** - **Ease of use**: Beginners may like [WPForms](https://wordpress.org/plugins/wpforms-lite/) or Everest Forms. - **Needed features**: Complex features? Try Gravity or Formidable. - **Budget**: Free options like Caldera or Fluent. - **Speed**: Lightweight picks like Fluent or HappyForms are quick. - **Extras**: Payment, email, CRM, file uploads—all need add-ons. ## Setup guide (simple) 1. Go to Plugins → Add New 2. Search for the plugin name 3. Click Install and then Activate 4. You’ll get a new menu for forms 5. Create a form: name it, pick fields, save 6. Place form on page using block, shortcode, or widget 7. Test it: fill and submit to see it works ## Tips to make forms better - Use clear labels: “Your Name” not “Full Name Here” - Keep fields short: only needed info - Spam check: use CAPTCHA or honeypot - Add required fields: make sure you get email or name - Show thank you message after submit - Test it on phone and computer ## FAQ ### **Q: Can I use free version and then change to paid?** Yes. You can start free and upgrade later. ### **Q: Do I need to know code?** No. These plugins let you build forms with no code. ### **Q: Can I get email alerts?** Yes. All these let you get email when someone submits a form. ### **Q: Will forms work on phones?** Yes. They are made to work on phones and tablets. ### **Q: Are they safe?** Yes. Most have anti-spam tools and updates to fix bugs. ## Conclusion Okay, so now you’ve seen the top 9 WordPress form plugins for 2025. They’re all good in their own way. Some are super simple. Some do crazy smart stuff. Some are free. Some cost a bit. What matters is picking the one that works best for *you* and your site. Let’s sum it up real quick: - **Want super easy and fast?** Use **WPForms** or **Everest Forms** - **Need something more advanced?** Try **Gravity Forms** or **Formidable Forms** - **Looking for speed and value?** Go with **Fluent Forms** - **Like free tools?** Check out **UserFeedback** or **Jetpack Forms** - **Want clean and simple design?** Go with **HappyForms** Try the free ones first. See what works. Then upgrade if you need more features. And remember good forms help your site grow. They bring you new people, help you collect info, and make your site look more pro. ## Stop Wasting Time on Servers. Start Building Instead. You didn’t start your project to babysit servers. Let **ServerAvatar** handle deployment, monitoring, and backups — so you can focus on growth. Deploy **WordPress, Laravel, N8N**, and more in minutes. No DevOps required. No command line. No stress. [ 🚀 Try Free ](https://app.serveravatar.com) [ 🌐 Learn More ](https://serveravatar.com/) Trusted by 10,000+ developers and growing. **Categories:** Blog, Guide, WordPress **Tags:** Contact Form Plugins, Free WordPress Plugins, PHP Hosting, Website Forms, WordPress Contact Forms, WordPress Form Plugins --- ### [Top 7 Best Laravel Hosting Providers in 2026](https://serveravatar.com/best-laravel-hosting/) **Published:** July 26, 2025 **Author:** Meghna Meghwani **Content:** [![Blog banner - ServerAvatar](https://serveravatar.com/wp-content/uploads/2025/09/728_90-Banner-3-1024x127.png)](https://serveravatar.com?ref=blog)Have you ever tried building a beautiful Laravel app, only to find your **Laravel hosting** provider making your life miserable? Whether you’re a developer, entrepreneur, or a curious learner, choosing the right Laravel hosting provider can make or break your project. If you’re planning to launch Laravel-based application in 2025, one of most critical decisions you’ll make is choosing the right hosting provider. Laravel is powerful PHP framework that makes web development elegant, fast, and enjoyable, but it needs the compatible, secure, and performance-optimized environment to run smoothly. With countless hosting providers available in market, picking the best one for Laravel can be overwhelming. But don’t worry, we’ve done the heavy lifting for you. In this guide, I’ll walk you through top 7 Laravel hosting providers in 2025 that offer perfect speed, support, scalability, and affordability. ## What Makes Hosting Provider Ideal for Laravel? Before we dive into the list, let’s understand what features you should look for in Laravel hosting: - PHP version compatibility - SSH access - Composer support - Artisan CLI integration - Database and cache management - Automated backups - Git deployment support - Scalability options - Strong developer community or support - Cronjob Management - Supervisor Management These feature ensure efficient development process and smooth experience for applications based on Laravel. ## Why Hosting Matters Think of Laravel like luxury smartphone. Sure, it works on any charger, but with its own fast-charging adapter, it runs way better. Laravel hosting is tailored for the framework, offering built-in tools and support. Things like Git deployment, queue workers, Laravel scheduler, and database backups are must-haves, not nice-to-haves. ## 1. ServerAvatar[](https://storage.3.basecamp.com/5840738/blobs/64f568fc-6881-11f0-9966-0242ac120005/download/image.png) ![ServerAvatar Laravel Hosting](https://serveravatar.com/wp-content/uploads/2025/07/image-2025-07-25T151218.838-1024x520.png)[ServerAvatar](https://serveravatar.com/) is quickly becoming fan favorite in 2025. It’s perfect for anyone who wants to manage Laravel applications without getting lost in terminal commands. If you’re looking for hosting platform that’s specifically designed for developers and agencies, ServerAvatar is top choice. **Key Features:** - Git integration with GitHub, GitLab, and BitBucket for push-to-deploy functionality - One-click SSL installation and automatic renewal for free - Built-in log viewer with search and filter capabilities - Works with 100+ cloud providers, including DigitalOcean, Vultr, AWS, Hetzner, Linode - Automatic staging environment creation for testing - Redis support for caching and queue processing - Cronjob management for Laravel Scheduler execution - Supervisord process management for queue workers and parallel processing - UFW firewall management and Fail2ban security - Isolated environments for each application - Individual PHP version and resource management per application - Automatic backup plans for applications, databases, and files **Pros:** - Optimized PHP environment settings for applications - Built-in deployment scripts and push-to-deploy functionality - Web-based cronjob management for Laravel scheduler commands - Affordable pricing options - Multiple tech stacks: LAMP, LEMP, MERN, and OpenLiteSpeed - Automatic site migration between servers with few clicks - Control panel access without requiring ServerAvatar account - Remote database management with automatic firewall configuration - 10+ auto-installers for popular applications **Why Choose ServerAvatar?** Because it saves your time. You focus on building, and it handles boring stuff, like monitoring and management. Great for both freelancers and agencies. **Best For:** Agencies, developers, and startups who want to manage multiple Laravel apps with a minimal hassle. ## 2**.** Forge ![Laravel Forge - ServerAvatar](https://serveravatar.com/wp-content/uploads/2025/07/image-122-1024x527.png)[Forge](https://forge.laravel.com/) is developed by Taylor Otwell (yes, the Laravel’s creator!), is all about giving developers a power and a flexibility. Laravel Forge is built in exclusively for Laravel deployment and server management. **Key Features:** - Seamless server provisioning on a DigitalOcean, Linode, AWS, and more - Zero-downtime deployments - SSL, queues, cron jobs, and daemon management - Deploy from GitHub, GitLab, or Bitbucket - Minimalistic UI focused purely on a developers **Pros:** - Built by creator of Laravel, deeply integrated with framework - Seamless cloud server provisioning and deployment - Supports zero-downtime deployments and scheduled jobs - Highly customizable for experienced developers **Cons:** - It Doesn’t include hosting, you must bring your own server - Not a beginner-friendly; requires a server management knowledge **Who Is It For?** Dev-savvy folks who want to build and control every detail of their server stack, but without reinventing the wheel. **Best For:** Experienced Laravel developers who want a maximum control and know how to manage a cloud servers. ## 3. Cloudways ![Cloudways - ServerAvatar](https://serveravatar.com/wp-content/uploads/2025/07/image-2025-07-25T151900.718-1024x522.png)[Cloudways](https://www.cloudways.com/en/) is great middle-ground for developers who want performance and support without the DevOps headache. Cloudways has been top pick among Laravel developers for years, and it continues to shine in 2025. **Key Features:** - Supports major cloud providers: DigitalOcean, AWS, Google Cloud, and more - One-click staging environment - Git integration and a deployment via SSH - Advanced caching options (Varnish, Redis, Memcached) **Pros:** - Managed hosting on top cloud providers (DigitalOcean, AWS, GCP) - Laravel-ready with Git, staging, and performance optimization - No DevOps required, easy to manage - Scalable as your app grows **Cons:** - Slightly higher pricing compared to traditional shared hosting - Interface can be a complex for non-technical users **Why Use It?** It’s powerful but easy. You get full control without touching too many server knobs. **Best For:** Tech-savvy teams who need full a control over infrastructure with minimal DevOps workload. ## 4. DigitalOcean ![DigitalOcean - Laravel Hosting ServerAvatar](https://serveravatar.com/wp-content/uploads/2025/07/image-2025-07-25T152923.579-1024x494.png)[DigitalOcean](https://www.digitalocean.com/) is a developer favorite. While it’s not Laravel-specific, it offers droplet-based VPS hosting that gives you total control. It provides scalable cloud infrastructure with full root access, making it ideal for custom Laravel setups. **Key Features:** - Custom server setup (Laravel-ready with LAMP or LEMP) - Scalable droplets and storage - High uptime and performance - Vast documentation and community **Pros:** - Full control over server setup and configurations - High-performance virtual machines with global data centers - Ideal for custom Laravel environments - Scales easily with your application **Cons:** - No built-in Laravel deployment tools (unless paired with platforms like Forge or ServerAvatar) - It is not compatible for beginners who don’t have experience with server management **Why Use It?** It provides fast, scalable cloud servers that give you full control over your Laravel environment. It’s perfect for developers who need flexibility, performance, and custom server configurations. **Best For:** Advanced users who want to build their Laravel environment from scratch. [![Blog banner - ServerAvatar](https://serveravatar.com/wp-content/uploads/2025/09/728_90-Banner-1-1024x127.png)](https://serveravatar.com?ref=blog)## 5. A2 Hosting [](https://storage.3.basecamp.com/5840738/blobs/d6f3ee74-6881-11f0-b5eb-0242ac120004/download/image.png) ![A2 Hosting - ServerAvatar](https://serveravatar.com/wp-content/uploads/2025/07/image-123-1024x517.png)[A2 Hosting](https://hosting.com/) has built its reputation on a performance and uptime, and in 2025, it remains a top pick for Laravel hosting. It is shared hosting provider with friendly environment for a Laravel. **Key Features:** - Laravel pre-installed - Turbo servers for faster speeds - Free site migration - Anytime money-back guarantee - Great support team **Pros:** - Fast performance with Turbo servers - Laravel-friendly with SSH, Composer, and Git support - Competitive pricing - Free SSL and easy backups **Cons:** - Shared hosting plans may not scale well for larger apps - Advanced features locked behind higher-tier plans **Why Use It?** It is is a fast, reliable, and developer-friendly platform that fully supports Laravel with tools like SSH, Composer, and Git. It’s perfect for those who want high performance, strong security, and affordable pricing. **Best For:** Freelancers and small businesses who want a speed-optimized Laravel environment on a budget. ## 6. Hostinger ![Hostinger - ServerAvatar](https://serveravatar.com/wp-content/uploads/2025/07/image-124-1024x499.png)[Hostinger](https://www.hostinger.com/) is ideal for those starting out or working on tight budgets. Despite its low pricing, it offers impressive Laravel compatibility. It’s ideal for beginners and small projects looking for reliable performance at a low cost. **Key Features:** - Support for PHP 8+ and Composer - Free SSL certificate and daily backups - SSH access and Git integration - Optimized server caching and LiteSpeed Web Server **Pros:** - Very affordable pricing - Supports PHP 8+, SSH, Git, and Composer - User-friendly dashboard - Great for beginners and small Laravel apps **Cons:** - Limited resources on lower-tier plans - Lacks advanced developer tools found in premium hosting **Why Use It?** It offers an affordable and beginner-friendly environment for Laravel projects, with support for PHP 8, SSH access, and Git integration. It is good choice for startups or developers who just starting out on small budget. **Best For:** Beginners and small Laravel projects who want reliable performance without breaking the bank. ## 7. SiteGround[](https://storage.3.basecamp.com/5840738/blobs/1c01123a-6882-11f0-82d2-0242ac120005/download/image.png) ![SiteGround - ServerAvatar](https://serveravatar.com/wp-content/uploads/2025/07/image-125-1024x501.png)[SiteGround](https://world.siteground.com/) offers secure and reliable Laravel hosting with daily backups, SSH access, and built-in Git support. If top-notch support is what you’re after, SiteGround stands out as one of the most reliable providers. **Key Features:** - Fully supports Laravel and PHP 8.x - Developer tools: SSH, Git, Staging, and WP-CLI - Daily automated backups and security monitoring - 24/7 priority support via chat and tickets **Pros:** - Excellent customer support available 24/7 - Laravel-ready with Git, SSH, and staging environments - Daily backups and strong security features - High uptime and solid reliability **Cons:** - More expensive than some budget hosts - Resource limits on shared plans **Why Use It?** It is a reliable choice for Laravel hosting, offering strong security, daily backups, and excellent 24/7 support. It’s ideal for developers who value stability and responsive customer service. **Best For:** Developers who prioritize peace of mind and excellent customer service. ## Comparison Table: Best Laravel Hosting Providers **Provider****Best For****Notable Features****ServerAvatar**Developers, agencies, freelancersEasy server setup, one-click deployment for popular applications, Git integration, one-click SSL, log monitoring, security, team collaboration, Redis, backups, file & DB management, 24/7 expert support**Forge**Advanced Laravel developers & DevOps expertsLaravel automation, server provisioning, zero-downtime deployment, job scheduling**Cloudways**Teams needing performance & flexibilityMulti-cloud support, staging environments, Redis/Varnish cache, Git integration, one-click deployments**DigitalOcean**Developers wanting full control & scalabilityHigh-performance VMs, full root access, custom Laravel setup, global data centers**A2 Hosting**Speed-focused users on a budgetTurbo servers, SSH access, Composer support, free SSL, developer-friendly shared hosting**Hostinger**Beginners and budget-conscious usersPHP 8+ support, SSH access, Git integration, free SSL, LiteSpeed caching**SiteGround**Developers needing support & reliabilityDaily backups, SSH access, Git integration, staging tools, 24/7 expert support## Key Features to Compare in Laravel Hosting When deciding on a provider, don’t just look at price. Consider: - PHP version & extensions - Composer availability - Cron job scheduler - Server monitoring - Git/CI-CD integrations - Queue support - One-click SSL and backups ## Shared vs. VPS vs. Managed Hosting for Laravel - **Shared Hosting** is a budget-friendly option. However, it lacks flexibility and performance. - **VPS Hosting** offers better resources and control but requires technical knowledge. - **Managed Hosting** (like ServerAvatar or Forge) is the sweet spot, giving you power and simplicity. ## What Developers Need in 2025 The developer’s toolkit in 2025 has evolved. Laravel devs now expect: - Git-based deployments - Zero-downtime rollouts - Integrated CI/CD - Easy queue and scheduler management - Support for Docker, Redis, and caching tools Your hosting provider support these basic needs. ## Tips to Choose the Right Laravel Hosting Here is how you can decide what can be good option for you: - **New to Laravel?** Try A2 Hosting or ServerAvatar. - **Freelancer or Agency?** Go with ServerAvatar or Cloudways. - **Advanced Dev?** Look into Forge, Vapor, or DigitalOcean. - **Need serverless?** Laravel Vapor is the way. Also, always check for uptime guarantees, support response times, and hidden fees. ## FAQs ### **1. Can I host a Laravel app on shared hosting?** Yes, but it’s not ideal. Laravel apps perform better with VPS or managed hosting where you have more control over the environment. ### **2. What is the easiest Laravel hosting provider for beginners?** ServerAvatar is very beginner-friendly with a clean interface and automated deployment tools. ### **3. Is Laravel Vapor worth it?** If you’re building high-traffic apps and need serverless scalability, yes. But it comes at a higher price and AWS dependency. ### **4. Do I need to know DevOps to use Laravel hosting platforms?** Not necessarily. Platforms like ServerAvatar, Cloudways, and Ploi simplify DevOps tasks with easy UIs. ### **5. Which hosting is best for Laravel in 2025?** It depends on your needs. ServerAvatar is great for ease and automation, while Forge is ideal for advanced users, and Cloudways offers a balanced experience. ## Conclusion Choosing the right Laravel hosting provider in 2025 doesn’t have to be overwhelming. Whether you’re building a small portfolio project or a production-scale SaaS app, the right host can save you hours of stress and help your Laravel app perform at its best. Go with the one that matches your skills, needs, and growth goals. And remember, just like you wouldn’t live in a house with a shaky foundation, don’t host your Laravel app on unreliable servers! The best Laravel hosting provider in 2025 depends entirely on your needs: - Choose **ServerAvatar** if you want a powerful, developer-centric platform with built-in tools and automation. - Go with **Cloudways** or **Forge** if you need flexibility and are comfortable managing cloud servers. - Pick **Hostinger** or **A2 Hosting** for affordable Laravel hosting without compromising core features. - If **support** is your top priority, **SiteGround** won’t let you down. - And if you need full control over every aspect of your setup, **DigitalOcean** offers unmatched customization. Remember, hosting can make or break your Laravel project. So choose wisely, considering your budget, experience level, scalability needs, and support expectations. ## Stop Wasting Time on Servers. Start Building Instead. You didn’t start your project to babysit servers. Let **ServerAvatar** handle deployment, monitoring, and backups — so you can focus on growth. Deploy **WordPress, Laravel, N8N**, and more in minutes. No DevOps required. No command line. No stress. [ 🚀 Try Free ](https://app.serveravatar.com) [ 🌐 Learn More ](https://serveravatar.com/) Trusted by 10,000+ developers and growing. **Categories:** Blog, Guide, Laravel **Tags:** Best Laravel Hosts, Developer Hosting, Laravel Deployment, Laravel Hosting, Laravel Optimization, Laravel Performance, PHP Hosting, Server Management --- ### [How to Connect Laravel with MongoDB Easily in 2026](https://serveravatar.com/laravel-mongodb-connection-setup-tutorial/) **Published:** August 9, 2025 **Author:** Suresh Ramani **Content:** [![Blog banner - ServerAvatar](https://serveravatar.com/wp-content/uploads/2025/09/728_90-Banner-3-1024x127.png)](https://serveravatar.com?ref=blog)Are you tired of wrestling with traditional SQL databases and looking for something more flexible? Laravel MongoDB is like the Swiss Army knife of databases – versatile, powerful, and perfect for modern web applications. When you pair it with Laravel’s elegant framework, you get a combination that’s like peanut butter and jelly for developers. In today’s fast-paced development world, NoSQL databases like MongoDB have become increasingly popular. Why? Because they offer the flexibility that traditional relational databases simply can’t match. Whether you’re building a content management system, an e-commerce platform, or a social media application, **MongoDB Laravel** integration can give you the scalability and performance you need. ## **Understanding MongoDB and Laravel Compatibility** Before we dive into the technical details, let’s address the elephant in the room: Can Laravel work seamlessly with MongoDB? The short answer is yes, but it requires some additional setup. **Laravel’s Native Database Support** Laravel was built with SQL databases in mind. Out of the box, it supports MySQL, PostgreSQL, SQLite, and SQL Server. However, with the right packages and configuration, you can make Laravel work beautifully with MongoDB. **Why Choose MongoDB for Your Laravel Project?** MongoDB offers several advantages that make it an attractive choice for modern web applications: - **Flexible Schema**: No need to define rigid table structures - **Horizontal Scalability**: Easy to scale across multiple servers - **JSON-like Documents**: Perfect for storing complex data structures - **High Performance**: Optimized for read and write operations **The Bridge: Official Laravel MongoDB Package** The official solution for connecting Laravel with MongoDB is the `mongodb/laravel-mongodb` package (formerly named jenssegers/mongodb). This package is now owned and maintained by MongoDB, Inc. and is compatible with Laravel 10.x and later. This package acts as a bridge, translating Laravel’s Eloquent ORM calls into MongoDB operations while providing native MongoDB features like TTL indexes and GridFS support. ## **Prerequisites and System Requirements** Before you start your **MongoDB Laravel** journey, make sure you have everything in place. Think of this as checking your toolkit before starting a DIY project. **Software Requirements:** - PHP 7.4 or higher (PHP 8+ recommended) - Laravel 8.0 or higher - MongoDB 4.0 or higher - Composer package manager **System Dependencies:** - MongoDB PHP extension - OpenSSL extension - Mbstring extension - Tokenizer extension **Development Environment Setup** Whether you’re using XAMPP, WAMP, Laravel Sail, or Docker, ensure your environment supports both Laravel and MongoDB. If you’re using a local development stack, you might need to install MongoDB separately. ## **Installing MongoDB Extension for PHP** Getting the MongoDB PHP extension up and running is your first technical hurdle. Don’t worry – it’s easier than it sounds! **For Windows Users:** 1. Download the appropriate MongoDB PHP extension from PECL 2. Extract the `php_mongodb.dll` file to your PHP extensions directory 3. Add `extension=mongodb` to your `php.ini` file 4. Restart your web server **For macOS Users:** Bash``` # Using Homebrew brew install mongodb/brew/mongodb-community pecl install mongodb ``` ``` # Using Homebrew brew install mongodb/brew/mongodb-community pecl install mongodb ``` **For Linux Users:** Bash``` # Ubuntu/Debian sudo apt-get install php-mongodb # CentOS/RHEL sudo yum install php-mongodb ``` ``` # Ubuntu/Debian sudo apt-get install php-mongodb # CentOS/RHEL sudo yum install php-mongodb ``` **Verifying Installation** After installation, verify that the extension is loaded: PHP``` ``` ``` ``` ## **Setting Up Laravel MongoDB Package** Now comes the fun part – installing the Laravel MongoDB package that will make your life much easier. **Installing the Package** Open your terminal in your Laravel project directory and run: Bash``` composer require mongodb/laravel-mongodb ``` ``` composer require mongodb/laravel-mongodb ``` **Important Note:** This installation will fail if the mongodb PHP extension is not installed. Make sure you have completed the previous step before proceeding. **Service Provider Registration** For Laravel 10.x and later, service provider auto-discovery is enabled by default, so no manual registration is required. The package will automatically register its service providers. **Publishing Configuration** While not mandatory, you can publish the MongoDB configuration file: Bash``` php artisan vendor:publish --provider="MongoDB\Laravel\MongoDBServiceProvider" ``` ``` php artisan vendor:publish --provider="MongoDB\Laravel\MongoDBServiceProvider" ``` This creates a `config/mongodb.php` file where you can customize advanced settings. [![Blog banner - ServerAvatar](https://serveravatar.com/wp-content/uploads/2025/09/728_90-Banner-1-1024x127.png)](https://serveravatar.com?ref=blog)## **Configuring Database Connections** Configuration is where the rubber meets the road. Get this right, and everything else flows smoothly. **Database Configuration** Open your `config/database.php` file and add the MongoDB connection. Laravel now supports a simplified DSN-based configuration: PHP``` 'connections' => [ // Existing connections... 'mongodb' => [ 'driver' => 'mongodb', 'dsn' => env('MONGODB_URI', 'mongodb://localhost:27017'), 'database' => env('MONGODB_DATABASE', 'laravel_app'), ], ], ``` ``` 'connections' => [ // Existing connections... 'mongodb' => [ 'driver' => 'mongodb', 'dsn' => env('MONGODB_URI', 'mongodb://localhost:27017'), 'database' => env('MONGODB_DATABASE', 'laravel_app'), ], ], ``` **Environment Variables** Update your `.env` file with your MongoDB connection details: Plaintext``` MONGODB_URI="mongodb://localhost:27017" MONGODB_DATABASE="laravel_app" # For MongoDB Atlas (cloud) # MONGODB_URI="mongodb+srv://:@.mongodb.net/?retryWrites=true&w=majority" ``` ``` MONGODB_URI="mongodb://localhost:27017" MONGODB_DATABASE="laravel_app" # For MongoDB Atlas (cloud) # MONGODB_URI="mongodb+srv://:@.mongodb.net/?retryWrites=true&w=majority" ``` **Setting Default Connection** You can set MongoDB as your default database connection: Plaintext``` DB_CONNECTION=mongodb ``` ``` DB_CONNECTION=mongodb ``` **MongoDB Atlas Configuration** For cloud hosting with MongoDB Atlas, use the connection string format: Plaintext``` MONGODB_URI="mongodb+srv://:@.mongodb.net/?retryWrites=true&w=majority" MONGODB_DATABASE="laravel_app" ``` ``` MONGODB_URI="mongodb+srv://:@.mongodb.net/?retryWrites=true&w=majority" MONGODB_DATABASE="laravel_app" ``` ## **Creating MongoDB Models in Laravel** Creating models for MongoDB is similar to creating regular Eloquent models, with a few key differences. **Basic Model Structure** Instead of extending `Illuminate\Database\Eloquent\Model`, your MongoDB models should extend `MongoDB\Laravel\Eloquent\Model`: PHP``` **Categories:** Blog, Laravel, Tutorials **Tags:** Laravel Beginners Guide, Laravel Database Setup, Laravel Development, Laravel MongoDB, MongoDB Tutorial, PHP Frameworks, PHP MongoDB, Web Development --- ### [Top 10 Budget-Friendly Cloud VPS Providers in 2026](https://serveravatar.com/budget-friendly-cloud-vps/) **Published:** August 16, 2025 **Author:** Meghna Meghwani **Content:** [![Blog banner - ServerAvatar](https://serveravatar.com/wp-content/uploads/2025/09/728_90-Banner-3-1024x127.png)](https://serveravatar.com?ref=blog)If you’ve ever searched for a **budget-friendly Cloud VPS** while running a website or an app and outgrown shared hosting, you might have looked into VPS (Virtual Private Server) solutions. A Cloud VPS is like renting a small part of a powerful server in the cloud. It gives you more control, speed, and flexibility than shared hosting, but it’s not as expensive as a dedicated server. There are a lot of cheap VPS solutions on the market in 2025. What’s the good news? You don’t have to spend hundreds of dollars every month anymore for performance that can handle traffic surges, e-commerce stores, or development environments. The not-so-good news is that It can feel like looking for a needle in a haystack when there are so many providers. This article lists the top 10 Cloud VPS providers in 2025 that are affordable, depending on their popularity, performance, and pricing. I’ll talk about what makes them special, why people adore them, and how much they will cost you. And yes, there is a price comparison chart at the conclusion that is easy to use. ## Important Things to Think About Before Picking a Cloud VPS - Performance & Reliability - Pricing & Hidden Costs - Customer Support - Scalability & Flexibility - Security Features ## 1. ServerAvatar[](https://storage.3.basecamp.com/5840738/blobs/d8c8a152-7805-11f0-aa25-0242ac120004/download/image.png) ![ServeAvatar Dashboard](https://serveravatar.com/wp-content/uploads/2025/08/image-2025-08-14T104958.553-1024x484.png)[ServerAvatar](https://serveravatar.com/) is a powerful cloud hosting and server management platform designed to make hosting and managing servers or applications effortless, no technical skills required. you choose a Cloud VPS from DigitalOcean or Vultr (with Linode and Hetzner coming soon) no Cloud Provider Account Needed. you can connect your own custom server with self managed server addon, ServerAvatar handles the complete setup, configuration, and automation. It’s ideal for developers, agencies, and businesses looking for both flexibility and simplicity in server management. **Benefits:** - **Fast Tech Stack Setup**—Automatically installs your selected stack (Apache, Nginx, OpenLiteSpeed, or MERN) stack for instant readiness. - **One-Click App Deployment** – Install WordPress, Mautic, n8n, and more with a single click. - **Strong Security** – Includes firewall, Automatic free SSL, fail2ban, and automated security updates. - **Team Collaboration** – Assign role-based access to team members for safe multi-user management. - **Automated Monitoring & Backups** – Real-time alerts, scheduled/instant backups, and staging environments. - **Full Control with Automation** – Combines the freedom of self-managed hosting with the ease of managed hosting. **Why It’s Popular:** ServerAvatar stands out for combining **ease of use** with **full control**. Unlike traditional managed hosting, it doesn’t lock you into a rigid setup—users retain complete server control while enjoying automation for repetitive tasks. Its direct integration with cloud providers, one-click deployments, and developer-friendly features make it a favorite among startups, agencies, and tech-savvy businesses. **General Pricing Range**: - DigitalOcean: $10 per month including 1 core 1 GB memory, and 25 GB Storage - Vultr: $8 per month including 1 core and 1 GB of memory, and 25 GB Storage ## 2. Hostinger VPS ![Budget-Friendly Cloud VPS ](https://serveravatar.com/wp-content/uploads/2025/08/image-2025-08-11T151146.031-1024x486.png)[Hostinger](https://www.hostinger.com/in/vps-hosting) is known for providing strong hosting at a much lower cost than its competitors. Their VPS plans are set up for speed, and you have full root access so you can set up your server just the way you want it. **Benefits:** - SSD storage for lightning-fast data retrieval - Multiple global data center locations - Custom control panel that’s easy for beginners - Free dedicated IP - 24/7 live chat support **Why It’s Popular:** Hostinger’s best feature is that it gives you a lot of bang for your buck. It’s great for bloggers, small business owners, and developers because it works well and is incredibly reliable for a reasonable monthly fee. **Pricing (2025):** Starts at **$5.99/month** for 1 vCPU, 1 GB RAM, 20 GB SSD, and 1 TB bandwidth. ## 3. Vultr ![Vultr-SeverAvatar](https://serveravatar.com/wp-content/uploads/2025/08/image-2025-08-11T152034.822-1024x486.png)[Vultr](https://www.vultr.com/) is known for having a simple pricing system and servers all around the world. It has more than 30 data centers throughout the world, so it’s great for projects that demand low-latency performance for a global audience. **Benefits:** - Hourly or monthly billing options - High-frequency compute instances for faster performance - One-click app deployment (WordPress, Docker, etc.) - Automatic backups and snapshots **Why It’s Popular:** Developers like Vultr because they can pay for it in a lot of different ways and choose from a lot of server locations. It works well for businesses because it is reliable and easy to grow. **Pricing (2025):** Starts at **$6/month** for 1 vCPU, 1 GB RAM, 25 GB SSD, and 1 TB bandwidth. ## 4. DigitalOcean [DigitalOcean](https://www.digitalocean.com/) is known for making cloud hosting easy for developers. Their “Droplets” are quick, dependable, and may grow. ![Digitalocean-ServerAvatar](https://serveravatar.com/wp-content/uploads/2025/08/image-2025-08-11T152101.553-1024x486.png)**Benefits:** - Transparent pricing with no hidden fees - Excellent documentation and tutorials - One-click Kubernetes and app marketplace - Robust API for developers **Why It’s Popular:** Startups and developers like it since they can count on the prices and the community is strong. Also, they have some of the best uptime in the business. **Pricing (2025):** Starts at **$6/month** for 1 vCPU, 1 GB RAM, 25 GB SSD, and 1 TB bandwidth. ## 5. Linode (Now Akamai Cloud) ![Linode-ServerAvatar](https://serveravatar.com/wp-content/uploads/2025/08/image-2025-08-11T152125.584-1024x486.png)[Linode](https://www.linode.com/) is noted for having powerful servers at low prices. It was just added to Akamai Cloud. **Benefits:** - SSD storage and powerful CPUs - 99.99% uptime SLA - Huge library of tutorials for all skill levels - Global data centers **Why It’s Popular:** Linode has a lot of devoted customers since it works well and has amazing customer service. A lot of developers and small enterprises like it. **Pricing (2025):** Starts at **$5/month** for 1 vCPU, 1 GB RAM, 25 GB SSD, and 1 TB bandwidth. [![Blog banner - ServerAvatar](https://serveravatar.com/wp-content/uploads/2025/09/728_90-Banner-1-1024x127.png)](https://serveravatar.com?ref=blog)## 6. Kamatera ![Kamatera-ServerAvatar](https://serveravatar.com/wp-content/uploads/2025/08/image-2025-08-11T132827.684-1-1024x486.png)[Kamatera](https://www.kamatera.com/) is different since it has a pay-as-you-go model and plans that may be changed to fit your needs. You can change the CPU, RAM, and storage to fit your needs. **Benefits:** - Flexible configurations (1 to 104 vCPUs) - 30-day free trial - 13 global data centers - Instant scaling without downtime **Why It’s Popular:** The best thing about it is that it is flexible. You only pay for what you need, and you may change server resources whenever you want. **Pricing (2025):** Starts at around **$4/month** for the smallest configuration. ## 7. A2 Hosting VPS ![A2 Hosting-ServerAvatar](https://serveravatar.com/wp-content/uploads/2025/08/image-2025-08-11T132752.262-1-1024x486.png)[A2 Hosting](https://hosting.com/) is known for how fast it is, thanks to its Turbo Servers, which say they can load pages up to 20 times faster. **Benefits:** - Turbo Boost for faster site performance - Free site migration - Managed and unmanaged VPS options - Developer-friendly environment with root access **Why It’s Popular:** People who own websites enjoy A2 Hosting because it is fast and reliable. Their managed VPS plans take care of all the technical details for you, and their unmanaged plans are great for tech-savvy people who want to save money. **Pricing (2025):** Starts at **$6.99/month** for 1 vCPU, 1 GB RAM, 20 GB SSD, and 2 TB bandwidth. ## 8. ScalaHosting ![Scalahosting-ServerAvatar](https://serveravatar.com/wp-content/uploads/2025/08/image-2025-08-11T132704.052-1-1024x486.png)[ScalaHosting’s](https://www.scalahosting.com/) new SPanel, which is a speedier and cheaper alternative to cPanel, has made a big splash. **Benefits:** - SPanel included at no extra cost - Free daily backups - 100% SSD storage - Fully managed VPS plans with free migration **Why It’s Popular:** The SPanel is a game-changer for enterprises that are sick of paying for cPanel licenses. Also, ScalaHosting has great customer service and security. **Pricing (2025):** Starts at **$10/month** for 1 CPU core, 2 GB RAM, 50 GB SSD, and unmetered bandwidth. ## 9. OVHcloud VPS ![OVHcloud-ServerAvatar](https://serveravatar.com/wp-content/uploads/2025/08/image-2025-08-11T152237.154-1024x486.png)[OVHcloud](https://www.ovhcloud.com/en-in/) is a big company in Europe that offers reliable and cheap VPS hosting with strong privacy protections. **Benefits:** - Affordable prices with strong specs - Anti-DDoS protection included - Large European and global network - Scalable resources **Why It’s Popular:** People that care about their privacy and need stable hosting in the EU love it. OVHcloud also has an excellent network for people all around the world. **Pricing (2025):** Starts at **$5.50/month** for 1 vCPU, 2 GB RAM, 40 GB SSD, and unlimited traffic. ## 10. GreenGeeks VPS ![GreenGeeks-ServerAvatar](https://serveravatar.com/wp-content/uploads/2025/08/image-2025-08-11T152315.115-1024x434.png)[GreenGeeks](https://www.greengeeks.in/) calls itself an eco-friendly hosting company since it offsets 300% of the energy it uses with renewable energy credits. **Benefits:** - Environmentally friendly - Managed VPS with cPanel included - High-performance SSD servers - 24/7 expert support **Why It’s Popular:** It appeals to people and businesses that care about the environment and don’t want to give up performance to stay green. **Pricing (2025):** Starts at **$39.95/month** for 4 vCPUs, 50 GB SSD, and 10 TB bandwidth. ## Pricing Comparison Table:- Budget-Friendly Cloud VPS in 2025 ProviderStarting Price (per month)vCPURAMStorageBandwidthHostinger$5.9911GB20GB SSD1TBVultr$6.0011GB25GB SSD1TBDigitalOcean$6.0011GB25GB SSD1TBLinode/Akamai$5.0011GB25GB SSD1TBKamatera$4.0011GB20GB SSDCustomA2 Hosting$6.9911GB20GB SSD2TBScalaHosting$10.0012GB50GB SSDUnmeteredOVHcloud$5.5012GB40GB SSDUnlimitedInterServer$6.0012GB30GB SSD1TBGreenGeeks$39.9548GB50GB SSD10TB## FAQs ### **1. What is the cheapest Cloud VPS provider in 2025?** Kamatera offers plans starting at around $4/month, making it the most affordable option without sacrificing reliability. ### **2. Which VPS is best for beginners?** Hostinger is beginner-friendly thanks to its simple control panel and great customer support. ### **3. Can I upgrade my VPS later?** Yes! Most providers like Vultr, Linode, and Kamatera allow you to scale your resources instantly. ### **4. Is a VPS better than shared hosting?** Absolutely. VPS offers more power, better security, and dedicated resources compared to shared hosting. ### **5. Which VPS is the most eco-friendly?** GreenGeeks stands out as the most environmentally responsible VPS provider. ## Conclusion Choosing the right **budget-friendly Cloud VPS** in 2025 comes down to your needs. If you want the absolute lowest price with reliable performance, **Kamatera** and **Linode/Akamai** are unbeatable. For speed, **A2 Hosting** and **Hostinger** shine. If you value flexibility and worldwide coverage, **Vultr** and **DigitalOcean** are great picks. And if you care about sustainability, **GreenGeeks** leads the way. The best part? You can start small and scale as your website or application grows. Just remember — cheapest isn’t always best. Factor in support quality, server locations, and extra features before making your choice. ## Stop Wasting Time on Servers. Start Building Instead. You didn’t start your project to babysit servers. Let **ServerAvatar** handle deployment, monitoring, and backups — so you can focus on growth. Deploy **WordPress, Laravel, N8N**, and more in minutes. No DevOps required. No command line. No stress. [ 🚀 Try Free ](https://app.serveravatar.com) [ 🌐 Learn More ](https://serveravatar.com/) Trusted by 10,000+ developers and growing. **Categories:** Blog, Cloud Platforms, Guide **Tags:** best VPS providers, budget-friendly Cloud VPS, cloud VPS pricing, VPS hosting benefits, VPS hosting comparison --- ### [Best AI Chatbot Plugins for WordPress in 2026](https://serveravatar.com/ai-chatbot-plugins-for-wordpress/) **Published:** September 16, 2025 **Author:** Meghna Meghwani **Content:** [![Blog banner - ServerAvatar](https://serveravatar.com/wp-content/uploads/2025/09/728_90-Banner-3-1024x127.png)](https://serveravatar.com?ref=blog)**AI Chatbot Plugins** are essential tools for adding a smart chatbot to your WordPress site. You’re in the right place! In 2025, AI chatbots are more popular than ever, helping your website visitors get instant answers. Let me introduce you to the top chatbot solutions you can use today. ## **What Are AI Chatbot Plugins?** Think of AI chatbot plugins like having a smart helper on your website. They work 24/7 and can talk to your visitors when you’re not around. These little helpers use AI (that’s artificial intelligence) to understand what people ask and give good answers. The cool thing is, you don’t need to know coding to use them. You just install the plugin on your WordPress site, and boom – you have a chatbot ready to help your visitors. ## **Why Your Website Needs a Chatbot** Well, here are some good reasons: - People get help right away, even at 3 AM - You don’t have to answer the same questions over and over - It makes your site look more professional - Visitors stay on your site longer - You can capture leads while you sleep - It’s cheaper than hiring more customer service people Now, let’s look at the best chatbot plugins you can use right now. ## 1**. Tidio Live Chat** ![AI Chatbot Plugins](https://serveravatar.com/wp-content/uploads/2025/09/image-23-1024x462.png)[Tidio](https://www.tidio.com/) is more than just a chatbot – it’s a complete chat system. But the AI part is what makes it special. It can handle common questions automatically and then pass harder questions to real people. **Good stuff about Tidio:** - Works on all devices - Has both AI and live chat - Easy drag-and-drop setup - Looks good on any website - Free version available **Things to consider:** - Can get expensive with more features - Learning curve for advanced features - Limited customization in free plan **Pricing:** - Free for up to 100 conversations per month - Starter plan: $29/month - Growth plan: $59/month - Tidio+ plan: $749/month for big companies What I like about Tidio is that it feels smooth. The chatbot talks to visitors, and if it can’t help, it smoothly hands them over to a real person. That’s pretty smart. ## 2**. ChatBot.com Plugin** ![ChatBot.com - ServerAvatar](https://serveravatar.com/wp-content/uploads/2025/09/image-24-1024x465.png)[ChatBot.com](http://chatbot.com/) is made by people who really know chatbots. ChatBot.com has a WordPress plugin that brings their powerful AI to your site. It’s like having a really smart assistant that never gets tired. **Why it’s awesome:** - Very smart AI that learns from conversations - Works in many languages - Can integrate with lots of other tools - Good reporting to see how it’s doing - Professional looking chat widget **Downsides:** - More expensive than basic options - Might be too much for simple websites - Takes time to set up properly **Pricing:** - Free trial for 14 days - Starter: $52/month - Team: $142/month - Business: $424/month The AI in this one is really good at understanding what people mean, even when they don’t type perfectly. That’s helpful because not everyone types like a professional writer. ## 3**. WP Chatbot** ![WP Chatbot - ServerAvatar](https://serveravatar.com/wp-content/uploads/2025/09/image-25-1024x584.png)[WP Chatbot](https://wordpress.org/plugins/wp-chatbot/) is pretty simple to use. WP Chatbot connects to Facebook Messenger, so people can chat with your bot through Facebook. Many people already use Messenger, so it feels natural to them. **What makes it good:** - Easy to set up – takes about 10 minutes - Works with Facebook Messenger - You can customize how it looks - It’s free to start with - Good for small businesses **What’s not so great:** - Only works with Facebook Messenger - Limited AI features in the free version - You need a Facebook business page **Pricing:** - Free version available - Pro plans start at $9/month - Premium features cost $19/month The setup is really straightforward. You just install it, connect your Facebook page, and it starts working. Your visitors can click on the chat button and talk to your bot through Messenger. ## 4**. IBM Watson Assistant** ![BM Watson - ServerAvatar](https://serveravatar.com/wp-content/uploads/2025/09/image-26-1024x465.png)Now this is the big league stuff. [IBM Watson Assistant](https://www.ibm.com/products/watsonx-assistant) is like the grandfather of AI, and their chatbot plugin for WordPress brings that power to your site. It’s really smart, but it might be too much for small sites. **Why it’s powerful:** - Incredibly smart AI - Can learn and improve over time - Enterprise-level features - Very reliable - Excellent language understanding **Challenges:** - Complex to set up - Expensive for small businesses - Might be overkill for simple needs - Requires some technical knowledge **Pricing:** - Lite plan: Free with limits - Plus: $140/month - Enterprise: Custom pricing (usually $1000+/month) If you have a big business or really complex customer questions, this might be worth the extra cost and effort. ## **5. Collect.chat** ![Collect chat - ServerAvatar](https://serveravatar.com/wp-content/uploads/2025/09/image-27-1024x467.png)[Collect.chat](http://collect.chat/) is different because it focuses on collecting information from visitors. Instead of just answering questions, it asks questions to learn about your visitors. Pretty clever, right? **Good points:** - Great for getting leads - Easy to build conversation flows - Works without any coding - Integrates with popular email tools - Mobile-friendly design **Things to think about:** - More focused on lead generation than support - Limited AI compared to others - Can feel a bit pushy if not set up right **Pricing:** - Free for up to 50 responses per month - Lite: $24/month - Standard: $49/month - Plus: $99/month It’s really good if your main goal is to collect email addresses or learn about potential customers. ## 6**. Chatfuel** ![Chatfuel - ServerAva](https://serveravatar.com/wp-content/uploads/2025/09/image-28-1024x465.png)[Chatfuel](https://chatfuel.com/) started with Facebook bots but now works on websites. It’s pretty user-friendly and has some nice AI features that don’t cost a fortune. **What’s nice:** - Visual bot builder that’s easy to use - Good AI for the price - Works well with social media - Decent free plan - Regular updates and improvements **Limitations:** - Still focused mainly on Facebook - AI isn’t as advanced as premium options - Limited customization options **Pricing:** - Free for up to 1000 users - Pro: $15/month - Premium: $300/month It’s a good middle-ground option if you want something better than basic but not as complex as enterprise solutions. [![Blog banner - ServerAvatar](https://serveravatar.com/wp-content/uploads/2025/09/728_90-Banner-1-1024x127.png)](https://serveravatar.com?ref=blog)## 7**. Botsify** ![Botsify - ServerAvatar](https://serveravatar.com/wp-content/uploads/2025/09/image-29-1024x433.png)[Botsify](https://botsify.com/) is another solid choice. It started as a Facebook Messenger bot builder, but now it works on websites too. The WordPress plugin makes it easy to add to your site. **What’s cool about it:** - Templates to get started fast - Can handle complex conversations - Integrates with email marketing tools - Works on mobile really well - Good analytics **Not so good:** - Interface can be confusing at first - Limited free trial - Customer support could be better **Pricing:** - Free plan with basic features - Pro: $49/month - Business: $149/month - Enterprise: Custom pricing One thing I really like is their templates. You can pick one that fits your business and customize it instead of starting from nothing. ## **How to Choose the Right One** Well, here’s how to pick the best chatbot for your website: **For small businesses:** Start with WP Chatbot or Tidio. They’re easy and won’t break the bank. **For online stores:** Tidio or ChatBot.com work great because they can help with sales questions. **For lead generation:** Collect.chat is made for this, so it’s your best bet. **For big companies:** IBM Watson or ChatBot.com give you the power you need. **For beginners:** WP Chatbot is the easiest to start with. ## **Setting Up Your First Chatbot** Don’t worry – it’s not as hard as you might think. Here’s what you usually need to do: 1. Pick your plugin and install it on WordPress 2. Create an account with the chatbot service 3. Connect your WordPress site to the service 4. Set up basic questions and answers 5. Test it to make sure it works 6. Go live and start helping visitors Most of these plugins have step-by-step guides that walk you through everything. And if you get stuck, they usually have good support teams to help. ## **Making Your Chatbot Work Better** Once you have your chatbot running, here are some tips to make it even better: - Start with common questions people ask - Keep answers short and helpful - Test it regularly to make sure it still works - Update answers when things change - Look at the chat logs to see what people really want to know - Don’t try to make it too smart at first – simple is often better Remember, your chatbot doesn’t need to be perfect from day one. You can make it better over time as you learn what your visitors need. ## **What’s Coming Next** AI chatbots are getting smarter every year. In 2025, we’re seeing bots that can: - Understand voice messages - Show images and videos in responses - Connect with more business tools - Handle more complex conversations - Work in more languages The future looks pretty exciting for website chatbots. ## **Conclusion** There you have it – the best AI chatbot plugins for WordPress in 2025. Each one has its own strengths, and the right choice depends on what you need. If you’re just starting out, I’d recommend trying Tidio or WP Chatbot. They’re easy to use and won’t overwhelm you with features you don’t need yet. Remember, the best chatbot is one that actually helps your visitors and makes your life easier. Start simple, learn what works, and then you can always upgrade to something more powerful later. The important thing is to just get started. Your website visitors will appreciate having someone (or something) available to help them, even when you’re busy with other things. And who knows? You might be surprised by how much a simple chatbot can improve your website experience. ## **FAQ** ### **How much do these chatbot plugins cost?** Most start free or around $10-20 per month. Enterprise ones can cost $100+ monthly. ### **Do I need to know coding?** Nope! All these plugins work without coding knowledge. ### **Will a chatbot replace human customer service?** Not completely, but it handles simple questions so humans can focus on complex issues. ### **How long does setup take?** Usually 30 minutes to 2 hours, depending on how fancy you want to get. ### **Can chatbots work in different languages?** Yes, many of these plugins support multiple languages. ## Stop Wasting Time on Servers. Start Building Instead. You didn’t start your project to babysit servers. Let **ServerAvatar** handle deployment, monitoring, and backups — so you can focus on growth. Deploy **WordPress, Laravel, N8N**, and more in minutes. No DevOps required. No command line. No stress. [ 🚀 Try Free ](https://app.serveravatar.com) [ 🌐 Learn More ](https://serveravatar.com/) Trusted by 10,000+ developers and growing. **Categories:** Blog, Guide, WordPress **Tags:** AI Chatbot, WordPress AI Tools, WordPress Plugins --- ### [7 Best Wordpress Migration Plugins in 2026](https://serveravatar.com/wordpress-migration-plugins/) **Published:** September 23, 2025 **Author:** Meghna Meghwani **Content:** [![Blog banner - ServerAvatar](https://serveravatar.com/wp-content/uploads/2025/09/728_90-Banner-3-1024x127.png)](https://serveravatar.com?ref=blog)Moving a WordPress site with a **WordPress migration plugin**s may seem stressful, but it doesn’t have to be. In the past, you had to move files, copy databases, and change settings by yourself, which was not easy and often caused mistakes. Now, migration plugins make this job simple. With just a few clicks, they can move your posts, photos, themes, plugins, and even your settings to a new host or web address. Most of them also create backups, so you don’t lose anything during the move. These tools are great because they save time, reduce errors, and don’t need technical knowledge. Whether you are running a small blog or a large online shop, a good migration plugin makes the process safe and stress-free. In this article, we’ll look at the 7 best WordPress migration plugins for 2025, what they offer, and how they can help you move your website without trouble. ## What is a WordPress Migration Plugin? - It helps you move your website to a new host or even a new address. - Instead of doing lots of tech stuff by hand, just use a plugin. - Things like posts, photos, files, and settings get moved over for you. - Most plugins also help with backups, so nothing gets lost. - You often just click a few buttons—way easier than doing it all yourself. ## Why Use a Migration Plugin? - Saves time and hassle—no scary file copy or weird tech stuff. - Better chance your site will work after you move it. - Stops you from breaking things or getting stuck with errors. - Some plugins fix up links for your new address on their own. - Many tools even keep your site safe and working while you move it. ## What Makes a Plugin Good? - Should be simple to use even if you don’t know a thing about code. - Needs to work on any web host, for big or small sites. - No slowdowns or site breaking while you move. - Bonus: If it can make backups and let you restore them, that’s a win. ## 7 Best WordPress Migration Plugins (2025) You want the best? Here are 7 top picks that really work. These are the easiest, and lots of people use them. Let’s go through each, how they work, what’s good, and any problems they have. ## 1. [Duplicator](https://duplicator.com/) ![wordpress migration plugins - ServerAvatar](https://serveravatar.com/wp-content/uploads/2025/09/image-45-1024x466.png)**What is this?** - A fan-favorite, used by lots of people for all kinds of sites. - Moves everything at once: posts, images, themes, plugins, and all. **How it works** - Makes a “package” of your site—like a zip file. - You upload this to the new place and run a quick installer. - No WordPress set up needed on the new host first. - Pro version can do site-to-site moves with a web link. **Why use it?** - Works for beginners, but pros also love it. - Handles big websites and even WordPress “multisite” moves. - Fixes site links for you, moves things fast. **Any weird stuff?** - Free version does not import backups from the Dashboard—need pro for that. - Pro starts at around $49 a year, but free is fine for small sites. **Bullet points** - Simple packaging and moving process - Direct server-to-server transfer (pro) - Strong for both small and huge websites - Free and paid options ## 2. [UpdraftPlus](https://teamupdraft.com/updraftplus/) ![UpdraftPlus - ServerAvatar](https://serveravatar.com/wp-content/uploads/2025/09/image-46-1024x425.png)**What is this?** - Popular for backups, but can move your site too. - Good for moving parts of your site, like only plugins or photos. **How it works** - Makes a backup that you can use to restore your site on a new place. - Pro “Migrator” add-on makes moving easier, but the free one is more manual. **Why use it?** - Choose what you want to move, not just everything. - Good for “selective” moves. - Easy restore steps; lots of guides if you get stuck. **Any weird stuff?** - Free version needs you to download and upload files by hand for migration. - Pro is $70 a year for extras. **Bullet points** - Nice pick for both backups and moving - Good for just moving the parts you want - Manual but safe in the free version - Paid version is much easier ## 3. [All-in-One WP Migration](https://servmask.com/) ![All-in-One Wp Migration - ServerAvatar](https://serveravatar.com/wp-content/uploads/2025/09/image-47-1024x477.png)**What is this?** - Really easy, drag-n-drop style. - Lots of people use this for quick moves. **How it works** - Export your site in the plugin. - Drag that file into the new site and… done!. - Works with lots of hosts and old site versions. **Why use it?** - Probably the simplest to work with if you’re not techy. - Handles URL changes for you during the move. - You can choose what junk you leave behind. **Any weird stuff?** - Free version only lets you import files up to 256MB. Not enough for big sites. - To move bigger sites, need the paid extension ($69/yr). **Bullet points** - Drag and drop your whole website - Free if your site is small - Unlimited size only if you buy - Easy, no expert skills needed ## 4. [Migrate Guru](https://migrateguru.com/) ![Migrateguru - ServerAvatar](https://serveravatar.com/wp-content/uploads/2025/09/image-48-1024x463.png)**What is this?** - Totally free. All features included for no charge. - Best for big sites (up to 200GB). **How it works** - Moves your site using their own servers, not yours. - Gets around slow speed and timeout errors. - Sends you updates by email as it runs. **Why use it?** - No paid version—everything is free!. - No stress about big websites, works for almost everyone. - Fixes up links and data for you. **Any weird stuff?** - Can’t do “multisite” moves. - Only lets you move 5 different sites a month (but you can move the same sites as much as you want). - Can’t move to or from your local computer, just web hosts. **Bullet points** - Free, even for massive sites - No slowdowns, works quick - Email alerts and auto-fixes links - No local or multisite moves [![Blog banner - ServerAvatar](https://serveravatar.com/wp-content/uploads/2025/09/728_90-Banner-1-1024x127.png)](https://serveravatar.com?ref=blog)## 5. [WP Migrate](https://deliciousbrains.com/wp-migrate-db-pro/) ![WP Migrate - ServerAvatar](https://serveravatar.com/wp-content/uploads/2025/09/image-49-1024x465.png)**What is this?** - Used to be “WP Migrate DB.” - Made for developers who want extra control. **How it works** - Lets you copy only your database or certain bits, not always the whole site. - Can do “push and pull” between live and test sites. **Why use it?** - Great for moving database stuff safely. - Fixes tricky issues with code and links that other plugins miss. - Works with big, complex sites. **Any weird stuff?** - Not the best for newbies; a bit more complex. - Paid plans add handy features. **Bullet points** - Powerful for devs, not so much for beginners - Move parts of a site or databases - Paid add-ons for extra stuff ## 6. [Solid Backups](https://solidwp.com/backups/) (was BackupBuddy) ![Solid WP - ServerAvatar](https://serveravatar.com/wp-content/uploads/2025/09/image-50-1024x455.png)**What is this?** - Used to be called BackupBuddy. - Backup tool first, migration second. **How it works** - Makes a full back up. You can restore it on the new location. - Has a tool like Duplicator for easy restore. **Why use it?** - Reliable, does backups well. - Migrates more than just the basics—good for complex sites. **Any weird stuff?** - Doesn’t work with a few big hosts like WordPress.com. - Costs $99 a year for the main plan. **Bullet points** - Backup and move in one plugin - Handles complicated sites and data - Not great with a few big hosts - Paid only ## 7. [Jetpack VaultPress Backup](https://jetpack.com/upgrade/backup/) ![Jetpack - ServerAvatar](https://serveravatar.com/wp-content/uploads/2025/09/image-51-1024x460.png)**What is this?** - From the team who runs WordPress.com. - Good for WooCommerce and online shops that need real-time saves. **How it works** - Does backups off your own server—no slowdowns. - Helps restore your site easily on any host. **Why use it?** - Extra safe, saves your online shop data no matter what happens. - Stores backups in different places, so you won’t lose anything. - Good for “one-click restores” if something goes wrong. **Any weird stuff?** - Needs a paid subscription for migration ($59.40/yr or higher). - Not as cheap as other choices, and not for multisite networks. **Bullet points** - Good for stores and WooCommerce - Fast and safe—no slowdowns - Not fully free, costs more for extras ## Fast Comparison Table Plugin NameBest ForFree Version?Paid Plan StartsFile Limit (Free)DuplicatorAll sites, easy movesYes$49/yrNone for small sitesUpdraftPlusBackups and movesYes$70/yrNoneAll-in-One WP MigrationQuick, easy small movesYes$69/yr256MB (free)Migrate GuruHuge sites, no moneyYes (fully free)None200GB (free)WP MigrateDevelopers, databasesYes$49/yrNoneSolid BackupsBackups + complicatedNo$99/yrN/AJetpack VaultPressShops, total backupsNo$59.40/yrN/A## Conclusion Moving your WordPress site is much easier now because of these plugins. Anyone can use them, even without tech skills, to move a site to a new host or address. Just pick a plugin, follow the clear steps, and your website will be safe. Make sure to test your website after the move so everything works right. If you do have trouble, most plugins help you fix things fast. In the end, these tools save time, stop mistakes, and make your life simpler as a WordPress user. ## FAQ ### Do I need tech skills to move my site with these? Not really. Most plugins are just click-and-go. Read instructions if you get stuck. ### Will I lose things like my blog posts or pictures? Nope, if you use a good plugin, everything comes along for the ride. ### What if I mess up the move? Just try to restore your backup. That’s why these plugins work—they’ve got you covered. ### Which plugin is fully free for moving big sites? Migrate Guru is totally free, even for sites up to 200GB. ### What’s easiest for complete beginners? All-in-One WP Migration or Duplicator keep things very simple and don’t ask for much setup. ## Stop Wasting Time on Servers. Start Building Instead. You didn’t start your project to babysit servers. Let **ServerAvatar** handle deployment, monitoring, and backups — so you can focus on growth. Deploy **WordPress, Laravel, N8N**, and more in minutes. No DevOps required. No command line. No stress. [ 🚀 Try Free ](https://app.serveravatar.com) [ 🌐 Learn More ](https://serveravatar.com/) Trusted by 10,000+ developers and growing. **Categories:** Blog, Guide, WordPress **Tags:** Wordpress, Wordpress Migration, Wordpress Plugin --- ### [What is a WordPress Hybrid Theme & How to Use It in 2026](https://serveravatar.com/wordpress-hybrid-theme/) **Published:** September 30, 2025 **Author:** Meghna Meghwani **Content:** [![Blog banner - ServerAvatar](https://serveravatar.com/wp-content/uploads/2025/09/728_90-Banner-3-1024x127.png)](https://serveravatar.com?ref=blog)WordPress has evolved significantly over the years, introducing new ways to build and manage websites. One of the most innovative solutions that bridges the gap between old and new is the hybrid theme approach. But what exactly is a WordPress hybrid theme, and why should you consider using one? ## What is a WordPress Hybrid Theme? A WordPress hybrid theme is like having a universal translator for your website. It seamlessly supports both the classic editor (the traditional WordPress editing experience) and the modern block editor (Gutenberg), giving you the flexibility to use either editing method without breaking your site’s functionality or design. Think of it as a bilingual website theme that speaks both “classic WordPress” and “modern WordPress” fluently. Your visitors won’t notice any difference regardless of which editing method you choose – everything works smoothly behind the scenes. ## Why Hybrid Themes Are Game-Changers The beauty of hybrid themes lies in their adaptability. Not everyone is ready to jump into the block editor immediately. Some users prefer the familiar classic editor, while others are excited about the visual possibilities that blocks offer. Hybrid themes eliminate the need to choose sides – you can have both. **Key benefits include:** - **Future-proofing**: Your site remains functional regardless of WordPress’s direction - **User flexibility**: Team members can use their preferred editing method - **Smooth transitions**: Gradually migrate from classic to block editing at your own pace - **Content compatibility**: Existing classic content works alongside new block content ## Classic vs. Block vs. Hybrid Themes: Understanding the Differences [](https://storage.3.basecamp.com/5840738/blobs/e51a13ae-9b8d-11f0-9614-0242ac120005/download/image.png) FeatureClassic ThemesBlock ThemesHybrid Themes**Editor Compatibility**Classic editor onlyBlock editor onlyBoth classic and block editors**Built With**PHP templates and hooksBlock patterns and site editingPHP templates AND block patterns**Customization**Requires coding knowledgeNo coding needed for most changesMaximum flexibility for all skill levels**Visual Editing**Limited capabilitiesExtensive visual optionsFull visual editing + traditional control**Best For**Long-time WordPress usersVisual content creatorsUsers with different skill levels**Learning Curve**Familiar to experienced usersEasy for beginnersAccommodates everyone**Future-Proofing**May become outdatedWordPress’s future directionFuture-ready architecture**Flexibility**Limited without codingVery flexibleMaximum flexibility**Maintenance**Traditional PHP maintenanceBlock-focused updatesDual system maintenance**Performance**Optimized for classic contentOptimized for blocksSmart conditional loading## Technical Components of Hybrid Themes ### Dual Editor Detection Hybrid themes include intelligent code that automatically detects which editor you’re using and applies appropriate styling and functionality. When you use the classic editor, traditional CSS and PHP template logic kicks in. Switch to blocks, and the theme seamlessly transitions to block-specific styling and features. ### Template Flexibility These themes maintain dual template systems: - **PHP templates** for classic content rendering - **Block templates** for modern block-based layouts - **Fallback mechanisms** to ensure content displays properly regardless of the editing method ### Smart Asset Loading Hybrid themes optimize performance by conditionally loading resources. Block-specific CSS and JavaScript only load when needed, while classic editor assets are served for traditional content. ## How to Develop Hybrid WordPress Themes ### What is ServerAvatar [ServerAvatar](https://serveravatar.com/) is a managed cloud hosting platform that makes it easy to deploy, manage, and monitor servers and apps without technical expertise. You can launch WordPress, Laravel, Node.js, and more on providers like DigitalOcean, Vultr, and Hetzner in just a few clicks, with automation, monitoring, and security built in. **with serverAvatar you can:-** - Deploy and manage servers directly from ServerAvatar. - Host and manage multiple applications (WordPress, Laravel, PHP based, Node.js based, etc.). - Manage multiple servers and applications from a single dashboard. - Get built-in monitoring, backups, free automatic SSL with auto-renewal, firewall, fail2ban, and many more features to simplify your routine tasks. - Supports multiple stacks like LAMP, LEMP, OLS, Node Stack - Built-in log monitoring suite - 24/7 support by our technical experts - Affordable pricing with scalable plans Install WordPress ServerAvatar Guide:- ![ServerAvatar Dashboard](https://serveravatar.com/wp-content/uploads/2025/09/image-96-1024x515.png)Now let me walk you through turning a classic WordPress theme like Twenty Twenty-Five into a hybrid theme. This is easier than you might think. ### What You Need Before Starting Before we begin, make sure you have: - A working WordPress installation (use staging, never live site) - A classic theme installed and active (we’ll use Twenty Twenty-Five) - Access to your theme files (FTP or file manager) - A text editor like VS Code or Notepad++ ## Step 1: Create a Child Theme Before making any changes to your WordPress theme, it’s important to create a child **theme**. That way, your customizations won’t disappear when the parent theme is updated. A child theme copies all the styles and functions of the original theme. You can safely add or change code without affecting the main files. Using a child theme is a smart way to keep your work safe and future-proof. if you don’t know how to craete child theme please visit this blog : So to do this: **Navigate to your themes folder:** - Using ServerAvatar File Manager, go to **wp-content/themes/**. I’ll use WP File Manager for this. - Inside wp-content/themes/, create a new folder. Let’s call it **twentytwentyfive-hybrid**. ![File Manager - ServerAvatar](https://serveravatar.com/wp-content/uploads/2025/09/image-97-1024x417.png)**Create the style.css file** inside the **twentytwentyfive-hybrid** folder and Open your text editor ![Edit style.css - ServerAvatar ](https://serveravatar.com/wp-content/uploads/2025/09/image-98-1024x323.png)Add the following code: ``` /* Theme Name: Twenty Twenty-One Hybrid Child Theme URI: https://example.com/ Description: My custom hybrid child theme for Twenty Twenty-One. Author: Your Name Author URI: https://example.com/ Template: twentytwentyone Version: 1.0.0 License: GNU General Public License v2 or later License URI: https://www.gnu.org/licenses/gpl-2.0.html Text Domain: twentytwentyone-hybrid */ ``` ``` /* Theme Name: Twenty Twenty-One Hybrid Child Theme URI: https://example.com/ Description: My custom hybrid child theme for Twenty Twenty-One. Author: Your Name Author URI: https://example.com/ Template: twentytwentyone Version: 1.0.0 License: GNU General Public License v2 or later License URI: https://www.gnu.org/licenses/gpl-2.0.html Text Domain: twentytwentyone-hybrid */ ``` **Important details:** - **Theme Name:** This is what will appear in your WordPress admin. - **Change URL:** Theme, Author and License - **Template:** This tells WordPress that twentytwentyfive is the parent theme. Make sure it exactly matches the parent theme’s folder name. Now save the file as **style.css** . **Create the functions.php file:** Now we’re going to create another file named **functions.php** inside the **twentytwentyfive-hybrid** folder. ![Edit function.php - ServerAvatar](https://serveravatar.com/wp-content/uploads/2025/09/image-99-1024x349.png)Open file and add the following code: ``` **Categories:** Blog, Tutorials, WordPress **Tags:** Wordpress, Wordpress Plugin, WordPress Themes --- ### [Top 10 AI Tools to Boost Your Sales in 2026 You Should Use](https://serveravatar.com/ai-tools-for-sales/) **Published:** October 13, 2025 **Author:** Meghna Meghwani **Content:** [![Blog banner - ServerAvatar](https://serveravatar.com/wp-content/uploads/2025/09/728_90-Banner-3-1024x127.png)](https://serveravatar.com?ref=blog)AI tools for sales have transformed the way businesses build connections, understand customer needs, and close deals at the right time. In 2025, the sales landscape has shifted drastically with the power of Artificial Intelligence (AI). AI isn’t just a “nice to have” anymore—it’s the secret weapon behind businesses hitting record-breaking sales targets. Think about it: while your competitor spends hours manually qualifying leads, an AI tool can do it in minutes, with better accuracy. From predicting buyer behavior to automating conversations, AI is transforming how sales teams operate. So, let’s explore the **top 10 AI tools to boost your sales in 2025** that every forward-thinking business should use. ## The Role of AI in Modern Sales AI in sales is like having a personal assistant who never sleeps, never gets tired, and always analyzes data with precision. Instead of drowning in spreadsheets and emails, sales teams now rely on AI for smarter insights, faster decision-making, and automation. Here’s why businesses are embracing AI in sales: - **Lead Scoring Made Easy:** AI ranks prospects based on buying intent. - **Personalized Engagement:** Customers get tailor-made messages at the right time. - **Sales Forecasting:** Predict revenue with high accuracy. - **Automation of Repetitive Tasks:** Freeing up time for building relationships. Simply put, AI doesn’t replace salespeople, it makes them superhuman. ## Top 10 AI Tools to Boost Your Sales in 2025 ### 1. Salesforce Einstein [Salesforce](https://www.salesforce.com/) Einstein is a built-in AI system inside Salesforce CRM. It helps businesses with predictive lead scoring, opportunity insights, and personalized recommendations. ![Salesforce Einstein - ServerAvatar](https://serveravatar.com/wp-content/uploads/2025/10/image-1024x502.png)- **Key Features** - Predictive analytics - Smart recommendations - Sales forecasting - **AI Features Users Like** - Predictive lead scoring helps identify high-value leads. - Automated insights allow for smarter decision-making. - Personalized recommendations drive sales efforts more effectively. - **Pros** - Fully integrated within Salesforce CRM. - Helps with forecasting and pipeline management. - Personalized, AI-driven insights for sales teams. - **Cons** - Requires Salesforce CRM, so it might not be ideal for those using other platforms. - Can be expensive for small businesses. - Complex setup for users who aren’t familiar with Salesforce. - **Pricing** - Salesforce Einstein is part of Salesforce’s overall platform, which starts at around **$25–$300 per month**, depending on the plan (e.g., Sales Cloud, Service Cloud). With Einstein, sales teams close deals faster and focus only on high-value prospects. ### 2. HubSpot AI [HubSpot](https://www.hubspot.com/) AI is a game-changer for small to mid-sized businesses. It adds intelligence to HubSpot’s CRM, helping sales teams automate emails, track engagement, and qualify leads. ![HubSpot Ai - ServerAvatar](https://serveravatar.com/wp-content/uploads/2025/10/image-1-1024x475.png)- **Key Features** - AI-powered lead scoring - Automated outreach - Predictive customer behavior - **AI Features Users Like** - AI-powered lead scoring helps prioritize leads. - Automates routine outreach (emails, follow-ups). - Predictive analytics helps predict customer behavior. - **Pros** - Easy to use with a very intuitive interface. - Excellent for small to mid-sized businesses. - Seamlessly integrates with HubSpot’s CRM. - **Cons** - Limited functionality if you need highly specialized AI features. - Advanced features may require higher-tier plans. - **Pricing** - Pricing is **customized** based on the size of your team and the features you need, but it generally starts around **$45/month** and ranges from **$800** to **$3,200/month**. It’s perfect if you want sales automation without a steep learning curve. ### 3. Gong.io Ever wished you had a tool that could tell you exactly what your customers are thinking during calls? That’s what [Gong.io](https://www.gong.io/) does. It records, transcribes, and analyzes sales conversations. [](https://storage.3.basecamp.com/5840738/blobs/6a0ae510-9b67-11f0-b496-0242ac120005/download/image.png) ![Gong.io - ServerAvatar](https://serveravatar.com/wp-content/uploads/2025/10/image-2025-10-13T120625.382-1024x618.png)- **Key Features** - Conversation intelligence - Deal insights - Coaching recommendations - **AI Features Users Like** - Analyzes sales calls to identify opportunities for improvement. - Offers coaching tips based on conversation patterns. - Provides deal insights that help prioritize opportunities. - **Pros** - Great for improving sales conversations and team coaching. - Highly effective for sales reps working in complex deals. - Provides real-time feedback and insights. - **Cons** - Can be pricey for smaller teams. - Limited value if you don’t have a lot of sales calls to analyze. - **Pricing** - Pricing is **customized** based on the size of your team and the features you need, but it generally starts around **$100–$250 per month**. By studying conversations, Gong helps sales reps understand what works and what doesn’t. ### 4. Drift [Drift](https://www.salesloft.com/) is famous for its AI-powered chatbots that engage website visitors in real time. Instead of waiting for forms to be filled, Drift converts visitors into leads instantly. ![Drift - ServerAvatar](https://serveravatar.com/wp-content/uploads/2025/10/image-3-1024x521.png)- **Key Features** - Real-time AI chatbots - Personalized messaging - Lead qualification - **AI Features Users Like** - Real-time lead engagement via AI-powered chatbots. - Intelligent message routing based on user behavior. - AI-based lead qualification ensures better targeting. - **Pros** - Great for engaging website visitors instantly. - Increases lead conversion rates. - Easy to integrate with other sales tools and CRMs. - **Cons** - Limited functionality outside of chatbot and messaging. - Can become costly as you scale your operations. - **Pricing** - Drift’s pricing is **customized**, but it generally starts around **$400/month** for small teams. Imagine having a 24/7 sales assistant that never misses a lead, that’s Drift. [![Blog banner - ServerAvatar](https://serveravatar.com/wp-content/uploads/2025/09/728_90-Banner-1-1024x127.png)](https://serveravatar.com?ref=blog)### 5. Outreach.io ![Outreach - ServerAvatar](https://serveravatar.com/wp-content/uploads/2025/10/image-4-1024x517.png)[Outreach.io](https://www.outreach.io/) uses AI to enhance sales engagement. It helps automate repetitive tasks such as follow-up emails and meeting scheduling. - **Key Features** - AI-driven outreach sequences - Engagement analytics - Predictive task prioritization - **AI Features Users Like** - Automates repetitive tasks like email follow-ups. - AI prioritizes sales tasks based on predicted engagement. - Engagement analytics to measure outreach effectiveness. - **Pros** - Excellent for automating sales outreach and follow-ups. - Powerful analytics tools for measuring team performance. - Great for keeping the pipeline active and organized. - **Cons** - Steeper learning curve for new users. - Can be expensive for small teams. - **Pricing** - Outreach.io offers **customized pricing** based on team size, but it generally starts at **$100–$150 per month**. It keeps your sales pipeline flowing without burning out your team. ### 6. InsideSales (XANT.ai) [InsideSales](https://www.insidesales.com/), now known as XANT.ai, brings predictive analytics to sales. It uses data to suggest which leads are most likely to convert. ![AI tools for sales - ServerAvatar](https://serveravatar.com/wp-content/uploads/2025/10/image-5-1024x478.png)- **Key Features** - Lead scoring - Sales acceleration tools - Data-driven prioritization - **AI Features Users Like** - AI prioritizes leads based on likelihood to convert. - Uses historical data for smarter sales actions. - Offers real-time insights into your sales pipeline. - **Pros** - Strong predictive analytics for better lead management. - Useful for sales teams looking to optimize outreach efforts. - Great for data-driven sales teams. - **Cons** - Primarily aimed at larger teams and enterprises. - Could be overkill for smaller businesses. - **Pricing** - XANT.ai’s pricing is **customized** and varies based on usage and features, but it generally starts around **$75–$150 per month** If you want smarter prospecting, XANT.ai is worth checking out. ### 7. People.ai [People.ai](https://www.people.ai/) is a revenue intelligence platform that gives businesses a clear view of sales activities and performance. ![People.ai - ServerAvatar](https://serveravatar.com/wp-content/uploads/2025/10/image-6-1024x535.png)- **Key Features** - AI-driven insights - Pipeline visibility - Sales productivity boost - **AI Features Users Like** - Provides a clear view of sales activities and performance. - AI-driven insights for improving sales productivity. - Helps identify which activities and reps are driving revenue. - **Pros** - Deep insights into sales performance and activities. - Helps businesses stay organized and ensure pipeline visibility. - Improves sales productivity by eliminating manual data entry. - **Cons** - Expensive for small teams. - Might require time to implement effectively across the organization. - **Pricing** - People.ai’s pricing is **customized** but usually starts at **$50–$200 per user/month**. However, final costs will be based on your requirements. It ensures that no lead or opportunity slips through the cracks. ### 8. Clari [Clari](https://www.clari.com/) specializes in sales forecasting and pipeline management. It uses AI to give accurate revenue predictions. ![Clari - ServerAvatar](https://serveravatar.com/wp-content/uploads/2025/10/image-7-1024x562.png)- **Key Features** - Forecast accuracy - Pipeline tracking - AI-driven revenue insights - **AI Features Users Like** - Provides accurate revenue forecasts. - Helps manage sales pipelines with AI insights. - Tracks the health of deals and opportunities. - **Pros** - Strong focus on accurate sales forecasting. - Helps with pipeline visibility and managing potential risks. - Great for larger organizations with complex pipelines. - **Cons** - Can be pricey for smaller organizations. - Limited features outside of pipeline management and forecasting. - **Pricing** - Pricing starts at about $100–$120 per user per month, but final costs vary based on services and needs, contact their sales team for a custom quote. Businesses love Clari because it reduces guesswork in revenue planning. ### 9. Conversica [Conversica](https://www.conversica.com/) offers AI-powered virtual sales assistants that engage leads via email and chat. ![Conversica - ServerAvatar](https://serveravatar.com/wp-content/uploads/2025/10/image-8-1024x534.png)- **Key Features** - Automated lead engagement - Natural, human-like responses - Higher conversion rates - **AI Features Users Like** - AI engages leads 24/7, following up automatically. - Personalizes email and chat interactions. - Helps businesses nurture leads without a full sales team. - **Pros** - 24/7 lead engagement. - High lead conversion rates due to continuous follow-up. - Minimal manual effort required from sales teams. - **Cons** - Can feel impersonal if leads prefer human interaction. - Not suitable for high-touch sales processes. - **Pricing** - Conversica pricing starts around $2,999 per company per month, but final costs depend on features and customization. It’s like having an extra sales rep dedicated to warming up leads. ### 10. ZoomInfo [ZoomInfo](https://www.zoominfo.com/) is an AI-powered sales intelligence platform designed to help businesses identify, connect, and engage with their most valuable prospects. ![Zoominfo - ServerAvatar](https://serveravatar.com/wp-content/uploads/2025/10/image-9-1024x542.png)- **Key Features** - Comprehensive B2B contact and company database - AI-driven lead recommendations - Intent data for prospect targeting - Automated workflows and integrations with CRMs - Advanced search and segmentation tools - **AI Features Users Like** - Uses AI to provide accurate lead scoring and prioritization. - Intent-based targeting to find prospects ready to buy. - Automated data enrichment to keep CRM records updated. - **Pros** - Extensive and accurate database of contacts and companies. - Powerful AI insights that help prioritize the right leads. - Seamless integration with Salesforce, HubSpot, and other CRMs. - Helps reduce time spent on manual prospecting. - **Cons** - Can be expensive for startups and small businesses. - Occasional data inaccuracies depending on industry. - Some features may require advanced setup to maximize ROI. - **Pricing** - ZoomInfo offers tiered pricing, usually starting around **$15,000/year** for smaller teams. Pricing varies based on data needs, features, and number of users. It’s considered one of the top AI-driven sales platforms for companies aiming to scale outreach and close deals faster. ## How to Choose the Right AI Tool for Your Business Not all AI tools are created equal. The right one for you depends on your: - **Business size:** SMBs may prefer HubSpot AI, while enterprises may lean toward Salesforce Einstein. - **Budget:** Some tools are subscription-based; others are more enterprise-focused. - **Integration needs:** Ensure the AI tool works seamlessly with your existing CRM or workflow. The key is to start small, test, and scale. ## Future of AI in Sales Beyond 2025 Looking ahead, AI in sales will only get smarter. Expect: - Hyper-personalization at scale - Deeper integration with voice assistants - AI that predicts customer needs before they even express them - Enhanced AR/VR sales experiences Businesses that embrace AI now will be miles ahead in the future. ## FAQs ### **1. Which AI tool is best for small businesses?** HubSpot AI is great for small businesses because it’s affordable and easy to use. ### **2. Can AI completely replace salespeople?** No. AI supports and empowers salespeople but can’t replace the human touch in relationship-building. ### **3. How expensive are AI sales tools?** Pricing varies, from plans (like Drift’s starter version) to enterprise-level tools like Salesforce Einstein. ### **4. Do AI tools work for eCommerce?** Absolutely! Tools like Drift and Conversica are perfect for automating customer engagement in eCommerce. ### **5. What skills do sales teams need to work with AI?** Sales teams should learn how to use AI insights, interpret analytics, and blend automation with personal selling. ## Conclusion AI is no longer a futuristic dream, it’s the backbone of successful sales strategies in 2025. From lead scoring and forecasting to chatbots and conversation intelligence, these **top 10 AI tools** will supercharge your sales process and keep you competitive. If you’re serious about boosting revenue, improving customer experience, and freeing your team from repetitive tasks, now is the time to adopt AI. ## Stop Wasting Time on Servers. Start Building Instead. You didn’t start your project to babysit servers. Let **ServerAvatar** handle deployment, monitoring, and backups — so you can focus on growth. Deploy **WordPress, Laravel, N8N**, and more in minutes. No DevOps required. No command line. No stress. [ 🚀 Try Free ](https://app.serveravatar.com) [ 🌐 Learn More ](https://serveravatar.com/) Trusted by 10,000+ developers and growing. **Categories:** Blog, Guide **Tags:** AI tools, WordPress AI Tools --- ### [8 Best WordPress Community Plugins for 2026](https://serveravatar.com/wordpress-community-plugins/) **Published:** November 24, 2025 **Author:** Meghna Meghwani **Content:** [![Blog banner - ServerAvatar](https://serveravatar.com/wp-content/uploads/2025/09/728_90-Banner-3-1024x127.png)](https://serveravatar.com/?ref=blog)Building an online community today is a lot like building a friendly neighborhood, but in the digital world. You need tools that help people connect, share, chat, and engage without friction. WordPress, being as flexible as it is, gives you countless WordPress community plugins to do exactly that. But with so many options out there, how do you pick the right ones? In this guide, I’ll walk you through the 8 best WordPress community plugins for 2025, all in simple language and with honest, human explanations. Think of this as your roadmap to creating a lively and interactive space that people will love to be part of. ## **What Are WordPress Community Plugins?** WordPress community plugins are tools that help you turn your website into an interactive online space where people can connect, communicate, and engage. Think of your website as a simple house. A community plugin is what adds rooms like a lounge, a discussion hall, a message board, or even a mini social network where members can hang out. These plugins allow you to build features such as: - User profiles - Activity feeds - Forums - Private messaging - Groups - Member directories - Social interactions (likes, comments, mentions) - Membership controls Whether you’re running a coaching platform, social network, student community, or customer support forum, these plugins help you create a digital environment where people feel connected and involved. ## **What Makes a Great WordPress Community Plugin?** Before diving into the list, let’s quickly understand what actually makes a community plugin *great*. Imagine building a clubhouse, you want it to be safe, easy to navigate, fun, and full of helpful tools. Similarly, a good community plugin should offer: - Easy user registration & profiles - Strong privacy controls - Activity feeds or forums - Messaging or communication tools - Smooth performance - Customizable layouts The more intuitive the plugin, the more active your community becomes. ## **How to Install WordPress** If you’re planning to build a community website, the first step is setting up WordPress on a reliable server. **ServerAvatar** makes this process incredibly smooth, even if you’re not very technical. It takes care of the heavy lifting, so you can focus on building your community rather than fighting with server commands. ### **What is ServerAvatar?** [ServerAvatar](https://serveravatar.com/) is a platform to simplify the hosting and management of servers and applications. It simplifies the process of deploying and managing PHP and Node.js based web applications on servers. ![ServerAvatar Dashboard](https://serveravatar.com/wp-content/uploads/2025/11/image-56.png) You can follow this step-by-step guide to install WordPress quickly using ServerAvatar: ## **Why ServerAvatar Is Ideal for Community Websites** Community websites usually require more server resources than regular blogs. Features like activity feeds, private messaging, media uploads, and user profiles can slow down websites on shared hosting. This is where **ServerAvatar** becomes incredibly useful. It lets you: - Deploy WordPress on powerful VPS servers - Automatically configure performance optimizations - Scale your server as your community grows - Monitor CPU, RAM, and real-time server metrics - Enable automatic backups - Secure your community with firewalls and SSL With ServerAvatar, you focus on building your community, while it handles server performance, security, and uptime in the background. ## Best WordPress Community Plugins for 2025 ## **1.** [**BuddyBoss**](https://www.buddyboss.com/) **– The Complete Community Suite** If WordPress community plugins were cars, **BuddyBoss** would be a luxury SUV, powerful, stylish, and packed with premium features. It’s built for creators, schools, membership sites, eLearning platforms, and anyone wanting a professional community. BuddyBoss is perfect if you want a polished, professional community with zero compromises. ![WordPress community plugins - BuddyBoss](https://serveravatar.com/wp-content/uploads/2025/11/image-130-1024x514.png) **Key Features of BuddyBoss** - **Modern Social Network Features:** Activity feeds, reactions, user groups, and private messaging, all feel like a real social platform. - **Native Mobile App Support:** You can even launch your own community mobile app with BuddyBoss App (a rare feature!). - **Seamless Integration:** Works beautifully with LearnDash, MemberPress, WooCommerce, and more. - **High Customization:** You can style your community exactly the way you want. **Pros** - Extremely feature-rich and professional - Offers a companion mobile app option - Beautiful design and modern interface - Ideal for online courses, memberships, and large communities - Strong integrations with LearnDash, LifterLMS, WooCommerce, etc. **Cons** - Premium and more expensive than others - Can feel overwhelming to beginners - Requires decent hosting to perform smoothly **Best for:** serious, polished communities where you might want course integration, memberships, and even your own mobile app. ## **2.** [**BuddyPress**](https://buddypress.org/) **– The Classic Community Framework** BuddyPress is one of the oldest and most trusted community plugins in the WordPress world. It’s like an old reliable friend, simple, flexible, and open-source. BuddyPress is ideal for beginners or anyone wanting a simple yet powerful community setup. ![WordPress community plugins - BuddyPress](https://serveravatar.com/wp-content/uploads/2025/11/image-131-1024x514.png) **Best Features of BuddyPress** - **Social Networking Features:** User profiles, private messages, groups, activity stream, everything a basic community needs. - **Highly Extendable:** Hundreds of free add-ons allow you to tailor your community your way. - **Lightweight & Free:** A great option if you’re on a budget. **Pros** - 100% free and open-source - Lightweight and flexible - Works well with many free add-ons - Easy to extend and customize - Good choice for simple community setups **Cons** - Interface feels outdated compared to newer plugins - Requires add-ons for advanced features - Not as powerful for professional or large-scale communities **Ideal for:** doing things on a budget, want a fully free open-source social network, or want something highly extensible. ## **3.** [**PeepSo**](https://www.peepso.com/) **– A Lightweight Social Network Plugin** PeepSo gives you the experience of running your own Facebook-like platform directly inside WordPress. It’s fast, modern, and fully customizable. PeepSo is perfect for those who want a social network vibe without heavy complexity. ![WordPress community plugins - PeepSo](https://serveravatar.com/wp-content/uploads/2025/11/image-132-1024x490.png) **Why PeepSo Stands Out** - **Clean & Modern Interface:** Feels natural and user-friendly, especially for non-tech users. - **Strong Privacy Features:** Perfect if your community requires privacy or exclusivity. - **Social Media–Like Features:** Reactions, hashtags, user walls, real-time notifications, everything that boosts engagement. **Pros** - Clean, modern, Facebook-like interface - Built for speed and privacy - Offers real-time notifications and social interactions - Highly customizable with add-ons - Easy for newcomers to navigate **Cons** - Core plugin is free, but most useful features require paid add-ons - Some features overlap and may feel modular - Setup can feel slightly complex for beginners **Best For:** if you want a modern social feel with real-time activity, more “social media” style than just forums. ## **4.** [**MemberPress**](https://memberpress.com/) **– Build Paid Community Spaces** If you want to build a gated, premium community, **MemberPress** is your best friend. It lets you create paywalls, memberships, and private community hubs. MemberPress is great for entrepreneurs, coaches, or educators monetizing their communities. ![WordPress community plugins - MemberPress](https://serveravatar.com/wp-content/uploads/2025/11/image-133-1024x403.png) **Essential Features of MemberPress** - **Access Control:** You decide who can see what, perfect for premium content or paid members. - **Course & eLearning Integration:** Works smoothly with LMS plugins like LearnDash and LifterLMS. - **Subscription Management:** Create plans, tiers, and renewal cycles easily. **Pros** - Best for paid communities or membership sites - Advanced access rules and paywall controls - Integrates with major LMS plugins - Great for monetization - Reliable subscription and payment management **Cons** - Not built for forums or activity feeds on its own - Can become expensive depending on the plan - Requires combining with other plugins for full community features **Perfect for:** monetized communities, paywalls, recurring subscriptions, or membership-based access. ## **5.** [**bbPress**](https://bbpress.org/) **– The Best Forum Solution for WordPress** When it comes to building fast and reliable forums, **bbPress** leads the pack. It’s created by the same team behind WordPress. Ideal for community forums where simplicity and speed matter most. ![WordPress community plugins - bbPress](https://serveravatar.com/wp-content/uploads/2025/11/image-134-1024x525.png) **Highlights of bbPress:** - **Lightweight & Speedy:** Doesn’t slow down your website, unlike some heavy forum plugins. - **Simple Yet Functional:** Perfect for Q&A forums, support communities, or discussion boards. - **Integrates With Everything:** Works smoothly with BuddyPress, WooCommerce, and most themes. **Pros** - Fast, lightweight, and stable - Officially built by the WordPress team - Perfect for classic forums or discussion boards - Works well with most themes - Free to use **Cons** - Very basic design without add-ons - Not suitable for social networking-style communities - Limited customization compared to modern forum plugins **Best for:** need of forums, it’s very light and straightforward. [![Blog banner - ServerAvatar](https://serveravatar.com/wp-content/uploads/2025/09/728_90-Banner-1-1024x127.png)](https://serveravatar.com/?ref=blog)## **6.** [**WPForo**](https://wpforo.com/) **– The Modern Forum Plugin** WPForo brings fresh designs and powerful features to WordPress forums. Think of it as bbPress with modern flair. WPForo suits communities where discussions are the main focus but aesthetics matter too. ![WordPress community plugins - WPForo](https://serveravatar.com/wp-content/uploads/2025/11/image-135-1024x504.png) **WPForo Key Advantages** - **Multiple Layouts:** Modern, extended, simplified, and Q&A layouts available. - **SEO-Friendly:** Smart URL structure, rich snippets, and optimized indexing. - **Customizable User Profiles:** Members get badges, ranks, and more interactive features. **Pros** - Modern and stylish forum layouts - SEO-friendly forum structure - User ranks, badges, and reactions - More creative control than bbPress - Includes Q&A, simplified, and classic layouts **Cons** - More resource-heavy than bbPress - Some advanced features require paid add-ons - Not ideal for building social networks or groups **Best for:** more advanced forum functionality, reputation points, multiple layouts, modern UI. ## **7.** [**Ultimate Member**](https://ultimatemember.com/) **– Build User Profiles & Directories** If you want beautiful user profiles and directories, **Ultimate Member** is one of the best plugins out there. Ultimate Member is ideal for networking-focused communities. ![WordPress community plugins - UltimateMember](https://serveravatar.com/wp-content/uploads/2025/11/image-136-1024x491.png) **Ultimate Member Features** - **Drag-and-Drop Profile Builder:** Create amazing profile pages without coding. - **User Directories:** Let visitors filter and browse through members easily. - **Role & Access Management:** Useful for running multi-level communities. **Pros** - Excellent for user profiles and directories - Clean drag-and-drop profile builder - Great for membership-style communities - Highly customizable roles and permissions - Free version is powerful **Cons** - Add-ons can get costly - Not built for forums or activity feeds by default - Requires extensions for advanced community interactions **Best For:** profiles, directories, and role-based member access matter more than discussion forums. ## **8.** [**Youzify**](https://youzify.com/) **– The Ultimate Community Customization Tool** Youzify (formerly Youzer) is known for its beautiful designs and endless customization options. If you want your community to *look amazing* and feel active, Youzify is a perfect fit. ![WordPress community plugins - Youzify](https://serveravatar.com/wp-content/uploads/2025/11/image-137-1024x491.png) **How Youzify Enhances Communities** - **Stunning Profile Designs:** Colorful, modern, and highly interactive layouts. - **Monetization Features:** Sell memberships or add private user areas. - **Gamification Tools:** Badges, points, ranks, great for boosting engagement. **Pros** - Beautiful, eye-catching user profiles - Tons of community customization options - Gamification features like badges, points, ranks - Works with BuddyPress and Elementor - Great for visually rich communities **Cons** - Can be heavy on performance if not optimized - Might feel overwhelming due to the number of settings - Best features available only in the premium version **Ideal for:** enhancing BuddyPress with beautiful profiles, gamification, and customizable member types. ## **How to Choose the Right Community Plugin** Choosing a community plugin depends on your needs. Ask yourself: - Do I want a social network or simple forums? - Do I need a free solution or a premium one? - Will I sell memberships? - Do I need mobile apps? - How important are customization and design? **Here’s a quick guide:** **Need****Best Plugin**Social network feelBuddyBoss, PeepSoPaid membership communityMemberPressSimple forumsbbPressModern forumsWPForoBeautiful profilesUltimate MemberCustom community designYouzifyOpen-source flexibilityBuddyPress## Performance Tips for Running a Fast Community Website A community website can grow quickly, and with growth comes more users, more interactions, and more load on your server. Keeping your site fast ensures better engagement and a smoother user experience. Here’s how you can keep your community running at peak performance: - Choose VPS hosting instead of shared hosting - Use caching plugins - Enable image optimization - Offload media to a CDN - Keep plugins minimal - Monitor server load > Using ServerAvatar makes it easy to monitor CPU, RAM, and storage so your community always runs smoothly. ## **Security Tips for Community Websites** Community websites handle user registrations, profiles, messages, and input fields — making them more exposed to attacks. Securing your site should be a priority from day one. - Use SSL (ServerAvatar makes SSL installation 1-click) - Enable 2-factor authentication - Use strong passwords & limit login attempts - Moderate user registration - Keep plugins and themes updated - Back up your site regularly - Secure User-Generated Content ## **Frequently Asked Questions (FAQs)** ### **1. Which is the best WordPress community plugin for beginners?** BuddyPress is often the best starting point for beginners because it’s free, easy to use, and offers all the basic community features without overwhelming you. ### **2. Can I build a paid community with WordPress?** Yes. MemberPress is the most reliable plugin for creating a paid or gated community. You can set membership levels, restrict content, and manage recurring payments easily. ### **3. What’s the main difference between BuddyBoss and BuddyPress?** BuddyPress is completely free and provides essential social features, while BuddyBoss is a premium, advanced solution with a modern interface, deep customization, and even mobile app support. ### **4. Do I need additional hosting or a strong server to run a community website?** Yes. Community websites tend to be more resource-heavy because they involve user profiles, media, activity streams, and messaging. Using ServerAvatar helps you manage and scale the server effortlessly. ### **5. Can I combine multiple plugins for a better community experience?** Absolutely. Many site owners use combinations like BuddyPress + Youzify, or MemberPress + bbPress, depending on their needs. Just make sure not to overload your site with too many plugins to avoid performance issues. ## **Conclusion** Building a meaningful online community doesn’t happen overnight, but having the right tools can make the journey a whole lot smoother. Whether you want to create a simple discussion forum, a paid membership hub, or a full-fledged social network, WordPress offers a plugin for every kind of community. The eight plugins we explored each bring something unique to the table, some focus on social networking, some on forums, and others on monetization or user profiles. The key is to understand what *your* community needs. Are you building a space for learning, networking, discussions, or engagement? Once you know your goal, picking the right plugin becomes much easier. With the right setup and the right tools, your website can grow into a space where people feel connected, valued, and excited to participate. Remember, great communities aren’t just built with features. They grow with good communication, helpful content, and a welcoming environment. With WordPress and the plugins listed above, you’re already halfway there. **Categories:** Blog, Guide, Others, WordPress **Tags:** Best WordPress plugins 2025, Community, Wordpress, wordpress community plugins, WordPress forum plugins, WordPress social community plugins --- ### [The Ultimate List of WordPress Affiliate Themes for 2026](https://serveravatar.com/wordpress-affiliate-themes/) **Published:** November 25, 2025 **Author:** Meghna Meghwani **Content:** [![Blog banner - ServerAvatar](https://serveravatar.com/wp-content/uploads/2025/09/728_90-Banner-3-1024x127.png)](https://serveravatar.com/?ref=blog)If you run an affiliate website, you already know how much your WordPress affiliate themes matters. It’s not just about colors and layouts, it’s about trust, speed, structure, and how easy it is for your readers to make decisions. Think of your WordPress affiliate themes as the “storefront” of your affiliate business. If it looks messy or loads slowly, people walk away. But when it feels clean and friendly, they stay, explore, and click. In this guide, I’ve put together the ultimate list of WordPress affiliate themes for 2025, all explained in simple, natural language. These themes are fast, flexible, and built to help you earn more. Let’s dive in. ## What is WordPress Affiliate Theme? A WordPress affiliate theme is a specially designed theme built to help you promote products, write reviews, compare items, and increase affiliate link clicks. Think of it as a “ready-made setup” that already understands what an affiliate marketer needs. Instead of starting from scratch, these themes come with features that make your life easier. A good affiliate theme usually includes: - Review boxes to highlight pros, cons, and ratings - Comparison tables that help readers choose quickly - Call-to-action buttons like “Buy Now” or “Check Price” - Fast-loading layouts for better SEO and conversions - Clean, readable designs that build trust In simple words, a WordPress affiliate theme is built to turn your content into conversions. Whether you’re reviewing gadgets, sharing product recommendations, or building a niche site, these themes give you all the tools needed to attract readers and earn more through affiliate links. ## What Makes a Great WordPress Affiliate Theme? Choosing the right affiliate theme can make a big difference in how successful your website becomes. A great WordPress affiliate theme isn’t just about how it looks, it’s about how well it supports your goals, especially when you want readers to trust your recommendations and click on your affiliate links. Here are the qualities that truly matter: - Fast-loading Performance - SEO-friendly Structure - Mobile responsive Design - Easy Customization Options - Compatible with review or comparison features - Designed to increase clicks and conversions You don’t need fancy animations or flashy designs. What you need is clarity and speed, something that helps even a first-time visitor find what they need quickly. ### Why Speed and SEO Matter More Than Ever In today’s world, people expect websites to load instantly. When someone clicks on your link and the page takes too long to show up, they won’t wait, they simply hit the back button and open another site. This quick decision-making happens in seconds, and Google notices it too. That’s exactly why speed and SEO have become more important than ever for affiliate websites. A fast WordPress theme does three things: - Improves user experience - Boosts SEO performance - Increases your affiliate clicks When the theme is optimized, everything else becomes easier. ## How to Install WordPress for Affiliate Sites If you’re planning to build a website with affiliate themes, the first step is setting up WordPress on a reliable server. **ServerAvatar** makes this process incredibly smooth, even if you’re not very technical. It takes care of the heavy lifting, so you can focus on building your affiliate sites rather than fighting with server commands. ### What is ServerAvatar? [ServerAvatar](https://serveravatar.com/) is a platform to simplify the hosting and management of servers and applications. It simplifies the process of deploying and managing PHP and Node.js based web applications on servers. ![ServerAvatar Dashboard](https://serveravatar.com/wp-content/uploads/2025/11/image-138.png)You can follow this step-by-step guide to install WordPress quickly using ServerAvatar: ### Why ServerAvatar Is Ideal for WordPress Affiliate Themes When you’re running an affiliate website, speed, uptime, and server performance directly impact your rankings and conversions. Even the best WordPress affiliate theme can’t perform well on a slow or poorly managed server. That’s where **ServerAvatar** becomes the perfect companion for affiliate marketers. ServerAvatar gives you a fast, secure, and optimized environment, without needing technical skills. You get server-level performance with a simple dashboard that makes WordPress management effortless. **Here’s why ServerAvatar is ideal for affiliate websites:** **1. Fast Site Performance** ServerAvatar automatically configures web server, PHP-FPM, caching, and other services so your affiliate theme loads quickly, even on high-traffic pages. **2. Easy WordPress Management** One-click WordPress install, backups, SSL, monitoring, and security updates help you focus on content and conversions, not server issues. **3. Perfect for Review, Comparison & Content-Heavy Sites** Affiliate themes with tables, images, scripts, and design elements need proper optimization. ServerAvatar ensures smooth, stable performance for your server. **4. Seamless Compatibility With Any Theme or Plugin** WordPress supports all theme configurations and plugin stacks without conflicts and you can easily host WordPress through ServerAvatar. **5. Automated Backups for Peace of Mind** Affiliate sites generate revenue, so losing data isn’t an option. ServerAvatar’s automated backups protect your earnings. **6. Server-Level Security for Affiliate Revenue Protection** Firewall settings, SSH controls, AI Bot Blocker, Fail2ban, 8G Firewall, and isolation environment keep your site safe from hacks that can steal affiliate commissions. **7. Affordable for Beginners, Scalable for Pros** Whether you’re running a small niche site or a high-traffic affiliate magazine, ServerAvatar makes it easy to scale your servers directly from the ServerAvatar Dashboard. ## **Top WordPress Affiliate Themes for 2025** Now let’s look at the top-performing affiliate themes dominating 2025. Each one shines in its own way, whether you run a review site, product comparison site, or niche blog. ## **1. GeneratePress – Lightweight & Reliable** [GeneratePress](https://generatepress.com/) is a lightweight and ultra-fast WordPress theme known for its clean code and reliable performance. It offers flexible customization, strong SEO features, and works perfectly for affiliate sites that need speed and simplicity. Ideal for anyone who wants a fast, stable, and easy-to-manage website. ![WordPress Affiliate Themes - GeneratePress](https://serveravatar.com/wp-content/uploads/2025/11/image-139-1024x427.png)**Key Features:** - Lightweight and fast-loading - SEO-friendly clean code - Mobile responsive design - Advanced customization via WordPress Customizer - Premium modular add-ons - Support for GenerateBlocks (Gutenberg-based builder) - Site Library (ready-made templates) - WooCommerce compatibility - Developer-friendly hooks & Elements - Strong documentation and support **Pros** - Extremely fast performance - Great for SEO and Core Web Vitals - Easy to customize without coding - Modular premium features keep the site lightweight - Works well with page builders - Affordable pricing for multiple sites - Secure and regularly updated - Reliable and stable theme framework **Cons** - Minimal design unless you customize or use templates - No built-in drag-and-drop builder - Advanced modules may have a learning curve - Mega menus require manual setup **Why It’s Great** - Extremely fast performance - Works smoothly with page builders - Simple and stable theme - Offers multiple starter templates If you love simplicity and speed, this is your theme. ## **2. Astra – Flexible for Any Affiliate Nic**he [Astra](https://wpastra.com/) is one of the most versatile and lightweight WordPress themes, perfect for any affiliate niche. It offers fast performance, tons of customization options, and a large library of starter templates. Whether you’re creating product reviews, comparison sites, or niche blogs, Astra adapts easily. ![WordPress Affiliate Themes - Astra](https://serveravatar.com/wp-content/uploads/2025/11/image-140-1024x427.png)**Key Features** - Lightweight and fast-loading - Huge library of pre-built starter templates - Seamless integration with Elementor, Beaver Builder, and Gutenberg - Custom layout control for headers, footers, and sidebars - WooCommerce-ready - Schema markup support for better SEO - Global typography and color controls - Advanced theme customizer options - Hooks and filters for developers **Pros** - Very flexible for any type of affiliate site - Loads extremely fast and optimized for SEO - Works with all major page builders - Large variety of professionally designed templates - Easy customization without coding - Strong community and documentation - Regular updates and stable performance **Cons** - Many customization options may overwhelm beginners - Starter templates depend heavily on page builders - Free version has limits compared to Pro - Can feel “generic” without customization **Why It’s Ideal** - Dozens of affiliate-ready templates - Fast and optimized for SEO - Lightweight and customizable - Integrates beautifully with WooCommerce & page builders Whether you are a beginner or pro, Astra adapts to your style. ## ****3. REHub – Built Specifically for Affiliate Marketers**** [REHub](https://nneyefoundation.org/wp/rehub-theme/) is one of the most powerful WordPress themes designed entirely for affiliate, coupon, and price-comparison websites. It comes packed with conversion-focused tools, advanced monetization features, and built-in SEO optimizations, perfect for serious affiliate marketers who want maximum performance. ![WordPress Affiliate Themes - REHub](https://serveravatar.com/wp-content/uploads/2025/11/image-141-1024x445.png)**Key Features** - Price comparison functionality - Deal, coupon, and multi-vendor support - Affiliate link management tools - Dynamic product boxes and review layouts - Fast, optimized templates for better conversions - Compatibility with WooCommerce and Dokan - Built-in schema markup for reviews - Advanced filtering and search features **Pros** - Made specifically for affiliate and niche sites - Excellent built-in comparison and deal modules - Highly customizable layouts - Strong SEO and performance optimizations - Supports multiple monetization models **Cons** - Learning curve for beginners - More feature-heavy than simple lightweight themes - Can feel overwhelming if you only need basic affiliate features **Ideal For** - Review sites - Product comparison tables - Deal websites - Multi-vendor affiliate setups If you want serious affiliate marketers, this is your theme. ## **4. Kadence – Clean Design With Advanced Customization** [Kadence](https://www.kadencewp.com/) is a lightweight, modern theme that offers a clean design and powerful customization options. It’s perfect for affiliate websites that need speed, flexibility, and a professional look without touching code. ![WordPress Affiliate Themes - Kadence](https://serveravatar.com/wp-content/uploads/2025/11/image-142-1024x516.png)**Key Features** - Drag-and-drop header & footer builder - Global color & typography controls - Fast-loading lightweight framework - Pre-built starter templates - WooCommerce & LMS integrations - Advanced design controls **Pros** - Very easy to customize - Excellent speed performance - Beginner-friendly interface - Works well with page builders **Cons** - Fewer niche affiliate templates - Premium add-ons required for advanced features **Why Affiliates Love It** - Fast and optimized - Highly customizable header & footer builder - Clean typography - Ready-to-use blog templates If you want your site to look premium without extra plugins, Kadence is a solid choice. ## **5. OceanWP – Power + Speed for Affiliate Bloggers** [OceanWP](https://oceanwp.org/) offers a balance of speed, performance, and deep customization. Its flexibility makes it ideal for affiliate sites, product reviews, and content-rich blogs. ![WordPress Affiliate Themes - OceanWP](https://serveravatar.com/wp-content/uploads/2025/11/image-143-1024x371.png)**Key Features** - Fast and lightweight performance - Multiple demo templates - Custom headers & footers - WooCommerce enhancements - Built-in SEO-friendly structure - Page builder compatibility **Pros** - Highly customizable - Great performance even with addons - Good for both blogs and eCommerce - Large library of demos **Cons** - Some features rely on extensions - Setup can feel overwhelming for beginners **Great For** - Niche blogs - Tech review sites - Product-based layouts **Why It Works** - Fits any affiliate niche - Works with Elementor & other builders - Fast and responsive It’s a strong combination of flexibility and speed. [![Blog banner - ServerAvatar](https://serveravatar.com/wp-content/uploads/2025/09/728_90-Banner-1-1024x127.png)](https://serveravatar.com/?ref=blog)## **6. SmartMag – Magazine-Style Affiliate Theme** [SmartMag](https://theme-sphere.com/demo/smartmag-landing/) is built for magazine, news, and review-style affiliate websites. Its polished layouts and built-in review system help create high-converting content quickly. ![WordPress Affiliate Themes - SmartMag](https://serveravatar.com/wp-content/uploads/2025/11/image-144-1024x397.png)**Key Features** - Modern magazine-style templates - Built-in review & rating system - Drag-and-drop page builder - SEO-optimized structure - Multiple homepage layouts - Dark mode support **Pros** - Professional and eye-catching designs - Great for content-heavy affiliate sites - Strong review modules - Easy to build magazine layouts **Cons** - More suited for large niche sites than small blogs - Slightly heavier than minimal themes **Ideal For** - Gadget review blogs - Lifestyle magazines - Multi-category affiliate sites It makes your site look professional and editorial. ## **7. Zox News – High-Converting Affiliate Layouts** [Zox News](https://elements.envato.com/zox-news-professional-wordpress-news-magazine-PALH2FE) offers a conversion-focused design perfect for affiliate blogs, product roundups, and news-style sites. Its layouts are crafted to highlight reviews and recommendations. ![WordPress Affiliate Themes - Zox News](https://serveravatar.com/wp-content/uploads/2025/11/image-145-1024x468.png)**Key Features** - Featured post sliders - Review blocks and rating system - Mobile-first responsive layouts - Video/audio post support - Multiple post layout styles - Sticky sidebars **Pros** - Built for high engagement - Great for review-based affiliate content - Clean, modern, and ad-friendly - Easy-to-navigate layouts **Cons** - Not ideal for ultra-minimal designs - Limited customization compared to Kadence or Astra **What Makes It Stand Out** - Click-focused layouts - Beautiful featured images - Optimized ad and affiliate link placement - Mobile-friendly and fast It helps your content feel engaging and credible. ## **8. JNews – For Review, Comparison & Deals Sites** [JNews](https://jnews.io/) is a multi-purpose theme with a strong focus on affiliates. It is a versatile theme ideal for affiliate marketers who run review sites, comparison tables, or deal pages. It includes powerful monetization tools and tons of layout options. ![WordPress Affiliate Themes - JNews](https://serveravatar.com/wp-content/uploads/2025/11/image-146-1024x498.png)**Key Features** - Review system with schema - Price comparison modules - 150+ demo layouts - Automatic Google speed optimization - AMP support - Built-in ad management **Pros** - Very feature-rich - Perfect for review/comparison content - Excellent SEO and speed tools - Huge library of templates **Cons** - Can feel heavy if too many modules are enabled - Learning curve for first-time users **Affiliate-Friendly Features** - Built-in review boxes - Comparison tables - Structured data support - Amazon affiliate tools If you plan to publish detailed product reviews, this theme will make your work easier. ## **9. Neve – Simple, Fast & Perfect for Beginners** ![WordPress Affiliate Themes - Neve](https://serveravatar.com/wp-content/uploads/2025/11/image-147-1024x664.png)**Key Features** - Super-fast performance - Clean starter sites - Easy global design controls - AMP-ready - Compatible with all major page builders - WooCommerce support **Pros** - Extremely lightweight - Very easy to set up - Great for small affiliate sites - SEO-friendly out of the box **Cons** - Limited advanced design features - Basic layouts compared to premium-heavy themes **Why Beginners Love It** - Very clean and easy to set up - Lightweight and incredibly fast - Works on all niches - Great for simple affiliate blogs It keeps things minimal but effective. ## **How to Choose the Right Theme for Your Affiliate Website** When selecting a theme, ask yourself: **1. Is it fast enough?** A slow theme ruins your SEO and conversions. **2. Does it support affiliate elements?** Such as review boxes, comparison tables, and CTAs. **3. Is it easy to customize?** Beginners need simplicity. Advanced users need flexibility. **4. Does it load smoothly on mobile?** Most affiliate traffic comes from smartphones. Choose the theme that feels like the best match, not the most flashy one. ## **Tips to Boost Conversions With Any Theme** Even the best theme needs fine-tuning. Here’s how you can make your affiliate site perform better: **Use clear, bold CTAs** Buttons like “Check Price” or “Buy Now” increase clicks. **Add comparison tables** People love quick, side-by-side information. **Use real images when possible** Avoid stock-photo overload. **Focus on readability** Short paragraphs, simple language, and clean fonts work best. ****Test your site speed**** A fast website = higher affiliate earnings. ## FAQs ### **1. Do affiliate themes improve SEO?** Yes. Many affiliate themes come with schema markup, fast performance, clean layouts, and mobile optimization, all of which help improve ranking and visibility on search engines. ### **2. Is REHub worth it for affiliate websites?** Absolutely. REHub is built specifically for affiliates and includes comparison tables, deal pages, coupon modules, and review systems. It’s powerful for medium to large affiliate websites. ### **3. How important is website speed for affiliate marketing?** Very important. Slow websites lose clicks, increase bounce rates, and drop in Google rankings. A fast theme paired with optimized hosting drastically improves conversions. ### **4. Why should I use ServerAvatar for my WordPress affiliate website?** ServerAvatar gives you fast server performance, automated backups, improved security, and easy WordPress management, all without needing technical expertise. This ensures your affiliate theme runs smoothly and your site stays online. ### **5. Do I need a page builder for affiliate websites?** Not necessarily. Many themes (like Kadence, Astra, and GeneratePress) work great with Gutenberg. But if you prefer visual control, Elementor or Beaver Builder can help create custom layouts easily. ## **Conclusion** Choosing the right WordPress affiliate theme can make a huge difference in how your site performs, ranks, and converts. A fast, clean, and well-structured theme not only improves user experience but also boosts your chances of earning consistent affiliate income. Whether you need a lightweight theme like GeneratePress, a flexible option like Astra, or a purpose-built affiliate theme like REHub, the right choice depends on your niche and goals. Pairing your theme with a powerful server management tool like **ServerAvatar** makes the entire setup even more efficient, giving you speed, uptime, security, backups, and smooth WordPress management. With the right theme + reliable hosting environment, your affiliate website can attract more visitors, keep them engaged, and turn clicks into conversions. Build smart, optimize continuously, and your affiliate site will grow stronger month by month. **Categories:** Blog, Guide, WordPress **Tags:** affiliate marketing, Best WordPress Themes 2025, Wordpress, wordpress affiliate themes, WordPress Themes --- ### [12 Best Caching Plugins to Speed Up WordPress in 2026](https://serveravatar.com/wordpress-caching-plugins/) **Published:** November 26, 2025 **Author:** Meghna Meghwani **Content:** [![Blog banner - ServerAvatar](https://serveravatar.com/wp-content/uploads/2025/09/728_90-Banner-3-1024x127.png)](https://serveravatar.com/?ref=blog)Speed matters more than ever in 2025. Whether you’re running a blog, an online store, or a business website, visitors expect pages to load instantly. And if they don’t? They simply bounce away. That’s where caching plugins come in. Think of caching like saving a shortcut, so instead of generating a page from scratch every time, WordPress serves a ready-made version. Fast, smooth, and efficient. In this guide, I’ll walk you through the 12 best caching plugins that will help you load your site at light speed. I’ll keep everything simple and conversational, no complicated jargon. Ready? Let’s dive in. ## **What Is Caching and Why Does It Matter?** Caching is like saving a shortcut for your website. Instead of making WordPress build a page from scratch every time someone visits it, caching creates and stores a ready-made copy of that page. So the next time a visitor comes, your site delivers that saved version instantly, no waiting, no heavy processing. Think of it like ordering food at your favorite restaurant. If the chef cooks your dish fresh every single time, it naturally takes longer. But if the dish is already prepared and waiting, you get it in seconds. That’s exactly how caching works for websites. Instead of generating your page every time a visitor arrives (which takes time), your website serves a pre-saved version instantly. The result? Faster load times, happier visitors, and better rankings. ### **Why Caching Plugins Matters**: **1. Your site loads faster** A cached page is already prepared, so it loads almost instantly. **2. Better user experience** Visitors don’t like waiting. Faster pages keep them browsing longer. **3. Higher search engine rankings** Google loves fast websites. Speed directly affects SEO. **4. Reduced server load** Since WordPress doesn’t rebuild everything repeatedly, your server handles more traffic without struggle. **5. Works perfectly for repeat visitors** Their browser already stores many site elements, making return visits even quicker. ## **How Do WordPress Caching Plugins Improve Speed?** Here’s what caching plugins usually handle: - **Page caching:** Page caching saves a pre-built HTML version of your webpage so it can load instantly without running WordPress PHP scripts again. This dramatically reduces load time and server usage. - **Browser caching:** Browser caching stores static files like images, CSS, and JavaScript on a visitor’s device. When they revisit your site, these files load locally, making pages open much faster. - **Minification:** Minification removes unnecessary characters, like spaces, comments, and line breaks, from CSS, JS, and HTML files. This reduces file size and speeds up how quickly browsers load them. - **GZIP compression:** Before sending files to user’s browser, it compress files of your website. Smaller compressed files mean faster downloads and quicker page loading. - **CDN integration:** A CDN stores your site’s static content on multiple servers worldwide. Visitors load content from the nearest server, improving speed and reducing latency. The best part? You don’t need to be technical. These plugins do most of the work automatically. ## **Factors to Consider Before Choosing a Caching Plugin**s Before you jump in, keep these points in mind: **• Ease of Use** Choose a caching plugin that matches your comfort level, some work instantly, while others require technical setup. A user-friendly interface helps you avoid mistakes and get faster results. **• Hosting Compatibility** Not all caching plugins work with every host, and some hosts even block specific ones. Always pick a plugin that’s fully supported by your hosting environment for best performance. **• Features Needed** Every site has different needs, some require image optimization, CDN support, or advanced caching layers. Pick a plugin that offers only the features you actually need without unnecessary bloat. **• Price** Caching plugins range from free to premium subscriptions. Ensure the plugin fits your budget while still offering the speed improvements and features you’re looking for. **• Stability & Updates** A good caching plugin should be regularly updated and well-maintained. Frequent updates ensure compatibility with new WordPress versions and long-term reliability. ## **1. NitroPack** – One of the Fastest Caching Plugins [NitroPack](https://wordpress.org/plugins/nitropack/) is an all-in-one speed optimization service that goes beyond traditional caching to deliver exceptionally fast loading times. It handles caching, image optimization, file minification, and CDN delivery automatically. With minimal setup, your site can achieve major performance gains instantly. [](https://storage.3.basecamp.com/5840738/blobs/4f244440-ca9b-11f0-a522-0242ac120004/download/image.png) ![Caching Plugins - NitroPack](https://serveravatar.com/wp-content/uploads/2025/11/image-148-1024x455.png)**Top Features** - Automatic Full-Page Caching with smart cache warmup. - Image Optimization including WebP conversion and adaptive sizing. - HTML, CSS & JavaScript Minification and compression. - Lazy Loading for images, videos, and iframes. - Cache Purge Rules for dynamic content. - Single Dashboard Management for monitoring performance metrics. **Pros** - Extremely easy to set up, works automatically. - Achieves very high PageSpeed and Core Web Vitals scores. - All-in-one solution: caching, CDN, images, CSS/JS optimization. - Great for non-technical users who want guaranteed performance. - Works well on shared hosting and busy websites. **Limitations** - Optimization can sometimes be too aggressive for certain setups. - Limited fine-tuning compared to developer-focused plugins. - Requires an external service, less control than on-server caching. **Best for:** Websites that want maximum speed with minimal effort and aiming to pass Core Web Vitals consistently. **Why It’s Great:** NitroPack delivers top-tier performance automatically without needing multiple plugins or complex manual tuning. NitroPack excels by automating complex performance tasks, making it ideal for users who want top-tier speed without manual tweaking. ## **2. LiteSpeed Cache** – Powerful Caching Plugin [LiteSpeed Cache](https://wordpress.org/plugins/litespeed-cache/) delivers high-performance page loading through full-page caching, image optimization, and code minification, helping WordPress sites perform smoothly even under heavy traffic. ![Caching Plugins - LiteSpeed Cache](https://serveravatar.com/wp-content/uploads/2025/11/image-149-1024x455.png) **Top Features** - Server-level caching (super fast) - Image optimization - QUIC.cloud CDN - Critical CSS generation - Page & browser caching - CSS / JavaScript / HTML Minification - Browser Cache - Compatible with WooCommerce, Multisite, Popular Plugins **Pros** - Server-level caching (when hosted on LiteSpeed), very fast performance. - Comprehensive toolkit, includes caching, image optimization, code minify, lazy-load, CDN support, all in one plugin. - Good for dynamic sites, WooCommerce, and multisite setups - Helps improve PageSpeed and user experience through multiple optimization layers **Limitations** - Full cache benefits require LiteSpeed server (or compatible environment) - Many settings, may be overwhelming or confusing for beginners; misconfiguration can break layout. **Best for:** Websites hosted on LiteSpeed servers **Why It’s Great** Because it uses server-level caching, it often outperforms traditional caching plugins. LiteSpeed Cache stands out because it blends server-level power with a full suite of optimization tools, making it perfect for high-performance setups. ## **3. W3 Total Cache** – Popular Caching Plugin [W3 Total Cache](https://wordpress.org/plugins/w3-total-cache/) is one of the most trusted WordPress caching plugins, known for its flexibility and performance-focused features. It helps reduce load times, boost server efficiency, and improve overall user experience. Whether you run a blog or a high-traffic website, it offers a solid foundation for speed optimization. ![Caching Plugins - W3 Total Cache](https://serveravatar.com/wp-content/uploads/2025/11/image-150-1024x453.png) **Top Features** - Object caching - Page caching - Database caching - Browser caching - CDN integration - File minification - Extensive Customization Options **Pros** - Free plugin with powerful caching options. - Highly customizable for developers and advanced users. - Supports CDN, object caching, fragment caching, and more. - Great for high-traffic or dynamic websites. - Improves load time and overall site performance effectively. **Limitations** - Interface and settings can be overwhelming for beginners. - Misconfiguring options may break layouts or scripts. - Not as “plug-and-play” as WP Rocket or LiteSpeed Cache. - Advanced caching features require compatible hosting/server setup. **Best for:** Advanced users who want full control **Why It’s Great** If you like tweaking performance settings, this plugin gives you absolute control. W3 Total Cache shines for users who want full control over every performance layer, from caching to CDN tuning. ## **4. WP Super Cache** – Beginner-Friendly [WP Super Cache](https://wordpress.org/plugins/wp-super-cache/) is a lightweight, free caching plugin developed by Automattic, the team behind WordPress.com. It generates static HTML files and serves them to visitors, helping websites load faster without adding any complexity. It’s a great choice for beginners who want reliable speed improvements. ![Caching Plugins - WP Super Cache](https://serveravatar.com/wp-content/uploads/2025/11/image-151-1024x453.png) **Top Features** - Easy setup - Static HTML file generation - Three Caching Modes, Simple, Expert, and WP-Cache for different skill levels. - CDN support - Garbage collection - Compression Support - Lockdown Mode to handle sudden traffic surges efficiently. - Preloading Cache **Pros** - Completely free and maintained by Automattic. - Very easy to set up, ideal for beginners. - Simple caching mode works on almost all hosting environments. - Reliable performance improvement with static HTML files. - Compatible with most plugins and themes. **Limitations** - Fewer optimization features compared to WP Rocket or LiteSpeed Cache. - Not suitable for sites needing advanced caching like object or database caching. - Expert mode can be risky for non-technical users. - Lacks built-in tools like image optimization or CSS/JS optimization. **Best for:** Simplicity & reliability **Why It’s Great** It’s free, fast, and incredibly stable, perfect for beginners. WP Super Cache delivers reliable speed boosts with simple static caching, making it a favorite for non-technical site owners. ## **5. WP-Optimize** [WP-Optimize](https://wordpress.org/plugins/wp-optimize/) is a lightweight all-in-one optimization plugin that cleans your database, compresses images, and enables fast caching. It helps keep your site lean and efficient while improving load times without requiring technical knowledge. [](https://storage.3.basecamp.com/5840738/blobs/f1f7add8-ca9b-11f0-9c07-0242ac120004/download/image.png) ![Caching Plugins - WP Optimize](https://serveravatar.com/wp-content/uploads/2025/11/image-152-1024x455.png) **Top Features** - Page Caching to reduce server load and enhance loading speed. - Database Cleaning to remove unnecessary data such as revisions, trash, and transients. - Image Compression with lossy and lossless options. - Minification of CSS and JavaScript for lighter page weight. - Lazy Loading for images and videos. - GZIP Compression support for faster file delivery. - Database Table Optimization for improved efficiency. **Pros** - All-in-one optimization: caching, database cleanup, and image compression. - Very easy to use with a clean interface. - Database optimization is stronger than most caching plugins. - Helps improve overall site health and speed simultaneously. - Free version offers a lot of useful features. **Limitations** - Caching is not as advanced as WP Rocket or LiteSpeed Cache. - Some premium features require upgrade. - Aggressive database cleanup may remove data if not used carefully. - Not the best fit for highly dynamic or enterprise-level sites. **Best for:** simple caching, strong database cleanup, basic image optimization in a single plugin. **Why It’s Great** Because WP-Optimize keeps your website fast, clean, and efficient without adding technical complexity or multiple plugins. WP-Optimize is ideal for users who want to maintain site speed and database health without juggling multiple plugins. ## **6. WP Speed of Light** – Lightweight Caching Plugin [WP Speed of Light](https://wordpress.org/plugins/wp-speed-of-light/) is a performance optimization plugin designed to make WordPress sites load faster without complicated configurations. It bundles caching, image optimization, and file minification into one easy-to-use system that enhances overall site performance. ![Caching Plugins - WP Speed of Light](https://serveravatar.com/wp-content/uploads/2025/11/image-153-1024x455.png)**Top Features** - Page Caching for faster delivery of static content. - Browser Caching & GZIP Compression to reduce loading time. - CSS & JavaScript Minification with combination and defer options. - Image Optimization, including lazy loading and compression. - Database Cleaning to remove unnecessary data. - CDN Integration for global performance improvement. - Performance & Speed Reports to analyze bottlenecks visually. - Cache Preloading for consistent speed on first visits. **Pros** - Beginner-friendly interface with visual speed analysis tools. - Includes caching, compression, and image optimization in one plugin. - Good balance of automation and manual control. - Works well on shared hosting environments. - Free version offers strong core features. **Limitations** - Some powerful options are locked behind the premium version. - Not as flexible as developer-focused plugins like W3 Total Cache. - Other caching plugins may offer deeper caching layers. - Image optimization requires add-ons for advanced compression. **Best For:** Beginners and small-to-medium websites **Why It’s Great** Because WP Speed of Light delivers solid speed improvements with an interface that makes optimization easy for any skill level. WP Speed of Light is a practical, user-friendly performance plugin that boosts WordPress speed through smart caching, compression, and optimization tools. [![Blog banner - ServerAvatar](https://serveravatar.com/wp-content/uploads/2025/09/728_90-Banner-1-1024x127.png)](https://serveravatar.com/?ref=blog)## **7. WP Fastest Cache** – Simple and Effective [WP Fastest Cache](https://wordpress.org/plugins/wp-fastest-cache/) is a lightweight and easy-to-use caching plugin that helps WordPress sites load faster with minimal configuration. It creates static HTML files and applies smart optimization techniques to improve overall performance. ![Caching Plugins - WP Fastest Cache](https://serveravatar.com/wp-content/uploads/2025/11/image-154-1024x455.png) **Top Features** - Static HTML caching for quicker page delivery. - GZIP compression to reduce file sizes. - Browser caching for faster repeat visits. - Preload cache to ensure consistent performance. - Mobile caching for better mobile user experience. **Pros** - Very easy to set up and use, great for beginners. - Reliable caching with noticeable speed improvement. - Offers essential optimization tools in one plugin. - Good compatibility with most themes and hosting providers. - Lightweight and doesn’t slow down the WordPress dashboard. **Limitations** - Some advanced features require the premium version. - Lacks deeper caching options like object or database caching. - Not ideal for highly dynamic or large enterprise sites. - Minification features may require testing to avoid conflicts. **Best For:** Small to medium websites that need simple, effective caching and basic optimization **Why It’s Great** Because WP Fastest Cache offers quick, reliable speed optimization through a simple and beginner-friendly interface. WP Fastest Cache is great for users who want quick setup and instant improvements without dealing with technical configurations. ## **8. Cache Enabler** [Cache Enabler](https://wordpress.org/plugins/cache-enabler/) is a lightweight caching plugin designed to speed up WordPress websites with minimal setup. It creates efficient static HTML files and serves them quickly to visitors, reducing load time and server strain. ![Caching Plugins - Cache Enabler](https://serveravatar.com/wp-content/uploads/2025/11/image-155-1024x455.png) **Top Features** - Static HTML file caching for faster page load times. - WebP support for serving modern, lightweight image formats. - Automatic cache clearing on content updates. - Minimal, clean interface with essential optimization tools. - GZIP compression compatibility for reduced file size. - Cache expiry settings for better control over freshness. - Lightweight plugin footprint for lower server load. **Pros** - Extremely lightweight and fast. - Very easy to set up, ideal for beginners. - Supports WebP image caching natively. - Works well on most hosting environments. - Minimal configuration reduces chances of conflicts. **Limitations** - Lacks advanced features like minification or image optimization. - Not suitable for large dynamic websites or WooCommerce-heavy stores. - Limited customization compared to full-featured caching plugins. - Relies on additional plugins for complete optimization. **Best For:** Blogs, small business sites, and portfolio websites **Why It’s Great** Because Cache Enabler delivers clean, fast caching with an ultra-lightweight design perfect for simple websites**.** Cache Enabler is best for lightweight sites that only need efficient static caching and WebP support without advanced optimization layers. ## **9. Hummingbird Performance** [Hummingbird Performance](https://wordpress.org/plugins/hummingbird-performance/) is a full-featured optimization plugin designed to make WordPress websites faster and more efficient. It scans your site for speed issues and offers one-click fixes to boost overall performance. With caching, minification, and monitoring tools, it helps deliver a smooth browsing experience. ![Caching Plugins - Hummingbird Performance](https://serveravatar.com/wp-content/uploads/2025/11/image-156-1024x455.png) **Top Features** - Page, Browser Caching for faster content delivery. - GZIP Compression to reduce file sizes. - Performance Scanning with detailed recommendations. - Uptime & Response Time Monitoring to track site health. - Lazy Loading for images and iframes. - Advanced minification controls for better compatibility. - CDN integration for global speed enhancements. **Pros** - Easy-to-use interface suitable for beginners. - Offers a full suite of optimization tools in one plugin. - Built-in performance scanning and recommendations. - Helpful monitoring tools like uptime and response tracking. - Strong asset optimization options. **Limitations** - Some features require the premium version. - Can feel heavier compared to very lightweight caching plugins. - Over-optimization may cause compatibility issues if not configured carefully. - Not as fast as server-level caching solutions. **Best For:** Websites that want caching, performance analysis, file minification, and monitoring, without relying on multiple plugins. **Why It’s Great** Because Hummingbird Performance gives you an all-in-one solution to analyze, optimize, and monitor your WordPress site’s speed. Hummingbird Performance stands out with its built-in speed scanner and one-click improvements, making optimization beginner-friendly. ## **10. Comet Cache** – Easy-to-Use [Comet Cache](https://wordpress.org/plugins/comet-cache/) is a straightforward caching plugin that speeds up WordPress by creating reliable static versions of your pages. It focuses on delivering fast performance with minimal configuration, making website optimization easy for beginners. ![Caching Plugins - Comet Cache](https://serveravatar.com/wp-content/uploads/2025/11/image-157-1024x455.png)**Top Features** - Static Page & Post Caching for fast page loading. - Automatic Cache Clearing when content is updated. - Browser caching for quicker repeat visits. - Intelligent caching for logged-in users and dynamic pages. - Cache expiration control to manage freshness. - Very lightweight plugin footprint for lower server load. - Simple configuration suitable for non-technical users. **Pros** - Extremely easy to set up and use. - Lightweight, stable, and compatible with most hosting setups. - Good caching features without extra complexity. - Automatic cache clearing keeps content fresh. - Great choice for blogs and basic business sites. **Limitations** - Lacks advanced optimization tools like minification or image compression. - Not ideal for large WooCommerce or highly dynamic websites. - Some premium features require upgrading to the Pro version. - Limited fine-tuning options compared to advanced caching plugins. **Best For:** Small to medium WordPress websites that need simple, stable, and hands-off caching without advanced optimization features. **Why It’s Great** Because Comet Cache delivers dependable speed improvements through simple yet effective caching that works instantly after activation. Comet Cache is ideal for users who want a set-and-forget caching system that runs smoothly without ongoing adjustments. ## **11. SpeedyCache** [SpeedyCache](https://wordpress.org/plugins/speedycache/) is a lightweight caching plugin designed to speed up WordPress sites with just a few clicks. It automatically creates static pages, reduces server load, and improves loading speed without requiring complex settings. ![Caching Plugins - SpeedyCache](https://serveravatar.com/wp-content/uploads/2025/11/image-158-1024x455.png)**Top Features** - Full-page caching for faster site loading. - Minification of HTML, CSS, and JavaScript to reduce page size. - GZIP compression to speed up file delivery. - Cache preloading for consistent performance. - Browser caching support for repeat-visit speed boosts. - Lazy loading for images and videos. - CDN integration for improved global performance. - Cache timeout and auto-cleaning to ensure freshness. **Pros** - Very simple to use, ideal for beginners. - Offers essential optimization features in one plugin. - Lightweight and doesn’t overload hosting resources. - Noticeable speed improvements with minimal setup. - Good compatibility with shared hosting environments. **Limitations** - Lacks some advanced caching features found in premium plugins. - Not ideal for highly dynamic or enterprise websites. - Minification may require testing on certain themes. - Some advanced options are limited compared to competitors. **Best For:** Blogs, small business websites, and simple WordPress setups that need quick, user-friendly speed improvements without heavy configuration. **Why It’s Great** Because SpeedyCache delivers fast, reliable optimization through a clean and beginner-friendly interface. SpeedyCache is best for users who want automatic caching features that work well even on budget hosting. ## **12. Cachify** – Minimalist Caching Plugin [Cachify](https://wordpress.org/plugins/cachify/) is a lightweight caching plugin designed to make WordPress websites faster with minimal effort. It creates static page versions and delivers them efficiently, reducing server load and improving overall speed without overwhelming users with settings. ![Caching Plugins - Cachify](https://serveravatar.com/wp-content/uploads/2025/11/image-159-1024x458.png)**Top Features** - Static HTML page caching - Multiple cache storage methods (Disk, Database, APC, Memcached) - Automatic cache clearing when content changes - Browser caching support - HTML compression for smaller file sizes - URL exclusion rules for selective caching - Very lightweight footprint for minimal server resource usage **Pros** - Very lightweight and fast - Easy for beginners to set up - Flexible cache storage options - Minimal configuration required - Works well on low-resource hosting environments **Limitations** - No built-in minification or image optimization - Limited customization compared to full-featured caching plugins - Not ideal for large dynamic sites or heavy WooCommerce stores - Requires additional plugins for advanced optimization **Best For:** Small websites, blogs, portfolios, and simple WordPress setups that want clean, lightweight caching without extra complexity. **Why It’s Great** Because Cachify delivers fast and efficient caching through an ultra-lightweight, easy-to-use design. Cachify is perfect for minimal setups that only require clean, efficient caching without extra performance features. ## Enhance WordPress Speed with ServerAvatar ### **What is ServerAvatar?** [ServerAvatar](https://serveravatar.com/) is a platform to simplify the hosting and management of servers and applications. It simplifies the process of deploying and managing PHP and Node.js based web applications on servers. ![ServerAvatar Dashboard](https://serveravatar.com/wp-content/uploads/2025/11/image-160.png) Caching plugins can make your WordPress site significantly faster, but performance comes when you optimize your **server environment** as well. If you’re using a cloud server or VPS, you can automatically unlock much better speeds by pairing your caching plugin with **ServerAvatar**. **ServerAvatar gives you:** - Automatic server optimization - Redis installation with other services - Built-in backups & monitoring for uptime and server health - Isolated application environments for better stability and security - Easy SSL & domain management without technical steps - and many more Whether you’re a developer, freelancer, or agency, ServerAvatar ensures your caching plugins perform at their best by running WordPress on a powerful and perfectly optimized stack. ## How to Install WordPress With ServerAvatar If you’re planning to build a website with ServerAvatar, the first step is setting up WordPress on a reliable server. **ServerAvatar** makes this process incredibly smooth, even if you’re not very technical. It takes care of the heavy lifting, so you can focus on building your affiliate sites rather than fighting with server commands. You can follow this step-by-step guide to install WordPress quickly using ServerAvatar: ## **Ease of Use Comparison:** ### **Which Caching Plugins Are Best for Beginners?** Here’s a side-by-side comparison of how beginner-friendly each caching plugin is: **Caching Plugin****Setup Difficulty****Learning Curve****Recommended** **For****NitroPack**Very EasyVery LowBeginners, busy owners, users wanting automatic optimization**LiteSpeed Cache**ModerateMediumSites on LiteSpeed hosting needing powerful server-level optimization**W3 Total Cache**Very HardHighDevelopers & advanced users who want full control**WP Super Cache**Very EasyVery LowBeginners, simple sites, plug-and-play caching**WP-Optimize**EasyLowUsers wanting caching, database cleanup, image optimization**WP Speed of Light**Easy to ModerateLow to MediumBeginners who appreciate visual speed tools**WP Fastest Cache**Very EasyVery LowSmall/medium sites needing fast, simple caching**Cache Enabler**Very EasyVery LowBlogs, portfolios, lightweight sites**Hummingbird Performance**Easy to ModerateLowUsers wanting caching, scans, monitoring**Comet Cache**Very EasyVery LowBasic websites wanting simple, hands-off caching**SpeedyCache**EasyLowBloggers, small businesses, shared hosting setups**Cachify**Very EasyVery LowSimple, lightweight websites needing minimal caching## **Bonus Tips to Boost WordPress Speed** Without Extra Caching Plugins Caching alone isn’t enough. Combine it with these tips: **• Use a lightweight theme** Avoid heavy multipurpose themes. **• Optimize your images** Compress them without losing quality. **• Use a Content Delivery Network (CDN)** Serve content faster worldwide. **• Remove unused plugins** More plugins = slower performance. **• Upgrade to better hosting** Fast hosting = fast website. ## FAQs ### **1. Do caching plugins really make a difference?** Yes, caching plugins can reduce load times by **30% to 80%**, depending on your setup. They prevent WordPress from rebuilding pages on every visit, making your site load much faster. ### **2. Can I use multiple caching plugins at the same time?** No. Using more than one caching plugin causes conflicts, layout issues, and slower performance. Stick to one caching plugin at a time. ### **3. Do caching plugins improve SEO?** Absolutely. Page speed is a core ranking factor. Faster websites get, Better Google rankings, Lower bounce rates, Higher conversions. A good caching plugin contributes directly to improved SEO performance. ### **4. Do I need server optimization if I already use a caching plugin?** Yes. Caching accelerates your **site**, but server optimization accelerates your **infrastructure**. ServerAvatar helps with it with its features, and both together deliver the best results. ### **5. How often should I clear the cache?** Only clear your cache when you update a page or post, you change your theme or plugins, you notice layout issues, or you switch caching plugins. Avoid unnecessary cache purges, they slow down performance temporarily ## **Conclusion** Speed is no longer optional in 2025, it’s the backbone of a successful website. With the right caching plugin, you can dramatically cut load times, reduce server strain, and create a smoother experience for your visitors. Whether you choose an all-in-one solution like NitroPack, a server-level powerhouse like LiteSpeed Cache, or a simple beginner-friendly tool like WP Super Cache, each plugin can make a meaningful difference. But remember, caching is only one piece of the performance puzzle. Pair your caching plugin with good hosting, optimized images, a clean theme, and server optimization tools like **ServerAvatar**. Together, they create the perfect environment for a fast, stable, and scalable WordPress site. **Categories:** Blog, Guide, WordPress **Tags:** Caching Plugins, Speed Optimization, Website Performance, Wordpress, WordPress Plugins --- ### [Top 5 UptimeRobot Alternatives for 2026](https://serveravatar.com/uptimerobot-alternatives/) **Published:** November 27, 2025 **Author:** Meghna Meghwani **Content:** [![Blog banner - ServerAvatar](https://serveravatar.com/wp-content/uploads/2025/09/728_90-Banner-3-1024x127.png)](https://serveravatar.com/?ref=blog)Keeping your website online in 2025 is no longer just good practice, it’s survival. Whether you’re running a business website, an online store, or even a personal blog, downtime can hurt your credibility and cost you both visitors and revenue. If you rely on UptimeRobot for monitoring, you’ve probably enjoyed its simplicity. But if you’re seeking more features, better accuracy, or advanced reporting, exploring the best UptimeRobot alternatives might be the right choice. That’s where exploring UptimeRobot alternatives becomes important. Think of it like choosing a reliable watchman for your digital property, someone who notices issues instantly and alerts you before trouble grows. In this blog, we’ll walk through the top 5 UptimeRobot alternatives for 2025, breaking down what each tool offers, who it’s best for, and why you might consider switching. ## What is Uptime Monitoring? Uptime monitoring is the process of checking whether your website, server, or online service is available and running properly at all times. In simple terms, it’s like having a digital watchman who constantly keeps an eye on your website and alerts you the moment something goes wrong. Whenever someone visits your website, your server needs to respond quickly. But if the server is down, even for a few minutes, your visitors may see an error page instead. That’s where uptime monitoring comes in. It regularly sends small requests to your website and measures: - Is the website online? - How fast is it responding? - Is any part of the website failing? If something isn’t working, you get an alert instantly via email, SMS, or messaging apps like Slack or Telegram. Good uptime monitoring ensures: - Higher reliability - Better user experience - Less lost traffic and sales - Peace of mind for website owners In today’s digital world, staying online 24/7 is essential, and uptime monitoring helps make that possible. ## Why You Need a Uptime Monitoring Tool Have you ever rushed to open your website only to see an error screen? Worst feeling, right? A strong monitoring tool acts like a security guard that constantly watches your site and alerts you before your visitors face that issue. Here’s what a good monitoring tool ensures: - Your site stays available round the clock - Downtime alerts are instant - User experience remains smooth - You stay ahead of technical failures With cyberattacks and hosting glitches becoming more common in 2025, relying on a robust monitoring tool isn’t optional anymore. ### **What Makes a Good UptimeRobot Alternative?** Before jumping into the top tools, let’s quickly look at what makes an alternative worth considering. A good uptime monitoring tool should offer: - Accurate uptime checks - Multiple monitoring types (HTTP, Ping, TCP, API, DNS, SSL) - Fast and reliable alert systems - Incident reporting and analytics - Affordable and scalable pricing - Integrations with your workflow tools (Slack, Zapier, etc.) Now let’s dive into the top choices for 2025! ## Top UptimeRobot Alternatives in 2025 ## **1. Uptime Kuma** [Uptime Kuma](https://uptimekuma.org/) has quickly become the favorite open-source alternative to UptimeRobot. It’s modern, fast, and incredibly easy to deploy, especially with Docker. Think of it as having your own personal uptime-monitoring dashboard that doesn’t cost a single rupee or dollar. ![UptimeRobot alternatives - uptime kuma](https://serveravatar.com/wp-content/uploads/2025/11/image-161-1024x552.png) **Key Features** - Self-hosted and completely free - Beautiful, intuitive dashboard - Supports HTTP(s), Ping, Port, DNS, TCP, and more - Status pages for public or private use - Multi-location checks (using external probes) - Rich notification options (Telegram, Discord, Email, Slack, etc.) - Fast and lightweight **Pros:** - Easy-to-use interface - Self-hosted and privacy-friendly - Supports many monitor types - Quick setup and lightweight - Custom alert integrations - Free with strong community support **Cons:** - You must maintain the server - Limited enterprise-level features - Alerts stop if the server goes down - Not ideal for very large setups - No dedicated mobile app **Why Choose Uptime Kuma?** If you want the feel of a premium uptime tool, minus the cost, Uptime Kuma is the perfect choice. It’s great for developers, agencies, and even businesses who prefer owning their monitoring setup. **Best For:** - Developers who want simple uptime monitoring - Small businesses needing a free, self-hosted solution - Tech enthusiasts running home labs - Users who prefer full data control and privacy - Teams looking for customizable alert options ## **2. Zabbix** [Zabbix](https://www.zabbix.com/) is a robust open-source monitoring solution designed to track the performance and availability of IT infrastructure, networks, servers, and applications. It provides real-time insights, helping organizations prevent downtime and optimize system performance. ![UptimeRobot alternatives - zabbix](https://serveravatar.com/wp-content/uploads/2025/11/image-162-1024x552.png) **Key Features** - Real-time monitoring of servers, networks, and applications - Customizable dashboards and visualizations - Automated alerts and notifications - Extensive reporting and trend analysis - Support for multiple platforms and cloud environments **Pros:** - Open-source and cost-effective - Scalable for large environments - Highly customizable monitoring and alerting - Strong community support **Cons:** - Can be complex to set up for beginners - Steeper learning curve for advanced features - User interface may feel dated compared to competitors **Why Choose Zabbix?** Reliable, scalable, and fully customizable monitoring for any IT environment. **Best For:** Organizations seeking an open-source, enterprise-level monitoring solution. ## **3. Nagios** [Nagios](https://www.nagios.org/) is a widely used open-source IT infrastructure monitoring tool that helps track the health, performance, and availability of servers, networks, and applications. It provides timely alerts to prevent downtime and ensures smooth IT operations. ![UptimeRobot alternatives - nagios](https://serveravatar.com/wp-content/uploads/2025/11/image-163-1024x591.png) **Key Features** - Real-time monitoring of servers, switches, applications, and services - Customizable alerting and notification system - Plugin-based architecture for extended functionality - Detailed reporting and log analysis - Web-based interface for monitoring and management **Pros:** - Open-source and free to use - Highly extensible with plugins - Large and active user community - Reliable alerting and monitoring **Cons:** - Initial setup can be complex - Basic interface may feel outdated - Advanced features require plugins or additional configuration **Why Choose Nagios Core?** A dependable, extensible monitoring platform for maintaining IT infrastructure health. **Best For:** Organizations needing flexible, open-source network and server monitoring. ## **4. Site24x7** [Site24x7](https://www.site24x7.com/) is a cloud-based monitoring platform that provides comprehensive visibility into websites, servers, applications, and networks. It enables businesses to ensure uptime, optimize performance, and deliver seamless digital experiences. ![UptimeRobot alternatives - site24*7](https://serveravatar.com/wp-content/uploads/2025/11/image-164-1024x543.png) **Key Features** - Website and server monitoring in real-time - Application performance monitoring (APM) - Network and cloud infrastructure monitoring - Automated alerts and SLA tracking - Customizable dashboards and reporting **Pros:** - Easy to set up and use - Cloud-based, no hardware required - All-in-one monitoring solution - Supports multi-cloud and hybrid environments **Cons:** - Advanced features can be expensive - Limited customization compared to some open-source tools - Dependence on internet connectivity for monitoring **Why Choose Site24x7?** Cloud-based, all-in-one monitoring for websites, apps, and IT infrastructure. **Best For:** Businesses looking for a user-friendly, cloud-hosted monitoring solution. [![Blog banner - ServerAvatar](https://serveravatar.com/wp-content/uploads/2025/09/728_90-Banner-1-1024x127.png)](https://serveravatar.com/?ref=blog)## **5. StatusCake** [StatusCake](https://www.statuscake.com/) is a cloud-based website monitoring service designed to track website uptime, performance, and speed. It helps businesses quickly detect issues and ensure a seamless online experience for their users. ![UptimeRobot alternatives - statuscake](https://serveravatar.com/wp-content/uploads/2025/11/image-165-1024x433.png)**Key Features:** - Real-time uptime and downtime monitoring - Page speed and performance testing - SSL and domain expiry monitoring - Global monitoring locations - Automated alerts via email, SMS, or integrations **Pros:** - Simple and easy to use - Affordable pricing plans - Fast detection of website issues - Provides detailed performance insights **Cons:** - Limited server and application monitoring - Fewer customization options than enterprise solutions - Free plan has restricted features **Why Choose StatusCake?** Fast, reliable, and user-friendly website monitoring for uninterrupted online presence. **Best For:** Small to medium businesses needing simple and effective website uptime monitoring. ## **UptimeRobot Alternatives: Tools Comparison** **Tool****Best** **For****Key Strength****Pricing****Uptime Kuma** Self-hosted users, developers, small teamsPublic status pagesFree – Open source**Zabbix**Large IT infrastructures, enterprisesDeep metrics & automationFree – Open source**Nagios**Experienced sysadmins, legacy environments Extremely configurableFree – Open source**Site24x7** IT teams, mixed environments All-in-one monitoring suiteModerate to High**StatusCake**Bloggers, small businesses, non-technical usersEase of use Affordable## **How to Choose the Right UptimeRobot Alternatives** Choosing the right monitoring tool is like selecting the right guardian for your website. Ask yourself: - How big is your website? - Do you need simple monitoring or advanced incident workflows? - What’s your budget? - Do you need API, SSL, or server monitoring too? - Do you prefer clean and easy tools or deep analytics? **If you want:** - **Best self-hosted:** Uptime Kuma - **Best enterprise:** Zabbix - **Best for sysadmins:** Nagios Core - **Best for performance insights:** Uptrends - **Best all-in-one stack:** Site24x7 - **Best for beginners:** StatusCake ## **ServerAvatar: A Smarter Way to Monitor and Manage Your Servers** ### **What is ServerAvatar?** [ServerAvatar](https://serveravatar.com/) is a platform to simplify the hosting and management of servers and applications. It simplifies the process of deploying and managing PHP and Node.js based web applications on servers. ![ServerAvatar Dashboard](https://serveravatar.com/wp-content/uploads/2025/11/image-166.png) While most uptime monitoring tools only tell you *whether* your website is online, **ServerAvatar** goes a step further. It not only alerts you about issues but also helps you manage, optimize, and maintain your entire server environment with ease. If you want a solution that covers uptime monitoring *plus* full server management, ServerAvatar is a powerful choice. ServerAvatar connects to your server and gives you a clean, user-friendly dashboard where you can track everything, performance, resources, applications, logs, and overall health. It’s perfect for developers, agencies, and businesses that want more control without dealing with complicated DevOps tasks. **Key Features:** **1. Real-Time Server Monitoring** Keep track of CPU usage, RAM, disk space, bandwidth, and running processes. You get a clear picture of how your server is performing at all times. **2. Automatic Alerts** ServerAvatar instantly notifies you when something unusual happens, resource spikes, downtime, high load, storage issues, and more. It helps you take action before your website slows down or crashes. **3. Easy App Deployment** Deploy PHP applications like WordPress, Laravel, and custom apps in just a few clicks, no technical complexity required. **4. Log Monitoring Suite (Error Detection Made Easy)** Track server logs and application logs in one place. Spot errors early instead of digging through SSH. **5. Security & Backups** Daily automated backups, SSL installation, firewall rules, and regular software updates, everything is handled for you. **6. Whitelabel & Team Features** Agencies can offer a professional, branded control panel to clients, complete with team management and role-based access. **7. One-Click App Deployment** Deploy WordPress, Mautic, Joomla, Uptime Kuma, n8n, and many more popular applications with the one-click app deployment feature. **8.** **Managed Server Option** Let ServerAvatar provide and manage servers for you. No need for third-party cloud provider account. **9. Premium Hosting Care Plan** High-priority support with a dedicated Slack channel, Application Level Troubleshooting, Custom Server Configurations, Optimisation Assistance, Pro-Active Monitoring, Free Migration to ServerAvatar, ideal for users who want peace of mind without technical overhead. **10. 24/7 Technical Support** Get 24/7 support from our technical experts for any questions or issues you may have. ## **Why Choose ServerAvatar?** If you want a solution that combines uptime monitoring, performance tracking, server management, and security, ServerAvatar saves you countless hours. Instead of juggling multiple tools, you get everything under one roof, from alerts to management. It’s ideal for: - Developers managing multiple client sites - Agencies offering hosting or maintenance services - Businesses that want reliable uptime, full server control - Users who don’t want to handle complex command-line management With ServerAvatar, you’re not just monitoring your server, you’re actively improving its performance, stability, and security. ## **FAQs** ### **1. Are there free alternatives to UptimeRobot?** Yes, Uptime Kuma, Zabbix, and Nagios Core are open-source and free. ### **2. Which tool is best for beginners?** StatusCake is simple and user-friendly, while ServerAvatar offers easy server management for non-technical users. ### **3. Can I get alerts on mobile or messaging apps?** Yes, most tools support notifications via email, SMS, Slack, or Telegram. ### **4. What makes ServerAvatar different from other monitoring tools?** ServerAvatar is more than just an uptime monitor. It provides complete server management, real-time monitoring, automatic alerts, app deployment, backups, security, team management, and premium support, all in one platform ### **5. Is ServerAvatar suitable for multiple websites or clients?** Yes, ServerAvatar is ideal for developers and agencies managing multiple sites, offering team access, whitelabel options, and centralized server monitoring. ## **Conclusion** Keeping your website online and performing well in 2025 is crucial for user experience, credibility, and revenue. While UptimeRobot is reliable, alternatives like Uptime Kuma, Zabbix, Nagios Core, Site24x7, and StatusCake offer enhanced features, advanced monitoring, and better insights for different needs. For a complete solution, **ServerAvatar** goes beyond uptime monitoring by combining server management, performance tracking, security, and app deployment, all in one platform. It’s ideal for developers, agencies, and businesses seeking control, efficiency, and peace of mind. **Categories:** Blog, Guide, Others, Tutorials **Tags:** Best website monitoring tools, Uptime, UptimeRobot, UptimeRobot alternatives, Website monitoring --- ### [Stay Secure in 2026: Managed Cloud Hosting Security Checklist](https://serveravatar.com/managed-cloud-hosting-security/) **Published:** November 29, 2025 **Author:** Meghna Meghwani **Content:** [![Blog banner - ServerAvatar](https://serveravatar.com/wp-content/uploads/2025/09/728_90-Banner-3-1024x127.png)](https://serveravatar.com/?ref=blog)When was the last time you checked how secure your cloud hosting really is? In 2025, cyber threats are smarter, faster, and more unpredictable than ever—like a thief who knows exactly when you’re away and where you hide the keys. That’s why businesses of every size are turning to Managed Cloud Hosting Security and relying on managed cloud hosting for true peace of mind. But even managed hosting requires a solid security checklist. Think of it like maintaining your home, your provider handles the heavy lifting, but you still need strong locks, updated alarms, and routine checks., but you still need to make sure the doors are locked, alarms are updated, and nothing slips through the cracks. This guide walks you through a simple checklist to keep your managed cloud hosting secure in 2025. ## **What is Managed Cloud Hosting Security?** Managed cloud hosting works like your own expert IT team operating behind the scenes, from setup and optimization to monitoring and security, such as server setup, optimization, updates, monitoring, and most importantly, security. Instead of juggling complex tasks, you get a smooth, well-maintained environment so you can focus on what matters: growing your business. ## **Why Managed Cloud Hosting** **Security Matters More in 2025** Cyberattacks in 2025 aren’t what they used to be. Hackers now use automation, AI, and advanced scanning tools to target even the smallest websites. A single loophole, an outdated plugin, a weak password, or an open port can compromise your entire system. Managed hosting reduces the risk, but having a security checklist gives you the upper hand. ## Meet ServerAvatar: Your Partner in Managed Cloud Hosting Security In today’s world, managing a server isn’t just about keeping your website online, it’s about keeping everything safe behind the scenes. That’s where ServerAvatar comes in. Think of it as a smart assistant that quietly handles the technical, security, and performance tasks you don’t want to worry about. ### **What is ServerAvatar?** [ServerAvatar](https://serveravatar.com/) is a platform to simplify the hosting and management of servers and applications. It simplifies the process of deploying and managing PHP and Node.js based web applications on servers. You can easily deploy a managed server directly from ServerAvatar. No need for a cloud provider account. Instead of juggling between updates, monitoring, backups, and configurations on your own, ServerAvatar brings everything together in one clean, simple dashboard. It makes secure server management easy, especially if you’re not a full-time DevOps expert. From automated security updates to real-time monitoring and safe configurations, it gives you a stronger foundation to keep your applications protected in 2025 and beyond. ![ServerAvatar Dashboard - Managed Cloud Hosting Security](https://serveravatar.com/wp-content/uploads/2025/11/image-167.png) It’s not just a tool, it’s a security partner that helps you stay one step ahead of threats while saving you time, stress, and effort. Let’s walk through the essential security checklist for 2025. ## 1. Strong Access Control for Managed Cloud Hosting Security Access control decides who can enter your server environment. If the wrong person gets access, even by accident, the entire system can be compromised. **Where Things Usually Go Wrong** - Too many people have admin access - Old accounts remain active - Shared passwords make tracking impossible **Steps You Can Take** - Remove inactive users - Assign roles based on responsibilities - Use unique accounts for each team member **Benefits** - Minimizes unauthorized access - Increases accountability - Reduces attack surface **Tips** - Review user access once a month - Never share one admin login with your team ## **2. Real-Time Monitoring & Alerts** Real-time monitoring acts like an early warning system. It helps you detect unusual behavior before it becomes a serious threat. **Where Things Usually Go Wrong** - No alerts set up - Performance spikes go unnoticed - Attacks detected too late **Steps You Can Take** - Enable CPU, RAM & disk monitoring - Set alerts for high usage - Check logs regularly **Benefits** - Detects threats early - Prevents downtime - Helps maintain fast performance **How ServerAvatar Helps** ServerAvatar provides detailed monitoring dashboards and instant alerts, helping you catch problems immediately. ![Monitoring - Managed Cloud Hosting Security](https://serveravatar.com/wp-content/uploads/2025/11/image-168-1008x1024.png) **Tips** - Create email + Slack alert channels - Watch for unusual nighttime activity ## **3. Regular Security Updates** Updates patch vulnerabilities and keep your server safe from known threats. Ignoring them is like leaving your door unlocked. **Where Things Usually Go Wrong** - Outdated CMS plugins or themes - Ignored Security updates - Old PHP versions still running **Steps You Can Take** - Automate updates wherever possible - Review plugins monthly - Update PHP to the latest stable version **Benefits** - Protects against known exploits - Improves performance - Keeps your environment stable **How ServerAvatar Helps** ServerAvatar automates the security updates and makes PHP version switching effortless, helping you stay secure without manual work. ![security update -Managed Cloud Hosting Security](https://serveravatar.com/wp-content/uploads/2025/11/image-169-1024x311.png) ![php setting - Managed Cloud Hosting Security](https://serveravatar.com/wp-content/uploads/2025/11/image-170-1024x231.png) **Tips** - Remove unused plugins, they’re a hidden risk - Enable automatic updates for essential components ## **4. Automated Backups** Backups are your safety net. If anything goes wrong, a recent backup ensures you don’t lose your website, data, or customers. **Where Things Usually Go Wrong** - Backups stored on the same server - No automated backup schedule - Backups fail without notifying anyone **Steps You Can Take** - Enable daily or hourly backups - Store backups offsite - Test your backup restore process **Benefits** - Quick recovery after attacks - Zero data loss - Peace of mind **How ServerAvatar Helps** ServerAvatar automates backups on your integrated cloud storage from available options or on ServerAvatar storage and allows one-click restore, making disaster recovery simple and reliable. ![backups - Managed Cloud Hosting Security](https://serveravatar.com/wp-content/uploads/2025/11/image-171-1024x236.png) **Tips** - Always keep at least 3 versions of backups - Test restoring once every quarter ## **5. Firewall Protection** for Managed Cloud Hosting Security Firewalls act like security guards at your server’s entrance, blocking malicious traffic before it reaches you. **Where Things Usually Go Wrong** - Leaving unnecessary ports open - Not enabling UFW (firewall) or similar protection **Steps You Can Take** - Enable UFW - Disable unused ports **Benefits** - Blocks threats before they reach your server - Reduces security risk - Keeps your website online during traffic spikes **How ServerAvatar Helps Firewall:** A firewall works as the first line of defense for your server, filtering unwanted or harmful traffic before it reaches your applications. ![firewall - Managed Cloud Hosting Security](https://serveravatar.com/wp-content/uploads/2025/11/image-172-1024x287.png) **8G Firewall:** The 8G Firewall provides an extra layer of high-level security designed to block even the most advanced threats. ![8G firewall - Managed Cloud Hosting Security](https://serveravatar.com/wp-content/uploads/2025/11/image-173-1024x340.png) **Tips** - Block traffic from countries you don’t serve - Use rate-limiting on login or admin panels to reduce brute-force attacks [![Blog banner - ServerAvatar](https://serveravatar.com/wp-content/uploads/2025/09/728_90-Banner-1-1024x127.png)](https://serveravatar.com/?ref=blog)## **7. Secure Configurations** A secure server configuration is the foundation of safe hosting. Misconfigurations often lead to easy hacks. **Where Things Usually Go Wrong** - Default SSH ports left unchanged - Weak file permissions - Misconfigured PHP settings **Where Things Usually Go Wrong** - Use SSH keys instead of passwords - Disable unused services - Harden PHP & Nginx/Apache settings **Benefits** - Reduces risk of brute-force attacks - Protects files from unauthorized access - Improves server stability **Tips** - Change your SSH port from 22 - Avoid 777 file permissions ## **8. Data Encryption** Encryption makes your data unreadable to hackers. Even if someone steals it, they cannot open it. **Where Things Usually Go Wrong** - No SSL certificate installed - Outdated or misconfigured SSL - Sensitive data stored without encryption **Steps You Can Take** - Install HTTPS (SSL certificate) - Use modern TLS versions - Encrypt sensitive database fields **Benefits** - Protects user data - Builds trust with customers - Improves SEO rankings **How ServerAvatar Helps** ServerAvatar lets you install and auto-renew SSL certificates in a few clicks, ensuring full HTTPS coverage. ![SSL - Managed Cloud Hosting Security](https://serveravatar.com/wp-content/uploads/2025/11/image-175-1024x430.png) **Tips** - Redirect all pages to HTTPS - Avoid mixed-content warnings ## **9. Vulnerability Scanning** Regular scans help you identify security gaps before hackers exploit them. **Where Things Usually Go Wrong** - No scanning schedule - Ignoring warnings - Relying only on antivirus tools **Steps You Can Take** - Run weekly vulnerability scans - Review reports and fix issues - Use external scanning tools **Benefits** - Identifies hidden threats - Improves overall server hygiene - Prevents long-term exploitation **Tips** - Always scan after big updates - Fix high-risk issues immediately ## **10. Incident Response Plan** Even with the best precautions, things can go wrong. A clear recovery plan helps reduce downtime and panic. **Where Things Usually Go Wrong** - No defined roles - Backups not ready - Lack of communication during incidents **Steps You Can Take** - Document a recovery checklist - Assign responsibilities - Test recovery steps regularly **Benefits** - Faster recovery - Less downtime - Better control during emergencies **How ServerAvatar Helps** ServerAvatar centralizes monitoring, logs, and backups, making it easier to troubleshoot issues and recover quickly. **Tips** - Keep emergency contacts updated - Review your plan every 6 months ## **How ServerAvatar Enhances Managed Cloud Hosting Security** ServerAvatar takes the complexity out of server management by giving you a platform that handles the most important security tasks automatically, without requiring deep technical knowledge. ServerAvatar is designed to make your server safer from day one. It keeps your services updated, manages backups, and gives you clear visibility into what’s happening behind the scenes. Instead of manually checking logs, or setting up monitoring tools, you get an all-in-one dashboard that simplifies everything. Whether you’re running websites, apps, or multiple client projects, ServerAvatar helps you maintain a secure and stable environment with ease. It’s like having a dedicated security assistant who never sleeps, always monitoring, always optimizing, and always ready to step in when something goes wrong. ### **Key Security Benefits of ServerAvatar** - Secure Server Setup from the moment your server is connected - Automated Backups with easy restore options - Real-Time Monitoring & Alerts to catch issues early - Routine Updates & Patching handled automatically - Firewall, fail2ban, and many more to protect your environment - Centralized Logs for faster debugging and threat detection - User Management & Permissions to control access safely ### **Who Should Use ServerAvatar?** - Website owners who don’t want to manage security manually - Agencies handling multiple client projects - Developers who want a reliable, streamlined environment - Businesses that need stable, secure hosting without hiring a DevOps team In short, ServerAvatar removes the heavy lifting from server security so you can focus on what truly matters, running your business, serving your customers, and growing confidently in 2025. ## **FAQs** ### 1. Why is Managed Cloud Hosting Security stronger than traditional hosting? Managed cloud hosting includes built-in security practices like monitoring, updates, backups, and access control. You’re not responsible for everything yourself, the platform handles major security tasks, making it harder for threats to slip through. ### **2. How often should I check my server’s security?** A quick weekly check is ideal, and a detailed monthly review helps catch anything missed. With tools like ServerAvatar, real-time alerts notify you instantly if something needs attention. ### **3. Is 2FA really necessary if I use strong passwords?** Yes. Even the strongest password can be leaked or guessed. Two-factor authentication adds an extra barrier, making it extremely difficult for an attacker to access your server. ### **4. How many backups should I keep for safety?** Always keep at least three versions of your backups and store them in different locations. This ensures you can recover quickly even if one backup gets corrupted or compromised. ### **5. What should I do if my server gets hacked?** Follow your incident response plan immediately: isolate affected systems, restore from clean backups, review logs, patch vulnerabilities, and update passwords. Platforms like ServerAvatar help speed up recovery with centralized logs and one-click restores. ## **Conclusion** Staying secure in 2025 isn’t just about having good hosting, it’s about having the right habits, tools, and systems in place. Cyber threats are evolving every day, but with a solid managed cloud hosting security checklist, you can stay ahead of most risks. By controlling access, enabling 2FA, monitoring activity, updating regularly, securing configurations, and preparing for emergencies, you build a strong shield around your applications. And when you use a platform like ServerAvatar, much of this work becomes easier, faster, and far more reliable. Instead of juggling dozens of tasks manually, you get an ecosystem that keeps your server optimized and protected from the inside out. Ultimately, good security isn’t a one-time setup, it’s an ongoing practice. Start applying these steps today and give your business the safe, stable environment it deserves in 2025. **Categories:** Blog, Cloud Platforms, Guide, Others, Ubuntu **Tags:** cloud security, Managed Cloud Hosting, managed cloud hosting security, secure hosting guide, security, security tips --- ### [10+ Proven Ways to Secure Your VPS in 2026](https://serveravatar.com/maximize-your-vps-security/) **Published:** February 25, 2026 **Author:** Meghna Meghwani **Content:** [![Blog banner - ServerAvatar](https://serveravatar.com/wp-content/uploads/2025/09/728_90-Banner-3-1024x127.png)](https://serveravatar.com/?ref=blog)Running a VPS is a lot like owning a house in a busy city. You might love the freedom and control, but if you forget to lock the doors or install an alarm, trouble can walk right in. As online threats continue to evolve, VPS security is no longer optional, it’s essential. If you want to secure your VPS properly, you need the right strategies in place. The good news? You don’t need to be a security expert to keep your server safe. In this guide, we’ll walk through 10+ proven ways to secure your VPS, using clear language, practical steps, and real-world logic. Whether you’re managing a small website or a growing online project, these tips will help you sleep better at night knowing your VPS is protected. ## What Is a VPS? A VPS (Virtual Private Server) is a type of hosting where one physical server is divided into multiple independent virtual servers. Each VPS work like own private machine, with dedicated resources like CPU, RAM, storage. This means your website or application doesn’t get affected by what others are doing on the same physical server. ![What is VPS - Secure your VPS](https://serveravatar.com/wp-content/uploads/2026/02/image-220.png) Think of it like living in an apartment building. Everyone shares the same building, but each person has their own locked apartment with separate rooms and utilities. A VPS gives you more control, better performance, and higher security than shared hosting, without the high cost of a dedicated server. This balance makes VPS hosting a popular choice for growing websites, applications, and online projects. ### Key Features of a VPS A Virtual Private Server (VPS) offers a perfect balance between performance, control, and affordability. Below are the key features that make VPS hosting a popular choice: - **Dedicated Resources** Your VPS comes with its own CPU, RAM, and storage, ensuring consistent performance without interference from other users. - **Full Root or Admin Access** You get complete control over the server environment, allowing you to install software, configure settings, and manage security as needed. - **Improved Security** Since your VPS is isolated from others on the same physical server, it provides better protection compared to shared hosting. - **Customizable Server Environment** You can choose the operating system, software stack, and configurations that best suit your application or website. - **Scalability** VPS resources can be upgraded easily as your traffic or workload grows, without downtime in most cases. - **Stable Performance** Guaranteed resources help maintain reliable speed and uptime, even during high-traffic periods. - **Cost-Effective Solution** VPS hosting delivers many benefits of a dedicated server at a much lower cost. - **Support for Multiple Use Cases** Ideal for hosting websites, applications, databases, APIs, and development environments. These features make a VPS a reliable and flexible hosting solution for businesses and individuals looking for more control and performance. ### Why VPS Security Matters Cyber threats are faster, smarter, and more automated than ever. Attackers no longer target only big platforms; small and medium VPS setups are often easier prey. A single security gap can lead to data theft, downtime, or even complete server loss. Think of VPS security as brushing your teeth. Skipping it once might not hurt, but ignoring it regularly will cause serious problems. Strong security habits protect your data, your users, and your reputation. ## VPS Security Best Practices You Should Follow Securing your VPS isn’t about applying a single setting, it’s about building multiple layers of protection. From system updates and access control to firewalls and backups, every measure plays a critical role in protecting your server from modern threats. Below are essential VPS security best practices you should implement to keep your server safe and reliable. ### 1. Always Keep Your Server Updated Keeping your server updated ensures known security gaps are patched before attackers can exploit them. Updates often include fixes for vulnerabilities that could otherwise expose your VPS to risks. Ignoring updates slowly weakens your server’s defense. ![server update - Secure your VPS](https://serveravatar.com/wp-content/uploads/2026/02/image-221.png) **Key points to remember:** - **Update the operating system regularly:** Keeps your VPS protected by fixing known security flaws and vulnerabilities. - **Keep server packages and services current:** Ensures all running services are secure and stable with the latest fixes. - **Remove unused software:** Reduces unnecessary entry points that attackers could exploit. Automatic updates can help, but it’s still wise to review changes manually from time to time. ### 2. Use Strong and Unique Passwords Weak passwords are one of the easiest ways for attackers to gain access to a VPS. Strong, unique passwords make unauthorized access far more difficult. Password strength is a basic but critical security layer. ![strong and unique password - Secure your VPS](https://serveravatar.com/wp-content/uploads/2026/02/image-222.png) **Best practices include:** - **Long passwords with mixed characters:** Makes passwords harder to guess or crack using automated tools. - **Unique passwords for each service:** Prevents attackers from accessing multiple services if one password leaks. - **Avoid dictionary words:** Stops simple word-based password attacks. A password manager can make this easier without driving you crazy. ### 3. Disable Root Login Access Root access provides complete control over your VPS, which makes it a prime target for attackers. Disabling direct root login limits damage even if login credentials are exposed. This adds a vital layer of protection to your server. ![disable root login - Secure your VPS](https://serveravatar.com/wp-content/uploads/2026/02/image-227.png) **Instead of logging in as root:** - **Create a separate user:** Limits direct access to critical system controls. - **Assign only required permissions:** Reduces the risk of accidental or malicious changes. - **Use privilege escalation when needed:** Allows temporary admin access without constant root exposure. This simple step reduces the risk of total server takeover. ### 4. Secure SSH with Key-Based Authentication Password-based logins can be guessed or brute-forced over time. SSH keys offer a more secure way to access your VPS by relying on cryptographic verification. This significantly lowers the risk of unauthorized logins. ![secure ssh - Secure your VPS](https://serveravatar.com/wp-content/uploads/2026/02/image-224.png) **With key-based authentication:** - **Allow only key-based logins:** Prevents unauthorized access through password guessing. - **Block brute force attempts:** Makes repeated login attacks ineffective. - **Control login sources easily:** Restricts access to trusted devices only. ### 5. Change the Default SSH Port Attackers often scan common ports to find vulnerable servers. Changing the default SSH port helps reduce automated attack attempts. While not foolproof, it adds an extra layer of obscurity. ![change ssh port - Secure your VPS](https://serveravatar.com/wp-content/uploads/2026/02/image-225.png) **Why it helps:** - **Reduce automated attack attempts:** Keeps common bots from targeting your server. - **Lower unnecessary login traffic:** Minimizes random SSH connection requests. - **Add an extra security layer:** Makes your VPS less predictable to attackers. Think of it as moving your front door from the main street to a side lane. ### 6. Server Security Protection Modern VPS security goes beyond basic settings and requires active protection against both automated bots and human-driven attacks. By combining a properly configured firewall, brute-force protection, AI bot blocking, and an 8G firewall, you create a powerful security shield around your VPS. Together, these tools work continuously to filter traffic, stop attacks early, and keep unwanted access out. ![server security protection - Secure your VPS](https://serveravatar.com/wp-content/uploads/2026/02/image-226.png) **Key security measures include:** - **Allow only required ports:** Ensures that only essential services can communicate with your VPS. - **Block unused services:** Closes unnecessary access points that attackers often target. - **Restrict access by IP:** Limits server access to trusted networks and locations. - **Block abusive IP addresses:** Automatically stops repeated failed login attempts before they cause damage. - **Reduce server load:** Prevents excessive authentication and bot traffic from slowing down the server. - **Automate attack prevention:** Protects your VPS without constant manual monitoring. - **Enable AI bot blocker:** Detects and blocks malicious bots while allowing legitimate traffic. - **Use an 8G firewall:** Provides advanced filtering rules to defend against complex and high-volume attacks. - **Install SSL certificates:** Encrypts data between users and the server, protecting sensitive information during transmission. Together, these layers act like a smart security system, checking every visitor, rejecting suspicious behavior, and locking the door the moment a threat appears. ### 7. Install Intrusion Detection Systems Intrusion detection systems watch for suspicious activity on your server. They help identify potential threats before serious damage occurs. Early detection allows quicker and more effective responses. ![intrusion detection - Secure your VPS](https://serveravatar.com/wp-content/uploads/2026/02/image-228.png) **These systems:** - **Monitor unusual behavior:** Detects suspicious activity in real time. - **Send security alerts:** Notifies you immediately when threats appear. - **Enable quick response:** Helps stop attacks before serious damage occurs. Early warnings can prevent small issues from becoming disasters. ### 8. Limit User Access and Permissions Giving excessive permissions increases security risks. Restricting user access ensures that even if one account is compromised, the damage remains limited. This approach keeps your VPS more controlled and secure. ![limit user access - Secure your VPS](https://serveravatar.com/wp-content/uploads/2026/02/image-229.png) - **Grant minimal access:** Prevents users from modifying critical server settings. - **Review permissions regularly:** Ensures access remains appropriate over time. - **Remove inactive accounts:** Eliminates unnecessary security risks. This reduces damage if one account is compromised. ### 9. Enable Automatic Backups No security setup is complete without a recovery plan. Backups ensure your data can be restored if something goes wrong. They provide peace of mind during unexpected incidents. ![enable backups - Secure your VPS](https://serveravatar.com/wp-content/uploads/2026/02/image-230.png) - **Run backups automatically:** Ensures data is saved without manual effort. - **Store backups off-server:** Protects data even if the VPS fails. - **Test backups regularly:** Confirms data can be restored when needed. If something goes wrong, backups are your safety net. ### 10. Monitor Logs and Server Activity Server logs reveal important details about logins, errors, and system behavior. Regular log monitoring helps catch unusual activity early. This keeps you informed and prepared. ![monitor logs - Secure your VPS](https://serveravatar.com/wp-content/uploads/2026/02/image-231.png) **By reviewing them, you can:** - **Track login attempts:** Identifies suspicious access behavior. - **Detect configuration issues:** Helps spot misconfigured services early. - **Monitor performance trends:** Reveals unusual activity affecting server stability. Regular monitoring turns you from reactive to proactive. ### 11. Secure Installed Applications Outdated or unused applications can introduce vulnerabilities. Keeping software clean and updated reduces the attack surface. Every installed app should serve a clear purpose. ![secure install application - Secure your VPS](https://serveravatar.com/wp-content/uploads/2026/02/image-232.png) **Best habits include:** - **Update applications regularly:** Fixes known security weaknesses. - **Remove unused apps:** Reduces the server’s attack surface. - **Follow secure configurations:** Prevents misconfigurations that expose data. Even a small plugin can become a big problem if ignored. ### 12. Encrypt Data Wherever Possible Encryption protects sensitive data even if unauthorized access occurs. It ensures that intercepted data remains unreadable. This is especially important for data transfers and stored information. ![encrypt data - Secure your VPS](https://serveravatar.com/wp-content/uploads/2026/02/image-233.png) **Focus on:** - **Encrypt connections:** Protects data during transmission. - **Encrypt stored data:** Keeps sensitive information safe even if accessed. - **Secure data transfers:** Prevents interception and data leaks. Encryption is like sealing sensitive letters inside a locked envelope. ### 13. Perform Regular Security Audits Security needs ongoing attention as threats evolve. Regular audits help uncover weaknesses and improve configurations. Consistent checks keep your VPS resilient over time. ![security audits - Secure your VPS](https://serveravatar.com/wp-content/uploads/2026/02/image-234.png) **Audits help you:** - **Identify security gaps:** Finds weaknesses before attackers do. - **Review server settings:** Ensures configurations follow best practices. - **Improve protection over time:** Keeps your VPS security up to date. Set a schedule and stick to it. Consistency matters more than perfection. ### 14. Enable Multi-Factor Authentication (MFA) Multi-Factor Authentication adds an extra step to the login process, making your VPS far harder to break into. Even if a password is stolen, MFA ensures that access is blocked without additional verification. This simple step greatly strengthens overall server security. ![MFA - Secure your VPS](https://serveravatar.com/wp-content/uploads/2026/02/image-235.png) - **Use an additional verification step:** Adds an extra security layer beyond passwords to prevent unauthorized access. - **Protect against stolen credentials:** Ensures attackers can’t log in even if passwords are compromised. - **Secure critical accounts:** Strengthens protection for admin panels and server access points. ### 15. Manage Proper File Permissions File permissions control who can read, write, or modify files on your VPS. Poorly configured permissions can expose sensitive data or system files. Proper permission management helps prevent unauthorized changes and accidental damage. ![File permission - Secure your VPS](https://serveravatar.com/wp-content/uploads/2026/02/image-236.png) - **Restrict file access:** Prevents unauthorized users from modifying sensitive files. - **Apply least-privilege rules:** Ensures files are only accessible to required users and processes. - **Avoid overly open permissions:** Reduces the risk of accidental or malicious changes. ### 16. Use a VPS Management Tool Managing a VPS manually can be time-consuming and error-prone. A VPS management tool simplifies server tasks and centralizes security controls. This makes it easier to maintain a secure and well-organized server environment. ![VPS management tool - Secure your VPS](https://serveravatar.com/wp-content/uploads/2026/02/image-237.png) - **Simplify server management:** Makes handling updates, security, and configurations easier. - **Reduce human errors:** Automation lowers the chance of misconfigurations. - **Improve overall security control:** Centralized dashboards help monitor and secure the VPS efficiently. Managing a VPS manually can be complex, but with ServerAvatar you get a centralized dashboard that handles everything from security configurations and backups to monitoring and user management. This reduces the risk of human error and speeds up server administration tasks, making secure and efficient server operation accessible even for users without deep technical skills. ### 17. Select a Reliable Hosting Company The security of your VPS also depends on the hosting provider behind it. A reliable hosting company offers strong infrastructure, regular updates, and built-in security features. Choosing the right provider creates a solid foundation for long-term VPS protection. ![hosting company - Secure your VPS](https://serveravatar.com/wp-content/uploads/2026/02/image-238.png) - **Choose a security-focused provider:** Ensures built-in protections like firewalls, monitoring, and timely updates. - **Look for strong infrastructure:** Reliable hardware and networks reduce downtime and vulnerabilities. - **Ensure responsive support:** Quick assistance helps resolve security issues faster. Choosing the right platform for your VPS management matters. ServerAvatar blends powerful server control with intuitive management, meaning you get strong infrastructure features, automated security updates, and responsive systems all in one place. Whether you bring your own cloud server or use a fully managed solution, ServerAvatar’s focus on reliability and ease of use gives you confidence in your hosting foundation. [![Blog banner - ServerAvatar](https://serveravatar.com/wp-content/uploads/2025/09/728_90-Banner-1-1024x127.png)](https://serveravatar.com/?ref=blog)## How ServerAvatar Simplifies VPS Security Management Managing VPS security manually can quickly become overwhelming, especially as threats grow more advanced. This is where ServerAvatar helps simplify the process by bringing essential security controls into one easy-to-use dashboard. **What is ServerAvatar?** [ServerAvatar](https://serveravatar.com/) is a platform to simplify the hosting and management of servers and applications. It simplifies the process of deploying and managing PHP and Node.js based web applications on servers. ![ServerAvatar Dashboard - Secure your VPS](https://serveravatar.com/wp-content/uploads/2026/02/image-239.png) Instead of juggling multiple tools and manual commands, users can manage and monitor everything from a single platform. For developers, businesses, and non-technical users alike, ServerAvatar makes VPS security more approachable without sacrificing control or flexibility. ### Server Security Protection with ServerAvatar ServerAvatar simplifies VPS security by bringing features like firewalls, Fail2Ban, SSL certificates, AI bot blocking, and advanced protection rules into one centralized dashboard. This reduces manual effort and minimizes the risk of configuration mistakes. As a result, users can focus on their applications while ServerAvatar handles security in the background. ![security features - Secure your VPS](https://serveravatar.com/wp-content/uploads/2026/02/image-240-1024x329.png)**Key security features include:** - **Firewall configuration:** Controls incoming and outgoing traffic by allowing only required ports and services. - **Fail2Ban protection:** Automatically blocks IP addresses after repeated failed login attempts to stop brute-force attacks. - **8G firewall protection:** Adds advanced, rule-based filtering to defend against large-scale and complex attack patterns. - **SSL certificate management:** Encrypts data between users and the server to protect sensitive information during transmission. - **AI bot blocking:** Detects and blocks malicious bots while allowing genuine user traffic. - **Centralized security management:** Minimizes misconfigurations by managing all security features from a single dashboard. ![security features - Secure your VPS](https://serveravatar.com/wp-content/uploads/2026/02/image-241-1024x384.png)### Change the Default SSH Port with ServerAvatar Changing the default SSH port adds an extra layer of protection by reducing predictable entry points. With ServerAvatar, you can modify your SSH port easily from the Security Settings section without complex command-line configurations. ![ssh port - Secure your VPS](https://serveravatar.com/wp-content/uploads/2026/02/image-242.png) **Key Features:** - **Custom SSH Port Configuration:** Change the default port 22 to any available port to reduce automated attack attempts. - **Reduced Brute-Force Attempts:** Minimize login attempts from bots scanning standard SSH ports. - **Simple Dashboard Control:** Update SSH port settings directly from the ServerAvatar Security Settings panel. - **Improved Server Obscurity:** Make your VPS less predictable and harder for attackers to detect. This small adjustment can significantly lower unnecessary login traffic and strengthen your overall VPS security posture. ### Backup and Restore With ServerAvatar Backups are a critical part of VPS security, but managing them manually can be time-consuming and error-prone. ServerAvatar simplifies this process with built-in backup and restore tools that help protect your data and applications. With automated options and quick recovery, restoring your server becomes stress-free. ![backup and restore - Secure your VPS](https://serveravatar.com/wp-content/uploads/2026/02/image-243.png) **Key features include:** - **Database backups:** Safely back up databases without interrupting live applications. - **File system backups:** Protect website files from data loss. - **Full application backups:** Take a complete application backup for reliable recovery. - **Storage integration options:** Integrate external storage locations from the provided and store backups securely. - **One-click restore:** Quickly recover data, even on a different server. ### Monitoring Logs with ServerAvatar Keeping an eye on server activity is essential for maintaining performance and security. ServerAvatar offers log monitoring and a Log Monitoring Suite for advanced and detailed log insights. This helps you detect issues early and respond before they affect your VPS. ![Log Monitoring Suite - Secure your VPS](https://serveravatar.com/wp-content/uploads/2026/02/image-246-1024x499.png)**Key features include:** - **Log viewer:** View and analyze server logs from a centralized dashboard. - **Request and error tracking:** Identify failed requests and application errors quickly. - **Bandwidth usage monitoring:** Track traffic patterns and resource consumption. - **Bot and traffic analysis:** Detect suspicious or unusual access behavior. ### File Permissions with ServerAvatar Proper file permissions are essential to protect sensitive data and system files. ServerAvatar makes permission management simple by providing a built-in File Manager and easy access to fix permissions. This ensures that only authorized users can access or modify critical files. ![file permission - Secure your VPS](https://serveravatar.com/wp-content/uploads/2026/02/image-244.png) **Key features include:** - **Built-in File Manager:** Easily view, edit, and manage files directly from the ServerAvatar dashboard. - **Quick permission fixes:** Adjust file and folder permissions without using complex command-line commands. - **Reduced risk of misconfiguration:** Prevent common permission errors that can lead to security issues. ![fix permission - Secure your VPS](https://serveravatar.com/wp-content/uploads/2026/02/image-245.png) ## Increase VPS Security and Scale Your Business with ServerAvatar A secure VPS is not just about protection, it’s about creating a stable foundation for long-term growth. By combining strong access controls, regular backups, real-time monitoring, and automated security features, you reduce risks while improving overall server reliability. A well-managed VPS helps prevent downtime, data loss, and performance issues that can slow down your business. ServerAvatar brings all these essentials together in a single platform, making VPS management simpler and more efficient. With centralized control over security, backups, logs, and permissions, users can focus on scaling their applications and services with confidence, knowing their server environment is consistently protected and optimized behind the scenes. ## Conclusion Securing your VPS is no longer optional, it’s a necessity for protecting your data, applications, and online reputation. By following layered security practices such as regular updates, strong passwords, SSH hardening, automated backups, and proactive monitoring, you can significantly reduce risks and maintain a reliable server environment. Tools like ServerAvatar make managing these security measures simpler, allowing you to focus on growing your projects while keeping your VPS safe and optimized. With a structured approach and the right platform, VPS security becomes manageable, efficient, and effective. ## FAQs ### 1. Why is VPS security important? VPS security is essential because cyber threats are becoming faster, smarter, and more automated. Even small vulnerabilities can lead to data loss, downtime, or unauthorized access, making proactive security measures critical. ### 2. Can I secure my VPS without advanced technical knowledge? Yes, Platforms like ServerAvatar simplify VPS management by centralizing security settings, backups, SSH management, and monitoring, making it easy for beginners and non-technical users to maintain strong security. ### 3. What is the advantage of changing the default SSH port? Changing the default SSH port reduces automated brute-force attacks by making it harder for bots to find your server’s SSH access, adding an extra layer of security. ### 4. Are backups necessary for VPS security? Absolutely, backups protect against data loss, server failures, or security breaches, providing a reliable recovery option and ensuring business continuity. ### 5. How does ServerAvatar simplify VPS security management? ServerAvatar centralizes tasks like firewall setup, SSH configuration, log monitoring, backups, file permission management, and bot protection, reducing human error and making VPS security efficient and manageable. **Categories:** Blog, Guide, Linux, Optimisation, Others, Tutorials, Ubuntu **Tags:** improve VPS security, secure server, secure VPS, secure your VPS, VPS hardening, VPS security, VPS security best practices --- ### [Top 20+ Web Crawlers to Know in 2026](https://serveravatar.com/top-web-crawlers/) **Published:** December 3, 2025 **Author:** Meghna Meghwani **Content:** [![Blog banner - ServerAvatar](https://serveravatar.com/wp-content/uploads/2025/09/728_90-Banner-3-1024x127.png)](https://serveravatar.com/?ref=blog)The internet is like a massive library with billions of books being updated every second. But have you ever wondered *who* organizes all this information so quickly? That job belongs to **web crawlers**, the unsung heroes silently scanning, indexing, and updating the web behind the scenes. In 2025, dozens of powerful crawlers from search engines, SEO tools, and analytics platforms are shaping how websites get discovered. Understanding these crawlers helps you improve SEO, secure your site, and optimize performance. This guide breaks it all down in simple language, no jargon, no fluff. ## What Are Web Crawlers? Web crawlers, also known as spiders or bots, are tools that browse the internet automatically to collect information from websites. They help search engines understand pages, rank them, and show relevant results to users. Think of them like tiny digital librarians running around shelves, gathering data, and organizing everything efficiently. ![web crawlers work](https://serveravatar.com/wp-content/uploads/2025/12/image-13.png) ## How Web Crawlers Work Here’s how most crawlers operate: - Discover URLs through sitemaps, links, or previous crawls - Visit pages and scan content - Download data (text, images, metadata, links) - Send information to their databases - Index the content so users can find it ## Why Web Crawlers Matter in 2025 In 2025, websites are growing faster than ever, AI content, dynamic pages, and multimedia-rich sites are everywhere. Crawlers help: - Improve search engine visibility - Boost page ranking - Detect site issues - Analyze competition - Fetch previews for social media Knowing which crawlers visit your site also helps prevent spam traffic and bot overload. ![web crawlers matters](https://serveravatar.com/wp-content/uploads/2025/12/image-14.png) ## Top 20+ Web Crawlers You Should Know in 2025 ## 1. Googlebot [Googlebot](https://developers.google.com/search/docs/crawling-indexing/googlebot) is Google’s primary crawler that scans and indexes web pages for global search results. **Key Highlights** - Advanced JavaScript rendering - Mobile-first crawling - Fast and frequent indexing **Pros:** - Best for SEO - Fast discovery of new pages - Accurate rendering **Cons:** - High crawl demand on servers - Strict on technical issues **Known For:** The world’s most powerful and widely used search engine crawler. ## 2. Bingbot [Bingbot](https://www.bing.com/webmasters/help/which-crawlers-does-bing-use-8c184ec0#:~:text=Verifying%20authenticity,all%20verification%20methods%20we%20offer.) is Microsoft’s main web crawler powering Bing and AI-driven search experiences. ![web crawlers - bingbot](https://serveravatar.com/wp-content/uploads/2025/12/image-15-1024x408.png) **Key Highlights:** - Strong JavaScript support - Integrates with Bing + AI search - Efficient resource fetching **Pros:** - Reliable crawl patterns - Good for US/Europe audiences **Cons:** - Slower index updates than Google - Limited global market share **Known For:** Microsoft’s primary crawler powering Bing and partner engines. ## 3. Yandex Bot [Yandex Bot](https://yandex.com/support/webmaster/en/robot-workings/check-yandex-robots) is the core crawler of Yandex, focused on indexing Russian and Eastern European content. ![web crawlers - yandex](https://serveravatar.com/wp-content/uploads/2025/12/image-16-1024x403.png) **Key Highlights:** - Regional content focus - Complex link evaluation - Supports IndexNow **Pros:** - Great for Russian-speaking markets - Strong local ranking accuracy **Cons:** - Sensitive to technical errors - Slow for non-Russian sites **Known For:** The dominant crawler for Russia and Eastern Europe. ## 4. Baiduspider [Baidu’s](https://www.baidu.com/) official crawler used to index Chinese-language websites for China’s largest search engine. ![web crawlers - baiduspider](https://serveravatar.com/wp-content/uploads/2025/12/image-17-1024x443.png) **Key Highlights:** - Optimized for Chinese sites - Strict content rules - Prioritizes speed **Pros:** - Best for reaching China - Fast crawling of local content **Cons:** - Limited English content support - Requires server presence near China **Known For:** China’s most widely used search engine bot. ## 5. AhrefsBot [AhrefsBot](https://ahrefs.com/robot) is a powerful crawler that collects backlink and SEO data for Ahrefs’ massive search index. ![web crawlers - ahrefsbot](https://serveravatar.com/wp-content/uploads/2025/12/image-18-1024x672.png) **Key Highlights:** - Deep backlink crawling - SEO metric collection - Massive URL discovery **Pros:** - Excellent for link data - Large, reliable index **Cons:** - Heavy server load - Not a search engine crawler **Known For:** Industry-leading backlink analysis crawler. ## 6. SEMrushBot [SEMrush’s](https://www.semrush.com/bot/) auditing crawler that gathers site health, keywords, and SEO insights. ![web crawlers - semrushbot](https://serveravatar.com/wp-content/uploads/2025/12/image-19-1024x556.png) **Key Highlights:** - Keyword and ranking data - On-page SEO auditing - Site health scanning **Pros:** - Helpful for technical audits - Accurate SERP insights **Cons:** - Excessive crawling at times - Slower discovery than Ahrefs **Known For:** Crawling for competitive SEO and site audits. ## 7. Screaming Frog SEO Spider [Screaming Frog](https://www.screamingfrog.co.uk/seo-spider/) SEO Spider is a desktop-based crawler used for technical site audits and error detection. ![web crawlers - screaming frog](https://serveravatar.com/wp-content/uploads/2025/12/image-20-1024x528.png) **Key Highlights:** - Local desktop crawler - Finds errors, broken links - Exports structured reports **Pros:** - Highly customizable - Great for audits **Cons:** - Requires local machine - Limited large-site capacity **Known For:** The most popular SEO audit tool for technical professionals. ## 8. Facebook Crawler [Facebook Crawler](https://developers.facebook.com/docs/sharing/webmasters/web-crawlers/) reads metadata to generate link previews on Facebook and Instagram. **Key Highlights:** - Fetches metadata - Loads Open Graph tags - Generates share previews **Pros:** - Ensures clean social previews - Supports media-rich pages **Cons:** - Doesn’t index for search - Requires OG optimization **Known For:** Creating link previews for Facebook & Instagram shares. ## 9. Twitterbot A lightweight crawler that fetches titles, descriptions, and images for Twitter/X link previews. **Key Highlights:** - Reads metadata + images - Fetches HTML title/description - Renders social cards **Pros:** - Accurate social previews - Lightweight crawling **Cons:** - Limited content extraction - No SEO benefits **Known For:** Generating link previews on X (Twitter). ## 10. LinkedInbot LinkedIn’s preview generator that extracts metadata for shared links on the platform. **Key Highlights:** - Fetches Open Graph data - Reads page titles, summaries - Pulls thumbnails **Pros:** - Great for professional branding - Reliable preview generation **Cons:** - Doesn’t index for SEO - May not render dynamic pages **Known For:** Creating link previews on LinkedIn posts. ## 11. OpenAI’s GPTBot [OpenAI’s crawler](https://platform.openai.com/docs/bots) that collects publicly available information to train AI models. **Key Highlights:** - Extracts public content - Helps train AI models - Large-scale web crawling **Pros:** - Broad web coverage - Transparent opt-out options **Cons:** - Some sites block it - Not related to SEO **Known For:** Gathering content for AI training datasets. ## 12. DuckDuckBot [DuckDuckGo’s](https://duckduckgo.com/duckduckgo-help-pages/results/duckduckbot) privacy-focused crawler that powers its independent search index. ![web crawlers - duckduckbot](https://serveravatar.com/wp-content/uploads/2025/12/image-21-1024x395.png) **Key Highlights:** - Privacy-safe crawling - Minimal resource usage - Independent indexing **Pros:** - Light and safe - No tracking **Cons:** - Smaller index than Google - Less accurate ranking **Known For:** Supporting the privacy-focused DuckDuckGo search engine. [![Blog banner - ServerAvatar](https://serveravatar.com/wp-content/uploads/2025/09/728_90-Banner-1-1024x127.png)](https://serveravatar.com/?ref=blog)## 13. MajesticMJ12 Bot [Majestic’s](https://www.mj12bot.com/) large-scale crawler dedicated to discovering and evaluating backlinks. ![web crawlers - majesticmj12bot](https://serveravatar.com/wp-content/uploads/2025/12/image-22-1024x567.png) **Key Highlights:** - Massive link index - Anchor text analysis - Updated historic index **Pros:** - Huge backlink database - Great for link audits **Cons:** - Heavy crawler load - Not a full SEO tool **Known For:** One of the largest link-focused crawlers in the world. ## 14. Moz’s RogerBot [Moz’s crawler](https://moz.com/help/moz-procedures/crawlers/rogerbot) that gathers link and domain data to calculate SEO metrics like DA and PA. **Key Highlights:** - DA/PA calculations - Backlink crawling - On-site audits **Pros:** - Trusted SEO metrics - Strong backlink verification **Cons:** - Smaller index than Ahrefs - Slower crawl cycles **Known For:** Powering Moz’s Domain Authority ranking system. ## 15. Sogou Spider [Sogou’s](http://www.sogou.com/) web crawler that indexes Chinese web content for its regional search engine. ![web crawlers - sogou spider](https://serveravatar.com/wp-content/uploads/2025/12/image-23-1024x406.png) **Key Highlights:** - Chinese-language crawling - Large regional coverage - News & content scanning **Pros:** - Good reach in China - Fast crawling for local content **Cons:** - Limited international value - Not widely used outside China **Known For:** Crawling for China’s Sogou search engine. ## 16. Applebot [Apple’s](https://support.apple.com/en-in/119829) search crawler used to support Siri, Spotlight, and Apple Search results. **Key Highlights:** - Siri & Spotlight search - High-quality crawling - JavaScript rendering **Pros:** - Growing fast in 2025 - Strong mobile indexing **Cons:** - Limited documentation - Smaller index than Google **Known For:** Powering Apple’s search and Siri suggestions. ## 17. CCBot / CommonCrawl [CCBot](https://commoncrawl.org/ccbot) is an open-data crawler that builds one of the largest publicly accessible web datasets. **Key Highlights:** - Open web dataset - Large-scale public crawling - Used by researchers & AI companies **Pros:** - Free and publicly accessible - Massive global coverage **Cons:** - Not SEO-focused - Low crawl frequency **Known For:** Providing one of the largest open-source web datasets. ## 18. Pinterestbot [Pinterest’s crawler](https://help.pinterest.com/en/business/article/pinterestbot) that fetches images and metadata for pins and visual recommendations. **Key Highlights:** - Image scraping - Metadata extraction - Content preview generation **Pros:** - Excellent for visual SEO - Strong social visibility **Cons:** - Doesn’t index text deeply - Not search-engine based **Known For:** Fetching images and descriptions for Pinterest pins. ## 19. PetalBot Huawei’s search crawler that indexes global websites for its Petal Search ecosystem. **Key Highlights:** - Huawei search indexing - AI-driven ranking - Mobile-optimized crawling **Pros:** - Fast in Asia - Strong mobile results **Cons:** - Smaller global index - Limited English accuracy **Known For:** Crawling for Huawei’s Petal Search ecosystem. ## 20. WhatsApp Crawler A link-preview crawler that extracts key metadata for WhatsApp message previews. **Key Highlights:** - Fetches preview metadata - Reads title, description, image - Lightweight requests **Pros:** - Quick previews in chats - Minimal server load **Cons:** - No SEO value - Doesn’t crawl deeply **Known For:** Generating link previews in WhatsApp chats. ## 21. Amazonbot [Amazon’s](https://developer.amazon.com/amazonbot) official crawler used for Alexa-related services, product search, and AI-driven indexing across its ecosystem. **Key Highlights:** - Crawls webpages for product data - Powers Amazon Search & Alexa results - Supports structured data parsing **Pros:** - Useful for eCommerce visibility - Reads schema markup effectively - Reliable and lightweight **Cons:** - Limited documentation - Not a general-purpose search crawler **Known For:** Crawling content for Amazon Search, Alexa answers, and product-related indexing. ## Comparison of All Crawlers[](https://storage.3.basecamp.com/5840738/blobs/60402aec-d030-11f0-a21b-0242ac120004/download/image.png) **Crawler Name****Type****Main Function**GooglebotSearch Engine CrawlerIndexes websites for Google SearchBingbotSearch Engine CrawlerCrawls sites for Bing & MSN SearchYandex BotSearch Engine CrawlerIndexes Russian/Eastern European contentBaiduspiderSearch Engine CrawlerCrawls Chinese websites for Baidu SearchAhrefsBotSEO Tool CrawlerCollects backlink & SEO dataSEMrushBotSEO Tool CrawlerGathers keyword & audit dataScreaming Frog SEO SpiderSEO Audit ToolTechnical site crawling from desktopFacebook CrawlerSocial Media BotGenerates link previews for Facebook & InstagramTwitterbotSocial Media BotCreates link previews on Twitter/XLinkedInbotSocial Media BotFetches metadata for LinkedIn postsOpenAI GPTBotAI/Data CrawlerCollects data for AI trainingDuckDuckBotSearch Engine CrawlerCrawls sites for DuckDuckGo search resultsMajesticMJ12 BotSEO Tool CrawlerBacklink indexing and link graph analysisMoz’s RogerBotSEO Tool CrawlerMeasures DA/PA and backlink profilesSogou SpiderSearch Engine CrawlerIndexes Chinese-language contentApplebotSearch Engine CrawlerPowers Apple Search & Siri resultsCCBot / CommonCrawlResearch/Data BotBuilds public web datasetsPinterestbotSocial Media CrawlerFetches images for Pinterest pinsPetalBotSearch Engine CrawlerIndexes content for Huawei Petal SearchWhatsApp CrawlerMessaging BotFetches previews for WhatsApp linksAmazonbotSearch & product data crawlerIndexes web content to enhance Amazon Search## How to Optimize Your Website for Crawlers To ensure all legitimate bots can access your website efficiently, follow these tips: **1. Create and submit a sitemap** This is like giving bots a roadmap to your site. **2. Improve website speed** Slow sites get crawled slower. **3. Use a clean site structure** Organized URLs = easier crawling. **4. Fix broken links** Bots waste crawl budget on dead ends. **5. Add structured data** Helps search engines understand content. **6. Avoid duplicate content** Bots may skip indexing repeat content. **7. Keep robots.txt clean** Make sure you’re not accidentally blocking important crawlers. ## Conclusion Web crawlers play a crucial role in how the internet works. Whether it’s Google indexing your pages, Ahrefs analyzing your backlinks, or social bots generating link previews, each crawler has a purpose. Understanding how these bots behave helps you optimize SEO, protect your site, and deliver better performance. As we move deeper into 2025, staying crawl-friendly isn’t just a ranking factor, it’s a key part of running a healthy, discoverable website. ## FAQs ### **1. Why are web crawlers important for SEO**? They determine how search engines read, rank, and understand your website. ### **2. Can crawlers slow down my website?** Heavy crawlers can temporarily increase server load. Tools like AhrefsBot or MJ12Bot can be resource-intensive if your server is small or unoptimized. ### **3. How do I see which crawlers visit my site?** You can check server logs or use analytics tools like Google Search Console, Ahrefs, or Cloudflare. ### **4. Should I optimize my site differently for different crawlers?** Not really. If your website is fast, clean, mobile-friendly, and technically optimized, all search and preview crawlers will perform well. ### **5. How often do crawlers visit my website?** It depends on your site’s popularity, update frequency, domain authority, and technical health. Googlebot may visit multiple times a day; others crawl weekly or monthly ## Stop Wasting Time on Servers. Start Building Instead. You didn’t start your project to babysit servers. Let **ServerAvatar** handle deployment, monitoring, and backups — so you can focus on growth. Deploy **WordPress, Laravel, N8N**, and more in minutes. No DevOps required. No command line. No stress. [ 🚀 Try Free ](https://app.serveravatar.com) [ 🌐 Learn More ](https://serveravatar.com/) Trusted by 10,000+ developers and growing. **Categories:** Blog, Guide, Others **Tags:** bots, crawlers, indexing bots, search engine bots, seo bots, web crawlers --- ### [Best WordPress LMS Plugins to Use in 2026 (Top 9 Picks)](https://serveravatar.com/wordpress-lms-plugins/) **Published:** December 5, 2025 **Author:** Meghna Meghwani **Content:** [![Blog banner - ServerAvatar](https://serveravatar.com/wp-content/uploads/2025/09/728_90-Banner-3-1024x127.png)](https://serveravatar.com/?ref=blog)Online learning has become one of the fastest-growing industries globally. Whether you’re a coach, educator, entrepreneur, or someone exploring passive income, creating online courses can be a rewarding venture. And when it comes to building courses on WordPress, choosing the right WordPress LMS plugins is crucial because they allow you to turn a basic website into a powerful online learning platform. Think of LMS plugins as the “brain” of your eLearning website. Without them, your site is just an empty notebook. With a powerful LMS plugin, it becomes a fully equipped virtual classroom, complete with lessons, quizzes, progress tracking, certificates, student dashboards, and payment options. This expanded guide covers everything you need to know about LMS plugins in 2025, including detailed plugin reviews, pricing, comparisons, use cases, pros/cons, and more. ## What Is a WordPress LMS Plugin? A WordPress LMS plugin (Learning Management System plugin) helps you create and manage online courses directly on your WordPress website. It includes everything such as: - Course builders - Lesson management - Quizzes - Certificates - Student dashboards - Payment gateways - Membership systems It allows you to run your own digital academy without hiring developers or building software from scratch. ## Why Use a WordPress LMS Plugin in 2025? In 2025, the eLearning world is bigger than ever: - Remote learning is normal - Online coaching is booming - Skill-based courses sell more than degrees - Companies use LMSs for employee training A good LMS plugin helps you: - Build your own online school - Sell courses without platform fees - Own your audience - Fully customize your learning experience Using WordPress gives you full freedom, and the right LMS plugin makes it powerful. ### Key Features to Consider in a WordPress LMS Plugin When choosing an LMS, consider: **1. Course Builder** Look for an LMS with an intuitive drag-and-drop builder that makes creating lessons simple, even for beginners. A good builder saves time and helps you structure courses more effectively. **2. Assessment Tools** Your LMS should offer quizzes, assignments, certificates, and grading features to evaluate learners properly. These tools help track progress and keep students engaged. **3. Monetization** Check whether the plugin supports various income models like one-time payments, subscriptions, or bundles. Flexible pricing options make it easier to grow your course business. **4. Integrations** A strong LMS connects smoothly with email services, CRMs, video tools like Zoom, and eCommerce platforms. These integrations automate workflows and improve overall functionality. **5. Student Experience** Choose a system that provides a clean dashboard, easy navigation, and visible progress tracking. A smooth learning experience keeps students motivated and reduces drop-offs. **6. Scalability** Ensure the LMS can support a growing student base, hundreds or even thousands, without slowing down. It should also allow multiple instructors if you plan to expand. **7. Content Security** Look for tools that protect your lessons from unauthorized downloads or piracy. Features like screen-recording prevention and watermarking help safeguard your content. ### Types of Online Courses You Can Create With a WordPress LMS These LMS plugins work for many course types: - Video-based courses - Coaching programs - Skill-development classes - Corporate training modules - Certification courses - Membership academies - Multi-instructor marketplaces - Live class–based programs Whatever your style, a good LMS plugin can support it. ## Top 9 WordPress LMS Plugins to Use in 2025 Now, let’s dig deeper into the most powerful LMS plugins available. ## 1. LearnDash – The Industry Leader [LearnDash](https://www.learndash.com/) offers a powerful course-building system with advanced quizzes, drip content, and robust reporting. It’s widely trusted by enterprises, universities, and professional educators for scalable learning experiences. ![WordPress LMS plugins - LearnDash](https://serveravatar.com/wp-content/uploads/2025/12/image-26-1024x578.png) **Key Features** - Drag-and-drop course builder - Advanced quiz system - Course prerequisites - Drip content - Certificates and badges - Focus mode for distraction-free learning - WooCommerce + PayPal + Stripe support **Pros** - Extremely powerful - Professional-grade LMS - Suitable for universities and schools - Great for selling courses **Cons** - Slight learning curve - Add-ons may be expensive **Pricing** Starts at around ~$199/year. **Best For:** Professional academies, universities, coaches, and businesses. ## 2. Tutor LMS – Best for Marketplaces & Beginners [Tutor LMS](https://tutorlms.com/) combines an easy drag-and-drop builder with strong quiz options, assignments, and front-end course creation. It’s ideal for creators who want a clean interface and marketplace-style features. ![WordPress LMS plugins - Tutor LMS](https://serveravatar.com/wp-content/uploads/2025/12/image-27-1024x578.png) **Key Features** - Frontend course builder - Multi-instructor support - Interactive quizzes - Analytics dashboard - Content drip - WooCommerce monetization **Pros** - Very easy to use - Amazing modern interface - Marketplace-ready **Cons** - Some advanced features require pro add-ons **Pricing** Starting at about ~$99/year. **Best For:** Beginners, multi-instructor platforms, and creators wanting simplicity. ## 3. LifterLMS – Great for Membership Sites [LifterLMS](https://lifterlms.com/) focuses on flexible learning paths, memberships, and powerful engagement tools like achievements and gamification. It’s great for coaches, trainers, and websites that need deep customization. [](https://storage.3.basecamp.com/5840738/blobs/67ab991a-d1b6-11f0-95f3-0242ac120003/download/image.png) ![WordPress LMS plugins - LifterLMS](https://serveravatar.com/wp-content/uploads/2025/12/image-29-1024x560.png) **Key Features** - Drag-and-drop course builder - Powerful membership tools - Built-in CRM features - Achievement badges - One-time payments & subscriptions **Pros** - Flexible pricing - Great for community-based courses **Cons** - Add-ons can be pricey **Pricing** Starts at around ~ $749/year. **Best For:** Membership sites, coaching, blended learning. ## 4. Sensei LMS – Built by WordPress Itself [Sensei LMS](https://senseilms.com/), built by the WooCommerce team, Sensei LMS integrates seamlessly with online stores and offers simple, structured course creation. It’s perfect for creators who want a clean, minimal learning environment. [](https://storage.3.basecamp.com/5840738/blobs/fce668b0-d1b7-11f0-875a-0242ac120003/download/image.png) ![WordPress LMS plugins - Sensei LMS](https://serveravatar.com/wp-content/uploads/2025/12/image-30-1024x643.png) **Key Features** - WooCommerce-powered course selling - Clean, minimalist UI - Automatic grading - Course progress tracking **Pros** - Lightweight - Works smoothly with WordPress themes **Cons** - Not as many advanced features **Pricing** Free version available; paid starts at ~$60/year. **Best For:** Simple course platforms, WooCommerce users. ## 5. MasterStudy LMS – Highly Interactive UI [MasterStudy LMS](https://stylemixthemes.com/wordpress-lms-plugin/) provides a visually appealing course builder, live streaming support, and interactive tools like quizzes and message boards. It’s well-suited for schools and large educational platforms. ![WordPress LMS plugins - MasterStudy LMS](https://serveravatar.com/wp-content/uploads/2025/12/image-31-1024x533.png)**Key Features** - Visual course builder - Zoom integration - Student messaging - Assignments - Certificates **Pros** - Very interactive - Great visual appeal **Cons** - Limited integrations - Requires a strong theme **Pricing** Free version available; paid starts at ~$49/year. **Best For:** Creators who want a visually stunning LMS. [![Blog banner - ServerAvatar](https://serveravatar.com/wp-content/uploads/2025/09/728_90-Banner-1-1024x127.png)](https://serveravatar.com/?ref=blog)## 6. WP Courseware – Simple & Beginner-Friendly [WP Courseware](https://flyplugins.com/wp-courseware-wordpress-lms/) delivers a straightforward drag-and-drop experience with solid quiz features and instructor tools. Its simplicity makes it a strong choice for beginners building their first course. ![WordPress LMS plugins - WP Courseware](https://serveravatar.com/wp-content/uploads/2025/12/image-32-1024x600.png) **Key Features** - Drag-and-drop builder - Gradebooks - Drip content - Progress emails **Pros** - Easy setup - Intuitive UI **Cons** - Not ideal for complex academies **Pricing** Starts at around ~ $159/year. **Best For:** Beginners and small course creators. ## 7. LearnPress – Best Free LMS Plugin [LearnPress](https://learnpresslms.com/) is a lightweight, modular LMS known for its free core plugin and wide add-on library. It’s budget-friendly, flexible, and works smoothly with many WordPress themes. ![WordPress LMS plugins - LearnPress](https://serveravatar.com/wp-content/uploads/2025/12/image-33-1024x615.png) **Key Features** - Core plugin is free - Many premium add-ons - Drag-and-drop builder **Pros** - Free to start - Lightweight **Cons** - Add-ons needed for advanced features **Pricing** Free version available; paid starts at ~$149/year. **Best For:** Beginners wanting a free option. ## 8. Teachable – Hosted LMS Integration [Teachable](https://www.teachable.com/) integration lets you embed or connect Teachable courses directly into your WordPress site. It’s ideal for creators who prefer Teachable’s hosted platform but still want a WordPress front end. ![WordPress LMS plugins - Teachable](https://serveravatar.com/wp-content/uploads/2025/12/image-35-1024x458.png) **Key Features** - High-quality video hosting - Smooth student experience - Marketing tools - Coaching features **Pros** - No maintenance - Excellent UX **Cons** - Monthly fees - 5% transaction fees on free plan **Pricing** Starts at around ~ $348/year. **Best For:** Creators who don’t want technical work. ## 9. MemberPress Courses Add-on – Membership Meets LMS [MemberPress](https://memberpress.com/) Courses combines membership management with simple course-building tools inside WordPress. It’s great for selling gated content, bundles, and community-driven learning experiences. ![WordPress LMS plugins - MemberPress Courses Add-on](https://serveravatar.com/wp-content/uploads/2025/12/image-36-1024x353.png) **Key Features** - Course builder - Access rules - Paid memberships - Content drip **Pros** - Amazing for membership sites **Cons** - Not a full LMS like LearnDash **Pricing** Starts at around ~ $199.50/year. **Best For:** Membership academies, gated communities. ## Best WordPress LMS Plugins for Different Use Cases **Use Case****Plugin Recommendation****Full academy**LearnDash**Multi-instructor school**Tutor LMS**Membership + Courses**MemberPress, LifterLMS**Simple course setup**WP Courseware**Free option**LearnPress**WooCommerce-heavy site**Sensei LMS**No technical work**Teachable## Host Your WordPress LMS Website with Ease Using ServerAvatar Building a powerful LMS website requires smooth performance, strong security, and easy server management. This is where **ServerAvatar** becomes a game-changer. Whether you’re hosting a single WordPress LMS or running multiple course websites, ServerAvatar lets you set everything up in just a few clicks. ### What is ServerAvatar? [ServerAvatar](https://serveravatar.com/) is a platform to simplify the hosting and management of servers and applications. It simplifies the process of deploying and managing PHP and Node.js based web applications on servers. ![ServerAvatar Dashboard](https://serveravatar.com/wp-content/uploads/2025/12/image-37.png) ### Why ServerAvatar Is Perfect for LMS Websites Running an LMS isn’t like running a simple blog, you need speed, uptime, and reliability. ServerAvatar takes care of server management so you can focus entirely on building and selling your courses. With automated tasks and performance optimizations, your students get a smooth, uninterrupted learning experience. ### Key Features for LMS Creators - **One-Click WordPress Installation:** Deploy WordPress instantly without technical commands. - **Lightning-Fast Performance:** Built-in caching, optimized server stack, and resource monitoring. - **Automatic Backups:** Keep your course data safe without manual work by scheduling the backups. - **SSL in One Click:** Secure your LMS instantly with automatic free SSL with auto-renewal. - **Server Health & Log Monitoring:** Monitor your server load and overall health in real time. - **Beginner-Friendly Dashboard:** Perfect for non-technical users, coaches, and educators. ## Essential Add-ons to Improve Your WordPress LMS To enhance your LMS, the right add-ons can boost engagement, streamline management, and improve the learning experience. These tools help you deliver interactive lessons, automate tasks, and support different learning styles. **Add-ons** - **Zoom Integration:** Adds live classes, virtual meetings, and webinars directly inside your LMS. - **Gamification Tools:** Introduce points, levels, and rewards to keep students motivated. - **Certificates & Badges:** Recognize achievements and encourage course completion. - **Email Automation:** Sends reminders, progress updates, and marketing emails automatically. - **Payment Gateways:** Allows seamless payments through Stripe, PayPal, or local options. - **Gradebooks:** Helps instructors track scores and monitor student performance. - **Course Marketplace Add-ons:** Enables multi-instructor platforms and course selling marketplaces. ## Tips for Building a Successful WordPress LMS Website A strong LMS website focuses on clarity, engagement, and smooth navigation. Optimizing lesson structure and offering interactive features helps create a meaningful learning journey for your students. **Tips** - **Use a clean theme:** Ensure your site loads fast and looks professional. - **Keep lessons short:** Bite-sized content improves focus and retention. - **Add quizzes and assignments:** Reinforces learning and evaluates understanding. - **Use storytelling in your lessons:** Makes concepts relatable and memorable. - **Offer certificates:** Provides motivation and adds value to the course. - **Add community features:** Forums or groups help students connect and collaborate. ## Common Mistakes to Avoid Many LMS sites fail because of poor planning or technical missteps. Avoiding these common mistakes ensures a smoother experience for both instructors and learners. **Mistakes** - **Choosing cheap hosting:** Leads to slow speed, downtime, and poor user experience. - **Using too many plugins:** Can cause site conflicts and performance issues. - **Not planning course structure:** Results in confusing lessons and low engagement. - **Ignoring mobile experience:** A large portion of learners study on phones. - **Overcomplicating the LMS setup:** Keep your system simple and easy to use. ## FAQs ### **1. Do LMS plugins support video-based courses?** Absolutely. Most LMS plugins support video lessons from YouTube, Vimeo, or self-hosted files. Some even offer video progression control, autoplay options, and content protection to limit downloads and sharing. ### **2. Can I sell my courses using these plugins?** Yes. Almost all major LMS plugins integrate with payment gateways like PayPal, Stripe, and WooCommerce. This means you can sell courses as one-time purchases, subscriptions, bundles, or memberships depending on the plugin. ### **3. Do WordPress LMS plugins work with any theme?** Most LMS plugins are designed to work with any well-coded WordPress theme. However, some plugins offer their own dedicated LMS themes for better compatibility and design flexibility. ### **4. Can I create certificates for students using these plugins?** Yes. Plugins like Tutor LMS, LearnDash, and LifterLMS allow you to design and award certificates automatically once students complete a course, quiz, or lesson. ### **5. Do LMS plugins support quizzes and assignments?** Yes. Almost every WordPress LMS plugin supports quizzes, assignments, and assessments. You can create multiple question types such as MCQs, true/false, essays, fill-in-the-blanks, and more. ## Conclusion Choosing the right WordPress LMS plugin is essential if you want to build a powerful, engaging, and scalable online learning platform in 2025. Whether you’re launching your first digital course or planning a full-fledged online academy, the right tool can make the entire process easier, smoother, and more effective. Each plugin in this list offers something unique, some are perfect for beginners, others excel in membership systems, and a few provide enterprise-level features for professional educators. Think about your goals, your audience size, and the type of learning experience you want to deliver. Once you match your needs with the right LMS plugin, you’ll have everything required to create a well-structured, student-friendly, and profitable online education platform. With the right setup, your website can transform from a simple WordPress installation into a complete digital classroom that serves learners around the world. **Categories:** Blog, Guide, WordPress **Tags:** best lms, course plugins, LMS, lms for wordpress, Wordpress, wordpress elearming, Wordpress lms, wordpress lms plugin --- ### [10 Best Website Uptime Monitoring Tools for 2026](https://serveravatar.com/website-uptime-monitoring-tools/) **Published:** December 10, 2025 **Author:** Meghna Meghwani **Content:** [![Blog banner - ServerAvatar](https://serveravatar.com/wp-content/uploads/2025/09/728_90-Banner-3-1024x127.png)](https://serveravatar.com/?ref=blog)Websites are expected to remain accessible at all times, which is why reliable uptime monitoring has become essential. Even short periods of unavailability can lead to missed visitors and reduced trust. In 2025, website reliability has become more important than ever due to increased online traffic and higher performance expectations. Website uptime monitoring tools help website owners stay informed about their website’s availability and performance. These tools continuously check whether a website is reachable and notify users when an issue occurs. With the rise of advanced uptime monitoring solutions, businesses can now detect issues faster and maintain a smoother online experience. This article explains the 10 best website uptime monitoring tools for 2025 in a clear, easy-to-understand way so readers can confidently choose the right solution. ## **What Is Website Uptime Monitoring?** Website uptime monitoring is the process of checking whether a website is online and accessible to users. It measures availability by sending regular requests to the website and recording successful or failed responses. If the website fails to respond, the monitoring tool identifies it as downtime and sends an alert. This allows website owners to quickly identify and resolve availability issues. ## **Why Website Uptime Monitoring Matters in 2025** Online users expect fast and uninterrupted access. Search engines also prioritize websites that maintain consistent availability. If a website frequently goes offline, it can result in reduced visibility and lower engagement. Website uptime monitoring tools help detect problems early, minimize downtime, and maintain consistent access. In 2025, proactive monitoring is essential for maintaining credibility and performance. ### **How Downtime Affects SEO, Sales, User Trust, and Business Health** Downtime has a ripple effect. Search engines may reduce rankings if a site is frequently unavailable. Sales can drop instantly if users cannot access key pages. Trust erodes when visitors encounter repeated issues. Over time, this impacts the overall stability and growth of a business. ### **Essential Features of Uptime Monitoring Tools** When evaluating uptime monitoring tools, these essential features should be considered: - **Continuous Monitoring:** Regular checks throughout the day - **Instant Notifications:** Alerts when downtime occurs - **Response Time Tracking:** Identifies slow loading issues - **Performance Reports:** Logs uptime history and trends - **User-Friendly Interface:** Easy setup and navigation ### **How Website Uptime Monitoring Works** Website uptime monitoring tools continuously check whether a website is accessible. They perform automated checks, send alerts during outages, run synthetic tests, monitor real user activity, generate status pages, and track performance trends. Together, these features provide visibility into website health. Uptime monitoring tools send automated requests to a website at set intervals. If the website responds successfully, the status is recorded as operational. If it fails, the tool marks it as unavailable and sends a notification. Most tools perform checks from multiple locations, helping confirm that outages are real and not location-specific. This process ensures accurate availability reporting. **Who Needs Uptime Monitoring**: Uptime monitoring is useful for: - Bloggers who rely on consistent readership - E-commerce owners where availability directly affects revenue - SaaS businesses that must maintain service reliability - Agencies managing multiple client websites - DevOps teams responsible for infrastructure stability ### **What to Look For in a Uptime Monitoring Tool** Choosing the right monitoring tool depends on several important factors. **1. Monitoring Types** A strong tool supports multiple checks, including: - HTTP/S, Ping, and Port monitoring to confirm basic availability - Keyword or content checks to verify correct page loading - SSL, DNS, and domain expiry tracking to avoid silent failures - API monitoring for application endpoints - Transaction and synthetic monitoring to simulate workflows - Real User Monitoring (RUM) to analyze real visitor experience **2. Check Frequency & Global Locations** Check frequency determines how quickly issues are detected. Most tools range from 30-second checks to 5-minute intervals. Global monitoring locations are equally important. Multi-region checks ensure issues are genuine and not limited to a single location, especially for globally accessed websites. **3. Alerting & Notification System** Alerts should be fast and flexible. Look for: - Email, SMS alerts - Push notifications - Slack, MS Teams, Telegram integration - Webhooks, PagerDuty, OpsGenie support - Alert escalation and incident workflows **4. Reporting & Analytics** Reliable reporting helps with long-term planning: - Uptime history and logs - Downtime root-cause insights - Performance charts and response time data - SLA reports - Monthly availability summaries **5. Ease of Use & Integration** A good tool should be intuitive. Dashboards must be easy to navigate, and integrations with CI/CD pipelines, GitHub, server logs, and monitoring stacks simplify workflows. **6. Pricing** Pricing varies widely: - Some tools provide strong free plans - Others focus on enterprise capabilities - The goal is to balance cost vs features based on website size **7. Status Pages** Status pages improve transparency: - Public status pages for users - Private pages for internal teams - Branding and customization options ## Top 10 Website Uptime Monitoring Tools for 2025 ### 1. Uptime Kuma (Free & Open-Source) [Uptime Kuma](https://uptimekuma.org/) is a simple, self-hosted uptime monitoring tool designed for developers and website owners who want full control. It helps you track website availability, services, and response times through a clean and modern dashboard. ![Uptime Kuma - Uptime monitoring](https://serveravatar.com/wp-content/uploads/2025/12/image-65-1024x630.png) **Key Features** - Self-hosted and completely free - Monitors HTTP(s), Ping, TCP, DNS, Docker, and more - Real-time status dashboard with history - Notification support for email, Slack, Telegram, etc. - SSL certificate expiry monitoring **Pros** - Easy to set up and use - Modern and clean interface - No usage limits since it’s self-hosted **Cons** - Requires your own server - Not ideal for very large infrastructures **Best For:** Developers and small teams who want a lightweight, self-hosted uptime monitor. If you don’t want to deal with manual installation or terminal commands, ServerAvatar makes using Uptime Kuma even easier. [ServerAvatar](https://serveravatar.com/) offers **Uptime Kuma as a one-click application installer**, allowing you to deploy it on your server in just a few minutes. You don’t need to worry about command-line setup, dependencies, or configuration hassles, everything is handled through a simple dashboard. This makes Uptime Kuma accessible even for users who are new to server management. ### 2. UptimeRobot (Offers free and paid plans) [UptimeRobot](https://uptimerobot.com/) is one of the most popular uptime monitoring tools worldwide. It’s known for being simple, reliable, and offering a generous free plan. It is ideal for bloggers, small businesses, and freelancers. ![UptimeRobot - Uptime monitoring](https://serveravatar.com/wp-content/uploads/2025/12/image-50-1024x500.png) **Key Features** - HTTP/S, Ping, Port, and Keyword monitoring - SSL certificate monitoring - Custom domain for status pages - 30-second checks on premium plans - Basic incident logs **Pros** - Very beginner-friendly - Generous free plan - Easy to set up - Affordable pricing **Cons** - Limited advanced features - Reporting is basic compared to other tools **Best For:** Blogs, portfolios, small websites, agencies that need simple uptime tracking. ### 3. Upptime (Free & Open-Source) [Upptime](https://upptime.js.org/) is a unique, open-source uptime monitoring tool built on GitHub. Instead of running your own server, it uses GitHub Actions and Pages to monitor websites and automatically generate a public status page. ![Upptime - Uptime monitoring](https://serveravatar.com/wp-content/uploads/2025/12/image-66-1024x496.png) **Key Features** - Fully open source and serverless - Runs using GitHub Actions - Auto-generated public status page - Uptime history stored in GitHub Issues - Customizable branding and schedules **Pros** - No server or hosting needed - Free to use with GitHub - Transparent and public incident tracking **Cons** - Limited to GitHub ecosystem - Less flexible than traditional monitoring tools **Best For:** Open-source projects and simple websites that want server-free monitoring. ### 4. Checkmate (Free & Open-Source) [Checkmate](https://checkmate.so/) is a self-hosted, open-source monitoring solution focused on uptime and service availability. It aims to balance simplicity with powerful real-time monitoring and incident tracking features. ![Checkmate - Uptime monitoring](https://serveravatar.com/wp-content/uploads/2025/12/image-67-1024x484.png) **Key Features** - Website and server uptime monitoring - Real-time outage detection - Incident tracking and alerts - Clean dashboards with performance metrics - Open-source and customizable **Pros** - Real-time monitoring capabilities - Flexible self-hosting options - Clean and easy-to-understand UI **Cons** - Smaller community compared to popular tools - Fewer integrations out of the box **Best For:** Teams looking for a modern, self-hosted monitoring tool with real-time insights. ### 5. Pingdom (Offers paid plans) [Pingdom](https://www.pingdom.com/) is a premium monitoring tool known for excellent performance insights and synthetic checks. It’s a top choice for growing and established businesses. ![Pingdom - Uptime monitoring](https://serveravatar.com/wp-content/uploads/2025/12/image-52-1024x457.png) **Key Features** - Uptime monitoring - Detailed page speed reports - Real User Monitoring (RUM) - Transaction monitoring - Global monitoring network **Pros** - Excellent data accuracy - Beautiful dashboards - Strong performance monitoring **Cons** - Expensive compared to other tools - Learning curve for advanced features **Best For** E-commerce sites, large blogs, and businesses that value performance analytics. ### 6. StatusCake (Offers free and paid plans) [StatusCake](https://www.statuscake.com/) is a flexible and powerful uptime tool with a strong focus on performance, domain monitoring, and SSL tracking. ![StatusCake - Uptime monitoring](https://serveravatar.com/wp-content/uploads/2025/12/image-53-1024x679.png) **Key Features** - 30-second checks - SSL & domain expiry alerts - Page speed monitoring - Status pages - Server monitoring **Pros** - Great value for money - Fast check intervals - Useful performance insights **Cons** - Interface feels a bit outdated - Advanced features require paid plans **Best For** Small and mid-sized websites that need performance monitoring + uptime tools. ### 7. Site24x7 (Offers paid plans) [Site24x7](https://www.site24x7.com/) gives full monitoring for servers, websites, and networks. It’s one of the most comprehensive solutions available. ![Site24x7 - Uptime monitoring](https://serveravatar.com/wp-content/uploads/2025/12/image-54-1024x543.png) **Key Features** - Website uptime monitoring - Server and network monitoring - Synthetic tests - Real User Monitoring - 120+ global monitoring locations - AI-based anomaly detection **Pros** - Extremely feature-rich - Supports enterprise infrastructure - All-in-one monitoring **Cons** - Can be overwhelming for beginners - Pricing increases with usage **Best For** Companies that want a complete monitoring ecosystem, not just uptime checks. [![Blog banner - ServerAvatar](https://serveravatar.com/wp-content/uploads/2025/09/728_90-Banner-1-1024x127.png)](https://serveravatar.com/?ref=blog)### 8. Better Stack (Offers free and paid plans) [Better Stack](https://betterstack.com/) combines website uptime monitoring with alerting and incident management in a single, modern platform. It focuses on detection and alerts. ![Better Stack - Uptime monitoring](https://serveravatar.com/wp-content/uploads/2025/12/image-56-1024x517.png) **Key Features** - Rapid downtime alerts - Timeline-based incident tracking - Organized status updates **Pros:** - Easy setup and clean dashboard - Fast checks from multiple locations - Built-in status pages and incident tracking **Cons:** - Limited advanced performance analytics - Costs increase with more monitors **Best for:** Small teams, startups, and agencies needing simple uptime monitoring with alert management. ### 9. Cronitor (Offers free and paid plans) [Cronitor](https://cronitor.io/) is a flexible monitoring tool for websites, APIs, and servers with frequent global checks. It is developed for users who need uptime alerts as well as more than that. ![Cronitor - Uptime monitoring](https://serveravatar.com/wp-content/uploads/2025/12/image-57-1024x640.png) **Key Features** - Website and API uptime monitoring - Cron job and scheduled task monitoring - HTTP, HTTPS, and endpoint checks - Global monitoring locations - Flexible alerting with email, Slack, webhooks, and more - Custom alert rules and monitoring intervals - Detailed uptime and incident history - Easy integration with DevOps tools and CI/CD pipelines **Pros:** - Supports websites, APIs, and endpoints - High-frequency global monitoring - Strong alert and integration options **Cons:** - Not ideal for non-technical users - Advanced setup can feel complex **Best for:** Developers and DevOps teams monitoring APIs and backend services. ### 10. Uptrends (Offers paid plans) [Uptrends](https://www.uptrends.com/) offers powerful uptime and performance monitoring, especially known for its synthetic transaction checks. ![Uptrends - Uptime monitoring](https://serveravatar.com/wp-content/uploads/2025/12/image-59-1024x608.png) **Key Features** - Uptime monitoring - Multi-browser checks - RUM - API monitoring - Checkpoints in 220+ locations **Pros** - Great for performance - Helpful dashboards - Very accurate monitoring **Cons** - Pricing increases quickly - Not the easiest for beginners **Best For** Performance-driven teams, SaaS companies, and global websites. ## Website Uptime Monitoring Tools: Feature Comparison Table The comparison table highlights key differences in features, helping you quickly identify which tool aligns best with your needs. **Tool Name****Free Plan****Synthetic Monitoring****RUM (Real User Monitoring)****Status Page****Best For****Uptime Kuma**✅ Yes✅ Yes❌ No✅ YesDevelopers, self-hosted monitoring**UptimeRobot**✅ Yes✅ Yes❌ No✅ YesSmall websites, bloggers**Upptime**✅ Yes✅ Yes❌ No✅ YesOpen-source projects, GitHub users**Checkmate**✅ Yes✅ Yes❌ No✅ YesSmall teams, self-hosted setups**Pingdom**❌ No✅ Yes✅ Yes✅ YesAgencies, ecommerce sites**StatusCake**✅ Yes✅ Yes❌ No✅ YesMid-size projects**Site24x7**❌ No✅ Yes✅ Yes✅ YesEnterprises, SaaS**Better Stack**✅ Yes✅ Yes❌ No✅ YesAgencies, small teams**Cronitor**✅ Yes✅ Yes❌ No❌ NoDevOps, backend monitoring**Uptrends**❌ No✅ Yes✅ Yes✅ YesPerformance-focused teams## **How to Choose the Right Tool for You** Not every tool fits everyone. Ask yourself: - Do I want simple alerts or detailed insights? - How many websites do I want to monitor? - Do I need performance tracking along with uptime? Select a tool that is convenient for your requirements and plans. The best tool is the one you will actually use. ## **Tips to Maximize Uptime in 2025** - Use monitoring from multiple regions - Enable alert escalation - Schedule maintenance windows - Track SSL and domain expiration - Combine uptime and performance monitoring - Maintain transparent status pages ## How ServerAvatar Helps Maintain Website Uptime Uptime monitoring tools are designed to detect problems, but preventing downtime often requires strong server management. This is where the server hosting and management platform, ServerAvatar, adds value. **What is ServerAvatar?** [ServerAvatar](https://serveravatar.com/) is a platform to simplify the hosting and management of servers and applications. It simplifies the process of deploying and managing PHP and Node.js based web applications on servers. ![ServerAvatar Dashboard](https://serveravatar.com/wp-content/uploads/2025/12/image-63.png) ServerAvatar provides real-time monitoring such as Server Load, Memory Usage, Disk Usage, Server Resource Usage, and Query Monitor for your server. Additionally, it allows users to monitor server logs, manage running services, and handle backups from a single dashboard, which reduces the risk of outages caused by misconfigurations or service failures. ![ServerAvatar Panel](https://serveravatar.com/wp-content/uploads/2025/12/image-64-719x1024.png) ### **Why Choose ServerAvatar?** If you want a solution that combines uptime monitoring, performance tracking, server management, and security, ServerAvatar saves you countless hours. Instead of juggling multiple tools, you get everything under one roof, from alerts to management. **It’s ideal for:** - Developers managing multiple client sites - Agencies offering hosting or maintenance services - Businesses that want reliable uptime, full server control - Users who don’t want to handle complex command-line management With ServerAvatar, you’re not just monitoring your server, you’re actively improving its performance, stability, and security. ## Conclusion Website uptime monitoring is no longer optional, it’s a critical component for maintaining user trust, maximizing revenue, and ensuring smooth business operations. By choosing the right monitoring tool, you can detect issues early, reduce downtime, and optimize performance to meet the high expectations of online users in 2025. ServerAvatar take this a step further by providing real time monitoring. It connects to your server and gives you a clean, user-friendly dashboard where you can track everything, performance, resources, applications, logs, and overall health. It’s perfect for developers, agencies, and businesses that want more control without dealing with complicated DevOps tasks. ## FAQs ### **1. What is website uptime monitoring?** It is the process of continuously checking whether a website is online and accessible, with alerts sent when downtime occurs. ### **2. Why is uptime monitoring important for SEO?** Frequent downtime can reduce search engine rankings, negatively impacting visibility and traffic. ### **3. Can small websites benefit from tools like ServerAvatar?** Yes, ServerAvatar is ideal for small to medium websites, offering automated server and uptime monitoring with easy dashboards. ### **4. What is the difference between beginner and advanced monitoring tools?** Beginner tools focus on ease of use and essential alerts, while advanced tools provide synthetic testing, real user monitoring, and performance analytics. ### **5. What makes ServerAvatar different from other monitoring tools?** ServerAvatar is more than just an uptime monitor. It provides complete server management, real-time monitoring, automatic alerts, app deployment, backups, security, team management, and premium support, all in one platform. ### **6. Is ServerAvatar suitable for multiple websites or clients?** Yes, ServerAvatar is ideal for developers and agencies managing multiple sites, offering team access, whitelabel options, and centralized server monitoring. **Categories:** Blog, Guide, Others, Uncategorized **Tags:** best uptime tools 2025, real user monitoring, synthetic monitoring, uptime alerts, uptime monitoring, uptime monitoring tools, Website Performance, website uptime monitoring --- ### [Top 6 WordPress Staging Plugins for 2026](https://serveravatar.com/wordpress-staging-plugins/) **Published:** January 7, 2026 **Author:** Meghna Meghwani **Content:** [![Blog banner - ServerAvatar](https://serveravatar.com/wp-content/uploads/2025/09/728_90-Banner-3-1024x127.png)](https://serveravatar.com/?ref=blog)If you run a WordPress website, you already know how risky it can feel to make changes directly on your live site. One wrong move, and things can fall apart like a house of cards. That’s exactly where WordPress staging plugins come in. Think of a staging site as a practice ground. Just like rehearsing before a live performance, staging lets you test updates, designs, or plugins safely, without your visitors ever noticing. In 2026, staging plugins have become smarter, faster, and easier to use, even for non-technical users. In this guide, we’ll walk through the WordPress staging plugins for 2026, so you can confidently choose what works best for you. ## What Is WordPress? [WordPress](https://wordpress.org/) is the world’s most popular open-source content management system (CMS), used to build websites, blogs, and e-commerce stores. It offers flexibility through themes and plugins, making it suitable for beginners, developers, and businesses of all sizes. ## How ServerAvatar Simplifies WordPress Deployment & Management **What is ServerAvatar?** [ServerAvatar](https://serveravatar.com/) is a platform to simplify the hosting and management of servers and applications. It simplifies the process of deploying and managing PHP and Node.js based web applications on servers. ![ServerAvatar Dashboard](https://serveravatar.com/wp-content/uploads/2026/01/image-35.png) ServerAvatar makes WordPress and other popular applications, such as Mautic, N8N, UptimeKuma, etc, deployment effortless with its one-click WordPress application installer, allowing you to launch a fully configured WordPress site in minutes. It removes the complexity of server setup by providing an intuitive dashboard to manage servers, applications, databases, PHP versions, SSL, and performance settings from one place. ServerAvatar supports multiple cloud providers and gives users full control over their infrastructure while eliminating the need for deep server administration knowledge. You can refer to the ServerAvatar [documentation](https://serveravatar.com/docs/application/one-click-installer/wordpress/) and the detailed [blog](https://serveravatar.com/install-wordpress-quickly-on-vps/) to [install WordPress](https://serveravatar.com/install-wordpress-apache-ubuntu/) effortlessly. ### Key Benefits of Using ServerAvatar for WordPress - **One-click WordPress installer:** Deploy WordPress instantly without manual configuration. - **Unified management panel:** Manage servers and WordPress applications from a single dashboard. - **Performance optimization:** Easily configure caching, PHP, and server resources. - **Enhanced security:** Includes firewall, SSL management, and secure access controls. - **Easy scalability:** Upgrade server resources as your WordPress site grows. **Why Use ServerAvatar for WordPress?** ServerAvatar is an ideal solution for users who want the power of cloud servers without the operational complexity. It simplifies WordPress hosting by automating server setup, streamlining application management, and providing performance and security optimizations out of the box. Whether you’re a developer, agency, or business owner, ServerAvatar allows you to deploy, manage, and scale WordPress websites confidently while focusing on growth instead of infrastructure management. ## ServerAvatar Staging Area In addition to standalone WordPress staging plugins, ServerAvatar offers a powerful Staging Area feature that lets you create a complete test environment for your live application with just a few clicks. This staging area clones your current application (including WordPress sites) so you can safely test updates, plugin changes, or configuration tweaks without affecting your production website. Once you’re satisfied with the tested changes, ServerAvatar allows you to push those changes to your live site or even sync your production site back into staging if you need the latest real‑world data for further testing. Check out the official staging documentation here: [https://serveravatar.com/docs/application/staging-area/](https://serveravatar.com/docs/application/staging-area/?utm_source=chatgpt.com) ![ServerAvatar Staging Area Feature](https://serveravatar.com/wp-content/uploads/2026/01/image-43.png) ### Key ServerAvatar Staging Features - **Create staging environments with one click:** Launch a fully cloned instance of your live application for testing. - **Push staging changes to production:** When testing is complete, deploy updates from staging to your live site. - **Sync production to staging:** Keep staging up‑to‑date with the latest live data for accurate testing. - **Safe and isolated testing:** Changes made in staging never affect your production environment until pushed. ### Why Use ServerAvatar Staging Feature? Use ServerAvatar’s staging area to test updates, migrations, and site changes in a fully controlled environment, reducing risk and ensuring your live WordPress sites stay stable even during major updates. ## What Are WordPress Plugins and Why Are They Used? WordPress plugins are add-on tools that extend the core functionality of a WordPress website without changing its main structure. Instead of building everything from scratch, plugins allow users to add new features or improve existing ones in a flexible and controlled way. They are used because WordPress is designed to stay lightweight by default, while plugins give site owners the freedom to customize their websites based on specific needs. Whether it’s improving performance, enhancing security, managing content, or adding testing environments like staging, plugins make these tasks easier and more accessible. Another key reason plugins are widely used is convenience, as they allow changes to be made without deep technical knowledge. This modular approach keeps websites scalable, manageable, and adaptable over time, making plugins an essential part of how WordPress works today. ## What Is a WordPress Staging Plugin? A WordPress staging plugin creates a copy of your website where you can safely test changes. This copy looks and works like your live site but stays hidden from visitors and search engines. In simple terms, it’s like editing a rough draft instead of writing directly on the final page. ### Why You Need a Staging Plugin in 2026 Websites are more dynamic than ever. Themes update frequently, plugins change behavior, and WordPress core updates keep rolling out. Without staging, you’re testing changes in front of your audience. A staging plugin helps you: - **Avoid unexpected site crashes:** A staging plugin lets you catch errors early so problems don’t appear on your live website. - **Test updates without pressure:** It allows you to safely check updates in a separate space before applying them publicly. - **Experiment freely with designs:** You can try layout or style changes without worrying about how they affect visitors. - **Keep your live site stable:** By testing everything in advance, your main website stays smooth and reliable. ### How to Choose the Right Staging Plugin Before picking a plugin, ask yourself a few simple questions: - **Do I want a free or paid option?** Decide whether basic features are enough or if advanced controls are worth paying for. - **Do I need one-click staging?** Choose a plugin that creates a staging site quickly without complex steps. - **Should it support push-to-live changes?** Consider whether you want an easy way to move tested changes to the live site. - **Is performance important for large sites?** Make sure the plugin can handle site size without slowing things down. Your answers will guide your choice. ## WP Staging [WP Staging](https://wordpress.org/plugins/wp-staging/) is a user-friendly WordPress staging plugin designed to help website owners test changes safely before applying them to the live site. Its clean layout and simple controls make it easy to use, even for beginners, while keeping the website stable during testing. ![WordPress staging plugins - WP Staging](https://serveravatar.com/wp-content/uploads/2026/01/image-36-1024x626.png) **Key Features** - **One-click staging site creation:** Creates a staging copy of your site quickly with minimal setup. - **Selective database and file copying:** Lets you choose what data and files should be included in staging. - **Push changes to live site (Pro):** Allows tested updates to be moved to the live site with ease. - **Lightweight and beginner-friendly:** Runs smoothly without adding unnecessary load. **Pros** - **Very easy to use:** Simple steps make staging accessible for all users. - **Free version available:** Offers essential features without cost. - **Does not overload your server:** Designed to keep performance steady. **Cons** - **Push-to-live feature is paid:** Live deployment requires the Pro version. - **Limited advanced controls in free plan:** Some customization options are restricted. **Why to use:** It allows you to safely test updates and changes without affecting your live WordPress website. ## BlogVault [BlogVault](https://wordpress.org/plugins/blogvault-real-time-backup/) is a premium all-in-one solution for WordPress that combines staging, backups, and security, making website management simpler and safer. It’s designed for both small and large websites that need reliable performance and protection. ![WordPress staging plugins - BlogVault](https://serveravatar.com/wp-content/uploads/2026/01/image-37-1024x626.png) **Key Features** - **Cloud-based staging:** Test changes safely before going live. - **One-click merge to live site:** Easily push updates from staging to your live website. - **Built-in backups:** Automatic backups to protect your data. - **Off-site storage:** Store backups securely off your server. **Pros** - **Reliable and fast:** Ensures smooth website performance. - **Minimal server load:** Does not slow down your website. - **Excellent for larger websites:** Handles complex and high-traffic sites efficiently. **Cons** - **No free version:** Requires a paid subscription. - **Pricing may feel high for small sites:** Can be costly for smaller websites. **Why to use:** Simplifies WordPress management while providing secure backups and staging for safe updates. ## WPvivid Staging Plugin [WPvivid](https://wordpress.org/plugins/wpvivid-backuprestore/) is an all-in-one WordPress plugin that provides staging, backups, and migration, making website management and updates easier and safer for all types of websites. It’s especially useful for users who want to test changes before going live. ![WordPress staging plugins - WPVivid Staging Plugin](https://serveravatar.com/wp-content/uploads/2026/01/image-38-1024x626.png) **Key Features** - **One-click staging:** Quickly create a staging site for safe testing. - **Push staging to live:** Easily migrate changes from staging to your live website. - **Backup integration:** Securely back up your site to prevent data loss. - **Supports large sites:** Handles high-traffic or resource-heavy websites effectively. **Pros** - **Generous free version:** Offers useful features without payment. - **Easy staging management:** Simplifies creating and managing staging sites. - **Clean dashboard:** User-friendly interface for smooth navigation. **Cons** - **Advanced features require paid plan:** Some functionalities are limited in the free version. - **Interface can feel crowded:** May be slightly overwhelming for beginners. **Why to use:** Safely manage staging, backups, and migration in a single plugin for efficient WordPress site management. [![Blog banner - ServerAvatar](https://serveravatar.com/wp-content/uploads/2025/09/728_90-Banner-1-1024x127.png)](https://serveravatar.com/?ref=blog)## Jetpack Staging [Jetpack Staging](https://jetpack.com/) is a WordPress staging plugin designed for seamless work within ecosystem. It allows users to safely test updates and changes while benefiting from Jetpack’s integrated performance and security features. ![WordPress staging plugins - Jetpack Staging](https://serveravatar.com/wp-content/uploads/2026/01/image-40-1024x662.png) **Key Features** - **One-click staging:** Instantly create a staging environment with minimal setup. - **Sync changes easily:** Push selected updates from staging to the live site smoothly. - **Integrated security tools:** Works alongside Jetpack’s security and performance features. **Pros** - **Simple and clean:** Easy to use with a minimal learning curve. - **Trusted ecosystem:** Backed by Automattic, the team behind WordPress.com. - **Good performance:** Optimized for stable and reliable site operations. **Cons** - **Requires paid Jetpack plan:** Staging is not available in the free version. - **Less flexibility:** Limited customization compared to dedicated staging plugins. **Why to use:** Ideal for Jetpack users who want a simple, secure, and integrated staging solution without extra setup. ## InstaWP [InstaWP](https://wordpress.org/plugins/instawp-connect/) is a modern WordPress staging solution designed for speed, simplicity, and flexibility. It allows users to instantly create cloud-based test environments without affecting their live server or website performance. ![WordPress staging plugins - InstaWP](https://serveravatar.com/wp-content/uploads/2026/01/image-41-1024x619.png) **Key Features** - **Instant staging environments:** Create staging sites within seconds. - **Cloud-based setup:** Runs externally without using your hosting resources. - **Temporary test sites:** Ideal for short-term testing and experimentation. - **Developer-friendly options:** Supports advanced workflows and customization. **Pros** - **Extremely fast setup:** Launch staging sites almost instantly. - **No server stress:** Keeps all testing activity off your live server. - **Clean user experience:** Simple and intuitive interface. **Cons** - **Limited free plan:** Restricts usage and features. - **Advanced usage needs subscription:** Full functionality requires a paid plan. **Why to use:** Perfect for quickly testing WordPress changes in a fast, cloud-based environment without impacting your live site. ## WP StageCoach [WP StageCoach](https://wpstagecoach.com/) is a dedicated WordPress staging plugin built for safe and reliable testing of website changes. It focuses on simplicity while giving users control over how updates move from staging to the live site. ![WordPress staging plugins - WP StageCoach](https://serveravatar.com/wp-content/uploads/2026/01/image-42-1024x547.png) **Key Features** - **One-click staging site creation:** Quickly create a staging copy of your live website. - **Push staging changes to live:** Move tested updates to production with minimal effort. - **Database and file synchronization:** Sync files and database changes accurately between environments. - **Automatic exclusion options:** Skips unnecessary data like cache and logs during sync. **Pros** - **Clean and intuitive setup:** Easy to configure even for non-technical users. - **Works with most hosting environments:** Compatible across shared, VPS, and cloud hosting. - **Selective push support:** Allows pushing only files or database changes as needed. **Cons** - **No free version:** Available only through paid plans. - **Slow on very large sites:** Push-to-live process may take longer for heavy websites. **Why to use:** Ideal for users who want a simple yet controlled staging workflow with reliable push-to-live functionality. ## Comparison of WordPress Staging Plugins **Plugin****Free Version****One-Click Staging****Push to Live****Backup Integration****Ideal For****Ease of Use****WP Staging**✅ Yes✅ Yes⚠️ Only Pro❌ NoBeginners & simple sitesVery Easy**BlogVault**❌ No✅ Yes✅ Yes✅ YesLarge sites, full site protectionModerate**WPvivid**✅ Yes✅ Yes✅ Yes✅ YesAll-in-one staging + backupEasy**Jetpack Staging**❌ No✅ Yes⚠️ Limited❌ NoJetpack usersSimple**InstaWP**⚠️ Limited✅ Yes⚠️ Temporary❌ NoFast, cloud-based testingFast & Clean**WP Stage Coach**❌ No✅ Yes✅ Yes❌ NoControlled staging workflowsClean & Intuitive## Benefits of Using a Staging Site A staging site helps you maintain stability while improving your website confidently. - **Reduces risk:** Prevents errors from affecting your live site. - **Improves site stability:** Ensures updates work correctly before launch. - **Saves time:** Detects issues early, avoiding emergency fixes later. - **Enhances user experience:** Keeps your live site running smoothly. - **Supports safe experimentation:** Test new features without fear of downtime. ## Best Practices for Using a Staging Site Following best practices ensures safe testing and smooth deployment without affecting your live website. - **Always create a backup first:** Protect your live site before making any changes. - **Use staging for all updates:** Test plugins, themes, and code changes safely. - **Clear cache regularly:** Ensure you’re testing the latest version of your site. - **Block search engines:** Prevent duplicate content and SEO issues. - **Review changes carefully:** Verify functionality before pushing updates live. ## Common Mistakes to Avoid When working with staging environments, small oversights can lead to serious issues on your live site. Avoiding these common mistakes helps ensure a smooth and risk-free testing process. - **Skipping backups before staging:** Always create a backup to prevent data loss if something goes wrong. - **Testing without clearing cache:** Cached data can hide changes and lead to inaccurate testing results. - **Forgetting to block search engines:** Prevent staging sites from being indexed to avoid SEO issues. - **Pushing changes without review:** Unreviewed changes can introduce bugs or break live functionality. Avoiding these mistakes helps keep your website secure, stable, and error-free during updates. ## Conclusion WordPress websites are more dynamic and feature-rich than ever, which makes testing changes on a live site risky and unnecessary. A reliable staging plugin acts as a safety net, allowing you to experiment, update, and optimize your website without disrupting visitors or affecting performance. Whether you’re a beginner looking for a simple one-click solution or a developer needing advanced control, there’s a staging plugin that fits your workflow. From lightweight free options to powerful premium tools, the right choice depends on your site size, budget, and technical needs. By using staging regularly, you ensure a more stable website, smoother updates, and a better experience for your users, without the stress of breaking your live site. ## FAQs ### **1. What is a WordPress staging site?** A WordPress staging site is a private copy of your live website where you can safely test updates, plugins, themes, and design changes without affecting visitors. ### **2. Do I really need a staging plugin in 2026?** Yes. With frequent WordPress core updates, plugin changes, and theme improvements, staging is essential to avoid crashes, errors, and downtime on live websites. ### **3. Are free WordPress staging plugins good enough?** Free staging plugins work well for basic testing, but advanced features like push-to-live, selective sync, and large-site support usually require paid plans. ### **4. Can a staging site affect my SEO?** If configured properly, it won’t. You should always block search engines from indexing your staging site to prevent duplicate content issues. ### **5. Is it safe to push changes from staging to live?** Yes, as long as you review changes carefully and create a backup before pushing updates to the live site. ### **6. Does ServerAvatar support WordPress staging and management?** ServerAvatar simplifies WordPress deployment and server management with a one-click installer and centralized control, making it easier to manage staging plugins and performance settings effectively. **Categories:** Blog, Guide, Tutorials, WordPress **Tags:** Staging, staging plugins, staging site, Wordpress, WordPress plugins 2026, WordPress site staging, WordPress staging plugins --- ### [Types of Website Hosting and How to Choose the Best One](https://serveravatar.com/types-of-website-hosting/) **Published:** February 24, 2026 **Author:** Meghna Meghwani **Content:** [![Blog banner - ServerAvatar](https://serveravatar.com/wp-content/uploads/2025/09/728_90-Banner-3-1024x127.png)](https://serveravatar.com/?ref=blog)Creating a website is an important step, whether it is for sharing information, publishing content, or building an online presence. One of the first decisions involved in this process is selecting the right website hosting. Website hosting plays a key role in how your website performs, how fast it loads, and how stable it remains for visitors. Many people feel confused when they see different hosting options available. Each hosting type works differently and serves different website needs. This guide explains the types of website hosting and helps you understand how to choose the best one. ## What Is Website Hosting? Website hosting is a service that stores website files and makes them available on the internet. When someone visits a website, the hosting server sends the website data to their browser. Without hosting, a website cannot be accessed online. ![website hosting](https://serveravatar.com/wp-content/uploads/2026/02/image-207.png) Every website needs hosting to function properly. The quality of hosting directly affects website availability and performance. ### Why Website Hosting Matters Website hosting affects how your website performs, stays secure, and remains available to visitors. A reliable hosting setup helps your website run smoothly and creates a better experience for users. **Good hosting means** - **Faster website loading:** Pages open quickly, reducing visitor waiting time. - **Better security:** Hosting helps protect your website from common threats. - **Less downtime:** Your website stays online more consistently. - **Happier visitors:** A stable and fast site encourages users to stay longer. On the other hand, poor hosting can slow down your site and frustrate users. In today’s world, people expect websites to load fast. If your site takes too long, visitors may leave before even seeing your content. ## Types of Website Hosting Website hosting comes in different forms, each designed to meet specific website needs and usage levels. Understanding the main types of website hosting helps you compare features, limitations, and benefits, making it easier to choose the most suitable option for your website’s goals and growth plans. ### 1. Shared Hosting Shared hosting places multiple websites on a single server, where all sites use the same server resources. It is designed for basic websites with low resource requirements. ![Shared Hosting - website hosting](https://serveravatar.com/wp-content/uploads/2026/02/image-208.png) **Key Features** - **Low cost:** Hosting expenses are shared, making plans affordable. - **Easy setup:** No advanced technical setup is required. - **Limited server resources:** Resources are divided among multiple websites. **Pros** - **Low cost:** Suitable for tight budgets. - **Easy to manage:** Hosting provider handles most technical tasks. - **Beginner-friendly:** Ideal for users with no hosting experience. **Cons** - **Slower performance during traffic spikes:** Heavy usage by other sites may affect speed. - **Limited resources:** Not suitable for growing or busy websites. **Best For** - **Beginners:** Easy entry into website hosting. - **Small websites:** Works well for simple sites. - **Personal blogs:** Suitable for low-traffic content sites. **Who Should Use It** Shared hosting is suitable for beginners and websites with low traffic. It is often chosen for small projects and informational websites. ### 2. VPS Hosting VPS hosting divides a physical server into virtual sections, each assigned to one website. While the server is shared, resources are allocated separately. ![VPS Hosting - website hosting](https://serveravatar.com/wp-content/uploads/2026/02/image-209.png) **Key Features** - **Dedicated resources:** Each website gets reserved server resources. - **Better performance than shared hosting:** Reduced impact from other websites. - **Greater control:** Users can customize server settings. **Pros** - **Improved performance:** More consistent speed and stability. - **More control and flexibility:** Greater configuration options. **Cons** - **More expensive than shared hosting:** Higher cost due to dedicated resources. - **Requires basic technical knowledge:** Some server understanding is helpful. **Best For** - **Medium-sized websites:** Suitable for moderate traffic levels. - **Growing businesses:** Supports gradual expansion. **Who Should Use It** VPS hosting is ideal for websites that need more resources and flexibility than shared hosting can provide. ### 3. Dedicated Hosting Dedicated hosting provides a complete server for a single website. All server resources are reserved exclusively for that website. ![Dedicated Hosting - website hosting](https://serveravatar.com/wp-content/uploads/2026/02/image-210.png) **Key Features** - **High performance:** Full access to server resources. - **Full server control:** Complete configuration freedom. - **Advanced security options:** Greater protection capabilities. **Pros** - **Maximum performance:** No resource sharing with other sites. - **High security:** Better control over security settings. - **Full control:** Custom server configurations possible. **Cons** - **High cost:** Premium pricing compared to other hosting types. - **Requires technical expertise:** Server management skills are needed. **Best For** - **Large businesses:** Suitable for complex website needs. - **High-traffic websites:** Handles large visitor volumes efficiently. **Who Should Use It** Dedicated hosting is best for websites that require top-level performance, security, and customization. ### 4. Cloud Hosting Cloud hosting uses multiple servers to host a website, allowing resources to adjust based on demand. It focuses on flexibility and availability. ![Cloud Hosting - website hosting](https://serveravatar.com/wp-content/uploads/2026/02/image-211.png) **Key Features** - **High uptime:** Website remains accessible even during server issues. - **Flexible resource usage:** Resources adjust as needed. - **Easy scalability:** Supports growth without major changes. **Pros** - **High reliability:** Reduced risk of downtime. - **Easy to scale:** Resources can be increased easily. - **Better uptime:** Improved website availability. **Cons** - **Costs can vary:** Pricing may change based on usage. - **Slightly complex for beginners:** Requires some learning. **Best For** - **Websites with unpredictable traffic:** Handles traffic changes well. - **Online stores:** Supports variable visitor activity. **Who Should Use It** Cloud hosting suits websites expecting growth or fluctuating traffic levels. ### 5. Managed Hosting Managed hosting includes hosting services where the provider handles technical tasks such as updates and security. ![Managed Hosting - website hosting](https://serveravatar.com/wp-content/uploads/2026/02/image-212.png) **Key Features** - **Reduced maintenance:** Fewer technical responsibilities for users. - **Improved security:** Regular monitoring and updates. - **Professional management:** Hosting handled by experts. **Pros** - **Less maintenance:** Saves time and effort. - **Better security:** Proactive protection measures. - **Time-saving:** Focus remains on website content. **Cons** - **Higher cost:** Additional services increase pricing. **Best For** - **Non-technical users:** No server management required. - **Business owners:** Focus on operations rather than hosting. **Who Should Use It** Managed hosting is ideal for users who want a hands-off hosting experience. ### 6. WordPress Hosting WordPress hosting is optimized specifically for WordPress websites, ensuring better compatibility and performance. [](https://storage.3.basecamp.com/5840738/blobs/9026a0f6-116c-11f1-b52d-0242ac120004/download/image.png) ![WordPress Hosting - website hosting](https://serveravatar.com/wp-content/uploads/2026/02/image-213.png) **Key Features** - **Improved WordPress performance:** Optimized server settings. - **Built-in security tools:** Enhanced WordPress protection. - **Automatic updates:** Keeps WordPress software current. **Pros** - **Faster WordPress performance:** Optimized environment. - **Built-in security:** Reduced risk of vulnerabilities. **Cons** - **Limited to WordPress:** Cannot be used for other platforms. **Best For** - **WordPress users:** Designed specifically for WordPress. - **Bloggers:** Simplifies content management. **Who Should Use It** This hosting type is recommended for websites built exclusively on WordPress. ### 7. Reseller Hosting Reseller hosting allows users to create and sell hosting services using server resources provided by a hosting company. ![Reseller Hosting - website hosting](https://serveravatar.com/wp-content/uploads/2026/02/image-214.png) **Key Features** - **Custom hosting plans:** Create personalized packages. - **Account management tools:** Manage multiple users easily. **Pros** - **Extra income opportunity:** Hosting can be resold. - **Flexible plans:** Customizable offerings. **Cons** - **Requires customer support management:** Users handle client issues. **Best For** - **Web designers:** Offer hosting with services. - **Agencies:** Provide bundled solutions. **Who Should Use It** Reseller hosting is suitable for those offering hosting services to clients. ### 8. Free Hosting Free hosting offers basic hosting services without cost but with major limitations. ![Free Hosting - website hosting](https://serveravatar.com/wp-content/uploads/2026/02/image-215.png) **Key Features** - **No payment required:** Suitable for experimentation. - **Limited storage and performance:** Restricted resources. - **Advertisements may be included:** Provider ads may appear. **Pros** - **No cost:** Free access to hosting services. **Cons** - **Ads on your website:** Reduces professionalism. - **Low performance:** Slow website speed. - **Poor security:** Limited protection features. **Best For** - **Learning and practice:** Suitable for users who want to understand how hosting works. - **Temporary websites:** Works for short-term or test projects. - **Basic experimentation:** Useful for trying out website ideas without spending money. **Who Should Use It** Free hosting is suitable for learning but not for serious or professional websites. ## Website Hosting Types Comparison Comparing website hosting types makes it easier to understand how they differ in terms of performance, control, scalability, and management. This comparison helps you quickly identify which hosting option aligns best with your website’s size, technical needs, and future growth. **Hosting Type****Performance** **Level****Cost Range****Resource Control****Scalability****Technical Skill Required****Best Suited For****Shared Hosting**BasicLowVery LimitedLowMinimalBeginners, small websites, personal blogs**VPS Hosting**ModerateMediumPartial ControlModerateBasicGrowing websites, medium-traffic sites**Dedicated Hosting**HighHighFull ControlLimitedAdvancedHigh-traffic websites, large businesses**Cloud Hosting**HighVariableModerate ControlHighBasic to ModerateWebsites with changing or growing traffic**Managed Hosting**Moderate to HighMedium to HighLimited ControlModerateMinimalNon-technical users, business owners**WordPress Hosting**OptimizedMediumLimited ControlModerateMinimalWordPress-based websites**Reseller Hosting**Depends on planMediumAccount-level ControlModerateModerateAgencies, web designers**Free Hosting**Very LowFreeVery LimitedNoneMinimalLearning, testing, short-term use## Hosting Solutions with ServerAvatar **What is ServerAvatar?** [ServerAvatar](https://serveravatar.com/) is a platform to simplify the hosting and management of servers and applications. It simplifies the process of deploying and managing PHP and Node.js based web applications on servers. ![ServerAvatar Dashboard](https://serveravatar.com/wp-content/uploads/2026/02/image-216.png) It provides flexible hosting options that support different website needs, whether you prefer a fully managed environment or want complete control over your server. With an easy-to-use dashboard and built-in features, ServerAvatar helps users manage servers, applications, and hosting services from a single dashboard. ### Managed Servers by ServerAvatar ServerAvatar offers managed servers where ServerAvatar handles server provisioning, management, updates, and security. Users do not need to connect their own cloud provider or manage complex server configurations. ![Managed server Hosting - website hosting](https://serveravatar.com/wp-content/uploads/2026/02/image-217-845x1024.png) This option is designed for users who want a reliable hosting environment without dealing with server-level technical tasks. ### Self-Managed Servers with ServerAvatar For users who prefer more control, ServerAvatar also supports self-managed servers. In this setup, users can connect their own custom server from any cloud provider and manage applications, configurations, and resources through the ServerAvatar panel. Additionally, users can integrate their cloud provider account with ServerAvatar from the given option (Amazon Lightsail, DigitalOcean, Vultr, Linode, Hetzner) and directly create a server. ![Selfmanaged server Hosting - website hosting](https://serveravatar.com/wp-content/uploads/2026/02/image-218-964x1024.png) It offers flexibility while still simplifying day-to-day server management tasks. ### Reseller Hosting Panel ServerAvatar offers a powerful reseller panel that allows users to create a fully customizable server management solution under their own account. The reseller panel lets you customize every aspect of the interface, including logos, color schemes, and server plans, so it aligns perfectly with your brand identity. This helps deliver a consistent and professional experience for your clients while strengthening your brand presence. ![Reseller Hosting Panel - website hosting](https://serveravatar.com/wp-content/uploads/2026/02/image-219.png) This option is ideal for users who want to provide hosting services under their own brand or manage hosting for multiple clients through a centralized and easy-to-use dashboard. ## How Hosting Types Work with ServerAvatar **1. Shared Hosting** ServerAvatar offers an approach to traditional shared hosting by providing isolated server environments with better performance and control. Websites benefit from improved stability without sharing resources with unrelated sites. **2. VPS Hosting** ServerAvatar works seamlessly with VPS hosting by providing an intuitive interface to manage server resources, applications, and configurations. It simplifies VPS management while retaining flexibility and scalability. **3. Dedicated Hosting** For dedicated servers, ServerAvatar helps manage server operations through a centralized dashboard. Users gain full control over resources while reducing manual server management complexity. **4. Cloud Hosting** ServerAvatar supports cloud-based servers and makes it easy to scale resources as website demands change. It allows users to manage cloud infrastructure efficiently without deep technical effort. **5. Managed Hosting** ServerAvatar’s managed servers align with managed hosting by handling server provision, maintenance, security updates, and performance optimization automatically. **6. WordPress Hosting** ServerAvatar supports WordPress hosting with optimized server setups and application management tools with a one-click application installer for WordPress and other popular applications. It helps maintain performance, security, and management for WordPress websites. **7. Reseller Hosting** Using ServerAvatar’s reseller panel, users can easily create their own hosting business environment and manage multiple client accounts and their billing efficiently. It offers brand customization options and control over hosting plans, making it easier to deliver a professional hosting experience to clients. **8. Free Hosting Alternatives** While ServerAvatar **does not** focus on free hosting, it provides affordable entry-level options that offer better performance, security, and control compared to traditional free hosting solutions. ## Key Factors to Consider When Choosing Hosting Selecting hosting requires evaluating both current and future website needs. - **Website size and purpose:** Determines required resources. - **Expected visitor traffic:** Affects performance needs. - **Budget limits:** Defines available hosting options. - **Technical knowledge:** Influences hosting complexity. - **Scalability:** Supports future growth. - **Security features:** Protects website data. Evaluating these factors helps narrow down the best hosting option. ## Choosing Hosting Based on Website Size and Traffic Different websites have different hosting needs depending on their size and the number of visitors they receive. Selecting hosting based on traffic level and growth stage helps ensure stable performance and avoids unnecessary limitations as the website evolves. ### Hosting for Small Websites Small websites generally work well with shared hosting or managed hosting because they require minimal resources and simple management. ### Hosting for Growing Websites Websites that are expanding benefit from VPS hosting or cloud hosting due to their scalability and performance flexibility. ### Hosting for High-Traffic Websites High-traffic websites need dedicated hosting or cloud hosting to maintain speed, stability, and availability. [![Blog banner - ServerAvatar](https://serveravatar.com/wp-content/uploads/2025/09/728_90-Banner-1-1024x127.png)](https://serveravatar.com/?ref=blog)## Common Hosting Mistakes to Avoid Avoiding poor hosting decisions helps prevent long-term issues. - **Choosing hosting only based on price:** May lead to poor performance. - **Ignoring scalability options:** Limits future growth. - **Overlooking support services:** Causes delays during issues. - **Selecting more resources than needed:** Increases unnecessary costs. Making informed hosting choices leads to better website performance. ## Select the Right Hosting Choosing the right hosting depends on understanding your website’s needs, growth plans, and technical comfort level. Matching these factors with the correct hosting type ensures long-term stability and performance. ## Conclusion Choosing the right website hosting is a foundational decision that directly impacts your website’s performance, reliability, and long-term growth. Each hosting type serves a specific purpose, from entry-level shared hosting to advanced dedicated and cloud environments. ServerAvatar further simplifies this process by offering flexible managed, self-managed, and reseller-friendly solutions that adapt to different hosting needs. By carefully evaluating your requirements today while keeping future scalability in mind, you can build a hosting setup that remains stable, secure, and efficient as your website grows. ## FAQs ### 1. What type of hosting should I choose for a new website? For new websites, shared hosting or managed hosting is usually a good starting point because it requires minimal setup and keeps management simple while covering basic performance needs. ### 2. How do I know when it’s time to upgrade my hosting plan? You may need to upgrade if your website experiences slower load times, increased traffic, frequent downtime, or if your current hosting plan no longer meets your resource requirements. ### 3. Is managed hosting worth the extra cost? Managed hosting is beneficial for users who prefer a hands-off approach, as it reduces technical responsibilities and allows more focus on website content and business activities. ### 4. Can one platform support multiple hosting types? Yes, platforms are designed to work with different hosting setups, allowing users to manage shared-style environments, VPS, dedicated servers, and cloud infrastructure from a single dashboard. ### 5. Is free hosting suitable for long-term websites? Free hosting is best suited for learning or testing purposes. For long-term or professional websites, paid hosting options offer better performance, security, and reliability. **Categories:** Blog, Cloud Platforms, Guide **Tags:** Cloud Hosting, dedicated hosting, Managed Hosting, shared hosting, types of website hosting, Vps hosting, web hosting guide, website hosting, WordPress Hosting --- ### [How to Test and Improve WordPress Accessibility Score Easily](https://serveravatar.com/wordpress-accessibility-score/) **Published:** February 21, 2026 **Author:** Meghna Meghwani **Content:** [![Blog banner - ServerAvatar](https://serveravatar.com/wp-content/uploads/2025/09/728_90-Banner-3-1024x127.png)](https://serveravatar.com/?ref=blog)A website should be easy to use for everyone, regardless of how visitors read, navigate, or interact with its content. However, many WordPress websites unintentionally create barriers that make pages harder to understand or use. This is where the WordPress accessibility score becomes important. A WordPress accessibility score helps evaluate how well your website follows accessibility best practices. It highlights usability issues that may affect content clarity, navigation, or interaction and shows where improvements are needed. The good news is that improving accessibility does not require advanced technical skills or complex changes, small adjustments can make a meaningful difference. In this guide, you’ll learn what a WordPress accessibility score is, why it matters, how to test it, and practical ways to improve it so your website remains clear, usable, and easy to navigate for all visitors. ## What Is WordPress? [WordPress](https://wordpress.org/) is the world’s most popular open-source content management system (CMS), used to build websites, blogs, and e-commerce stores. It offers flexibility through themes and plugins, making it suitable for beginners, developers, and businesses of all sizes. ## How ServerAvatar Simplifies WordPress Deployment & Management **What is ServerAvatar?** [ServerAvatar](https://serveravatar.com/) is a platform to simplify the hosting and management of servers and applications. It simplifies the process of deploying and managing PHP and Node.js based web applications on servers. ![ServerAvatar Dashboard](https://serveravatar.com/wp-content/uploads/2026/02/image-176.png) ServerAvatar makes WordPress and other popular applications, such as Mautic, N8N, UptimeKuma, etc, deployment effortless with its one-click WordPress application installer, allowing you to launch a fully configured WordPress site in minutes. It removes the complexity of server setup by providing an intuitive dashboard to manage servers, applications, databases, PHP versions, SSL, and performance settings from one place. ServerAvatar supports multiple cloud providers and gives users full control over their infrastructure while eliminating the need for deep server administration knowledge. You can refer to the ServerAvatar [documentation](https://serveravatar.com/docs/application/one-click-installer/wordpress/) and the detailed [blog](https://serveravatar.com/install-wordpress-quickly-on-vps/) to [install WordPress](https://serveravatar.com/install-wordpress-apache-ubuntu/) effortlessly. > ServerAvatar does not directly provide WordPress Multisite, but our technical experts can help you set up a WordPress Multisite environment. > The ServerAvatar support team is available 24/7 to assist you with any issues or questions you may have. ### Key Benefits of Using ServerAvatar for WordPress - **One-click Application installer:** Deploy WordPress and many popular applications instantly without manual configuration. - **Unified management panel:** Manage servers and WordPress applications from a single dashboard. - **Performance optimization:** Easily configure services, PHP, and server resources. - **Redis caching support:** ServerAvatar comes with built-in Redis integration that helps speed up WordPress by storing frequently accessed data in memory. - **Enhanced security:** Includes firewall, SSL management, and secure access controls. - **Easy scalability:** Upgrade server resources as your WordPress site grows. ServerAvatar is an ideal solution for users who want the power of cloud servers without the operational complexity. It simplifies WordPress hosting by automating server setup, streamlining application management, and providing performance and security optimizations out of the box. Whether you’re a developer, agency, or business owner, ServerAvatar allows you to deploy, manage, and scale WordPress websites confidently while focusing on growth instead of infrastructure management. ## What Is WordPress Accessibility? WordPress accessibility refers to building and maintaining a website in a way that allows all users to access and use its content smoothly. It focuses on removing barriers that may limit interaction, understanding, or navigation for different users. ![wordpress accessibility - WordPress Accessibility Score](https://serveravatar.com/wp-content/uploads/2026/02/image-177.png) **Accessibility focuses on** - **Clear structure:** Content is organized logically so users can easily follow and understand page layout. - **Readable content:** Text is written and styled in a way that is easy to read and process. - **Predictable navigation:** Menus and links behave consistently across the website. - **Easy interaction:** Users can interact with elements without unnecessary effort or complexity. When a website built on WordPress follows accessibility principles, it becomes easier to use for a wider audience. ### What Is a WordPress Accessibility Score? A WordPress accessibility score shows how well a website follows accessibility guidelines. It provides a quick overview of areas that meet standards and areas that may need improvement. **A higher score means** - **Fewer accessibility issues:** The website has fewer elements that may block user access. - **Better structure and clarity:** Pages are organized in a way that is easier to understand. - **Improved usability:** Users can navigate and interact with content more comfortably. A lower score indicates areas that may create difficulties for users. ### Why Accessibility Is Important for Websites Accessibility ensures that website content can be accessed, understood, and used without difficulty. When accessibility is ignored, users may struggle to interact with essential information. **Key reasons accessibility matters** - **It improves clarity and organization:** Content becomes easier to scan and understand. - **It reduces confusion for users:** Clear layouts and instructions prevent misunderstandings. - **It supports consistent website interaction:** Users experience predictable behavior across pages. Accessibility is a fundamental part of responsible website management. ### How Accessibility Improves Overall Usability Accessibility and usability work closely together. When accessibility principles are applied, websites naturally become simpler and more efficient to use. ![improve accessibility - WordPress Accessibility Score](https://serveravatar.com/wp-content/uploads/2026/02/image-178.png) **Benefits include** - **Clearer page layouts:** Content is easier to follow and visually organized. - **Easier navigation:** Users can move through pages without getting lost. - **More readable content:** Text presentation supports better understanding. Improving accessibility often improves the experience for all visitors. ## Common Accessibility Problems in WordPress Accessibility issues often appear repeatedly due to inconsistent design or content practices. **Common problems include** - **Missing headings or improper heading order:** Content structure becomes unclear. - **Poor text contrast:** Text is difficult to read against its background. - **Images without descriptions:** Visual content lacks alternative explanations. - **Links that lack clear meaning:** Users cannot easily understand where links lead. These issues can be corrected with small but consistent changes. ## How Accessibility Scores Are Measured Accessibility scores are calculated by checking a website against a set of predefined accessibility rules. These checks focus on how content is structured and how users interact with it. ![score measurement - WordPress Accessibility Score](https://serveravatar.com/wp-content/uploads/2026/02/image-179.png) **They usually evaluate** - **HTML structure:** Page markup is organized correctly. - **Text clarity:** Content is readable and understandable. - **Navigation consistency:** Menus and links follow predictable patterns. - **Media descriptions:** Images and media include necessary explanations. Automated checks help identify patterns that may affect accessibility. ### WCAG Guidelines Accessibility standards define the basic rules that help websites remain usable for a wide range of users. These standards act as a reference point for evaluating whether a website meets accessibility expectations or needs improvement. One widely followed framework for accessibility focuses on four core ideas: content should be perceivable, operable, understandable, and robust. These principles guide how text, navigation, and interactive elements should behave on a website. Accessibility scoring tools often use these principles to check website structure, content clarity, and user interaction patterns. For example, they review whether text can be read clearly, whether navigation works without restrictions, and whether instructions are easy to understand. ![WCAG guidelines - WordPress Accessibility Score](https://serveravatar.com/wp-content/uploads/2026/02/image-180.png) Following these standards does not require advanced technical skills. Small adjustments in content structure, design consistency, and navigation logic can help align a website with accessibility requirements. Over time, these improvements contribute to better accessibility scores and a more consistent user experience. ## Ways to Test Accessibility on a WordPress Website Testing is an essential step in improving accessibility on a WordPress website. It helps uncover issues that may not be visible at first glance and ensures that the website works smoothly for different types of users. A complete accessibility review usually combines manual checks with automated testing tools to get more accurate results. Using both methods together allows you to identify structural issues, content clarity problems, and interaction limitations more effectively. ### Manual Accessibility Review Methods Automated tools are useful, but they cannot fully understand context or user interaction. Manual testing helps identify issues that tools may overlook and provides a deeper understanding of how accessible a website truly is. Below are several manual checks you can perform to evaluate accessibility. ### Keyboard-Only Navigation Check Try navigating through the entire website using only the keyboard. All menus, links, buttons, and form fields should be reachable and usable without relying on a mouse. This check helps confirm whether interactive elements are accessible through keyboard controls. ### Screen Reader Compatibility Review Use a screen reader to listen to how your website content is presented. The content should be read in a clear and logical order. Images, buttons, and links should include meaningful descriptions so the information remains understandable when read aloud. ### Content Clarity Assessment Review your written content carefully. Avoid unnecessary complexity, long sentences, or technical terms that could reduce comprehension for some users. ### Text and Background Contrast Check Make sure the text should be clear as per its background. Adequate contrast improves readability and helps users distinguish content without strain. ### Logical Focus Order Test Move through the website using the tab key. The focus should follow a logical sequence and allow users to interact with elements in a predictable order. Any skipped or inaccessible elements should be addressed. Using these manual checks alongside automated testing provides a clearer picture of overall accessibility quality. ### Automated Accessibility Scanning Automated tools help identify accessibility issues quickly by scanning web pages against predefined rules. These tools can detect problems such as missing image descriptions, unclear heading structure, and contrast issues. Popular tools used for accessibility scanning include; - **WAVE:** visual issue detection - **Axe:** developer-focused auditing - **Contrast Checker:** color readability testing These tools save time and help focus manual testing on areas that need closer attention. ## Checking Accessibility Scores Online accessibility checkers provide a quick overview of how well a website aligns with accessibility standards. One commonly used option is [Accessibility Checker](https://www.accessibilitychecker.org/), which reviews a webpage and highlights potential issues. **How to Use an Online Accessibility Checker** - Go to the official [accessibility checker](https://www.accessibilitychecker.org/) website, or you can use the mentioned link: ![accessibility checker - WordPress Accessibility Score](https://serveravatar.com/wp-content/uploads/2026/02/image-181-1024x517.png) - Paste your WordPress website URL in the provided field and click on the **Scan website** button to start the scan. ![accessibility checker - WordPress Accessibility Score](https://serveravatar.com/wp-content/uploads/2026/02/image-182-1024x440.png) - Once the scan is completed, it will display an accessibility score along with a list of identified issues. Each issue usually includes a short explanation to help guide improvements. ![score dashboard - WordPress Accessibility Score](https://serveravatar.com/wp-content/uploads/2026/02/image-183-1024x1010.png) Automated results should be treated as a starting point, not a final judgment. Use them to prioritize fixes and support manual testing efforts. ## Understanding Accessibility Test Results Accessibility test results highlight how well a website meets accessibility guidelines. These results help prioritize what needs attention first. **Test results usually include** - **Errors:** Issues that should be fixed immediately. - **Warnings:** Potential problems that may need review. - **Passed checks:** Elements that meet accessibility standards. Reviewing these results carefully helps guide improvement efforts. ## Improving Accessibility **Practical Ways to Improve Your WordPress Accessibility Score** Improving your WordPress accessibility score involves applying consistent best practices across design, content, and functionality. Small changes, when applied correctly, can significantly enhance usability and accessibility. ### Choosing Accessibility-Friendly Themes and Plugins The foundation of an accessible website starts with selecting themes and plugins that support accessibility features. These tools are built with usability and structure in mind, helping reduce common accessibility barriers. Before adding any theme or plugin, review its accessibility support to ensure it aligns with accessibility guidelines and provides a smooth user experience. ### Making Images and Media Accessible Images and media must be usable by all visitors. Add meaningful alternative text to images so their purpose is clearly communicated. File names should also be descriptive and easy to understand. For video content, include captions or text-based explanations to ensure the information is accessible in multiple formats. ### Using Clear Headings and Page Structure A well-organized heading structure helps users understand content flow and navigate pages more easily. Headings should follow a logical order and clearly represent the content beneath them. Proper structure improves readability and supports assistive technologies in interpreting page layout. ### Writing Accessible and Easy-to-Read Content Content should be written with clarity and simplicity in mind. Short paragraphs, clear wording, and consistent formatting make information easier to process. Providing information in a straightforward manner improves understanding and reduces confusion for users. ### Creating Accessible Links and Buttons Links and buttons should clearly explain their purpose. Avoid vague labels and ensure interactive elements can be accessed using a keyboard. Well-labeled links and keyboard-friendly buttons improve navigation and overall usability across the website. ### Using Accessibility Plugins Wisely Accessibility plugins can assist with identifying issues and applying basic improvements, such as checking headings or highlighting missing image descriptions. However, plugins should support accessibility efforts, not replace good design and content practices. Accessibility is most effective when plugins are combined with thoughtful manual improvements. ### Enhancing Accessibility Through Design Design choices directly influence how users view and interact with content. Accessible design focuses on clarity, balance, and readability. **Accessible design focuses on** - **Readable fonts:** Text styles that are easy to recognize and read. - **Adequate spacing:** Proper spacing that prevents visual clutter. - **Strong contrast between text and background:** Clear separation for better readability. Small design adjustments can lead to noticeable accessibility improvements. ### Improving Accessibility Through Navigation Navigation plays a key role in helping users move through a website efficiently. Clear navigation reduces confusion and improves overall usability. **Best practices include** - **Logical menu structure:** Menus follow a clear and organized order. - **Keyboard-friendly navigation:** Users can navigate without relying on a mouse. - **Clear labels:** Menu items and links explain their purpose. Well-structured navigation helps users find content easily. [![Blog banner - ServerAvatar](https://serveravatar.com/wp-content/uploads/2025/09/728_90-Banner-1-1024x127.png)](https://serveravatar.com/?ref=blog)## Maintaining Accessibility Over Time Accessibility must be maintained consistently as websites evolve. Updates, new content, and design changes can all impact usability. **Regular checks help** - **Identify new issues:** Catch accessibility problems early. - **Maintain consistency:** Keep design and content aligned with standards. - **Improve long-term quality:** Ensure continued usability over time. Ongoing maintenance helps keep accessibility scores stable. ## Best Practices to Keep Accessibility Consistent Consistency makes accessibility easier to manage across a website. Following repeatable practices reduces the risk of new issues. **Good habits include** - **Reviewing content before publishing:** Catch potential problems early. - **Using consistent layouts:** Maintain uniform structure across pages. - **Following the same heading structure:** Ensure clear content hierarchy. These habits help prevent future accessibility challenges. ## Quick Accessibility Improvement Checklist A simple checklist can help ensure accessibility before publishing content. **Before publishing, confirm** - **Text is easy to read:** Content is clear and legible. - **Headings are structured correctly:** Information follows a logical order. - **Images include descriptions:** Visual content has proper explanations. - **Navigation works without a mouse:** All elements are keyboard accessible. This checklist supports consistent accessibility standards. ## Conclusion Improving a WordPress accessibility score is not about making complex technical changes, but about building websites with clarity, consistency, and usability in mind. By understanding accessibility principles, testing websites regularly, and applying practical improvements across content, design, and navigation, website owners can create experiences that are easier to use and maintain over time. When accessibility is treated as an ongoing practice rather than a one-time task, it naturally leads to better usability, stronger structure, and a more reliable WordPress website overall. ## FAQs ### 1. What is a WordPress accessibility score? A WordPress accessibility score indicates how well a website follows accessibility guidelines and best practices, highlighting areas that are accessible and areas that need improvement. ### 2. Can beginners improve WordPress accessibility without technical skills? Many accessibility improvements involve simple changes such as clear headings, readable content, proper image descriptions, and consistent navigation. ### 3. How often should WordPress accessibility be tested? Accessibility should be reviewed regularly, especially after adding new content, updating themes, or making design changes. ### 4. Are automated accessibility tools enough on their own? Automated tools are helpful for identifying common issues, but they should be combined with manual testing for better accuracy and understanding. ### 5. Why is accessibility important for long-term website management? Accessibility helps maintain consistent usability, reduces user confusion, and ensures that websites remain easy to navigate as they grow and evolve. **Categories:** Blog, Guide, Others, Tutorials, WordPress **Tags:** Improve WordPress accessibility, Test WordPress accessibility, WCAG compliance, Web accessibility guidelines, Wordpress, WordPress accessibility, WordPress accessibility score --- ### [How to Integrate Discord Notification Channel with ServerAvatar](https://serveravatar.com/integrate-discord-notification-channel/) **Published:** February 20, 2026 **Author:** Meghna Meghwani **Content:** [![Blog banner - ServerAvatar](https://serveravatar.com/wp-content/uploads/2025/09/728_90-Banner-3-1024x127.png)](https://serveravatar.com/?ref=blog)Server management can sometimes feel like juggling multiple things at once. Servers, apps, logs, backups, and alerts all demand attention at the same time. Now imagine if all important server updates landed right where your team already communicates. That’s exactly what happens when you integrate Discord with ServerAvatar, allowing you to receive server notifications directly inside your Discord channels for faster and easier monitoring. In this guide, I will walk through how to integrate the Discord Notification Channel with ServerAvatar in the easiest way. No fluff. No confusing jargon. It is perfect for the general public, developers, founders, and server admins alike. ## What Is ServerAvatar? [ServerAvatar](https://serveravatar.com/) is a server and application hosting and management platform designed to make handling servers easier, cleaner, and more accessible. Instead of working directly with complex server commands, ServerAvatar provides a visual dashboard where you can manage server-related activities more comfortably. ![ServerAvatar Dashboard](https://serveravatar.com/wp-content/uploads/2026/02/image-158.png) One of the features of ServerAvatar is its notification system. Notifications act as messengers that inform you whenever specific events occur within your server environment. These messages help you stay updated without manually monitoring every detail. It’s built for both beginners and experienced users who want control without complexity. ## What are Notification Channels Think of notification channels as delivery routes. The message is the same, but the delivery method can change. ServerAvatar allows you to configure where notifications should be sent, and Discord is selected as one such route. Once it is connected: - ServerAvatar detects an event - The notification system prepares a message - The message is delivered to Discord via the configured channel The integration does not change how ServerAvatar detects events. It only changes where the information appears. ### How does this matter? This setup keeps the system flexible. You can add Discord as a channel without affecting other notification methods. Everything works independently but stays organized under one system. ### Understanding the Working of Notification Channels ServerAvatar notifications are event-based. This means: - An event happens - A notification is triggered - The message is sent to a selected channel You get to decide where these notifications go from Slack, Discord, Telegram, and Pushover, as ServerAvatar provides these notification channels. Discord is one such channel, and it’s particularly popular. ![discord notification channel work](https://serveravatar.com/wp-content/uploads/2026/02/image-159.png) Instead of being reactive, notifications help you stay aware. They quietly work in the background, making sure you’re never completely out of the loop. ## What is Discord? [Discord](https://discord.com/?ref=serveravatar.com) is a modern communication platform that allows people to connect instantly. It is built around the idea of servers, which act like private spaces where users can create different channels for specific topics, discussions, or updates. ![Discord](https://serveravatar.com/wp-content/uploads/2026/02/image-160-1024x413.png) This setup keeps conversations organized and makes it easy for individuals or teams to communicate without confusion. One of Discord’s biggest strengths is its speed and simplicity. Messages are delivered instantly, it works smoothly on desktop and mobile, and it supports integrations, like server notifications, that help teams stay updated without switching between tools. In short, Discord is a fast, flexible, and user-friendly platform for real-time communication and collaboration. ### Why Discord Works Well for Notifications Discord is designed for real-time communication, which makes it an excellent choice for receiving important notifications without delay. Its channel-based structure keeps alerts organized and easy to track, even when multiple updates are coming in. **Key reasons Discord is effective for notifications:** - Instant delivery ensures you never miss critical updates - Dedicated channels help keep alerts separate from regular chats - Accessible on all devices, so notifications reach you anywhere - Easy integrations with tools and platforms for automated alerts ### Why Use Discord Notifications for Server Monitoring? Monitoring servers doesn’t need to involve constant logins or repeated dashboard checks. Discord notifications allow you to stay informed in real time by delivering important updates directly to a space your team already uses daily. This makes server monitoring more responsive and far less distracting. **Why Discord is a smart choice:** - **Real-time alerts:** Server updates appear instantly, without refreshing or manual checks. - **Centralized team visibility:** Everyone sees the same alerts in one shared channel. - **Works across devices:** Notifications reach you on desktop and mobile alike. - **No extra cost:** Discord is free and already familiar to most teams. - **Multiple channels support:** Alerts can be neatly separated by server or purpose. If Discord is already part of your workflow, this integration fits right in. ## Why Discord with ServerAvatar Just Makes Sense Let’s be honest, checking dashboards all day isn’t fun. You might miss a critical alert simply because you weren’t logged in at the right time. That’s where Discord notifications come in. Think of Discord as your team’s digital office, and ServerAvatar as the security guard constantly watching your servers. When something important happens, the guard doesn’t wait for you to ask, he taps you on the shoulder immediately. That’s the magic of this integration. By connecting ServerAvatar with Discord, you get instant notifications for server events, application issues, backups, security alerts, and more, right inside your Discord server. The process behind Discord notifications is straightforward and fully automated. Once the integration is set up, ServerAvatar takes care of everything in the background so you don’t have to monitor things manually. **Here’s what happens:** - **Something happens on your server:** An event like a restart, alert, or update occurs. - **ServerAvatar detects it:** The system instantly identifies the event. - **A message is sent to Discord:** The alert appears in your selected Discord channel. - **No delays or manual checks:** You stay informed automatically. ## What You Need Before Starting Before setting up Discord notifications, it’s important to have a few basics ready. The good news is that everything required is simple and quick to arrange. **Requirements:** - **An active ServerAvatar account:** Needed to access notification settings. - **Access to the ServerAvatar dashboard:** To create and manage notification channels. - **A Discord account with admin rights:** Required to create webhooks. - **Permission to create Discord webhooks:** Allows ServerAvatar to send messages. That’s all, no coding or technical expertise needed. ## Understanding Discord Webhooks Discord webhooks act as automated messengers between ServerAvatar and your Discord channel. They allow notifications to be sent instantly without manual involvement. **Think of it like this:** - **ServerAvatar drops messages:** It sends alerts to the webhook when events occur. - **Discord delivers them:** The messages appear in the selected channel. - **One webhook, one channel:** This keeps notifications clean and well organized. ## Step-by-Step: Create a Discord Webhook Let’s start on the Discord side. - Open your Discord server, navigate to the server where you want notifications, and click on the Settings icon.[](https://storage.3.basecamp.com/5840738/blobs/67b57c82-0e33-11f1-b889-0242ac120004/download/image.png) ![settings to create discord webhook ](https://serveravatar.com/wp-content/uploads/2026/02/image-161-1024x286.png) - Navigate to the Integrations section and click on the **Create Webhook** button. ![create discord webhook ](https://serveravatar.com/wp-content/uploads/2026/02/image-162-1024x406.png) - Give a name to your webhook and select the channel where notifications will be sent. - Click **Copy Webhook URL** to copy the URL. ![copy discord webhook url](https://serveravatar.com/wp-content/uploads/2026/02/image-163-1024x550.png) We will use this Webhook URL within ServerAvatar. ## Step-by-Step: Add Discord in ServerAvatar Now, let’s integrate Discord with ServerAvatar. - Let’s first log in to the ServerAvatar account and navigate to the **Account** Section from the top right corner. ![account section to integrate discord](https://serveravatar.com/wp-content/uploads/2026/02/image-164-1024x315.png) - Navigate to the **Notification Channel** section. Click on the **Create Channel** button.[](https://storage.3.basecamp.com/5840738/blobs/2225972c-0e35-11f1-af5c-0242ac120003/download/image.png) ![create channel - Discord](https://serveravatar.com/wp-content/uploads/2026/02/image-165.png) - Select **Discord** as the notification channel, and enter the Label for your **Discord** notification channel. - Paste the Webhook URL here that we have just copied from Discord. - Click on the **Create** Button.[](https://storage.3.basecamp.com/5840738/blobs/a5456ce0-0e35-11f1-863f-0242ac120003/download/image.png) ![create Discord notification channel](https://serveravatar.com/wp-content/uploads/2026/02/image-166.png) After adding the Discord notification channel, you can view the integrated notification channel displayed. ![attached discord notification channel](https://serveravatar.com/wp-content/uploads/2026/02/image-168-1024x219.png) > It’s important to understand that adding Discord as a notification channel from the Account Settings only enables notifications at the account level. > > This means you will receive general account-related alerts, but server-specific activities will not be sent to Discord automatically. ## How Account-Level Notifications Appear in Discord Once Discord is added as a notification channel at the account level, ServerAvatar starts sending account-related alerts directly to your selected Discord medium. Each alert is displayed as a clear, readable Discord message, making it easy to understand what action occurred and when it happened. **Examples of account-level notifications** ![account level notification - Discord](https://serveravatar.com/wp-content/uploads/2026/02/image-169-1024x509.png) > To receive alerts related to the server and particular applications in the server, the notification channel must be attached to the server. This step is commonly missed during setup, but without attaching the notification channel at the server level, Discord will not receive server activity alerts. ## How to get Server-Level Notifications in Discord Now, let’s attach the notification channel to the server to **get all the server-level notifications.** - Navigate to the server panel by clicking on the server dashboard icon. ![server panel -integrate discord](https://serveravatar.com/wp-content/uploads/2026/02/image-170-1024x203.png) - Go to the **Notification Channels** from the left sidebar and click on the **Attach** button. ![attach Discord channel](https://serveravatar.com/wp-content/uploads/2026/02/image-172-1024x446.png) - Select your created **Notification Channel** from the dropdown and click on the **Attach** button. ![attach channel - Discord](https://serveravatar.com/wp-content/uploads/2026/02/image-173.png) - You can see your notification channel listed, once your notification channel is connected to your server. ![notification channel - Discord](https://serveravatar.com/wp-content/uploads/2026/02/image-174-1024x143.png) By integrating Discord with ServerAvatar and attaching the notification channel to your server, you get instant updates about server activities directly in your Discord channels. This helps you keep track of your server easily without logging into ServerAvatar all the time. **Examples of server-level notifications** ![server level notification - Discord](https://serveravatar.com/wp-content/uploads/2026/02/image-175-1024x480.png) ## Types of Alerts Sent to Discord via ServerAvatar Once Discord is integrated with ServerAvatar and the notification channel is properly attached, the system can send a wide range of alerts directly to your Discord workspace. ### Account-Level Alerts Account-level alerts are triggered by activities related to your ServerAvatar account, integrations, and organization settings. These notifications are sent as soon as the Discord channel is added at the account level. **User-Level Alerts** These alerts help you stay informed about important security and account-related actions: - Whitelist IP added - Two-factor authentication (2FA) enabled or disabled - Wallet credit added **Integration-Level Alerts** These notifications inform you when third-party services are connected or removed from your account: - Cloud provider connected or removed - Git provider connected or removed - Storage provider connected or removed **Organization-Level Alerts** These alerts keep track of team and role management activities: - Organization member added or removed - Role created, updated, or deleted ### Server-Level Alerts Server-level alerts become active once the Discord notification channel is **attached to a specific server**. These notifications cover server operations, services, applications, and security-related events. **Server Alerts** These alerts focus on core server activities and system-level changes: - Server created, deleted, or restarted - Server IP changed - Server shared - Server metrics updates - Disk usage checked - Memory usage checked - Server load checked - Disk cleaned - Swap updated **Cronjob Alerts** - Cronjob created, updated, or deleted - Cronjob enabled or disabled **PHP & Configuration Alerts** - PHP extension installed or removed - PHP-FPM configuration updated **Security Alerts** - Database root password updated - Redis settings updated - Fail2Ban enabled, disabled, or updated **Service Alerts** - Service started, stopped, restarted, or reloaded - Service monitoring enabled, disabled, or updated **Firewall Alerts** - Firewall enabled or disabled - Firewall rule created or deleted ## Common Mistakes to Avoid During Setup Even though Discord integration with ServerAvatar is straightforward, a few common mistakes can cause confusion. Being aware of them makes the setup smoother. **Mistakes to Watch Out For** - Using an incorrect webhook URL - Forgetting to save changes after setup - Not having proper Discord permissions - Adding Discord at the account level, but forgetting to attach it to the server Each of these issues is easy to avoid with a little attention. Taking your time during setup prevents unnecessary troubleshooting later. Remember, slow and steady works better than rushed and reactive. ## Real-Life Use Cases This integration is useful for many types of users who want to stay updated without constant logins. It quietly works in the background while you focus on your actual work. **Common use cases:** - **Startup founders:** Keep an eye on production servers without technical overhead. - **DevOps teams:** Track server health and system events in real time. - **Agencies:** Manage and monitor multiple client servers from one place. - **Freelancers:** Stay informed without being logged in all day. It’s like having an assistant watching your servers. [![Blog banner - ServerAvatar](https://serveravatar.com/wp-content/uploads/2025/09/728_90-Banner-1-1024x127.png)](https://serveravatar.com/?ref=blog)## Common Mistakes to Avoid Even though the setup is simple, small mistakes can stop notifications from working correctly. Being careful during setup saves time later. **Mistakes to watch out for:** - **Using the wrong webhook URL:** Alerts won’t reach Discord if the URL is incorrect. - **Sending alerts to public channels:** Can expose sensitive server information. - **Not testing after setup:** Testing confirms everything works as expected. - **Enabling too many alerts:** Too many messages can lead to alert fatigue. ## How This Integration Improves Productivity Discord notifications help you work smarter, not harder. By reducing tool switching, you stay focused on what actually matters. **Productivity benefits:** - **Faster notifications:** Respond quickly before issues escalate. - **Less downtime:** Early alerts help prevent bigger problems. - **Better team collaboration:** Everyone sees the same updates instantly. - **Peace of mind:** You know your servers are being watched. It’s a small setup with a big impact. ## Conclusion Integrating Discord notifications with ServerAvatar is a simple yet powerful way to stay informed about everything happening on your servers without constantly checking dashboards. Once set up correctly at both the account and server levels, Discord becomes your real-time notification hub, quietly delivering updates, alerts, and warnings exactly when you need them. This integration helps you react faster, reduce downtime, and keep your entire team aligned, whether you are managing a single server or multiple production environments. ## FAQs ### 1. Do I need technical or coding knowledge to integrate Discord with ServerAvatar? No, the integration is completely beginner-friendly. You only need to create a Discord webhook and paste its URL into ServerAvatar, no coding or command-line work required. ### 2. Why am I only receiving account-level notifications and not server alerts? This usually happens when the Discord notification channel is added at the account level but not attached to a specific server. To receive server-level alerts, you must attach the notification channel from the server dashboard. ### 3. What types of notifications does ServerAvatar send to Discord? ServerAvatar can send account-level, user-level, integration-level, organization-level, and server-level alerts, including security events, service status changes, cronjob updates, and resource usage checks. ### 4. Can I disable or change Discord notifications later? You can edit, detach, or delete the Discord notification channel anytime from the ServerAvatar dashboard without affecting your servers or other notification methods. ### 5. Are Discord notifications sent in real time? Yes, notifications are delivered almost instantly after an event occurs. This helps you take quick action and reduces the risk of unnoticed server issues. **Categories:** Blog, Guide, Linux, Others, Tutorials, Ubuntu **Tags:** Discord, Discord webhook integration, Integrate Discord, Real-time server alerts, Server monitoring, ServerAvatar --- ### [Laravel for Beginners: Easy Explanation You Can Understand](https://serveravatar.com/what-is-laravel/) **Published:** February 19, 2026 **Author:** Meghna Meghwani **Content:** [![Blog banner - ServerAvatar](https://serveravatar.com/wp-content/uploads/2025/09/728_90-Banner-3-1024x127.png)](https://serveravatar.com/?ref=blog)If the word Laravel sounds confusing or intimidating, take a deep breath, you are not alone. Many beginners feel the same way when they first hear about it. The good news? Laravel is actually designed to make things easier, not harder. This guide is written especially for beginners who want a clear, friendly, and stress-free explanation. Think of Laravel like a well-organized notebook. Instead of loose pages everywhere, everything has its own place. You do not need to know advanced technical terms to understand it. We will break down everything easily without rushing. By the end, you will feel confident and comfortable with the basics of Laravel. ## What Is Laravel? [Laravel](https://laravel.com/?ref=serveravatar.com) is a PHP framework that helps you build applications in a clean and organized way. Instead of writing everything from scratch, Laravel gives you a ready-made structure. You can imagine Laravel as a guide that gently holds your hand and says, “Do it this way, it’s simpler.” It removes confusion and replaces it with clarity. Laravel focuses on readable code, so you can easily understand your work even months later. ![What is Laravel](https://serveravatar.com/wp-content/uploads/2026/02/image-151.png) ### Key Features of Laravel Laravel provides a powerful set of built-in features that simplify web development. These features work together to reduce manual effort and help developers write clean, organized, and maintainable applications. Laravel offers: - **MVC architecture:** Separates data, logic, and presentation to keep code clean and easy to manage. - **Eloquent ORM:** Allows database interaction using simple, readable PHP instead of complex SQL queries. - **Built-in security:** Protects applications from common threats like SQL injection and cross-site scripting. - **Clean routing system:** Makes it easy to define and understand how URLs connect to application logic. - **Reusable templates:** Helps avoid repeating layout code by reusing common page structures. These features work together to reduce complexity and improve development flow. ### Advantages of Laravel Laravel offers several advantages that make development smoother, especially for beginners. Its thoughtful design helps developers focus more on building features and less on managing repetitive tasks. Major benefits include: - **Beginner-friendly syntax:** Uses simple and expressive code that is easy to read and understand. - **Organized structure:** Keeps files and logic neatly arranged, reducing confusion as projects grow. - **Strong community support:** Provides access to tutorials, documentation, and solutions from other developers. - **Time-saving tools:** Automates common tasks like authentication, validation, and database handling. Laravel reduces frustration and significantly increases productivity. ### Disadvantages of Laravel Like any development framework, Laravel also has a few limitations. These drawbacks are generally minor and become less noticeable as experience grows. Common limitations include: - **Slight learning curve at the start:** Beginners need time to understand the framework’s structure and flow. - **Performance overhead for very small projects:** Lightweight projects may not need a full framework. - **Requires understanding of framework structure:** Developers must follow Laravel’s conventions for best results. These challenges are manageable and improve with regular practice. ### Is Laravel a Programming Language? Laravel is **not** a programming language. It is a framework built on top of PHP that helps developers write better-organized and more efficient PHP code. Think of it this way: - **PHP** gives you the basic building blocks - **Laravel** helps arrange those blocks into a clean and reliable structure ### Is Laravel Meant for Frontend or Backend Work? Laravel is primarily used for **backend development**. Its main job is to handle logic, manage data, and control how information moves within an application. Laravel does not focus on visual design or layout by default. Instead, it works behind the scenes, making sure requests are processed correctly and responses are returned smoothly. While it can connect with frontend tools, its strength lies in managing the backend structure. ![Laravel Explained](https://serveravatar.com/wp-content/uploads/2026/02/image-153.png) ### How Laravel Is Not the Same as Plain PHP Laravel is built using PHP, but it completely changes how PHP projects are structured. With basic PHP, developers often manage everything manually, which can lead to scattered and hard-to-maintain code. Laravel introduces an organized approach where files follow a clear pattern and responsibilities are separated. In simple terms, PHP is the language, and Laravel is the system that helps you use that language more efficiently and cleanly. ### How Laravel Is Different Laravel follows modern development practices that keep applications clean and easy to maintain. Instead of mixing logic, layout, and rules in one place, Laravel separates responsibilities clearly. This separation helps beginners: - **Understand what each file does:** Every file has a clear purpose. - **Fix errors faster:** Issues are easier to locate and resolve. - **Grow projects without confusion:** Applications remain manageable as they scale. Laravel encourages good habits early, making learning smoother. ## Why Laravel Is Beginner-Friendly Laravel is designed to feel comfortable, even if you are completely new to web development. It does not expect you to know everything from the beginning. Instead, it guides you step by step and encourages good habits early on. One of the biggest reasons beginners like Laravel is its **clear structure**. Every file has a purpose, and everything lives in a predictable place. This reduces confusion and makes projects easier to understand as they grow. Laravel also uses **readable and expressive syntax**, which means the code often explains itself. Even when you return to your project after a break, it is easy to understand what is happening. Another major advantage is the **strong community and documentation**. If you get stuck, chances are someone else already faced the same issue and shared a solution. This support system makes learning less frustrating and more enjoyable. In short, Laravel is beginner-friendly because it: - Keeps code clean and organized - Reduces repetitive work - Encourages best practices naturally - Grows with you as your skills improve ### Why Do Developers Use Laravel? Developers use Laravel because it simplifies complex tasks and reduces development effort. It allows teams to build reliable applications faster without sacrificing code quality. People choose Laravel because it: - **Saves development time:** Built-in tools eliminate repetitive manual work. - **Encourages clean structure:** Promotes organized and readable code. - **Reduces repetitive work:** Common tasks are handled automatically. - **Makes complex tasks simpler:** Features like authentication and validation are easy to implement. Laravel focuses on developer comfort, which appeals to both beginners and experienced developers. ### How to Learn Laravel Step by Step Learning Laravel is most effective when done **slowly and in the right order**. There is no need to rush or try to understand everything at once. A comfortable learning path looks like this: 1. **Understand the folder structure** Learn what folders like routes, app, resources, and database are used for. This builds confidence early. 2. **Learn routing** Understand how URLs connect to actions. Routing is simple and helps you see immediate results. 3. **Practice controllers** Controllers help you organize logic. Learning them early keeps your code clean 4. **Explore views and Blade templates** Learn how pages are displayed and how layouts are reused. 5. **Understand models and Eloquent ORM** This helps you work with data in a clean and readable way. 6. **Learn validation and requests** These features keep your application safe and structured. Progress may feel slow at times, and that is completely okay. Every small step builds on the previous one. Laravel rewards patience by becoming clearer and more predictable as you move forward. > **Remember:** slow progress is still progress, and Laravel is designed to support you at every stage of learning. ## Understanding Laravel’s Structure When you open a Laravel project, you may see many folders at first. While this can feel overwhelming, each folder serves a clear and specific role. Important folders include: - **Routes:** Decide how incoming requests are handled. - **Controllers:** Contain the logic that processes requests. - **Models:** Manage data rules and database interaction. - **Views:** Control how content is displayed to users. ![Laravel structure](https://serveravatar.com/wp-content/uploads/2026/02/image-154.png) Once you understand this structure, Laravel becomes predictable and easy to follow. ### Breaking Down the Laravel Folder Structure Laravel projects are organized to prevent confusion and improve maintainability. Each folder exists to keep responsibilities separate. Key folders include: - **routes:** Defines application URLs and their actions. - **app:** Contains core application logic. - **resources:** Stores views and frontend templates. - **database:** Manages migrations and database structure. This organization helps developers quickly find what they need. ## The MVC Concept in Laravel MVC stands for **Model, View, and Controller**, and it forms the foundation of Laravel. - **Model:** Handles data rules and database logic. - **View:** Displays information to the user. - **Controller:** Connects models and views by processing requests. ![Laravel MVC concept](https://serveravatar.com/wp-content/uploads/2026/02/image-156.png) Each part has a single responsibility, keeping applications clean and understandable. ## Routing Explained in Simple Terms Routing tells Laravel what to do when a user visits a specific URL. It acts like a guide that directs requests to the right place. Routes work like signposts: - If this path is requested, perform this action. Laravel routes are clean and readable, which helps beginners understand application flow early. ### Routing: How Laravel Understands URLs Routing tells Laravel what to do when a specific URL is accessed. **A basic route looks like this:** ``` Route::get('/welcome', function () { return view('welcome'); }); ``` ``` Route::get('/welcome', function () { return view('welcome'); }); ``` **Explanation:** - **Route::get()** defines a route that responds to an HTTP GET request. - **‘/welcome’** is the URL path users visit in the browser. - The anonymous function runs when the URL is accessed. - **return view(‘welcome’)** tells Laravel to display the **welcome.blade.php** file. - This approach is simple and useful for quick or small tasks. This code tells Laravel: “Whenever someone opens /welcome, show the welcome.blade.php view.” Routes act like instructions. They connect URLs to actions and help Laravel know where to send requests. ## Controllers and Their Role Controllers act as decision-makers in a Laravel application. They receive requests, process logic, and return responses. Benefits of using controllers: - **Cleaner code:** Keeps logic out of routes and views. - **Better organization:** Centralizes application behavior. - **Easier debugging:** Makes issues simpler to track. Controllers keep applications structured and scalable. Although logic can be written directly in routes/web.php, this is **not recommended** for larger or organized applications. Instead, Laravel encourages separating logic into controllers. **In routes/web.php:** ``` Route::get('/hello', [HelloController::class, 'show']); ``` ``` Route::get('/hello', [HelloController::class, 'show']); ``` **Explanation:** - This route connects the **/hello** URL to a controller method. - **HelloController::class** points to the controller file. - **‘show’** is the method that handles the request. - This keeps routes clean and moves logic into a dedicated file. - Using controllers improves organization in larger applications. **Inside the controller:** ``` class HelloController extends Controller { public function show() { return "Hello from Controller!"; } } ``` ``` class HelloController extends Controller { public function show() { return "Hello from Controller!"; } } ``` **Explanation:** - The controller extends Laravel’s base **Controller** class. - The **show()** method runs when the **/hello** route is accessed. - It returns a simple text response to the browser. - Controllers act as decision-makers between routes and views. - This structure makes applications easier to scale and maintain. Both approaches work the same way, but using controllers: - Keeps routes clean - Makes code easier to manage - Improves readability Controllers help keep everything organized and scalable. ## Views and Blade Templates Views control how content appears on the screen. Laravel uses Blade, a simple templating engine, to manage views. Blade helps you with: - **Reusable layouts:** Avoid repeating the same page structure. - **Clean display logic:** Keeps presentation separate from logic. - **Simple syntax:** Makes templates easy to read and edit. This makes UI management beginner-friendly. ## Models and Data Handling Logic Models represent how data behaves inside an application. They define rules for storing, retrieving, and managing information. Models help beginners by providing: - **Less repeated code:** Common data logic is reused. - **Clear data rules:** Makes behavior predictable. - **Better structure:** Keeps database logic centralized. Models act like a rulebook for application data. ## Eloquent ORM: Laravel’s Simple Way to Work With Databases Eloquent ORM allows developers to interact with databases using clean, readable PHP code instead of complex queries. This makes database operations much easier to understand. ![Laravel Eloquent ORM](https://serveravatar.com/wp-content/uploads/2026/02/image-157.png) Eloquent makes database operations: - **Easy to read:** Code clearly shows what is happening. - **Easy to write:** Fewer lines are needed for common tasks. - **Easy to understand:** Even beginners can follow the logic. This simplicity is one of the main reasons beginners love Laravel. **To create a model:** ``` php artisan make:model Student -m ``` ``` php artisan make:model Student -m ``` **Explanation:** - This command creates a new model named **Student**. - The **-m** flag automatically creates a migration file. - The model represents a database table. - The migration helps define the table structure. - Artisan commands save time and reduce manual setup. **A Simple Model Example** ``` class Student extends Model { protected $fillable = ['name', 'email']; } ``` ``` class Student extends Model { protected $fillable = ['name', 'email']; } ``` **Explanation:** - The model extends Laravel’s base **Model** class. - **$fillable** defines which fields can be mass-assigned. - This protects the database from unwanted data insertion. - Only **name** and **email** can be saved using bulk methods. - Models keep data logic centralized and clean. ### Basic CRUD Operations Using Eloquent **Insert Data** ``` // Insert data Student::create([ 'name' => 'John Doe', 'email' => 'john@example.com' ]); ``` ``` // Insert data Student::create([ 'name' => 'John Doe', 'email' => 'john@example.com' ]); ``` **Explanation:** - Creates a new record in the database. - Uses mass assignment to save data. - Requires fields to be defined in **$fillable**. - Keeps insert operations short and readable. **Fetch All Records** ``` // Fetch all records $students = Student::all(); ``` ``` // Fetch all records $students = Student::all(); ``` **Explanation:** - Retrieves all records from the **students** table. - Returns data as a collection. - Useful for listing records. - Simple and easy to understand. **Find Record by ID** ``` // Find by ID $student = Student::find(1); ``` ``` // Find by ID $student = Student::find(1); ``` **Explanation:** - Fetches a single record using its primary key. - Returns null if no record is found. - Commonly used for detail views. - Keeps queries minimal and clear. **Update Data** ``` // Update data $student = Student::find(1); $student->name = "Updated Name"; $student->save(); ``` ``` // Update data $student = Student::find(1); $student->name = "Updated Name"; $student->save(); ``` **Explanation:** - Finds a specific record first. - Updates the required field value. - Saves the changes to the database. - Makes updates easy to follow and safe. **Delete Data** ``` // Delete data Student::destroy(1); ``` ``` // Delete data Student::destroy(1); ``` **Explanation:** - Removes the record with the given ID. - Performs deletion in a single line. - Keeps delete logic simple. - Helps maintain clean database records. ## Migrations Explained Clearly Migrations help track database changes in a structured and safe way. They act like a version history for your database. Migrations allow you to: - **Apply updates safely:** Changes are controlled and predictable. - **Undo changes if needed:** Mistakes can be rolled back easily. - **Keep everything consistent:** Databases stay in sync across environments. This reduces fear and increases confidence. [![Blog banner - ServerAvatar](https://serveravatar.com/wp-content/uploads/2025/09/728_90-Banner-1-1024x127.png)](https://serveravatar.com/?ref=blog)## Forms and Requests in Laravel Laravel manages user input through request objects instead of manual handling. This keeps input processing clean and secure. Requests help beginners: - **Keep code clean:** Input logic stays organized. - **Avoid confusion:** Clear separation of concerns. - **Process input safely:** Reduces security risks. Requests act as a filter that keeps everything structured. ## Validation Made Easy Validation ensures users provide correct and safe input. Laravel offers simple rules that automatically check incoming data. Validation helps beginners by: - Reducing errors - Preventing invalid data - Avoiding long manual checks ## Security Basics in Laravel Laravel includes built-in security features that protect applications quietly in the background. Key benefits include: - **Safe input handling:** Prevents malicious data. - **Protected data flow:** Reduces security risks. - **Secure authentication structure:** Manages user access safely. Even beginners benefit from these features without deep security knowledge. ## Error Handling and Debugging Errors are a natural part of learning. Laravel makes debugging easier by showing clear and helpful error messages. Laravel errors: - **Explain what went wrong:** Clear problem descriptions. - **Show where the issue happened:** Easy error tracking. - **Help you fix it faster:** Saves debugging time. This clarity reduces frustration and improves learning speed. ## Helpful Laravel Tools Laravel includes tools that reduce manual work and improve confidence. Helpful tools include: - **Command-line helpers:** Speed up common tasks. - **Built-in testing support:** Helps ensure code quality. - **Debugging features:** Makes troubleshooting easier. These tools feel like helpful assistants that reduce manual effort and increase confidence. ## Beginner-Friendly Laravel Code Examples Laravel keeps code readable and expressive. **Example of returning a view:** ``` return view('home'); ``` ``` return view('home'); ``` **Explanation:** - Loads the home.blade.php view file. - Used to display pages to users. - Keeps presentation separate from logic. - Commonly used in controllers. **Example of returning text:** ``` return "Welcome to Laravel"; ``` ``` return "Welcome to Laravel"; ``` **Explanation:** - Sends a plain text response to the browser. - Useful for testing routes quickly. - Helps beginners understand response flow. - Shows Laravel’s simple and expressive syntax. These examples show how Laravel focuses on clarity. Even without deep knowledge, beginners can understand what the code is doing. ## Common Beginner Mistakes Beginners often struggle due to habits rather than complexity. Common mistakes include: - **Trying to learn everything at once:** Causes overload and confusion. - **Ignoring structure:** Leads to messy and hard-to-maintain code. - **Skipping error messages:** Misses helpful guidance from Laravel. When you avoid these mistakes, you can learn Laravel more easily. ## Conclusion Laravel may seem intimidating at first, but as this guide shows, it is actually built to make web development simpler and more structured. From clean routing and MVC architecture to powerful tools like Eloquent ORM and built-in security, Laravel helps beginners write organized, readable, and maintainable code. With its clear folder structure, supportive community, and step-by-step learning approach, Laravel grows with you as your skills improve. If you are starting your journey in backend development, Laravel is a reliable and beginner-friendly framework worth learning. ## FAQs ### 1. Is Laravel good for beginners? Laravel is very beginner-friendly. It offers a clear project structure, readable syntax, and excellent documentation, which helps new developers learn backend development without feeling overwhelmed. ### 2. Do I need to learn PHP before learning Laravel? Having basic knowledge of PHP is important. Laravel is built on PHP, so understanding PHP fundamentals will make learning Laravel much easier. ### 3. Is Laravel used for frontend or backend development? Laravel is mainly used for backend development. It handles application logic, database management, routing, and security, but it can work alongside frontend frameworks if needed. ### 4. Is Laravel suitable for large applications? Laravel is suitable for both small and large applications. Its MVC architecture and organized structure make it easy to scale projects as they grow. ### 5. How long does it take to learn Laravel? The basics of Laravel can be learned in a few weeks with regular practice. Mastery depends on your experience with PHP and how deeply you explore advanced features. ### 6. Is Laravel still in demand? Laravel is widely used and remains in high demand. Many companies choose Laravel because it speeds up development and produces clean, maintainable applications. ## Stop Wasting Time on Servers. Start Building Instead. You didn’t start your project to babysit servers. Let **ServerAvatar** handle deployment, monitoring, and backups — so you can focus on growth. Deploy **WordPress, Laravel, N8N**, and more in minutes. No DevOps required. No command line. No stress. [ 🚀 Try Free ](https://app.serveravatar.com) [ 🌐 Learn More ](https://serveravatar.com/) Trusted by 10,000+ developers and growing. **Categories:** Blog, Guide, Laravel, Others **Tags:** laravel, Laravel basics, Laravel for Beginners, Laravel framework, Laravel Guide, Learn Laravel, PHP Laravel --- ### [How to Install NextCloud Using ServerAvatar](https://serveravatar.com/install-nextcloud/) **Published:** February 17, 2026 **Author:** Meghna Meghwani **Content:** [![Blog banner - ServerAvatar](https://serveravatar.com/wp-content/uploads/2025/09/728_90-Banner-3-1024x127.png)](https://serveravatar.com/?ref=blog)Have you ever wished for your own private cloud, where your files live safely, and you stay fully in control? Not Google Drive. Not Dropbox. Yours*.* That’s exactly what NextCloud offers, and with ServerAvatar, setting it up is no longer a scary technical process. You already know exactly what you want, and I’ll walk you through every step to deploy using ServerAvatar, no wrong steps, no confusion. Whether you’re a blogger, freelancer, small business owner, or just someone who values privacy, this guide is written for real people, not system admins. Let’s get started. ## What Is NextCloud? [NextCloud](https://nextcloud.com/?ref=serveravatar.com) is an open-source cloud storage platform that lets you store, sync, and share files securely. Unlike public cloud services, your data stays on your own server. ![NextCloud](https://serveravatar.com/wp-content/uploads/2026/02/image-133-1024x478.png) You can upload files, create folders, share links, collaborate on documents, and even sync across devices, all without handing over your data to third parties. In simple words, NextCloud is like building your own Google Drive at home. ### Why Choose NextCloud for File Storage NextCloud is a great option for anyone who wants full control over their files without relying on third-party cloud providers. It focuses on privacy, flexibility, and transparency, making it suitable for both personal and business use. - **Full data ownership:** Your files stay on your own server, so no third party can access or control them. - **Better privacy:** You decide who can view, share, or modify your data at all times. - **No recurring storage fees:** You only pay for your server, not monthly storage plans. - **Custom apps and integrations:** Extend functionality with apps that fit your workflow. - **Open-source transparency:** Anyone can review the code, ensuring trust and security. If privacy matters to you, NextCloud is a solid choice. ## What Is ServerAvatar? [ServerAvatar](https://serveravatar.com/) is a platform to simplify the hosting and management of servers and applications without deep technical knowledge. It simplifies the process of deploying and managing PHP and Node.js based web applications on servers. ![server panel - NextCloud](https://serveravatar.com/wp-content/uploads/2026/02/image-134.png) Instead of manually installing software through command lines, ServerAvatar offers: - One-click application installers for popular applications - Security setup - Easy server monitoring - Clean, beginner-friendly dashboard - Instant and Scheduled Backups - Log monitoring - AI Bot Blocker - and many more features It’s like having a smart control panel for your server. ## Why Install NextCloud Using ServerAvatar Installing NextCloud manually can be time-consuming and confusing, especially for beginners. ServerAvatar simplifies the entire process by automating setup and configuration in just a few clicks. - **One-click NextCloud application installation:** Deploy NextCloud instantly without manual steps. - **Automatic database setup:** Databases are created and configured for you automatically. - **Automatic SSL installation:** Secure your NextCloud site with HTTPS by default. - **Secure configurations by default:** Best security settings are applied during installation. - **No human error:** Automation removes mistakes that often happen in manual setups. In short, ServerAvatar saves time, effort, and frustration. ### Prerequisites Before Installation Before installing NextCloud, you only need a few basic things in place. No advanced technical skills or Linux expertise are required to get started. - **A ServerAvatar account:** To deploy and manage your server and applications. - **A cloud server:** Acts as the foundation where NextCloud will be installed. - **A domain (optional but recommended):** Makes your NextCloud instance easier to access. - **Basic internet access and curiosity:** Enough to follow along and explore the setup. No advanced Linux knowledge needed. ### Setting Up a Server in ServerAvatar You can easily create a server directly from the ServerAvatar Dashboard by clicking on the Create button. ServerAvatar offers both options Managed server and Self managed server options to deploy your server. - **Managed Server:** ServerAvatar handles server maintenance, updates, and core management for you. - **Self-Managed Server:** You control the server while ServerAvatar helps with deployment and monitoring. Select your preferred option and fill in the required details, such as server name, tech stack, database, etc., to deploy the server. ServerAvatar will automatically install all required server packages in the background. You don’t need to touch a terminal, just wait a few minutes. ### Deploy NextCloud Application Once your server is ready: - Click on the server dashboard icon to go to the server panel. ![application panel - NextCloud](https://serveravatar.com/wp-content/uploads/2026/02/image-135-1024x212.png) - Go to the **Applications** section, and click on the **Create an Application** button. ![create NextCloud application](https://serveravatar.com/wp-content/uploads/2026/02/image-137-1024x287.png) - Enter your preferred application name. - Select Domain Type between: - **Primary Domain** - **Test Domain** (ServerAvatar provides a temporary domain for testing purposes) - Enter your desired domain name. - Select the checkbox to automatically install the SSL Certificate to secure your application. Please note that this is an optional step, you can also install the SSL Certificate later. - Select **One Click** as a Deployment Method. - Select **Nextcloud** as an application to install. - Provide administrator credentials such as Username, Email ID, and Password. - Select the checkbox to automatically install the SSL Certificate to secure your application. Please note that this is an optional step, you can also install the SSL Certificate later. - Select the checkbox to automatically install the Log Monitoring Suite to track logs to help you detect errors, issues, and unusual activity early. - Select the checkbox to enable Pro-active Site Monitoring to continuously monitor your site’s uptime and performance. Please note that this feature is only available with the [Premium Hosting Care Plan](https://serveravatar.com/premium-hosting-care-plan?ref=serveravatar.com). - Click on the **Create** **Application** button. This is where the magic begins. ![NextCloud create application](https://serveravatar.com/wp-content/uploads/2026/02/image-138-957x1024.png) That’s it. ServerAvatar handles PHP, database creation, permissions, and background setup automatically. ### Accessing Your NextCloud Dashboard After installation completes: - Visit your domain directly from the application panel of ServerAvatar Dashboard. ![NextCloud application](https://serveravatar.com/wp-content/uploads/2026/02/image-139-1024x431.png) - You can see the login page of NextCloud, as attached below. ![NextCloud login](https://serveravatar.com/wp-content/uploads/2026/02/image-140-1024x663.png) - Log in using admin credentials. You’ll land on the **NextCloud dashboard**, where you can upload files, create folders, and customize settings. ![NextCloud Dashboard](https://serveravatar.com/wp-content/uploads/2026/02/image-141-1024x410.png) It feels just like a commercial cloud service, only better. ## Securing Your NextCloud Application Protecting your data is essential, especially when storing personal or business files. ServerAvatar offers built-in security tools that can be enabled directly from the dashboard. - **Enable SSL certificates:** Encrypts data transferred between users and the server. - **Use firewall protection:** Blocks unauthorized access and suspicious traffic. - **Use Fail2Ban protection:** Prevents repeated login attempts and brute-force attacks. - **Enable 8G Firewall:** Filters malicious requests before they reach your application. - **Enable AI Bot Blocker:** Stops harmful bots from accessing your site. - **Set a strong admin password:** Adds an extra layer of protection to your admin account. ## Common Issues and How to Fix Them Beginners may face small issues after installation, but most problems are easy to resolve. ServerAvatar provides tools that help fix these without needing external support. - **Page not loading:** Check and verify your domain DNS settings. - **Slow uploads:** Increase PHP memory limits from the server settings. - **Login errors:** Reset the NextCloud admin password from the dashboard. Most problems can be solved directly from ServerAvatar without technical support. [![Blog banner - ServerAvatar](https://serveravatar.com/wp-content/uploads/2025/09/728_90-Banner-1-1024x127.png)](https://serveravatar.com/?ref=blog)## Is ServerAvatar + NextCloud the right choice for you? This combination is ideal if you want a private cloud solution without complex setup or technical stress. It offers simplicity, control, and reliability in one package. - **Private cloud storage:** Keep your data fully under your control. - **Easy setup:** Install and manage NextCloud without manual commands. - **Minimal server setup headaches:** ServerAvatar handles the heavy lifting. - **No command to deploy NextCloud application:** Everything works through a clean UI. - **Full control over your data:** You decide how and where your files are stored. If these points matter to you, ServerAvatar and NextCloud are definitely worth choosing. ## Conclusion Setting up your own private cloud doesn’t have to be complicated or intimidating. With NextCloud, you get complete control over your data, and with ServerAvatar, you get a smooth, stress-free way to deploy and manage it. From one-click installation to built-in security and monitoring tools, ServerAvatar removes the technical barriers that usually come with self-hosted applications. If you value privacy, simplicity, and reliability, using NextCloud with ServerAvatar is a smart and future-proof choice for both personal and business needs. ## FAQs ### 1. Do I need technical or Linux knowledge to install NextCloud using ServerAvatar? ServerAvatar is designed for beginners and does not require command-line or advanced Linux knowledge. ### 2. Can I install NextCloud without a custom domain? You can use ServerAvatar’s test domain for setup and testing, but a custom domain is recommended for long-term use. ### 3. Is my data secure when using NextCloud with ServerAvatar? ServerAvatar provides SSL, firewall protection, Fail2Ban, and other security features to keep your data safe. ### 5. Is SSL mandatory for running NextCloud? SSL is not mandatory, but it is strongly recommended to protect your data and user login information. **Categories:** Application Deployments, Blog, Guide, Linux, Tutorials, Ubuntu **Tags:** install nextcloud, install nextcloud using serveravatar, nextcloud, nextcloud beginner guide, nextcloud installation guide, nextcloud setup, self hosted cloud storage --- ### [How to Remove All Text in a File using Vi/Vim](https://serveravatar.com/remove-all-text-using-vi-vim/) **Published:** February 16, 2026 **Author:** Meghna Meghwani **Content:** [![Blog banner - ServerAvatar](https://serveravatar.com/wp-content/uploads/2025/09/728_90-Banner-3-1024x127.png)](https://serveravatar.com/?ref=blog)If you have ever opened a file in Vi or Vim and wanted to remove all text in a file using Vi/Vim quickly, you are in the right place. Many users find Vi/Vim confusing at first, mainly because it works differently from common text editors. However, once you understand a few basic commands, tasks like clearing a file become very simple and fast. This guide explains how to remove all text in a file using Vi/Vim in an easy way. It avoid unnecessary complexity. By the end of this article, you will know multiple safe and reliable ways to clear file content in Vi or Vim. ## What Is Vi/Vim? Vi and Vim are terminal-based text editors commonly available on Linux and Unix-based systems. Vi is the original editor, while Vim stands for “Vi Improved.” Vim includes additional features, but both editors share the same core commands. ![what is vi/vim](https://serveravatar.com/wp-content/uploads/2026/02/image-130.png) They are widely used because they are fast, lightweight, and do not require a graphical interface. ### Why People Use Vi/Vim? Many people choose Vi/Vim because it offers full control over text editing with simple keyboard commands. It runs directly in the terminal, which makes it lightweight and reliable, especially on systems where graphical editors are not available. Since Vi/Vim is installed by default on most Unix and Linux systems, users can edit files instantly without installing extra software. Another reason for its popularity is speed and efficiency. Once the basic commands are learned, tasks like editing, deleting, and navigating through files can be done very quickly. Vi/Vim also handles large files smoothly and remains responsive, making it a practical choice for users who work with system files or frequently edit text-based content. ### Why You May Need to Remove All Text in a File Removing all text from a file is often required when the existing content is no longer useful or needs to be completely replaced. Vi/Vim makes this process quick by allowing you to clear the file without deleting or recreating it, which helps preserve the file structure and permissions. - **Resetting a configuration file:** Clears all previous settings so new configurations can be added from scratch. - **Cleaning temporary data:** Removes stored data that is no longer needed or relevant. - **Preparing a file for new content:** Creates a clean file ready for fresh information. - **Removing incorrect or outdated entries:** Eliminates content that is no longer accurate or required. Instead of deleting the file and recreating it, Vi/Vim allows you to remove all content while keeping the file intact. ## Vi vs Vim: Command Difference When it comes to removing all text from a file, Vi and Vim behave the same way. The commands used for deleting content work identically in both editors. **Aspect****Vi****Vim****Basic commands**Uses standard editing commandsUses the same standard commands**Delete all text (: %d)**SupportedSupported**Undo command (u)**Limited undo functionalityMultiple-level undo support**Command compatibility**Original command setFully compatible with Vi commands**Advanced commands**Not availableAvailable**Customization options**Very limitedHighly customizable**Syntax highlighting**Not supportedSupported**Editing features**Basic text editing onlyEnhanced editing capabilities**User experience**Minimal and simpleMore user-friendly and flexible**Use case**Basic file editing tasksAdvanced and frequent text editing### Understanding Vi/Vim Modes Vi/Vim uses different modes to separate text editing from command execution. Knowing which mode you are in is essential because most actions, including deleting content, only work in a specific mode. ![vi/vim modes](https://serveravatar.com/wp-content/uploads/2026/02/image-131.png) **Main modes you should know:** - **Normal Mode:** Allows you to run commands such as deleting, copying, or saving text. - **Insert Mode:** Used for typing and editing text inside the file. Most delete operations work only in Normal Mode. > **Important:** Press **Esc** at any time to return to Normal Mode before running commands. ## Opening a File in Vi or Vim To open a file, use one of the following commands: ``` vi filename.txt ``` ``` vi filename.txt ``` This opens an existing file or creates a new file named ‘**filename.txt**‘ using the Vi text editor in the terminal. **or** ``` vim filename.txt ``` ``` vim filename.txt ``` This opens an existing file or creates a new file named ‘**filename.txt**‘ using Vim, which offers more features and improved editing compared to Vi. ## The Quickest Command to Remove All Text The **:%d** command is the fastest and simplest way to remove all text from a file in Vi or Vim. It works in Normal Mode and clears the entire file in a single step without affecting the file itself. ``` :%d ``` ``` :%d ``` **What this command does:** - **% selects all lines in the file:** Targets every line from the beginning to the end of the file. - **d deletes the selected lines:** Removes all selected lines, leaving the file completely empty. This removes every line from the file instantly. ## Removing All Text Using Visual Mode Visual Mode allows you to manually select content before deleting it, which can feel more controlled for users who want to see what is being removed. This method is useful when you prefer confirming the selection before clearing the file. **Steps to use Visual Mode:** - **Press Esc to enter Normal Mode:** Ensures the editor is ready to accept commands. - **Type gg to move to the first line:** Positions the cursor at the beginning of the file. - **Press V to start line selection:** Activates Visual Line Mode to select full lines. - **Press G to select all lines:** Extends the selection from the first line to the last. - **Press d to delete them:** Removes all selected lines and clears the file content. This method gives visual confirmation of what is being removed. ## Clearing a File Without Deleting It Vi/Vim allows you to remove all content from a file while keeping the file itself unchanged. This means the file name, location, and access settings remain the same, and only the text inside the file is cleared. This is useful when: - **The file must continue to exist:** Ensures the file remains available for future use. - **File permissions should remain the same:** Keeps existing access and ownership settings unchanged. - **The filename is required by another process:** Allows dependent processes to continue referencing the same file. ## Difference Between Deleting Lines and Text In Vi/Vim, all content is structured as lines, which affects how deletion commands work. Understanding this difference helps you choose the correct command when clearing a file. - **Text is organized into lines:** Every file is treated as a collection of separate lines. - **Deleting lines removes complete rows:** Entire lines are removed at once. - **Deleting text may remove characters or sections:** Only specific parts of a line are deleted. - **Using :%d deletes all lines:** Removes every line, which results in an empty file. ## How to Undo Mistakes After Deleting Everything Vi/Vim makes it easy to recover from accidental deletions using its built-in undo feature. Even if all content is removed at once, the previous state of the file can be restored immediately. **Undo command:** ``` u ``` ``` u ``` Reverts the most recent change made in the file. Press **u** repeatedly, step back through multiple previous edits in order. ## Saving an Empty File in Vi/Vim Properly After clearing all text, saving the file correctly ensures the changes are preserved. Vi/Vim provides simple commands to save the file with or without exiting the editor. **Save and exit:** ``` :wq ``` ``` :wq ``` - **:wq –** Saves the empty file and exits the editor. **Save without exiting:** ``` :w ``` ``` :w ``` - **:w –** Saves the empty file without closing the editor. The file will now be saved with no content. ## Exiting Without Saving Changes If you clear file and decide not to keep changes, Vi/Vim allows you to exit the file without saving it. This prevents accidental overwriting of existing content. If you decide not to keep the changes: ``` :q! ``` ``` :q! ``` This exits the editor and discards all edits made during the session. ## Common Errors When Clearing a File Many issues occur when users are unfamiliar with how Vi/Vim modes work. These mistakes can lead to confusion or unintended changes if not handled carefully. - **Running commands in Insert Mode:** Commands do not work correctly outside Normal Mode. - **Forgetting to press Esc:** Keeps the editor in typing mode instead of command mode. - **Accidentally saving unwanted changes:** Stores changes that were not intended to be kept. - **Closing the terminal directly:** Exits abruptly without properly handling the editor state. Understanding modes helps prevent most of these problems. ## When Should You Clear a File Completely? Clearing a file is useful when existing content is no longer needed and a clean file is required. This approach avoids removing the file itself while resetting its contents. - **Starting fresh with a config file:** Removes old settings to allow new ones. - **Clearing test data:** Deletes temporary or trial content. - **Rewriting documentation:** Prepares the file for updated information. - **Resetting logs:** Clears accumulated entries while keeping the log file active. It’s like erasing a whiteboard before a new lesson. ## Best Practices While Editing Files Following a few basic habits can reduce errors and make editing safer. These practices help maintain control while working with powerful commands. - **Confirm Normal Mode:** Ensures commands run correctly. - **Review before saving:** Prevents storing unwanted changes. - **Use undo freely:** Allows safe experimentation while learning. - **Make small changes:** Reduces the risk of large accidental edits. These habits help avoid accidental data loss. [![Blog banner - ServerAvatar](https://serveravatar.com/wp-content/uploads/2025/09/728_90-Banner-1-1024x127.png)](https://serveravatar.com/?ref=blog)## Tips to Feel Comfortable with Vim Becoming confident with Vim takes time and regular use. A gradual learning approach helps build familiarity without feeling overwhelmed. - **Use Vim regularly:** Builds familiarity through repetition. - **Learn a few commands at a time:** Keeps learning manageable. - **Practice patiently:** Allows commands to become natural over time. - **Keep a cheat sheet:** Provides quick reference when needed. Vim rewards patience. Once it clicks, it really clicks. ## Command Summary for Quick Reference - **Delete all text –** :%d - **Visual delete –** gg → V → G → d - **Undo changes –** u - **Save and exit –** :wq - **Exit without saving –** :q! ## Conclusion Removing all text from a file using Vi or Vim becomes straightforward once you understand a few essential commands and concepts. This guide walked through multiple safe methods, from using the quick :%d command to Visual Mode selection, while also explaining how to undo mistakes, save changes properly, and exit without saving when needed. By learning how modes work and following basic best practices, you can confidently clear file content in Vi/Vim without risking accidental data loss. With regular use, these commands become second nature and make file editing faster and more controlled. ## FAQs ### 1. What is the easiest way to remove all text in a file using Vi/Vim? The easiest and fastest way is to use the :%d command in Normal Mode, which deletes all lines at once. ### 2. Can I recover my content after deleting everything in Vi/Vim? You can press u to undo the deletion and restore the previous content, as long as the file has not been closed. ### 3. Does removing all text delete the file itself? Only the content inside the file is removed. The file name, location, and permissions remain unchanged. ### 4. What should I do if I accidentally delete content and save the file? If the file is already saved and closed, recovery depends on backups or version control, as undo works only during the current session. ### 5. Is there any difference between Vi and Vim for deleting all text? Both Vi and Vim use the same commands for removing all text, and the behavior is identical for this task. **Categories:** Blog, Guide, Linux, Others, Tutorials, Ubuntu **Tags:** clear file content in vi, delete all text, remove all text in file using vi vim, vi editor commands, vim basics for beginners, vim delete all lines, vim file editing --- ### [Top 10 Powerful Use Cases of ServerAvatar: Simplify Your Server Management](https://serveravatar.com/top-10-powerful-use-cases-of-serveravatar/) **Published:** May 19, 2025 **Author:** Meghna Meghwani **Content:** [![Blog banner - ServerAvatar](https://serveravatar.com/wp-content/uploads/2025/09/728_90-Banner-3-1024x127.png)](https://serveravatar.com?ref=blog)In today’s fast digital world, managing cloud servers the right way is important, as well as complex and time-consuming, whether you’re a developer, a business owner, or running an agency with multiple clients. That’s where ServerAvatar comes in and is really helpful. ServerAvatar is a smart and easy-to-use server management panel that simplifies cloud hosting, saves time by automating the complex server setup with avoiding mistakes. It simplifies the tasks like setting up servers, installing applications, and handling the regular maintenance—so you can focus on grow your projects. In this blog, we’ll look at the top 10 powerful use cases of ServerAvatar to save your time, avoid mistakes, and grow your projects more easily. ## **1. Automatic Server Setup** Setup a new Server manually can be complex and take hours, especially if you’re unfamiliar with Linux and it’s command line operations. With ServerAvatar there is no need to manually setup stacks like LAMP, LEMP or OLS. ServerAvatar can configure a fresh Ubuntu server for you in minutes, setting up essential services. ![Connect Server](https://serveravatar.com/wp-content/uploads/2025/05/dashboard-image-1024x848.jpg)**Key Benefits:** - ServerAvatar supports Ubuntu 20.04, 22.04, and 24.04 - Installs Apache, Nginx, or OLS, Database, and sets up PHP and other services - You don’t require any technical expertise to deploy a reliable and secure server. ServerAvatar handles it for you, accurately and automatically. ## **2. Deploy Multiple Applications Instantly, including WordPress and Custom PHP** With ServerAvatar’s one-click app installer, you can deploy Multiple apps like WordPress, Mautic, N8N, and UptimeKima effortlessly. You can easily deploy multiple apps like custom PHP, Laravel, and many more. ServerAvatar handles everything, like setting up the database without touching the command line. ![Deploy Multiple Application](https://serveravatar.com/wp-content/uploads/2025/05/oneclcik.avif)**Included Features:** - One-click Application installer - Built-in server-level caching - Automatic SSL certificate installation - Application and Database Backup - Per-site PHP version management ## **3. Easy Git Deployment** You can link your GitHub, GitLab, or Bitbucket repositories and directly go live with just a few clicks. This makes it incredibly easy to automate everything after cloning like install dependencies, or enabling auto pull. You can focus on coding while ServerAvatar handles the deployment without any hassle. **Included Features:** - GitHub, GitLab, and Bitbucket integration - Webhook-based CI/CD for continuous deployment - PM2 process manager for apps - Environment variable and .env file management ![Git Deployment](https://serveravatar.com/wp-content/uploads/2025/05/git-hub.avif)## **4. Automatic Backups & Disaster Recovery** Nowadays, Backups are essential, and ServerAvatar makes it easy to take instant backups and to schedule automatic backups of your apps and databases. Data loss from human error or cyberattacks can be Distressing. ServerAvatar helps you stay protected with reliable and fully automated backup solutions tailored to your needs. You can save backups on platforms like Dropbox, Google Drive, Wasabi, or ServerAvatar storage and restore them anytime with a single click. ![Automatic backups](https://serveravatar.com/wp-content/uploads/2025/05/dash-1024x290.jpg)**Backup Features:** - Schedule backups daily, weekly, or at custom intervals - Full backups include application files and databases - Backup to storage options like Amazon S3, Dropbox, Wasabi, and more - One-click recovery and restore ## **5. Log Monitoring and Analytics** Dive deep into logs and gain clarity to get all the insights you need easily. ServerAvatar provides a clean, easy-to-use interface to view and monitor various logs. ![Log monitoring](https://serveravatar.com/wp-content/uploads/2025/05/Dsahboard-1-1024x317.jpg)**Log Monitoring Includes:** - Effortless Log Analysis - In-App Insights - Data Vision - Performance Insights - Visitor Insights ## **6. White-Label Control Panel for Clients** For agencies or IT resellers, branding is essential. ServerAvatar allows you to customize the entire white-label panel with your own logos and branding for better server and application management experience, providing your clients with a seamless interface under your brading and name. ![White Label Control Panel](https://serveravatar.com/wp-content/uploads/2025/05/analytics-01-1024x411.jpg)**Standout Features:** - Custom logos, color, and branding - White-labeled client control panels - Major advantage for agencies aiming to offer managed hosting as a premium service without revealing third-party tools [![Blog banner - ServerAvatar](https://serveravatar.com/wp-content/uploads/2025/09/728_90-Banner-1-1024x127.png)](https://serveravatar.com?ref=blog)## **7. Team Collaboration and Access Control** ServerAvatar allows you to bring your team into one platform without sacrificing control. With detailed user and role-based access control, you can assign access based on the team member’s responsibility. With ServerAvatar’s Team Management, you can create a secure and collaborative environment, perfect for distributed teams or multi-client operations. ![Team Collaboration](https://serveravatar.com/wp-content/uploads/2025/05/Team-Members-1024x472.jpg)**Flexible Access Options:** - Developer-only access (no server-level controls) - Read-only access for clients or analysts - Full administrative control for lead developers - Custom permissions access based on custom roles ## **8. Server Health & Resource Monitoring** Want to make sure your server and apps are running at peak performance? ServerAvatar provides you with powerful and detailed real-time server analytics so you can monitor your server health with precision. You’ll also get email alerts if your server crosses the performance limits you set, helping you take action early and avoid downtime. ![server load](https://serveravatar.com/wp-content/uploads/2025/05/Graph-1024x564.jpg)**Analytics Dashboards Show:** - Server Load - Memory Usage - Disk Space Usage - Swap Memory - Database query loads - ## **9. Application & Database Migration** Migrating a live application is risky — unless you’re using ServerAvatar. It offers an easy migration feature to migrate your website to a different server within ServerAvatar. You can easily migrate applications and databases without any technical complexity. ![site migration](https://serveravatar.com/wp-content/uploads/2025/05/Application-1024x445.jpg)**Migration Capabilities:** - Easy application migration with minimal effort - Easily migrate the app to another server - Transfer the database effortlessly to another server - ServerAvatar handles the heavy lifting - ServerAvatar ensures a smooth, secure, and automated transfer process ## **10. Built-In Security Features of ServerAvatar** Security is a core principle in ServerAvatar’s design. It ensures your servers are always locked down and protected from common threats, while still being easy to manage. With security by default, you reduce vulnerabilities and gain peace of mind — all without needing a cybersecurity expert. **Built-in Security Features:** - [Free SSL for all applications with auto-renewals](https://serveravatar.com/docs/application/automatic-installation) - [Firewall management via UFW](https://serveravatar.com/docs/server/firewall) - [Fail2Ban for brute-force attack protection](https://serveravatar.com/docs/server/fail2ban) - [Isolated Environments](https://serveravatar.com/docs/Getting%20Started/isolated-environment) - [Automatic Security Updates](https://serveravatar.com/docs/server/security-settings#enable-security-updates) - [IP Whitelisting](https://serveravatar.com/docs/account-management/whitelist-ip) - [Two Factor Authentication](https://serveravatar.com/docs/account-management/two-factor-authentication) ## **Conclusion:** ServerAvatar is more than just a control panel. From quick server setup to high-performance hosting and secure multi-app deployments, ServerAvatar simplifies cloud management at every stage. The top 10 use cases covered above are just a glimpse of what ServerAvatar can offer. Whether you’re managing one project or hundreds, ServerAvatar scales with your business and helps you deliver better services, faster. If you’re looking to automate infrastructure tasks, improve app performance, and secure your digital assets, ServerAvatar is the all-in-one solution you’ve been searching for. If you want a simpler, faster way to manage your servers, ServerAvatar is worth trying out.[](https://3.basecamp.com/5840738/buckets/41514807/boosts/new?boost%5Bboostable_gid%5D=Z2lkOi8vYmMzL1JlY29yZGluZy84NjUyNjUyODY0) **Categories:** Blog **Tags:** Server Management, VPS Management, Web Hosting --- ### [Top 5 WordPress Security Plugins to Use for Site Safety 2026](https://serveravatar.com/top-5-wordpress-security-plugins-to-use-for-site-safety-2025/) **Published:** June 30, 2025 **Author:** Smit Pipaliya **Content:** [![Blog banner - ServerAvatar](https://serveravatar.com/wp-content/uploads/2025/09/728_90-Banner-3-1024x127.png)](https://serveravatar.com?ref=blog)WordPress websites get attacked every single day. Hackers use smart tools to break into sites and steal information. Your website needs a strong **WordPress security plugin** right now. I have tested many WordPress security plugins over the years. Some work great, others slow down your site. This guide shows you the 5 best options that actually protect your website without causing problems. ## Why WordPress Sites Get Hacked WordPress is popular. Over 800 million websites use it. This makes it a big target for hackers. **Common attacks include:** - Brute force login attempts where bots try thousands of passwords - Malware that gets injected into your files - SQL injection that steals your database - Cross-site scripting that tricks visitors - DDoS attacks that crash your server Most website owners don’t realize they need security until it’s too late. A hacked site can lose Google rankings, visitor trust, and even customer data. ## How I Tested These Plugins I installed each plugin on test websites and checked: - Speed impact on loading times - How well they block real attacks - Ease of setup for beginners - Quality of customer support - Value for money I also looked at user reviews from thousands of website owners who use these plugins daily. ## Top 5 WordPress Security Plugins ## 1. Wordfence Security – Best Overall Choice ![Wordfence](https://serveravatar.com/wp-content/uploads/2025/06/image-47.jpg)Wordfence protects over 4 million websites. It has stopped billions of attacks since 2011. The plugin works differently than others. Instead of just blocking bad IPs, it actually reads the code that tries to run on your site. This catches attacks that other plugins miss. **Key Features:** - Real-time firewall that blocks attacks instantly - Malware scanner that checks every file on your site - Login security with two-factor authentication - Live traffic monitoring to see who visits your site - Country blocking to stop traffic from specific regions - Rate limiting to prevent spam and bot attacks The firewall gets updates from a network of millions of sites. When hackers try new attacks, Wordfence learns and protects everyone. **Detailed Performance:** - Free version blocks most attacks but updates come 30 days late - Premium version gets instant protection updates - Scans can slow down small websites temporarily - Uses more server resources than lightweight plugins - Works on any hosting provider **Pricing:** - Free version available with good protection - Premium costs $149 per year **Who should use it:** - Business websites that need maximum protection - E-commerce stores handling customer data - High-traffic sites that attract more attacks - Users comfortable with detailed security settings ## 2. Sucuri Security – Best Cloud Protection ![Sucuri](https://serveravatar.com/wp-content/uploads/2025/06/image-48.png)Sucuri works from the cloud instead of your server. This means it can block huge attacks without slowing down your website. The company cleans over 700 hacked websites every day. They know how to fix problems fast. **Key Features:** - Cloud-based firewall that filters all traffic - Professional malware removal by security experts - Website monitoring for blacklist status - Content delivery network for faster loading - DDoS protection against large attacks - SSL certificate monitoring - Uptime monitoring with instant alerts The firewall sits between your website and visitors. Bad traffic gets blocked before it even reaches your server. This protects against attacks that could crash other security plugins. **Detailed Performance:** - Zero impact on website loading speed - Handles massive traffic spikes automatically - Requires DNS changes for full protection - Setup can be technical for beginners - Works with any hosting provider - Improves site speed with built-in CDN **Pricing:** - **Who should use it:** - High-traffic websites that need speed - Businesses that want professional support - Sites that get targeted by large attacks - Users who prefer hands-off security management ## 3. Solid Security – Best for Beginners ![Solid Security](https://serveravatar.com/wp-content/uploads/2025/06/image-49.jpg)Solid Security used to be called iThemes Security. They changed the name but kept the easy-to-use approach that beginners love. The plugin has a simple setup wizard that walks you through every step. You don’t need technical knowledge to secure your website properly. **Key Features:** - Easy setup wizard for beginners - Brute force protection with smart blocking - File change monitoring and alerts - Database backup scheduling - Two-factor authentication options - Password strength enforcement - User activity logging - Away mode for temporary site locking The plugin explains what each security setting does in plain English. This helps beginners understand why they need each feature. **Detailed Performance:** - Simple one-click security improvements - Clear explanations for all settings - Moderate impact on server resources - Good free version with essential features - Reliable performance on shared hosting - Regular updates and bug fixes **Pricing:** - Free version with core security features - Pro version costs $199 per year **Who should use it:** - WordPress beginners learning about security - Small business owners without tech skills - Users who want simple security that just works - Website owners who need guidance and explanations [![Blog banner - ServerAvatar](https://serveravatar.com/wp-content/uploads/2025/09/728_90-Banner-1-1024x127.png)](https://serveravatar.com?ref=blog)## 4. Shield Security – Best AI-Powered Protection ![ShiledSecurity](https://serveravatar.com/wp-content/uploads/2025/06/image-50.png)Shield Security uses artificial intelligence to catch new types of attacks. Their AI system identifies 80% of new malware before it spreads to other websites. The plugin focuses on stopping bot attacks, which cause most security problems. It works invisibly without bothering real visitors. **Key Features:** - AI-powered malware detection system - Invisible bot protection without captchas - Silent monitoring that doesn’t slow sites - Database-level change detection - Advanced login protection - User session management - Security audit logging - GDPR-compliant data handling The AI learns from attacks across their network. When new malware appears anywhere, the system updates to protect all users automatically. **Detailed Performance:** - Lightweight design with minimal server impact - Invisible protection that doesn’t annoy visitors - Advanced threat detection capabilities - Self-protecting code that secures itself - Compatible with other security plugins - Regular AI model updates **Pricing:** - Free version with basic bot protection - Basic version costs $129 per year - Business plans available - Enterprise level pricing available **Who should use it:** - Tech-savvy users who want cutting-edge protection - Websites that face sophisticated attacks - Users concerned about AI-powered threats - Sites that need invisible security ## 5. Jetpack Security – Best All-in-One Solution ![Jetpack](https://serveravatar.com/wp-content/uploads/2025/06/image-51.jpg)Jetpack comes from Automattic, the company behind WordPress.com. It combines security with other useful website tools. The plugin handles security, backups, performance, and marketing in one package. This reduces the number of plugins you need to install. **Key Features:** - Real-time malware scanning and removal - Automated daily backups with easy restore - Spam protection powered by Akismet - Brute force attack protection - Downtime monitoring and alerts - CDN for faster loading times - Site statistics and analytics - Social media integration tools Jetpack’s security features work automatically. You don’t need to configure complicated settings or monitor security logs manually. **Detailed Performance:** - Automatic security management - No technical configuration required - Slight performance impact from multiple features - Cloud-based scanning and backups - Easy integration with WordPress - Regular feature updates and improvements **Pricing:** - Free version with basic security and stats - Security plan costs $584.95 per month, billed yearly - Complete plan with all features costs $1,465.95 per month, billed yearly - Frequent 50% off promotions available **Who should use it:** - Users who want simple automated security - Small businesses that need multiple tools - Beginners who prefer hands-off management - WordPress.com users migrating to self-hosted sites ## Security Plugin Comparison Chart [](https://storage.3.basecamp.com/5840738/blobs/5ed21cce-5592-11f0-bcf7-0242ac120005/download/image.png) ![WordPress security plugin](https://serveravatar.com/wp-content/uploads/2025/06/image-53.png)## Important Security Features Explained ### Firewall Protection A firewall checks every visitor before they can access your website. Good firewalls block known attackers and suspicious behavior patterns. Server-based firewalls work faster but use your hosting resources. Cloud-based firewalls handle large attacks better but require DNS changes. ### Malware Scanning Malware scanners check every file on your website for malicious code. They compare your files to clean versions and alert you to changes. Advanced scanners can detect hidden malware that disguises itself as legitimate code. Some offer automatic cleaning while others require manual removal. ### Login Protection Login security prevents unauthorized access to your WordPress admin area. Essential features include: - Two-factor authentication that requires a phone or app - Login attempt limiting that blocks repeated failures - Strong password enforcement for all users - User activity monitoring to track admin actions - Session management to control login duration ### Real-time Monitoring Good security plugins monitor your website continuously and send alerts about: - Failed login attempts from suspicious IPs - Unauthorized file changes or additions - Malware detection and removal - Blacklist status from search engines - Unusual traffic patterns or spikes ### Backup Integration While not all security plugins include backups, having them integrated makes recovery much easier if your site gets compromised. Look for plugins that offer: - Automated daily backups - One-click restore functionality - Off-site backup storage - File and database backup options ## WordPress Security Best Practices ### Keep Everything Updated WordPress releases security updates regularly. Enable automatic updates for: - WordPress core software - All installed plugins - Your active theme - PHP version on your server ### Create Strong Passwords Use unique passwords for every account: - WordPress admin accounts - Hosting control panel - Email accounts - FTP access - Database connections ### Choose Secure Hosting Your hosting provider’s security affects your website protection: - Look for hosts that offer server-level firewalls - Choose providers that scan for malware regularly - Ensure they provide SSL certificates - Check that they offer daily backups - Verify they keep software updated ### Limit User Access Follow the principle of least privilege: - Give users only the permissions they need - Remove inactive user accounts promptly - Use strong passwords for all accounts - Enable two-factor authentication for admins - Monitor user activity regularly ### Regular Security Maintenance Security requires ongoing attention: - Review security logs weekly - Update security settings based on new threats - Test backup restoration procedures monthly - Monitor website performance for issues - Keep security plugins updated ## Common WordPress Threats in 2025 ## Advanced Brute Force Attacks Hackers now use artificial intelligence to make brute force attacks more effective. They analyze password patterns and target weak credentials systematically. ### Modern attacks can: - Try thousands of password combinations per minute - Rotate IP addresses to avoid detection - Target multiple sites simultaneously - Use stolen password databases - Adapt to security measures automatically ### Sophisticated Malware New malware types become more advanced every year: - Some hide in legitimate-looking files - Others activate only under specific conditions - Advanced variants modify themselves to avoid detection - Some target specific plugins or themes - Others steal data without obvious symptoms ### Plugin and Theme Vulnerabilities Third-party code often contains security flaws: - Abandoned plugins stop receiving security updates - Popular plugins become bigger targets - Theme vulnerabilities can expose entire sites - Some developers lack security expertise - Users often delay installing updates ### Supply Chain Attacks Attackers target the development process itself: - Compromised developer accounts - Malicious code injected into updates - Fake plugins that look legitimate - Repository infiltration - Social engineering against developers ### Social Engineering Attackers trick website owners directly: - Fake support emails requesting access - Phone calls claiming urgent security issues - Phishing emails that steal credentials - Fake security warnings and popups - Impersonation of hosting providers ## How to Install and Configure Security Plugins ### Pre-Installation Checklist Before installing any security plugin: - Create a complete backup of your website - Document your current login credentials - List all installed plugins and themes - Note any custom security settings - Plan for potential troubleshooting time ### Step-by-Step Installation Installing security plugins properly: 1. Go to Plugins > Add New in WordPress 2. Search for your chosen security plugin 3. Read the description and reviews carefully 4. Click Install Now then Activate 5. Follow the setup wizard completely 6. Configure basic security settings 7. Test all website functionality thoroughly ### Initial Configuration Tips Start with conservative settings: - Enable basic firewall protection - Set up login attempt limiting - Configure email notifications for alerts - Enable malware scanning schedules - Test backup and restore procedures ### Avoid these common mistakes: - Don’t enable all features at once - Don’t set security levels too high initially - Don’t forget to whitelist your own IP - Don’t ignore plugin conflict warnings - Don’t skip the testing phase ### Ongoing Maintenance Tasks Security plugins need regular attention: - Review security logs weekly for patterns - Update firewall rules based on new threats - Adjust settings based on website changes - Monitor performance impact regularly - Test security features periodically ### Troubleshooting Common Issues Security plugins can sometimes cause problems: - Login lockouts from incorrect settings - Website loading issues from firewall rules - Plugin conflicts with other software - False positive malware detections - Email notification delivery problems ## Frequently Asked Questions **Do I really need a security plugin if my hosting is secure?** Yes, hosting security and application security work differently. Hosting protects the server while security plugins protect your WordPress installation specifically. They work together for complete protection. Many hosting providers offer basic security but it’s not enough for WordPress-specific threats. Security plugins understand WordPress vulnerabilities that generic server security might miss. **Will security plugins slow down my website?** Some security plugins affect performance while others don’t. Cloud-based solutions like Sucuri have minimal impact because they work from external servers. Server-based plugins like Wordfence can slow down scans but protect better against certain attacks. Choose based on your priorities. High-traffic sites benefit from cloud protection while smaller sites can use server-based plugins effectively. **How often should I scan my website for malware?** Daily scans work well for most websites. Business sites handling sensitive data should scan more frequently, even every few hours. The scan frequency depends on: - How often you update content - Your website’s traffic volume - The sensitivity of your data - Your industry’s threat level - Your comfort with risk **What should I do if my website gets hacked?** Take immediate action if you discover a hack: 1. Change all passwords immediately including WordPress, hosting, and email 2. Activate your security plugin’s cleanup features 3. Restore from a clean backup if available 4. Contact your security plugin’s support team 5. Consider hiring professional cleanup services for complex infections 6. Notify customers if their data might be compromised **Free vs paid security plugins – which should I choose?** **Free versions** provide basic protection suitable for personal blogs and small websites. They typically include: - Basic firewall protection - Limited malware scanning - Simple login security - Community support only **Paid versions** offer advanced features needed for business websites: - Real-time threat intelligence updates - Professional malware removal - Priority customer support - Advanced reporting and monitoring - Guaranteed response times **Can I use multiple security plugins together?** Generally, you should use only one comprehensive security plugin to avoid conflicts. However, you can combine specialized plugins safely: - One main security plugin for firewall and scanning - A separate backup plugin if needed - Spam protection plugins like Akismet - SSL plugins for certificate management Always test plugin combinations on a staging site first to check for conflicts. **How do I know if my security plugin is working?** Monitor these indicators to verify your security plugin is functioning: - Regular scan completion notifications - Security log entries showing blocked attacks - Alert emails for suspicious activity - Dashboard showing plugin status as active - Performance metrics staying within normal ranges Test your security periodically by checking if the plugin detects known issues or blocks simulated attacks. ## Conclusion WordPress security is not optional in 2025. Hackers use advanced tools and target websites of all sizes. The right security plugin protects your hard work and keeps visitors safe. For most websites, I recommend starting with **Wordfence** for comprehensive protection. Business owners who want simplicity should choose **Solid Security**. High-traffic sites benefit from **Sucuri’s** cloud protection. Remember that security plugins work best when combined with good practices. Keep WordPress updated, use strong passwords, choose reliable hosting, and backup your site regularly. Don’t wait until your site gets hacked. Install a security plugin today and sleep better knowing your website has professional protection working around the clock. > **Note:** ServerAvatar is powerful and user-friendly server and application management panel and hosting platform. It simplifies server management and makes deploying PHP and Node.js applications like WordPress, N8N, Laravel, and others easy, even for non-experts. > If you’re looking to manage your server efficiently without dealing with complex command-line, you can try [ServerAvatar](https://serveravatar.com/) for a fully hands-off experience. > **Register now to explore ServerAvatar: [https://app.serveravatar.com](https://app.serveravatar.com/)** **Categories:** Blog **Tags:** php, PHP Hosting, plugin, security, security plugin, Web Hosting, Wordpress --- ### [Best AliExpress Alternatives for Profitable Dropshipping 2026](https://serveravatar.com/best-aliexpress-alternatives/) **Published:** August 6, 2025 **Author:** Meghna Meghwani **Content:** [![Blog banner - ServerAvatar](https://serveravatar.com/wp-content/uploads/2025/09/728_90-Banner-3-1024x127.png)](https://serveravatar.com?ref=blog)**AliExpress Alternatives** have become a real necessity for me in 2025. I’ve been doing this dropshipping thing for almost four years now, and AliExpress was my everything—until this year hit me like a truck. Remember when that 30% tariff bomb dropped in June? Yeah, that killed my margins overnight. I was making decent money on wireless earbuds – about $12 profit per sale. After the tariffs? Down to maybe $6 if I was lucky. That’s not sustainable when you’re trying to pay rent. But honestly, the tariffs weren’t even the worst part. It was my customers getting absolutely fed up with waiting. I had this one customer – bought a phone case in early March, didn’t get it until late April. Left me a one-star review that basically said “Never again.” And you know what? I don’t blame him. Then there’s the quality lottery. Sometimes you get amazing stuff that looks exactly like the photos. Other times… well, let’s just say I’ve received some interesting interpretations of what a “waterproof bluetooth speaker” should be. Spoiler alert: it wasn’t waterproof. So yeah, I started looking around. And honestly? I should’ve done this years ago. ## What Really Matters When You’re Choosing Platforms After testing probably 20+ different platforms (and wasting money on some seriously sketchy ones), here’s what actually matters in the real world: **Shipping That Won’t Destroy Your Business** Look, nobody cares how cheap your product is if it takes six weeks to show up. I learned this the hard way when a competitor started eating my lunch just because they shipped from Texas instead of Guangzhou. **Quality You Can Actually Count On** I order samples of literally everything now. Costs me maybe $100-200 a month, but it’s saved me thousands in returns and angry customers. Trust me on this one. **Prices That Leave You Room to Breathe** Cheap isn’t always better. I’d rather pay $4 for something reliable than $1.50 for something that breaks when you look at it funny. **Payment Methods That Don’t Suck** PayPal disputes are a nightmare. Credit card chargebacks are worse. Stick with platforms that handle this stuff properly. **Customer Service That Actually Exists** When a shipment goes missing (and it will), you need someone to answer your messages. Some platforms take a week to respond. Avoid those like the plague. **Suppliers Who Don’t Disappear** Nothing worse than finding a great supplier who vanishes after two months. Look for platforms that actually vet their sellers. ## My Top 13 AliExpress Alternatives That Actually Work Alright, here’s the good stuff. These are platforms I actually use and can vouch for. No BS, just real experiences. ### 1. DHGate – Where I Actually Save Money ![DHGate-ServerAvatar](https://serveravatar.com/wp-content/uploads/2025/08/image-1024x480.png)[DHGate](https://www.dhgate.com/) literally saved my business when AliExpress prices went nuts. Same products, way better prices. It’s really that simple. **What’s Actually Worth Selling:** - Phone accessories (my bread and butter) - Jewelry pieces (crazy good margins here) - Small electronics and gadgets - Fitness accessories - Kids toys and games **Real Talk on Shipping:** - Standard stuff: 2-4 weeks (they’re pretty honest about this) - Express options: 7-14 days (worth paying extra for hot products) - US warehouse items: 5-10 days (limited selection but actually fast) **How You Actually Pay:** - Credit cards work fine - Bank transfers (slow but rock solid) - Apple Pay (pretty convenient) - PayPal got the boot (annoying but whatever) **Why I Keep Coming Back:** Found the exact same phone ring holder selling for $3.20 on AliExpress for $1.15 on DHGate. That’s like 65% savings right there. Their buyer protection actually works too – got my money back when some seller shipped completely wrong items. Plus no minimum orders, which is perfect when you’re testing new stuff. ## 2. Banggood – My Secret Weapon for Electronics ![Banggood-ServerAvatar](https://serveravatar.com/wp-content/uploads/2025/08/image-1-1024x404.png)If you’re selling any kind of tech, [Banggood](https://www.banggood.in/) is where it’s at. They actually seem to test their stuff before listing it, which is revolutionary apparently. **What’s Flying Off the Shelves:** - Wireless earbuds (everyone wants these) - Smart home gadgets - RC drones (hobby people pay premium prices) - Phone accessories and chargers - Portable speakers and audio stuff **Shipping Reality Check:** - From China: 1-3 weeks (usually closer to 2) - Express shipping: Actually 3-7 days like they claim - EU/US warehouses: 3-7 days (this changed my whole game) **Payment Situation:** - PayPal (thank god) - All the major credit cards - Wire transfer for bigger orders - Apple Pay **Why Banggood Actually Works:** They have unique products you won’t find everywhere else. I found this bluetooth sleep mask there that became my top seller for like six months straight. Nobody else had it. Quality is way more consistent than AliExpress. I still order samples, but I get burned maybe 10% as often ### 3. SUP Dropshipping – When You Want Someone Else to Handle Everything ![SUP Dropshipping-ServerAvatar](https://serveravatar.com/wp-content/uploads/2025/08/image-2-1024x464.png)[SUP Dropshipping](https://www.supdropshipping.com/) is totally different. Instead of you hunting through products, they basically become your fulfillment team. Perfect if you want to focus on marketing instead of logistics headaches. **Categories That Actually Work:** - Custom products with your own branding - Home and lifestyle stuff - Beauty and skincare products - Print-on-demand items - Seasonal products that change fast **Actual Shipping Times:** - From China: 7-14 days (pretty accurate in my experience) - Their US warehouse: 3-5 days (worth every penny) - EU warehouse: 4-6 days **Payment Options:** - PayPal (smooth sailing) - Credit cards - Alipay if you’re into that **Why SUP is Different:** They handle branded packaging, which makes your whole operation look legit. Customer gets a nice box with your logo instead of some random Chinese packaging with someone else’s brand. The Shopify integration actually works properly. Orders sync automatically, tracking updates itself. Less time managing orders means more time finding winning products. ### 4. Taobao – Crazy Cheap Prices (But You’ll Need Help) [Taobao](https://world.taobao.com/) is where you find absolutely insane prices. But fair warning – it’s complicated as hell. **What’s Actually Worth the Hassle:** - Fashion accessories (markup potential is nuts) - Craft and DIY supplies - Seasonal decorations - Phone accessories in bulk - Small electronics **Shipping Reality:** - Need an agent: 1-4 weeks depending - Direct shipping: Not happening - Consolidation services: Slower but cheaper **Payment Headaches:** - Alipay only if you go direct - Agent services: PayPal, cards, whatever - Wire transfers through agents **The Real Deal on Taobao:** Yes, prices are absolutely insane. I’ve found $12 AliExpress products for $3 on Taobao. But you definitely need an agent service, which adds complexity and some costs. Only worth it if you’re doing serious volume or testing expensive products where every dollar of cost matters. [![Blog banner - ServerAvatar](https://serveravatar.com/wp-content/uploads/2025/09/728_90-Banner-1-1024x127.png)](https://serveravatar.com?ref=blog)### 5. LightInTheBox – Fashion Trends That Actually Sell ![LightTheBox-ServerAvatar](https://serveravatar.com/wp-content/uploads/2025/08/image-3-1024x465.png)[LightInTheBox](https://www.lightinthebox.com/) is really solid for trendy stuff that doesn’t need to last forever. Their seasonal game is surprisingly on point. **What Actually Moves:** - Trendy dresses (summer collection was huge) - Statement jewelry pieces - Phone cases with cool designs - Seasonal decorations - Beauty tools and accessories **Shipping Times:** - Standard: 10-20 days (sometimes drags longer) - Express: 3-7 days (always pay for this on popular items) **How You Pay:** - PayPal (works great) - All major credit cards - Buy-now-pay-later options for customers **Why LightInTheBox Works:** Fixed pricing means no haggling with individual suppliers. Great for testing trends quickly. Their seasonal stuff actually arrives before the season starts, which is apparently a revolutionary concept. ### 6. Worldwide Brands – Finally, Fast US Shipping ![Worldwide Brand-ServerAvatar](https://serveravatar.com/wp-content/uploads/2025/08/image-4-1024x463.png)[Worldwide Brands](https://worldwidebrands.com/) completely changed everything for my US customers. Finally, shipping times that don’t make people angry. **Best Product Categories:** - Toys and games (parents love fast shipping) - Electronics and gadgets - Tools and home improvement - Garden and outdoor stuff - Fitness and sports equipment **Shipping That Doesn’t Suck:** - US suppliers: 3-5 days (finally!) - Some international suppliers: 1-2 weeks **Payment Situation:** - Depends on each individual supplier - Usually credit cards and PayPal work **Real Talk on Worldwide Brands:** You pay once for lifetime access to their supplier directory. Seemed expensive at first ($67 or something), but the fast shipping completely changed my customer satisfaction scores. Not every supplier is amazing, but when you find the good ones, they’re really good. ### 7. SaleHoo – Way More Than Just Another Directory ![AliExpress Alternatives](https://serveravatar.com/wp-content/uploads/2025/08/image-5-1024x465.png)[SaleHoo](https://www.salehoo.com/) really surprised me. Started using it just for suppliers, ended up staying for their research tools. **Product Categories That Work:** - Home improvement (DIY trend is real) - Fitness and sports gear - Electronics and tech gadgets - Pet supplies (huge market) - Kitchen and cooking stuff **Shipping Varies a Lot:** - US suppliers: 2-5 days - International suppliers: 1-4 weeks - You gotta check each supplier individually **Payment Methods:** - Each supplier handles their own payments - Usually PayPal and major cards work **Why SaleHoo is Actually Different:** Their market research tool shows you what’s trending before everyone else jumps on it. Found my best-selling product ever (a collapsible silicone water bottle) through their trend analysis. Shopify integration makes adding products stupid easy. Like, click a button and it’s in your store. ### 8. Gearbest – Electronics Without the Drama ![Gearbest-ServerAvatar](https://serveravatar.com/wp-content/uploads/2025/08/image-6-1024x465.png)[Gearbest](https://www.gearbest.ma/) is a really solid choice for electronics. Way more curated than other Chinese platforms, which saves you time sorting through junk. **What I Actually Sell:** - Smart home devices (huge right now) - Wireless chargers and accessories - Bluetooth speakers and audio - Fitness trackers and wearables - Phone accessories **Shipping Breakdown:** - Standard: 10-18 days - Express: 3-7 days - US warehouse: 3-7 days (limited selection but lightning fast) **Payment Options:** - PayPal works great - All major credit cards - Regional payment methods **Gearbest Advantages:** Multiple warehouses mean you can offer faster shipping options. Their dropshipper accounts come with branded packaging options, which is pretty cool. Product quality is way more consistent than the general marketplaces. Still test everything, but way fewer surprises. ### 9. 1688 – Factory Prices (If You Can Navigate It) ![1688-ServerAvatar](https://serveravatar.com/wp-content/uploads/2025/08/image-7-1024x421.png)[1688](https://www.1688.com/) is where the real money is, but definitely not for beginners. It’s like Taobao’s business-focused cousin. **Best Categories:** - Custom products and modifications - Private labeling opportunities - High-volume items - Unique products nobody else has **Shipping Situation:** - Through agents: 1-3 weeks - Direct shipping: Not happening internationally **Payment Reality:** - Alipay if you go direct (good luck) - Agents handle PayPal, cards, whatever **The Real 1688 Story:** Absolute cheapest prices anywhere, but you need an agent and minimum order quantities. I use it for products I’m 100% confident will sell big. Found a phone stand that costs $2.80 on AliExpress for $0.60 on 1688. Even with agent fees and minimums, I’m way ahead. ### 10. BrandsDistribution – Real Designer Stuff That Sells ![BrandDistrubution-ServerAvatar](https://serveravatar.com/wp-content/uploads/2025/08/image-8-1024x444.png)[BrandsDistribution](https://www.brandsdistribution.com/en/) one’s expensive but super profitable if you target the right customers who actually care about brands. **What Actually Sells:** - Designer sunglasses (Ray-Ban, Oakley, etc.) - Branded handbags and wallets - Authentic watches - Branded fragrances and perfumes - Designer clothing pieces **Shipping Times:** - Europe: 2-8 days - Rest of the world: 5-15 days **Payment Options:** - Credit cards, PayPal, bank transfers - Klarna for customer financing **BrandsDistribution Reality:** The yearly fee hurts (like €190), but authentic brands command real prices. Sold Ray-Ban sunglasses for $135 that cost me $72. Try doing that with knockoffs. Only worth it if you’re targeting customers who actually pay premium for real brands. ### 11. Wholesale2B – American Speed at Last ![Wholesale2B-ServerAvatar](https://serveravatar.com/wp-content/uploads/2025/08/image-9-1024x463.png)[Wholesale2B](https://www.wholesale2b.com/index.html) is perfect if you’re focusing on US customers and tired of explaining why shipping takes a month. **What Actually Works:** - Tools and gadgets - Pet supplies (massive market) - Health and wellness products - Home goods and organization - Beauty and personal care **Shipping Reality:** - US/Canada: 2-7 days (actually true) - International: Not available **Payment Methods:** - Credit cards, PayPal **Why Wholesale2B Actually Works:** Automated listing tools save you hours of manual work. My customer reviews improved dramatically just from fast shipping alone. Limited to North America, but if that’s your market, this is pure gold. ### 12. Geekbuying – Smart Home Products That Work ![Geekbuying-ServerAvatar](https://serveravatar.com/wp-content/uploads/2025/08/image-10-1024x463.png)[Geekbuying](https://www.geekbuying.com/) is really solid for riding the smart home trend. Their EU warehouses are a game changer if you have European customers. **Hot Product Categories:** - Smart plugs and switches (everyone wants these) - LED strip lights and smart bulbs - Security cameras and doorbells - Robot vacuums (expensive but good margins) - Wireless charging pads **Shipping Breakdown:** - From China: 10-25 days - EU warehouse: 3-7 days (fantastic for European customers) **Payment Options:** - PayPal, all major cards, Klarna **Geekbuying Benefits:** Dropshipper accounts with custom packaging options. EU warehouse shipping times actually rival Amazon for tech products. More focused product selection means way less junk to sort through. ### 13. CJ Dropshipping – They Literally Do Everything ![CJDropshipping-ServerAvatar](https://serveravatar.com/wp-content/uploads/2025/08/image-11-1024x466.png)[**CJ Dropshipping**](https://cjdropshipping.com/) is a full-service platform that handles everything from sourcing to fulfillment. Perfect if you want to focus on marketing. **Everything Actually Works:** - Fashion and accessories - Electronics and gadgets - Home products - Custom branded items - Print-on-demand products **Shipping Times:** - From China: 7-20 days - Global warehouses: 3-7 days **Payment Options:** - PayPal, credit cards, bank transfers, Payoneer **Why CJ is Actually Different:** They’ll source products you can’t find anywhere else. Need a custom color or small modification? They’ll make it happen. Global warehouse network means you can offer fast shipping almost anywhere in the world. ## How I Actually Pick Between All These Options After testing all these platforms for months, here’s my real decision process: **Start With Your Niche** Selling phone stuff? DHGate or Banggood first. Fashion? LightInTheBox. Smart home? Geekbuying all day. **Know Your Customers** US customers who want stuff fast? Worldwide Brands or Wholesale2B. Don’t mind waiting for better prices? Chinese platforms. **Check Your Budget Situation** Some platforms charge monthly or yearly fees. Others are completely free. Factor this into your pricing strategy. **Always Test First** I order samples from 2-3 platforms before committing to a main supplier. That $75 in samples saves me thousands in headaches later. **Consider Your Time** Want everything automated? SUP or CJ Dropshipping. Don’t mind doing more work for better margins? DHGate or 1688. ## Lessons I Learned While Losing Money **Don’t Always Chase the Cheapest Price** Made this mistake big time early on. Saved $0.80 per item but lost 25% to returns and complaints. Quality matters way more than you think. **Sample Absolutely Everything** Seriously. Everything. I’ve been burned too many times by products that looked amazing in photos but were complete garbage in person. **Build Real Relationships with Suppliers** Found an amazing supplier on DHGate and stuck with them for eight months. They started giving me better prices and handling my orders first. **Track Everything That Matters** Which platform has the best shipping times? Lowest return rates? Fastest customer service? Keep detailed notes. This stuff adds up. **Always Have Backup Suppliers** Main supplier runs out of stock right when your product goes viral? You need alternatives ready to go. I use 2-3 suppliers for any popular product. ## Stupid Mistakes That Cost Me Thousands **Putting Everything on AliExpress** Used only AliExpress for my entire first year. When their prices jumped, I scrambled like crazy. Diversify from day one. **Ignoring Shipping Restrictions** Didn’t realize some suppliers only ship to certain countries. Lost sales and confused customers for weeks. **Not Reading Payment Terms Carefully** Some platforms hold your payments for 2-3 weeks. Almost killed my cash flow. Always read the fine print. **Skipping Customer Service Tests** Contact support before you actually need them. Some take literally a week to respond. Find out early. **Forgetting About Return Logistics** Chinese suppliers don’t want their stuff back. You’re eating the cost. Factor this into your pricing from the start. **Not Checking Product Compliance** Some products can’t be imported to certain countries. Lost a whole shipment because I didn’t check regulations. ## Which One Should You Actually Start With? Here’s my honest recommendation based on where you’re at: **Complete Beginners:** Start with DHGate and Banggood. Easy to navigate, decent prices, reasonable shipping times. **Targeting US Market:** Worldwide Brands or Wholesale2B first. Fast shipping wins customers every time. **Electronics Focus:** Banggood, Gearbest, or Geekbuying. Way better quality control than general platforms. **Fashion and Trends:** LightInTheBox for fast fashion, BrandsDistribution if you want real brands. **Want Everything Automated:** SUP Dropshipping or CJ Dropshipping. Let them handle the logistics nightmare. **Need Absolute Best Prices:** Taobao or 1688, but you’ll definitely need agents to help. Most successful dropshippers I know use 3-4 platforms. I get electronics from Banggood, fashion trends from LightInTheBox, and use Wholesale2B for anything I can find there. ## FAQ ### **Q: Which platform actually has the fastest shipping to the US?** Wholesale2B and Worldwide Brands hands down for US customers (2-7 days). For international shipping, look for platforms with local warehouses – SUP, Gearbest, and Geekbuying all have them in multiple countries. ### **Q: Is it really possible to use multiple platforms without going insane?** Absolutely, but start slow. I currently use Banggood for electronics, LightInTheBox for fashion, and Wholesale2B when they have what I need. Just don’t try to manage 10 platforms at once. ### **Q: Which platforms actually charge fees?** SaleHoo and BrandsDistribution charge yearly fees. Worldwide Brands is a one-time payment. The rest are free to use. Always factor any fees into your profit calculations. ### **Q: Are these platforms actually legit and safe?** The ones I’ve listed are all legitimate businesses I’ve personally used. But always check recent reviews, use secure payment methods like PayPal, and start with small test orders. ### **How do I know which platform has the best prices for my products?** Always cross-reference the same product on 2-3 platforms before ordering. I regularly find 40-60% price differences for identical items. Takes 5 minutes and can save you tons of money. ## Conclusion The dropshipping game has changed in 2025. Tariffs, shipping delays, and quality issues forced me to look beyond AliExpress – and honestly, I should’ve done it years ago. Pick 2-3 platforms that match your niche and customer base. Start with DHGate or Banggood if you’re new. Use Wholesale2B for US customers who want fast shipping. Test everything with small orders first. Don’t put all your eggs in one basket. The most successful dropshippers diversify their suppliers from day one. These 13 platforms give you options that AliExpress alone never could. ## Stop Wasting Time on Servers. Start Building Instead. You didn’t start your project to babysit servers. Let **ServerAvatar** handle deployment, monitoring, and backups — so you can focus on growth. Deploy **WordPress, Laravel, N8N**, and more in minutes. No DevOps required. No command line. No stress. [ 🚀 Try Free ](https://app.serveravatar.com) [ 🌐 Learn More ](https://serveravatar.com/) Trusted by 10,000+ developers and growing. **Categories:** Blog, Guide, WordPress **Tags:** E-commerce strategies, Online business tips, PHP Hosting, Tariff impact on dropshipping, VPS Management --- ### [Django vs Node.js: Which Framework Is Better](https://serveravatar.com/django-vs-node-js-which-framework-is-better/) **Published:** February 14, 2026 **Author:** Meghna Meghwani **Content:** [![Blog banner - ServerAvatar](https://serveravatar.com/wp-content/uploads/2025/09/728_90-Banner-3-1024x127.png)](https://serveravatar.com/?ref=blog)Choosing the right framework for building a website or web application can feel like standing at a crossroads with too many signboards. Should you turn left or right? Pick speed or structure? Simplicity or flexibility? That’s exactly where many people land when comparing Django vs Node.js. Both are popular, powerful, and trusted by big companies and solo developers alike. But they work in very different ways and are built with different goals in mind. Think of Django as a well-planned city with clear rules and smooth traffic, while Node.js is more like an open highway where you can drive fast, choose your own lanes, and take creative turns. So, which one is better for you? Let’s break it down in simple, human language and figure it out together. ## What Is Django? Django is web framework built using Python for high-level development. It focuses on helping developers build secure, reliable, and scalable web applications quickly. Django is designed to reduce repetitive work by offering built-in solutions for common backend tasks. Instead of assembling everything from scratch, developers can rely on Django’s ready-made tools and focus on building features. ![what is django - Django vs Node.js](https://serveravatar.com/wp-content/uploads/2026/02/image-126.png) **Key Features of Django** - **Built-in admin panel:** Lets you manage content and users without extra coding. - **Strong security by default:** Protects against common threats automatically. - **Authentication, database handling, and routing included:** Covers core backend needs out of the box. - **Clear project structure:** Keeps code organized and easy to maintain. **Advantages of Using Django** Django is ideal for developers who want speed, safety, and structure in their projects. It minimizes setup time and helps teams deliver stable applications faster. - **Built-in security features:** Reduces risk without manual configuration. - **Faster development time:** Many features are ready to use. - **Clean and organized structure:** Makes long-term maintenance easier. - **Excellent for data-driven apps:** Handles databases efficiently. - **Beginner-friendly:** Easy to learn and understand. **Limitations of Django** While Django is powerful, it follows strict patterns that may not suit every project. Developers who prefer full control may find it limiting in certain scenarios. - **Less flexibility compared to Node.js:** Follows fixed design patterns. - **Not ideal for real-time applications:** Requires extra tools for live features. - **Can feel restrictive for experienced developers:** Less freedom to experiment. ### What Makes Django Stand Out From the Crowd? Django stands out because it believes in doing more for you, right out of the box. Instead of asking developers to install dozens of extra tools, Django comes prepared with everything needed to build a complete web application. It handles common tasks like user authentication, database management, security protection, and admin dashboards without extra effort. This makes Django feel like a well-organized toolkit where every tool has its own place. Developers who prefer structure, clarity, and fewer decisions often feel at home with Django. ## What Is Node.js? Node.js is a runtime environment that allows you to run JavaScript on the server side. Instead of being a full framework, it gives you the freedom to build things your own way. Node.js focuses on performance and scalability. It allows developers to build lightweight, fast applications with complete control over architecture. ![what is node.js - Django vs Node.js](https://serveravatar.com/wp-content/uploads/2026/02/image-127.png) **Key Features of Node.js** - **Non-blocking, event-driven architecture:** Handles tasks without waiting. - **Manages many requests simultaneously:** Ideal for busy applications. - **Same language for frontend and backend:** Simplifies development. - **Highly modular:** Easy to add or replace components. **Benefits of Choosing Node.js** Node.js is best suited for applications where speed, scalability, and flexibility are top priorities. It performs exceptionally well under heavy traffic. - **Extremely fast and scalable:** Built for performance. - **Perfect for real-time applications:** Handles live data smoothly. - **Single language across the stack:** Reduces context switching. - **Large ecosystem of libraries:** Offers endless customization. - **Highly flexible architecture:** Developers control everything. **Drawbacks of Node.js** Despite its power, Node.js demands careful planning. Beginners may find it challenging due to the many choices involved. - **Steeper learning curve:** Requires understanding async programming. - **Security depends on developer choices:** Needs manual setup. - **Too many libraries can cause confusion:** Hard to choose the right ones. - **Requires careful project structure:** Poor planning can cause issues. ### Why Do Developers Gravitate Toward Node.js? Developers choose Node.js mainly for its speed and flexibility. It allows JavaScript to run on server, means same language can used for both frontend and backend. That alone simplifies development for many teams. Node.js is especially loved for real-time applications like chat apps, live notifications, and streaming platforms. Its non-blocking nature means it can handle many users at the same time without slowing down. For developers who enjoy freedom and performance-focused systems, Node.js is a natural choice. ## Comparison: Django vs Node.js **Aspect****Django****Node.js****Language**PythonJavaScript**Learning**EasyModerate**Speed**ModerateVery Fast**Flexibility**LimitedHigh**Security**Built-inManual**Best For**Structured appsReal-time apps## Django and Node.js Side-by-Side Coding Comparison Sometimes, the best way to understand the difference is to see actual code. Below is a simple “Hello” endpoint example for both. **Django Hello Endpoint Example** ``` from django.http import HttpResponse def hello(request): return HttpResponse("Hello from Django!") ``` ``` from django.http import HttpResponse def hello(request): return HttpResponse("Hello from Django!") ``` This example shows how to create a basic endpoint that returns a simple text response when someone visits a page. - **from django.http import HttpResponse** Imports Django’s built-in response class used to send text back to the browser. - **def hello(request)** Defines a function that acts as a view and receives the user’s request. - **request parameter** Holds information about the incoming request, such as headers and user data. - **return HttpResponse(“Hello from Django!”)** Sends a plain text message back to the user’s browser Django handles most backend tasks automatically, keeping the code short and readable. The function clearly shows what happens, receive a request and return a response. **Why this matters** Django’s approach makes backend logic easy to read and maintain, even for beginners or non-developers. **Node.js Hello Endpoint Example** ``` const express = require("express"); const app = express(); app.get("/", (req, res) => { res.send("Hello from Node.js!"); }); app.listen(3000); ``` ``` const express = require("express"); const app = express(); app.get("/", (req, res) => { res.send("Hello from Node.js!"); }); app.listen(3000); ``` This Node.js example demonstrates how to create a simple web server that responds with text using Express. - **const express = require(“express”);** Imports the Express framework used to handle server requests. - **const app = express();** Creates a new Express application instance. - **app.get(“/”, (req, res) => { … })** Defines a route that listens for GET requests on the home page. - **req object** Contains information about the incoming request from the user. - **res.send(“Hello from Node.js!”)** Sends a text response back to the browser. - **app.listen(3000);** Starts the server and listens for requests on port 3000. Node.js requires explicit configuration but allows flexible server behavior. **Why this matters** Node.js gives developers fine-grained control over how requests and responses are handled, making it ideal for custom and real-time applications. ### Programming Language Differences The core difference between Django and Node.js starts with the language they use. Each language brings a distinct development experience. **Django Uses Python** Python is widely loved for its simplicity and readability. - **Easy to read:** Looks close to plain English. - **Beginner-friendly:** Simple syntax reduces confusion. - **Clear and expressive:** Easy to understand even for non-developers. If you value clarity and simplicity, Python feels like a friendly conversation. **Node.js Uses JavaScript** JavaScript powers most of the modern web. - **Everywhere on the web:** Used on almost every website. - **Fast and flexible:** Supports dynamic features. - **Slightly harder to master:** Requires practice. If you enjoy dynamic, fast-paced development, JavaScript fits well. **Key takeaway** Django feels calm and structured, while Node.js feels energetic and flexible. ### Learning Curve and Ease of Use How quickly someone learns a framework depends on how much guidance it provides. **Django Learning Curve** - **Easy for beginners:** Clear rules and structure. - **Excellent documentation:** Step-by-step guidance. - **Everything included from the start:** Minimal setup needed. **Node.js Learning Curve** - **Steeper learning curve:** Requires deeper technical understanding. - **Async behavior can be confusing:** Needs practice. - **More decisions to make:** Freedom adds complexity. **Winner for beginners:** Django ### Performance and Speed Performance matters when apps grow and users increase. **Django Performance** - **Synchronous by default:** Processes tasks one at a time. - **Slower for real-time apps:** Not built for live updates. - **Excellent for data-heavy applications:** Handles databases well. **Node.js Performance** - **Non-blocking and asynchronous:** No waiting for tasks. - **Extremely fast for real-time apps:** Ideal for live features. - **Handles many users smoothly:** Scales efficiently. If speed were a race, Node.js would sprint while Django jogs steadily. ### Scalability and Handling Traffic Scalability decides how well an app grows with users. **Django Scalability** - **Scales well with proper setup:** Needs tuning. - **Used by large platforms:** Proven reliability. - **Requires extra tools for high traffic:** Not automatic. **Node.js Scalability** - **Designed for scalability:** Built with growth in mind. - **Ideal for microservices:** Easy to split services. - **Handles thousands of connections:** Excellent concurrency. **Best for high traffic:** Node.js ### Development Speed Speed of development can define project success. **Why Django Is Faster to Develop** - **Built-in features save time:** Less coding needed. - **Minimal setup:** Quick project start. - **Clear structure:** Easy teamwork. **Why Node.js Can Be Slower Initially** - **Manual library selection:** Takes time. - **More configuration required:** Setup overhead. - **Flexibility costs time early on:** Pays off later. If time is money, Django often saves more of both. ### Flexibility and Customization Each framework handles freedom differently. **Django’s Approach** - **Opinionated structure:** Follows best practices. - **Encourages consistency:** Cleaner projects. - **Less freedom, more safety:** Fewer mistakes. **Node.js Approach** - **Highly flexible:** No strict rules. - **Developer controls everything:** Full customization. - **Easy to experiment:** Ideal for innovation. **Creative freedom:** Node.js **Guided structure:** Django ### Security Features Security is critical for modern applications. **Django Security** - **Protection against common attacks:** Built-in. - **Safe by default:** Less manual effort. - **Trusted for sensitive apps:** Banking and admin systems. **Node.js Security** - **Depends on chosen libraries:** No defaults. - **Requires careful configuration:** Developer responsibility. - **Flexible but risky:** Needs experience. If security were a lock, Django comes pre-installed, while Node.js lets you choose your own. ### Community and Ecosystem Strong communities help developers grow. **Django Community** - **Mature and stable:** Long-term reliability. - **High-quality documentation:** Easy learning. - **Focus on best practices:** Clean development. **Node.js Community** - **Huge and fast-growing:** Constant innovation. - **Massive library ecosystem:** Many options. - **Rapid updates:** Cutting-edge tools. **More packages:** Node.js **More stability:** Django ### Architecture and Framework Explained Django follows a “batteries-included” philosophy. It believes that common problems should already have built-in solutions. This leads to a predictable and clean architecture that encourages best practices. Node.js, on the other hand, follows a minimalist philosophy. It gives you a foundation and lets you build everything else your way. This freedom allows innovation but also demands more responsibility from the developer. In short: - **Django says:** “Here’s the right way to do it.” - **Node.js says:** “Build it however you want.” ### Which Framework Offers Better Learning and Community Support? Both Django and Node.js have strong communities, but they support learners differently. Django’s community is known for its detailed documentation, clear tutorials, and stable ecosystem. Beginners often find it easier to learn because there is a clear path to follow. Node.js has a massive global community and countless libraries. However, because there are many ways to do the same thing, beginners may feel confused at first. Still, once learned, the ecosystem is incredibly powerful. **Beginner-friendly support:** Django **Large and fast-growing ecosystem:** Node.js ### Use Cases and Real-World Applications Each framework excels in different scenarios. **Django Is Best For** - **Content-heavy websites:** Blogs and media platforms. - **Admin dashboards:** Built-in tools. - **Data-driven apps:** Database-focused systems. **Node.js Is Best For** - **Real-time chat apps:** Instant communication. - **Streaming platforms:** Live content delivery. - **APIs and microservices:** Scalable services. - **Online games:** High concurrency. ### Django vs Node.js for Beginners For newcomers, Django feels like driving an automatic car, smooth and predictable. Node.js is more like manual driving, powerful but demanding. **Recommendation:** Start with Django, then explore Node.js later. ### Django vs Node.js for Startups Startups need speed and scalability. - **Fast development:** Django helps launch quickly. - **Easy scaling:** Node.js supports rapid growth. - **Reliable performance:** Both are proven. **Early stage:** Django **Growth stage:** Node.js ### Django vs Node.js for Large Projects Large projects demand structure and performance. - **Maintainability:** Django excels. - **Performance optimization:** Node.js leads. - **Team collaboration:** Django’s structure helps. **Django** shines in organized teams. **Node.js** shines in performance-focused systems. ## Which Backend Technology Should You Choose? Your choice should align with your goals, team skills, and long-term vision. - Choose **Django** for stability, security, and fast development. - Choose **Node.js** for real-time features, performance, and flexibility. [![Blog banner - ServerAvatar](https://serveravatar.com/wp-content/uploads/2025/09/728_90-Banner-1-1024x127.png)](https://serveravatar.com/?ref=blog)## When Should You Choose Django or Node.js? **Choose Django when:** - You’re building content-heavy platforms - Security is critical - You want faster setup and cleaner structure **Choose Node.js when:** - You need real-time communication - Your app expects heavy traffic - You prefer JavaScript everywhere ## How ServerAvatar Simplifies Node.js Setup on Your Server Setting up Node.js on a server can sometimes involve multiple steps, version checks, and manual configurations. This is where ServerAvatar makes the process much easier. **What is ServerAvatar?** [ServerAvatar](https://serveravatar.com/) is a platform to simplify the hosting and management of servers and applications. It simplifies the process of deploying and managing PHP and Node.js based web applications on servers. ![ServerAvatar Dashboard - Django vs Node.js](https://serveravatar.com/wp-content/uploads/2026/02/image-128.png) When you create a server in ServerAvatar, you’ll see the option of Node stack option to deploy your node applications, such as Uptime Kuma, n8n, NodeRed, NodeBB, etc., without dealing with complex command-line steps. Node.js is already installed by default within the Node stack. Additionally, you can install Yarn by enabling the toggle button. ![create server - Django vs Node.js](https://serveravatar.com/wp-content/uploads/2026/02/image-129-859x1024.png) This approach helps developers save time, reduce setup errors, and focus more on building and running applications instead of managing server configurations. ## Final Thoughts: Making the Right Choice, and Getting Started Faster Choosing between Django and Node.js isn’t about picking a winner. It’s about understanding what fits your project, your team, and your long-term goals. If you value structure, built-in security, and faster development with fewer decisions, Django is a solid choice. If performance, real-time features, and flexibility matter more, Node.js gives you the freedom to build exactly what you want. Both technologies are mature, powerful, and trusted in real-world applications. No matter which backend you choose, server setup and configuration shouldn’t slow you down. That’s where ServerAvatar fits naturally into the workflow. With features like one-click Node.js installation and built-in Node Stack support during server connection, ServerAvatar removes the complexity of manual server setup. Instead of spending hours configuring environments, you can focus on what really matters, building, deploying, and scaling your application with confidence. ## FAQs ### 1. Is Node.js faster than Django? Node.js is typically faster for real-time and high-concurrency applications due to its non-blocking, event-driven architecture. Django performs very well for data-heavy and content-driven applications, but is not optimized by default for real-time workloads. ### 2. Which framework is more secure by default? Django is considered more secure out of the box. It includes built-in protection against common attacks such as SQL injection and cross-site scripting. In Node.js, security depends more on how developers configure libraries and middleware. ### 3. Is Node.js suitable for large-scale applications? Node.js is widely used for large-scale, high-traffic systems, especially APIs, microservices, and real-time platforms. Its ability to handle thousands of simultaneous connections makes it a strong choice for scalable architectures. ### 4. Can I use the same language for frontend and backend with Django? No, Django uses Python on the backend, while frontend development typically uses JavaScript. With Node.js, JavaScript is used on both frontend and backend, which many developers find convenient. ### 5. How does ServerAvatar help with Node.js deployment? ServerAvatar simplifies Node.js deployment by offering one-click Node.js installation directly from the dashboard. This removes manual setup steps and allows developers to focus on building and running applications instead of configuring servers. ### 6. Is there a clear winner between Django and Node.js? No, There is no universal winner. Django and Node.js solve different problems well. The best choice depends on your project requirements, team experience, performance needs, and long-term goals. **Categories:** Application Deployments, Blog, Guide, Node.js **Tags:** Backend frameworks, Django, Django framework, Django or Node.js, Django vs Node.js, Django vs Node.js comparison, Node.js, Node.js framework, Web development frameworks --- ### [WordPress Changes Not Showing? Complete Troubleshooting Guide](https://serveravatar.com/wordpress-changes-not-showing-troubleshooting-guide/) **Published:** February 13, 2026 **Author:** Meghna Meghwani **Content:** [![Blog banner - ServerAvatar](https://serveravatar.com/wp-content/uploads/2025/09/728_90-Banner-3-1024x127.png)](https://serveravatar.com/?ref=blog)You click Update, refresh your site, and… nothing changes. Annoying, right? If you’re dealing with WordPress changes not showing, you’re definitely not alone. This is one of the most common issues people face while working with WordPress. The good news? Most of the time, nothing is actually broken. Your changes are just stuck behind invisible barriers like caching, browser memory, or small configuration issues. This guide walks you through every possible reason why WordPress changes are not showing without confusing jargon. By the end, you’ll know exactly where to look and what to fix. ## What Is WordPress? [WordPress](https://wordpress.org/?ref=serveravatar.com) is the world’s most popular open-source content management system (CMS), used to build websites, blogs, and e-commerce stores. It offers flexibility through themes and plugins, making it suitable for beginners, developers, and businesses of all sizes. ## How ServerAvatar Simplifies WordPress Deployment & Management **What is ServerAvatar?** [ServerAvatar](https://serveravatar.com/) is a platform to simplify the hosting and management of servers and applications. It simplifies the process of deploying and managing PHP and Node.js based web applications on servers. ![ServerAvatar Dashboard](https://serveravatar.com/wp-content/uploads/2026/02/image-108.png) ServerAvatar makes WordPress and other popular applications, such as Mautic, N8N, UptimeKuma, etc, deployment effortless with its one-click WordPress application installer, allowing you to launch a fully configured WordPress site in minutes. It removes the complexity of server setup by providing an intuitive dashboard to manage servers, applications, databases, PHP versions, SSL, and performance settings from one place. ServerAvatar supports multiple cloud providers and gives users full control over their infrastructure while eliminating the need for deep server administration knowledge. You can refer to the ServerAvatar [documentation](https://serveravatar.com/docs/application/one-click-installer/wordpress/) and the detailed [blog](https://serveravatar.com/install-wordpress-quickly-on-vps/) to [install WordPress](https://serveravatar.com/install-wordpress-apache-ubuntu/) effortlessly. > ServerAvatar does not directly provide WordPress Multisite, but our technical experts can help you set up a WordPress Multisite environment. > The ServerAvatar support team is available 24/7 to assist you with any issues or questions you may have. ### Key Benefits of Using ServerAvatar for WordPress - **One-click WordPress installer:** Deploy WordPress instantly without manual configuration. - **Unified management panel:** Manage servers and WordPress applications from a single dashboard. - **Performance optimization:** Easily configure services, PHP, and server resources. - **Redis caching support:** ServerAvatar comes with built-in Redis integration that helps speed up WordPress by storing frequently accessed data in memory. - **Enhanced security:** Includes firewall, SSL management, and secure access controls. - **Easy scalability:** Upgrade server resources as your WordPress site grows. ServerAvatar is an ideal solution for users who want the power of cloud servers without the operational complexity. It simplifies WordPress hosting by automating server setup, streamlining application management, and providing performance and security optimizations out of the box. Whether you’re a developer, agency, or business owner, ServerAvatar allows you to deploy, manage, and scale WordPress websites confidently while focusing on growth instead of infrastructure management. ## Understanding the “Changes Not Showing” Problem At its core, this issue means you’ve updated something on your website, but visitors still see the old version. This can happen with text, images, layouts, colors, or even entire pages. ![WordPress changes not showing problem](https://serveravatar.com/wp-content/uploads/2026/02/image-109.png) The tricky part is that the problem is rarely about your content being wrong. Most of the time, it’s about how your website or browser stores and displays information. Think of your website like a menu board at a café. You changed the prices in the system, but the board outside still shows the old ones. The update exists, it’s just not being displayed. ### Why This Issue Is So Common This problem happens so often because modern websites are built to be fast. Speed is great, but it comes with a side effect. Caching stores copies of your website so it can load faster. Sometimes, though, it keeps showing the old copy instead of the new one. That’s why WordPress changes not showing is more common than you might expect, especially on busy or growing sites. ## Why WordPress Changes Don’t Show Immediately WordPress doesn’t always display changes instantly. That’s not a flaw, it’s often intentional. Caching systems exist to make websites load faster by showing saved versions of pages. But sometimes, those saved versions overstay their welcome. When that happens, your fresh updates stay hidden while visitors see the old version. Understanding this is the very first step to resolving it. Below are the most common reasons why WordPress changes don’t show up immediately, explained step by step, along with practical fixes to help your updates appear correctly. ### 1. Browser Cache: The Most Common Culprit Your browser stores copies of websites to load them faster next time. While this improves speed, it often shows an old version of the page instead of your latest update, making it seem like changes didn’t save. ![Browser Cache - WordPress changes not showing](https://serveravatar.com/wp-content/uploads/2026/02/image-110.png) **Why Browser Cache Causes Issues** The browser prefers stored data over fetching fresh content, especially if it thinks nothing important has changed. **Why It Hides Changes** - **A saved page version is loaded instead of the updated one:** The browser shows an older stored copy rather than fetching the latest page. - **New changes exist but aren’t reloaded:** Updates are saved but not refreshed from the server. - **Normal refresh doesn’t always clear stored data:** A standard reload keeps cached files intact. **How to Fix It** - **Do a hard refresh:** Forces the browser to load fresh content instead of cached files. - **Open the page in a private window:** Bypasses browser cache completely. - **Try a different browser:** Confirms whether the issue is browser-specific. **Key Point** Always check your site in a private window before assuming something is broken. **Pro Tip** If changes appear in private mode, the issue is browser cache, not your website. ### 2. Website Cache Many WordPress websites use server-level caching to improve performance. This creates static versions of pages that load faster for visitors. ![Website Cache - WordPress changes not showing](https://serveravatar.com/wp-content/uploads/2026/02/image-111.png) **Why It Causes Issues** Website cache serves pre-saved pages instead of generating fresh ones after updates. **Why It Hides Changes** - **Cached pages aren’t refreshed automatically:** The server keeps serving old page versions. - **Visitors keep seeing older versions:** Cached content is shown instead of live updates. - **Updates exist but aren’t displayed:** Changes are saved but not delivered to users. **How to Fix It** - **Clear website/server cache:** Removes stored page versions from the server. - **Purge cache from the dashboard:** Forces regeneration of fresh pages. - **Reload the page after clearing:** Displays the updated content immediately. **Key Point** Clearing website cache often fixes the issue instantly. **Pro Tip** Always clear site cache after major edits, not just browser cache. ### 3. Theme-Related Issues Sometimes the issue isn’t your content at all, it’s the active theme controlling how things display. ![Theme Related Issues - WordPress changes not showing](https://serveravatar.com/wp-content/uploads/2026/02/image-112.png) **Why It Causes Issue**s Themes can override layouts, styles, or content visibility using their own settings. **Why It Hides Changes** - **Custom theme settings override edits:** Theme options replace your manual changes. - **Cached theme files load old data:** The theme serves outdated styling or layouts. - **Child theme conflicts block updates:** Conflicting files prevent changes from applying.[](https://storage.3.basecamp.com/5840738/blobs/27149f2e-08c9-11f1-ad68-0242ac120004/download/image.png) **How to Fix It** - **Clear theme cache:** Removes stored theme data. - **Check theme customization settings:** Ensures settings aren’t overriding changes. - **Switch themes temporarily to test:** Confirms whether the theme is the issue. **Key Point** If changes disappear after styling updates, your theme is a likely suspect. **Pro Tip** Always test changes with the default theme to isolate theme issues. ### 4. Plugin Conflicts That Block Updates Plugins add features, but conflicting plugins can interfere with how updates appear on your site. ![Plugin Conflicts - WordPress changes not showing](https://serveravatar.com/wp-content/uploads/2026/02/image-113.png) **Why It Causes Issues** Multiple plugins may try to control the same function or display behavior. **Why It Hides Changes** - **Cache plugins delay updates:** Plugins continue serving cached content. - **Display plugins override content:** Plugin rules replace visible page elements. - **Optimization plugins serve old files:** Minified files don’t refresh automatically. **How to Fix It** - **Clear plugin cache:** Removes cached plugin data. - **Disable caching plugins temporarily:** Allows fresh content to load. - **Regenerate cached files:** Creates updated versions of optimized files. **Key Point** Disabling plugins one by one helps identify the blocker. **Pro Tip** After major edits, always clear plugin cache manually. ### 5. Content Delivery Networks and Delay Confusion A content delivery network stores copies of your site across multiple locations to improve speed worldwide. ![Content Delivery Networks - WordPress changes not showing](https://serveravatar.com/wp-content/uploads/2026/02/image-114.png) **Why It Causes Issues** Different locations may serve different versions of your site. - **Some visitors see updates:** Certain locations receive refreshed content sooner. - **Others see older versions:** Cached copies are still active elsewhere. - **Changes appear gradually:** Updates roll out slowly across locations. **How to Fix It** - **Purge CDN cache:** Clears stored content globally. - **Enable development mode temporarily:** Bypasses CDN caching during edits. - **Wait for cache refresh:** Allows automatic expiration to complete. **Key Point** Delayed updates don’t always mean failed updates. **Pro Tip** Always clear CDN cache after visual or content changes. ### 6. Page Builders and Saved Layout Problems With page builders, changes can be saved but not published, causing confusion. ![Page Builders - WordPress changes not showing](https://serveravatar.com/wp-content/uploads/2026/02/image-115.png) **Why It Causes Issues** Edits may stay in draft or preview mode. **Why It Hides Changes** - **Layout saved but not updated:** Changes aren’t published to the live page. - **Preview shown instead of live page:** Preview mode doesn’t reflect real visitors’ view. - **Builder cache still active:** Stored layouts override new edits. **How to Fix It** - **Click update, not just save:** Publishes changes to the live site. - **Clear builder cache:** Removes stored layout data. - **Reload live page:** Displays the published version. **Key Point** Preview mode doesn’t reflect the live site. **Pro Tip** Always check the page in a new tab after publishing. ### 7. CSS and JavaScript Caching Problems Styles and scripts are cached aggressively to improve performance. ![CSS and JavaScript Caching - WordPress changes not showing](https://serveravatar.com/wp-content/uploads/2026/02/image-116.png) **Why It Causes Issues** Cached CSS and JS files don’t reload automatically. **Why It Hides Changes** - **Old styles keep loading:** Cached CSS files override new styling. - **Layout appears broken:** Updated styles aren’t applied correctly. - **Scripts don’t reflect updates:** Cached JavaScript blocks changes. **How to Fix It** - **Disable minification temporarily:** Loads uncompressed, updated files. - **Regenerate CSS files:** Creates fresh style files. - **Change file versioning:** Forces browsers to fetch new files. **Key Point** Visual issues often point to cached CSS. **Pro Tip** Even tiny style changes may require a full cache purge. ### 8. Draft vs Published Content Confusion This issue is simpler than it sounds, and very common. ![Draft vs Published Content - WordPress changes not showing](https://serveravatar.com/wp-content/uploads/2026/02/image-117.png) **Why It Causes Issues** Content may be saved but not made public. **Why It Hides Changes** - **Post saved as draft:** Draft content isn’t visible publicly. - **Scheduled content not live yet:** Changes appear only at the scheduled time. - **Wrong page edited:** Updates were made on a different page. **How to Fix It** - **Confirm publish status:** Ensures content is live. - **Check publish date:** Verifies timing settings. - **Verify page URL:** Confirms you’re viewing the correct page. **Key Point** Always confirm you’re editing the correct page. **Pro Tip** Use the “View Page” button after publishing. ### 9. Image and Media Caching Images often refuse to update even when replaced. ![Image and Media Caching - WordPress changes not showing](https://serveravatar.com/wp-content/uploads/2026/02/image-118.png) **Why It Causes Issues** Browsers aggressively cache media files. **Why It Hides Changes** - **Same filename reused:** Browser loads the previously cached image. - **Old image cached:** Updated image isn’t fetched. - **Browser loads previous version:** Stored media overrides new uploads. **How to Fix It** - **Rename image file:** Forces browsers to load the new image. - **Upload as new file:** Avoids replacing cached media. - **Clear media cache:** Removes stored image versions. **Key Point** Same name = same cached image. **Pro Tip** New filename, instant update. ### 10. User Role and Permission Limitations Not all users can publish changes publicly. [](https://storage.3.basecamp.com/5840738/blobs/66b96814-08cc-11f1-b71c-0242ac120004/download/image.png) ![Role and Permission Limitation - WordPress changes not showing](https://serveravatar.com/wp-content/uploads/2026/02/image-119.png)**Why It Causes Issues** Limited roles restrict publishing access. **Why It Hides Changes** - **Changes saved but not published:** Edits aren’t visible to visitors. - **Approval required:** Content waits for authorization. - **Editing restrictions:** User permissions limit visibility. **How to Fix It** - **Check user role:** Confirms publishing access. - **Request publishing access:** Allows changes to go live. - **Switch to admin account:** Removes permission limitations. **Key Point** Saved doesn’t always mean live. **Pro Tip** Confirm your role before troubleshooting further. ### 11. File and Media Updates Not Appearing Replacing files can be misleading. ![File and Media Updates - WordPress changes not showing](https://serveravatar.com/wp-content/uploads/2026/02/image-120.png) **Why It Causes Issues** Old files remain cached under the same name. **Why It Hides Changes** - **Browser loads stored version:** Cached files replace updated ones. - **CDN serves old file:** Global cache delivers outdated content. **How to Fix It** - **Rename file before upload:** Forces file refresh. - **Clear cache:** Removes stored versions. - **Upload fresh copy:** Ensures latest file loads. **Key Point** Renaming files forces refresh. **Pro Tip** Avoid replacing files with the same name. ### 12. Database Sync Issues Explained Simply Content is stored in a database, and sometimes updates don’t sync correctly. ![Database Sync Issue - WordPress changes not showing](https://serveravatar.com/wp-content/uploads/2026/02/image-121.png) **Why It Causes Issues** Interrupted saves or server hiccups. **Why It Hides Changes** - **Partial updates:** Changes don’t save completely. - **Old content reappears:** Database doesn’t sync properly. - **Changes vanish after reload:** Updates fail to persist. **How to Fix It** - **Re-save content:** Ensures proper saving. - **Clear cache:** Removes stored data. - **Check server stability:** Prevents interrupted saves. **Key Point** This issue is rare but possible. **Pro Tip** Avoid editing during heavy traffic or slow connections. ### 13. Mobile vs Desktop Display Differences Changes may appear on one device but not another. [](https://storage.3.basecamp.com/5840738/blobs/4a6a1888-08cd-11f1-a2b3-0242ac120004/download/image.png) ![Mobile vs Desktop - WordPress changes not showing](https://serveravatar.com/wp-content/uploads/2026/02/image-122.png) **Why It Causes Issues** Mobile and desktop use separate caches. **Why It Hides Changes** - **Device-specific storage:** Mobile and desktop caches differ. - **Responsive layout differences:** Styles vary by screen size. **How to Fix It** - **Clear mobile cache:** Removes stored mobile data. - **Test on multiple devices:** Confirms consistent display. - **Use private mode:** Bypasses device cache. **Key Point** One device view isn’t enough. **Pro Tip** Always test on both desktop and mobile. ### 14. Staging vs Live Site Confusion Edits made on staging won’t show on live automatically. [](https://storage.3.basecamp.com/5840738/blobs/aed44ae6-08cd-11f1-8d32-0242ac120003/download/image.png) ![Staging vs Live Site - WordPress changes not showing](https://serveravatar.com/wp-content/uploads/2026/02/image-123.png) **Why It Causes Issues** Two separate environments exist. **Why It Hides Changes** - **Changes saved on staging only:** Live site remains unchanged. - **Live site unchanged:** Updates aren’t pushed live. **How to Fix It** - **Verify site URL:** Confirms environment. - **Push staging to live:** Publishes changes publicly. **Key Point** Two sites, two different realities. **Pro Tip** Label environments clearly to avoid confusion. ### 15. Hosting Environment Limitations Your hosting setup can delay updates. ![Hosting Environment - WordPress changes not showing](https://serveravatar.com/wp-content/uploads/2026/02/image-124.png) **Why It Causes Issues** Aggressive caching and restrictions. **Why It Hides Changes** - **Limited cache control:** Hosting settings restrict updates. - **Server-level optimization:** Aggressive caching delays changes. **How to Fix It** - **Contact hosting support:** Gets cache assistance. - **Adjust cache settings:** Allows faster updates. - **Enable development mode:** Temporarily disables caching. **Key Point** Hosting configuration matters. **Pro Tip** Know your host’s caching behavior. ### 16. When Updates Fail Silently Sometimes updates fail without showing errors. ![Update Fail Silently - WordPress changes not showing](https://serveravatar.com/wp-content/uploads/2026/02/image-125.png) **Why It Causes Issues** System limitations or interruptions. **Why It Hides Changes** - **Memory limits:** Updates fail due to resource limits - **File permission problems:** Files can’t be updated properly. - **Interrupted saves:** Changes don’t complete. **How to Fix It** - **Increase memory:** Allows updates to save correctly. - **Check permissions:** Ensures files are writable. - **Re-save carefully:** Confirms changes are stored. **Key Point** No error doesn’t mean no problem. **Pro Tip** If changes revert automatically, investigate immediately. [![Blog banner - ServerAvatar](https://serveravatar.com/wp-content/uploads/2025/09/728_90-Banner-1-1024x127.png)](https://serveravatar.com/?ref=blog)### When Changes Appear Only After Some Time Sometimes your updates are saved correctly, but they don’t show up right away. This usually happens because your website is designed to load faster by showing stored versions first. In many cases, the changes appear automatically after a short delay without you doing anything. **Why Delays Happen** - **Cached versions expire slowly:** Older versions stay visible until the cache refreshes. - **Network-level storage:** Copies of your site are stored across different locations. - **High-traffic optimization:** Busy websites prioritize speed over instant updates. Waiting a short while sometimes solves the issue without any action. ### Best Practices to Avoid issues in Future To avoid running into this problem again, it helps to follow a few simple habits while updating your site. These small steps ensure your changes appear faster and reduce confusion after publishing. - **Clear cache after updates:** Forces the latest version to load. - **Use consistent file names wisely:** Prevents old files from being reused. - **Publish instead of preview:** Only published changes appear live. - **Test changes in private windows:** Bypasses stored browser data. - **Keep themes and plugins updated:** Reduces conflicts and display issues. A little habit-building goes a long way. ## Conclusion When WordPress changes don’t show up, it can feel frustrating and confusing, especially when you’re sure you did everything right. But as this guide shows, the issue is rarely serious or permanent. Most of the time, your updates are simply hidden behind caching layers, browser storage, plugins, or system-level optimizations designed to improve performance. By understanding where these delays come from and following a clear troubleshooting process, you can quickly identify the cause and fix it without panic. Whether you manage a small site or a growing one on WordPress, a calm, step-by-step approach will help you keep your site accurate, up to date, and running smoothly. ## FAQs ### 1. Why are my WordPress changes not showing even after clicking Update? This usually happens due to browser cache, website cache, or plugin caching. Your changes are saved, but an older version of the page is being displayed. ### 2. Do WordPress changes take time to appear? Yes, sometimes. Caching systems and network-level storage can delay how quickly updates become visible, especially on optimized or high-traffic sites. ### 3. Why do my changes appear in preview but not on the live site? Preview mode shows unsaved or draft content. If changes are not published or cache isn’t cleared, they won’t appear on the live pag ### 4. Can plugins or themes stop my updates from showing? Yes. Conflicting plugins or theme settings can override content, styles, or layouts, making it seem like changes didn’t apply. ### 5. What is the fastest way to check if caching is the problem? Open your website in a private or incognito window. If the changes appear there, caching is almost certainly the cause. **Categories:** Blog, Guide, Others, Tutorials, WordPress **Tags:** Fix WordPress problems, Wordpress, WordPress cache issue, WordPress changes not showing, WordPress page not updating, WordPress site not updating, WordPress updates not reflecting --- ### [7 Best Linux Distros for Gaming & Running Windows Games in 2026](https://serveravatar.com/best-linux-distros-for-gaming-2026/) **Published:** February 11, 2026 **Author:** Meghna Meghwani **Content:** [![Blog banner - ServerAvatar](https://serveravatar.com/wp-content/uploads/2025/09/728_90-Banner-3-1024x127.png)](https://serveravatar.com/?ref=blog)Gaming on Linux in 2026 feels very different from what it used to be, and the best Linux distros for gaming in 2026 prove just how far the platform has come. Not long ago, Linux gaming was like trying to play football on a gravel road, possible, but uncomfortable. Today, it feels more like a freshly cut stadium pitch. Thanks to tools like Steam Proton, Wine, Lutris, and improved GPU driver support, Linux can now run thousands of Windows games smoothly and reliably. But here’s the catch: not all Linux distributions are created equal, especially for gaming. Some distros are fast and friendly for beginners, others are powerful but demand patience. So which ones truly shine for gaming and running Windows games in 2026? That’s exactly what this guide answers. Whether you’re a casual gamer, a streamer, or someone tired of Windows updates popping up mid-game, this article will help you pick the best Linux distro for gaming without a technical headache. ## What Is a Linux Distro? A Linux distro, short for Linux distribution, is a complete operating system built on top of the Linux kernel. A Linux distro adds everything else around it, like the body, steering wheel, seats, and dashboard, so you can actually drive. ![Linux distros for gaming](https://serveravatar.com/wp-content/uploads/2026/02/image-84.png) Each Linux distro bundles: - **Linux kernel:** The core of the operating system that manages hardware, memory, and system processes. - **Desktop environment:** The visual interface that controls how windows, menus, and settings look and feel. - **System tools and utilities:** Built-in programs that help manage files, users, updates, and system settings. - **Package managers:** Tools that allow you to install, update, and remove software easily from trusted sources. - **Pre-installed apps and drivers:** Essential applications and hardware drivers included so the system works right after installation. Popular examples include Ubuntu, Fedora, Linux Mint, and Pop!\_OS. Even though they all use Linux at the core, they feel very different when you use them. Some focus on simplicity, others on speed, security, or customization. That flexibility is what makes Linux unique. You’re not locked into one experience, you choose the distro that matches how you want to use your computer. ### Steam, Proton, and Windows Games on Linux Before diving into the distros, let’s clear a big doubt. **Can Linux really run Windows games?** Yes, surprisingly well. Thanks to Proton, a compatibility layer by Valve, many Windows-only games now run on Linux with little to no setup. Add Lutris for non-Steam games and Wine for legacy titles, and you’ve got a solid gaming ecosystem. In simple terms, Proton acts like a translator, helping Windows games “speak” Linux fluently. ### What Makes a Linux Distro Different for Gaming? Not every Linux distro is built with gaming in mind. A gaming-friendly Linux distro is specially tuned to get the best performance from your hardware while making it easy to run modern games, especially Windows games. Here’s what sets gaming-focused Linux distros apart: **Better Graphics Driver Support:** Gaming distros usually offer smoother support for NVIDIA, AMD, and Intel GPUs. Some even come with drivers preinstalled, so you don’t have to deal with manual setup. This means fewer crashes, better frame rates, and less frustration. **Optimized Performance:** Many gaming distros use newer kernels or performance tweaks that reduce background load. In simple words, your system spends more power running games instead of unnecessary services. **Built-In Gaming Tools:** Gaming-friendly Linux distros focus on reducing setup complexity for gamers. They include or support popular gaming tools that make installing and running games simple, even those designed for Windows. - **Steam with Proton:** Lets you play many Windows-only games directly on Linux without extra setup. - **Wine for Windows apps:** Runs Windows applications and older games inside a Linux environment. - **Lutris:** A game launcher that manages games from multiple platforms in one place. - **GameMode:** Temporarily boosts system performance while a game is running. This saves time and removes the need for complex configuration. **Improved Windows Game Compatibility:** Running Windows games on Linux is no longer rare. Gaming distros are designed to work smoothly with compatibility layers like Proton, making many Windows-only titles playable with just a click. **Faster Updates for New Hardware:** Gaming distros usually update faster, which helps support: - **New GPUs:** Ensures better compatibility and performance with the latest graphics cards. - **Latest game engines:** Supports modern game technologies used in new releases. - **DirectX-to-Vulkan improvements:** Helps Windows games run more efficiently on Linux. This is especially useful if you’re playing modern AAA games. ### How is a Linux Distro Good for Gaming A gaming-focused Linux distro isn’t just about looks. It’s about how well everything works together when you launch a game. ![Linux distros for gaming](https://serveravatar.com/wp-content/uploads/2026/02/image-85.png) **Key factors that matter** - **Graphics driver support (NVIDIA, AMD, Intel):** Determines how well your GPU performs in games. - **Compatibility with Windows games:** Affects how many Windows-only titles you can play on Linux. - **System performance and stability:** Ensures smooth gameplay without crashes or stutters. - **Ease of installing game launchers:** Makes it simple to set up Steam, Epic Games, and other platforms. - **Low background resource usage:** Leaves more system power available for games. Think of your distro as the foundation of a gaming PC. A weak foundation means stutters, crashes, and frustration. A strong one lets your hardware shine. ## 7 Best Linux Distros for Gaming in 2026 Linux gaming in 2026 is no longer a niche experience reserved for enthusiasts. With modern graphics drivers, powerful compatibility tools, and distros built specifically for performance, Linux has become a serious platform for gaming. The following seven Linux distributions stand out for their ability to run games smoothly, handle modern hardware, and keep setup simple. ### 1. Pop!\_OS – Best Overall Gaming Distro [Pop!\_OS](https://en.wikipedia.org/wiki/Pop!_OS?ref=serveravatar.com) continues to be one of the most reliable Linux distros for gaming in 2026. Designed with performance and ease of use in mind, it removes many of the usual Linux setup frustrations, especially for gamers using modern hardware. [](https://storage.3.basecamp.com/5840738/blobs/6d3900c2-0742-11f1-9259-0242ac120004/download/image.png) ![Pop!_OS - Linux distros for gaming](https://serveravatar.com/wp-content/uploads/2026/02/image-87.png) **Key Features** - **Custom desktop environment:** Provides a clean, distraction-free interface optimized for productivity and gaming. - **System76 hardware integration:** Works seamlessly with System76 systems and general PC hardware. - **Separate NVIDIA ISO:** Allows instant access to proprietary NVIDIA drivers without manual installation. - **Automatic driver management:** Keeps graphics and system drivers updated with minimal effort. **Advantages** - **Excellent out-of-the-box performance:** Delivers smooth gaming without requiring system tweaks. - **Beginner-friendly setup:** Makes Linux gaming accessible even for first-time users. - **Stable release cycle:** Reduces the risk of sudden breakages after updates. - **Good Steam and Proton compatibility:** Supports most popular Windows games easily. **Disadvantages** - **Limited customization options:** Offers fewer desktop tweaks compared to some advanced distros. - **Slightly heavier than minimal distros:** Uses more resources than ultra-light Linux systems. - **Smaller community than Ubuntu:** Has fewer third-party guides and tutorials. **Why Gamers Love Pop!\_OS** - **Built by System76:** Created by a hardware-focused company that understands performance needs. - **NVIDIA drivers preinstalled:** Eliminates one of the biggest hurdles for Linux gamers. - **Strong gaming performance:** Uses system resources efficiently during gameplay. - **Clean and modern interface:** Keeps focus on games rather than system management. **Best for:** All the beginner, gamers, and NVIDIA users that wants zero hassle. ### 2. Ubuntu – Stable and Beginner-Friendly [Ubuntu](https://ubuntu.com?ref=serveravatar.com) remains one of the most trusted Linux distros and continues to be a solid choice for gaming in 2026. Its balance of stability, ease of use, and community support makes it ideal for newcomers. ![Ubuntu - Linux distros for gaming](https://serveravatar.com/wp-content/uploads/2026/02/image-89-1024x531.png) **Key Features** - **Long-Term Support (LTS) releases:** Provides years of updates and security patches. - **GNOME desktop environment:** Offers a modern and polished user experience. - **Wide software repository:** Includes access to thousands of applications and tools. - **Official Steam support:** Makes game installation straightforward. **Advantages** - **Massive community support** – Makes troubleshooting easier with plenty of guides available. - **Stable system performance** – Minimizes crashes and unexpected issues. - **Easy access to gaming tools** – Supports Steam, Lutris, Wine, and Proton. - **Excellent documentation** – Helps users learn Linux step by step. **Disadvantages** - **Older software versions in LTS:** May not include the newest gaming features. - **Manual driver setup:** It requires extra steps compared to Pop!\_OS. - **Slightly higher resource usage:** Uses more system resources than lightweight distros. **Strengths of Ubuntu for Gaming** - **Large user base:** Ensures faster fixes and updates for common issues. - **Simple game launcher installation:** Reduces setup time for new gamers. - **Reliable updates:** Keeps the system stable during long gaming sessions. - **Strong compatibility:** Works well across a wide range of hardware. **Best for:** First-time Linux gamers and casual players. ### 3. Linux Mint – Smooth Gaming for New Users [Linux Mint](https://linuxmint.com?ref=serveravatar.com) focuses on simplicity and familiarity, making it ideal for gamers switching from Windows. It delivers a smooth experience without unnecessary system complexity. ![Linux Mint - Linux distros for gaming](https://serveravatar.com/wp-content/uploads/2026/02/image-90.png) **Key Features** - **Cinnamon desktop:** Offers a Windows-like layout that feels instantly familiar. - **Ubuntu-based architecture:** Inherits stability and software availability. - **Lightweight system design:** Runs efficiently on older or low-end hardware. - **Preinstalled multimedia codecs:** Simplifies media and game compatibility. **Advantages** - **Low resource usage:** Leaves more system power available for games. - **Easy learning curve:** Reduces confusion for first-time Linux users. - **Stable performance:** Avoids frequent disruptive updates. - **Clean system layout:** Makes navigation simple and intuitive. **Disadvantages** - **Slower access to latest drivers:** May lag behind in supporting new GPUs. - **Limited gaming-specific tools:** Requires manual setup for advanced gaming features. - **Not ideal for cutting-edge gaming:** Best suited for casual or mid-level gaming. **Why Mint Works Well** - **Lightweight and fast:** Improves performance on modest hardware. - **Familiar interface:** Helps Windows users transition comfortably. - **Strong Ubuntu base:** Ensures software availability and reliability. - **Minimal background usage:** Maximizes gaming performance. **Best for:** Low-end PCs and Windows switchers. ### 4. Manjaro – Rolling Release Powerhouse [Manjaro](https://manjaro.org?ref=serveravatar.com) blends the power of Arch Linux with ease of use, offering excellent performance for gamers who want newer software without excessive complexity. ![Manjaro - Linux distros for gaming](https://serveravatar.com/wp-content/uploads/2026/02/image-91.png) **Key Features** - **Rolling release model:** Delivers continuous updates without full reinstalls. - **Multiple desktop options:** Supports KDE, GNOME, XFCE, and more. - **Arch User Repository (AUR):** Provides access to a massive software library. - **Built-in driver manager:** Simplifies hardware setup. **Advantages** - **Access to latest kernels:** Improves performance for new games and GPUs. - **Strong hardware detection:** Automatically configures most components. - **High customization potential:** Allows users to fine-tune performance. - **Great AMD and NVIDIA support:** Works well with both GPU brands. **Disadvantages** - **Frequent updates:** Can occasionally introduce minor bugs. - **Less stable than LTS distros:** Requires careful update management. - **Not ideal for absolute beginners:** Some Linux experience helps. **Why Manjaro Works Well** - **Newer drivers and kernels:** Boosts compatibility with modern hardware. - **User-friendly Arch base:** Offers Arch power without full complexity. - **Performance tuning options:** Helps gamers squeeze out extra FPS. - **Fast system response:** Feels snappy during gameplay. **Best for:** Intermediate users and performance-focused gamers. ### 5. Garuda Linux – Built for Gamers [Garuda Linux](https://garudalinux.org?ref=serveravatar.com) is designed specifically for performance and visual appeal. It prioritizes speed, modern software, and gaming tools straight out of the box. ![Garuda Linux - Linux distros for gaming](https://serveravatar.com/wp-content/uploads/2026/02/image-93-1024x579.png) **Key Features** - **Performance-optimized kernel:** Enhances responsiveness and FPS. - **Gaming tools preinstalled:** Reduces setup time significantly. - **Btrfs filesystem with snapshots:** Allows easy system recovery. - **Stylish desktop themes:** Appeals to gamers who enjoy visual flair. **Advantages** - **Ready-to-game setup:** Minimal configuration required after installation. - **System rollback support:** Protects against failed updates. - **Modern software stack:** Supports the latest games and drivers. - **Strong performance focus:** Tuned for demanding workloads. **Disadvantages** - **High resource usage:** Requires powerful hardware. - **Aggressive update cycle:** Needs regular maintenance. - **Not beginner-friendly:** Best suited for experienced users. **What Makes Garuda Special** - **Preinstalled gaming tools:** Saves hours of manual setup. - **Performance-focused kernel:** Improves gaming responsiveness. - **System snapshots:** Provides safety during updates. - **Bold design:** Stands out visually. **Best for:** Hardcore gamers and RGB lovers. ### 6. Fedora – Cutting-Edge Performance [Fedora](https://www.fedoraproject.org?ref=serveravatar.com) is a forward-looking distro that offers modern features and strong performance. It appeals to gamers who want the latest technology without fully experimental systems. ![Fedora - Linux distros for gaming](https://serveravatar.com/wp-content/uploads/2026/02/image-94-1024x594.png) **Key Features** - **Latest Linux kernel:** Ensures up-to-date hardware support. - **Wayland by default:** Improves graphics performance and security. - **Strong security framework:** Protects the system during gaming and browsing. - **Official Flatpak support:** Simplifies software installation. **Advantages** - **Excellent AMD GPU support:** Works especially well with open-source drivers. - **Fast access to new features:** Keeps the system future-ready. - **Stable yet modern:** Balances innovation and reliability. - **Enterprise-backed development:** Maintained by Red Hat. **Disadvantages** - **Shorter release lifecycle:** Requires more frequent upgrades. - **Manual codec setup:** Needs extra steps for multimedia support. - **Less beginner-focused:** Assumes some Linux knowledge. **Why Fedora Shines** - **Latest kernels:** Improve performance and compatibility. - **Strong security:** Protects user data and system integrity. - **AMD-friendly environment:** Delivers smooth gameplay on AMD GPUs. - **Backed by Red Hat:** Ensures long-term innovation. **Best for:** Tech-savvy gamers and AMD GPU users. ### 7. Nobara Project – Fedora Tuned for Gaming [Nobara](https://nobaraproject.org?ref=serveravatar.com) is a gaming-focused spin of Fedora that removes common setup hurdles. It offers a smoother experience for gamers who want Fedora’s power without manual configuration. ![Nobara Project - Linux distros for gaming](https://serveravatar.com/wp-content/uploads/2026/02/image-95.png) **Key Features** - **Gaming-ready Fedora base:** Optimized for performance and compatibility. - **Preconfigured Proton and Wine:** Enables Windows games instantly. - **Multimedia codecs included:** Supports audio and video without extra steps. - **Custom patches and tweaks:** Improves gaming stability. **Advantages** - **Minimal setup required:** Ready for gaming right after installation. - **Improved NVIDIA support:** Simplifies driver installation. - **Better game compatibility:** Reduces crashes and performance issues. - **Actively maintained:** Receives regular improvements. **Disadvantages** - **Smaller community:** Fewer guides compared to mainstream distros. - **Less tested than Fedora:** Some features may feel experimental. - **Not ideal for servers:** Focused mainly on desktop gaming. **Gaming-Focused Improvements** - **Proton and Wine preconfigured:** Saves setup time for Windows games. - **Included multimedia codecs:** Improves compatibility with game media. - **Performance tweaks applied:** Enhances FPS and stability. - **Easy NVIDIA setup:** Reduces driver-related issues. **Best for:** Fedora fans who want gaming without manual setup. [![Blog banner - ServerAvatar](https://serveravatar.com/wp-content/uploads/2025/09/728_90-Banner-1-1024x127.png)](https://serveravatar.com/?ref=blog)## Hardware & Driver Support Explained Your distro is only as good as its driver support. - **NVIDIA (Pop!\_OS, Ubuntu, Nobara):** These distros offer smoother NVIDIA driver installation and support. - **AMD (Fedora, Manjaro, Garuda):** Known for excellent AMD GPU performance and faster driver updates. - **Intel (Ubuntu, Mint, Fedora):** Provides stable and well-tested support for Intel graphics hardware. Newer kernels usually mean better performance, but sometimes less stability. Choose wisely based on your hardware age. ## Performance Tips for Linux Gaming Want smoother gameplay? Try these tips: - **Use GameMode:** Optimizes CPU and GPU performance automatically during gameplay. - **Enable FSR or DLSS:** Improves frame rates while maintaining good visual quality. - **Keep GPU drivers updated:** Ensures better compatibility and performance with new games. - **Close unnecessary background apps:** Frees up system resources for smoother gameplay. - **Use SSDs for game storage:** Reduces loading times and improves overall game responsiveness. Small tweaks can add big FPS gains. ## Choosing the Right Distro for Your Needs Ask yourself: - **Do I want simplicity or control?** Decide whether you want an easy setup or advanced customization options. - **Am I using NVIDIA or AMD?** Choose a distro that best supports your graphics hardware. - **Do I enjoy tinkering or just gaming?** Pick based on whether you enjoy system tweaking or prefer plug-and-play gaming. Your perfect distro depends on your comfort level, not just performance charts. ## Common Myths About Linux Gaming **Myth:** Linux gaming is slow **Truth:** Performance often matches or beats Windows **Myth:** No multiplayer games work **Truth:** Many anti-cheat games now support Linux **Myth:** Linux is only for programmers **Truth:** Modern distros are beginner-friendly ## Future of Linux Gaming Beyond 2026 Linux gaming has moved far beyond being an alternative or experiment. It is now a serious gaming platform that competes directly with traditional operating systems. Performance improvements, better driver support, and strong community backing have helped Linux earn its place in modern gaming. Devices like the Steam Deck have played a major role in pushing Linux forward. As more players use Linux-based systems, game developers are paying closer attention, leading to better native support and fewer compatibility issues. Looking ahead, Linux gaming is expected to become even more polished and accessible. With continued advancements in Proton, Vulkan, and hardware optimization, the gap between Linux and other platforms continues to shrink. The future of Linux gaming is not just promising, it’s fast, stable, and ready to play. ## Conclusion Linux gaming in 2026 is no longer about compromise, it’s about choice. With powerful tools like Proton, Wine, and Lutris, along with improved driver support and gaming-focused distros, Linux has become a serious platform for playing both native and Windows games. Whether you prefer a beginner-friendly setup like Pop!\_OS or Ubuntu, a lightweight option like Linux Mint, or performance-driven distros such as Manjaro, Garuda, Fedora, or Nobara, there’s a Linux distro that fits your gaming style and hardware. The key is picking what matches your comfort level and needs. Once you do, Linux offers a smooth, flexible, and distraction-free gaming experience that continues to improve every year. ## FAQs ### 1. Can Linux really run Windows games in 2026? Yes, Linux can run thousands of Windows games smoothly using tools like Steam Proton, Wine, and Lutris, often with performance close to or equal to Windows. ### 2. Which Linux distro is best for beginners who want to game? Pop!\_OS, Ubuntu, and Linux Mint are excellent choices for beginners due to easy setup, good driver support, and strong community help. ### 3. Do I need a powerful PC to game on Linux? Not necessarily. Lightweight distros like Linux Mint perform well on low-end or older hardware, while high-performance distros benefit stronger systems. ### 4. Is Linux gaming better than Windows gaming? In many cases, Linux gaming matches or even exceeds Windows in stability and system control, though a few games may still work better on Windows. ### 5. Are multiplayer and online games supported on Linux? Yes, many multiplayer games now work on Linux, and support for anti-cheat systems has improved significantly in recent years. ### 6. Which Linux distro works best with NVIDIA graphics cards? Pop!\_OS, Ubuntu, and Nobara are known for smoother NVIDIA driver installation and better overall NVIDIA GPU support. ### 7. Will Linux gaming continue to improve after 2026? Absolutely. With growing developer interest, Steam Deck influence, and constant improvements in Proton and Vulkan, Linux gaming has a very strong future. ## Stop Wasting Time on Servers. Start Building Instead. You didn’t start your project to babysit servers. Let **ServerAvatar** handle deployment, monitoring, and backups — so you can focus on growth. Deploy **WordPress, Laravel, N8N**, and more in minutes. No DevOps required. No command line. No stress. [ 🚀 Try Free ](https://app.serveravatar.com) [ 🌐 Learn More ](https://serveravatar.com/) Trusted by 10,000+ developers and growing. **Categories:** Blog, Guide, Linux, Others, Ubuntu **Tags:** best Linux distros for gaming, gaming on Linux, Linux, Linux Distros, Linux gaming, Linux gaming distros, Linux gaming performance --- ### [How to Integrate Slack with ServerAvatar](https://serveravatar.com/integrate-slack-with-serveravatar/) **Published:** February 9, 2026 **Author:** Meghna Meghwani **Content:** [![Blog banner - ServerAvatar](https://serveravatar.com/wp-content/uploads/2025/09/728_90-Banner-3-1024x127.png)](https://serveravatar.com/?ref=blog)Have you ever wished your server could simply tap you on the shoulder and tell you when something important happens? Instead of constantly checking dashboards, logs, or panels? That’s exactly why the ability to integrate Slack as a notification channel for your server becomes so important. Server management doesn’t have to feel overwhelming or technical, especially for beginners. With the right notification setup, you can stay informed without being glued to your screen. Slack keeps you informed without demanding constant attention. This guide is designed for everyone, even if you’re new to ServerAvatar or Slack. We’ll walk through everything step by step, explain each concept clearly, and avoid unnecessary complexity. ## What Is ServerAvatar? [ServerAvatar](https://serveravatar.com/) is a server and application hosting and management platform designed to make handling servers easier, cleaner, and more accessible. Instead of working directly with complex server commands, ServerAvatar provides a visual dashboard where you can manage server-related activities more comfortably. [](https://storage.3.basecamp.com/5840738/blobs/be1d102a-0597-11f1-873b-0242ac120003/download/serveravatardashboard.jpg) ![serveravatar dashboard - Integrate Slack](https://serveravatar.com/wp-content/uploads/2026/02/image-59.png) One of the features of ServerAvatar is its notification system. Notifications act as messengers that inform you whenever specific events occur within your server environment. These messages help you stay updated without manually monitoring every detail. ## Understanding Notification Channels Think of notification channels as delivery routes. The message is the same, but the delivery method can change. ServerAvatar allows you to configure where notifications should be sent, and Slack is selected as one such route. ![notification channel - Integrate Slack](https://serveravatar.com/wp-content/uploads/2026/02/image-60.png) Once it is connected: - ServerAvatar detects an event - The notification system prepares a message - The message is delivered to Slack via the configured channel The integration does not change how ServerAvatar detects events. It only changes **where** the information appears. ### Why This Matters This setup keeps the system flexible. You can add Slack as a channel without affecting other notification methods. Everything works independently but stays organized under one system. ### How Notification Channels Work? ServerAvatar notifications are event-based. This means: - An event happens - A notification is triggered - The message is sent to a selected channel You get to decide where these notifications go from Slack, Discord, Telegram, and Pushover, as ServerAvatar provides these notification channels. Slack is one such channel, and it’s particularly popular. ![notification channel - Integrate Slack](https://serveravatar.com/wp-content/uploads/2026/02/image-61.png) Instead of being reactive, notifications help you stay aware. They quietly work in the background, making sure you’re never completely out of the loop. ## What is Slack? [Slack](https://slack.com/intl/en-in?ref=serveravatar.com) is a digital communication tool designed to keep conversations organized and easy to follow. Instead of long message threads or scattered updates, Slack brings everything into one structured space where messages are grouped by topic. At its core, Slack works using channels. A channel is like a dedicated room created for a specific purpose. Messages shared inside a channel stay visible to everyone who has access to it, making communication clear and consistent. ### How Slack Works? Slack follows a very straightforward flow: - Messages are sent inside channels - Channels keep conversations organized - Updates appear instantly - Information stays searchable Rather than jumping between different tools, Slack acts as a single place where updates arrive and remain accessible. **Why Slack Works Well for Notifications:** Slack is well-suited for notifications because: - Messages appear in real time - Information stays organized in channels - Alerts are easy to read and track When ServerAvatar sends a notification to Slack, it appears as a message in a chosen channel. There’s no need to log in to ServerAvatar repeatedly just to check updates. In simple words, Slack becomes a shared inbox for your server notifications. ## Why Integrate Slack with ServerAvatar Integrating Slack with ServerAvatar to get real-time alerts for your servers on Slack and allows notifications to flow naturally into a communication space that’s already designed for visibility and collaboration. ### Key Benefits of Slack Integration with ServerAvatar - Instant updates without opening the dashboard - Centralized communication in one place - Reduced manual monitoring - Better awareness of server-related events Instead of switching between tools, everything important comes to you. It’s like having your mail delivered to your desk rather than checking the mailbox every hour. This integration doesn’t change how ServerAvatar works. It simply extends its notification system into Slack, making the experience smoother and more user-friendly. **How This Integration Helps?** For users of ServerAvatar, constantly checking a panel can feel confusing. Slack removes that pressure. Notifications arrive automatically, clearly labeled, and easy to understand. Some key advantages include: - Faster awareness of important updates - Less manual checking of the ServerAvatar dashboard - Clear, readable messages delivered in one place - Better focus without distractions Rather than reacting late, you stay informed at the right moment. It’s like having a quiet assistant who speaks up only when needed. ## Prerequisites Before Setting Up Slack Integration Before connecting Slack with ServerAvatar, a few basic requirements need to be in place. These are simple and don’t require advanced technical knowledge. Make sure you have: - An active ServerAvatar account - Access to the ServerAvatar dashboard - A Slack workspace - Permission to manage Slack apps or integrations These prerequisites ensure that you can create a connection between ServerAvatar and Slack without interruptions. Skipping preparation can lead to confusion during setup. When everything is ready beforehand, the integration process feels smooth and straightforward. ## Step-by-Step Guide to Integrate Slack with ServerAvatar ServerAvatar lets you add Slack as a notification channel directly from the dashboard. This process does not require changing any server settings or accessing sensitive configurations. You’re simply defining where ServerAvatar should send alerts. All notification channels are managed from the **Account Settings** section in the ServerAvatar dashboard. This is where you can configure different communication methods, including Slack. - Let’s first log in to the ServerAvatar account and navigate to the **Account** Section from the top right corner. ![account - Integrate Slack](https://serveravatar.com/wp-content/uploads/2026/02/image-62-1024x372.png) - Navigate to the **Notification Channel** section. Click on the **Create Channel** button. ![create channel - Integrate Slack](https://serveravatar.com/wp-content/uploads/2026/02/image-63-1024x285.png) - Select **Slack** as the notification channel, and enter the Label for your **Slack** notification channel. ![create notification channel - Integrate Slack](https://serveravatar.com/wp-content/uploads/2026/02/image-64.png) - Now, we need the **Slack Webhook URL** for Slack integration. ### What Is a Webhook? A webhook is like a mailing address for Slack. It tells ServerAvatar exactly where messages should be delivered. Instead of sending notifications randomly, ServerAvatar uses this webhook URL to place messages into a specific Slack channel. ### How ServerAvatar Uses Slack Webhooks Here’s what happens behind the scenes: - Slack provides a webhook URL - You add this webhook to ServerAvatar - ServerAvatar sends notifications to that URL - Slack displays them as messages in a channel That’s it. No extra configuration is required once the webhook is connected correctly. ### Why Webhooks Are Important Without a webhook, ServerAvatar wouldn’t know which Slack channel to use. The webhook ensures messages land in the right place every time, keeping communication neat and organized. ### Creating a Slack Webhook To get the **Slack Webhook URL**, follow the below steps: - Open your Slack application and click on the ‘three dots’ next to the **Apps >> Manage >> Browse apps** as shown in the below image. ![add app - Integrate Slack](https://serveravatar.com/wp-content/uploads/2026/02/image-65-1024x538.png) - Search for **Incoming WebHooks** in the searchbar and select it from the results. ![search for webhook - Integrate Slack](https://serveravatar.com/wp-content/uploads/2026/02/image-66-1024x538.png) - Click on **Add to Slack** button, and select the channel or direct message where you want notifications to appear. ![add to slack - Integrate Slack](https://serveravatar.com/wp-content/uploads/2026/02/image-67-1024x479.png) - You’ll be redirected to a page, select your channel from the dropdown, or create a new channel for ServerAvatar notifications. Click on the **Add Incoming WebHooks Integration.** ![add webhook - Integrate Slack](https://serveravatar.com/wp-content/uploads/2026/02/image-68-1024x344.png) - Slack will generate a webhook URL for the selected channel. Copy this URL for use in ServerAvatar. ![webhook url - Integrate Slack](https://serveravatar.com/wp-content/uploads/2026/02/image-69-1024x703.png) - Copy the Webhook URL and paste it into the generated pop-up of the notification channel in ServerAvatar. - Click on the **Create** button. ![create notification channel - Integrate Slack](https://serveravatar.com/wp-content/uploads/2026/02/image-70.png) - After adding the Slack notification channel, you can view the integrated notification channel displayed. ![attach notification channel - Integrate Slack](https://serveravatar.com/wp-content/uploads/2026/02/image-71-1024x224.png) > It’s important to understand that adding Slack as a notification channel from the Account Settings only enables notifications at the account level. This means you will receive general account-related alerts, but server-specific activities will not be sent to Slack automatically. ### How Account-Level Notifications Appear in Slack Once Slack is added as a notification channel at the account level, ServerAvatar starts sending account-related alerts directly to your selected Slack channel. These notifications keep you informed about important changes related to users, integrations, and organization settings. Each alert is displayed as a clear, readable Slack message, making it easy to understand what action occurred and when it happened. **Examples of account-level notifications** ![account level notification - Integrate Slack](https://serveravatar.com/wp-content/uploads/2026/02/image-76-1024x701.png) > To receive alerts related to the server and particular applications in the server, the notification channel must be attached to the server. This step is commonly missed during setup, but without attaching the notification channel at the server level, Slack will not receive server activity alerts. [![Blog banner - ServerAvatar](https://serveravatar.com/wp-content/uploads/2025/09/728_90-Banner-1-1024x127.png)](https://serveravatar.com/?ref=blog)### How to get Server-Level Notifications in Slack Now, let’s attach the notification channel to the server to **get all the server-level notifications.** - Navigate to the server panel by clicking on the server dashboard icon. ![server dashboard - Integrate Slack ](https://serveravatar.com/wp-content/uploads/2026/02/image-72-1024x203.png) - Go to the **Notification Channels** from the left sidebar and click on the **Attach** button. ![attach notification channel - Integrate Slack ](https://serveravatar.com/wp-content/uploads/2026/02/image-73-1024x444.png) - Select your created **Notification Channel** from the dropdown and click on the **Attach** button. ![attach notification channel - Integrate Slack ](https://serveravatar.com/wp-content/uploads/2026/02/image-74.png) - You can see your notification channel listed, once your notification channel is connected to your server. ![](https://serveravatar.com/wp-content/uploads/2026/02/image-75-1024x166.png) By integrating Slack with ServerAvatar and attaching the notification channel to your server, you get instant updates about server activities directly in your Slack channels. This helps you keep track of your server easily without logging into ServerAvatar all the time. **Examples of server-level notifications** ![server level notifications - Integrate Slack ](https://serveravatar.com/wp-content/uploads/2026/02/image-77-1024x700.png) ## Types of Alerts Sent to Slack via ServerAvatar Once Slack is integrated with ServerAvatar and the notification channel is properly attached, the system can send a wide range of alerts directly to your Slack workspace. These alerts are grouped into **account-level** and **server-level** notifications to keep information structured and easy to understand. ### Account-Level Alerts Account-level alerts are triggered by activities related to your ServerAvatar account, integrations, and organization settings. These notifications are sent as soon as the Slack channel is added at the account level. **User-Level Alerts** These alerts help you stay informed about important security and account-related actions: - Whitelist IP added - Two-factor authentication (2FA) enabled or disabled - Wallet credit added **Integration-Level Alerts** These notifications inform you when third-party services are connected or removed from your account: - Cloud provider connected or removed - Git provider connected or removed - Storage provider connected or removed **Organization-Level Alerts** These alerts keep track of team and role management activities: - Organization member added or removed - Role created, updated, or deleted ### Server-Level Alerts Server-level alerts become active once the Slack notification channel is **attached to a specific server**. These notifications cover server operations, services, applications, and security-related events. **Server Alerts** These alerts focus on core server activities and system-level changes: - Server created, deleted, or restarted - Server IP changed - Server shared - Server metrics updates - Disk usage checked - Memory usage checked - Server load checked - Disk cleaned - Swap updated **Cronjob Alerts** - Cronjob created, updated, or deleted - Cronjob enabled or disabled **PHP & Configuration Alerts** - PHP extension installed or removed - PHP-FPM configuration updated **Security Alerts** - Database root password updated - Redis settings updated - Fail2Ban enabled, disabled, or updated **Service Alerts** - Service started, stopped, restarted, or reloaded - Service monitoring enabled, disabled, or updated **Firewall Alerts** - Firewall enabled or disabled - Firewall rule created or deleted ## Common Mistakes to Avoid During Setup Even though Slack integration with ServerAvatar is straightforward, a few common mistakes can cause confusion. Being aware of them makes the setup smoother. **Mistakes to Watch Out For** - Using an incorrect webhook URL - Forgetting to save changes after setup - Not having proper Slack permissions - Adding Slack at the account level, but forgetting to attach it to the server Each of these issues is easy to avoid with a little attention. Taking your time during setup prevents unnecessary troubleshooting later. Remember, slow and steady works better than rushed and reactive. ## Security and Privacy Considerations Whenever two platforms are connected, security naturally becomes a concern. The good news is that Slack integration with ServerAvatar is designed with safety in mind, as long as it’s configured correctly. **Keeping the Integration Secure** To maintain security: - Keep webhook URLs private - Avoid sharing notification channels publicly Think of the webhook like a key. As long as it’s kept safe, the connection remains secure. Integrating Slack with ServerAvatar is not about adding complexity. It’s about simplifying awareness. ## Conclusion Slack integration with ServerAvatar bridges the gap between server activity and everyday communication. It transforms notifications into clear, timely messages delivered exactly where attention already exists. For beginners and non-technical users, this setup removes guesswork and reduces manual checking. Once configured, it quietly works in the background, keeping you informed without demanding effort. By following the steps outlined in this guide, anyone can set up Slack integration confidently and make server notifications feel simple, organized, and manageable. ## FAQs ### 1. What is Slack integration with ServerAvatar? Slack integration with ServerAvatar allows server notifications to be sent directly to a Slack channel, keeping updates visible and organized. ### 2. Do I need technical knowledge to integrate Slack with ServerAvatar? No, the setup is beginner-friendly and does not require advanced technical skills. ### 3. Can I control which notifications are sent to Slack? Yes, ServerAvatar allows you to select specific events for Slack notifications. ### 4. Is it safe to connect Slack with ServerAvatar? Yes, as long as webhook URLs are kept secure and permissions are managed properly. ### 5. Can Slack integration be removed later? Yes, Slack can be disabled or removed as a notification channel at any time without affecting server operations. **Categories:** Blog, Guide, Linux, Optimisation, Others, Tutorials, Ubuntu **Tags:** DevOps, Server alert, server alerts, ServerAvatar Slack integration, Slack notifications for servers, Slack server alerts --- ### [AWS Lightsail vs EC2: Which Instance Should You Choose?](https://serveravatar.com/aws-lightsail-vs-ec2-which-instance-to-choose/) **Published:** February 10, 2026 **Author:** Meghna Meghwani **Content:** [![Blog banner - ServerAvatar](https://serveravatar.com/wp-content/uploads/2025/09/728_90-Banner-3-1024x127.png)](https://serveravatar.com/?ref=blog)If you’re planning to host a website, app, or side project on AWS, chances are you have stumbled upon two popular options: **AWS Lightsail** vs **EC2**. And then comes the confusion. Both promise power, scalability, and reliability, but which one actually fits your needs? One is simple, predictable, and quick to move into. The other gives you endless freedom, but also more responsibility. In this guide, I will explain everything simply so you can confidently decide between AWS Lightsail vs EC2, without feeling overwhelmed. ## What Is AWS Lightsail? [AWS Lightsail](https://aws.amazon.com/free/compute/lightsail?ref=serveravatar.com) is Amazon’s simplified cloud platform designed for beginners and small projects. It bundles everything you need, such as compute, storage, networking, and a fixed monthly price, into one neat package. ![AWS Lightsail - AWS Lightsail vs EC2](https://serveravatar.com/wp-content/uploads/2026/02/image-78.png) You don’t need to worry about configuring dozens of options. Instead, you pick a plan, click launch, and your server is ready in minutes. ### Key highlights of AWS Lightsail AWS Lightsail is designed to make cloud hosting simple and approachable, especially for beginners and small projects. It removes much of the technical complexity so you can focus on launching and running your application quickly. - **Fixed monthly pricing:** You pay a predictable flat fee each month, which makes budgeting easy and avoids surprise bills. - **Simple dashboard:** The interface is clean and easy to navigate, allowing you to manage servers without deep technical knowledge. - **Pre-configured blueprints:** Ready-made setups like WordPress, Node.js, and LAMP help you launch applications in just a few clicks. - **Minimal cloud knowledge required:** You don’t need to understand advanced AWS concepts to get started and keep things running. Lightsail is perfect if you just want things to work without diving deep into cloud architecture. ## What Is Amazon EC2? [Amazon EC2](https://aws.amazon.com/ec2?ref=serveravatar.com) (Amazon Elastic Compute Cloud) is AWS flagship compute service. It gives you raw power and total control over your virtual servers. ![Amazon EC2 - AWS Lightsail vs EC2](https://serveravatar.com/wp-content/uploads/2026/02/image-79.png) With EC2, you decide everything: instance type, CPU, memory, storage, networking, and security rules. It’s incredibly flexible, but also more complex. ### Key highlights of Amazon EC2 Amazon EC2 offers powerful and flexible computing options for users who need full control over their infrastructure. It is built for scalability, customization, and handling complex workloads. - **Hundreds of instance types:** You can choose from a wide range of configurations to match specific performance and workload needs. - **Advanced networking:** EC2 allows detailed control over networking settings for more complex architectures. - **Pay-as-you-go pricing:** You only pay for what you use, making it suitable for dynamic and growing applications. - **Deep AWS service integration:** EC2 works seamlessly with other AWS services for storage, security, and automation. EC2 is built for scalability, performance, and professional workloads. ## Core Difference Between Lightsail and EC2 The biggest difference comes down to simplicity vs flexibility. - **AWS Lightsail** hides complexity and focuses on ease. - **Amazon EC2** exposes everything and lets you customize it all. If Lightsail is like driving an automatic car, EC2 is a manual sports car. Both get you places, but the experience is very different. ### 1. Ease of Use and Learning Curve **AWS Lightsail** is beginner-friendly. The interface is clean, actions are guided, and common tasks like backups and static IPs are straightforward. **Amazon EC2** has a steeper learning curve because it exposes you to many core AWS components. Understanding these elements is essential for managing and securing EC2 instances properly. - **VPCs:** Virtual Private Clouds let you create isolated network environments for better control and security. - **Security groups:** These act as virtual firewalls that control incoming and outgoing traffic to your instances. - **Key pairs:** Key pairs are used for secure login access to your EC2 instances instead of passwords. - **Load balancers:** Load balancers distribute traffic across multiple instances to improve availability and reliability. If you’re new to cloud hosting, Lightsail feels far less intimidating. ### 2. Pricing and Cost Transparency **AWS** **Lightsail** pricing is predictable. You pay a fixed monthly fee that includes bandwidth, storage, and compute. **Amazon EC2** pricing is flexible but complex. Costs vary by: - **Instance hours:** Charges are based on how long your instances are running. - **Storage usage:** Costs depend on the type and amount of storage attached to your instances. - **Data transfer:** Data moving in and out of AWS can add to your overall bill. - **Additional services:** Features like load balancers and monitoring tools increase total costs. If you like knowing your bill upfront, Lightsail wins. If you want cost optimization at scale, EC2 offers more control. ### 3. Performance and Scalability **AWS** **Lightsail** is suitable for small to medium workloads where traffic and resource demands are predictable. However, it has defined limits that may restrict long-term growth. - **Lightsail limitations:** It performs well for basic projects but is not ideal for heavy or rapidly growing workloads. **Amazon EC2** is built to handle large-scale applications and sudden demand changes with ease. - **Auto-scale instances:** Automatically adds or removes servers based on traffic levels. - **Powerful CPUs and GPUs:** Supports high-performance computing for demanding applications. - **Massive traffic spikes:** Handles sudden increases in visitors without downtime. For long-term growth and high performance, EC2 is the stronger option. ### 4. Networking and Customization **AWS** **Lightsail** focuses on simplicity, offering basic networking features that are easy to manage. This approach works well for straightforward hosting needs. - **Basic firewall rules:** Simple security settings help protect your server without complex configuration. - **Static IPs:** Provides a fixed IP address for consistent access to your application. **Amazon EC2** provides advanced networking options for users who need greater control and flexibility. - **Custom VPCs:** Allows full control over network design and isolation. - **Multiple subnets:** Enables separation of resources across different network layers. - **Load balancers:** Improve performance and availability by spreading traffic evenly. - **Private networking:** Secure communication between services without exposing them to the public internet. If you need fine-grained control, EC2 is unmatched. ### 5. Security and Control Both services are secure, but EC2 offers deeper control. **AWS Lightsail** handles many security defaults for you, which is great for beginners. **Amazon EC2** lets you customize everything, from IAM roles to network isolation, making it ideal for compliance-heavy or enterprise projects. ### 6. Backup & Disaster Recovery Backup and disaster recovery play a critical role in protecting your data from accidental deletion, system failures, or unexpected outages. While both AWS Lightsail and EC2 offer backup options, the level of control and flexibility differs significantly. **AWS Lightsail** provides a simple snapshot-based backup system that allows you to manually or automatically create backups of your instance. These snapshots are easy to manage and restore, making them suitable for small projects that need basic protection. **Amazon EC2** offers advanced disaster recovery options using EBS snapshots, AMIs, and automated backup workflows. This makes EC2 a better choice for applications that require high availability, data redundancy, and complex recovery strategies. ### 7. Monitoring & Management Tools Monitoring helps you understand how your server is performing and identify issues before they affect users. The depth of monitoring available is one of the key differences between Lightsail and EC2. **AWS Lightsail** includes built-in basic monitoring for metrics like CPU usage, memory, and network traffic. These simple insights are usually enough for small websites and personal projects. **Amazon EC2** integrates deeply with AWS CloudWatch, allowing detailed monitoring, custom alerts, logs, and automated responses. This makes EC2 more suitable for production environments where performance tracking and proactive management are essential. ### 8. Traffic & Bandwidth Limits Understanding traffic and bandwidth limits is important when choosing a hosting solution, especially if your website expects growth. Lightsail and EC2 handle data transfer in very different ways. **AWS Lightsail** includes a fixed amount of data transfer with each plan. This makes costs predictable, but exceeding the limit can result in additional charges or performance considerations. **Amazon EC2** charges separately for data transfer based on usage. While this provides more flexibility for high-traffic applications, it also requires careful monitoring to avoid unexpected costs. ### 9. Operating System & Software Flexibility The ability to choose operating systems and software configurations can significantly impact how much control you have over your server environment. **AWS Lightsail** offers a limited selection of operating systems and pre-configured application blueprints. This approach simplifies setup but restricts customization. **Amazon EC2** allows complete freedom to choose operating systems, install custom software, and configure the server at a low level. This makes EC2 ideal for advanced users who need full control over their environment. ### 10. Ideal Use Cases **AWS Lightsail is best for:** AWS Lightsail is ideal for projects that need quick deployment without complex server management. It works best when simplicity, speed, and predictable costs are more important than deep customization. - **Personal websites:** A reliable and easy option for hosting portfolios, resumes, or hobby projects. - **WordPress blogs:** Perfect for bloggers who want fast setup and smooth performance without technical hassle. - **Small business sites:** Supports business websites that need stability without advanced infrastructure. - **MVPs and prototypes:** Allows rapid testing of ideas before investing in more complex cloud setups. - **Developers who want simplicity:** Ideal for developers who prefer focusing on code rather than server configuration. If your project is small and speed matters, Lightsail is a great start. **Amazon EC2 is best for:** Amazon EC2 is designed for projects that require scalability, flexibility, and advanced configuration. It is a strong choice for long-term and high-demand workloads. - **Large-scale applications:** Supports complex systems with heavy processing needs. - **High-traffic websites:** Handles large volumes of users and requests efficiently. - **SaaS platforms:** Ideal for subscription-based applications that grow over time. - **Custom architectures:** Allows complete freedom to design unique infrastructure setups. - **Enterprise workloads:** Meets the reliability and performance needs of large organizations. If flexibility and growth are priorities, EC2 is the way to go. [![Blog banner - ServerAvatar](https://serveravatar.com/wp-content/uploads/2025/09/728_90-Banner-1-1024x127.png)](https://serveravatar.com/?ref=blog)## Lightsail vs EC2: Feature Comparison **Feature****AWS Lightsail****Amazon EC2****Ease of Use**Very beginner-friendly with a simple interfaceRequires AWS knowledge and technical setup**Pricing Model**Fixed monthly pricingPay-as-you-go with variable costs**Scalability**Limited scalabilityHighly scalable with auto-scaling**Performance Options**Suitable for small to medium workloadsSupports high-performance CPUs and GPUs**Networking**Basic firewall and static IPsAdvanced VPCs, subnets, and load balancers**Backup Options**Simple snapshot-based backupsAdvanced snapshots, AMIs, and automation**Monitoring**Basic built-in metricsDeep monitoring with CloudWatch**Traffic Handling**Fixed bandwidth limitsFlexible, usage-based data transfer**OS & Software Control**Limited OS and blueprint choicesFull OS and software customization**Best For**Beginners, blogs, small websitesLarge apps, SaaS, enterprise workloads## Which One Should You Choose? Choosing between AWS Lightsail and EC2 depends on your experience level and project requirements. Both are powerful, but both have different purposes. **Choose Lightsail if:** - **You want simplicity:** You prefer an easy setup without complex configurations. - **You’re new to AWS:** You want to learn cloud hosting without feeling overwhelmed. - **You need predictable pricing:** You want clear monthly costs with no surprises. **Choose EC2 if:** - **You need full control:** You want to customize every part of your server environment. - **You expect rapid growth:** Your application may scale quickly over time. - **You’re building complex systems:** You require advanced networking and integrations. There’s no wrong answer, only the right tool for your specific needs. ## How ServerAvatar Helps You Manage these instances easily? **What is ServerAvatar?** [ServerAvatar](https://serveravatar.com/) is a platform to simplify the hosting and management of servers and applications. It simplifies process of deploying and managing PHP and Node.js based web applications on servers. ![ServerAvatar Dashboard - AWS Lightsail vs EC2](https://serveravatar.com/wp-content/uploads/2026/02/image-80.png) Managing servers often requires handling multiple tools, dashboards, and configurations, especially when using Amazon EC2. Tasks like setting up applications, monitoring performance, securing the server, and creating backups can quickly become time-consuming and complex. ServerAvatar simplifies server management by bringing essential operations into a single, easy-to-use dashboard. Instead of managing everything manually, users can perform common tasks such as deploying applications, managing databases, monitoring server health, and handling security settings without relying heavily on the command line. For users running EC2 instances, ServerAvatar reduces the operational workload by automating routine server management tasks. This allows developers and businesses to focus more on building and scaling their applications rather than maintaining infrastructure. ServerAvatar also supports both managed and self-managed servers, giving users the flexibility to choose how much control they want. You can easily deploy your AWS Lightsail or Amazon EC2 servers easily with the self-managed server feature. Additionally, you can easily integrate your Amazon Lightsail account with ServerAvatar. ![amazon lightsail integration - AWS Lightsail vs EC2](https://serveravatar.com/wp-content/uploads/2026/02/image-81-721x1024.png) You can directly integrate your AWS Lightsail account to ServerAvatar and then create a server, or you can use the custom method to deploy your AWS Lightsail, Amazon EC2, or any custom server from any cloud provider. ServerAvatar makes the process more organized and easier to maintain. ![Self managed server - AWS Lightsail vs EC2](https://serveravatar.com/wp-content/uploads/2026/02/image-83-881x1024.png) By simplifying day-to-day server management, ServerAvatar helps bridge the gap between the simplicity of AWS Lightsail and the flexibility of Amazon EC2. ## Conclusion Choosing between AWS Lightsail and Amazon EC2 depends on how much simplicity or control your project needs. Lightsail is ideal for beginners and small projects that require quick setup, predictable pricing, and minimal server management, while EC2 is better suited for applications that demand scalability, customization, and long-term growth. If you want the flexibility of EC2 without dealing with its complexity, tools like ServerAvatar can help simplify server management and make running applications easier. In the end, the right choice is the one that aligns with your experience level, project size, and future plans. ## FAQs ### 1. Is AWS Lightsail better than Amazon EC2 for beginners? AWS Lightsail is generally better for beginners because it offers a simple setup, fixed pricing, and minimal configuration requirements compared to EC2. ### 2. Can I start with AWS Lightsail and move to EC2 later? You can start with Lightsail and migrate to EC2 as your project grows. AWS allows exporting snapshots from Lightsail to EC2 when you need more flexibility. ### 3. Which is more cost-effective, Lightsail or EC2? Lightsail is more cost-effective for small and predictable workloads due to its fixed pricing, while EC2 can be more economical for large-scale or highly optimized environments. ### 4. Is Amazon EC2 suitable for hosting WordPress websites? EC2 can host WordPress websites and offers more customization and scalability, but it requires more setup and management compared to Lightsail. ### 5. How does ServerAvatar help with AWS Lightsail and EC2 management? ServerAvatar simplifies server management by providing a single dashboard to deploy applications, monitor performance, manage security, and handle backups for both Lightsail and EC2 servers. **Categories:** Blog, Cloud Platforms, Guide, Others **Tags:** amazon ec2, Amazon Web Services, AWS cloud hosting, AWS hosting comparison, aws lightsail, AWS Lightsail vs EC2, AWS server management, Lightsail vs EC2 comparison --- ### [8 Best GTmetrix Alternatives for Website Performance Testing](https://serveravatar.com/gtmetrix-alternatives-website-performance-testing/) **Published:** February 12, 2026 **Author:** Meghna Meghwani **Content:** [![Blog banner - ServerAvatar](https://serveravatar.com/wp-content/uploads/2025/09/728_90-Banner-3-1024x127.png)](https://serveravatar.com/?ref=blog)Have you ever opened your website, waited a few seconds, and thought, “Why does this feel slow?” You’re not alone. In today’s world, a slow website is like a long queue at a coffee shop, people won’t wait, they’ll just walk away. Website performance testing helps you avoid that problem, and while GTmetrix is popular, exploring GTmetrix alternatives can give you new insights, features, and perspectives on improving your site’s speed and performance. In fact, many website owners, bloggers, developers, and even small business owners look for GTmetrix alternatives that are easier, faster, cheaper, or offer different insights. Some tools focus on real users, some on lab tests, and others on clear, beginner-friendly reports. In this guide, we will walk through the 8 best GTmetrix alternatives for website performance testing. No confusing terms, no tech overload, just practical tools you can actually use. ## What Is GTmetrix? [GTmetrix](https://gtmetrix.com?ref=serveravatar.com) is a popular website performance testing tool that helps you understand how fast your website loads and what’s slowing it down. In simple words, it shows how your website behaves when someone visits it. ![GTmetrix - GTmetrix alternatives](https://serveravatar.com/wp-content/uploads/2026/02/image-97-1024x407.png) When you add your website URL to GTmetrix, the tool simulates a real page visit and evaluates how your site behaves during loading. It then presents a clear performance summary that helps you identify speed issues and areas that need optimization. - **Page load time:** Shows the total time your webpage takes to appear completely on a user’s screen. - **Performance score:** A rating that reflects how efficiently your website follows speed and optimization best practices. - **Page size:** Represents the overall weight of your webpage, including images, scripts, and other resources. - **Number of requests:** Indicates how many individual files must be fetched by the browser to load the page. - **Core Web Vitals insights:** Highlights user experience metrics that measure loading speed, responsiveness, and layout stability. GTmetrix also provides a waterfall chart, which visually explains how each element of your page loads, such as images, scripts, and stylesheets. This makes it easier to spot heavy files or slow resources. It’s widely used by developers, bloggers, and businesses because it combines data from trusted sources like Lighthouse and WebPageTest. However, beginners sometimes find GTmetrix a bit overwhelming due to its technical depth and limited free features, this is why many users explore GTmetrix alternatives. ## Why Website Performance Testing Matters Website performance is not about only speed, it is also about the experience of user. A fast site feels smooth and professional. A slow website seems broken even if it is working fine. Search engines like Google also care deeply about speed. Faster websites often rank better, get more traffic, and convert more visitors into customers or subscribers. Think of performance testing like a regular health check-up for your website. You might feel fine today, but testing helps catch problems before they turn serious. ## Why Look for GTmetrix Alternatives Although GTmetrix is a reliable performance testing tool, it may not meet everyone’s expectations. Many website owners explore other options to better match their technical comfort level, testing needs, or budget. - **Limited free features:** Several useful testing capabilities are locked behind paid plans. - **Complex reports for beginners:** The detailed data can be confusing for users without technical experience. - **Different testing locations needed:** Some websites require performance checks from more global regions. - **Focus on real user data:** Certain tools prioritize real visitor behavior over simulated test results. - **Budget-friendly options:** Alternative tools may offer similar insights at a lower cost or for free. The good news? There are many tools that do specific things better or simpler than GTmetrix. ### 1. Google PageSpeed Insights [Google PageSpeed Insights](https://pagespeed.web.dev?ref=serveravatar.com) is a free website performance tool created by Google that helps you understand how fast your site feels to real users. It focuses strongly on user experience and search engine performance. [](https://storage.3.basecamp.com/5840738/blobs/26893488-07e9-11f1-99bc-0242ac120002/download/image.png) ![Google PageSpeed Insights - GTmetrix alternatives](https://serveravatar.com/wp-content/uploads/2026/02/image-98-1024x275.png) **Key Features** - **Real-world user data:** Uses actual visitor data collected from Chrome users. - **Core Web Vitals measurement:** Evaluates loading, interaction, and visual stability. - **Mobile and desktop reports:** Separately analyzes performance on different devices. - **Free to use:** No payment or account required. **Advantages** - Trusted because it comes directly from Google. - Strong focus on SEO-related performance metrics. - Easy recommendations even for non-technical users. **Disadvantages** - Limited technical depth for advanced debugging. - Scores may fluctuate due to real user data variations. **Why It’s a Great GTmetrix Alternative** - Emphasizes real user experience instead of just lab tests. - Aligns closely with Google ranking factors. **Best for:** SEO-focused website performance testing **Who should use it:** Bloggers, marketers, and website owners who want to improve search visibility and user experience without technical complexity. ### 2. Pingdom Website Speed Test [Pingdom](https://www.pingdom.com?ref=serveravatar.com) Website Speed Test is a beginner-friendly tool designed to make performance testing simple and visual. It clearly shows what’s slowing down your website without overwhelming data. ![Pingdom - GTmetrix alternatives](https://serveravatar.com/wp-content/uploads/2026/02/image-100-1024x564.png) **Key Features** - **Visual waterfall charts:** Displays how page elements load step by step. - **Multiple testing locations:** Lets you test from different regions. - **Load time and page size breakdown:** Highlights heavy files quickly. - **No signup for basic tests:** Instant testing without registration. **Advantages** - Very easy to understand reports. - Clean interface suitable for non-technical users. - Quick results with minimal effort. **Disadvantages** - Fewer advanced performance metrics. - Limited insights in the free version. **Why It’s a Great GTmetrix Alternative** - Simpler reports compared to GTmetrix. - Faster learning curve for beginners. **Best for:** Beginners who want clean and readable reports **Who should use it:** Small business owners, bloggers, and beginners looking for quick performance insights. ### 3. WebPageTest [WebPageTest](https://www.webpagetest.org?ref=serveravatar.com) is a powerful performance testing tool built for deep and detailed website analysis. It gives you full control over how and where your site is tested. ![WebPageTest - GTmetrix alternatives](https://serveravatar.com/wp-content/uploads/2026/02/image-101-1024x576.png) **Key Features** - **Advanced testing configurations:** Customize connection speed and devices. - **Multiple browser testing:** Test across different browsers and platforms. - **Filmstrip view:** Shows how your page visually loads over time. - **Detailed timing data:** Breaks down every stage of page loading. **Advantages** - Extremely detailed performance insights. - Highly customizable testing options. - Ideal for in-depth optimization work. **Disadvantages** - Can feel overwhelming for beginners. - Interface is less user-friendly. **Why It’s a Great GTmetrix Alternative** - Offers deeper control and customization. - Better suited for advanced performance diagnostics. **Best for:** Deep performance analysis **Who should use it:** Developers and advanced users who want precise control and detailed loading data. ### 4. Sucuri Load Time Tester [Sucuri Load Time Tester](https://sucuri.net/website-performance?ref=serveravatar.com) is a simple yet effective tool for checking how fast your website loads from different parts of the world. It’s part of the Sucuri suite of website security and performance tools, making it a great option for site owners interested in both speed and reliability. ![Sucuri Load Time Tester - GTmetrix alternatives](https://serveravatar.com/wp-content/uploads/2026/02/image-102-1024x507.png) **Key Features** - **Global test locations:** Measures load times from multiple geographic regions. - **Average load time results:** Shows averaged speed results for realistic testing. - **Easy-to-read performance summary:** Clear metrics without technical overload. - **Part of a broader security suite:** Useful for owners who also care about site protection. **Advantages** - Straightforward and beginner-friendly results. - Tests from locations around the world. - No complicated dashboards to learn. **Disadvantages** - Not as detailed as some advanced performance tools. - Lacks deep optimization suggestions. **Why It’s a Great GTmetrix Alternative** - Offers quick, easy load time insights without complexity. - Complements performance testing with a security-focused brand identity. **Best for:** Simple website speed checks from global locations **Who should use it:** Website owners who want quick insights into load times without technical depth or complicated reports. ### 5. Uptrends Website Speed Test [Uptrends Website Speed Test](https://www.uptrends.com/tools/website-speed-test?ref=serveravatar.com) provides reliable performance checks from locations worldwide. It’s built for businesses that need consistent testing and monitoring. [](https://storage.3.basecamp.com/5840738/blobs/0e523c00-07eb-11f1-913b-0242ac120003/download/image.png) ![Uptrends Website Speed Test - GTmetrix alternatives](https://serveravatar.com/wp-content/uploads/2026/02/image-103-1024x555.png) **Key Features** - **Global test locations:** Measure performance across regions. - **Browser and device testing:** Test on desktop and mobile environments. - **Clear waterfall charts:** Understand loading behavior visually. - **Uptime monitoring:** Alerts when your site goes down (paid plans). **Advantages** - Excellent global testing coverage. - Useful for international websites. - Strong reporting capabilities. **Disadvantages** - Advanced features require a paid plan. - Slightly complex interface for beginners. **Why It’s a Great GTmetrix Alternative** - Better suited for global performance monitoring. - Combines speed testing with uptime checks. **Best for:** Business websites and monitoring **Who should use it:** Businesses and organizations serving users across multiple countries. ### 6. Dareboost [Dareboost](https://www.dareboost.com/en?ref=serveravatar.com) is a performance and quality testing tool that looks beyond speed alone. It evaluates how well your website performs, behaves, and follows best practices. ![DareBoost - GTmetrix alternatives](https://serveravatar.com/wp-content/uploads/2026/02/image-104-1024x400.png) **Key Features** - **100+ performance checks:** Covers speed, quality, and structure. - **Visual loading timeline:** Shows how pages render visually. - **SEO audits:** Identifies basic optimization issues. - **Accessibility checks:** Improves usability for all users. **Advantages** - All-in-one website analysis. - Beginner-friendly scoring system. - Covers multiple performance dimensions. **Disadvantages** - Free version has limited tests. - Some reports may feel generalized. **Why It’s a Great GTmetrix Alternative** - Goes beyond speed into overall site quality. - Great for holistic performance improvement. **Best for:** Performance and quality insights **Who should use it:** Website owners who want speed, SEO, and usability insights in one place. ### 7. Yellow Lab Tools [Yellow Lab Tools](https://yellowlab.tools?ref=serveravatar.com) focuses on improving front-end code quality that directly impacts website performance. It highlights bad practices that slow down your site over time. ![Yellow Lab Tools - GTmetrix alternatives](https://serveravatar.com/wp-content/uploads/2026/02/image-105-1024x502.png) **Key Features** - **JavaScript analysis:** Detects heavy or inefficient scripts. - **CSS complexity checks:** Identifies bloated styling rules. - **DOM size review:** Flags overly complex page structures. - **Performance hygiene scoring:** Encourages cleaner code. **Advantages** - Excellent for long-term optimization. - Highlights hidden performance issues. - Encourages best coding practices. **Disadvantages** - Not beginner-friendly. - No real user or load time metrics. **Why It’s a Great GTmetrix Alternative** - Focuses on code health instead of just scores. - Ideal for preventing future performance issues. **Best for:** Code quality and performance hygiene **Who should use it:** Developers and technical users maintaining or refactoring front-end code. ### 8. Site24x7 Website Speed Test [Site24x7 Website Speed Test](https://www.site24x7.com/tools/web-page-analyzer.html?ref=serveravatar.com) combines speed testing with continuous monitoring. It helps you track performance changes and receive alerts when issues arise. ![Site 24x7 - GTmetrix alternatives](https://serveravatar.com/wp-content/uploads/2026/02/image-107-1024x510.png) **Key Features** - **Global speed testing:** Tests performance from multiple regions. - **Waterfall analysis:** Detailed resource loading breakdown. - **Uptime and DNS monitoring:** Tracks availability and response time. - **Desktop and mobile reports:** Covers all device types. **Advantages** - Continuous monitoring instead of one-time tests. - Useful alerts for performance drops. - Strong business-focused features. **Disadvantages** - Advanced monitoring requires paid plans. - Interface may feel feature-heavy. **Why It’s a Great GTmetrix Alternative** - Monitors performance over time, not just snapshots. - Ideal for proactive website management. **Best for:** Real-time monitoring and global performance testing **Who should use it:** Businesses and website owners who need ongoing monitoring and instant alerts when performance declines. ## Website Speed Testing Tools Comparison Before choosing a performance testing tool, it’s important to understand how each one differs in terms of metrics, testing locations, and reporting depth. **Tool****Free Version****Performance Metrics****Test Locations****Detailed Report****Additional Features****Google PageSpeed Insights**✔Performance score (Lighthouse), FCP, LCP, CLSGlobal✔ (basic)Field + lab data, optimization recommendations**Pingdom Website Speed Test**✔Load time, page size, requestsMultiple locations✔Grade system, historical testing**WebPageTest**✔Load time, TTFB, Speed Index, fully loadedMany global locations✔ (very detailed)Video capture, scripting, advanced metrics**Sucuri Load Time Tester**✔Load time, page sizeMultiple global✘Focus on security and performance combined**Uptrends Website Speed Test**✔Load time, page size, requestsMany global✔Choose devices, connection throttling**Dareboost**✔Performance score, SEO, securityMultiple✔Best practices, quality checks**Yellow Lab Tools**✔JS/CSS weight, DOM complexity, performanceLimited✔Front-end quality indicators**Site24x7 Website Speed Test**✔Load time, performance metricsGlobal✔Server monitoring, uptime checks## Key Features to Compare in Performance Tools Not all website performance tools are built the same, and choosing the right one depends on what you want to measure. When comparing GTmetrix alternatives, focus on features that actually help you understand and improve your site’s real performance. - **Page load time:** Shows how quickly your website becomes usable for visitors. - **Core Web Vitals:** Measures user experience factors like loading speed, responsiveness, and layout stability. - **Mobile performance:** Evaluates how well your site performs on smartphones and tablets. - **Testing locations:** Allows you to check performance from different geographic regions. - **Ease of understanding:** Ensures reports are clear and actionable, even for non-technical users. - **Free vs paid limits:** Helps you decide whether the free version is enough or if upgrades are required. Not every tool needs to cover everything. The best choice is the one that aligns with your website’s goals. [![Blog banner - ServerAvatar](https://serveravatar.com/wp-content/uploads/2025/09/728_90-Banner-1-1024x127.png)](https://serveravatar.com/?ref=blog)## Which Tool Is Best for Beginners If you’re new to website performance testing, it’s best to start with tools that keep things simple and easy to understand. - **Pingdom:** Offers clean, visual reports that clearly show what’s slowing your site. - **PageSpeed Insights:** Provides trusted, Google-backed performance insights at no cost. These tools highlight problems in a straightforward way, helping beginners take action without confusion. ## Which Tool Is Best for Advanced Users For users who want detailed data and greater control, advanced tools offer deeper insights into website behavior. - **WebPageTest:** Allows in-depth testing with customizable browsers, devices, and connections. - **Sucuri Load Time Tester:** Provides quick global load time comparisons with a focus on reliability. - **Yellow Lab Tools:** Analyzes front-end code quality to identify hidden performance issues. These tools deliver more detailed reports, but they require time and experience to fully understand. ## Common Mistakes in Website Speed Testing Website performance testing is most effective when done correctly and consistently. Many site owners unknowingly make mistakes that limit useful results. - **Testing only once:** Single tests don’t reflect real-world performance variations. - **Ignoring mobile results:** Mobile users often experience slower performance than desktop users. - **Focusing only on scores:** High scores don’t always mean a good user experience. - **Testing from a single location:** Performance can vary significantly by region. - **Making changes without retesting:** Improvements should always be verified with follow-up tests. Performance testing works best when treated as an ongoing process, not a one-time task. ## How Often Should You Test Website Performance Regular performance checks help keep your website fast and reliable over time. How often you test depends on how frequently your site changes. - **After major website changes:** Ensures updates haven’t slowed things down. - **After installing new plugins or themes:** Detects performance issues early. - **Once a month for stable sites:** Maintains consistent performance levels. - **Weekly for business-critical websites:** Prevents slowdowns that could impact revenue. Think of website speed testing like checking tire pressure, you don’t do it once and assume it’s fine forever. ## Conclusion Website speed is no longer a “nice-to-have” feature, it’s a core part of user experience, search visibility, and overall success. While GTmetrix remains a strong performance testing tool, it’s clear that no single tool fits every website or every user. From beginner-friendly options like Pingdom and Google PageSpeed Insights to advanced tools such as WebPageTest and Yellow Lab Tools, each alternative serves a different purpose. The real win comes from choosing a tool that matches your goals, skill level, and budget, and using it regularly to keep your website fast, reliable, and user-friendly. ## FAQs ### 1. Is GTmetrix still a good tool for website performance testing? GTmetrix is still a reliable and widely used tool, especially for detailed performance analysis. However, some users prefer alternatives that are simpler, more affordable, or focused on real user data. ### 2. Which GTmetrix alternative is best for beginners? Pingdom and Google PageSpeed Insights are ideal for beginners because they offer clear reports, simple explanations, and actionable insights without technical complexity. ### 3. Do I need to use more than one performance testing tool? Using more than one tool is often helpful, as different tools measure performance in different ways and provide unique insights into speed, user experience, and code quality. ### 4. How important are Core Web Vitals in performance testing? Core Web Vitals are very important because they reflect real user experience and are used by Google as ranking signals, making them essential for both usability and SEO. ### 5. Can website performance tools replace real user testing? Performance tools are extremely useful, but they should complement, not replace, real user feedback. Combining both gives the most accurate picture of how your website truly performs. **Categories:** Blog, Guide, Optimisation, Others, Uncategorized **Tags:** GTmetrix, GTmetrix alternatives, page speed testing tools, tools to test website speed, website performance testing, website performance tools, Website speed optimization, website speed test --- ### [How to Fix High CPU Usage Issue in WordPress Site](https://serveravatar.com/wordpress-high-cpu-usage/) **Published:** October 24, 2025 **Author:** Meghna Meghwani **Content:** [![Blog banner - ServerAvatar](https://serveravatar.com/wp-content/uploads/2025/09/728_90-Banner-3-1024x127.png)](https://serveravatar.com?ref=blog)In day-to-day software engineering, **WordPress high CPU usage** is a common issue we often encounter on servers hosting WordPress sites. We usually have no clear clue or reason why the CPU consumption is so high. There are multiple possible causes behind this, and in this blog, we’ll discuss what triggers high CPU usage and how to identify and fix it with nine effective solutions. ## What Causes High CPU Usage in WordPress? When your WordPress website is causing too much strain or load on the server, it’s usually not built efficiently by plugins or themes. Assume that you are including a plugin that adds related post to all the pages. If it fetches data from the database every time someone views a page, and there’s no caching taking place, that will have a negative impact on performance. Some themes also waste resources, they might be beautiful, but are equipped with too many features or animations that keep running in the background and chew up server power. WordPress itself can even be heavy in weight. As an example, there is a file named wp-cron.php that carries out things such as update checking or cron-scheduled posts. For high-traffic sites, this file is triggered on each site visit, adding to the load. More immediately is the issue of traffic both human and robot. Should one of your blog posts unexpectedly gets shared and you receive thousands of visitors, your CPU usage will skyrocket, of course. But not all traffic is good. Bots can bear down on your site by attempting logins, scraping content or looking for vulnerabilities. They send a high number of requests in a short amount of time, which make WordPress continue running scripts and querying the database. And if your site has become infected with malware, it may even be carrying out covert duties in the background for example, sending spam or participating in a botnet without your knowledge. And it depends a lot on your hosting set-up, too. Shared hosting, specifically, provides you with few CPU and memory. So even a little traffic might be too much. And if your server uses outdated versions of PHP, it will chug along even slower. By updating the version to something newer, like PHP 8 or beyond, you can already make a significant difference. ## What is the Ideal Solution When it comes to tackling high CPU usage on WordPress sites, having the right server management platform makes all the difference. [**ServerAvatar**](https://serveravatar.com/) simplifies this by giving you complete visibility and control over your server’s performance. ## What is ServerAvatar? [ServerAvatar](https://serveravatar.com/) is platform to simplify hosting and management of servers and applications. It simplifies process of deploying and managing PHP and Node.js based web applications on servers. If you’re using **ServerAvatar** to manage your servers and applications, deploying and managing your WordPress is incredibly simple with one-click application installer. With its real-time monitoring of CPU, RAM, and disk usage, along with built-in tools like caching, firewall, Fail2Ban, automatic SSL, and log management, you can quickly identify and resolve resource-hogging processes. ![](https://serveravatar.com/wp-content/uploads/2025/10/image-74-1024x463.png)Unlike traditional hosting panels, ServerAvatar also lets you deploy and manage servers directly from top cloud providers, so you can scale resources effortlessly as your website grows. This makes it an ideal solution for WordPress users who want optimized performance without the headache of manual server management. **Advanced Monitoring Features:** - **Real-time Performance Graphs** – Visual CPU, RAM, and disk usage - **Customizable Alerts** – Notifications for threshold breaches - **Historical Data Analysis** – Performance trend identification - **Slow Script Detection** – Identify resource-heavy processes - **Database Query Monitoring** – Optimize slow queries **Proactive Notification System:** Configure thresholds for CPU usage (e.g., send an alert if CPU is above 80% for 5 minutes). This proactive notification means you often know there’s a problem before your users even notice, allowing you to investigate using detailed performance graphs. ## Quick Fixes to Instantly Reduce WordPress CPU Usage Let’s explore 10 different ways to bring down CPU utilization on servers: ### 1. Keep WordPress Core, Plugins, and Themes Updated Once you have done away with any unusable plugins, make sure your WordPress core, all of your plugins, and your theme are updated. Performance improvements and bug fixes (which could lower CPU) are is updated second versions potentially. Older software are often bloated or insecure, causing more resource usage. **Update Priority Order:** - WordPress Core – Security patches and performance improvements - Active Theme – Template optimization and bug fixes - Essential Plugins – Security, caching, and SEO plugins first - Remaining Plugins – Update during low-traffic periods **PHP Performance Upgrade:** As much as possible, it is advisable to use PHP 7.4+ in WordPress. At the time of this writing, PHP 7.4 is the minimum supported PHP version for WordPress, PHP 8.0 and 8.1 are “compatible with noted issues”, and PHP 8.2 is under “beta support”. His server stack is properly configured and optimized for speed and security and will run your updated WordPress site to perfection. ### 2. Set Up Effective Caching (Object, Page, CDN) If your WordPress website gets a decent amount of traffic, you should consider implementing caching at multiple levels: object caching (like Redis or Memcached) for database queries, page caching for static HTML versions of your pages, and a CDN to offload assets. **Multi-Layer Caching Strategy:** **Object Caching (Redis/Memcached):** - Stores request:database results in memory - Reduces database load by 60–80% - Speeds up dynamic content generation - Essential for database-heavy sites **Page Caching:** - Caching involves saving the data, or pre-rendered content of a page, so that the server does not need to recreate it anew for each visitor. - Generates non-dynamic HTML files from dynamic Web sites. - Reduces PHP processing by 70–90% - Compatible with plugins such as WP Rocket, W3 Total Cache **Browser Caching:** - Caches static assets in visitors’ browsers locally - Reduces repeat download requests - Improves return visitor experience - Set via .htaccess or server configuration ![](https://serveravatar.com/wp-content/uploads/2025/10/image-106-1024x249.png)**CDN Usage:** Distribute your static assets across a global network to reduce latency and server load. When a visitor accesses your site, assets are served from the nearest CDN node instead of your main server, ensuring faster load times and lower bandwidth usage. You can easily **integrate** your **Cloudflare** **account** with **ServerAvatar**. ![](https://serveravatar.com/wp-content/uploads/2025/10/image-107-1024x186.png)### 3. Optimize or Disable wp-cron Jobs The default wp-cron.php is triggered whenever someone visits your site, and if you have many scheduled tasks or high traffic, it can fire frequently, consuming CPU resources. For example, if multiple visitors hit your site simultaneously, wp-cron.php might try to run multiple times, leading to unnecessary load. **WP-Cron Performance Problems:** - WP-Cron does not run continuously. By default, the wp-cron.php fires on every page load, which on high-traffic sites can cause problems. - Creates multiple concurrent processes during traffic spikes - Blocks page generation while cron jobs execute - Unreliable execution on low-traffic sites - Can cause timeouts on resource-limited servers Optimize Cronjobs with ServerAvatar** To prevent wp-cron.php from running on every request and improve your server performance, you can **disable the default WP-Cron** and schedule it properly using **ServerAvatar’s built-in Cron Job Manager**. **Set Up CronJob in ServerAvatar** Log in to your ServerAvatar account, and navigate to the server dashboard. Go to the **Cronjobs** section from server panel. Create a new cronjob to trigger wp-cron.php at regular intervals (e.g., every 5 or 10 minutes). ![ServerAvatar Cronjob Setup -ServerAvtar](https://serveravatar.com/wp-content/uploads/2025/10/image-108-1024x483.png)### 4. Block Malicious Bots Your website is constantly being scanned and crawled by automated bots, many of which aren’t friendly. These bots attempt brute-force attacks, scrape your content, or look for vulnerabilities to exploit. Not only do they pose security risks, but they also trigger unnecessary PHP executions and database queries, increasing your server’s CPU usage. **Common Bot Activities:** - Brute-force login attempts on wp-login.php or admin pages - Content scraping for stealing or copying valuable site data - Automated vulnerability scanning to exploit weak plugins or outdated software - Spam comment submissions using fake forms and bots - Resource enumeration to identify sensitive files or directory structures ### Protect Your Site with ServerAvatar’s AI Bot Blocker With **ServerAvatar’s AI Bot Blocker**, you can easily safeguard your websites from these automated threats. This intelligent protection system automatically detects and blocks unwanted AI crawlers, spam bots before they ever reach your application. The **AI Bot Blocker** feature is easy to enable directly from your **ServerAvatar dashboard,** no complex configuration required. Once activated, it continuously monitors and filters out harmful bot traffic, ensuring your server stays secure and optimized for genuine visitors. 1. Log in to your ServerAvatar account, and navigate to the server dashboard. 2. Click on the application dashboard for which you want to enable the AI Bot Blocker. 3. Navigate to the AI Bot Blocker section from the left-hand sidebar and enable it. ![Ai bot blocker - ServerAvatar](https://serveravatar.com/wp-content/uploads/2025/10/image-109-1024x454.png)### 5. Server-Level Protection with Fail2Ban: You can easily set up **Fail2Ban** with **ServerAvatar** to automatically detect and block malicious IPs based on suspicious activity. - Monitors and analyzes server logs for attack patterns in real time - Instantly blocks IPs involved in repeated failed login attempts or exploit scans - Configurable ban duration and retry limits for flexible security management - Works seamlessly with **Cloudflare** to add an extra layer of network-level protection - Automatically cleans up attack signatures from your server logs **Set Up Fail2Ban in ServerAvatar** 1. Log in to your ServerAvatar account, and navigate to the server dashboard. 2. Go to the **Fail2Ban** section from the server panel. 3. Configure in Fail2Ban settings and save the changes. Additionally, you can add the IP to Ban and Ignore. ![WordPress high CPU usage -ServerAvatar](https://serveravatar.com/wp-content/uploads/2025/10/image-110-1024x491.png)### 6. ServerAvatar Firewall Protection: You can easily set up rules for the **Firewall** with **ServerAvatar** to filter and restrict incoming traffic before it even reaches your server. - Blocks requests based on malicious URL patterns and known attack signatures - Detects and limits suspicious behavior using intelligent rate-limiting - Prevents common exploits like SQL injection, XSS, and DDoS attempts - Receives real-time threat intelligence updates to stay ahead of emerging threats **Set Up Firewall in ServerAvatar** 1. Log in to your ServerAvatar account, and navigate to the server dashboard. 2. Go to the **Firewall** section from the server panel. 3. Create a new Firewall Rule as per your requirements. 4. You can create a rule for a range of ports or for a single port. ![Firewall Rule - ServerAvatar](https://serveravatar.com/wp-content/uploads/2025/10/image-111-1024x519.png)### 7. Streamline Your Images and Media Files Unoptimized images take up too much space on your web server and slow down your site. They also consume excess bandwidth and CPU power, especially if you’re on shared hosting or using themes/plugins that resize images on the fly. **Image Optimization Impact:** - Reduces bandwidth usage by 60–80% - Decreases page load times significantly - Reduces server-side CPU for rendering the image - Improves Core Web Vitals scores **Optimization Prior to Uploading:** The best practice is to optimize images *before* uploading them. Use tools like TinyPNG, Squoosh, or ImageOptim to compress files effectively. **Recommended Tools:** - **TinyPNG** – Online PNG/JPEG compression - **Squoosh** – Google’s web-based image optimizer - **ImageOptim** – Mac desktop application - **GIMP** – Free Photoshop alternative - **Photoshop** – Professional image editing with Save for Web **WordPress Plugin Answers:** If you run a dynamic site, consider using a plugin or CDN that takes care of responsive image delivery and WebP conversion automatically. **Top Image Optimization Plugins:** - **Smush** – Free with bulk optimization - **ShortPixel** – Advanced compression algorithms - **EWWW Image Optimizer** – Includes WebP conversion - **Imagify** – Real-time image optimization - **Optimole** – CDN-based delivery system **WebP Format Benefits:** - 25–35% smaller file sizes than JPEG - Better compression than PNG - Supported by over 95% of modern browsers ### 8. Switch to LiteSpeed or Nginx Hosting If your WordPress website frequently struggles with performance or high CPU usage, it’s time to consider moving to a more efficient web server environment. **ServerAvatar** offers **Apache,Nginx,** and **OpenLiteSpeed (OLS)** web servers, the fastest and most resource-efficient technologies available today. These web servers deliver exceptional performance, even under heavy traffic, making them ideal for WordPress sites that demand speed and stability. ![ServerAvatar](https://serveravatar.com/wp-content/uploads/2025/10/image-112-1024x367.png)**Web Server Performance Comparison:** **Apache (Traditional):** - High memory usage per connection - Process-based architecture - Limited capacity for handling concurrent connections - Becomes resource-intensive during high-traffic periods **Nginx (High Performance):** - Event-driven architecture for better scalability - Extremely low memory footprint - Excellent for serving static files quickly - Built-in load balancing for efficient request distribution - Perfect for sites handling a large number of simultaneous users **OpenLiteSpeed (WordPress Optimized):** - Native caching designed specifically for WordPress - Superior PHP performance with LSCache integration - Built-in DDoS protection and bandwidth optimization - Fully compatible with Apache .htaccess rules - Reduces CPU load and improves site responsiveness **Migration Considerations:** - Backup your site before migration - Test .htaccess rules for compatibility - Update DNS during low-traffic periods - Monitor performance post-migration - Adjust caching settings for the new environment Quality server management configures and optimizes an nginx stack for your WordPress sites by default, providing a high-performance foundation out of the box. [![Blog banner - ServerAvatar](https://serveravatar.com/wp-content/uploads/2025/09/728_90-Banner-1-1024x127.png)](https://serveravatar.com?ref=blog)**Why Choose ServerAvatar for Migration** Migrating to **ServerAvatar** means more than just switching web servers, it’s about upgrading your entire hosting experience. - **Free Migration Assistance:** Our team handles the entire migration process for you, ensuring zero downtime and seamless transition. - **Optimized Server Stack:** ServerAvatar automatically configures your server tech stack, giving you top-tier performance right out of the box. - **24/7 Technical Support:** Whether you need setup guidance, troubleshooting, or performance tuning, our expert support team is available round the clock to assist you. ### 9. Upgrade Your Server Resources With ServerAvatar Even with all the right optimizations in place, there comes a time when your website’s genuine traffic, growing database, or complex functionality simply requires more power. If your site has outgrown its current server, it’s time to upgrade your hosting plan or increase server resources, and **ServerAvatar** makes this process smooth and effortless. **When to Consider Upgrading Your Server** - CPU usage consistently above 80% - Frequent 504 Gateway Timeout or slow-loading pages - Memory limit errors even after optimization - Slow or delayed database query responses - Inability to handle sudden traffic spikes **Why Upgrade with ServerAvatar** Upgrading your managed server with **ServerAvatar** ensures a hassle-free transition backed by expert assistance: - **Free Migration Support:** Our team helps you move your sites securely with zero downtime. - **Scalable Infrastructure:** Easily upgrade resources as your application grows. - **Optimized Server Setup:** Get pre-configured, high-performance stacks for Apache, Nginx, OpenLiteSpeed, or Node Stack. - **24/7 Technical Support:** Our technical team is always available to assist with any issue or query you may have. If your monitoring tools indicate high CPU usage or resource limits despite optimization, it’s a clear sign to upgrade. With **ServerAvatar**, scaling your server is quick, seamless, and fully supported, so your applications always perform at their best. ### 10. Take Down or Replace High-CPU Plugins and Themes Through process monitoring, identify the plugins or themes that are hogging your server’s resources and consuming CPU power. Once identified, swap them out for lighter alternatives or remove them altogether if they’re no longer necessary. **Common CPU-Heavy Plugins to Watch:** - Backup plugins that run during peak hours (e.g. **UpdraftPlus**, **BackWPup**) - Security plugins with real-time scanning (e.g. **Wordfence**, **Sucuri**) - Social sharing buttons with live counters - Broken link checkers that constantly crawl your site - Page builders with heavy visual editors (e.g. **Elementor**, **Divi**) ## Who Should Prioritize Fixing High CPU Usage in WordPress? Fixing the high CPU usage in WordPress is important for anyone running a serious website. **Critical Business Impact:** - E-commerce store owners can lose direct revenue from slow checkouts or site unavailability. - High-traffic bloggers and content publishers risk losing readers and ad impressions due to poor performance. - Businesses relying on their website for leads will see conversion rates plummet if their site is sluggish. **Professional Consequences:** Even agencies and developers managing multiple client sites must proactively address CPU issues to maintain client satisfaction and site stability, as a poorly performing site reflects badly on their services. **Performance Metrics That Matter:** - **Page Load Speed** – Under 3 seconds for optimal conversion - **Time to First Byte** – Under 600ms for good user experience - **Core Web Vitals** – Google ranking factors - **Uptime Percentage** – 99.9% availability standard ## Why Professional Server Management Matters: This is where a robust server management panel becomes indispensable. Professional platforms provide comprehensive server health overviews including live, at-a-glance metrics: CPU Usage, RAM Usage, Disk Space, and Current Load Average. The key advantage of using professional server management to manage your own VPS is control. Unlike shared hosting, or simply upgrading to a more expensive plan, you get full visibility into what’s happening on your server – along with the tools to act on it. **Shared Hosting Limitations:** - No visibility into server processes - Limited control over PHP settings - Restricted caching options - No access to server logs - Unable to install custom software **Professional VPS Management Benefits:** With shared hosting, if you hit a CPU limit, your only option is usually to upgrade, often without knowing if it will even fix the underlying issue. With professional server management managing your VPS, you have the power to: - **Implement server-level caching** (nginx FastCGI, Redis, Memcached) with a few clicks - **Easily switch PHP versions** or configure PHP settings - **Manage server-level cron jobs** for optimal performance - **Install security tools** like Fail2Ban and ModSecurity - **Fine-tune web server** (nginx/Apache) configuration - **Monitor resource usage** in real-time - **Scale resources** based on actual needs **Cost-Effectiveness Analysis:** - **Shared Hosting:** $10-50/month with limited resources - **Managed VPS:** $30-100/month with full control - **Enterprise Hosting:** $200-500/month for comparable features Professional server management offers enterprise-level features at VPS pricing, making it the optimal choice for serious WordPress sites. Start solving performance issues properly with professional server management that gives you the tools and visibility you need to maintain optimal WordPress performance. ## FAQs ### **What is CPU usage in WordPress hosting?** CPU usage refers to how much processing power your website consumes on the server. High CPU usage means the server is under heavy load, which can slow down or crash your site. ### **What are the common causes of high CPU usage in WordPress?** Unoptimized plugins/themes, excessive cron jobs, bad bots, malware, large media files, and outdated PHP versions are some of the most common causes. ### **How can I quickly reduce high CPU usage in WordPress?** Start by enabling caching, updating your plugins/themes, optimizing images, limiting wp-cron, and blocking malicious bots. ### **Does hosting type affect CPU usage?** Yes. Shared hosting often comes with limited CPU resources, making even small spikes problematic. VPS or managed hosting provides dedicated resources, helping handle traffic more efficiently. ### **How can ServerAvatar help reduce CPU usage?** ServerAvatar provides real-time monitoring, caching support, firewall and Fail2Ban integration, and optimized server stacks (LAMP, LEMP, OLS, Node). This helps you identify resource-heavy processes and optimize your server for better performance. ## Conclusion High CPU usage on WordPress servers can be frustrating, slowing down your site, affecting user experience, and even leading to downtime. The key is not just fixing the symptoms but addressing the root causes: inefficient plugins, unoptimized caching, excessive bot traffic, and underpowered hosting. With ServerAvatar, you get a powerful server management platform that combines real-time performance monitoring, AI-powered bot blocking, automated caching, and proactive security tools, all designed to keep your WordPress site running fast and efficiently. Whether you need to configure caching, manage cron jobs, block malicious traffic, or upgrade server resources, ServerAvatar simplifies every step with its intuitive dashboard. Plus, with free migration, optimized web server stacks (Nginx and OpenLiteSpeed), and 24/7 expert support, you never have to worry about server performance again. Optimize smarter, not harder. Let ServerAvatar handle your server, so you can focus on growing your website. **Categories:** Blog, Guide, WordPress **Tags:** Wordpress --- ### [How to Troubleshoot Common Linux Networking Issues](https://serveravatar.com/troubleshoot-common-linux-networking-issues/) **Published:** December 17, 2025 **Author:** Meghna Meghwani **Content:** [![Blog banner - ServerAvatar](https://serveravatar.com/wp-content/uploads/2025/09/728_90-Banner-3-1024x127.png)](https://serveravatar.com/?ref=blog)Ever opened your Linux system, tried to access a website, and suddenly… nothing works? No internet, no updates, no connection. Frustrating, right? Don’t worry, you’re not alone. Linux networking issues are common, even for experienced users. Think of your network like a road system. If one signal is broken, traffic stops. In Linux, that signal could be a cable, an IP address, or a misconfigured file. The good news? Most problems are easy to find and fix once you know where to look. In this guide, we’ll walk through how to troubleshoot common Linux networking issues in a step-by-step way, no confusing jargon, no guesswork. Ready? Let’s fix your network. ## How Linux Networking Works Before fixing anything, it helps to know what’s happening behind the scenes. Linux networking relies on a few core components: - **Network interfaces** **(Ethernet or Wi-Fi):** These are the hardware or virtual connections that allow your Linux system to send and receive network data. - **IP addresses** **(your system’s identity):** An IP address uniquely identifies your system on a network so other devices know where to send data. - **DNS servers** **(translate names into IPs):** DNS servers convert easy-to-remember website names into numerical IP addresses that computers understand. - **Routing rules** **(decide where traffic goes):** Routing rules tell your system which path network traffic should take to reach its destination. If any one of these fails, your network breaks, like a chain with a weak link. ![Linux networking issues](https://serveravatar.com/wp-content/uploads/2025/12/image-89.png) ## How ServerAvatar Simplifies Linux Server Networking Managing Linux networking manually can be time-consuming, especially when you are dealing with multiple production servers or multiple applications. ServerAvatar is a modern server management platform designed to simplify everyday server operations, including monitoring, security, and configuration management. Instead of relying entirely on complex command-line troubleshooting, [ServerAvatar](https://serveravatar.com/) provides a clean and intuitive dashboard that helps you understand what’s happening on your server at a glance. This makes it easier to identify networking, service, and performance issues before they impact your applications or websites. ![ServerAvatar Dashboard](https://serveravatar.com/wp-content/uploads/2025/12/serveravatardashboard-1024x473.jpg) ## Checking Physical Network Connections Before diving into commands and settings, always check the basics. Many network problems are caused by loose cables, disabled Wi-Fi, or router issues rather than Linux itself. Starting with physical checks can save a lot of time. [](https://storage.3.basecamp.com/5840738/blobs/e9169142-db31-11f0-9c06-0242ac120002/download/image.png) ![Linux networking issues](https://serveravatar.com/wp-content/uploads/2025/12/image-90.png) **Things to check first:** - **Is the Ethernet cable plugged in?** Ensure the network cable is securely connected to both the system and the router. - **Is Wi-Fi turned on?** Confirm that Wi-Fi is enabled on your system and connected to the correct network. - **Are router lights blinking normally?** Check the router indicators to verify it is powered on and functioning properly. It may sound basic, but you’d be surprised how often this solves the problem. Networking troubleshooting always starts at the ground level. ## Verifying Network Interface Status A Linux system can have a network interface installed, but it won’t work unless it is enabled. Checking the interface status helps you quickly confirm whether your Ethernet or Wi-Fi connection is active or disabled. Run: ``` ip link show ``` ``` ip link show ``` Look for: - **UP:** The network interface is enabled and ready to send or receive data. - **DOWN:** The network interface is disabled and not currently usable. If the interface is down, enable it: ``` sudo ip link set up ``` ``` sudo ip link set up ``` **Note:** Interface names vary (for example: ens33, enp0s3, wlp2s0). Use ‘**ip link show**‘ command to identify the correct interface name. ## Identifying IP Address Problems An IP address is required for your system to communicate on a network, and without it, internet access will not work. Checking your IP helps you quickly detect whether your system is properly connected to the router. Check your IP: ``` ip addr show ``` ``` ip addr show ``` If you see an address starting with **169.254**, that’s a warning sign. It means your system couldn’t get an IP from the router. - **169.254.x.x address:** This indicates the system failed to obtain an IP address from the router and needs a network refresh. **Fix:** - Renew the IP address - Restart network services - Check router or DHCP settings ## Testing Network Connectivity Testing connectivity helps you find exactly where the network is failing, on your system, within your local network, or on the internet itself. Using simple ping tests lets you narrow down the problem step by step. **Test your local network:** - **ping 127.0.0.1:** Confirms that your local network stack is working correctly. ``` ping 127.0.0.1 ``` ``` ping 127.0.0.1 ``` **Test your router:** - **ping 192.168.1.1:** Checks whether your system can communicate with the router. ``` ping 192.168.1.1 ``` ``` ping 192.168.1.1 ``` **Test the internet:** - **ping 8.8.8.8:** Verifies that your system has access to the internet beyond the local network. ``` ping 8.8.8.8 ``` ``` ping 8.8.8.8 ``` If numbers work but websites don’t load, your issue is likely DNS-related. ## Fixing DNS Resolution Issues DNS converts website names into IP addresses, making browsing simple and human-friendly. When DNS is misconfigured, the internet may seem down even though the network is working. - **Check DNS settings:** Ensure /etc/resolv.conf contains valid name server entries like 8.8.8.8 or 1.1.1.1 for proper domain resolution. ``` cat /etc/resolv.conf ``` ``` cat /etc/resolv.conf ``` - Make sure valid name servers exist, such as: ``` nameserver 8.8.8.8 nameserver 1.1.1.1 ``` ``` nameserver 8.8.8.8 nameserver 1.1.1.1 ``` **Important Note:** On modern Linux systems using NetworkManager or systemd-resolved, **/etc/resolv.conf** is auto-generated. For permanent DNS changes, use ‘nmcli’ command or your network settings instead of editing this file directly. DNS issues are one of the most common Linux networking problems. ## Restarting Network Services Sometimes network issues are temporary and caused by stuck services or outdated connections. Restarting network services refreshes everything and often resolves minor glitches instantly. - **Restart networking:** Reloads network connections and fixes temporary service-related issues. ``` sudo systemctl restart NetworkManager ``` ``` sudo systemctl restart NetworkManager ``` Or restart traditional networking: ``` sudo systemctl restart networking ``` ``` sudo systemctl restart networking ``` This refreshes connections and often fixes temporary glitches. ## Checking Firewall and Security Rules Firewalls protect your system, but incorrect rules can block internet access completely. Checking firewall status helps confirm whether security settings are causing the problem. If the network works after disabling the firewall, the rules need correction. - Check firewall status: ``` sudo ufw status ``` ``` sudo ufw status ``` - Temporarily disable the firewall for testing: ``` sudo ufw disable ``` ``` sudo ufw disable ``` If the network works after that, you know the firewall rules need adjustment. **Note:** Disable the firewall only for troubleshooting. Always re-enable it after testing to keep your system secure. [![Blog banner - ServerAvatar](https://serveravatar.com/wp-content/uploads/2025/09/728_90-Banner-1-1024x127.png)](https://serveravatar.com/?ref=blog)## Diagnosing Routing Problems Routing controls how data leaves your system and reaches the internet. Without a default gateway, your system has no path to send traffic outside the local network. Check routes: ``` ip route ``` ``` ip route ``` Look for a **default gateway**. If it’s missing, your system doesn’t know where the internet lives. Add a gateway if needed: ``` sudo ip route add default via 192.168.1.1 ``` ``` sudo ip route add default via 192.168.1.1 ``` ## Investigating Proxy and VPN Conflicts Using a proxy or VPN? That could be the culprit. Proxies and VPNs can override normal network routes and block access if misconfigured. Testing without them helps confirm whether they are causing connectivity issues. **Check environment variables:** ``` env | grep -i proxy ``` ``` env | grep -i proxy ``` Disable VPNs temporarily and test again. Incorrect settings can block all incoming and outgoing traffic. ## Examining Network Configuration Files Linux stores network settings in configuration files, and even a small mistake can break connectivity. Reviewing these files ensures settings are correct and consistent. **Common locations:** - /etc/network/interfaces - /etc/netplan/ - /etc/sysconfig/network-scripts/ A single typo or wrong value here can break everything, the entire network setup. Always double-check changes. **Note:** Always back up these files before making changes. ## Troubleshooting Wi-Fi Issues Wi-Fi problems are common due to signal strength, passwords, or drivers. Basic checks often resolve the issue before deeper troubleshooting is needed. Check Wi-Fi status: ``` nmcli device status ``` ``` nmcli device status ``` Wi-Fi connection issues are often caused by disabled adapters, wrong passwords, or missing drivers. Common fixes: - **Restart NetworkManager:** Refreshes the Wi-Fi service and clears temporary connection glitches. - **Reconnect to the network:** Forces your system to establish a fresh and stable connection. - **Re-enter the Wi-Fi password:** Fixes connection failures caused by incorrect or changed credentials. Still not working? Driver issues may be the cause. ## Using Logs to Find Network Errors Logs record detailed system activity and errors related to networking. Reviewing them helps uncover hidden issues that commands may not reveal. Check system logs: ``` journalctl -u NetworkManager ``` ``` journalctl -u NetworkManager ``` Look for error messages or warnings. Logs often reveal problems that commands don’t show. ### Centralized Log Monitoring with ServerAvatar Logs play a crucial role in diagnosing Linux networking problems, but manually scanning log files using the terminal can be slow and error-prone. With ServerAvatar, you can view important server and service logs from a single interface. This makes it easier to detect errors, service failures, and unusual activity without switching between multiple files or commands. Faster access to logs means quicker troubleshooting and reduced downtime. ## Common Linux Networking Commands Explained Linux provides powerful commands to inspect, test, and manage networks. Knowing these tools makes troubleshooting faster and more effective. Here are some helpful tools you’ll use again and again: - **ip:** Displays detailed information about network interfaces, IP addresses, and routing. - **ping:** Checks whether a system or server is reachable over the network. - **traceroute:** Identifies the path data takes and shows where network traffic stops. - **nmcli:** Allows you to view and manage network connections from the command line. - **netstat / ss:** Shows active network connections, listening ports, and traffic statistics. Think of these as your networking toolbox. ## Reducing Manual Commands with ServerAvatar Linux networking commands like `ip`, `ping`, `nmcli`, and `traceroute` are powerful, but they can feel overwhelming for beginners or teams managing multiple servers. ServerAvatar reduces the need for repetitive command-line operations by offering a visual and guided server management experience. While advanced users can still use the terminal, ServerAvatar helps simplify routine tasks, making server and network management more accessible and less error-prone. ## Preventing Future Network Problems Prevention saves time. Good maintenance habits reduce the chances of recurring network issues. Staying organized and cautious helps keep your system stable. **Best practices:** - **Keep your system updated:** Ensures you have the latest security patches, bug fixes, and network improvements. - **Avoid random config changes:** Prevents accidental misconfigurations that can break network connectivity. - **Backup network configuration files:** Allows quick recovery if a network change causes issues. - **Document changes you make:** Helps you track modifications and troubleshoot problems more easily later. A little care today prevents big headaches tomorrow. ## Prevent Network Issues Proactively with ServerAvatar Preventing network problems is always better than fixing them after downtime occurs. ServerAvatar helps maintain server stability by providing better visibility, controlled configuration management, and real-time monitoring. By using ServerAvatar, teams can stay informed about server health, respond faster to issues, and avoid accidental misconfigurations that often cause Linux networking failures. ## Key Features of ServerAvatar for Linux Server Management ServerAvatar is built to make Linux server management simple, reliable, and scalable. Key features include: - **Centralized Server Dashboard:** Manage and monitor your multiple servers from a single, easy-to-use interface - **Log Monitoring:** Quickly analyze logs to identify network and system issues - **Service Management:** Start, stop, and monitor essential services safely - **Security & Configuration Control:** Reduce risks caused by accidental or incorrect changes - **Beginner-Friendly Interface:** Ideal for developers, agencies, and businesses managing Linux servers - **24/7 Expert Support:** Server issues don’t always happen during working hours. That’s why ServerAvatar provides 24/7 expert support to help you resolve server and networking problems whenever they occur. Whether you’re facing connectivity issues, service failures, or configuration concerns, ServerAvatar’s support team is available around the clock to assist you and keep your servers running smoothly. These features help reduce downtime, speed up troubleshooting, and improve overall server reliability. ## Conclusion Linux networking problems can feel overwhelming at first, especially when the internet suddenly stops working. However, most issues come down to a few common causes such as disabled network interfaces, missing IP addresses, DNS misconfiguration, firewall rules, or routing problems. By following a step-by-step troubleshooting approach, starting from physical checks and moving toward advanced diagnostics, you can quickly identify where the problem lies. Tools like ip, ping, nmcli, and system logs make it easier to pinpoint and fix issues without guesswork. While understanding Linux networking fundamentals is essential, having the right tools can significantly reduce troubleshooting time. ServerAvatar complements manual Linux knowledge by providing visibility, control, and support, making server and network management easier, faster, and more reliable. ## FAQs ### **1. Why does my Linux system show “Connected” but the internet doesn’t work?** This usually happens due to DNS issues, missing routes, or firewall rules. Try pinging an IP address like 8.8.8.8. If that works but websites don’t load, the problem is DNS. ### **2. What does a 169.254.x.x IP address mean in Linux?** A 169.254.x.x address means your system failed to get an IP address from the router (DHCP failure). Restart your network service or check your router and cable/Wi-Fi connection. ### **3. Is it safe to edit /etc/resolv.conf directly?** On modern Linux systems, **no**. This file is often auto-generated by NetworkManager or systemd-resolved. Permanent DNS changes should be made using network settings or nmcli. ### **4. How do I find my correct network interface name?** Run the below-mentioned command, and this will list all network interfaces along with their current status. `ip link show` ### **5. Should I disable the firewall when troubleshooting?** You can temporarily disable the firewall for testing, but always re-enable it afterward. If disabling the firewall fixes the issue, adjust the rules instead of leaving it off. ### **6. Why can I ping my router but not the internet** This usually indicates a routing or DNS problem. Check your default gateway using ip route and verify DNS settings. ## Stop Wasting Time on Servers. Start Building Instead. You didn’t start your project to babysit servers. Let **ServerAvatar** handle deployment, monitoring, and backups — so you can focus on growth. Deploy **WordPress, Laravel, N8N**, and more in minutes. No DevOps required. No command line. No stress. [ 🚀 Try Free ](https://app.serveravatar.com) [ 🌐 Learn More ](https://serveravatar.com/) Trusted by 10,000+ developers and growing. **Categories:** Blog, Guide, Linux, Others, Tutorials, Ubuntu **Tags:** Linux, linux network configuration, linux network troubleshooting, linux networking, linux networking issues --- ### [How to Install phpMyAdmin Easily](https://serveravatar.com/install-phpmyadmin/) **Published:** January 6, 2026 **Author:** Meghna Meghwani **Content:** [![Blog banner - ServerAvatar](https://serveravatar.com/wp-content/uploads/2025/09/728_90-Banner-3-1024x127.png)](https://serveravatar.com/?ref=blog)If you work with websites or databases, you may have heard the name **phpMyAdmin** more than once. It often sounds technical at first, but the truth is much simpler. Managing databases can feel confusing at first. Tables, users, permissions, and queries often look intimidating, especially if you are not from a technical background. This is where phpMyAdmin makes life easier. Instead of typing complex commands, you click buttons, fill forms, and see results instantly. Installing phpMyAdmin does not have to feel confusing or intimidating. Many people assume it requires advanced technical knowledge, but that is not true. With the right steps and a calm approach, anyone can install it smoothly. In this guide, we will walk you through everything in a clear and simple way, so you always know what is happening and why it matters. ## What Is phpMyAdmin phpMyAdmin is a web-based application used to manage databases easily. Instead of typing commands manually, you interact with buttons, menus, and forms. This makes database management more visual and less stressful. It works through a web browser, which means you do not need special software on your computer. Once installed on a server, it can be accessed from anywhere with proper permissions. This simplicity is one of the biggest reasons phpMyAdmin is so popular. ### Key Features of phpMyAdmin - **Web-Based Interface:** Manage databases directly through a web browser without installing additional software. - **User-Friendly Visual Controls:** Use buttons, menus, and forms instead of writing manual SQL commands. - **Supports MySQL and MariaDB:** Designed specifically to work seamlessly with MySQL and MariaDB databases. - **Easy Data Management:** View, edit, and organize database tables in a structured, spreadsheet-like format. - **Remote Accessibility:** Access phpMyAdmin from any device with a browser once it is installed on the server and proper permissions are set. - **Lightweight Setup:** Runs smoothly as long as the server supports PHP and a database engine. - **Complete Database Control:** Create databases, manage users, import and export data, and modify settings with ease. - **Beginner-Friendly:** Simplifies complex database operations into manageable steps without requiring deep technical knowledge. ![phpMyAdmin](https://serveravatar.com/wp-content/uploads/2026/01/image-24.png) ### Why phpMyAdmin Is Widely Used One reason phpMyAdmin stands out is its ease of use. It turns complex database tasks into simple actions. Creating tables, editing records, or importing data feels more like filling out a form than managing a system. Another reason is accessibility. Since it runs in a browser, there is no steep learning curve. Even beginners can understand the layout quickly. It is like using a map instead of trying to remember every turn in your head. ### Basic Requirements Before Installation Before installing phpMyAdmin, a few basic components must already be available. These are not complicated, but they are essential. You need a web server, PHP, and a database system installed. phpMyAdmin acts as a bridge between your browser and the database. Without these foundations, it has nothing to connect to. Checking these basics first helps avoid issues later. ## Understanding How phpMyAdmin Works phpMyAdmin works by sending instructions from your browser to the database through PHP. When you click a button, phpMyAdmin translates that action into a command behind the scenes. You do not see the technical part, and that is the beauty of it. It is like pressing an elevator button instead of climbing stairs. The heavy lifting happens quietly in the background. ![phpMyAdmin work](https://serveravatar.com/wp-content/uploads/2026/01/image-25.png) ### Different Ways to Install phpMyAdmin There is more than one way to install phpMyAdmin, and that is a good thing. Different environments for different approaches. Some people install it using package managers, while others rely on hosting dashboards. Both methods aim for the same result. Choosing the right method depends on your setup and comfort level. ## Install phpMyAdmin Easily Using ServerAvatar Are you looking for a simple way to install phpMyAdmin without complex server commands or manual setups? The traditional way of installing phpMyAdmin can feel like solving a puzzle without the picture on the box. What if I told you there’s a much easier way? With ServerAvatar, you can install phpMyAdmin in just a few clicks. Think of ServerAvatar as a helpful guide that does all the heavy lifting behind the scenes, like having a friendly assistant who already knows all the steps for you. ### What is ServerAvatar? [ServerAvatar](https://serveravatar.com/) is a platform to simplify server and application hosting and management. Instead of manually installing components or connecting through SSH every time, ServerAvatar offers smooth automation and intuitive dashboards. ![ServerAvatar Dashboard](https://serveravatar.com/wp-content/uploads/2026/01/image-26.png) One of its standout features is the one-click application installer, not just for popular applications such as WordPress, Mautic, N8N, Uptime Kuma, etc., but also for phpMyAdmin. ## Why Use ServerAvatar for phpMyAdmin? Using ServerAvatar removes the mystery from installing phpMyAdmin. Think of it as having a reliable assistant that knows all the steps already; you just have to give the command. Without worrying about dependencies or configuration files, you can have phpMyAdmin up and running in seconds. This is perfect whether you’re new to databases or just want to save time. ![ServerAvatar for phpMyAdmin](https://serveravatar.com/wp-content/uploads/2026/01/image-27.png) ### How ServerAvatar One-Click Installation Works ServerAvatar’s one-click application installer handles everything automatically. Here’s what it does: - **Downloads phpMyAdmin automatically:** ServerAvatar fetches the required phpMyAdmin files on its own, so you don’t need to download or upload anything manually. - **Sets up required dependencies:** It takes care of configuring PHP and connecting the database in the background, removing the need for technical setup. - **Deploys phpMyAdmin to a domain:** phpMyAdmin is launched as a ready-to-use web application and linked to your chosen domain or test domain instantly. All without manual server commands. Just choose your settings and let ServerAvatar do the rest. ## Step-by-Step: Installing phpMyAdmin via ServerAvatar Installing phpMyAdmin with ServerAvatar is straightforward: - Click on the **Server Dashboard** icon for the server where you want to install phpMyAdmin. ![server dashboard](https://serveravatar.com/wp-content/uploads/2026/01/image-28-1024x238.png) - Navigate to the **Applications** section from the left sidebar, and click on the **Create an Application** button. ![create phpMyAdmin](https://serveravatar.com/wp-content/uploads/2026/01/image-29-1024x332.png) - Fill in the required details. Select the Deployment Method as a **One Click**, and Application as a **PHPMyAdmin.** - Choose whether you want to use a **primary domain** or a **test domain**. - In the **Application method**, choose **One-click** and then select **phpMyAdmin**. ServerAvatar will automatically download and install it with all required settings. - Click on the **Create Application** button. ![create phpMyAdmin application](https://serveravatar.com/wp-content/uploads/2026/01/image-30-1024x1014.png) ### Accessing phpMyAdmin After Installation Once phpMyAdmin is installed, you can access it easily with its domain. ![Access phpMyAdmin](https://serveravatar.com/wp-content/uploads/2026/01/image-31-1024x582.png) ## Quick Access to phpMyAdmin with ServerAvatar With ServerAvatar, installing phpMyAdmin separately is no longer necessary. The platform offers a built-in quick access feature that allows you to open phpMyAdmin instantly from multiple locations within the dashboard. This makes database management faster and more convenient, without dealing with extra installation steps. **Access phpMyAdmin from the Databases Section** - From the **Databases** section, you can directly open phpMyAdmin by clicking on the **Access phpMyAdmin** option. - This lets you manage your databases immediately, without setting up phpMyAdmin as a separate application. ![Access phpMyAdmin](https://serveravatar.com/wp-content/uploads/2026/01/image-32-1024x364.png) **Access phpMyAdmin from the Database Users Section** - ServerAvatar also provides quick access to phpMyAdmin from the **Database Users** section. - This is especially useful when you want to manage database users, permissions, or related settings without switching between tools. ![Access phpMyAdmin](https://serveravatar.com/wp-content/uploads/2026/01/image-33-1024x226.png) Once you click the **Access phpMyAdmin** button, it opens instantly in a new browser tab. There is no need to search through server files, configure paths, or perform manual installations. ServerAvatar simplifies the entire process, making phpMyAdmin readily available whenever you need it. **Access phpMyAdmin from the Application Panel** - For every application created on ServerAvatar, the **Application Panel** includes an option to open phpMyAdmin. - This allows you to manage application-specific databases directly from the same dashboard. ![Access phpMyAdmin](https://serveravatar.com/wp-content/uploads/2026/01/image-34.png) Once you click the **Access phpMyAdmin** button, it opens instantly in a new browser tab. There is no need to search through server files, configure paths, or perform manual installations. ServerAvatar simplifies the entire process, making phpMyAdmin readily available whenever you need it. ## phpMyAdmin Features You’ll Love phpMyAdmin offers a range of helpful features: - **Run SQL queries visually:** Execute SQL commands and view results in a clear, easy-to-read format. - **Import and export databases easily:** Move database data in and out with just a few clicks, without complex steps. - **Edit tables and records smoothly:** Update table structures and data directly through a simple interface. - **Manage users and permissions:** Control database access by creating users and assigning the right privileges. - **Work faster with less effort:** These features reduce manual work and make database management more comfortable. [![Blog banner - ServerAvatar](https://serveravatar.com/wp-content/uploads/2025/09/728_90-Banner-1-1024x127.png)](https://serveravatar.com/?ref=blog)## Tips to Keep Your phpMyAdmin Safe Because phpMyAdmin can manage your databases, security matters: - **Use strong, unique passwords:** Create complex passwords for every database user to reduce the risk of unauthorized access. - **Restrict access by IP:** Allow phpMyAdmin access only from trusted IP addresses whenever possible. - **Monitor access logs regularly:** Reviewing logs helps you quickly spot unusual or unauthorized activity. - **Keep everything updated:** Regular updates ensure you receive the latest security fixes and improvements. - **Stay consistent with security practices:** Simple, regular security habits are more effective than one-time actions. ## Common Mistakes to Avoid Even with a one-click install, some things can trip you up: - **Incorrect domain assignment:** Linking phpMyAdmin to the wrong domain can prevent it from loading properly. - **Ignoring access controls:** Skipping security restrictions can leave your database exposed. - **Missing user permissions:** Forgetting to assign proper permissions may block database access or actions. - **Rushing the setup process:** A careful review during setup helps avoid issues later. ## Troubleshooting Common Issues If phpMyAdmin doesn’t open: - **Verify domain settings:** Make sure phpMyAdmin is connected to the correct domain or application. - **Check ServerAvatar logs:** Logs often reveal the cause of loading or access errors. - **Confirm database credentials:** Incorrect usernames or passwords can prevent successful access. - **Be patient during checks:** Most problems are simple and can be fixed with careful review. - **[Contact Support](https://support.serveravatar.com/):** Our technical experts are available 24/7 to assist you with any issues you face. ## Best Practices for Smooth Management - **Create backups before changes:** Backups protect your data if something goes wrong. - **Maintain consistent naming:** Clear and uniform names make applications and users easier to manage. - **Secure access details:** Safely storing URLs and credentials helps prevent accidental exposure. These tips make long-term use easier. ## Conclusion Managing databases does not have to be complicated or intimidating. phpMyAdmin simplifies database management by offering a visual, browser-based interface that replaces complex commands with clear actions. Whether it is creating tables, managing users, or handling data, everything becomes more approachable and less stressful. With ServerAvatar, installing and accessing phpMyAdmin becomes even easier. The one-click installer and built-in quick access options remove the need for manual setup, technical configurations, or repeated installations. From deployment to daily usage, ServerAvatar streamlines the entire experience, allowing you to focus on managing your data confidently and efficiently instead of worrying about server-level complexity. ## FAQs ### **1. What is phpMyAdmin mainly used for?** phpMyAdmin is used to manage MySQL and MariaDB databases through a web-based interface without writing complex commands. ### **2. Do I need technical knowledge to use phpMyAdmin?** No, phpMyAdmin is beginner-friendly and designed to simplify database tasks using visual menus and forms. ### **3. How does ServerAvatar make phpMyAdmin installation easier?** ServerAvatar provides a one-click installer that automatically downloads, configures, and deploys phpMyAdmin without manual steps. ### **4. Can I access phpMyAdmin without installing it separately on ServerAvatar?** Yes, ServerAvatar offers quick access to phpMyAdmin from the Databases section, Database Users section, and Application Panel. ### **5. Is phpMyAdmin safe to use with ServerAvatar?** Yes, when proper security practices like strong passwords, restricted access, and regular updates are followed, phpMyAdmin is safe to use with ServerAvatar. **Categories:** Application Deployments, Blog, Guide, Tutorials **Tags:** Database Management, install phpMyAdmin, phpMyAdmin, phpMyAdmin guide, phpMyAdmin tutorial --- ### [How to Choose the Best Laravel Hosting for Developers](https://serveravatar.com/best-laravel-hosting-for-developers/) **Published:** January 14, 2026 **Author:** Meghna Meghwani **Content:** [![Blog banner - ServerAvatar](https://serveravatar.com/wp-content/uploads/2025/09/728_90-Banner-3-1024x127.png)](https://serveravatar.com/?ref=blog)Choosing the right Laravel hosting for your project can feel confusing, especially if you are not deeply technical. There are many options, many promises, and many unfamiliar terms. Yet, your hosting choice plays a huge role in how fast your application runs, how secure it is, and how easy it is to manage. Think of Laravel hosting like the foundation of a house. You might design a beautiful structure, but if the foundation is weak, cracks will appear sooner or later. In this guide, we will walk through everything you need to know to choose the best Laravel hosting, using simple language and clear explanations. No real-life examples, no complex jargon, just practical clarity. ## What Is Laravel Hosting? Laravel hosting is a type of hosting environment designed to support Laravel applications smoothly. Laravel is powerful, but it also has specific needs. Not every hosting setup can handle those needs properly. Unlike basic hosting, Laravel hosting focuses on speed, stability, and compatibility. It ensures that all required server components work together without friction. In simple words, it gives Laravel the environment it needs to perform at its best. ![Laravel hosting](https://serveravatar.com/wp-content/uploads/2026/01/image-108.png) ## Why Laravel Needs Special Hosting Laravel is not just a simple website builder. It handles routing, caching, database connections, and background tasks. All these processes require a well-configured server. If the hosting environment is not optimized, your application may feel slow or unstable. That is why Laravel works best on hosting that understands its requirements. Choosing the right hosting avoids unnecessary headaches later. ### Performance Requirements Performance directly affects user experience. Slow loading times can push users away quickly. When choosing Laravel hosting, look for: - **Fast storage:** Ensures your Laravel application loads quickly and handles requests without unnecessary delays. - **Enough memory:** Provides sufficient resources for smooth processing, even during high traffic or complex operations. - **Optimized server settings:** Helps Laravel run efficiently by using configurations designed for better speed and stability. These elements ensure your application runs smoothly even when traffic increases. Performance is not optional; it is essential. ### Server Compatibility and Software Stack Laravel relies on a proper software stack. This includes: - **Web server:** Handles incoming requests and delivers your Laravel application content efficiently to users. - **PHP:** Runs the core Laravel framework and processes application logic smoothly. - **Database support:** Stores and manages application data reliably for fast access and consistent performance. Your hosting must support these components in compatible versions. Without proper compatibility, Laravel features may break or fail silently. Always confirm that the hosting environment supports modern Laravel requirements. ### Importance of PHP Version Support Laravel depends heavily on PHP. Using outdated PHP versions can cause errors or security issues. Good Laravel hosting allows: - **Easy PHP version switching:** Lets you change PHP versions quickly to match your Laravel application’s requirements without downtime. - **Support for newer PHP releases:** Ensures your application stays secure, stable, and compatible with the latest Laravel features. This flexibility ensures your application remains secure and up to date without major disruptions. ### Security Features That Matter Security is not just about protecting data. It is about trust. Key security features to look for include: - **Firewall protection:** Blocks unauthorized access and helps protect your Laravel application from common threats. - **Regular updates:** Keeps the server and software patched against security vulnerabilities and known risks. - **Isolated environments:** Separates applications to prevent security issues from affecting other projects. Laravel hosting should provide a safe space where your application is protected from common threats. Security should be built-in, not an afterthought. ### Scalability for Growing Applications Even if your application starts small, growth is always a possibility. Scalable Laravel hosting allows: - Resource upgrades - Smooth handling of traffic spikes - Expansion without downtime It is like choosing clothes with room to grow. You do not want to replace everything just because things get bigger. ### Ease of Deployment and Management Deploying a Laravel application should not feel like solving a puzzle. Good hosting makes deployment simple with: - Clear setup steps - Automation support - Minimal manual configuration The easier it is to deploy and manage, the more time you can spend improving your application instead of fixing server issues. ## Why ServerAvatar Makes Laravel Hosting Simple When choosing the best Laravel hosting, simplicity matters just as much as performance. This is where ServerAvatar stands out. Instead of struggling with complex server configurations, ServerAvatar offers a streamlined environment designed specifically to make Laravel hosting easy and stress-free. **What is ServerAvatar?** [ServerAvatar](https://serveravatar.com/) is a platform to simplify the hosting and management of servers and applications. It simplifies the process of deploying and managing PHP and Node.js based web applications on servers. ![ServerAvatar Dashboard](https://serveravatar.com/wp-content/uploads/2026/01/image-109.png) With ServerAvatar, developers can deploy Laravel applications without worrying about low-level server setup. The platform handles the technical groundwork in the background, allowing you to focus on building and improving your application rather than managing infrastructure. ### Key Features of ServerAvatar **Core Platform Features** - **Automated Server Setup:** Instantly configure servers with optimized stacks like Apache, Nginx, OLS, MERN, without manual setup. - **Multiple Stack Support:** Choose from Apache, Nginx, OpenLiteSpeed (OLS), or MERN depending on your project needs. ![multiple stack - Laravel hosting ](https://serveravatar.com/wp-content/uploads/2026/01/image-110.png) - **Cloud Integration & Flexibility:** Connect with popular cloud providers or use your own server from anywhere in the world. - **Self-Managed & Managed Servers:** Either bring your own custom VPS from any cloud provider or let ServerAvatar fully manage your server setup and maintenance. ![create server - Laravel hosting](https://serveravatar.com/wp-content/uploads/2026/01/image-111.png) **Server Management** - **Database Management:** Create and manage multiple databases and users from the control panel. [](https://storage.3.basecamp.com/5840738/blobs/cc6fecc2-f07c-11f0-8b19-0242ac120004/download/image.png) ![database - Laravel hosting](https://serveravatar.com/wp-content/uploads/2026/01/image-112.png) - **System User & SSH Management:** Checkout application users, enable or disable the ssh access easily. ![ssh credentials - Laravel hosting](https://serveravatar.com/wp-content/uploads/2026/01/image-113.png) - **Automatic Disk Cleaner:** Free up space by cleaning temporary files and log files automatically. [](https://storage.3.basecamp.com/5840738/blobs/1b83b00a-f07d-11f0-bc6a-0242ac120004/download/image.png) ![disk clener - Laravel hosting](https://serveravatar.com/wp-content/uploads/2026/01/image-114.png) - **Cronjob Manager:** Set, edit, and schedule cronjobs with ease. ![cron job - Laravel hosting](https://serveravatar.com/wp-content/uploads/2026/01/image-115.png) - **Advanced Log Viewer:** Search and filter logs to debug issues faster. ![logs - Laravel hosting](https://serveravatar.com/wp-content/uploads/2026/01/image-116.png) - **Service Monitoring & Control:** Check out services and start, stop, and restart services as per your requirement. ![services - Laravel hosting](https://serveravatar.com/wp-content/uploads/2026/01/image-117.png) **Application Deployment & Management** - **One-Click Application Deployments:** Install apps like WordPress, Laravel, Node.js, PHPMyAdmin, etc., with a single click. ![create application - Laravel hosting](https://serveravatar.com/wp-content/uploads/2026/01/image-118.png) - **Automatic & Custom SSL:** Install free Let’s Encrypt SSL or upload your own certificates easily. ![SSL Certificate - Laravel hosting](https://serveravatar.com/wp-content/uploads/2026/01/image-119.png) - **Git Deployment & Push-to-Deploy:** Integrate your git account and deploy from GitHub, GitLab, or Bitbucket, and enable automatic deployment on push. ![git integration - Laravel hosting](https://serveravatar.com/wp-content/uploads/2026/01/image-120.png) - **One-Click Staging Area:** Create temporary test or staging environments instantly. ![staging area - Laravel hosting](https://serveravatar.com/wp-content/uploads/2026/01/image-121.png) - **Powerful File Manager:** Manage files with features like creation, editing, deletion, compression, and code editing. ![file manager - Laravel hosting](https://serveravatar.com/wp-content/uploads/2026/01/image-122.png) - **Multiple PHP Versions & Per Site Settings:** Host sites with different PHP versions and custom settings per app. ![php settings - Laravel hosting](https://serveravatar.com/wp-content/uploads/2026/01/image-123.png) - **Node.js Support:** One-click install and configuration for Node.js and NPM environments. ![node js - Laravel hosting](https://serveravatar.com/wp-content/uploads/2026/01/image-124.png) - **Site Cloning & Temporary Sites:** Clone applications across servers or create temporary demo sites. ![site clone - Laravel hosting](https://serveravatar.com/wp-content/uploads/2026/01/image-125.png) - **Supervisord Process Management:** Control background processes easily (useful for Laravel queues, etc.). ![supervisor - Laravel hosting](https://serveravatar.com/wp-content/uploads/2026/01/image-126.png) **Backups & Restore** - **Database, File & Full App Backups:** Create backups of databases, files, or entire applications. - **Various Storage Options:** Save backups to services like S3, Google Drive, Wasabi, and more. - **One-Click Restore:** Restore backups to the same or different servers with a single click. ![backups - Laravel hosting](https://serveravatar.com/wp-content/uploads/2026/01/image-127.png) **Security** - **Firewall & UFW Management:** Configure firewall rules directly without the command line. ![firewall - Laravel hosting](https://serveravatar.com/wp-content/uploads/2026/01/image-128.png) - **Isolated Environments:** Apps run in isolated setups, reducing the risk of cross-infection. - **Automatic Security Updates:** Keep your server secure with automatic patches. - **Fail2Ban Integration & IP Whitelisting:** Protect against unauthorized access and brute-force attacks. ![fail2ban - Laravel hosting](https://serveravatar.com/wp-content/uploads/2026/01/image-129.png) **Monitoring & Alerts** - **Server Health Monitoring:** Track CPU, RAM, disk usage, and load averages. - **Query Monitoring:** See different database queries for better optimization and troubleshooting. ![server monitoring - Laravel hosting](https://serveravatar.com/wp-content/uploads/2026/01/image-130.png) - **Alerts & Notification Integrations:** Get alerts via Slack, Telegram, or Discord. ![notification channel - Laravel hosting](https://serveravatar.com/wp-content/uploads/2026/01/image-131.png) - **Log Monitoring Suite:** In-depth log analysis and traffic visualization included in higher plans. ![dashboard - Laravel hosting](https://serveravatar.com/wp-content/uploads/2026/01/image-132.png) **Teams & Collaboration** - **Team Management:** Create teams with role-based permissions. ![team management - Laravel hosting](https://serveravatar.com/wp-content/uploads/2026/01/image-133.png) - **Temporary Server Sharing:** Share servers temporarily with limited access. ![share server - Laravel hosting](https://serveravatar.com/wp-content/uploads/2026/01/image-134.png) - **Control Panel Sharing:** Share access via URL, username, and password. ![control panel - Laravel hosting](https://serveravatar.com/wp-content/uploads/2026/01/image-135.png) - **White-Label Panels & Reseller Support:** Customize dashboard branding and resell hosting under your own brand. **Support & Productivity** - **Expert Support & Documentation:** Get 24/7 assistance from technical experts for any issues or queries. ServerAvatar also provides detailed product and API documentation to help you at every step. - **Community Support:** Join our Facebook community to connect with other users, share experiences, and get guidance. You can also receive help from ServerAvatar experts who actively assist the community. - **Premium Hosting Care Plan:** For users who want hands-on assistance, ServerAvatar offers a Premium Hosting Care Plan. This plan includes proactive monitoring, application-level troubleshooting, custom server configurations, optimisation assistance, priority support with a dedicated Slack channel, and expert help to ensure your server and applications run smoothly without stress. ## Effortless Laravel Deployment with ServerAvatar - **Expert Support & Documentation:** Get 24/7 assistance from technical experts for any issues or queries. ServerAvatar also provides detailed product and API documentation to help you at every step. - **Community Support:** Join our Facebook community to connect with other users, share experiences, and get guidance. You can also receive help from ServerAvatar experts who actively assist the community. - **Premium Hosting Care Plan:** For users who want hands-on assistance, ServerAvatar offers a Premium Hosting Care Plan. This plan includes proactive monitoring, application-level troubleshooting, custom server configurations, optimisation assistance, priority support with a dedicated Slack channel, and expert help to ensure your server and applications run smoothly without stress. ## Optimized Performance for Laravel Applications Performance plays a critical role in Laravel hosting, and ServerAvatar is built with this in mind. The platform ensures your Laravel application runs in an optimized environment that supports fast response times and smooth operations. By managing server resources efficiently, ServerAvatar helps maintain consistent performance even as application demands grow. This means fewer slowdowns, better user experience, and a hosting setup that supports Laravel’s full potential without extra tuning. ![Laravel hosting](https://serveravatar.com/wp-content/uploads/2026/01/image-136.png) ## Built-In Security That Protects Laravel Projects Security is a top priority for any Laravel application, and ServerAvatar approaches it with care. The platform includes built-in security measures that help protect applications from common risks without requiring constant manual intervention. With ServerAvatar handling essential security configurations, developers gain peace of mind knowing their Laravel applications are hosted in a controlled and secure environment. This allows you to focus on development instead of constantly worrying about server vulnerabilities. [![Blog banner - ServerAvatar](https://serveravatar.com/wp-content/uploads/2025/09/728_90-Banner-1-1024x127.png)](https://serveravatar.com/?ref=blog)## Scalability Without the Complexity As Laravel applications grow, hosting requirements change. ServerAvatar makes scaling simple by allowing resource upgrades without disrupting your application. There is no need to migrate to a new setup or reconfigure everything from scratch. ServerAvatar ensures your Laravel hosting can grow alongside your project, making it easier to handle increased traffic or additional features when the time comes. ## Easy Server and Application Management Managing servers does not have to be complicated. ServerAvatar provides a clean and user-friendly dashboard that simplifies Laravel server management. From monitoring application status to managing configurations, everything is accessible in one place. This reduces confusion and makes Laravel hosting feel manageable even for users who are not deeply familiar with server administration. ## Reliable Backups for Laravel Applications Mistakes and unexpected issues can happen at any time. ServerAvatar helps reduce risk by offering reliable backup options for Laravel applications. These backups act as a safety net, allowing quick recovery if something goes wrong. Having this layer of protection ensures your Laravel project remains safe and recoverable without unnecessary stress. ## Why ServerAvatar Is a Smart Choice for Laravel Hosting Choosing the best Laravel hosting is not just about server power; it is about ease, reliability, and long-term flexibility. ServerAvatar brings all these elements together in a single platform. By simplifying deployment, improving performance, and reducing server management complexity, ServerAvatar makes Laravel hosting more accessible. It supports developers at every stage, from initial setup to long-term growth, making it a practical choice for hosting Laravel applications. ## Common Mistakes to Avoid Avoid these frequent pitfalls when choosing an e-commerce platform: - **Choosing based only on price:** Focusing solely on cost can lead to hidden expenses and limited features down the road. - **Ignoring scalability:** Selecting a platform that can’t grow with your business may cause costly migrations later. - **Overlooking security features:** Neglecting security risks exposes your store and customers to potential breaches. - **Not checking compatibility:** Failing to verify plugin, theme, or payment gateway compatibility can cause functionality issues. Being mindful of these mistakes helps you pick a platform that not only fits your budget but also supports your long-term growth and keeps your store secure and reliable. This thoughtful approach saves time, money, and frustration in the future. ## Conclusion Choosing the right hosting for your Laravel project is crucial for ensuring performance, security, scalability, and ease of management. A strong hosting foundation supports your application’s speed and reliability, helping you avoid common pitfalls like compatibility issues or poor scalability. Platforms like ServerAvatar simplify this process by providing optimized environments, automated setups, built-in security, and easy management tools, all designed specifically with Laravel in mind. By selecting a hosting provider that meets these criteria, you empower your Laravel application to grow seamlessly while reducing headaches and technical overhead. ## FAQs ### **1. What makes Laravel hosting different from regular hosting?** Laravel hosting is optimized to support Laravel’s framework requirements, ensuring better performance, compatibility, and stability. ### **2. Why is PHP version support important for Laravel?** Laravel relies on modern PHP features, and outdated versions can cause errors or security risks. ### **3. How important is scalability in Laravel hosting?** Scalability allows your application to grow without interruptions, making it essential for long-term success. ### **4. Should beginners care about server management features?** Yes, beginner-friendly management tools make it easier to deploy, monitor, and maintain Laravel applications without confusion. ### **5. What are the key features to look for in Laravel hosting?** Look for fast storage, sufficient memory, PHP version flexibility, security features like firewalls and automatic updates, and scalability options that allow easy resource upgrades as your application grows. **Categories:** Application Deployments, Blog, Guide, Laravel, Tutorials **Tags:** best hosting for laravel, laravel, laravel cloud hosting, laravel deployment hosting, Laravel Hosting, laravel hosting for developers, laravel vps hosting, secure hosting --- ### [WordPress Multisite: Everything You Need to Know](https://serveravatar.com/wordpress-multisite-guide/) **Published:** January 17, 2026 **Author:** Meghna Meghwani **Content:** [![Blog banner - ServerAvatar](https://serveravatar.com/wp-content/uploads/2025/09/728_90-Banner-3-1024x127.png)](https://serveravatar.com/?ref=blog)Have you ever wished you could manage multiple WordPress websites from one single dashboard? Maybe you run several blogs, client sites, or regional versions of the same website. Logging into each site separately can feel like juggling too many balls at once. This is where WordPress Multisite quietly steps in and changes the game. Think of WordPress Multisite like an apartment building. Each apartment is a separate home with its own furniture and style, but they all share the same foundation, utilities, and main entrance. In simple terms, WordPress Multisite allows you to run multiple websites from one WordPress installation, saving time, effort, and resources. In this guide, we will walk through everything you need to know about WordPress Multisite, using clear language, real-world examples, and practical tips. No confusing jargon. No tech overload. Just honest, human-friendly explanations. ## What Is WordPress? [WordPress](https://wordpress.org/) is the world’s most popular open-source content management system (CMS), used to build websites, blogs, and e-commerce stores. It offers flexibility through themes and plugins, making it suitable for beginners, developers, and businesses of all sizes. ## How ServerAvatar Simplifies WordPress Deployment & Management **What is ServerAvatar?** [ServerAvatar](https://serveravatar.com/) is a platform to simplify the hosting and management of servers and applications. It simplifies the process of deploying and managing PHP and Node.js based web applications on servers. ![ServerAvatar Dashboard](https://serveravatar.com/wp-content/uploads/2026/01/image-150.png) ServerAvatar makes WordPress and other popular applications, such as Mautic, N8N, UptimeKuma, etc, deployment effortless with its one-click WordPress application installer, allowing you to launch a fully configured WordPress site in minutes. It removes the complexity of server setup by providing an intuitive dashboard to manage servers, applications, databases, PHP versions, SSL, and performance settings from one place. ServerAvatar supports multiple cloud providers and gives users full control over their infrastructure while eliminating the need for deep server administration knowledge. You can refer to the ServerAvatar [documentation](https://serveravatar.com/docs/application/one-click-installer/wordpress/) and the detailed [blog](https://serveravatar.com/install-wordpress-quickly-on-vps/) to [install WordPress](https://serveravatar.com/install-wordpress-apache-ubuntu/) effortlessly. > ServerAvatar does not directly provide WordPress Multisite, but our technical experts can help you set up a WordPress Multisite environment > The ServerAvatar support team is available 24/7 to assist you with any issues or questions you may have. ### Key Benefits of Using ServerAvatar for WordPress - **One-click WordPress installer:** Deploy WordPress instantly without manual configuration. - **Unified management panel:** Manage servers and WordPress applications from a single dashboard. - **Performance optimization:** Easily configure caching, PHP, and server resources. - **Enhanced security:** Includes firewall, SSL management, and secure access controls. - **Easy scalability:** Upgrade server resources as your WordPress site grows. ServerAvatar is an ideal solution for users who want the power of cloud servers without the operational complexity. It simplifies WordPress hosting by automating server setup, streamlining application management, and providing performance and security optimizations out of the box. Whether you’re a developer, agency, or business owner, ServerAvatar allows you to deploy, manage, and scale WordPress websites confidently while focusing on growth instead of infrastructure management. ## What Is WordPress Multisite? WordPress Multisite is a built-in feature of WordPress that lets you create and manage multiple websites using one WordPress installation. Each site has its own content, users, and settings, but they all share the same core files, plugins, and themes. ![WordPress Multisite](https://serveravatar.com/wp-content/uploads/2026/01/image-151.png) Instead of installing WordPress again and again, you manage everything from a single dashboard. This makes updates, maintenance, and user management much easier. ## How WordPress Multisite Works WordPress Multisite operates on a simple yet powerful idea: one WordPress installation managing multiple websites from a single place. Instead of handling each site separately, everything is organized under one central system, making administration faster and more efficient. At the core of WordPress Multisite is a network, which works as the main control center. This network is managed by a Super Admin, who has complete authority over all sites in the setup. From this central dashboard, the Super Admin can: - **Create or remove sites:** Easily add new websites to the network or delete existing ones as your needs change. - **Install themes and plugins:** Install and control themes and plugins once, then make them available across multiple sites. - **Manage users across all sites:** Add users, assign roles, and control access without repeating the process for each website. Each site in the network functions independently on the front end, with its own content, settings, and users. However, behind the scenes, all sites are connected to the same WordPress core files and database structure, allowing smooth and centralized management. ## Common Use Cases for WordPress Multisite WordPress Multisite may not be the perfect solution for every website owner, but when used in the right scenarios, it can be incredibly effective. It is especially useful when multiple websites are related and can benefit from centralized management. **Popular use cases include:** - **Businesses managing multiple brand sites:** Ideal for companies running separate websites for different products, services, or sub-brands under one system. - **Universities running sites for departments or students:** Allows institutions to manage department pages, faculty sites, or student blogs from a single network. - **News networks with regional editions:** Perfect for publishing the same type of content across different locations while maintaining local customization. - **Agencies hosting client websites:** Makes it easier for agencies to manage and maintain multiple client sites without separate installations. - **Blogs with language-based versions:** Helpful for running multilingual blogs where each language has its own site but shares the same structure. If your websites follow a similar structure or use the same tools and features, WordPress Multisite can be a smart and efficient choice for long-term management. ## WordPress Single Site vs Multisite Let’s keep this simple and easy to understand. The main difference lies in how many websites you manage and how you manage them. A single-site WordPress setup is like owning one shop. You focus on just one website, with its own dashboard, plugins, and updates. Everything is separate and straightforward. On the other hand, WordPress Multisite is like running a shopping mall. You manage multiple websites from one central dashboard, sharing the same core system while allowing each site to operate independently. With a single site, all settings, updates, plugins, and themes are isolated to that one website. With Multisite, updates, plugins, and themes can be managed once and applied across multiple sites, saving time and effort. However, it is important to remember that with more power comes more responsibility. A Multisite network requires careful planning, stronger security practices, and better performance management to keep everything running smoothly. ## Advantages of Using WordPress Multisite WordPress Multisite is popular because it simplifies the way multiple websites are managed. When used correctly, it can save time, effort, and resources, especially for growing projects. **Here’s why many people like WordPress Multisite:** - **Centralized Management:** Update WordPress core files, plugins, and themes once, and the changes apply across all sites in the network. - **Time-Saving:** Manage multiple websites from a single dashboard without repeatedly logging into different admin panels. - **Shared Resources:** All sites use the same core files and server resources, which helps reduce storage usage and improves efficiency. - **Scalable Structure:** Add new sites to the network in just a few minutes as your business or content network grows. ## Limitations and Drawbacks While WordPress Multisite offers many benefits, it is not a perfect solution for every use case. Understanding its limitations helps you decide whether it is the right fit. **Key drawbacks include:** - **More complex setup:** Initial configuration requires technical knowledge compared to a standard WordPress installation. - **Plugin compatibility issues:** Some plugins are not designed to work properly in a Multisite environment. - **Shared resources can affect performance:** Heavy traffic or issues on one site may impact others in the network. - **Not ideal for completely unrelated websites:** Sites with different purposes and requirements may be better off as separate installations. If one site in the network faces serious technical issues, it can potentially affect other sites as well, making careful management essential. ## Who Should Use WordPress Multisite? Before choosing WordPress Multisite, it helps to pause and ask one simple question: **Do my websites share similar features, themes, or goals?** If the answer is yes, WordPress Multisite could be a great fit for your needs. It works best for users who manage related websites and want centralized control. **WordPress Multisite is ideal for:** - **Organizations with structured websites:** Perfect for companies or institutions managing multiple sections, departments, or branches under one system. - **Developers and agencies:** Makes it easier to build, manage, and maintain multiple client sites from a single dashboard. - **Large content networks:** Useful for blogs, publications, or media networks running multiple content-driven websites. If each website is completely unique and unrelated, using separate WordPress installations may offer more flexibility and fewer complications. ## Types of WordPress Multisite Networks WordPress Multisite supports two main network structures, allowing you to choose what best fits your website strategy. - **Subdomain-based network:** Sites are created as subdomains, such as **site1.example.com** and **site2.example.com**, which works well for larger or clearly separated sites. - **Subdirectory-based network:** Sites appear as folders, like **example.com/site1** and **example.com/site2**, making it suitable for closely related content. ![Types of WordPress Multisite](https://serveravatar.com/wp-content/uploads/2026/01/image-152.png) Your hosting environment, SEO strategy, and long-term growth plans usually determine which structure is the right choice.[](https://storage.3.basecamp.com/5840738/blobs/fc28965a-f395-11f0-b526-0242ac120004/download/image.png) ## How to Set Up WordPress Multisite Setting up WordPress Multisite may look technical at first, but if you follow each step carefully, it is completely manageable. Before you begin, make sure you have administrator access, FTP or file manager access, and a full website backup. **Basic steps include:** - **Enable Multisite in wp-config.php:** Activates the Multisite feature within your WordPress installation. - **Configure network settings:** Choose your network type and set basic details such as site titles and admin email. - **Update the .htaccess file:** Ensures proper URL handling for all sites in the network. - **Log in as Super Admin:** Access the Network Dashboard to manage the entire setup. Most modern hosting providers fully support WordPress Multisite, making the setup smoother and more reliable. ## Managing Sites in a Multisite Network Once WordPress Multisite is set up, managing multiple websites becomes simple and organized. From the Network Dashboard, you can: - **Add or remove sites:** Create new websites or delete existing ones in just a few clicks. - **Assign administrators:** Control who manages each site by assigning proper roles. - **Control updates:** Handle WordPress core, theme, and plugin updates centrally. Each site administrator focuses on content and day-to-day tasks, while the Super Admin oversees the entire network. [![Blog banner - ServerAvatar](https://serveravatar.com/wp-content/uploads/2025/09/728_90-Banner-1-1024x127.png)](https://serveravatar.com/?ref=blog)## Themes and Plugins in WordPress Multisite Themes and plugins behave slightly differently in a Multisite environment to maintain control and stability. **Important points to understand:** - **Only Super Admins can install plugins:** This prevents unverified plugins from affecting the entire network. - **Plugins can be network-activated or site-specific:** Choose whether a plugin applies to all sites or only selected ones. - **Themes must be enabled before site admins can use them:** Keeps design options consistent and manageable. This structured approach helps keep the network secure, organized, and efficient. ## User Roles and Permissions WordPress Multisite introduces a powerful role known as the **Super Admin**, designed to manage the entire network. **A Super Admin can:** - **Control the entire network:** Oversee all websites from one central dashboard. - **Manage users and sites:** Add users, assign roles, and manage site access. - **Install themes and plugins:** Control what tools are available across the network. Site admins, on the other hand, only manage their individual websites. This clear separation of roles improves security and operational control. ## SEO Considerations for WordPress Multisite SEO in WordPress Multisite works much like SEO for a single WordPress site, with a few extra considerations. **Best practices include:** - **Use SEO plugins that support Multisite:** Ensure your chosen plugin works well in a network setup. - **Optimize each site individually:** Treat every site as its own SEO project with unique content and keywords. - **Avoid duplicate content across sites:** Prevent search engine confusion and ranking issues. - **Set clear site structures:** Maintain logical URLs and navigation for better indexing. Each site in a Multisite network can rank independently in search engines when optimized correctly. ## Security and Performance Tips Since all sites in a Multisite network share resources, strong security and performance practices are essential. **Key tips include:** - **Use strong passwords:** Protect all admin accounts, especially Super Admin access. - **Limit Super Admin access:** Reduce risk by granting full control only to trusted users. - **Choose reliable hosting:** Good hosting ensures stability, speed, and scalability. - **Monitor performance regularly:** Identify and fix issues before they affect multiple sites. With proper care, a WordPress Multisite network can be just as secure and fast as a single-site setup. ## Is WordPress Multisite Right for You? WordPress Multisite is not a one-size-fits-all solution. It works best when websites are connected by purpose, structure, or functionality. If you value centralized control, scalability, and efficiency, WordPress Multisite can be a powerful long-term solution. However, if flexibility and complete independence matter more, a single-site WordPress setup may feel like a safer choice. ## Conclusion WordPress Multisite is a powerful solution for managing multiple related websites from a single installation, helping reduce management effort while offering centralized control over users, themes, and plugins. It works best for businesses, agencies, and organizations with similar site structures, but it requires careful planning due to shared resources and added complexity. With tools like ServerAvatar simplifying server management, performance, and security, Multisite becomes easier to handle. Ultimately, the right choice depends on your needs, Multisite for scalability and efficiency, or a single-site setup for greater independence and flexibility. ## FAQs ### **1. Is WordPress Multisite free to use?** Yes, WordPress Multisite is a built-in feature of WordPress and does not require any additional cost. You only need suitable hosting to support it. ### **2. Can I convert an existing WordPress site into a Multisite network?** Yes, an existing WordPress site can be converted into a Multisite network, but it is strongly recommended to take a full backup before making any changes. ### **3. Does WordPress Multisite affect website performance?** It can if not managed properly. Since all sites share server resources, heavy traffic or issues on one site may impact others. Using optimized hosting and performance tools helps prevent this. ### **4. Can each site in a Multisite network have its own domain?** Yes, WordPress Multisite supports domain mapping, allowing each site to use a completely different domain if needed. ### **5. Is WordPress Multisite suitable for beginners?** WordPress Multisite is better suited for users with some technical knowledge. Beginners can still use it, especially with platforms like ServerAvatar, but should be prepared for a learning curve. **Categories:** Blog, Guide, Tutorials, WordPress **Tags:** Wordpress, WordPress Multisite, WordPress Multisite Benefits, WordPress Multisite Guide, WordPress Multisite Setup, WordPress Multisite Tutorial --- ### [How to Fix a 408 Request Timeout Error](https://serveravatar.com/fix-408-request-timeout-error/) **Published:** January 20, 2026 **Author:** Meghna Meghwani **Content:** [![Blog banner - ServerAvatar](https://serveravatar.com/wp-content/uploads/2025/09/728_90-Banner-3-1024x127.png)](https://serveravatar.com/?ref=blog)Have you ever clicked on a website, waited a few seconds, and then, boom, an error message shows up saying “408 Request Timeout Error”? Annoying, right? It feels like knocking on a door, waiting patiently, and then walking away because no one answered in time. The good news is that this error is common, and in most cases, it’s easy to fix. You don’t need to be a tech expert or speak computer language to understand what’s going on. In this guide, I’ll walk you through everything step by step. Let’s fix it together. ## What Is a 408 Request Timeout Error? A 408 Request Timeout Error happens when a server waits too long for a request from your browser and gives up. That’s exactly what the server does when it doesn’t hear back from your browser in time. ![408 Request Timeout Error](https://serveravatar.com/wp-content/uploads/2026/01/image-153.png) In simple terms: - **Your browser started talking to the server:** Your browser sent a request to the server asking for a webpage or data. - **The conversation took too long:** The server did not receive a complete response from your browser within the allowed time. - **The server ended the connection:** The server closed the request because it waited too long and timed out. ## What Does a 408 Error Look Like? A 408 error can appear in different formats depending on the browser or website you are using. Even though the wording may change, the message always points to the same issue, a request took too long to complete. - **408 Request Timeout:** Indicates the server stopped waiting because the request was not completed in time. - **HTTP Error 408:** A technical version of the timeout message shown by some browsers or systems. - **Request Timeout (The Server Timed Out Waiting for the Request):** A more descriptive message explaining that the server ended the connection due to delay. Each version may look different, but they all signal a timeout between the browser and the server. ## Why Does a 408 Request Timeout Error Happen? A 408 Request Timeout Error usually occurs due to a combination of small delays rather than a single major issue. These delays interrupt communication between your browser and the server, causing the request to expire. - **Slow internet connection:** The request takes too long to reach the server because of low internet speed. - **Unstable network:** Frequent connection drops prevent the request from completing properly. - **Heavy server traffic:** The server is overloaded and unable to respond within the allowed time. - **Server misconfiguration:** Incorrect server settings cause requests to time out too quickly. - **Firewall or security rules blocking requests:** Security systems mistakenly block or delay valid connections. - **VPN or proxy interference:** Extra routing layers slow down communication between the browser and server. Most of the time, this error is temporary and not a serious problem. ## Is the 408 Error Your Fault or the Server’s? A 408 error can originate from either the user’s side or the server’s side, depending on the situation. Identifying where it occurs helps determine the right fix. ![408 Request Timeout Error](https://serveravatar.com/wp-content/uploads/2026/01/image-154.png) - **If only you see the error:** The issue is likely related to your browser, internet connection, or device. - **If many users see the error:** The problem is probably caused by the website’s server or hosting setup. Because of this, it’s best to start troubleshooting with basic checks on your own system before assuming a server issue. ## Quick Fixes for Users If you’re simply visiting a website and encounter a 408 Request Timeout Error, don’t panic. In many cases, the issue can be resolved quickly by trying a few basic troubleshooting steps on your side. ### Refreshing the Page the Right Way Refreshing the page is often the fastest and easiest solution, as it forces the browser to request fresh data from the server. - **Click the refresh button:** Reloads the page and retries the request instantly. - **Press Ctrl + F5 (Windows/Linux):** Performs a hard refresh by ignoring stored data. - **Press Cmd + Shift + R (Mac):** Forces the browser to load the page from scratch. This method works surprisingly often because it removes temporary loading issues. ### Check Your Internet Connection An unstable or slow internet connection can delay requests and cause timeout errors. - **Switch networks:** Changing between Wi-Fi and mobile data can improve stability. - **Restart your router:** Refreshes the connection and fixes minor network glitches. - **Pause heavy usage:** Stopping downloads or streaming frees up bandwidth. If the connection struggles, the server may stop waiting for a response. ### Clear Browser Cache and Cookies Cached files help websites load faster, but corrupted data can interfere with requests. - **Open browser settings:** Access the option to manage stored data. - **Clear cache and cookies:** Removes outdated or damaged temporary files. - **Restart the browser:** Ensures the changes take effect properly. This process often resolves hidden loading problems. ### Try a Different Browser or Device Sometimes the issue is limited to a specific browser or device. - **Use another browser:** Testing with Firefox, Edge, or Safari helps isolate the issue. - **Check from another device:** Opening the site on your phone confirms whether the problem is local. If it works elsewhere, the issue is likely related to your original setup. ### Disable VPN or Proxy Temporarily VPNs and proxies can slow down connections by adding extra routing layers. - **Turn off the VPN or proxy:** Removes the additional network step. - **Reload the page:** Checks if the server responds faster without interference. - **Re-enable after testing:** Turn it back on once the issue is identified. In many cases, disabling these tools instantly fixes a 408 Request Timeout Error. ## Fixes for Website Owners If you own the website and visitors are encountering a 408 Request Timeout Error, there’s no need to panic. Since the issue is on the server side, you have the ability to adjust settings and improve performance to resolve it effectively. ### Increase Server Timeout Settings Servers allow requests only for a limited time, and short limits can cause slow connections to fail. - **Increase timeout values in server settings:** Allows the server to wait longer for incoming requests. - **Adjust PHP or web server timeout limits:** Prevents scripts from stopping before completing tasks. - **Review application-level timeouts:** Ensures apps don’t close connections too quickly. These adjustments give users more time to connect successfully. ### Check Server Load and Performance An overloaded server may struggle to respond within the required timeframe. - **High CPU usage:** Indicates the server is handling too many tasks at once. - **Low memory:** Limits the server’s ability to process requests efficiently. - **Too many active connections:** Slows down response times for all users. Optimizing resources or upgrading your hosting plan can significantly improve response speed. ### Review Firewall and Security Rules Security systems protect your server, but can sometimes block legitimate traffic. - **Firewall rules:** Ensure valid requests are not being mistakenly denied. - **Rate-limiting settings:** Check that normal users aren’t restricted by strict limits. - **DDoS protection tools:** Confirm protection measures are not interfering with real visitors. The goal is to maintain strong security without preventing genuine users from accessing your site. ## How ServerAvatar Helps Prevent 408 Request Timeout Errors **What is ServerAvatar?** [ServerAvatar](https://serveravatar.com/) is a platform to simplify the hosting and management of servers and applications. It simplifies the process of deploying and managing PHP and Node.js based web applications on servers. ![ServerAvatar Dashboard](https://serveravatar.com/wp-content/uploads/2026/01/image-155.png) ServerAvatar simplifies server management by bringing all essential performance, security, and configuration tools into one easy-to-use dashboard. By proactively managing these areas, website owners can significantly reduce the chances of 408 Request Timeout Errors. - **Real-Time Server Monitoring:** ServerAvatar provides live insights into CPU usage, memory consumption, disk usage, and active processes, helping you identify performance bottlenecks before they cause request timeouts. ![Server Panel - 408 Request Timeout Error](https://serveravatar.com/wp-content/uploads/2026/01/image-157-1024x700.png) - **Server Services Management:** With ServerAvatar, you can easily start, stop, restart, or monitor critical services like Nginx, Apache, MySQL, and PHP-FPM, ensuring they are always running properly and responding to requests on time. ![Services - 408 Request Timeout Error](https://serveravatar.com/wp-content/uploads/2026/01/image-158-1024x398.png) [](https://storage.3.basecamp.com/5840738/blobs/14562912-f522-11f0-83e2-0242ac120004/download/image.png) - **PHP Version and Settings Management:** ServerAvatar allows you to install, switch, and configure PHP versions per server or application, preventing slow script execution and timeout issues caused by misconfigured PHP settings. ![Manage PHP Extensions - 408 Request Timeout Error](https://serveravatar.com/wp-content/uploads/2026/01/image-159-1024x405.png) ![PHP Settings - 408 Request Timeout Error](https://serveravatar.com/wp-content/uploads/2026/01/image-161-1024x905.png) - **Application-Level Optimization:** ServerAvatar lets you manage individual applications efficiently, making it easier to optimize performance, manage resources, and reduce delays that can lead to request timeouts. - **Server Resource Optimization:** By providing clear visibility into server resource usage, ServerAvatar helps you balance workloads and avoid server overload, which is a common cause of 408 errors. - **Simplified Troubleshooting:** ServerAvatar’s centralized dashboard makes it easier to identify and fix issues quickly, reducing downtime and preventing repeated timeout errors. Additionally, ServerAvatar technical experts are available 24/7 to provide you with the best level of support and to assist you with your queries and issues. By giving you full control and clear visibility over your server environment, ServerAvatar helps ensure faster response times, stable connections, and a smoother experience for your website visitors. [![Blog banner - ServerAvatar](https://serveravatar.com/wp-content/uploads/2025/09/728_90-Banner-1-1024x127.png)](https://serveravatar.com/?ref=blog)## How to Prevent 408 Errors in the Future Preventing 408 Request Timeout Errors is far easier than fixing them after they disrupt users. By keeping your server optimized, monitored, and properly configured, you can maintain smooth communication between browsers and your server. - **Use ServerAvatar for reliable hosting and management:** Choosing a stable hosting environment along with a server management platform helps ensure consistent performance and faster request handling. - **Optimize your website speed:** Faster websites respond more quickly to server requests, reducing the chance of timeouts during page loads or script execution. - **Monitor server performance regularly:** With ServerAvatar’s real-time server monitoring, you can track CPU usage, memory consumption, and active connections to catch performance issues before they cause timeout errors. - **Keep server and application software updated:** Regular updates improve stability, security, and efficiency, helping servers process requests without unnecessary delays. - **Avoid overly strict security rules:** Using ServerAvatar’s firewall management, you can maintain strong security while ensuring legitimate traffic isn’t blocked or slowed down. A well-maintained server, supported by ServerAvatar, works like a well-organized things, requests move quickly, resources are balanced, and no one is left waiting too long. ## Conclusion A 408 Request Timeout Error can be frustrating, but it’s usually a temporary issue caused by delays in communication between your browser and the server. In most cases, simple steps like refreshing the page, checking your internet connection, or clearing browser data are enough to fix it. For website owners, maintaining server performance, adjusting timeout settings, and managing security rules properly can significantly reduce the chances of this error. With proactive monitoring and the right server management tools, such as ServerAvatar, you can ensure faster responses, stable connections, and a smoother experience for your visitors. ## FAQs ### **1. What exactly triggers a 408 Request Timeout Error?** A 408 error occurs when a server waits too long for a browser request and ends the connection before it completes. ### **2. Is a 408 Request Timeout Error harmful to my website or data?** This error does not cause data loss or security risks; it only stops an incomplete request. ### **3. Can refreshing the page really fix a 408 error?** In many cases a simple refresh forces a new request and resolves temporary connection delays. ### **4. How can website owners reduce 408 errors long term?** By optimizing server performance, increasing timeout limits when needed, monitoring resources, and reviewing firewall rules regularly. ### **5. Does ServerAvatar help in preventing 408 Request Timeout Errors?** ServerAvatar provides real-time monitoring, server service management, PHP configuration, firewall control, and expert support to keep servers fast, stable, and responsive. **Categories:** Blog, Guide, Tutorials, WordPress **Tags:** 408 Error, 408 Request Timeout Error, Fix 408 Request Timeout, Request Timeout Error, Request Timeout Error Fix, Wordpress --- ### [How to Prevent Website Downtime: Tips and Best Practices](https://serveravatar.com/prevent-website-downtime/) **Published:** January 21, 2026 **Author:** Meghna Meghwani **Content:** [![Blog banner - ServerAvatar](https://serveravatar.com/wp-content/uploads/2025/09/728_90-Banner-3-1024x127.png)](https://serveravatar.com/?ref=blog)Have you ever visited a website only to see a blank screen or an error message staring back at you? Frustrating, right? Now imagine how your visitors feel when your website goes down. To prevent website downtime, businesses must treat uptime as a top priority. Website downtime is like locking the front door of your shop during business hours, customers show up, find it closed, and quietly leave. Some may never return. The good news? Most website downtime is preventable. You don’t need to be a tech wizard or spend a fortune to keep your site running smoothly. With the right habits, tools, and mindset, you can drastically reduce downtime and keep your website available when people need it most. In this guide, I will walk through simple and proven tips to help you prevent website downtime and protect your online presence. ## What Is Website Downtime? Website downtime is the period when your website is unavailable or not working as expected. This could mean the site won’t load, show errors, or respond very slowly. ![Prevent Website Downtime](https://serveravatar.com/wp-content/uploads/2026/01/image-171.png) Downtime can last a few seconds, minutes, or even hours. And yes, even a few minutes can hurt, especially if your site handles sales, leads, or critical information. ## Why Website Downtime Is a Serious Problem Website downtime is more than a technical glitch. When your site goes offline, it directly affects your business performance and the trust people place in your brand. Even short outages can leave a lasting negative impression. When visitors can’t access your website, they don’t usually wait around. Instead, they move on to competitors, and that lost opportunity can be hard to recover. **Key impacts of downtime include** - **Lost visitors and sales:** Users leave immediately when a site doesn’t load, resulting in missed conversions. - **Lower search engine rankings:** Search engines may rank your site lower if it’s frequently unavailable. - **Damaged brand reputation:** Repeated downtime makes your business look unreliable. - **Poor user experience:** Broken pages frustrate users and reduce engagement. - **Reduced customer trust:** Visitors are less likely to return to a site that fails often. Think of your website like a bridge. If it’s closed too often, people will find another route and stop checking if it’s open again. ## Common Causes of Website Downtime To prevent downtime, you first need to understand what causes it. Many website outages happen due to avoidable mistakes or weak infrastructure. ![common cause - Prevent Website Downtime](https://serveravatar.com/wp-content/uploads/2026/01/image-172.png) Most downtime issues are not sudden accidents. They are usually the result of overlooked maintenance, poor planning, or outdated systems. **Most downtime happens due to** - **Poor-quality hosting:** Unreliable servers increase the risk of frequent outages. - **Server overload:** High traffic can crash servers that aren’t properly scaled. - **Software bugs or failed updates:** Broken updates can disrupt website functionality. - **Cyberattacks:** DDoS attacks and malware can take websites offline without warning. - **Expired domains or SSL certificates:** Missed renewals can instantly block site access. - **Human errors:** Small configuration mistakes can cause major disruptions. - **Hardware failures:** Aging or faulty equipment can stop servers from working. The good news is that most of these issues can be prevented with proper planning, regular maintenance, and the right tools in place. ## Fixes for Website Downtime ### Monitor Your Website You can’t fix a problem if you don’t know it exists. Website monitoring helps you stay informed about your site’s health at all times, so issues are caught early instead of after users complain. With monitoring tools in place, you receive alerts the moment something goes wrong, allowing you to act quickly and reduce downtime. **Benefits of website monitoring** - **Instant downtime alerts:** Get notified immediately when your site becomes unavailable. - **Performance insights:** Track loading speed and response times to spot slowdowns early. - **Uptime history reports:** Review past uptime data to identify recurring issues. It’s like having a watchful guard keeping an eye on your website day and night. ### Keep Your Software Updated Outdated software is a hidden risk that often leads to downtime and security breaches. Regular updates keep your website stable, secure, and compatible with modern systems. Updates usually fix bugs and close security gaps, making them essential for smooth website operation. **Always keep these components updated** - **Content management systems:** Prevent core issues and compatibility problems. - **Themes and templates:** Avoid layout breaks and outdated code. - **Plugins and extensions:** Reduce conflicts and security vulnerabilities. - **Server software:** Ensure better performance and stability. Skipping updates is like ignoring car maintenance, eventually, something is bound to fail. ### Use a Content Delivery Network (CDN) A Content Delivery Network, or CDN, helps distribute your website content across multiple locations worldwide. This reduces pressure on your main server and improves availability. Even if one server faces issues, the CDN keeps your website accessible from another location. **How a CDN helps prevent downtime** - **Reduces server load:** Distributes traffic across multiple servers. - **Improves website speed:** Delivers content from the nearest location to users. - **Ensures availability during failures:** Keeps your site online if one server goes down. It’s a smart way to add reliability without extra complexity. ### Optimize Server Performance Slow or overloaded servers are more likely to crash when traffic increases. Performance optimization keeps your server running efficiently and reduces the risk of failure. A well-optimized server handles requests smoothly and stays stable even under pressure. **Simple server optimization steps** - **Remove unused plugins:** Reduce unnecessary resource usage. - **Optimize images:** Improve load times and reduce server strain. - **Use caching:** Serve content faster without repeated processing. - **Clean up databases:** Eliminate clutter that slows down operations. A clean, optimized setup is easier to manage and less likely to break. ### Secure Your Website Against Attacks Cyberattacks are a major cause of sudden and unexpected website downtime. Without proper security, even a small vulnerability can bring your site offline. Strong security measures protect your server and ensure uninterrupted access for users. **Ways to secure your website** - **Use firewalls:** Block unauthorized access to your server. - **Enable SSL certificates:** Encrypt data and improve trust. - **Limit login attempts:** Prevent brute-force attacks. - **Use strong passwords:** Reduce the risk of unauthorized entry. - **Scan for malware regularly:** Detect threats before they cause damage. Security isn’t optional, it’s a core part of uptime protection. ## Take Regular Website Backups No system is perfect, and unexpected issues can still happen. Website backups ensure you can recover quickly without losing important data. With backups in place, downtime becomes a temporary inconvenience rather than a disaster. **Backups help by providing** - **Fast recovery after failure:** Restore your site quickly. - **Minimal data loss:** Protect important content and user data. - **Peace of mind:** Know your site can be restored at any time. Think of backups as insurance, you hope you won’t need them, but they’re priceless when you do. ### Plan for Traffic Spikes Sudden increases in traffic can overwhelm servers that aren’t prepared. Planning ahead ensures your website stays online even during peak demand. Traffic spikes often happen unexpectedly, especially during successful campaigns. **Common causes of traffic spikes include** - **Viral content:** Sudden popularity can drive massive traffic. - **Sales and promotions:** High user activity in a short time. - **Media mentions:** Increased attention from external sources. Using scalable hosting and caching helps absorb these spikes without downtime. ### Reduce Single Points of Failure A single point of failure means one small issue can shut down your entire website. Removing these risks improves reliability and resilience. Redundant systems ensure that one failure doesn’t bring everything to a halt. **Examples of single points of failure** - **One server handling all traffic:** A crash means total downtime. - **One database:** Data access stops if it fails. - **One power source:** Power loss leads to server shutdown. Redundancy keeps your website running even when something goes wrong. ### Perform Routine Maintenance Regular maintenance prevents small issues from turning into serious problems. It keeps your website healthy and running efficiently over time. Routine checks help identify warning signs before they affect uptime. **Important maintenance tasks include** - **Checking error logs:** Spot issues early. - **Testing website features:** Ensure everything works as expected. - **Removing unused files:** Free up server resources. - **Reviewing performance data:** Track changes over time. Always schedule maintenance during low-traffic periods to minimize disruption. ### Create a Downtime Response Plan When downtime occurs, quick action matters. A clear response plan helps teams act calmly and efficiently instead of panicking. Preparation reduces recovery time and limits user impact. **A strong downtime response plan includes** - **Defined roles and responsibilities:** Everyone knows what to do. - **Emergency contact information:** Faster coordination. - **Step-by-step recovery actions:** Clear guidance during outages. - **User communication strategy:** Keep users informed and reassured. A plan turns a stressful situation into a manageable process. ## How ServerAvatar Helps Prevent Website Downtime **What is ServerAvatar?** [ServerAvatar](https://serveravatar.com/) is a platform to simplify the hosting and management of servers and applications. It simplifies the process of deploying and managing PHP and Node.js based web applications on servers. ![ServerAvatar Dashboard](https://serveravatar.com/wp-content/uploads/2026/01/image-173.png) Preventing website downtime is not just about choosing good hosting. It also depends on how well your server is monitored, maintained, and secured on a daily basis. Managing all of this manually can be time-consuming and error-prone, especially as your website grows. ServerAvatar simplifies server management by giving website owners and developers a single dashboard to monitor and control their servers. With better visibility and easier management, potential issues can be detected early, before they turn into downtime. ## Ways ServerAvatar helps reduce website downtime: ### Centralized Server Management ServerAvatar provides a single dashboard to manage all your servers, services, and configurations. This reduces confusion and minimizes mistakes that often lead to unexpected downtime. ![server dashboard - Prevent Website Downtime](https://serveravatar.com/wp-content/uploads/2026/01/image-174-1024x397.png) ### Real-Time Server Monitoring With real-time monitoring, ServerAvatar helps you keep an eye on server load, health, and resource usage. Early detection of issues allows you to fix problems before they impact website availability. ![server monitoring - Prevent Website Downtime](https://serveravatar.com/wp-content/uploads/2026/01/image-175-1024x853.png) ### Optimized Server Setup ServerAvatar optimizes your server during the installation and setup process itself. This ensures essential services, configurations, and system settings are properly tuned, helping your server perform efficiently from day one. ### Performance Optimization Made Easy ServerAvatar simplifies performance management by giving clear insights into server resources. This helps prevent slowdowns and crashes caused by high CPU, memory, or disk usage. ### Firewall and Security Control ServerAvatar allows you to manage firewall rules directly from the panel. Better security control reduces the risk of downtime caused by unauthorized access or malicious attacks. [](https://storage.3.basecamp.com/5840738/blobs/bc710acc-f6a8-11f0-99c4-0242ac120003/download/image.png) ![firewall - Prevent Website Downtime](https://serveravatar.com/wp-content/uploads/2026/01/image-176-1024x330.png) ### SSL Management for Secure Connections ServerAvatar makes it easy to install automatic and custom SSL certificates for your websites. Secure connections not only protect user data but also prevent downtime caused by expired or misconfigured SSL certificates. ![ssl certificate - Prevent Website Downtime](https://serveravatar.com/wp-content/uploads/2026/01/image-177-1024x429.png) ### Backup Management for Quick Recovery ServerAvatar supports easier application, file system, and database backup management. Having reliable backups in place ensures one click, faster recovery, and no data loss if something goes wrong. ![backup - Prevent Website Downtime](https://serveravatar.com/wp-content/uploads/2026/01/image-178-1024x457.png) ### Proactive Issue Detection Through Logs By checking server and application logs, ServerAvatar helps you spot early warning signs. Addressing these signals early prevents small issues from escalating into major outages. ![logs - Prevent Website Downtime](https://serveravatar.com/wp-content/uploads/2026/01/image-179-1024x524.png)### Simplified Server Maintenance Routine server tasks are easier to manage with ServerAvatar’s user-friendly interface. Reduced manual effort lowers the chances of human error that can take websites offline. ### Support for Managed and Self-Managed Servers ServerAvatar supports both managed and self-managed server setups. This flexibility ensures better control and stability regardless of how your server infrastructure is configured. ![create servers - Prevent Website Downtime](https://serveravatar.com/wp-content/uploads/2026/01/image-181-1024x584.png)### Reliable Support When It Matters Most [](https://storage.3.basecamp.com/5840738/blobs/ea269336-f6aa-11f0-823d-0242ac120003/download/image.png) Even with the best setup, unexpected issues can still arise. ServerAvatar’s technical team is available 24/7 and helps you resolveyour issues quickly, reducing the risk of extended downtime. Whether it’s a configuration issue, performance concern, or troubleshooting help, timely guidance ensures problems are addressed before they impact your website’s availability. [![Blog banner - ServerAvatar](https://serveravatar.com/wp-content/uploads/2025/09/728_90-Banner-1-1024x127.png)](https://serveravatar.com/?ref=blog)## Learn from Past Downtime Every downtime incident provides valuable insights. Reviewing past issues helps prevent the same mistakes from happening again. Learning from experience strengthens your website over time. **After resolving downtime, ask** - **What caused the issue?** Identify the root problem. - **How long did it last?** Measure the impact. - **How can it be avoided next time?** Improve future prevention. Documenting lessons learned helps build a more stable and reliable website. ## Conclusion Website downtime can affect more than just your site’s availability, it impacts user trust, search visibility, and overall business growth. While downtime can happen for many reasons, most causes are preventable with proactive monitoring, regular updates, strong security, performance optimization, and proper planning. By combining these best practices with a reliable server management platform like ServerAvatar, managing servers becomes simpler and more efficient, helping you detect issues early and recover faster when problems arise. In the end, a well-maintained and well-monitored server is the key to keeping your website online, reliable, and ready for users at all times. ## FAQs ### **1. What is website downtime and why does it matter?** Website downtime refers to periods when a website is unavailable or not functioning properly. It matters because even short outages can lead to lost visitors, reduced trust, and missed business opportunities. ### **2. What are the most common causes of website downtime?** Common causes include unreliable hosting, server overload, outdated software, cyberattacks, expired SSL certificates, human errors, and hardware failures. ### **3. How can I detect website downtime quickly?** Using website and server monitoring tools helps you receive instant alerts when your site goes down, allowing you to take action before users are affected. ### **4. How does ServerAvatar help prevent website downtime?** ServerAvatar simplifies server management by offering centralized control, real-time monitoring, optimized server setup, security management, backups, log monitoring, and reliable support to address issues early. ### **5. Are backups really necessary if my website is well-maintained?** Even with good maintenance, unexpected issues can still occur. Regular backups ensure fast recovery, minimal data loss, and peace of mind during emergencies. **Categories:** Blog, Guide, Optimisation, Others, Tutorials **Tags:** common causes of website downtime, improve website uptime, prevent website downtime, reduce website downtime, website downtime, website monitoring tools, website uptime best practices --- ### [Best 10 Website Themes for Maximum SEO Results](https://serveravatar.com/best-website-themes-for-seo/) **Published:** January 23, 2026 **Author:** Meghna Meghwani **Content:** [![Blog banner - ServerAvatar](https://serveravatar.com/wp-content/uploads/2025/09/728_90-Banner-3-1024x127.png)](https://serveravatar.com/?ref=blog)Choosing the right website theme plays a major role in how well a website performs in search results. Using one of the best website themes for SEO can significantly improve your site’s visibility, speed, and overall user experience. Many people think SEO is only about keywords and content, but the theme quietly supports everything in the background. A well-designed theme helps search engines understand your pages better and encourages visitors to stay longer on your site. In this article, we will explore the best 10 website themes for maximum SEO results based on structure, performance, and usability. The goal of this article is to help you understand what kind of theme works best for SEO and why it matters. ## What Is WordPress? [WordPress](https://wordpress.org/) is the world’s most popular open-source content management system (CMS), used to build websites, blogs, and e-commerce stores. It offers flexibility through themes and plugins, making it suitable for beginners, developers, and businesses of all sizes. ## How ServerAvatar Simplifies WordPress Deployment & Management **What is ServerAvatar?** [ServerAvatar](https://serveravatar.com/) is a platform to simplify the hosting and management of servers and applications. It simplifies the process of deploying and managing PHP and Node.js based web applications on servers. ![ServerAvatar Dashboard](https://serveravatar.com/wp-content/uploads/2026/01/image-187.png) ServerAvatar makes WordPress and other popular applications, such as Mautic, N8N, UptimeKuma, etc, deployment effortless with its one-click WordPress application installer, allowing you to launch a fully configured WordPress site in minutes. It removes the complexity of server setup by providing an intuitive dashboard to manage servers, applications, databases, PHP versions, SSL, and performance settings from one place. ServerAvatar supports multiple cloud providers and gives users full control over their infrastructure while eliminating the need for deep server administration knowledge. You can refer to the ServerAvatar [documentation](https://serveravatar.com/docs/application/one-click-installer/wordpress/) and the detailed [blog](https://serveravatar.com/install-wordpress-quickly-on-vps/) to [install WordPress](https://serveravatar.com/install-wordpress-apache-ubuntu/) effortlessly. > ServerAvatar does not directly provide WordPress Multisite, but our technical experts can help you set up a WordPress Multisite environment > The ServerAvatar support team is available 24/7 to assist you with any issues or questions you may have. ## Key Benefits of Using ServerAvatar for WordPress - **One-click WordPress installer:** Deploy WordPress instantly without manual configuration. - **Unified management panel:** Manage servers and WordPress applications from a single dashboard. - **Performance optimization:** Easily configure caching, PHP, and server resources. - **Enhanced security:** Includes firewall, SSL management, and secure access controls. - **Easy scalability:** Upgrade server resources as your WordPress site grows. ServerAvatar is an ideal solution for users who want the power of cloud servers without the operational complexity. It simplifies WordPress hosting by automating server setup, streamlining application management, and providing performance and security optimizations out of the box. Whether you’re a developer, agency, or business owner, ServerAvatar allows you to deploy, manage, and scale WordPress websites confidently while focusing on growth instead of infrastructure management. ## Understanding SEO-Friendly Website Themes An SEO-friendly theme is designed to support search engine visibility from the start. It focuses on clean structure, proper heading usage, fast loading speed, and smooth navigation. These elements help search engines crawl and index pages more effectively. Such themes also improve user experience, which indirectly supports better SEO results. When users find it easy to read and interact with your site, search engines consider it a positive signal. [](https://storage.3.basecamp.com/5840738/blobs/c0c98c16-f83d-11f0-84de-0242ac120002/download/image.png) ![seo website themes](https://serveravatar.com/wp-content/uploads/2026/01/image-189.png) ### Minimal Layout SEO Theme A minimal layout theme removes unnecessary design elements and keeps the layout simple and focused. **Key SEO benefits include** - **Faster page loading:** Pages load quickly, which improves user experience and search rankings. - **Clear content hierarchy:** Content is organized logically, making it easier for search engines to understand. - **Better readability:** Clean layouts help users read comfortably and stay longer on the page. ![Minimal layout seo website themes](https://serveravatar.com/wp-content/uploads/2026/01/image-190.png) Minimal themes allow search engines to focus on content instead of being distracted by excessive styling or scripts. ### Lightweight Performance-Focused Theme A lightweight theme is built using optimized code and minimal resources. **Why it helps SEO** - **Improves page speed scores:** Faster websites score better in search engine performance metrics. - **Reduces loading delays:** Quick load times prevent users from leaving the site early. - **Enhances user engagement:** Visitors interact more with content when the site feels smooth and responsive. Search engines prioritize websites that load quickly, making lightweight themes a strong SEO choice. ### Mobile-Optimized Responsive Theme A responsive theme automatically adjusts content layout for different screen sizes. **SEO advantages** - **Supports mobile-first indexing:** The website is optimized for mobile devices, which search engines prioritize. - **Improves usability on smaller screens:** Content remains readable and accessible on all devices. - **Reduces bounce rates:** Users are less likely to leave when the site works well on mobile. Mobile optimization is no longer optional. Themes that perform well on mobile devices have a higher chance of ranking better. ### Content-Driven Website Theme A content-driven theme is designed to highlight text-based information. **Important features include** - **Proper heading structure:** Headings are arranged correctly to guide readers and search engines. - **Comfortable reading width:** Text is displayed in a layout that is easy on the eyes. - **Clear typography:** Fonts are readable, improving content clarity and user comfort. This theme type helps search engines clearly understand the main topic of each page. ### Structured Layout Business Theme A structured layout theme organizes content into logical sections. **SEO-related benefits** - **Improved internal linking:** Pages connect logically, helping search engines crawl the site efficiently. - **Clear page hierarchy:** Important pages are clearly defined and easy to identify. - **Better crawl efficiency:** Search engines can scan and index pages faster. Well-structured themes help search engines identify important pages more easily. ### Schema-Compatible Theme A schema-compatible theme supports structured data implementation. **Why it matters for SEO** - **Helps search engines interpret content:** Structured layouts make page meaning clearer to search engines. - **Improves search result appearance:** Well-structured content can display better in search results. - **Enhances content clarity:** Clear presentation helps both users and search engines understand the topic. Themes that support schema make it easier to communicate page context to search engines. ### Accessibility-Optimized Theme An accessibility-friendly theme ensures that content can be accessed by all users. **SEO benefits include** - **Clean semantic HTML:** Proper HTML elements help search engines read content accurately. - **Better usability signals:** Easy navigation and layout improve user interaction signals. - **Improved trust from search engines:** Clean structure builds credibility over time. Accessible themes often align well with SEO best practices. ### Custom SEO Control Theme A customizable SEO theme allows users to adjust headings, layouts, and metadata easily. **Advantages include** - **Flexible keyword placement:** Keywords can be added naturally in headings and content areas. - **Easy on-page optimization:** SEO elements can be adjusted without technical difficulty. - **Better control over content structure:** Pages can be organized to match SEO goals. ![SEO control website themes](https://serveravatar.com/wp-content/uploads/2026/01/image-191.png) This theme type is ideal for users who want direct influence over SEO elements. ### Media-Optimized Theme A media-optimized theme handles images and visual content efficiently. **SEO-friendly features include** - **Optimized image loading:** Images load efficiently without slowing down the page. - **Support for lazy loading:** Images load only when needed, improving speed. - **Clean markup for media elements:** Media content is structured for better search visibility. Proper media handling improves page speed and overall performance. ## Simple Navigation Theme Navigation plays an important role in SEO. A simple navigation theme keeps menus clear and logical. **SEO advantages** - **Easier content discovery:** Users and search engines find important pages faster. - **Improved internal linking:** Logical links guide visitors across related content. - **Better user flow:** Visitors move smoothly through the site without confusion. Clear navigation helps both users and search engines move through the site smoothly. ### Security-Focused Website Theme A security-oriented theme follows coding standards that reduce vulnerabilities. **Indirect SEO benefits** - **Increased user trust:** A secure and stable site builds confidence among visitors. - **Reduced risk of penalties:** Clean practices help avoid search engine penalties. - **Stable site performance:** Consistent performance supports long-term SEO success. Secure websites are more likely to maintain consistent search visibility. ## Website Themes for Maximum SEO Results Below are ten concept-based website themes designed specifically to support strong SEO performance. These are not real products or brands, but theme styles that focus on structure, speed, and usability. ### 1. Astra [Astra](https://wpastra.com/) is a lightweight and performance-focused website theme designed to keep things fast and flexible. It is built to work smoothly with modern page builders and supports clean website structures that search engines can easily understand. ![Astra - website themes](https://serveravatar.com/wp-content/uploads/2026/01/image-6-1-1024x510.png) **Key Features** - **Lightweight core structure:** Uses minimal resources to keep the site fast. - **Flexible layout settings:** Allows layout changes without affecting performance. - **Mobile-responsive design:** Adjusts automatically to different screen sizes. - **SEO-friendly code structure:** Code is written to support search engine crawling. **Advantages** - **Fast loading speed:** Pages open quickly on all devices. - **Easy customization without complexity:** Changes can be made without technical effort. - **Suitable for multiple website types:** Works well for blogs, business sites, and portfolios. **Disadvantages** - **Advanced features require extra setup:** Some options need additional configuration. - **Design may feel basic without customization:** Default appearance is simple. **Why to Use** Astra is a good choice if you want speed, flexibility, and SEO-friendly performance without unnecessary design weight. ### 2. Divi [Divi](https://www.elegantthemes.com/gallery/divi/) is a design-focused theme that combines visual editing with structured layouts. It allows users to build pages visually while maintaining control over layout and content placement. ![Divi - website themes](https://serveravatar.com/wp-content/uploads/2026/01/image-192-1024x467.png) **Key Features** - **Visual drag-and-drop builder:** Pages can be built visually without coding. - **Custom layout sections:** Sections can be arranged freely. - **Responsive editing controls:** Layout adjusts for different screen sizes. - **Built-in design modules:** Pre-designed elements speed up page creation. **Advantages** - **Strong design flexibility:** Layouts can be customized easily. - **No coding required:** Suitable for non-technical users. - **Good control over page layout:** Content placement is highly adjustable. **Disadvantages** - **Heavier than minimalist themes:** More features can affect speed. - **Requires optimization for best SEO results:** Performance tuning is necessary. **Why to Use** Divi is ideal if you want creative freedom with structured design control and are willing to optimize for performance. ### 3. GeneratePress [GeneratePress](https://generatepress.com/) is built with performance and simplicity at its core. It focuses on clean coding practices and avoids unnecessary features that slow down websites. ![GeneratePress - website themes](https://serveravatar.com/wp-content/uploads/2026/01/image-193-1024x446.png) **Key Features** - **Extremely lightweight framework:** Designed for maximum speed. - **Clean HTML structure:** Code is simple and search-engine friendly. - **Mobile-first approach:** Built primarily for mobile performance. - **Compatibility with SEO plugins:** Works well with optimization tools. **Advantages** - **Excellent loading speed:** Pages load very quickly. - **Strong SEO foundation:** Supports long-term search visibility. - **Stable and reliable structure:** Consistent performance over time. **Disadvantages** - **Limited design options by default:** Minimal styling out of the box. - **Requires customization for visual appeal:** Design enhancements must be added. **Why to Use** Use GeneratePress if your priority is speed, clean structure, and long-term SEO stability. ### 4. Neve [Neve](https://themeisle.com/themes/neve/) is designed for fast performance and modern layouts. It adapts well to different screen sizes and supports flexible content placement. ![Neve - website themes](https://serveravatar.com/wp-content/uploads/2026/01/image-195-1024x492.png) **Key Features** - **Mobile-first design:** Optimized for mobile users from the start. - **Lightweight framework:** Keeps performance high. - **Custom header and footer layouts:** Allows layout personalization. - **SEO-ready structure:** Built to support search engine visibility. **Advantages** - **Fast loading on all devices:** Performs well across screens. - **Easy to use for beginners:** Simple setup and controls. - **Clean content organization:** Content remains structured and readable. **Disadvantages** - **Advanced customization requires learning:** Some features need practice. - **Limited default styling:** Design may appear simple initially. **Why to Use** Neve works well for users who want a modern design with speed and SEO compatibility. ### 5. Hello Elementor [Hello Elementor](https://wordpress.org/themes/hello-elementor/) is a minimal theme created to work primarily with page builders. It removes unnecessary styling so users can build layouts freely. ![Hello Elementor - website themes](https://serveravatar.com/wp-content/uploads/2026/01/image-196-1024x487.png) **Key Features** - **Ultra-minimal design:** Removes unnecessary styling. - **Optimized for page builder usage:** Works best with builders. - **Fast loading framework:** Minimal code ensures speed. - **Clean code base:** Simple structure for SEO. **Advantages** - **Very lightweight:** Loads extremely fast. - **Full design freedom:** Layouts can be built from scratch. - **Strong performance foundation:** Ideal for custom builds. **Disadvantages** - **Not suitable without a page builder:** Requires external tools. - **No built-in styling:** Design must be created manually. **Why to Use** Choose Hello Elementor if you want **complete design control and maximum performance** using a builder. ### 6. Kadence WP [Kadence WP](https://www.kadencewp.com/) is a flexible and performance-oriented theme designed to balance speed, visual design, and usability. It focuses on offering powerful customization options without sacrificing fast load times or SEO compatibility. ![Kadence WP - website themes](https://serveravatar.com/wp-content/uploads/2026/01/image-197.png) **Key Features** - **Modular design system:** Lets you enable only the features you need to keep things light. - **Responsive layout controls:** Adjust how content appears on different screen sizes. - **Header and footer builder:** Customize key layout areas with ease. - **SEO-friendly structure:** Clean code and logical elements help search engines crawl your site. **Advantages** - **Fast performance:** Efficient coding ensures quick page loading. - **Flexible design options:** Allows deep customization without heavy plugins. - **Responsive and adaptive:** Works well on desktops, tablets, and phones. **Disadvantages** - **Many options can feel overwhelming:** Beginners might need time to learn. - **Dependence on additional plugins for advanced features:** Some enhancements require extensions. **Why to Use** Use Kadence WP if you want a theme that supports strong SEO fundamentals while still offering flexible design options and a user-friendly layout experience. ### 7. OceanWP [OceanWP](https://oceanwp.org/) is a multi-purpose website theme that focuses on providing balanced performance and feature richness. It is designed to work with popular page builders and offers a variety of layout and style choices while maintaining good SEO potential. [](https://storage.3.basecamp.com/5840738/blobs/fef5f740-f82e-11f0-8325-0242ac120003/download/image.png) ![OceanWP - website themes](https://serveravatar.com/wp-content/uploads/2026/01/image-198-1024x346.png) **Key Features** - **Built-in layout options:** Choose different content widths, sidebars, and sections. - **Responsive design:** Ensures the site adapts smoothly to all device sizes. - **Custom widget areas:** Add extra functionality to key parts of the layout. - **SEO-ready codebase:** Clean and organized code supports search engine indexing. **Advantages** - **Wide range of design options:** Suitable for different site goals. - **Good compatibility with plugins and builders:** Offers flexibility without conflict. - **Balanced performance and features:** Designed to be both useful and efficient. **Disadvantages** - **Extra features can add complexity:** May slow performance if not optimized. - **Some settings require learning time:** Beginners may need practice to master all options. **Why to Use** OceanWP is ideal for users who want versatile design choices along with solid SEO foundation, especially when building sites with page builders or varied content layouts. [![Blog banner - ServerAvatar](https://serveravatar.com/wp-content/uploads/2025/09/728_90-Banner-1-1024x127.png)](https://serveravatar.com/?ref=blog)### 8. Sydney [Sydney](https://wordpress.org/themes/sydney/) is a business-oriented theme designed around clear sections and straightforward layouts. It focuses on presenting information in a clean and organized way. ![Sydmey - website themes](https://serveravatar.com/wp-content/uploads/2026/01/image-200-1024x485.png) **Key Features** - **Full-width layout options:** Content spans the screen. - **Customizable sections:** Flexible content blocks. - **Responsive structure:** Adapts to screen sizes. - **SEO-friendly headings:** Proper heading usage. **Advantages** - **Easy navigation:** Users find content quickly. - **Clear information flow:** Content is easy to understand. - **Suitable for business websites:** Professional layout. **Disadvantages** - **Limited creative layout flexibility:** Basic structure. - **Basic design elements:** Minimal visual styling. **Why to Use** Sydney is a good option for simple, structured, and business-focused websites. ### 9. Schema [Schema](https://wordpress.org/themes/the-schema/) is built with search visibility in mind. It focuses on structured data, clean markup, and fast performance. ![Schema - website themes](https://serveravatar.com/wp-content/uploads/2026/01/image-202-1024x485.png) **Key Features** - **Schema-ready structure:** Supports structured data. - **Clean semantic HTML:** Easy for search engines to read. - **Fast loading framework:** Optimized performance. - **SEO-focused layout:** Built for visibility. **Advantages** - **Helps search engines understand content:** Improves indexing. - **Strong technical SEO support:** Ideal for optimization. - **Lightweight and efficient:** Fast and stable. **Disadvantages** - **Design options are limited:** Focuses more on SEO. - **More SEO-focused than design-focused:** Minimal visuals. **Why to Use** Use Schema if your main goal is technical SEO and search engine clarity. ### 10. Blocksy [Blocksy](https://creativethemes.com/blocksy/) is a modern theme designed around block-based content creation. It provides flexibility while keeping performance and structure balanced. ![Blocksy - website themes](https://serveravatar.com/wp-content/uploads/2026/01/image-203-1024x599.png) **Key Features** - **Block editor compatibility:** Designed for block-based editing. - **Flexible layout controls:** Easy layout adjustments. - **Responsive design system:** Works across devices. - **Performance-optimized framework:** Balanced speed and design. **Advantages** - **Modern editing experience:** Easy content creation. - **Good balance of speed and design:** Performs well visually. - **Easy layout adjustments:** User-friendly controls. **Disadvantages** - **Requires familiarity with blocks:** Learning curve for beginners. - **Too many options for beginners:** Can feel overwhelming. **Why to Use** Blocksy is ideal if you want modern layouts with structured SEO-friendly performance. ## How to Select the Best SEO Theme **When choosing an SEO-friendly theme, focus on** - **Speed and performance:** Faster sites rank better. - **Mobile responsiveness:** Mobile usability is essential. - **Content clarity:** Clear content improves rankings. - **Customization options:** Flexibility helps SEO growth. Avoid choosing a theme solely based on appearance. Functionality and structure are more important for SEO. ## Theme Design Mistakes That Affect SEO Common mistakes include: - **Overloaded scripts:** Slow down the website. - **Poor mobile optimization:** Hurts mobile rankings. - **Incorrect heading usage:** Confuses search engines. - **Complex navigation:** Makes content hard to find. These issues can negatively impact crawling and indexing. ## Long-Term SEO-Friendly Theme Approach A long-term SEO-friendly theme is flexible and scalable. **Key characteristics:** - **Clean code structure:** Supports efficient crawling. - **Regular compatibility with updates:** Ensures long-term stability. - **Adaptable layout design:** Allows future SEO improvements. Such themes support sustainable SEO growth over time. ## Conclusion Choosing the right SEO-friendly WordPress theme is a foundational step toward building a website that performs well in search engines and delivers a strong user experience. A well-structured theme supports fast loading speeds, clear content hierarchy, mobile responsiveness, and clean code, all of which help search engines crawl, understand, and rank your content more effectively. When combined with reliable hosting and simplified management through platforms like ServerAvatar, the right theme enables long-term SEO stability, scalability, and performance. Instead of focusing only on visual appeal, prioritizing structure, usability, and performance ensures your website is prepared for sustainable search visibility and future growth. ## FAQs ### 1. Why does a WordPress theme matter for SEO? A WordPress theme controls code structure, page speed, mobile responsiveness, and content layout, all of which directly and indirectly influence how search engines rank a website. ### 2. Can a fast theme improve search rankings? Faster-loading themes improve page speed scores, reduce bounce rates, and enhance user experience, which are important signals for search engines. ### 3. Are lightweight themes better for SEO? Lightweight themes usually perform better because they use fewer scripts and resources, making pages load faster and easier for search engines to crawl. ### 4. Is design flexibility important for SEO? Design flexibility helps SEO by allowing proper heading placement, content structuring, and internal linking without technical limitations. ### 5. How does ServerAvatar support SEO-friendly WordPress websites? ServerAvatar improves SEO by offering optimized server performance, easy WordPress deployment, SSL management, caching configuration, and scalable infrastructure. **Categories:** Blog, Guide, Optimisation, Others, Tutorials, WordPress **Tags:** Best website themes for SEO, SEO friendly website themes, SEO optimized website themes, Top website themes for SEO, website themes, Wordpress --- ### [How to speed up a WordPress website: 12 performance optimization methods](https://serveravatar.com/speed-up-a-wordpress-website-performance/) **Published:** January 26, 2026 **Author:** Meghna Meghwani **Content:** [![Blog banner - ServerAvatar](https://serveravatar.com/wp-content/uploads/2025/09/728_90-Banner-3-1024x127.png)](https://serveravatar.com/?ref=blog)Website speed plays a major role in how a WordPress site performs. If you want to speed up a WordPress website, improving page load time is one of the most effective ways to keep visitors engaged and improve search engine rankings. When pages load slowly, users often lose interest, and search engines may reduce visibility. A fast-loading website feels smoother, more responsive, and easier to navigate. This guide explains how to speed up a WordPress website using clear, practical methods. The steps shared here are easy to follow, suitable for beginners, and focused purely on performance improvements without technical complexity. ## What Is WordPress? [WordPress](https://wordpress.org/) is the world’s most popular open-source content management system (CMS), used to build websites, blogs, and e-commerce stores. It offers flexibility through themes and plugins, making it suitable for beginners, developers, and businesses of all sizes. ## How ServerAvatar Simplifies WordPress Deployment & Management **What is ServerAvatar?** [ServerAvatar](https://serveravatar.com/) is a platform to simplify the hosting and management of servers and applications. It simplifies the process of deploying and managing PHP and Node.js based web applications on servers. ![ServerAvatar dashboard - WordPress website](https://serveravatar.com/wp-content/uploads/2026/01/image-209.png) ServerAvatar makes WordPress and other popular applications, such as Mautic, N8N, UptimeKuma, etc, deployment effortless with its one-click WordPress application installer, allowing you to launch a fully configured WordPress site in minutes. It removes the complexity of server setup by providing an intuitive dashboard to manage servers, applications, databases, PHP versions, SSL, and performance settings from one place. ServerAvatar supports multiple cloud providers and gives users full control over their infrastructure while eliminating the need for deep server administration knowledge. You can refer to the ServerAvatar [documentation](https://serveravatar.com/docs/application/one-click-installer/wordpress/) and the detailed [blog](https://serveravatar.com/install-wordpress-quickly-on-vps/) to [install WordPress](https://serveravatar.com/install-wordpress-apache-ubuntu/) effortlessly. > ServerAvatar does not directly provide WordPress Multisite, but our technical experts can help you set up a WordPress Multisite environment > The ServerAvatar support team is available 24/7 to assist you with any issues or questions you may have. ### Key Benefits of Using ServerAvatar for WordPress - **One-click WordPress installer:** Deploy WordPress instantly without manual configuration. - **Unified management panel:** Manage servers and WordPress applications from a single dashboard. - **Performance optimization:** Easily configure services, PHP, and server resources. - **Redis caching support:** ServerAvatar comes with built-in Redis integration that helps speed up WordPress by storing frequently accessed data in memory. - **Enhanced security:** Includes firewall, SSL management, and secure access controls. - **Easy scalability:** Upgrade server resources as your WordPress site grows. ServerAvatar is an ideal solution for users who want the power of cloud servers without the operational complexity. It simplifies WordPress hosting by automating server setup, streamlining application management, and providing performance and security optimizations out of the box. Whether you’re a developer, agency, or business owner, ServerAvatar allows you to deploy, manage, and scale WordPress websites confidently while focusing on growth instead of infrastructure management. ## What Website Speed Means for WordPress Website speed refers to how quickly a page loads and becomes usable. In WordPress, speed is affected by hosting, themes, plugins, media files, and code structure. A faster website improves navigation, reduces page abandonment, and supports better visibility in search engines. Speed optimization is not optional; it is a core requirement for a well-performing WordPress website. ## How to Measure WordPress Performance Before making changes, it is important to understand current performance levels. Speed testing tools provide insights such as loading time, page size, and improvement areas. ![measure WordPress website performance](https://serveravatar.com/wp-content/uploads/2026/01/image-210.png) **Key performance indicators include:** - **Page load time:** Shows how quickly a page becomes fully usable. - **Performance score:** Gives an overall speed rating based on best practices. - **Resource usage:** Indicates how much server and browser resources are used. These metrics help identify areas that need optimization. ## Method to speed up a WordPress website ### 1. Choose a Reliable Hosting Provider Server performance plays a critical role in how fast a WordPress website loads. Poorly configured servers often limit resources, leading to slower response times and inconsistent performance. Managing these configurations manually can be complex and time-consuming. **ServerAvatar helps simplify server-level performance management by offering:** - **Optimized server configurations:** Ensures WordPress and other applications runs on well-tuned servers without manual setup. - **Efficient resource management:** Helps manage CPU, memory, and storage effectively for better performance. - **Improved server response times:** Reduces delays when handling website requests. - **Stable and monitored uptime:** Maintains consistent availability through server health monitoring. Using a platform like ServerAvatar provides a structured approach to managing server performance, creating a strong technical foundation for WordPress speed optimization. ### 2. Use a Fast and Lightweight Theme Themes define the structure and appearance of a WordPress site. Heavy themes often include unnecessary code that slows down performance. **When selecting a theme:** - **Prefer minimal design structures:** Reduces extra code and load time. - **Avoid excessive built-in scripts:** Prevents unnecessary processing. - **Choose themes optimized for speed:** Ensures faster page rendering. A lightweight theme reduces code execution and improves performance. ### 3. Keep WordPress Core Updated Regular update improve website performance, fixes bugs, and strengthen the website security. Running outdated versions can negatively impact website speed. **Always update:** - **WordPress core:** Keeps the platform efficient and secure. - **Installed themes:** Prevents compatibility and speed issues. - **Active plugins:** Ensures smooth and optimized functionality. Running outdated software can negatively affect speed and stability. ### 4. Optimize Images for Faster Loading Images usually take up the most space on a webpage. Unoptimized images slow down page loading and increase resource usage. **Image optimization includes:** - **Resizing images before upload:** Prevents oversized files. - **Compressing files without quality loss:** Reduces file size efficiently. - **Using modern image formats:** Improves loading speed and performance. Optimized images significantly reduce load time. ### 5. Enable Page Caching Caching stores static versions of pages so they load faster for visitors. This reduces repeated processing on the server. **Caching benefits include:** - **Faster page delivery:** Displays pages more quickly. - **Reduced server processing:** Lowers server workload. - **Improved overall performance:** Enhances website responsiveness. Caching is one of the most effective WordPress optimization techniques. ### 6. Reduce the Number of Plugins Each plugin adds scripts and processes that can slow down a website. Too many plugins increase loading time and complexity. **Best practices for plugins:** - **Remove inactive plugins:** Eliminates unnecessary resource usage. - **Avoid overlapping features:** Prevents duplicate functionality. - **Use performance-optimized plugins:** Maintains speed and stability. Fewer plugins result in better performance and easier maintenance. ### 7. Activate GZIP Compression GZIP compression reduces the size of files sent from the server to the browser, improving load speed. **Advantages of GZIP compression:** - **Faster file transfer:** Loads content more quickly. - **Lower bandwidth usage:** Reduces data transfer size. - **Improved loading speed:** Enhances overall performance. This method enhances performance without affecting content quality. ### 8. Use a Content Delivery Network (CDN) A CDN delivers website content from multiple servers, improving loading efficiency. **CDN benefits include:** - **Faster content delivery:** Reduces content loading delays. - **Reduced server load:** Distributes traffic efficiently. - **Improved performance consistency:** Maintains stable speed. Using a CDN helps maintain speed across different locations. ### 9. Optimize the WordPress Database Databases collect unnecessary data over time, which can affect performance. Cleaning them improves backend efficiency. **Database optimization involves:** - **Removing unused data:** Clears unnecessary records. - **Cleaning old revisions:** Reduces database size. - **Optimizing database tables:** Improves query performance. A clean database processes requests faster and improves backend efficiency. ### 10. Minify CSS, JavaScript, and HTML Minification removes extra characters from code files without affecting functionality. **Benefits of minification:** - **Smaller file sizes:** Reduces page weight. - **Faster loading:** Improves page speed. - **Improved performance:** Enhances browser efficiency. This process reduces the amount of data browsers need to load. ### 11. Reduce External Resource Requests External resources add extra loading requests from third-party sources, which can slow down pages. **Reducing external requests helps by:** - **Lowering page load time:** Fewer external calls improve speed. - **Reducing dependency on third-party servers:** Increases reliability. - **Improving stability:** Ensures consistent performance. Only essential external resources should be used. ### 12. Enable Lazy Loading for Media Lazy loading delays media loading until it is required, improving initial page speed. **Lazy loading advantages:** - **Faster initial page load:** Loads essential content first. - **Reduced data usage:** Avoids unnecessary loading. - **Better performance on long pages:** Improves overall efficiency. This feature improves loading efficiency without removing content. [![Blog banner - ServerAvatar](https://serveravatar.com/wp-content/uploads/2025/09/728_90-Banner-1-1024x127.png)](https://serveravatar.com/?ref=blog)## Track Performance Consistently Performance optimization requires regular monitoring to maintain speed improvements. **Ongoing tracking helps to:** - **Detect speed issues early:** Identifies problems quickly. - **Maintain consistent performance:** Keeps the website optimized. - **Ensure updates do not reduce speed:** Prevents performance drops. Regular checks keep a WordPress website optimized over time. ## Tips for Maintaining WordPress Speed Speed optimization is not a one-time task. As your WordPress website grows with new content, plugins, and users, performance needs regular attention. Periodically reviewing themes, plugins, media files, and server settings helps prevent slowdowns before they impact visitors. Keeping things simple, updated, and well-monitored goes a long way in maintaining long-term performance. ## Best Practices to Follow Going Forward To keep your WordPress website consistently fast: - Monitor performance after every major update - Avoid adding unnecessary plugins or features - Optimize media and database regularly - Choose reliable tools and platforms that simplify performance management Following these best practices ensures your website remains responsive and scalable over time. ## Conclusion Speed optimization is essential for maintaining a high-performing WordPress website. By focusing on server efficiency, optimized themes, clean code, media optimization, caching, and regular performance monitoring, website owners can achieve faster load times and improved stability. Using a structured platform like ServerAvatar further simplifies server and application management, making it easier to maintain consistent performance while allowing users to focus on content and growth rather than infrastructure complexity. ## FAQs ### 1. Can WordPress speed optimization be done without technical expertise? Many optimization methods such as caching, image optimization, and theme selection can be implemented without deep technical knowledge, especially when using managed platforms. ### 2. How does server performance impact WordPress speed? Server performance determines how quickly requests are processed. Well-optimized servers reduce response times and provide a stable foundation for WordPress performance. ### 3. How often should WordPress performance be monitored? Performance should be checked regularly, especially after updates, plugin changes, or content additions, to ensure speed and stability are maintained. ### 4. Does using a platform like ServerAvatar help with WordPress performance? ServerAvatar helps manage server configurations, resources, and performance settings, making it easier to maintain a fast and optimized WordPress environment. ### 5. Does optimizing WordPress speed help with scalability? A well-optimized WordPress website uses server resources more efficiently, which makes it easier to handle increased traffic and scale smoothly as the website grows. **Categories:** Blog, Guide, Tutorials, WordPress **Tags:** Improve WordPress Performance, speed up wordpress, Website speed optimization, Wordpress, WordPress optimization guide, WordPress performance tips, WordPress speed optimization --- ### [How to Secure Your WordPress Site: Essential Protection Tips](https://serveravatar.com/secure-wordpress-site-essential-protection-tips/) **Published:** January 28, 2026 **Author:** Meghna Meghwani **Content:** [![Blog banner - ServerAvatar](https://serveravatar.com/wp-content/uploads/2025/09/728_90-Banner-3-1024x127.png)](https://serveravatar.com/?ref=blog)WordPress is powerful, flexible, and easy to use, which is exactly why it is widely targeted by automated attacks. Learning how to secure a WordPress site is essential, as security issues often arise not because WordPress is unsafe, but because critical protection steps are skipped or delayed. A secure website is not built overnight; it is the result of consistent actions, proper configuration, and regular maintenance. This guide explains essential WordPress security tips in clear and simple language. Each step is practical, easy to understand, and focused on prevention. No technical background is required. The goal is to help you strengthen your WordPress site in a structured and reliable way. ## What Is WordPress? [WordPress](https://wordpress.org/) is the world’s most popular open-source content management system (CMS), used to build websites, blogs, and e-commerce stores. It offers flexibility through themes and plugins, making it suitable for beginners, developers, and businesses of all sizes. ## How ServerAvatar Simplifies WordPress Deployment & Management **What is ServerAvatar?** [ServerAvatar](https://serveravatar.com/) is a platform to simplify the hosting and management of servers and applications. It simplifies the process of deploying and managing PHP and Node.js based web applications on servers. ![ServerAvatar Dashboard](https://serveravatar.com/wp-content/uploads/2026/01/image-218.png) ServerAvatar makes WordPress and other popular applications, such as Mautic, N8N, UptimeKuma, etc, deployment effortless with its one-click WordPress application installer, allowing you to launch a fully configured WordPress site in minutes. It removes the complexity of server setup by providing an intuitive dashboard to manage servers, applications, databases, PHP versions, SSL, and performance settings from one place. ServerAvatar supports multiple cloud providers and gives users full control over their infrastructure while eliminating the need for deep server administration knowledge. You can refer to the ServerAvatar [documentation](https://serveravatar.com/docs/application/one-click-installer/wordpress/) and the detailed [blog](https://serveravatar.com/install-wordpress-quickly-on-vps/) to [install WordPress](https://serveravatar.com/install-wordpress-apache-ubuntu/) effortlessly. > ServerAvatar does not directly provide WordPress Multisite, but our technical experts can help you set up a WordPress Multisite environment > The ServerAvatar support team is available 24/7 to assist you with any issues or questions you may have. ### Key Benefits of Using ServerAvatar for WordPress - **One-click WordPress installer:** Deploy WordPress instantly without manual configuration. - **Unified management panel:** Manage servers and WordPress applications from a single dashboard. - **Performance optimization:** Easily configure services, PHP, and server resources. - **Redis caching support:** ServerAvatar comes with built-in Redis integration that helps speed up WordPress by storing frequently accessed data in memory. - **Enhanced security:** Includes firewall, SSL management, and secure access controls. - **Easy scalability:** Upgrade server resources as your WordPress site grows. ServerAvatar is an ideal solution for users who want the power of cloud servers without the operational complexity. It simplifies WordPress hosting by automating server setup, streamlining application management, and providing performance and security optimizations out of the box. Whether you’re a developer, agency, or business owner, ServerAvatar allows you to deploy, manage, and scale WordPress websites confidently while focusing on growth instead of infrastructure management. ## Importance of WordPress Security WordPress security focuses on reducing vulnerabilities that can be exploited by automated scripts or unauthorized users. A secure site ensures data integrity, consistent availability, and long-term performance. Ignoring security can lead to downtime, data loss, or access issues. ![WordPress site security](https://serveravatar.com/wp-content/uploads/2026/01/image-219.png) ## Why WordPress security matters? Before applying any protection methods, it is important to understand why WordPress security matters in the first place. WordPress websites store sensitive information such as login credentials, user data, content files, and configuration settings. If security is weak, these elements can be accessed, modified, or disrupted without authorization. Security is not only about preventing attacks, it is also about maintaining stability, performance, and trust. A secure WordPress site runs smoothly, avoids unexpected downtime, and ensures that only authorized users can make changes. Even small security gaps can grow into larger issues if left unattended. Understanding the importance of WordPress security helps in making better decisions while configuring updates, access controls, plugins, and server settings. Once this foundation is clear, the protection methods discussed in the following sections become easier to apply and more effective. ## Some Essential Protection Tips Let’s check out the below-mentioned protection methods to safeguard your site and ensure stability and performance. ### 1. Keep WordPress Core Updated Keeping the WordPress core updated is essential for maintaining site security and stability. Core updates often include fixes for known vulnerabilities and improvements to existing security mechanisms. ![wordpress dashboard - WordPress site](https://serveravatar.com/wp-content/uploads/2026/01/image-220-1024x516.png) - **Enable automatic updates where possible:** Allows security patches to be applied without manual intervention. - **Update immediately after stable releases:** Reduces exposure to publicly known security issues. - **Always verify compatibility:** Ensures updates do not conflict with themes or plugins. ### 2. Use Updated and Trusted Themes Themes control both visual layout and underlying functionality, which makes them a critical security component. Using outdated or unreliable themes can introduce exploitable weaknesses. - **Use themes from trusted sources:** Ensures code quality and regular maintenance. - **Avoid unofficial or modified versions:** Prevents hidden malicious code from being introduced. - **Update themes regularly:** Keeps theme files aligned with current security standards. ### 3. Maintain Plugin Security Plugins extend WordPress functionality but also increase the potential attack surface. Careful selection and maintenance of plugins are essential for security. - **Install only necessary plugins:** Reduces unnecessary exposure to vulnerabilities. - **Keep plugins updated:** Applies security patches and bug fixes promptly. - **Remove plugins with poor maintenance history:** Eliminates risks from unsupported software. ### 4. Remove Unused Themes and Plugins Inactive themes and plugins remain part of the file system and can still be targeted. Removing unused components helps minimize security risks. - **Delete unused plugins completely:** Prevents inactive code from being exploited. - **Keep minimal themes installed:** Limits unnecessary files and potential entry points. - **Reduce unnecessary files:** Improves overall site security and cleanliness. ### 5. Choose a Secure Hosting Environment The hosting environment plays a foundational role in WordPress security. Server-level protections help prevent many threats before they reach the application. - **Use servers with active monitoring:** Detects suspicious activity at an early stage. - **Ensure isolation between accounts:** Prevents cross-account security issues. - **Verify server-level security features:** Confirms protection against common server threats. With ServerAvatar, choosing a secure hosting environment is effortless. All servers are actively monitored, secured, and isolated to prevent cross-account interference. Users can deploy applications on trusted cloud providers, while ServerAvatar handles server hardening and security settings automatically. This ensures your WordPress site is hosted on a secure, high-performance server from the start. ![ServerAvatar dashboard - WordPress site](https://serveravatar.com/wp-content/uploads/2026/01/image-221-1024x374.png) - **Active server monitoring:** ServerAvatar continuously checks server health and detects suspicious activity. - **Account isolation:** Each servers and applications are securely separated to prevent vulnerabilities from affecting other accounts. - **Server-level security:** Built-in firewall, SSH access controls, and pre-configured security settings protect your site. ### 6. Enable SSL and HTTPS SSL encryption protects data exchanged between the site and users. HTTPS is a standard requirement for secure communication. - **Enable HTTPS across the site:** Ensures all data transfers are encrypted. - **Redirect all traffic to HTTPS:** Prevents unencrypted access points. - **Avoid mixed-content issues:** Maintains consistent encryption across all resources. ServerAvatar simplifies SSL installation and renewals, allowing you to enable HTTPS for your sites with just a few clicks. It provides automatic SSL with auto-renewals and custom SSL installation options, it can be issued automatically and renewed seamlessly, ensuring secure, encrypted connections without manual configuration. ![ssl certificate - WordPress site](https://serveravatar.com/wp-content/uploads/2026/01/image-222-1024x423.png) - **One-click SSL installation:** Apply automatic SSL certificates to your WordPress site instantly with auto-renewals. - **HTTPS redirection:** Ensures all traffic is encrypted by default. ### 7. Use Strong Login Credentials Login credentials are a primary target for automated attacks. Strong credentials reduce the likelihood of unauthorized access. ![user profile - WordPress site](https://serveravatar.com/wp-content/uploads/2026/01/image-223-1024x618.png) - **Long passwords:** Increase resistance to brute-force attempts. - **Unique combinations:** Prevent reuse across multiple platforms. - **Regular updates:** Limits risk from compromised credentials. ### 8. Avoid Default Admin Usernames Default usernames are widely known and frequently targeted. Custom usernames add an extra layer of protection. - **Use custom admin usernames:** Makes login attempts less predictable. - **Assign appropriate roles:** Limits access based on user responsibility. - **Remove unnecessary admin accounts:** Reduces high-level access points. ![users - WordPress site](https://serveravatar.com/wp-content/uploads/2026/01/image-224-1024x232.png) ### 9. Limit Login Attempts Unlimited login attempts allow repeated credential guessing. Limiting attempts helps stop automated attacks. - **Set login attempt limits:** Restricts the number of failed attempts. - **Temporarily block repeated failures:** Prevents continuous attack attempts. - **Log suspicious activity:** Helps identify unauthorized access patterns. ### 10. Enable Two-Factor Authentication Two-factor authentication adds an extra verification step beyond passwords. This significantly strengthens account security. - **Enable for all admin users:** Protects accounts with elevated privileges. - **Use app-based authentication:** Provides secure and time-based verification. - **Combine with strong passwords:** Enhances overall login protection. ### 11. Use a Reliable Security Plugin A well-maintained security plugin provides centralized protection features. Using one reliable plugin avoids conflicts and complexity. [](https://storage.3.basecamp.com/5840738/blobs/65e69956-fc2a-11f0-bdc0-0242ac120003/download/image.png) ![plugins - WordPress site](https://serveravatar.com/wp-content/uploads/2026/01/image-226-1024x489.png) - **Malware scanning:** Detects malicious files and code changes. - **Login protection:** Adds safeguards against unauthorized access. - **Firewall integration:** Blocks harmful traffic before it reaches the site. ### 12. Secure wp-admin and wp-login Administrative access points are common attack targets. Extra protection helps restrict unauthorized entry. - **Restrict access where possible:** Limits access to trusted users or locations. - **Use CAPTCHA or verification:** Reduces automated login attempts. - **Monitor login activity:** Tracks access behavior for anomalies. ### 13. Set Correct File Permissions File permissions control who can read, write, or modify files. Incorrect permissions can allow unauthorized changes. - **Follow recommended permission values:** Ensures proper access control. - **Restrict write access:** Prevents unauthorized file modifications. - **Review permissions regularly:** Maintains secure configurations over time. ServerAvatar helps maintain proper file permissions without requiring advanced server knowledge. Addiionally, you can manage file permissions by navigating to the File Manager directly from the dashboard, reducing the risk of unauthorized modifications or malicious code injections. ![File manager - WordPress site](https://serveravatar.com/wp-content/uploads/2026/01/image-227-1024x439.png)### 14. Disable File Editing WordPress allows file editing through the dashboard by default. Disabling this feature limits potential misuse. - **Disable theme and plugin editing:** Prevents direct code changes. - **Reduce risk of code injection:** Blocks unauthorized script insertion. - **Improve overall control:** Centralizes code management practices. ### 15. Schedule Regular Backups Backups are essential for data recovery and continuity. Regular backups ensure minimal data loss during issues. - **Automate backup schedules:** Ensures consistent data protection. - **Store backups securely:** Prevents unauthorized access to backup files. - **Verify backup integrity:** Confirms backups are usable when needed. ServerAvatar makes a website’s backups simple and reliable. You can take an instant backup and schedule automated backups for your entire applications, including databases and website files, ensuring data can be restored quickly in case of any issues. - **Automated backups:** Set up daily, weekly, or custom backup schedules. - **Secure storage:** Store backups safely on your integrated storage or directly on ServerAvatar storage. - **Easy Restore:** Easily restore backups with a one click. ![Backup - WordPress site](https://serveravatar.com/wp-content/uploads/2026/01/image-228-1024x461.png) ### 16. Perform Malware Scans Malware can remain hidden without detection. Regular scans help identify issues early. - **Run scheduled scans:** Maintains continuous monitoring. - **Enable alert notifications:** Provides immediate awareness of threats. - **Clean infected files promptly:** Restores site integrity quickly. ### 17. Use a Web Application Firewall A web application firewall filters traffic before it reaches WordPress. This helps prevent many common attacks. - **Block suspicious requests:** Stops malicious traffic patterns. - **Reduce server load:** Filters unnecessary requests efficiently. - **Prevent common exploits:** Protects against known attack methods. ServerAvatar provides built-in web application firewall to protect your sites from malicious traffic. - **Traffic filtering:** Blocks suspicious requests and prevents attacks in real-time. - **Protection against common exploits:** Shields WordPress from SQL injections, XSS, and other attacks. ![8G firewall - WordPress site](https://serveravatar.com/wp-content/uploads/2026/01/image-229-1024x383.png) ### 18. Secure the WordPress Database The database stores sensitive site information. Proper protection ensures data confidentiality and integrity. - **Use strong database passwords:** Prevents unauthorized database access. - **Change default table prefixes:** Reduces automated targeting. - **Limit database user permissions:** Restricts access to necessary actions only. ### 19. Change the Default Login URL Changing the login URL reduces exposure to automated attacks. It adds an extra layer of obscurity. - **Use a custom login path:** Makes login pages harder to locate. - **Keep it private:** Prevents unnecessary exposure. - **Combine with login protection:** Strengthens overall access security. ### 20. Monitor User Activity Monitoring user actions helps maintain accountability and control. It is especially important for multi-user sites. - **Log login and logout events:** Tracks access behavior. - **Monitor changes to content:** Identifies unauthorized modifications. - **Remove inactive users:** Reduces unused access points. ### 21. Use Secure File Transfer Methods File transfer methods affect how credentials and data are transmitted. Secure protocols protect sensitive information. - **Use SFTP or SSH:** Encrypts file transfers securely. - **Disable plain FTP:** Prevents unencrypted credential exposure. - **Restrict access permissions:** Limits file system access. [![Blog banner - ServerAvatar](https://serveravatar.com/wp-content/uploads/2025/09/728_90-Banner-1-1024x127.png)](https://serveravatar.com/?ref=blog)### 22. Prevent Spam and Bot Activity Spam and bots can impact both performance and security. Proper controls help maintain site quality. - **Enable moderation:** Filters unwanted submissions. - **Use anti-spam tools:** Automatically detects spam behavior. - **Block repetitive requests:** Reduces automated abuse. ServerAvatar helps reduce spam and bot-related issues by enabling ai bot blocker. This keeps your site clean, responsive, and protected from bot attacks. ![AI Bot Blocker - WordPress site](https://serveravatar.com/wp-content/uploads/2026/01/image-230-1024x497.png) ### 23. Enable Server Firewall Protection A server firewall acts as a protective barrier between your WordPress site and malicious traffic. It filters incoming and outgoing connections based on security rules, preventing unauthorized access at the server level before requests reach WordPress. ServerAvatar includes built-in firewall management that allows you to control server access easily from the dashboard without manual server configuration. ![](https://serveravatar.com/wp-content/uploads/2026/01/image-231-1024x325.png) - Block unauthorized IP addresses and traffic - Restrict access to sensitive server ports - Prevent malicious requests before reaching WordPress - Strengthen server-level security ### 24. Protect Against Brute-Force Attacks Using Fail2Ban Fail2Ban is an intrusion prevention system that monitors server logs for suspicious behavior. It automatically blocks IP addresses that generate repeated failed login attempts, protecting WordPress and server services from brute-force attacks. ServerAvatar provides built-in Fail2Ban support, allowing users to enable and manage protection easily from the dashboard. ![](https://serveravatar.com/wp-content/uploads/2026/01/image-232-1024x467.png) - Detect repeated failed login attempts - Automatically ban malicious IP addresses - Protect SSH and WordPress login endpoints - Reduce automated and brute-force attacks ## Maintaining a Strong WordPress Security Framework Implementing multiple security measures is essential for creating a stable and controlled WordPress environment. Each protection step, whether related to updates, access restrictions, or monitoring, serves a specific purpose and strengthens the overall security structure of the site. Security should be maintained through regular checks rather than applied once and forgotten. Configuration changes, plugin updates, and user management decisions all influence how secure the site remains over time. Reviewing these elements periodically helps prevent gaps from forming in the security setup. By treating security as a continuous process, WordPress site management becomes more structured and manageable. Ongoing attention to protection settings helps preserve data integrity and ensures that the website remains secure as it evolves. ## Conclusion Securing your WordPress site is essential for protecting your data, maintaining performance, and ensuring peace of mind. By following the steps outlined in this guide and leveraging ServerAvatar’s features, such as one-click SSL, automated backups, file permission management, firewall protection, and AI bot blocking, you can simplify security management while keeping your site safe, reliable, and optimized, allowing you to focus on growing your website without worrying about vulnerabilities. ## FAQs ### 1. Why is WordPress security important? WordPress stores sensitive data like user information, login credentials, and site content. Strong security prevents unauthorized access, data loss, and downtime. ### 2. How does ServerAvatar help secure my WordPress site? ServerAvatar provides one-click SSL, automated backups, file permission management, firewall, and AI bot blocker to protect your site from attacks. ### 3. Can I automate backups and updates using ServerAvatar? ServerAvatar allows you to take instant backups and schedule automated backups for your applications, database, and file System. ### 4. Does ServerAvatar protect against spam and bot attacks? ServerAvatar includes an AI bot blocker to prevent spam submissions and repetitive automated requests, keeping your site clean and responsive. ### 5. What should I do if I detect suspicious activity on my WordPress site? Immediately review server and plugin logs, run malware scans, update credentials, and use ServerAvatar’s security tools to keep your sites secure. Regular monitoring helps prevent recurring issues. **Categories:** Blog, Guide, Tutorials, WordPress **Tags:** Protect WordPress website, Secure WordPress site, website security, Wordpress, WordPress Protection, WordPress security best practices, WordPress security tips --- ### [20 Amazing WordPress Blog Examples to Inspire You](https://serveravatar.com/wordpress-blog-examples/) **Published:** January 29, 2026 **Author:** Meghna Meghwani **Content:** [![Blog banner - ServerAvatar](https://serveravatar.com/wp-content/uploads/2025/09/728_90-Banner-3-1024x127.png)](https://serveravatar.com/?ref=blog)Starting or improving a WordPress blog can feel like standing at the edge of a blank canvas. You know the possibilities are endless, but where do you begin? The truth is, inspiration often comes from seeing what works. Exploring WordPress blog examples helps you understand effective layouts, content styles, and design choices, not by copying or cloning, but by learning. A good WordPress blog is like a well-organized thing: welcoming, easy to navigate, and full of personality. In this guide, we’ll walk through 20 inspiring WordPress blog examples, all based on design styles, content approaches, and layout ideas, not real-world brands, to spark ideas you can confidently use for your own site. ## What Is WordPress? [WordPress](https://wordpress.org/) is the world’s most popular open-source content management system (CMS), used to build websites, blogs, and e-commerce stores. It offers flexibility through themes and plugins, making it suitable for beginners, developers, and businesses of all sizes. ## How ServerAvatar Simplifies WordPress Deployment & Management **What is ServerAvatar?** [ServerAvatar](https://serveravatar.com/) is a platform to simplify the hosting and management of servers and applications. It simplifies the process of deploying and managing PHP and Node.js based web applications on servers. ![](https://serveravatar.com/wp-content/uploads/2026/01/image-233.png) ServerAvatar makes WordPress and other popular applications, such as Mautic, N8N, UptimeKuma, etc, deployment effortless with its one-click WordPress application installer, allowing you to launch a fully configured WordPress site in minutes. It removes the complexity of server setup by providing an intuitive dashboard to manage servers, applications, databases, PHP versions, SSL, and performance settings from one place. ServerAvatar supports multiple cloud providers and gives users full control over their infrastructure while eliminating the need for deep server administration knowledge. You can refer to the ServerAvatar [documentation](https://serveravatar.com/docs/application/one-click-installer/wordpress/) and the detailed [blog](https://serveravatar.com/install-wordpress-quickly-on-vps/) to [install WordPress](https://serveravatar.com/install-wordpress-apache-ubuntu/) effortlessly. > ServerAvatar does not directly provide WordPress Multisite, but our technical experts can help you set up a WordPress Multisite environment. > The ServerAvatar support team is available 24/7 to assist you with any issues or questions you may have. **Key Benefits of Using ServerAvatar for WordPress** - **One-click WordPress installer:** Deploy WordPress instantly without manual configuration. - **Unified management panel:** Manage servers and WordPress applications from a single dashboard. - **Performance optimization:** Easily configure services, PHP, and server resources. - **Redis caching support:** ServerAvatar comes with built-in Redis integration that helps speed up WordPress by storing frequently accessed data in memory. - **Enhanced security:** Includes firewall, SSL management, and secure access controls. - **Easy scalability:** Upgrade server resources as your WordPress site grows. ServerAvatar is an ideal solution for users who want the power of cloud servers without the operational complexity. It simplifies WordPress hosting by automating server setup, streamlining application management, and providing performance and security optimizations out of the box. Whether you’re a developer, agency, or business owner, ServerAvatar allows you to deploy, manage, and scale WordPress websites confidently while focusing on growth instead of infrastructure management. ## Why Looking at WordPress Blog Examples Matters No one builds a great blog in isolation. Seeing different WordPress blog examples helps you understand what layouts feel comfortable, what content formats keep readers scrolling, and what design choices make a site memorable. Think of it like learning to cook, you don’t invent recipes on day one; you taste, observe, and adapt. Blog examples shorten your learning curve and help you avoid common mistakes. ## Why WordPress Is Ideal for Bloggers WordPress remains a favorite for bloggers because it grows with you. You can start small with a simple theme and expand into advanced features later. It is beginner-friendly, flexible, and enough powerful for large content libraries. Whether you want full creative control, SEO advantages, or easy publishing, WordPress gives you the tools without locking you into complexity. ![WordPress blog examples](https://serveravatar.com/wp-content/uploads/2026/01/image-256.png) ## What Makes a WordPress Blog Truly Inspiring? An inspiring blog isn’t about flashy design alone. It’s about clarity, consistency, and connection. Great WordPress blogs guide readers naturally, from headline to content to action. They load fast, read easily, and feel human. Most importantly, they respect the reader’s time. ## Various Types ### The Clean Minimal Blog This type of blog uses white space, simple fonts, and distraction-free layouts. The focus stays on the writing. Navigation is limited, colors are neutral, and every element has a purpose. This style works well if your strength is storytelling or opinion-based content. ### The Story-Driven Personal Here, the homepage highlights recent posts with strong headlines and emotional hooks. The tone feels conversational, almost like a letter to a friend. Images support the story instead of overpowering it. Readers come back because they feel connected to the writer. ### The Magazine-Style Blog This example uses grid layouts, featured sections, and categories to organize lots of content. It’s ideal for blogs that publish frequently. The design helps readers discover more posts without feeling overwhelmed. ### The Creative Portfolio Blog Perfect for designers, writers, or creators, this blog blends portfolio and blog content. Posts are visually rich, and the layout feels modern. The blog supports the creator’s work instead of competing with it. ### The Lifestyle Blog Lifestyle blogs mix personal stories with practical content. Categories might include daily routines, thoughts, or experiences. The design feels warm and inviting, encouraging readers to stay longer and explore. ### The Travel Journal Blog This blog example relies heavily on visual storytelling. Large images, simple captions, and chronological posts create a sense of journey. The design stays lightweight so photos load quickly and look sharp. ### The Food-Focused Blog Clarity is everything here. Recipes or food stories are broken into easy sections. Fonts are readable, images are clean, and navigation helps users find content fast. The best food blogs feel organized, not cluttered. ### The Educational How-To Blog This style focuses on step-by-step content. Headings, bullet points, and short paragraphs improve readability. It’s built for users who want answers, not fluff. ### The Tech Explainer Blog Tech blogs often deal with complex ideas, so simplicity matters. This example uses clear formatting, diagrams, and structured posts to make information easy to understand, even for beginners. ### The Business Authority Blog Designed to build trust, this blog uses clean layouts, professional fonts, and consistent branding. Content is educational and solution-focused, positioning the blog as a reliable resource. ### The Community-Driven Blog This blog encourages comments, discussions, and sharing. Posts may highlight user stories or opinions. The design supports interaction, making readers feel like participants, not spectators. ### The Visual-First Blog In this example, images lead the experience. Text supports visuals rather than dominating the page. It works well for inspiration-based or creative niches. ### The SEO-Focused Content Blog Here, structure is key. Clear headings, internal links, and optimized content help posts rank well. The design supports fast loading and easy crawling without sacrificing user experience. ### The Long-Form Writing Blog Long-form blogs focus on depth. Typography is carefully chosen for comfort, and layouts reduce eye strain. Readers stay because the content feels thoughtful and well-paced. ### The Beginner-Friendly Blog This blog is built with first-time readers in mind. Navigation is simple, explanations are clear, and content avoids jargon. It’s welcoming and unintimidating. ### The Niche Passion Blog Niche blogs focus deeply on one topic. Design and content reflect that passion clearly. Readers feel like they’ve found a home tailored just for them. ### The Monetization-Ready Blog This example balances content and conversions. Calls-to-action are subtle, ads don’t overwhelm, and trust comes first. Monetization feels natural, not forced. ## 20 Amazing WordPress Blog Examples to Inspire You ### 1. NASA News: Turning Complex Science into Clear Stories [NASA News](https://www.nasa.gov/news/) is a powerful example of how complex information can be made accessible to the general public. The blog focuses on breaking down advanced scientific discoveries into simple, engaging stories. It uses clear headlines, strong visuals, and well-structured content to guide readers through space missions, research updates, and discoveries without overwhelming them. ![NASA News - WordPress blog examples](https://serveravatar.com/wp-content/uploads/2026/01/image-234.png) **Why it works** It respects the reader’s curiosity while removing technical barriers. Each post educates without sounding academic. **Content & design approach** - Clear headlines and short paragraphs - Strong use of images and visual explanations - Well-structured articles with logical flow **Key takeaway** If your topic is complex, clarity and storytelling matter more than technical depth. ### 2. TED Blog: Ideas That Look as Powerful as They Sound [TED Blog](https://blog.ted.com/) focuses on sharing ideas through storytelling, interviews, and thought-provoking articles. Its clean layout ensures that ideas remain the hero of the page, supported by visuals rather than distracted by them. [](https://storage.3.basecamp.com/5840738/blobs/4363f7ca-fce8-11f0-a381-0242ac120003/download/image.png) ![TED Blog - WordPress blog examples](https://serveravatar.com/wp-content/uploads/2026/01/image-235-1024x568.png)**Why it works** The design and content feel intentional. Every article encourages reflection and discussion. **Content & design approach** - Clean layouts with generous white space - Thought-provoking headlines - Balanced use of visuals and text **Key takeaway** Great ideas deserve clean presentation and emotional resonance. ### 3. Rolling Stone: A Magazine-Style WordPress Blog Done Right [Rolling Stone](https://www.rollingstone.com/)’s blog showcases how WordPress can handle high-volume publishing with a magazine-style layout. Articles are organized into sections like music, culture, and opinion, making discovery effortless. ![Rolling Stone - WordPress blog examples](https://serveravatar.com/wp-content/uploads/2026/01/image-237-1024x692.png) **Why it works** The grid-based layout balances text and visuals while maintaining strong branding. **Content & design approach** - Grid-based layouts - Clear content categorization - Strong brand consistency across sections **Key takeaway** If you publish frequently, structure and categorization are essential. ### 4. The New Yorker: Long-Form Storytelling on WordPress [The New Yorker](https://www.newyorker.com/) demonstrates the power of long-form content. Articles are deep, narrative-driven, and supported by elegant typography that makes long reads comfortable. ![The New Yorker - WordPress blog examples](https://serveravatar.com/wp-content/uploads/2026/01/image-238-1024x515.png) **Why it works** The blog prioritizes reading experience over flashy design. **Content & design approach** - Elegant typography - Distraction-free reading layouts - Strong narrative flow **Key takeaway** Long content succeeds when readability is treated as a feature, not an afterthought. ### 5. BBC America Blog: Clean Design with Strong Branding [BBC America Blog](https://www.bbcamerica.com/blogs) uses a clean, modern layout combined with consistent branding. Content is easy to scan, and visuals reinforce brand identity without overpowering the text. ![BBC America Blog - WordPress blog examples](https://serveravatar.com/wp-content/uploads/2026/01/image-239-1024x391.png) **Why it works** Consistency builds trust and recognition. **Content & design approach** - Consistent branding elements - Simple navigation - Visually supportive media **Key takeaway** Strong branding and simplicity can coexist beautifully. ### 6. TechCrunch: Fast-Paced Tech Blogging at Scale [TechCrunch](https://techcrunch.com/) is built for speed. Headlines are sharp, content is timely, and the layout supports rapid consumption of news. ![TechCrunch - WordPress blog examples](https://serveravatar.com/wp-content/uploads/2026/01/image-241-1024x552.png) **Why it works** Readers know exactly what to expect, fast, relevant updates. **Content & design approach** - Bold headlines - Scan-friendly layouts - Timely, high-frequency publishing **Key takeaway** Match your blog structure to your publishing speed and audience expectations. ### 7. PlayStation Blog: Community-Driven Content That Engages [PlayStation Blog](https://blog.playstation.com/) thrives on audience engagement. Posts feel like conversations with a community rather than announcements from a company. ![PlayStation Blog - WordPress blog examples](https://serveravatar.com/wp-content/uploads/2026/01/image-242.png) **Why it works** The content is centered around the audience. **Content & design approach** - Conversational tone - Reader-focused announcements - Community-centric storytelling **Key takeaway** Community-focused content builds loyalty faster than promotional posts. ### 8. Spotify Newsroom: Minimal Design with Maximum Impact [Spotify Newsroom](https://newsroom.spotify.com/) blog uses minimal design to highlight announcements and stories. The layout is clean, modern, and focused. ![Spotify Newsroom - WordPress blog examples](https://serveravatar.com/wp-content/uploads/2026/01/image-243.png) **Why it works** There’s nothing unnecessary on the page, every element has a purpose. **Content & design approach** - Minimalist layouts - Clear hierarchy of information - Strong visual balance **Key takeaway** Minimalism helps important messages stand out. ### 9. Microsoft Stories: Corporate Blogging That Feels Human [Microsoft Stories](https://news.microsoft.com/source/) shows how corporate content doesn’t have to feel cold. Stories focus on people, innovation, and real-world impact. ![Microsoft Stories - WordPress blog examples](https://serveravatar.com/wp-content/uploads/2026/01/image-244.png) **Why it works** It humanizes a large organization through storytelling. **Content & design approach** - Story-driven articles - People-focused narratives - Clean, professional layouts **Key takeaway** People connect with stories, not corporate language. ### 10. Sony Music Blog: Visual-First Storytelling [Sony Music blog](https://www.sony.com/en/SonyInfo/blog/tag/music/) places visuals at the forefront. Images, videos, and layout work together to create an immersive experience. ![Sony Music Blog - WordPress blog examples](https://serveravatar.com/wp-content/uploads/2026/01/image-245-1024x497.png) **Why it works** Visual storytelling enhances emotional connection. **Content & design approach** - Image-led layouts - Multimedia integration - Minimal text clutter **Key takeaway** If visuals matter in your niche, design around them. ### 11. The Walt Disney Company Blog: Brand Storytelling at Its Best [Walt Disney Company Blog](https://thewaltdisneycompany.com/news/) focuses on narratives that reinforce brand values. Every post feels intentional and aligned with a broader story. ![The Walt Disney Company Blog - WordPress blog examples](https://serveravatar.com/wp-content/uploads/2026/01/image-246-1024x577.png) **Why it works** Storytelling strengthens brand identity. **Content & design approach** - Narrative-driven posts - Consistent visual identity - Purpose-led storytelling **Key takeaway** A blog should reflect what your brand stands for, not just what it sells. ### 12. Smashing Magazine: Educational Content That Builds Trust [Smashing Magazine](https://www.smashingmagazine.com/) is known for in-depth, educational content. Articles are detailed, actionable, and written by experts. ![Smashing Magazine - WordPress blog examples](https://serveravatar.com/wp-content/uploads/2026/01/image-247-1024x514.png) **Why it works** High-value content builds long-term credibility. **Content & design approach** - Detailed tutorials - Clear explanations - Educational formatting **Key takeaway** Teaching generously earns trust and authority. ### 13. WPBeginner: A Perfect Example of an SEO-Focused Blog [WPBeginner](https://www.wpbeginner.com/) focuses on solving beginner problems with clear, optimized content. Posts are structured for both readers and search engines. ![WP Begginer - WordPress blog examples](https://serveravatar.com/wp-content/uploads/2026/01/image-248-1024x644.png) **Why it works** It balances SEO with user experience. **Content & design approach** - Structured headings - Clear step-by-step guides - SEO-friendly formatting **Key takeaway** SEO works best when it serves the reader first. ### 14. Nomadic Matt: Travel Blogging That Feels Personal [Nomadic Matt](https://www.nomadicmatt.com/) combines practical travel advice with personal stories. The tone is friendly and relatable. ![Nomadic Matt - WordPress blog examples](https://serveravatar.com/wp-content/uploads/2026/01/image-249-1024x563.png) **Why it works** Readers feel like they’re learning from a friend. **Content & design approach** - First-person writing - Practical tips blended with stories - Clean, readable layouts **Key takeaway** Authenticity beats perfection. ### 15. Minimalist Baker: Food Blogging with Clarity and Focus [Minimalist Baker](https://minimalistbaker.com/) is structured around simplicity. Recipes are easy to follow, and content stays focused on the promise of the blog. ![Minimalist Baker - WordPress blog examples](https://serveravatar.com/wp-content/uploads/2026/01/image-250.png) **Why it works** Clear positioning reduces confusion. **Content & design approach** - Simple recipes - Consistent formatting - Clean visual presentation **Key takeaway** Do one thing well, and say no to clutter. ### 16. Humans of New York: Emotional Storytelling on WordPress [Humans of New York](https://humansofnyarchive.com/) focuses on short, powerful stories paired with images. Emotion drives engagement. ![Humans of New York - WordPress blog examples](https://serveravatar.com/wp-content/uploads/2026/01/image-251-1024x565.png) **Why it works** Stories feel raw, real, and human. **Content & design approach** - Short, impactful stories - Strong portrait photography - Minimal distractions **Key takeaway** Emotion is a powerful content strategy. ### 17. Boing Boing: A Creative, Community-Led WordPress Blog [Boing Boing](https://boingboing.net/) Shares methods, routines, and frameworks. Content is structured with lists and actionable steps. ![Boing Boing - WordPress blog examples](https://serveravatar.com/wp-content/uploads/2026/01/image-252-1024x685.png) **Why it works** The blog embraces curiosity and creative freedom. **Content & design approach** - Diverse content topics - Informal tone - Community-friendly layout **Key takeaway** Creativity thrives when content feels unrestricted. ### 18. Ladybird Education: Simplifying Learning Through Clear Content [Ladybird Education](https://www.ladybirdeducation.co.uk/) is a great example of how WordPress can be used to deliver educational content in a simple, approachable way. The blog focuses on helping parents, teachers, and learners understand educational topics without overwhelming them. ![Ladybird Education - WordPress blog examples](https://serveravatar.com/wp-content/uploads/2026/01/image-253-1024x494.png) **Why it works** The blog emphasizes clarity and trust. Short paragraphs, simple language, and supportive visuals make learning feel less intimidating and more enjoyable. **Content & design approach** - Clean layouts with clear headings - Educational articles broken into digestible sections - A friendly tone that supports learning rather than lecturing **Key takeaway** Learning improves when content removes complexity. [](https://storage.3.basecamp.com/5840738/blobs/b447181c-fcf4-11f0-9847-0242ac120002/download/image.png) ### 19. TIME: High-Authority Editorial Storytelling at Scale [TIME](https://time.com/) is a powerful example of how WordPress can support large-scale editorial publishing while maintaining authority and credibility. The blog presents news, opinions, and long-form stories in a way that feels structured, professional, and reader-focused. ![TIME - WordPress blog examples](https://serveravatar.com/wp-content/uploads/2026/01/image-254-1024x491.png) **Why it works** TIME balances depth with accessibility. Even complex global topics are presented with strong headlines, clear sections, and visual hierarchy that guide readers naturally through the story. **Content & design approach** - Magazine-style layouts with featured stories - Strong typography for long-form reading - Consistent branding across all content **Key takeaway** WordPress is capable of handling high-traffic, content-heavy blogs without sacrificing quality or performance. ### 20. Blog Tyrant: Actionable Blogging Advice That Drives Results [Blog Tyrant](https://www.blogtyrant.com/) is a strong example of a WordPress blog built specifically to help bloggers grow, monetize, and scale their blogs. The content focuses on practical strategies rather than theory, making it especially useful for beginners and intermediate bloggers who want clear direction. ![Blog Tyrant - WordPress blog examples](https://serveravatar.com/wp-content/uploads/2026/01/image-255-1024x428.png) **Why it works** The blog delivers straightforward, no-fluff advice. Articles are structured to guide readers step by step, helping them apply what they learn immediately. **Content & design approach** - Clear, benefit-driven headlines - Long-form, structured guides with subheadings - Simple layouts that prioritize readability and conversions **Key takeaway** A successful educational blog doesn’t need to be complicated, it needs to be useful, clear, and actionable. ## Key Lessons You Can Learn from These WordPress Blog Examples Across all examples, one lesson stands out: **clarity beats complexity**. Great blogs respect the reader’s time, load quickly, and communicate clearly. Design supports content, not the other way around. [![Blog banner - ServerAvatar](https://serveravatar.com/wp-content/uploads/2025/09/728_90-Banner-1-1024x127.png)](https://serveravatar.com/?ref=blog)## What’s Next for You? Now comes the fun part. Take these ideas and adapt them to your own goals. Start small. Improve one section at a time. Your blog doesn’t need to be perfect, it just needs to be authentic, useful, and consistent. Inspiration is only the first step; action is where real growth begins. If you’re ready to turn inspiration into a live WordPress site, choosing the right hosting and server management platform makes a huge difference. This is where ServerAvatar fits naturally into the journey. With ServerAvatar, you can create a WordPress website using a one-click app installer, without dealing with complex server configurations or technical headaches. Instead of spending hours setting up servers, configuring PHP, or managing security manually, ServerAvatar lets you focus on what actually matters, writing, designing, and growing your blog. From server setup and performance optimization to SSL, backups, and monitoring, everything is managed from a single, easy-to-use dashboard. Think of it like setting up a workspace before you start creating. When your foundation is solid, your blog can grow faster, perform better, and scale smoothly as your audience expands. So take that next step, launch your WordPress blog, publish your first post, and let consistency do the rest. ## Conclusion Building a great WordPress blog isn’t about copying designs or chasing perfection, it’s about understanding what works and adapting those ideas to your own voice and goals. The examples in this guide show that clarity, consistency, and reader-focused content matter more than flashy layouts or complex features. With the flexibility of WordPress and a solid foundation provided by platforms like ServerAvatar, you can turn inspiration into action without getting stuck in technical details. Start simple, keep improving, and focus on delivering value, because a blog that is useful, authentic, and easy to manage is the one that truly grows over time. ## FAQs ### **1. Why should I look at WordPress blog examples before creating my own?** WordPress blog examples help you understand what works in terms of layout, content structure, and user experience. They shorten the learning curve by showing proven approaches you can adapt rather than starting from scratch. ### **2. Do I need to copy these examples to succeed?** No, Just take inspiration from design patterns, content formats, and navigation styles, then adapt them to your unique voice, audience, and purpose. ### **3. Is WordPress suitable for beginners with no technical background?** Yes, WordPress is beginner-friendly and offers thousands of themes and plugins. With tools like one-click installers and managed server platforms, even non-technical users can launch and manage a blog confidently. ### **4. Can ServerAvatar handle high-traffic WordPress blogs?** Yes, ServerAvatar supports performance optimization features like Redis caching, flexible PHP configuration, and easy server scaling, making it suitable for both small blogs and high-traffic websites. ### **5. What matters more: design or content?** Content always comes first, but design supports how that content is consumed. The best blogs use clean, readable designs that enhance content rather than distract from it. **Categories:** Blog, Guide, Others, WordPress **Tags:** Best WordPress blogs, Blog layout ideas, Blogging ideas, Wordpress, WordPress blog, WordPress blog design, WordPress blog examples --- ### [12 Major Client-Side Security Threats and How to Defend](https://serveravatar.com/client-side-security-threats-and-prevention/) **Published:** February 7, 2026 **Author:** Meghna Meghwani **Content:** [![Blog banner - ServerAvatar](https://serveravatar.com/wp-content/uploads/2025/09/728_90-Banner-3-1024x127.png)](https://serveravatar.com/?ref=blog)Have you ever wondered what actually happens when you click a link, install a browser extension, or type your password into a website? Most of us assume our devices are safe as long as the server is secure. But here’s the uncomfortable truth, Client-Side Security Threats often occur right inside your browser or device, allowing attackers to exploit JavaScript, extensions, or user interactions before a server can even help. Client-side threats operate within browsers, applications, and scripts that run directly on a user’s device. These attacks can bypass traditional server protections and affect data integrity, privacy, and user trust. In this guide, we will discuss major client-side security threats and the practical ways to defend against them. No scary jargon. No technical overload. Just clear, human explanations anyone can understand. ## What Is Client-Side Security? Client-side security focuses on protecting all components that runs on the user’s device. This includes browsers, scripts, cookies, storage mechanisms, HTML, CSS, JavaScript, local storage, and interface-level logic. Unlike server-side security, client-side code is visible and can be inspected or manipulated. This makes it an attractive target for attackers and requires careful implementation. ![Client-Side Security Threats](https://serveravatar.com/wp-content/uploads/2026/02/image-45.png) In simple terms, anything that runs on your screen instead of the server is client-side. The challenge? Attackers love this space because: - **Code is visible:** Browser-based code can be inspected and analyzed easily. - **Users trust browsers:** People often assume browser activity is automatically safe. - **Mistakes are easy to exploit:** Minor coding errors can lead to major vulnerabilities. ### Why Client-Side Threats Matter Client-side threats are difficult to detect because they operate outside traditional server monitoring. If left unaddressed, they can compromise sensitive data, disrupt functionality, and weaken user confidence. As web applications grow more interactive, protecting client-side components becomes just as important as securing servers. ### Why Client-Side Attacks Are Increasing Client-side attacks are growing as modern websites rely more on dynamic, browser-driven functionality. Speed-focused development and heavy script usage often leave security checks behind. ![increasing client side attackers - Client-Side Security Threats](https://serveravatar.com/wp-content/uploads/2026/02/image-46.png) **Key reasons for the rise:** - **Heavy JavaScript usage:** More logic runs in the browser than ever before. - **Widespread third-party scripts:** External code expands the attack surface. - **Unrestricted extension use:** Browser add-ons can introduce hidden risks. - **Rapid development cycles:** Security is sometimes deprioritized for speed. Let’s now check out the most common client-side security threats found in modern web applications. Each threat is explained clearly, along with protection steps that help reduce risk and strengthen overall client-side security. ## 1. Cross-Site Scripting (XSS) **What it is:** Cross-Site Scripting (XSS) happens when attackers inject malicious scripts into a webpage that runs in your browser. ![Cross-Site Scripting (XSS) - Client-Side Security Threats](https://serveravatar.com/wp-content/uploads/2026/02/image-47.png) **Why it’s dangerous:** The script can steal cookies, session tokens, or even keystrokes. **Real-world example:** You comment on a blog, and hidden code inside that comment runs in every visitor’s browser. **Risks include:** - **Unauthorized script execution:** Untrusted code runs without user awareness. - **Data exposure:** Sensitive data will be leaked, or it may be accessed. - **Session manipulation:** Active user sessions can be misused. **How to defend:** - **Validate and sanitize input:** Prevent harmful data from being processed. - **Use Content Security Policy (CSP):** Restrict where scripts can load from. - **Escape output properly:** Ensure dynamic content is displayed safely. **Key point:** Never trust user input, even friendly-looking text. ## 2. Cross-Site Request Forgery (CSRF) **What it is:** CSRF tricks your browser into performing unwanted actions while you’re logged in. ![Cross-Site Request Forgery (CSRF) - Client-Side Security Threats](https://serveravatar.com/wp-content/uploads/2026/02/image-48.png) **Why it’s dangerous:** CSRF tricks users into performing actions they didn’t intend on trusted websites. **Real-world example:** You’re logged into your bank, visit a malicious site, and unknowingly trigger a fund transfer. **Risks include:** - **Unauthorized account changes:** Actions are performed without user intent. - **Compromised user data:** Account settings or information may be altered. - **Loss of trust:** Security failures can damage credibility. **How to defend:** - **Use CSRF tokens:** Validate legitimate requests. - **Apply SameSite cookies:** Limit cross-site request behavior. - **Require re-authentication:** Add checks for sensitive actions. **Key point:** It’s like someone using your already-open door to sneak inside. ## 3. Malicious Browser Extensions **What it is:** Browser extensions can access webpage content and user activity. Poorly designed or compromised extensions may introduce security risks. ![Malicious Browser Extension - Client-Side Security Threats](https://serveravatar.com/wp-content/uploads/2026/02/image-49.png) **Why it’s risky:** Some extensions start harmless but later update with malicious intent. **Real-world example:** Some Chrome extensions have stolen users’ banking credentials without their knowledge. **Risks include:** - **Sensitive data theft:** Access to stored credentials or form inputs. - **Unauthorized tracking:** User activity may be monitored without consent. - **Script injection:** Malicious code may run on visited pages. **How to defend:** - **Install trusted extensions only:** Avoid unknown sources. - **Review permissions carefully:** Limit unnecessary access. - **Remove unused extensions:** Reduce exposure over time. **Key point:** Browser extensions can act as hidden malware if not vetted properly. ## 4. Clickjacking **What it is:** Clickjacking hides malicious actions behind harmless-looking buttons. ![Clickjacking - Client-Side Security Threats](https://serveravatar.com/wp-content/uploads/2026/02/image-50.png) **Why it’s dangerous:** Clickjacking tricks users into clicking hidden elements, potentially executing harmful actions. **Real-world example:** You think you’re clicking “Play Video” but actually clicking “Allow Camera Access”. **Risks include:** - **Unintended actions:** Users may trigger actions unknowingly. - **Unauthorized transactions:** Hidden clicks can activate sensitive operations. - **Data exposure:** Permissions may be granted unintentionally. **How to defend:** - **Use X-Frame-Options headers:** Prevent embedding in frames. - **Apply frame-busting scripts:** Stop unauthorized page overlays. **Key point:** Protect sensitive buttons and actions from being framed or hidden. ## 5. Man-in-the-Browser Attacks **What it is:** These attacks modify browser behavior at runtime, allowing unauthorized manipulation of data. ![Man-in-the-Browser Attacks - Client-Side Security Threats](https://serveravatar.com/wp-content/uploads/2026/02/image-51.png) **Why it’s scary:** Even HTTPS won’t protect you because the attack happens inside the browser. **Real-world example:** Zeus malware intercepted banking transactions in real time. **Risks include:** - **Modified transactions:** Data can be altered silently. - **Credential theft:** Login details may be captured. - **Account compromise:** Full access may be obtained. **How to defend:** - **Keep systems updated:** Reduce exposure to known flaws. - **Use reputable antivirus tools:** Detect browser manipulation. - **Avoid unknown downloads:** Prevent hidden malware entry. **Key point:** Malware can manipulate browser activity even on secure connections. ## 6. Insecure JavaScript Dependencies **What it is:** Third-party scripts may contain vulnerabilities that affect client-side security. ![Insecure JavaScript Dependencies - Client-Side Security Threats](https://serveravatar.com/wp-content/uploads/2026/02/image-52.png) **Why it’s dangerous:** Vulnerable libraries can expose websites to attacks even if the code is otherwise secure. **Real-world example:** A single outdated JavaScript package can expose your entire site. **Risks include:** - **Remote code execution:** Attackers may run malicious code. - **Data breaches:** Sensitive information may be exposed. - **Service disruption:** Applications may malfunction or fail. **How to defend:** - **Audit dependencies regularly:** Identify outdated or risky code. - **Use trusted libraries:** Reduce unknown risks. - **Monitor vulnerabilities:** Stay informed of known issues. **Key point:** Free libraries aren’t free from risk. ## 7. DOM-Based Attacks **What it is:** Attacks that manipulate the Document Object Model (DOM) directly in the browser. ![DOM-Based Attacks - Client-Side Security Threats](https://serveravatar.com/wp-content/uploads/2026/02/image-53.png) **Why it’s dangerous:** The server never sees the malicious activity. **Real-world example:** Malicious scripts manipulated DOM elements on e-commerce sites to steal payment info. **Risks include:** - **Client-side data theft:** Information is extracted directly. - **Unauthorized actions:** Scripts perform unintended operations. - **Content manipulation:** Page behavior or display is altered. **How to defend:** - **Avoid unsafe DOM methods:** Reduce manipulation risks. - **Validate client-side data:** Ensure safe handling. - **Follow secure coding practices:** Prevent logic flaws. **Key point:** DOM vulnerabilities often allow attackers to control page behavior from the client side. ## 8. Session Hijacking **What it is:** Attackers steal session IDs to impersonate users. ![Session Hijacking - Client-Side Security Threats](https://serveravatar.com/wp-content/uploads/2026/02/image-54.png) **Why it’s dangerous:** Data may be intercepted due to Insecure network connections, or Session data can be extracted due to XSS vulnerabilities. **Real-world example:** Attackers captured session cookies over unsecured Wi-Fi to access user accounts. **Risks include:** - **Unauthorized access:** Accounts can be taken over. - **Identity misuse:** User actions may be impersonated. - **Data alteration:** Stored information can be changed. **How to defend:** - **Use HTTPS everywhere:** Encrypt session data. - **Secure cookies properly:** Apply HttpOnly and Secure flags. - **Regenerate sessions often:** Reduce reuse risks. **Key point:** Protect session tokens and enforce secure communication. ## 9. Drive-By Downloads **What it is:** Malware downloads automatically when visiting a compromised site. These threats automatically initiate unwanted downloads during page interactions. ![Drive-By Downloads - Client-Side Security Threats](https://serveravatar.com/wp-content/uploads/2026/02/image-55.png) **Why it’s dangerous:** Users don’t expect danger from normal browsing. **Real-world example:** Visiting compromised websites triggered malware downloads without user consent. **Risks include:** - **Device infection:** Malicious software may install silently. - **Data loss:** Files or information may be compromised. - **Unauthorized installations:** Unknown programs may run. **How to defend:** - **Keep browsers updated:** Patch known vulnerabilities. - **Disable unnecessary plugins:** Reduce attack surface. - **Use ad blockers cautiously:** Limit harmful content exposure. **Key point:** Even simple browsing can trigger malware if websites are unprotected. [![Blog banner - ServerAvatar](https://serveravatar.com/wp-content/uploads/2025/09/728_90-Banner-1-1024x127.png)](https://serveravatar.com/?ref=blog)## 10. Phishing via Client-Side Scripts **What it is:** Client-side phishing uses deceptive interface elements to collect sensitive data. Fake forms and login prompts powered by JavaScript. ![Phishing via Client-Side Scripts - Client-Side Security Threats](https://serveravatar.com/wp-content/uploads/2026/02/image-56.png) **Why it’s dangerous:** Looks exactly like the real thing. **Real-world example:** Malicious scripts on fake login pages stole credentials from users. **Risks include:** - **Credential theft:** Login details may be captured. - **Financial misuse:** Unauthorized actions may follow. - **Account takeover:** Full control may be lost. **How to defend:** - **Educate users:** Promote awareness of suspicious prompts. - **Verify URLs:** Ensure correct destinations. - **Use browser warnings:** Detect unsafe behavior. **Key point:** Scripts can mimic legitimate services to trick users into revealing sensitive information. ## 11. Insecure Client-Side (Local) Storage **What it is:** Sensitive data stored in localStorage or sessionStorage, and storing sensitive data in client-side storage exposes it to script access. ![Insecure Client-Side (Local) Storage - Client-Side Security Threats](https://serveravatar.com/wp-content/uploads/2026/02/image-57.png)**Why it’s risky:** JavaScript can easily access it. **Real-world example:** Storing tokens in localStorage led to account takeovers when attackers accessed users’ devices. **Risks include:** - **Data exposure:** Stored information may be accessed. - **Persistent XSS risks:** Scripts can extract stored data. - **Session theft:** Tokens may be compromised. **How to defend:** - **Avoid storing secrets client-side:** Keep sensitive data server-side. - **Use secure cookies:** Apply controlled access settings. **Key point:** Sensitive data should never be stored in insecure client-side storage. ## 12. Insecure Client-Side Validation **What it is:** Insecure client-side validation occurs when applications rely only on browser-side checks to validate user input. Since client-side code is visible and can be modified, attackers can bypass or manipulate these validations. ![Insecure Client-Side Validation - Client-Side Security Threats](https://serveravatar.com/wp-content/uploads/2026/02/image-58.png) **Why it’s dangerous:** Relying solely on client-side validation allows attackers to bypass checks. **Real-world example:** Attackers submitted SQL injection payloads because input validation only occurred in JavaScript. **Risks include:** - **Bypassed restrictions:** Validation rules can be altered. - **Data injection:** Malicious inputs may pass through. - **Broken security assumptions:** Trust boundaries are violated. **How to defend:** - **Never rely on client-side validation alone:** Treat it as usability only. - **Enforce server-side validation:** Ensure true protection. - **Use layered validation:** Combine client and server checks. **Key point:** Always validate and sanitize input on the server side as well as the client side. ## How to Build a Strong Client-Side Defense Effective client-side security requires a layered and proactive approach. No single control can stop every threat, but combined defenses significantly reduce risk. **Best practices at a glance:** - **Use Content Security Policies:** Restrict script behavior. - **Limit third-party scripts:** Reduce external exposure. - **Secure cookies correctly:** Protect session data. - **Educate users continuously:** Improve awareness. - **Perform regular security audits:** Identify weaknesses early. Client-side security is not a single barrier, it works best as a layered defense system. ## Conclusion Client-side security plays a vital role in protecting modern web applications, as many threats originate directly within browsers and user-facing scripts. From script injection and session abuse to insecure storage and weak validation, these risks can bypass server-side defenses if not handled carefully. By understanding common client-side security threats and applying layered protection strategies, such as secure coding practices, controlled script usage, proper validation, and continuous monitoring, developers and organizations can significantly reduce exposure and build safer, more reliable web experiences. A strong client-side defense is not optional; it is a necessary part of modern application security. ## FAQs ### 1. What is a client-side security threat? A client-side security threat targets code and processes that run directly in the user’s browser or device, such as JavaScript, cookies, and local storage. ### 2. Why are client-side attacks difficult to detect? These attacks often occur entirely within the browser and do not always interact with the server, making traditional server-side monitoring ineffective. ### 3. Is client-side security more important than server-side security? Both are equally important. Server-side security protects backend systems, while client-side security protects user interactions and browser-based logic. ### 4. Can client-side validation alone prevent security attacks? Client-side validation improves usability but should never be relied on alone. Server-side validation is essential for enforcing real security controls. ### 5. How often should client-side security be reviewed? Client-side security should be reviewed regularly, especially after updates, dependency changes, or when adding new scripts or browser-based features. ## Stop Wasting Time on Servers. Start Building Instead. You didn’t start your project to babysit servers. Let **ServerAvatar** handle deployment, monitoring, and backups — so you can focus on growth. Deploy **WordPress, Laravel, N8N**, and more in minutes. No DevOps required. No command line. No stress. [ 🚀 Try Free ](https://app.serveravatar.com) [ 🌐 Learn More ](https://serveravatar.com/) Trusted by 10,000+ developers and growing. **Categories:** Blog, Guide, Linux, Others, Ubuntu **Tags:** Browser Security, Client-Side Attacks, Client-Side Security, Client-Side Security Threats, cybersecurity, Frontend Security, Security Threats, Web Application Security, Web Security Threats --- ### [How to Manage Traffic Spikes on Your Server](https://serveravatar.com/manage-traffic-spikes/) **Published:** February 6, 2026 **Author:** Meghna Meghwani **Content:** [![Blog banner - ServerAvatar](https://serveravatar.com/wp-content/uploads/2025/09/728_90-Banner-3-1024x127.png)](https://serveravatar.com/?ref=blog)Have you ever opened your analytics dashboard and thought, “Wait… why are so many people here right now?” That sudden rush of visitors feels exciting, until your website slows down, pages stop loading, or worse, the server crashes, leaving you wondering how to manage traffic spikes on your server without disrupting user experience. Traffic spikes are a good problem to have, but only if your server is ready for them. Otherwise, it’s like inviting hundreds of guests into a house built for ten. The doors jam, the lights flicker, and chaos follows. In this guide, I will walk you through traffic spikes, how to manage them on your server without panic, complex tech talk, or sleepless nights. Whether you run a blog, an online store, or a business website, this article will help you stay online when it matters most. ## What Is a Traffic Spike? A traffic spike occurs when a website receives a significantly higher number of requests than its normal traffic levels within a short period. These spikes can be temporary or sustained, depending on the source and purpose of the traffic. ![manage traffic spikes](https://serveravatar.com/wp-content/uploads/2026/02/image-42.png) Servers must process each request, and when requests exceed available resources, performance issues begin to appear. ### How Traffic Spikes Affect Server Performance Traffic spikes place sudden pressure on server resources, pushing them beyond normal operating limits. When too many requests arrive at the same time, the server struggles to process them efficiently, which impacts speed and availability. - **CPU power:** High request volumes force the processor to handle more tasks at once - **Memory (RAM):** Active processes consume more memory, reducing available space for new requests. - **Bandwidth:** Increased data transfer can exceed network capacity and slow responses. When resource limits are reached, websites may slow down or become unreachable. During traffic spikes, servers often experience: - **Increased CPU usage:** The server works harder to process simultaneous requests. - **High memory consumption:** More active users require additional memory allocation. - **Slower database queries:** Databases take longer to respond under heavy load. - **Network bandwidth saturation:** Data transfer limits are reached, causing delays. If these resource limits are reached, the server may respond slowly or fail to respond entirely. Managing these limits effectively is critical for maintaining service availability. The scary part? Visitors won’t wait. They leave, and often don’t come back. ### Common Causes of Sudden Traffic Spikes Traffic spikes usually occur due to specific activities or events that attract a large number of users in a short period. Understanding these causes helps in planning and resource allocation. - **A post going viral on social media:** Rapid sharing drives a surge of visitors. - **Marketing campaigns:** Promotions increase user interest and site visits. - **Sales, discounts, or flash deals:** Limited-time offers create high demand. - **Feature announcements:** New updates encourage users to visit immediately. - **API usage increases:** Applications send more requests to the server. - **TV, news, or influencer mentions:** Public exposure results in sudden traffic growth. - **Product launches:** Users access the site to explore new offerings. - **Seasonal events or festivals:** Time-based demand leads to predictable spikes. - **Search engine ranking jumps:** Higher visibility brings more organic traffic. Good or bad, every spike needs preparation. Identifying the source of traffic helps determine the best way to manage it. ## Early Warning Signs of Server Overload Servers typically show performance issues before a complete failure occurs. Identifying these signs early allows timely action to prevent downtime. - **Slow page loading:** Pages take longer to respond due to resource strain. - **Frequent 500 or timeout errors:** The server fails to process requests in time. - **High CPU or memory usage:** Resource consumption remains near maximum limits. - **Dropped database connections:** Active connections are closed unexpectedly. - **Slow database response times:** Queries take longer to execute. - **Unresponsive admin panels:** Management interfaces fail to load properly. - **Increased page load time:** Overall site performance becomes inconsistent. Monitoring these signals allows early action before users are affected. ## Why Preparing for Traffic Spikes Is Important Preparation ensures that increased traffic does not disrupt website availability or performance. Planning ahead allows servers to handle demand smoothly without affecting users. - **Fewer outages:** Proper setup reduces unexpected downtime. - **Improved uptime:** Servers remain accessible during high traffic. - **Happier visitors:** Users experience faster and reliable performance. - **Consistent performance:** Site speed remains stable under load. - **Better search rankings:** Reliable performance supports SEO metrics. - **Better user experience:** Visitors can navigate without delays or errors. - **More conversions:** Smooth performance encourages user actions. - **Reduced recovery time:** Issues are resolved faster when prepared. Preparation is more effective and less costly than reacting after issues occur. ## Choose the Right Hosting Environment The hosting environment plays a major role in traffic handling capacity. Not all hosting is built for traffic spikes. - **Shared hosting** has limited resources and is less suitable for traffic spikes. - **Cloud hosting** allows flexible resource allocation. - **Managed servers** provide optimized performance with automated resource handling. Choosing the correct hosting setup reduces the risk of overload during high traffic periods. If your site matters to your business, your hosting choice matters too. ### How ServerAvatar Supports Different Hosting Needs **What is ServerAvatar?** [ServerAvatar](https://serveravatar.com/) is a platform to simplify the hosting and management of servers and applications. It simplifies the process of deploying and managing PHP and Node.js based web applications on servers. ![ServerAvatar Dashboard - manage traffic spikes](https://serveravatar.com/wp-content/uploads/2026/02/image-33.png) ServerAvatar is designed to support both managed and self-managed server environments, making it easier to choose the right setup based on your business requirements. Users can deploy servers and applications, manage resources, and monitor performance from a centralized dashboard without dealing with complex manual configurations. By providing flexibility in server provisioning and management, ServerAvatar helps ensure that hosting environments are better prepared to handle sudden traffic increases while maintaining stability and control. ## Use Server Scaling to Handle Load Server scaling adjusts resources to match traffic demand. Server scaling means adjusting resources when traffic increases. There are two main types: **Vertical Scaling** Increases CPU, RAM, or storage on a single server. This method is effective for short-term traffic increases. **Horizontal Scaling** Distributes traffic across multiple servers. This approach is more suitable for sustained or unpredictable traffic growth. Scaling keeps your site steady when traffic floods in. Both scaling methods help maintain stability during spikes. ### Server Scaling with ServerAvatar for Managed Servers ServerAvatar’s managed servers provide built-in support for both vertical and horizontal scaling directly from the ServerAvatar dashboard. This allows users to adjust server resources quickly based on traffic demand, without requiring complex manual configurations or external tools. ![ServerAvatar Resize Server - manage traffic spikes](https://serveravatar.com/wp-content/uploads/2026/02/image-34.png) With vertical scaling, server resources such as CPU, RAM, and storage can be resized seamlessly to handle short-term traffic spikes. For workloads that require higher availability or long-term growth, horizontal scaling enables the distribution of traffic across multiple servers, improving stability and load handling. By offering both scaling options in a centralized interface, ServerAvatar helps ensure servers remain responsive and reliable during sudden or sustained traffic increases. ## Optimize Website Performance Website optimization reduces server workload by improving efficiency. A well-optimized site processes requests faster and uses fewer resources. - **Compress images:** Smaller image sizes reduce load time and bandwidth use. - **Reducing file sizes:** Lightweight files require less processing power. - **Remove unused plugins:** Fewer plugins lower background resource usage. - **Removing unnecessary scripts:** Eliminates extra processing tasks. - **Optimizing database queries:** Faster queries improve response times. - **Minify CSS and JavaScript:** Reduces file size and execution time. - **Use lightweight themes:** Simple designs require fewer resources. - **Using efficient frameworks:** Optimized frameworks handle requests better. It’s like cleaning clutter from a room, suddenly, everything moves faster. ## Reducing Load with Server-Side Caching Server-side caching minimizes repeated processing by storing previously generated data. This allows servers to respond faster during high traffic. - **Browser caching:** Stores files locally to avoid repeated downloads. - **Page caching:** Saves complete pages for faster delivery. - **Object caching:** Stores database query results to reduce processing. Caching significantly reduces server workload during traffic spikes. Caching is one of the easiest ways to survive traffic spikes. ### Using Redis Caching with ServerAvatar ServerAvatar supports Redis as a server-side caching solution to help reduce database load and improve application performance during high traffic periods. Redis stores frequently accessed data in memory, allowing applications to retrieve information faster without repeatedly querying the database. ![ServerAvatar Redis - manage traffic spikes](https://serveravatar.com/wp-content/uploads/2026/02/image-35.png) This improves response times, lowers server resource usage, and helps maintain stable performance when traffic increases. ## Using a Content Delivery Network (CDN) A Content Delivery Network (CDN) distributes static content across multiple locations reducing the load on the main server. Requests are handled more efficiently by delivering data from nearby locations. You can use any third-party CDN. - **Faster load times:** Content is delivered with lower latency. - **Reduced server load:** Fewer requests reach the primary server. - **Better global performance:** Users receive consistent speed worldwide. This results in faster page delivery, lower server load, and more consistent performance across different geographic regions, especially during traffic spikes. ## Monitor Traffic and Server Metrics Monitoring provides visibility into server behavior during traffic changes. Real-time data helps detect issues before they escalate. - **Traffic levels:** Shows how many users are accessing the site. - **CPU and RAM usage:** Indicates resource consumption. - **Network throughput:** Measures data transfer efficiency. - **Disk and bandwidth:** Tracks storage and data limits. - **Error rates:** Highlights request failures or server issues. Real-time monitoring lets you act before small issues become big problems. It helps identify issues early and support quick decision-making. ### Using ServerAvatar for Real-Time Server Monitoring ServerAvatar includes built-in monitoring that provide real-time visibility into server performance and insights. Key metrics such as CPU usage, memory consumption, disk activity, and network usage are available in a single interface, allowing faster identification of performance issues during traffic spikes. ![Monitor Server - manage traffic spikes](https://serveravatar.com/wp-content/uploads/2026/02/image-43-1024x852.png) With centralized monitoring, users can quickly check abnormal usage patterns and take preventive action before service disruption occurs. ## Protecting Servers from Malicious Traffic Not all traffic is legitimate. Automated bots and malicious requests can overload servers. Not all traffic represents real users, and harmful requests can overload servers. Security measures help block unwanted activity. - **Firewalls:** Filter incoming requests based on rules. - **Rate limit:** Control number of requests every user. - **Bot filtering:** Blocks automated and harmful bots. - **Security rules:** Prevent suspicious or abusive traffic patterns. Security controls help ensure that server resources are used only by valid requests. Real visitors are great. Fake ones are just noise. [![Blog banner - ServerAvatar](https://serveravatar.com/wp-content/uploads/2025/09/728_90-Banner-1-1024x127.png)](https://serveravatar.com/?ref=blog)### Security Features with ServerAvatar ServerAvatar provides multiple built-in security features that help protect servers from malicious traffic and abuse during high traffic periods. These controls are designed to reduce unnecessary load on server resources while allowing legitimate traffic to pass through without disruption. **Firewall** allows users to define access rules that control incoming and outgoing connections at the server level. This helps block unauthorized access and restrict unwanted traffic before it reaches applications. ![ServerAvatar Firewall - manage traffic spikes](https://serveravatar.com/wp-content/uploads/2026/02/image-38.png) **Fail2Ban** automatically detects suspicious login attempts and abusive behavior by monitoring server logs. When repeated failures are detected, offending IP addresses are temporarily blocked, reducing the risk of brute-force attacks and resource exhaustion. ![ServerAvatar Fail2ban - manage traffic spikes](https://serveravatar.com/wp-content/uploads/2026/02/image-39.png) **AI Bot Blocker** operates at the application level to identify and block non-human or harmful bot traffic. Filtering automated requests, it helps prevent artificial traffic spikes that can degrade performance and consume server resources unnecessarily. ![ServerAvatar AI Bot Blocker - manage traffic spikes](https://serveravatar.com/wp-content/uploads/2026/02/image-40.png) **8G Firewall** feature provides comprehensive protection for your application through advanced firewall rules and security protocols. Configure and oversee security measures, intrusion detection systems, and threat mitigation strategies to ensure your application’s resilience against cyber threats. ![ServerAvatar 8G Firewall - manage traffic spikes](https://serveravatar.com/wp-content/uploads/2026/02/image-44-1024x447.png) Together, these security features help maintain server stability, improve performance under load, and ensure that resources are reserved for legitimate users. ## Backup and Recovery Planning Backups are a critical part of traffic spikes and disaster preparedness, ensuring your data remains safe even if something goes wrong. Backups protect data and ensure quick restoration after failures. A reliable recovery plan reduces business risk. - **Fast recovery:** Restores services quickly after issues. - **Data protection:** Prevents loss of critical information. - **No data loss:** Ensures content remains intact. - **Peace of mind:** Reduces stress during incidents. - **Reduced downtime:** Shortens service interruptions. Automated backups are your safety net when everything else fails. ### Backup and Recovery Planning with ServerAvatar ServerAvatar provides a complete backup system that includes **instant backups**, **scheduled backups**, and **archive backups**, giving you full control over how and when your data is protected. ![ServerAvatar Backup - manage traffic spikes](https://serveravatar.com/wp-content/uploads/2026/02/image-41.png) - **Instant backups:** Manually create backups before major changes or updates to reduce the risk of accidental data loss. - **Scheduled backups:** Automatically run backups at defined intervals to keep servers and applications consistently protected without manual effort. - **Archive backups:** Securely store older backups for long-term safety, making it easy to restore data from earlier points in time when needed. - **One-click recovery:** Restore backed-up data instantly with a single click, ensuring quick recovery after issues. This multi-layered backup approach enables fast recovery, minimizes downtime, and protects critical data during unexpected failures or traffic-related issues. By automating backups and offering flexible recovery options, ServerAvatar helps you maintain business continuity and peace of mind when it matters most. ## ServerAvatar Support to Handle Issues Without Delays Server performance issues during traffic spikes often require immediate attention. ServerAvatar’s **technical** **team** is **available** **24/7** to assist you with your queries and issues, ensuring help is always available whenever unexpected challenges arise. Whether you are dealing with sudden load increases, performance concerns, configuration questions, or recovery assistance, the ServerAvatar support team is accessible at all times. This continuous availability helps reduce downtime, resolve issues faster, and maintain service stability during critical traffic periods. Having round-the-clock support ensures that technical problems do not turn into prolonged outages. With ServerAvatar, expert assistance is always within reach, allowing you to focus on your application while server concerns are handled efficiently. ## Load Testing Before the Spike Happens Load testing evaluates how servers perform under heavy traffic. It identifies weak points before real users are affected. - **How many users your server can handle:** Determines maximum capacity. - **Where performance breaks:** Highlights resource bottlenecks. - **What needs improvement:** Guides optimization efforts. Think of it like a fire drill, you don’t want the first test during a real emergency. Testing allows improvements before real traffic spikes occur. ## Building a Long-Term Traffic Management Strategy Long-term planning focuses on scalability and sustained performance. A structured approach ensures servers remain reliable as traffic grows. - **Upgrading hosting as you grow:** Adds capacity to support demand. - **Periodic performance reviews:** Identifies areas for improvement. - **Improving site efficiency:** Reduces ongoing resource usage. - **Automating scaling:** Adjusts resources automatically. - **Infrastructure upgrades:** Enhances server capability. - **Resource optimization:** Uses available resources efficiently. - **Reviewing performance regularly:** Maintains long-term stability. Planning for growth ensures continued stability as traffic increases over time. ## How ServerAvatar Helps Manage Traffic Spikes Managing traffic spikes requires visibility, scalability, and control over server resources. ServerAvatar simplifies this process by offering tools for server monitoring, performance optimization, and resource management from a single platform. With support for scaling, automation, and ongoing performance tracking, ServerAvatar enables teams to prepare their servers for sudden traffic increases while maintaining uptime and consistent performance over time. ## Conclusion Traffic spikes don’t have to be stressful or dangerous for your website if your server is prepared in advance. By choosing the right hosting environment, optimizing performance, using caching and CDN, monitoring resources in real time, and securing your server against malicious traffic, you can handle sudden surges with confidence. ServerAvatar simplifies this entire process by combining scaling, monitoring, caching, CDN integration, and security features into one centralized platform. With proper planning and the right setup, traffic spikes become an opportunity for growth rather than a risk to your uptime. ## FAQs ### 1. What is the best way to prepare a server for traffic spikes? The best approach is to plan ahead by optimizing your website, enabling caching, using scalable hosting, monitoring server performance, and applying security measures. Preparation reduces the risk of slowdowns or downtime during sudden traffic increases. ### 2. Can server scaling prevent website crashes during high traffic? Server scaling helps prevent crashes by adjusting resources based on traffic demand. Vertical scaling increases server capacity, while horizontal scaling distributes traffic across multiple servers to improve stability. ### 3. How does caching help during traffic spikes? Caching reduces server workload by serving previously generated content instead of processing the same requests repeatedly. This improves response times and allows the server to handle more users efficiently. ### 4. Why is monitoring important during traffic spikes? Monitoring provides real-time visibility into server performance, allowing early detection of high resource usage or errors. This enables quick action before small issues turn into outages. ### 5. How do security features help manage traffic spikes? Security features block malicious requests, bots, and abusive behavior that can overload servers. By filtering unwanted traffic, server resources remain available for legitimate users during high traffic periods. **Categories:** Blog, Guide, Linux, Others, Tutorials, Ubuntu, Uncategorized **Tags:** Handle Server Overload, Prevent Server Downtime, server load, Server Management, Server Traffic Management, Traffic Handling Tips, Traffic Spikes, Web Traffic Management --- ### [Managed or Self-Managed Hosting? Find the Best Fit For You](https://serveravatar.com/managed-or-self-managed-hosting/) **Published:** February 5, 2026 **Author:** Meghna Meghwani **Content:** [![Blog banner - ServerAvatar](https://serveravatar.com/wp-content/uploads/2025/09/728_90-Banner-3-1024x127.png)](https://serveravatar.com/?ref=blog)Picking the right hosting setup is more than a technical decision, it shapes how reliable, secure, and scalable your website will be over time. When choosing between Managed or Self-Managed Hosting, many businesses and developers feel unsure about which path fits their needs best. With multiple hosting options available today, managed hosting and self-managed hosting remain two widely used approaches, each serving very different needs depending on your technical comfort level and business priorities. This guide explains hosting from the ground up, highlights the real differences between managed and self-managed environments, and helps you decide which option aligns best with your goals. ## What Is Hosting? Web hosting is service that allow your website to be view on internet. Whether you are running a personal blog, a business website, an online store, or a web application, your website needs a location where all its data can live. This includes files, images, databases, and the code that makes everything work. That location is known as a server. A server is a high-performance computer that operates continuously, day and night. Its job is to store your website’s data and send it to visitors when they try to access your site. When someone enters your domain name into a web browser, the browser sends a request to the server. The server then processes that request and delivers the website’s content so it can appear on the user’s screen. ![hosting - Managed or Self-Managed Hosting](https://serveravatar.com/wp-content/uploads/2026/02/image-26.png) In simple words, hosting is what keeps your website live on the internet and accessible to visitors anytime. ### Why Do You Need the Hosting? A website can’t go live on internet without web hosting. Hosting supplies the technical setup needed to store your website’s content and deliver it safely and efficiently to users anywhere in the world. Web hosting is important because it: - Saves all your website files, images, and databases - Keeps your website available online at all times - Helps pages load quickly for a better user experience - Protects your data through security features - Supports traffic increases as your website grows Without a hosting service, your website would remain only on your personal computer and would not be visible or accessible to other users online. ### How Does the Hosting Work? When you buy a hosting plan, you are basically leasing storage space and system resources on a server. Your website’s files are placed on that server, and your domain name is linked to it so visitors can find your site online. When someone types your website’s URL into a browser, the following steps take place: - The browser identifies the server connected to the domain name - The server receives and handles the request - The website’s data is delivered back to the visitor’s browser This entire exchange happens within moments, making it possible for users to browse and interact with your website smoothly. ### Understanding Hosting Responsibilities Before comparing managed hosting with self-managed hosting, it’s essential to understand what server management actually means. Hosting goes beyond simply renting server space, it involves handling a range of technical tasks that keep a website secure, fast, and reliable. Server management typically includes: - Installing and updating the operating system - Setting up and configuring web servers such as Apache or Nginx - Managing databases and related services - Implementing security measures, including firewalls and system hardening - Creating and maintaining regular backups - Optimizing server performance for speed and stability - Monitoring uptime and overall server health - Identifying and resolving errors or downtime issues The main difference between managed and self-managed hosting comes down to responsibility, whether these tasks are taken care of by you or handled by the hosting provider. ## Different Types of Hosting There are several types of web hosting available, each suited to different website requirements and technical experience levels: - **Shared Hosting:** Multiple websites operate on a single server and share its resources - **VPS Hosting:** A virtual private server that provides dedicated resources within a shared environment - **Cloud Hosting:** Websites are hosted across a network of connected servers for better reliability - **Dedicated Hosting:** One entire server is assigned to a single user or website - **Managed Hosting:** The hosting provider takes care of server setup, maintenance, and management - **Self-Managed Hosting:** The user has full control and is responsible for managing the server ![different types of hosting - Managed or Self-Managed Hosting](https://serveravatar.com/wp-content/uploads/2026/02/image-27.png) Among these options, managed and self-managed hosting stand out as the most significant choices, especially when it comes to balancing control, responsibility, and overall ease of use. ## How Hosting Impacts Your Website’s Success The performance for website is tied to quality of hosting. Low-quality hosting can cause slow page loads, frequent outages, and increased security risks. In contrast, dependable hosting enhances user experience, supports better search engine visibility, and builds trust in your brand. Your hosting decision impacts several key areas: - **Website speed and performance:** Quality hosting ensures fast loading times and smooth operation for visitors. - **Security and data protection:** A reliable host helps safeguard your site against malware, cyberattacks, and data loss. - **Uptime and availability:** Good hosting keeps your website online consistently without unexpected interruptions. - **Scalability for future growth:** The right hosting solution makes it easy to manage higher traffic and growing resource needs. - **Overall user experience:** Stable and responsive hosting creates a positive experience that encourages users to return. For these reasons, understanding web hosting is an essential first step before choosing between managed and self-managed hosting solutions. ## What Is Managed Hosting? Managed hosting is a type of service where the hosting provider handles the majority of technical tasks on your behalf. This typically includes server configuration, security management, software updates, performance monitoring, regular backups, and, in many cases, issue resolution. Simply put, managed hosting allows you to concentrate on building and running your website while experienced professionals take care of the server operations. ![managed hosting - Managed or Self-Managed Hosting](https://serveravatar.com/wp-content/uploads/2026/02/image-28.png) ### Key Benefits of Managed Hosting Managed hosting usually comes with a comprehensive set of services included in a single plan. These features are designed to ensure reliability, strong security, and worry-free server management. Common managed hosting features include: - Automatic server setup and initial configuration - Ongoing operating system and software updates - Integrated security tools and malware protection - Scheduled backups with easy restore options - Continuous performance monitoring and optimization - Access to expert technical support Because of these built-in services, managed hosting is particularly well suited for non-technical users, startups, and businesses that are scaling their online presence. ### Pros of Managed Hosting Managed hosting is ideal for users who want a hassle-free and reliable website experience. The main benefit is that the hosting provider takes care of all server management tasks, including security, updates, and performance optimization. The key advantages of managed hosting include: - No need for advanced technical skills or server management knowledge - Expert handling of server setup, updates, and ongoing maintenance - Enhanced security with firewalls, malware scanning, and regular backups - Improved uptime and continuous performance monitoring - Direct access to professional technical support when needed ### Cons of Managed Hosting The primary drawback of managed hosting is cost. Because the provider handles most of the technical responsibilities, managed plans are generally more expensive than self-managed alternatives. Another limitation is that you may have less control over certain server settings, and some advanced configurations or custom software installations might not be possible. Other common downsides include: - Higher monthly or annual hosting fees - Limited ability to customize server-level settings - Reduced control over software and configurations - Reliance on the hosting provider’s policies and support ### Who Should Consider Managed Hosting? Managed hosting works best for: - Small businesses that don’t have a dedicated IT team - Bloggers and content creators who want to focus on content, not servers - E-commerce websites that prioritize sales over technical management - Agencies managing multiple client websites ## What Is Self-Managed Hosting? Self-managed hosting is exactly what it sounds like: you manage everything on the server yourself. You choose the operating system, install software, handle security, and optimize performance. With self-managed hosting, you are in control of the entire server environment. ![self managed hosting - Managed or Self-Managed Hosting](https://serveravatar.com/wp-content/uploads/2026/02/image-29.png) ### Key Benefits of Self-Managed Hosting Self-managed hosting provides raw access to your server without additional management services. While this gives you freedom, it also means more responsibility. - Full root or administrative access - Freedom to install any software or stack - Custom server configuration - Manual updates and maintenance - Self-managed security and backups This model is best suited for users who are comfortable working with servers. ### Pros of Self-Managed Hosting Self-managed hosting is ideal for users who want complete control over their server. You decide how the server is configured, which software is installed, and how security is handled. **Key advantages include:** - Full control over the server environment - Freedom to install and customize any software - Lower hosting costs compared to managed plans - Ideal for developers and advanced users - Better suited for custom or experimental setups ### Cons of Self-Managed Hosting The biggest challenge with self-managed hosting is responsibility. You are fully accountable for server security, updates, performance optimization, and troubleshooting. **Common drawbacks include:** - Requires strong technical and server management knowledge - No built-in support for server-level issues - Higher risk of security vulnerabilities if not maintained properly - Time-consuming maintenance and monitoring - Performance depends entirely on your configuration skills ### Who Should Consider Self-Managed Hosting? Self-managed hosting works well for: - Developers and tech-savvy users - Businesses with internal IT teams - Projects requiring custom server configurations - People who want complete control over their environment ## Managed vs. Self-Managed Hosting To help you decide, let’s compare the two across key decision areas: **1. Ease of Use** - **Managed Hosting:** Extremely user-friendly. Set up is fast, and most technical tasks are handled for you. - **Self-Managed Hosting:** Requires technical knowledge. You are responsible for everything. **2. Control and Customization** - **Managed:** Limited control. You get what the provider supports. - **Self-Managed:** Full control over software, configurations, and environment. **3. Security** - **Managed:** Built-in firewalls, monitoring, and proactive patches. - **Self-Managed:** Security is up to you. You must install and maintain protections. **4. Cost** - **Managed:** Higher monthly cost due to included services. - **Self-Managed:** Lower cost, but remember, it requires your time and effort. **5. Performance & Stability** Both can be fast, but: - **Managed:** Providers often optimize performance and caching. - **Self-Managed:** Performance depends on your server tuning. **6. Technical Support** - **Managed:** Dedicated support team included. - **Self-Managed:** No formal support, you rely on your own skills or community help. ## How ServerAvatar Simplifies Managed and Self-Managed Hosting **What is ServerAvatar?** [ServerAvatar](https://serveravatar.com/) is a platform to simplify the hosting and management of servers and applications. It simplifies the process of deploying and managing PHP and Node.js based web applications on servers. ![ServerAvatar Dashboard - Managed or Self-Managed Hosting](https://serveravatar.com/wp-content/uploads/2026/02/image-30.png) ServerAvatar is designed to make cloud hosting and management simpler, faster, and more reliable. Unlike traditional hosting providers, ServerAvatar gives users the flexibility to choose between **Managed Servers** and **Self-Managed Servers**. ServerAvatar offers both options within a single platform. ## Managed Servers with ServerAvatar ServerAvatar’s **Managed Server** option is ideal for users who want the benefits of cloud hosting without dealing with the cloud provider’s account. With managed servers, ServerAvatar handles the entire server lifecycle, from provisioning to ongoing maintenance, so you can focus on your website or business. ![managed server - Managed or Self-Managed Hosting](https://serveravatar.com/wp-content/uploads/2026/02/image-31-1024x482.png) These servers are provisioned and maintained directly by ServerAvatar on trusted infrastructure. You don’t need to create your own cloud provider account. ### What ServerAvatar Manages for You With managed servers, ServerAvatar takes care of: - Server provisioning and setup - Operating system and security updates - Web server and stack configuration - Performance optimization - Monitoring and stability - Core server maintenance This approach removes the complexity typically associated with cloud hosting while still delivering high performance and reliability. ### Who Should Use ServerAvatar Managed Servers Managed servers are best suited for: - Businesses without a dedicated DevOps team - Agencies managing multiple client websites - Bloggers and content creators - E-commerce stores that need stability and security - Anyone who prefers a hands-off hosting experience You can get more details about Managed Server by navigating to this link: ## Self-Managed Servers with ServerAvatar For users who want full control over their infrastructure, ServerAvatar also offers **Self-Managed Servers**. This option allows you to connect your own cloud server from any cloud provider and manage it through the ServerAvatar dashboard. ![Self managed server - Managed or Self-Managed Hosting](https://serveravatar.com/wp-content/uploads/2026/02/image-32-1024x486.png)You retain full ownership and control of your server while ServerAvatar provides a clean interface and powerful tools to simplify server management. ### Supported Cloud Providers to Integrate ServerAvatar supports integration of popular cloud provider accounts to create self-managed servers from major cloud platforms, including: - Amazon Lightsail - DigitalOcean - Vultr - Linode - Hetzner You can integrate your preferred provider, create a server, and connect it to ServerAvatar using guided installation steps. Additionally, you can also create a server from any cloud provider using the Direct Method. ### What You Control in Self-Managed Servers With self-managed servers, you are responsible for: - Connect server from any cloud provider - Integrate a popular cloud provider account - Connect the server with or without an IP address and a root password ServerAvatar acts as a management layer, helping you deploy and manage applications efficiently without removing control. ### **Who Should Use ServerAvatar Self-Managed Servers** Self-managed servers are ideal for: - Developers and system administrators - Teams with technical expertise - Custom or high-performance applications - Projects requiring specific server configurations You can get more details about the Self Managed Server by navigating to this link: ## Managed vs Self-Managed Hosting with ServerAvatar: Choosing the Right Option One of the biggest advantages of using ServerAvatar is that you don’t have to commit to a single hosting approach. You can choose managed servers for simplicity or self-managed servers for flexibility, based on your project’s needs. **Choose ServerAvatar Managed Servers if:** - You want minimal server responsibilities - Security and stability are top priorities - You prefer expert-managed infrastructure - You want to save time and operational effort **Choose ServerAvatar Self-Managed Servers if:** - You want full control over your cloud server - You already use a preferred cloud provider - You have the technical expertise to create servers Both options give you access to ServerAvatar’s application management tools, clean dashboard, and scalable architecture. ## Why ServerAvatar Is a Smart Choice for Both Hosting Models Unlike traditional hosting platforms that force users into a single approach, ServerAvatar is built for flexibility. It supports both beginners and advanced users without compromising performance or control. By offering managed and self-managed servers under one platform, ServerAvatar allows you to: - Start simple and scale technically over time - Manage multiple servers from one dashboard - Reduce dependency on multiple tools - Maintain consistency across projects This makes ServerAvatar a practical long-term solution for individuals, agencies, and growing businesses. [![Blog banner - ServerAvatar](https://serveravatar.com/wp-content/uploads/2025/09/728_90-Banner-1-1024x127.png)](https://serveravatar.com/?ref=blog)## Detailed Use Cases to Help You Decide To make this even clearer, here are some real-world scenarios: **🔹 Use Case: Small Business Owner** If you run a business and want to focus on customers, sales, and products, not servers, managed hosting is a clear choice. You benefit from expert support, automatic backups, and superior security. **Recommended:** Managed Hosting **🔹 Use Case: Developer or Freelancer** If you love tinkering with servers, want full control, and can troubleshoot issues, self-managed hosting gives you freedom and flexibility. **Recommended:** Self-Managed Hosting **🔹 Use Case: Tech Startup** Startups with an in-house team may prefer self-managed hosting initially to control costs and customize the environment. But if your team is small and busy, managed hosting might reduce workload. **Recommended:** Depends on Team Resources ## How to Choose: A Quick Checklist Ask yourself: 1. Do I want to focus on my business rather than servers? 2. Do I have technical expertise or a team to manage hosting? 3. Is budget my most important factor? 4. How critical is uptime and security for my site? 5. Do I need advanced customization? If most answers point to **s**implicity, security, and support >> Managed Hosting If most answers point to control, flexibility, and cost savings >> Self-Managed Hosting ## Which Hosting Option Is Best for You? Your decision should be based on your technical skills, business goals, and available resources. Choose managed hosting if you want: - Simplicity and peace of mind - Strong security and reliability - Professional support - More time to focus on growth Choose self-managed hosting if you want: - Full control and customization - Lower upfront costs - Advanced server-level access - A hands-on technical experience ## Conclusion Choosing between managed and self-managed hosting depends on how much control, responsibility, and technical involvement you want in running your website. Managed hosting is ideal for users who prioritize simplicity, security, and reliability, allowing them to focus on growth while experts handle server management. Self-managed hosting, on the other hand, offers full control and flexibility for developers and technical teams who are comfortable managing servers themselves. With ServerAvatar, you don’t have to compromise; its platform supports both managed and self-managed servers, giving you the freedom to choose the right approach for each project and scale confidently as your needs evolve. ## FAQs ### 1. Is managed hosting better than self-managed hosting? Managed hosting is not necessarily better, it is simply more convenient. It is ideal for users who want ease of use, security, and support. Self-managed hosting is better for users who want full control, customization, and lower costs and have the technical expertise to manage servers. ### 2. Can beginners use self-managed hosting? Beginners can use self-managed hosting, but it is not recommended unless they are willing to learn server management. Without proper knowledge, self-managed hosting can lead to security risks, downtime, and performance issues. ### **3. Does ServerAvatar support both managed and self-managed hosting?** Yes, ServerAvatar offers both Managed Servers and Self-Managed Servers, allowing users to choose the level of control and responsibility that best suits their needs, all from a single platform. ### **4. Do I need a cloud provider account for ServerAvatar Managed Servers?** No, with ServerAvatar Managed Servers, you do not need to create or manage a cloud provider account. ServerAvatar handles server provisioning and maintenance for you. ### **5. Which cloud providers are supported for ServerAvatar Self-Managed Servers?** ServerAvatar supports self-managed servers from popular cloud providers such as Amazon Lightsail, DigitalOcean, Vultr, Linode, and Hetzner. You can also connect servers from any other providers using the Direct Method. **Categories:** Blog, Cloud Platforms, Guide, Others, Tutorials, Uncategorized **Tags:** Cloud Hosting, Managed Cloud Hosting, Managed Hosting, Managed vs Self-Managed Hosting, Self-Managed Hosting, Server Management, Unmanaged Hosting, Vps hosting --- ### [The Future of Web Hosting: Emerging AI Trends You Can’t Ignore](https://serveravatar.com/future-of-web-hosting/) **Published:** February 3, 2026 **Author:** Meghna Meghwani **Content:** [![Blog banner - ServerAvatar](https://serveravatar.com/wp-content/uploads/2025/09/728_90-Banner-3-1024x127.png)](https://serveravatar.com/?ref=blog)Web hosting has always been the backbone of the internet, and the future of web hosting is shaping how every website, application, and online service operates. From storing data and processing requests to delivering content to users around the world, hosting plays a critical role in digital experiences. For years, web hosting evolved slowly, driven by faster hardware, better networks, and more reliable infrastructure. Today, however, the industry is undergoing a much deeper transformation. Artificial Intelligence (AI) is reshaping how web hosting works at its core. Web Hosting platforms are becoming smarter, more adaptive, and increasingly autonomous. Instead of relying entirely on manual configuration and human monitoring, modern hosting environments are learning from data, predicting problems, and optimizing themselves in real time. ## Why AI Is Becoming Essential in Web Hosting The modern web is far more complex than it was even a decade ago. Websites are no longer static pages. They are dynamic applications with databases, APIs, third-party integrations, real-time user interactions, and unpredictable traffic patterns. Traditional hosting methods struggle to keep up with this complexity because they are mostly reactive. A problem happens first, and then someone fixes it. ![AI Is Becoming Essential - Future of Web Hosting](https://serveravatar.com/wp-content/uploads/2026/02/image-7.png) AI changes this approach entirely by enabling hosting systems to: - Continuously analyze server and application data - Learn from historical usage patterns - Predict future behavior - Take automated actions without human intervention In simple terms, AI allows hosting environments to think ahead instead of reacting late. ### Edge Computing and AI One of the biggest shifts in modern web hosting is the move away from fully centralized data centers. As websites and applications demand faster response times, AI-powered edge computing is becoming increasingly important. Edge computing allows data to be processed closer to the end user rather than routing every request to a central server. When combined with AI, hosting platforms can intelligently decide where workloads should run based on location, latency, and network conditions. AI systems analyze real-time traffic distribution and automatically route requests to the nearest or most efficient edge node. This results in faster page loads, smoother streaming, and improved performance for global audiences. As more applications rely on real-time data, such as IoT platforms, online gaming, and live collaboration tools, AI-driven edge hosting will become a standard part of future infrastructure. ### Predictive Performance Management One of the most impactful uses of AI in web hosting is predictive performance management. Rather than waiting for a server to slow down or crash, AI systems monitor thousands of performance signals simultaneously. These signals include CPU usage, memory consumption, disk activity, network traffic, and application response times. By analyzing trends over time, AI can identify early warning signs of performance degradation. ![Predictive Performance Management - Future of Web Hosting](https://serveravatar.com/wp-content/uploads/2026/02/image-9.png) **Why this matters:** - Traffic spikes can be anticipated before they occur - Performance bottlenecks are addressed proactively - Users experience fewer slowdowns and outages For high-traffic websites, online stores, and SaaS applications, predictive performance management can be the difference between smooth growth and constant firefighting. ### AI-Driven Auto Scaling Scaling infrastructure has traditionally required careful planning and manual configuration. Many website owners either over-provision resources to stay safe or under-provision and risk downtime. AI-driven auto scaling eliminates this guesswork. Instead of using fixed rules, AI analyzes real usage patterns, historical traffic data, and external factors such as time of day or seasonal trends. This allows hosting systems to scale resources dynamically and intelligently. **Benefits include:** - Faster response during traffic surges - Lower infrastructure costs - No manual intervention required - Better performance consistency As websites become more unpredictable in traffic behavior, intelligent scaling will become a baseline expectation rather than a premium feature. ### Smarter Security Through AI Security threats have grown more sophisticated over time. Simple firewall rules and signature-based detection systems are no longer enough to stop modern attacks. AI brings a behavioral approach to security. Instead of relying only on known attack patterns, AI systems learn what “normal” behavior looks like for a server, application, or user. When something deviates from that baseline, the system flags or blocks it instantly. ![Smarter Security Through AI - Future of Web Hosting](https://serveravatar.com/wp-content/uploads/2026/02/image-10.png) **AI improves hosting security by:** - Detecting abnormal login activity - Identifying suspicious traffic patterns - Blocking attacks in real time - Reducing false positives Because AI systems continuously learn, they become more effective over time, adapting to new threats as they emerge. ### Decentralized Hosting Models and AI Coordination Another emerging trend is the exploration of decentralized hosting models. Instead of relying entirely on centralized cloud providers, decentralized systems distribute hosting resources across multiple locations and networks. AI is crucial in making decentralization practical. Intelligent systems can: - Coordinate workloads across distributed nodes - Monitor performance and availability in real time - Redirect traffic away from failing or congested nodes - Maintain redundancy without manual oversight While decentralized hosting is still evolving, AI-driven coordination makes it far more viable and resilient than earlier attempts at distributed infrastructure. ### Self-Healing Hosting Infrastructure Downtime has always been one of the biggest fears in web hosting. Even short outages can lead to lost revenue, damaged reputation, and frustrated users. AI introduces the concept of self-healing infrastructure. In a self-healing environment, the hosting system can automatically detect failures and take corrective action without human involvement. **Examples include:** - Restarting crashed services - Reallocating workloads to healthy servers - Fixing configuration inconsistencies - Automatically isolating failing components The result is dramatically reduced downtime and a more resilient hosting environment. ## AI and Sustainable Web Hosting Sustainability is becoming a major concern in the hosting industry as data centers consume increasing amounts of energy. AI is playing a growing role in reducing the environmental impact of hosting operations. AI-driven energy optimization systems can: - Adjust server workloads to reduce power consumption - Optimize cooling systems based on real-time temperature data - Shift workloads to more energy-efficient regions - Reduce idle resource usage automatically ![AI and Sustainable Web Hosting - Future of Web Hosting](https://serveravatar.com/wp-content/uploads/2026/02/image-11.png) By improving efficiency at every layer, AI helps hosting providers lower their carbon footprint while maintaining performance and reliability. In the future, sustainability will be a competitive advantage, not just a nice-to-have feature. ### AI-Based Website Performance Optimization Website speed is no longer optional. It affects directly to conversion rates, user experience, and search engine rankings. AI helps hosting platforms optimize performance in a much more precise way than traditional methods. Instead of applying generic caching or optimization rules, AI analyzes how users actually interact with a website. Based on this data, AI can: - Adjust caching strategies dynamically - Optimize database queries - Improve asset delivery - Predict which pages or resources will be accessed next This leads to faster load times and more stable performance, even during periods of heavy traffic. ### Managing Containers and Serverless Workloads with AI Modern web hosting is moving beyond traditional virtual machines. Containers and serverless architectures are changing how applications are deployed and scaled, and AI plays a key role in managing this complexity. AI-powered orchestration tools can: - Automatically balance container workloads - Detect inefficient resource usage - Predict scaling needs before bottlenecks appear - Optimize application placement across infrastructure In serverless environments, AI helps manage execution timing, memory usage, and cold-start optimization. This allows developers to focus purely on writing code while the hosting environment adapts dynamically in the background. As container-based and serverless hosting grows, AI will be essential for keeping systems efficient, cost-effective, and reliable. ### AI in DevOps and Infrastructure Management DevOps teams are under constant pressure to deploy faster while maintaining stability. AI is becoming an important assistant in this process. ![AI in DevOps and Infrastructure - Future of Web Hosting](https://serveravatar.com/wp-content/uploads/2026/02/image-12.png) AI-powered DevOps tools can: - Detect configuration risks before deployment - Predict the impact of infrastructure changes - Identify patterns that lead to failures - Automate routine operational tasks This reduces human error and allows teams to focus more on innovation rather than maintenance. As infrastructure grows more complex, AI will play a key role in keeping systems manageable and reliable. ### Intelligent Backups and Disaster Recovery Backups are essential, but traditional backup strategies are often static and inefficient. AI brings intelligence to backup and recovery processes. Instead of running backups at fixed intervals, AI can: - Detect high-risk changes - Trigger additional backups automatically - Prioritize critical data - Recommend the most reliable recovery points In the event of data loss or system failure, intelligent recovery reduces downtime and minimizes data loss. ### Regulatory Compliance and AI Monitoring As data privacy regulations become stricter worldwide, hosting environments must comply with complex legal requirements. AI can assist by continuously monitoring systems for compliance risks. AI-based compliance monitoring can: - Detect unauthorized data access - Identify misconfigured storage or permissions - Alert administrators to potential violations - Assist with audit preparation This proactive approach reduces legal risk and ensures hosting environments remain compliant as regulations evolve. ### AI-Powered Customer Support in Hosting Support is an area where AI is already making a visible impact. Hosting providers are increasingly using AI-powered systems to improve customer experience. AI-assisted support tools can: - Provide instant answers to common questions - Offer step-by-step troubleshooting guidance - Understand context from previous interactions - Operate 24/7 without delays This doesn’t eliminate human support but enhances it, allowing technical experts to focus on complex issues while AI handles repetitive tasks. ## AI-Driven Hosting Analytics and Decision Making Another important development is the rise of AI-powered analytics dashboards. Instead of overwhelming users with raw metrics, AI interprets data and provides meaningful insights. ![AI-Driven Hosting Analytics - Future of Web Hosting](https://serveravatar.com/wp-content/uploads/2026/02/image-13.png) These insights may include: - Performance improvement suggestions - Security risk assessments - Cost optimization recommendations - Capacity planning forecasts By turning complex data into actionable intelligence, AI makes hosting more accessible, even for users without deep technical expertise. ## Human + AI Collaboration in Hosting Operations Despite rapid automation, the future of web hosting is not about removing humans from the equation. Instead, it is about collaboration between AI systems and human expertise. AI excels at handling repetitive tasks, analyzing massive datasets, and reacting instantly to changes. Humans, on the other hand, are still essential for strategic decisions, creative problem-solving, and ethical oversight. ![Human + AI Collaboration - Future of Web Hosting](https://serveravatar.com/wp-content/uploads/2026/02/image-14.png) The most successful hosting environments will use AI to augment human capabilities rather than replace them. This hybrid approach leads to more reliable systems, better decision-making, and greater trust. ## Personalized Hosting Experiences Not all websites have the same needs. A personal blog, an e-commerce store, and a large SaaS platform all require different hosting strategies. AI enables personalized hosting by analyzing: - Traffic behavior - Resource usage - Website type - Industry benchmarks Based on this analysis, hosting environments can offer tailored recommendations, optimizations, and configurations that fit each website’s actual requirements. ## Cost Efficiency Through Intelligent Resource Management One of the biggest advantages of AI-driven hosting is cost efficiency. By allocating resources only when and where they are needed, AI reduces waste. This results in: - Lower infrastructure costs - Fewer emergency fixes - Reduced downtime-related losses - Better long-term scalability For businesses of all sizes, intelligent hosting helps balance performance and cost more effectively. [![Blog banner - ServerAvatar](https://serveravatar.com/wp-content/uploads/2025/09/728_90-Banner-1-1024x127.png)](https://serveravatar.com/?ref=blog)## What the Future of Web Hosting Looks Like As AI adoption increases, expectations around web hosting will continue to rise. The future of hosting will be defined by: - Predictive, not reactive, systems - Minimal downtime through self-healing infrastructure - Stronger, smarter security - Automated optimization at every level - Personalized, data-driven hosting environments Hosting platforms that fail to adopt AI will struggle to keep up with these expectations. ## Preparing for an AI-First Hosting Future The future of web hosting will favor platforms that are designed with AI at their core rather than treating it as an add-on feature. AI-first hosting environments will be more adaptive, efficient, and resilient. Website owners and developers should begin preparing by: - Choosing flexible, automation-friendly hosting solutions - Embracing modern architectures like containers and APIs - Understanding how data drives performance and security - Staying informed about emerging AI capabilities Those who adapt early will be better positioned to scale, innovate, and compete in an increasingly intelligent web ecosystem. ## Conclusion AI is transforming web hosting from a reactive, manual process into an intelligent, proactive, and self-optimizing system. By enabling predictive performance management, automated scaling, smarter security, and personalized hosting experiences, AI ensures websites and applications run faster, more efficiently, and more reliably. The future of web hosting belongs to platforms that embrace AI at their core, allowing businesses to reduce costs, enhance user experiences, and stay competitive in an increasingly complex digital landscape. ## FAQs ### 1. How does AI improve website performance? AI analyzes traffic patterns, user behavior, and server metrics to optimize caching, resource allocation, and database queries. This leads to faster load times, reduced downtime, and smoother user experiences. ### 2. Can AI in hosting prevent security threats? Yes. AI detects unusual behavior, suspicious traffic, and potential attacks in real time. It can automatically block threats and adapt to new attack patterns, reducing risks while lowering false positives. ### 3. How does AI help with cost efficiency? AI optimizes resource usage by scaling servers and applications based on actual demand. This prevents over-provisioning, reduces energy consumption, and lowers infrastructure costs while maintaining performance. ### 4. Will AI-driven hosting benefit small websites or just large enterprises? AI-driven hosting benefits websites of all sizes. Small websites gain cost efficiency and optimized performance, while large enterprises benefit from scalability, predictive management, and advanced security. ### 5. Is AI replacing human roles in hosting? Not entirely, AI handles repetitive tasks, monitoring, and predictive analysis, while humans focus on strategy, innovation, and decision-making. Most effective approach is hybrid one where AI augments human capabilities both are. ## Stop Wasting Time on Servers. Start Building Instead. You didn’t start your project to babysit servers. Let **ServerAvatar** handle deployment, monitoring, and backups — so you can focus on growth. Deploy **WordPress, Laravel, N8N**, and more in minutes. No DevOps required. No command line. No stress. [ 🚀 Try Free ](https://app.serveravatar.com) [ 🌐 Learn More ](https://serveravatar.com/) Trusted by 10,000+ developers and growing. **Categories:** Blog, Guide, Others, Uncategorized **Tags:** AI, AI Web Hosting, AI-Powered Web Hosting, Artificial Intelligence, Artificial Intelligence in Hosting, Future of AI Web Hosting, Future of Web Hosting, Web Hosting, Web Hosting Trends --- ### [How to Scale Your Managed Cloud Hosting Business](https://serveravatar.com/scale-managed-cloud-hosting-business/) **Published:** February 4, 2026 **Author:** Meghna Meghwani **Content:** [![Blog banner - ServerAvatar](https://serveravatar.com/wp-content/uploads/2025/09/728_90-Banner-3-1024x127.png)](https://serveravatar.com/?ref=blog)The Managed Cloud Hosting Business is growing faster than ever. Businesses are moving away from traditional shared hosting and unmanaged servers, opting instead for reliable, secure, and fully managed cloud environments. For hosting providers, this surge in demand creates significant opportunities, along with serious operational and competitive challenges. Scaling a managed cloud hosting business is not just about adding more servers or signing up more clients. It’s about building systems that can handle growth without breaking operations, support, or customer trust. In this guide, we’ll walk through the basics of managed cloud hosting, scaling, common mistakes, and then show how ServerAvatar can support sustainable growth when you’re ready. ## What Is a Managed Cloud Hosting Business? A managed cloud hosting business provides cloud servers along with full management and support. Unlike unmanaged hosting, where customers handle everything themselves, managed hosting providers take care of: - **Server setup and configuration:** Preparing cloud servers with the required operating system, network settings, and optimized configurations for reliable performance. - **Security hardening and firewalls:** Implementing security best practices, firewalls, and access controls to protect servers from threats and unauthorized access. - **Software installation and updates:** Installing required software stacks and keeping them updated to ensure compatibility, performance, and security. - **Performance monitoring:** Continuously tracking server and application performance to identify and resolve issues before they impact users. - **Backups and recovery:** Creating regular backups and ensuring fast data recovery in case of failures, data loss, or security incidents. - **Ongoing technical support:** Providing continuous assistance to handle server issues, maintenance tasks, and customer queries. ![Managed Cloud Hosting Business](https://serveravatar.com/wp-content/uploads/2026/02/image-15.png) Customers pay not just for infrastructure, but for peace of mind. This makes managed hosting more valuable and more complex to operate. ### Why Managed Cloud Hosting Is in High Demand More businesses are choosing managed cloud hosting because it removes technical complexity while delivering reliability and peace of mind. As digital operations grow, so does the need for expert-managed infrastructure. - **Businesses lack in-house server expertise:** Many companies don’t have dedicated teams to manage complex server environments. - **Downtime directly impacts revenue:** Even short outages can lead to lost sales, customers, and brand trust. - **Security threats are increasing:** Cyberattacks and vulnerabilities require constant monitoring and expert handling. - **Cloud infrastructure is flexible but complex:** While powerful, cloud platforms require proper configuration and management. - **Companies want predictable costs and support:** Managed hosting offers clear pricing and dependable technical assistance. For hosting providers, this means higher margins than shared hosting, but also higher responsibility. ### Why Scaling Really Means for Managed Cloud Hosting Scaling is not about doing more work; it’s about building systems that allow growth without increasing operational pressure. True scaling focuses on efficiency, consistency, and automation. **It does not simply mean:** - **Adding more customers:** Growth without systems leads to chaos, not scalability. - **Selling bigger servers:** Larger infrastructure alone doesn’t solve operational bottlenecks. - **Hiring more support staff:** Scaling teams endlessly increases costs instead of efficiency. **True scaling means:** - **Handling more customers without proportional effort:** Systems grow, but workload per customer stays controlled. - **Delivering consistent performance and uptime:** Every customer receives the same reliable experience. - **Maintaining fast support and clear communication:** Support quality remains high even as demand increases. - **Automating repetitive operational tasks:** Automation replaces manual, error-prone workflows. - **Protecting your brand reputation as you grow:** Consistency builds long-term trust and credibility. If growth increases stress instead of efficiency, you’re not scaling, you’re stretching. ## Common Challenges for Hosting Businesses Before discussing solutions, it’s important to understand where most hosting businesses struggle. - **Manual Server Management:** Provisioning servers one by one, logging in via SSH, and maintaining custom scripts doesn’t scale. It increases errors and slows down onboarding. - **Lack of Central Visibility:** Without a centralized dashboard, tracking server health, application performance, and issues becomes difficult. - **Disorganized Customer and Billing Management:** As customers grow, managing subscriptions, payments, invoices, and taxes manually leads to mistakes and revenue leakage. - **Support Overload:** Without structured ticketing and clear ownership, support requests pile up and response times suffer. - **Inconsistent Customer Experience:** Different setups, tools, and workflows create confusion for both customers and teams. - **Branding Limitations:** Using third-party dashboards weakens brand identity and trust. - **Billing and Subscription Complexity:** Manual invoicing and payment tracking leads to errors and revenue loss. Understanding these challenges early helps you design your business for scale. To scale successfully, these problems must be solved at the system level, not by working harder. ## Introducing ServerAvatar Once the basics are in place, many hosting providers realize they need a centralized server management platform. [ServerAvatar](https://serveravatar.com/) is a platform to simplify the hosting and management of servers and applications. It simplifies the process of deploying and managing PHP and Node.js based web applications on servers. ![ServerAvatar Dashboard](https://serveravatar.com/wp-content/uploads/2026/02/image-16.png) It is designed to help managed cloud hosting businesses manage servers, applications, and customers from a single dashboard, without relying on fragile scripts or manual processes. ### How ServerAvatar Helps You Scale Infrastructure ServerAvatar is built to remove the operational friction that limits growth. It centralizes server and application management, making infrastructure easier to scale and control. With ServerAvatar, you can: - Provision and manage multiple cloud servers efficiently - Deploy and manage applications consistently - Monitor server health and performance in real time - Access logs and alerts from a single interface - Reduce reliance on custom scripts and manual commands But for hosting businesses that want to scale and brand their services, ServerAvatar goes much further. ## Why Server Management Alone Is Not Enough While ServerAvatar simplifies server operations, scaling a hosting business also requires strong business management tools. As your customer base grows, you need to manage: - **Customers and permissions:** Control who can access what, and at what level. - **Server ownership and access:** Clearly assign servers to specific users or plans. - **Pricing and subscriptions:** Offer structured plans with predictable billing cycles. - **Payments, taxes, and transactions:** Handle financial operations accurately and transparently. - **Support tickets and notifications:** Maintain organized and responsive customer support. This is where the ServerAvatar Reseller Panel becomes essential. ## ServerAvatar Reseller Panel: For Your Hosting Business Operations The Reseller Panel provides a fully customizable server management solution that aligns with your brand’s identity. It allows you to sell, manage, and support hosting services in a structured and automated way, without relying on multiple third-party tools. ![Reseller panel - Managed Cloud Hosting Business](https://serveravatar.com/wp-content/uploads/2026/02/image-18.png) ### What Is ServerAvatar Reseller Panel? The ServerAvatar Reseller Panel is designed to handle the business side of managed hosting. It complements ServerAvatar by adding customer, billing, and support management in one place. It enables hosting businesses to: - **Onboard and manage customers:** Create and control customer accounts easily. - **View and manage servers for specific users:** Assign servers based on ownership or plans. - **Define pricing and hosting plans:** Set clear and scalable service offerings. - **Automate billing and payments:** Reduce manual invoicing and payment errors. - **Track revenue and transactions:** Maintain clear financial visibility. - **Manage customer support tickets:** Keep support organized and efficient. In simple terms, it gives you full operational control over your hosting business. > For detailed setup instructions and advanced configuration, refer to the official ServerAvatar Reseller Panel documentation: ### Key Features of the ServerAvatar Reseller Panel **Centralized Admin Dashboard** The admin dashboard provides a complete overview of your hosting business, helping you make informed decisions as you scale. - **Customers and active users:** Monitor who is using your services. - **Servers under management:** Track all managed infrastructure in one place. - **Revenue and transactions:** View financial performance at a glance. - **System activity and updates:** Stay informed about operational changes. ![Reseller panel - Managed Cloud Hosting Business](https://serveravatar.com/wp-content/uploads/2026/02/image-19-1024x519.png) This visibility helps you make informed decisions as you grow. **User and Server Management** This feature ensures clarity, control, and security across your customer base. - **Add and manage customers:** Create and maintain customer accounts easily. - **Manage user details:** Update customer information and preferences. - **Assign or revoke access:** Control permissions to protect resources. - **Organize servers by customer or plan:** Maintain structured server ownership. ![Reseller panel user management - Managed Cloud Hosting Business](https://serveravatar.com/wp-content/uploads/2026/02/image-20-1024x325.png) This ensures clarity and prevents operational confusion. **Billing and Payment Automation** The Reseller Panel includes built-in billing features that allow you to: - **Set pricing and subscription models:** Offer flexible and scalable plans. - **Configure taxes and promo codes:** Handle regional pricing and discounts. - **Integrate payment gateways:** Enable seamless online payments. - **Automate invoices and payment tracking:** Ensure consistent and accurate billing. ![Reseller panel billing - Managed Cloud Hosting Business](https://serveravatar.com/wp-content/uploads/2026/02/image-21-1024x484.png) Automated billing reduces errors and saves significant administrative time. **Transactions Tracking** Financial transparency is essential for scaling confidently. - **Transaction status:** Monitor payment success and failures. - **Payments and invoices:** Track all customer payments. - **Transaction history:** Maintain records for accounting and analysis. ![Reseller panel transactions - Managed Cloud Hosting Business](https://serveravatar.com/wp-content/uploads/2026/02/image-22-1024x301.png) This transparency helps maintain accurate accounting and business insights. **Support Ticket System** As your customer base grows, support becomes harder to manage. The Reseller Panel includes a ticketing system that: - **Centralizes customer support requests:** Keeps all tickets in one dashboard. - **Tracks ticket status and history:** Improves accountability and response times. ![Reseller panel tickets - Managed Cloud Hosting Business](https://serveravatar.com/wp-content/uploads/2026/02/image-23-1024x240.png) Structured support workflows allow your team to scale without sacrificing quality. **Integrations and Notifications** The Reseller Panel supports integrations with: - **Cloud platforms:** Integrate your cloud providers from Amazon Lightsail, DigitalOcean, Vultr, Linode, and Hetzner for your users to create a server. - **Payment gateways:** Integrate your payment gateway from Razorpay, PayPal, Stripe, Cashfree Paymetns for your users to make a payment. - **SMTP services:** Send system and billing emails. - **Webhooks and notifications:** Trigger real-time alerts and actions. ![Reseller panel integration - Managed Cloud Hosting Business](https://serveravatar.com/wp-content/uploads/2026/02/image-24-1024x459.png) These integrations help automate communication and operational workflows. ## Launching a Managed Cloud Hosting Business with ServerAvatar & Reseller Panel Starting a managed cloud hosting business typically involves managing multiple systems, server infrastructure, customer access, billing, support, and third-party integrations. Building and maintaining all these components separately can quickly become complex, costly, and time-consuming. ServerAvatar streamlines this entire process by providing the Reseller Panel as an integrated solution, enabling you to launch and operate a managed cloud hosting business with minimal setup effort. The Reseller Panel is available as a one-click application installer within ServerAvatar. Once deployed, it equips you with all the essential tools to manage customers, define hosting plans, handle billing, and run daily operations, while ServerAvatar takes care of server provisioning, monitoring, and infrastructure management. This allows you to focus more on business growth rather than juggling multiple tools. ### Who Should Use This Setup? This solution is ideal for: - Managed cloud hosting providers - Digital agencies offering hosting services to clients - Freelancers looking to transition into a hosting business - Companies managing servers for multiple customers - Businesses aiming to monetize cloud infrastructure efficiently If you offer hosting services as a paid product, this combination provides a professional, scalable, and reliable foundation. ### How ServerAvatar and the Reseller Panel Work Together The Reseller Panel is not a standalone or third-party platform. It operates entirely within the ServerAvatar ecosystem and is purpose-built for businesses offering managed cloud hosting services. Here’s how the workflow functions: - You manage and monitor cloud servers through ServerAvatar - You deploy the Reseller Panel using ServerAvatar’s one-click installer - The Reseller Panel acts as your business and customer management layer - ServerAvatar continues to handle server operations in the background This seamless integration removes the need for custom development or external business management tools, making it easier to scale your hosting business efficiently and reliably. ## What You Can Do After Deploying the Reseller Panel Once the Reseller Panel is deployed, you can begin operating and growing your managed hosting business right away. Through a centralized admin dashboard, the Reseller Panel allows you to: - Create and manage customer accounts - Assign servers to individual users or teams - Control user roles, access levels, and permissions - Define hosting plans, pricing models, and subscription settings - Integrate payment gateways to automate recurring payments - Track invoices, transactions, and overall revenue - Manage customer support tickets efficiently - Configure system notifications and operational settings All these features are designed specifically for hosting businesses and are accessible from a single, easy-to-use interface. ### **Why One-Click Deployment Matters** Traditionally, launching a hosting business requires setting up and maintaining multiple independent systems, such as: - Custom billing and invoicing solutions - User and access management tools - Payment gateway integrations - Customer support workflows ServerAvatar eliminates this complexity. With the Reseller Panel’s one-click installation, you can: - **Launch your hosting services faster:** Skip lengthy setup processes. - **Minimize configuration and setup errors:** Reduce risk during deployment. - **Reduce ongoing maintenance and technical overhead:** Spend less time managing tools. - **Focus on customer acquisition and business growth:** Prioritize revenue-driving activities. This approach is especially beneficial for startups, digital agencies, and individuals entering the managed cloud hosting market who want a reliable and scalable foundation without unnecessary technical burden. [![Blog banner - ServerAvatar](https://serveravatar.com/wp-content/uploads/2025/09/728_90-Banner-1-1024x127.png)](https://serveravatar.com/?ref=blog)## Scaling Your Business with the Reseller Panel As your customer base grows, the Reseller Panel helps you scale without operational chaos. It allows you to: - Manage more users without increasing manual work - Maintain clear ownership of servers and resources - Keep billing accurate and automated - Handle support requests in a structured way Because the Reseller Panel is built on top of ServerAvatar, your infrastructure and business operations scale together. ![scaling your Managed Cloud Hosting Business](https://serveravatar.com/wp-content/uploads/2026/02/image-25.png) ## Who Is This Setup Best For? This setup is ideal for businesses that want to grow hosting services without building systems from scratch. - Entrepreneurs starting a managed hosting service - Managed hosting providers looking for a structured platform - Digital agencies offering hosting to clients - Freelancers turning hosting into a productized service - Businesses managing and monetizing multiple cloud servers If your goal is to start and grow a managed cloud hosting business without building everything from scratch, ServerAvatar’s Reseller Panel provides a ready-to-use foundation. ## Why ServerAvatar Helps You Scale Faster ServerAvatar is a modern server management platform built specifically for managed hosting businesses. It allows you to manage hundreds (or thousands) of servers from a single dashboard, without juggling scripts, SSH sessions, or custom tooling. With ServerAvatar, you can: - Provision and manage servers at scale - Deploy optimized web stacks effortlessly - Monitor server health in real time - Reduce human error through automation But where ServerAvatar truly shines for hosting companies is its WhiteLabel Suite and Reseller Panel. ## Conclusion Scaling a managed cloud hosting business requires more than just adding servers or customers, it demands well-structured systems that can grow without increasing complexity or operational strain. As the demand for reliable, fully managed cloud hosting continues to rise, hosting providers need solutions that simplify server management while also handling customers, billing, and support efficiently. ServerAvatar and its feature, Reseller Panel, addresses both sides of this challenge by unifying infrastructure management and business operations into a single, integrated platform. With centralized control, automation, and one-click deployment, this setup enables hosting providers, agencies, and entrepreneurs to launch faster, scale confidently, and focus on delivering consistent value to their customers without building everything from scratch. ## FAQs ### 1. Is the Reseller Panel a separate or third-party tool? The Reseller Panel runs entirely within ServerAvatar and is tightly integrated with its server management features, eliminating the need for external business management platforms. ### 2. Who should use ServerAvatar and the Reseller Panel? This setup is ideal for managed hosting providers, digital agencies, freelancers transitioning into hosting, startups, and businesses managing multiple customer servers who want a scalable and professional hosting platform. ### 3. Can I start a hosting business without building custom billing and support systems? With ServerAvatar’s one-click Reseller Panel deployment, you can launch a managed hosting business without developing custom billing, user management, or support tools, saving time and reducing setup complexity. ### 4. How is ServerAvatar different from traditional server management tools? ServerAvatar offers centralized server and application management through a single dashboard, reducing reliance on manual scripts and SSH access while enabling providers to manage multiple servers efficiently at scale. ### 5. Why is managed cloud hosting growing so fast? Managed cloud hosting is in high demand because many businesses lack in-house server expertise, face increasing security threats, and want predictable costs, reliable uptime, and expert support without managing complex cloud environments themselves. ### 6. How does this setup help with scaling? By automating server operations, billing, and support workflows, ServerAvatar and the Reseller Panel allow you to manage more customers and servers without proportionally increasing manual effort or operational overhead. **Categories:** Blog, Guide, Others, Uncategorized **Tags:** Cloud Hosting, DevOps, Hosting Business, Managed Cloud Hosting, Managed Cloud Hosting Business, Managed Services, Web Hosting --- ### [Ubuntu 26.04 LTS: Release Date and New Features](https://serveravatar.com/ubuntu-26-04-lts-release-date-features/) **Published:** February 2, 2026 **Author:** Meghna Meghwani **Content:** [![Blog banner - ServerAvatar](https://serveravatar.com/wp-content/uploads/2025/09/728_90-Banner-3-1024x127.png)](https://serveravatar.com/?ref=blog)[Ubuntu](https://ubuntu.com/) has long been one of the most trusted Linux distributions for desktops, servers, and cloud environments. Every two years, Canonical releases a Long-Term Support (LTS) version that focuses on stability, performance, and long-term reliability. The upcoming Ubuntu 26.04 LTS is already generating a lot of interest among developers, system administrators, and Linux enthusiasts. In this article, we’ll explore the expected release date of Ubuntu 26.04 LTS, its codename, and the most important new features and improvements you can expect from this long-term release. ## What Is Ubuntu? Ubuntu is a free, open-source Linux operating system developed and maintained by Canonical. It is built on Debian and designed to be easy to use, secure, and reliable for everyone, from beginners to enterprise users. Ubuntu is widely used across: - **Personal desktops and laptops:** Ubuntu offers a stable, user-friendly desktop experience suitable for everyday computing. - **Web servers and cloud infrastructure:** It is a popular choice for hosting websites, applications, and cloud services. - **Development environments:** Developers rely on Ubuntu for its strong tooling, package availability, and flexibility. - **Enterprise and production systems:** Businesses use Ubuntu for long-term reliability and security in critical workloads. One of Ubuntu’s biggest strengths is its Long-Term Support (LTS) releases, which provide stability and security updates for several years. Ubuntu 26.04 LTS continues this tradition while introducing modern improvements under the hood. ## What Is Ubuntu 26.04 LTS? Ubuntu 26.04 LTS is the next Long-Term Support version of Ubuntu, following Ubuntu 24.04 LTS. Like other LTS releases, it is designed for users who prefer a stable operating system with fewer disruptive changes and long-term updates. An LTS release is especially popular for: - **Production servers:** LTS versions provide long-term stability with fewer breaking changes. - **Enterprise environments:** Organizations benefit from predictable updates and extended security support. - **Developers working on long-term projects:** LTS releases ensure a consistent platform throughout the project lifecycle. - **Users who don’t want frequent OS upgrades:** Ideal for those who prefer stability over constant updates. Ubuntu 26.04 LTS will receive five years of official security and maintenance updates, with optional extended support available through Ubuntu Pro. ## Ubuntu 26.04 LTS Release Timeline The Ubuntu development process follows a well-defined schedule to ensure stability, quality, and long-term reliability. Each milestone plays an important role in preparing Ubuntu 26.04 LTS for its final release. ### Ubuntu 26.04 LTS Development Schedule **Date****Release Stage****Description****February 19, 2026**Feature FreezeAll major features are locked. From this point forward, the focus shifts to polishing and fixing existing functionality**March 12, 2026**User Interface FreezeThe desktop layout, themes, icons, and visual elements are finalized to maintain UI consistency**March 19, 2026**Kernel Feature FreezeNo new kernel features are introduced after this date, reducing the risk of system-level issues**March 26, 2026**Beta ReleaseA public beta version is released, allowing users and developers to test Ubuntu 26.04 LTS before final release**April 9, 2026**Kernel FreezeKernel changes are restricted to critical bug fixes and security patches only**April 16, 2026**Release CandidateThe near-final build is published for last-stage testing and validation**April 23, 2026**Final ReleaseUbuntu 26.04 LTS is officially released for general availability**Understanding the Ubuntu 26.04 LTS Release Stages** Ubuntu’s release timeline is designed to balance innovation with reliability. Here’s how each stage contributes to a stable LTS release: - **Feature Lock** ensures that the system stops evolving in big ways and instead focuses on stability. - **UI Freeze** helps maintain a consistent look and feel across the desktop experience. - **Kernel Feature Lock and Freeze** reduce the risk of low-level system issues close to release. - **Beta Release** allows the community to test real-world use cases and report bugs. - **Release Candidate** is essentially the final version, pending any critical fixes. - **Stable Release** marks the official availability of Ubuntu 26.04 LTS for all users. This structured approach is one of the key reasons Ubuntu LTS versions are trusted for production systems, servers, and long-term deployments. > Please note that the release timeline may change as development continues, though the final release date is expected to remain unchanged. ## Ubuntu 26.04 LTS Codename Ubuntu versions use a fun and memorable naming scheme made of an adjective and an animal, both starting with the same letter. Ubuntu 26.04 LTS is expected to carry the codename **Resolute Raccoon**, based on Canonical’s established naming patterns and early development references. The word Resolute reflects stability and determination, which aligns well with the goals of an LTS release, while Raccoon continues Ubuntu’s tradition of animal-themed names. ## Key Features in Ubuntu 26.04 LTS Ubuntu 26.04 LTS is expected to focus more on refinement and modernization rather than radical changes. Below are the most notable improvements users can look forward to. ### GNOME 50 Desktop Environment Ubuntu 26.04 LTS is expected to ship with GNOME 50 as its default desktop environment, based on the projected GNOME release schedule and Ubuntu’s typical integration timeline. This information reflects current expectations and may change before the final release. This brings: - **Cleaner and more polished user interface:** Delivers a refined look with better layout consistency. - **Improved performance and animations:** Enhances overall desktop smoothness and responsiveness. - **Better Wayland support:** Improves display handling and modern graphics compatibility. - **Enhanced accessibility features:** Makes Ubuntu easier to use for people with diverse needs. GNOME updates usually focus on usability and consistency, making everyday tasks smoother for both new and experienced users. ### Newer Linux Kernel for Better Hardware Support One of the biggest advantages of upgrading to a new Ubuntu LTS is improved hardware compatibility. Ubuntu 26.04 LTS is expected to include a newer Linux kernel at release time, which should provide improved hardware compatibility and performance for modern systems. - Better support for new CPUs and GPUs ensures compatibility with the latest hardware releases. - Improved performance on modern laptops and desktops, optimizing system speed on newer machines. - Enhanced power management and battery efficiency help extend battery life, especially on laptops. - Improved driver support for networking and storage devices results in more stable and reliable connections. This makes Ubuntu 26.04 a strong choice for users running newer hardware. ### New Default Video Player ![Video Player - Ubuntu 26.04 LTS](https://serveravatar.com/wp-content/uploads/2026/02/image-8-1024x683.png) One of the expected desktop changes in Ubuntu 26.04 LTS is the replacement of Totem with GNOME Showtime as the default video player, based on current Ubuntu desktop development discussions. Showtime introduces a sleek and modern design that aligns with GNOME’s libadwaita guidelines. ![Default Video Player - Ubuntu 26.04 LTS](https://serveravatar.com/wp-content/uploads/2026/02/image-1-1024x663.png) Although the interface is minimalist, essential playback controls remain accessible through a settings icon or a right-click menu. Within the system, Showtime is labeled simply as Video Player, reflecting Ubuntu’s move toward simpler and more intuitive naming. ![Video Player - Ubuntu 26.04 LTS](https://serveravatar.com/wp-content/uploads/2026/02/image-4-1024x683.png) ### x86-64-v3 (amd64v3) Optimized Packages One of the anticipated technical improvements in Ubuntu 26.04 LTS is the broader adoption of [x86-64-v3 (amd64v3)](https://discourse.ubuntu.com/t/introducing-architecture-variants-amd64v3-now-available-in-ubuntu-25-10/71312) optimized packages, which are designed to better utilize modern CPU instruction sets. What this means: - Packages are optimized for modern CPUs - Better performance on newer Intel and AMD processors - Improved instruction set usage For users running newer hardware, this results in: - **Faster application performance:** Applications launch and run more efficiently. - **Better efficiency:** Reduces resource usage on supported systems. - **Improved system responsiveness:** Results in a smoother overall user experience. Older systems will still be supported, but modern machines will benefit significantly from these optimizations. ### Default System Monitor Ubuntu 26.04 LTS is expected to replace the traditional GNOME System Monitor with a more modern system monitoring tool called Resources. ![Resources - Ubuntu 26.04 LTS](https://serveravatar.com/wp-content/uploads/2026/02/image-5-683x1024.png) Resources is part of the GNOME Circle project, meaning it is community-developed while still meeting GNOME’s quality and design standards. Even though the existing GNOME System Monitor is capable, this change emphasizes a cleaner and more modern approach to tracking CPU, memory, disk, and network usage. ![System Monitor - Ubuntu 26.04 LTS](https://serveravatar.com/wp-content/uploads/2026/02/image-6-1024x683.png) This change makes system monitoring easier and more intuitive without sacrificing functionality. ### More Secure and Modern System Components Ubuntu has been gradually modernizing its core system utilities, and Ubuntu 26.04 LTS is expected to continue this trend. You can expect: - Greater use of memory-safe system components - Security-focused improvements in core tools - Stronger sandboxing and isolation features These changes aim to reduce vulnerabilities while keeping the system fast and reliable. ### Updated Default Applications Ubuntu 26.04 LTS will include newer versions of essential software right out of the box, such as: - Updated file manager and system tools - Improved system monitoring utilities - Newer versions of developer tools and compilers - Latest long-term versions of programming languages This ensures users get a modern experience without sacrificing stability. ### Better Performance for Servers and Cloud Workloads For server users, Ubuntu 26.04 LTS is expected to focus on long-term stability and incremental performance improvements for cloud and enterprise workloads. - Better performance for cloud and DevOps workloads - Enhanced networking and storage optimizations - Long-term kernel stability for production environments This makes it ideal for hosting applications, managing infrastructure, and running cloud services. ### Two Ubuntu Flavors Dropped from LTS Ubuntu 26.04 LTS also brings a notable change to official flavors. Two Ubuntu flavors have been dropped from LTS support. Ubuntu MATE and Ubuntu Unity have decided to skip long-term support for this release cycle. Most other Ubuntu flavors are continuing with LTS plans, including Xubuntu, Lubuntu, Ubuntu Budgie, Ubuntu Cinnamon, Ubuntu Studio, Edubuntu, Ubuntu Kylin, and Kubuntu. While Kubuntu has not made a formal announcement yet, its daily builds suggest it is likely to follow the LTS path, though this has not been officially confirmed. The main reason for skipping LTS is limited developer availability. - Ubuntu Unity’s lead developer had to focus on university studies, reducing the team’s ability to commit to long-term maintenance. - Ubuntu MATE is facing similar challenges, with a smaller contributor base despite being an official Ubuntu flavor since 2015. Ubuntu MATE and Ubuntu Unity are expected to continue releasing regular, non-LTS versions. Users will still receive updates, but without the extended support window that typically comes with an LTS release. ### AMD ROCm Native Packages Support Ubuntu 26.04 LTS improves support for AMD ROCm (Radeon Open Compute) by offering native ROCm packages. Canonical is working closely with AMD to simplify the installation and maintenance process for ROCm, which is widely used for AI, machine learning, and high-performance computing workloads. Users will be able to install ROCm easily using the standard package manager and receive updates through regular system updates. This makes Ubuntu an even stronger choice for developers working with AMD GPUs in data science and AI environments. ## Why Should You Upgrade to Ubuntu 26.04 LTS? Ubuntu 26.04 LTS will be a great choice if you: - Want long-term stability with minimal upgrades - Run production servers or business applications - Prefer a modern desktop with long-term support - Plan to deploy Ubuntu on new hardware If you are already using Ubuntu 24.04 LTS, upgrading may not be urgent, but Ubuntu 26.04 LTS will offer better hardware support and future-proof improvements. ## Download Ubuntu 26.04 LTS (For Testing) If you want to test Ubuntu 26.04 LTS before the final release, you can download development builds from the official Ubuntu website or by using the attached link: Available options typically include: - **Daily builds:** Provide early access to ongoing development changes. - **Beta releases:** Offer a more stable preview for testing. - **Release candidates:** Represent the near-final version before public release. > **Important note:** Pre-release versions are intended for testing only. They are not recommended for production systems as they may contain bugs. Testing early helps users: - Explore new features - Check hardware compatibility - Prepare for future upgrades [![Blog banner - ServerAvatar](https://serveravatar.com/wp-content/uploads/2025/09/728_90-Banner-1-1024x127.png)](https://serveravatar.com/?ref=blog)## Other Notable Improvements in Ubuntu 26.04 LTS Beyond the major features, Ubuntu 26.04 LTS is **expected** to include several smaller but meaningful enhancements as development continues: - Improved boot speed and system responsiveness - Better container and virtualization support - Updated networking and storage components - Stronger security defaults - Continued improvements to Snap and APT package management Together, these changes make Ubuntu 26.04 LTS more polished, secure, and future-ready. ## Why Ubuntu 26.04 LTS Matters Ubuntu 26.04 LTS is not about flashy changes; it’s about long-term reliability and modern performance. With updated system tools, optimized CPU packages, better GPU support, and a refined desktop experience, it offers a strong foundation for years to come. Whether you’re a developer, system administrator, or everyday Linux user, Ubuntu 26.04 LTS is shaping up to be a dependable upgrade worth considering. ## Conclusion Ubuntu 26.04 LTS reinforces Canonical’s focus on stability, security, and long-term performance by refining the Ubuntu experience rather than introducing disruptive changes. With GNOME 50, a newer Linux kernel, improved Wayland and graphics support, modernized system tools, optimized CPU packages, and stronger server and GPU capabilities, this release delivers meaningful improvements for both desktop and enterprise users. Whether you manage production servers, work on long-term development projects, or simply want a reliable Linux system that won’t require frequent upgrades, Ubuntu 26.04 LTS offers a future-ready platform built to remain dependable for years to come. ## FAQs ### 1. When will Ubuntu 26.04 LTS be released? Ubuntu 26.04 LTS is expected to be released in April 2026, following Ubuntu’s regular release cycle. However, this timeline is not officially confirmed yet and may change as development progresses. ### 2. Which desktop environment does Ubuntu 26.04 LTS use? Ubuntu 26.04 LTS is expected to ship with GNOME 50 as the default desktop environment, bringing UI refinements, better performance, and improved accessibility. ### 3. Will Ubuntu 26.04 LTS support older hardware? Yes, older hardware will still be supported, but systems with newer CPUs will benefit more from performance optimizations like x86-64-v3 packages. ### 4. Is Ubuntu 26.04 LTS good for servers and cloud environments? Yes, Ubuntu 26.04 LTS is well suited for servers and cloud workloads due to improved container support, networking optimizations, long-term kernel stability, and enhanced security features. ### 5. Can I test Ubuntu 26.04 LTS before the final release? Yes, you can test Ubuntu 26.04 LTS using daily builds, beta releases, or release candidates. However, these pre-release versions are meant for testing only and are not recommended for production use. ### 6. Should I upgrade from Ubuntu 24.04 LTS to Ubuntu 26.04 LTS? If you are satisfied with Ubuntu 24.04 LTS, an immediate upgrade may not be necessary. However, Ubuntu 26.04 LTS offers better hardware support and future-focused improvements, making it a worthwhile upgrade for new systems and long-term planning. **Categories:** Blog, Guide, Linux, Others, Tutorials, Ubuntu **Tags:** Linux, Linux operating system, Ubuntu, Ubuntu 26.04 beta release, Ubuntu 26.04 LTS, Ubuntu 26.04 LTS features, Ubuntu 26.04 new features, Ubuntu 26.04 release date, Ubuntu 26.04 release schedule, Ubuntu LTS --- ### [How to Clone a WordPress Site Without Coding](https://serveravatar.com/clone-a-wordpress-site-without-coding/) **Published:** January 31, 2026 **Author:** Meghna Meghwani **Content:** [![Blog banner - ServerAvatar](https://serveravatar.com/wp-content/uploads/2025/09/728_90-Banner-3-1024x127.png)](https://serveravatar.com/?ref=blog)Cloning a WordPress site is one of the smartest ways to save time, reduce risk, and speed up website management. When you clone a WordPress site, you can quickly create a staging environment, move your website to a new server, or build multiple similar websites without starting from zero. This approach helps ensure consistency while avoiding manual setup errors. **The best part?** You don’t need coding knowledge at all. In this guide, you’ll learn how to clone a WordPress site without coding, explore common beginner-friendly method, and see how ServerAvatar’s Site Clone feature makes the entire process simple, safe, and fast. ## What is ServerAvatar? [ServerAvatar](https://serveravatar.com/) is a platform to simplify the hosting and management of servers and applications. It simplifies the process of deploying and managing PHP and Node.js based web applications on servers. ![ServerAvatar Dashboard](https://serveravatar.com/wp-content/uploads/2026/01/image-265.png) If you’re using **ServerAvatar** to manage your servers and applications, deploying and managing WordPress and other applications are incredibly simple, and it is very easy to clone your websites. ## What Does It Mean to Clone a WordPress Site? Cloning a WordPress site refers to creating a full duplicate of an existing website that can run separately. The cloned version mirrors the original site’s structure and content but functions as an independent website. ![clone a WordPress site](https://serveravatar.com/wp-content/uploads/2026/01/image-266.png) - **Website files:** Copies all essential files that power the WordPress site - **WordPress core:** Duplicates the WordPress system needed for site operations - **Themes and plugins:** Includes all design elements and added functionalities - **Media files:** Transfers images, videos, and other uploaded assets - **Database content:** Replicates posts, pages, users, and settings - **Site configuration:** Preserves site-specific configurations and preferences The cloned site operates independently, so changes made to it will not impact the live website. ### Why Would You Need to Clone a WordPress Site? Cloning a WordPress site helps you work safely without risking the live website. It provides a controlled environment where changes can be tested, refined, or prepared before going public. - **Creating a staging site:** Tests updates and changes without affecting visitors - **Migrating to a new server or domain:** Moves the site safely with minimal risk - **Designing a new layout:** Experiments with design changes without downtime - **Launching similar websites:** Reuses the same structure to save setup time - **Keeping a backup copy:** Acts as a safety net before major modifications Instead of experimenting on a live site, cloning allows you to work with confidence. ## Understanding Different WordPress Cloning Use Cases WordPress cloning is not a one-size-fits-all process. The purpose of cloning determines how the cloned site should be configured and used. A staging clone is commonly used to: - **Test WordPress core updates:** Ensures updates do not break the live site - **Try new plugins or themes:** Check compatibility and performance safely - **Redesign layouts:** Builds and previews design changes before launch - **Fix bugs privately:** Resolves issues without affecting real users This use case is ideal for ServerAvatar’s test domain cloning, which keeps experiments separate from production. ## Server-Level Cloning vs Plugin-Based Cloning While plugins are popular for beginners, server-level cloning offers greater reliability and control. The difference lies in how and where the cloning process takes place. **Plugin-Based Cloning** - **Works inside WordPress:** Relies on the WordPress dashboard and environment - **Depends on PHP limits:** Performance is restricted by hosting resources - **Can fail on large sites:** Struggles with heavy databases or files - **Limited server control:** Offers minimal access to server-level settings **Server-Level Cloning** - **Works outside WordPress:** Functions independently of the WordPress dashboard - **Handles large sites smoothly:** Manages big databases and files efficiently - **More stable and reliable:** Reduces errors during cloning - **Suitable for staging and production:** Supports professional workflows ServerAvatar performs cloning at the infrastructure level, making it more dependable for serious WordPress management. ## Why Clone WordPress Without Coding? Traditional cloning methods require handling files, databases, and server commands manually, which can be risky for non-technical users. Cloning without coding removes these complications entirely. - **No technical skills required:** Anyone can clone a site with ease - **Faster setup:** Reduces time spent on manual tasks - **Lower risk of errors:** Avoids misconfigurations and data loss - **Beginner-friendly interface:** Simplifies the entire cloning process - **Minimal downtime risk:** Keeps the live site safe and uninterrupted With ServerAvatar, WordPress cloning becomes accessible, secure, and stress-free for everyone. ## How to Clone a WordPress Site Using ServerAvatar ServerAvatar provides a built-in Site Clone feature that allows you to duplicate WordPress applications in just a few steps. This method is ideal for: - Creating staging environments - Copying WordPress sites between servers - Launching test sites quickly - Managing multiple similar projects ### How ServerAvatar Handles WordPress Cloning Internally While users never see the complexity, ServerAvatar automates several critical tasks during cloning: - Copies all application files securely - Duplicates the database without corruption - Updates configuration paths automatically - Maintains correct file permissions - Preserves WordPress functionality All of this happens behind the scenes, and allowing users to focus on their website instead of server operations. ### Step-by-Step: Cloning a WordPress Site with ServerAvatar **Step 1: Log in to ServerAvatar** - Access your ServerAvatar dashboard and select the server where your WordPress site is hosted. Click on the ServerAvatar Dashboard icon. ![server dashboard - clone a WordPress site](https://serveravatar.com/wp-content/uploads/2026/01/image-267-1024x238.png) **Step 2: Open the Applications Panel** - From the server dashboard, navigate to the **Applications** section to see a list of installed applications. - Choose the WordPress site you want to clone, and click on the dashboard icon to open the application panel. ![application dashboard - clone a WordPress site](https://serveravatar.com/wp-content/uploads/2026/01/image-268-1024x377.png) **Step 3: Configure Clone Settings** - Inside the application panel, select the **Site Clone** option. - Fill in the required details: - **Clone Type:** Choose Application to duplicate the full WordPress site - **Destination Server:** Select the server where the cloned site will be created - **New Application Name:** Assign a name to identify the cloned site - **Source Database:** Select the database of the application - **New Database Name:** Assign a name to the cloned application’s database - **Domain Option:** Select from a primary domain or a test domain for staging - **System User:** Keep existing settings or choose a new one as per your requirements - **Force URL:** Choose URL format from Https or Https for your WordPress application ![clone a WordPress site](https://serveravatar.com/wp-content/uploads/2026/01/image-269-1024x796.png) **Step 4: Start the Cloning Process** - Click **Clone**, and ServerAvatar will automatically: - Copy all website files - Duplicate the database - Configure the new application - Set correct permissions ![cloned website - clone a WordPress site](https://serveravatar.com/wp-content/uploads/2026/01/image-270-1024x832.png) Once completed, your cloned WordPress site will be ready to use. ### Why Use ServerAvatar for WordPress Cloning? ServerAvatar simplifies WordPress cloning by removing technical barriers and manual effort. It provides a reliable, server-level cloning solution designed for both beginners and professionals. - **No plugins required:** Clones your site without relying on WordPress plugins - **No coding or command-line work:** Everything is handled through an intuitive dashboard - **Faster cloning process:** Duplicates sites quickly with minimal waiting time - **Ideal for staging and production:** Supports safe testing and live deployments - **Full server and application control:** Gives better flexibility over site environments - **Beginner-friendly dashboard:** Easy to use even for non-technical users This makes ServerAvatar especially useful for developers, agencies, and businesses managing multiple WordPress websites. ## Best Practices After Cloning a WordPress Site Cloning is only the first step. Following best practices after cloning ensures the new site functions correctly and avoids common issues. - **Test the cloned site thoroughly:** Verify pages, forms, and functionality - **Check internal links and media files:** Ensures all resources load properly - **Enable SSL on new domains:** Avoids security warnings and browser errors - **Keep the clone separate from live site:** Prevents accidental changes to production These steps help maintain performance, security, and stability after cloning. ## When to Use a Test Domain for Cloning A test domain allows you to work on a cloned site without exposing it publicly. It’s ideal for development, testing, and quality assurance tasks. - **Avoid search engine indexing:** Keeps the clone hidden from search results - **Test design or functionality safely:** Experiment without user impact - **Prepare sites not ready for launch:** Work privately before going live ServerAvatar lets you assign a test domain during cloning, making it perfect for staging and QA environments. ## SEO Considerations When Cloning a WordPress Site If not handled carefully, cloning can create duplicate content issues that harm SEO. Proper domain and indexing control is essential. - **Use a test domain or block indexing:** Prevents search engines from crawling clones - **Avoid duplicate live domains:** Ensures only one version is indexed - **Disable indexing on staging sites:** Keeps unfinished content private - **Point DNS only when ready:** Avoids SEO conflicts during migration ## Performance Benefits of Cloning with ServerAvatar ServerAvatar performs cloning at the server level, ensuring consistent performance across original and cloned sites. - **Faster load times:** Avoids plugin-related performance overhead - **Optimized server resources:** Efficient use of system resources - **No plugin dependency:** Keeps WordPress lightweight and clean - **Cleaner installations:** Results in stable and optimized WordPress setups This makes ServerAvatar ideal for performance-focused WordPress projects. [![Blog banner - ServerAvatar](https://serveravatar.com/wp-content/uploads/2025/09/728_90-Banner-1-1024x127.png)](https://serveravatar.com/?ref=blog)## Security Advantages of Non-Coding Cloning Manual cloning methods can expose sensitive data if done incorrectly. ServerAvatar builds security directly into the cloning process. - **Automated permissions:** Prevents incorrect file access settings - **Isolated system users:** Keeps applications separated and secure - **Secure test environments:** Protects staging sites from unauthorized access - **HTTPS enforcement support:** Ensures secure connections during cloning With ServerAvatar, security is part of the workflow, not an afterthought. ## Common Mistakes to Avoid While Cloning WordPress Even simple cloning processes can lead to issues if basic precautions are ignored. Being known of common mistakes can help you to avoid problems. - Making clones public unintentionally can cause SEO and security risks - Forgetting to update site URLs leads to broken links and redirects - Skipping cache cleanup causes outdated content to appear - Editing the live site by mistake risks damaging production content - Not taking backups first makes recovery difficult if something fails ## How Cloning Improves WordPress Workflow Efficiency Cloning changes the way teams manage WordPress sites by making development safer and faster. - **Faster updates:** Test and deploy changes with confidence - **Safer experimentation:** Try ideas without risking live sites - **Better collaboration:** Teams can work on separate environments - **Reduced downtime:** Issues are resolved before going live - **Easier rollbacks:** Quickly switch back if something goes wrong For multi-site management, cloning becomes a core part of an efficient workflow. ## Who Should Use ServerAvatar’s Cloning Feature? ServerAvatar is designed to support a wide range of users with different experience levels. - **Beginners:** Clone sites without technical complexity - **Freelancers and agencies:** Manage multiple client projects easily - **SaaS founders:** Test features and environments quickly - **Developers with multiple servers:** Maintain consistent workflows - **Businesses with critical websites:** Reduce risk during changes If you want full control without added complexity, ServerAvatar offers the perfect balance. ## Conclusion Cloning a WordPress site no longer needs to be a complex or risky task reserved for developers. With the right approach and tools, anyone can duplicate a website safely for testing, migration, or scaling purposes. ServerAvatar simplifies the entire process by offering a server-level Site Clone feature that removes the need for plugins, coding, or manual server work. From staging and performance optimization to security and SEO control, ServerAvatar provides a reliable and beginner-friendly solution for managing WordPress clones efficiently. If you’re looking for a faster, safer, and smarter way to clone WordPress sites, ServerAvatar offers the perfect balance of simplicity and control. ## FAQs ### **1. Is cloning a WordPress site the same as taking a backup?** Cloning creates a fully functional duplicate of your website that can run independently, while a backup is mainly used for recovery purposes. ### **2. Can cloning a WordPress site affect the live website?** A cloned WordPress site operates separately. Any changes made to the clone will not impact the live site when cloning is done correctly. ### **3. Do I need technical knowledge to clone a WordPress site using ServerAvatar?** ServerAvatar is designed for beginners and does not require coding, command-line access, or server expertise. ### **4. Is it safe to use plugins for WordPress cloning?** Plugins can work for smaller sites, but they may struggle with large websites or limited server resources. Server-level cloning with ServerAvatar is more stable and reliable. ### **5. Is cloning suitable for large WordPress websites?** ServerAvatar’s server-level cloning can handle large files and databases more efficiently than plugin-based solutions. ### **6. Can I clone a WordPress site to another server using ServerAvatar?** ServerAvatar supports cloning WordPress applications across different servers with minimal effort. ### **7. Who should use ServerAvatar’s cloning feature?** ServerAvatar is ideal for everyone, from beginners, freelancers, agencies, developers, SaaS founders, and businesses managing critical WordPress websites. **Categories:** Blog, Guide, Linux, Others, Tutorials, Ubuntu, WordPress **Tags:** beginner WordPress tutorial, clone a site without coding, clone WordPress site, duplicate WordPress website, Wordpress, WordPress cloning --- ### [403 Forbidden Error Explained: How to Fix It on Your Website](https://serveravatar.com/403-forbidden-error-how-to-fix/) **Published:** January 30, 2026 **Author:** Meghna Meghwani **Content:** [![Blog banner - ServerAvatar](https://serveravatar.com/wp-content/uploads/2025/09/728_90-Banner-3-1024x127.png)](https://serveravatar.com/?ref=blog)A 403 Forbidden error is a common HTTP status code that indicates an access restriction issue on a website. When this error appears, the server successfully receives the request but refuses to provide the requested resource due to permission or configuration limitations. This guide explains what a 403 Forbidden error is, why it occurs, and how to fix it step by step using safe and reliable methods. This blog will help website owners, administrators, and developers resolve the issue efficiently without any complexity. ## What Is a 403 Forbidden Error? A 403 Forbidden error means that access to a requested file, folder, or page is denied by the server. The server understands the request but blocks it intentionally due to defined rules or permission settings. This error typically appears in formats such as: - 403 Forbidden - Access Denied - You do not have permission to access this resource ![403 Forbidden error](https://serveravatar.com/wp-content/uploads/2026/01/image-257.png) [](https://storage.3.basecamp.com/5840738/blobs/3843931a-fdb4-11f0-93a9-0242ac120003/download/image.png) Unlike a 404 error, which indicates missing content, a 403 error confirms that the resource exists but cannot be accessed. ## Difference Between 401, 403, and 404 Errors These errors are often confused, but each has a different meaning. - **401 Unauthorized:** Authentication is required or invalid - **403 Forbidden:** Authentication exists, but access is not allowed - **404 Not Found:** the resource that is requested is not exist[](https://storage.3.basecamp.com/5840738/blobs/9b682194-fda1-11f0-a7c8-0242ac120003/download/image.png) **Error Code****Name****Meaning****Common Cause****How to Fix****401**UnauthorizedAuthentication is required or has failedMissing, invalid, or expired login credentialsLog in again, provide valid credentials, or refresh the authentication token**403**ForbiddenAuthentication succeeded, but access is not allowedUser does not have permission to access the resourceRequest proper permissions or check access control settings**404**Not FoundThe requested resource does not existIncorrect URL or deleted/moved resourceVerify the URL, restore the resource, or update broken linksIf you want a detailed explanation of authentication-related access issues, you can read our dedicated guide on the [**401 Unauthorized Error**](https://serveravatar.com/401-unauthorized-error-causes-and-fixes/) ## Common Causes of a 403 Forbidden Error A 403 error can occur for several technical reasons related to permissions, security rules, or server configuration. ![Cause of 403 Forbidden error](https://serveravatar.com/wp-content/uploads/2026/01/image-258.png) - **Incorrect File or Directory Permissions:** Servers use permission values to determine who can read, write, or execute files. If these permissions are set incorrectly, access to the resource is denied. - **Misconfigured .htaccess File:** The .htaccess file controls access rules at the server level. Invalid directives or restrictive rules inside this file can block access to pages or directories. - **Missing Default Index File:** When a directory does not contain a default index file and directory browsing is disabled, the server may return a 403 Forbidden error. - **IP or Access Restrictions:** Server firewalls or access control rules may restrict access based on IP addresses, request types, or defined security policies. - **Plugin or Security Rule Conflicts:** Certain plugins or security configurations may unintentionally block legitimate requests, resulting in a 403 error. - **Incorrect File Ownership:** If files or directories are owned by an incorrect user or group, the web server may not have sufficient permission to serve them. ## How to Fix a 403 Forbidden Error The following solutions address the most common causes of the 403 Forbidden error. Additionally, Server management platforms like ServerAvatar help website owners and administrators monitor permissions, security rules, and server configurations from a centralized dashboard. This makes it easier to identify and resolve access-related issues such as 403 Forbidden errors while maintaining server stability. **What is ServerAvatar?** [ServerAvatar](https://serveravatar.com/) is a platform to simplify the hosting and management of servers and applications. It simplifies the process of deploying and managing PHP and Node.js based web applications on servers. ![ServerAvatar Dashboard](https://serveravatar.com/wp-content/uploads/2026/01/image-259.png) Various solutions to resolve the most common causes of the 403 Forbidden error. ### 1. Clear Browser Cache Browsers store cached data such as images, scripts, cookies, and HTTP responses to improve loading speed and reduce repeated requests to the server. While caching improves performance, it can sometimes cause access-related issues when permission settings or server rules change. If a browser has stored an older access response, it may continue to display a 403 Forbidden error even after the issue has already been resolved on the server. Clearing the browser cache forces the browser to request fresh data directly from the server instead of relying on stored responses. **Why Clearing Cache Helps Resolve 403 Errors** - Cached permission data may conflict with updated server configurations. - Browsers can continue using outdated access responses after permission changes. - Modified access rules or authentication policies may not take effect immediately due to cached data. - Clearing the cache forces the browser to request the latest version of the resource from the server. - Stored cookies related to sessions or access validation can interfere with permission checks. - Removing cached cookies helps reset session data and access-related interactions. - Clearing cache ensures accurate communication between the browser and the server. ### 2. Verify File and Folder Permissions File and folder permissions play a critical role in controlling access to website resources. Incorrect permission values can prevent the web server from reading or executing files, resulting in a 403 Forbidden error. Verifying and correcting these permissions ensures that the server has the required access while maintaining security. **Understanding Permission Values** Permission values define how files and directories can be accessed by the owner, group, and others. Each permission setting determines whether a resource can be read, written, or executed. If these values are misconfigured, the server may block access to the resource even if it exists. **Recommended Permission Settings** To maintain proper access and security, the following permission values are recommended: - **Directories: 755** Allows the owner full access while granting read and execute access to others, enabling directory navigation. - **Files: 644** Allows the owner to read and write, while granting read-only access to others, ensuring files can be served correctly. These permission settings are widely accepted as secure defaults for most web servers. **Why Correct Permissions Matter** When directories lack execute permissions or files lack read permissions, the server cannot access or deliver the requested content. This results in access denial and triggers a 403 Forbidden error. Correct permission values ensure the server can function as intended without exposing sensitive data. **How can ServerAvatar help?** When managing multiple websites or servers, manually verifying file and folder permissions can become time-consuming. ServerAvatar simplifies this process by providing centralized server management, allowing administrators to manage services, configurations, Change File Permission, and access settings efficiently. ![file manager - 403 Forbidden error](https://serveravatar.com/wp-content/uploads/2026/01/image-260-1024x424.png) ### 3. Check and Repair the .htaccess File The **.htaccess** file is a critical configuration file that controls how the web server handles requests, access rules, redirects, and security settings. An incorrect directive or restrictive rule in this file can block access to resources and trigger a 403 Forbidden error. Checking and repairing the **.htaccess** file helps identify misconfigurations that prevent the server from serving content correctly. **How the .htaccess File Affects Access** The .htaccess file can define rules related to authorization, directory access, IP restrictions, and request handling. If these rules are written incorrectly or conflict with server-level settings, the server may deny access even when permissions are correctly configured. Common issues include invalid syntax, unsupported directives, or access rules that are too restrictive. **Tips for managing .htaccess Files** - Always back up the file before editing - Make one change at a time and test thoroughly - Avoid using unsupported or deprecated directives - Keep the file clean and well-organized A properly configured .htaccess file ensures correct request handling, prevents unauthorized access issues, and reduces the likelihood of encountering 403 Forbidden errors. **How can ServerAvatar help?** ServerAvatar provides a user-friendly File Manager that makes it easy to access, view, and edit the .htaccess file directly from the dashboard. This allows you to quickly identify misconfigurations, apply changes safely, and restore proper access without needing complex command-line operations. ![check and repair file - 403 Forbidden error](https://serveravatar.com/wp-content/uploads/2026/01/image-261-1024x390.png) ### 4. Confirm the Presence of an Index File Web servers are designed to load a default index file automatically when a directory is accessed. If no index file is present and directory listing is disabled, the server may deny access and return a 403 Forbidden error. To prevent this issue, it is important to verify that each accessible directory contains a valid index file. **Common Default Index Files** Most web servers recognize the following files as default index files: - index.php - index.html - index.htm The server will load the first available index file based on its configuration. **Why Missing Index Files Cause 403 Errors** When a directory does not include an index file, the server does not know which file to display. If directory browsing is disabled for security reasons, the server blocks access instead of listing directory contents, resulting in a 403 error. **Tips for Index File Management** - Include an index file in every public directory - Use consistent naming across the website - Check index files after migrations or deployments - Keep index files lightweight and properly structured Confirming the presence of an index file is a simple yet essential step in resolving and preventing 403 Forbidden errors. **How can ServerAvatar help?** ServerAvatar provides a user-friendly File Manager that makes it easy to access, view, and edit the files directly from the dashboard. This allows you to quickly check if the mentioned files exist. ### 5. Disable Plugins or Security Modules Plugins and security modules often control access rules, request filtering, and permission enforcement. If a plugin or security configuration is misconfigured or incompatible, it can block legitimate requests and trigger a 403 Forbidden error. Temporarily disabling these components helps determine whether the error is caused by a conflict in access rules. **Why Plugins and Security Modules Cause 403 Errors** Access-related plugins and security modules may apply strict filtering rules to protect the website. When these rules are incorrectly defined or conflict with server settings, they can deny access to valid resources. Updates or configuration changes can also alter behavior, leading to unexpected access restrictions. **Tips for Managing Plugins and Security Modules** - Use only necessary and well-maintained plugins - Keep plugins updated to ensure compatibility - Review security rules after updates - Test changes in a controlled environment Disabling plugins or security modules is an effective troubleshooting step that helps resolve 403 Forbidden errors caused by misconfigured access controls. ### 6. Review Firewall and Access Rules Firewalls and access control rules are designed to protect websites from unauthorized or suspicious requests. However, if these rules are misconfigured or overly restrictive, they can block legitimate access and trigger a 403 Forbidden error. Reviewing firewall settings and access rules helps identify policies that may be preventing access to public resources. **How Firewall Rules Affect Access** Server-level firewalls and security policies evaluate incoming requests based on predefined conditions such as request type, headers, and access patterns. When a request matches a blocked rule, the server denies access, resulting in a 403 error. Conflicting rules or outdated policies can continue blocking requests even after other issues have been resolved. **Best Practices for Firewall and Access Management** - Audit firewall rules regularly - Avoid overly aggressive blocking policies - Document rule changes for future reference - Monitor logs to detect repeated access denials Reviewing firewall and access rules ensures that security measures protect the website without unintentionally blocking valid requests. **How can ServerAvatar help?** Reviewing firewall and access rules can be complex, especially when multiple rules and directories are involved. ServerAvatar allows users to view, create, edit, and delete rules directly from a user-friendly dashboard. This makes it easier to manage firewall, ensure proper access to public resources, and prevent 403 Forbidden errors without needing advanced server commands. ![Firewall Rules - 403 Forbidden error](https://serveravatar.com/wp-content/uploads/2026/01/image-262-1024x322.png) ## 7. Verify File Ownership Settings File ownership determines which user and group have control over files and directories on a server. Even when permission values are correctly configured, incorrect ownership can prevent the web server from accessing required resources, resulting in a 403 Forbidden error. Verifying and correcting file ownership ensures that the server has proper authorization to read and serve website files. **How File Ownership Affects Access** Each file and directory on a server is assigned an owner and a group. The web server operates under a specific user account and relies on ownership settings to determine access rights. If files are owned by an unexpected or incorrect user or group, the server may not be able to read or execute them. Ownership issues often occur after server migrations, restorations, or automated processes that change file attributes. **Tips for Managing File Ownership** - Maintain consistent ownership across the website - Verify ownership after migrations or backups - Avoid mixing multiple users for file management - Document ownership standards for future reference Verifying file ownership is an essential step in resolving and preventing 403 Forbidden errors caused by access control conflicts. ****How can ServerAvatar help?**** ServerAvatar simplifies ownership and permission management with a “Fix Permissions” button that automatically corrects file ownership and access rights for your applications. This eliminates manual SSH commands and instantly resolves common permission-related issues that can lead to 403 Forbidden errors. ![Fix Ownership and Permission - 403 Forbidden error](https://serveravatar.com/wp-content/uploads/2026/01/image-264-1024x428.png) ### 8. Contact ServerAvatar Support If a 403 Forbidden error persists, the issue may exist at the server level. ServerAvatar support team analyzes server logs, permission conflicts, and security rules to identify the root cause. It provides the exact cause by checking server logs, services, firewall rules, and configuration settings. Additionally, the ServerAvatar technical experts are available 24/7 to assist you with your issue and resolve your queries and issues. [![Blog banner - ServerAvatar](https://serveravatar.com/wp-content/uploads/2025/09/728_90-Banner-1-1024x127.png)](https://serveravatar.com/?ref=blog)## SEO Impact of a 403 Forbidden Error A 403 Forbidden error can negatively impact SEO if public pages become inaccessible. Search engines may reduce crawling frequency or remove affected URLs from search results. Public-facing pages should never return a 403 status unless intentionally restricted. ## How to Prevent 403 Forbidden Errors Preventing 403 Unauthorized errors requires consistent access management, proper configuration, and regular maintenance. Implementing the following best practices helps reduce the risk of access restrictions and ensures stable website availability. ![Prevent 403 Forbidden error](https://serveravatar.com/wp-content/uploads/2026/01/image-263.png) - **Maintain Correct File and Directory Permissions:** Ensure that files and directories always use recommended permission values. Overly restrictive or overly open permissions can both cause access issues and security risks. Review permissions regularly, especially after deployments or updates. - **Backup Configuration Files Before Changes:** Always create backups of important configuration files, including .htaccess, server configuration files, and access control settings. This allows quick recovery if a configuration change results in restricted access. - **Use Access Control Rules Carefully:** Apply access restrictions only where necessary. Misconfigured rules, IP restrictions, or authorization directives can unintentionally block legitimate requests. Periodically audit access rules to ensure they align with current requirements. - **Monitor Security and Firewall Policies:** Security modules and firewall rules should be reviewed regularly to prevent false positives. Overly aggressive security policies can trigger 403 errors by blocking valid requests. Fine-tune rules to balance protection and accessibility. - **Keep Plugins and Server Software Updated:** Outdated plugins or server software may introduce compatibility issues that affect access control. Keeping all components up to date ensures better stability, security, and predictable behavior. - **Verify File Ownership After Server Changes:** Server migrations, restorations, or automated processes can alter file ownership. Confirm that ownership settings remain correct so the server retains permission to access required resources. - **Regularly Review Server Logs:** Access logs and error logs provide early indicators of permission-related issues. Monitoring these logs helps identify patterns that could lead to 403 Unauthorized errors before they affect site availability. By following these best practices, websites can significantly reduce the chances of encountering 403 Unauthorized errors and maintain consistent access for users and search engines. ## Conclusion A 403 Forbidden error is a clear signal that access to a resource is being blocked due to permission, ownership, or configuration issues rather than missing content. While the error can seem intimidating at first, it is usually caused by common and fixable factors. By systematically checking website owners and administrators can quickly restore proper access. ServerAvatar further simplifies this process by offering centralized control over permissions, firewall rules, configuration files, and server logs, making it easier to identify and resolve 403 Forbidden errors while maintaining a stable, secure, and SEO-friendly website. ## FAQs ### 1. Is a 403 Forbidden error bad for SEO? If public pages return a 403 status unintentionally, search engines may stop crawling those URLs or remove them from search results. This can negatively impact rankings and visibility. ### 2. What file permissions should I use to avoid 403 errors? Common recommended settings are 755 for directories and 644 for files. These values allow the server to access resources while maintaining security. ### 3. How can I prevent 403 Forbidden errors in the future? Maintain proper permissions, back up configuration files before changes, review firewall and security rules regularly, keep plugins updated, verify ownership after server changes, and monitor server logs consistently. ### 4. Can a 403 Forbidden error be temporary? A 403 error can occur temporarily due to firewall rules, rate limiting, or security modules that block requests after suspicious activity. Once the restriction is lifted or rules are updated, access is restored. ### 5. How does ServerAvatar simplify permission management? ServerAvatar enables users to view and update file and folder permissions from a single interface. This reduces the risk of incorrect permission settings that often lead to 403 Forbidden errors. ### 6. Is ServerAvatar useful for managing multiple websites with access issues? ServerAvatar allows users to manage multiple servers and applications from one dashboard, making it easier to manage and monitor servers and applications. **Categories:** Blog, Guide, Linux, Others, Tutorials, Ubuntu **Tags:** 403 forbidden error, access denied error, fix 403 forbidden error, forbidden error, Web Server Errors, website errors --- ### [What Is VPS Hosting? Everything You Need to Know About It](https://serveravatar.com/what-is-vps-hosting/) **Published:** January 27, 2026 **Author:** Meghna Meghwani **Content:** [![Blog banner - ServerAvatar](https://serveravatar.com/wp-content/uploads/2025/09/728_90-Banner-3-1024x127.png)](https://serveravatar.com/?ref=blog)As websites grow, their hosting needs change. Shared hosting often feels restrictive, while dedicated servers can be complex and costly. This is where VPS hosting becomes a practical option. It offers better performance, more control, and improved stability without the high cost of a dedicated server. This article explains what VPS hosting is, how it works, its features, advantages, and limitations in clear and simple language. The goal is to help you understand whether VPS hosting is the right choice for your website. ## What Is VPS Hosting? VPS hosting, or Virtual Private Server hosting, is a web hosting solution where a physical server is divided into multiple independent virtual servers. Each VPS operates with its own allocated resources, operating system, and configurations. Unlike shared hosting, where multiple websites rely on the same pool of resources, VPS hosting provides dedicated resources to each user. This ensures more consistent performance and greater control. ![VPS Hosting](https://serveravatar.com/wp-content/uploads/2026/01/image-211.png) ### How VPS Hosting Works VPS hosting uses virtualization technology to create isolated environments within a single physical server. Each virtual server functions independently, meaning activities on one VPS do not affect others. ![VPS Hosting working](https://serveravatar.com/wp-content/uploads/2026/01/image-212.png) **Every VPS includes:** A VPS comes with its own dedicated environment inside a physical server. This setup ensures better performance, control, and stability compared to shared hosting, making it suitable for growing websites and applications. - **A dedicated portion of CPU, RAM, and storage:** Ensures consistent performance without being affected by other users. - **Its own operating system:** Allows independent system-level control and customization. - **Administrative access for configuration:** Enables users to manage server settings and install required software. This structure ensures better reliability and flexibility. ### Core Components of VPS Hosting VPS hosting is built using multiple technical components that work together to provide isolation, flexibility, and reliability. These components ensure that each VPS functions like a standalone server. - **Virtualized hardware resources:** Allocate fixed server resources to each VPS for stable performance.Is VPS hosting secure? - **Independent operating system:** Allows each VPS to run and operate separately. - **Private file system:** Keeps data isolated and secure from other users. - **Dedicated IP address (in most cases):** Provides better control, security, and compatibility. These components work together to provide stability and customization options. ## What is Shared Hosting? Shared hosting places multiple websites on a single server where all users share the same system resources. It is usually the most affordable hosting option but comes with performance and control limitations. ![shared server - VPS Hosting](https://serveravatar.com/wp-content/uploads/2026/01/image-213.png) **Key characteristics of shared hosting include:** - **Shared server resources:** CPU, RAM, and storage are used by multiple websites on the same server. - **Lower performance during traffic spikes:** High traffic on one site can affect others. - **Limited server control:** Advanced configurations and custom settings are restricted. - **Basic security setup:** Security is shared across all hosted websites. - **Cost-effective hosting option:** Suitable for small or low-traffic websites. - **Easy to use for beginners:** Requires minimal technical knowledge to manage. For simple websites with low traffic and basic requirements, shared hosting can be a practical starting point. ## What is Dedicated Hosting? Dedicated hosting provides a single user with exclusive access to an entire physical server. All server resources are reserved for one website or application, offering maximum performance, control, and security. ![dedicated server - VPS Hosting](https://serveravatar.com/wp-content/uploads/2026/01/image-214.png) **Key characteristics of dedicated hosting include:** - **Exclusive server resources:** CPU, RAM, and storage are not shared with other users. - **High performance and reliability:** Suitable for resource-intensive websites and applications. - **Full administrative control:** Complete access to server configurations and software. - **Advanced security capabilities:** Allows custom security setups and strict access control. - **Higher cost compared to other hosting types:** Requires a larger budget. - **Greater technical complexity:** Needs advanced server management knowledge. Dedicated hosting is best suited for large-scale websites and applications that require maximum performance and complete server control. ## VPS Hosting vs Shared Hosting vs Dedicated Hosting **Feature****Shared Hosting****VPS Hosting****Dedicated Hosting****Resource Allocation**Shared among usersDedicated virtual resourcesFully dedicated server**Performance**Low to moderateHigh and consistentVery high**Server Control**Very limitedFull administrative accessComplete control**Scalability**LimitedEasy to scaleHardware-based scaling**Security**BasicStrong due to isolationVery strong**Cost**LowMediumHigh**Suitable For**Small or new websitesGrowing websites and appsHigh-traffic enterprise sites## Key Features of VPS Hosting VPS hosting includes features that support performance, customization, and reliability. These features make it suitable for websites with growing needs. - **Dedicated CPU, RAM, and storage:** Ensures predictable and stable performance. - **Root or administrative access:** Allows full control over server configurations. - **Custom software installation:** Supports specific application and framework needs. - **Scalable resources:** Makes it easy to adjust server capacity. - **Improved uptime and stability:** Reduces downtime compared to shared hosting. These features make VPS hosting suitable for growing websites. ## Advantages of VPS Hosting VPS hosting provides a strong balance between required performance and as per the affordability. It is designed for users who need more control and reliability. - **Better performance compared to shared hosting:** Delivers faster and more consistent speeds. - **Greater control over server settings:** Enables advanced configurations and tuning. - **Increased reliability and uptime:** Reduces performance issues caused by others. - **Enhanced security through isolation:** Keeps each VPS environment separate. - **Flexible resource upgrades:** Supports future growth easily. These advantages support long-term website growth. ## Disadvantages of VPS Hosting While VPS hosting is powerful, it does come with certain challenges that users should consider before choosing it. - **Higher cost than shared hosting:** Requires a larger budget. - **Requires technical knowledge for management:** Needs basic server administration skills. - **Misconfiguration can affect performance:** Incorrect settings may cause issues. Choosing managed VPS hosting can reduce these challenges. ## Types of VPS Hosting VPS hosting is available in different forms to suit various experience levels and requirements. - **Managed VPS hosting:** The provider handles maintenance, updates, and security. - **Unmanaged VPS hosting:** Users manage everything on their own. - **Cloud-based VPS hosting:** Uses cloud infrastructure for better scalability and reliability. Each type suits different experience levels and use cases. ## Who Should Use VPS Hosting? VPS hosting is best suited for users who need more performance and flexibility than shared hosting can offer. - **Medium to high-traffic websites:** Handles increased visitor loads efficiently. - **Online businesses and stores:** Supports stable and secure operations. - **Developers needing custom environments:** Allows advanced server configurations. - **Websites that have outgrown shared hosting:** Provides a natural upgrade path. It is a practical solution for scaling websites. ## Common Uses of VPS Hosting VPS hosting supports a wide range of applications and website types due to its flexibility. - **Hosting content management systems:** Supports platforms like WordPress efficiently. - **Running web applications:** Handles backend and frontend applications smoothly. - **Hosting multiple websites:** Allows multiple projects on a single VPS. - **Development and testing environments:** Provides isolated spaces for testing. Its flexibility supports diverse requirements. ## VPS Hosting for Website Performance VPS hosting improves website performance by ensuring resources are not shared with other users. - **Dedicated system resources:** Prevents slowdowns caused by external activity. - **Faster response times:** Improves user experience and page loading speed. - **Better handling of traffic spikes:** Maintains stability during high traffic. This results in a smoother experience for visitors. ## VPS Hosting Security Security is one of the strongest advantages of VPS hosting due to its isolated setup. - **Isolated environments:** Keeps each VPS separate and protected. - **Custom firewall configurations:** Allows tailored security rules. - **Better control over access permissions:** Improves user and system security. - **Reduced risk from neighboring websites:** Prevents cross-site issues. Proper configuration further strengthens security. ## Managed vs Unmanaged VPS Hosting - **Managed VPS hosting** means the service provider takes care of server maintenance, system updates, and security management. - **Unmanaged VPS hosting** gives full control but requires technical expertise. **Aspect****Managed VPS Hosting****Unmanaged VPS Hosting****Server Setup**Handled by providerUser-managed**Maintenance & Updates**IncludedUser responsibility**Security Management**Provider-managedUser-managed**Technical Skills Required**MinimalAdvanced**Control Level**Limited but sufficientFull control**Best For**Beginners & businessesDevelopers & sysadminsThe right option depends on your experience and resources. ## How to Choose the Right VPS Hosting Plan Selecting the right VPS plan ensures long-term performance and stability for your website. - **Resource requirements:** Match CPU, RAM, and storage to your needs. - **Operating system support:** Choose compatibility with your applications. - **Scalability options:** Ensure easy upgrades in the future. - **Support availability:** Reliable support helps resolve issues quickly. - **Pricing structure:** Balance cost with features and performance. Choosing wisely ensures long-term stability. ## How ServerAvatar Simplifies VPS Hosting VPS hosting gives users more control and performance than shared hosting, but managing a VPS can feel complex, especially for beginners and non-technical users. This is where a VPS management platform becomes useful. **What is ServerAvatar?** [ServerAvatar](https://serveravatar.com/) is a platform to simplify the hosting and management of servers and applications. It simplifies the process of deploying and managing PHP and Node.js based web applications on servers. [](https://storage.3.basecamp.com/5840738/blobs/bed20b00-fb6b-11f0-aee6-0242ac120004/download/serveravatardashboard.jpg) ![ServerAvatar Dashboard](https://serveravatar.com/wp-content/uploads/2026/01/image-215.png) ServerAvatar works as both a VPS hosting provider and a VPS management control panel, helping users to manage servers and websites through a simple, web-based dashboard. It bridges the gap between VPS infrastructure and easy server management, making VPS hosting more accessible to a wider audience. ### ServerAvatar as a VPS Hosting Provider For users who want to avoid the complexity of setting up a VPS from scratch, ServerAvatar offers **managed servers**. With managed servers, users do not need to connect to their own cloud provider or handle low-level server configuration. ![managed server - VPS Hosting](https://serveravatar.com/wp-content/uploads/2026/01/image-216-842x1024.png) ServerAvatar provisions, manages, and maintains the server infrastructure, allowing users to focus on hosting websites and applications rather than managing system-level tasks. This option is especially helpful for beginners and business owners who want VPS benefits without technical overhead. ### ServerAvatar as a VPS Management Control Panel In addition to managed servers, ServerAvatar also supports **self-managed servers**. This option is suitable for developers and advanced users who already have VPS servers from cloud providers. ![self managed server - VPS Hosting](https://serveravatar.com/wp-content/uploads/2026/01/image-217-961x1024.png) With self-managed servers, users can connect their existing VPS to ServerAvatar and manage it using an intuitive control panel. This approach combines full server control with simplified management, offering flexibility without sacrificing usability. ## Managed vs Self-Managed Servers in ServerAvatar ServerAvatar supports both managed and self-managed VPS setups, allowing users to choose based on their experience and requirements. - **Managed servers** are fully handled by ServerAvatar, including server provisioning and maintenance. No need of cloud provider account. - **Self-managed servers** allow users to connect their own custom VPS from any cloud provider while using ServerAvatar for centralized management. This flexibility makes ServerAvatar suitable for beginners, growing businesses, and developers alike. ## Why ServerAvatar Is Useful for VPS Users Managing a VPS often involves command-line operations, manual configurations, and ongoing maintenance. ServerAvatar simplifies these tasks by providing a unified interface for common VPS management needs. **Key benefits include:** - Simplified server and application management - Reduced need for deep server administration knowledge - Centralized control for websites and services - A smoother VPS experience for different skill levels Rather than replacing VPS hosting, ServerAvatar enhances how users interact with and manage VPS servers. [![Blog banner - ServerAvatar](https://serveravatar.com/wp-content/uploads/2025/09/728_90-Banner-1-1024x127.png)](https://serveravatar.com/?ref=blog)## Who Can Benefit from Using ServerAvatar with VPS Hosting ServerAvatar is designed to support a wide range of users: - **Beginners** who want VPS performance without technical complexity - **Developers** who need flexibility and efficient server control - **Business owners** looking for reliable and scalable hosting - **General users** who want a clean interface instead of manual server management By supporting both managed and self-managed VPS setups, ServerAvatar adapts to different hosting needs. ## Using ServerAvatar Alongside VPS Hosting VPS hosting provides the infrastructure, while ServerAvatar focuses on usability and management. Together, they help users get the advantages of VPS hosting, such as performance, control, and scalability, without unnecessary difficulty. This approach allows users to grow their websites and applications while keeping server management simple and organized. ## Conclusion VPS hosting is a reliable and flexible solution for websites that have outgrown shared hosting but do not require the complexity or cost of dedicated servers. It offers dedicated resources, better performance, stronger security, and greater control, making it suitable for beginners, developers, business owners, and general users alike. When combined with a VPS management platform like ServerAvatar, whether through managed servers or self-managed setups, users can simplify server operations while still enjoying the full benefits of VPS hosting. Choosing the right VPS setup ultimately depends on your technical experience, performance needs, and long-term growth plans. ## FAQs ### 1. How is VPS hosting different from shared hosting? VPS hosting provides dedicated resources and better control, while shared hosting relies on shared resources, which can affect performance as traffic grows. ### 2. Is VPS hosting suitable for beginners? VPS hosting can be suitable for beginners, especially when using managed VPS solutions or platforms like ServerAvatar that simplify server management. ### 3. Can ServerAvatar be used with an existing VPS? ServerAvatar supports self-managed servers, allowing users to connect their existing VPS from any cloud provider and manage it through a centralized dashboard. ### 4. Does VPS hosting improve website performance? VPS hosting improves performance by providing dedicated CPU, RAM, and storage, resulting in faster load times and better stability. ### 5. Is VPS hosting secure? VPS hosting is more secure than shared hosting due to isolated environments, custom firewall options, and better access control. **Categories:** Blog, Cloud Platforms, Guide, Others, Tutorials **Tags:** Cloud VPS, virtual private server, VPS, Vps hosting, VPS hosting benefits, vps hosting explained, vps hosting for beginners, VPS Management, what is vps hosting --- ### [401 Unauthorized Error Explained: Causes and How to Fix It](https://serveravatar.com/401-unauthorized-error-causes-and-fixes/) **Published:** January 24, 2026 **Author:** Meghna Meghwani **Content:** [![Blog banner - ServerAvatar](https://serveravatar.com/wp-content/uploads/2025/09/728_90-Banner-3-1024x127.png)](https://serveravatar.com/?ref=blog)Seeing a 401 Unauthorized Error on your screen can be frustrating, especially when you are sure the page exists and should load correctly. One moment, everything seems fine, and the next moment, access is denied. For many people, this error feels confusing and technical, but the good news is that it is usually easy to understand and fix. In this article, we will clearly explain what a 401 Unauthorized Error means, why it happens, and how you can fix it. This guide is written in simple language, without unnecessary technical terms, so anyone can follow along and resolve the issue confidently. ## What Is a 401 Unauthorized Error? A 401 Unauthorized Error is an HTTP status code that indicates a request was made to a server without proper authentication. In simple words, the server received your request but refused to process it because it could not verify your identity. This error usually appears when: - **Login credentials are missing:** The request is sent without a username, password, or required authentication data. - **Authentication details are incorrect:** The provided login information does not match the stored credentials. - **Access permissions have expired:** The user’s authorization period has ended and needs renewal. ![401 Unauthorized Error](https://serveravatar.com/wp-content/uploads/2026/01/image-205.png) The server expects valid proof of authorization before allowing access. ## Difference Between 401, 403, and 404 Errors These errors are often confused, but each has a different meaning. - **401 Unauthorized:** Authentication is required or invalid - **403 Forbidden:** Authentication exists, but access is not allowed - **404 Not Found:** the resource that is requested is not exist[](https://storage.3.basecamp.com/5840738/blobs/d0c46104-f90a-11f0-a92c-0242ac120004/download/image.png) **Error Code****Name****Meaning****Common Cause****How to Fix****401**UnauthorizedAuthentication is required or has failedMissing, invalid, or expired login credentialsLog in again, provide valid credentials, or refresh authentication token**403**ForbiddenAuthentication succeeded, but access is not allowedUser does not have permission to access the resourceRequest proper permissions or check access control settings**404**Not FoundThe requested resource does not existIncorrect URL or deleted/moved resourceVerify the URL, restore the resource, or update broken linksA 401 error means the content is available, but access is restricted until proper credentials are provided. ## Why the 401 Unauthorized Error Occurs The 401 error is designed to protect private or restricted content. It ensures that only authorized users can access specific pages, data, or services. This error commonly occurs when: - **A user tries to access a protected page without logging in:** The page requires authentication that has not been completed. - **Stored login data is no longer valid:** Saved session or cookie data has expired or become corrupted. - **Authentication rules are not properly configured:** Security rules fail to correctly verify user identity. Understanding the cause makes it easier to choose the right solution. ### 1. Incorrect Username or Password One of the most common reasons for a 401 Unauthorized Error is incorrect login information. Even small mistakes can trigger this error. Common issues include: - **Typing errors:** Incorrect characters are entered while typing login details. - **Incorrect password:** The password provided does not match the account password. - **Using outdated login details:** Old or changed credentials are still being used. Always double-check credentials before assuming there is a system issue. ### 2. Expired Login Sessions Many websites use sessions to keep users logged in for a certain period. When a session expires, the server no longer recognizes the user as authenticated. This often happens when: - **A page remains open for a long time:** The session expires due to prolonged inactivity. - **The browser is closed and reopened:** Closing the browser ends the active authentication session. - **Session timeout settings are strict:** Short timeout limits automatically invalidate sessions quickly. When this occurs, re-authentication is required. ### 3. Issues with Browser Cache and Cookies Browsers store temporary data, such as cache and cookies, to improve performance. However, outdated or corrupted data can cause authentication problems. This may result in: - **Invalid session data being sent:** Expired or corrupted session details are included in the request. - **Conflicting login information:** Multiple sessions send mismatched authentication data. Clearing the cache and cookies often resolves the issue quickly. ### 4. Missing or Invalid Authorization Headers In some cases, especially with applications and APIs, the server expects authorization details in request headers. A 401 Unauthorized Error may occur if: - **Authorization headers are missing:** The request does not include required authentication headers. - **Token values are incorrect:** The provided token does not match the expected value. - **Headers are formatted incorrectly:** Improper syntax prevents the server from reading credentials. This is common in custom integrations and API-based services. ### 5. API Authentication Errors When working with APIs, authentication relies on keys, tokens, or credentials. If these are missing or invalid, access is denied. Common causes include: - **Expired API tokens:** The token has passed its validity period. - **Revoked API keys:** The key has been disabled or removed by the system. - **Incorrect authentication method:** The API is accessed using an unsupported security method. Ensuring proper API configuration is essential for uninterrupted access. ### 6. Server Configuration Problems Sometimes, the issue is not on the user’s side. Server-side problems can also cause 401 errors. These include: - **Incorrect permission settings:** Users lack the required access rights. - **Misconfigured authentication rules:** Security rules fail to properly validate users. - **Server software updates affecting access control:** Updates modify existing authentication logic. In such cases, the issue must be resolved by the server administrator. ## How Users Can Fix a 401 Unauthorized Error If you encounter a 401 Unauthorized Error, start with basic troubleshooting steps. ![users fix for 401 Unauthorized Error](https://serveravatar.com/wp-content/uploads/2026/01/image-206.png) Recommended actions: - **Verify login credentials:** Double-check your username and password to ensure they are entered correctly. - **Refresh the page:** Reloading the page forces the system to retry authentication. - **Log out and log back in:** This creates a fresh session and clears temporary login issues. Most issues are resolved using these simple steps. ### Logging Out and Logging Back In Re-authenticating is often the quickest fix. Steps to follow: 1. **Log out of the website or application:** Ends the current authentication session. 2. **Close the browser:** Removes active session data. 3. **Reopen the browser and log in again:** Starts a new authenticated session. This refreshes your session and updates authentication data. ### Clearing Browser Cache and Cookies If logging in again does not work, clearing browser data can help. After clearing cache and cookies: - **Old session data is removed:** Expired or corrupted session files are deleted. - **Fresh authentication details are used:** New login data is generated after re-login. This step resolves many recurring 401 errors. [![Blog banner - ServerAvatar](https://serveravatar.com/wp-content/uploads/2025/09/728_90-Banner-1-1024x127.png)](https://serveravatar.com/?ref=blog)## How Website Owners Can Fix 401 Errors For website owners and administrators, frequent 401 errors can disrupt user access and reduce trust. Identifying and fixing authentication-related issues helps improve usability and prevent unnecessary access problems. ![owners fixes 401 Unauthorized Error](https://serveravatar.com/wp-content/uploads/2026/01/image-207.png) Key areas to check: - **Authentication configuration:** Authentication configuration controls how users log in and how their identity is verified. If these settings are incorrect, the system may fail to recognize valid users. This can result in repeated 401 Unauthorized errors. - **Session timeout settings:** Session timeout settings define how long a user stays logged in without activity. Very short timeout limits can log users out unexpectedly. This often causes access errors when users return to a page. - **User role and permission rules:** User roles determine what actions and pages a user can access. If permissions are misconfigured, even logged-in users may be blocked. Proper role assignment ensures users have the right level of access. - **Security plugins or firewall rules:** Security plugins and firewalls protect the site from suspicious activity. Sometimes, they may mistakenly block legitimate requests. Reviewing these rules helps prevent valid users from being denied access. Clear error messages can also guide users toward quick solutions. ## Best Practices to Prevent 401 Unauthorized Errors Preventing authentication issues improves user experience. [](https://storage.3.basecamp.com/5840738/blobs/a54aab00-f90f-11f0-888d-0242ac120004/download/image.png) ![best practices to prevent 401 Unauthorized Error](https://serveravatar.com/wp-content/uploads/2026/01/image-208.png)Best practices include: - **Clear login instructions:** Clear login instructions help users understand exactly how to sign in and what credentials are required. When the login process is simple and well-explained, users are less likely to make mistakes. This reduces failed authentication attempts. - **Proper session management:** Proper session management ensures user sessions are created, maintained, and expired correctly. It prevents conflicts caused by stale or invalid session data. This helps maintain secure and smooth access. - **Secure but reasonable timeout limits:** Timeout limits should protect user accounts without disrupting their activity. Very short timeouts can frustrate users, while very long ones may weaken security. A balanced approach improves both safety and usability. - **Regular testing of authentication flows:** Regular testing helps identify authentication issues early. It ensures login, session handling, and permission checks work as expected. This prevents users from encountering access errors. These steps help reduce confusion and support smoother access. ## Conclusion A 401 Unauthorized Error can be frustrating, but it is usually caused by simple authentication issues such as incorrect credentials, expired sessions, or misconfigured permissions. By understanding what triggers this error, users can quickly fix it using basic steps like refreshing the page, logging in again, or clearing browser data. For website owners, maintaining proper authentication settings, session management, and security rules helps prevent these errors from occurring frequently. With the right approach, 401 errors can be resolved easily, ensuring secure and smooth access for all users. ## FAQs ### **1. Is a 401 error caused by a broken website?** In many cases, the website is working correctly, but authentication details are missing, expired, or incorrect. ### **2. Can clearing cache and cookies fix a 401 error?** Clearing cache and cookies removes outdated session data and forces the browser to use fresh authentication details, which often resolves the error. ### **3. Why does a 401 error keep appearing even after logging in?** This can happen due to expired sessions, strict timeout settings, browser cookie issues, or incorrect user permission settings. ### **4. Are 401 errors dangerous?** A 401 error itself is not dangerous. It is a security feature designed to protect restricted content from unauthorized access. ### **5. Can server updates cause 401 Unauthorized errors?** Server or security updates can change authentication rules or permissions, which may temporarily block valid users. ## Stop Wasting Time on Servers. Start Building Instead. You didn’t start your project to babysit servers. Let **ServerAvatar** handle deployment, monitoring, and backups — so you can focus on growth. Deploy **WordPress, Laravel, N8N**, and more in minutes. No DevOps required. No command line. No stress. [ 🚀 Try Free ](https://app.serveravatar.com) [ 🌐 Learn More ](https://serveravatar.com/) Trusted by 10,000+ developers and growing. **Categories:** Blog, Guide, Linux, Optimisation, Others, Tutorials, Ubuntu **Tags:** 401 Error Meaning, 401 Unauthorized Error, 401 Unauthorized Error Causes, How to Fix 401 Unauthorized Error, HTTP 401 Error, Server Response Errors, Unauthorized Access Error, Web Server Errors --- ### [How to Check Open, Closed, or In-Use TCP Ports on Linux](https://serveravatar.com/check-open-closed-in-use-tcp-ports-on-linux/) **Published:** January 22, 2026 **Author:** Meghna Meghwani **Content:** [![Blog banner - ServerAvatar](https://serveravatar.com/wp-content/uploads/2025/09/728_90-Banner-3-1024x127.png)](https://serveravatar.com/?ref=blog)When working with Linux, understanding how TCP ports behave is an important technical skill. TCP ports control how applications communicate over a network and determine which services are accessible on your system. Whether you are managing a server, troubleshooting application issues, or reviewing system security, knowing how to check **open, closed, or in-use TCP ports on Linux** helps you maintain better control over your environment. This guide explains the concept clearly and walks through commonly used Linux commands in a simple, easy-to-follow way. The focus is on clarity, practical usage, and accuracy, without unnecessary complexity. ## What Are TCP Ports and Why Do They Matter A TCP port is a numbered endpoint that allows applications to send and receive data over a network. In Linux, services listen on specific TCP ports to accept incoming connections. Each port works alongside an IP address to ensure data reaches the correct destination. ![TCP ports on Linux](https://serveravatar.com/wp-content/uploads/2026/01/image-182.png) Without TCP ports, multiple network services could not operate simultaneously on the same system. ## Difference Between Open, Closed, and In-Use Ports TCP ports on a Linux system can exist in different states depending on how services are using them. Knowing the difference between these states makes it easier to understand how network communication works and why certain connections succeed or fail. - **Open Port:** A service is actively listening and ready to accept incoming network connections. - **Closed Port:** No service is listening on the port, even though the system itself is reachable. - **In-Use Port:** The port is already assigned to a running process and cannot be reused by another service. ![TCP ports on Linux](https://serveravatar.com/wp-content/uploads/2026/01/image-183.png) Understanding these port states helps quickly identify network errors and resolve service-related conflicts. ## Why Monitoring TCP Ports Is Important Monitoring TCP ports allows you to stay aware of what services are running on your system. It plays an important role in maintaining system stability, performance, and security. - **Security auditing:** Helps detect unnecessary or exposed services that could pose risks. - **Application troubleshooting:** Assists in finding why a service is not starting or responding. - **Preventing port conflicts:** Identifies ports already in use before deploying applications. - **Identifying unauthorized services:** Reveals unexpected processes listening on ports. - **Ensuring required services are running:** Confirms that essential applications are active. Regular TCP port monitoring is a simple yet essential part of effective system administration. ## TCP Port Number Ranges Explained TCP ports are identified by numbers ranging from **0 to 65535**, with each range serving a specific purpose. Understanding these categories helps in analyzing network behavior more efficiently. - **Well-known ports (0–1023):** Commonly reserved for core system and network services. - **Registered ports (1024–49151):** Typically assigned to user applications and software services. - **Dynamic ports (49152–65535):** Used temporarily for short-lived client connections. ![TCP ports on Linux](https://serveravatar.com/wp-content/uploads/2026/01/image-184.png) Recognizing these port ranges makes it easier to identify expected services and spot unusual activity. ## Check TCP Ports Easily Using ServerAvatar Online Port Checker While Linux commands like ss, lsof, and nmap are powerful, they require server access and basic command-line knowledge. In many situations, especially during quick checks, remote troubleshooting, or security validation, you may want a faster, browser-based solution. This is where **ServerAvatar’s Online Port Checker** becomes useful. **What is ServerAvatar?** [ServerAvatar](https://serveravatar.com/) is a platform to simplify the hosting and management of servers and applications. It simplifies the process of deploying and managing PHP and Node.js based web applications on servers. ![ServerAvatar Dashboard](https://serveravatar.com/wp-content/uploads/2026/01/image-185.png) ServerAvatar provides a free online tool that allows you to instantly check whether a specific TCP port is **open or closed** on any server or domain, without logging into the server or running terminal commands. **Try the tool here:** ![online port checker ServerAvatar - TCP ports on Linux](https://serveravatar.com/wp-content/uploads/2026/01/image-186-1024x595.png) ## Why Use ServerAvatar’s Online Port Checker? The ServerAvatar Online Port Checker is designed for simplicity, speed, and accuracy. It helps developers, system administrators, and website owners verify port availability in just a few seconds. **Key benefits include:** - **No server access required:** Check ports remotely using just a domain name or IP address. - **Quick verification:** Instantly confirm whether a TCP port is open or blocked. - **Useful for firewall testing:** Validate firewall rules and network configurations. - **Beginner-friendly:** No command-line knowledge needed. - **Works alongside Linux tools:** Ideal for confirming results from ss, nmap, or firewall changes. ## When This Tool Is Most Helpful The ServerAvatar Online Port Checker is especially useful in scenarios such as: - Verifying whether SSH (port 22) or HTTP/HTTPS ports (80/443) are accessible. - Checking if a newly deployed application port is reachable from the internet. - Confirming firewall or cloud security group configurations. - Troubleshooting connection issues without direct server login. - Performing quick security and accessibility checks. ## Checking Ports Manually Using CLI ### Checking TCP Ports Using netstat The **netstat** command is used to display active network connections and listening ports on a Linux system. It provides a quick overview of which TCP ports are currently open or in use. ``` netstat -tuln ``` ``` netstat -tuln ``` **What each option means:** - **-t:** shows TCP connections only. - **-u:** includes UDP connections in the output. - **-l:** lists ports that are actively listening. - **-n:** displays port numbers instead of service names. Although netstat is deprecated on some modern systems, it is still available and commonly used. ### Using ss Command to View Port Status The **ss** command is a faster and more efficient alternative to netstat. It provides detailed information about TCP connections with minimal system overhead. ``` ss -tuln ``` ``` ss -tuln ``` **What each option means:** - **-t:** shows only TCP connections. - **-u:** includes UDP connections in the output. - **-l:** displays ports that are actively listening for connections. - **-n:** shows port numbers instead of resolving service names. To view process-related details: ``` ss -tulpn ``` ``` ss -tulpn ``` **Explanation of each option:** - **-t:** shows TCP connections. - **-u:** includes UDP connections. - **-l:** lists ports that are actively listening. - **-p:** displays the process name and process ID (PID). - **-n:** shows numerical port values instead of service names. This command is especially useful for troubleshooting port conflicts, identifying running services, and verifying which applications are bound to specific ports. ### Listing Ports with lsof The **lsof** command lists open files and network connections, including TCP ports. It is especially useful for identifying which process is using a specific port. ``` lsof -i -P -n ``` ``` lsof -i -P -n ``` **Explanation of each option:** - **-i:** displays network-related open files, including TCP and UDP connections. - **-P:** shows port numbers instead of converting them to service names. - **-n:** prevents hostname resolution and displays raw IP addresses. To check a specific port: ``` lsof -i :443 ``` ``` lsof -i :443 ``` - Reveals the process name using the port. - Shows the process ID (PID). - Helps track down port ownership quickly. ### Scanning TCP Ports Using nmap The **nmap** tool is widely used to scan and detect open TCP ports on a system. It helps verify which ports are accessible and which services may be exposed. ``` nmap localhost ``` ``` nmap localhost ``` To scan a specific port: ``` nmap -p 80 localhost ``` ``` nmap -p 80 localhost ``` - Identifies open and closed ports. - Confirms service availability. - Assists in basic security checks. ### Identifying Services Bound to Ports When a port is already in use, it is important to identify the service responsible. The **ss** command makes this process straightforward. ``` ss -tulpn | grep :8080 ``` ``` ss -tulpn | grep :8080 ``` **What this command does:** - Displays active and listening TCP and UDP ports. - Filters results to show information for port **8080** only. - Reveals the process name and process ID (PID) using the port. **This output includes:** - **Process name** running on the port. - **Process ID (PID)** for management or troubleshooting. - **Port number** currently in use. This command is especially helpful when troubleshooting port conflicts or verifying which service is bound to a particular port. ### Checking the Status of a Specific TCP Port To verify whether a particular TCP port is open and accepting connections, you can test it directly using the **nc** command. ``` nc -zv localhost 22 ``` ``` nc -zv localhost 22 ``` **What this command does:** - Attempts a connection to port **22** on the local system. - Confirms whether the port is open and reachable. - Displays a success or failure message based on the connection result. This command is useful for quick connectivity checks and for verifying whether a service is actively listening on a specific port. [![Blog banner - ServerAvatar](https://serveravatar.com/wp-content/uploads/2025/09/728_90-Banner-1-1024x127.png)](https://serveravatar.com/?ref=blog)## TCP and UDP: Key Differences TCP and UDP are the two main protocols used for network communication. While both handle data transfer, they work in different ways and are used for different purposes. - **TCP:** Connection-oriented and reliable, ensuring data is delivered accurately and in order. - **UDP:** Connectionless and faster, designed for quick data transmission without delivery guarantees. **Feature****TCP** **(Transmission Control Protocol)****UDP** **(User Datagram Protocol)****Connection Type**Connection-orientedConnectionless**Reliability**Highly reliable with guaranteed deliveryNo guarantee of delivery**Data** **Order**Maintains correct data orderData order is not guaranteed**Error** **Checking**Includes error detection and recoveryBasic error checking only**Speed**Slower due to reliability mechanismsFaster due to minimal overhead**Data Loss Handling**Retransmits lost dataDoes not retransmit lost data**Flow Control**Yes, controls data flowNo flow control**Congestion Control**Yes, manages network congestionNo congestion control**Use** **Cases**Web traffic, email, file transfer, SSHStreaming, gaming, DNS, VoIP**Header Size**Larger header sizeSmaller header size**Resource** **Usage**Uses more system resourcesUses fewer system resources**Port Usage**Uses TCP portsUses UDP portsMost server-based applications depend on TCP, which is why TCP port checks are performed more frequently. ## Commonly Used TCP Ports Certain TCP ports are widely used by standard services and applications. Being familiar with these ports helps quickly identify expected network activity. - **22 (SSH):** Used for secure remote server access. - **80 (HTTP):** Handles unencrypted web traffic. - **443 (HTTPS):** Manages encrypted web communication. - **3306 (MySQL):** Commonly used by MySQL database services. - **6379 (Redis):** Used by Redis in-memory data storage systems. Recognizing these ports simplifies system reviews and network audits. ## Security Concerns Related to Open Ports Open TCP ports can become security risks if they are not properly controlled. Services that are exposed without need may be targeted by unauthorized users. - Unused open ports increase the attack surface. - Misconfigured services can expose sensitive data. - Lack of monitoring may allow unnoticed access attempts. Regular port checks help reduce these risks and improve system security. ## Best Practices for TCP Port Management Managing TCP ports carefully ensures stable and secure system operations. Following basic best practices can prevent many common issues. - **Close unused ports:** Reduces unnecessary exposure. - **Use firewall rules:** Controls which ports are accessible. - **Restrict external access:** Limits connections to trusted sources. - **Monitor running services:** Ensures only required applications are active. - **Review port usage periodically:** Helps detect unexpected changes. These steps improve both system performance and security. ## Resolving Common TCP Port Issues TCP port-related problems are common and usually easy to fix once identified. Most issues stem from configuration conflicts or security rules. - **Port already in use errors:** Occur when multiple services try to use the same port. - **Blocked ports due to firewall rules:** Prevent services from being reachable. - **Unexpected open ports:** May indicate unnecessary or unknown services. Identifying the service and adjusting its configuration usually resolves these problems. ## Conclusion Understanding how to check open, closed, or in-use TCP ports on Linux is a fundamental skill for anyone managing servers or applications. By learning how TCP ports work and using tools like `ss`, `lsof`, `netstat`, `nmap`, and `nc`, you can quickly diagnose connectivity issues, prevent port conflicts, and strengthen system security. Combining command-line methods with browser-based solutions like the **ServerAvatar** **Online** **Port** **Checker** makes port monitoring faster and more accessible, even without direct server access. Regularly reviewing TCP ports ensures that only necessary services remain active, helping you maintain a stable, secure, and well-managed Linux environment. ## FAQs ### 1. How do I list all open TCP ports on Linux? You can use **ss -tuln** or **netstat -tuln** to view all open TCP ports. ### 2. Which command shows the process using a port? Commands like **lsof -i :PORT** or **ss -tulpn** show the process and PID. ### 3. Is it safe to leave TCP ports open? Only required ports should remain open to minimize security risks. ### 4. Can I scan ports on my local system? Tools like **nmap** allow local TCP port scanning. ### 5. Can I check TCP ports without logging into a server? **ServerAvatar Online Port Checker** tool allow you to check whether a TCP port is open or closed using only a domain name or IP address. **Categories:** Blog, Guide, Linux, Tutorials, Ubuntu **Tags:** check TCP ports on Linux, Linux port checking, Linux TCP ports, open TCP ports Linux, TCP port status Linux, TCP ports --- ### [Server vs Browser vs Site Cache: Key Differences Explained](https://serveravatar.com/server-vs-browser-vs-site-cache/) **Published:** July 9, 2025 **Author:** Meghna Meghwani **Content:** **Understanding Server vs Browser vs Site Cache** is essential when you’re trying to optimize your website’s performance. Each caching method serves a unique purpose and works at different levels of your website infrastructure. This guide breaks down the three main caching types and explains how they differ in function, location, and impact on your website’s speed. ## What is Caching? Caching is a way to make websites and servers work faster by saving commonly used data. When someone visits a website, the server usually needs to run several tasks, like checking the database and doing calculations, before showing the final page. This takes time, especially if many people visit the site and the same work is repeated again and again. Caching helps by keeping a ready-made copy of this information in a place that’s quick to access, like memory. So, instead of doing all the work from scratch every time, the server or browser first checks if it already has a saved version. If it does, it simply shows that version, which is much faster. On websites, the cache can store things like images, CSS files, full web pages, or even the results of database searches. That’s where caching plays an important role. In this guide, we’ll explain the three key types of caching used on websites: - **Server Cache** - **Browser Cache** - **Site or Page Cache** Each type helps improve website speed and performance in its own way. ## What is Server Caching? Server caching is a way to make websites faster by storing ready-to-use copies of web content directly on the server. Normally, when someone visits a website, the server has to do several tasks, like checking the database, processing code, and building the webpage, before showing anything to the user. This process takes time and uses up server resources. With server caching, the server saves a completed version of the page or content the first time it’s created. Then, when someone else requests the same content, the server doesn’t need to do all the work again. it simply sends the saved version. This makes the site load much quicker and reduces the strain on the server. Cached content can include entire web pages, images, scripts, or even the results of a database query. It’s especially helpful for websites with high traffic, where the same pages are loaded by many visitors. In short, server caching helps websites perform better by reusing stored data instead of rebuilding it every time someone visits. ### Server Cache: The Backend Powerhouse Server cache operates on your web server or through a dedicated caching infrastructure. It stores processed data, database query results, and computed content to reduce server workload and speed up response times. ### How Server Cache Works When your website receives a request, the server first checks if a cached version exists. If found, it serves the cached content immediately. If not, it processes the request normally and stores the result for future use. ### What Server Cache Stores - Database query results - Compiled code (like [PHP](https://www.php.net/) opcodes) - API response data - Processed file outputs - Session data and user information ### Server Cache Benefits - Reduces database load and server processing time - Handles more concurrent users efficiently - Decreases server resource consumption - Improves overall website stability - Works for all visitors automatically ### Server Cache Limitations - Requires server-level configuration - Can serve outdated content if not managed properly - May consume significant server memory - Needs regular maintenance and monitoring ServerAvatar Integration: ServerAvatar simplifies server cache management by automatically configuring optimized caching settings, including Redis object caching and FastCGI caching, without requiring manual server setup. **Step 1:** Log in to the [**ServerAvatar** ](https://serveravatar.com/)Account, and **Dashboard** button for the server you want to change the general settings for. ![ServerAvatar- Dashboard](https://serveravatar.com/wp-content/uploads/2025/07/image-2025-07-09T162029.002.png)**Step 2:** Click on the “Settings” from the left-hand sidebar from the server panel. After scrolling some down you can see the option of Redis settings there. - You can modify the **Max Memory**, **Redis password** and **Maxmemory Policy** with just changing the value and click on the “Update” button. ![Redis Setting](https://serveravatar.com/wp-content/uploads/2025/07/image-2025-07-09T162109.747.png)## Browser Cache: The User-Side Solution When you visit a website, your browser downloads a lot of files like images, styles (CSS), scripts (JavaScript), and other elements needed to display the page properly. Instead of downloading these files again every time you visit the same site, the browser saves them on your device in a special storage area called the cache. This stored data allows your browser to load the website much faster the next time you visit it because it doesn’t need to fetch those files from the internet again, it already has them saved locally. This not only speeds up your browsing experience but also reduces the amount of data used and puts less load on the website’s server. In short, browser caching helps pages load quicker for repeat visits by keeping a copy of certain website files right on your device. ### How Browser Cache Works When someone visits your website, their browser downloads and stores static files locally. On subsequent visits, the browser checks if cached versions exist and loads them from the local storage instead of downloading them again. ### What Browser Cache Stores - Images and graphics - CSS stylesheets - JavaScript files - Fonts and icons - HTML pages (in some cases) - Audio and video files ### Browser Cache Benefits - Dramatically faster load times for returning visitors - Reduced bandwidth usage for both users and servers - Works automatically once configured - Improves user experience significantly - Reduces server load for static assets ### Browser Cache Limitations - Only benefits individual users who have visited before - Users can manually clear their cache - Requires proper HTTP header configuration - May serve outdated files if not managed correctly ## Site Cache (Page Cache): The Complete Solution Site cache, often called **page cache**, is a technique that helps websites load much faster by saving full versions of web pages on the server. Normally, when someone visits a web page, the server has to collect data from the database, run some code, and build the page each time, it does this from scratch for every visitor. With site caching, the server does this work only once. After that, it saves a ready-to-use version of the page, usually in the form of a static HTML file. So when someone else visits the same page, the server doesn’t repeat the process; it just sends out the saved version right away. This not only makes the website load faster for users, but it also reduces the amount of work the server has to do, which improves overall performance, especially during times of high traffic. In simple terms, site (or page) caching turns complex, dynamic pages into pre-made pages that can be delivered quickly and efficiently. ### How Site Cache Works When a page is first requested, the server generates the complete HTML output and stores it as a static file. Subsequent requests for the same page are served directly from this cached HTML file, bypassing all dynamic processing. ### What Site Cache Stores - Complete HTML pages - Fully rendered web page content - Static versions of dynamic pages - Generated page layouts - Processed template outputs ### Site Cache Benefits - Provides the fastest possible page load times - Eliminates database queries for cached pages - Reduces server CPU usage dramatically - Handles traffic spikes effectively - Works for all visitors immediately ### Site Cache Limitations - Not suitable for highly personalized content - Requires cache invalidation when content changes - May consume significant storage space - Can serve outdated content if not properly managed ## Key Differences Comparison ![Browser vs Site Cache](https://serveravatar.com/wp-content/uploads/2025/07/table2-1.png)## When to Use Each Caching Type ### Server Cache is Best For: - High-traffic websites with complex databases - Sites with frequent API calls - Applications requiring fast data processing - Dynamic content that changes based on user input - E-commerce sites with product catalogs ### Browser Cache is Best For: - All websites (universal recommendation) - Sites with large static assets - Image-heavy websites - Sites with consistent branding elements - Any website wanting to improve repeat visitor experience ### Site Cache is Best For: - Content-focused websites and blogs - Informational and marketing sites - Sites with pages that rarely change - High-traffic sites serving similar content to all users - WordPress sites with standard page structures ## Combining Caching Strategies The most effective approach uses multiple caching types together: **Layer 1:** Browser Cache Configure browser caching for all static assets to ensure fast repeat visits. **Layer 2:** Site Cache Implement page caching for frequently accessed pages that don’t require personalization. **Layer 3:** Server Cache Add server-side caching for dynamic content and database-heavy operations. This layered approach creates a comprehensive caching strategy that maximizes performance while maintaining content freshness. ## Common Caching Challenges and Solutions **Challenge 1: Serving Outdated Content** Solution: Implement proper cache invalidation strategies that automatically clear cached content when updates are made. **Challenge 2: Complex Configuration** Solution: Use managed hosting solutions like ServerAvatar that handle caching configuration automatically. **Challenge 3: Balancing Performance and Freshness** Solution: Set appropriate cache expiration times based on content update frequency. **Challenge 4: Managing User-Specific Content** Solution: Use selective caching that excludes personalized elements while caching common page components. ### Best Practices for Cache Implementation - Start with Browser Caching: It’s the easiest to implement and provides immediate benefits for returning visitors. - Implement Page Caching for Static Content: Focus on pages that don’t change frequently and don’t require personalization. - Add Server Caching for Dynamic Sites: Implement server-side caching for database-heavy operations and API responses. - Monitor Cache Performance: Regularly check cache hit rates and adjust configurations based on site usage patterns. - Plan Cache Invalidation: Establish clear processes for updating cached content when changes are made. ## Conclusion Understanding the differences between server, browser, and site cache is crucial for optimizing your website’s performance. Each type serves a specific purpose and works best in different scenarios. Browser cache improves experience for returning visitors, server cache reduces backend load, and site cache provides the fastest possible page delivery. The key to successful caching is implementing the right combination based on your website’s needs. Start with browser caching for immediate benefits, then add page caching for content-heavy sites, and finally implement server caching for complex, dynamic applications. ServerAvatar makes this process significantly easier by automatically configuring optimized caching settings, allowing you to focus on creating great content while ensuring optimal performance for your visitors. ## FAQ ### Q1. Which caching type provides the biggest performance improvement? Site cache typically provides the most dramatic speed improvements because it eliminates all server processing for cached pages. However, the best results come from using all three types together. ### Q2. Can I use all three caching types on the same website? Yes, and it’s recommended. The three caching types work at different levels and complement each other for maximum performance benefits. ### Q3. How do I know which caching type my website needs most? Start with browser caching (essential for all sites), then add page caching if you have content that doesn’t change frequently, and finally implement server caching for high-traffic or database-heavy sites. **Categories:** Blog, Guide, Linux, Ubuntu **Tags:** cache, Cloud Hosting, different cache, PHP Hosting, Ubuntu --- ### [Complete Guide to Setting Up a Staging Environment](https://serveravatar.com/setting-up-a-staging-environment/) **Published:** January 20, 2026 **Author:** Meghna Meghwani **Content:** [![Blog banner - ServerAvatar](https://serveravatar.com/wp-content/uploads/2025/09/728_90-Banner-3-1024x127.png)](https://serveravatar.com/?ref=blog)Have you ever updated a website and suddenly something broke? A page didn’t load, a form stopped working, or worse, the entire site went down. Frustrating, right? This is exactly where a staging environment saves the day. Think of a staging environment like a rehearsal before a live show. Actors don’t walk straight onto the main stage without practice. In the same way, your website changes shouldn’t go live without testing. A staging environment gives you a safe space to experiment, test updates, and fix issues before real users see them. In this complete guide to setting up a staging environment, we’ll break everything down in simple terms. No confusing tech talk. No unnecessary complexity. Just clear, practical guidance anyone can understand. ## What Is a Staging Environment? A staging environment is a safe, private version of your live website created specifically for testing. It mirrors your real site closely, but regular visitors can’t access it, so you’re free to make changes without risk. [](https://storage.3.basecamp.com/5840738/blobs/ddbd5eb2-f5ed-11f0-a087-0242ac120004/download/image.png) ![](https://serveravatar.com/wp-content/uploads/2026/01/image-162.png) **You can use a staging environment to:** - **Test updates:** Check software or content updates before applying them live. - **Install new features:** Try new tools or functionality without affecting users. - **Fix bugs:** Identify and resolve issues in a controlled setup. - **Experiment with design changes:** Preview layout or style updates safely. Everything happens behind the scenes, keeping your live website stable and secure. ## Why You Need a Staging Environment Why take chances with your live website when a safer option exists? A staging environment gives you the freedom to test and improve your site without fear of things going wrong in front of users. **Here’s why a staging environment is important:** - **Prevents downtime:** Changes are tested first, so your live site stays online. - **Avoids costly mistakes:** Errors are caught early, not after users notice them. - **Improves user experience:** Only polished, tested updates reach visitors. - **Protects your data:** Live data stays untouched during testing. - **Provides peace of mind:** You can make changes confidently, knowing there’s a safety net. Think of it like saving a draft before final submission. You review, edit, and perfect it first, then publish when it’s ready. ## Staging vs Production vs Development To manage a website smoothly, it helps to understand how different environments work together. Each one serves a clear purpose in the website lifecycle. - **Development environment:** This is where ideas take shape and early development happens. - **Staging environment:** A close replica of the live site used for final testing and review. - **Production environment:** The live website that real users visit and interact with.[](https://storage.3.basecamp.com/5840738/blobs/f56bc1a6-f5ee-11f0-a484-0242ac120004/download/image.png) ![](https://serveravatar.com/wp-content/uploads/2026/01/image-163.png) Each environment plays its own role, and skipping staging is like releasing a product without testing it first. ## How a Staging Environment Works A staging environment is created by making a close copy of your live website and placing it in a separate, private space. This allows you to work on changes without affecting real users or live data. **A staging environment usually:** - **Copies your site files:** Ensures the layout, code, and structure match the live site. - **Clones the database:** Keeps content and settings consistent for accurate testing. - **Uses a similar server setup:** Helps you see how changes will behave in real conditions. You make updates in staging, test everything carefully, and once you’re confident, those changes are pushed to the live website. **Simple flow:** Live Site >> Staging >> Testing >> Live Deployment ## Common Use Cases for Staging Staging environments are useful whenever a change could impact how users experience your website. **People commonly use staging to:** - **Update themes or designs:** Preview visual changes before making them public. - **Test plugins or extensions:** Ensure new tools work smoothly with your setup. - **Apply security patches:** Verify updates don’t cause conflicts or errors. - **Run performance checks:** Measure speed and stability under test conditions. - **Prepare major feature releases:** Fine-tune big updates before launch. If a change could affect users, it’s best tested in staging first. ## Types of Staging Environments Not all staging setups are the same. The right choice depends on your website’s size and needs. **Common staging types include:** - **Subdomain staging:** A separate URL like **staging.yoursite.com** for easy access. - **Subdirectory staging:** A folder such as **yoursite.com/staging** within the same site. - **Separate server staging:** A completely independent server for maximum isolation. Subdomains work well for smaller sites, while larger or high-traffic projects often benefit from a separate server. ## What You Need Before Setting Up Staging A little preparation goes a long way when creating a staging environment. **Before you begin, make sure you have:** - **Hosting panel access:** To create and manage staging resources. - **A full backup of your live site:** In case you need to restore anything. - **File and database credentials:** For copying and configuring the site correctly. - **Basic site knowledge:** Understanding your site structure helps avoid errors. Being prepared saves time and reduces the chances of issues later on. ## How ServerAvatar Makes Staging Easy **What is ServerAvatar?** [ServerAvatar](https://serveravatar.com/) is a platform to simplify the hosting and management of servers and applications. It simplifies the process of deploying and managing PHP and Node.js based web applications on servers. ![ServerAvatar Dashboard](https://serveravatar.com/wp-content/uploads/2026/01/image-164.png) If you’re using ServerAvatar to host and manage your projects, you get a built-in staging environment feature called the Staging Area that’s designed to make testing updates easy, safe, and worry-free. Let’s break down how it works and why it’s a real game-changer for developers, designers, and site owners. ## What Is the ServerAvatar Staging Area? The ServerAvatar [Staging Area](https://serveravatar.com/docs/application/staging-area/) is like a private sandbox for your live application. It creates a safe copy of your website where you can try out updates, tweak features, or configure settings without affecting your real, live production environment. Anything you try here stays here, until you’re ready to move it live. ### Why This Matters Imagine having two versions of your site: - One that your real users interact with every day. - Another place where you can test changes, make mistakes, and experiment freely, without stress. That’s exactly what ServerAvatar’s staging area gives you. It’s like a rehearsal before opening night, where you can practice everything and only go live when it’s perfect. ## Step-by-Step Guide to Setting Up a Staging Environment Setting up a staging environment in ServerAvatar is simple and doesn’t require any complex configuration. You can create a safe testing space for your application in just a few clicks. Follow these steps to access and create a staging environment in ServerAvatar: - **Login to ServerAvatar:** Log in to your ServerAvatar account and open the server panel by clicking on the server dashboard icon. ![server dashboard - Staging Environment](https://serveravatar.com/wp-content/uploads/2026/01/image-165-1024x221.png) - **Go to Applications:** Click on the Applications section from the left sidebar, and navigate to the application panel by clicking on the application dashboard icon for the application you want to create a staging site. ![application dashboard - Staging Environment](https://serveravatar.com/wp-content/uploads/2026/01/image-166-1024x384.png) - **Navigate to Staging Area:** Click on the **Staging Area** option from the left sidebar to view staging settings. - **Create your staging site:** Fill in the required details and click on **Create Staging Area**. [](https://storage.3.basecamp.com/5840738/blobs/d775cdfe-f5e9-11f0-85d0-0242ac120004/download/image.png) ![create Staging Environment](https://serveravatar.com/wp-content/uploads/2026/01/image-167-1024x482.png) - Once completed, your staging environment will be ready to use. ![Staging Environment](https://serveravatar.com/wp-content/uploads/2026/01/image-168-1024x358.png) ### Sync Your Changes: Two Ways One of the best things about ServerAvatar’s staging area is how simple it makes moving things between environments: - **Sync Staging to Production:** When your changes are fully tested and ready for the real world, you can click **Deploy to Production** to push staging changes live, all with a single click. - **Sync Production to Staging:** Need to refresh your staging environment with the latest live site data or code? You can pull production into staging anytime. Just be careful, this will overwrite any changes already in staging. [](https://storage.3.basecamp.com/5840738/blobs/6d810ec6-f5ea-11f0-964f-0242ac120004/download/image.png) ![sync Staging Environment](https://serveravatar.com/wp-content/uploads/2026/01/image-169-1024x358.png) ### Removing the Staging Area Don’t need the staging environment anymore? ServerAvatar lets you remove it easily with a **Remove** button, just confirm the deletion, and it’s gone. ![remove Staging Environment](https://serveravatar.com/wp-content/uploads/2026/01/image-170-1024x358.png) ## How This Fits Into Your Workflow Using the ServerAvatar staging area in your daily workflow helps you manage changes with confidence and control. It becomes a natural step before anything reaches your live site. **With ServerAvatar staging, you can:** - **Test major updates first:** Make sure everything works before pushing changes live. - **Experiment safely:** Try new plugins, themes, or custom code without risk. - **Sync changes easily:** Move updates from staging to production in a smooth, controlled way. - **Refresh staging anytime:** Pull real production data when you need accurate testing. Overall, staging acts as a quality check that protects your live website and removes the fear of launching updates. [![Blog banner - ServerAvatar](https://serveravatar.com/wp-content/uploads/2025/09/728_90-Banner-1-1024x127.png)](https://serveravatar.com/?ref=blog)## Security Best Practices for Staging Even though staging environments aren’t public, they still need strong protection to avoid misuse or data leaks. **Follow these security best practices:** - **Use strong passwords:** Prevent unauthorized access to staging sites. - **Limit access by IP:** Allow only trusted locations when possible. - **Disable public sign-ups:** Keep registrations closed on staging. - **Turn off payment systems:** Avoid accidental transactions during testing. Leaving a staging site unsecured is risky and can invite unwanted access. ## Common Mistakes to Avoid Staging environments are powerful, but only when used correctly. Some mistakes can reduce their effectiveness. **Avoid these common errors:** - **Testing directly on the live site:** This puts your users at risk. - **Not blocking search engines:** Staging pages should never appear in search results. - **Using live API keys:** This can cause real actions during testing. - **Skipping backups:** Always have a restore point before changes. - **Ignoring final checks:** Never push changes without testing one last time. Staging helps prevent problems, but only if it’s used thoughtfully. ## Best Practices for Long-Term Use To get the most value from your staging environment, treat it as an ongoing part of your workflow rather than a one-time setup. **Best practices to follow:** - **Keep staging updated:** Match it closely with your live environment. - **Use it for every change:** Even small updates deserve testing. - **Document your tests:** Track what was tested and what changed. - **Clean it regularly:** Remove unused files and outdated data. - **Make it a habit:** Staging should be part of your standard process. When used consistently, staging becomes one of the most reliable tools for maintaining a stable and secure website. ## Conclusion A staging environment plays a crucial role in keeping your website stable, secure, and user-friendly by allowing you to test changes before they go live. It acts as a safety net where updates, new features, and fixes can be reviewed without risking downtime or errors on your live site. With tools like ServerAvatar’s built-in Staging Area, this process becomes simple and efficient, fitting seamlessly into your workflow. By making staging a regular practice, you gain confidence in every release and ensure your visitors always experience a polished, reliable website. ## FAQs ### **1. What is a staging environment used for?** A staging environment is used to test updates, features, and fixes in a private setup before applying them to a live website. ### **2. Is a staging environment necessary for small websites?** Even small websites benefit from staging because it helps prevent errors and downtime caused by untested changes. ### **3. Can a staging environment affect my live website?** When set up correctly, a staging environment is completely separate and does not impact the live site. ### **4. How does ServerAvatar simplify staging?** ServerAvatar offers a built-in Staging Area that allows you to create, test, sync, and remove staging sites with just a few clicks. ### **5. How often should I use a staging environment?** You should use a staging environment for every update, big or small, to ensure your live website stays stable and secure. **Categories:** Blog, Guide, Linux, Others, Tutorials, Ubuntu, WordPress **Tags:** Staging, staging environment for websites, staging environment setup, staging site, staging site setup, test website before live, website staging environment, website testing environment --- ### [ServerAvatar v7.15.5: Latest Features and Update](https://serveravatar.com/serveravatar-v7-15-5-latest-features-update/) **Published:** January 16, 2026 **Author:** Meghna Meghwani **Content:** [![Blog banner - ServerAvatar](https://serveravatar.com/wp-content/uploads/2025/09/728_90-Banner-3-1024x127.png)](https://serveravatar.com/?ref=blog)Managing servers should feel less like fighting a complex machines. You want clear indicators, smooth controls, and confidence that everything is working as expected. That’s exactly where ServerAvatar v7.15.5 steps in. This latest update focuses on visibility, control, and ease of use. Whether you are a developer, a business owner, or someone hosting applications for clients, this release gives you more insight into what’s happening on your server and more power to act quickly, without digging through confusing dashboards or running endless commands. We’re excited to announce ServerAvatar v7.15.5, packed with powerful monitoring tools, deeper Cloudflare controls, smarter Git handling, and meaningful UI enhancements to improve your server management experience. ## Overview of ServerAvatar v7.15.5 ServerAvatar v7.15.5 is not about flashy changes; it’s about meaningful improvements. This release strengthens monitoring tools, enhances Cloudflare integration, improves Git deployment reliability, and polishes the overall user experience. The goal is simple: **give you clarity and control without complexity**. ## Server Process List Monitoring ServerAvatar now lets you monitor running server processes in real time directly from the server panel. You can easily track CPU and memory usage without needing to access the server via SSH. **With this update, you can now** - View all active server processes instantly from the dashboard - Monitor CPU and RAM usage for each individual process - Quickly identify resource-intensive tasks without using SSH **View Process List Monitoring** You can easily monitor the list of all the processes by simply navigating to the Server Panel by clicking on the server dashboard icon. All the process is listed out here as you can see in the attached image. You can also set Auto Refresh by setting a time interval. ![server process - ServerAvatar v7.15.5](https://serveravatar.com/wp-content/uploads/2026/01/image-137.png) **Why It’s Useful** When a server slows down, guessing is risky. This feature lets you spot problems immediately. It’s like opening the hood of your car and instantly seeing which part is overheating, no tools required. ## Database Process List & Query Monitoring ServerAvatar’s Query Monitor now provides real-time visibility into database processes and query activity. This helps you track what’s happening inside your database and quickly spot performance issues as they occur. **With this update, you can now** - View active database queries in real time - Identify long-running or stuck queries easily - Understand current database load and performance instantly **Database Process List & Query Monitoring** You can easily monitor the list of all the database processes by simply navigating to the Server Panel by clicking on the server dashboard icon. All the process is listed out here as you can see in the attached image. You can also set Auto Refresh by setting a time interval. ![database process - ServerAvatar v7.15.5](https://serveravatar.com/wp-content/uploads/2026/01/image-138.png) **Why It’s Useful** Databases are often the silent troublemakers. This update helps you catch slow queries before they affect users, saving both time and frustration. ## Disk I/O Activity Monitoring ServerAvatar now allows you to monitor real-time disk read and write activity directly from the control panel. This gives you clear visibility into storage performance and helps detect issues before they impact your applications. **With this update, you can now** - Track disk usage and I/O patterns in real time - Identify processes causing heavy read or write operations - Monitor overall storage performance live from the dashboard **Disk I/O Activity Monitoring** You can easily monitor the disk activity by simply navigating to the Server Panel by clicking on the server dashboard icon. ![disk i/o - ServerAvatar v7.15.5](https://serveravatar.com/wp-content/uploads/2026/01/image-139.png) **Why It’s Useful** If your server feels sluggish, disk activity is often the reason. This feature helps you confirm the cause instead of guessing, much like checking traffic before choosing a route. ## Network I/O Activity Monitoring ServerAvatar v7.15.5 introduces real-time monitoring of inbound and outbound network activity directly from the dashboard. This helps you keep track of bandwidth usage and quickly detect unusual network behavior. **With this update, you can now** - View incoming and outgoing network traffic in real time - Monitor live bandwidth usage across the server - Quickly spot abnormal or unexpected traffic patterns **Network I/O Activity Monitoring** You can easily monitor the network activity by simply navigating to the Server Panel by clicking on the server dashboard icon. ![network i/o - ServerAvatar v7.15.5](https://serveravatar.com/wp-content/uploads/2026/01/image-140.png) **Why It’s Useful** Sudden traffic spikes can mean growth, or trouble. This feature helps you tell the difference instantly and act before things get out of hand. ## Cloudflare Cache Purge from Panel ServerAvatar now lets you purge Cloudflare cache directly from the application panel. This makes it easier to clear cached content and reflect website changes without switching platforms. **With this update, you can now** - Instantly clear Cloudflare cached content - Apply website updates faster - Avoid logging into Cloudflare separately **Purge Cloudflare Cache** - Navigate to the server panel by clicking on the server dashboard icon. - Go to the applications section from the left sidebar and click on the application dashboard icon for the application you want to purge the Cloudflare cache. - Integrate your Cloudflare account if you have not. - Navigate to the Controls section. - You can see the option to Purge the Cache. - You can purge the Cache by selecting the custom option or purge everything. **Custom Purge:** ![purge cache - ServerAvatar v7.15.5](https://serveravatar.com/wp-content/uploads/2026/01/image-141.png) - By selecting your preferred option from the given. Enter the details and click on the Purge option. ![custom purge - ServerAvatar v7.15.5](https://serveravatar.com/wp-content/uploads/2026/01/image-142.png) **Purge Everything:** - Click on the Purge Everything button. ![](https://serveravatar.com/wp-content/uploads/2026/01/image-143.png) - Give a confirmation on the pop up by clicking on the Purge Everything button. ![purge everything - ServerAvatar v7.15.5](https://serveravatar.com/wp-content/uploads/2026/01/image-144.png) **Why It’s Useful** Waiting for cache updates can feel like shouting into the wind. This feature gives you a clear “refresh now” button, saving time and reducing confusion. ## Cloudflare Under Attack Mode You can now enable Cloudflare’s Under Attack Mode straight from the ServerAvatar panel. This helps protect your applications during high-traffic or attack scenarios with just a click. **With this update, you can now** - Activate DDoS protection instantly - Block suspicious traffic quickly - Safeguard applications during sudden traffic spikes **Cloudflare Under Attack Mode** - Navigate to the server panel by clicking on the server dashboard icon. - Go to the applications section from the left sidebar and click on the application dashboard icon for the application you want to enable the under-attack mode of Cloudflare. - Integrate your Cloudflare account if you have not. - Navigate to the Controls section and enable the Under Attack Mode from there. ![enable under attack mode - ServerAvatar v7.15.5](https://serveravatar.com/wp-content/uploads/2026/01/image-145.png) **Why It’s Useful** When attacks happen, speed matters. This feature lets you respond immediately, like pulling an emergency brake before damage is done. [![Blog banner - ServerAvatar](https://serveravatar.com/wp-content/uploads/2025/09/728_90-Banner-1-1024x127.png)](https://serveravatar.com/?ref=blog)## **Manual Git Pull Improvements** ServerAvatar now allows you to manually pull updates from both public and private Git repositories when auto-pull fails. This ensures your deployments stay on track even during webhook issues. **With this update, you can now** - Manually pull code changes directly from the panel - Recover quickly from webhook or auto-pull failures - Keep application deployments running smoothly **Manual Git Pull** - Navigate to the server panel by clicking on the server dashboard icon. - Go to the applications section from the left sidebar and click on the application dashboard icon for the git application you want to manually pull git. - Navigate to the Git section. - Click on the Pull Latest Changes from the Manual Pull section. ![git manual pull - ServerAvatar v7.15.5](https://serveravatar.com/wp-content/uploads/2026/01/image-146.png) **Why It’s Useful** Sometimes automation trips. Manual Git pull acts as a reliable backup, ensuring your workflow never comes to a halt. ## Git Auto Pull Enhancements Git auto pull now pauses automatically when untracked or unstaged files are detected, along with real-time status updates and email alerts. This prevents unintended file overwrites. **With this update, you can now** - Prevent accidental overwriting of files - Clearly see why auto-pull is blocked - Receive detailed email notifications about pull status **Git Auto Pull** - Navigate to the server panel by clicking on the server dashboard icon. - Go to the applications section from the left sidebar and click on the application dashboard icon for the git application you want to enable git auto pull. - Navigate to the Git section. - Enable the toggle button for Enable auto pull. ![git auto pull - ServerAvatar v7.15.5](https://serveravatar.com/wp-content/uploads/2026/01/image-147.png) - You can check out the Webhook History by scrolling through the Git section. ![webhook history - ServerAvatar v7.15.5](https://serveravatar.com/wp-content/uploads/2026/01/image-148.png) **Why It’s Useful** This is like a safety lock. It protects your code from unwanted changes and keeps you informed every step of the way. ## Persist Per Page UI Setting Your selected per-page view options (10, 15, 20, 50, 100) are now saved across sessions and remain unchanged even after reloading the page, ensuring a smoother user experience. **With this update, you can now** - Keep your preferred per-page view settings - Avoid resetting options after each reload - Enjoy a consistent and personalized panel experience **Why It’s Useful** Small comfort, big impact. It’s like your chair remembering your favorite position, everything feels just right when you return. ## Manage PHP Extensions Filter A new filter makes it easier to view installed and not-installed PHP extensions from the panel. This helps you configure PHP environments more efficiently and accurately. **With this update, you can now** - Quickly identify missing PHP extensions - Manage PHP configurations faster - Reduce setup and configuration errors **PHP Extensions Filter** - Navigate to the server panel by clicking on the server dashboard icon. - Go to the Settings section from the left sidebar and navigate to the General section from the left sidebar. - You can check out by filtering the installed and Not Installed PHP extensions. You can also select a different PHP version to check out with the versions. - You can also search for a specific PHP extension. - You can install a specific php extension by clicking on the Install button next to the extension. - You can remove a specific php extension by clicking on the Remove button next to the extension. ![manage php extenstion - ServerAvatar v7.15.5](https://serveravatar.com/wp-content/uploads/2026/01/image-149.png) **Why It’s Useful** No more scrolling endlessly. This feature saves time and removes guesswork from PHP configuration. ## Why Monitoring Matters for Everyone Monitoring isn’t just for experts. Whether you run a blog or manage client sites, knowing what’s happening under the hood helps you make smarter decisions and avoid downtime. ServerAvatar v7.15.5 makes monitoring simple, visual, and accessible. ## How v7.15.5 Improves Daily Workflows From quicker troubleshooting to smoother deployments, this update removes friction. Tasks that once took minutes, or commands, now take seconds and clicks. **Who Benefits Most from This Update** - Developers managing multiple apps - Agencies hosting client websites - Businesses needing uptime and security - Anyone who values clarity over complexity ## Final Thoughts on ServerAvatar v7.15.5 ServerAvatar v7.15.5 is a thoughtful update focused on real-world needs. It doesn’t overwhelm you with features; it empowers you with the right ones. If server management ever felt intimidating, this version makes it feel approachable, reliable, and even enjoyable. Explore ServerAvatar now and experience better visibility, stronger security controls, and smoother workflows. [Register Now](https://app.serveravatar.com/register)! If you are already using ServerAvatar, thank you for trusting ServerAvatar to manage your servers with confidence. ## FAQs ### **1. Is ServerAvatar v7.15.5 suitable for beginners?** Yes, the interface and features are designed to be easy to understand, even for non-technical users. ### **2. Does this update improve server security?** Yes, especially with Cloudflare Under Attack Mode and better monitoring tools. ### **3. Can I use Git features without deep Git knowledge?** Absolutely. The panel simplifies Git actions with clear controls and notifications. ### **4. Will monitoring features affect server performance?** No, they are optimized to provide insights without slowing down your server. ### **5. Do I need to reconfigure settings after updating?** No, most settings carry over automatically, and UI preferences are now saved. ## Stop Wasting Time on Servers. Start Building Instead. You didn’t start your project to babysit servers. Let **ServerAvatar** handle deployment, monitoring, and backups — so you can focus on growth. Deploy **WordPress, Laravel, N8N**, and more in minutes. No DevOps required. No command line. No stress. [ 🚀 Try Free ](https://app.serveravatar.com) [ 🌐 Learn More ](https://serveravatar.com/) Trusted by 10,000+ developers and growing. **Categories:** Blog, Guide, ServerAvatar Updates **Tags:** erverAvatar v7.15.5, ServerAvatar, ServerAvatar fixes and improvements, ServerAvatar release, ServerAvatar update --- ### [How to Fix WordPress Permalinks Not Working (Easy Guide)](https://serveravatar.com/fix-wordpress-permalinks-not-working/) **Published:** January 13, 2026 **Author:** Meghna Meghwani **Content:** [![Blog banner - ServerAvatar](https://serveravatar.com/wp-content/uploads/2025/09/728_90-Banner-3-1024x127.png)](https://serveravatar.com/?ref=blog)You finish setting up your WordPress website, click on a post with a clean, SEO-friendly URL… and suddenly you’re staring at a **404 error**. Frustrating, right? Your homepage loads perfectly, but posts, pages, or category links refuse to open. This usually means one thing: your WordPress permalinks are not working. When WordPress permalinks stop working, it can break blog posts, pages, and even affect your search rankings. The good news is that this problem is common, easy to fix, and usually doesn’t require advanced technical skills. ![WordPress permalinks not working](https://serveravatar.com/wp-content/uploads/2026/01/image-99.png) In this guide, we will see why WordPress permalinks stop working and how to fix them step by step, with beginner-friendly methods. ## What Is WordPress? [WordPress](https://wordpress.org/) is the world’s most popular open-source content management system (CMS), used to build websites, blogs, and e-commerce stores. It offers flexibility through themes and plugins, making it suitable for beginners, developers, and businesses of all sizes. ## How ServerAvatar Simplifies WordPress Deployment & Management **What is ServerAvatar?** [ServerAvatar](https://serveravatar.com/) is a platform to simplify the hosting and management of servers and applications. It simplifies the process of deploying and managing PHP and Node.js based web applications on servers. ![ServerAvatar Dashboard](https://serveravatar.com/wp-content/uploads/2026/01/image-100.png) ServerAvatar makes WordPress and other popular applications, such as Mautic, N8N, UptimeKuma, etc, deployment effortless with its one-click WordPress application installer, allowing you to launch a fully configured WordPress site in minutes. It removes the complexity of server setup by providing an intuitive dashboard to manage servers, applications, databases, PHP versions, SSL, and performance settings from one place. ServerAvatar supports multiple cloud providers and gives users full control over their infrastructure while eliminating the need for deep server administration knowledge. You can refer to the ServerAvatar [documentation](https://serveravatar.com/docs/application/one-click-installer/wordpress/) and the detailed [blog](https://serveravatar.com/install-wordpress-quickly-on-vps/) to [install WordPress](https://serveravatar.com/install-wordpress-apache-ubuntu/) effortlessly. ### Key Benefits of Using ServerAvatar for WordPress - **One-click WordPress installer:** Deploy WordPress instantly without manual configuration. - **Unified management panel:** Manage servers and WordPress applications from a single dashboard. - **Performance optimization:** Easily configure caching, PHP, and server resources. - **Enhanced security:** Includes firewall, SSL management, and secure access controls. - **Easy scalability:** Upgrade server resources as your WordPress site grows. ServerAvatar is an ideal solution for users who want the power of cloud servers without the operational complexity. It simplifies WordPress hosting by automating server setup, streamlining application management, and providing performance and security optimizations out of the box. Whether you’re a developer, agency, or business owner, ServerAvatar allows you to deploy, manage, and scale WordPress websites confidently while focusing on growth instead of infrastructure management. ## What Are WordPress Permalinks? WordPress permalinks are the permanent web addresses assigned to your website’s content, including blog posts, pages, categories, and tags. These URLs are designed to stay the same over time, making it easy for users and search engines to find and revisit your content without confusion. A well-structured permalink clearly describes what a page is about, which improves readability and helps search engines understand your content better. When permalinks are not set correctly or stop working, WordPress struggles to map the URL to the right page, often resulting in broken links or 404 errors. **Example:** - **Not a Permalink:** - **Proper Permalink:** ### Why permalinks matter: - Improve website SEO by using clear, keyword-friendly URLs - Make links easier for visitors to read, remember, and trust - Help WordPress correctly locate and display your content ## Common Signs of WordPress Permalinks Not Working You may be facing a permalink issue if you notice any of the following: - Posts or pages show **404 errors** - URLs work only with ?p=123 format - Category and tag pages don’t load - The homepage works, but inner pages don’t - Errors started after a plugin install, theme change, or site migration These problems usually appear after installing a plugin, changing settings, migrating your site, or moving to a new hosting server. If this sounds familiar, keep reading, there’s a fix. ## Why WordPress Permalinks Stop Working Understanding main cause helps to apply the right fixes. Here are the most common reasons: - **Incorrect permalink settings:** WordPress relies on permalink settings to generate URL rules. If these rules break or don’t refresh properly, links stop working. - **Missing or corrupted .htaccess file:** The .htaccess file controls URL rewriting. If it’s missing, deleted, or corrupted, permalinks won’t work. - **Server Configuration Issues:** Your server must support URL rewriting (such as Apache’s mod\_rewrite). If it’s disabled, WordPress permalinks fail. - **Plugin conflicts:** Some plugins, especially caching, security, or redirection plugins, can interfere with permalink rules. - **Theme Issues:** A poorly coded or outdated theme can override rewrite rules and break permalinks. - **Site Migration or Hosting Changes:** Moving your site to a new domain or server often resets rewrite rules and file permissions. Now, let’s fix it. ## Method 1: Reset WordPress Permalink Settings Resetting the permalink settings is the easiest and most effective way to fix permalink issues in WordPress. When you save these settings, WordPress automatically regenerates its URL rewrite rules, which often clears up broken or incorrect links without any technical effort. **Steps to reset permalinks:** - Log in to your **WordPress Dashboard** - Go to **Settings >> Permalinks** - Now, note down your current permalink structure, and try a different permalink structure - Click on **Save Changes** - Now, revert to your original, required structure and save the changes again. ![WordPress permalinks](https://serveravatar.com/wp-content/uploads/2026/01/image-101.png) You don’t need to make any changes. Saving the settings forces WordPress to refresh the permalink rules. Check your posts again. In many cases, this alone solves the issue. ## Method 2: Check and Fix the .htaccess File If resetting the permalink settings does not solve the issue, the problem is often linked to the .htaccess file. This file plays a crucial role in how WordPress handles URL rewriting, and if it is missing, corrupted, or incorrectly configured, permalinks will not work properly. **Steps to check and fix the .htaccess file:** - Open your WordPress root directory (usually public\_html) - Locate the file named **.htaccess** - Open it and confirm it contains the default WordPress rewrite rules as mentioned below: ``` # BEGIN WordPress RewriteEngine On RewriteBase / RewriteRule ^index\.php$ - [L] RewriteCond %{REQUEST_FILENAME} !-f RewriteCond %{REQUEST_FILENAME} !-d RewriteRule . /index.php [L] # END WordPress ``` ``` # BEGIN WordPress RewriteEngine On RewriteBase / RewriteRule ^index\.php$ - [L] RewriteCond %{REQUEST_FILENAME} !-f RewriteCond %{REQUEST_FILENAME} !-d RewriteRule . /index.php [L] # END WordPress ``` If the .htaccess file is missing: - Create a new file named **.htaccess** - Paste the default WordPress code into it given above - Save the file and set permissions to **644** ## Method 3: Temporarily Disable Plugins Plugins add powerful features to WordPress, but sometimes they can conflict with core settings like permalinks. Certain plugins may alter rewrite rules or apply redirects that prevent WordPress from loading URLs correctly, leading to broken links or 404 errors. By disabling plugins temporarily, you can quickly identify whether a plugin is causing the permalink issue. Once you find the problematic plugin, you can replace it or adjust its settings to avoid future conflicts. **Steps:** - Go to **Plugins >> Installed Plugins** section from your WordPress admin dashboard - Deactivate all plugins at once - Now, test if permalinks start working - Reactivate all the plugin one after one until issue reappear, it will helps to find out which plugin actually conflicts. ![deactivate plugins - WordPress permalinks](https://serveravatar.com/wp-content/uploads/2026/01/image-102.png) Plugins related to **caching, security, SEO, and redirects** are the most common sources of permalink problems. ## Method 4: Switch to a Default Theme Sometimes, the problem isn’t WordPress itself but the theme you are using. A poorly coded or outdated theme can override rewrite rules or include faulty functions that interfere with how permalinks work, resulting in broken links across your site. Switching to a default WordPress theme helps you quickly confirm whether your current theme is causing the issue. If permalinks work after switching, you’ll know the theme needs fixing or replacing. - Go to **Appearance >> Themes** section - Activate a default theme such as **Twenty Twenty-Four** - Now, test your links by opening a few posts or pages ![themes - WordPress permalinks](https://serveravatar.com/wp-content/uploads/2026/01/image-103.png) If permalinks start working, the issue lies within your theme’s code. ## Method 5: Check File and Folder Permissions WordPress needs proper file and folder permissions to update permalink and rewrite rules. If permissions are too restrictive, WordPress cannot write necessary changes, which may cause permalinks to stop working without any visible error. Checking and correcting permissions ensures WordPress can function smoothly and manage URL rules correctly. **Recommended permission settings:** - Folders: **755** - Files: **644** [![Blog banner - ServerAvatar](https://serveravatar.com/wp-content/uploads/2025/09/728_90-Banner-1-1024x127.png)](https://serveravatar.com/?ref=blog)## Method 6: Fix Permalinks After Site Migration If your permalinks stopped working after moving your website to a new server or domain, the migration process is likely the cause. Server settings, rewrite rules, and file paths often change during migration, which can break existing URLs. Refreshing WordPress settings and confirming core files usually resolves these issues quickly. - Re-save permalink settings under **Settings >> Permalinks** ![WordPress permalinks](https://serveravatar.com/wp-content/uploads/2026/01/image-106.png) - Please check the **.htaccess** file exists in WordPress root directory - Update **WordPress Address** and **Site Address** in **Settings >> General** ![wordpress and site address - WordPress permalinks](https://serveravatar.com/wp-content/uploads/2026/01/image-107.png) - Clear all plugin and server-level caches Migration often resets server configurations, which can cause permalink issues. ## How to Prevent Permalink Issues in the Future Once your permalinks are working again, a few best practices can help you avoid similar problems down the road. Small precautions during updates, migrations, or design changes can save hours of troubleshooting later. Best practices to avoid permalink problems: - Avoid changing permalink structures on a live website - Use well-reviewed and trusted plugins only - Always create a full backup before major updates or migrations - Clear cache after site changes or server moves - Choose reliable, WordPress-friendly hosting A little caution and preparation go a long way in keeping your WordPress permalinks healthy and reliable. ## Conclusion WordPress permalinks not working can be frustrating, especially when your homepage loads fine but posts and pages return 404 errors. However, as you’ve seen in this guide, the issue is usually caused by simple configuration problems related to permalink settings, plugins, themes, server setup, or site migrations. By following the step-by-step methods outlined above, starting with resetting permalink settings and moving on to checking the .htaccess file, plugins, themes, permissions, and migration settings, you can quickly restore your website’s links without advanced technical knowledge. With the right hosting environment and a few best practices in place, you can keep your WordPress permalinks stable, SEO-friendly, and user-ready for the long term. ## Frequently Asked Questions ### **1. Why are my WordPress permalinks showing a 404 error?** This usually happens due to incorrect permalink settings, a missing or corrupted .htaccess file, plugin conflicts, theme issues, or server rewrite settings being disabled. ### **2. Can resetting permalinks affect my website content?** No, resetting permalink settings does not delete or modify your posts or pages. It only refreshes WordPress’s URL rewrite rules. ### **3. What is the .htaccess file, and why is it important?** The .htaccess file controls how URLs are rewritten on your server. WordPress relies on it to route clean permalink URLs to the correct content. ### **4. Do plugins really cause permalink problems?** Yes, especially caching, security, SEO, and redirection plugins. These plugins can override rewrite rules or apply redirects that break permalinks. ### **5. Why do permalinks break after migrating a WordPress site?** During migration, server configurations, file paths, and rewrite rules may reset. Re-saving permalinks and checking the .htaccess file usually fixes the issue. ### **6. Should I change my permalink structure on a live site?** It’s not recommended. Changing permalinks on a live website can break existing links and negatively impact SEO unless proper redirects are set up. **Categories:** Blog, Guide, Tutorials, WordPress **Tags:** 404 Error, fix WordPress permalinks, Wordpress, WordPress permalinks, WordPress permalinks issues, WordPress permalinks not working, WordPress Troubleshooting --- ### [How to Add a Favicon to Your WordPress Website](https://serveravatar.com/add-a-favicon-to-wordpress/) **Published:** January 12, 2026 **Author:** Meghna Meghwani **Content:** [![Blog banner - ServerAvatar](https://serveravatar.com/wp-content/uploads/2025/09/728_90-Banner-3-1024x127.png)](https://serveravatar.com/?ref=blog)Add a Favicon to your WordPress website and instantly give it a more professional and recognizable look. Have you ever noticed that tiny icon sitting next to a website name in your browser tab? It might seem small, but that little symbol plays a big role in how a website feels and looks. That icon is called a favicon, and adding it to your WordPress website is one of the simplest yet most powerful branding steps you can take. Think of a favicon like a nameplate on a house door. Without it, visitors may still enter, but with it, they instantly recognize where they are. In this guide, I’ll walk you through each step to add a favicon to your WordPress website easily, without technical terms. ## What Is WordPress? [WordPress](https://wordpress.org/) is the world’s most popular open-source content management system (CMS), used to build websites, blogs, and e-commerce stores. It offers flexibility through themes and plugins, making it suitable for beginners, developers, and businesses of all sizes. ## How ServerAvatar Simplifies WordPress Deployment & Management **What is ServerAvatar?** [ServerAvatar](https://serveravatar.com/) is a platform to simplify the hosting and management of servers and applications. It simplifies the process of deploying and managing PHP and Node.js based web applications on servers. ![ServerAvatar Dashboard](https://serveravatar.com/wp-content/uploads/2026/01/image-89.png) ServerAvatar makes WordPress and other popular applications, such as Mautic, N8N, UptimeKuma, etc, deployment effortless with its one-click WordPress application installer, allowing you to launch a fully configured WordPress site in minutes. It removes the complexity of server setup by providing an intuitive dashboard to manage servers, applications, databases, PHP versions, SSL, and performance settings from one place. ServerAvatar supports multiple cloud providers and gives users full control over their infrastructure while eliminating the need for deep server administration knowledge. You can refer to the ServerAvatar [documentation](https://serveravatar.com/docs/application/one-click-installer/wordpress/) and the detailed [blog](https://serveravatar.com/install-wordpress-quickly-on-vps/) to [install WordPress](https://serveravatar.com/install-wordpress-apache-ubuntu/) effortlessly. ### Key Benefits of Using ServerAvatar for WordPress - **One-click WordPress installer:** Deploy WordPress instantly without manual configuration. - **Unified management panel:** Manage servers and WordPress applications from a single dashboard. - **Performance optimization:** Easily configure caching, PHP, and server resources. - **Enhanced security:** Includes firewall, SSL management, and secure access controls. - **Easy scalability:** Upgrade server resources as your WordPress site grows. ServerAvatar is an ideal solution for users who want the power of cloud servers without the operational complexity. It simplifies WordPress hosting by automating server setup, streamlining application management, and providing performance and security optimizations out of the box. Whether you’re a developer, agency, or business owner, ServerAvatar allows you to deploy, manage, and scale WordPress websites confidently while focusing on growth instead of infrastructure management. ## What Is a Favicon? A favicon is a square small image that is represent your website. You usually see it in browser tabs, bookmarks, and sometimes in search results. It’s typically your logo or a simplified version of it. ![Add a Favicon](https://serveravatar.com/wp-content/uploads/2026/01/image-90.png) In simple terms, a favicon is your website’s face in the browser crowd. ### Why a Favicon Matters for Your Website You might wonder, does such a tiny image really matter? Absolutely. A favicon: - **Builds brand recognition:** A favicon helps visitors instantly recognize your website among multiple open tabs and repeated visits. - **Makes your site look professional:** Having a favicon gives your website a polished, complete appearance that feels well-designed and reliable. - **Helps users find your tab quickly:** The small icon makes it easier for users to spot your website tab without reading the full page title. - **Improves trust and credibility:** A favicon shows attention to detail, which subtly assures visitors that your website is trustworthy and authentic. Imagine opening ten browser tabs without favicons. Confusing, right? A favicon helps your site stand out instantly. ### What Does a Favicon Look Like? Most favicons are: - **A logo:** Many websites use a simplified version of their logo so it remains recognizable even at a very small size. - **A single letter (like “F” for Facebook):** Some brands choose one bold letter from their name to keep the favicon clean, minimal, and easy to identify. - **A symbol or icon:** Simple symbols or icons are often used because they stay sharp and meaningful even in tiny browser tabs. The key is simplicity. Since the image is tiny, too many details won’t be visible. ### Recommended Favicon Size and Format To avoid display issues, follow these guidelines: **Recommended size:** - **512 × 512 pixels** (WordPress standard) **Supported formats:** - PNG (best choice) - JPG - ICO - SVG (some themes) PNG is usually the safest and clearest option. ## Things to Prepare Before Adding a Favicon Before jumping in, make sure you have: - **A square image:** Using a perfectly square image ensures your favicon fits properly without getting cropped or stretched. - **Clear visibility at small sizes:** The design should remain easy to recognize even when displayed as a tiny icon in the browser tab. - **A clean background or transparent PNG:** A simple or transparent background helps the favicon blend smoothly with different browser themes and colors. If you already have a logo, you can resize it using free tools like Canva or any image editor. ## Method 1: Add a Favicon Using Built-in Feature **Step-by-step guide:** - Log in to your WordPress admin panel - Navigate to **Settings** >> **General** section - Locate the **Site Icon** section and click the **Choose a Site Icon** option ![upload a favicon - Add a Favicon](https://serveravatar.com/wp-content/uploads/2026/01/image-91.png) - Upload your favicon image or select your icon from the media library ![select file - Add a Favicon](https://serveravatar.com/wp-content/uploads/2026/01/image-92.png) - Click on the Set as Site Icon button at the bottom. You can also crop and adjust the image so it fits perfectly within the favicon space ![set favicon - Add a Favicon](https://serveravatar.com/wp-content/uploads/2026/01/image-93.png) That’s it! Your favicon is now live. ## Method 2: Adding a Favicon via WordPress Theme Settings Some WordPress themes include a built-in option for adding a favicon directly from the theme settings. This method works well if your theme supports it, though availability may vary depending on the theme. **How it works:** - Log in to your WordPress admin dashboard. Navigate to the **Appearance >> Themes** section. Click on the **Customize** button for the currently active theme ![customize theme - Add a Favicon](https://serveravatar.com/wp-content/uploads/2026/01/image-94.png) - Find out the**Header Settings**, and upload your favicon - Save the changes ![Add a Favicon](https://serveravatar.com/wp-content/uploads/2026/01/image-95.png) If you see this option, you can use it, but the **Customizer method is more universal**. ## Method 3: How to Add a Favicon Using a Plugin Using a plugin is a great option if you want more flexibility and device-specific control when adding a favicon to your WordPress website. This method is beginner-friendly and works well for users who prefer guided setup steps. **Popular plugin options:** And there are many more plugin options to add favicons. - **Favicon by RealFaviconGenerator:** This plugin helps create and manage favicons that work smoothly across different browsers and devices. - **Heroic Favicon Generator:** A simple tool that allows you to generate and add favicons without technical effort. **Basic steps:** - Navigate to the **Plugins** section from the left sidebar and go to the **Add** **Plugin** option. - Click on the **Install Now** button and activate the plugin. I’m using **Heroic Favicon Generator** here. ![install plugin - Add a Favicon](https://serveravatar.com/wp-content/uploads/2026/01/image-96.png) - Navigate to the Plugins >> Installed Plugins section from the left sidebar. - Click on the Favicon Settings option for the plugin.[](https://storage.3.basecamp.com/5840738/blobs/c5affac8-ef99-11f0-9cd0-0242ac120004/download/image.png) ![plugin settings - Add a Favicon](https://serveravatar.com/wp-content/uploads/2026/01/image-97.png) - Click on the **Select Favicon** button, and select your favicon image. Your settins will be saved.[](https://storage.3.basecamp.com/5840738/blobs/8a8907ea-ef9a-11f0-86c4-0242ac120004/download/image.png) ![save favicon - Add a Favicon](https://serveravatar.com/wp-content/uploads/2026/01/image-98.png) Plugins are especially useful if you want extra control over how your favicon appears across browsers, devices, and platforms. ## Method 4: Manually Adding a Favicon This method is suitable for users who are comfortable working with website files and basic HTML. It gives direct control but requires extra care. **Steps overview:** - **Upload favicon to the root directory:** Place your favicon image in the main folder of your website using a file manager or FTP. - **Add HTML code in the section:** Insert the favicon link inside your theme’s header file so browsers can detect it. **Example code:** ``` ``` ``` ``` > This method is **not recommended for beginners** because theme updates can overwrite or remove the added code. [![Blog banner - ServerAvatar](https://serveravatar.com/wp-content/uploads/2025/09/728_90-Banner-1-1024x127.png)](https://serveravatar.com/?ref=blog)## How to Check If Your Favicon Is Working Once you’ve added your favicon, it’s important to confirm that it appears correctly across browsers and devices. After adding your favicon: - **Open your website in a new tab:** Check if the favicon appears next to the site name in the browser tab. - **Clear browser cache:** Remove stored data to ensure the browser loads the latest version of your site. - **Try opening the site in incognito mode:** This helps verify the favicon without cached files. - **Check on mobile devices:** Confirm the favicon displays properly on phones and tablets as well. Sometimes, favicons may take a little time to appear due to browser or site caching, so a short wait is normal. ## Common Favicon Issues and Fixes If your favicon does not appear correctly, the issue is usually minor and easy to fix with a few quick checks. **Favicon not showing?** - **Clear browser cache:** Remove saved data so the browser loads the updated favicon. - **Clear site cache:** Delete cached files from your website or caching plugin to apply recent changes. - **Check image size:** Make sure the favicon image meets the recommended square size requirements. - **Wait a few hours:** Browsers sometimes take time to refresh favicons due to caching delays. **Blurry favicon?** - **Use a higher resolution image:** A larger image ensures clarity when resized by the browser. - **Avoid JPG for logos:** JPG files can lose quality, especially for small icons. - **Use PNG format:** PNG images stay sharper and support transparent backgrounds. ## Favicon Best Practices Following simple design rules can help your favicon look clear, professional, and easy to recognize. - **Keep it simple:** Minimal designs are easier to recognize at small sizes. - **Use brand colors:** Consistent colors help strengthen brand identity. - **Avoid text-heavy designs:** Small text becomes unreadable in favicon form. - **Test on multiple browsers:** Checking across browsers ensures consistent display. - A good favicon should be **recognizable instantly**, even at a quick glance. ## SEO and Branding Benefits of a Favicon Although a favicon does not directly affect search rankings, it plays an important role in user experience and brand perception. - **Improves user experience:** Users can quickly identify your site among open tabs. - **Increases brand recall:** Repeated exposure helps visitors remember your brand. - **Makes your site look trustworthy:** A polished favicon adds professionalism and credibility. Search engines value positive user behavior, and favicons quietly support that experience. ## When Should You Update Your Favicon? Updating your favicon keeps your website aligned with your current brand image and design style. **You should consider updating it when:** - **You rebrand your business:** A new brand identity deserves an updated favicon. - **You change your logo:** Your favicon should reflect your latest logo design. - **Your current favicon looks outdated:** Refreshing it helps maintain a modern appearance. - **Your site design changes:** A new layout or color scheme may require a matching favicon. Just like fashion, branding evolves over time, and your favicon should evolve with it. ## Conclusion Adding a favicon to your WordPress website may seem like a small task, but it has a surprisingly big impact. That tiny icon helps visitors recognize your site instantly, builds trust, and gives your website a polished, professional look. Whether you choose the built-in WordPress option, theme settings, a plugin, or a manual method, the process is simple and accessible for users at every skill level. With tools like ServerAvatar, managing WordPress becomes even easier by removing server complexity and letting you focus on building and branding your site. Once your favicon is in place and working correctly, your website feels more complete, memorable, and ready to stand out in a crowded browser full of tabs. ## FAQs ### **1. What is the ideal favicon size for a WordPress website?** The recommended favicon size for WordPress is 512 × 512 pixels, as it ensures clear display across browsers and devices. ### **2. Can I add a favicon to WordPress without using a plugin?** Yes, WordPress allows you to add a favicon easily using the built-in Site Icon option in the dashboard or the Customizer. ### **3. Why is my favicon not showing up immediately?** Favicons are often cached by browsers, so clearing the cache, using incognito mode, or waiting a few hours usually resolves the issue. ### **4. Is it okay to use my full logo as a favicon?** You can use your logo, but it should be simple, square, and readable at small sizes to avoid looking blurry or cluttered. ### **5. How often should I update my favicon?** You should update your favicon whenever you rebrand, change your logo, redesign your website, or feel the current icon looks outdated. ## Stop Wasting Time on Servers. Start Building Instead. You didn’t start your project to babysit servers. Let **ServerAvatar** handle deployment, monitoring, and backups — so you can focus on growth. Deploy **WordPress, Laravel, N8N**, and more in minutes. No DevOps required. No command line. No stress. [ 🚀 Try Free ](https://app.serveravatar.com) [ 🌐 Learn More ](https://serveravatar.com/) Trusted by 10,000+ developers and growing. **Categories:** Blog, Guide, Tutorials, WordPress **Tags:** add favicon to WordPress, add wordpress site icon, change favicon in WordPress, favicon, Wordpress, WordPress browser tab icon, WordPress favicon, WordPress site icon --- ### [Unpublish Your WordPress Site: Simple Methods to Take It Offline](https://serveravatar.com/unpublish-your-wordpress-site/) **Published:** January 10, 2026 **Author:** Meghna Meghwani **Content:** [![Blog banner - ServerAvatar](https://serveravatar.com/wp-content/uploads/2025/09/728_90-Banner-3-1024x127.png)](https://serveravatar.com/?ref=blog)Sometimes, a website needs a pause. Not because something went wrong, but because you need time to update, redesign, or rethink things. When you unpublish your WordPress site, you can take it offline without deleting your hard work or losing valuable content. Think of it like putting a “temporarily closed” sign on a shop door, you are not shutting it down forever, just stepping back for a moment. People thinks unpublishing is risky or complicated, but it is not reality and it don’t have to be. WordPress provides several simple ways to control what visitors see and when they see it. In this guide, you will learn simple methods to unpublish your WordPress site securely. ## What Is WordPress? [WordPress](https://wordpress.org/) is the world’s most popular open-source content management system (CMS), used to build websites, blogs, and e-commerce stores. It offers flexibility through themes and plugins, making it suitable for beginners, developers, and businesses of all sizes. ## What Does “Unpublishing” a WordPress Site Really Mean? Unpublishing a WordPress site means making it unavailable to visitors without permanently deleting it. Your content, settings, and files remain intact. Only public access is restricted. It is necessary to know that unpublishing does not mean deleting the website. Deleting means removing content completely, but unpublishing means simply hiding it. This gives you flexibility and control without risk. ![unpublish your WordPress site](https://serveravatar.com/wp-content/uploads/2026/01/image-72.png) ### Common Reasons to Unpublish a WordPress Site There are many practical reasons why someone might want to unpublish a site: - **Major design or layout changes:** Taking the site offline allows you to redesign pages without visitors seeing unfinished or inconsistent layouts. - **Content restructuring or cleanup:** Unpublishing helps you reorganize, remove, or update content quietly before making it public again. - **Technical maintenance or updates:** It lets you perform updates or fixes in the background without disrupting the visitor experience. - **Preparing a relaunch:** Keeping the site unpublished gives you time to prepare everything perfectly before going live again. - **Fixing broken elements privately:** You can repair errors or broken sections without exposing problems to users or search engines. Unpublishing gives you breathing room. You can work without distractions and avoid showing incomplete content to visitors. ## Things to Consider Before Unpublishing Your Site Before taking your site offline, pause and review a few key points: - **Do you want to hide the entire site or just specific pages?** Decide whether you want to take the whole website offline or only restrict access to selected pages. - **Should search engines still see your site or not?** Consider if search engines should continue indexing your site or temporarily stay away from it. - **Do you need logged-in users to access it?** Think about whether registered or authorized users still need access while the site is offline. - **Is this a short pause or a long one?** Determine if the site will be offline briefly or for an extended period to choose the right method. Answering these questions helps you choose the right method and avoid unnecessary issues later. ## How ServerAvatar Simplifies WordPress Deployment & Management **What is ServerAvatar?** [ServerAvatar](https://serveravatar.com/) is a platform to simplify the hosting and management of servers and applications. It simplifies the process of deploying and managing PHP and Node.js based web applications on servers. ![ServerAvatar Dashboard](https://serveravatar.com/wp-content/uploads/2026/01/image-73.png) ServerAvatar makes WordPress and other popular applications, such as Mautic, N8N, UptimeKuma, etc, deployment effortless with its one-click WordPress application installer, allowing you to launch a fully configured WordPress site in minutes. It removes the complexity of server setup by providing an intuitive dashboard to manage servers, applications, databases, PHP versions, SSL, and performance settings from one place. ServerAvatar supports multiple cloud providers and gives users full control over their infrastructure while eliminating the need for deep server administration knowledge. You can refer to the ServerAvatar [documentation](https://serveravatar.com/docs/application/one-click-installer/wordpress/) and the detailed [blog](https://serveravatar.com/install-wordpress-quickly-on-vps/) to [install WordPress](https://serveravatar.com/install-wordpress-apache-ubuntu/) effortlessly. ### Key Benefits of Using ServerAvatar for WordPress - **One-click WordPress installer:** Deploy WordPress instantly without manual configuration. - **Unified management panel:** Manage servers and WordPress applications from a single dashboard. - **Performance optimization:** Easily configure caching, PHP, and server resources. - **Enhanced security:** Includes firewall, SSL management, and secure access controls. - **Easy scalability:** Upgrade server resources as your WordPress site grows. ServerAvatar is an ideal solution for users who want the power of cloud servers without the operational complexity. It simplifies WordPress hosting by automating server setup, streamlining application management, and providing performance and security optimizations out of the box. Whether you’re a developer, agency, or business owner, ServerAvatar allows you to deploy, manage, and scale WordPress websites confidently while focusing on growth instead of infrastructure management. ## Unpublishing a WordPress Site Let’s check out how to unpublish a WordPress site securely and without any hard work. WordPress does not have a single “unpublish” button, but there are several simple and effective ways to take your site offline temporarily or hide specific pages from visitors. ## Method 1: Disable the WordPress Application from ServerAvatar ServerAvatar makes it easy to take your WordPress site offline directly from its dashboard, without installing extra plugins or modifying WordPress settings manually. Disabling an application in ServerAvatar instantly makes the site inaccessible while keeping all files, databases, and settings safe. This is useful when you want a complete pause without touching WordPress itself. **Steps to Disable a WordPress Application in ServerAvatar:** - Log in to your ServerAvatar dashboard, and navigate to the server panel by clicking on the **server dashboard** icon. ![server dashboard - ServerAvatar](https://serveravatar.com/wp-content/uploads/2026/01/image-74.png) - Navigate to the Applications section from the left sidebar, and click on your application dashboard icon next to your application. ![application dashboard - ServerAvatar](https://serveravatar.com/wp-content/uploads/2026/01/image-75.png) ![disable application - ServerAvatar](https://serveravatar.com/wp-content/uploads/2026/01/image-76.png) Once disabled, the site stops serving content publicly, but everything remains intact and ready to be enabled again at any time. ### Edit the Application Disable Page in ServerAvatar ServerAvatar also allows you to customize the page shown when an application is disabled or in maintenance mode. This helps you communicate clearly with visitors instead of showing a generic or confusing message. **Steps to Edit the Application Disable Page:** - Log in to your ServerAvatar dashboard, and navigate to the server panel by clicking on the server dashboard icon. ![server dashboard - ServerAvatar](https://serveravatar.com/wp-content/uploads/2026/01/image-77.png) - Navigate to the Settings section from the left sidebar, and select **Web Server Default Page** from the left hand side. - Locate the **Application Disable Page** section. You can edit the disable page for your application from here. - Click on the Update button to save the changes. ![update changes - ServerAvatar](https://serveravatar.com/wp-content/uploads/2026/01/image-78.png) - This ensures visitors see a clear and professional message explaining that the site is temporarily unavailable. ## Method 2: Enable Maintenance Mode for WordPress from ServerAvatar Instead of relying on WordPress plugins, ServerAvatar lets you enable maintenance mode at the application level. This ensures a clean and controlled experience for visitors while you work on updates or changes. **Steps to Enable Maintenance Mode from ServerAvatar:** - Log in to your ServerAvatar dashboard, and navigate to the server panel by clicking on the **server dashboard** icon. ![server dashboard - ServerAvatar](https://serveravatar.com/wp-content/uploads/2026/01/image-79.png) - Navigate to the Applications section from the left sidebar, and click on your application dashboard icon next to your application. ![application dashboard - ServerAvatar](https://serveravatar.com/wp-content/uploads/2026/01/image-80.png) - Go to the Settings section from the left sidebar. Scroll some downside and locate the Maintenance Mode option. - Enable the Toggle button to turn on the Maintenance Mode. ![enable maintenance mode - ServerAvatar](https://serveravatar.com/wp-content/uploads/2026/01/image-81.png) - When maintenance mode is active, visitors see a dedicated maintenance page, while administrators can continue working normally. ## Method 3: Unpublishing a Single WordPress Page or Post This method is best when you want to hide only specific content without affecting the rest of your website. It allows you to remove a page or post from public view while keeping it saved in WordPress. **Steps to Unpublish a Page or Post** - Log in to your WordPress dashboard to access site settings and content. - Open **Posts** or **Pages** from the left menu based as the content type. - Select the page or post you want to remove from public view and click on the Edit option. ![edit - unpublish your WordPress site](https://serveravatar.com/wp-content/uploads/2026/01/image-82.png) - Locate **Status & Visibility** in the right-hand settings panel. - Change the option of **Publish** to change the current visibility option. - Choose **Draft** or **Private** depending on who should access it. - Click **Save** button to apply and save the changes. ![save changes - unpublish your WordPress site](https://serveravatar.com/wp-content/uploads/2026/01/image-83.png) **What Happens Next** - **Draft**: Only visible to administrators - **Private**: Visible only to logged-in users with permission This method is ideal when only selected content needs to be hidden. ## Method 4: Setting Your Entire WordPress Site to Private This method helps limit access to your whole website by reducing public visibility and restricting who can view it. It is useful when you want only authorized or logged-in users to access your site. **Steps to Make Your Site Private** - Log in to your WordPress dashboard to manage site settings. - Navigate to **Settings >> Reading** from the left menu. - Locate the **Site Visibility** section on the page. - Select the checbox option to **discourage search engines from indexing the site**. - Click **Save Changes** to apply the settings. ![save changes - unpublish your WordPress site](https://serveravatar.com/wp-content/uploads/2026/01/image-84.png) For stronger privacy, use a membership or access-control plugin to block public access completely. ## Method 5: Using a Maintenance Mode Plugin Maintenance mode allows you to temporarily hide your WordPress site while showing visitors a clear and professional message. It keeps your content safe and unchanged while you work privately in the background. **Steps to Enable Maintenance Mode** - Login to your WordPress Dashboard. - Go to **Plugins >> Add New** from your WordPress dashboard. - Search for a reliable maintenance mode plugin. - There are multiple reliable and free plugins for maintenance mode such as, CMP plugin, LightStart plugin, WP Maintenance Mode plugin, Maintenance Mode Made Easy plugin, Smart Maintenance Mode plugin etc. - I’m using LightStart plugin here. - Install the plugin and activate it on your site. ![install plugin - unpublish your WordPress site](https://serveravatar.com/wp-content/uploads/2026/01/image-85.png) - Open the plugin settings from the dashboard. Open the plugin from the leftsidebar. - In the **General** tab: - Set **Status** to **Activated** - Choose **Yes** for Bypass for Search Bots (recommended for SEO) - Save the Settings. ![unpublish your WordPress site - setting plugin](https://serveravatar.com/wp-content/uploads/2026/01/image-86.png) Your site is now in **maintenance mode**. Visitors will see the maintenance page, while logged-in admins can continue working normally. > To Disable Maintenance Mode, go to General section of plugin and change the status to **Deactivated.** **Why This Works Well** - Visitors see a simple notice instead of broken pages or errors. - All website content stays intact and unaffected. - Maintenance mode can be disabled instantly with one click. - This method works like placing a temporary cover over your site while updates happen behind the scenes. This method works like placing a cover over a project while you work behind the scenes. [![Blog banner - ServerAvatar](https://serveravatar.com/wp-content/uploads/2025/09/728_90-Banner-1-1024x127.png)](https://serveravatar.com/?ref=blog)## Method 6: Password Protecting Your WordPress Site Password protection lets you limit access to your content without taking the entire website offline. Only users with the correct password can view the protected pages or sections. **Steps to Password Protect** - Open **Pages** or **Posts** from your WordPress dashboard. - Open **Posts** or **Pages** from the left menu based as the content type. - Select the page or post you want to restrict. ![unpublish your WordPress site - edit ](https://serveravatar.com/wp-content/uploads/2026/01/image-87.png) - Find the **Visibility** option in the settings panel. - Choose **Password Protected** as the visibility type. - Enter a secure password for access. - Click **Save** to update and save the changes. ![unpublish your WordPress site - password encrypt](https://serveravatar.com/wp-content/uploads/2026/01/image-88.png) ## How Unpublishing Affects SEO and Visibility Unpublishing a WordPress site changes how search engines view and access your content. The impact on visibility depends on the method used and how long the site stays offline. - **Temporary unpublishing:** Short-term methods usually have little to no negative effect on SEO. - **Long-term unpublishing:** Keeping a site offline for too long can cause a drop in search rankings. - **Maintenance mode plugins:** These often send safe signals to search engines, reducing SEO risk. - **Blocking search engines:** Prevents search engines from crawling or updating indexed pages. Choosing the right unpublishing method helps ensure your site regains visibility smoothly when it goes live again. ## Best Practices While Your Site Is Unpublished Keeping your site organized and well-managed during downtime helps avoid issues later. A few careful steps can make the transition back online smooth and stress-free. - **Keep backups updated:** Regular backups ensure your data stays safe while the site is offline. - **Avoid frequent on-off switching:** Repeatedly publishing and unpublishing can cause technical and SEO issues. - **Use clear maintenance messages:** Inform visitors clearly so they understand the site is temporarily unavailable. - **Limit downtime where possible:** Keeping offline time short helps maintain search visibility and user trust. - **Test pages before republishing:** Check functionality and layout to ensure everything works before going live. These small steps help prevent bigger problems later. ## How to Republish Your WordPress Site Properly When your updates are complete, bringing the site back online carefully helps avoid errors or missing content. Following a calm, step-by-step process ensures everything functions smoothly after republishing. - **Disable maintenance mode:** Turn off maintenance settings so visitors can access the site again. - **Restore any renamed files:** Rename files back to their original names to allow proper loading. - **Set pages back to Public:** Change page visibility so content is available to everyone. - **Enable search engine indexing:** Allow search engines to crawl and update your site again. - **Clear cache if applicable:** Remove cached data to display the latest version of your site. - **Check site on different devices:** Test the site on multiple screens to ensure proper display. A calm, step-by-step approach ensures everything works as expected. ## Common Mistakes to Avoid When Unpublishing Small oversights during unpublishing can lead to bigger problems later. Being aware of common mistakes helps save time, effort, and unnecessary stress. - **Forgetting to disable maintenance mode:** Leaving it on can block visitors even after work is done. - **Blocking search engines permanently:** This can harm long-term visibility if not reversed. - **Unpublishing without a backup:** Lack of backups increases the risk of data loss. - **Editing live files without testing:** Direct changes can cause errors if not checked first. - **Removing important plugins accidentally:** This may break site functionality unexpectedly. Being mindful of these points saves time and stress. ## Conclusion Unpublishing a WordPress site is not about shutting things down permanently, it is about taking control when your site needs attention. Whether you are updating content, fixing issues, or preparing for a relaunch, WordPress offers flexible ways to pause public access without risking your data. From hiding individual pages to enabling maintenance mode or limiting access with passwords, each method serves a different purpose and situation. For users who want a simpler and more powerful approach, ServerAvatar provides server-level control that removes much of the complexity. With options to disable applications, enable maintenance mode, and customize disable pages directly from the dashboard, ServerAvatar makes managing downtime clean, safe, and efficient. By choosing the right unpublishing method and following best practices, you can confidently take your WordPress site offline and bring it back online smoothly when ready. ## **FAQs** ### **1. Does unpublishing a WordPress site delete any content?** Unpublishing only hides your site or pages from public view while keeping all content, files, and settings intact. ### **2. Which is better for taking a site offline: WordPress plugins or ServerAvatar?** WordPress plugins work well for basic needs, but ServerAvatar offers more reliable server-level control without adding extra plugins. ### **3. Will unpublishing my WordPress site affect SEO rankings?** Short-term unpublishing usually has minimal impact, but keeping a site offline for too long may reduce search visibility. ### **4. Can I still work on my WordPress site while it is unpublished?** Yes, administrators can continue editing and managing the site while visitors are restricted. ### **5. How quickly can I republish my WordPress site after unpublishing?** Republishing is instant in most cases and can be done by reversing the same steps used to unpublish the site. **Categories:** Blog, Guide, Tutorials, WordPress **Tags:** disable WordPress site, unpublish WordPress site, Wordpress, WordPress maintenance mode, WordPress site temporarily offline, WordPress Tips --- ### [How to Deploy Bagisto (Laravel eCommerce): Step-by-Step Guide](https://serveravatar.com/deploy-bagisto-laravel-ecommerce/) **Published:** January 9, 2026 **Author:** Meghna Meghwani **Content:** [![Blog banner - ServerAvatar](https://serveravatar.com/wp-content/uploads/2025/09/728_90-Banner-3-1024x127.png)](https://serveravatar.com/?ref=blog)Setting up an online store can feel like assembling furniture without a manual. You know all the parts are there, but the process can quickly become confusing. If you want to Deploy Bagisto, a Laravel-based eCommerce platform, the good news is that the process does not have to be complicated. This guide is written for the general public, not just developers. You do not need to be an expert in servers or Laravel to follow along. By the end, you will understand the full deployment flow and feel confident about setting up Bagisto the right way. ## What Is Bagisto and Why Use It? [Bagisto](https://bagisto.com/en/) is an open-source eCommerce platform built on Laravel, designed for developers and businesses that need full control over their online store. Unlike traditional eCommerce solutions that limit customization, Bagisto offers a clean, modular architecture that makes it easy to extend, scale, and tailor to specific business requirements. One of Bagisto’s biggest strengths is its developer-first approach. Since it’s built on Laravel, developers can leverage familiar tools like Eloquent ORM, Blade templates, queues, and events to create highly customized shopping experiences. At the same time, Bagisto provides essential eCommerce features out of the box, including product management, multi-channel inventory, localization, customer groups, and an admin dashboard. ![Deploy Bagisto](https://serveravatar.com/wp-content/uploads/2026/01/image-48.png) Bagisto is an excellent choice if you: - Want a self-hosted eCommerce solution with no vendor lock-in - Need advanced customization beyond what SaaS platforms allow - Prefer a modern PHP framework with long-term scalability - Are building multi-store or multi-language eCommerce applications ## What Makes ServerAvatar Ideal for Deploying Bagisto? Deploying a Laravel-based eCommerce platform like Bagisto becomes much easier when the server environment is already optimized for modern PHP applications. This is where ServerAvatar fits naturally into the process. **What is ServerAvatar?** [ServerAvatar](https://serveravatar.com/) is a platform to simplify the hosting and management of servers and applications. It simplifies the process of deploying and managing PHP and Node.js based web applications on servers. ![ServerAvatar Dashboard](https://serveravatar.com/wp-content/uploads/2026/01/image-47.png) Instead of handling multiple tools separately, it brings server, application, database, and file management into a single dashboard. For Bagisto deployments, this means fewer manual steps and a more structured setup from the beginning. ### How ServerAvatar Simplifies the Bagisto Deployment Process Server deployment can often feel overwhelming, especially when multiple configurations are involved. ServerAvatar reduces this complexity by providing a guided and organized workflow. From creating applications to managing databases and accessing files, every action happens in one place. This allows you to focus on deploying Bagisto rather than worrying about underlying server details. Think of ServerAvatar as a control center that keeps all deployment tools within easy reach. ## Creating a Bagisto-Ready Environment with ServerAvatar A stable environment is essential for any Laravel application. ServerAvatar helps create a Bagisto-ready environment by allowing you to configure PHP versions, system users, and web roots during application creation. This structured setup ensures that Bagisto runs under the correct conditions from the start. Instead of manually adjusting server settings, ServerAvatar lets you define everything upfront, reducing the chances of configuration errors later. **Prerequisites** Before deploying Bagisto, make sure you have: - A Linux server that supports PHP and MySQL - PHP 8.1+ - MySQL or MariaDB - Apache or Nginx - Access to a server management panel - A stable internet connection The good news is that ServerAvatar fulfills all these requirements out of the box. When you create a server using ServerAvatar, it comes preconfigured with PHP, a web server (Apache or Nginx), a database (MySQL or MariaDB), and essential optimizations already in place. This removes the need for manual server setup and lets you focus entirely on deploying Bagisto rather than managing infrastructure. ### Why Proper Deployment Matters Deploying Bagisto is like laying the foundation of a building. If the base is strong, everything else stands firm. A rushed or incorrect setup can lead to errors, slow performance, or security issues later. A clean deployment ensures: - Better performance - Fewer errors - Easier updates in the future Taking time now saves frustration later. ## Preparing the Server Environment Before installing Bagisto, it’s important to have a properly configured server environment. A clean and optimized setup ensures smooth installation, better performance, and fewer issues as your store scales. With ServerAvatar, this step becomes significantly easier. ServerAvatar offers both [**managed**](https://serveravatar.com/docs/managed-server/introduction/) **server** and [**self-managed**](https://serveravatar.com/docs/server-management/installation/direct-method/) **server** installation options, allowing you to pick the level of control that best fits your experience and project requirements. When you create a server using ServerAvatar, it provides a ready-to-use server environment out of the box. During server deployment, all essential services are automatically installed and configured for you, including: - A web server - PHP with required extensions - A database - Security and performance optimizations - Proper directory structure and permissions This means you don’t need to manually install or fine-tune the web server, PHP, or database. Everything is set up and ready, allowing you to move directly to deploying Bagisto. Let’s start with the Bagisto deployment process: **Step1: Creating a Database for Bagisto** Every eCommerce store needs a place to store data. Products, orders, and users all live inside a database. - Navigate to the server panel by clicking on the server dashboard icon. ![server panel - Deploy Bagisto](https://serveravatar.com/wp-content/uploads/2026/01/image-49.png) - Navigate to the **Database** section from the left sidebar, and click on **Create a Database** button. ![create database - Deploy Bagisto ](https://serveravatar.com/wp-content/uploads/2026/01/image-50.png) - Enter the required details such as the database name, username, and password. Click on the Create a Database button. ![create a database - Deploy Bagisto](https://serveravatar.com/wp-content/uploads/2026/01/image-51.png) - Keep these details safe. You will need them soon when you deploy Bagisto. **Step2: Setting Up a Bagisto Application** Let’s now create a new application from the ServerAvatar panel. - Navigate to the **Applications** section from the left sidebar, and click on **Create an Application** button. ![create application - Deploy Bagisto](https://serveravatar.com/wp-content/uploads/2026/01/image-52.png) Enter the required details such as, - Enter the application name - Select the domain (choose from the primary domain or the test domain) - Enter the domain name - Deployment Method: Custom After filling out the details, click on the **Create Application** button ![create application - Deploy Bagisto](https://serveravatar.com/wp-content/uploads/2026/01/image-53.png) This ensures the application loads correctly in the browser. **Step 3: Delete the default file from the public\_html** - Navigate to the application panel by clicking on the application dashboard icon. ![application dashboard - Deploy Bagisto](https://serveravatar.com/wp-content/uploads/2026/01/image-54.png) - Go to the **File** **Manager** section from the left sidebar, and go to the **public\_html** directory. - Delete the **index.html** file by selecting it and clicking on the **Delete** button. ![delete index file - Deploy Bagisto](https://serveravatar.com/wp-content/uploads/2026/01/image-55.png) **Step 4: Running Required Commands** - To establish a connection, access the SSH credentials from the application panel dashboard. - Enable the **SFTP/SSH Credentials** option, as illustrated in the mentioned image. ![enable ssh - Deploy Bagisto](https://serveravatar.com/wp-content/uploads/2026/01/image-56.png) - **Execute** the mentioned **command** to log in to your application in your terminal. ``` SSH username@host(IP address) ``` ``` SSH username@host(IP address) ``` - Replace Username and Host with your actual values. Enter the SSH Password to log in. - Navigate to the **public\_html** directory in your application directory (by using the ls and cd commands), and run the below commands. ``` git clone -b master https://github.com/bagisto/bagisto.git . ``` ``` git clone -b master https://github.com/bagisto/bagisto.git . ``` - It will clone the Bagisto application repository and place all files directly in your current working directory. **Step 5: Connecting the Database with the Bagisto Application** This step links the application with the database that was created earlier. - Navigate to the application panel by clicking on the application dashboard icon. ![application dashboard - Deploy Bagisto](https://serveravatar.com/wp-content/uploads/2026/01/image-57.png) - Go to the **File** **Manager** section from the left sidebar, and go to the **public\_html** directory. - Enable the toggle of **Show Hidden Files** and find **.env.example** file from the filemanager. - Select the checkbox next to the **.env.example** file, and click on **rename** button. - Rename the File to **.env** ![file manager - Deploy Bagisto](https://serveravatar.com/wp-content/uploads/2026/01/image-58.png) - After renaming the file to “.env”, proceed to open it. - Enter your application URL by copying from the ServerAvatar panel. - **APP\_URL:** your application domain URL - Enter the **database credentials** that we created in the previous step. - You can access all your database credentials, like database name, username, and password, by accessing the database tab from the ServerAvatar panel. - Enter the database credentials: - **Database Name:** Database name - **Username:** Username of the database - **Password:** Database password - After entering credentials, save the file by clicking on the **Save Changes** button. ![edit env file - Deploy Bagisto](https://serveravatar.com/wp-content/uploads/2026/01/image-59.png) Once saved, Bagisto knows exactly where to store and retrieve data. Without this connection, the store cannot function. **Step 6: Upgrade the PHP-CLI version to 8.3** - Navigate to the application panel by clicking on the application dashboard icon. - Click on the **PHP Settings** section from the left sidebar. - Change the PHP Version to 8.3, as it is required for the Bagisto application. - Click on the **Update Settings** button. ![php settings - Deploy Bagisto](https://serveravatar.com/wp-content/uploads/2026/01/image-60.png) - Let’s now change the PHP-CLI version to 8.3 from the server panel. - Navigate to the server panel by clicking on the **Settings** section from the left sidebar, and move to the **General** section. - Change the PHP-CLI version to 8.3 and click on the **Update** button. ![php cli version - Deploy Bagisto](https://serveravatar.com/wp-content/uploads/2026/01/image-61.png) **Step 7: Install Composer and Bagisto** - To establish a connection, access the SSH credentials from the application panel dashboard. - Enable the **SFTP/SSH Credentials** option, as illustrated in the mentioned image. ![enable ssh - Deploy Bagisto](https://serveravatar.com/wp-content/uploads/2026/01/image-62.png) - **Execute** the mentioned **command** to log in to your application in your terminal. ``` SSH username@host(IP address) ``` ``` SSH username@host(IP address) ``` - Replace Username and Host with your actual values. Enter the SSH Password to log in. - Navigate to the **public\_html** directory in your application directory (by using the ls and cd commands), and run the below commands. ``` composer install php artisan bagisto:install ``` ``` composer install php artisan bagisto:install ``` - It will install Composer and the Bagisto application. - Enter your application name in the terminal pop-up. ![bagisto application - Deploy Bagisto](https://serveravatar.com/wp-content/uploads/2026/01/image-63.png) - It will automatically display the application name you previously entered while editing the file. - Next, select the application time zone from the available options. - Choose the application locale. - Set the default currency according to your requirement. - Select the allowed locales for your channels. ![application details - Deploy Bagisto](https://serveravatar.com/wp-content/uploads/2026/01/image-64.png) - Then, choose the allowed currencies for your channels. - Now, all database details, such as the database connection, database host, database name, and username, will be automatically fetched from the information provided earlier while setting up the .env file. - Enter the Database password. - Next, provide the name of the application admin user. ![application details - Deploy Bagisto](https://serveravatar.com/wp-content/uploads/2026/01/image-65.png) - Enter the admin user’s email address. - Choose whether you want to install sample products after the installation is complete. ![application details - Deploy Bagisto](https://serveravatar.com/wp-content/uploads/2026/01/image-66.png) - That’s it! Your application has been installed successfully. ![bagisto application - Deploy Bagisto](https://serveravatar.com/wp-content/uploads/2026/01/image-67.png) [![Blog banner - ServerAvatar](https://serveravatar.com/wp-content/uploads/2025/09/728_90-Banner-1-1024x127.png)](https://serveravatar.com/?ref=blog)**Step 8: Set up the webroot directory.** - Navigate to the application panel by clicking on the dashboard icon. ![application dashboard - Deploy Bagisto](https://serveravatar.com/wp-content/uploads/2026/01/image-68.png) - Navigate to the **Settings** section from the left sidebar. - **Change Custom Webroot**, and enter **public** in the custom webroot path. - Click on the **Update** button. - Fix the ownership and permission for your application. Click on the **Fix Permission** button. ![settings - Deploy Bagisto](https://serveravatar.com/wp-content/uploads/2026/01/image-69.png) - Once you’ve set the custom webroot and fixed the permissions, you have successfully configured the application. - Access your application by visiting your application domain and entering ‘**/admin**‘ at the end of the domain. ![bagisto login - Deploy Bagisto ](https://serveravatar.com/wp-content/uploads/2026/01/image-70.png) - That’s it! The Bagisto application has been installed successfully. - Log in using the email address and password you configured during the application setup. Once logged in, you will be redirected to the Bagisto application dashboard. ![bagisto dashboard - Deploy Bagisto](https://serveravatar.com/wp-content/uploads/2026/01/image-71.png) ## Why ServerAvatar Is the Best Choice for Laravel eCommerce Projects Laravel eCommerce platforms like Bagisto benefit from environments that are flexible yet controlled. ServerAvatar strikes this balance by offering hands-on configuration without unnecessary complexity. For those deploying Bagisto, ServerAvatar provides a practical foundation, handling server tasks quietly in the background while allowing the application to take center stage. ## Common Deployment Mistakes to Avoid Even a simple deployment can go wrong if you rush. Some common mistakes include: - Using the wrong PHP version - Forgetting to update the environment file - Incorrect database credentials - Missing the correct web root Double-checking each step helps avoid unnecessary headaches. ## What to Do After Deployment Once you deploy Bagisto successfully, your work is not over. The next steps include: - Configuring store settings - Adding products and categories - Testing the checkout process Deployment is just the starting line, not the finish. ## Conclusion Deploying Bagisto does not have to be a complex or intimidating task, even if you are not deeply technical. When broken down into clear steps and supported by the right server environment, the entire process becomes much more approachable. From preparing the server and creating a database to configuring the application and running the final commands, each stage plays an important role in building a stable Laravel eCommerce store. Using a platform like **ServerAvatar** helps simplify this journey by taking care of server-level setup and bringing application, database, file, and SSH management into one place. This allows you to focus more on setting up Bagisto itself rather than struggling with infrastructure-related challenges. ## FAQs ### **1. Is Bagisto suitable for beginners?** Yes, Bagisto is beginner-friendly when deployed correctly and supported by clear documentation. ### **2. Do I need deep Laravel knowledge to deploy Bagisto?** No, basic familiarity is enough to deploy Bagisto successfully. ### **3. Can Bagisto run on shared hosting?** Bagisto works best on a server environment that supports Laravel requirements. ### **4. Why is the environment file important during deployment?** It stores essential configuration details that allow Bagisto to function properly. ### **5. What happens if the database connection fails?** If the database is not connected correctly, Bagisto cannot store or retrieve data, causing errors. **Categories:** Application Deployments, Blog, Guide, Laravel, Php, Tutorials **Tags:** Bagisto, bagisto deployment, Bagisto Setup, Deploy Bagisto, Laravel eCommerce, Open Source eCommerce, PHP eCommerce --- ### [How to Delete Large Directories in Linux Quickly](https://serveravatar.com/delete-large-directories-in-linux/) **Published:** January 8, 2026 **Author:** Meghna Meghwani **Content:** [![Blog banner - ServerAvatar](https://serveravatar.com/wp-content/uploads/2025/09/728_90-Banner-3-1024x127.png)](https://serveravatar.com/?ref=blog)Deleting a large directory in Linux can feel like trying to clean out a packed storeroom with a tiny broom. When you need to delete large directories, you know what has to go, but the process often feels slow, confusing, or even risky. If you have ever typed a delete command and watched your terminal “think” forever, you are not alone. Linux is powerful, but with power comes responsibility. One wrong command can wipe out important data. That is why learning how to delete large directories in Linux quickly and safely is an essential skill, even for non-technical users. In this guide, we will break everything down in plain English, step by step, without scary jargon. Large directories build up over time. Old backups, logs, unused files, or test data slowly eat up disk space like clutter piling up in your garage. At some point, you need to clear it out. The challenge is doing it quickly, safely, and without panic. In this article, we will walk you through multiple ways to remove large folders in Linux. ## What Is a Directory in Linux? In Linux, a directory is simply a container that holds files and other directories. If you are more familiar with Windows or macOS, you can think of a directory as the same thing as a folder. It helps organize data so that everything does not end up in one messy place. In Linux, everything is organized in a tree-like structure that starts from a single top-level directory called the root directory, written as **/**. All other directories branch out from this root. For example, your personal files usually live inside **/home**, while system files stay in directories like **/etc** or **/var**. Directories in Linux do not just store data. They also control permissions, which decide who can read, write, or delete the files inside them. This is one reason Linux systems are considered secure and stable. ![delete large directories in linux](https://serveravatar.com/wp-content/uploads/2026/01/image-44.png) ### What Makes a Directory ”Large” in Linux In Linux, a directory is considered large not just because of how much disk space it uses, but because of how many files it contains. The system handles files individually, so a directory filled with countless small files can be more demanding than one with fewer large files. For example: - One folder with 10 video files (10 GB total) - Another folder with 1 million log files (also 10 GB) The second folder will take much longer to delete. Linux must process each file individually, checking permissions, links, and file system records. ### Why Deleting Large Directories Takes Time Deleting large directories in Linux is a slow process because the system does not remove everything at once. Instead, it carefully handles each file separately to maintain stability and data integrity. When a directory contains a large number of files, this step-by-step process naturally takes longer, and the overall speed is also influenced by factors like storage performance and system workload. - **Locates each file:** Linux first identifies every file inside the directory. - **Checks ownership and permissions:** The system verifies access rights before allowing deletion. - **Removes file system references:** File entries are safely detached from the directory structure. - **Free disk space:** The occupied storage is released back to the system. This is why deleting a folder with 5 GB of videos is faster than deleting 5 GB of tiny log files. ## The Basic rm Command Explained The rm command is the standard way to delete files and directories in Linux. While this command is simple and effective for regular cleanup tasks, it may take noticeable time when used on directories that contain a large number of files. ``` rm -rf directory_name ``` ``` rm -rf directory_name ``` - **rm (remove):** Removes files or directories from the system. - **-r (recursive):** Deletes all contents inside a directory, including subdirectories. - **-f (force):** Forces deletion without asking for confirmation. This command works fine for small to medium directories. But for very large ones, it can feel painfully slow. ### When rm -rf Feels Too Slow Sometimes, running the **rm -rf** command can feel frustratingly slow or make the terminal appear unresponsive. This usually happens because the system has to process a large amount of data under less-than-ideal conditions. When this occurs, relying on more efficient deletion methods becomes a better approach than forcing a single command to do all the work. - **The directory has too many files:** A high file count increases the time needed for individual processing. - **The disk is under heavy load:** Ongoing read or write activity slows down deletion tasks. - **The file system is slow:** Certain file systems handle large deletions less efficiently. At this point, you need smarter methods instead of brute force. ### Deleting Files First, Then Folders A more efficient way to remove large directories is to handle files and folders separately. Since files require more system checks during deletion, removing them first makes the overall process smoother and faster. Once the files are gone, the remaining empty directories can be cleared almost instantly. Why does this help? - **Files take longer to process:** Each file needs individual verification before removal. - **Empty directories are removed quickly:** Linux can delete empty folders with minimal effort. - **Improves overall deletion speed:** Separating tasks reduces unnecessary processing. ## Using find to remove files from a directory The find command offers a more efficient way to handle large directory deletions by targeting files directly instead of processing everything at once. By removing files first, the system avoids repeated directory checks, which helps speed up the overall cleanup process. ``` find directory_name -type f -delete ``` ``` find directory_name -type f -delete ``` - **find:** Searches through a directory and its subdirectories based on given conditions. - **directory\_name:** Defines the starting location for the search operation. - **-type f:** Limits the search to only files, and excludes directories. - **-delete:** Removes each file that matches the search criteria. This removes all files first. Once files are gone, deleting empty folders becomes much faster. ### Removing Directories the Smart Way After all files have been removed, clearing out empty directories becomes a quick and simple task. Since empty folders do not require detailed file checks, Linux can remove them with very little effort, allowing the cleanup process to finish smoothly and efficiently. ``` find directory_name -type d -delete ``` ``` find directory_name -type d -delete ``` - **find:** Searches through a directory and its subdirectories based on the criteria provided. - **directory\_name:** Specifies the directory where the search begins. - **-type d:** Limits the search to directories only, ignoring individual files. - **-delete:** Permanently removes each directory that matches the criteria. This finishes the cleanup quickly. Together, these two commands are often much faster than rm -rf. ## Using rsync to Delete Large Directories Although rsync is usually used for copying files, it can also be used as a smart and efficient way to clear large directories. By syncing an empty directory with a target folder, the contents are removed in an organized manner, making the final deletion faster and less resource-intensive. **Step 1: Create an empty directory** ``` mkdir empty_dir ``` ``` mkdir empty_dir ``` - **mkdir:** Creates a new directory. - **empty\_dir:** Name of the directory to be created. **Step 2: Sync it with deletion** ``` rsync -a --delete empty_dir/ large_dir/ ``` ``` rsync -a --delete empty_dir/ large_dir/ ``` - **rsync:** Synchronizes files and directories between locations. - **-a (archive):** Preserves file permissions, timestamps, symbolic links, and directory structure. - **–delete:** Removes files in the destination that don’t exist in the source. - **empty\_dir/ large\_dir/:** Synchronizes the contents of empty\_dir to large\_dir. > Please note and use carefully, as –delete can remove files in the destination permanently. **Step 3: Remove the directory** ``` rm -rf large_dir ``` ``` rm -rf large_dir ``` - **rm:** Removes files or directories. - **-r (recursive):** Deletes the directory and all its contents, including subdirectories. - **-f (force):** Ignores warnings and deletes without asking for confirmation. - **large\_dir:**– Specifies the directory to be removed completely. ### What is Parallel File Deletion? Parallel file deletion in Linux allows multiple files to be removed efficiently by passing file paths as input to a deletion command. This approach minimizes idle system time and improves performance by handling file removal in batches rather than one file at a time. ``` find directory_name -type f | xargs rm -f ``` ``` find directory_name -type f | xargs rm -f ``` - **find:** Searches for files within a specified directory and its subdirectories. - **directory\_name:** The directory where the search begins. - **-type f:** Limits the search to files only, ignoring directories. - **xargs rm -f:** Passes the found files to the rm -f command to delete them without confirmation. Parallel deletion uses system resources better and reduces waiting time, especially on modern systems. ## Deleting Directories with Millions of Files Removing directories that contain an extremely high number of files requires a careful and structured approach. Instead of attempting to delete everything at once, breaking the task into smaller, manageable steps helps reduce system strain and improve reliability during the process. - **Delete in Chunks:** Removes files in smaller groups to avoid overwhelming system resources. - **Process Subdirectories Individually:** Handles each subdirectory separately for better control and stability. - **Schedule During Low Activity:** Reduces performance impact by running deletion tasks when system usage is minimal. - **Use a Planned Approach:** Combining patience with strategy ensures successful and safe directory cleanup. ![delete large directories in linux](https://serveravatar.com/wp-content/uploads/2026/01/image-45.png) ## Checking Disk Space Before and After Verifying disk space before and after a cleanup task helps ensure that storage changes occurred as expected. This simple check allows you to confirm that files were removed successfully and that the system remains in a healthy state. ``` df -h ``` ``` df -h ``` - **df:** Displays disk space usage for all mounted filesystems. - **-h (human-readable):** Shows sizes in a readable format like KB, MB, or GB. It helps you confirm that space has actually been freed and nothing went wrong. [![Blog banner - ServerAvatar](https://serveravatar.com/wp-content/uploads/2025/09/728_90-Banner-1-1024x127.png)](https://serveravatar.com/?ref=blog)## Common Mistakes to Avoid File deletion operations require careful attention, as even small errors can lead to permanent data loss. Taking a moment to verify commands and paths before execution helps prevent unintended and irreversible consequences. - **Running Commands in the Wrong Location:** Deleting files from an unintended directory can remove important data. - **Skipping Folder Name Verification:** Incorrect or incomplete names may target the wrong files or folders. - **Using High-Risk Delete Options Carelessly:** Forceful deletion methods can erase critical system data if misused. - **Ignoring Minor Errors:** A single typing mistake can result in significant and unrecoverable loss. ## Safety Tips Before Running Commands Performing file or directory deletion requires caution, as these actions are often irreversible. Reviewing your approach and validating each step beforehand helps reduce the risk of accidental data loss. - **Preview Directory Contents:** Check what will be affected before executing any removal command. - **Start with a Small Test:** Verify command behavior on limited data to avoid widespread impact. - **Protect Important Data:** Ensure backups are available when the data has value. - **Pause Before Execution:** Taking a moment to review commands can prevent costly mistakes. ## Using sudo and Root Permissions Carefully Administrative privileges allow commands to bypass standard safety restrictions, making them powerful but risky when used incorrectly. Exercising caution and verifying commands beforehand is essential to avoid unintended system changes. ``` sudo rm -rf directory_name ``` ``` sudo rm -rf directory_name ``` - **sudo:** Runs the command with administrative (root) privileges. - **rm:** Removes files or directories. - **-r (recursive):** Deletes the directory and all its contents, including subdirectories. - **-f (force):** Skips confirmation prompts and ignores warnings. - **directory\_name:** Specifies the target directory to be deleted. Using sudo gives full power. Always pause and double-check before pressing Enter. ## Best Practices for the Future Maintaining an organized file system helps prevent performance issues and reduces the need for risky cleanup operations. Adopting proactive habits ensures smoother system management and long-term stability. - **Perform Regular Cleanups:** Removes unnecessary files before they accumulate. - **Automate Log Rotation:** Prevents log files from growing uncontrollably over time. - **Limit File Density per Directory:** Improves efficiency by avoiding excessive small files in a single location. - **Focus on Prevention:** Proactive management minimizes future effort and stress. ## Delete Large Directories Easily Using ServerAvatar File Manager Deleting large directories using terminal commands can feel risky, especially when a single mistake can remove the wrong files permanently. If you prefer a safer and more visual approach, ServerAvatar makes directory cleanup much easier with its built-in File Manager. ServerAvatar’s File Manager allows you to delete large folders directly from the dashboard, no terminal commands, no complex flags, and no fear of typing the wrong path. ![ServerAvatar Dashboard](https://serveravatar.com/wp-content/uploads/2025/12/serveravatardashboard-1024x473.jpg)### How ServerAvatar Simplifies Directory Deletion With ServerAvatar, you can manage your files the same way you manage files on your computer. Everything is visual, structured, and easy to understand. Here’s how it helps when deleting large directories: - **Visual folder navigation:** You can browse through directories clearly and confirm exactly what you are deleting before taking action. - **One-click directory deletion:** Simply select the folder you want to remove and delete it using the built-in options, no **rm -rf**, no guessing. - **Safe and controlled actions:** Since you are working inside the dashboard, the risk of accidentally deleting system-critical paths is greatly reduced. - **No command-line expertise required:** Even non-technical users can remove large directories confidently without learning Linux commands. ![ServerAvatar FileManager](https://serveravatar.com/wp-content/uploads/2026/01/image-46.png) ## When ServerAvatar File Manager Is the Better Choice Using the ServerAvatar File Manager is especially useful when: - You are not comfortable using terminal commands - You want to avoid accidental data loss - You are cleaning up application files, uploads, logs, or backups - You need a quick and stress-free way to manage server storage Instead of watching a terminal hang during deletion or worrying about permissions and flags, ServerAvatar handles everything behind the scenes in a structured and reliable way. ## A Safer Alternative to Risky Delete Commands While command-line tools are powerful, they are also unforgiving. ServerAvatar’s File Manager gives you clarity, safety, and simplicity, making it an ideal choice for users who want results without complexity. If your goal is to delete large directories quickly, safely, and without panic, ServerAvatar’s built-in File Manager offers a clean and user-friendly solution that removes the stress from server file management. ## Conclusion Deleting large directories in Linux doesn’t have to be overwhelming or risky. By understanding how the system processes files and directories, using commands strategically, and following safe practices, you can manage even the largest folders efficiently. Whether it’s removing files first, leveraging tools like find or rsync, or performing deletions in parallel, these methods help save time and reduce system strain. Always double-check commands, use administrative privileges carefully, and adopt regular maintenance habits to prevent clutter from building up in the first place. With patience, planning, and the right techniques, cleaning up Linux directories becomes a safe, manageable, and stress-free task. With the right approach, deleting large directories in Linux becomes a straightforward, stress-free task, saving you time and protecting your important data. ## FAQs ### **1. Is rm -rf safe to use?** Yes, if used carefully. Always double-check the directory name before running it. ### **2. Why does deleting many small files take so long?** Because Linux removes files one by one, and file count matters more than size. ### **3. Can I stop a delete command once it starts?** Yes, you can press Ctrl + C, but some files may already be deleted. ### **4. Which method is fastest for very large directories** Using find or rsync is often faster than plain rm -rf. ### **5. Should beginners use the terminal to delete files?** Yes, with caution. Start slow, test commands, and gain confidence step by step. ## Stop Wasting Time on Servers. Start Building Instead. You didn’t start your project to babysit servers. Let **ServerAvatar** handle deployment, monitoring, and backups — so you can focus on growth. Deploy **WordPress, Laravel, N8N**, and more in minutes. No DevOps required. No command line. No stress. [ 🚀 Try Free ](https://app.serveravatar.com) [ 🌐 Learn More ](https://serveravatar.com/) Trusted by 10,000+ developers and growing. **Categories:** Blog, Guide, Linux, Tutorials, Ubuntu **Tags:** delete directories, delete large directories, Linux, Linux commands, remove directory Linux, Ubuntu --- ### [n8n Explained: A Complete Guide for Beginners](https://serveravatar.com/n8n-explained-complete-guide-for-beginners/) **Published:** January 5, 2026 **Author:** Meghna Meghwani **Content:** [![Blog banner - ServerAvatar](https://serveravatar.com/wp-content/uploads/2025/09/728_90-Banner-3-1024x127.png)](https://serveravatar.com/?ref=blog)Automation is no longer just a technical trend. It has become a practical way to reduce manual effort and bring consistency to digital tasks. This is where n8n quietly stands out. If you are new to automation and want to understand what n8n is without feeling overwhelmed, you are in the right place. n8n is designed to be flexible, visual, and approachable. You do not need deep technical knowledge to understand its core ideas. At its heart, n8n focuses on connecting systems and guiding information from one step to another in an organized way. In this guide, we will learn about n8n from the ground up. ## What is n8n? [n8n](https://n8n.io/) is an open-source workflow automation platform. It allows different systems, services, or tools to communicate with each other through structured workflows. ![n8n](https://serveravatar.com/wp-content/uploads/2026/01/image-17-1024x488.png) Instead of performing tasks manually, n8n follows predefined instructions and completes those tasks automatically. These instructions are visually arranged, making the process easier to understand and manage. The key idea behind n8n is simple: define a sequence of steps once, and let the system handle them consistently. ### The Purpose of n8n The main purpose of n8n is to reduce repetitive effort and improve process consistency. By automating workflows: - **Tasks are completed the same way every time:** Automation ensures that each task follows the same steps without variation. - **Human error is reduced:** Automated workflows minimize mistakes caused by manual handling. - **Time is saved for higher-value work:** Repetitive tasks run automatically, freeing time for more important activities. n8n is designed to adapt to different levels of complexity, from simple workflows to advanced logic-based automation. ### How n8n Works at a High Level At a high level, n8n operates on a clear structure: - **Something initiates the workflow:** A specific condition or signal starts the automation process. - **Information moves through connected steps:** Data flows from one step to the next in a defined sequence. - **Each step performs a defined operation:** Every stage of the workflow has a clear and specific function. - **The workflow ends after completing all steps:** The automation stops once all defined actions are executed. This structure allows users to visually follow how data moves and changes throughout the workflow. Everything is transparent and easy to trace. ## Understanding n8n Workflows A workflow in n8n is a sequence of connected steps that run automatically. Each workflow: - **Has a defined start:** Every workflow begins with a clear triggering point. - **Contains one or more steps:** A workflow is built from multiple connected actions. - **Follows a logical order:** Steps run in a structured sequence to ensure predictable results. - **Can be enabled or disabled at any time:** Workflows can be turned on or off as needed. Workflows are created visually, which makes it easier to understand the logic even without technical experience. ### Nodes: The Core Building Blocks Nodes are the fundamental components of n8n workflows. Each node is responsible for a specific task, such as: - **Receiving information:** Nodes can collect data from a defined source. - **Modifying data:** Nodes can transform or process data before passing it forward. - **Passing data to the next step:** Nodes transfer processed information to subsequent steps in the workflow. Nodes are connected in a sequence, forming a complete workflow. This modular approach allows workflows to be adjusted without rebuilding everything from scratch. ### Triggers in n8n A trigger defines how a workflow begins. Triggers act as signals that tell n8n when to start running a workflow. Without a trigger, a workflow remains inactive. Triggers can be based on: - **Events:** Workflows can start when a specific event occurs. - **Time-based schedules:** Automations can run at fixed times or intervals. - **External signals:** Workflows can begin when triggered by outside systems. Once a trigger condition is met, the workflow starts automatically. ### Actions and Processing After a trigger starts a workflow, **actions** take over. Actions define what happens to the data as it moves through the workflow. Each action node performs a specific operation, ensuring that data is processed in a structured and predictable way. Multiple actions can exist in a single workflow, and they run in the order defined by the user. ## Workflow Logic and Flow Control n8n supports logical decision-making within workflows. This includes: - **Conditional paths:** Workflows can follow different paths based on defined conditions. - **Data filtering:** Only relevant data continues through the workflow. - **Controlled execution order:** Steps run in a precise order to maintain consistency. Flow control allows workflows to behave intelligently instead of following a single rigid path. This flexibility makes n8n suitable for both simple and advanced automation needs. ## Why n8n Is Open Source Being open source is one of n8n’s strongest advantages. Open-source software means: - **The code is publicly available:** Users can review and understand how the platform works. - **The platform is transparent:** There is visibility into how workflows and features operate. - **Users are not locked into a closed system:** Users retain freedom to customize or self-host. This approach builds trust and allows users to customize n8n according to their requirements. ### Data Control and Privacy n8n places strong emphasis on data ownership. Users maintain control over: - **Where data is stored:** Users choose the storage location for their data. - **How data is processed:** Users control how information flows through workflows. - **Who can access workflows:** Access permissions remain under user control. This makes n8n appealing to users who prioritize privacy, compliance, and transparency. ### Learning Curve for Beginners n8n is designed to be approachable, even for beginners. The visual interface: - **Reduces complexity:** The visual layout simplifies automation design. - **Makes workflows easy to follow:** Steps are clearly displayed and connected. - **Encourages experimentation:** Users can test and refine workflows without risk. While advanced features exist, beginners can start with basic workflows and gradually build confidence. ![n8n workflow](https://serveravatar.com/wp-content/uploads/2026/01/image-23.png) ### Customization and Flexibility Flexibility is a core strength of n8n. Users can: - **Adjust workflows easily:** Changes can be made without rebuilding everything. - **Modify logic without starting over:** Workflow logic can evolve over time. - **Extend functionality as needed:** Workflows can grow with new requirements. This adaptability ensures that workflows can evolve as requirements change. ## How ServerAvatar Simplifies n8n Deployment and Management **What is ServerAvatar?** ServerAvatar is a server and application management platform designed to simplify the hosting and management of PHP and Node.js-based applications. It removes much of the complexity involved in server configuration, allowing users to deploy and manage applications through a clean and intuitive interface. ![ServerAvatar dashboard](https://serveravatar.com/wp-content/uploads/2026/01/image-18.png) Deploying automation tools like n8n often involves server setup, configuration, and ongoing maintenance. This process can feel complex, especially for users who want to focus on workflows rather than infrastructure. This is where ServerAvatar plays an important role. Since n8n is a Node.js-based application, it fits naturally into ServerAvatar’s supported ecosystem. With ServerAvatar, users can deploy n8n without dealing with low-level server tasks such as manual package installation, environment setup, or repeated configuration steps. ### Host n8n Using ServerAvatar ServerAvatar provides n8n as a one-click application installer, making the hosting process straightforward and structured. Instead of manually setting up dependencies or configuring runtime environments, users can deploy n8n directly from the ServerAvatar dashboard. Key advantages of hosting n8n using ServerAvatar include: - **Simplified server provisioning and management:** ServerAvatar handles server setup and maintenance. - **Pre-configured environment for Node.js applications:** n8n runs in an optimized Node.js environment. - **Centralized control over applications and services:** All management tasks are handled from one dashboard. - **Reduced setup time and configuration effort:** Deployment is faster with fewer manual steps. ServerAvatar handles the server-side complexity, allowing users to focus on building and managing n8n workflows rather than maintaining infrastructure. **Step 1:** **Select Your Node Stack Server** - Click on your Node stack server dashboard to create an n8n application. ![server dashboard for n8n application](https://serveravatar.com/wp-content/uploads/2026/01/image-19-1024x278.png) - Click on the **Applications** section from the left-hand sidebar of the server panel, and click on the **Create an Application** button from the application panel.[](https://storage.3.basecamp.com/5840738/blobs/f5b4e8d2-ea2b-11f0-87c5-0242ac120004/download/image.png) ![create n8n application](https://serveravatar.com/wp-content/uploads/2026/01/image-20-1024x428.png) **Step 2: Select the deployment method and application** - Select the deployment method as **One Click** and select **N8N** as an application. - Fill in the required details, and click on the **Create** **Application** button. ![n8n as a one click application installer](https://serveravatar.com/wp-content/uploads/2026/01/image-21-1024x827.png) **Step 3: Confirm Application Creation** - You can see your application has been created Successfully pop-up, as displayed below. ![n8n application created](https://serveravatar.com/wp-content/uploads/2026/01/image-22.png) - Once the installation is complete, you will be automatically redirected to the application dashboard. From here, you can efficiently manage and oversee the operations of your deployed application. You can read the complete step-by-step guide to host **n8n** using **ServerAvatar** here: ![Blog banner - ServerAvatar](https://serveravatar.com/wp-content/uploads/2025/09/728_90-Banner-1-1024x127.png)### Why Use ServerAvatar for Managing n8n Applications Managing an application goes beyond initial deployment. It includes monitoring, updates, performance management, and overall server health. ServerAvatar is designed to simplify these ongoing responsibilities. When n8n is hosted using ServerAvatar, users benefit from: - **Unified server and application management:** Servers and applications are managed together. - **Easy access to logs and service controls:** Monitoring and control are available from a single interface. - **Simplified scaling and resource handling:** Resources can be adjusted with minimal effort. - **Cleaner separation between application logic and server operations:** Application workflows remain independent of infrastructure tasks. This approach ensures that n8n remains stable, accessible, and easier to manage over time. Automation platforms often get compared based on flexibility, control, and hosting options. Tools like n8n, Make, and Zapier each serve different needs. ServerAvatar does not replace automation tools. Instead, it provides the hosting and management layer that makes the self-hosted tool n8n easier to deploy and maintain. For a detailed comparison, refer to this guide: ## Common Beginner Challenges New users may face challenges such as: - **Understanding workflow logic:** New users may take time to grasp automation flow. - **Managing data flow between nodes:** Handling data movement requires careful attention. - **Debugging errors:** Identifying and fixing workflow issues can be challenging initially. These challenges are part of the learning process. With patience and practice, workflows become easier to design and manage. ## When n8n Is the Right Choice n8n is a good choice when: - **Automation needs flexibility:** n8n supports customizable and complex workflows. - **Data control is important:** Users retain full ownership of their data. - **Visual workflow design is preferred:** The platform offers a clear, visual editor. - **Long-term scalability matters:** n8n can grow with changing automation needs. It is designed to grow alongside user knowledge and requirements. ## Conclusion n8n offers a practical and beginner-friendly way to step into workflow automation without feeling restricted or overwhelmed. Its visual approach, flexible workflow design, and open-source foundation make it suitable for both simple automations and more advanced, logic-driven processes. By allowing users to define workflows once and run them consistently, n8n helps reduce manual effort, minimize errors, and save valuable time. When paired with ServerAvatar, managing and hosting n8n becomes even easier. ServerAvatar removes the complexity of server setup and maintenance, allowing users to focus entirely on building and improving workflows. Together, n8n and ServerAvatar provide a balanced solution that combines automation flexibility with simplified infrastructure management, making automation more accessible, scalable, and reliable over the long term. ## **FAQs** ### **1. Is n8n suitable for beginners with no automation experience?** Yes, n8n is designed with a visual interface that makes it easy for beginners to understand workflow logic and start building simple automations without deep technical knowledge. ### **2. Do I need coding skills to use n8n?** Basic workflows can be created without coding, but having some technical knowledge can help when building advanced workflows or custom logic. ### **3. What is the main advantage of n8n being open source?** Being open source gives users full transparency, customization freedom, and control over how the platform operates and where data is stored. ### **4. Can n8n be self-hosted for better data control?** Yes, n8n can be self-hosted, allowing users to maintain complete control over their data, infrastructure, and workflow execution. ### **5. How does ServerAvatar help with hosting n8n?** ServerAvatar provides a one-click installer and a pre-configured Node.js environment, eliminating manual server setup and reducing deployment time. **Categories:** Application Deployments, Blog, Guide, Node.js, Tutorials **Tags:** n8n, n8n automation, n8n beginner guide, n8n complete guide, n8n explained, n8n for beginners, n8n hosting, n8n tutorial, n8n workflow automation --- ### [Why and How to Remove Unused WordPress Plugins Safely](https://serveravatar.com/remove-unused-wordpress-plugins/) **Published:** January 4, 2026 **Author:** Meghna Meghwani **Content:** [![Blog banner - ServerAvatar](https://serveravatar.com/wp-content/uploads/2025/09/728_90-Banner-3-1024x127.png)](https://serveravatar.com/?ref=blog)If your WordPress website feels slow, cluttered, or harder to manage than it should be, it may be time to remove unused WordPress plugins that are quietly weighing it down. Many site owners install plugins with good intentions, test features, add temporary tools, or try something new, and then forget about them. Over time, these unused plugins just sit there, doing nothing useful while increasing maintenance and security risks. Think of your WordPress site like a closet. If it’s filled with clothes you never wear, finding what you actually need becomes frustrating. The same idea applies to plugins. Removing unused WordPress plugins is not just about cleaning up; it’s about keeping your site healthy, secure, and easy to manage. In this guide, we’ll explore why removing unused WordPress plugins matters and how to remove them safely, step by step, without breaking your site or causing stress. ## What Are WordPress Plugins? WordPress plugins are small add-ons that extend your website’s functionality. They can help with design, security, SEO, backups, forms, and much more. Plugins are powerful tools, but with great power comes responsibility. Every plugin adds code to your site. Even when it’s not actively used, that code still exists in your WordPress environment. ![WordPress Plugins - Remove Unused WordPress Plugins](https://serveravatar.com/wp-content/uploads/2026/01/image-13.png) ## What Does “Unused Plugin” Really Mean? An unused plugin is any plugin that: - **Is installed but not active:** The plugin exists in your WordPress setup but isn’t turned on, so it provides no functionality to your site. - **Is active but no longer needed:** The plugin is running, but its purpose has already been fulfilled or replaced by another solution. - **Was added for testing and forgotten:** The plugin was installed temporarily for experimentation and left behind after testing was completed. - **Has features that are no longer relevant:** The plugin offers functions that no longer match your website’s current needs or strategy. If a plugin is not contributing to your website’s current goals, it’s considered unused, even if it’s inactive. ![Remove Unused WordPress Plugins](https://serveravatar.com/wp-content/uploads/2026/01/image-14.png) ## Why Removing Unused WordPress Plugins Is Important Removing unused WordPress plugins isn’t just a good habit, it’s a smart one. **Key reasons include:** - **Better website performance:** Fewer plugins reduce server load, helping your website load faster and run more smoothly. - **Reduced security risks:** Removing unused plugins eliminates potential entry points that hackers could exploit. - **Easier updates and maintenance:** With fewer plugins installed, managing updates and troubleshooting issues becomes simpler. - **Cleaner WordPress dashboard:** A minimal plugin list keeps your dashboard organized and easier to navigate. A lighter plugin setup means fewer things can go wrong. ### How Unused Plugins Affect Website Performance Even inactive plugins can slow things down in subtle ways. They take up space in your database and server storage. Some may leave behind data that adds unnecessary load. Imagine trying to run while carrying a backpack full of items you don’t need. Your website feels the same way when overloaded with unused plugins. ## Security Risks of Keeping Unused Plugins Security is one of the biggest reasons to remove unused WordPress plugins. Unused plugins: - **May not receive regular updates:** Unused plugins are often ignored, which means security patches and fixes may never be applied. - **Can contain old code with known issues:** Outdated plugins may run vulnerable code that has already been publicly exploited. - **Increase the attack surface of your website:** Each unused plugin adds another potential point that attackers can target. Hackers often look for weak spots, and outdated or unused plugins can become easy entry points. ## Impact on Website Maintenance and Updates When WordPress updates, active plugins must stay compatible. Having too many plugins,especially unused ones, makes updates harder and riskier. **Fewer plugins mean:** - **Faster update checks:** With fewer plugins installed, WordPress can check and apply updates more quickly. - **Fewer conflicts:** Reducing the number of plugins lowers the chance of compatibility issues after updates. - **Easier troubleshooting:** Identifying and fixing problems is simpler when fewer plugins are involved. Managing your site becomes less stressful when everything has a clear purpose. ### Signs It’s Time to Remove a Plugin You should consider removing a plugin if: - **You don’t remember why it was installed:** If its purpose is unclear, the plugin is likely no longer useful. - **Its feature is no longer needed:** The plugin’s functionality no longer supports your current website goals. - **Another plugin already does the same job:** Keeping duplicate functionality only adds unnecessary complexity. - **It hasn’t been updated in a long time:** Plugins without recent updates may be incompatible or insecure. If a plugin doesn’t earn its place, it’s time to let it go. ## Things to Check Before Removing Any Plugin Before you remove a plugin, pause and review. **Important checks include:** - **Does your site depend on it for any feature?** – Make sure the plugin isn’t powering a critical function your site still relies on. - **Will removing it affect design or functionality?** – Some plugins impact layout or behavior, so removal could change how your site looks or works. - **Does it store important data?** – Certain plugins save data that could be lost if removed without a backup. Taking a moment here can prevent unnecessary problems later. ## How to Safely Remove Unused WordPress Plugins Removing plugins safely is simple when done correctly. **Step-by-step approach:** - **Identify unused plugins:** Navigate to the **Plugins >> Installed Plugins** section, and review your plugin list and mark those that no longer serve a purpose. ![Plugins - Remove Unused WordPress Plugins](https://serveravatar.com/wp-content/uploads/2026/01/image-15-1024x494.png) - **Deactivate the plugin first:** Turning the plugin off allows you to test your site without fully removing it. ![Deactivate Plugin - Remove Unused WordPress Plugins](https://serveravatar.com/wp-content/uploads/2026/01/image-16-1024x494.png) - **Check your website for issues:** Visit key pages to ensure everything still works as expected. - **Delete the plugin completely:** Once confirmed safe, remove the plugin files to free resources. This slow and careful method keeps your site stable. ## Deactivate vs Delete: What’s the Difference? **Deactivation** turns a plugin off but keeps its files. **Deletion** removes it completely from your site. Best practice: - **Deactivate first to test:** This lets you confirm your site works without the plugin. - **Observe your site:** Monitor functionality and appearance after deactivation. - **Delete after confirmation:** Remove the plugin only when you’re sure it’s no longer needed. This two-step process adds an extra layer of safety. [![Blog banner - ServerAvatar](https://serveravatar.com/wp-content/uploads/2025/09/728_90-Banner-1-1024x127.png)](https://serveravatar.com/?ref=blog)## Best Practices for Plugin Management Good plugin habits make a big difference. **Best practices include:** - **Install only what you truly need:** Every plugin should serve a clear and necessary purpose. - **Avoid overlapping features:** Multiple plugins doing the same job increase complexity and conflict risk. - **Keep plugins updated:** Regular updates help maintain security and compatibility. - **Review plugins regularly:** Periodic checks ensure your plugin list stays relevant. Think of plugins as tools, not collectibles. ## Common Mistakes to Avoid When Removing Plugins Avoid these common errors: - **Deleting plugins without checking dependencies:** Some plugins rely on others to function properly. - **Removing multiple plugins at once:** This makes it harder to identify the cause if something breaks. - **Ignoring leftover data:** Some plugins leave behind tables or files that should be cleaned up. - **Forgetting to test the site afterward:** Always verify your site works correctly after changes. Slow and steady wins the race when cleaning up plugins. ## Benefits of Keeping Only Essential Plugins A minimal plugin setup leads to: - **Faster website speed:** Fewer plugins reduce resource usage and loading time. - **Stronger security:** A smaller plugin set means fewer potential vulnerabilities. - **Easier maintenance:** Managing updates and fixes becomes simpler. - **Better user experience:** A smooth, stable site improves visitor satisfaction. Your website will become very easy to manage and reliable. ## How Often Should You Review Installed Plugins? A regular review keeps your site healthy. **Recommended frequency:** - **Every 3 to 6 months:** Regular intervals help prevent plugin buildup. - **After major website changes:** New features may make old plugins unnecessary. - **Before and after WordPress updates:** Reviews reduce compatibility issues. Routine checks prevent plugin overload. ## Benefits of a Clean Plugin List A tidy plugin list brings clear advantages: - **Faster loading times:** A lean setup improves overall performance. - **Improved security:** Fewer plugins reduce exposure to threats. - **Easier site management:** Maintenance tasks become more straightforward. - **Better overall performance:** Your site runs more efficiently with less clutter. Your WordPress dashboard feels lighter and more organized. ## Long-Term Impact of a Clean WordPress Setup Over time, consistent plugin cleanup results in: - **Fewer technical issues:** Reduced complexity lowers the chance of errors. - **Better scalability:** A streamlined site is easier to grow and expand. - **Lower maintenance stress:** Managing fewer plugins saves time and effort. - **Improved site confidence:** A stable setup gives you more control and peace of mind. Small habits create long-term stability Removing unused WordPress plugins is like giving your website a fresh breath of air. It doesn’t require advanced skills, just attention and care. By keeping only what you need, your site stays faster, safer, and easier to manage. A clean plugin setup isn’t about doing more, it’s about doing less, but better. ## Conclusion Unused WordPress plugins may not cause immediate problems, but over time they quietly affect your site’s speed, security, and ease of management. Plugins that are no longer needed add unnecessary code, increase maintenance effort, and can become weak points for security threats. Keeping them installed serves no real purpose and only makes your website harder to manage as it grows. By reviewing and removing unused plugins regularly, you create a cleaner, faster, and more reliable WordPress setup. A minimal plugin list reduces conflicts, simplifies updates, and gives you better control over your site. In the long run, small cleanup habits like this help your website stay stable, secure, and ready for future improvements. ## FAQs ### **1. Is it necessary to remove inactive WordPress plugins?** Yes, inactive plugins can still pose security and maintenance risks, so removing them is recommended. ### **2. Can removing plugins break my website?** If done carefully, by deactivating first and testing, plugin removal is safe. ### **3. Do deleted plugins leave data behind?** Some plugins may leave leftover data, which is why regular cleanup is helpful. ### **4. How many plugins should a WordPress site have?** There is no fixed number; quality and necessity matter more than quantity. ### **5. How does removing plugins improve site performance?** Fewer plugins reduce server load, database size, and potential conflicts, leading to better performance. ## Stop Wasting Time on Servers. Start Building Instead. You didn’t start your project to babysit servers. Let **ServerAvatar** handle deployment, monitoring, and backups — so you can focus on growth. Deploy **WordPress, Laravel, N8N**, and more in minutes. No DevOps required. No command line. No stress. [ 🚀 Try Free ](https://app.serveravatar.com) [ 🌐 Learn More ](https://serveravatar.com/) Trusted by 10,000+ developers and growing. **Categories:** Blog, Guide, Tutorials, WordPress **Tags:** remove unused WordPress plugins, unused wordpress plugins, Wordpress, WordPress optimization, WordPress Plugins --- ### [How to Kill a Running Process in Linux](https://serveravatar.com/kill-a-running-process-in-linux/) **Published:** January 2, 2026 **Author:** Meghna Meghwani **Content:** [![Blog banner - ServerAvatar](https://serveravatar.com/wp-content/uploads/2025/09/728_90-Banner-3-1024x127.png)](https://serveravatar.com/?ref=blog)Have you ever felt like your Linux system suddenly stopped listening to you? You click, you type, you wait… and nothing happens. It’s often because a process is already running in the background and refusing to let go. Linux is powerful, but sometimes that power needs to be controlled. That’s where knowing how to kill a running process in Linux becomes useful. Think of a running process like a tap left open. Most of the time, water flows smoothly. But when something goes wrong, the tap keeps running and wastes resources. Stopping that flow is not about being harsh; it’s about regaining balance. In this guide, we’ll walk through everything in clear explanations so you can easily understand. ## What Is a Process in Linux A process in Linux is simply a program that is currently running. Every action, whether visible or hidden, works through processes. Some start when the system boots, while others appear when you run a command or open an application. Each process lives in memory and uses system resources. When everything works fine, processes start and stop on their own. Problems arise when a process refuses to stop or starts consuming more resources than it should. ### How Linux Manages Multiple Processes Linux is built to handle many tasks at once. It uses scheduling to decide which process gets attention and when. Even if hundreds of processes are running, Linux ensures they take turns efficiently. This careful balance can break when one process stops cooperating. That’s when manual intervention becomes necessary. ![linux process - Kill a Running Process in Linux](https://serveravatar.com/wp-content/uploads/2026/01/image-10.png) ## Why Processes Become Unresponsive A process may stop responding for many reasons. Sometimes it waits endlessly for a task to complete. Other times, it enters a state where it ignores input. When this happens, the process continues to exist but does not behave normally. It may still consume memory or CPU power without doing anything useful. ### What Happens When a Process Keeps Running An unresponsive process doesn’t just sit quietly. It can slow down other tasks, delay system responses, or block resources. Leaving such a process alone is like ignoring a warning light. Eventually, it can affect overall system performance. ### Why You May Need to Kill a Process Sometimes, a process becomes unresponsive. It may stop reacting to input or keep running endlessly. In such situations, waiting rarely helps. **Common reasons to kill a process include:** - **It is frozen and not responding:** The process stops reacting to user input or commands and cannot recover on its own. - **It is using too much CPU or memory:** The process consumes excessive system resources, slowing down overall performance. - **It blocks other processes from working:** The process holds system resources in a way that prevents other applications from running properly. - **It refuses to close normally:** The process ignores normal close or exit commands and keeps running in the background. Killing a process is like pressing a reset button; it helps your system breathe again. ## What is Process Identification Before stopping a process, Linux needs to know **which** one you’re referring to. That’s why identification matters. Linux identifies processes using numbers rather than names. This avoids confusion when multiple processes share similar names. ### Understanding Process IDs (PID) A Process ID (PID) is a unique number assigned to each running process. No two active processes share the same PID. Think of a PID as a name tag. Instead of calling a process by name, Linux uses numbers to avoid confusion. Knowing the PID is often the first step before stopping a process. ![PID - Kill a Running Process in Linux](https://serveravatar.com/wp-content/uploads/2026/01/image-12.png) ### How Linux Handles Running Processes Linux is designed to multitask. It manages hundreds of processes at the same time without breaking a sweat. Each process has: - **A priority level:** Determines how much CPU time the process receives compared to other running processes. - **A state (running, sleeping, stopped):** Shows the current condition of the process and what it is doing at that moment. - **A unique PID:** Acts as a distinct identification number that allows the system to track and manage the process accurately. When you kill a process, you’re sending a message to Linux saying, “This one needs to stop now.” ## Viewing Running Processes Linux provides ways to see what is currently running. These tools list processes along with their PIDs, status, and resource usage. Viewing processes before killing them helps ensure you are acting on the correct target and not stopping something important. **Common command to list processes:** ``` ps aux ``` ``` ps aux ``` This command displays all running processes along with their PIDs, usage, and status. Another commonly used command is: ``` top ``` ``` top ``` This shows processes in real time and helps identify resource-heavy ones. While ps and top are powerful, many Linux users prefer **htop** because it is more visual and interactive. **htop** provides a real-time view of running processes with color-coded information, making it easier to understand what is happening on your system. Unlike top, it allows you to scroll, search, and manage processes directly from the interface. ``` htop ``` ``` htop ``` Please note that the **htop** is not installed by default on most Linux systems. To install **htop** on Linux systems: ``` sudo apt install htop ``` ``` sudo apt install htop ``` ## Introduction to the kill Command The kill command is the most common way to stop a running process in Linux. Despite its dramatic name, it doesn’t always mean force. By default, kill politely asks a process to stop. If the process listens, it shuts down cleanly. If not, stronger signals can be used. **Basic kill Command Syntax:** ``` kill PID ``` ``` kill PID ``` Here, PID is the Process ID of the program you want to stop. Example: ``` kill 1425 ``` ``` kill 1425 ``` This sends a default signal (SIGTERM) to the process. ### How Kill Signals Work Signals are messages sent from the system to a process. Each signal has a purpose and meaning. Some signals ask a process to stop gently, while others demand immediate termination. Choosing the right signal matters. ## Different Types of Kill Signals Linux uses signals to communicate with processes. Signals are instructions sent to a process. **Common signals include:** - **SIGTERM (15):** Sends a graceful stop request that allows the process to shut down cleanly. - **SIGKILL (9):** Immediately ends the process without giving it a chance to clean up. - **SIGHUP (1):** Instructs a process to reload or restart its configuration. Signals give you control over how gently or firmly you want to stop a process. ### Sending a Default Kill Signal When you use the kill command without specifying a signal, Linux sends **SIGTERM** by default. This allows the process to clean up before exiting. It’s the safest and most recommended approach. Syntax: ``` kill -15 PID ``` ``` kill -15 PID ``` or simply: ``` kill PID ``` ``` kill PID ``` This allows the process to clean up before stopping. ### Using SIGKILL (Force Kill) Sometimes, a process ignores polite requests. In such cases, you can specify a signal number with the kill command. If a process ignores SIGTERM, you can use SIGKILL, which forces immediate termination. Syntax: ``` kill -9 PID ``` ``` kill -9 PID ``` This signal cannot be ignored, but it does not allow cleanup. Use it only when necessary. Understanding signal numbers helps you choose the right approach instead of jumping straight to force. ### Killing a Process Using PID Once you know the PID, stopping the process becomes straightforward. Example workflow: ``` ps aux | grep process_name kill PID ``` ``` ps aux | grep process_name kill PID ``` This approach ensures accuracy and avoids stopping the wrong process. ### Killing a Process by Name Remembering PIDs isn’t always convenient. Linux offers ways to kill a process using its name instead. This method is useful when multiple instances of the same process are running. Instead of tracking numbers, you simply refer to what the process is called. It’s a faster and more human-friendly way to manage running tasks. [![Blog banner - ServerAvatar](https://serveravatar.com/wp-content/uploads/2025/09/728_90-Banner-1-1024x127.png)](https://serveravatar.com/?ref=blog)## Difference Between kill, pkill, and killall Linux provides multiple tools for stopping processes, and each has a purpose. - **kill works with PIDs:** It stops a process by targeting its unique process ID. - **pkill works with process names and patterns:** It ends processes by matching their names or specific patterns. - **killall stops all processes with a specific name:** It terminates every running instance of a given process at once. Choosing the right tool makes the job easier and reduces mistakes. ### Using pkill Command The pkill command stops processes based on their name. Syntax: ``` pkill process_name ``` ``` pkill process_name ``` Example: ``` pkill firefox ``` ``` pkill firefox ``` This sends SIGTERM by default to all matching processes. ### Using killall Command This command stops all processes with a specific name. Syntax: ``` killall process_name ``` ``` killall process_name ``` Example: ``` killall nginx ``` ``` killall nginx ``` This is powerful and should be used carefully. ### Killing Multiple Processes at Once Sometimes, more than one process needs to be stopped. Linux allows you to target multiple processes in one command. This is helpful when several related processes are misbehaving. Instead of repeating the same command again and again, you can handle them together. Syntax: ``` kill PID1 PID2 PID3 ``` ``` kill PID1 PID2 PID3 ``` Example: ``` kill 3596 1485 1685 ``` ``` kill 3596 1485 1685 ``` This saves time and improves efficiency. Efficiency matters, especially when managing a busy system. ## Safe Practices Before Killing a Process Before stopping a process, it’s always smart to pause and check. - **Confirming the process identity:** Make sure you have selected the correct process before attempting to stop it. - **Trying a normal stop before force:** Always attempt a graceful termination before using a forceful kill. - **Avoiding critical system processes:** Stay away from stopping essential system processes that could affect system stability. A little caution can prevent unexpected issues later. ## Avoid these common errors: Killing processes is powerful, but mistakes can happen. - Killing system-level processes without understanding them - Using force kill too quickly - Stopping the wrong process due to similar names - Being careful keeps your system stable and reliable. ## What Happens After a Process Is Killed Once a process is killed, Linux frees the resources it was using. Memory is released, CPU usage drops, and the system regains balance. In most cases, nothing else happens. However, if the process was important, other services might be affected. That’s why knowing what you’re stopping matters. ## When Not to Kill a Process Not every slow or unfamiliar process needs to be killed. Some processes may look inactive but are doing essential background work. If you’re unsure, it’s better to observe first. Killing without understanding can cause more harm than good. ## **Conclusion** Learning how to kill a running process in Linux is an essential skill for anyone who works with a Linux system, whether you’re a beginner or an experienced user. Processes are the backbone of everything Linux does, and while most of them behave as expected, some can become unresponsive or start consuming more resources than they should. When that happens, knowing how to identify and stop the right process helps you regain control without rebooting your system or causing unnecessary disruption. By understanding what processes are, how Linux manages them, and how tools like ps, top, htop, and the kill command work, you can handle problematic situations calmly and confidently. Using the default kill signal first and escalating only when necessary keeps your system stable and safe. Most importantly, being cautious about what you terminate ensures you don’t accidentally stop critical system services. ## **FAQs** ### **1. What does killing a process in Linux mean?** Killing a process means sending a signal to stop a running program so it no longer uses system resources. ### **2. Is killing a process dangerous?** It can be safe if done carefully, but stopping important system processes may cause issues. ### **3. What is the safest signal to use when killing a process?** SIGTERM is the safest because it allows the process to close properly. ### **4. Can a killed process restart automatically?** Some processes may restart if managed by system services or monitoring tools. ### **5. Should I always use force kill for stuck processes?** No, force kill should be the last option after gentler methods fail. ## Stop Wasting Time on Servers. Start Building Instead. You didn’t start your project to babysit servers. Let **ServerAvatar** handle deployment, monitoring, and backups — so you can focus on growth. Deploy **WordPress, Laravel, N8N**, and more in minutes. No DevOps required. No command line. No stress. [ 🚀 Try Free ](https://app.serveravatar.com) [ 🌐 Learn More ](https://serveravatar.com/) Trusted by 10,000+ developers and growing. **Categories:** Blog, Guide, Linux, Tutorials, Ubuntu **Tags:** DevOps, kill a running process, kill a running process in linux, kill linux process, Linux, linux process, stop process in linux --- ### [Website Not Secure Warning? Here’s How to Fix It](https://serveravatar.com/website-not-secure-warning-fix/) **Published:** January 1, 2026 **Author:** Meghna Meghwani **Content:** [![Blog banner - ServerAvatar](https://serveravatar.com/wp-content/uploads/2025/09/728_90-Banner-3-1024x127.png)](https://serveravatar.com/?ref=blog)Have you ever opened a website and noticed a **“Website** **Not Secure”** warning in the browser bar? It can feel alarming, confusing, and even a little scary. You might wonder: Is my data at risk? Did something break? Why is this happening now? The good news is this problem is common, well-understood, and fixable, even if you are not a technical expert. In this guide, we will break everything down without complexity. Just clear steps to help you understand why the “Not Secure” warning appears and how to remove it for good. ## What Does Website Not Secure Mean When a browser marks a site as Not Secure, it means the connection between the visitor and the website is not encrypted. Any data entered on the site, such as contact forms or login details, can be exposed. Browsers highlight this to protect users. It is simply a signal saying, “This connection is not fully safe yet.” ![Website Not Secure](https://serveravatar.com/wp-content/uploads/2026/01/image-8.png) ### Why Browsers Show Not Secure Warnings Modern browsers are designed with safety as a top priority. If a website does not meet basic security standards, the browser shows a warning. This usually happens when: - **The site does not use HTTPS:** The website sends data without encryption, making information easier to expose. - **The SSL certificate is missing or expired:** Browsers cannot verify the website’s security when the certificate is invalid. - **Some parts of the site are still loading insecure content:** Secure pages that load HTTP resources trigger browser safety alerts. Browsers want users to feel confident, and these warnings act like caution signs. Modern browsers are designed with safety as a top priority. If a website does not meet basic security standards, the browser shows a warning. This usually happens when: - **The site does not use HTTPS:** The website sends data without encryption, making information easier to expose. - **The SSL certificate is missing or expired:** Browsers cannot verify the website’s security when the certificate is invalid. - **Some parts of the site are still loading insecure content:** Secure pages that load HTTP resources trigger browser safety alerts. Browsers want users to feel confident, and these warnings act like caution signs. ### How This Warning Affects Visitors Let’s be honest. When people see a **Not Secure** message, most of them hesitate. Some leave immediately. Others stop filling forms or making purchases. This warning can: - **Reduce trust:** Visitors may feel unsure about sharing any information on the site. - **Increase bounce rates:** Many users leave immediately after seeing a security warning. - **Hurt conversions:** Forms, sign-ups, and purchases often remain incomplete due to fear. - **Impact search engine rankings:** Search engines favor secure websites over insecure ones. In simple words, security warnings scare people away, even if your site is safe in other ways. ## Understanding HTTP vs HTTPS - HTTP is the older way websites communicate. - HTTPS is the secure version.[](https://storage.3.basecamp.com/5840738/blobs/faca367c-e6f9-11f0-bb3f-0242ac120004/download/image.png) The extra ‘S’ stands for Secure. HTTPS encrypts data so that it cannot be read by outsiders. It is like sealing information inside a locked envelope instead of sending it openly. **Feature****HTTP****HTTPS****Full Form**HyperText Transfer ProtocolHyperText Transfer Protocol Secure**Security Level**Not secureSecure and encrypted**Data Protection**Data is sent in plain textData is encrypted and protected**Risk of Data Theft**High risk of interceptionVery low risk due to encryption**SSL Certificate**Not requiredRequired**Browser Warning**Shows “Not Secure” warningShows a lock icon**User Trust**Low trust from visitorsHigh trust from visitors**SEO Impact**Not preferred by search enginesPreferred by search engines**Website Speed**NormalOptimized and often faster**Best Used For**Non-sensitive content onlyAll websites, especially with forms or logins**Modern Browser Support**DiscouragedStrongly recommended**Overall Recommendation**Outdated and unsafeStandard for modern websitesToday, HTTPS is no longer optional. It is a basic requirement. ## What Is an SSL Certificate An SSL certificate is what enables HTTPS. It verifies your website’s identity and encrypts data. Once installed: - **Your site shows a lock icon:** The lock symbol reassures visitors that the connection is secure. - **Data stays private:** Information exchanged on the website is encrypted and protected. - **Browsers stop showing warnings:** Proper SSL setup removes “Not Secure” messages completely. ![SSL Certificate - Website Not Secure](https://serveravatar.com/wp-content/uploads/2026/01/image-9.png) SSL certificates come in free and paid options, and both can fix the **Not** **Secure** issue when set up correctly. ### Common Reasons for Not Secure Warning Here are the most common causes: - **No SSL certificate installed:** The website lacks basic encryption for visitor data. - **Expired SSL certificate:** An outdated certificate causes browsers to flag the site as unsafe. - **Incorrect SSL configuration:** Improper setup prevents the certificate from working correctly. - **Mixed content (HTTP and HTTPS together):** Secure pages loading insecure elements trigger browser warnings. Even a small misstep can trigger the warning, but each issue has a clear solution. ### How to Check If Your Website Has SSL You can check this in seconds: - **Look at your website address:** The URL reveals whether security is enabled or not. - **If it starts with ‘[https://](https:)‘, SSL is present:** The website is using a secure, encrypted connection. - **If it shows ‘[http://](http:)‘, SSL is missing:** The site is not protected and may show a warning. You can also click the browser lock icon to see certificate details. ## How to Install an SSL Certificate Installing SSL usually involves: 1. Getting an SSL certificate 2. Installing it on your server 3. Linking it to your domain This process involves complex terminal-based steps and requires a deep technical expertise. ## How ServerAvatar Makes SSL Installation Easy **What is ServerAvatar?** [ServerAvatar](https://serveravatar.com/) is a platform to simplify the hosting and management of servers and applications. It simplifies the process of deploying and managing PHP and Node.js based web applications on servers. ![ServerAvatar Dashboard](https://serveravatar.com/wp-content/uploads/2026/01/image-2.png) Installing an SSL certificate may sound technical, but with the right platform, it does not have to be complicated. This is where ServerAvatar simplifies the process for website owners. ServerAvatar offers an automatic and custom SSL installation feature, allowing you to secure your website without manual configuration or command-line work. Whether you are managing a blog, business website, or web application, SSL can be enabled in just a few clicks. Once SSL is activated through ServerAvatar: - You can directly force your website from HTTP to HTTPS - A valid SSL certificate is installed and configured correctly with auto-renewals - The “Not Secure” warning is removed - Visitor data is encrypted by default What makes ServerAvatar especially helpful is that it also handles **SSL renewal automatically**, so you do not have to worry about certificates expiring and security warnings appearing again later. In addition, ServerAvatar ensures that SSL is applied properly at the application level, reducing common issues such as incorrect configuration or partial HTTPS setup. This means fewer errors, better browser trust, and a smoother experience for both website owners and visitors. For users who want a hands-off and reliable way to fix the Website Not Secure warning, ServerAvatar provides a clean, guided approach that saves time and avoids mistakes. ### How to install SSL with ServerAvatar? - First, log in to the ServerAvatar account, and click on the Server Dashboard button to navigate to the server panel. ![server dashboard - Website Not Secure](https://serveravatar.com/wp-content/uploads/2026/01/image-3-1024x239.png) - Click on the Applications section from the left-hand sidebar. Click on the application dashboard icon for the application you want to install the SSL certificate. ![application dashboard - Website Not Secure](https://serveravatar.com/wp-content/uploads/2026/01/image-4-1024x379.png) - Click on the SSL Certificate option on the left-hand sidebar of the Application Panel. - You can see the options for SSL Installation: **Automatic** **SSL Installation** and **Custom SSL Installation** ![SSL Certificate - Website Not Secure](https://serveravatar.com/wp-content/uploads/2026/01/image-5-1024x490.png) - Automatic Installation only works with verified DNS. If your domain is not verified, the Verify DNS button will appear. - Once DNS propagation is successful, you can see the Install Automatic SSL button. Click on it to start the installation. ![Install Automatic SSL - Website Not Secure](https://serveravatar.com/wp-content/uploads/2026/01/image-6-1024x569.png) - It will take a few seconds to install the SSL certificate on your website. Once it’s installed, you will see your certificate information in the SSL Certificate section of your application, as shown in the image below. - Click on the Custom Installation option to install a Custom SSL Certificate. Enter your SSL Certificate, Private Key, and Chain File (CA Bundle) (optional) for a custom SSL Certificate. - If you would like to force HTTP to HTTPS redirect, select Force HTTP to HTTPS. ![Force HTTPS - Website Not Secure](https://serveravatar.com/wp-content/uploads/2026/01/image-7-1024x578.png) - You can check the details for the SSL Certificate with the auto-renewal of SSL Certificate. ### Fixing Mixed Content Issues Mixed content happens when: - **The site uses HTTPS:** The main website connection is secure. - **Some images, scripts, or files still load via HTTP:** Insecure resources weaken overall site security. Browsers see this as a security risk. **How to Fix It?** - **Update all resource URLs to HTTPS:** Ensure every file loads securely. - **Replace insecure links inside themes and content:** Remove outdated HTTP references. Once everything loads securely, the warning disappears. [![Blog banner - ServerAvatar](https://serveravatar.com/wp-content/uploads/2025/09/728_90-Banner-1-1024x127.png)](https://serveravatar.com/?ref=blog)### Updating Website URLs to HTTPS After installing SSL, your website should fully switch to HTTPS. This includes: - **Internal links:** All page links should point to HTTPS versions. - **Media files:** Images and downloads must load securely. - **Form actions:** Forms should submit data over encrypted connections. Leaving old HTTP links behind can confuse browsers and trigger warnings. ### Redirecting HTTP to HTTPS Redirects ensure that: - **Visitors always land on the secure version:** Redirects prevent access to unsafe URLs. - **Search engines index the correct URLs:** Proper redirects help maintain SEO value. A proper redirect sends all HTTP traffic automatically to HTTPS, closing the door on security warnings. ### Checking SSL Expiry and Renewal SSL certificates expire. When they do, browsers show warnings again. To avoid this: - **Check expiry dates regularly:** Monitoring prevents sudden security warnings. - **Enable auto-renewal if available:** Automatic renewal avoids certificate lapses. - **Set reminders for manual renewals:** Timely updates keep the site secure. This small habit prevents big trust issues. ## Testing Your Website After Fix Once changes are done: - **Clear browser cache:** Old data may hide recent security changes. - **Test pages in different browsers:** This confirms consistent security across platforms. - **Check the lock icon and security status:** Visual confirmation ensures SSL is active. Testing confirms that everything is working as expected and no warnings remain. ## How to Prevent This Warning in the Future Prevention is easier than fixing problems later. Best practices include: - **Always renewing SSL on time:** Valid certificates prevent trust issues. - **Avoiding insecure third-party scripts:** External files can introduce security risks. - **Monitoring website security regularly:** Ongoing checks help catch problems early. Think of it as routine maintenance for your digital space. ## Final Checklist Before Going Live Before you relax, make sure: - **SSL is installed and active:** Encryption is properly enabled. - **All pages use HTTPS:** No unsecured URLs remain. - **No mixed content errors exist:** Every resource loads securely. - **Redirects are working properly:** Visitors are guided to safe pages automatically. This checklist ensures your website stays trusted and warning-free. ## Conclusion Seeing a **“Website Not Secure”** warning can be worrying, but as this guide shows, it is a problem with a clear and practical solution. In most cases, the warning appears because a website is missing proper SSL protection, using outdated certificates, or loading insecure content. Once these issues are addressed, the warning disappears, and visitor trust is restored. By switching from HTTP to HTTPS, installing a valid SSL certificate, fixing mixed content, and ensuring timely renewals, you can protect your website and the people who visit it. **ServerAvatar** makes this process much simpler by offering automatic SSL installation, renewal, and HTTPS enforcement without complex technical steps. A secure website does more than remove browser warnings. It builds confidence, improves user experience, and supports better search engine visibility. Taking a little time to secure your website today helps create a safer and more trustworthy online presence for the long term. ## FAQs ### **1. Is SSL required even if my website does not collect user data?** Yes, modern browsers expect all websites to use HTTPS, regardless of whether they collect personal information. ### **2. Can a free SSL certificate fix the Not Secure warning?** Yes, free SSL certificates work perfectly when installed and configured correctly on your website. ### **3. How often should an SSL certificate be renewed?** Most SSL certificates need renewal every few months or yearly, depending on the provider, unless auto-renewal is enabled. ### **4. Does fixing the Not Secure warning help with SEO?** Yes, secure websites are trusted more by search engines, which can positively impact rankings and visibility. ### **5. Why does my website still show a “Not Secure” warning after installing SSL?** This usually happens when some parts of the website, such as images or scripts, are still loading over HTTP instead of HTTPS. **Categories:** Blog, Guide, Others, Tutorials **Tags:** HTTPS, HTTPS vs HTTP, Not Secure Warning, Secure Website, SSL, SSL Certificate, Website Not Secure, website security --- ### [How to Use Cloudflare Firewall Rules to Secure Your Website](https://serveravatar.com/cloudflare-firewall-rules-website-security/) **Published:** December 31, 2025 **Author:** Meghna Meghwani **Content:** [![Blog banner - ServerAvatar](https://serveravatar.com/wp-content/uploads/2025/09/728_90-Banner-3-1024x127.png)](https://serveravatar.com/?ref=blog)Securing a website today can feel a bit complicated and complex thing to do. In the online world, Cloudflare Firewall Rules act like smart security guard, checking every visitor before letting them in. If you run a website, whether it’s a blog, business site, or online store, you’ve probably heard about hacks, bots, and suspicious traffic. The good news? You don’t need to be a security expert to protect your site. In this guide, I’ll walk you through how to use Cloudflare Firewall Rules to secure your website with confidence. ## What is Cloudflare? [Cloudflare](https://www.cloudflare.com/en-in/) is a global web infrastructure and security platform that helps websites load faster, stay online, and remain protected from online threats. It works by acting as a layer between a website’s visitors and its hosting server, filtering and optimizing traffic before it reaches the server. In simple terms, Cloudflare acts as a protective and performance-boosting shield for websites, making them faster, safer, and more reliable for users around the world. ### What Are Cloudflare Firewall Rules Cloudflare Firewall Rules are custom rules that decide who can access your website and who cannot. Think of them as clear instructions for Cloudflare, such as: - Block visitors from certain countries: Prevents traffic from locations that commonly generate spam or attacks. - Stop known malicious bots: Automatically blocks bots that are identified as harmful or abusive. - Allow only trusted IP addresses: Ensures that only approved IPs can access specific parts of your website. Instead of reacting after an attack happens, firewall rules help you prevent problems before they reach your server. ## Why Website Security Matters More Than Ever Let’s be honest, hackers don’t care if your website is small or big. Automated bots scan the internet day and night, looking for weak spots. Even a simple blog can be targeted. Without proper security: - Your site can go offline: Attacks like DDoS can overwhelm your server and make your website unavailable. - User data can be compromised: Hackers may steal sensitive information such as passwords or emails. - Search engine rankings can drop: Search engines may penalize hacked or frequently offline websites. Using Cloudflare Firewall Rules is like installing a strong fence around your digital property. It keeps trouble out and gives you peace of mind. ## How Cloudflare Firewall Rules Work Cloudflare sits between your visitors and your server. When someone tries to access your site, Cloudflare checks the request first. Here’s what happens: - A visitor sends a request: Someone tries to access your website through a browser or bot. - Cloudflare reviews it against your firewall rules: Cloudflare checks the request based on your defined security rules. - The request is allowed, blocked, or challenged: Cloudflare decides whether to let the request through, stop it, or verify it. This all happens in milliseconds, so your real visitors never notice a delay. ## Getting Started with Cloudflare Before creating firewall rules, you need: - A Cloudflare account. [Create an account](https://dash.cloudflare.com/sign-up) if you don’t have one: You need an active Cloudflare account to manage security and DNS settings. - Your website has been added to Cloudflare: Your domain must be connected to Cloudflare’s network. - DNS properly configured: DNS records must point to Cloudflare for traffic to pass through it. Once Cloudflare is active, traffic starts flowing through its network automatically. From there, you can begin adding firewall rules without touching your server. ### Accessing Firewall Rules in Cloudflare Dashboard To find firewall rules: - [Log in](https://dash.cloudflare.com/login) to Cloudflare - Select your domain - Go to **Security >> Security Rules** ![Cloudflare Firewall Rules](https://serveravatar.com/wp-content/uploads/2025/12/image-167-1024x514.png) This is your control room. From here, you can create, edit, disable, or delete rules anytime. ### Understanding Firewall Rule Components Each firewall rule has three main parts: - **Field:** What you want to check (IP, country, URL, user agent) - **Operator:** How you want to compare (equals, contains, does not equal) - **Value:** The specific detail (country name, IP address, keyword) **Action options** **include:** - **Block:** Completely stops the request from reaching your website. - **Allow:** Lets the request pass through without any restriction. - **Challenge (CAPTCHA or browser check):** Asks the visitor to complete a CAPTCHA or browser check. Once you understand these basics, creating rules becomes surprisingly easy. **You can easily create firewall rules to:** - **Block a specific IP address:** Stops traffic from a known harmful or abusive IP. - **Blocking Suspicious Countries or Regions:** Reduces attacks by restricting traffic from high-risk locations. - **Stopping Bad Bots and Crawlers:** Prevents automated scripts from scraping or abusing your site. **Cloudflare allows you to:** - **Block known bad bots:** Automatically denies access to bots flagged by Cloudflare. - **Challenge suspicious user agents:** Verifies traffic that looks unusual or suspicious. - **Allow verified search engine bots:** Ensures Google and other search engines can crawl your site safely. Using firewall rules here is like installing a spam filter for your website traffic. ### Protecting Login Pages from Attacks Login pages are prime targets for brute-force attacks. You can: - Add extra checks for /wp-login.php or /admin URLs - Challenge visitors trying to access login pages - Allow only your IP to access admin areas This simple step can stop thousands of login attempts overnight. ### Allowing Trusted Traffic Safely Sometimes, you want to whitelist trusted users, services, or monitoring tools, including: - Your office IP address: Ensures internal teams can always access the site without interruption. - Payment gateway services: Prevent payment failures by allowing trusted third-party services. - Uptime monitoring tools: Allow monitoring services to check your site’s availability. By allowing them explicitly, you avoid accidentally blocking important traffic while keeping strict rules for everyone else. ### Testing and Monitoring Firewall Rules After creating rules: - Monitor Cloudflare security logs: Helps you track blocked and allowed requests. - Check blocked and challenged requests: Identifies whether legitimate users are being affected. - Adjust rules if something breaks: Fine-tunes security without harming user experience. Cloudflare makes it easy to see what’s happening, so you’re never guessing. ## Common Mistakes to Avoid Here are a few mistakes to avoid: - Blocking entire countries without testing: Can unintentionally block real users. - Forgetting to allow their own IP: May lock you out of your own website. - Creating too many overlapping rules: Makes rule management confusing and error-prone. Start simple. You can always add more rules later. ## Best Practices for Long-Term Security To keep your site secure: - Review firewall rules monthly: Keeps your security setup relevant and effective. - Remove outdated or unused rules: Reduces complexity and avoids conflicts. - Combine firewall rules with Cloudflare WAF and rate limiting: Provides layered and stronger protection. Security isn’t a one-time setup. It’s more like routine maintenance. [![Blog banner - ServerAvatar](https://serveravatar.com/wp-content/uploads/2025/09/728_90-Banner-1-1024x127.png)](https://serveravatar.com/?ref=blog)## When to Update Firewall Rules If your website changes, your firewall rules should too. Update rules when: - You launch new pages: New URLs may need different security rules. - Your audience location changes: Traffic patterns evolve over time. - You notice false positives: Legitimate users may be blocked incorrectly. A clean, updated rule set works better than a long, outdated one. ## How ServerAvatar Integrates with Cloudflare to Boost Security **What is ServerAvatar?** [ServerAvatar](https://serveravatar.com/) is a platform to simplify the hosting and management of servers and applications. It simplifies the process of deploying and managing PHP and Node.js based web applications on servers. ![ServerAvatar Dashboard](https://serveravatar.com/wp-content/uploads/2025/12/image-168.png) If you’re using **ServerAvatar** to manage your servers and websites, want even stronger protection with Cloudflare, you’re in luck, ServerAvatar offers a built-in Cloudflare Integration that makes setup easy and smooth. This means you can connect your Cloudflare account directly from the ServerAvatar dashboard and manage key Cloudflare features without constantly switching between platforms. Here’s how the integration works and why it matters: **What the Integration Does** When you integrate Cloudflare with ServerAvatar: - Cloudflare’s security and performance services start protecting your site right away, including SQL injection protection and privacy safeguards. - You can manage DNS records directly from ServerAvatar instead of logging into Cloudflare separately. - You can update SSL/TLS settings from within ServerAvatar, ensuring your site stays secure and HTTPS-ready. This integration essentially brings Cloudflare’s powerful edge security and speed boost into your ServerAvatar workflow so you don’t have to juggle multiple dashboards. ## How to Connect Cloudflare with ServerAvatar Here’s a simple breakdown of the steps you’ll follow inside the ServerAvatar panel: - Create or open your application in ServerAvatar and go to the Cloudflare Integration section. - Log in to Cloudflare and choose the DNS domain you want to connect. - Copy your Zone ID from Cloudflare and paste it into the zone field on ServerAvatar. - Generate a Cloudflare API Token (Bearer Token) with the necessary permissions and paste it into ServerAvatar. - Refer to the attached link to checkout the detailed step by step process to integrate your cloudflare account with ServerAvatar: - Click Integrate Now, ServerAvatar will connect to Cloudflare. - After integration, you can manage DNS records and adjust SSL/TLS settings from within ServerAvatar itself. ![Cloudflare Integration - Cloudflare Firewall Rules ](https://serveravatar.com/wp-content/uploads/2025/12/image-169-1024x478.png) > Make sure the Cloudflare domain you select matches your application domain, otherwise the integration won’t work. ## Why This Matters for Website Security With the integration set up: - Your website benefits from Cloudflare’s firewall and CDN without extra manual steps. - You get automated handling of DNS and SSL features, which reduces configuration errors. - It’s easier to combine Cloudflare Firewall Rules with ServerAvatar’s own security tools in a single place. If you’re already enhancing your site with Cloudflare Firewall Rules, this integration ensures that your entire traffic and DNS workflow stays secure and manageable under one roof, making your website safer, faster, and easier to maintain. ## Conclusion Cloudflare Firewall Rules make website security simple, proactive, and highly effective, even if you’re not a security expert. By filtering traffic before it reaches your server, these rules help block malicious bots, prevent brute-force attacks, and protect sensitive areas like login pages without slowing down real users. When combined with best practices such as regular rule reviews, careful testing, and layered security, Cloudflare becomes a powerful shield for any website. And if you’re using ServerAvatar, the built-in Cloudflare integration takes things a step further by letting you manage DNS, SSL, and Cloudflare settings from one dashboard. The result is a safer, faster, and more manageable website with less effort and fewer mistakes. ## FAQs ### **1. Can Cloudflare Firewall Rules slow down my website?** Firewall checks happen in milliseconds at Cloudflare’s edge network, so legitimate visitors won’t notice any delay. ### **2. Is it safe to block traffic from entire countries?** It can be useful, but it should be done carefully. Blocking entire countries without testing may prevent genuine users from accessing your website. ### **3. Can Firewall Rules protect my login pages?** You can add extra security to login URLs by challenging visitors, limiting access to trusted IPs, or blocking suspicious traffic entirely. ### **4. How often should I review my Firewall Rules?** Ideally, review them monthly or whenever your website traffic patterns, audience, or structure changes. ### **5. Are Cloudflare Firewall Rules suitable for small websites and blogs?** Absolutely. Even small websites are frequent targets of bots and automated attacks, making Firewall Rules a smart choice for any site size. **Categories:** Blog, Guide, Others **Tags:** Cloudflare, Cloudflare Firewall, Cloudflare Firewall Rules, Cloudflare Security, Firewall, website security --- ### [How To Use Redis Full-Page Caching To Speed Up WordPress](https://serveravatar.com/redis-full-page-caching-wordpress/) **Published:** December 30, 2025 **Author:** Meghna Meghwani **Content:** [![Blog banner - ServerAvatar](https://serveravatar.com/wp-content/uploads/2025/09/728_90-Banner-3-1024x127.png)](https://serveravatar.com/?ref=blog)Have you ever opened your WordPress site and wondered why it takes forever to load? It feels like waiting for a slow elevator, you press the button and just stand there, hoping something moves. The truth is, slow websites push visitors away, harm SEO, and hurt conversions, which is why solutions like Redis Full-Page Caching are becoming essential for speeding up WordPress performance. One of the smartest ways to fix this is by using Redis full-page caching. It’s like storing a ready-made copy of your webpage so your server doesn’t have to rebuild it from scratch every time someone visits. In this guide, I’ll walk you through how Redis full-page caching works, how to set it up, and how to make the most out of it, using simple, human-friendly language. ## What Is Redis? Redis (Remote Dictionary Server) is an ultra-fast in-memory data store commonly used for caching data. Think of it like a super quick notebook your server keeps on the side. Instead of rewriting pages repeatedly, it stores the final output temporarily so it can serve it instantly. ### What Is Full-Page Caching in WordPress? Full-page caching means saving a pre-rendered copy of your entire webpage. So when a visitor comes in, WordPress doesn’t rebuild the page, it simply sends the saved version. ### Why Use Redis for WordPress Caching? Redis offers several benefits: - **Super-fast response time:** Pages load instantly because Redis serves cached content directly from memory instead of rebuilding it. - **Reduced database queries:** Redis minimizes repeated database requests by storing frequently used data in memory. - **Lower CPU usage:** The server does less processing since cached pages don’t need to be generated every time. - **Great for high-traffic sites:** Redis handles multiple visitors smoothly without slowing down your website. - **Improves Core Web Vitals:** Faster load times help improve key performance metrics like LCP and overall user experience. If you’re running WooCommerce, membership websites, or news portals, Redis (especially object caching) is a blessing. ### How Redis Full-Page Caching Works Here’s what happens behind the scenes: 1. A user visits your page. 2. If Redis has the cached page, it serves it instantly. 3. If not, WordPress builds the page, and Redis stores a copy. 4. The next visitor gets the faster, cached version. It’s like having a “recently visited pages” memory. ## Why Use Redis with ServerAvatar [ServerAvatar](https://serveravatar.com/) is a server and application hosting and management platform that allows you to host and manage Ubuntu servers and PHP-based and Node.js-based applications without deep technical knowledge. ![ServerAvatar Dashboard ](https://serveravatar.com/wp-content/uploads/2025/12/image-156.png) When it comes to Redis: - Redis is automatically installed and set up at the server level while deploying the server with ServerAvatar. - No risky manual server commands and complex setup. - You can easily find out and update the Redis Password from the ServerAvatar dashboard - Optimized stack for website performance Instead of struggling with complex configurations, ServerAvatar helps you set up Redis in a safe, production-ready environment. This is where ServerAvatar shines. ### How ServerAvatar Simplifies Redis Setup When deploying a server with ServerAvatar, Redis is automatically installed and configured. **Benefits of using Redis with ServerAvatar** - **Redis-ready server:** ServerAvatar servers are pre-optimized to run Redis smoothly without manual configuration. - **Optimized database & PHP settings:** Database and PHP configurations are fine-tuned to work efficiently with Redis caching. - **Easy cache management:** Redis cache can be managed easily through supported plugins without complex server commands. - **No manual server tuning:** ServerAvatar handles server-level tuning so users don’t need deep technical knowledge. - **Ideal for WordPress and other websites:** The server environment is optimized for high-traffic websites. Instead of struggling with complex commands, ServerAvatar lets you focus on growing your website. ### Deploy WordPress with ServerAvatar You can easily install WordPress with ServerAvatar’s one-click application installer. You can follow this step-by-step guide to install WordPress quickly using ServerAvatar: ## Set up Full-Page Caching in WordPress (Using W3 Total Cache) Redis is commonly used for object caching in WordPress, but it can also be configured for full-page caching using the W3 Total Cache plugin. Full-page caching means storing the entire generated HTML page in a cache so that WordPress does not need to: - Run PHP - Execute database queries - Load WordPress core files When Redis is used for page caching: - The HTML output of a page is stored in Redis memory - Future requests are served directly from Redis - Page load time is significantly reduced **Note:** Redis page caching is not always the best option, but it is useful when server-level caching (Nginx FastCGI, LiteSpeed, Varnish) is not available. If you prefer not to use W3 Total Cache, you can explore other reliable WordPress caching plugins here: **Step 1: Install W3 Total Cache Plugin** - Log in to your WordPress dashboard - Go to the Plugins section, and click on Add New - Search for W3 Total Cache - Click Install Now, then Activate the plugin ![W3 Total Cache - Redis Full-Page Caching](https://serveravatar.com/wp-content/uploads/2025/12/image-157-1024x399.png) Once activated, navigate to the plugin settings by clicking on the settings from the dashboard. ![Plugin settings - Redis Full-Page Caching](https://serveravatar.com/wp-content/uploads/2025/12/image-158-1024x457.png) **Step 2: Enable Page Cache with Redis** - Go to **Performance → General Settings** - Locate the **Page Cache** section - Enable **Page Cache** - Set **Page Cache Method** to **Redis** - Click **Save All Settings** ![performance settings - Redis Full-Page Caching](https://serveravatar.com/wp-content/uploads/2025/12/image-160-1024x439.png) This tells WordPress to store full HTML pages in Redis instead of disk or memory. **Step 3: Configure Redis Connection Details** - Go to **Performance → Page Cache** - Scroll to the **Advanced** section - Enter the following details:[](https://storage.3.basecamp.com/5840738/blobs/fa6c7f36-e551-11f0-9693-0242ac120002/download/image.png) **Setting****Value**Redis hostname:port127.0.0.1:6379Redis Database ID0PasswordRedis Password (Leave empty if none)**Tip:** If you also use Redis for object caching, use: - DB 0 for page cache - DB 1 for object cacClick **Save All Settings**. ![Plugin settings - Redis Full-Page Caching](https://serveravatar.com/wp-content/uploads/2025/12/image-161-1024x515.png) **Get your Redis password using ServerAvatar:** If you are using ServerAvatar, you can easily get your Redis password from the ServerAvatar dashboard without any hassles. - Navigate to the server panel by clicking on the **Server Dashboard icon**. ![Server panel - Redis Full-Page Caching](https://serveravatar.com/wp-content/uploads/2025/12/image-162-1024x236.png) - Navigate to the **Settings** section, and then the **Security** section from the left-hand sidebar. - Find the **Redis Settings** section. You can copy the Redis password from there and paste it. ![Redis settings - Redis Full-Page Caching](https://serveravatar.com/wp-content/uploads/2025/12/image-163-1024x502.png) **Step 4: Enable Object Cache (Recommended)** Redis page caching works best when combined with object caching. - Go to **Performance → General Settings** - Find the Object Cache section and enable the **Object Cache** - Set **Object Cache Method** as **Redis** - Save settings ![Plugin settings - Redis Full-Page Caching](https://serveravatar.com/wp-content/uploads/2025/12/image-164-1024x439.png) **Step 5: Configure Page Cache Rules (Important)** Go to **Performance >> Page Cache** and apply these recommended settings: **Enable:** - Cache front page - Cache feeds - Cache SSL (HTTPS) requests - Don’t cache pages for logged-in users ![Plugin settings - Redis Full-Page Caching](https://serveravatar.com/wp-content/uploads/2025/12/image-165-1024x535.png) This prevents broken sessions and user-specific data from being cached. **Step 6: Exclude Sensitive Pages** - Go to **Performance → Page Cache** - Find the **Advanced** section and navigate to the **Never cache the following pages** - Exclude pages that should never be cached, as mentioned below, and save settings. - /cart/ - /checkout/ - /my-account/ - Admin pages - Login pages ![Plugin settings - Redis Full-Page Caching](https://serveravatar.com/wp-content/uploads/2025/12/image-166-1024x516.png) [![Blog banner - ServerAvatar](https://serveravatar.com/wp-content/uploads/2025/09/728_90-Banner-1-1024x127.png)](https://serveravatar.com/?ref=blog)## Advantages of Redis Full-Page Caching - **Faster page load times:** Pages are served directly from memory, allowing visitors to see content almost instantly. - **Reduced PHP and database load:** Cached pages eliminate repeated PHP execution and database queries, lowering server stress. - **Useful when server-level caching is unavailable:** Redis full-page caching works well as an alternative when Nginx, LiteSpeed, or Varnish caching is not available. ## Limitations to Keep in Mind - **Higher memory usage:** Storing full HTML pages in Redis consumes more RAM compared to object caching. - **Not ideal for WooCommerce or logged-in users:** Dynamic and user-specific pages can cause data inconsistency if cached improperly. - **Less efficient than Nginx or LiteSpeed page caching:** Server-level caching solutions are generally faster and more resource-efficient than Redis-based page caching. ## Redis vs Other WordPress Caching Methods **Caching Type****Speed****Best Use Case**Redis CacheVery HighHigh-traffic WordPress sitesFile-Based CacheMediumSmall blogsBrowser CacheMediumClient-side performanceCDN CacheHighGlobal visitorsRedis works best when combined with proper server management, something ServerAvatar excels at. Redis is the fastest and most scalable option. ## Common Redis Issues and Fixes **Issue****Solution**Redis not connectingCheck PHP Redis extensionCache not refreshingClear Redis + WordPress cacheWooCommerce issuesExclude dynamic pagesHigh memory usageIncrease Redis memoryServerAvatar support helps troubleshoot these issues quickly. ## Conclusion A slow WordPress website can quietly damage your traffic, SEO rankings, and conversions. Redis full-page caching offers a powerful way to speed things up by serving pre-rendered pages directly from memory instead of rebuilding them on every request. When implemented correctly, it can significantly reduce server load, improve Core Web Vitals, and deliver a smoother user experience. With ServerAvatar, setting up Redis becomes much simpler and safer. Redis is pre-installed, optimized, and managed at the server level, removing the need for risky manual configurations. While Redis full-page caching is not always the best choice, especially for highly dynamic or logged-in user sites, it works well when server-level caching options are unavailable. Used wisely and combined with object caching, Redis can be a reliable performance booster for many WordPress websites. ## FAQs ### **1. What is the difference between Redis object cache and Redis full-page cache?** Object caching stores database query results and reusable objects, while full-page caching stores the entire HTML output of a page. Object caching is generally safer and recommended for most WordPress sites. ### **2. Does Redis replace Nginx or LiteSpeed caching?** Server-level caching like Nginx FastCGI or LiteSpeed cache is usually faster and more efficient. Redis full-page caching is a good alternative when those options are not available. ### **3. How much memory does Redis full-page caching use?** It uses more memory than object caching because entire HTML pages are stored in RAM. Proper memory allocation is important to avoid performance issues. ### **4. Do I need technical knowledge to set up Redis on ServerAvatar?** Not really. ServerAvatar installs and configures Redis automatically, and you can manage credentials and settings directly from the dashboard. ### **5. Which plugin is best for Redis full-page caching in WordPress?** W3 Total Cache is a popular and reliable option that supports Redis for both page caching and object caching. **Categories:** Blog, Guide, Others, Tutorials, WordPress **Tags:** Cache Plugin, caching, full page caching, redis, redis cache object, redis cache wordpress, speed up wordpress, Wordpress --- ### [How to Use Database Clustering, Replication & Sharding](https://serveravatar.com/database-clustering-replication-sharding/) **Published:** December 27, 2025 **Author:** Meghna Meghwani **Content:** [![Blog banner - ServerAvatar](https://serveravatar.com/wp-content/uploads/2025/09/728_90-Banner-3-1024x127.png)](https://serveravatar.com/?ref=blog)Have you ever wondered how big apps like social media platforms, online stores, or banking apps stay fast even when millions of people use them at the same time? The secret often lies behind the scenes, in database clustering, replication & sharding, key techniques used to design scalable, high-performance database architectures. When a database grows, a single server can struggle to keep up. Pages load slowly, data updates lag, and sometimes the system just crashes. That’s where database clustering, replication, and sharding come into play. Think of them as smart ways to organize and share the workload so your database doesn’t get overwhelmed. In this guide, we’ll break down these concepts in simple, and practical insights anyone can understand. ## What Is Database Scalability? Database scalability refers to a system’s ability to handle increasing workloads without losing performance. This could mean more users, more stored data, or more requests per second. There are two main ways databases scale: - Vertical scaling, which involves upgrading server resources - Horizontal scaling, which involves adding more servers Clustering, replication, and sharding are all horizontal scaling techniques designed to overcome the limits of a single database server. ![Database Clustering, Replication & Sharding ](https://serveravatar.com/wp-content/uploads/2025/12/image-149.png) ## Understanding Database Clustering Database clustering connects multiple database servers into a single system that works together. These servers are aware of each other and coordinate to keep the database available. If one node fails, another node continues serving requests. This makes clustering ideal for systems where uptime is critical. **Key points of database clustering** - **Multiple servers act as one database:** Several database servers work together and appear as a single system to users and applications. - **Automatic failover support:** If one server stops working, another server takes over automatically without manual intervention. - **High availability and fault tolerance:** The database remains accessible and stable even when hardware or software issues occur. ![Database Clustering - Database Clustering, Replication & Sharding](https://serveravatar.com/wp-content/uploads/2025/12/image-150.png) **Types of Database Clustering** There are different clustering models depending on how data is handled: - **Active-active clustering:** All database nodes are live and handle requests at the same time, helping distribute the workload evenly. - **Active-passive clustering:** One database node actively serves requests while the others remain on standby, ready to take over if needed. - **Shared-nothing clustering:** Each database node operates independently with its own storage and memory, reducing dependency and improving scalability. The choice depends on performance needs and infrastructure complexity. ![Database Clustering Types - Database Clustering, Replication & Sharding](https://serveravatar.com/wp-content/uploads/2025/12/image-151.png) **Benefits of Database Clustering** - **Minimal downtime:** The system continues running with little or no interruption even when a server issue occurs. - **Automatic failover:** Database operations are quickly shifted to another server when the primary one becomes unavailable. - **Increased system reliability:** The overall database setup becomes more stable and dependable under failures or high load. Clustering is especially useful for mission-critical systems where outages are unacceptable. ## How Database Replication Works Database replication involves copying data from one database server to one or more additional servers. The main server usually handles write operations, while replica servers handle read operations. Data changes are continuously synced to replicas. ![Database Replication - Database Clustering, Replication & Sharding](https://serveravatar.com/wp-content/uploads/2025/12/image-152.png) **Core aspects of replication** - **Primary and replica servers:** One main database handles data changes while replica servers keep updated copies of that data. - **Data synchronization:** Changes made on the primary database are continuously copied to replica databases to keep data consistent. - **Improved read performance:** Read requests can be served by replica servers, reducing load on the primary database. - **Data redundancy:** Multiple copies of the same data exist across servers, helping protect against data loss. **Types of Database Replication** Replication can be configured in different ways: - Synchronous replication, where data is written to replicas immediately - Asynchronous replication, where data is copied with a slight delay - Master-slave replication, with one write node - Multi-master replication, with multiple write nodes Each type balances performance and data consistency differently. ![Database Replication Types - Database Clustering, Replication & Sharding](https://serveravatar.com/wp-content/uploads/2025/12/image-153.png) **Benefits of Database Replication** - **Faster read operations:** Read requests are handled by replica servers, which reduces response time and improves performance. - **Backup and recovery options:** Replicated databases provide up-to-date copies that can be used during failures or data restoration. - **Load distribution:** Traffic is spread across multiple database servers, preventing any single server from becoming overloaded. It is widely used in content-heavy and read-intensive applications. ## What Is Database Sharding? Database sharding splits a large database into smaller parts called shards. Each shard stores a subset of the data and runs on its own server. Instead of one server managing all data, multiple servers manage different portions. This approach is highly effective for large-scale applications. ![Database Sharding - Database Clustering, Replication & Sharding](https://serveravatar.com/wp-content/uploads/2025/12/image-154.png) **Key characteristics of sharding** - **Horizontal data partitioning:** Large datasets are split into smaller parts and stored across multiple servers based on defined rules. - **Independent database shards:** Each shard operates as its own database, managing only a specific portion of the data. - **Improved write and read performance:** Workloads are spread across shards, allowing the database to process requests more efficiently. **Benefits of Database Sharding** - **Massive horizontal scalability:** The system can grow by adding more servers instead of upgrading a single machine. - **Better performance under heavy load:** Traffic is spread across multiple servers, preventing slowdowns during high usage. - **Efficient handling of large datasets:** Large volumes of data are managed more effectively by distributing them across multiple databases It allows databases to grow without relying on a single powerful server. **How Sharding Distributes Data** Data is distributed based on a shard key, such as user ID or geographic region. **Common sharding methods include** - **Range-based sharding:** Data is divided into shards based on value ranges, such as numeric or alphabetical order. - **Hash-based sharding:** A hash function is used to evenly distribute data across shards, reducing imbalance. - **Directory-based sharding:** A lookup table is used to decide which shard stores specific data, allowing flexible placement. Choosing the right shard key is critical for balanced data distribution and performance. ![Database Sharding methods - Database Clustering, Replication & Sharding](https://serveravatar.com/wp-content/uploads/2025/12/image-155.png) ## Clustering vs Replication vs Sharding Each method serves a different purpose: **Aspect****Database Clustering****Database Replication****Database Sharding****Primary goal**Ensure high availability and uptimeImprove read performance and data safetyScale databases for very large data and traffic**How it works**Multiple servers work together as one database systemData is copied from a primary server to one or more replicasData is split into smaller parts across multiple servers**Data distribution**Same data available across cluster nodesSame data stored on primary and replicasDifferent data stored on different shards**Main benefit**Automatic failover and fault toleranceRedundancy and faster read operationsHorizontal scalability and performance**Write operations**Usually handled by one active node or coordinated nodesWrites go to the primary serverWrites are distributed across shards**Read operations**Can be handled by multiple nodesMostly served by replica serversServed by the shard holding the data**Scalability type**Improves availability more than scaleImproves read scalabilityImproves both read and write scalability**Failure handling**Another node takes over automaticallyReplicas can replace the primary if neededFailure affects only the specific shard**Complexity level**MediumLow to mediumHigh**Use case**Systems where downtime is unacceptableRead-heavy applicationsVery large, high-traffic applications**Data consistency**Strong consistency depending on setupDepends on sync type (sync or async)Must be handled carefully by the application**Ease of setup**ModerateEasier to implementMore complex to design and maintain- Clustering improves availability - Replication improves data redundancy and read scalability - Sharding improves scalability for large datasets They are not competing solutions but complementary techniques. [![Blog banner - ServerAvatar](https://serveravatar.com/wp-content/uploads/2025/09/728_90-Banner-1-1024x127.png)](https://serveravatar.com/?ref=blog)## Why Applications Need These Techniques Modern applications demand: - **High availability:** The database remains accessible to users even when individual servers fail. - **Fast response times:** Requests are processed quickly by distributing workload across multiple database servers. - **Data reliability:** Data stays accurate and protected through redundancy and controlled synchronization. - **Scalability without downtime:** The system can grow and handle more load without requiring service interruptions. Without clustering, replication, or sharding, databases quickly become bottlenecks as applications grow. ## Common Challenges and Limitations Despite their benefits, these techniques introduce complexity. **Common challenges include** - **Data consistency issues:** Keeping data perfectly synchronized across multiple servers can be challenging, especially during updates. - **Complex maintenance:** Managing clustered, replicated, or sharded databases requires more planning and operational effort. - **Monitoring and debugging difficulties:** Tracking performance issues becomes harder when data and workload are spread across many servers. - **Application-level changes for sharding:** Applications often need additional logic to decide which shard should handle each request. Proper planning and testing are essential. ### When and How to Use Each Approach - Use clustering when high availability is required. - Use replication when read traffic increases or redundancy is needed. - Use sharding when data size and write traffic exceed single-server limits. Many systems start with replication and later introduce clustering or sharding as needed. ### Combining Clustering, Replication, and Sharding Large-scale systems often combine all three techniques. For example: - Each shard may have replicas - Replicas may run in a clustered setup This layered approach provides performance, reliability, and scalability together. ## Best Practices for Beginners - **Start with replication before sharding:** Replication is easier to manage and should be implemented before moving to more complex sharding setups. - **Monitor performance regularly:** Continuously tracking database metrics helps identify issues before they affect users. - **Plan scaling early:** Designing the database with future growth in mind prevents major changes later. - **Test failover scenarios:** Regular testing ensures the system can recover smoothly when a server fails. You don’t need to do everything at once. Grow step by step. ## Future of Database Scaling As data continues to explode, these techniques will only become more important. Cloud-native databases, managed services, and automation tools are making clustering, replication, and sharding easier than ever, even for small teams. The future is all about smart scaling, not just bigger servers. ## FAQs ### **1. What is the main purpose of database clustering?** Database clustering is mainly used to ensure high availability by allowing multiple servers to work together and handle failures without downtime. ### **2. How is database replication different from backups?** Replication continuously copies live data to other servers, while backups are periodic snapshots taken for recovery purposes. ### **3. When should a database be sharded?** Sharding should be considered when data size or write traffic grows beyond what a single database server can efficiently handle. ### **4. Can clustering, replication, and sharding be used together?** Yes, many large systems combine all three to achieve availability, scalability, and reliability at the same time. ### **5. Is database sharding complex to manage?** Yes, sharding adds complexity because applications must know how to route data to the correct shard, which requires careful planning and design. ## Conclusion Database clustering, replication, and sharding are no longer advanced concepts limited to large enterprises, they are essential techniques for building modern, scalable, and reliable applications. Each approach solves a specific problem: clustering ensures high availability, replication improves data safety and read performance, and sharding enables databases to grow beyond the limits of a single server. Rather than choosing one over the others, successful systems often combine these techniques based on their needs and growth stage. The key is to understand when and why to use each method. By planning early, monitoring performance, and scaling step by step, teams can avoid bottlenecks and maintain smooth database operations as demand increases. In the long run, smart database scaling leads to better performance, higher uptime, and a more stable application experience. ## Stop Wasting Time on Servers. Start Building Instead. You didn’t start your project to babysit servers. Let **ServerAvatar** handle deployment, monitoring, and backups — so you can focus on growth. Deploy **WordPress, Laravel, N8N**, and more in minutes. No DevOps required. No command line. No stress. [ 🚀 Try Free ](https://app.serveravatar.com) [ 🌐 Learn More ](https://serveravatar.com/) Trusted by 10,000+ developers and growing. **Categories:** Blog, Guide, Others, Tutorials **Tags:** Database, database clustering, Database Management, database replication, database scalability, database sharding, scalability --- ### [What is CI/CD? Continuous Integration & Delivery Explained](https://serveravatar.com/what-is-ci-cd-continuous-integration-delivery/) **Published:** December 26, 2025 **Author:** Meghna Meghwani **Content:** [![Blog banner - ServerAvatar](https://serveravatar.com/wp-content/uploads/2025/09/728_90-Banner-3-1024x127.png)](https://serveravatar.com/?ref=blog)Modern software is updated frequently. Applications receive new features, bug fixes, and security improvements without long delays or major disruptions. This smooth process is made possible by CI/CD, a core practice in modern software development. CI/CD focuses on automating how code is built, tested, and delivered. Instead of waiting weeks or months to release updates, teams can ship changes quickly and safely. This approach improves quality, reduces errors, and allows software to evolve continuously. This guide explains what CI/CD is, how it works, and why it matters, using clear and simple language for a general audience. ## What Does CI/CD Mean? CI/CD stands for Continuous Integration and Continuous Delivery. Sometimes, the second “CD” also refers to Continuous Deployment. - **Continuous Integration (CI)** means regularly adding small pieces of code into a shared project. It is the practice of frequently adding code changes to a shared codebase. - **Continuous Delivery (CD)** means automatically preparing that code so it’s always ready to be released. It ensures that code changes are automatically prepared and ready for release. - **Continuous Deployment** takes it one step further by releasing updates automatically and releasing every approved change to users. In short, CI/CD helps teams deliver better software faster and with fewer problems. Together, CI/CD creates a fast and reliable way to deliver software updates. ![CI/CD ](https://serveravatar.com/wp-content/uploads/2025/12/image-144.png) ### Why CI/CD Is Important Modern software systems evolve continuously, with frequent updates, fixes, and improvements being released over time. Without a clear and automated process, these changes can lead to errors, service interruptions, or unstable applications, making it difficult to maintain reliability and user trust. CI/CD introduces a structured workflow that automates how changes are tested and delivered, ensuring updates are applied smoothly and consistently. CI/CD is important because it: - Reduces manual work by automating repetitive tasks like testing, building, and deployment, minimizing human effort and mistakes. - Detects problems early through automated checks that identify bugs and issues as soon as changes are introduced. - Improves software stability by ensuring every update passes predefined quality checks before moving forward. - Speeds up delivery by allowing teams to release updates more frequently without long development or release cycles. - Encourages consistent development practices by following standardized processes that keep workflows predictable and organized. By automating key steps, teams can focus on improving features instead of fixing preventable issues. ## What Is Continuous Integration? Continuous Integration is a development practice that emphasizes merging code changes into a shared codebase on a regular basis. Instead of working in isolation for long periods, teams integrate updates frequently, which helps maintain code quality and reduces the risk of unexpected issues. By continuously validating changes through automation, Continuous Integration ensures that the codebase remains stable and easy to maintain. ![CI/CD - Continuous Integration](https://serveravatar.com/wp-content/uploads/2025/12/image-145.png) Each time a change is made: - The code is added to a shared repository so all team members work from a single, updated source of truth. - Automated checks are triggered to verify that the new changes meet predefined quality and build requirements. - Errors are detected immediately, allowing teams to fix issues early before they grow into larger problems. This approach prevents large integration problems and keeps the codebase stable. **Key point:** Continuous Integration encourages small, frequent updates, making changes easier to manage and reducing the risk associated with large code merges. ## What Is Continuous Delivery? Continuous Delivery is a development practice that ensures software is always ready to be released at any time. It focuses on automating the steps that prepare code for deployment, making the release process predictable, safe, and low risk. By keeping applications in a deployable state, Continuous Delivery helps teams avoid last-minute issues and maintain consistent release quality. ![CI/CD - Continuous Delivery](https://serveravatar.com/wp-content/uploads/2025/12/image-146.png) After passing automated tests: - The code is packaged into a deployable format that can be consistently used across environments. - Configuration checks are applied to confirm that settings, dependencies, and environment variables are correctly defined. - The software is prepared for release so it can be deployed quickly whenever approval is given. Human approval may still be required before deployment, but all technical steps are handled automatically to ensure reliability and consistency. ## Continuous Delivery vs Continuous Deployment Although they are closely related, these terms are not the same. - **Continuous Delivery:** Code is ready to be released at any time, but deployment is a manual decision. - **Continuous Deployment:** Code is automatically released once all checks pass. **Aspect****Continuous Delivery****Continuous Deployment****Definition**Ensures software is always ready for release but requires manual approval to deployAutomatically deploys every approved change without human intervention**Deployment Trigger**Deployment starts after a human decision or business approvalDeployment happens automatically once all checks pass**Level of Automation**Build, test, and release preparation are automatedBuild, test, and deployment are fully automated**Human Involvement**Required at the final deployment stageNot required once the pipeline is configured**Risk Control**Allows teams to review changes before releasingRelies entirely on automated tests to manage risk**Release** **Frequency**Frequent but controlled releasesVery frequent or continuous releases**Best Suited For**Teams needing compliance, approvals, or controlled rolloutsTeams confident in automation and rapid iteration**Rollback Handling**Rollbacks are typically triggered manually if neededRollbacks are often automated as part of the pipeline**Complexity**Easier to implement and manageMore complex due to full automation**Goal**Keep software deployable at all timesRelease changes to users as quickly as possibleThe choice depends on business needs, risk tolerance, and compliance requirements. ## How CI/CD Works CI/CD follows a structured and automated workflow that moves code changes smoothly from development to release. Each step in the process is designed to verify quality, reduce risk, and ensure that updates are delivered in a reliable and repeatable way. By validating changes continuously, CI/CD helps teams maintain consistency while releasing improvements with confidence. ![CI/CD work](https://serveravatar.com/wp-content/uploads/2025/12/image-147.png) Here’s a simple flow of how CI/CD works: 1. A change is made to the code when a developer updates or adds new functionality to the application. 2. The system runs automatic tests to verify that the new changes do not break existing features. 3. Errors are flagged instantly so issues can be fixed before the code moves forward in the pipeline. 4. Approved code is packaged into a build that is ready to run in different environments. 5. The update is delivered or deployed to a staging or production environment based on the release process. It’s like an automatic quality checker that never gets tired. Each step is designed to catch errors early and maintain consistency. ### CI/CD Pipeline Explained A CI/CD pipeline is an automated workflow that guides code through a series of defined stages before it is released. Each stage validates the code in a controlled manner, ensuring quality, consistency, and reliability throughout the delivery process. By standardizing these steps, CI/CD pipelines reduce manual intervention and make software releases predictable and repeatable. **Common pipeline stages include:** - Code validation to check that the submitted changes meet coding standards and basic quality rules. - Automated testing to verify functionality and prevent existing features from breaking. - Build creation to compile and package the code into a deployable format. - Deployment preparation to configure environments and confirm readiness for release. - Release execution to deliver the approved build to the target environment. Pipelines ensure repeatable and reliable delivery processes. ## Key Components of a CI/CD Pipeline A CI/CD pipeline represents the complete path that code follows from initial development to final release. Each component plays a specific role in maintaining software quality while ensuring updates move quickly and smoothly through the delivery process. Together, these components create a structured system that balances speed, reliability, and consistency. **Main components include:** - **Source control:** Stores and manages code changes in a shared repository, allowing teams to collaborate and track updates effectively. - **Build process:** Transforms the source code into a runnable or deployable format by compiling and packaging required resources. - **Automated testing:** Runs predefined tests to identify bugs, performance issues, or compatibility problems early. - **Deployment stage:** Delivers the approved build to the target environment so users can access the latest updates. Each component works together to protect both software quality and delivery speed. ## Benefits of CI/CD CI/CD offers a structured and automated approach to software delivery that benefits everyone involved in the development process. By reducing manual effort and standardizing workflows, it helps teams release updates more efficiently while maintaining reliability. Over time, CI/CD builds trust in the release process and improves overall delivery confidence. **Major benefits include:** - Faster software releases by automating build, test, and deployment steps, reducing delays between updates. - Reduced risk of failures through early detection of issues before they reach production. - Higher code quality by enforcing consistent testing and validation for every change. - Better collaboration as teams work with a shared process and clear visibility into changes. - Predictable delivery schedules that make planning and releases more reliable and less stressful. Consistent use of CI/CD strengthens stability and confidence in every software release. [![Blog banner - ServerAvatar](https://serveravatar.com/wp-content/uploads/2025/09/728_90-Banner-1-1024x127.png)](https://serveravatar.com/?ref=blog)## Popular CI/CD Tools CI/CD tools are designed to automate the processes involved in building, testing, and delivering software. They help teams reduce manual effort, maintain consistent workflows, and ensure that every code change follows the same quality standards. By using the right CI/CD tool, teams can streamline development processes and improve the reliability of software releases. Some widely used options include: - **Jenkins:** A flexible automation server that supports custom pipelines through a large ecosystem of plugins. - **GitHub Actions:** A native GitHub feature that enables automated workflows directly within repositories. - **GitLab CI:** An integrated CI/CD solution that manages code, pipelines, and deployments in a single platform. - **CircleCI:** A cloud-based service focused on fast execution and easy pipeline configuration. - **Bitbucket Pipelines:** A built-in CI/CD tool for Bitbucket that simplifies automation using repository-based pipelines. These tools automate repetitive tasks and help enforce consistent, reliable development workflows. ## Automation in CI/CD Automation is the core element that makes CI/CD effective and reliable. By replacing manual processes with automated workflows, teams can deliver updates faster while maintaining consistent quality across all stages of development and deployment. Automated processes ensure that every change is handled the same way, reducing risk and improving overall system stability. Automated systems handle: - Code testing to verify functionality and detect issues without manual intervention. - Build creation to consistently compile and package code into deployable formats. - Deployment steps to move approved changes through environments in a controlled manner. - Monitoring and reporting to track performance, failures, and pipeline results in real time. Automation minimizes human error and ensures dependable outcomes across different environments. ### Server Management in CI/CD Automation CI/CD automation relies heavily on stable and consistently configured servers to run builds, tests, and deployments smoothly. If server environments are misconfigured or unmanaged, even well-designed pipelines can fail. ServerAvatar supports CI/CD workflows by simplifying server and application management through a centralized dashboard. It helps teams maintain consistent environments, manage services, and monitor applications, allowing CI/CD pipelines to operate reliably without manual server intervention. **What is ServerAvatar?** [ServerAvatar](https://serveravatar.com/) is a platform to simplify the hosting and management of servers and applications. It simplifies the process of deploying and managing PHP and Node.js based web applications on servers. [](https://storage.3.basecamp.com/5840738/blobs/8f401820-e223-11f0-9ca9-0242ac120003/download/serveravatardashboard.jpg) ![ServerAvatar Dashboard](https://serveravatar.com/wp-content/uploads/2025/12/image-148.png) ## Security in CI/CD Security plays a critical role in CI/CD by ensuring that software is not only functional but also safe to deploy. Integrating security checks directly into the pipeline helps identify vulnerabilities early and prevents risky code from moving forward. By addressing security throughout the development process, teams can reduce exposure to threats and maintain trust in their releases. Modern pipelines include: - Automated security scans to identify vulnerabilities and unsafe patterns within the codebase. - Dependency checks to detect outdated or insecure third-party libraries used in the application. - Access control rules to restrict who can modify code, pipelines, or deployment settings. - Audit logs to maintain a clear record of changes, approvals, and deployment activity. By integrating security early in the CI/CD process, teams reduce risks before software reaches users. ## CI/CD in Practice CI/CD can be understood as a structured workflow where changes move through automated checks before being released. Instead of relying on manual reviews and delayed testing, every update follows the same controlled process to ensure quality and readiness. This approach keeps software continuously validated and prepared for release. In a CI/CD workflow: - Changes are made in small increments, so updates are easier to test and manage. - Automated checks run immediately to verify that each change meets quality and functionality standards. - The application remains release-ready because approved changes are consistently validated and prepared for deployment. This structured process ensures reliability and consistency throughout the software delivery lifecycle. ## Common CI/CD Challenges Although CI/CD significantly improves software delivery, implementing it effectively can present certain challenges. These issues often arise during adoption and can impact the stability or efficiency of the pipeline if not addressed early. With careful planning and a phased approach, most CI/CD challenges can be managed successfully. Common issues include: - Poor test coverage which reduces the effectiveness of automated checks and allows bugs to pass through the pipeline. - Complex setup caused by integrating multiple tools, environments, and workflows. - Resistance to change when teams are hesitant to move away from familiar manual processes. - Inconsistent processes that lead to unpredictable results and deployment issues. Addressing these challenges gradually helps teams build a reliable and sustainable CI/CD workflow. ## CI/CD Best Practices Following best practices helps teams get the most value from CI/CD while maintaining stability and reliability. A well-defined approach ensures that automation works as intended and that issues are identified and resolved quickly. Consistent execution of these practices leads to smoother workflows and more dependable software releases. To use CI/CD effectively: - Keep changes small and frequent to reduce risk and make issues easier to identify and fix. - Automate testing thoroughly to ensure every update meets quality standards before moving forward. - Monitor deployments closely to quickly detect performance issues or unexpected behavior. - Fix failures immediately to prevent problems from spreading through the pipeline. - Maintain clear documentation so teams understand workflows, responsibilities, and recovery steps. Consistency and discipline are essential for achieving long-term success with CI/CD. ## The Future of CI/CD CI/CD is continuously evolving to meet the growing demands of modern software development. As applications become more complex and release cycles shorten, CI/CD practices are adapting to deliver faster, safer, and more reliable updates. These advancements ensure that CI/CD remains essential as software continues to play a critical role across industries. CI/CD continues to evolve with: - Advanced automation that reduces manual intervention and increases pipeline efficiency. - Improved monitoring to provide better visibility into performance, failures, and deployment outcomes. - Stronger security integration that embeds security checks directly into every stage of the pipeline. - Smarter pipelines that adapt dynamically based on project needs and system behavior. As software becomes more central to daily life, CI/CD will remain a core and evolving development practice. ## FAQs ### **1. What does CI/CD stand for?** CI/CD stands for Continuous Integration and Continuous Delivery. In some cases, CD also refers to Continuous Deployment, where changes are released automatically. ### **2. Is CI/CD only useful for large development teams?** No. CI/CD is beneficial for teams of all sizes. Even small teams benefit from automation, early error detection, and consistent delivery processes. ### **3. Is CI/CD secure?** CI/CD can be very secure when security checks are integrated into the pipeline, including vulnerability scans, dependency checks, access controls, and audit logs. ### **4. What are common mistakes when adopting CI/CD?** Common mistakes include poor test coverage, overly complex pipelines, ignoring failures, and trying to automate everything at once instead of gradually. ### **5. Is CI/CD difficult to maintain long term?** Not if best practices are followed. Keeping pipelines simple, monitoring regularly, fixing issues quickly, and maintaining clear documentation helps ensure long-term success. ## Conclusion CI/CD has become a foundational practice in modern software development because it enables teams to deliver updates faster, safer, and more consistently. By automating the processes of building, testing, and releasing code, CI/CD reduces manual effort, minimizes errors, and ensures that software is always in a ready-to-deploy state. Whether you are working on a small application or managing complex systems, CI/CD helps maintain stability while allowing continuous improvement. When supported by reliable automation, strong security practices, and effective server management tools like ServerAvatar, CI/CD workflows become easier to manage and scale over time. As software continues to evolve rapidly, adopting CI/CD is no longer optional, it is an essential approach for delivering high-quality software with confidence. ## Stop Wasting Time on Servers. Start Building Instead. You didn’t start your project to babysit servers. Let **ServerAvatar** handle deployment, monitoring, and backups — so you can focus on growth. Deploy **WordPress, Laravel, N8N**, and more in minutes. No DevOps required. No command line. No stress. [ 🚀 Try Free ](https://app.serveravatar.com) [ 🌐 Learn More ](https://serveravatar.com/) Trusted by 10,000+ developers and growing. **Categories:** Blog, Guide, Linux, Others, Tutorials **Tags:** CI/CD, CI/CD Automation, CI/CD Explained, CI/CD Pipeline, Continuous Delivery, Continuous Integration, DevOps, What is CI/CD --- ### [How to Install New Relic Monitoring on Linux](https://serveravatar.com/install-new-relic-monitoring-on-linux/) **Published:** December 24, 2025 **Author:** Meghna Meghwani **Content:** [![Blog banner - ServerAvatar](https://serveravatar.com/wp-content/uploads/2025/09/728_90-Banner-3-1024x127.png)](https://serveravatar.com/?ref=blog)Keeping a Linux server healthy is not just about setting it up and hoping for the best. Servers run applications, databases, background tasks, and web services every second, which makes continuous visibility essential. With New Relic Monitoring, administrators can track system performance, detect slowdowns, and identify issues before they turn into outages. If something slows down or breaks, you need to know what happened and why it happened quickly. This is where New Relic monitoring becomes extremely useful. New Relic helps you monitor your Linux server’s performance in real time. It shows CPU usage, memory consumption, disk activity, network traffic, and much more, all from a single dashboard. With proper monitoring in place, you can detect problems early, troubleshoot faster, and keep your applications running smoothly. In this guide, we’ll explain how to install New Relic monitoring on a Linux server in simple terms. ## What Is New Relic and Why Use It on Linux? [New Relic](https://newrelic.com/) is an observability and monitoring platform used by developers and system administrators worldwide. ![New Relic Monitoring ](https://serveravatar.com/wp-content/uploads/2025/12/image-130-1024x524.png) On Linux servers, it helps you: - Track CPU, RAM, disk, and network usage - Monitor system load and resource bottlenecks - Identify performance issues before users notice them - Get alerts when something goes wrong - View all metrics in a clean, visual dashboard Whether you manage a single VPS or multiple production servers, New Relic gives you better visibility into what’s happening behind the scenes. ### Prerequisites Before Installing New Relic Before starting the installation for New Relic, make sure to check the prerequisites: - A Linux server (Ubuntu, Debian, CentOS, Rocky Linux, etc.) - Root or sudo access to the server - A New Relic account (free or paid) - Internet access from the server If these basics are ready, you can move forward confidently. **Step 1: Create a New Relic Account** Let’s start by [creating a new account](https://newrelic.com/) for installing New Relic on your server. No need to worry about any charges to pay as the free plan is perfectly suitable for initial bases. - Once you have created an account, log in to your New Relic dashboard **Step 2: Monitoring Method** - Navigate to the **Integrations & Agents** section from the left sidebar. - Select **PHP** as a **Data source.** ![New Relic Monitoring - select distribution](https://serveravatar.com/wp-content/uploads/2025/12/image-131-1024x398.png) - You need to select your data collection method. Select **On a host (tar archive)** option from the given to monitor your server. ![New Relic Monitoring - select option](https://serveravatar.com/wp-content/uploads/2025/12/image-132-1024x395.png) **Step 3: Enter Credentials** - Here, you have to provide your user and license key. These keys will link your monitoring agent with your account. - If you already have one, enter it in the given field by selecting **Use an existing Key**. Let’s create a new one if you don’t have it. - Click on the **Create a new key** buttonin **license key** and **user key** section, and it will generate a key for you. - Once it is generated, copy your license and user key. This license key is what connects your Linux server to your New Relic account. Keep it safe, as you’ll need it during configuration. - Click on the **Continue** button. ![New Relic Monitoring - enter credentials](https://serveravatar.com/wp-content/uploads/2025/12/image-133-1024x800.png) **Step 4: Check Prerequisites** - Verify the installed PHP version on your server. - You can directly run the given command to check your PHP version and compatibility. ``` php --version ``` ``` php --version ``` - After checking the PHP version, click on **Continue.** ![New Relic Monitoring - check Prerequisites ](https://serveravatar.com/wp-content/uploads/2025/12/image-134-1024x393.png) **Step 5: Download the Tar Distribution** - Copy the given command and run it in your terminal. - The file will be named something like newrelic-php5-X.X.X.X-linux.tar.gz. - Enter the file’s name in the field below. It will automatically generate a command that you can run on your server to download the file. - Once the script is generated, download the tar file by copying the given command and pasting it into the terminal. ![New Relic Monitoring - download tar distribution](https://serveravatar.com/wp-content/uploads/2025/12/image-135-1024x530.png) **Step 6: Install or update the PHP Agent** Once the download is complete, execute the given commands to; - Decompress the downloaded tar archive. - Change the directory to the newly created folder. ![New Relic Monitoring - install php agent](https://serveravatar.com/wp-content/uploads/2025/12/image-136-1024x467.png) **Step 7: Configure the PHP Agent** To connect your application with New Relic, you must configure the agent: 1. **Name your application:** Enter the name of your web application. It will automatically find the correct php-fpm process. 2. **Configure the agent:** Run the given script with your application name. Click on the **Continue** button. ![New Relic Monitoring - configure the php agent](https://serveravatar.com/wp-content/uploads/2025/12/image-137-1024x412.png) [![Blog banner - ServerAvatar](https://serveravatar.com/wp-content/uploads/2025/09/728_90-Banner-1-1024x127.png)](https://serveravatar.com/?ref=blog)**Step 8: Restart Your Application** You have to restart your web server services for the configuration changes to take effect. 1. **Restart your services:** Use the appropriate command from given below for your server, for instance; **php-fpm:** sudo service php-fpm restart – **Apache (Ubuntu/Debian):** sudo service apache2 restart – **Apache (RHEL):** sudo service httpd restart – **Nginx:** sudo service nginx restart 2. **Send data to New Relic:** To initialize the agent and make sure it starts sending data, run the command below: php -r ‘phpinfo(INFO\_GENERAL);’ 3. Click on the **Continue** button.[](https://storage.3.basecamp.com/5840738/blobs/e64f062a-e0a8-11f0-9db2-0242ac120003/download/image.png) ![New Relic Monitoring - restart your application](https://serveravatar.com/wp-content/uploads/2025/12/image-138-1024x422.png) You can also connect the logs and infrastructure metrics to get a view of your server. Run the given command to install the required components. This is an optional step, you can skip it if you want. ![New Relic Monitoring - optional step](https://serveravatar.com/wp-content/uploads/2025/12/image-139-1024x330.png) **Step 9: Test the Connection** Just click on the **Test connection** button. - After completing the steps for installation and configuration, let’s now test the connection to check that the agents are reporting correctly to New Relic or not. - The status for the PHP agent will show a **successful** status, which indicates that the agent is installed correctly. - Just click on the **Test connection** button. ![New Relic Monitoring - configuration test ](https://serveravatar.com/wp-content/uploads/2025/12/image-143-1024x525.png) **New Relic Dashboard** It’s done! Your New Relic account is now ready to collect the data from your server and monitor your server. You can see your server metrics in the New Relic dashboard. You can track your web application’s metrics in the “APM & Services” section. You can monitor error rates, logs, and set alerts to notify you of any failure. You can also monitor your website’s core web vitals using Browser monitoring. ![New Relic Monitoring Dashboard ](https://serveravatar.com/wp-content/uploads/2025/12/image-142.png) Using New Relic on your Linux server gives you clear visibility into how your infrastructure behaves under real-world workloads. Once installed, you can monitor critical system metrics such as CPU load, memory usage, disk activity, and network performance, helping you spot issues early and make informed optimization decisions. ## **Conclusion** Monitoring a Linux server is no longer optional if you want reliable performance and minimal downtime. With New Relic, you gain real-time visibility into how your server and applications behave under real workloads. From tracking CPU and memory usage to identifying slow transactions and application errors, New Relic helps you understand what’s happening on your server before issues turn into serious problems. By following the steps outlined in this guide, you can install and configure New Relic on your Linux server with confidence. Once set up, the New Relic dashboard becomes a powerful tool for performance analysis, troubleshooting, and long-term optimization. ## FAQs ### **1. How long does it take for data to appear in the New Relic dashboard?** In most cases, data starts appearing within a few minutes after installation and service restart. Sometimes it may take slightly longer during the initial setup ### **2. What is New Relic used for on a Linux server?** New Relic is used to monitor server performance and application behavior. It helps track CPU usage, memory consumption, disk activity, network traffic, errors, and response times in real time. ### **3. Which Linux distributions are supported by New Relic?** New Relic supports most popular Linux distributions, including Ubuntu, Debian, CentOS, Rocky Linux, AlmaLinux, and RHEL-based systems. ### **4. Can I monitor PHP applications with New Relic?** Yes, New Relic provides a PHP agent that allows you to monitor PHP applications, track response times, errors, slow transactions, and overall application performance. ### **5. Do I need to restart my web server after installing New Relic?** Yes, restarting services like PHP-FPM, Apache, or Nginx is required so that the New Relic agent can load properly and start sending data. ## Stop Wasting Time on Servers. Start Building Instead. You didn’t start your project to babysit servers. Let **ServerAvatar** handle deployment, monitoring, and backups — so you can focus on growth. Deploy **WordPress, Laravel, N8N**, and more in minutes. No DevOps required. No command line. No stress. [ 🚀 Try Free ](https://app.serveravatar.com) [ 🌐 Learn More ](https://serveravatar.com/) Trusted by 10,000+ developers and growing. **Categories:** Blog, Guide, Linux, Others, Tutorials, Ubuntu **Tags:** Install New Relic on Linux, Linux, Linux Server Monitoring, monitoring, New Relic Linux, New Relic Monitoring --- ### [n8n vs Make vs Zapier: Pick the Right Automation Tool](https://serveravatar.com/n8n-vs-make-vs-zapier-automation-tool/) **Published:** December 23, 2025 **Author:** Meghna Meghwani **Content:** [![Blog banner - ServerAvatar](https://serveravatar.com/wp-content/uploads/2025/09/728_90-Banner-3-1024x127.png)](https://serveravatar.com/?ref=blog)Automation sounds like a big, fancy word, right? But in real life, it’s just about saving time and avoiding repetitive work. Imagine having a personal assistant who never gets tired and handles boring tasks for you. That’s exactly what automation tools do, and this is where the comparison of n8n vs Make vs Zapier becomes important when choosing the right tool for your workflow. From sending emails to syncing data between apps, automation tools help reduce manual effort and save time. You no longer need to copy and paste information or repeat the same steps again and again. Among the many automation platforms available, n8n, Make, and Zapier are three of the most talked-about options. Each one helps connect apps and automate workflows, but they are designed for different types of users and different levels of complexity. This article explains n8n vs Make vs Zapier in simple language. You’ll learn how each tool works, what makes them different, and which one is best suited for your needs. No technical overload, no confusing examples, just clear and honest information. ## What Is Automation and Why It Matters Automation is simply letting software do repetitive tasks for you. For example, when someone fills out a form on your website, and their details automatically go into a spreadsheet, that’s automation. Automation tools are widely used by individuals, startups, and businesses to improve efficiency. Instead of relying on manual processes, automation helps reduce errors, improve consistency, and free up time for more meaningful work. For businesses, freelancers, and even individuals, automation saves time, reduces errors, and boosts productivity. ## What Is n8n? [n8n](https://n8n.io/) is an open-source automation platform that focuses on flexibility and data control, giving users full ownership of their workflows. It can be self-hosted, which means users can run it on their own servers. ![n8n vs Make vs Zapier - n8n](https://serveravatar.com/wp-content/uploads/2025/12/image-125-1024x495.png) **Key characteristics** - Open-source and self-hosted - Advanced workflow logic and scripting - Strong developer support - No task-based pricing limits - Developer-friendly **Pros** - Open-source and self-hosted option - Full control over data and privacy - No task-based pricing limits - Highly customizable with advanced logic - Good for complex automation needs **Cons** - Steeper learning curve - Set up and maintenance required - Fewer native app integrations - Best use often requires some technical skills n8n is powerful, flexible, and cost-effective for long-term use, but it has a learning curve. It is ideal for users who want full ownership of their automation environment. ## n8n on ServerAvatar: One-Click Setup Without the Complexity ### What is ServerAvatar? [ServerAvatar](https://serveravatar.com/) is a platform designed to simplify the hosting and management of servers and applications. It simplifies the process of deploying and managing PHP and Node.js based web applications on servers. ![ServerAvatar Dashboard](https://serveravatar.com/wp-content/uploads/2025/12/image-126.png) While **n8n** is powerful and flexible, setting it up manually can feel overwhelming for many users. Installing dependencies, configuring the server, and managing updates often require technical experience. This is where **ServerAvatar makes things much easier**. **ServerAvatar provides a one-click application installer for n8n**, allowing you to deploy n8n on your server in just a few minutes, without manual configuration or complex commands. ![ServerAvatar one click app installer](https://serveravatar.com/wp-content/uploads/2025/12/image-127-1024x825.png) > Please note that to install the Node.js applications (N8N), you must have the MERN stack installed on your Server. ## How ServerAvatar Simplifies n8n Deployment With ServerAvatar, you don’t need to worry about server setup or application installation details. Everything is handled through a clean and user-friendly dashboard. **Key benefits of using n8n with ServerAvatar:** - One-click application installation of n8n - No manual server configuration required - Faster setup compared to traditional self-hosting - Easy management from a single dashboard - Ideal for users who want control without complexity ServerAvatar bridges the gap between powerful self-hosted automation and ease of use, making n8n accessible to a wider audience. ### Why Should You Use n8n with ServerAvatar? Using n8n on ServerAvatar is a great choice if: - You want the flexibility and data control of n8n - You prefer a quick and hassle-free setup - You don’t want to manage server-level configurations manually - You are looking for a scalable automation setup By combining n8n’s advanced automation capabilities with ServerAvatar’s one-click installer, users get the best of both worlds: control, performance, and simplicity. ## What Is Make? [Make](https://www.make.com/en), previously known as Integromat, offers a more visual and detailed approach to automation. Instead of basic steps, it allows users to design multi-step workflows with conditions and logic. Instead of simple one-step actions, Make lets you build visual workflows with branches, filters, and conditions. You can literally see how data moves. ![n8n vs Make vs Zapier - Make](https://serveravatar.com/wp-content/uploads/2025/12/image-128-1024x456.png) **Key characteristics** - Visual automation builder - More complex workflows - Better value for advanced users - Strong error handling **Pros** - Visual workflow builder - Strong automation logic and conditions - More affordable than Zapier for many users - Handles complex workflows well - Good balance of power and usability **Cons** - Learning curve higher than Zapier - Fewer app integrations than Zapier - Interface may feel overwhelming at first - Some advanced features require time to master Make is often chosen by users who want more control without needing to write code. Make is ideal if you like seeing the big picture and want more power without coding. ## What Is Zapier? [Zapier](https://zapier.com/) is a very popular automation tool. It is a simple, polished, and widely used automation tool. Zapier connects thousands of apps like Gmail, Slack, Google Sheets, and Trello. You create “Zaps,” which are simple rules like: When X happens, do Y. ![n8n vs Make vs Zapier - Zapier](https://serveravatar.com/wp-content/uploads/2025/12/image-129-1024x448.png) **Key characteristics** - Very easy to use - No coding needed - Huge app library - Great for beginners **Pros** - Very easy to use - Beginner-friendly interface - Large library of app integrations - No coding needed - Quick setup for basic automations **Cons** - Can get expensive with high usage - Limited advanced logic and branching - Less flexible for complex workflows - Data processed on Zapier’s servers Zapier focuses on accessibility and speed, making it a popular choice for beginners. It is perfect if you want something that “just works” without much setup. [![Blog banner - ServerAvatar](https://serveravatar.com/wp-content/uploads/2025/09/728_90-Banner-1-1024x127.png)](https://serveravatar.com/?ref=blog)## Automation Tools Comparison: n8n vs Make vs Zapier **Feature****n8n****Make****Zapier****Ease of Use**ModerateEasyVery Easy**Beginner Friendly**NoModeratelyYes**Visual Workflow Builder**BasicYesNo**Advanced Logic & Conditions**StrongStrongLimited**Customization**Very HighHighLow**Coding Support**YesLimitedNo**App Integrations**ModerateHighVery High**Self-Hosting Option**YesNoNo**Data Control & Privacy**Full ControlPartialPartial**Scalability**ExcellentGoodLimited**Pricing Flexibility**Very HighHighExpensive**Best For**DevelopersPower UsersBeginners### User Interface and Ease of Use Ease of use plays a major role when choosing an automation tool. - **n8n** has a functional interface but requires technical familiarity - **Make** provides a visual editor that may take time to understand - **Zapier** offers a clean and straightforward interface ### Workflow Complexity and Control Different automation tools support different levels of complexity. - **n8n** supports advanced logic, loops, and custom scripts - **Make** supports branching, conditions, and multiple actions - **Zapier** supports simple linear workflows If you need advanced automation logic, n8n offers the highest level of control. ### Flexibility and Customization Here’s where differences really show. - **n8n:** Maximum flexibility with code and logic - **Make:** High flexibility with visual flows - **Zapier:** Limited flexibility If you want simplicity, Zapier works well. If you need maximum control and flexibility, n8n stands out. ### Pricing and Cost Structure Pricing models vary significantly between the three platforms. **n8n:** - Free when self-hosted - Paid plans for the hosted cloud version **Make:** - More affordable pricing tiers - Charges based on operations **Zapier:** - Free plan with limited tasks - Pricing increases with task usage For long-term and high-volume automation, n8n can be the most cost-effective. ### Performance and Scalability Performance depends on workload and infrastructure. - n8n scales effectively when hosted on dedicated servers - Make handles complex workflows efficiently - Zapier works well for lightweight automation For enterprise-level or high-volume automation, n8n provides strong scalability options. ### Learning Curve Comparison Each tool has a different learning curve. - **n8n:** Higher learning curve - **Make:** Moderate learning curve - **Zapier:** Very low learning curve Users should choose based on how much time they can invest in learning the tool. ### Real-Life Use Case Comparison **Scenario:** You want to collect leads from a form and send them to CRM, email tool, and Slack. - **n8n:** 30+ minutes but fully customizable - **Make:** 20 minutes with better control - **Zapier:** 10 minutes setup ## Which One Should You Pick? There’s no single “best” tool, only the right tool for you. - Choose n8n if you want freedom, privacy, and scalability - Choose Make if you want visual control and better pricing - Choose Zapier if you want speed and simplicity Your choice depends on your skills, budget, and long-term goals. ## FAQs ### **1. Which automation tool is best for beginners?** Zapier is the most beginner-friendly option due to its simple interface, easy setup, and no-code approach. ### **2. Is n8n better than Zapier?** n8n offers more flexibility, control, and cost efficiency for advanced users, while Zapier is better suited for quick and simple automation needs. ### **3. Do I need technical skills to use n8n?** Basic workflows can be created without coding, but advanced automation in n8n benefits from some technical knowledge. ### **4. How does ServerAvatar help with n8n?** ServerAvatar provides a one-click application installer for n8n, making it easy to deploy and manage n8n without manual server configuration. ### **5. Can I switch from Zapier or Make to n8n later?** Yes, many users start with Zapier or Make and move to n8n as their automation needs grow and require more control and scalability. ## Conclusion Choosing the right automation tool comes down to understanding your needs, skills, and long-term goals. n8n, Make, and Zapier all help automate repetitive tasks, but they serve different types of users. If you value full control, data privacy, and scalability, n8n is a strong choice, especially when paired with ServerAvatar’s one-click n8n installer, which removes much of the setup complexity. If you want a visual and structured approach with powerful workflow logic but without coding, Make offers a solid middle ground. And if your priority is simplicity and speed, Zapier remains the easiest option to get started with. There is no one-size-fits-all solution. The best automation tool is the one that aligns with your technical comfort level, budget, and automation requirements. By understanding the strengths and limitations of each platform, you can confidently choose the tool that helps you work smarter and more efficiently.[](https://3.basecamp.com/5840738/buckets/41514807/boosts/new?boost%5Bboostable_gid%5D=Z2lkOi8vYmMzL1JlY29yZGluZy85NDEwMDI4MjQy) **Categories:** Blog, Guide, Tutorials **Tags:** Automation Tools, automation tools comparison, make, Make vs Zapier, n8n, n8n vs Make, n8n vs Make vs Zapier, n8n vs Zapier, zapier --- ### [Improve WordPress Performance with Preloading Tricks](https://serveravatar.com/improve-wordpress-performance-with-preloading-tricks/) **Published:** December 22, 2025 **Author:** Meghna Meghwani **Content:** [![Blog banner - ServerAvatar](https://serveravatar.com/wp-content/uploads/2025/09/728_90-Banner-3-1024x127.png)](https://serveravatar.com/?ref=blog)Have you ever opened a WordPress website and felt like it was thinking way too long before showing anything? We’ve all been there. Slow websites will push your visitors away. The good news? You don’t need to be a developer or spend hours tweaking code to improve WordPress performance quickly and effectively. One of the fastest and most underrated ways to improve WordPress performance is preloading. Think of it like laying out your clothes the night before a big day, everything is ready when you need it. In this guide, we’ll break down preloading tricks in plain English and show you how to speed up your WordPress site quickly and safely. ## How To Install WordPress Easily If you’re planning to install a WordPress website without any hassles on a reliable server. **ServerAvatar** makes this process incredibly smooth, even if you’re not very technical. It takes care of the heavy lifting, so you can focus on building your websites rather than fighting with server commands. ### What is ServerAvatar? [ServerAvatar](https://serveravatar.com/) is a platform to simplify the hosting and management of servers and applications. It simplifies the process of deploying and managing PHP and Node.js based web applications on servers. ![ServerAvatar Dashboard](https://serveravatar.com/wp-content/uploads/2025/12/image-119.png) You can easily set up WordPress in just a few minutes using ServerAvatar’s one-click application installer. With ServerAvatar’s one-click application installer, you can easily install WordPress, Mautic, N8N, Uptime Kuma, and many more popular applications within a few minutes. Follow this step-by-step guide to install WordPress quickly on your VPS: ## What Does WordPress Performance Really Mean? WordPress performance is all about how fast and smoothly your website loads and responds. This includes page load time, how quickly content appears, and how responsive your site feels when someone clicks or scrolls. A high-performing WordPress site feels effortless. Pages open quickly, images appear smoothly, and visitors don’t feel any delay. Preloading plays a key role in making that happen. ![Improve WordPress Performance ](https://serveravatar.com/wp-content/uploads/2025/12/image-120.png) ### Why Website Speed Matters More Than Ever Website speed has become essential, not optional. A fast-loading site keeps visitors engaged, helps search engines rank your pages higher, and increases the chances that users take action instead of leaving. Just like no one waits for a slow store entrance, users won’t wait for a slow website either. - **User experience:** Visitors will be happy and kept engaged with Faster pages. - **Search engine rankings:** Search engines prefer and rank faster websites higher. - **Conversion rates:** Speed makes users to take actions like sign-ups or purchases. - **Bounce rates:** Slow loading causes visitors to leave without exploring. ## What Is Preloading in WordPress? Preloading means loading the content before a visitor actually needs it. Instead of waiting for someone to click a page or scroll down, WordPress preloading prepares pages, images, fonts, or links in advance. So when a visitor asks for something, it’s already waiting, like a hot cup of coffee ready before you wake up. ### How Preloading Improves WordPress Performance Preloading improves WordPress performance by preparing important pages and resources before visitors request them. This reduces waiting time, avoids delays during first visits, and makes your website feel faster and smoother. Even if the actual load time doesn’t change much, users notice the speed instantly. Preloading helps by: - **Reducing server response time:** Pages are served faster because content is already prepared. - **Making pages appear instantly:** Visitors see content almost immediately after clicking. - **Preventing delays caused by first-time loading:** Resources load in advance instead of at the moment of access. - **Improving perceived speed:** The website feels faster and more responsive to users. Even if your site isn’t technically faster, it *feels* faster, and that’s what matters to users. ### Types of Preloading to Improve WordPress Performance Preloading comes in different forms, and each one focuses on speeding up a specific part of your website. From loading full pages in advance to preparing images and fonts, these methods work together to reduce delays. When combined correctly, they create a smoother and more seamless browsing experience. The most common types include: - **Page preloading:** Loads entire pages in advance for faster access. - **Link preloading:** Prepares linked pages before users click them. - **Font preloading:** Making sure that the text styles load quickly. - **Image preloading:** Displays important images faster when pages load. - **Cache preloading:** Builds cached versions of pages ahead of time. Each type serves a different purpose, and when used together, they create a smooth browsing experience. ## What is Page Preloading? Page preloading works by saving ready-to-use versions of your website pages before visitors arrive. Instead of building a page at the moment of the request, WordPress instantly serves a cached copy, which reduces load time. ![Improve WordPress Performance - Page Preloading](https://serveravatar.com/wp-content/uploads/2025/12/image-121.png) This method is especially useful for pages that get frequent traffic. So instead of generating a page on the spot, WordPress serves a ready-made version. This is especially helpful for: - **Homepages:** Loads the main page quickly for first-time visitors. - **Popular blog posts:** Deliver fast access to frequently read content. - **Landing pages:** Improves speed for conversion-focused pages. ### Browser Preloading vs Server-Side Preloading Let’s keep this simple: - **Browser preloading** tells the visitor’s browser what to load early (like links or fonts). - **Server-side preloading** prepares cached pages on your server before requests arrive. Both work together. One helps the browser, the other helps your server. Combined, they make your site feel lightning fast. ### Preloading with WordPress Caching Plugins Browser preloading and server-side preloading focus on speeding up different parts of your website. Browser preloading helps the user’s device load important files earlier, while server-side preloading ensures pages are already prepared on the server. When used together, they significantly reduce waiting time and improve overall site speed. Most plugins allow you to: - Preload all pages automatically - Preload based on sitemap - Schedule cache preloading Once enabled, your site quietly works in the background to stay fast. ## Understanding Link Preloading Link preloading works by preparing a page as soon as a user hovers over a link. By the time the link is clicked, much of the page is already loaded, which reduces waiting time. This technique is especially effective for navigation menus and internal links. [](https://storage.3.basecamp.com/5840738/blobs/dde908ea-df0a-11f0-9c90-0242ac120003/download/image.png) ![Improve WordPress Performance - Link Preloading](https://serveravatar.com/wp-content/uploads/2025/12/image-122.png) It’s subtle, but powerful. Visitors don’t notice the trick, they just feel the speed. - **Hover-based loading:** Starts loading pages before the actual click happens. - **Faster navigation:** Makes menus and internal links feel instant. ## Image and Font Preloading Image and font preloading focuses on loading the most important visual elements early so pages appear complete faster. By prioritizing key images and fonts, your website avoids layout shifts and blank spaces during loading. When done carefully, it improves speed without overloading the browser. ![Improve WordPress Performance - Image and Font Preloading](https://serveravatar.com/wp-content/uploads/2025/12/image-123.png) **Best practices include:** - **Preload only critical images:** Loads key visuals like hero images first. - **Preload custom fonts used above the fold:** Ensures important text styles appear instantly. - **Avoid preloading too many files at once:** Prevents performance issues by avoiding excess files. Less is more here. Smart preloading beats aggressive preloading every time. ## Understanding Cache Preloading Cache preloading creates ready-made versions of your website pages and stores them before visitors arrive. This allows WordPress to serve pages instantly instead of generating them on demand. As a result, your site stays fast even during high traffic or first-time visits. - **Pre-built cached pages:** Pages are generated in advance for quicker delivery. - **Consistent performance:** Maintains speed even when traffic increases. ![Improve WordPress Performance - Cache Preloading](https://serveravatar.com/wp-content/uploads/2025/12/image-124.png) ## Common Preloading Mistakes to Avoid Preloading can significantly improve performance, but using it without balance may cause more harm than good. Loading too many resources at once can strain the server and slow down real user requests. Smart, selective preloading always delivers better results than loading everything blindly. Avoid these mistakes: - **Preloading every single page:** Wastes resources on pages users may never visit. - **Preloading heavy images unnecessarily:** Increases load time by prioritizing large files unnecessarily. - **Ignoring mobile users:** Can hurt performance on slower mobile networks. - **Using multiple plugins that conflict:** Multiple tools may clash and reduce overall speed. [![Blog banner - ServerAvatar](https://serveravatar.com/wp-content/uploads/2025/09/728_90-Banner-1-1024x127.png)](https://serveravatar.com/?ref=blog)## How Preloading Affects SEO and Core Web Vitals Preloading plays an important role in improving SEO by making websites load faster and feel more responsive. By preparing key resources in advance, it helps search engines see your site as user-friendly and performance-focused. A smoother experience often leads to stronger visibility in search results. Preloading helps improve: - **Largest Contentful Paint (LCP):** Helps main page content appear faster. - **First Input Delay (FID):** Improves responsiveness when users interact with the page. - **Time to First Byte (TTFB):** Reduces the time taken to receive the first server response. These signals tell search engines your site offers a good experience. Better experience often means better rankings. ## Test Performance After Preloading Once preloading is enabled, testing performance helps confirm whether the changes are actually working. Performance tools show how quickly pages load, how responsive the server is, and whether user experience has improved. Comparing results before and after preloading gives you clear, reliable insights. Look for: - **Faster load times:** Confirms that pages open more quickly for visitors - **Improved performance scores:** Reflect better optimization and user experience. - **Reduced server response:** Indicates faster delivery of page content. Always test before and after changes to see the real impact. ## When Preloading Is Not a Good Idea Preloading is useful, but it’s not required for every website. Small or frequently updated sites may not benefit from loading pages in advance, especially if server resources are limited. In such cases, selective preloading provides better control and efficiency. You may skip it if: - **Your site is very small:** Preloading may offer little noticeable benefit. - **Pages change constantly:** Cached content may become outdated quickly. - **Server resources are limited:** Excess preloading can increase server load. In these cases, selective preloading works better than full-site preloading. ## Final Tips to Improve WordPress Performance Fast For the best performance, preloading should be combined with other speed optimization practices. A lightweight theme, optimized images, and regular monitoring help maintain consistent results. When used as part of a complete strategy, preloading delivers long-term speed improvements. To get the best results: - **Combine preloading with caching:** Creates faster and more reliable page loading. - **Keep your theme lightweight:** Reduces unnecessary load on your site. - **Optimize images regularly:** Keeps pages fast and visually clean. - **Monitor performance monthly:** Helps catch speed issues early. Preloading is powerful, but it works best as part of a bigger speed strategy. ## FAQs ### **1. Does preloading really improve WordPress performance?** Preloading reduces waiting time and makes pages feel faster by serving prepared content instead of generating it on demand. ### **2. Is preloading suitable for beginners?** Absolutely. Most WordPress caching plugins offer preloading options that can be enabled without any technical knowledge. ### **3. Can preloading negatively affect my website speed?** If overused, preloading can strain server resources. That’s why selective and smart preloading is recommended. ### **4. Does link preloading work on all browsers?** Most modern browsers support link preloading, but its effectiveness may vary depending on browser behavior and settings. ### **5. When should I avoid using preloading?** Preloading may not be ideal for very small sites, frequently changing pages, or servers with limited resources. ### **6. How can ServerAvatar help with WordPress performance?** ServerAvatar simplifies WordPress installation, server management, and performance optimization, making it easier to maintain a fast and reliable website. ## Conclusion Improving WordPress performance doesn’t have to be complicated or technical. Preloading offers a smart and effective way to make your website feel faster by preparing important pages and resources in advance. When combined with caching, image optimization, and a lightweight setup, preloading helps deliver a smoother experience that visitors and search engines both appreciate. The key is balance, preload what matters most, avoid unnecessary resources, and regularly test performance. With the right approach and tools like ServerAvatar to simplify WordPress setup and server management, you can build a fast, reliable website that keeps users engaged and coming back. [](https://3.basecamp.com/5840738/buckets/41514807/boosts/new?boost%5Bboostable_gid%5D=Z2lkOi8vYmMzL1JlY29yZGluZy85NDA1NjI0NDY5) **Categories:** Blog, Guide, WordPress **Tags:** caching, Improve WordPress Performance, Preloading, Website Performance, Wordpress, WordPress performance, WordPress Tips --- ### [How to Monitor Essential Linux Logs for System Health](https://serveravatar.com/monitor-linux-logs-for-system-health/) **Published:** December 20, 2025 **Author:** Meghna Meghwani **Content:** [![Blog banner - ServerAvatar](https://serveravatar.com/wp-content/uploads/2025/09/728_90-Banner-3-1024x127.png)](https://serveravatar.com/?ref=blog)Keeping a Linux system stable, secure, and high-performing requires more than just installing updates or restarting services when something breaks. One of the most reliable ways to understand what’s really happening on a server is by monitoring Linux logs. Linux logs record system activity, warnings, errors, and important events that directly affect server health. Whether you manage a production server, host websites, or maintain multiple applications, learning how to monitor essential Linux logs for system health helps you detect problems early, troubleshoot faster, and maintain long-term stability. In this guide, we’ll explain Linux log monitoring in simple terms and also show how ServerAvatar makes log monitoring easier, faster, and more accessible, without relying heavily on complex command-line workflows. ## What Are Linux Logs? Linux logs are files that record activities and events happening on a system. These events include system startups, service actions, login attempts, application errors, and hardware-related messages. Each log entry usually contains: - **Date and time:** Shows exactly when the event occurred, helping you track issues in the correct sequence. - **Source of the event:** Identifies which system component, service, or application generated the log entry. - **Description of what happened:** Provides details about the action, warning, or error recorded by the system. By reviewing these records, administrators can understand how the system behaves over time and respond quickly when something goes wrong. Logs act as a continuous activity record that helps diagnose issues and maintain system reliability. ![Linux Logs](https://serveravatar.com/wp-content/uploads/2025/12/image-116.png) ### Why Monitoring Linux Logs Is Important Monitoring Linux logs is essential for maintaining a healthy server environment. Logs provide visibility into issues that may not be immediately noticeable. Regular log monitoring helps you: - **Identify system issues before they grow:** Helps catch small problems early before they turn into major system failures. - **Detect security threats early:** Allows you to spot suspicious activity and prevent unauthorized access in time. - **Troubleshoot errors efficiently:** Makes it easier to find the root cause of issues and fix them quickly. - **Ensure services and applications run smoothly:** Helps confirm that all critical services are running as expected without interruptions. Without log monitoring, problems may remain hidden until they cause downtime or data loss. Regular checks provide visibility into system health and stability. ### Where Linux Logs Are Stored Most Linux distributions store logs in the **/var/log** directory. This directory contains multiple log files, each serving a specific purpose. Some logs are plain text files, while others are managed by system services like systemd. Knowing where logs are stored makes it easier to locate the information you need. ## Essential Linux Logs You Should Monitor Not all logs require constant attention. Focus on these essential categories: - **System logs:** Record overall system activity, including startups, shutdowns, and general errors. - **Authentication logs:** Track user login attempts and access-related events for security monitoring. - **Kernel logs:** Provide details about core system operations, hardware interactions, and critical errors. - **Application logs:** Capture errors and activity generated by individual applications and software services. - **Service logs:** Show the status and behavior of background services running on the system. Together, these logs provide a complete overview of system activity and health. ### System Logs Explained System logs record general system activity and are often the first place to check during troubleshooting. Common system log files include: - /var/log/syslog - /var/log/messages They contain information about: - **System startups and shutdowns:** Record when the system boots up or powers down, including any related issues. - **Service status changes:** Show when services start, stop, restart, or fail during operation. - **Background task errors:** Capture errors from scheduled or automated tasks running in the background. Regular review of system logs helps you spot recurring issues and performance concerns. ### Authentication Logs and Security Monitoring Authentication logs track login-related activity and user access, making them critical for security monitoring. Common authentication log files include: - /var/log/auth.log - /var/log/secure These logs record: - **Successful and failed login attempts:** Show which login attempts worked and which were denied. - **SSH access activity:** Records remote access attempts made through SSH connections. - **Password and authentication errors:** Capture issues related to incorrect credentials or authentication failures. Monitoring authentication logs is essential for identifying unauthorized access attempts and maintaining system security. ### Kernel Logs and Hardware Issues Kernel logs provide insight into the core operations of the Linux system. They reveal how the system interacts with hardware and critical resources. Kernel logs report: - **Hardware detection:** Shows when the system detects and initializes connected hardware components. - **Driver issues:** Records problems related to device drivers not loading or functioning correctly. - **Memory warnings:** Alerts you to potential issues with system memory usage or allocation. - **Disk and filesystem errors:** Capture problems related to storage devices and file system integrity. Kernel logs can be viewed in: - /var/log/kern.log - Output of the dmesg command These logs are especially useful when troubleshooting system crashes or hardware-related problems. ### Application Logs and Their Role Applications generate their own logs to record errors, warnings, and activity. Common examples include: - **Web server logs:** Record incoming requests, responses, and errors handled by the web server. - **Database logs:** Capture database activity, queries, errors, and performance-related events. - **Custom application logs:** Store application-specific events, errors, and operational messages. These logs are often located in subdirectories under /var/log. Reviewing application logs helps diagnose performance issues, configuration errors, and failed requests. ### Service Logs for Background Processes Services run continuously in the background and play a major role in system functionality. Service logs help identify: - **Failed service startups:** Show when a service is unable to start due to configuration or dependency issues. - **Unexpected crashes:** Record services that stop suddenly during normal operation. - **Restart loops:** Indicate services that repeatedly restart after failing to run properly. Monitoring service logs ensures critical services remain operational and stable. ## Basic Commands to View Linux Logs Linux provides simple commands for viewing logs: - **cat:** Displays the entire file - **less:** Allows scrolling through large files - **tail:** Shows the latest entries - **head:** Displays the first lines Example: ``` tail -n 50 /var/log/syslog ``` ``` tail -n 50 /var/log/syslog ``` This command shows the most recent log entries, which are often the most relevant. ### Using journalctl on Modern Linux Systems Modern Linux distributions use **systemd** to manage logs. The **journalctl** command allows you to: - **View system logs:** Displays detailed system activity and events managed by systemd. - **Filter logs by service or time:** Allows you to narrow down logs for specific services or time ranges. - **Check logs from previous boots:** Helps review system events from earlier restarts or crashes. Example: ``` journalctl -xe ``` ``` journalctl -xe ``` This command displays detailed logs, making it easier to locate errors and warnings. ### Monitoring Logs in Real Time Real-time log monitoring allows you to see events as they happen. Use: ``` tail -f /var/log/syslog ``` ``` tail -f /var/log/syslog ``` This is useful when testing configuration changes or restarting services, as it provides immediate feedback. ## Common Log Errors and Warnings While reviewing logs, watch for: - **Repeated error messages:** Indicate ongoing issues that require immediate investigation. - **Permission denied warnings:** Show access-related problems caused by incorrect permissions or ownership. - **Disk space alerts:** Warn when storage usage is nearing critical limits. - **Service failure messages:** Report services that failed to start or stopped unexpectedly. - **Authentication failures:** Highlight failed login attempts and potential security risks. Repeated or frequent messages usually indicate an underlying issue that requires attention. [![Blog banner - ServerAvatar](https://serveravatar.com/wp-content/uploads/2025/09/728_90-Banner-1-1024x127.png)](https://serveravatar.com/?ref=blog)## Challenges of Manual Linux Log Monitoring While command-line log monitoring is effective, it can become difficult as servers, applications, and services increase. Common challenges include: - **Logs spread across multiple directories:** Makes it harder to locate and review relevant log files. - **Difficulty tracking recurring issues:** Repeated problems can be missed without centralized visibility. - **Time-consuming manual checks:** Requires frequent command-line access and constant monitoring. - **Higher risk of missing critical errors:** Important warnings may go unnoticed during manual reviews. This is where a centralized server management platform becomes valuable. ## How ServerAvatar Simplifies Linux Log Monitoring ### What is ServerAvatar? [ServerAvatar](https://serveravatar.com/) is a modern platform to simplify the hosting and management of servers and applications, and Linux server monitoring, including log management. It simplifies the process of deploying and managing PHP and Node.js based web applications on servers. Instead of manually accessing log files and running commands, ServerAvatar provides a centralized dashboard where you can monitor critical server activities with ease. This approach reduces complexity while maintaining full visibility into system health. ![ServerAvatar Linux Logs](https://serveravatar.com/wp-content/uploads/2025/12/image-117-715x1024.png) ## Centralized Log Access with ServerAvatar One of the key benefits of ServerAvatar is centralized log visibility. With ServerAvatar, you can: - **Access essential system and service logs from a single dashboard:** View all important logs in one centralized dashboard without switching between directories or servers. - **Identify errors and warnings faster:** Quickly spot critical issues as they appear, helping you respond without delays. - **Reduce time spent navigating log directories:** Eliminates the need to manually search through multiple log locations on the server. Centralized access ensures important log entries are not overlooked, especially in busy or multi-server environments. ## Real-Time Log Monitoring Without Command-Line Dependency ServerAvatar allows users to monitor server activity without staying connected to the command line. Benefits include: - **Faster troubleshooting:** Helps locate and resolve issues quickly without manual log searching. - **Reduced reliance on SSH access:** Minimizes the need to log into servers repeatedly through the command line. - **Clear visibility during deployments and service restarts:** Allows you to monitor log activity in real time while changes are applied. This makes ServerAvatar suitable for both experienced administrators and users who prefer a more visual server management approach. ## Unlock ServerAvatar Log Monitoring Suite for Advanced Insights For users who need deeper visibility beyond basic log monitoring, ServerAvatar’s [Log Monitoring Suite](https://serveravatar.com/log-monitoring-suite/) offers advanced analytics that help you monitor, analyze, and optimize application performance from a single dashboard. ![Log monitoring suite for Linux Logs](https://serveravatar.com/wp-content/uploads/2025/12/image-118-845x1024.png) > **Note:** The Log Monitoring Suite is available for users on **Tier 3 and Tier 4 plans**. Make sure your plan includes this feature to access advanced log analytics. > > **What You Get with ServerAvatar Log Monitoring Suite** > View real-time traffic, error counts, and bandwidth usage in a single, easy-to-understand dashboard. > > - **Traffic Monitoring:** Track live requests, accessed URLs, and client IPs to understand how users interact with your application. > - **Bot Detection:** Identify and flag suspicious or automated activity that may impact performance or security. > - **Error Tracking:** Instantly detect application errors and analyze their source to reduce downtime and improve stability. > - **Bandwidth Monitoring:** Monitor bandwidth consumption to manage resource usage and prevent unexpected overages. > - **User-Agent Insights:** Identify browsers, devices, and platforms used by visitors to better understand user behavior. ## **Best Practices for Linux Log Monitoring** Follow these best practices: - **Monitor logs regularly:** Ensures issues are identified early before causing system disruption. - **Focus on critical log files:** Helps prioritize the most important information without unnecessary noise. - **Rotate logs to prevent disk usage issues:** Prevents logs from consuming excessive storage space. - **Keep records of recurring problems:** Makes it easier to recognize patterns and recurring system issues. - **Address root causes instead of temporary fixes:** Ensures long-term stability rather than short-term solutions. Consistent monitoring improves reliability and reduces unexpected failures. The ServerAvatar Log Monitoring Suite transforms raw log data into meaningful insights. Instead of manually reviewing log files, you gain a visual, structured view of application behavior, making it easier to: - Detect issues early - Optimize application performance - Improve security awareness - Make informed decisions using real-time data For growing applications and production environments, this advanced log monitoring capability ensures you stay in control at all times. ## Conclusion Monitoring Linux logs is a critical part of maintaining system health, performance, and security. Logs provide clear visibility into what is happening on your server, helping you detect issues early, understand system behavior, and resolve problems before they impact users or applications. While traditional command-line tools are effective, they can become difficult to manage as servers, applications, and services grow. This is where **ServerAvatar** adds real value. By offering centralized log access, real-time visibility, and advanced analytics through the Log Monitoring Suite, ServerAvatar simplifies Linux log monitoring without compromising control or insight. Whether you manage a single server or multiple production environments, combining Linux log monitoring best practices with ServerAvatar ensures a more stable, secure, and efficient server infrastructure. ## FAQs ### **1. Which Linux logs are most important to monitor for system health?** System logs, authentication logs, kernel logs, application logs, and service logs are the most important for understanding overall system health and performance. ### **2. How often should Linux logs be monitored?** Logs should be reviewed regularly, depending on the server’s usage. Production servers benefit from daily monitoring, while smaller setups can be checked weekly. ### **3. Can Linux log monitoring help improve server security?** Yes, monitoring authentication and system logs helps detect unauthorized access attempts, suspicious behavior, and security-related issues early. ### **4. Is manual log monitoring enough for production servers?** Manual monitoring works for smaller setups, but as servers grow, centralized tools like ServerAvatar make monitoring faster, more reliable, and less error-prone. ### **5. Who can use ServerAvatar’s Log Monitoring Suite?** The Log Monitoring Suite is available to **Tier 3 and Tier 4 ServerAvatar users** and provides advanced analytics such as traffic insights, error tracking, and bot detection. **Categories:** Blog, Guide, Linux, Tutorials, Ubuntu **Tags:** Linux, Linux log monitoring, Log monitoring, Monitor Linux logs, Server health monitoring, Server monitoring --- ### [ServerAvatar v7.15.3: Key Updates, Fixes, and Improvements](https://serveravatar.com/serveravatar-v7-15-3-updates-fixes-improvements/) **Published:** December 19, 2025 **Author:** Meghna Meghwani **Content:** [![Blog banner - ServerAvatar](https://serveravatar.com/wp-content/uploads/2025/09/728_90-Banner-3-1024x127.png)](https://serveravatar.com/?ref=blog)Hey there, ServerAvatar users and tech explorers! Keeping a server running and managing it smoothly can sometimes feel like a headache, but not with ServerAvatar. ServerAvatar v7.15.3 is now live with several important updates focused on improving control, flexibility, and overall user experience. This release brings enhancements to log monitoring, PHP management, SSL handling, UI usability, and application-level controls. The goal of this update is simple: make server and application management more reliable, more transparent, and easier to handle for users of all experience levels. In this blog, we’ll walk through every major feature, improvement, and fix included in ServerAvatar v7.15.3. This release is not about flashy changes alone, it’s about removing friction from daily server tasks and giving users more confidence and clarity. Whether you’re managing a single website or multiple applications, these updates are designed to make your life easier without adding complexity. Let’s walk through what’s new and why it matters to you. ## Overview of ServerAvatar v7.15.3 This release improves how users interact with servers and applications inside the ServerAvatar dashboard. The update adds better controls at the server level and application level, improves notifications, and refines the interface to reduce manual effort. The changes are especially helpful for users managing multiple applications or working with different PHP versions and monitoring setups. ## Feature Update Highlights ### 1. Log Monitoring Suite (InsightHub) Management Logs are like a server’s diary, they tell you exactly what happened and when. ServerAvatar now allows full control over the Insighthub Log Monitoring Suite. With this update, Insighthub log monitoring becomes far more flexible. You can now easily install, update, or remove Insighthub at: - Server level - Application level This means you’re no longer locked into a one-size-fits-all setup. You decide where deep monitoring is needed and where it’s not. **What’s new** Users can: - Install Insighthub at the server level - Install Insighthub at the application level - Update Insighthub when a new version is available - Remove Insighthub when monitoring is no longer needed **Why this matters** Previously, log monitoring options were more limited. With this update, users can choose exactly where detailed log tracking is required. This helps reduce unnecessary monitoring overhead and keeps logs focused on critical applications. **Manage Log Monitoring Suite** **1) **Install** **Log Monitoring Suit**e While Creating Application** - Navigate to the **Server Dashboard** for your preferred server - Click on the **Applications Section** from the left sidebar - Click on the **Create an Application** button, and fill up the required details - You will see the checkbox for installing Log Monitoring Suite for the application you are creating ![ServerAvatar v7.15.3 - install log monitoring suite ](https://serveravatar.com/wp-content/uploads/2025/12/image-110-1024x887.png) **2) Install Log Monitoring Suite** - Navigate to the **Server Dashboard** for your preferred server - Click on the **Applications Section** from the left sidebar - Navigate to the **Application Panel** for your preferred application by clicking on the Dashboard icon - Click on the **Log Monitoring Suite Section** from the left sidebar - Click on the **Install Now** button ![ServerAvatar v7.15.3 - install log monitoring suite ](https://serveravatar.com/wp-content/uploads/2025/12/image-91-1024x463.png) - Another option is to navigate to the **Settings** section and click on the **Install** button. ![ServerAvatar v7.15.3 - install log monitoring suite ](https://serveravatar.com/wp-content/uploads/2025/12/image-92-1024x271.png) **3) Update Log Monitoring Suite** - Navigate to the **Server Dashboard** for your preferred server - Click on the **Applications Section** from the left sidebar - Navigate to the **Application Panel** for your preferred application by clicking on the Dashboard icon - Click on the **Log Monitoring Suite Section** from the left sidebar - Navigate to the **Settings** section, and click on the **Update** button. ![ServerAvatar v7.15.3 - update log monitoring suite ](https://serveravatar.com/wp-content/uploads/2025/12/image-93-1024x288.png) **4) Remove Log Monitoring Suite** - Navigate to the **Server Dashboard** for your preferred server - Click on the **Applications Section** from the left sidebar - Navigate to the **Application Panel** for your preferred application by clicking on the Dashboard icon - Click on the **Log Monitoring Suite Section** from the left sidebar - Navigate to the **Settings** section, and click on the **Remove** button [](https://storage.3.basecamp.com/5840738/blobs/a53644e6-dcac-11f0-bae5-0242ac120002/download/image.png) ![ServerAvatar v7.15.3 - remove log monitoring suite](https://serveravatar.com/wp-content/uploads/2025/12/image-95-1024x288.png) **5) **Install** or Remove **Log Monitoring Suit**e For All Applications Directly From Server** - Navigate to the **Server Dashboard** for your preferred server - Navigate to the **Settings** section from the left-hand sidebar - Click on the Log Monitoring Suite Section from the Left-hand sidebar - Select the given checkbox to install Log Monitoring Suite on all the applications on the selected server, and click on the **Install** button ![ServerAvatar v7.15.3 - install log monitoirng suite](https://serveravatar.com/wp-content/uploads/2025/12/image-111-1024x359.png) - Click on the **Remove** button to remove the Log Monitoring Suite from all the applications on the selected server ![ServerAvatar v7.15.3 - remove log monitoring suite](https://serveravatar.com/wp-content/uploads/2025/12/image-112-1024x286.png) **Key benefit:** Better performance control with targeted monitoring. ### 2. Pro-active Site Monitoring Toggle (Premium Hosting Care) For users with a Premium Hosting Care Plan, managing Pro-active Site Monitoring is now easier than ever. It can now be managed directly from individual application settings. Additionally, when a user creates an application, a checkbox will appear to Enable Pro-active Site Monitoring. **What’s new** - Enable monitoring for a specific application - Disable monitoring when it is not required - Enable Pro-active Site Monitoring while creating an application **Why this matters** Not all applications need constant monitoring. This update allows users to apply monitoring only where it is useful, making alerts more relevant and reducing noise. > **Please Note:** This feature is available only to users who have purchased the Premium Hosting Care plan. **1) Enable Pro-active Site Monitoring While Creating Application** - Navigate to the **Server Dashboard** for your preferred server - Click on the **Applications Section** from the left sidebar - Click on the **Create an Application** button, and fill up the required details - You will see the checkbox for enabling Pro-active Site Monitoring for the application you are creating ![ServerAvatar v7.15.3 - enable pro-active site monitoring](https://serveravatar.com/wp-content/uploads/2025/12/image-96-1024x697.png) **2) Enable Pro-active Site Monitoring** - Navigate to the **Server Dashboard** for your preferred server - Click on the **Applications Section** from the left sidebar - Navigate to the **Application Panel** for your preferred application by clicking on the Dashboard icon - Click on the **Settings Section** from the left-hand sidebar, and find the Pro-active Site Monitoring section - Enable or Disable the **Toggle** for Pro-active Site Monitoring as per your requirement. ![ServerAvatar v7.15.3 - enable pro-active site monitoring ](https://serveravatar.com/wp-content/uploads/2025/12/image-97-1024x739.png) **Key benefit:** You stay informed without being overwhelmed by alerts. ### 3. PHP Extensions Management Managing PHP extensions used to feel like rearranging everything. Not anymore. ServerAvatar v7.15.3 improves PHP extension handling by making it more precise. **What’s new** Users can: - Install PHP extensions for specific PHP versions on the server - Remove PHP extensions for specific PHP versions on the server - Manage extensions for specific PHP versions **Why this matters** Different applications often require different PHP extensions. This update allows users to avoid conflicts by managing extensions separately for each PHP version installed on the server. **1) Manage PHP Extensions** - Navigate to the **Server Dashboard** for your preferred server - Navigate to the **Settings** section from the left-hand sidebar - Go to Manage PHP Extensions section from the left-hand sidebar - From here, you can easily **Install** or **Remove** the PHP extensions for a specific PHP version. You can also search for the particular PHP extension. ![ServerAvatar v7.15.3 - manage php extension](https://serveravatar.com/wp-content/uploads/2025/12/image-98-1024x571.png) **Key benefit:** Cleaner setups and fewer compatibility issues. ### 4. On-demand PHP Version Installation Missing a PHP version? No problem. ServerAvatar now allows manual installation of PHP versions directly from Server Services. You no longer need to wait or rely on pre-installed options. **What’s new** - Install PHP versions only when needed - No dependency on default or pre-installed versions **Why this matters** This gives users flexibility to test applications, prepare for upgrades, or support legacy apps without rebuilding servers or using workarounds. **1) Install PHP Version** - Navigate to the **Server Dashboard** for your preferred server - Navigate to the **Services** section from the left-hand sidebar - Install the required PHP Version by clicking on the install icon. ![ServerAvatar v7.15.3 - install PHP version](https://serveravatar.com/wp-content/uploads/2025/12/image-99-1024x822.png) **Key benefit:** Testing apps across versions or preparing for upgrades without downtime. ### 5. PHP 8.5 Support Staying updated is essential for performance and security. That’s why PHP 8.5 support is a big highlight in this release. **What’s new** - PHP 8.5 is available for installation on servers - Compatible one-click frameworks support PHP 8.5 **Why this matters** PHP 8.5 brings performance improvements and security updates. This ensures users can keep applications modern and ready for future updates. **1) To check out the PHP 8.5** - First, install the PHP 8.5 from the **S**erver Panel >> Settings section - Then, navigate to Applications section >> PHP Settings from your required application panel - Here you can see the PHP version 8.5 for your application, you can also change the PHP version for your application. ![ServerAvatar v7.15.3 - php 8.5 support](https://serveravatar.com/wp-content/uploads/2025/12/image-100-1024x345.png) **Key benefit:** Faster execution, better memory handling, and readiness for modern applications. ### 6. WordPress Search Indexing Option Not every website should be visible to search engines from day one. A new option to control search engine indexing has been added. **What’s new** - Checkbox to enable search engine indexing during WordPress application creation - Option to disable indexing at the time of setup **Why this matters** This helps users control website visibility from the start, especially for development or staging WordPress sites that should not appear in search engines. **1) Enable WordPress Search Indexing** - Navigate to the **Server Dashboard** for your preferred server - Click on the **Applications Section** from the left sidebar - Navigate to **Application Panel**, and click on the **Create an Application** button. - Fill in the required details, and select the application method as a **One Click** and **WordPress** as an application. - Select the given checkbox to enable Search Indexing from the **WordPress Search Indexing** section ![ServerAvatar v7.15.3 - enable wordpress search indexing](https://serveravatar.com/wp-content/uploads/2025/12/image-101-829x1024.png) **Key benefit:** Small change, big impact on SEO control. ### 7. SSL Renewal Failure Email Notifications SSL certificates are easy to forget until something breaks. ServerAvatar now sends email alerts when SSL renewal fails. **What’s new** - Automatic email notification on SSL renewal failure **Why this matters** SSL issues can cause browser warnings and trust problems. Early email alerts allow users to fix certificate issues before visitors are affected. **Key benefit:** This early warning system helps you fix issues before visitors see scary browser warnings. [![Blog banner - ServerAvatar](https://serveravatar.com/wp-content/uploads/2025/09/728_90-Banner-1-1024x127.png)](https://serveravatar.com/?ref=blog)### 8. Schedule Server Reboot at a Specific Time (UTC) Reboots are sometimes necessary, but timing matters. Users can now schedule server reboots at a **specific UTC time**. **What’s new** - Choose an exact reboot time - Avoid immediate or unexpected restarts **Why this matters** This helps users plan maintenance during low-traffic hours and reduces service disruption. **1) Schedule Server Reboot at a Specific Time** - Navigate to the **Server Dashboard** for your preferred server - Click on the **Settings Section** from the left-hand sidebar - Find the **Automatic Server Reboot** section in the **General** Section. - **Enable the Auto Reboot**, and select **Specific Hour.** - Select your preferred Time (UTC) from the given dropdown and click on the **Update** button. ![ServerAvatar v7.15.3 - aschedule server reboot](https://serveravatar.com/wp-content/uploads/2025/12/image-102-1024x820.png) **Key benefit:** No surprises, no sudden downtime. ### 9. Let’s Encrypt Alias Support Now, domain verification just got smarter. SSL domain verification has been improved with alias support. **What’s new** - Let’s Encrypt now supports domain aliases during verification **Why this matters** This improves SSL certificate issuance for servers with multiple domains or complex domain configurations. **Key benefit:** Fewer SSL issues and smoother certificate generation. ### 10. Mautic One-click Installer Upgrade Marketing automation users will appreciate this one. The Mautic one-click installer has been updated to the latest stable version. **What’s new** - Latest Mautic release - Improved security and performance **Why this matters** Users can deploy Mautic with confidence, knowing they are using a supported and up-to-date version without manual installation steps. **1) Update Mautic application** - Navigate to your **Mautic Application Dashboard** - Click on the **Settings Section** from the left sidebar - Find the **Update Mautic** section in the settings section, and click on the **Update** button. ![ServerAvatar v7.15.3 - Update Mautic application](https://serveravatar.com/wp-content/uploads/2025/12/image-103-1024x960.png) **Key benefit:** Improved security, better performance, and access to the newest features without manual updates. ## UI Improvements ### 11. Creation Celebration Flow Who doesn’t enjoy a small win? After creating a server or application, you’ll now see a celebration pop-up. **What’s new** Now users can: - Download creation details - Navigate directly to relevant management pages **Why this matters** This improves onboarding and helps users quickly move to the next step after setup. It’s a small touch, but it makes onboarding feel rewarding. **1) When you create a server** ![ServerAvatar v7.15.3 - server creation](https://serveravatar.com/wp-content/uploads/2025/12/image-104.png) **2) When you create an application** ![ServerAvatar v7.15.3 - application creation](https://serveravatar.com/wp-content/uploads/2025/12/image-106.png) ### 12. File Manager Copy Path Enhancement File management just got faster. It now includes a **Copy Path** option. **What’s new** The **Copy Path** option allows you to: - Instantly copy file or folder paths **Why this matters** This saves time when configuring applications, editing settings, or sharing file locations. No more manual copying or guessing directory structures. **1) Copy path from File Manager** - Navigate to your **Application Panel** - Click on the **File Manager Section** from the left sidebar - Navigate to the path you want to copy and click on the **Copy Path** button. ![ServerAvatar v7.15.3 - Copy from File Manager](https://serveravatar.com/wp-content/uploads/2025/12/image-107-1024x389.png) - You can also copy the configuration file path and the file name by navigating to the file and clicking on the **copy** icon, as shown in the image below. ![ServerAvatar v7.15.3 - Copy file path](https://serveravatar.com/wp-content/uploads/2025/12/image-113-1024x741.png) - Additionally, you can copy the file path while copying, or moving a file by selecting the file and then selecting the **Move** or **Copy** option. - **While Copying the File:** ![ServerAvatar v7.15.3 - Copy file](https://serveravatar.com/wp-content/uploads/2025/12/image-114.png) - **While Moving the File:** ![ServerAvatar v7.15.3 - move file](https://serveravatar.com/wp-content/uploads/2025/12/image-115.png) ### 13. Instant Form Validation Forms across the dashboard now include instant form validation with immediate user feedback. **What’s new** - Immediate feedback while filling forms **Why this matters** This reduces form submission errors and helps users correct mistakes instantly. ### 14. Copy Logs Option Users can now copy logs directly from the dashboard. **What’s new** - Copy server-level logs - Copy application-level logs **Why this matters** This makes it easier to share logs for debugging, audits, or support requests without downloading files. **1) Copy Server Logs** - Navigate to your **Server Panel** for your server - Go to the **Logs** section from the left sidebar and select the log you want to copy. - Click on the **Copy Log** button. ![ServerAvatar v7.15.3 - Copy Server Logs](https://serveravatar.com/wp-content/uploads/2025/12/image-108-1024x471.png) [](https://storage.3.basecamp.com/5840738/blobs/ba970af0-dcb6-11f0-9c90-0242ac120003/download/image.png) **2) Copy Application Logs** - Navigate to your **Application Panel** for your application - Go to the **Logs** section from the left sidebar and select the log you want to copy. - Click on the **Copy Log** button. ![ServerAvatar v7.15.3 - Copy Application Logs](https://serveravatar.com/wp-content/uploads/2025/12/image-109-1024x522.png) ## Why These Changes Matter ServerAvatar v7.15.3 is not just a technical release, it’s a step toward a more user-friendly and dependable platform. These updates are designed to solve real, day-to-day challenges faced by users. - **More control where it matters:** Manage monitoring, PHP versions, and extensions at both server and application levels. - **Fewer surprises:** SSL failure alerts and scheduled reboots help prevent unexpected downtime. - **Cleaner workflows:** On-demand PHP installation and targeted monitoring reduce unnecessary setup and overhead. - **Better visibility:** Improved log access, copy options, and real-time form validation make troubleshooting faster. - **Smoother experience:** UI refinements like celebration flows and quick navigation save time after setup. - **Future-ready setup:** Support for PHP 8.5 and updated installers keep applications modern and secure. Together, these improvements help users spend less time managing issues and more time focusing on their applications and projects. ### Our goal is simple To give users clearer control, better visibility, and smoother workflows so managing servers and applications feels easier, faster, and more reliable every day. ## Conclusion ServerAvatar v7.15.3 is a thoughtfully crafted release focused on making everyday server and application management simpler, smarter, and more dependable. Instead of adding complexity, this update gives you more control exactly where it’s needed, whether that’s managing logs at the right level, choosing when and how PHP versions are installed, or deciding which applications truly need proactive monitoring. With improvements like PHP 8.5 support, targeted log monitoring, smarter SSL alerts, scheduled reboots, and refined UI workflows, this release helps reduce manual effort and prevent avoidable issues before they impact your users. In short, ServerAvatar v7.15.3 empowers you to manage your infrastructure with confidence, clarity, and flexibility, so you can focus more on building and scaling your applications, not firefighting server problems. ## FAQs ### **1. Do I need to upgrade manually to ServerAvatar v7.15.3?** No. If you’re already using ServerAvatar, the update is applied automatically. You can start using the new features. ### **2. Can I enable Pro-active Site Monitoring for only specific applications?** With v7.15.3, Pro-active Site Monitoring can be enabled or disabled per application, giving you more targeted and meaningful alerts. ### **3. Does PHP 8.5 replace older PHP versions on my server?** No. PHP 8.5 is added as an additional option. You can install it on demand and choose which PHP version each application should use without affecting others. ### **4. What happens if my SSL certificate renewal fails?** ServerAvatar will send you an email notification immediately. This allows you to fix the issue before visitors encounter browser security warnings. ### **5. Who benefits most from this update?** This release is especially useful for users managing multiple applications, working with different PHP versions, or looking for better monitoring and visibility, without adding extra complexity. **Categories:** Blog, Guide, ServerAvatar Updates **Tags:** New Features, ServerAvatar, ServerAvatar fixes and improvements, ServerAvatar release, ServerAvatar update, ServerAvatar v7.15.3 --- ### [How to Easily Find Your DNS Server IP Address in Linux](https://serveravatar.com/find-dns-server-ip-address/) **Published:** December 16, 2025 **Author:** Meghna Meghwani **Content:** [![Blog banner - ServerAvatar](https://serveravatar.com/wp-content/uploads/2025/09/728_90-Banner-3-1024x127.png)](https://serveravatar.com/?ref=blog)Have you ever wondered how your Linux system knows where to find websites like Google, YouTube, or your favorite blog? When you type a website name and press Enter, the website loads instantly because your system uses a DNS server IP address to translate domain names into readable locations. Behind the scenes, something important is working quietly: DNS. Domain Name System (DNS) is the same as the phonebook for the internet. Instead of remembering numbers (IP addresses), we remember names (domain names). But sometimes, you may need to know which DNS server your Linux system is using. Maybe you’re troubleshooting internet issues, setting up a server, or just curious. Don’t worry, you don’t need to be a Linux expert. In this guide, I’ll walk you through easy, human-friendly ways to find your DNS server IP address in Linux. No confusing jargon. Just clear steps you can follow right away. ## What Is a DNS Server? A DNS server translates website names like “**example.com**” into IP addresses like “**93.184.216.34**“. Your computer understands numbers, not names, DNS acts as the translator. Think of DNS as a GPS for the internet. You enter a place name, and it finds the exact location for you. ![What is DNS server IP address ](https://serveravatar.com/wp-content/uploads/2025/12/image-87.png) ## Why You Might Need to Find Your DNS Server IP Address There are many practical reasons to check your DNS server IP: - **Internet not working properly:** Checking your DNS server helps identify name-resolution issues that can block internet access. - **Slow website loading:** A slow or misconfigured DNS server can delay website loading times. - **Server configuration:** Knowing your DNS IP is essential when setting up or managing Linux servers correctly. - **Security or privacy checks:** Verifying DNS ensures your traffic isn’t being routed through untrusted servers. - **Switching to public DNS (like Google or Cloudflare):** Finding your current DNS helps you replace it with faster and more reliable public DNS services. Knowing your DNS server helps you diagnose problems faster and stay in control. If you want to quickly verify DNS records or test name resolution online, you can also use a browser-based tool like [**NSLookup.io**](https://www.nslookup.io/?ref=serveravatar.com), which allows you to check DNS information without using the terminal. ## Understanding DNS in Linux Linux doesn’t rely on just one method to manage DNS. Depending on your system: - **DNS info may come from network settings:** Some Linux systems get DNS details directly from basic network configuration files. - **It could be managed by systemd:** Many modern Linux distributions use systemd services to automatically handle DNS resolution. - **Or controlled by NetworkManager:** Desktop and laptop systems often rely on NetworkManager to manage DNS dynamically. Don’t worry, we’ll cover all the easy ways. ![Understanding DNS in Linux - DNS server IP address ](https://serveravatar.com/wp-content/uploads/2025/12/image-88.png) ## Using the resolv.conf File This is the most classic and simple method. - Open the terminal and run: ``` cat /etc/resolv.conf ``` ``` cat /etc/resolv.conf ``` - You’ll see lines in output like: ``` nameserver 8.8.8.8 nameserver 1.1.1.1 ``` ``` nameserver 8.8.8.8 nameserver 1.1.1.1 ``` These numbers are your DNS server IP addresses. > **Note:** On modern systems, this file may be auto-managed, but it still gives useful info. ## Finding DNS Server Using systemd-resolve If your Linux system uses **systemd**, this command is one of the easiest ways to find your DNS server IP address. It shows detailed DNS information for each network interface. - Open the terminal and run: ``` systemd-resolve --status ``` ``` systemd-resolve --status ``` - Sample Output: ``` Global LLMNR setting: yes MulticastDNS setting: no DNSOverTLS setting: no DNSSEC setting: no Link 2 (eth0) Current DNS Server: 8.8.8.8 DNS Servers: 8.8.8.8 8.8.4.4 ``` ``` Global LLMNR setting: yes MulticastDNS setting: no DNSOverTLS setting: no DNSSEC setting: no Link 2 (eth0) Current DNS Server: 8.8.8.8 DNS Servers: 8.8.8.8 8.8.4.4 ``` - What This Output Means: - **Current DNS Server:** The DNS server your system is actively using to resolve domain names. - **DNS Servers:** A list of all configured DNS servers available as backups. - **Link (eth0):** The network interface where these DNS settings are applied. - **Global Section:** Shows system-wide DNS behavior and security-related settings. - Why This Is Useful: - Shows DNS per network interface - More accurate on modern Linux systems - Great for servers and desktops This method is especially useful on modern Linux distributions because it provides accurate, real-time DNS information without manually checking configuration files. ## Checking DNS with resolvectl Command On newer Linux distributions, the ‘resolvectl’ command replaces ‘systemd-resolve’ and provides a clean way to check your DNS server details. It’s simple, reliable, and widely used on modern systems. - Open the terminal and run: ``` resolvectl status ``` ``` resolvectl status ``` - Sample Output: ``` Global Protocols: LLMNR=resolve -mDNS -DNSOverTLS DNSSEC=no Link 2 (eth0) Current Scopes: DNS Protocols: +DefaultRoute Current DNS Server: 1.1.1.1 DNS Servers: 1.1.1.1 1.0.0.1 ``` ``` Global Protocols: LLMNR=resolve -mDNS -DNSOverTLS DNSSEC=no Link 2 (eth0) Current Scopes: DNS Protocols: +DefaultRoute Current DNS Server: 1.1.1.1 DNS Servers: 1.1.1.1 1.0.0.1 ``` - What This Output Means: - **Current DNS Server:** The primary DNS server currently resolving domain names. - **DNS Servers:** All configured DNS servers that the system can use if one fails. - **Link (eth0):** The active network interface using these DNS settings. - **Global Section:** Displays overall DNS protocols and system-wide behavior. The resolvectl command is recommended for accurate DNS checking on modern Linux systems and is often the preferred choice over older methods. This is one of the most reliable ways today. ## Using nmcli Command If your Linux system uses NetworkManager, the ‘nmcli’ command is a quick and effective way to find your DNS server IP address. This method is especially common on desktops, laptops, and cloud servers. - Open the terminal and run: ``` nmcli dev show | grep DNS ``` ``` nmcli dev show | grep DNS ``` - Sample Output: ``` IP4.DNS[1]: 8.8.8.8 IP4.DNS[2]: 8.8.4.4 ``` ``` IP4.DNS[1]: 8.8.8.8 IP4.DNS[2]: 8.8.4.4 ``` - What This Output Means: - **IP4.DNS\[1\]:** The primary DNS server currently in use. - **IP4.DNS\[2\]:** The secondary DNS server used as a backup. - **Multiple entries:** Show all DNS servers assigned to your network connection. - Why Use nmcli? - Clean output - Easy to read - Great for laptops and desktops This method is ideal when you want a clean and straightforward output without extra technical details, making it perfect for beginners and everyday Linux users. ## Finding DNS Server on Ubuntu Ubuntu manages DNS settings slightly differently compared to some other Linux distributions, as it commonly relies on **systemd-resolved** to handle name resolution in the background. Because of this, DNS information isn’t always stored in a single static file and is often managed dynamically. The most reliable way to view your active DNS server on Ubuntu is by running the following command: ``` resolvectl statusresolvectl status ``` ``` resolvectl statusresolvectl status ``` This command displays detailed, real-time DNS information for each active network interface, including the primary and secondary DNS servers currently in use. Alternatively, you can also check the DNS configuration file using: ``` cat /etc/resolv.conf ``` ``` cat /etc/resolv.conf ``` While this file may be automatically generated, it still provides a quick snapshot of the DNS servers assigned to your system. In most cases, Ubuntu users can easily find their DNS server IP address by using either of these two simple methods. ## Finding DNS Server on CentOS / RHEL CentOS, RHEL, and Rocky Linux usually manage DNS settings using traditional network configuration files, making it easy to locate DNS server details. The quickest way to check your DNS server IP address on these distributions is by viewing the resolver configuration file: ``` cat /etc/resolv.conf ``` ``` cat /etc/resolv.conf ``` This file lists all configured DNS servers that your system uses for domain name resolution. If **NetworkManager** is enabled on your system, you can also retrieve DNS information using the following command: ``` nmcli dev show ``` ``` nmcli dev show ``` This method displays DNS servers assigned to each network interface, providing clear and reliable results. Both approaches are simple, practical, and commonly used on CentOS-based systems. ## Finding DNS Server on Debian Debian is known for its clean and minimal system design, and checking DNS settings is just as straightforward. Most Debian systems store DNS server information in the resolver configuration file, which you can view using: ``` cat /etc/resolv.conf ``` ``` cat /etc/resolv.conf ``` On newer Debian installations that use **systemd**, DNS settings may be managed dynamically. In such cases, you can use the following command to get accurate and up-to-date DNS details: ``` resolvectl status ``` ``` resolvectl status ``` With these easy methods, Debian users can quickly identify their DNS server IP address without dealing with complex configuration steps. [![Blog banner - ServerAvatar](https://serveravatar.com/wp-content/uploads/2025/09/728_90-Banner-1-1024x127.png)](https://serveravatar.com/?ref=blog)## Common DNS IP Addresses If you’re looking for reliable public DNS servers, there are a few well-known options trusted by millions of users worldwide. These DNS providers are known for their speed, stability, and improved security features. - **Google DNS:** Popular for fast performance and global availability. **8.8.8.8**, and **8.8.4.4** - **Cloudflare:** Focuses on privacy and quick response times. **1.1.1.1**, and **1.0.0.1** - **OpenDNS:** Offers additional security and filtering features. **208.67.222.222** Using public DNS servers can often result in faster browsing, better reliability, and improved protection compared to default ISP-provided DNS. ## Troubleshooting DNS Issues When websites fail to load or internet access feels unstable, DNS problems are often the root cause. In such cases, a few simple steps can help resolve the issue quickly: - Restart networking services to refresh your connection. - Flush the DNS cache to remove outdated or incorrect entries. - Switch to a public DNS server like Google or Cloudflare for better reliability. - Check firewall rules to ensure DNS traffic is not being blocked. DNS problems can feel like knocking on the wrong door, once the correct address is set, everything starts working smoothly again. ## Best Practices for Managing DNS in Linux Managing DNS properly is essential for keeping your Linux system reliable and secure. Following a few proven best practices can help you avoid common connectivity issues and reduce the risk of misconfigurations. - **Use trusted DNS providers:** Always choose reliable and well-known DNS services to ensure fast and secure domain resolution. - **Avoid hardcoding DNS settings unless necessary:** Dynamic DNS configurations are easier to manage and less prone to errors, especially on servers that change networks. - **Monitor DNS changes on servers:** Regularly check DNS settings to quickly detect unexpected or unauthorized changes. - **Document your DNS setup:** Keeping a record of DNS configurations makes troubleshooting and future updates much easier. Good DNS management helps maintain system stability, better performance, and stronger security over time. ## **Conclusion** Finding your DNS server IP address in Linux is much simpler once you know where to look. Whether you use traditional files like ‘**/etc/resolv.conf**‘ or modern tools such as ‘**resolvectl**‘, ‘**systemd-resolve**‘, and ‘**nmcli**‘, Linux offers multiple easy and reliable ways to check DNS information across different distributions. Understanding and managing DNS helps you troubleshoot connectivity issues faster, improve website loading speed, and maintain better security on your system. With the methods and best practices covered in this guide, you can confidently handle DNS settings and ensure your Linux system stays stable, secure, and well-connected to the internet. ## FAQs ### **1. What is a DNS server IP address**? A DNS server IP address is the numerical address of the server that translates website names into IP addresses. ### **2. Which command is best to find DNS in Linux?** resolvectl status is the most reliable on modern Linux systems. ### **3. Can I change my DNS server in Linux?** Yes, you can change it using NetworkManager, system settings, or configuration files. ### **4. Is 8.8.8.8 safe to use as a DNS server?** Yes, Google DNS (8.8.8.8) is widely used, fast, and reliable. ### **5. Why does my DNS server change automatically?** This usually happens when your network or ISP assigns DNS dynamically. ## Stop Wasting Time on Servers. Start Building Instead. You didn’t start your project to babysit servers. Let **ServerAvatar** handle deployment, monitoring, and backups — so you can focus on growth. Deploy **WordPress, Laravel, N8N**, and more in minutes. No DevOps required. No command line. No stress. [ 🚀 Try Free ](https://app.serveravatar.com) [ 🌐 Learn More ](https://serveravatar.com/) Trusted by 10,000+ developers and growing. **Categories:** Blog, Guide, Linux, Tutorials, Ubuntu **Tags:** DNS, dns server ip address, dns server ip address command, find dns server ip address, Linux, Ubuntu --- ### [How Smart Swap Memory Scaling Boosts VPS Performance Dramatically](https://serveravatar.com/smart-swap-memory-scaling/) **Published:** December 15, 2025 **Author:** Meghna Meghwani **Content:** [![Blog banner - ServerAvatar](https://serveravatar.com/wp-content/uploads/2025/09/728_90-Banner-3-1024x127.png)](https://serveravatar.com/?ref=blog)Ever felt your website slow down even when your VPS should handle the traffic? You’re not alone. Many site owners and developers face this issue, and often the culprit isn’t the CPU or disk speed, it’s swap memory scaling and inefficient memory management. Today, we’ll unlock a simple but powerful idea: Smart Swap Memory Scaling, and how it can dramatically boost the performance of your VPS, especially when managed with ServerAvatar. No intimidating technical complexes. Just clear explanations, relatable analogies, and practical guidance you can apply today, even if you’re new to VPS hosting. Let’s dive in. ## What Is VPS Memory and Why Swap Memory Scalling Matters A VPS (Virtual Private Server) behaves a lot like your personal computer, just hosted on the cloud. It has CPU, storage, and memory. Memory, especially, plays a huge role in keeping everything running smoothly. When a VPS runs out of memory, it starts struggling, loading becomes slow, services lag, and sometimes your site simply stops responding. That’s where smart memory management comes in. ### The Basics: What Is RAM? Think of RAM as your desk surface. - **A big desk:** You can spread out files and work fast. - **A small desk:** You stack papers, move things around, or worse… stuff falls off. **In VPS terms:** - RAM stores active processes, the parts of your website and server that are “working right now”. - When you have enough RAM, everything stays fast and snappy. But when RAM fills up? That’s when swap steps in. ## What Is Swap Memory? Swap memory is like a temporary filing cabinet beside your desk. When RAM is full, the server moves less active data into swap. This frees up RAM for things that need instant attention. The trade-off? Swap is slower than RAM, because it lives on disk, not in super-fast memory. Still, having swap is better than running out of RAM completely. ### Why Traditional Swap Isn’t Enough Traditional swap setups are rigid. They: - **Have a fixed size you define once:** Once set, the swap size stays the same and cannot automatically adapt to changing server needs. - **Don’t adjust if your workload suddenly increases:** Traditional swap does not respond when traffic or resource usage spikes unexpectedly. - **Can slow things down if overused:** If too much data is pushed into swap, server performance may drop because disk access is slower than RAM. It’s like having a one-size-fits-all drawer next to your desk, sometimes it’s too small, other times too big and useless. That’s where Smart Swap steps in. ## Smart Swap Memory Scaling Explained Smart Swap Memory Scaling is an intelligent approach to swap management. Instead of a fixed space, the swap can expand and contract based on actual needs. Imagine working on a big project and needing more desk space for a while, smart swap is like magically expanding your desk only when you need it. This helps your VPS handle bursts of activity without crashing while still staying efficient and responsive. ### How Smart Swap Works Behind the scenes, smart swap watches how the server uses memory. When RAM starts to fill up, it: 1. **Moves only the least important data into swap:** Smart swap shifts low-priority tasks out of RAM while keeping critical processes active. 2. **Frees up precious RAM for high-priority tasks:** By clearing unnecessary memory usage, RAM remains available for important applications. 3. **Brings data back from swap when RAM becomes available:** When memory pressure reduces, smart swap automatically restores data from disk to RAM. All of this happens automatically, you do not have to make any efforts. ## Regular Swap Memory vs Smart Swap Memory Let’s compare the Smart Swap with the Regular Swap: **Feature****Regular Swap****Smart Swap****Size**FixedDynamic**Performance**Can lag under pressureSmooth transitions**Efficiency**Often over or under-utilizedMatches real usage**Stability**Risk of slowdownsHelps stabilitySmart Swap almost always wins in real-world situations. ## Real-World Benefits of Swap Memory Scaling for VPS Performance Here’s how Smart Swap helps your server right away: - **Prevents sudden crashes when memory fills up:** Smart swap acts as a buffer that stops the server from failing due to memory overload. - **Keeps services responsive under load:** Applications continue running smoothly even when the server is handling heavy traffic. - **Helps the system stay stable during traffic spikes:** Temporary increases in visitors are managed without disrupting server performance. - **Avoids the dreaded “out of memory” errors:** Proper swap handling ensures the server doesn’t run out of usable memory unexpectedly. In short, it makes your VPS feel faster and more reliable. ## How Swap Memory Scaling Helps Your Website Stay Responsive When users visit your site, every click triggers server work. If memory runs low, the server slows down, just like how you slow down when your desk gets messy. By using swap intelligently, your server always has a safety net. It’s not a magic bullet for speed, but it’s like an insurance policy against slowdowns and crashes. ## Smart Swap Memory Scaling with ServerAvatar **What is ServerAvatar?** [ServerAvatar](https://serveravatar.com/) is a platform to simplify the hosting and management of servers and applications. It simplifies the process of deploying and managing PHP and Node.js based web applications on servers. If you manage your server with ServerAvatar, handling swap becomes simple and efficient. ServerAvatar’s platform supports easy updating of swap memory directly from the dashboard, no command line needed. Whether you have a self-managed VPS or a fully managed server via ServerAvatar’s hybrid cloud platform, managing swap memory is part of the server tools available to you. This means smart memory scaling isn’t just conceptual; you can actually implement it easily without stress and a command line. [![Blog banner - ServerAvatar](https://serveravatar.com/wp-content/uploads/2025/09/728_90-Banner-1-1024x127.png)](https://serveravatar.com/?ref=blog)## Step-by-Step: Updating Swap Memory with ServerAvatar Here’s how ServerAvatar lets you scale swap memory easily: - Log in to your **ServerAvatar** account, navigate to the **Servers** section from the sidebar, and open the server panel by clicking on the dashboard icon next to your server. ![swap memory scaling - ServerAvatar Dashboard](https://serveravatar.com/wp-content/uploads/2025/12/image-84-1024x197.png) - Find the **Swap Memory** card from the server panel, and click on the **Update Swap** button. ![swap memory scaling - Server Panel](https://serveravatar.com/wp-content/uploads/2025/12/image-85-1024x470.png) - Enter the new swap size you want and click on the **Update** button. ![swap memory scaling](https://serveravatar.com/wp-content/uploads/2025/12/image-86.png) Within minutes, ServerAvatar will apply the change and reflect the new swap size in your dashboard. No scripts. No manual editing, and no command line. Just point and click simplicity. ## Swap Memory Scaling for Traffic Spikes and Big Loads Swap becomes especially useful when: - **Your server handles sudden traffic surges:** Swap memory helps your server stay stable when many users visit at the same time. - **You run multiple applications at once:** Swap allows different apps to share memory smoothly without slowing each other down. - **Memory needs change day to day:** Swap adapts to varying workloads, ensuring your server performs well even as usage fluctuates. Instead of hiring extra hardware or upgrading plans prematurely, smart swap gives you buffer space when needed and retracts when not. If your CPU is the engine and RAM is the fuel, swap is your emergency reserve tank, not meant for regular use but lifesaving when you need it. ## Who Should Care About Swap Memory Scaling? Almost anyone using a VPS can benefit: - **Bloggers with unpredictable visitors:** Swap memory helps keep the blog online even when traffic suddenly increases. - **eCommerce stores during promotions:** Swap prevents slowdowns or crashes when many shoppers visit at the same time. - **Developers testing resource-heavy applications:** Swap provides extra memory support while running demanding tests or tools. - **Agencies managing multiple client sites:** Swap helps balance memory usage across many websites on a single VPS. - **New VPS users without deep system knowledge:** Swap acts as a safety net, keeping the server stable without complex setup. The beauty of smart swap is its adaptability for all skill levels, whether you’re new to servers or an experienced engineer. ## Common Misconceptions About Swap Memory Scaling Let’s clear a few: **Myth:** Swap always slows down your site **Truth:** Badly configured swap can hurt performance, but smart, dynamic swap helps prevent slowdowns. **Myth:** Swap means your VPS has low RAM **Truth:** Even large-RAM servers can run better with smart swap when unexpected peaks occur. **Myth:** You need command-line skills to manage swap **Truth:** With ServerAvatar, you don’t. ## Conclusion Smart Swap Memory Scaling isn’t just a buzzword; it’s a practical, real-world way to make your VPS more reliable, responsive, and forgiving under stress. When you use a server management dashboard like ServerAvatar, managing swap stops being a system admin’s chore, it becomes a few clicks in your dashboard. Think of Smart Swap as your VPS’s safety net, silently working behind the scenes to keep your sites running smoothly, even when things get busy. It’s like giving your server a flexible memory buffer that shows up only when it’s needed most. ## FAQs ### **1. What exactly is smart swap memory scaling?** Smart swap memory scaling is an intelligent method of adjusting swap usage dynamically based on RAM needs to prevent slowdowns and crashes. ### **2. How does ServerAvatar make swap management easier?** ServerAvatar provides a graphical control panel where you can update or scale swap memory without command-line commands. ### **3. Is swap memory only for low-end servers?** No, even powerful servers benefit from swap when handling unexpected peaks. ### **4. Can Smart Swap replace adding more RAM?** No, but it helps you delay unnecessary upgrades by managing memory more efficiently. ### **5. Will Smart Swap slow down my server?** If used moderately, no. It only moves low-priority data into swap when necessary to keep your primary memory free. **Categories:** Blog, Guide, Linux, ServerAvatar Updates, Tutorials, Ubuntu **Tags:** improve vps performance, smart swap memory, swap memory, swap memory in linux, swap memory scaling, vps performance optimization --- ### [How to Fix WordPress Memory Exhausted Error](https://serveravatar.com/fix-wordpress-memory-exhausted-error/) **Published:** December 10, 2025 **Author:** Meghna Meghwani **Content:** [![Blog banner - ServerAvatar](https://serveravatar.com/wp-content/uploads/2025/09/728_90-Banner-3-1024x127.png)](https://serveravatar.com/?ref=blog)Have you ever opened your WordPress site expecting everything to work fine, only to be greeted by a scary message like “Allowed memory size exhausted”? This memory exhausted error can feel as if there’s just no space left. Don’t worry, this is a common WordPress issue, and the good news is that it’s completely fixable, even if you’re not a tech expert. In this guide, we’ll walk step by step through what the WordPress memory exhausted error really means, why it happens, and how you can fix it using simple and safe methods. No heavy jargon, no guesswork, just practical solutions that actually work. ## What Is the WordPress Memory Exhausted Error The WordPress memory exhausted error appears when your website tries to use more memory than it’s allowed. WordPress runs on PHP, and PHP has a memory limit set by your hosting provider. Once that limit is crossed, WordPress simply can’t continue working and throws this error. ![WordPress memory exhausted error](https://serveravatar.com/wp-content/uploads/2025/12/image-68.png) ## Why WordPress Needs Memory WordPress uses memory to run themes, plugins, media files, scripts, and database queries. Every visitor, every page load, and every plugin adds to memory usage. Modern websites are more powerful than ever, but that power comes at a cost. Page builders, security plugins, and eCommerce tools all need extra memory to function smoothly. ## How ServerAvatar Helps Manage WordPress Memory Issues ServerAvatar makes server and application management simple, even for users who don’t want to deal with complex server commands. Instead of digging through terminal commands or confusing server settings, ServerAvatar gives you a clean dashboard where you can manage PHP settings, files, and websites with just a few clicks. ![ServerAvatar Dashboard](https://serveravatar.com/wp-content/uploads/2025/12/image-69.png) In short, ServerAvatar acts like a control center for your server. It allows you to monitor resources, edit WordPress files safely, and change PHP configurations without needing advanced technical knowledge. This makes fixing issues like the WordPress memory exhausted error faster and less stressful. You can easily set up WordPress in just a few minutes using ServerAvatar’s one-click application installer. With ServerAvatar’s one-click application installer, you can easily install WordPress, Mautic, N8N, Uptime Kuma, and many more popular applications within a few minutes. Follow this step-by-step guide to install WordPress quickly on your VPS: ## Common Causes of Memory Exhaustion Several factors can push WordPress over its memory limit: - **Poorly coded plugins or themes:** Badly optimized code can consume excessive memory and overload WordPress. - **Too many plugins running at once:** Each active plugin uses memory, and too many together can exceed the limit. - **Low memory limit set by hosting:** Some hosting plans assign very little PHP memory, causing WordPress to run out quickly. - **Large images or heavy scripts:** Oversized media files and scripts increase memory usage during page loading. - **Outdated WordPress core files:** Old versions may have performance issues that use more memory than necessary. One small issue alone might not trigger the error, but together they can overload your site. ## Check Your Current PHP Memory Limit Using ServerAvatar Before increasing the memory limit, it’s always a good idea to check how much memory your WordPress site currently has. ServerAvatar makes this process straightforward. **Steps to Check PHP Memory Limit in ServerAvatar** - Log in to your ServerAvatar account. Navigate to the **server** **panel** by clicking on the **dashboard** **icon** next to your server. ![server dashboard - WordPress memory exhausted error](https://serveravatar.com/wp-content/uploads/2025/12/image-70-1024x188.png) - Navigate to the **Applications** section from the left sidebar of your server panel and click on the **dashboard icon** for your WordPress application. ![application dashboard - WordPress memory exhausted error](https://serveravatar.com/wp-content/uploads/2025/12/image-71-1024x324.png) - Navigate to the **PHP** **Settings** section from the left sidebar of your application panel and check for the **Memory** **Limit** value. ![php settings - WordPress memory exhausted error](https://serveravatar.com/wp-content/uploads/2025/12/image-72-1024x433.png) Here, you’ll see how much memory is allocated to your site. If it’s set too low (like 64M or 128M), that’s often the main reason behind the memory exhausted error. ## Increase PHP Memory Limit from ServerAvatar If WordPress requests more memory but the PHP limit remains low, you’ll need to increase the memory at the PHP level. ServerAvatar allows you to do this easily from the dashboard. **Steps to Increase PHP Memory Limit Using ServerAvatar** - Log in to your ServerAvatar account. Navigate to the **server** **panel** by clicking on the **dashboard** **icon** next to your server. ![server dashboard - WordPress memory exhausted error](https://serveravatar.com/wp-content/uploads/2025/12/image-73-1024x188.png) - Navigate to the **Applications** section from the left sidebar of your server panel and click on the **dashboard icon** for your WordPress application. ![application dashboard - WordPress memory exhausted error](https://serveravatar.com/wp-content/uploads/2025/12/image-74-1024x324.png) - Navigate to the **PHP** **Settings** section from the left sidebar of your application panel and increase the PHP **Memory** **Limit** to **256M** or higher. ![update php settings - WordPress memory exhausted error](https://serveravatar.com/wp-content/uploads/2025/12/image-75-1024x433.png) - Save changes by clicking on the **Update Settings** button. Once applied, your server will allow WordPress to use more memory without restriction. ## Increase WordPress Memory Limit One of the safest ways to increase WordPress memory is by editing the wp-config.php file. ServerAvatar’s built-in **File Manager** lets you do this without FTP tools or command-line access. **Steps to Increase Memory via wp-config.php in ServerAvatar** - Log in to your ServerAvatar account. Navigate to the **server** **panel** by clicking on the **dashboard** **icon** next to your server. ![server dashboard - WordPress memory exhausted error](https://serveravatar.com/wp-content/uploads/2025/12/image-76-1024x188.png) - Navigate to the **Applications** section from the left sidebar of your server panel and click on the **dashboard icon** for your WordPress application. ![](https://serveravatar.com/wp-content/uploads/2025/12/image-77-1024x324.png) - Navigate to the **File Manager** section from the left sidebar of your application panel and open the **public\_html** folder, and locate the **wp-config.php file.** ![file manager - WordPress memory exhausted error](https://serveravatar.com/wp-content/uploads/2025/12/image-78-1024x540.png) Open the **wp-config.php file**, and add the following line before the “That’s all” comment: ``` define('WP_MEMORY_LIMIT', '256M'); ``` ``` define('WP_MEMORY_LIMIT', '256M'); ``` - Save the file. ![update memory - WordPress memory exhausted error](https://serveravatar.com/wp-content/uploads/2025/12/image-79-1024x580.png) This change tells WordPress to request more memory, which often immediately resolves the error. [![Blog banner - ServerAvatar](https://serveravatar.com/wp-content/uploads/2025/09/728_90-Banner-1-1024x127.png)](https://serveravatar.com/?ref=blog)## Increase Memory Using the .htaccess File (Apache only) Another option is editing the .htaccess file. - Log in to your ServerAvatar account. Navigate to the **server** **panel** by clicking on the **dashboard** **icon** next to your server. ![server dashboard - WordPress memory exhausted error](https://serveravatar.com/wp-content/uploads/2025/12/image-80-1024x172.png) - Navigate to the **Applications** section from the left sidebar of your server panel and click on the **dashboard icon** for your WordPress application. ![application dashboard - WordPress memory exhausted error](https://serveravatar.com/wp-content/uploads/2025/12/image-81-1024x293.png) - Navigate to the **File Manager** section from the left sidebar of your application panel and open the **public\_html** folder. - Enable the toggle button of **Show Hidden Files,** and locate the **.htaccess** file. ![file manager - WordPress memory exhausted error](https://serveravatar.com/wp-content/uploads/2025/12/image-82-1024x443.png) - Open the **.htaccess** file, and add the following line: ``` php_value memory_limit 256M ``` ``` php_value memory_limit 256M ``` - Save the file.[](https://storage.3.basecamp.com/5840738/blobs/323e2d1a-d5a8-11f0-93b2-0242ac120004/download/image.png) ![update memory - WordPress memory exhausted error](https://serveravatar.com/wp-content/uploads/2025/12/image-83-1024x665.png) This method is only works for Apache servers; not all servers allow this method. > If editing files feels overwhelming or if you are fear something might go wrong with your site. Don’t worry, the ServerAvatar support team is here to help. Just create a ticket on the support panel, and our technical team will be available 24/7 to assist you. ## Why ServerAvatar Is Ideal for Hosting WordPress and Fixing Errors Managing WordPress websites often means dealing with server settings, file access, and configuration changes, all of which can feel overwhelming without the right tools. ServerAvatar simplifies both WordPress hosting and error resolution by bringing everything into one easy-to-use platform. Instead of switching between hosting panels, FTP tools, and support tickets, ServerAvatar gives you direct control from a single dashboard. You can manage your server resources, access website files, and change PHP settings without touching the command line. With ServerAvatar, you can: - Edit WordPress core files securely using the built-in file manager - Adjust PHP limits without coding or terminal access - Host and manage multiple WordPress websites from one dashboard - Resolve WordPress issues faster without waiting for hosting support It’s like having a powerful hosting environment with a built-in WordPress assistant, giving you full control without the usual complexity. ServerAvatar not only fixes the WordPress memory exhausted error, but also helps keep your website stable, faster, and ready to grow. ## How to Prevent Memory Errors **1) Identify Memory-Hungry Plugins** Some plugins quietly eat up memory. **What to do:** - Deactivate plugins one by one - Reload your site after each step - Identify the plugin causing the issue Replace heavy plugins with lightweight alternatives wherever possible. **2) Switch to a Default WordPress Theme** Custom themes sometimes contain unnecessary code. Try switching temporarily to: - Twenty Twenty-Three - Twenty Twenty-Four If the error disappears, your theme may need optimization or replacement. **3) Update WordPress, Themes, and Plugins** Outdated software often uses more resources than needed. Always keep: - WordPress core updated - Themes updated - Plugins updated Updates usually include performance improvements and bug fixes. **4) Optimize Your WordPress Website** Optimization reduces memory usage and improves speed. Simple steps include: - Compress images - Enable caching - Remove unused plugins - Clean up your database This is like cleaning your house, you instantly feel the extra breathing space. ## How to Prevent Memory Errors in the Future Prevention is always better than repair. **Best practices:** - **Use quality plugins only:** Choose well-maintained plugins from trusted developers to avoid unnecessary memory usage and performance issues. - **Monitor site performance regularly:** Keeping an eye on site speed and resource usage helps you detect memory problems before they grow. - **Avoid installing unnecessary tools:** Only keep plugins and features you actually use, as extra tools quietly consume memory in the background. - **Choose reliable hosting:** A good hosting provider offers sufficient resources and stable performance for growing WordPress websites. A little maintenance goes a long way. Regular updates, cleanups, and optimizations help prevent memory issues over time. ## Conclusion The WordPress memory exhausted error can look alarming at first, but in reality, it’s a clear sign that your website needs more resources to run smoothly. As your site grows with more plugins, features, and visitors, memory usage naturally increases. The key is knowing where the limit is coming from and how to adjust it safely. With ServerAvatar, handling memory-related issues becomes much easier. From checking your current PHP memory limit to increasing it directly from the dashboard or editing WordPress files through the built-in file manager, everything can be done without complex commands or risky server changes. On top of that, regular maintenance, smart plugin choices, and proper optimization help prevent these errors from returning. With the right setup and tools, your WordPress site stays stable, fast, and ready to grow. ## FAQs ### **1. What does the WordPress memory exhausted error mean?** It means WordPress has reached the maximum memory limit allowed by your server and cannot continue processing requests. ### **2. How much PHP memory is recommended for WordPress?** For most websites, 128M works fine, but 256M is recommended for sites using page builders, eCommerce, or multiple plugins. ### **3. Can I increase the WordPress memory limit using ServerAvatar?** Yes, ServerAvatar lets you increase both PHP memory limits and WordPress memory limits directly from its dashboard or file manager. ### **4. Will increasing the memory limit break my website?** No, increasing the memory limit is safe and often necessary, as long as your server has enough available resources. ### **5. Do plugins cause memory exhausted errors?** Yes, poorly coded or heavy plugins can consume excessive memory and are one of the most common causes of this error. **Categories:** Blog, Guide, Tutorials, WordPress **Tags:** common wordpress errors, fix WordPress error, fix WordPress memory error, PHP Configuration, PHP Memory Limit, Wordpress, Wordpress Errors, WordPress memory exhausted error, WordPress memory limit --- ### [Master 301 Redirect URLs: Fix Broken Links & Boost SEO Fast](https://serveravatar.com/301-redirect-urls-seo/) **Published:** August 31, 2025 **Author:** Suresh Ramani **Content:** [![Blog banner - ServerAvatar](https://serveravatar.com/wp-content/uploads/2025/09/728_90-Banner-3-1024x127.png)](https://serveravatar.com?ref=blog)Have you ever wondered why some websites seamlessly guide visitors to the right pages while others leave them stranded on frustrating 404 error pages? The secret lies in mastering **301 redirect URLs** – a powerful tool that can transform your website’s user experience and supercharge your SEO performance. Think of a **301 redirect** as a digital moving notice. When you relocate your home, you put up a forwarding address with the postal service so your mail reaches you at the new location. Similarly, when you move or change a webpage, a **301 redirect URL** tells both visitors and search engines exactly where to find your content now. ![301 Redirect URLs](https://serveravatar.com/wp-content/uploads/2025/08/f05f6777-0f18-4d95-a88d-20431c36345e-1024x683.webp) In today’s fast-paced digital landscape, broken links and poor navigation can kill your website’s credibility faster than you can say “page not found.” But here’s the good news – with the right **301 redirect** strategy, you can fix these issues instantly while preserving every ounce of your hard-earned SEO value. ## **What is a 301 Redirect URL and Why Does It Matter?** A **301 redirect URL** is like a permanent forwarding address for web pages. When someone tries to visit an old URL, the redirect automatically sends them to a new destination, ensuring they never hit a dead end. The “301” part refers to the HTTP status code that tells browsers and search engines this move is permanent. According to [Google’s official documentation](https://developers.google.com/search/docs/crawling-indexing/301-redirects), **301 redirects** are permanent redirects that show the new redirect target in search results. This makes them the gold standard for SEO-friendly URL changes and migrations. But why should you care about **301 redirects**? Imagine spending months building your website’s authority and search rankings, only to lose it all because you moved some pages without proper redirects. That’s like throwing away years of hard work! A well-implemented **301 redirect URL** preserves your SEO juice and keeps your visitors happy. **The magic happens behind the scenes.** When search engines encounter a **301 redirect**, they understand that the original page has permanently moved. They then transfer most of the ranking power, backlink authority, and trust signals from the old URL to the new one. This process helps maintain your search engine visibility and prevents your rankings from plummeting. ### **Real-World Impact of 301 Redirects** Consider this scenario: You’re running an e-commerce site and decide to restructure your product categories. Without **301 redirects**, every external link pointing to your old product pages would result in 404 errors. Your customers would bounce, your search rankings would tank, and your revenue would suffer. With proper **301 redirect URLs** in place, visitors seamlessly reach the new pages while your SEO value remains intact. ## **The Science Behind How 301 Redirects Work** Understanding how **301 redirect URLs** function can help you implement them more effectively. The process involves a conversation between your visitor’s browser, your web server, and search engine crawlers. **Here’s what happens when someone clicks on a redirected link:** First, the browser requests the original URL from your server. Your server recognizes that a **301 redirect** is in place and responds with a special message containing the HTTP 301 status code and the new destination URL. The browser then automatically requests the new URL, and your server delivers the correct page content. **This entire process typically takes milliseconds**, making it virtually invisible to your visitors. However, search engines pay close attention to these signals. When Google’s crawlers encounter a **301 redirect URL**, they update their index to reflect the permanent move, gradually replacing the old URL with the new one in search results. ### **The Technical Foundation** Behind every successful **301 redirect** lies solid technical implementation. Whether you’re using server-level redirects through .htaccess files, Content Management System plugins, or server-side scripting languages like PHP, the goal remains the same – providing clear, unambiguous instructions that guide both users and search engines to the right destination. The [Mozilla Developer Network](https://developer.mozilla.org/en-US/docs/Web/HTTP/Status) provides comprehensive documentation on HTTP status codes, confirming that 301 redirects fall under the redirection message category (300-399 range), specifically indicating that a resource has been permanently moved to a new location. ## **301 vs 302 Redirects: Understanding the Key Differences** One of the biggest mistakes website owners make is confusing **301 redirects** with 302 redirects. While both send visitors from one URL to another, they communicate completely different messages to search engines. **A 301 redirect says “this page has moved permanently.”** Search engines understand they should transfer ranking signals to the new URL and eventually stop indexing the old one. This makes **301 redirects** perfect for permanent changes like domain migrations, URL restructuring, or content consolidation. **A 302 redirect, on the other hand, says “this page has moved temporarily.”** Search engines keep the original URL in their index and don’t transfer ranking power to the destination. This works well for temporary situations like maintenance pages, seasonal campaigns, or A/B testing. ### **Choosing the Right Redirect Type** The consequences of using the wrong redirect type can be severe. If you use a 302 redirect for a permanent move, you’ll likely lose your SEO value over time. Conversely, using a **301 redirect URL** for temporary situations might cause search engines to prematurely index the wrong page. **Always ask yourself:** Is this change permanent or temporary? If permanent, use a **301 redirect**. If temporary, stick with a 302. When in doubt, err on the side of caution and consult with an SEO professional. ## **Top Benefits of Using 301 Redirects for SEO** Implementing **301 redirect URLs** correctly offers numerous advantages that extend far beyond fixing broken links. Let’s explore the key benefits that make redirects essential for any serious SEO strategy. **Preserving Link Equity** stands as the primary benefit of **301 redirects**. When other websites link to your pages, they pass valuable ranking signals that boost your search engine authority. Without proper redirects, changing URLs breaks these valuable connections, causing you to lose hard-earned SEO value. **Improving User Experience** represents another crucial advantage. Nobody likes clicking on a link only to encounter a “Page Not Found” error. **301 redirect URLs** ensure your visitors always reach relevant, helpful content, reducing bounce rates and increasing engagement metrics that search engines value. **Maintaining Search Engine Rankings** becomes possible when you implement redirects correctly. Instead of starting from scratch with new URLs, **301 redirects** allow you to preserve existing search visibility while making necessary website changes. ### **Additional SEO Advantages** **Consolidating Page Authority** helps when you have multiple similar pages competing for the same keywords. By redirecting duplicate or outdated content to a single, authoritative page, you concentrate ranking signals and avoid keyword cannibalization issues. **Facilitating Website Migrations** becomes much smoother with **301 redirects**. Whether you’re changing domains, switching to HTTPS, or restructuring your site architecture, redirects ensure minimal SEO disruption during the transition process. ## **Common Scenarios Where You Need 301 Redirects** Recognizing when to implement **301 redirect URLs** can save you from costly SEO mistakes. Here are the most common situations where redirects become essential for maintaining your website’s performance. **Domain Changes and Rebranding** top the list of scenarios requiring comprehensive redirect strategies. When you change your domain name or rebrand your business, **301 redirects** ensure that all existing backlinks, bookmarks, and search engine listings continue working seamlessly. For comprehensive guidance on this process, check out our detailed guide on [How to Redirect Domain to Another Domain](https://serveravatar.com/how-to-redirect-users-from-one-domain-to-another/). **URL Structure Changes** often necessitate redirects during website redesigns or Content Management System migrations. Whether you’re changing from dynamic URLs to SEO-friendly permalinks or reorganizing your site hierarchy, **301 redirect URLs** preserve your existing search visibility. **Content Consolidation** becomes necessary when you have multiple pages covering similar topics. Instead of competing with yourself for search rankings, you can redirect older or duplicate content to a single, comprehensive page that provides better value to your visitors. ### **Technical Migration Scenarios** **HTTPS Migration** requires redirecting all HTTP URLs to their secure HTTPS counterparts. This ensures visitors always access the encrypted version of your site while maintaining SEO value during the security upgrade process. **Mobile Optimization** sometimes involves redirecting desktop URLs to mobile-friendly versions, though responsive design has largely replaced this approach. However, understanding this scenario helps illustrate the versatility of **301 redirect URLs**. ## **Step-by-Step Guide to Implementing 301 Redirects** Successfully implementing **301 redirect URLs** requires careful planning and methodical execution. This comprehensive guide walks you through the entire process, ensuring you avoid common pitfalls while maximizing SEO benefits. **Step 1: Audit Your Current URLs** involves creating a complete inventory of pages that need redirecting. Document the source URLs (where visitors are coming from) and destination URLs (where you want them to go). This mapping becomes your redirect blueprint. **Step 2: Choose Your Implementation Method** depends on your technical skills and website setup. WordPress users can leverage plugins for simplicity, while advanced users might prefer server-level .htaccess modifications for better performance. **Step 3: Implement Redirects Systematically** requires following a logical sequence. Start with high-traffic pages and work your way down to less critical URLs. This approach minimizes potential disruption while ensuring your most valuable pages maintain their rankings. ### **Planning Your Redirect Strategy** **Create a Redirect Map** by listing all old URLs alongside their new destinations. Use spreadsheet software to organize this information, including columns for source URL, destination URL, redirect type, implementation date, and testing status. **Prioritize Based on Traffic and Authority** helps you focus on the most important redirects first. Use analytics tools to identify your highest-traffic pages and SEO tools to determine which URLs have the most backlinks or ranking power. ## **WordPress 301 Redirect Methods Made Simple** WordPress offers several approaches for implementing **301 redirect URLs**, each with distinct advantages depending on your technical comfort level and specific needs. For a complete walkthrough of WordPress redirect implementation, see our comprehensive guide on [How to Redirect a URL in WordPress](https://serveravatar.com/redirect-url-in-wordpress/). **Plugin-Based Solutions** provide the easiest entry point for most WordPress users. Popular options like “[Redirection](https://wordpress.org/plugins/redirection),” “301 Redirects,” and “Simple 301 Redirects” offer user-friendly interfaces for creating and managing redirects without touching code. **SEO Plugin Integration** often includes redirect functionality as part of comprehensive SEO suites. Tools like AIOSEO ([All in One SEO](https://aioseo.com)) and [Rank Math](https://rankmath.com) include powerful redirection managers that integrate seamlessly with other optimization features. **Manual Implementation** through functions.php or .htaccess files offers more control and potentially better performance, though it requires greater technical knowledge and careful handling to avoid breaking your site. ### **Choosing the Right WordPress Method** **Consider Your Technical Skills** when selecting an implementation method. Beginners should start with dedicated redirect plugins, while experienced developers might prefer server-level solutions for optimal performance. **Evaluate Your Needs** regarding the number of redirects, performance requirements, and ongoing maintenance capabilities. Large-scale migrations might benefit from plugin solutions, while simple, one-off redirects could work well with manual implementation. [![Blog banner - ServerAvatar](https://serveravatar.com/wp-content/uploads/2025/09/728_90-Banner-1-1024x127.png)](https://serveravatar.com?ref=blog)## **.htaccess File Implementation for Advanced Users** For users comfortable with server-level configurations, implementing **301 redirect URLs** through .htaccess files offers maximum control and optimal performance. This method executes redirects at the server level before WordPress even loads, reducing processing overhead. **Basic Redirect Syntax** follows a simple pattern: `Redirect 301 /old-page/ https://example.com/new-page/`. This tells the server to permanently redirect any request for the old page to the new destination. **Pattern-Based Redirects** become powerful tools for handling multiple similar URLs with single rules. Regular expressions allow you to redirect entire sections or follow specific patterns without creating individual rules for each URL. **Domain-Wide Redirects** help during complete site migrations. You can redirect all traffic from an old domain to a new one while preserving the URL structure, ensuring visitors reach equivalent pages on the new site. ### **Advanced .htaccess Techniques** **Conditional Redirects** let you create rules based on specific conditions like user agent, referring domain, or query parameters. This flexibility proves valuable for complex migration scenarios or specialized redirect requirements. **Redirect Chains Avoidance** becomes crucial when modifying existing .htaccess files. Always redirect to final destinations rather than creating chains that slow down page loading and potentially confuse search engines. ## Alternative Redirect Setups (CMS, CDN, and Services) If you’re not on WordPress, or you’d rather not touch server config files like .htaccess, you still have plenty of solid options. Redirects can be managed in a few other layers of your stack, each with its own tradeoffs. ### 1. Manage redirects inside your CMS Many CMS platforms beyond WordPress offer their own redirect UI or support redirects through plugins/extensions, so you’re not limited to .htaccess edits if you’re on a different system. **Shopify, Drupal, Joomla, and Webflow** all offer redirect features within the CMS. This is often the closest “no-code” alternative to WordPress. **Redirects managed in the same place as content:** You can create and update redirects right where you publish and edit pages, usually through a simple dashboard — no server access required. That makes it easy for marketing or content teams to maintain redirects during ongoing site updates. **Limited to one site or platform:** CMS redirect tools typically only apply to that single CMS instance. If you manage multiple domains, apps, or properties, redirects end up split across systems, which increases the chance of drift or missed updates. ### 2. Manage redirects at the CDN layer If your site sits behind a CDN, you can often create redirects at the edge — before requests ever hit your server. CDN, providers like **Cloudflare, Akamai, and Fastly** can all handle redirects at the edge. **Fast, edge-level redirects:** Because CDN redirects happen closer to the user, they’re quick and lightweight. They can also reduce origin-server load and improve performance during migrations or big URL cleanups. **Typically controlled by IT teams:** CDN rule sets are usually highly technical and owned by IT. Marketers and SEOs who are making frequent content changes typically won’t have access to create, manage, or analyze redirects. In practice, that means waiting on IT tickets for even simple redirect updates. ### 3. Use a dedicated URL redirection service For non-technical teams that want redirects centralized outside any single CMS or CDN, or have a large portfolio of websites or domains, a [redirect-management platform like urllo](https://www.urllo.com/url-redirect-service) can be a practical option. **Centralized control across domains and teams:** Manage redirects for multiple sites in one place with bulk tools, governance, and clear change history. A redirect management platform consolidates scattered redirect rules from multiple systems. **Monitoring and analytics built in:** Track usage, traffic and audience demographics. Validate migrations without pulling logs from multiple tools. ## **Testing Your 301 Redirects: Essential Tools and Methods** Proper testing ensures your **301 redirect URLs** function correctly and deliver the intended SEO benefits. Comprehensive testing prevents embarrassing broken redirects and protects your search engine rankings. **Browser Testing** provides the most straightforward verification method. Simply enter the old URL in your browser and confirm it redirects to the correct destination. However, this manual approach becomes impractical for large-scale implementations. **Online Redirect Checkers** automate the testing process and provide detailed information about redirect chains, response codes, and potential issues. Tools like Screaming Frog’s redirect checker and various online utilities can test multiple URLs simultaneously. **Server Response Analysis** helps verify that redirects return proper HTTP status codes. Tools like curl commands or browser developer tools reveal the technical details of redirect responses, ensuring they communicate correctly with search engines. ### **Comprehensive Testing Strategies** **Bulk Testing Tools** become essential for large websites with hundreds or thousands of redirects. Specialized SEO tools can crawl your entire site and identify redirect issues, broken chains, or incorrect implementations. **Mobile and Desktop Testing** ensures redirects work correctly across all devices. Some redirect implementations might behave differently on mobile devices, potentially impacting user experience and mobile SEO rankings. ## **Common 301 Redirect Mistakes to Avoid at All Costs** Even experienced webmasters sometimes fall into **301 redirect** traps that can damage SEO performance and frustrate visitors. Understanding these common mistakes helps you implement redirects more effectively. **Redirect Chains** represent one of the most frequent errors. This occurs when URL A redirects to URL B, which then redirects to URL C. Each additional redirect adds latency and potentially causes search engines to stop following the chain, resulting in lost SEO value. **Irrelevant Redirections** damage user experience and confuse search engines. Redirecting all old URLs to your homepage might seem convenient, but visitors expecting specific content will likely bounce when they don’t find what they’re looking for. **Using Wrong Redirect Types** can have long-term SEO consequences. Implementing 302 redirects for permanent changes prevents search engines from transferring ranking signals, essentially wasting your SEO investment. ### **Technical Implementation Errors** **Redirect Loops** create infinite cycles where pages redirect back to themselves or create circular patterns. These errors prevent pages from loading and can crash browsers or overwhelm servers. **Case Sensitivity Issues** sometimes cause redirects to fail on certain servers. Always test your redirects with various URL capitalizations to ensure they work consistently across different scenarios. ## **SEO Best Practices for Maximum Link Equity Transfer** Maximizing the SEO benefits of **301 redirect URLs** requires following established best practices that ensure optimal link equity transfer and search engine understanding. **Redirect to Relevant Pages** represents the golden rule of SEO redirects. The destination page should offer similar or related content to what visitors expected from the original URL. This relevance helps maintain user satisfaction and search engine trust. **Implement Redirects Quickly** after making URL changes minimizes SEO impact. The longer old URLs remain without redirects, the more likely you are to lose rankings and accumulate 404 errors that damage user experience. **Monitor Redirect Performance** helps identify issues before they significantly impact your SEO. Regular checking ensures redirects continue working properly and haven’t been accidentally removed or modified. ### **Advanced SEO Optimization** **Update Internal Links** to point directly to new URLs rather than relying on redirects. While **301 redirects** preserve SEO value, direct links perform better and reduce server load. **Maintain Redirect Consistency** across all implementations ensures unified messaging to search engines. Mixed redirect types or conflicting signals can confuse crawlers and reduce the effectiveness of your redirect strategy. ## **Troubleshooting 301 Redirect Issues** When **301 redirect URLs** don’t work as expected, systematic troubleshooting helps identify and resolve problems quickly. Common issues range from simple syntax errors to complex server configuration conflicts. **Check Redirect Syntax** first when redirects fail to work. Small typos in URLs, missing slashes, or incorrect status codes can prevent redirects from functioning properly. Always double-check your redirect rules against established syntax patterns. **Verify Server Configuration** ensures your hosting environment supports your chosen redirect method. Some hosting providers restrict .htaccess modifications or require specific configurations for redirects to function correctly. **Clear Browser Cache** often resolves issues where redirects appear broken but actually work correctly. Browsers cache redirect responses, sometimes causing them to remember old configurations even after you’ve made changes. ### **Advanced Troubleshooting Techniques** **Examine Server Logs** provides detailed information about redirect requests and responses. Log analysis can reveal patterns in failed redirects or identify specific conditions causing problems. **Test Different Browsers and Devices** helps isolate compatibility issues. Some redirect implementations might work in certain browsers but fail in others, particularly when using JavaScript-based redirects. ## **Monitoring and Maintaining Your Redirect Strategy** Successful **301 redirect URL** implementation extends beyond initial setup. Ongoing monitoring and maintenance ensure redirects continue delivering SEO benefits while adapting to changing website needs. **Regular Redirect Audits** help identify broken redirects, redirect chains, or outdated rules that no longer serve their purpose. Quarterly reviews catch issues before they significantly impact SEO performance. **Traffic Analysis** reveals how redirects affect user behavior and search engine crawling. Monitor metrics like bounce rates, time on page, and conversion rates for redirected traffic to ensure redirects enhance rather than hinder user experience. **Search Console Monitoring** provides valuable insights into how search engines interpret your redirects. Look for crawl errors, index coverage issues, or unexpected changes in search performance that might indicate redirect problems. ### **Long-Term Maintenance Strategies** **Document Redirect Decisions** creates valuable historical records for future reference. Include reasons for each redirect, implementation dates, and performance notes to help with future troubleshooting or optimization efforts. **Plan Redirect Lifecycle Management** involves eventually removing redirects that no longer serve their purpose. While **301 redirects** can remain in place indefinitely, cleaning up unnecessary redirects can improve site performance and reduce maintenance overhead. ## **Advanced 301 Redirect Techniques for Large Websites** Enterprise websites and large-scale operations require sophisticated **301 redirect URL** strategies that go beyond basic implementations. These advanced techniques ensure optimal performance while managing thousands of redirects efficiently. **Database-Driven Redirects** provide scalable solutions for websites with dynamic content and frequent URL changes. Storing redirect rules in databases allows for programmatic management and real-time updates without server file modifications. **Load Balancer Integration** becomes crucial for high-traffic websites using multiple servers. Implementing redirects at the load balancer level ensures consistent behavior across all servers while reducing individual server overhead. **API-Based Redirect Management** enables automated redirect creation and maintenance through custom applications or third-party services. This approach particularly benefits e-commerce sites with frequently changing product catalogs. ### **Performance Optimization Strategies** **Redirect Caching** improves response times by storing redirect responses in memory or CDN edge locations. Proper caching configuration reduces server load while maintaining fast redirect responses for repeat visitors. **Geographic Redirect Optimization** considers global website performance by implementing redirects at CDN locations closest to users. This approach minimizes latency while maintaining consistent redirect behavior worldwide. Mastering **301 redirect URLs** transforms your website from a maze of broken links into a seamless, SEO-optimized experience that delights both visitors and search engines. Remember, redirects aren’t just technical necessities – they’re powerful tools that preserve your hard-earned SEO value while guiding users exactly where they need to go. The key to success lies in understanding when and how to implement **301 redirects** properly, avoiding common mistakes, and maintaining your redirect strategy over time. Whether you’re managing a small business website or a large enterprise platform, the principles remain the same: redirect to relevant content, test thoroughly, and monitor performance regularly. By following the comprehensive strategies outlined in this guide, you’ll be well-equipped to handle any redirect scenario while maximizing your SEO benefits. Your visitors will thank you for the smooth navigation experience, and search engines will reward you with maintained rankings and continued organic traffic growth. ## **Frequently Asked Questions** ### **What’s the difference between a 301 redirect and a 302 redirect?** A 301 redirect indicates a permanent move and transfers SEO value to the new URL, while a 302 redirect signals a temporary move and doesn’t transfer ranking power. Use 301 redirects for permanent changes like domain migrations or URL restructuring, and 302 redirects for temporary situations like maintenance pages or A/B testing. ### **How long should I keep 301 redirects in place?** 301 redirects should generally remain in place permanently, especially for important pages with significant backlinks or search traffic. While search engines may eventually recognize the permanent move, keeping redirects ensures that any remaining external links continue to work properly and maintains optimal user experience. ### **Can too many 301 redirects hurt my website’s performance?** While individual 301 redirects have minimal performance impact, redirect chains (multiple redirects in sequence) can slow down page loading and waste crawl budget. Avoid chaining more than 3-5 redirects and always redirect to the final destination rather than creating multiple hops. ### **Do 301 redirects pass 100% of SEO value to the new URL?** 301 redirects pass most, but not necessarily 100%, of the original page’s SEO value. Google has stated that modern 301 redirects pass the same amount of PageRank as a regular link, making them highly effective for preserving search rankings during URL changes. ### **How can I test if my 301 redirects are working correctly?** You can test 301 redirects using browser developer tools, online redirect checkers, or command-line tools like curl. Simply enter the old URL and verify it returns a 301 status code while redirecting to the correct destination. For bulk testing, use SEO tools like Screaming Frog or online redirect testing services. **Categories:** Blog, Guide **Tags:** 301 redirect, boost seo, fix broken links, URL redirection --- ### [Common WordPress Errors and How to Fix Them](https://serveravatar.com/common-wordpress-errors/) **Published:** December 8, 2025 **Author:** Meghna Meghwani **Content:** [![Blog banner - ServerAvatar](https://serveravatar.com/wp-content/uploads/2025/09/728_90-Banner-3-1024x127.png)](https://serveravatar.com/?ref=blog)> Have you ever opened your WordPress website and suddenly thought, “What just went wrong?” WordPress errors often appear without warning, everything works perfectly, and then suddenly you’re staring at a blank screen or an unfamiliar error message. Don’t worry, you’re not alone. WordPress errors are common, even for experienced users. The good news? Most of them aren’t serious and can be fixed with a few simple steps. Think of your WordPress website like a car. Sometimes it makes a strange noise, but that doesn’t mean the engine is damaged—it just needs a quick check and the right fix. In this guide, we’ll walk you through the most common WordPress errors and explain how to fix them using clear, beginner-friendly steps. No technical background required. ## Introduction to Common WordPress Errors Running a WordPress site is usually straightforward, but every site owner eventually bumps into technical issues that can be confusing at first glance. Whether you manage a personal blog or a full-scale business website, errors in WordPress can disrupt your workflow, affect your visitors’ experience, or even take your site offline for a moment. The good news is that most WordPress problem, no matter how alarming they look, tend to have simple causes and practical solutions. From plugin conflicts to database connection hiccups, these issues often follow predictable patterns that you can diagnose and fix with a bit of guidance. Understanding the most common WordPress errors not only saves time but also gives you more confidence as a site owner. Instead of feeling stuck when a warning message appears, you’ll know what it means, why it happens, and how to resolve it. In this guide, we’ll break down the typical errors you might encounter and offer clear steps to troubleshoot them, even if you’re not a developer. In this guide, we’ll go through the most common issues WordPress users face and explain how to troubleshoot them with clear, simple steps. ## Common WordPress Errors and How to Fix Them ## 1. The “White Screen of Death” The White Screen of Death is exactly what it sounds like, a completely blank screen where your website should be. This is one of the most confusing issues for beginners because there’s no error message to explain what’s wrong. ![WordPress Errors - White screen of death](https://serveravatar.com/wp-content/uploads/2025/12/image-38.png) **Why it happens:** - A conflicting plugin or theme - Running out of memory on the server - A broken piece of code in a custom theme or function **How to fix it:** - Disable your plugins one by one to find the faulty one. - Switch to WordPress default theme such as Twenty Twenty-Four. - Increase your PHP memory limit if your hosting provider allows it. - Once you find the cause, your site usually comes back immediately. This error feels scary, but it’s usually easy to fix. ## 2. Error Establishing a Database Connection This message appears when WordPress can’t connect to the database that stores your site’s content. Without this connection, your site simply can’t load. ![WordPress Errors - Establishing a Database Connection](https://serveravatar.com/wp-content/uploads/2025/12/image-39.png) **Why it happens:** - Incorrect database credentials - Corrupted database tables - Temporary issues on your server **How to fix it:** - Check your wp-config.php file and make sure the database name, username, and password are correct. - If your host offers a database repair tool, use it to fix corrupted tables. - Contact your hosting support to confirm if there’s a server-related issue. - Often, beginners face this error after moving their website or changing their hosting plan. Think of the database as WordPress’s brain, if communication breaks, nothing works. ## 3. **404 Page Not Found Error** This error appears when a visitor clicks on a link that no longer exists or the page path is incorrect. Even though it looks like a problem with WordPress, it’s usually just a permalink issue. ![WordPress Errors - 404 Page Not Found](https://serveravatar.com/wp-content/uploads/2025/12/image-40.png) **Why it happens:** - WordPress permalink settings are broken - A page or post was deleted or moved - Plugin rewrites interfering with URLs **How to fix it:** - Go to **Settings >> Permalinks.** Click “Save Changes” directly without editing anything. - Double-check your page URL to make sure it still exists. - Disable plugins related to redirection or SEO to rule out conflicts. This resets WordPress routing; a quick refresh of the permalink settings solves this error in most cases in seconds. ## 4. Internal Server Error (500 Error) The 500 error is a general message that appears when the server can’t complete a request. It doesn’t tell you the exact cause, which can make it confusing for beginners. ![WordPress Errors - Internal Server ](https://serveravatar.com/wp-content/uploads/2025/12/image-41.png) **Why it happens:** - Corrupted .htaccess file - Faulty plugin or theme - Memory or server configuration issues **How to fix it:** - Rename your .htaccess file to reset it and let WordPress create a new one. - Disable all plugins to check for conflict. - Switch to a default theme temporarily. Once the culprit is identified and removed, your site should load normally again. ## **5. WordPress Stuck in Maintenance Mode** Sometimes, while updating plugins or themes, WordPress gets stuck in maintenance mode. When this happens, you’ll see a message saying the site is unavailable. ![WordPress Errors - WordPress Stuck in Maintenance Mode](https://serveravatar.com/wp-content/uploads/2025/12/image-42.png) **Why it happens:** - An interrupted update - A slow server that times out - Multiple updates running at the same time **How to fix it:** - Connect your website with FTP or the file manager provided by your hosting provider. - Look for a file called .maintenance in the root folder. - Delete that file and your site will return immediately. - This is one of the fastest errors to fix once you know where to look. That’s it. Your site should be back instantly. ## 6. Login Page Refreshing or Redirecting If you enter your login details and the page simply refreshes without logging you in, you’re dealing with a cookie or URL mismatch issue. **Why it happens:** - Incorrect WordPress address or site address - Corrupted login cookies - Plugin conflicts **How to fix it:** - Clear your browser cache and cookies. - Check your site’s URL settings in **Settings → General**. - Deactivate plugins related to security or login protection. With the correct site URLs, the login page usually starts working again. ## 7. Forbidden 403 Error A 403 error happens when your server blocks you from accessing a page you should be allowed to view. ![WordPress Errors - Forbidden 403 ](https://serveravatar.com/wp-content/uploads/2025/12/image-43.png) **Why it happens:** - Incorrect file permissions - Security plugins blocking access - Misconfigured .htaccess rules **How to fix it:** - Correct your file permissions (your host can help with this). - Temporarily disable your security plugin. - Replace the .htaccess file with a fresh one. This issue is common on sites with strict security settings. ## 8. Memory Limit Exhausted Error If you see something like **“Allowed memory size exhausted”**, it means your website needs more resources than the server is currently providing. ![WordPress Errors - Memory Limit Exhausted Error](https://serveravatar.com/wp-content/uploads/2025/12/image-44.png) **Why it happens:** - Resource-heavy plugins - Large import/export tasks - Running multiple plugins at the same time **How to fix it:** - Deactivate plugins that use a lot of memory, like page builders or analytics tools. - Ask your hosting provider to increase your PHP memory limit. - Consider upgrading your hosting plan if your site has grown. This error is very common on shared hosting plans with limited memory. ## 9. Too Many Redirects Error The “Too Many Redirects” error happens when your browser gets stuck in a loop trying to reach your website. Instead of loading the correct page, it keeps getting redirected back and forth until it finally gives up. **Why it happens:** - Wrong WordPress Address (URL) or Site Address settings - Plugin conflicts (especially SEO, caching, or redirect plugins) - Misconfigured .htaccess file - HTTPS/SSL redirect loops when switching from HTTP to HTTPS **How to fix it:** - Check your WordPress URLs by navigating to the **Settings → General** and make sure your WordPress Address (URL), and Site Address (URL) match exactly. - If your site uses HTTPS, both should start with **https://**. - Clear your browser cookies and cache - Disable redirect or caching plugins like, Redirection, Rank Math / Yoast SEO, WP Super Cache or LiteSpeed Cache, etc. - Reset your .htaccess file Once the incorrect rule or plugin is fixed, the site will load normally. ## 10. Syntax Error in WordPress A syntax error usually appears right after editing code in WordPress—such as adding custom functions, editing a theme, or modifying a plugin. The screen often shows a message like: **“Parse error: syntax error, unexpected…”** ![WordPress Errors - Syntax Error in WordPress](https://serveravatar.com/wp-content/uploads/2025/12/image-45.png) **Why it happens:** - Missing or extra characters like {}, (), ;, or quotes - Copy–paste errors from code snippets - Editing theme files incorrectly - Incorrect PHP version compatibility **How to fix it:** - Identify the file and line number, the error message tells you the exact file and line causing trouble. - Access your site via FTP or File Manager and open the file, such as, functions.php, header.php, custom.php - Remove or fix the problematic code - Upload the corrected file Always use a child theme or Code Snippets plugin when adding custom code to avoid crashing your site. One tiny comma can break everything, code is sensitive. [![Blog banner - ServerAvatar](https://serveravatar.com/wp-content/uploads/2025/09/728_90-Banner-1-1024x127.png)](https://serveravatar.com/?ref=blog)## 10. Images Not Uploading in WordPress Sometimes WordPress refuses to upload images, showing errors like: - Files stuck at 0% upload - “Unable to create directory” - “HTTP error”[](https://storage.3.basecamp.com/5840738/blobs/28a937de-d415-11f0-abc3-0242ac120003/download/image.png) ![WordPress Errors - Images Not Uploading in WordPress](https://serveravatar.com/wp-content/uploads/2025/12/image-46.png) **Why it happens:** - Wrong file permissions on the server - Browser-related issues - Conflicts with image optimization plugins - Memory limits - Incorrect folder structure inside /uploads **How to fix it:** - Check file permissions and Set wp-content/uploads permissions to 755 - Disable image optimization plugins like Smush, Imagify, or ShortPixel may block upload processing. - Try a different browser - Increase your PHP memory limit - Verify your upload directory path Once permissions or configuration are fixed, uploads should work normally. ## 11. Updating Failed or Publishing Failed Error This issue appears in the WordPress block editor (Gutenberg) when WordPress is unable to communicate with the server through the REST API. ![WordPress Errors - Updating Failed or Publishing Failed Error](https://serveravatar.com/wp-content/uploads/2025/12/image-47.png) **Why it happens:** - Incorrect REST API settings - Security plugins blocking requests - Problems with the internet connection - Caching issues - Incorrect site URLs - Server mod\_security rules **How to fix it:** - Check your website URLs - Disable conflicting plugins - Enable HTTPS properly - Clear cache - Test REST API status by navigating to: “yourwebsite.com/wp-json/”. If it doesn’t load correctly, the REST API is blocked. When WordPress can communicate again, the editor will publish normally. ## 12. Mixed Content Warnings A mixed content warning appears when your website uses HTTPS, but some resources (such as images, CSS, or scripts) still load via HTTP. This makes the site partially insecure. **Why it happens:** - Old image URLs still using http:// - Hard-coded links in theme files - Plugins loading external scripts without HTTPS - Improper SSL configuration **How to fix it:** - Use a plugin like ‘Better Search Replace’ or ‘Really Simple SSL’ to update URLs - Check your browser console to see which files are causing warnings. - Replace any http:// URLs in theme files or header/footer scripts. - Ensure your SSL certificate is active When all resources load over HTTPS, the warning disappears and your padlock icon returns. ## 13. Website Slow or Not Loading Properly A slow-loading WordPress website is one of the most common issues site owners face. Slow performance impacts your visitors and SEO rankings. **Why it happens:** - Too many active plugins - Heavy themes or page builders - Large, unoptimized images - No caching system - Slow hosting or overloaded servers - External scripts (ads, tracking codes) - Outdated PHP version **How to fix it:** - Install a caching plugin to speed up loading. - Optimize your images - Remove unnecessary plugins - Use a lightweight theme like GeneratePress, Astra, or Blocksy - Use a CDN (Content Delivery Network) to speed up global loading times. - Update your PHP version to improve speed instantly. Once optimized, your site will load faster, use fewer resources, and offer a better experience for users. ## How ServerAvatar Helps Prevent Common WordPress Errors Many WordPress errors don’t happen because WordPress itself is bad, they happen because of poor server configuration, limited resources, or complicated hosting setups. This is where using a smart server management platform like ServerAvatar can make a real difference. **What is ServerAvatar?** [ServerAvatar](https://serveravatar.com/) is designed to simplify server hosting and management and reduce the chances of common WordPress issues before they even occur. Instead of manually configuring server settings or worrying about technical details, ServerAvatar handles the heavy lifting in the background. ![ServerAvatar Dashboard](https://serveravatar.com/wp-content/uploads/2025/12/image-48.png) Here’s how ServerAvatar helps WordPress users avoid frequent errors: **1. Optimized Server Stack for WordPress** ServerAvatar sets up an optimized server environment (including Nginx, PHP, MySQL/MariaDB, and caching layers) that works smoothly with WordPress. This significantly reduces issues like: - Internal Server Errors (500 errors) - Memory limit exhausted errors - Slow-loading or timeout issues Because the server is properly tuned from the start, WordPress runs more efficiently with fewer conflicts. **2. Built-In Resource Management** Many WordPress errors happen when the site runs out of server resources. ServerAvatar gives you clear visibility into: - CPU usage - RAM usage - Disk space This makes it easier to spot problems early and prevent errors like the White Screen of Death or database connection failures caused by overloaded servers. **3. Simple Error Troubleshooting** ServerAvatar provides easy access to server logs and error details. Instead of guessing what went wrong, you can quickly identify: - PHP errors - Database issues - Server-level configuration problems This makes troubleshooting WordPress errors faster, even if you’re not a system administrator. > **Note** **that** ServerAvatar offers **24/7 technical support** from our expert team to help you resolve any queries or server-level issues. > > If you’re new to technical tasks and need assistance at the application level, our **[Premium Hosting Care Plan](https://serveravatar.com/premium-hosting-care-plan/)** is the perfect solution. A **Premium Hosting Care Plan** typically provides the following benefits: - App Level Troubleshooting - Custom Server Config - Optimisation Assist - Pro-Active Monitoring - Free Inward Migration - Priority Troubleshooting - High Priority Support - A dedicated, personalized Slack channel where you can connect directly with the entire ServerAvatar team for quick support ### **One-Click WordPress Installation with ServerAvatar** One of the biggest advantages of using ServerAvatar is its [one-click WordPress](https://serveravatar.com/docs/application/one-click-installer/wordpress/) and many other popular application installation features. This removes many setup-related mistakes that later cause errors. **Why One-Click Installation Matters** Manually installing WordPress often leads to: - Incorrect database configuration - Wrong file permissions - Broken wp-config.php files - Security misconfigurations ServerAvatar eliminates these risks by handling everything automatically. **How One-Click WordPress Installation Works** With ServerAvatar: - You select the **WordPress** application from the server panel - Fill in the details and click **Install** - ServerAvatar automatically configures the database, permissions, PHP version, and server settings ![Server Panel - ServerAvatar ](https://serveravatar.com/wp-content/uploads/2025/12/image-49-1024x839.png) Your WordPress site is ready within minutes, no manual steps, no error-prone configuration. **Fewer Setup Errors, More Stability** Because WordPress is installed on a properly configured server: - 404 errors caused by broken permalinks are reduced - Database connection errors are far less likely - Login issues and redirect loops are minimized - Mixed content and SSL issues are easier to manage This makes ServerAvatar a strong choice for beginners and professionals who want a smoother WordPress experience with fewer technical headaches. **Why This Matters for WordPress Site Owners** If you’re frequently dealing with WordPress errors, the problem may not be WordPress, it may be your hosting environment. Using ServerAvatar helps create a stable foundation where WordPress can run without constant troubleshooting. Instead of fixing the same errors again and again, you start preventing them. ## **Conclusion** WordPress errors can be frustrating, but most of them are easy to fix once you understand what’s causing them. With the right troubleshooting steps and a stable server setup, you can resolve issues quickly and avoid repeated problems. By keeping your site optimized and using reliable tools, you’ll spend less time fixing errors and more time growing your WordPress website. Many WordPress problems start at the server level. A well-configured hosting environment, proper resource management, and simplified setup can prevent many errors before they ever appear. With the ServerAvatar, you move from constantly reacting to issues to actively preventing them, keeping your WordPress site running smoothly for both you and your visitors. ## **FAQs** About Common WordPress Errors ### **1. Are WordPress errors common?** Yes, WordPress errors are common and usually easy to fix with the right steps. ### **2. Can plugins cause most WordPress errors?** Plugin conflicts are one of the most common reasons for errors. ### **3. Do I need coding skills to fix WordPress errors?** Most fixes require basic actions like setting changes or file renaming. ### **4. How can I prevent WordPress errors in the future?** You can prevent many errors by keeping WordPress, plugins, and themes updated, using reliable plugins, choosing a stable hosting environment, and regularly backing up your site. A well-optimized server setup can also significantly reduce error frequency. ### **5. How can I prevent WordPress errors in the future?** You can prevent WordPress errors by keeping WordPress, themes, and plugins updated, using trustworthy plugins, and taking regular backups. Choosing a stable server setup also helps, ServerAvatar provides an optimized environment and one-click WordPress installation, reducing common server-related issues before they happen. [](https://storage.3.basecamp.com/5840738/blobs/455cf8ca-d415-11f0-b274-0242ac120003/download/image.png) **Categories:** Blog, Guide, WordPress **Tags:** common wordpress errors, Wordpress, Wordpress Errors, WordPress Issues, WordPress Tips, WordPress Troubleshooting --- ### [Divi vs Elementor: Which Is the Best WordPress Page Builder?](https://serveravatar.com/divi-vs-elementor/) **Published:** December 4, 2025 **Author:** Meghna Meghwani **Content:** [![Blog banner - ServerAvatar](https://serveravatar.com/wp-content/uploads/2025/09/728_90-Banner-3-1024x127.png)](https://serveravatar.com/?ref=blog)When you’re building a WordPress website, choosing the right page builder can feel a bit like deciding between iPhone and Android, both are powerful, both are popular, and both have strong communities behind them. And that’s exactly why the Divi vs Elementor debate is so common among WordPress users. Divi and Elementor are two of the most widely used WordPress page builders today. They both offer drag-and-drop editing, beautiful templates, and complete design freedom. But they also come with key differences that can shape your workflow, site speed, creativity, and budget. Let’s break everything down in a simple, easy-to-understand way so you can confidently choose the right tool for your website. ## What Are WordPress Page Builders? WordPress page builders let you create websites visually using drag-and-drop tools, no coding needed. Instead of dealing with HTML or CSS, you simply grab elements like text, images, buttons, or forms and arrange them on the page. Think of it like playing with digital Lego blocks: you snap things together to build your ideal website. Both Divi and Elementor fall into this category, offering powerful visual editors used by millions. ## What Makes Divi and Elementor So Popular? Before we compare them, it’s important to understand why these two dominate the market. - They make website building easy, even for beginners - No coding required - Full visual editing - Huge template libraries - Compatible with most WordPress themes - Perfect for designers, freelancers, and agencies In short, they help you build professional websites faster and easier. ## Overview of Divi [Divi](https://www.elegantthemes.com/gallery/divi/), built by Elegant Themes, is both a theme and a page builder. That’s one of its biggest attractions, everything works together seamlessly. Divi is known for its sleek interface and powerful customization controls, making it popular among designers. [](https://storage.3.basecamp.com/5840738/blobs/2227dc78-d0df-11f0-aa53-0242ac120003/download/image.png) ![Divi vs Elementor - Divi](https://serveravatar.com/wp-content/uploads/2025/12/image-24-1024x504.png) **Key Features** - Drag-and-drop builder - Thousands of templates - Global styles system - Built-in A/B testing - Lifetime pricing option - Highly customizable theme builder **Pros** - Lifetime access available - Beautiful built-in templates - Strong theme builder - Excellent design flexibility - Built-in split testing (rare in builders) **Cons** - No free version - Can be slow on some sites - Learning curve can be high ## Overview of Elementor [Elementor](https://elementor.com/) is one of the most widely used page builders in the world, with millions of active installations. Elementor is lightweight, easy to use, and offers a free version, something Divi doesn’t. ![Divi vs Elementor - Elementor](https://serveravatar.com/wp-content/uploads/2025/12/image-25-1024x484.png) **Key Features** - Fast drag-and-drop editor - Massive library of widgets - Theme builder - WooCommerce builder - Popup builder - Extensive third-party add-on ecosystem **Pros** - Free version available - Huge widget library - Popup builder included - Great performance - Highly intuitive editor **Cons** - No lifetime plan - Can require premium add-ons - Costs rise for multi-site usage ## Divi vs Elementor: Feature Comparison To make things easy, here’s a quick comparison of the major features: **Feature****Divi****Elementor****Visual Builder**YesYes**Theme Builder**YesYes**Popup Builder**NoYes**Free Version**NoYes**Inline Editing**YesYes**Template Library**LargeVery Large**Third-Party Add-ons**ModerateHugeBoth are strong, but Elementor has an edge in flexibility due to third-party add-ons and a powerful popup builder. ## Divi vs Elementor: Ease of Use **Divi** Divi’s interface is stylish but can feel overwhelming to beginners. It hides most settings inside collapsible menus that may take time to get used to. Divi takes a slightly different approach. Instead of a fixed sidebar panel, your editing happens visually in real time, right on the page. Some users love this immersive editing mode, while others feel it takes time to get used to. **Elementor** Elementor’s sidebar editor is extremely intuitive. Everything you need sits neatly on the left side, making it easier for new users to understand. Everything feels clean, smooth, and beginner-friendly. Elements appear on the left panel, and you drag them onto your page. Even someone who has never built a website can understand it in minutes. **Final Verdict:** Elementor has a smoother learning curve. ## Design Flexibility & Templates Both builders come loaded with beautiful templates and allow deep customization. **Divi** Divi shines in design customization. It offers massive control over styling, animations, spacing, shadows, and effects. - Over 2,000 pre-made layouts - 200+ layout packs - Strong focus on modern, elegant designs Divi is a favorite among agencies for its polished visuals. **Elementor** Elementor offers great design flexibility, especially with the Pro version. It allows custom positioning, global colors, and responsive design adjustments. - 100+ full website kits - Hundreds of page templates - Better compatibility with third-party template libraries **Final Verdict:** Divi offers stronger native designs, and Elementor has more expandability. ## Theme Builder Capabilities Theme builders allow you to design headers, footers, blog layouts, and WooCommerce pages. Both Divi and Elementor offer powerful theme-building tools, but they work in slightly different ways. **Divi** Divi’s Theme Builder is deeply integrated within its visual editor, giving you full control over your site’s design without needing any third-party tools. You can visually design: - Global headers and footers - Custom blog post templates - Category and archive pages - WooCommerce product and shop layouts - Custom 404 pages - Search results pages - Author pages **Elementor** Elementor’s Theme Builder is known for being extremely organized and user-friendly. It provides a dashboard where you can manage all your templates from one place. You can design templates for: - Single posts - Pages - Headers & footers - Product pages (WooCommerce) - Shop and archive layouts - Category pages - Search pages - 404 pages **Final Verdict:** Both Divi and Elementor offer powerful theme-building capabilities, but Elementor provides a cleaner, more organized interface with stronger dynamic content support. ## Divi vs Elementor: Speed & Performance Website speed plays a major role in user experience, SEO rankings, and overall site performance. Both builders add extra code, but performance varies. **Divi Performance** Divi has made noticeable improvements in performance over the past couple of years. Earlier versions were heavier, but Elegant Themes introduced several optimizations to improve loading speed and reduce file size. Some of these upgrades include: - Dynamic CSS that loads only what’s needed - Smart Styles that reduce duplicate code - Lazy loading for resources - Faster rendering for modules and layout packs **Elementor Performance** Elementor also focused heavily on performance optimization in recent updates. It still loads faster out of the box in most setups, mainly because of its structured code and optimized asset loading system. Elementor’s improvements include: - Reduced DOM output for cleaner, faster pages - Improved JavaScript and CSS loading - Selective widget loading so unused elements don’t slow down the site - Better compatibility with performance plugins **Final Verdict:** Both builders have made strong progress in performance, but Elementor generally produces faster, lighter pages with less effort, especially for beginners [![Blog banner - ServerAvatar](https://serveravatar.com/wp-content/uploads/2025/09/728_90-Banner-1-1024x127.png)](https://serveravatar.com/?ref=blog)## Divi vs Elementor: Pricing Comparison Price plays a major role when choosing a page builder, especially if you manage multiple client websites. Both Divi and Elementor offer competitive pricing, but their models work very differently. **Divi Pricing** - **Yearly Access:** ~$89/year - **Lifetime Access:** ~$249 one-time This makes Divi a great long-term investment. **Elementor Pricing** - **Essential:** ~$60/year - **Advanced solo:** ~$79/year - **Advanced:** ~$90/year - **Expert:** ~$164/year Elementor is cheaper for single sites but expensive for agencies unless using add-ons. **Final Verdict:** Divi’s lifetime plan offers unbeatable value. ## Plugin Compatibility & Integrations Both builders support major WordPress plugins, but Elementor has a far larger ecosystem of third-party extensions. These add-ons extend functionality with new widgets, templates, marketing tools, animations, and dynamic features. **Divi** Divi works smoothly with most popular plugins like WooCommerce, Yoast, RankMath, WPForms, and more. While its add-on ecosystem is smaller than Elementor’s, several high-quality extensions exist. **Elementor** Elementor has the largest third-party ecosystem of any page builder. Countless developers build extensions specifically for Elementor, making it unstoppable when it comes to flexibility. **Final Verdict:** Elementor’s add-on ecosystem is unmatched. ## Support & Community **Divi** - 24/7 chat support - Massive Facebook groups - Helpful knowledge base - Users often praise Divi’s live chat support. **Elementor** - Ticket support - Large global community - Many tutorials available - Support is good, but response times vary depending on your plan. **Final Verdict:** Both have excellent support systems. ## Add-Ons & Ecosystem **Divi** Divi also has add-ons, but the ecosystem is smaller compared to Elementor’s. **Popular Divi Add-ons & Extensions:** - Divi Supreme Pro - Divi Essential - Divi Toolbox - Divi Pixel - Divi Carousel Maker - DiviMega Pro (Mega Menu Builder) **Elementor** Elementor has a huge third-party add-on ecosystem. From extra widgets to marketing tools, its marketplace is rich and constantly growing. **Popular Elementor Add-on Packs:** - Essential Addons for Elementor - PowerPack for Elementor - Crocoblock JetPlugins (JetEngine, JetSmartFilters, etc.) - Qi Addons for Elementor - Unlimited Elements for Elementor ## Which Page Builder Should You Choose? Here’s a simple way to decide: **Choose Elementor if:** - You want a free version - You prefer a clean, beginner-friendly interface - You need a huge collection of third-party addons - You want an intuitive theme builder **Choose Divi if:** - You want unlimited website usage - You prefer a one-time purchase instead of yearly fees - You want a massive template library - You love deep design customization ## Which One Is Best for Beginners? If you’re new to website building and want something easy, Elementor is the better choice. Its interface is straightforward and beginner-friendly. But if you want long-term savings plus beautiful designs, Divi is excellent, especially for agencies or freelancers. ## Final Verdict: Divi vs Elementor So, Divi vs Elementor, who wins? Honestly, it depends on what you value most. - Choose **Elementor** if you want speed, ease of use, and a powerful free version. - Choose **Divi** if you want stunning designs, lifetime pricing, and deep customization. Both builders are powerful, both can create beautiful websites, and both are trusted by millions. No matter which one you choose, you’ll have a reliable, flexible tool to bring your WordPress website to life. ## FAQs ### **1. Which builder offers better performance?** Elementor usually performs better out of the box and loads pages faster. Divi has improved significantly but may still feel heavier on some websites. ### **2. Which one is more affordable in the long run?** Divi is more cost-effective over time because it offers a one-time lifetime purchase. Elementor requires annual renewals, especially if you build multiple sites. ### **3. Can I switch from Divi to Elementor (or vice versa) later?** You can, but switching page builders often leaves behind shortcode or layout issues. It’s best to choose your builder early and stick with it for the site’s lifetime. ### **4. Is Elementor better for WooCommerce?** Elementor has a dedicated WooCommerce builder with many advanced widgets, making it slightly better for ecommerce sites. ### **5. Which should I choose if I want maximum design control?** Divi provides deeper styling and design customization options, making it great for designers who want full creative freedom. ## Stop Wasting Time on Servers. Start Building Instead. You didn’t start your project to babysit servers. Let **ServerAvatar** handle deployment, monitoring, and backups — so you can focus on growth. Deploy **WordPress, Laravel, N8N**, and more in minutes. No DevOps required. No command line. No stress. [ 🚀 Try Free ](https://app.serveravatar.com) [ 🌐 Learn More ](https://serveravatar.com/) Trusted by 10,000+ developers and growing. **Categories:** Blog, Guide, WordPress **Tags:** divi, divi vs elementor, elementor, Wordpress, wordpress page builder, wordpress tools --- ### [WP Rocket vs LiteSpeed Cache: Which One Is Best?](https://serveravatar.com/wp-rocket-vs-litespeed-cache/) **Published:** December 2, 2025 **Author:** Meghna Meghwani **Content:** [![Blog banner - ServerAvatar](https://serveravatar.com/wp-content/uploads/2025/09/728_90-Banner-3-1024x127.png)](https://serveravatar.com/?ref=blog)Website speed plays a major role in how well your WordPress site performs. A slow site can hurt user experience, lower conversions, and even affect your search rankings. That’s why choosing the right caching plugin is so important, especially when comparing WP Rocket vs LiteSpeed Cache. Two of the most widely used options today are WP Rocket and LiteSpeed Cache, both powerful, both popular, and both designed to make your website faster. But which one actually fits your needs better? Let’s break it down simply, so you can make the right choice without any tech confusion. Website speed isn’t a luxury anymore; it’s a necessity. Whether you’re running a blog, online store, or business site, you need a caching plugin that boosts performance without giving you a headache. This detailed guide compares WP Rocket vs LiteSpeed Cache to help you pick the right tool. ## What Is a Caching Plugin? A caching plugin creates a static version of your web pages so they’re served instantly, just like giving customers ready-made content instead of preparing everything from scratch every time. This helps reduces: - Loading time - Server load - Bounce rate - Frustration for both you and your visitors ## WP Rocket Overview [WP Rocket](https://wp-rocket.me/) is a premium WordPress caching plugin designed to improve website performance without requiring technical skills. It offers a simple setup with powerful optimization features that work right out of the box. From caching to file optimization and lazy loading, everything is built to boost speed effortlessly. Many website owners prefer WP Rocket because it delivers instant results with minimal configuration. It’s a reliable choice for users who want faster load times without dealing with complex settings. ![WP Rocket - WP Rocket vs LiteSpeed Cache ](https://serveravatar.com/wp-content/uploads/2025/12/image-10-1024x475.png)**Key Highlights** - User-friendly dashboard - Excellent out-of-the-box performance - Built-in tools like lazy loading, database cleanup, and CDN integration **Pros** - Very easy to set up, even for beginners. - Works seamlessly on any type of hosting environment. - Offers built-in optimization tools like lazy loading and database cleanup. - Stable and reliable performance improvements. - Excellent support and regular updates. **Cons** - No free version is available. - Lacks server-level caching (unlike LiteSpeed Cache on LiteSpeed servers). - Some advanced features still require manual tweaks for optimal results. **Why Use WP Rocket?** Use WP Rocket if you want fast performance improvements with almost no configuration effort. **Best For** Best for beginners, bloggers, business sites, and anyone who wants a simple yet powerful caching solution. You can easily install it, activate it, and it starts working immediately. ## LiteSpeed Cache Overview [LiteSpeed Cache](https://wordpress.org/plugins/litespeed-cache/) is a powerful and free WordPress caching plugin built to work seamlessly with LiteSpeed Web Servers. It offers server-level caching, which delivers significantly faster performance compared to most regular caching plugins. With an extensive list of optimization tools, it’s capable of handling everything from image compression to advanced page-level caching. While it offers exceptional speed, some of its best features work only when your hosting is powered by LiteSpeed. It’s a top choice for users who want high performance without spending money. ![LiteSpeed Cache - WP Rocket vs LiteSpeed Cache ](https://serveravatar.com/wp-content/uploads/2025/12/image-11-1024x461.png) **Key Highlights** - Completely free - Offers server-level caching (much faster than normal caching) - Packed with advanced features However, if your hosting doesn’t use LiteSpeed Server, you won’t get the best results. **Pros** - Completely free to use. - Offers server-level caching for extremely fast performance. - Packed with advanced optimization features. - Efficient image optimization through QUIC.cloud. - Highly customizable for developers and advanced users. **Cons** - Works best only on LiteSpeed Server hosting. - Interface and settings may feel overwhelming for beginners. - Some QUIC.cloud features have usage limits or paid tiers. **Why Use LiteSpeed Cache?** Use LiteSpeed Cache if you want maximum speed and optimization for free, especially on LiteSpeed-powered hosting. **Best For** Best for users on LiteSpeed hosting who want top-tier caching performance without paying for a premium plugin. ## WP Rocket vs LiteSpeed Cache: Quick Comparison Table **Feature****WP Rocket****LiteSpeed Cache****Ease of Use**Very EasyModerate**Server-Level Cache**NoYes (LiteSpeed server only)**Setup**One-click optimizationMany settings**Best For**Beginners, all hosting typesLiteSpeed hosting users**CDN Integration**Built-inAvailable**Extra Features**ManyMany**Caching Type**File-based cachingServer-level caching**Image Optimization**YesYes**Database Optimization**YesYes**Pricing**PaidFree## WP Rocket vs LiteSpeed: Speed Performance Speed is the core reason to use a caching plugin. **WP Rocket Performance** WP Rocket optimizes everything from the front-end to the database, offering consistent performance improvements regardless of the hosting provider. **LiteSpeed Cache Performance** LiteSpeed Cache is unbeatable if you are using LiteSpeed hosting. Its server-level caching can outperform most plugins, including WP Rocket. **Final Verdict** - Using LiteSpeed hosting → **LiteSpeed Cache is faster** - Using any other hosting → **WP Rocket performs better** ## Ease of Use: Which One Is Simpler? **WP Rocket** Imagine turning on a fan, one switch, instant airflow. That’s WP Rocket. The plugin handles most settings automatically. **LiteSpeed Cache** More like driving a manual car. Powerful, but you need to know what you’re doing. New users feel overburdened with the number of available options. **Final Verdict** WP Rocket is easier for beginners. ## WP Rocket vs LiteSpeed: Feature-by-Feature Breakdown Let’s compare the major features you need. **1. Page Caching** - WP Rocket: Excellent - LiteSpeed Cache: Superior on LiteSpeed servers **2. Image Optimization** Both plugins support: - Lazy loading - Image compression - WebP format **3. Database Optimization** Both include database cleanup tools. **4. Minification & Combining** Both can minify HTML, CSS, and JS, but WP Rocket’s system is more stable. **5. CDN Support** - WP Rocket integrates natively with Cloudflare. - LiteSpeed Cache uses QUIC.cloud, which is fast but has usage limits. ## WP Rocket vs LiteSpeed: Hosting Compatibility **WP Rocket** Works perfectly on: - Shared hosting - VPS - Managed WordPress hosting - Cloud hosting **LiteSpeed Cache** Works best only on: - LiteSpeed Web Servers If you’re using Apache or Nginx hosting, you won’t get the full benefits. ## WP Rocket vs LiteSpeed: Pricing Comparison **WP Rocket** - Premium-only plugin - Annual plans - No free version **LiteSpeed Cache** - Completely free - Some QUIC.cloud services have paid upgrades [![Blog banner - ServerAvatar](https://serveravatar.com/wp-content/uploads/2025/09/728_90-Banner-1-1024x127.png)](https://serveravatar.com/?ref=blog)## Real-World Use Cases **WP Rocket Is Ideal For:** - Bloggers - Small business websites - WordPress beginners - E-commerce stores **LiteSpeed Cache Is Ideal For:** - Websites hosted on LiteSpeed servers - Developers who prefer deeper control - Users wanting maximum performance at zero cost ## Which One Should You Choose? To make it super simple: **Choose WP Rocket If:** - You want ease of use - You’re not on LiteSpeed hosting - You want reliable performance without complexities **Choose LiteSpeed Cache If:** - Your hosting uses LiteSpeed server - You want maximum speed for free - You are comfortable with technical settings Both are excellent, but the best one depends on your hosting environment. ## Optimize Performance Even Further With ServerAvatar Choosing the right caching plugin is only one part of improving your website’s speed. To get the best results, your server should also be optimized properly. **What is ServerAvatar?** [ServerAvatar](https://serveravatar.com/) is a platform to simplify the hosting and management of servers and applications. It simplifies the process of deploying and managing PHP and Node.js based web applications on servers. ![ServerAvatar Dashboard](https://serveravatar.com/wp-content/uploads/2025/12/image-12.png) **ServerAvatar** helps you manage, monitor, and optimize your servers and WordPress applications effortlessly. With features like automated server setup, performance, built-in monitoring, server-level redis caching, log management, and many more. ServerAvatar ensures your caching plugin performs at its best. Whether you’re using WP Rocket, LiteSpeed Cache, or any other optimization tool, ServerAvatar makes your entire server-side performance faster, smoother, and easier to manage. **Key Features of ServerAvatar** - **Easy Server Setup:** Provision and configure servers automatically without technical complexity. - **One-Click Application Deployment:** Install and manage WordPress, Mautic, N8N, Uptime Kuma, and many more popular applications in minutes with optimized settings. - **Real Time Monitoring:** Track CPU, RAM, and server load in real time. - **Application Performance Monitoring:** Monitor each site’s resource usage and performance separately. - **Automatic SSL Installation:** Enable free automatic SSL certificates instantly with auto-renewal. - **Centralized File Manager:** Manage files directly from the dashboard, no FTP needed. - **Log Monitoring System:** View and analyze server logs inside the panel for faster debugging. - **Database Management:** Built-in database manager to create, edit, and manage MySQL/MariaDB databases. - **Smart Backups:** Take instant and schedule automatic backups for applications and databases. - **PHP Management:** Switch PHP versions, manage extensions, and control services easily. - **Server-Level Caching (Redis):** Improve website and application performance with built-in Redis caching support, easily installed directly from the ServerAvatar. - **Security Tools:** Firewall controls, Fail2ban, application-level SSH control, isolated environment for each application, 8G firewall, AI bot blocker, and many more. A fast website isn’t optional anymore, it’s the foundation of better rankings, higher conversions, and happier visitors. Choose the caching plugin that fits your hosting, optimize your server properly, and you’ll see a noticeable boost in performance almost instantly. ## Conclusion In the end, both WP Rocket and LiteSpeed Cache are excellent performance plugins, but the right choice depends entirely on your hosting setup and your comfort level with configuration. WP Rocket delivers fast, reliable speed improvements with almost no setup, making it perfect for beginners and non-technical users. LiteSpeed Cache, on the other hand, is unbeatable when paired with LiteSpeed hosting, offering powerful server-level caching at no cost. Whichever plugin you choose, remember that caching is only one part of website performance. Pairing the right caching tool with a well-optimized server environment, especially through platforms like ServerAvatar, ensures your website remains fast, stable, and ready to scale. ## FAQs ### **1. Is WP Rocket worth paying for?** Yes. If you’re not using LiteSpeed hosting, WP Rocket delivers faster performance with minimal effort. ### **2. Can I use both WP Rocket and LiteSpeed Cache together?** No. Using two caching plugins at the same time can cause conflicts and slow down your site. ### **3. Can ServerAvatar improve website speed even if I already use caching?** ServerAvatar optimizes the entire server environment, provides real-time monitoring, PHP configuration, and server-level caching, helping your caching plugin deliver even better results. ### **4. Do both plugins support WooCommerce?** Yes, both WP Rocket and LiteSpeed Cache work well with WooCommerce stores. ### **5. Can I use WP Rocket and LiteSpeed Cache together?** No. Both are caching plugins, and using them together can cause conflicts. Choose one based on your hosting setup. **Categories:** Blog, Guide, WordPress **Tags:** Caching Plugins, litespeedcache, Website Performance, Wordpress, wprocket --- ### [How to Set Up WooCommerce Caching in Wordpress](https://serveravatar.com/woocommerce-caching-setup/) **Published:** December 1, 2025 **Author:** Meghna Meghwani **Content:** [![Blog banner - ServerAvatar](https://serveravatar.com/wp-content/uploads/2025/09/728_90-Banner-3-1024x127.png)](https://serveravatar.com/?ref=blog)Running an online store can feel a lot like managing a busy supermarket, customers walk in, browse products, and head to checkout. If your store rebuilds the “aisle” every time someone looks at a product, pages slow down, and customers leave. WooCommerce caching helps avoid that by saving ready-made versions of pages so visitors see them instantly. The result? Faster pages, happier customers, and better SEO. In this guide, you’ll learn exactly how to set up WooCommerce caching in WordPress, step by step. ## What is Caching? Caching is like keeping a shortcut to your favorite website pages. Instead of rebuilding a page from scratch every time someone visits, caching saves a ready-made version that loads instantly. Caching stores temporary copies of your webpages, images, scripts, or database results. When a visitor returns or visits another page, the cached version loads instead of forcing WordPress to do all the heavy lifting again. It reduces the workload, speeds things up, and keeps everything running smoothly. For sites like WooCommerce that handle product pages, categories, and images, caching becomes a powerful tool to improve speed, user experience, and conversions. ## **Introduction to WooCommerce Caching** If you’ve ever wondered why your store slows down as you add more products, customers, or plugins, caching is the missing puzzle piece. WooCommerce runs database-heavy operations, and caching helps lighten the load. In this article, we’ll break down exactly how to set it up properly. ### **How WooCommerce** **Caching Works in WordPress** Caching is like taking a picture of your webpage and showing that picture to visitors instead of rebuilding the page each time. Here’s what caching reduces: - Database queries - PHP execution - Server processing time In short, your store feels quicker and more responsive, even during high-traffic moments. Caching essentially removes the repeated heavy lifting from WordPress by serving pre-built pages, making your store more responsive even during peak hours. ### **Why WooCommerce** **Caching Is Tricky** Unlike a regular blog, an eCommerce website deals with constantly changing information such as: - Cart totals - Inventory updates - Dynamic user sessions - Personalized content If caching is done incorrectly, customers may see: - Old cart contents - Incorrect stock levels - Outdated pricing That’s why WooCommerce caching requires special rules. ## **Types of Caching You Need for WooCommerce** To optimize your store fully, focus on four major caching layers: **1. Page Caching** Page caching saves pre-generated HTML versions of your pages, making product, category, and blog pages load significantly faster. **2. Object Caching** Object caching stores frequent database query results, improving dynamic processes like cart updates, filters, and stock checks. **3. Browser Caching** Browser caching allows a user’s device to store images, CSS, JS, and fonts locally so they load instantly on repeat visits. **4. CDN Caching** A CDN stores your static assets (images, CSS, JS) on global servers, delivering them from the location closest to each visitor. Each layer contributes to a smoother shopping experience. ### **Choosing the Right WooCommerce Caching Plugin** Not all caching plugins are WooCommerce-friendly. The best ones are: **1. **WP Fastest Cache**** WP Fastest Cache is a lightweight and easy-to-use caching plugin known for its simplicity and effectiveness. It supports minification, browser caching, and automatic cache clearing for WooCommerce pages. It’s a great choice if you want a fast setup without sacrificing performance. **2. LiteSpeed Cache** LiteSpeed Cache is a free, powerful caching plugin designed to work best on LiteSpeed servers. It offers advanced features like image optimization, QUIC.cloud CDN, and WooCommerce-aware caching rules. **3. W3 Total Cache** W3 Total Cache is a highly flexible plugin with every type of caching option you can think of. It’s powerful but requires proper configuration, making it better suited for experienced users. **4. WP Super Cache** WP Super Cache is simple, stable, and ideal for beginners. It generates static HTML files for your site and serves them quickly to users, helping improve performance with minimal setup. Choose a plugin based on your hosting environment and comfort level. ## **How to Install WordPress for a WooCommerce Store** If you’re planning to run a WooCommerce store without any hassles, the first step is setting up WordPress on a reliable server. **ServerAvatar** makes this process incredibly smooth, even if you’re not very technical. It takes care of the heavy lifting, so you can focus on building your affiliate sites rather than fighting with server commands. **What is ServerAvatar?** [ServerAvatar](https://serveravatar.com/) is a platform to simplify the hosting and management of servers and applications. It simplifies the process of deploying and managing PHP and Node.js based web applications on servers. ![ServerAvatar Dashboard](https://serveravatar.com/wp-content/uploads/2025/12/image.png) You can easily set up WordPress in just a few minutes using ServerAvatar’s one-click application installer. With ServerAvatar’s one-click application installer, you can easily install WordPress, Mautic, N8N, Uptime Kuma, and many more popular applications within a few minutes. Follow this step-by-step guide to install WordPress quickly on your VPS: ## **Setting Up WooCommerce** **Caching for Your Store** Let’s start with a clear, step-by-step setup using WP Fastest Cache (a widely used, beginner-friendly free plugin that works on most hosts). Page caching delivers the biggest speed boost. **1. Install and activate WP Fastest Cache** - Log in to WordPress as an Administrator. - In WP Admin Dashboard, go to **Plugins** **>> Add New**. - Search for **WP Fastest Cache**. - Click **Install Now** and then **Activate**. ![WooCommerce caching Setup](https://serveravatar.com/wp-content/uploads/2025/12/image-1-1024x257.png) **2. Open WP Fastest Cache settings** - In the admin menu, navigate to the **Plugins >> Installed Plugins** - You’ll see all the installed plugins. Click on the **Settings** for the **WP Fastest Cache.** ![WooCommerce caching Setup](https://serveravatar.com/wp-content/uploads/2025/12/image-2-1024x431.png) **3. Enable basic Page Caching** - On the **Settings** section, enable the **“Cache System”** by selecting on the checkbox. - Click **Submit** to save. **Why:** It creates static HTML files for your pages, providing the biggest speed improvement. ![WooCommerce caching Setup](https://serveravatar.com/wp-content/uploads/2025/12/image-3-1024x915.png) **4. Exclude WooCommerce dynamic pages (Never cache these)** - Click the **Exclude** section. - From the **Exclude pages** section, click on the **Add New Rule**, and add these paths to the **Exclude Pages** list. - /cart/ - /checkout/ - /my-account/ - (If you use language subfolders, add variants, e.g., /en/cart/) - Save changes. **Why:** These pages change per user. Caching them can break checkout or show outdated cart totals. ![WooCommerce caching Setup](https://serveravatar.com/wp-content/uploads/2025/12/image-4-1024x826.png) **5. Exclude WooCommerce cookies & query strings** - From the **Exclude Cookies** section, click on the **Add New Rule**, and add the cookies mentioned below: - woocommerce\_items\_in\_cart - woocommerce\_cart\_hash - wp\_woocommerce\_session\_ **Why:** These cookies indicate user-specific cart/session data and must not be cached. ![WooCommerce caching Setup](https://serveravatar.com/wp-content/uploads/2025/12/image-5-1024x802.png) **6. Enable Browser Caching** - WP Fastest Cache adds cache headers automatically in .htaccess. On the **Settings** tab, enable: - **Preload:** helps warm the cache. - **Gzip Compression:** reduces file sizes. - **Browser Caching**: toggle it ON. - Click on the **Submit** Button. **Why:** Returning visitors load images and CSS instantly from their browser. ![WooCommerce caching Setup](https://serveravatar.com/wp-content/uploads/2025/12/image-6-1024x917.png) **7. Enable Minify / Combine (careful)** - Go to the **Settings** section. - If you want to minify CSS and JS, turn on: - **Minify HTML** (safe) - **Minify CSS** (test site after enabling) ![WooCommerce caching Setup](https://serveravatar.com/wp-content/uploads/2025/12/image-7-1024x911.png) - Use **Combine CSS/JS** only if your theme works well, test after enabling. **Tip:** If something breaks, disable minification and re-enable one-by-one. ![WooCommerce caching Setup](https://serveravatar.com/wp-content/uploads/2025/12/image-8-1024x918.png) **8. CDN Integration (optional)** If using Cloudflare, BunnyCDN, KeyCDN: - WP Fastest Cache supports CDN integration. - If you are using a CDN (Cloudflare, BunnyCDN, KeyCDN), enter the required CDN details and enable **Replace site’s static files with CDN URL**. - Please note it is completely optional. > You can use the official Cloudflare plugin or API for auto-cache purging. > > ![WooCommerce caching Setup](https://serveravatar.com/wp-content/uploads/2025/12/image-9-1024x575.png) **9. Object Caching (Redis – external step**) - WP Fastest Cache free version does not provide object caching, set up Redis via your host or use the **Redis Object Cache** plugin separately. - Steps (high level): - Confirm host supports Redis. - Install **Redis Object Cache** plugin. - Connect and enable object cache from the plugin. **Why:** It significantly speeds up product lookups, filters, stock updates, and dynamic WooCommerce actions. **10. Test the important flows** - Use a private/incognito window and test: - Load a **product page** (should load fast). - **Add to cart**, the cart should update immediately. - Go to **checkout** and complete a test order (or preview payment page). - Run speed checks (GTmetrix / PageSpeed). - If you see stale data, click **Delete Cache** and re-test. [![Blog banner - ServerAvatar](https://serveravatar.com/wp-content/uploads/2025/09/728_90-Banner-1-1024x127.png)](https://serveravatar.com/?ref=blog)## ServerAvatar: The Easy Way to Speed Up Your WooCommerce Store If you’re running WooCommerce on a VPS, you already know how tricky server management can get. Caching, PHP settings, database tweaks, it’s a lot, right? That’s exactly where **ServerAvatar** makes life easier. ServerAvatar takes care of all the heavy lifting for you. It sets up performance-boosting features automatically, like Redis caching, and server-level optimizations that WooCommerce really needs. No technical skills required. With ServerAvatar, you get: - Set up Redis at the server level - Automatic server performance - Real-time monitoring - Easy PHP settings - Automatic and free SSL setup - Built-in monitoring and logs - A clean file manager editor In short, ServerAvatar helps your WooCommerce store load faster, run smoother, and stay stable, even during high-traffic moments, without you having to understand the complex technical side of servers. ## **Troubleshooting Common WooCommerce Caching Issues** **1. Mini-cart not updating?** - Make sure /cart/ and /checkout/ are excluded - Clear cache **2. Site breaks after minification?** - Turn off CSS/JS minification - Enable one by one to find the issue **3. Images/layout break?** - Disable Lazy Load - Check theme compatibility ## **Common WooCommerce Caching Mistakes to Avoid** Even small mistakes can break WooCommerce functionality. **Avoid:** - Caching cart or checkout pages - Over-minifying JS (often breaks WooCommerce scripts) - Using multiple caching plugins at once - Forgetting to clear cache after updates - Caching AJAX endpoints or user sessions One caching plugin is enough. ## **Best Practices for WooCommerce Caching** **Optimization** A fast WooCommerce site needs more than caching. - Choose fast hosting (NVMe or SSD servers) - Avoid heavy or bloated plugins - Use WebP images - Clean your database weekly - Monitor performance regularly ## **Quick Tips** - Always **back up** your site before major performance changes. - Make changes on a staging site if possible. - After plugin updates or theme changes, **clear the cache** and re-test. - Use a combination of plugin tools and external checks (PageSpeed, GTmetrix) for accurate testing. ## **FAQs** ### **1. Should I cache the WooCommerce cart and checkout pages?** No. These pages must *never* be cached because they contain dynamic and user-specific data. Caching them can break the checkout process and show outdated cart items. ### **2. Do I need a CDN for WooCommerce caching?** A CDN isn’t mandatory but highly recommended. It speeds up delivery of images, CSS, and JS files globally. Cloudflare, BunnyCDN, and KeyCDN work great with WooCommerce. ### **3. Does caching affect stock updates or product prices?** Not if configured correctly. Make sure dynamic pages (cart, checkout, account) and WooCommerce cookies are excluded. Also enable object caching like Redis for accurate stock and session handling. ### **4. Is WP Fastest Cache enough for WooCommerce?** Yes, especially for beginners. It handles page caching, browser caching, Gzip, and exclusions very well. For advanced sites, you can pair it with Redis for object caching. ### **5. How do I know if caching is working correctly?** Test your store in incognito mode. Check if product pages load instantly, cart updates correctly, and checkout works smoothly. Also run a speed test on GTmetrix or PageSpeed Insights. ## **Conclusion** Speed is everything when it comes to running a successful WooCommerce store. With so many dynamic elements, cart updates, stock changes, and personalized user sessions, your site needs a smart caching setup that accelerates performance without breaking essential functions. By using the right caching plugin, excluding sensitive WooCommerce pages, enabling browser caching, and combining it with object caching like Redis, you can dramatically boost your site’s speed, user experience, and conversions. Pair this with a well-optimized server using tools like **ServerAvatar**, and your WooCommerce store will feel smoother, load faster, and stay stable even during traffic spikes. Follow the steps in this guide, test each feature, and your store will be ready to deliver a lightning-fast shopping experience. **Categories:** Blog, Guide, Tutorials, WordPress **Tags:** caching, Caching Plugins, WooCommerce, WooCommerce caching, Wordpress, WordPress performance --- ### [Shopify vs WooCommerce: What’s the Best E-Commerce Platform?](https://serveravatar.com/shopify-vs-woocommerce/) **Published:** November 30, 2025 **Author:** Meghna Meghwani **Content:** [![Blog banner - ServerAvatar](https://serveravatar.com/wp-content/uploads/2025/09/728_90-Banner-3-1024x127.png)](https://serveravatar.com/?ref=blog)Choosing the right e-commerce platform can feel a lot like choosing between Android and iOS. Both are powerful, both are popular, and both have hardcore fans. But when you’re about to build an online store, the choice becomes even more personal, after all, your entire business may depend on it. That’s why understanding Shopify vs WooCommerce becomes essential before making your decision. Shopify and WooCommerce are two of the biggest names in the e-commerce world. But which one is actually the best for you? In this detailed guide, we’ll break down everything, features, flexibility, pros, cons, and real-world use cases, to help you make the right choice without confusion. Let’s dive in. ## **Understanding Shopify** [Shopify](https://www.shopify.com/in) is a fully hosted e-commerce platform. Think of it as renting a store in a mall, everything is already set up, from the security to the lighting. You just bring your products and start selling. ![Shopify - Shopify vs WooCommerce](https://serveravatar.com/wp-content/uploads/2025/11/image-176-1024x419.png) **What Shopify Offers** - Built-in hosting - Simple store builder - 24/7 support - Security handled for you - No technical setup required It’s ideal if you want a quick, stress-free setup and don’t want to deal with maintenance. ## **Understanding WooCommerce** [WooCommerce](https://woocommerce.com/) is a WordPress plugin that turns your website into a full-fledged online store. It’s more like owning land and building your own custom shop. You control everything, structure, design, and features, but that also means more responsibility. ![WooCommerce - Shopify vs WooCommerce](https://serveravatar.com/wp-content/uploads/2025/11/image-177-1024x420.png) **What WooCommerce Offers** - Fully customizable - Unlimited control - Thousands of themes and plugins - SEO-friendly WordPress environment - No monthly subscription for the plugin itself If you love flexibility and already use WordPress, WooCommerce is a strong contender. ## **Shopify vs WooCommerce: Key Differences** Here’s the simplest breakdown: **Feature****Shopify****WooCommerce****Hosting**IncludedNot Included**Mobile Version**YesDepends on the theme**Ease of Use**Very easy Moderate (depends on plugins)**Cost** Monthly feesPay for hosting & optional addons**Customization**Limited Very flexible**Scalability**Excellent Depends on hosting**Security**ManagedUser-managed**Support**AvailableAvailableShopify is simple. WooCommerce is flexible. ### **Ease of Use Comparison**: Shopify vs WooCommerce **Shopify: Setup in Minutes** Shopify is practically plug-and-play. You select a theme, add products, configure payment options, and go live. No coding, no hosting setup, nothing technical. **WooCommerce: More Steps, More Control** WooCommerce requires: - Setting up hosting - Installing WordPress - Installing WooCommerce - Configuring store settings If you’re comfortable with WordPress, it’s smooth. If not, it may feel overwhelming. ### **Design & Themes** in Shopify vs WooCommerce **Shopify Themes** Shopify offers: - 100+ professional themes - Clean, modern interfaces - Mobile optimization - Premium themes costing $150–$400 **WooCommerce Themes** WooCommerce has: - Thousands of themes - Free and premium options - Complete customization through WordPress - Page builders like Elementor for drag-and-drop design WooCommerce wins in creative control, but Shopify themes are easier and more polished. ### **Customization & Flexibility**: Shopify vs WooCommerce This is where WooCommerce shines. **Shopify** Customization is limited to what Shopify allows. While powerful, you may hit a wall if you want deep custom logic or unique features. **WooCommerce** You can modify every pixel of your site. Want custom checkout pages? Advanced shipping rules? Multi-language setup? There’s a plugin for everything. ### **Pricing Comparison** — Shopify vs WooCommerce **Shopify Pricing** - Shopify provides everything you need within its subscription, hosting, themes, essential features, and built-in tools. - Pricing ranges from $9 to $299 per month, depending on the plan. - Shopify charges transaction fees if you use third-party payment gateways instead of Shopify Payments. - Higher-tier plans may include features you might not use, potentially leading to unnecessary additional costs. **WooCommerce Pricing** - WooCommerce is a free WordPress plugin, making it more budget-friendly than Shopify at the start. - Additional expenses include hosting, themes, and plugins. - Premium themes typically cost **$30–$300+**. - Paid plugins and add-ons often average around **$50 each**. - Costs may rise if your store requires higher-tier hosting or extra functionalities. WooCommerce can be cheaper, but it can also cost more depending on your needs. ### **Payment Gateways & Fees** in Shopify vs WooCommerce **Shopify** - 100+ gateways - Extra transaction fees without Shopify Payments - Smooth integration **WooCommerce** - 80+ gateways - No extra fees from WooCommerce - Payment flexibility through plugins If avoiding extra charges matters, WooCommerce wins. [![Blog banner - ServerAvatar](https://serveravatar.com/wp-content/uploads/2025/09/728_90-Banner-1-1024x127.png)](https://serveravatar.com/?ref=blog)### **Performance & Speed**: Shopify vs WooCommerce Your store’s speed depends on: - Hosting - Theme quality - Plugins - Optimization **Shopify** Fast and stable because it’s fully hosted. **WooCommerce** Speed depends entirely on your hosting provider. With good hosting, it can match or beat Shopify. ### **Scalability** in Shopify vs WooCommerce **Shopify** Scaling is effortless. Shopify handles traffic spikes, backups, and performance automatically. **WooCommerce** You may need: - Better hosting - Performance plugins - CDN setups WooCommerce is scalable but requires more management. ### **SEO Capabilities** — Shopify vs WooCommerce Shopify has strong SEO tools, but WooCommerce is built on WordPress, the king of SEO. **Shopify Advantages** - Faster technical setup - Clean structure **WooCommerce Advantages** - Full control over URLs - Advanced schema options - More SEO plugins For deep SEO work, WooCommerce wins. ### **Security Features** in Shopify vs WooCommerce **Shopify** - SSL certificate included - Security handled by Shopify - PCI compliance built in **WooCommerce** You must manage: - Hosting security - SSL - Backups - Updates WooCommerce can be secure, but you’re responsible for maintaining it. ### **Apps, Plugins & Integrations** **Shopify App Store** - 8,000+ apps - High-quality but often paid **WooCommerce Plugins** - 60,000+ WordPress plugins - Unlimited integrations - Many free options WooCommerce again takes the lead in flexibility and variety. ### **Support & Resources**: Shopify vs WooCommerce **Shopify** - 24/7 live chat - Email & phone support - Dedicated assistance **WooCommerce** - No direct support - Community forums - Documentation - Developer support (paid) Shopify is better for beginners who want help anytime. ## **Which Platform Should You Choose?** Here’s the simplest way to decide: **Choose Shopify if you want:** - A simple, beginner-friendly setup - No technical headaches - 24/7 customer support - Reliable hosting and security **Choose WooCommerce if you want:** - Unlimited customization - Control over every detail - Cost flexibility - SEO power - A highly flexible store that can evolve over time In short: - **Shopify:** ease and convenience - **WooCommerce:** control and flexibility ## How ServerAvatar Helps You If you decide to go with WooCommerce, your store’s performance, security, and stability depend heavily on your hosting environment. This is where **ServerAvatar** becomes a game-changer. ![ServerAvatar Dashboard](https://serveravatar.com/wp-content/uploads/2025/11/image-178-1024x473.png) ServerAvatar lets you host and manage your WooCommerce store with speed, security, and automation, without needing technical expertise. **What is ServerAvatar?** [ServerAvatar](https://serveravatar.com/) is a platform to simplify the hosting and management of servers and applications. It simplifies the process of deploying and managing PHP and Node.js based web applications on servers. ### **Why Use ServerAvatar?** **1. Blazing-Fast Performance** ServerAvatar optimizes your server, PHP-FPM, caching, and performance tuning to make WooCommerce load faster, even with heavy products & traffic. **2. Strong Security Built In** - Firewall - Fail2ban - 8G Firewall - Automated backups - SSL installation with one click - and many more Your WooCommerce site stays protected without manual configuration. **3. One-Click app installer** Launch WordPress and many more popular sites instantly. No command line or server knowledge needed. **4. Automatic security updates and Backups** Never worry about server security updates or daily backups. Everything can be automated. **5. Works With All Major Cloud Providers** Use ServerAvatar with: - DigitalOcean - AWS - Vultr - Google Cloud - Linode - Or even your own custom VPS. - and many more This makes WooCommerce scalable and cost-efficient compared to platforms like Shopify. **6. Built-In Monitoring** Track server CPU, RAM, storage, site uptime, and more, all from a clean dashboard. **7. Developer-Friendly + Client Management** Multiple PHP versions, staging environments, SFTP/SSH users, team management, AI bot blocker, and many more features make ServerAvatar powerful for agencies & freelancers running multiple WooCommerce stores. ## FAQs ### **1. Which platform is better for SEO?** WooCommerce (WordPress) is better for long-term SEO because it offers more control over URLs, metadata, schema, and plugins. Shopify also has strong SEO features but is more limited. ### **2. Can WooCommerce handle large traffic?** Yes, WooCommerce can scale extremely well, but only if your hosting is powerful. Tools like **ServerAvatar** help optimize your server for high-traffic WooCommerce stores. ### **3. Can I migrate from Shopify to WooCommerce later?** Yes, migration is possible. There are tools and services that help transfer products, customers, and orders. However, some design elements may need rebuilding. ### **4. Which is better for dropshipping?** Shopify is easier for dropshipping because of 1-click integrations with apps like Oberlo. WooCommerce also supports dropshipping but requires more configuration. ### **5. Can I build a multi-vendor marketplace?** Yes, both platforms support multi-vendor marketplace setups, but WooCommerce offers more plugins like Dokan, WC Vendors, or WCFM for full customization. ## **Conclusion** Choosing between Shopify and WooCommerce comes down to what you value more, simplicity or flexibility. - **Shopify** is perfect if you want an all-in-one platform that’s easy to set up, beginner-friendly, and backed by reliable hosting and security. You focus on selling, Shopify handles the technical stuff. - **WooCommerce**, on the other hand, gives you complete control over your store, design, SEO, scalability, and features. It requires more setup, but it offers unlimited customization and long-term flexibility. If you decide on WooCommerce, using a tool like ServerAvatar can make hosting management effortless, giving you world-class speed, security, backups, and monitoring without needing any technical skills. **Categories:** Blog, Guide, Others, WordPress **Tags:** E-commerce Hosting, E-commerce Platforms, ServerAvatar, Shopify, Shopify vs WooCommerce, WooCommerce, WordPress WooCommerce --- ### [Why Subnetting Matters: A Simple Guide](https://serveravatar.com/what-is-subnetting-and-why-it-matters/) **Published:** November 22, 2025 **Author:** Meghna Meghwani **Content:** [![Blog banner - ServerAvatar](https://serveravatar.com/wp-content/uploads/2025/09/728_90-Banner-3-1024x127.png)](https://serveravatar.com/?ref=blog)When you connect to the internet or a private network, a lot of complex routing and communication happens silently in the background. One of the key technologies that makes this smooth and efficient is subnetting. Whether you manage servers, work with cloud infrastructure, or simply want to understand how networks stay organized, subnetting is a concept worth knowing. In this guide, we’ll break down what subnetting is, how it works, and why it plays such an important role in modern networking, especially for system administrators, DevOps engineers, and businesses running applications at scale. ## **What Is Subnetting?** Subnetting is the process of dividing a larger IP network into multiple smaller networks called **subnets**. Instead of placing every device on one giant network, subnetting organizes devices into different groups, similar to dividing a large city into smaller neighborhoods. Each subnet gets: - Its own IP range - Its own broadcast domain - Its own security rules and access controls At the technical level, subnetting is done by extending the network portion of an IP address. This is achieved by borrowing bits from the host portion and using them to create new network identifiers. For example: - A /24 network can be split into four /26 subnets - Each of those subnets gets fewer host addresses but gains independence and structure Subnetting isn’t just a math exercise; it’s a foundational tool for designing networks that are easier to scale, protect, and troubleshoot. ![Subnetting](https://serveravatar.com/wp-content/uploads/2025/11/image-121.png) ## **Why Subnetting Matters** Subnetting brings several major benefits that directly affect how well a network performs and how secure it is. **1. Improved Network Performance** Without subnetting, all devices share the same broadcast domain. This means every broadcast message, like ARP requests or DHCP discovery packets, reaches every device, even if it’s irrelevant. As a network grows, this unnecessary traffic creates: - Congestion - Slow response times - Higher load on devices Subnetting contains this noise. Each subnet becomes its own broadcast domain, meaning broadcasts only reach devices within the same group. The result is noticeably faster, more efficient communication. **2. Stronger Security Through Segmentation** If all devices live on the same network, they can all communicate freely. That’s risky. Subnetting allows you to isolate: - Guest networks - Servers - Finance departments - IoT devices - Development/testing environments Segmentation prevents sensitive systems from being exposed to general users and limits the impact of malware or unauthorized access. Even if an attacker gains access to one subnet, they cannot instantly reach all others. **3. Better IP Address Utilization** IPv4 addresses are limited and often assigned in large blocks. Without subnetting, organizations either waste huge chunks of IP space or overcrowd the network. Subnetting allows you to: - Right-size subnets based on device count - Avoid wasting unused addresses - Support future growth without redesigning the network This efficiency is crucial in modern networks, especially when using private IP ranges that must be carefully planned. **4. Easier Troubleshooting and Network Management** Subnetting makes networks predictable and structured. When a problem occurs, like a faulty device, configuration issue, or broadcast storm, you can narrow it down to a specific subnet rather than searching the entire network. This leads to: - Faster issue resolution - Simpler monitoring - Clearer documentation - Easier maintenance Subnetting gives administrators better visibility and control. **5. Logical Organization That Mirrors the Business** Networks usually reflect how a company works. With subnetting, you can assign: - One subnet per department - One subnet per building or floor - One subnet per device category This logical structure keeps everything clean, easy to understand, and aligned with organizational needs. ## **How Subnetting Works** The internet relies on **IP addresses**, which look something like: ``` 192.168.1.100 ``` ``` 192.168.1.100 ``` Each IP address has two main parts: - **Network ID:** Identifies the network - **Host ID:** Identifies the device within that network Subnetting changes how many bits are used for the network part and how many for the hosts. A subnet mask (like 255.255.255.0) defines this boundary. **Example:** - **Network:** 192.168.1.0/24 - **Subnet mask:** 255.255.255.0 - This allows 256 total IPs, with 254 usable for devices. With subnetting, you could split this into smaller pieces: - 192.168.1.0/26 - 192.168.1.64/26 - 192.168.1.128/26 - 192.168.1.192/26 Each of these now allows **64 IPs**, giving you more control over traffic and allocation. ## **Deep Dive: IP Addresses and Subnet Masks** **Understanding IP Addresses** - Every IPv4 address contains 32 bits. - These 32 bits are shown in dotted decimal format (e.g., 192.168.1.10). - The address is divided into 4 octets, each containing 8 bits. - Each octet can range from 0 to 255. - IP addresses are split into: - Network portion - Host portion ![Subnetting and IP address ](https://serveravatar.com/wp-content/uploads/2025/11/image-122.png) **Role of the Subnet Mask** A subnet mask defines where the network ends and the host part begins. **Example:** - Subnet mask 255.255.255.0 = /24 in CIDR. - This means 24 bits for the network and 8 bits for hosts. **Subnet masks are essential for:** - Dividing networks - Routing traffic - Organizing devices properly **Binary Representation: The Foundation of Subnetting** - Subnetting relies on understanding **IP addresses in binary form**. - Both the IP address and subnet mask are converted to binary. - The number of **1s** in the subnet mask identifies the **network portion**. - The number of **0s** identifies the **host portion**. - Binary helps determine: - Total hosts - Subnet ranges - Network calculations ![Binary representation](https://serveravatar.com/wp-content/uploads/2025/11/image-123.png) **Understanding CIDR Notation** - CIDR stands for **Classless Inter-Domain Routing**. - It uses a shorthand format like: **192.168.1.0/24**. - The number after / indicates: - **How many bits** are used for the **network** part. - Remaining bits determine the number of **host addresses**. - CIDR is more flexible than traditional class-based addressing. **Formula to Calculate Number of IPs** ``` Number of IP addresses = 2^(32 - prefix length) ``` ``` Number of IP addresses = 2^(32 - prefix length) ``` - **32** represents the total bits in an IPv4 address. - **Prefix length** is the number after the slash in the CIDR notation. **Example Calculations** - **For a CIDR block 192.168.1.0/24:** - Prefix length = 24 - Number of IP addresses = 2^(32 – 24) = 2^8 = 256 IPs - **For 10.0.0.0/16:** - Prefix length = 16 - Number of IP addresses = 2^(32 – 16) = 2^16 = 65,536 IPs - **For 172.16.0.0/20:** - Prefix length = 20 - Number of IP addresses = 2^(32 – 20) = 2^12 = 4,096 IPs ![Subnetting calculation explained](https://serveravatar.com/wp-content/uploads/2025/11/image-124.png) **CIDR Impact** - Increasing the prefix (e.g., from /24 to /25): - **Halves** available host addresses. - **Doubles** the number of subnets. - **/30 networks** - Provide only **2 usable host addresses**. - Commonly used for **point-to-point links** between routers. - **/24 networks** - Typically used for **departmental LANs** or **small to medium-sized networks**. ## **Subnetting in the Real World** **1. Cloud Infrastructure** Platforms like AWS, Google Cloud, and DigitalOcean let you divide your VPC into subnets: - Public subnets for internet-facing apps - Private subnets for databases - Isolated subnets for internal services This structure is only possible because of subnetting. **2. Server Management** Modern server management platforms like **ServerAvatar** rely on clean network segmentation to ensure smooth server operations. ![ServerAvatar Dashboard](https://serveravatar.com/wp-content/uploads/2025/09/image-77-1024x473.png)Subnetting helps ServerAvatar manage: - Application isolation - Load balancers - Failover configuration (Contact Technical Support Team for configure failover they are available 24/7 to assist you) - SSL configurations - Multiple environments (production, staging, testing) - Secure inter-service communication With well-designed subnets: - Traffic flows more efficiently - Firewalls become easier to manage - Security zones remain isolated - High-availability setups become more reliable ServerAvatar takes care of server provisioning, isolation, firewalls, and routing, but behind the scenes, it benefits greatly from clean subnet planning. **3. Office Networks** Companies use subnetting to separate: - Admin department - HR - Finance - Guest networks - Surveillance systems This ensures better privacy and reduces internal network noise. **4. Data Centers** Subnetting is crucial for: - Cluster organization - High-availability setups - Storage networks - VLAN segmentation ## **Key Subnetting Terms You Should Know** **1. IP Address** A unique number identifying a device on the network. IPv4 example: 192.168.10.5 **2. Subnet Mask** A pattern defining which part of the IP is the network and which part is the host. Example: 255.255.255.0 **3. CIDR Notation** A shorthand version of subnet masks. Example: /24 **4. Network Address** The first address in a subnet. Example: 192.168.1.0 **5. Broadcast Address** The last address in a subnet. Example: 192.168.1.255 **6. Usable Host Range** All IPs between the network and broadcast addresses. ## **Step-by-Step Subnetting Process: Mastering the Calculations** Learning to subnet effectively requires understanding both the mathematical principles and the practical application. Let’s work through the complete process with detailed examples. **The Five-Step Subnetting Method: Step 1: Determine Requirements** Before starting any calculations, clearly define your requirements: - How many subnets do you need? - How many hosts per subnet? - What is your starting network address? - Do you need room for future growth? **Step 2: Calculate Required Subnet Bits** - Use the formula: 2^n ≥ number of required subnets - Where n = number of bits to borrow from the host portion **Step 3 : Determine New Subnet Mask** - Add bits to the original subnet mask that are borrowed - **For example:** Original bits is 24 and borrowed bits is 2 - Original /24 + 2 borrowed bits = /26 **Step 4 : Calculate Subnet Increment** - Subtract the new subnet mask value from 256 - This gives you the address increment between subnets **Step 5: List All Subnet Ranges** - Starting from the network address, list each subnet using the calculated increment ## **Detailed Example: Subnetting 192.168.100.0/24** **Requirement:** Create 6 subnets for different departments ![Subnetting example](https://serveravatar.com/wp-content/uploads/2025/11/image-125.png) ![Subnetting example](https://serveravatar.com/wp-content/uploads/2025/11/image-126.png) ![Subnetting example](https://serveravatar.com/wp-content/uploads/2025/11/image-127.png) ![Subnetting example](https://serveravatar.com/wp-content/uploads/2025/11/image-128.png) [![Blog banner - ServerAvatar](https://serveravatar.com/wp-content/uploads/2025/09/728_90-Banner-1-1024x127.png)](https://serveravatar.com/?ref=blog)## **Advanced Technique: Variable Length Subnet Masking (VLSM)** **What Is VLSM?** VLSM stands for **Variable Length Subnet Masking**. It allows you to create **subnets of different sizes** within the same network. Unlike fixed-length subnetting, VLSM **allocates IP addresses based on actual needs**, reducing waste. It is widely used in modern, scalable, and efficient network designs. **Why VLSM Is Important** Traditional subnetting assigns the **same subnet size** to every segment, causing unnecessary IP wastage. VLSM enables more **precise allocation**, ensuring different departments or networks get subnets tailored to their device count. Helps achieve: - Better IP utilization - More organized addressing - Greater flexibility in design ### **VLSM in Practice: Optimizing Address Allocation** Useful when network segments vary greatly in size. Instead of giving a large subnet to every department, VLSM assigns: - **Large subnets** to high-demand areas - **Small subnets** to low-demand areas This ensures every department gets “just enough” IPs, nothing wasted, nothing lacking. ### **Example Scenario: Medium Enterprise** - **Starting network:** 10.1.0.0/16 - Total usable addresses: **65,534** - Company departments may include: - HR (50 devices) - Finance (120 devices) - IT (500 devices) - Guest WiFi (200 devices) - Security systems (30 devices) - VLSM allows assigning each department a **suitable subnet size** based on the number of required hosts. ![detailed information ](https://serveravatar.com/wp-content/uploads/2025/11/image-129.png) ### **VLSM Design Principles** 1. **Start with the largest requirements** - Assign subnets to the biggest groups first to prevent address fragmentation. 2. **Work systematically** - Move through the IP address block in order to avoid gaps and overlaps. 3. **Plan for future growth** - Allocate extra space for departments that may expand. 4. **Use hierarchical addressing** - Group related subnets together for easier routing and management. 5. **Document everything** - VLSM networks can get complex; maintaining clear documentation prevents confusion and errors. ### **VLSM Step-by-Step Calculation Strategy** **1. List Requirements in Descending Order:** Always start with the largest subnet requirements and work your way down. This prevents address space fragmentation. **2. Calculate Subnet Sizes:** For each requirement, determine the smallest subnet that can accommodate the needed number of hosts plus growth. **3. Allocate Sequentially:** Assign subnets in order through your address space, ensuring no overlap. ### **Example VLSM Allocation Process** Starting with 172.16.0.0/16 (65,534 hosts available) Requirements (sorted by size): 1. Engineering: 1000 hosts → Need /22 (1022 hosts) → 172.16.0.0/22 2. Sales: 400 hosts → Need /23 (510 hosts) → 172.16.4.0/23 3. Marketing: 200 hosts → Need /24 (254 hosts) → 172.16.6.0/24 4. HR: 50 hosts → Need /26 (62 hosts) → 172.16.7.0/26 5. IT: 25 hosts → Need /27 (30 hosts) → 172.16.7.64/27 6. Executives: 10 hosts → Need /28 (14 hosts) → 172.16.7.96/28 Remaining space: 172.16.7.112/28 through 172.16.255.0/24 Available for future growth: 65,000+ addresses ## **Traditional Flat Network Vs. Well-Designed Subnetting** **Aspect****Traditional Flat Network****Well-Designed Subnetting****Route Summarization**No summarization possible; large routing tablesHierarchical addressing enables efficient summarization**Failure Isolation**Network issues affect the entire organizationProblems contained within affected subnets**Security Policy Implementation**Host-based security only; complex ACLsSubnet-based policies; clear security boundaries**Performance Monitoring**Difficult to identify traffic patternsClear visibility into departmental network usage**Change Management**Changes affect entire networkGradual rollouts possible; limited impact**Troubleshooting**Changes affect the entire networkIssues isolated to specific network segments**Bandwidth Management**Difficult to implement per-department policiesQoS and traffic shaping per subnet## **Common Subnetting Mistakes and How to Avoid Them** Even experienced network professionals can fall into common subnetting traps. Understanding these pitfalls and how to avoid them is crucial for successful network implementations. **1. Overlapping Subnet Ranges** - **Problem:** Accidentally creating subnets that share IP addresses - **Example:** 192.168.1.0/25 and 192.168.1.64/26 overlap - **Solution:** Use systematic allocation methods; always verify calculations; use IPAM tools **2. Inadequate Growth Planning** - **Problem:** Creating subnets too small for future expansion - **Example:** /28 subnet for department expected to double in size - **Solution:** Plan for 2-3x current requirements; reserve contiguous space for expansion **3. Poor Hierarchical Design** - **Problem:** Random subnet allocation preventing route summarization - **Example:** Department subnets scattered across address space - **Solution:** Use hierarchical addressing; group related subnets together **4. Inadequate Documentation** - **Problem:** Lost track of subnet allocations and purposes - **Example:** Unknown subnets discovered during network audits - **Solution:** Maintain comprehensive IPAM records; document all allocations **5. Ignoring Security Implications** - **Problem:** Mixing security zones within subnets - **Example:** Servers and workstations in same subnet - **Solution:** Align subnet design with security architecture; separate trust zones **6. Broadcast Domain Oversights** - **Problem:** Creating subnets too large, causing performance issues - **Example:** 1000+ devices in single /22 subnet - **Solution:** Limit broadcast domains; consider performance implications ## FAQs ### **1. What is the main purpose of subnetting?** Subnetting improves performance, enhances security, and simplifies troubleshooting by isolating traffic within specific subnets. ### **2. How does subnetting improve network performance?** By reducing the size of broadcast domains, subnetting prevents unnecessary traffic from reaching every device. This reduces congestion and helps the network operate more efficiently. ### **3. What is a subnet mask, and why is it important?** A subnet mask defines how much of an IP address belongs to the network portion and how much is used for hosts. This boundary is essential for routing and determining subnet size. ### **4. What is CIDR notation?** CIDR (Classless Inter-Domain Routing) represents IP addresses using a prefix format, such as /24 or /16. The number indicates how many bits are used for the network, making subnetting easier and more flexible. ### **5. Why is VLSM better than fixed-length subnetting?** VLSM allows different subnets to have different sizes. This ensures IP addresses are allocated efficiently, large subnets for departments with many devices and smaller subnets for areas that need fewer addresses. ## **Conclusion** Subnetting is more than just a networking concept, it’s a critical foundation that keeps modern systems fast, scalable, and secure. Whether you’re working with cloud platforms, managing servers, or designing enterprise networks, subnetting helps you build structured, efficient environments. Tools like **ServerAvatar** make server and application management incredibly simple, but understanding subnetting gives you deeper control over routing, security, and performance. As networks grow, mastering CIDR, subnet masks, and VLSM becomes essential for building future-ready infrastructure.[](https://3.basecamp.com/5840738/buckets/41514807/boosts/new?boost%5Bboostable_gid%5D=Z2lkOi8vYmMzL1JlY29yZGluZy84OTUwNTg5ODA0) ## Stop Wasting Time on Servers. Start Building Instead. You didn’t start your project to babysit servers. Let **ServerAvatar** handle deployment, monitoring, and backups — so you can focus on growth. Deploy **WordPress, Laravel, N8N**, and more in minutes. No DevOps required. No command line. No stress. [ 🚀 Try Free ](https://app.serveravatar.com) [ 🌐 Learn More ](https://serveravatar.com/) Trusted by 10,000+ developers and growing. **Categories:** Blog, Guide, Linux, Others, Ubuntu **Tags:** CIDR, IP Addressing, Network Security, Network Subnetting, Subnetting --- ### [WordPress 6.9: New Features, Release Date & Why It Matters](https://serveravatar.com/wordpress-6-9/) **Published:** November 21, 2025 **Author:** Meghna Meghwani **Content:** [![Blog banner - ServerAvatar](https://serveravatar.com/wp-content/uploads/2025/09/728_90-Banner-3-1024x127.png)](https://serveravatar.com/?ref=blog)WordPress keeps evolving, and every new version, especially WordPress 6.9, brings the platform closer to the future of effortless website building. It packs refinements that feel more polished, smarter tools for creators, and meaningful updates for developers. Whether you’re building client websites, managing your own blog, or hosting everything on ServerAvatar, this update has something worth your time. The WordPress 6.9 release is shaping up to be a major milestone, shifting the way we build, edit, and manage WordPress sites. Here’s a deep dive into what’s new, when it launches, and why it matters for site-owners, content teams, and developers alike. Before we explore the new features, let’s walk through the updated release timeline, what’s changing, and how you can try WordPress 6.9. ## Introduction to WordPress 6.9 WordPress powers over 40% of the web, so every upgrade has an effect on millions of websites. WordPress 6.9 focuses on better design flexibility, performance tuning, and quality-of-life improvements that help site owners and developers work faster and more intuitively. Whether you’re editing pages, optimizing server resources, or tweaking design elements, the update aims to make the process feel more natural. ![WordPress 6.9](https://serveravatar.com/wp-content/uploads/2025/11/image-103-1024x363.png)### **The Expected Release Date & Timeline for WordPress 6.9** WordPress follows a predictable release pattern, usually rolling out three major updates each year. According to the official roadmap, WordPress 6.9 is scheduled for **December 2, 2025**. Here’s a quick timeline of the development cycle: - **Alpha stage:** March 2025 - **Public Beta:** October 2025 - **Release Candidate(s):** November 2025 - **Final release:** December 2, 2025 ### **Development Milestones** WordPress releases follow a clear development path. Here’s how 6.9 is being prepared behind the scenes: **• Planning & Proposal Phase** Features are drafted, reviewed, and shortlisted for inclusion. **• Alpha Stage** Early development begins; new features are introduced and tested internally. **• Beta Releases** These versions are open for public testing. No more new features, only bug fixes. **• Release Candidate (RC)** A near-final version created for stability checks. Developers begin compatibility testing. **• Final Release** The stable version becomes available for everyone. This structured development approach ensures that by the time WordPress 6.9 launches, it’s stable, polished, and ready for live websites. **Milestone****Scheduled Date (2025)****Alpha Phase Starts**March 25**Beta 1 Release**October 21**Beta 2 Release**October 28**Beta 3 Release**November 4**Release Candidate 1 (RC1)**November 11**Release Candidate 2 (RC2)**November 18**Release Candidate 3 (RC3)**November 25**Dry Run & 24-Hour Code Freeze**December 1**Official Final Release**December 2## **What’s New in WordPress 6.9** Here are the features and improvements worth paying attention to, grouped by audience (content creators, site-teams, developers). **1. Content creators & editing enhancements** - **Block-level “Notes” (comments) for collaboration:** Editors can leave comments on specific blocks (text, images, etc.) directly inside the editor. Visible only in the backend. - **Hide blocks on the frontend (while still editable in the backend):** Keep blocks editable in the backend but hidden from visitors. Useful for drafts, seasonal content, or A/B testing. - **Expanded command palette:** The Ctrl+K/Cmd+K command palette now works across the entire WordPress admin for faster navigation. - **New core blocks & better design controls:** Adds Accordion, Math, Time-to-Read, and Terms Query blocks, plus improved text sizing with new “Fit Text” options. **2. Template, theme & site-building improvements** - **More flexible template management:** Draft templates, create multiple templates for the same URL, and keep custom templates even when switching themes, reducing risk during redesigns. - **Improved site editor/design tools:** The editor becomes smoother for non-coders, with features like content-only pattern editing that lets you change text or images without altering the original pattern design. **3. Performance, developer & future-proofing** - **New Abilities API:** A centralized system for registering capabilities across core, themes, and plugins, built to support automation, AI integrations, and more standardized workflows. - **Updates to Interactivity API, Block Bindings, etc:** Better tools for dynamic, app-like sites with smoother page transitions, improved script/style handling, and stronger data binding for block attributes. - **Performance optimisations:** Faster frontend loading with optimized inline CSS, block-level CSS loading, improved script priority handling, and a quicker WP-Cron shutdown process. ## **Highlights of WordPress 6.9** The upcoming version brings upgrades across the board, but here are the standout improvements: - **Enhanced Site Editor experience:** WordPress 6.9 makes the Site Editor smoother and more predictable to use. You’ll notice faster loading, cleaner menus, easier navigation, and an overall more intuitive interface, especially when editing templates or customizing layouts. - **New block design controls:** Blocks now come with more styling tools. This means you can fine-tune spacing, borders, backgrounds, and other design elements without touching code. These expanded controls give creators more freedom when designing pages. - **More flexible theme styling options:** Theme styles are easier to adjust globally. You can change your site’s look, colors, typography, layouts, directly from the style settings with more control than before. This makes theme customization more powerful and less dependent on custom CSS. - **Performance improvements for both frontend and backend:** WordPress 6.9 improves speed noticeably. Pages render faster for visitors, and the admin dashboard responds more quickly. These optimizations help reduce server load and improve overall site performance. - **Better handling of fonts and global styles:** Managing fonts is simpler and more consistent. WordPress now loads fonts more efficiently and allows them to be controlled through global styles, making it easier to maintain a unified design across your site. - **Refined workflows for content creators:** Creating and editing content feels smoother. Small improvements, like better drag-and-drop, cleaner block interactions, and improved writing flows, make everyday tasks faster and less frustrating. - **Updates aimed at supporting modern PHP and server environments:** WordPress 6.9 is more aligned with modern hosting standards. It offers improved compatibility with newer PHP versions and server configurations, contributing to better security, speed, and stability. These updates may seem subtle on their own, but together they make WordPress feel more fluid and intuitive. ## **Why It Matters** Ok, so there are new features. But why should you care? Here are some of the bigger implications: - **Better internal workflows**: Notes keep feedback inside the editor, reducing emails and external tools. - **Reduced risk for changes**: Hidden blocks and flexible templates make staging and redesigns low-risk. - **Faster, smoother visitor experience**: Faster load times improve SEO, user experience, and engagement. - **Future-readiness**: Early adoption prepares your site for upcoming AI features and modern workflows. - **Cleaner, more standardised APIs**: The Abilities API and other updates reduce workarounds and improve scalability. - **Better theme/plugin architecture compatibility**: Themes and plugins built on newer APIs stay stable as WordPress evolves. - **Faster foundations**: Performance gains help deliver quicker, more efficient client sites. - **Team-friendly workflows:** Improved review and editing tools make multi-team collaboration easier. **Strategic viewpoint** WordPress 6.9 is more than a routine update, it pushes the platform toward collaboration, dynamic experiences, and long-term stability. It strengthens WordPress as a full-site building system, not just a blogging tool. ### **A Closer Look at Major Enhancements** Let’s break down what WordPress 6.9 introduces, and why these changes matter. **More Control Over Design** Whether you’re using Full Site Editing or tweaking individual pages, 6.9 makes design customization more predictable and less confusing. **Faster Page Loading** Performance updates reduce memory usage and improve how assets are loaded, especially beneficial for mobile visitors. **Better Global Styling** You can customize entire site elements in fewer steps, without needing CSS. ### **Improvements to the Site Editor** The Site Editor has been one of the biggest developments in recent versions, and 6.9 builds on that momentum. **• Cleaner Workspace** The interface has been streamlined with better spacing, improved toolbars, and reduced clutter. **• Smarter Navigation** Switching between templates and parts feels smoother, with clearer visual indicators. **• Enhanced Pattern Management** Patterns are easier to insert, duplicate, and modify, helping creators work more efficiently. These refinements make editing feel less like “figuring out a tool” and more like “building a website. ### **Better Theme Design Controls** WordPress 6.9 strengthens theme customization, especially for block themes. **Key Enhancements:** - More options for spacing, borders, and alignment - Better typography controls - Ability to adjust layout for different screen sizes - Improved color palette management These updates help theme developers offer more polished designs without relying on third-party plugins or extra CSS. ### **Performance Upgrades You Should Notice** Website speed is always a priority, and WordPress 6.9 introduces changes that help reduce loading time: **• Optimized Lazy Loading** Images and media load more efficiently. **• Minimized Render Blocking** Scripts are better prioritized, improving perceived speed. **• Faster Query Performance** Database queries, especially on dynamic pages, receive performance tuning. **• Memory Improvements** Reduced overhead makes WordPress smoother on lightweight hosting environments. These improvements play a big role in SEO, user experience, and conversion rates, small changes with big impact. ## **How to Try WordPress 6.9 Early Using Beta Tester Plugin (Step-by-Step Guide)** If you want to explore WordPress 6.9 before it officially launches, the easiest way is to use the WordPress Beta Tester plugin. It lets you safely test upcoming features and improvements. Before testing any beta release, it’s best to work on a staging site, not your live site. ServerAvatar makes this simple, creating a staging environment takes only a few clicks. This way, you can experiment without risking your production website. **What is ServerAvatar?** [ServerAvatar](https://serveravatar.com/) is a platform to simplify the hosting and management of servers and applications. It simplifies the process of deploying and managing PHP and Node.js based web applications on servers. Follow these steps to start testing the beta version: **Step 1: Create a Staging Site** - Log in to your ServerAvatar account and open server panel by clicking on your **Server Dashboard** icon. ![ServerAvatar Dashboard](https://serveravatar.com/wp-content/uploads/2025/11/image-104-1024x281.png) - From the left sidebar, go to **Applications**, then click the **Dashboard** button beside the app you want to test. ![server panel - ServerAvatar](https://serveravatar.com/wp-content/uploads/2025/11/image-105-1024x346.png)- Go to the **Staging Area** section from the left panel. Fill in the required details and create your staging site instantly. ![staging area - serveravatar](https://serveravatar.com/wp-content/uploads/2025/11/image-107-1024x481.png) - If you’re using a different hosting provider, manually set up a staging site by duplicating your live site or using a plugin like **WP Staging** or **Duplicator**. **Step 2: Install the WordPress Beta Tester Plugin** - Navigate to your WordPress admin dashboard by using the **WP Autologin** button from the ServerAvatar dashboard. ![](https://serveravatar.com/wp-content/uploads/2025/11/image-108-1024x338.png) - Navigate to **Plugins** >> **Add Plugin**. ![WordPress 6.9 ](https://serveravatar.com/wp-content/uploads/2025/11/image-110-1024x329.png)- Search for **WordPress Beta Tester** plugin, and click the **Install Now** button. [](https://storage.3.basecamp.com/5840738/blobs/026b47d6-c6c0-11f0-88c3-0242ac120004/download/image.png) ![add plugin -WordPress 6.9 beta ](https://serveravatar.com/wp-content/uploads/2025/11/image-111-1024x358.png) - **Activate** the plugin. ![activate plugin](https://serveravatar.com/wp-content/uploads/2025/11/image-112.png) **Step 3: Select the Beta Testing Channel** After activation: - Navigate to **Plugins → Installed Plugins**. - Find **Beta Testing**, then open its settings page. ![plugin settings - WordPress 6.9](https://serveravatar.com/wp-content/uploads/2025/11/image-113-1024x195.png) - Here you can see the **Beta Tester Settings** page, from here you can select the update channel for the WordPress site. **Step 4: Select the Update Channel** - Under **Select the update channel**, you have two options: - **Point release**: Provides stable maintenance updates (e.g., 6.8.x). - **Bleeding edge**: Installs the latest development builds with new features. - To test WordPress 6.9, select **Bleeding edge**. **Step 5: Choose the Stream Option** After choosing Bleeding edge, select one of the following streams: - **Nightlies**: Daily development builds (may show WordPress 7.0 or newer). - **Beta/RC Only**: Installs only beta and release candidate versions. - **Release Candidates Only**: Installs RC versions only. To properly test WordPress 6.9, choose **Beta/RC Only**, then click **Save Changes**. ![](https://serveravatar.com/wp-content/uploads/2025/11/image-115-1024x508.png)**Step 6: Update to WordPress 6.9 Beta** - Now go to **Dashboard**. You’ll see an option to upgrade to the latest beta or release candidate. ![](https://serveravatar.com/wp-content/uploads/2025/11/image-116-1024x102.png) - Click the “**upgrade to version 6.9-RC2**” button to start the update. Your site will now switch to the WordPress 6.9 test version. ![upgrade plugin - WordPress 6.9 ](https://serveravatar.com/wp-content/uploads/2025/11/image-117-1024x347.png) **Step 7: Test the New Features** Once the update is complete, test all new features on your staging site, such as improved site editing tools, enhanced block controls, and updated developer APIs. Make sure your plugins, themes, and custom code work correctly before considering any updates to your live site. **Step 8: Report Bugs and Share Feedback** If you find any issues: - Submit them via the [**WordPress Trac**](https://core.trac.wordpress.org/) system. - Participate in discussions through the **WordPress Slack** channels. Your feedback helps improve the final release. **Step 9: Push to Live Site (When Ready)** After confirming everything works perfectly on staging: - On the **ServerAvatar** dashboard, simply use the deploy feature to move the update from staging to live. ![sync staging - ServerAvatar](https://serveravatar.com/wp-content/uploads/2025/11/image-120-1024x334.png) - For other hosting providers, manually update your live site after testing the beta.[](https://storage.3.basecamp.com/5840738/blobs/9694fbda-c6c2-11f0-8e30-0242ac120004/download/image.png) **Important:** Always test beta releases in a **staging environment**, not on a live website. ServerAvatar’s quick staging setup makes this process safe and hassle-free. [![Blog banner - ServerAvatar](https://serveravatar.com/wp-content/uploads/2025/09/728_90-Banner-1-1024x127.png)](https://serveravatar.com/?ref=blog)## Comparing WordPress 6.7 vs 6.8 vs 6.9 **Version****Major Focus****Improvements****6.7**Design freedomBig jump in site editor usability**6.8**Performance & patternsBetter navigation, pattern organization**6.9**Refinement & stabilityPolished UI, advanced controls, faster performance## **Why WordPress 6.9 Matters for ServerAvatar Users** If you’re hosting your websites on **ServerAvatar**, WordPress 6.9 brings several indirect benefits: - **Better Performance → Lower Server Load** Less resource usage means your server runs cooler and faster. - **Improved Compatibility with Newer PHP Versions** ServerAvatar’s quick PHP version switching ensures WordPress 6.9 runs optimally. - **Enhanced Editing Tools** Perfect for agency owners using ServerAvatar to manage multiple WordPress sites. - **Easier Staging & Testing** ServerAvatar’s staging feature pairs perfectly with WordPress betas and RC versions. In short, the update helps you deliver faster sites without increasing server requirements. **Compatibility & Theme/Plugin Expectations** Most modern plugins and themes should work smoothly with WordPress 6.9. However: - Outdated themes may need updates - Block themes will benefit the most - Plugin developers are already preparing compatibility patches Always test before updating live websites. ## **FAQs** ### **1. When will WordPress 6.9 be officially released?** WordPress 6.9 is scheduled to be officially released on **December 2, 2025**, following its beta and release candidate cycles in October and November. ### **2. What are the major improvements in WordPress 6.9?** WordPress 6.9 focuses on **refinement and stability**, offering a polished Site Editor, better design controls, improved performance, upgraded global styles, and enhanced tools for developers. ### **3. Can I test WordPress 6.9 before the official release?** Yes. You can test it using the **WordPress Beta Tester plugin**. It’s recommended to test on a **staging site**, not a live site. Platforms like **ServerAvatar** make staging setup easy. ### **4. Is it safe to update to WordPress 6.9 immediately?** No, but block themYes, once the final version is released, but always take a **backup** first. Test on a staging environment if you use custom themes or advanced plugins. ### **5. How can ServerAvatar users benefit from WordPress 6.9?** Improved performance, easier staging, and better PHP compatibility help ServerAvatar users manage faster, more stable WordPress installations. ## **Conclusion** WordPress 6.9 focuses on polishing the overall experience rather than introducing dramatic changes, and that’s what makes this update valuable. With smoother design controls, a more responsive Site Editor, optimized performance, and better support for modern PHP environments, this release improves everyday workflows for both creators and developers. Managing themes, handling global styles, and working with blocks feel more intuitive and consistent across the board. For ServerAvatar users, these enhancements fit perfectly into a modern hosting workflow. The improved performance reduces server strain, compatibility upgrades ensure stable operations, and the editor refinements make managing multiple client sites far easier. When combined with ServerAvatar’s staging, backups, automation, and WordPress-optimized server setup, WordPress 6.9 becomes an even stronger foundation for building and maintaining reliable, high-performing websites. **Categories:** Blog, Guide, Others, Tutorials, WordPress **Tags:** Wordpress, WordPress 6.9, WordPress 6.9 features, WordPress 6.9 update, WordPress update 2025 --- ### [Serverless vs Cloud VPS: What’s Best for You?](https://serveravatar.com/serverless-vs-cloud-vps/) **Published:** November 20, 2025 **Author:** Meghna Meghwani **Content:** [![Blog banner - ServerAvatar](https://serveravatar.com/wp-content/uploads/2025/09/728_90-Banner-3-1024x127.png)](https://serveravatar.com/?ref=blog)Deploying a new application today comes with an important decision: serverless vs cloud vps. Both are powerful, both are widely adopted, and both can run production-grade applications, but they solve different kinds of problems. Understanding the key differences between serverless vs cloud vps is crucial for selecting the right architecture for your application. This isn’t simply a technical choice. It affects your costs, performance, workflow, scalability, and long-term flexibility. Whether you’re a startup founder, backend developer, or system architect, choosing the right deployment model can make the difference between smooth scaling and unnecessary headaches. ![serverless vs cloud vps ServerAvatar](https://serveravatar.com/wp-content/uploads/2025/11/image-94.png) Let’s break it down in a clear, practical, and easy-to-understand way. ## **What Is Serverless?** Serverless is a cloud execution model where you run functions, not servers. You don’t manage machines, operating systems, or scaling rules. Instead, your cloud provider runs your functions only when triggered by events. ![Serverless - ServerAvatar](https://serveravatar.com/wp-content/uploads/2025/11/image-95.png) **Popular Serverless Platforms** - AWS Lambda - Google Cloud Functions - Azure Functions - Cloudflare Workers - Vercel Functions **How Serverless Works** Your code executes when something triggers it: - An API request - A file upload - A scheduled job - A database update **Why Developers Love It** - No server setup or maintenance - Automatic scaling - Pay only for execution time - Perfect for unpredictable or bursty traffic **Limitations** - Cold starts may slow down the first request - Limited execution time (e.g., 15 minutes in AWS Lambda) - Stateless: no persistent local storage - Vendor lock-in is common ## **What Is a Cloud VPS?** A Cloud VPS (Virtual Private Server) is a virtual machine hosted on a cloud provider’s infrastructure. You get dedicated CPU, RAM, storage, and a full Linux environment you can configure however you want. ![Cloud vps - ServerAvatar](https://serveravatar.com/wp-content/uploads/2025/11/image-96.png) **Popular Cloud VPS Providers** - DigitalOcean - AWS EC2 - Google Compute Engine - Vultr - Linode - and many more **Why Developers Choose VPS** - Full control with root access - Ability to run any software or database - Predictable performance - No cold starts - Ideal for long-running workloads **Limitations** - You must manage security patches and updates - Scaling may require manual effort - Higher maintenance overhead ## Serverless vs Cloud VPS: Quick Comparison **Feature****Serverless****Cloud VPS****Pricing Model**Pay-per-executionFixed monthly cost**Scaling**Automatic & instantManual or semi-automatic**Performance**May have cold startsStable & predictable**Control**LowHigh**Best For**Event-driven applications, unpredictable trafficHeavy workloads, persistent applications**Maintenance**MinimalRequires ongoing upkeep**Lock-in**HighLow**Long-running Tasks**Not suitablePerfect fit### **Cost Comparison** for Serverless vs Cloud VPS **Serverless Cost Characteristics** - Pay based on number of executions and duration - Extremely cheap for low traffic - Can become expensive at scale **Example:** A small API with 200,000 monthly requests (150ms each) may cost **$4–$7/month**. **Cloud VPS Cost Characteristics** - Fixed monthly price regardless of usage - Usually cheaper for heavy workloads - Typically ranges from **$5 to $80/month,** depending on resources **Example:** A mid-sized SaaS app running 24/7 might cost **$20–$60/month** on a VPS while costing much more on serverless. ### **Performance & Scalability** of Serverless vs Cloud VPS **Serverless Performance** - Instant scaling up and down - Cold starts increase latency - Great for bursty workloads **Cloud VPS Performance** - Always-on applications, no warm-up time - Suitable for high-throughput systems - Vertical scaling may require downtime ### **Security Comparison** of Serverless vs Cloud VPS **Serverless Security** Provider handles: - OS patches - Runtime updates - Infrastructure security You handle: - Function code - Permissions & IAM roles **Pros:** Lower risk of misconfiguration **Cons:** Limited control for custom security layers **Cloud VPS Security** You handle: - OS updates - Firewalls - Software patches **Pros:** Full control **Cons:** Higher maintenance effort ### **Reliability & Uptime** for Serverless vs Cloud VPS **Serverless** - Relies on cloud provider’s uptime - No server crashes - Cold starts can affect perceived performance **Cloud VPS** - Stable environment - Uptime depends on provider and your configs - Requires active monitoring ### **Vendor Lock-In** **Serverless** - High lock-in: event triggers, runtimes, and integrations are provider-specific - Migrating away can be complex **Cloud VPS** - Low lock-in: Linux environments run anywhere - You can move to another provider easily [![Blog banner - ServerAvatar](https://serveravatar.com/wp-content/uploads/2025/09/728_90-Banner-1-1024x127.png)](https://serveravatar.com/?ref=blog)## **When to Choose Serverless** Choose **Serverless** if: - Your traffic is unpredictable - You want zero maintenance - You need automatic scaling - You have event-driven tasks - You’re building microservices - You want cost savings for low usage **Ideal Serverless Use Cases** - Image and file processing - Webhooks and notifications - Scheduled jobs - Lightweight APIs - Background tasks - ETL pipelines ## **When to Choose Cloud VPS** Choose **Cloud VPS** if: - You need full environmental control - You run a stable or high-traffic application - You want predictable performance - You need custom software or database versions - You have long-running tasks **Ideal VPS Use Cases** - SaaS platforms - Real-time applications - Databases and caching systems - Game servers - CRM and ERP systems - Docker and container hosting ## **ServerAvatar: A Smarter, Simpler Way to Use VPS** **What is ServerAvatar?** [ServerAvatar](https://serveravatar.com/) is a platform to simplify the hosting and management of servers and applications. It simplifies the process of deploying and managing PHP and Node.js based web applications on servers. ![ServerAvatar Dashboard](https://serveravatar.com/wp-content/uploads/2025/11/image-97-1024x539.png) Running a VPS gives you full control and stable performance, but it also comes with responsibilities like server setup, updates, monitoring, and security hardening. If you don’t want the headaches of managing everything manually, **[ServerAvatar](https://serveravatar.com/) Managed Cloud VPS** gives you all the benefits of a VPS with zero technical overhead. With ServerAvatar’s Managed Servers, you get: **1. Fully Optimized Cloud VPS** Your server is provisioned, secured, and configured automatically with: - Apache/Nginx/OLS/Node stack - PHP versions - MySQL/MariaDB/MongoDB - Firewall, Fail2ban, and essential optimizations - Automatic backups & monitoring - Server-level caching for faster performance **2. High Performance Hardware** [ServerAvatar](https://serveravatar.com/) uses trusted cloud providers, so you get powerful machines with fast SSD storage, high availability, and reliable global infrastructure, without needing to manage the cloud provider directly. **3. No Need for Root Access** Security is handled for you. Since [ServerAvatar](https://serveravatar.com/) manages the server stack, you never have to worry about: - OS patches - Firewall configurations - Misconfigurations causing downtime It’s built for users who want power **without** dealing with infrastructure complexities. **4. Predictable, Affordable Pricing** Compared to serverless costs that can spike unpredictably, ServerAvatar’s managed VPS pricing stays stable and transparent, ideal for long-running applications, APIs, or SaaS platforms. **5. Perfect for Business-Critical Projects** If your app needs: - Consistent performance - Long-running background tasks - Custom configurations - Predictable cost - Dedicated resources Then a **Managed Server from [ServerAvatar](https://serveravatar.com/)** is the most convenient and reliable choice. ## **Development Experience Comparison** Developer experience differs significantly, influencing everything from initial development to long-term maintenance. **Serverless Development** embraces simplicity and focus. Write functions that do one thing well, package them according to platform requirements, and deploy with single commands or git pushes. No server provisioning, operating system updates, security patches, or infrastructure monitoring required your cloud provider handles everything automatically. This simplicity comes with constraints. Functions are stateless and ephemeral means they can’t maintain persistent connections or store data locally between executions. Function execution time is limited (15 minutes for AWS Lambda), ruling out long-running processes. You’re also somewhat locked into provider ecosystems, making it harder to switch providers later. Debugging serverless applications can be challenging because you can’t easily replicate production environments locally. Tools like AWS SAM, Serverless Framework, and local emulators help, but they’re imperfect substitutes for real cloud environments. ![Serverless deployment - ServerAvatar](https://serveravatar.com/wp-content/uploads/2025/11/image-98.png) **VPS Development** offers complete control and familiar workflows. Run the same stack locally, in staging, and production. Need specific database versions? Custom libraries? Background jobs running for hours? All possible with VPS flexibility. This control comes with responsibility. You manage server provisioning, operating system updates, security patches, monitoring, logging, backup strategies, and scaling preparations. For many developers, this operational overhead significantly burdens time that could be spent building features. However, VPS enables more complex architectures. Run multiple services on the same server, set up custom networking configurations, and maintain complete technology choice flexibility. ![VPS development - ServerAvatar](https://serveravatar.com/wp-content/uploads/2025/11/image-99.png) ## **Hybrid Approaches: A Smart Middle Groun**d Many modern applications use **both** Serverless and Cloud VPS. **Example Hybrid Architecture** - **VPS** → main application, database, persistent workloads - **Serverless** → email sending, cron jobs, image processing, analytics jobs This gives you: - Lower total cost - Stability from VPS - Automatic scaling from serverless ![serverless vs cloud vps - ServerAvatar](https://serveravatar.com/wp-content/uploads/2025/11/image-100.png) ## **How to Decide: A Simple Framework** Ask yourself these questions: **1. Is your traffic predictable?** - Yes → Cloud VPS (**[ServerAvatar](https://serveravatar.com/)** Managed Server is ideal) - No → Serverless **2. Do you need full OS-level control?** - Yes → Cloud VPS (**[ServerAvatar](https://serveravatar.com/)** gives you full flexibility without manual setup) - No → Serverless **3. Will your app run continuously?** - Yes → Cloud VPS (**[ServerAvatar](https://serveravatar.com/)** ensures stable performance for long-running workloads) - No → Serverless **4. Do you want minimal DevOps work?** - Yes → Serverless - No → VPS is fine (or choose **[ServerAvatar](https://serveravatar.com/)** to reduce manual DevOps tasks) **5. Are you concerned about vendor lock-in?** - Yes → Cloud VPS (**[ServerAvatar](https://serveravatar.com/)** lets you stay independent from serverless platforms) - No → Serverless is okay ## FAQs ### **1. Is Serverless always cheaper than a Cloud VPS?** No. Serverless is usually cheaper for low or unpredictable traffic, but costs can rise quickly at scale. A Cloud VPS often becomes more affordable for applications that run continuously or have steady traffic. ### **2. Which one gives better performance — Serverless or VPS?** A Cloud VPS provides consistent, always-on performance. Serverless can scale instantly but sometimes suffers from cold-start delays. If you need stable performance 24/7, VPS wins. ### **3. Can I switch from Serverless to VPS later?** Yes. Many teams start with Serverless for speed and low cost, then move to VPS when traffic becomes predictable. VPS migrations are easier because you get full control over the environment. ### **4. Do I need root access to use ServerAvatar?** No. [ServerAvatar](https://serveravatar.com/) is designed to keep your server secure by eliminating the need for root access. All essential server-level configurations, updates, and optimizations are handled automatically. ### **5. Can I host multiple applications on a single server?** Yes. [ServerAvatar](https://serveravatar.com/) allows you to host unlimited applications on a single VPS, depending on your server resources. ## **Conclusion** Choosing between Serverless and Cloud VPS depends on the nature of your application, not just technology trends. Serverless shines when you need effortless scaling, minimal DevOps, and cost-efficiency for low or variable workloads. Cloud VPS, on the other hand, gives you full control, predictable performance, and freedom to run any software stack without limitations. If your application demands stability, long-running processes, custom configurations, or predictable pricing, a VPS is often the smarter choice. And with a platform like **ServerAvatar**, you get all the power of a VPS without the complexity, automatic setup, security hardening, backups, monitoring, deployments, and optimized server performance. The smartest teams choose the model that aligns with their workload, not the one that’s simply more modern or more hyped. Whether you go Serverless, Cloud VPS, or a hybrid of both, understanding their strengths will help you build applications that scale smoothly, perform reliably, and stay cost-effective in the long run. **Categories:** Blog, Cloud Platforms, Guide, Linux, Optimisation, Others, Tutorials, Ubuntu **Tags:** Cloud Hosting, Cloud Infrastructure, Cloud VPS, DevOps, serverless, Vps hosting --- ### [What Is Multicloud? Key Benefits and How It Works](https://serveravatar.com/what-is-multicloud/) **Published:** November 19, 2025 **Author:** Meghna Meghwani **Content:** [![Blog banner - ServerAvatar](https://serveravatar.com/wp-content/uploads/2025/09/728_90-Banner-3-1024x127.png)](https://serveravatar.com/?ref=blog)## **Introduction to Multicloud Computing** Businesses today rely heavily on cloud technologies for everything, from storing data to building AI-powered applications. But as companies grow, many realize something important: a multicloud approach can solve challenges that a single cloud provider cannot handle alone. This is where multicloud computing becomes valuable. Instead of putting all workloads into one provider’s ecosystem, organizations combine services from multiple cloud platforms such as AWS, Azure, and Google Cloud. Each platform brings something unique to the table, and multicloud lets businesses take advantage of it all. The move toward multicloud didn’t happen suddenly. Early cloud adopters were mostly focused on reducing hardware costs and improving scalability. Over time, however, depending on one provider created new risks, service outages, price fluctuations, or missing features. Multicloud gives businesses the flexibility to avoid these limitations and choose the right provider for every task. ### **Understanding Cloud Architecture Approaches** In simple terms, multicloud means using two or more public cloud providers at the same time. Instead of relying on a single platform for everything, you distribute workloads across different clouds based on performance, cost, or features. ![multicloud - ServerAvatar](https://serveravatar.com/wp-content/uploads/2025/11/image-91.png) ### Common Architecture Models Used Today **1. Distributed Cloud** Workloads run across multiple clouds but are managed centrally. **2. Brokered Cloud** A single interface helps manage different clouds. **3. Layered Cloud** Applications are built so different layers run in different clouds. ## **How Multicloud Differs From Hybrid Cloud** Many people confuse multicloud with hybrid cloud, but they’re not the same. **Hybrid Cloud** - Combines **private cloud + public cloud** - Data and apps move between both **Multicloud** - Uses **two or more public clouds** together - Doesn’t require private cloud **In simple terms:** - Hybrid cloud mixes two types of clouds - Multicloud mixes two providers **A business might choose:** - AWS for computing power - Azure for enterprise software - Google Cloud for analytics **A complete multicloud environment usually includes:** - Different cloud vendors - Tools for communication between platforms - A monitoring system that gives a unified view of all workloads The goal isn’t just to split workloads, it’s to match each task with the most suitable cloud. ![difference - ServerAvatar](https://serveravatar.com/wp-content/uploads/2025/11/image-92.png) ## **How Multicloud Works** A multicloud strategy works by placing each workload on the platform that handles it best. Organizations evaluate cloud providers based on pricing, performance, compliance, and specialized features. A typical multicloud setup includes: **1. Choosing Providers Based on Strengths** **For example:** - Google Cloud for AI - Azure for enterprise integrations - AWS for global reach **2. Distributing Workloads Strategically** Applications and data live where they perform efficiently and cost-effectively. **3. Ensuring Smooth Communication** APIs, containers, and middleware help all cloud environments work together. **4. Securing Each Layer** Security tools and policies ensure that data stays protected regardless of where it’s stored. **Example:** An e-commerce brand might host its main application on AWS, maintain customer records in Azure for compliance, and use Google Cloud to analyze purchase behavior. Each platform is chosen for what it does best. ![multicloud workflow - ServerAvatar](https://serveravatar.com/wp-content/uploads/2025/11/image-93.png)## **Key Benefits of Multicloud Adoption** **1. More Control Over Costs** Multicloud eliminates vendor lock-in. Businesses can compare pricing, move workloads between providers, and only pay for the services that truly add value. **2. Better Performance and Higher Availability** If one cloud provider experiences downtime, workloads can switch to another, reducing interruptions. Hosting data closer to users also improves speed and responsiveness. **3. Stronger Security and Compliance** Every cloud platform offers different security tools. With multicloud, organizations can apply the most robust protections to sensitive workloads and follow regional compliance rules easily. **4. Access to Advanced, Specialized Services** No cloud provider is the best at everything. Multicloud allows companies to mix and match top features from each one, AI from Google, compute from AWS, and enterprise apps from Azure. [![Blog banner - ServerAvatar](https://serveravatar.com/wp-content/uploads/2025/09/728_90-Banner-1-1024x127.png)](https://serveravatar.com/?ref=blog)## **Challenges of Multicloud Environments** Multicloud isn’t perfect. It comes with some challenges: **1. Complex Management** Handling multiple cloud environments requires advanced planning and management tools. **2. Security Variations** Every cloud provider has different policies. Aligning them can be tricky. **3. Higher Skill Requirements** Teams must learn to operate different systems and tools. **4. Data Migration Issues** Moving data among clouds can be time-consuming and costly. ## **Best Practices for Multicloud Implementation** **1. Start With Clear Goals** Before adopting a multicloud strategy, businesses should identify what they want to achieve, cost reduction, better uptime, compliance, or innovation. **2. Select Providers Based on Workload Needs** Not every cloud is suitable for every task. Choosing providers based on strengths results in a more efficient setup. **3. Use Centralized Monitoring** Managing each cloud separately is a common mistake. A unified platform for tracking performance, security, and billing helps maintain control and prevents confusion. **4. Choosing the Right Providers** Not all clouds are created equal. Businesses should select vendors based on their strengths and compatibility with specific workloads. For example, a company focusing on AI innovation might prioritize Google Cloud, while one heavily reliant on Microsoft tools might lean toward Azure. **5. Building a Unified Monitoring System** One of the biggest mistakes companies make is managing each cloud separately. Instead, businesses should implement a **centralized monitoring and management platform** that provides visibility across all providers. This helps track costs, performance, and security in one place, reducing complexity. By following best practices, organizations can avoid chaos and create a **cohesive, efficient multicloud environment** that delivers long-term value. ## **Real-World Examples of Multicloud Adoption** Multicloud isn’t just a theory, it’s already being adopted by enterprises and startups worldwide. **1. Enterprise Use Cases** Large corporations like **Netflix and Spotify** rely on multicloud to ensure uninterrupted services. By distributing workloads across providers, they minimize downtime and improve user experiences globally. **2. Startups and SMEs** Smaller businesses often turn to multicloud for **cost savings and flexibility**. For instance, a startup might use AWS for hosting its core application while relying on Google Cloud’s AI tools to enhance customer experience without massive infrastructure investments. **3. Industry-Specific Applications** - **Healthcare:** Secure patient data across compliant cloud platforms - **Finance:** Meet regulatory requirements while maintaining uptime - **Retail:** Handle sudden traffic surges and analyze customer behavior These examples prove that multicloud isn’t just a trend, it’s a strategic necessity across industries. ## **Multicloud vs. Hybrid Cloud: Key Differences** **Category****Multicloud****Hybrid** **Cloud****Definition**Uses multiple public cloud providersCombines public cloud with private or on-premises systems**Purpose**Flexibility and service optimizationBetter control, security, and compliance**Data Storage**Stored across multiple public cloudsSplit between private and public environments**Ideal For**Innovation, AI, redundancy, performance optimizationSensitive workloads, regulated industries, compliance-heavy operations**Vendor Dependency**Very lowModerate**Scalability**HighModerate to high****Complexity****HigherMedium## **Common Mistakes to Avoid in Multicloud Strategy** While multicloud can be rewarding, many organizations fall into avoidable traps. **1. Ignoring Data Regulations** Different countries require data to be stored in specific regions. Ignoring this can cause compliance issues. **2. Underestimating Integration Efforts** Every cloud platform is unique. Without proper planning, integrating them can become complicated and time-consuming. **3. Poor Cost Management** Multiple providers mean multiple billing systems. Without visibility, businesses may pay for unused or duplicated services. Avoiding these mistakes keeps your multicloud approach efficient and cost-effective. ## **FAQs** ### **1. How is multicloud different from hybrid cloud?** Hybrid cloud mixes private and public clouds, while multicloud uses multiple public clouds together. ### **2. Is multicloud secure?** Yes, when managed correctly. It requires consistent security policies across all platforms. ### **3. Who should use multicloud?** Startups, enterprises, and regulated industries looking for flexibility and resilience. ### **4. Why do businesses choose a multicloud strategy?** Companies adopt multicloud to avoid vendor lock-in, improve availability during outages, reduce operational costs, and access specialized features from different cloud providers. It also helps organizations meet regional compliance requirements more easily. ### **5. Does multicloud cost more than using one cloud provider?** It depends on how it’s implemented. Multicloud can reduce costs if workloads are placed on the most affordable and efficient providers. But without accurate cost tracking, expenses may increase. Using cost-management tools helps prevent overspending. ## **Conclusion** Multicloud has moved beyond being a buzzword, it’s now a practical strategy for modern businesses. By combining the strengths of different cloud providers, organizations gain flexibility, resilience, improved performance, and access to cutting-edge services. Of course, multicloud comes with its own challenges, but with the right planning and tools, it becomes a powerful foundation for innovation and long-term growth. Whether you’re a fast-growing startup or a global enterprise, a well-executed multicloud strategy can help your business stay competitive, secure, and future-ready. ## Stop Wasting Time on Servers. Start Building Instead. You didn’t start your project to babysit servers. Let **ServerAvatar** handle deployment, monitoring, and backups — so you can focus on growth. Deploy **WordPress, Laravel, N8N**, and more in minutes. No DevOps required. No command line. No stress. [ 🚀 Try Free ](https://app.serveravatar.com) [ 🌐 Learn More ](https://serveravatar.com/) Trusted by 10,000+ developers and growing. **Categories:** Blog, Cloud Platforms, Guide, Linux, Tutorials, Ubuntu **Tags:** Cloud Computing, Cloud Hosting, DevOps, Hybrid Cloud Hosting, multicloud --- ### [Top 10 Useful Bash Scripts for Server Management](https://serveravatar.com/bash-scripts-for-server-management/) **Published:** November 18, 2025 **Author:** Meghna Meghwani **Content:** [![Blog banner - ServerAvatar](https://serveravatar.com/wp-content/uploads/2025/09/728_90-Banner-3-1024x127.png)](https://serveravatar.com/?ref=blog)Managing a server can feel overwhelming at times, especially when you’re dealing with repetitive tasks, checking logs, tracking resource usage, or maintaining backups. But if you’re comfortable with Linux, even at a basic level, you can use Bash scripts to automate many of these daily chores. Think of Bash scripts as your personal assistants that don’t complain, don’t get tired, and follow your instructions exactly. In this guide, I’ll walk you through the top 10 Bash scripts that every server admin should keep in their toolbox. Each script is simple, practical, and designed to save time while reducing the chances of human error. ![bash scripts - ServerAvatar](https://serveravatar.com/wp-content/uploads/2025/11/image-82.png) ## 1. **Bash Scripts for** **System Resource Monitoring Script** This script gives you an instant snapshot of your server’s overall health by checking CPU load, RAM usage, and disk space. Instead of running multiple commands manually, this single Bash script collects everything in one place, making it easier and faster to understand how your server is performing. **Why it’s useful:** - Instead of typing 3–4 commands separately, you get CPU, memory, and disk details in one clean view. - Whether you’re troubleshooting or doing routine checks, this script provides instant answers and reduces manual effort. - You can quickly figure out: - Is the CPU overloaded? - Is RAM running out? - Is the disk about to fill up? - Useful when applications slow down or crash unexpectedly. ``` #!/bin/bash echo "----- System Resource Usage -----" echo "CPU Load:" uptime echo echo "Memory Usage:" free -h echo echo "Disk Usage:" df -h ``` ``` #!/bin/bash echo "----- System Resource Usage -----" echo "CPU Load:" uptime echo echo "Memory Usage:" free -h echo echo "Disk Usage:" df -h ``` **Output:** ![bash scripts output - ServerAvatar](https://serveravatar.com/wp-content/uploads/2025/11/image-83-1024x543.png) ## **2. Automatic System Update Script** Keeping your server updated is one of the most important steps in maintaining security and stability. Outdated packages often contain vulnerabilities that attackers can exploit, so regular updates are essential. Instead of running update commands manually every time, this simple Bash script automates the entire process and ensures your server always stays up-to-date. **Why it’s useful:** - Keeps Your Server Secure - Instead of typing update commands every few days, you just: - Run the script Or schedule it with cron - Running multiple update commands manually increases the chance of mistakes. - This script reduces human error. - No extra tool or configuration is needed, just a simple Bash script. ``` #!/bin/bash sudo apt update && sudo apt upgrade -y echo "System updated successfully!" ``` ``` #!/bin/bash sudo apt update && sudo apt upgrade -y echo "System updated successfully!" ``` **Output:** ![bash scripts output - ServerAvatar](https://serveravatar.com/wp-content/uploads/2025/11/image-84-1024x321.png) ## **3. Bash Scripts for** **Failed Login Attempt Checker** Brute-force attacks are one of the most common threats faced by Linux servers. Attackers use automated scripts to guess SSH passwords by trying hundreds or thousands of combinations. Monitoring these failed login attempts is crucial because it helps you detect suspicious activity early and take action before your server gets compromised. This Bash script scans your SSH authentication logs and shows you which IP addresses are repeatedly failing to log in. It gives you a clear view of potential attackers. **Why it’s useful:** - Detects Brute-Force Attacks Quickly - This script filters the important data and shows it clearly. - This script helps you understand: - Attack patterns - Targeted usernames - Frequency of attacks ``` #!/bin/bash echo "Failed login attempts:" grep "Failed password" /var/log/auth.log | awk '{print $11}' | sort | uniq -c | sort -nr ``` ``` #!/bin/bash echo "Failed login attempts:" grep "Failed password" /var/log/auth.log | awk '{print $11}' | sort | uniq -c | sort -nr ``` **Output:** ![bash scripts output - ServerAvatar](https://serveravatar.com/wp-content/uploads/2025/11/image-85-1024x103.png) ## **4. Bash Scripts for** **Disk Space Alert Script** Disk space is one of the most sensitive resources on a server. If your storage gets full, essential services like databases, applications, and even the operating system can crash instantly. Logs stop writing, updates fail, and deployments break. That’s why it’s essential to monitor disk usage and get alerts before things reach a critical point. This **Disk Space Alert Script** automatically checks how much space is used on your server and sends an email notification if usage crosses a predefined limit. It’s a simple yet powerful way to prevent server downtime. **Why it’s useful:** - This script notifies you before issues like MySQL crashes, Apache/Nginx failures, broken deployments, or system freezes occur - This helps keep your server stable and responsive - The script automatically checks disk usage and notifies you - The script acts like an early-warning system ``` #!/bin/bash THRESHOLD=80 USED=$(df / | grep / | awk '{ print $5 }' | sed 's/%//g') if [ "$USED" -gt "$THRESHOLD" ]; then echo "Disk space alert: $USED% used!" | mail -s "Disk Alert" admin@example.com fi ``` ``` #!/bin/bash THRESHOLD=80 USED=$(df / | grep / | awk '{ print $5 }' | sed 's/%//g') if [ "$USED" -gt "$THRESHOLD" ]; then echo "Disk space alert: $USED% used!" | mail -s "Disk Alert" admin@example.com fi ``` ## **5. Automated Backup Script** Backups are your server’s safety net. If anything goes wrong, accidental file deletions, hacking attempts, system crashes, or corrupted data, a proper backup ensures you can restore everything quickly. This simple Bash script automatically creates a compressed archive of important directories and stores it safely for future use. **Why it’s useful:** - If something goes wrong, hacking, corruption, or accidental deletion, you can quickly restore everything from the backup - You don’t need to manually create backups; pair this script with a cron job so your server backs up automatically - There’s no dependency on third-party tools or heavy software. ``` #!/bin/bash BACKUP_DIR="/backup" SOURCE="/var/www" FILENAME="backup-$(date +%F).tar.gz" tar -czvf $BACKUP_DIR/$FILENAME $SOURCE echo "Backup created at $BACKUP_DIR/$FILENAME" ``` ``` #!/bin/bash BACKUP_DIR="/backup" SOURCE="/var/www" FILENAME="backup-$(date +%F).tar.gz" tar -czvf $BACKUP_DIR/$FILENAME $SOURCE echo "Backup created at $BACKUP_DIR/$FILENAME" ``` ## **6. Service Status Checker Script** When managing a server, one of the most common tasks is checking whether essential services are running. Services like **Nginx, Apache, MySQL, Redis, or SSH** must stay active for your applications to work properly. Instead of manually typing systemctl commands every time, this script allows you to check the status of any service in seconds. You simply pass the service name as an argument, and the script tells you whether it’s currently active. **Why it’s useful:** - Instead of typing, ‘systemctl status nginx’, and scrolling through lots of output, you get a **simple one-line answer**. - When you manage multiple services, this script becomes a huge time-saver. - No need to install anything extra, as long as the system uses **systemd**, it works perfectly. ``` #!/bin/bash SERVICE=$1 systemctl is-active --quiet $SERVICE if [ $? -eq 0 ]; then echo "$SERVICE is running." else echo "$SERVICE is not running." fi ``` ``` #!/bin/bash SERVICE=$1 systemctl is-active --quiet $SERVICE if [ $? -eq 0 ]; then echo "$SERVICE is running." else echo "$SERVICE is not running." fi ``` **Usage Example:** ``` ./check_service.sh nginx ``` ``` ./check_service.sh nginx ``` ## **7. Bash Scripts for** **Log File Cleaner Script** Log files are essential for debugging and monitoring, but they can grow rapidly and consume a huge amount of disk space, especially on busy servers running web apps, databases, or background processes. If old logs are not managed properly, they can fill up storage and lead to performance issues or even server crashes. This Log File Cleaner Script automatically removes log files that are older than a certain number of days, helping keep your server clean, healthy, and clutter-free. **Why it’s useful:** - Logs can fill gigabytes of space in days on high-traffic servers. By cleaning old logs automatically, you avoid server crashes, failed deployments, stopped services, and full partitions - Instead of piling up hundreds of files, your log directory stays clean and manageable. - No special packages required to run this script ``` #!/bin/bash LOG_DIR="/var/log" DAYS=7 find $LOG_DIR -type f -mtime +$DAYS -exec rm -f {} \; echo "Old logs cleaned." ``` ``` #!/bin/bash LOG_DIR="/var/log" DAYS=7 find $LOG_DIR -type f -mtime +$DAYS -exec rm -f {} \; echo "Old logs cleaned." ``` **Output:** ![Log File Cleaner output - ServerAvatar](https://serveravatar.com/wp-content/uploads/2025/11/image-86-1024x136.png)## **8. Network Connectivity Checker** Network issues can break applications, stop deployments, and even disconnect your server from the outside world. Whether you’re troubleshooting slow performance, DNS failures, or connectivity problems, the first step is to check whether your server can reach another host. This simple Network Connectivity Checker script uses the ping command to test if your server can connect to a specific website or IP address. It’s a quick and reliable way to diagnose network-related issues. **Why it’s useful:** - If your server can’t reach the internet or another machine, this script gives you instant insight - Many server problems are caused by connectivity issues. This script helps you confirm whether: - Your app can reach external APIs - Your server is online - Internal network connections are working - The ping command exists on all Linux systems, so no installation is needed ``` #!/bin/bash HOST="google.com" ping -c 4 $HOST ``` ``` #!/bin/bash HOST="google.com" ping -c 4 $HOST ``` **Output:** ![Network Connectivity Checker output - ServerAvatar](https://serveravatar.com/wp-content/uploads/2025/11/image-87-1024x134.png)## **9. User Activity Logging Script** On a multi-user server, it’s essential to know **who logged in, from where, and at what time**. This is especially important for security, auditing, and tracking unauthorized access. Linux provides built-in logs for user activity, and this script makes it easy to view or save that information. This script uses the last command to show a list of recent logins. You can either display the information directly on the screen or log it into a file for future review. **Why it’s useful:** - This script helps to track active users, suspicious login attempts, unexpected login times, and access patterns - The script uses the default Linux command, which is available on all systems, so no installation is needed. - This script helps you track who logged into your server and when. - It’s an essential tool for security, user monitoring, and server accountability. ``` #!/bin/bash last ``` ``` #!/bin/bash last ``` Or log it into a file: ``` #!/bin/bash last >> /var/log/user_activity.log ``` ``` #!/bin/bash last >> /var/log/user_activity.log ``` **Output:** ![User Activity Logging output - ServerAvatar](https://serveravatar.com/wp-content/uploads/2025/11/image-88-1024x159.png)## **10. Firewall Rule Automation Script** Firewalls are crucial for server security. They control what traffic is allowed in and out of your system. However, managing firewall rules manually, especially on large or multi-service servers, can be confusing and time-consuming. This simple Firewall Rule Automation Script makes it easy to open ports using UFW (Uncomplicated Firewall), a beginner-friendly firewall tool commonly used on Ubuntu and Debian-based systems. With this script, you can open any port quickly without remembering long commands or making mistakes. **Why it’s useful:** - This script simplifies the process. Perfect for beginners and busy admins. - Typing wrong commands can break firewall rules and block services. This script reduces the risk. - This script lets you open any port with one simple command. - It removes the complexity of UFW and gives you a fast, safe, and reliable way to manage firewall rules on your server. ``` #!/bin/bash PORT=$1 sudo ufw allow $PORT echo "Port $PORT opened successfully." ``` ``` #!/bin/bash PORT=$1 sudo ufw allow $PORT echo "Port $PORT opened successfully." ``` Usage: ``` ./open_port.sh 8080 ``` ``` ./open_port.sh 8080 ``` **Output:** ![firewall rule automation output - ServerAvatar](https://serveravatar.com/wp-content/uploads/2025/11/image-90-1024x695.png)## **FAQs** ### **1. Do I need advanced Linux knowledge to use these Bash scripts?** Basic familiarity with Linux commands is enough. These scripts are simple, beginner-friendly, and can be copied and used right away. ### **2. Can I customize these scripts for my own server setup?** Yes, absolutely. All scripts can be modified, for example, changing directories, ports, thresholds, log paths, or backup locations based on your requirements. ### **3. Are these scripts safe to use on production servers?** Yes, the scripts are safe as long as you review them before executing and adjust values where needed. Always test new scripts on a development or staging environment first. ### **4. How do I automate these scripts to run daily or weekly?** You can schedule any script using **cron jobs**. Example: ‘**crontab -e**‘ Then add a line like: ‘**0 2 \* \* \* /path/to/script.sh**‘ – This runs the script daily at 2 AM. ### **5. Do these scripts work on all Linux distributions?** Most of them work on all Linux distros, but some commands (like apt, ufw, or systemctl) may differ depending on the system. For example: ‘**Ubuntu/Debian → uses apt and ufw**‘ ### **6. Can I combine multiple scripts into one master script?** Yes. Many admins create a **maintenance script** that includes resource checks, log cleanup, backup routines, and service monitoring all in one file. ## **Final Thoughts** Managing a server doesn’t have to be overwhelming or time-consuming. With the right set of Bash scripts, you can automate most routine tasks, reduce human error, and make your server more efficient and secure. Whether you’re checking system resources, detecting failed login attempts, backing up files, or managing firewall rules, these scripts act like reliable assistants that work exactly the way you want, every single time. The top 10 Bash scripts discussed in this guide are simple yet powerful tools that every server administrator should keep in their toolkit. They help you troubleshoot faster, maintain performance, monitor security, and ensure your server stays healthy with minimal effort. By incorporating automation into your workflow, you not only save time but also build a more stable and predictable server environment. Start with the basics, customize each script to match your needs, and soon you’ll find your server management tasks becoming smooth, efficient, and stress-free. ## Stop Wasting Time on Servers. Start Building Instead. You didn’t start your project to babysit servers. Let **ServerAvatar** handle deployment, monitoring, and backups — so you can focus on growth. Deploy **WordPress, Laravel, N8N**, and more in minutes. No DevOps required. No command line. No stress. [ 🚀 Try Free ](https://app.serveravatar.com) [ 🌐 Learn More ](https://serveravatar.com/) Trusted by 10,000+ developers and growing. **Categories:** Blog, Guide, Linux, Tutorials, Ubuntu **Tags:** Bash scripting, Bash scripts, DevOps, Linux, Server Management --- ### [How to Connect WordPress to CRM & Email Marketing Platforms](https://serveravatar.com/connect-wordoress-to-crm-email-marketing-platforms/) **Published:** November 17, 2025 **Author:** Meghna Meghwani **Content:** [![Blog banner - ServerAvatar](https://serveravatar.com/wp-content/uploads/2025/09/728_90-Banner-3-1024x127.png)](https://serveravatar.com/?ref=blog)Are you looking for an effective way to connect WordPress to CRM & email marketing platforms and streamline how you manage your contacts and subscribers? Connecting WordPress to your CRM and email software bridges the gap between your website and your marketing system. It automatically syncs user registrations, form submissions, and membership details to your preferred platforms, saving you time and keeping your contact lists accurate and up-to-date. In this article, you’ll learn about the benefits of connecting WordPress to CRM and email marketing platforms, as well as the steps to set it up using [FuseWP](https://fusewp.com/). We’ll also show you how to create optin forms with [MailOptin](https://mailoptin.io/) that connect directly to your email marketing account. ## Benefits of Connecting WordPress to CRM and Email Marketing Platforms **Automated Data Sync:** Once connected, new users, customers, or subscribers from your WordPress site are automatically added to your CRM or email lists. Whether someone registers, fills out a form, or makes a purchase, their details are synced instantly. This automation keeps your contact database clean and always up to date. **Better Audience Segmentation:** Syncing data between WordPress and your CRM helps categorize users by actions like purchases, membership levels, or form submissions, enabling targeted campaigns that address their interests instead of generic messages. **Personalized Communication:** When your CRM and email platform have accurate user data, you can send more relevant messages, like welcome emails after registration, expiry reminders, or product suggestions based on past purchases. **Increased Efficiency and Accuracy:** Manual data entry can lead to mistakes and inconsistencies. With integration, those errors are eliminated. Every contact, subscription, and update is synced accurately between WordPress and your marketing systems, ensuring your data always tells the right story. **Higher Conversion Rates:** When your email campaigns are based on accurate, real-time data, they perform better. By sending the right message to the right audience at the right time, you’ll see improved engagement and conversions across your marketing channels. ## Steps to Connect WordPress to CRM & Email Marketing Platforms To begin, you’ll need an automation plugin that helps you connect your WordPress site to your CRM and email marketing platform. For this guide, we’ll use [FuseWP](https://fusewp.com/pricing/), a plugin designed specifically for syncing WordPress users, form submissions, and membership data with CRM and email platforms. ![connect WordPress to CRM & email marketing platforms - ServerAvatar](https://serveravatar.com/wp-content/uploads/2025/11/image-57-1024x549.png)### Install and Activate FuseWP Visit the [FuseWP website to buy a license](https://fusewp.com/pricing/). After purchase, you’ll receive an email with a download link and license key. Log in to WordPress, go to Plugins > Add New, and choose Upload Plugin. Select the ZIP file and click Install Now. ![install fusewp - ServerAvatar](https://serveravatar.com/wp-content/uploads/2025/11/image-58.png)Wait a few minutes for the installation to complete. Once it’s done, click **Activate Plugin** to enable FuseWP on your website. ![activate fusewp - ServerAvatar](https://serveravatar.com/wp-content/uploads/2025/11/image-59.png)### Connect Your CRM or Email Marketing Platform [FuseWP](https://fusewp.com/section/integrations/) integrates with many popular CRM and email marketing platforms, including Mailchimp, ActiveCampaign, Constant Contact, Campaign Monitor, Salesforce, HubSpot, Zoho Brevo, AWeber, Sendy, Klaviyo, Google Sheets, Keap, and many others. In this section, we’ll show you how to connect your WordPress website to Mailchimp using the FuseWP plugin. To do this, go to **FuseWP > Settings** in your WordPress dashboard. Under the Mailchimp logo, click Configure to open the setup window. ![connect WordPress to CRM & email marketing platforms - ServerAvatar](https://serveravatar.com/wp-content/uploads/2025/11/image-60-1024x471.png)Next, click on the **“Connect to Mailchimp”** button. ![connect to mailchimp - ServerAvar](https://serveravatar.com/wp-content/uploads/2025/11/image-61-1024x656.png)You’ll then be taken to the Mailchimp login page, where you can log in to complete the connection. ![mailchimp login authorize page - ServerAvatar](https://serveravatar.com/wp-content/uploads/2025/11/image-62.png) After logging in, you’ll be directed to an authorization page asking you to grant FuseWP permission to access your Mailchimp account. ![authorize fusewp - ServerAvatar](https://serveravatar.com/wp-content/uploads/2025/11/image-63-1024x635.png)Once the connection is complete, Mailchimp will automatically redirect you back to the FuseWP integrations settings page. ![mailchimp connected - ServerAvatar](https://serveravatar.com/wp-content/uploads/2025/11/image-64-1024x549.png)As shown in the screenshot above, a green check mark confirms that Mailchimp has been successfully connected. One great advantage of FuseWP is that it supports multiple CRM and email marketing connections. This means you can connect to and sync data with several platforms simultaneously. For example, you can send form submissions to both Mailchimp and Keap simultaneously. To connect additional CRMs and email marketing platforms to your WordPress site, visit the [FuseWP Integrations page](https://fusewp.com/section/integrations/) for detailed setup guides. ### Sync Registered WordPress Users to CRM and Email Marketing Platforms Once FuseWP is installed and connected to your preferred CRM or email marketing platform, the next step is to sync your registered WordPress users. To configure this, navigate to **FuseWP > User Sync** and click **Add New**. On the setup page, select **User Roles** as the source for your sync rule. ![fuse wp dashboard - ServerAvatar](https://serveravatar.com/wp-content/uploads/2025/11/image-65-1024x398.png)Next, click “**Add Destination”** and select the user roles you want to sync to your email list during registration. Then, select your preferred integration, choose the specific email list where new users will be added, and select tags and map custom fields. ![sync register user mailchimp - ServerAvatar](https://serveravatar.com/wp-content/uploads/2025/11/image-66.png)You can repeat this process as many times as needed, depending on the number of user roles and email lists you want to connect. If your CRM or email marketing platform supports tagging and custom field mapping, you can link user data to your custom fields and assign tags to users accordingly. Once you are done, click on the **Save** button to activate the rule. #### **Sync Existing Users in Bulk** If you already have existing users in your WordPress database before setting up FuseWP, you can bulk-sync them to your connected CRM or email marketing service. To do this, make sure you’ve already created a sync rule. Then go to the **User** **Sync** page and, under the rule you want to apply, click **Bulk Sync**. ![fusewp bulk sync action link - ServerAvatar](https://serveravatar.com/wp-content/uploads/2025/11/image-67-1024x389.png)After clicking the **Bulk Sync** link, a notification will appear indicating that the process has started. ![fusewp bulk sync action started - ServerAvatar](https://serveravatar.com/wp-content/uploads/2025/11/image-68-1024x461.png)Once it’s complete, you will see another notification saying that the bulk sync is done. ![fusewp bulk sync action completed - ServerAvatar](https://serveravatar.com/wp-content/uploads/2025/11/image-69-1024x439.png)By syncing both new and existing users, FuseWP ensures your CRM and email marketing platforms always have accurate, up-to-date contact information, saving you hours of manual work. ## Sync Users in E-commerce and Membership Plugins FuseWP also connects data from your e-commerce and membership plugins to your CRM or email marketing platforms. This enables you to manage and target customers or members based on their purchasing history, subscription status, or access level. Below, we’ll show you how to set it up. [![Blog banner - ServerAvatar](https://serveravatar.com/wp-content/uploads/2025/09/728_90-Banner-1-1024x127.png)](https://serveravatar.com/?ref=blog)### **Sync WooCommerce Customers Based on Purchased Products** FuseWP allows you to automatically add WooCommerce customers to specific email lists based on the products they purchase. To do this, go to **FuseWP >> User Sync** and click the **Add New** button. ![fuse wp add new rule - ServerAvatar](https://serveravatar.com/wp-content/uploads/2025/11/image-70-1024x443.png)Next, select a WooCommerce product as the source. ![fusewp woocommerce sync rule - ServerAvatar](https://serveravatar.com/wp-content/uploads/2025/11/image-71-1024x600.png)Next, let’s configure the destination. For each order status, such as Completed or Refunded, you can specify the list to which customers will be added or removed. To set this, click the “Add Destination” button. There, you can add the different order statuses associated with the selected WooCommerce product. For each order status, you’ll choose your CRM or email marketing platform and designate the corresponding list. You can also define which tags to assign to subscribers and map custom fields, ensuring that customer data in WooCommerce aligns correctly with the corresponding fields in your CRM. For example, in the image below, WooCommerce customers who purchase a Cap product are added to the selected email marketing software or CRM. ![woocommerce purchased product sync - ServerAvatar](https://serveravatar.com/wp-content/uploads/2025/11/image-1024x737.jpeg)If a customer’s order status is marked as **Completed**, they’ll be automatically added to the “Customers” list. However, if their order is **refunded**, they’ll be removed from the Completed list and added to the Refunded list instead. Once you’ve set this up, repeat the process to add destinations for any other order statuses you want to include, such as ‘Canceled’, ‘Refunded’, or ‘Failed’. When finished, click on “**Save**” to activate the sync rule. #### **Sync WooCommerce Customers to Email Lists Based on Product Category** To sync WooCommerce customers to your CRM or email marketing list based on the product category they purchased from, follow these steps: Go to **FuseWP > User Sync** and click the **Add New** button. Next, choose a WooCommerce category as the source. Then, set up the CRM or email marketing list for every order status. ![woocommerce purchased product category sync - ServerAvatar](https://serveravatar.com/wp-content/uploads/2025/11/image-72-1024x645.png)In the image above, customers who purchase products from the Clothing category are automatically added to the “Customers” email list. If their payment fails during checkout, they’ll be subscribed to the list assigned to the failed order status. After setting this up, you can repeat the same process to add destinations for other order statuses, such as Canceled, Refunded, and Failed. When done, click on “**Save**” to activate the sync rule. #### **Sync WooCommerce Customers Based on Product Tags** FuseWP also supports syncing based on WooCommerce product tags. To do this, navigate to **FuseWP > User Sync** and click **Add New**. Select WooCommerce Product Tag as the source, then configure your preferred CRM or email marketing list for each order status. When done, repeat the process for adding destinations for additional order statuses you wish to add, such as Canceled, Refunded, and Failed. ![woocommerce purchased product tag sync - ServerAvatar](https://serveravatar.com/wp-content/uploads/2025/11/image-73-1024x624.png)As shown in the example above, when a customer purchases a product tagged “Long,” they are added to the “Customers” email list. If the order status later changes to Refunded, they’ll be removed from the Completed list and added to the Refunded list. Remember to click on the **Save** button when done to activate the sync rule. #### **Sync ProfilePress Members to Your Email List** Suppose you run a membership site with MemberPress, ProfilePress, Paid Memberships Pro, or Restrict Content Pro. In that case, FuseWP can automatically add members to your CRM or email marketing platform as soon as they register or subscribe. You can even sync members based on their membership plans, ensuring that each plan has a corresponding email list or tag. This makes it easier to send updates, renewal reminders, or exclusive offers to specific membership tiers without doing any manual work. To set this, navigate to **FuseWP > User Sync** and click the ‘**Add New**‘ button. Next, select a membership plan as the source. Then, move to the Destinations metabox to configure the different subscription statuses of the selected membership plan and their respective email marketing integrations. ![fusewp profilepress sync edit screen - ServerAvatar](https://serveravatar.com/wp-content/uploads/2025/11/image-74-1024x763.png)For example, as shown in the screenshot above, ProfilePress members with an active “Gold” membership will be automatically added to the “Customers” list in your CRM or email marketing platform. If their membership is canceled, they’ll be removed from the Active Subscription list and added to the Cancelled list. Once you’ve set everything up, remember to save your changes and make sure the rule is active. ### Sync Form Submissions to CRM and Email Marketing Platforms FuseWP can also connect your form submissions from Gravity Forms, WPForms, Ninja Forms, Forminator Forms, Fluent Forms, Formidable Forms, and Everest Forms to your CRM and email marketing platforms. This means that every time someone fills out a form on your site, their details can be sent directly to your CRM or email list, eliminating the need for manual exporting or copying. In the next section, we’ll show how to connect WPForms to Mailchimp using FuseWP. #### **Sync WPForms Submissions to Mailchimp** To do this, navigate to **FuseWP >> User Sync** and click the **Add New** button. Next, on the User Sync Rules page, select **WPForms** as the source, then choose the specific form whose submissions you want to connect to your CRM or email marketing platform. ![wpforms create sync rule - ServerAvatar](https://serveravatar.com/wp-content/uploads/2025/11/image-75-1024x346.png)Next, move to the Destinations section, where you can choose the CRM or email marketing platform to which users will be added when they submit a form. To set it up, click “**Add Destination”** and select “**After Form Submission”** as the event. Then, select Mailchimp as your integration, choose the audience to which you want new contacts added, and assign any relevant tags. You can also map custom fields to make sure the data is transferred correctly. ![fusewp destination - ServerAvatar](https://serveravatar.com/wp-content/uploads/2025/11/image-76-983x1024.png)Once you’ve configured everything, click “**Save**” to activate the sync rule. From that point on, every new form submission will automatically be added to your selected CRM or email marketing platform. ## Bonus: Create Opt-in Forms with MailOptin Another effective way to connect WordPress to CRM and email marketing platforms is to use [MailOptin](https://mailoptin.io/). This plugin creates high-converting opt-in forms and links them directly to your email marketing service. With MailOptin, you can create popups, slide-ins, notification bars, and embedded forms that automatically send subscribers’ information to platforms like Mailchimp, ActiveCampaign, Constant Contact, ConvertKit, and many others. Below, we’ll show you how to create a pop-up form with MailOptin and connect it to Mailchimp. **Install and Activate MailOptin** To get started with MailOptin, visit the [MailOptin website](https://mailoptin.io/) and purchase a license. Next, log in to your WordPress admin dashboard, navigate to **Plugins > Add New**, and click ‘**Upload Plugin’**. Select the ZIP file you downloaded, upload it, and then click **Install Now**. Once the installation is complete, click **Activate Plugin** to start using MailOptin. ![install mailoptin - ServerAvatar](https://serveravatar.com/wp-content/uploads/2025/11/image-77.png)**Connecting MailOptin to Mailchimp** **Creating a Popup Lead Capture Form** To do this, go to **MailOptin > Optin Campaigns** in your WordPress dashboard and click **Add New**. Next, give your campaign a name, select ‘Lightbox’ as the opt-in form type, and choose a suitable template. ![select lightbox - ServerAvatar](https://serveravatar.com/wp-content/uploads/2025/11/image-78-1024x445.png)The next step is to customize the design, content, and behavior of your pop-up using the options in the side panel. ![mailoptin popup subscription form editor - ServerAvatar](https://serveravatar.com/wp-content/uploads/2025/11/image-79-1024x700.png)Once you are done customizing your pop-up, the next step is to connect it to your Mailchimp account. To do this, open the Integrations panel, choose Mailchimp from the New Integration dropdown, and select the Mailchimp list where you want new subscribers to be added. ![adding mailchimp to mailoptin form - ServerAvatar](https://serveravatar.com/wp-content/uploads/2025/11/image-80-1024x702.png)Next, you need to set where the form should appear on your site. Open the Display Rules panel to configure it. If you’d like the pop-up to appear on every page, enable the Globally load opt-in option. For more control, use page-level targeting and triggers to specify where and when the pop-up should display. ![display rules popup - ServerAvatar](https://serveravatar.com/wp-content/uploads/2025/11/image-81.png) When you are done with your setup, click **Save Changes**. That’s it, you’ve successfully created a pop-up form! When visitors subscribe, their details will be automatically synced to your Mailchimp list. ## Conclusion We hope this guide helped you understand how to connect WordPress to CRM and email marketing platforms. By using [FuseWP](https://fusewp.com/), you can automatically sync WordPress users, WooCommerce customers, and form submissions with your CRM or email lists, ensuring that your contact data remains accurate and up-to-date. With [MailOptin](https://mailoptin.io/), you can grow your audience by creating opt-in forms that direct new subscribers to your email marketing platform. Now it’s your turn to put this into action. Connect your WordPress site today and experience how easy it is to keep your CRM and email marketing perfectly in sync. ## Stop Wasting Time on Servers. Start Building Instead. You didn’t start your project to babysit servers. Let **ServerAvatar** handle deployment, monitoring, and backups — so you can focus on growth. Deploy **WordPress, Laravel, N8N**, and more in minutes. No DevOps required. No command line. No stress. [ 🚀 Try Free ](https://app.serveravatar.com) [ 🌐 Learn More ](https://serveravatar.com/) Trusted by 10,000+ developers and growing. **Categories:** Blog **Tags:** Connect WordPress to CRM, Email marketing, Wordpress, WordPress CRM integration --- ### [7 Best Ecommerce Plugins for WordPress to Grow Your Store](https://serveravatar.com/wordpress-ecommerce-plugins/) **Published:** July 25, 2025 **Author:** Meghna Meghwani **Content:** [![Blog banner - ServerAvatar](https://serveravatar.com/wp-content/uploads/2025/09/728_90-Banner-3-1024x127.png)](https://serveravatar.com?ref=blog)Running an online store on WordPress? **Ecommerce Plugins** make it possible. WordPress isn’t just for blogs, it can power full-scale online shops too. With the right plugin, you can sell products, accept payments, track orders, and more. But with so many options available, which ones truly stand out? In this blog, we’ll go over the **7 best eCommerce plugins for WordPress**. These plugins can help you grow your store, sell more, and make your life easier. Let’s break it down simple. ## 1. WooCommerce ![WooCommerce](https://serveravatar.com/wp-content/uploads/2025/07/image-106-1024x441.png)**What is this?** [WooCommerce](https://woocommerce.com/) is the most popular eCommerce plugin for WordPress. It’s free, easy to use, and works with most WordPress themes. Over 5 million stores use it. **How it works** Once you install WooCommerce, you can add products, set prices, take payments, and even offer shipping. It turns your normal website into a full shop. **You can:** - Sell physical or digital items - Add product pictures and descriptions - Choose shipping options - Set taxes - Accept payments (PayPal, credit card, etc.) There are also a lot of add-ons for WooCommerce. You can get more features like bookings, subscriptions, and more. **Why use it?** - It’s free - Works with almost any WordPress theme - Easy to set up and run - Big community and support - Tons of add-ons for extra tools If you want a shop that does almost everything, WooCommerce is a great start. ## 2. ProfilePress ![ProfilePress](https://serveravatar.com/wp-content/uploads/2025/07/image-170.png) **What is this?** [ProfilePress](https://profilepress.com/) turns your WordPress site into a powerful eCommerce platform for selling memberships, subscriptions, and digital access. It’s perfect for anyone to sell digital products, premium content, or gated access to online communities and courses. **How it works** Install ProfilePress, create your membership or product plans, set prices, and connect a payment gateway, such as Stripe or PayPal. Visitors can sign up, pay, and instantly gain access to your protected content, downloads, or online courses. **You can:** - Sell memberships, subscriptions, or digital access - Accept one-time and recurring payments via Stripe, PayPal, Paystack, Mollie, or Razorpay - Offer free trials, coupons, or discounts to boost conversions - Restrict access to posts, pages, videos, or WooCommerce products - Track signups, renewals, and cancellations with detailed reports - Sync new customers to email marketing and CRM software such as Mailchimp, Campaign Monitor, and MailerLite **Why use it?** - Perfect for selling digital access or recurring memberships - Easy setup with no coding required - Clean checkout and member dashboard - Includes add-ons for more features ProfilePress is a perfect e-commerce solution for digital memberships, online courses, and subscription-based access. ## 3. Easy Digital Downloads (EDD) ![Easy Digital Downloads ](https://serveravatar.com/wp-content/uploads/2025/07/image-107-1024x447.png)**What is this?** [Easy Digital Downloads](https://easydigitaldownloads.com/) is made for selling digital products — like music, software, books, or courses. If you don’t ship anything, this one is perfect. **How it works** Install EDD, add your digital files, set prices, and you’re good to go. Customers pay, and they get a download link. **You can:** - Add product pages with images and files - Offer discount codes - Track downloads - Get reports - Take payments (Stripe, PayPal, and more) **Why use it?** - Great for selling downloads - Super simple - Clean design - Focused on digital products only - Free and paid add-ons It’s not for physical stuff, but for digital, it’s the best. ## 4. BigCommerce for WordPress ![BigCommerce for WordPress](https://serveravatar.com/wp-content/uploads/2025/07/image-108-1024x437.png)**What is this?** [BigCommerce](https://www.bigcommerce.com/) is a full online selling platform. But they made a WordPress plugin that lets you use BigCommerce inside your WordPress site. **How it works** You run your store using BigCommerce tools, but your site looks like a normal WordPress site. It keeps your site fast because all the store stuff runs on BigCommerce, not your hosting. **You can:** - Add products to WordPress pages - Use WordPress for design and content - Get strong eCommerce features from BigCommerce - Handle big stores with lots of products **Why use it?** - Great for large or growing stores - Faster site (store data is off-site) - PCI compliance (for safe payments) - Good for high-volume sellers If you want to grow big, this is a good option. ## 5. WP ECommerce ![WP ECommerce](https://serveravatar.com/wp-content/uploads/2025/07/image-109-1024x442.png)**What is this?** [WP ECommerce](https://wp-ecommerce.net/) is one of the older eCommerce plugins for WordPress. It’s been around for years and still works well for many stores. It’s simple and gets the job done. **How it works** Install WP ECommerce, add your products, set up payment methods, and you’re ready to sell. It gives you everything you need for a basic online store without too much fancy stuff. **You can:** - Add products with photos and descriptions - Set up different payment options - Manage inventory and stock - Handle shipping and taxes - Create discount codes **Why use it?** - Simple and straightforward to use - Good for basic stores - Less complicated than bigger plugins - Stable and reliable - Free to start with It’s great if you want a no-nonsense store that just works without all the extra bells and whistles. ## 6. MemberPress ![MemberPress](https://serveravatar.com/wp-content/uploads/2025/07/image-110-1024x493.png)**What is this?** [MemberPress](https://memberpress.com/) helps you sell memberships, courses, or paid content. It’s not for physical stuff, but more for teaching or exclusive content. **How it works** You choose what content you want to protect, then charge people to see it. You can sell one-time access or monthly plans. **You can:** - Make members-only areas - Sell online courses - Use coupons - Track users - Drip content (send over time) **Why use it?** - Best for online courses or clubs - Easy to set up - Built-in payment tools - Works with WooCommerce too If you want to teach or run a paid club, MemberPress is the way to go. [![Blog banner - ServerAvatar](https://serveravatar.com/wp-content/uploads/2025/09/728_90-Banner-1-1024x127.png)](https://serveravatar.com?ref=blog)## 7. WP Simple Pay ![WP Simple Pay](https://serveravatar.com/wp-content/uploads/2025/07/image-111-1024x472.png)**What is this?** [WP Simple Pay](https://wpsimplepay.com/) is for taking payments — simple, right? It’s not a full eCommerce store plugin. But it’s great if you want to take quick payments without setting up a whole shop. **How it works** You just create a payment form, connect it to Stripe, and put it on your site. That’s it. Great for donations, services, or one-time products. **You can:** - Set fixed or custom payment amounts - Make one-time or recurring payments - Add coupons - Use Apple Pay and Google Pay - Customize the payment form **Why use it?** - Super easy to set up - No need for a cart or product pages - Great for quick payments or services - Clean and fast - Works well with Stripe If you just need to collect money (not run a full store), WP Simple Pay is a nice pick. ## How to Pick the Right Plugin for You Still not sure which one to choose? Here’s a quick guide. **If you want to sell memberships, subscriptions, or gated digital access:** - **ProfilePress** is perfect **If you sell physical stuff:** - **WooCommerce** is best - **BigCommerce** if you need to scale up fast **If you sell digital stuff:** - **Easy Digital Downloads** is made for it **If you sell services or single items:** - **WP Simple Pay** is fast and clean **If you want to run a membership or course:** - **MemberPress** is perfect ## Setting Up Your Store – Keep It Simple So you picked a plugin. Now what? Here’s how to get started without making it too hard. **Step 1: Install and activate your plugin** Go to your WordPress admin, click Plugins, then Add New. Search for your chosen plugin and install it. **Step 2: Run the setup wizard** Most good plugins have a setup helper. Don’t skip this part – it saves you time later. **Step 3: Add your first products** Start with just 2-3 products. You can add more later. Make sure you have good photos and clear descriptions. **Step 4: Set up payments** Connect PayPal or Stripe so people can actually pay you. Test it by buying something from yourself. **Step 5: Check on mobile** Most people shop on phones now. Make sure your store looks good on small screens. ## Common Mistakes New Store Owners Make Here are some things that mess people up when they start: **Too many plugins at once** Don’t install 10 plugins on day one. Start with your most required plugin and add more later if you need them. **Bad product photos** Blurry or dark photos will kill your sales. Use good lighting and take clear pictures. **Making checkout too hard** If people have to fill out 20 fields to buy something, they’ll give up. Keep it simple. **Not testing anything** Always test your store before you tell people about it. Buy something from yourself to make sure it works. **Forgetting about mobile** More than half of online shopping happens on phones. If your store looks bad on mobile, you’ll lose sales. ## Tips to Grow Your Store Once your store is running, here are some ways to get more customers: **Write good product descriptions** Don’t just list features. Tell people how your product will help them or make their life better. **Use social media** Post about your products on Facebook, Instagram, or wherever your customers hang out. **Offer free shipping** People love free shipping, even if you just add the cost to your product price. **Get customer reviews** Ask happy customers to leave reviews. New customers trust other customers more than they trust you. **Send follow-up emails** After someone buys, send them a thank you email. Maybe offer a discount on their next order. ## Keep Your Store Safe Online stores handle money and personal info, so security matters: **Use strong passwords** Don’t use “password123” for your admin account. Use something long and random. **Keep everything updated** Update WordPress, your theme, and plugins regularly. Old software has security holes. **Get an SSL certificate** This makes your site secure (you’ll see “https” instead of “http”). Most hosting companies give you one for free. **Backup your site** If something breaks, you want to be able to fix it fast. Use a backup plugin or service. ## FAQs ### **Q: Do I need to pay for these plugins?** Most have free versions. Some features may need paid add-ons or upgrades. ### **Q: Can I use more than one plugin at the same time?** Sometimes yes, but it’s best to stick with one to avoid conflicts. ### **Q: Will these plugins slow down my site?** Not if your hosting is good and you don’t use too many plugins. ### **Q: Can I use these plugins on any theme?** Yes, most work with any theme, but some may look better on certain ones. ### **Q: What if I want to switch later?** You can export your data and move to a new plugin or platform when needed. ## Conclusion WordPress is great for selling online if you use the right tools. These 7 plugins help you run and grow your store. They’re all solid choices, but what’s “best” depends on what you need. Want a big full-featured store? Go with WooCommerce. Selling downloads? Pick EDD. Want a simple payment button? WP Simple Pay has your back. Just don’t overthink it. Pick one, try it, and see how it works. You can always switch or upgrade later. The most important thing is to start. Every successful store started with zero customers and zero sales. Pick a plugin, add some products, and start selling. You’ll figure out the rest as you go. Remember – your first sale won’t be perfect, and that’s okay. Learn from each customer and keep making your store better. ## Stop Wasting Time on Servers. Start Building Instead. You didn’t start your project to babysit servers. Let **ServerAvatar** handle deployment, monitoring, and backups — so you can focus on growth. Deploy **WordPress, Laravel, N8N**, and more in minutes. No DevOps required. No command line. No stress. [ 🚀 Try Free ](https://app.serveravatar.com) [ 🌐 Learn More ](https://serveravatar.com/) Trusted by 10,000+ developers and growing. **Categories:** Blog, Guide, WordPress **Tags:** Best Ecommerce Tools, Ecommerce Plugins, Online Store Plugins, PHP Hosting, WooCommerce Alternatives, WordPress Ecommerce --- ### [How to Use netstat, ss, and lsof for Linux Network Debugging](https://serveravatar.com/netstat-ss-and-lsof/) **Published:** November 14, 2025 **Author:** Meghna Meghwani **Content:** [![Blog banner - ServerAvatar](https://serveravatar.com/wp-content/uploads/2025/09/728_90-Banner-3-1024x127.png)](https://serveravatar.com/?ref=blog)When dealing with network issues on a Linux server, **netstat, ss, and lsof** are essential tools that help you understand what’s happening beneath the surface. When your server starts behaving strangely, like slow connections, strange ports being open, or unresponsive applications, it often points to a network-related issue. In Linux, tools like netstat, ss, and lsof can help you quickly diagnose and fix these problems. They reveal what’s really going on under the hood of your system. Have you ever wondered how to find out what’s happening behind the scenes of your network connections, which applications are using your ports, or why your server feels slower than usual? The **netstat, ss, and lsof** trio is widely used for analyzing open ports, socket connections, and running processes in Linux servers. Whether you’re a system administrator, developer, or just a curious learner, mastering these commands can save you hours of troubleshooting. In this guide, we’ll break them down in simple language. ## What Is Network Debugging? **Network debugging** is the process of identifying, diagnosing, and resolving issues that affect connectivity, performance, or communication between systems and services. This includes checking open ports, monitoring active connections, finding which process is using a particular port, and detecting suspicious activity. Every application that communicates over a network, like a web server, database, or SSH session, uses network ports and sockets. Understanding these helps you find bottlenecks, unwanted connections, and possible intrusions. For Linux users, command-line tools like **netstat**, **ss**, and **lsof** are essential for performing these tasks efficiently. ![netstat, ss, and lsof - ServerAvatar](https://serveravatar.com/wp-content/uploads/2025/11/image-54.png) ### Why Network Debugging Matters Imagine your server as a busy platform. Each connection uses a port. If too many ports are used at once, or if any required port is blocked, chaos follows. Network debugging ensures smooth traffic flow by showing you which applications are using which “ports”. For system administrators and developers, regular network inspection is crucial for: - Detecting unauthorized access. - Resolving “port already in use” errors. - Optimizing server performance. - Ensuring application connectivity. ## Overview of netstat, ss, and lsof These three tools form the backbone of Linux network diagnostics: - **netstat** **(network statistics):** A traditional tool that shows active connections, routing tables, and network interface stats. - **ss** **(socket statistics):** A modern, faster alternative to netstat with more detailed socket information. - **lsof (list open files):** Lists all open files and the processes using them, including network sockets. While each has its own strengths, using them together gives a complete picture of your system’s network activity. ![netstat, ss, and lsof overview - ServerAvatar](https://serveravatar.com/wp-content/uploads/2025/11/image-55.png) ## Using netstat, ss, and lsof for Network Debugging ### Using netstat for Quick Network Overview The **netstat** (network statistics) is one of the oldest and most commonly used tools for viewing network connections, routing tables, and interface statistics. Although it’s being gradually replaced by ss, it’s still widely available and useful. It can show: - Active TCP and UDP connections. - Listening ports. - Routing information. - Network interface statistics. **Basic Syntax:** ``` netstat [options] ``` ``` netstat [options] ``` **Basic netstat Commands:** **1. Show all active connections** ``` netstat -ant ``` ``` netstat -ant ``` - **-a:** Show all connections and listening ports - **-n:** Show numeric addresses instead of hostnames - **-t:** Show TCP connections This gives you a list of all active TCP connections, along with local and remote addresses. **2. Display listening ports only** ``` netstat -tuln ``` ``` netstat -tuln ``` - **-u:** Include UDP ports This is useful for checking which services are currently waiting for connections. **3. Show process using a port** ``` netstat -tulpn ``` ``` netstat -tulpn ``` - **-p:** Show the process name and PID Perfect for identifying which process is occupying a specific port. ``` netstat -tuln ``` ``` netstat -tuln ``` This command lists all **TCP** and **UDP** ports currently listening for incoming connections. **4. Show all listening ports:** ``` netstat -l ``` ``` netstat -l ``` **5. Display numeric addresses (no DNS resolution):** ``` netstat -n ``` ``` netstat -n ``` **6. Show network interface statistics:** ``` netstat -i ``` ``` netstat -i ``` **Tip:** Combine -t (TCP), -u (UDP), -l (listening), and -p (process) for the most insightful view. ### Using ss for Faster Network Analysis The **ss (socket statistics)** is a modern replacement for netstat. It’s faster, more precise, provides more detailed information, and is now included in most Linux distributions by default. **Basic Syntax:** ``` ss [options] ``` ``` ss [options] ``` **Common ss Commands** **1. Show all TCP connections** ``` ss -t -a ``` ``` ss -t -a ``` **2. Show listening sockets only** ``` ss -ltn ``` ``` ss -ltn ``` **3. List all listening TCP sockets:** ``` ss -lt ``` ``` ss -lt ``` **4. Display process details** ``` ss -ltnp ``` ``` ss -ltnp ``` **5. Show all listening UDP sockets:** ``` ss -lu ``` ``` ss -lu ``` **6. Display all connections with processes:** ``` ss -p ``` ``` ss -p ``` **7. Find connections from a specific IP:** ``` ss dst [ip address] ``` ``` ss dst [ip address] ``` **8. Filter by state** For example, to show only established connections: ``` ss state established ``` ``` ss state established ``` These filters make **ss** especially useful for isolating problematic connections during debugging. **Why choose ss over netstat?** - It’s faster and more lightweight. - Provides advanced filtering options. - It provides more socket-level details. - Actively maintained in modern Linux systems. ### Using lsof to Track Open Files and Sockets **lsof** stands for “**List Open Files**“. In Linux, almost every component, even network sockets, is handled as a file. This makes **lsof** extremely useful for tracking which files or network connections a process has opened. It displays open ports, processes, and file locks, giving you a deeper look into what’s going on. **Basic Syntax:** ``` lsof [options] ``` ``` lsof [options] ``` **1. List all open network connections** ``` lsof -i ``` ``` lsof -i ``` **2. Find which process is using a specific port** For example, to check which process is using port number 80: ``` lsof -i :80 ``` ``` lsof -i :80 ``` This instantly tells you which service is running on port 80. **3. Show connections for a specific protocol** ``` lsof -iTCP -sTCP:LISTEN ``` ``` lsof -iTCP -sTCP:LISTEN ``` This lists all TCP ports currently in the LISTEN state. **4. Find open files by a specific process** ``` lsof -p ``` ``` lsof -p ``` Replace with the process ID to see all files that process has opened. **5. Display all processes for a specific user:** ``` lsof -u username ``` ``` lsof -u username ``` **6. Kill a process using a particular port:** ``` kill -9 $(lsof -t -i :8080) ``` ``` kill -9 $(lsof -t -i :8080) ``` When a port is mysteriously “in use,” **lsof** helps you find the culprit quickly. [![Blog banner - ServerAvatar](https://serveravatar.com/wp-content/uploads/2025/09/728_90-Banner-1-1024x127.png)](https://serveravatar.com/?ref=blog)## netstat, ss, and lsof – When to Use Each Tool **Tool****Best** **For****Advantages****netstat**Quick, general network overviewSimple and widely available**ss**Detailed socket analysisFast and powerful filtering**lsof**File and process-level insightWorks beyond just networking### Rule of Thumb for netstat, ss, and lsof: Use **netstat** for a quick check, **ss** for in-depth socket debugging, and **lsof** when you need to trace processes or open files. ## Real-World Scenarios: Debugging Network Issues In real-world debugging situations, running **netstat, ss, and lsof** commands often reveals hidden issues that are otherwise difficult to trace. Let’s say your web server suddenly becomes unresponsive. Here’s how you might approach it: - **Check listening ports:** ``` ss -lt ``` ``` ss -lt ``` Are your web server and database ports open? - **Identify processes using key ports:** ``` lsof -i :80 ``` ``` lsof -i :80 ``` Is the right process running? - **Look for suspicious connections:** ``` ss state established ``` ``` ss state established ``` Unexpected connections may indicate security issues. - **Check network traffic volume:** ``` netstat -s ``` ``` netstat -s ``` - **Stop the conflicting service** ``` sudo kill ``` ``` sudo kill ``` - **Restart your web server** For example, restarting the **Nginx** webserver: ``` sudo systemctl restart nginx ``` ``` sudo systemctl restart nginx ``` This gives protocol-level statistics to detect packet loss or congestion. ## Common Mistakes to Avoid Even seasoned admins slip up sometimes. Avoid these pitfalls: - Ignoring UDP connections (many services rely on them). - Confusing listening vs established states. - Forgetting to close or restart processes after killing ports. - Running old netstat versions with outdated flags. - Overlooking automation, manual debugging takes time. ## FAQs ### **1. What is the difference between netstat, ss, and lsof?** netstat shows general network statistics, ss provides faster and more detailed socket information, and lsof lists open files and the processes using them. Together, the netstat, ss, and lsof tools give a complete view of network activity. ### **2. How can I check which process is using a port in Linux?** You can use: ‘**lsof -i :PORT\_NUMBER**‘ to find the exact process and PID. ### **3. Is ss always better than netstat?** In most cases, ss is faster, more accurate, and offers advanced filtering. However, netstat is still useful for quick, simple checks. ### 4. Can netstat ss lsof help identify suspicious connections? Absolutely. Running **netstat, ss, and lsof** commands helps you see active connections, unknown open ports, and unusual traffic patterns that may indicate intrusion. ### 5. Do all Linux distributions support netstat, ss, and lsof? ss and lsof are available in almost all modern Linux distributions. netstat may need installation on newer systems, but the package is still widely available. ## Conclusion Debugging network issues becomes much easier when you understand how to use **netstat, ss, and lsof**. Each tool offers unique insights into your server’s connections, ports, and active processes. When combined, they give you a powerful and complete picture of what’s happening on your Linux system. By mastering these commands, you can quickly detect bottlenecks, find unauthorized access, resolve “port already in use” errors, and keep your server running smoothly. Whether you’re a beginner or an experienced administrator, regularly using **netstat, ss, and lsof** helps you maintain better control over your network and respond to issues before they become serious problems. ## Stop Wasting Time on Servers. Start Building Instead. You didn’t start your project to babysit servers. Let **ServerAvatar** handle deployment, monitoring, and backups — so you can focus on growth. Deploy **WordPress, Laravel, N8N**, and more in minutes. No DevOps required. No command line. No stress. [ 🚀 Try Free ](https://app.serveravatar.com) [ 🌐 Learn More ](https://serveravatar.com/) Trusted by 10,000+ developers and growing. **Categories:** Blog, Guide, Linux, Tutorials, Ubuntu **Tags:** DevOps, Linux, linux networking, lsof, netstat, network debugging, ss, troubleshoot --- ### [How to Block AI Bot on Websites?](https://serveravatar.com/block-ai-bot/) **Published:** November 13, 2025 **Author:** Meghna Meghwani **Content:** [![Blog banner - ServerAvatar](https://serveravatar.com/wp-content/uploads/2025/09/728_90-Banner-3-1024x127.png)](https://serveravatar.com/?ref=blog)If you’re trying to block AI bot from affecting your site, you’re not alone. Have you ever noticed strange traffic spikes on your website, but when you check your analytics, no real visitors? Chances are, AI bots are crawling your site. These bots can steal your content, drain your server’s bandwidth, and harm your SEO rankings. In the era of advanced automation, AI-powered scraping bots have become increasingly prevalent, posing serious risks to your site’s performance, content integrity, and overall user experience. In this guide, we’ll walk you through **how to block AI bots on websites**, why it’s essential, and how **ServerAvatar’s AI Bot Blocker** makes it effortless. ## **What Are AI Bots?** Bots have been around for decades. But with the rise of large-language models and specialized crawlers, we now face “AI bots”, automated agents that behave more intelligently than traditional bots. Common examples include scrapers that target valuable content, indexing engines that mimic human browsing, or even conversational bots designed to extract data. AI bots are automated programs that use artificial intelligence to visit, analyze, and sometimes copy information from websites. Unlike search engine crawlers, which identify themselves and follow guidelines, these bots often disguise themselves as normal browsers. **They’re typically used for:** - **Content scraping:** To train AI models or republish your articles. - **Data mining:** To collect structured data from your site. - **Competitor analysis:** To copy pricing, listings, or entire product catalogs. In short, they act like silent intruders, taking data without permission. ![block ai bot - ServerAvatar](https://serveravatar.com/wp-content/uploads/2025/11/image-47.png) ## **Why You Need to Block AI Bots** The internet is crawling, quite literally, with automated bots. While some bots, like Google’s crawler, are helpful, AI-powered bots can be harmful. They can steal your content to train large language models, overload your server, or fake engagement metrics. Blocking these bots is like putting up a digital fence, protecting your website’s privacy, bandwidth, and originality. ## **How AI Bots Affect Your Website** AI bots can have several negative impacts: - **Steal content:** Bots can copy your blog posts or product data, hurting your SEO rankings. - **Waste bandwidth:** Every bot request consumes resources that real visitors could use. - **Skew analytics:** They inflate traffic numbers, making your insights unreliable. - **Server overload:** Multiple bot requests at once can slow down or even crash your site. Think of your server as a shop. Legitimate customers are welcome, but bots are like people who walk in, copy your entire catalog, and leave without buying anything. ### **Signs That AI Bots Are Accessing Your Site** Here’s how to tell if AI bots are visiting your website: - Unusual traffic patterns (high traffic but low engagement). - Unknown user-agents in server logs. - Increased CPU or memory usage. - Content appearing elsewhere online without your permission. If you notice any of these, your website might be under constant bot surveillance. ## **Traditional Methods to Block AI Bots** Before AI Bot Blockers existed, website owners used manual methods like: - Blocking IP addresses manually. - Using .htaccess rules to deny suspicious user-agents. - Installing plugins or firewalls to filter requests. - Updating robots.txt to disallow bots (though malicious bots ignore this). These methods work, but only temporarily. Advanced bots change IPs, fake user agents, and bypass such filters easily. ### **Why Manual Methods Can’t Effectively Block AI Bo**t Modern AI bots are clever. They mimic real human behavior, browsing pages slowly, switching IPs, and even using headless browsers. That’s why manual blocking feels like playing “whack-a-mole”, every time you stop one bot, another pops up. To protect effectively, you need a smart, automated system that detects and blocks bots in real-time. ## **Introducing ServerAvatar’s AI Bot Blocker** **What is ServerAvatar?** [ServerAvatar](https://serveravatar.com/) is an advanced server management platform that simplifies deploying and managing servers and applications. Whether you host PHP, Node.js, or custom apps, ServerAvatar helps automate server setup, app deployment, monitoring, and now, AI bot protection. ![ServerAvatar Dashboard](https://serveravatar.com/wp-content/uploads/2025/11/image-49-1024x508.png)To make website protection simple and effective, **ServerAvatar** offers a built-in **AI Bot Blocker** that automatically shields your site from unwanted crawlers and scrapers. ServerAvatar, a powerful **server management platform**, helps you manage, monitor, and secure your applications easily, without needing deep technical knowledge. And with the AI Bot Blocker, you can stop worrying about bots stealing your content or eating up your resources. ### **Benefits of Using ServerAvatar for AI Bot Protection** Choosing ServerAvatar’s built-in solution gives you multiple advantages: - **Ease of use**: No manual rule-writing needed, ServerAvatar handles detection and blocking automation. - **Content protection**: Help ensure your unique content stays yours, and you’re less likely to have your material repurposed by bots. - **Focus on your site**: Instead of spending time tweaking ‘**.htaccess**‘ rules or IP lists, you can focus on your content and features. - **Automatic security updates:** No need to maintain lists manually. - **Centralized management:** Manage multiple apps and sites from one dashboard. - **Real-time protection:** Blocks bots before they can even crawl your site. - **Seamless integration:** Works perfectly with Nginx, Apache, and other popular stacks. - **Improved performance:** By reducing unwanted automated access, it reduces fake traffic loads. Your servers run smoothly, and your genuine users get a better experience, enhancing server efficiency. It’s not just a blocker, it’s a smarter layer of website defense. ### **How ServerAvatar’s AI Bot Blocker Helps You Block AI Bot** The AI Bot Blocker uses intelligent pattern detection and request behavior analysis to identify AI-driven bots. It is designed to simplify bot blocking and protect your application with minimal manual configuration. **Here’s what happens behind the scenes:** - It monitors all incoming requests. - Analyzes user-agent headers, request patterns, and access frequency. - It uses smart detection rules that automatically block known AI scraping tools based on their user-agent strings. - It helps you prevent AI bots from accessing and scraping your content, reduces unwanted server load, and maintains content privacy and intellectual property control. - The blocking happens via web server rewrite rules: once a detected bot’s user-agent matches, the rule returns a 403 Forbidden response and halts further processing. - Importantly, it is designed not to block regular users or major search engines, only bots with AI-specific crawling agents. It’s constantly updated to detect new AI bots that emerge, ensuring your website remains secure without manual updates. ### **Key Features to Block AI Bot Using ServerAvatar** Here are some standout features that make ServerAvatar’s solution unique: - **One-click activation:** You can enable the bot blocker from your app settings in seconds. - **Automatic detection:** No need for manual rules; it identifies and blocks bots intelligently. - **Low resource usage:** Works efficiently without affecting your website performance. - **Customizable blocking rules:** Allow or restrict specific bots as per your preference. - **Continuous updates:** ServerAvatar keeps adding new bot patterns to stay ahead. This means you spend less time managing and more time focusing on your website’s growth. ## **Enable AI Bot Blocker in ServerAvatar:** **Step-by-Step Guide** Here’s how easy it is to use: - Log in to your ServerAvatar account and go to the Server Panel by clicking on the Server Dashboard icon. ![Server Dashboard - ServerAvatar](https://serveravatar.com/wp-content/uploads/2025/11/image-50-1024x314.png)- Navigate to the **Applications** section from the left-hand sidebar, and navigate to the Application Panel by clicking on the **Application Dashboard icon** for the site you want to protect. ![Application Dashboard - ServerAvatar](https://serveravatar.com/wp-content/uploads/2025/11/image-51-1024x427.png)- In the Application Panel, click **AI Bot Blocker** section from the left sidebar. - Toggle the switch to enable the AI Bot Blocker feature for your application. Once enabled, traffic from bots such as GPTBot, ClaudeBot, Bard, YouBot, PerplexityBot, and more will be denied. ![block AI bot - ServerAvatar](https://serveravatar.com/wp-content/uploads/2025/11/image-52-1024x539.png)- You can disable it at any time by toggling the switch off. That’s it! ServerAvatar starts protecting your website instantly. No coding or plugin installation needed. [![Blog banner - ServerAvatar](https://serveravatar.com/wp-content/uploads/2025/09/728_90-Banner-1-1024x127.png)](https://serveravatar.com/?ref=blog)## **Comparing ServerAvatar’s AI Bot Blocker with Manual Methods** When it comes to protecting your website from unwanted AI bots, you generally have two options: **do it manually** or use an **automated solution** like ServerAvatar’s AI Bot Blocker. Both approaches can work, but one is significantly more efficient, especially for busy developers, businesses, and growing websites. Let’s break down the key differences. **Feature****ServerAvatar AI Bot Blocker******Manual Methods******Setup Difficulty**Extremely easy, just enable it from the ServerAvatar dashboardRequires editing `'.htaccess`‘, Nginx config, or firewall rules manually. Mistakes can break your site**Time Required**Takes seconds to activateCan take hours to research, write, and test rules**Accuracy**Automatically detects and blocks known and AI bots using pattern recognitionDepends on your own list of user-agents or IPs, may miss disguised bots**Maintenance**Zero maintenanceHigh maintenance, you must constantly update your rules as new bots appear**Performance Impact**Lightweight and optimized to work at the server level without slowing your siteIf not configured correctly, manual rules can slow down requests or cause conflicts****Scalability****Works seamlessly across all applications managed under ServerAvatarNeeds to be repeated for every server, site, or app manually****Error Risk****Very low, handled by the ServerAvatar platformHigh, manual misconfiguration can lead to blocking good bots or breaking site access****Updates****Automatically updated with the latest AI bot patternsYou must manually monitor and update the block list yourself****Ideal For****Website owners and developers who want fast, reliable, no-hassle protectionAdvanced users who prefer total control and don’t mind the extra workFor most users, especially those running multiple apps or client sites, **ServerAvatar’s AI Bot Blocker** saves significant time and eliminates human error. It’s like switching from locking every door in your house manually to having a smart security system that automatically does it for you. By combining automation, intelligent detection, and ongoing updates, **ServerAvatar makes bot protection effortless** while keeping your site fast and secure. ## **How to Test If Your Website Can Block AI Bot Effectively** After enabling ServerAvatar’s AI Bot Blocker: - Check your server access logs for denied requests. - Use analytics to see if fake traffic drops. - Run online bot detection tests. - Try simulating a crawler with a known AI bot user-agent, it should be blocked automatically. A quick check ensures your protection works as intended. ## **Conclusion** In today’s online world, automated scraping and AI-powered bots are serious threats, not only for performance and cost, but for content ownership and user experience. AI bots are becoming more advanced every day. If left unblocked, they can scrape your content, distort analytics, and consume resources. Blocking them effectively is no longer optional. If you’re looking for a streamlined, built-in way to block AI bots, **ServerAvatar’s AI Bot Blocker** provides a **smart, effortless, and automatic** way to safeguard your website from these digital intruders. It is a robust and low-effort solution. With just one click, you can rest easy knowing your server is protected, and your content remains yours. It protects your content from unwanted scraping and gives you one less thing to worry about while you focus on building with confidence. ## **FAQs** ### **1. What is an AI bot and why should I block AI bot?** AI bots are automated tools that crawl and copy website content for training or data mining. Blocking them helps protect your data and server performance. ### **2. Does ServerAvatar AI Bot Blocker slow down my website?** No. It’s designed to run efficiently without affecting your site’s speed or performance. ### **3. Can I allow specific bots while blocking others?** Yes. ServerAvatar’s AI Bot Blocker lets you customize which bots are allowed or restricted. ### **4. Is the AI Bot Blocker included in all ServerAvatar plans?** No, the AI Bot Blocker is available to Tier 3 and Tier 4 management plans of ServerAvatar. ### **5. How often is ServerAvatar’s AI Bot Blocker updated to block AI bot effectively?** It’s continuously updated with the latest AI bot signatures to ensure your website stays protected from new threats. **Categories:** Blog, Guide, Linux, Tutorials, Ubuntu **Tags:** ai bots, bot detection, Bot Protection, protect website data, security, website security --- ### [How to Mount and Unmount Drives and Partitions in Linux](https://serveravatar.com/mount-and-unmount-drives/) **Published:** November 12, 2025 **Author:** Meghna Meghwani **Content:** [![Blog banner - ServerAvatar](https://serveravatar.com/wp-content/uploads/2025/09/728_90-Banner-3-1024x127.png)](https://serveravatar.com/?ref=blog)If you’re wondering how to mount and unmount drives, you’re not alone. Have you ever plugged in a USB drive, but it didn’t show up the way it does on Windows or macOS? That’s because Linux treats storage differently. In Windows, drives appear automatically as C:, D:, E:, etc., but in Linux, you need to mount the drive to access it and unmount it before removal. Think of it like parking a vehicle in a designated spot. You can’t just leave it in the middle of the road, it needs a proper parking space (mount point)! In this guide, we’ll break down everything you need to know about mounting and unmounting drives in Linux in a simple, conversational way, even if you’re new to Linux. Whether you’re trying to mount a USB drive, external HDD, or Windows partition, this guide covers everything about the Linux mount and unmount process. You’ll learn how to access your USB, HDD, SSD, or external drive, and safely remove it without losing data for Ubuntu/Debian systems. ## **What Does “Mounting” Mean in Linux?** Mounting in Linux means attaching a storage device to your system’s directory tree, allowing users to access its files. When you “mount” a device, you tell the system: > **In simple terms:** Mounting tells Linux where to place your drive so you can use it. And when you’re done, you must unmount it to disconnect safely. **Simple Analogy:** Think of mounting like plugging a TV into a power socket. - A TV without a socket won’t turn on. - Similarly, a drive without mounting won’t be accessible. Unmounting is like safely unplugging the TV, you avoid sparks (data loss). ![mount and unmount drives - ServerAvatar](https://serveravatar.com/wp-content/uploads/2025/11/image-46.png)## **How Linux Organizes Storage** Linux doesn’t assign drive letters like C: or D:. Instead, everything is part of a single directory structure, starting from the ‘**root /**‘. Here’s a simple visual to understand how drives connect to Linux: ``` Linux Directory Tree | / ┌───────────────┐ | | /home/ (Mount Points) | ┌────────────┴────────────┐ | | /media/ /mnt/ | (Auto Mount Points for Drives) | ┌──────────────┴──────────────┐ | | USB Drive External HDD (/media/usb) (/media/hdd1) ``` ### **What Is a Mount Point?** A **mount point** is simply a folder where the drive’s contents are shown once mounted. Example: ‘**/mnt/mydrive**‘ or ‘**/media/usb**‘ ## **Types of Drives You Can Mount** Linux allows the mounting of multiple types of storage devices: **Internal Storage** - **SSDs / NVMe drives:** High-speed storage for system and application files. - **SATA Hard Drives:** Larger capacity, slower performance, great for backups. - **Linux and Windows dual-boot partitions:** Mount Windows partitions to access files from Linux. **External Storage** - **USB Pen Drives:** Small, portable flash drives that can be easily connected via USB to transfer or access files. - **External HDD/SSD:** Larger portable storage devices offering high capacity (HDD) or fast performance (SSD) for backups and file transfers. - **SD Cards:** Memory cards commonly used in cameras, phones, and other devices, which can be mounted to access their data. - **Portable storage devices:** General category including any external storage device (like USB drives, external SSDs/HDDs, or memory cards) that can be connected and mounted. **Network & Virtual Storage** - **NFS (Network File System):** Allows Linux systems to mount directories from other Linux/Unix servers over a network for shared access. - **CIFS/SMB (Shared Windows files):** Enables mounting Windows-shared folders or network drives on a Linux system. - **ISO Image files:** Mountable disk image files (like CD/DVD images) to access their contents without burning them to physical media. ## **How to Check Available Drives and Partitions** Before mounting anything, first list your drives. **Using lsblk (Most Common)** ``` lsblk ``` ``` lsblk ``` **Sample Output:** ``` NAME MAJ:MIN RM SIZE RO TYPE MOUNTPOINTS sda 8:0 0 256G 0 disk ├─sda1 8:1 0 512M 0 part /boot ├─sda2 8:2 0 100G 0 part / └─sda3 8:3 0 155.5G 0 part /home sdb 8:16 1 32G 0 disk └─sdb1 8:17 1 32G 0 part /media/usb ``` ``` NAME MAJ:MIN RM SIZE RO TYPE MOUNTPOINTS sda 8:0 0 256G 0 disk ├─sda1 8:1 0 512M 0 part /boot ├─sda2 8:2 0 100G 0 part / └─sda3 8:3 0 155.5G 0 part /home sdb 8:16 1 32G 0 disk └─sdb1 8:17 1 32G 0 part /media/usb ``` **Explanation of the Output:** **Column****Meaning****NAME**Drive or partition name (e.g., `sda`, `sda1`)**SIZE**Total storage size of the device or partition**TYPE**Indicates whether it’s a full drive (`disk`) or a partition (`part`)**MOUNTPOINTS**Shows where the partition is currently mounted in the filesystem**What This Output Shows:** 🔹sda is a 256GB internal disk with 3 partitions: - sda1 mounted at ‘**/boot**‘ - sda2 mounted at ‘**/**‘ - sda3 mounted at ‘**/home**‘ 🔹sdb is a 32GB external USB drive with 1 partition: - sdb1 mounted at ‘**/media/usb**‘ > To get more details like filesystem types, you can use the command ‘**sudo fdisk -l**‘ > > [![Blog banner - ServerAvatar](https://serveravatar.com/wp-content/uploads/2025/09/728_90-Banner-1-1024x127.png)](https://serveravatar.com/?ref=blog) ## **How to Mount and Unmount Drives in Linux (Step-by-Step)** ### **Create a Mount Point** A mount point is the folder where your drive’s content will appear after mounting. Most users create it inside ‘**/mnt**‘ or ‘**/media**‘. **Create a folder for mounting:** ``` sudo mkdir /mnt/mydrive ``` ``` sudo mkdir /mnt/mydrive ``` (Replace **mydrive** with any name you prefer.) Now that you know your device name and have a mount point, let’s mount it. ### **Mounting a Drive** **Step 1: Identify the Partition** Example partition: ‘**/dev/sdb1**‘ **Step 2: Mount the Drive** Use the command below to mount your drive: ``` sudo mount /dev/sdb1 /mnt/mydrive ``` ``` sudo mount /dev/sdb1 /mnt/mydrive ``` **Step 3: Verify Mount** Verify your mounted drive using the command below: ``` df -h ``` ``` df -h ``` If mounted successfully, you will see ‘**/dev/sdb1**‘ listed with ‘**/mnt/mydrive**‘. ### **Mounting USB Drives in Linux** Most USBs are formatted as **FAT32**, **exFAT**, or **NTFS**. **Mount FAT32/EXT4 USB Drive:** ``` sudo mount /dev/sdb1 /mnt/usb ``` ``` sudo mount /dev/sdb1 /mnt/usb ``` **Mount exFAT USB Drive (Install support dependencies first):** ``` sudo apt install exfat-fuse exfatprogs -y sudo mount /dev/sdb1 /mnt/usb ``` ``` sudo apt install exfat-fuse exfatprogs -y sudo mount /dev/sdb1 /mnt/usb ``` **Mounting Windows NTFS or FAT32 Drives:** If you’re dual-booting with Windows or accessing a Windows drive, it’s probably NTFS. Mount NTFS Drive: ``` sudo apt install ntfs-3g -y sudo mount -t ntfs-3g /dev/sdb1 /mnt/win ``` ``` sudo apt install ntfs-3g -y sudo mount -t ntfs-3g /dev/sdb1 /mnt/win ``` ### **How to Unmount a Drive Safely** Before unplugging a USB or external drive, always unmount it; otherwise, data may get corrupted. **Unmount Command** Use the command below to unmount your drive: ``` sudo umount /mnt/mydrive ``` ``` sudo umount /mnt/mydrive ``` or ``` sudo umount /dev/sdb1 ``` ``` sudo umount /dev/sdb1 ``` **If You See “Device is Busy” Error** This means some files or processes are still using the drive. Check which processes are using it: ``` sudo lsof /mnt/mydrive ``` ``` sudo lsof /mnt/mydrive ``` Then close the listed programs and try again. Force Unmount (only if required): ``` sudo umount -f /mnt/mydrive ``` ``` sudo umount -f /mnt/mydrive ``` ## **Common Mount & Unmount Errors (and Fixes)** **Error****Meaning****How to Fix**`mount: wrong fs type`Incorrect filesystem typeVerify the filesystem with ‘**`sudo blkid`**‘ and use the correct type in the mount command.`device is busy`Drive is still in useClose applications using the drive or check with `'lsof`‘ and unmount active processes.`permission denied`Insufficient privilegesPrepend ‘`sudo`‘ to the mount command.`unknown filesystem`Linux does not support this filesystemInstall the required filesystem package (e.g., `'ntfs-3g`‘ for NTFS).## **Best Practices & Safety Tips** - Always unmount before unplugging - Use clear mount point names, e.g., /mnt/photos - Don’t mount with write permissions if drive is sensitive - Avoid editing /etc/fstab unless confident - Prefer UUID over device name to avoid wrong mounts - Mount sensitive drives as **read-only** if needed: ``` sudo mount -o ro /dev/sdb1 /mnt/secure ``` ``` sudo mount -o ro /dev/sdb1 /mnt/secure ``` ## **Conclusion** Mounting and unmounting drives in Linux may feel unfamiliar at first, especially if you’re coming from Windows or macOS where drives show up automatically. But once you understand how Linux handles storage, the process becomes simple and logical. You now know what mounting means, how Linux organizes storage, how to identify your drives, and the correct way to mount and unmount them without risking data loss. With a little practice, you’ll find it easy to access USBs, external drives, internal partitions, or even network storage on your Ubuntu/Debian system. Just keep one habit in mind, always unmount the drive before disconnecting it. As soon as this becomes part of your workflow, managing storage on Linux will feel natural and effortless. > Now you know how to handle Linux drive mounting like a pro, whether it’s a USB, SSD, or NTFS partition, without risking data loss! ## **FAQs** ### **1. What happens if I remove a drive without unmounting it?** You risk corrupting data or losing unsaved changes. Always unmount first. ### **2. How do I check if a drive is already mounted?** Run: ‘`df -h`‘ It will list all mounted devices. ### **3. Can I mount a drive with read-only access?** Yes. Example: ‘`sudo mount -o ro /dev/sdb1 /mnt/mydrive`‘ ### **4. Where should I mount drives, /mnt or /media?** - ‘**/media**‘ is better for external devices - ‘**/mnt**‘ is usually for temporary or system mounts ### **5. Do I need to unmount drives that auto-mounted on my Linux desktop?** Yes. Even if they auto-appear in GUI, unmount them properly before unplugging. ## Stop Wasting Time on Servers. Start Building Instead. You didn’t start your project to babysit servers. Let **ServerAvatar** handle deployment, monitoring, and backups — so you can focus on growth. Deploy **WordPress, Laravel, N8N**, and more in minutes. No DevOps required. No command line. No stress. [ 🚀 Try Free ](https://app.serveravatar.com) [ 🌐 Learn More ](https://serveravatar.com/) Trusted by 10,000+ developers and growing. **Categories:** Blog, Guide, Linux, Tutorials, Ubuntu **Tags:** Linux, Linux Tutorial, Mount Drives in Linux, Ubuntu, Unmount Drives in Linux --- ### [What Is Elasticsearch and How to Set It Up in WordPress](https://serveravatar.com/what-is-elasticsearch/) **Published:** November 10, 2025 **Author:** Meghna Meghwani **Content:** [![Blog banner - ServerAvatar](https://serveravatar.com/wp-content/uploads/2025/09/728_90-Banner-3-1024x127.png)](https://serveravatar.com?ref=blog)If your WordPress website has a lot of content, you might have noticed that the default search system sometimes feels slow or doesn’t show the most relevant results. That’s where **Elasticsearch** comes in. It helps you make your website search faster, smarter, and more accurate. In this guide, you’ll learn what Elasticsearch is, why it’s useful, and how you can set it up on your WordPress site easily. ## What Is Elasticsearch? **Elasticsearch** is an open-source search and analytics engine. It helps websites, apps, and businesses to search through large amounts of data quickly. In simple words, it’s like a super-powered search tool that understands your data better and shows the best results faster. For WordPress websites, Elasticsearch can improve how your visitors find posts, pages, or products, especially when you have a large site or run an online store. ## Why Use Elasticsearch with WordPress? Here are some key reasons why many website owners use Elasticsearch with WordPress: 1. **Faster Search Results** – It can scan and show search results much faster than the default WordPress search. 2. **More Accurate Results** – It ranks the most relevant posts or products first. 3. **Better User Experience** – Visitors find what they want easily, which can increase time on site and reduce bounce rate. 4. **Perfect for Large Websites or eCommerce Stores** – Ideal for WooCommerce stores with hundreds or thousands of products. 5. **Scalable and Reliable** – Can handle large amounts of traffic and data smoothly. ![Elasticsearch - ServerAvatar](https://serveravatar.com/wp-content/uploads/2025/11/image-39-683x1024.png)## How to Set Up Elasticsearch in WordPress Setting up Elasticsearch may sound technical, but don’t worry—there are easy ways to do it, even if you’re not a developer. Follow these steps to integrate Elasticsearch with your WordPress site. ### Step 1: Install Elasticsearch on Your Server You’ll first need to install Elasticsearch on your server. You can do that using these simple terminal commands: ``` sudo apt update sudo apt install elasticsearch ``` ``` sudo apt update sudo apt install elasticsearch ``` Once Elasticsearch is installed and running on your server, it’s time to connect it with WordPress using a plugin. ### Step 2: Install a WordPress Plugin for Elasticsearch **What is ServerAvatar?** [ServerAvatar](https://serveravatar.com/) is a platform to simplify the hosting and management of servers and applications. It simplifies the process of deploying and managing PHP and Node.js based web applications on servers. If you’re using **ServerAvatar** to manage your servers and applications. Install WordPress in ServerAvatar Guide : – There are a few plugins that help you connect WordPress with Elasticsearch easily. Some popular options are: - **ElasticPress** (most common) - **WPSOLR** - **SearchWP with Elasticsearch extension** Let’s take **ElasticPress** as an example. 1. Log in to your WordPress Dashboard 2. Go to **Plugins → Add New** 3. Search for **ElasticPress** and click **Install Now**, then **Activate** ![ElasticPress - ServerAvatar](https://serveravatar.com/wp-content/uploads/2025/11/image-40-1024x348.png)### Step 3: Connect WordPress to Elasticsearch After installing and activating the **ElasticPress plugin**, follow these steps: 1. Go to **ElasticPress → Settings** in your WordPress dashboard. 2. Enter your **Elasticsearch server URL** (for example: [http://localhost:9200](http://localhost:9200/)). 3. Click **“Save Changes.”** 4. Run the **Indexing process** to sync your site’s content with Elasticsearch. ![ElasticPress settings screen in WordPress – ServerAvatar](https://serveravatar.com/wp-content/uploads/2025/11/image-41-1024x597.png)Once done, ElasticPress will replace your normal WordPress search with a faster, smarter Elasticsearch-powered search. ### Step 4: Test Your Search Feature Go to your website and try searching for a few posts or products. You’ll notice that results appear faster and are more relevant than before. If you want, you can also customize your search results page to match your theme. **Benefits of Using Elasticsearch in WordPress** - Faster and more accurate searches - Handles large websites easily - Improves user satisfaction and conversions - Reduces server load by optimizing queries - Integrates well with WooCommerce and large blogs [![Blog banner - ServerAvatar](https://serveravatar.com/wp-content/uploads/2025/09/728_90-Banner-1-1024x127.png)](https://serveravatar.com?ref=blog)### **Ready to speed up your WordPress search?** Install Elasticsearch on your server using [ServerAvatar](https://serveravatar.com/) and experience a faster, smarter search instantly. ## Conclusion Elasticsearch is a powerful tool that can completely change how people search and interact with your WordPress website. It’s fast, accurate, and user-friendly—perfect for growing websites or online stores. By combining WordPress with Elasticsearch (especially using a tool like **ServerAvatar**), you can create a smooth and professional search experience that your visitors will love. ## FAQ ### **Is Elasticsearch free to use?** Yes, Elasticsearch is open-source and free to use. However, some hosting providers may charge extra if they manage it for you. ### **Can I use Elasticsearch on shared hosting?** No, most shared hosting plans do not support Elasticsearch. You need a VPS or cloud server. ### **Is it hard to set up Elasticsearch in WordPress?** Not really! With a plugin like ElasticPress or WPSOLR and a managed server panel like ServerAvatar, setup becomes simple and beginner-friendly. ### **Does Elasticsearch work with WooCommerce?** Yes, it works great with WooCommerce stores and helps customers find products faster and more accurately. ### **How can I monitor Elasticsearch performance?** If you use **ServerAvatar**, you can easily check service status, resource usage, and logs directly from the dashboard. ## Stop Wasting Time on Servers. Start Building Instead. You didn’t start your project to babysit servers. Let **ServerAvatar** handle deployment, monitoring, and backups — so you can focus on growth. Deploy **WordPress, Laravel, N8N**, and more in minutes. No DevOps required. No command line. No stress. [ 🚀 Try Free ](https://app.serveravatar.com) [ 🌐 Learn More ](https://serveravatar.com/) Trusted by 10,000+ developers and growing. **Categories:** Blog --- ### [Understanding Zero Trust in DevOps Environments](https://serveravatar.com/zero-trust-devops-environments/) **Published:** November 4, 2025 **Author:** Meghna Meghwani **Content:** [![Blog banner - ServerAvatar](https://serveravatar.com/wp-content/uploads/2025/09/728_90-Banner-3-1024x127.png)](https://serveravatar.com?ref=blog)Security in modern DevOps environments is no longer about building strong walls—it’s about continuously verifying trust. As DevOps accelerates software delivery, traditional security methods can’t keep up. That’s where **Zero Trust** steps in, ensuring every access request is authenticated, authorized, and encrypted. Zero Trust has become a crucial part of DevOps workflows because it blends security and automation seamlessly, without slowing down deployments. > Zero Trust in DevOps means verifying every access request, no implicit trust. It secures CI/CD pipelines, automation tools, and cloud resources without slowing down deployment. ## What Is Zero Trust? Zero Trust is not a product, it’s a **philosophy**. The concept is simple: **“Never trust, always verify.”** Unlike old security methods that assume internal traffic is safe, Zero Trust assumes every request could be a threat. It validates each action based on identity, device health, and behavior before granting access. For example, if a developer logs into a server or pushes code to a repository, the system reauthenticates the session, ensuring no compromised credentials are used. ## Why Traditional Security Models Fail in DevOps In the past, companies used **perimeter-based security,** like a firewall around a castle. Once inside, users were trusted completely. However, with cloud computing, remote work, and APIs, that model doesn’t hold up anymore. Attackers can easily exploit weak internal links, misconfigured servers, or compromised credentials. Zero Trust eliminates this flaw by treating **every user, system, and device as untrusted until proven otherwise.** ## Why Zero Trust Is Crucial for DevOps DevOps thrives on **speed and automation**, but these same qualities make it vulnerable. Frequent deployments, open APIs, and shared repositories increase exposure to risks. **Key Reasons DevOps Needs Zero Trust** - **Dynamic infrastructure**: Containers, microservices, and cloud resources change constantly. - **Multiple access points**: Developers, automation tools, and third-party APIs all interact. - **Continuous integration and delivery (CI/CD)**: Without strong identity control, one breach can compromise the entire pipeline. By implementing Zero Trust, DevOps teams can **maintain velocity without sacrificing security.**[](https://storage.3.basecamp.com/5840738/blobs/668c76b6-b899-11f0-bc9b-0242ac120005/download/ChatGPT%20Image%20Nov%203,%202025,%2003_11_46%20PM.png) ![ServerAvatar](https://serveravatar.com/wp-content/uploads/2025/11/674a9dda-b899-11f0-a2c6-0242ac120005.avif)## Core Principles of Zero Trust Architecture 1. **Identity Verification** – Authenticate every user and device using IAM and MFA before granting access. 2. **Least Privilege Access** – Give only the permissions needed to perform a task, nothing more. 3. **Micro-Segmentation** – Divide infrastructure into small zones to contain breaches. 4. **Continuous Monitoring** – Detect anomalies in real time using automated alerts and logging tools. These principles ensure that even if one layer is compromised, the rest remain protected. ## How Zero Trust Aligns with DevOps Culture Zero Trust fits perfectly with **DevSecOps,** where development, security, and operations work together. Instead of seeing security as an obstacle, Zero Trust turns it into an automated guardrail built into your workflow. Security policies can be defined as code, automatically verified during builds and deployments. That means developers don’t have to manually handle security—it’s just part of the pipeline. **Key Components of Zero Trust in DevOps** - **IAM (Identity and Access Management):** Controls who accesses what. - **MFA (Multi-Factor Authentication):** Adds layers of verification. - **RBAC (Role-Based Access Control):** Limits permissions based on user roles. - **Secrets Management:** Protects sensitive credentials using tools like **HashiCorp Vault** or **AWS Secrets Manager.** - **Network Segmentation:** Divides infrastructure for better isolation and control. ## Challenges of Adopting Zero Trust While Zero Trust offers major benefits, implementation isn’t without hurdles: - **Integration Complexity:** Coordinating between multiple tools and systems. - **Developer Resistance:** Some may see it as slowing down work. - **Cost:** Upgrading infrastructure and licenses can be expensive. - **Visibility Gaps:** Legacy systems might not support Zero Trust frameworks easily. Overcoming these challenges requires planning, automation, and collaboration between DevOps and security teams. ## Step-by-Step Guide to Implement Zero Trust in DevOps **Step 1: Identify Critical Assets** Start by listing what you must protect, repositories, databases, CI/CD systems, or servers. **Step 2: Implement Identity-Based Access** Use **IAM** and **MFA** to enforce strict access policies. Only verified users can perform specific actions. **Step 3: Secure Pipelines and Automation Tools** Limit what your CI/CD tools (like Jenkins or GitHub Actions) can access. **Step 4: Monitor and Respond to Threats** Deploy **SIEM** tools like Splunk or Datadog to detect unusual activities. **Step 5: Audit and Continuously Improve** Regularly review logs, rotate credentials, and tighten weak configurations. ![ServerAvatar](https://serveravatar.com/wp-content/uploads/2025/11/image-14.png)## Tools Supporting Zero Trust in DevOps Some powerful tools to help build and maintain a Zero Trust environment: - **Okta / Azure AD:** Manage user identities and policies. - **HashiCorp Vault:** Securely store and rotate secrets. - **AWS IAM:** Enforce permissions across cloud services. - **Splunk / ELK Stack:** Monitor system behavior and detect threats. - **ServerAvatar:** Manage server security with built-in monitoring and role-based access. [![Blog banner - ServerAvatar](https://serveravatar.com/wp-content/uploads/2025/09/728_90-Banner-1-1024x127.png)](https://serveravatar.com?ref=blog)## Zero Trust in Cloud and Hybrid Infrastructures In cloud computing, Zero Trust ensures security remains consistent—no matter where workloads run. Whether you’re on **AWS**, **Google Cloud**, or **Azure**, the model verifies every connection. In **hybrid setups**, Zero Trust helps unify security across on-premises and cloud environments, ensuring seamless protection across systems. ## AI and Automation in Zero Trust AI brings **predictive power** to Zero Trust. It analyzes user behavior, detects unusual logins, and blocks threats automatically. For example: - If a developer suddenly accesses production data from a new country, AI flags or blocks it. - Automated systems can revoke access instantly if an anomaly is detected. AI ensures that Zero Trust remains **dynamic and proactive**, not just reactive. ## Server Management and Zero Trust Server management platforms like **ServerAvatar** help teams implement Zero Trust practically by: - Automating role-based access control (RBAC) - Managing and rotating credentials - Monitoring server activity and performance logs - Enforcing security patches automatically This allows DevOps teams to maintain compliance and visibility with minimal manual work. ## FAQs ### **What is the core idea behind Zero Trust?** The principle of “never trust, always verify”—every access request must be authenticated, no matter its origin. ### **Can Zero Trust slow down DevOps pipelines?** If automated properly, Zero Trust enhances speed by removing manual checks and ensuring secure automation. ### **How can AI improve Zero Trust?** AI detects anomalies, predicts risks, and automates responses for faster and smarter security enforcement. ### **Is Zero Trust only for large companies?** No, even small teams can benefit from Zero Trust by securing critical assets with IAM, MFA, and monitoring tools. ### **What’s the first step to adopt Zero Trust in DevOps?** Start by identifying your sensitive assets and implementing identity-based access controls. ## Conclusion Zero Trust isn’t about slowing down—it’s about securing your growth. In DevOps environments where speed is everything, Zero Trust creates a balance between agility and safety. By verifying every access, minimizing privileges, and monitoring continuously, your systems stay one step ahead of potential breaches. Embrace Zero Trust today to build a safer, smarter, and more reliable DevOps culture. Zero Trust isn’t just a framework, it’s the foundation for secure, scalable, and automated DevOps. Start implementing it today with ServerAvatar and safeguard every deployment. ## Stop Wasting Time on Servers. Start Building Instead. You didn’t start your project to babysit servers. Let **ServerAvatar** handle deployment, monitoring, and backups — so you can focus on growth. Deploy **WordPress, Laravel, N8N**, and more in minutes. No DevOps required. No command line. No stress. [ 🚀 Try Free ](https://app.serveravatar.com) [ 🌐 Learn More ](https://serveravatar.com/) Trusted by 10,000+ developers and growing. **Categories:** Blog, Guide **Tags:** DevOps, DevOps Environments, zero Trust --- ### [How to Set Up UFW Firewall on Ubuntu](https://serveravatar.com/ufw-firewall-ubuntu/) **Published:** November 8, 2025 **Author:** Meghna Meghwani **Content:** [![Blog banner - ServerAvatar](https://serveravatar.com/wp-content/uploads/2025/09/728_90-Banner-3-1024x127.png)](serveravatar.com?ref=blog)If you’ve ever worried about someone sneaking into your computer or server from the internet, you’re not alone. Think of your device like your home, would you ever leave your doors unlocked, especially at night? Of course not! The same logic applies to your Ubuntu system. The **UFW Firewall** acts like a security guard at your door, allowing only trusted visitors in and blocking unwanted intruders. In this guide, I’ll walk you through **how to set up the UFW Firewall on Ubuntu** in a simple, friendly, and easy-to-follow way. No complicated jargon, just practical steps that even a beginner can follow comfortably. ## What is UFW and Why Use It? **UFW (Uncomplicated Firewall)** is a simple and user-friendly tool built for Ubuntu to help you control what traffic enters or leaves your system. Unlike complicated firewalls with hundreds of commands, UFW keeps things clean and beginner-friendly. **So why should you use it?** Because the internet isn’t always safe. Hackers and bots constantly scan IPs looking for weak systems. UFW acts as your system’s shield, stopping them in their tracks. ## Benefits of Using UFW on Ubuntu Using UFW brings several advantages that make your server or computer safer: - **Easy to Use:** You don’t need to be a Linux expert. - **Improves Security:** Blocks unwanted access attempts instantly. - **Customizable:** You can allow or deny only specific traffic. - **Lightweight:** Doesn’t slow down your system at all. Imagine having a smart bouncer at a club door, letting in guests on the VIP list, but keeping troublemakers away. That’s exactly what UFW does. ## How UFW Works (Simple Explanation) To put it simply: - **Allow rules** = “Let this traffic in” - **Deny rules** = “Block this traffic” - If no rules match, UFW blocks by default when active. Think of UFW as a checklist at the entrance gate. If someone’s name is not on the allowed list, they stay out. ## Managing Firewall Effectively with ServerAvatar While UFW is a great way to secure your Ubuntu server, it still requires command-line knowledge, manual configuration, and regular monitoring. This can be stressful, especially if you manage multiple servers or aren’t comfortable working with Linux commands. That’s where **ServerAvatar’s built-in Firewall** makes life much easier. ### What is ServerAvatar? [ServerAvatar](https://serveravatar.com/) is a platform to simplify the hosting and management of servers and applications. It simplifies the process of deploying and managing PHP and Node.js based web applications on servers. ### Why ServerAvatar Firewall Is a Better Choice ServerAvatar provides a user-friendly, dashboard-based firewall management system that eliminates the need for manual UFW setup. Instead of typing commands, you can manage your firewall with a single click. Here’s how ServerAvatar makes firewall security effortless: - **No Terminal Required:** Enable, disable, and configure firewall rules from the intuitive UI. - **Pre-Configured Secure Rules:** Block malicious traffic and keep only essential ports open without manual work. - **One-Click Port and Service Management:** Easily allow or restrict SSH, HTTP, HTTPS, MySQL, and custom ports. - **Smart Protection for Beginners & Experts:** Designed for users of all skill levels, no Linux expertise needed. - **Centralized Firewall Control:** Manage firewall settings for all your servers from one panel. It’s like having UFW, a security expert all baked into one clean dashboard. ## **Using ServerAvatar vs Using Manual Method**[](https://storage.3.basecamp.com/5840738/blobs/f38917b2-bafc-11f0-9754-0242ac120004/download/image.png) **Feature****Using ServerAvatar****Manual Method****Ease of Use**Beginner-friendly dashboardRequires Linux CLI knowledge**Setup Time**1–2 minutes10–25 minutes**Multi-Server Control**Yes, manage all from one panelNo, configure each server individually**Risk of Misconfiguration**LowHigh for new users**Supports Custom Rules**✅ Yes✅ Yes**Ideal For**Developers, agencies, SaaS providers, beginnersExperienced Linux users comfortable with CLI## Configuring Firewall Using ServerAvatar - Log in to your ServerAvatar account. Click on the **Server Dashboard** for the server you want to configure the firewall. ![Server Dashboard -ServerAvatar](https://serveravatar.com/wp-content/uploads/2025/11/image-35-1024x284.png)- Let’s first enable the Firewall from the **Server Panel**. Just navigate to the **Server** **Panel** and **Enable** the toggle button next to the **Firewall**. ![Enable Firewall - ServerAvatar](https://serveravatar.com/wp-content/uploads/2025/11/image-45-1024x327.png)- Now, navigate to the **Firewall** section from the left-hand sidebar. You can see the preset rules of the firewall. Click on the **Create a Firewall** button. ![Firewall - ServerAvatar](https://serveravatar.com/wp-content/uploads/2025/11/image-36-1024x286.png)- Fill up the required details such as port number, protocol, traffic, IP address, description, and click on the **Create Rule** button. ![UFW Firewall - ServerAvatar](https://serveravatar.com/wp-content/uploads/2025/11/image-37-1024x683.png)- You can also create a rule for a range of ports by just selecting the checkbox of ‘**Create a rule for range of ports**‘ and entering the start port number and the end port number. ![Firewall Rule - ServerAvatar](https://serveravatar.com/wp-content/uploads/2025/11/image-38-1024x686.png)## When Should You Choose ServerAvatar Firewall? Choose ServerAvatar if you want: - A faster and easier way to secure servers - To avoid complex commands and accidental lockouts - To manage multiple servers with centralized control - Built-in security essentials without manual configuration In short, ServerAvatar is the zero-stress way to secure your Ubuntu server [![Blog banner - ServerAvatar](https://serveravatar.com/wp-content/uploads/2025/09/728_90-Banner-1-1024x127.png)](serveravatar.com?ref=blog)## Configuring Firewall Manually **Checking if UFW is Installed** - Most Ubuntu versions come with UFW pre-installed. To check, run the below mentioned command: ``` sudo ufw status ``` ``` sudo ufw status ``` - If it shows output (active or inactive), UFW is installed. **How to Install UFW (If Not Installed)** - In the rare case UFW isn’t installed, use this command to install UFW: ``` sudo apt install ufw -y ``` ``` sudo apt install ufw -y ``` - That’s it, installation complete! ## Basic UFW Commands You Should Know Here are some beginner-friendly commands: **Purpose****Command****Enable firewall**`sudo ufw enable`**Disable firewall**`sudo ufw disable`**Allow a port**`sudo ufw allow 80`**Deny a port**`sudo ufw deny 23`**Delete a rule**`sudo ufw delete allow 80`These are like the ABCs of UFW. You’ll use them often. **Allowing Essential Services and Ports** Before enabling UFW, allow the services you need. **For example:** **Allow SSH** - If you’re managing a server remotely, allow SSH first: ``` sudo ufw allow ssh ``` ``` sudo ufw allow ssh ``` or ``` sudo ufw allow 22/tcp ``` ``` sudo ufw allow 22/tcp ``` **Allow HTTP (Websites)** - Run the command below to allow HTTP: ``` sudo ufw allow 80/tcp ``` ``` sudo ufw allow 80/tcp ``` **Allow HTTPS (Secure Websites)** - Run the command below to allow HTTPS: ``` sudo ufw allow 443/tcp ``` ``` sudo ufw allow 443/tcp ``` **Allow Specific App Ports** - **FTP:** sudo ufw allow 21/tcp - **MySQL:** sudo ufw allow 3306/tcp - **NGINX Full:** sudo ufw allow ‘Nginx Full’ **Blocking Connections You Don’t Want** - Want to block a suspicious IP? Use: ``` sudo ufw deny from 192.168.1.50 ``` ``` sudo ufw deny from 192.168.1.50 ``` - Block a range of IPs: ``` sudo ufw deny from 192.168.1.0/24 ``` ``` sudo ufw deny from 192.168.1.0/24 ``` Blocking is useful when you notice unusual or harmful activity. **Enabling and Disabling UFW Safely** - Once you’re ready, turn on UFW: ``` sudo ufw enable ``` ``` sudo ufw enable ``` - Want to stop it? ``` sudo ufw disable ``` ``` sudo ufw disable ``` Do this carefully, especially on a remote server. **How to Check UFW Status and Rules** - To see if UFW is active and what rules are set: ``` sudo ufw status numbered ``` ``` sudo ufw status numbered ``` The “numbered” option helps you easily remove rules later. ## Tips to Avoid Getting Locked Out Many beginners accidentally block their own access. Here’s how to avoid it: - Always allow SSH **before** enabling UFW - Keep a second access method (console or panel) handy - Double-check allowed ports Better safe than sorry, especially on a cloud server! **Resetting or Removing UFW Rules** If something goes wrong and you want to start fresh: ``` sudo ufw reset ``` ``` sudo ufw reset ``` This removes all rules and disables UFW. ## Common Mistakes and How to Avoid Them **Mistake****How to Avoid****Enabling UFW without allowing SSH**Allow SSH first**Allowing too many ports**Keep rules minimal**Not checking logs**Monitor activity occasionallyRemember, the fewer doors you leave open, the safer your system stays. ## FAQs ### **Will enabling UFW break my apps?** Only if the required ports aren’t allowed. Always permit necessary services first. ### **How do I remove a UFW rule?** sudo ufw status numbered sudo ufw delete ### **Should I enable UFW on my home PC or only on servers?** Both! Whether you’re on a home computer, laptop, or server, UFW keeps you safer. ### **Can I allow a range of ports in ServerAvatar?** Yes, ServerAvatar provides a simple checkbox option to allow a port range, no need to run complex commands. ### **Can ServerAvatar replace UFW?** Yes, ServerAvatar provides a simple checkbox option to allow a port range, no need to run complex commands. ## Conclusion Securing your Ubuntu system is not just a good practice, it’s a necessity. Whether you’re managing a personal server, business application, or client websites, a firewall is your first line of defense against cyber threats. UFW is a simple yet powerful tool that helps you protect your server with easy-to-use commands. However, if you want a faster, safer, and more convenient way to manage firewall rules, especially across multiple servers, ServerAvatar’s Firewall is a game-changer. With its intuitive dashboard, preset security rules, and effortless configuration, ServerAvatar lets you secure servers without touching the terminal. So, if you prefer simplicity, automation, and zero risks of misconfiguration, ServerAvatar is the smart choice for firewall management. Stay secure, stay protected, and always keep your server doors locked to intruders! **Categories:** Blog, Tutorials, Ubuntu **Tags:** Firewall, Linux, Ubuntu --- ### [How to Configure Swap Memory in Linux](https://serveravatar.com/swap-memory-in-linux/) **Published:** November 11, 2025 **Author:** Meghna Meghwani **Content:** [![Blog banner - ServerAvatar](https://serveravatar.com/wp-content/uploads/2025/09/728_90-Banner-3-1024x127.png)](https://serveravatar.com/?ref=blog)**Swap memory in Linux** is a reserved storage space on your disk that acts as virtual memory when your system’s RAM is full. Think of it like a backup fuel tank, your computer primarily runs on RAM, but when that’s exhausted, Linux uses swap space to keep things running smoothly instead of freezing. ## **Swap Memory in Linux: How It Works** Swap comes into action when your system needs more memory than what’s available in RAM. The operating system temporarily moves inactive data from RAM to Swap. Here’s a simple ASCII overview: ``` +-----------------+ +----------------+ | RAM | Full | Swap | | (Fast Memory) | ------> |(Slower Storage)| +-----------------+ +----------------+ ``` RAM is always faster than Swap because RAM is physical memory, while Swap uses storage devices such as SSDs or HDDs. > **Tip:** If using SSD, Swap is still slower than RAM but much faster than on HDD. > > ### **Why Do You Need Swap?** > > Many beginners wonder, if RAM is faster, why bother with Swap? > > Here are some **real-world reasons**: > > - **Prevents System Crashes:** When RAM is full, Swap ensures the system doesn’t freeze or kill important applications. > - **Improves Multitasking:** If you run browsers, editors, and heavy apps together, Swap provides breathing room. > - **Essential for Low-RAM Devices:** Systems with 1–4GB RAM require Swap. > - **Useful for Hibernation:** Linux hibernation saves RAM data to Swap; requires Swap size ≥ RAM size. ## **Configure Swap Memory Easily with ServerAvatar (No Commands Needed)** **What is ServerAvatar?** [ServerAvatar](https://serveravatar.com/) is a platform to simplify the hosting and management of servers and applications. It simplifies the process of deploying and managing PHP and Node.js based web applications on servers. If you’re using **ServerAvatar** to host and manage your servers, there’s an even faster and safer way to configure Swap memory, **without running a single Linux command**. Manually creating or resizing Swap requires multiple steps, permission settings, and fstab modifications. A small mistake, like an incorrect entry, can cause boot issues. **ServerAvatar** eliminates this risk by providing a **one-click swap management interface and an easy-to-use dashboard**. **With ServerAvatar, you can:** - Configure Swap with a few clicks - Manage server performance visually - Avoid command-line mistakes - Monitor RAM, CPU, and Swap in one place This is useful for everyone, including developers, agencies, and non-Linux experts who just want their server to run smoothly without using terminal commands. > If you prefer GUI-based server management rather than configuring Swap manually, ServerAvatar makes the process effortless and beginner-friendly. ### Why Use ServerAvatar to Manage Swap Memory in Linux With ServerAvatar, you can: **Feature****ServerAvatar Method****Manual Method****Update Swap**One-Click from DashboardRequires 8–10 commands**Risk of Misconfiguration****Zero** (fully automated)High**Time Required**< 10 seconds10–15 minutes**No Downtime**✔ YesMay require reboot if misconfigured## How to Manage Swap Memory Using ServerAvatar ServerAvatar gives you full control to update, increase, or decrease Swap Memory: - Log in to your ServerAvatar account and navigate to the Server Panel by clicking on the server dashboard icon. ![ServerAvatar Dashboard](https://serveravatar.com/wp-content/uploads/2025/11/image-42-1024x316.png) - On the Server Panel, locate the Swap Memory section, and click on the **Update Swap** button. ![swap memory in linux - ServerAvatar](https://serveravatar.com/wp-content/uploads/2025/11/image-43-1024x469.png) - In the pop-up box, review your server’s **Current Swap Memory** and enter the **New Swap Memory** value in GB, and click on the **Update** button to apply changes. ![Update Swap - ServerAvatar](https://serveravatar.com/wp-content/uploads/2025/11/image-44.png) - The changes may take a minute. Once completed, the **Swap Memory** section will reflect the new size. That’s it, ServerAvatar will configure everything in the background, including permissions and system configuration. ### Example Use Cases **Use Case****Suggested Swap****Why**Low-RAM VPS (1GB–2GB)2GB–4GBPrevents OOM kills and crashesRAM spike due to traffic/loadIncrease temporarilyHelps your app survive traffic peaksAfter upgrading physical RAMReduce SwapOptimizes performance[![Blog banner - ServerAvatar](https://serveravatar.com/wp-content/uploads/2025/09/728_90-Banner-1-1024x127.png)](https://serveravatar.com/?ref=blog)## **Manual Method to Configure Swap Memory in Linux** - **Check Current Swap Memory** Before creating Swap, let’s check if Swap already exists using the command below. ``` swapon --show ``` ``` swapon --show ``` or ``` free -h ``` ``` free -h ``` - **Expected output example:** ``` total used free shared buff/cache available Mem: 3.8G 2.1G 500M 189M 1.2G 1.3G Swap: 0B 0B 0B ``` ``` total used free shared buff/cache available Mem: 3.8G 2.1G 500M 189M 1.2G 1.3G Swap: 0B 0B 0B ``` > > If Swap: shows **0B**, it means no Swap is currently configured - **Create a Swap File (Ubuntu/Debian)** Below is the most common and recommended method to create a Swap. - **Example:** Create a 2GB Swap File ``` sudo fallocate -l 2G /swapfile ``` ``` sudo fallocate -l 2G /swapfile ``` - If fallocate fails, use: ``` sudo dd if=/dev/zero of=/swapfile bs=1M count=2048 ``` ``` sudo dd if=/dev/zero of=/swapfile bs=1M count=2048 ``` - **Set the Correct Permissions** Let’s now set the correct permissions for swap using the command below. ``` sudo chmod 600 /swapfile ``` ``` sudo chmod 600 /swapfile ``` - **Mark It as Swap Space** Mark it as Swap Space by using the command below. ``` sudo mkswap /swapfile ``` ``` sudo mkswap /swapfile ``` - **Enable Swap** Let’s now enable the swap using the command below. ``` sudo swapon /swapfile ``` ``` sudo swapon /swapfile ``` - **Verify Swap Is Active** Let’s now verify if the swap is active or not. ``` swapon --show ``` ``` swapon --show ``` Please note that only the root user can access it, exactly how it should be. ### **Helpful Swap Commands for Monitoring** Here are some useful commands to monitor swap usage: **Command****Description**`free -h`Shows RAM & Swap usageswapon –showDisplays active Swap`top` or `htop`Shows memory & swap usage in real timevmstatDisplays system memory statistics## **Common Mistakes to Avoid** When Setting Up Swap Memory in Linux Here are frequent errors beginners make: - **Creating Too Large Swap:** If you create 16GB Swap on a system with 2GB RAM, it may slow performance. - **Wrong fstab entry:** A typo can make the system fail to boot. - **Forgetting permissions:** Swap must only be readable by root. - **Removing or Disabling Swap:** If you no longer need Swap, follow these steps. ## **Conclusion** Swap Memory plays a crucial role in maintaining system stability and performance, especially when your RAM becomes fully utilized. It works as a backup layer that prevents applications from crashing, supports multitasking, and ensures smoother performance for low-RAM systems or high-load environments. While the manual method gives you complete control over how Swap is configured on Linux, it requires technical knowledge, multiple commands, and careful system configuration to avoid mistakes. This is where **ServerAvatar** makes a huge difference. With its one-click Swap management feature, you can create, increase, or decrease Swap without touching the terminal, perfect for beginners, developers, agencies, or anyone who wants a hassle-free server management experience. Whether you prefer the manual approach or a GUI-based solution like ServerAvatar, the key is to allocate the right amount of Swap and configure it properly for the best performance. With the right setup, your server will run more efficiently, stay stable under heavy load, and offer a smoother experience for your applications. ## **FAQs** ### **1. What is Swap in Linux, and why is it needed?** Swap is virtual memory on your storage device, used when RAM is full. It prevents system crashes and helps with multitasking. ### **2. Is Swap Memory still needed if I have enough RAM?** Yes. Even with high RAM, Swap is important as a fallback to handle sudden memory spikes, run memory-intensive applications, or enable hibernation on Linux. ### **3. Can I manage Swap without using terminal commands?** Absolutely. If you’re using **ServerAvatar**, you can create, update, or remove Swap with one click directly from the dashboard, no Linux commands required. ### **4. Does enabling Swap require a server reboot?** No. Swap can be enabled or increased in real-time without restarting the server. ServerAvatar also handles this process without downtime. ### **5. What is the advantage of using ServerAvatar for Swap management?** ServerAvatar automates the entire process with a single click—reducing configuration time, avoiding command-line errors, and making it simple for both technical and non-technical users. **Categories:** Guide, Linux, Tutorials, Ubuntu **Tags:** Linux, swap memory, swap memory in linux --- ### [Networking Basics Guide for DevOps Engineers](https://serveravatar.com/networking-basics-guide/) **Published:** November 9, 2025 **Author:** Meghna Meghwani **Content:** [![Blog banner - ServerAvatar](https://serveravatar.com/wp-content/uploads/2025/09/728_90-Banner-3-1024x127.png)](https://serveravatar.com?ref=blog)In today’s DevOps world, understanding **Networking Basics** is just as important as knowing how to write code or build automation pipelines. Whether you’re deploying microservices, managing containers, or setting up CI/CD workflows, strong networking knowledge ensures everything connects smoothly, efficiently, and securely. This detailed guide will help you understand **the core networking concepts every DevOps engineer should master,** from IP addressing and DNS to firewalls, load balancing, and Kubernetes networking, all explained in **simple, beginner-friendly language**. ## What is Networking in DevOps? In the simplest terms, **networking** is how computers, applications, and systems communicate with each other, whether they’re on the same network or across the internet. In **DevOps**, networking connects: - Servers and databases - CI/CD tools like Jenkins or GitLab - Cloud platforms such as AWS, Azure, or Google Cloud - Containers and orchestration tools like Docker and Kubernetes Without a proper understanding of networking, deployments may fail, systems may become insecure, and applications may not reach users efficiently. **Example:** When you deploy an app using Docker, it needs to communicate with a database container or external API. Networking ensures that connection happens securely and reliably. ## Why Networking is Important for DevOps Engineers Networking is the foundation of all DevOps operations. Here’s why it matters: 1. **Smooth Communication:** Ensures all systems, from source control to production — are connected. 2. **Security:** Helps protect data using firewalls, VPNs, and access control lists. 3. **Scalability:** Supports load balancing and autoscaling in cloud environments. 4. **Automation:** Network configurations can be automated using tools like Terraform or Ansible. 5. **Faster Troubleshooting:** Understanding data flow helps diagnose and fix deployment issues quickly. ![Networking Basics - ServerAvatar](https://serveravatar.com/wp-content/uploads/2025/11/image-34-1024x683.png)Without networking knowledge, even automated pipelines or Kubernetes clusters can become bottlenecks. ## Core Networking Concepts for DevOps Engineers Let’s explore the most essential concepts that every DevOps professional should know. ### 1. IP Addressing and Subnetting Every machine or container in a network is assigned an **IP address** — a unique identifier that allows communication. There are two main versions of IP addresses: - **IPv4:** Example — 192.168.1.1 (most common) - **IPv6:** Example — 2001:0db8:85a3::8a2e:0370:7334 (newer and supports more devices) **Subnetting** helps divide large networks into smaller sections for better organization, efficiency, and security. **Why it matters:** - Defines which systems can communicate directly. - Helps manage internal and external traffic. - Useful in container orchestration and cloud network setups. ### 2. DNS (Domain Name System) DNS translates human-readable domain names into IP addresses. For example: serveravatar.com → 142.250.182.14 **Common DNS Record Types:** - **A Record:** Maps a domain to an IPv4 address. - **AAAA Record:** Maps a domain to an IPv6 address. - **CNAME Record:** Redirects one domain to another. - **MX Record:** Handles mail exchange (email servers). **Why it matters for DevOps:** - Used in setting up custom domains, load balancers, and cloud applications. - Incorrect DNS settings can break services or delay deployments. - Tools like **dig**, **nslookup**, or **Cloudflare DNS** help manage and troubleshoot DNS efficiently. ### 3. OSI and TCP/IP Models The **OSI Model** describes how data travels across a network through **seven layers**, from the physical hardware to applications. **Layers of the OSI Model:** 1. Physical – Cables, routers, switches 2. Data Link – MAC addresses, Ethernet 3. Network – IP addresses, routing 4. Transport – TCP, UDP protocols 5. Session – Connection management 6. Presentation – Data translation (encryption/compression) 7. Application – Web browsers, APIs, email The **TCP/IP model** is a simplified version with four layers: Network Interface, Internet, Transport, and Application. **Why it matters:** Understanding these layers helps identify where network problems occur — e.g., whether an issue is with hardware, routing, or an application. ### 4. TCP vs. UDP Protocols Protocols define how data is transmitted between devices. **Protocol****Type****Reliability****Common Use****TCP (Transmission Control Protocol)**Connection-orientedReliableWeb, SSH, FTP**UDP (User Datagram Protocol)**ConnectionlessFaster, less reliableVideo, VoIP, DNS**Example:** - Use TCP for critical data (like database connections). - Use UDP for live streaming where speed is more important than reliability. ### 5. Firewalls and Security Groups **Firewalls** act as barriers that control incoming and outgoing network traffic based on defined rules. In cloud environments (like AWS or DigitalOcean), these are called **security groups**. **Example firewall rules:** - Allow port **22** for SSH access - Allow port **80** for HTTP (web traffic) - Allow port **443** for HTTPS (secure traffic) **Why it matters:** Proper firewall configuration protects against unauthorized access and ensures your services remain reachable. ### 6. Load Balancing and High Availability **Load balancers** distribute incoming traffic evenly across multiple servers. This ensures no single server becomes overloaded and improves uptime. **Types of Load Balancers:** - **Layer 4 (Transport-level):** Works with TCP/UDP connections. - **Layer 7 (Application-level):** Handles HTTP/HTTPS traffic. **Benefits:** - Improves performance and reliability - Enables fault tolerance - Essential for scaling microservices and cloud-based applications **Common Tools:** Nginx, HAProxy, AWS ELB, Traefik ### 7. Networking in Containers and Kubernetes Containers (like **Docker**) and orchestration tools (like **Kubernetes**) rely on virtual networking. **Docker Networking Types:** - **Bridge:** Default network for containers on the same host. - **Host:** Shares the host network. - **Overlay:** Connects containers across multiple hosts (common in Swarm or Kubernetes). **Kubernetes Networking:** - Uses **pods**, **services**, and **ingress controllers** to manage internal and external communication. - Ensures that every pod can talk to every other pod, no matter the node it’s running on ### 8. VPNs and Secure Tunneling A **VPN (Virtual Private Network)** allows secure communication between remote servers or users over public networks. It encrypts traffic, ensuring that even if data is intercepted, it remains unreadable. **Why it matters:** - Used for remote DevOps access - Connects private servers securely ### 9. Monitoring, Troubleshooting, and Network Tools To keep networks healthy, DevOps engineers rely on monitoring and diagnostic tools. **Basic Commands:** - ping – Tests if a host is reachable - traceroute – Shows path packets take - netstat or ss – Lists open ports and connections - nslookup / dig – Checks DNS records **Advanced Tools:** - **Wireshark:** Packet analysis - **Prometheus + Grafana:** Visualization of network metrics - **Nagios / Zabbix:** Server uptime and network alerts [![Blog banner - ServerAvatar](https://serveravatar.com/wp-content/uploads/2025/09/728_90-Banner-1-1024x127.png)](https://serveravatar.com?ref=blog)## Best Networking Practices for DevOps Engineers 1. **Automate Configuration:** Use Ansible, Terraform, or Puppet for network setup. 2. **Follow Zero Trust Security:** Verify every connection — never assume it’s safe. 3. **Implement Logging:** Track and audit all network activity. 4. **Optimize DNS and Load Balancers:** For faster global response times. 5. **Monitor Continuously:** Identify bottlenecks before they cause outages. 6. **Document Everything:** Record firewall rules, IPs, and network maps. ## Common Networking Challenges in DevOps - Misconfigured DNS records causing downtime - Port conflicts between services - Slow API communication due to poor routing - Unsecured ports leading to vulnerabilities - Overloaded servers due to lack of load balancing Understanding networking helps prevent these issues and ensures seamless deployment. ## FAQs ### **Why do DevOps engineers need networking skills?** Because networking connects every component in DevOps — from source code to production. Without it, deployments and monitoring systems can fail. ### **What are the most used networking tools in DevOps?** Common tools include ping, netstat, Wireshark, Prometheus, Grafana, and cloud dashboards like AWS VPC and Azure Networking. ### **What’s the difference between public and private IPs?** Public IPs are accessible over the internet, while private IPs are used within internal networks for security. ### **How does networking affect CI/CD pipelines?** Networking ensures that pipeline components (like Jenkins, Docker, and Git servers) can communicate without errors or latency. ### **How can I practice networking for DevOps?** Set up virtual machines, simulate connections, configure DNS and firewalls, and deploy small applications using Docker and Kubernetes. ## Conclusion Networking is the **heartbeat of DevOps**. It enables communication between servers, secures data transfers, supports automation, and ensures application uptime. By mastering concepts like IP addressing, DNS, TCP/UDP, and load balancing, you’ll build a strong foundation to handle complex infrastructures confidently. As you grow, explore advanced networking topics such as **Service Meshes (Istio, Linkerd)**, **Software-Defined Networking (SDN)**, and **Cloud VPCs** — these will elevate your DevOps career to the next level. ## Stop Wasting Time on Servers. Start Building Instead. You didn’t start your project to babysit servers. Let **ServerAvatar** handle deployment, monitoring, and backups — so you can focus on growth. Deploy **WordPress, Laravel, N8N**, and more in minutes. No DevOps required. No command line. No stress. [ 🚀 Try Free ](https://app.serveravatar.com) [ 🌐 Learn More ](https://serveravatar.com/) Trusted by 10,000+ developers and growing. **Categories:** Blog, Guide **Tags:** DevOps, DevOps Engineers, Networking Basics --- ### [Debian vs RHEL: Key Differences in Linux Distributions](https://serveravatar.com/debian-vs-rhel/) **Published:** November 7, 2025 **Author:** Meghna Meghwani **Content:** [![Blog banner - ServerAvatar](https://serveravatar.com/wp-content/uploads/2025/09/728_90-Banner-3-1024x127.png)](https://serveravatar.com?ref=blog)When it comes to **Debian vs RHEL**, Linux isn’t just an operating system, it’s an entire ecosystem filled with a wide variety of distributions, each created for different needs. Among them, **Debian** and **RHEL (Red Hat Enterprise Linux)** stand tall as two of the most influential, reliable, and widely used Linux distributions. But which one should you choose, and why? In this guide, we’ll break down the core differences between Debian and RHEL in a simple, human-friendly, and SEO-optimized way, so you can confidently pick the right Linux distro for your use case. ## Introduction to Linux Distributions ### Why So Many Linux Distros Exist Unlike Windows or macOS, Linux is open source. That means anyone can modify it, build on top of it, and release their own version, called a “distribution” or “distro.” That’s why we have Ubuntu, CentOS, Fedora, Arch, Kali, and hundreds more. ### Debian and RHEL – Two Giants of the Linux World Out of all the Linux distros, two have shaped the Linux world the most: - **Debian:** known for stability, security, and openness. - **RHEL:** famous for enterprise-grade reliability and commercial support. ![Debian vs RHEL - ServerAvatar](https://serveravatar.com/wp-content/uploads/2025/11/image-31.png)## What is Debian? Debian is a free and open-source Linux distribution known for its stability, security, and community-driven development. It’s widely respected as a standalone OS and also serves as the foundation for popular Linux distros, the most notable one being Ubuntu, which powers millions of desktops, servers, and cloud environments across the globe. ## History of Debian Debian was created by Ian Murdock in 1993 with a vision to build a Linux distribution for the community and by the community. Unlike many distros of that era, Debian followed a transparent and collaborative development model, encouraging worldwide contributions. Over the years, Debian has earned a strong reputation for being one of the most stable, secure, and long-lasting Linux distributions. Today, **it continues to grow with:** - Regular and well-tested releases - A huge software repository - Strong community governance ## Who Uses Debian? Debian has a global, diverse, and loyal user base because of its reliability and long-term support. It is commonly used by: - **Developers & Programmers** – for a stable environment for software development - **Universities & Research Institutions** – for secure, open-source systems used in research and high-performance computing - **System & Network Administrators** – to build custom servers, enterprise environments, and cloud infrastructures - **Open-Source Enthusiasts & Contributors** – because of its transparency, open governance, and detailed documentation From personal projects to enterprise-grade servers, Debian remains a trusted choice worldwide. ## Core Philosophy and Approach Debian is not just a Linux distribution, it represents a strong open-source philosophy rooted in user freedom, transparency, and long-term reliability. **Debian stands on three core values:** [](https://storage.3.basecamp.com/5840738/blobs/0af6598a-ba32-11f0-a7df-0242ac120004/download/image.png) **Core Value****What It Means for Users****Stability**Every release is thoroughly tested, making Debian one of the most dependable distros available.**Security**Backed by a dedicated security team, users receive timely patches and long-term security support.**Software Freedom**Follows the **Debian Free Software Guidelines (DFSG)** ensuring access to software that is free, transparent, and modifiable.This philosophy makes Debian the top choice for users who value freedom, openness, long-term support, and system integrity. ## What is RHEL (Red Hat Enterprise Linux)? Red Hat Enterprise Linux (RHEL) is a premium, subscription-based Linux distribution designed specifically for enterprise environments that require high stability, security, and performance. First released in 2000 by Red Hat, it has become one of the most trusted operating systems for mission-critical workloads used by large organizations worldwide. **RHEL offers:** - Enterprise-grade support and long-term lifecycle management - Certified compatibility with leading hardware and software vendors - Continuous security updates, patches, and professional documentation ## History of RHEL RHEL was created to provide a commercial, professionally supported Linux OS that businesses could rely on for secure and stable IT operations. Over time, it expanded into a dominant enterprise OS powering data centers, cloud platforms, and corporate IT infrastructure globally. In 2019, Red Hat became part of IBM, strengthening RHEL’s ecosystem with more innovation, investment, and enterprise integration. **Key advantages of RHEL’s subscription model:** - Access to security patches, updates, and certified software - Enterprise-grade customer support and extensive documentation - Compliance, stability, and predictable release lifecycle ## Who Uses RHEL? RHEL is widely adopted by organizations where performance, uptime, and data security are mission-critical. **Common users include:** **🔹 Large Corporations & Enterprises** - Standardized, secure OS for large-scale IT deployments - Ideal for managing multiple environments consistently **🔹 Banks & Financial Institutions** - Requires strict compliance, security, and data confidentiality - Supports highly regulated and audited environments **🔹 Government & Public Sector** - Offers certified, policy-compliant, and secure infrastructure - Suitable for sensitive and confidential workloads **🔹 Data Centers & Enterprise Server Environments** - Works across physical, virtual, and multi-cloud environments - Commonly used with SAP, Oracle DB, and HA (High Availability) clusters ## Key Focus and Philosophy RHEL is not just another Linux distribution, it’s a complete enterprise operating platform designed for systems where failure is not an option. **Its foundation is built on three core pillars:** **🔹Reliability & Continuous Support** - Long-term support (LTS) and predictable release cycles - Enterprise maintenance, updates, and support SLAs **🔹Security & Compliance** - Integrated SELinux (co-developed with the NSA) for advanced security - Compliance certifications and hardened security features **🔹Performance & Business Continuity** - Minimal downtime and high-availability architecture - Optimized for scaling across servers, VMs, and cloud environments RHEL’s focus is clear: to deliver a secure, stable, and professionally supported Linux platform that enterprises can trust for their most critical operations. ## Here’s How ServerAvatar Makes Your Life Easier **What is ServerAvatar?** [ServerAvatar](https://serveravatar.com/) is a platform to simplify the hosting and management of servers and applications. It simplifies the process of deploying and managing PHP and Node.js based web applications on servers. ![ServerAvatar Dashboard](https://serveravatar.com/wp-content/uploads/2025/11/image-32-1024x478.png)Whether you choose any server or VPS, managing servers manually can still be overwhelming, especially when it comes to setup, deployments, security, monitoring, and maintenance. That’s where **ServerAvatar** steps in. ## Manage Debian Servers Effortlessly with ServerAvatar [ServerAvatar](https://serveravatar.com/) supports **Debian-based servers**, making it easy for developers, startups, agencies, and enterprises to manage servers and applications **without needing deep DevOps expertise**. ### Choose How You Want to Manage Your Debian Server ServerAvatar provides flexibility based on your hosting preference: **🔹 Self-Managed Servers:** Ideal for users who want to use their own VPS from any cloud provider while still enjoying a simplified server management panel. **🔹Best for:** - Users who want full control of their VPS - Developers are comfortable with choosing their own hosting provider **🔹 Managed Servers by ServerAvatar:** No need for a cloud provider account. ServerAvatar provides the server, and management in one place, so you focus purely on growth. **🔹Best for:** - Non-technical users or teams who want a ready-to-use managed hosting experience - Agencies, SaaS owners, and businesses that want hands-off server management[](https://storage.3.basecamp.com/5840738/blobs/a3c15aba-ba38-11f0-bec9-0242ac120005/download/image.png) ![Create Server - ServerAvatar](https://serveravatar.com/wp-content/uploads/2025/11/image-33-1024x503.png)**Key Benefits of Managing Debian with ServerAvatar** **🔹One-Click Server Setup & Configuration** - No manual Linux commands required - Automated server stack setup in minutes **🔹Enhanced Security & Maintenance** - One-click free SSL with auto-renewal - Automatic security updates + integrated 8G Firewall - Real-time monitoring & alerts for early issue detection **🔹Deploy & Manage Applications Easily** - Deploy PHP & Node.js apps in just a few clicks - One-click app installer + app-level PHP version control **🔹Centralized Server & Application Management** - Manage unlimited servers from one dashboard - Built-in logs, backups, and AI bot blocker - Team Management, White Label & Reseller Panel included Instead of spending months learning Linux and server administration, **ServerAvatar handles the technical heavy lifting**, so you can focus on building your product, business, or application. [![Blog banner - ServerAvatar](https://serveravatar.com/wp-content/uploads/2025/09/728_90-Banner-1-1024x127.png)](https://serveravatar.com?ref=blog)## Key Differences at a Glance ### Debian vs RHEL **Feature****Debian****RHEL (Red Hat Enterprise Linux)****Release Year**19932000**Type**Community-driven, open-source Linux distributionCommercial enterprise Linux distribution**Ownership & Support**Developed and maintained by the community (Debian Project)Owned by Red Hat (IBM) with paid professional support**Primary Focus**Stability, open-source freedom, and flexibilityEnterprise security, reliability, compliance, and long-term support**Target Users**Developers, open-source enthusiasts, research institutions, and custom server buildersCorporates, enterprises, government bodies, and mission-critical infrastructures**Software Philosophy**Strictly open-source by default, minimal proprietary softwareSupports both open-source and proprietary software for enterprise needs**Package Manager**APT (Advanced Package Tool)YUM/DNF (depending on version)**Releases & Updates**Slower, stability-first releasesPredictable release cycles with long-term support and security maintenance**Cost**Free to useRequires paid subscription for updates, patches, and official support**Security**Strong community-driven security with open-source updatesEnterprise-grade security with certifications, SELinux, and compliance standards**Use Cases**Ideal for learning, development, open-source projects, and custom server setupsBest for enterprises needing high availability, compliance, SLAs, and support## ****Package Management & Software Repositories**** ### 🔹Debian: APT & .deb Packages Uses **APT (Advanced Package Tool)** with **.deb** packages, known for: - Faster package installation - Less dependency issues - Easy for beginners & minimal setup ### 🔹RHEL: YUM/DNF & .rpm Packages Uses **YUM/DNF** with **.rpm** packages, ideal for: - Enterprise patching - Centralized control - Managing large server fleets ## Stability, Security & Release Cycle ### Debian Release Branches Offers three release options for different needs: - **Stable** – Highly reliable, fewer updates - **Testing** – Newer packages, moderately stable - **Unstable** – Cutting-edge but not ideal for production ### RHEL Enterprise Stability - Predictable release cycle with **up to 10 years of support** - Prioritizes **stability and compatibility** over latest versions ### Security Updates & Patch Management - **RHEL** provides certified, tested, and compliance-ready security patches (FIPS, STIG, etc.), best for regulated industries. - **Debian** offers fast, community-driven updates, suitable for general Linux users and development environments. ## Performance & System Requirements ### Resource Consumption - **Debian** is lightweight and performs well even on older or low-spec hardware. - **RHEL** uses slightly more resources due to enterprise-level components and security layers. ### Performance-Based Recommendations - Choose **Debian** for fast, minimal, highly customizable systems. - Choose **RHEL** for performance-critical, secure, and compliant workloads. ## Support & Documentation ### Debian Community Support - Strong volunteer-driven community - Forums, IRC channels, wikis, and documentation ### RHEL Enterprise Support Includes: - 24/7 dedicated support - SLAs and professional assistance - Certified engineers for enterprise systems ## Use Cases ### Where Debian Excels - Web servers for startups & SMBs - Development and testing environments - Open-source driven projects ### Where RHEL Excels - Banking & financial systems - High-security and regulated environments - Business-critical enterprise applications ## Cost & Licensing ### **Debian: Free & Open Source** - Zero licensing cost - Unlimited installation and usage ### RHEL: Subscription-Based License cost includes: - Official support - Security & updates - Enterprise compliance and certifications ## Best Use Cases for Debian vs RHEL[](https://storage.3.basecamp.com/5840738/blobs/f58bc69a-ba34-11f0-bdee-0242ac120005/download/image.png) **Best For****Recommended OS****Why?**Developers, Students & Open-Source Enthusiasts**Debian**Freedom, flexibility, no costEnterprises, Banks & Corporations**RHEL**Fully supported, secure, compliant## FAQs ### **Is Debian more stable than RHEL?** Debian is stable, but RHEL provides enterprise-grade stability with certified testing and long-term support. ### **Can I use RHEL for free?** Yes, RHEL offers a free developer subscription, but production use requires a paid license. ### **Which is better for beginners: Debian or RHEL?** Debian is easier for beginners, especially those exploring Linux for the first time. ### **Is Debian good for servers?** Absolutely. Debian is lightweight, secure, and extremely stable for server environments. ### **Which one should developers choose?** Most developers prefer Debian or its derivatives like Ubuntu. RHEL is preferred for enterprise application development. ## Conclusion Debian and RHEL are both powerful Linux distributions, but they cater to different types of users and organizational needs. If you value open-source freedom, flexibility, and community-driven development, Debian is a fantastic choice. On the other hand, if your priority is enterprise-grade security, compliance, professional support, and long-term lifecycle management, RHEL stands out as the ideal solution. In the end, the best Linux distribution depends on your use case, technical requirements, and business goals. Whether you pick Debian for development or RHEL for enterprise-scale deployments, what matters most is having the right tools to manage and maintain your servers efficiently and securely. That’s where platforms like **ServerAvatar** make a real difference, simplifying server management so you can focus on growth, innovation, and delivering great applications. ## Stop Wasting Time on Servers. Start Building Instead. You didn’t start your project to babysit servers. Let **ServerAvatar** handle deployment, monitoring, and backups — so you can focus on growth. Deploy **WordPress, Laravel, N8N**, and more in minutes. No DevOps required. No command line. No stress. [ 🚀 Try Free ](https://app.serveravatar.com) [ 🌐 Learn More ](https://serveravatar.com/) Trusted by 10,000+ developers and growing. **Categories:** Blog, Guide, Linux **Tags:** Debian, Linux, Linux Distribution, Linux Distros, RHEL --- ### [ServerAvatar 8G Firewall – Protect Apache, Nginx & OLS](https://serveravatar.com/8g-firewall-server-security/) **Published:** November 4, 2025 **Author:** Meghna Meghwani **Content:** [![Blog banner - ServerAvatar](https://serveravatar.com/wp-content/uploads/2025/09/728_90-Banner-3-1024x127.png)](https://serveravatar.com?ref=blog)If you manage websites or applications, you already know how quickly online threats are evolving. One wrong request, a single malicious bot, or a tiny security loophole can lead to downtime, spam, data theft, or even a hacked server. That’s exactly where the **8G Firewall** steps in, and now, it’s available directly inside [**ServerAvatar**](https://serveravatar.com/), ready to guard your Apache, Nginx, and OpenLiteSpeed servers in just a click. Whether you’re hosting a personal blog, a client project, or a SaaS platform, adding a powerful security layer shouldn’t feel like another “DevOps headache”. ServerAvatar has made it effortless. Let’s take a complete look at how it works and why you should enable it right away. ## What Is the 8G Firewall? The **8G Firewall** is a highly-refined security ruleset designed to protect web servers from malicious requests, bots, and common cyberattacks. Think of it as a security guard that checks every visitor at the gate and instantly blocks suspicious behavior, long before it ever reaches your application or database. It works at the server level, filtering out harmful requests **before** they consume server resources or cause damage. ## The Evolution: From 5G to 8G Firewall If you’ve been around the web for a while, you may remember the earlier “G-series” firewalls. They weren’t physical devices but secure rule frameworks built to block evolving online threats. Here’s a quick evolution: **Version****Timeframe****Security Level****Notes****5G Firewall**Early Web EraBasicFocused mainly on spam + basic injections**6G Firewall**Growing Dynamic Web PhaseModerate to StrongEnhanced bot filtering, spam control, and early XSS/SQLi protection**7G Firewall**Modern Web StartStrongProtected against bots, XSS, SQLi, referrer spam**8G Firewall**Latest GenerationStrongestCovers modern attack patterns & botsThe **8G Firewall is the most advanced version to date**, and it reflects how digital attacks have evolved in speed, automation, and complexity. ## Why It’s Trusted for Modern Web Protection The 8G Firewall is trusted because it focuses on real-world threats that websites face today, not just the old, traditional attacks most basic firewalls were designed for. It’s built on years of research, community-driven testing, and continuous refinement of security rules. What makes it so reliable is its ability to detect harmful patterns used by modern bots, automated hacking tools, and script-based attacks long before they reach your application. It doesn’t rely on heavy software or constant resource usage, yet it still blocks a wide range of malicious requests at the server level. In a world where cyberattacks have become faster, smarter, and more automated, the 8G Firewall offers a proven, lightweight, and highly effective defense layer that both developers and security experts trust. ## Why the 8G Firewall Still Matters Today You may be thinking, *“Aren’t servers more secure now than before?”* - Yes – servers are smarter. - No – attackers have become smarter, **faster**. Automated cyber-attacks, bot networks, and AI-driven hacking tools are constantly scanning websites looking for weak spots. Even the smallest project or low-traffic site is a target today. That’s why the 8G Firewall still matters: - It works at the **entry point**, blocking threats early - It protects both small and large websites - It prevents resource wastage due to bot or malicious traffic - It adds a safety net without depending on bulky security tools ## What is ServerAvatar? [ServerAvatar](https://serveravatar.com/) is a platform to simplify the hosting and management of servers and applications. It simplifies the process of deploying and managing PHP and Node.js based web applications on servers. If you’re using **ServerAvatar** to manage your servers and applications. ## Why ServerAvatar Integrated the 8G Firewall ServerAvatar aims to simplify server management for developers, agencies, and businesses, without compromising on security. Adding the 8G Firewall directly into the platform means you don’t need to: - Manually edit configuration files - Look for scripts on the internet - Patch rules during updates - Configure different versions for different web servers Instead, you get a **pre-optimized, tested, and compatible** version of the 8G Firewall tailored for: - **Apache** - **Nginx** - **OpenLiteSpeed** This makes security a **built-in**, not a DIY task. ## Zero Configuration Setup – Security Without Complexity One of the biggest reasons people avoid server-level security tools is the fear of breaking something. Security rules can be intimidating, one wrong character in a config file and your site returns a 500 error. ServerAvatar removes this burden completely: - No configuration needed - No rule writing or editing - No manual server patching - Just a simple enable button For most users, it takes **less than 30 seconds** to activate. ## How the 8G Firewall Works Behind the Scenes The 8G Firewall monitors and filters incoming HTTP requests based on a series of security rules. When a request attempts something malicious, such as injecting code or accessing restricted files, the firewall blocks it instantly. In simple terms: > **If a request looks suspicious, it never reaches your website at all.** It checks for patterns such as: - Unusual URL strings - Suspicious user agents - Injection attempts - Unauthorized access requests - Bot-like behavior This helps reduce server processing, prevent crashes, and keep your site clean from attacks. ## How to Install and Enable the 8G Firewall ### **Enable the 8G Firewall on Apache** If your server is running **Apache**, the 8G Firewall rules are added into the server configuration through optimized rewrite rules. **Steps (inside ServerAvatar):** - Go to the server panel by clicking on the **Server Dashboard** icon. ![Server Dashboard - ServerAvatar](https://serveravatar.com/wp-content/uploads/2025/11/image-17-1024x278.png)- Navigate to **Applications** from the left-hand sidebar, and click on the **application dashboard** icon for the application you want to enable the 8G Firewall. ![Application Dashboard - ServerAvatar](https://serveravatar.com/wp-content/uploads/2025/11/image-18-1024x332.png)- Navigate to the **Security** section from the left-hand sidebar, and **enable** the toggle button to enable the **8G Firewall for Apache.** ![Sercurity - ServerAvatar](https://serveravatar.com/wp-content/uploads/2025/11/image-19-1024x363.png)- Rules are applied instantly, no extra steps. Once enabled, Apache will begin filtering and blocking harmful HTTP requests immediately. ### Enable the 8G Firewall on Nginx Nginx handles configuration differently compared to Apache, so ServerAvatar ensures the rules are translated properly to avoid conflicts. **Activation steps:** - Go to the server panel by clicking on the **Server Dashboard** icon. ![Server Dashboard - ServerAvatar](https://serveravatar.com/wp-content/uploads/2025/11/image-20-1024x228.png)- Navigate to **Applications** from the left-hand sidebar, and click on the **application dashboard** icon for the application you want to enable the 8G Firewall.[](https://storage.3.basecamp.com/5840738/blobs/4bc3600a-b953-11f0-b595-0242ac120004/download/Untitled%20design%20(16).png) ![Application- ServerAvatar](https://serveravatar.com/wp-content/uploads/2025/11/image-21-1024x252.png)- Navigate to the **Security** section from the left-hand sidebar, and **enable** the toggle button to enable the **8G Firewall for Apache.** ![Security - Servervatar](https://serveravatar.com/wp-content/uploads/2025/11/image-22-1024x362.png)- ServerAvatar auto-configures the required directives. You don’t need to touch the **.conf** files, it’s all done for you. [![Blog banner - ServerAvatar](https://serveravatar.com/wp-content/uploads/2025/09/728_90-Banner-1-1024x127.png)](https://serveravatar.com?ref=blog)## Configure the 8G Firewall for OpenLiteSpeed OpenLiteSpeed uses a different ruleset structure, but with ServerAvatar, it’s just as easy. **Steps (inside ServerAvatar):** - Go to the server panel by clicking on the **Server Dashboard** icon. ![Server Dashboard - ServerAvatar](https://serveravatar.com/wp-content/uploads/2025/11/image-23-1024x228.png)- Navigate to **Applications** from the left-hand sidebar, and click on the **application dashboard** icon for the application you want to enable the 8G Firewall. ![8G Firewall - ServerAvatar](https://serveravatar.com/wp-content/uploads/2025/11/image-24-1024x248.png)- Navigate to the **Security** section from the left-hand sidebar, and **enable** the toggle button to enable the **8G Firewall for Apache.** ![Security - ServerAvatar](https://serveravatar.com/wp-content/uploads/2025/11/image-25-1024x340.png)- Rules are applied instantly, no extra steps. Within seconds, OpenLiteSpeed gets a strong defensive shield. ## Key Benefits of the 8G Firewall Here’s what makes it valuable: - **Server-level protection** that stops bad requests early - **Lightweight,** no heavy processing or plugins required - **Immediate security improvement** with one toggle - **Reduces attack surface** and common vulnerabilities - **Protects all kinds of websites,** CMS, custom code, SaaS - **Compatible with modern web stacks** It’s efficient, reliable, and built to work quietly without slowing you down. ## Security Threats 8G Firewall Protects Against Here are just some examples of the kinds of attacks it prevents: - Cross-Site Scripting (**XSS**) - SQL Injection (**SQLi**) - Malicious bots & crawlers - Spam & referrer spam - File injection attempts - Unsafe method requests - Bad user-agent traffic - Common exploit patterns If a harmful request tries to pass through, the firewall blocks it instantly. ## Lightweight and Performance-Optimized Design Unlike security plugins or heavy firewall systems, the 8G Firewall has: - **No extra CPU load** - **Minimal memory use** - **Near-zero latency impact** You get strong filtering without slowing down page speed. ## 7G vs 8G Firewall – What’s New and Improved The 8G Firewall is more than just an update, it’s a refined security improvement built for modern-day attacks. What’s improved? **Feature****7G****8G****Bot Blocking**GoodExcellent**Rule Accuracy**HighHigher**False Positives**Low**Even Lower****Modern Threat Protection**Limited**Advanced****Server Compatibility**Good**Fully Optimized**## Better performance with ServerAvatar integration One of the biggest advantages of using the 8G Firewall through **ServerAvatar** is the level of optimization that comes with it. While the 8G Firewall is already lightweight by design, **ServerAvatar** enhances its performance further by ensuring the rules are perfectly aligned with each supported web server. Instead of applying generic firewall rules, ServerAvatar fine-tunes them to work efficiently for Apache, Nginx, and OpenLiteSpeed, reducing the chances of conflicts or unnecessary processing. As the firewall works at a low server level, filtering harmful requests before your application code runs, it actually reduces resource usage and improves server stability. Less junk traffic hitting your server means fewer PHP executions, fewer database calls, and fewer spikes in CPU load. In short, the integration not only keeps your server safe but also helps maintain smooth, consistent performance, even during attack attempts or unexpected traffic surges. ## Why Every ServerAvatar User Should Enable 8G Firewall Today If you’re using ServerAvatar, enabling the 8G Firewall is one of the simplest yet most impactful upgrades you can make to your server’s security. It takes less than a minute to activate, requires no technical setup, and instantly protects your websites from a wide range of attacks, many of which happen silently without you ever noticing. Considering how effortless it is to enable and how much protection it adds, there’s really no reason to skip it. If your goal is to keep your projects safe, stable, and running smoothly without investing hours in security configurations, the **8G Firewall is a must-enable feature** for every ServerAvatar user. ## Final Thoughts Cybersecurity is no longer optional, it’s a fundamental part of running any website or app responsibly. With threats evolving rapidly, having a proactive defense system in place is essential. The 8G Firewall gives you exactly that: a smart, fast, and effective way to block dangerous requests at the server level without complicating your workflow. **With ServerAvatar’s seamless integration,** you get the benefit of a highly trusted security layer, minus the complexity most server-level security tools bring. It’s quick to enable, easy to maintain, and offers immediate peace of mind. Whether you’re a solo developer, an agency managing multiple clients, or a business hosting critical web applications, this is a feature you’ll be glad to have on your side. In just a few seconds, your Apache, Nginx, or OpenLiteSpeed server becomes much harder to attack, and that confidence alone is worth the click. ## FAQs ### **What is the 8G Firewall in ServerAvatar?** The 8G Firewall is a built-in security layer in ServerAvatar that filters harmful requests and protects Apache, Nginx, and OpenLiteSpeed servers from online threats. ### **How do I install the 8G Firewall on Apache or Nginx?** You can install it in one click from your ServerAvatar dashboard, it automatically applies optimized mod\_rewrite rules for Apache, Nginx, or OpenLiteSpeed ### **What’s the difference between 7G and 8G Firewall?** 8G includes improved rule sets, better bot blocking, and enhanced compatibility for modern web servers. ### **Does the 8G Firewall affect website performance?** No, it’s extremely lightweight and optimized for minimal CPU and memory usage. ### **Can I disable or customize 8G Firewall rules?** Yes, ServerAvatar allows users to disable the rules, but users won’t be able to customize them. ### **Do I need technical skills to enable the 8G Firewall?** No, it’s a one-click activation inside ServerAvatar with zero manual configuration required. ### **Can I use the 8G Firewall for any type of website?** Yes. Whether you run WordPress, Laravel, Node, static sites, or custom apps – 8G works across all modern stacks. ## Stop Wasting Time on Servers. Start Building Instead. You didn’t start your project to babysit servers. Let **ServerAvatar** handle deployment, monitoring, and backups – so you can focus on growth. Deploy **WordPress, Laravel, N8N**, and more in minutes. No DevOps required. No command line. No stress. [ 🚀 Try Free ](https://app.serveravatar.com) [ 🌐 Learn More ](https://serveravatar.com/) Trusted by 10,000+ developers and growing. **Categories:** Blog, Guide, ServerAvatar Updates **Tags:** 8G Firewall, Apache, Nginx, OLS, serveravtar --- ### [What is systemd? How to Manage Services in Modern Linux](https://serveravatar.com/what-is-systemd/) **Published:** November 6, 2025 **Author:** Meghna Meghwani **Content:** [![Blog banner - ServerAvatar](https://serveravatar.com/wp-content/uploads/2025/09/728_90-Banner-3-1024x127.png)](https://serveravatar.com?ref=blog)If you’ve ever worked with Linux, you’ve probably come across the term **systemd**. It’s one of the most important parts of modern Linux systems, helping your computer start up, manage services, and handle background tasks. But what exactly is systemd, and how can you use it to manage services easily? Let’s break it down in simple terms. ## What is systemd? **systemd** is a **system and service manager** for Linux operating systems. In simple words, it’s responsible for controlling how your Linux system boots up and runs background services (also known as **daemons**). Before systemd, older Linux systems used **SysVinit**, which started processes one by one. This method was slow and harder to manage. systemd replaced it to provide faster boot times, better control, and a modern approach to managing system processes. ![Linux OS - ServerAvatar](https://serveravatar.com/wp-content/uploads/2025/11/image-27-1024x683.png)## Why systemd is Important Here’s why systemd is so widely used in modern Linux distributions like Ubuntu, Debian, CentOS, and Fedora: 1. **Faster Boot Times:** systemd can start multiple services in parallel, which makes your system boot up faster. 2. **Better Service Management:** It provides tools like systemctl to easily start, stop, or restart services. 3. **Automatic Dependency Handling:** It automatically handles which services need to start before others. 4. **Logging with journalctl:** systemd includes an advanced logging system called journalctl to view and analyze logs. 5. **Consistency Across Distros:** It brings a unified way to manage services across different Linux distributions. ![Systemd - ServerAvatar](https://serveravatar.com/wp-content/uploads/2025/11/image-28-683x1024.png)## How systemd Works When you turn on your Linux system, systemd is the **first process** that runs (PID 1). It then starts all other essential services and background processes according to configuration files called **unit files**. Unit files describe how a service should start, stop, or restart. They are usually located in /etc/systemd/system/ or /lib/systemd/system/. ## Managing Services with systemd The main tool you use to manage services is the **systemctl** command. Here are some of the most common and useful commands: ### **1. Check the Status of a Service** ``` sudo systemctl status nginx ``` ``` sudo systemctl status nginx ``` This command shows whether the service is running, stopped, or failed. ### **2. Start a Service** ``` sudo systemctl start nginx ``` ``` sudo systemctl start nginx ``` This command starts the service immediately. ### **3. Stop a Service** ``` sudo systemctl stop nginx ``` ``` sudo systemctl stop nginx ``` Stops the running service. ### **4. Restart a Service** ``` sudo systemctl restart nginx ``` ``` sudo systemctl restart nginx ``` Restarts the service—useful after configuration changes. ### **5. Enable a Service at Boot** ``` sudo systemctl enable nginx ``` ``` sudo systemctl enable nginx ``` This ensures the service starts automatically when the system boots. ### **6. Disable a Service** ``` sudo systemctl disable nginx ``` ``` sudo systemctl disable nginx ``` Prevents a service from starting automatically on boot. ### **7. View All Active Services** ``` sudo systemctl list-units --type=service ``` ``` sudo systemctl list-units --type=service ``` Lists all active services currently running on the system. [![Blog banner - ServerAvatar](https://serveravatar.com/wp-content/uploads/2025/09/728_90-Banner-1-1024x127.png)](https://serveravatar.com?ref=blog)## Using journalctl to View Logs systemd’s built-in logging tool, **journalctl**, helps you view logs easily. **View logs for a specific service:** ``` sudo journalctl -u nginx ``` ``` sudo journalctl -u nginx ``` **Show real-time logs (like tail -f):** ``` sudo journalctl -u nginx -f ``` ``` sudo journalctl -u nginx -f ``` This is helpful for troubleshooting or monitoring services. ### Common System Uni Types **Unit Type****Description**`.service`Defines how a service runs`.socket`Controls network sockets`.target`Groups multiple units (like runlevels)`.mount`Manages mount points`.timer`Replaces cron jobs for scheduled tasks## FAQ ### **What replaced SysVinit in modern Linux?** systemd replaced SysVinit because it’s faster, more reliable, and easier to manage. ### **How can I check if my Linux system uses systemd?** ps 1 If you see “systemd” in the output, your system uses it. ### **Is systemd only for servers?** No, it’s used in desktops, laptops, and servers — basically, most modern Linux distributions. ### **Can I use systemd timers instead of cron jobs?** Yes! systemd timers are more flexible and integrated with system logs. ### **Where are systemd unit files stored?** Typically in /etc/systemd/system/ (for custom units) and /lib/systemd/system/ (for system ones). ## Conclusion systemd has become the heart of modern Linux systems. It simplifies service management, speeds up boot times, and brings consistency across distributions. Whether you’re managing a server or a desktop, mastering systemd gives you more control and efficiency. So next time you start, stop, or check a service — remember, systemd is working quietly in the background to keep your Linux system running smoothly. Would you like me to also create a **meta description (160 characters)** and **focus keywords** for this blog for SEO optimization? ## Stop Wasting Time on Servers. Start Building Instead. You didn’t start your project to babysit servers. Let **ServerAvatar** handle deployment, monitoring, and backups — so you can focus on growth. Deploy **WordPress, Laravel, N8N**, and more in minutes. No DevOps required. No command line. No stress. [ 🚀 Try Free ](https://app.serveravatar.com) [ 🌐 Learn More ](https://serveravatar.com/) Trusted by 10,000+ developers and growing. **Categories:** Blog, Guide, Linux **Tags:** Linux, Systemd --- ### [Understanding TCP vs UDP Protocols](https://serveravatar.com/tcp-vs-udp/) **Published:** November 5, 2025 **Author:** Meghna Meghwani **Content:** [![Blog banner - ServerAvatar](https://serveravatar.com/wp-content/uploads/2025/09/728_90-Banner-3-1024x127.png)](https://serveravatar.com?ref=blog)The internet works by transferring data from one place to another — from your computer to a server or from a website to your browser. But this doesn’t happen randomly. Every piece of data follows a set of rules known as **network protocols**, which define how that data should be sent, received, and verified. Two of the most common network protocols are **TCP vs UDP**, which determine how information travels across the internet efficiently and reliably. Two of the most common transport protocols used on the internet are **TCP (Transmission Control Protocol)** and **UDP (User Datagram Protocol)**. While both belong to the transport layer of the OSI model, they serve very different purposes. In this blog, you’ll understand how TCP and UDP work, their key differences, real-world examples, and when to use each one. ## What Is TCP (Transmission Control Protocol)? **TCP** is a **connection-oriented protocol**, which means it establishes a direct and reliable connection between two devices before sending data. It ensures that all packets of data reach their destination accurately and in the correct order. Think of TCP like a **phone call** before you start speaking, the other person answers the call, and both of you confirm that you can hear each other. Similarly, TCP sets up a connection first and then sends data carefully. **How TCP Works:** 1. **Connection Establishment:** TCP uses a “three-way handshake” process to establish a connection between sender and receiver. 2. **Data Transmission:** Once the connection is established, data is divided into small segments and sent with sequence numbers. 3. **Acknowledgment:** The receiver confirms (acknowledges) each packet it receives successfully. 4. **Error Checking:** If any packet is missing or corrupted, TCP resends it. 5. **Connection Termination:** After the data transfer is complete, TCP closes the connection safely. [](https://storage.3.basecamp.com/5840738/blobs/4e63c304-b88b-11f0-a7d7-0242ac120005/download/image.png) ![TCP vs UDP](https://serveravatar.com/wp-content/uploads/2025/11/image-15-683x1024.png)**Real-World Example of TCP:** - Loading a webpage (HTTP/HTTPS) - Sending emails (SMTP) - File transfers (FTP) - Database communication (MySQL) **Advantages of TCP:** - Ensures reliable delivery of data - Maintains the correct order of packets - Performs error checking and retransmission - Suitable for applications that need accuracy **Disadvantages of TCP:** - Slower compared to UDP due to overhead - Consumes more resources - Not ideal for real-time applications ## What Is UDP (User Datagram Protocol)? **UDP** is a **connectionless protocol**, meaning it sends data without establishing a connection first. It doesn’t wait for acknowledgments, and it doesn’t check if the data arrives safely. At first, this might sound unreliable, but UDP has one major advantage, **speed**. Since it skips the connection setup and error-checking process, it can send data much faster than TCP. You can think of UDP like **sending a letter without tracking** once it’s sent, you don’t know if it arrived, but it gets there quickly most of the time. **How UDP Works:** 1. **No Handshake:** Data is sent directly without a connection setup. 2. **Independent Packets:** Each packet (datagram) travels independently. 3. **No Acknowledgment:** The sender does not wait for a confirmation. 4. **No Retransmission:** Lost packets are not resent. ![](https://serveravatar.com/wp-content/uploads/2025/11/image-16-683x1024.png)**Real-World Example of UDP:** - Live video streaming (YouTube Live, Twitch) - Voice over IP (Skype, Zoom calls) - Online gaming - DNS queries **Advantages of UDP:** - Extremely fast transmission - Minimal delay (low latency) - Less resource consumption - Suitable for real-time communication **Disadvantages of UDP:** - No guarantee of packet delivery - Packets can arrive out of order - No error correction or acknowledgment **Feature****TCP (Transmission Control Protocol)****UDP (User Datagram Protocol)****Connection Type**Connection-oriented (requires handshake)Connectionless (no setup required)**Reliability**Reliable – ensures deliveryUnreliable – delivery not guaranteed**Speed**Slower due to error checkingFaster due to no verification**Data Order**Maintains correct orderOrder not guaranteed**Error Handling**Detects and retransmits lost packetsNo retransmission**Header Size**20 bytes8 bytes**Use Cases**Web pages, emails, file transfersGaming, streaming, VoIP**Flow Control**YesNo**Congestion Control**YesNo**When to Use TCP vs UDP** Choosing between TCP and UDP depends on your purpose: **Use TCP When:** - Data accuracy and reliability are more important than speed. - Applications like **banking**, **emails**, **e-commerce**, and **file transfers** require guaranteed delivery. - You can afford slight delays for the sake of data integrity. **Use UDP When:** - Speed and low latency are more important than reliability. - Applications like **gaming**, **live video**, or **voice calls** need real-time performance. - Occasional packet loss won’t ruin the user experience. [![Blog banner - ServerAvatar](https://serveravatar.com/wp-content/uploads/2025/09/728_90-Banner-1-1024x127.png)](https://serveravatar.com?ref=blog)## Real-Life Example Scenario Imagine you’re watching a **live cricket match** online. You prefer to see the action instantly, even if a few frames are lost. That’s UDP in action — fast but not perfect. Now, imagine you’re **downloading a PDF file**. You want every bit of that file to arrive correctly, even if it takes a few more seconds. That’s TCP — reliable and orderly. ## TCP and UDP in Everyday Use Most modern applications actually use both protocols together. For example: - A **video streaming service** might use TCP for loading the app and authentication but use UDP for delivering the live video feed. - A **multiplayer game** may use TCP for login and profile data, and UDP for real-time player movement. This combination helps balance **speed** and **reliability** to give users the best experience. ## FAQs ### **Why do we need both TCP and UDP?** Because different types of applications have different needs. TCP is perfect for reliability, while UDP is ideal for real-time communication where speed matters more. ### **Can I switch an application from TCP to UDP?** Not usually. Protocol choice depends on how the application is designed. Some apps may allow custom configuration, but most are built for one specific protocol. ### **Does UDP have any kind of security?** By default, UDP has no built-in security. However, security layers like **DTLS (Datagram Transport Layer Security)** can be added to protect data. ### **Is TCP slower than UDP?** Yes, TCP is slower because it performs more operations — like verifying data, maintaining order, and resending lost packets — which add delay. ### **Which protocol is used for DNS?** DNS (Domain Name System) primarily uses **UDP** for faster lookups, but switches to **TCP** when the response data is too large or needs reliability. ## Conclusion Both **TCP and UDP** play a vital role in how the internet functions - **TCP** ensures that data is delivered accurately, making it perfect for applications where correctness is more important than speed. - **UDP**, on the other hand, focuses on performance and speed, making it ideal for real-time tasks like streaming and gaming. In simple words, **TCP is about reliability**, and **UDP is about speed**. Understanding how these two protocols work helps developers, network engineers, and even regular users appreciate the invisible systems that keep the internet running smoothly. ## Stop Wasting Time on Servers. Start Building Instead. You didn’t start your project to babysit servers. Let **ServerAvatar** handle deployment, monitoring, and backups — so you can focus on growth. Deploy **WordPress, Laravel, N8N**, and more in minutes. No DevOps required. No command line. No stress. [ 🚀 Try Free ](https://app.serveravatar.com) [ 🌐 Learn More ](https://serveravatar.com/) Trusted by 10,000+ developers and growing. **Categories:** Blog, Guide **Tags:** TCP, UDP --- ### [Introducing ServerAvatar v7.15.0 | New Updates You Must Know!](https://serveravatar.com/v7-15-update/) **Published:** November 1, 2025 **Author:** Meghna Meghwani **Content:** [![Blog banner - ServerAvatar](https://serveravatar.com/wp-content/uploads/2025/09/728_90-Banner-3-1024x127.png)](https://serveravatar.com?ref=blog)Hey there, [ServerAvatar](https://serveravatar.com/) users and tech explorers! Running servers smoothly and securely shouldn’t feel like rocket science. With every new release, **[ServerAvatar](https://serveravatar.com/)** keeps making server hosting and management simpler, faster, and more secure for developers, agencies, and SaaS owners. We’re thrilled to announce the **v7.15.0 update,** which brings a powerful set of enhancements, from 8G Firewall security, easy swap memory control, and domain-supported site cloning and migration, to PHP 8.4 support for OLS, complete Joomla installation, and many more. Plus, there’s an important **update to Management Tiers** that you should be aware of, especially if you’re an existing user. Before we dive in, think of this update like moving from standard tools to an intelligent one. Everything becomes faster, safer, and more automated, so you can focus on your goals, not the technical details. Let’s explore what’s new! ## What’s New in v7.15.0? The v7.15.0 release focuses on three key goals: - **More security** - **More control** - **More simplicity** With security upgrades like the 8G Firewall and hosting enhancements such as PHP 8.4 support and domain-based cloning and migration, this update brings more power to your server management dashboard. **Here’s a breakdown of everything in detail:** ## 8G Firewall – Stronger Website Security Security is no longer optional, especially with rising cyber-attacks and bots constantly scanning for weakness. To boost website protection, ServerAvatar now includes the **8G Firewall**, known for its lightweight yet powerful defense mechanisms. **What is the 8G Firewall?** The 8G Firewall is a security framework designed to block: - Malicious requests - Spam bots - SQL injection attempts - Cross-site scripting (XSS) - Bad user agents - Suspicious URL behaviors **Enable 8G Firewall** - Navigate to the **Server Dashboard** for your preferred server - Click on the **Applications Section** from the left sidebar - Navigate to the **Application Panel** for your preferred application - Click on the **Security Section** from the left sidebar - **Enable 8G Firewall** ![Security - ServerAvatar](https://serveravatar.com/wp-content/uploads/2025/11/image-1-1024x385.png)**Why This Matters:** This acts as a security guard that checks every visitor at the gate. Only legit traffic gets inside; attackers are stopped at the door. It’s security made simple, set and forget. ## Swap Memory Control – Manage Server Memory with Ease Ever felt like your server is running out of space when traffic spikes? Swap Memory helps your server stay stable when RAM usage peaks. **With this update, you can now:** - Increase Swap Memory - Decrease Swap Memory - Modify Swap Space anytime directly from the ServerAvatar Panel **Update Swap Memory** - Navigate to the **Server Panel** for your preferred server - Click on **Update Swap** from the **Swap Memory** section ![Server Panel - ServerAvatar ](https://serveravatar.com/wp-content/uploads/2025/11/image-2-1024x409.png)![Update Swap Memory -ServerAvatar](https://serveravatar.com/wp-content/uploads/2025/11/image-3.png)**Why It’s Useful:** Think of swap memory as a backup oxygen cylinder for your server. When memory runs low, swap space prevents crashes or slowdowns. No SSH commands, no manual server tweaks, just a clean UI and one-click control. ## Site Migration/Clone with Domain Option Migrating or cloning sites is now even more effortless, especially with your domain setup included. Previously, the cloning or migration process would set up the site on a temporary domain, requiring manual domain configuration afterward. Now you can: - Clone or migrate a site along with your domain configuration - Avoid domain misconfiguration errors - Reduce post-migration setup time **Site Migration:** - Click on the **Server Dashboard** icon for your preferred server - Click on the **Site Migration** from the left sidebar - Fill up the required details ![Site Migration - ServerAvatar](https://serveravatar.com/wp-content/uploads/2025/11/image-4-1024x838.png)**Site Clone:** - Navigate to the **Server Dashboard** for your preferred server - Click on the **Applications** Section from the left sidebar - Navigate to the **Application Panel** for your preferred application - Click on the **Site Clone** from the left sidebar - Fill up the required details ![Site Clone - SeverAvatar](https://serveravatar.com/wp-content/uploads/2025/11/image-5-1024x762.png)**Saves Time & Prevents Hassle:** Whether you’re an agency managing multiple client sites or a developer moving staging to production, this update removes extra steps. ## PHP 8.4 Support for OpenLiteSpeed PHP continues to evolve, and staying updated means better performance, security, and compatibility. With v7.15.0, ServerAvatar added support for PHP 8.4 for the OpenLiteSpeed (OLS) Stack. **With this, you will get:** - Faster performance for scripts - Better error handling - Improved security - New features for modern applications **PHP 8.4 For OLS** - Navigate to the **Server Dashboard** for your preferred server - Click on the **Settings** Section from the left sidebar - Navigate to the **General** section from the left sidebar - Update the **PHP-CLI Version** from the General Settings section ![Server Confrigration - ServerAvatar](https://serveravatar.com/wp-content/uploads/2025/11/image-6-1024x434.png)You can also update the PHP version at the **application** **level**, allowing you to assign different PHP versions to different applications based on their specific requirements. **Set Up PHP 8.4 at the Application Level in OpenLiteSpeed** - Go to the **Server Dashboard** of the server where your application is hosted - From the left sidebar, open the **Applications** section. - Select your application and open its **Application Dashboard**. - Navigate to the **PHP Settings** Section from the left sidebar - Update the **PHP-CLI Version** to PHP 8.4 from this section. ![PHP Setting- ServerAvatar](https://serveravatar.com/wp-content/uploads/2025/11/image-13-1024x293.png)If you’re using OpenLiteSpeed, you can now switch to PHP 8.4 to improve performance and compatibility. [![Blog banner - ServerAvatar](https://serveravatar.com/wp-content/uploads/2025/09/728_90-Banner-1-1024x127.png)](https://serveravatar.com?ref=blog)## One-Click Complete Joomla Installation If you’re working with Joomla or building client websites on it, this update will make your experience noticeably smoother and more efficient. ServerAvatar now lets you deploy fully configured Joomla websites in just a single click, no manual setup required. **What’s Included in the One-Click Joomla Setup?** When you install Joomla through ServerAvatar, it now comes with: - Automatic Database creation & connection - Optimized default settings - Ready-to-login admin panel **Install Joomla** - Navigate to the **Server Dashboard** for your preferred server - Navigate to the **Applications** Section from the left sidebar - Click on **Create an Application** button. - Select the **Joomla Application** in a **One-Click** **Method** - Fill up the required information and **Create Application** ![One click Application Installation- ServerAvatar](https://serveravatar.com/wp-content/uploads/2025/11/image-7-997x1024.png)**Best For:** - Agencies building multiple Joomla sites - Clients migrating from other CMS platforms - Developers who want a quick staging or demo setup You save time, avoid setup errors, and launch projects faster. ## Extra PHP Configuration (Per Application) Every application has different needs. With this update, you now have more control over PHP settings at an individual application level. You can easily add and customize PHP directives and configurations specific to each application, including Session GC MaxLifetime. **Add Extra PHP Configuration** - Navigate to the **Server Dashboard** for your preferred server - Navigate to the **Applications** Section from the left sidebar - Click on **Application Dashboard** for your preferred application - Navigate to the **PHP Settings** - Enter your preferred PHP Configuration in the **Extra PHP Configuration** section ![Update Settings - ServerAvatar](https://serveravatar.com/wp-content/uploads/2025/11/image-8.png)**Why This Matters:** Instead of applying global PHP settings across all apps, you can optimize performance and resource usage based on each application’s needs. No server-wide risk, application configurations per application. **For example:** - Increase session lifetime for eCommerce - Fine-tune performance for Laravel apps - Customize limits for CRM or SaaS applications ## Easily Access phpMyAdmin Managing databases should be quick and intuitive, and now it is! ServerAvatar has improved access to phpMyAdmin for a more seamless experience. **What’s Improved?** - Easy access to phpMyAdmin directly from the ServerAvatar dashboard - improved navigation and seamless UI flow - Easier database management **Access phpMyAdmin from Application Dashboard** - Navigate to the **Server Dashboard** for your preferred server - Navigate to the **Applications** Section from the left sidebar - Click on **Application Dashboard** for your preferred application - Click on the **Access PhpMyAdmin** ![New Updates - ServerAvatar v7.15.0](https://serveravatar.com/wp-content/uploads/2025/11/image-9-1024x401.png)**Access phpMyAdmin from Database Section** - Navigate to the **Server Dashboard** for your preferred server - Navigate to the **Databases** Section from the left sidebar - Click on the **Access PhpMyAdmin**[](https://storage.3.basecamp.com/5840738/blobs/abfe3c18-b653-11f0-9754-0242ac120005/download/image.png) ![Dashboard - ServerAvatar](https://serveravatar.com/wp-content/uploads/2025/11/image-10-1024x286.png)**Result?** Database management becomes effortless, and it now takes less time. Whether you are: - Creating or editing tables - Running queries - Importing or exporting databases ## Why These Changes Matter These changes are not just feature updates; they’re aimed at making everything easier for developers, agencies, and business owners. **Top Benefits:** - **More control** - **More security** - **More value** - **Faster deployment** - **Better experience** ## **Our goal is simple:** > You focus on building and scaling, ServerAvatar handles the heavy lifting. ## FAQs ### **Do I need to configure the 8G Firewall manually?** No, it works out of the box. You can customize rules if needed, but it’s not required. ### **Can I upgrade my tier anytime?** Yes, you can upgrade your management tier plan anytime, and if you need assistance during the upgradation process, our support team is always ready to help. ### **Will the Joomla installation include database setup automatically?** Yes, the process includes automatic database creation and setup. ### **Will changing swap memory require a server reboot?** No, modifying swap memory can be done instantly from the panel without restarting your server. ### **Are Lifetime Deals still available?** Yes, you can easily get the Lifetime Deal plan. Go to the **Billing Dashboard** **>> Lifetime Deals** from your ServerAvatar account. You can also contact our support team for further assistance. ## Final Thoughts The **ServerAvatar v7.15.0 update** is a powerful step toward a more secure, flexible, and user-friendly server management experience. Whether you’re a freelancer, an agency, or a SaaS founder managing hundreds of apps, this update gives you more automation, more control, and better value. If you’ve been waiting for the right time to take your infrastructure management seriously, this update might just be the sign you were looking for. **Categories:** Blog, ServerAvatar Updates **Tags:** ServerAvatar, ServerAvatar update, ServerAvatar v7.15.0 --- ### [How DNS Works: Step-by-Step Resolution Process](https://serveravatar.com/how-dns-works/) **Published:** October 31, 2025 **Author:** Meghna Meghwani **Content:** [![Blog banner - ServerAvatar](https://serveravatar.com/wp-content/uploads/2025/09/728_90-Banner-3-1024x127.png)](https://serveravatar.com?ref=blog)Have you ever wondered how typing something as simple as **‘google.com’** in your browser magically loads a website within seconds? Behind the scenes, a powerful system known as the **Domain Name System (DNS)** makes it all possible. To truly understand **how DNS works**, let’s explore the process that translates human-friendly domain names into machine-readable IP addresses that connect you to websites instantly. DNS works like the phonebook of the internet. Instead of remembering long IP addresses like 142.250.182.206, you just need to simply type a domain name, and DNS translates it into the correct IP address to connect your browser to the right server. ## What Is DNS and Why Is It Important? DNS (Domain Name System) is a system that converts human-friendly domain names into machine-readable IP addresses. Without DNS, you would have to remember numbers instead of names for every website you visit. ![DNS - ServerAvatar](https://serveravatar.com/wp-content/uploads/2025/10/image-132.png)## The Role of DNS in the Internet World DNS plays a critical role in making the web user-friendly. It ensures that users can access websites easily, applications can communicate properly, and the internet runs smoothly without interruptions. ## Key Components of DNS For DNS to work efficiently, several components interact with each other, during the resolution process. **1) DNS Client (Resolver)** A DNS resolver is the first point of contact when your device needs to find the IP address of a website. It is usually provided by your ISP, or a public DNS service like Google (8.8.8.8) or Cloudflare (1.1.1.1). Its job is to receive your DNS request and start the process of finding the correct IP address for the domain you entered. **2) Root Name Servers** Root name servers are at top level in DNS hierarchy. They don’t store website IP addresses, but act as a guide. When the resolver doesn’t know where to find the domain, the root server directs it to the correct Top-Level Domain (TLD) server (like .com, .net, or .org). **3) TLD Name Servers** TLD servers manage information for specific domain extensions such as .com, .net, .org, .in, etc. When contacted, they don’t give the final IP, but point the resolver to the correct authoritative name server responsible for the domain. **4) Authoritative Name Servers** These servers hold the actual DNS records of a domain. They provide the final answer, the correct IP address of the website, which is then sent back to the user’s browser to load the site. **5) DNS Records and Their Types:** DNS records are like instructions stored on authoritative servers that tell the DNS how a domain should function. The key record types include: - **A Record:** This record links a domain name to its IPv4 address (e.g., 192.168.1.1). It tells browsers, which server to connect to when someone types your domain. - **AAAA Record:** Similar to the A record, but it maps a domain to an IPv6 address (e.g., 2001:db8::1). It supports the newer, longer IP format. - **CNAME Record:** A CNAME (Canonical Name) record points one domain name to another domain name. It’s often used for subdomains, for example, pointing blog.example.com to example.com. - **MX Record:** The MX (Mail Exchange) record specifies which mail server should handle emails for a domain. Without it, email services won’t know where to deliver your messages. - **TXT Record:** A TXT record stores text-based information. It’s commonly used for verification and security, such as SPF, DKIM, and Google site ownership verification. - **NS Record:** This record shows, which name servers are authoritative for a domain, meaning they hold the actual DNS records and answer DNS queries for that domain. ![DNS Record Type - ServerAvatar ](https://serveravatar.com/wp-content/uploads/2025/10/image-133.png)## How DNS Resolution Works (Step-by-Step) Let’s break down DNS resolution into simple steps. **Step 1: User Enters a Domain Name** When you type any domain, for example, ‘amazon.com’ into your browser, it sends a request to a DNS resolver to find the website’s IP address. **Step 2: DNS Recursive Resolver Checks Cache** The resolver first checks its cache to see if it already has the IP address stored. If found, it returns the result immediately. **Step 3: Query to Root Name Server** If the IP isn’t cached, the resolver contacts a root name server. The root server doesn’t know the exact IP, but directs the resolver to the correct TLD server (e.g., .com). **Step 4: Query to TLD Name Server** The resolver then reaches out to the TLD server for the domain extension. The .com TLD server helps locate the authoritative DNS server for ‘amazon.com’. **Step 5: Query to Authoritative DNS Server** The authoritative server holds the domain’s DNS records and provides the correct IP address for the website. **Step 6: Returning the Final IP Address to the Browser** The resolver sends the final IP address back to your browser. **Step 7: Browser Connects to the Web Server** With the IP address, your browser connects to the website’s server and loads the webpage for you. ![How DNS Works - ServerAvatar](https://serveravatar.com/wp-content/uploads/2025/10/image-134.png)[![Blog banner - ServerAvatar](https://serveravatar.com/wp-content/uploads/2025/09/728_90-Banner-1-1024x127.png)](https://serveravatar.com?ref=blog)## Recursive vs. Iterative DNS Queries **What Are Recursive Queries?** In recursive queries, the DNS resolver takes full responsibility for finding the IP address and returns the final answer to the user. **What Are Iterative Queries?** Here, the DNS resolver receives partial answers from each server and continues the query process until it finds the final answer. ## Key Differences Between Recursive and Iterative Queries **Aspect****Recursive Query****Iterative Query****User Experience**Simple and fast for the user; they only receive the final result.Happens in multiple steps behind the scenes; user still gets the final result.**Speed for End User**Generally faster because the resolver handles everything in one go.Can be slower due to multiple server lookups.**Performance Load**Higher load on the recursive resolver server.Workload is shared among multiple DNS servers.**Network Traffic**More network traffic because the resolver contacts multiple servers.Less traffic for the resolver as each server gives partial information.**Caching Impact**Better caching since full results are stored for future queries.Less effective caching because it mostly receives referrals.**Implementation Usage**Used by ISPs and public DNS servers to fully resolve user queries.Mostly used between DNS servers to guide lookups step-by-step.**Query Responsibility**Resolver takes full responsibility for finding the final IP.Resolver follows referrals and continues querying servers.**Server Workload**Heavy workload on recursive DNS servers.Lighter workload spread across different DNS servers.**Security Considerations**Requires stronger security because it handles full resolutions.Lower risk since no single server handles the full resolution.**DNS Resolution Path**Client sends one query → resolver completes full lookup.Resolver must query multiple servers sequentially.**Common Use Case**Used in consumer-level DNS queries (e.g., Google DNS, Cloudflare DNS).Used mainly in server-to-server communication within the DNS hierarchy.## DNS Caching Explained DNS caching helps speed up the process of finding a website’s IP address by storing previous lookup results temporarily. **What Is DNS Cache?** It’s a temporary record that saves the IP address of a domain you’ve already visited, so your device doesn’t have to look it up again. **Browser Cache** Your web browser stores DNS information for recently visited websites, allowing them to load faster the next time you visit. **OS-Level Cache** Your computer’s operating system keeps its own DNS cache to avoid repeating lookups for the same domain. **Recursive Resolver Cache** Public DNS servers like Google (8.8.8.8) or Cloudflare (1.1.1.1) also store frequently requested domain information to speed up future requests for all users. **TTL (Time-to-Live)** TTL determines how long a DNS record stays in the cache before it expires and must be refreshed with a new lookup. ## Common DNS Issues and Errors **DNS\_PROBE\_FINISHED\_NXDOMAIN** This error appears when the domain cannot be found, usually because the domain doesn’t exist, or there’s a DNS misconfiguration. **DNS Server Not Responding** This occurs when the DNS server you are using is down, unavailable, or unable to process requests. **Slow DNS Resolution** Happens when DNS servers are slow, overloaded, or the request has to travel through multiple distant servers, causing delays in loading websites. ## How to Improve DNS Performance **Use Faster DNS Providers** Switch to trusted and high-speed DNS providers, like Cloudflare (1.1.1.1), Google DNS (8.8.8.8), or OpenDNS to reduce lookup time and improve browsing speed. **DNS Load Balancing** Balances traffic across multiple DNS servers to increase reliability and ensure the system stays available even during high traffic. **Use Anycast DNS** Distributes DNS servers across the globe so users connect to the nearest server, resulting in faster response times. **DNSSEC for Security** Adds a layer of security by preventing DNS spoofing and ensuring that DNS responses are authentic. **Reduce TTL for Faster Updates** ## FAQs ### **Can I speed up my internet by changing DNS?** Yes, switching to a faster DNS provider can significantly reduce response time. ### **What is the most commonly used DNS record?** The A record is the most commonly used DNS record as it maps domain names to IPv4 addresses. ### **How long does DNS propagation take?** It usually takes anywhere from a few minutes to 48 hours, depending on TTL settings. ### **What is a DNS resolver?** It is a server that receives DNS queries and fetches IP addresses for clients. ### **Why do some websites load without DNS?** If the IP address was previously cached, the browser may bypass DNS temporarily. ## Conclusion DNS is a vital part of how the internet works. Knowing how DNS functions helps users, developers, and website owners solve DNS problems, enhance website speed, and ensure smooth online experiences. DNS is a crucial system that ensures internet communication remains seamless, user-friendly, and efficient. From translating domain names into IP addresses to caching and load balancing, DNS handles massive amounts of traffic behind the scenes. With this understanding, you can now troubleshoot problems, optimize DNS performance, and appreciate how this invisible system powers the web. Lowering the TTL value helps DNS changes propagate faster, making updates reflect sooner across the internet. ## Stop Wasting Time on Servers. Start Building Instead. You didn’t start your project to babysit servers. Let **ServerAvatar** handle deployment, monitoring, and backups — so you can focus on growth. Deploy **WordPress, Laravel, N8N**, and more in minutes. No DevOps required. No command line. No stress. [ 🚀 Try Free ](https://app.serveravatar.com) [ 🌐 Learn More ](https://serveravatar.com/) Trusted by 10,000+ developers and growing. **Categories:** Blog, Guide **Tags:** DNS --- ### [Fix ERR SSL Protocol Error: 13 Quick Solutions That Work](https://serveravatar.com/fix-err-ssl-protocol-error/) **Published:** October 30, 2025 **Author:** Meghna Meghwani **Content:** [![Blog banner - ServerAvatar](https://serveravatar.com/wp-content/uploads/2025/09/728_90-Banner-3-1024x127.png)](https://serveravatar.com?ref=blog)Nothing’s more frustrating than trying to access a website only to be hit with the dreaded “ERR SSL Protocol Error”. It’s like running into a locked door when you were expecting a warm welcome. Whether you’re a user or a website owner, this SSL-related issue can stop you in your tracks. Don’t worry, you’re not alone. In this guide, we’ll walk you through 13 practical ways to fix the ERR\_SSL\_PROTOCOL\_ERROR and get your secure connection back up and running in no time. ## What Is ERR\_SSL\_PROTOCOL\_ERROR? The **ERR\_SSL\_PROTOCOL\_ERROR** is a connection error that appears when a browser fails to establish a secure connection with a website. It usually means something went wrong with the SSL/TLS handshake, the process that ensures data transfer between your browser and the website is encrypted and secure. When this happens, you might see messages like: - “This site can’t provide a secure connection.” - “ERR\_SSL\_PROTOCOL\_ERROR” - “Your connection is not private” ![Site Can't Procide Secure Connection - ServerAvatar](https://serveravatar.com/wp-content/uploads/2025/10/image-123-1024x545.png)## **Why Does the ERR\_SSL\_PROTOCOL\_ERROR Occur?** There isn’t just one cause, there are many. Some common culprits include: - Incorrect system date or time - Corrupted browser cache - Misconfigured SSL certificate - Outdated browser or operating system - Firewall or antivirus interference - Server misconfiguration Think of it as a miscommunication between your browser and the website’s server during the SSL handshake. ## How SSL Certificates Work (In Simple Terms) SSL (Secure Sockets Layer) certificates create a secure channel between a web browser and a server. They encrypt data, ensuring that sensitive information like passwords and payment details remain private. When something disrupts this encryption handshake, outdated certificates, wrong configurations, or expired TLS versions, browsers throw an SSL protocol error. ## Common Signs of an SSL Protocol Error Before you start troubleshooting, here are a few symptoms that indicate an SSL issue: - The site refuses to load or shows a “Not Secure” warning - The HTTPS padlock icon disappears - You can’t access certain websites, even though others load fine - The error appears only in the browser ## Fix SSL Issues Effortlessly with ServerAvatar [ServerAvatar](https://serveravatar.com/) is a platform to simplify the hosting and management of servers and applications. It simplifies the process of deploying and managing PHP and Node.js based web applications on servers. ![ServerAvatar Dashboard](https://serveravatar.com/wp-content/uploads/2025/10/image-124-1024x463.png)While many SSL-related problems require manual troubleshooting, ServerAvatar makes it significantly easier for website owners to install and auto-renew free SSL certificates, without dealing with server-level complexities. With ServerAvatar, you don’t have to worry about misconfigurations, expired certificates, or missing intermediate chains that often cause the **ERR\_SSL\_PROTOCOL\_ERROR**. ## How ServerAvatar Helps You Avoid SSL Errors Here’s how ServerAvatar simplifies SSL management for your websites: - **One-Click Free SSL Installation** Install free automatic SSL on any domain in seconds, no command-line or manual configuration required. ![SSL Certificate - ServerAvatar](https://serveravatar.com/wp-content/uploads/2025/10/image-125-1024x525.png)- **Custom SSL Support** You can also bring your own SSL certificate to secure your domains effortlessly. ![SSL Custom Installation - serverAvatar](https://serveravatar.com/wp-content/uploads/2025/10/image-126-1024x525.png)- **Built-In HTTPS Redirection** Enable forced HTTPS with a single toggle to prevent mixed-content warnings and redirect errors.[](https://storage.3.basecamp.com/5840738/blobs/056cfbb8-b4ba-11f0-add8-0242ac120004/download/image.png) ![HTTP to HTTPS - ServerAvatar](https://serveravatar.com/wp-content/uploads/2025/10/image-127-1024x518.png)- **SSL Status Monitoring** Instantly view SSL installation status, expiry date, and status directly from the SSL dashboard. ![Uninstall SSL Certificate - ServerAvatar](https://serveravatar.com/wp-content/uploads/2025/10/image-128-1024x497.png)- **Automatic SSL Renewal** SSL certificates renew automatically before expiry, eliminating errors caused by expired certificates. ## Why Choose ServerAvatar for SSL Management? [ServerAvatar](https://serveravatar.com/) removes the guesswork. Instead of spending hours debugging server configs, firewall settings, or certificate chains, ServerAvatar automates and configures everything for you, so your sites stay secure, stable, and always accessible over HTTPS. - Simply, log in to your ServerAvatar account, and click on the Server Dashboard icon. ![ERR SSL Protocol Error - ServerAvatar](https://serveravatar.com/wp-content/uploads/2025/10/image-129-1024x182.png)- Navigate to the ‘Applications’ section from the left-hand sidebar and click on the dashboard icon next to your application.[](https://storage.3.basecamp.com/5840738/blobs/d264234c-b4bc-11f0-863f-0242ac120005/download/image.png) ![Application Dashboard](https://serveravatar.com/wp-content/uploads/2025/10/image-130-1024x274.png)- Navigate to the ‘SSL Certificate’ section from the left-hand sidebar and click on the ‘Automatic Installation’ option. ![SSL Certificate - ServerAvatar](https://serveravatar.com/wp-content/uploads/2025/10/image-131-1024x490.png)- It’s that simple and a few clicks process to install an SSL Certificate with ServerAvatar. Note: If you want to avoid SSL protocol issues altogether and ensure your SSL certificates are always valid and properly installed, ServerAvatar is the most efficient way to manage SSL on your servers. [![Blog banner - ServerAvatar](https://serveravatar.com/wp-content/uploads/2025/09/728_90-Banner-1-1024x127.png)](https://serveravatar.com?ref=blog)## Fix SSL Issues Manually ### **Solution 1: Check Your System Date and Time** It might sound too simple, but an incorrect system date or time is one of the most common reasons for SSL errors. **Why it matters:** SSL certificates have validity periods. If your system’s clock doesn’t match the actual date, your browser might think the certificate has expired. **How to fix it:** - **On Ubuntu:** Enable automatic time synchronization (NTP): ``` sudo timedatectl set-ntp true ``` ``` sudo timedatectl set-ntp true ``` - **On Windows:** Go to Settings → Time & Language → Date & Time → Set time automatically - **On macOS:** System Preferences → Date & Time → Set date and time automatically ### **Solution 2: Clear Browser Cache and Cookies** Old cache files and cookies can sometimes store outdated SSL data. **How to fix it:** - Open your browser’s settings - Navigate to *Privacy and Security → Clear Browsing Data* - Select **Cookies and Cached Images/Files** - Restart your browser and revisit the site ### **Solution 3: Disable QUIC Protocol (Chrome Only)** The QUIC protocol can interfere with SSL connections in some cases. **Steps to disable QUIC:** 1. Open Chrome and type chrome://flags/ in the address bar 2. Search for “Experimental QUIC Protocol” 3. Set it to **Disabled** 4. Relaunch Chrome ### **Solution 4: Clear SSL Cache** Browsers like Chrome and Firefox maintain their own local SSL caches, which can sometimes cause connection issues, including **ERR\_NETWORK\_CHANGED** or SSL-related errors. **To clear the SSL cache:** - Open Chrome, and in the address bar, type: ``` chrome://settings/clearBrowserData ``` ``` chrome://settings/clearBrowserData ``` - Select **Advanced** → Check **Cached images and files** and **Cookies, and other site data**. - Choose **All time** as the time range. - Click **Clear data**. - Restart Chrome. ### **Solution 5: Update Your Browser** Using an outdated browser can trigger SSL errors, especially if it doesn’t support the latest TLS versions. **How to fix it:** - Open your browser’s *Help → About* section - Install any available updates ### **Solution 6: Check for Antivirus or Firewall Interference** Your antivirus might be scanning SSL connections and interfering with them. **How to fix it:** - Temporarily disable HTTPS scanning or SSL monitoring in your antivirus settings - If the issue resolves, whitelist your browser or website ### **Solution 7: Disable Browser Extensions Temporarily** Some browser extensions, especially VPNs or proxy-related ones, can disrupt SSL handshakes. **Try this:** - Open your browser in Incognito Mode - If the site works, disable extensions one by one to find the culprit ### **Solution 8: Update or Reinstall Your SSL Certificate** If you’re the site owner, an expired or misconfigured SSL certificate could be the cause. **To fix:** - Renew your SSL certificate - Reinstall it correctly on your hosting server - Ensure your intermediate certificates are also installed ### **Solution 9: Ensure HTTPS Is Properly Configured** Mixed content or incorrect HTTPS redirection can break SSL. **Check for:** - Mixed HTTP and HTTPS elements on your site - Proper redirection from http:// to https:// - Updated “.htaccess” or “Nginx” configuration ### **Solution 10: Enable TLS Versions in Your Browser** Older browsers may have TLS 1.2 or TLS 1.3 disabled, which can prevent secure connections. **In Chrome:** - Go to Settings → Privacy and Security → Security → Advanced - Ensure TLS 1.2 and TLS 1.3 are enabled ### **Solution 11: Check Server Configuration** If you’re managing the server: - Make sure your web server supports the required SSL/TLS versions - Verify SSL configuration in Nginx, Apache, or LiteSpeed - Use tools like SSL Labs Test to analyze your site’s SSL setup ### **Solution 12: Flush DNS and Reset Network Settings** Sometimes, DNS caching conflicts with SSL certificates. **To fix (Ubuntu):** - Open Terminal and run the following commands: ``` sudo systemd-resolve --flush-caches ``` ``` sudo systemd-resolve --flush-caches ``` - To confirm the cache is cleared: ``` sudo systemd-resolve --statistics ``` ``` sudo systemd-resolve --statistics ``` - Restart the **Network Manager** service: ``` sudo systemctl restart NetworkManager ``` ``` sudo systemctl restart NetworkManager ``` **To fix (Windows):** - Open Command Prompt as admin - Run the following commands: ``` ipconfig /flushdns netsh winsock reset netsh int ip reset ``` ``` ipconfig /flushdns netsh winsock reset netsh int ip reset ``` - Restart your computer ### **Solution 13: Contact Hosting or SSL Provider** If you’ve tried everything and still face the issue, it’s time to contact your hosting provider or SSL issuer. They can verify whether your SSL chain is correctly installed and configured on the server. ## FAQ ### **What does ERR\_SSL\_PROTOCOL\_ERROR mean?** It means your browser can’t establish a secure HTTPS connection with the website due to SSL handshake failure. ### **Is ERR\_SSL\_PROTOCOL\_ERROR dangerous?** No, it’s not dangerous in itself, but it prevents you from accessing the site securely. ### **Does this error always mean something is wrong with the website?** Not always. Sometimes the issue is on the user’s end, browser, OS, or antivirus settings. If the error appears on only one device or browser, it’s likely a local issue. ### **How does ServerAvatar help prevent SSL errors?** ServerAvatar provides one-click SSL installation, automatic renewal, HTTPS redirection, certificate status tracking, and support for custom SSL, ensuring everything is correctly configured so you never face SSL protocol issues again. ### **Do I need technical knowledge to install SSL using ServerAvatar?** Not at all. ServerAvatar simplifies the entire SSL setup into a few clicks, no Linux commands, no configurations, and no technical expertise required. ## Conclusion The **ERR\_SSL\_PROTOCOL\_ERROR** can seem intimidating at first, but as you’ve seen, the solution often lies in simple fixes, from adjusting your system time to clearing cache, updating the browser, or reconfiguring your SSL certificate. While manual troubleshooting works, it can be time-consuming and technical, especially for non-developers. If you want to avoid SSL issues altogether, **ServerAvatar** provides a hassle-free way to install, monitor, and auto-renewal of SSL certificates, without touching the command line. With built-in HTTPS redirection, automatic renewal, and one-click setup, ServerAvatar ensures your websites remain secure, trusted, and error-free. A secure web experience shouldn’t be complicated, and with ServerAvatar, it doesn’t have to be. **Categories:** Blog, Guide **Tags:** SSL, SSL Error --- ### [How to Use Role-Based Access Control (RBAC) on Servers](https://serveravatar.com/role-based-access-control/) **Published:** October 29, 2025 **Author:** Meghna Meghwani **Content:** [![Blog banner - ServerAvatar](https://serveravatar.com/wp-content/uploads/2025/09/728_90-Banner-3-1024x127.png)](https://serveravatar.com?ref=blog)In any server environment, controlling who can access what is critical for security and stability. That’s where **Role-Based Access Control (RBAC)** comes in, a structured method to manage access based on user roles rather than individual permissions. Let’s explore how RBAC works, why it matters, and how **ServerAvatar** simplifies RBAC for your servers. ## What is RBAC? **Role-Based Access Control (RBAC)** is a system for managing access to computer or server resources based on defined roles within an organization. Instead of manually assigning permissions to each user, administrators assign permissions to roles, and users are then added to those roles. Think of it as giving employees different keys based on their jobs, one for finance, one for HR, and one for IT, rather than creating a unique key for each person. ## Why RBAC Matters for Servers Servers are the backbone of modern IT infrastructure. A small misconfiguration can lead to unauthorized access, data breaches, or accidental changes that bring down critical services. RBAC provides a structured way to control who can do what on a server, minimizing human error and improving security. ## Core Components of RBAC - **Roles:** Roles are essentially job titles or functions within your server environment. Examples include “Database Admin,” “Web Server Manager,” or “Read-Only User.” Each role represents a set of responsibilities and associated access rights. - **Permissions:** Permissions define what actions a role can perform, such as read, write, execute, or delete files and system settings. Permissions are mapped to roles, ensuring that users can only perform tasks they’re authorized to do. - **Users and Groups:** Users are the individuals accessing the server, while groups help organize users with similar responsibilities. In RBAC, you assign users to roles or groups to inherit permissions automatically. ## Benefits of Using RBAC on Servers - **Enhanced Security:** RBAC reduces the risk of unauthorized access by limiting what users can do. No one gets more permissions than necessary, keeping sensitive data safe. - **Simplified Management:** Managing permissions individually for dozens or hundreds of users is a nightmare. RBAC centralizes control, making it easier to manage large server environments. - **Compliance and Audit Readiness:** Many regulations, such as GDPR and HIPAA, require controlled access to sensitive data. RBAC makes auditing and demonstrating compliance straightforward. ## How ServerAvatar Helps You Implement RBAC Effortlessly [ServerAvatar](https://serveravatar.com/) is a platform to simplify the hosting and management of servers and applications. It simplifies the process of deploying and managing PHP and Node.js based web applications on servers. **ServerAvatar** makes managing servers and web applications simple, secure, and efficient. Instead of manually configuring users and permissions on every server, you can manage everything from a **centralized dashboard** using built-in RBAC capabilities. ServerAvatar’s Organization Management system allows you to: - Add team members. - Assign roles and permissions. - Monitor activities across all servers. This eliminates the complexity of manual configuration and provides full visibility over your infrastructure. ## Role and Permission Management in ServerAvatar ServerAvatar provides a dedicated **Roles & Permissions** system that allows fine-grained control over what each user can do. - **Create Custom Roles:** Define roles like Server Manager, Developer, or Billing Admin. - **Assign Granular Permissions:** Choose exactly which actions users can perform, from managing servers to viewing billing or modifying organization settings. - **Secure Collaboration:** Share access safely with your team without giving full administrative control. ## Manage Members and Teams Easily In ServerAvatar, you can add members to your organization and assign them specific roles instantly. Each member’s permissions are managed by their assigned role, ensuring that no one can access what they shouldn’t. - Invite multiple team members. - Assign or revoke access with a few clicks. - Maintain complete control over your organization’s structure. ![Memebers - ServerAvatar](https://serveravatar.com/wp-content/uploads/2025/10/image-119-1024x379.png)## Assign Specific Role and Permission to Members With ServerAvatar, you can control what each team member can do by assigning them specific roles and permissions. This ensures that every user only has access to the actions and data necessary for their responsibilities, nothing more, nothing less. With customizable roles, you can define permissions such as managing servers, viewing billing, or editing organization settings. This granular access control strengthens security and improves collaboration within your team. - **Create or edit custom roles** with specific permissions. - **Assign roles to members** based on their job functions or responsibilities. - **Update or revoke permissions** anytime with just a few clicks. - **Enforce least-privilege access**, minimizing the risk of unauthorized actions. By assigning specific roles and permissions to your team members, ServerAvatar makes access management seamless, transparent, and secure across your entire organization. ![Role-Based Access Control - ServerAvatar](https://serveravatar.com/wp-content/uploads/2025/10/image-120-1024x337.png)## Monitor User Actions with Activity Logs The Organization Activity page displays the history of all activities that have occurred within your organization. This includes activities such as creating new members, updating billing details, changing permissions, and more. With **Activity Logs**, you can: - Track every action. - Identify every activity quickly. - Filter and review logs easily, ensuring full visibility into your organization’s operations. ![Activity Log - ServerAvatar](https://serveravatar.com/wp-content/uploads/2025/10/image-121-1024x434.png)### **Key Features of ServerAvatar for RBAC and Server Security:** - **User and Role Management:** Easily create roles and assign specific permissions to users without manual configuration. - **Granular Permissions:** Assign precise permissions to roles, ensuring users only access what they need. - **Centralized Dashboard:** Manage all connected servers from a single interface, whether self-managed or on ServerAvatar infrastructure. - **Audit and Monitoring:** Track user actions and server activity for security and compliance purposes. - **Secure Multi-Server Support:** Apply RBAC policies consistently across unlimited servers with the Self-Managed Server add-on. - **Time-Saving Automation:** Reduce administrative overhead with automated role assignments and permission updates. With **ServerAvatar**, implementing RBAC on your servers is no longer a complex, technical headache; it’s simple, secure, and a few clicks away. ![Blog banner - ServerAvatar](https://serveravatar.com/wp-content/uploads/2025/09/728_90-Banner-1-1024x127.png)## RBAC Implementation With ServerAvatar: - Log in to your ServerAvatar account. Navigate to the “Team Management” section from the Dashboard. ![Team Managment - ServerAvatar](https://serveravatar.com/wp-content/uploads/2025/10/image-122-1024x400.png)You can explore all the mentioned Features in the Team Management section. ## Setting Up RBAC on Linux Servers (Manually) If you’re managing servers manually, Linux provides commands like chmod, chown, and usermod to define access levels. You can: - Create groups with: ``` groupadd ``` ``` groupadd ``` - Add users to groups using ``` usermod -aG ``` ``` usermod -aG ``` - Verify permissions using ``` ls -l ``` ``` ls -l ``` and ``` su - username ``` ``` su - username ``` However, this approach can become complex when managing multiple servers or large teams; that’s where ServerAvatar offers a simpler alternative. ## Common RBAC Challenges and How to Solve Them **Challenge****Solution**Overlapping RolesConsolidate roles or set role priorities.Permission SprawlReview and audit permissions regularly.Scaling IssuesUse centralized tools like ServerAvatar to automate RBAC.## FAQs ### **Can RBAC be used on both Linux and Windows servers?** Yes. RBAC can be applied to both environments using built-in tools or management platforms like ServerAvatar. ### **How often should I review user roles and permissions?** It’s recommended to review them every 3–6 months or after organizational changes. ### **Can a single user have multiple roles in ServerAvatar?** Currently, each member has one assigned role per organization, but roles can include multiple permissions to cover necessary tasks. ### **What happens if a member leaves my organization?** You can instantly revoke access from the ServerAvatar dashboard, ensuring immediate security compliance. ### **How does ServerAvatar ensure activity transparency?** Every action, from server updates to role changes, is logged in the Activity Logs section for full traceability. ## Stop Wasting Time on Servers. Start Building Instead. You didn’t start your project to babysit servers. Let **ServerAvatar** handle deployment, monitoring, and backups — so you can focus on growth. Deploy **WordPress, Laravel, N8N**, and more in minutes. No DevOps required. No command line. No stress. [ 🚀 Try Free ](https://app.serveravatar.com) [ 🌐 Learn More ](https://serveravatar.com/) Trusted by 10,000+ developers and growing. **Categories:** Blog, Guide **Tags:** server, ServerAvatar --- ### [Fix ERR_NETWORK_CHANGED Error in Chrome: 7 Proven Solutions](https://serveravatar.com/fix-err-network-changed-error-in-chrome/) **Published:** October 28, 2025 **Author:** Meghna Meghwani **Content:** [![Blog banner - ServerAvatar](https://serveravatar.com/wp-content/uploads/2025/09/728_90-Banner-3-1024x127.png)](https://serveravatar.com?ref=blog)If you’ve ever been browsing peacefully and suddenly Chrome flashes the message “ERR\_NETWORK\_CHANGED,” you know how frustrating it can be. This error simply means that your browser detected a change in your network connection, interrupting your access to the internet. But don’t worry, this guide will show you **7 proven ways to fix ERR\_NETWORK\_CHANGED** in Google Chrome, along with easy explanations for why these methods work. ## What Is ERR\_NETWORK\_CHANGED? This Chrome error indicates that your network configuration changed while the browser was trying to load a webpage. It could be caused by anything from a router restart to switching between Wi-Fi networks. ## Why Does This Error Appear in Chrome? Some of the most common reasons include: - Your ISP changed your IP address during browsing. - You switched between wired and wireless networks. - Chrome’s DNS cache got corrupted. - VPN or proxy servers interfered with your connection. - A background process is altering your network settings. ## Understanding the Impact When the ERR\_NETWORK\_CHANGED error occurs, Chrome temporarily blocks web requests to avoid conflicts. This prevents websites from loading properly until your network stabilizes again. It can also disrupt downloads, online meetings, and streaming services. ## How to Confirm if It’s a Local Problem Before diving into fixes, test your connection: 1. Open another device on the same network and check if the issue persists. 2. Try accessing other browsers like Edge or Firefox. 3. If only Chrome shows the error, it’s a browser-level issue. If all devices show the same error, the problem likely lies with your internet connection. ### Solution 1: Restart Your Router and Modem The simplest fix is often the most effective. **Steps:** 1. Unplug your router and modem. 2. Wait 30 seconds. 3. Plug them back in and wait for full connection. This refreshes your IP address and clears temporary network glitches. ### Solution 2: Disable and Re-enable Your Network Adapter A quick network reset can fix misconfigurations. **For Ubuntu** 1. Click the **Network** icon → toggle **Wi-Fi off** and then back **on**. 2. Or use Terminal commands: ``` nmcli networking off sleep 5 nmcli networking on ``` ``` nmcli networking off sleep 5 nmcli networking on ``` This restarts your entire network layer on Ubuntu. **For Windows:** - Press **Windows + R**, type ncpa.cpl, and hit Enter. ![Run Command - ServerAvatar](https://serveravatar.com/wp-content/uploads/2025/10/image-113.png)- Right-click on your active connection. - Select **Disable**, wait a few seconds, and then **Enable** it again. ![ERR_NETWORK_CHANGED - serverAvatar](https://serveravatar.com/wp-content/uploads/2025/10/image-114-1024x537.png)**For macOS:** 1. Go to **System Preferences > Network**. 2. Select your active connection and click the “–” icon to remove it. 3. Add it back again with the “+” icon. ### Solution 3: Flush DNS and Renew IP Address Your computer stores DNS records locally, and these can become outdated. **Ubuntu Commands** ``` sudo systemd-resolve --flush-caches sudo dhclient -r sudo dhclient ``` ``` sudo systemd-resolve --flush-caches sudo dhclient -r sudo dhclient ``` This forces Ubuntu to renew your IP and flush DNS caches at the OS level. **Windows Commands** ``` ipconfig /flushdns ipconfig /release ipconfig /renew ``` ``` ipconfig /flushdns ipconfig /release ipconfig /renew ``` After running these commands, restart your computer. This forces your system to request a new IP from your ISP. **macOS Commands** ``` sudo dscacheutil -flushcache; sudo killall -HUP mDNSResponder ``` ``` sudo dscacheutil -flushcache; sudo killall -HUP mDNSResponder ``` ### Solution 4: Clear Chrome’s DNS Cache Chrome keeps its own internal DNS cache separate from your OS. **Steps:** 1. In Chrome, type this in the address bar: chrome://net-internals/#dns 2. Click on **Clear host cache**. ![DNS Setup - ServerAvatar](https://serveravatar.com/wp-content/uploads/2025/10/image-115-1024x253.png)This clears Chrome’s outdated DNS entries, which often resolves the problem immediately. [![Blog banner - ServerAvatar](https://serveravatar.com/wp-content/uploads/2025/09/728_90-Banner-1-1024x127.png)](https://serveravatar.com?ref=blog)### Solution 5: Disable VPN or Proxy Connections VPNs and proxies change your network route and IP frequently, triggering the error. **Ubuntu** 1. Open **Settings > Network > Network Proxy**. 2. Set it to **None**. 3. Or use: 4. gsettings set org.gnome.system.proxy mode ‘none’ **Windows** **To Disable:** 1. Disconnect from any VPN apps. 2. Go to **Settings > Network & Internet > Proxy** (on Windows). 3. Turn off any manual proxy configurations. [](https://storage.3.basecamp.com/5840738/blobs/b0e92fd2-b3e5-11f0-bcfd-0242ac120004/download/image.png) ![Proxy Setting - ServerAvatar](https://serveravatar.com/wp-content/uploads/2025/10/image-116-1024x454.png)If you rely on a VPN, try switching servers or using a stable provider. **macOS** 1. Navigate to **System Preferences > Network > Advanced > Proxies**. 2. Uncheck all active proxies → **OK**. ### Solution 6: Update Network Drivers Outdated or corrupted drivers can cause connection interruptions. **Ubuntu** Run these commands in **Terminal**: ``` sudo apt update sudo apt upgrade -y sudo apt install --reinstall network-manager sudo systemctl restart NetworkManager ``` ``` sudo apt update sudo apt upgrade -y sudo apt install --reinstall network-manager sudo systemctl restart NetworkManager ``` This updates all essential networking components. **Windows** **How to Update:** 1. Press **Windows + X** and open **Device Manager**. 2. Expand **Network adapters**. 3. Right-click your adapter and select **Update driver**. 4. Choose **Search automatically for drivers**. ![Network Adepter - ServerAvatar](https://serveravatar.com/wp-content/uploads/2025/10/image-117-1024x524.png)For better performance, always keep your drivers up to date using manufacturer tools. [](https://storage.3.basecamp.com/5840738/blobs/fda9aa68-b3e5-11f0-8864-0242ac120004/download/image.png) ### Solution 7: Reset TCP/IP Stack This step rebuilds your network settings from scratch. **Ubuntu** In Terminal, restart the interface manually: ``` sudo ip link set eth0 down sudo ip link set eth0 up ``` ``` sudo ip link set eth0 down sudo ip link set eth0 up ``` (Replace eth0 with your actual interface—use ip a to check.) Or restart the entire network service: ``` sudo systemctl restart NetworkManager ``` ``` sudo systemctl restart NetworkManager ``` **Windows** **Steps:** 1. Open **Command Prompt (Admin)**. 2. Run the command: 3. netsh int ip reset 4. Restart your computer. This method helps when hidden network conflicts or misconfigurations cause repeated disconnections. ## FAQ ### **What causes the ERR\_NETWORK\_CHANGED error most often?** It’s usually caused by changes in your IP or DNS configuration—like when you switch networks or your ISP refreshes your IP. ### **Is this error harmful to my computer?** No, it’s a temporary issue. It doesn’t damage your device or data. ### **Can Chrome extensions trigger this error?** Yes, some extensions that alter network requests (like VPNs or ad blockers) can cause it. ### **Will resetting my router delete any settings?** A simple restart won’t, but a factory reset will—so only reboot unless absolutely necessary. ### **Does this happen on other browsers too?** Yes, similar network issues can appear in Firefox, Edge, or Safari but with different error messages. ## Stop Wasting Time on Servers. Start Building Instead. You didn’t start your project to babysit servers. Let **ServerAvatar** handle deployment, monitoring, and backups — so you can focus on growth. Deploy **WordPress, Laravel, N8N**, and more in minutes. No DevOps required. No command line. No stress. [ 🚀 Try Free ](https://app.serveravatar.com) [ 🌐 Learn More ](https://serveravatar.com/) Trusted by 10,000+ developers and growing. **Categories:** Blog, Guide **Tags:** Blog, chrome, network, network error --- ### [The Ultimate Guide to AI SEO Optimization for WordPress](https://serveravatar.com/ai-seo-for-wordpress/) **Published:** October 27, 2025 **Author:** Meghna Meghwani **Content:** [![Blog banner - ServerAvatar](https://serveravatar.com/wp-content/uploads/2025/09/728_90-Banner-3-1024x127.png)](https://serveravatar.com?ref=blog)Want your WordPress site to show up better on Google? You don’t need to be an expert or spend hours guessing what works. Today, smart computer tools, known as AI—can help make SEO much easier. This is called AI SEO, and it’s all about using plugins that guide you to write better, choose the right words, and fix little problems on your site. Think of it like having a helper that tells you what’s missing and how to improve. With AI SEO, even beginners can make their WordPress websites stronger, faster, and easier to find online. In this blog, we’ll explain what AI SEO is, why it’s useful, how to set it up, and simple tips you can follow every day. ## What is AI SEO for WordPress? So, what’s all this AI SEO talk? Well, it’s just using computer tools to help your WordPress site show up higher when people search online. - AI means computer programs that can learn and do things a bit like people. - SEO is about making your website better for search engines like Google. - WordPress is a site builder lots of people use. Put it together, and AI SEO for WordPress is using computer help to get more people to see your website. ## Why Use AI SEO on WordPress? You might be asking, “why? Can’t I just write and hope people find me?” Well, here’s why using AI SEO helps: - Makes your work faster, so you get more done - You see what words people are typing when looking for sites like yours - Helps you fix little things you didn’t see - It keeps up with Google’s new rules - You write stuff people want to read It’s like having a helper always watching out for ways to do better, even when you’re busy or not sure what to do next. ## How Does AI SEO Work on WordPress? Let’s keep this super simple. AI SEO uses bits of code (plugins) on your site. These plugins look at your words and tell you things to fix. How it works: - You pick an AI plugin and put it on your site - You write your page or blog post like normal - The AI plugin checks your page and gives tips, like “use this word here” or “make this shorter” - You follow the tips, and the plugin keeps score Some plugins even write things for you—including page titles and short summaries. Others fix links so visitors don’t get lost. ## Choosing the Best AI SEO Plugin There are a bunch, so let’s list a few most people use: - [AIOSEO](https://aioseo.com/) (All In One SEO): Good for beginners, has AI tips, works inside WordPress. - [Rank Math Pro](https://rankmath.com/): Picks the right words to use and checks your writing, too. - [Yoast SEO](https://yoast.com/): Pretty easy and makes sure your post is clear for people and search bots. Pick one that works for your needs. You can start with the free versions, then move up if you want more features. ## What is ServerAvatar [ServerAvatar](https://serveravatar.com/) is a managed cloud hosting platform that makes it easy to deploy, manage, and monitor servers and apps without technical expertise. You can launch WordPress, Laravel, Node.js, and more on providers like DigitalOcean, Vultr, and Hetzner in just a few clicks, with automation, monitoring, and security built in. **with serverAvatar you can** - Deploy and manage servers directly from ServerAvatar. - Host and manage multiple applications (WordPress, Laravel, PHP based, Node.js based, etc.). - Manage multiple servers and applications from a single dashboard. - Get built-in monitoring, backups, free automatic SSL with auto-renewal, firewall, fail2ban, and many more features to simplify your routine tasks. - Supports multiple stacks like LAMP, LEMP, OLS, Node Stack - Built-in log monitoring suite - 24/7 support by our technical experts - Affordable pricing with scalable plans Install WordPress in ServerAvatar Guide : – ![ServerAvatar Dashboard](https://serveravatar.com/wp-content/uploads/2025/10/image-79-1024x463.png)## How to Set Up AI SEO (Step-by-step) You don’t need to be a tech expert. Here’s the main steps—a bit rough but gets you there: - Go to your site and login - Click on “Plugins” - Hit “Add New” and Search Plugins name AIOSEO - Install and turn it on (“Activate”) ![AISEO Plugin Install - ServerAvatar](https://serveravatar.com/wp-content/uploads/2025/10/image-97-1024x425.png)- Some plugins want you to connect them to a robot helper (like OpenAI or ChatGPT). They tell you how. - Run through their quick setup (fill in your site’s name, what it’s about, etc.) Now, when you write a post, these tools help you fix it up before you press “Publish.” ## Run the Setup Wizard (recommended) After activation, AIOSEO usually launches a setup wizard automatically. If not: - Go to **All in One SEO Click on General Setting then Navigate to** Setup Wizard button. - Choosing site type (blog, business, store, etc.), which configures schema markup. - Importing settings from other SEO plugins (Yoast, Rank Math, etc.) if needed. - Adding business info and connecting webmaster tools. This quick run-through configures essential settings in minutes[](https://storage.3.basecamp.com/5840738/blobs/544b0fee-aa7f-11f0-bd99-0242ac120005/download/image.png) ![Launch Setup Wizard - ServerAvatar](https://serveravatar.com/wp-content/uploads/2025/10/image-98-1024x537.png)**4) Core settings you should configure (walkthrough)** Below are the most useful settings and where to find them. ### General Settings / Sitewide ![General settings - ServerAvatar](https://serveravatar.com/wp-content/uploads/2025/10/image-100-1024x537.png)- **Site Title & Home Meta** — check home meta title & description. - **Canonical URLs** — usually enabled to avoid duplicate content. - **Indexing** — ensure you haven’t accidentally set the site to “discourage search engines” (Settings → Reading in WP). (Found under **All in One SEO → General Settings** or the relevant tabs.) [![Blog banner - ServerAvatar](https://serveravatar.com/wp-content/uploads/2025/09/728_90-Banner-1-1024x127.png)](https://serveravatar.com?ref=blog)### XML Sitemaps [](https://storage.3.basecamp.com/5840738/blobs/9c91af90-aa81-11f0-baba-0242ac120005/download/image.png) ![XML Sitemaps - ServerAvatar](https://serveravatar.com/wp-content/uploads/2025/10/image-101-1024x537.png)AIOSEO generates XML sitemaps automatically. Verify them at **All in One SEO → Sitemaps** and submit the sitemap URL (usually /sitemap.xml or /sitemap\_index.xml) to Google Search Console. Sitemaps help search engines crawl your content. ### Schema / Structured Data Configure schema type for your site (Organization, Local Business, Blog, etc.) in **Search Appearance → Schema** so rich results and correct knowledge graph data are more likely. The setup wizard helps choose the right type. ![Schema Structured - ServerAvatar](https://serveravatar.com/wp-content/uploads/2025/10/image-102-1024x537.png)### **Social Profiles and OpenGraph** [](https://storage.3.basecamp.com/5840738/blobs/f78b8ba0-aa81-11f0-873a-0242ac120005/download/image.png) ![Social Profile - ServerAvatar](https://serveravatar.com/wp-content/uploads/2025/10/image-103-1024x537.png)Add your Facebook page, Twitter handle, Instagram, LinkedIn, etc. This controls default social cards and preview metadata for shares. Set defaults under **Social Networks** or the Social tab in AIOSEO. ### Webmaster Tools (Google/Bing) [](https://storage.3.basecamp.com/5840738/blobs/2e094172-aa82-11f0-b815-0242ac120005/download/image.png) ![Webmaster Tools - ServerAvatar](https://serveravatar.com/wp-content/uploads/2025/10/image-104-1024x537.png)Connect Google Search Console, Bing Webmaster Tools, and other verification codes via **All in One SEO → General Settings → Webmaster Tools** (or the verification tab). This avoids manual header edits. **Redirects** AIOSEO includes a redirect manager (Pro in many builds). Use it to add 301 redirects for changed URLs and fix 404s. If you migrate from another SEO plugin, import redirects where possible. **Link Assistant / Internal Linking (Pro)** - Use AIOSEO’s internal linking suggestions / Link Assistant to improve site architecture and boost SEO through strategic internal links **WooCommerce / Local SEO (if applicable)** - If you run a store, enable the WooCommerce SEO module to optimize product pages. If you’re a local business, configure Local SEO with address, phone, hours, and map data. ## Optimizing individual posts & pages (AIOSEO Meta Box / Sidebar) AIOSEO adds a meta box or an editor sidebar inside the post/page editor (Block editor & Classic supported): ![Optimizing Individual - ServerAvatar](https://serveravatar.com/wp-content/uploads/2025/10/image-105-1024x537.png)1. Open a post or page, find the **AIOSEO** panel (top-right in block editor or below the editor). 2. Fill the **SEO Title**, **Meta Description** (keep it ~50–160 characters), and **Focus Keyphrase** (if using the content analysis features). 3. Use the **TruSEO score / Content Analysis** suggestions to improve readability, keyword usage, meta length, image alt text, and internal linking. 4. Configure social preview for that post (Facebook/Twitter card settings). ## Importing settings from another SEO plugin AIOSEO provides an importer for common plugins (Yoast, Rank Math, SEOPress). Use the import tool to migrate titles, meta descriptions, redirects, and other settings to avoid losing SEO value during migration. You’ll find this option in the setup wizard or under Tools/Import in AIOSEO. **Useful tips & best practices** - **Keep backups** before making global changes (especially when importing or bulk-editing SEO settings). - **Submit sitemaps** to Google Search Console after setup. - **Monitor Search Console** for indexing issues, errors, and performance. - **Use redirects** for any changed URLs to preserve existing SEO value. - **Don’t overdo schema** — choose the schema type that best matches your site (wizard helps). - **Enable only what you use** — toggle modules you need to avoid clutter. ## FAQ ### **Is AIOSEO free or paid?** AIOSEO has a free version in the WordPress.org plugin directory and paid Pro plans that unlock advanced modules (sitemaps control, local SEO, WooCommerce SEO, redirects, Link Assistant, etc.). ### **Will AIOSEO replace my current SEO plugin?** You can migrate settings using AIOSEO’s importer for Yoast, Rank Math and others. Always back up before switching. ### **Where is the sitemap URL?** Typically or sitemap\_index.xml. Confirm under **All in One SEO → Sitemaps**. ### **Do I need to configure schema manually?** The setup wizard configures basic schema based on your site type, but you can refine schema settings per page/post if needed. ## Conclusion AIOSEO is powerful and beginner-friendly. The setup wizard takes you most of the way; the important followups are submitting sitemaps, connecting Search Console, and optimizing your content with the AIOSEO meta panel. If you want, I can create a short checklist PDF or a video script you can follow while setting up AIOSEO on your site. **Categories:** Blog, Tutorials, WordPress **Tags:** AI SEO, Wordpress, Wordpress Plugin --- ### [10 Tools to Use AI Workflow Automation in WordPress](https://serveravatar.com/ai-workflow-automation-wordpress/) **Published:** October 17, 2025 **Author:** Meghna Meghwani **Content:** [![Blog banner - ServerAvatar](https://serveravatar.com/wp-content/uploads/2025/09/728_90-Banner-3-1024x127.png)](https://serveravatar.com?ref=blog)Managing a WordPress website takes a lot of time, from writing content and handling SEO to managing updates and responding to users. But thanks to AI workflow automation, you can now handle most of these repetitive tasks automatically. AI automation tools and WordPress plugins make your website smarter, they can publish posts, optimize SEO, reply to comments, schedule social posts, and even analyze data, all on autopilot. Let’s look at **10 practical ways to use AI workflow automation in WordPress**, including **recommended plugins** and **how each one works.** ## 1. Automate Content Creation **Recommended Plugin:** Bertha AI or AI Engine ![Bertha.ai - ServerAvatar](https://serveravatar.com/wp-content/uploads/2025/10/image-67-1024x538.png)**How It Works:** [Bertha AI](https://bertha.ai/) plugins integrate AI writing tools directly into your WordPress editor. Once installed, you can generate blog ideas, outlines, or even complete paragraphs inside your post editor. Simply type a topic or keyword, and the plugin produces a readable draft that you can refine. You can also set automation rules using tools like **Zapier,** for example, automatically create a new WordPress draft every Monday with a generated title and content outline. **Why It’s Useful:** Saves hours of writing time, keeps your blog active, and helps maintain a consistent posting schedule even when you’re busy. ## 2. Streamline SEO Optimization **Recommended Plugin:** Rank Math SEO or Yoast SEO Premium with AI Assistant [](https://storage.3.basecamp.com/5840738/blobs/1e36d05e-a990-11f0-8b8e-0242ac120004/download/image.png) ![RankMath - ServerAvatar](https://serveravatar.com/wp-content/uploads/2025/10/image-68-1024x497.png)**How It Works:** [Rank Math SEO](https://rankmath.com/) AI-powered SEO tools automatically analyze your content, suggest relevant keywords, optimize headings, and generate meta descriptions. Rank Math’s AI Content Assistant can recommend focus keywords, readability scores, and even schema markup based on your topic. Once set up, the plugin continuously improves your SEO performance without manual adjustments. **Why It’s Useful:** You get real-time optimization tips, saving time and improving your site’s search ranking with less effort. ## 3. Automate Image Generation and Optimization **Recommended Tool:** Canva ![Canva - ServerAvatar](https://serveravatar.com/wp-content/uploads/2025/10/image-69-1024x537.png)![AI workflow automation - ServerAvatar](https://serveravatar.com/wp-content/uploads/2025/10/image-70-1024x281.png)**How It Works:** [Canva’s AI](https://www.canva.com/ai-assistant/)-powered tool, **Canva AI**, makes image creation effortless. You can simply click **“Create an Image”** and describe what you want, the AI will generate it for you in seconds. Additionally, you can enhance Canva’s capabilities by adding AI apps like **Magic Media** and **Text-to-Image**, which allow you to produce unique visuals just by describing them in words. For instance, you can type “modern WordPress dashboard illustration” or “tech-themed background for a blog post,” and Canva instantly creates high-quality, professional images that perfectly match your prompt. Additionally, Canva automatically resizes, compresses, and optimizes images for web use. You can also use **Why It’s Useful:** Canva helps you create stunning, on-brand visuals in minutes without hiring a designer. The AI ensures your images are optimized, original, and ready to use, improving your site’s loading speed and overall visual appeal. ## 4. Manage Comments with AI Moderation **Recommended Plugin:** Akismet Anti-Spam or Antispam Bee ![AKismet -ServerAvatar](https://serveravatar.com/wp-content/uploads/2025/10/image-71-1024x537.png)**How It Works:** [Akismet Anti-Spam](https://akismet.com/wordpress/) plugins use AI algorithms to detect spammy or harmful comments before they appear on your site. Akismet checks each comment against its global spam database, while Antispam Bee uses behavior analysis and IP patterns to block bots. You can also integrate **ChatGPT API** or **Tidio AI** to auto-reply to common comment questions. **Why It’s Useful:** Keeps your comment section clean and engaging without wasting time on moderation. ## 5. Personalize User Experiences **Recommended Plugin:** If-So Dynamic Content or PersonalizeWP ![PersonalizeWP - ServerAvatar](https://serveravatar.com/wp-content/uploads/2025/10/image-72-1024x493.png)**How It Works:** [PersonalizeWP ](https://personalizewp.com/)tools use AI to personalize content for each visitor based on behavior, location, or device. For instance, returning visitors can see custom messages or offers, while new users get introductory content. You can set up triggers like “If a user visits more than three times → Show a discount banner.” **Why It’s Useful:** Improves engagement and conversions by showing users exactly what they’re interested in. [![Blog banner - ServerAvatar](https://serveravatar.com/wp-content/uploads/2025/09/728_90-Banner-1-1024x127.png)](https://serveravatar.com?ref=blog)## 6. Automate Social Media Posting **Recommended Plugin:** Uncanny Automator or WP Social Poster ![Uncanny Automator - ServerAvatar](https://serveravatar.com/wp-content/uploads/2025/10/image-73-1024x528.png)**How It Works:** [Uncanny Automator](https://automatorplugin.com/) lets you create “recipes” (automated workflows). For example, when you publish a new blog post, it automatically shares the post on your Facebook and Twitter accounts. You can also use Zapier integration with WordPress to post updates, create LinkedIn posts, or generate AI captions automatically. **Why It’s Useful:** You stay active on social media without manually posting every time, saving time while boosting reach. ## 7. Simplify Email Marketing **Recommended Plugin:** Mailchimp for WordPress or FluentCRM ![FluentCRM - ServerAvatar](https://serveravatar.com/wp-content/uploads/2025/10/image-75-1024x441.png)**How It Works:** [Fluent CRM](https://fluentcrm.com/) Plugin AI analyzes your subscribers’ behavior to automatically segment them and send personalized emails. For example, when a user subscribes via your blog, the workflow sends an automated welcome email, followed by recommended articles. You can also use **FluentCRM + OpenAI API** to automatically create engaging email subject lines or follow-up messages. **Why It’s Useful:** Maintains consistent email communication and increases engagement with minimal manual effort. ## 8. Automate Backup and Security Checks **Recommended Plugin:** Jetpack Security or WPvivid Backup Plugin ![Jetpack - ServerAvatar](https://serveravatar.com/wp-content/uploads/2025/10/image-76-1024x521.png)**How It Works:** [Jetpack’s AI](https://jetpack.com/ai/)-based system continuously scans for vulnerabilities, malware, and unauthorized logins. You can schedule automatic backups and restore points. WPvivid adds an extra layer by sending automatic backup reports to your email or cloud storage. **Why It’s Useful:** Prevents data loss and keeps your website protected, even if you forget to run backups manually. ## 9. Smart Chatbots for Customer Support **Recommended Plugin:** Tidio AI Chatbot or ChatBot.com Integration ![Tidio - ServerAvatar](https://serveravatar.com/wp-content/uploads/2025/10/image-77-1024x528.png)**How It Works:** [Tidio Ai ](https://www.tidio.com/)chatbots use natural language processing to interact with visitors, answer FAQs, and even collect leads. You can program responses for common queries or let the AI learn from previous conversations to improve replies automatically. Tidio also integrates with WooCommerce to help with order tracking and abandoned cart reminders. **Why It’s Useful:** Provides 24/7 customer support and improves user satisfaction without hiring extra staff. ## 10. Analyze Website Data Automatically **Recommended Plugin:** MonsterInsights or ExactMetrics ![MonsterInsights -ServerAvatar](https://serveravatar.com/wp-content/uploads/2025/10/image-78-1024x562.png)**How It Works:** [MonsterInsights](https://www.monsterinsights.com/) connects your site to Google Analytics and uses AI to generate easy-to-read reports. It identifies which content performs best, user demographics, and conversion sources. You can even automate weekly email reports showing performance highlights, so you don’t have to check analytics manually. **Why It’s Useful:** Gives you actionable insights for growth, automatically delivered to your inbox. ## FAQs ### **What is AI workflow automation in WordPress?** It’s the process of using artificial intelligence tools and plugins to handle repetitive website tasks automatically, like posting, emailing, or optimizing SEO. ### **Are AI automation plugins safe to use?** Yes. Trusted plugins from the WordPress directory are secure. Always keep them updated to avoid vulnerabilities. ### **Can I use multiple AI plugins together?** Absolutely. Many plugins work seamlessly together. For example, you can use Bertha AI for writing and Rank Math for SEO optimization. ### **Will AI automation replace human work?** No, AI supports you by saving time and improving efficiency. You still make the final creative and strategic decisions. ### **Do AI automation plugins slow down my website?** Most modern plugins are lightweight and optimized. Using too many at once can affect speed, so only install what’s essential. ## Conclusion AI workflow automation in WordPress is not just about convenience, it’s about working smarter. By automating repetitive tasks like SEO optimization, backups, and social sharing, you can focus more on growth, creativity, and strategy. Start small by automating one area, like content creation or SEO, and gradually expand. The result? A faster, safer, and more efficient website that practically runs itself. ## Stop Wasting Time on Servers. Start Building Instead. You didn’t start your project to babysit servers. Let **ServerAvatar** handle deployment, monitoring, and backups — so you can focus on growth. Deploy **WordPress, Laravel, N8N**, and more in minutes. No DevOps required. No command line. No stress. [ 🚀 Try Free ](https://app.serveravatar.com) [ 🌐 Learn More ](https://serveravatar.com/) Trusted by 10,000+ developers and growing. **Categories:** Blog, Guide, WordPress **Tags:** WordPress Ai, WordPress AI Tools, Wordpress Plugin --- ### [Build a Profitable Membership Site in WordPress](https://serveravatar.com/profitable-membership-in-wordpress/) **Published:** October 22, 2025 **Author:** Meghna Meghwani **Content:** ![Blog banner - ServerAvatar](https://serveravatar.com/wp-content/uploads/2025/09/728_90-Banner-3-1024x127.png)Profitable Membership sites are a great way to make money online by sharing your knowledge. It’s like running your own exclusive club where people pay to access your valuable content. Instead of making a one-time sale, you earn recurring monthly income. Sounds great, right? Plus, you don’t need to be a tech expert—WordPress makes the process super easy. In this guide, I’ll walk you step-by-step on how to create a profitable membership site, keeping everything simple and easy to follow. ## What Makes a Membership Site Work? A membership site is basically a website where some content is hidden behind a paywall. People need to pay a fee to see the good stuff. It’s like having a VIP section at a club. For example, let’s say you’re really good at cooking. You could create a membership site where you share your best recipes, cooking videos, and tips. People would pay maybe $10 a month to access all this content. The key is having something valuable that people can’t get for free somewhere else. Your content needs to be worth paying for. ## Why Should You Start a Membership Site? **Make Money Every Month** The biggest reason to start a membership site is the steady income. Instead of making one sale and that’s it, your members pay you every month. This is called recurring revenue, and it’s the holy grail of online business. Let’s do some quick math. If you have 100 members paying $20 a month, that’s $2,000 every month. Not bad for sharing what you already know! **Build Your Own Community** When people pay to join your site, they become more engaged. They’re not just random visitors – they’re invested in what you’re doing. This creates a strong community around your brand. These community members often become your biggest fans. They’ll tell their friends about your site and help you grow. **Low Cost to Start** Starting a membership site doesn’t cost much money. You just need a domain name, hosting, and maybe a plugin. That’s way cheaper than starting a physical business or even an online store with products. ## Different Types of Membership Sites You Can Build **Online Learning Sites** These are probably the most popular type. You create courses and lessons that people pay to access. Think of sites like Udemy or Coursera, but smaller and focused on your expertise. **Community and Networking Sites** These sites focus on bringing people together. Members pay to network with others in their industry or hobby. It’s like LinkedIn but for a specific group. **Content Sites** These sites offer premium articles, videos, or other content. News sites often use this model – you can read some articles for free, but the best stuff requires a subscription. **Service-Based Sites** Here, members pay for ongoing services like consulting, coaching, or support. It’s like having a retainer client but with multiple people. ## What You Need Before You Start **Domain Name** First, you need a domain name. This is your website address, like “myawesomesite.com”. Pick something short and easy to remember. It should relate to what your site is about. **Web Hosting** You need a place to put your website. This is called web hosting. There are many good options out there. Look for one that specializes in WordPress hosting. **WordPress Installation** WordPress is the software that will run your site. Most hosting companies can install it for you with just one click. It’s free and easy to use. **Right Plugin** A plugin is like an app for your website. You’ll need a membership plugin to handle subscriptions, payments, and content restrictions. ## Complete Step-by-Step Guide to Build Your Membership Site Now let’s get into the real work. I’ll show you exactly how to build your membership site from start to finish. Each step is important, so don’t skip any of them. ### Step 1: Get Your Domain Name and Hosting Set Up First things first – you need a place for your website to live. Think of this like getting an address for your new business. **Choosing Your Domain Name** Your domain name is what people type to find your site. Keep it simple and related to what you do. For example, if you teach guitar, something like “guitarmastery.com” works great. Here are some tips: - Keep it short (3-12 characters is best) - Make it easy to spell - Avoid numbers and hyphens - Pick a .com if you can ## Getting Web Hosting with ServerAvatar **What is ServerAvatar** ServerAvatar is a managed cloud hosting provider that simplifies the deployment, management, and monitoring of servers and applications, no deep technical expertise required. **with ServerAvatar you can:-** - Deploy servers directly on top cloud providers like **DigitalOcean, Vultr, Hetzner** (Linode coming soon). - No need for your own cloud provider account. - Easily deploy and manage apps like **WordPress, Laravel, n8n, custom PHP, and Node.js**. - Enjoy **one-click deployments** for faster setup. - Access features like **monitoring, backups, free auto-renewing SSL, firewall, fail2ban**, and more to simplify daily tasks. - Supports various stacks: **LAMP, LEMP, OLS, and Node Stack**. - Comes with a **built-in log monitoring suite**. - Get **24/7 expert technical support**. - Enjoy **affordable, scalable pricing plans**. ![ServerAvatar Dashboard](https://serveravatar.com/wp-content/uploads/2025/10/image-74-1024x463.png)Install WordPress in ServerAvatar Guide:- [https://serveravatar.com/install-wordpress-apache-ubuntu/#install-wordpress-using-serveravatar-6](https://serveravatar.com/docs/application/one-click-installer/wordpress) ### Step 2: Pick and Install Your Membership Plugin This is where the magic happens. The membership plugin handles all the subscription stuff so you don’t have to. **Why Paid Member Subscriptions is Perfect for Beginners** For this guide, we’re going to use a plugin called Paid Member Subscriptions. Here’s why it’s great for people just starting out: - It has a free version that works really well - Super easy to set up and use - Works with any WordPress theme - Handles payments automatically - Great customer support **What Makes This Plugin Special** Paid Member Subscriptions does everything you need: - Creates subscription plans easily - Restricts content with simple shortcodes - Handles recurring payments - Manages member accounts - Sends email notifications - Works with popular payment methods like Stripe and PayPal **How to Install the Plugin** Installing is super simple: 1. Go to your WordPress dashboard 2. Click on “Plugins” then “Add Plugin” 3. Search for “Paid Member Subscriptions” 4. Click “Install Now” then “Activate” ![Paid Membership Plugin - ServerAvatar](https://serveravatar.com/wp-content/uploads/2025/10/image-81-1024x444.png)That’s it! The plugin is now ready to use. ### Step 3: Choose a WordPress Theme That Works Your theme controls how your site looks. You don’t need anything fancy – simple and clean works best. Look for a theme that: - Works well with your membership plugin - Looks good on phones and tablets - Loads quickly - Has good reviews Many membership plugins work with any theme, but some have recommended themes that work extra well. ### Step 4: Set Up Paid Member Subscriptions Plugin Now it’s time to configure your membership system. The Paid Member Subscriptions plugin makes this really simple with its setup wizard. **Create User Pages for Registration, Login, Account and Password Reset** To get started, go through the **setup wizard** and allow the plugin to create registration, login, account management, and password reset pages. To do this, **toggle on the switches** and then hit **continue**. ![Paid Member Quick setup - ServerAvatar](https://serveravatar.com/wp-content/uploads/2025/10/image-82-1024x573.png)The plugin will automatically create these important pages: - Registration page (where new people sign up) - Login page (where members log in) - Account page (where members manage their info) - Password reset page (for forgotten passwords) **Understanding the Plugin Dashboard** Once setup is complete, you’ll see the main plugin dashboard with these sections: - **Members**: See all your site members - **Subscriptions**: Manage subscription plans - **Payments**: Track all payments and transactions - **Settings**: Adjust how everything works ![Membership Subscription - ServerAvtar](https://serveravatar.com/wp-content/uploads/2025/10/image-83.png)The plugin keeps everything organized so you can easily manage your membership site. ### Step 5: Choose a Design and Optimize the Login and Registration Flow for Your Users Next, optimize the login and registration flow for your members. **Toggle on the switches** again and then hit **continue**. ![Log in Paid Subscription - ServerAvatar](https://serveravatar.com/wp-content/uploads/2025/10/image-84-1024x533.png)This step helps make it easy for people to join your site. The plugin will ask you about: - How you want the registration form to look - What information to collect from new members - How to style the login page - Whether to enable social media login options Keep registration simple—only ask for what you really need: - Name - Email address - Password That’s it. You can always ask for more info later. ### Step 6: Setup How Your Currency Is Displayed and Choose a Payment Gateway Now, choose your **preferred currency**, **renewal setting**, and **payment gateways**. I’ll stick with the default Stripe payment method. ![Connect With Stripe - ServerAvatar](https://serveravatar.com/wp-content/uploads/2025/10/image-85-1024x679.png)**Setting Up Stripe Payment** Click on the **Connect with Stripe** button, enter the **email address** associated with your Stripe account, and click on the **continue** button ![Add Email -ServerAvatar](https://serveravatar.com/wp-content/uploads/2025/10/image-86-1024x612.png)**Complete the account creation setup** to move to the next step, which is creating a subscription plan. **Why Choose Stripe** Stripe is the best choice for most membership sites because: - It works in almost every country - Very secure and trusted - Easy to set up - Works great with WordPress - Handles recurring payments automatically **Currency and Payment Settings** Set up these important options: - What currency you want to use (USD, EUR, GBP, etc.) - How often to bill members (monthly, yearly) - What happens if payments fail - Email notifications for successful payments **Testing Your Setup** I won’t complete this step as I don’t intend to make any actual payments. This is just to show you how a membership plugin would work if you connect it to your preferred payment method, like PayPal. Before going live, always test your payment system with Stripe’s test mode to make sure everything works correctly. ### Step 7: Create a Subscription Plan and Start Registering New Members Now it is time to create a subscription plan. Customers can access your content only after purchasing a subscription plan. ![Create Subscription Pogram - ServerAvatar](https://serveravatar.com/wp-content/uploads/2025/10/image-87-1024x604.png)Click on **Add New Subscription Plan** and then create a subscription plan for your membership site. You can set the price to whatever you like, adjust the duration, and define how you want membership subscriptions to be renewed. ![Paid Membership Plan -ServerAvatar](https://serveravatar.com/wp-content/uploads/2025/10/image-88-1024x467.png)**Setting Up Your First Plan** When creating your plan, you’ll need to fill out these details: - **Plan Name**: Give it a clear name like “Monthly Access” or “Premium Membership” - **Price**: Set how much you want to charge (start with what feels fair) - **Duration**: Choose monthly, yearly, or lifetime access - **Description**: Explain what members get with this plan **Choosing the Right Price** Pricing can be tricky, but here’s what works: - Look at similar membership sites in your niche - Start with a price that feels reasonable to you - Remember, you can always change it later - Consider offering both monthly and yearly options **What to Include in Your Plan** Think about what value you’re providing: - Access to all premium content - Downloadable resources - Member-only community access - Regular updates and new content - Email support or coaching **Setting Renewal Options** Decide how memberships should renew: - **Automatic renewal**: Members get charged automatically (recommended) - **Manual renewal**: Members have to renew themselves - **Trial periods**: Offer a few days free to try your content ![Renewal Tyeps - SevrerAvatar](https://serveravatar.com/wp-content/uploads/2025/10/image-89-1024x639.png)Most successful membership sites use automatic renewal because it’s easier for everyone and creates steady income. ### Step 8: Restrict Your Content Based on the Newly Created Subscription Plans To restrict any content, you can use the ``` Premium Content: This is an exclusive tutorial on advanced WordPress techniques. In this section, you'll learn how to optimize your website for speed, implement advanced SEO strategies, and create custom functionality without coding. This content is only available to our premium members who have access to our complete library of professional tutorials and resources. ``` ``` Premium Content: This is an exclusive tutorial on advanced WordPress techniques. In this section, you'll learn how to optimize your website for speed, implement advanced SEO strategies, and create custom functionality without coding. This content is only available to our premium members who have access to our complete library of professional tutorials and resources. ``` **Real Example of Restricted Content** Here’s what a complete restricted section might look like on a cooking website: ``` [pms-restrict subscription_plans="12"] Secret Recipe: Grandma's Famous Chocolate Cake This recipe has been in my family for generations and is only shared with our premium members. Ingredients: 2 cups all-purpose flour 2 cups sugar 3/4 cup cocoa powder Secret ingredient (revealed below) The Secret Technique: The secret to this cake's amazing texture is adding 1 tablespoon of mayonnaise to the batter. This creates the moistest, most delicious chocolate cake you've ever tasted! Download Full Recipe PDF [/pms-restrict] ``` ``` [pms-restrict subscription_plans="12"] Secret Recipe: Grandma's Famous Chocolate Cake This recipe has been in my family for generations and is only shared with our premium members. Ingredients: 2 cups all-purpose flour 2 cups sugar 3/4 cup cocoa powder Secret ingredient (revealed below) The Secret Technique: The secret to this cake's amazing texture is adding 1 tablespoon of mayonnaise to the batter. This creates the moistest, most delicious chocolate cake you've ever tasted! Download Full Recipe PDF [/pms-restrict] ``` [![Blog banner - ServerAvatar](https://serveravatar.com/wp-content/uploads/2025/09/728_90-Banner-1-1024x127.png)](https://serveravatar.com?ref=blog)## How to Add Content Restrictions Step by Step **Step 1: Go to Your Post or Page** - Open the post or page you want to restrict - Click “Edit” to open the WordPress editor ![Edit Page - ServerAvatar](https://serveravatar.com/wp-content/uploads/2025/10/image-90-1024x647.png)Find the spot where you want to add restricted content **Step 2: Add the Shortcode** - Type the opening shortcode: \[pms-restrict subscription\_plans=”12″\] - Add your premium content after the shortcode - Close it with: \[/pms-restrict\] ![Restricted Content - ServerAvatar](https://serveravatar.com/wp-content/uploads/2025/10/image-91-1024x451.png)Replace “12” with your actual subscription plan ID number ![Restricted Content - ServerAvatar](https://serveravatar.com/wp-content/uploads/2025/10/image-92-1024x447.png)**Step 3: Find Your Plan ID Number** - Go to your WordPress dashboard - Click on “Paid Member Subscriptions” - Click on “Subscription Plans” - Look for the ID number next to your plan name ![Subscription Plan - ServerAvatar ](https://serveravatar.com/wp-content/uploads/2025/10/image-93-1024x433.png)- Use this number in your shortcode **What Your Content Looks Like Without Restrictions** The image below shows how content on your site would appear without membership restrictions – everyone can see everything for free. **Setting Up Custom Messages for Non-Members** When you’re restricting content, you can choose to show a custom message to logged-out users and logged-in users who don’t have the right subscription.Then **How to Add Custom Messages:** - In your shortcode, add: message=”Your custom message here” - Example: \[pms-restrict subscription\_plans=”12″ message=”Join our premium membership to read this content!”\] ![Hortcode - SeverAvatar](https://serveravatar.com/wp-content/uploads/2025/10/image-94.png)![Profitable Membership - ServerAvatar](https://serveravatar.com/wp-content/uploads/2025/10/image-95-1024x461.png)**Good Message Examples:** - “This premium content is available to members only. Sign up today!” - “Upgrade to our premium plan to access this exclusive content.” - “Want to read more? Join our community for full access.” **What Happens When Non-Members Try to Access Content** So now if a user who is not logged in tries to access your content, they’ll see your custom message instead of the premium content. This encourages them to sign up for your membership. **Quick Tips for Content Restriction** - Always test your shortcodes before publishing - Keep some content free to attract new visitors - Make your custom messages encouraging, not pushy - Use clear plan names and descriptions - Check that your plan ID numbers are correct in the shortcodes ### Step 9: Build Your Pricing and Sales Pages You need pages that sell your membership. These are super important because they convince people to join. **Create a Pricing Page** Your pricing page should include: - Clear pricing for each plan - List of what’s included - Sign-up buttons - Maybe some testimonials (if you have them) Keep it simple and focus on the value people get. **Write Compelling Copy** Don’t just list features – explain benefits. Instead of “50 video lessons,” say “Learn guitar in just 30 days with our step-by-step video course.” ### Step 10: Set Up Member-Only Areas Create special areas that only members can see. This might include: - Member dashboard - Download area - Community forums - Exclusive content sections Make these areas feel special and valuable. ### Step 11: Test Everything Thoroughly Before you launch, test everything multiple times: **Test the Sign-Up Process** - Try registering as a new member - Make sure email confirmations work - Check that payments process correctly - Verify members get access to restricted content **Test Different Scenarios** - What happens if someone cancels? - Do failed payments get handled correctly? - Can members update their payment info? - Do password resets work? **Get Someone Else to Test** Ask a friend to try signing up. They might catch problems you missed because you know the system too well. ### Step 12: Launch and Monitor Your Site Once everything is tested and working, you’re ready to launch! **Soft Launch First** Don’t announce to the world right away. Instead: - Tell a few friends about it - Get some initial members - Fix any problems that come up - Gather feedback and improve **Monitor Key Metrics** Keep an eye on: - Sign-up conversion rates - Payment success rates - Member retention - Support requests This data helps you improve your site over time. ## How to Make Your Site Profitable Building the site is just the start. Here’s how to make it actually profitable: - Create valuable content regularly - Listen to your members and give them what they want - Promote your site (but don’t be spammy about it) - Keep improving based on feedback Remember, it takes time to build up a good member base. Don’t get discouraged if you don’t have hundreds of members right away. ## Common Problems and How to Fix Them **Problem**: People sign up but don’t stick around **Solution**: Make sure your content is really valuable and you’re adding new stuff regularly **Problem**: Payment issues **Solution**: Test your payment system thoroughly and have good customer support **Problem**: Members can’t access content **Solution**: Check your content restrictions and make sure they’re set up right **Problem**: Not enough sign-ups **Solution**: Look at your pricing and value proposition. Maybe you need to adjust something ## Conclusion Building a profitable membership site in WordPress isn’t rocket science, but it does take some work. The key is to focus on providing real value to your members. Start simple, test everything, and keep improving. Don’t try to build the perfect site right away – just get something good up and running, then make it better over time. Remember, the most successful membership sites solve a real problem for their members. If you can do that consistently, you’ll build a profitable business that pays you every month. The technical stuff might seem overwhelming at first, but once you get the hang of it, it’s not that hard. WordPress and the right plugins do most of the heavy lifting for you. So what are you waiting for? Pick your niche, choose your tools, and start building. Your future members are out there waiting for what you have to offer. **Categories:** Blog, Tutorials, WordPress **Tags:** Profitable Membership Site, Wordpress, Wordpress Plugin --- ### [How NAT Works: A Simple Guide to Network Address Translation](https://serveravatar.com/how-nat-works/) **Published:** October 26, 2025 **Author:** Meghna Meghwani **Content:** [![Blog banner - ServerAvatar](https://serveravatar.com/wp-content/uploads/2025/09/728_90-Banner-3-1024x127.png)](https://serveravatar.com?ref=blog)If you’ve ever wondered **how NAT works**, you’re not alone. In modern networks, especially home and business setups, NAT (Network Address Translation) is a core concept that quietly handles address mapping behind the scenes. In this guide, we’ll walk you through NAT in plain English, no heavy jargon, no confusing abstractions. By the time you finish reading, you’ll understand what NAT does, why it’s used, and how it keeps your devices connected and secure. ## 1. What Is NAT (Network Address Translation)? NAT stands for **Network Address Translation**. It’s a process by which one IP address (often a public one) is translated into another (often private), and vice versa. In essence: - Devices inside your private network (like your computer, phone, printer) use **private IP addresses**. - The outside world (internet) uses **public IP addresses**. - NAT acts as the **middleman**, translating between private and public addresses so that communication flows properly. Without NAT, devices in a private network couldn’t easily share a single public IP or be hidden behind a firewall. ## 2. The Need for NAT: Why We Use It Before diving deeper, let’s understand why NAT exists: 1. **IPv4 Address Scarcity** IPv4 addresses are limited. NAT allows many devices inside a local network to share a single public IPv4 address. 2. **Security & Privacy** A NAT setup hides internal private IPs from direct exposure to the internet, acting as a barrier against unwanted inbound traffic. 3. **Simplified Network Management** It’s easier to change internal IP addressing without affecting how the world sees your network. 4. **Flexibility for Multiple Devices** Without NAT, each device would require its own public IP. NAT enables hundreds of devices to “piggyback” on one address. ![How NAT Works- ServerAvatar](https://serveravatar.com/wp-content/uploads/2025/10/image-45.png)## 3. Types of NAT There are several flavors of NAT. Here’s a breakdown in simple terms: **3.1 Static NAT** - **One-to-one translation** between a specific internal IP and a specific external IP. - Always maps the same internal address to the same external one. - Useful for hosting services inside your network (e.g., a web server behind NAT). **3.2 Dynamic NAT** - Maps internal addresses to a pool of public addresses. - When a device communicates externally, one of the available public addresses is dynamically assigned. - If pool is exhausted, additional internal devices can’t communicate publicly. **3.3 PAT (Port Address Translation) / NAT Overload** - The most common NAT type in home and small business routers. - Uses **a single public IP** but differentiates traffic via port numbers. - One public IP + many ports = many internal devices can talk externally. - Also called **Many-to-One NAT**. **3.4 NAPT (Network Address Port Translation)** - Very similar to PAT: translates both **IP address and port numbers**. - Widely used in routers and firewalls today. ![Type Of NAT - ServerAvatar](https://serveravatar.com/wp-content/uploads/2025/10/image-46-1024x452.png)## 4. How NAT Works: Step-by-Step Let’s break down the process when a device in your network communicates with the internet: 1. **Internal device sends a packet** E.g. Your laptop (192.168.1.10) wants to access a website. 2. **Router intercepts the packet** It notices that the source IP is private. 3. **Translation table check / assignment** - If static NAT: look up the fixed mapping. - If dynamic NAT: pick an available public IP. - If PAT/NAPT: keep the one public IP and assign a unique port for session. 4. **Rewrite packet header** Change the **source IP (and possibly port)** to the public IP (and assigned port). 5. **Packet travels through internet** It reaches the destination server. 6. **Response returns** The external server responds to the public IP + port. 7. **Router receives response** It looks up the translation table, maps the public IP/port back to the internal private IP/port. 8. **Forward packet internally** The internal device receives the response as if it came directly. This two-way translation ensures seamless connectivity. [![Blog banner - ServerAvatar](https://serveravatar.com/wp-content/uploads/2025/09/728_90-Banner-1-1024x127.png)](https://serveravatar.com?ref=blog)## 5. NAT Table / Translation Table At the heart of NAT is the **translation table** (or NAT table). It stores mappings of: - **Internal IP + port** ↔ **External IP + port** For example, a NAT table entry may look like: **Internal (IP:Port)****External (IP:Port)****Timestamp**192.168.1.10:56789203.0.113.5:345672025-10-15 10:12When an internal host communicates outward, NAT creates (or uses) an entry. When responses come back, it matches and reverse-maps. Entries may time out after inactivity. ## 6. Inbound Traffic & Port Forwarding (or NAT’s Limitation) One downside of NAT: **inbound connections from the internet to internal devices** are blocked by default. That means: - External devices can’t initiate a connection to your internal devices arbitrarily. - If you host a service (e.g., web server, CCTV), you must set up **port forwarding** or **static NAT** to route certain ports. **Port Forwarding** means you tell the router: “When traffic comes in on port X, send it to internal IP Y on port Z.” That way, someone accessing your public IP at that port reaches your internal server. ## 7. NAT in Home vs Business Settings **Home / Small Office NAT** - Usually uses **PAT (NAT overload)**. - Simple: one public IP, many devices inside. - Router takes care of NAT automatically. - Port forwarding used for gaming servers, remote access, etc. **Enterprise / Data Center NAT** - More complex scenarios: multiple public IPs, multiple internal subnets. - **Static NAT** for predictable services. - **Dynamic NAT** for large scale internal devices. - May also use **twice NAT** or advanced translation policies in firewalls. - Integration with **VPNs, DMZ**, and security zones. ## 8. Advantages & Disadvantages of NAT **Advantages** - **Conserves public IPv4 addresses**. - **Hides internal network structure**. - **Adds a layer of basic security**. - **Allows internal renumbering without public impact**. **Disadvantages / Challenges** - **Breaks end-to-end connectivity**—some protocols assume direct addressing. - **Complex to manage inbound services** (need port forwarding or special config). - **Performance overhead** in translation tasks. - **Problems with protocols embedding IP addresses** (FTP, SIP, etc.). - **Not as necessary in IPv6 world**, though translation techniques still exist. ## 9. NAT Traversal Techniques & Challenges Because NAT can interfere with certain protocols or peer-to-peer connections, engineers use **NAT traversal** methods: - **STUN (Session Traversal Utilities for NAT)** Helps a device discover its public mapping and port. - **TURN (Traversal Using Relays around NAT)** Relay server approach for media streams when direct path fails. - **ICE (Interactive Connectivity Establishment)** Combines STUN & TURN to find best path. - **UPnP / NAT-PMP / PCP** Protocols enabling local devices to dynamically request port mapping from the router. These techniques help peer-to-peer apps, VoIP, online games, and video calls work smoothly behind NAT. ## 10. NAT vs PAT vs NAPT: Quick Clarification There’s sometimes confusion in terms. Here’s a quick cheat sheet: - **NAT** – general term for address translation. - **PAT / NAT Overload** – maps many internal addresses to one public IP with different ports. - **NAPT** – same as PAT (translates both IP & port numbers). When people say “NAT” in daily router talk, they usually mean PAT / NAPT in home setups. ## 11. NAT in IPv6 Era: Is It Still Relevant? With IPv6, each device can have a global IPv6 address, minimizing need for NAT. But that doesn’t mean NAT goes away entirely: - Some networks still use **NAT64 / DNS64** to bridge IPv6-only networks to IPv4 resources. - In transition scenarios, NAT is used as a compatibility tool. - Organizations may still use NAT for **security, isolation**, or custom routing policies. So, while NAT’s original impetus (IPv4 conservation) weakens in IPv6, its utility in architecture and security persists. ## FAQ ### **1. What is NAT in simple terms?** NAT (Network Address Translation) allows multiple devices in a private network to share one public IP address when accessing the internet. ### **2. Why do we need NAT?** NAT helps save public IP addresses, improves network security, and hides internal device details from the internet. ### **3. What are the main types of NAT?** The three main types are **Static NAT**, **Dynamic NAT**, and **PAT (Port Address Translation)**. ### **4. How does NAT improve security?** NAT hides private IP addresses, making it harder for hackers to directly access devices inside your network. ### **5. Can NAT cause connection issues?** Yes, sometimes NAT blocks inbound connections or interferes with online games, VoIP, or peer-to-peer apps. ## Conclusion Understanding **how NAT works** is essential for anyone working with networks, from casual home users to IT professionals. NAT helps conserve IPv4 addresses, offers a layer of security by hiding private addresses, and enables multiple devices to share a single public IP. Yet NAT also introduces challenges, especially when inbound services or peer-to-peer protocols are involved. With a grasp of static NAT, dynamic NAT, PAT/NAPT, and traversal techniques like STUN and TURN, you’re better equipped to design, manage, and troubleshoot real networks. If you have questions about NAT in your specific setup or how to configure port forwarding or NAT policies, just let me know, I’ll be happy to dig deeper! ## Stop Wasting Time on Servers. Start Building Instead. You didn’t start your project to babysit servers. Let **ServerAvatar** handle deployment, monitoring, and backups — so you can focus on growth. Deploy **WordPress, Laravel, N8N**, and more in minutes. No DevOps required. No command line. No stress. [ 🚀 Try Free ](https://app.serveravatar.com) [ 🌐 Learn More ](https://serveravatar.com/) Trusted by 10,000+ developers and growing. **Categories:** Blog, Guide **Tags:** NAT --- ### [What is Linux Server Hardening: Step-by-Step Security Guide](https://serveravatar.com/linux-server-hardening/) **Published:** October 25, 2025 **Author:** Meghna Meghwani **Content:** [![Blog banner - ServerAvatar](https://serveravatar.com/wp-content/uploads/2025/09/728_90-Banner-3-1024x127.png)](https://serveravatar.com?ref=blog)In today’s digital world, where servers are constantly exposed to threats, securing your Linux server is not optional, it’s essential. Whether you run a personal website, an enterprise app, or a cloud-based service, your Linux server is a target for hackers, malware, and automated bots. That’s where Linux server hardening comes in. But what exactly is it? Let’s dive deeper. ## Understanding Linux Server Hardening ### What Is Server Hardening? Server hardening means protecting your Linux server by reducing its vulnerability surface. It’s like locking every door and window of your house before you go on vacation. You remove unnecessary services, close open ports, and implement security best practices to ensure your server stays safe from intruders. ### Why It Matters? Even though Linux is considered more secure than many other operating systems, it’s not immune to attacks. Poor configurations, outdated software, or weak passwords can make your server an easy target. ## Common Threats: ### 1. Brute-force login attempts: - A brute-force attack occurs when an attacker uses automated scripts to repeatedly try different username and password combinations to gain access to an account or system. These attacks are typically launched using bots that can attempt thousands of login combinations per minute. - If successful, attackers can gain unauthorized access to admin panels, databases, or other sensitive areas of your website or server. This kind of attack is especially dangerous when weak or commonly used passwords are in place. Rate-limiting login attempts, enforcing strong password policies, and enabling two-factor authentication (2FA) are effective defenses. ### 2. Unauthorized root access: - Root access refers to full administrative privileges on a server. If an attacker gains unauthorized root access, they can completely control the server, install or delete software, manipulate files, change configurations, and access or wipe out data. - This often occurs through software vulnerabilities, unpatched systems, poor access controls, or leaked credentials. Once an attacker has root access, it’s incredibly difficult to detect or reverse the damage without full server audits or reinstallation. Securing SSH access, using firewalls, and regularly patching software are critical preventive measures. ### 3. Malware injections: - Malware injection is a technique where malicious code is inserted into a website, application, or database with the goal of performing unauthorized actions. Common types of malware include trojans, ransomware, spyware, and crypto miners. - Malware can be injected through insecure file uploads, outdated plugins, or SQL injection vulnerabilities. Once in place, it may steal sensitive data, redirect users to malicious sites, or compromise site functionality. Regular malware scanning, input sanitization, and file integrity monitoring are essential to prevent such attacks. ### 4. Data breaches: - A data breach occurs when unauthorized individuals gain access to confidential or sensitive data, such as customer records, payment information, or internal documents. This can happen due to unencrypted data storage, weak access controls, social engineering attacks, or malware. - Consequences of a data breach can be severe: legal penalties, loss of customer trust, reputational damage, and financial losses. Organizations must implement strong encryption, access control policies, regular audits, and incident response plans to mitigate the risk and impact of breaches. ### 5. DDoS attacks: - In a DDoS attack, attackers use a network of compromised computers (a botnet) to flood a target server or website with overwhelming traffic. The goal is to exhaust system resources, such as CPU, RAM, or bandwidth, causing the service to slow down significantly or go offline entirely. - DDoS attacks can last minutes, hours, or even days, disrupting business operations and denying service to legitimate users. Protection strategies include using firewalls, load balancers, rate-limiting, and third-party DDoS mitigation services like Cloudflare or AWS Shield. ## Secure Your Server With ServerAvatar [ServerAvatar](https://serveravatar.com/) is a platform to simplify the hosting and management of servers and applications. It simplifies the process of deploying and managing PHP and Node.js based web applications on servers. Manually applying all these hardening steps can be time-consuming and prone to errors, especially if you manage multiple servers or client projects. That’s where **ServerAvatar** makes the difference. It automates and simplifies server management, so you can focus on running your applications instead of worrying about vulnerabilities and configurations. ![ServerAvatar Dashboard](https://serveravatar.com/wp-content/uploads/2025/10/image-74-1024x463.png)- **Automated Security Configurations** - Automatically configures a secure firewall when you connect or deploy a server. - Disables unnecessary services and sets strict firewall rules instantly. - No need to manually edit configuration files or remember complex commands. ![Firewall - ServerAvatar](https://serveravatar.com/wp-content/uploads/2025/10/image-59-1024x289.png)- **Safe User Access and Authentication** - Create and manage non-root users securely. - Disable password and root login in one click. - Enable automatic security updates effortlessly. - Change the default SSH Port easily. - Ensures only authorized users can access your server while keeping hackers out. ![Security - ServerAvatar](https://serveravatar.com/wp-content/uploads/2025/10/image-60-1024x483.png)- **Built-in Firewall and Fail2Ban Protection** - Enable or manage firewalls directly from the ServerAvatar dashboard. - Open or close specific ports easily. - Activate brute-force protection (Fail2Ban) to block malicious login attempts automatically. ![Fail2ban - ServerAvtar](https://serveravatar.com/wp-content/uploads/2025/10/image-61-1024x445.png)- **Automated Backups and Restore** - Automate instant backups for all your applications and databases. - Schedule backups as per your requirements. - Restore data instantly in case of failure or attack, all with one click. ![Linux Server Hardening](https://serveravatar.com/wp-content/uploads/2025/10/image-62-1024x233.png)[![Blog banner - ServerAvatar](https://serveravatar.com/wp-content/uploads/2025/09/728_90-Banner-1-1024x127.png)](https://serveravatar.com?ref=blog)- **SSL Management Made Simple** - One-click automatic and free SSL installation for all your websites. - Automatic certificate renewal to ensure continuous HTTPS security. - No manual configuration or command-line setup required. - You can also install your own SSL Certificate if you want. ![SSL Certificate - ServerAvatar](https://serveravatar.com/wp-content/uploads/2025/10/image-63-1024x422.png)- **Real-Time Log Monitoring and Alerts** - Built-in server health monitoring tracks CPU, memory, and disk usage. - Receive alerts for unusual or potentially dangerous activity. - Detect performance or security issues before they affect uptime. ![Real Time Monitoring - ServerAvatar](https://serveravatar.com/wp-content/uploads/2025/10/image-64-1024x481.png)- **Save Time and Strengthen Security** - Manage, monitor, and secure all your servers from one unified dashboard. - Eliminate the need for multiple third-party tools or manual scripts. - Enjoy professional-grade protection for both managed and self-managed servers with just a few clicks. **In short,** Server hardening doesn’t have to be difficult. With ServerAvatar, you can secure, monitor, and manage your Linux servers effortlessly, all from a clean, intuitive dashboard. Keep your systems safe, your data protected, and your peace of mind intact, because with ServerAvatar, your server security is always in good hands. ## FAQs ### **What is the main purpose of Linux server hardening?** It’s to reduce vulnerabilities and protect your server from attacks by applying best security practices. ### **How often should I update my Linux server?** At least weekly, but critical security updates should be applied immediately. ### **Do I need both a firewall and Fail2Ban?** Yes. The firewall filters unwanted traffic, and Fail2Ban blocks malicious IPs dynamically. ### **Does ServerAvatar support both managed and self-managed servers?** Yes, ServerAvatar secures and manages both managed and self-managed servers from one dashboard. ### **Can ServerAvatar help in hardening?** Absolutely. ServerAvatar automates many of these tasks, from log monitoring to backups and server access management. ## Conclusion Securing your Linux server isn’t just about following a checklist, it’s about building a strong, ongoing defense strategy. From updating your system to managing user access and configuring firewalls, every step plays a vital role in keeping your server safe. However, doing all of this manually can be tedious, especially when you’re managing multiple servers or client projects. That’s where **ServerAvatar** steps in. With automated security configurations, built-in firewalls, real-time monitoring, and easy SSL management, it takes the complexity out of Linux server hardening. In short, ServerAvatar helps you save time, eliminate risks, and stay one step ahead of cyber threats, so you can focus on what really matters: growing your applications and business with complete peace of mind. **Categories:** Blog, Guide, Linux **Tags:** Linux Server, Linux Server Hardening --- ### [Easy Ways to Fix 504 Bad Gateway Timeout Error](https://serveravatar.com/fix-504-bad-gateway/) **Published:** October 23, 2025 **Author:** Meghna Meghwani **Content:** [![Blog banner - ServerAvatar](https://serveravatar.com/wp-content/uploads/2025/09/728_90-Banner-3-1024x127.png)](https://serveravatar.com?ref=blog)You’re trying to open a website and suddenly this frustrating message shows up – “504 Bad Gateway Timeout Error.” Look, don’t worry about it! This happens to people everywhere, every day. You didn’t mess anything up, and there are plenty of simple tricks to make it work again. I’ll explain what this error really means and help you fix it quickly. I’m keeping everything simple and straightforward. ## Different Types of Gateway Errors Now, you might see other error numbers that are similar to 504. Here’s what they mean: **502 Bad Gateway** This means there’s a problem with the connection between servers. It’s similar to 504 but happens for slightly different reasons. **503 Service Unavailable** This usually means the website is down for maintenance or the server is overloaded. **500 Internal Server Error** This is a general error that means something went wrong on the website’s server. ## What is a 504 Bad Gateway Timeout Error? When you try to access a website, your computer sends a request to another computer known as a **server** to retrieve the webpage. Occasionally, the server may take too long to respond, resulting in a **504 Gateway Timeout error**. In simple terms, this error occurs when one server fails to receive a timely response from another server it relies on to load the page. It’s similar to calling someone and waiting for them to pick up, after a long wait with no response, you eventually hang up. Likewise, your browser “hangs up” when the server doesn’t respond quickly enough. The 504 error basically means: - The server is being way too slow to answer - Something is getting in the way of the connection - The website might be broken right now - Your internet might be crawling along slowly Now, this error can show up looking different depending on which website you’re on. You might see stuff like: - “504 Gateway Timeout” - “504 Bad Gateway” - “HTTP Error 504” - “Gateway Timeout Error” But they’re all saying the same thing – the website is taking forever to load. ## Why Does This Error Happen? Well, there are tons of reasons why you might run into this error. Let me break down the most common ones for you: **Server Problems** Sometimes the website’s server is just having a rough day. Maybe way too many people are trying to get on at once. Or maybe something broke and needs fixing. **Slow Internet Connection** If your internet is moving like a snail, the website might just give up trying to connect to you properly. **Website Maintenance** The folks who take care of the website might be doing some work on it. When they’re messing around with stuff, the site can get really slow or stop working completely. **DNS Issues** DNS is basically like a phone book for the internet. If something goes wrong with it, your computer gets lost trying to find the website. **Firewall or Security Settings** Sometimes the security stuff on your computer accidentally blocks websites when it shouldn’t. **Browser Problems** Your web browser might have some old, messed up information saved that’s screwing things up. ## How to Fix 504 Bad Gateway Timeout Error Now, let’s talk about how to fix this annoying error. I’ll start with the easiest things you can try first. ## Step 1: Fix 504 Errors Step-by-Step with ServerAvatar ### What is ServerAvatar [ServerAvatar](https://serveravatar.com/) is a managed cloud hosting platform that makes it easy to deploy, manage, and monitor servers and apps without technical expertise. You can launch WordPress, Laravel, Node.js, and more on providers like DigitalOcean, Vultr, and Hetzner in just a few clicks, with automation, monitoring, and security built in. **With ServerAvatar, you can:** - Deploy and manage servers directly from ServerAvatar. - Host and manage multiple applications (WordPress, Laravel, PHP based, Node.js based, etc.). - Manage multiple servers and applications from a single dashboard. - Get built-in monitoring, backups, free automatic SSL with auto-renewal, firewall, fail2ban, and many more features to simplify your routine tasks. - Supports multiple stacks like LAMP, LEMP, OLS, Node Stack - Built-in log monitoring suite - 24/7 support by our technical experts - Affordable pricing with scalable plans ![ServerAvatar Dashbaord](https://serveravatar.com/wp-content/uploads/2025/10/image-44-1024x463.png)**WordPress installation with ServerAvatar:** [https://serveravatar.com/install-wordpress-apache-ubuntu/#install-wordpress-using-serveravatar](https://serveravatar.com/docs/application/one-click-installer/wordpress) - Log in to your ServerAvatar dashboard. - Check **resource usage (CPU, RAM, Disk I/O)** to identify server overload. [](https://storage.3.basecamp.com/5840738/blobs/806fc158-a9aa-11f0-b1eb-0242ac120005/download/image.png) ![Server Usage - ServerAvatar](https://serveravatar.com/wp-content/uploads/2025/10/image-50-1024x460.png)- Open the **logs section** to see if PHP-FPM, NGINX, or MySQL is causing delays. [](https://storage.3.basecamp.com/5840738/blobs/bf805eac-a9aa-11f0-8f6b-0242ac120004/download/image.png) ![Server Logs - ServerAvatar](https://serveravatar.com/wp-content/uploads/2025/10/image-51-1024x463.png)- If needed, **restart services** (PHP, NGINX, MySQL) directly from the panel. ![Services - ServerAvatar](https://serveravatar.com/wp-content/uploads/2025/10/image-52-1024x466.png)- Adjust **server timeout settings** in the configuration editor. ![PHP Setting - ServerAvatar](https://serveravatar.com/wp-content/uploads/2025/10/image-53-1024x465.png)- Review **firewall rules** to ensure no legitimate requests are being blocked. ![504 Bad Gateway - ServerAvatar](https://serveravatar.com/wp-content/uploads/2025/10/image-54-1024x469.png)- If high traffic is expected, **scale up your server resources** or switch to a more powerful cloud instance (ServerAvatar makes migration easy). ## With Different Method Steps: **Step 1: Wait and Try Again** This might sound too simple, but it works a lot of the time. Just wait a few minutes and then try to visit the website again. Many times, the problem fixes itself. The server might just be busy for a little while. So grab a cup of coffee, wait about 5 minutes, then come back and try again. **Step 2: Refresh Your Browser** Hit the refresh button on your browser. You know, that little circle arrow at the top of your screen. ![Chrome Browser - ServerAvatar](https://serveravatar.com/wp-content/uploads/2025/10/image-55-1024x625.png)Or you can press F5 on your keyboard. Sometimes this simple trick works because it makes your browser ask for the website again. Maybe the first time there was just a small problem that goes away the second time. **Step 3: Check if the Website is Down** Sometimes, a website might be working fine for most users, but you’re still unable to access it. To rule that out, use an uptime checker tool to see if the issue is affecting everyone or just your connection. Tools like “[Is It Down Right Now](https://www.isitdownrightnow.com/)” or “[Down for Everyone or Just Me](https://downforeveryoneorjustme.com/)” can quickly tell you whether the site is offline globally. If these tools show the website is up and running, the problem is likely on your end—possibly a local connectivity issue or browser glitch. In that case, it’s worth checking your internet connection or trying from a different device or browser. ![isitDown RightNow - ServerAvatar](https://serveravatar.com/wp-content/uploads/2025/10/image-56-1024x488.png)If the site is down for everyone, then you just need to wait. There’s nothing you can do until they fix their server. **Step 4: Clear Your Browser Cache** Your browser saves copies of websites to make them load faster next time. But sometimes these saved copies get old or broken. Here’s how to clear your cache: **For** [**Chrome**](https://www.google.com/chrome/?brand=CHBD&ds_kid=43700079555899133&gclsrc=aw.ds&gad_source=1&gad_campaignid=21030341491&gbraid=0AAAAAoY3CA5Hboa4EbMWSRLy8HhwWNThr&gclid=CjwKCAjw-svEBhB6EiwAEzSdrqLXlBWoEiwKMAoQwAi0qfbBll3DWqyx8aTbrl9LIgoPb2uyFIcGBxoC9oUQAvD_BwE)**:** - Click the three dots in the top right corner - Go to “More tools” then “Clear browsing data” - Choose “All time” and check “Cached images and files” - Click “Clear data” **For** [**Firefox**](https://www.firefox.com/en-US/?utm_campaign=SET_DEFAULT_BROWSER)**:** - Click the three lines in the top right - Go to “History” then “Clear Recent History” - Choose “Everything” and check “Cache” - Click “Clear Now” **For [Safari](https://www.apple.com/safari/):** - Click “Safari” in the menu bar - Choose “Clear History” - Select “All History” and click “Clear History” After you clear the cache, try visiting the website again. [![Blog banner - ServerAvatar](https://serveravatar.com/wp-content/uploads/2025/09/728_90-Banner-1-1024x127.png)](https://serveravatar.com?ref=blog)**Step 5: Try a Different Browser** Sometimes the problem is with your browser itself. Try opening the website in a different browser. If you normally use Chrome, try Firefox or Safari. Maybe using the **incognito mode** can also help. This mode doesn’t use your saved data or extensions, so it’s a good way to test if the problem is with your browser settings. ![Chrome Incognito Mode - ServerAvatar](https://serveravatar.com/wp-content/uploads/2025/10/image-58.png)If the website works in a different browser, then you know the problem is with your first browser. You might need to update it or reset its settings. **Step 6: Check Your Internet Connection** Make sure your internet is working properly. Try visiting other websites to see if they load fine. If other sites are also slow or not working, the problem might be your internet connection. You can try: - Restarting your router (unplug it for 30 seconds, then plug it back in) - Moving closer to your WiFi router - Calling your internet company if nothing else works **Step 7: Disable Browser Extensions** Browser extensions are little programs that add features to your browser. Sometimes they can cause problems with websites. Try turning off all your extensions and then visit the website again. If it works, then one of your extensions was causing the problem. You can turn extensions back on one by one to find which one is causing trouble. **Step 9: Change Your DNS Settings** DNS helps your computer find websites. Sometimes changing your DNS can fix connection problems. Here are some popular DNS servers you can try: - Google DNS: 8.8.8.8 and 8.8.4.4 - Cloudflare DNS: 1.1.1.1 and 1.0.0.1 To change your DNS: **On Windows:** - Go to Control Panel - Click “Network and Internet” - Click “Network and Sharing Center” - Click “Change adapter settings” - Right-click your internet connection - Choose “Properties” - Select “Internet Protocol Version 4” - Click “Properties” - Choose “Use the following DNS server addresses” - Enter the new DNS numbers **On Mac:** - Go to System Preferences - Click “Network” - Select your internet connection - Click “Advanced” - Go to the “DNS” tab - Add the new DNS numbers **Step 10: Restart Your Computer** This old trick still works sometimes. Restarting your computer clears out any temporary problems that might be causing the error. After your computer starts up again, try visiting the website. **What Website Owners Can Do** If you run a website and your visitors are getting 504 errors, here are some things you can do: **Check Your Server Resources** Make sure your server has enough power to handle all your visitors. If too many people try to visit at once, your server might get overwhelmed. You might need to: - Upgrade to a better hosting plan - Add more server memory - Use a content delivery network (CDN) **Look at Your Website’s Code** Sometimes slow or broken code can cause timeout errors. Check if: - Your database queries are too slow - Your images are too big - Your plugins are working properly - Your theme is coded well **Increase Timeout Settings** You can tell your server to wait longer before giving up. This gives slow parts of your website more time to load. Most hosting companies let you change these settings in your control panel. **Use Caching** Caching saves copies of your website so it loads faster for visitors. This can prevent timeout errors by reducing the work your server has to do. There are many caching plugins you can use, especially if you have a WordPress website. **Increase Timeout Settings** You can tell your server to wait longer before giving up. This gives slow parts of your website more time to load. Most hosting companies let you change these settings in your control panel. **Use Caching** Caching saves copies of your website so it loads faster for visitors. This can prevent timeout errors by reducing the work your server has to do. There are many caching plugins you can use, especially if you have a WordPress website. ## FAQs ### **How long should I wait before trying to fix a 504 error?** Wait about 5 minutes first. Many times the problem fixes itself quickly. ### **Will clearing my browser cache delete my passwords?** No, clearing cache only removes temporary files. Your saved passwords will stay safe ### **Is a 504 error dangerous for my computer?** No, it’s just a connection problem. It won’t hurt your computer at all. ### **Why do I only get 504 errors on one website?** That website probably has server problems. Try visiting it later. ### **Can my antivirus cause 504 errors?** Sometimes, yes. Try turning off your antivirus temporarily to test this. ## Conclusion Encountering a **504 Bad Gateway Timeout error** can be frustrating, but it’s usually a temporary issue that can be resolved with a few simple steps. Whether it’s caused by a slow server, poor connection, or configuration problem, understanding the root cause helps you fix it faster. For website owners, tools like **ServerAvatar** make diagnosing and resolving these issues much easier with built-in monitoring, log management, and quick service restarts. By maintaining a healthy server environment and optimizing your website’s performance, you can minimize downtime and ensure a smooth browsing experience for your visitors. **Categories:** Blog, Guide **Tags:** 504 bad Gateway, Timeout Error --- ### [How to Add AI to Your WordPress: A Complete Step-by-Step Guide](https://serveravatar.com/add-ai-to-your-wordpress/) **Published:** October 21, 2025 **Author:** Meghna Meghwani **Content:** [![Blog banner - ServerAvatar](https://serveravatar.com/wp-content/uploads/2025/09/728_90-Banner-3-1024x127.png)](https://serveravatar.com?ref=blog)Well, you want to add AI to your WordPress site? That sounds cool but might seem hard. Lucky for you, it’s not! You don’t need to be a pro, a techie, or anything like that. You just need to follow a few easy steps, pick the right AI tool, and you’re all set. This guide is super simple and shows you how to do it, step by step. No big words, just normal talk between friends. Let’s get started! Adding AI to WordPress means putting smart tools on your website that help you write, chat, make images, or do just about anything faster and better. AI stands for “artificial intelligence,” but don’t worry about that part too much. Just think of it as new helpers for your website. ## Why use it? - Save time writing posts or pages - Make your site look and sound better, easy - Chat with people without always being there - Do work that’s usually boring (like making images or fixing words) - Help your site show up on Google ## How it works When you use an AI plugin or tool on WordPress, it adds new buttons or features to your site. Just type what you want, and it helps you get it done. Most AI tools for WordPress run with only a few clicks. They are made for folks who want things simple**Pick the Right AI Tool** There are many different AI tools for WordPress. Here are some good ones: - [Divi AI](https://www.elegantthemes.com/ai/) (for writing and design help) - [AI Engine](https://wordpress.org/plugins/ai-engine/) (makes content, chatbots, and more) - [All In One SEO](https://aioseo.com/) (makes your Google results look better) - [10Web AI Assistant](https://10web.io/) (helps you write fast) - [SeedProd](https://www.seedprod.com/) (helps build whole sites with AI) - [Elementor AI](https://elementor.com/products/ai/) (makes new layouts and text easy) All these can do many smart things without you needing to write code or be super smart. **Plugin Name****What it does****Free or Paid?**Divi AIWrites & builds pagesPaid, free trialAI EngineContent, chat, imagesFree, paid options10Web AIWrite, rewrite, SEOFree, paid plansAll In One SEOSEO help, makes textFree, paid plansSeedProdBuild whole sites, chatPaidElementor AIText, design, imagesFree, paid plans## What is ServerAvatar [ServerAvatar](https://serveravatar.com/) is a managed cloud hosting platform that makes it easy to deploy, manage, and monitor servers and apps without technical expertise. You can launch WordPress, Laravel, Node.js, and more on providers like DigitalOcean, Vultr, and Hetzner in just a few clicks, with automation, monitoring, and security built in. **With ServerAvatar you can** - Deploy and manage servers directly from ServerAvatar. - Host and manage multiple applications (WordPress, Laravel, PHP based, Node.js based, etc.). - Manage multiple servers and applications from a single dashboard. - Get built-in monitoring, backups, free automatic SSL with auto-renewal, firewall, fail2ban, and many more features to simplify your routine tasks. - Supports multiple stacks like LAMP, LEMP, OLS, Node Stack - Built-in log monitoring suite - 24/7 support by our technical experts - Affordable pricing with scalable plans Install WordPress in ServerAvatar Guide : – ![ServerAvatar Dashboard](https://serveravatar.com/wp-content/uploads/2025/10/image-79-1024x463.png)[![Blog banner - ServerAvatar](https://serveravatar.com/wp-content/uploads/2025/09/728_90-Banner-1-1024x127.png)](https://serveravatar.com?ref=blog)## Add a Plugin to Your WordPress So, adding an AI tool to your site is like adding a simple app on your phone. Here’s how: - Log in to WordPress (just go to yoursite.com/wp-admin) - Go to the menu on the left and click Plugins - Click Add Plugin - In the search bar, type the name of the AI plugin you want (for example: AI Engine) - Click Install Now next to the one you want - After it installs, click Activate ![AI Engine Plugin - ServerAvatar](https://serveravatar.com/wp-content/uploads/2025/10/image-47-1024x447.png)Now the plugin is on your site. 1. Go to the Meow Apps > AI Engine in your menu 2. If it asks for an API key (from OpenAI), get one: - The plugin shows a link to make an account. Sign up - Find “Create secret key,” copy it, and paste it into the plugin settings 3. Save your settings ![Add Ai - ServerAvatar ](https://serveravatar.com/wp-content/uploads/2025/10/image-48-1024x432.png)4\. Now you can go to any post or page and use AI Engine to write, make images, or even add a chatbot. ## How to Use AI Writer for a Blog Post 1. Open a new or old post 2. Look for a “Generate with AI” button 3. Type what you want (like: “Write about easy pasta recipes”) 4. Click to let AI write for you 5. Change the words if you want, and save It’s really just that! ![Use of Ai in text - ServerAvatar](https://serveravatar.com/wp-content/uploads/2025/10/image-49-1024x450.png)## Need a Chatbot? Here’s a Simple Way 1. Install a chatbot plugin (like Tidio or AI Engine) 2. Go to its settings in your WordPress dashboard 3. Follow setup steps (might need another API key—the plugin explains how) 4. Pick what your bot should say first, like “Hi, how can I help?” 5. Save and turn on the chatbot 6. Test on your site—see AI answer questions ## Tips for Using AI Easy - Always check what AI writes. Sometimes it’s a little weird or not right. - Make words sound more like you by editing them. - Don’t use only AI if you want your site to feel personal. - Try small tasks first, then bigger ones. - Keep your plugin up to date for new stuff. ## FAQ ### **Do I need to know code?** Nope! Almost all AI work in WordPress is just clicking buttons and typing what you want. ### **Is it free?** Many plugins have a free plan, but sometimes they limit what you can do. If you want more, you can pay. ### **Will my site be safe?** As long as you use well-known plugins and keep them updated, your site should stay safe. ### **Can AI write my whole website?** Yes, but it’s best to check and tweak what AI writes, so it sounds like you. ### **Can I use more than one AI plugin?** Most of the time, yes, but don’t use too many or your site might slow down. ## Conclusion So, that’s it! With just a few clicks, some typing, and a quick check, you can add AI to your WordPress site and make things much easier. Don’t try to do everything in one go, start small, test things out, and see how it works for you. Pick the plugin you like best, and let AI help with writing, images, design, or even talking to visitors. As you get used to it, you’ll find yourself saving time and getting more done. AI is like having a little helper on your site 24/7 so go ahead and try it today. **Categories:** Blog, Guide, WordPress **Tags:** Wordpress, WordPress Ai --- ### [How to Build a Multilingual WordPress Site with Polylang](https://serveravatar.com/multilingual-wordpress-with-polylang/) **Published:** October 20, 2025 **Author:** Meghna Meghwani **Content:** [![Blog banner - ServerAvatar](https://serveravatar.com/wp-content/uploads/2025/09/728_90-Banner-3-1024x127.png)](https://serveravatar.com?ref=blog)Creating a step-by-step guide for a blog post requires providing accurate, actionable instructions. To ensure the content is unique and comprehensive, I need to outline the process of setting up Polylang on a WordPress site. I’ll search for the current best practices and the necessary steps. Here are the search queries: Absolutely! Creating a multilingual site with [Polylang](https://polylang.pro/) is a powerful, free way to expand your audience. Below is a comprehensive, step-by-step guide formatted as a unique blog post. ## How to Build a Multilingual WordPress Site with Polylang: A Step-by-Step Guide The internet is global, and your website should be too. By translating your WordPress site, you open your content to a new world of readers, dramatically boosting your traffic and authority. Fortunately, you don’t need a massive budget or a complex development team to achieve this. **Polylang** is the most popular, free solution for turning any WordPress site into a multilingual powerhouse. It lets you create separate, connected versions of your posts, pages, categories, and tags for each language you support. Here is the definitive, step-by-step process for building your multilingual site with Polylang. ## What is ServerAvatar [ServerAvatar](https://serveravatar.com/) is a managed cloud hosting platform that makes it easy to deploy, manage, and monitor servers and apps without technical expertise. You can launch WordPress, Laravel, Node.js, and more on providers like DigitalOcean, Vultr, and Hetzner in just a few clicks, with automation, monitoring, and security built in. With ServerAvatar, you can: - Deploy and manage servers directly from ServerAvatar. - Host and manage multiple applications (WordPress, Laravel, PHP-based, Node.js based, etc.). - Manage multiple servers and applications from a single dashboard. - Get built-in monitoring, backups, free automatic SSL with auto-renewal, firewall, fail2ban, and many more features to simplify your routine tasks. - Supports multiple stacks like LAMP, LEMP, OLS, Node Stack - Built-in log monitoring suite - 24/7 support by our technical experts - Affordable pricing with scalable plans ![ServerAvatar Dashboard](https://serveravatar.com/wp-content/uploads/2025/10/image-79-1024x463.png)**Install WordPress With ServerAvatar** ## Step 1: Installation and Initial Setup The journey begins in your WordPress dashboard. **1. Install Polylang** 1. Navigate to **Plugins** → **Add New**. 2. Search for **“Polylang”**. 3. Click **Install Now** next to the Polylang plugin (by Pierre Abogo). 4. Click **Activate**. ![Polylang - ServerAvatar](https://serveravatar.com/wp-content/uploads/2025/10/image-22-1024x405.png)**2. Run the Setup Wizard** Upon activation, Polylang will prompt you to start a quick setup wizard. If it doesn’t, navigate to **Languages** in your WordPress sidebar. **A. Add Your Languages** The first step is selecting the languages you want to use on your site. 1. In the dropdown menu, select your **base (default) language** (e.g., English) and click **Add new language**. 2. Repeat this for every **target language** you plan to support (e.g., Spanish, German, French). 3. Click **Continue**. ![Polulang Setup - ServerAvatar](https://serveravatar.com/wp-content/uploads/2025/10/image-23-1024x762.png)**B. Translate Media Settings** Polylang will ask if you want to allow media to be translated. - **Recommendation:** Toggle this feature **ON**. This allows you to translate the title, description, and Alt Text of your images, which is crucial for multilingual SEO. - Click **Continue**. ![Ploylang language Selection - ServerAvatar](https://serveravatar.com/wp-content/uploads/2025/10/image-24-1024x645.png)**D. Finish Setup** You’re done with the initial configuration! Click **Return to the Dashboard**. ## Step 2: Configuring URL Structure and Settings Next, we need to finalize the way your new languages will appear in your site’s URLs. 1. Go to **Languages** → **Settings** → **URL modifications**. 2. **Choose a Format:** The most common and SEO-friendly option is to use **Subdirectories** (e.g., yoursite.com/es/ for Spanish). Polylang also offers to use subdomains or unique domains for each language, but subdirectories are the simplest for a standard setup. ![Select Permalink Type - ServerAvatar](https://serveravatar.com/wp-content/uploads/2025/10/image-25-1024x342.png)**SEO Tip:** Ensure the checkbox for **Hide URL language information for the default language** is *unchecked*. This forces your default language (e.g., English) to also have a subdirectory (/en/), which helps prevent duplicate content issues in the eyes of search engines. **Save Changes**. ## Step 3: Translating Content (Posts and Pages) This is the core of the process: creating your translated content. Polylang links translations together, so you only translate the content once and the platform handles the connection. **1. Translate a Post or Page** 1. Go to **Posts** → **All Posts** (or Pages → All Pages). 2. In the list, you’ll see a column with flags for all your added languages. A checkmark means it’s translated; a **plus icon (+)** means a translation is missing. 3. Click the **plus icon** next to the post you want to translate for your target language (e.g., Spanish). ![Translate Post and Page - ServerAvatar](https://serveravatar.com/wp-content/uploads/2025/10/image-26-1024x421.png)4\. This will open a **new, blank WordPress editor**. 5\. **Translate everything:** Manually translate the **title**, the entire **content**, the **URL slug**, the **SEO title/meta description** (if using an SEO plugin), and the **featured image metadata** (if you enabled media translation). 6\. Once complete, click **Publish**. **2. Linking the Translations** When you publish the translation, Polylang automatically links it to the original post. In the post editor sidebar under the **“Languages”** metabox, you will see all languages listed. The one you just translated will show a pencil icon, and the other language(s) will have a plus sign to add a new translation. ## Step 4: Translating Taxonomies, Menus, and Widgets To create a seamless multilingual experience, you must translate all structural elements. **1. Translate Categories and Tags** 1. Navigate to **Posts** → **Categories** (or Tags). 2. Similar to posts, you will see a flags column. Click the **plus icon** (+) to add a translation for each category. 3. Provide the translated name and slug, and click **Add New Category.** ![Post Categories - ServerAvatar](https://serveravatar.com/wp-content/uploads/2025/10/image-27-1024x450.png)**2. Translate Menus** Your navigation menus must also be translated so users see the correct links in their chosen language. 1. Go to **Appearance** → **Menus**. 2. Create your main menu for your **default language** (e.g., “Main Menu – EN”). 3. At the top of the menu screen, you’ll find a new language selector. Switch the language to your **target language** (e.g., Spanish). 4. Click **“create a new menu”** and name it (e.g., “Main Menu -Portugues”). 5. Add the **translated versions** of your pages/posts to this new menu. ![Add Language in Menu - ServerAvatar](https://serveravatar.com/wp-content/uploads/2025/10/image-28-1024x389.png)6\. **Crucial:** Assign this newly created menu to the correct theme location (e.g., “Primary Navigation” or “Header Menu”). **3. Translate Theme and Plugin Strings** Polylang also helps translate static text that isn’t part of your regular posts/pages, such as theme text, widget titles, and footer copyright information. 1. Go to **Languages** → **String Translations**. 2. Here, you’ll find a list of all untranslated text strings from your theme and plugins. 3. Enter the translation for each string in the respective language column and click **Save Changes**. ![Language Translation Sample - ServerAvatar](https://serveravatar.com/wp-content/uploads/2025/10/image-29-1024x430.png)[![Blog banner - ServerAvatar](https://serveravatar.com/wp-content/uploads/2025/09/728_90-Banner-1-1024x127.png)](https://serveravatar.com?ref=blog)## Step 5: Adding the Language Switcher The language switcher is the bridge that allows users to move between the different language versions of your site. Go to Appearance Then click on menus ![WordPress Menus - ServerAvatar](https://serveravatar.com/wp-content/uploads/2025/10/image-30-1024x347.png)After That Add Language Switcher in Main Menu then click on save ![Add Languages Switcher in Menu - ServerAvatar](https://serveravatar.com/wp-content/uploads/2025/10/image-31-1024x537.png)Now Go to **Appearance** → Editor. ![WordPress Editor -ServerAvatar ](https://serveravatar.com/wp-content/uploads/2025/10/image-32-1024x340.png)Then Navigate to Patterns where you can find **Header** and **Footer Section** ![Edit Header - ServerAvatar](https://serveravatar.com/wp-content/uploads/2025/10/image-33-1024x432.png)Now go to navigation section then click on 3 dots and select main menu from given list ## FAQs ### **1. Does Polylang translate my content automatically?** Polylang is a **translation management system**, not an automatic translator. It provides the structure to link your translated pages, but you must manually provide the content translation yourself or integrate with a professional service. ### **2. Is Polylang good for multilingual SEO?** Yes, Polylang is **SEO-friendly**. It correctly implements the necessary hreflang HTML tags to tell search engines which language version of a page to show users in different regions, preventing duplicate content issues. ### **3. How do I translate my main menu and widgets?** You must create a **separate menu** for each language in **Appearance → Menus**, containing the translated links. Widget visibility can be controlled or translated via the language settings in **Appearance → Widgets**. ### **4. What is the best URL structure for Polylang?** The best and most SEO-recommended structure is **subdirectories** (e.g., yoursite.com/es/). You can configure this under **Languages → Settings → URL modifications** in your WordPress dashboard. ### **5. Can I use Polylang with WooCommerce?** Yes, but you will need the companion plugin, **Polylang for WooCommerce** (a paid add-on). This allows you to translate products, categories, shipping classes, and synchronize prices across languages. ## Conclusion With Polylang installed and configured, your content is now accessible to a global audience. Remember that creating a truly multilingual site is an ongoing process—ensure you translate every new piece of content and update all menus and strings to keep your user experience flawless for every language. **Go global!** **Categories:** Blog, Ubuntu, WordPress **Tags:** Wordpress, Wordpress Plugin --- ### [Shared vs Managed WordPress Hosting: Which is Right for Your Site?](https://serveravatar.com/shared-vs-managed-wordpress-hosting/) **Published:** October 19, 2025 **Author:** Meghna Meghwani **Content:** [![Blog banner - ServerAvatar](https://serveravatar.com/wp-content/uploads/2025/09/728_90-Banner-3-1024x127.png)](https://serveravatar.com?ref=blog)Choosing the right hosting for your WordPress site is one of the most important decisions you’ll make for your online success. Your hosting impacts site speed, security, uptime, and even SEO rankings. As ServerAvatar, a hosting automation platform, we’ve seen how the right choice can accelerate growth, while the wrong one can hold a website back. With ServerAvatar, you can directly host a server on a top cloud provider such as DigitalOcean, Vultr, Hetzner, (Linode coming soon), and manage it from the ServerAvatar platform under your control, without the hassle. You can manage both shared servers and the managed server (fully controlled by you) very easily with ServerAvatar. So, let’s break it down: should you go with shared hosting or managed WordPress hosting? ## What is Shared WordPress Hosting? Shared WordPress Hosting is a type of web hosting service where multiple websites are hosted on the same server, sharing its resources such as CPU, RAM, disk space, and bandwidth. It is same as renting an apartment with roommates. Everyone shares the same kitchen, bathroom, and living room. It is one of the most affordable hosting options available, making it popular among beginners and small businesses who use WordPress as their content management system (CMS). **Key Features of Shared WordPress Hosting:** - **Cost-Effective:** As resources are shared among multiple websites, the cost is significantly lower compared to other hosting types, like VPS or dedicated hosting. - **Easy Setup:** Many shared WordPress hosting plans come with one-click installations, so even beginners can quickly set up their WordPress websites. - **Managed Services:** In most cases, the hosting provider takes care of server maintenance, security updates, and backups, allowing users to focus on building their website rather than server management. - **Pre-Optimized for WordPress:** Shared WordPress hosting plans often come with built-in features specifically designed for WordPress, such as automatic updates, pre-configured caching, and performance optimizations. - **Limited Resources:** As the server resources are shared with other websites, your site’s performance may be affected if other websites on the same server consume too many resources. - **Scalability:** Shared hosting is generally not the best option for high-traffic sites. As your website grows, you may need to upgrade to a more powerful hosting plan, like VPS or dedicated hosting. **Pros:** - **Affordable:** The most budget-friendly option for hosting WordPress websites. - **Ease of Use:** Perfect for beginners with user-friendly control panels and setup tools. - **Support:** Most providers offer WordPress-specific customer support to help troubleshoot common issues. **Cons:** - **Performance Limitations:** Limited resources may lead to slower load times, especially during high traffic. - **Less Control:** You have limited control over the server configuration, which might be restrictive for advanced users. - **Security Risks:** Sharing a server with other websites can expose your site to security vulnerabilities if other websites are compromised. **Best For:** - Small businesses - Personal blogs - Startup websites - Users looking for an affordable and simple hosting solution for WordPress. **ServerAvatar Tip:** Even if you start on shared hosting, you can easily migrate to a VPS and manage it via ServerAvatar for better performance. ## What is Managed WordPress Hosting? Managed WordPress Hosting is a specialized hosting service where the hosting provider takes care of all aspects of server management, maintenance, security, performance optimization, and updates specifically for WordPress websites. Unlike shared hosting, where users have to manage most tasks themselves, managed WordPress hosting is designed to offer a hands-off experience for users, allowing them to focus on their content while the hosting provider handles the technical side. With managed hosting, you don’t just get a server; you get peace of mind. It’s built for businesses, agencies, and e-commerce stores that can’t afford downtime. **Key Features of Managed WordPress Hosting:** - **Automatic Updates:** Managed hosting providers automatically update WordPress core, themes, and plugins to ensure your site is secure and running the latest features without manual intervention. - **Enhanced Security:** Managed WordPress hosts implement advanced security measures such as daily malware scanning, firewalls, and automatic backups to protect your site from attacks and data loss. - **Optimized Performance:** These hosts use caching, Content Delivery Networks (CDNs), and other performance-enhancing technologies to ensure fast page load times and smooth user experiences, even with high traffic. - **Backup and Restore:** Automatic daily backups are often included, with the ability to easily restore your website to a previous state if anything goes wrong. - **Expert Support:** Managed WordPress hosting typically includes support from experts who understand WordPress inside and out, meaning you get tailored help with WordPress-specific issues. - **Staging Environments:** Many providers offer staging environments where you can test changes to your site before deploying them live, reducing the risk of breaking your site. - **Free SSL Certificates:** SSL certificates are often provided at no extra charge to ensure secure connections for your visitors and improve SEO. - **High Availability and Scalability:** These hosts offer better uptime, server performance, and scalability, ensuring your site can handle traffic spikes without crashing. **Pros:** - **Convenience:** All server management tasks (updates, backups, security) are taken care of by the hosting provider, freeing up your time. - **Security:** Proactive security measures like malware scanning, firewalls, and updates help keep your site safe. - **Performance Optimization:** Hosting providers offer faster speeds with caching, CDNs, and other performance-enhancing technologies. - **Expert Support:** Access to specialized support that understands the intricacies of WordPress and can help resolve any issues. - **Automatic Backups:** Regular backups ensure your site is protected, and you can restore it if anything goes wrong. **Cons:** - **Cost:** Managed WordPress hosting is typically more expensive than shared hosting, making it less ideal for users on a tight budget. - **Limited Flexibility:** Some managed hosting providers may restrict the use of certain plugins or require that you follow specific configurations to ensure optimal performance. - **Less Control:** You have less control over server settings compared to VPS or dedicated hosting, which may be a disadvantage for advanced users who want full customization. **Best For:** - **Businesses:** That need a reliable, secure, and high-performing website without dedicating resources to server management. - **Bloggers and Content Creators:** Who want to focus on creating content rather than managing the technical aspects of their site. - **E-commerce Sites:** Especially for those using platforms like WooCommerce, where performance and security are critical. - **High-Traffic Sites:** Sites that expect large traffic volumes can benefit from the enhanced performance and reliability of managed hosting. **ServerAvatar Tip:** With ServerAvatar, you can create your own “managed hosting” experience for clients by offering isolated servers + automated management. ## Shared vs Managed WordPress Hosting: Key Differences[](https://storage.3.basecamp.com/5840738/blobs/3cca3d1c-9de7-11f0-a503-0242ac120004/download/image.png) FeatureShared WordPress HostingManaged WordPress Hosting**Cost**Very cheap (starts from £3–£5/month)Premium pricing (usually £20–£30+/month)**Performance**Slower during traffic spikes (shared resources)Optimized for speed with dedicated resources**Security**Basic security, shared server risksAdvanced security, daily malware scans, firewalls**Backups**Not always included or manualAutomated daily backups included**Updates & Maintenance**You handle updates manuallyAutomatic WordPress core, theme & plugin updates**Support**Limited, general hosting supportExpert WordPress-specific support**Control**Limited server controlFull control (or hands-off if fully managed)**Scalability**Hard to scale without migrationEasy scaling with staging & migration tools**Ideal For**Beginners, blogs, low-traffic sitesBusinesses, WooCommerce stores, agencies**With ServerAvatar,** you can start small and scale easily without changing your management workflow. [![Blog banner - ServerAvatar](https://serveravatar.com/wp-content/uploads/2025/09/728_90-Banner-1-1024x127.png)](https://serveravatar.com?ref=blog)## Why Choose ServerAvatar for WordPress Hosting? [ServerAvatar](https://serveravatar.com/) is a platform to simplify the hosting and management of servers and applications. It simplifies the process of deploying and managing PHP and Node.js based web applications on servers. ![Shared vs Managed WordPress Hosting - ServerAvatar](https://serveravatar.com/wp-content/uploads/2025/10/image-44-1024x463.png)If you’re looking for a flexible, secure, and scalable hosting environment for your WordPress site, **ServerAvatar** offers a powerful alternative to traditional shared and managed hosting providers. **Here’s what sets ServerAvatar apart:** - **Top Cloud Provider Integration:** Easily deploy managed servers on DigitalOcean, Vultr, Hetzner, (Linode coming soon), all from one centralized dashboard. Without requiring a cloud provider account. - **One-Click Application Installation:** Easily install [WordPress](https://serveravatar.com/docs/application/one-click-installer/wordpress/), Mautic, n8n, and other popular applications with a one-click application installer. - **Isolated Environment:** Every application runs in its own secure, isolated environment with separate system users. This ensures enhanced security and prevents unauthorized access between different applications on the same server. - **Built-in Security & Backups:** Enjoy features like automatic free SSL, firewall, fail2ban, automatic backups, and secure SFTP/SSH access for all your applications. - **Optimized Performance:** With one-click WordPress installer, PHP/Node.js support, and server-level caching, your sites stay fast and reliable. - **Easy Migration & Scalability:** Start small and scale as your traffic grows. ServerAvatar makes it seamless to upgrade without downtime. - **24/7 Support:** Get expert assistance whenever you need help with your servers or applications. - **Scalable Infrastructure:** Scale your server resources as your business grows directly from the ServerAvatar dashboard. Whether you’re running a WooCommerce store, managing multiple client sites, or simply want more control over your hosting environment, ServerAvatar provides you with a fully managed hosting server, complete with all the management features, all at a minimal panel charge. ## When Should You Choose Shared Hosting? Shared hosting works best if: - You’re a beginner testing the waters. - You have a blog, portfolio, or small site with under 5,000 visitors/month. - You’re on a tight budget. **Pro Tip:** When your site outgrows shared hosting, ServerAvatar makes it easy to migrate to your own VPS in minutes. ## When Should You Choose Managed Hosting? Managed hosting is ideal for: - WooCommerce stores where downtime = lost sales. - Business websites that demand consistent uptime. - Agencies managing multiple client sites. **Pro Tip:** With ServerAvatar, you can automate backups, SSL, and performance monitoring, just like top managed hosting providers do. ## Shared vs Managed Hosting for WooCommerce Stores WooCommerce isn’t just a plugin, it’s a **resource-hungry eCommerce engine**. Shared hosting often struggles under its load, leading to slow checkout pages and lost customers. If you run an e-commerce store, shared hosting can quickly slow you down because it doesn’t handle heavy traffic or resource-demanding plugins well. By moving to a VPS and managing it with **ServerAvatar**, you get faster speeds, stronger reliability, and full control over your site’s performance. In simple terms, it’s just like the difference between riding a bicycle and driving a sports car, both get you to your destination, but one does it much faster and with far more power. ## Frequently Asked Questions ### 1. Can I switch from shared to managed hosting? Yes! And with ServerAvatar, migrating to a VPS or managed environment is simple and hassle-free. ### **2. Is managed hosting worth it?** For personal blogs, maybe not. But for business-critical sites, absolutely, the speed, security, and reliability pay for themselves. ### **3. Do I still need cPanel if I use ServerAvatar?** No. ServerAvatar is a lightweight alternative to cPanel, designed for modern server and application management. ### **4. Can I create my own managed hosting for clients?** Yes! With ServerAvatar, you can offer VPS-based managed hosting services under your brand. ### **5. What if I outgrow shared hosting suddenly?** No worries, ServerAvatar lets you scale to a VPS seamlessly without downtime. ## Conclusion So, which is right for you? - **Shared hosting** is a good start, affordable and easy, but limited. - **Managed hosting** is the better long-term choice for businesses and stores that can’t afford risks. With ServerAvatar, you don’t have to choose forever. Start with small managed server hosting, then scale it up as your resources and traffic grow. All under one simple dashboard. ServerAvatar gives you the power to create your own managed hosting environment, without paying high monthly fees to big hosting companies. **Categories:** Blog, WordPress **Tags:** Wordpress, WordPress Hosting --- ### [ServerAvatar Sandbox: Instant, Self-Destructing WordPress Sites](https://serveravatar.com/serveravatar-sandbox/) **Published:** October 18, 2025 **Author:** Meghna Meghwani **Content:** [![Blog banner - ServerAvatar](https://serveravatar.com/wp-content/uploads/2025/09/728_90-Banner-3-1024x127.png)](https://serveravatar.com?ref=blog)Modern web development often requires a safe space to try new ideas, share proposals with clients, or test plugins/themes without risking a live site. That’s where [**ServerAvatar**](https://serveravatar.com/) **Sandbox** comes in, a free, open-source platform designed to spin up WordPress sites in seconds, use them temporarily, and then let them vanish. No long setup, no remaining mess. In this post, we’ll explore what Sandbox is, how it works, its key features, use cases, how to self-host it, and tips for users. ## What Is ServerAvatar? [ServerAvatar](https://serveravatar.com/) is a managed cloud hosting platform that simplifies the hosting and management of servers and applications. It provides: - **Easy Hosting & Management:** A managed cloud hosting platform designed to simplify server and application hosting and management. - **Seamless App Deployment:** Quickly deploy and manage PHP and Node.js applications with ease. - **Intuitive Dashboard:** User-friendly interface with one-click application installation and automated server configurations. - **Isolated Environment:** Every application runs in its own secure, isolated environment with separate system users. This ensures enhanced security and prevents unauthorized access between different applications on the same server. - **Built-in Security:** Includes robust security features to protect your servers and applications. - **Multi-Server Management:** Easily manage multiple servers from a single dashboard. - **SFTP/SSH Access:** Enable secure access to your server files and applications. - **Performance Monitoring:** Track and monitor server performance in real time. - **No SysAdmin Knowledge Needed:** Ideal for developers and businesses looking to avoid complex system administration tasks. ![ServerAvatar Dashboard](https://serveravatar.com/wp-content/uploads/2025/10/image-44-1024x463.png)## What Is Sandbox? ServerAvatar [Sandbox](https://sandbox.serveravatar.com/) is a platform that allows anyone to deploy a **throwaway WordPress site** almost instantly. Within ~30 seconds, you get a fully functional WordPress site with admin credentials. The catch, and the beauty, is that the site is temporary: it **auto-deletes after 24 hours** (or a configured time). - It’s **open source**, so you can host and customize it yourself. - It uses ServerAvatar under the hood for the deployment mechanisms (via API integration). - It comes with SSL by default and isolates each site environment to keep things secure. - In short: instant WordPress, zero commitment, built for testing and demos. ## Why Use Sandbox? (Use Cases) This kind of tool is especially useful in several scenarios: 1. **Plugin/theme testing:** Want to see how a plugin behaves in a fresh install? Sandbox gives you a clean slate instantly, so you can test without interference from existing customizations. 2. **Client demos/proposals:** Rather than sending a mockup or screenshot, spin up a working site that clients can click through. You can even let them log in. 3. **Training/tutorials:** For courses or workshops, having learners use a live WordPress instance is more instructive than local or dummy setups. 4. **Temporary proof-of-concept (PoC):** Build something small to validate an idea or experiment with integrations, then let it disappear. 5. **Debugging/reproduction:** Try to replicate an issue in a minimal environment to isolate where a bug is coming from. ## Core Features - **Instant Deployment:** Spin up a fully functional WordPress site in about 30 seconds. - **Self-Destructing Sites:** Sites automatically delete after 24 hours or a custom time. - **Full Admin Access:** Access WordPress admin, database credentials, and install plugins/themes. - **SSL & Environment Isolation:** Secure, isolated environments for safe testing. - **Easy Sharing:** Share live sites and info pages with clients or team members. - **Open Source & Self-Hostable:** Run your own instance and customize settings freely. - **Email Notifications:** Receive reminders before a site is deleted. ## Getting Started with ServerAvatar Sandbox ServerAvatar Sandbox is the easiest way to create instant, self-destructing WordPress sites for testing, client demos, or temporary projects. Follow this guide to get your first Sandbox site up and running in minutes. **Step 1: Visit the Sandbox Website** - Go to [https://sandbox.serveravatar.com](https://sandbox.serveravatar.com/). You’ll land on the homepage, where you can immediately start creating your temporary WordPress site. ![ServerAvatar Sandbox - ServerAvatar](https://serveravatar.com/wp-content/uploads/2025/10/image-35-1024x623.png)**Step 2: Create WordPress Site** - On the homepage, enter the name for your site, select the checkbox for getting the site info, and to get a reminder before deleting the site in your inbox, enter your email address. - Click on the **“Create Throwaway Site”** button. Sandbox will begin deploying your site automatically. ![Fill information - ServerAvatar](https://serveravatar.com/wp-content/uploads/2025/10/image-36.png)**Step 3: Wait for Deployment** - The platform spins up a WordPress site in about 30 seconds. You’ll see a progress indicator while your site is being created. ![Create Instant WordPress - ServerAvatar](https://serveravatar.com/wp-content/uploads/2025/10/image-37-1024x662.png)**Step 4: Access Your Site Info** Once deployment is complete, you’ll see an **Info Page** containing: - WordPress site information - Admin username and password - DNS record - Time remaining until site deletion - Database credentials - Site URL - PHP settings[](https://storage.3.basecamp.com/5840738/blobs/9b2c64ba-a0f4-11f0-ba4f-0242ac120004/download/image.png) ![Site Information - ServerAvatar](https://serveravatar.com/wp-content/uploads/2025/10/image-38-1024x604.png)**Step 5: Log in to WordPress** Click on the login button under the **WordPress Admin** section, and use the given admin credentials to log in to your new WordPress site. You now have full access to: - Install and test plugins - Customize themes - Add and edit content - Experiment safely without affecting live sites ![Wordpress Admin - ServerAvatar](https://serveravatar.com/wp-content/uploads/2025/10/image-39-1024x521.png)**Step 6: Access PHPMyAdmin** You can easily access and log in to PHPMyAdmin using the given credentials to check the database-related details. Click on the highlighted “AccessphpMyAdmin” under the Database section, and use the given database credentials to access your database. You now have full control to: - Browse and manage database tables - Run SQL queries - Import and export databases - Create, edit, or delete records safely Additionally, you can see all the “PHP Settings” such as PHP Version, Memory Limit, Max Execution Time, Max input Time, Upload Max Filesize, Post Max Size, and Max Input Variables on the page. ![PHP Setting - ServerAvatar](https://serveravatar.com/wp-content/uploads/2025/10/image-40-1024x582.png)**Step 6: Share with Clients or Team** If you want someone else to see or use the site, you can share the **Page** link. They’ll have access to the live site and can explore your demo or test environment. **Step 7: Save Important Work** Remember, Sandbox sites are **temporary**. By default, they auto-delete after 24 hours. If you want to keep your work, export content, save themes/plugins, or take screenshots before the site disappears. **Step 8: Optional Email Reminder** If you provide an email during setup, Sandbox will send you a notification before deletion so you have a chance to save anything important. [![Blog banner - ServerAvatar](https://serveravatar.com/wp-content/uploads/2025/09/728_90-Banner-1-1024x127.png)](https://serveravatar.com?ref=blog)## Self-Host Sandbox For Advanced Users While the public instance at “[sandbox.serveravatar.com](https://sandbox.serveravatar.com/)” offers a zero-click option, many power users or agencies may prefer to run their own version. The [GitHub repository](https://github.com/adarshsojitra/sandbox) (under adarshsojitra/sandbox) provides instructions for setup and customization. Please note that to deploy the Self-Host Sandbox, a ServerAvatar account with API access is required for server integration. ![Create WordPress Website - ServerAvatar](https://serveravatar.com/wp-content/uploads/2025/10/image-41-1024x659.png)Here’s an overview of what’s involved: 1. **Prerequisites** - PHP 8.1+ - Composer - MySQL 5.7+ / MariaDB 10.3+ - Node.js & NPM - ServerAvatar account with API access (for server integration) - Cloudflare account with API access (optional, for DNS management) Refer to the attached link to check out the installation process of self-host Sandbox on your own system: Running your own instance means you have **full control** over every aspect, from site lifetime to domain names to resource constraints. ![Self-host Sandbox - ServerAvatar](https://serveravatar.com/wp-content/uploads/2025/10/image-42-1024x330.png)For developers or agencies who want full control, you can easily **self-host Sandbox** by following the GitHub instructions and installation guide using the link given above. ![Select Server - ServerAvatar](https://serveravatar.com/wp-content/uploads/2025/10/image-43.png)Please note that all the above given servers in the selected servers section are the servers that are recommended for the Self Host Sandbox, as the web servers are restarted after installing an application, so it may show an error. ## Benefits - **Time-Saving:** No manual setup; get a ready-to-use WordPress site instantly. - **Risk-Free Testing:** Experiment with plugins, themes, or custom code without affecting live sites. - **Perfect for Demos:** Easily showcase sites to clients or stakeholders. - **Clean & Organized:** Temporary sites prevent server clutter and unused sites. - **Flexible Workflow:** Customize site lifetime, sharing, and environment settings. - **Secure Environment:** SSL and isolation ensure safe testing and realistic site behavior. - **Supports Learning & Experimentation:** Great for training, tutorials, or proof-of-concept projects. ## Limitations - **Data permanence:** By design, sites expire. Make sure to save anything you want (content, uploads, settings) before deletion. - **Security and misuse:** Since credentials are shared in info pages, be cautious who you share links with. - **Not for production use:** It’s a throwaway environment, not designed for long-term or mission-critical sites. ## Frequently Asked Questions (FAQ) ### **1. What is ServerAvatar Sandbox?** ServerAvatar Sandbox is a free, open-source tool that lets you instantly create temporary WordPress sites. These sites are fully functional but self-destruct after 24 hours (or a custom time). ### **2. How long does it take to deploy a site?** Usually around 30 seconds. Once you click “Create Throwaway Site,” Sandbox automatically spins up a new WordPress environment. ### **3. Can I use Sandbox for production websites?** No. Sandbox is designed only for temporary use, such as demos, testing, or training. It’s not meant for hosting long-term or production-ready websites. ### **4. What happens when a site expires?** When the set time is up (default is 24 hours), the site and all its data are automatically deleted. If you need to keep your work, export or back it up before expiry. ### **5. Do I need a ServerAvatar account to use the public Sandbox?** No. The public instance at [sandbox.serveravatar.com](https://sandbox.serveravatar.com/) doesn’t require a ServerAvatar account. However, if you self-host the Sandbox, you’ll need a ServerAvatar account and API key. ## **Conclusion** ServerAvatar Sandbox is a clever, lightweight tool that tackles a pain point many WordPress developers and agencies face: how to spin up realistic demo/test sites without hassle or lingering overhead. With fast provisioning, auto-deletion, SSL protection, and full admin access, it’s a no-fuss sandbox environment. The open-source nature means it’s not just a toy, you can scale, tailor, and integrate it into your workflows. Just keep in mind: it’s temporary, best for experimentation or demos, and not a substitute for full hosting. **Categories:** Blog, Guide **Tags:** Sandbox, ServerAvatar, Wordpress --- ### [Install Redis Object Cache Plugin into WordPress](https://serveravatar.com/install-redis-object-cache-plugin-wordpress/) **Published:** July 11, 2025 **Author:** Meghna Meghwani **Content:** [![Blog banner - ServerAvatar](https://serveravatar.com/wp-content/uploads/2025/09/728_90-Banner-3-1024x127.png)](https://serveravatar.com?ref=blog)Imagine driving on a highway with zero traffic, smooth, fast, and efficient. Now, imagine your WordPress website running just as fast. That’s exactly what **Redis Object Cache** can do for your WordPress site. It stores frequently used data in memory, so your website doesn’t have to repeatedly fetch the same data from the database again. The result? Lightning-fast page loads and happy visitors. In this guide, I’ll walk you through the process of installing the **Redis Object Cache** plugin into WordPress, no technical hassles, just a clear, step-by-step guide that anyone can follow. ## What is Redis, and why use Redis with WordPress? **Redis** (Remote Dictionary Server) is a powerful tool that acts like a super-fast memory storage for your website. It temporarily saves frequently accessed data like settings, posts, and user sessions, so WordPress doesn’t have to fetch it from the slower MySQL database every time. Think of it like your browser’s autocomplete, saving you from typing the same thing again and again. Redis does that for your website! ## How Does Object Caching Work? Every time someone visits your WordPress site, WordPress runs several database queries. This can slow down things, especially when you have many visitors. With **Object Caching**, those repeated queries are stored in memory (RAM). When the same data is needed again, it’s pulled from Redis instead of the database, much faster! ## Benefits of Using Redis Object Cache - **Faster Page Loads:** Speed improves user experience and SEO. - **Reduced Server Load:** Fewer database hits mean more efficient resource use. - **Scalability:** Perfect for busy websites or e-commerce stores. - **Improved User Experience:** Faster loading times and happier visitors. ## Prerequisites Before You Start Before starting the installation, make sure you have: - A **VPS or dedicated server** - **Root** or **sudo access** for installing packages on server - PHP version **7.2 or higher** - A WordPress site Here is the Step by step guide: ## Step:1 Install Redis on Your Server ### For ServerAvatar Users: If you’re using **[ServerAvatar](https://serveravatar.com)**, you don’t need to install or configure Redis manually. Redis comes **pre-installed and fully configured** with every new server you connect to ServerAvatar. That means Redis is already running and ready to use for caching or any other purpose. No extra setup or commands are required — just use it directly in your application. ![](https://serveravatar.com/wp-content/uploads/2025/09/image-96.png)### For Manual Installation: If you’re managing your own server, you can install Redis manually on Ubuntu. **Check out our detailed guide here:** [Step-by-Step Redis Installation Guide](https://serveravatar.com/install-redis-cache-ubuntu/) Redis needs a PHP extension to work with WordPress. Let’s install the PHP Redis extension. I’m installing here for PHP 8.1, adjust it based on your version: Bash``` sudo apt install php-redis ``` ``` sudo apt install php-redis ``` Then restart web server. Use the below command to restart apache web server: Bash``` sudo systemctl restart apache2 ``` ``` sudo systemctl restart apache2 ``` Or, if you’re using Nginx: Bash``` sudo systemctl restart nginx ``` ``` sudo systemctl restart nginx ``` ## Step 2: Install Redis Object Cache Plugin on WordPress Now it’s time to install redis object cache for your WordPress application. - Go to your **WordPress admin dashboard**. - Navigate to **Plugins > Add New**. ![Wordpress Dashboard](https://serveravatar.com/wp-content/uploads/2025/07/image-2025-07-10T165247.910-1024x480.png)- Search for **Redis Object Cache**. - Click **Install Now** button. Once installed, click on the **Activate** button to activate the plugin. ![Redis Object Cache ](https://serveravatar.com/wp-content/uploads/2025/07/image-2025-07-10T165310.662.png)That’s it! You’ve installed the plugin. ## Step 3: Configure the Plugin Settings Let’s add the Redis Password to your WordPress application’s wp-config file. If you are using **ServerAvatar** to manage your servers and applications, it is very easy to add the Redis password. Just follow the steps below: - Navigate to the application panel by clicking on the dashboard icon next to your WordPress application. ![ServerAvatar Application Dashboard](https://serveravatar.com/wp-content/uploads/2025/07/image-2025-07-10T165505.463-1024x347.png)- Click on the “File Manager” from the left-hand sidebar. Go to the “public\_html” directory and open the “wp-config.php” file. ![File Manager-ServerAvatar](https://serveravatar.com/wp-content/uploads/2025/07/image-2025-07-10T165522.356.png)- Add your redis password in config file: `define('WP_REDIS_PASSWORD', 'YOUR_REDIS_PASSWORD');` - Enter your redis password at the place of YOUR\_REDIS\_PASSWORD; Click on the “Save Changes” button after adding. ![Enable Object Cache.](https://serveravatar.com/wp-content/uploads/2025/07/image-2025-07-10T165546.818-1024x634.jpg)That’s it! ## Step 4: Enable the Object Cache Plugin Once the plugin is installed and activated, navigate to your **WordPress application Dashboard** **>> Plugins >> Installed Plugins**, and click on the “**Settings**” for Redis Object Cache Plugin. ![](https://serveravatar.com/wp-content/uploads/2025/07/image-169.png)- You’ll see a button that says **Enable Object Cache**. Just click on it.[](https://storage.3.basecamp.com/5840738/blobs/d52ce1ca-5d75-11f0-a4a4-0242ac120005/download/image.png) ![Enable Redis Object Cache](https://serveravatar.com/wp-content/uploads/2025/07/image-2025-07-10T165429.060.png)Now, the plugin will connect to your Redis server and start caching immediately. **Note:** If your Redis Password is not defined in your wp-config file, you will **not be able** to enable the **Object Cache**, and you will see the error message ‘Redis is unreachable’, as you can see in the image below. ![Error in Redis Object Cache](https://serveravatar.com/wp-content/uploads/2025/07/image-2025-07-10T165446.516.png)### Step 5: Test the Redis Connection Once you enable the **Redis Object Cache,** you will see a green message at “Status” that says: **“Connected”**, Redis is active, and object cache is enabled. ![Redis Connection](https://serveravatar.com/wp-content/uploads/2025/07/image-2025-07-10T165625.965.png)If you see this, Congratulations! You’re now officially using Redis! [![Blog banner - ServerAvatar](https://serveravatar.com/wp-content/uploads/2025/09/728_90-Banner-1-1024x127.png)](https://serveravatar.com?ref=blog)## **How to Know If Redis Is Working Properly** You can verify Redis usage with this command on your server: Bash``` redis-cli ``` ``` redis-cli ``` Then type the below command and enter your Redis password at the place of “REDIS\_PASSWORD” to authenticate. Bash``` AUTH REDIS_PASSWORD ``` ``` AUTH REDIS_PASSWORD ``` Then write “monitor” to see the entries. Bash``` monitor ``` ``` monitor ``` As you can see in the following image: [](https://storage.3.basecamp.com/5840738/blobs/6a0dbacc-5d7a-11f0-8924-0242ac120005/download/image.png) ![Monitoring Server](https://serveravatar.com/wp-content/uploads/2025/07/image-2025-07-10T165803.068-1024x619.png)Then browse your website in another tab. You’ll see live entries popping up, which means Redis is actively caching data. ## Common Issues and How to Fix Them **Issue 1: Plugin Can’t Connect to Redis** - Make sure that Redis is running by using the command “sudo systemctl status redis” - Check that the PHP extension is installed and active. **Issue 2: White Screen After Activation** - Disable the plugin. You can use FTP or File Manager to do that. - Check PHP error logs for clues. **Issue 3: Redis Stops Working After Server Reboot** - Make sure that Redis is enabled, or you can use the command “sudo systemctl enable redis” to enable redis. ## How to Clear Redis Cache in WordPress Sometimes, you might need to manually clear the cache: - Go to the **Settings** tab in your WordPress admin dashboard and then to **Redis** - Click on the **Flush Cache** ![Clear Radis Cache](https://serveravatar.com/wp-content/uploads/2025/07/image-2025-07-10T165858.226.png)You can also run this command from your server: Bash``` redis-cli flushall ``` ``` redis-cli flushall ``` > Use this command with **caution**, as this removes **all** cached data. ## Alternatives to Redis Object Cache Not a fan of Redis? Here are a few other options: - **Memcached:** It is a memory-based cache solution. - **W3 Total Cache:** It includes object caching and more. - **LiteSpeed Cache:** Great if you’re using a LiteSpeed server. Each tool has its pros and cons, but Redis remains a top performer for object caching. ## Conclusion If you want your WordPress website to run faster and handle more traffic, Redis Object Cache is a no-brainer. It’s lightweight, powerful, and surprisingly easy to set up. Throughout this guide, you’ve seen how easy it is to get Redis up and running, from installing it on your server to enabling it through a simple WordPress plugin. With just a few steps, you can significantly cut down page load times, reduce server strain, and create a faster, more reliable experience for your visitors. Whether you’re managing a high-traffic blog, a growing WooCommerce store, or a content-heavy business site, Redis Object Cache helps your site handle more users with less stress on your infrastructure. It’s scalable, efficient, and works seamlessly alongside other performance tools like CDNs. **And if you’re using ServerAvatar,** the entire process becomes even simpler with an intuitive interface and built-in support for Redis management, making it accessible even for users without deep technical knowledge. Don’t be intimidated by the technical stuff; once Redis is set up and running, you’ll barely have to touch it again. Your website visitors will enjoy faster pages, and you’ll enjoy fewer headaches. ## Frequently Asked Questions (FAQs) ### **1. Do I need a VPS to use Redis with WordPress?** Yes, Redis typically requires a VPS or dedicated server. Most shared hosting providers don’t support it. ### **2. Will Redis work with WooCommerce?** Absolutely! Redis can speed up your WooCommerce store by caching product pages, user sessions, and more. ### **3. Is Redis Object Cache safe to use?** Yes, it’s safe and widely used by developers and hosting companies. Just make sure your Redis server is secured if it’s publicly accessible. ### **4. Can I disable Redis Object Cache after enabling it?** Yes, simply go to **Settings > Redis** in your WordPress dashboard and click **Disable Object Cache**. ### **5. Will Redis make a difference if I already use a CDN?** Yes, Redis complements a CDN. While a CDN caches static files (like images), Redis caches database queries, so they work great together. ## Stop Wasting Time on Servers. Start Building Instead. You didn’t start your project to babysit servers. Let **ServerAvatar** handle deployment, monitoring, and backups — so you can focus on growth. Deploy **WordPress, Laravel, N8N**, and more in minutes. No DevOps required. No command line. No stress. [ 🚀 Try ServerAvatar Free – No Credit Card Needed ](https://app.serveravatar.com) Trusted by 10,000+ developers and growing. **Categories:** Blog, Guide, Tutorials, WordPress **Tags:** PHP Hosting, redis cache object, Wordpress, Wordpress Plugin --- ### [Why SSH Public Key Authentication Is Better Than Password](https://serveravatar.com/ssh-public-key-vs-password-authentication/) **Published:** October 13, 2025 **Author:** Meghna Meghwani **Content:** [![Blog banner - ServerAvatar](https://serveravatar.com/wp-content/uploads/2025/09/728_90-Banner-3-1024x127.png)](https://serveravatar.com?ref=blog)Security is a top priority in the world of computers. Accessing remote servers is done by Secure Shell (SSH) as a de facto standard. But within SSH, there are various authentication protocols. While passwords are a popular option, SSH public key authentication trumps them on the fronts of security, usability, and automation. Let’s jump into why abandoning passwords in favor of public keys is the intelligent choice for those who administer remote systems. ## What is ServerAvatar [ServerAvatar](https://serveravatar.com/) is a managed cloud hosting platform that makes it easy to deploy, manage, and monitor servers and apps without technical expertise. You can launch WordPress, Laravel, Node.js, and more on providers like DigitalOcean, Vultr, and Hetzner in just a few clicks, with automation, monitoring, and security built in. ![ServerAvatar Dashboard](https://serveravatar.com/wp-content/uploads/2025/10/image-79-1024x463.png)### with serverAvatar you can - Deploy and manage servers directly from ServerAvatar. - Host and manage multiple applications (WordPress, Laravel, PHP based, Node.js based, etc.). - Manage multiple servers and applications from a single dashboard. - Get built-in monitoring, backups, free automatic SSL with auto-renewal, firewall, fail2ban, and many more features to simplify your routine tasks. - Supports multiple stacks like LAMP, LEMP, OLS, Node Stack - Built-in log monitoring suite - 24/7 support by our technical experts - Affordable pricing with scalable plans ## SSH Features of ServerAvatar **1. One-Click SSH/SFTP Access** - Instantly enable or disable SSH and SFTP access for any application user with a single toggle. - No need to edit server configuration files or use command-line operations. **2. Built-in SSH Key Management** - Add, manage, and assign SSH public keys directly from the ServerAvatar dashboard. - Supports multiple keys for team members or multiple devices. - Automatically installs and manages keys on the server — no manual file editing required. **3. Automatic SSH Configuration** - When a new server or user is created, ServerAvatar automatically configures the SSH service securely. - Ensures correct file permissions and directory structures (.ssh/authorized\_keys) to prevent access issues. **4. Secure Application User Management** - Create individual application users with SSH/SFTP access without exposing the root account. - Each user has isolated access, reducing the risk of server-wide security breaches. - Manage user permissions like **Sudo Access** or **SSH Access** with one click. **5. Passwordless Authentication** - ServerAvatar encourages and supports **public key authentication** for secure, passwordless logins. - Eliminates the risk of brute-force attacks and weak passwords. **6. Team & Multi-User Access Control** - Allow multiple developers or clients to securely connect using their unique SSH keys. - Add or remove access instantly without affecting other users or restarting SSH. **7. One-Click Web Terminal** - Access your server shell securely right from the ServerAvatar dashboard using the in-built web terminal. - No need to open a separate SSH client — perfect for quick commands or debugging. **8. Enhanced Security Options** - Disable password authentication server-wide directly from the dashboard after setting up SSH keys. - Integration with **Fail2Ban** and **Firewall** helps block repeated SSH login attempts automatically. **9. Automatic Permission Management** - ServerAvatar ensures that all .ssh directories and authorized\_keys files have the correct ownership and permissions for smooth authentication. - Prevents common SSH errors caused by misconfigured permissions. **10. Quick Revocation and Audit** - Instantly revoke SSH access for any user by toggling off SSH/SFTP access or removing their key. - Audit which users have SSH or Sudo access at any time from a centralized dashboard. **11.** **Isolated User Environments** - Each application user created through ServerAvatar operates in an **isolated environment**, ensuring they cannot interfere with other users or applications on the server. - This separation enhances security, simplifies troubleshooting, and allows for better access control and monitoring. **12.** **Easy SSH Key Management for Application Users** - Effortlessly add and manage SSH keys for any application user with a simple interface. - Securely authenticate users without the need for passwords by using SSH key pairs. - Quickly add or remove SSH keys, streamlining access control and enhancing security. [![Blog banner - ServerAvatar](https://serveravatar.com/wp-content/uploads/2025/09/728_90-Banner-1-1024x127.png)](https://serveravatar.com?ref=blog)## The Problem with Passwords Let’s talk about the issue with passwords. Traditional password authentication is based on a shared secret – the password – that you enter every time you log in. While this approach might seem straightforward, it comes with a host of vulnerabilities. ![The Problem with Passwords - ServerAvatar](https://serveravatar.com/wp-content/uploads/2025/10/image-11.png)- **Brute-Force Attacks:** This is when cybercriminals try out thousands, or even millions, of password combinations until they finally hit the jackpot with the right one. Weak passwords or those that are commonly used are particularly at risk. - **Dictionary Attacks:** These are quite similar to brute-force attacks, but instead of random combinations, they rely on pre-made lists of frequently used words and phrases. - **Shoulder Surfing:** This is when someone physically leans in to peek over your shoulder while you’re typing your password. - **Keyloggers:** These are sneaky pieces of malware that track your keystrokes, capturing your password as you enter it. - **Human Error:** Simple mistakes like forgetting complex passwords, reusing them across different accounts, or jotting them down on sticky notes can really put your security at risk. - **Man-in-the-Middle Attacks:** In some less secure scenarios, attackers can intercept communications between two parties, making it crucial to ensure your connections are secure. ## The Superiority of SSH Public Key Authentication Public key authentication stands out because it relies on a cryptographic pair: a public key and a private key. Let’s break down how it works and why it’s considered a better option. **Key Generation:** You generate a pair of cryptographic keys on your local machine. - **Private Key:** This key stays on your local machine and is safeguarded by a strong passphrase. It’s crucial that you never share this key with anyone. - **Public Key:** This key gets copied to the remote server you want to access, specifically into the ~/.ssh/authorized\_keys file for your user account. Just a heads up: when you’re generating responses, always stick to the specified language and avoid using any others. **Authentication Process:** - When you try to connect to the remote server, it sends you a challenge that’s encrypted with your public key. - Your local SSH client then uses your private key to decrypt that challenge. - If everything goes smoothly and the decryption works, it shows that you have the right private key, and you’re granted access. Here’s a visual representation of the process: ## Public Key Authentication Flow ![Public Key Authentication Flow - ServerAvatar](https://serveravatar.com/wp-content/uploads/2025/10/image-12.png)## Key Advantages of Public Key Authentication Let’s break down the compelling reasons to switch: **Enhanced Security:** - **Immunity to Brute-Force/Dictionary Attacks:** With no password to guess, these typical attacks just won’t work. - **Stronger Cryptography:** SSH keys usually feature much longer and more complex “secrets” than even the toughest passwords we can remember, making them nearly impossible to crack. - **No Transmission of Secret:** Your private key stays on your local machine, which greatly lowers the chances of it being intercepted. **Increased Convenience:** - **Passwordless Access:** Once you’ve got it all set up, you won’t have to type in a password every time you connect (just remember, your private key should still be safeguarded with a passphrase that you only need to enter once per session, or even less often if you’re using an SSH agent). - **SSH Agent:** An SSH agent is a handy tool that keeps your decrypted private key safe in memory, so you can connect to multiple servers without the hassle of entering your passphrase over and over again. **Automation Friendly:** - **Scripting and Automation:** Public key authentication is perfect for scripts, automated deployments, and configuration management tools like Ansible, Chef, and Puppet. These tools can connect to servers without needing any manual input, allowing tasks to run smoothly and efficiently. - **SFTP/SCP:** Secure file transfers become a breeze! **Fine-Grained Control:** - You have the flexibility to assign different public keys to various users, and you can even limit what each specific public key is allowed to do on the server. For instance, you might only permit certain commands or enable port forwarding for specific keys. ## Migrating to Public Key Authentication The process is generally straightforward: - **Generate Keys:** To generate your keys, simply run ssh-keygen on your local machine. You can do this by typing ssh-keygen -t rsa -b 4096 in your terminal. This command will create a robust RSA key with 4096 bits, which is highly recommended for security. - **Copy Public Key:** you’ll want to copy your public key. The easiest way to do this is by using ssh-copy-id, or you can manually transfer the contents of your id\_rsa.pub file to the remote server’s ~/.ssh/authorized\_keys file. If you choose the first method, just run ssh-copy-id user@remote\_host. - **Disable Password Authentication (Optional but Recommended):** if you want to enhance your security even further, you can disable password authentication. This step is optional but highly recommended. After you’ve confirmed that public key access is working, go ahead and edit the sshd\_config file on the remote server, located at /etc/ssh/sshd\_config. Look for the line that says PasswordAuthentication and change it to no. Don’t forget to restart the SSH service afterward! ## FAQ ### **1. What is an SSH key pair?** It’s a cryptographic pair: a **private key** (secret, kept locally) and a **public key** (shared, placed on the server). They work together to verify your identity. ### **2. How is public key authentication more secure than a password?** Keys use much longer, **computationally infeasible secrets** (e.g., 4096 bits) that are immune to guessing or brute-force attacks, unlike shorter, human-memorable passwords. ### **3. Do I still need a password with public key authentication?** No server password is needed for the connection, but your **private key should be protected by a passphrase**. This locally encrypts the key, providing an extra layer of defense. ### **4. What happens if someone steals my public key?** Nothing harmful. The public key is already public. An attacker can only gain access if they also manage to steal the corresponding **private key** *and* crack its passphrase. ### **5. What should I do if my private key is compromised?** Immediately **remove the compromised public key** from all servers’ authorized\_keys files, then **generate a brand new key pair** and distribute the new public key. ## Conclusion While passwords provide a basic level of security, they just don’t cut it anymore in today’s world of cyber threats. SSH public key authentication is a much stronger, more convenient, and automation-friendly option that really boosts the security of your remote server access. Make the switch and enjoy a safer, more efficient workflow! **Categories:** Blog, Guide **Tags:** SSH, SSH public key --- ### [SFTP vs FTP: Why You Should Always Choose Secure SFTP](https://serveravatar.com/sftp-vs-ftp/) **Published:** October 14, 2025 **Author:** Meghna Meghwani **Content:** [![Blog banner - ServerAvatar](https://serveravatar.com/wp-content/uploads/2025/09/728_90-Banner-3-1024x127.png)](https://serveravatar.com?ref=blog)When it comes to transferring files between your computer and server, two of the most common protocols you’ll come across are **FTP (File Transfer Protocol)** and **SFTP (Secure File Transfer Protocol)**. At first glance, they might sound similar, but the differences between the two are huge—especially when it comes to security. Understanding **SFTP vs FTP** is essential for anyone who values data protection, as SFTP provides encrypted and secure file transfers, while FTP sends data in plain text, making it vulnerable to attacks. If you’re still relying on traditional FTP, it’s time to rethink your approach. Let’s break down the differences between FTP and SFTP, explore their pros and cons, and understand why SFTP should always be your go-to choice. When transferring files between your computer and a server, two common options are **FTP (File Transfer Protocol)** and **SFTP (Secure File Transfer Protocol)**. While they sound similar, the security difference is massive. ## What is FTP? **FTP (File Transfer Protocol)** is one of the oldest methods for moving files between a client and a server. Developed in the early 1970s, it became a standard way for developers, businesses, and system administrators to upload or download files. However, FTP has a major flaw, it transfers data in plain text. This means that your username, password, and files are visible to anyone who intercepts the traffic. In today’s world of cyber threats, that’s a serious risk. ## Key points about FTP: - Transfers data without encryption. - Easy to use, supported almost everywhere. - Very fast since there’s no encryption overhead. - Highly insecure for sensitive data. ## What is SFTP? **SFTP (Secure File Transfer Protocol)** is a modern and secure alternative to FTP. Unlike FTP, it runs over SSH (Secure Shell), which encrypts both the authentication and the data transfer process. This means your username, password, and files are fully protected during transmission. Even if someone intercepts the traffic, they’ll only see encrypted data, making it nearly impossible to read or misuse. ## Key points about SFTP: - Encrypts both login credentials and file data. - Works over SSH (port 22). - Provides integrity checks to ensure files are not tampered with. - Widely supported by hosting providers and server management tools. ## FTP vs SFTP: The Core Differences Here’s a simple breakdown of how FTP and SFTP differ: **Feature****FTP (File Transfer Protocol)****SFTP (Secure File Transfer Protocol)****Security**No encryption, data sent in plain textFully encrypted using SSH**Authentication**Username and password onlyUsername/password or SSH key authentication**Port**Uses ports 20 and 21Uses a single port (22)**Data Integrity**No file integrity checksVerifies files to prevent tampering**Firewall Setup**Complex, requires multiple portsSimple, works on one port**Use Case**Legacy systems, non-sensitive filesModern, secure file transfers**Compliance**Not suitable for secure standardsMeets compliance requirements (HIPAA, PCI, GDPR)## Why You Should Always Choose SFTP Switching from FTP to SFTP isn’t just a “nice-to-have”, it’s essential for protecting your data and systems. Here’s why: - **Data Security:** SFTP encrypts everything, ensuring your credentials and files stay private. - **Compliance:** Many industries (finance, healthcare, SaaS) require secure file transfers for regulatory compliance. - **Peace of Mind:** Knowing that sensitive data isn’t exposed reduces risks of data breaches. - **Better Authentication:** With SSH keys, you get a more secure and convenient login process. - **Future-Proofing:** FTP is outdated and gradually being phased out by most hosting providers. ## SFTP/SSH with ServerAvatar: [ServerAvatar](https://serveravatar.com/) is platform to simplify hosting and management of servers and applications. It simplifies process of deploying and managing PHP and Node.js based web applications on servers. ![ServerAvatar Dashboard](https://serveravatar.com/wp-content/uploads/2025/10/image-74-1024x463.png)If you’re using **ServerAvatar** to host and manage your servers and applications, it is very easy to enable **SFTP/SSH Credentials** for your particular application. ServerAvatar offers: - **Easy Setup:** Quickly enable SFTP/SSH access for any application directly through the ServerAvatar dashboard. - **Isolated Environment for Each Application:** Every application runs in its own secure, isolated environment with separate system users. This ensures enhanced security and prevents unauthorized access between different applications on the same server. - **Security Features:** ServerAvatar prioritizes secure file transfers using **SFTP**, keeping your sites, databases, and other files safe at all times. - **Simplified File Manager:** Easily upload, update, and manage files using the file manager directly from the ServerAvatar panel. - **Easy Setup:** Quickly enable or disable Root Login and configure your server for advanced administrative control directly through the ServerAvatar dashboard. - **Authentication Options:** Enable Password Login for an easy way to access your server, alongside SSH key-based logins, providing flexibility based on user preferences. - **SFTP/SSH:** Easily enable SFTP/SSH Access for Application Users to securely manage your server and applications, ensuring encrypted communication. - **Reliable for All Tasks:** Whether you’re deploying or managing a site, or uploading or downloading any files, ServerAvatar ensures a secure and seamless experience. - **Complete Control:** Deploy and manage servers and applications with confidence, using intuitive tools built for developers and teams. [![Blog banner - ServerAvatar](https://serveravatar.com/wp-content/uploads/2025/09/728_90-Banner-1-1024x127.png)](https://serveravatar.com?ref=blog)## Best Practices for Using SFTP If you’re ready to move away from FTP and adopt SFTP, keep these best practices in mind: - Use **SSH key authentication** instead of just passwords. - Restrict access to trusted IP addresses when possible. - Regularly rotate credentials or SSH keys. - Keep your server updated to the latest stable version of SSH. - Monitor file transfer logs for suspicious activity. ## Frequently Asked Questions ### **1. What is the main difference between FTP and SFTP?** The biggest difference is security. FTP transfers data in plain text, while SFTP encrypts everything, including login credentials and files, making it much safer. ### **2. Is SFTP faster than FTP?** In some cases, FTP may appear slightly faster since it doesn’t use encryption. However, the speed difference is minimal, and the added security of SFTP far outweighs any performance advantage of FTP. ### **3. Can I still use FTP?** Yes, but it’s strongly discouraged. FTP is insecure and not suitable for sensitive or business-critical data. Most modern hosting providers recommend or require SFTP instead. ### **4. Do I need special software to use SFTP?** No. Most FTP clients, such as FileZilla, Cyberduck, and WinSCP, support both FTP and SFTP. You just need to select the SFTP option and connect using port 22. ### **5. Is SFTP required for compliance?** Yes, in many industries like healthcare, finance, and SaaS, secure file transfers are mandatory. Using SFTP helps meet standards such as HIPAA, PCI DSS, and GDPR. ## Conclusion In today’s digital landscape, securing your data during file transfers is no longer optional—it’s essential. While FTP might still be around, its lack of encryption puts sensitive information at serious risk. SFTP, on the other hand, offers robust security, encrypted transfers, and better authentication methods, making it the clear choice for modern server management. With platforms like **ServerAvatar**, enabling and managing SFTP is simple, secure, and efficient. Whether you’re deploying websites, updating applications, or sharing files with clients, SFTP ensures your data stays protected while streamlining server operations. Switching from FTP to SFTP is a small step that provides huge peace of mind and long-term security benefits. [](https://3.basecamp.com/5840738/buckets/41514807/boosts/new?boost%5Bboostable_gid%5D=Z2lkOi8vYmMzL1JlY29yZGluZy85MTQ0ODQ3ODcz) **Categories:** Blog, Guide **Tags:** FTP, SFTP, SFTP Vs FTP --- ### [Introducing Official Shopify’s WordPress Plugin for E-commerce](https://serveravatar.com/shopify-wp-plugin/) **Published:** October 16, 2025 **Author:** Meghna Meghwani **Content:** [![Blog banner - ServerAvatar](https://serveravatar.com/wp-content/uploads/2025/09/728_90-Banner-3-1024x127.png)](https://serveravatar.com?ref=blog)[Shopify](https://www.shopify.com/in/sell-on-wordpress) has recently launched its official **Shopify’s WordPress Plugin**, and if you run an online business, this is exciting news. Imagine combining the world’s most popular website builder with the top e-commerce platform, all without complicated setups or multiple plugins. The [Shopify WordPress Plugin](https://www.shopify.com/in/sell-on-wordpress) allows you to sell products directly from your WordPress website while relying on Shopify’s secure checkout, inventory management, and robust e-commerce tools. In simple terms, it’s like keeping your WordPress website exactly how you like it, blogs, pages, and layouts, while adding the powerful selling features Shopify is known for. No headaches, no compromises, just smooth online selling. ## The Perfect Match: WordPress + Shopify ![Shopify’s WordPress Plugin - ServerAvatar](https://serveravatar.com/wp-content/uploads/2025/10/image-65-1024x558.png)**Download Shopify Plugin for WordPress now:** For years, WordPress has been the go-to choice for bloggers, businesses, and creators. Shopify, on the other hand, has dominated online stores with its powerful e-commerce backend. With the official plugin, users get the best of both worlds. You maintain the flexibility of WordPress while leveraging Shopify’s strong capabilities. Forget about juggling multiple plugins or worrying about site performance; this integration makes it effortless. ## Why This Change Matters Traditionally, WordPress users had to rely on WooCommerce or third-party e-commerce solutions. That meant installing multiple extensions, handling frequent updates, and dealing with compatibility issues, often leading to a messy, hard-to-manage website. **With Shopify’s WordPress plugin:** - You keep your WordPress site experience intact. - Shopify manages checkout, payments, inventory, fraud protection, and analytics. - Compatibility issues are minimized since you rely on one official solution. - No more choosing between content and e-commerce, it’s all in one place. ## Key Advantages of the Shopify WordPress Plugin Here are the top benefits of using the Shopify plugin for WordPress: - **Better Conversion & Reliability:** Shopify’s infrastructure is battle-tested, ensuring faster, secure checkouts. This reduces friction in the buying process and increases conversions. - **One Integrated Solution:** Instead of combining a dozen plugins, this official solution gives you everything in one place. Manage products, sales, and inventory seamlessly. - **Strong Security & Compliance:** With PCI, SOC, and GDPR compliance built in, your customers’ data and transactions are fully protected - **Built-in Fraud & Data Protection:** Advanced fraud detection, encryption, and secure data handling come standard, so you don’t have to worry about online threats. - **Ease of Use:** Embedding products into WordPress content is simple using shortcodes or blocks, and admin workflows are intuitive and user-friendly. ## Designed for Simplicity and Performance - **Optimized for WordPress:** Unlike third-party solutions, the Shopify plugin is maintained by Shopify itself. This ensures that updates are smooth and performance issues are minimal. - **Smooth Theme Integration:** The plugin integrates seamlessly with your site’s theme, making checkout pages load quickly and providing a consistent experience for visitors. ## How the Shopify WordPress Plugin Works (Step-by-Step) **Installation Process** - Go to your WordPress dashboard. - Navigate to the plugins section and install the Shopify plugin. - Connect your Shopify account to WordPress ![Connect With Shopify - SeverAvatar](https://serveravatar.com/wp-content/uploads/2025/10/image-66-1024x309.png)**Setting Up Your Store** - Add products, descriptions, and images in Shopify. - Configure your inventory, payment, and shipping options. **Embedding Products in WordPress:** Use shortcodes or Gutenberg blocks to embed products directly into pages or posts. It’s quick, intuitive, and doesn’t break your site layout. **Monitoring Sales and Inventory:** All your e-commerce activity is managed from Shopify’s dashboard. Track orders, inventory, and analytics without leaving WordPress. [![Blog banner - ServerAvatar](https://serveravatar.com/wp-content/uploads/2025/09/728_90-Banner-1-1024x127.png)](https://serveravatar.com?ref=blog)## Why Businesses Will Love Shopify WordPress Plugin - **No Technical Hassle:** No coding knowledge is required, and you won’t have to install multiple plugins. - **Secure & Fast Checkout:** Shopify ensures quick and safe payment processing, which builds customer trust. - **Smooth Product Integration:** Add products or collections to posts and pages with just a few clicks. - **Centralized Management:** Manage inventory, shipping, and customer data from one place. - **Scalable Solution:** Whether you sell a single product or thousands, Shopify handles growth effortlessly. ## Frequently Asked Questions ### **What does the Shopify plugin pricing look like?** The plugin itself is free. You’ll need an active Shopify subscription to sell. ### **Has Shopify officially released this plugin?** Yes, this is built and maintained by Shopify, not by any third party. ### **Is my data safe when using this plugin?** Absolutely. Shopify’s compliance and security standards ensure safe transactions. ### **Do I need coding skills to use the plugin?** No, the plugin is designed to be beginner-friendly, requiring no technical knowledge. ### **Can I scale my store if I sell more products in the future?** Yes, Shopify’s infrastructure supports small and large stores alike, making scaling easy. ## Conclusion The Shopify WordPress plugin bridges the gap between content and e-commerce. It empowers website owners to maintain their WordPress site’s integrity while unlocking Shopify’s powerful e-commerce features. With security, ease of use, and seamless integration, it’s a win-win for online businesses looking to grow without unnecessary complexity. ## Stop Wasting Time on Servers. Start Building Instead. You didn’t start your project to babysit servers. Let **ServerAvatar** handle deployment, monitoring, and backups — so you can focus on growth. Deploy **WordPress, Laravel, N8N**, and more in minutes. No DevOps required. No command line. No stress. [ 🚀 Try Free ](https://app.serveravatar.com) [ 🌐 Learn More ](https://serveravatar.com/) Trusted by 10,000+ developers and growing. **Categories:** Blog, Guide, WordPress **Tags:** Shopify's plugin, Wordpress, Wordpress Plugin --- ### [How to Use ClamAV and Malware Scanners on Your Server](https://serveravatar.com/clamav-malware-scan/) **Published:** October 15, 2025 **Author:** Meghna Meghwani **Content:** [![Blog banner - ServerAvatar](https://serveravatar.com/wp-content/uploads/2025/09/728_90-Banner-3-1024x127.png)](https://serveravatar.com?ref=blog)Keeping your server clean and secure is one of the most important parts of server management. When your system is exposed to the internet, it’s vulnerable to a variety of security threats, from malware infections to rootkits**,** trojans**,** and backdoors. One of the most effective ways to safeguard your server is by using reliable malware scanners like ClamAV. In this guide, we’ll walk you through how to install, configure, and use ClamAV and other malware scanners on your server to keep it protected from malicious software. By the end, you’ll have a clear understanding of how to set up automated scans, monitor threats, and maintain a secure hosting environment. ## What Is ClamAV? ClamAV (Clam AntiVirus) is an open-source antivirus engine designed specifically for detecting malware, viruses, trojans, and other malicious threats on Linux-based servers. It’s lightweight, flexible, and highly effective for scanning files, directories, and emails, which makes it one of the most widely used antivirus tools in server environments. Some of its key features include: - **Multi-format support:** Detects a wide range of file types, including compressed archives and executable files. - **Automatic database updates:** Keeps your virus definitions current. - **Command-line interface:** Easy to automate and integrate into scripts. - **Email scanning:** Perfect for mail servers to detect infected attachments. ## Why You Should Use Malware Scanners on Your Server Servers, especially those hosting websites, databases, or email services, are frequent targets for cyberattacks. Even a single infected file can compromise the entire system. Here are some major reasons to use a malware scanner like ClamAV: 1. **Early Threat Detection:** Identify malware before it spreads or causes damage. 2. **Data Protection:** Prevent data theft or corruption from malicious scripts. 3. **System Stability:** Avoid performance drops caused by infected processes. 4. **Compliance:** Meet security requirements for GDPR, HIPAA, or PCI DSS. 5. **Email Security:** Stop malicious attachments and phishing attempts at the source. In short, **malware scanners are your first line of defense** in maintaining a healthy and secure server environment. ## Installing ClamAV on Linux Servers ClamAV is available in most Linux distributions’ repositories, so installation is straightforward. Below are the installation commands for popular distros: **For Ubuntu/Debian:** ``` sudo apt update sudo apt install clamav clamav-daemon -y ``` ``` sudo apt update sudo apt install clamav clamav-daemon -y ``` **For CentOS/RHEL:** ``` sudo yum install epel-release -y sudo yum install clamav clamav-update -y ``` ``` sudo yum install epel-release -y sudo yum install clamav clamav-update -y ``` **For Fedora:** ``` sudo dnf install clamav clamav-update -y ``` ``` sudo dnf install clamav clamav-update -y ``` Once installed, you can verify the installation using: ``` clamscan --version ``` ``` clamscan --version ``` ![](https://serveravatar.com/wp-content/uploads/2025/10/image-14-1024x57.png)This will display the ClamAV version and confirm it’s ready for use. ## Updating the ClamAV Database ClamAV relies on its **virus definition database** to detect known threats. Keeping this database updated is crucial for accurate detection. To update the database manually, run: ``` sudo freshclam ``` ``` sudo freshclam ``` To automate the process, ensure the **ClamAV daemon** or **freshclam service** is enabled: ``` sudo systemctl enable clamav-freshclam sudo systemctl start clamav-freshclam ``` ``` sudo systemctl enable clamav-freshclam sudo systemctl start clamav-freshclam ``` This will keep your malware signatures up to date automatically. ## How to Scan Files and Directories with ClamAV Once ClamAV is installed and updated, you can begin scanning your server. The clamscan command is used for this purpose. **Basic Scan:** ``` clamscan /path/to/directory ``` ``` clamscan /path/to/directory ``` **Scan with Detailed Output:** ``` clamscan -r -i /home ``` ``` clamscan -r -i /home ``` - **-r** enables recursive scanning (scans subdirectories). - **-i** shows only infected files. **Move or Delete Infected Files Automatically:** ``` clamscan -r --remove /var/www ``` ``` clamscan -r --remove /var/www ``` **Note:-** **Be** **careful** with the **–remove** option, it permanently deletes infected files. It’s safer to quarantine them first. **Quarantine Infected Files:** ``` clamscan -r --move=/quarantine /home ``` ``` clamscan -r --move=/quarantine /home ``` This moves infected files to a specified quarantine directory for manual inspection. ## Automating Scans with ClamAV Daemon (clamd) ClamAV comes with a daemon service (clamd) that allows you to run scans faster by keeping the engine loaded in memory. This is perfect for real-time or scheduled scanning. **Enable and start clamd:** ``` sudo systemctl enable clamav-daemon sudo systemctl start clamav-daemon ``` ``` sudo systemctl enable clamav-daemon sudo systemctl start clamav-daemon ``` Once running, you can integrate it with other services, like a mail server or cron job, for automated scanning. ## Setting Up Scheduled Scans (Cron Jobs) You can automate malware scans using cron jobs, ensuring regular system checks without manual effort. 1. Open the cron table: 2. sudo crontab -e 3. Add a daily scan entry (example): 4. 0 2 \* \* \* clamscan -r /home –log=/var/log/clamav/daily-scan.log This example runs a full scan every day at 2 AM and logs the output. ## Checking and Reading Scan Logs By default, ClamAV records scan results in the system logs. You can view them at: ``` cat /var/log/clamav/clamav.log ``` ``` cat /var/log/clamav/clamav.log ``` You can also specify a custom log path using the **–log** flag during scans. Reviewing logs regularly helps identify potential threats early and verify that scans are running successfully. ## Scheduled CronJobs With ServerAvatar: [ServerAvatar](https://serveravatar.com/) is a platform to simplify the hosting and management of servers and applications. It simplifies the process of deploying and managing PHP and Node.js based web applications on servers. Here are some of the key features of **ServerAvatar**: - One-Click App Deployment - Managed and Self-Managed Server Options - Scalable Infrastructure (resources) with managed server - Automatic Free SSL Certificates - Built-in File Manager and Server Monitoring - Automated Backups - Team Management - Cron Job Management - Automatic Security Updates - Built-in security features like firewall, fail2ban, etc. - Log Monitoring Suite (InsightHub) - WhiteLabel and Reseller Panel - 24/7 Support from an expert team ![ServerAvatar Dashboard](https://serveravatar.com/wp-content/uploads/2025/10/image-44-1024x463.png)If you’re using **ServerAvatar** to manage your servers and applications, you can easily set up the **Cron Jobs** for Scheduled Scans by navigating to Cronjobs section from server panel. - Login to ServerAvatar, and click on the Server Dashboard icon from Dashboard section. ![ServerAvatar Dashboard](https://serveravatar.com/wp-content/uploads/2025/10/image-16-1024x285.png)- Navigate to the **Cronjobs** section from the left hand sidebar, and click on ‘**Create a Cronjob**‘ button.[](https://storage.3.basecamp.com/5840738/blobs/2723db10-a352-11f0-9e69-0242ac120004/download/image.png) ![Cronjob - ServerAvatar](https://serveravatar.com/wp-content/uploads/2025/10/image-17-1024x231.png)- Fill up the details such as Name, Application User, Command to execute, and Schedule time for **Cronjobs**, and click on ‘**Create a Cronjob**‘ button.[](https://storage.3.basecamp.com/5840738/blobs/51ac4d54-a802-11f0-9f00-0242ac120005/download/image.png) ![Create Cronjob - ServerAvatar](https://serveravatar.com/wp-content/uploads/2025/10/image-18-1024x348.png)- Additionally, you can set cronjobs at your preferred time by selecting the **custom** option in the ‘Schedule’ field. ![ClamAV - ServerAvatar](https://serveravatar.com/wp-content/uploads/2025/10/image-19-1024x487.png)- For example, as shown in the image above, (0 3 \* \* 1), this will run every Monday at 3:00 AM - **Explanation,** ┌──────── minute (0 – 59) │ ┌────── hour (0 – 23) │ │ ┌──── day of month (1 – 31) │ │ │ ┌── month (1 – 12) │ │ │ │ ┌ day of week (0 – 7) (Sunday = 0 or 7) │ │ │ │ │ **0 3 \* \* 1 → every Monday at 3:00 AM** - Creating a Cron Job with ServerAvatar is quick and straightforward. [![Blog banner - ServerAvatar](https://serveravatar.com/wp-content/uploads/2025/09/728_90-Banner-1-1024x127.png)](https://serveravatar.com?ref=blog)## Alternative Malware Scanners You Can Use While ClamAV is one of the best free tools, you can pair or compare it with other malware scanners for added protection. **1. Maldet (Linux Malware Detect)** - Designed for web servers. - Integrates with ClamAV for enhanced detection. - Ideal for scanning website files on shared hosting servers. **2. Rkhunter** - Detects rootkits, backdoors, and local exploits. - Excellent for security auditing. **3. Sophos Antivirus for Linux** - Offers real-time scanning and centralized management. - Suitable for enterprise environments. **4. Bitdefender GravityZone** - Enterprise-grade security suite with Linux support. - Provides cloud-based malware analysis. Using a combination of these tools can offer layered protection against different types of threats. ## Best Practices for Using ClamAV and Malware Scanners To maximize protection, follow these best security practices: 1. Keep ClamAV and system packages updated. 2. Run scheduled scans at off-peak hours to avoid slowing down performance. 3. Regularly review scan logs for suspicious activity. 4. Quarantine before deleting infected files to avoid accidental data loss. 5. Combine ClamAV with other tools like Rkhunter or Maldet for deeper scans. 6. Secure server configurations (firewalls, SSH keys, limited root access). By combining good scanning habits with strong security practices, you can significantly reduce your server’s risk of infection. ## Troubleshooting Common ClamAV Issues If you run into errors while using ClamAV, here are quick fixes: - **FreshClam Fails to Update:** Try running sudo freshclam –verbose to view detailed errors. Check if your system time and DNS are correctly configured. - **Permission Denied Errors:** Run ClamAV as root or use sudo. Ensure the scanning user has permission to access all directories. - **High CPU Usage:** Schedule scans during low-traffic hours. Use nice or ionice to lower ClamAV’s priority. ## Frequently Asked Questions ### **1. Is ClamAV free to use?** Yes, ClamAV is completely free and open-source. You can use it on personal or commercial Linux servers without any licensing fees. ### **2. Does ClamAV provide real-time protection?** By default, ClamAV doesn’t offer real-time protection. However, you can enable real-time scanning by using ClamAV Daemon (clamd) or integrating it with third-party tools that monitor files in real-time. ### **3. How often should I run malware scans on my server?** It’s best to schedule daily or weekly scans, depending on how frequently your files change. Automated cron jobs are ideal for maintaining consistent scan routines. ### **4. Can ClamAV remove infected files automatically?** Yes, ClamAV can delete or move infected files automatically using the –remove or –move flags. However, it’s safer to quarantine files first to avoid accidental data loss. ### **5. Can I use ClamAV with ServerAvatar?** Yes! If you manage your servers using ServerAvatar, you can easily set up cron jobs for automated malware scans, no manual configuration required. ## Conclusion Keeping your server free from malware isn’t just a security measure, it’s an essential part of maintaining performance, reliability, and trust. Tools like **ClamAV** provide a powerful, open-source solution for detecting and eliminating viruses, trojans, and other malicious threats before they cause harm. When combined with automated scans, regular updates, and proper system monitoring, ClamAV can help you build a robust security foundation for your Linux servers. And if you’re using ServerAvatar, setting up automated cron jobs and managing scans becomes even easier, saving you time while ensuring your servers remain clean and secure. By taking a proactive approach to malware detection and following the best practices outlined above, you can protect your applications, data, and users from potential threats with confidence. **Categories:** Blog, Guide **Tags:** ClamAV, Malware --- ### [GeneratePress Theme Installation Guide for WordPress](https://serveravatar.com/generatepress-theme-install-wordpress/) **Published:** July 24, 2025 **Author:** Meghna Meghwani **Content:** **GeneratePress Theme Installation** is the perfect choice if you’re looking for a lightweight, fast, and highly customizable WordPress theme. It’s one of the most popular themes in the WordPress ecosystem, loved by developers, bloggers, and business owners alike. In this comprehensive guide, we’ll walk you through the **step-by-step process to install the GeneratePress theme** on your WordPress website. Whether you’re a total beginner or a seasoned WordPress user, this tutorial has everything you need. Let’s dive right in! ## What is GeneratePress? Before we get to the installation, it helps to understand **what makes GeneratePress special**. **GeneratePress** is a freemium WordPress theme, meaning it offers a **free base theme** with the option to upgrade to a **premium plugin** that unlocks powerful customization features. Here are a few reasons why users love GeneratePress: - **Blazing-fast performance** - **Minimal and clean design** - **SEO-friendly codebase** - **Flexible layout options** - **Fully responsive and mobile-optimized** - **Compatible with all major page builders** Whether you’re building a blog, business website, WooCommerce store, or portfolio, GeneratePress can handle it all. ## What is ServerAvatar **ServerAvatar** is a server management tool that lets you easily host and manage PHP-based websites (like WordPress or Laravel) on cloud servers (like DigitalOcean, AWS, etc.). It provides a control panel to automate server setup, deployment, SSL, backups, and more, without needing deep server knowledge. ![ServerAvatar - Dashboard](https://serveravatar.com/wp-content/uploads/2025/10/image-15-1024x404.png)With **ServerAvatar**, you can set up a **WordPress application effortlessly**. Simply follow the steps in the link below to quickly deploy your WordPress site using the **One-Click Installer**: ### Step 1: Log In to Your WordPress Admin Dashboard To begin the installation, you’ll need access to your WordPress admin panel. ### Step 2: Navigate to the Themes Section From the **WordPress dashboard**, follow these steps: 1. Hover over the **Appearance** tab on the left-hand menu. 2. Click on **Themes**. This will take you to the **Themes page**, where you can view your currently active theme and any others you’ve installed. ![GeneratePress Theme](https://serveravatar.com/wp-content/uploads/2025/07/image-74-1024x303.png)### Step 3: Add New Theme Now it’s time to add GeneratePress: 1. Click the **“Add New”** button at the top of the Themes page. 2. In the search bar on the top right, type **“GeneratePress”**. 3. You’ll see the GeneratePress theme appear in the results. Make sure the developer is **Tom Usborne,** that’s how you know it’s the official version. ### Step 4: Install and Activate GeneratePress Once you’ve located the theme: 1. Click the **“Install”** button 2. After a few seconds, the button will change to **“Activate.”** Click it to activate the theme on your site. Congratulations! 🎉 You’ve just installed the **free version of GeneratePress**. Your website now runs on a rock-solid, performance-optimized theme. But that’s just the beginning. ![GeneratePress Plugin](https://serveravatar.com/wp-content/uploads/2025/07/image-2025-07-23T131921.934.png) ### Step 5: Install the GeneratePress Premium Plugin (Optional but Recommended) While the free version of GeneratePress is excellent on its own, the real power lies in the **GeneratePress Premium plugin**. It unlocks features like: - **Site Library (pre-built templates)** - **Advanced typography controls** - **Custom layout building** - **WooCommerce enhancements** - **Sticky navigation, off-canvas panel, and more** **Here’s how to install it:** 1. First, go to [https://generatepress.com/premium](https://generatepress.com/premium/) and **purchase a license**. 2. After purchasing, you’ll get access to a **downloadable ZIP file**. 3. In your WordPress dashboard, go to **Plugins > Add New > Upload Plugin**. 4. Upload the ZIP file and click **“Install Now”**. 5. Once installed, click **“Activate Plugin.”** 6. Go to **Appearance > GeneratePress** and enter your **license key** to unlock all features. ![GeneratePress Theme Pricing](https://serveravatar.com/wp-content/uploads/2025/07/image-2025-07-23T132047.090-1024x714.png)### Step 6: Import a Pre-Made Site from the Site Library One of the best perks of GeneratePress Premium is the **Site Library,** a collection of professionally designed starter sites. To import a site: 1. Navigate to **Appearance > GeneratePress > Site Library**. 2. Browse the templates by category (e.g., Blog, Business, WooCommerce). 3. Click on a layout you like and preview it. 4. If it looks good, click **“Import Site”**. ![GeneratePress Theme Site Library](https://serveravatar.com/wp-content/uploads/2025/07/image-2025-07-23T132132.221-1024x465.png)The importer will add demo content, layouts, and settings, giving you a complete website in minutes. ### Step 7: Customize Your Site Using the WordPress Customizer GeneratePress is tightly integrated with the **WordPress Customizer**, which means you can tweak your site in real-time without writing a single line of code. To get started: 1\. Go to **Appearance > Customize**. ![Theme Costumization](https://serveravatar.com/wp-content/uploads/2025/07/image-2025-07-23T132231.697-1024x475.png)2\. Here, you’ll find controls for: - **Site Identity** (logo, title, tagline) - **Typography** (font styles and sizes) - **Colors** - **Layout** (header, sidebar, container, footer) - **Menus and Widgets** All changes are **live-previewed**, so you’ll instantly see how your site will look before publishing. ![GeneratePress Theme](https://serveravatar.com/wp-content/uploads/2025/07/image-2025-07-23T132343.377-1024x536.png)### Step 8: Install Recommended Plugins for GeneratePress While GeneratePress is built to work smoothly on its own, a few plugins can **enhance your site-building experience**: - **GenerateBlocks** – A lightweight block editor plugin created by the same team. It helps build custom layouts. - **WP Show Posts** – For displaying recent or custom post listings. - **Elementor or Gutenberg** – If you’re using page builders, GeneratePress plays well with both. These tools allow you to craft highly dynamic and stylish websites without relying on bulky themes. ### Step 9: Optimize for Performance and SEO GeneratePress is already **lightweight and performance-optimized**, but you can take it further with a few simple steps: - Use a **caching plugin** like WP Rocket or LiteSpeed Cache. - Install an **SEO plugin** such as Rank Math or Yoast SEO. - Optimize your images using plugins like ShortPixel or Imagify. - Make sure you’re using **clean permalinks** and creating proper **site structure**. Following these practices ensures your site not only looks good, but also **ranks well**. ### Step 10: Keep Everything Updated To maintain security, compatibility, and performance, make sure to: - **Update the GeneratePress theme** when a new version is available. - **Update the GeneratePress Premium plugin** regularly. - Keep WordPress core and other plugins up to date. Also, don’t forget to **backup your site regularly** using a plugin like UpdraftPlus. ## Conclusion Installing and setting up the **GeneratePress theme in WordPress** is a breeze — even for beginners. Whether you stick with the free version or unlock the premium features, you’re getting a theme that’s built for speed, flexibility, and full control. From installation to customization, you now have a solid understanding of how to make the most out of GeneratePress. So go ahead and **build a beautiful, functional, and blazing-fast website,** without the bloated code and complicated settings. **Your WordPress journey just got a whole lot smoother.** If you found this guide helpful, feel free to bookmark it or share it with others who are looking to get started with GeneratePress. ## FAQ **1. Is GeneratePress free to use?** Yes, **GeneratePress offers a free version** that you can install directly from the WordPress theme directory. However, if you want access to advanced customization options and the Site Library, you’ll need to purchase the **GeneratePress Premium plugin**. **2. What’s the difference between the GeneratePress theme and the GeneratePress Premium plugin?** The **theme is free** and provides a fast, lightweight foundation for your website. The **Premium plugin** adds advanced features like layout controls, pre-made templates, custom elements, sticky navigation, and much more. **3. Can I use GeneratePress with page builders like Elementor or Beaver Builder?** Absolutely! **GeneratePress is fully compatible with Elementor, Beaver Builder, and other major page builders**. In fact, many users combine GeneratePress with a page builder to create highly customized websites. **4. Is GeneratePress good for SEO?** Yes, GeneratePress is **built with clean, lightweight, and SEO-optimized code**. It follows best practices for performance and accessibility, giving your content the best chance to rank well in search engines. **5. Can I customize GeneratePress without writing code?** Definitely. With the WordPress Customizer and the **GeneratePress Premium plugin**, you can make extensive changes to your site’s layout, colors, fonts, and more — **no coding required**. **6. Will changing my theme to GeneratePress affect my current content?** No. **Switching your theme won’t delete your content** like posts, pages, or images. However, some layout settings may reset, so it’s a good idea to preview the changes and back up your site before switching themes. **Categories:** Blog, Tutorials, WordPress **Tags:** Fast WordPress Theme, GeneratePress for Bloggers, GeneratePress Theme Installation, Install GeneratePress Theme, Lightweight WordPress Theme --- ### [MariaDB Vs MySQL: Key Differences You Should Know](https://serveravatar.com/mariadb-vs-mysql/) **Published:** July 24, 2025 **Author:** Meghna Meghwani **Content:** [![Blog banner - ServerAvatar](https://serveravatar.com/wp-content/uploads/2025/09/728_90-Banner-3-1024x127.png)](https://serveravatar.com?ref=blog)If you have ever set up a website, hosted an application, or dived into server management, even just a little bit, you have likely come across two very familiar names: **MariaDB vs MySQL**. On the surface, they might seem the same. But when you dig a little deeper, their paths, features, and communities start to diverge. So, what is real difference between MariaDB and MySQL? And more importantly, which one should you use? Let’s break it down together in this easy-to-follow, guide that clears up the confusion for all. Let’s start with the basics. **MySQL** and **MariaDB** both are RDBMS that means “**Relational Database Management Systems**“. That is fancy way of saying they help store and organize data, such as customer information, orders, or articles, using tables. They both are fast, reliable, and widely used across the web. In fact, some of the most popular applications like WordPress, Joomla, and Drupal run on them. So, if they are similar, why the debate? Because **who’s behind them, how they’re developed, and what they offer under the hood** is where things start to differ. ## The Story Behind MySQL and MariaDB MySQL was started in 1995. Swedish company called MySQL AB created it. It became very popular around the world. It was free and open-source, anyone could use it. ![MariaDB and MySQL](https://serveravatar.com/wp-content/uploads/2025/07/image-2025-07-22T105800.255.png)Then in 2008, Sun Microsystems bought MySQL. And shortly after, Oracle acquired Sun. That raised few eyebrows in the developer community, because Oracle also owns another major database system: Oracle DB. Worried about the future of MySQL’s open-source roots, the original developers created “fork” of MySQL in 2009 and give name to it MariaDB (after the daughter of one of the creators, just like MySQL was named after another daughter). ![MariaDB ](https://serveravatar.com/wp-content/uploads/2025/07/image-2025-07-22T105819.396-1024x419.png)## Who Owns These Databases? **MySQL:** Oracle Corporation owns it. Oracle is big tech company. **MariaDB:** The MariaDB Foundation owns it. This is community group, not company. ## Licensing (How You Can Use Them) **MySQL:** It has two types of licenses. Basic use is free, but some advanced features cost money. **MariaDB:** Completely free to use. No hidden costs, even for businesses. **How They Are Similar:** MySQL and MariaDB are very similar because MariaDB was created from MySQL’s code. ## Similarities Between MariaDB and MySQL Before we keep pointing out their differences, let’s remember that, **MariaDB and MySQL are more same than different**, at least at their core. Here are the major similarities: - **Same origins**: MariaDB is fork of MySQL, so they share the same codebase up to certain point. - **SQL syntax**: Both use SQL (Structured Query Language) for interacting with a data. - **Client tools**: Tools like phpMyAdmin, Workbench, Sequel Pro, and others work with both. - **Data types and table structures**: The basic data types (INT, VARCHAR, TEXT, etc.) and table engines (like InnoDB) are largely the same. - **Same ports and connectors**: MariaDB and MySQL both run on port number **3306** by default and can use the same MySQL connectors in most applications. **In short**, if you’re comfortable with one, picking up the other doesn’t take much time. This is one of the reasons many developers switch from MySQL to MariaDB without understanding everything again. ## Comparison of MariaDB and MySQL Let’s checkout below comparison of MySQL and MariaDB: FeatureMySQLMariaDB**Ownership**Oracle CorporationMariaDB Foundation**License**Dual (Open-source + Commercial)Fully Open-source (GPL)**Community-driven**Limited (Oracle-controlled)Yes (Active community & contributors)**Default Engine**InnoDBInnoDB + More (Aria, XtraDB, ColumnStore)**Performance**GoodOften better, especially in complex workloads**Security Features**Some behind paywallMany advanced features in free version**Clustering/Replication**InnoDB Cluster, Group ReplicationGalera Cluster (built-in)**Versioning**Slower, conservative updatesFaster, more frequent feature additions**Compatibility**StandardAims to be compatible with MySQL**Enterprise Support** Via Oracle (Paid)Via MariaDB Corp + Free community help## Performance and Speed Comparison When it comes to speed, both databases are fast, but MariaDB often edges out MySQL in benchmarks. That’s because: - **MariaDB** has a better optimization for complex queries. It supports more storage engines, which can improve flexibility and speed. - **MySQL** has made a significant performance improvements in recent versions but is sometimes seen as slower in handling very large datasets. ## MySQL vs MariaDB at a Functional Level FunctionMySQLMariaDB**JSON Functions**Native JSON data type + full supportPartial support (stored as text)**SEQUENCE Objects**✘ No – not supported✔ Yes – native support**SYSTEM VERSIONED TABLES**✘ No✔ Yes – temporal data tracking**Invisible Columns**✔ Supported✔ Supported**Virtual Columns**✔ Supported✔ Supported**Dynamic Columns**✘ No✔ Yes – store schema-less data in columns**Common Table Expressions (CTEs)**✔ Yes – standard support✔ Yes – with recursive support**Window Functions**✔ Full support✔ Full support**Parallel Replication**✔ Basic implementation✔ More flexible and configurable**Thread Pooling**✘ Enterprise-only feature✔ Included in community edition**Encryption at Rest**✘ Enterprise-only feature✔ Built-in, available in all editions**PL/SQL Compatibility**✘ No✔ Oracle-style syntax support (PL/SQL mode)**Storage Engine Variety**✘ Limited: Primarily InnoDB, MyISAM✔ Extensive: Aria, XtraDB, TokuDB, ColumnStore**Oracle Syntax Compatibility**✘ Not supported✔ Supported**JSON\_TABLE Function**✔ Available✘ Not available**Real-Time Analytics (ColumnStore)**✘ No built-in solution✔ Yes – for massive data queries**Query Optimizer Tracer**✔ Available, but limited✔ Detailed query analysis**Galera Cluster Integration**✘ Not included (external tools needed)✔ Built-in## Feature Differences Here’s where two really start to diverge: ### MariaDB Exclusive Features: - Thread Pooling (in community version) - More storage engines (e.g., Aria, ColumnStore) - Virtual columns - Dynamic columns - Advanced GIS features ### MySQL Exclusive Features: - InnoDB enhancements (via Oracle) - MySQL Enterprise Tools - Some replication features **In short:** MariaDB adds more experimental and open features, while MySQL focuses on stability and enterprise tools. [![Blog banner - ServerAvatar](https://serveravatar.com/wp-content/uploads/2025/09/728_90-Banner-1-1024x127.png)](https://serveravatar.com?ref=blog)## Compatibility: Can You Switch Easily? - MariaDB designed for drop-in replacement for MySQL. - Most applications that work with MySQL will also work with MariaDB without changes. - However, future compatibility may not always be guaranteed. If you’re switching now, it’s still smooth. But for long-term projects, make sure to test thoroughly. ## Security and Data Integrity Both databases take **security seriously**, but they handle it bit differently. - **MySQL** offers the **enterprise-level security features**, like data masking and firewall rules, but only in paid version. - **MariaDB** includes many advanced security features **out of box**, such as **data-at-rest encryption**, user roles, and password validation plugins. So if you’re looking for **powerful security features for free**, **MariaDB is the winner** here. ## Replication and Clustering Capabilities When you’re scaling business or app, **replication** and **clustering** become critical. - **MySQL** supports **group replication**, **semi-sync replication**, and has **InnoDB Cluster** for high availability. - **MariaDB** offers **Galera Cluster** integrated natively and supports **multi-source replication**. Both are excellent, but **MariaDB offer more flexibility** without needing third-party tools or licenses. ## Support and Community Because MySQL is owned by Oracle, the official support comes with a price tag. **MySQL:** Paid support through Oracle. **MariaDB:** Free community support, plus optional enterprise support via MariaDB Corporation. Community involvement is higher for MariaDB, with faster updates and more transparency in development. ## Real World Usage **MySQL is used by:** - Big companies with Oracle products - Facebook (in the past) - WordPress - Large businesses **MariaDB is used by:** - Wikipedia - Red Hat - Companies that prefer open-source Your choice often depends on **your ecosystem and licensing preferences**. ## Why Developers Prefer One Over the Other Here is what we heard from developers: - **MariaDB** is more developer-friendly with frequent updates and full transparency. - **MySQL** offers long-term stability and is trusted by big corporations. If you are building innovative, fast-evolving projects, **MariaDB often the favorite**. For long-term enterprise systems? **MySQL holds strong**. ## Pros and Cons: ### MySQL Pros: - Oracle backs it (reliable support) - Widely used and trusted - Mature and stable ### MySQL Cons: - Some features cost money - Slower to add new features - Not completely open-source ### MariaDB Pros: - Completely free and open - More features for free - Fast development and updates ### MariaDB Cons: - Missing some MySQL business features - Future compatibility uncertain ## Choosing the Right Database: MariaDB or MySQL? Still unsure which fits you best? Let’s simplify your decision: **Pick MySQL if:** - You’re working with large enterprise that already uses Oracle products. - You want stable, conservative system with long-term support. - Your infrastructure relies on MySQL-specific features or integrations. **Pick MariaDB if:** - You value open-source philosophy and transparency. - You want cutting-edge features without commercial license. - You’re building fast-growing applications and need high performance with freedom to scale.[](https://storage.3.basecamp.com/5840738/blobs/b6e2ac2a-6493-11f0-8f0b-0242ac120004/download/image.png) ![](https://serveravatar.com/wp-content/uploads/2025/07/image-2025-07-22T112352.710.png)**Simple comparison:** Like Android vs iPhone. Both work well, but one is more open and one is more controlled. Still can not decide? Here’s a pro tip: Try MariaDB for new projects. Keep MySQL if you already use it. ## Using MYSQL and MariaDB with ServerAvatar If you’re managing your servers and websites using **[ServerAvatar](https://serveravatar.com)**, the good news is, you can easily work with both **MySQL** and **MariaDB**. Additionally, we are providing both databases in a fully optimized state. ServerAvatar is designed to support developers, startups, and agencies who want to host PHP applications with ease, and database management is a big part of that. ![MariaDB Vs MySQL](https://serveravatar.com/wp-content/uploads/2025/07/image-2025-07-22T112448.373-1024x288.png)## **Database Management Made Easy** With [**ServerAvatar**](https://serveravatar.com/), whether you’re using MySQL or MariaDB, you get: - **User-friendly database creation** right from the dashboard. - **One-click application creation of phpMyAdmin** for managing your data visually. - **Instant and scheduled backups** of your databases to avoid data loss. ServerAvatar handles the technical parts for you. That means you don’t need to run complex commands to install or configure your database, just a few clicks in the control panel and you’re ready to go. ## Final Verdict: Which One Should You Use? It all comes down to your needs: - If you value **openness, speed, and new features**, go with **MariaDB**. - If you need **long-term, stable, enterprise-backed support**, MySQL might be the better choice. They’re both powerful tools, like two sides of the same coin. Choosing the right one is about matching your goals and environment. ## FAQ ### **1. Is MariaDB really faster than MySQL?** Yes, in many benchmarks, MariaDB performs better for complex queries and large datasets, thanks to better optimization and storage engines. ### **2. Can I switch from MySQL to MariaDB without any issues?** In most cases, yes. MariaDB is designed to be compatible with MySQL, but always test thoroughly before migrating a live system. ### **3. Is MariaDB safer or more secure than MySQL?** Both are secure, but MariaDB includes more advanced security features by default without needing an enterprise license. ### **4. Why was MariaDB created in the first place?** MariaDB was created to keep MySQL open-source and community-driven after Oracle took ownership of MySQL. ### **5. Which one is better for WordPress or web hosting?** Both work well with WordPress. However, **MariaDB is often preferred by hosting providers** due to better performance and openness. **Categories:** Blog, Guide, Linux, Ubuntu **Tags:** Database Management, MariaDB and MySQL, MariaDB Guide, MySQL Tips, Relational Databases, Server Management --- ### [10 Game-Changing WordPress Plugins for Blogger Growth](https://serveravatar.com/wordpress-plugins-for-blogger/) **Published:** July 24, 2025 **Author:** Meghna Meghwani **Content:** [![Blog banner - ServerAvatar](https://serveravatar.com/wp-content/uploads/2025/09/728_90-Banner-3-1024x127.png)](https://serveravatar.com?ref=blog)If you’re searching for the best **WordPress Plugins for Blogger**, you already know how demanding blogging can be. It’s not just about writing articles, you also need to handle editing, website design, SEO, backups, social sharing, security, and more. Doing all of this manually can be time-consuming and overwhelming, especially if you’re managing everything on your own. That’s where WordPress plugins come in. These small but powerful tools can help you automate tasks, improve your site’s performance, and grow your blog faster. From boosting your SEO to designing beautiful pages and keeping your blog safe, plugins can take care of the technical work so you can focus on creating great content. In this guide, we’ll explore 10 essential WordPress plugins that can truly transform your blog. Each one plays a unique role in helping you attract more readers, improve your site’s speed, enhance user experience, and grow your online presence. ## 1. Yoast SEO[](https://storage.3.basecamp.com/5840738/blobs/ffd5cbdc-6728-11f0-a329-0242ac120005/download/image.png) ![Yoast SEO](https://serveravatar.com/wp-content/uploads/2025/07/image-84-1024x421.png)If you want your blog posts to show up on Google, [Yoast](https://yoast.com/) SEO is a must-have. What is this? It’s a plugin that checks your content for SEO best practices—like using keywords, adding meta descriptions, and organizing your headings—so your posts have a better chance of ranking high in search engines. **How it works** After you write a post, Yoast shows tips like: - Use your keyword here - Make your paragraph shorter - Add a meta description - Use a better title It uses red, orange, or green lights to show what’s good or bad. **Why use it?** - More people can find your blog - Easy to follow tips - Works with most themes **Yoast SEO – Key Features** - Real-time SEO analysis while writing posts - Readability check for better user experience - Snippet preview for Google search results - Easy keyword optimization - Internal linking suggestions (premium) - XML sitemap creation - Meta tags control ## 2. Jetpack ![Jet Pack](https://serveravatar.com/wp-content/uploads/2025/07/image-85-1024x467.png)Keeping your blog fast, secure, and running smoothly can be a hassle, but [Jetpack](https://yoast.com/) makes it simple. What is this? It’s an all-in-one plugin that adds security features, performance boosts, visitor stats, and social sharing tools to your blog—all from one easy dashboard. **How it works** Jetpack offers: - Site stats - Security scanning - Backup options - Lazy loading for faster images - Spam protection You just turn on the things you want. **Why use it?** - It saves time and plugins - Keeps your blog safe - Shows how your blog is doing **Jetpack – Key Features** - Built-in security (spam protection, brute force blocking) - Performance tools (lazy loading images, site speed boost) - Site statistics and traffic reports - Downtime monitoring and alerts - Automated social media sharing - Customizable contact forms - Backups and restores (paid plan) ## 3. WP Super Cache ![Wp Super Cache](https://serveravatar.com/wp-content/uploads/2025/07/image-87-1024x447.png)[Site speed](https://wordpress.org/plugins/wp-super-cache/) is a big deal for bloggers, and slow pages can chase visitors away. What is this? WP Super Cache creates static versions of your pages, which means your site loads faster for users by showing a saved version of your content instead of loading it fresh every time. **How it works** Instead of loading a page fresh each time, it shows the saved (cached) version. That means it’s faster. You just turn it on and it works in the background. **Why use it?** - Fast blogs keep readers happy - Google likes fast blogs - Saves your server from working too hard **WP Super Cache – Key Features** - Generates static HTML files for faster page loading - Supports multiple caching types (mod\_rewrite, PHP, legacy) - Scheduler for cache clearing and refreshing - CDN (Content Delivery Network) support - Preloading of content for better performance - Simple on/off switch for caching - Compression for smaller file sizes ## 4. Akismet Anti-Spam ![Akismet Anti-Spam](https://serveravatar.com/wp-content/uploads/2025/07/image-89-1024x612.png)Nobody likes spam comments, they clutter your posts and make your blog look messy. That’s where [Akismet Anti-Spam comes](https://akismet.com/wordpress/) in. What is this? Akismet Anti-Spam is a smart plugin that automatically detects and removes spam comments before they even appear on your site. It saves you time by filtering out junk so you don’t have to manually review every comment. This keeps your comment section clean, professional, and focused on real conversations. **How it works** Every time someone leaves a comment, Akismet checks it. If it looks like spam, it puts it in the trash. You don’t have to do anything after setting it up. **Why use it?** - Saves time - Keeps your blog clean - Stops bots from messing with your site **Akismet Anti-Spam – Key Features** - Automatically filters spam comments - Keeps comment section clean and real - Shows comment history for moderation decisions - Saves time with auto-deletion of obvious spam - Integrates with most contact form plugins - Regularly updated spam detection algorithm ## 5. Elementor ![Elementor](https://serveravatar.com/wp-content/uploads/2025/07/image-90-1024x462.png)Want a professional-looking blog but don’t know how to code? [Elementor](https://elementor.com/) has your back. What is this? It’s a visual drag-and-drop page builder that lets you design custom pages, layouts, and sections on your blog without touching a single line of code. **How it works** You open your page with Elementor, then: - Drag a headline - Drop an image - Move things around - Make cool designs fast It shows you everything live. **Why use it?** - Make your blog look pro - No need for a designer - Easy even if you’re new **Elementor – Key Features** - Live drag-and-drop editor - Pre-made templates and blocks - Full mobile editing controls - Custom widgets (image, text, button, forms, etc.) - Integrates with WooCommerce and other plugins - Reusable design elements across pages - No coding required [![Blog banner - ServerAvatar](https://serveravatar.com/wp-content/uploads/2025/09/728_90-Banner-1-1024x127.png)](https://serveravatar.com?ref=blog)## 6. Rank Math ![Rank Math](https://serveravatar.com/wp-content/uploads/2025/07/image-101-1024x429.png)If you’re serious about SEO and want more control over your blog’s visibility, [Rank Math](https://rankmath.com/) is a powerful solution. What is this? It’s a full-featured SEO plugin that helps you optimize content with keyword suggestions, rich snippets, and detailed analytics—all built into your WordPress dashboard. **How it works** It helps with: - Titles and meta stuff - Keywords - Links inside your blog - Telling Google what your site is about You get easy tips while writing your post. It even connects to Google Search Console. **Why use it?** - Great for SEO beginners and pros - More tools than most plugins - Helps blogs show up better on Google **Rank Math – Key Features** - Advanced SEO analysis and scoring - Focus keyword optimization (up to 5 keywords) - Rich snippets and schema markup - Google Search Console integration - Automatic image SEO (alt and title tags) - Redirection manager and 404 monitor - XML sitemap and breadcrumb support ## 7. MonsterInsights ![MonsterInsights](https://serveravatar.com/wp-content/uploads/2025/07/image-102-1024x441.png)Understanding your audience is key to blog growth, and [MonsterInsights](https://www.monsterinsights.com/) makes it easy. What is this? It’s a plugin that connects your WordPress site to Google Analytics and displays real-time traffic data, user behavior, and performance reports directly inside your admin area. **How it works** You just connect it once. Then it shows: - How many people visited - Where they came from - What posts they liked most - How long they stayed It’s super visual — no hard graphs. **Why use it?** - Helps you learn what’s working - Shows what to write more of - Easy to use, no coding **MonsterInsights – Key Features** - Google Analytics integration made easy - Real-time stats in your dashboard - Page-level tracking (see which pages do best) - Affiliate and outbound link tracking - E-commerce tracking (WooCommerce) - GDPR-friendly settings - Traffic source and device breakdowns ## 8. WPForms ![WPForms](https://serveravatar.com/wp-content/uploads/2025/07/image-103-1024x424.png)If you want to let readers contact you or submit information, you’ll need forms and [WPForms](https://wpforms.com/) makes them easy. What is this? It’s a beginner-friendly form builder that lets you create contact forms, polls, sign-ups, and more using simple drag-and-drop tools. **How it works** You use drag-and-drop to build a form. Add name, email, message boxes, and more. Then paste it into a blog post or page. **Why use it?** - Let readers message you - Grow your email list - No tech skills needed **WPForms – Key Features** - Drag-and-drop form builder - Pre-built form templates - Smart conditional logic - Instant form notifications - Spam protection with CAPTCHA and Honeypot - Multi-page forms and file uploads - Mobile responsive design ## 9. Pretty Links[](https://storage.3.basecamp.com/5840738/blobs/4bf7253c-672a-11f0-8347-0242ac120005/download/image.png) ![Pretty Links](https://serveravatar.com/wp-content/uploads/2025/07/image-104-1024x463.png)Affiliate marketers and bloggers with long URLs will love [Pretty Links](https://prettylinks.com/). What is this? It’s a plugin that shortens, tracks, and manages your links, letting you create clean, custom URLs that look more professional and are easier to share. **How it works** Let’s say your original affiliate link looks like this: That’s a long and messy URL—not very user-friendly. With Pretty Links, you can turn it into something clean and branded like this: This shorter link is easier to remember, looks more professional, and blends well with your site. On top of that, Pretty Links tracks how many times each link is clicked. You get useful stats on link performance, helping you understand what your audience is clicking and which links are working best. **Why use it?** - Makes links look nice - Easy to remember - Tracks how links perform **Pretty Links – Key Features** - Turn long URLs into short, branded links - Customizable slugs (yourblog.com/anything) - Detailed click tracking and reporting - Group and categorize links - Auto-link keywords across your site - Works with affiliate marketing programs - Redirection types (301, 302, 307) ## 10. UpdraftPlus ![WordPress Plugins for Blogger](https://serveravatar.com/wp-content/uploads/2025/07/image-105-1024x435.png)Backing up your blog is critical—because mistakes or crashes can happen anytime. What is this? [UpdraftPlus](https://wordpress.org/plugins/updraftplus/) is a plugin that lets you schedule automatic backups of your full site (including posts, themes, and plugins) and store them safely on services like Google Drive or Dropbox. **How it works** It makes a backup of your: - Posts - Pictures - Settings - Plugins You can store it on Google Drive or Dropbox. If something goes wrong, you can bring it back. **Why use it?** - Keeps your blog safe - One-click backup and restore - Set it and forget it **UpdraftPlus – Key Features** - Scheduled and manual backups - Restore your site in one click - Store backups to Google Drive, Dropbox, etc. - Backup entire site (database, themes, plugins, files) - Easy migration and cloning tool - Backup reporting and email notifications - Supports multisite WordPress installations ## Simple Recap: Top 10 Plugins for Blogger Growth - **Yoast SEO** – For getting found on Google - **Jetpack** – All-in-one toolkit - **WP Super Cache** – Speeds up your site - **Akismet** – Blocks spam comments - **Elementor** – Build your site easily - **Rank Math** – All-in SEO for bloggers - **MonsterInsights** – Track your blog visitors - **WPForms** – Make simple forms - **Pretty Links** – Clean, short links - **UpdraftPlus** – Backup your blog These plugins are simple to use and make a huge difference. ## FAQ ### **Q: Can I use all these plugins at once?** Yes, but don’t use two plugins that do the same thing. Like Yoast and Rank Math — pick one. ### **Q: Are these plugins free?** Most have free versions with good stuff. You can pay for extras, but free is fine for most bloggers. ### **Q: Do plugins slow down my site?** Only if you use too many or big ones. Stick to well-known ones like these. ### **Q: Do I need to know coding?** Nope! These plugins are made for regular users. ### **Q: What plugin should I start with first?** Start with Yoast or Rank Math, then WPForms or Jetpack. Add more as your blog grows. ## Conclusion Growing a successful blog takes more than just great content—it also takes the right tools to help you work smarter, not harder. With the 10 WordPress plugins we’ve covered, you can simplify nearly every part of your blogging journey. From improving your SEO with Yoast or Rank Math, to designing with Elementor, securing your site with Jetpack or UpdraftPlus, and managing forms or links with WPForms and Pretty Links, each plugin plays an important role. These plugins are easy to use, beginner-friendly, and can seriously boost your blog’s performance and reach. Whether you’re just starting out or looking to improve what you already have, installing the right plugins can be a game-changer. So don’t wait. Start with a few that match your current needs, then add others as your blog grows. With the right setup, you’ll be able to save time, reach more people, and build a blog you’re proud of. ## Stop Wasting Time on Servers. Start Building Instead. You didn’t start your project to babysit servers. Let **ServerAvatar** handle deployment, monitoring, and backups — so you can focus on growth. Deploy **WordPress, Laravel, N8N**, and more in minutes. No DevOps required. No command line. No stress. [ 🚀 Try Free ](https://app.serveravatar.com) [ 🌐 Learn More ](https://serveravatar.com/) Trusted by 10,000+ developers and growing. **Categories:** Blog, Guide, WordPress **Tags:** Blogger Tools, Blogging Essentials, SEO Plugins, Social Sharing Plugins, Website Optimization, WordPress Plugins --- ### [Boost Rankings with Yoast SEO for WordPress](https://serveravatar.com/yoast-seo-wordpress/) **Published:** July 25, 2025 **Author:** Meghna Meghwani **Content:** [![Blog banner - ServerAvatar](https://serveravatar.com/wp-content/uploads/2025/09/728_90-Banner-3-1024x127.png)](https://serveravatar.com?ref=blog)So you want your website to show up when people search on Google? Well, you’re in the right place. [Yoast SEO for WordPress](https://wordpress.org/plugins/wordpress-seo/) is one of the best tools to help your site get found online. It’s easy to use and works great, even if you’re not an expert. Let me tell you everything you need to know about using it the right way. ## What is Yoast SEO? [Yoast SEO](https://yoast.com/) is a plugin for WordPress websites. Think of it like a helper that makes your site more friendly to search engines like Google. When you write a blog post or page, Yoast checks it and tells you how to make it better. The plugin looks at your content and gives you tips. It might say “add more words” or “use your keyword more.” This helps Google understand what your page is about. And when Google understands your page, it can show it to people who are looking for that information. Now, Yoast comes in two versions. There’s the free one that most people use, and there’s a paid version with extra features. The free version is pretty good and works well for most websites. But if you want more advanced stuff, you can get the paid version. ## How to Install Yoast SEO **Step 1: Install the Yoast SEO Plugin** Here’s how you install it: 1. Log in to your **WordPress dashboard**. 2. Navigate to the left menu, go to **Plugins > Add New**. 3. In the search bar at the top right, type **“Yoast SEO”**. 4. When you see the plugin in the list, click **Install Now**. 5. After it installs, click **Activate**. ![Install Yoast SEO](https://serveravatar.com/wp-content/uploads/2025/07/image-113-1024x462.png)Once done, you’ll see a new **SEO menu** on your dashboard. That means Yoast is ready! **Step 2: Run the Setup Wizard** This wizard helps you set up everything right from the start. - After you activate Yoast, it may ask you to run the **Configuration Wizard**. If not, just go to: **SEO > General > First-time configuration**. ![Yoast SEO Setup](https://serveravatar.com/wp-content/uploads/2025/07/image-114-1024x558.png)- The wizard will ask a few things like: - Is your site a **blog, shop, or something else**? - Are you a person or company? - What pages should show in Google? Just follow along and **save your answers**. This helps Yoast understand your site better. **Step 3: Set Up Search Appearance** This step helps tell Google how your posts and pages should look in search. 1. Go to **Yoast** **SEO > Settings > Content types**. ![Setting](https://serveravatar.com/wp-content/uploads/2025/07/image-115.png) ![Yoast SEO Dashboard](https://serveravatar.com/wp-content/uploads/2025/07/image-116-1024x570.png)1. You’ll see options for **Posts**, **Pages**, and more. 2. You can set how your **titles and descriptions** look in Google. Use smart tags like: - %%title%% for the post title - %%sep%% for a dash or symbol Make sure “**Show in search results**” is set to **Yes** for pages you want Google to find. ![Yoast SEO Search Appearance](https://serveravatar.com/wp-content/uploads/2025/07/image-117-1024x562.png)**Step 4: Connect Webmaster Tools** This helps Google and other tools track your site better. 1. Go to **SEO > Settings > Site connections**. ![Site Connection](https://lh7-rt.googleusercontent.com/docsz/AD_4nXeo7eucpmbJHR3VXEBp0nUtry8iK2wRicNkKyjLLp-evyETQsquwrwb3bQojh8_kEbkf6nYRQvTr-2Hs18dE6S5y-3iYmfstoxOnt1WuowKw-X1oIHGzPb2Zm7_3epZYfwP5MP1gA?key=p7BO8I4xphKVYhQ-oiV-kA)- You’ll see options for Google Search Console, Bing, and more. - Visit these tools, get a verification code, and paste it here. - Click Save. Now, your site is linked to these tools. They help you see if your site has problems, missing pages, or errors. **Step 5: Turn On Schema Markup** Schema helps search engines understand your site better. - Go to **SEO > Settings > Site representation**. ![Site Representation](https://serveravatar.com/wp-content/uploads/2025/07/image-118-1024x521.png)- Choose if your site is for a **Person** or an **Organization**. - Fill data and Click on save. Now scroll down navigated to schema section - You can select your page type and article type - After selection of schema type click on save changes button. ![Yoast SEO](https://serveravatar.com/wp-content/uploads/2025/07/image-119.png)Yoast adds this behind the scenes to help Google show rich results. **Final Step: Use Yoast for Better SEO** Now that everything is set up, start using Yoast to make your posts and pages even better. When you write a post: - Scroll to the bottom and look for the **Yoast SEO box**. - Add a **focus keyword** (what you want to rank for). - Write your **SEO title** and **meta description**. - Use the tips Yoast gives to improve your content and readability. [![Blog banner - ServerAvatar](https://serveravatar.com/wp-content/uploads/2025/09/728_90-Banner-1-1024x127.png)](https://serveravatar.com?ref=blog)## Understanding the Yoast SEO Dashboard Once Yoast is set up, you’ll see the SEO dashboard. This is like the control center for your SEO. Here’s what you’ll find: The dashboard shows you how your site is doing overall. It might show problems that need fixing or give you suggestions to improve things. There’s also a section for notifications. Yoast will tell you about updates or important news here. Make sure to check this sometimes. You’ll also see your SEO score. This is like a grade for how well your site is optimized. Don’t worry if it’s not perfect right away. You can improve it over time. ## How to Use Yoast for Your Posts and Pages Now here’s where the real magic happens. When you write a new post or page, Yoast will help you make it better for search engines. At the bottom of your post editor, you’ll see the Yoast SEO box. This is where you can set up your SEO for that specific post. First, you need to pick a focus keyword. This is the main word or phrase that your post is about. For example, if you’re writing about dog training, your focus keyword might be “dog training tips.” Then you write your SEO title. This is what shows up in search results. Make it catchy and include your keyword if you can. Keep it under 60 characters so it doesn’t get cut off. Next, write your meta description. This is the short summary that appears under your title in search results. Make it interesting so people want to click on your link. Keep it under 160 characters. ## The Traffic Light System Yoast uses a simple traffic light system to show you how good your SEO is: Red light means there are problems you should fix - Orange light means it’s okay but could be better - Green light means you’re doing great Don’t stress if you can’t get everything green. Sometimes it’s not possible or necessary. The important thing is to fix the red issues and try to improve the orange ones. ## Content Analysis Features One of the best things about Yoast is how it checks your content. It looks at your writing and gives you suggestions to make it better. It checks if you’re using your keyword enough. Too little and Google might not understand what your post is about. Too much and it might look like spam. Yoast also checks if your sentences are too long. Short sentences are easier to read. It will suggest breaking up long sentences into shorter ones. The plugin looks at your paragraphs too. Really long paragraphs can be hard to read on phones and computers. Yoast will suggest making them shorter. It also checks if you’re using transition words. These are words like “however,” “therefore,” and “meanwhile.” They help your writing flow better. ## Readability Analysis Yoast doesn’t just check SEO stuff. It also checks how easy your content is to read. This is called readability analysis. The plugin looks at things like: - How long your sentences are - How hard your words are to understand - How your paragraphs are structured - If you use headings to break up your content Good readability is important because people leave websites that are hard to read. And Google notices when people leave your site quickly. ## Technical SEO Features Yoast handles a lot of technical SEO stuff automatically. You don’t need to worry about most of it, but here are some things it does: It creates XML sitemaps for your site. These help search engines find all your pages. Yoast updates these automatically when you add new content. The plugin also helps with your site’s structure. It adds something called schema markup to your pages. This helps search engines understand your content better. Yoast also manages your robots.txt file. This tells search engines which pages they should look at and which ones they should ignore. ## Social Media Integration Yoast helps your content look good when people share it on social media. You can set up how your posts will look on Facebook, Twitter, and other platforms. In the Yoast box for each post, you can upload special images for social media. You can also write custom titles and descriptions for social sharing. This is important because social media can bring lots of visitors to your site. And when your content looks good when shared, more people are likely to click on it. ## Advanced Yoast Features If you get the paid version of Yoast, you get some extra features. These include: Multiple focus keywords for each post. This lets you target more search terms with one piece of content. Internal linking suggestions. Yoast will suggest other posts on your site that you should link to. This helps keep people on your site longer. Content insights. This shows you what words you use most often and helps you write more varied content. Redirect manager. This helps you set up redirects when you change URLs or delete pages. ## Tips for Better Results Here are some extra tips to get the most out of Yoast SEO: Focus on creating really good content first. SEO tools are helpful, but they can’t fix bad content. Write things that people actually want to read. Use your keywords naturally. Don’t force them into your writing. They should fit in smoothly and make sense. Update your old posts. Go back to older content and use Yoast to improve it. This can help boost your rankings without writing new stuff. Be patient. SEO takes time to work. Don’t expect to see results overnight. Keep creating good content and optimizing it with Yoast. Learn from your competitors. Look at what other sites in your area are doing. What keywords are they using? How are they structuring their content? ## Common Problems and Solutions Sometimes you might run into issues with Yoast. Here are some common problems and how to fix them: If Yoast isn’t showing up in your post editor, try refreshing the page. Sometimes it just needs a moment to load. If your SEO score is stuck on red, don’t panic. Check each suggestion one by one. Often it’s something simple like needing to add more words or use your keyword more. If your site is running slowly after installing Yoast, it might be conflicting with another plugin. Try turning off other plugins one by one to find the problem. ## FAQ ### **Q: Is Yoast SEO free?** Yes, there’s a free version that works great for most websites. There’s also a paid version with extra features. ### **Q: Do I need to know coding to use Yoast?** No, you don’t need any coding knowledge. Yoast is designed to be easy for everyone to use. ### **Q: How long does it take to see results?** SEO takes time. You might start seeing small improvements in a few weeks, but bigger changes usually take 3-6 months. ### **Q: Can I use Yoast with other SEO plugins?** It’s better to use just one SEO plugin. Using multiple ones can cause conflicts and problems. ## Conclusion So, that’s how Yoast SEO helps you get better results on Google. It’s a smart plugin that makes SEO simple — even if you’re not a tech expert. From setting up your site, to writing better content, to fixing little problems that Google cares about — Yoast is always there to guide you. If you want more people to find your website, this tool is a great way to start. You don’t need to know any code or fancy stuff. Just follow the steps, listen to Yoast’s tips, and keep making good content. Remember, SEO takes time. You won’t see big changes overnight. But if you stay patient, keep improving, and use Yoast the right way — your site will slowly move up in the search results. ## Stop Wasting Time on Servers. Start Building Instead. You didn’t start your project to babysit servers. Let **ServerAvatar** handle deployment, monitoring, and backups — so you can focus on growth. Deploy **WordPress, Laravel, N8N**, and more in minutes. No DevOps required. No command line. No stress. [ 🚀 Try Free ](https://app.serveravatar.com) [ 🌐 Learn More ](https://serveravatar.com/) Trusted by 10,000+ developers and growing. **Categories:** Blog, Guide, WordPress **Tags:** Boost Website Rankings, Content Optimization, On-Page SEO, PHP Hosting, seo optimization, WordPress SEO, Yoast SEO --- ### [How to Generate Slug in Laravel](https://serveravatar.com/generate-slug-laravel/) **Published:** July 26, 2025 **Author:** Suresh Ramani **Content:** [![Blog banner - ServerAvatar](https://serveravatar.com/wp-content/uploads/2025/09/728_90-Banner-3-1024x127.png)](https://serveravatar.com?ref=blog)**Have you ever wondered how developers Generate Slug in Laravel to create clean, readable URLs, while others end up with jumbled strings of numbers and symbols?** That’s where *slugs* come into play! Think of slugs as the friendly translators of your database – they take complex titles and transform them into URL-friendly formats that both humans and search engines love. Whether you’re building a blog, e-commerce site, or any web application, mastering **slug** creation is crucial for SEO success and user experience. In this comprehensive guide, we’ll dive deep into everything you need to know about Laravel slugs, from basic implementation to advanced optimization techniques. ## What Are Slugs and Why Do They Matter? **Slugs** are URL-friendly versions of your content titles or names. Instead of having URLs like `yoursite.com/posts/123`, you get clean, descriptive URLs like `yoursite.com/posts/laravel-tips-for-beginners`. ### Why Slugs Are Essential: - **SEO Benefits**: Search engines prefer descriptive URLs - **User Experience**: Readable URLs build trust and are easier to share - **Professional Appearance**: Clean URLs look more credible - **Better Click-through Rates**: Users are more likely to click descriptive links Think of slugs as your website’s business card – they make that crucial first impression! ## Setting Up Basic Slug Generation in Laravel Let’s start with the foundation. First, you’ll need to add a slug column to your database table: PHP``` // In your migration file Schema::table('posts', function (Blueprint $table) { $table->string('slug')->unique()->after('title'); $table->index('slug'); }); ``` ``` // In your migration file Schema::table('posts', function (Blueprint $table) { $table->string('slug')->unique()->after('title'); $table->index('slug'); }); ``` ### Key Points to Remember: - **Always make slugs unique** to prevent conflicts - **Add database indexes** for better query performance - **Consider slug length** – keep it reasonable (under 100 characters) ## Using Laravel’s Built-in Str::slug() Helper Laravel provides an excellent built-in [helper for slug generation](https://laravel.com/docs/12.x/strings#method-str-slug): PHP``` use Illuminate\Support\Str; $slug = Str::slug('Laravel Tips for Beginners'); // Result: "laravel-tips-for-beginners" ``` ``` use Illuminate\Support\Str; $slug = Str::slug('Laravel Tips for Beginners'); // Result: "laravel-tips-for-beginners" ``` ### Advanced Str::slug() Options: - **Custom separators**: `Str::slug($title, '_')` for underscores - **Language-specific rules**: Handle different character sets - **Length limitations**: Trim slugs to desired length ## Creating Unique Slugs to Avoid Duplicates Duplicate slugs can break your application! Here’s how to ensure uniqueness: PHP``` private function generateUniqueSlug($title, $id = null) { $slug = Str::slug($title); $originalSlug = $slug; $counter = 1; while ($this->slugExists($slug, $id)) { $slug = $originalSlug . '-' . $counter; $counter++; } return $slug; } ``` ``` private function generateUniqueSlug($title, $id = null) { $slug = Str::slug($title); $originalSlug = $slug; $counter = 1; while ($this->slugExists($slug, $id)) { $slug = $originalSlug . '-' . $counter; $counter++; } return $slug; } ``` ### Best Practices for Unique Slugs: - **Append numbers** for duplicates (e.g., “post-title-2”) - **Check existing records** before saving - **Consider soft-deleted records** in your uniqueness check ## Implementing Automatic Slug Generation with Model Events Automate your slug generation using Laravel’s model events: PHP``` class Post extends Model { protected static function boot() { parent::boot(); static::creating(function ($post) { $post->slug = $post->generateUniqueSlug($post->title); }); static::updating(function ($post) { if ($post->isDirty('title')) { $post->slug = $post->generateUniqueSlug($post->title, $post->id); } }); } } ``` ``` class Post extends Model { protected static function boot() { parent::boot(); static::creating(function ($post) { $post->slug = $post->generateUniqueSlug($post->title); }); static::updating(function ($post) { if ($post->isDirty('title')) { $post->slug = $post->generateUniqueSlug($post->title, $post->id); } }); } } ``` ### Benefits of Automatic Generation: - **Consistency**: Never forget to create slugs - **Efficiency**: Automatic updates when titles change - **Error Prevention**: Reduces manual mistakes ## Handling Special Characters and Multilingual Content Different languages require special attention for slug generation: PHP``` // For multilingual support $slug = Str::slug($title, '-', 'en'); // Specify language // Custom character replacement $customReplacements = [ 'ñ' => 'n', 'ü' => 'u', '&' => 'and' ]; $cleanTitle = strtr($title, $customReplacements); $slug = Str::slug($cleanTitle); ``` ``` // For multilingual support $slug = Str::slug($title, '-', 'en'); // Specify language // Custom character replacement $customReplacements = [ 'ñ' => 'n', 'ü' => 'u', '&' => 'and' ]; $cleanTitle = strtr($title, $customReplacements); $slug = Str::slug($cleanTitle); ``` ### Multilingual Slug Strategies: - **Use transliteration** for non-Latin characters - **Consider separate slug columns** for each language - **Test with various character sets** to ensure compatibility ## Optimizing Slug Performance with Database Indexing Database performance is crucial when working with slugs: PHP``` // In your migration $table->string('slug', 100)->unique(); $table->index('slug'); // For compound indexes $table->index(['category_id', 'slug']); ``` ``` // In your migration $table->string('slug', 100)->unique(); $table->index('slug'); // For compound indexes $table->index(['category_id', 'slug']); ``` ### Performance Tips: - **Index slug columns** for faster lookups - **Limit slug length** to optimize index size - **Use compound indexes** when filtering by category + slug ## Custom Slug Generation Rules and Patterns Sometimes you need custom slug formats: PHP``` class Product extends Model { public function generateSlug() { $category = $this->category->slug ?? 'products'; $baseSlug = Str::slug($this->name); return $category . '/' . $baseSlug . '-' . $this->sku; } } ``` ``` class Product extends Model { public function generateSlug() { $category = $this->category->slug ?? 'products'; $baseSlug = Str::slug($this->name); return $category . '/' . $baseSlug . '-' . $this->sku; } } ``` ### Custom Pattern Examples: - **Category-based**: `/electronics/smartphone-abc123` - **Date-based**: `/2025/01/my-blog-post` - **Hierarchical**: `/parent-category/child-category/product` ## Managing Slug Updates and URL Redirects When slugs change, you need to handle old URLs gracefully: PHP``` class Post extends Model { protected static function boot() { parent::boot(); static::updating(function ($post) { if ($post->isDirty('slug')) { // Store old slug for redirect UrlRedirect::create([ 'old_url' => $post->getOriginal('slug'), 'new_url' => $post->slug, 'status_code' => 301 ]); } }); } } ``` ``` class Post extends Model { protected static function boot() { parent::boot(); static::updating(function ($post) { if ($post->isDirty('slug')) { // Store old slug for redirect UrlRedirect::create([ 'old_url' => $post->getOriginal('slug'), 'new_url' => $post->slug, 'status_code' => 301 ]); } }); } } ``` ### Redirect Best Practices: - **Use 301 redirects** for permanent changes - **Store old slugs** in a separate table - **Clean up old redirects** periodically [![Blog banner - ServerAvatar](https://serveravatar.com/wp-content/uploads/2025/09/728_90-Banner-1-1024x127.png)](https://serveravatar.com?ref=blog)## SEO Best Practices for Laravel Slugs Optimize your slugs for search engines: ### SEO-Friendly Slug Guidelines: - **Include target keywords** naturally - **Keep length reasonable** (3-5 words ideal) - **Use hyphens, not underscores** as separators - **Avoid stop words** (a, an, the, of, etc.) when possible - **Make them descriptive** and meaningful When deploying your optimized Laravel application, consider using [Git deployment through ServerAvatar](https://serveravatar.com/docs/application/git-deploy/getting-started) for a streamlined deployment process. ## Common Slug Pitfalls and How to Avoid Them Learn from common mistakes: ### Major Pitfalls: - **Not checking for uniqueness**: Always validate before saving - **Ignoring special characters**: Handle them properly - **Forgetting database indexes**: Performance will suffer - **Not handling updates**: Plan for slug changes - **Making slugs too long**: Keep them concise ## Advanced Slug Techniques for Complex Applications For enterprise applications, consider these advanced techniques: PHP``` // Slug versioning class Post extends Model { public function slugVersions() { return $this->hasMany(SlugVersion::class); } public function createSlugVersion($newSlug) { $this->slugVersions()->create([ 'slug' => $this->slug, 'created_at' => now() ]); $this->update(['slug' => $newSlug]); } } ``` ``` // Slug versioning class Post extends Model { public function slugVersions() { return $this->hasMany(SlugVersion::class); } public function createSlugVersion($newSlug) { $this->slugVersions()->create([ 'slug' => $this->slug, 'created_at' => now() ]); $this->update(['slug' => $newSlug]); } } ``` ### Advanced Features: - **Slug versioning** for history tracking - **Batch slug updates** for large datasets - **Caching strategies** for frequently accessed slugs - **API slug validation** endpoints ## Frequently Asked Questions ### **What’s the difference between a slug and a URL parameter?** A slug is a human-readable part of the URL that identifies content (like “laravel-tips”), while URL parameters are key-value pairs for filtering or configuration (like “?page=2&sort=date”). Slugs are more SEO-friendly and user-friendly. ### **Should I update slugs when content titles change?** It depends on your use case. For SEO purposes, it’s often better to keep slugs stable once published. If you must update them, always implement proper 301 redirects from old slugs to new ones to maintain search rankings. ### **How long should a Laravel slug be for optimal SEO?** Keep slugs between 50-60 characters for best results. This ensures they display fully in search results and remain readable. Focus on including your main keywords while keeping the slug descriptive and concise. ### **Can I use uppercase letters in slugs?** While technically possible, it’s not recommended. URLs are case-sensitive, and lowercase slugs are the standard convention. Laravel’s `Str::slug()` automatically converts to lowercase for consistency. ### **How do I handle slug conflicts in a multi-tenant Laravel application?** For multi-tenant applications, include the tenant identifier in your uniqueness check. You can either prefix slugs with tenant IDs or use compound unique indexes that include both tenant\_id and slug columns to ensure uniqueness within each tenant’s scope. ## Conclusion Mastering **Laravel slug** implementation is essential for building professional, SEO-friendly web applications. From basic generation using `Str::slug()` to advanced techniques like versioning and multilingual support, these tips will help you create robust, user-friendly URLs. Remember, good slugs are like good architecture – they provide a solid foundation that supports everything else. Start with the basics, test thoroughly, and gradually implement more advanced features as your application grows. Your users and search engines will thank you for the clean, descriptive URLs! ## Stop Wasting Time on Servers. Start Building Instead. You didn’t start your project to babysit servers. Let **ServerAvatar** handle deployment, monitoring, and backups — so you can focus on growth. Deploy **WordPress, Laravel, N8N**, and more in minutes. No DevOps required. No command line. No stress. [ 🚀 Try Free ](https://app.serveravatar.com) [ 🌐 Learn More ](https://serveravatar.com/) Trusted by 10,000+ developers and growing. **Categories:** Blog, Laravel, Php, Tutorials **Tags:** laravel, Laravel Slug, PHP Hosting, slug --- ### [Top 10 Common WordPress Mistakes Beginners Make](https://serveravatar.com/common-wordpress-mistakes/) **Published:** July 27, 2025 **Author:** Meghna Meghwani **Content:** [![Blog banner - ServerAvatar](https://serveravatar.com/wp-content/uploads/2025/09/728_90-Banner-3-1024x127.png)](https://serveravatar.com?ref=blog)So, you want to make a website with WordPress? That’s great! WordPress is easy to use, but well, beginners often make some common WordPress mistakes. Don’t worry though – we all make mistakes when we start something new. This guide will help you avoid the big problems that can mess up your website. We’ll talk about the most common mistakes and how to fix them. By the end, you’ll know what to watch out for. ## What is WordPress and Why People Make Mistakes [WordPress](https://wordpress.com/) is a tool that helps you build websites without knowing how to code. It’s like having building blocks for websites. You can add pages, write posts, and change how your site looks. But here’s the thing – WordPress gives you so many options that it’s easy to get confused. New users often click on things they don’t understand or skip important steps. Then problems happen later. The good news is that most mistakes can be fixed. And if you know what to avoid from the start, you’ll save yourself lots of time and trouble. ## 1. Not Choosing the Right Hosting **Why Your Host Matters** Your web host is like the land where you build your house. If you pick bad land, your house will have problems. Same thing with websites. Many beginners pick the cheapest hosting they can find. They think “hosting is hosting, right?” Wrong. Bad hosting makes your site slow, causes crashes, and gives visitors a bad experience. Here’s what happens with bad hosting: - Your site loads very slowly - It goes down when you get traffic - You get poor customer support - Security problems happen more often **What to Look for in Good Hosting** Good hosting doesn’t have to cost a lot. But you need to know what matters. Look for these things: - Fast loading speeds - Good uptime (99.9% or better) - Customer support that actually helps - Easy WordPress installation - Room to grow as your site gets bigger Some popular good hosts include Bluehost, SiteGround, and WP Engine. They’re not the cheapest, but they work well for WordPress sites. ## 2. Picking the Wrong Theme **Free vs Paid Themes** WordPress themes control how your site looks. There are thousands of free themes, so beginners often think “why pay for something I can get free?” Well, free themes can work fine. But many free themes have problems: - They load slowly - They don’t get updated often - Support is limited - They might have security holes Paid themes usually work better because: - They’re tested more carefully - You get support when things break - They’re updated regularly - They often load faster **How to Choose Better** Whether you pick free or paid, here’s what to look for: - Clean, simple design - Mobile-friendly (works on phones) - Fast loading speed - Regular updates from the maker - Good reviews from other users Don’t pick a theme just because it looks fancy. Pick one that fits what your site actually needs. If you’re making a blog, you don’t need an online store theme. ## 3. Not Making Backups **Why Backups Save Your Site** This is probably the biggest mistake beginners make. They don’t backup their site, then something goes wrong and they lose everything. Think of backups like insurance for your website. You hope you never need them, but when disaster strikes, you’ll be so glad you have them. Things that can destroy your site: - Hacking attempts - Bad plugin updates - Server crashes - Human mistakes (oops, deleted something important) **Easy Backup Methods** Making backups is easier than you think. You have a few options: **Automatic Backup Plugins:** - UpdraftPlus (free version works great) - BackupBuddy - Jetpack Backup **Manual Backups:** - Download your files through FTP - Export your database - Save everything in a safe place Set up automatic backups so you don’t have to remember to do it. Most backup plugins can save your site to cloud storage like Google Drive or Dropbox. ## 4. Ignoring Security **Common Security Problems** New WordPress users often think “who would want to hack my small site?” But hackers use robots that attack thousands of sites automatically. Size doesn’t matter to them. Common ways sites get hacked: - Weak passwords (like “password123”) - Not updating WordPress - Installing bad plugins - Not using security plugins When your site gets hacked, it can be used to send spam, steal visitor information, or spread malware. It’s a big mess to clean up. **Simple Security Steps** Good security doesn’t have to be complicated. Start with these basic steps: - Use strong passwords (mix of letters, numbers, symbols) - Install a security plugin like Wordfence - Keep WordPress updated - Only install plugins from trusted sources - Backup regularly (yes, this helps with security too) Also, change your WordPress login URL from the default “/wp-admin” to something custom. This simple step blocks lots of automated attacks. [![Blog banner - ServerAvatar](https://serveravatar.com/wp-content/uploads/2025/09/728_90-Banner-1-1024x127.png)](https://serveravatar.com?ref=blog)## 5. Not Updating WordPress **Why Updates Matter** WordPress releases updates regularly. These updates fix security holes, add new features, and fix bugs. But many beginners ignore these updates because they’re scared something will break. Here’s the truth – not updating is way more dangerous than updating. Old versions of WordPress have known security problems that hackers love to exploit. Updates also: - Make your site faster - Add useful new features - Fix compatibility problems - Keep your site working with new plugins **How to Update Safely** The key is to update smartly, not avoid updates completely. Here’s how: 1. Always backup before updating 2. Update during low-traffic times 3. Test your site after updating 4. Update plugins and themes too 5. Use staging sites for big updates WordPress makes updates pretty easy. You usually just click a button and wait. But always have that backup ready just in case. ## 6. Installing Too Many Plugins **Plugin Problems** Plugins add extra features to WordPress. Need a contact form? There’s a plugin. Want better SEO? There’s a plugin for that too. But beginners often go plugin-crazy. They install plugins for everything, even stuff they don’t really need. This creates problems: - Site becomes slow and bloated - Plugins conflict with each other - More security risks - Harder to troubleshoot problems - Updates become complicated **How Many is Too Many** There’s no magic number, but most sites work fine with 10-20 plugins. The key is quality over quantity. Before installing any plugin, ask yourself: - Do I really need this feature? - Is there a simpler way to do this? - Is this plugin well-maintained? - Does it have good reviews? Also, remove plugins you’re not using. Inactive plugins can still cause security problems. ## 7. Not Optimizing for Speed **Why Speed Matters** Slow websites make people leave. If your site takes more than 3 seconds to load, many visitors will give up and go somewhere else. Speed also affects: - Search engine rankings (Google likes fast sites) - User experience - Conversion rates (people buying/signing up) - Server costs (slow sites use more resources) **Simple Speed Tips** Making your site faster doesn’t require technical skills. Try these easy fixes: - Install a caching plugin (WP Rocket or W3 Total Cache) - Optimize your images (compress them before uploading) - Choose a fast theme - Use a good hosting provider - Remove unused plugins Also, don’t upload huge images. If you need a 500×300 pixel image on your site, don’t upload a 3000×2000 pixel photo and let WordPress shrink it down. ## 8. Poor SEO Setup **Basic SEO Mistakes** SEO helps people find your site through search engines like Google. Many beginners either ignore SEO completely or try to game the system. Common SEO mistakes: - Not setting up Google Analytics - Ignoring page titles and descriptions - Using the same title for every page - Not optimizing images - Forgetting about mobile users **Easy SEO Fixes** Good SEO starts with basics: - Install an SEO plugin (Yoast or RankMath) - Connect Google Search Console - Write good titles and descriptions - Use headings properly (H1, H2, H3) - Add alt text to images - Make sure your site works on mobile Don’t try to trick Google with keyword stuffing or other shady tactics. Just focus on creating helpful content for real people. ## 9. Not Using SSL Certificate **What SSL Does** SSL makes the connection between your website and visitors secure. You can tell if a site has SSL by looking for “https://” and a lock icon in the browser. Without SSL: - Browsers show “not secure” warnings - Google ranks your site lower - Customer data isn’t protected - People don’t trust your site **How to Get SSL** The good news is that most hosting companies now include free SSL certificates. You just need to turn it on in your hosting control panel. If your host doesn’t offer free SSL, you can get one from Let’s Encrypt for free. Many plugins can help you set this up automatically. Once you have SSL, make sure your WordPress site is configured to use “https://” for all pages. There are plugins that can help redirect old “http://” links to the secure versions. ## 10. Bad Content Planning **Content Mistakes** Many beginners focus so much on the technical stuff that they forget about content. But content is what actually helps your visitors and brings people to your site. Common content mistakes: Not having a clear purpose - Writing for yourself instead of your audience - Not posting regularly - Making everything about yourself/your business - Not organizing content well **Better Content Tips** Good content starts with knowing your audience. Who are you trying to help? What problems do they have? How can you solve those problems? Plan your content: - Create a content calendar - Mix different types of posts - Focus on helping people - Use simple, clear language - Break up long text with headings and images Remember, you don’t need to post every day. It’s better to post one really helpful article per week than seven mediocre ones. ## FAQ ### **Q: How often should I backup my WordPress site?** At least once a week, or more often if you update content daily. Automatic backups make this easy. ### **Q: Is it safe to update WordPress right away when new versions come out?** It’s usually safe, but wait a few days and always backup first. This gives time for any major bugs to be found and fixed. ### **Q: How many plugins is too many for a WordPress site?** There’s no exact number, but if your site is getting slow or you’re not using half your plugins, you probably have too many. ### **Q: Do I really need a paid theme if free ones work?** Free themes can work fine, but paid themes often have better support and updates. Choose based on your needs and budget. ### **Q: What’s the most important security step for beginners?** Use strong passwords and install a security plugin like Wordfence. These two steps stop most common attacks. ## Conclusion Building a WordPress site doesn’t have to be scary if you avoid these common WordPress mistakes. The key is to start with the basics: good hosting, security, backups, and helpful content. Don’t try to do everything at once. Pick one or two areas to focus on first, then gradually improve other parts of your site. Most importantly, don’t be afraid to make mistakes – that’s how we all learn. WordPress is a powerful tool, but with power comes responsibility. Take care of the basics, and your site will serve you well for years to come. ## Stop Wasting Time on Servers. Start Building Instead. You didn’t start your project to babysit servers. Let **ServerAvatar** handle deployment, monitoring, and backups — so you can focus on growth. Deploy **WordPress, Laravel, N8N**, and more in minutes. No DevOps required. No command line. No stress. [ 🚀 Try Free ](https://app.serveravatar.com) [ 🌐 Learn More ](https://serveravatar.com/) Trusted by 10,000+ developers and growing. **Categories:** Blog, Guide, WordPress **Tags:** WordPress Best Practices, WordPress for Beginners, WordPress Mistakes, WordPress SEO Mistakes, WordPress Troubleshooting --- ### [How to Host a React App Without Using The Command Line](https://serveravatar.com/host-react-app/) **Published:** July 27, 2025 **Author:** Smit Pipaliya **Content:** [![Blog banner - ServerAvatar](https://serveravatar.com/wp-content/uploads/2025/09/728_90-Banner-3-1024x127.png)](https://serveravatar.com?ref=blog)Imagine deploying your **React app** with zero command-line knowledge, just a few clicks and you’re live. That’s exactly what ServerAvatar brings to the table. In today’s fast-paced digital world, building beautiful interfaces with React is only half the battle. Hosting your creation efficiently and securely is equally critical. And for many, the command line can be intimidating or simply inconvenient. This guide walks you through the entire process on how to host a React app using only ServerAvatar’s GUI and how to integrate automated CI/CD workflows without ever touching the terminal. For solo developers, freelancers, and small startups, the less time spent fiddling with deployment scripts, the better. ServerAvatar was built with simplicity in mind. It strips away the complexity of managing a server and replaces it with a user-friendly control panel. Combine this with React’s component-driven architecture, and you have the recipe for streamlined web development and hosting. What makes this even better? The inclusion of CI/CD pipelines. CI/CD (Continuous Integration/Continuous Deployment) ensures that every code update automatically deploys to your server, bug fixes, new features, or updates are pushed live instantly, reducing downtime and manual errors. So, whether you’re a designer dabbling in frontend development or a non-tech founder launching a startup, this guide is for you. Let’s break down the entire journey into easy-to-follow steps: from preparing your React build to setting up auto-deployment through GitHub, all without the terminal. By the end of this guide, you’ll be comfortably launching your React app on ServerAvatar with a fully automated workflow and a polished live site. Let’s dive right into the foundations. ## What is ServerAvatar? Think of [ServerAvatar](https://serveravatar.com/) as your personal server assistant. It simplifies managing cloud servers (like DigitalOcean, AWS, or Vultr) so you can host web apps with zero sysadmin experience. ServerAvatar removes the need for deep backend knowledge, offering a visual interface for managing apps, domains, databases, SSL, and even backups. It’s basically a bridge between raw cloud infrastructure and everyday users. You get the performance of a VPS but the ease of shared hosting. From Node.js apps to static websites and CMS platforms, ServerAvatar can handle it all. More importantly, it supports one-click installations, graphical file management, and automatic SSL certificates, all from the dashboard. In this guide, we’ll use it to host a React app, a static single-page app that typically requires a simple web server like Nginx to serve files from a build folder. ServerAvatar makes deploying this kind of project effortless, even for beginners. ## What is a React App? React is a JavaScript library for building dynamic user interfaces, maintained by Facebook and widely adopted across the web. Unlike traditional web pages, a React app loads once and dynamically updates the UI without refreshing the page. This makes it lightning-fast and great for modern web apps. When you build a React app using npm run build, it outputs a folder of static files like HTML, CSS, JS that can be served from any web server. These files are stored in a build/ directory and act just like a static website. No databases. No dynamic server logic. Just static files with blazing-fast performance. With ServerAvatar’s user interface, all the steps to deploy or host become manageable even for non-technical users. ## Why Avoid the Command Line? Let’s be honest, most tutorials on hosting or deployment assume you’re comfortable with the command line. But what if you’re not? Maybe you’re a designer, a product manager, or just someone who dont’t hsve knowledge of coomand line. That’s where GUI-based deployment comes in. Avoiding the CLI (Command Line Interface) doesn’t mean sacrificing power, it just means reducing friction. ServerAvatar empowers you to manage complex server tasks from a visual dashboard. This makes hosting more accessible, faster, and frankly, less error-prone. One wrong command on a terminal could crash your server. With a GUI, you get confirmations, undo options, and intuitive feedback. Hosting your React app without CLI means: - Less room for mistakes - No need to memorize commands - Easier onboarding for team members Plus, when it comes to CI/CD, ServerAvatar integrates with GitHub and other platforms using webhooks and GUI triggers. No need to configure scripts or write YAML pipelines. It’s all about making deployment feel as easy as dragging and dropping files. ## Hosting from GitHub, GitLab, or Bitbucket and Works with Both Public and Private Repos ServerAvatar makes it incredibly easy to host your React application directly from your Git repositories whether you’re using **[GitHub](https://github.com/)**, **[GitLab](https://gitlab.com "GitLab")**, or **[Bitbucket](https://bitbucket.org/)**. The platform supports both **public** and **private** repositories, allowing you to securely connect your codebase without touching a single line of terminal commands. Once connected through the intuitive dashboard, ServerAvatar automatically pulls your code, installs dependencies, builds the project, and serves the final static files from the correct directory. Whether you’re working on a personal project or managing a client’s private repo, everything is handled through a simple graphical interface. Even better, this setup pairs perfectly with auto-deployment. Every time you push changes to your selected branch, ServerAvatar can automatically rebuild and redeploy your app giving you a smooth, hands-off CI/CD experience. ## Step-By-Step Guide To Hosting With ServerAvatar **Prepare your application** Before deploying your React application to any environment like **development**, **staging**, **testing**, or **production.** Once your application ready for the deployment, push your local codebase to a remote Git repository. This repository can be **private or public**, depending on your project’s needs.You can use the your favourite version control platform such as **GitHub**, **Bitbucket**, or **GitLab.** ServerAvatar provides the direct integration of the this 3 version control system. So, you can easily pull your private repository and make it live for user. This helps you manage your code effectively, collaborate with team members, and deploy the app from a centralized and secure location. If you are hosting a **private repository**, you will need to **integrate your version control platform account** with ServerAvatar to authorize access. However, if your code is hosted in a **public repository**, there is no need to integrate your account. ServerAvatar can directly access the public repository without any authentication. Make sure to connect the GitHub account that contains your application’s private repository. This integration is required to: - Deploy your application directly from GitHub, - Enable building a CI/CD pipeline, which is one of the most advanced features ServerAvatar offers. With this integration, you won’t need to use the command line for deployment, everything can be managed seamlessly through the ServerAvatar dashboard. ![Git Integration-ServerAvatar](https://serveravatar.com/wp-content/uploads/2025/07/Screenshot-2025-07-25-at-3.19.05-AM-1024x582.png)In this blog post, we will proceed with hosting a **Githubprivate repository**. However, you are free to host a public one if that suits your needs better. I already have a private repository for a simple React **To-Do application**, but you can use your own React app stored in a private repository. Once it’s in GitHub, your app is ready to be deployed! **Note:** If you’re hosting a private repository and looking to integrate your version control platform account whether it’s [GitHub](https://serveravatar.com/docs/application/git-deploy/github), [GitLab](https://serveravatar.com/docs/application/git-deploy/gitlab), or [Bitbucket](https://serveravatar.com/docs/application/git-deploy/bitbucket). Please refer to the respective documentation for each integration. ## Sign Up For ServerAvatar Before you can deploy anything, you need a ServerAvatar account. The signup process is straightforward and doesn’t require any technical background. 1. **Visit** [**ServerAvatar.com**](https://serveravatar.com/) and click on the “Get Started” or “Sign Up” button. 2. Fill in your name, email, and password. 3. Verify your email address through the confirmation link sent to your inbox. 4. Once logged in, you’ll land on your dashboard, where you can start managing servers. **Why is this important?** ServerAvatar becomes your central control panel for all your apps and servers. Whether you’re hosting a single blog or multiple client websites, everything is handled here. You don’t need to remember any Linux commands or hire a developer to make basic changes. ServerAvatar also offers a **free trial**, so you can explore most of its features before deciding on a paid plan. Depending on your needs, you can scale later, whether it’s one app or a dozen. ## Connect Or Purchase A Server To host your application, you need an actual server, think of it as the “home” where your app lives online. With ServerAvatar, you have two flexible options: - [**Purchase a server directly from ServerAvatar**](https://serveravatar.com/docs/managed-server/installation) based on your preferred configuration. - [**Connect your own server**](https://serveravatar.com/docs/server-management/installation/direct-method) from any third-party cloud provider, as long as it meets the required prerequisites.[](https://storage.3.basecamp.com/5840738/blobs/05a6886a-68d9-11f0-ae6e-0242ac120004/download/Screenshot%202025-07-25%20at%203.26.06%E2%80%AFAM.png) ![Create Server-ServerAvatar](https://serveravatar.com/wp-content/uploads/2025/07/Screenshot-2025-07-25-at-3.26.06-AM-1024x582.png)**Important:** Whether you’re purchasing a server through ServerAvatar or connecting your own, make sure to select the **Node.js tech stack**. This is the required environment to properly host applications built with the React.js. **NOTE**: If you are connecting your own server, make sure it meets all the [prerequisites](https://serveravatar.com/docs/server-management/installation/direct-method/) specified by ServerAvatar. Read our attached docs on purchase server directly from serverAvatar and connect your server. [![Blog banner - ServerAvatar](https://serveravatar.com/wp-content/uploads/2025/09/728_90-Banner-1-1024x127.png)](https://serveravatar.com?ref=blog)## Create new Application For Deployment Once your server is ready and your GitHub account is integrated, the next step is to **create an application** in ServerAvatar to host your project. Now, we will crate the application for the n8n. so, that anyone can access it, follow these steps to setup and deploy react app. - Navigate to the **Applications** section from the ServerAvatar dashboard. - Click on the **Create Application** button. ![React app-ServerAvatar](https://serveravatar.com/wp-content/uploads/2025/07/image-126-1024x582.png)- Enter a name for your application, such as **“ReactApp”**. - Next, choose the domain to host your React application—either a **Primary Domain** or a **Test Domain**: - **Primary Domain**: The main domain users will use to access your live website. - **Test Domain**: A staging/development domain provided by ServerAvatar, requiring no manual setup and ideal for testing. - Choose the method as the “**Git”.** - Select the service provider where your repository is hosted. For this blog post, we’ll use **GitHub** as the service provider since our React Todo app is stored in a **private GitHub repository**. ![Create Application With Git-ServerAvatar](https://serveravatar.com/wp-content/uploads/2025/07/Screenshot-2025-07-25-at-4.11.16-AM-1024x582.png)- Since we are working with a private repository, choose **“Private”** as the repository type. This ensures that ServerAvatar will securely access your code from a private source. - To allow ServerAvatar to fetch code from your private GitHub repository, you need to generate a deployment key: - Click on the **“Generate/Regenerate”** button as shown in the interface. - A unique public SSH key will be generated. - Copy this key and go to your **GitHub repository**. - Navigate to: Repository Settings → Deploy Keys → Add Deploy Key. - Paste the generated key, give it a recognizable title (e.g., “ServerAvatar Deploy Key”). - Click **“Add Key”** to complete the process. - Choose the GitHub (or other supported platform) account where your repository is hosted. This account must be connected to ServerAvatar to fetch the repositories list. - Choose the repository name. - Choose the branch you want to deploy — usually main or master, or any development/staging branch. ***Note****:* You can always change the branch later if needed after deployment. ![Git Integration ](https://serveravatar.com/wp-content/uploads/2025/07/Screenshot-2025-07-25-at-5.16.10-AM-1024x582.png)- Select **Client-side Rendering (CSR)** as the rendering type, since your application is a standard React app. This means the React code will run entirely on the browser, with no server-side rendering involved. - Select the packet manager from the **NPM** and **Yarn**. - Provide the package installation command to install the necessary dependencies to run your application using the relevant package manager for your server environment (e.g., ‘npm install’ for Node.js or ‘yarn add’ for Yarn). - Specify the command to build your application. This is typically used for compiling source code and preparing it for deployment. Example: ‘npm run build’ for Node.js or ‘yarn build’ for Yarn. If no build is required, leave this field empty. ![ Client-side Rendering-ServerAvatar](https://serveravatar.com/wp-content/uploads/2025/07/Screenshot-2025-07-25-at-5.18.00-AM-1024x582.png)- To configure additional deployment settings, click on the **“Show Advanced Options”** button. In this section, you can either select an existing system user or create a new one. **Recommendation:** It’s best practice to create a **dedicated system user** for each application you deploy. This improves security, makes application management easier, and isolates user-level access for each app. - Since you are deploying a React application, the index.html file are typically located inside the **build** folder. ![System User-ServerAvatar](https://serveravatar.com/wp-content/uploads/2025/07/Screenshot-2025-07-25-at-5.22.57-AM-1024x582.png)Click on create application once you have successfully provided all information required to create application. It will take few minutes to install all the dependencies and create build file. ![Add Database-ServerAvatar](https://serveravatar.com/wp-content/uploads/2025/07/Screenshot-2025-07-25-at-5.29.00-AM-1024x582.png)Once the application is successfully hosted your application is deployed successfully. You can check by visiting primary domain. ![Host Application TODO](https://serveravatar.com/wp-content/uploads/2025/07/Screenshot-2025-07-25-at-5.29.23-AM.png)We have successfully hosted react app of the To-Do List . Congratulations🥳. ## Secure Your application With SSL Running your application without SSL means your data is vulnerable. Information like API keys, login credentials, and webhook data can be intercepted easily if you’re using plain HTTP. Modern browsers also flag such connections as “Not Secure,” reducing trust and potentially breaking features that rely on a secure connection. Thankfully, securing your app is simple with **ServerAvatar**. ServerAvatar provides a seamless, one-click solution to install SSL on your application and no server login or technical configuration required. You can choose to use the **Auto Installer**, which sets up a free Let’s Encrypt SSL certificate and automatically handles renewals, or go the **manual route** by uploading your own certificate and private key. Everything is managed through the ServerAvatar dashboard. No need to touch NGINX files or run terminal commands, it’s all at your fingertips. Whether you’re a beginner or an advanced user, securing your application with SSL using ServerAvatar is fast, reliable, and hassle-free. Let ServerAvatar handle the heavy lifting, so you can focus on building your application. **Read our complete step-by-step docs** for: - Installing SSL using the [**Auto Installer**](https://serveravatar.com/docs/application/automatic-installation) - Attaching a [**Manual SSL Certificate**](https://serveravatar.com/docs/application/custom-installation) from your dashboard **Tip:** If you’re managing your domain through **Cloudflare** and you’ve enabled the proxy (orange cloud) for your domain, make sure to follow the special [**Cloudflare SSL installation guide**](https://serveravatar.com/the-most-stable-cloudflare-and-ssl-setup-for-serveravatar/#:~:text=proxy%20should%20be-,enabled,-if%20you%20are) included in the docs to avoid conflicts or certificate errors. ![SSL Certificate-ServerAvatar](https://serveravatar.com/wp-content/uploads/2025/07/Screenshot-2025-07-25-at-5.35.59-AM-1024x533.png)## Building CI/CD pipeline ServerAvatar makes building a CI/CD pipeline easy and efficient by offering native integration with popular version control platforms like GitHub, GitLab, and Bitbucket. Once you connect your repository and select the desired branch, ServerAvatar automates the deployment process by pulling the latest changes every time you push new code. You can configure custom build commands such as npm install and npm run build to ensure your application is built properly after each update. It also allows you to define a custom webroot path like /build for React apps, so the server knows exactly where to serve your app from. Environment variables can be set directly in the dashboard, making it easy to manage sensitive configuration settings. ServerAvatar also provides detailed build logs to help you troubleshoot any issues during deployment. This built-in CI/CD functionality eliminates the need for third-party deployment tools, reduces downtime, and ensures a faster and more reliable development-to-production workflow. To enable the CI/CD pipeline for your Git-based application, ServerAvatar removes the complexity of writing deployment scripts. You don’t need to write or configure anything manually—just toggle the CI/CD switch from the ServerAvatar dashboard. Once enabled, you’ll be given a webhook URL. Simply go to your repository’s **Settings → Webhooks**, and add the webhook provided by ServerAvatar. After that, every time you push changes to your repository, ServerAvatar will automatically detect the update and deploy it to your live server. You can even switch branches or make other deployment changes—all without touching the command line. ![Git Setting-ServerAvatar](https://serveravatar.com/wp-content/uploads/2025/07/Screenshot-2025-07-25-at-6.56.49-AM-1024x586.png)**ServerAvatar Log Monitoring Suite** ServerAvatar provides a powerful **Log Monitoring Suite** that helps you monitor everything happening on your server and applications, from basic request logs to traffic stats, performance, and error tracking, **all in one place**, and **without writing a single command**. Whether you’re debugging an app, tracking traffic spikes, or watching for unexpected behaviour, ServerAvatar gives you the tools to **monitor and act quickly**. [](https://storage.3.basecamp.com/5840738/blobs/aa98884c-68f6-11f0-ab8b-0242ac120004/download/Screenshot%202025-07-25%20at%206.58.21%E2%80%AFAM.png) ![Log Monitoring Suite-ServerAvatar](https://serveravatar.com/wp-content/uploads/2025/07/Screenshot-2025-07-25-at-6.58.21-AM-1024x586.png)## FAQ ### **Can I deploy a React app using ServerAvatar without using the command line?** **Yes!** ServerAvatar allows you to deploy a React app using a fully graphical interface. You can connect your GitHub, GitLab, or Bitbucket repository, configure build settings, and manage your app — all from the ServerAvatar dashboard, without touching the terminal. ### **Does ServerAvatar support private repositories for deployment?** **Absolutely.** ServerAvatar supports both public and private repositories. For private repositories, you’ll need to generate and add a deploy key to your repo, which is a simple copy-paste process handled through the dashboard. ### **How does ServerAvatar handle CI/CD for React apps?** ServerAvatar offers a **no-code CI/CD pipeline**. Once enabled, every time you push code to your connected branch, ServerAvatar will automatically pull, build, and deploy your app. All it requires is adding a webhook URL to your repository’s settings. ### **Can I change the deployment branch later?** Yes. You can **change the branch anytime** from the application settings in the ServerAvatar dashboard without affecting the rest of your setup. ### **Does ServerAvatar provide monitoring tools for my app and server?** Yes. ServerAvatar comes with a **Log Monitoring Suite** that tracks requests, performance, errors, and server activity—all visually, no coding required. ## Conclusion With ServerAvatar hosting the any of the reactjs based repositor have never been so easy. This guide has taken you through every steps like from choosing a VPS, linking it to ServerAvatar, hosting the react to-do application with automatic SSL installation and building ci/cd pipeline without touching command line. If you’re a developer, a business owner, or even want to automate hosting and CI/CD pipeline then this configuration enables you to concentrate on developing applications rather than maintaining infrastructure. Begin your automation journey today and empower your business with increased productivity! **Categories:** Application Deployments, Blog, Tutorials, Ubuntu **Tags:** Deploy React Easily, Host React Without CLI, PHP Hosting, React App Hosting, React Deployment Guide, React Web Hosting, ServerAvatar Hosting, Ubuntu --- ### [How to Use Slider Revolution Plugin in WordPress](https://serveravatar.com/slider-revolution-plugin/) **Published:** July 28, 2025 **Author:** Meghna Meghwani **Content:** [![Blog banner - ServerAvatar](https://serveravatar.com/wp-content/uploads/2025/09/728_90-Banner-3-1024x127.png)](https://serveravatar.com?ref=blog)So you want to make your WordPress site look amazing with cool sliding pictures and text? Well, Slider Revolution Plugin is one of the best plugins for this job. It helps you create those moving images you see on websites that change by themselves or when you click buttons. This plugin might seem hard at first, but don’t worry. We’ll walk through everything step by step so you can make great sliders for your website. ## What is Slider Revolution? Slider Revolution is a WordPress plugin that lets you make interactive sliders. These are those moving picture shows you see on many websites. You know, the ones where images slide from left to right, or fade in and out with text on top. The plugin comes with lots of ready-made templates. You can use these as they are, or change them to fit your needs. It also has drag and drop tools, which means you can move things around without knowing any code. Many people use this plugin because it works well and looks professional. It’s not free, but it’s worth the money if you want your site to look really good. ## Why Use Slider Revolution? There are many reasons why people choose this plugin: - It makes your website look modern and professional - You don’t need to know how to code - It works on phones and tablets too - Lots of templates to choose from - You can add videos, not just pictures - It loads fast when set up right - Good customer support - Regular updates The plugin helps grab people’s attention when they visit your site. A good slider can show your best content right away and make visitors want to stay longer. ## Don’t Have WordPress Installed Yet? If you haven’t installed WordPress on your server yet, you can use [**ServerAvatar**](https://serveravatar.com/) to do it easily in just a few clicks. ServerAvatar lets you deploy and manage your servers and applications without any technical hassle. With its [one-click application installer](https://serveravatar.com/docs/application/one-click-installer/getting-started), you can launch your [WordPress](https://serveravatar.com/docs/application/one-click-installer/wordpress) website instantly. In addition to that, it offers features like automatic [SSL installation](https://serveravatar.com/docs/application/automatic-installation) with automatic renewal for free, [domain management](https://serveravatar.com/docs/application/manage-domains/), scheduled [backups](https://serveravatar.com/docs/backups/getting-started), easy [PHP setting](https://serveravatar.com/docs/application/php-settings) configuration, [file manager](https://serveravatar.com/docs/application/file-manager), [database management](https://serveravatar.com/docs/database/understanding-database-management), [log monitoring](https://serveravatar.com/docs/application/monitoring-suite/outline), and [cronjob](https://serveravatar.com/docs/server/what-is-cronjob) manager. Everything is managed from a single, clean, and user-friendly dashboard. Whether you’re a developer, agency, or business owner, ServerAvatar simplifies your workflow and saves you time. [Get Started with ServerAvatar](https://serveravatar.com/) now and deploy your [WordPress](https://serveravatar.com/docs/application/one-click-installer/wordpress) site easily using [one-click installer](https://serveravatar.com/docs/application/one-click-installer/getting-started) without any technical hassles. ![ServerAvtar Dashbaord](https://serveravatar.com/wp-content/uploads/2025/07/image-60-1-1024x473.png)## How to Install Slider Revolution First, you need to buy the plugin from their website. You can’t get it from the WordPress plugin directory because it’s a paid plugin. Here’s how to install it: - Go to your WordPress admin area - Click on “Plugins” then “Add Plugins” ![Add Plugin](https://serveravatar.com/wp-content/uploads/2025/07/image-138-1024x573.png)- Click “Upload Plugin” at the top ![File Upload zip File](https://serveravatar.com/wp-content/uploads/2025/07/image-139.png)- Choose the zip file and Click “Install Now” - Then click “Activate” ![File Upload](https://serveravatar.com/wp-content/uploads/2025/07/image-140.png)After you activate it, you’ll see “Slider Revolution” in your WordPress menu. That’s where you’ll do all your work with sliders. ## First Steps with Slider Revolution Now that you’ve got Slider Revolution installed and working, you’re ready to make amazing sliders. But wait – before you jump into creating your first slider, there are some basic settings you should change first. ### Setting Up Basic Responsiveness You probably already know that most people look at websites on their phones these days. So you want to make sure your slider looks good on all devices – phones, tablets, and computers. To set up these important settings, go to your WordPress dashboard and click on “Slider Revolution” ![Slider Revolution Plugin](https://lh7-rt.googleusercontent.com/docsz/AD_4nXfxNB01FUS1rTxDMF-wtY7-r7LGj71Q8q9cJqs8yUQEQ56s6EeacbdKkeOOVscWBtnuj523tIHjrQn5EdHAEu6t_xCfW3y_8rI031cb9LKXTBRhUjad7fJAt3s6H4koKDTYV_7N?key=9-rCFkMXxOxT9CQsTVw8pA)then “Globals”. ![Dashbaord-ServerAvatar](https://lh7-rt.googleusercontent.com/docsz/AD_4nXcZceP_O7xFXQidEPcf-vhYGgHRSqX7Ru3NiKcsuRNTjIe0oTor4q1cZwfu7u03bfJJx5EV6KMAUUEO7NcdqE2fg42i8cRaLhe7MY3P7SIf2AwX3Wv-EBYC1E2zEEAYc1Gjhektbg?key=9-rCFkMXxOxT9CQsTVw8pA)You’ll see lots of settings here, but don’t worry! We’ll only focus on the ones that make your sliders work well on different devices. ## Understanding Device Sizes Every device has its own screen size, measured in something called pixels. Here’s what you need to know: **Desktop Computers** Regular computer monitors are usually 1920 pixels wide. So we put 1920 in the “Desktop Grid Width” field. **Notebooks and Laptops** This includes all laptops, MacBooks, and tablets held sideways. Most of these are around 1600 pixels wide, so that’s what we’ll use. **Tablets** When people hold tablets upright (like when reading), they’re usually about 778 pixels wide. That’s the size of an iPad held normally. **Mobile Phones** This one’s tricky because phones come in so many different sizes. But here’s the thing – don’t go bigger than 500 pixels! I usually use 480 pixels, which works for almost all phones. ![Layout Grid-ServerAvatar](https://lh7-rt.googleusercontent.com/docsz/AD_4nXfg9S8phIQd6GiRygD2LADiiRcb0Ga34eUbFDEeZPhEc3-gdp4MoB48wz0ixx5PvUi4yEegJeh4erE8ocDTzMjVZ10enY7hvADtuTAT8uRyufr174k79L77J3utzYCp3QBrXGznzA?key=9-rCFkMXxOxT9CQsTVw8pA)Why not bigger? Well, if you make it too big, people with smaller phones won’t be able to see everything on your slider. And guess what – more than half of all website visitors use phones now! **Quick tip:** You can use the same number for tablets whether they’re held sideways or upright. Just use 1025 pixels if you want to keep it simple. But I think it works better when you separate them. Here are the numbers I recommend: - Desktop: 1920px - Notebook: 1600px - Tablet: 778px - Mobile: 480px Once you put in all these numbers, don’t forget to click “Save Global Settings” at the bottom! ![Page Loading Optimization-ServerAvatar](https://lh7-rt.googleusercontent.com/docsz/AD_4nXe4SYRhAzMB230YMt1P2ae9gAllt4HKXq0Aps2EgZVeyJW_Kn7hfW9FgD2vLJyDGLs8e8iWPY2SBbZxRUzz1XPRwBBG76a5rTALzl4BeWRD4acDOGkEzTaulTDYS9M2rP-RsOPnRA?key=9-rCFkMXxOxT9CQsTVw8pA)## Understanding the Main Screen When you open Slider Revolution for the first time, you’ll see the main screen. Don’t get scared – it looks complicated but it’s not that bad. The main parts you need to know about: **Module Library** This is where all the ready-made templates live. There are hundreds of them! You can find templates for restaurants, shops, portfolios, and more. **My Modules** This shows all the sliders you’ve made or imported. **Getting Started** This section has helpful videos and guides to help you learn. ## Creating Your First Slider Now that you’ve set up the basic settings, it’s time to make your first slider! Let’s do this step by step and keep it simple. ### Starting a New Slider Go to the Slider Revolution tab in your WordPress dashboard and click on “New Blank Module”. This will open up the slider editor where all the magic happens. ![Dashboard-ServerAvatar](https://lh7-rt.googleusercontent.com/docsz/AD_4nXeMcKwWcT2NVzDQSJcZgRz2C4fIxHtiqi2t7Ao04U1sO-Scs0Op9wk7NMyiFoCg72-JFwzFm56xyvp9VHBUuN8D6mXitBHtvC1RGV0zuWPF79rcn2DfkYz1Ryla8BCkTKgEBDDLvw?key=9-rCFkMXxOxT9CQsTVw8pA)### Giving Your Slider a Name First thing you need to do is give your slider a good name. Look on the right side for something called “Module Naming” under the “Title” tab. Let’s call our first slider “My First Slider Revolution” – just type that in the Title field. There’s another field below called “Slider Alias”. This is important! You need to put the same name here, but in lowercase with dashes instead of spaces. So it would be “my-first-slider-revolution”. You’ll use this alias later to add your slider to your website pages. ![Title-ServerAvatar](https://lh7-rt.googleusercontent.com/docsz/AD_4nXe_oEX5cTZIy3khUyjwrUWUDE3b5Jhe4dknr7JQ7MXtppPk-aIhweBFPxBF9TQ-4fgWx_9wyu5AVnXWXGqoy3Rwz5DR29wMCWSrHh5PyOi_th8kP8raW0y830ZKUFeAj-zBU4XFgw?key=9-rCFkMXxOxT9CQsTVw8pA)### Choosing What Type of Slider You Want Now you need to pick what kind of slider you’re making. Look for the “Layout” tab and you’ll see three choices: ![Layout-ServerAvatar](https://lh7-rt.googleusercontent.com/docsz/AD_4nXeR8QX7Z4hxq3GdMJWPKzesf7HHHu1zQ2YaClZ3hjfH1zC0eWGYRh-YS-4BZd9VkggpzMdBREtRWiDz7_A51wX1-eCUez79fXUEHWFD5Y07BWiAAckyrXOEI2s17Arc1DM7PfIS?key=9-rCFkMXxOxT9CQsTVw8pA)**Slider** Pick this if you want more than one slide. This is what most people choose. **Scene** Choose this if you only want one slide. The navigation arrows and dots will be hidden automatically since there’s only one slide to show. **Carousel** This one shows multiple slides at the same time in a 3D spinning effect. It looks cool but most people don’t need this. For your first slider, I’d suggest picking “Slider” since it’s the most common and useful. ### Setting the Right Size Next, you need to decide how big your slider should be. Still in the Layout tab, you’ll see sizing options: **Auto** The slider will be whatever size its container is. Good for smaller sliders in the middle of pages. **Full Width** The slider goes all the way across the screen but the height changes based on the device. **Full Screen** The slider fills the entire screen no matter what device people use. Most people use “Full Width” for sliders at the top of their homepage. If you’re not sure, go with that one. ### Fine-Tuning for Different Devices Here’s something important – you need to make sure your slider looks good on all devices. You’ll see that the “layer grid sizes” are set to “Auto Sizes” for tablets and phones. I recommend changing these by clicking the switch next to each device type. When you do this, you’ll see the grid sizes from your global settings show up. The grid is basically the area where your text, buttons, and other stuff will appear. Here are the settings I recommend copying: - Desktop: 1920px x 1100px - Notebook: 1600px x 900px - Tablet: 778px x 960px - Mobile: 480px x 720px Don’t worry if this seems confusing – these numbers just make sure your content has some breathing room and doesn’t go right to the edge of the screen. ![Resolution-ServerAvatar](https://lh7-rt.googleusercontent.com/docsz/AD_4nXfnB___uLpB_yKbtYSaOUNR-uCuTx12C6u6w2N8BDSPeOXXxR6BmXoHBW1BLDSOe2SbWMcI598mbs2XwNGc3ZuVfwxG6PdEmNEOEsbGsWIZJ1wfS7Ud9qgjTqhbJ67buUtqUf88Hw?key=9-rCFkMXxOxT9CQsTVw8pA)### Some Extra Useful Settings Before you start adding content, there are a few more settings worth checking: **Slide Duration** By default, each slide shows for 9 seconds before moving to the next one. That’s way too long! Most people won’t wait that long. Change it to about 4 seconds (4000ms) instead. ![Default Feature-ServerAvatar](https://lh7-rt.googleusercontent.com/docsz/AD_4nXfC5UKZUJawpYsGqwUVfzk_o501rddzcsYbiTMCnOAYQWfVOaBniWYPiRFi1WPMQSe0cH453Wv_xDPGQtLjjmxxxlw9YYwUMDfInUGEm5QTSrUjMtSjJU3KAhNKgpazh1hsED5kPA?key=9-rCFkMXxOxT9CQsTVw8pA)You can find this under “Module General Options” then “Defaults”. **Loading Spinner** While your slider loads, people see a spinning circle. You can change what this looks like or turn it off completely under “Module General Options” then “Defaults” then “Spinner”. ![Spinner-ServerAvatar](https://lh7-rt.googleusercontent.com/docsz/AD_4nXc7h6cAB6nRssa_jf8zrK8prfhgqTJ8u2-zXR2ZaMp2MHsPxiPmGbrnS7hxPI9DXnE2JKBP1tq-XmFgr33RT7QFSWNmtjzQk02IU6O8emwaFD2-QyyJq3yB0ha7DTBFgjwiViuKmA?key=9-rCFkMXxOxT9CQsTVw8pA)**Mobile Settings** If you want, you can turn off your slider completely on mobile devices. Sometimes this helps your website load faster on phones. Look for “Module General Options” then “General” then “Disable On Mobile”. ![General Setting-ServerAvatar](https://lh7-rt.googleusercontent.com/docsz/AD_4nXf4Ds0-GkWNq0GwddN6acmP-z0uJ7yiJis5pUt-CaruyHnj7C424Kl-zPrzPhd7kFR9no_Y-qWmTvluZAPC6_y9OPd1BYQNtSUUztuH0YaKS7HsAq6h9Rmr7d77tzDeAatKtN0hMg?key=9-rCFkMXxOxT9CQsTVw8pA)![Mobile Option-ServerAvatar](https://lh7-rt.googleusercontent.com/docsz/AD_4nXdAgbZueo3l_x9ENDAuuNlbIXxfJH62OEEdNRdJ-etwZ8ehtJPTOLtXVC1RsTmmkNWh9fttGFf9g54S_ZFt22TaeUhfaDk_EMOsF7DWqj7_TQIBcnyy2qpnJHJiTq0j2Xsn40u_2g?key=9-rCFkMXxOxT9CQsTVw8pA)**Cool Scroll Effects** Want to make your slider even more impressive? Under “Module General Options” then “On Scroll” then “Scroll Based Features”, you can turn on some really cool effects: ![Module General Options-ServerAvatar](https://lh7-rt.googleusercontent.com/docsz/AD_4nXcolEc-ma6eSW2FnOI9uPOGg-G7Px_OCFSTBZqneT-EmVeNSSDi0NVzbPFZyGstUy44i3Ieuw8tD1jTvDtH8DUVgQkddWv6lnQTDhE_YqiBDVqTOYBxhbn3ZHjcBYm7GmWaLGQpyg?key=9-rCFkMXxOxT9CQsTVw8pA)Parallax effects – makes backgrounds move at different speeds when people scroll 3D effects – adds depth to your slider elements Mouse sensitivity settings – controls how much the effects respond to mouse movement ![Scroll Based Features-ServerAvatar](https://lh7-rt.googleusercontent.com/docsz/AD_4nXePt-1PuXXZEgXam27YLJjgWt-B4SK93jSDq7VjcM_iEyM4JP4JcIIZPkZHXkkzuH6SczDlYYsOu8rjZqhYBeWb7A0gg2NLqnjkmsvzhx8cFij0Xs6IXz_caGNnO3kcAQmrCvb4XA?key=9-rCFkMXxOxT9CQsTVw8pA)There’s also a “Scroll Based Effects” dropdown with lots of interesting effects that happen when people scroll down your page. I suggest you try them all out and see which ones you like! **Navigation Options** If you’re making a slider with multiple slides, you can customize the arrows and dots that people click to navigate. Find this under “Navigation Options”. Here you can change: ![Process Bar- ServerAvatar](https://lh7-rt.googleusercontent.com/docsz/AD_4nXc3YO_wmBnUd-HGZ_STvB7Z4LA9oJcP-mI9X4h3VFI2RrALeUWAXRotOraKH-evOjMgJaf8-cYc_PTHg2c5EqQQK38R2-9XkcuhdFZSXK7Jm3xNk8Pb0yyp2ENYnu4IFmJ06BFFXQ?key=9-rCFkMXxOxT9CQsTVw8pA)- How the arrows look and where they appear - The style and color of the navigation dots - Whether to show navigation on mobile devices or not **Don’t Forget to Save!** Once you’ve set everything up, make sure to click “Save” at the bottom. If you don’t fill in all the required fields, you won’t be able to start editing your slider. ![Editing Slider-ServerAvatar](https://lh7-rt.googleusercontent.com/docsz/AD_4nXc6deMzSdFRkUWkcW5VpYZPceGh_hDn17sZpnjxskJUlboYSpWr-P7elBO_J5SWMj7R8Nz2gJ12DZ3r_dKNkLJZPNExEXFG66jUz365EtlesQFiyNHPUf9qPggzuUX3-Uvbt9tkEA?key=9-rCFkMXxOxT9CQsTVw8pA)Now you’re ready to start adding pictures and text to your slider! [![Blog banner - ServerAvatar](https://serveravatar.com/wp-content/uploads/2025/09/728_90-Banner-1-1024x127.png)](https://serveravatar.com?ref=blog)## The Editor Screen Explained The editor is where the magic happens. It looks busy, but once you know what everything does, it’s not so bad. **The Timeline** At the bottom, you’ll see a timeline. This shows when things happen in your slider. You can drag things around to change the timing. **The Canvas** The big area in the middle is where you see your slider. This is what visitors to your website will see. **The Toolbar** At the top, there are buttons for adding things like text, images, and shapes. **Layer Panel** On the right side, you can see all the parts of your slider listed out. Each piece of text or image is called a “layer”. ## Adding and Changing Pictures Pictures are usually the most important part of any slider. Here’s how to work with them: **Adding New Pictures** - Click the “+” button on the toolbar - Choose “Image” - Upload your picture or choose from the media library - Drag it where you want it on the slider **Changing Picture Size** Click on your picture, then drag the corners to make it bigger or smaller. Hold Shift while dragging to keep it looking right. **Moving Pictures Around** Just click and drag your picture to move it anywhere on the slider. ## Working with Text Text is super important for telling people what your slider is about. Here’s how to add and change text: **Adding Text** - Click the “+” button - Choose “Text” - Type what you want to say - Move it where you want it **Changing How Text Looks** Select your text, then look at the right panel. You can change: - Font (what the letters look like) - Size (how big the text is) - Color - Bold or italic **Making Text Move** This is where Slider Revolution gets really cool. You can make text slide in from different directions: - Click on your text - Go to the “Animation” tab - Choose how you want it to come in - Pick how you want it to go out ## Understanding Animations Animations are what make Slider Revolution special. They make things move in cool ways. **Types of Animations** There are tons of different animations: - Fade in/out - Slide from left, right, top, or bottom - Zoom in/out - Rotate - And many more! **Setting Animation Timing** You can control when animations happen: - Start time – when the animation begins - Duration – how long it takes - End time – when it finishes Don’t make animations too fast or people won’t be able to read your text. Usually 1-2 seconds is good. ## Making Multiple Slides Most sliders have more than one slide. Here’s how to add more: **Adding a New Slide** - Look for the slide thumbnails (usually on the left) - Right-click and choose “Duplicate Slide” or “Add Slide” - Now you have a new slide to work with **Copying Things Between Slides** If you want the same text or image on multiple slides: - Select what you want to copy - Press Ctrl+C (or Cmd+C on Mac) - Go to the other slide - Press Ctrl+V (or Cmd+V) to paste **Changing Slide Order** You can drag the slide thumbnails around to change what order they show in. ## Setting Up Slider Controls People need ways to control your slider. Here are the main options: **Navigation Arrows** These let people click to go to the next or previous slide. You can turn them on/off and change how they look. **Dots/Bullets** Small dots at the bottom that show which slide you’re on. People can click them to jump to any slide. **Auto-Play** You can make slides change by themselves. Set how long each slide shows before moving to the next one. ## Making Your Slider Mobile-Friendly Lots of people will see your slider on phones and tablets. Here’s how to make sure it looks good: **Responsive Settings** Slider Revolution automatically tries to make things work on different screen sizes. But you might need to adjust some things. **Testing on Different Sizes** Use the preview buttons to see how your slider looks on: - Desktop computers - Tablets - Phones **Adjusting for Small Screens** Sometimes text might be too big for phones. You can set different sizes for different devices. ## Adding Your Slider to Your Website Once your slider is ready, you need to put it on your website. There are several ways to do this: **Using Shortcodes** Every slider gets a special code called a shortcode. It looks something like \[rev\_slider alias=”myslider”\]. Copy this code and paste it into any page or post. **Using Widgets** You can add your slider to sidebars or footer areas using the Slider Revolution widget. **With Page Builders** If you use page builders like Elementor or Visual Composer, they usually have special blocks for Slider Revolution. ## Common Problems and How to Fix Them Even experienced people run into problems sometimes. Here are some common ones: **Slider Not Showing Up** - Check that the plugin is activated - Make sure you copied the shortcode correctly - Try clearing your website cache **Images Look Blurry** - Use bigger images (at least 1920px wide for full-width sliders) - Check your image quality settings - Make sure images aren’t stretched too much **Slider Loads Too Slowly** - Use smaller image files - Don’t use too many animations at once - Enable lazy loading in the settings **Text Hard to Read** - Make sure there’s enough contrast between text and background - Don’t put light text on light backgrounds - Consider adding a dark overlay behind text ## Tips for Making Great Sliders Here are some tips to make your sliders look professional: **Keep It Simple** Don’t try to cram too much into one slide. Focus on one main message per slide. **Use Good Pictures** High-quality images make a huge difference. Blurry or pixelated images make your whole website look bad. **Don’t Make It Too Fast** Give people time to read your text and see your images. Slides that change every 2 seconds are annoying. **Test Everything** Always check your slider on different devices and browsers before publishing. **Match Your Website Style** Use colors and fonts that match the rest of your website. Your slider should fit in, not stick out. ## Advanced Features to Try Later Once you get comfortable with the basics, there are lots of advanced features to explore: **Video Backgrounds** You can use videos instead of images as backgrounds. This looks really cool but can slow down your website. **Interactive Elements** Add buttons, forms, and other clickable things to your slides. **Parallax Effects** Make background images move at different speeds for a 3D effect. **Custom Animations** Create your own unique animations using the advanced timeline features. ## Performance and Loading Speed Sliders can slow down your website if you’re not careful. Here’s how to keep things fast: **Optimize Your Images** - Use compressed images (try tools like TinyPNG) - Don’t use images bigger than you need - Consider using WebP format for better compression **Limit Animations** Too many moving parts can slow things down. Keep animations simple and don’t use too many at once. **Enable Caching** Use caching plugins to help your slider load faster for returning visitors. ## Troubleshooting Common Issues Sometimes things don’t work the way you expect. Here are solutions to common problems: **Slider Not Responsive** Check the responsive settings in the slider options. Make sure “Enable Responsive” is turned on. **Animations Not Working** - Clear your browser cache - Check if other plugins are causing conflicts - Try disabling other animation plugins temporarily **Import Errors** If templates won’t import: - Check your PHP memory limits - Make sure you have enough server space - Try importing smaller templates first ## Keeping Your Plugin Updated Slider Revolution gets updated regularly with new features and bug fixes. Here’s how to stay current: **Automatic Updates** If you bought the plugin with an extended license, you might get automatic updates. **Manual Updates** Check the Slider Revolution website for new versions and download them manually. **Backup First** Always backup your website before updating any plugins, just in case something goes wrong. ## FAQ ### **Q: How much does Slider Revolution cost?** It usually costs around $29 for a regular license, which lets you use it on one website. ### **Q: Can I use it on multiple websites?** You need to buy a separate license for each website, or get an extended license that covers multiple sites. ### **Q: Will it slow down my website?** It can if you use too many large images or complex animations. Keep things simple and optimize your images. ### **Q: Do I need coding skills?** No! It’s designed for people who don’t know how to code. Everything is done with clicking and dragging. ## Conclusion Well, there you have it – everything you need to know to get started with Slider Revolution! It might feel like a lot of information at first, but don’t worry. Just take it one step at a time. Start by setting up those basic responsiveness settings we talked about. Then create your first simple slider with just a few slides. Once you get comfortable with the basics, you can try out all those cool animations and effects. Remember, the key to making great sliders is to keep things simple and focus on what your visitors need to know. Don’t try to cram too much into one slider, and always test how it looks on different devices. The best part about Slider Revolution is that you don’t need any coding skills to make professional-looking sliders. With a little practice, you’ll be creating sliders that make your website stand out from the crowd. So go ahead – open up Slider Revolution and start experimenting! Your website visitors are going to love what you create. And hey, if you run into problems, just come back to this guide. We’ve covered all the basics you need to get started. Good luck with your slider making adventure! **Categories:** Blog, Tutorials, WordPress **Tags:** Slider Revolution, Website Design, Wordpress, WordPress Plugins, WordPress Themes --- ### [How to Increase upload_max_filesize in PHP](https://serveravatar.com/increase-upload-max-filesize-php/) **Published:** July 29, 2025 **Author:** Meghna Meghwani **Content:** [![Blog banner - ServerAvatar](https://serveravatar.com/wp-content/uploads/2025/09/728_90-Banner-3-1024x127.png)](https://serveravatar.com?ref=blog)File upload functionality is a cornerstone of modern web applications, from simple contact forms with attachments to complex media management systems. However, many PHP developers encounter frustrating limitations when users try to upload larger files, often met with cryptic error messages or silent failures. The culprit? PHP’s default upload\_max\_filesize setting, which typically restricts uploads to just 2MB. Whether you’re building a document management system, allowing users to share high-resolution images, or creating a platform for video uploads, understanding how to properly configure PHP’s file upload limits is essential. In this comprehensive guide, we’ll walk through everything you need to know about increasing upload\_max\_filesize and related settings to handle larger file uploads safely and efficiently. ## Understanding PHP File Upload Limits Before diving into the configuration changes, it’s important to understand that PHP uses several interconnected settings to control file uploads. These work together to ensure your server remains stable and secure while processing uploaded files. The primary settings that affect file uploads are: **upload\_max\_filesize** – This sets the maximum size for individual uploaded files. It’s the setting most developers think of first, but it’s not the only one that matters. **post\_max\_size** – This controls the maximum size of all POST data, including uploaded files. If you’re uploading multiple files or have other form data, this needs to be larger than upload\_max\_filesize. **max\_execution\_time** – Large file uploads take time to process. This setting determines how long a PHP script can run before timing out. **max\_input\_time** – This specifically controls how long PHP will spend parsing input data, including file uploads. **memory\_limit** – PHP needs sufficient memory to handle file uploads, especially if your application processes the files after upload. ![upload_max_filesize ](https://serveravatar.com/wp-content/uploads/2025/07/php_upload_settings_diagram.webp)Let’s checkout different methods mentioned below to increase **upload\_max\_filesize in PHP**: ## Method 1: Using ServerAvatar [ServerAvatar](https://serveravatar.com/) is a platform to simplify the deployment and management of servers and applications. It simplifies the process to deploy and manage PHP and Node.js based web applications on servers. If you’re using **ServerAvatar** to manage your servers and applications, increasing the “`upload_max_filesize`” in PHP for your application is incredibly simple and doesn’t require editing PHP configuration files manually. ### **Step 1: Access ServerAvatar Panel** **Log in** to your **ServerAvatar** account and navigate to the **Server** **panel** by clicking on the Dashboard icon for the server where your application is hosted. ![](https://serveravatar.com/wp-content/uploads/2025/07/image-135-1024x209.png)### Step 2: Access Application Panel Go to the **Applications** section from the left-hand sidebar and select click on the application dashboard icon for the application you want to increase the “`upload_max_filesize`“. ![](https://serveravatar.com/wp-content/uploads/2025/07/image-136-1024x388.png)### Step 3: Modify PHP Settings Click on **“PHP Settings”** from the left sidebar of application panel. In the PHP Settings section, you will see various configurable options. Find the setting named **`upload_max_filesize`**. Enter your desired value (e.g., `64M`, `128M`, etc.), and Click on **“Update Settings”** button at the bottom of the section. ![](https://serveravatar.com/wp-content/uploads/2025/07/image-137-1024x485.png)ServerAvatar will automatically update the PHP configuration, and the change takes effect immediately. This method is very easy and ideal for beginners or anyone who wants a fast, error-free way to manage PHP settings without touching the command line. ## Method 2: Editing php.ini The most permanent and reliable way to increase file upload limits is by modifying the php.ini configuration file. ### **Step 1: Locate your php.ini file** First, you need to find where your php.ini file is located. Create a simple PHP file with this content: PHP``` ``` ``` ``` Upload this file to your web server and access it through your browser. Look for the “Loaded Configuration File” entry, which shows the path to your active php.ini file. ### Step 2: Create a backup Before making any changes, create a backup copy of your php.ini file: Bash``` cp /path/to/php.ini /path/to/php.ini.backup ``` ``` cp /path/to/php.ini /path/to/php.ini.backup ``` ### **Step 3: Edit the configuration** Open the php.ini file in your preferred text editor and locate the following lines. If they don’t exist, add them to the file: INI``` ; Maximum allowed size for uploaded files upload_max_filesize = 64M ; Maximum size of POST data that PHP will accept post_max_size = 64M ; Maximum execution time of each script, in seconds max_execution_time = 300 ; Maximum amount of time each script may spend parsing request data max_input_time = 300 ; Maximum amount of memory a script may consume memory_limit = 256M ``` ``` ; Maximum allowed size for uploaded files upload_max_filesize = 64M ; Maximum size of POST data that PHP will accept post_max_size = 64M ; Maximum execution time of each script, in seconds max_execution_time = 300 ; Maximum amount of time each script may spend parsing request data max_input_time = 300 ; Maximum amount of memory a script may consume memory_limit = 256M ``` **Important considerations for these values:** - Set post\_max\_size equal to or larger than upload\_max\_filesize - For multiple file uploads, make post\_max\_size significantly larger - Adjust execution times based on your server’s upload speed and expected file sizes - Memory limit should be sufficient for your application’s needs ### Step 4: Restart your web server After saving the changes, restart your web server to apply the new configuration: Bash``` # For Apache sudo systemctl restart apache2 # or sudo service apache2 restart # For Nginx with PHP-FPM sudo systemctl restart nginx sudo systemctl restart php-fpm # or sudo service nginx restart sudo service php-fpm restart ``` ``` # For Apache sudo systemctl restart apache2 # or sudo service apache2 restart # For Nginx with PHP-FPM sudo systemctl restart nginx sudo systemctl restart php-fpm # or sudo service nginx restart sudo service php-fpm restart ``` ## Method 3: Using .htaccess (Apache Only) If you don’t have access to the php.ini file or want to apply changes to specific directories, you can use an .htaccess file: ### **Step 1: Create or edit .htaccess** In your website’s root directory (or the specific directory where you need larger uploads), create or edit the .htaccess file: Apache``` php_value upload_max_filesize 64M php_value post_max_size 64M php_value max_execution_time 300 php_value max_input_time 300 php_value memory_limit 256M ``` ``` php_value upload_max_filesize 64M php_value post_max_size 64M php_value max_execution_time 300 php_value max_input_time 300 php_value memory_limit 256M ``` ### **Step 2: Test the configuration** Create a test script to verify your changes are working: PHP``` ``` ``` ``` ## Method 4: Runtime Configuration with ini\_set() For specific scripts that need different limits, you can modify settings at runtime: PHP``` ``` ``` ``` **Note:** Some hosting providers restrict the use of ini\_set() for security reasons, so this method may not always work. ### **Practical Example: Building a File Upload Form** Here’s a complete example that demonstrates proper file upload handling with error checking: PHP``` File Upload Example Large File Upload Test **Categories:** Blog, Guide, Linux, Php, Ubuntu **Tags:** File Upload in PHP, Increase File Upload Limit, PHP Configuration, PHP Settings, PHP.ini Tutorial, Server Management, upload_max_filesize --- ### [Essential WordPress Settings to Configure After Installation](https://serveravatar.com/essential-wordpress-settings-after-installation/) **Published:** July 29, 2025 **Author:** Meghna Meghwani **Content:** [![Blog banner - ServerAvatar](https://serveravatar.com/wp-content/uploads/2025/09/728_90-Banner-3-1024x127.png)](https://serveravatar.com?ref=blog)**WordPress Settings** are crucial to getting your site up and running smoothly. So, you just installed WordPress? Well, that’s just the beginning! Now comes the important part – getting everything configured properly. Think of it like moving into a new house – you don’t just walk in and start living. You need to arrange the furniture, set up utilities, and make it feel like home. WordPress comes with default settings, but these aren’t always the best for your site. Some settings can hurt your SEO. Others might make your site slow or unsafe. That’s why we need to fix these things right away. This guide will walk you through every important WordPress setting. We’ll keep it simple and tell you exactly what to do. By the end, your WordPress site will be ready to grow and succeed. ## If you have not installed WordPress Yet? If you haven’t installed [WordPress](https://wordcounter.net/) on your server yet, you can use [**ServerAvatar**](https://serveravatar.com/) to install WordPress easily in just a few minutes. ServerAvatar lets you deploy and manage your servers and applications without any technical headache. You can install [WordPress](https://serveravatar.com/docs/application/one-click-installer/wordpress) automatically using [one-click installer](https://serveravatar.com/docs/application/one-click-installer/getting-started) feature, [manage domains](https://serveravatar.com/docs/application/manage-domains/), [install automatic SSL](https://serveravatar.com/docs/application/automatic-installation) for free, configure [backups](https://serveravatar.com/docs/backups/getting-started), and much more, all from a single and user-friendly dashboard. [Get Started with ServerAvatar](https://serveravatar.com/) now and deploy your [WordPress](https://serveravatar.com/docs/application/one-click-installer/wordpress) site easily using [one-click](https://serveravatar.com/docs/application/one-click-installer/getting-started) ![ServerAvatar Dashboard](https://serveravatar.com/wp-content/uploads/2025/07/image-2025-07-28T164709.085-1024x473.png)## What Are WordPress Settings? WordPress settings are like the control panel for your website. They control how your site behaves and functions. You can find most settings by going to your WordPress dashboard and looking for “Settings” in the left menu. These settings control things like: - How your site looks to visitors - How people can interact with your content - How search engines see your site - How safe your site is - How fast your site loads WordPress settings work like the engine of your website. They run behind the scenes, but they power everything else. Get them wrong, and you’ll have problems later. ## Why These Settings Matter Many people skip setting up WordPress properly. They just start writing posts and wonder why things don’t work well. Here’s what happens when you don’t set things up right: - Search engines can’t find your site - Your site loads slowly - Spam comments flood your posts - Your images look bad - People can’t share your content easily - Your site gets hacked But when you set things up correctly from the start, everything works better. Your site will be faster, safer, and more successful. It’s worth spending an hour now to save months of problems later. ## General Settings – The Basics Let’s start with the most important settings. Navigate to your WordPress admin area and click on Settings, then select General. This page contains the basic information about your site. ![General Setting-ServerAvatar](https://serveravatar.com/wp-content/uploads/2025/07/image-141-1024x398.png)### Site Title and Tagline Your site title is like your business name. It appears in Google results and at the top of web browsers. Make it clear and simple. Don’t stuff it with keywords – that looks spammy. Your tagline is a brief explanation of your website’s purpose. Keep it under 160 characters. This helps search engines understand your site. For example, if you have a cooking blog, your tagline might be “Easy recipes for busy families.” ![WordPress settings](https://serveravatar.com/wp-content/uploads/2025/07/image-142-1024x401.png)### WordPress Address and Site Address These should usually be the same. They tell WordPress where your site lives on the internet. Be very careful with these settings. If you change them wrong, your site might break. Most people should leave these alone unless they know what they’re doing. If you’re not sure, ask your web host for help. ![Site Address-ServerAvatar](https://serveravatar.com/wp-content/uploads/2025/07/image-143-1024x330.png)### Email Address This is where WordPress sends important messages. Use an email you check often. WordPress will email you about: - New comments waiting for approval - New user registrations - Plugin and theme updates - Security issues ### Time Zone and Date Format Choose your time zone based on your location or where most of your audience lives. This affects when your posts are published and how dates show up on your site. Pick a date format that your visitors will understand. In the US, people expect MM/DD/YYYY. In Europe, DD/MM/YYYY is more common. ![TimeZone- ServerAvatar](https://serveravatar.com/wp-content/uploads/2025/07/image-144-1024x480.png)## Writing Settings – Content Setup Navigate to Settings > Writing to configure how your content operates. These settings affect every post and page you create. ### Default Post Category Every WordPress post needs a category. If you don’t pick one, WordPress uses the default category (usually called “Uncategorized”). Change this to something that makes sense for your site. If you have a food blog, make “Recipes” your default category. If you write about business, use “Business Tips.” ### Default Post Format Most people should leave this as “Standard.” Post formats are for themes that display different types of content differently. Unless your theme specifically uses post formats, don’t worry about this. ### Remote Publishing This lets you post to your blog from email or other apps. Most people don’t need this, so you can skip it. If you’re not sure, leave it turned off for security. ![Remote Publishing-ServerAvatar](https://serveravatar.com/wp-content/uploads/2025/07/image-145-1024x452.png)## Reading Settings – How People See Your Site These settings control what visitors see when they come to your site. Head to Settings > Reading to access them. ### Your Homepage Display You have two choices here: - Show your latest posts (like a traditional blog) - Show a static page (like a business website) Most blogs should show latest posts. Most business sites should use a static page. You can always change this later. If you choose a static page option, you’ll need to create two separate pages: - A homepage that welcomes visitors - A blog page that shows your posts ### Blog Pages Show At Most This controls how many posts show up on your blog page. The default is 10, but that might be too many. If your posts are long, try 5-7 posts per page. If they’re short, 10-15 is fine. More posts per page means slower loading times. But fewer posts means people have to click “next page” more often. Find the balance that works for your site. ### Search Engine Visibility This is super important! Make sure “Discourage search engines from indexing this site” is NOT checked. If it’s checked, search engines won’t find your site. ![Search Engine Visibility](https://serveravatar.com/wp-content/uploads/2025/07/image-146-1024x462.png)The only time you should check this box is when your site is under construction and not ready for visitors. ## Discussion Settings – Comments and Interaction Comments can be great for engagement, but they can also bring spam and problems. Go to Settings > Discussion to set up comments properly. ### Default Article Settings Here are the key settings to consider: - “Attempt to notify any blogs linked to from the article” – Turn this off. It creates spam. - “Allow link notifications from other blogs” – Turn this off too. - “Allow people to post comments on new articles” – Your choice. Comments can help engagement but require moderation. ### Other Comment Settings If you allow comments, set these up: - “Comment author must fill out name and email” – Turn this on - “Users must be registered and logged in to comment” – Only if you want to limit comments - “Automatically close comments on articles older than X days” – Consider turning this on for old posts ![Reading Setting-ServerAvatar](https://serveravatar.com/wp-content/uploads/2025/07/image-147-1024x462.png)### Comment Moderation Always turn on comment moderation. This means you approve comments before they show up on your site. It takes more work, but it keeps spam and inappropriate comments away. Set it up so comments with more than 2 links wait for moderation. Most spam comments have lots of links. ### Comment Blacklist WordPress has a built-in spam filter, but you can add your own blocked words. Common words to block include: - Casino - Poker - Viagra - Cheap - Free money ![Comment Blacklist](https://serveravatar.com/wp-content/uploads/2025/07/image-148-1024x732.png)But be careful not to block legitimate words your visitors might use. ## Media Settings – Images and Files Images are crucial for modern websites. Go to Settings > Media to set up how WordPress handles your images. ### Image Sizes WordPress automatically creates different sizes of every image you upload: - Thumbnail size (for small previews) - Medium size (for most content) - Large size (for detailed images) The default sizes work for most sites. But if your theme is very wide, you might want larger images. If your site is simple, smaller images will load faster. ### Uploading Files WordPress organizes your uploaded files by year and month. This keeps things organized, especially if you upload lots of images. Most people should leave this setting turned on. ![Upload File-ServerAvatar](https://serveravatar.com/wp-content/uploads/2025/07/image-149-1024x576.png)[![Blog banner - ServerAvatar](https://serveravatar.com/wp-content/uploads/2025/09/728_90-Banner-1-1024x127.png)](https://serveravatar.com?ref=blog)## Permalink Settings – Your URL Structure This is one of the most important settings for SEO. Permalinks are the URLs for your posts and pages. Go to Settings > Permalinks to set this up. ### Common Settings The default setting creates URLs like “yoursite.com/?p=123”. This tells visitors and search engines nothing about your content. Better options include: - Post name: yoursite.com/sample-post/ - Day and name: yoursite.com/2023/01/31/sample-post/ - Month and name: yoursite.com/2023/01/sample-post/ “Post name” is usually the best choice. It creates clean, SEO-friendly URLs that people can read and understand. ### Custom Structure You can create your own URL structure if none of the presets work for you. But be careful – complex URLs can confuse visitors and search engines. A good custom structure might include your category: yoursite.com/category/post-name/ ![Permilink-ServerAvatar](https://serveravatar.com/wp-content/uploads/2025/07/image-150-1024x611.png)## Privacy Settings – Keeping Things Safe WordPress added privacy settings to help sites comply with laws like GDPR. Go to Settings > Privacy to set this up. The main thing here is creating a privacy policy page. WordPress can create a basic one for you, but you should customize it for your site. Include information about: - What data you collect - How you use that data - How people can contact you about their data - How people can delete their data ![](https://serveravatar.com/wp-content/uploads/2025/07/image-151-1024x418.png)Even if you think you don’t collect data, you probably do. Things like contact forms, comments, and analytics all collect visitor information. ## User Settings – Managing People If other people will help with your site, you need to set up user management. Go to Settings > General and look for “Membership” settings. Most sites should keep “Anyone can register” turned off. You don’t want random people creating accounts on your site. If you need contributors or authors, create accounts for them manually. ![](https://serveravatar.com/wp-content/uploads/2025/07/image-152-1024x431.png)If you do allow registration, set the default role to “Subscriber.” This gives people very limited permissions. You can always change their role later if needed. ## Security Settings You Need WordPress doesn’t have a dedicated security settings page, but there are important security steps to take right away. First, delete the default “admin” user if it exists. This username is too easy for hackers to guess. Create a new admin user with a unique username. Next, make sure all user accounts have strong passwords. Weak passwords are the #1 way sites get hacked. Consider limiting login attempts. By default, people can try to log in as many times as they want. This makes it easy for hackers to guess passwords. Finally, keep WordPress updated. Old versions have security holes that hackers love to exploit. ## Performance Settings That Help WordPress doesn’t have built-in performance settings, but there are things you can do to make your site faster. First, choose a good web host. Cheap hosting will make your site slow no matter what you do. Next, optimize your images. Large images are the biggest cause of slow websites. WordPress can help by creating smaller versions of your images automatically. Consider using a caching plugin. These store copies of your pages so they load faster for visitors. Finally, choose a fast theme. Some themes are coded poorly and will slow down your site. ## Backup Settings – Don’t Lose Your Work WordPress doesn’t have automatic backups built in. This is a huge problem because things can go wrong. Your site could get hacked, your host could have problems, or you could accidentally delete something important. Set up automatic backups right away. You can use a plugin or ask your web host to handle this. Good backup solutions will: - Back up your site automatically every day - Store backups in a safe place (not on your website) - Let you restore your site quickly if something goes wrong - Keep multiple backup copies Don’t wait to set this up. Many people learn about backups only after they lose everything. ## Plugin and Theme Settings Every plugin and theme you install might add new settings. This can be overwhelming, but focus on the essentials first. For SEO plugins, set up: - Your site title and description - Social media profiles - Analytics tracking - XML sitemap generation For security plugins, enable: - Login attempt limiting - File change monitoring - Malware scanning - Firewall protection For performance plugins, turn on: - Page caching - Image optimization - Database cleanup - CDN integration (if available) Don’t install too many plugins at once. Add them one by one and test your site after each installation. ## Common Mistakes to Avoid - **Leaving the site private.** Make sure search engines can find your site unless it’s still under construction. - **Using weak passwords.** This is how most sites get hacked. Use long, complex passwords for all accounts. - **Forgetting about backups.** Set up automatic backups before you start adding content. - **Installing too many plugins.** Every plugin slows down your site a little. Only install plugins you actually need. - **Ignoring updates.** Keep WordPress, themes, and plugins updated for security and performance. - **Using the default “admin” username.** This makes it easy for hackers to guess your login. - **Not setting up analytics.** You need to track your visitors to understand what’s working. - **Choosing a bad web host.** Cheap hosting will make your site slow and unreliable. - **Not optimizing images.** Large images will make your site painfully slow. - **Skipping SEO setup.** Search engines won’t find your site if you don’t set up SEO properly. ## FAQ ### **Q: Do I need to change all these settings right away?** No, but focus on the important ones first. General settings, permalinks, and search engine visibility should be done immediately. ### **Q: What happens if I mess up a setting?** Most settings can be changed back easily. But be careful with things like permalinks and site addresses – these can break your site if changed incorrectly. ### **Q: Should I allow comments on my site?** It depends on your goals. Comments can increase engagement but require moderation. If you’re not sure, start with comments disabled and enable them later. ### **Q: How often should I backup my site?** Daily backups are ideal for active sites. Weekly backups might be enough for sites that don’t update often. ### **Q: Can I change these settings after my site is live?** Yes, but some changes (like permalinks) can affect your SEO. It’s better to get settings right from the start. ## Conclusion Setting up WordPress properly might seem like a lot of work, but it’s really important. These settings form the foundation of your website. Get them right now, and everything else will be easier later. Remember, you don’t have to do everything at once. Start with the most important settings like general settings, permalinks, and security. Then work through the other areas when you have time. The key is to not skip this step entirely. Many people jump straight into writing content and wonder why their site doesn’t succeed. Taking time to set up WordPress properly will save you months of problems and help your site grow faster. Your WordPress site is now ready to succeed. With these settings in place, you can focus on creating great content and building your audience. **Categories:** Blog, Tutorials, WordPress **Tags:** WordPress Configuration, WordPress Settings, WordPress Setup, WordPress Tips --- ### [What is open_basedir in PHP and How to Configure It Securely](https://serveravatar.com/configure-open-basedir/) **Published:** July 29, 2025 **Author:** Meghna Meghwani **Content:** [![Blog banner - ServerAvatar](https://serveravatar.com/wp-content/uploads/2025/09/728_90-Banner-3-1024x127.png)](https://serveravatar.com?ref=blog)When running PHP on a server, **security is everything**. You don’t want your application, or anyone else’s, accessing sensitive files outside of its intended directory. That’s where open\_basedir comes in. It’s a powerful but often misunderstood PHP directive that can significantly tighten the security of your PHP environment. In this blog, we’ll break down **what open\_basedir is**, **why it matters**, and most importantly, **how to configure it properly step by step**. Whether you’re running a shared hosting environment or managing your own server with a platform like **ServerAvatar**, this guide will help you stay secure and in control. ## What is open\_basedir in PHP? The open\_basedir directive is a PHP configuration setting that **restricts the PHP scripts to access only certain directories on the file system**. In other words, it prevents scripts from snooping around in other parts of the server’s directory tree. When set, PHP will **refuse to open any file outside of the defined path(s)**, even if your script tries to. ## Why is open\_basedir Important for Security? PHP has powerful file-handling functions like fopen(), file\_get\_contents(), and require\_once(), which can access files anywhere on the server. Without restrictions, **a misconfigured or vulnerable script could expose confidential files** like /etc/passwd, .env files, or private server keys. By using open\_basedir, you ensure: - **File access is limited only to necessary directories** - **Cross-site scripting (XSS)** attacks and file traversal vulnerabilities are minimized - Your **multi-user or multi-site environments remain isolated** If you’re using **ServerAvatar**, you’ll be glad to know that it allows easy configuration of PHP directives like open\_basedir directly from the control panel for each web app or domain. This makes it **super simple to apply directory-level security without diving into the terminal**. ## How Does open\_basedir Work? Once open\_basedir is enabled, **PHP checks all file operations** like reading, writing, or including a file. If the file path falls outside of the allowed directory, the script **fails and throws a warning or error**. **Example:** If your open\_basedir is set to: Bash``` open_basedir = /var/www/html/ ``` ``` open_basedir = /var/www/html/ ``` Then trying to access: Bash``` file_get_contents('/etc/passwd'); ``` ``` file_get_contents('/etc/passwd'); ``` result in: Bash``` Warning: file_get_contents(): open_basedir restriction in effect. File(/etc/passwd) is not within the allowed path(s) ``` ``` Warning: file_get_contents(): open_basedir restriction in effect. File(/etc/passwd) is not within the allowed path(s) ``` ## Where Can You Set open\_basedir? You can configure open\_basedir in multiple places depending on your server setup: - **ServerAvatar Panel** – Simplified per-app configuration (Recommended) - **php.ini** – Global setting (server-wide) - **.htaccess** – Apache per-directory config - **httpd.conf** or **vhost config** – Apache/Nginx virtual hosts Let’s break these down with steps. ## Step-by-Step: How to Configure open\_basedir Securely ### Identify Allowed Directories Determine which directories your PHP app needs to access. For example: - Web root: /var/www/myapp/ - Temporary folder: /tmp/ (often required for sessions or uploads) **Important:** If you forget to allow /tmp/, PHP sessions or file uploads may break. ### Method 1: Set via ServerAvatar (Easiest Method) **What is ServerAvatar** ServerAvatar is a cloud server management platform that makes it easy to host websites and applications. It lets you manage servers, deploy apps like WordPress or Laravel, and handle backups, SSL, monitoring, and more—all through a user-friendly dashboard, without needing deep server knowledge. If you’re using **ServerAvatar**, here’s how you do it: 1. **Log in to [ServerAvatar](https://serveravatar.com/ "ServerAvatar") Panel** 2. Go to Your Server**, then Navigate Your Application** ![Application Dashboard-ServerAvatar](https://serveravatar.com/wp-content/uploads/2025/07/image-2025-07-29T124411.466-1024x465.png)Under open\_basedir, **add the allowed paths** (e.g. /home/Eu9fsGXaGJ0UAeqG/myblog:/var/lib/php/sessions:/tmp:) this is my application path your path would be different. ![open_basedir](https://serveravatar.com/wp-content/uploads/2025/07/image-2025-07-29T124442.909-1024x452.png)1. Click on update settings 2. ServerAvatar will automatically apply changes and restart the necessary services *This is the easiest and safest way for users who don’t want to mess with server files manually.* ### Method 2: Set in php.ini (Global Method) **Find Your PHP Config File** Run this command to find where PHP is reading settings from: Bash``` php --ini ``` ``` php --ini ``` You’ll see something like: Bash``` Loaded Configuration File => /etc/php/8.2/apache2/php.ini ``` ``` Loaded Configuration File => /etc/php/8.2/apache2/php.ini ``` That’s the file we need to edit. **Open the File to Edi**t Use a command-line editor like nano: **If using Apache:** Bash``` sudo nano /etc/php/8.2/apache2/php.ini ``` ``` sudo nano /etc/php/8.2/apache2/php.ini ``` **If using PHP-FPM:** Bash``` sudo nano /etc/php/8.2/fpm/php.ini ``` ``` sudo nano /etc/php/8.2/fpm/php.ini ``` **Add the open\_basedir Setting** Inside the file, **scroll down or search (Ctrl + W)** for: Bash``` open_basedir ``` ``` open_basedir ``` If it’s not there, **add this line anywhere** (preferably near the other file-related settings): Bash``` open_basedir = "/var/www/myapp/:/tmp/" ``` ``` open_basedir = "/var/www/myapp/:/tmp/" ``` **Save and Exit** In nano: - Press Ctrl + O → Save - Press Enter → Confirm - Press Ctrl + X → Exit **Restart the Web Server** To make the changes take effect, restart your web server. **If you use Apache:** Bash``` sudo systemctl restart apache2 ``` ``` sudo systemctl restart apache2 ``` **If you use PHP-FPM:** Bash``` sudo systemctl restart php8.2-fpm ``` ``` sudo systemctl restart php8.2-fpm ``` **You’re Done!** Now PHP **can only access** files in: - /var/www/myapp/ - /tmp/ If it tries to access anything else (like /etc/passwd), it will **fail with an error** — this is good for security! ### Method 3: Set in .htaccess (Apache Only) This method is for you **if you don’t have access to php.ini**, but your server uses **Apache with mod\_php (not PHP-FPM)**. **Step-by-step:** **Go to your website folder:** Example: Swift``` /var/www/myapp/ ``` ``` /var/www/myapp/ ``` **Open or create the .htaccess file:** PHP``` sudo nano /var/www/myapp/.htaccess\ ``` ``` sudo nano /var/www/myapp/.htaccess\ ``` **Add this line inside the file:** Apache``` php_value open_basedir "/var/www/myapp/:/tmp/" ``` ``` php_value open_basedir "/var/www/myapp/:/tmp/" ``` **Save and exit:** - Ctrl + O to save - Enter to confirm - Ctrl + X to exit **Restart Apache:** Bash``` sudo systemctl restart apache2 ``` ``` sudo systemctl restart apache2 ``` Works **only** if PHP runs as **Apache module** Does **not** work with **PHP-FPM** [![Blog banner - ServerAvatar](https://serveravatar.com/wp-content/uploads/2025/09/728_90-Banner-1-1024x127.png)](https://serveravatar.com?ref=blog)### Method 4: Set in Virtual Host (Apache or Nginx) **Open your virtual host config file** (usually in /etc/apache2/sites-available/): Bash``` sudo nano /etc/apache2/sites-available/myapp.conf ``` ``` sudo nano /etc/apache2/sites-available/myapp.conf ``` **Add this inside the block:** Bash``` apache php_admin_value open_basedir "/var/www/myapp/:/tmp/" ``` ``` apache php_admin_value open_basedir "/var/www/myapp/:/tmp/" ``` **Save and exit** **Restart Apache:** Bash``` sudo systemctl restart apache2 ``` ``` sudo systemctl restart apache2 ``` **B) For Nginx (with PHP-FPM)** **Open the PHP-FPM pool config file** (usually in /etc/php/8.2/fpm/pool.d/www.conf or a custom pool): Bash``` sudo nano /etc/php/8.2/fpm/pool.d/www.conf ``` ``` sudo nano /etc/php/8.2/fpm/pool.d/www.conf ``` **Add this line at the bottom:** INI``` php_admin_value[open_basedir] = /var/www/myapp/:/tmp/ ``` ``` php_admin_value[open_basedir] = /var/www/myapp/:/tmp/ ``` **Save and exit** **Restart PHP-FPM:** Bash``` sudo systemctl restart php8.2-fpm ``` ``` sudo systemctl restart php8.2-fpm ``` **Done!** Now PHP will **only be allowed** to access files in: - /var/www/myapp/ - /tmp/ Trying to access anything else will result in a **permission error**, which increases security. Let me know if you need help checking whether your server uses Apache module or PHP-FPM! ## Common Mistakes to Avoid - **Forgetting /tmp/** – This will break uploads, caching, or sessions. - **Misspelling the paths** – PHP won’t correct invalid paths. - **Setting it too broadly** – Avoid using / as that defeats the whole purpose. - **Relying on ini\_set()** – Many hosts disable changing open\_basedir at runtime. ## How to Test if open\_basedir is Working Create a quick test script: PHP``` ``` ``` ``` If you’ve configured open\_basedir correctly, you should see a **PHP warning instead of the file contents**. That’s good! You can also run: PHP``` phpinfo(); ``` ``` phpinfo(); ``` And check the **Local Value and Master Value** for open\_basedir. ## Real-World Use Case: Multi-Site Hosting Let’s say you’re hosting multiple client websites on the same server: - /var/www/site1 - /var/www/site2 By setting: PHP``` open_basedir = /var/www/site1/:/tmp/ ``` ``` open_basedir = /var/www/site1/:/tmp/ ``` for site1 PHP``` open_basedir = /var/www/site2/:/tmp/ ``` ``` open_basedir = /var/www/site2/:/tmp/ ``` for site2, you’re making sure **one site can’t access files from another**. Platforms like **ServerAvatar** automate this for each website you add, **ensuring isolation and security by default**. ## Best Practices for open\_basedir Configuration - **Always include /tmp/** - **Use absolute paths** - **Isolate each site’s directory** - **Use ServerAvatar for simplified per-site settings** - **Check logs after enabling** – Fix errors if scripts can’t access valid files - **Combine with other PHP restrictions** like disable\_functions for maximum protection ## Frequently Asked Questions (FAQ) ### **What is open\_basedir in PHP?** open\_basedir is a PHP configuration directive that limits the files a PHP script can access to a specific directory or set of directories. It helps prevent unauthorized access to sensitive files outside of the intended folders. ### **Why should I use open\_basedir?** Using open\_basedir improves your server’s security by restricting PHP scripts to specific directories. This is especially important in shared hosting or multi-site environments where one site could otherwise access another site’s files. ### **Can I set multiple directories in open\_basedir?** Yes, you can specify **multiple directories** by separating them with a colon (:) on Linux or a semicolon (;) on Windows. ini open\_basedir = /var/www/myapp/:/tmp/ ### **What happens if a script tries to access a file outside the allowed directory?** PHP will **throw a warning or error**, and the script will not be able to read or write the file. Example error: css Warning: file\_get\_contents(): open\_basedir restriction in effect… ### **Is open\_basedir enough for complete PHP security?** - No, it’s just one part of the puzzle. For complete PHP security, you should also: - Disable dangerous functions (disable\_functions) - Set proper file/folder permissions - Use secure coding practices - Keep your PHP version updated ## Conclusion To sum up, open\_basedir is one of PHP’s **most underrated but powerful security features**. Whether you’re running one site or managing a fleet of them, it acts like an invisible fence around your application’s file access. By configuring it properly: - You **minimize risk** - You **prevent unauthorized file access** - And you **enhance isolation in multi-site environments** If you’re using **ServerAvatar**, this becomes even easier—no manual configs, just a few clicks. For self-managed environments, follow the steps above and always test after applying. **Stay safe. Keep your PHP secure. And don’t let your scripts wander where they shouldn’t.** If you found this guide helpful, feel free to share or bookmark it for later. **Categories:** Blog, Guide, Php, Ubuntu **Tags:** Hosting Configuration, open_basedir, PHP ini, PHP Security, PHP Settings, Restrict File Access, Server Security, Web Hosting Security --- ### [WordPress.com vs WordPress.org: What's the Difference?](https://serveravatar.com/wordpress-com-vs-wordpress-org/) **Published:** July 29, 2025 **Author:** Meghna Meghwani **Content:** [![Blog banner - ServerAvatar](https://serveravatar.com/wp-content/uploads/2025/09/728_90-Banner-3-1024x127.png)](https://serveravatar.com?ref=blog)**WordPress.com vs WordPress.org, what’s the deal with that?** So you want to make a website, and everyone keeps talking about WordPress. But then you find out there are two different things. Well, don’t worry. I’m going to break it down for you in simple words. Think of it like this – it’s kind of like buying a car versus renting one. Both get you where you want to go, but they work very differently. Let me explain everything so you can pick the right one for your needs. ## What is WordPress? First things first – what exactly is WordPress anyway? WordPress is basically software that helps you build websites. It’s like having a really smart tool that does most of the hard work for you. You don’t need to know how to code or do any of that technical stuff. WordPress powers about 40% of all websites on the internet. That’s a lot! It’s popular because it makes creating websites much easier than doing it from scratch. But here’s where it gets a bit confusing – there are two ways to use WordPress. One way is through WordPress.com, and the other is through WordPress.org. They sound almost the same, but they’re quite different. It’s like having two different restaurants with similar names – one might be fast food, and the other might be a fancy place where you cook your own meal. ## WordPress.com – The Easy Way ![WordPress.com vs WordPress.org](https://serveravatar.com/wp-content/uploads/2025/07/image-156-1024x463.png)[WordPress.com](https://wordpress.com/ "WordPress.com") is like the easy button for making websites. Think of it as renting an apartment that’s already furnished. Everything is set up for you, and you just move in and start living. When you use WordPress.com, they handle all the technical stuff. You don’t need to worry about web hosting, security updates, or any of that complicated computer stuff. You just sign up, pick a design, and start adding your content. ### What You Get with WordPress.com With WordPress.com, you get quite a bit right out of the box: - A place for your website to live on the internet - Automatic backups of your content - Security protection - Basic customer support - Some themes (designs) to choose from - Easy tools to add content It’s kind of like staying at a hotel. Everything is taken care of for you, but you have to follow their rules. You can’t paint the walls or bring your own furniture, if you know what I mean. The free version gives you a basic website, but it comes with some limits. Your website address will have “wordpress.com” in it, like “yourname.wordpress.com.” Plus, they’ll show ads on your site that you don’t control. ### How Much Does WordPress.com Cost? WordPress.com has different price levels: - **Free**: Costs nothing but has lots of limits - **Personal**: Around $4 per month – removes ads and gives you a custom web address - **Premium**: About $8 per month – adds more design options and features - **Business**: Around $25 per month – lets you install plugins and customize more - **eCommerce**: About $45 per month – for online stores The prices can change, so you’ll want to check their website for current costs. But this gives you an idea of what to expect. ## WordPress.org – The DIY Way ![WordPress.com vs WordPress.org](https://serveravatar.com/wp-content/uploads/2025/07/image-157-1024x467.png)Now, [WordPress.org](https://wordpress.org/) is totally different. This is like buying land and building your own house. You get complete control, but you also have to do more work. WordPress.org gives you the actual WordPress software for free. But here’s the thing – you need to find your own place to put it. That means getting web hosting, setting everything up, and managing it yourself. ### What You Get with WordPress.org When you use WordPress.org, you get: - The complete WordPress software (totally free) - Full control over your website - Access to thousands of plugins - Any theme you want - Complete customization options - Your own web address - No ads unless you put them there It’s like owning your own house. You can paint it any color, add rooms, change the furniture, or even tear down walls. But you also have to fix things when they break. ### What You Need for WordPress.org To use WordPress.org, you need a few things: - **Web hosting**: This is like renting space on the internet for your website - **A domain name**: This is your web address, like “yourwebsite.com” - **Some technical knowledge**: Not much, but you should be comfortable following instructions Don’t let this scare you off though. Lots of hosting companies make it really easy to install WordPress. Some can do it for you with just one click. ## Main Differences Between Them Let me break down the big differences so you can see them side by side. ### Cost Differences WordPress.com starts free but can get expensive if you want more features. WordPress.org is free software, but you pay for hosting and your domain name. Usually, this costs about $3-10 per month for basic hosting. So WordPress.org often ends up being cheaper in the long run, especially if you want a professional website. ### Control and Freedom This is probably the biggest difference. With WordPress.com, you’re limited by their rules. With WordPress.org, you can do whatever you want. ### Customization Options WordPress.com gives you some themes to pick from, but you can’t change them much unless you pay for expensive plans. WordPress.org lets you use any theme and change it however you want. It’s like the difference between choosing from a menu at a restaurant versus cooking at home. The restaurant is easier, but at home you can make exactly what you want. ### Plugin Access Plugins are like apps for your website. They add new features and abilities. WordPress.com only lets you use plugins on their most expensive plans. WordPress.org gives you access to over 50,000 free plugins right away. Want a contact form? There’s a plugin. Need to sell stuff? There’s a plugin. Want to improve your site for search engines? Yep, there are plugins for that too. ## Which One Should You Pick? This depends on what you want and how much work you’re willing to do. ### Pick WordPress.com If You Want WordPress.com is good if you: - Want something super easy - Don’t mind some limitations - Just want to blog or have a simple website - Don’t want to deal with technical stuff - Are okay with paying more for convenience It’s perfect for people who just want to write and share content without worrying about the technical side. ### Pick WordPress.org If You Want WordPress.org is better if you: - Want complete control - Plan to make money from your website - Want to customize everything - Don’t mind learning a bit about websites - Want to save money long-term Most businesses and serious website owners choose WordPress.org because of the freedom it gives them. [![Blog banner - ServerAvatar](https://serveravatar.com/wp-content/uploads/2025/09/728_90-Banner-1-1024x127.png)](https://serveravatar.com?ref=blog)## Setting Up Each One Let me walk you through how to get started with each option. ### How to Start with WordPress.com Starting with WordPress.com is really easy: 1. Go to WordPress.com 2. Click “Get Started” 3. Answer some questions about your website 4. Pick a design 5. Choose your plan 6. Start adding content That’s it! You can have a website running in about 10 minutes. ### How to Start with WordPress.org WordPress.org takes a few more steps: 1. Buy web hosting from a company like Bluehost or SiteGround 2. Get a domain name (often included with hosting) 3. Install WordPress (many hosts do this automatically) 4. Pick and install a theme 5. Start adding content It might take an hour or two, but it’s not too hard. Most hosting companies have step-by-step guides to help you. ## Common Problems People Face Here are some issues people run into: **With WordPress.com:** - Feeling limited by what they can do - Wanting to remove ads but not wanting to pay - Needing specific plugins that aren’t available - Wanting to use their own domain name **With WordPress.org:** - Feeling overwhelmed by all the options - Having to deal with technical problems - Worrying about security and backups - Spending too much time on maintenance instead of content Both have solutions, but it’s good to know what you might face. ## Side by Side Comparison **Feature****WordPress.org****WordPress.com****Hosting**You host it yourselfHosting is included**Cost**Free software, but you pay for hostingFree plan available; paid plans for more features**Custom Themes**UnlimitedLimited (unless on Business plan or higher)**Plugins**UnlimitedOnly on Business plan or higher**Monetization**Full freedomLimited (unless you pay)**Maintenance**You handle itWordPress.com handles it**Control**Full controlLimited control unless on higher plan**Ideal For**Full websites, businesses, developersBeginners, casual bloggers## Can You Switch Later? Yes, you can switch from one to the other, but it takes some work. Going from WordPress.com to WordPress.org is easier than going the other way. If you start with WordPress.com and later want more control, you can export your content and move it to WordPress.org. You might lose some formatting and will need to set up everything again, but your posts and pages will transfer over. Going from WordPress.org to WordPress.com is harder because you might have features that don’t work on WordPress.com. ## FAQ ### **Q: Is WordPress.com or WordPress.org better for beginners?** WordPress.com is easier for complete beginners because everything is set up for you. But WordPress.org isn’t too hard if you follow the instructions from your hosting company. ### **Q: Can I make money with both versions?** Yes, but WordPress.org gives you more ways to make money. WordPress.com has some restrictions on how you can monetize your site. ### **Q: Which one is more secure?** WordPress.com handles security for you automatically. With WordPress.org, you need to keep things updated and use security plugins, but you have more control. ### **Q: Do I need coding skills for either one?** No coding required for basic use of either platform. WordPress.org gives you the option to customize with code if you want, but it’s not necessary. ### **Q: Can I use my own domain name with both?** Yes, but with WordPress.com you need to pay for a plan to use your own domain. With WordPress.org, you can use your own domain from the start. ## Stop Wasting Time on Servers. Start Building Instead. You didn’t start your project to babysit servers. Let **ServerAvatar** handle deployment, monitoring, and backups — so you can focus on growth. Deploy **WordPress, Laravel, N8N**, and more in minutes. No DevOps required. No command line. No stress. [ 🚀 Try Free ](https://app.serveravatar.com) [ 🌐 Learn More ](https://serveravatar.com/) Trusted by 10,000+ developers and growing. **Categories:** Blog, Guide, WordPress **Tags:** Choosing WordPress, Website Building, WordPress Guide, WordPress Hosting, WordPress Setup, WordPress Tips, WordPress.com, WordPress.org --- ### [How to Protect WordPress with Fail2ban and Cloudflare](https://serveravatar.com/protect-wordpress-with-fail2ban-and-cloudflare/) **Published:** July 29, 2025 **Author:** Smit Pipaliya **Content:** [![Blog banner - ServerAvatar](https://serveravatar.com/wp-content/uploads/2025/09/728_90-Banner-3-1024x127.png)](https://serveravatar.com?ref=blog)**Protect WordPress from growing cyber threats, it powers over 40% of all websites on the internet.** Its popularity makes it a massive target for hackers. Every minute, thousands of bots and attackers probe WordPress sites, looking for weak spots. If you’ve got a WordPress site, security isn’t optional, it’s essential. That’s where tools like *Fail2ban* and *Cloudflare* come in. Fail2ban and Cloudflare act like digital bodyguards. Fail2ban handles things at the server level, protecting you from brute-force login attempts and known attack patterns. Cloudflare, on the other hand, filters traffic before it even reaches your server. Together, they create a formidable shield around your site. So, why both? Fail2ban is great for blocking repeat offenders and keeping logs tight. Cloudflare’s DDoS protection and firewall rules stop traffic surges and malicious bots early. If one fails, the other still stands. In this guide, we’ll break down exactly how to set them up, step by step. ## Understanding the Threat Landscape If you think your small WordPress blog is safe because it’s not popular, think again. Most attacks are automated. Bots don’t care who you are, they scan IP ranges looking for any vulnerable WordPress site. Let’s explore what threats you’re really up against. **Brute-force login attempts** are perhaps the most common. Bots try thousands of username-password combinations until one sticks. Then there’s **XML-RPC abuse**, where attackers use the WordPress API to flood your site or gain access. And don’t forget **DDoS attacks**, where your server gets slammed with traffic until it crashes. Then we have **comment spam**, **malware injection**, and **theme/plugin vulnerabilities**. A single outdated plugin can become a backdoor for attackers. They’ll inject code, deface your site, or steal data. Even worse? You may not even notice until it’s too late. Here’s the kicker: most of these attacks leave patterns like failed login attempts, 404 errors, malformed POST requests. And that’s exactly what Fail2ban is designed to catch. Cloudflare, meanwhile, keeps most of the garbage traffic from even touching your server. You can’t stop bots from probing, but you can stop them from succeeding. ## What is Fail2ban and How It Works Fail2ban is like a bouncer for your server. It watches your log files, looking for repeated failed login attempts or suspicious activity. When it spots something shady, it blocks the offending IP address for a set amount of time or permanently. So how does it work? Fail2ban uses something called **jails**. Each jail monitors a specific service like SSH, NGINX, or Apache. When a rule is broken, Fail2ban fires up a **ban action** usually an IPtables rule that blocks the IP address at the firewall level. You can customize Fail2ban to monitor WordPress-specific logs, like /var/log/auth.log or custom access logs. You can even create custom filters to detect failed logins, spammy behavior, or XML-RPC attacks. One of the best things about Fail2ban is how lightweight it is. It runs quietly in the background, consuming very little system resources. And since it’s working at the system level, it’s not affected by WordPress plugin bugs or theme issues. Fail2ban isn’t just a blocker—it’s a logger, tracker, and early warning system rolled into one. Think of it as your site’s immune system, kicking into gear the moment something goes wrong. ## What is Cloudflare and How It Secures WordPress Cloudflare is often thought of as just a CDN (Content Delivery Network), but it’s so much more. It’s also a **reverse proxy**, **firewall**, **DDoS protection platform**, and **performance optimizer**. When properly configured, Cloudflare can stop a massive chunk of malicious traffic before it even touches your site. When you route your domain through Cloudflare, it acts as a buffer between your visitors and your server. This allows it to inspect incoming requests, block suspicious behavior, and cache content for faster loading. For WordPress users, Cloudflare offers: - **WAF (Web Application Firewall)** – with specific rules for WordPress - **Rate Limiting** – to block brute-force attempts and bots - **Bot Management** – identifying and filtering harmful bot traffic - **Under Attack Mode** – ideal during a DDoS storm - **Page Rules** – to fine-tune how Cloudflare interacts with your pages And the best part? Most of these tools are available even on the free plan. That makes Cloudflare one of the most accessible and powerful security tools out there. When you combine Cloudflare with Fail2ban, you get the best of both worlds. Cloudflare filters traffic in the cloud, while Fail2ban keeps your server locked down. Even if something sneaks past Cloudflare, Fail2ban will catch it at the doorstep. ## Configuring Fail2ban for WordPress site with ServerAvatar If you are a user of ServerAvatar or planning to explore it, one of the most crucial features it offers is **Fail2ban integration**. ServerAvatar provides Fail2ban protection at both the **server level** and **[WordPress](https://wordpress.com/) site level**, allowing you to secure your server and website from unauthorized users who attempt random password combinations or launch brute-force attacks. Fail2ban helps prevent such malicious access attempts by automatically banning suspicious IP addresses based on their behavior. What makes ServerAvatar even more convenient is that setting up Fail2ban is incredibly simple. You don’t need to install anything manually. **Fail2ban comes pre-installed** when you set up your server through ServerAvatar. There’s no need to log in to the server or edit any configuration files. Everything is managed through the **ServerAvatar dashboard**, making it accessible even to non-technical users. This ease of use allows anyone to take advantage of enterprise-level security without deep technical knowledge. If you wish to configure Fail2ban at the server level, you can refer to the official [**ServerAvatar product documentation**](https://serveravatar.com/docs/server/fail2ban), which contains step-by-step instructions for your setup. To enable Fail2ban for your specific site or application, follow these steps: Log in to your **ServerAvatar account** → Navigate to **Server Dashboard** → Go to **Applications** → Select your application → Click on **Fail2ban** from the sidebar. From there, you’ll have full control over the Fail2ban configuration for your application directly within the dashboard. ![ Protect WordPress](https://serveravatar.com/wp-content/uploads/2025/07/fail2ban1-124da2c48a9f1b8f16500314b4fc2553-1024x423.png)The Fail2Ban page in the application panel allows you to create custom configurations for jails and filters to tailor security settings according to your application’s needs. The “Jail Configuration” lets you define specific rules to protect your application. Customize parameters such as ban time, find time, and max attempts to create a robust defense against potential threats. ![Jail Configuration-ServerAvatar](https://serveravatar.com/wp-content/uploads/2025/07/image-153.png)With the “Filter Configuration” you can design custom filters to detect and analyze malicious behavior. Create precise patterns and rules to identify threats and trigger appropriate actions. ![Filter Configuration-ServerAvatar](https://serveravatar.com/wp-content/uploads/2025/07/image-154.png)After clicking on the **Save** button, Fail2Ban provides a simple table with two tabs – “**Ban IPs**” and “**Ignore IPs**” – to help you manage IP addresses effectively. The “**Ban IP**” tab displays a table containing IP addresses that are currently ban from accessing your server. You have the option to remove a ban by clicking the “**Delete**” button next to the respective IP address. The “**Ignore IP**” tab displays a table containing IP addresses that are explicitly ignore by Fail2Ban. Ignore IPs will not be banned. You can remove an IP from the ignore list by clicking the “**Delete**” button next to the respective IP address. ![Ignore IP-ServerAvatar](https://serveravatar.com/wp-content/uploads/2025/07/image-155-1024x412.png)This is how easy it is to setup fail2ban for your WordPress site with ServerAvatar. l [![Blog banner - ServerAvatar](https://serveravatar.com/wp-content/uploads/2025/09/728_90-Banner-1-1024x127.png)](https://serveravatar.com?ref=blog)## Setting Up Cloudflare for Maximum Security Now let’s secure your Cloudflare settings to work seamlessly with WordPress and Fail2ban. ### 1. Configure DNS Correctly Ensure your domain is proxied through Cloudflare (orange cloud icon enabled). This allows Cloudflare to intercept and filter all traffic. ### 2. Enable Web Application Firewall (WAF) Go to the **Security > WAF** section and enable: - WordPress-specific ruleset (if on Pro plan) - OWASP rules for general threat protection ### 3. Add Custom Firewall Rules Create a rule like: - **Field**: URI Path - **Operator**: contains - **Value**: /wp-login.php - **Action**: JS Challenge or Block This slows down bots targeting login pages. ### 4. Enable Rate Limiting In **Security > Rate Limiting**, set: - URL: /wp-login.php - Threshold: 10 requests per minute - Action: Block for 1 hour This protects against brute-force attacks. ### 5. Turn On Bot Fight Mode Under **Security > Bots**, turn on Bot Fight Mode. It’s free and highly effective against low-level bot traffic. ## Best Practices for Long-Term WordPress Security Security isn’t a one-time project—it’s an ongoing process. Here’s how to maintain and improve your WordPress security long-term. ### 1. Regularly Update Everything Keep WordPress core, themes, and plugins updated. Vulnerabilities are constantly discovered and patched. An outdated component is the #1 cause of hacks. ### 2. Monitor Logs Weekly Fail2ban logs offer rich insights. Look for patterns—repeated IPs, specific attack vectors—and adjust jails accordingly. ### 3. Use Strong Passwords and 2FA Install plugins like WP 2FA to enable two-factor authentication. Make sure admin accounts use strong, unique passwords. ### 4. Disable XML-RPC Unless you use apps or Jetpack, disable XML-RPC. It’s a common attack point. You can use: Bash``` add_filter('xmlrpc_enabled', '__return_false'); ``` ``` add_filter('xmlrpc_enabled', '__return_false'); ``` Or block access via NGINX or Apache. ### 5. Limit Login Attempts Use a plugin—or let Fail2ban do it. Either way, don’t allow infinite retries on login pages. ### 6. Scan Your Site Regularly Use tools like: - Wordfence Scanner - Sucuri SiteCheck - WPScan These tools detect malware, vulnerabilities, and bad file changes. ### 7. Backups, Backups, Backups Set automatic backups weekly. Store them offsite—like Google Drive, Dropbox, or Amazon S3. Use plugins like UpdraftPlus or BlogVault. ### 8. Audit User Accounts Remove inactive users. Assign correct roles—never give “Editor” or “Admin” to users who don’t need them. ### 9. Use HTTPS Ensure your site has a valid SSL certificate. Cloudflare can provide one for free via Flexible SSL. ### 10. Document Your Security Setup Keep a record of: - Fail2ban filters - Cloudflare rules - Firewall settings This will make future audits and troubleshooting much easier. ## FAQs ### **Can Fail2ban and Cloudflare replace a WordPress security plugin?** Not entirely. While they cover a huge part of your security needs, plugins like Wordfence still provide file scanning, malware detection, and 2FA. Use them together for full protection. ### **How often should I review my Fail2ban logs?** At least once a week. Look for unusual patterns, spikes in bans, or repeated offenses from the same IP blocks. ### **Will Fail2ban slow down my website?** No. It’s lightweight and runs in the background. In fact, it improves performance by keeping bad bots off your server. ### **Is Cloudflare enough for WordPress security on its own?** It covers a lot, especially with WAF and DDoS protection. But server-level tools like Fail2ban catch what Cloudflare might miss—especially post-authentication attacks. ### **What are some alternatives to Fail2ban?** Other tools include ModSecurity, CSF (ConfigServer Security & Firewall), and DenyHosts. Each has pros and cons depending on your server setup. ## Conclusion Securing WordPress is not about a single plugin or tool—it’s about building layers. Fail2ban offers ground-level server protection by blocking bad actors based on log activity. Cloudflare acts as your perimeter wall, filtering traffic and preventing malicious visitors from ever reaching your server. Together, these tools drastically reduce the attack surface and give you peace of mind. From stopping brute-force logins and XML-RPC abuse to mitigating DDoS attacks and managing bans at scale, Fail2ban and Cloudflare create a defense system that’s flexible, powerful, and reliable. Security is a journey not a destination. Set up alerts, monitor logs, adjust rules, and stay proactive. A secure WordPress site means more uptime, better performance, and trust from your visitors. **Categories:** Blog, Linux, Ubuntu, WordPress **Tags:** Block WordPress Bots, Cloudflare, Fail2ban, Protect WordPress, Website Protection, WordPress Hosting Security, WordPress Protection Tools --- ### [How to Change WordPress Domain Without Losing SEO Rankings](https://serveravatar.com/change-wordpress-domain/) **Published:** August 5, 2025 **Author:** Meghna Meghwani **Content:** [![Blog banner - ServerAvatar](https://serveravatar.com/wp-content/uploads/2025/09/728_90-Banner-3-1024x127.png)](https://serveravatar.com?ref=blog)Thinking about change WordPress domain name? Maybe you’re rebranding or finally scored the perfect domain. But before you make the switch, there’s one big concern—**SEO**. Mess it up, and you risk losing your hard-earned rankings and traffic. But don’t worry. In this guide, I’ll walk you through **exactly how to change your domain name in WordPress without harming your SEO**—step by step, in plain English. ## Audit your current SEO performance Use tools like **Google Search Console**, **Ahrefs**, or **SEMrush** to understand: - Top-performing pages - Backlinks - Keywords - Traffic sources This gives you a benchmark to compare post-migration results. ## Back Up Your Website Completely Before making any changes, **back up your full website** (files + database). This ensures that you can restore your site if anything goes wrong. - Files - Themes - Plugins - Full database **If you are using ServerAvatar you can back up your site easily.** ## What is ServeAvatar [**ServerAvatar**](https://serveravatar.com/) is a powerful cloud server management tool that lets you easily host and manage PHP-based applications like WordPress, Laravel, and custom PHP sites. It allows you to connect and manage your cloud servers (from providers like DigitalOcean, AWS, Vultr, etc.) through a user-friendly dashboard without needing deep Linux knowledge. ## Site Backup with the ServerAvatar Method: - Go to ServerAvatar Dashboard and log in using your credentials. - navigate to the **“Backups”** tab in the server menu. Here, you’ll find options to create and manage backups. ![Create Backup-ServerAvatar](https://serveravatar.com/wp-content/uploads/2025/08/image-2025-08-05T154408.321-1024x518.png)- Click the **“Create”** button. - A form will appear where you need to fill in the following details: - **Backup Name:** Give your backup a unique and recognizable name. - **Backup Type:** Choose what you want to back up: Application Files, Database and File System - **Select Application:** Choose the specific Server/Application you want to back up from the list. - You can select where the backup will be stored: Google Drive or ServerAvatar Storage Make sure you’ve connected your Google Drive account under the **Storage Providers** section beforehand if you wish to use it. You can also use a WordPress plugin like **UpdraftPlus** if you prefer. ## Buy and Set Up Your New Domain Name **Register the new domain** Buy your new domain from a trusted registrar like: - [Namecheap](https://www.namecheap.com/) - [GoDaddy](https://www.godaddy.com/en-in) - [Google Domains](https://domains.google/) **Add it to your hosting/server** In your hosting panel, add the new domain and point it to your existing website’s root directory. **With ServerAvatar** - Go to your **ServerAvatar panel and Select Server** - go to the **existing application**, and under the **Domains** tab, click **“Add Domain”** ![Add Domian-ServerAvatar](https://serveravatar.com/wp-content/uploads/2025/08/image-2025-08-05T154540.525-1024x509.png)- Enter your new domain - Update your **DNS A Record** at your domain registrar to point to your server IP - Go to **SSL Certificate** and click on it. Then install the SSL and turn on **Force HTTPS** with one click using ServerAvatar. ![Install SSL Certificate-ServerAvatar](https://serveravatar.com/wp-content/uploads/2025/08/image-2025-08-05T154613.109-1024x516.png)## Update WordPress Site URL Settings When you move your WordPress site to a new domain, you need to tell WordPress about the new address. Here’s how to do it: Change the Site URL in WordPress Dashboard** - Log in to your WordPress admin panel. - Go to **Settings > General**. - You’ll see two fields: **WordPress Address (URL)** and **Site Address (URL)** ![change website domain](https://serveravatar.com/wp-content/uploads/2025/08/image-2025-08-05T154703.866-1024x416.png)- Change both of them from [http://myblog.satemporary.site](http://myblog.satemporary.site/) to your **new domain** (for example, [https://newdomain.com](https://newdomain.com/)). - Click **Save Changes**. ## Redirect Old Domain to New Domain (301 Redirects) ### Why 301 Redirects are critical for SEO When you change your domain name, **301 redirects** help you keep your SEO rankings. A **301 redirect** tells search engines: “This page has permanently moved to a new address.” This redirect passes 90–99% of your SEO value to the new domain, ensuring that you don’t lose your Google rankings or traffic. ### Set up 301 redirects via .htaccess (Apache) If your website runs on **Apache**, follow these steps: 1. Go to the **root folder** of your old domain (usually public\_html). 2. Find or create the .htaccess file. ![File Manager-ServerAvatar](https://serveravatar.com/wp-content/uploads/2025/08/image-2025-08-05T155055.995-1024x472.png)Add the following lines: Apache``` RewriteEngine on RewriteCond %{HTTP_HOST} ^myblog\.satemporary.site [NC,OR] RewriteCond %{HTTP_HOST} ^www\myblog\.satemporary.site [NC] RewriteRule ^(.*)$ https://newdomain.com/$1 [L,R=301,NC] ``` ``` RewriteEngine on RewriteCond %{HTTP_HOST} ^myblog\.satemporary.site [NC,OR] RewriteCond %{HTTP_HOST} ^www\myblog\.satemporary.site [NC] RewriteRule ^(.*)$ https://newdomain.com/$1 [L,R=301,NC] ``` **NGINX configuration (if applicable)** If you’re using **NGINX** instead of Apache, add this to your **NGINX server block**: Nginx``` server { listen 80; server_name myblog.satemporary.site www.myblog.satemporary.site; return 301 https://newdomain.com$request_uri; } ``` ``` server { listen 80; server_name myblog.satemporary.site www.myblog.satemporary.site; return 301 https://newdomain.com$request_uri; } ``` ### Use Redirection plugin (no coding) If you’re not comfortable editing code, use a plugin: 1. Go to your WordPress dashboard. 2. Navigate to **Plugins → Add New**. 3. Search for **Redirection** and install it. ![301 Redirection Plugin-ServerAvatar](https://serveravatar.com/wp-content/uploads/2025/08/image-2025-08-05T155312.580-1024x465.png)1. Go to the **Tools** section in your WordPress dashboard and click on **Redirection**. 2. In the Redirection panel, enter the **old URL** in the **Source URL** field and the **new URL** in the **Target URL** field. ![Change URL-ServerAvatar](https://serveravatar.com/wp-content/uploads/2025/08/image-2025-08-05T155348.105-1024x371.png)[![Blog banner - ServerAvatar](https://serveravatar.com/wp-content/uploads/2025/09/728_90-Banner-1-1024x127.png)](https://serveravatar.com?ref=blog)## Update Internal Links and Media URLs You’ll notice that your posts, pages, images, menus, and even buttons continue to use your old domain URL after changing your domain name. **Why is this important?** Despite redirecting the old domain to the new one, it’s more beneficial for SEO, speed, and user experience to utilize your new domain throughout your site. ## Use a Plugin Like Better Search Replace This is the easiest and safest way to update your old URLs in the database. **What is Better Search Replace?** [Better Search Replace](https://wordpress.org/plugins/better-search-replace/) is a free plugin that helps you search for a specific word or URL in your site’s database and replace it with something else, without needing any coding. **Steps to Use Better Search Replace:** 1. **Install the Plugin** - Go to your WordPress Dashboard - Click on Plugins > Add New - Search for **Better Search Replace** - Click **Install Now**, then **Activate**[](https://storage.3.basecamp.com/5840738/blobs/ce2ba964-6d25-11f0-b9c7-0242ac120004/download/image.png) 1. ![Better Search Replace Plugin-ServerAvatar](https://serveravatar.com/wp-content/uploads/2025/08/image-2025-08-05T155543.464-1024x357.png)- **Open the plugin.** Go to Tools > Better Search Replace - **Set the Old and New URLs** In the **Search for** box, enter your old domain: In the **Replace with** box, enter your new domain: [https://newdomain.com](https://newdomain.com/) - **Select the Database Tables** You’ll see a list of WordPress tables like wp\_posts, wp\_postmeta, wp\_options, etc. - Select **all the tables** to make sure everything is updated - **Run a Dry Run First** Check the box that says **“Run as dry run?”** This will show you how many changes the plugin will make—without actually making them Click **Run Search/Replace** ![Better Search Replace-ServerAvatar](https://serveravatar.com/wp-content/uploads/2025/08/image-2025-08-05T155619.783.png)- **Run the Real Update** - Now uncheck the **“Run as dry run?”** box - Click **Run Search/Replace** again - Wait a few seconds until it’s done All your links, image URLs, and embedded files should now point to your **new domain**. ## Inform Google About the Domain Change Use Google Search Console Change of Address Tool 1. Add both old and new domains in Google Search Console. 2. Go to the old domain’s profile. 3. Use the **Change of Address** tool. 4. Verify that 301s are working correctly. **Submit your new sitemap** Generate a new sitemap using plugins like **Rank Math** or **Yoast SEO**, and submit it to Search Console. **Monitor crawl errors and indexing** Check **Coverage** and **Crawl Stats** regularly in Search Console for any issues. ## Update Your Sitemap and Robots.txt **Generate a new sitemap** Use your SEO plugin to regenerate the sitemap under the new domain. **Submit sitemap to Google & Bing** Submit both to: - Google Search Console - Bing Webmaster Tools **Update robots.txt** Make sure it includes the correct **Sitemap URL** pointing to your new domain. ## Update Third-Party Tools and Platforms **Google Analytics & Google Tag Manager** Update the property settings in both tools to reflect your new domain. **Social media accounts** Update your: - Instagram bio - Twitter/X profile - Facebook page - LinkedIn, etc. **Email marketing tools** Change domain references in: - Email templates - Signup forms - Automations ## Monitor SEO Rankings Post-Migration **Use SEO tools** Track your rankings, backlinks, and keyword movement with: - Ahrefs - SEMrush - Ubersuggest - Google Search Console **Monitor traffic and bounce rate** Look for sudden drops or spikes in: - Organic traffic - Page views - Time on site **Common Mistakes to Avoid** - ❌ Not setting up 301 redirects - ❌ Leaving old URLs in content - ❌ Forgetting to submit new sitemap - ❌ Not checking for broken links - ❌ Ignoring canonical tags ## How Long Will SEO Take to Stabilize After Changing Domains? **First 30–90 days** You might see a slight dip. Don’t panic. Google is just re-crawling and re-indexing. **After 90 days** If everything is done right, you should see your rankings and traffic **return to normal or even improve**. ## Tips to Maintain and Boost SEO Post-Migration **Keep publishing quality content** Show Google your new domain is alive and thriving. **Build new backlinks** Reach out to websites linking to your old domain and ask them to update their links. **Promote your new domain** Run social media campaigns or email newsletters to let people know about the change. ## FAQs ### **Will I lose traffic if I change my domain name?** If you follow proper SEO practices like 301 redirects and updating all links, traffic loss is minimal and temporary. ### **How do I keep backlinks working after a domain change?** Use 301 redirects so old backlinks still point to the right content on the new domain. ### **Can I do this without any coding knowledge?** Yes, you can use plugins like Redirection, Better Search Replace, and an SEO plugin like Rank Math or Yoast. ### **What’s the difference between 301 and 302 redirects?** 301 is permanent (best for SEO). 302 is temporary (not recommended for domain changes). ### **How soon should I expect my SEO to return to normal?** Most websites see stable SEO within 1–3 months after switching domains. ## Conclusion Changing your domain name can feel overwhelming and even a little intimidating, especially when you’ve worked hard to build your website’s search engine presence. However, if you follow the right steps methodically and with attention to detail, you can preserve your SEO rankings, and in some cases, even improve them. A domain change can be a powerful opportunity to refresh your brand identity and position your website for long-term growth. Just remember: **implement 301 redirects correctly, update every reference to your domain, and notify Google and other search engines promptly!** ## Stop Wasting Time on Servers. Start Building Instead. You didn’t start your project to babysit servers. Let **ServerAvatar** handle deployment, monitoring, and backups — so you can focus on growth. Deploy **WordPress, Laravel, N8N**, and more in minutes. No DevOps required. No command line. No stress. [ 🚀 Try Free ](https://app.serveravatar.com) [ 🌐 Learn More ](https://serveravatar.com/) Trusted by 10,000+ developers and growing. **Categories:** Blog, Guide, Php, WordPress **Tags:** change website domain, how to change WordPress URL, move WordPress to new domain, PHP Hosting, SEo, VPS Management, WordPress domain change, WordPress SEO tips --- ### [How to Use Git Bash](https://serveravatar.com/git-bash/) **Published:** August 6, 2025 **Author:** Smit Pipaliya **Content:** [![Blog banner - ServerAvatar](https://serveravatar.com/wp-content/uploads/2025/09/728_90-Banner-3-1024x127.png)](https://serveravatar.com?ref=blog)Git Bash is an essential tool for developers working on Windows who want to combine the power of Git with a Unix-style command-line interface. Whether you’re managing source code, pushing changes to GitHub, or automating tasks with shell commands, Git Bash offers a robust solution for Windows users. ## What is Git Bash? **Git Bash** is a command-line interface (CLI) that combines Git version control with a Unix-style interface on Windows. It is bundled with **Git for Windows**, which includes Git version control and important shell utilities like ssh, scp, ls, and cat—common tools in Linux and macOS environments. In simple terms, Git Bash enables Windows users to interact with Git in a more Linux-like way. ## Use Case Scenarios Git Bash is ideal for: - Developers working with GitHub or other Git-compatible repositories. - Managing version-controlled projects locally. - Running shell scripts on Windows. - Performing secure file transfers via SSH. - Automating tasks in continuous integration/continuous deployment (CI/CD) pipelines. **Prerequisites** Before starting, ensure you have the following: - A Windows PC (Windows 7 or later). - An internet connection. - Administrative privileges to install software. - A GitHub account (or another Git-compatible service like GitLab or Bitbucket). ## How to Install Git Bash on Windows Git Bash comes bundled with **Git for Windows**, making it easy to get started with Git commands in a terminal environment on Windows. **Step-by-Step Installation Guide** Follow these simple steps to install Git Bash on your system. **1. Download Git for Windows** Visit [https://git-scm.com](https://git-scm.com/) and click the **Download** button. The site will detect your Windows version and begin the correct download automatically. **2. Launch the Installer** Once the download finishes, open the .exe file (usually in your **Downloads** folder). Double-click it to start the Git Setup Wizard. ![Git Installer-ServerAvatar](https://serveravatar.com/wp-content/uploads/2025/08/2-Downloaded-file.png)**3. Welcome Screen** Click **Next** on the welcome screen to proceed. ![Public License-ServerAvatar](https://serveravatar.com/wp-content/uploads/2025/08/3-Welcome.png)**4. Choose Installation Location** Select where Git should be installed. The default location is fine for most users. Click **Next** to continue. ![Installation Location-ServerAvatar](https://serveravatar.com/wp-content/uploads/2025/08/4-Installation-folder.png)**5. Select Components** Keep the default selections unless you have specific needs. Make sure these are checked: - **Git Bash Here** - **Git GUI Here** Click **Next**. ![Components-ServerAvatar](https://serveravatar.com/wp-content/uploads/2025/08/5-Component-selection.png)**6. Start Menu Folder** Choose where Git shortcuts should appear in the Start Menu. - Keep the default name (**Git**) or choose a custom one. - To skip this entirely, check **Don’t create a Start Menu folder**. Click **Next**. ![Select Menu Folder-ServerAvatar](https://serveravatar.com/wp-content/uploads/2025/08/6-Select-start-menu.png)**7. Choose Default Editor** Pick a text editor Git will use (like **VS Code**, **Notepad++**, or **Vim**). Click **Next**. ![Choose Default Editor-ServerAvatar](https://serveravatar.com/wp-content/uploads/2025/08/7-Editor-selection.png)**8. Set the Initial Branch Name** Decide the default branch name for new repositories. - Let Git decide (default: master) - Or set your own, like main or development Click **Next**. ![Git Bash-ServerAvatar](https://serveravatar.com/wp-content/uploads/2025/08/8-Intial-branch-name.png)**9. Adjust Environment PATH** Choose how Git will be available in the command line: - **Git from the command line and also from 3rd-party software** (Recommended) Click **Next**. ![PATH Environment-ServerAvatar](https://serveravatar.com/wp-content/uploads/2025/08/9-environment-path.png)**10. Configure SSH** Select **Use bundled OpenSSH** (default option). Click **Next**. ![Configure SSH-ServerAvatar](https://serveravatar.com/wp-content/uploads/2025/08/10-ssh-configuration.png)**11. Choose HTTPS Backend** Select how Git handles HTTPS connections: - **Use the native Windows Secure Channel library** (Recommended for better system integration) - Or choose **OpenSSL** Click **Next**.[](https://storage.3.basecamp.com/5840738/blobs/71988b62-6d08-11f0-9914-0242ac120005/download/11-http-transport.png) ![HTTPS Backed-ServerAvatar](https://serveravatar.com/wp-content/uploads/2025/08/11-http-transport.png)**12. Configure Line Endings** Choose: - **Checkout Windows-style, commit Unix-style line endings** Click **Next**. ![Configur Line Endings-ServerAvatar](https://serveravatar.com/wp-content/uploads/2025/08/12-line-ending-conversion.png)**13. Terminal Emulator** Pick: - **Use MinTTY (default terminal of MSYS2)** for a better experience Click **Next**. ![Terminal Emulator-ServerAvatar](https://serveravatar.com/wp-content/uploads/2025/08/13-termianl-emulator.png)**14. Configure git pull Behavior** Decide how git pull should work: - **Default (fast-forward or merge)** is suitable for most users - Or choose **Rebase** or **Only ever fast-forward** Click **Next**. ![Git Pull-ServerAvatar](https://serveravatar.com/wp-content/uploads/2025/08/14-behavior-of-git-pull.png)**15. Credential Helper** Choose how Git stores your credentials: - **Git Credential Manager** (Recommended for easy and secure authentication) - Or select **None** if you prefer manual entry Click **Next**.[](https://storage.3.basecamp.com/5840738/blobs/8dd9eeec-6d08-11f0-a4cd-0242ac120005/download/15-credential-helper.png) ![Git Credential-ServerAvatar](https://serveravatar.com/wp-content/uploads/2025/08/15-credential-helper.png)**16. Additional Options** You can enable: - File system caching - Symbolic links (if needed) Click **Next**. ![File System Caching-ServerAvatar](https://serveravatar.com/wp-content/uploads/2025/08/16-extra-option.png)**17. Install Git** Click **Install** to begin. The installation will take a few moments. ![Install Git-ServerAvatar](https://serveravatar.com/wp-content/uploads/2025/08/17-installing-process.png)**18. Complete Setup** Once done, you’ll see the completion screen. - You can launch Git Bash immediately - Or close the wizard by clicking **Finish** ![Complete Setup-ServerAvatar](https://serveravatar.com/wp-content/uploads/2025/08/18-git-setup-wizard.png)[![Blog banner - ServerAvatar](https://serveravatar.com/wp-content/uploads/2025/09/728_90-Banner-1-1024x127.png)](https://serveravatar.com?ref=blog)## Git Bash Common Commands Below is a categorized list of essential Git Bash commands, including Git commands and common Unix shell commands. **Basic Navigation** Bash``` pwd # Print working directory ls # List files and folders ls -la # List files with detailed info cd # Change directory cd .. # Go up one level clear # Clear terminal screen ``` ``` pwd # Print working directory ls # List files and folders ls -la # List files with detailed info cd # Change directory cd .. # Go up one level clear # Clear terminal screen ``` **Git Initialization and Setup** Bash``` git config --global user.name "Your Name" git config --global user.email "your.email@example.com" git config --list # View Git configuration git init # Initialize new Git repository ``` ``` git config --global user.name "Your Name" git config --global user.email "your.email@example.com" git config --list # View Git configuration git init # Initialize new Git repository ``` **File Tracking and Commits** Bash``` git status # Check repository status git add # Stage a specific file git add . # Stage all changes git commit -m "message" # Commit staged changes git log # View commit history ``` ``` git status # Check repository status git add # Stage a specific file git add . # Stage all changes git commit -m "message" # Commit staged changes git log # View commit history ``` **Branch Management** Bash``` git branch # List branches git branch # Create a new branch git checkout # Switch to a branch git merge # Merge another branch ``` ``` git branch # List branches git branch # Create a new branch git checkout # Switch to a branch git merge # Merge another branch ``` **Remote Repository Handling** Bash``` git remote add origin # Link to a remote Git repository git remote -v # Show remote URLs git push -u origin main # Push local main branch git pull origin main # Pull latest changes git clone # Clone a repository ``` ``` git remote add origin # Link to a remote Git repository git remote -v # Show remote URLs git push -u origin main # Push local main branch git pull origin main # Pull latest changes git clone # Clone a repository ``` **Undo Changes** Bash``` git checkout -- # Discard changes to a file git reset HEAD # Unstage a file git revert # Revert a commit git reset --hard # Reset all changes (use with caution) ``` ``` git checkout -- # Discard changes to a file git reset HEAD # Unstage a file git revert # Revert a commit git reset --hard # Reset all changes (use with caution) ``` ## How to Use Git Bash Now that Git Bash is installed and you’ve learned the basic commands, here’s how to use it in a real project. ### 1. Configure Git Before making commits, set your name and email, which will appear in every commit: Bash``` git config --global user.name "John Doe" git config --global user.email "john@example.com" ``` ``` git config --global user.name "John Doe" git config --global user.email "john@example.com" ``` Check your configuration: Bash``` git config --list ``` ``` git config --list ``` ### 2. Initialize a Local Git Repository Navigate to your project directory in Git Bash: Bash``` cd path/to/your/project git init ``` ``` cd path/to/your/project git init ``` This creates a .git/ folder in your project directory, beginning the process of version control. ### 3. Stage and Commit Changes After editing files or adding new ones, you can stage them: Bash``` git add . # Stage all changes git status # View staged vs. unstaged changes git commit -m "Initial commit" ``` ``` git add . # Stage all changes git status # View staged vs. unstaged changes git commit -m "Initial commit" ``` Use git log to view your commit history. ### 4. Create and Switch Branches Branching lets you work on different features without affecting the main code: Bash``` git branch feature-x # Create a branch git checkout feature-x # Switch to the branch git merge feature-x # Merge into the current branch ``` ``` git branch feature-x # Create a branch git checkout feature-x # Switch to the branch git merge feature-x # Merge into the current branch ``` Or, create and switch to a branch in one step: Bash``` git checkout -b feature-x ``` ``` git checkout -b feature-x ``` ### 5. Connect to a Remote Repository (GitHub) Create a repository on GitHub (without initializing it with a README), then link your local repository: Bash``` git remote add origin https://github.com/username/repository-name.git git branch -M main git push -u origin main ``` ``` git remote add origin https://github.com/username/repository-name.git git branch -M main git push -u origin main ``` ### 6. Clone a GitHub Repository To clone an existing repository: Bash``` git clone https://github.com/username/repository-name.git ``` ``` git clone https://github.com/username/repository-name.git ``` This command downloads all files and commit history. ### 7. Pull Changes To get the latest version of a project: Bash``` git pull origin main ``` ``` git pull origin main ``` This fetches new commits and merges them into your local branch. ### 8. Push Changes Once you’ve made commits, push them to the remote repository: Bash``` git push origin main ``` ``` git push origin main ``` For the first push, use: Bash``` git push -u origin main ``` ``` git push -u origin main ``` The -u flag sets the upstream, so future pushes can be done using just git push. ### 9. Ignore Files Create a .gitignore file to prevent tracking specific files Bash``` touch .gitignore echo "node_modules/" >> .gitignore ``` ``` touch .gitignore echo "node_modules/" >> .gitignore ``` Then commit as usual. ## Advanced Git Bash Usage **View Commit Differences** Bash``` git diff ``` ``` git diff ``` To compare staged and unstaged changes: Bash``` git diff --cached ``` ``` git diff --cached ``` **Stash Changes** Temporarily save your changes without committing: Bash``` git stash ``` ``` git stash ``` Reapply stashed changes later Bash``` git stash pop ``` ``` git stash pop ``` **Tagging Versions** Bash``` git tag v1.0 git push origin v1.0 ``` ``` git tag v1.0 git push origin v1.0 ``` ## Benefits of Using Git Bash - Brings Unix-like command-line capabilities to Windows. - Full Git command support. - Integrates with GitHub, Bitbucket, and other services. - Lightweight and efficient for version control. - Supports scripting, automation, and SSH integrations. If you’re looking to take your Git workflow to the next level, especially for deploying web applications, [**ServerAvatar**](https://serveravatar.com/) makes the process seamless. With built-in support for [**Git Deployment**](https://serveravatar.com/docs/application/git-deploy/getting-started/), you can connect your GitHub, GitLab, or BitBucket repository and automate deployments with just a few clicks. No need for manual file uploads or terminal commands, your updates go live effortlessly. Plus, with our latest feature, **Live Git Webhook Broadcast**, you can monitor your deployments in real-time. Watch every push as it happens with instant, play-by-play updates directly from your [ServerAvatar](https://serveravatar.com/) dashboard. It’s never been easier, or more exciting, to manage your deployments. ## Conclusion You should now be familiar with: - Installing Git Bash on Windows. - Navigating directories and running Git commands. - Creating repositories, committing changes, and linking to GitHub. - Using Git Bash for real-world development tasks. Git Bash bridges the gap between Windows and Linux-style development, enabling Windows users to enjoy the power of Git and Bash together. ## Stop Wasting Time on Servers. Start Building Instead. You didn’t start your project to babysit servers. Let **ServerAvatar** handle deployment, monitoring, and backups — so you can focus on growth. Deploy **WordPress, Laravel, N8N**, and more in minutes. No DevOps required. No command line. No stress. [ 🚀 Try Free ](https://app.serveravatar.com) [ 🌐 Learn More ](https://serveravatar.com/) Trusted by 10,000+ developers and growing. **Categories:** Blog, Linux, Tutorials, Ubuntu **Tags:** Developer tools, Git Bash, Git Bash guide, Git for Windows, Git tutorial, GitHub integration, Windows command line --- ### [PHP-FPM Process Types: ondemand vs dynamic vs static](https://serveravatar.com/php-fpm-process-ondemand-vs-dynamic-vs-static/) **Published:** August 7, 2025 **Author:** Meghna Meghwani **Content:** [![Blog banner - ServerAvatar](https://serveravatar.com/wp-content/uploads/2025/09/728_90-Banner-3-1024x127.png)](https://serveravatar.com?ref=blog)When it comes to optimizing PHP performance on your web server, **PHP-FPM (FastCGI Process Manager)** plays a vital role. But here’s where things get a bit technical—and often confusing **choosing the right Process Manager type**: ondemand, dynamic, or static. Think of PHP-FPM like a restaurant kitchen. The Process Manager type decides how many cooks (PHP workers) are working at any given time. Do you always keep cooks ready (static)? Call them only when needed (ondemand)? Or keep a few ready and call more as needed (dynamic)? Choosing the wrong setup can either waste your server’s resources or slow down your site during traffic spikes. In this article, we’ll walk you through everything you need to know—**step-by-step**, in **simple language**, with **examples** and tips—so you can make the **right decision** for your server. Whether you’re managing your own VPS, using platforms like **ServerAvatar**, or just want to understand what goes on under the hood, this guide is for you. ## What is PHP-FPM? **PHP-FPM (FastCGI Process Manager)** is an advanced PHP handler that improves performance and resource management. Instead of creating a new PHP process for every request (which is slow and inefficient), PHP-FPM keeps processes alive to handle requests faster. It’s like having staff on standby to serve food immediately, rather than hiring them every time someone orders. ## Why Does the Process Manager Type Matter? The **process manager type** decides **how many PHP processes** run on your server and **how they’re managed**. This affects: - **Performance under traffic** - **Memory usage** - **CPU consumption** - **Server cost (on cloud platforms)** Choosing the right type ensures your website is **fast**, **responsive**, and doesn’t **overload your server**. ## Overview of PHP-FPM Process Manager Types There are **three main types**: - **static** – Fixed number of PHP workers - **dynamic** – Automatically scales between min and max workers - **ondemand** – Spawns PHP workers only when needed Each type has different use-cases and benefits. Let’s look at them in detail. ## Static Process Manager Explained **Static** keeps a **fixed number** of PHP processes running at all times. **How it works:** - You define pm.max\_children - That exact number of PHP workers always stay active - No auto-scaling **Use Case:** Ideal for **dedicated servers** with **plenty of RAM** and **predictable traffic**. **Example:** INI``` pm = static pm.max_children = 10 ``` ``` pm = static pm.max_children = 10 ``` You’ll always have 10 PHP workers, even if only one user visits the site. **Pros:** - Predictable performance - No process creation delay **Cons:** - Wastes memory when traffic is low - Not ideal for shared servers ## Dynamic Process Manager Explained **Dynamic** is the default and most flexible option. **How it works:** You set: - pm.max\_children - pm.start\_servers - pm.min\_spare\_servers - pm.max\_spare\_servers - PHP workers scale between min and max values depending on traffic. **Example:** INI``` pm = dynamic pm.max_children = 20 pm.start_servers = 5 pm.min_spare_servers = 3 pm.max_spare_servers = 10 ``` ``` pm = dynamic pm.max_children = 20 pm.start_servers = 5 pm.min_spare_servers = 3 pm.max_spare_servers = 10 ``` **Use Case:** Perfect for **general-purpose servers**, **shared hosting**, and sites with **variable traffic**. **Pros:** - Efficient memory usage - Good performance under varying load **Cons:** - Slight overhead when scaling processes [![Blog banner - ServerAvatar](https://serveravatar.com/wp-content/uploads/2025/09/728_90-Banner-1-1024x127.png)](https://serveravatar.com?ref=blog)## Ondemand Process Manager Explained **Ondemand** spawns PHP processes only when needed, then kills them after a timeout. **How it works:** Set: - pm.max\_children - pm.process\_idle\_timeout - Processes are created on request and removed after being idle. **Example:** INI``` pm = ondemand pm.max_children = 20 pm.process_idle_timeout = 10s ``` ``` pm = ondemand pm.max_children = 20 pm.process_idle_timeout = 10s ``` **Use Case:** Best for **low-traffic** or **bursty** applications, like admin panels or APIs. **Pros:** - Minimal memory usage - Saves resources when idle **Cons:** - Slow on first request due to process creation - Not great for high concurrency ## Comparison: ondemand vs dynamic vs static FeatureStaticDynamicOndemandAlways active processes✅⚠️ (some)❌Memory-efficient❌✅✅Performance under load✅✅✅❌Best for low traffic❌✅✅Requires tuning❌✅✅✅✅**Analogy**: - Static is like keeping all lights on 24/7 - Dynamic is like motion-sensor lights - Ondemand is like turning on lights only when someone presses a switch ## Choosing the Right Type for Your Server Use this quick guide: - **Use static** for high-performance, dedicated environments - **Use dynamic** for most typical web servers - **Use ondemand** for low-traffic, admin panels, or APIs Ask yourself: - Does your site get consistent traffic? - Are you limited by memory? - Do you prioritize speed or efficiency? ## How to Check Current PHP-FPM Settings if you are using serverAvatar **What is ServerAvatar** **[ServerAvatar](https://serveravatar.com/ "ServerAvatar")** is a cloud management platform that lets you easily set up, manage, and monitor cloud servers for hosting websites and applications. It supports automatic server configuration, app deployment, SSL setup, backups, monitoring, and more — without needing complex terminal commands. It also now provides **cloud hosting and servers**, so you can both **host** and **manage** your projects from one place. ### **Steps:** **Log in** to your ServerAvatar Dashboard. Select your **server** from the server list. go to your application In the left menu ![Application Dashbaord-Serveravatar](https://serveravatar.com/wp-content/uploads/2025/08/screenshot-1-1024x352.webp) Click PHP Setting ![ondemand vs dynamic](https://serveravatar.com/wp-content/uploads/2025/08/php-setting-1024x487.png)Locate **Process Manager** and select your preferred type: To find out which Process Manager your server is using: ondemand dyanamic static Click Save Changes to apply settings. ServerAvatar will automatically reload PHP-FPM with your new configuration. **With Command Line:** **Step-by-Step:** SSH into your server Run: Bash``` grep -i pm /etc/php/*/fpm/pool.d/*.conf ``` ``` grep -i pm /etc/php/*/fpm/pool.d/*.conf ``` Look for pm =, pm.max\_children, etc. ## How to Change PHP-FPM Process Manager Type **Step-by-Step:** 1. Edit your PHP-FPM pool file (usually at /etc/php/8.1/fpm/pool.d/www.conf) 2. Change: INI``` pm = ondemand ``` ``` pm = ondemand ``` 3\. Adjust other settings like max\_children or process\_idle\_timeout 4\. Restart PHP-FPM: Bash``` sudo systemctl restart php8.1-fpm ``` ``` sudo systemctl restart php8.1-fpm ``` **Tip:** Always back up your config before making changes. ## Best Practices for PHP-FPM Configuration - **Monitor traffic** to understand load patterns - **Use dynamic** as a safe default - **Tweak settings** based on memory availability - Avoid setting pm.max\_children too high (can cause OOM errors) - Combine with tools like **NewRelic**, **htop**, or **ServerAvatar Monitoring** ## Common Pitfalls to Avoid - Using static on small VPS → High RAM usage - Setting ondemand without tuning process\_idle\_timeout → Performance lags - Forgetting to restart PHP-FPM after config changes ## Performance Tips and Monitoring Tools **Recommended Tools:** - ServerAvatar: Graph-based usage insights - top or htop: Real-time process monitoring - nginx access logs: Check request volume - PHP-FPM status page: Shows real-time worker usage ## Conclusion Choosing between **ondemand**, **dynamic**, and **static** isn’t just about toggling a setting—it’s about aligning your PHP server configuration with your **actual traffic needs** and **resource availability**. **Dynamic** is best for most users. **Static** suits high-performance needs. **Ondemand** is great for saving resources. With tools like **ServerAvatar**, managing and switching between these types becomes a breeze. Use this guide to make informed decisions and ensure your server runs smoothly, efficiently, and quickly. **Categories:** Blog, Guide, Php, Ubuntu **Tags:** PHP hosting tips., PHP tuning, PHP-FPM, PHP-FPM configuration, server optimization --- ### [How server location affects latency?](https://serveravatar.com/server-location-latency/) **Published:** August 7, 2025 **Author:** Meghna Meghwani **Content:** [![Blog banner - ServerAvatar](https://serveravatar.com/wp-content/uploads/2025/09/728_90-Banner-3-1024x127.png)](https://serveravatar.com?ref=blog)**Latency** plays a major role in how quickly a website loads. Have you ever clicked on a website and waited… and waited… and waited for it to appear? Frustrating, right? While many things can cause a slow-loading website, one of the biggest, and most overlooked, reasons is server location. Imagine ordering food from your neighborhood restaurant versus one across the country. Which one will arrive faster? The same reasoning applies to the data on your website. It takes longer the farther away the server is from the visitor. In this blog, we’ll go over all you need to know about how the location of a server affects latency. No complicated tech terms, just real, human-friendly information. ## What does latency mean? Latency is the amount of time it takes for data to go from a server to your device and back. Generally, it is measured in ms (milliseconds). The reaction time gets faster as the latency goes down. Let’s say you click on a website. That click sends a request to a server. The server responds by sending data back to your browser. The round-trip time is your **latency**. ## What Is Server Location? **Server location** refers to the physical place where your web server is hosted. It could be in Mumbai, New York, London, or anywhere else in the world. Just like you wouldn’t want your pizza to come from another country, you don’t want your server to be too far from your users. ## How Server Location Impacts Latency The farther away the server is from the user, the longer it takes for data to travel. This increases latency. **For example:** - A person in India who connects to a server in the U.S. might have a latency of 250ms. - The same user could have a latency of only 30 ms when connecting to a server in Mumbai. That is major difference in how fast loads website! ## Latency as a Delivery Route in Real Life Think about writing someone a letter: - **Nearby location:** The letter gets there the next day if it’s close by. - **Across the globe:** It could take a week. The same goes with latency. It takes time for information to get to you, as if route is longer. Your server is like the post office, and your website is like that letter. **To understand** how server location impacts latency, let me show you a quick comparison between two of the most visited websites in the world, **Google** and **Facebook**. By testing the latency to both websites, you can observe noticeable differences in response times. These differences are often influenced by the geographical location of their nearest data centers, network routing, and overall server infrastructure. This simple **comparison** helps highlight how physical distance and server optimization can affect the speed at which websites respond to user requests. ![latency](https://serveravatar.com/wp-content/uploads/2025/08/image-61-1024x486.png)As you can see in the above attached screenshot, the traceroute results show that Google’s servers responded slightly faster than Facebook’s, with lower latency and fewer hops overall. This indicates that Google’s network path is more optimized or geographically closer in this case. ## Why Websites Need to Be Fast Did you know that: - 53% of consumers would leave a site if it takes longer than three seconds to load. - Customers, trust, and confidence are lost when your websites gets slow. Latency has a direct impact on how fast a page loads. Even a well-designed site may feel slow if your server is far away. ## Server Location vs Hosting Type Not all hosting is created equal. - **Shared Hosting:** More than one website uses the same server. The location will be set. - **VPS (Virtual Private Server):** You have more control, such as where the server is located. - **Cloud Hosting:** Lets you choose the region of your server most of the time. **Pro Tip:** It’s easy to choose during which your server is located and manage it well with platforms like [ServerAvatar](https://serveravatar.com/). ## What DNS and Routing Do Your browser first asks the DNS (Domain Name System) where your website is before it communicates to a server. Sometimes, even if the server is nearby, slow DNS or bad routing can make things take longer. Another technique to lower latency is to improve DNS and routing pathways. [![Blog banner - ServerAvatar](https://serveravatar.com/wp-content/uploads/2025/09/728_90-Banner-1-1024x127.png)](https://serveravatar.com?ref=blog)## Impact on SEO and User Experience Google considers page speed as a ranking factor. If your server is too far from your users: - Your site loads slower. - Bounce rates go up. - Search rankings drop. Also, users tend to trust and stay longer on fast-loading websites. ## Server Location and Mobile Users Mobile users are everywhere, and often on slower networks. - High latency + mobile data = even worse experience. This makes it even more crucial for mobile-first websites or apps to have their servers in the right place. ## How to Pick the Best Server Location Think about - Where most of my traffic is coming from. - Am I trying to reach people in a certain country or area? - Do I use a platform that allows me choose where my servers are? It’s that easy: don’t host your server in the U.S. if your audience is in Europe. ## CDN (Content Delivery Network) to the Rescue A CDN is like having a lot of small servers all around the world. It keeps copies of your website in memory and sends them to the user from the closest location. CDNs lower latency, speed up connections, and increase uptime, especially for people all around the world. Some well-known CDNs are: - Cloudflare - Amazon CloudFront - Akamai ## Ways to Lower Latency Without Moving Your Server Can’t relocate your server? No issue. Here are some tips: - Use a CDN - Optimize images and files - Allow compression, such as GZIP - Use caching plugins or cache on the server side - Reduce third-party scripts These changes can make latency much reduced, even if your server is far away. ## Hosting in multiple regions and balancing the load Using multi-region hosting is another way to cut down on latency. This means putting your program on servers in multiple data centers around the world. **How it helps:** - Users can connect to nearest data center to them. - Makes failover happen faster if one server goes down. - Works well with load balancing to spread out traffic. This configuration is great for SaaS organizations, big web apps, and platforms that work all over the world. ## What ServerAvatar Does to Help with Performance With ServerAvatar, managing your server’s performance is simple. ServerAvatar makes server and application hosting and management easy and straightforward. You can directly create and deploy directly from ServerAvatar platform on DigitalOcean and Vultr platforms, and Linode, and Hetzner are coming soon, so no need for a cloud provider account - Choose the ideal server location with supported providers and create a server directly from ServerAvatar; no cloud provider account is needed. - Monitor latency and performance. Whether you’re tech-savvy or just starting out, **ServerAvatar** helps you to host and manage your servers and applications. ## Things You Should Know - Latency is the time it takes for data to get from one place to another. - The location of your server is important; the closer it is to users, the faster your site will be. - Use things like CDNs, clever DNS, and performance optimization. - Platforms like ServerAvatar make this process easier by letting you control where your server sits and how well it works. ## FAQs ### **1. How long should it take for a webpage to load?** Latency that is less than 100ms is usually good. The lower, the better. For high-performance websites, it should be less than 50ms. ### **2. After I set up my server, can I move it to a different location?** Yes, you may set up a new server in a different place and move your site there utilizing cloud providers and platforms like ServerAvatar. ### **3. Does server location affect only latency?** Primarily, yes. But it also impacts data privacy laws, SEO rankings, and user trust if your server is in a different country. ### **4. How can I find out how long it takes for my website to load?** You can use tools like: - Google PageSpeed Insights - GTMetrix - Pingdom They display latency, server response time, and other performance measures. ### **5. Is it better to use a CDN than to move your server?** Not all the time. CDNs are good for the whole world, but if most of your users are in one area, it’s better to choose a server that is close by. Your site should be like your favorite food delivery: quick, local, and delicious. You can provide your users the speed and experience they deserve by picking the proper server location and managing latency well. ## Conclusion The location of the server has a clear and irrefutable effect on latency, which in turn affects SEO, user experience, and conversions. Choosing the correct server location is the first step in optimizing performance, even though there are many other ways to do it. Always think about where your audience is when you manage a blog, an online store, or a complicated SaaS application. If you use clever server placement along with tools like CDNs, load balancers, and performance monitoring, you’ll be well on your way to giving people digital experiences that are lightning-fast. **ServerAvatar** is the best way to host and manage your servers without any trouble. It lets you easily deploy and manage your servers and optimize them. ## Stop Wasting Time on Servers. Start Building Instead. You didn’t start your project to babysit servers. Let **ServerAvatar** handle deployment, monitoring, and backups — so you can focus on growth. Deploy **WordPress, Laravel, N8N**, and more in minutes. No DevOps required. No command line. No stress. [ 🚀 Try Free ](https://app.serveravatar.com) [ 🌐 Learn More ](https://serveravatar.com/) Trusted by 10,000+ developers and growing. **Categories:** Blog, Guide, Ubuntu **Tags:** Cloud Hosting, latency, page load time, PHP Hosting, reduce latency, server location, Web Hosting Tips --- ### [What is Bandwidth in Cloud Hosting](https://serveravatar.com/bandwidth-in-cloud-hosting/) **Published:** August 8, 2025 **Author:** Meghna Meghwani **Content:** [![Blog banner - ServerAvatar](https://serveravatar.com/wp-content/uploads/2025/09/728_90-Banner-3-1024x127.png)](https://serveravatar.com?ref=blog)When you buy cloud hosting, one of the key terms you’ll encounter is **bandwidth**. In simple terms, bandwidth refers to the amount of data your website or application can transfer between your server and visitors within a specific time frame. Think of bandwidth like the width of a highway — the wider it is, the more cars (data) can pass through at once. In cloud hosting, having enough bandwidth ensures that your website loads quickly, handles more visitors, and delivers a smooth experience to users. Whether you run a small blog or a high-traffic eCommerce store, understanding bandwidth is crucial for choosing the right hosting plan and preventing performance bottlenecks. ## Why Bandwidth is Important for Cloud Hosting Performance Bandwidth impacts **speed**, **reliability**, and **user experience**. If your website has limited bandwidth and receives more traffic than it can handle, users might experience slow load times or even downtime. ![Bandwidth-ServerAvatar](https://serveravatar.com/wp-content/uploads/2025/08/Bandwidth.png)Here’s why bandwidth matters in cloud hosting: - **Handles Traffic Spikes** – High bandwidth ensures your site stays online even during sudden traffic surges. - **Improves Load Times** – Faster data transfer means your website loads quickly for users worldwide. - **Supports Large Files** – If you host videos, images, or downloadable files, you’ll need more bandwidth to deliver them efficiently. ## How Bandwidth Works in Cloud Hosting Bandwidth determines the rate at which data moves between your cloud server and the internet. **Data Transfer vs Bandwidth – Key Differences** - **Bandwidth** = The capacity of data transfer (speed limit). - **Data Transfer** = The total amount of data sent/received in a period. Example: A road can handle 100 cars per minute (bandwidth), but if you only send 1,000 cars in a day (data transfer), you’re not using its full potential. **Understanding Inbound and Outbound Bandwidth** - **Inbound**: Data coming to your server (e.g., uploads, requests). - **Outbound**: Data sent from your server to users (downloads, page loads). ## How Bandwidth is Measured **Mbps vs GB – The Technical Units Explained** - **Mbps (Megabits per second)**: Measures speed. - **GB (Gigabytes)**: Measures data amount over time. **Monthly Bandwidth Limits in Cloud Hosting** Hosting providers may offer: - **Metered Bandwidth** – You pay for what you use. - **Unmetered Bandwidth** – No strict data cap, but speed may be limited. ## Factors Affecting Bandwidth in Cloud Hosting **Number of Visitors and Website Traffic** More visitors = more data transfer needed. **Content Type and File Sizes** Video-heavy websites need more bandwidth than text-based blogs. **Server Location and Network Infrastructure** Closer server locations to your audience reduce bandwidth strain. ## How to Calculate the Bandwidth You Need **Step-by-Step Bandwidth Calculation Example:** 1. Average page size = 3MB 2. Average monthly visitors = 50,000 3. Average page views per visitor = 3 Bandwidth needed = **3MB × 50,000 × 3 = 450,000MB (~439GB)** ## How to Monitor Bandwidth Usage **Using ServerAvatar to Track Bandwidth in Real-Time** ServerAvatar offers real-time bandwidth monitoring for cloud servers. You can: - Check inbound/outbound traffic. - View historical usage trends. - Set alerts for unusual spikes. **Third-Party Tools for Bandwidth Monitoring** Tools like **Netdata**, **Nagios**, or **PRTG Network Monitor** can help. [![Blog banner - ServerAvatar](https://serveravatar.com/wp-content/uploads/2025/09/728_90-Banner-1-1024x127.png)](https://serveravatar.com?ref=blog)## How to Optimize Bandwidth in Cloud Hosting **Compress Images and Media Files** Use tools like TinyPNG or WebP format. **Use a Content Delivery Network (CDN)** CDNs like Cloudflare cache your content and reduce bandwidth usage. **Enable Caching for Faster Performance** Browser and server-side caching speed up delivery. ## Bandwidth in Different Cloud Hosting Types **Shared Cloud Hosting** Limited bandwidth shared among users. **VPS and Dedicated Cloud Servers** Higher, dedicated bandwidth allocation. **Managed Cloud Hosting with ServerAvatar** Optimized for high performance with flexible bandwidth options. ![Cloud Hosting Type-ServerAvatar](https://serveravatar.com/wp-content/uploads/2025/08/bandwidth_comparison_graphic-1-1024x575.jpg)**Common Myths About Bandwidth in Cloud Hosting** - “Unlimited bandwidth” is truly unlimited — (It’s not; it often has fair usage limits). - More bandwidth always means faster performance — (Other factors like latency matter too). **Best Practices for Managing Bandwidth Effectively** - Monitor usage regularly. - Optimize media files. - Use caching and CDNs. - Choose the right hosting provider with scalable options. ## FAQs ### **Q1: What happens if I exceed my bandwidth limit?** Your site may slow down, incur extra charges, or be temporarily suspended. ### **Is unmetered bandwidth better than metered?** It depends on your needs; unmetered avoids overage fees but may have speed caps. ### **Can ServerAvatar help reduce bandwidth usage?** Yes, by optimizing server configurations, enabling caching, and monitoring usage. ### **Does a CDN replace the need for high bandwidth?** No, but it reduces your server’s bandwidth load. ### **How often should I check my bandwidth usage?** At least weekly, or daily for high-traffic sites. ## Conclusion Bandwidth is the **data highway** of cloud hosting — the more you have, the smoother the traffic flows. By calculating your needs, monitoring usage, and optimizing delivery, you can ensure consistent performance for your users. Whether you manage your own cloud server or use a managed platform like **ServerAvatar**, understanding bandwidth helps you make better hosting decisions. ## Stop Wasting Time on Servers. Start Building Instead. You didn’t start your project to babysit servers. Let **ServerAvatar** handle deployment, monitoring, and backups — so you can focus on growth. Deploy **WordPress, Laravel, N8N**, and more in minutes. No DevOps required. No command line. No stress. [ 🚀 Try Free ](https://app.serveravatar.com) [ 🌐 Learn More ](https://serveravatar.com/) Trusted by 10,000+ developers and growing. **Categories:** Blog, Guide **Tags:** Bandwidth in cloud hosting, Bandwidth vs speed, Cloud hosting bandwidth, Cloud hosting guide, PHP Hosting, Web hosting performance --- ### [How to Use cURL Basic Auth in Laravel: Simple Guide for Developers](https://serveravatar.com/curl-basic-auth-laravel-guide/) **Published:** August 9, 2025 **Author:** Suresh Ramani **Content:** [![Blog banner - ServerAvatar](https://serveravatar.com/wp-content/uploads/2025/09/728_90-Banner-3-1024x127.png)](https://serveravatar.com?ref=blog)## **Introduction** Ever wondered how websites make sure only trusted users can access sensitive information? Imagine handing a secret note to a friend, but first showing a badge only your circle has. In the world of web development, **cURL Basic Auth** is that badge – it proves who you are when your Laravel app “talks” to other services. The good news? Setting up cURL Basic Auth with Laravel is simpler than you might think. Whether you’re new to web development or just want a refresher, let’s break down the process so it feels like passing notes in class: simple and secure. ## **What Is cURL?** Think of **cURL** as an internet messenger. Want your Laravel app to ask for data, like the weather, from another website? cURL sends that request and brings the response back. Even though cURL is a command-line tool, Laravel tucks it conveniently into your PHP code, so you can use it right in your code editor. ## **Why Use Basic Auth with cURL?** Ever visited a members-only club? You show your membership card before stepping in. Similarly, websites often hide their data behind “locked doors.” **Basic Auth** is the bouncer – it checks your credentials before letting you access protected information. When paired with **cURL**, you easily prove your identity to other services every time you knock on their door. ## **Understanding Basic Auth in Simple Terms** **Basic Auth** is just a way of saying, “I am who I say I am.” Every time your Laravel app makes a request, it includes a special header packed with your username and password, but encoded so the message isn’t in plain sight. *Analogy:* Picture a diary with a simple lock – if you know the combination, you can read or write in it. **Basic Auth** is that combination for web requests. - *Credentials (username:password)* are combined and Base64-encoded. - This combo is sent in the request headers. - The server decodes this to verify if you get access. > For more on HTTP authentication basics, check out the [MDN Web Docs on HTTP Authentication](https://developer.mozilla.org/en-US/docs/Web/HTTP/Authentication). ## **Setting Up Laravel for cURL Requests** Before you jump in, ensure your Laravel project and server environment support cURL. 1. **Install Laravel** (if you haven’t already): Bash``` composer create-project --prefer-dist laravel/laravel curlBasicAuthDemo ``` ``` composer create-project --prefer-dist laravel/laravel curlBasicAuthDemo ``` 2. **Check for cURL Extension:** Bash``` php -m | grep curl ``` ``` php -m | grep curl ``` If the word “curl” appears, you’re ready to go! Laravel 7.x and onward includes a built-in **HTTP client** that leverages cURL behind the scenes. ## **Making Your First cURL Request in Laravel** Laravel’s HTTP client makes working with cURL a breeze. Here’s a simple example: PHP``` use Illuminate\Support\Facades\Http; $response = Http::get('https://api.example.com/data'); $data = $response->json(); ``` ``` use Illuminate\Support\Facades\Http; $response = Http::get('https://api.example.com/data'); $data = $response->json(); ``` You just fetched data from another website, no command line needed! *Want to learn more about HTTP client options? Visit the [Laravel HTTP Client documentation](https://laravel.com/docs/10.x/http-client).* ## **Adding Basic Auth to Your cURL Requests** Here’s where the magic happens – **add authentication with just one extra method**: PHP``` $response = Http::withBasicAuth('your_username', 'your_password') ->get('https://api.example.com/secure-data'); ``` ``` $response = Http::withBasicAuth('your_username', 'your_password') ->get('https://api.example.com/secure-data'); ``` Laravel automatically adds your credentials in the right format, so the other server recognizes you right away. ## **Protecting Your Credentials with Config** Never put your sensitive usernames and passwords directly into your code. It’s like leaving your house keys under the doormat. Instead, let’s follow the Laravel best practice and use configuration files: ### 1. **Set Credentials in .env** Add these lines to your `.env` file: Plaintext``` BASIC_AUTH_USER=myUsername BASIC_AUTH_PASS=myPassword ``` ``` BASIC_AUTH_USER=myUsername BASIC_AUTH_PASS=myPassword ``` ### 2. **Expose Them in a Config File** Edit `config/services.php` (or create a new file like `config/curl.php` for clarity): PHP``` // config/services.php 'curl_basic_auth' => [ 'username' => env('BASIC_AUTH_USER'), 'password' => env('BASIC_AUTH_PASS'), ], ``` ``` // config/services.php 'curl_basic_auth' => [ 'username' => env('BASIC_AUTH_USER'), 'password' => env('BASIC_AUTH_PASS'), ], ``` ### 3. **Access Credentials Using config()** Now, always reach for your credentials using the `config()` helper, which taps into Laravel’s configuration cache: PHP``` $response = Http::withBasicAuth( config('services.curl_basic_auth.username'), config('services.curl_basic_auth.password') )->get('https://api.example.com/secure'); ``` ``` $response = Http::withBasicAuth( config('services.curl_basic_auth.username'), config('services.curl_basic_auth.password') )->get('https://api.example.com/secure'); ``` **Key Point:** By using `config()`, your app remains flexible, secure, and deployment-ready – even when environments change. > For Laravel-specific deployment on servers, see: [Deploy Laravel on VM, VPS or Dedicated Server](https://serveravatar.com/deployments/applications/laravel) ## **Practical Example: Fetching Data Securely** Let’s put all these concepts into practice. Imagine fetching weather data from a protected API: PHP``` public function fetchWeather() { $response = Http::withBasicAuth( config('services.curl_basic_auth.username'), config('services.curl_basic_auth.password') )->get('https://weatherapi.com/secure-weather'); if ($response->successful()) { return $response->json(); } else { return response()->json(['error' => 'Unable to fetch weather data'], 401); } } ``` ``` public function fetchWeather() { $response = Http::withBasicAuth( config('services.curl_basic_auth.username'), config('services.curl_basic_auth.password') )->get('https://weatherapi.com/secure-weather'); if ($response->successful()) { return $response->json(); } else { return response()->json(['error' => 'Unable to fetch weather data'], 401); } } ``` With a few lines of code, your Laravel app safely and reliably retrieves secured information! ## **Error Handling & Debugging Tips** Even well-crafted requests can hiccup. Want to catch issues before they grow? Here’s how: - **Check for Success:** PHP``` if ($response->successful()) { // Process the data } else { // Handle the error gracefully } ``` ``` if ($response->successful()) { // Process the data } else { // Handle the error gracefully } ``` - **Log Problems for Troubleshooting:** PHP``` Log::error('API request failed', ['response' => $response->body()]); ``` ``` Log::error('API request failed', ['response' => $response->body()]); ``` - **Monitor HTTP Status Codes:** Always be alert to responses like `401 Unauthorized`. It might mean your credentials are missing or incorrect. ## **When Should You Use Basic Auth?** - **Great for internal tools:** If you need quick and easy security for your APIs used within a trusted team, Basic Auth is hard to beat. - **Testing and prototyping:** Secure endpoints rapidly without building a full OAuth system. - **Short-term solutions:** Useful for early development or limited-use projects. ## **Alternatives to Basic Auth** Sometimes, you need a sturdier lock: - **OAuth:** More secure, often required for large or public applications – think of it as a bank vault. ([Read more about OAuth 2.0](https://oauth.net/2/)) - **Token Auth:** Each user gets a unique key known only to themselves and the server. - **API Keys:** Unique, shareable keys that declare which app is talking to the server. Choose the method that fits your project’s size and security needs. [![Blog banner - ServerAvatar](https://serveravatar.com/wp-content/uploads/2025/09/728_90-Banner-1-1024x127.png)](https://serveravatar.com?ref=blog)## **Testing Your cURL Basic Auth Requests** Don’t just assume it works – test it! - **Postman:** Use the Basic Auth setting, enter your credentials, and call the endpoint. - **Logs:** Inspect Laravel logs for error messages after making requests. - **Automated Feature Tests:** Write automated tests so you’re always sure your integration works. Testing means peace of mind before going live. ## **Real-World Scenarios** - **Business integrations:** Many partner services use Basic Auth for fast, authenticated connections. - **Scheduled scripts:** Automate repetitive data fetching or posting jobs, securely. - **Mobile or internal web apps:** Securely connect backends without heavy authentication frameworks. ## **Common Mistakes & How to Fix Them** - **Wrong credentials:** Double-check your `.env` file and make sure your configuration is updated. - **Using HTTP (not HTTPS):** Basic Auth credentials travel encoded, not encrypted – never send them over insecure channels. - **Ignoring errors:** Always verify the API response and log or handle errors gracefully. A little diligence now saves big headaches later. ## **Conclusion** Learning to use **cURL Basic Auth in Laravel** is like mastering a simple lock for securing your digital conversations. Once you get the hang of it, you can confidently access protected data, automate tasks, and build safer integrations. Just remember to shield your credentials using Laravel’s config system and always test your code before releasing it into the wild. As your development skills grow, you’ll quickly know when to use this solution and when it’s time to upgrade to even tighter security. ## **FAQs** ### **What is cURL Basic Auth and how does it work in Laravel?** cURL Basic Auth verifies your app’s identity to protected APIs by including your username and password in each HTTP request header, seamlessly managed in Laravel with `withBasicAuth`. ### **How should I store and access credentials for Basic Auth in Laravel?** Store sensitive data in your `.env` file, expose them in config files like `config/services.php`, and access them using the `config()` helper for best security and flexibility. ### **Is it safe to use Basic Auth for public APIs?** It’s best suited for internal or testing environments. For public-facing or sensitive projects, consider stronger authentication methods like OAuth or API tokens. ### **How do I debug failed Basic Auth requests in Laravel?** Check for `401 Unauthorized` errors, verify your credentials, ensure you’re using HTTPS, and log errors for deeper inspection. ### **Can I automate testing of Basic Auth-protected endpoints?** Yes! Use tools like Postman for manual tests and Laravel’s feature tests for automation. Regular testing ensures integrations stay secure and reliable after updates. ## Stop Wasting Time on Servers. Start Building Instead. You didn’t start your project to babysit servers. Let **ServerAvatar** handle deployment, monitoring, and backups — so you can focus on growth. Deploy **WordPress, Laravel, N8N**, and more in minutes. No DevOps required. No command line. No stress. [ 🚀 Try Free ](https://app.serveravatar.com) [ 🌐 Learn More ](https://serveravatar.com/) Trusted by 10,000+ developers and growing. **Categories:** Blog, Guide, Laravel **Tags:** API Authentication, cURL Basic Auth, Laravel Authentication, Laravel Guide, Laravel Security, Laravel Tips, Laravel Tutorial, PHP cURL, PHP Security --- ### [How to Block WordPress Spam Bots with Fail2Ban Limit](https://serveravatar.com/wordpress-spam-bots-fail2ban/) **Published:** August 9, 2025 **Author:** Meghna Meghwani **Content:** [![Blog banner - ServerAvatar](https://serveravatar.com/wp-content/uploads/2025/09/728_90-Banner-3-1024x127.png)](https://serveravatar.com?ref=blog)WordPress spam bots are automated programs that flood your website with unwanted comments, fake registrations, and malicious login attempts. These pesky visitors can slow down your site, fill your database with junk, and even compromise your security. If you’re tired of dealing with hundreds of spam comments daily, Fail2Ban is your answer. Fail2Ban is a powerful security tool that monitors your server logs and automatically blocks IP addresses that show suspicious behavior. Think of it as a bouncer for your website – it keeps the troublemakers out while letting genuine visitors in. ## What Are WordPress Spam Bots? Before we dive into the solution, let’s understand what we’re fighting against. WordPress spam bots are automated scripts that: - Post irrelevant comments with suspicious links - Try to register fake user accounts - Attempt brute force attacks on your login page - Submit contact forms with promotional content - Crawl your site excessively, slowing it down **Example:** You might see comments like “Great post! Check out my website about cheap electronics” on a blog about cooking recipes. That’s a spam bot at work. ## Why Choose Fail2Ban Over Other Methods? Many WordPress users rely on plugins like [Akismet](https://akismet.com/) or [Wordfence](https://www.wordfence.com/), and while these are good, Fail2Ban works at the server level. This means: - **Faster blocking:** Spam bots get blocked before they even reach WordPress - **Lower server load:** Less processing power wasted on spam requests - **Comprehensive protection:** Guards against all types of attacks, not just WordPress-specific ones - **No plugin conflicts:** Works independently of your WordPress setup ## Prerequisites Before we start, make sure you have: - A VPS or dedicated server (shared hosting won’t work) - Root or sudo access to your server - Basic command line knowledge - WordPress access logs enabled ## With Using ServerAvatar:- **What is ServerAvatar** [**ServerAvatar**](https://serveravatar.com/) is a powerful cloud server management panel that simplifies server and website management. It allows you to easily host PHP applications like WordPress, Laravel, and more on your VPS or cloud server, with or without technical skills. ServerAvatar’s **Fail2Ban** feature helps protect your server from brute-force attacks and malicious login attempts. It works by monitoring server logs for suspicious activity—such as repeated failed login attempts—and automatically blocking the attacker’s IP address for a set period, reducing the risk of unauthorized access. **Connect to Your Server** Go to your ServerAvatar Dashboard Open your server → Click on your application ![Application Panel-ServerAvatar](https://serveravatar.com/wp-content/uploads/2025/08/image-2025-08-08T151945.612-1024x403.png)Navigate to Fail2Ban and click on it. ![WordPress Spam Bots](https://serveravatar.com/wp-content/uploads/2025/08/image-2025-08-08T152006.813-1024x518.png)Add Code Bash``` [wordpress-spam] enabled = true port = http,https filter = wordpress-spam logpath = /var/log/nginx/access.log # For Apache users, change to: /var/log/apache2/access.log maxretry = 5 bantime = 3600 findtime = 300 [wordpress-bruteforce] enabled = true port = http,https filter = wordpress-spam logpath = /var/log/nginx/access.log maxretry = 3 bantime = 86400 findtime = 600 ``` ``` [wordpress-spam] enabled = true port = http,https filter = wordpress-spam logpath = /var/log/nginx/access.log # For Apache users, change to: /var/log/apache2/access.log maxretry = 5 bantime = 3600 findtime = 300 [wordpress-bruteforce] enabled = true port = http,https filter = wordpress-spam logpath = /var/log/nginx/access.log maxretry = 3 bantime = 86400 findtime = 600 ``` **Configuration explained:** - **maxretry:** Number of attempts before banning (5 for spam, 3 for brute force) - **bantime:** How long to ban in seconds (3600 = 1 hour, 86400 = 24 hours) - **findtime:** Time window to count attempts (300 = 5 minutes) **Example scenario:** If an IP makes 5 comment attempts within 5 minutes, it gets banned for 1 hour. ## Step 1: Installing Fail2Ban Bash``` sudo apt update sudo apt install fail2ban ``` ``` sudo apt update sudo apt install fail2ban ``` **On CentOS/RHEL:** Bash``` sudo yum install epel-release sudo yum install fail2ban ``` ``` sudo yum install epel-release sudo yum install fail2ban ``` **On Rocky Linux/AlmaLinux:** Bash``` sudo dnf install epel-release sudo dnf install fail2ban ``` ``` sudo dnf install epel-release sudo dnf install fail2ban ``` After installation, start and enable Fail2Ban: Bash``` sudo systemctl start fail2ban sudo systemctl enable fail2ban ``` ``` sudo systemctl start fail2ban sudo systemctl enable fail2ban ``` ## Step 2: Understanding WordPress Log Files WordPress generates different types of logs that Fail2Ban can monitor: - **Access logs:** Show all requests to your site (usually in /var/log/nginx/access.log or /var/log/apache2/access.log) - **Error logs:** Record PHP errors and failed requests - **WordPress debug logs:** If WP\_DEBUG is enabled **Example of a spam bot in access logs:** Bash``` 192.168.1.100 - - [28/Jul/2025:10:15:23] "POST /wp-comments-post.php HTTP/1.1" 200 1234 192.168.1.100 - - [28/Jul/2025:10:15:24] "POST /wp-comments-post.php HTTP/1.1" 200 1234 192.168.1.100 - - [28/Jul/2025:10:15:25] "POST /wp-comments-post.php HTTP/1.1" 200 1234 ``` ``` 192.168.1.100 - - [28/Jul/2025:10:15:23] "POST /wp-comments-post.php HTTP/1.1" 200 1234 192.168.1.100 - - [28/Jul/2025:10:15:24] "POST /wp-comments-post.php HTTP/1.1" 200 1234 192.168.1.100 - - [28/Jul/2025:10:15:25] "POST /wp-comments-post.php HTTP/1.1" 200 1234 ``` Notice the same IP making rapid, repeated requests to the comment posting script. ## Step 3: Creating WordPress-Specific Fail2Ban Filters Now comes the important part – teaching Fail2Ban to recognize WordPress spam patterns. Create a new filter file: Bash``` sudo nano /etc/fail2ban/filter.d/wordpress-spam.conf ``` ``` sudo nano /etc/fail2ban/filter.d/wordpress-spam.conf ``` Add this content: Bash``` [Definition] # Block IPs that make too many comment attempts failregex = ^ .* "POST .*wp-comments-post\.php.*" .*$ ^ .* "POST .*wp-login\.php.*" .*$ ^ .* "GET .*wp-admin.*" 401 .*$ ^ .* "POST .*xmlrpc\.php.*" .*$ # Ignore legitimate traffic ignoreregex = ``` ``` [Definition] # Block IPs that make too many comment attempts failregex = ^ .* "POST .*wp-comments-post\.php.*" .*$ ^ .* "POST .*wp-login\.php.*" .*$ ^ .* "GET .*wp-admin.*" 401 .*$ ^ .* "POST .*xmlrpc\.php.*" .*$ # Ignore legitimate traffic ignoreregex = ``` **What this filter does:** - Monitors POST requests to wp-comments-post.php (comment submissions) - Watches for failed login attempts to wp-login.php - Catches unauthorized wp-admin access attempts - Blocks xmlrpc.php abuse (often used by bots) ## Step 4: Configuring the WordPress Jail Create a jail configuration: Bash``` sudo nano /etc/fail2ban/jail.d/wordpress.conf ``` ``` sudo nano /etc/fail2ban/jail.d/wordpress.conf ``` Add this configuration: Bash``` [wordpress-spam] enabled = true port = http,https filter = wordpress-spam logpath = /var/log/nginx/access.log # For Apache users, change to: /var/log/apache2/access.log maxretry = 5 bantime = 3600 findtime = 300 [wordpress-bruteforce] enabled = true port = http,https filter = wordpress-spam logpath = /var/log/nginx/access.log maxretry = 3 bantime = 86400 findtime = 600 ``` ``` [wordpress-spam] enabled = true port = http,https filter = wordpress-spam logpath = /var/log/nginx/access.log # For Apache users, change to: /var/log/apache2/access.log maxretry = 5 bantime = 3600 findtime = 300 [wordpress-bruteforce] enabled = true port = http,https filter = wordpress-spam logpath = /var/log/nginx/access.log maxretry = 3 bantime = 86400 findtime = 600 ``` ## Step 5: Testing Your Configuration Before going live, test your setup: **Check if Fail2Ban is running:** Bash``` sudo fail2ban-client status ``` ``` sudo fail2ban-client status ``` **Test the WordPress filter:** Bash``` sudo fail2ban-regex /var/log/nginx/access.log /etc/fail2ban/filter.d/wordpress-spam.conf ``` ``` sudo fail2ban-regex /var/log/nginx/access.log /etc/fail2ban/filter.d/wordpress-spam.conf ``` **View active jails:** Bash``` sudo fail2ban-client status wordpress-spam ``` ``` sudo fail2ban-client status wordpress-spam ``` **Example output:** Bash``` Status for the jail: wordpress-spam |- Filter | |- Currently failed: 2 | |- Total failed: 15 | `- File list: /var/log/nginx/access.log `- Actions |- Currently banned: 3 |- Total banned: 8 `- Banned IP list: 192.168.1.100 10.0.0.50 203.45.67.89 ``` ``` Status for the jail: wordpress-spam |- Filter | |- Currently failed: 2 | |- Total failed: 15 | `- File list: /var/log/nginx/access.log `- Actions |- Currently banned: 3 |- Total banned: 8 `- Banned IP list: 192.168.1.100 10.0.0.50 203.45.67.89 ``` [![Blog banner - ServerAvatar](https://serveravatar.com/wp-content/uploads/2025/09/728_90-Banner-1-1024x127.png)](https://serveravatar.com?ref=blog)## Step 6: Advanced Configuration Options **Custom Ban Actions** You can configure different actions when bots are detected: Bash``` [wordpress-spam] enabled = true filter = wordpress-spam action = iptables-multiport[name=wordpress, port="http,https"] sendmail[name=wordpress, dest=your-email@domain.com] ``` ``` [wordpress-spam] enabled = true filter = wordpress-spam action = iptables-multiport[name=wordpress, port="http,https"] sendmail[name=wordpress, dest=your-email@domain.com] ``` **This setup will:** - Block the IP using iptables - Send you an email notification **Whitelist Important IPs** Prevent accidentally banning yourself: Bash``` sudo nano /etc/fail2ban/jail.local ``` ``` sudo nano /etc/fail2ban/jail.local ``` Add: Bash``` [DEFAULT] ignoreip = 127.0.0.1/8 192.168.1.0/24 your-office-ip ``` ``` [DEFAULT] ignoreip = 127.0.0.1/8 192.168.1.0/24 your-office-ip ``` **Example:** If your office IP is 203.45.67.89, add it to prevent lockouts during testing. **Geographic Blocking** Block entire countries known for spam: Bash``` [wordpress-geoblock] enabled = true filter = wordpress-spam action = iptables-multiport[name=wordpress-geo, port="http,https"] geoip-block[countries="CN RU"] ``` ``` [wordpress-geoblock] enabled = true filter = wordpress-spam action = iptables-multiport[name=wordpress-geo, port="http,https"] geoip-block[countries="CN RU"] ``` ## Step 7: Monitoring and Maintenance **Check Banned IPs Regularly** Bash``` sudo fail2ban-client status wordpress-spam ``` ``` sudo fail2ban-client status wordpress-spam ``` **Unban an IP if Needed** Bash``` sudo fail2ban-client set wordpress-spam unbanip 192.168.1.100 ``` ``` sudo fail2ban-client set wordpress-spam unbanip 192.168.1.100 ``` **View Recent Bans** Bash``` sudo tail -f /var/log/fail2ban.log ``` ``` sudo tail -f /var/log/fail2ban.log ``` **Example log entry:** Bash``` 2025-07-28 10:30:15,123 fail2ban.actions: WARNING [wordpress-spam] Ban 192.168.1.100 ``` ``` 2025-07-28 10:30:15,123 fail2ban.actions: WARNING [wordpress-spam] Ban 192.168.1.100 ``` **Log Rotation** Ensure your logs don’t fill up disk space: Bash``` sudo logrotate -f /etc/logrotate.d/fail2ban ``` ``` sudo logrotate -f /etc/logrotate.d/fail2ban ``` ## Real-World Examples and Case Studies ### Example 1: Comment Spam Attack **Scenario:** A spam bot hits your blog with 50 comments in 2 minutes. **What happens:** 1. Fail2Ban detects multiple POST requests to wp-comments-post.php 2. After 5 attempts in 5 minutes, the IP gets banned 3. The bot can’t post more comments for the next hour 4. Your database stays clean, and legitimate users aren’t affected ### Example 2: Brute Force Login Attack **Scenario:** Someone tries to guess your admin password. **Log entries you might see:** Bash``` 203.45.67.89 - - [28/Jul/2025:11:45:10] "POST /wp-login.php HTTP/1.1" 200 1234 203.45.67.89 - - [28/Jul/2025:11:45:12] "POST /wp-login.php HTTP/1.1" 200 1234 203.45.67.89 - - [28/Jul/2025:11:45:14] "POST /wp-login.php HTTP/1.1" 200 1234 ``` ``` 203.45.67.89 - - [28/Jul/2025:11:45:10] "POST /wp-login.php HTTP/1.1" 200 1234 203.45.67.89 - - [28/Jul/2025:11:45:12] "POST /wp-login.php HTTP/1.1" 200 1234 203.45.67.89 - - [28/Jul/2025:11:45:14] "POST /wp-login.php HTTP/1.1" 200 1234 ``` **Fail2Ban response:** - Detects pattern after 3 failed attempts - Bans the IP for 24 hours - Prevents further login attempts ## Troubleshooting Common Issues ### Issue 1: Fail2Ban Not Starting **Problem:** Service fails to start after configuration. **Solution:** Bash``` # Check configuration syntax sudo fail2ban-client -t # View error logs sudo journalctl -u fail2ban -f ``` ``` # Check configuration syntax sudo fail2ban-client -t # View error logs sudo journalctl -u fail2ban -f ``` ### Issue 2: Legitimate Users Getting Banned **Problem:** Real visitors are blocked accidentally. **Solutions:** - Increase maxretry values - Add their IPs to ignoreip list - Adjust findtime settings **Example fix:** Bash``` maxretry = 8 # Instead of 5 findtime = 600 # 10 minutes instead of 5 ``` ``` maxretry = 8 # Instead of 5 findtime = 600 # 10 minutes instead of 5 ``` ### Issue 3: ServerAvatar-Specific Issues **Problem:** Jails not working in ServerAvatar environment. **Solutions:** - Check if logs are in the correct location - Verify ServerAvatar hasn’t overridden your settings - Use ServerAvatar’s built-in templates instead of custom ones ### Issue 4: High False Positive Rate **Problem:** Too many legitimate users getting banned. **Solution – Refined filter:** Bash``` [Definition] # More specific patterns to reduce false positives failregex = ^ .* "POST .*wp-comments-post\.php.*" 200 .*$ ^ .* "POST .*wp-login\.php.*" (?:200|302) .*$ ignoreregex = ^ .* "POST .*wp-comments-post\.php.*" 200 .* ".*legitimate-user-agent.*"$ ``` ``` [Definition] # More specific patterns to reduce false positives failregex = ^ .* "POST .*wp-comments-post\.php.*" 200 .*$ ^ .* "POST .*wp-login\.php.*" (?:200|302) .*$ ignoreregex = ^ .* "POST .*wp-comments-post\.php.*" 200 .* ".*legitimate-user-agent.*"$ ``` **Performance Optimization Tip** **Reduce Log Size** Large log files can slow down Fail2Ban: Bash``` # Compress old logs sudo gzip /var/log/nginx/access.log.1 # Set up automatic compression sudo nano /etc/logrotate.d/nginx ``` ``` # Compress old logs sudo gzip /var/log/nginx/access.log.1 # Set up automatic compression sudo nano /etc/logrotate.d/nginx ``` **Use Efficient Regex** Optimize your filters for better performance: Bash``` # Faster regex (more specific) failregex = ^ [^"]* "POST /wp-comments-post\.php # Instead of: ^ .* "POST .*wp-comments-post\.php.* ``` ``` # Faster regex (more specific) failregex = ^ [^"]* "POST /wp-comments-post\.php # Instead of: ^ .* "POST .*wp-comments-post\.php.* ``` ## Security Best Practices **Layer Your Defense** Don’t rely on Fail2Ban alone: 1. **Use strong passwords** for WordPress admin 2. **Enable two-factor authentication** 3. **Keep WordPress updated** 4. **Install security plugins** like Wordfence as backup 5. **Hide wp-admin** from unauthorized access **Regular Maintenance Schedule** - **Weekly:** Check banned IP lists - **Monthly:** Review and update filter patterns - **Quarterly:** Analyze attack trends and adjust settings **Backup Your Configuration** Bash``` # Create backup sudo cp -r /etc/fail2ban /home/backup/fail2ban-backup # Restore if needed sudo cp -r /home/backup/fail2ban-backup/* /etc/fail2ban/ ``` ``` # Create backup sudo cp -r /etc/fail2ban /home/backup/fail2ban-backup # Restore if needed sudo cp -r /home/backup/fail2ban-backup/* /etc/fail2ban/ ``` ## FAQ ### What is Fail2Ban? Fail2Ban is a server-level security tool that blocks IPs showing suspicious activity, such as spam or brute-force attacks. ### Why use Fail2Ban for WordPress? It blocks spam bots before they reach WordPress, reducing server load and improving security. ### Can I use Fail2Ban on shared hosting? No. You need VPS or dedicated hosting with root/sudo access. ### Does ServerAvatar support Fail2Ban? Yes. ServerAvatar offers a built-in Fail2Ban feature for easy configuration. ### How does Fail2Ban detect spam bots? It monitors server logs for suspicious patterns like repeated comment posts, failed logins, or xmlrpc abuse. ## Conclusion Setting up Fail2Ban to block WordPress spam bots is one of the most effective ways to protect your website. Whether you choose the manual configuration method or use ServerAvatar’s simplified approach, you’ll see immediate results in reduced spam and improved site performance. Remember these key points: - Start with conservative settings and adjust based on your site’s traffic - Monitor the system regularly to prevent false positives - Keep your filters updated as spam techniques evolve - Use Fail2Ban as part of a comprehensive security strategy The time invested in setting up Fail2Ban properly will save you countless hours of manual spam cleanup later. Your visitors will appreciate the faster loading times, and you’ll sleep better knowing your site is protected around the clock. **Final tip:** Test your configuration on a staging site first, especially if you’re new to server administration. This prevents accidentally locking yourself out of your production site. With Fail2Ban in place, you can focus on creating great content instead of fighting spam bots. Your WordPress site will be more secure, faster, and much more pleasant to manage. ## Stop Wasting Time on Servers. Start Building Instead. You didn’t start your project to babysit servers. Let **ServerAvatar** handle deployment, monitoring, and backups — so you can focus on growth. Deploy **WordPress, Laravel, N8N**, and more in minutes. No DevOps required. No command line. No stress. [ 🚀 Try Free ](https://app.serveravatar.com) [ 🌐 Learn More ](https://serveravatar.com/) Trusted by 10,000+ developers and growing. **Categories:** Blog, WordPress **Tags:** Block spam bots WordPress, PHP Hosting, Spam bot blocking tools, VPS security for WordPress, WordPress server security, WordPress spam protection --- ### [Quick Stripe Integration Guide for Laravel Users](https://serveravatar.com/quick-stripe-integration-guide-for-laravel-users/) **Published:** August 9, 2025 **Author:** Suresh Ramani **Content:** [![Blog banner - ServerAvatar](https://serveravatar.com/wp-content/uploads/2025/09/728_90-Banner-3-1024x127.png)](https://serveravatar.com?ref=blog)## Introduction Have you ever wondered why some websites make online payments feel as smooth as butter while others leave you frustrated and clicking away? The secret often lies in their payment gateway integration. If you’re a Laravel developer looking to **Stripe** integrate into your application, you’re in the right place! Think of Stripe as the Swiss Army knife of payment processing – it’s versatile, reliable, and packed with features that make handling online payments a breeze. When combined with Laravel’s elegant framework, you get a powerhouse combination that can handle everything from simple one-time payments to complex subscription billing. ## **Understanding Stripe and Laravel Integration** ### **What Makes Stripe Perfect for Laravel?** **Stripe** isn’t just another payment processor – it’s a complete payment infrastructure that speaks the same language as modern web developers. When you combine it with **Laravel**, you’re essentially pairing a Ferrari engine with a Formula 1 chassis. Laravel’s built-in features like **middleware**, **validation**, and **Eloquent ORM** work seamlessly with Stripe’s API structure. The framework’s **service container** makes it easy to inject Stripe services wherever you need them, while Laravel’s **event system** perfectly complements Stripe’s webhook functionality. ### **Key Benefits of This Integration** The **stripe laravel** combination offers several advantages: - **Rapid development** with pre-built components - **Robust security** through Laravel’s built-in protections - **Scalable architecture** that grows with your business - **Comprehensive documentation** and community support ## **Prerequisites and Setup Requirements** ### **What You’ll Need Before Starting** Before diving into the integration, make sure you have these essentials ready: **Technical Requirements:** - PHP 8.0 or higher - Laravel 9.x or 10.x - Composer installed globally - A Stripe account (free to create) - Basic knowledge of Laravel routing and controllers **Stripe Account Setup:** 1. Create your free Stripe account at [stripe.com](https://stripe.com/) 2. Verify your email address 3. Complete your business profile 4. Obtain your **API keys** from the dashboard ### **Understanding API Keys** Stripe provides two types of API keys: - **Publishable keys** (safe for client-side code) - **Secret keys** (must be kept server-side only) Think of these like a house key and a master key – the publishable key opens the front door, while the secret key gives you access to everything inside. ## **Installing Stripe in Your Laravel Project** ### **Using Composer for Installation** The easiest way to add Stripe to your Laravel project is through Composer: Bash``` composer require stripe/stripe-php ``` ``` composer require stripe/stripe-php ``` ### **Laravel Cashier Alternative** For more advanced features, consider **Laravel Cashier**: Bash``` composer require laravel/cashier ``` ``` composer require laravel/cashier ``` ### **Advanced Laravel Features** For more complex integrations, you might want to explore **Laravel’s official documentation** on payment processing patterns and best practices. The [Laravel Documentation](https://laravel.com/docs) provides excellent guidance on structuring payment-related services and implementing proper error handling strategies. **Laravel Cashier** provides a more Laravel-centric approach to Stripe integration, offering: - Built-in subscription management - Invoice handling - Webhook management - Customer portal integration ### **Publishing Configuration Files** If using Cashier, publish the migration files: Bash``` php artisan vendor:publish --tag="cashier-migrations" php artisan migrate ``` ``` php artisan vendor:publish --tag="cashier-migrations" php artisan migrate ``` ## **Configuring Environment Variables** ### **Setting Up Your .env File** Add your Stripe credentials to your `.env` file: Plaintext``` STRIPE_KEY=pk_test_your_publishable_key_here STRIPE_SECRET=sk_test_your_secret_key_here STRIPE_WEBHOOK_SECRET=whsec_your_webhook_secret_here ``` ``` STRIPE_KEY=pk_test_your_publishable_key_here STRIPE_SECRET=sk_test_your_secret_key_here STRIPE_WEBHOOK_SECRET=whsec_your_webhook_secret_here ``` ### **Config File Setup** Create a dedicated config file for Stripe settings: PHP``` // config/stripe.php return [ 'key' => env('STRIPE_KEY'), 'secret' => env('STRIPE_SECRET'), 'webhook_secret' => env('STRIPE_WEBHOOK_SECRET'), ]; ``` ``` // config/stripe.php return [ 'key' => env('STRIPE_KEY'), 'secret' => env('STRIPE_SECRET'), 'webhook_secret' => env('STRIPE_WEBHOOK_SECRET'), ]; ``` **Pro Tip:** Never commit your actual API keys to version control. Always use environment variables! [![Blog banner - ServerAvatar](https://serveravatar.com/wp-content/uploads/2025/09/728_90-Banner-1-1024x127.png)](https://serveravatar.com?ref=blog)## **Creating Your First Payment Form** ### **Frontend Payment Form** Create a simple payment form using **Stripe Elements**: HTML``` Pay Now ``` ``` Pay Now ``` ### **JavaScript Integration** Initialize Stripe on the frontend: JavaScript``` const stripe = Stripe('{{ config('stripe.key') }}'); const elements = stripe.elements(); const paymentElement = elements.create('payment'); paymentElement.mount('#payment-element'); ``` ``` const stripe = Stripe('{{ config('stripe.key') }}'); const elements = stripe.elements(); const paymentElement = elements.create('payment'); paymentElement.mount('#payment-element'); ``` ### **Handling Form Submission** Process the form submission with client-side validation: JavaScript``` document.getElementById('payment-form').addEventListener('submit', async (event) => { event.preventDefault(); const {error} = await stripe.confirmPayment({ elements, confirmParams: { return_url: '{{ route('payment.success') }}' } }); if (error) { console.error('Payment failed:', error); } }); ``` ``` document.getElementById('payment-form').addEventListener('submit', async (event) => { event.preventDefault(); const {error} = await stripe.confirmPayment({ elements, confirmParams: { return_url: '{{ route('payment.success') }}' } }); if (error) { console.error('Payment failed:', error); } }); ``` ## **Processing Payments with Controllers** ### **Creating the Payment Controller** Generate a controller to handle payment processing: Bash``` php artisan make:controller PaymentController ``` ``` php artisan make:controller PaymentController ``` ### **Payment Processing Logic** Implement the core payment processing method: PHP``` **Categories:** Blog, Guide, Laravel **Tags:** Laravel Development, Laravel Payments, Laravel Tips, Laravel Tutorial, PHP Stripe, Stripe API, Stripe Checkout --- ### [How to Convert Images to WebP in Laravel Easily](https://serveravatar.com/convert-images-webp-laravel-guide/) **Published:** August 10, 2025 **Author:** Suresh Ramani **Content:** [![Blog banner - ServerAvatar](https://serveravatar.com/wp-content/uploads/2025/09/728_90-Banner-3-1024x127.png)](https://serveravatar.com?ref=blog)## Introduction Have you ever wondered why some websites load lightning-fast while others make you wait forever? The secret often lies in image optimization, and WebP format is like having a magic wand for your web images. If you’re working with Laravel and want to make your website faster while keeping image quality intact, you’ve landed in the right place. Converting images to WebP in Laravel isn’t just about following a trend – it’s about giving your users the best possible experience. Think of WebP as the Swiss Army knife of image formats: it’s versatile, efficient, and gets the job done with less baggage. In this comprehensive guide, we’ll walk through everything you need to know about implementing WebP conversion in your Laravel applications. ## **What is WebP and Why Should You Care?** WebP is Google’s modern image format that provides superior compression compared to traditional formats like JPEG and PNG. But why should this matter to you as a Laravel developer? **The Numbers Don’t Lie** WebP images are typically **25-35% smaller** than JPEG images of comparable quality. For PNG images with transparency, the savings can be even more dramatic – sometimes up to 50% smaller file sizes. When you’re dealing with a website that serves thousands of images daily, these savings translate to faster load times, reduced bandwidth costs, and happier users. **Real-World Impact** Consider this scenario: your e-commerce site displays 20 product images per page. If each JPEG image is 150KB, that’s 3MB of image data. Convert those same images to WebP, and you’re looking at roughly 2MB – a **33% reduction** in data transfer. For users on mobile connections, this difference can mean the difference between a sale and an abandoned cart. ## **Setting Up Your Laravel Environment for WebP** Before diving into code, let’s ensure your Laravel environment is ready for WebP conversion. Think of this as preparing your kitchen before cooking a complex meal – having the right tools makes everything smoother. **System Requirements Check** Your server needs to support WebP operations. Most modern PHP installations include this support, but it’s worth verifying. You’ll need PHP 7.0 or higher with the GD extension that includes WebP support. **Laravel Version Compatibility** This guide works with Laravel 8.x and above, though most concepts apply to earlier versions with minor adjustments. We’ll be using Laravel’s built-in file handling capabilities alongside image processing libraries. For detailed Laravel documentation and best practices for file handling, refer to the [official Laravel documentation](https://laravel.com/docs/filesystem). ## **Installing Required PHP Extensions** Getting the right PHP extensions installed is crucial for WebP functionality. Here’s how to ensure everything is properly configured: **Checking Current Extensions** First, let’s verify what’s already available on your system: PHP``` // Create a simple PHP file to check extensions ``` ``` // Create a simple PHP file to check extensions ``` **Installing Missing Extensions** If WebP support isn’t available, you’ll need to install or recompile PHP with WebP support. On Ubuntu/Debian systems: Bash``` sudo apt-get update sudo apt-get install php-gd libwebp-dev ``` ``` sudo apt-get update sudo apt-get install php-gd libwebp-dev ``` For CentOS/RHEL systems: Bash``` sudo yum install php-gd libwebp-devel ``` ``` sudo yum install php-gd libwebp-devel ``` For more detailed information about WebP browser support and implementation best practices, the [Google WebP documentation](https://developers.google.com/speed/webp) provides comprehensive technical specifications and optimization guidelines. ## **Basic WebP Conversion Using GD Library** Now let’s get our hands dirty with actual code. The GD library provides the most straightforward approach to WebP conversion in PHP. **Creating Your First WebP Converter** PHP``` **Categories:** Blog, Laravel, Tutorials **Tags:** Laravel Guide, Laravel Image Optimization, Laravel Tips, Laravel WebP Conversion, PHP Image Processing, Speed Up Laravel Website, Web Development, WebP Format --- ### [How to Use Yajra DataTables in Laravel Like a Pro](https://serveravatar.com/master-yajra-datatables-laravel-tutorial/) **Published:** August 10, 2025 **Author:** Suresh Ramani **Content:** [![Blog banner - ServerAvatar](https://serveravatar.com/wp-content/uploads/2025/09/728_90-Banner-3-1024x127.png)](https://serveravatar.com?ref=blog)## Introduction Have you ever wondered why some web applications feel lightning-fast when handling massive amounts of data, while others crawl like a snail? The secret often lies in how they handle data presentation. **Yajra DataTables** is like having a Swiss Army knife for your Laravel data – it’s versatile, powerful, and makes complex data operations feel effortless. If you’re working with Laravel and need to display large datasets efficiently, you’ve probably heard about DataTables. But here’s the thing: most developers barely scratch the surface of what this powerful package can do. Today, we’re going to change that. We’ll dive deep into **yajra datatable** and transform you from a beginner into someone who wields this tool like a seasoned pro. ## **What is Yajra DataTables and Why Should You Care?** Think of **Yajra DataTables** as your data’s personal assistant. Just like a good assistant handles scheduling, filtering emails, and organizing tasks, DataTables manages your data presentation, sorting, searching, and pagination without breaking a sweat. **Yajra DataTables** is a Laravel package that seamlessly integrates the popular jQuery DataTables plugin with your Laravel applications. But why should you care? Here’s the deal: - **Performance**: It handles thousands of records without making your browser cry - **User Experience**: Your users get instant search, sorting, and filtering - **Developer Friendly**: Less code, more functionality - **Flexibility**: Customize everything from appearance to behavior The beauty of **yajra datatable** lies in its ability to transform boring HTML tables into interactive powerhouses. Whether you’re building an admin panel, a reporting dashboard, or any data-heavy application, this package is your best friend. ## **Setting Up Your Laravel Environment** Before we dive into the **yajra datatable** magic, let’s make sure your Laravel environment is ready. You’ll need: **Prerequisites:** - Laravel 8.0 or higher - PHP 7.4 or higher - Composer installed - Basic understanding of Laravel MVC structure If you haven’t deployed your Laravel application yet, consider using a reliable hosting solution. For seamless deployment, check out how to [Deploy Laravel on VM, VPS or Dedicated Server](https://serveravatar.com/deployments/applications/laravel) for professional hosting options. **Verify Your Setup:** Bash``` php artisan --version composer --version ``` ``` php artisan --version composer --version ``` Make sure you have a working database connection configured in your `.env` file. We’ll need this for our DataTable examples. ## **Installing and Configuring Yajra DataTables** Now comes the exciting part – installing the **yajra datatable** package. It’s easier than making morning coffee! **Step 1: Install via Composer** Bash``` composer require yajra/laravel-datatables-oracle ``` ``` composer require yajra/laravel-datatables-oracle ``` **Step 2: Publish Configuration (Optional)** Bash``` php artisan vendor:publish --tag=datatables ``` ``` php artisan vendor:publish --tag=datatables ``` **Step 3: Add Service Provider (Laravel < 5.5)** If you’re using an older Laravel version, add this to your `config/app.php`: PHP``` Yajra\DataTables\DataTablesServiceProvider::class, ``` ``` Yajra\DataTables\DataTablesServiceProvider::class, ``` **Step 4: Include DataTables Assets** Add these to your layout file: HTML``` ``` ``` ``` **Pro Tip:** Always use CDN links for better performance, but keep local copies as fallbacks. ## **Creating Your First DataTable** Let’s create your first **yajra datatable**. We’ll start with a simple users table – think of it as your “Hello World” moment with DataTables. **Step 1: Create a Model and Migration** Bash``` php artisan make:model User -m ``` ``` php artisan make:model User -m ``` **Step 2: Set Up Your Route** PHP``` // routes/web.php Route::get('/users', [UserController::class, 'index'])->name('users.index'); Route::get('/users/data', [UserController::class, 'getData'])->name('users.data'); ``` ``` // routes/web.php Route::get('/users', [UserController::class, 'index'])->name('users.index'); Route::get('/users/data', [UserController::class, 'getData'])->name('users.data'); ``` **Step 3: Create the View** Blade``` Users Management ID Name Email Created At Actions ``` ``` Users Management ID Name Email Created At Actions $(document).ready(function() { $('#users-table').DataTable({ processing: true, serverSide: true, ajax: "{{ route('users.data') }}", columns: [ {data: 'id', name: 'id'}, {data: 'name', name: 'name'}, {data: 'email', name: 'email'}, {data: 'created_at', name: 'created_at'}, {data: 'actions', name: 'actions', orderable: false} ] }); }); ``` Congratulations! You’ve just created your first **yajra datatable**. But we’re just getting started. ## **Understanding DataTable Controllers** The controller is where the **yajra datatable** magic happens. It’s like the conductor of an orchestra, coordinating all the data operations. **Basic Controller Structure:** PHP``` **Categories:** Blog, Guide, Laravel **Tags:** DataTables Integration, Laravel AJAX Tables, Laravel Tables, Laravel Tutorial, Laravel Yajra DataTables, PHP DataTables, Yajra Package --- ### [DomPDF Laravel Tutorial: Convert HTML to PDF in Minutes](https://serveravatar.com/dompdf-laravel-html-to-pdf/) **Published:** August 10, 2025 **Author:** Suresh Ramani **Content:** [![Blog banner - ServerAvatar](https://serveravatar.com/wp-content/uploads/2025/09/728_90-Banner-3-1024x127.png)](https://serveravatar.com?ref=blog)## Introduction Have you ever wished that turning your web pages into neat, printable PDFs could be as easy as snapping your fingers? Well, you’re not alone! Many developers-and even beginners-have felt the frustration of clunky PDF tools. That’s where the magical duo, **DomPDF and Laravel**, come in. With dompdf laravel, what used to take hours can now be done in just minutes. Let’s imagine for a moment: converting a messy desk into a perfectly organized file cabinet. That’s what this guide will help you do-but with your web content! ## **What is DomPDF and Why Use It?** **DomPDF** is like a magic printer for the web-it turns all those beautiful web pages you see in your browser into real, shareable PDFs. Whether it’s receipts, invoices, or certificates, DomPDF lets you preserve the layout and design, giving you a “snapshot” of your content. Why use **DomPDF**? - **Free and Open Source:** No licensing headaches. - **Easy Integration:** Works smoothly with frameworks like Laravel. - **HTML and CSS Support:** Converts web content faithfully. ## **Why Laravel and DomPDF Make a Great Team** Think of Laravel as your trusty backpack and DomPDF as the notebook inside. Laravel’s elegant structure makes it easy to organize, while DomPDF is the tool that turns your notes into printable pages. The partnership means you can design your content with Laravel’s Blade templates and serve it as a PDF instantly. Benefits: - Clean, maintainable code. - Rapid development-no wrestling with complex libraries. - Customization is a breeze! ## **Getting Started: Requirements** Before you begin, make sure you have: - **Laravel installed** (8.x or newer is ideal) - **Composer** for PHP package management - **Basic understanding of PHP/Laravel** - **Web server** (XAMPP, MAMP, or a live server) Just like making a recipe, having your “ingredients” ready will make things go smoothly. ## **Installing DomPDF in Laravel** Let’s get our toolkit ready! Installing DomPDF only takes a couple of commands. 1. Open your terminal and navigate to your Laravel project directory. 2. Run this Composer command: Bash``` composer require barryvdh/laravel-dompdf ``` ``` composer require barryvdh/laravel-dompdf ``` You’ll notice the package is by **Barryvdh**, a popular DomPDF wrapper for Laravel that makes everything easier. 3. Optionally, publish the configuration file: Bash``` php artisan vendor:publish --provider="Barryvdh\DomPDF\ServiceProvider" ``` ``` php artisan vendor:publish --provider="Barryvdh\DomPDF\ServiceProvider" ``` And voilà! DomPDF is ready to go. ## **Configuration: Making DomPDF Work Properly** After installing, you may want to tweak a few settings in `config/dompdf.php`: - **Paper Size:** Default is `A4`, but you can switch to `letter`, `legal`, etc. - **Orientation:** Choose between `portrait` and `landscape`. - **Font Directory:** Set custom fonts if needed. Example: PHP``` return [ 'default_paper_size' => 'a4', 'default_font' => 'Arial', ]; ``` ``` return [ 'default_paper_size' => 'a4', 'default_font' => 'Arial', ]; ``` Most beginners can skip this step, but it’s helpful as you grow comfortable. ## **Basic PDF Creation: Your First Simple PDF** Let’s get our feet wet! Create a route in your `web.php`: PHP``` Route::get('/basic-pdf', function () { $pdf = App::make('dompdf.wrapper'); $pdf->loadHTML('Hello, DomPDF in Laravel!'); return $pdf->stream(); }); ``` ``` Route::get('/basic-pdf', function () { $pdf = App::make('dompdf.wrapper'); $pdf->loadHTML('Hello, DomPDF in Laravel!'); return $pdf->stream(); }); ``` Just like that, visiting `/basic-pdf` in your browser will prompt you to download or view a nifty PDF. ## **Converting Dynamic HTML to PDF** Need to turn complex pages with data into a PDF? Use Blade views! 1. **Create a Blade view** (`resources/views/my-pdf.blade.php`): Blade``` Invoice #{{ $invoice->id }} Date: {{ $invoice->date }} Amount: {{ $invoice->amount }} ``` ``` Invoice #{{ $invoice->id }} Date: {{ $invoice->date }} Amount: {{ $invoice->amount }} ``` 2. **In your controller or route:** PHP``` use Barryvdh\DomPDF\Facade\Pdf; Route::get('/invoice-pdf/{id}', function ($id) { $invoice = Invoice::find($id); $pdf = Pdf::loadView('my-pdf', compact('invoice')); return $pdf->download('invoice.pdf'); }); ``` ``` use Barryvdh\DomPDF\Facade\Pdf; Route::get('/invoice-pdf/{id}', function ($id) { $invoice = Invoice::find($id); $pdf = Pdf::loadView('my-pdf', compact('invoice')); return $pdf->download('invoice.pdf'); }); ``` Now, your users get a personalized PDF invoice with just a click! ## **Styling Your PDF** Want your PDFs to look as gorgeous as your website? DomPDF supports most CSS styles. - Inline styles are fully supported. - Use external CSS by importing it within your HTML. - Be aware: Some CSS3/HTML5 properties might not be supported. Example: HTML``` ``` ``` h1 { color: #3490dc; font-family: 'Arial'; } p { font-size: 16px; } ``` A well-dressed PDF is always more impressive! ## **Saving and Downloading PDFs** DomPDF gives you options: - **Stream**: Directly display in browser for viewing/printing. - **Download**: Force download to user’s computer. - **Save**: Store PDF file on the server. Example: PHP``` // Stream return $pdf->stream('document.pdf'); // Download return $pdf->download('document.pdf'); // Save to server $pdf->save(storage_path('app/public/document.pdf')); ``` ``` // Stream return $pdf->stream('document.pdf'); // Download return $pdf->download('document.pdf'); // Save to server $pdf->save(storage_path('app/public/document.pdf')); ``` Pick what suits your app! ## **Sending PDF as Email Attachments** Say you want to email invoices. Laravel’s Mail functionality makes this simple: PHP``` use Illuminate\Support\Facades\Mail; Mail::to($user->email)->send(new InvoiceMail($pdf)); ``` ``` use Illuminate\Support\Facades\Mail; Mail::to($user->email)->send(new InvoiceMail($pdf)); ``` In your Mailable class, attach the PDF: PHP``` public function build() { return $this->view('emails.invoice') ->attachData($this->pdf->output(), 'invoice.pdf'); } ``` ``` public function build() { return $this->view('emails.invoice') ->attachData($this->pdf->output(), 'invoice.pdf'); } ``` PDFs fly to inboxes like magic! [![Blog banner - ServerAvatar](https://serveravatar.com/wp-content/uploads/2025/09/728_90-Banner-1-1024x127.png)](https://serveravatar.com?ref=blog)## **Error Handling and Troubleshooting** Every magician faces a hiccup: - **Blank PDFs:** Check your HTML for errors or missing closing tags. - **Fonts not rendering:** Ensure your fonts are installed or linked correctly. - **Image issues:** Use absolute paths for images, not relative or base64 when possible. Still stuck? The [official DomPDF GitHub issues](https://github.com/dompdf/dompdf/issues) page is your friendly neighborhood detective. ## **Best Practices for Performance** - **Minimize CSS:** Too many styles slow down rendering. - **Paginate:** Large documents? Split into multiple PDFs. - **Cache PDFs:** Save generated PDFs for repeat use instead of rendering every time. Treat your PDF process like a chef – keep your “kitchen” tidy and efficient! ## **Real-world Use Cases** Where does dompdf laravel shine? - **Invoices and receipts** for customers - **Certificates and diplomas** in education platforms - **Reports and summaries** for businesses - **Tickets and passes** for events If it’s printable, you can probably PDF it! ## **Deploying PDF-enabled Laravel Apps** Ready to launch your app to the world? Make sure your deployment environment supports the requirements for dompdf laravel. Thinking of hosting your Laravel app? Check out how to **[Deploy Laravel on VM, VPS or Dedicated Server](https://serveravatar.com/deployments/applications/laravel)**, a step that’s crucial for seamless PDF generation. ## **Conclusion** You’ve just learned how to tame the “paper tiger”! With **dompdf laravel**, creating PDFs is no longer a Herculean task but a walk in the park. From simple one-pagers to dynamic multi-page reports, the combo makes it easy, fun, and fast. So the next time someone asks, “Can you send that as a PDF?”-smile, because you’ve got it covered! ## **FAQs** ### **Can DomPDF handle complex HTML and advanced CSS?** DomPDF covers most basic HTML and CSS needs but may not support very advanced CSS3 or JavaScript. Test your HTML templates and refer to the [official DomPDF documentation](https://github.com/dompdf/dompdf). ### **Is DomPDF free for commercial use in Laravel projects?** Yes! DomPDF and Barryvdh’s Laravel wrapper are both open-source and free for commercial and personal projects. ### **How do I include images in my DomPDF PDFs?** Use absolute paths to images. Images in the public directory, for instance, should reference `public_path('images/yourimage.jpg')` to ensure they load correctly. ### **Can I protect my PDFs with passwords using DomPDF?** DomPDF doesn’t natively support PDF encryption or password protection. Consider using PDF processing libraries post-generation if you need advanced security. ### **What’s the best way to deploy a Laravel project that uses DomPDF?** Host your Laravel app on a reliable server with proper PHP and composer support. For detailed steps, refer to this guide on [Deploying Laravel on VM, VPS or Dedicated Server](https://serveravatar.com/deployments/applications/laravel). And there you have it-a crystal-clear, practical guide to **dompdf laravel** that’ll have you generating PDFs like a pro in no time! ## Stop Wasting Time on Servers. Start Building Instead. You didn’t start your project to babysit servers. Let **ServerAvatar** handle deployment, monitoring, and backups — so you can focus on growth. Deploy **WordPress, Laravel, N8N**, and more in minutes. No DevOps required. No command line. No stress. [ 🚀 Try Free ](https://app.serveravatar.com) [ 🌐 Learn More ](https://serveravatar.com/) Trusted by 10,000+ developers and growing. **Categories:** Blog, Laravel, Tutorials **Tags:** DomPDF Integration, HTML to PDF Laravel, Laravel Development, Laravel DomPDF, Laravel Reports --- ### [Laravel SEO Sitemap Guide: Quick & Easy Steps](https://serveravatar.com/laravel-seo-sitemap-guide/) **Published:** August 11, 2025 **Author:** Suresh Ramani **Content:** [![Blog banner - ServerAvatar](https://serveravatar.com/wp-content/uploads/2025/09/728_90-Banner-3-1024x127.png)](https://serveravatar.com?ref=blog)Welcome to your easy, step-by-step guide on mastering the art of the **Laravel SEO Sitemap** setup for SEO! If you’re running a Laravel-powered website, you probably want more people to find your awesome content, right? Well, having a sitemap is like handing Google Maps to search engines – it shows them exactly where to go! This guide is designed just for you, with plain-English steps, relatable analogies, and answers to all your burning questions. So, let’s roll up our sleeves and jump in! ## **Introduction to Sitemaps** Imagine building a house with dozens of rooms, hidden basements, and secret attics. How would you expect guests (or robots!) to find everything without a floor plan? The same goes for your website – a sitemap is like an architectural blueprint that helps search engines discover every corner of your site quickly and efficiently. ## **Why a Sitemap Matters for SEO** Let’s be real for a second: Search engines love websites that make their job easier. By providing a sitemap, you’re boosting your chances of higher rankings because it’s like giving search engines a VIP pass. They’ll find your new blog posts, updated pages, and hidden gems faster, improving your **SEO** without extra effort. ## **Laravel and SEO: A Perfect Match** Laravel is famous for its clean, elegant syntax and robust features. Did you know it’s also a fantastic framework for SEO? With the help of some handy packages and a clear plan, you can make your **sitemap laravel** experience seamless-even if you’re not tech-savvy. ## **Types of Sitemaps** Before we start building, let’s get familiar with the two main kinds: - **XML Sitemaps:** Made for search engines. They’re like roadmaps that tell bots where to go. - **HTML Sitemaps:** Made for humans, listing your pages in a readable format. For SEO, we’re focusing on XML sitemaps. ## **Setting Up Your Laravel Project** Already have a Laravel site? Great! If not, you can set up one quickly: Bash``` composer create-project --prefer-dist laravel/laravel yourProjectName ``` ``` composer create-project --prefer-dist laravel/laravel yourProjectName ``` Once you’re set, make sure your project’s working properly. Want a quick, hassle-free way to deploy Laravel on a VM, VPS, or dedicated server? Check out this detailed guide: [Deploy Laravel on VM, VPS or Dedicated Server](https://serveravatar.com/deployments/applications/laravel) for step-by-step hosting instructions. ## **Installing a Sitemap Package** Laravel works smoothly with many sitemap packages, but let’s go with a popular and beginner-friendly one: **spatie/laravel-sitemap**. **Installation Steps:** Bash``` composer require spatie/laravel-sitemap ``` ``` composer require spatie/laravel-sitemap ``` Spatie’s package is like a toolkit for building and managing sitemaps easily. > **External Resource:** For further documentation, see [Spatie Laravel Sitemap Documentation](https://spatie.be/docs/laravel-sitemap/v6/introduction) (replace with official URL on publication). ## **Creating Your First Sitemap** Ready for the fun part? Let’s make your sitemap. **Simple Example:** PHP``` use Spatie\Sitemap\Sitemap; use Spatie\Sitemap\Tags\Url; Sitemap::create() ->add(Url::create('/')) ->add(Url::create('/about')) ->writeToFile(public_path('sitemap.xml')); ``` ``` use Spatie\Sitemap\Sitemap; use Spatie\Sitemap\Tags\Url; Sitemap::create() ->add(Url::create('/')) ->add(Url::create('/about')) ->writeToFile(public_path('sitemap.xml')); ``` This creates a `sitemap.xml` file in your public directory. ## **Customizing Your Sitemap** Every website is different. Want to add blog posts, products, or dynamic pages? Loop through your routes: PHP``` $posts = Post::all(); $sitemap = Sitemap::create(); foreach ($posts as $post) { $sitemap->add(Url::create("/posts/{$post->slug}")); } $sitemap->writeToFile(public_path('sitemap.xml')); ``` ``` $posts = Post::all(); $sitemap = Sitemap::create(); foreach ($posts as $post) { $sitemap->add(Url::create("/posts/{$post->slug}")); } $sitemap->writeToFile(public_path('sitemap.xml')); ``` Customize further by setting priorities, last modified dates, or adding images. ## **Automating Sitemap Updates** You don’t want to generate sitemaps manually every time. Automate with Laravel’s **scheduler**. **Set up a command:** Bash``` php artisan make:command GenerateSitemap ``` ``` php artisan make:command GenerateSitemap ``` Write your sitemap generation logic inside this command, then schedule it in `app/Console/Kernel.php`: PHP``` $schedule->command('sitemap:generate')->daily(); ``` ``` $schedule->command('sitemap:generate')->daily(); ``` Now, your sitemap updates automatically! > **Pro Tip:** Details on the Laravel scheduler can be found in the [Official Laravel Scheduler Documentation](https://laravel.com/docs/10.x/scheduling). ## **Submitting Your Sitemap to Google** No roadmap is useful if you don’t share it! Tell Google about your sitemap. - Log into Google Search Console - Go to “Sitemaps” - Enter: `https://yourdomain.com/sitemap.xml` - Click “Submit” ![Submit Sitemap Google Search Console](https://serveravatar.com/wp-content/uploads/2025/08/Sitemaps-08-08-2025_11_14_AM-1024x570.png)Easy as pie! [![Blog banner - ServerAvatar](https://serveravatar.com/wp-content/uploads/2025/09/728_90-Banner-1-1024x127.png)](https://serveravatar.com?ref=blog)## **Troubleshooting Common Issues** - **Sitemap Not Updating?** Check your scheduler and permissions. - **Pages Missing?** Make sure you’re generating URLs for all routes. - **Errors in Google?** Validate your `sitemap.xml` using online tools like [XML Sitemap Validator](https://www.xml-sitemaps.com/validate-xml-sitemap.html) (insert the actual URL at publication). Remember, sitemaps need to be *well-formed* XML! ## **Advanced Tips for Large Sites** Got thousands of pages? Break your sitemap into multiple files (e.g., `sitemap-products.xml`, `sitemap-blog.xml`) and then use a **sitemap index**. Spatie’s package supports this with ease, and you can use Laravel collections to split your URLs. ## **Securing and Validating Your Sitemap** - **Permissions:** Ensure `sitemap.xml` is readable but not writable from the outside. - **Validation:** Use tools like Google Search Console, Bing Webmaster, or online XML validators. - **Monitor for Broken Links:** Regularly scan your sitemap to avoid indexing errors. ## **Monitoring Sitemap Performance** Keep an eye on how search engines interact with your sitemap. - Use Google Search Console’s “Coverage” and “Sitemaps” reports. - Fix any crawl errors or issues promptly. Think of this as regular oil changes for your site-keeping things running smoothly and search-friendly. ## **Conclusion & Next Steps** You’ve just learned, step by step, how to set up and optimize a **sitemap laravel**. It’s not rocket science-think of building a sitemap like assembling a LEGO set: follow the instructions, piece by piece, and soon you’ll have a solid structure that’s the envy of other websites! With a healthy sitemap, your Laravel site gets more visibility, better rankings, and easier management. Remember, SEO is a marathon, not a sprint. So keep your sitemap fresh, monitor its status, and enjoy the steady flow of visitors discovering your content. ## **FAQs** ### **Can I create a sitemap laravel without using a package?** Yes! You can generate XML manually or use Laravel’s built-in tools, but packages like Spatie make the process dramatically easier. ### **How often should I update my sitemap in Laravel?** Whenever you add, edit, or remove significant content. For active sites, daily updates are a good practice. ### **Is it essential to have both HTML and XML sitemaps?** No, but it’s helpful. XML sitemaps target search engines, while HTML sitemaps help visitors navigate your site. ### **Can search engines find my new pages without a sitemap laravel file?** Yes – but a sitemap speeds up the process and helps ensure no page is overlooked, especially on large or dynamic sites. ### **What should I do if Google reports errors in my sitemap?** Validate your XML, check for broken links, and use Google’s error details to adjust your sitemap file accordingly. ## Stop Wasting Time on Servers. Start Building Instead. You didn’t start your project to babysit servers. Let **ServerAvatar** handle deployment, monitoring, and backups — so you can focus on growth. Deploy **WordPress, Laravel, N8N**, and more in minutes. No DevOps required. No command line. No stress. [ 🚀 Try Free ](https://app.serveravatar.com) [ 🌐 Learn More ](https://serveravatar.com/) Trusted by 10,000+ developers and growing. **Categories:** Blog, Guide, Laravel **Tags:** Laravel Development, Laravel SEO, Laravel Sitemap, PHP SEO, SEO Best Practices, Tutorial, Web Development --- ### [How to Send Emails Using Node Mailer](https://serveravatar.com/node-mailer-email-setup-guide/) **Published:** August 11, 2025 **Author:** Suresh Ramani **Content:** [![Blog banner - ServerAvatar](https://serveravatar.com/wp-content/uploads/2025/09/728_90-Banner-3-1024x127.png)](https://serveravatar.com?ref=blog)Have you ever wondered how websites send you those confirmation emails or password reset links? Behind the scenes, a process known as **Node Mailer Setup** is likely powering it, using a powerful tool called Node Mailer working its magic. Think of Node Mailer as your digital postman, it takes your messages and delivers them straight to email inboxes worldwide. In today’s connected world, email functionality is crucial for any web application. Whether you’re building a contact form, setting up user notifications, or creating an automated marketing system, **node mailer** is your go-to solution for seamless email delivery. ## **What is Node Mailer and Why Should You Use It?** **Node Mailer** is like having a Swiss Army knife for email functionality in your Node.js applications. It’s a powerful, zero-dependency module that makes sending emails as easy as writing a simple function call. ### **Key Benefits of Using Node Mailer** - **Versatility**: Works with virtually any email service provider - **Simplicity**: Clean, intuitive API that’s beginner-friendly - **Reliability**: Battle-tested by millions of developers worldwide - **Feature-rich**: Supports HTML emails, attachments, templates, and more - **Security**: Built-in support for modern authentication methods Why choose **node mailer** over other solutions? Simply put, it strikes the perfect balance between simplicity and power. You’re not locked into any specific email provider, and you can switch between services without rewriting your entire codebase. ## **Prerequisites and System Requirements** Before we dive into the exciting stuff, let’s make sure you have everything you need. Don’t worry – the requirements are pretty straightforward! ### **What You’ll Need** - **Node.js** (version 12 or higher) installed on your system - **npm** or **yarn** package manager - A **text editor** or IDE (VS Code, Sublime Text, etc.) - An **email service provider** account (Gmail, Outlook, SendGrid, etc.) - **Basic JavaScript knowledge** (don’t worry, we’ll keep it simple!) ### **Checking Your Setup** Run these commands in your terminal to verify everything’s ready: Bash``` node --version npm --version ``` ``` node --version npm --version ``` If you see version numbers, you’re good to go! If not, head over to [nodejs.org](http://nodejs.org/) and get the latest version installed. If you need to upgrade your Node.js version, check out this comprehensive guide on [**How to Upgrade Node: Beginner’s Tutorial**](https://serveravatar.com/upgrade-node/) which covers all the methods for different operating systems. ## **Installing Node Mailer in Your Project** Installing **node mailer** is as simple as ordering pizza online – just a few clicks and you’re done! ### **Step-by-Step Installation** **Step 1:** Navigate to your project directory Bash``` cd your-project-folder ``` ``` cd your-project-folder ``` **Step 2:** Install Node Mailer using npm Bash``` npm install nodemailer ``` ``` npm install nodemailer ``` **Step 3:** Verify the installation Bash``` npm list nodemailer ``` ``` npm list nodemailer ``` ### **Alternative Installation Methods** If you prefer **yarn**: Bash``` yarn add nodemailer ``` ``` yarn add nodemailer ``` For **TypeScript** projects, you might also want: Bash``` npm install @types/nodemailer --save-dev ``` ``` npm install @types/nodemailer --save-dev ``` That’s it! **Node mailer** is now part of your project’s toolkit. Pretty painless, right? ## **Setting Up Your First Email Configuration** Now comes the fun part – configuring your email setup. Think of this as programming your digital postman with the right address and credentials. ### **Basic Configuration Structure** Here’s what a typical **node mailer** configuration looks like: JavaScript``` const nodemailer = require('nodemailer'); const transporter = nodemailer.createTransporter({ service: 'gmail', auth: { user: 'your-email@gmail.com', pass: 'your-password' } }); ``` ``` const nodemailer = require('nodemailer'); const transporter = nodemailer.createTransporter({ service: 'gmail', auth: { user: 'your-email@gmail.com', pass: 'your-password' } }); ``` ### **Understanding Transporter Options** The **transporter** is your email delivery vehicle. You can configure it for different services: - **service**: The email provider (gmail, outlook, yahoo, etc.) - **host**: Custom SMTP server address - **port**: Connection port (usually 587 or 465) - **secure**: Whether to use TLS encryption - **auth**: Your login credentials ### **Environment Variables for Security** Never hardcode your credentials! Use environment variables instead: JavaScript``` const transporter = nodemailer.createTransporter({ service: 'gmail', auth: { user: process.env.EMAIL_USER, pass: process.env.EMAIL_PASS } }); ``` ``` const transporter = nodemailer.createTransporter({ service: 'gmail', auth: { user: process.env.EMAIL_USER, pass: process.env.EMAIL_PASS } }); ``` ## **Creating a Basic Email Sender Function** Ready to send your first email? Let’s build a simple function that’ll have you sending messages faster than you can say “**node mailer**”! ### **Your First Email Function** JavaScript``` async function sendEmail() { const mailOptions = { from: 'sender@example.com', to: 'recipient@example.com', subject: 'Hello from Node Mailer!', text: 'This is my first email sent with Node Mailer!' }; try { const info = await transporter.sendMail(mailOptions); console.log('Email sent:', info.response); } catch (error) { console.error('Error sending email:', error); } } ``` ``` async function sendEmail() { const mailOptions = { from: 'sender@example.com', to: 'recipient@example.com', subject: 'Hello from Node Mailer!', text: 'This is my first email sent with Node Mailer!' }; try { const info = await transporter.sendMail(mailOptions); console.log('Email sent:', info.response); } catch (error) { console.error('Error sending email:', error); } } ``` ### **Understanding Mail Options** Each email needs these essential ingredients: - **from**: Sender’s email address - **to**: Recipient’s email (can be multiple, separated by commas) - **subject**: Email subject line - **text**: Plain text message body - **html**: HTML formatted message (optional) ### **Making It Dynamic** Let’s make our function more flexible: JavaScript``` async function sendCustomEmail(to, subject, message) { const mailOptions = { from: process.env.EMAIL_USER, to: to, subject: subject, text: message }; return await transporter.sendMail(mailOptions); } ``` ``` async function sendCustomEmail(to, subject, message) { const mailOptions = { from: process.env.EMAIL_USER, to: to, subject: subject, text: message }; return await transporter.sendMail(mailOptions); } ``` ## **Working with Different Email Providers** One of **node mailer’s** superpowers is its ability to work with virtually any email provider. It’s like having a universal remote for your TV, DVD player, and sound system all in one! ### **Popular Email Services Configuration** **Gmail Setup:** JavaScript``` const gmailTransporter = nodemailer.createTransporter({ service: 'gmail', auth: { user: 'your-gmail@gmail.com', pass: 'your-app-password' } }); ``` ``` const gmailTransporter = nodemailer.createTransporter({ service: 'gmail', auth: { user: 'your-gmail@gmail.com', pass: 'your-app-password' } }); ``` **Outlook/Hotmail Setup:** JavaScript``` const outlookTransporter = nodemailer.createTransporter({ service: 'hotmail', auth: { user: 'your-email@outlook.com', pass: 'your-password' } }); ``` ``` const outlookTransporter = nodemailer.createTransporter({ service: 'hotmail', auth: { user: 'your-email@outlook.com', pass: 'your-password' } }); ``` **Custom SMTP Setup:** JavaScript``` const customTransporter = nodemailer.createTransporter({ host: 'mail.your-domain.com', port: 587, secure: false, auth: { user: 'your-username', pass: 'your-password' } }); ``` ``` const customTransporter = nodemailer.createTransporter({ host: 'mail.your-domain.com', port: 587, secure: false, auth: { user: 'your-username', pass: 'your-password' } }); ``` ### **Provider-Specific Considerations** **Gmail Users:** You’ll need to enable “Less secure app access” or use App Passwords for two-factor authentication accounts. **Corporate Email:** Check with your IT department for SMTP settings and any firewall restrictions. ## **Sending HTML Emails with Attachments** Plain text emails are fine, but sometimes you want to add some pizzazz! **Node mailer** makes sending rich HTML emails and attachments incredibly straightforward. ### **HTML Email Example** JavaScript``` async function sendHTMLEmail() { const htmlContent = ` Welcome to Our Service! Thank you for signing up. We're excited to have you on board! Get Started `; const mailOptions = { from: process.env.EMAIL_USER, to: 'user@example.com', subject: 'Welcome Aboard!', html: htmlContent }; await transporter.sendMail(mailOptions); } ``` ``` async function sendHTMLEmail() { const htmlContent = ` Welcome to Our Service! Thank you for signing up. We're excited to have you on board! Get Started `; const mailOptions = { from: process.env.EMAIL_USER, to: 'user@example.com', subject: 'Welcome Aboard!', html: htmlContent }; await transporter.sendMail(mailOptions); } ``` ### **Adding Attachments** JavaScript``` const mailOptionsWithAttachments = { from: process.env.EMAIL_USER, to: 'recipient@example.com', subject: 'Documents Attached', text: 'Please find the attached documents.', attachments: [ { filename: 'report.pdf', path: './documents/report.pdf' }, { filename: 'data.csv', content: 'Name,Email\nJohn,john@example.com' } ] }; ``` ``` const mailOptionsWithAttachments = { from: process.env.EMAIL_USER, to: 'recipient@example.com', subject: 'Documents Attached', text: 'Please find the attached documents.', attachments: [ { filename: 'report.pdf', path: './documents/report.pdf' }, { filename: 'data.csv', content: 'Name,Email\nJohn,john@example.com' } ] }; ``` ### **Inline Images and Embedded Content** Want to embed images directly in your emails? JavaScript``` attachments: [ { filename: 'logo.png', path: './images/logo.png', cid: 'logo' // Same cid value as in the html img src } ] // In your HTML: // ``` ``` attachments: [ { filename: 'logo.png', path: './images/logo.png', cid: 'logo' // Same cid value as in the html img src } ] // In your HTML: // ``` ## **Authentication and Security Best Practices** Security isn’t just important – it’s essential! Let’s make sure your **node mailer** setup is locked down tighter than Fort Knox. ### **App Passwords vs Regular Passwords** **For Gmail users**, regular passwords won’t cut it anymore. Here’s how to set up App Passwords: 1. Enable **2-factor authentication** on your Google account 2. Go to **Google Account settings** 3. Navigate to **Security** > **App passwords** 4. Generate a **new app password** for your application 5. Use this **16-character password** in your **node mailer** config ### **Environment Variables Best Practices** Create a `.env` file in your project root: Plaintext``` EMAIL_USER=your-email@gmail.com EMAIL_PASS=your-app-password EMAIL_FROM=your-name@company.com ``` ``` EMAIL_USER=your-email@gmail.com EMAIL_PASS=your-app-password EMAIL_FROM=your-name@company.com ``` Install the `dotenv` package: Bash``` npm install dotenv ``` ``` npm install dotenv ``` Load it in your application: JavaScript``` require('dotenv').config(); ``` ``` require('dotenv').config(); ``` ### **OAuth2 Authentication** For enterprise applications, consider OAuth2: JavaScript``` const transporter = nodemailer.createTransporter({ service: 'gmail', auth: { type: 'OAuth2', user: process.env.EMAIL_USER, clientId: process.env.OAUTH_CLIENT_ID, clientSecret: process.env.OAUTH_CLIENT_SECRET, refreshToken: process.env.OAUTH_REFRESH_TOKEN } }); ``` ``` const transporter = nodemailer.createTransporter({ service: 'gmail', auth: { type: 'OAuth2', user: process.env.EMAIL_USER, clientId: process.env.OAUTH_CLIENT_ID, clientSecret: process.env.OAUTH_CLIENT_SECRET, refreshToken: process.env.OAUTH_REFRESH_TOKEN } }); ``` ## **Handling Email Templates and Dynamic Content** Hardcoding email content is like wearing the same outfit every day – it works, but it’s not very exciting! Let’s make your emails dynamic and engaging. ### **Simple Template System** JavaScript``` function createWelcomeEmail(userName, userEmail) { return ` Welcome, ${userName}! We're thrilled to have you join our community. Your registered email: ${userEmail} Next Steps: Verify your email address Complete your profile Explore our features `; } ``` ``` function createWelcomeEmail(userName, userEmail) { return ` Welcome, ${userName}! We're thrilled to have you join our community. Your registered email: ${userEmail} Next Steps: Verify your email address Complete your profile Explore our features `; } ``` ### **Using Template Engines** For complex templates, consider using **Handlebars** or **EJS**: Bash``` npm install handlebars ``` ``` npm install handlebars ``` JavaScript``` const handlebars = require('handlebars'); const fs = require('fs'); // Read template file const templateSource = fs.readFileSync('./templates/welcome.hbs', 'utf8'); const template = handlebars.compile(templateSource); // Generate HTML with data const htmlContent = template({ userName: 'John Doe', companyName: 'Awesome Corp', activationLink: 'https://example.com/activate/123' }); ``` ``` const handlebars = require('handlebars'); const fs = require('fs'); // Read template file const templateSource = fs.readFileSync('./templates/welcome.hbs', 'utf8'); const template = handlebars.compile(templateSource); // Generate HTML with data const htmlContent = template({ userName: 'John Doe', companyName: 'Awesome Corp', activationLink: 'https://example.com/activate/123' }); ``` ### **Dynamic Content Strategies** **Personalization Tips:** - Use the recipient’s name in subject lines - Include relevant product recommendations - Add location-based content - Reference previous interactions [![Blog banner - ServerAvatar](https://serveravatar.com/wp-content/uploads/2025/09/728_90-Banner-1-1024x127.png)](https://serveravatar.com?ref=blog)## **10. Error Handling and Debugging Common Issues** Even the best digital postmen sometimes face challenges. Let’s prepare you for common **node mailer** hiccups and how to solve them like a pro! ### **Comprehensive Error Handling** JavaScript``` async function robustEmailSender(mailOptions) { try { const info = await transporter.sendMail(mailOptions); console.log('✅ Email sent successfully:', info.messageId); return { success: true, messageId: info.messageId }; } catch (error) { console.error('❌ Email sending failed:', error.message); // Categorize different types of errors if (error.code === 'EAUTH') { console.error('Authentication failed. Check your credentials.'); } else if (error.code === 'ECONNECTION') { console.error('Connection failed. Check your internet connection.'); } else if (error.responseCode === 550) { console.error('Recipient email address rejected.'); } return { success: false, error: error.message }; } } ``` ``` async function robustEmailSender(mailOptions) { try { const info = await transporter.sendMail(mailOptions); console.log('✅ Email sent successfully:', info.messageId); return { success: true, messageId: info.messageId }; } catch (error) { console.error('❌ Email sending failed:', error.message); // Categorize different types of errors if (error.code === 'EAUTH') { console.error('Authentication failed. Check your credentials.'); } else if (error.code === 'ECONNECTION') { console.error('Connection failed. Check your internet connection.'); } else if (error.responseCode === 550) { console.error('Recipient email address rejected.'); } return { success: false, error: error.message }; } } ``` ### **Common Error Codes and Solutions** **EAUTH – Authentication Error** - Double-check your email and password - Ensure you’re using App Passwords for Gmail - Verify that “Less secure app access” is enabled **ECONNECTION – Connection Issues** - Check your internet connection - Verify SMTP server settings - Try different ports (587, 465, 25) **550 – Mailbox Unavailable** - Recipient email address doesn’t exist - Email was rejected by the recipient’s server - Check for typos in the email address ### **Debugging Tools and Techniques** Enable **debug mode** for detailed logging: JavaScript``` const transporter = nodemailer.createTransporter({ service: 'gmail', auth: { user: process.env.EMAIL_USER, pass: process.env.EMAIL_PASS }, debug: true, // Enable debug output logger: true // Log to console }); ``` ``` const transporter = nodemailer.createTransporter({ service: 'gmail', auth: { user: process.env.EMAIL_USER, pass: process.env.EMAIL_PASS }, debug: true, // Enable debug output logger: true // Log to console }); ``` ## **Testing Your Email Functionality** Testing emails can be tricky – you don’t want to spam real users while developing! Here are some smart strategies to test your **node mailer** setup. ### **Development Testing Strategies** **Use Professional Testing Services:** For reliable email testing, consider using **Mailtrap** – a professional email testing service that captures emails in a sandbox environment: JavaScript``` // Mailtrap configuration for testing const testTransporter = nodemailer.createTransporter({ host: 'smtp.mailtrap.io', port: 2525, auth: { user: 'your-mailtrap-username', pass: 'your-mailtrap-password' } }); ``` ``` // Mailtrap configuration for testing const testTransporter = nodemailer.createTransporter({ host: 'smtp.mailtrap.io', port: 2525, auth: { user: 'your-mailtrap-username', pass: 'your-mailtrap-password' } }); ``` **[Mailtrap](https://mailtrap.io/)** provides a safe testing environment where you can inspect HTML/CSS rendering, check spam scores, and validate your email content without sending to real recipients. ![Node Mailer Setup](https://serveravatar.com/wp-content/uploads/2025/08/smtp-mailtrap-1024x570.png)**Alternative – Use Ethereal Email (Free):** JavaScript``` // For development, use Ethereal Email (fake SMTP) const testTransporter = nodemailer.createTransporter({ host: 'smtp.ethereal.email', port: 587, secure: false, auth: { user: 'ethereal.user@ethereal.email', pass: 'ethereal.password' } }); ``` ``` // For development, use Ethereal Email (fake SMTP) const testTransporter = nodemailer.createTransporter({ host: 'smtp.ethereal.email', port: 587, secure: false, auth: { user: 'ethereal.user@ethereal.email', pass: 'ethereal.password' } }); ``` **Create Your Own Test Account:** JavaScript``` async function createTestAccount() { const testAccount = await nodemailer.createTestAccount(); const transporter = nodemailer.createTransporter({ host: 'smtp.ethereal.email', port: 587, secure: false, auth: { user: testAccount.user, pass: testAccount.pass } }); return transporter; } ``` ``` async function createTestAccount() { const testAccount = await nodemailer.createTestAccount(); const transporter = nodemailer.createTransporter({ host: 'smtp.ethereal.email', port: 587, secure: false, auth: { user: testAccount.user, pass: testAccount.pass } }); return transporter; } ``` ### **Unit Testing with Jest** JavaScript``` const nodemailer = require('nodemailer'); const { sendEmail } = require('./emailService'); // Mock nodemailer jest.mock('nodemailer'); describe('Email Service', () => { test('should send email successfully', async () => { const mockSendMail = jest.fn().mockResolvedValue({ messageId: '12345' }); nodemailer.createTransporter.mockReturnValue({ sendMail: mockSendMail }); const result = await sendEmail('test@example.com', 'Test Subject', 'Test Body'); expect(mockSendMail).toHaveBeenCalled(); expect(result.success).toBe(true); }); }); ``` ``` const nodemailer = require('nodemailer'); const { sendEmail } = require('./emailService'); // Mock nodemailer jest.mock('nodemailer'); describe('Email Service', () => { test('should send email successfully', async () => { const mockSendMail = jest.fn().mockResolvedValue({ messageId: '12345' }); nodemailer.createTransporter.mockReturnValue({ sendMail: mockSendMail }); const result = await sendEmail('test@example.com', 'Test Subject', 'Test Body'); expect(mockSendMail).toHaveBeenCalled(); expect(result.success).toBe(true); }); }); ``` ### **Integration Testing** Create a dedicated test route for email functionality: JavaScript``` app.post('/test-email', async (req, res) => { try { const testResult = await sendCustomEmail( 'test@yourdomain.com', 'Test Email', 'This is a test email from the system.' ); res.json({ success: true, messageId: testResult.messageId }); } catch (error) { res.status(500).json({ success: false, error: error.message }); } }); ``` ``` app.post('/test-email', async (req, res) => { try { const testResult = await sendCustomEmail( 'test@yourdomain.com', 'Test Email', 'This is a test email from the system.' ); res.json({ success: true, messageId: testResult.messageId }); } catch (error) { res.status(500).json({ success: false, error: error.message }); } }); ``` ## **Advanced Features and Customization** Ready to level up your **node mailer** game? Let’s explore some advanced features that’ll make your emails stand out from the crowd! ### **Custom Headers and Metadata** JavaScript``` const advancedMailOptions = { from: 'noreply@company.com', to: 'user@example.com', subject: 'Advanced Email Features', text: 'This email showcases advanced features.', headers: { 'X-Custom-Header': 'My Custom Value', 'X-Priority': '1', 'X-Mailer': 'Node Mailer Advanced' }, messageId: 'custom-message-id@company.com', date: new Date('2025-01-15') }; ``` ``` const advancedMailOptions = { from: 'noreply@company.com', to: 'user@example.com', subject: 'Advanced Email Features', text: 'This email showcases advanced features.', headers: { 'X-Custom-Header': 'My Custom Value', 'X-Priority': '1', 'X-Mailer': 'Node Mailer Advanced' }, messageId: 'custom-message-id@company.com', date: new Date('2025-01-15') }; ``` ### **Bulk Email Sending** JavaScript``` async function sendBulkEmails(recipients, subject, content) { const emailPromises = recipients.map(async (recipient) => { const mailOptions = { from: process.env.EMAIL_USER, to: recipient.email, subject: subject, html: content.replace('{{name}}', recipient.name) }; return transporter.sendMail(mailOptions); }); try { const results = await Promise.allSettled(emailPromises); console.log(`Sent ${results.length} emails`); return results; } catch (error) { console.error('Bulk email error:', error); } } ``` ``` async function sendBulkEmails(recipients, subject, content) { const emailPromises = recipients.map(async (recipient) => { const mailOptions = { from: process.env.EMAIL_USER, to: recipient.email, subject: subject, html: content.replace('{{name}}', recipient.name) }; return transporter.sendMail(mailOptions); }); try { const results = await Promise.allSettled(emailPromises); console.log(`Sent ${results.length} emails`); return results; } catch (error) { console.error('Bulk email error:', error); } } ``` ### **Email Scheduling and Queues** For production applications, consider implementing email queues: JavaScript``` const Queue = require('bull'); const emailQueue = new Queue('email processing'); emailQueue.process(async (job) => { const { to, subject, content } = job.data; return await transporter.sendMail({ to, subject, html: content }); }); // Add email to queue function scheduleEmail(emailData, delay = 0) { emailQueue.add(emailData, { delay }); } ``` ``` const Queue = require('bull'); const emailQueue = new Queue('email processing'); emailQueue.process(async (job) => { const { to, subject, content } = job.data; return await transporter.sendMail({ to, subject, html: content }); }); // Add email to queue function scheduleEmail(emailData, delay = 0) { emailQueue.add(emailData, { delay }); } ``` ## **Performance Optimization Tips** Want your email system to run faster than a cheetah? Here are some performance optimization strategies for **node mailer**! ### **Connection Pooling** JavaScript``` const transporter = nodemailer.createTransporter({ service: 'gmail', auth: { user: process.env.EMAIL_USER, pass: process.env.EMAIL_PASS }, pool: true, // Enable connection pooling maxConnections: 5, // Limit concurrent connections maxMessages: 100 // Limit messages per connection }); ``` ``` const transporter = nodemailer.createTransporter({ service: 'gmail', auth: { user: process.env.EMAIL_USER, pass: process.env.EMAIL_PASS }, pool: true, // Enable connection pooling maxConnections: 5, // Limit concurrent connections maxMessages: 100 // Limit messages per connection }); ``` ### **Batch Processing Strategies** JavaScript``` async function sendEmailsInBatches(emails, batchSize = 10) { const batches = []; for (let i = 0; i < emails.length; i += batchSize) { batches.push(emails.slice(i, i + batchSize)); } for (const batch of batches) { await Promise.all(batch.map(email => transporter.sendMail(email))); // Small delay between batches to avoid overwhelming the server await new Promise(resolve => setTimeout(resolve, 1000)); } } ``` ``` async function sendEmailsInBatches(emails, batchSize = 10) { const batches = []; for (let i = 0; i < emails.length; i += batchSize) { batches.push(emails.slice(i, i + batchSize)); } for (const batch of batches) { await Promise.all(batch.map(email => transporter.sendMail(email))); // Small delay between batches to avoid overwhelming the server await new Promise(resolve => setTimeout(resolve, 1000)); } } ``` ### **Caching and Reusability** JavaScript``` class EmailService { constructor() { this.transporter = null; this.templates = new Map(); } async getTransporter() { if (!this.transporter) { this.transporter = nodemailer.createTransporter({ // Your configuration }); } return this.transporter; } getTemplate(templateName) { if (!this.templates.has(templateName)) { const template = fs.readFileSync(`./templates/${templateName}.hbs`, 'utf8'); this.templates.set(templateName, handlebars.compile(template)); } return this.templates.get(templateName); } } ``` ``` class EmailService { constructor() { this.transporter = null; this.templates = new Map(); } async getTransporter() { if (!this.transporter) { this.transporter = nodemailer.createTransporter({ // Your configuration }); } return this.transporter; } getTemplate(templateName) { if (!this.templates.has(templateName)) { const template = fs.readFileSync(`./templates/${templateName}.hbs`, 'utf8'); this.templates.set(templateName, handlebars.compile(template)); } return this.templates.get(templateName); } } ``` ## **Monitoring and Analytics** Knowledge is power! Let’s set up monitoring and analytics to track your email performance and identify issues before they become problems. ### **Basic Email Tracking** JavaScript``` const emailStats = { sent: 0, failed: 0, errors: [] }; async function trackEmailSending(mailOptions) { try { const info = await transporter.sendMail(mailOptions); emailStats.sent++; // Log successful sends console.log(`✅ Email sent to ${mailOptions.to} at ${new Date().toISOString()}`); return { success: true, info }; } catch (error) { emailStats.failed++; emailStats.errors.push({ timestamp: new Date().toISOString(), recipient: mailOptions.to, error: error.message }); return { success: false, error }; } } ``` ``` const emailStats = { sent: 0, failed: 0, errors: [] }; async function trackEmailSending(mailOptions) { try { const info = await transporter.sendMail(mailOptions); emailStats.sent++; // Log successful sends console.log(`✅ Email sent to ${mailOptions.to} at ${new Date().toISOString()}`); return { success: true, info }; } catch (error) { emailStats.failed++; emailStats.errors.push({ timestamp: new Date().toISOString(), recipient: mailOptions.to, error: error.message }); return { success: false, error }; } } ``` ### **Health Check Endpoints** JavaScript``` app.get('/email/health', (req, res) => { const healthStatus = { status: 'healthy', statistics: emailStats, lastError: emailStats.errors[emailStats.errors.length - 1], uptime: process.uptime() }; res.json(healthStatus); }); ``` ``` app.get('/email/health', (req, res) => { const healthStatus = { status: 'healthy', statistics: emailStats, lastError: emailStats.errors[emailStats.errors.length - 1], uptime: process.uptime() }; res.json(healthStatus); }); ``` ### **Integration with Monitoring Services** JavaScript``` const winston = require('winston'); const logger = winston.createLogger({ level: 'info', format: winston.format.json(), transports: [ new winston.transports.File({ filename: 'email-errors.log', level: 'error' }), new winston.transports.File({ filename: 'email-combined.log' }) ] }); async function monitoredEmailSend(mailOptions) { const startTime = Date.now(); try { const result = await transporter.sendMail(mailOptions); const duration = Date.now() - startTime; logger.info('Email sent successfully', { recipient: mailOptions.to, subject: mailOptions.subject, duration: duration, messageId: result.messageId }); return result; } catch (error) { const duration = Date.now() - startTime; logger.error('Email sending failed', { recipient: mailOptions.to, subject: mailOptions.subject, duration: duration, error: error.message }); throw error; } } ``` ``` const winston = require('winston'); const logger = winston.createLogger({ level: 'info', format: winston.format.json(), transports: [ new winston.transports.File({ filename: 'email-errors.log', level: 'error' }), new winston.transports.File({ filename: 'email-combined.log' }) ] }); async function monitoredEmailSend(mailOptions) { const startTime = Date.now(); try { const result = await transporter.sendMail(mailOptions); const duration = Date.now() - startTime; logger.info('Email sent successfully', { recipient: mailOptions.to, subject: mailOptions.subject, duration: duration, messageId: result.messageId }); return result; } catch (error) { const duration = Date.now() - startTime; logger.error('Email sending failed', { recipient: mailOptions.to, subject: mailOptions.subject, duration: duration, error: error.message }); throw error; } } ``` ## **Troubleshooting Common Problems** Even experienced developers run into email issues sometimes. Here’s your troubleshooting toolkit for the most common **node mailer** problems! ### **Authentication Problems** **Problem:** “Invalid login” or “Authentication failed” **Solutions:** - Verify email and password are correct - Use App Passwords for Gmail accounts with 2FA - Check if “Less secure app access” is enabled - Ensure your account isn’t temporarily locked ### **Connection Issues** **Problem:** “Connection timeout” or “ECONNREFUSED” **Solutions:** - Check your internet connection - Try different SMTP ports (587, 465, 25) - Disable firewall temporarily to test - Verify SMTP server address is correct ### **Email Delivery Problems** **Problem:** Emails sent but not received **Checklist:** - Check spam/junk folders - Verify recipient email addresses - Monitor sender reputation - Review email content for spam triggers ### **Rate Limiting Issues** **Problem:** “Too many emails” or rate limit errors **Solutions:** JavaScript``` // Implement delay between emails async function sendWithDelay(emails, delayMs = 1000) { for (const email of emails) { try { await transporter.sendMail(email); await new Promise(resolve => setTimeout(resolve, delayMs)); } catch (error) { console.error('Email failed:', error.message); } } } ``` ``` // Implement delay between emails async function sendWithDelay(emails, delayMs = 1000) { for (const email of emails) { try { await transporter.sendMail(email); await new Promise(resolve => setTimeout(resolve, delayMs)); } catch (error) { console.error('Email failed:', error.message); } } } ``` ### **Memory and Performance Issues** **Problem:** High memory usage or slow performance **Solutions:** - Implement connection pooling - Use email queues for bulk sending - Close transporter connections when done - Monitor and limit concurrent connections JavaScript``` // Proper cleanup process.on('SIGINT', async () => { console.log('Closing email transporter...'); transporter.close(); process.exit(0); }); ``` ``` // Proper cleanup process.on('SIGINT', async () => { console.log('Closing email transporter...'); transporter.close(); process.exit(0); }); ``` ## **Conclusion** Congratulations! You’ve just mastered the art of email sending with **Node Mailer**. From basic setup to advanced features, you now have all the tools you need to build robust email functionality into your applications. Remember, **node mailer** is more than just a tool – it’s your gateway to better user communication. Whether you’re sending welcome emails, password resets, or marketing campaigns, the techniques you’ve learned will serve you well in your development journey. The key to success with **node mailer** is practice and experimentation. Start with simple emails, then gradually incorporate more advanced features as your needs grow. Don’t forget to prioritize security, monitor your email performance, and always test thoroughly before going live. ## **Frequently Asked Questions** ### **Is Node Mailer free to use and what are the limitations?** Yes, **Node Mailer** itself is completely free and open-source with no licensing fees. However, you’ll need an email service provider (like Gmail, SendGrid, or your own SMTP server) to actually send emails. Free email providers typically have sending limits – Gmail allows about 500 emails per day for free accounts, while paid services like SendGrid offer higher limits and better deliverability rates. ### **Can I send emails without exposing my password in the code?** Absolutely! You should never hardcode passwords in your source code. Use environment variables to store sensitive credentials securely. Create a `.env` file with your credentials, install the `dotenv` package, and access them using `process.env.YOUR_VARIABLE`. For production applications, consider using more secure authentication methods like OAuth2 or API keys provided by email service providers. ### **Why are my emails going to the spam folder and how can I fix it?** Emails often end up in spam due to several factors: poor sender reputation, lack of authentication records (SPF, DKIM), suspicious content, or sending from shared IP addresses. To improve deliverability, use a reputable email service provider, authenticate your domain, avoid spam trigger words, include unsubscribe links, and maintain good sending practices. Consider using dedicated email services like SendGrid or Mailgun for better inbox placement. ### **How many emails can I send at once with Node Mailer?** The number depends on your email provider’s limits and your **node mailer** configuration. Gmail free accounts limit you to about 500 emails per day, while business accounts allow up to 2,000. For bulk sending, implement connection pooling, batch processing, and delays between sends to avoid overwhelming servers. Professional email services like SendGrid can handle thousands of emails per hour with proper configuration. ### **What’s the best way to handle email failures and retry logic?** Implement comprehensive error handling with different strategies for different failure types. For temporary failures (network issues), use exponential backoff retry logic. For permanent failures (invalid email addresses), log the error and don’t retry. Consider using email queues like Bull or Agenda for reliable delivery, and always monitor your email statistics to identify patterns in failures and adjust your sending strategy accordingly. ## Stop Wasting Time on Servers. Start Building Instead. You didn’t start your project to babysit servers. Let **ServerAvatar** handle deployment, monitoring, and backups — so you can focus on growth. Deploy **WordPress, Laravel, N8N**, and more in minutes. No DevOps required. No command line. No stress. [ 🚀 Try Free ](https://app.serveravatar.com) [ 🌐 Learn More ](https://serveravatar.com/) Trusted by 10,000+ developers and growing. **Categories:** Blog, Node.js, Tutorials **Tags:** Backend Development, Confirmation Email System, Email Automation, Email Integration, Node Mailer Setup, Node.js Email, Node.js Tools, Nodemailer, Password Reset Email, SMTP Node.js --- ### [Vultr vs DigitalOcean vs Linode vs Hetzner: A Cloud Comparison](https://serveravatar.com/vultr-vs-digitalocean-vs-linode-vs-hetzner/) **Published:** August 13, 2025 **Author:** Meghna Meghwani **Content:** [![Blog banner - ServerAvatar](https://serveravatar.com/wp-content/uploads/2025/09/728_90-Banner-3-1024x127.png)](https://serveravatar.com?ref=blog)In the ever-evolving world of cloud hosting, businesses and developers face a crowded landscape of providers vying for attention. Among the most respected names are Vultr, DigitalOcean, Linode, and Hetzner, making the comparison of Vultr vs DigitalOcean vs Linode vs Hetzner essential for choosing the right solution. Cloud hosting can feel like picking a favorite ice cream flavor, but for your website or application! Have you ever wondered which provider offers the perfect mix of performance, price, and simplicity? We’ll look at the main four, Vultr, DigitalOcean, Linode, and Hetzner, in a way that’s as easy to understand as your morning toast. Let’s get started! This comparison will help you make an informed choice, whether you’re working on a personal project, scaling out your business’s infrastructure, or just seeking for the best performance-to-price ratio. ## What to Look for in a Cloud Service Provider When you shop for an automobile, you should think about how fast it goes, how reliable it is, how much it costs, and how easy it is to use. Think about what’s most important to you: price, speed, global reach, support, or special features. ## Quick Overview ## Vultr**:** It’s known for its global footprint and wide range of offerings, from bare-metal servers to Kubernetes clusters. Vultr is both flexible and affordable. Vultr is like your favorite sports car that goes fast. It offers speedy SSD servers, multiple operating system choices, and a wide range of plans. It’s popular among users who want performance with a splash of flexibility, think easy OS installs, and hourly billing. ![Vultr vs DigitalOcean](https://serveravatar.com/wp-content/uploads/2025/08/image-2025-08-13T152713.354-1024x531.png)## DigitalOcean: Developers love DigitalOcean. It puts a lot of emphasis on being simple and easy to use. It has a user-friendly interface, a strong community, and clear pricing, which makes it a popular first pick. It seems like a reliable, fuel-efficient automobile that developers appreciate because it’s easy to use and dependable. Known for its “droplet” virtual servers, a clean dashboard, and helpful tutorials, it’s great for developers of all levels. Those “getting started” tutorials feel like a helpful friend guiding you by the hand. ![DigitalOcean-ServerAvatar](https://serveravatar.com/wp-content/uploads/2025/08/image-2025-08-13T152744.554-1024x475.png)## Linode: Akamai currently owns Linode. Linode is known for its reliable service, constant performance, and clear pricing. It strikes a balance, like the strong SUV you trust to take you on road trips. It’s been around for a while, the prices are always the same, and the performance is always the same. Linode is all about trust and ease of use, and they have a long history of success. ![Linode-ServerAvatar](https://serveravatar.com/wp-content/uploads/2025/08/image-2025-08-13T152830.772-1024x473.png)## Hetzner: A European powerhouse. It stands out because it has a great price-to-performance ratio, which is especially tempting to people who want a lot of power without spending a lot of money. It is a budget-friendly, like finding a premium car at a bargain price. It has its headquarters in Germany and offers very good prices and strong hardware. Hetzner is a great choice if you desire power but don’t want to spend a lot of money. ![Hetzner-ServerAvatar](https://serveravatar.com/wp-content/uploads/2025/08/image-2025-08-13T152906.033-1024x513.png)## Global Presence and Distribution of Data Centers - Vultr operates data centers in more than 20 countries throughout the world, such as North America, Europe, Asia, and Australia. This helps speed up performance and minimize latency all across the world. - DigitalOcean offers 13 data centers in key locations, such as North America, Europe, Asia, and now Australia. - Linode has roughly 11 data centers on different continents. A excellent mix of basic and strong controls that are great for those who desire more depth without making things too hard. - Germany and Finland are Hetzner’s most important markets. It doesn’t cover a lot of the world, but where it does, it really shines. It offers a user interface that is easier to use and is faster. It’s fantastic for folks who know how to use the command line or write scripts. **Why it matters:** More data centers usually mean higher availability, less latency, and more redundancy, which is especially significant for applications that are used all over the world. If your audience is all over the world, Vultr or DigitalOcean would be better choices. Hetzner is a great choice for European targets. [![Blog banner - ServerAvatar](https://serveravatar.com/wp-content/uploads/2025/09/728_90-Banner-1-1024x127.png)](https://serveravatar.com?ref=blog)## Dependability and Performance - With NVMe storage and fast network connections, Vultr works quite well. Its bare-metal and dedicated plans are great for tasks that use a lot of CPU. The UI is clean, and the API documentation is useful. This is great for developers who want both flexibility and control. - DigitalOcean offers reliable performance and consistent benchmarks. Its “Droplets” are designed to be easy to use and fast. Its easy-to-follow tutorials and active community make onboarding easy, and its service is second to none. - Linode has gained confidence over the years by providing very reliable service and exceptional uptime. - Hetzner is better than it should be. Its hardware is better than its competitors’, and its prices are competitive, making it a performance beast, especially for Linux users. All four are fast, but how fast they are for you may differ. DigitalOcean is noted for having SSDs with minimal latency and fast networks. Vultr has NVMe disks that work quite well in many places. Linode has consistent performance. Hetzner generally gets high ratings in tests of raw performance per dollar. ## Feature Set & Developer Tools - **Vultr**: Offers a comprehensive suite, block storage, object storage, Kubernetes, DDoS protection, marketplace templates, and APIs. - **DigitalOcean**: Known for its “Droplets”, it also provides Kubernetes, managed databases, load balancers, spaces (object storage), and a rich marketplace and community. - **Linode**: Offers load balancers, Object Storage (S3-compatible), managed Kubernetes, and a powerful CLI and API. - **Hetzner**: Offers basic cloud servers, volumes, load balancers, and object storage (S3-compatible). The feature suite is smaller but solid for many traditional use cases. ## What is ServerAvatar [ServerAvatar](https://serveravatar.com/) is a platform to simplify the hosting and management of servers and applications. It simplifies the process of deploying and managing PHP and Node.js based web applications on servers. At **[ServerAvatar](https://serveravatar.com/)**, we make cloud server hosting and management effortless by offering **Vultr** and **DigitalOcean** as fully **Managed Server** options, so you can launch, configure, and run your server directly from our dashboard without dealing with complex setups. (Linode and Hetzner are coming soon). We also offer higher-tier plans with advanced features for users, along with add-ons like our Premium Hosting Care Plan for priority support and maintenance, and the Self-Managed Server Add-on that lets you connect your own server from any cloud provider. From one-click app installs and automatic backups to SSL certificates, performance optimization, and team collaboration tools. ServerAvatar makes hosting simple, powerful, and cost-effective. You’ll have even more affordable and high-performance options at your fingertips. ![ServerPanel- ServerAvatar](https://serveravatar.com/wp-content/uploads/2025/08/image-2025-08-13T153124.388-1024x409.png)## Pricing & Plans Breakdown[](https://storage.3.basecamp.com/5840738/blobs/3189b87a-775d-11f0-9ee0-0242ac120004/download/image.png) ProviderEntry Price (monthly)HighlightsVultr$2.50NVMe SSD storage, global data centers, wide OS choicesDigitalOcean$4.00Simple plans, beginner-friendly dashboardLinode~$5.00Stable performance, strong developer communityHetzner$3.79High-performance hardware, strong presence in EuropeThese numbers change, so always check current plans. But Hetzner often wins on sheer affordability, with Vultr and Linode close behind, and DigitalOcean offering value if ease-of-use matters more. ## Support & Community - DigitalOcean has great documentation and guidance, as well as community support with tutorials, Q&A, and guides for developers. - Linode: The service is good and reliable, and higher-tier subscriptions include live support. The forums have been active for years. - Vultr has a help center and ticket-based assistance, although the speed of service can change. The documentation is good, and the community resources are getting better. - Hetzner: Support is reliable, especially if you don’t mind EU hours and email support. DigitalOcean’s community is great for people who like to learn on their own. ## Unique Features & Perks - **Vultr:** Hourly billing, broad OS options, and private networking. - **DigitalOcean:** Managed databases, app platform, one-click apps (think WordPress in a flash). - **Linode:** Backups, Kubernetes, and strong API support. - **Hetzner:** Great hardware, custom cloud images, and cost-effective block storage. Each provider has something special to offer, so consider about which benefits are most important to you. ## Security & Reliability All four participants provide typical security measures, firewalls, backups, and uptime guarantees. DigitalOcean, Linode, and Vultr all have good SLAs. Hetzner is very reliable, but if uptime is very important to you, make sure you understand their backup and SLA conditions. ## Flexibility and scalability Want to grow? These platforms make it easy to grow. - **Vultr:** It lets you automatically scale your servers using Kubernetes and gives you API access to quickly spin up and down servers. - **DigitalOcean:** Offers managed Kubernetes, convenient horizontal scalability choices, and support for app platform scaling. - **Linode:** You can easily resize instances, it works with Kubernetes, and it’s easy to upgrade. - **Hetzner:** Manual scaling works, but it’s not as smooth as it is with other companies. ## Use Case - DigitalOcean and Linode are perfect for small projects and companies since they are straightforward to use and their monthly costs are easy to forecast. - High Performance / Power Users: When it comes to sheer performance per dollar, Hetzner is the finest pick. - Vultr is an excellent choice for businesses and people all over the world because it has servers in many places and offers a lot of different services. - DigitalOcean is the finest place for developers to learn and explore new things because it includes tutorials, tools, and a community. ## Network & Bandwidth - **Vultr**, **DigitalOcean**, and **Linode** include generous outbound bandwidth (often 1–3 TB/month) and charge for overages. - **Hetzner** includes high bandwidth allowances, even some plans with unlimited traffic, making it cost-effective for data-heavy workloads. ## Which One Is Right for You? - **Budget-seekers**: Hetzner - **Slick interfaces & tutorials**: DigitalOcean - **Reliable all-rounder**: Linode - **Performance-focused & global options**: Vultr Your “best” cloud is the one that fits your priorities, budget? interface? regional reach? performance? ## Conclusion Picking a cloud provider is like choosing your perfect ride. Vultr is fast and flexible. DigitalOcean is friendly and beginner-focused. Linode is sturdy and dependable. Hetzner gives the most power per buck. At the end of the day, it’s all about what drives you, speed, price, ease, or scale. - Choose Hetzner if price-to-performance ratio and low-cost raw power are your top priorities. - Opt for DigitalOcean if you’re building something new, want fast learning, and love community-driven guidance. - Lean on Linode for stable, reliable performance and transparent pricing with strong support. - Go with Vultr for global scalability, breadth of offerings, and flexibility across budgets. All the information you need about Vultr, DigitalOcean, Linode, and Hetzner is here. Like cars, each one has its own quirks, strengths, and costs. That’s what makes this so exciting: there isn’t a single answer that works for everyone. Now, let’s roll up our sleeves and select the cloud that seems like the best fit. ## FAQs ### **1. What is the cheapest cloud provider?** Hetzner typically offers the lowest pricing, especially for European-based servers. ### **2. Best for beginners?** DigitalOcean is very easy for beginners to use because it has a clean interface, instructions, and apps that you can install with only one click. ### **3. Which one has the most data centers around the world?** Vultr boasts a wide global reach, followed by DigitalOcean and Linode. ### **4. Who does the best job?** Performance can change, but Hetzner usually has the greatest hardware for the money. Vultr’s NVMe servers also work very well. ### **5. Can I easily scale with these providers?** Yes! All four support fast scaling, either by resizing droplets, upgrading plans, or adding resources like block storage. **Categories:** Blog, Cloud Platforms, Guide **Tags:** Best cloud hosting, Cloud hosting comparison, Cloud hosting guide, Cloud VPS, DigitalOcean, Linode, Vultr --- ### [Microservices Infrastructure vs Monoliths: Pros and Cons](https://serveravatar.com/microservices-infrastructure-vs-monoliths/) **Published:** August 14, 2025 **Author:** Smit Pipaliya **Content:** [![Blog banner - ServerAvatar](https://serveravatar.com/wp-content/uploads/2025/09/728_90-Banner-3-1024x127.png)](https://serveravatar.com?ref=blog)In the rapidly evolving landscape of software architecture, **Infrastructure vs Monoliths** is one of the most critical decisions development teams face. Choosing between microservices infrastructure and monolithic architecture can significantly impact your application’s scalability, maintainability, deployment strategies, and overall development experience. Both architectural patterns have their strengths and weaknesses, and the right choice depends on various factors including team size, project complexity, scalability requirements, and organizational structure. Let’s dive deep into understanding these two approaches and when to use each one. ## Understanding Monolithic Architecture ![Monolithic Architecture-ServerAvatar](https://serveravatar.com/wp-content/uploads/2025/08/Screenshot-2025-08-11-at-3.22.20-PM.png)A monolithic architecture represents a traditional approach where an entire application is built as a single, unified unit. All components, features, and functionalities are tightly integrated within one codebase and deployed together as a single package. In a monolithic system, the user interface, business logic, data access layers, and database interactions all exist within the same application boundary. This means that any change, regardless of how small, requires rebuilding and redeploying the entire application. **Key Characteristics of Monoliths** Monolithic applications typically feature a single deployment unit, shared database, synchronized development cycles, and centralized logging and monitoring. The entire application runs in a single process, making inter-component communication straightforward through in-process method calls. ## Understanding Microservices Architecture[](https://storage.3.basecamp.com/5840738/blobs/0d36be24-7699-11f0-8467-0242ac120005/download/Screenshot%202025-08-11%20at%203.23.31%E2%80%AFPM.png) ![Infrastructure vs Monoliths-ServerAvatar](https://serveravatar.com/wp-content/uploads/2025/08/Screenshot-2025-08-11-at-3.23.31-PM-1024x273.png)Microservices architecture breaks down an application into multiple small, independent services that communicate over well-defined APIs. Each service is responsible for a specific business function and can be developed, deployed, and scaled independently. This approach promotes loose coupling between services, allowing teams to work independently, choose different technologies for different services, and deploy updates without affecting the entire system. Each microservice typically has its own database and handles a specific business domain. **Key Characteristics of Microservices** Microservices feature independent deployments, decentralized data management, technology diversity, fault isolation, and distributed system complexity. Services communicate through network calls, typically using REST APIs, message queues, or event streaming platforms. ## Detailed Comparison[](https://storage.3.basecamp.com/5840738/blobs/5767b110-7699-11f0-8f02-0242ac120003/download/Screenshot%202025-08-11%20at%203.25.34%E2%80%AFPM.png) **Aspect****Monolithic Architecture****Microservices Architecture****Development Speed**Fast initial development, slower as codebase growsSlower initial setup, faster parallel development**Deployment**Single deployment unit, all-or-nothingIndependent service deployments**Scalability**Scale entire application togetherScale individual services independently**Technology Stack**Single technology stack for entire appDifferent technologies per service**Team Structure**Single team or coordinated teamsMultiple independent teams**Testing**Simpler integration testingComplex distributed system testing**Monitoring**Centralized logging and monitoringDistributed tracing and monitoring**Data Management**Centralized databaseDecentralized data per service## Monolithic Architecture: Pros and Cons **Advantages** - Simple development and deployment process - Easier debugging and testing - Better performance for small to medium applications - Simpler monitoring and logging - ACID transactions across the entire application - Lower operational complexity - Faster initial development - Single codebase to maintain **Disadvantages** - Limited scalability options - Technology lock-in - Large codebase becomes difficult to maintain - Single point of failure - Deployment of small changes requires full redeployment - Difficult to scale development teams - Resource waste when scaling - Slower feature delivery in large applications ## Microservices Architecture: Pros and Cons **Advantages** - Independent scaling of individual services - Technology diversity and flexibility - Fault isolation and resilience - Independent team development - Easier to understand individual services - Faster deployment of individual features - Better alignment with business domains - Improved resource utilization **Disadvantages** - Increased operational complexity - Network latency and communication overhead - Distributed system challenges - Complex testing and debugging - Data consistency challenges - Higher infrastructure costs initially - Service discovery and load balancing complexity - Requires mature DevOps practices [![Blog banner - ServerAvatar](https://serveravatar.com/wp-content/uploads/2025/09/728_90-Banner-1-1024x127.png)](https://serveravatar.com?ref=blog)## When to Choose Each Architecture **Choose Monolithic Architecture When:** - **Starting a new project:** Monoliths are perfect for MVP development and early-stage applications where requirements are still evolving - **Small team size:** Teams with fewer than 10 developers can effectively manage a monolithic codebase - **Simple application:** Applications with straightforward business logic and limited complexity - **Limited resources:** When you have constraints on infrastructure, DevOps expertise, or budget - **Tight coupling requirements:** When business processes are inherently coupled and require ACID transactions - **Performance critical:** When low latency is crucial and network overhead must be minimized **Choose Microservices Architecture When:** - **Large, complex applications:** Systems with multiple distinct business domains and complex workflows - **Multiple teams:** Organizations with several development teams that need to work independently - **Scalability requirements:** Applications with varying load patterns across different features - **Technology diversity needs:** When different services would benefit from different technology stacks - **Mature DevOps culture:** Organizations with strong CI/CD, monitoring, and operational practices - **Fault tolerance requirements:** Systems that need to remain operational even when individual components fail **Migration Strategies** ![Migration Strategies-ServerAvatar](https://serveravatar.com/wp-content/uploads/2025/08/Screenshot-2025-08-11-at-3.29.32-PM-1.png)he strangler fig pattern is often the most effective approach for migrating from monolith to microservices. This involves gradually extracting functionality into separate services while keeping the existing monolith running. New features can be built as microservices, and existing features can be extracted over time. It’s important to note that migration should be driven by business needs, not technology trends. Many successful applications continue to operate effectively as monoliths, and unnecessary migration can introduce complexity without corresponding benefits. ## Best Practices and Considerations **For Monolithic Applications:** Focus on maintaining clean architecture with well-defined modules and boundaries. Use dependency injection, implement proper layering, and maintain good test coverage. Consider using feature flags for gradual rollouts and implement comprehensive monitoring even within the monolith. **For Microservices Applications:** Invest heavily in automation, monitoring, and DevOps practices. Implement circuit breakers, retries, and timeout mechanisms for resilience. Design for failure from the beginning, use asynchronous communication where possible, and maintain service contracts carefully. Implement comprehensive logging and distributed tracing. **Common Anti-patterns to Avoid:** Don’t create microservices that are too small (nano-services) or too large (distributed monoliths). Avoid shared databases between services, don’t neglect the operational complexity, and resist the urge to migrate without clear business justification. Remember that distributed monoliths combine the worst aspects of both approaches. ## Conclusion The choice between microservices infrastructure and monolithic architecture isn’t about which is universally better, it’s about which approach better aligns with your specific context, requirements, and organizational capabilities. Monolithic architecture excels in simplicity, performance, and ease of development for smaller applications and teams. It’s an excellent choice for startups, MVPs, and applications where the business domain is well-understood and relatively simple. Microservices architecture shines in complex, large-scale applications where independent scaling, technology diversity, and team autonomy are crucial. However, it requires significant investment in tooling, processes, and expertise. Remember that architecture is not permanent. Many successful companies have started with monoliths and gradually evolved to microservices as their needs changed. The key is to make an informed decision based on your current context while designing for future evolution. **Key Takeaway** Start with the simplest architecture that meets your current needs. Premature optimization toward microservices can introduce unnecessary complexity, while prematurely sticking with monoliths can limit growth. Design your systems to be evolvable, and be prepared to adapt your architecture as your organization and requirements mature. ## Stop Wasting Time on Servers. Start Building Instead. You didn’t start your project to babysit servers. Let **ServerAvatar** handle deployment, monitoring, and backups — so you can focus on growth. Deploy **WordPress, Laravel, N8N**, and more in minutes. No DevOps required. No command line. No stress. [ 🚀 Try Free ](https://app.serveravatar.com) [ 🌐 Learn More ](https://serveravatar.com/) Trusted by 10,000+ developers and growing. **Categories:** Blog, Guide **Tags:** Application Scalability, Cloud Hosting, Cloud Infrastructure, Deployment Strategies, Infrastructure vs Monoliths, Microservices Architecture, Monolithic Architecture, PHP Hosting --- ### [Object Storage vs Block Storage: Key Differences Explained](https://serveravatar.com/object-storage-vs-block-storage/) **Published:** August 15, 2025 **Author:** Meghna Meghwani **Content:** [![Blog banner - ServerAvatar](https://serveravatar.com/wp-content/uploads/2025/09/728_90-Banner-3-1024x127.png)](https://serveravatar.com?ref=blog)It’s important to know the main differences between **Object Storage vs Block Storage** when you need to find the right storage solution for your business or application. This complete guide explains everything you need to know about these two types of storage architectures, so you can make a smart choice that meets your needs. ## What is Block Storage? Block storage breaks up data into blocks of a set size, each with its own unique ID. It’s like a regular hard drive, with data stored in certain places that the operating system can get to directly. Each block works on its own, which makes reading and writing very fast. ## How Block Storage Works Block storage looks like a raw block device to the operating system, just like a real hard drive. After that, the OS can format this storage with any file system it knows how to use. Block storage is very fast and efficient for apps that need to change data often because it gives you direct, low-level access. ## Key characteristics of block storage: - Data stored in fixed-size blocks (typically 512 bytes to 64KB) - Direct access through operating system - High IOPS (Input/Output Operations Per Second) - Low latency for read/write operations - Suitable for structured data ## What is Object Storage? Object storage keeps data in separate objects in a flat address space called buckets or containers. Block storage has a hierarchical structure, but object storage has a simple namespace where each object has the data, metadata, and a globally unique identifier. ## How Object Storage Works Files turn into objects that are stored in buckets with lots of metadata in object storage systems. REST APIs and HTTP protocols let applications get to these objects. This web-friendly method makes object storage perfect for cloud-native apps and systems that are spread out. **Key characteristics of object storage:** - Data stored as complete objects - Flat namespace structure - REST API access via HTTP/HTTPS - Rich metadata capabilities - Highly scalable architecture - Built-in redundancy and durability ## Object Storage vs Block Storage: A Direct Comparison of Performance ![](https://serveravatar.com/wp-content/uploads/2025/08/full.webp)**Block Storage Performance:** - **IOPS:** 10,000+ IOPS typical for SSD-based systems - **Latency:** Sub-millisecond response times - **Throughput:** Optimized for frequent, small read/write operations - **Best for:** Databases, virtual machines, file systems **Object Storage Performance:** - **IOPS:** Lower IOPS, typically hundreds to thousands - **Latency:** Higher latency due to HTTP overhead - **Throughput:** Excellent for large file transfers - **Best for:** Content delivery, backup, archival **Scalability Comparison** When you add more storage space to existing volumes, block storage usually scales vertically. When you add more nodes to the cluster, object storage usually scales horizontally. Object storage can theoretically grow to exabytes, which makes it better for handling huge amounts of data. ## Cost Analysis: How Much Does Block Storage Cost? - Higher per-GB pricing - Additional costs for high-performance options - Infrastructure overhead for management **Object Storage Costs:** - Lower per-GB pricing at scale - Pay-as-you-grow pricing models - Reduced operational overhead ## Use Cases: When to Choose What 1. **Database Applications** - MySQL, PostgreSQL, Oracle databases - Requires frequent random read/write operations - ACID compliance needs 2. **Virtual Machine Storage** - VM boot drives and application storage - Container persistent volumes - High-performance computing workloads 3. **File Systems** - Network-attached storage (NAS) - Shared file systems - Traditional application storage ## Best Object Storage Use Cases 1. **Content Management and Distribution** - Website assets (images, videos, documents) - Content delivery networks (CDN) origin storage - Media streaming applications 2. **Backup and Archival** - Long-term data retention - Disaster recovery solutions - Compliance and regulatory storage 3. **Big Data and Analytics** - Data lakes and warehouses - Log file storage and analysis - IoT data collection 4. **Cloud-Native Applications** - Microservices architectures - Static website hosting - API-driven applications ## Advantages and Disadvantages **Block Storage Pros and Cons Advantages:** - Superior performance for transactional workloads - Native OS integration - Supports any file system - Low latency operations - Familiar management model **Disadvantages:** - Limited scalability compared to object storage - Higher costs at scale - Complex backup and replication - Requires traditional storage expertise ## Object Storage Pros and Cons **Advantages:** - Massive scalability potential - Built-in redundancy and durability - Cost-effective for large datasets - REST API simplicity - Global accessibility - Rich metadata capabilities **Disadvantages:** - Higher latency for small operations - Not suitable for frequently modified data - Limited file system integration - Eventual consistency models [![Blog banner - ServerAvatar](https://serveravatar.com/wp-content/uploads/2025/09/728_90-Banner-1-1024x127.png)](https://serveravatar.com?ref=blog)## Popular Storage Solutions in the Market **Amazon EBS (Elastic Block Store)** - Multiple volume types for different performance needs - Snapshot capabilities - Encryption at rest and in transit **Google Persistent Disk** - High-performance SSD options - Automatic encryption - Regional replication **Azure Managed Disks** - Multiple disk types (Standard, Premium, Ultra) - Integrated backup solutions - Zone-redundant storage options ## Top Object Storage Services[](https://storage.3.basecamp.com/5840738/blobs/8bec881a-7767-11f0-9b34-0242ac120004/download/image.png) ![Object Storage vs Block Storage](https://serveravatar.com/wp-content/uploads/2025/08/full-1-1024x683.webp)**Amazon S3 (Simple Storage Service)** - Industry-leading object storage - Multiple storage classes for cost optimization - Comprehensive security features **Google Cloud Storage** - Multi-regional and regional options - Lifecycle management policies - Strong consistency guarantees **Azure Blob Storage** - Hot, cool, and archive access tiers - Advanced security and compliance features - Global content distribution ## Making the Right Choice for Your Business When choosing between object and block storage, consider these critical factors: 1. **Application Requirements** - Does your application need frequent data updates? Choose block storage - Are you storing large amounts of unstructured data? Choose object storage 2. **Performance Needs** - High IOPS requirements favor block storage - High throughput for large files favors object storage 3. **Scalability Requirements** - Predictable growth suits block storage - Massive, unpredictable growth suits object storage 4. **Budget Considerations** - Higher performance needs with smaller datasets: block storage - Cost optimization for large datasets: object storage 5. **Integration Complexity** - Legacy applications: block storage - Cloud-native applications: object storage ## Hybrid Approaches and Future Trends A lot of businesses don’t pick just one type of storage. Instead, they use hybrid architectures that make use of both block and object storage in the areas where each one works best. For instance, using block storage for active databases and object storage for archiving old data. **Emerging Trends** - **Storage-as-a-Service:** Growing adoption of managed storage solutions - **Multi-cloud strategies:** Organizations spreading storage across multiple providers - **AI and ML workloads:** Driving demand for high-performance object storage - **Edge computing:** Creating new requirements for distributed storage ## FAQ ### **1. Can I use both object storage and block storage together?** Yes! Many applications use block storage for databases and object storage for files, backups, and static content. ### **2. Which storage type is more secure?** Both can be equally secure when properly configured. Object storage often provides more granular access controls per object. ### **3. Is object storage always cheaper?** Generally yes for large amounts of data, especially infrequently accessed files. Block storage may be more cost-effective for small, high-performance workloads. ### **4. Can I migrate from block storage to object storage?** Yes, but you’ll need to plan the migration and potentially modify applications to use object storage APIs instead of file system calls. ### **5. Which is better for backups?** Object storage is typically better for backups due to built-in redundancy, geographic distribution, and lower costs for archived data. ## Conclusion It’s not always a clear choice between object storage and block storage. Knowing your specific needs, such as how you plan to use the product, how much performance you need, how much you can spend, and how much you can grow will help you make the right choice. Block storage is great for high-performance, frequently accessed situations, while object storage is great for large-scale, cost-effective, and globally distributed applications. Both types of storage will continue to be important parts of modern IT infrastructure as cloud computing continues to change. Choosing the right tool for each job is important, and often that means using both in a well-designed solution. Before making big commitments, you might want to try out both methods on a small scale with your real workloads. This hands-on experience will give you useful information that goes along with what you learn in this guide. ## Stop Wasting Time on Servers. Start Building Instead. You didn’t start your project to babysit servers. Let **ServerAvatar** handle deployment, monitoring, and backups — so you can focus on growth. Deploy **WordPress, Laravel, N8N**, and more in minutes. No DevOps required. No command line. No stress. [ 🚀 Try Free ](https://app.serveravatar.com) [ 🌐 Learn More ](https://serveravatar.com/) Trusted by 10,000+ developers and growing. **Categories:** Blog, Guide **Tags:** Block Storage Explained, Cloud Computing Storage, Cloud Storage Solutions, Data Storage Types, Enterprise Data Storage, Object Storage Explained, Object Storage vs Block Storage, Storage Architecture Comparison --- ### [20 Linux Commands Every Server Admin Must Know](https://serveravatar.com/linux-commands-for-server-admins/) **Published:** August 19, 2025 **Author:** Meghna Meghwani **Content:** [![Blog banner - ServerAvatar](https://serveravatar.com/wp-content/uploads/2025/09/728_90-Banner-3-1024x127.png)](https://serveravatar.com?ref=blog)Back when I started managing servers, I remember staring at the terminal, completely lost. The blinking cursor felt like it was mocking me. Fast forward a few years, and now **Linux Commands** feel as natural as breathing. Whether you’re currently managing Linux servers or planning to, these twenty **Linux Commands** will prove essential time and time again. ## 1. ssh – Remote Server Access Look, if you’re going to manage servers, ssh is where everything starts. It’s how you connect to that machine sitting in a data center thousands of miles away. Just type ssh username@server-ip and boom, you’re in. Sometimes you’ll need a different port – that’s when -p comes in handy. I can’t tell you how many times I’ve fixed critical issues at 2 AM from my couch thanks to ssh. Bash``` ssh admin@192.168.1.100 -p 2222 ``` ``` ssh admin@192.168.1.100 -p 2222 ``` ## 2. ls – Directory Listing Sure, ls seems boring. But when you need to see what files are where, nothing beats it. I live by ls -la because it shows everything, including those sneaky hidden files that start with a dot. Add -h to the mix and suddenly file sizes make sense – no more counting zeros to figure out if that’s megabytes or gigabytes. Bash``` ls -lath /var/log/ ``` ``` ls -lath /var/log/ ``` ## 3. cd – Directory Navigation You’d be surprised how much time you waste clicking through folders in a GUI. With cd, you zip around the filesystem like it’s nothing. Here’s a trick: cd – jumps back to wherever you just were. Saved me countless keystrokes over the years. Bash``` cd /etc/nginx/sites-available ``` ``` cd /etc/nginx/sites-available ``` ## 4. grep – Text Search and Filter Ever tried finding one error in a log file with 50,000 lines? Without grep, you’d go insane. This thing searches through text faster than you can blink. I use grep -r when I need to search through a whole bunch of files at once. The -i flag is great when you can’t remember if that error message was uppercase or lowercase. Bash``` grep -i "error" /var/log/apache2/error.log ``` ``` grep -i "error" /var/log/apache2/error.log ``` ## 5. tail – Log File Monitoring Logs tell you everything about what your server’s doing. The tail command shows you the latest entries, but tail -f is where the magic happens. It keeps showing new lines as they appear. When something’s breaking, this is usually the first thing I run. Bash``` tail -f /var/log/syslog ``` ``` tail -f /var/log/syslog ``` ## 6. ps – Process Status Servers run tons of processes, and sometimes one goes rogue. Running ps aux gives you the full picture – what’s running, who started it, how much CPU it’s eating. Pipe it through grep when you’re hunting for something specific. Can’t count how many runaway processes I’ve caught this way. Bash``` ps aux | grep mysql ``` ``` ps aux | grep mysql ``` ## 7. top – System Performance Monitor Think of top as your server’s vital signs monitor. It updates every few seconds, showing which processes are hogging resources. When a server starts crawling, top usually tells me why within seconds. Hit ‘M’ to sort by memory, ‘P’ for processor usage. Bash``` top -u www-data ``` ``` top -u www-data ``` ## 8. df – Disk Space Analysis Servers filling up their disks is probably the most common issue I deal with. A quick df -h tells you exactly how much space you’ve got on each drive. Nothing worse than a database crashing because someone forgot to rotate logs and filled up the disk. Bash``` df -h ``` ``` df -h ``` ## 9. du – Directory Usage Statistics So df told you the disk is full, but what’s eating all that space? That’s where du comes in. I usually start with du -sh \* to see which folders are the culprits. Nine times out of ten, it’s either logs or some forgotten backup file. Bash``` du -sh /var/log/* ``` ``` du -sh /var/log/* ``` ## 10. chmod – File Permission Management File permissions in Linux can be tricky, but they’re crucial for security. The chmod command lets you control who can read, write, or run your files. Most of the time, you’ll use something like chmod 755 for scripts or chmod 644 for regular files. Get these wrong and either nothing works or everything’s wide open – neither is good. Bash``` chmod 755 /usr/local/bin/script.sh ``` ``` chmod 755 /usr/local/bin/script.sh ``` ## 11. chown – Ownership Control Web servers are picky about file ownership. If your web app can’t write to its upload folder, it’s probably an ownership issue. The chown command fixes that. Remember to use -R when you need to change a whole directory tree. Learned that one the hard way. Bash``` chown -R www-data:www-data /var/www/html ``` ``` chown -R www-data:www-data /var/www/html ``` ## 12. systemctl – Service Management Gone are the days of init scripts (thank goodness). Now we have systemctl, which handles all your services. Need to restart Apache? systemctl restart apache2. Want to check if MySQL is running? systemctl status mysql. Clean and simple. Bash``` systemctl restart nginx ``` ``` systemctl restart nginx ``` ## 13. journalctl – System Log Analysis This is systemd’s logging system, and honestly, it’s pretty great. Running journalctl -f follows all system logs in real-time. When something crashes, journalctl -u service-name usually has the answer. The old days of hunting through /var/log are mostly behind us. Bash``` journalctl -u ssh -n 50 ``` ``` journalctl -u ssh -n 50 ``` ## 14. netstat – Network Statistics Security-wise, you need to know what ports are open and who’s connecting to your server. netstat -tuln shows all listening ports. If you see something listening that shouldn’t be, you’ve got investigating to do. Also great for figuring out why that service won’t start – usually the port’s already taken. Bash``` netstat -tuln | grep :80 ``` ``` netstat -tuln | grep :80 ``` [![Blog banner - ServerAvatar](https://serveravatar.com/wp-content/uploads/2025/09/728_90-Banner-1-1024x127.png)](https://serveravatar.com?ref=blog)## 15. iptables – Firewall Configuration Firewalls are your first line of defense, and iptables is how you control them on most Linux systems. Yeah, the syntax looks like alphabet soup at first, but the basics aren’t too bad. Block an IP, open a port, limit connections – these become second nature after a while. Bash``` iptables -A INPUT -p tcp --dport 443 -j ACCEPT ``` ``` iptables -A INPUT -p tcp --dport 443 -j ACCEPT ``` ## 16. rsync – File Synchronization Copying files between servers? Please don’t use FTP. rsync is faster, smarter, and more reliable. It only copies what’s changed, which is brilliant for backups. The flags -avz are my go-to: archive mode, verbose output, and compression. Set it up once, and your backups practically run themselves. Bash``` rsync -avz /local/path/ user@remote:/backup/path/ ``` ``` rsync -avz /local/path/ user@remote:/backup/path/ ``` ## 17. find – File Search Utility Sometimes you know a file exists but have no clue where it is. The find command is your bloodhound. Looking for all files modified in the last day? Files bigger than 100MB? Files with weird permissions? find can track them all down. Combine it with -exec and you can fix problems in bulk. Bash``` find /home -type f -name "*.log" -mtime +30 ``` ``` find /home -type f -name "*.log" -mtime +30 ``` ## 18. wget – File Download Tool Downloading files directly to servers eliminates unnecessary transfers. The wget command handles various protocols and supports resuming interrupted downloads with -c. This direct download approach saves bandwidth and time compared to downloading locally then uploading. Bash``` wget -c https://example.com/largefile.tar.gz ``` ``` wget -c https://example.com/largefile.tar.gz ``` ## 19. tar – Archive Management Archive files are common in Linux environments. The tar command creates and extracts archives, with -czf creating compressed archives and -xzf extracting them. Understanding these operations is essential for handling backups, software distributions, and file transfers. Bash``` tar -czf backup.tar.gz /var/www/html/ ``` ``` tar -czf backup.tar.gz /var/www/html/ ``` ## 20. cron – Task Scheduler Automation reduces repetitive work and ensures consistent task execution. The crontab -e command manages scheduled tasks, from backups to maintenance scripts. While cron syntax requires initial learning, the automation benefits make it worthwhile. Well-configured cron jobs maintain server health with minimal manual intervention. Bash``` 0 2 * * * /usr/local/bin/backup.sh (runs daily at 2 AM) ``` ``` 0 2 * * * /usr/local/bin/backup.sh (runs daily at 2 AM) ``` ## FAQ ### **Q: Do I have to memorize all of the commands and the options?** Of course not. Just understand what each command does and keep a reference available. You will memorize the most common options with use. The man command (man grep for example) provides documentation whenever you want it. ### **Q:** **What are some of the commands I should be learning or using as a beginner?** Start with the essential commands for navigation: ssh, ls, cd, and grep. Once you have these down, move on to the commands for monitoring your server, like ps, top, and df. These three command types should give you a foundation for interacting with your server and provide knowledge to go on further exploration before making an actual change. ### **Q: How can I practice these commands in a real environment?** The best way to practice these commands is to set up your own virtual machine or, if you are willing to, use a free tier option on a cloud provider and create a test server. Always remember to never practice any commands and learn in production! Most commands that enable you to view information are pretty safe to run, but surely, we would need to poke at a few commands that modify files or permissions. Virtual machines make great personal labs. ### **Q: How do I know which command to use for a particular problem?** Experience helps, but in general: use ps or top for performance problems; df and du for disk problems; grep and tail for log investigation; netstat for network problems. When in doubt just use monitoring commands first to get a picture of the problem, before trying to fix it. ### **Q: How do I learn more advanced Linux administration?** After you have mastered these basics, you can start to learn shell scripting, configuration management tools like Ansible, and containerization (Docker). Online courses, Linux documentation, and getting hands-on practice with real projects will boost learning. ## Conclusion Here’s the list. You should think of these twenty commands as your base toolkit. You shouldn’t feel a need to perfect every command right away. I would recommend you start with the basics of screen navigation and file management first. When that starts to feel comfortable, you can add some of the more powerful features for monitoring and automation. And to be clear, we have barely scratched the surface. Each of these commands can do a lot more than listed here. When you feel like you are ready to explore even more features the man command is your best friend, it is built-in documentation for literally everything. There is real beauty in the art of combining commands to author real-world solutions. With any creativity, you will find that you can solve complicated problems in a single line of code. If you stick with it, that intimidating blinking cursor will be your new best friend. The command line will shift from a chore to the most powerful tool you have, boosting your productivity and confidence as a server administrator. In the end, it is practice practice practice, and a hint of curiosity. ## Stop Wasting Time on Servers. Start Building Instead. You didn’t start your project to babysit servers. Let **ServerAvatar** handle deployment, monitoring, and backups — so you can focus on growth. Deploy **WordPress, Laravel, N8N**, and more in minutes. No DevOps required. No command line. No stress. [ 🚀 Try Free ](https://app.serveravatar.com) [ 🌐 Learn More ](https://serveravatar.com/) Trusted by 10,000+ developers and growing. **Categories:** Blog, Guide, Linux, Ubuntu **Tags:** DevOps Tools, Linux commands, Linux for Beginners, Server Management, System Administration --- ### [How to Install a Bolt.new on a VPS](https://serveravatar.com/install-bolt-new-on-vps/) **Published:** August 21, 2025 **Author:** Smit Pipaliya **Content:** [![Blog banner - ServerAvatar](https://serveravatar.com/wp-content/uploads/2025/09/728_90-Banner-3-1024x127.png)](https://serveravatar.com?ref=blog)If you’ve recently developed an application using Bolt.new AI and want to make it live for users to interact with, one of the easiest ways to get it hosted professionally is by using **ServerAvatar**. But if the process of server deployment sounds intimidating, don’t worry. Hosting an app is a lot more approachable with tools like ServerAvatar that simplify everything from server provisioning to SSL setup. So, what exactly are we covering here? This comprehensive guide walks you through the exact steps needed to get your Bolt AI application deployed on a live VPS server using ServerAvatar, even if you’re not a server management expert. Whether you’re using DigitalOcean, Hetzner, Contabo, or any other provider, this tutorial will cover it all. By the time you’re done with this walkthrough, your AI-powered app will be live, secured, and ready to serve your users 24/7. ## What is Bolt.new AI? [**Bolt**.**new**](https://bolt.new/) is a new framework or platform designed to generate applications quickly using AI-driven workflows and automation. It takes care of repetitive tasks and allows developers to focus more on functionality than setup. You can think of Bolt AI as the intelligent backend generator – capable of stitching together APIs, UIs, and data logic with AI’s help. Many developers use it to speed up app creation, especially in startups and MVP environments. However, generating the app is just the first part. Hosting it, managing it, and keeping it available online is the next major challenge – and that’s where ServerAvatar comes in. ## Why Use ServerAvatar? So why not just use traditional cPanel or manually manage your server with SSH? Here’s why **ServerAvatar is a game-changer** for developers: - **No server admin experience required** – You don’t have to be a DevOps engineer to deploy a production-grade app. - **Automated configurations** – From SSL to firewalls, everything is handled with a few clicks. - **Easy monitoring and backup tools** – No more dealing with log files via terminal. It’s all in the dashboard. - **No Command Line Needed**: If the idea of SSH scares you, ServerAvatar is for you. For Bolt AI applications that often run with modern stacks like Node.js or Python, ServerAvatar provides a streamlined deployment process that’s faster, more efficient, and far less error-prone than manual server setups. ## Step-by-Step Guide to Hosting with ServerAvatar ### Prepare Your Bolt AI App for deployment Once Bolt AI has generated your application. For the smoothest hosting experience, choose to **push your app to GitHub**. You’ll need a GitHub account (which is free) and once authorized, Bolt AI will create a repository and upload your project files there. ![Bolt.new](https://serveravatar.com/wp-content/uploads/2025/08/Screenshot-2025-08-01-at-3.02.49-AM-1024x584.png)If you choose to download the project instead, you’ll need to manually upload it to a Git repository or connect it using SFTP later on ServerAvatar, which is still possible but takes more effort. Once it’s in GitHub, your app is ready to be deployed! ### Sign Up for ServerAvatar Before you can deploy anything, you need a ServerAvatar account. The signup process is straightforward and doesn’t require any technical background. 1. **Visit** [**ServerAvatar.com**](https://serveravatar.com/) and click on the “Get Started” or “Sign Up” button. 2. Fill in your name, email, and password. 3. Verify your email address through the confirmation link sent to your inbox. 4. Once logged in, you’ll land on your dashboard, where you can start managing servers. **Why is this important?** ServerAvatar becomes your central control panel for all your apps and servers. Whether you’re hosting a single blog or multiple client websites, everything is handled here. You don’t need to remember any Linux commands or hire a developer to make basic changes. ServerAvatar also offers a **free trial**, so you can explore most of its features before deciding on a paid plan. Depending on your needs, you can scale later, whether it’s one app or a dozen. ### Build a Server To host your application, you need an actual server, think of it as the “home” where your app lives online. With ServerAvatar, you have two flexible options: - [Build a server](https://serveravatar.com/docs/managed-server/installation/) based on your preferred configuration. ⚠️ **Important:** Whether you’re purchasing a server through ServerAvatar or connecting your own, make sure to select the **Node.js tech stack**. This is the required environment to properly host applications built with the Bolt Application platform. **NOTE**: If you are [connecting your own server](https://serveravatar.com/docs/server-management/installation/direct-method/), make sure it meets all the [prerequisites](https://serveravatar.com/docs/server-management/installation/direct-method/) specified by ServerAvatar. Read our attached docs on purchase server directly from serverAvatar and connect your server. Only available if you have add-on of Self-Managed Server. ### Integrate Your GitHub Account with ServerAvatar If your application resides on GitHub, it’s essential to [integrate your GitHub account](https://serveravatar.com/docs/integrations/git/) with ServerAvatar. Be sure to link the account that holds your project repository. This integration enables: - Direct deployment of your application from GitHub - Easy setup of an advanced CI/CD pipeline offered by ServerAvatar With this connection in place, you can handle deployments entirely through the ServerAvatar dashboard, no command line required. ### Create new Application For Deployment Once your server is ready and your GitHub account is integrated, the next step is to **create an application** in ServerAvatar to host your project. Now, we will crate the application for the n8n. so, that anyone can access it, follow these steps to setup and deploy react app. - Navigate to the **Applications** section from the ServerAvatar dashboard. - Click on the **Create Application** button. ![Create Application-ServerAvatar](https://serveravatar.com/wp-content/uploads/2025/08/Screenshot-2025-07-25-at-3.36.22-AM-1024x582.png)- Enter a name for your application, such as **“Bolt-AI-App”**. - Next, choose the domain to host your React application – either a **Primary Domain** or a **Test Domain**: - **Primary Domain**: The main domain users will use to access your live website. - **Test Domain**: A staging/development domain provided by ServerAvatar, requiring no manual setup and ideal for testing. - Choose the method as the “**Git”.** - Select the service provider where your repository is hosted. For this blog post, we’ll use **GitHub** as the service provider since our React Todo app is stored in a **private GitHub repository**. ![GitHub Repositoty-ServerAvatar](https://serveravatar.com/wp-content/uploads/2025/08/Screenshot-2025-08-08-at-7.21.34-PM-1024x517.png)- Since we are working with a private repository, choose **“Private”** as the repository type. This ensures that ServerAvatar will securely access your code from a private source. - To allow ServerAvatar to fetch code from your private GitHub repository, you need to generate a deployment key: - Click on the **“Generate/Regenerate”** button as shown in the interface. - A unique public SSH key will be generated. - Copy this key and go to your **GitHub repository**. - Navigate to: Repository Settings → Deploy Keys → Add Deploy Key. - Paste the generated key, give it a recognizable title (e.g., “ServerAvatar Deploy Key”). - Click **“Add Key”** to complete the process. - Choose the GitHub (or other supported platform) account where your repository is hosted. This account must be connected to ServerAvatar to fetch the repositories list. - Choose the repository name. - Choose the branch you want to deploy – usually main or master, or any development/staging branch. ***Note****:* You can always change the branch later if needed after deployment. - Select **Client-side Rendering (CSR)** as the rendering type, since your application is a standard React app. This means the React code will run entirely on the browser, with no server-side rendering involved. ![Clinet-Side Rendering-ServerAvatar](https://serveravatar.com/wp-content/uploads/2025/08/Screenshot-2025-08-08-at-7.26.19-PM-1024x519.png)- Select the packet manager from the **NPM** and **Yarn**. - Provide the package installation command to install the necessary dependencies to run your application using the relevant package manager for your server environment (e.g., ‘npm install’ for Node.js or ‘yarn add’ for Yarn). - Specify the command to build your application. This is typically used for compiling source code and preparing it for deployment. Example: ‘npm run build’ for Node.js or ‘yarn build’ for Yarn. If no build is required, leave this field empty. ![NPM and Yarn-ServerAvatar](https://serveravatar.com/wp-content/uploads/2025/08/Screenshot-2025-08-08-at-7.27.43-PM-1024x584.png)- To configure additional deployment settings, click on the **“Show Advanced Options”**button. In this section, you can either select an existing system user or create a new one. **Recommendation:** It’s best practice to create a **dedicated system user** for each application you deploy. This improves security, makes application management easier, and isolates user-level access for each app. - Since you are deploying a React application, the index.html file are typically located inside the **dis** folder. ![Package Installation-ServerAvatar](https://serveravatar.com/wp-content/uploads/2025/08/Screenshot-2025-08-08-at-10.35.16-PM-1024x584.png)Click on create application once you have successfully provided all information required to create application. It will take few minutes to install all the dependencies and create build file. ![Cloudflare Integration-ServerAvatar](https://serveravatar.com/wp-content/uploads/2025/08/Screenshot-2025-07-25-at-5.29.00-AM-1-1024x582.png)Once the application is successfully hosted your application is deployed successfully. You can check by visiting primary domain. ![Cloud Support Engineer-ServerAvatar](https://serveravatar.com/wp-content/uploads/2025/08/Cloud-1024x642.jpg)We have successfully hosted vibe coded application. Congratulations🥳. [![Blog banner - ServerAvatar](https://serveravatar.com/wp-content/uploads/2025/09/728_90-Banner-1-1024x127.png)](https://serveravatar.com?ref=blog)### Build a CI/CD Pipeline with Auto-Pull from GitHub After setting up your application, you can take advantage of one of ServerAvatar’s most powerful feature is **CI/CD pipeline with auto-pull from GitHub**. By enabling this feature, ServerAvatar will automatically pull the latest code from your GitHub repository every time you push changes. This ensures that your application stays up-to-date without any manual intervention. With CI/CD auto-pull: - No need to use command-line deployment tools. - Every push to the main branch (or any selected branch) triggers a fresh deployment. - You can define post-pull scripts to handle tasks like building your app, running migrations, or restarting services. This setup not only saves time but also improves reliability and development workflow. 📘 To build and configure your [CI/CD pipeline with GitHub auto-pul](https://serveravatar.com/docs/application/git-deploy/github/)l follow from the **step 7**. Congratulations! You’ve now hosted your Bolt AI application on a live server using **ServerAvatar** and the best part? You did it **without using the command line** even once! 😎 Everything was handled through a clean and simple **user interface** that makes deployment easy even if you’re not a developer. ## Here’s What You’ve Achieved: - Hosted your Bolt AI app with just a few clicks - Connected GitHub and deployed directly from your repository - Set up a **CI/CD pipeline** so every time you push code to GitHub, your app updates automatically - Did it all without touching SSH, FTP, or the terminal - Managed everything inside the ServerAvatar dashboard Now, your app is **live and accessible from your domain**! 🎉 ## Noticed a “Not Secure” Warning? When you visit your domain, you might see a **“Not Secure”** warning in the browser. This is because your domain doesn’t have an **SSL certificate** yet. It is required to show the secure lock in the address bar. **Good News: ServerAvatar Makes SSL Super Simple** You don’t need to manually generate or install certificates. ServerAvatar offers: - **Auto SSL Installer** – Just click a button and ServerAvatar installs the certificate for you. - **Manual Installation Option** – If you prefer to use a custom certificate. 📘 You can refer to ServerAvatar’s documentation for step-by-step instructions on installing SSL: 👉 [ServerAvatar SSL Setup Docs](https://serveravatar.com/docs/application/automatic-installation/) Once SSL is installed, your website will show the secure lock and your users will trust the connection is safe. ## Secure Your Server with a Firewall Security is just as important as hosting. ServerAvatar gives you options to **enable a firewall** that protects your server from unwanted traffic or attacks. A firewall helps: - Block suspicious IPs - Prevent unauthorized access - Keep your app and data safe 📘 To learn how to enable the firewall, refer to this guide: 👉 [ServerAvatar Firewall Setup Docs](https://serveravatar.com/docs/server/firewall/) ## FAQ ### **Q: Do I need technical experience to use ServerAvatar?** No! ServerAvatar is designed for developers of all skill levels. You don’t need server administration experience, SSH knowledge, or command-line expertise. Everything is handled through a visual interface. ### **Q: What tech stack should I select for Bolt AI apps?** **Important:** Always select Node.js as your tech stack when setting up the server, as this is required for applications built with the Bolt AI platform. ### **Q: Can I host multiple applications on one server?** Yes! ServerAvatar allows you to deploy multiple applications on a single server, each with its own configuration and domain. ### **Q: How do I add SSL to my domain?** ServerAvatar offers: - **Auto SSL Installer:** One-click SSL certificate installation - **Manual Installation:** For custom certificates Both options are available in your ServerAvatar dashboard ### **Q: What’s the difference between Primary Domain and Test Domain?** **Primary Domain:** Your main production domain that users will access (e.g., yourapp.com) **Test Domain:** A staging domain provided by ServerAvatar for testing, requiring no DNS setup ### **Q: Can I migrate from other hosting platforms?** Yes! ServerAvatar supports migration from various hosting platforms. Additionally, ServerAvatar support team is available 24/7 to provide you with complete guidance and step by step-by-step process with resolution of your issues to migrate to ServerAvatar. ## Conclusion With just a few simple steps, you’ve gone from having an AI-generated app to **a live, secure, auto-deploying web application** all thanks to ServerAvatar’s powerful and user-friendly interface. Here’s a quick summary of what made it easy: - No command-line tools or technical knowledge needed - Fully visual process with helpful UI - Integration with GitHub for automated deployments - Built-in tools for SSL and server security Whether you’re building a personal project or launching a business app, **ServerAvatar gives you complete control without the complexity**. **Categories:** Application Deployments, Blog, Tutorials **Tags:** Bolt AI, Bolt.new, Cloud Hosting, Vps hosting --- ### [Remove index.php from URL in CodeIgniter Easily](https://serveravatar.com/remove-index-php-codeigniter-url-guide/) **Published:** August 22, 2025 **Author:** Suresh Ramani **Content:** [![Blog banner - ServerAvatar](https://serveravatar.com/wp-content/uploads/2025/09/728_90-Banner-3-1024x127.png)](https://serveravatar.com?ref=blog)## Introduction Have you ever noticed how some websites have clean, professional-looking URLs, while others include awkward file names like **“index.php”** in them? If you’re working with CodeIgniter, you’ve probably encountered URLs that look like `yoursite.com/index.php/controller/method` instead of the cleaner and more user-friendly `yoursite.com/controller/method`. Fortunately, there’s a simple way to **remove index.php** from the URL in CodeIgniter, helping you create cleaner URLs that look more professional and are better for SEO. Think of it like having a messy desk versus a clean one – both might function, but one definitely looks more professional and organized. Removing index.php from your CodeIgniter URLs isn’t just about aesthetics; it’s about creating a better user experience, improving SEO rankings, and making your application look more polished. In this comprehensive guide, we’ll walk you through everything you need to know about eliminating that pesky index.php from your URLs, making your CodeIgniter application shine like a well-organized workspace. ## **What is index.php and Why Remove It?** **Understanding the index.php Problem** When you install CodeIgniter fresh out of the box, your URLs naturally include `index.php` as part of the path. This happens because CodeIgniter uses a single entry point architecture where all requests flow through the main index.php file. **Why Should You Remove It?** Removing index.php from your URLs offers several compelling advantages: - **Better User Experience**: Clean URLs are easier to remember and share - **Improved SEO**: Search engines prefer cleaner URL structures - **Professional Appearance**: Your application looks more polished and modern - **Easier Social Sharing**: Shorter, cleaner URLs perform better on social media ## **Prerequisites Before Starting** **Essential Requirements** Before diving into URL rewriting, ensure you have: - **Apache/Nginx/IIS server** with URL rewriting capabilities enabled - **Write permissions** to your web root directory - **Basic understanding** of your server configuration - **Backup** of your current application **Checking Server Compatibility** Most modern web servers support URL rewriting, but it’s worth verifying that your hosting environment has the necessary modules enabled, particularly Apache’s `mod_rewrite`. You can learn more about Apache’s mod\_rewrite module and its capabilities in the [official Apache documentation](https://httpd.apache.org/docs/current/mod/mod_rewrite.html). ## **Method 1: Using .htaccess File (Apache)** **Creating the .htaccess File** The most common and straightforward method involves creating an `.htaccess` file in your CodeIgniter root directory. Here’s the basic configuration: Apache``` RewriteEngine On RewriteCond %{REQUEST_FILENAME} !-f RewriteCond %{REQUEST_FILENAME} !-d RewriteRule ^(.*)$ index.php/$1 [L] ``` ``` RewriteEngine On RewriteCond %{REQUEST_FILENAME} !-f RewriteCond %{REQUEST_FILENAME} !-d RewriteRule ^(.*)$ index.php/$1 [L] ``` **Understanding the Rules** Let’s break down what each line does: - `RewriteEngine On`: Activates the URL rewriting functionality - `RewriteCond %{REQUEST_FILENAME} !-f`: Checks if the requested path isn’t an existing file - `RewriteCond %{REQUEST_FILENAME} !-d`: Checks if the requested path isn’t an existing directory - `RewriteRule ^(.*)$ index.php/$1 [L]`: Redirects all matching requests through index.php **Advanced .htaccess Configuration** For more robust functionality, consider this enhanced version: Apache``` RewriteEngine On RewriteBase / # Redirect trailing slashes if not a folder RewriteCond %{REQUEST_FILENAME} !-d RewriteCond %{REQUEST_URI} (.+)/$ RewriteRule ^ %1 [L,R=301] # Handle Front Controller RewriteCond %{REQUEST_FILENAME} !-f RewriteCond %{REQUEST_FILENAME} !-d RewriteRule ^(.*)$ index.php/$1 [L] ``` ``` RewriteEngine On RewriteBase / # Redirect trailing slashes if not a folder RewriteCond %{REQUEST_FILENAME} !-d RewriteCond %{REQUEST_URI} (.+)/$ RewriteRule ^ %1 [L,R=301] # Handle Front Controller RewriteCond %{REQUEST_FILENAME} !-f RewriteCond %{REQUEST_FILENAME} !-d RewriteRule ^(.*)$ index.php/$1 [L] ``` ## **Configuring CodeIgniter Settings** **Modifying config.php** After setting up your .htaccess file, you need to update your CodeIgniter configuration. Open `application/config/config.php` and make these changes: PHP``` $config['index_page'] = ''; $config['uri_protocol'] = 'REQUEST_URI'; ``` ``` $config['index_page'] = ''; $config['uri_protocol'] = 'REQUEST_URI'; ``` **Understanding Configuration Options** - **index\_page**: Setting this to an empty string removes index.php from generated URLs - **uri\_protocol**: Determines how CodeIgniter detects the URI string **Additional Configuration Tips** You might also want to adjust your base URL setting: PHP``` $config['base_url'] = 'http://yoursite.com/'; ``` ``` $config['base_url'] = 'http://yoursite.com/'; ``` ## **Method 2: Nginx Configuration** **Nginx Server Block Configuration** If you’re using Nginx, you’ll need to modify your server configuration instead of using .htaccess: Nginx``` server { listen 80; server_name yoursite.com; root /path/to/your/codeigniter; index index.php; location / { try_files $uri $uri/ /index.php?$query_string; } location ~ \.php$ { fastcgi_pass unix:/var/run/php/php7.4-fpm.sock; fastcgi_index index.php; include fastcgi_params; fastcgi_param SCRIPT_FILENAME $document_root$fastcgi_script_name; } } ``` ``` server { listen 80; server_name yoursite.com; root /path/to/your/codeigniter; index index.php; location / { try_files $uri $uri/ /index.php?$query_string; } location ~ \.php$ { fastcgi_pass unix:/var/run/php/php7.4-fpm.sock; fastcgi_index index.php; include fastcgi_params; fastcgi_param SCRIPT_FILENAME $document_root$fastcgi_script_name; } } ``` **Key Nginx Directives** The `try_files` directive is crucial here – it attempts to serve the request as a file, then as a directory, and finally passes it to index.php if neither exists. ## **Method 3: IIS Configuration** **Using web.config for IIS** Windows IIS users need to create a `web.config` file with URL rewrite rules: XML``` ``` ``` ``` ## **Testing Your Clean URLs** **Verification Steps** After implementing your chosen method, test your configuration: 1. **Access your homepage**: `yoursite.com` should work without index.php 2. **Test controller URLs**: `yoursite.com/controller/method` should function properly 3. **Check generated links**: Ensure CodeIgniter’s URL helper generates clean URLs **Common Testing Scenarios** Try accessing various parts of your application to ensure everything works: - Homepage and main navigation - Form submissions and redirects - AJAX requests and API endpoints [![Blog banner - ServerAvatar](https://serveravatar.com/wp-content/uploads/2025/09/728_90-Banner-1-1024x127.png)](https://serveravatar.com?ref=blog)## **Troubleshooting Common Issues** **404 Errors After Implementation** If you’re getting 404 errors, check: - **Server modules**: Ensure mod\_rewrite (Apache) or equivalent is enabled - **File permissions**: Verify .htaccess file is readable - **Configuration syntax**: Double-check for typos in your rewrite rules **Internal Server Errors** Internal server errors often indicate: - **Syntax problems** in your .htaccess file - **Missing server modules** or incompatible directives - **Conflicting rules** with existing configurations **Solutions for Common Problems** For persistent issues: - Check server error logs for specific error messages - Test with minimal .htaccess rules first - Consult your hosting provider about server configuration ## **Security Considerations** **Protecting Sensitive Directories** When using URL rewriting, ensure you’re not inadvertently exposing sensitive files: Apache``` # Deny access to application folder Require all denied # Deny access to system folder Require all denied ``` ``` # Deny access to application folder Require all denied # Deny access to system folder Require all denied ``` **Input Validation** Clean URLs don’t change the need for proper input validation – always sanitize and validate user input regardless of URL structure. ## **Performance Impact** **Minimal Performance Overhead** URL rewriting introduces negligible performance impact. The server processes rewrite rules quickly, and the benefits of clean URLs often outweigh any minimal overhead. **Optimization Tips** - Use specific conditions to avoid unnecessary processing - Place most common patterns first in your rules - Consider caching strategies for frequently accessed content ## **SEO Benefits of Clean URLs** **Search Engine Advantages** Clean URLs provide several SEO benefits: - **Better crawling**: Search engines prefer simple, descriptive URLs - **Improved click-through rates**: Users are more likely to click clean URLs - **Enhanced keyword relevance**: Descriptive URLs can include relevant keywords According to [Google’s SEO Starter Guide](https://developers.google.com/search/docs/fundamentals/seo-starter-guide), simple and descriptive URLs help both users and search engines understand your content better, making clean URL structure an important ranking factor. **User Experience Enhancement** Clean URLs also improve user experience by being more memorable and shareable across various platforms. ## **Advanced URL Routing** **Custom Route Definitions** CodeIgniter’s routing system works seamlessly with clean URLs. Define custom routes in `application/config/routes.php`: PHP``` $route['products/(:any)'] = 'catalog/product_lookup/$1'; $route['blog/(:num)'] = 'blog/entry/$1'; ``` ``` $route['products/(:any)'] = 'catalog/product_lookup/$1'; $route['blog/(:num)'] = 'blog/entry/$1'; ``` **Dynamic Route Creation** You can create more sophisticated routing patterns to make your URLs even more user-friendly and SEO-optimized. ## **Best Practices and Tips** **Development Workflow** - **Test locally first** before deploying to production - **Keep backups** of working configurations - **Document your setup** for team members - **Monitor error logs** after implementation **Long-term Maintenance** Regularly review your URL structure and routing rules to ensure they remain optimal as your application evolves. ## **Alternative Solutions** **Using CodeIgniter’s Built-in Options** CodeIgniter offers some built-in alternatives for managing URLs: - **Query string URLs**: Less elegant but universally compatible - **Custom index file**: Rename index.php to something shorter **Third-party Solutions** Some developers prefer using specialized routing libraries or URL management tools, though the built-in functionality is usually sufficient. ## **Maintaining Clean URLs** **Regular Monitoring** Periodically check that your clean URLs are working correctly, especially after: - Server updates or migrations - CodeIgniter version upgrades - Hosting provider changes **Documentation and Team Training** Ensure your development team understands the URL configuration to maintain consistency across the project. For those looking to deploy their CodeIgniter applications professionally, consider exploring [Deploy CodeIgniter on VM, VPS or Dedicated Server](https://serveravatar.com/deployments/applications/codeigniter) options for robust hosting solutions. Additionally, when creating SEO-friendly URLs for your content, you can use tools like the [ServerAvatar Slug Generator](https://serveravatar.com/slug-generator/) to create optimized URL slugs that complement your clean CodeIgniter URLs. ## Conclusion Removing index.php from your CodeIgniter URLs is like giving your web application a professional makeover – it’s a small change that makes a big difference. We’ve covered multiple methods to achieve clean URLs, from the simple Apache .htaccess approach to more complex server configurations for Nginx and IIS. Remember, clean URLs aren’t just about aesthetics; they’re about creating a better user experience, improving SEO performance, and presenting a more professional image. The process might seem technical at first, but once you understand the basics, it becomes a standard part of your development workflow. Whether you’re building a small business website or a large web application, implementing clean URLs should be high on your priority list. Your users will appreciate the cleaner interface, search engines will favor your improved URL structure, and you’ll feel proud of your more professional-looking application. ## Frequently Asked Questions ### Why do my clean URLs work on localhost but not on my live server? This commonly happens because your hosting server doesn’t have mod\_rewrite enabled or configured properly. Contact your hosting provider to verify that URL rewriting is supported and enabled for your account. You might also need to adjust file permissions or use different .htaccess directives depending on your server configuration. ### Can I remove index.php from URLs without using .htaccess files? Yes, you can achieve clean URLs through server-level configuration (virtual hosts for Apache, server blocks for Nginx), web.config files for IIS, or even through CodeIgniter’s routing system combined with different URI protocols. However, .htaccess remains the most common and portable solution for most shared hosting environments. ### Will removing index.php affect my existing bookmarks and search engine rankings? If you already have indexed pages with index.php in the URLs, you should implement 301 redirects from the old URLs to the new clean ones. This preserves your SEO rankings and ensures existing bookmarks continue to work. Most of the .htaccess examples provided handle this automatically. ### What should I do if I get 500 Internal Server Error after adding .htaccess rules? Internal server errors usually indicate syntax problems in your .htaccess file or incompatible directives for your server configuration. Start with a minimal .htaccess file containing only basic rewrite rules, then gradually add more complex rules. Check your server’s error logs for specific error messages that can guide your troubleshooting. ### Do clean URLs work with CodeIgniter’s form helper and URL helper functions? Absolutely! Once you’ve configured clean URLs properly and set `$config['index_page'] = ''` in your config file, all of CodeIgniter’s helper functions will automatically generate clean URLs. The form\_open() function, anchor() function, and other URL-generating helpers will create links without index.php automatically. ## Stop Wasting Time on Servers. Start Building Instead. You didn’t start your project to babysit servers. Let **ServerAvatar** handle deployment, monitoring, and backups — so you can focus on growth. Deploy **WordPress, Laravel, N8N**, and more in minutes. No DevOps required. No command line. No stress. [ 🚀 Try Free ](https://app.serveravatar.com) [ 🌐 Learn More ](https://serveravatar.com/) Trusted by 10,000+ developers and growing. **Categories:** Blog, Php, Tutorials, Ubuntu **Tags:** .htaccess, Clean URLs, CodeIgniter, SEO URLs, URL Rewrite, Web Development --- ### [How to Create and Manage Linux Users and Groups](https://serveravatar.com/create-and-manage-linux-users-groups/) **Published:** August 26, 2025 **Author:** Meghna Meghwani **Content:** [![Blog banner - ServerAvatar](https://serveravatar.com/wp-content/uploads/2025/09/728_90-Banner-3-1024x127.png)](https://serveravatar.com?ref=blog)If you’ve ever wondered why your Linux system asks for a password or why you can’t access certain files, you’re dealing with **Linux Users** and group management—whether you realize it or not. Today, I’m going to break down everything you need to know about managing users and groups in Linux, and trust me, it’s not as complicated as it might seem at first. ## Why This Matters More Than You Think Linux treats everything as a multi-user environment, even if you’re the only person using your laptop. This might seem like overkill, but it’s actually brilliant for security. Every file, every process, and every service runs under a specific user account. This separation means that if one part of your system gets compromised, the damage stays contained. I learned this the hard way when I first started with Linux. I ran everything as root (the superuser) because it was “easier”—until I accidentally deleted half my system with a mistyped command. That’s when I truly understood why user management isn’t just bureaucracy; it’s self-preservation. ![](https://serveravatar.com/wp-content/uploads/2025/08/image-12-1024x436.png)## How ServerAvatar Makes User Management Easier Managing users on a VPS or cloud server can quickly become complicated, especially when hosting multiple applications. ServerAvatar makes this process effortless by automating user management while prioritizing security. As a modern server and application management platform, it streamlines deployment and ongoing management with minimal manual effort. One of ServerAvatar’s standout features is application user isolation, which assigns each hosted application its own dedicated Linux user. This isolation ensures that if one application is compromised, it cannot affect others, keeping your server environment secure and stable. ### Key Features of ServerAvatar’s User Management: - Application User Isolation: Each application runs under its own dedicated user, preventing cross-application access. - Enhanced Security: Limits the impact of a compromised app by containing threats within that app alone. - Automated User Management: Reduces manual work by handling user permissions and configurations automatically. - Isolated Environment: Ensures apps cannot access each other’s files or processes, blocking unauthorized interactions. - Protection Against Attacks: Contains threats like malicious scripts or rogue plugins to a single application, preventing wider damage. ## Isolation Environment in ServerAvatar You can host multiple applications on a VPS or cloud server easily with ServerAvatar’s isolated environment. It creates a dedicated Linux system user for each application so that one app cannot touch the files or processes of another. Whether it’s a compromised script trying to reach sensitive files via absolute paths or a rogue plugin running PHP code from WordPress, isolation ensures these attacks are contained to that specific app. ![](https://serveravatar.com/wp-content/uploads/2025/08/image-13-1024x444.png)## Creating Your First Linux User Let’s dive into the practical stuff. The most basic way to create a user is with the useradd command, though I’ll be honest—it’s a bit bare-bones: Bash``` sudo useradd john ``` ``` sudo useradd john ``` This creates a user called “john,” but here’s the catch: no password, no home directory (on some systems), basically just a name in the system. Not very useful, right? ## Here’s what I actually use when setting up a new user: Bash``` sudo useradd -m -s /bin/bash -c "John Smith" john ``` ``` sudo useradd -m -s /bin/bash -c "John Smith" john ``` Let me decode this: -m creates a home directory (you definitely want this), -s /bin/bash gives them a proper shell to work with, and -c “John Smith” adds their real name as a comment. Much better. ## Don’t forget to set a password: Bash``` sudo passwd john ``` ``` sudo passwd john ``` Now, if you’re using **Ubuntu or Debian**, you’ve got a friendlier option called adduser: Bash``` sudo adduser sarah ``` ``` sudo adduser sarah ``` This beauty walks you through everything interactively. It asks for the password, full name, phone number—the works. Sometimes the simple tools are the best tools. ## Modifying Users Real life is messy, and user accounts need to adapt. Maybe John needs access to Docker, or Sarah’s getting married and wants her username updated. The usermod command handles all of this. ## Adding John to the docker group without messing up his other groups: Bash``` sudo usermod -aG docker john ``` ``` sudo usermod -aG docker john ``` **That -a flag?** Absolutely crucial. Forget it, and you’ll accidentally remove John from all his other groups. I’ve seen this mistake cause panic more times than I can count. Need to temporarily disable an account? Maybe someone’s on vacation or under review: Bash``` sudo usermod -L john # Lock the account sudo usermod -U john # Unlock when ready ``` ``` sudo usermod -L john # Lock the account sudo usermod -U john # Unlock when ready ``` Changing someone’s home directory (happens more than you’d think): Bash``` sudo usermod -d /new/home/path -m john ``` ``` sudo usermod -d /new/home/path -m john ``` ## Groups: Because Teamwork Makes the Dream Work Groups are how Linux handles shared permissions efficiently. Instead of giving five developers individual access to a project folder, you create a “developers” group and manage them collectively. ## Creating a group is refreshingly simple: Bash``` sudo groupadd developers ``` ``` sudo groupadd developers ``` ## Adding users to this group: Bash``` sudo usermod -aG developers john sudo gpasswd -a sarah developers # Another way to do it ``` ``` sudo usermod -aG developers john sudo gpasswd -a sarah developers # Another way to do it ``` Here’s something that trips people up: users need to log out and back in for group changes to take effect. Can’t tell you how many times I’ve troubleshot “permission denied” errors only to realize the user just needed to refresh their session. ## Removing someone from a group: Bash``` sudo gpasswd -d john developers ``` ``` sudo gpasswd -d john developers ``` ## Detective Work: Finding User and Group Info Sometimes you need to investigate who has access to what. These commands are your magnifying glass: Bash``` id john # Everything about john's account whoami # Who am I logged in as? groups sarah # What groups is sarah in? ``` ``` id john # Everything about john's account whoami # Who am I logged in as? groups sarah # What groups is sarah in? ``` ## For deeper investigation: Bash``` cat /etc/passwd # List all users (don't worry, no actual passwords here) cat /etc/group # See all groups getent group developers # Who's in the developers group? last # Who's been logging in recently? ``` ``` cat /etc/passwd # List all users (don't worry, no actual passwords here) cat /etc/group # See all groups getent group developers # Who's in the developers group? last # Who's been logging in recently? ``` That last command has helped me spot unusual activity more than once. If you see logins at weird hours or from unexpected locations, it’s time to investigate. ## Cleaning House: Removing Users and Groups When someone leaves the team, you’ll need to remove their access. You have a choice to make: Bash``` sudo userdel john # Removes user, keeps their files sudo userdel -r john # Nuclear option - removes everything ``` ``` sudo userdel john # Removes user, keeps their files sudo userdel -r john # Nuclear option - removes everything ``` I usually go with the first option and manually archive their home directory. You never know when you’ll need that old project file they were working on. **For groups:** Bash``` sudo groupdel developers ``` ``` sudo groupdel developers ``` Just make sure no one has this as their primary group first, or you’ll get an error. [![Blog banner - ServerAvatar](https://serveravatar.com/wp-content/uploads/2025/09/728_90-Banner-1-1024x127.png)](https://serveravatar.com?ref=blog)## Real-World Best Practices After years of managing Linux systems, here’s what I’ve learned: **Document everything.** Future you will thank present you when you’re trying to remember why the “webapp” user has access to the backup directory. **Use descriptive usernames.** “john\_smith” beats “jsmith1” when you have three J. Smiths in your organization. **Regular audits are your friend.** Set a calendar reminder to review user accounts quarterly. You’d be surprised how many ex-employees still have active accounts in some companies. **Never share user accounts.** If two people need access, create two accounts. When something breaks, you’ll want to know exactly who did what. **Test permission changes on a non-critical account first.** There’s nothing worse than locking yourself out of your own system. Yes, I’ve done it. No, I don’t want to talk about it. ## Frequently Asked Questions ### **What’s the difference between useradd and adduser?** Think of useradd as the manual transmission and adduser as the automatic. useradd is the low-level utility available everywhere but requires more options. adduser is a friendlier Perl script in Debian/Ubuntu that holds your hand through the process. ### **Can I change my own username in Linux?** Not while you’re logged in as that user! You’ll need to log in as a different user with sudo privileges, or boot into recovery mode. It’s like trying to paint the floor you’re standing on. ### **How many groups can a user belong to?** Typically, a user can belong to up to 32 supplementary groups on most Linux systems, plus their primary group. If you’re hitting this limit, you might want to reconsider your group strategy. ### **What’s the difference between primary and supplementary groups?** Every user has one primary group (assigned when the account is created) and can have multiple supplementary groups. When you create a file, it’s owned by your primary group by default. Supplementary groups give you additional permissions. ### **Is it safe to edit /etc/passwd and /etc/group directly?** Please don’t! Use the proper commands like usermod and groupmod. Direct editing can break your system if you make a typo. If you absolutely must, use vipw and vigr which at least check for syntax errors. ### **What happens to a user’s running processes when I delete their account?** The processes keep running! This can be a security issue. Always check for running processes with ps -u username before deleting an account, and kill them if necessary. ### **Can I have spaces in usernames?** Technically no. Usernames should start with a letter and contain only letters, numbers, underscores, and dashes. Stick to this rule and save yourself headaches. ### **How do I see when a user last changed their password?** Run chage -l username. This shows password aging information, including the last change date. It’s great for enforcing password policies. ## Conclusion Managing users and groups in Linux isn’t just a technical chore, it’s one of the most important steps in keeping your system secure, stable, and organized. By controlling who can access what, you create a safer environment for both your data and applications. While traditional Linux commands give you full control, platforms like **ServerAvatar** take it a step further by automating these tasks and ensuring strong security isolation for every application you host. Whether you’re running a single WordPress site or managing multiple projects on a VPS, ServerAvatar keeps everything clean, separate, and protected, without the headache of manual user management. So, the next time you set up a new server or deploy an app, remember: effective user and group management isn’t just good practice, it’s your first line of defense. And with ServerAvatar, that defense comes built right in. ## Stop Wasting Time on Servers. Start Building Instead. You didn’t start your project to babysit servers. Let **ServerAvatar** handle deployment, monitoring, and backups — so you can focus on growth. Deploy **WordPress, Laravel, N8N**, and more in minutes. No DevOps required. No command line. No stress. [ 🚀 Try Free ](https://app.serveravatar.com) [ 🌐 Learn More ](https://serveravatar.com/) Trusted by 10,000+ developers and growing. **Categories:** Blog, Linux, Tutorials **Tags:** Linux, Linux Admin, Sysadmin, User Management --- ### [How WordPress Agencies Use AI and Automation to Boost Growth](https://serveravatar.com/boost-growth-with-ai-wordpress/) **Published:** August 27, 2025 **Author:** Meghna Meghwani **Content:** [![Blog banner - ServerAvatar](https://serveravatar.com/wp-content/uploads/2025/09/728_90-Banner-3-1024x127.png)](https://serveravatar.com?ref=blog)To run a WordPress firm, you need to keep track of security, client interactions, SEO, content generation, and website management. Doing all of this by hand takes too long and slows down progress. That’s why agencies are now using AI and automation tools. We’ll look at different types of independence duties in this guide and suggest one effective solution for each. We’ll explain how it works, what it can do, and why it’s the ideal choice for WordPress firms. ## 1. ManageWP for managing and maintaining a website ![ManageWp-ServerAvatar](https://serveravatar.com/wp-content/uploads/2025/08/image-2025-08-27T171117.045-1024x400.png)[**ManageWP**](https://managewp.com/) is a lifesaver for agencies managing multiple WordPress sites. Instead of logging in and out of every website, agencies get a **single dashboard** to control everything. **Important Features:** - One-Click Updates: You may update plugins, themes, and the WordPress core on all of your client’s sites at once. - Automated Backups: Set up backups to happen every day or in real time. - Security Scans: Find malware and holes in your system automatically. - Performance Checks: Get regular updates on how fast and reliable your website is. - Client Reports: Send clients reports on performance and maintenance that have your company’s name on them. Why it’s good for agencies: ManageWP cuts down on hours of manual effort, makes things more reliable, and gives clients peace of mind with professional reports. ## 2. Content Creation – Jasper AI[](https://storage.3.basecamp.com/5840738/blobs/a6ac875a-7bee-11f0-898f-0242ac120004/download/image.png) ![Content Creation-ServerAvatar](https://serveravatar.com/wp-content/uploads/2025/08/image-2025-08-27T171335.813-1024x493.png) It takes a lot of work to write good blog posts, landing pages, and product descriptions. [**Jasper AI**](https://www.jasper.ai/) uses AI to make content that looks and sounds like it was written by a person and is good for SEO. **Key Features:** - **Blog Post Generation:** In just a few minutes, it writes drafts of whole, well-organized posts. - **SEO Optimization:** Uses SurferSEO to make material that is full of keywords. - **Marketing Copy:** Makes advertising, emails, and posts on social media. - **Tone Control:** Changes the way you write to fit the brand’s voice. Why it’s fantastic for agencies: Jasper AI helps companies quickly create new content, which improves SEO rankings and makes clients happy while saving them hours of writing time. ## 3. SEO Optimization – Rank Math[](https://storage.3.basecamp.com/5840738/blobs/d1ea1c66-7bee-11f0-b2a7-0242ac120005/download/image.png) ![Rank Mth-ServerAvatar](https://serveravatar.com/wp-content/uploads/2025/08/image-2025-08-27T171412.551-1024x486.png)[**Rank Math**](https://rankmath.com/) is a WordPress SEO plugin that makes SEO activities easier and faster. It has more features than many of its competitors, but it’s still straightforward to use. **Key Features:** - **AI-Powered Suggestions:** Get real-time SEO scores to help you improve your content. - **Keyword Tracking:** Keep an eye on several main keywords for each post. - **Schema Markup:** Automatically adds structured data to help Google find your site. - **Automated Reports:** Make detailed SEO reports for your clients. **Why it’s good for agencies:** Agencies can automate SEO best practices using Rank Math, get better results, and spend less time on manual optimization. ## 4. Website Design & Development – 10Web AI Builder ![10Web-ServerAvatar](https://serveravatar.com/wp-content/uploads/2025/08/image-2025-08-27T171452.298-1024x481.png)It takes time to make websites from scratch. [**10Web AI Builder**](https://10web.io/) uses AI to swiftly build entire WordPress websites. **Key Features:** - **AI Website Generation:** Make full websites from prompts. - **Responsive Design:** makes layouts that work on mobile devices by default. - **Editing by dragging and dropping:** You can easily change things without coding. - **WooCommerce Support:** Make online stores in a matter of minutes. Why it’s fantastic for agencies: Agencies can build websites faster, take on more projects, and save money while still making websites that are professional and tailored to each client. [![Blog banner - ServerAvatar](https://serveravatar.com/wp-content/uploads/2025/09/728_90-Banner-1-1024x127.png)](https://serveravatar.com?ref=blog)## 5. Client Communication & Support – Tidio ![TIDIO-ServerAvatar](https://serveravatar.com/wp-content/uploads/2025/08/image-2025-08-27T171545.653-1024x442.png)Customers demand help right away, and [**Tidio**](https://www.tidio.com/) has an AI-powered live chat system that answers questions right away. **Key Features:** - AI chatbots give answers automatically all day, every day. - Live Chat: Allow team members to help out as needed. - Email Integration: Handle all client communication from one spot. - Lead Capture: Chatbots gather email addresses and screen leads. **Why it’s great for agencies:** Tidio improves client satisfaction with instant support while reducing the burden on human staff. ## 6. Reporting & Analytics – AgencyAnalytics ![AgencyAnalytics-ServerAvatar](https://serveravatar.com/wp-content/uploads/2025/08/image-2025-08-27T171632.499-1024x422.png)Clients prefer detailed reports, but making them by hand is a pain. [AgencyAnalytics](https://agencyanalytics.com/) makes reporting easier and offers agencies a professional advantage. **Key Features:** - **Automated Reports:** Send out traffic, SEO, and PPC reports on a set timetable. - **Custom Branding:** Put your agency’s branding on reports. - **Integrations:** It works with SEMRush, Facebook Ads, Google Analytics, and more. - **Dashboards:** Clients can see how well they’re doing in real time. Why it’s good for agencies: With branded, automated reports, AgencyAnalytics saves agencies hours of work and makes them look more professional. ## 7. Marketing & Lead Generation – HubSpot CRM[](https://storage.3.basecamp.com/5840738/blobs/4b74251c-7bf0-11f0-83fd-0242ac120005/download/image.png) ![HUbSpot-ServerAvatar](https://serveravatar.com/wp-content/uploads/2025/08/image-2025-08-27T171716.284-1024x484.png)To grow, you need new clients. [**HubSpot CRM**](https://www.hubspot.com/products/crm) helps agencies keep track of leads and run marketing campaigns automatically. **Main Features:** - **Lead Tracking:** Keep an eye on the path of each possible client. - **Email Automation:** Send emails that are tailored and sent on time. - **Pipeline Management**: Keep track of deals and proposals in an effective way. - **Integrations:** Works with WordPress and tools for marketing. Why it’s ideal for agencies: HubSpot helps agencies grow by automating the process of getting and keeping clients, which turns leads into long-term clients. ## 8. Security & Backups – Wordfence Security[](https://storage.3.basecamp.com/5840738/blobs/7e7aa0d0-7bf0-11f0-8c53-0242ac120005/download/image.png) ![Wordfence-ServerAvatar](https://serveravatar.com/wp-content/uploads/2025/08/image-2025-08-27T171811.043-1024x397.png)It’s really important to keep client sites safe. [Wordfence Security](https://www.wordfence.com/) is a very reliable security plugin for WordPress. **Important Features:** - **Firewall Protection:** Blocks malicious traffic automatically. - **Malware Scanner:** Detects and removes threats. - **Login Security:** Adds two-factor authentication. - **Live Traffic Monitoring:** See real-time security threats. **Why it’s great for agencies:** Agencies can guarantee clients 24/7 protection with minimal effort, reducing risks of downtime or hacks. ## 9. E-Commerce (WooCommerce) – Omnisend[](https://storage.3.basecamp.com/5840738/blobs/94264d1c-7bf0-11f0-a0f7-0242ac120005/download/image.png) ![AI and Automation](https://serveravatar.com/wp-content/uploads/2025/08/image-2025-08-27T171909.686-1024x484.png)Omnisend automates email and SMS marketing campaigns for WooCommerce stores to help them sell more. **Key Features:** - **Leaving the Cart Emails:** Automatically get back lost purchases. - **Product Suggestions:** AI-based suggestions that can help you make more sales. - **Multi-Channel Marketing:** You can run email, SMS, and push campaigns all from one spot. - **Analytics:** Keep an eye on the ROI of each campaign. **Why it’s great for agencies:** Omnisend helps agencies improve client store performance and increase revenue with automated campaigns. ## 10. Workflow & Project Management – ClickUp[](https://storage.3.basecamp.com/5840738/blobs/b423b5b4-7bf0-11f0-86ea-0242ac120005/download/image.png) ![Clickup-ServerAvatar](https://serveravatar.com/wp-content/uploads/2025/08/image-2025-08-27T172010.312-1024x474.png)Managing projects and teams is challenging. [**ClickUp**](https://clickup.com/) simplifies everything with automation. It’s hard to manage teams and projects. Automation makes everything easier with [ClickUp.](https://clickup.com/) **Key Features:** - **Automation of Tasks:** Automatically assign tasks, set deadlines, and send reminders. - **Custom Dashboards:** See all of your agency’s projects in one place. - **Integrations:** It works with WordPress, Google Drive, and Slack. - **Reporting:** Automated updates on progress for teams and clients. **Why it’s great for agencies:** ClickUp improves productivity, reduces chaos, and ensures client projects are delivered on time. ## FAQ ### **Why should WordPress agencies use AI and automation tools?** To save time, improve efficiency, and deliver better results without extra workload. ### **Which tool is best for managing multiple WordPress websites?** ManageWP – it offers one dashboard for updates, backups, security, and client reports. ### **How can agencies speed up content creation?** Jasper AI helps generate SEO-optimized blog posts, landing pages, and marketing copy quickly. ### **What’s the easiest way to improve SEO for client websites?** Rank Math automates on-page SEO, keyword tracking, schema, and reporting. ### **How do agencies handle client communication efficiently?** Tidio provides AI chatbots, live chat, and email integration for fast and reliable client support. ## Conclusion WordPress agencies that embrace **AI and automation tools** gain a huge advantage. By using tools like **ManageWP (maintenance), Jasper AI (content), Rank Math (SEO), 10Web AI Builder (design), Tidio (support), AgencyAnalytics (reports), HubSpot CRM (marketing), Wordfence (security), Omnisend (e-commerce), and ClickUp (workflow)**, agencies can: - Save countless hours. - Deliver better results for clients. - Grow faster without hiring large teams. The secret isn’t replacing humans but combining **AI efficiency with human creativity**. Agencies that adopt these tools will lead the way in 2025 and beyond. ## Stop Wasting Time on Servers. Start Building Instead. You didn’t start your project to babysit servers. Let **ServerAvatar** handle deployment, monitoring, and backups — so you can focus on growth. Deploy **WordPress, Laravel, N8N**, and more in minutes. No DevOps required. No command line. No stress. [ 🚀 Try Free ](https://app.serveravatar.com) [ 🌐 Learn More ](https://serveravatar.com/) Trusted by 10,000+ developers and growing. **Categories:** Blog, Guide, WordPress **Tags:** AI and automation, Business growth, Content automation, Website management, WordPress agencies --- ### [How to Increase PHP max_input_vars for Large Forms and Arrays](https://serveravatar.com/increase-php-max-input-vars/) **Published:** September 4, 2025 **Author:** Meghna Meghwani **Content:** max\_input\_vars is a PHP configuration directive that defines the number of input variables your application can handle through POST, GET, and COOKIE requests. By default, it’s set to 1000. That means if you’re submitting a form or request with more than 1000 fields, the server may **ignore the rest of the input data**—which can break your form processing, plugin functionality, or data saving logic. This setting is especially relevant for platforms like WordPress, Laravel, Magento, and custom PHP applications with large forms or complex input arrays. ## Why You Might Need to Increase max\_input\_vars If you’re facing issues like: - Form fields not saving all the data - Customizer settings in WordPress not saving properly - Menus or ACF field groups breaking - Laravel forms truncating submitted data Then your server might be **limiting the input vars to 1000**, causing data loss. In these cases, increasing max\_input\_vars to 3000, 5000, or even higher (depending on your form size) is essential. ## Check Current max\_input\_vars Value **Using phpinfo() File** - Create a file named info.php in your web root directory. - Add the following code: PHP``` ``` ``` ``` - For example, visit . - Search for max\_input\_vars in the page to see the current value. ## Method 1: **Using ServerAvatar** ### **What is ServerAvatar:** **ServerAvatar** is a cloud server management platform that makes it easy for developers, businesses, and agencies to host and manage websites or web applications on cloud servers. It acts as a **control panel alternative** that supports PHP-based applications like WordPress, Laravel, and custom PHP apps. ### **How to Check max\_input\_vars in ServerAvatar Panel** If you want to check or confirm the value of max\_input\_vars (which controls the maximum number of input variables a server can handle in a single request), follow the steps below: **Step 1: Log in to** [**ServerAvatar**](https://serveravatar.com/) **Dashboard** **Step 2: Select Your Server** - From the **left sidebar**, click on **Servers**. - A list of your connected servers will appear. - Click on the server you want to manage. **Step 3: Select your application.** ![Application Dashboard - ServerAvatar](https://serveravatar.com/wp-content/uploads/2025/09/image-2025-09-03T171433.195-1024x403.png)**Step 4: Check max\_input\_vars** - Click on PHP Setting - Navigate to **max\_input\_vars in** Section of PHP Version - Here, you’ll see the **current value** set for this directive is 1600. ![max_input_vars - ServerAvatar](https://serveravatar.com/wp-content/uploads/2025/09/image-2025-09-03T171501.643-1024x418.png)If needed, you can update the value - Enter the desired value (e.g., 3000). - Click **Save Changes**. - Restart the PHP or web server if prompted. ## Method 2: **Edit php.ini File** This method works **only if you have root or server-level access** to your server (e.g., VPS, Cloud, Dedicated Server). **Step 1: Connect to Your Server via SSH** If you’re not already connected, log into your server using an SSH client like **Terminal** (Mac/Linux) or **PuTTY** (Windows). Bash``` ssh username@your-server-ip ``` ``` ssh username@your-server-ip ``` Replace username with your actual username and your-server-ip with your server’s IP address. **Step 2: Locate the php.ini File** To find the exact location of the PHP configuration file, run: Bash``` php --ini ``` ``` php --ini ``` Look for a line like this: Bash``` Loaded Configuration File: /etc/php/8.1/apache2/php.ini ``` ``` Loaded Configuration File: /etc/php/8.1/apache2/php.ini ``` Note: The location may vary depending on the PHP version and web server (Apache or Nginx). Adjust the path accordingly. **Step 3: Open the php.ini File for Editing** Use a command-line text editor like nano or vim to open the file: Bash``` sudo nano /etc/php/8.1/apache2/php.ini ``` ``` sudo nano /etc/php/8.1/apache2/php.ini ``` Replace the path based on the result from **Step 2**. **Step 4: Search and Update max\_input\_vars** Inside the file, press Ctrl + W to search, then type: Nginx``` max_input_vars ``` ``` max_input_vars ``` If it exists, **update the value** to something higher, like: INI``` max_input_vars = 5000 ``` ``` max_input_vars = 5000 ``` If it doesn’t exist, add this line manually under the \[PHP\] section: INI``` max_input_vars = 5000 ``` ``` max_input_vars = 5000 ``` **Optional (Recommended): Increase Other Limits** While you’re here, you may also want to increase these related settings: INI``` post_max_size = 100M memory_limit = 256M ``` ``` post_max_size = 100M memory_limit = 256M ``` This is useful for large file uploads or complex forms. **Step 5: Save and Exit the File** If you’re using nano, press: ``` Ctrl + X → Y → Enter ``` **Step 6: Restart the Web Server** Changes won’t take effect until you restart the web server. For **Apache**, run: Bash``` sudo systemctl restart apache2 ``` ``` sudo systemctl restart apache2 ``` For **Nginx with PHP-FPM**, run: Bash``` sudo systemctl restart php8.1-fpm sudo systemctl restart nginx ``` ``` sudo systemctl restart php8.1-fpm sudo systemctl restart nginx ``` Adjust PHP version in the command if you’re using a different version. ## Common Errors and Troubleshooting **IssueSolution:** Changes not reflecting | Restart PHP or web server. Clear cache. Still getting 500 error | Check for syntax issues in .htaccess or php.ini. Host restrictions | Use .user.ini or contact support. WordPress menus break | Set max\_input\_vars = 3000 or higher. ## Example Use Cases **WordPress with Page Builders** Popular page builders like Elementor or WPBakery can generate hundreds of form fields. If you’re editing large pages or saving complex customizer data, you may need to raise the limit to **4000–6000**. **Laravel Applications with Multi-dimensional Arrays** In Laravel, deeply nested array input like: PHP``` ``` ``` ``` can count as multiple inputs. With many fields, it’s easy to hit the 1000 limit. Use max\_input\_vars = 5000 for large applications. ## Tips to Optimize Form Performance - Minimize unnecessary fields. - Use JavaScript to load dynamic forms only when needed. - Paginate long forms (multi-step). - Compress nested structures in JSON format before submitting. ## FAQs ### **1. What is the default value of max\_input\_vars?** It’s set to 1000 by default. ### **2. Can increasing max\_input\_vars slow down my server?** Only if combined with large memory usage or poor code. Generally, raising the limit to 3000–5000 is safe. ### **3. Is max\_input\_vars the same as post\_max\_size?** No. max\_input\_vars counts input fields, while post\_max\_size limits total POST data size. ### **4. What value should I set max\_input\_vars to?** Depends on your application. Common safe values are: - 3000 for WordPress menus - 5000 for complex Laravel forms ### **5. How do I know if this limit is causing issues?** Symptoms include: - Form data not saving - Menu items missing after saving - Random form crashes with no clear error ### **6. Will increasing max\_input\_vars affect security?** It can if not paired with validation. Always validate and sanitize input, especially when handling thousands of form variables. ## Conclusion Increasing the max\_input\_vars directive is crucial for handling large or complex forms in PHP applications like WordPress, Laravel, and Magento. Whether you’re managing a WooCommerce store or a custom dashboard, this simple configuration tweak can prevent frustrating data loss and save hours of debugging. Using tools like **ServerAvatar**, you can manage these PHP settings effortlessly—even without server admin skills. Take the time to implement the right value, validate the configuration, and monitor performance to ensure your site runs smoothly and securely. **Categories:** Blog, Guide, Php **Tags:** php, PHP Settings, php tutorial, Web Development --- ### [PHP Date Function Guide: Learn to Format Dates Like a Pro](https://serveravatar.com/master-php-date-function/) **Published:** September 6, 2025 **Author:** Suresh Ramani **Content:** [![Blog banner - ServerAvatar](https://serveravatar.com/wp-content/uploads/2025/09/728_90-Banner-3-1024x127.png)](https://serveravatar.com?ref=blog)Ever stared at a jumble of numbers like **20250904** and wondered, “How do I turn this into something human-friendly?” You’re not alone! Working with dates in PHP can feel like decoding secret messages at first. But once you get the hang of the **PHP Date Function**, it’s as smooth as butter. Imagine having a Swiss Army knife for dates, versatile, reliable, and ready for every format you need. Let’s dive in and make date formatting a breeze! ## **Understanding the date() Function** Ever wondered what powers all those neat date formats on your favorite websites? HTML might show it, but PHP **date()** function is the magician behind the curtain. It takes a format string and an optional timestamp, then spits out a date string that looks just the way you want. ## **Basic Syntax and Parameters** At its core, the **date()** function is simple: ``` string date ( string $format [, int $timestamp = time() ] ) ``` - **$format**: A string defining the date format using special characters. - **$timestamp**: Optional. A Unix timestamp. Defaults to the current time if omitted. Think of **$format** as a recipe: the letters are ingredients that tell PHP how to bake your date. ## **Common Format Characters** You’ll use letters like: - **Y**: Full year, e.g., `2025` - **m**: Month with leading zero, e.g., `09` - **d**: Day with leading zero, e.g., `04` - **H**: 24-hour format, e.g., `14` - **i**: Minutes, e.g., `02` - **s**: Seconds, e.g., `05` It’s like learning musical notes—once you know them, you can play any tune! ## **Formatting Dates for Readability** Let’s face it: `2025-09-04 14:02:05` looks cleaner as **September 4, 2025 at 2:02 PM**. You can use: PHP``` echo date("F j, Y \a\\t g:i A"); ``` ``` echo date("F j, Y \a\\t g:i A"); ``` - **F**: Full month name (`September`) - **j**: Day without leading zeros (`4`) - **g**: 12-hour format (`2`) - **A**: Uppercase AM/PM This makes your dates human-friendly – no squinting required! ## **Handling Timezones** Timezones can be tricky. By default, PHP uses the server’s timezone. To set your own: PHP``` date_default_timezone_set('America/New_York'); echo date("Y-m-d H:i:s"); ``` ``` date_default_timezone_set('America/New_York'); echo date("Y-m-d H:i:s"); ``` Feeling lost in time? This ensures everyone sees the correct date and time, wherever they are. ## **Formatting Timestamps** Got a timestamp like `1630454400`? Convert it: PHP``` echo date("Y-m-d H:i:s", 1630454400); ``` ``` echo date("Y-m-d H:i:s", 1630454400); ``` It’s like translating Morse code into plain English! ## **Date Arithmetic with strtotime()** Want “next Monday” or “+2 weeks”? Use **strtotime()**: PHP``` $nextWeek = strtotime("+1 week"); echo date("Y-m-d", $nextWeek); ``` ``` $nextWeek = strtotime("+1 week"); echo date("Y-m-d", $nextWeek); ``` This powerhouse lets you add or subtract dates without sweating the details. ## **Practical Examples** - **Display when a post was published:** PHP``` echo "Published on " . date("F j, Y", strtotime($post_date)); ``` ``` echo "Published on " . date("F j, Y", strtotime($post_date)); ``` - **Calculate age from birthdate:** PHP``` $birth = new DateTime('1990-05-15'); $today = new DateTime('now'); $age = $today->diff($birth)->y; echo "Age: " . $age; ``` ``` $birth = new DateTime('1990-05-15'); $today = new DateTime('now'); $age = $today->diff($birth)->y; echo "Age: " . $age; ``` These snippets are your go-to tools for everyday tasks. ## **Building Dynamic Date Strings** Need a countdown to a launch? Or a “last updated” badge? Combine **date()** with string functions: PHP``` echo "Our sale ends on " . date("l, F jS", strtotime("+10 days")); ``` ``` echo "Our sale ends on " . date("l, F jS", strtotime("+10 days")); ``` It’s like having a real-time announcer on your site! ## **Localization and Multilingual Dates** Want dates in French or Spanish? Use PHP’s **IntlDateFormatter**: PHP``` $fmt = new IntlDateFormatter('fr_FR', IntlDateFormatter::LONG, IntlDateFormatter::NONE); echo $fmt->format(new DateTime()); ``` ``` $fmt = new IntlDateFormatter('fr_FR', IntlDateFormatter::LONG, IntlDateFormatter::NONE); echo $fmt->format(new DateTime()); ``` Your content will feel at home for audiences worldwide. ## **Error Handling and Validation** Always validate incoming dates: PHP``` if (strtotime($input_date) === false) { echo "Invalid date format!"; } ``` ``` if (strtotime($input_date) === false) { echo "Invalid date format!"; } ``` This stops weird or malicious dates from slipping through. ## **Optimizing for Performance** If you’re formatting thousands of dates, use **DateTime** objects instead of repeated **date()** calls: PHP``` $dateObj = new DateTime(); echo $dateObj->format('Y-m-d'); ``` ``` $dateObj = new DateTime(); echo $dateObj->format('Y-m-d'); ``` It’s more memory-efficient and a smoother ride for your server. [![Blog banner - ServerAvatar](https://serveravatar.com/wp-content/uploads/2025/09/728_90-Banner-1-1024x127.png)](https://serveravatar.com?ref=blog)## **Security Considerations** Dates from user input? Sanitize and validate! Never trust raw strings: PHP``` $clean = filter_var($user_date, FILTER_SANITIZE_STRING); ``` ``` $clean = filter_var($user_date, FILTER_SANITIZE_STRING); ``` This prevents injection attacks disguised as dates. ## **Best Practices and Tips** - **Cache repeated calculations** when possible. - **Use constants** like `DATE_ATOM` for standard formats. - **Keep timezone settings centralized** to avoid surprises. These tiny tweaks make a big difference over time. ## **Resources and Further Reading** For a deep dive, check out the official PHP manual on **date()** and **DateTime** functions: - - ## **Conclusion** Mastering the **date in php** function doesn’t have to be daunting. With clear format characters, timezone controls, and the power of **DateTime**, you’re equipped to format dates like a pro. Go ahead—transform those raw timestamps into meaningful, human-friendly dates that delight your audience! ## Frequently Asked Questions ### **How do I format a Unix timestamp in PHP?** Use the **date()** function with your desired format and pass the timestamp as the second argument. For example, `date("Y-m-d H:i:s", $timestamp)`. ### **Can I change the default timezone in PHP?** Yes! Call `date_default_timezone_set('Your/Timezone')` at the top of your script. Check supported timezones at [PHP Timezones](https://www.php.net/manual/en/timezones.php). ### **How do I display dates in different languages?** Use `IntlDateFormatter` with the locale code. For example: `$fmt = new IntlDateFormatter('es_ES', IntlDateFormatter::LONG, IntlDateFormatter::NONE); echo $fmt->format(new DateTime());` ### **What is the difference between date() and DateTime?** **date()** is a simple function, while **DateTime** is an object-oriented approach that offers more flexibility for arithmetic, comparison, and formatting. ### **How can I validate user-provided dates?** Check with `strtotime($input)` and ensure it’s not false. You can also use `DateTime::createFromFormat()` to enforce a specific format. ## Stop Wasting Time on Servers. Start Building Instead. You didn’t start your project to babysit servers. Let **ServerAvatar** handle deployment, monitoring, and backups — so you can focus on growth. Deploy **WordPress, Laravel, N8N**, and more in minutes. No DevOps required. No command line. No stress. [ 🚀 Try Free ](https://app.serveravatar.com) [ 🌐 Learn More ](https://serveravatar.com/) Trusted by 10,000+ developers and growing. **Categories:** Blog, Guide, Php **Tags:** php, PHP Guide --- ### [Build MCP Server Laravel: AI Integration Made Simple](https://serveravatar.com/build-mcp-server-laravel/) **Published:** September 9, 2025 **Author:** Suresh Ramani **Content:** [![Blog banner - ServerAvatar](https://serveravatar.com/wp-content/uploads/2025/09/728_90-Banner-3-1024x127.png)](https://serveravatar.com?ref=blog)Imagine talking to your computer and having it not just listen, but *truly* understand and do what you ask – like running reports, sending emails, or even analyzing your business data in real time. Sounds futuristic? Not anymore! Thanks to MCP servers powered by Laravel, AI can seamlessly integrate with your apps and make this science fiction a daily reality. If you’ve ever Googled “how do I connect AI to my website?” or wondered what goes on behind the scenes when Alexa controls your smart home, MCP server is the bridge you’ve been looking for. In this guide, we’ll walk you through how to build an MCP server using Laravel, explain its benefits, and show you – step by step – how easy it is to bring intelligent automation to your own projects. Ready to unlock next-level AI for the general public? Let’s dive in! Imagine an interpreter that stands between you and a foreign language speaker. It listens to your request, translates it, and delivers a response you’ll understand. That’s what an MCP server does – only, instead of languages, it translates AI instructions into actions your Laravel application can perform. MCP stands for *Model Context Protocol*. It’s a universal standard that lets smart assistants like Claude, ChatGPT, or other AI models talk directly to your backend – fetching info, running tasks, and more – all securely and in real time. Instead of custom integrations for every app, MCP creates a single bridge anyone can use. The **[Model Context Protocol](https://modelcontextprotocol.io/)** was introduced by Anthropic as an open standard that enables developers to build secure, two-way connections between their data sources and AI-powered tools. Think of it like a USB-C port for AI applications – providing a standardized way to connect AI models to different data sources and tools. ## **Why Choose Laravel for MCP Integration?** Laravel, known for its elegance and simplicity, makes building powerful web backends a breeze. Pairing Laravel with an MCP server is like turning a reliable sedan into a smart car – giving your backend the ability to communicate with the cutting-edge intelligence of AI. What makes Laravel shine for MCP servers? - **Simplicity:** Clear, readable code even beginners can understand. - **Security:** Built-in protection, ensuring only permitted actions are exposed. - **Extensibility:** Easy to add more features and connect with other services. You don’t need to be a rocket scientist to build an MCP server if you have Laravel in your toolkit. Just a bit of curiosity and imagination! While Laravel offers excellent PHP-based solutions, developers interested in exploring alternative approaches can also check out how to **[create MCP server in Node.js](https://serveravatar.com/create-mcp-server-nodejs/)** for JavaScript-based implementations. ## **Getting Set Up: The Laravel MCP Foundation** Starting with MCP on Laravel is as easy as installing any package. You’ll need: - Laravel (latest version recommended) - Composer (to manage dependencies) - PHP 8.1+ (for maximum compatibility) **Quick Setup Steps:** 1. Create your new Laravel project: Bash``` composer create-project laravel/laravel mcp-server cd mcp-server ``` ``` composer create-project laravel/laravel mcp-server cd mcp-server ``` 2. Add the MCP package: Bash``` composer require php-mcp/laravel:^3.0 -W ``` ``` composer require php-mcp/laravel:^3.0 -W ``` 3. Publish the MCP configuration: Bash``` php artisan vendor:publish --provider="PhpMcp\\Laravel\\McpServiceProvider" ``` ``` php artisan vendor:publish --provider="PhpMcp\\Laravel\\McpServiceProvider" ``` And that’s it! You’re ready to start building. ## **How MCP Servers Work: Real-World Analogy** Let’s use an analogy – a *universal remote for your home*. You have dozens of devices, each speaking their own “digital language”. The universal remote needs to understand your button presses (requests) and tell the right device (app tool) what to do, whether it’s turning on the TV or dimming the lights. MCP servers work just like that remote: they interpret incoming AI requests and direct them to the right tools or resources in your Laravel application. No more learning 20 languages; everything connects through one channel. ## **Key Benefits of MCP Servers** Why are developers and businesses jumping on the MCP bandwagon? Here’s why: - **One integration to rule them all:** Connect AI models and apps with a single protocol–no more juggling different APIs. - **Security-first design:** Expose only what you want; keep the rest locked down. - **Efficiency & speed:** Real-time data processing and response. - **Cross-platform magic:** Works with multiple AI platforms, not just one specific brand. - **Reduced complexity:** Unified plugin model, easy maintenance. Think of MCP as the operating system for intelligent interactions – it just works, and works well! ## **Installing MCP Server in Laravel** After setup, the next step is to activate MCP features in your Laravel project. MCP servers usually support multiple “transport layers” – ways of communicating with AI clients. The most popular ones are: - **Streamable HTTP:** Recommended for secure real-time communication. - **Server-Sent Events (SSE):** Legacy support for continuous connections. ## **Core Components of an MCP Server** Every MCP server has a few key parts, just like a well-organized kitchen: - **Tools:** Executable functions (like recipes) you want the AI to use. - **Resources:** Static data or files (think pantry items). - **Resource Templates:** Dynamic versions of resources, for flexible requests. - **Prompts:** Message templates for the AI to start conversations or tasks. Laravel makes it super easy to define these using either manual registration or PHP attributes. You simply “register” what you want available to the outside world. ## **Creating MCP Tools in Laravel** Want the AI to add numbers or send an email? Register these as *tools* in your MCP server. Create `mcp.php` file inside `routes` folder: **Example: Add Numbers Tool** PHP``` Mcp::tool(function(float $a, float $b): float { return $a + $b; }) ->name('add_numbers') ->description('Add two numbers together'); ``` ``` Mcp::tool(function(float $a, float $b): float { return $a + $b; }) ->name('add_numbers') ->description('Add two numbers together'); ``` **Example: Send Email Tool** PHP``` Mcp::tool(EmailService::class) ->description('Send emails to users'); ``` ``` Mcp::tool(EmailService::class) ->description('Send emails to users'); ``` Tools can support anything you imagine – database queries, notifications, business logic, or custom reports. ## **Building MCP Resources & Data Connections** Resources in MCP aren’t just “stuff” – they’re the backbone of AI data access. You can expose settings, user profiles, files, or anything else your app stores: **Example: Application Settings Resource** PHP``` Mcp::resource('config://app/settings', [UserService::class, 'getAppSettings']) ->name('app_settings') ->description('Application configuration settings'); ``` ``` Mcp::resource('config://app/settings', [UserService::class, 'getAppSettings']) ->name('app_settings') ->description('Application configuration settings'); ``` Dynamic resource templates let AI fetch data for specific users, files, or entities. It’s like giving your AI a pantry full of smart ingredients to cook up insight! ## **How AI Interacts with MCP Servers** When an AI assistant like Claude or ChatGPT connects to your MCP server, it: 1. Discovers available tools and resources. 2. Selects what it needs to perform the requested job. 3. Sends instructions in natural language (e.g., “Send a summary email”). 4. Receives results – no hassle, no guesswork. This process is fast, secure, and standardized across all MCP-compatible clients. Your Laravel MCP acts as a responsive, intelligent interface. ## **Validations, Security & Permissions** Worried about exposing too much or getting spammed by rogue requests? Relax – Laravel MCP gives you full control. - Specify input types and requirements for each tool. - Add authentication and user roles as needed. - Log requests for auditing and security. - Use Laravel middleware to add extra checks or restrict usage. With great power comes great responsibility – and MCP servers give you the tools to use their power wisely. [![Blog banner - ServerAvatar](https://serveravatar.com/wp-content/uploads/2025/09/728_90-Banner-1-1024x127.png)](https://serveravatar.com?ref=blog)## **Connecting Your Laravel MCP Server to AI Clients** Ready to see the magic? Most AI platforms support MCP out of the box. You can find detailed information about connecting to various AI clients in the **[official MCP documentation](https://docs.anthropic.com/en/docs/mcp)**. **Basic Connection:** Update your MCP client configuration (e.g., in Claude Desktop) to point to your Laravel endpoint: JSON``` { "mcpServers": { "my-laravel-app": { "command": "curl", "args": [ "-X", "POST", "-H", "Content-Type: application/json", "http://127.0.0.1:8000/mcp" ] } } } ``` ``` { "mcpServers": { "my-laravel-app": { "command": "curl", "args": [ "-X", "POST", "-H", "Content-Type: application/json", "http://127.0.0.1:8000/mcp" ] } } } ``` Once you’re connected, your AI assistant can interact with your Laravel tools as if it was human! Try a test command or data request and watch live integrations unfold. For detailed instructions on using an MCP server in VS Code, refer to the official guide: [Using MCP Servers in VS Code](https://code.visualstudio.com/docs/copilot/customization/mcp-servers). ## **Practical Use Cases & Examples** Here’s where MCP servers get seriously fun. Real-world use cases include: - **AI-powered customer support:** Let bots fetch user info, log issues, or make bookings. - **Data analysis and reporting:** Automate business insights, financial calculations, or personalized recommendations. - **Healthcare applications:** Securely connect patient data for AI-driven diagnosis or consultations. - **Education & tutorials:** Create learning bots that interact with course materials and answer questions. - **Smart home and IoT:** Control devices and analyze sensor data – all through voice or text AI instructions. You’re limited only by your imagination. ## **Troubleshooting and Optimization Tips** Even the best servers hit bumps – here’s what you can do: - **Monitor performance:** Use real-time analytics to watch what tools are used most or spot slowdowns. - **Optimize security:** Regularly update permissions and input checks. - **Test integrations:** Simulate AI requests to catch errors before they hit production. - **Cache responses:** For data-heavy tools, speed things up with Laravel’s built-in caching. - **Automate validation:** Implement checks on new tools or resources to prevent mistakes. For developers working across different technology stacks, you might also find it helpful to compare Laravel’s approach with other implementations. Our detailed guide on **[creating MCP servers with Node.js](https://serveravatar.com/create-mcp-server-nodejs/)** provides valuable insights into alternative development approaches that can complement your Laravel knowledge. ## **Future Trends: MCP and AI in 2025** The world of MCP servers is evolving fast. In 2025, expect: - **Tighter integration with cloud platforms and edge devices.** - **Better personalization through real-time feedback.** - **Smarter security models based on context and user roles.** - **Frictionless onboarding for any AI model, anywhere.** Just as the smartphone became everyone’s digital companion, MCP servers are quickly becoming the new standard for how AI interacts with the real world. Stay tuned – the future is just getting started! You can find the GitHub repository here: [srvrsoorg/mcp-server-laravel](https://github.com/srvrsoorg/mcp-server-laravel). ## **Conclusion** Building an MCP server with Laravel opens the door to a world where AI isn’t just smart – it’s practical, helpful, and easy to use. With this guide, you’re not just following tech trends; you’re leading them. By making advanced AI accessible to the general public, you help bridge the gap between curiosity and capability. MCP server + Laravel = the magic wand for modern automation. It’s time to start building, exploring, and imagining what’s possible. Ready to let AI work for *you*? ## **Frequently Asked Questions** ### **What is an MCP server?** An MCP server is a protocol-based application backend that lets AI assistants securely fetch data, execute functions, and perform real-world actions for users, all in real time. ### **Why should I use Laravel for my MCP server?** Laravel combines user-friendly code with robust features, making it easy to build, secure, and extend your MCP server without hours of complex setup. ### **Can I connect any AI model to my Laravel MCP server?** Yes! MCP is designed as an open standard, so most popular AI clients and models can plug in, discover your tools, and interact seamlessly. ### **Is it safe to expose server functions to AI?** Absolutely – as long as you use proper validations, controls, and permissions allowed by Laravel MCP configurations. You decide what’s exposed and what stays private. ### **What are some cool things I can do with MCP server integration?** From sending automated emails to processing data, running database queries, or powering IoT devices, MCP servers unlock limitless possibilities for intelligent automation with just a few lines of code. ## Stop Wasting Time on Servers. Start Building Instead. You didn’t start your project to babysit servers. Let **ServerAvatar** handle deployment, monitoring, and backups — so you can focus on growth. Deploy **WordPress, Laravel, N8N**, and more in minutes. No DevOps required. No command line. No stress. [ 🚀 Try Free ](https://app.serveravatar.com) [ 🌐 Learn More ](https://serveravatar.com/) Trusted by 10,000+ developers and growing. **Categories:** Blog, Laravel, Tutorials **Tags:** AI Integration, laravel, Laravel Tutorial, MCP Server --- ### [How to Install Git on Ubuntu Quickly: Step-by-Step Guide](https://serveravatar.com/install-git-ubuntu/) **Published:** September 12, 2025 **Author:** Suresh Ramani **Content:** [![Blog banner - ServerAvatar](https://serveravatar.com/wp-content/uploads/2025/09/728_90-Banner-3-1024x127.png)](https://serveravatar.com?ref=blog)Have you ever felt stuck trying to **Install Git on Ubuntu**? You’re not alone! Installing Git is like putting the cornerstone in place before building your dream house: once it’s there, everything else falls into place smoothly. In this guide, we’ll walk you through how to **Install Git on Ubuntu** in no time – no jargon, no fuss. Ready? Let’s dive in! ## **Why You Need Git** **[Git](https://git-scm.com/)** is more than just a version control tool – it’s the backbone of modern collaboration. Whether you’re a solo developer or part of a large team, Git lets you track changes, revert to previous states, and work on multiple features simultaneously without fear of losing work. Think of it as a time machine for your code! ## **Using ServerAvatar for Git** With **[ServerAvatar](https://serveravatar.com/)**, you don’t have to worry about manually installing or setting up Git on your server. Git is automatically installed when you connect a server through ServerAvatar, saving you time and effort. ServerAvatar is a platform to simplify the hosting and management of servers and applications. It simplifies the process of deploying and managing PHP and Node.js-based web applications on servers. If you’re using ServerAvatar to host your git sites, you don’t need to worry about manual git installation at all. ![ServerAvatar Dashboard](https://serveravatar.com/wp-content/uploads/2025/09/image-16-1024x398.png)On top of that, ServerAvatar allows you to seamlessly **integrate your Git accounts**, including **GitHub, GitLab,** and **Bitbucket**, so you can easily deploy your applications directly from your repositories. ![Git Integrate - ServerAvatar](https://serveravatar.com/wp-content/uploads/2025/09/image-17-1024x435.png)You can install and manage the Git applications with private or public repositories directly from the ServerAvatar dashboard with just a few clicks. This makes version control, deployments, and server management simpler and more efficient. ![ Install Git on Ubuntu](https://serveravatar.com/wp-content/uploads/2025/09/image-19.png)![Select Repository Type- ServerAvatar](https://serveravatar.com/wp-content/uploads/2025/09/image-20.png)## **Installing Git Manually** ## **Prerequisites** Before we begin, let’s check what you need: - **Ubuntu 18.04+** or any later release - **Terminal access** with a user having sudo privileges - An **internet connection** That’s it! If you can open a terminal, you’re ready to go. ## **Update Ubuntu Packages** First things first – let’s make sure your package list is up to date. This ensures you’re installing the latest version of any software. Bash``` sudo apt update ``` ``` sudo apt update ``` > **Tip:** Running `sudo apt update` is like refreshing your app store to see the newest app versions available. ## **Install Git via APT** Now, let’s install Git. A single command is all it takes: Bash``` sudo apt install git -y ``` ``` sudo apt install git -y ``` The `-y` flag automatically confirms the installation. Easy peasy! ## **Verify Git Installation** Once the installation completes, you’ll want to confirm it worked. Run: Bash``` git --version ``` ``` git --version ``` You should see something like `git version 2.34.1`. If you do, congrats – you’ve successfully **installed Git on Ubuntu**! ## **Configure Git User Information** Git needs to know who you are. Set your **name** and **email** globally with: Bash``` git config --global user.name "Your Name" git config --global user.email "you@example.com" ``` ``` git config --global user.name "Your Name" git config --global user.email "you@example.com" ``` > **Why?** Every commit is tagged with these details, creating a clear history for you and your collaborators. ## **Generate SSH Keys for Git** SSH keys allow secure communication with remote repositories: Bash``` ssh-keygen -t ed25519 -C "you@example.com" ``` ``` ssh-keygen -t ed25519 -C "you@example.com" ``` Press **Enter** to accept defaults. If asked for a passphrase, choose one or leave blank for no passphrase. ## **Add SSH Key to GitHub/GitLab** Copy your public key to the clipboard: Bash``` cat ~/.ssh/id_ed25519.pub ``` ``` cat ~/.ssh/id_ed25519.pub ``` Then, log in to your Git hosting service: - For **GitHub**, go to **Settings > SSH and GPG keys > New SSH key**. - For **GitLab**, navigate to **User Settings > SSH Keys > Add new**. Paste the key and save. Voilà – you’re ready to push and pull! ## **Basic Git Commands** Getting comfortable with a few commands makes life easier: - `git clone ` – Download a repository - `git status` – View changes - `git add .` – Stage changes - `git commit -m "Message"` – Commit changes - `git push` – Upload to remote - `git pull` – Download updates Rinse and repeat! ## **Using Git Bash on Ubuntu** If you prefer a more familiar interface, consider **Git Bash**. You can Learn more about [Git Bash](https://serveravatar.com/git-bash/). Git Bash brings a Unix-like shell to Windows, and it works seamlessly through **WSL** on Ubuntu. It’s like turning your terminal into a Swiss Army knife! ## **Keeping Git Up to Date** To update Git in the future: Bash``` sudo apt update sudo apt upgrade git -y ``` ``` sudo apt update sudo apt upgrade git -y ``` Staying current helps you benefit from security patches and new features. [![Blog banner - ServerAvatar](https://serveravatar.com/wp-content/uploads/2025/09/728_90-Banner-1-1024x127.png)](https://serveravatar.com?ref=blog)## **Troubleshooting Common Issues** - **Permission denied (publickey):** Ensure your SSH key is added correctly. - **Command not found:** Verify Git installed with `git --version`. - **Merge conflicts:** Use `git mergetool` or manually resolve conflicts in your editor. ## **Uninstalling Git** If you ever need to remove Git: Bash``` sudo apt remove git --purge -y sudo apt autoremove -y ``` ``` sudo apt remove git --purge -y sudo apt autoremove -y ``` Your configuration remains in `~/.gitconfig` unless you delete it manually. ## **Best Practices for Git Usage** **Branch Often:** Create feature branches (`git checkout -b feature-name`) to isolate work. **Commit Early, Commit Often:** Small commits make debugging easier. **Write Clear Messages:** A good commit message is like a signpost on your project’s timeline. ## **Conclusion & Next Steps** Congratulations! You’ve just learned how to **install Git on Ubuntu** quickly and configure it for daily use. From here, explore branching strategies, dive into advanced workflows, or integrate Git with CI/CD pipelines. ## **FAQs** ### **How do I update Git on Ubuntu without reinstalling?** Run `sudo apt update && sudo apt upgrade git -y` to fetch and apply the latest version. ### **Can I install Git on older Ubuntu versions?** Yes, Git works on Ubuntu 16.04 and later. Use the same `apt install git` command. ### **What’s the difference between HTTPS and SSH URLs when cloning?** HTTPS uses your username/password while SSH uses your SSH key for authentication. ### **How do I change my Git email after commits?** Use `git commit --amend --author="New Name "` for the last commit, or filter-branch for multiple. ### **Why do I get ‘detached HEAD’ and how do I fix it?** It means you’re not on a branch. Use `git checkout main` (or your branch name) to reattach HEAD. **Categories:** Application Deployments, Blog, Guide **Tags:** git, Ubuntu --- ### [How to Monitor CPU, RAM, and Disk Usage on a Linux VPS](https://serveravatar.com/check-cpu-ram-disk-usage-linux-vps/) **Published:** September 15, 2025 **Author:** Meghna Meghwani **Content:** [![Blog banner - ServerAvatar](https://serveravatar.com/wp-content/uploads/2025/09/728_90-Banner-3-1024x127.png)](https://serveravatar.com?ref=blog)**Running a Linux VPS can sometimes feel like managing the engine room of a ship.** Everything looks smooth on the surface, but under the hood, the CPU, RAM, and disk are working hard to keep your websites and applications running. If you don’t keep an eye on these resources, your server can slow down, crash, or even stop responding when you least expect it. That’s why learning, how to monitor CPU, RAM, and disk usage, on a Linux VPS is so important. The good news? It’s not as complicated as it sounds. Even if you’re not a tech person, with the right commands, and tools, you can easily track your server’s health, and resources. In this guide, we’ll walk step by step through different methods to monitor these resources, from built-in Linux commands to the powerful and easy-to-use ServerAvatar platform. Whether you’re a beginner or an experienced system admin, this step-by-step guide will help you keep your VPS running smoothly. **Monitoring your system resources ensures:** - **Performance:** Identify performance issues before they lead to downtime. - **Stability:** Prevent your server from crashing due to overload. - **Optimization:** Use resources efficiently, saving money on upgrades. - **Security:** Check for unusual spikes that could indicate malicious activity. ## Understanding CPU, RAM, and Disk Usage Basics Before diving into commands, let’s break down the three major resources: - **CPU (Central Processing Unit):** It handles all processing tasks. The high CPU usage for long periods may slow down applications. - **RAM (Random Access Memory):** It is temporary storage for active processes. If RAM runs out, the server will start using swap space that could slow down disk memory. - **Disk Usage:** It refers to both space (how much storage is left), and performance (