Adminer DB is a powerful and lightweight database management tool written in PHP. It provides a user-friendly web interface for managing various types of databases, including MySQL, PostgreSQL, SQLite, and more. Adminer DB enables effective database management without needing extensive technical knowledge. When selecting a hosting provider for Adminer DB, Azure stands out as a leading cloud infrastructure provider known for its simplicity, scalability, and user-friendly approach. ServerAvatar simplifies the deployment of Adminer DB on Azure VPS (Virtual Private Servers) through an intuitive interface, automating complex setup procedures, and allowing users with minimal technical knowledge to efficiently configure and manage their server environments.
Create VM Instance in Azure
Getting Started with Azure:
Azure virtual machines are one of several types of on-demand, scalable computing resources that Azure offers. Typically, you choose a virtual machine when you need more control over the computing environment than the other choices offer. An Azure virtual machine offers the benefits of virtualization without the need to purchase or manage the underlying physical hardware. However, you are responsible for tasks such as configuring, patching, and installing software on the virtual machine to ensure its proper functioning.
Azure virtual machines can serve a variety of purposes. Here are a few examples:
- Development and testing: Azure virtual machines provide a fast and straightforward method to deploy a computer environment tailored for coding and testing applications with specific configurations.
- Cloud-based applications: Given the variable demand for your application, it can be cost-effective to host it on an Azure virtual machine. You scale up by deploying additional virtual machines as needed and scale down by shutting them down during periods of lower demand.
- Extended data center: Virtual machines within an Azure virtual network can seamlessly integrate with your organization's network infrastructure.
Create a VM Instance in Azure:
To create a server in Microsoft Azure, First log in to Microsoft Azure. Once you are there, Follow the steps given below.
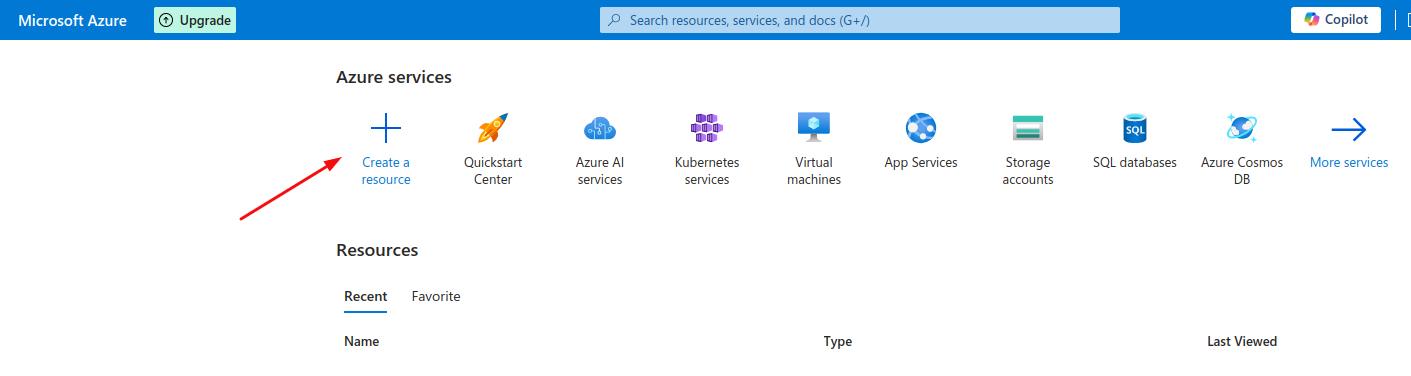
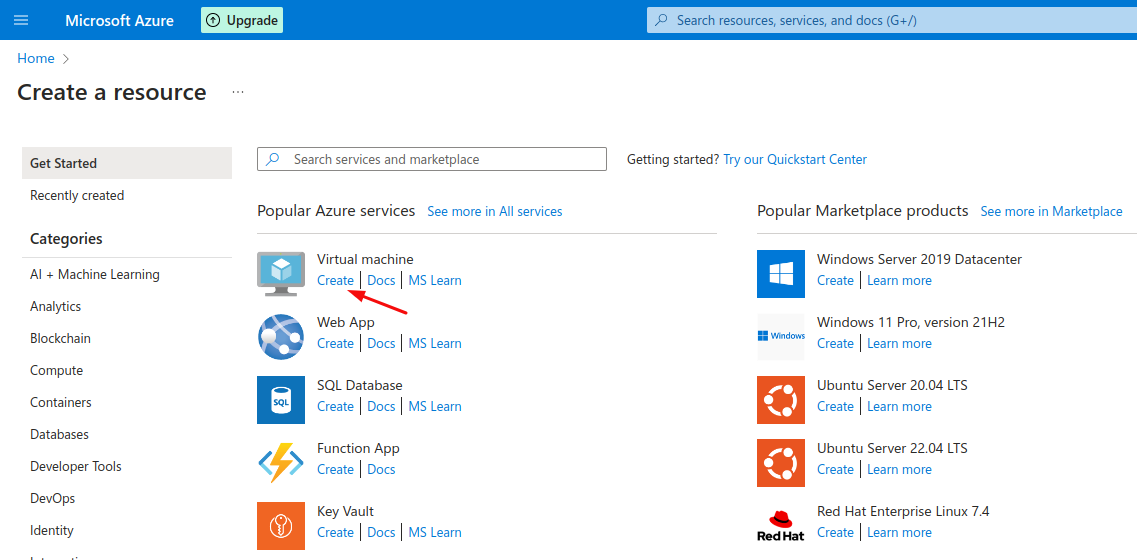
Step 1: Create a resource
- To access the resource creation form, Go to the Microsoft Azure Home and click on the addition icon button to create a resource. See the following image for reference.
- Then, click on the Create Virtual Machine as derived in the following image:
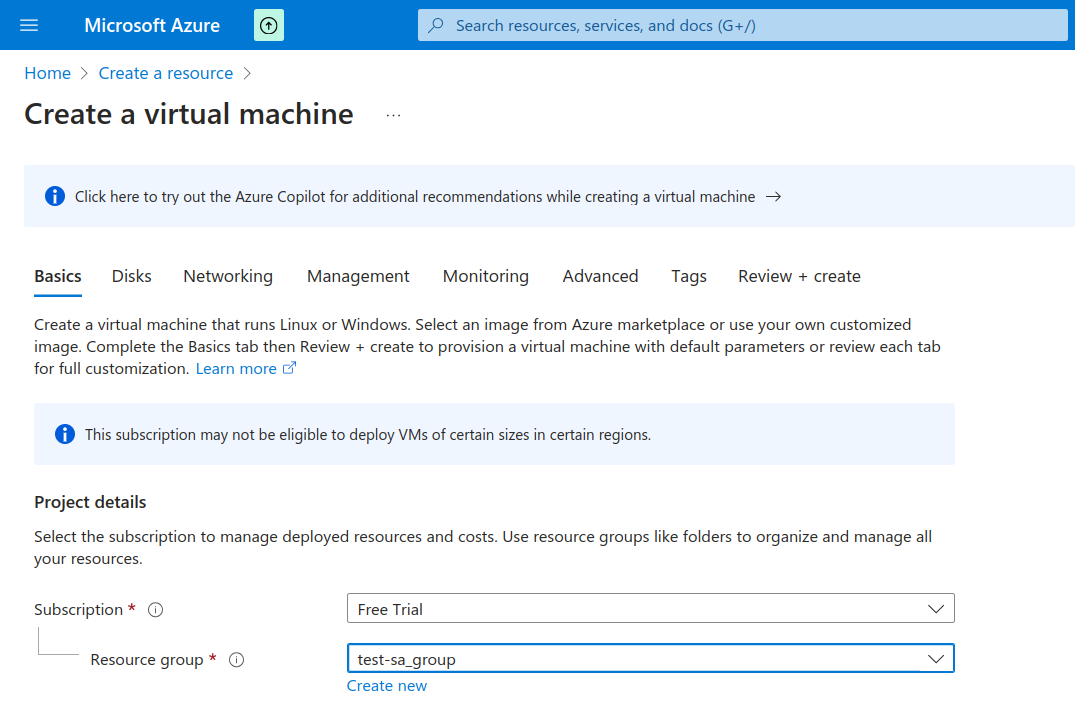
- By default, you are in the basic section, you have to fill out the details of your project. Select your Subscription plan and create a Resource group accordingly.
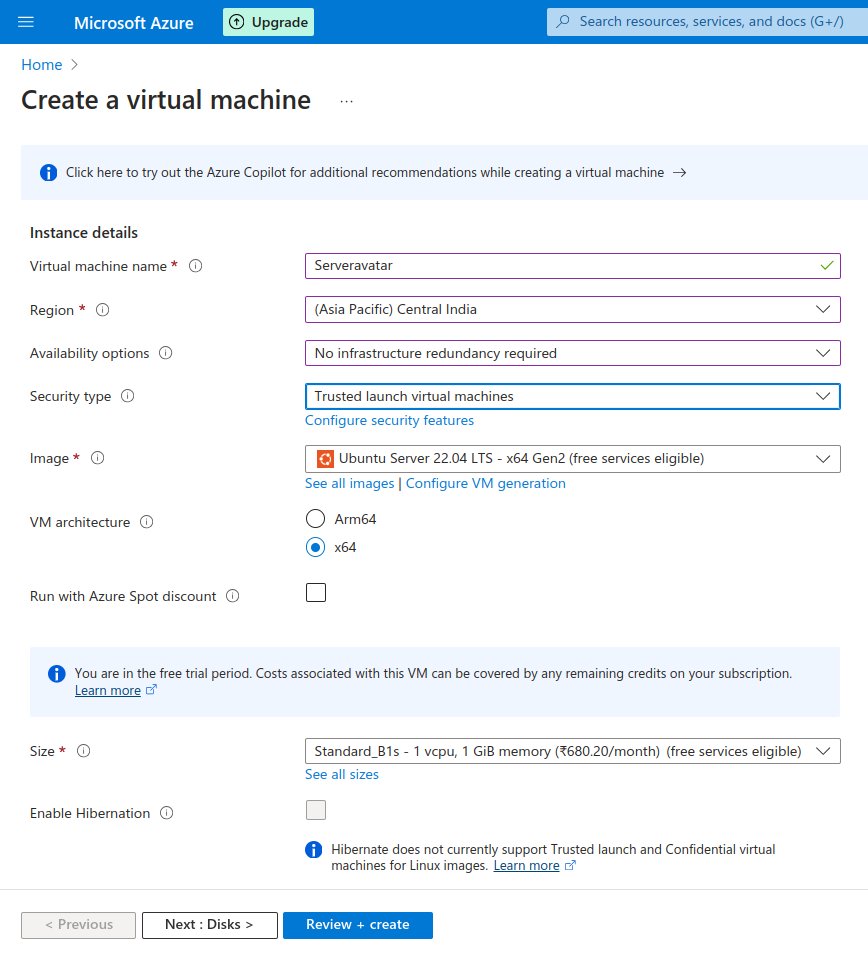
- After that, you have to enter the following details of your instance which includes:
- Virtual machine name: Enter your virtual machine name.
- Region: Select the Location of your Instance.
-
Availability options: There are four options available:
- No infrastructure redundancy is required. (Recommended)
- Availability Zone: If you select this option then you will have to choose the Zones available for your instance.
- Virtual machine scale set: If you select this option then you have to create your own Virtual machine scale set in your current resource and region.
- Availability Set: If you select this option then you can choose Aligned availability sets or Classic availability sets.
-
Security type: Azure offers three types of security:
- Standard: Selecting this type will provide a basic level of security.
- Trusted launch virtual machines: Selecting this will ensure a secure boot process by leveraging hardware-backed security features to protect against firmware-level attacks and other vulnerabilities. (Recommended)
- Confidential virtual machines: Selecting this will provide a secure environment where data can be processed in encrypted memory, safeguarding it from unauthorized access even from the cloud provider.
- Image: Generally, the Adminer DB requires Ubuntu 18.04 LTS or a later version for compatibility and support.ServerAvatar supports both Ubuntu 20.04 LTS and Ubuntu 22.04 LTS. Therefore, choose one of these supported operating systems.
- VM architecture: Select the radio button that shows x64 bit.
- Size: Select the VM component size as per your requirements.
- Enable Hibernation: Ignore this checkbox.
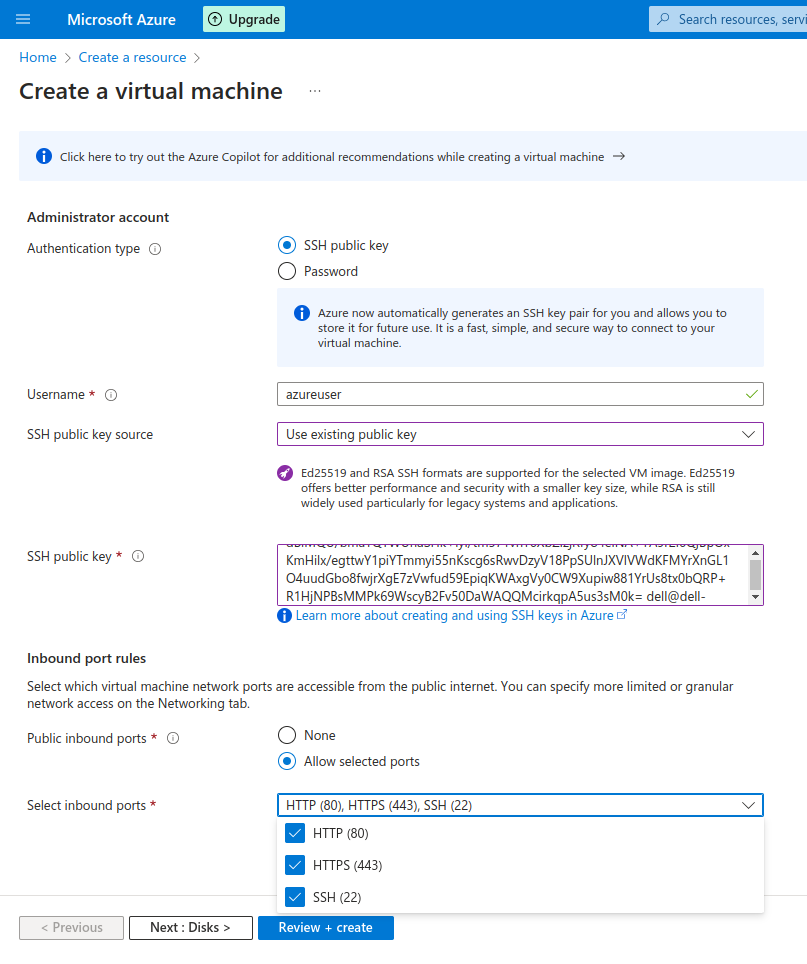
- Following the steps you have to enter the Administrator account details:
- Authentication type: You can either use the SSH public key or password for authentication, we recommend to use SSH public key.
- Username: Enter username of your choice.
-
SSH public key source: There are three sources available in Azure for SSH public key:
- Generate new key pair: If you want to generate a new SSH public key then you can choose this option and also you can select encryption format that is RSA SSH format or Ed25519 SSH Format. (Ed25519 provides enhanced performance and security using a smaller key size, whereas RSA remains prevalent, especially in legacy systems and applications).
- Use existing key stored in Azure: Select this if you have stored any SSH public key in Azure.
- Use existing public key: Select this if you already have a public key of your own.
- Now you have to set up Inbound port rules. Inbound port rules define how incoming network traffic is handled by a device or network service. These rules specify which ports on the device or service are open and accessible from external sources, such as the Internet or other networks. In this section, you have to select the ‘Allow Selected Port’ radio button as public inbound rules and select the inbound port as shown in the picture below.
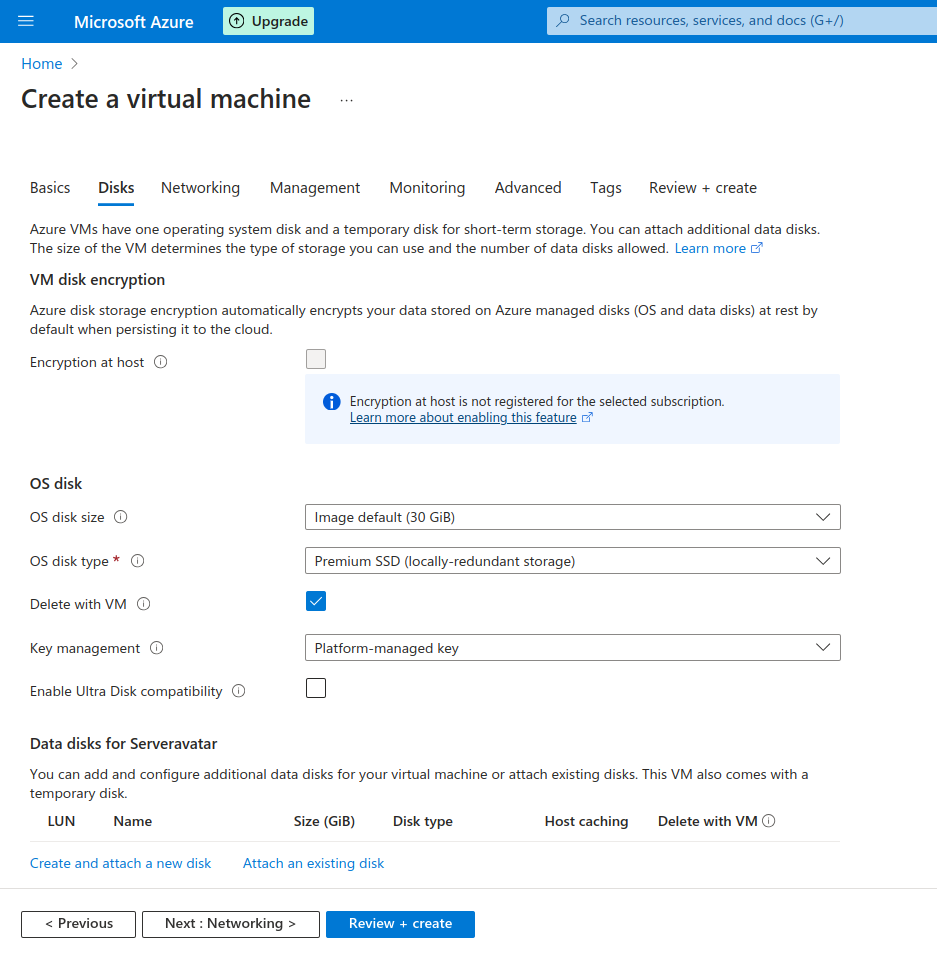
Step 2: Select the Disk for the Virtual Machine
- You can select the disk according to your requirements and needs. You can refer to the image to see the options available in Azure for configuring the disk.
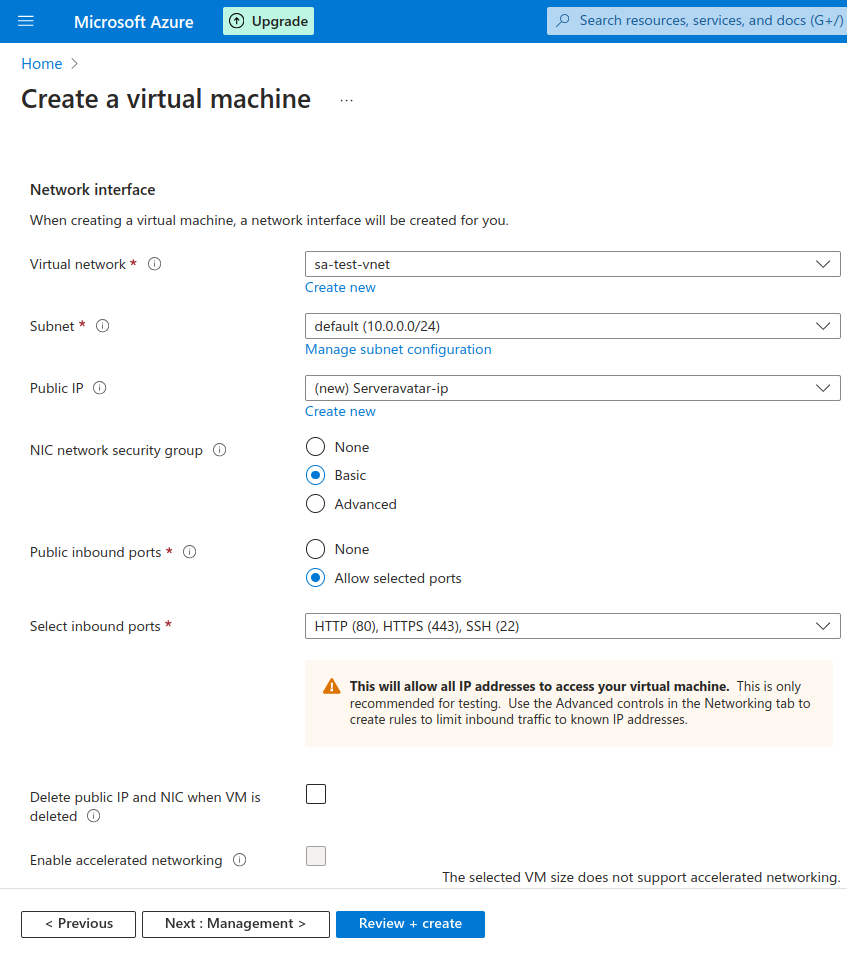
Step 3: Configuring Network Interface Settings
- Here you have to configure your virtual machine network interface, for that, you have to fill out the details as follows:
- Virtual network: Select the network or you can create one.
- Subnets: Select by default subnets or if you have knowledge you can manage and configure them on your own.
- Public IP: Select the newly created by default public IP or you can create one.
- NIC network security group: Leave it Basic as shown in the below image.
- Public inbound ports: Click on Allow selected ports.
- Select inbound ports: Select port HTTP(80), HTTPS(443) and SSH(22).
- Delete public IP and NIC when VM is deleted: Check this box as needed.
- Enable accelerated networking: Ignore this checkbox.
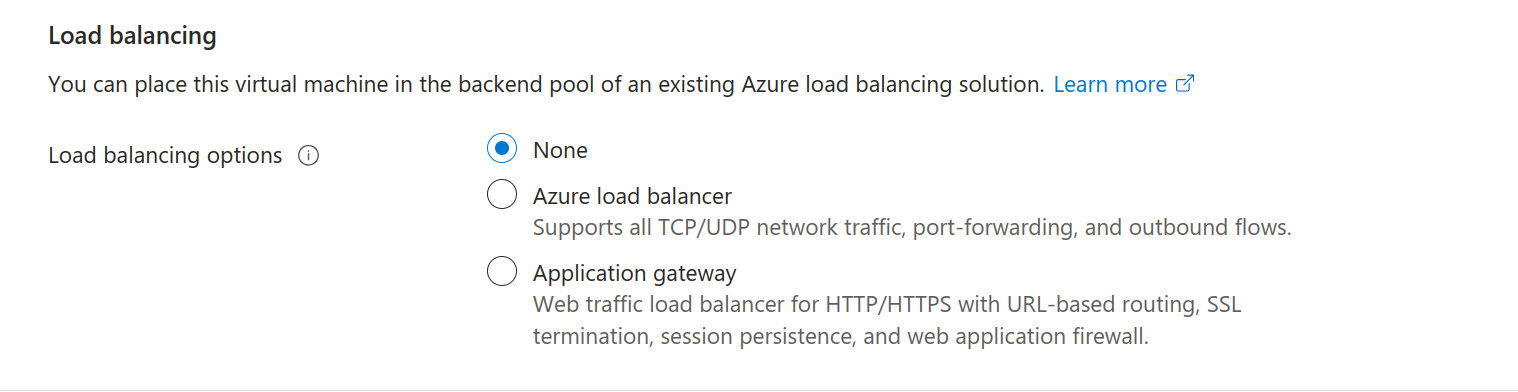
- Moreover, Microsoft Azure also provides load-balancing features. The purpose of this feature is to enhance resource utilization, increase throughput, reduce response times, and prevent any single resource from becoming overloaded.
- This practice is essential for maintaining high availability and reliability of applications and services by evenly distributing workloads. However, Microsoft Azure offers three options you can choose a radio button according to your needs, for that refer to the image depicted below:
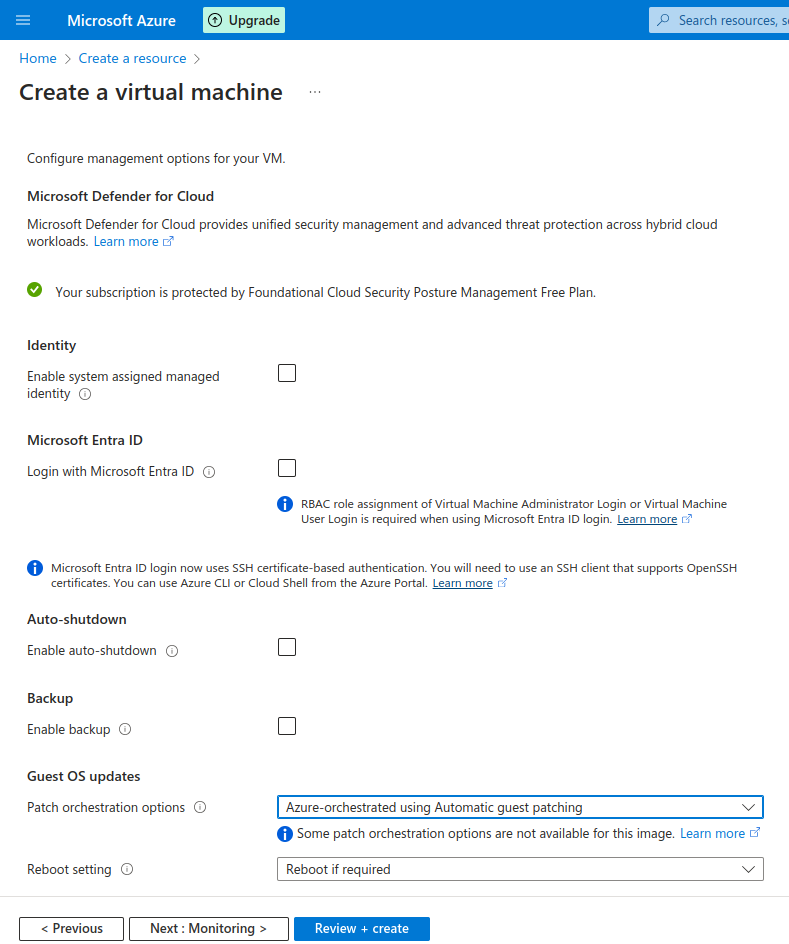
Step 4: Configure management options for your Virtual machine
- In this step, you can set up management of your virtual machine and you can configure it according to your requirements and needs.
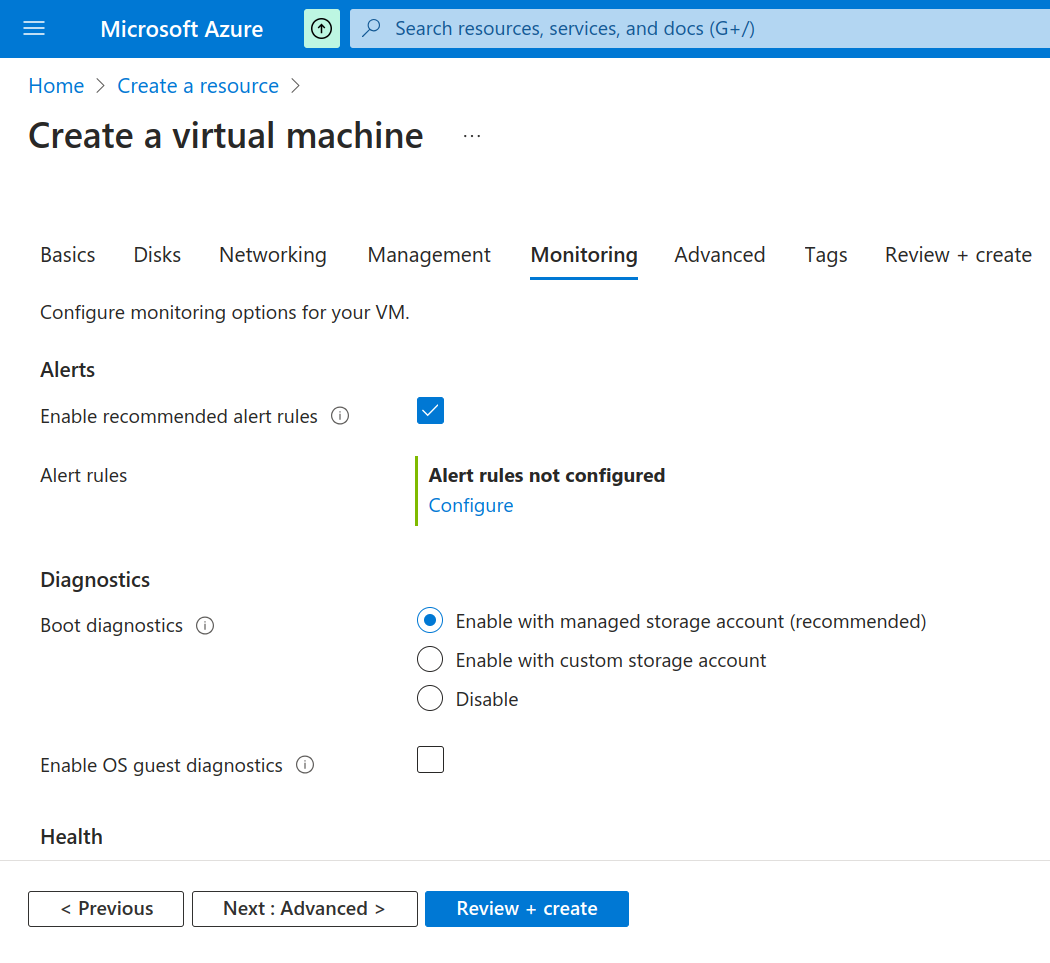
Step 5: Configure monitoring options for your Virtual machine
- The next step is to configure monitoring of virtual machines. With the help of this feature, you can monitor your virtual machine's Health by setting up Alerts and Diagnosing the issues related to your virtual machine. Please refer to the image mentioned below.
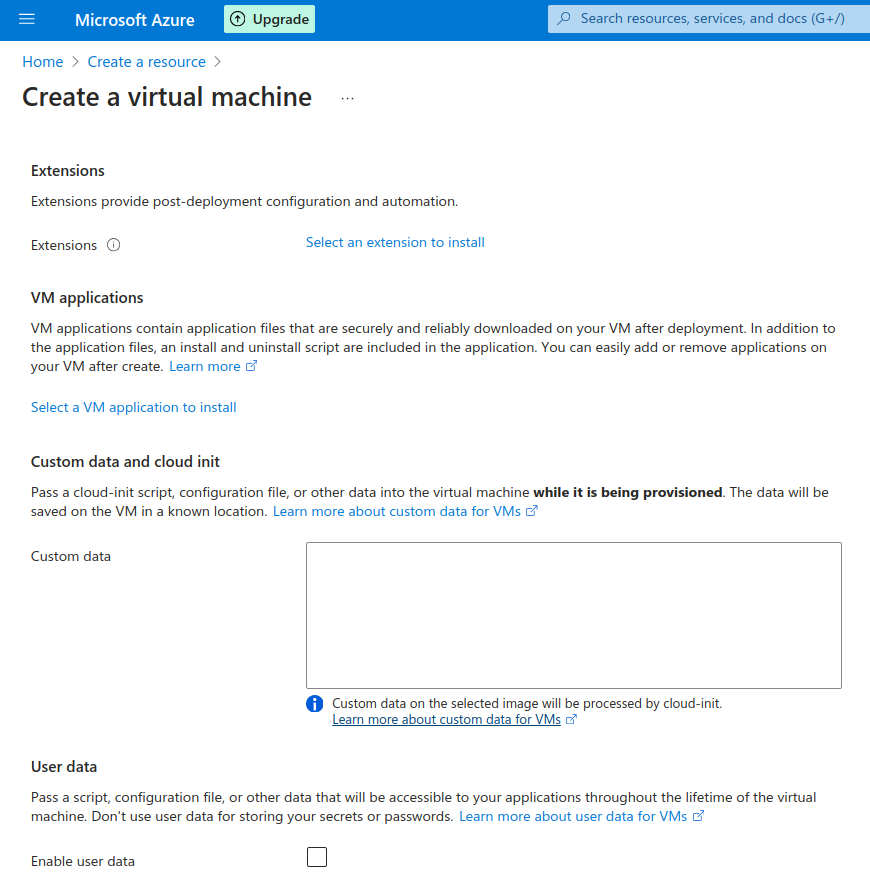
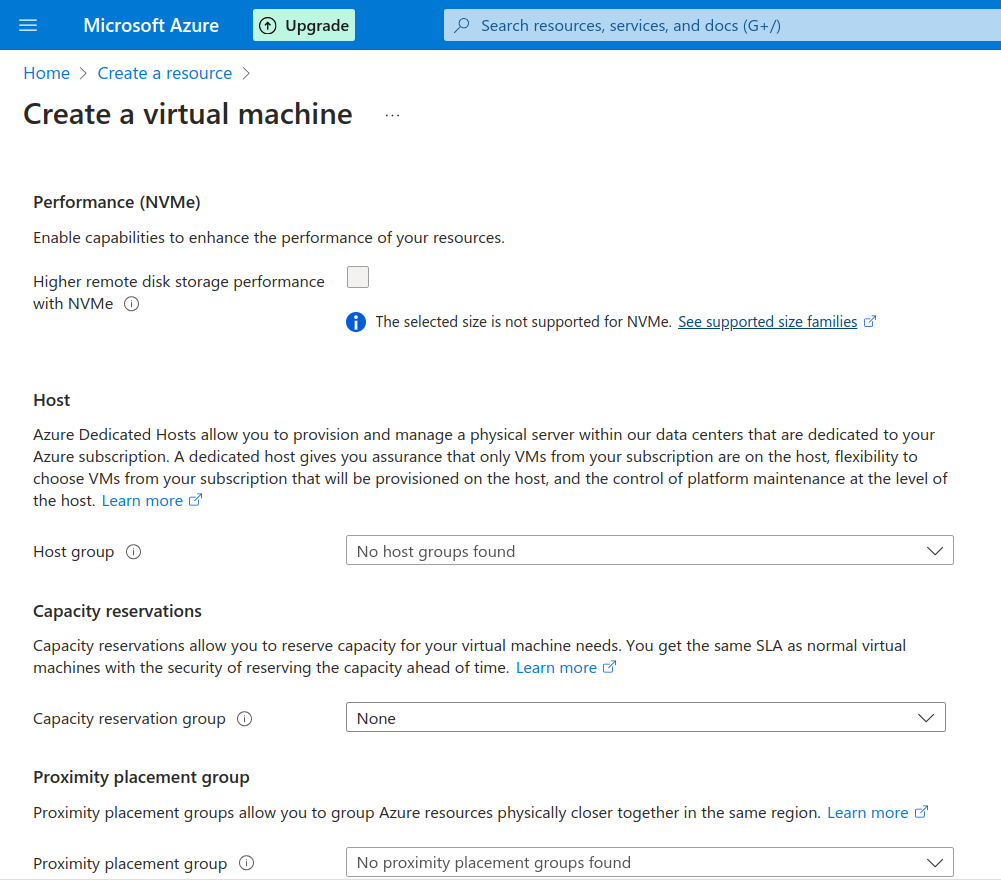
Step 6: Advanced option for your Virtual machine
- In this step, you can enhance configurations by adding additional agents, scripts, or applications through virtual machine extensions or cloud-init. Microsoft Azure makes various options available in this section to set up your virtual machine. You can select the feature you want to add to your virtual machine. Referring to the image below will give you a better understanding.
- Note: Feel free to skip this step, if you don't want to add additional features to your Virtual machine.
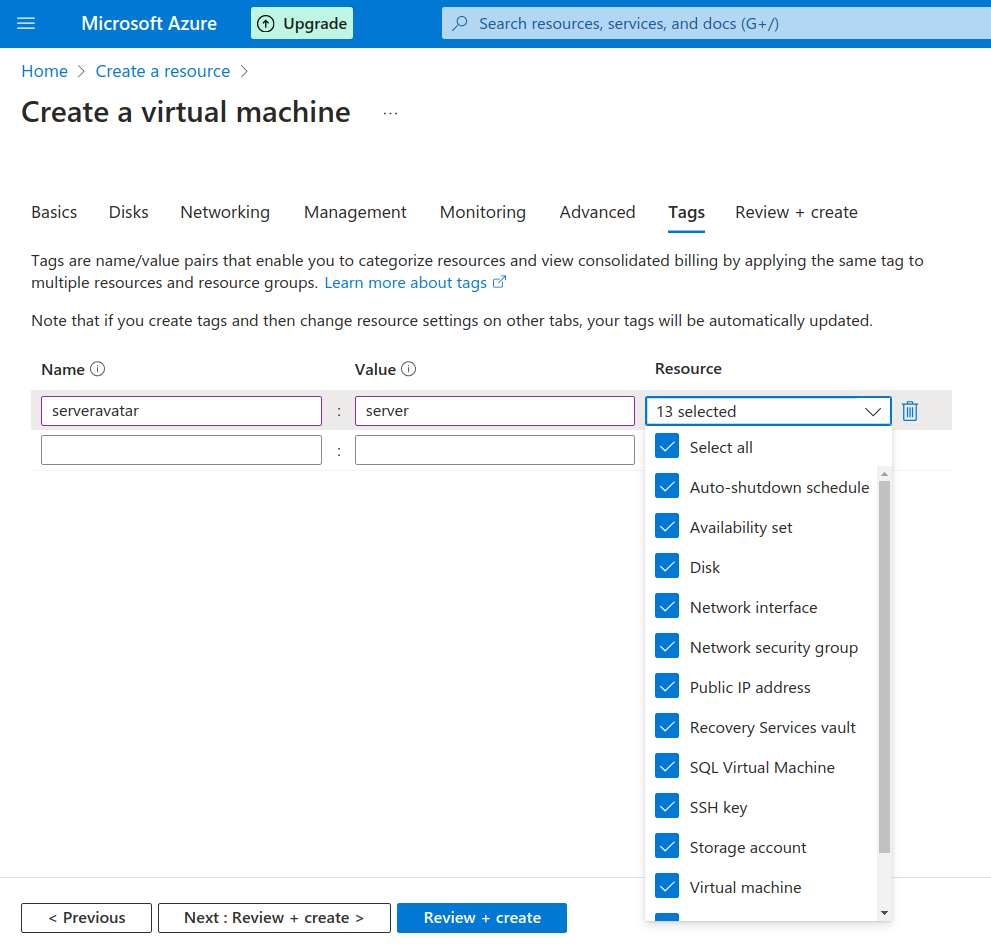
Step 7: Create tags for your Virtual machine
- Tags consist of name and value pairs that allow you to classify resources. They facilitate consolidated billing by applying the same tag to multiple resources and resource groups. You can create tags of your own choice and checkmark the resource as per your needs as depicted in the image below.
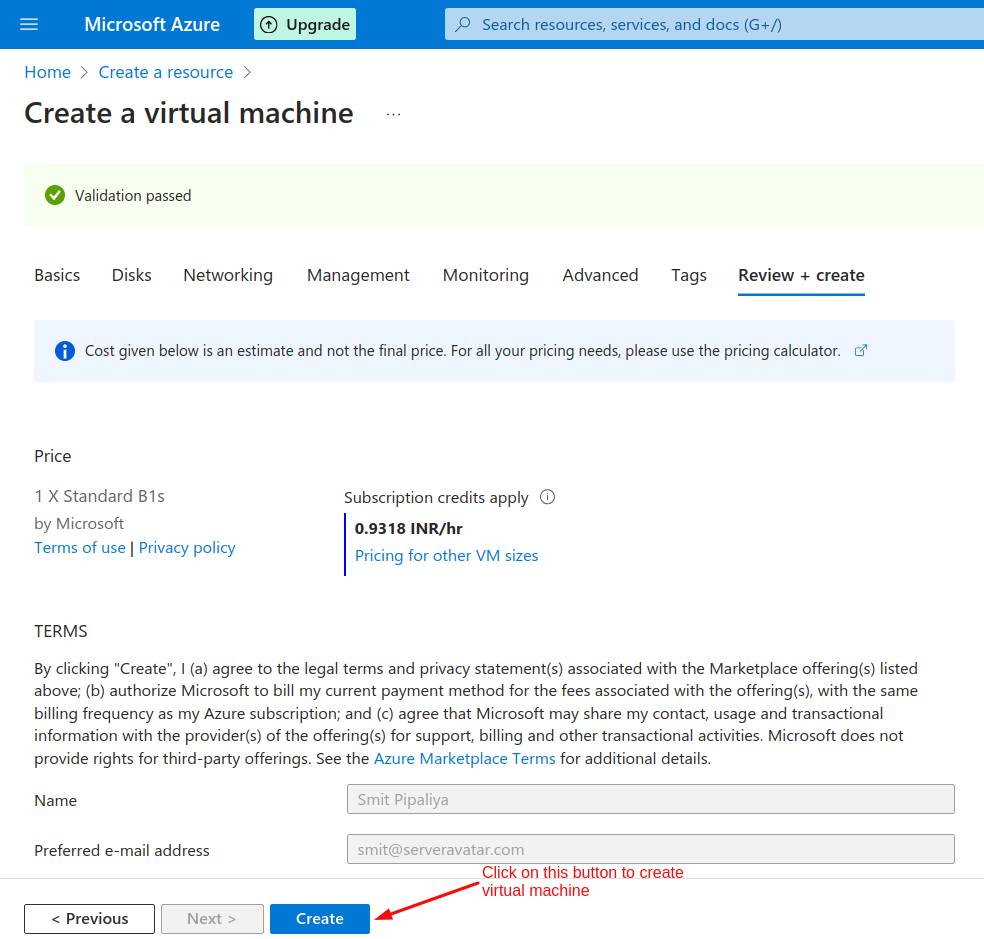
Step 8: Review And Create A Virtual Machine
- Lastly, you can check all the details you have entered for creating the Virtual machine in Microsoft Azure and after reviewing it, you can click on the Create button as shown in the image below.
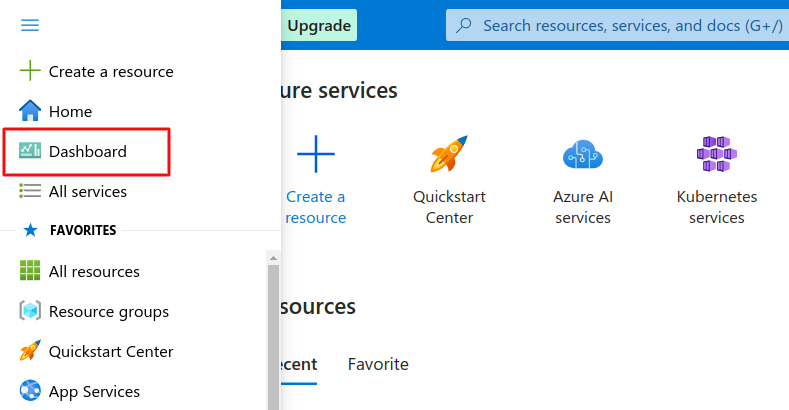
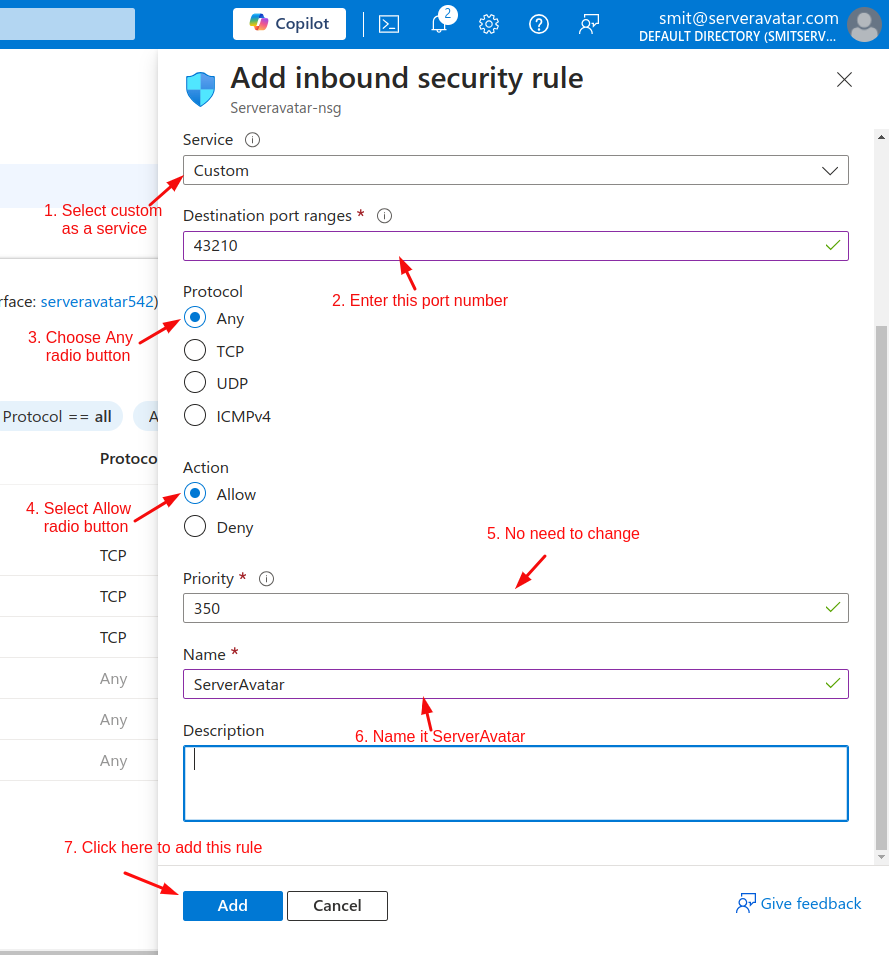
Step 9: Allow ServerAvatar port from Microsoft Azure Cloud panel
- The final step is to allow a port so that you can connect your virtual machine server to ServerAvatar. Follow the steps shown in the image below.
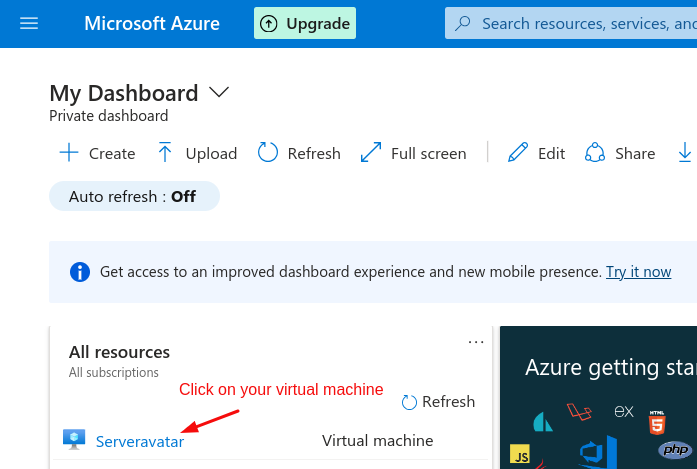
- Go to the Microsoft Azure Dashboard.
- After that click on your newly created Virtual machine
- Next, go to the Network settings and create new inbound port rules.
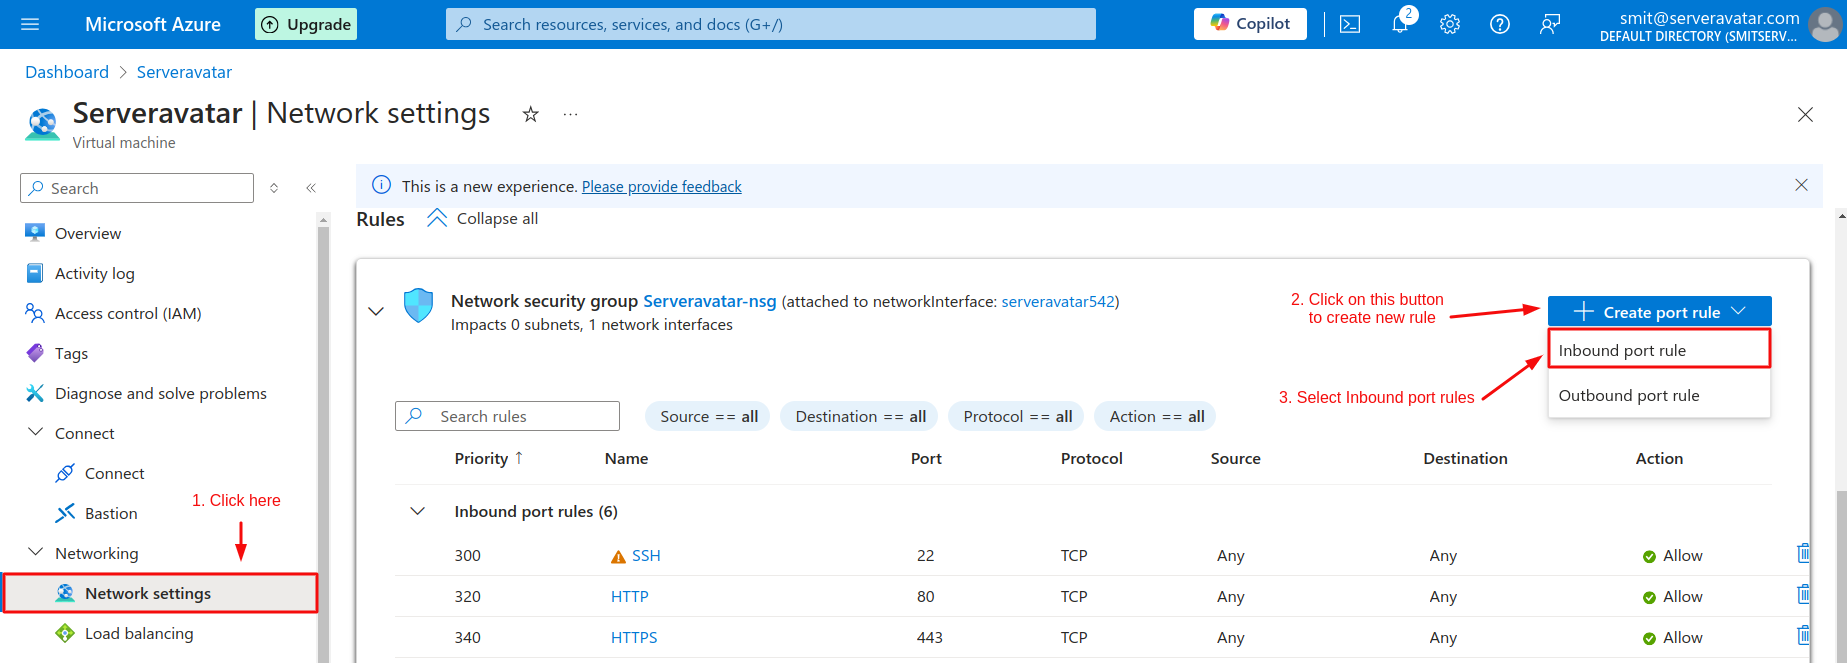
- Finally, add the details mentioned in the image below.
Congratulations! You have successfully created your instance in Microsoft Azure which is now ready to connect with ServerAvatar.
Initial Server Configuration
The Initial server configuration includes the installation and configuration of various packages required to host your website. Usually, You have to write commands and modify configuration files. Luckily, With ServerAvatar, Your full server configuration and optimization can be automated.
Here are the three ways to automatically configure your server with ServerAvatar.
Connect a server using a direct method
- Login/Register to ServerAvatar account, click the Create button from the right side of the screen, and select Server from the dropdown.
- Select Direct Method in the serve connecting method section.
- Type the Server Name as per your choice.
- Select a Tech Stack as per your need. You can either select Apache, Nginx, OpenLiteSpeed or Node Stack.
- Select a Database: MySQL, MariaDB or MongoDB.
- Enable the toggle if you want to install the latest LTS version of node.js on your server.
- Select a Management plan and click the Connect Now button.
- You’ll see the command on your screen. Login to your server using an ssh connection and execute that command as a root user.
- The server connection process will be started on your ServerAvatar account after executing the command.
Connect a server using integration
- Login/Register to your ServerAvatar account, navigate to the Integration tab from the sidebar of the panel, and access Cloud Platform from the dropdown.
- Now Select a cloud platform you want to link with ServerAvatar.
- The popup form will appear on your screen. Enter details to link your cloud provider account. The integration method is different based on the cloud provider you select.
- You can integrate five different cloud provider platforms with ServerAvatar, which is-
Check the above link of cloud platforms to know more about integrating cloud platforms with ServeAvatar.
Connect a server using commands
Step 1. Login to your server using root user
Once you create a server as per your requirements, connect to your server using an ssh connection and execute the below three commands as a root user in your server console area.
wget https://srvr.so/install
chmod +x install
./install
Step 2. Select a web server
It will ask you which web server you would like to install on your server: Apache, Nginx, OpenLiteSpeed or Node Stack. Type anyone that you would like to install on your server and hit the enter button.
Step 3. Claim your server
Completing the process will give you a link to claim your server.
Open the link on your browser to access the ServerAvatar server panel.
Install and Setup Adminer DB on Cloud using ServerAvatar
Adminer - Database management using Adminer With ServerAvatar
What Is Adminer?
Adminer is a PHP-based, Free, and Open Source Database Management Tool. It is very simple to deploy on your server and easy to use. Here, you only need to upload a single PHP file, point your browser to it, and simply click the login button.
Requirements:
- PHP: Ensure you have a PHP 5 or higher version installed.
Use Cases:
You can easily create, edit, and delete databases, tables, and rows, as well as execute SQL queries and view results in a clear and concise format. Adminer supports a wide range of database systems, including MySQL, MariaDB, PostgreSQL, SQLite, MS SQL, Oracle, etc.
Step-by-Step Installation Guide:
Let’s Configure Adminer with ServerAvatar.
First, you have to go to the following URL.
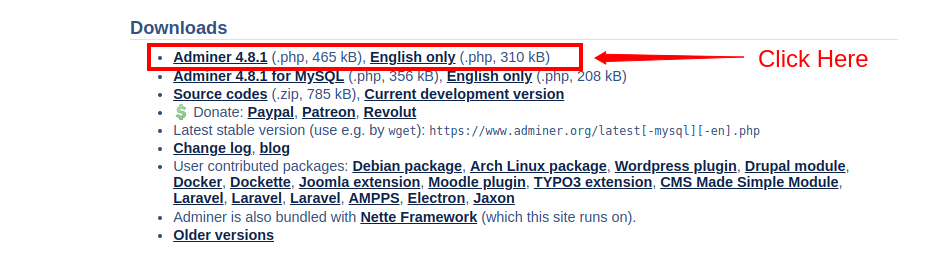
Step 1: Download the Adminer
Clicking on the link will take you to the official site of Adminer. Navigate to Downloads section and click on the version of Adminer according to your need.
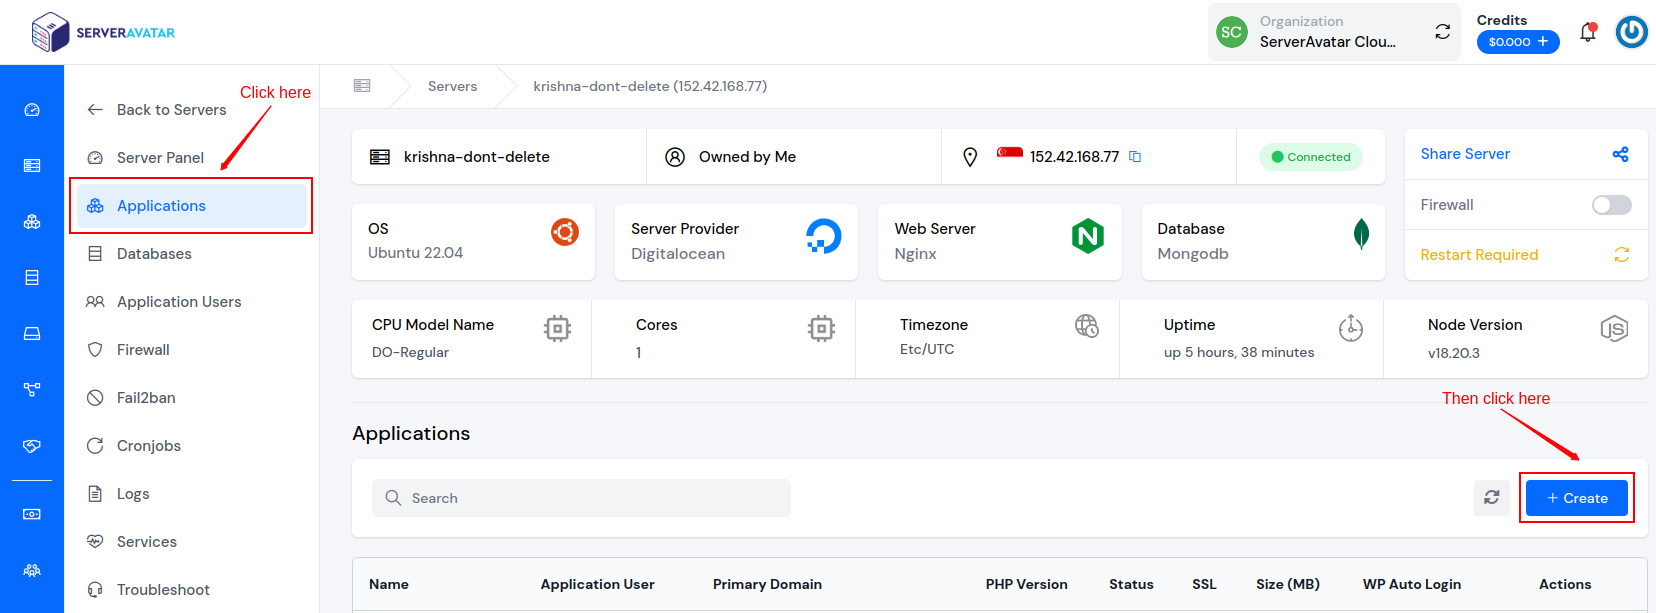
Step 2: Create a GitHub application
Start by creating a GitHub application using ServerAvatar. Go to the Applications tab on the server panel and click on the Create button as shown in the image below.
To proceed with the installation and deployment of Adminer, ensure you have met the prerequisites.
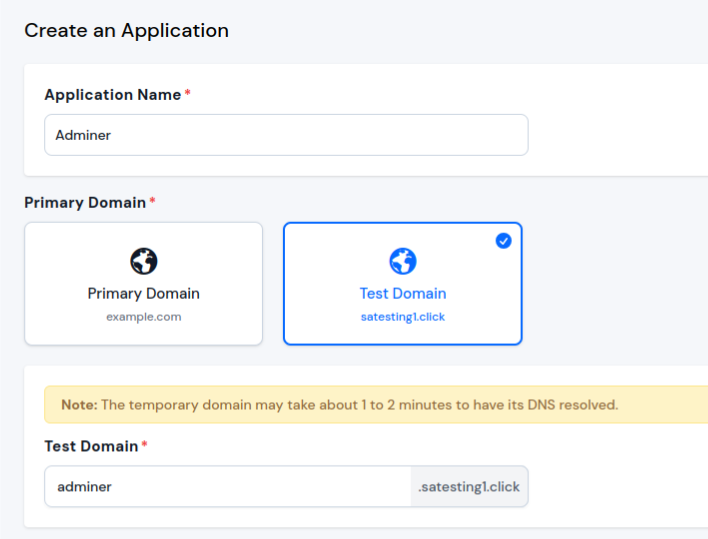
- Enter an Application Name of your choice.
- Specify a Domain (choose between a Test Domain or a Primary Domain).
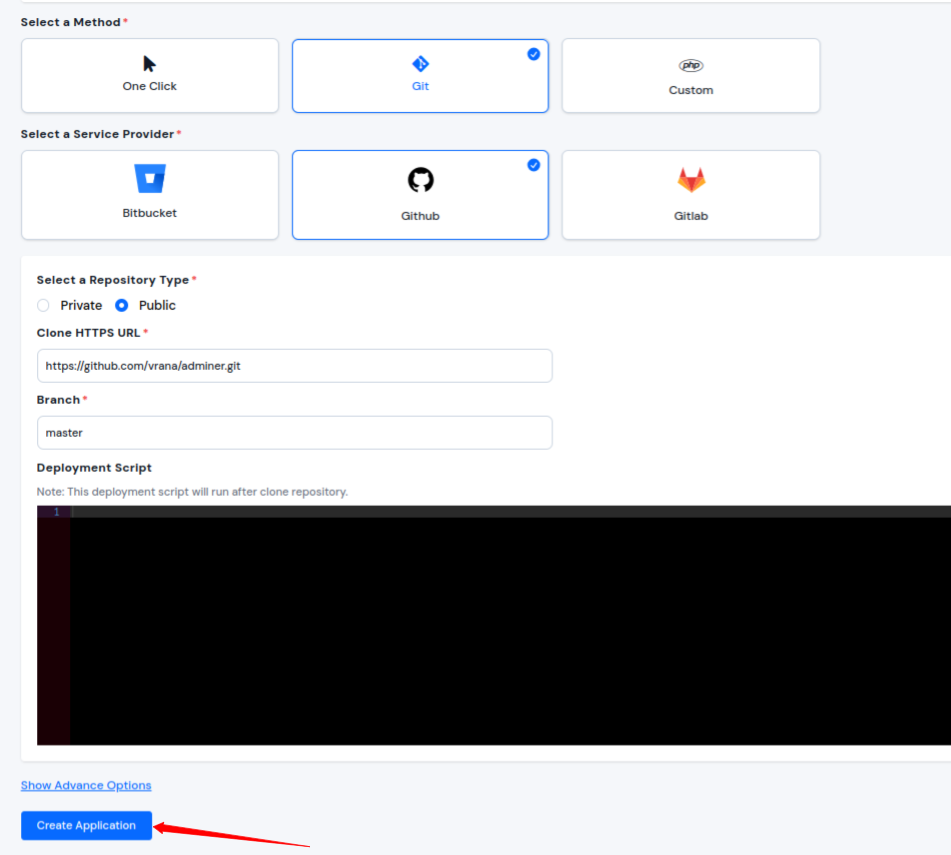
Now, Clone Adminer from the available public repository in Github. and then click on the Create Application button.
- Method: Git
- Service Provider: Github
- Repository Type: Public
- Clone HTTPS URL: https://github.com/vrana/adminer.git
-
Branch:
master
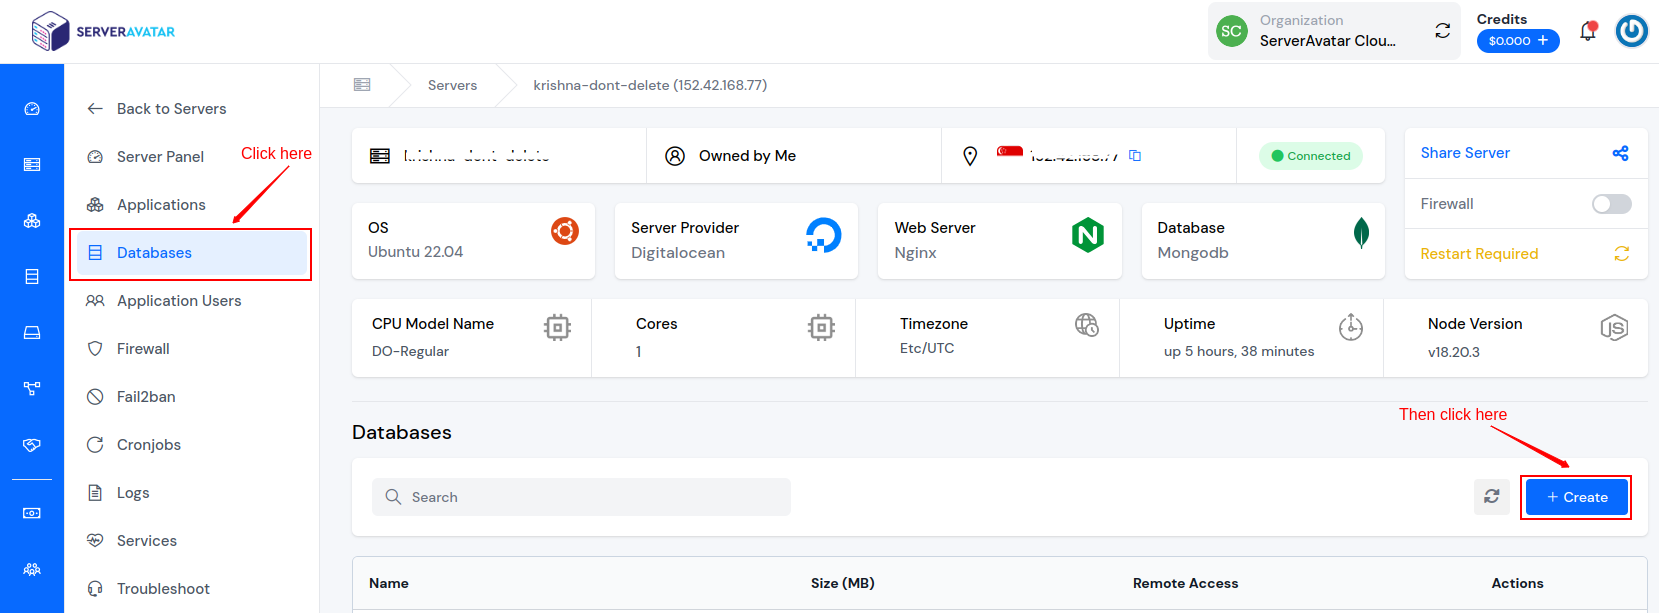
Step 3: Create Adminer Database
Go to the server panel, navigate to the Databases tab, and click on the Create button as shown in the following image.
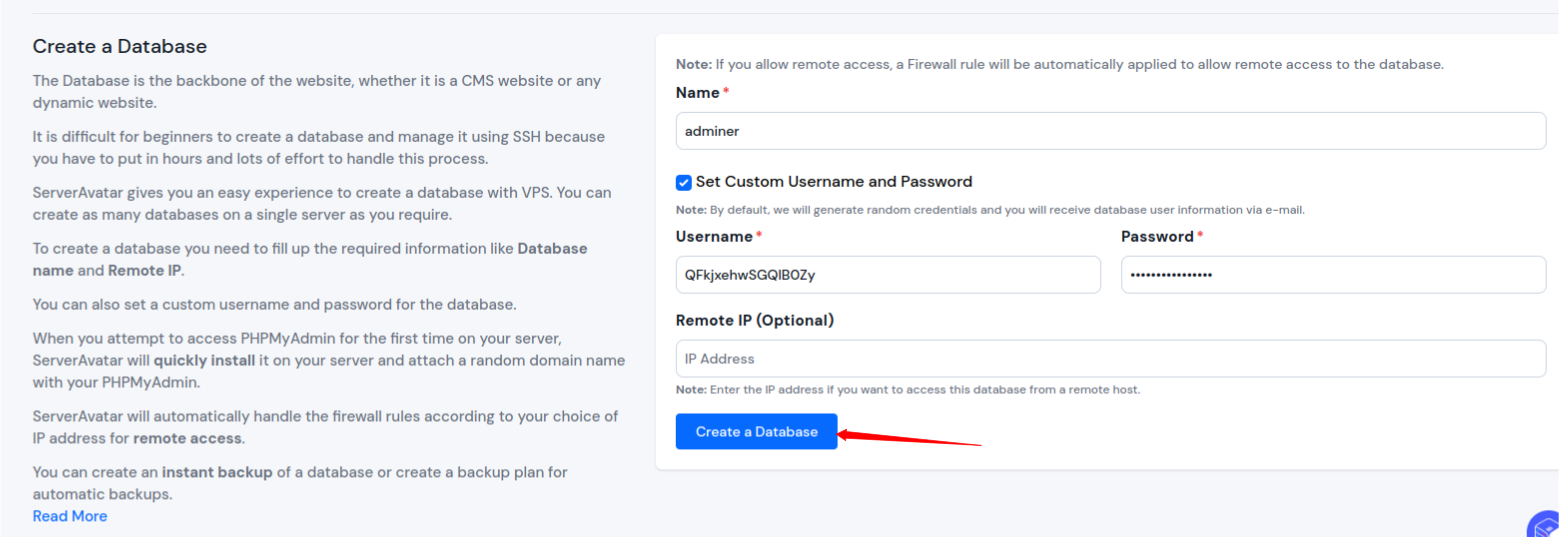
On the following screen, complete the database details, including:
- Database Name
- Database Username
- Database Password
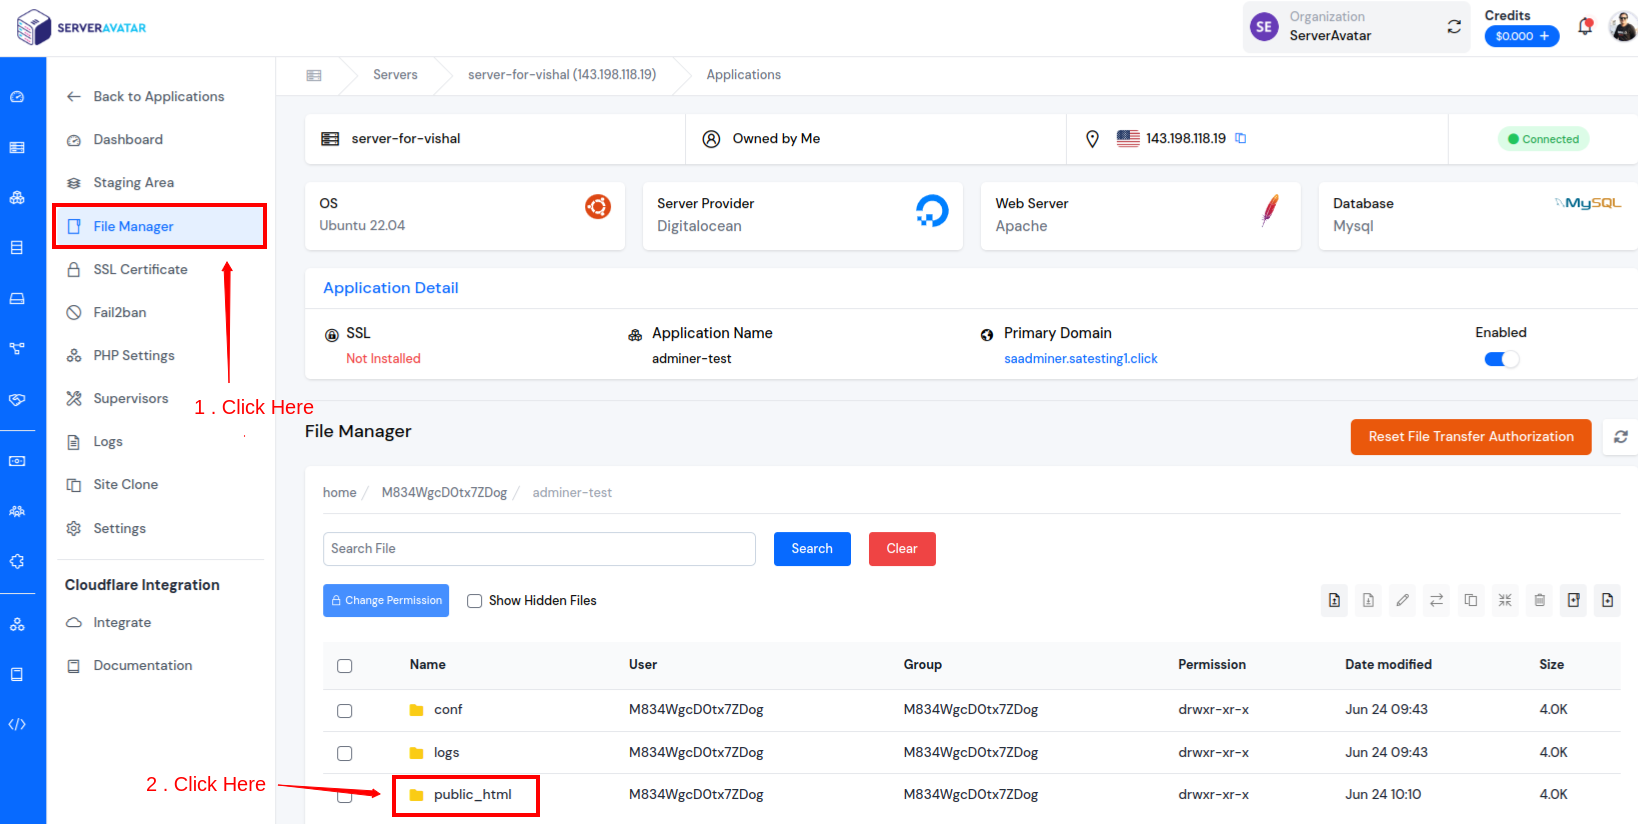
Step 4: Upload Adminer File
- Navigate to the Application Panel tab by clicking on the icon next to the application as shown in the below image.

- Now, go to the FIle Manager option and open the public_html folder.
- Click the Upload icon and choose the previously downloaded Adminer file to upload it into the public_html folder.
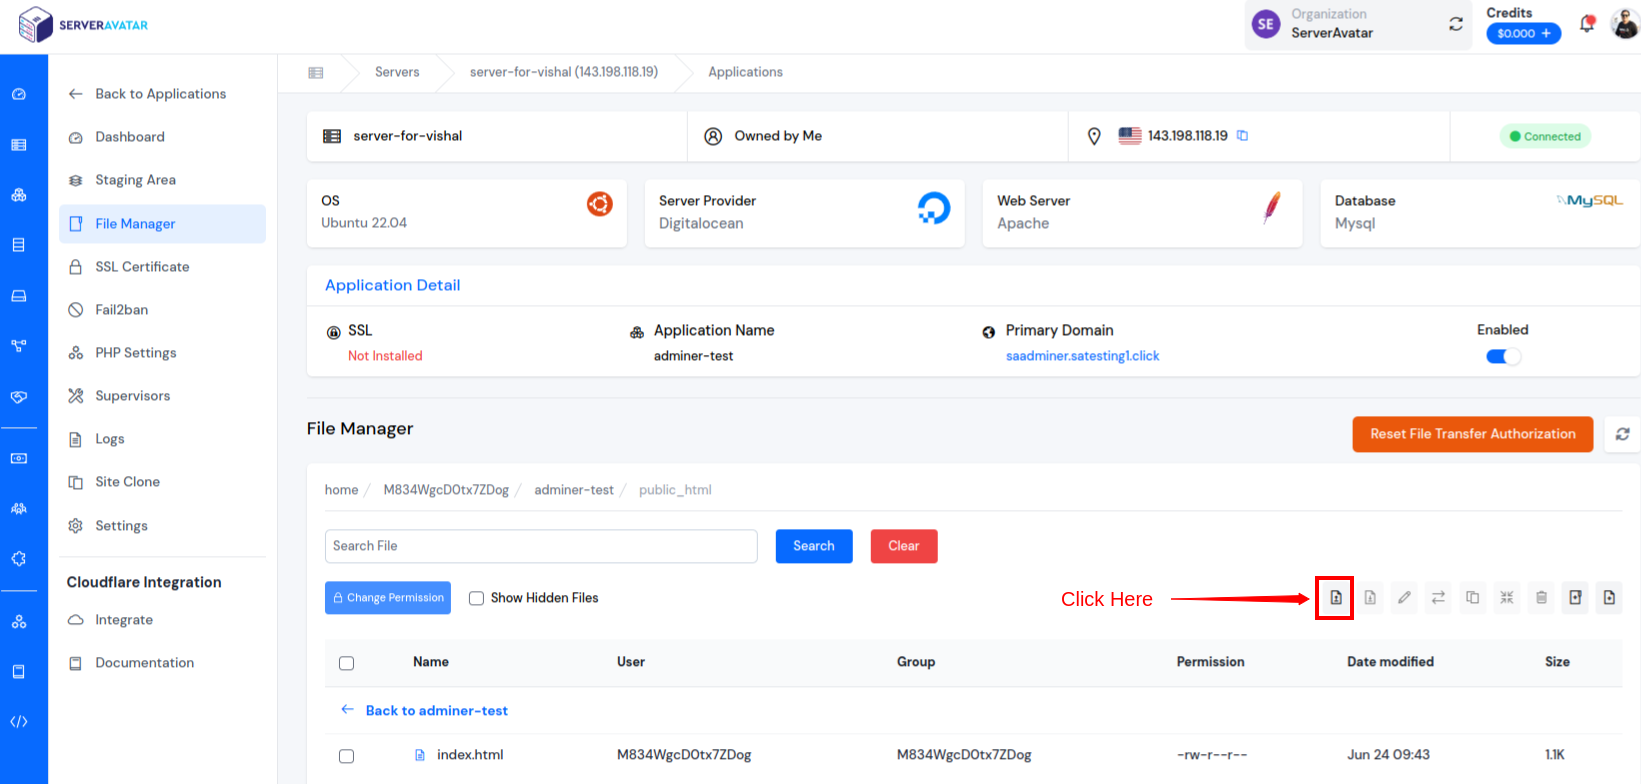
- You can see the Adminer file that you uploaded in the public_html directory as shown in the image below.
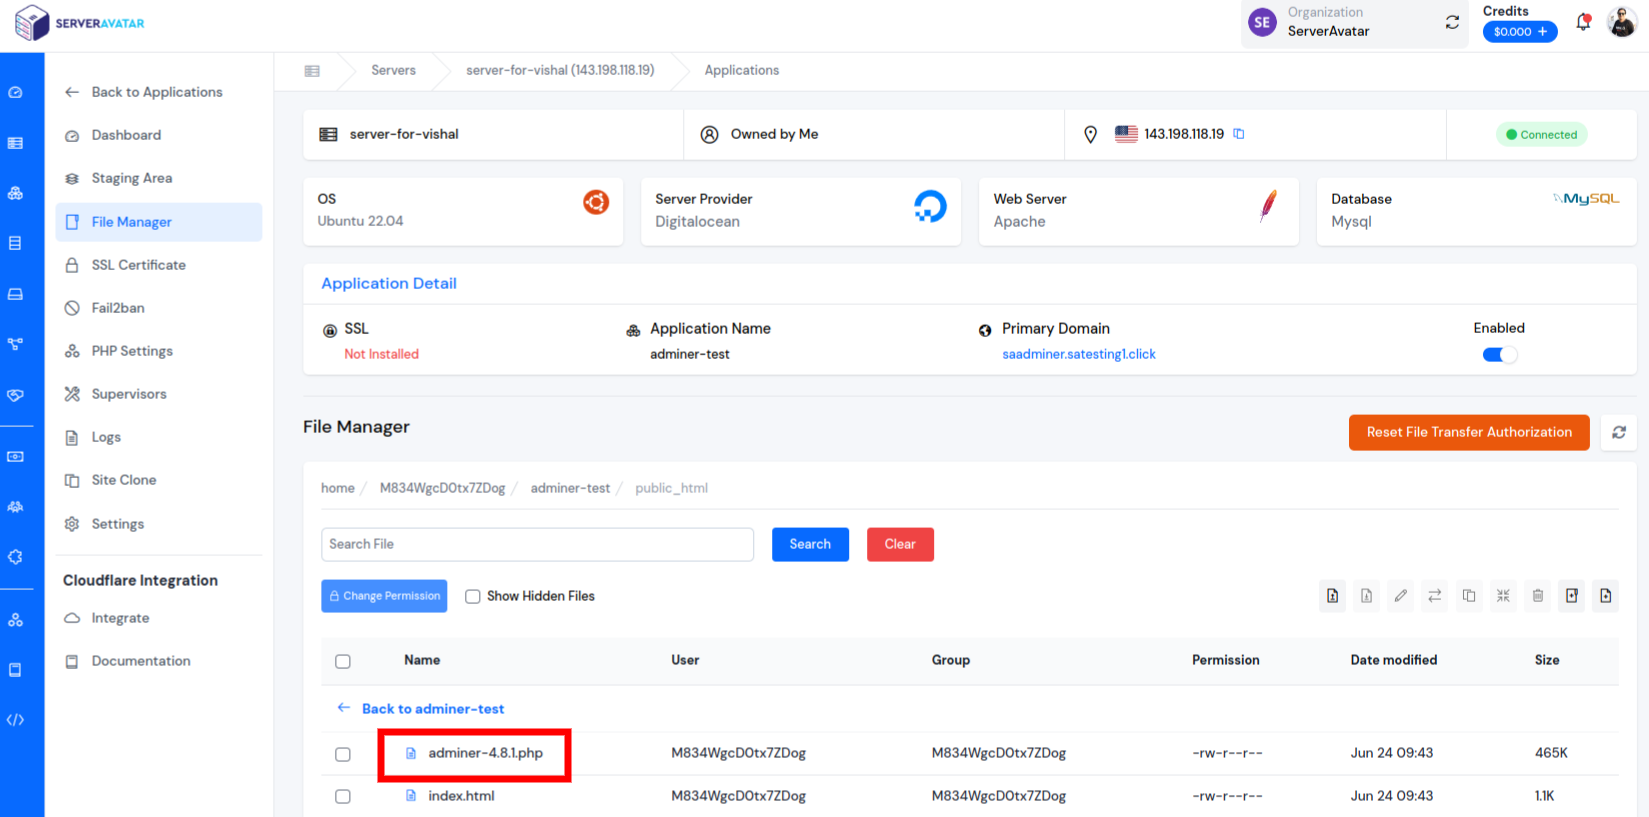
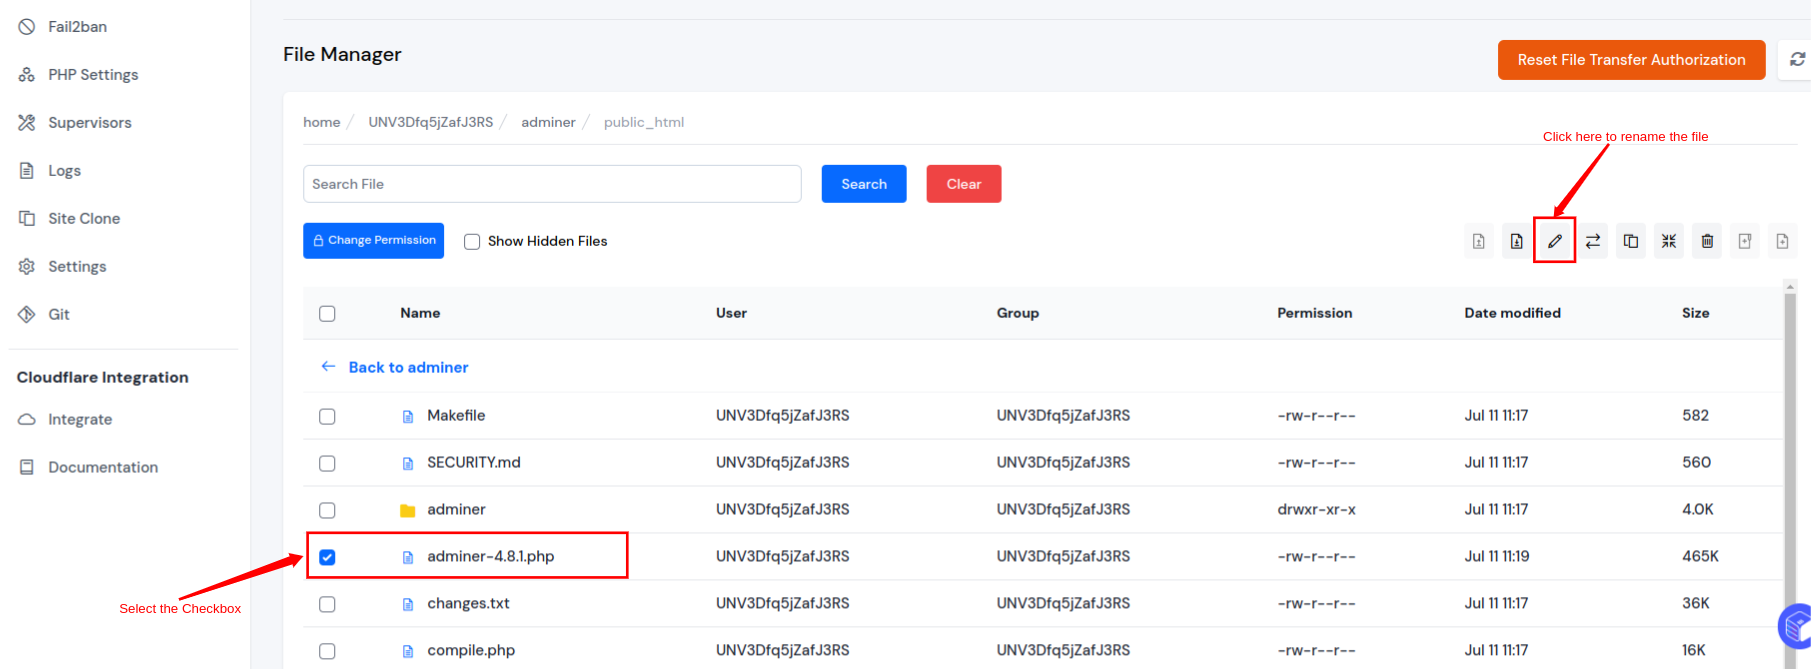
- Now, we need to rename the Adminer file that we uploaded. Select the checkbox next to the file and click on the rename icon, as shown in the image below. Rename the file to index.php.
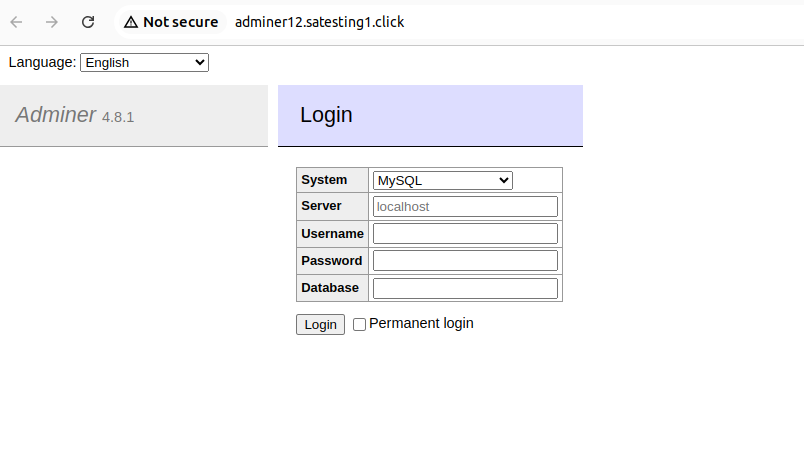
Step 5: Accessing the Adminer Database Homepage
- Now, to access the Adminer Database Homepage, open your application.
- To log in to your Adminer’s Database Homepage, you need to have your database Username and Password. Navigate to the Application Dashboard and click on the Databases option to get the database credentials.
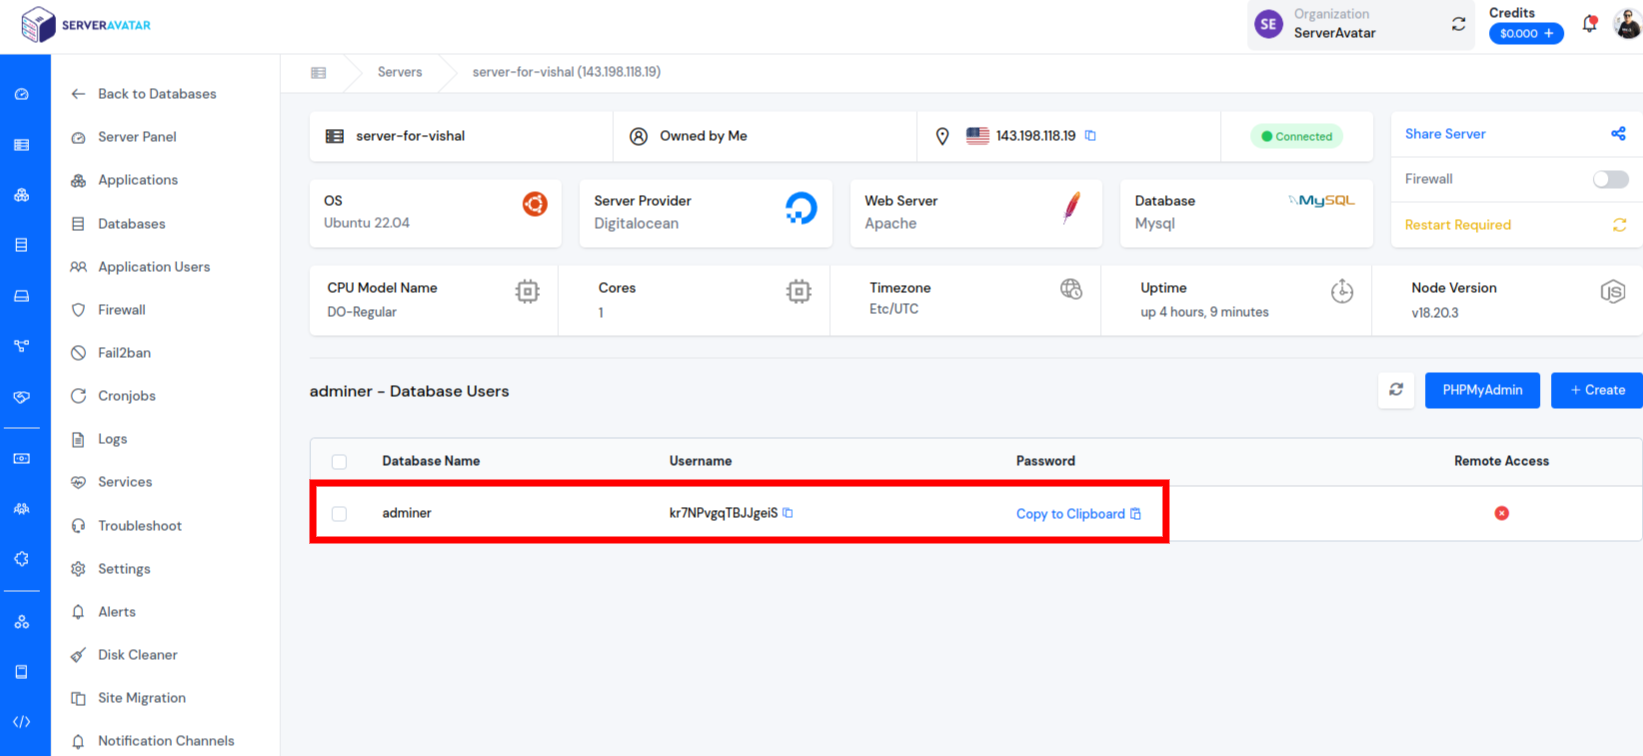
- After navigating to the Databases Section, you have to click on the users icon as highlighted in the below image.
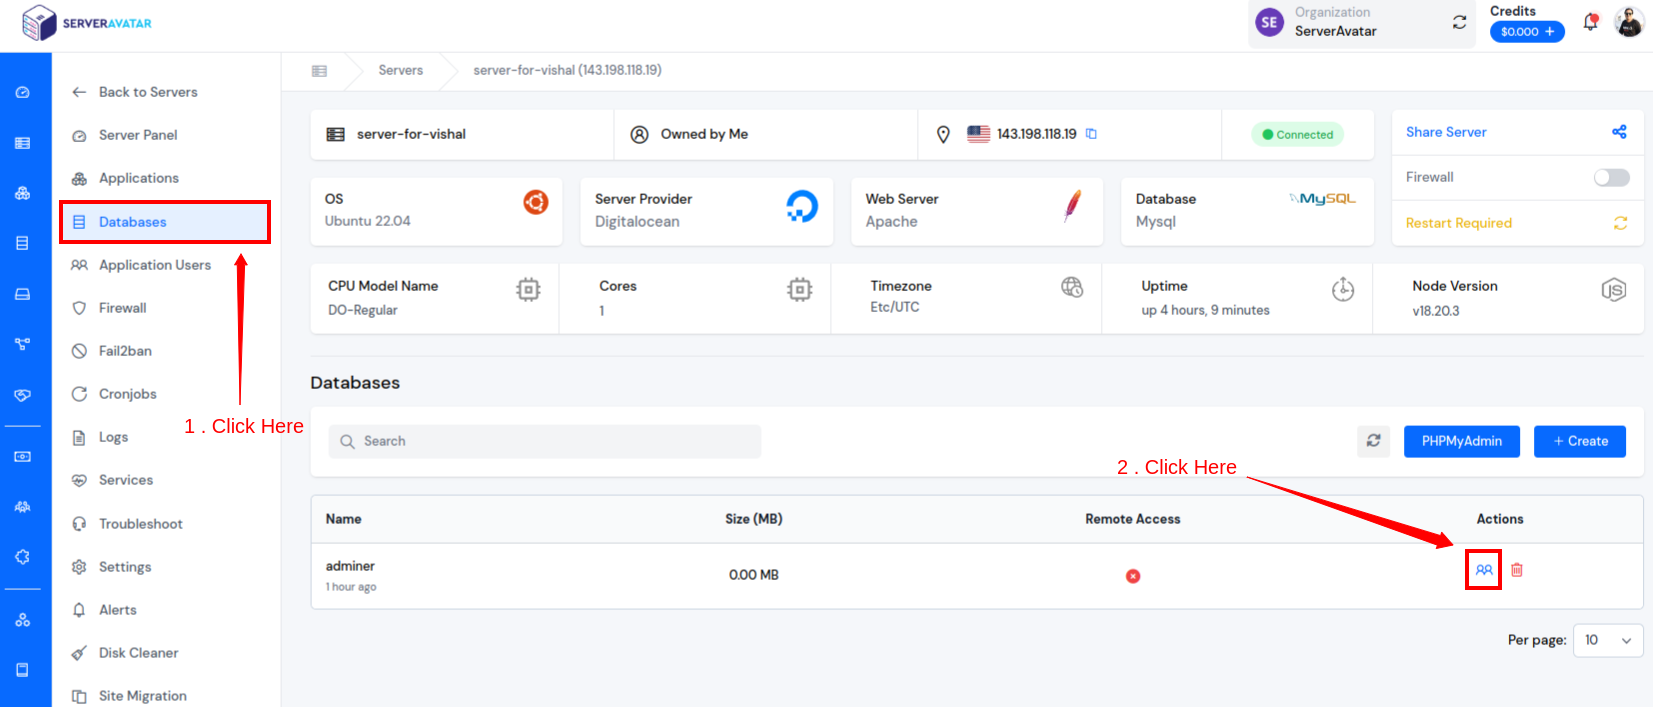
- After clicking on the user's icon, you will navigate to the database users page. You will get the database credentials from there.
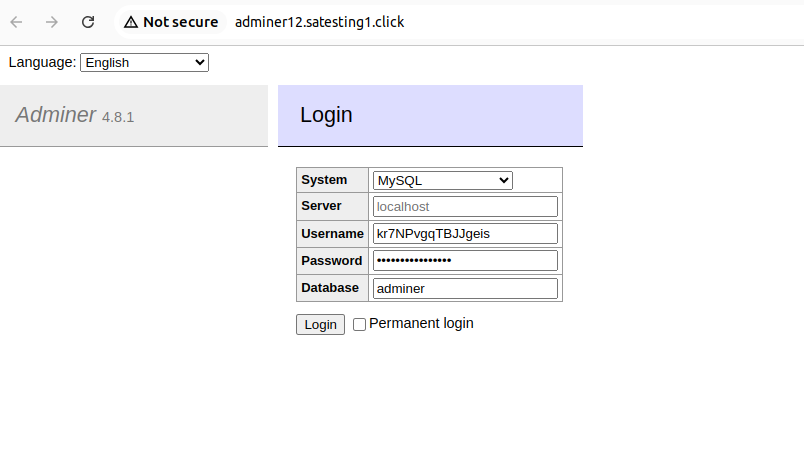
- Fill in the database information such as Database Name, Username, and Password on the login page of your Adminer as shown in the below image. After filling in the details click on the Login button.
- After successfully logging in, you will be able to see the dashboard.
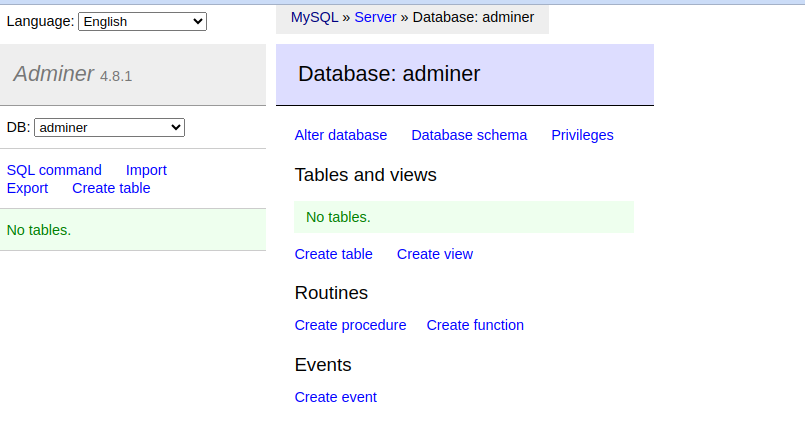
- Now you can perform various tasks such as creating tables, altering tables, dropping tables, inserting values into tables, updating values, and deleting values.
Conclusion:
- Adminer is a powerful, lightweight, and user-friendly database management tool that offers a wide range of features in a single PHP file.
- Its simplicity, efficiency, and support for multiple database systems make it an excellent choice for developers and administrators looking for an alternative to more complex tools.
- Whether managing a small personal project or a large enterprise database, Adminer offers extensive functionalities. By using Adminer you can experience the benefits of efficient database management.