Whiteboard is a NodeJS collaborative tool that is lightweight and highly customizable, allowing for easy adaptation to your needs. This application allows users to create, edit, and share visual content, such as drawings, notes, and diagrams, in real time. Hosting Whiteboard on InterServer provides a dependable and scalable solution. A whiteboard application is a digital tool that simulates the functionality of a physical whiteboard in a virtual environment. When choosing a hosting platform for Whiteboard, opting for InterServer ensures reliability with its scalable infrastructure and straightforward deployment options. ServerAvatar makes the deployment of the Whiteboard application on the InterServer platform an easy step-by-step process.
Create a VPS in InterServer
Getting started with InterServer:
InterServer's Virtual Private Server (VPS) hosting leads their array of hosting solutions, providing businesses and developers a sturdy platform to drive their online endeavors with dependable flexibility. InterServer's VPS hosting leverages cutting-edge technology and infrastructure housed in state-of-the-art data centers. This ensures optimal performance and uptime, crucial for demanding applications and websites. With Interserver's VPS plans, users benefit from dedicated resources including CPU cores, RAM, and storage, providing a scalable environment capable of handling varying levels of traffic and resource requirements.
Interserver's VPS hosting stands out for its cost-effectiveness while maintaining high performance and a rich feature set. Their range of VPS plans caters to diverse needs, accommodating startups, small businesses, and large enterprises with tailored solutions. Whether you're launching a new project, migrating an existing site, or seeking to upgrade to a more robust hosting solution, Interserver's VPS hosting offers the performance, scalability, and support needed to succeed in today's digital landscape.
Let’s get started with creating the virtual private server in Interserver, for that follow the steps given below.
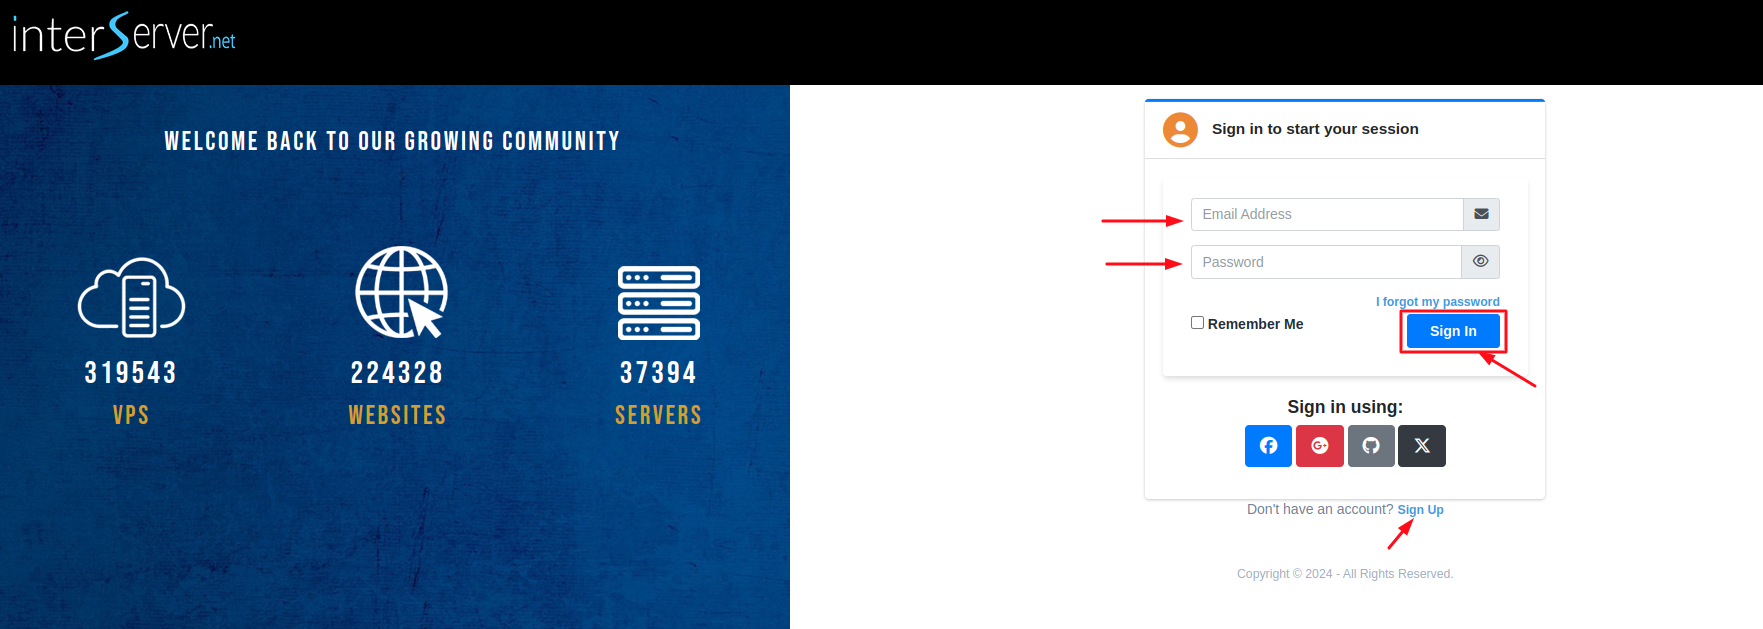
Step 1: Accessing Your InterServer Account
- First, log in to InterServer account. If you are new to InterServer, click on the Sign Up to register with InterServer. Refer to the below image.
Step 2: Create VPS in InterServer
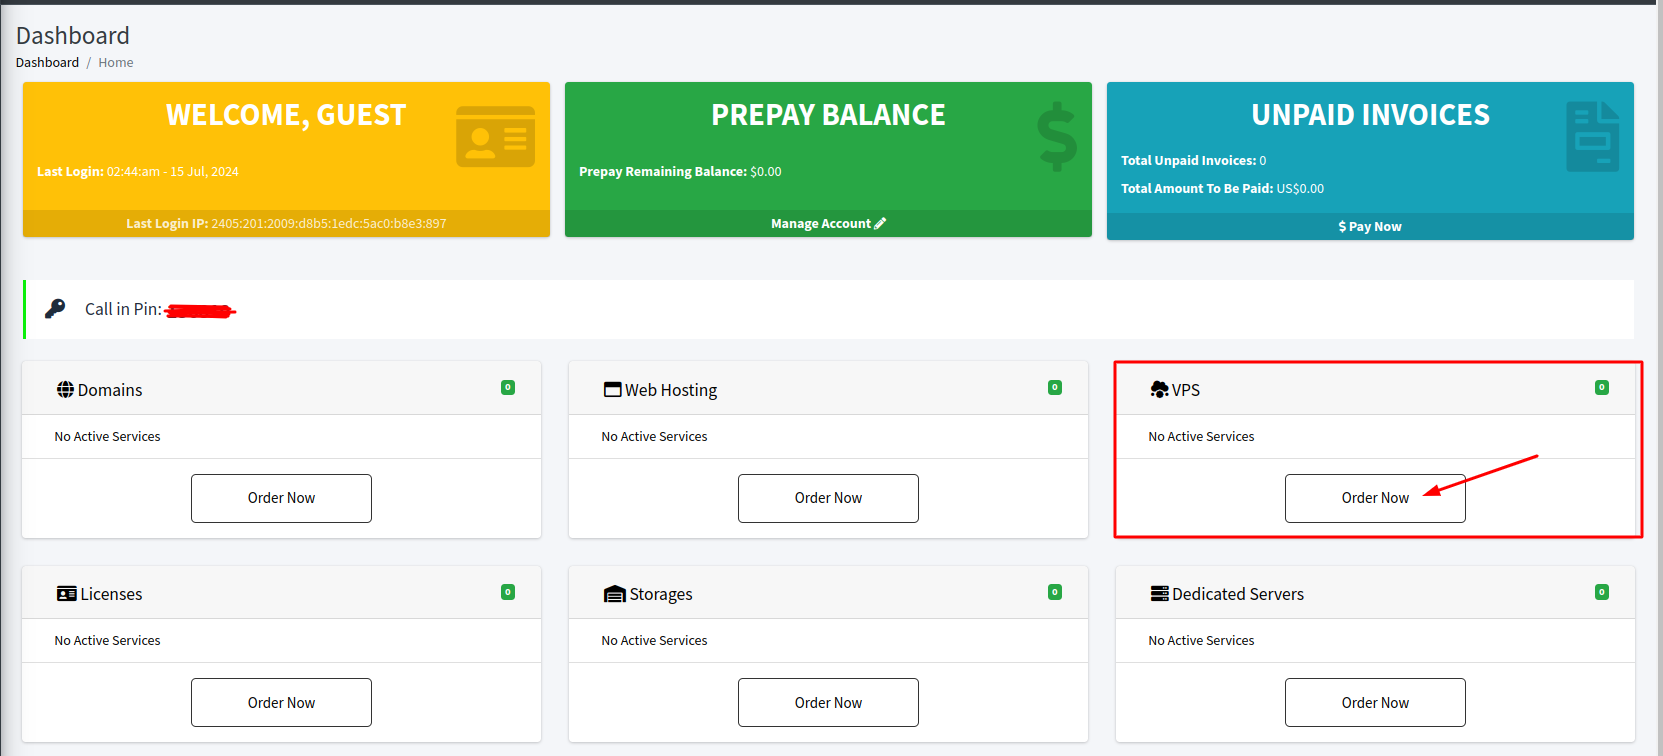
- After you log in to your InterServer account, the Dashboard of InterServer will appear. You can see various sections like Domains, Web Hosting, Licenses, Storage, and Dedicated Servers. However, you have to click on the Order Now button in the VPS section to create a fresh VPS.
Step 3: Configuring the VPS in InterServer
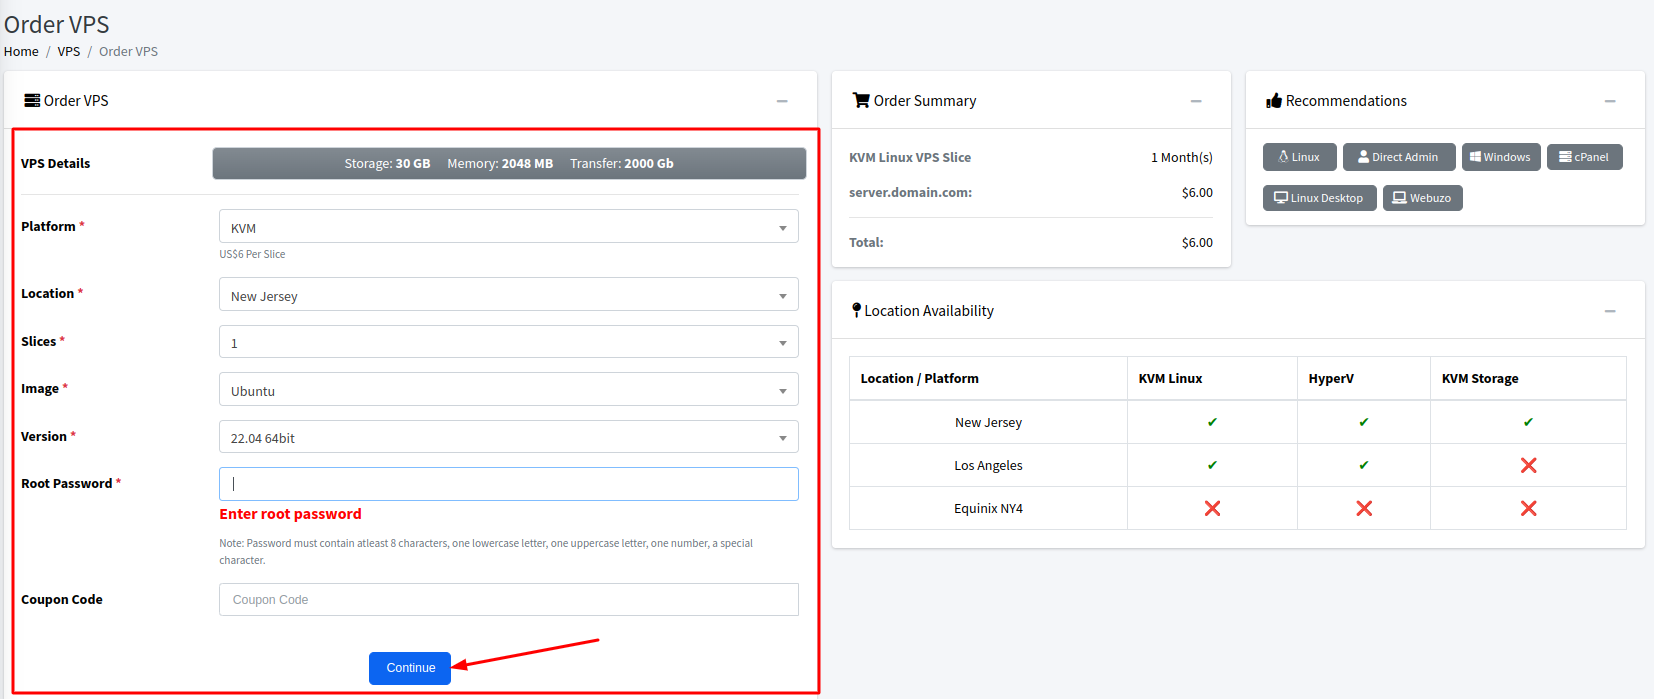
- First you need to choose the Platform for your VPS. It should be a kernel-based virtual machine (KVM).
- Now you have to select the location of your VPS. Make sure to select a server location closest to your major traffic source demographically.
- Then you have to select the Slices. It is the number of cores on your server, which you can select according to your requirements.
- Moreover, you have to choose image i.e. an operating system running on the server. So here you have to select an OS for your server along with its versions.
- The Whiteboard application generally requires Ubuntu 18.04 LTS or a later version for compatibility and support. If you are managing your servers with ServerAvatar, Select Ubuntu 20.04 x64 bit or Ubuntu 22.04 x64 bit.
- In addition to this you have to set the root password for your VPS of your own choice. After filling up all the necessary details for your VPS Click on the Continue button.
Step 4: Review your VPS details
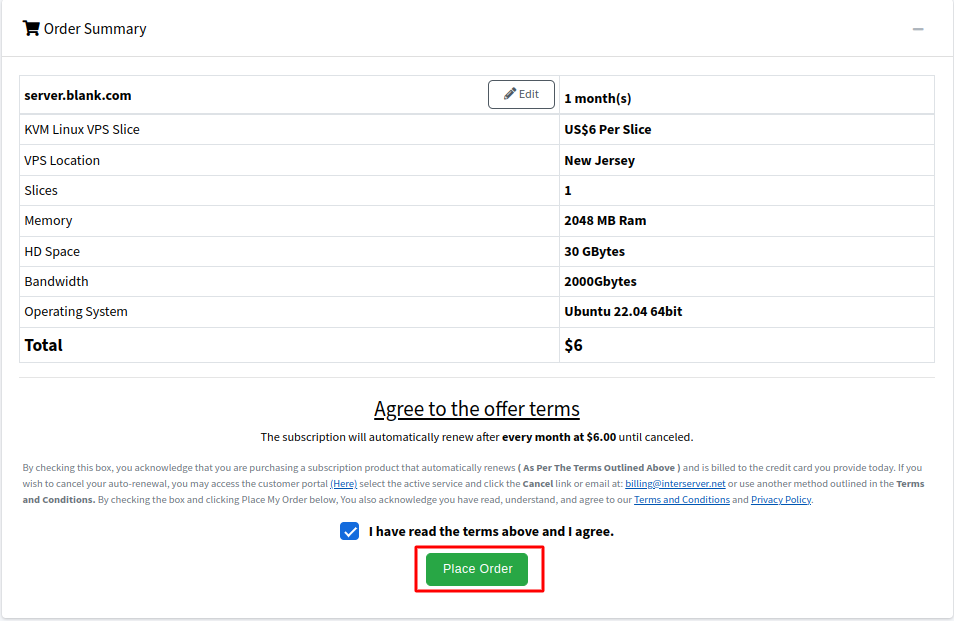
- Here you have to verify the details of your virtual machine, select the agreed terms checkbox, and click on the Place Order button to create VPS.
Step 5: Make a payment for your VPS
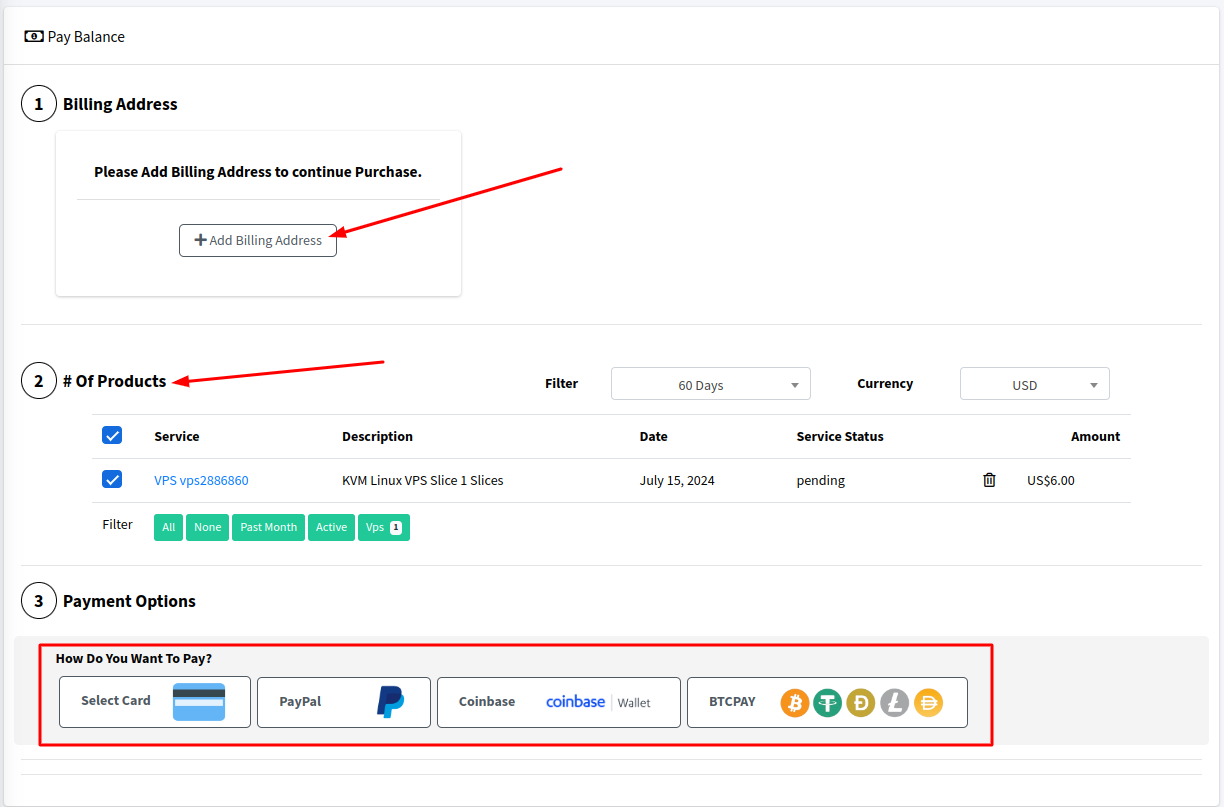
- The final step is to make a payment for your VPS, so for that, you have to Add Billing Address and verify your order of VPS. There are various modes of payment available to make a payment for your VPS. Select the mode as per your convenience.
- Congratulations! You have successfully created your instance in InterServer which is now ready to connect with ServerAvatar.
Initial Server Configuration
The Initial server configuration includes the installation and configuration of various packages required to host your website. Usually, You have to write commands and modify configuration files. Luckily, With ServerAvatar, Your full server configuration and optimization can be automated.
Here are the three ways to automatically configure your server with ServerAvatar.
Connect a server using a direct method
- Login/Register to ServerAvatar account, click the Create button from the right side of the screen, and select Server from the dropdown.
- Select Direct Method in the serve connecting method section.
- Type the Server Name as per your choice.
- Select a Tech Stack as per your need. You can either select Apache, Nginx, OpenLiteSpeed or Node Stack.
- Select a Database: MySQL, MariaDB or MongoDB.
- Enable the toggle if you want to install the latest LTS version of node.js on your server.
- Select a Management plan and click the Connect Now button.
- You’ll see the command on your screen. Login to your server using an ssh connection and execute that command as a root user.
- The server connection process will be started on your ServerAvatar account after executing the command.
Connect a server using integration
- Login/Register to your ServerAvatar account, navigate to the Integration tab from the sidebar of the panel, and access Cloud Platform from the dropdown.
- Now Select a cloud platform you want to link with ServerAvatar.
- The popup form will appear on your screen. Enter details to link your cloud provider account. The integration method is different based on the cloud provider you select.
- You can integrate five different cloud provider platforms with ServerAvatar, which is-
Check the above link of cloud platforms to know more about integrating cloud platforms with ServeAvatar.
Connect a server using commands
Step 1. Login to your server using root user
Once you create a server as per your requirements, connect to your server using an ssh connection and execute the below three commands as a root user in your server console area.
wget https://srvr.so/install
chmod +x install
./install
Step 2. Select a web server
It will ask you which web server you would like to install on your server: Apache, Nginx, OpenLiteSpeed or Node Stack. Type anyone that you would like to install on your server and hit the enter button.
Step 3. Claim your server
Completing the process will give you a link to claim your server.
Open the link on your browser to access the ServerAvatar server panel.
Install and Setup Whiteboard on Cloud using ServerAvatar
Getting Started With Whiteboard:
Whiteboard is a NodeJS collaborative tool that is lightweight and highly customizable, allowing for easy adaptation to your needs. A whiteboard is a versatile tool used in various settings for brainstorming, planning, teaching, and visual communication. Traditionally, it consists of a smooth, white surface where markers can be used to draw diagrams, write notes, and illustrate ideas. In recent years, digital whiteboards have become increasingly popular, offering similar functionality in a digital format.
Features:
- Shows remote user cursors while drawing
- Undo / Redo function for each user
- Drag+Drop / Copy+Paste Images or PDFs from PC and Browsers
- Resize, Move, Rotate & Draw Images to Canvas or Background
- Write text and sticky notes
- Save Whiteboard to Image and JSON
- Draw angle lines by pressing "Shift" while drawing (with line tool)
- Draw a square by pressing "Shift" while drawing (with the rectangle tool)
- Indicator that shows the smallest screen participating
- Keybindings for ALL the functions
- REST API
- Working on PC, Tablet & Mobile
Install and Setup the Whiteboard application on the Cloud using ServerAvatar:
Step 1: Create a Custom Application
- Access the Applications tab from the server panel to create a new custom application for Whiteboard. Now, create an application, click the Applications tab, then click the Create button on the server panel.
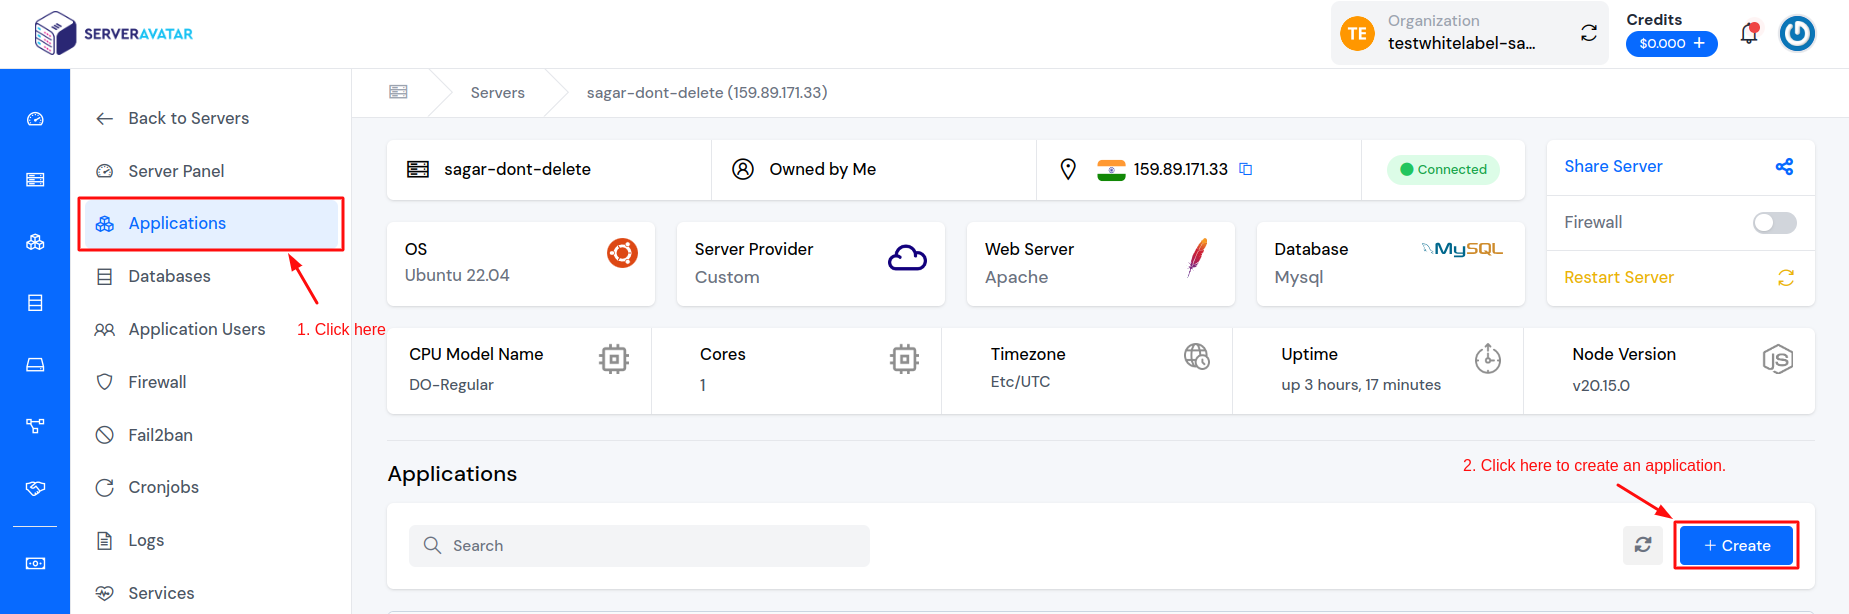
- To create an application and proceed with the installation and deployment of the Whiteboard, you need to fill in the prerequisite of the Whiteboard.
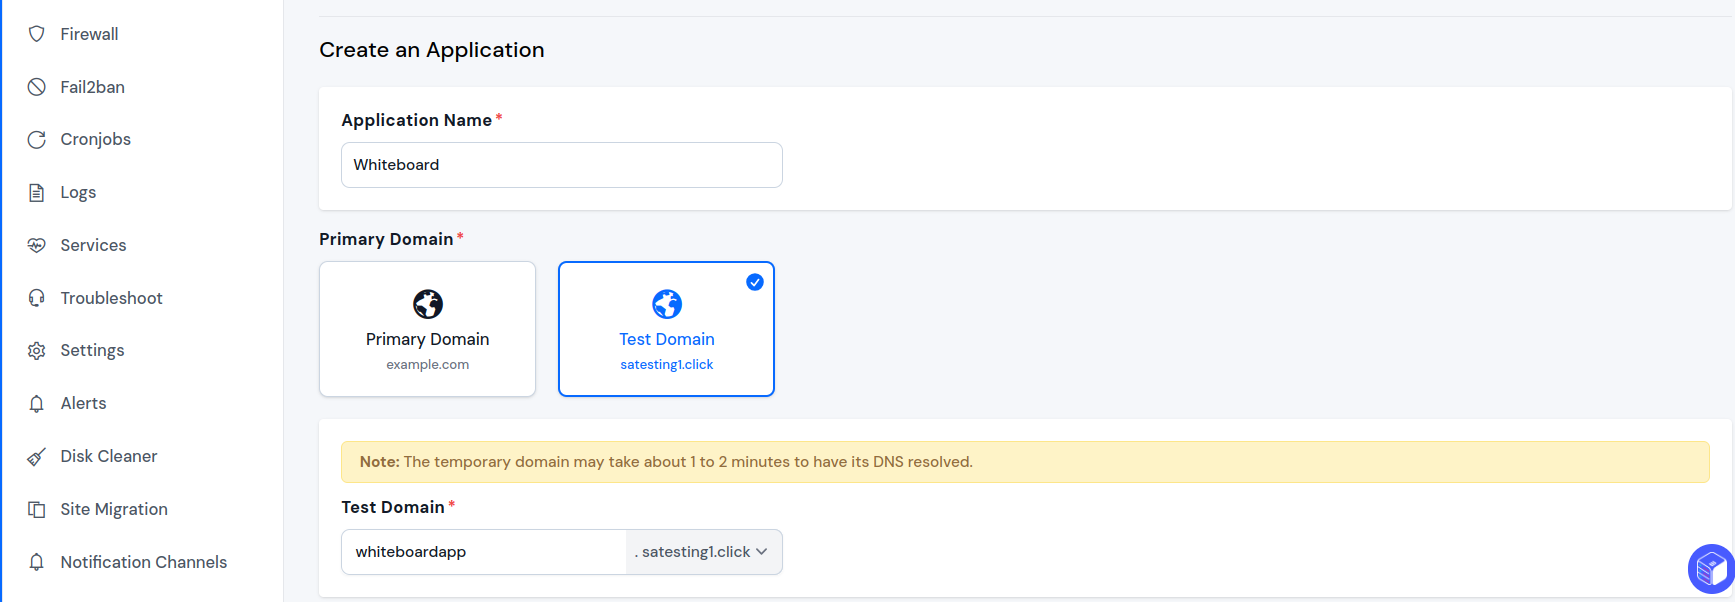
- Enter an application name of your choice. After that input the domain name where you'd like to direct your URL. You can choose between a test domain or a primary domain. If you decide on the test domain, you can use Serveravatar’s test domain. This flexibility ensures you can make the perfect selection for your project.
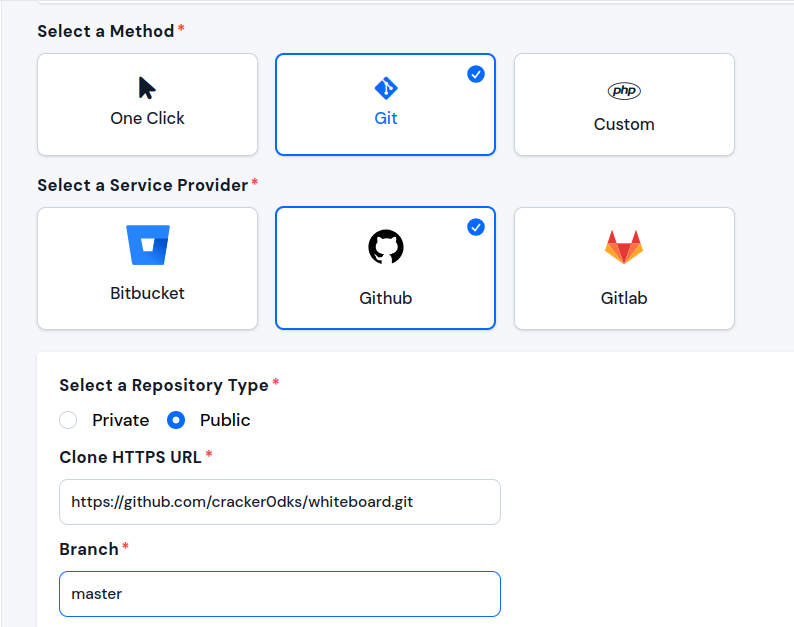
- Now, you can clone Whiteboard through the available repository in GitHub:
- Select a method: Git
- Select a Service Provider: GitHub
- Select a Repository Type: Public
- Clone HTTPS URL: https://github.com/cracker0dks/whiteboard.git
- Branch: master
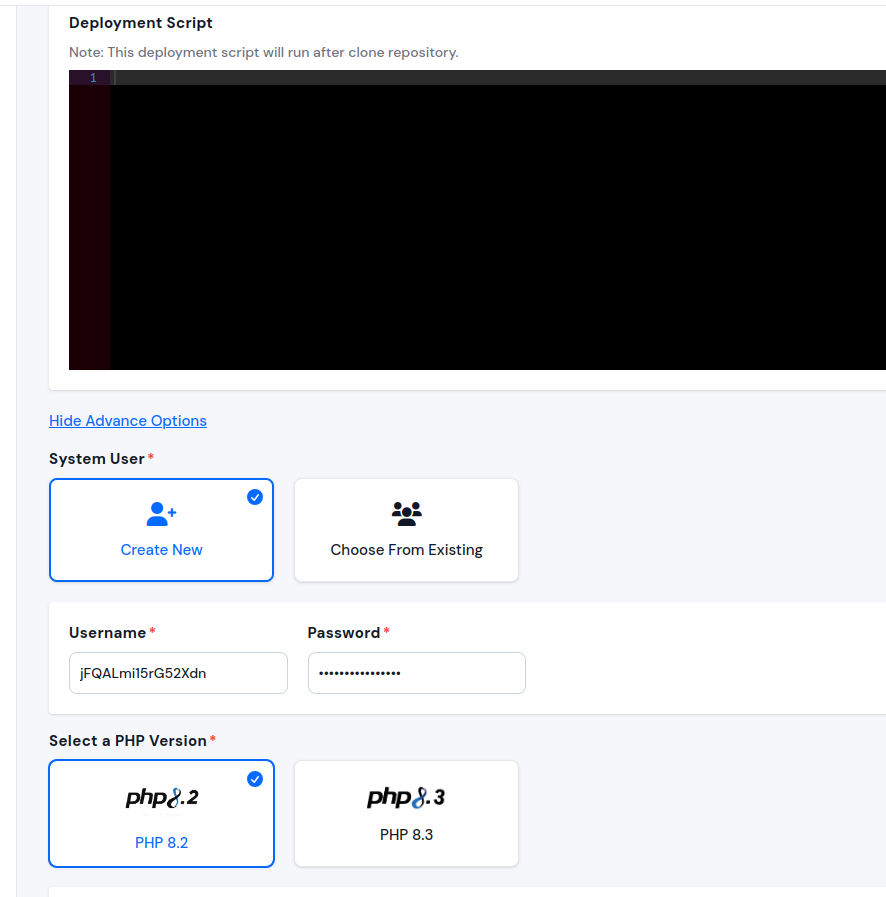
- Let's take the next step in creating your application. Now, you need to set up deployment scripts. These manually entered commands will run automatically after cloning the repository.
- Installing does not require running any manual scripts or commands in the deployment process. Therefore, you can simply leave this part blank.
- Deployment Scripts: (Leave it blank)
- To proceed further, click on the Show Advanced Options You'll find this right below the deployment scripts section.
- The next step is to create a system user for your application. You have the option to either select an existing user or create a new one dedicated to this application.
- Now, let's select the PHP version. Choose a PHP version 8.1 or a newer version if available.
Step 2: Configure the Application
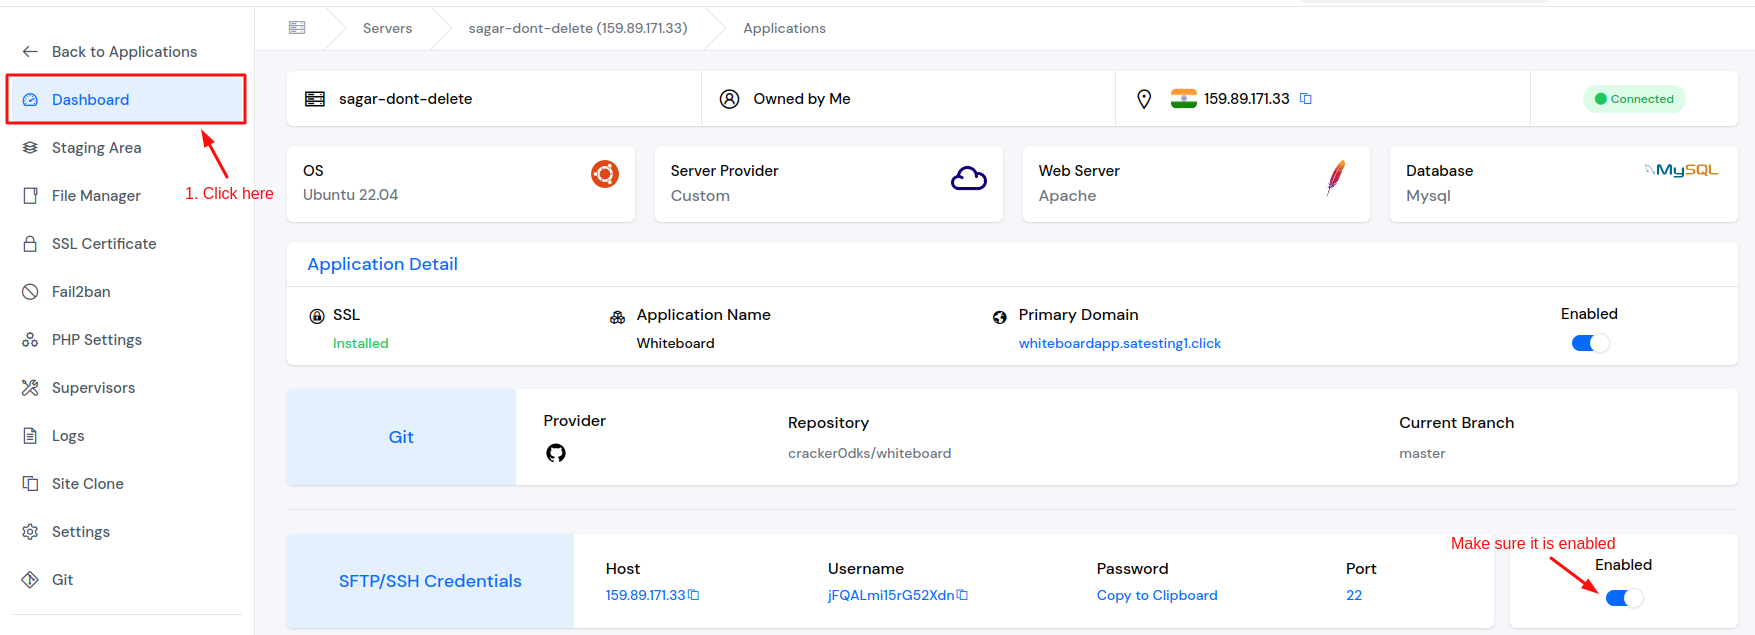
- To establish a connection, access the SSH credentials from the application panel dashboard. Ensure that the SFTP/SSH Credentials option is enabled, as illustrated in the provided snapshot.
-
Execute the below command to log in to the root user on your application in your terminal.
-
SSH Username@Host
-
-
Replace the Username and Host with your value. Enter the SSH Password to log in.

- Navigate to the Public_html directory (by using commands ls and cd) and run the below commands to install frontend packages and to build the assets (js, CSS).
-
npm install

-
npm run start:prod

-
Note: You always need to run the
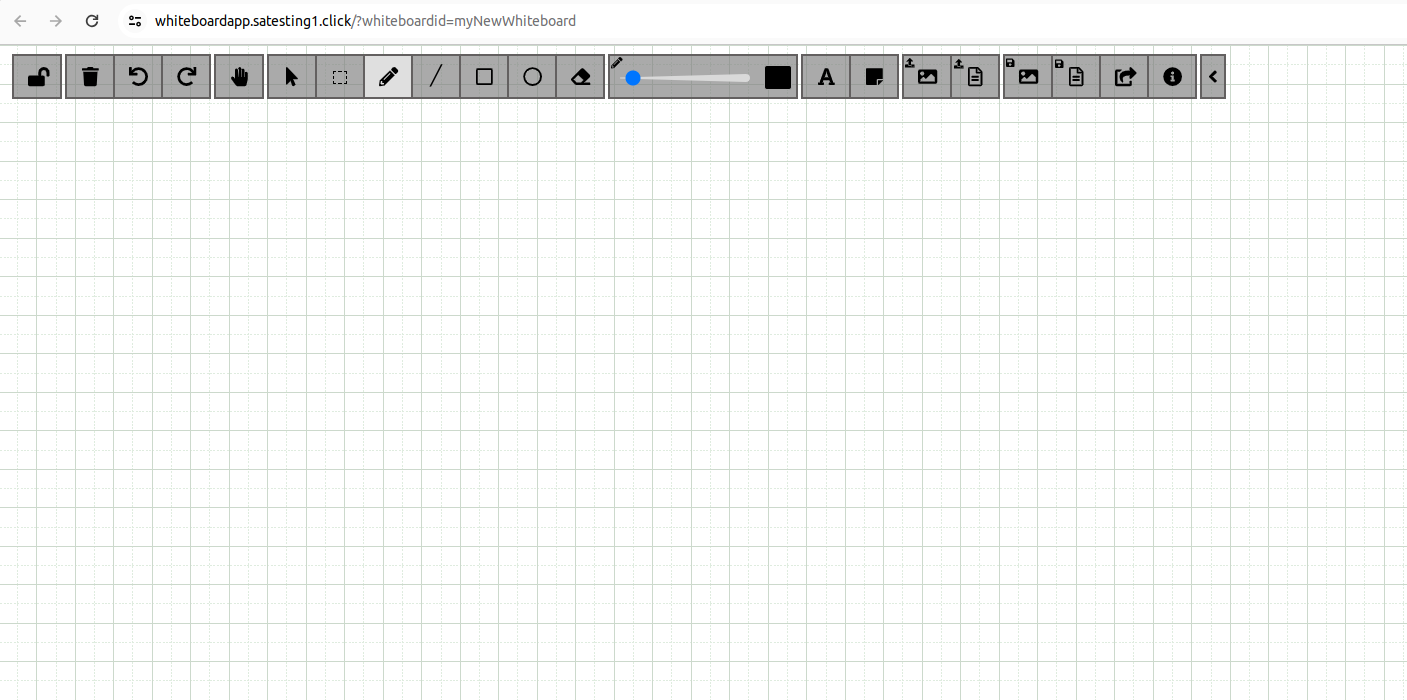
npm run start:prodcommand in the Public_html directory for using the Whiteboard. Now you can run Whiteboard by surfing http://YOURIP:8080. -
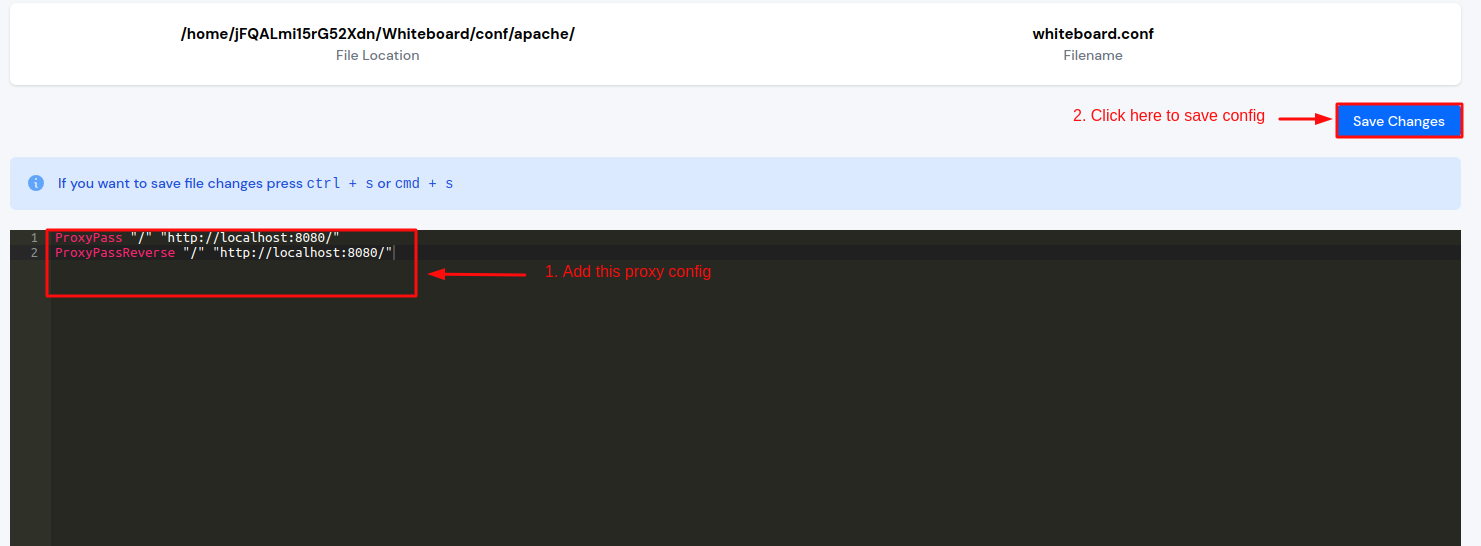
After that you have to create a new configuration file on your web server for setting proxy and to make a whiteboard application work on your domain. Follow the procedure as shown in the image below.
-
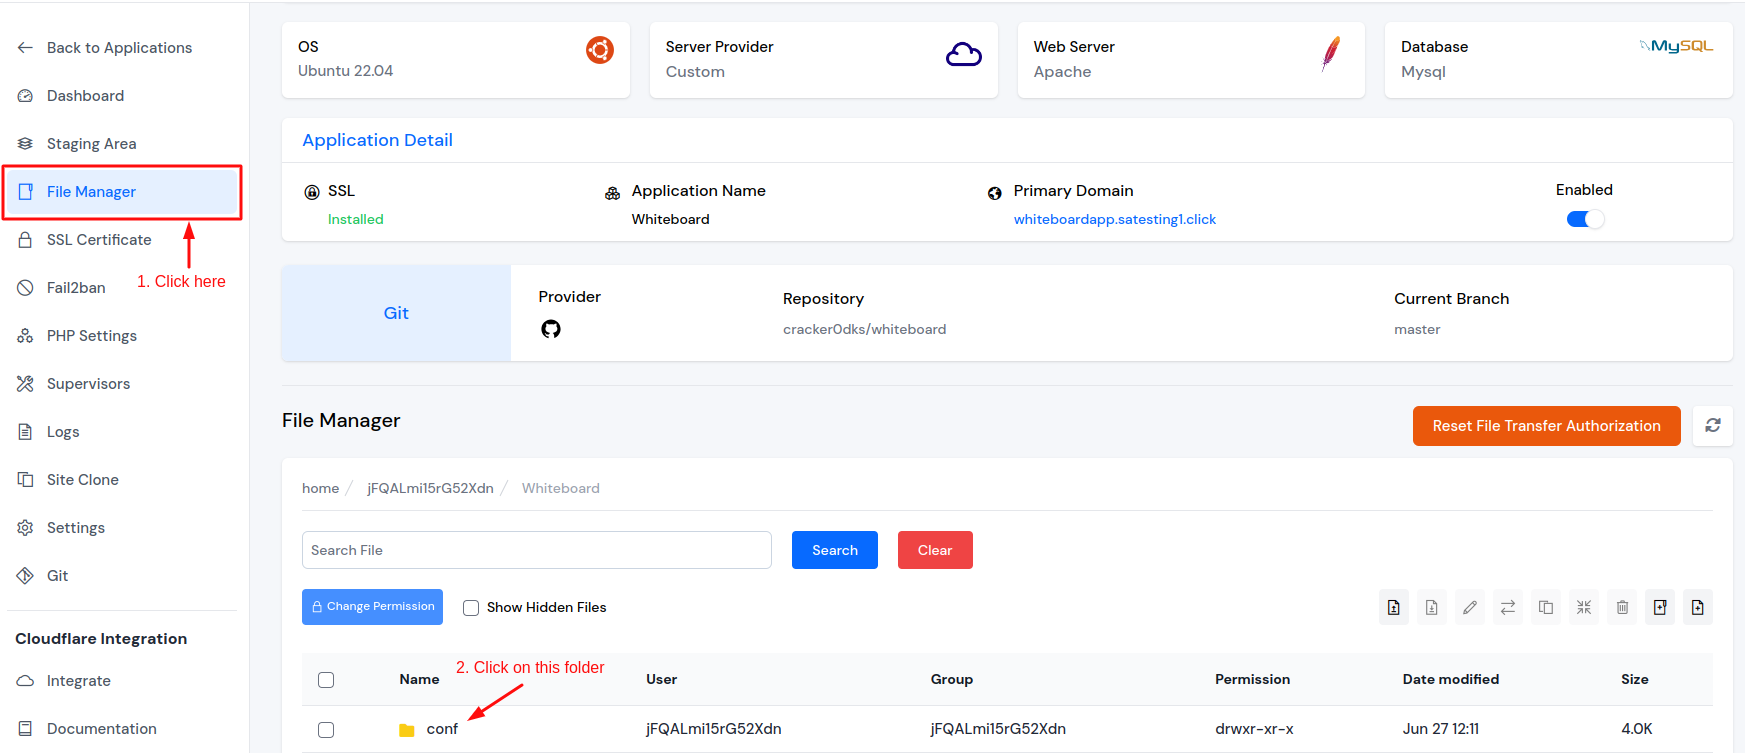
Go to the Application dashboard.

- Then go to File Manager and open the conf folder.
- After that, open the apache directory.

- The next step is to create a configuration file in the Apache directory.
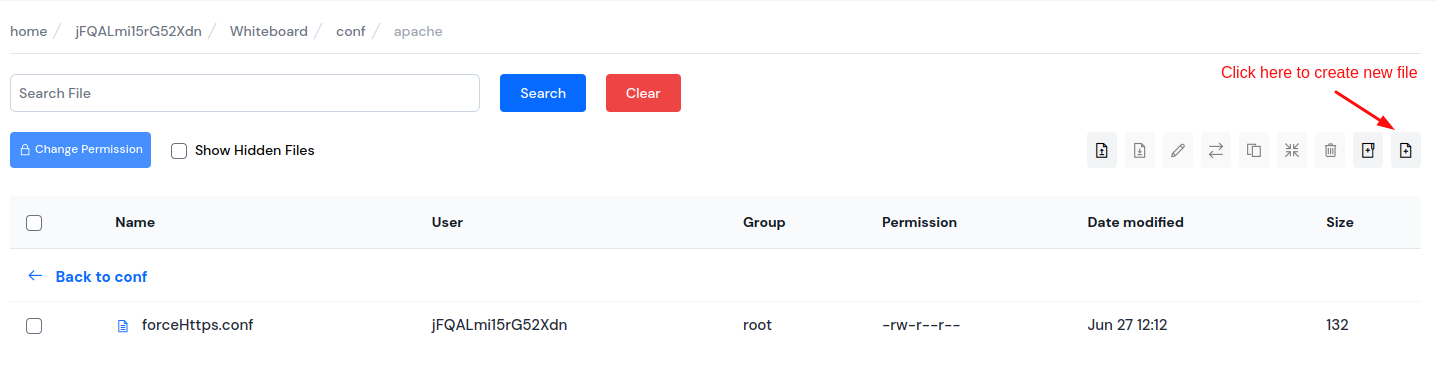
- Following that you can create a conf filename of your choice, but do not forget to add the .conf extension after the filename.
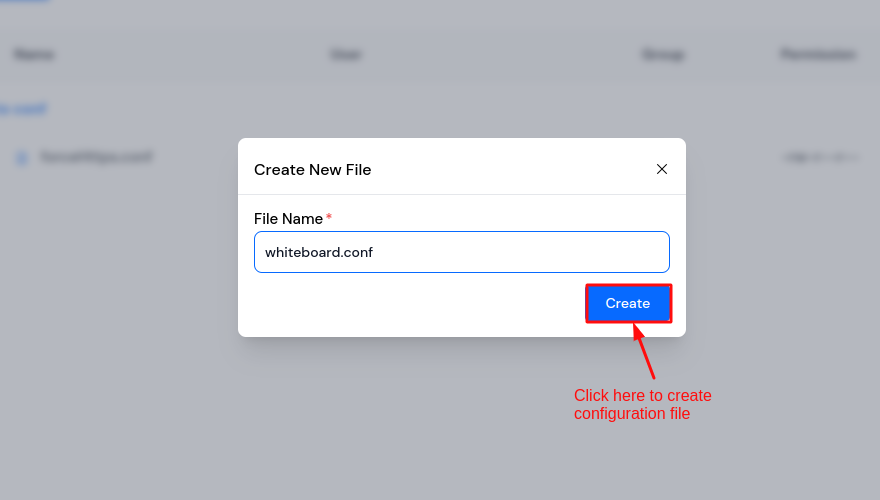
- Moreover, open your newly created configuration file and add the config shown in this image, and don’t forget to click on save changes.
- The last step is to again run the
npm run start:prodcommand in the Public_html directory, as the whiteboard works on the socket server so it is mandatory to run this command every time you want to use your Whiteboard application.
- Congratulations! You have successfully installed and deployed Whiteboard through ServerAvatar.