Bagisto is an open-source e-commerce platform known for its comprehensive features and flexibility. It enables businesses to efficiently create and manage online stores, providing tools for product management, order processing, and customer interaction. Vultr is a dependable hosting option for Bagisto, providing scalable infrastructure and simple deployment solutions. ServerAvatar makes it easy and user-friendly to deploy the Bagisto application on the Vultr platform.
Create a Cloud Instance in Vultr
To create a server in Vultr, follow the below-given steps. If you want to learn How to use Vultr to manage your infrastructure in Vultr, You can refer to our Vultr cloud guide.
Step 1: Go to the Instance Creation Page
Vultr provides different types of cloud instances. From the server creation page, you can create cloud instances such as Regular VMs, Dedicated, Bare Metal, Cloud GPUs, and some managed services.
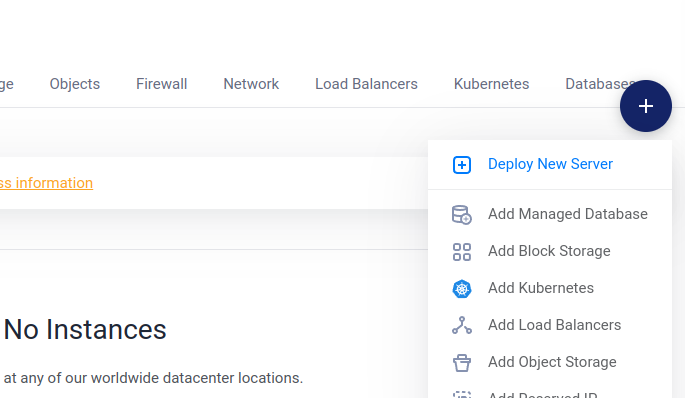
To access the server creation page, log in to your Vultr account and click on the Deploy New Server option from the + button given on the dashboard.
Step 2: Choose the Server
You can create 4 different types of cloud instances which includes Optimised Cloud Compute, Cloud Compute, Cloud GPU, and Bare Metal. Select the one that fits your requirements.

Step 3: Choose Server Type
Based on your selection of the server in the second step, You will have to select a specific type of server. If you have selected the Optimised Cloud Compute instance, You will see the options like this as shown in the image below:

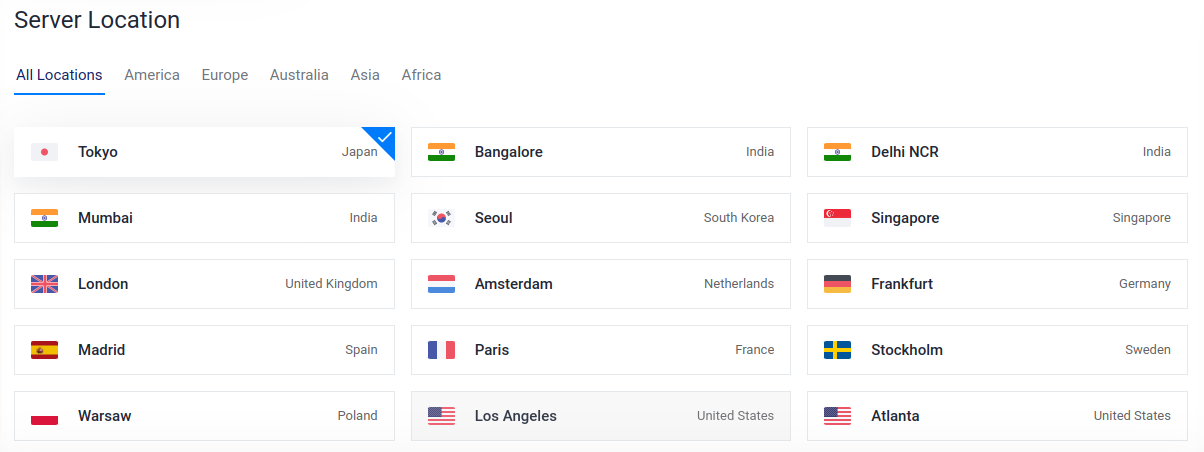
Step 4: Select Server Location
Location is a very important option. Make sure to select a server location closest to your major traffic source demographically. You can select locations in 5 different continents.
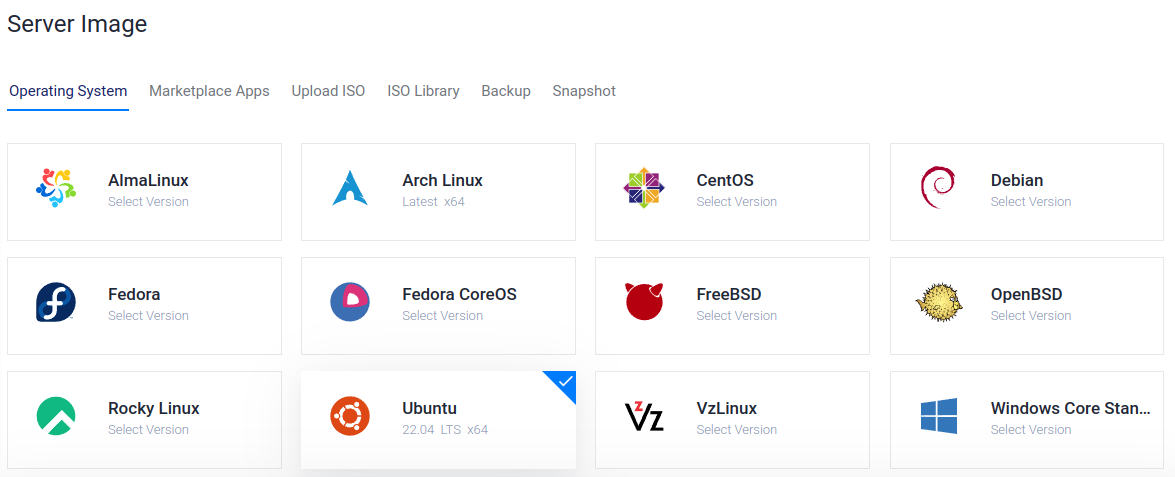
Step 5: Select Server Image
In simple terms, a Server image is an operating system running on the server. So here, You have to select an OS for your server.
If you are managing your servers with ServerAvatar, Select Ubuntu 20.04 or Ubuntu 22.04.
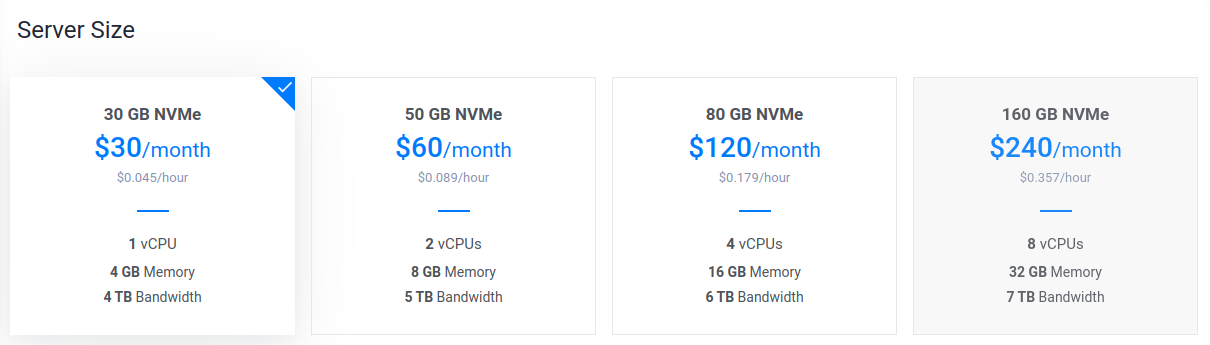
Step 6: Select Server Size
Here, Select a server size according to your requirements. If you are just getting started with the project, You can start with a small configuration and then upgrade it according to future requirements.
Step 7: Add Auto Backups and Additional Features
We recommend you to enable auto backups for important websites or apps. If you are creating a temporary server, You can skip the auto backups.
In addition to this feature, You can enable DDOS Protection and other options according to your requirements.
Do not enable the "No Public IPv4 Address" option. It will create the server without IPv4, which is impossible to connect with ServerAvatar.
Step 8: Select an SSH Key
If you use an SSH key to authenticate with the server, Select an SSH key in this section. If you haven't uploaded your key yet, You can do it by clicking on the Add New option.
SSH key is not mandatory. If you don’t want to use SSH keys, Ignore this option. You can still connect to your server by using the password.

Step 9: Firewall Group
If you are using the Vultr firewall, You can select the firewall group from here.
If you do not have the 43210 port enabled in your firewall group, you need to configure it to connect a server with ServerAvatar.

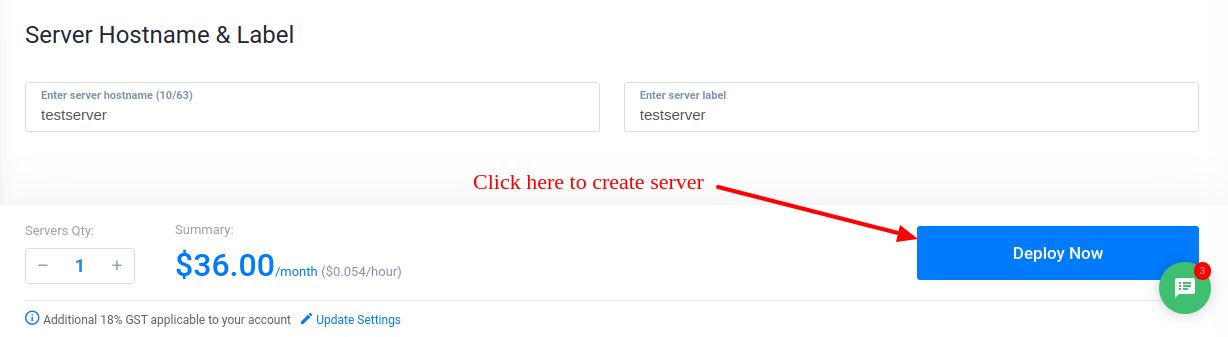
Step 10: Server Hostname and Label
In this step, you have to choose the hostname and the label for the server. You can set the same hostname and label. They are used for identification purposes only.

Step 11: Deploy Now!
Finally, click on the Deploy Now button to create a server. It might take a minute or two to fully boot up your server. Once it is ready, You will see it in the Products section in Vultr.
Initial Server Configuration
The Initial server configuration includes the installation and configuration of various packages required to host your website. Usually, You have to write commands and modify configuration files. Luckily, With ServerAvatar, Your full server configuration and optimization can be automated.
Here are the three ways to automatically configure your server with ServerAvatar.
Connect a server using a direct method
- Login/Register to ServerAvatar account, click the Create button from the right side of the screen, and select Server from the dropdown.
- Select Direct Method in the serve connecting method section.
- Type the Server Name as per your choice.
- Select a Tech Stack as per your need. You can either select Apache, Nginx, OpenLiteSpeed or Node Stack.
- Select a Database: MySQL, MariaDB or MongoDB.
- Enable the toggle if you want to install the latest LTS version of node.js on your server.
- Select a Management plan and click the Connect Now button.
- You’ll see the command on your screen. Login to your server using an ssh connection and execute that command as a root user.
- The server connection process will be started on your ServerAvatar account after executing the command.
Connect a server using integration
- Login/Register to your ServerAvatar account, navigate to the Integration tab from the sidebar of the panel, and access Cloud Platform from the dropdown.
- Now Select a cloud platform you want to link with ServerAvatar.
- The popup form will appear on your screen. Enter details to link your cloud provider account. The integration method is different based on the cloud provider you select.
- You can integrate five different cloud provider platforms with ServerAvatar, which is-
Check the above link of cloud platforms to know more about integrating cloud platforms with ServeAvatar.
Connect a server using commands
Step 1. Login to your server using root user
Once you create a server as per your requirements, connect to your server using an ssh connection and execute the below three commands as a root user in your server console area.
wget https://srvr.so/install
chmod +x install
./install
Step 2. Select a web server
It will ask you which web server you would like to install on your server: Apache, Nginx, OpenLiteSpeed or Node Stack. Type anyone that you would like to install on your server and hit the enter button.
Step 3. Claim your server
Completing the process will give you a link to claim your server.
Open the link on your browser to access the ServerAvatar server panel.
Install and Setup Bagisto on Cloud using ServerAvatar
Step1: Create Bagisto Database
The Bagisto installation process requires database Credentials. So, to create a MySQL database for Bagisto, Access the Database tab on the ServerAvatar server panel to create a Database.
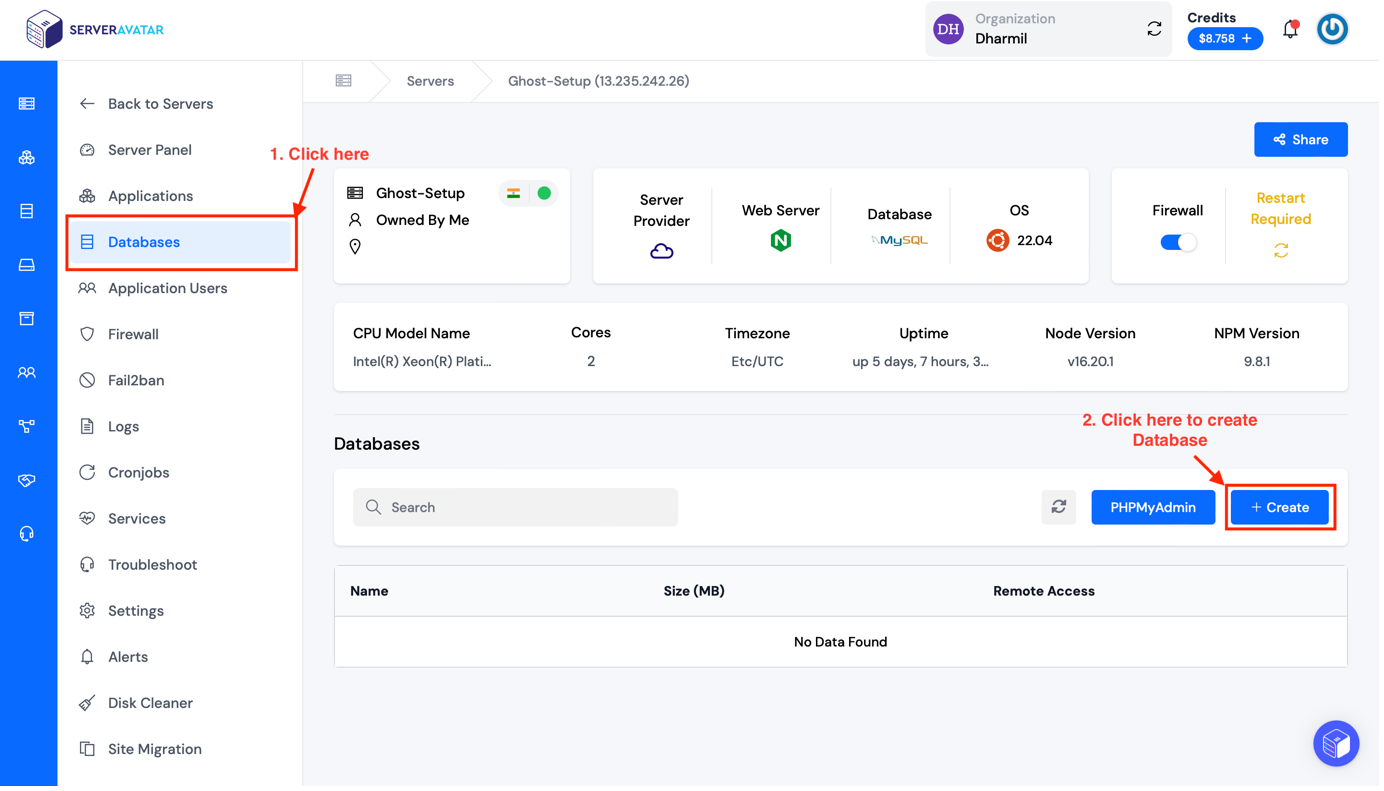
To create a Database, Enter the details, such as the Database Name, in the database creation form like the image below.
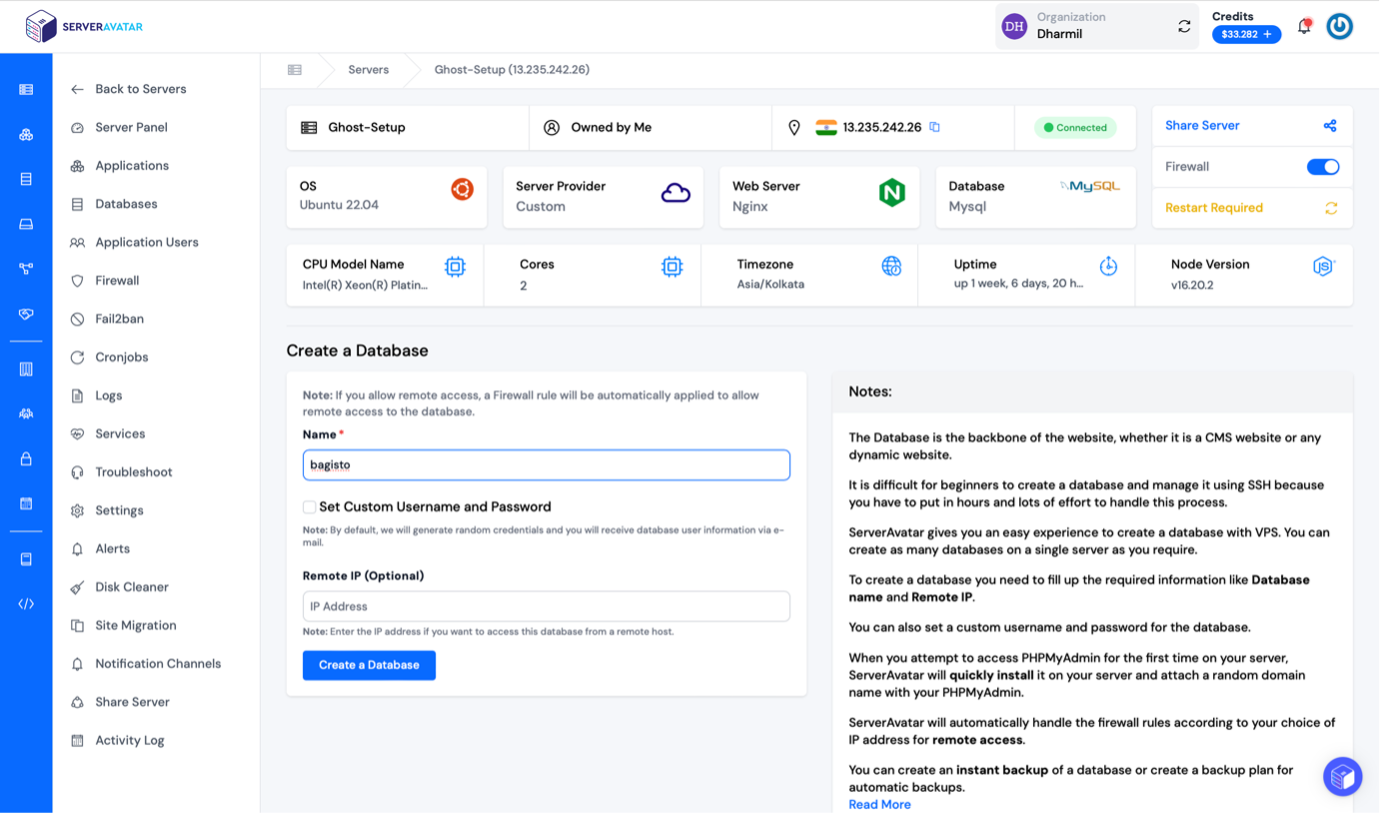
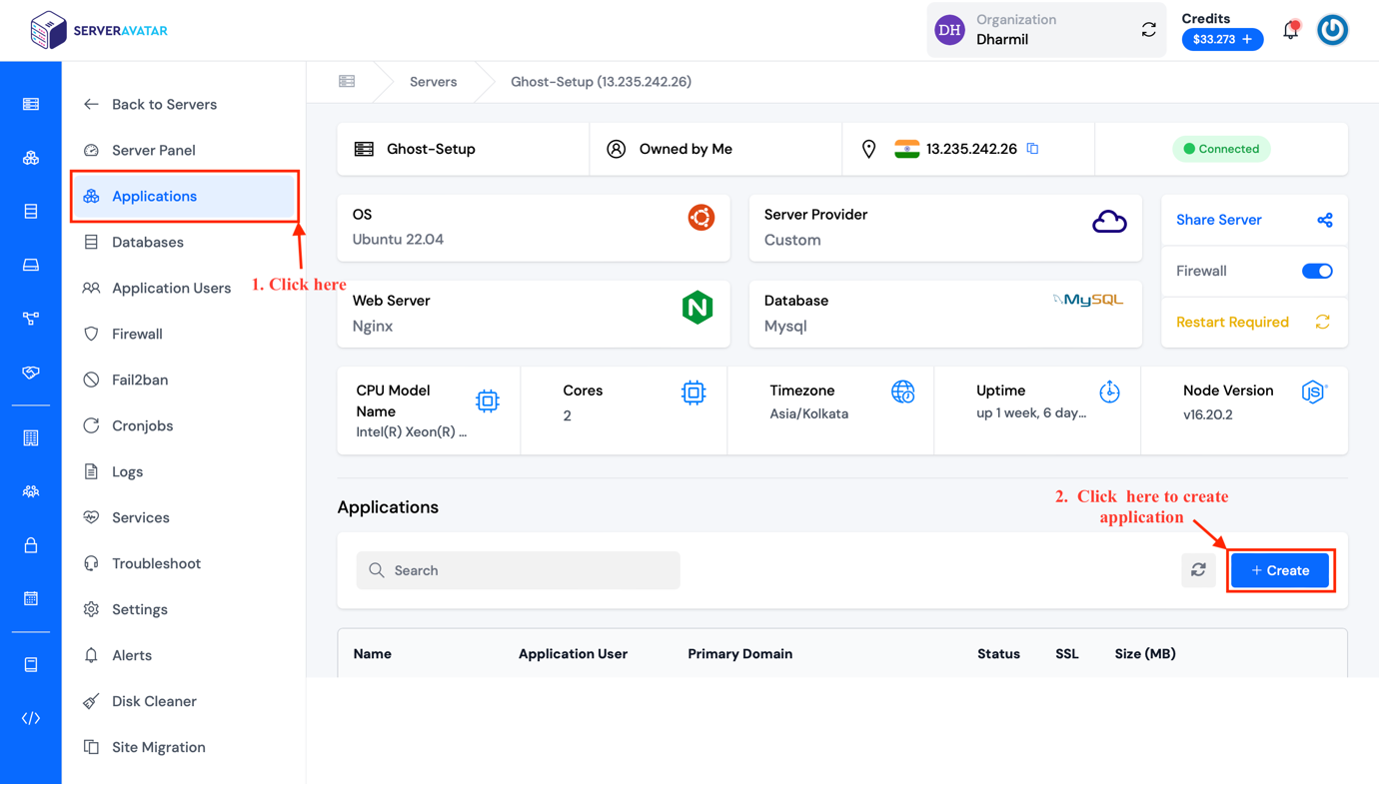
Step 2: Create a PHP Application
Access the Applications tab from the server panel to create a new PHP application for Bagisto. Now, create an application, click on the Applications tab, then click the Create button on the server panel.
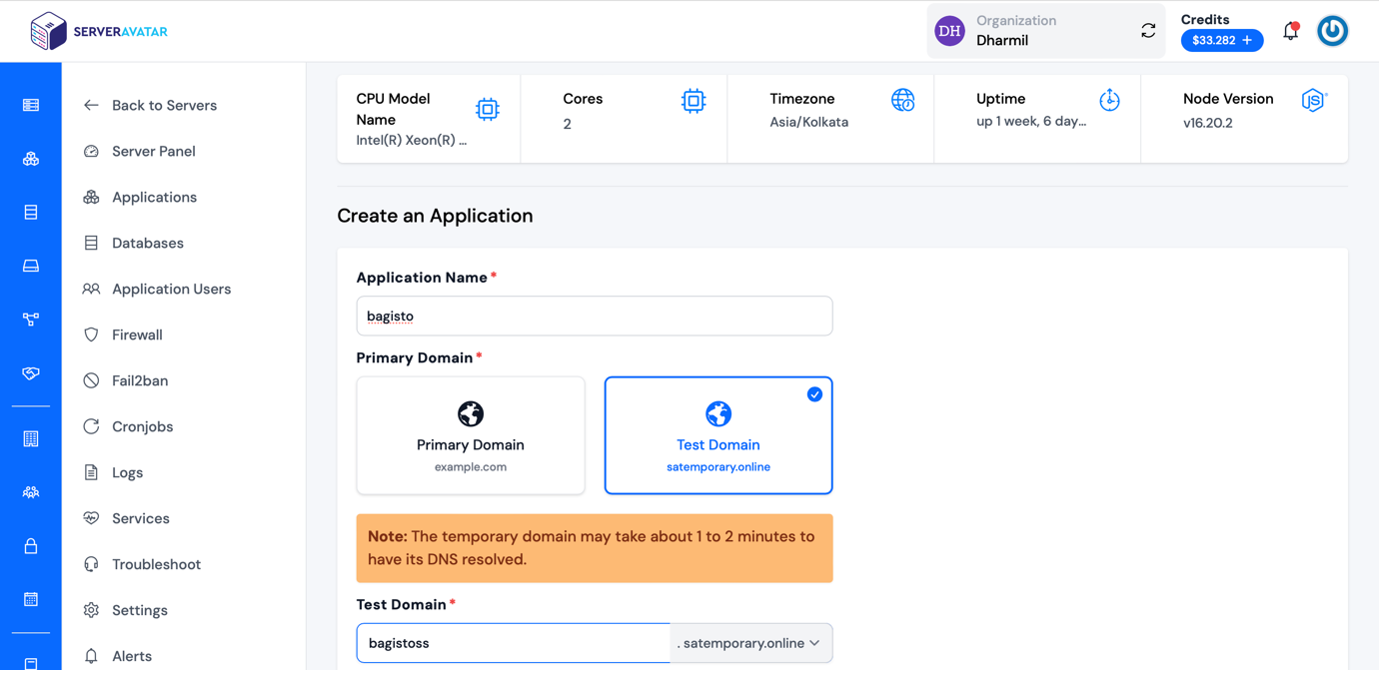
To create an application and proceed with the installation and deployment of Bagisto. You need to fill in the prerequisite for Bagisto.
Enter an application name of your choice. Afterward, input the domain name where you'd like to direct your URL. You have the choice between a test domain or a primary domain. If you decide on the test domain, you can use ".serveravatar" as a test domain extension. This flexibility ensures you can make the perfect selection for your project.
Note that:
If you want to host Bagisto on your domain, then make sure to point your domain to the current IP address of your server, and for that:
- Log in to your domain provider site, where you buy your domain. Click here for more info about your domain name.
- Access DNS Manager to edit your DNS records (contact the support team if you don’t find them)
- Change the IP address of A Record of your website to the current server’s IP address.
To host Bagisto on your subdomain, for example, Bagisto.yourdomain.com, create a new application with the subdomain as your primary domain and follow the same procedure. For accessing Opencart on the subdomain, you need to add your subdomain on A Record that points to the current IP address of your server. To point to an IPV6 address, you would need to use an AAAA record.
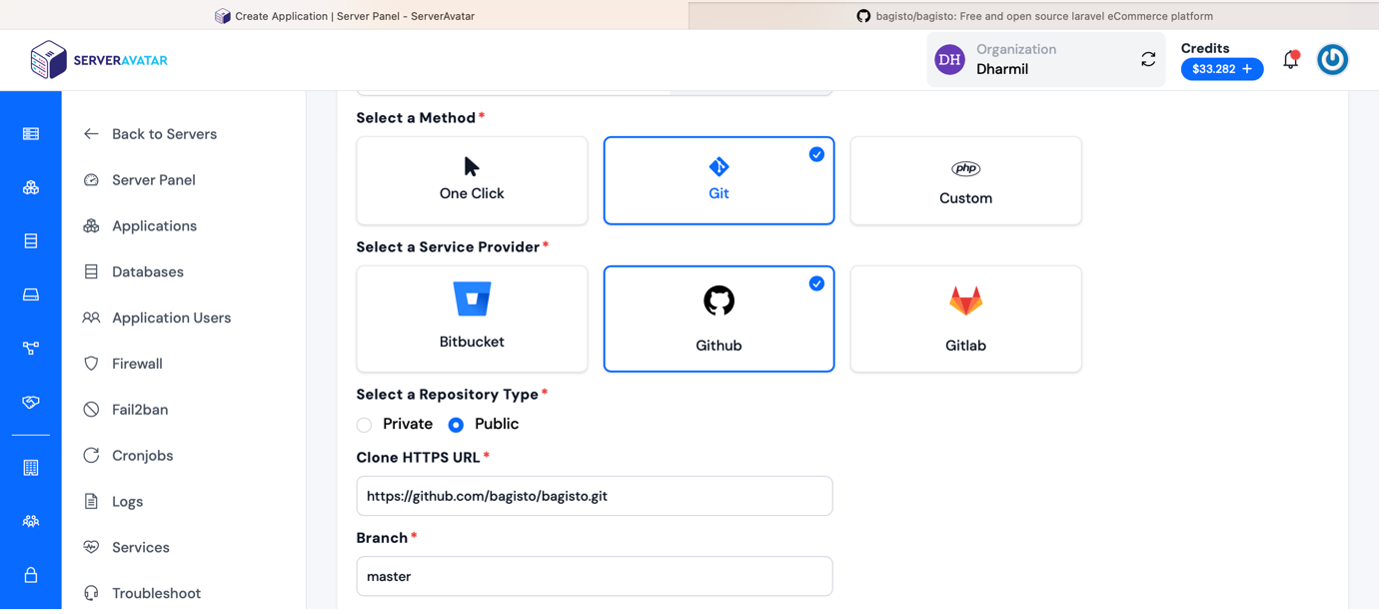
Now, you will clone Bagisto through the available repository in GitHub. So:
Select a method: Git
Select a Service Provider: GitHub
Select a Repository Type: Public
Clone HTTPS URL: https://github.com/bagisto/bagisto.git
Branch: master
Let's take the next step in creating your application. Now, you need to set up deployment scripts. These are the manually entered commands that will run automatically after the clone repository.
Installing Bagisto does not require running any manual scripts or commands in the deployment process. Therefore, you can simply leave this part blank.
Deployment Scripts: (Leave it blank)
To proceed further, select the checkbox labeled "Show Advanced Options" You'll find this checkbox right below the deployment scripts section.
The next step is to create a system user for your application. You have the option to either select an existing user or create a new one dedicated to this application.
Now, let's select the PHP version. Choose PHP version 7.4 or a newer version if available. Regarding the custom webroot for Bagisto, it should be set to "public" as illustrated in the provided snapshot. We are specifically looking for either an "index.php" or "index.html" file within this custom setup.
Select PHP Version: PHP version 7.4 or higher
Custom Webroot: public
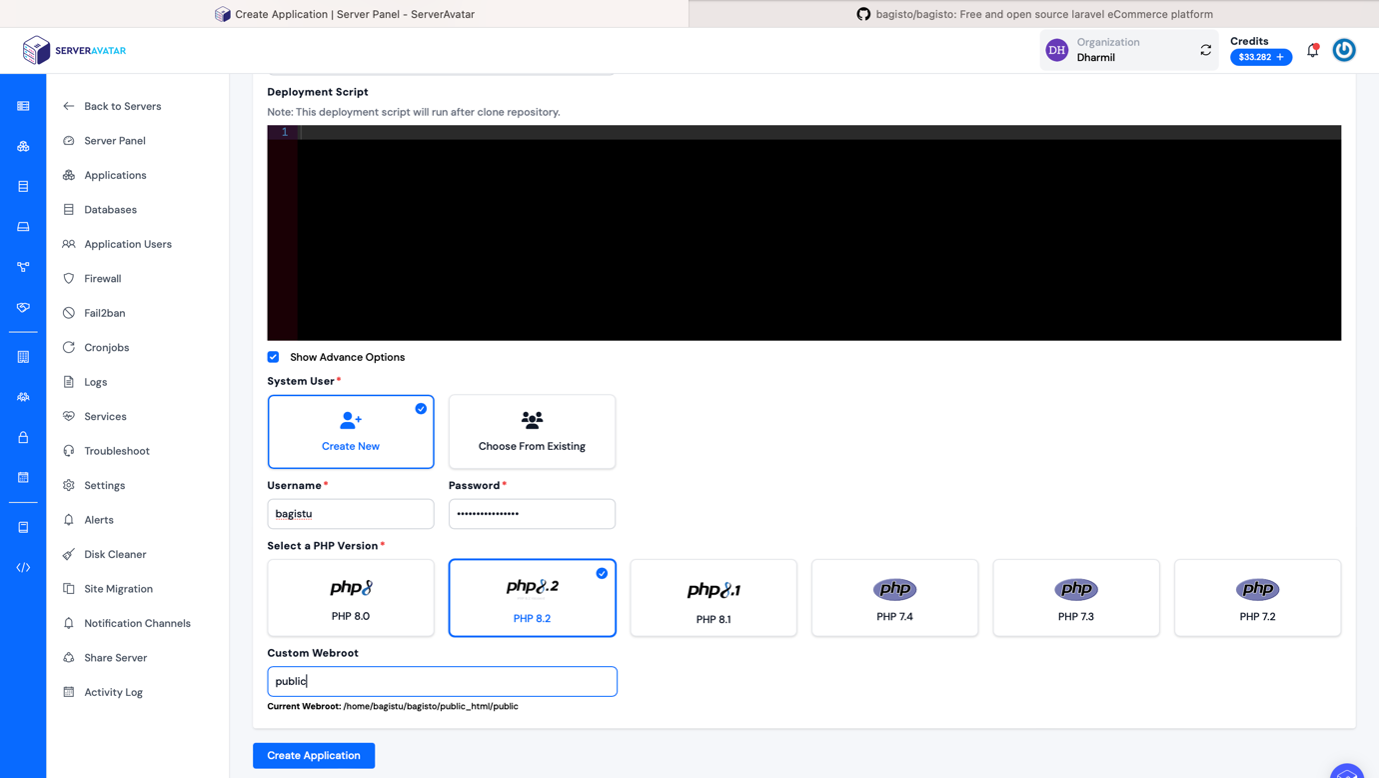
With all these settings in place, go ahead and click on the "Create Application" button to complete the procedure.
Congratulations! You've successfully created your application.
Step 3: Config Database with Application
In this step, we're connecting the database we created in Step 1 with the application from Step 2. To configure the database, we need to edit the environment (env) file.
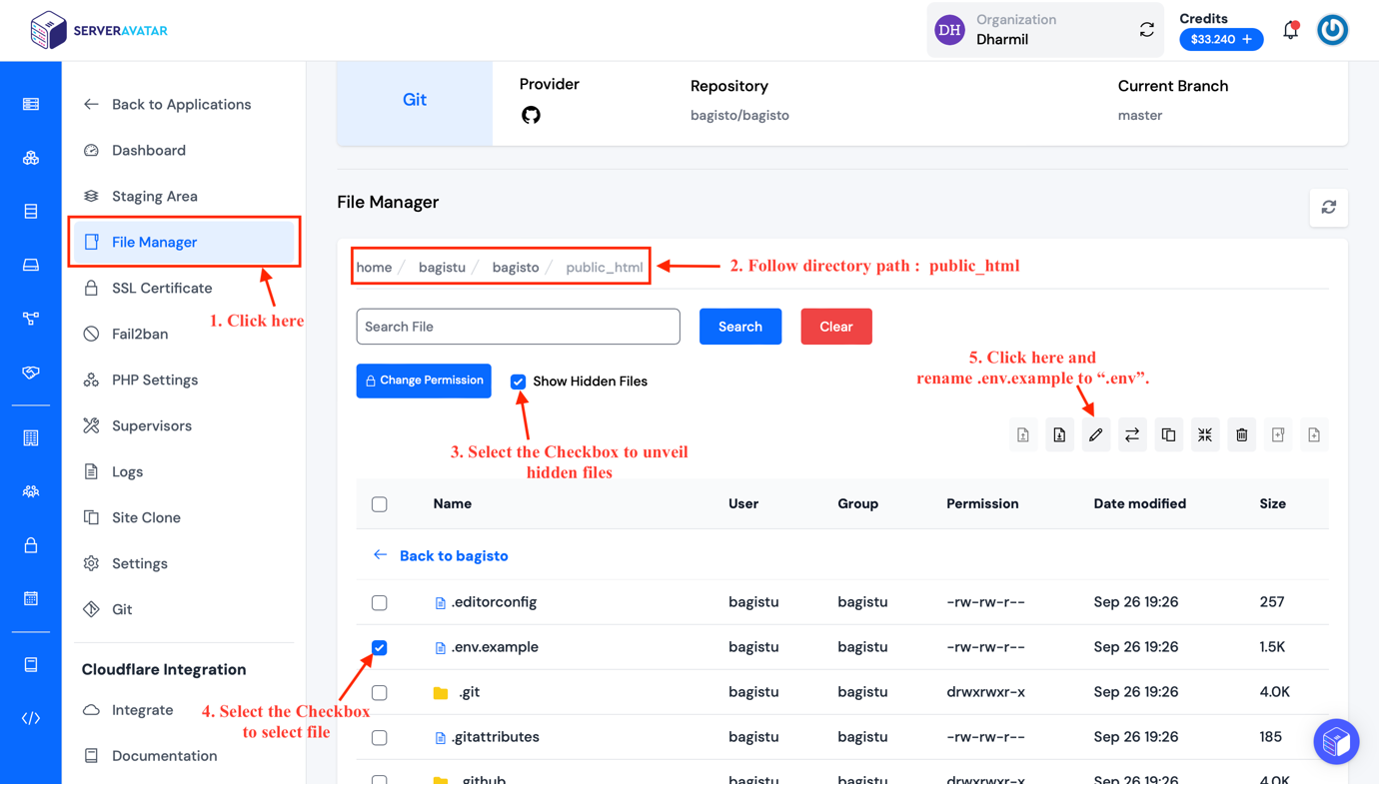
To edit the env file, you can access the public_html directory from your file manager or navigate through the directory path. Once you're there, make sure to select the checkbox for showing hidden files.
Now, within this directory, you'll find a file named ".env.example". To rename it, follow the procedure shown in the snapshot. Simply rename ".env.example" to ".env" This step is crucial for configuring the database properly.
After renaming the file to ".env," proceed to open it. Inside, you'll need to enter the database credentials that were created in Step 1.To establish a connection between the database and the application, enter the database credential we have already made. You can access all your database credentials, like database name, username, and password, by accessing the database tab from the server panel.
Enter the following database credential we have already created in ServerAvatar:
Database Name: Database name
Username: Username of database
Password: Database password
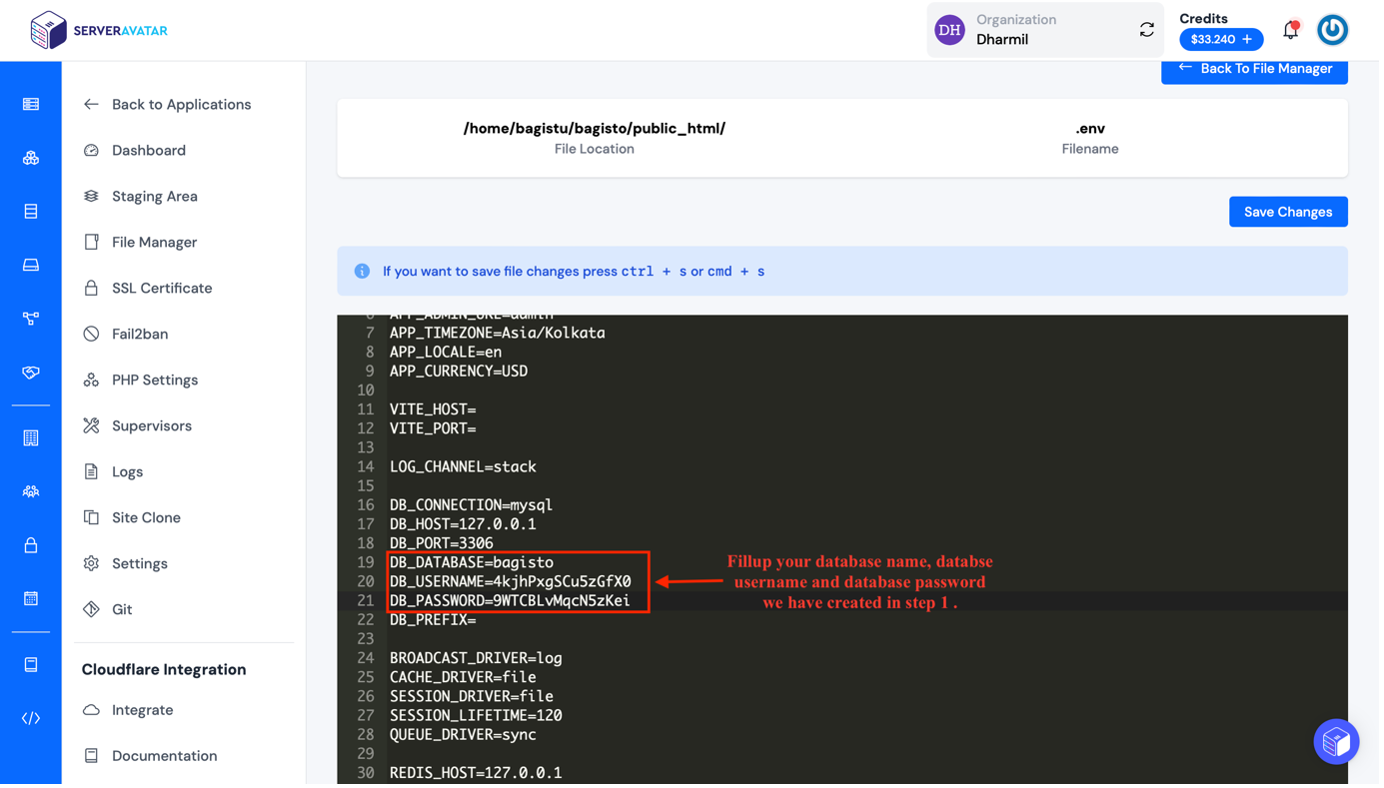
Don't forget to save the changes you've made to the ".env" file.
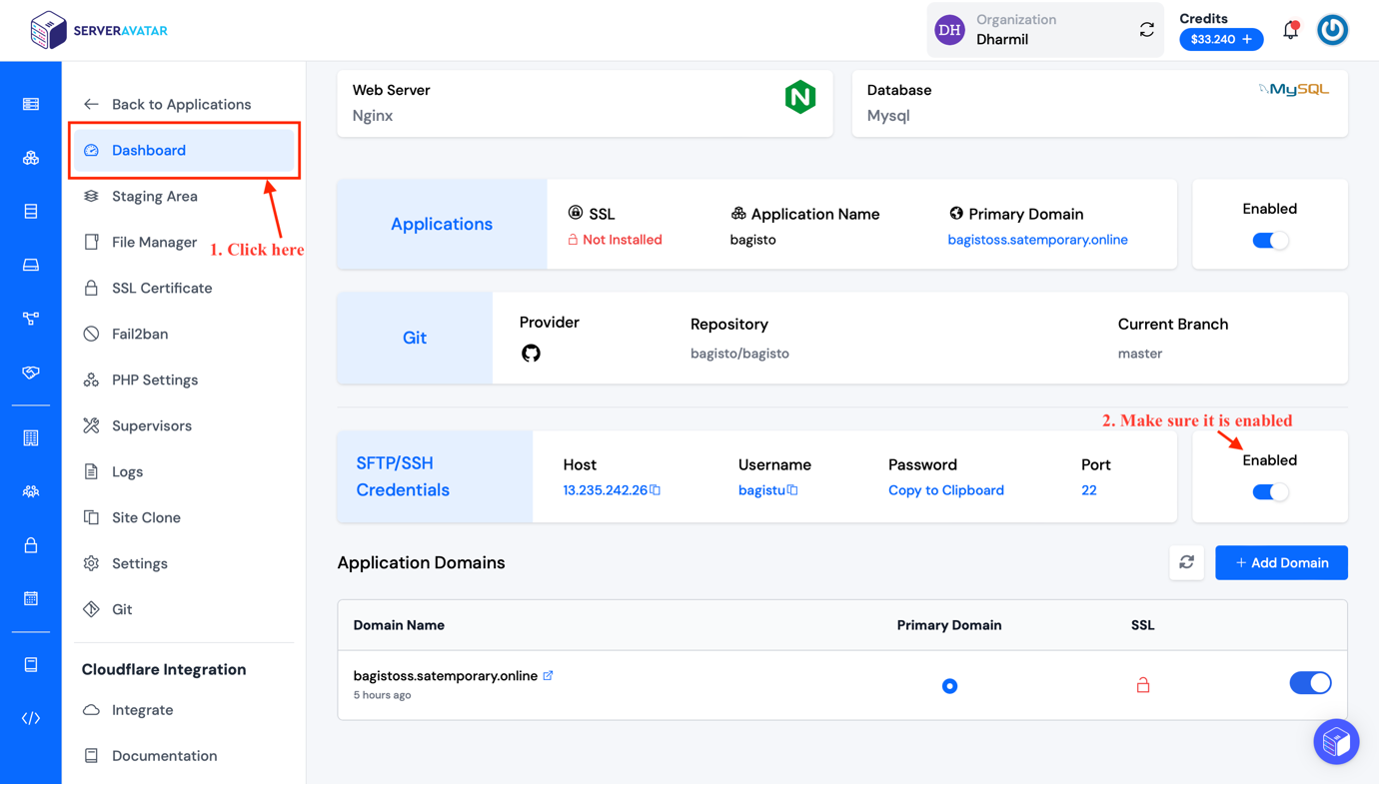
To establish a connection, access the SSH credentials from the application panel dashboard. Ensure that the SFTP/SSH Credentials option is enabled, as illustrated in the provided snapshot.
Execute the below command to log in to the root user on your application in your terminal.
SSH Username@Host
Replace Username and Host with your value. Enter the SSH Password to log in.
Go to the Public_html directory ( by using command ls and cd )and run the below commands.
composer install;
php artisan bagisto:install;
Once you've executed all of these commands, you will have successfully configured both the database and the application.
You can access it by visiting the http://yourdomain.com/admin in your web browser.
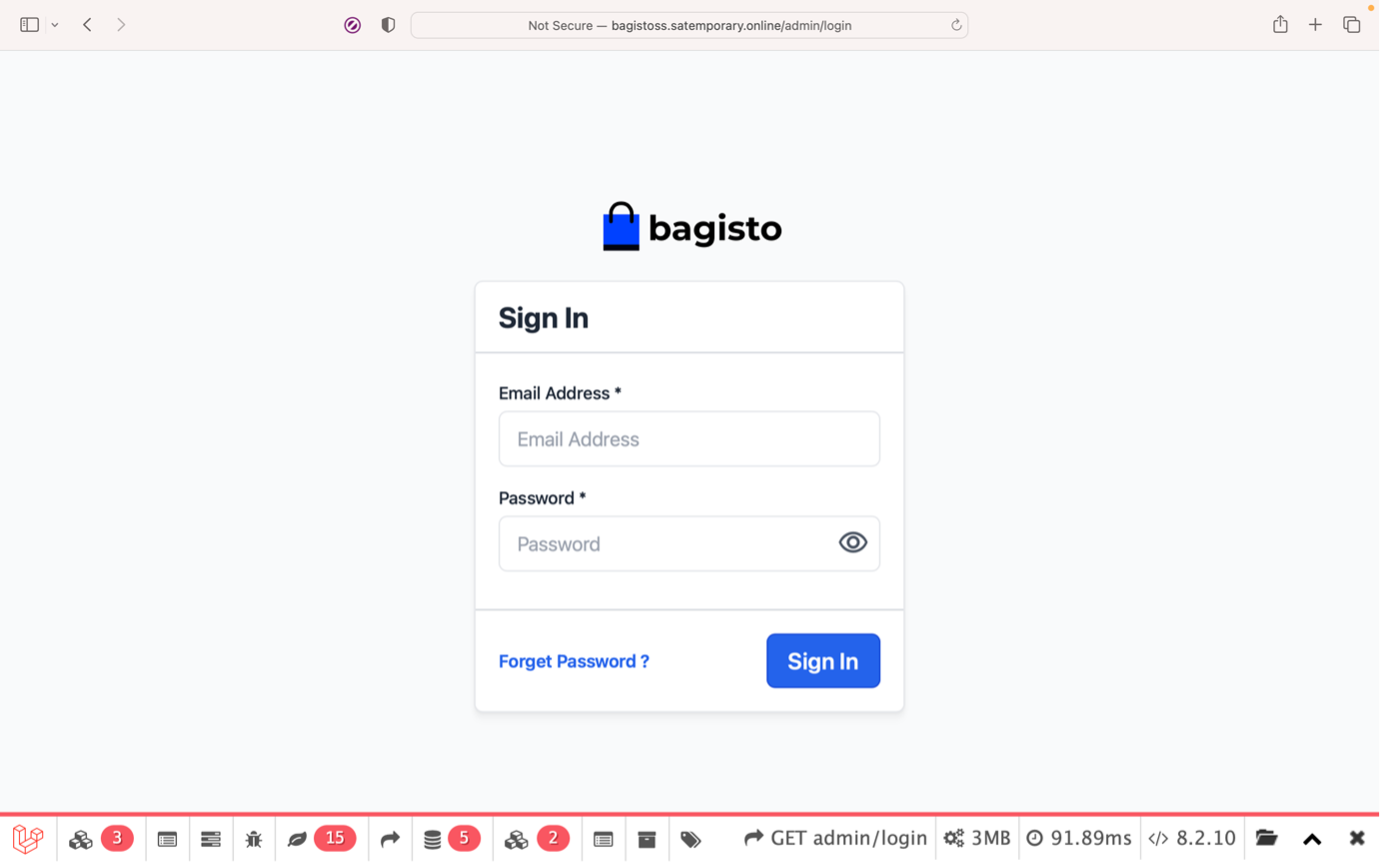
To log in to Bagisto, use the following credentials:
Email: admin@example.com
Password: admin123
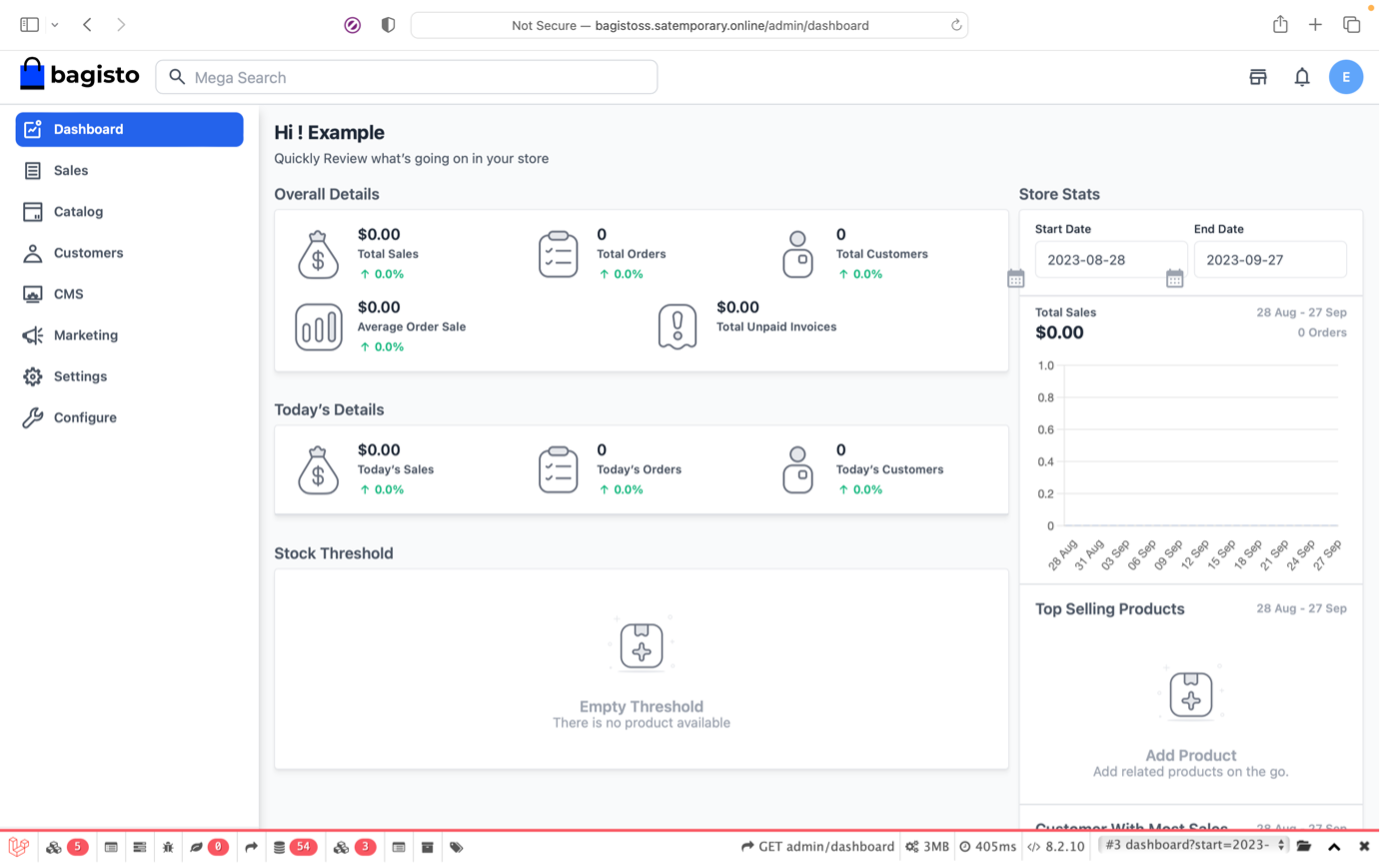
Congratulations! You have successfully installed and deployed Bagisto through ServerAvatar.