Joomla is an open-source content management system (CMS) known for its versatility and user-friendly interface. It enables users to create and manage websites of varying complexity, from personal blogs to corporate portals and online stores. Joomla provides flexibility in both design and functionality, accommodating a wide range of requirements without demanding advanced technical knowledge. Hosting Joomla on DigitalOcean ensures reliability with its scalable infrastructure and straightforward deployment options. ServerAvatar makes the deployment of the Joomla Application on the DigitalOcean platform an easy step-by-step process.
Create Server in Digitalocean
Digitalocean is one of the most popular cloud platforms right now. It offers on-demand cloud computing for various use cases as well as some managed solutions. We can deploy any PHP-based applications on Digitalocean Droplets. Droplets are the servers or cloud computing instances in Digitalocean. If you want to learn about droplet management in-depth in Digitalocean, We recommend you to read our Digitalocean guide.
To deploy any application on Digitalocean, We first need a Droplet. So, we will first create a droplet and perform the initial setup.
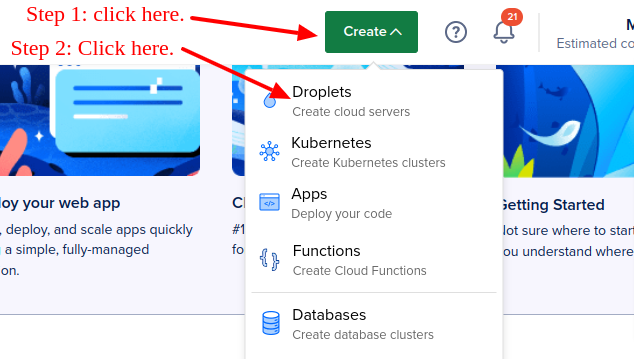
Step 1: Go to the Create Droplets page
Log in to your Digitalocean account and click on the Create button given on the top-right corner of the page. From the drop down menu, click on the Droplets option to see a droplet creation form.
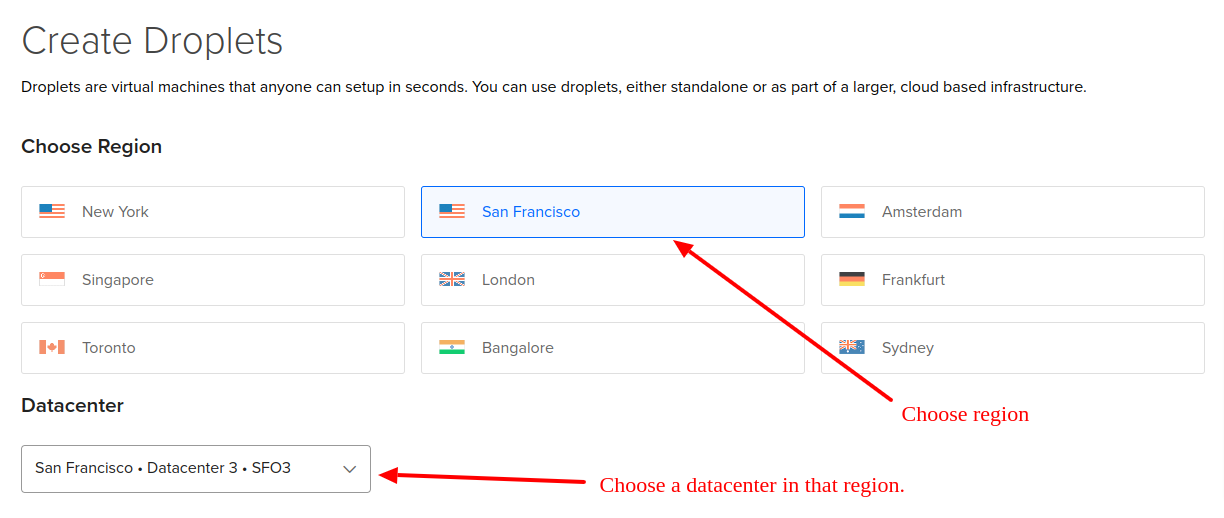
Step 2: Choose Region
On the Droplet creation page, you will find several sections for selecting different options. We will proceed step by step.
The first thing you have to do is select the region for your droplet. Digitalocean provides several options when it comes to selecting the location. The general rule is to select the region that is closest to your audience. It means that for the majority of your audience, Your sites will load faster due to low latency.
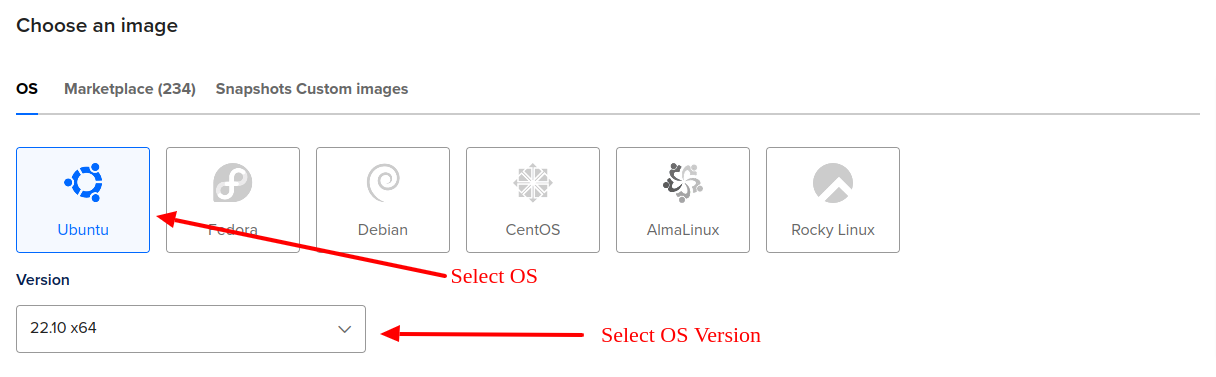
Step 3: Choose an Image or an OS
In this step, you have to select the operating system for your droplet. We recommend you to use Ubuntu 20.04 LTS x64 or Ubuntu 22.04 LTS x64. These operating systems are a requirement if you are using ServerAvatar to manage your droplets.
Step 4: Choose the size of the Droplet
Here you have to choose the size of your Droplet. As we mentioned above, Digitalocean provides many different types of droplets. Select the one that fits best for your project.
We recommend the minimum configuration of 1 or more GB of RAM for hosting Joomla. You can select another plan of higher configuration based on your specific requirements and usage.

If your site is brand new and does not have much traffic, start with a small plan. Once the project starts getting traction, you can upgrade the plan to handle more visitors on the site.
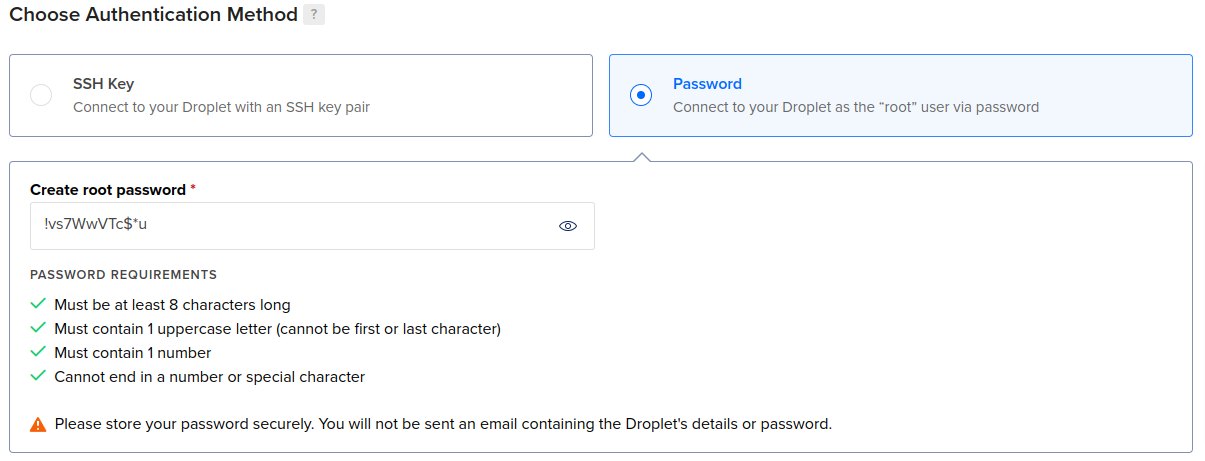
Step 5: Choose Authentication Method
Now you have to select the authentication method. There are two types of authentication methods. They are as follows:
- Authentication via SSH Keys
- Authentication via Password
Using SSH keys for authentication is the best option. If you are not familiar with SSH keys, you can choose the password method. Make sure to set a strong password for your root user, which is the most powerful user with all the privileges on Linux OS.
Step 6: Selecting Additional Options
There are three additional options you can choose from. They are optional but important in different use cases. The additional options are:
- Monitoring: It is a free feature by Digitalocean. It allows you to see additional monitoring data for your server.
- Backups: We recommend you to enable full server backups if you are going to deploy in a production environment. The cost of the backups depends on the size of the droplet.
- Managed Database: You do not need a Managed database if you are using ServerAvatar to manage sites on a droplet. A managed database is a pre-configured MySQL Droplet.
Step 7: Finalise Details
In the last step of this process, We have to enter the name of the droplet and, the number of droplets you want to create, Define any tags, and select the project. Enter all the details and click on the Create Droplet button to create a droplet.
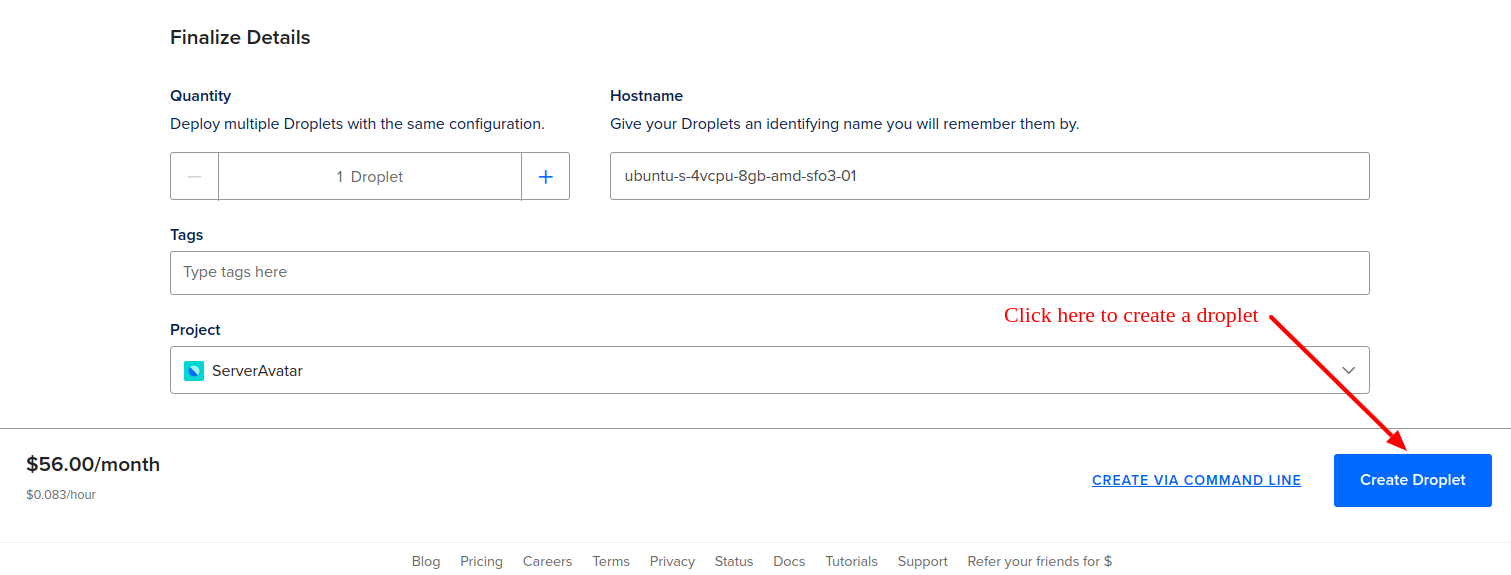
In a few minutes, You will have the Droplet up and running. Now, We have to perform the initial configuration on the Droplet to host PHP-based frameworks and software.
Initial Server Configuration
The Initial server configuration includes the installation and configuration of various packages required to host your website. Usually, You have to write commands and modify configuration files. Luckily, With ServerAvatar, Your full server configuration and optimization can be automated.
Here are the three ways to automatically configure your server with ServerAvatar.
Connect a server using a direct method
- Login/Register to ServerAvatar account, click the Create button from the right side of the screen, and select Server from the dropdown.
- Select Direct Method in the serve connecting method section.
- Type the Server Name as per your choice.
- Select a Tech Stack as per your need. You can either select Apache, Nginx, OpenLiteSpeed or Node Stack.
- Select a Database: MySQL, MariaDB or MongoDB.
- Enable the toggle if you want to install the latest LTS version of node.js on your server.
- Select a Management plan and click the Connect Now button.
- You’ll see the command on your screen. Login to your server using an ssh connection and execute that command as a root user.
- The server connection process will be started on your ServerAvatar account after executing the command.
Connect a server using integration
- Login/Register to your ServerAvatar account, navigate to the Integration tab from the sidebar of the panel, and access Cloud Platform from the dropdown.
- Now Select a cloud platform you want to link with ServerAvatar.
- The popup form will appear on your screen. Enter details to link your cloud provider account. The integration method is different based on the cloud provider you select.
- You can integrate five different cloud provider platforms with ServerAvatar, which is-
Check the above link of cloud platforms to know more about integrating cloud platforms with ServeAvatar.
Connect a server using commands
Step 1. Login to your server using root user
Once you create a server as per your requirements, connect to your server using an ssh connection and execute the below three commands as a root user in your server console area.
wget https://srvr.so/install
chmod +x install
./install
Step 2. Select a web server
It will ask you which web server you would like to install on your server: Apache, Nginx, OpenLiteSpeed or Node Stack. Type anyone that you would like to install on your server and hit the enter button.
Step 3. Claim your server
Completing the process will give you a link to claim your server.
Open the link on your browser to access the ServerAvatar server panel.
Auto-install Joomla with ServerAvatar
Step 1: Create a PHP application
Once you are on the admin panel, access the Application tab from the sidebar and click the Create button.
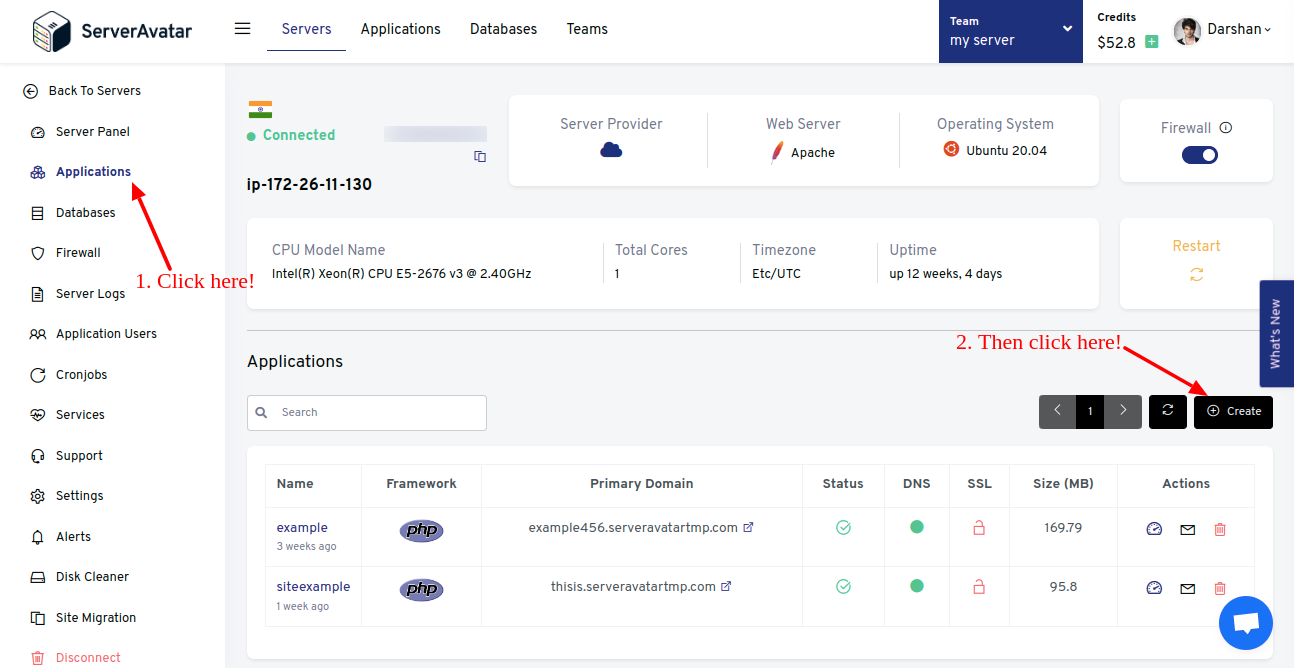
Now fill up the required details in the application form, as seen in the image below.
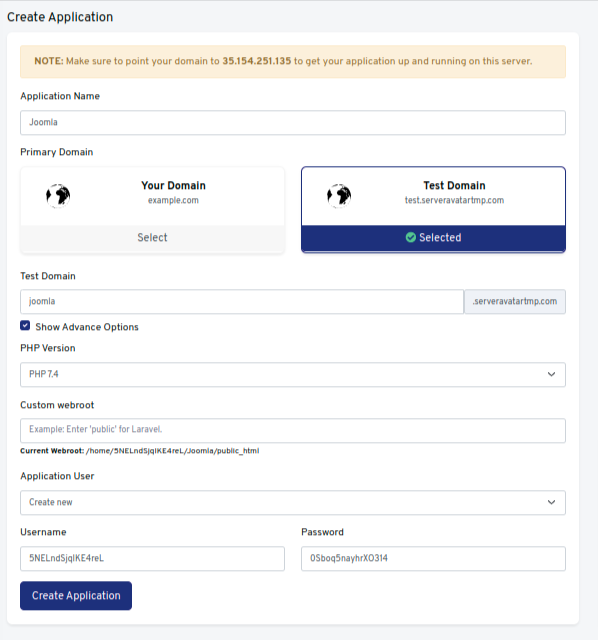
Note that:
If you want to host Joomla CMS on your domain, then make sure to point your domain to the current IP address of your server, and for that:
-
Log in to your hosting provider site, where you buy your domain. You can check your domain information with one click.
-
Access DNS Manager to edit your DNS records(contact the support team if you don’t find them)
-
Change the IP address of A Record of your website to the current server’s IP address.
Click the Create Application button.
Step 2: Create a Joomla database
The Joomla installation process takes database credentials. So to create a MySQL database for Joomla, Click on the Databases tab on the server panel.
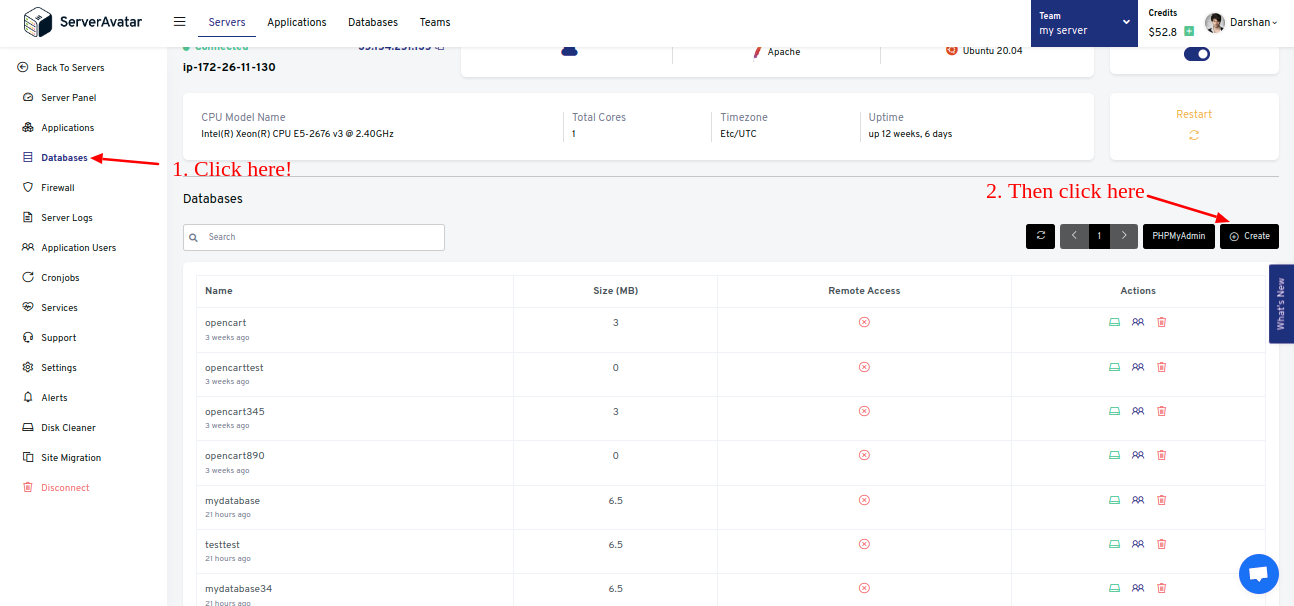
Enter the details such as Database Name, Username, and Password in the database creation form like the image below.
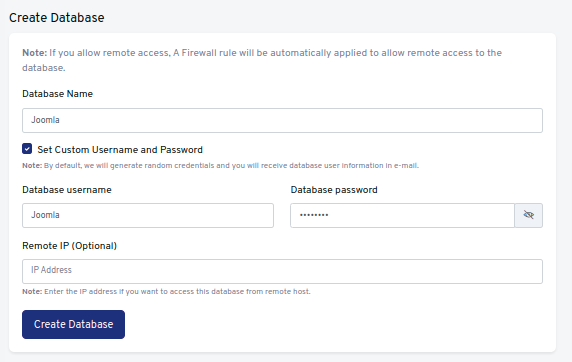
Click the Create Database button.
Step 3: Auto-install the Joomla application
To install Joomla on a Fresh PHP application, go to your application panel and access the** Auto Deploy** tab from the sidebar.
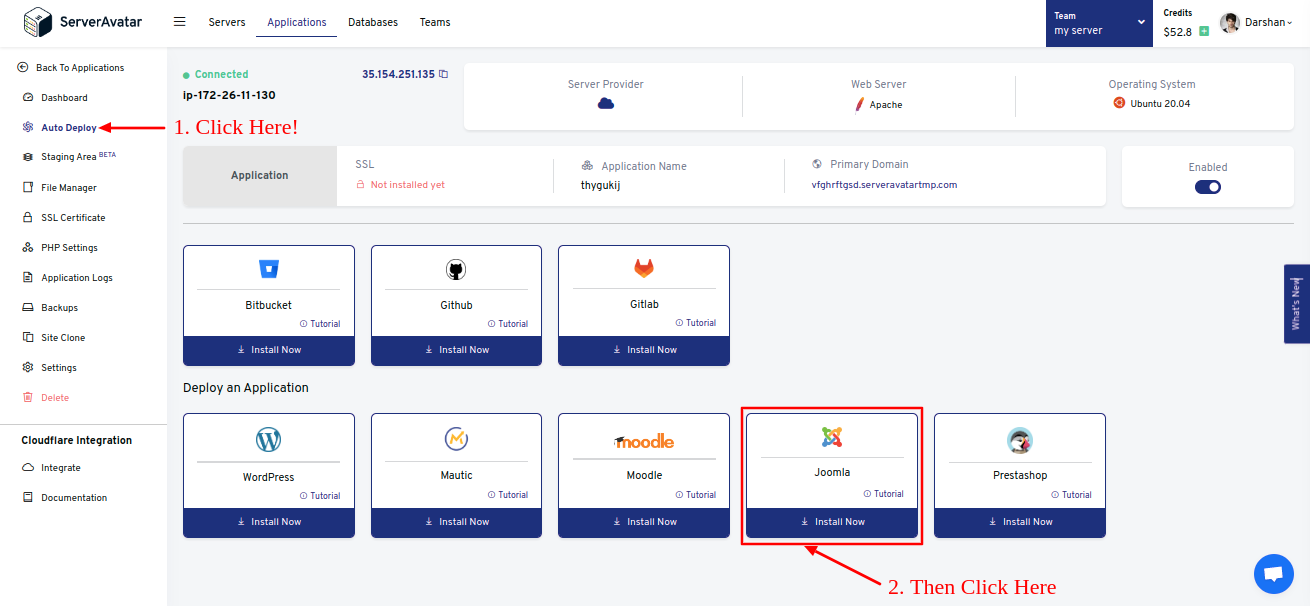
Click the Joomla Auto Install card on the screen, as shown in the above image.
Select the supported PHP version in the given field and click the Install Now button.
Step 4: Install and Setup Joomla
Now access the site URL from the Application panel to install and set up Joomla CMS.
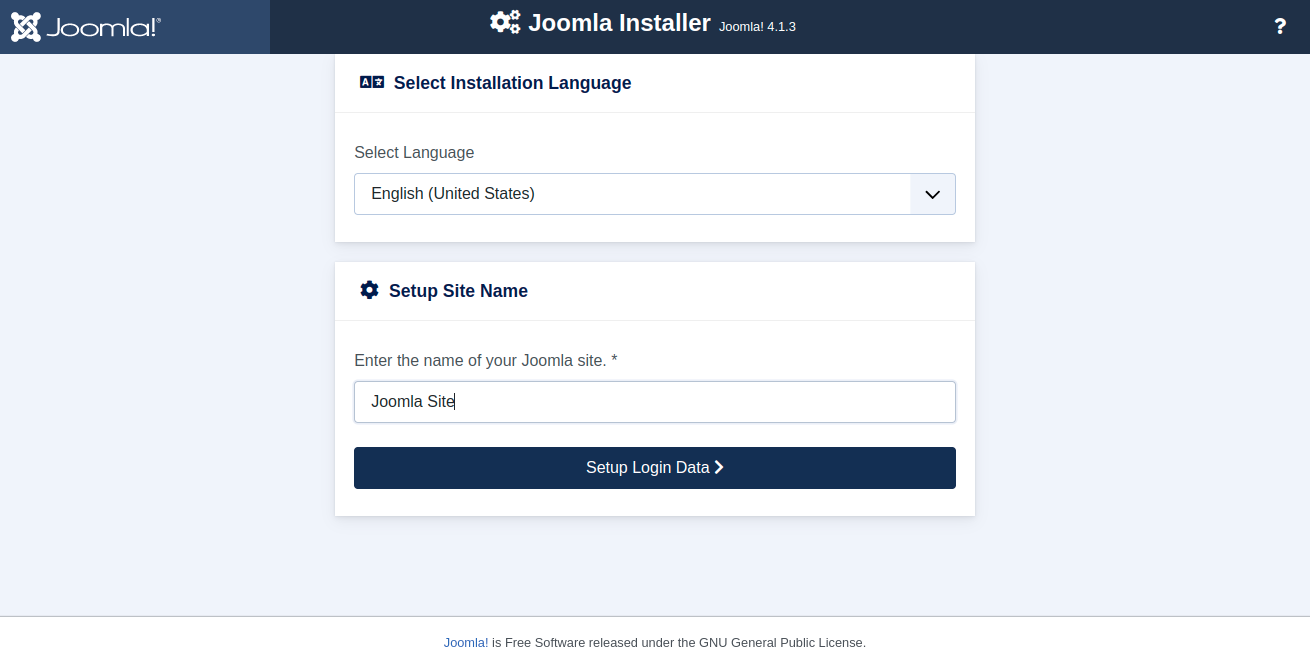
Joomla Installer
Select a language and Enter your Joomla site name.
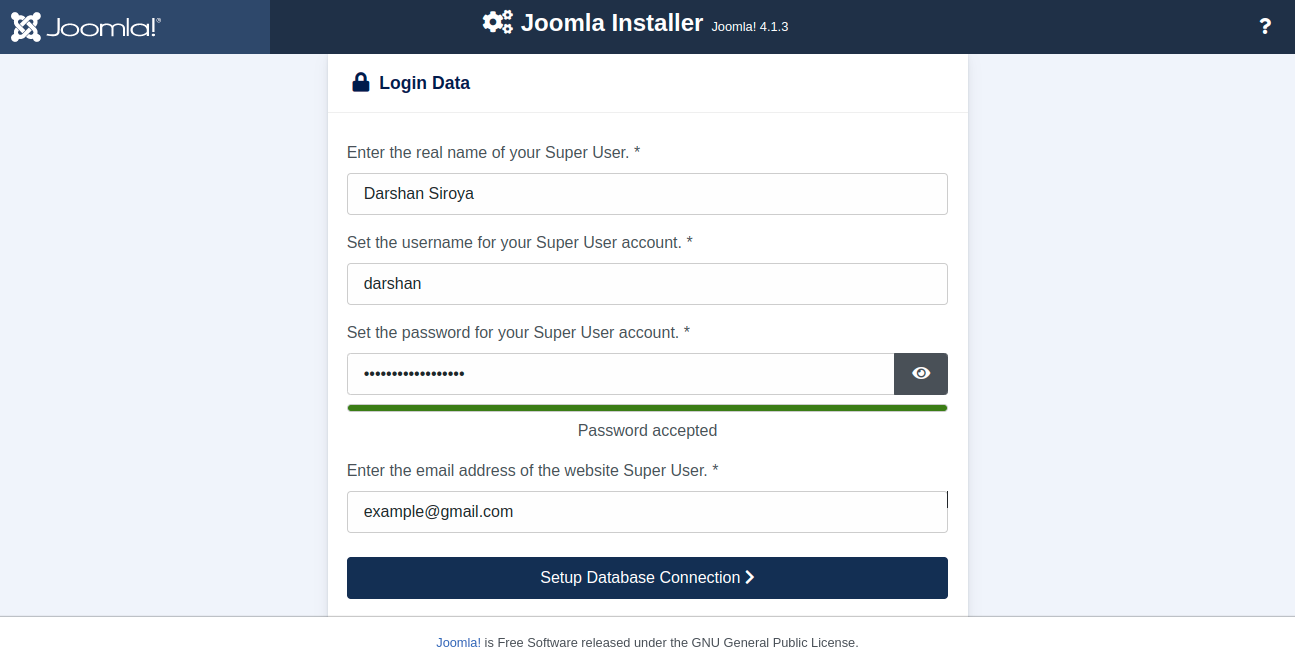
Admin Login data
Enter the administrator credentials in the Login Data field like the below image.
Database Configuration
Enter the database credential that we have created above in step 2. Database details include-
- Database Type: Type MySQLi as it supports both procedural and object-oriented interfaces.
- Host Name: leave this field as it is if you host your database on the same server as the application.
- Database Username: Enter your created database username in step 2.
- Database Password: Enter Your database password.
- Database Name: Enter the name of your database.
- Database table Prefix: Set the Joomla database table prefix as your choice.
- Connection Encryption: Set it by default.
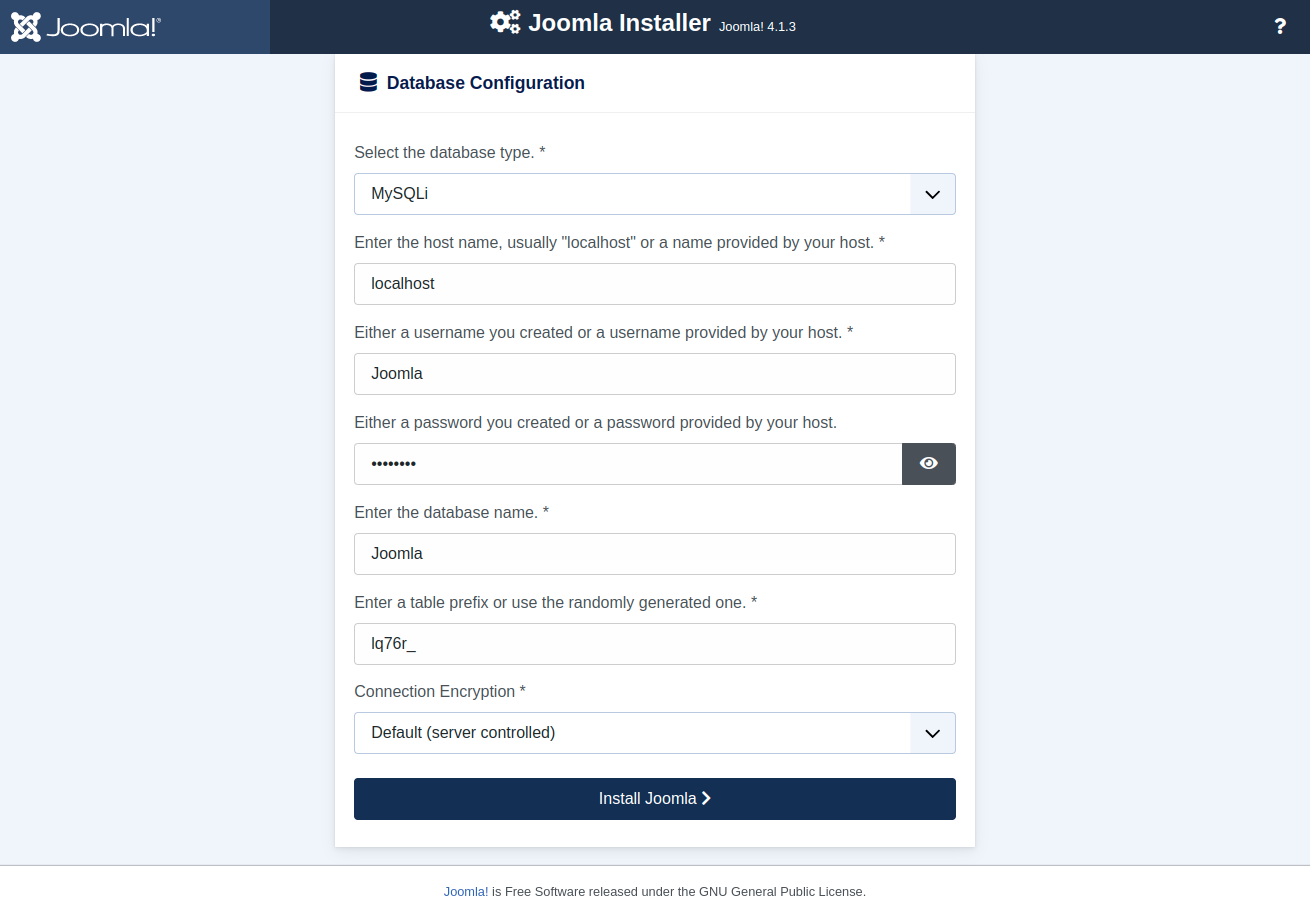
Click the Install Joomla button.
Delete the Installation folder
After successfully installing Joomla, deleting the Install directory is required.
To do this, access the File Manager tab from the application panel and go to the public_html directory.
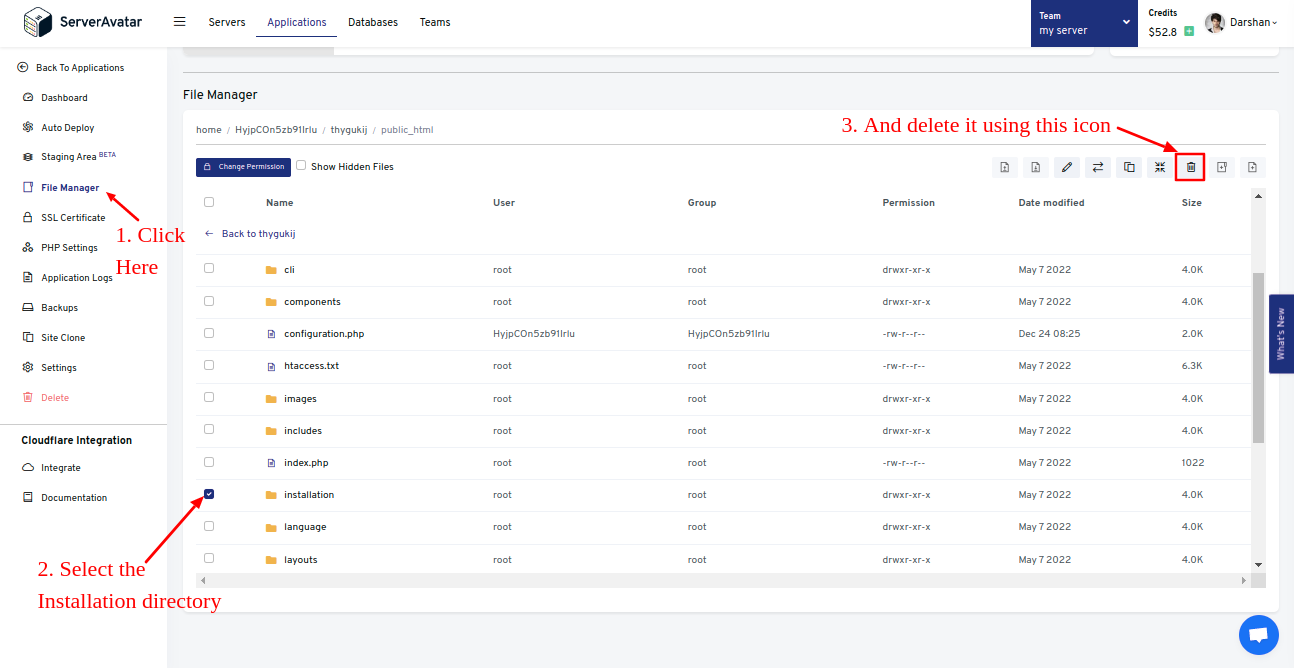
Now Delete the Installation directory like the above image.
Access Joomla admin login
The next screen allows you to access your site and the admin login page.
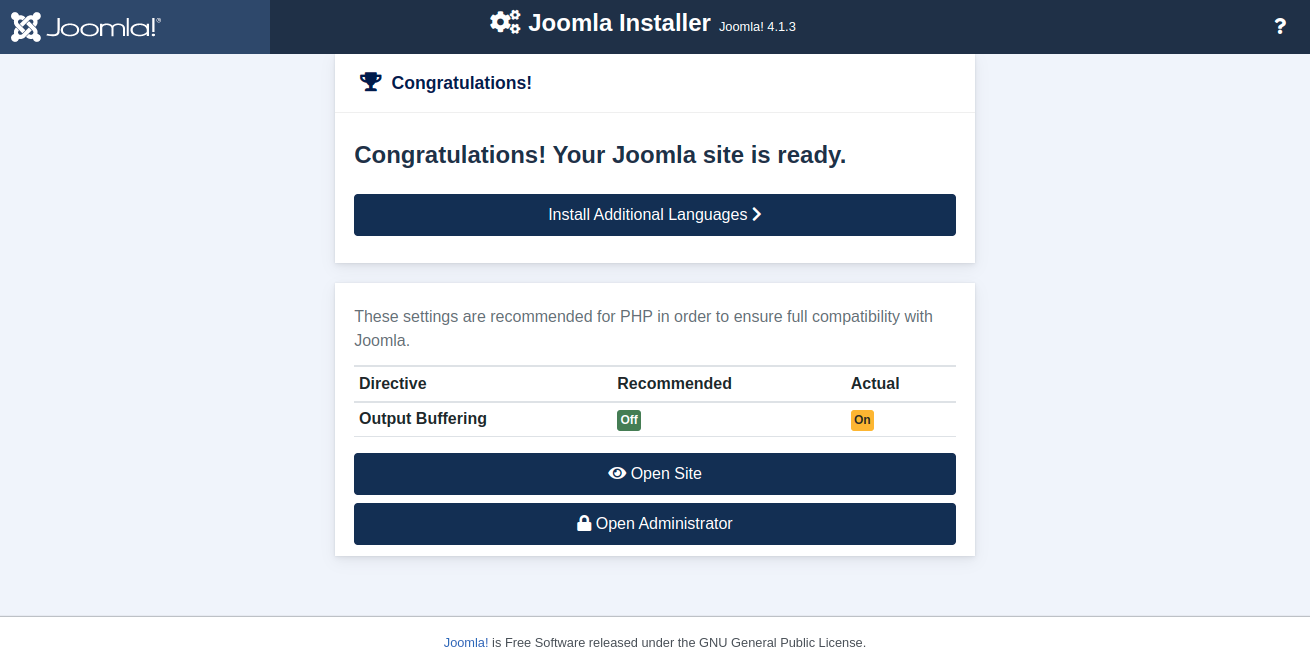
Click the Open Administrator to access the Joomla admin panel using admin credentials.
That’s it. You can now create a blog, e-commerce, and membership sites with an easy-to-use interface.