Laravel is a popular open-source PHP framework designed to enhance the development process by providing a robust set of tools and features. It offers comprehensive solutions for routing, authentication, and data management, allowing developers to create customized applications efficiently. Laravel simplifies building applications with its syntax and modular structure. When it comes to hosting Laravel, Contabo is preferred due to its scalable infrastructure and seamless deployment options. ServerAvatar makes the deployment of the Laravel Application on the Contabo platform an easy step-by-step process.
Create VM Instance in Contabo
What Is Contabo?
Contabo is a web hosting company that provides a variety of internet hosting services. Founded in Germany in 2003, Contabo offers services such as:
- VPS Hosting: Virtual Private Servers with scalable resources for various needs, from small projects to larger applications.
- Dedicated Servers: Physical servers dedicated to a single user, offering high performance and control.
- Web Hosting: Shared hosting solutions for websites, which include storage, bandwidth, and various management tools.
- Object Storage: Scalable storage solutions for managing large amounts of data.
- Domain Registration: Services for registering and managing domain names.
Contabo is known for its competitive pricing, high-performance hardware, and customer service, making it a popular choice for both individual users and businesses looking for reliable hosting solutions.
To set up a server in Contabo, begin by logging into your Contabo account. Once logged in, proceed with the following steps.
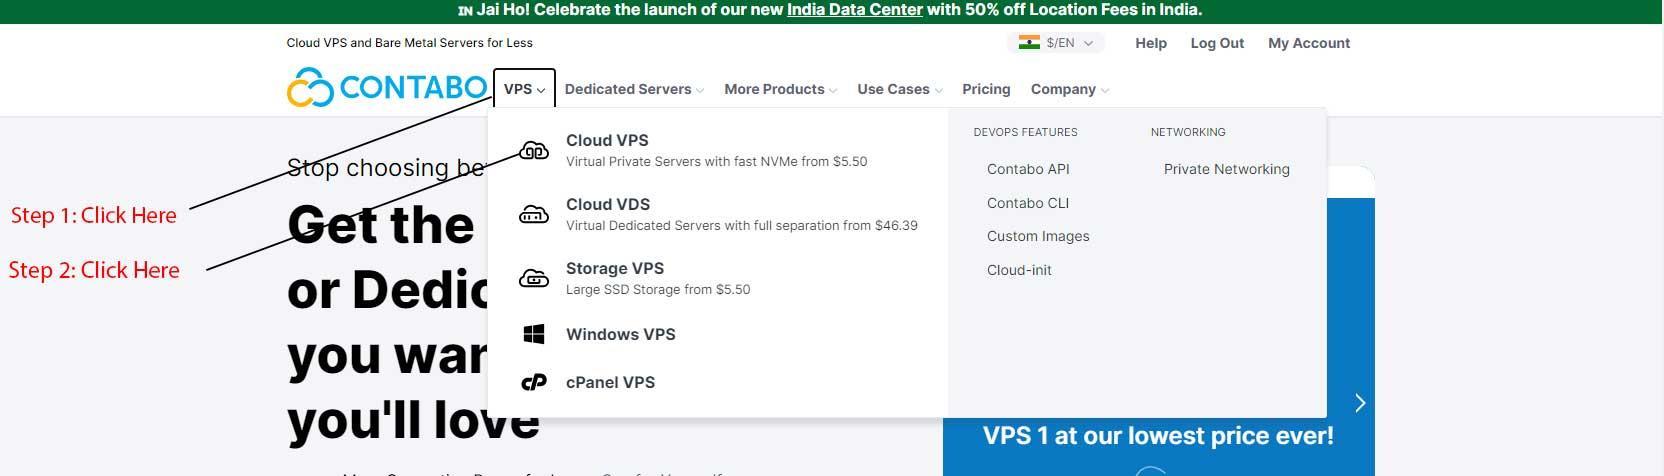
Step 1: Create an account on Contabo
Login to your Contabo account, select "VPS" from the dropdown menu, and then click on "Cloud VPS".
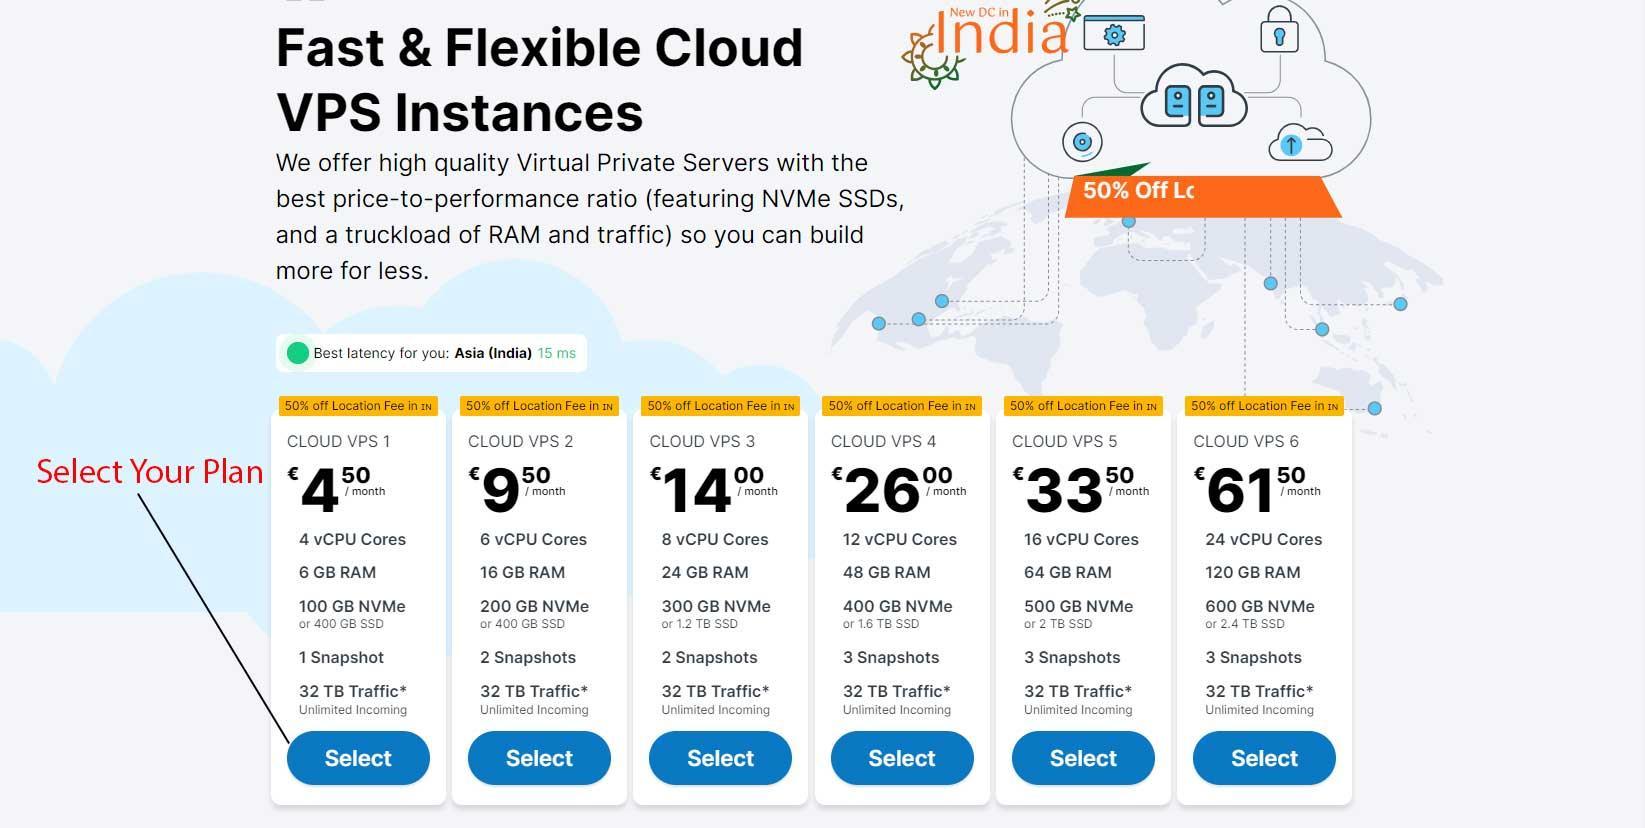
Step 2: Select your Cloud VPS plan
Contabo offers a variety of Cloud VPS options when it comes to plans and pricing. 1GB of RAM should be sufficient for a simple application or development environment and a minimum of 1GB to 5GB of disk storage covers the Laravel application itself, basic logs, and minimal database usage.
Here, you should select the plan that best meets your requirements as shown in the below image.
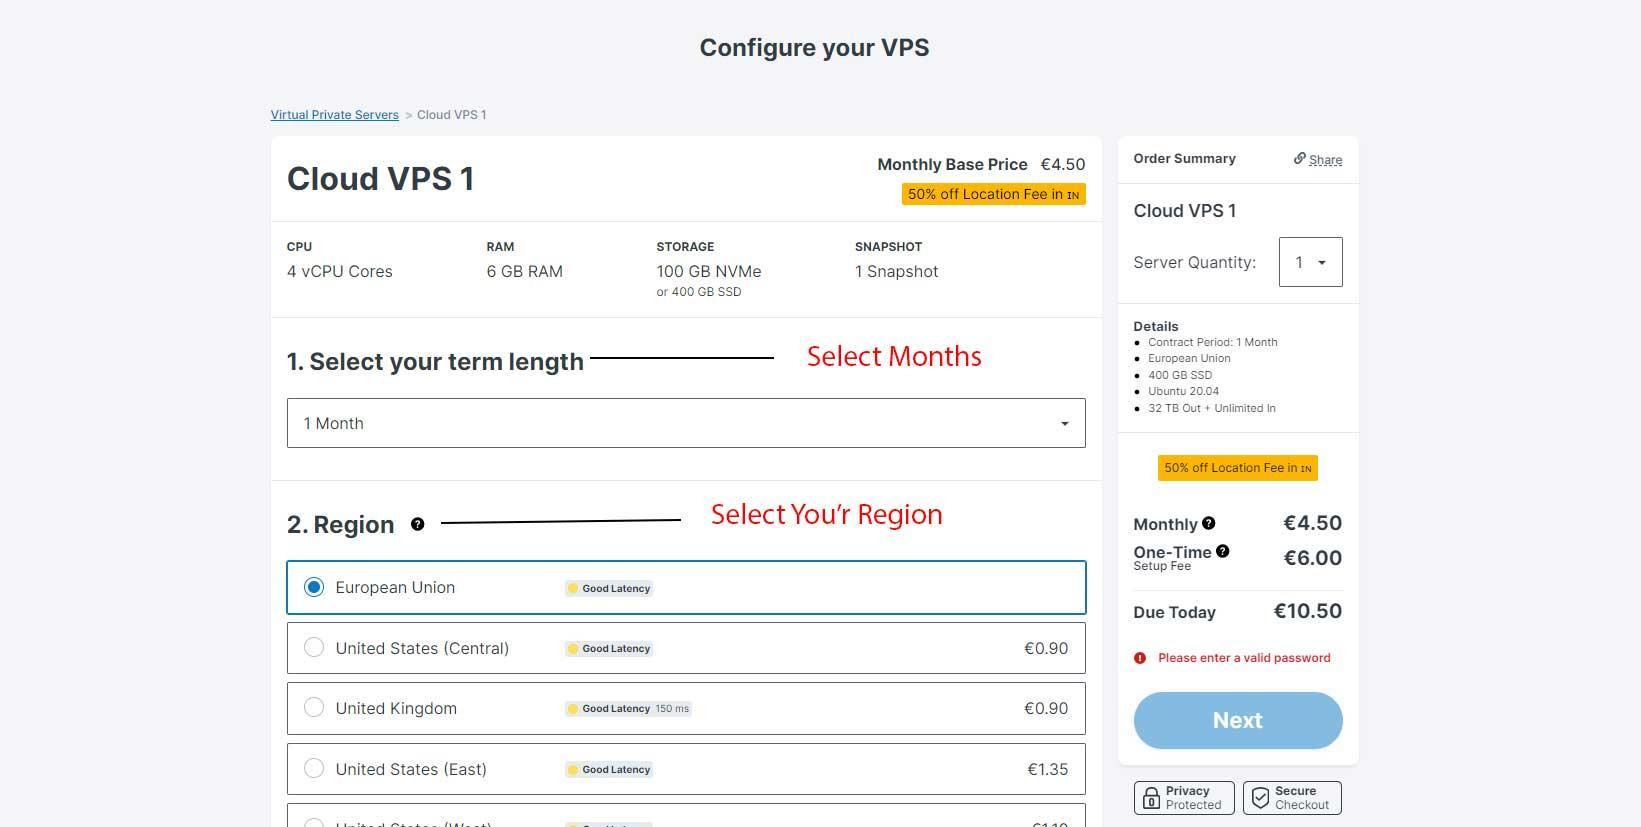
Step 3: Select Region
- First, you need to select the term length (in months) according to your requirements.
- Next, you will need to select the location for your VPS. Contabo offers multiple options for selecting the location.
- It's recommended to select the region closest to your audience. This ensures that your sites load faster for the majority of your audience due to reduced latency.
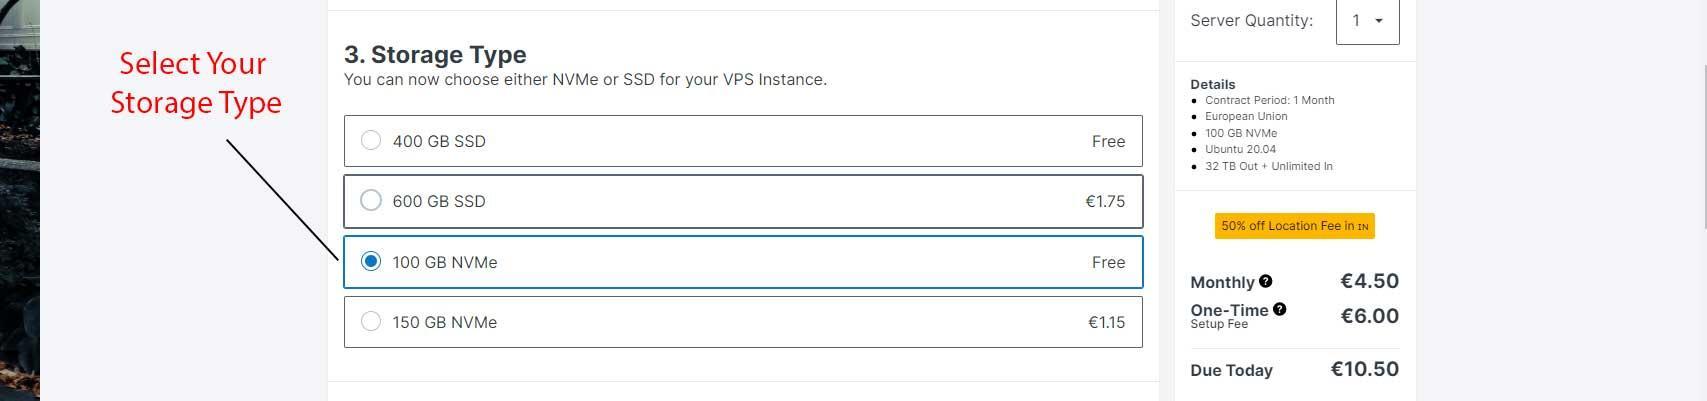
Step 4: Select your Storage Type
Contabo provides different types of storage space, including both complimentary and paid options. Here, you should select the storage type based on your specific requirements. As shown in the image below.
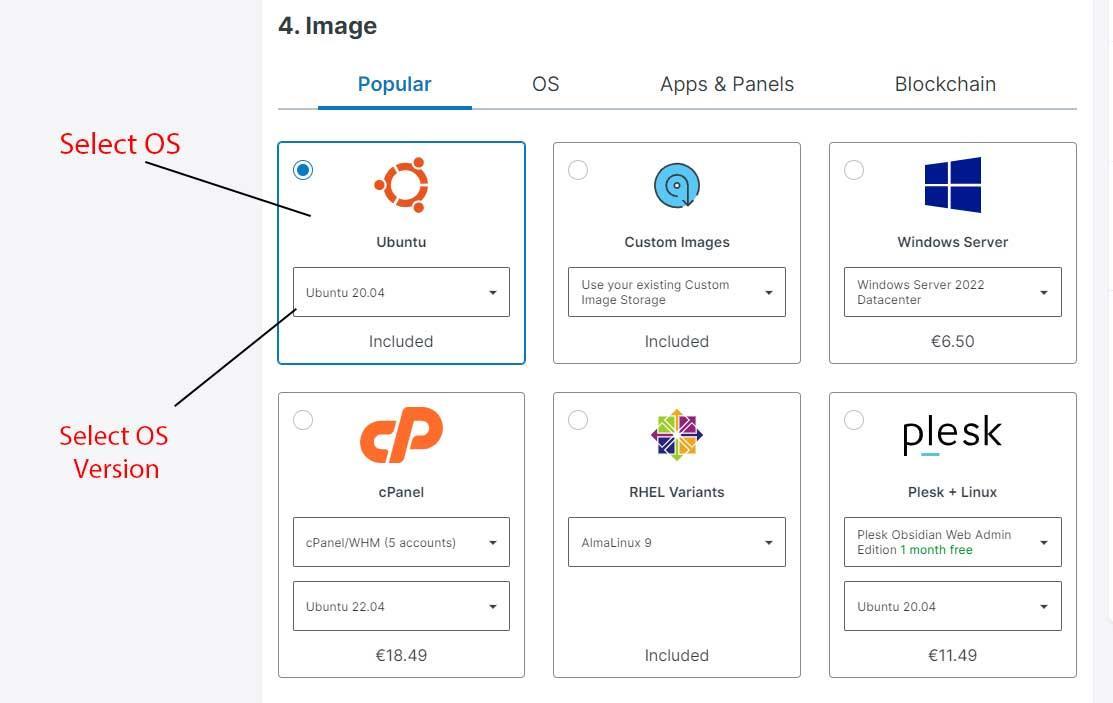
Step 5: Select an Image or an OS
In this step, you need to select the Operating System for your cloud VPS. We recommend using Ubuntu 20.04 LTS x64 or Ubuntu 22.04 LTS x64. Ubuntu is known for its ease of configuration and management. If you are using ServerAvatar to manage your cloud VPS, these operating systems are recommended.
Step 6: Setting a Password
Here, it's recommended to create a strong password for your root user, as it holds all privileges on the Linux OS.

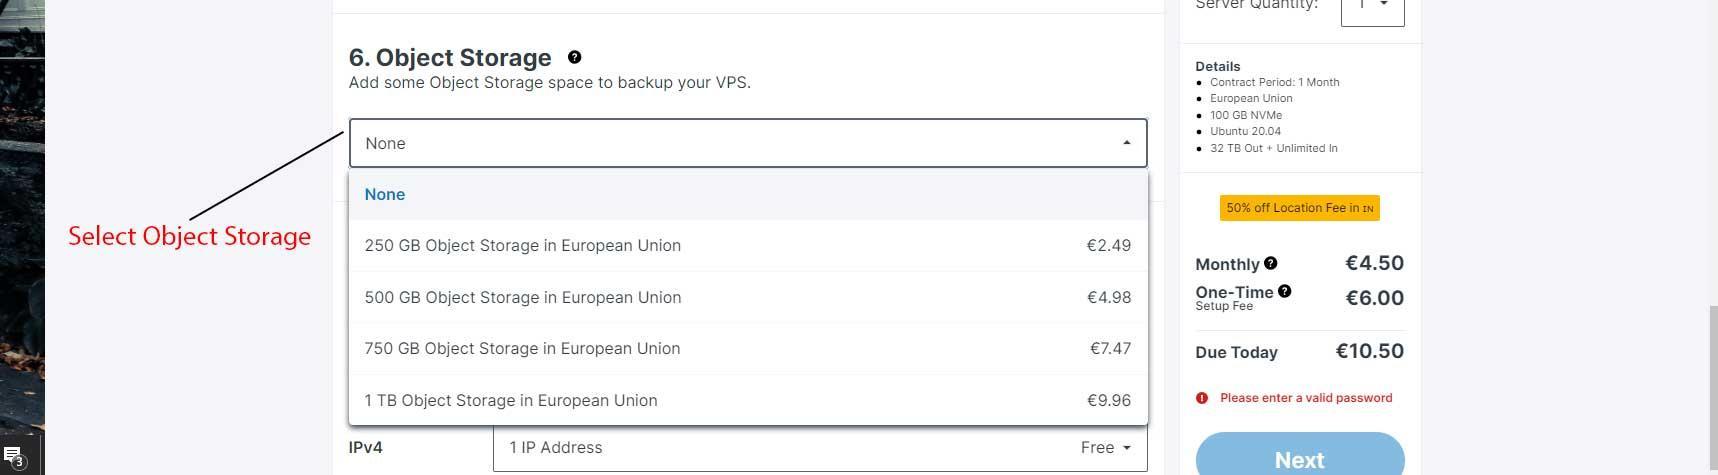
Step 7: Select Object Storage
Now, you need to select object storage space for backing up your VPS. You will find several options ranging from 250 GB to 1 TB. If you do not require object storage you can select the None option from the dropdown.
Step 8: Select Network
- In the Network section, you will find three options, You should select these according to your specific requirements:
- Private Network
- Bandwidth
- IPv4

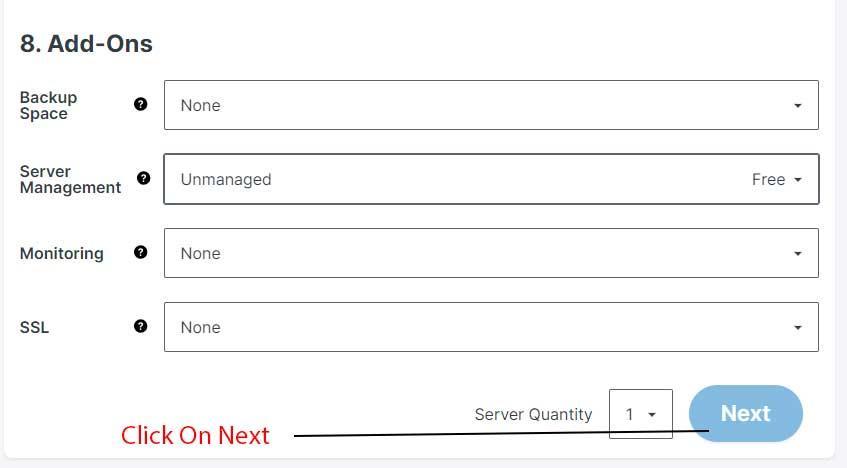
Step 9: Selecting Additional Options
- Backup Space: This option allows you to add additional storage space dedicated specifically for backups of your VPS data.
- Server Management: Contabo offers server management services where they handle the day-to-day operations of your VPS.
- Monitoring: This option provides monitoring services for your VPS. It includes monitoring server uptime, resource usage (CPU, RAM, disk), and network connectivity.
- SSL: SSL (Secure Sockets Layer) certificates are crucial for securing communication between your website and its visitors.
After completing all the necessary steps, click on the "Next" button to proceed to the payment method where you can finalize your details.
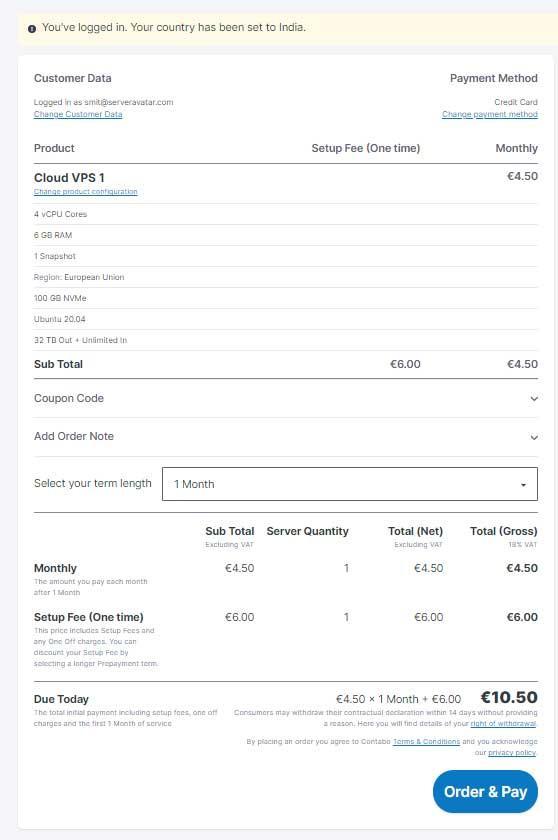
Step 10: Finalize Details
In this step, you can review all your selections for your Cloud VPS, finalize your details, and proceed with the payment. In a few minutes, your Cloud VPS will be ready. Now, we need to perform the initial configuration to host PHP-based frameworks and software.
Initial Server Configuration
The Initial server configuration includes the installation and configuration of various packages required to host your website. Usually, You have to write commands and modify configuration files. Luckily, With ServerAvatar, Your full server configuration and optimization can be automated.
Here are the three ways to automatically configure your server with ServerAvatar.
Connect a server using a direct method
- Login/Register to ServerAvatar account, click the Create button from the right side of the screen, and select Server from the dropdown.
- Select Direct Method in the serve connecting method section.
- Type the Server Name as per your choice.
- Select a Tech Stack as per your need. You can either select Apache, Nginx, OpenLiteSpeed or Node Stack.
- Select a Database: MySQL, MariaDB or MongoDB.
- Enable the toggle if you want to install the latest LTS version of node.js on your server.
- Select a Management plan and click the Connect Now button.
- You’ll see the command on your screen. Login to your server using an ssh connection and execute that command as a root user.
- The server connection process will be started on your ServerAvatar account after executing the command.
Connect a server using integration
- Login/Register to your ServerAvatar account, navigate to the Integration tab from the sidebar of the panel, and access Cloud Platform from the dropdown.
- Now Select a cloud platform you want to link with ServerAvatar.
- The popup form will appear on your screen. Enter details to link your cloud provider account. The integration method is different based on the cloud provider you select.
- You can integrate five different cloud provider platforms with ServerAvatar, which is-
Check the above link of cloud platforms to know more about integrating cloud platforms with ServeAvatar.
Connect a server using commands
Step 1. Login to your server using root user
Once you create a server as per your requirements, connect to your server using an ssh connection and execute the below three commands as a root user in your server console area.
wget https://srvr.so/install
chmod +x install
./install
Step 2. Select a web server
It will ask you which web server you would like to install on your server: Apache, Nginx, OpenLiteSpeed or Node Stack. Type anyone that you would like to install on your server and hit the enter button.
Step 3. Claim your server
Completing the process will give you a link to claim your server.
Open the link on your browser to access the ServerAvatar server panel.
Install and Setup Laravel on Cloud using ServerAvatar
Getting Started With Laravel:
Laravel is a PHP-based Framework that helps you build your application with elegant syntax and provides a variety of features. Laravel provides an amazing developer experience. There are lots of features and tools that are given by Laravel’s environment so that developers can use them to create something new. Laravel is based on MVC (Model, View, Controller) architecture. Laravel is the best choice for small or large projects and full-stack web applications.
Key Features:
- Open Source: Laravel is open-source, so you have the flexibility to build applications according to your needs.
- Extensible: Laravel offers the capability to enhance your web application through a wide range of features and tools.
- Developer-Friendly: Laravel provides an expressive framework with elegant syntax and a scalable environment, and it speeds up your development while maintaining ease of use.
- Secure: Laravel provides various Authentication processes and middleware to enhance the security of your web application.
Let's begin by creating the application.
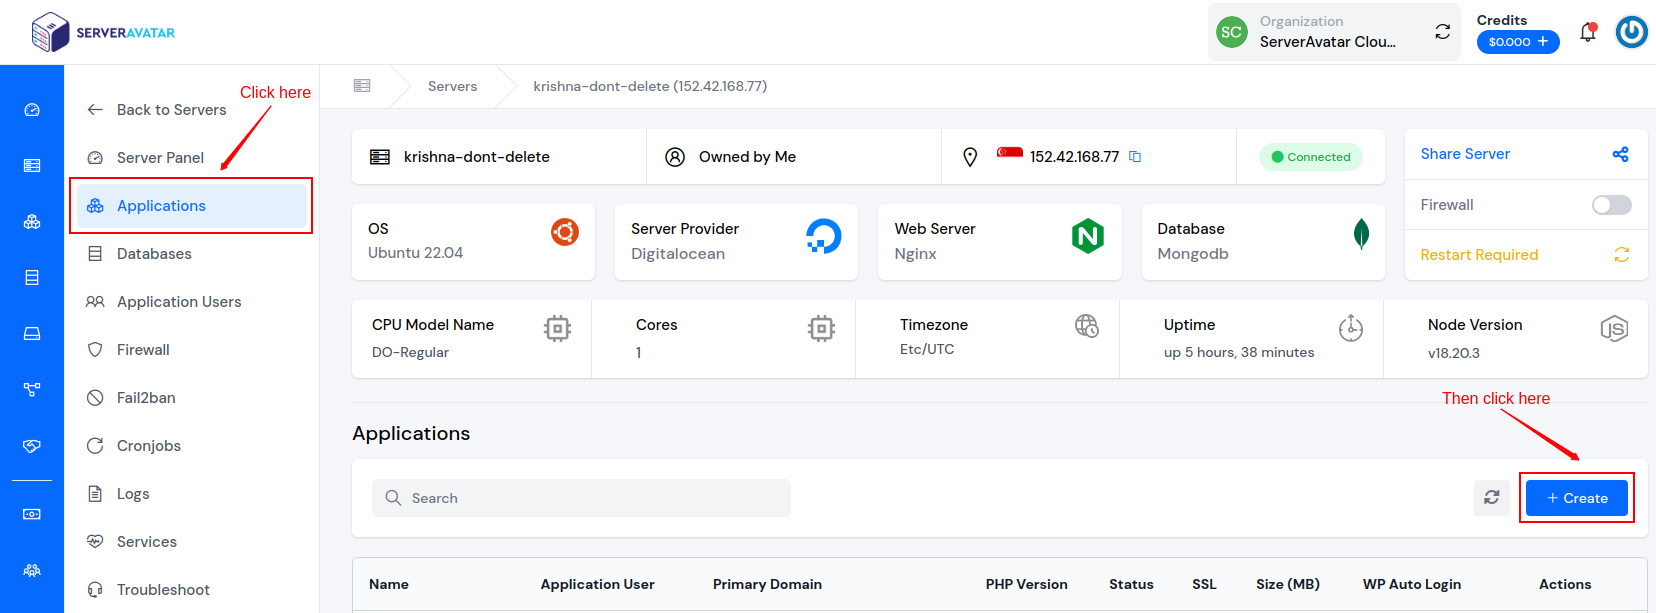
Step 1: Create a GitHub application
Start by creating a GitHub Application using ServerAvatar. Go to the Applications tab on the server panel and click on the Create button as shown in the image below.
On the following screen, fill in the Application details, including:
- Application Name: enter your Application Name.
- Select Domain: Select between a Test Domain or a Primary Domain as per your requirements.
- Enter Domain: Enter your Application Domain.
- Method: Select Git as your application method.
- Service Provider: Select GitHub as service provider for cloning the repository.
- Repository Type: Public
- Clone HTTPS URL: https://github.com/laravel/laravel.git
-
Branch:
master -
Deployment Script:
composer update(to update the composer after cloning)

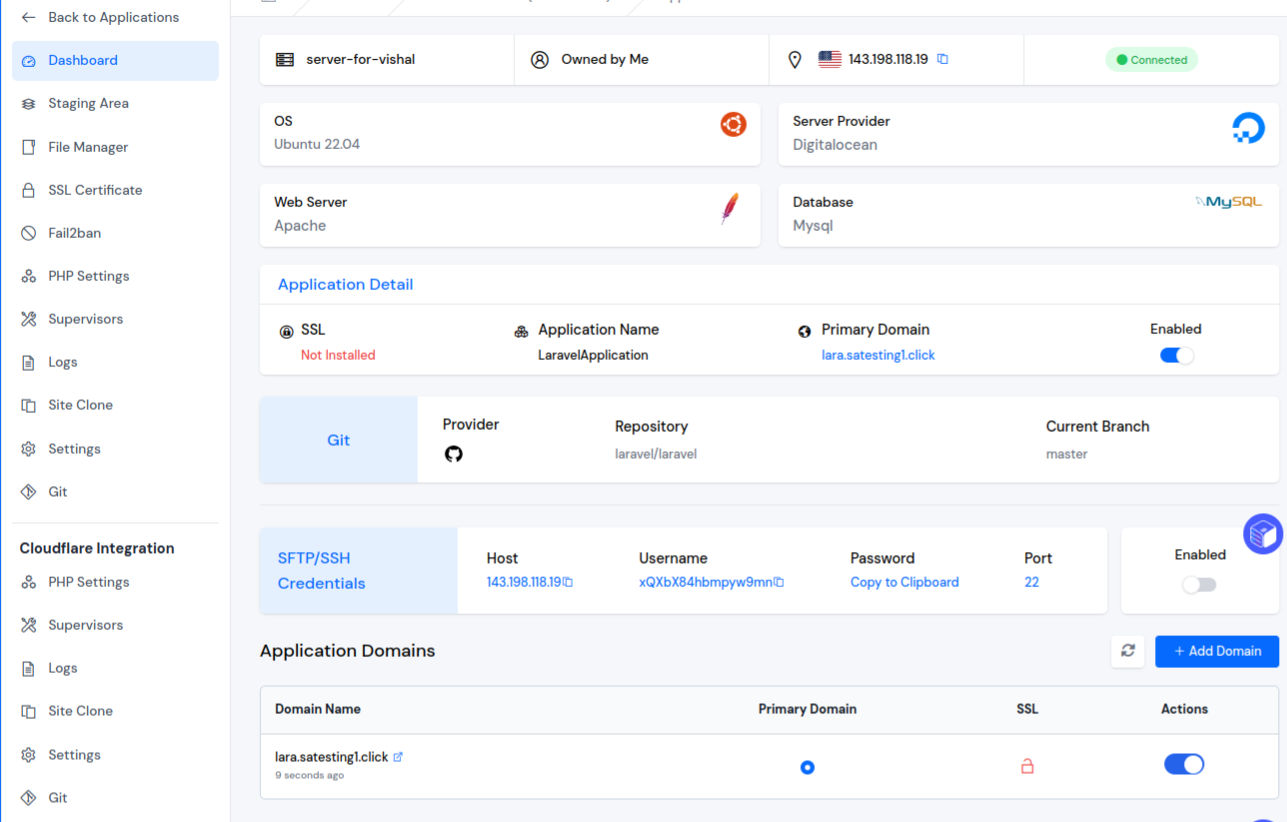
Now, your Application is ready. You can see your Application in the Dashboard.
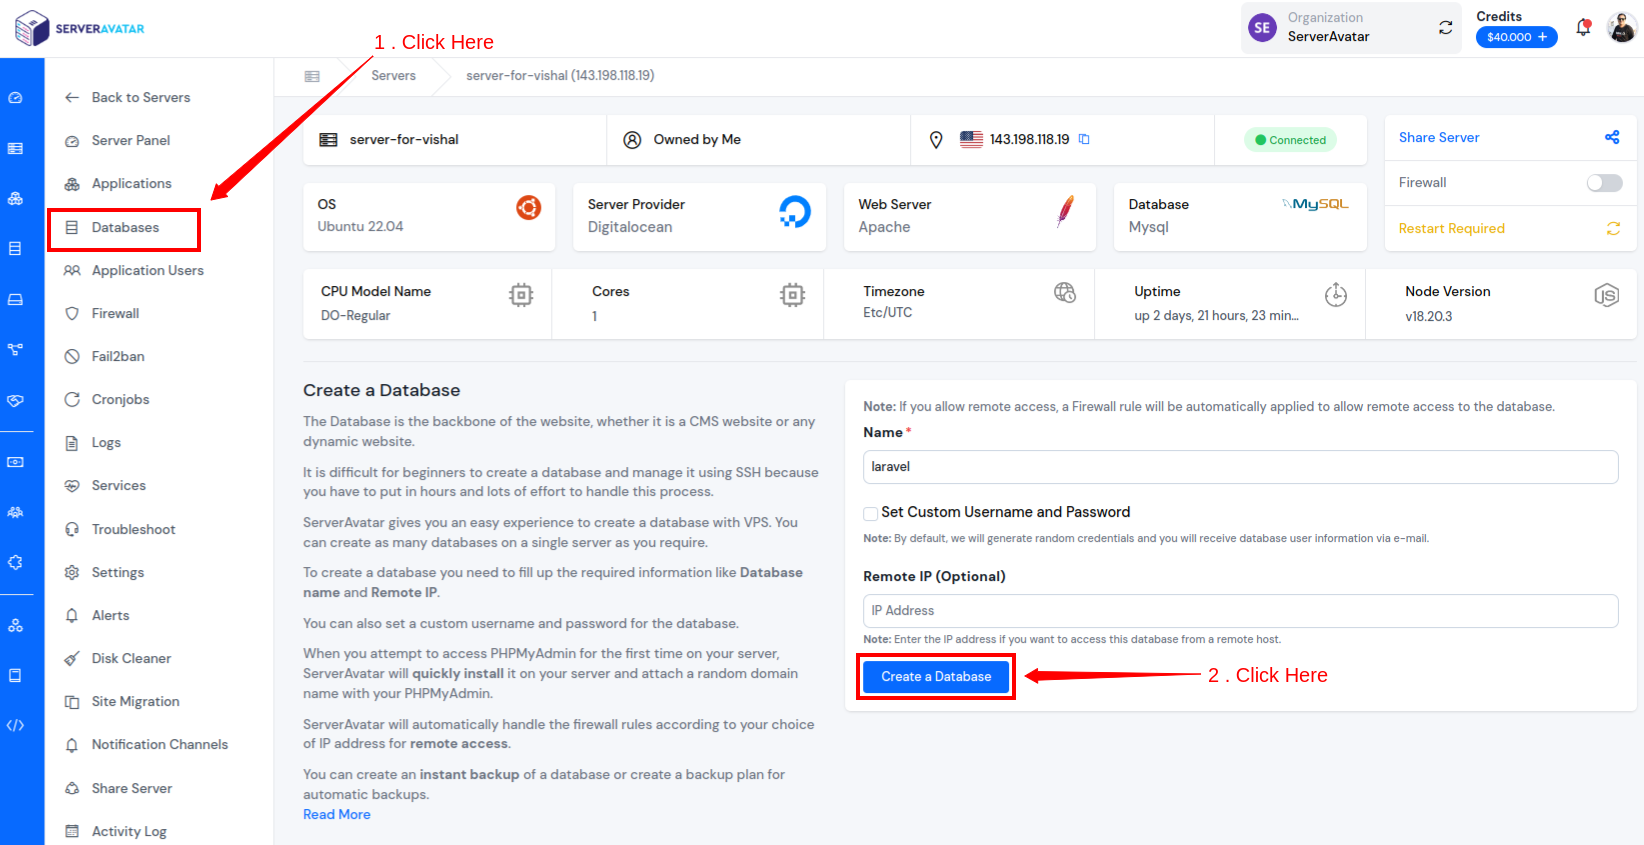
Step 2: Create a Database
To create a Database that stores your confidential data, Go to the Dashboard and click on the Databases option. Enter Your Database name and just hit on the “Create a Database” button as shown in the image below.
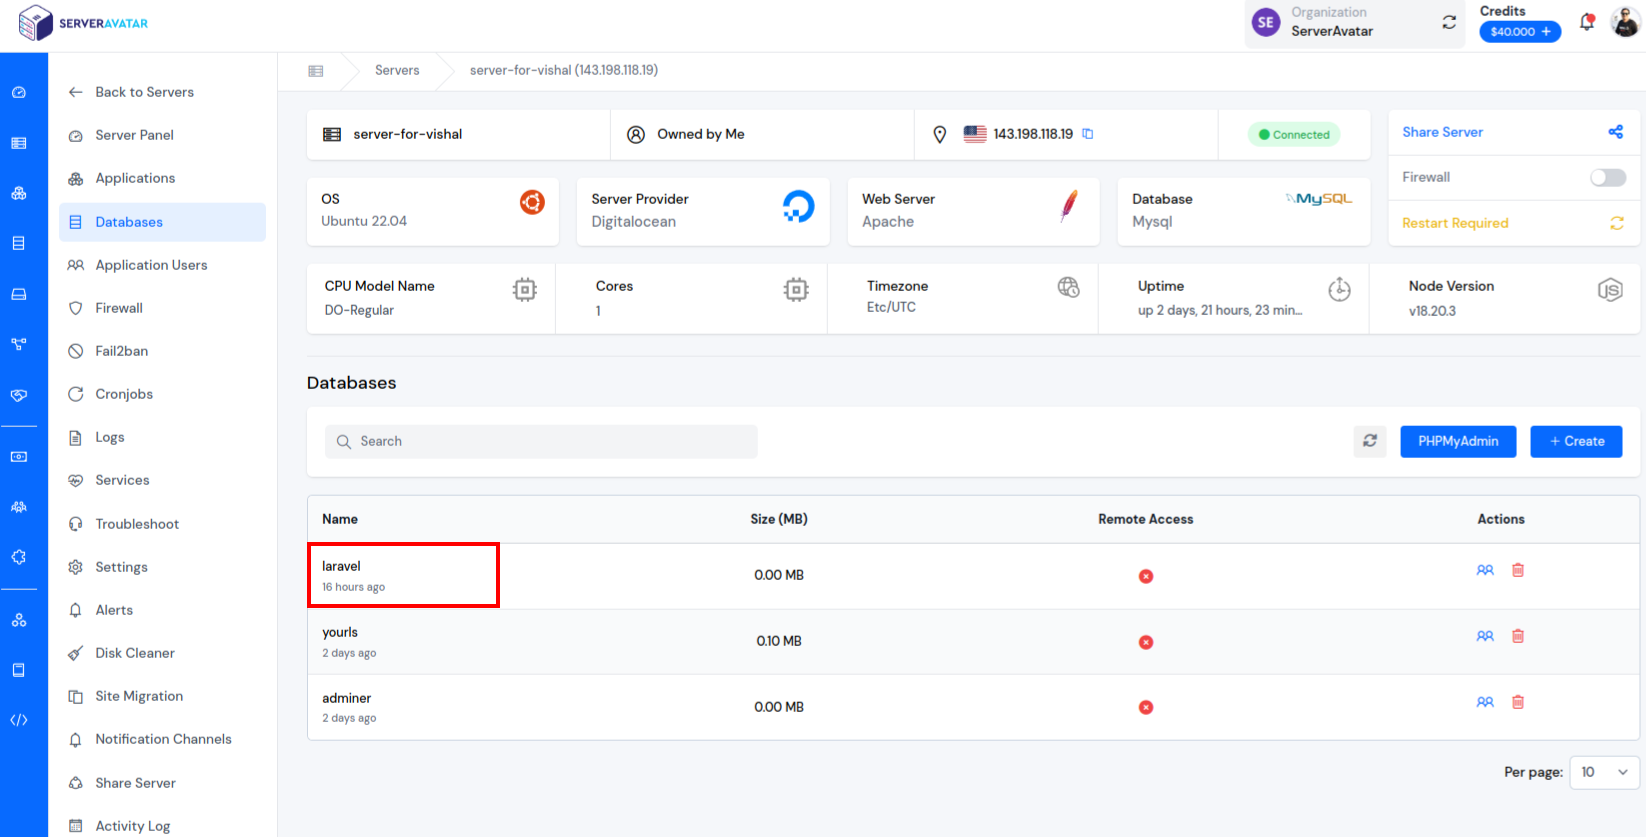
After successfully creating a Database, you can see your Database in the Databases Dashboard.
Step 3: SSH Setup and env Configuration
- First, go to the Application Dashboard and enable SFTP/SSH Credentials as shown in the below image.
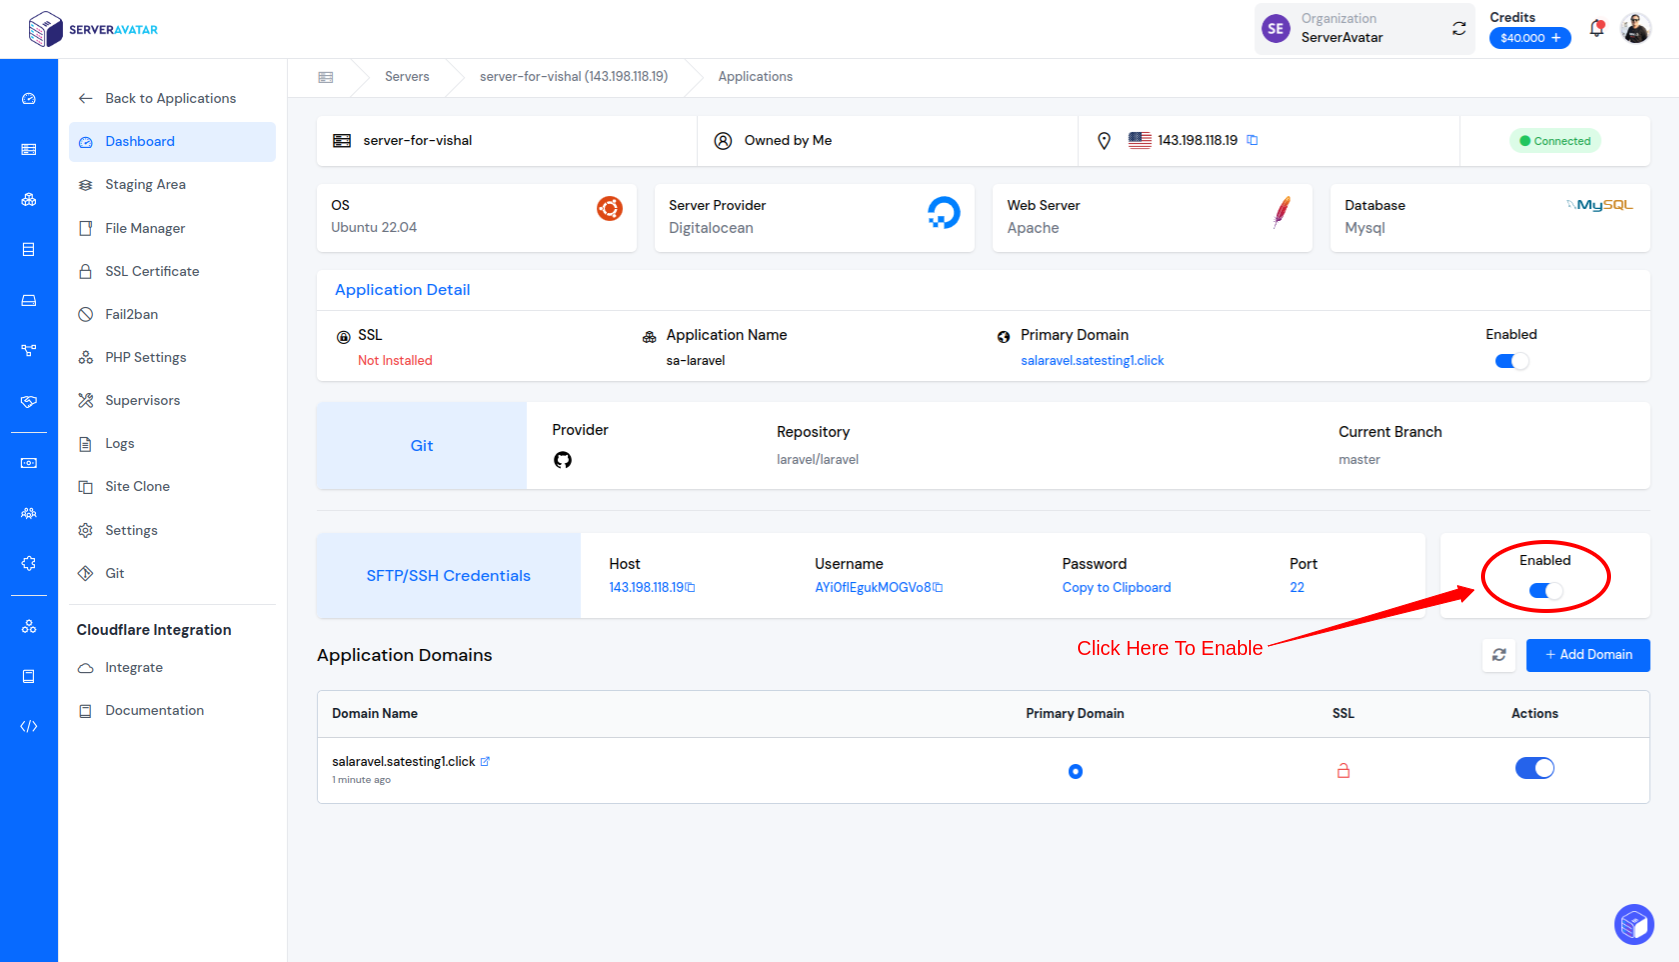
- After, enabling SFTP/SSH, you can log in to your server. Open a terminal and use the following command:
ssh {username}@{ip} - Replace
{username}with your actual Username and{ip}with your server's IP address. You will be prompted to enter your password. After successful authentication, you will have remote access to your server. - Navigate to your Application Path by running the following command:
cd LaravelApplication/public_html/

- Next, you need to copy the .env.example file to the .env file.
-
Command for Copy:
cp .env.example .env

Step 4: Generate App Key
- Next, you need to generate an APP_KEY in your .env file. To generate the key, execute the following command.
-
Command:
php artisan key:generate

Step 5: Configure .env file
- Navigate to the Application Panel access the FIle Manager option and open the public_html folder. Then, click on the Show Hidden Files option.

- Open the .env file by clicking on it.

- As shown in the image below, change the APP_URL from
http://localhosttoyour-application-domainin the .env file. - Edit and update your application's database details.

-
Note: If the details section in your database details starts with "#", please remove the # from the starting of the line, as it is treated as a comment and may prevent it from functioning properly.
-
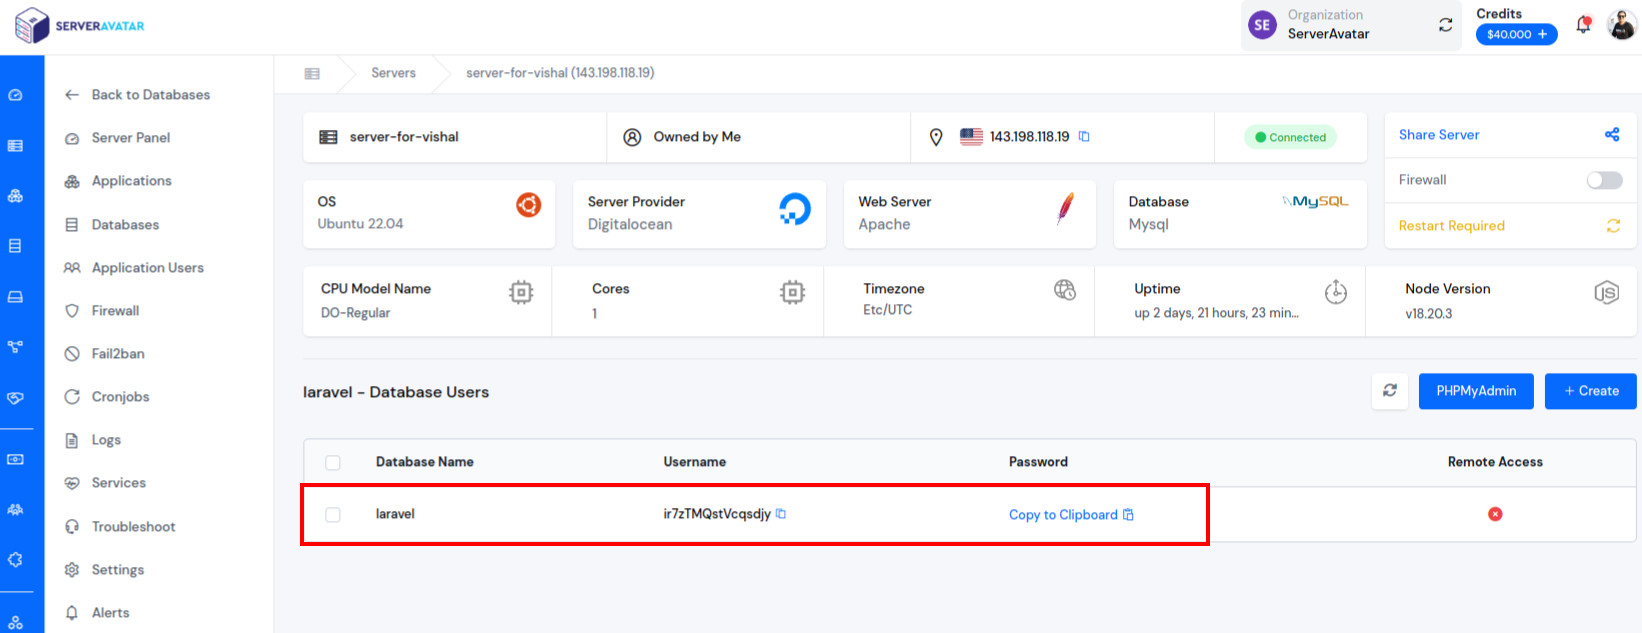
To find your database credentials, navigate to the Databases section in the server panel and click on the manage users icon next to the database you have set up for your application.
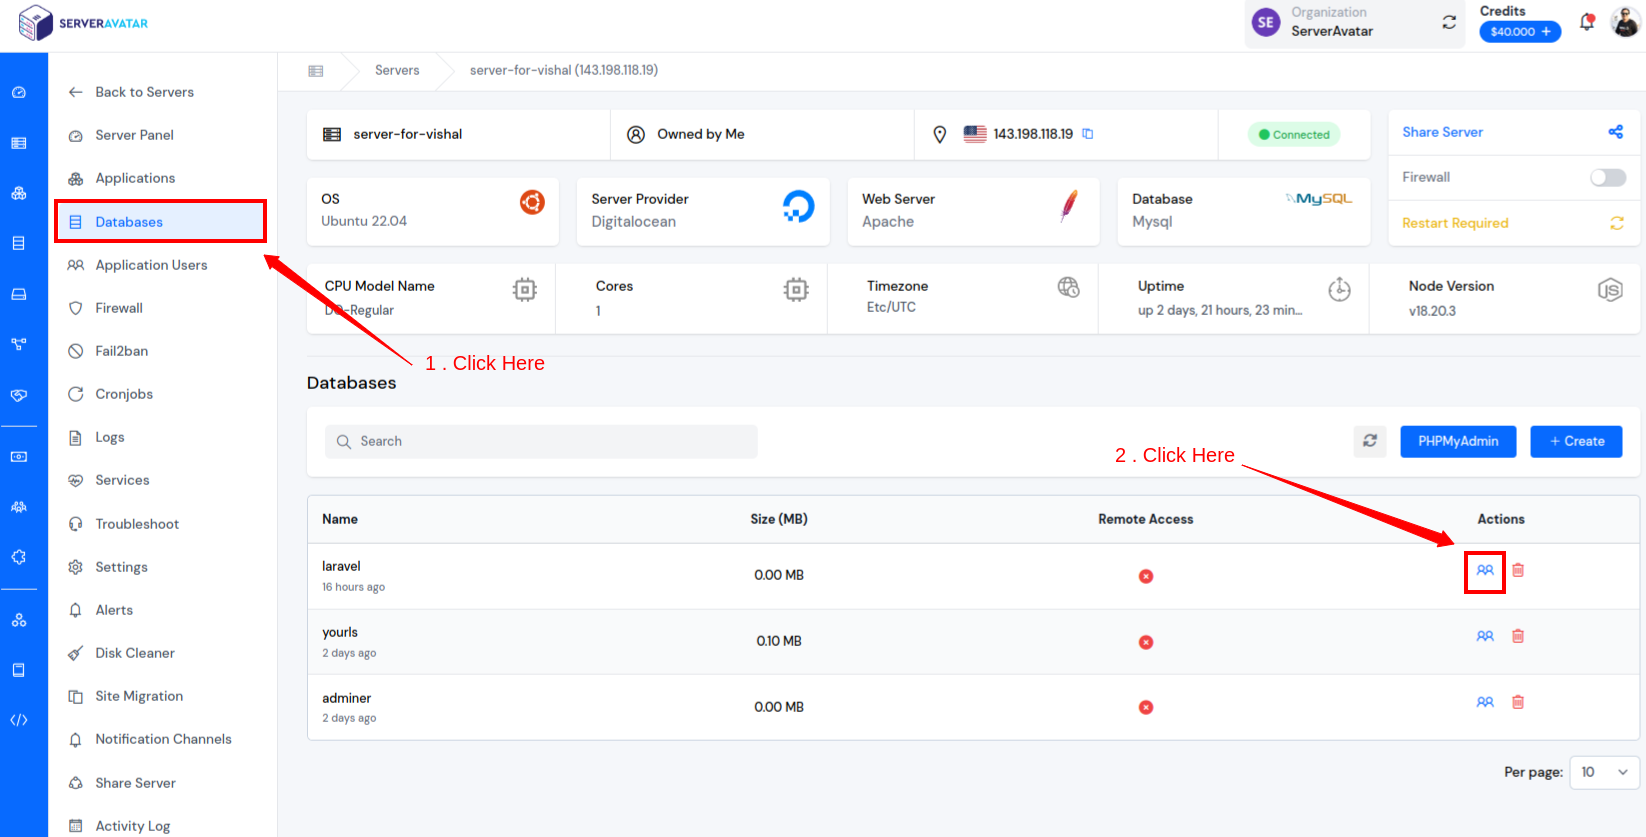
- You can see your Database credentials as shown in the image below.
Step 6: Migrate Database Tables
- Now, you have to migrate your Database tables. Execute the following command.
-
Command:
php artisan migrate

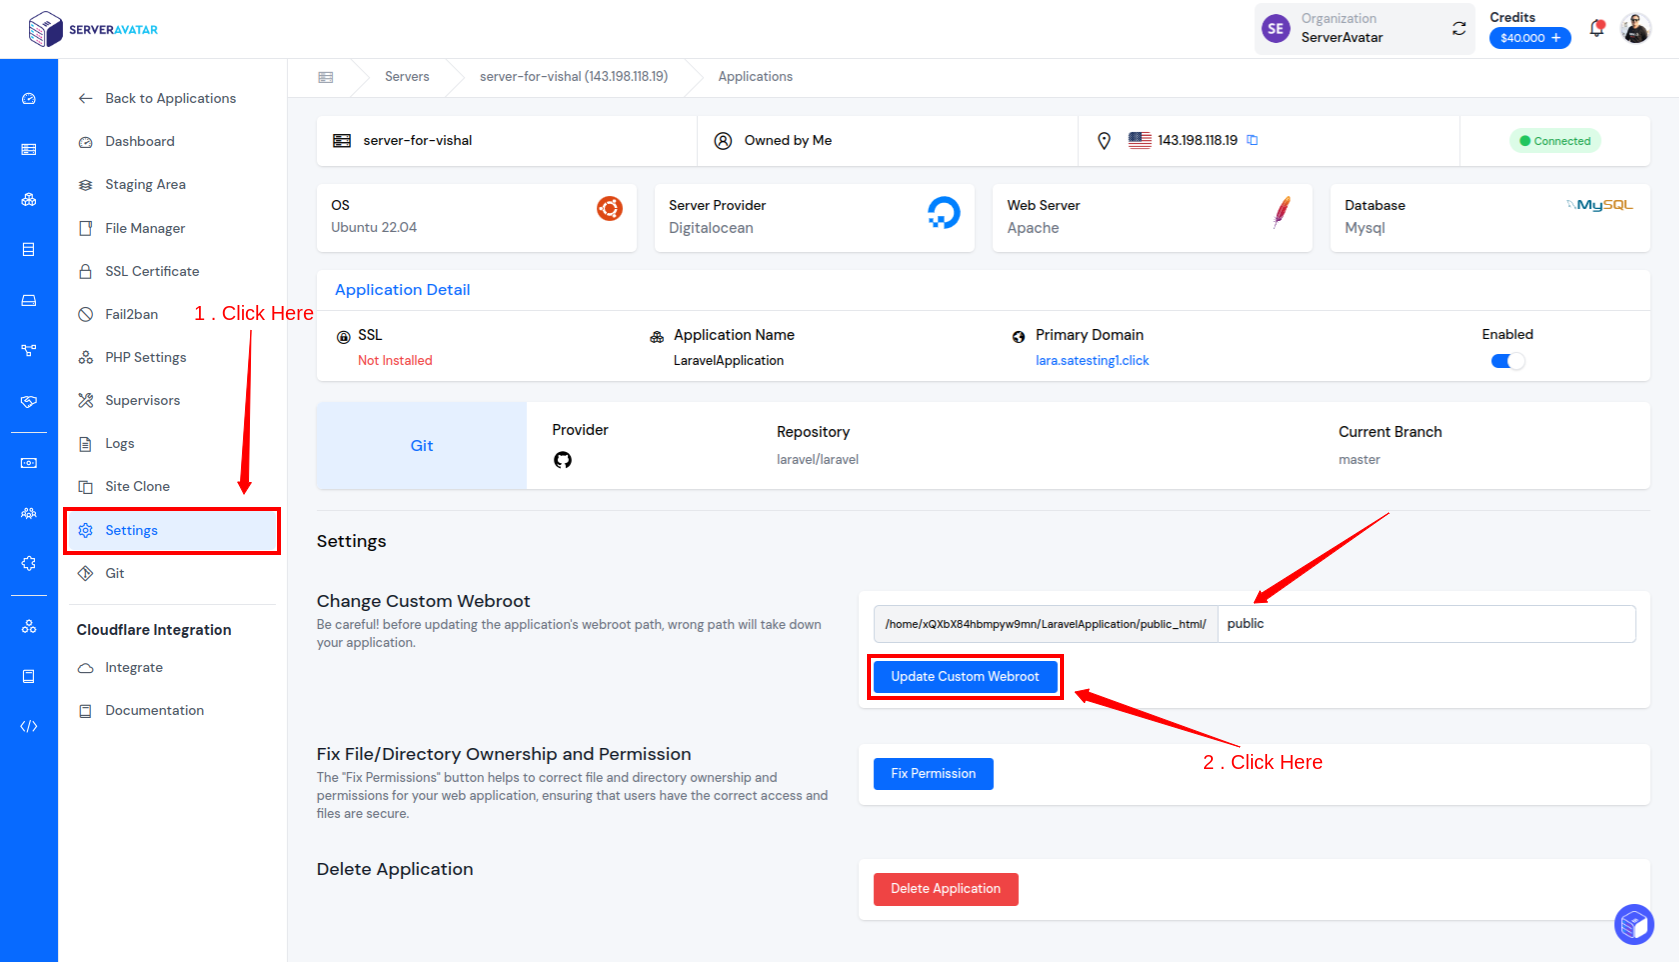
Step 7: Update Custom Webroot
- To run your application on a server, you must set your Custom Webroot to public. To update this setting, navigate to the Settings option in the sidebar of your application.
- Add public in the Custom Webroot Section and click on Update Custom Webroot as shown in the below image.
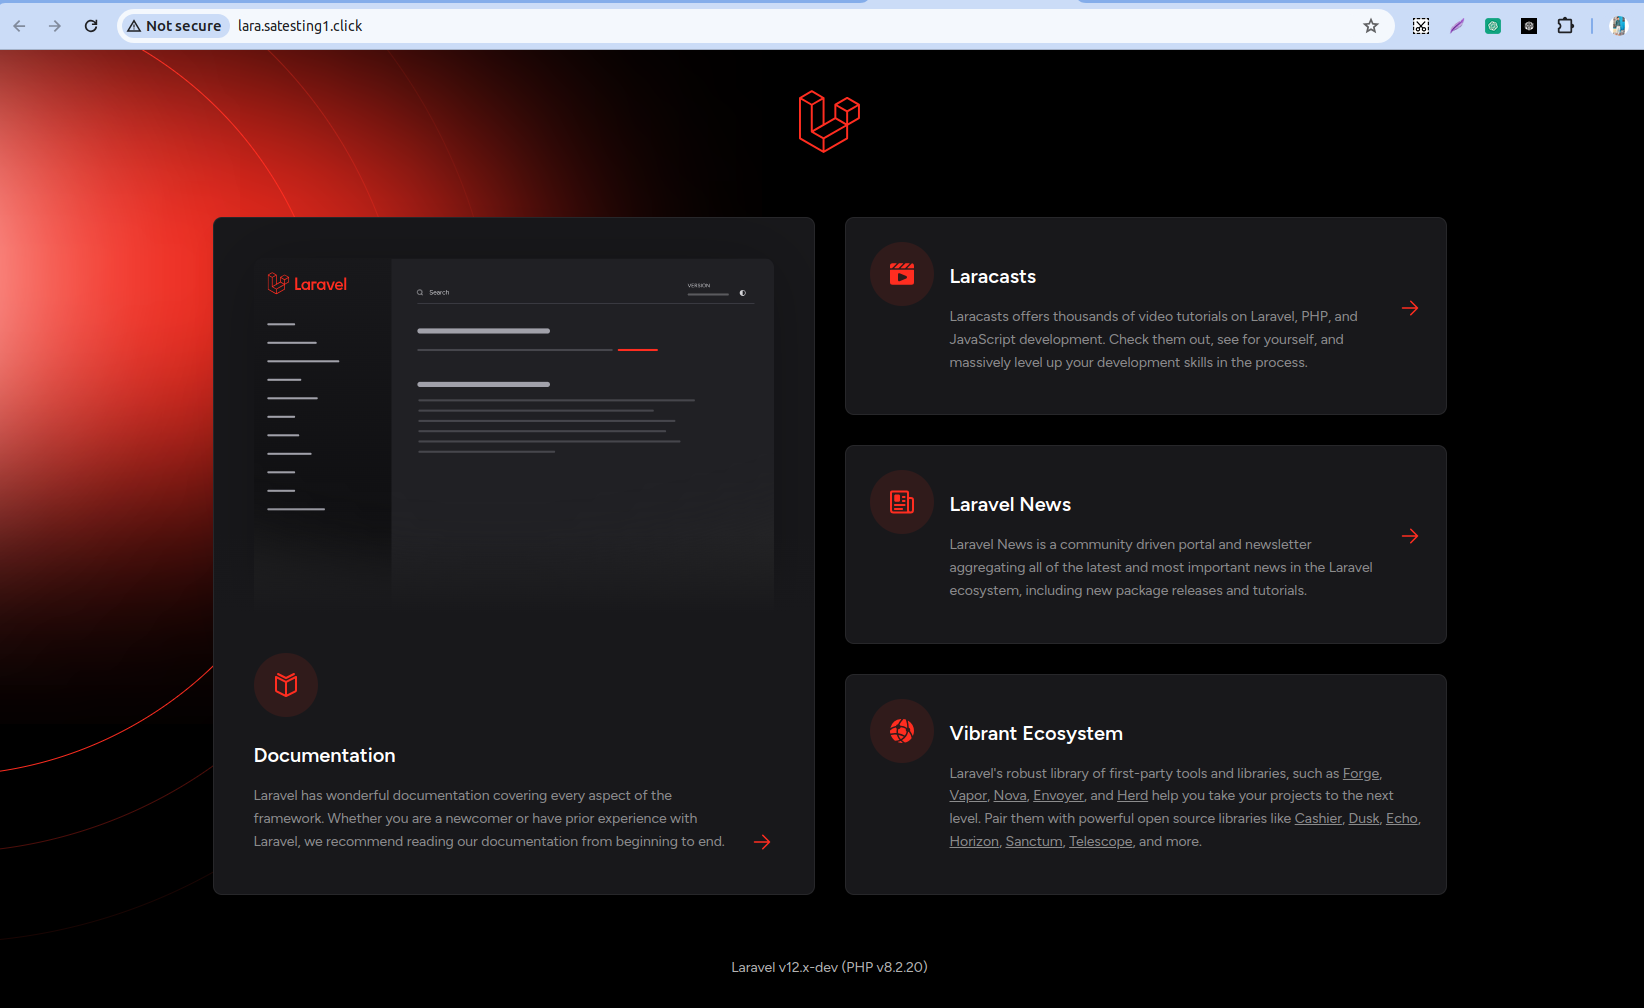
Step 8: Access Laravel
- Now, to access Laravel, open your web browser and enter your site's domain.
-
Example:
http://lara.satesting1.click -
For instance:
http://your-application-domain
-
Example:
Conclusion :
- Deploying your PHP Laravel application with ServerAvatar simplifies the entire process, ensuring a smooth and efficient setup. Each step is straightforward and well-guided, from creating the application and database to configuring server settings and migrating database tables.
- Laravel's robust features, combined with ServerAvatar’s user-friendly interface, make it an excellent choice for developers looking to deploy applications quickly and securely.
- Following the detailed steps outlined in this guide, you can confidently launch your Laravel application and take advantage of the powerful tools and environment both Laravel and ServerAvatar provide.