Mautic is a leading open-source marketing automation platform ideal for businesses of any scale. It provides essential tools for managing leads, emails, and campaigns, enabling users to automate and customize their marketing efforts. When considering hosting Mautic, deploying it on Upcloud is a dependable choice due to its reliable and scalable infrastructure with straightforward deployment options. ServerAvatar simplifies the Mautic installation process on the Upcloud platform with a straightforward, step-by-step guide.
Create a Server in UpCloud
Getting Started with UpCloud:
UpCloud is a high-performance VPS (Virtual Private Server) hosting platform designed for developers, businesses, and IT professionals. Renowned for its speed and reliability, UpCloud features the unique MaxIOPS storage technology, delivering performance significantly faster than traditional SSDs. This makes it an excellent choice for applications with high I/O demands, such as databases and web hosting. With its user-friendly control panel, UpCloud simplifies server management, making it an attractive option for anyone needing superior VPS hosting solutions.
To deploy any application on UpCloud, we must first set up a server. Therefore, our initial step will be to deploy a server and complete its initial setup.
Step 1: Server Deployment
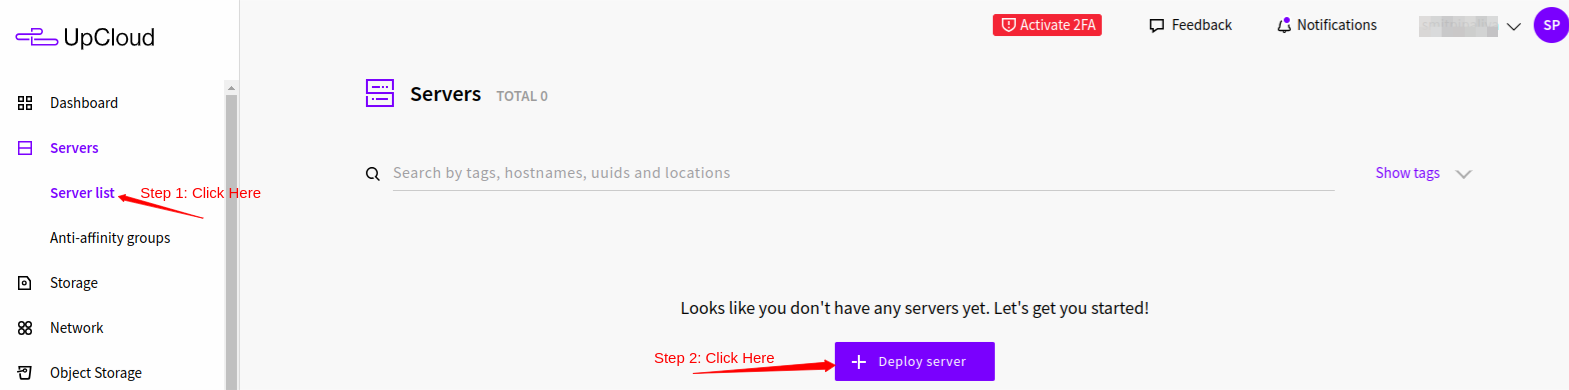
- Log in to your Upcloud account. If you don’t have an account, create an account on UpCloud.
- Then, Navigate to Server → Server List and click on the Deploy Server button, as shown in the image below.
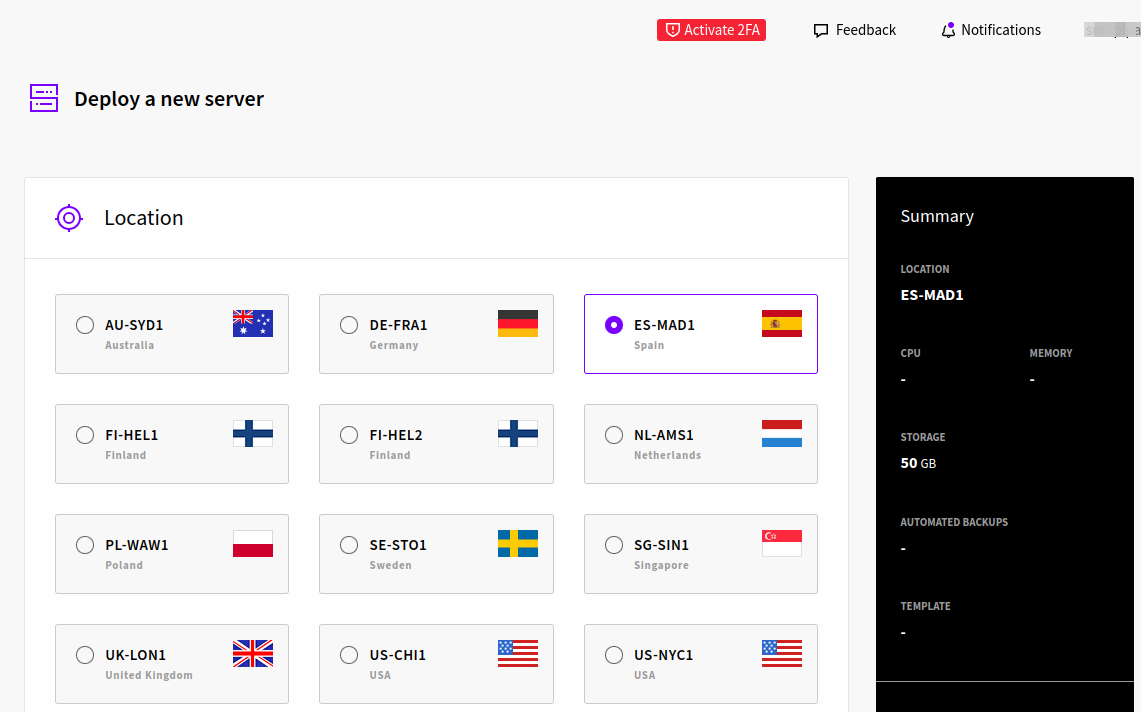
Step 2: Select Location
- The first thing you have to do is select the location for your server. UpCloud provides different options for selecting the location.
- The general rule is to select the region that is closest to your audience. It means that for the majority of your audience, Your sites will load faster due to lower latency.
Step 3: Select the plan for your Server
- Here you have to select the plan of your Droplet. UpCloud offers a variety of plans. Select the one that best meets your requirements.
- To host Mautic, the minimum requirements are 2-4 GB of RAM and 20-40 GB of disk space, depending on your usage and data needs.

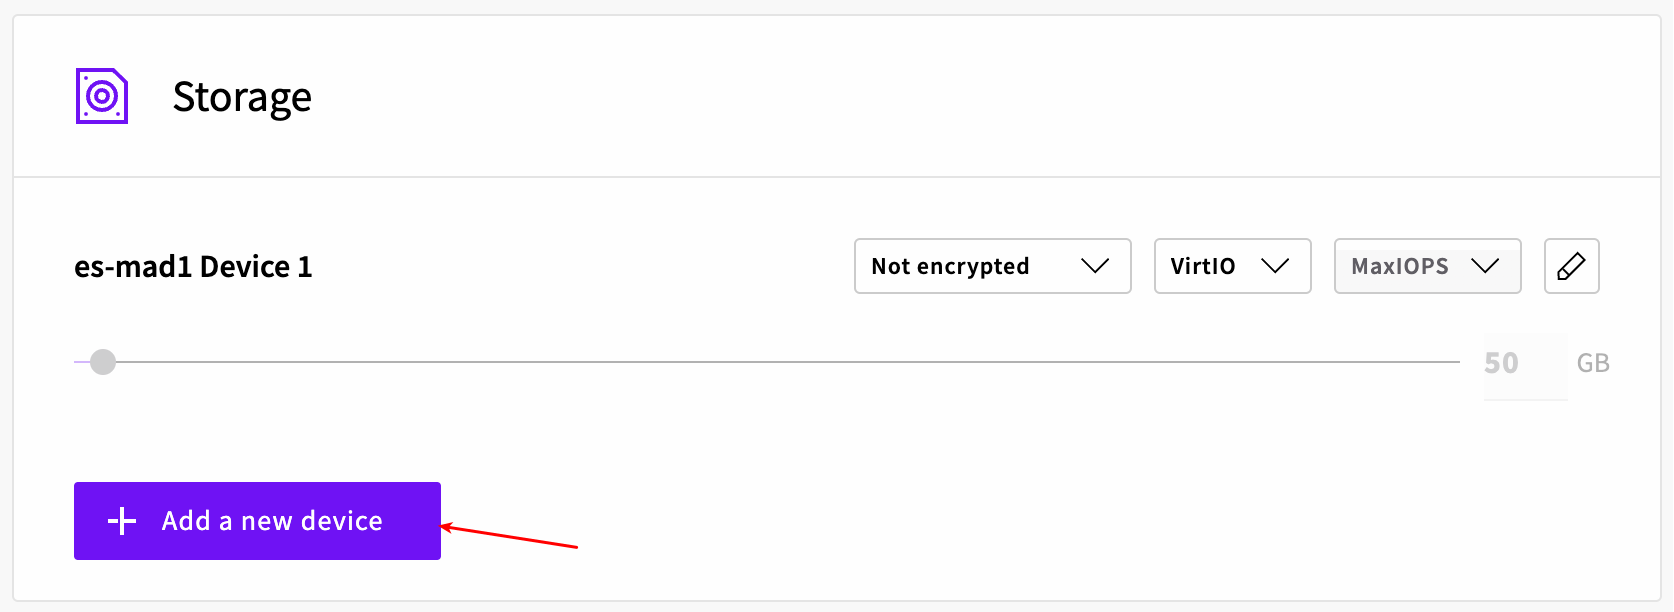
Step 4: Add New Storage Device
- In the Storage section, you can attach new storage devices as needed. Your initial storage is based on the selected server plan. You can attach up to 16 storage devices, each with a maximum size of 4 TB.
- To add more disks, click the "Add new device" button and adjust the storage size with the slider. You can modify the storage configuration later by adding, removing, or resizing disk devices.
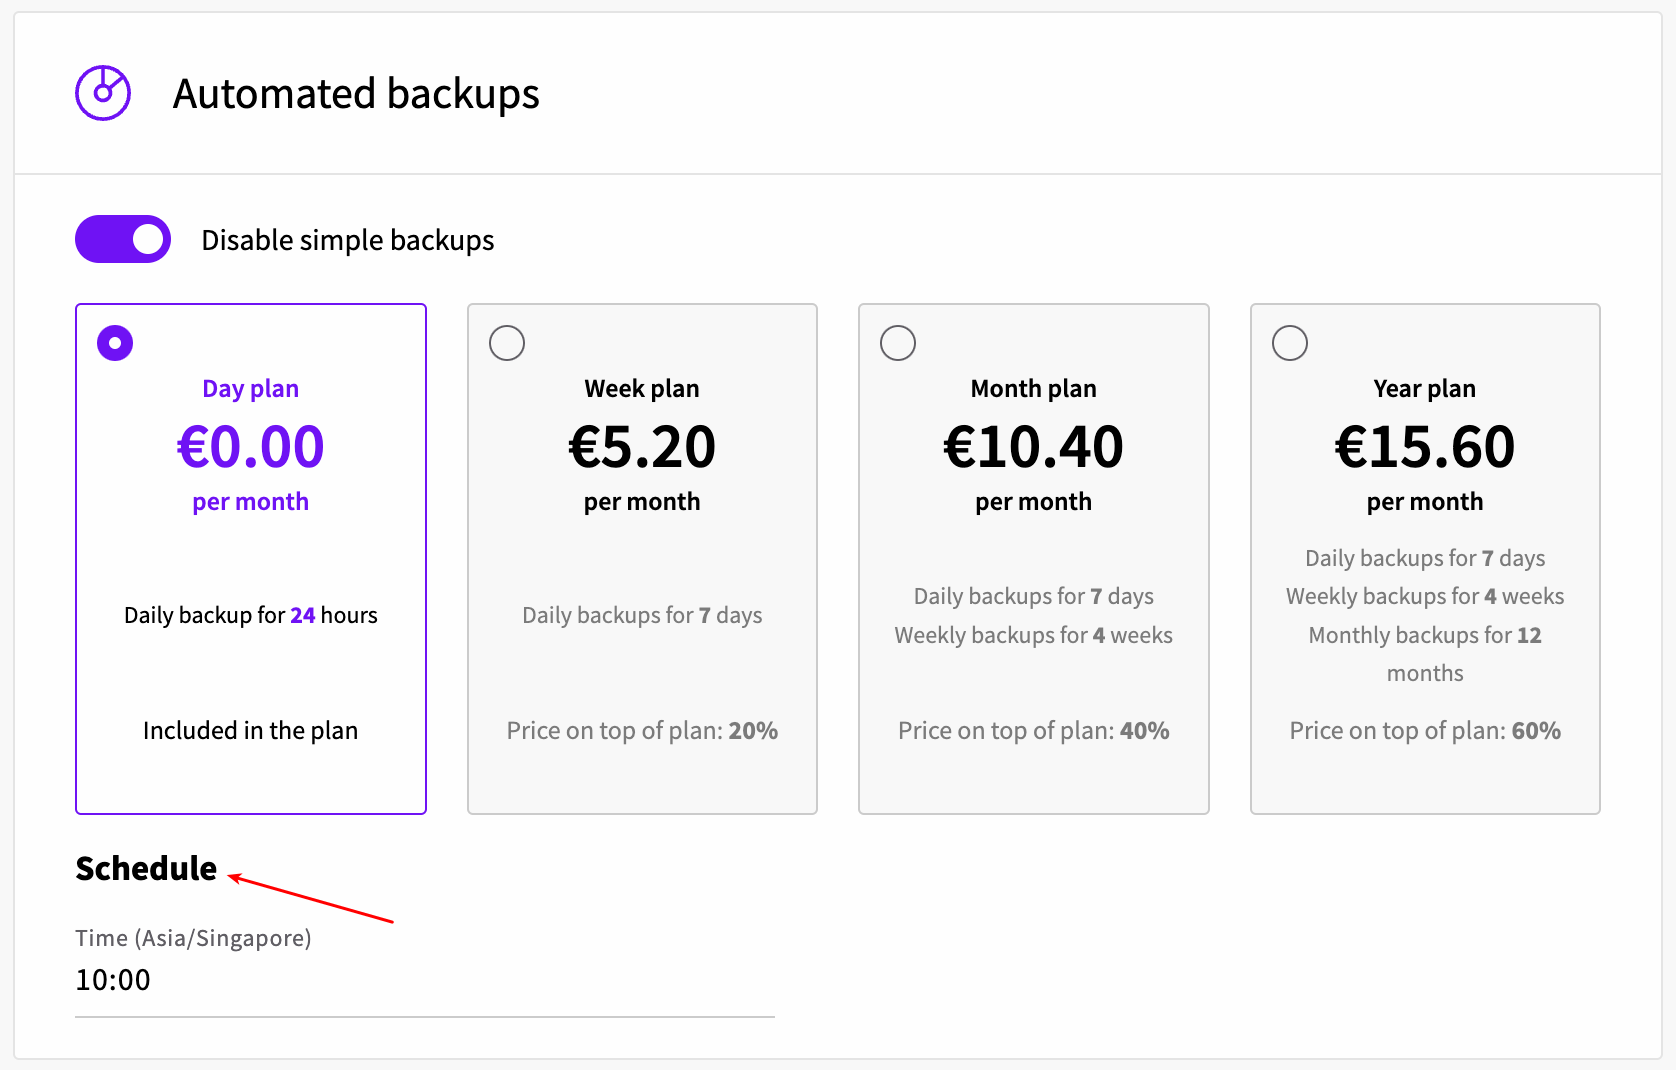
Step 5: Automated Backups
- You can also enable Automated Backups by clicking the toggle button on the right side. You can choose from Day, Week, Month, or Year plans.
- After selecting the appropriate plan, you can set a backup schedule using the drop-down menu below.
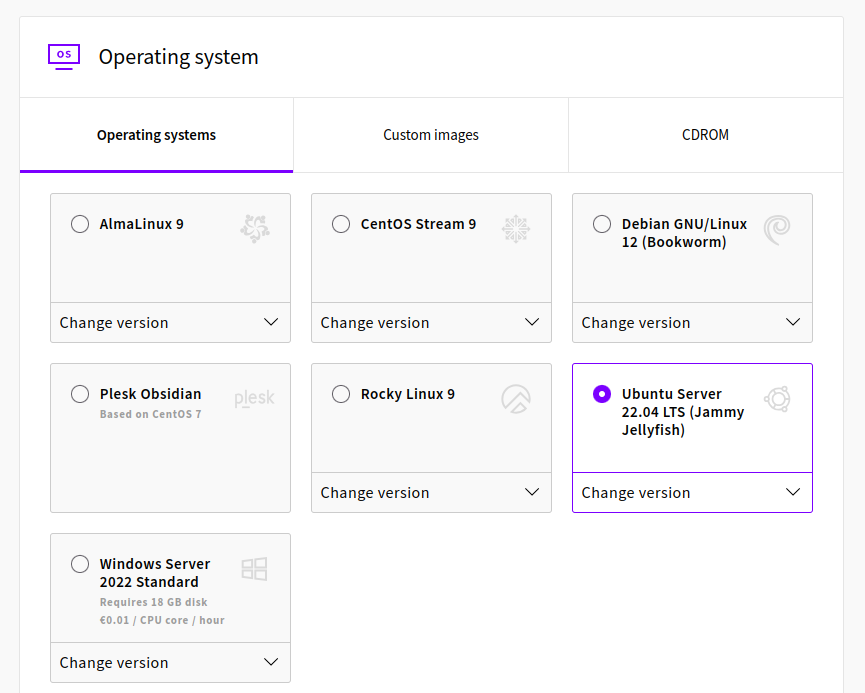
Step 6: Choose an Operating System
- In this step, you need to select your server operating system. We recommend selecting Ubuntu 20.04 LTS x64 or Ubuntu 22.04 LTS x64. If you are using ServerAvatar to manage your servers, these operating systems are required.
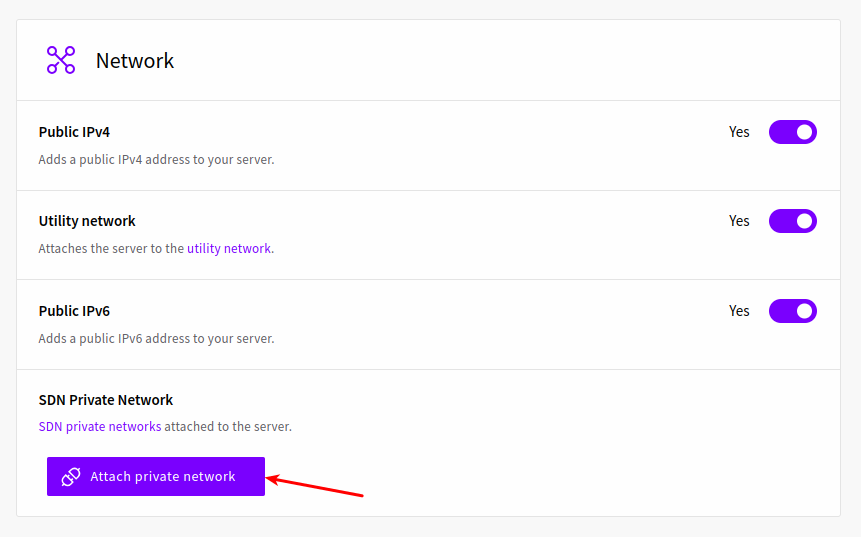
Step 7: Select Network Configuration
- In this step, by default network configurations are set that include IPv4 and IPv6 addresses, and a private Utility Network connection is set. You can customize these settings and attach your private network by clicking on the “Attach Private Network” option.
Step 8: Additional Options
- In this step, you can enable or disable IPv6 support and metadata service. Also, you can set the desired TimeZone and select between network and display adapters.
- If it suits you, we suggest keeping these options at their default settings.

Step 9: Select Login Method
- Now you have to select the Login method. There are two types of login methods. They are:
- Authentication via SSH Keys
- Authentication via One-Time Password
- If you are using SSH keys for authentication, It is the best option. You can also click on the “Add New” button to import your keys.
- If you do not know what is SSH key, You can go with the One-Time password method. You have to set a new password after the first time you log into this server.
- Make sure to set a strong password for your root user, which is the most powerful user with all the privileges on Linux OS. You can select the convenient way to have the password.

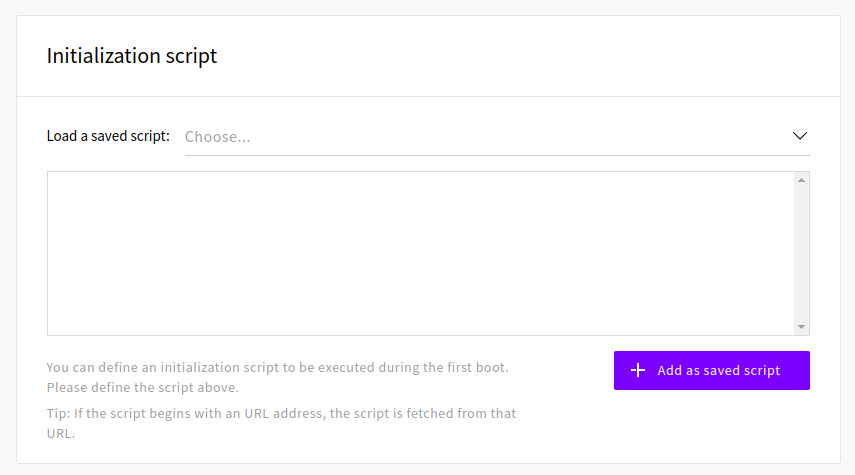
Step 10: Enter Initialization Script
- The Initialization scripts are user-defined automation scripts supported by all Linux public templates. When you select one of your stored scripts, it will appear in the edit field.
- You can make changes to the scripts or write a new one. The server will execute the script during the first bootup.
Step 11: Finalise Details
- In the last step of this process, We have to enter the Host Name, Server Name, and number of servers you want to deploy. Click on the Deploy button to create a server.
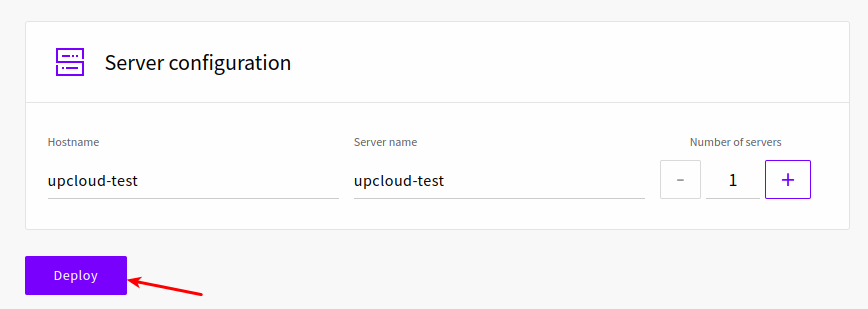
- In a few minutes, You will have the Server up and running.
- Now, We have to perform the initial step to allow the Serveravatar port from the firewall configuration.
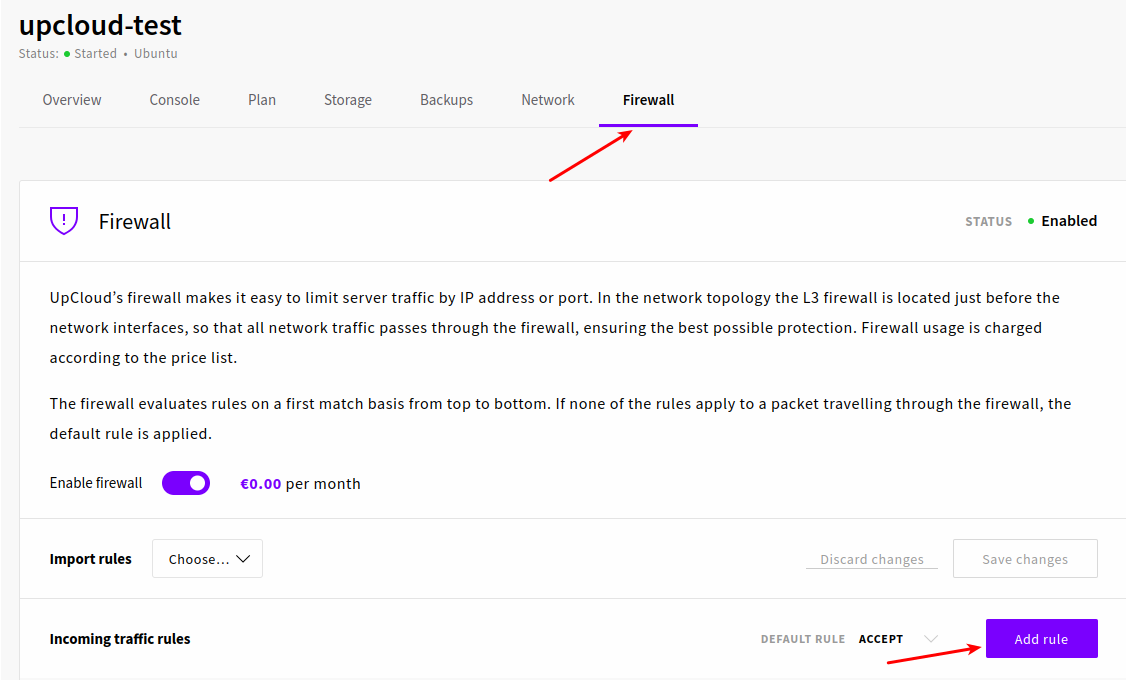
- To allow the Serveravatar port from firewall configuration, Click on the Server → Server List Option and then click on the icon next to your server as shown in the below image.

- Now, navigate to the Firewall Section and Click on “Add Rule”.
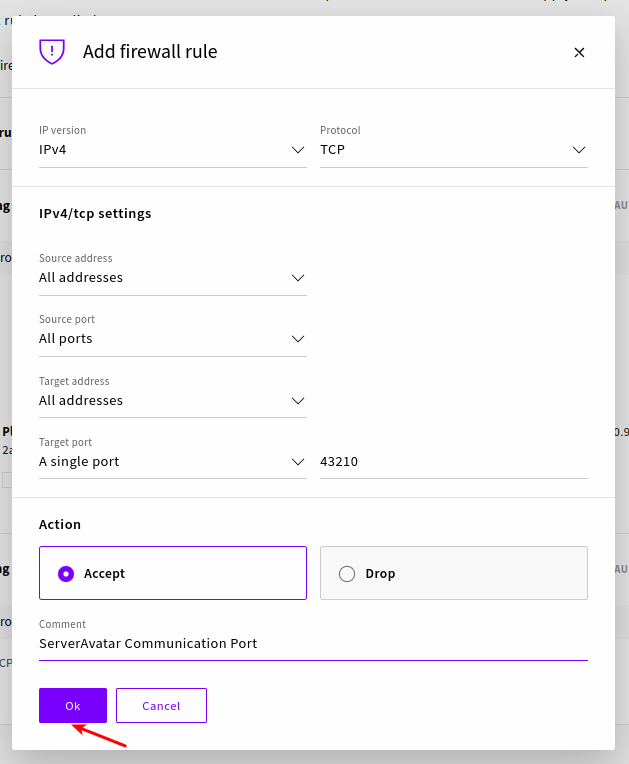
- Create a rule to allow ServerAvatar Communication Port - 43210 as shown in the below image. Click on the Ok to add the firewall rule.
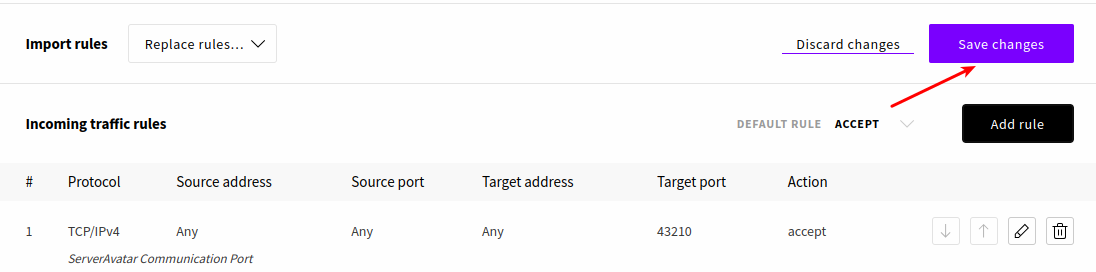
- Now, click on the “Save Changes” button to save the changes to Firewall Rules as shown in the below image.
Initial Server Configuration
The Initial server configuration includes the installation and configuration of various packages required to host your website. Usually, You have to write commands and modify configuration files. Luckily, With ServerAvatar, Your full server configuration and optimization can be automated.
Here are the three ways to automatically configure your server with ServerAvatar.
Connect a server using a direct method
- Login/Register to ServerAvatar account, click the Create button from the right side of the screen, and select Server from the dropdown.
- Select Direct Method in the serve connecting method section.
- Type the Server Name as per your choice.
- Select a Tech Stack as per your need. You can either select Apache, Nginx, OpenLiteSpeed or Node Stack.
- Select a Database: MySQL, MariaDB or MongoDB.
- Enable the toggle if you want to install the latest LTS version of node.js on your server.
- Select a Management plan and click the Connect Now button.
- You’ll see the command on your screen. Login to your server using an ssh connection and execute that command as a root user.
- The server connection process will be started on your ServerAvatar account after executing the command.
Connect a server using integration
- Login/Register to your ServerAvatar account, navigate to the Integration tab from the sidebar of the panel, and access Cloud Platform from the dropdown.
- Now Select a cloud platform you want to link with ServerAvatar.
- The popup form will appear on your screen. Enter details to link your cloud provider account. The integration method is different based on the cloud provider you select.
- You can integrate five different cloud provider platforms with ServerAvatar, which is-
Check the above link of cloud platforms to know more about integrating cloud platforms with ServeAvatar.
Connect a server using commands
Step 1. Login to your server using root user
Once you create a server as per your requirements, connect to your server using an ssh connection and execute the below three commands as a root user in your server console area.
wget https://srvr.so/install
chmod +x install
./install
Step 2. Select a web server
It will ask you which web server you would like to install on your server: Apache, Nginx, OpenLiteSpeed or Node Stack. Type anyone that you would like to install on your server and hit the enter button.
Step 3. Claim your server
Completing the process will give you a link to claim your server.
Open the link on your browser to access the ServerAvatar server panel.
Auto-install Mautic with ServerAvatar
Step 1: Create a PHP application
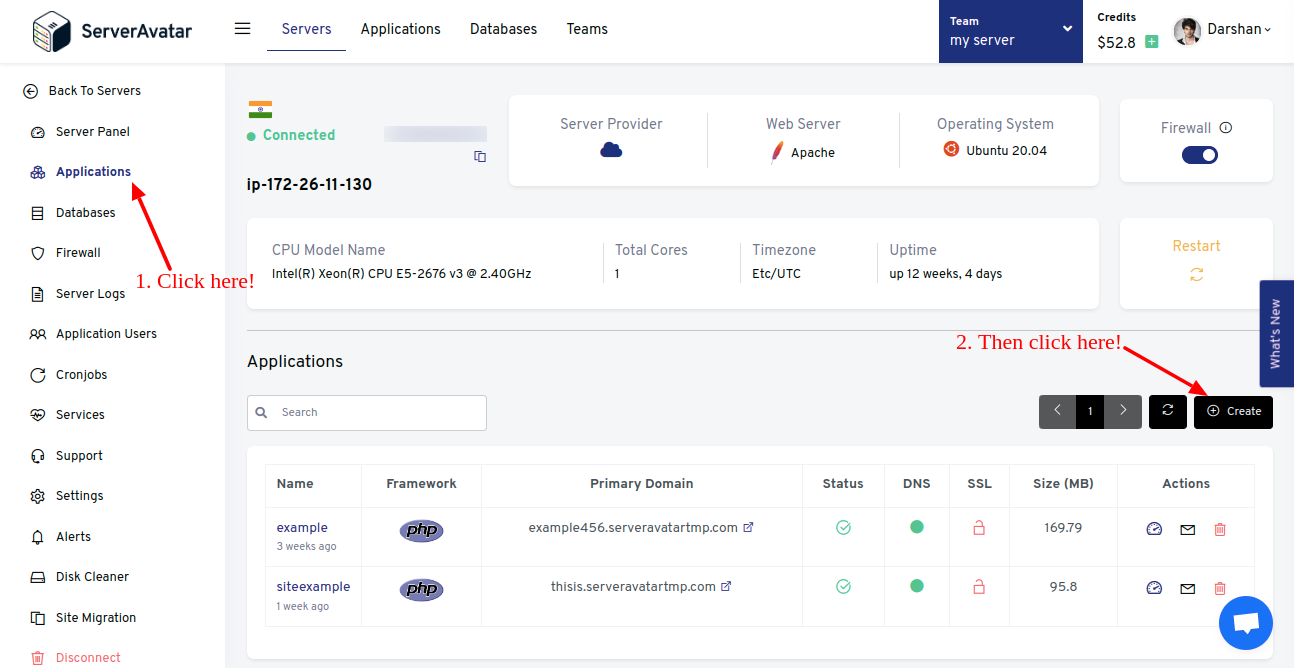
Once you are on the server panel, access the Application tab from the sidebar.
Now by clicking the Create button, you’ll see the application creation form as the below image. Fill in the required details to create an application, including the Application Name, Primary Domain, and other PHP Settings.
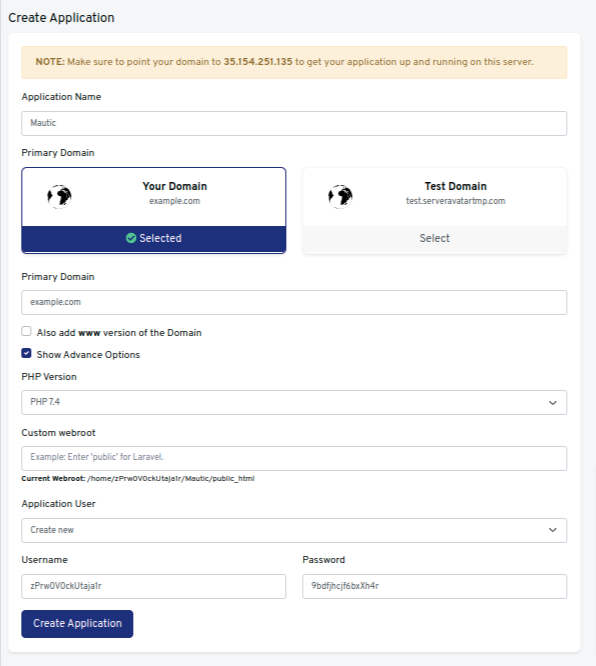
Click the Create Application button.
Note that:
If you want to host Mautic CRM on your domain, then make sure to point your domain to the current IP address of your server, and for that:
-
Log in to your hosting provider site, where you buy your domain. You can check your domain information with one click.
-
Access DNS Manager to edit your DNS records(contact the support team if you don’t find them)
-
Change the IP address of A Record of your website to the current server’s IP address.
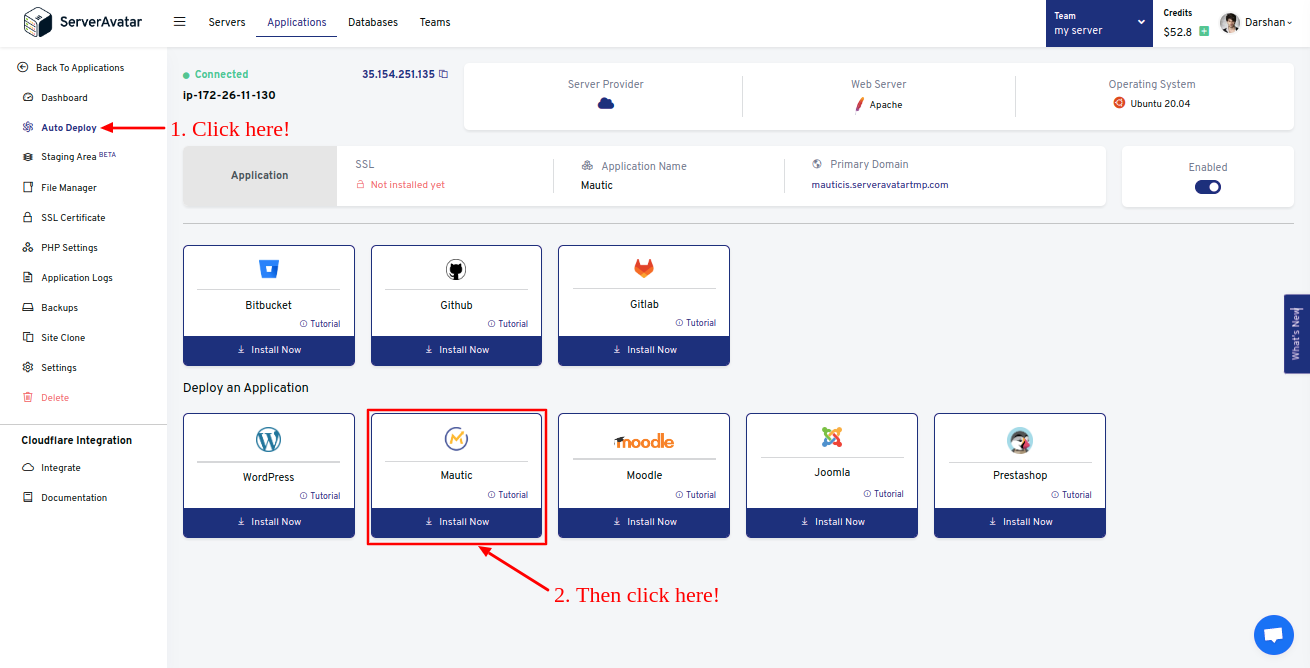
Step 2: Auto-install Mautic application
From your application panel, access the Auto deploy tab from the sidebar. Now click the Mautic Auto install card like the below image.
It asks to enter Mautic application details in the form. The details include the following-
Admin credential
These details are used for logging in to your Mautic panel as an admin.
- First Name: Enter admin first name
- Last Name: Enter admin last name
- Username: Enter admin username
- Email:You will use this email if you forget your password or want to reset the password.
- Password: Enter admin password
PHP Settings
PHP Version: You can here change the PHP version for your Mautic installation.
Email Configuration
Mail from Name: The name seen when you send an email. Mail from email: The email address from which you send an email. Mail Username: Username of chosen SMTP credential Mail password: Password of chosen SMTP credential Mail port: 25 or 465, or 587 would be recommended for sending an email. Mail Host: Chosen SMTP hostname. For example, smtp.pepipost.com.
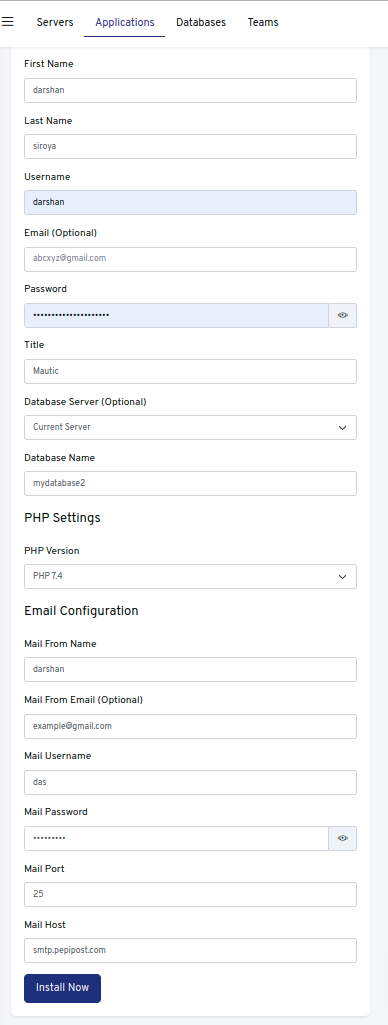
After filling up all the details, click the Install Now button.
Step 3: Install SSL Certificate
You can install SSL for your website using just one click. On the application panel, click on the SSL Certificates tab from the sidebar.
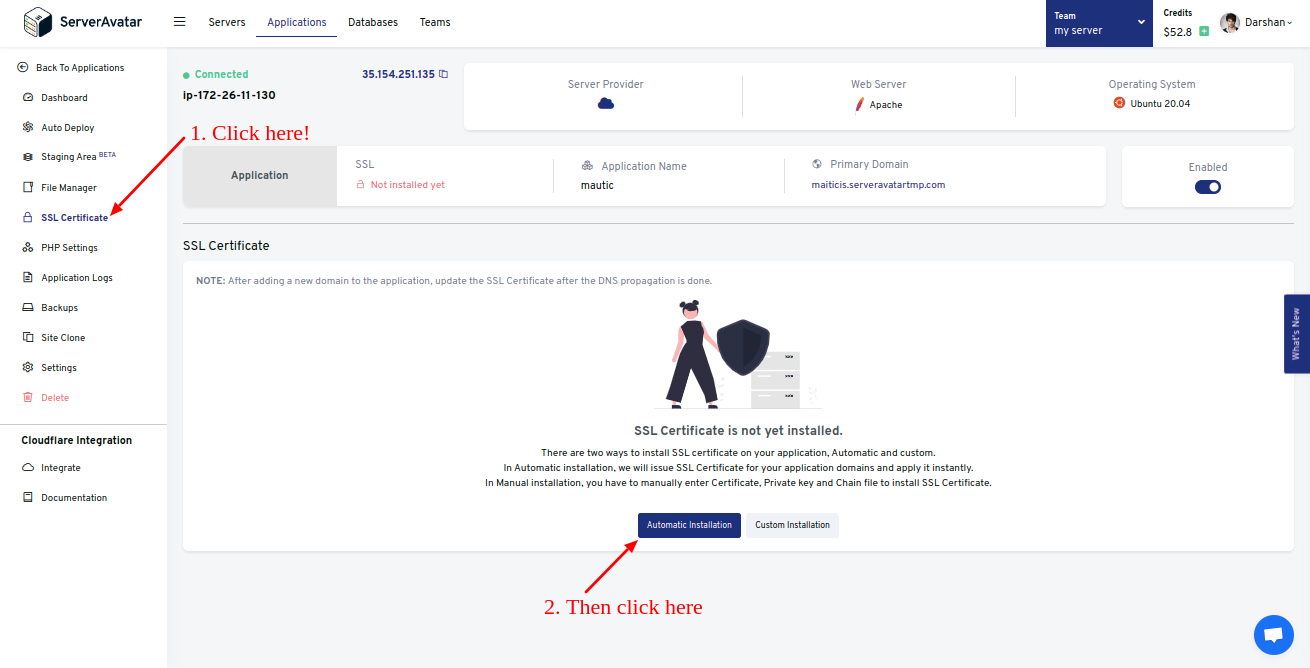
You can also use a custom installation method to install SSL certificates. After installing the SSL, check the box Force HTTP to HTTPS to secure the communication between your browser and the website.
Once you are done, access the Application URL on your browser. It redirects to the admin login page. Enter admin credentials to log in to your Mautic admin panel.
And that’s it. You can now use Mautic to create a strong marketing strategy for your business.