Snipe-IT is a flexible open-source tool designed for managing and organizing assets with ease. It enables users to store, categorize, and retrieve assets efficiently. For deploying Snipe-IT, SSD Nodes is an ideal choice due to its reliable, and easy-to-use cloud infrastructure. ServerAvatar simplifies the deployment of Snipe-IT on SSD Nodes VPS (Virtual Private Server) by providing a user-friendly interface that automates the setup process, making it accessible to users with various levels of technical expertise.
Create a Server in SSD Nodes
Getting started with SSD Nodes:
Discover how to create an account and set up a cloud VPS on SSDNodes, a top hosting provider. Follow our simple, step-by-step guide to get your account up and running quickly and easily, so you can start managing your hosting services today.
SSDNodes offers dependable and scalable hosting solutions to individuals and corporations because of its speed and affordability. They provide an infrastructure to host webpages, software, and other internet services effectively.
Step 1: Setup Cloud VPS with SSD Nodes
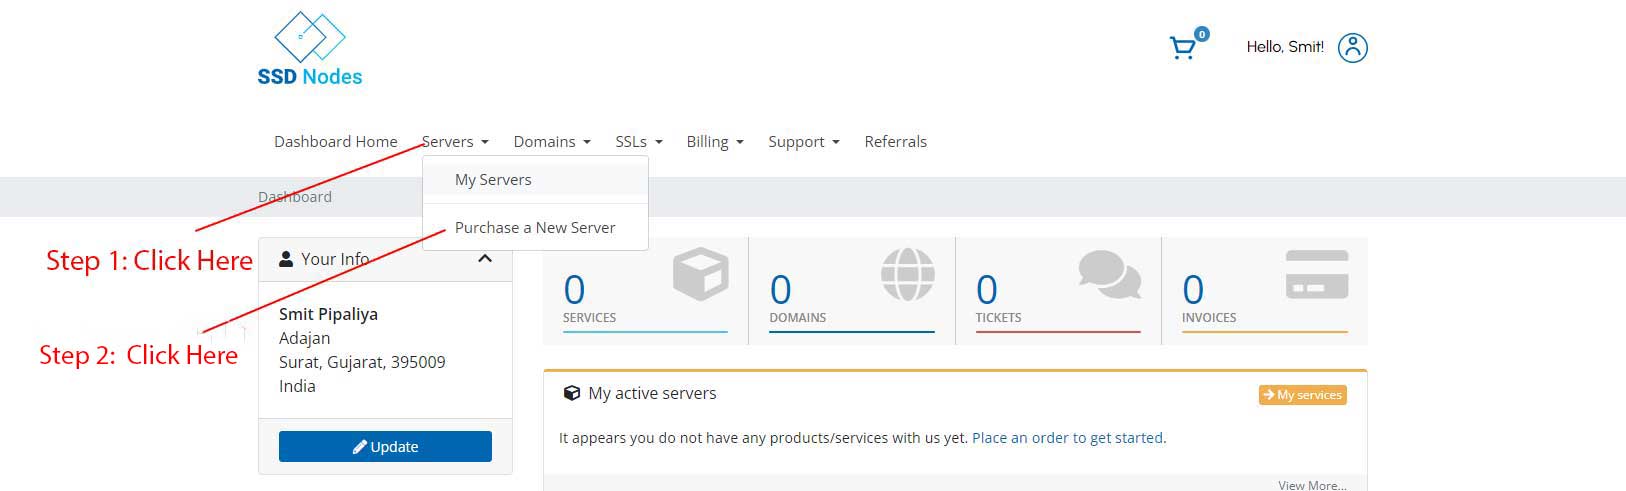
- First, log in to your SSD Nodes account and navigate to the Servers option. Next, click on Purchase a New Server from the dropdown menu.
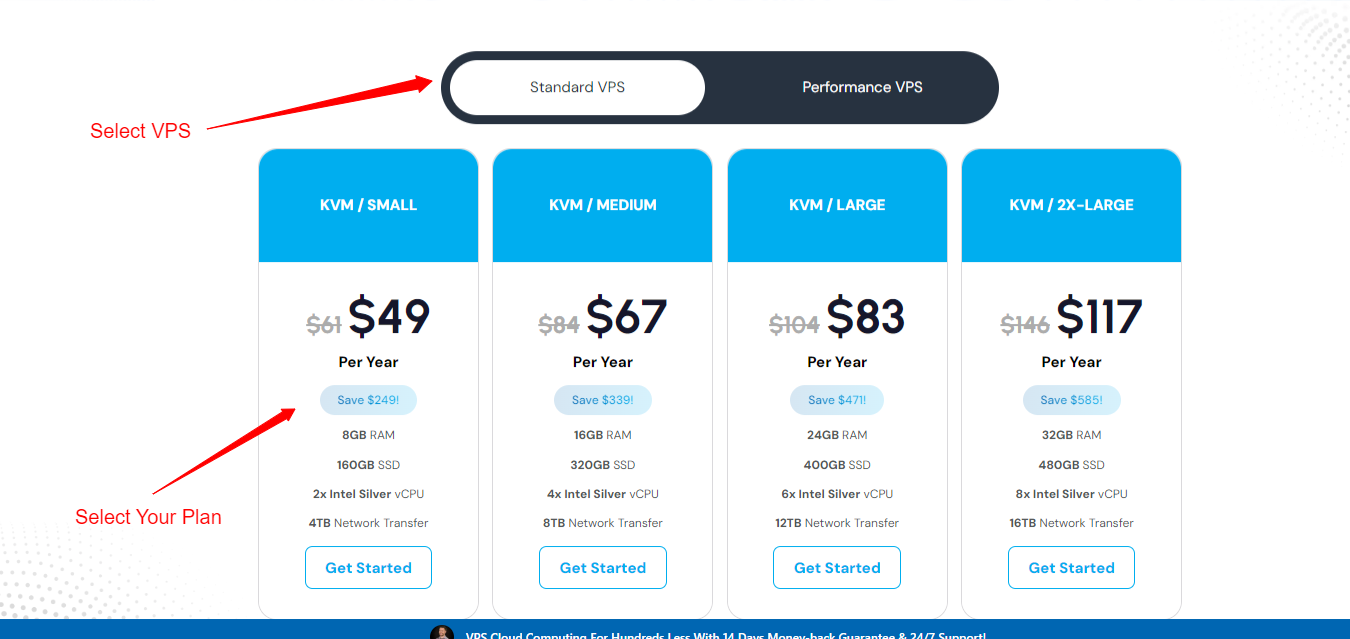
Step 2: Select the plan
- SSD Nodes Offer two Different VPS plans:
- Standard VPS
- Performance VPS
- You have to select a Plan according to your needs. After selecting your plan just click on Get Started.
Step 3: Finalizing Your VPS Selection
- In the following step, You will see the summary of your selected VPS Plan. Click Proceed to Checkout if you are satisfied with the plan you have chosen, or select Customize Your Own Server to modify your VPS server according to your requirements.
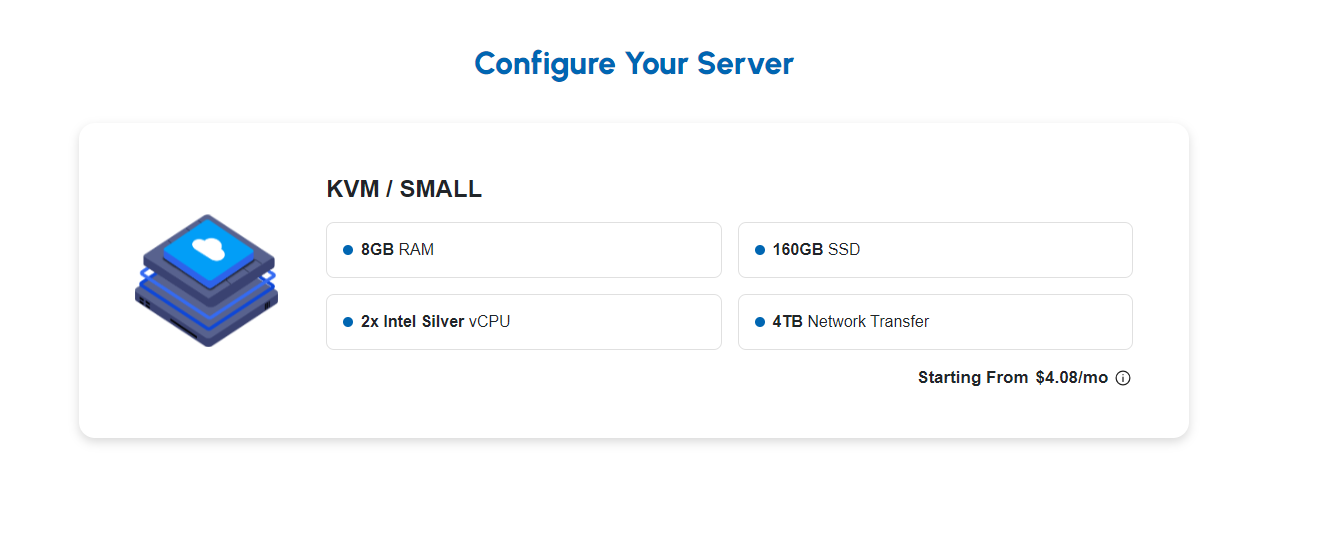
Step 4: Customizing the VPS Configuration
- You can see your selected plan as shown in the below image.
- You can select the billing cycle based on your requirements.

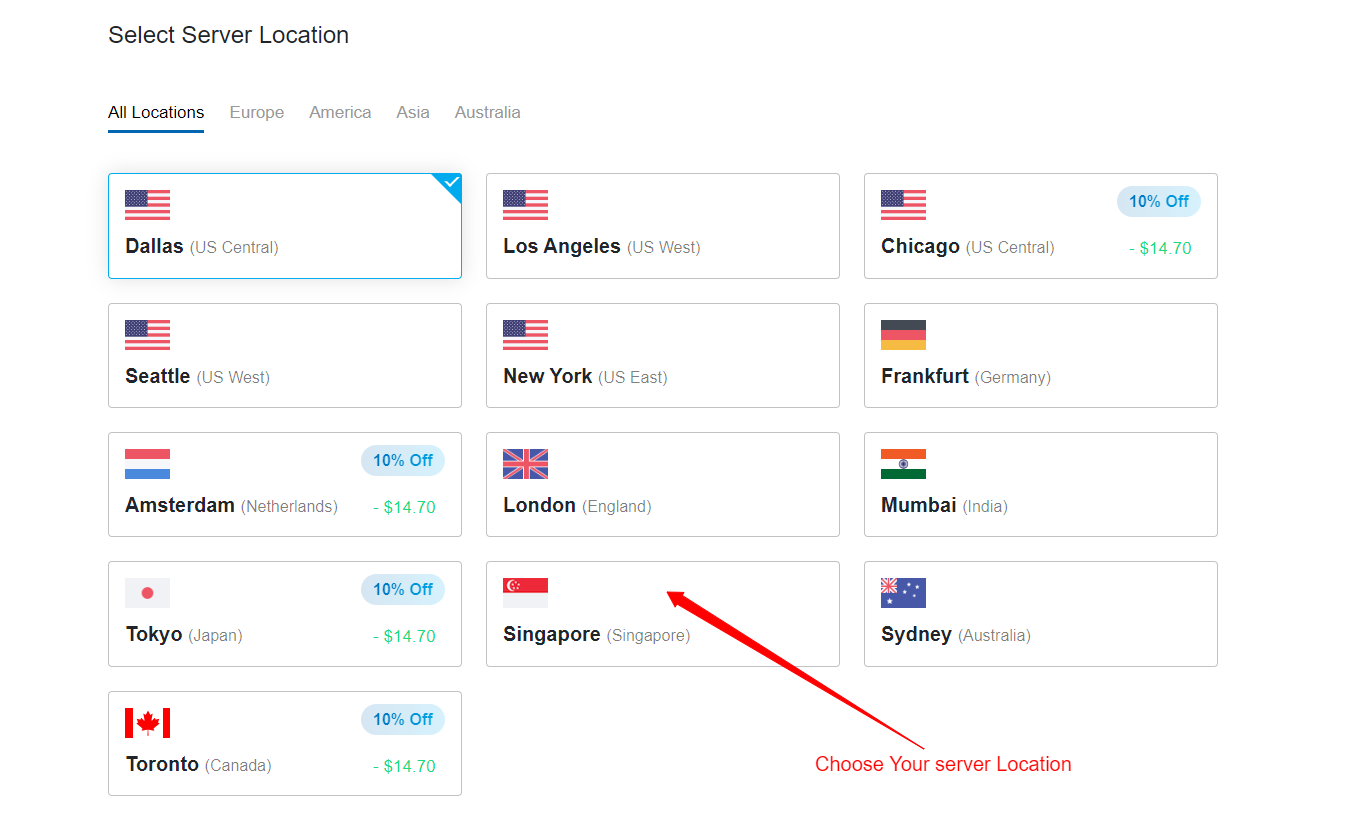
- You have the option to select a server location that is more convenient for you. It is recommended to select the location that is closest to your audience. It means that for the majority of your audience, Your sites will load faster due to lower latency.
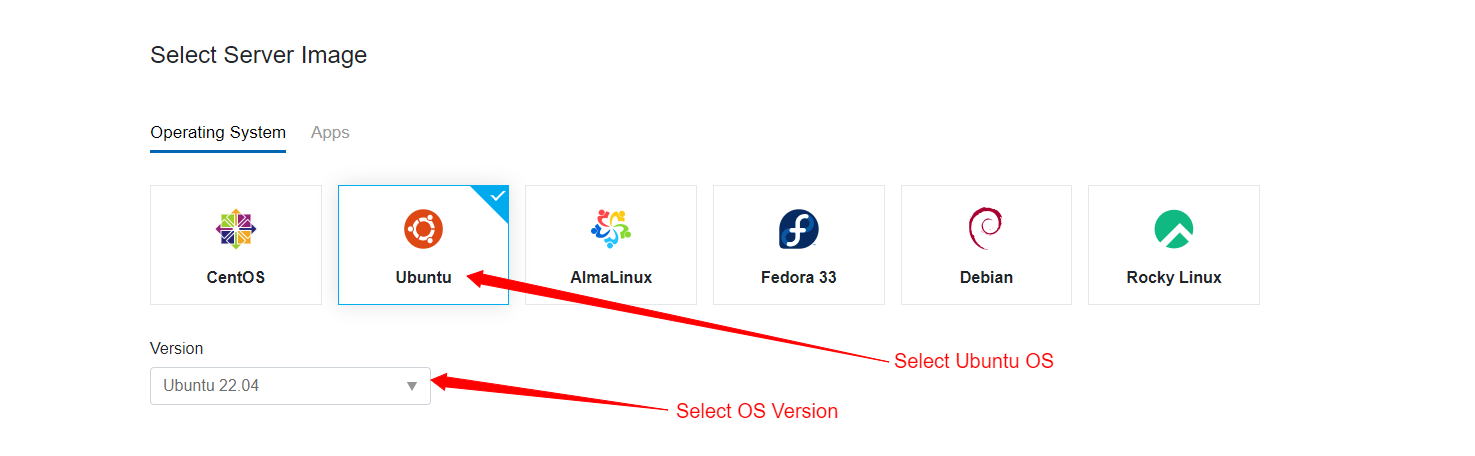
- Now, you have to select your preferred operating system. Generally, the Snipe-IT application requires Ubuntu 20.04 LTS or a later version for compatibility and support. We recommend selecting Ubuntu 20.04 64-bit or Ubuntu 22.04 64-bit. If you are using ServerAvatar to manage your servers, these operating systems are required.
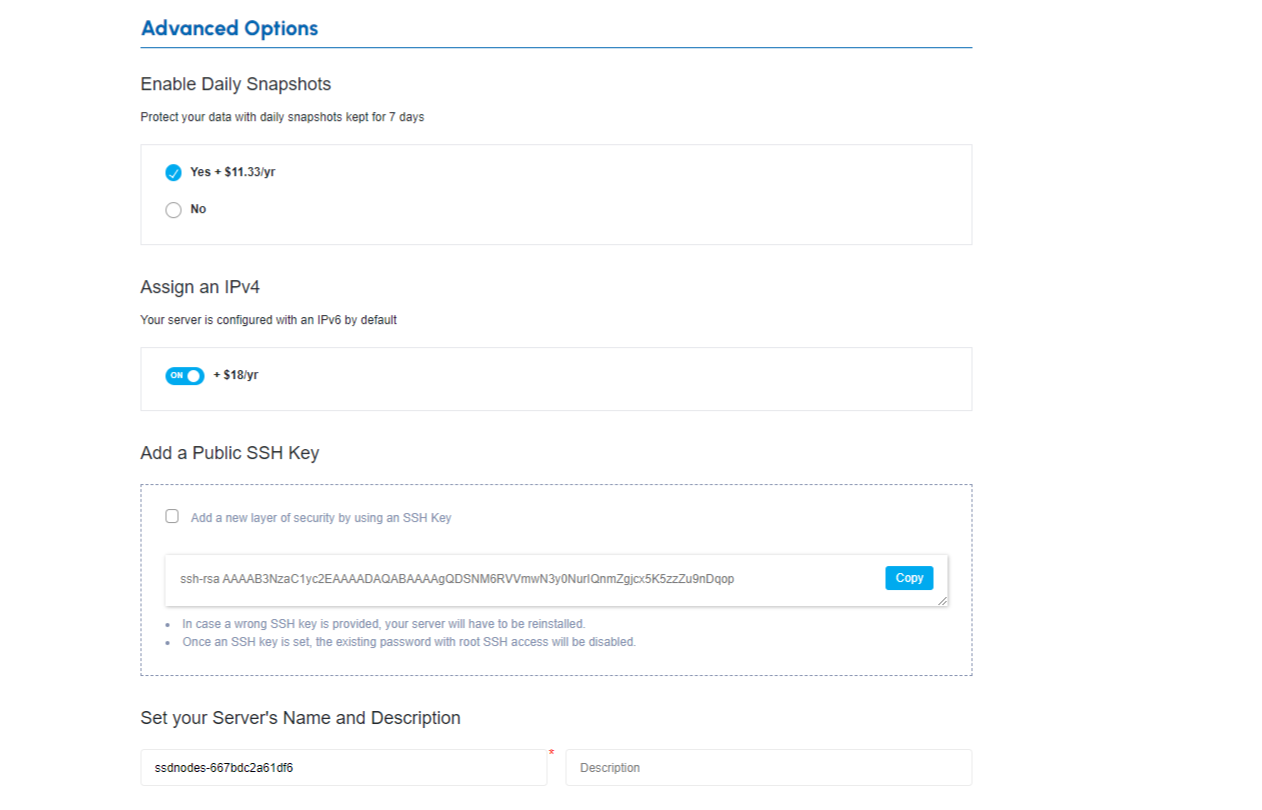
- Now, there is an Advance Options section where you can configure settings according to your requirements. Additionally, you can add a Public SSH Key and specify the Server's Name and Description. Once you've set up your Advanced Options, proceed to the payment checkout.
- Review and confirm all the choices you've made for your VPS and Click on the Proceed to Checkout option.
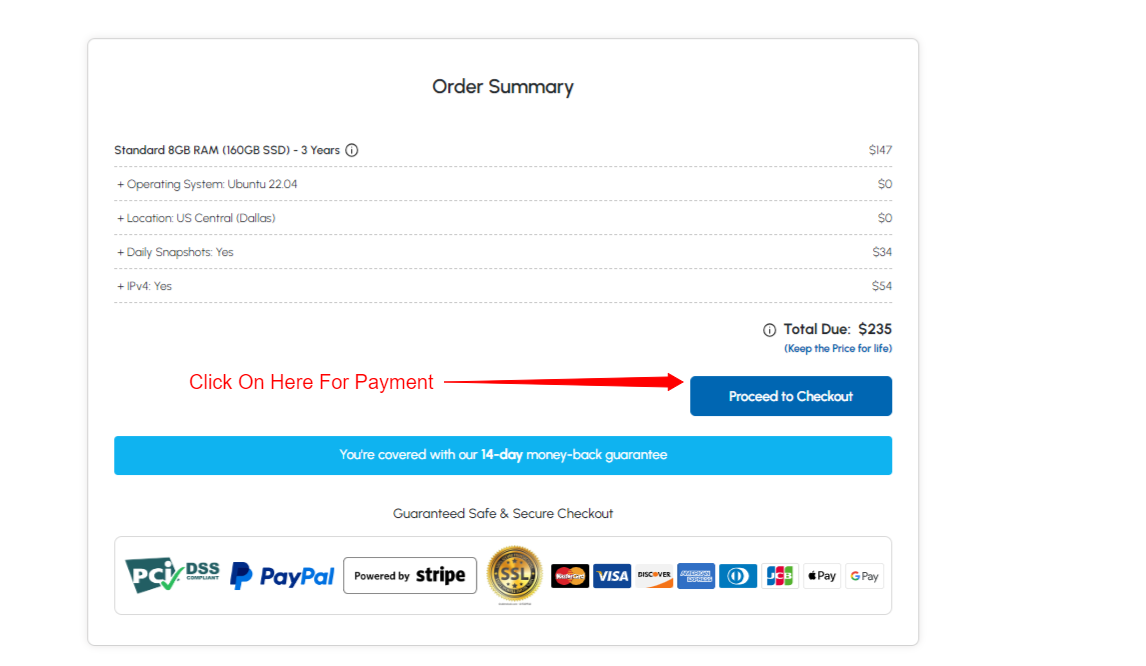
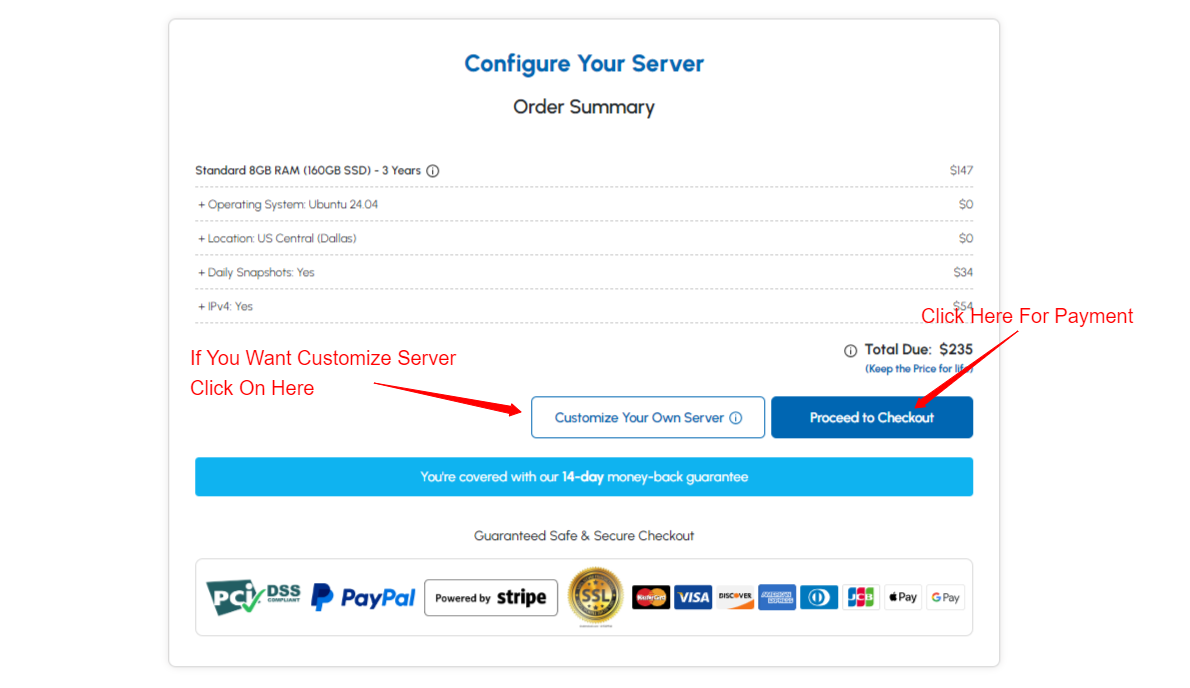
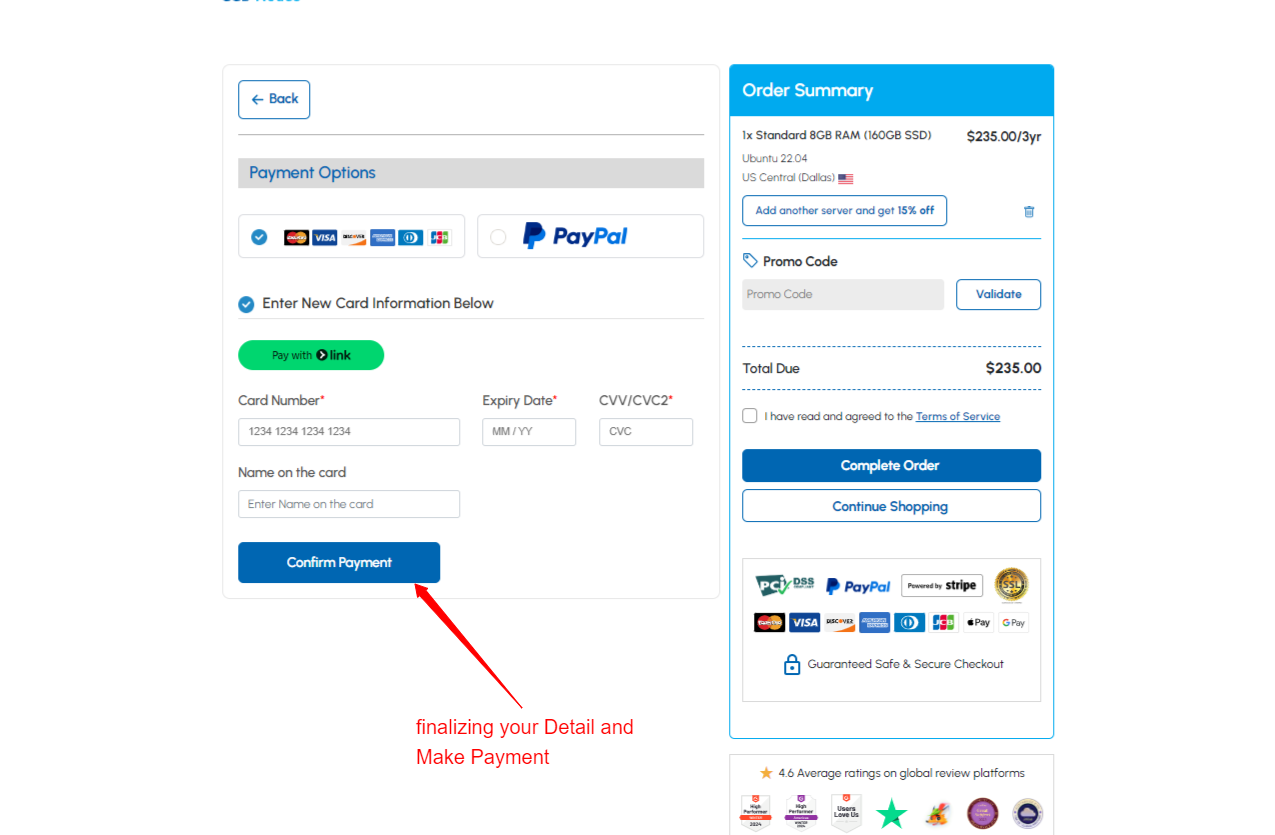
Step 5: Finalizing Your Order and VPS Deployment
- Now, you need to confirm and complete the payment, also you can review the Order Summary on the same page as shown in the image below. After you've completed the payment process, your VPS will be set up quickly and will be ready for use in a minimum amount of time.
- Congratulations! You have successfully created your SSD Nodes VPS, which is now ready to connect with ServerAvatar.
Initial Server Configuration
The Initial server configuration includes the installation and configuration of various packages required to host your website. Usually, You have to write commands and modify configuration files. Luckily, With ServerAvatar, Your full server configuration and optimization can be automated.
Here are the three ways to automatically configure your server with ServerAvatar.
Connect a server using a direct method
- Login/Register to ServerAvatar account, click the Create button from the right side of the screen, and select Server from the dropdown.
- Select Direct Method in the serve connecting method section.
- Type the Server Name as per your choice.
- Select a Tech Stack as per your need. You can either select Apache, Nginx, OpenLiteSpeed or Node Stack.
- Select a Database: MySQL, MariaDB or MongoDB.
- Enable the toggle if you want to install the latest LTS version of node.js on your server.
- Select a Management plan and click the Connect Now button.
- You’ll see the command on your screen. Login to your server using an ssh connection and execute that command as a root user.
- The server connection process will be started on your ServerAvatar account after executing the command.
Connect a server using integration
- Login/Register to your ServerAvatar account, navigate to the Integration tab from the sidebar of the panel, and access Cloud Platform from the dropdown.
- Now Select a cloud platform you want to link with ServerAvatar.
- The popup form will appear on your screen. Enter details to link your cloud provider account. The integration method is different based on the cloud provider you select.
- You can integrate five different cloud provider platforms with ServerAvatar, which is-
Check the above link of cloud platforms to know more about integrating cloud platforms with ServeAvatar.
Connect a server using commands
Step 1. Login to your server using root user
Once you create a server as per your requirements, connect to your server using an ssh connection and execute the below three commands as a root user in your server console area.
wget https://srvr.so/install
chmod +x install
./install
Step 2. Select a web server
It will ask you which web server you would like to install on your server: Apache, Nginx, OpenLiteSpeed or Node Stack. Type anyone that you would like to install on your server and hit the enter button.
Step 3. Claim your server
Completing the process will give you a link to claim your server.
Open the link on your browser to access the ServerAvatar server panel.
Install and Setup Snipe-IT on Cloud using ServerAvatar
Getting Started With Snipe-IT:
Snipe-IT is designed for IT asset management, offering a comprehensive solution for IT departments to track their assets efficiently. It allows teams to monitor which laptops are assigned to whom, record the purchase dates of these devices, and keep an updated inventory of software licenses and accessories. This centralized tracking system improves visibility and accountability, ensuring that all assets are properly managed. By using Snipe-IT, organizations can streamline their asset management processes, reduce the risk of asset loss or mismanagement, and enhance overall operational efficiency. The platform’s detailed tracking capabilities and user-friendly interface make Snipe-IT an invaluable tool for IT departments aiming to maintain an organized and well-managed asset portfolio.
Requirements:
If you want to host Snipe-IT yourself, you will need a server with:
- PHP 8.1 or newer
- HTTP server with PHP support (eg: Apache, Nginx)
- MySQL or MariaDB
- Composer
Install and Setup Snip-IT on Cloud using ServerAvatar:
Step 1: Create Snip-IT Database
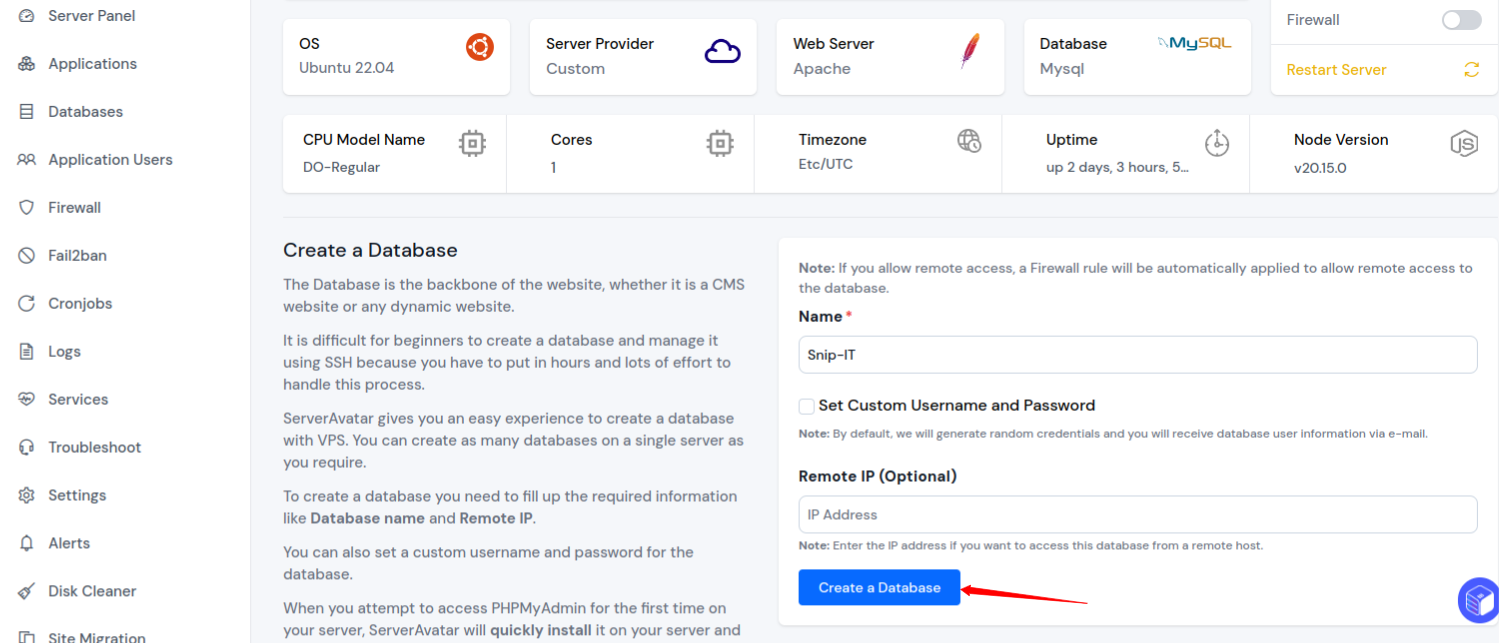
- The Snip-IT installation process requires a database. To create a MySQL database for Snip-IT, navigate to the Database tab on the ServerAvatar server panel and create a new Database.
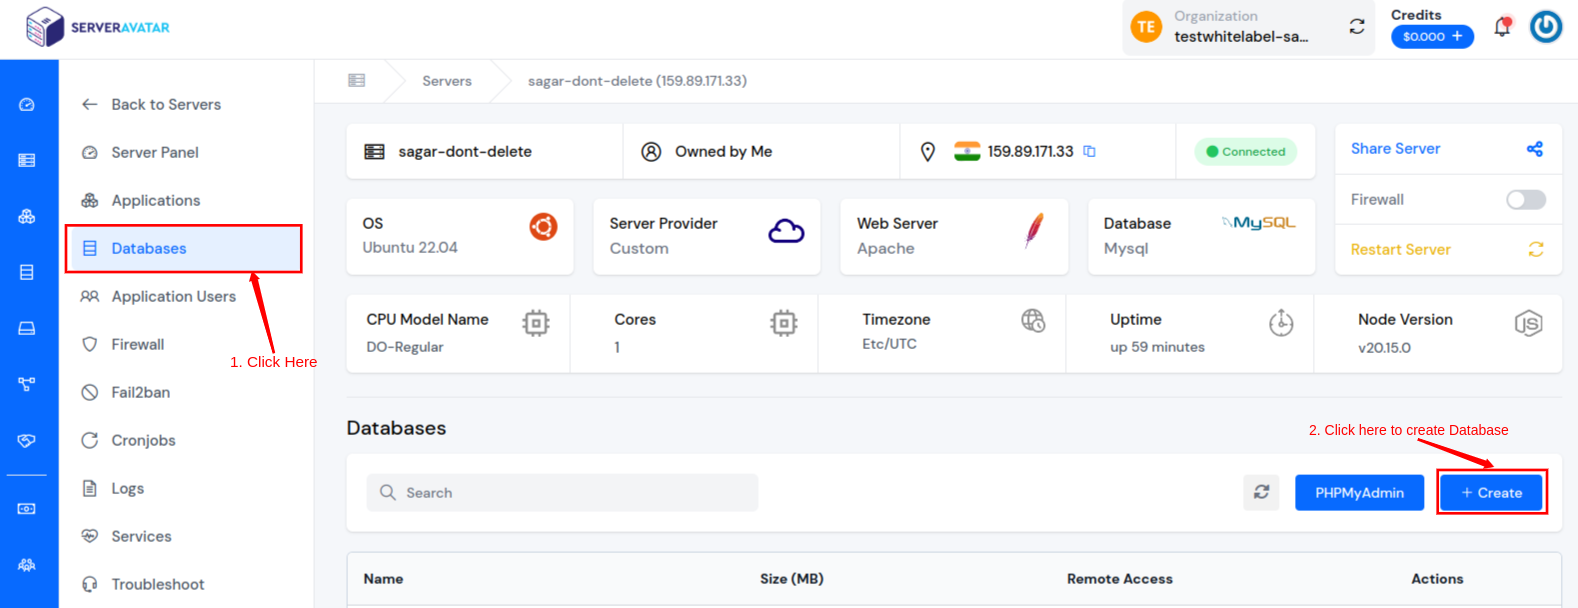
- To create a database, enter the necessary details, such as the database name, in the database creation form and click on the Create Database button as shown in the image below.
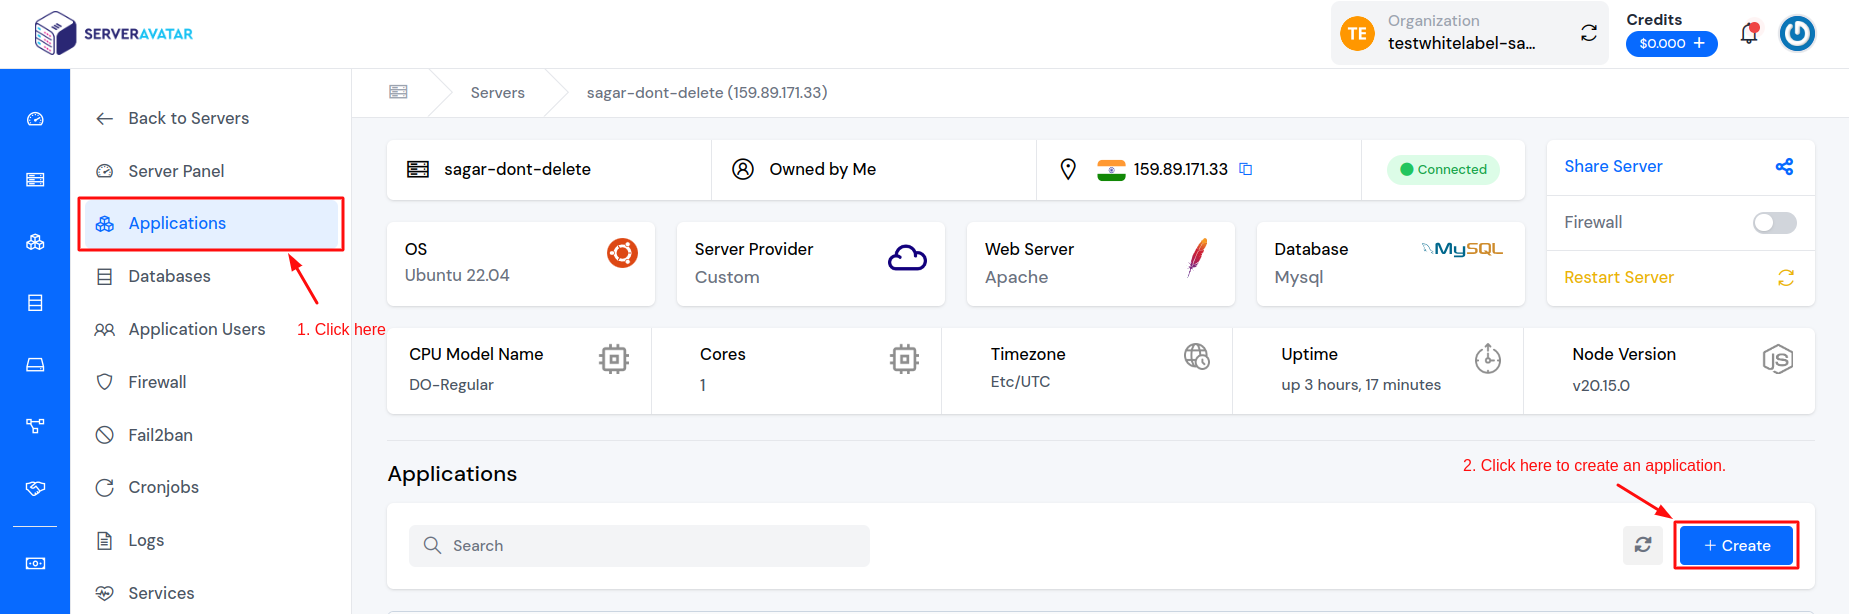
Step 2: Create a Custom Application
- To create a new Custom application for Snip-IT, navigate to the Applications tab on the server panel. Click on the Create button on the server panel to start the process of application creation.
-
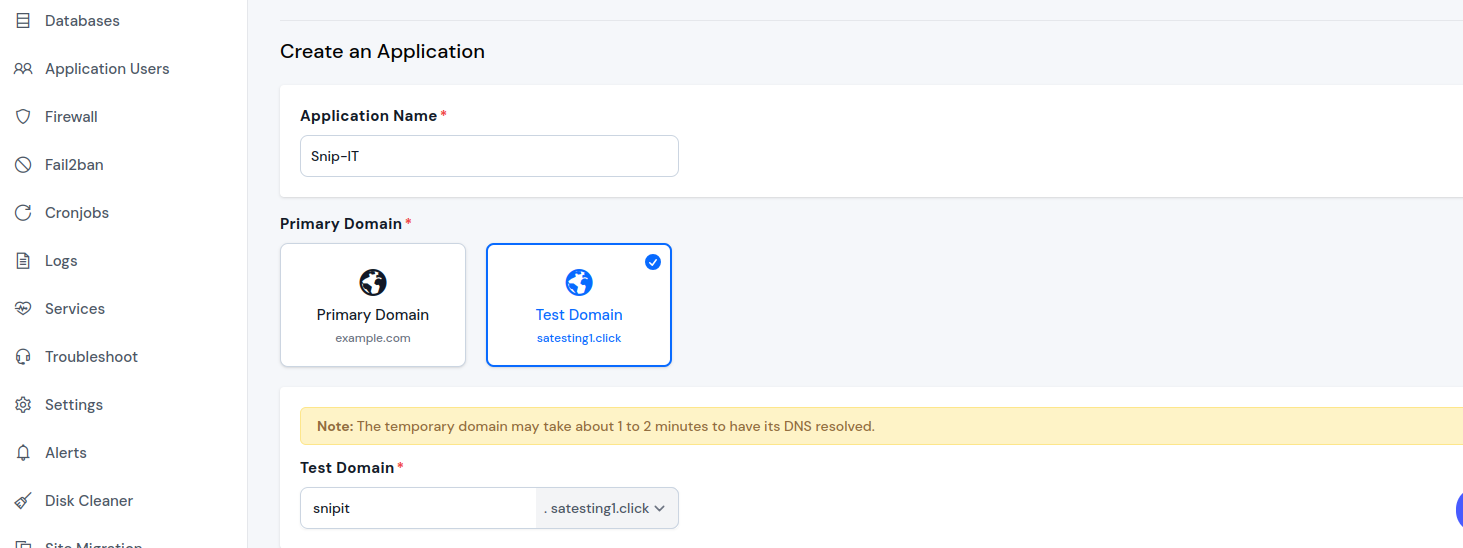
To create an application and proceed with the installation and deployment of Snip-IT, you need to complete the prerequisite setup.
- Start by entering an application name of your choice. Then, input the domain name where you want to direct your URL. You can select between a test domain or a primary domain. If you want to host it on a test domain, you can use ServerAvatar’s test domain. This flexibility allows you to make the perfect selection for your project.
- Note: If you want to host the Snip-IT application on your domain, then make sure to point your domain to the current IP address of your server.
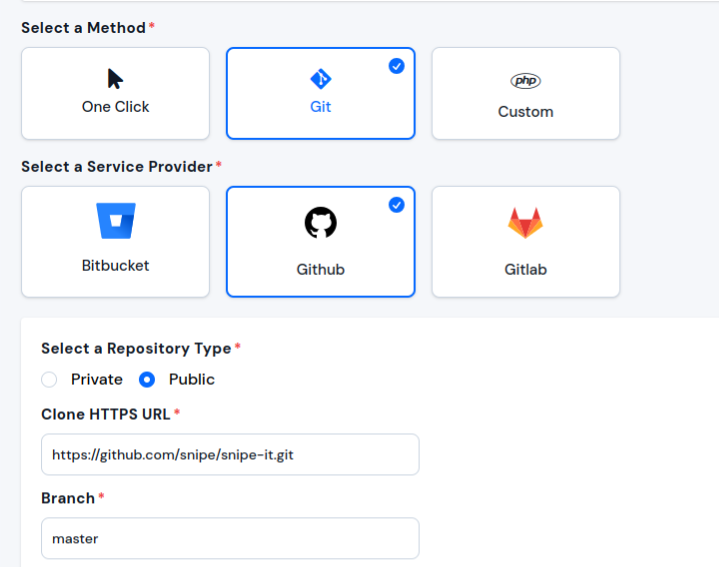
- Next, clone Snipe-IT from the available repository on GitHub.
- Select a method: Git
- Select a Service Provider: GitHub
- Select a Repository Type: Public
- Clone HTTPS URL: https://github.com/snipe/snipe-it.git
- Branch: master
- Let's move on to the next step in creating your application. Now, you need to set up deployment scripts. These are the manually entered commands that will run automatically after cloning the repository.
- Installing Snip-IT does not involve executing any manual scripts or commands during the deployment process. Therefore, you can simply leave this section blank.
- Deployment Scripts: (Leave it blank)
- To proceed further, click on "Show Advanced Options". You will find this option located just below the deployment scripts section.
- The next step is to create a system user for your application. You have the option to either select an existing user or create a new one specifically for this application.
- Now, select the PHP version. Choose a PHP version 8.1 or a newer version if available. For the custom webroot of Snip-IT, ensure it is set to public as shown in the provided snapshot.
- Select PHP Version: PHP version 8.1 or higher
- Custom Webroot: public
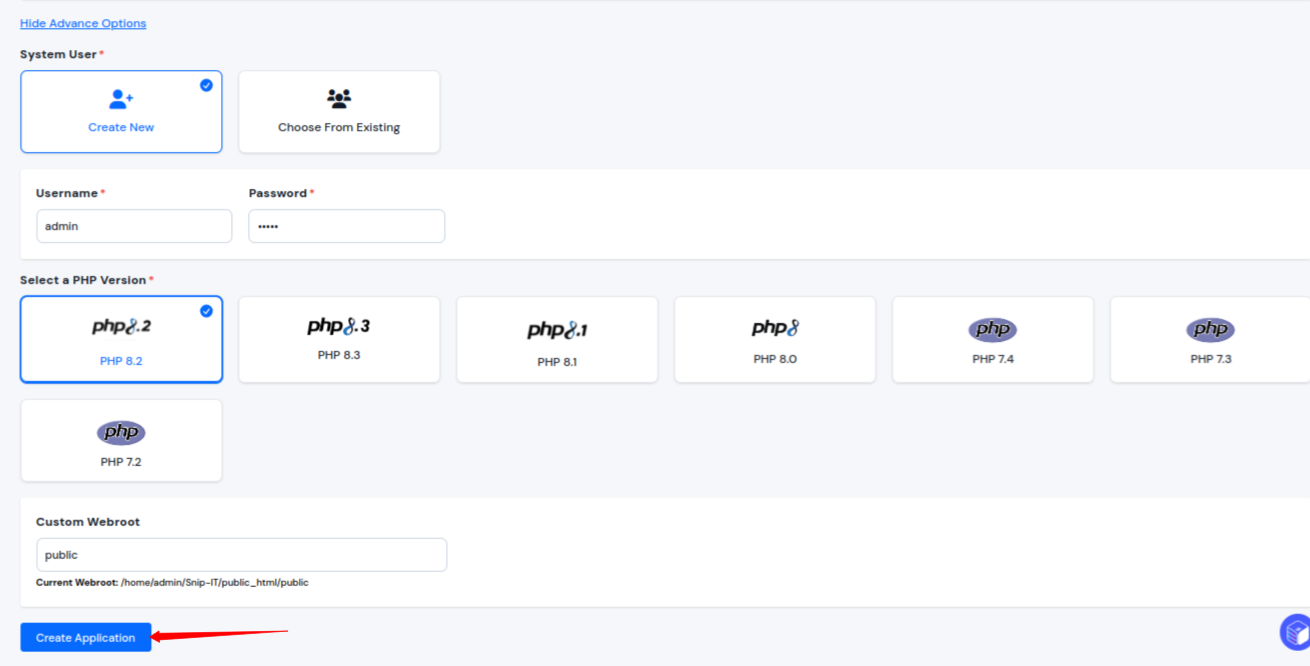
- Once you have configured all these settings, proceed by clicking the Create Application button to finish the process.
Step 3: Configure .env file
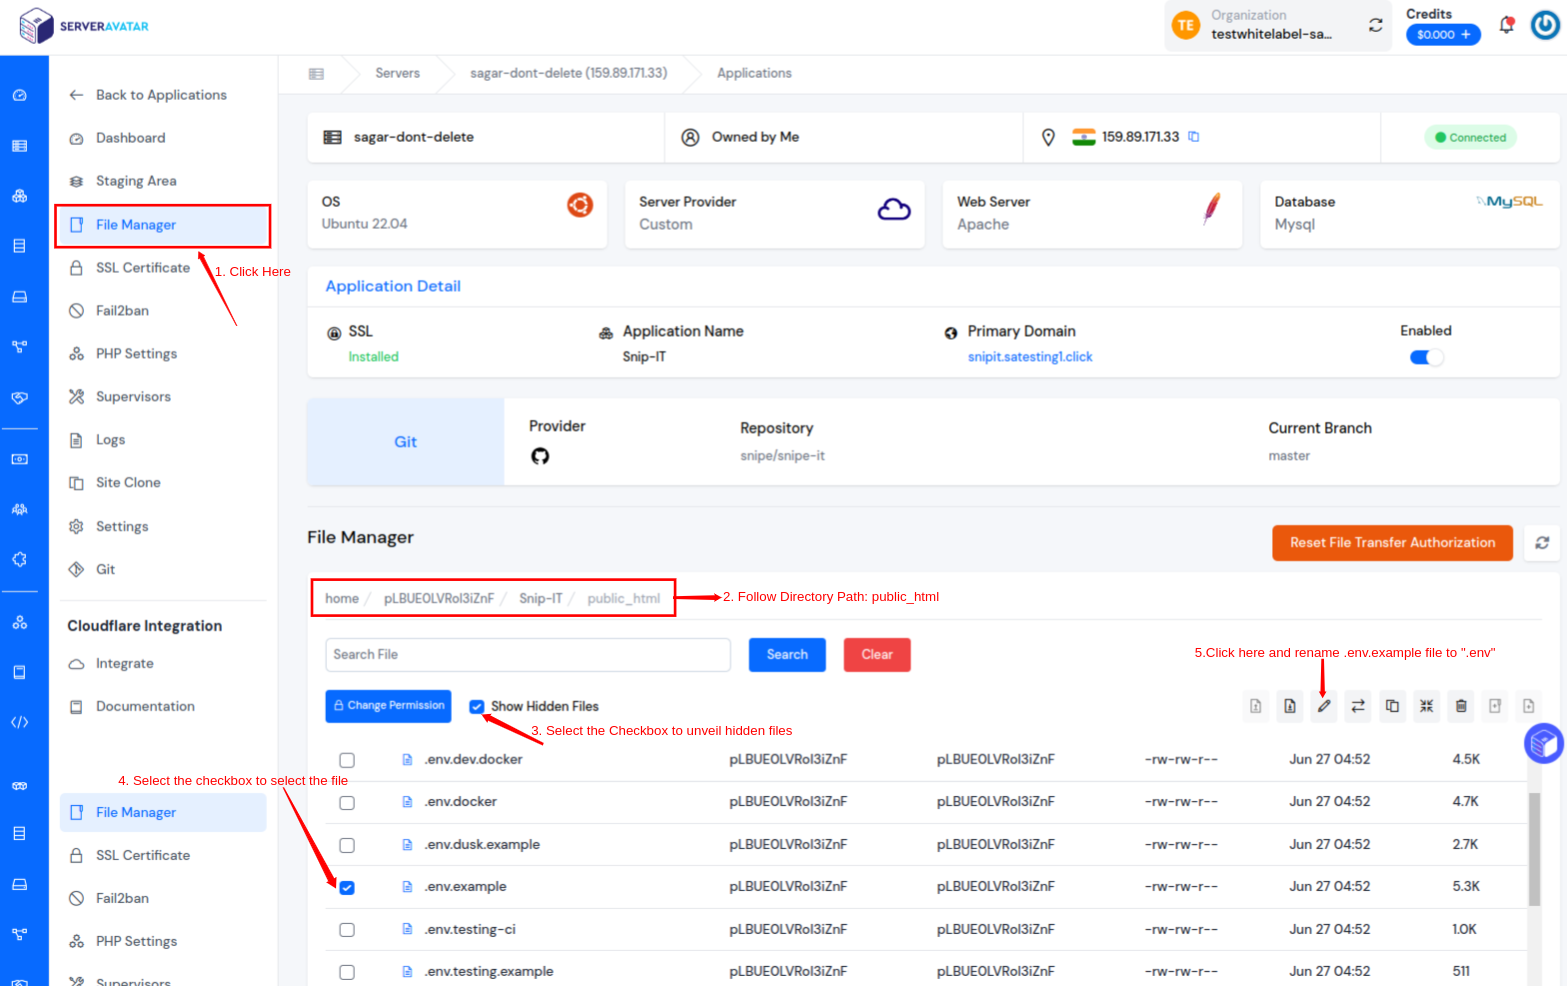
- In this step, we're connecting the database we created in Step 1 with the application we created in Step 2. To configure the database, we need to edit the environment (.env) file.
- To edit the .env file, you can access the public_html directory from your file manager or navigate through the directory path. Once you're there, make sure to select the checkbox for showing hidden files.
- Now, within this directory, you'll find a file named .env.example. To rename it, follow the procedure shown in the snapshot. Simply rename .env.example to .env This step is crucial for configuring the database properly.
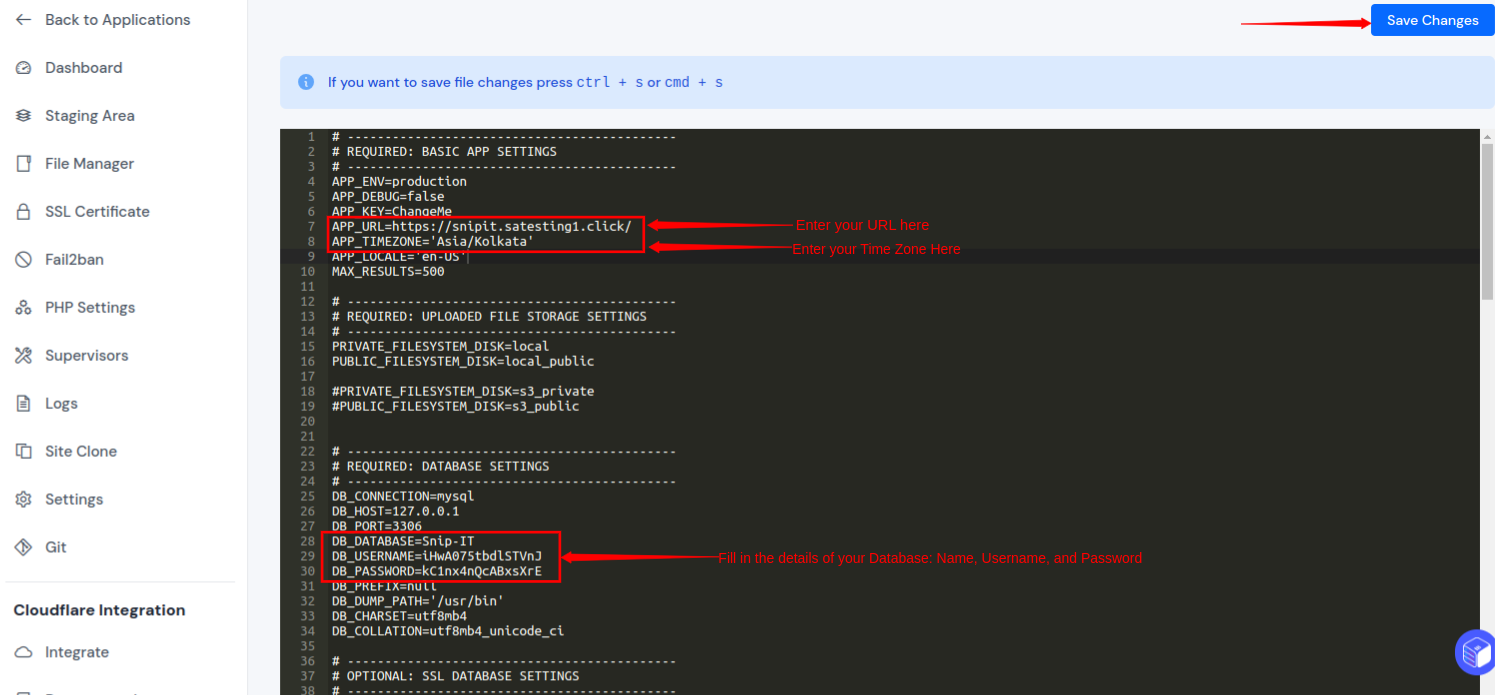
- After renaming the file to .env, open it and enter the database credentials that were created in Step 1. These credentials are necessary to establish a connection between the database and the application, enter the database credential we have already made. You can find all your database credentials, such as the database name, username, and password, by accessing the database tab from the server panel.
- Enter the following database credential we have already created in ServerAvatar:
- Database Name: Your Database name
- Database Username: Your Username
- Database password: Your Password
- Moreover, set the APP_URL to “your domain url”.
- Furthermore, you can set the Time Zone by making changes in APP_TIMEZONE='UTC'. This should use a PHP-supported timezone and should be enclosed in single quotes.
Setup your Outgoing Mail Settings:
- Configuring outgoing mail settings is required for your Snipe-IT installation to send emails.
- Without these settings, users won't be able to request a password reset if they get locked out, and your email alerts for expiring licenses and assets (etc) will not work. Additionally, asset acceptance and EULA requirements cannot be used on your system.
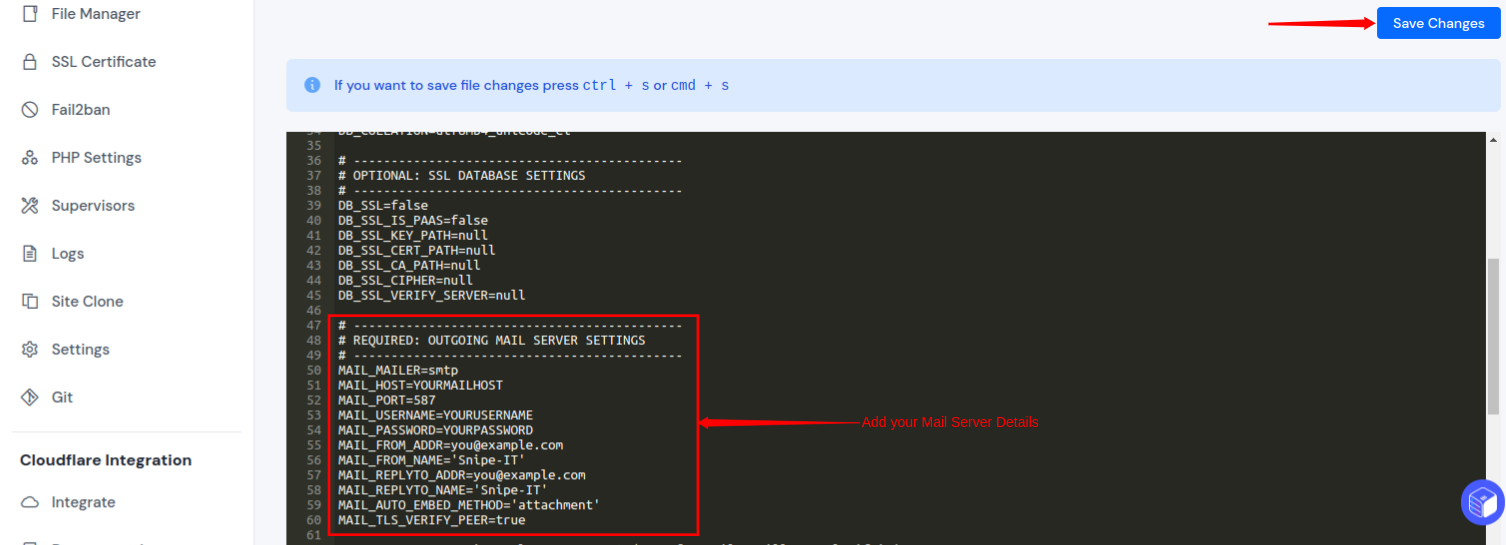
- Don't forget to Save the changes you've made to the ".env" file.
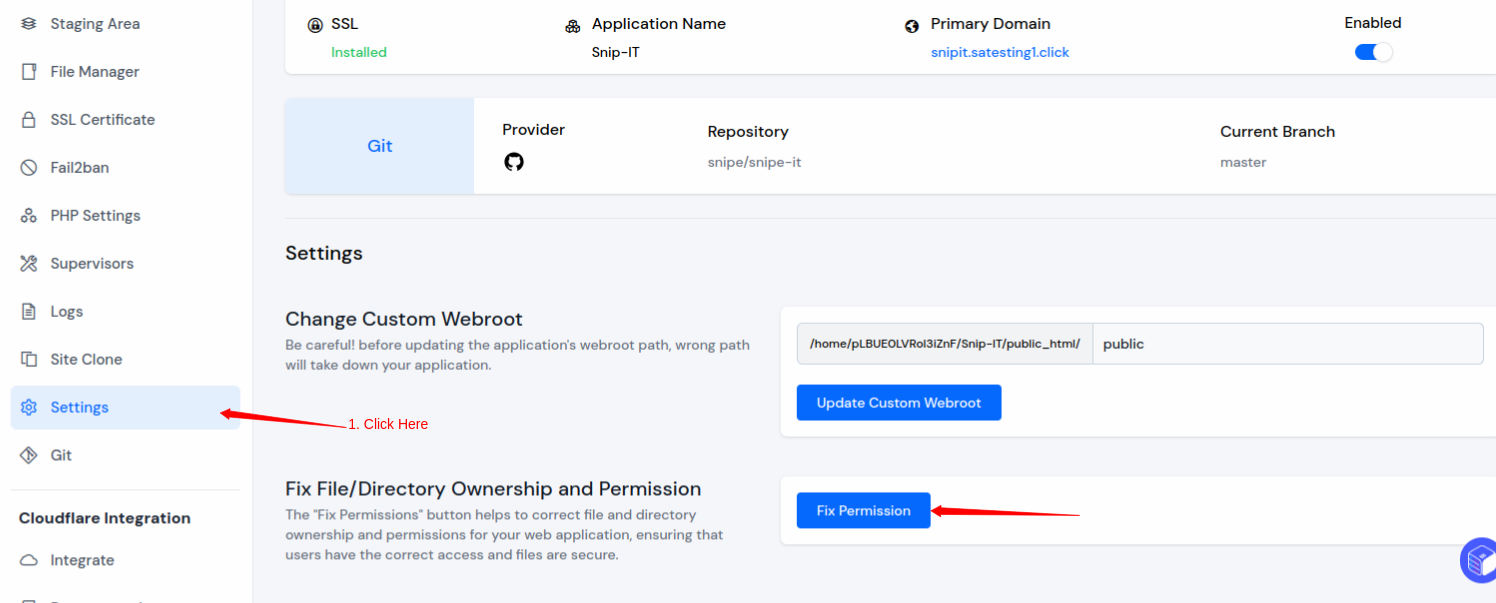
Set Directory Permissions:
- To fix the directory permissions, simply go to the Settings option within the application section. Click on the Fix Permission option from the “Fix File/Directory Ownership and Permission” section as shown in the below image.
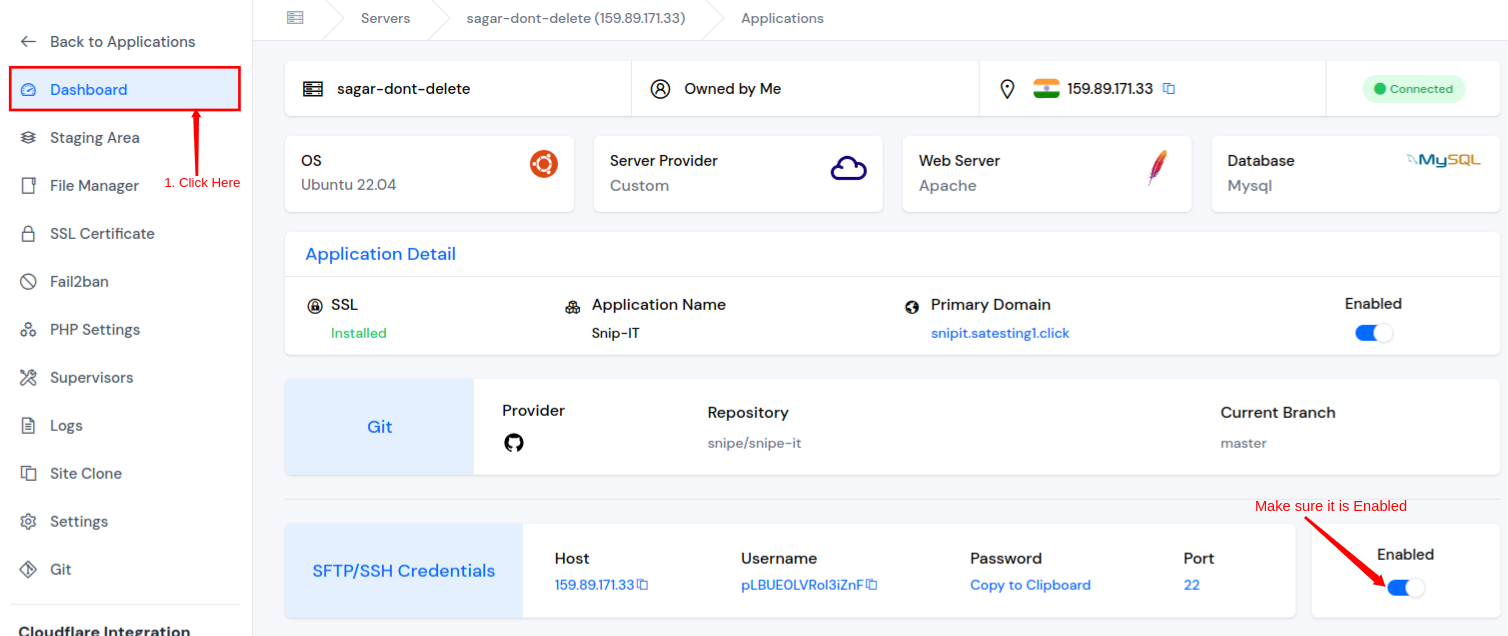
- To establish a connection, access the SSH credentials from the application panel dashboard. Ensure that the SFTP/SSH Credentials option is enabled, as illustrated in the provided snapshot.
- Execute the command to log in to the root user on your application in your terminal.
ssh {username}@{ip} - Replace
{username}with your actual username and{ip}with your server's IP address. You will be prompted to enter your password. After successful authentication, you will have remote access to your server. Enter the SSH Password to log in.

-
Go to the Public_html directory (by using commands ls and cd) and run the below commands.
curl -sS https://getcomposer.org/installer | php

php composer.phar install --no-dev --prefer-source

- OPTIONAL: It is not required to install Composer globally, however, if you wish to, you can find the command as shown in the image below:
composer install --no-dev --prefer-source

- The above command will install all the necessary packages.
- After that run the command to generate an application key. This will set APP_KEY with the right value automatically.
php artisan key:generate

- Once you've executed these commands, you will have successfully configured both the database and the application.
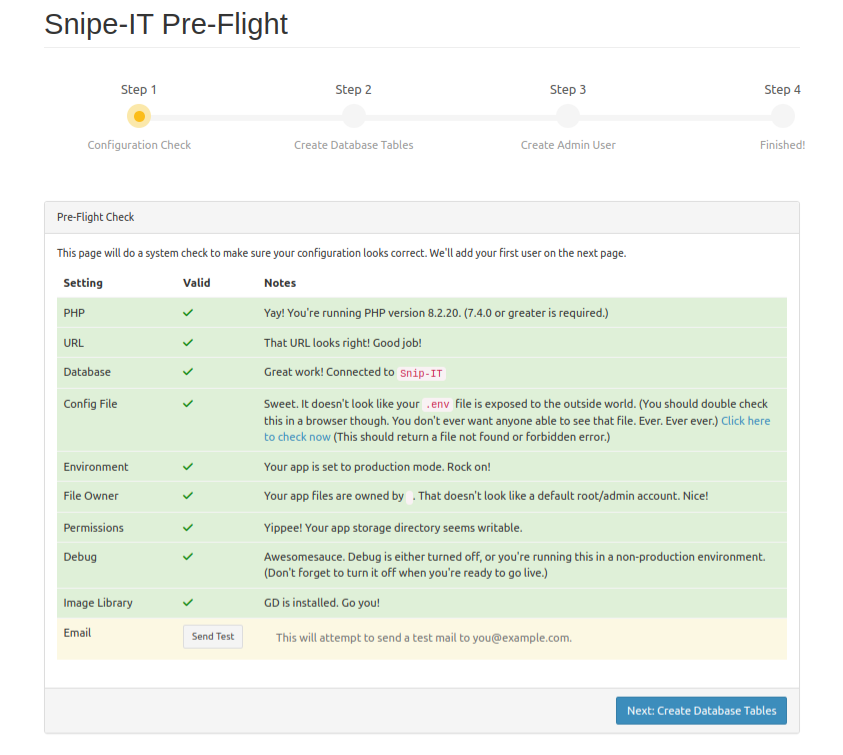
- When you open the Snip-IT by clicking on the link it will open the pre-flight page like the image below. Now, configure your Snipe-IT Pre-Flight with the required information.
- Once you've configured Snip-IT, you will see the login page like the image below.
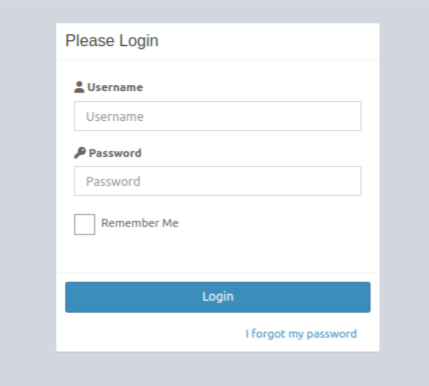
- To log in to Snip-IT, use the credentials you have set during the configuration and setup process.
- Username: Your Username
- Password: Your Password