WordPress is an open-source content management system known for its robust features and user-friendliness. It allows users to effortlessly create and manage a wide variety of websites using its extensive range of themes and plugins, offering customization without requiring advanced technical skills. For hosting WordPress, Google Cloud provides a reliable and scalable infrastructure with robust performance capabilities. ServerAvatar enhances the process by providing a straightforward, step-by-step guide for setting up WordPress on a Google Cloud server, ensuring a seamless and efficient installation.
Create a VM Instance in Google Cloud
Getting started with Google Cloud:
Google is one of the most famous and reliable cloud providers among all of its competitors in the market. Google Cloud Platform provides a robust and comprehensive set of cloud computing services, catering to diverse business needs from startups to large enterprises. With its focus on scalability, performance, security, and innovation, GCP enables organizations to build, deploy, and scale applications and services efficiently in the cloud. Whether it's computing, storage, data analytics, machine learning, or networking, GCP offers a powerful and flexible platform for modern cloud computing requirements.
Google Cloud Platform’s Compute Engine offers robust virtual machine capabilities designed to meet the needs of modern cloud computing environments. Whether you’re looking for flexibility, scalability, performance, or integration with other Google Cloud services, Compute Engine provides a comprehensive solution for running your applications and workloads in the cloud efficiently and securely. Here’s a detailed introduction to Google Cloud as a virtual machine provider:
- Compute Engine as a primary service: It allows you to quickly scale VMs up or down based on demand, allowing you to handle varying workloads effectively. Users have the flexibility to select VM instance types tailored to their needs for CPU, memory, and disk capacities. Google provides predefined machine types optimized for different tasks, or you can customize machine types to allocate resources according to specific requirements.
- Key Features and Capabilities: It provides preemptible VMs at a greatly reduced price, ideal for fault-tolerant and batch-processing tasks. VM instances can be migrated live between host systems without any downtime, ensuring exceptional availability and reliability. Users have the option to either create custom VM images or utilize Google's pre-built images for quick deployment of popular software configurations.
- Integration with Google Services: It offers Control access and permissions for VM instances by managing IAM roles and policies. Compute Engine seamlessly integrates with Google Cloud's VPC networking, enabling the creation of secure and isolated networks tailored for your VMs. It also supports VPNs, Cloud Interconnect, and Google Cloud Load Balancing to efficiently manage network traffic. Moreover, Google's Deployment Manager can be used to automate the creation and management of VMs and associated resources following Infrastructure-as-Code principles.
- Management and Monitoring: Administer VM instances using the Google Cloud Console, which offers a graphical interface for deploying, monitoring, and managing resources. Engage with Compute Engine programmatically through Google Cloud SDK tools and APIs, enabling automation and seamless integration with other systems.
- Security and Compliance: Compute Engine incorporates security features such as encryption of data at rest and in transit, secure boot, and IAM controls to safeguard VM instances and data. Google Cloud Platform adheres to various compliance standards (e.g., ISO, SOC, GDPR), providing assurances for regulatory requirements across different industries.
Let’s get started with creating a Virtual Machine on the Google Cloud Platform:
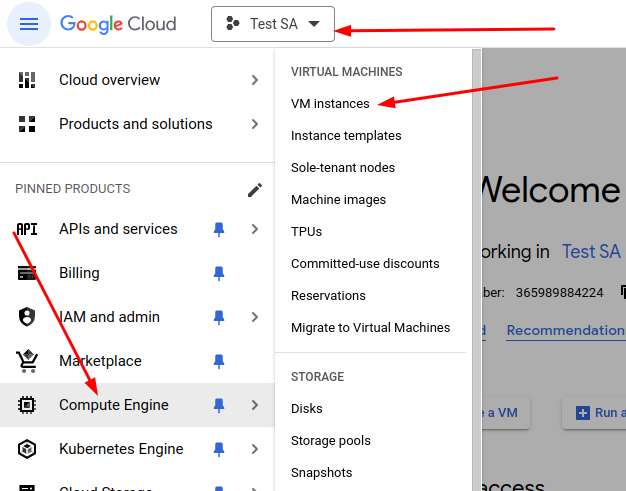
Step 1: Creating a VM in Google Cloud Platform
-
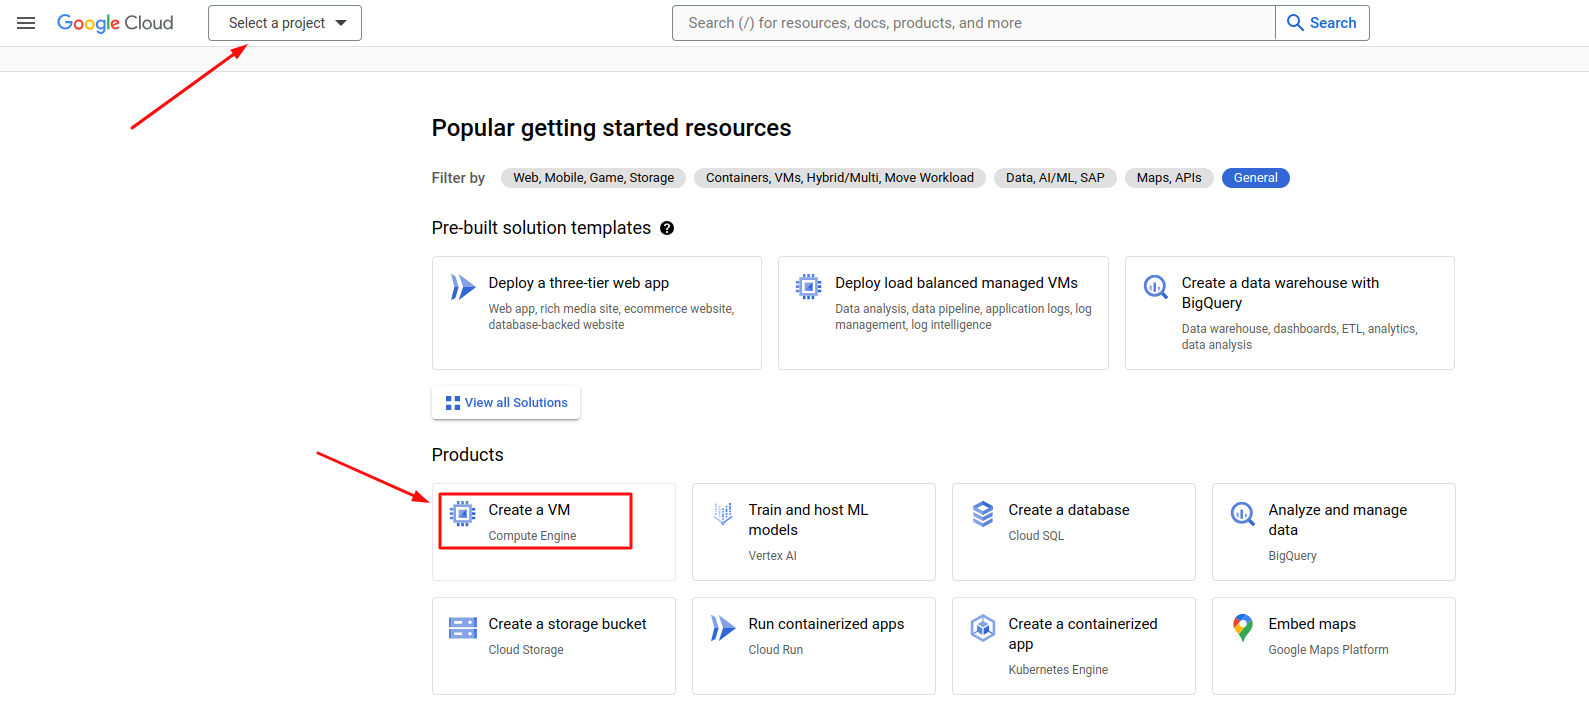
Click on the below link and log in to your Google account.
-
Here you can create a New project or you can select the project you want, and then click on Create a VM as shown in the image below.
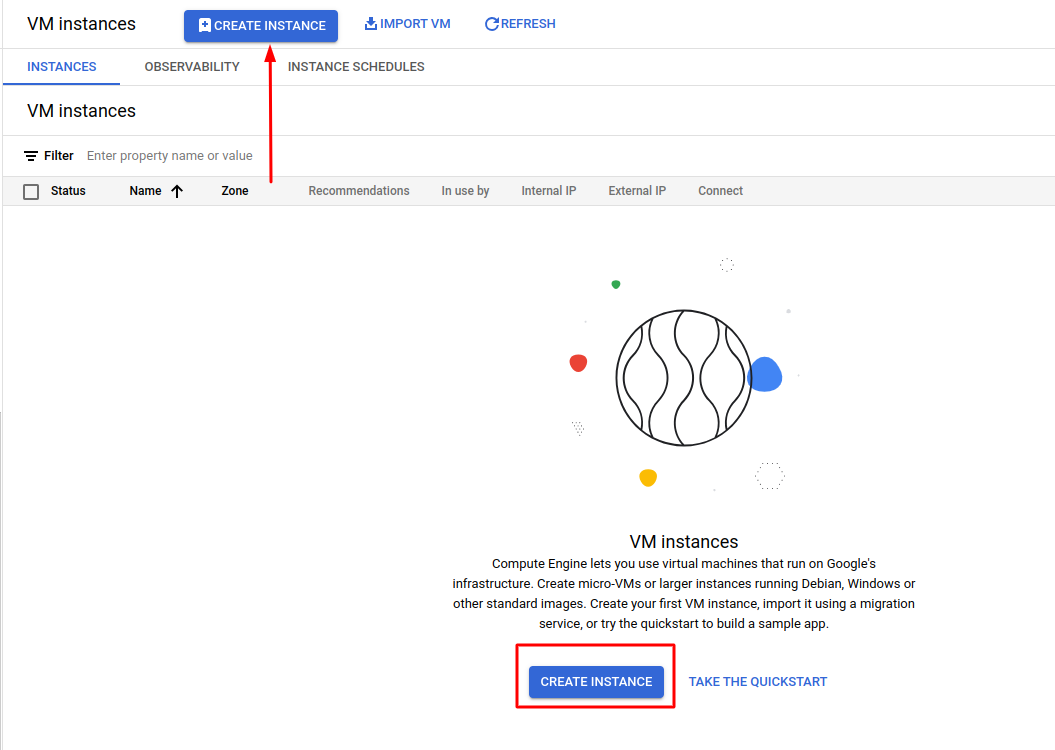
Step 2: Creating a VM Instance
- For creating a VM instance click on the sidebar, select the Compute Engine, and then click on the VM instances and Create Instance, as depicted in the images below.
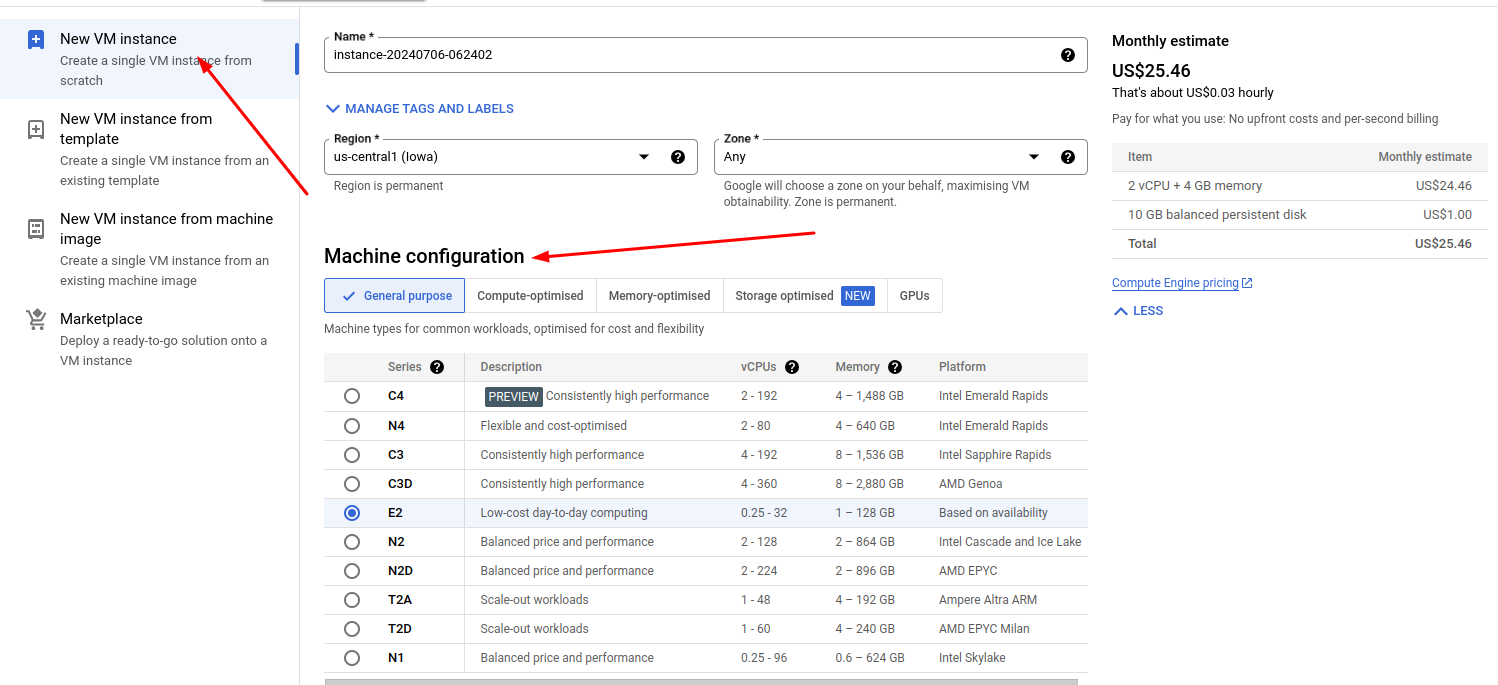
Step 3: Configuring a New VM Instance
- Click on New VM Instance, here you can give Name to your virtual machine. Additionally, you can select the Region and Zone of your choice. Moreover, you can select the machine according to your needs from the available types. Refer to the image below.
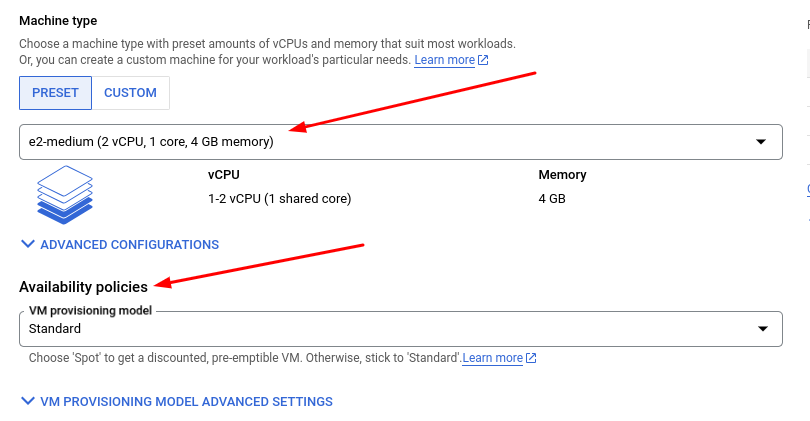
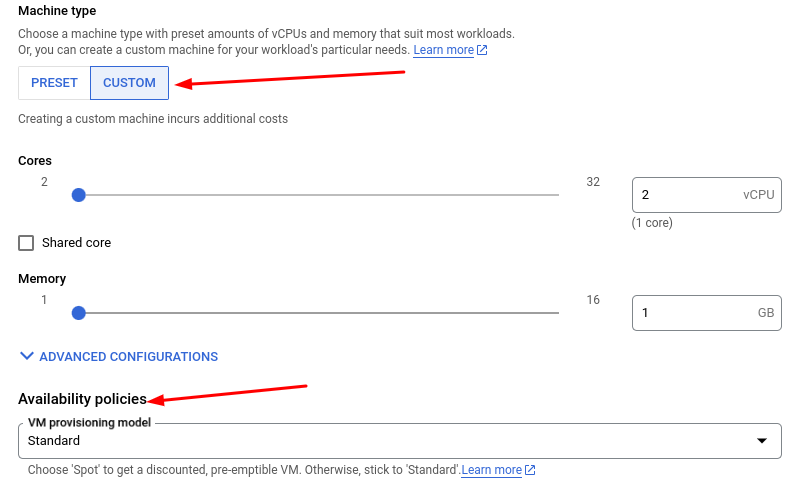
Step 4: Select the Machine type
- Now you have the option to select a Machine Type with predefined configurations of vCPUs and memory which is suitable for most workloads. In addition to this, you can also add Availability policies according to your needs. (Recommended Standard policy)
- Also, you can customize your machine that is suitable for your workload as shown in the image below.
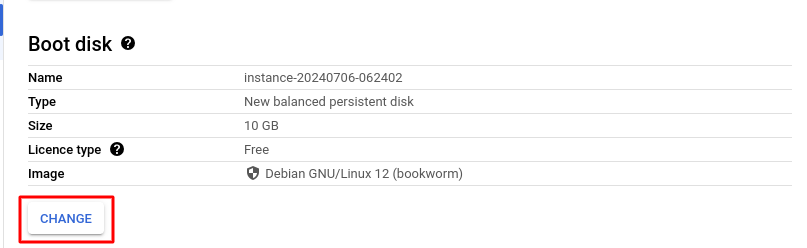
Step 5: Select the Boot disk
- In this step, you have to select the Operating System for your instance. Click on the Change button to select the boot disk as shown in the image below.
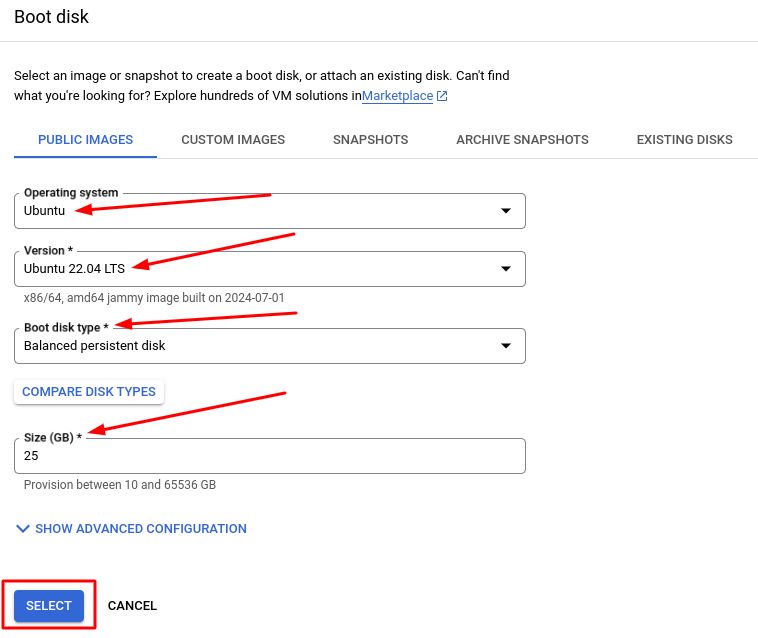
- We recommend you to use Ubuntu 20.04 LTS x64 or Ubuntu 22.04 LTS x64. Ubuntu is easy to configure and manage. If you are using ServerAvatar to manage your instance, these operating systems are required. Moreover, you can select the disk type you want; however, we recommend you select a Balanced persistence disk with a minimum 25 GB disk size, then click on the Select button as depicted in the following image.
Step 6: Firewall rules
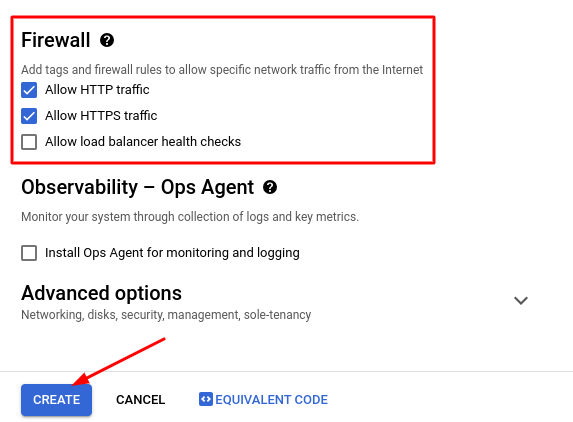
- The next step is to allow firewall rules that are available at the time of creating an instance in Google. Select the checkbox next to the HTTP and HTTPS to allow incoming traffic. Click on the Create button to create a VM instance in Google as shown in the image below.
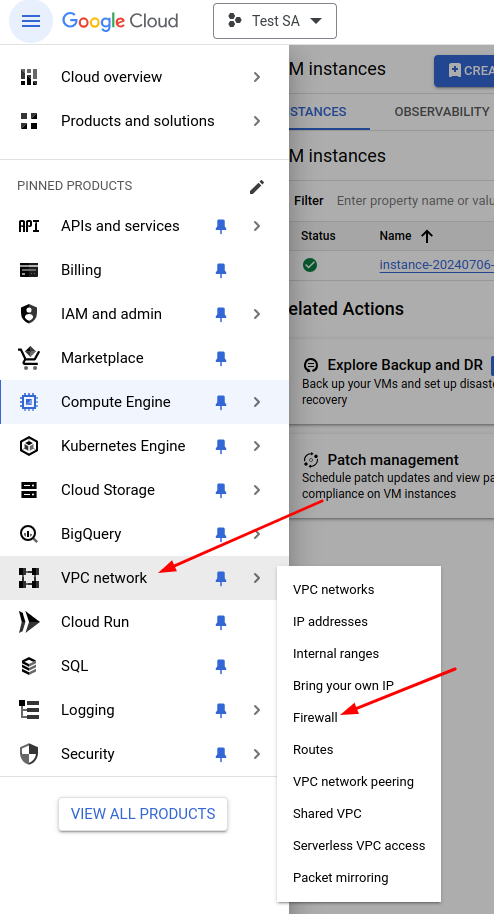
Step 7: Creating New Firewall Rule
- Now, you have to go to the VPC network by clicking on the sidebar and then click on the Firewall section. After that click on Create Firewall Rule as shown in the images below.
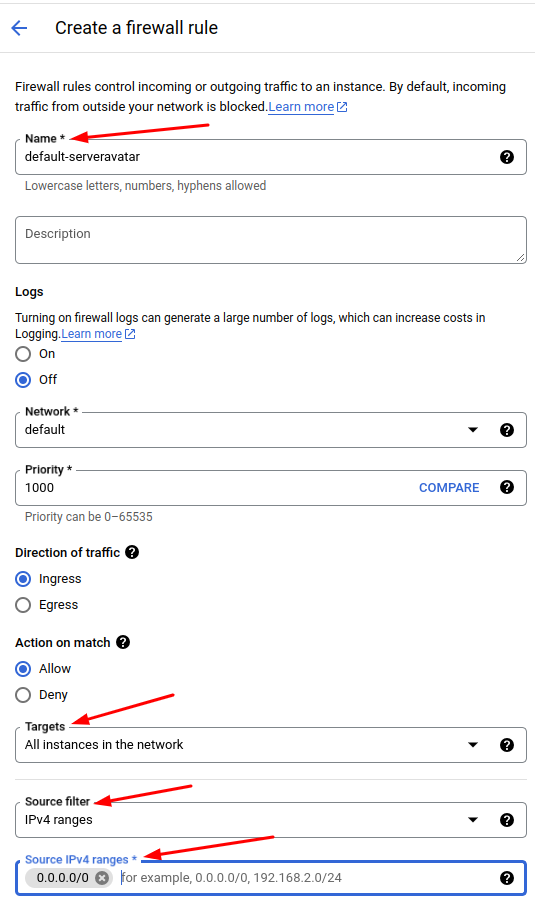
- Here you have to enter the details such as the Name of the rule and its description. You can also turn on firewall logs. In addition to this leave the network and priority sections as default. The direction of traffic should be Ingress and Allow the action. In the Targets section, you have three options: All instances in the network, Specified target tags, and Specified service accounts, select from them according to your needs. Furthermore, set the Source filter to IPv4 ranges you can specify the ranges as per your requirement in the Source IPv4 ranges input field. To understand it better refer to the image below.
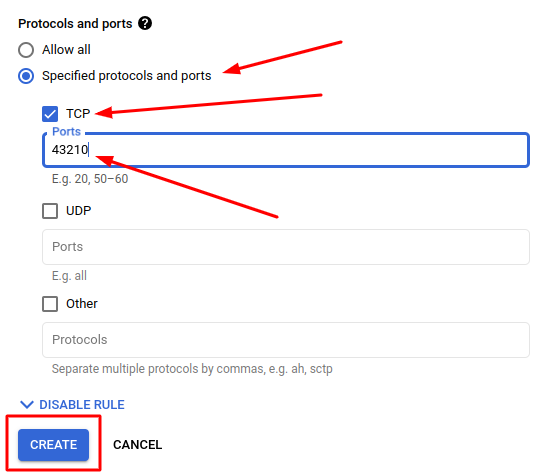
- Lastly, you need to specify the Protocols and ports. ServerAvatar requires 43210 port to be open and the protocol is TCP so add the port number in that field and click on Create as shown in the image below.
- Congratulations! You have successfully created your instance in Google Cloud which is now ready to connect with ServerAvatar.
Initial Server Configuration
The Initial server configuration includes the installation and configuration of various packages required to host your website. Usually, You have to write commands and modify configuration files. Luckily, With ServerAvatar, Your full server configuration and optimization can be automated.
Here are the three ways to automatically configure your server with ServerAvatar.
Connect a server using a direct method
- Login/Register to ServerAvatar account, click the Create button from the right side of the screen, and select Server from the dropdown.
- Select Direct Method in the serve connecting method section.
- Type the Server Name as per your choice.
- Select a Tech Stack as per your need. You can either select Apache, Nginx, OpenLiteSpeed or Node Stack.
- Select a Database: MySQL, MariaDB or MongoDB.
- Enable the toggle if you want to install the latest LTS version of node.js on your server.
- Select a Management plan and click the Connect Now button.
- You’ll see the command on your screen. Login to your server using an ssh connection and execute that command as a root user.
- The server connection process will be started on your ServerAvatar account after executing the command.
Connect a server using integration
- Login/Register to your ServerAvatar account, navigate to the Integration tab from the sidebar of the panel, and access Cloud Platform from the dropdown.
- Now Select a cloud platform you want to link with ServerAvatar.
- The popup form will appear on your screen. Enter details to link your cloud provider account. The integration method is different based on the cloud provider you select.
- You can integrate five different cloud provider platforms with ServerAvatar, which is-
Check the above link of cloud platforms to know more about integrating cloud platforms with ServeAvatar.
Connect a server using commands
Step 1. Login to your server using root user
Once you create a server as per your requirements, connect to your server using an ssh connection and execute the below three commands as a root user in your server console area.
wget https://srvr.so/install
chmod +x install
./install
Step 2. Select a web server
It will ask you which web server you would like to install on your server: Apache, Nginx, OpenLiteSpeed or Node Stack. Type anyone that you would like to install on your server and hit the enter button.
Step 3. Claim your server
Completing the process will give you a link to claim your server.
Open the link on your browser to access the ServerAvatar server panel.
Auto-Install WordPress with ServerAvatar
Step 1: Create a PHP application
Access the Application tab on your server panel and click the Create button.
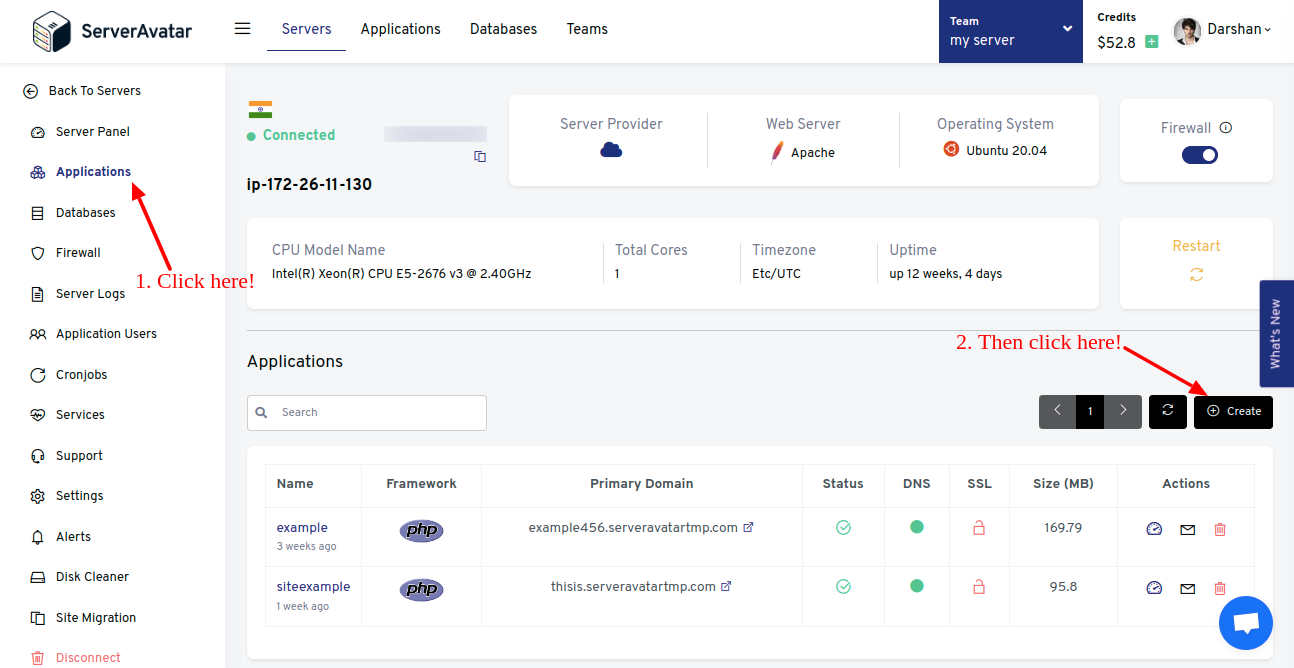
Fill up the required details and click the Create Application button.

Note That:
If you want to host WordPress CMS on your domain, then make sure to point your domain to the current IP address of your server, and for that:
-
Log in to your hosting provider site, where you buy your domain. You can check your domain information with one click.
-
Access DNS Manager to edit your DNS records(contact the support team if you don’t find them)
-
Change the IP address of A Record of your website to the current server’s IP address.
Step 2: Auto-install WordPress Application
On your application panel, click the Auto Deploy tab from the sidebar.
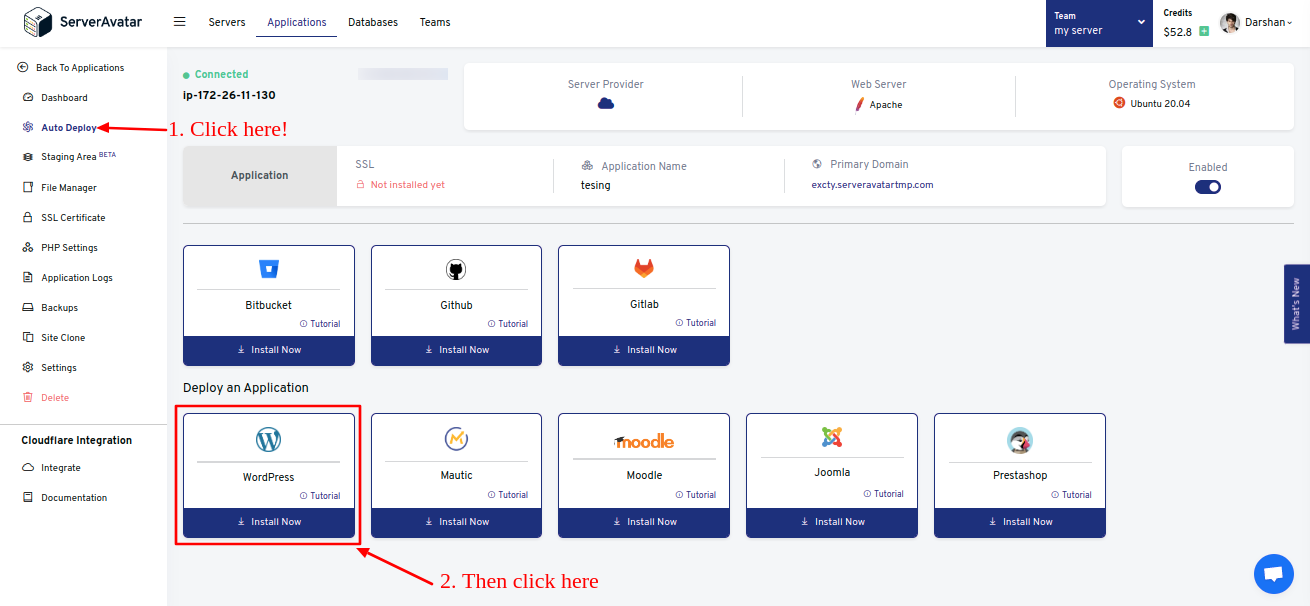
Now click on the WordPress Install Now card, as seen in the above image.
It asks to enter WordPress details on the form. It includes-
- WordPress Title: Title of your WordPress
- Username: WordPress admin username
- Email: Your Email address. It's an optional field. You can also set it after installing WordPress
- Password: WordPress admin password
- Database server: Choose a server in which you want your WordPress database
- Database Name: Enter the name of the WordPress database.
Once you fill up all the information, click the Install Now button, and that's it. ServerAvatar will install WordPress on your domain/ServerAvatar domain within a minute.
You can access the login page on the URL:example.com/wp-admin.