CodeIgniter is an open-source PHP framework known for its features and flexibility. It allows developers to build and manage web applications efficiently, providing tools for routing, database interaction, and session management. With its extensive libraries and easy customization options, CodeIgniter facilitates the creation of web solutions without requiring advanced technical skills. Linode is a dependable hosting option for Codeigniter, providing scalable infrastructure and simple deployment solutions. ServerAvatar makes it easy and user-friendly to deploy the Codeigniter on the Linode platform.
Create a server in Linode
First of all, Let's create a VM instance in Linode. It provides a lot of different types of VM instances. You can create shared VM instances, Dedicated Instances, Memory-optimized instances, and GPU instances. To host a simple website, You will need a shared VM instance.
If you think your application uses high CPU or RAM, You can go for a Dedicated CPU VM or Memory Optimised VM respectively. Let's get started with the process.
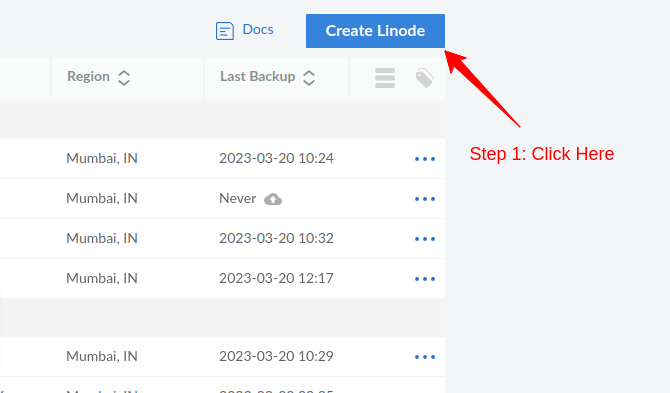
Step 1: Go to Linode VM Instance Creation Form
When you log in to your Linode account, You will see the Create Linode button on the top-right corner of the page. Click on it to go to the Linode creation form.
Step 2: Select the Distribution
ServerAvatar supports Ubuntu 20.04 LTS x64 and Ubuntu 22.04 LTS x64. So, it is recommended to select any one of the supported OS.

Step 3: Select the Region
Linode has multiple data centers located in different regions worldwide. It is recommended to choose the region that is closest to your major traffic source to reduce latency and improve the performance of your applications.

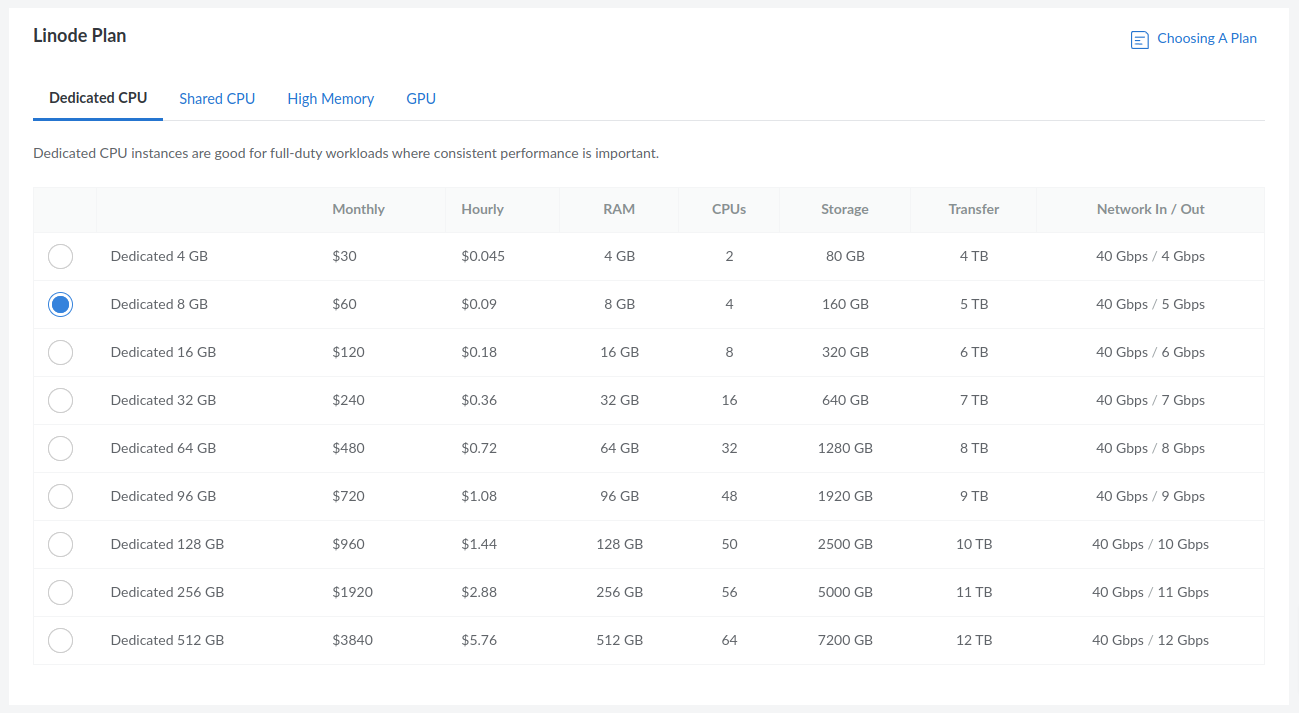
Step 4: Select Linode Plan
Linode offers various plans with different configurations of CPU, RAM, and storage. Choose a plan that fits in your budget and meets your application's needs. With ServerAvatar, You can also host multiple applications on a single Linode VM Instance.
The minimum requirements for hosting CodeIgniter are at least 1GB of RAM, more is required for better performance, and a minimum of 1GB of free disk space is recommended, but more may be needed depending on your application files, logs, and databases. The exact amount will depend on your usage and data storage needs.
Step 5: Set Label and Select Tags
The label is a human-readable name that you can use to identify your instance. Tags are keywords that you can use to categorize and search for your instances. You can also group Linodes by Tags on the dashboard.

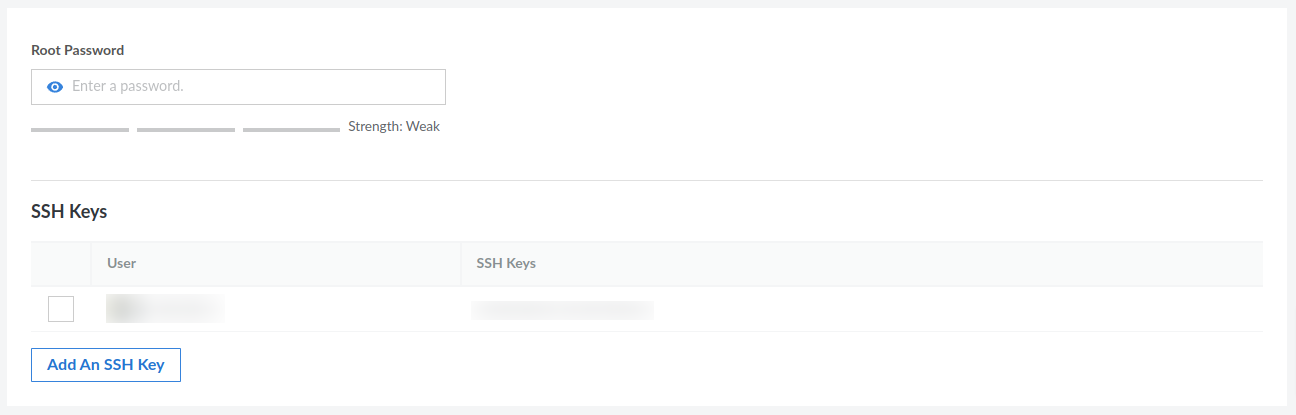
Step 6: Set Strong Root Password and Select SSH Key
The root password is the administrator password that you will use to access and manage your VM instance. Make sure to use a strong password that is hard to guess and includes a combination of uppercase and lowercase letters, numbers, and special characters.
Next, select an SSH key if you want to authenticate with SSH keys. SSH keys are a more secure way to log in to your VM instance than using passwords. If you have an SSH key, you can upload it to your Linode account and use it to log in to your VM instance.
Step 7: Select VLAN (If Required)
A VLAN is a logical network that separates traffic from different virtual machines or physical servers. It can be used to isolate network traffic and improve security.

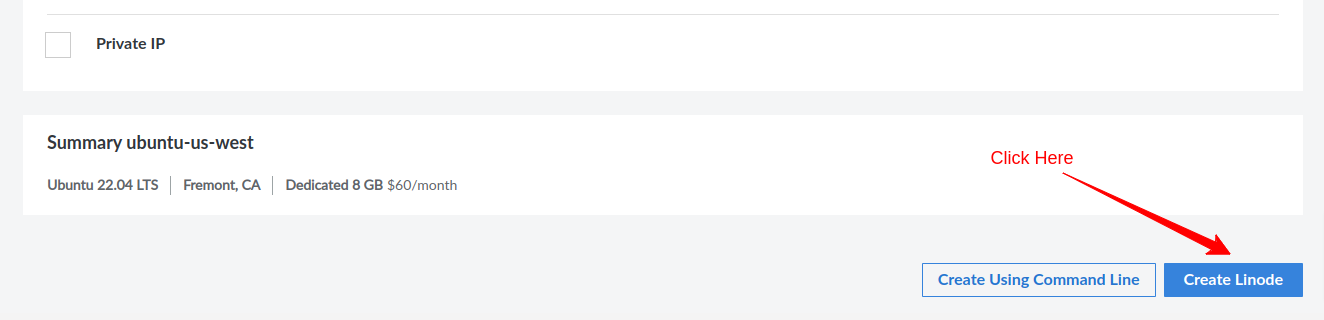
Step 8: Select Add-ons - Backups and Private IP
Linode provides an easy way to create and store backups for your VM instances. Backups are highly recommended as they can help you with disaster recovery quickly. In the last step, You can enable the Private IP address for your VM instance if required.

Step 9: Click on "Create Linode"
Finally, Click on the Create Linode button at the end of the form to create a Linode VM instance. It usually takes around 2 minutes to create a new Linode instance. Once done, You can connect it with ServerAvatar for ease of site and server configuration management.
Initial Server Configuration
The Initial server configuration includes the installation and configuration of various packages required to host your website. Usually, You have to write commands and modify configuration files. Luckily, With ServerAvatar, Your full server configuration and optimization can be automated.
Here are the three ways to automatically configure your server with ServerAvatar.
Connect a server using a direct method
- Login/Register to ServerAvatar account, click the Create button from the right side of the screen, and select Server from the dropdown.
- Select Direct Method in the serve connecting method section.
- Type the Server Name as per your choice.
- Select a Tech Stack as per your need. You can either select Apache, Nginx, OpenLiteSpeed or Node Stack.
- Select a Database: MySQL, MariaDB or MongoDB.
- Enable the toggle if you want to install the latest LTS version of node.js on your server.
- Select a Management plan and click the Connect Now button.
- You’ll see the command on your screen. Login to your server using an ssh connection and execute that command as a root user.
- The server connection process will be started on your ServerAvatar account after executing the command.
Connect a server using integration
- Login/Register to your ServerAvatar account, navigate to the Integration tab from the sidebar of the panel, and access Cloud Platform from the dropdown.
- Now Select a cloud platform you want to link with ServerAvatar.
- The popup form will appear on your screen. Enter details to link your cloud provider account. The integration method is different based on the cloud provider you select.
- You can integrate five different cloud provider platforms with ServerAvatar, which is-
Check the above link of cloud platforms to know more about integrating cloud platforms with ServeAvatar.
Connect a server using commands
Step 1. Login to your server using root user
Once you create a server as per your requirements, connect to your server using an ssh connection and execute the below three commands as a root user in your server console area.
wget https://srvr.so/install
chmod +x install
./install
Step 2. Select a web server
It will ask you which web server you would like to install on your server: Apache, Nginx, OpenLiteSpeed or Node Stack. Type anyone that you would like to install on your server and hit the enter button.
Step 3. Claim your server
Completing the process will give you a link to claim your server.
Open the link on your browser to access the ServerAvatar server panel.
Install and Setup CodeIgniter on Cloud using ServerAvatar
Getting Started with CodeIgniter:
CodeIgniter is a powerful PHP Framework. It's a fantastic choice for small websites and projects. CodeIgniter comes with various features and functionalities. CodeIgniter Framework is Light, Fast, Flexible, and Secure to build full-stack web applications. CodeIgniter is most often noted for its speed when compared to other PHP frameworks. Thanks to its versatile features and advantages, CodeIgniter is in high demand among PHP developers. Web applications developed with CodeIgniter perform efficiently and quickly.
Key Features:
- Open Source: CodeIgniter is open-source, you can build Web applications according to your needs.
- Light weight: CodeIgniter is extremely light-weighted. its core system requires a very small library. That is why it is quite fast and lightweight.
- SEO-friendly URLs: CodeIgniter generates clean, search-engine-friendly URLs.
- MVC Pattern: CodeIgniter follows the Model-View-Controller (MVC) pattern, which separates logic and presentation. The controller handles requests, the model performs database actions, and the view displays the output.
- Built-in libraries: CodeIgniter comes with a comprehensive set of libraries for web tasks like database handling, form validation, sending emails, image manipulation, and more.
Setting up CodeIgniter:
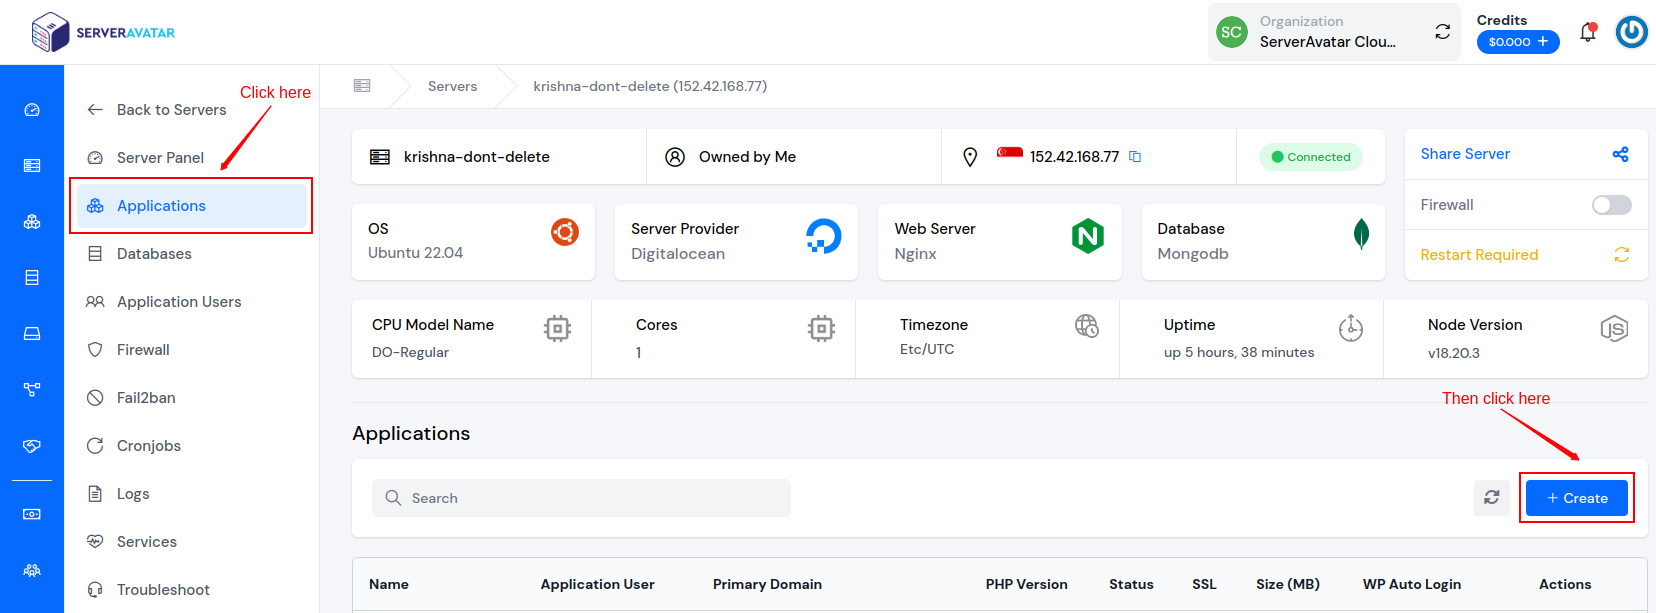
Step 1: Create a GitHub application
Start by creating a GitHub Application using ServerAvatar. Go to the Applications tab on the server panel and click on the Create button as shown in the image below.
On the following screen, fill in the Application details, including:
- Application Name: enter your Application Name.
- Select Domain: Select between a Test Domain or a Primary Domain as per your requirements.
- Enter Domain: Enter your Application Domain.
- Method: Select Git as your application method.
- Service Provider: Select GitHub as service provider for cloning the repository.
- Repository Type: Public
- Clone HTTPS URL: https://github.com/codeigniter4/CodeIgniter4.git
-
Branch:
master -
Deployment Script:
composer update(to update the composer after cloning)
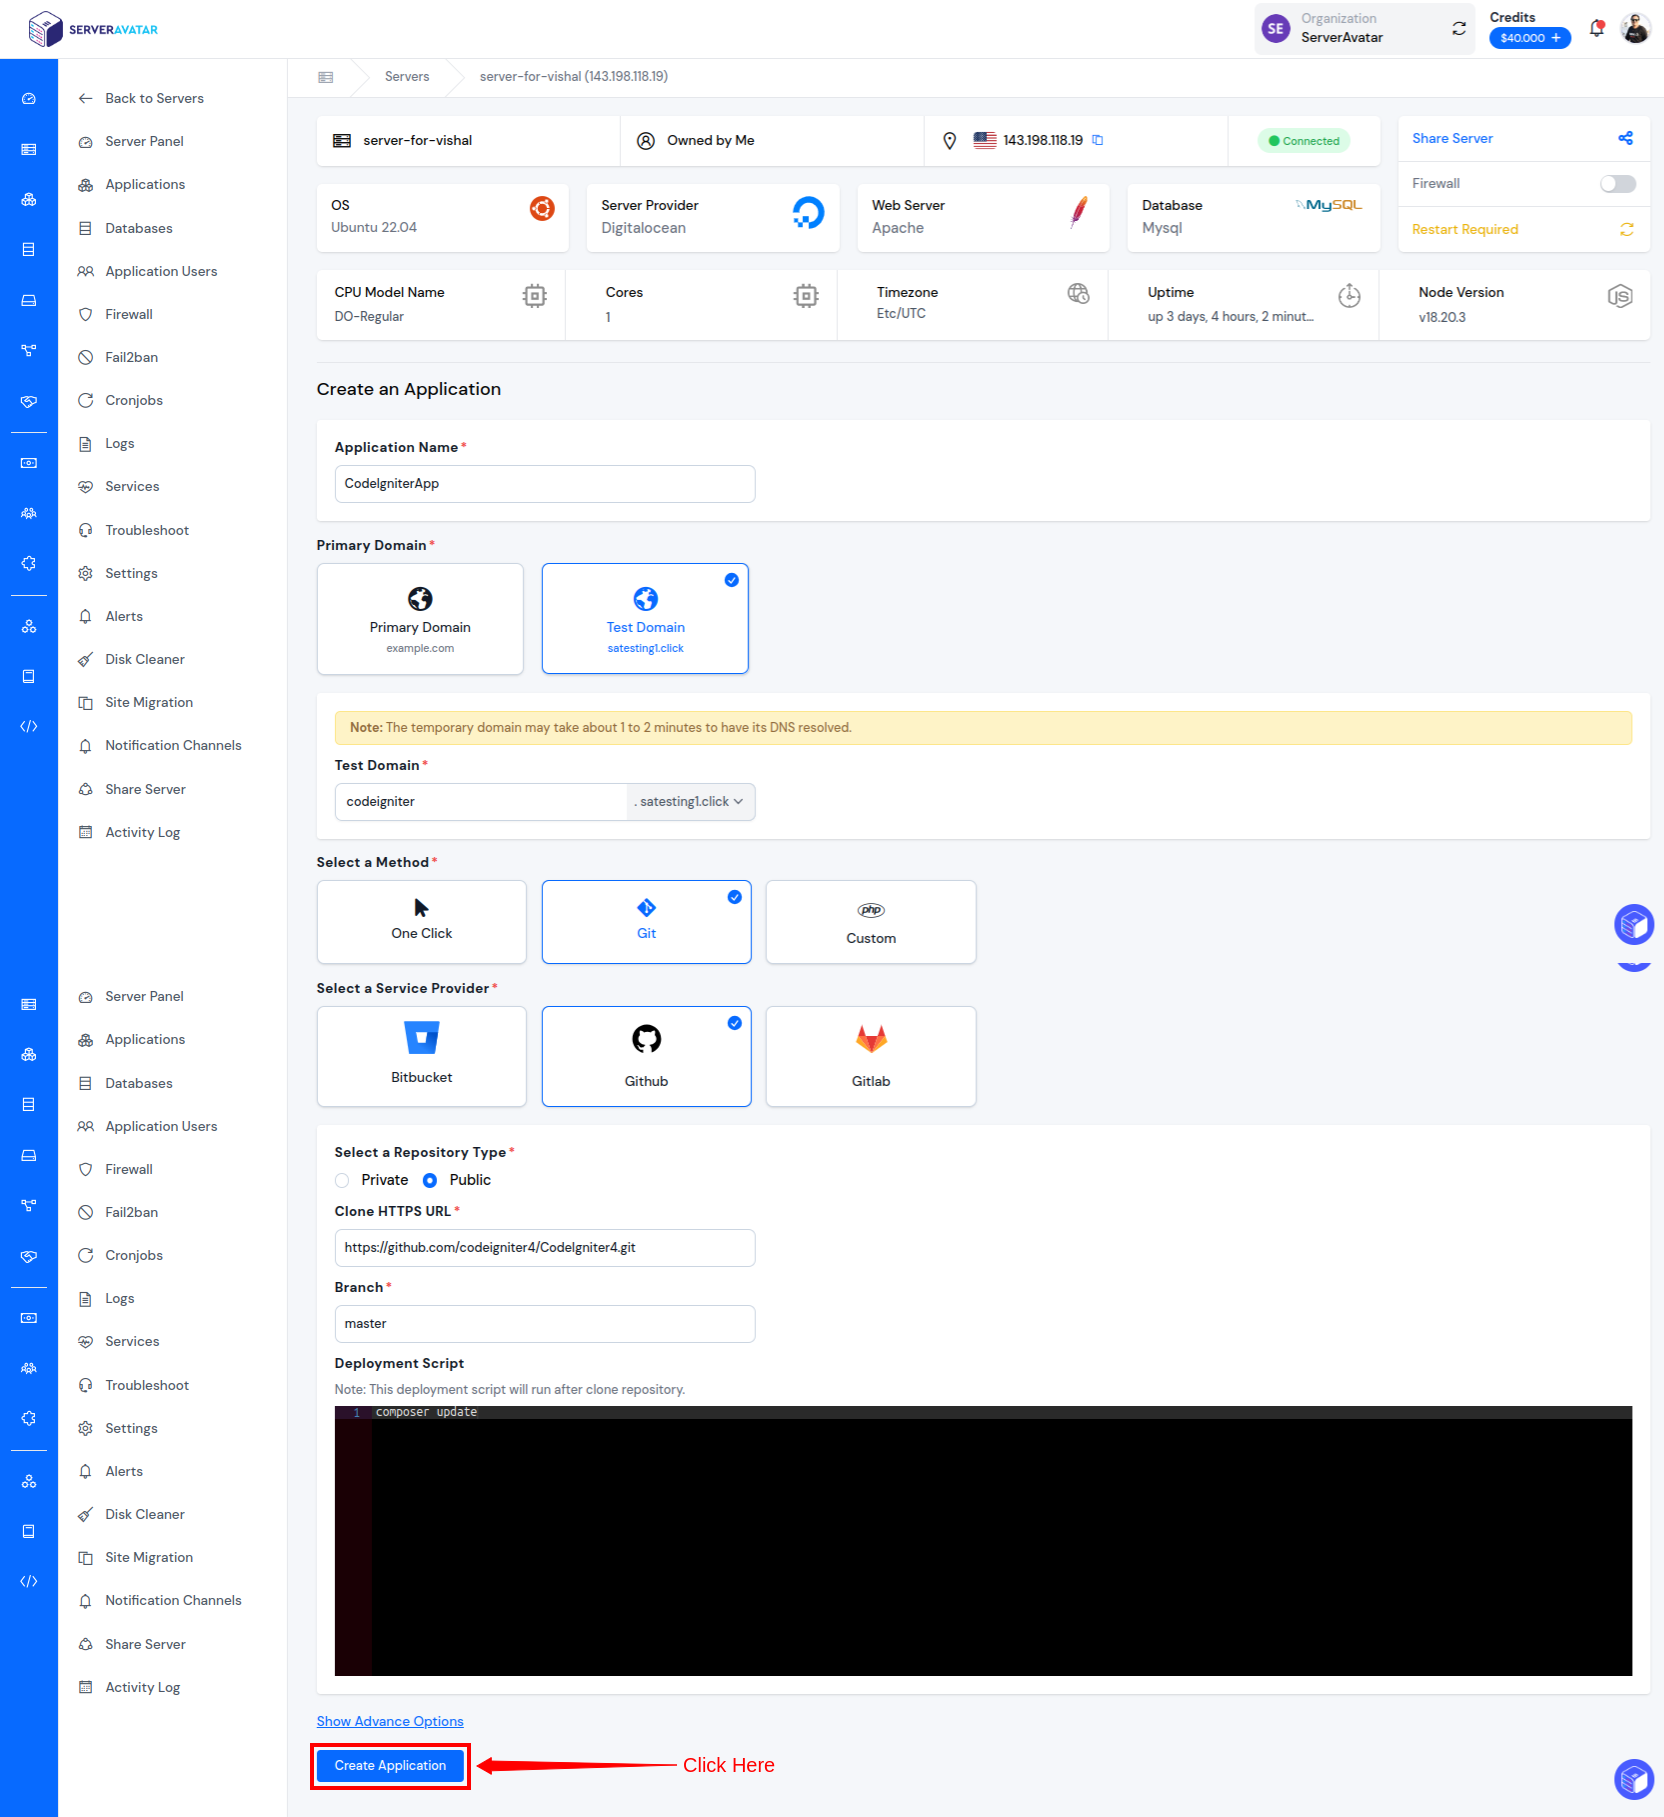
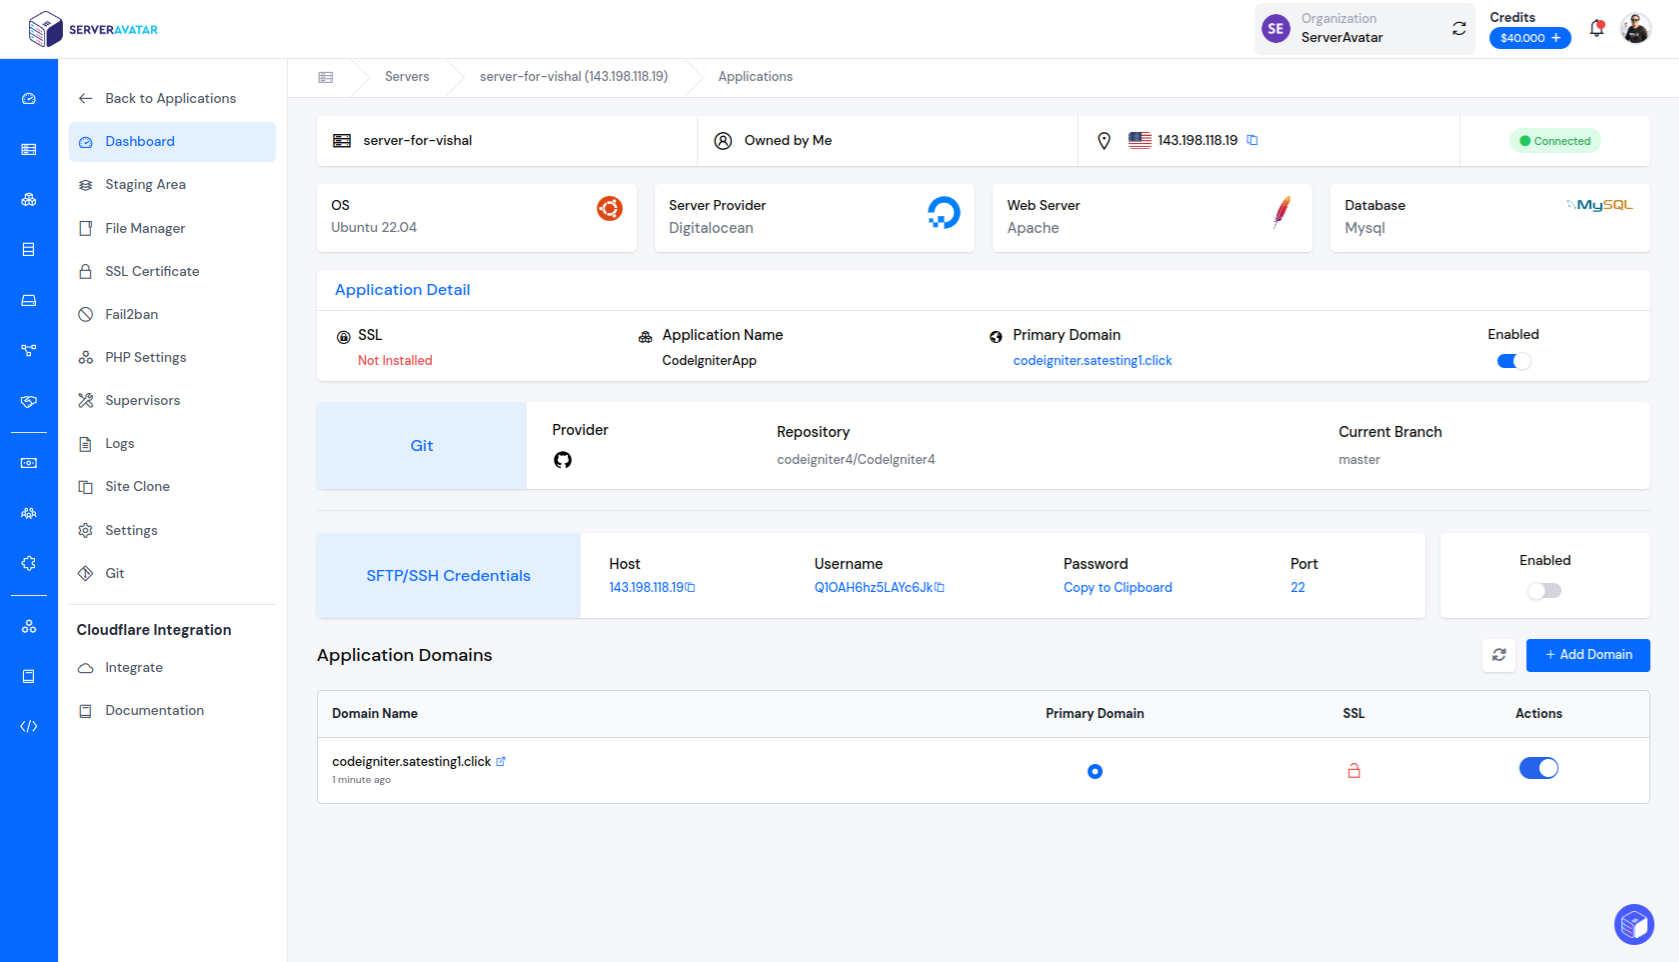
Now, your Application is ready. You can see your Application in the Dashboard.
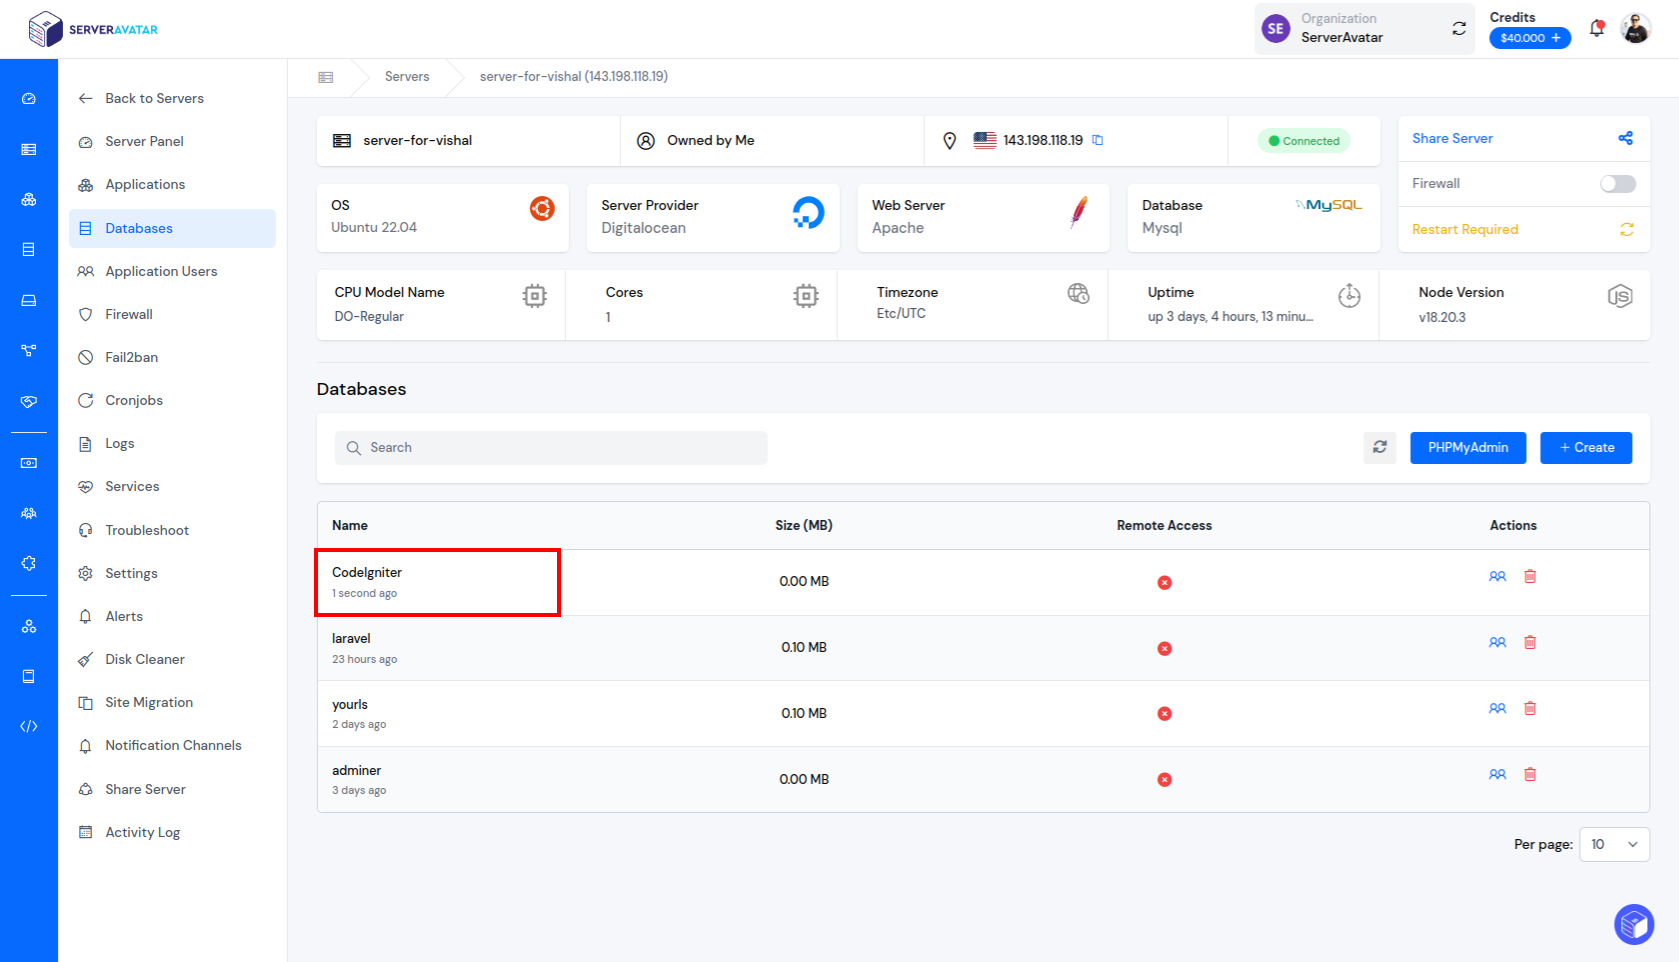
Step 2: Create a Database
To create a Database that stores your confidential data, Go to the Dashboard and click on the Databases option. Enter Your Database name and just hit on the “Create a Database” button as shown in the image below.

After successfully creating a Database, you can see your Database in the Databases Dashboard.
Step 3: SSH Setup and env Configuration
- First, go to the Application Dashboard and enable SFTP/SSH Credentials as shown in the below image.
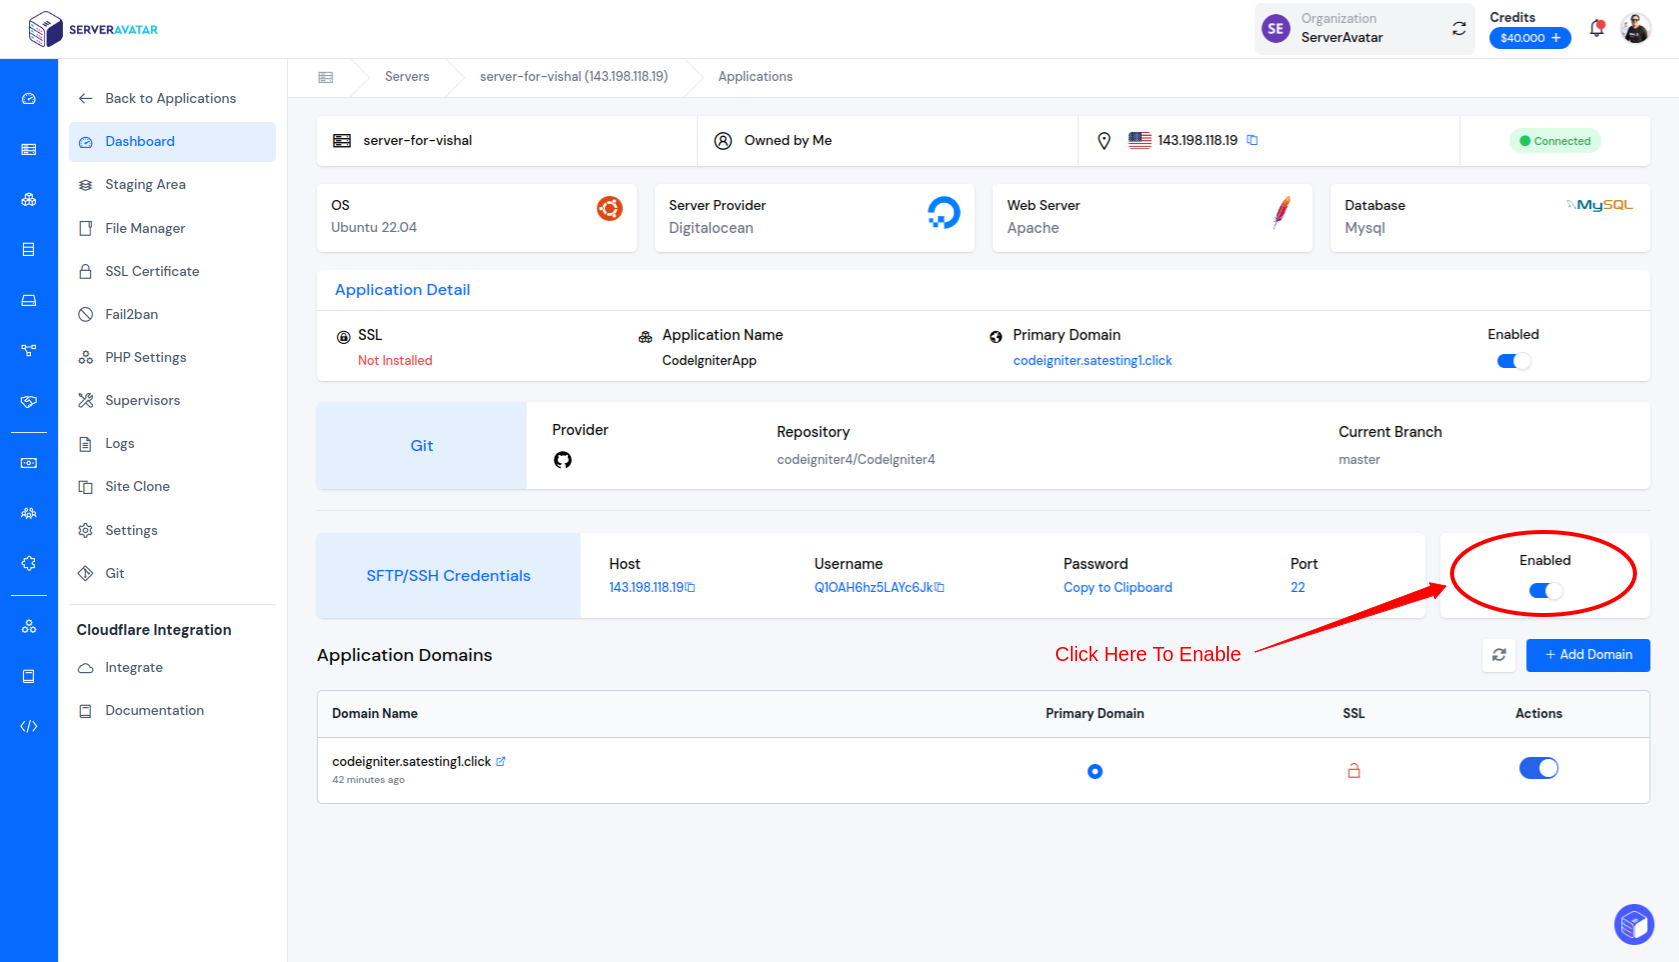
- After, enabling SFTP/SSH, you can log in to your server. Open a terminal and use the following command:
ssh {username}@{ip} - Replace
{username}with your actual Username and{ip}with your server's IP address. You will be prompted to enter your password. After successful authentication, you will have remote access to your server. - Navigate to your Application Path by running the following command:
cd CodeIgniterApp/public_html/

- Next, you need to copy or move the env file to the .env file.
-
Command for Copy:
cp env .env

OR
-
Command for Move:
mv env .env

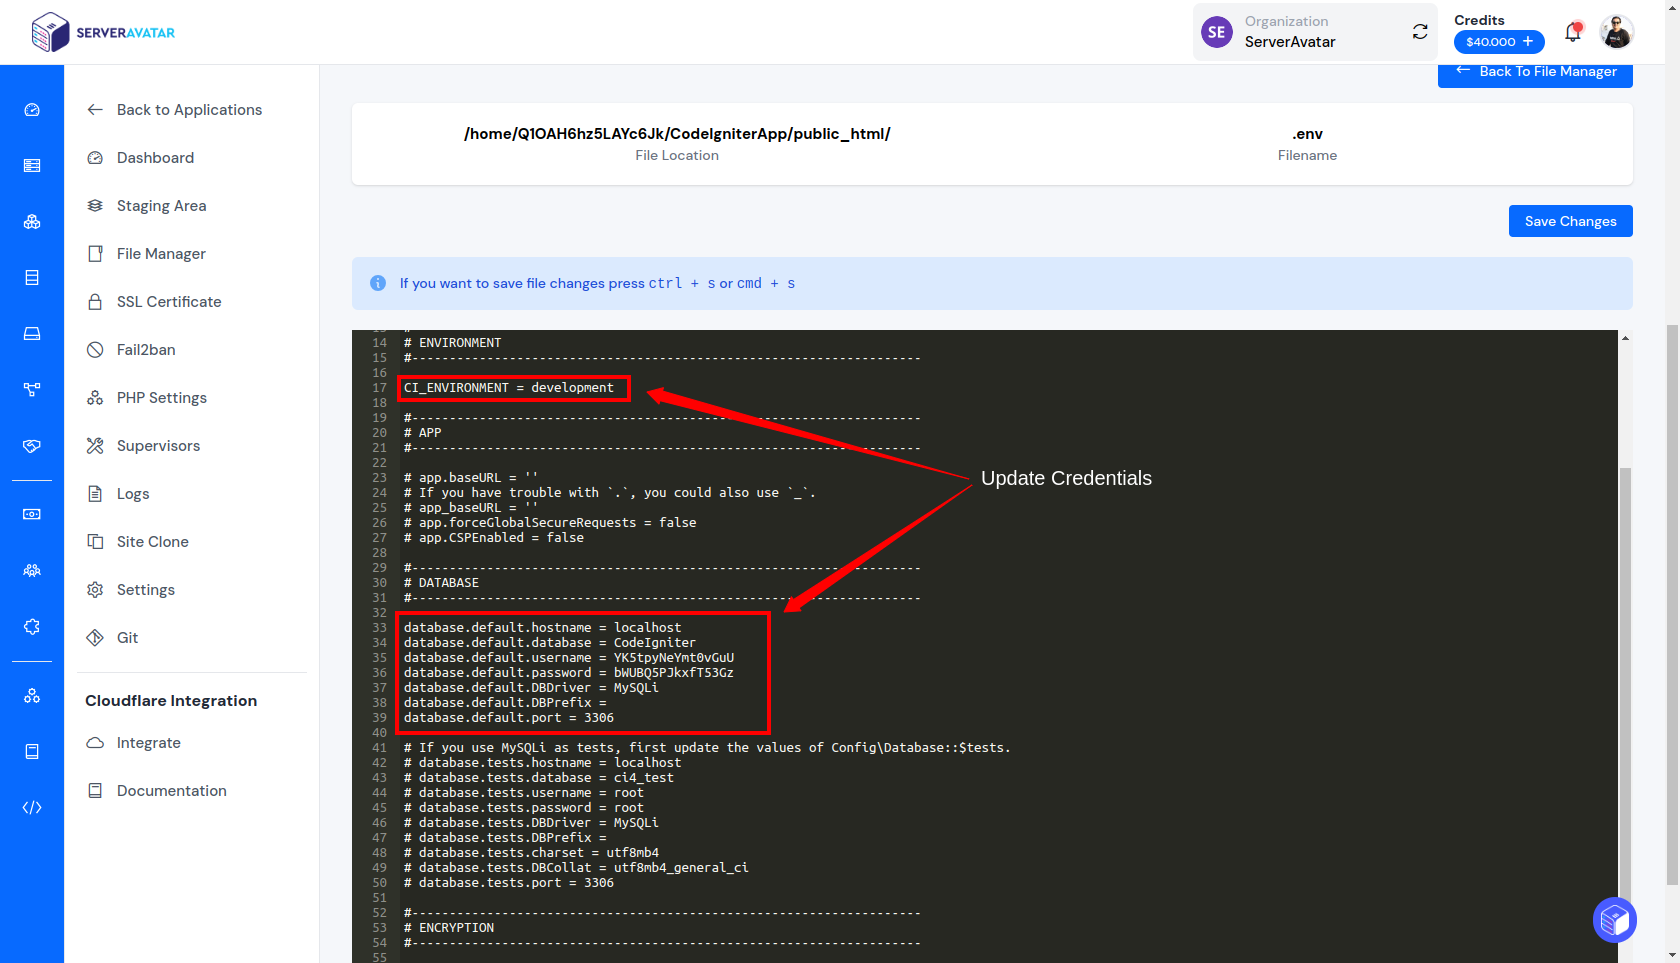
Step 4: Configure .env file
- Navigate to the Application Panel and go to the FIle Manager option and open the public_html folder.
- Now, click on the Show Hidden Files option and open the .env file by clicking on it.
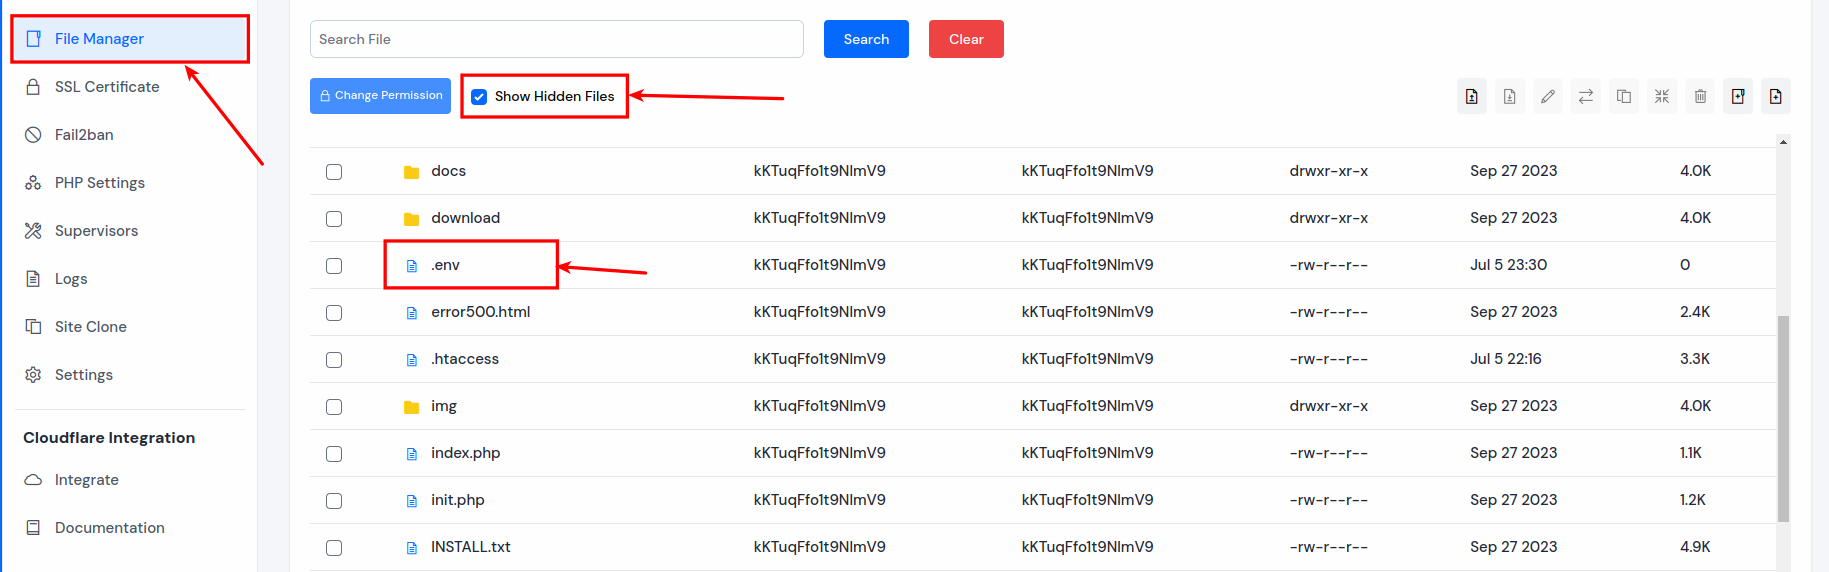
- As shown in the image below, the environment is set to production by default in the .env file. It's recommended to test your application in a development environment initially.
- Edit and update your application's database details:
- Database Name
- Database Username
- Database Password
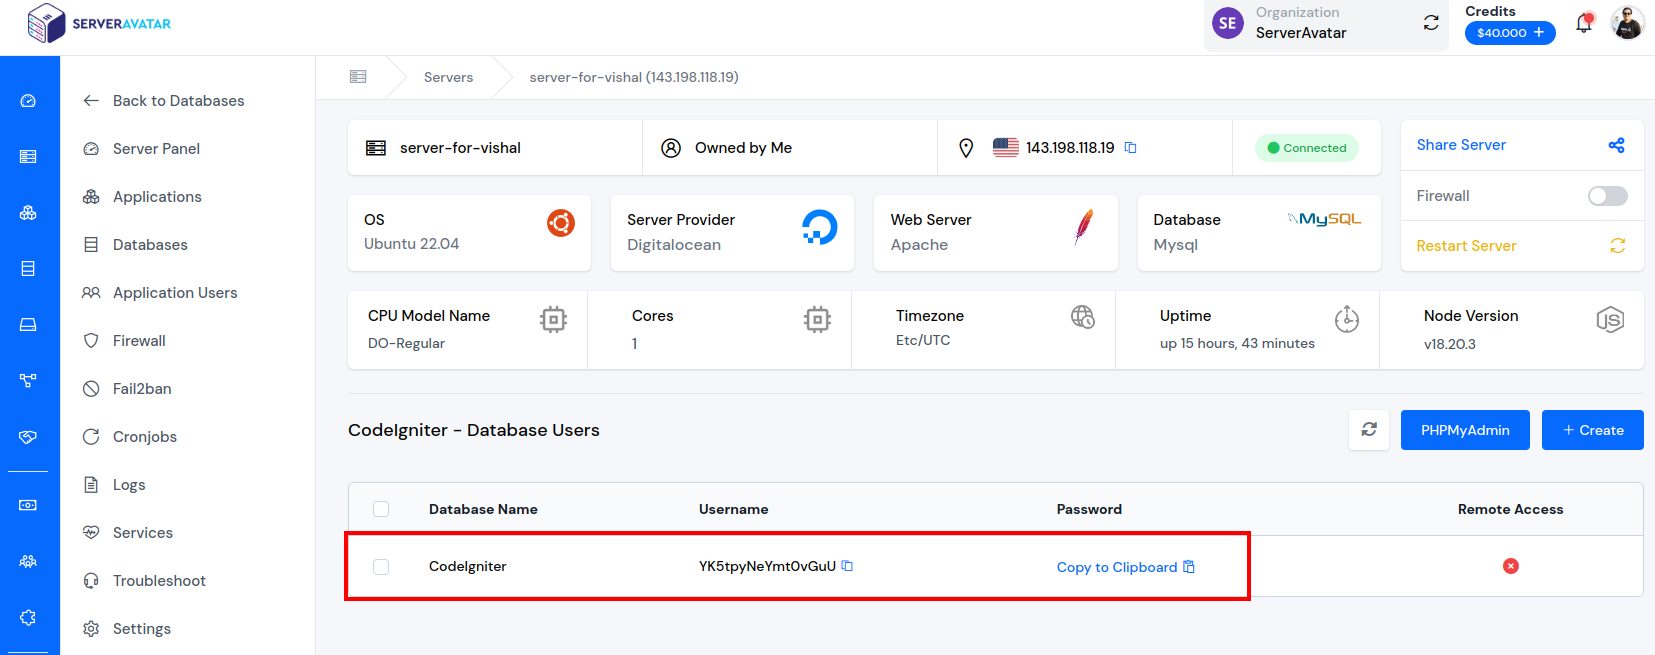
- To find your database credentials, navigate to the Databases section in the server panel and click on the manage users icon next to the database you have set up for your application.
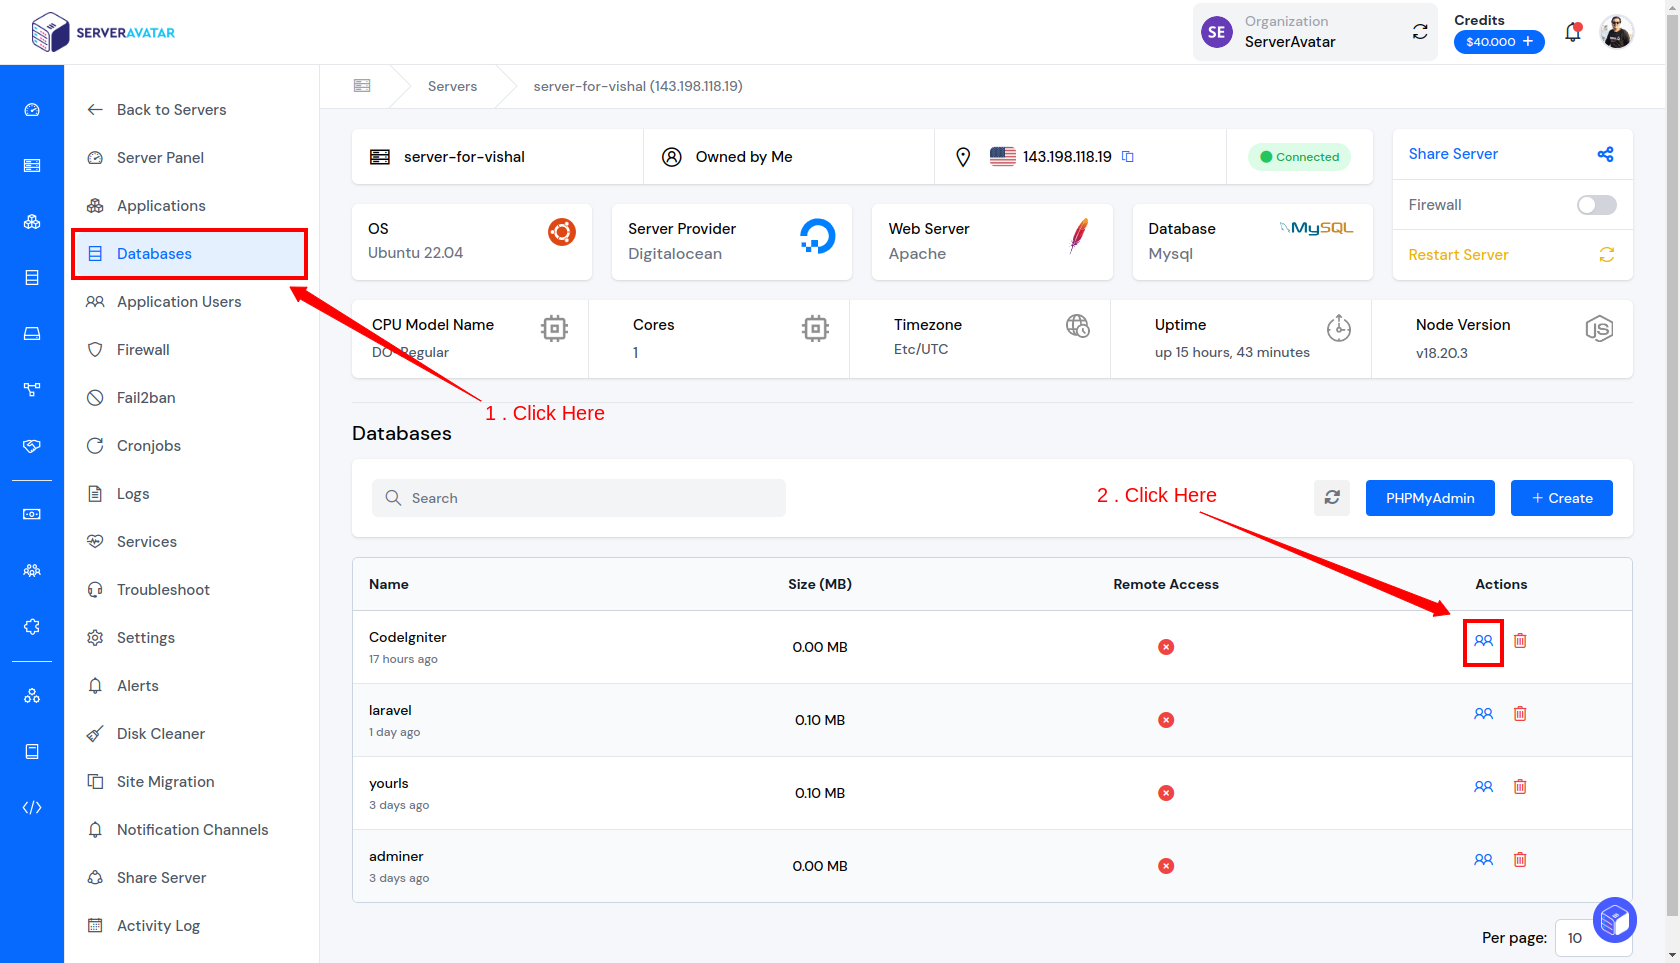
- You can see your Database credentials as shown in the image below.
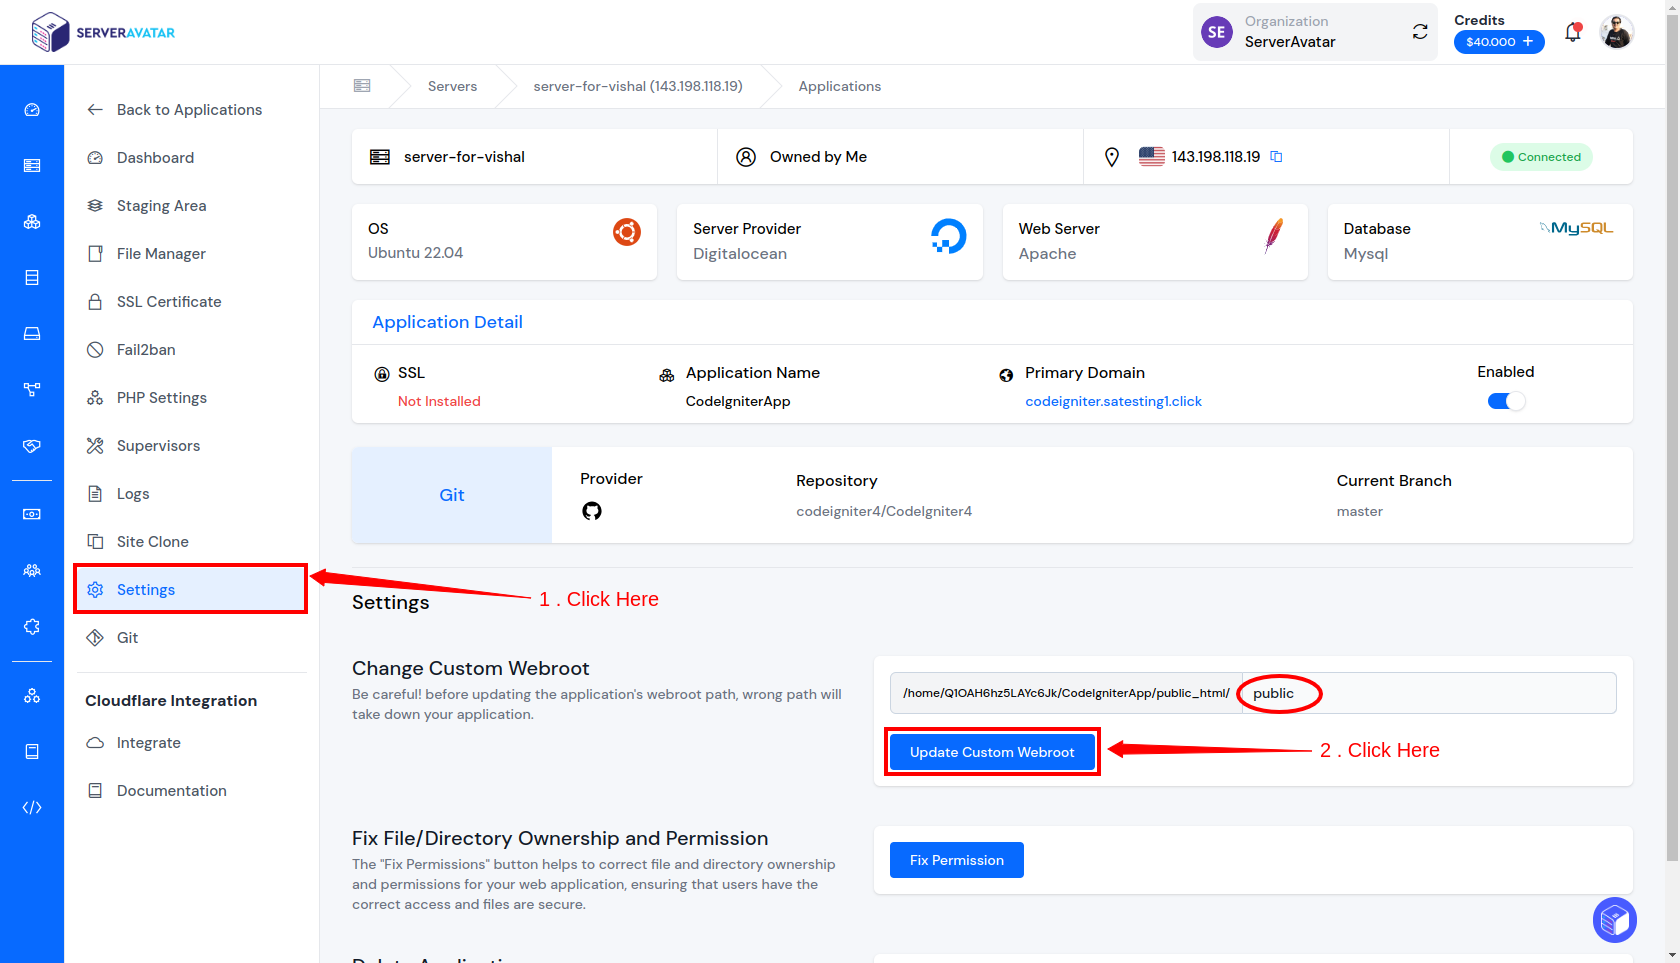
Step 5: Update Custom Webroot
- To run your application on a server, you must set your Custom Webroot to public. To update this setting, navigate to the Settings option in the sidebar of your application.
- Add public in the Custom Webroot Section and click on Update Custom Webroot as shown in the below image.
Step 6: Access CodeIgniter
- Now, to access the CodeIgniter, open your web browser and enter your site's domain.
-
Example:
http://codeigniter.satesting1.click -
For instance:
http://your-application-domain
-
Example:
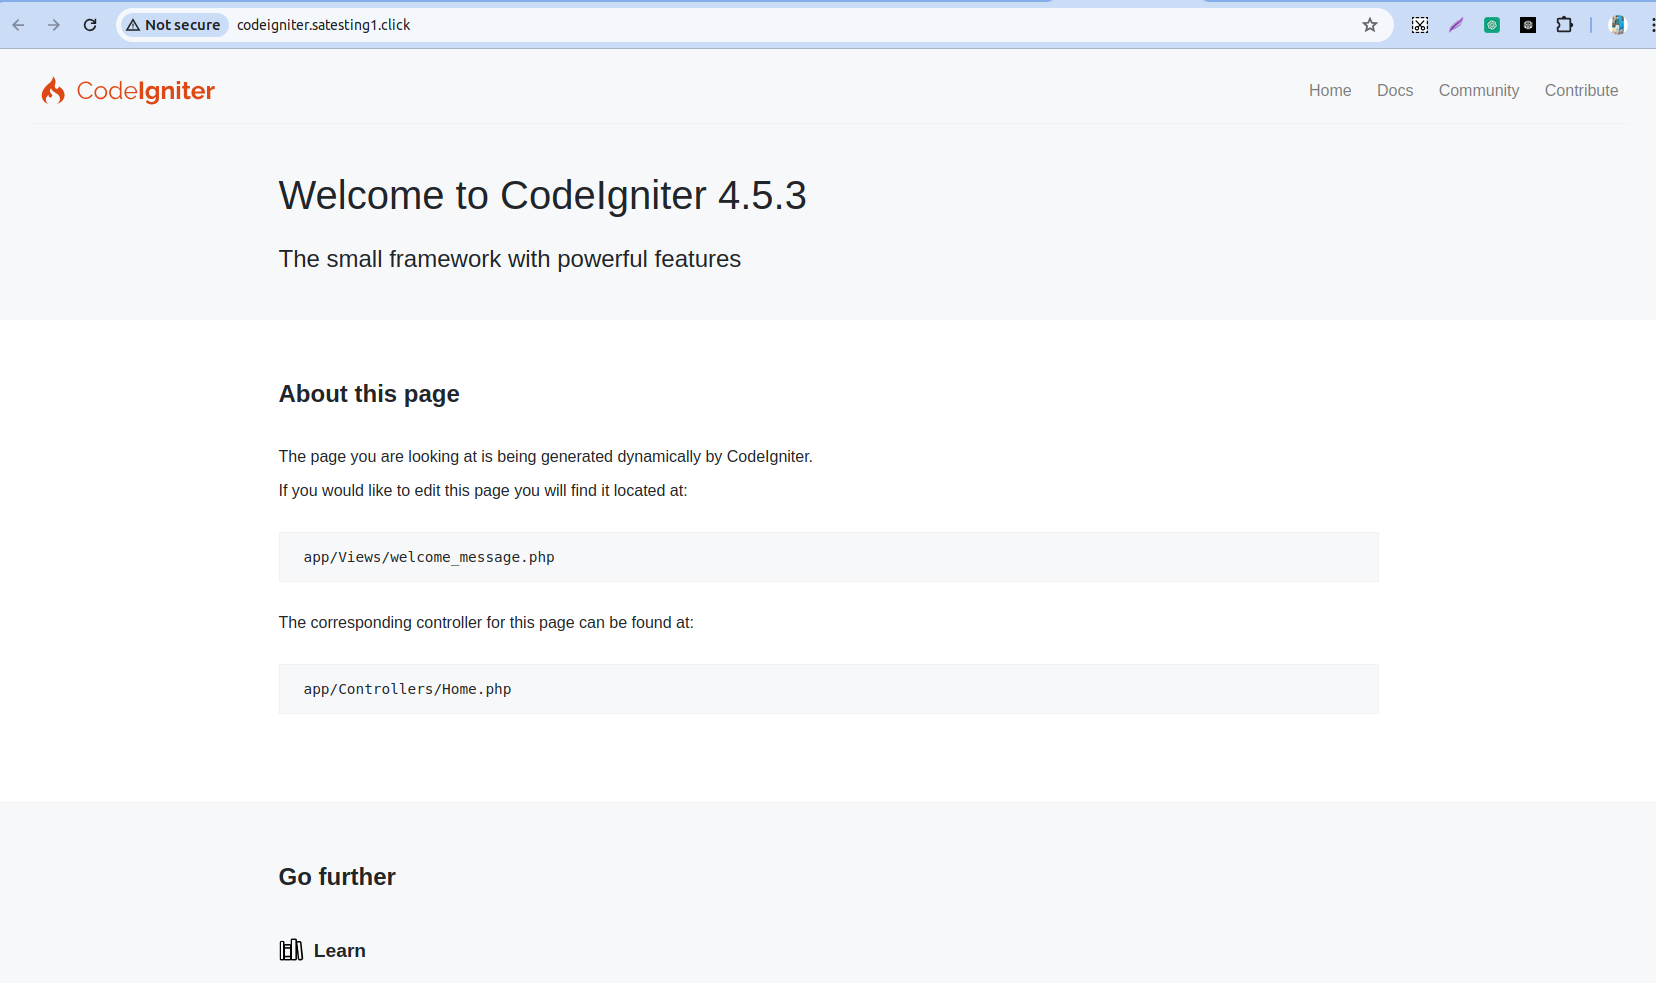
Congratulations! You have successfully installed and deployed CodeIgniter through ServerAvatar.
Conclusion :
- Deploying a CodeIgniter application with ServerAvatar is a straightforward process that ensures your web application is running efficiently & smoothly.
- ServerAvatar simplifies the deployment process with its user-friendly interface and robust features, making it an excellent choice for PHP developers looking to leverage the power of CodeIgniter.
- With CodeIgniter, start your deployment today and enjoy the benefits of a fast, flexible, and secure web application built on one of the most popular PHP frameworks.