Kanboard is an open-source application designed to streamline project management tasks for teams. It includes essential features for creating tasks, managing projects, and tracking progress, ensuring a seamless experience for both team members and project stakeholders. Hostinger is recognized for its dependable infrastructure scalability and user-friendly deployment options. ServerAvatar simplifies the deployment process of the Kanboard application on Hostinger VPS with easy-to-follow steps.
Create a VPS in Hostinger
Getting started with Hostinger:
Discover how simple it is to create an account and set up a cloud VPS on Hostinger, one of the top hosting providers. Follow our step-by-step guide to swiftly establish your account to deploy a server and complete its initial setup.
What Is Hostinger?
Hostinger is a popular web hosting company known for its affordable hosting solutions and user-friendly interface, offering services like domain registration, website hosting, and cloud hosting to help individuals and businesses manage their online presence effectively.
Step 1: Create an account
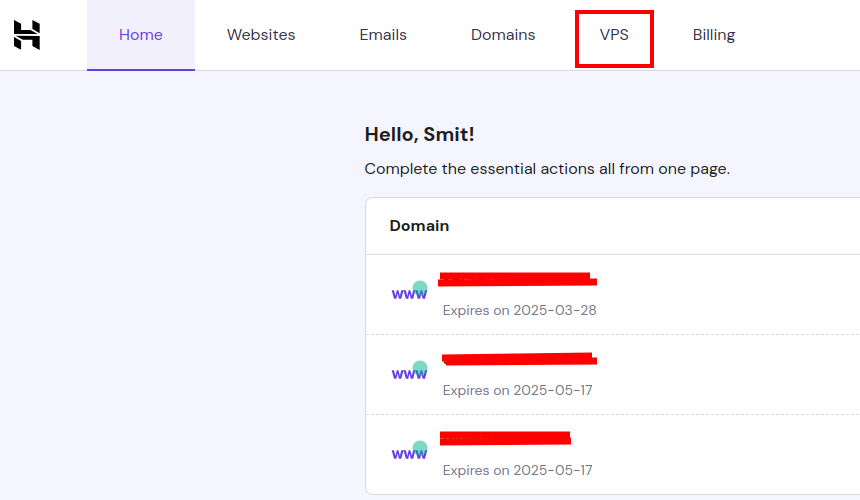
- Log in to your Hostinger account. If you don’t have an account, create an account on Hostinger.
- After login, Click on the VPS option as shown in the image below.
Step 2: Select the plan
- Next, you will see various plans offering different specifications for hosting your VPS. Select the plan that best fits your requirements.

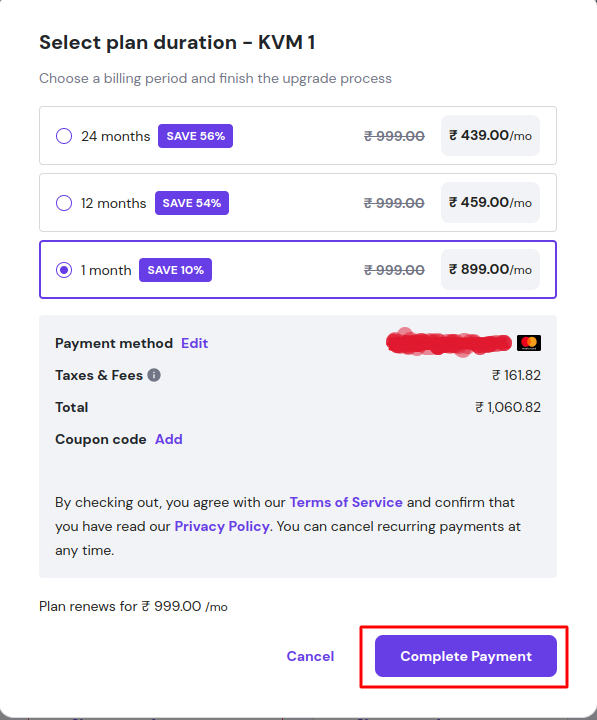
Step 3: Complete your Payment
- Now, you have to proceed to complete the payment for your VPS plan.
Step 4: Start with Setup
- Once the payment is complete, you will be redirected to the page to begin setting up your VPS. Click on the Start Now option to proceed.

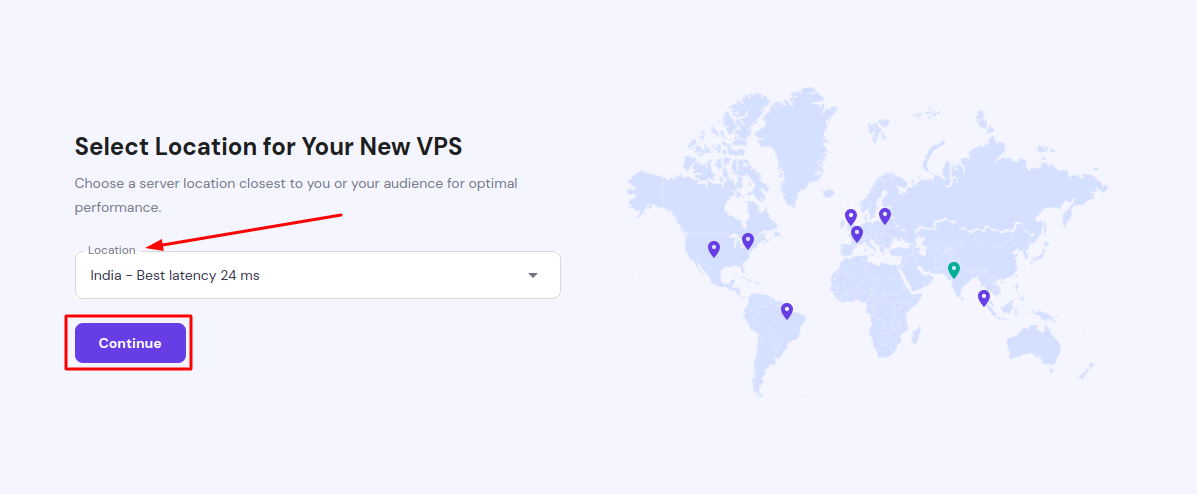
Step 5: Select Location
- Next, you have to select the location for your server. Hostinger provides various locations for setting up your VPS.
- The general rule is to select the region that is closest to your audience. It means that for the majority of your audience, Your sites will load faster due to lower latency.
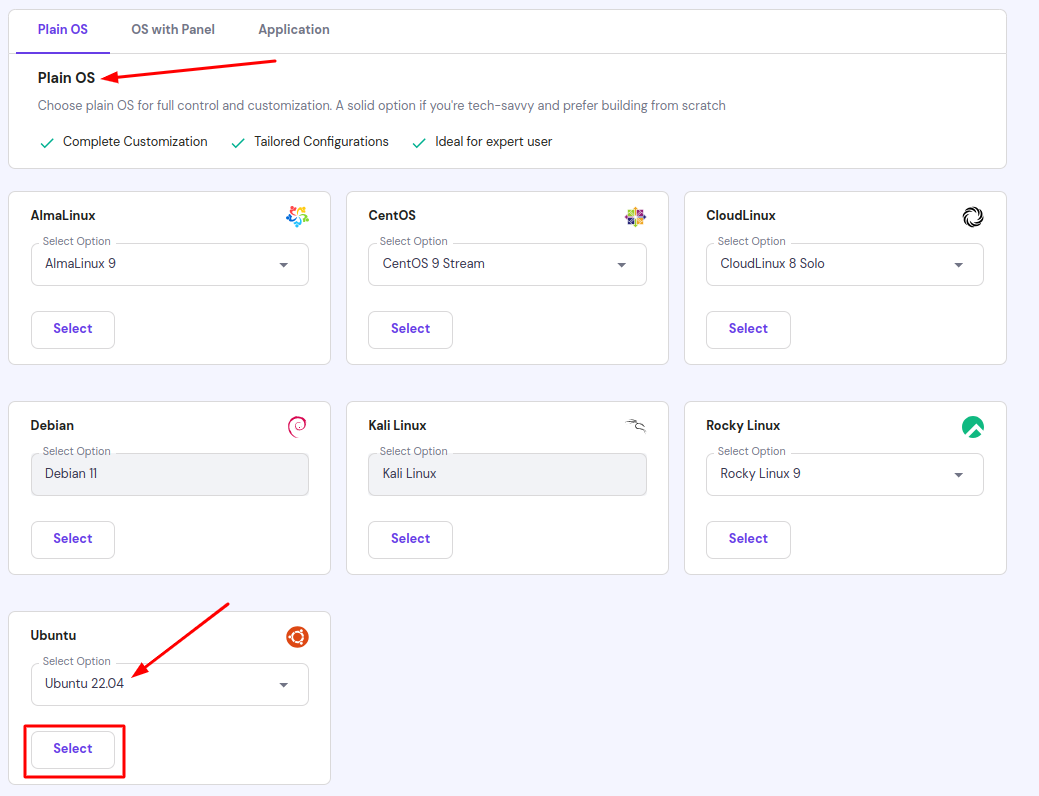
Step 6: Select an Operating System
- In this step, you need to select your server operating system. Generally, the Kanboard application required Ubuntu 18.04 LTS or a later version for compatibility and support.
- We recommend selecting Ubuntu 20.04 LTS x64 or Ubuntu 22.04 LTS x64. If you are using ServerAvatar to manage your servers, these operating systems are required.
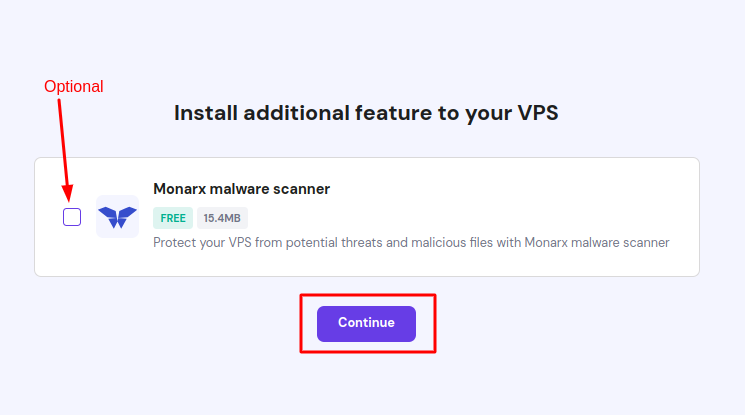
Step 7: Adding Additional Feature (Optional)
- The next option is to install an additional feature to your VPS. You can enable the malware scanner by selecting the provided checkbox. This step is optional; if you want to add it, select the checkbox and click on Continue.
Step 8: Login Method
- Next, you need to set a Root Password for your VPS and provide a Hostname. Additionally, you can add an SSH Key, which is optional. Once you have completed these steps, click on Continue.

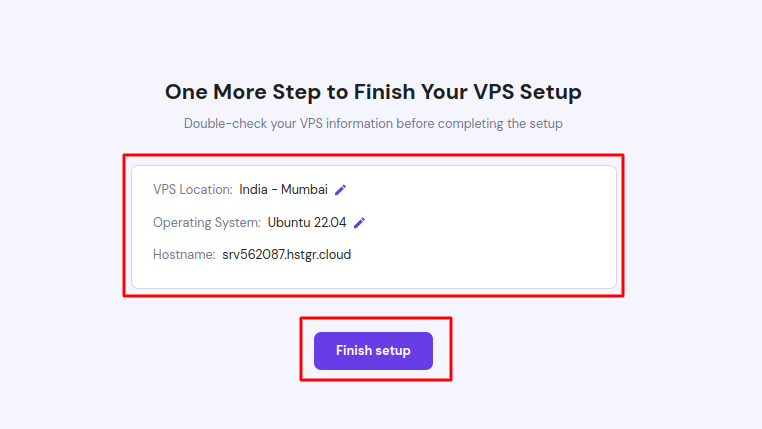
Step 9: Finalise Details
- In the last step of this process, you need to verify the VPS information. Click on the Finish Setup option to complete the setup process.
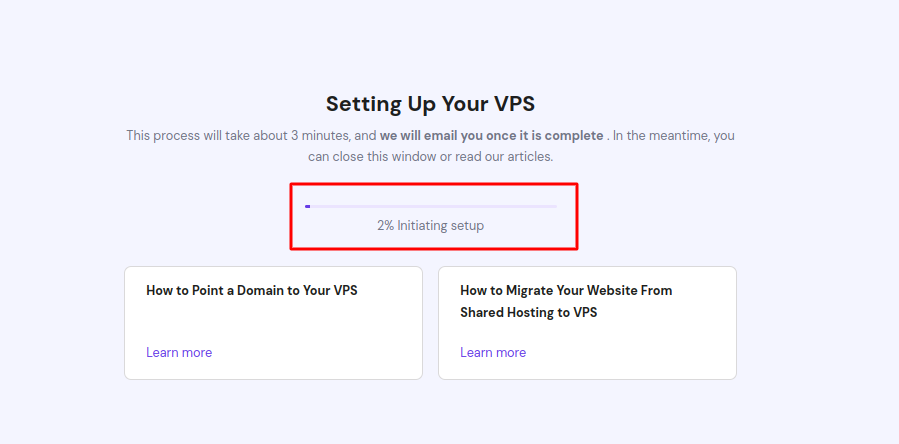
- After clicking the Finish Setup button, You can see the Initiating Setup process as displayed in the image below.
Step 10: VPS Management and SSH Key Access
- Once the setup is complete, you will find the option to Manage VPS, allowing you to manage your VPS from its Custom Dashboard. Additionally, you will have the SSH Access option, which enables server access via Terminal.
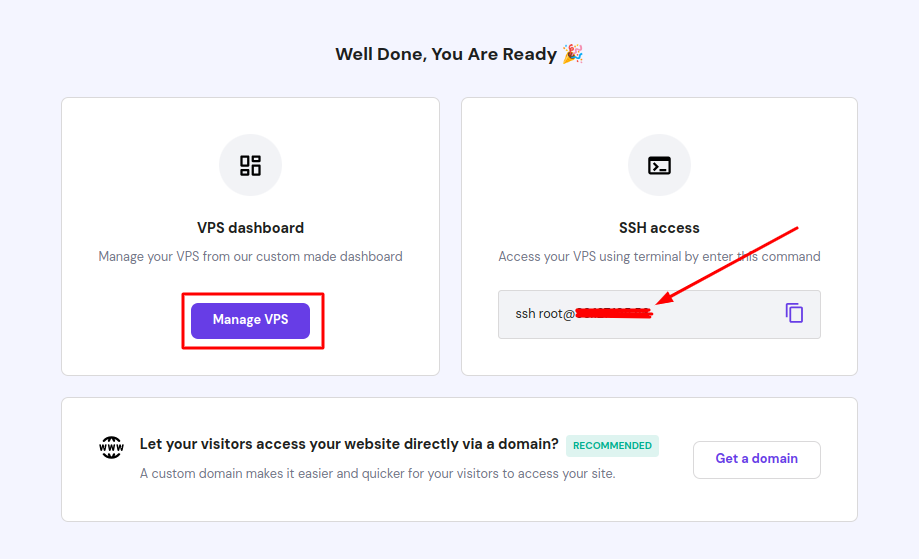
- Congratulations! You have successfully created your Hostinger VPS, which is now ready to connect with ServerAvatar.
Initial Server Configuration
The Initial server configuration includes the installation and configuration of various packages required to host your website. Usually, You have to write commands and modify configuration files. Luckily, With ServerAvatar, Your full server configuration and optimization can be automated.
Here are the three ways to automatically configure your server with ServerAvatar.
Connect a server using a direct method
- Login/Register to ServerAvatar account, click the Create button from the right side of the screen, and select Server from the dropdown.
- Select Direct Method in the serve connecting method section.
- Type the Server Name as per your choice.
- Select a Tech Stack as per your need. You can either select Apache, Nginx, OpenLiteSpeed or Node Stack.
- Select a Database: MySQL, MariaDB or MongoDB.
- Enable the toggle if you want to install the latest LTS version of node.js on your server.
- Select a Management plan and click the Connect Now button.
- You’ll see the command on your screen. Login to your server using an ssh connection and execute that command as a root user.
- The server connection process will be started on your ServerAvatar account after executing the command.
Connect a server using integration
- Login/Register to your ServerAvatar account, navigate to the Integration tab from the sidebar of the panel, and access Cloud Platform from the dropdown.
- Now Select a cloud platform you want to link with ServerAvatar.
- The popup form will appear on your screen. Enter details to link your cloud provider account. The integration method is different based on the cloud provider you select.
- You can integrate five different cloud provider platforms with ServerAvatar, which is-
Check the above link of cloud platforms to know more about integrating cloud platforms with ServeAvatar.
Connect a server using commands
Step 1. Login to your server using root user
Once you create a server as per your requirements, connect to your server using an ssh connection and execute the below three commands as a root user in your server console area.
wget https://srvr.so/install
chmod +x install
./install
Step 2. Select a web server
It will ask you which web server you would like to install on your server: Apache, Nginx, OpenLiteSpeed or Node Stack. Type anyone that you would like to install on your server and hit the enter button.
Step 3. Claim your server
Completing the process will give you a link to claim your server.
Open the link on your browser to access the ServerAvatar server panel.
Install and Setup Kanboard on cloud using ServerAvatar
Step1: Create Kanboard Database
The Kanboard installation process requires database Credentials. So, to create a MySQL database for Kanboard, Access the Database tab on the ServerAvatar server panel to create a Database.
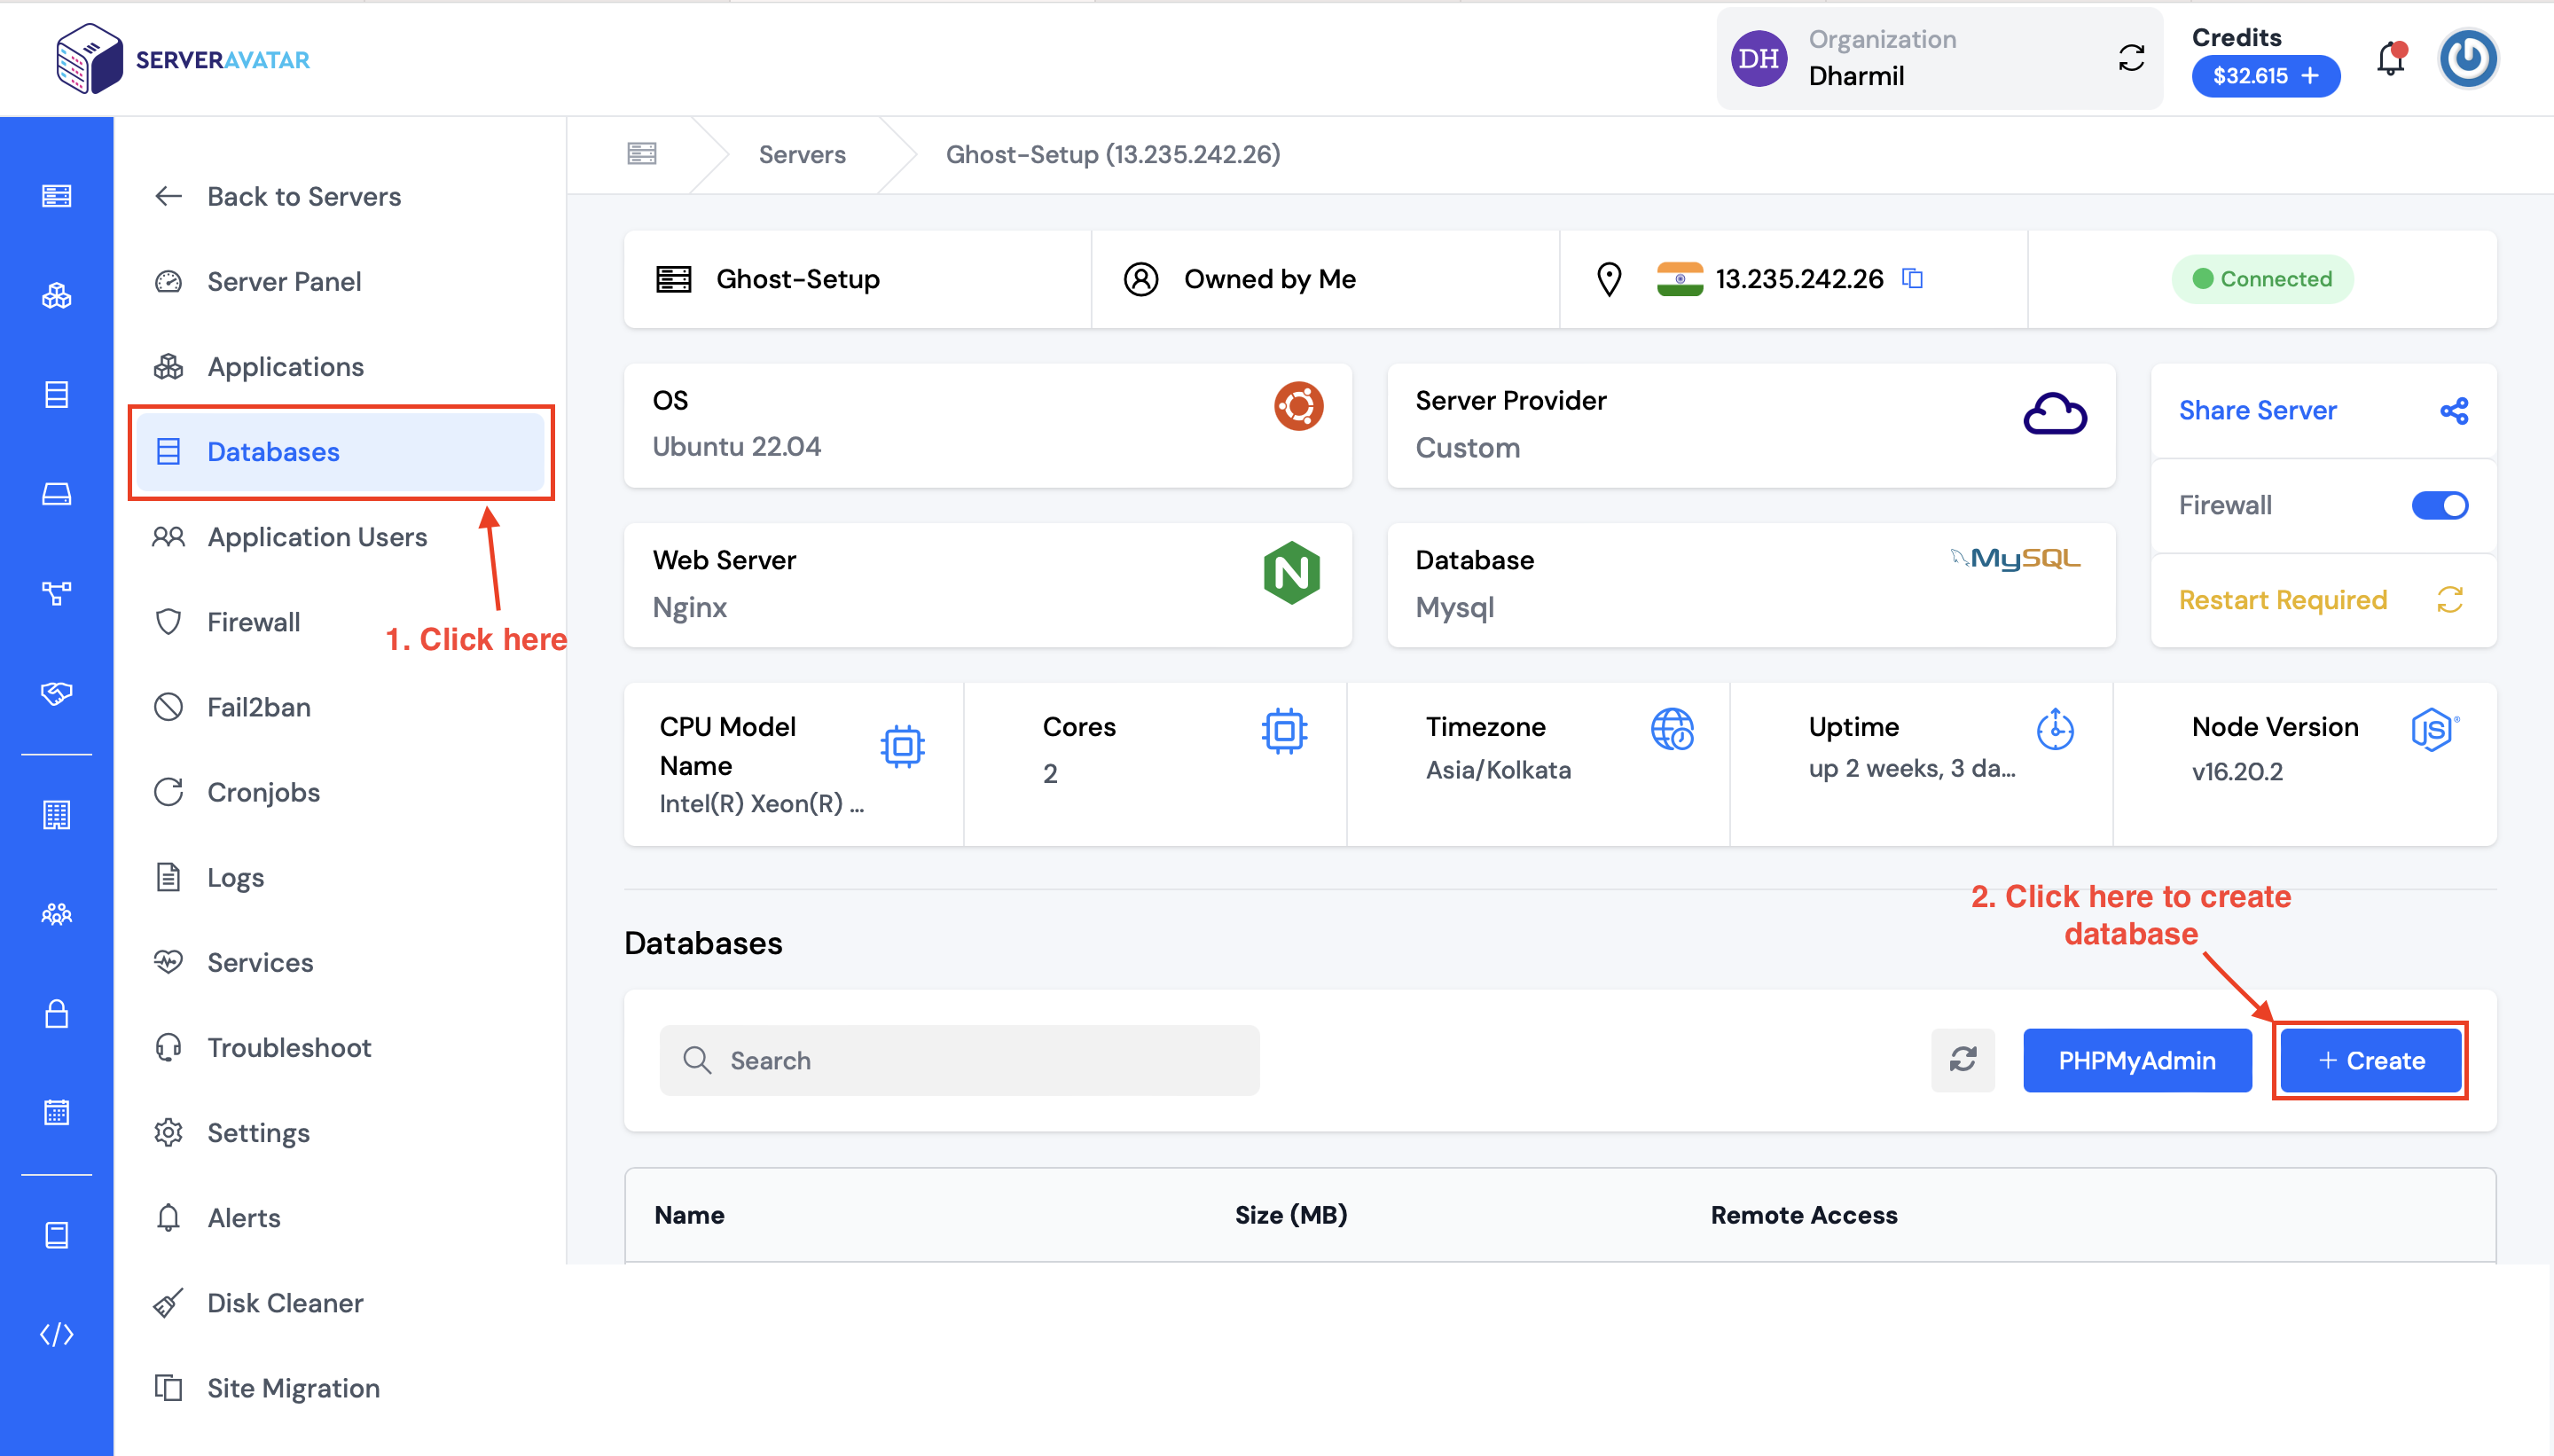
To create a Database, Enter the details, such as the Database Name, in the database creation form like the image below.
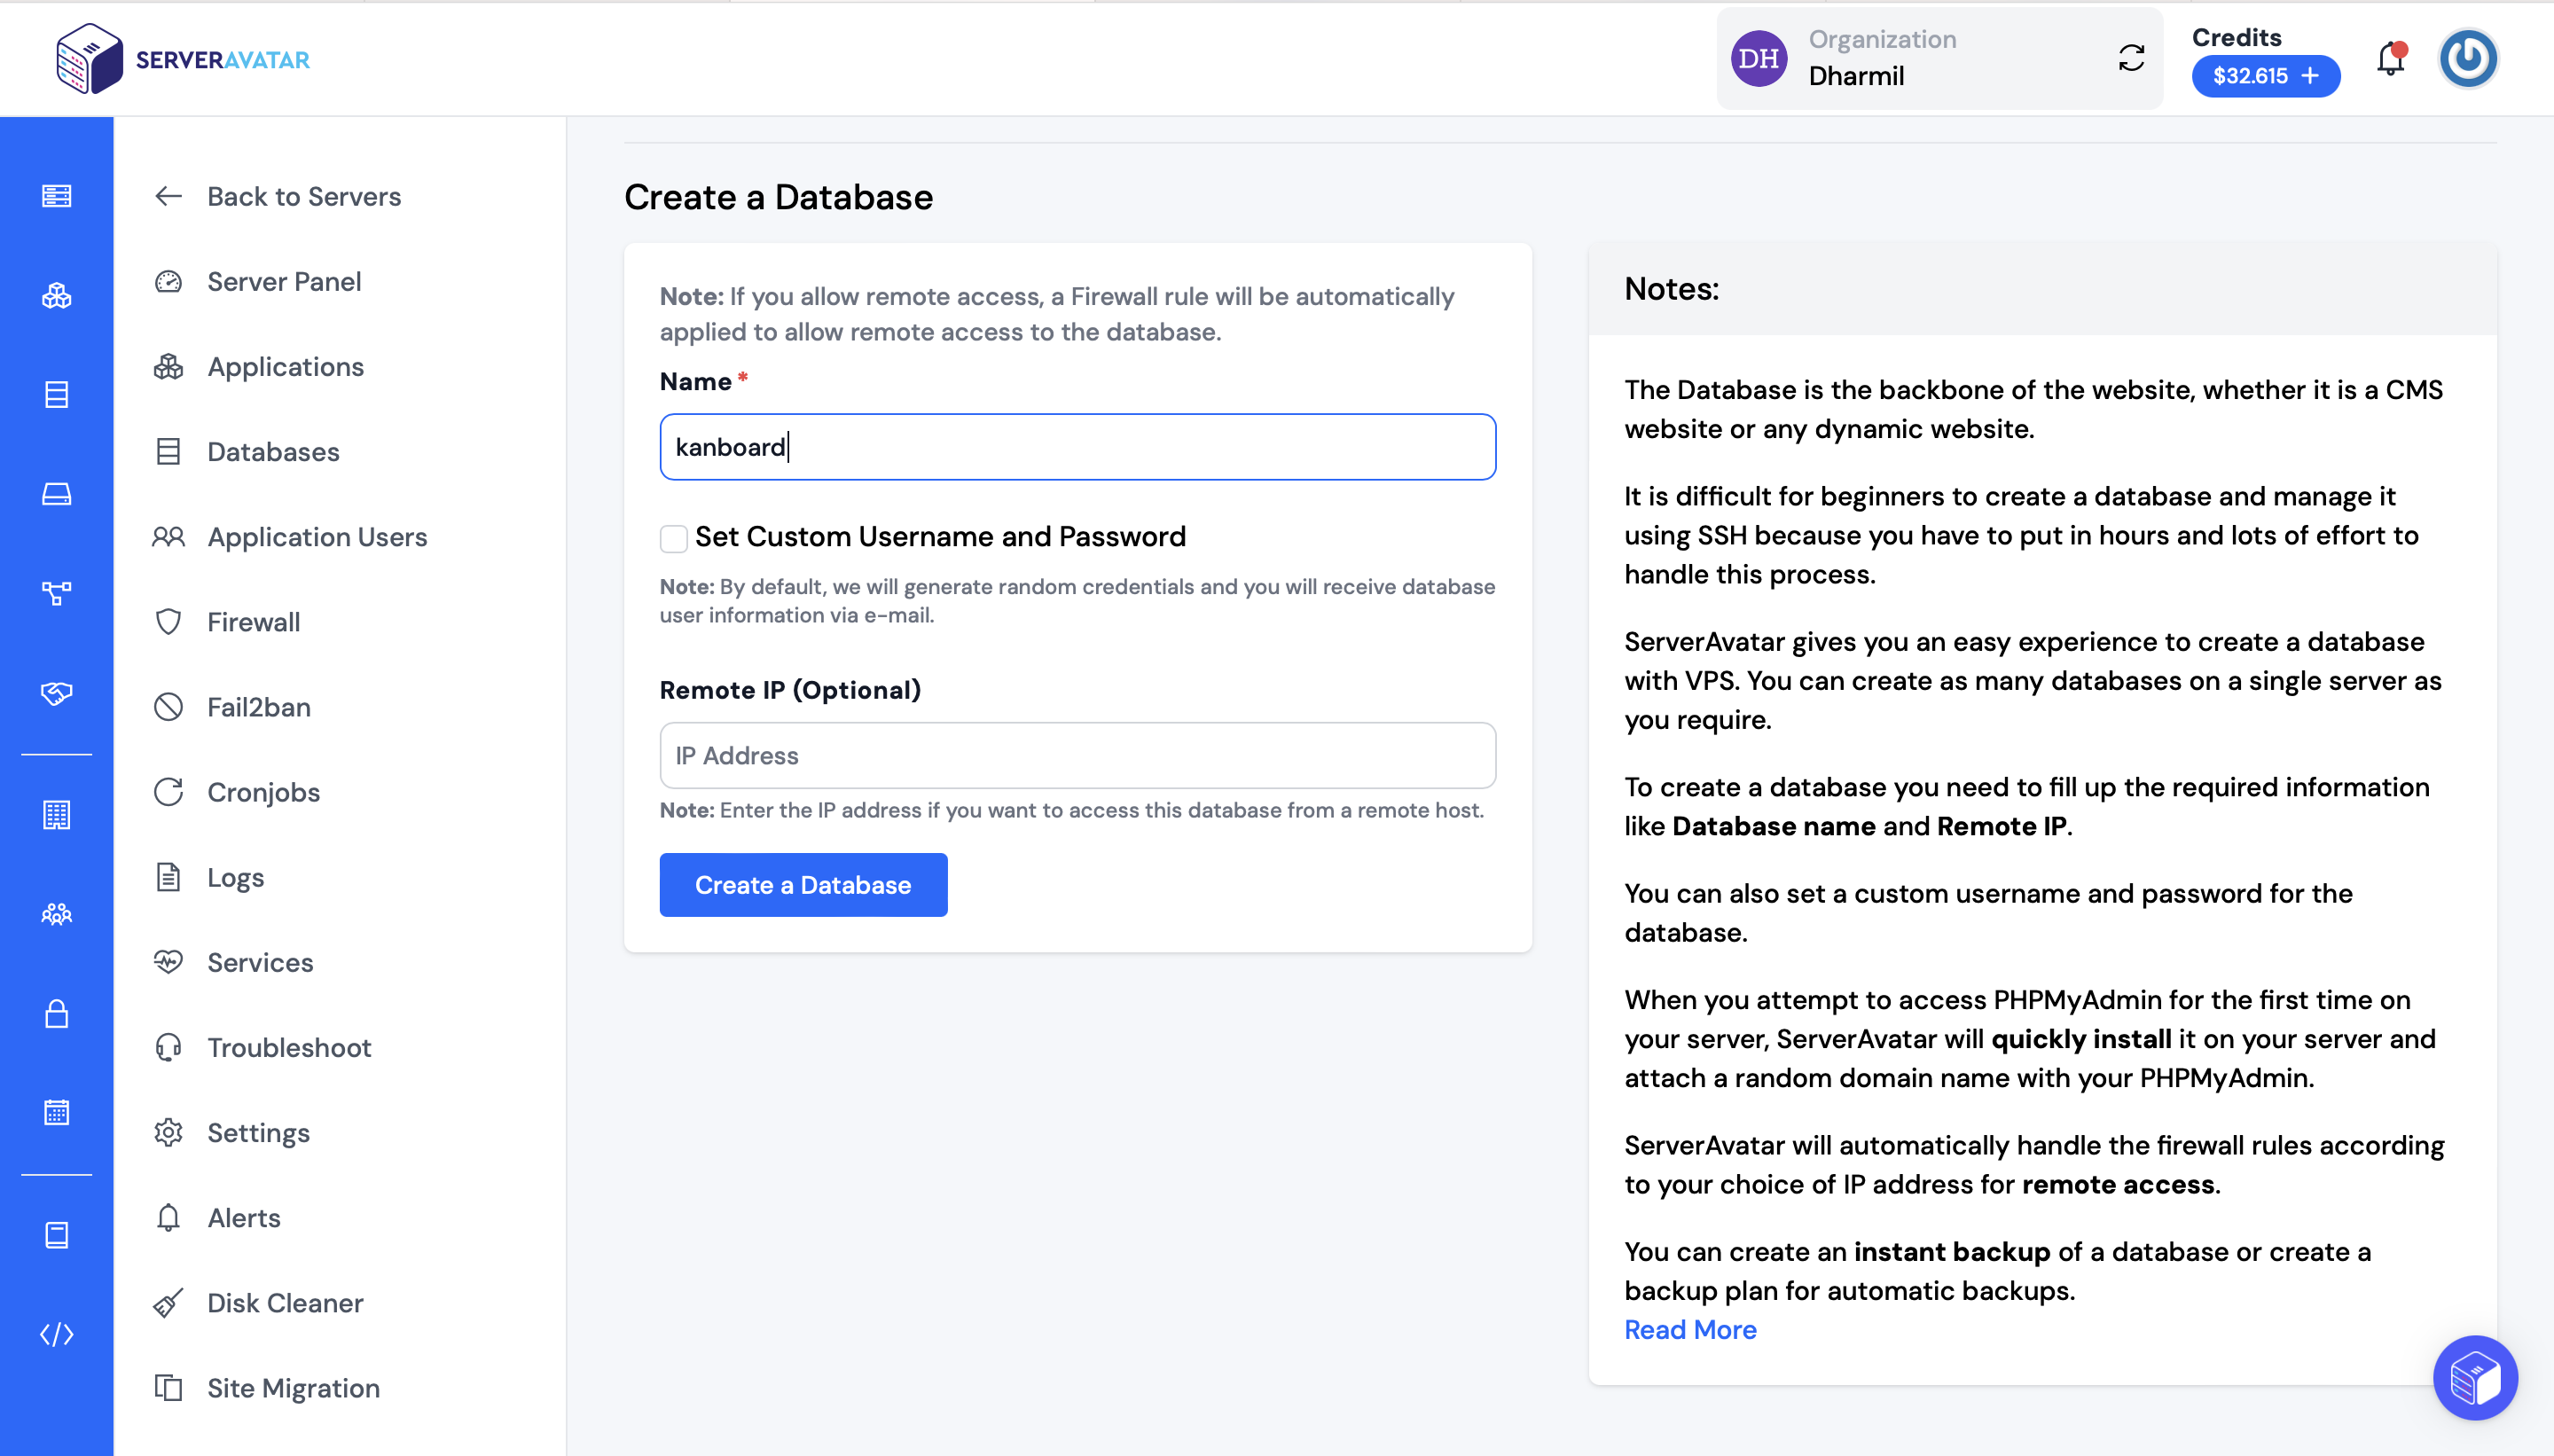
Congratulations! You've successfully created your database.
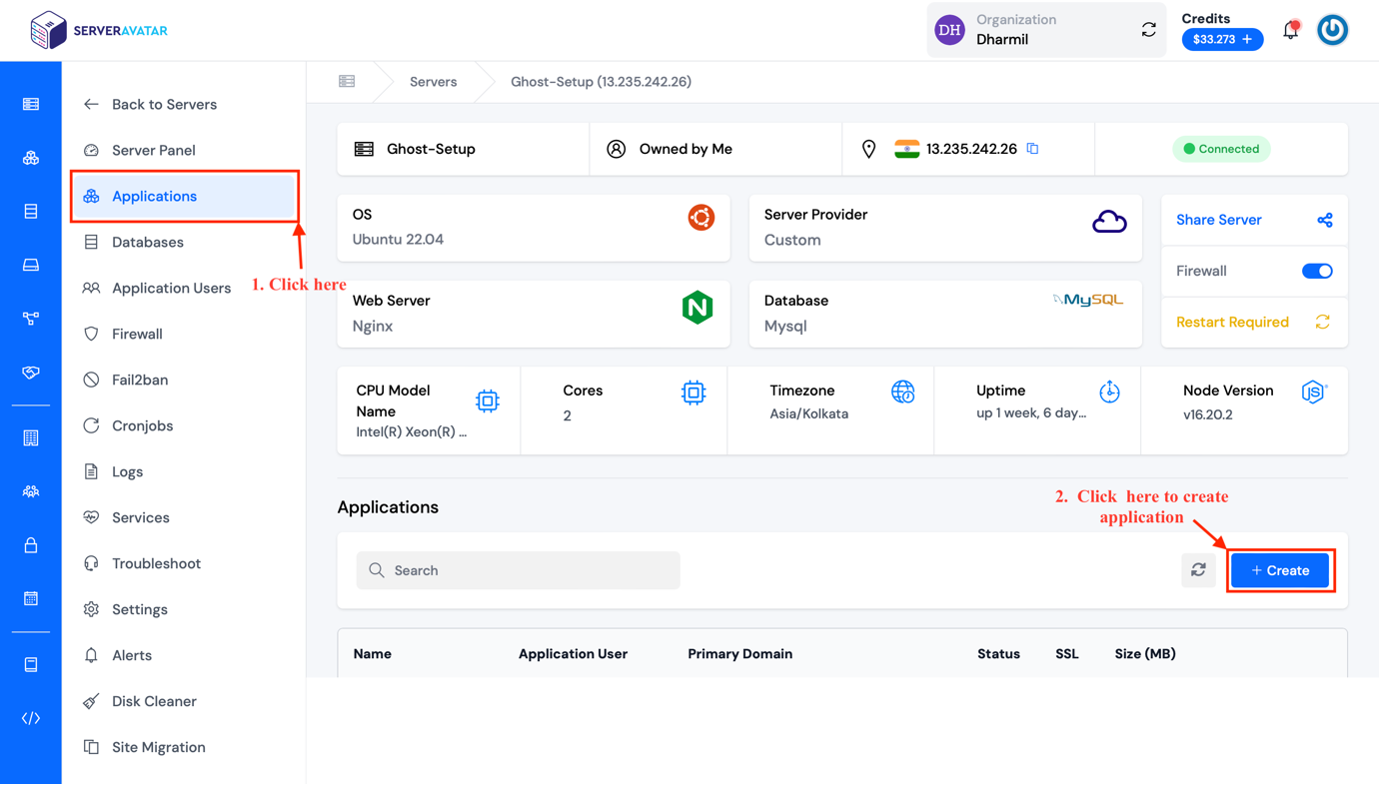
Step 2: Create a PHP Application
Access the Applications tab from the server panel to create a new PHP application for Kanboard. Now, create an application, click on the Applications tab, then click the Create button on the server panel.
To create an application and proceed with the installation and deployment of Kanboard. You need to feel the prerequisite for Kanboard.
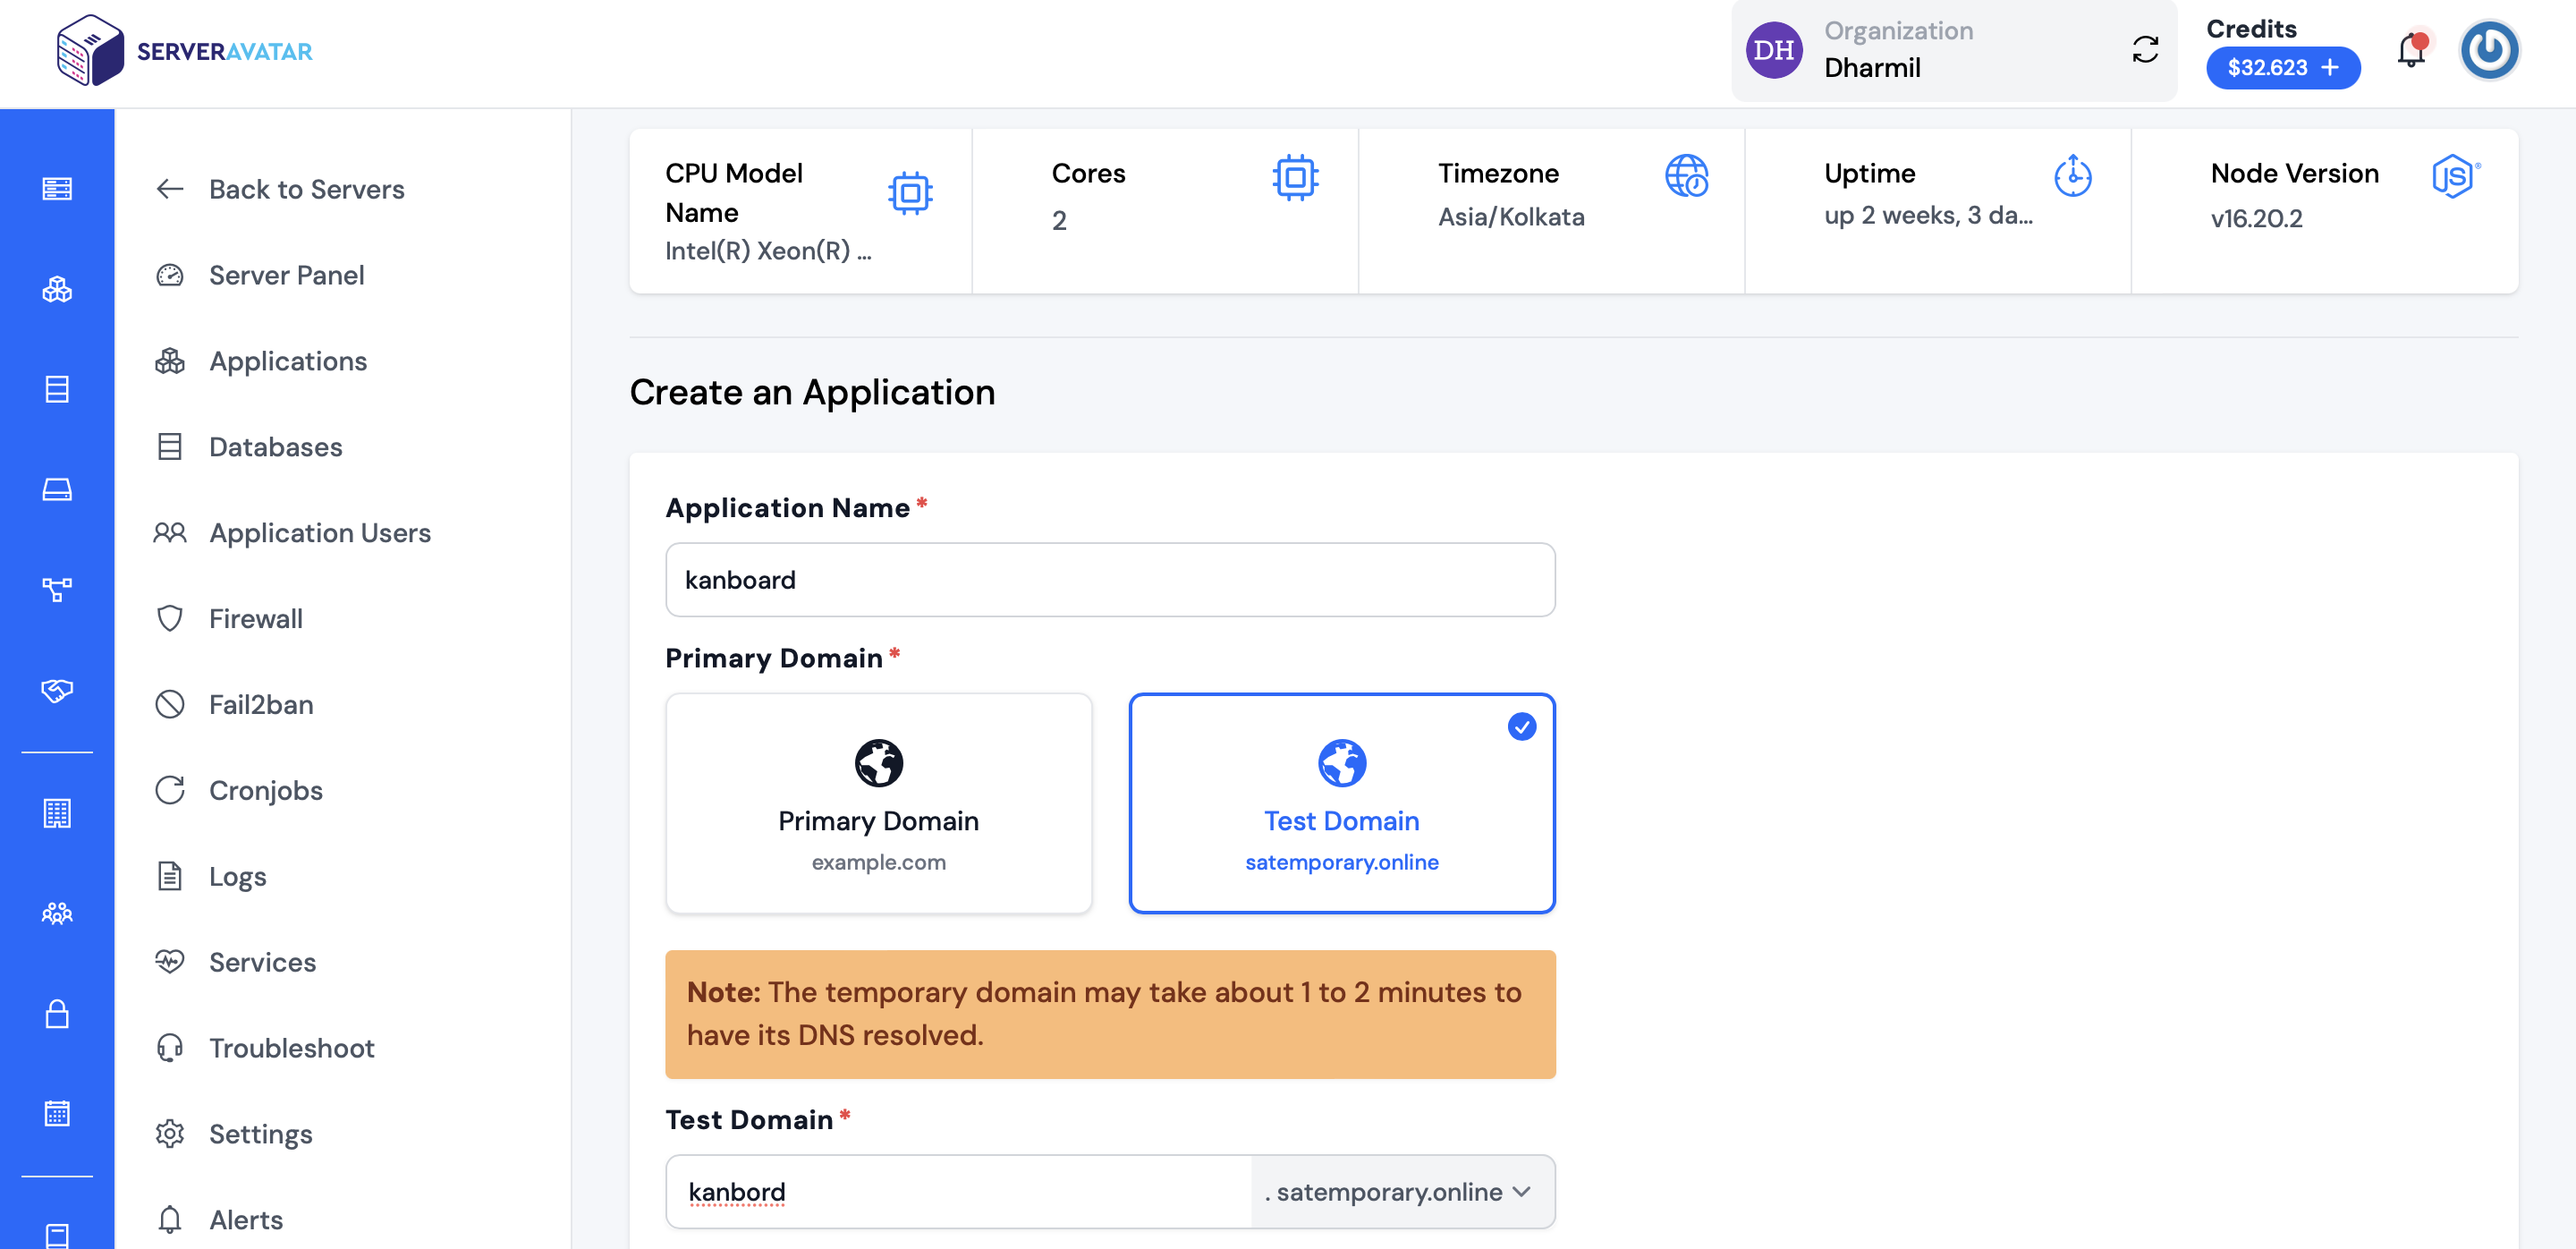
Please select an application name of your choice. Afterward, input the domain name where you'd like to direct your URL. You have the choice between a test domain or a primary domain. If you decide on the test domain, you can use ".serveravatar" as a test domain extension. This flexibility ensures you can make the perfect selection for your project.
Note that:
If you want to host Kanboard on your domain, then make sure to point your domain to the current IP address of your server, and for that:
- Log in to your domain provider site, where you buy your domain. Click here for more info about your domain name.
- Access DNS Manager to edit your DNS records (contact the support team if you don’t find them)
- Change the IP address of A Record of your website to the > current server’s IP address.
To host Kanboard on your subdomain, for example, Kanboard.yourdomain.com, create a new application with the subdomain as your primary domain and follow the same procedure. For accessing Opencart on the subdomain, you need to add your subdomain on A Record that points to the current IP address of your server. To point to an IPV6 address, you would need to use an AAAA record.
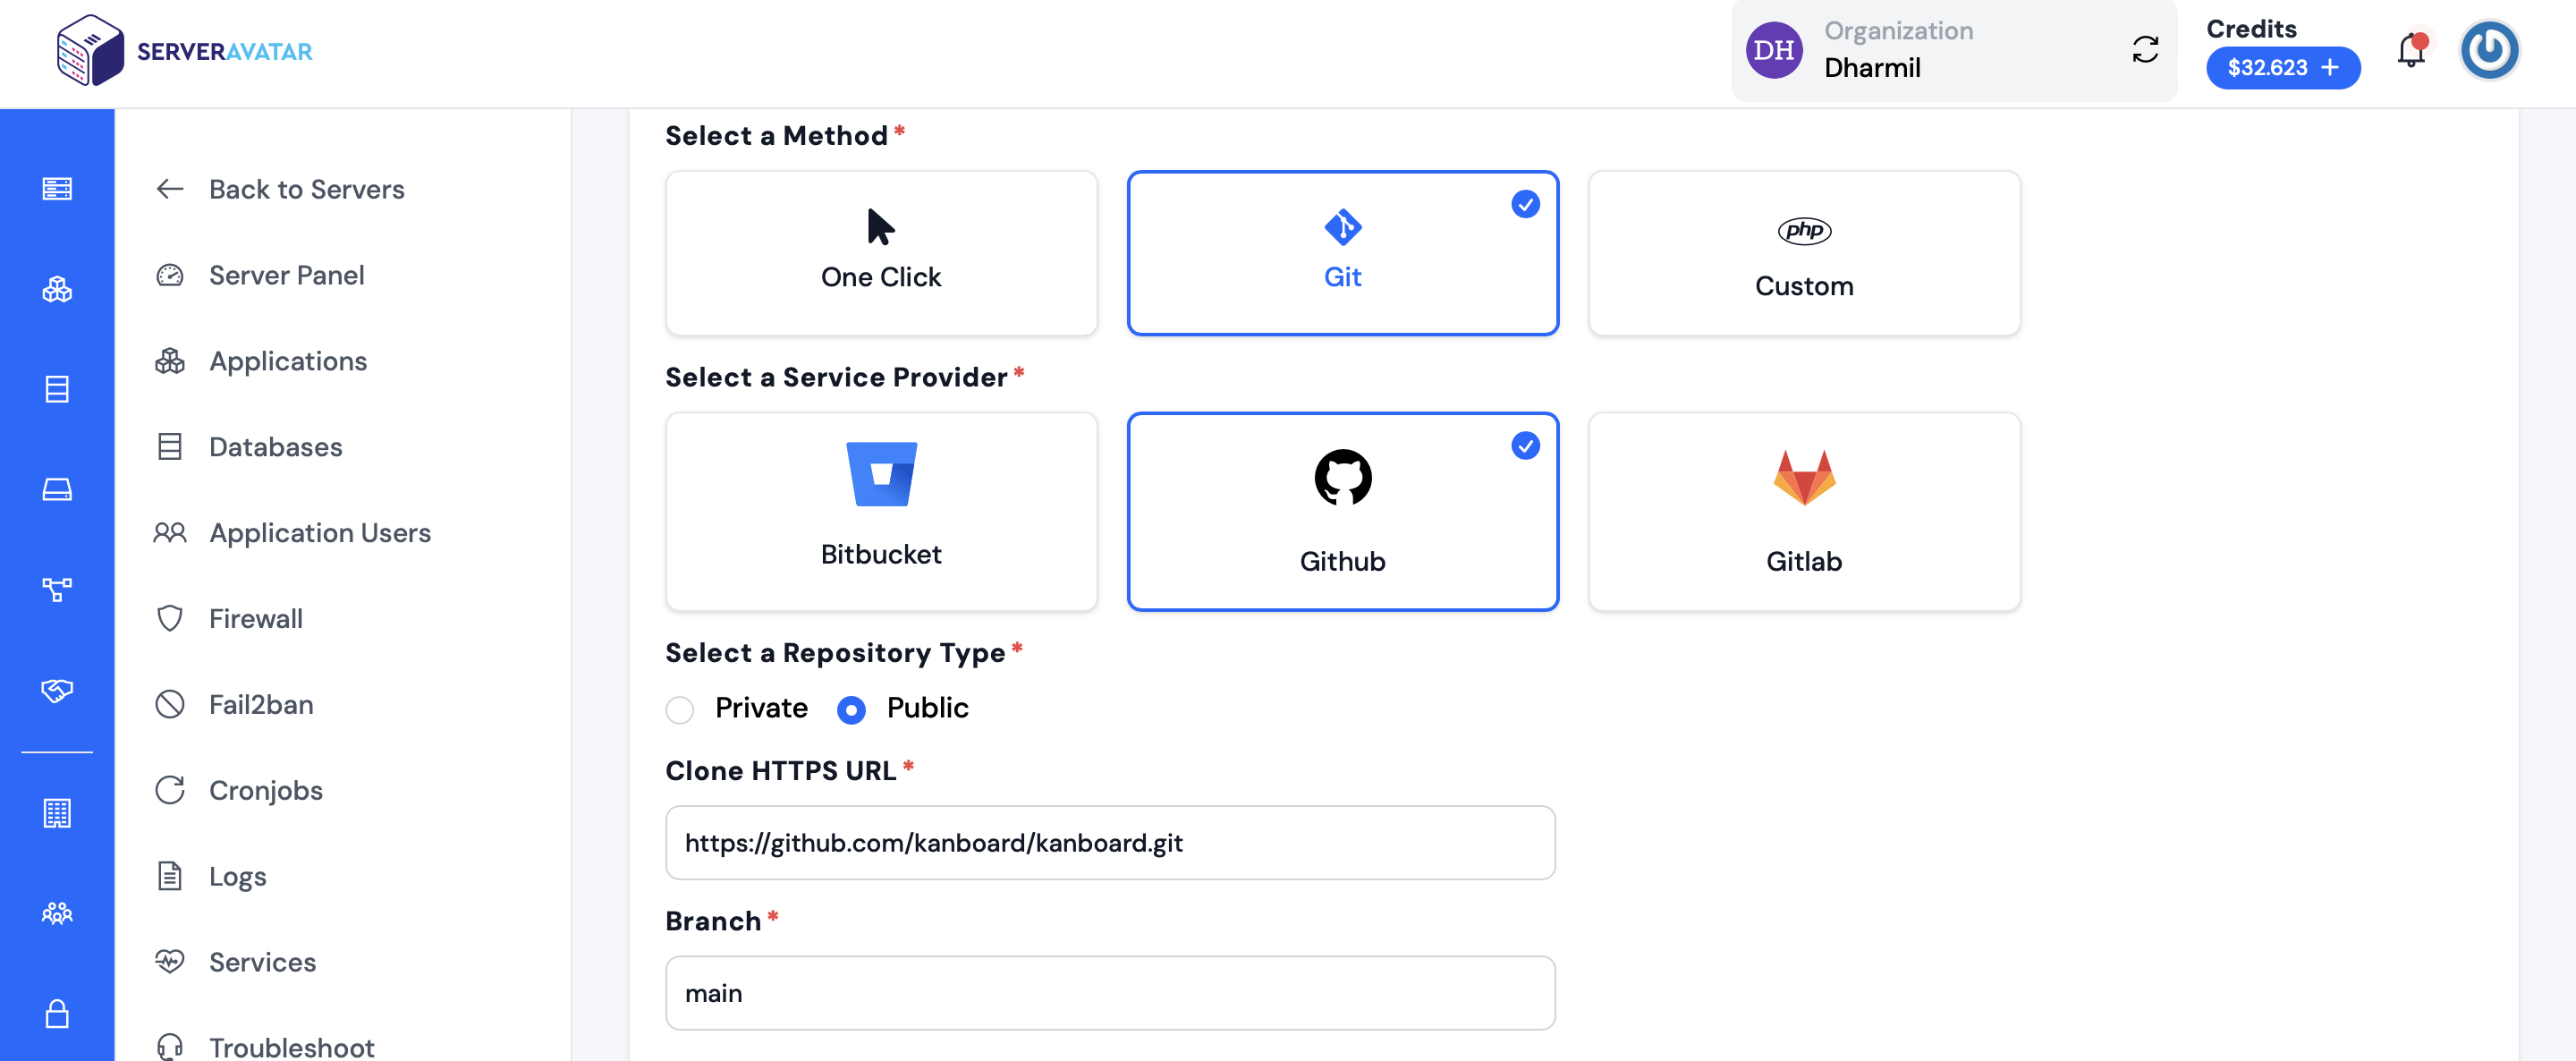
Now, you will clone Kanboard through the available repository in GitHub. so,
Select a method: Git
Select a Service Provider: GitHub
Select a Repository Type: Public
Clone HTTPS URL: https://github.com/kanboard/kanboard.git
Branch: main
Let's take the next step in creating your application. Now, you need to set up deployment scripts. These are the manually entered commands that will run automatically after you've cloned the repository.
Installing Kanboard requires running manual scripts or commands in the deployment process.
Deployment Scripts:
cp config.default.php config.php
To proceed further, select checkbox labeled "Show Advanced Options". You'll find this checkbox right below the deployment scripts section.
The next step is to create a system user for your application. You have the option to either select an existing user or create a new one dedicated to this application.
Now, let's select the PHP version. Choose PHP version 8.1 or a newer version if available. Regarding the custom webroot for Kanboard, it should be blank(do not write) as illustrated in the provided snapshot. We are specifically looking for either an "index.php" or "index.html" file within this custom setup.
Select PHP Version: PHP version 7.4 or higher
Custom Webroot: (leave it blank)
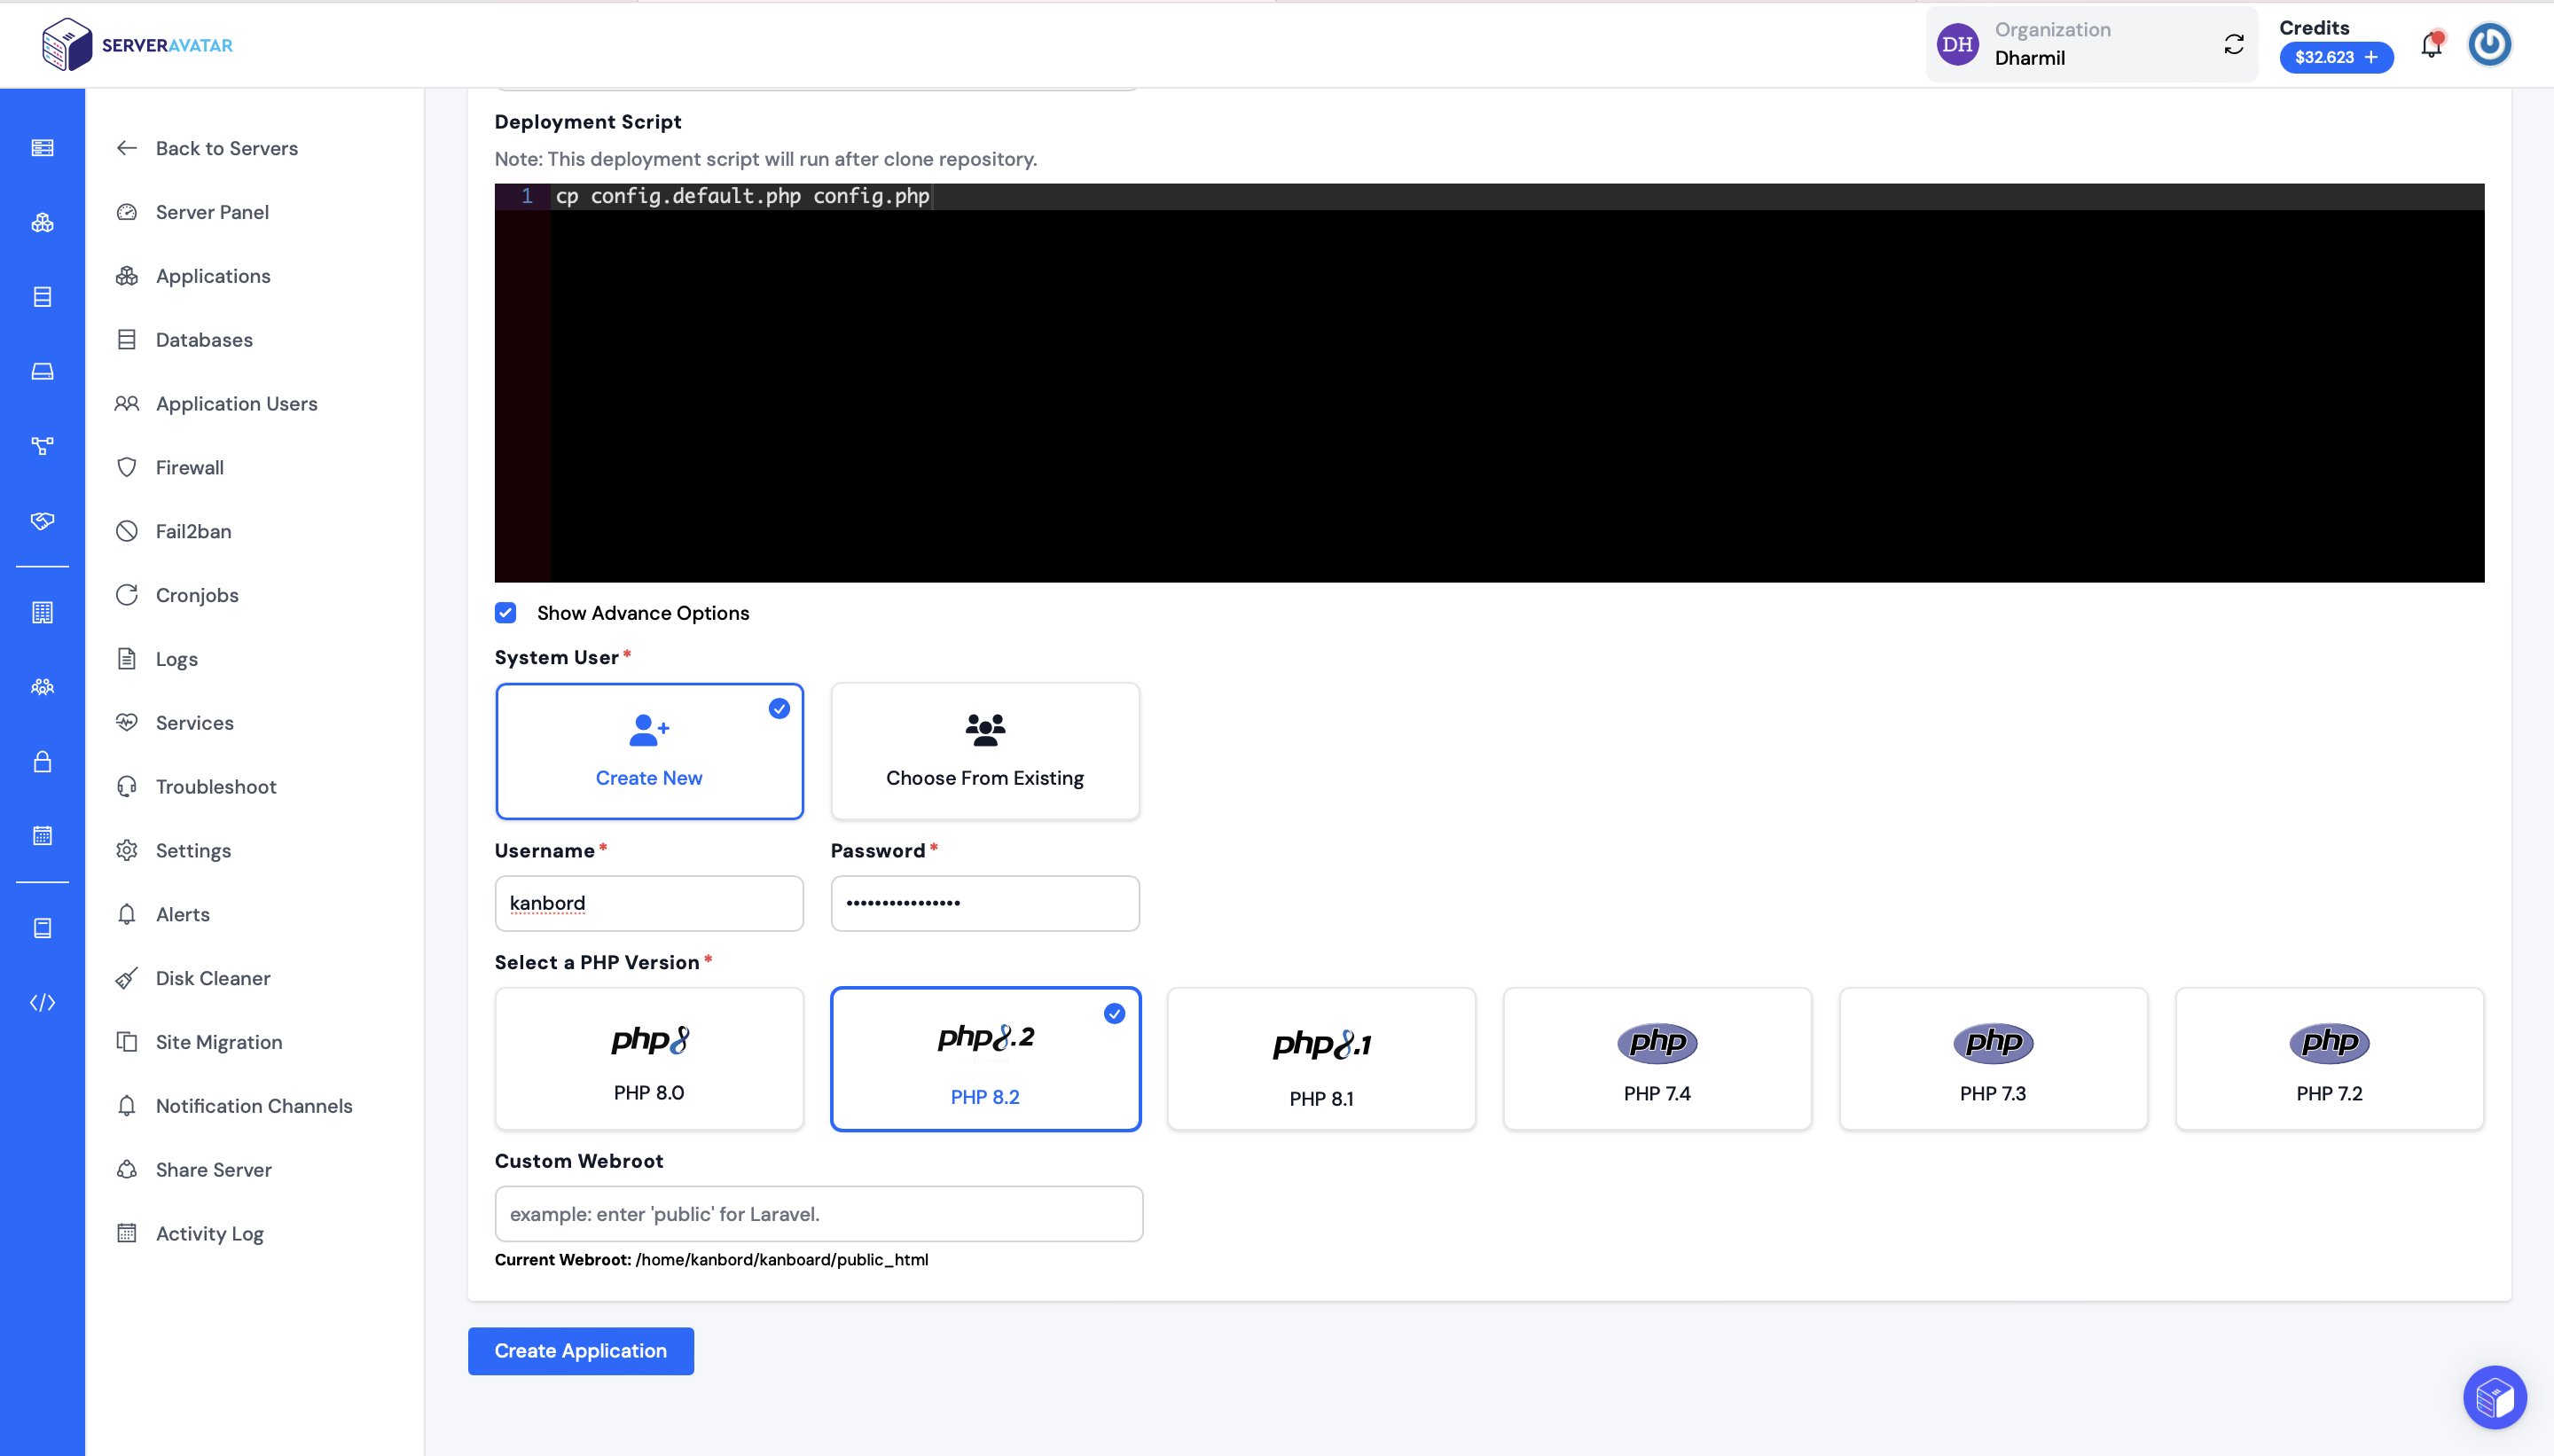
With all these settings in place, go ahead and click on the "Create Application" button to complete the procedure.
Congratulations! You've successfully created your application.
Step 3: Config Database with Application
In this step, we're connecting the database we created in Step 1 with the application from Step 2. To configure the database, we need to edit the config.php file.
To edit the config file, you can access the public_html directory from your file manager or navigate through the directory path.
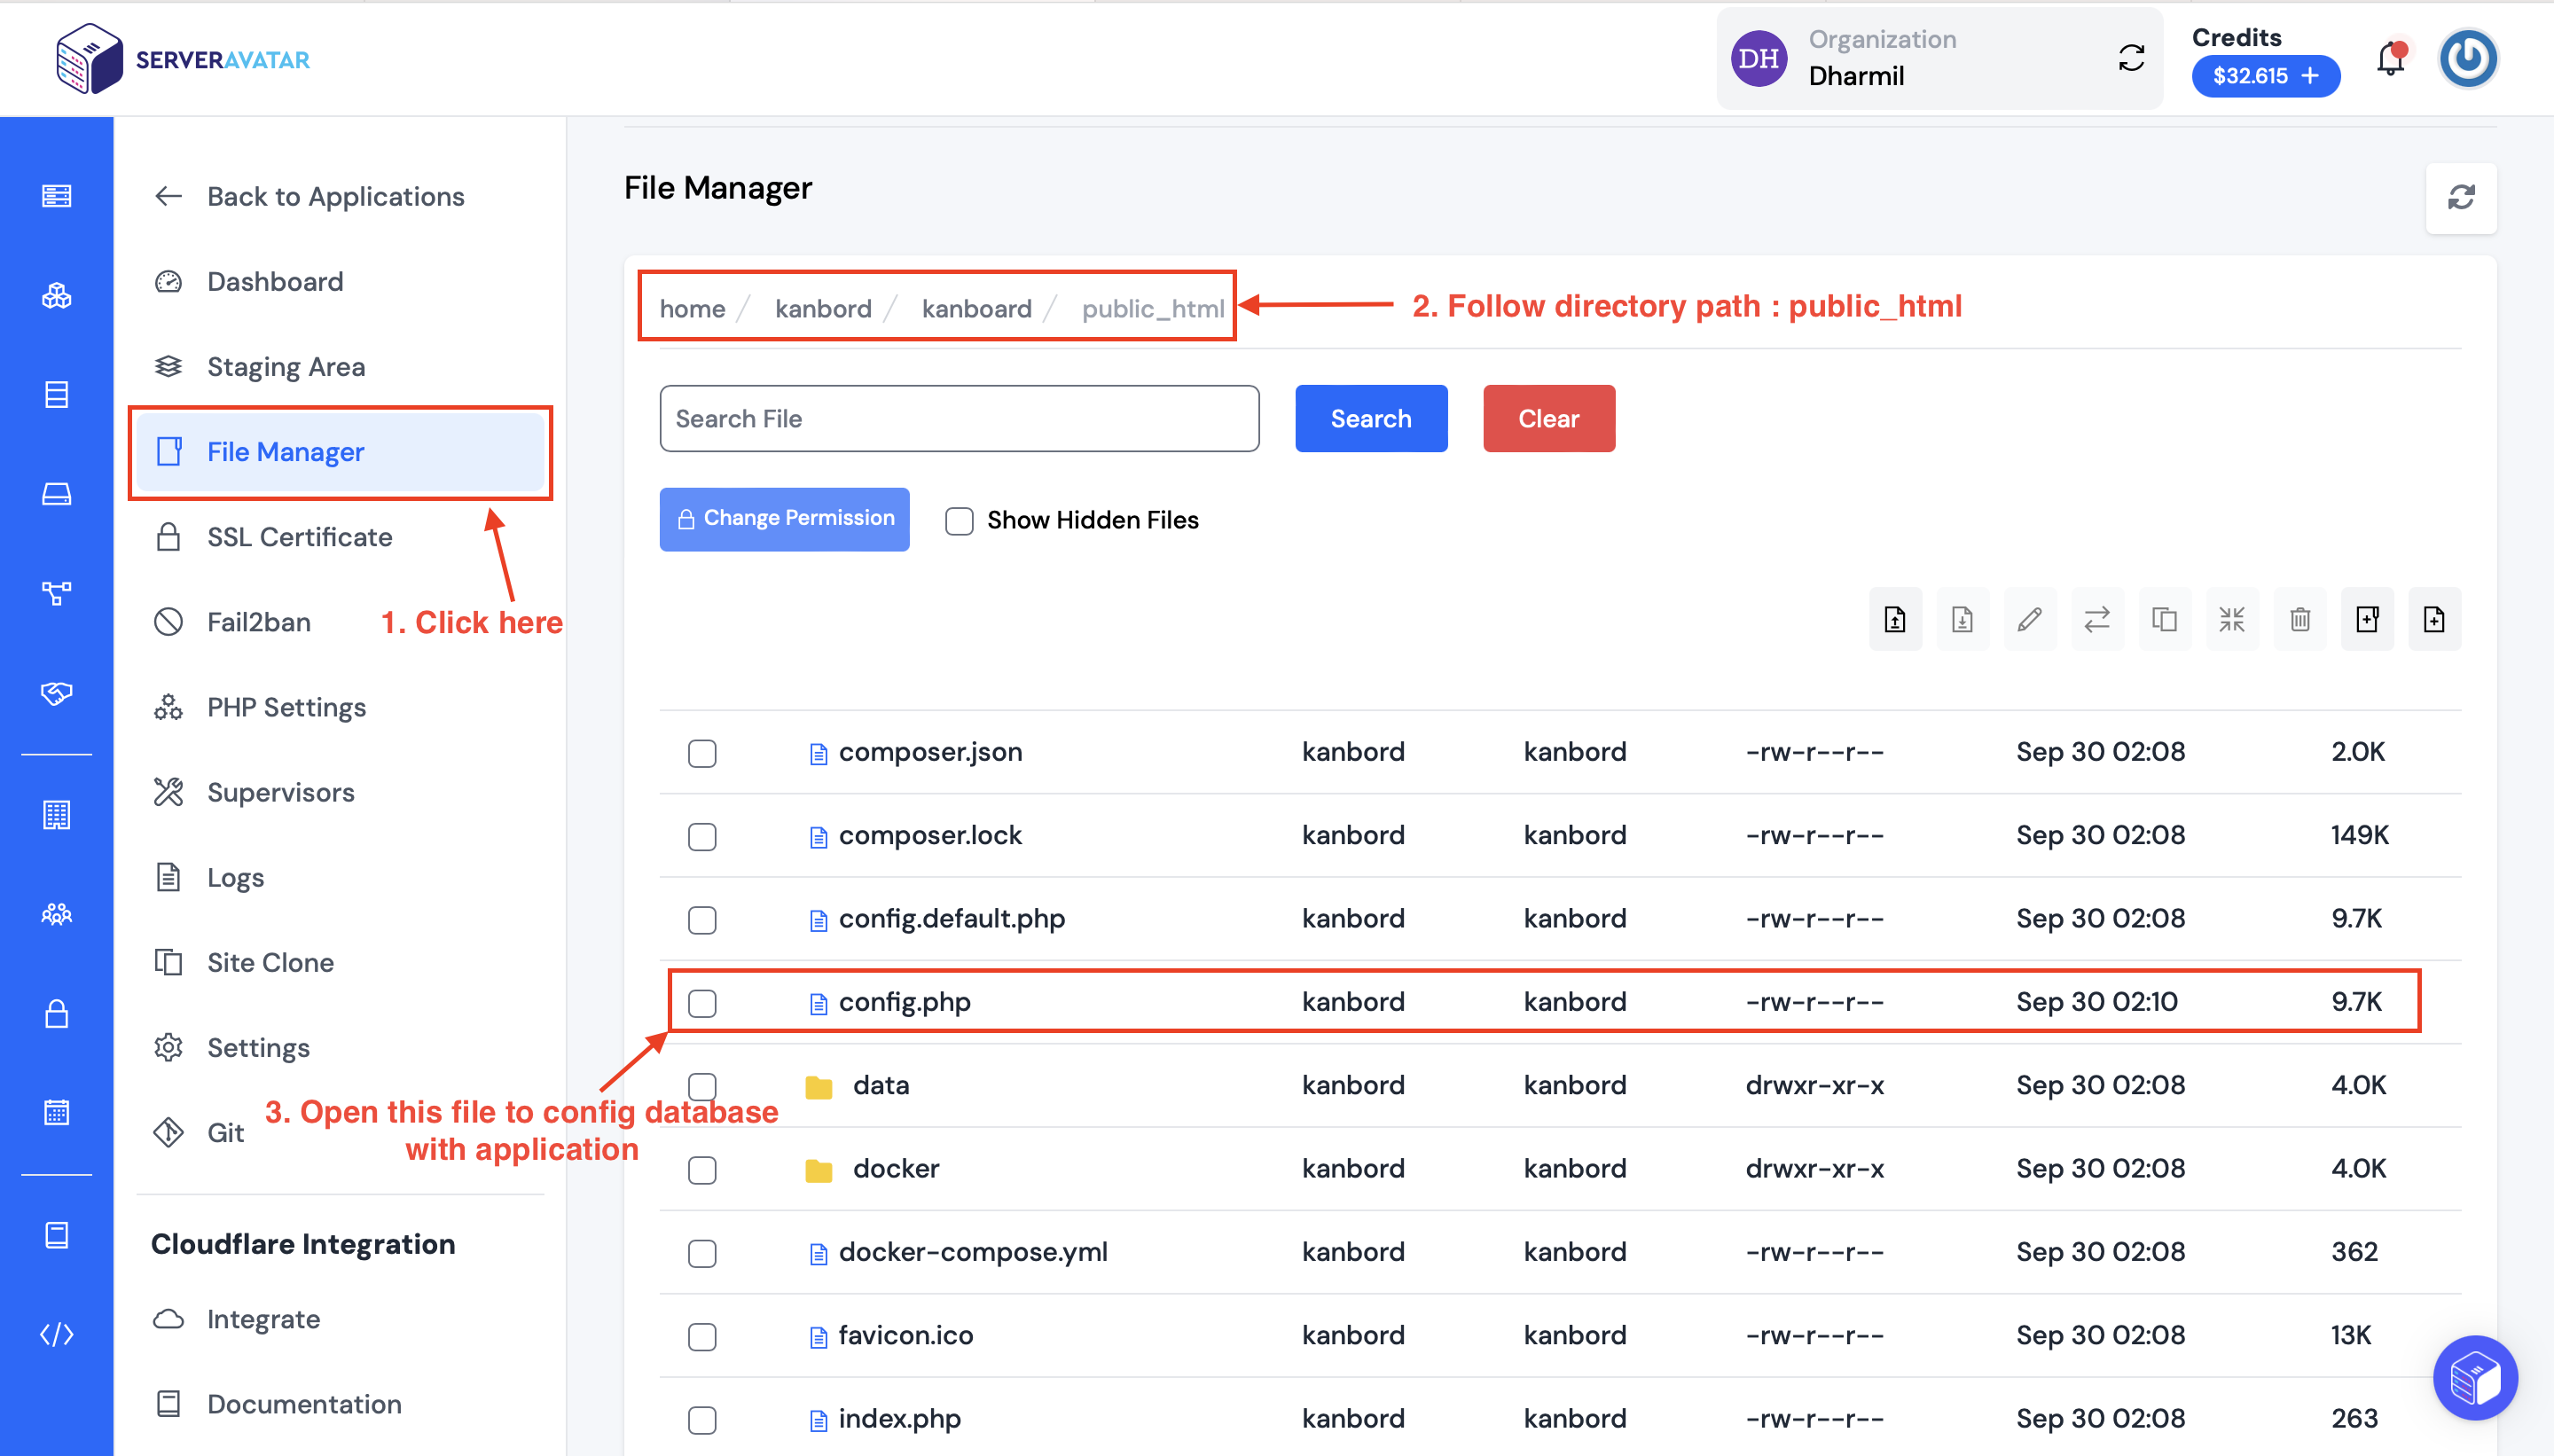
Proceed to open it. Inside, you'll need to enter the database credentials that were created in Step 1. To establish a connection between the database and the application, enter the database credential we have already made. You can access all your database credentials, like database driver, database name, username, hostname, and password, by accessing the database tab from the server panel.
Enter the following database credential we have already created in ServerAvatar:
DB_DRIVER: MySQL
DB_USERNAME: Username of database
DB_PASSWORD: Database password
DB_HOSTNAME: localhost
DB_NAME: Database name
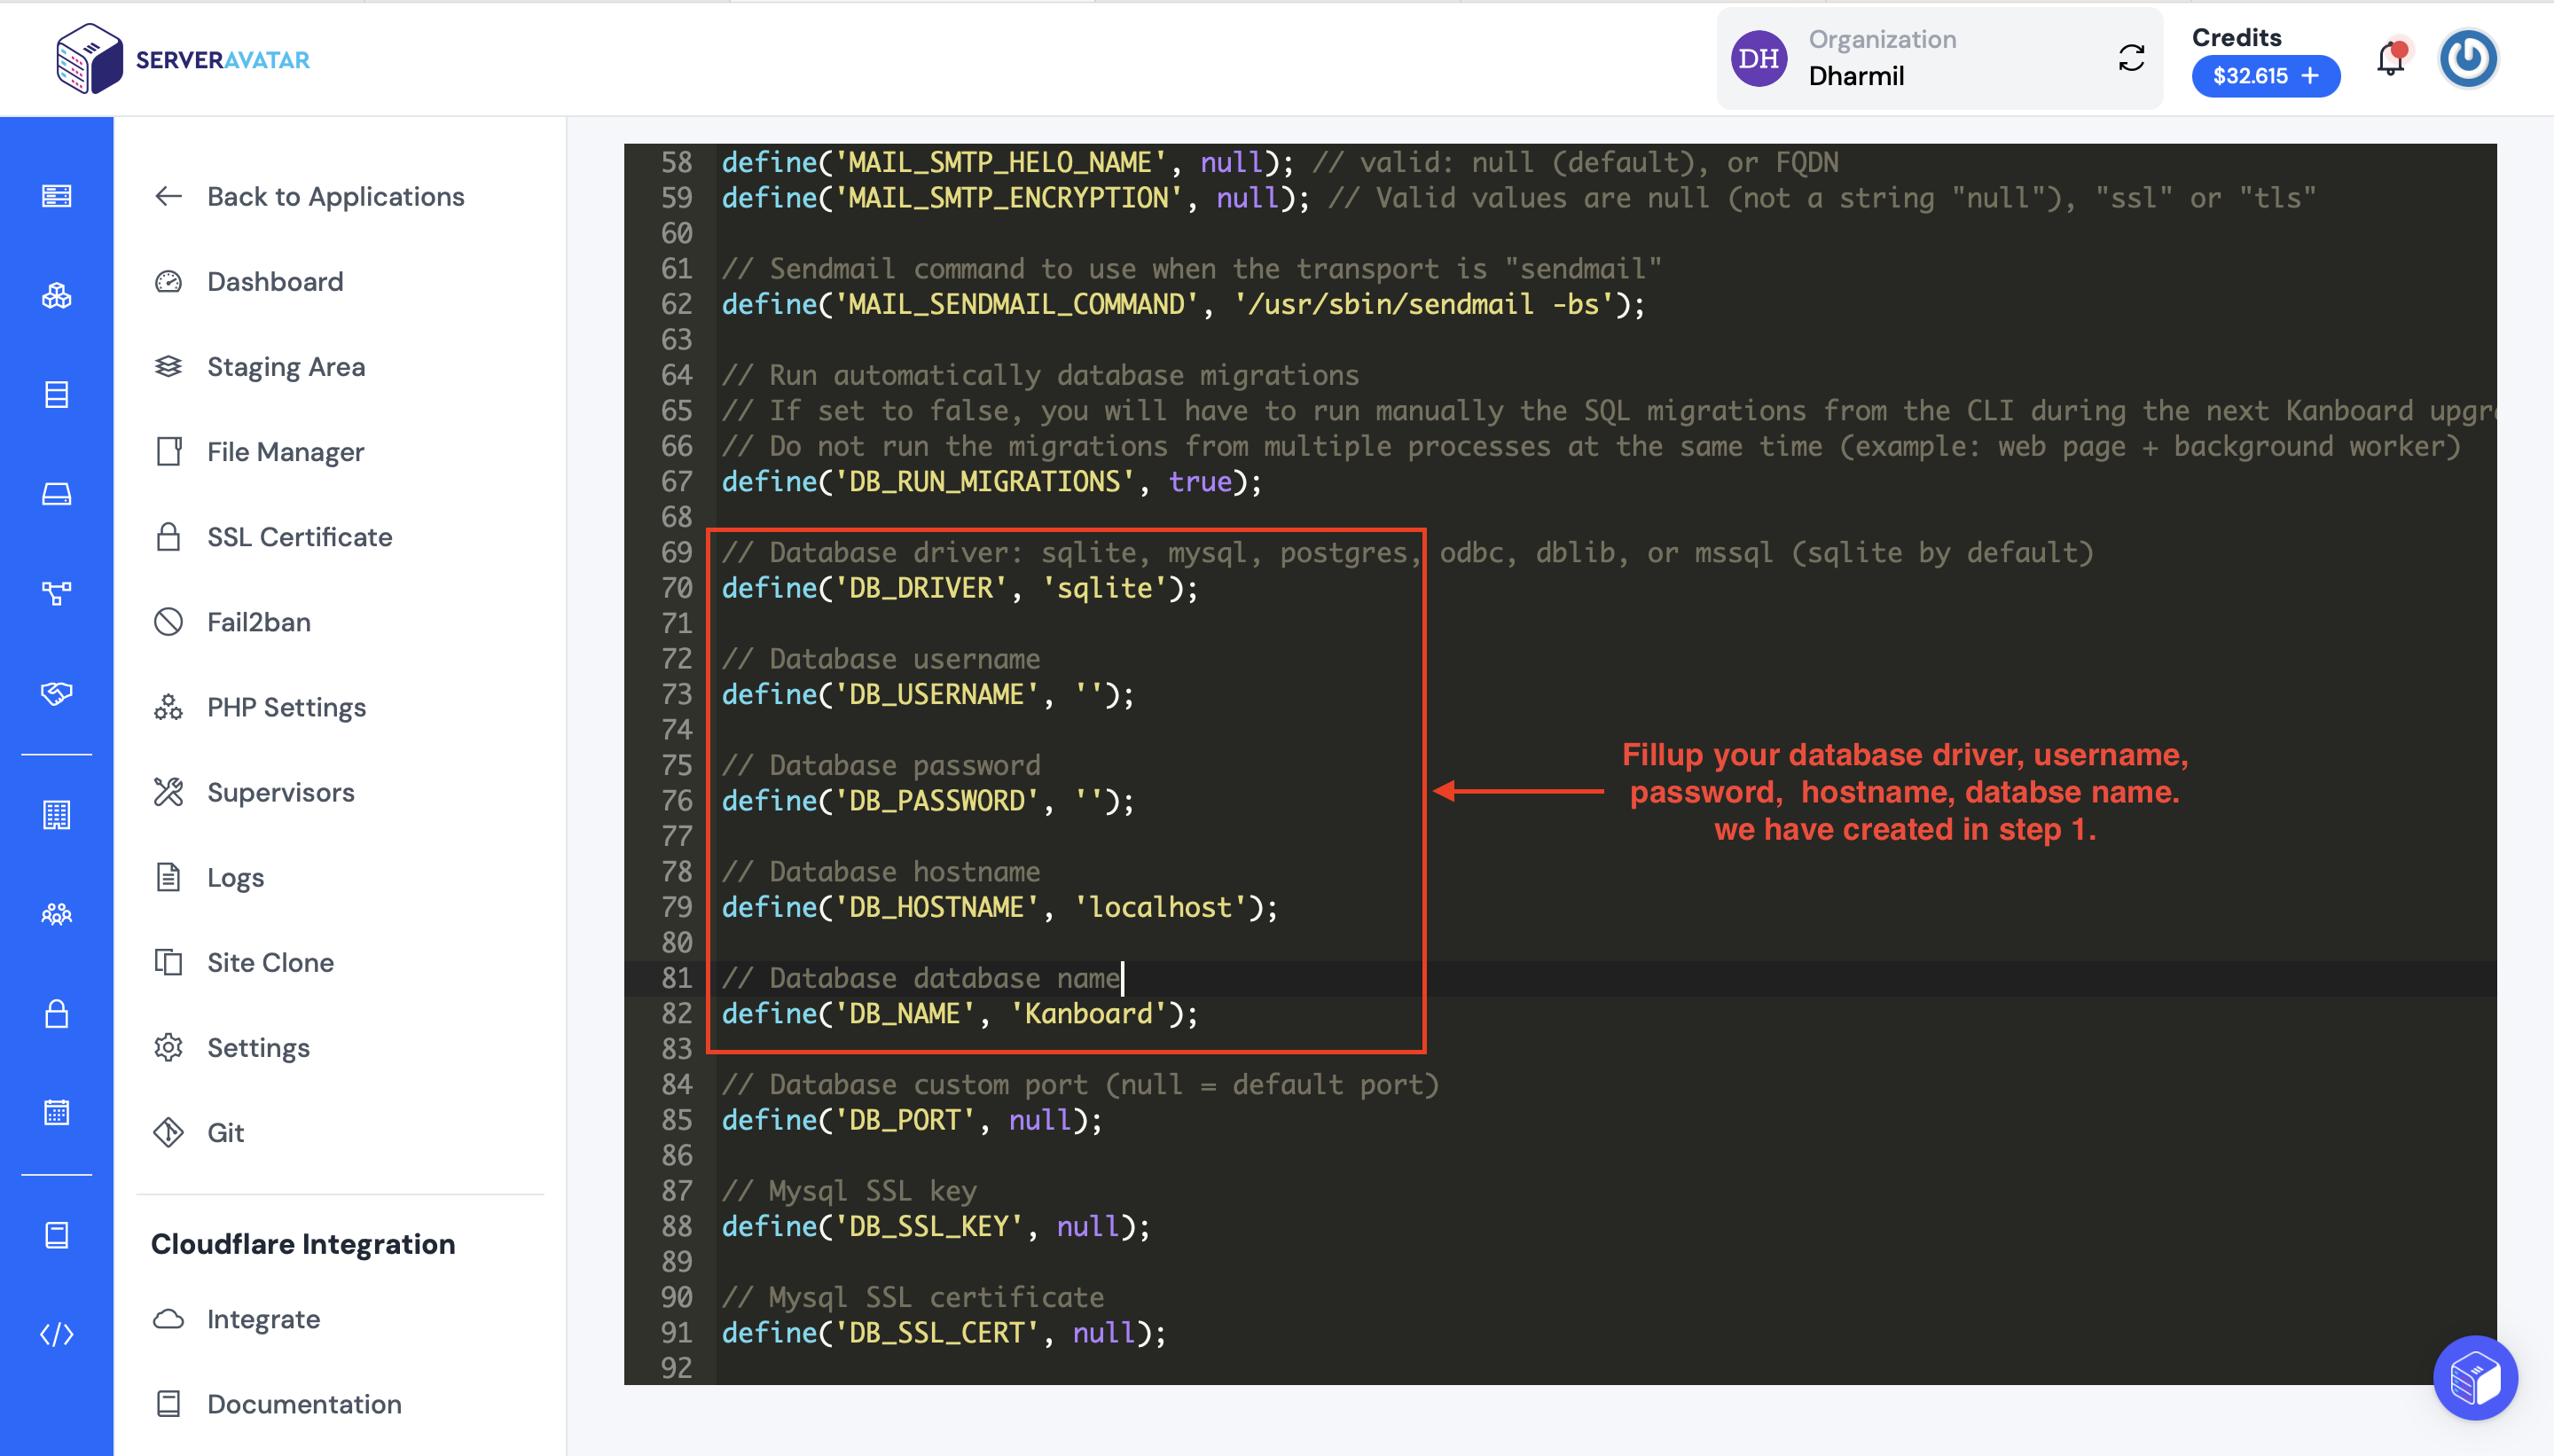
Don't forget to save the changes you've made to the "config.php" file.
The next step is, to update your directory permission.
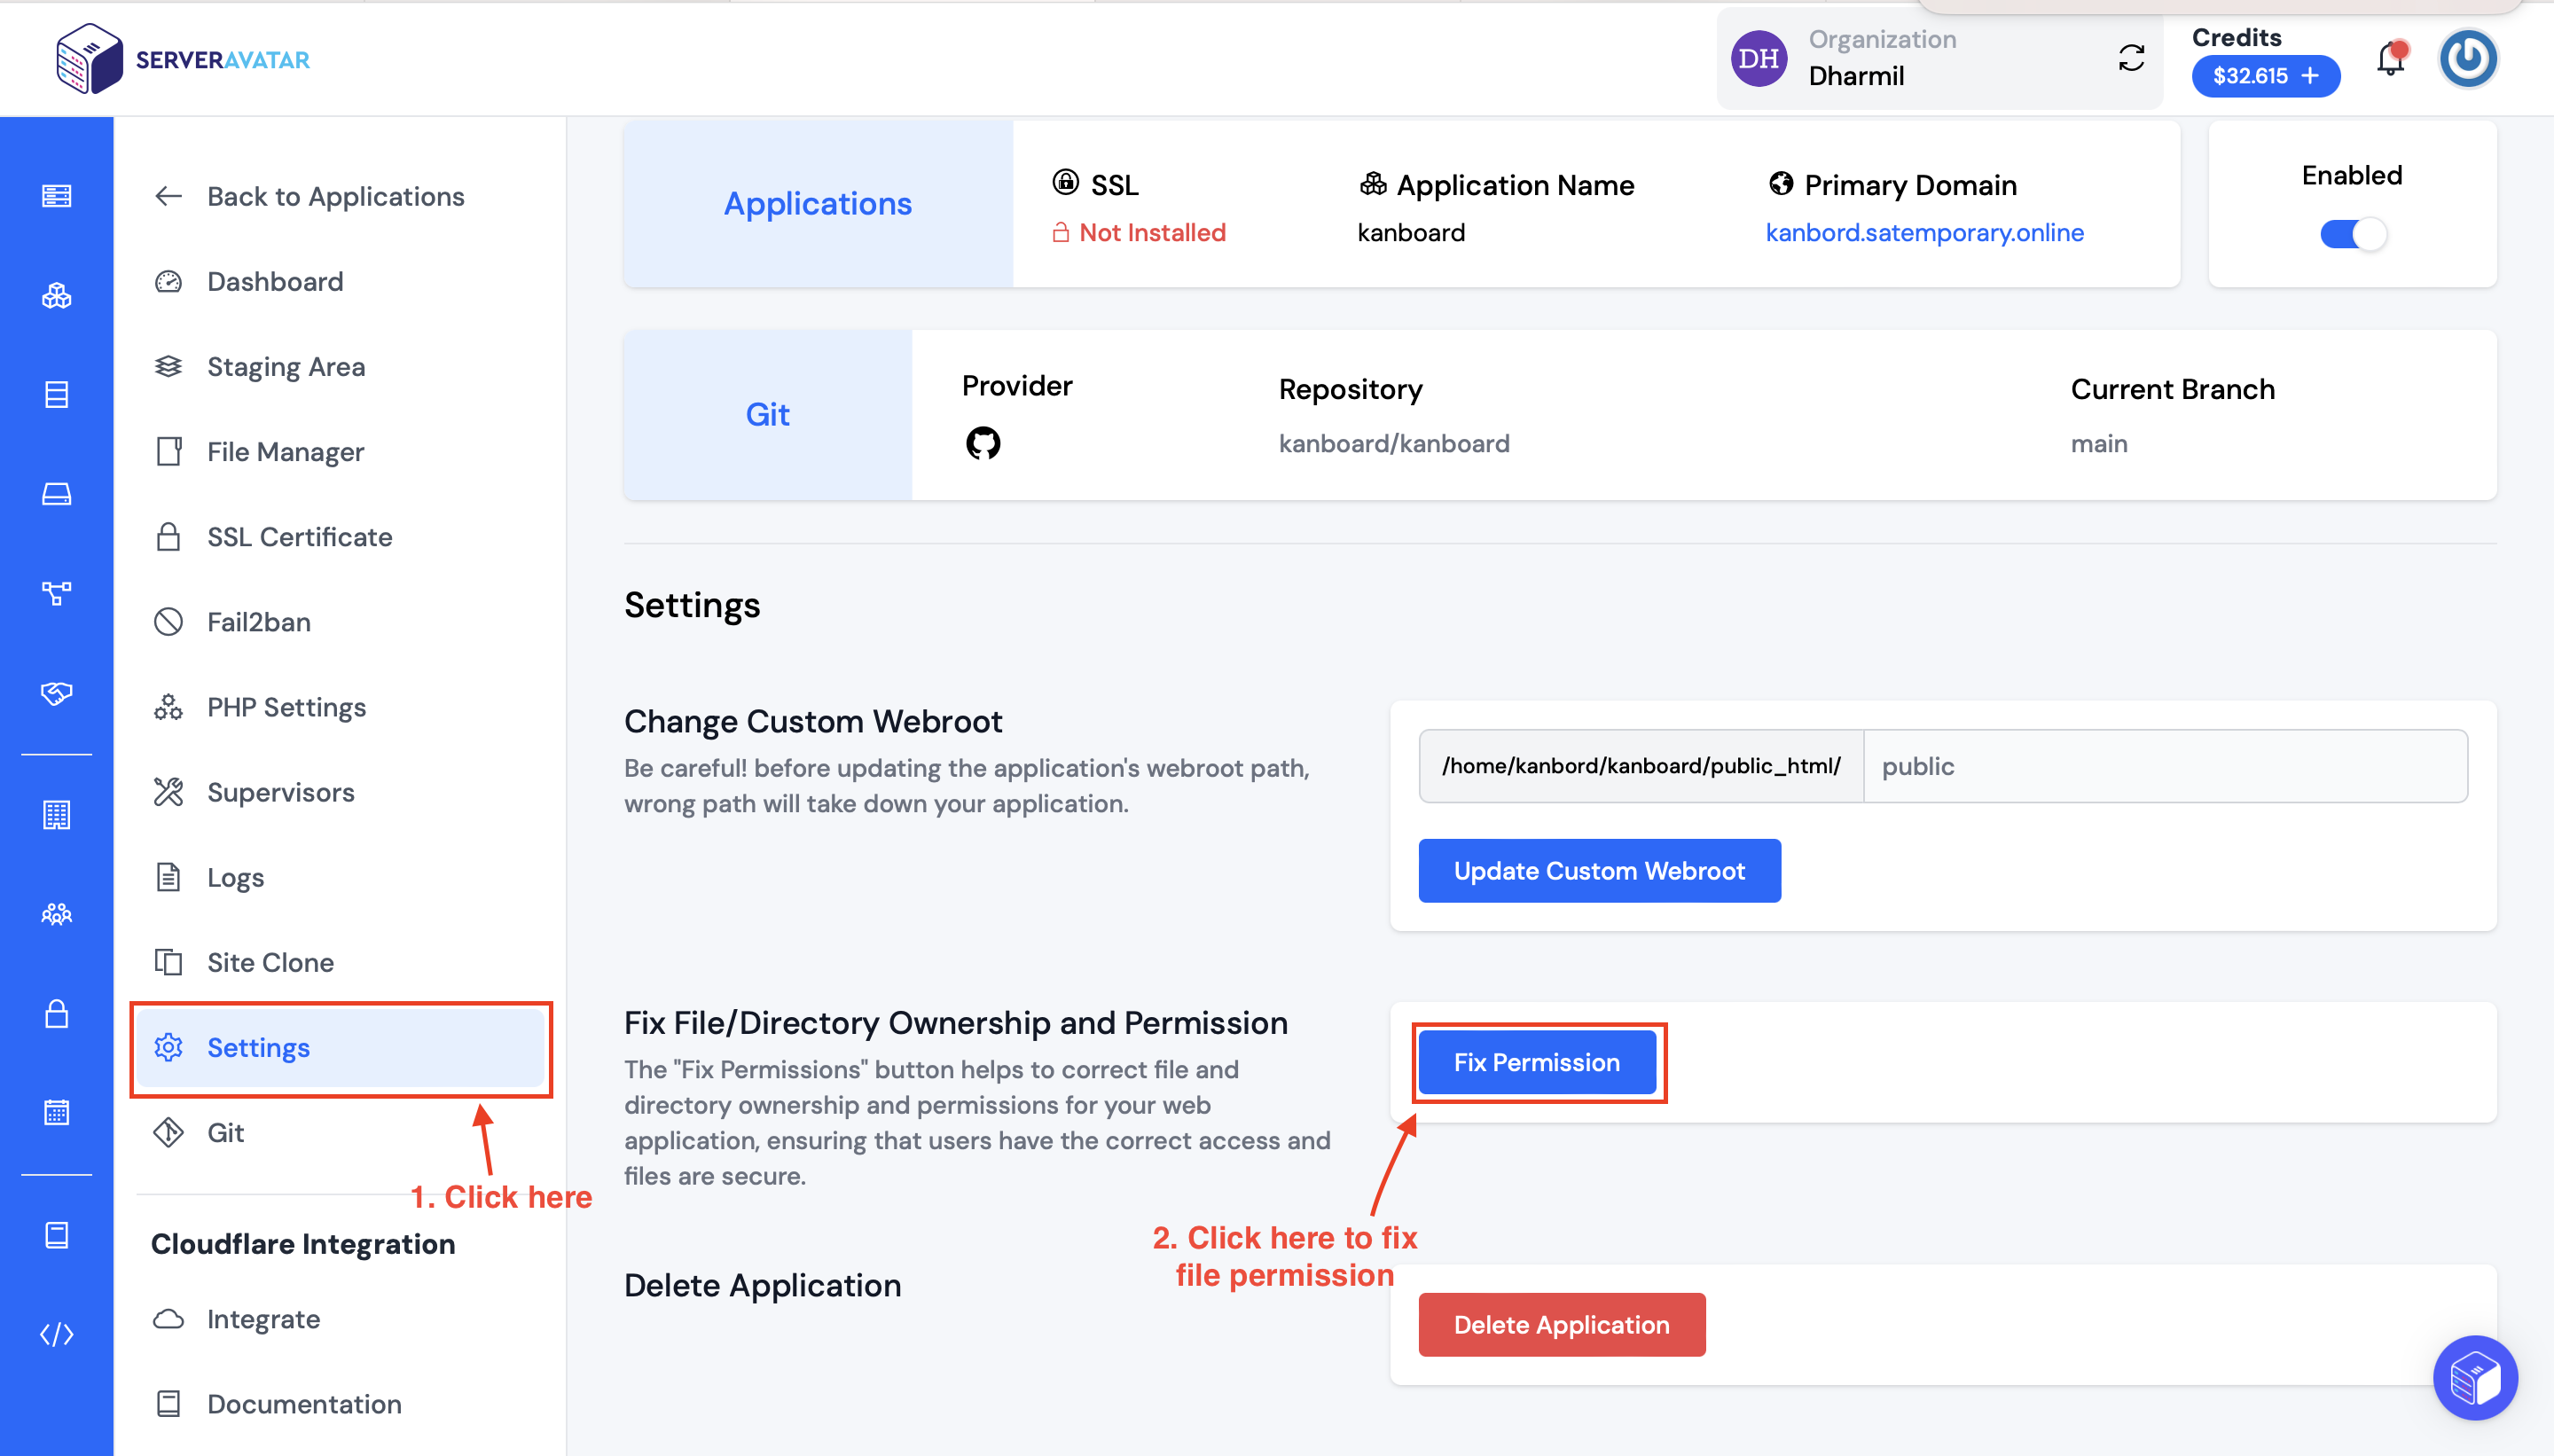
Congratulations! Successfully deployed Kanboard on the server through the ServerAvatar.
You can access it by visiting your domainname in your web browser.
Step 4: Access Kanboard Web UI
Now, access the site URL from the Application panel to log into Kanboard.
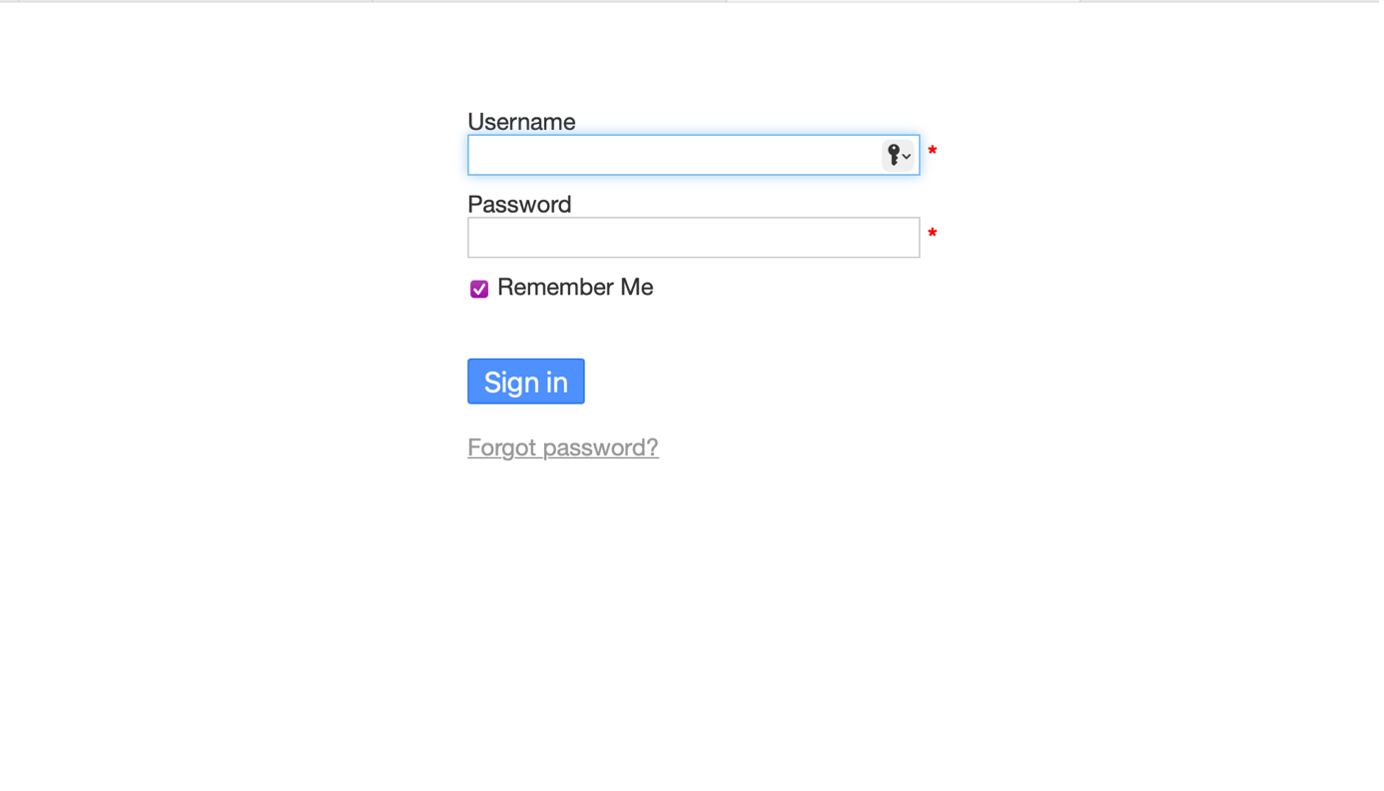
To login, use following credentials:
Username: admin
Password: admin
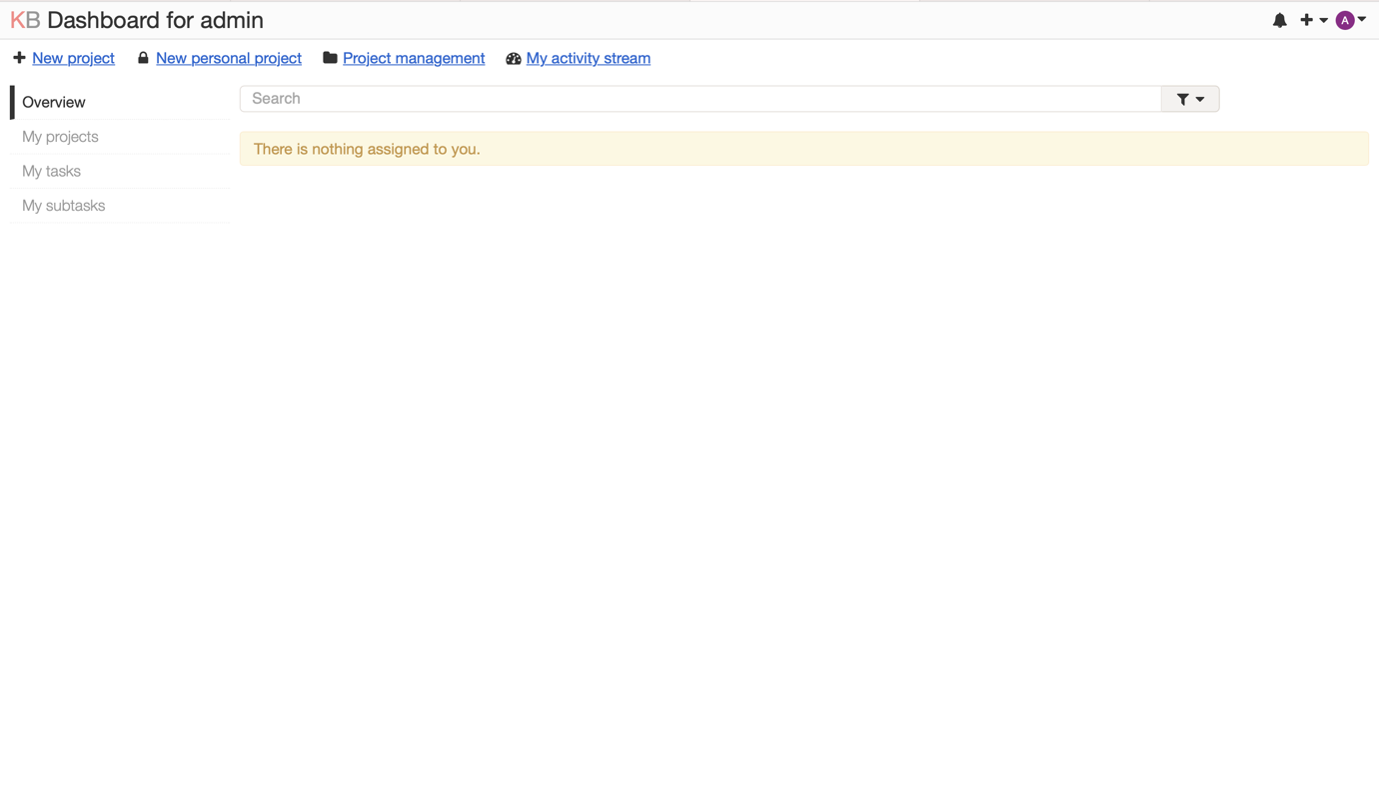
You successfully logged into Kanboard. You should get to a dashboard like below.
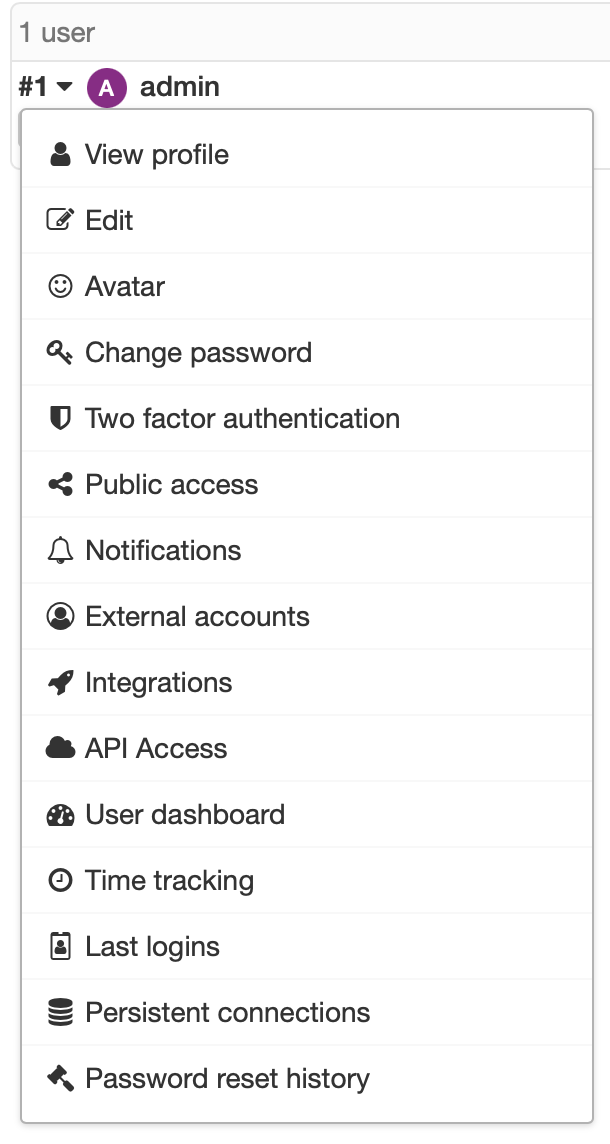
Reset admin password
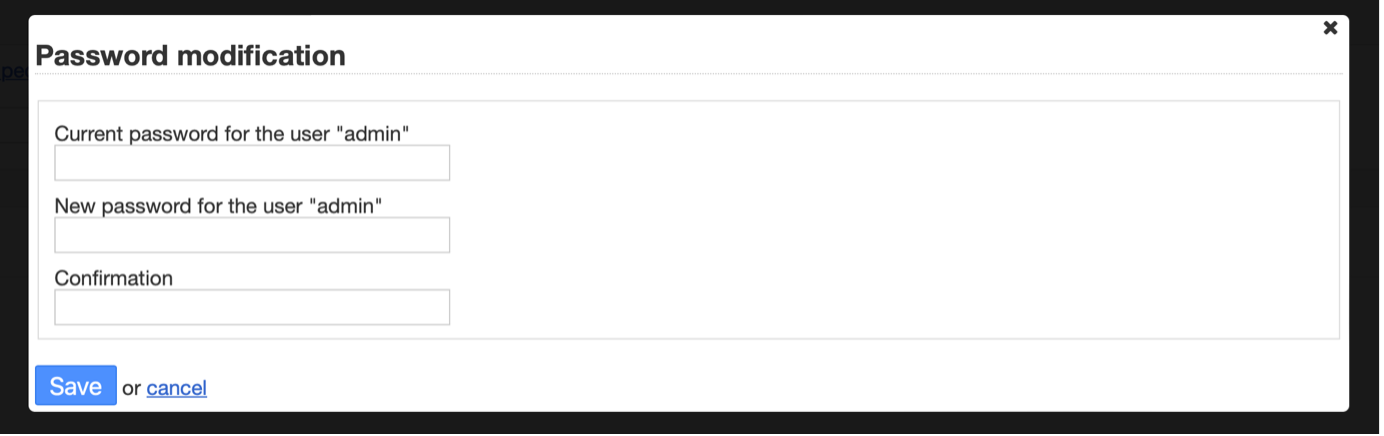
To reset your admin login credentials follow the given path: Admin > Users Management > admin > Change password.
Input current and new passwords for admin users.
Congratulations! Successfully install and setup Kanboard on the server through the ServerAvatar.
Check Kanboard documentation for more information related to installation and functionalities.