HumHub is an open-source social networking platform designed to enhance collaboration and communication within organizations. It features tools for creating social intranets, managing content, and promoting community interaction. With its customizable modules and themes, HumHub allows businesses to customize their social networking environment to specific needs without extensive technical knowledge. When considering hosting HumHub, deploying it on Racknerd is a dependable choice due to its scalable infrastructure and user-friendly deployment solutions. ServerAvatar assists with Racknerd VPS and simplifies the deployment of the HumHub application on the Racknerd platform through easy steps.
Create a VPS in Racknerd
Getting started with Racknerd:
Creating an account and setting up a cloud VPS on RackNerd is simpler than you might imagine! Just follow our easy, step-by-step guide, and you'll be ready to go quickly. Start managing your RackNerd services quickly and effortlessly with one of the top hosting providers. Let's get started!
What is Racknerd?
RackNerd is a top-notch hosting provider offering various services, from cloud servers to dedicated servers and colocation. With a reputation for affordability and reliability, RackNerd is a great choice for both individuals and businesses seeking scalable and efficient hosting solutions. They provide the infrastructure you need to manage and optimize your websites, applications, and other online services seamlessly.
Step 1: Setup Cloud VPS with Racknerd
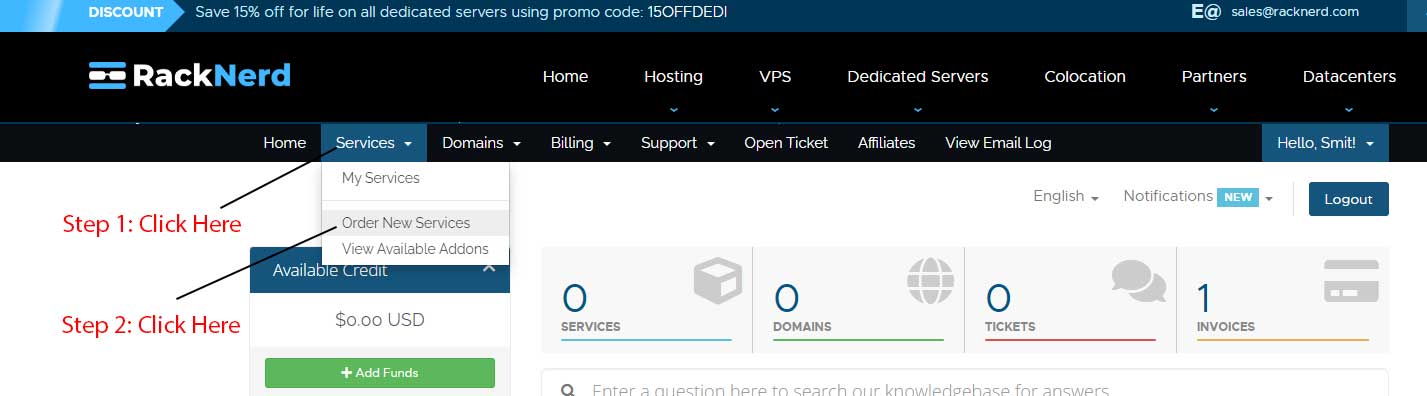
- First, log in to your RackNerd account and navigate to the Services option. Next, click on Order New Services from the dropdown menu.
Step 2: Select the plan
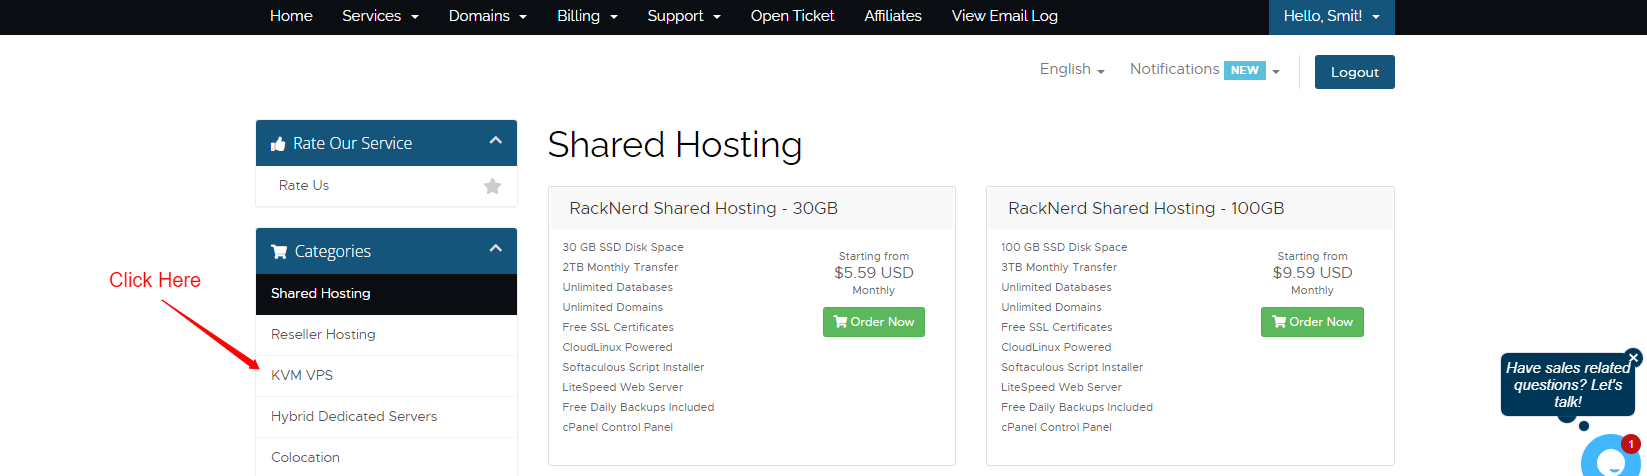
- At this point, you'll see a variety of Shared Hosting plans in the Categories section on the left-hand side menu. We recommend choosing the KVM VPS plan. To proceed, simply click on the KVM VPS Hosting plan.
- KVM VPS: KVM VPS (Kernel-based Virtual Machine Virtual Private Server) uses KVM technology to create virtualized environments with dedicated resources like CPU, RAM, and storage. This type of VPS offers high performance, security, and flexibility, making it perfect for hosting websites, applications, and other online services.
Step 3: Select KVM VPS Service
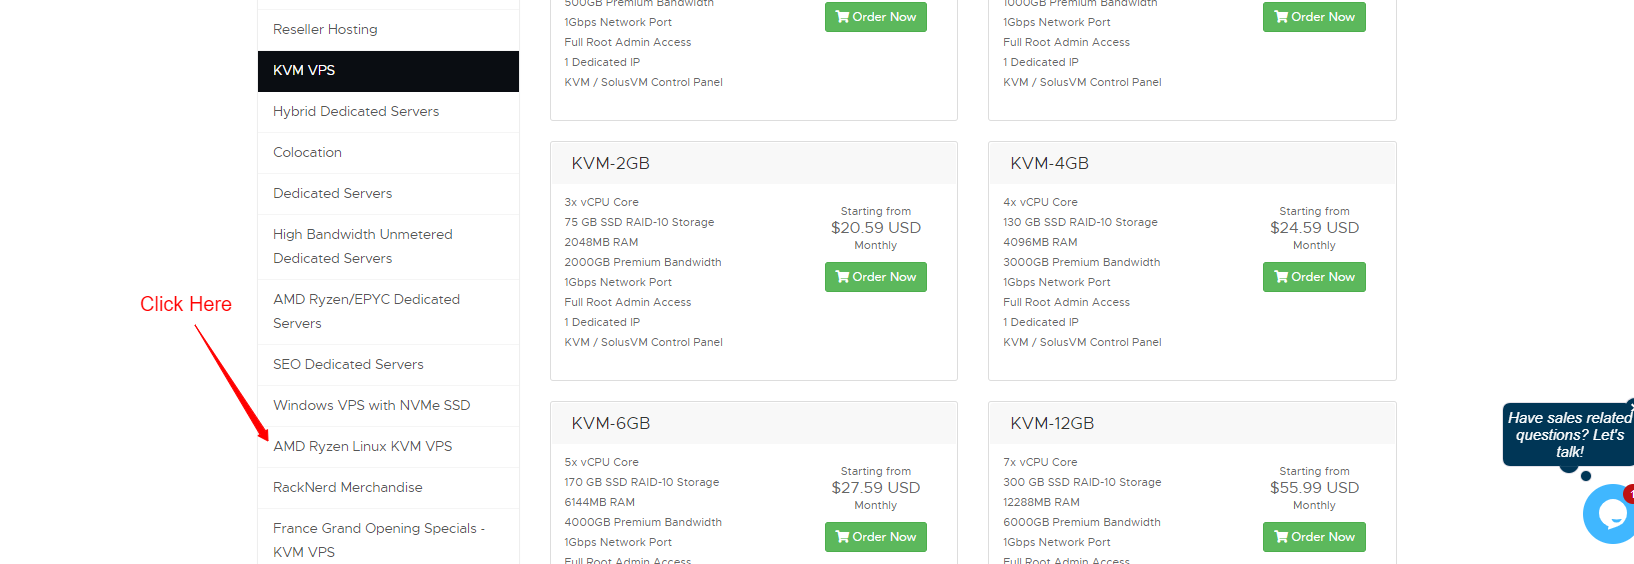
- At this stage, you'll find several options available in the KVM VPS section. You can choose any KVM VPS service that suits your needs, but we recommend selecting the AMD Ryzen Linux VPS service for the best performance.
- AMD Ryzen Linux VPS uses AMD Ryzen processors and the Linux operating system, providing high performance and reliability. It's ideal for websites, applications, and online services that require robust computing power and stability.
Step 4: Select your KVM VPS Configuration
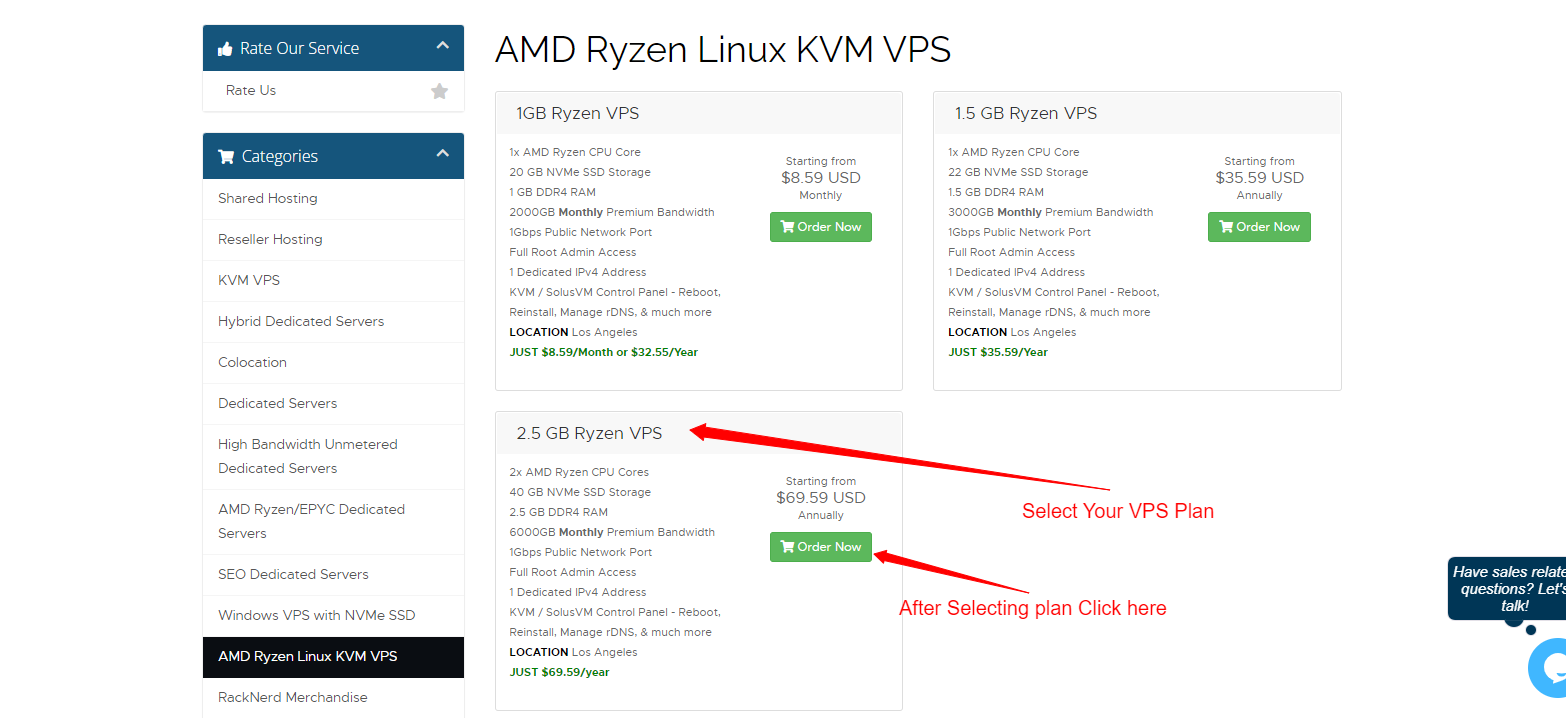
- Here in the KVM VPS service, you'll find a range of plans designed to meet your specific requirements. Once you've selected your plan, simply click on Order Now to proceed with the next steps.
Step 5: Additional VPS Options
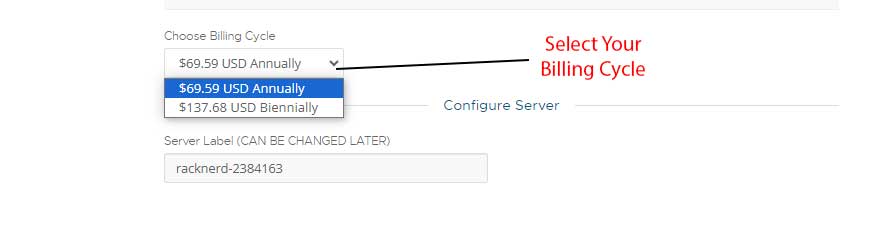
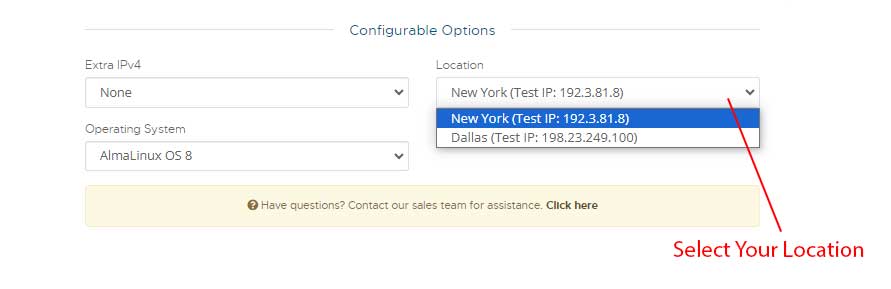
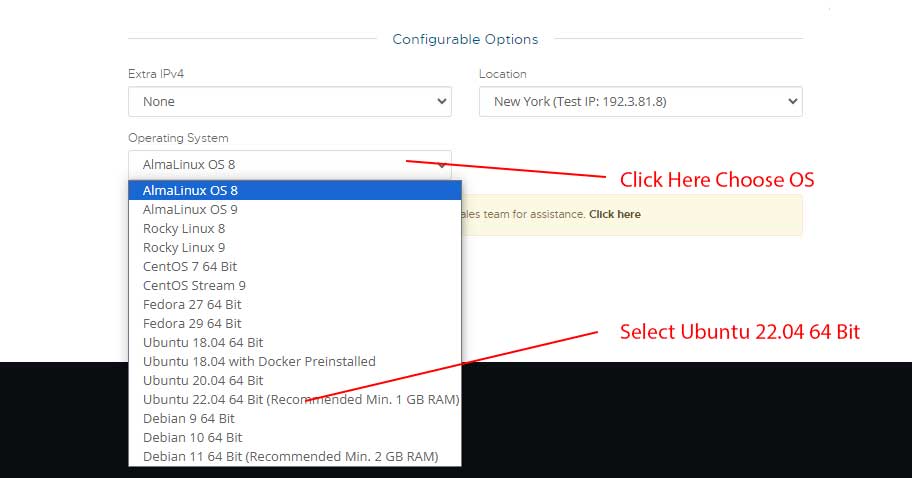
- Now, at this stage, you have to select additional options for your VPS. Here, you can select your billing cycle from annual or biennial payments. Furthermore, you can choose a location that is most suitable for you.
- Additionally, select your preferred operating system. Generally, the HumHub application requires Ubuntu 20.04 LTS or a later version for compatibility and support. We suggest Ubuntu 22.04 64-bit for the best performance.
- Click Continue to proceed to the next step.
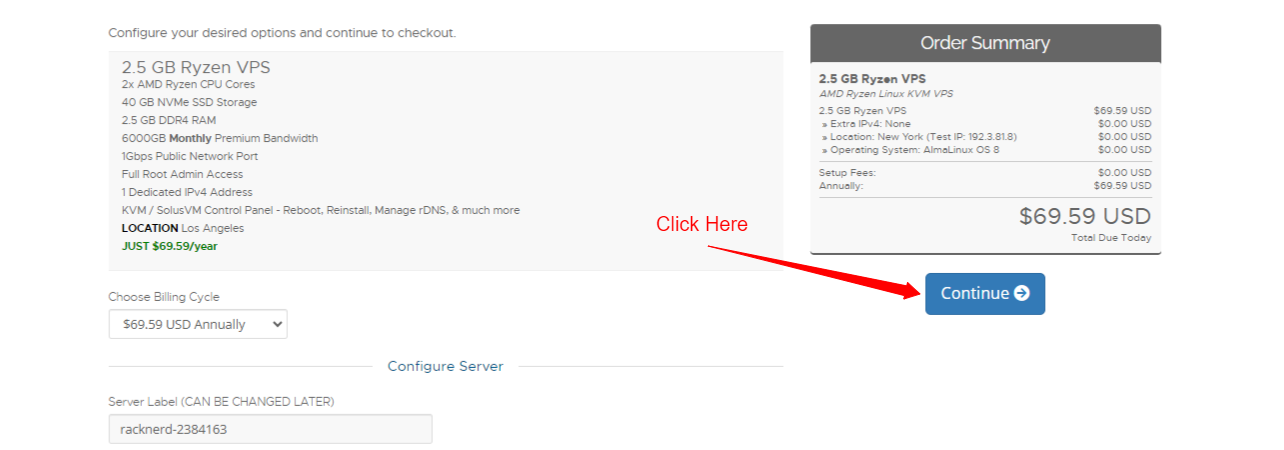
Step 6: Review and Finalize Details
- you can review and confirm all the choices you've made for your VPS. Once you're satisfied with your selections, proceed to complete the payment process. Your VPS will be set up quickly and will be ready for use in a minimum amount of time.
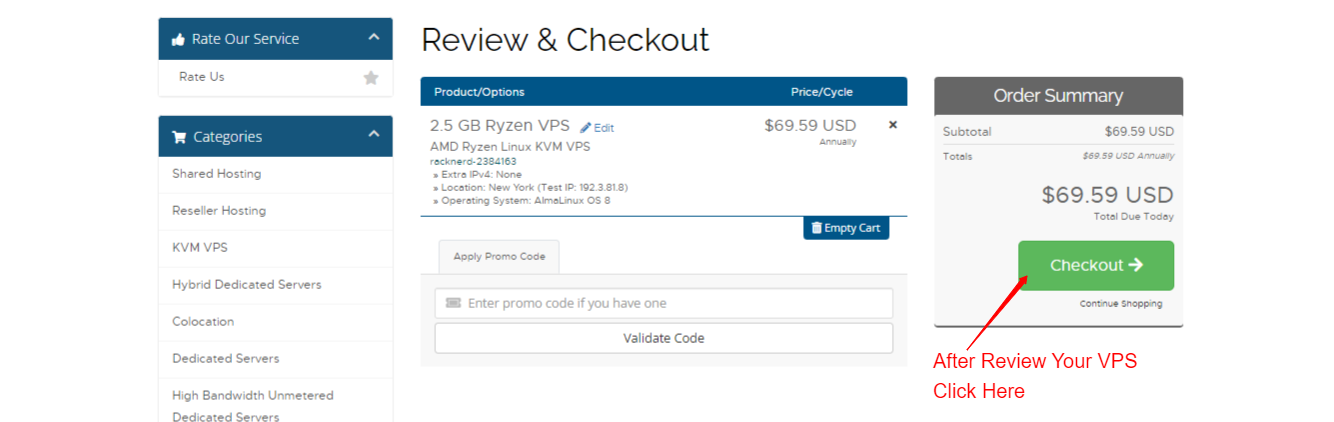
- Congratulations! You have successfully created your Racknerd VPS, which is now ready to connect with ServerAvatar.
Initial Server Configuration
The Initial server configuration includes the installation and configuration of various packages required to host your website. Usually, You have to write commands and modify configuration files. Luckily, With ServerAvatar, Your full server configuration and optimization can be automated.
Here are the three ways to automatically configure your server with ServerAvatar.
Connect a server using a direct method
- Login/Register to ServerAvatar account, click the Create button from the right side of the screen, and select Server from the dropdown.
- Select Direct Method in the serve connecting method section.
- Type the Server Name as per your choice.
- Select a Tech Stack as per your need. You can either select Apache, Nginx, OpenLiteSpeed or Node Stack.
- Select a Database: MySQL, MariaDB or MongoDB.
- Enable the toggle if you want to install the latest LTS version of node.js on your server.
- Select a Management plan and click the Connect Now button.
- You’ll see the command on your screen. Login to your server using an ssh connection and execute that command as a root user.
- The server connection process will be started on your ServerAvatar account after executing the command.
Connect a server using integration
- Login/Register to your ServerAvatar account, navigate to the Integration tab from the sidebar of the panel, and access Cloud Platform from the dropdown.
- Now Select a cloud platform you want to link with ServerAvatar.
- The popup form will appear on your screen. Enter details to link your cloud provider account. The integration method is different based on the cloud provider you select.
- You can integrate five different cloud provider platforms with ServerAvatar, which is-
Check the above link of cloud platforms to know more about integrating cloud platforms with ServeAvatar.
Connect a server using commands
Step 1. Login to your server using root user
Once you create a server as per your requirements, connect to your server using an ssh connection and execute the below three commands as a root user in your server console area.
wget https://srvr.so/install
chmod +x install
./install
Step 2. Select a web server
It will ask you which web server you would like to install on your server: Apache, Nginx, OpenLiteSpeed or Node Stack. Type anyone that you would like to install on your server and hit the enter button.
Step 3. Claim your server
Completing the process will give you a link to claim your server.
Open the link on your browser to access the ServerAvatar server panel.
Install and Setup HumHub on Cloud using ServerAvatar
Getting Started with HumHub: A Comprehensive Guide
HumHub is an open-source platform designed to facilitate social networking, knowledge sharing, and collaborative work. It’s modular, intuitive, and highly customizable, making it a versatile solution for various applications, including intranets, knowledge bases, and communication platforms. This tutorial will guide you through the core components of HumHub: Users, Spaces, Content, and Modules, helping you understand how to leverage each to build a dynamic and engaging community.
Understanding the Core Components
Users
In HumHub, every user has a customizable profile where they can include their name, profile picture, cover photo, and personal information. Users can follow each other, interact through comments and posts, and participate in various Spaces. Administrators have the flexibility to define profile fields, set permissions, and adjust settings to meet the specific needs of their community.
Key Features:
- Customizable profiles
- Follow and interact with other users
- Create content and join Spaces
- Administrator-defined profile fields and permissions
Spaces
Spaces in HumHub function as groups or rooms for specific projects, departments, events, or any other purposes. Administrators can create an unlimited number of Spaces and assign users accordingly. Each Space can have its own set of permissions and notification settings, making it easy to manage diverse groups within a single network.
Key Features:
- Unlimited Spaces for various purposes
- Advanced permission and notification system
- Automatic user mapping to Spaces
Content
HumHub allows users to create and share various types of content, including posts, wiki pages, photos, videos, events, and tasks. Depending on their permissions, users can collaborate on content within their Spaces. The platform includes features for reporting inappropriate content and supports multi-level commenting for in-depth discussions.
Key Features:
- Versatile content creation (posts, wiki pages, media, events, tasks)
- Multi-level commenting and collaboration options
- Content reporting and moderation
- Powerful search and filter functions
Modules
One of HumHub’s greatest strengths is its modular architecture. The platform can be extended with around 80 modules that add functionality such as advanced LDAP integration, RESTful APIs, mass user import, and more. These modules can be easily installed and activated, allowing administrators to tailor the platform to their specific requirements.
Key Modules:
- Advanced LDAP
- RESTful API
- Mass User Import
- Calendar
- Wiki
- OnlyOffice Integration
- JWT SSO
- Legal Tools
- Translation Manager
- Custom Themes and Pages
- Tasks, Gallery, News, Polls, and Direct Messaging
Benefits of Using HumHub
HumHub is designed to help organizations and communities connect, communicate, and collaborate more effectively. Here are some of the key benefits:
- Customization: Tailor the platform to your needs with customizable profiles, spaces, and modules.
- Collaboration: Foster teamwork through versatile content creation and multi-level commenting.
- Scalability: Create as many Spaces as needed to accommodate various projects and groups.
- Flexibility: Extend functionality with a wide range of modules.
Basic Requirements for Setting Up HumHub
To ensure a smooth installation and operation of HumHub, your environment should meet the following basic requirements:
Software Requirements
- Web Server: Apache 2.4+ or Nginx 1.10+
- Operating System: Linux (preferred), Windows, or macOS
-
PHP Version: 7.3 or higher with required extensions:
- cURL
- GD
- INTL
- MBString
- OpenSSL
- PDO and PDO MySQL
- XML
- ZIP
- Database: MySQL 5.7+ or MariaDB 10.2+
Hardware Requirements
- CPU: Dual-core processor
- RAM: 2GB
- Storage: 10GB of free disk space
For more detailed requirements and installation instructions, visit the HumHub Documentation.
Setting Up HumHub: A Comprehensive Step-by-Step Installation Guide
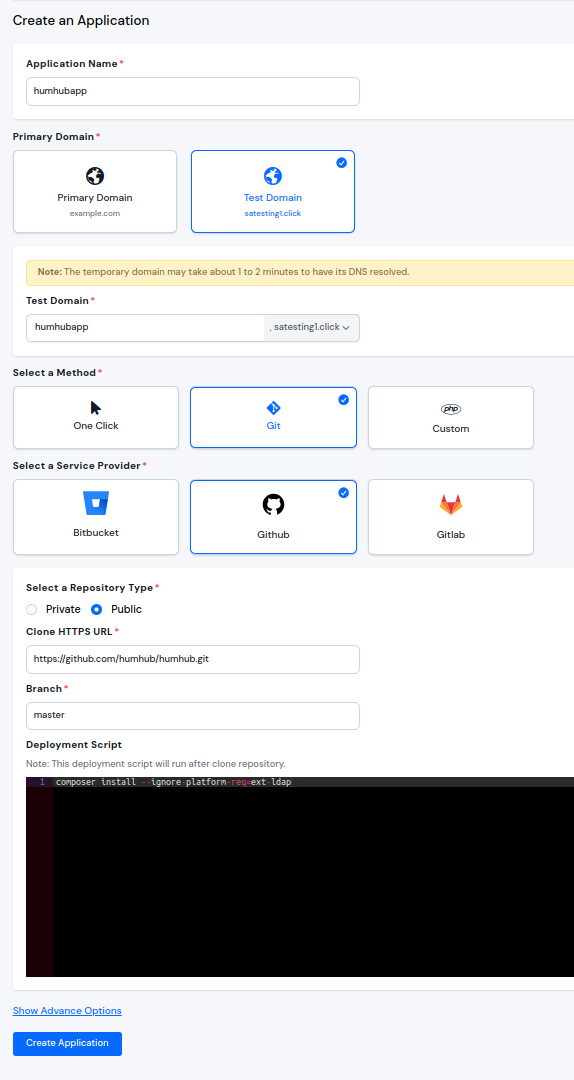
Step 1: Create a GitHub application
Start by creating a GitHub application using ServerAvatar. This will allow you to easily manage and deploy your HumHub instance. Follow these steps:
- Open ServerAvatar: Log in to your ServerAvatar account.
- Navigate to the Application Dashboard: In the dashboard, find the option to create a new application.
-
Create the GitHub Application:
- HTTP URL: Enter https://github.com/humhub/humhub.git
-
Branch Name: Set this to
master -
Deployment Script: Use the script
composer install --ignore-platform-req=ext-ldap
This configuration will clone the HumHub repository and install the necessary dependencies.
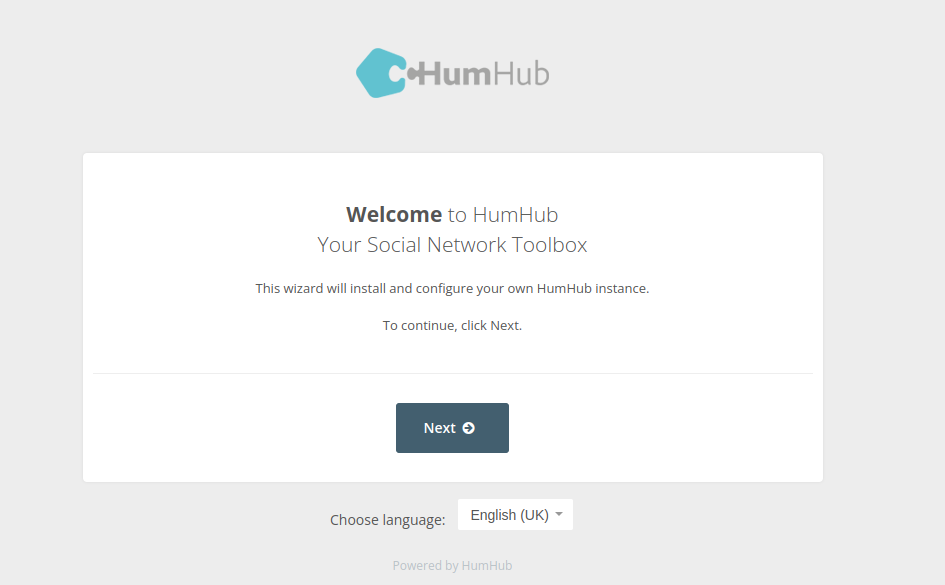
Step 2: Run the Installer
With your application set up, it's time to run the installer:
- Open Your Web Browser: Use any web browser of your choice.
- Navigate to Your Domain: Enter http://yourdomain.com in the address bar to start the web-based installation process.
- Follow On-Screen Instructions: The installer will guide you through the necessary steps. Simply follow the prompts to proceed.
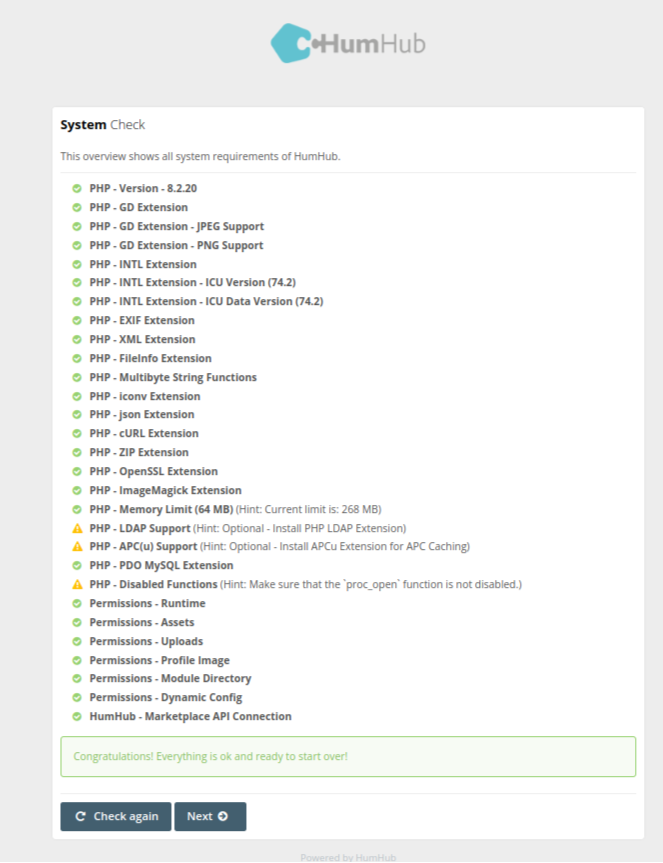
Step 3: System Check
Before proceeding with the installation, a system check is required to ensure that your server meets all the necessary requirements:
- Automatic System Check: The installer will automatically check your system configuration.
- Resolve Issues: If any issues are detected, resolve them based on the provided recommendations to ensure all requirements are met.
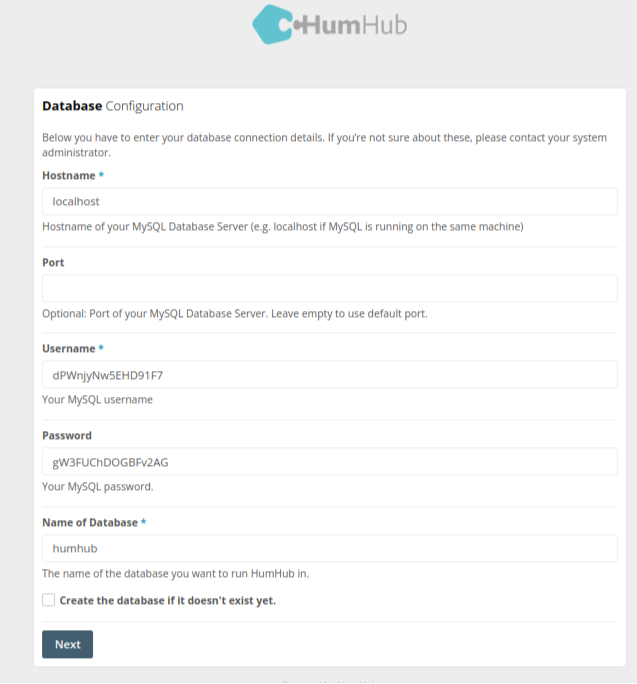
Step 4: Configure Your Database
Setting up a database is crucial for storing your HumHub data:
- Access Server Dashboard: Log in to your server's dashboard.
- Navigate to Databases Section: Find the section where you can manage databases.
-
Create a New Database and User: Set up a new database and a corresponding user in MySQL or MariaDB.
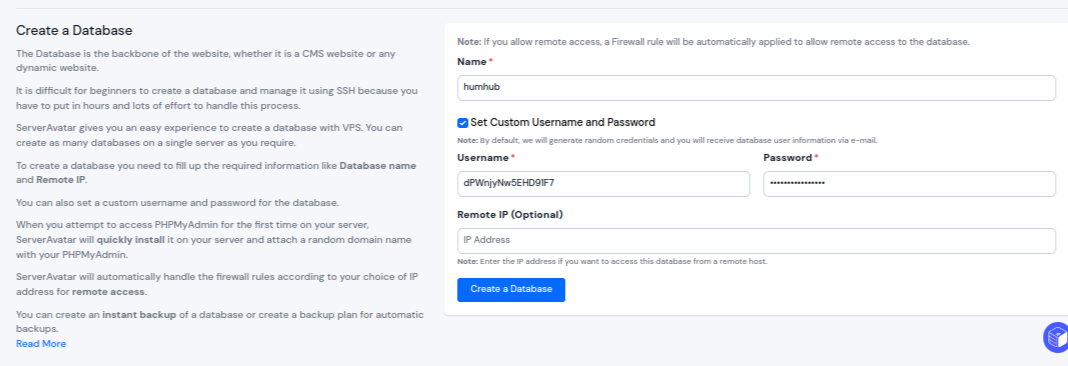
-
Note Down Database Details: Keep a record of the database name, username, and password for the next steps.
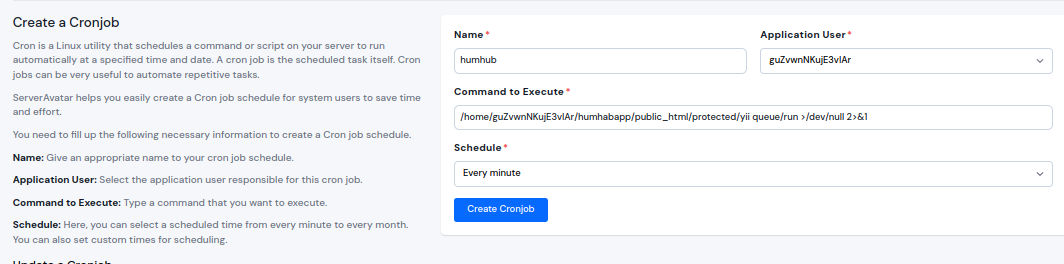
Step 5: Configure Scheduled Jobs (Cron Jobs)
Cron jobs are necessary for automating tasks within HumHub:
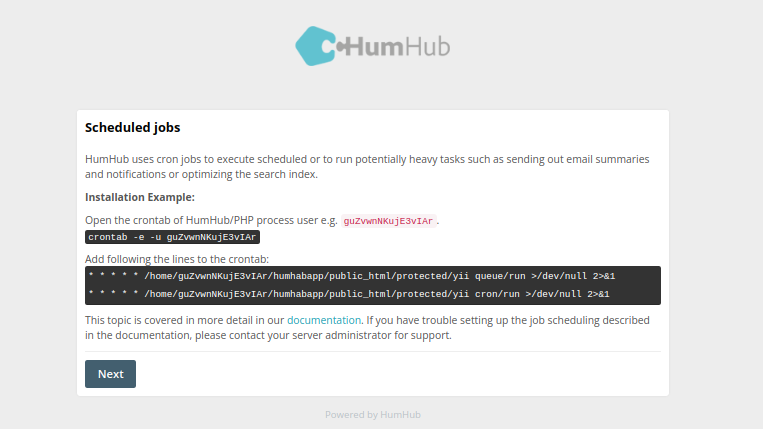
- Access Cron Jobs Section: Go to the cron jobs section in your server dashboard.
- Set Up Necessary Commands: Enter the commands required to schedule jobs for HumHub. This will ensure tasks such as email notifications and data cleanup are automated.
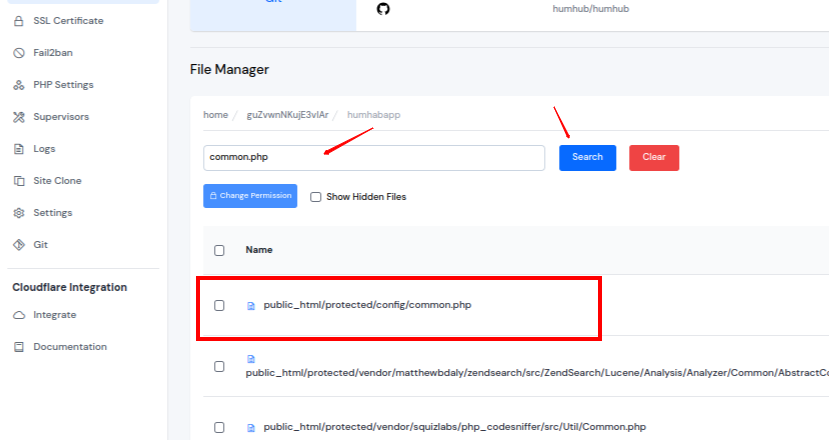
Step 6: Pretty URLs Configuration
To improve the readability and SEO-friendliness of your URLs, you need to configure pretty URLs:
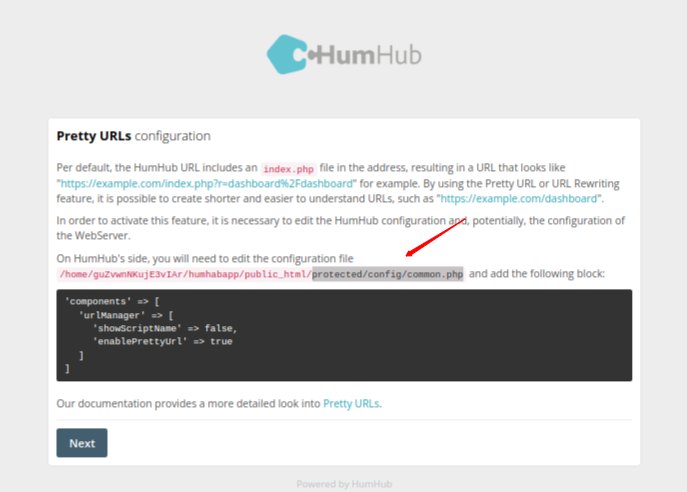
-
Locate the common.php File: Use the file manager in your application dashboard to find common.php
-
Edit the File: Add the necessary code to enable pretty URLs. The code will typically look something like this:
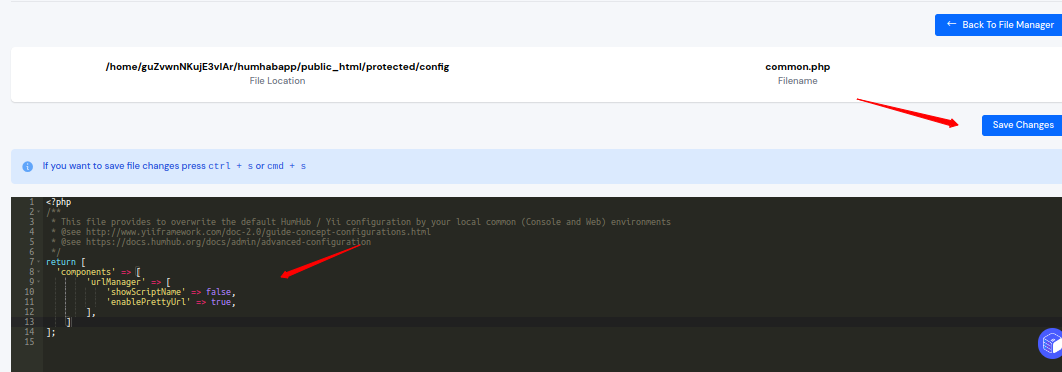
- Save Changes: After making the changes, save the file.
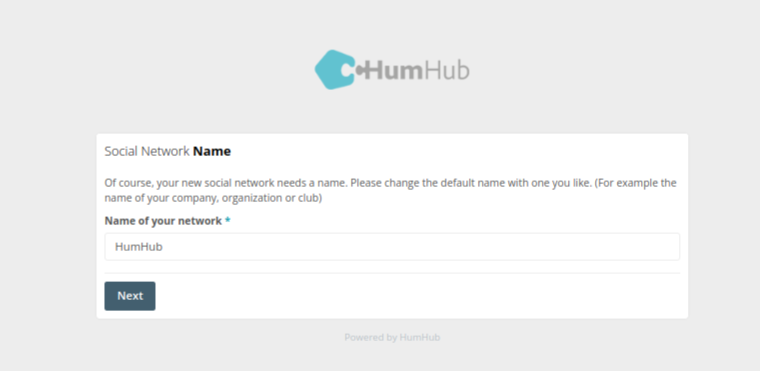
Step 7: Enter Social Network Name
During the installation, you will be prompted to enter the name of your social network:
- Enter Network Name: Choose a unique and relevant name for your social network.
- Proceed to Next Step: Click on the "Next" button to continue.
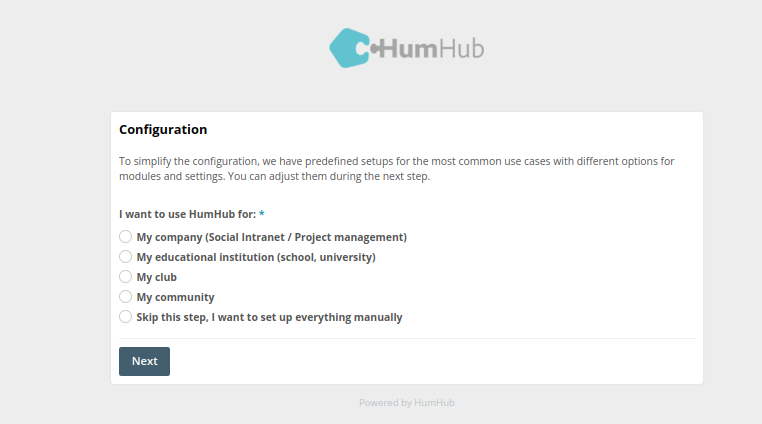
Step 8: Basic Configuration
Configure the basic settings of your HumHub installation:
- Select Configuration Options: Choose the options that best fit your needs.
- Click "Next": Move on to the next step by clicking the "Next" button.
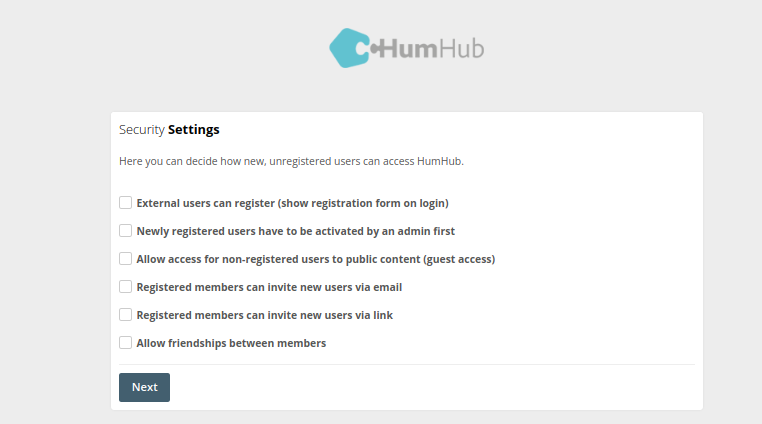
Step 9: Security Settings
Security settings determine how new, unregistered users can access your HumHub instance:
- Configure Security Options: Decide on the level of security and access control for new users.
- Proceed: Click "Next" to continue.
Step 10: Recommended Modules
HumHub comes with a set of recommended modules that enhance functionality:
-
Review Recommended Modules: Look through the list of suggested modules.
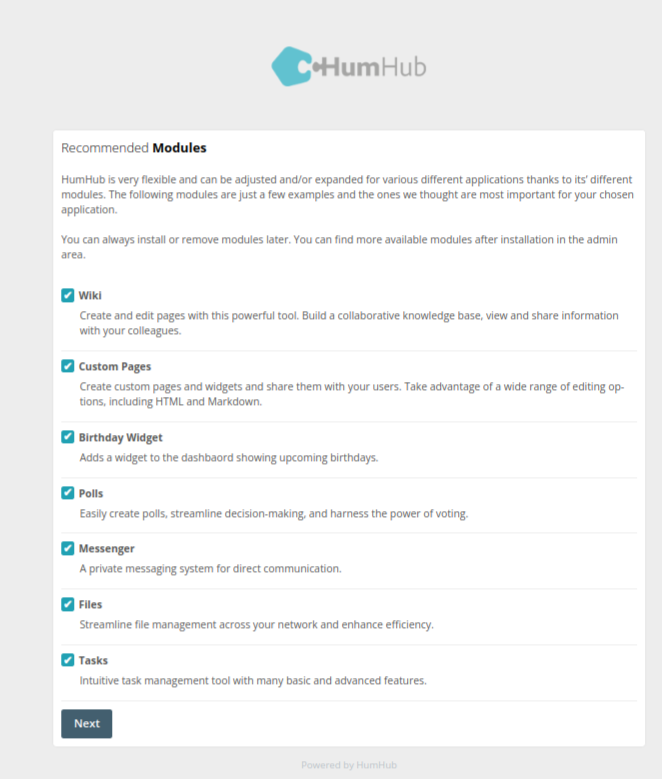
-
Install Modules: Choose which modules to install and click "Next" to proceed.
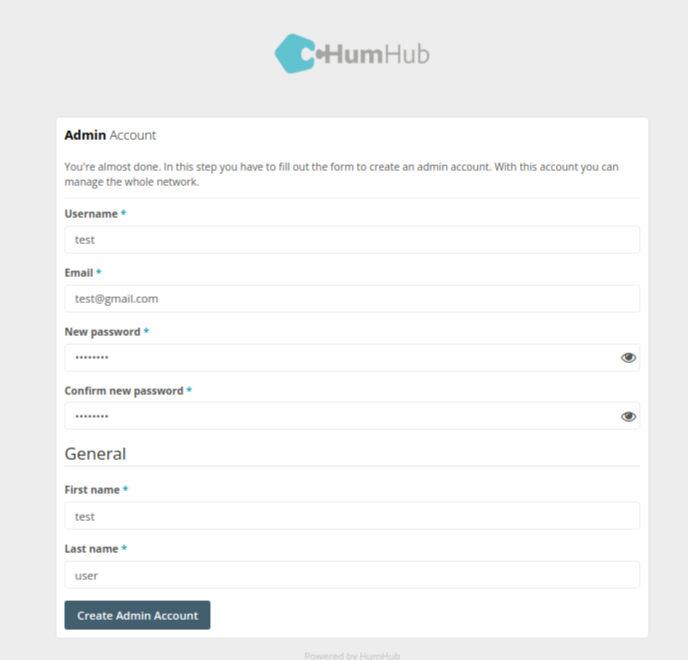
Step 11: Admin Account
Creating an admin account is crucial for managing your HumHub network:
- Fill Out the Form: Provide the necessary information to create an admin account.
-
Complete Account Creation: Submit the form to finalize the creation of your admin account.
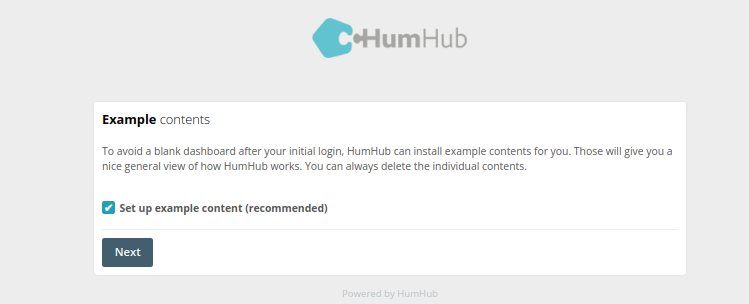
Step 12: Example Contents
To avoid a blank dashboard after your initial login, you can choose to install example contents:
- Install Example Contents: Opt to install sample content to see how your network will look with data.
-
Proceed to Next Step: Click "Next" to continue.
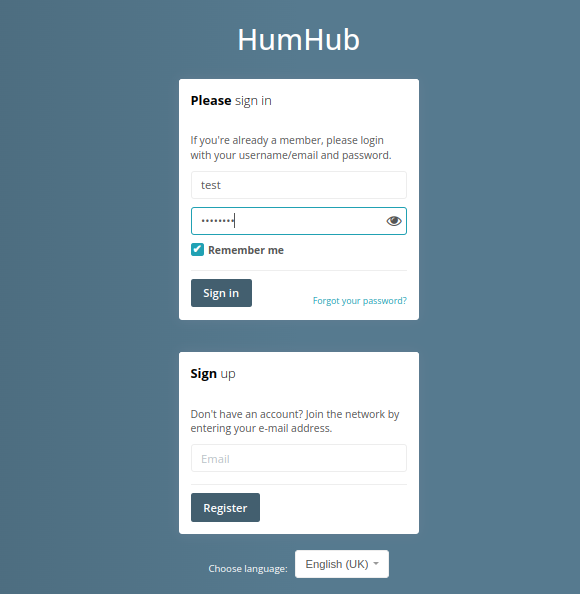
Step 13: Setup Complete
Once the installation is complete, you will see a confirmation screen:
-
Click on "Sign In": This will take you to the sign-in page.

Step 14: Sign In
Access your new HumHub instance:
- Enter Username and Password: Use the credentials you created for the admin account.
-
Sign In: Access your HumHub instance as an administrator.
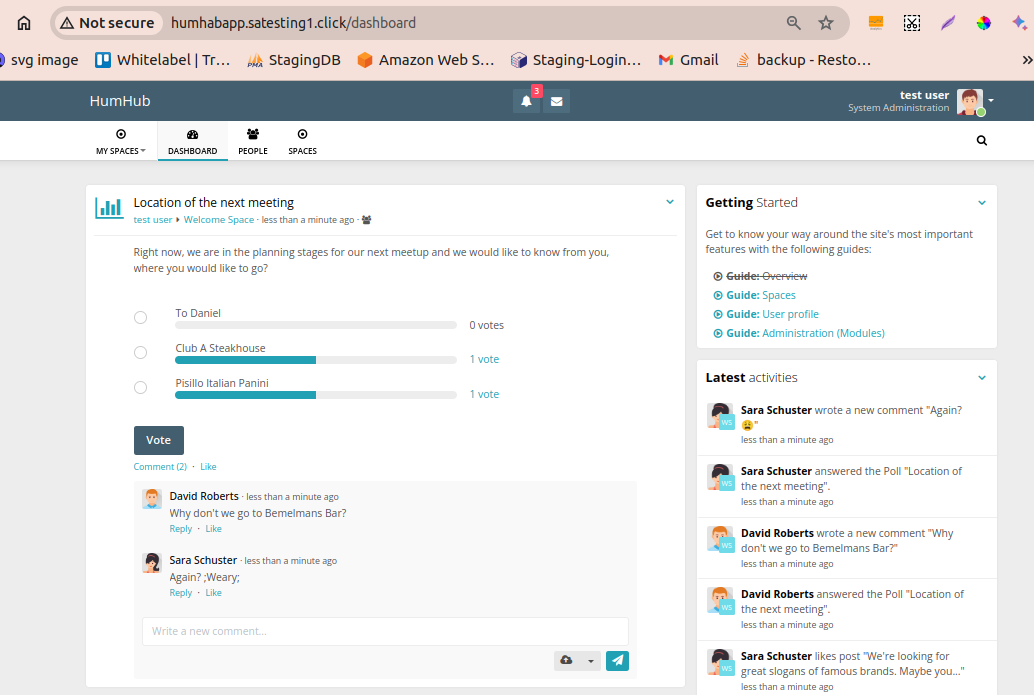
Step 15: Dashboard
After logging in, you will be taken to the HumHub dashboard:
- Configure Settings: Adjust the settings to suit your network's needs.
- Create User Roles: Define different user roles and permissions.
- Set Up Modules: Install and configure additional modules as needed.
By following these detailed steps, you can successfully set up HumHub and start building your community platform. For more detailed instructions and troubleshooting, refer to the HumHub Documentation.
Conclusion
HumHub is a powerful and flexible platform that can transform the way your organization communicates and collaborates. By leveraging its core components—Users, Spaces, Content, and Modules—you can build a robust and dynamic community tailored to your specific needs. Whether you’re looking to create a social network, knowledge base, or communication platform, HumHub provides the tools and features necessary to succeed. Start exploring HumHub today and discover how it can help you connect, share, and collaborate like never before.