If you’ve ever tried to host PHP sites, you probably know how annoying it can get—setting up servers, installing the right tools, making sure everything’s secure, and then dealing with errors when something breaks. It’s a lot. But there’s a much easier way to host PHP sites without all the technical complexity. ServerAvatar helps you skip all the complicated stuff and lets you manage your PHP hosting without the usual headache.
Whether you’re launching your first blog, deploying a Laravel app, or managing multiple client projects, ServerAvatar offers an all-in-one solution to automate server management and website hosting. It bridges the gap between self-hosted VPS freedom and managed hosting simplicity. With just a few clicks, you can connect a server, create a PHP website, configure SSL, and go live, without writing a single terminal command.
In this guide, I’ll walk you through how to host PHP sites the easy way using ServerAvatar. We’ll cover everything, from setting up your server to deploying your code, managing your databases, and keeping your site secure. By the end, you’ll see just how simple and stress-free it can be to host PHP sites professionally.
Let’s jump in and get your website up and running, without all the usual hassle.
Why Use ServerAvatar for PHP Hosting
If you’ve ever managed a server on your own, you know it can eat up a lot of time, and things don’t always go smoothly. That’s exactly why ServerAvatar was built. It takes the complicated parts out of the process and gives you a smarter, easier way to host and manage your PHP websites.
Here’s why developers and businesses love using ServerAvatar:
- Fast Setup: Just connect a fresh Ubuntu server, and you’ll have it ready to go in less than 15 minutes.
- Built-in Automation: Things like installing LAMP, LEMP, or OLS stacks, setting up firewalls, enabling SSL, and managing cron jobs are all handled for you, no manual work needed.
- Total Flexibility: You can host as many websites as you want and choose between Apache, Nginx, OLS, or Node Tech Stack, and MySQL, MariaDB, or MongoDB, depending on what suits your project best.
- Security: ServerAvatar comes with built-in tools for SSL, UFW firewall, Fail2Ban, and server monitoring.
- Budget-Friendly: ServerAvatar works with your own VPS providers like DigitalOcean, Vultr, Hetzner, Amazon Lightsail, Linode, or any custom VPS, so you only pay for the resources you actually use, nothing extra.
- Developer-Friendly Tools: Easily connect your Git repository, set environment variables, switch between PHP versions, and manage backups without any hassle.
Let’s face it, most developers don’t enjoy spending hours dealing with server stuff. ServerAvatar helps you skip all that. It takes care of the setup and day-to-day maintenance, so you can stay focused on building websites and applications instead of fixing server issues.
Here’s why developers and website owners really like using it
ServerAvatar isn’t just another control panel; it’s a game-changer for those who want a better way to host PHP applications. Whether you’re working alone or managing a client-focused agency, ServerAvatar makes things easier for you:
- Host Multiple Sites: Run as many PHP websites as you want on one server. Each site can have its own domain, PHP version, database, and SSL certificate.
- One Simple Dashboard: Keep track of all your servers and websites from a single, easy-to-use dashboard, no need to switch between different tools or use complicated command lines.
- Full Control with Less Complexity: You still get the power and flexibility of your VPS, without needing to be a Linux expert.
If you’ve been stuck with traditional hosting or overwhelmed by raw VPS management, ServerAvatar gives you the best of both worlds: automation with control.
Basics of PHP Hosting:
Before we start, let’s understand what PHP hosting means. Knowing what PHP is will help you see why good hosting is important.
What is PHP? Why is it popular?
PHP is a coding language used to build websites. It runs on the server and helps websites work better by doing things based on what visitors do.
Why do so many people use PHP?
- It’s easy to learn and use.
- It’s free and lots of people use it.
- Works on almost any server or computer.
- Powerful sites like WordPress.
- Has tools that make building sites faster.
- Works well with databases like MySQL.
PHP runs most websites because it’s reliable and flexible. Writing PHP code isn’t hard, but hosting a site can get tricky without the right help. ServerAvatar makes hosting simple and easy for you.
Old Hosting vs ServerAvatar
Old-style hosting can feel tight and limiting; you can’t do much, and it’s slow. However, ServerAvatar gives you more control and makes running your PHP site easier.
Here’s a comparison:
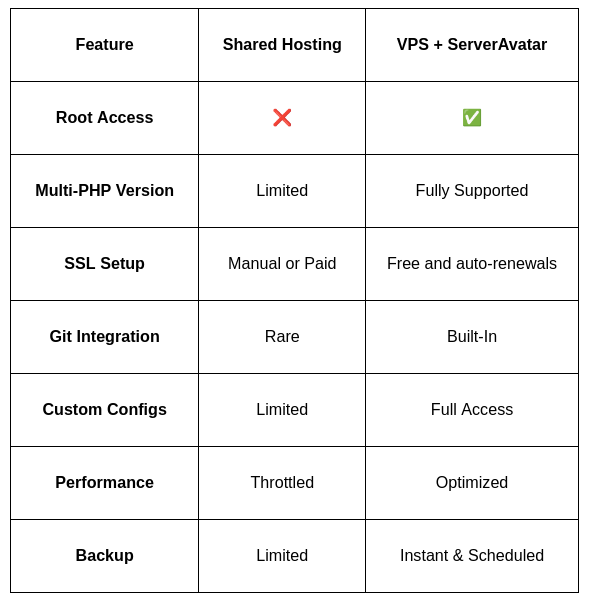
With ServerAvatar, you get the speed, power, and security of a dedicated VPS with the convenience of a control panel tailored for PHP hosting. It’s the smarter and more reliable way to go.
Getting Started with ServerAvatar
Now that you understand the benefits, let’s get hands-on. Hosting a PHP website on ServerAvatar starts with a few key prerequisites.
Choosing the Right Server Provider
ServerAvatar supports every cloud VPS provider that lets you use a clean Ubuntu installation. Here are popular choices:
- DigitalOcean: Great for beginners and mid-tier apps.
- Linode: Developer-friendly and well-documented.
- Vultr: Offers affordable, high-performance plans.
- Hetzner: Cost-effective and excellent for scaling.
- AWS EC2, Google Cloud, or Azure: Best for enterprise-level needs.
Things to consider when choosing:
- RAM: At least 1 GB for small projects, 2+ GB for real-world applications.
- CPU: 1 core is enough to start, and scale as traffic grows.
- SSD Storage: Faster response times and better performance.
Pick a provider, create your instance, and get your server IP and root login ready.
Setting Up a Fresh Ubuntu Server
This part is straightforward:
- Log in to your VPS provider.
- Select Ubuntu 20.04, 22.04, or 24.04 as the Operating System.
- Select the server size as per your requirements.
- Launch the server (instance) and note the public IP address and root credentials of your server.
Your server is now online. You’re ready to connect it with ServerAvatar and let the automation magic begin.
Requirements Before You Begin
Here’s what you need before starting:
- Server: Select Ubuntu 20.04, Ubuntu 22.04, or Ubuntu 24.04. No prior software should be installed, ServerAvatar takes care of the full stack.
- ServerAvatar Account: Go to ServerAvatar, sign up for an account, and select a plan as per your requirements.
- Port: If your cloud platform or server provider provides a firewall, make sure to enable the incoming connections on port 43210 (ServerAvatar Port).
Connecting Your Server to ServerAvatar
This is the most important step when setting up your PHP website with ServerAvatar, linking your server to their platform. After this, most of the work is done, and you can easily start deploying your PHP apps.
You can also create a new server directly on DigitalOcean or Vultr using ServerAvatar’s Managed Server feature. If you want to connect your own VPS from a custom VPS provider. ServerAvatar supports that too. Additionally, you can integrate your VPS account with ServerAvatar of popular cloud providers like DigitalOcean, Linode, Vultr, Hetzner, and Amazon LightSail.
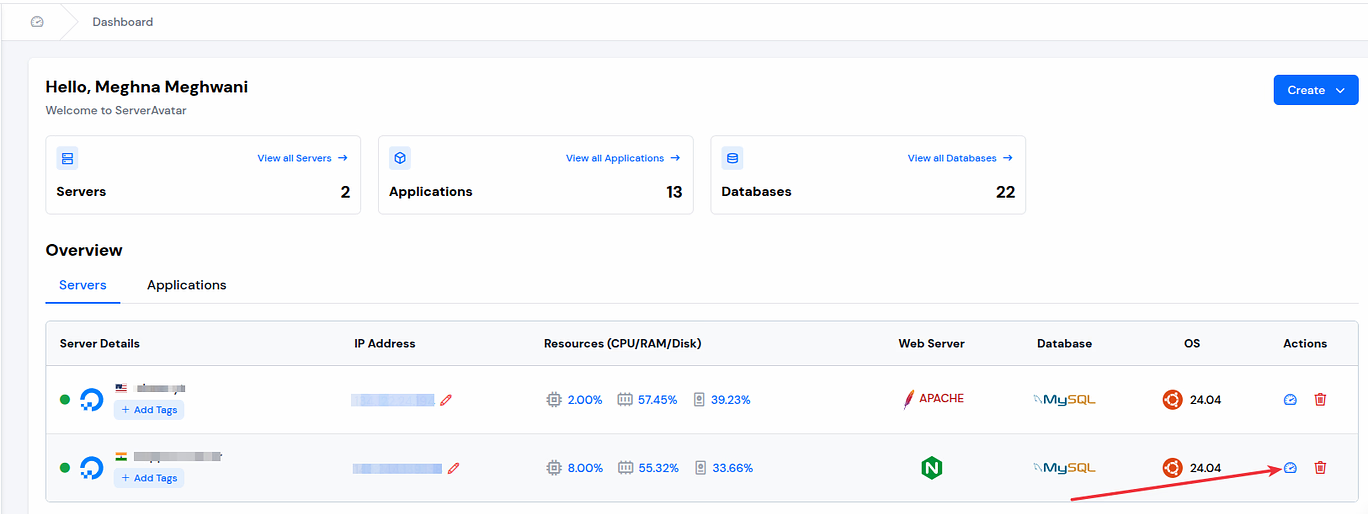
Once the installation is complete (usually within 10–15 minutes), the server will appear in your dashboard, fully functional.
From here, you can add multiple websites for your server. ServerAvatar has effectively taken care of all backend configurations, like installing PHP, web servers, and DBMS, so you can now shift focus to building and deploying your websites.
Another handy feature: ServerAvatar sends an email notification when your server is successfully connected and configured, along with any credentials or notes you may need.
Creating and Managing PHP Websites in ServerAvatar
So your server is ready, great! Now let’s get down to what you came here for: creating and managing your PHP website on ServerAvatar.
Adding a New PHP Website
Select Your Server:
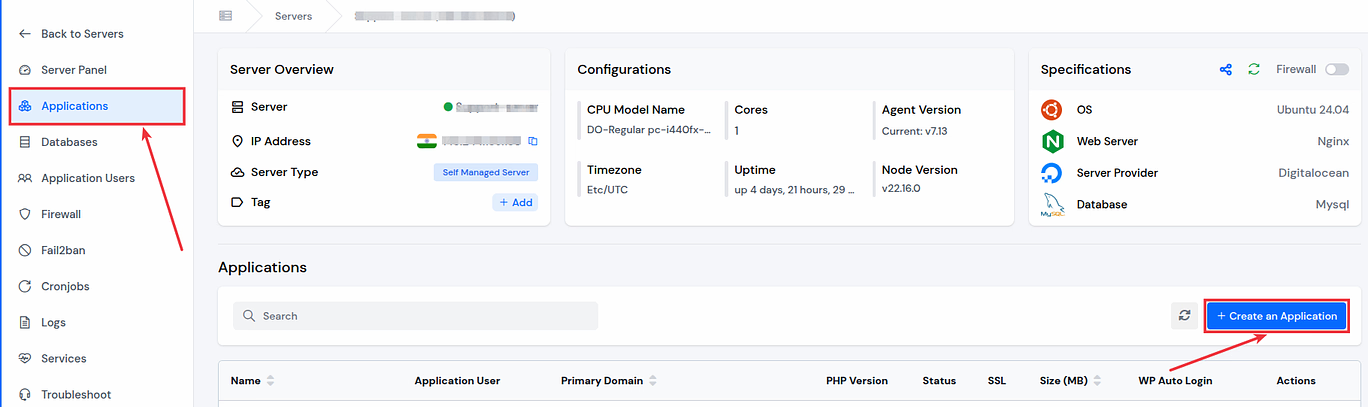
From the ServerAvatar panel, click on the “Server Dashboard” icon for the server on which you want to host your custom PHP application.
Navigate to the Application Section:
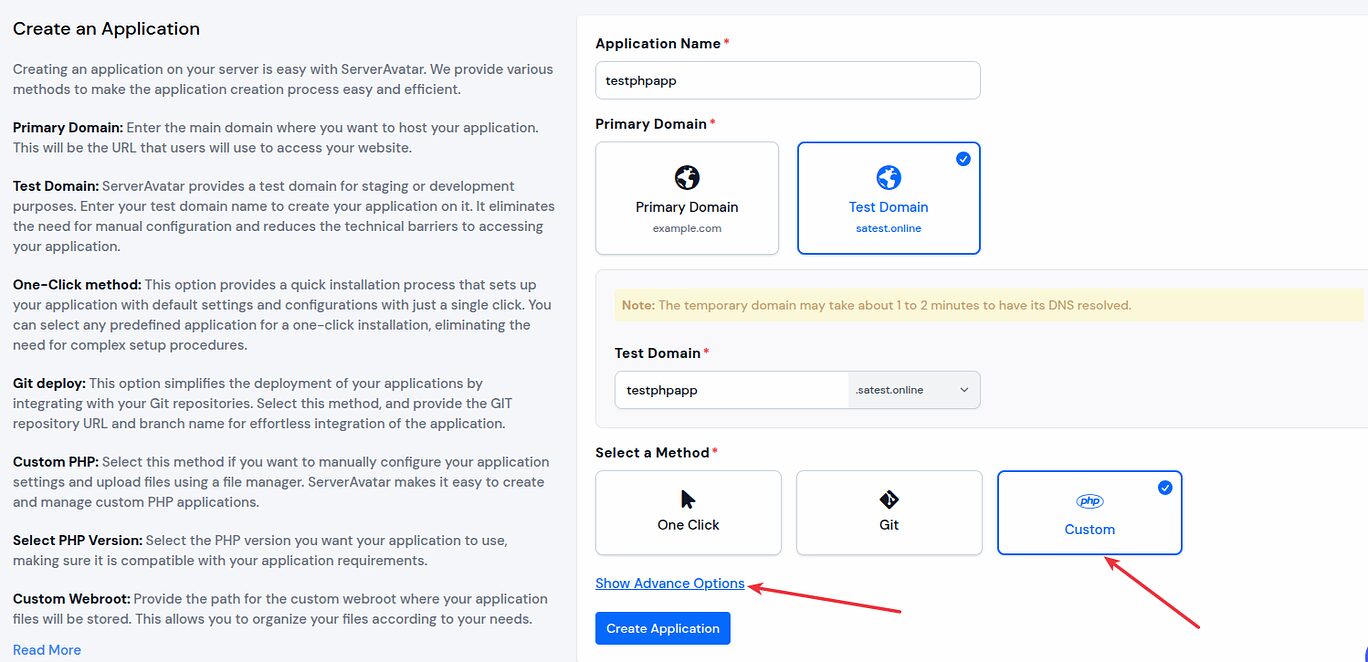
Once you navigate to the ServerAvatar panel, click on the “Applications” button from the left side bar, and click on the “Create an Application” button.
Fill Out Website Details:
- Application Name: Enter your application name.
- Domain name: Add your domain name.
- Select Method: Select custom PHP as a method
- System User: Select the existing user or create a new user by clicking on the “Show Advanced Option“
- PHP Version: Select the appropriate PHP version from the Advanced option
Click on the “Create Application” button.

That’s it, ServerAvatar will:
- Create a directory structure
- Assign default permissions
- Configure a virtual host
Now your site is technically live, you just need to upload your PHP file, configure databases, and set SSL if needed (we’ll get to that next).
You can host unlimited websites this way (depending on your server’s resources), making it perfect for agencies, freelancers, or anyone managing multiple client projects.
Creating a Database for Your PHP Site
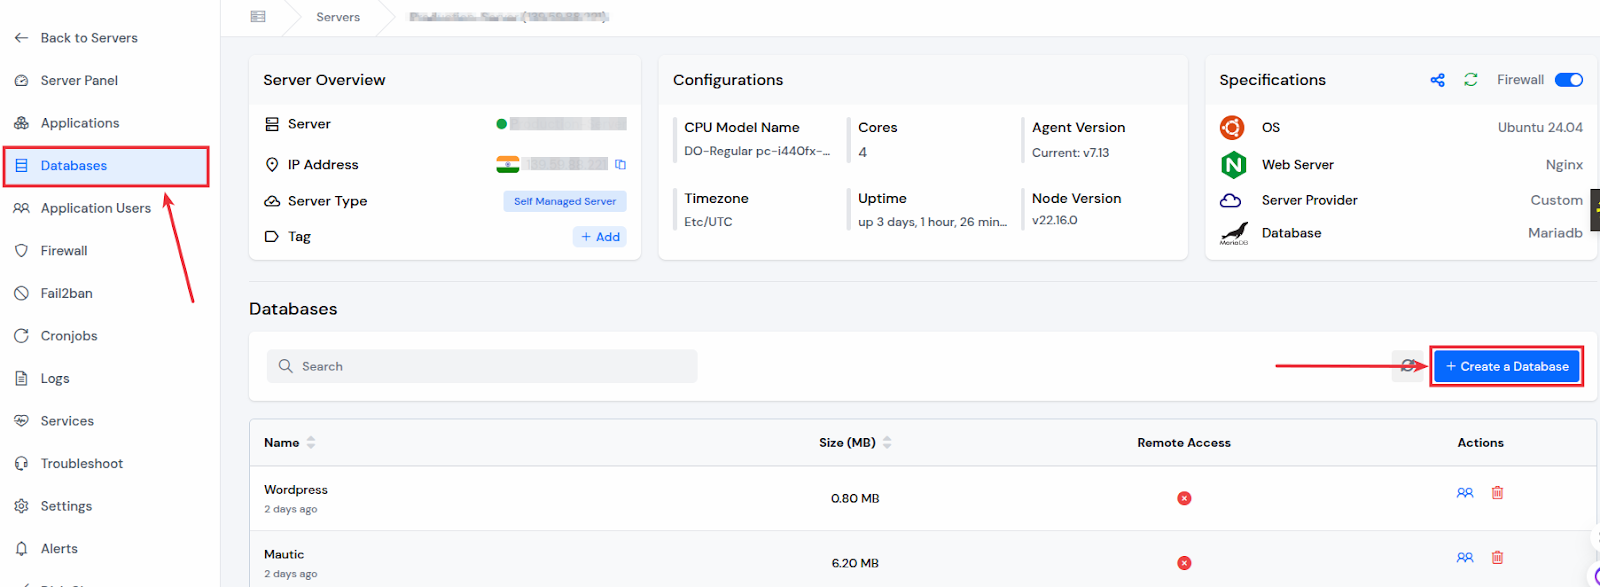
Almost every PHP website needs a database, especially if you’re running a CMS or a framework. ServerAvatar makes this part just as easy.
Create a Database:
- In your server dashboard, click on the database option and create a database by clicking on the “Create a Database” button.
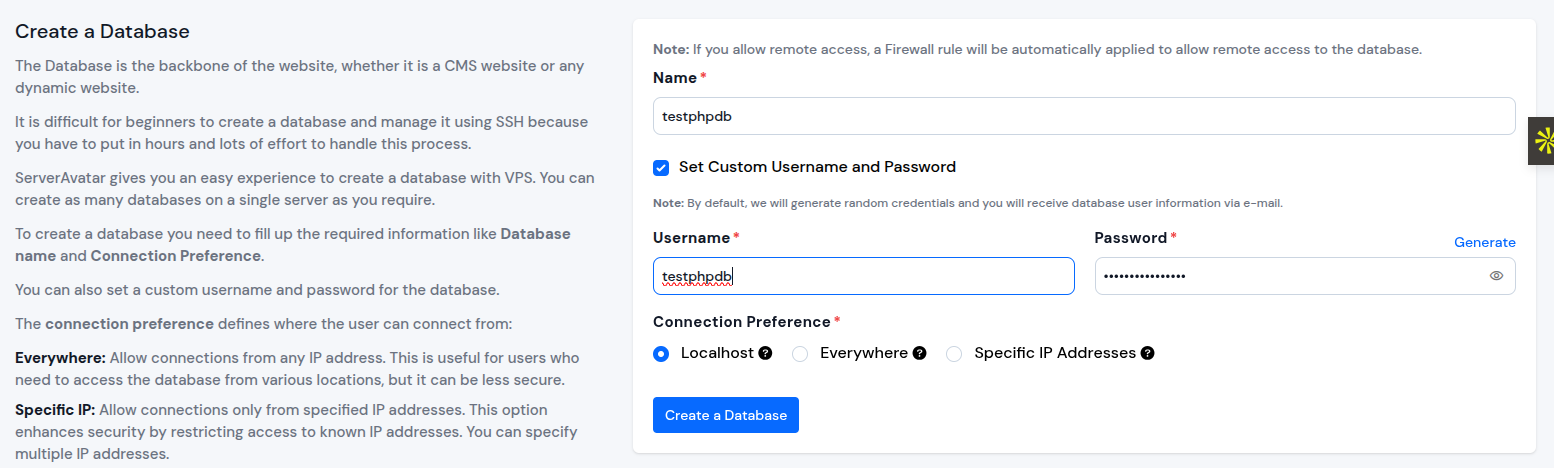
Provide the following details:
- Database name
- Set Custom Username and Password
- Select Connection Preference
Managing SSL Certificates
- Once your PHP application and database are ready, it’s time to install an SSL certificate.
SSL Installation:
- Navigate to the SSL Certificate section.
- Click on the “Automatic Installation” button under the automatic SSL Installation section.
- If you want to install a custom SSL certificate, select the Custom Installation button and enter your SSL Certificate and Private Key to install custom SSL.
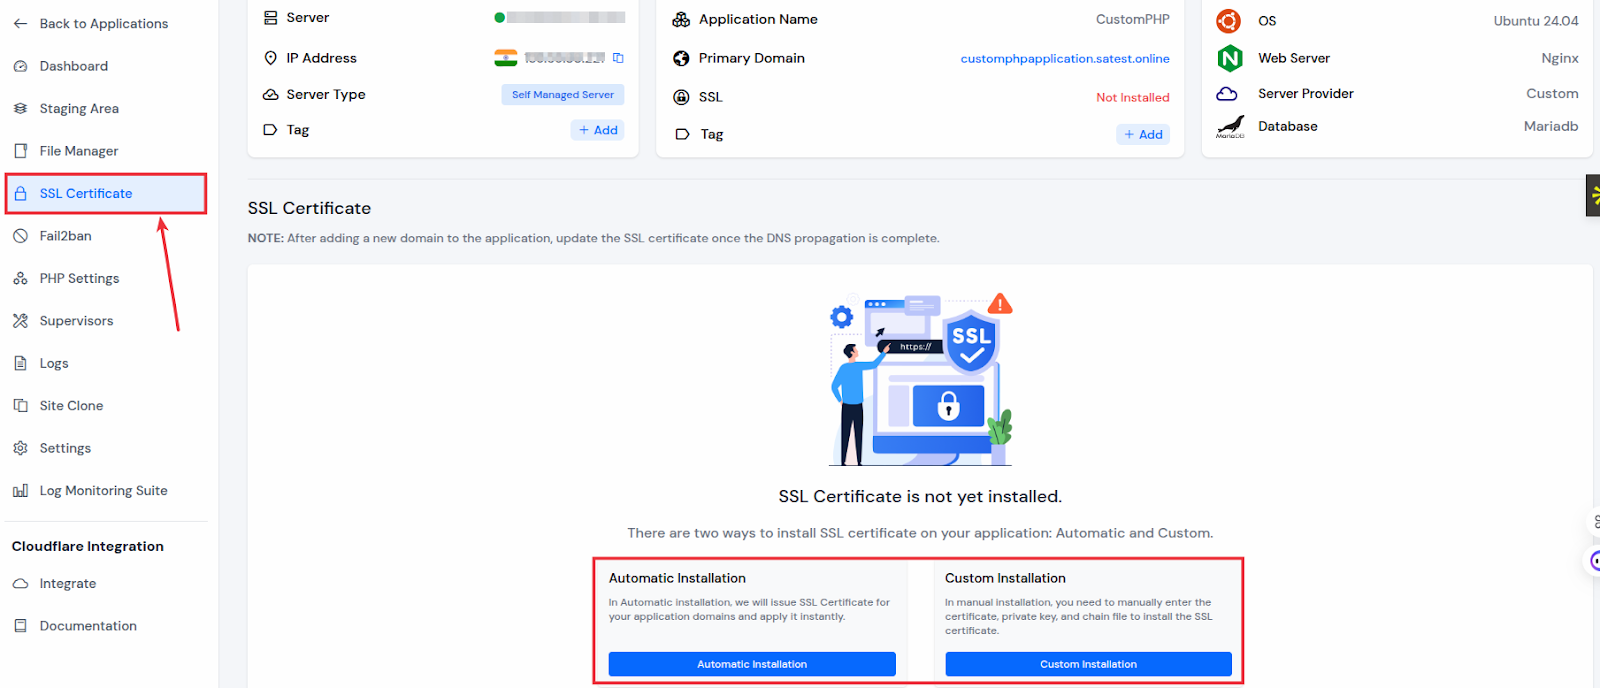
That’s it, ServerAvatar sets up the certificate. Automatic SSL will renew automatically. If you select automatic installation, no more manual certificate installations, no more expiration headaches. It just works.
Managing Security with ServerAvatar
Security is non-negotiable in web hosting. Luckily, ServerAvatar automates most of it, so you don’t have to stress about setting everything up manually.
Here’s what it includes:
- UFW Firewall: Configure the Firewall to block unwanted access.
- Fail2Ban: Prevents brute-force attacks by banning suspicious IPs.
- SSL Certificates: Free, automated, and easy to manage.
- Access & Error Logs: You can also view access and error logs from the ServerAvatar Dashboard.
In short, ServerAvatar doesn’t just make PHP hosting easy, it makes it secure by default.
Conclusion and Final Thoughts
By now, you’ve seen just how easy it is to host PHP websites using ServerAvatar. From spinning up a fresh server to creating and securing your site, every step has been designed to simplify and speed up the deployment process.
No more getting lost in SSH commands. No more worrying about SSL renewals or database permissions. ServerAvatar handles all the hard work so you can focus on building faster, better, and safer PHP applications.
Whether you’re a freelancer, run an agency, or work alone, ServerAvatar gives you full control like a VPS but without the complicated setup. Hosting PHP websites has never been easier. Once you try it, you won’t want to use anything else.
FAQ
Q-1: Can I use ServerAvatar without technical knowledge?
Yes! ServerAvatar is beginner-friendly. It handles server setup and management, stack installation, and site deployment and management through a user-friendly dashboard.
Q-2: Does ServerAvatar support Laravel or WordPress too?
Absolutely. It’s perfect for Laravel, WordPress, Mautic, and any PHP-based app. Just choose the right public path during site creation.
Q-3: How safe is it to host PHP websites on ServerAvatar?
Very safe. It includes UFW firewall, Fail2Ban, automatic SSL, and a backup feature, all designed for maximum protection.
Q-4: Is it suitable for e-commerce or high-traffic sites?
Yes. With proper server sizing, caching, and CDN setup, ServerAvatar can handle high-traffic PHP and e-commerce sites effectively.
Q-5: Can I migrate my existing PHP website to ServerAvatar?
Yes. You can upload your site files, import the database, and set the domain and SSL easily. ServerAvatar supports seamless migration steps.