Your WordPress admin dashboard is the control center of your website, and one of the most targeted areas by hackers and bots. If left unprotected, it becomes an easy entry point for brute-force attacks, login attempts, and malicious scripts. That’s why it’s essential to restrict WordPress admin access and ensure only trusted IP addresses can reach your /wp-admin or login page. Whether you’re running a blog, eCommerce store, or client website, securing the admin area should be a top priority. In this guide, we’ll walk you through multiple methods to restrict access by IP address using tools like Fail2Ban, WordPress security plugins, and .htaccess file editing, all easily manageable through ServerAvatar.
In this guide, we’ll show you three effective methods to restrict WordPress admin access by IP address using ServerAvatar:
- Using the File Manager (.htaccess method)
- Using the Fail2Ban method
- Using a Security Plugin
Why Restrict Access by IP?
Limiting WordPress admin access to specific IP addresses ensures that only authorized users from predefined locations can reach your login page. This:
- Prevents brute-force attacks
- Reduces load on your server
- Increases overall security
Method 1: Restrict Access via .htaccess (File Manager in ServerAvatar)
This method restricts access directly using the .htaccess file.
Step-by-Step:
Step 1: Open File Manager in ServerAvatar
- Go to your WordPress Application in ServerAvatar dashboard.
- Go to File Manager.
- Navigate to the root of your WordPress site (/public_html/wp-admin).
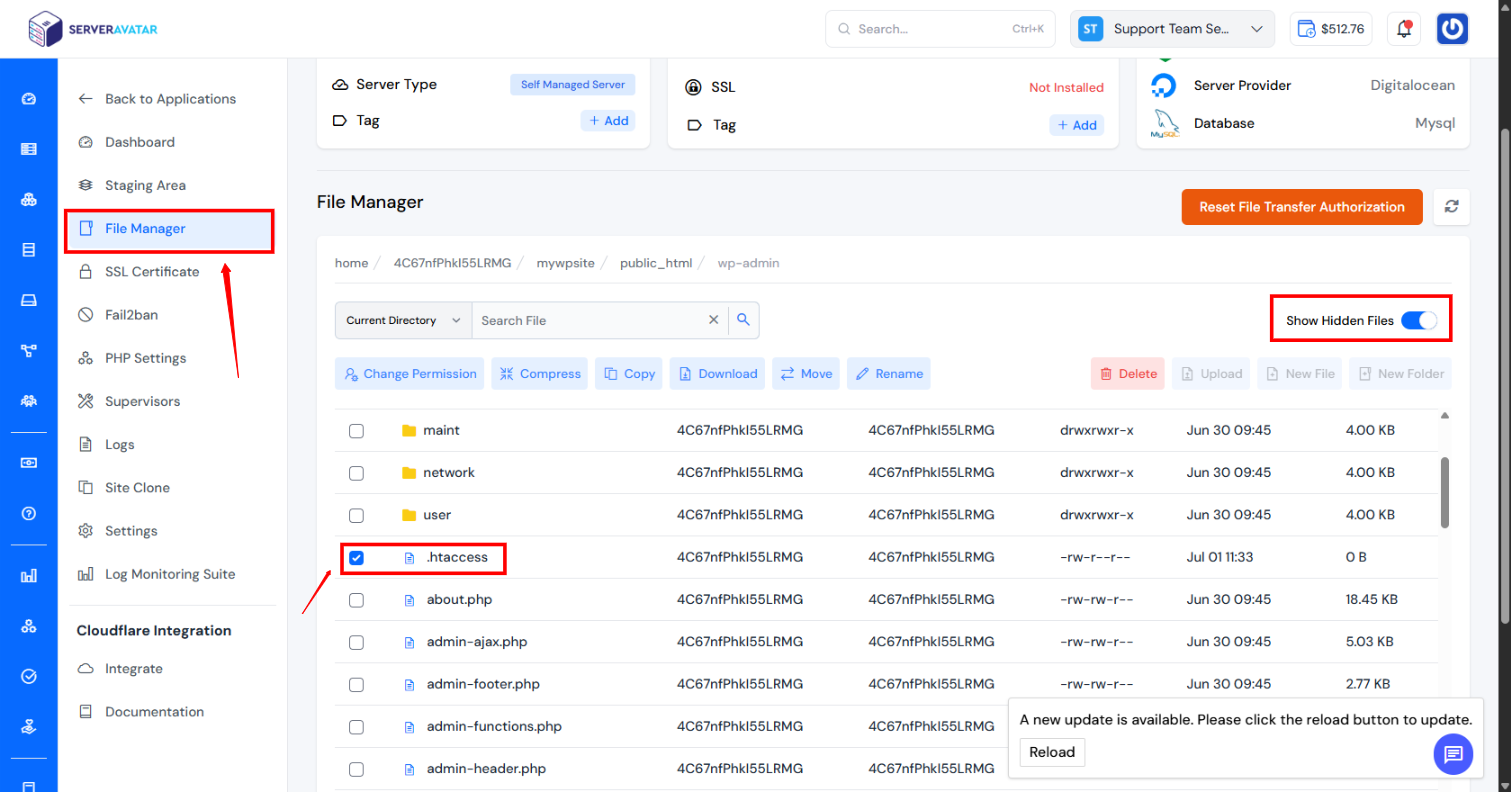
Step 2: Edit/Create .htaccess File in /wp-admin
<Limit GET POST>
order deny,allow
deny from all
allow from 123.45.67.89
</Limit>Add or Replace IP Address you want to allow
- <Limit GET POST>
Specifies that the following rules apply only to GET and POST HTTP methods (i.e., standard browser requests). - order deny,allow
Defines the evaluation order:
deny rules are processed first,
allow rules are processed second.
So, by default, access is denied unless explicitly allowed. - deny from all
Denies access to everyone by default. - allow from 123.45.67.89
Grants access only to the IP address 123.45.67.89. - </Limit>
Ends the limitation block.
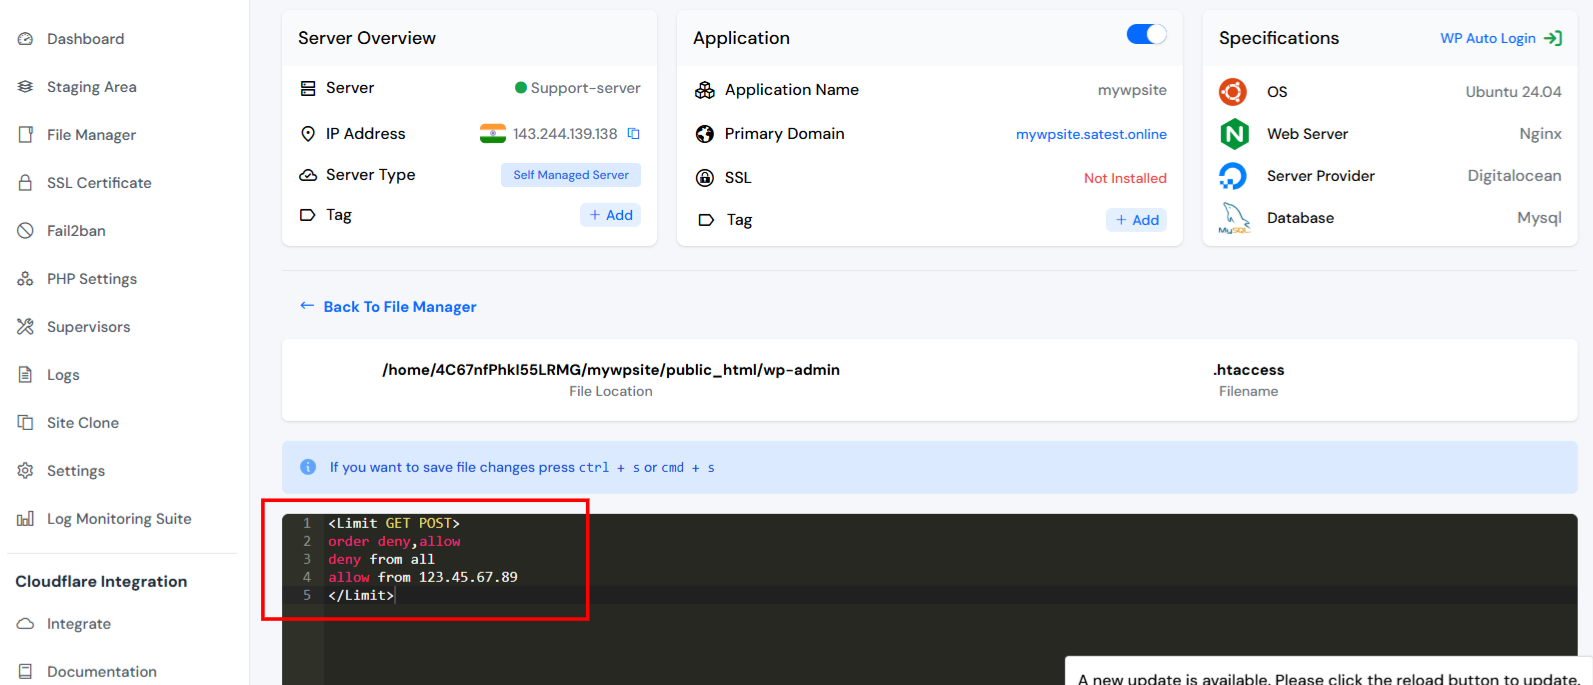
Step 3: Save the File
That’s it! Now only allowed IPs can access the admin directory.
Method 2 :- With Command Line Step-by-Step Guide to Restrict Access
Step 1: Connect to Your Server
If you have SSH access, connect to your server:
Enter your user name and server ip
ssh username@your-server-ipNavigate to your WordPress root directory:
cd /var/www/htmlThis path might be different depending on your server setup.
Step 2: Edit .htaccess in the WordPress Root Directory
Open the .htaccess file:
nano .htaccessAdd this code at the top to restrict access to the login page:
<Files wp-login.php>
    Order Deny,Allow
    Deny from all
    Allow from 123.45.67.89
</Files>To allow multiple IPs:
<Files wp-login.php>
    Order Deny,Allow
    Deny from all
    Allow from 123.45.67.89
    Allow from 123.54.76.98
</Files>Save the file and exit.
Step 3: Protect /wp-admin Directory
Now, navigate to the wp-admin folder:
cd wp-adminEdit or create a .htaccess file:
nano .htaccessPaste the following:
Order Deny,Allow
Deny from all
Allow from 123.45.67.89Save and exit.
Step 4: Restart (if required)
Although .htaccess takes effect immediately, restarting ensures rules are properly applied:
sudo systemctl restart apache2Restrict WordPress Admin Access via IP using Fail2Ban in ServerAvatar
Fail2Ban is an application-level tool that blocks malicious IPs after too many failed login attempts. When combined with ServerAvatar, it becomes easy to manage and configure.
Step-by-Step:
Step 1: Configure Fail2Ban from ServerAvatar Panel
- Go to your Server Dashboard in the ServerAvatar Panel.
- Click on the application section and go to your application dashboard.
- Select your WordPress Application, and navigate to the application dashboard.
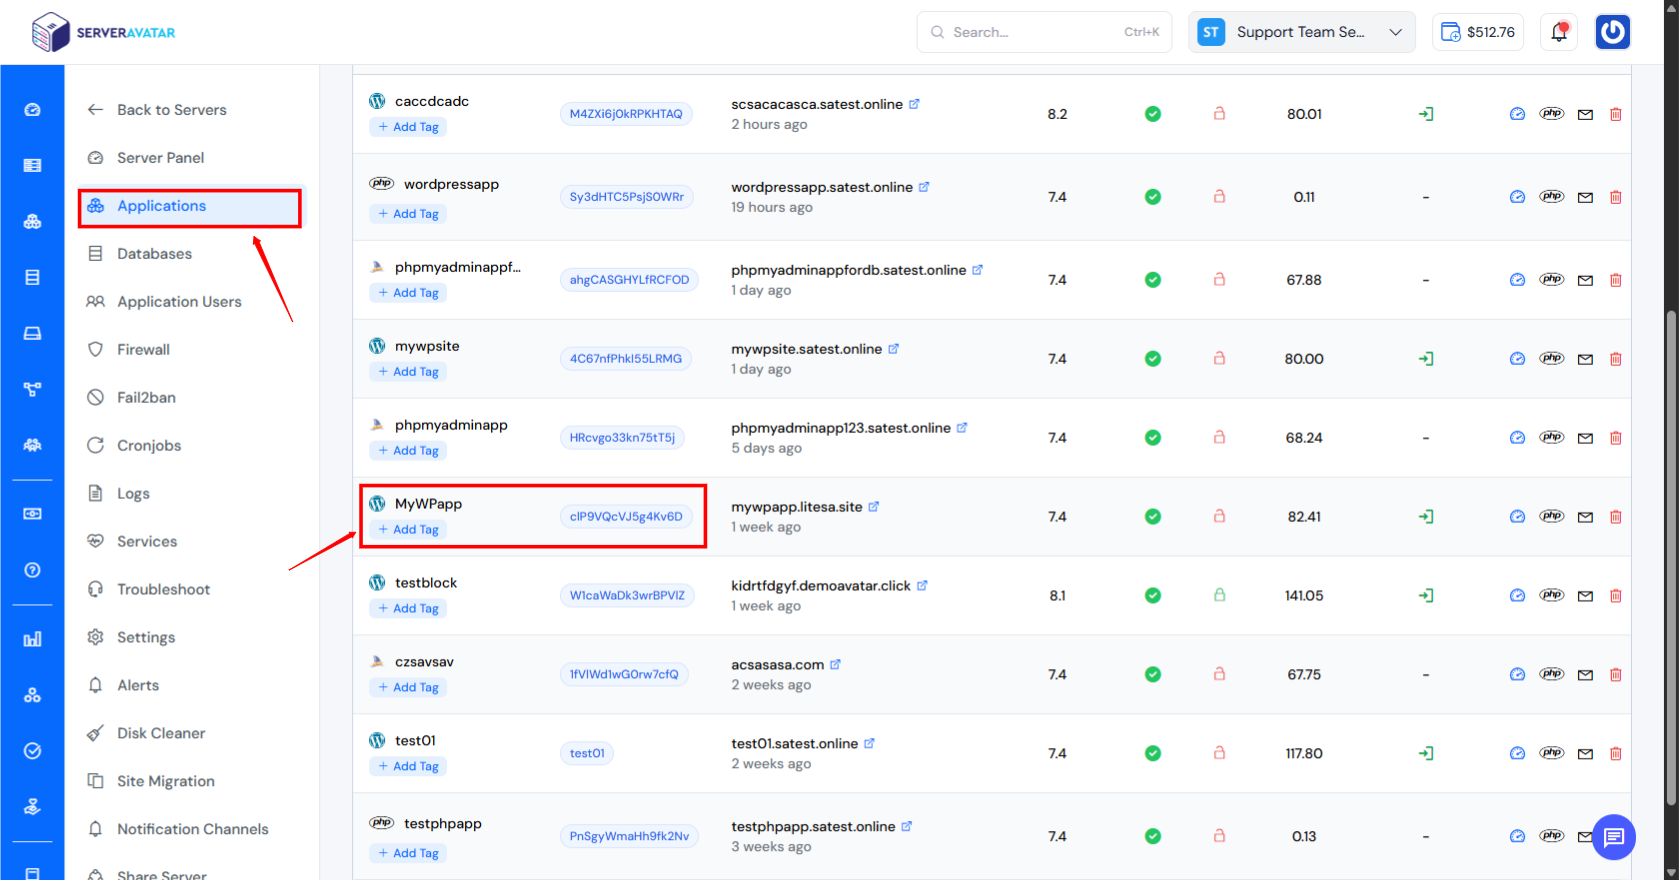
4. Navigate to the Fail2Ban from the lefthand sidebar.

Step 2: Create a Custom Fail2Ban configuration for WordPress
- SSH into your server (use the SSH access feature inside ServerAvatar).
- Create a custom jail:
- Add the following config:
[MyWPapp]

enabled = true
filter = MyWPapp
port = http,https
logpath = /home/clP9VQcVJ5g4Kv6D/MyWPapp/logs/access*log
maxretry = 1
bantime = 3600
findtime = 600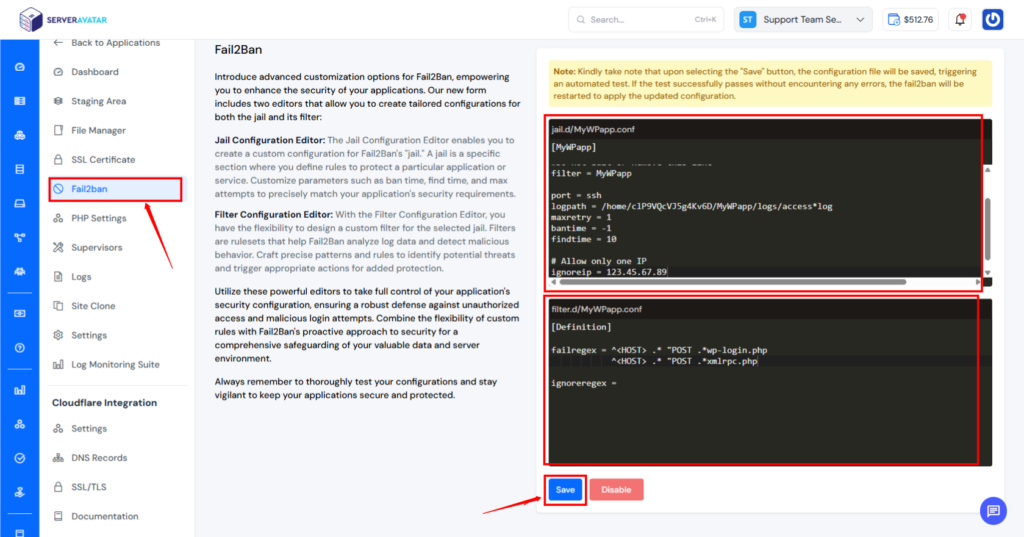
- Logpath= Add your access logpath for your application. Here mine is “/home/clP9VQcVJ5g4Kv6D/MyWPapp/logs/access*log”. change it to your appropriate log path. If you are using ServerAvatar, there is no need to change the logpath.
- bantime = This means permanent ban.
- All other IPs will be banned after 1 failed attempt (maxretry = 1).
- findtime = 60: Ban after failure within 10 seconds.
- Adjust port, logpath, and filter based on the service you’re protecting (like Nginx or FTP).
Step 3: Add Ignore IP:
- Add the IP address to the Ignore IP after saving the Fail2ban configuration. This will not block the ignored IP address as fail2ban will allow the IP address to login to the wp-admin.
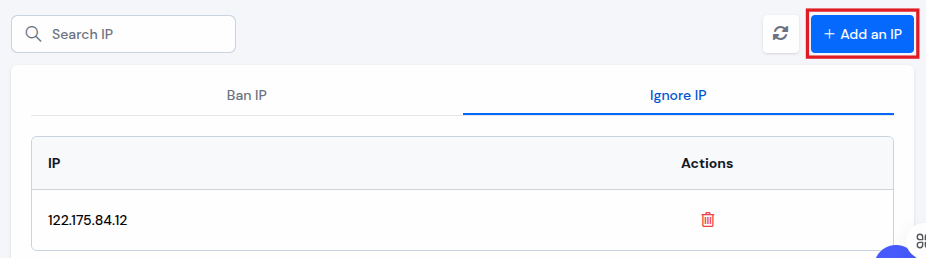
- Navigate to the Ignore IP section. Click on the “Add an IP”, and add the IP address to ignore the IP Address.
Step 4: Restart Fail2Ban
Navigate to the Services section, Locate Fail2Ban Service, and click the Restart button to restart the Fail2Ban service.

Done! Fail2Ban will now ban IPs after failed login attempts.
Tips:
- You can find your IP by searching “what’s my IP” on Google.
- If your IP changes often (dynamic IP), use the plugin method instead.
- Don’t block yourself, always allow your current IP before applying rules.
Restrict Access Using a WordPress Security Plugin
Plugins like Wordfence, All In One WP Security & Firewall, or iThemes Security make it easy to limit access to /wp-admin.
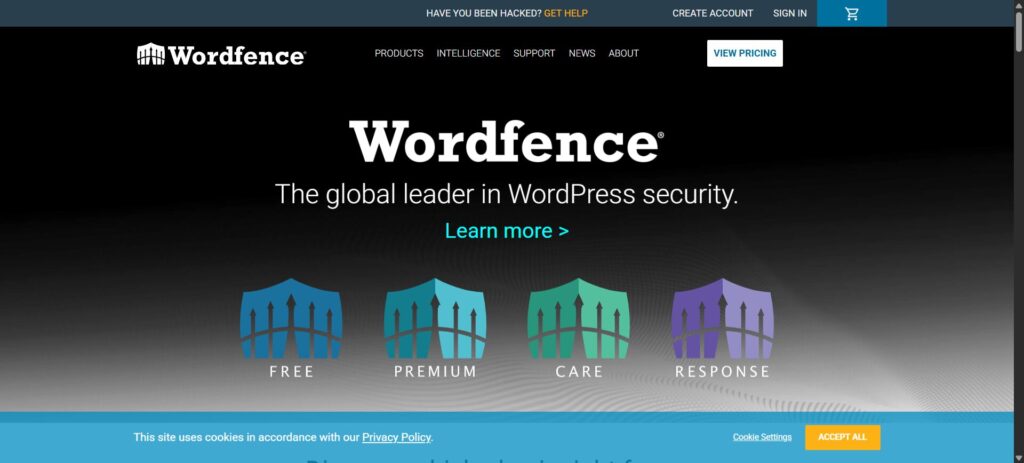
1. With Wordfence Plugin:
- Install and activate Wordfence Security.
- Go to Wordfence > Firewall > Blocking.
- Use the IP blocking feature to allowlist your own IP and block unknown IPs from accessing login and admin URLs.
Key Features:-
- Web Application Firewall (WAF)
- Malware Scanner
- Two-Factor Authentication (2FA)
- CAPTCHA Protection
- Limit Login Attempts
- Real-time Threat Defense Feed
- Country Blocking
- Live Traffic Monitoring
- IP Blocking
- File Change Detection
- Security Incident Recovery Tools
- Scheduled Security Scans
- One-Click File Repair
- Leaked Password Protection
- Brute Force Protection
- Detailed Security Reports
- Centralized Site Management (Wordfence Central)
- Manual and Automatic Blocking
- Malware Signature Updates
- WHOIS Lookup for Suspicious IPs
- Audit of Core File Changes
- Email Alerting System
- Rate Limiting
- Block Fake Google Crawlers
- Block Vulnerable Plugins and Themes
- Firewall Rule and Scan Configuration
- Login Attempt Logging
- IPv6 Compatibility
2. With All In One WP Security Plugin:
- Go to WP Security > Brute Force > Login Whitelist.
- Add your IP address to allow access.
- Enable login whitelist settings.
This method is easy, especially for non-technical users.
Key Feature:-
- User Account Security
- User Login Security
- User Registration Security
- Database Security
- File System Security
- .htaccess and wp-config.php File Backup
- Blacklist Functionality
- Firewall Protection
- Brute Force Login Attack Prevention
- Login Lockdown Feature
- Login Honeypot
- Force Logout for Idle Users
- Two-Factor Authentication (2FA)
- Google reCAPTCHA Integration
- Password Strength Enforcement
- Change WordPress Login URL
- Database Table Prefix Changer
- File Permission Checker
- Copy Protection for Content
- Prevent Hotlinking
- Disable Right Click
- Prevent Fake Googlebots
- Comment Spam Security
- Front-end Text Copy Protection
- Custom .htaccess Rules
- XML-RPC Protection
- Pingback Protection
- iFrame Protection
- WHOIS Lookup
- Failed Login Records
- Security Scanner
- Maintenance Mode Feature
- Security Strength Meter
- Automatic Lockout for Too Many Failed Logins
- Email Notifications for User Lockouts
- Country Blocking (via add-ons or integration)
- Login Activity Monitoring
- Security Logs Viewer
FAQ
1. Why should I restrict WordPress admin access by IP address?
Restricting admin access by IP prevents unauthorized users and bots from accessing your login and admin pages, protecting your site from brute-force attacks and reducing server load.
2. How do I restrict WordPress admin access using .htaccess in ServerAvatar?
You can use ServerAvatar’s File Manager to edit the .htaccess file inside /wp-admin. Add rules to deny all IPs except the ones you want to allow.
Edit<Limit GET POST> order deny,allow deny from all allow from YOUR.IP.ADD.RESS </Limit>
3. What is Fail2Ban and how does it help secure WordPress?
Fail2Ban scans access logs for failed login attempts and automatically blocks suspicious IPs. In ServerAvatar, you can easily configure Fail2Ban jails to protect your WordPress login page.
4. What if I have a dynamic IP that changes often?
If your IP changes frequently, using .htaccess or Fail2Ban might lock you out. In such cases, it’s better to use a WordPress security plugin like Wordfence or All In One WP Security for easier management.
5. Can I use multiple security methods together?
Yes, combining .htaccess, Fail2Ban, and a WordPress security plugin provides layered protection for your WordPress site, making it more secure against various types of attacks.