Your website feels slow? Well, you’re not alone. Most WordPress site speed issues happen because WordPress sites load way too slow, and guess what? Pictures are usually the main problem. But here’s the good news, there’s a simple fix that can make your site way faster.
It’s called WebP, and it’s like magic for your images. Let me show you how this works and why you should care about it.
What is WebP?
WebP is a new way to save pictures on your website. Think of it like this – you know how you can save a photo as a JPG or PNG file? Well, WebP is just another option, but it’s much better.
Google made WebP to help websites load faster. The cool thing is, WebP files are way smaller than regular photos, but they look just as good. Sometimes they even look better!
So when someone visits your site, their browser downloads smaller files. Smaller files = faster loading. Pretty simple, right?
Why Your Site Needs WebP Images
Here’s the thing – most WordPress sites are packed with images. You got photos, logos, buttons, graphics, all kinds of stuff. And each image file makes your site a bit slower.
Regular JPG and PNG files are pretty big. When someone visits your page, their browser has to download all these big files. That takes time, especially if they’re on a phone or have slow internet.
WebP fixes this problem. Here’s what happens:
- Your image files become 25-35% smaller
- Pages load way faster
- People don’t leave your site waiting for it to load
- Google likes fast sites, so you might rank better
- Your hosting costs might go down too
Now, I know what you’re thinking. “Does this actually work?” Yes, it really does. Big companies like Netflix, eBay, and tons of others use WebP. If it’s good enough for them, it’s probably good enough for your site.
How WebP Makes Images Smaller
This part is pretty cool. WebP uses smart tricks to make files smaller without making them look bad.
Regular image formats waste space. They save extra info that your eyes can’t even see. WebP throws away this useless stuff and keeps only what matters.
Think of it like packing for a trip. You could stuff everything in your suitcase, or you could fold things nicely and use every bit of space. WebP is like the neat packing method – it fits more in less space.
The best part? Most of the time, you can’t tell the difference. The image looks the same to you, but the file is much smaller.
Setting Up WebP on Your WordPress Site
Okay, so how do you actually use WebP on your WordPress site? Well, there are a few ways to do this. Let me walk you through the easiest ones.
Method 1: Use a Plugin
The easiest way is to use a plugin. There are several good ones:
WebP Converter for Media – This one is free and works great. It converts your existing images to WebP and serves them to visitors who can use them.
ShortPixel – This plugin compresses your images and converts them to WebP. It’s really good but costs money after a certain number of images.
Imagify – Another paid option that works well. It handles WebP conversion along with other image optimization.
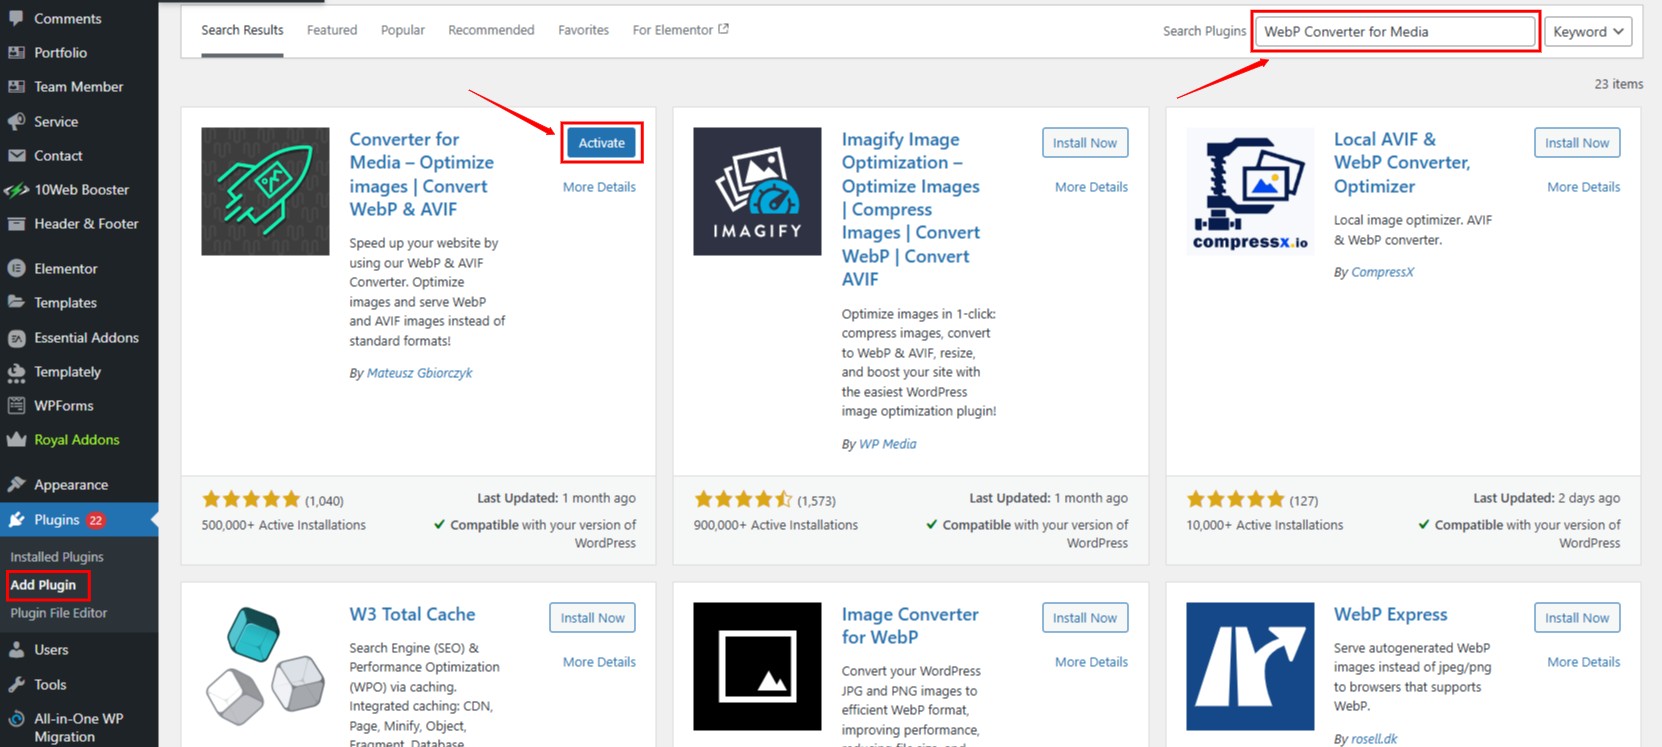
Here’s how to set up Converter for Media:
- Login to your WordPress admin
- Click on Plugins, then Add New
- Search for “WebP Converter for Media”
- Install and activate it
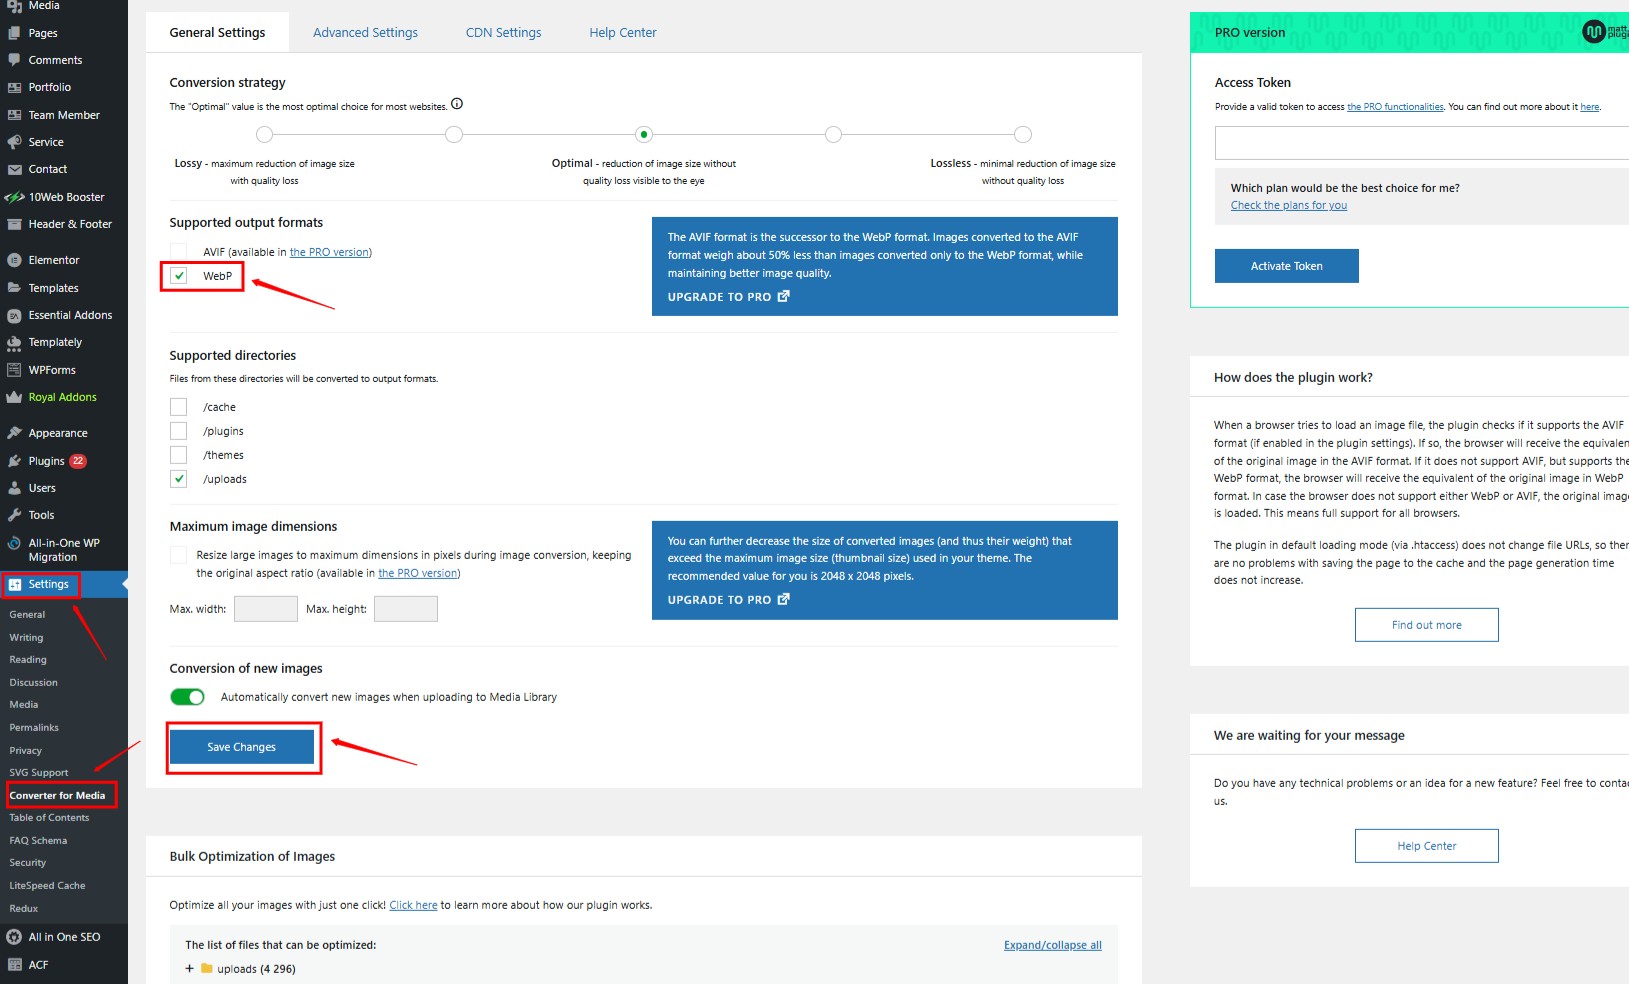
- Go to Settings > Converter For Media > General Settings
- Check the box on WebP and enable conversion of New images
- Click on the Save Button
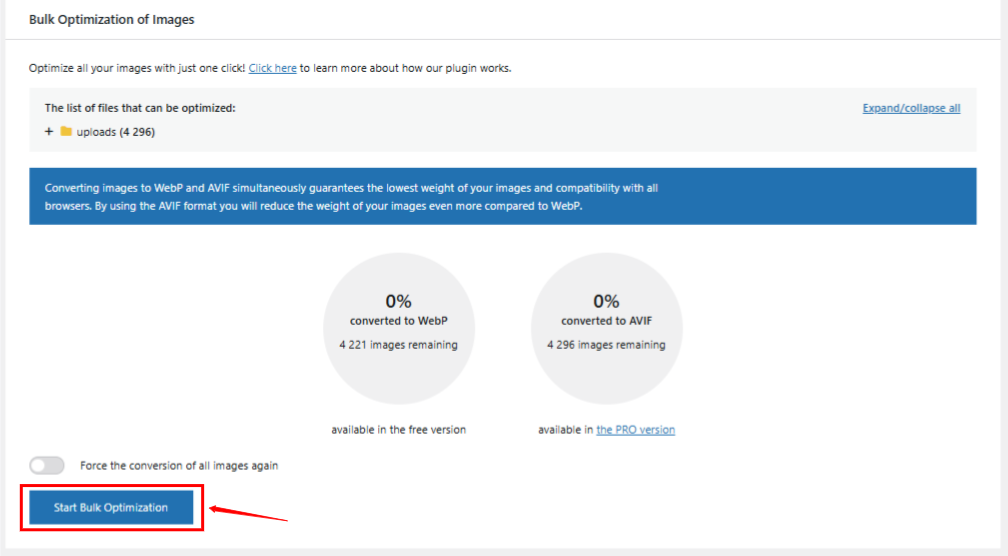
- Click “Start Optimization”
- Wait for it to finish
That’s it! The plugin will convert your images and serve WebP versions to browsers that support them.
Method 2: Manual WebP with Code
If you want more control, you can handle WebP manually with custom code.
Step 1: Add WebP Support Add this to your functions.php:
// Add WebP support
function custom_webp_support($mimes) {
    $mimes['webp'] = 'image/webp';
    return $mimes;
}
add_filter('upload_mimes', 'custom_webp_support');

// Convert images to WebP on upload
function convert_to_webp($file) {
    if (!in_array($file['type'], ['image/jpeg', 'image/png'])) {
        return $file;
    }

    $image_path = $file['tmp_name'];
    $webp_path = $file['tmp_name'] . '.webp';

    // Convert based on image type
    if ($file['type'] == 'image/jpeg') {
        $image = imagecreatefromjpeg($image_path);
    } else {
        $image = imagecreatefrompng($image_path);
    }

    // Save as WebP
    imagewebp($image, $webp_path, 80);
    imagedestroy($image);

    return $file;
}
add_filter('wp_handle_upload_prefilter', 'convert_to_webp');Step 2: Display WebP Images Add this function to serve WebP when supported:
function serve_webp_images() {
    if (strpos($_SERVER['HTTP_ACCEPT'], 'image/webp') !== false) {
        ob_start('replace_images_with_webp');
    }
}
add_action('init', 'serve_webp_images');

function replace_images_with_webp($buffer) {
    return preg_replace_callback(
        '/<img[^>]*src=["\']([^"\']*\.(jpe?g|png))["\'][^>]*>/i',
        function($matches) {
            $webp_url = preg_replace('/\.(jpe?g|png)$/i', '.webp', $matches[1]);
            return str_replace($matches[1], $webp_url, $matches[0]);
        },
        $buffer
    );
}Method 3: Manual WebP Format
You can also convert images yourself before uploading them. There are free tools online that convert JPG and PNG files to WebP.
Just search for “convert to WebP” and you’ll find several free tools. Convert your images, then upload the WebP versions to your site.
Here is the tool name that converts JPEG file to WebP Formate:-
1. Cloud Convert
2. FreeConvert
3. Cloudinary
4. Towebp
5. Picflow
Method 4: Using Cloudflare (No Code Needed)
If you use Cloudflare, you can enable WebP without any code or plugins.
Step 1: Log in to Cloudflare
- Go to your Cloudflare dashboard
- Select your website
Step 2: Enable Polish
- Go to Speed → Optimization
- Turn on “Polish”
- Select “Lossless” or “Lossy”
Step 3: Enable WebP
- Look for “WebP” option
- Turn it on
- Save changes
Cloudflare will automatically convert and serve WebP images to supported browsers.
Adding WebP Fallback Code
Some older browsers don’t support WebP. Add this code to show regular images as backup:
<picture>
  <source srcset="image.webp" type="image/webp">
  <img src="image.jpg" alt="Description">
</picture>Or use this PHP function:
function smart_webp_image($image_url, $alt_text = '') {
    $webp_url = preg_replace('/\.(jpe?g|png)$/i', '.webp', $image_url);

    echo '<picture>';
    echo '<source srcset="' . $webp_url . '" type="image/webp">';
    echo '<img src="' . $image_url . '" alt="' . $alt_text . '">';
    echo '</picture>';
}Use it like this:
<?php smart_webp_image('path/to/image.jpg', 'Image description'); ?>Advanced WebP Configuration
Want more control? Add this advanced configuration:
// Custom WebP quality settings
function custom_webp_quality($quality, $mime_type) {
    if ($mime_type == 'image/webp') {
        return 85; // Adjust quality (0-100)
    }
    return $quality;
}
add_filter('wp_editor_set_quality', 'custom_webp_quality', 10, 2);

// Automatic WebP generation for thumbnails
function generate_webp_thumbnails($metadata) {
    if (!isset($metadata['sizes'])) {
        return $metadata;
    }

    $upload_dir = wp_upload_dir();
    $base_dir = $upload_dir['basedir'];

    foreach ($metadata['sizes'] as $size => $data) {
        $image_path = $base_dir . '/' . dirname($metadata['file']) . '/' . $data['file'];
        $webp_path = preg_replace('/\.(jpe?g|png)$/i', '.webp', $image_path);

        if (function_exists('imagewebp')) {
            $image = null;

            if ($data['mime-type'] == 'image/jpeg') {
                $image = imagecreatefromjpeg($image_path);
            } elseif ($data['mime-type'] == 'image/png') {
                $image = imagecreatefrompng($image_path);
            }

            if ($image) {
                imagewebp($image, $webp_path, 85);
                imagedestroy($image);
            }
        }
    }

    return $metadata;
}
add_filter('wp_generate_attachment_metadata', 'generate_webp_thumbnails');Troubleshooting Common Issues
Problem 1: Images Don’t Load Add this to your .htaccess:
<Files *.webp>
  AddType image/webp .webp
</Files>Problem 2: WebP Not Working Check if your server supports WebP with this code:
function check_webp_support() {
    if (function_exists('imagewebp')) {
        echo "WebP is supported!";
    } else {
        echo "WebP is NOT supported on this server.";
    }
}

add_action('wp_footer', 'check_webp_support');Problem 3: Slow Conversion Add this to speed up conversion:
// Increase memory limit for WebP conversion
ini_set('memory_limit', '256M');

// Set max execution time
set_time_limit(300);Measuring Your Speed Gains
Track your improvements with this simple code:
// Log page load times
function log_page_speed() {
    $start_time = microtime(true);

    register_shutdown_function(function() use ($start_time) {
        $end_time = microtime(true);
        $load_time = $end_time - $start_time;
        error_log("Page load time: " . round($load_time, 3) . " seconds");
    });
}

add_action('init', 'log_page_speed');Final Tips and Best Practices
Here are some extra tips to get the most out of WebP:
- Start with your homepage and most important pages
- Keep original images as backup
- Test on different devices and browsers
- Monitor your site speed regularly
- Use 80-85% quality for best results
Quality Settings Guide:
// Different quality for different image types
function set_webp_quality($image_path) {
    if (strpos($image_path, 'hero') !== false) {
        return 90; // High quality for hero images
    } elseif (strpos($image_path, 'thumbnail') !== false) {
        return 75; // Lower quality for thumbnails
    }
    return 85; // Default quality
}That’s it! You now have everything you need to make your WordPress site lightning fast with WebP images. Pick the method that works best for you and start seeing faster load times today.
Remember, every second counts on the web. WebP is one of the easiest ways to give your visitors a better experience and boost your search rankings at the same time.
Things to Watch Out For
WebP is pretty great, but there are a few things you should know:
Browser Support – Most modern browsers support WebP, but some older ones don’t. Good news is, most plugins handle this automatically. They show WebP to browsers that support it, and regular images to older browsers.
WordPress Media Library – WordPress itself doesn’t fully support WebP yet in the media library. You can upload WebP files, but you might not see thumbnails. This is getting better with newer WordPress versions.
Theme Issues – Some themes might not play nice with WebP images. If you notice any weird display issues after enabling WebP, you might need to check with your theme developer.
Plugin Conflicts – Sometimes plugins don’t work well together. If you’re using multiple image optimization plugins, they might conflict. Stick to one good plugin instead of using several.
How to Check if WebP is Working
After you set up WebP, you’ll want to make sure it’s actually working. Here’s how to check:
Use Browser Tools – Right-click on an image on your site and select “Inspect” or “Inspect Element.” Look for the image source. If it ends with .webp, you’re good!
Check Page Speed – Use tools like Google PageSpeed Insights or GTmetrix. These tools will tell you if your images are optimized and how much time WebP is saving.
Browser Network Tab – In your browser’s developer tools, go to the Network tab and reload your page. You can see all the files being downloaded and their sizes.
Other Ways to Speed Up Your Site
WebP is awesome, but it’s not the only thing you can do to make your site faster. Here are some other simple tricks:
- Resize Images – Don’t upload huge images if you only need small ones. A 3000px wide image for a 300px space is wasteful.
- Use Caching – Install a caching plugin like WP Super Cache or W3 Total Cache. These save copies of your pages so they load faster.
- Optimize Database – Clean up your WordPress database regularly. Remove old revisions, spam comments, and unused plugins.
- Choose Good Hosting – Cheap hosting often means slow sites. Invest in quality hosting if you’re serious about speed.
- Minimize Plugins – Every plugin slows your site down a little. Only keep the ones you really need.
Common Problems and Solutions
Images Not Converting – If your images aren’t converting to WebP, check your server settings. Some hosts don’t allow WebP files. Contact your hosting support if needed.
Site Looks Broken – If your site looks weird after enabling WebP, try a different plugin or check your theme compatibility.
Still Slow – If your site is still slow after adding WebP, you might have other issues. Check your hosting, plugins, and theme.
File Size Not Smaller – Sometimes WebP files aren’t much smaller than the original. This happens with simple images that are already well-optimized.
Conclusion
WebP is one of the easiest ways to make your WordPress site load faster. It makes your image files smaller without making them look worse. In most cases, you just need to install a plugin, set it up once, and you’re done.
The best thing? Your visitors will notice the speed. Faster websites keep people happy, and happy visitors are more likely to stay longer and take action.
Give WebP a try. Start with a simple plugin to see how it works. Later, you can look into more advanced options if needed. Your site will load quicker, and your visitors will appreciate it.
Keep in mind, website speed isn’t just about using fancy tools. It’s about giving users a smooth experience when they visit your site. Fast-loading pages feel more professional and reliable. Plus, Google prefers fast websites, which can help you rank better.
WebP won’t fix every speed issue, but it’s a great first step. And the best part? After setting it up, it runs on its own. Every new image you upload can be converted to WebP automatically, without any extra effort.
FAQ
Q: Will WebP work on all browsers?
Most modern browsers support WebP, including Chrome, Firefox, Safari, and Edge. Good WebP plugins automatically show regular images to older browsers that don’t support WebP.
Q: Do I need to convert all my old images?
No, you don’t have to. Most plugins can convert your existing images automatically. You can also convert them gradually over time.
Q: Will WebP break my site?
No, WebP shouldn’t break your site. Good plugins serve WebP to browsers that support it and regular images to browsers that don’t. It’s a safe upgrade.
Q: How much faster will my site be?
It depends on how many images you have and how big they are. Most sites see a 10-30% improvement in loading speed, especially on image-heavy pages.
Q: Can I use WebP with any WordPress theme?
Yes, WebP works with any WordPress theme. The conversion happens at the server level, so your theme doesn’t need to do anything special.
Stop Wasting Time on Servers. Start Building Instead.
You didn’t start your project to babysit servers. Let ServerAvatar handle deployment, monitoring, and backups — so you can focus on growth.
Deploy WordPress, Laravel, N8N, and more in minutes. No DevOps required. No command line. No stress.
🚀 Try ServerAvatar Free – No Credit Card NeededTrusted by 10,000+ developers and growing.