

Have you ever tried to set up UpCloud server or any cloud server but felt completely lost? You’re not alone. Many people think that setting up a server is only for tech geeks. But the truth is, setting up a server is easier than assembling IKEA furniture (and way less frustrating!). Whether you’re hosting a website, launching a project, or testing an app, this guide will walk you through every step like a friend showing you the ropes.
In this post, we’ll break down the setup process in the simplest possible way, no technical headaches, no complicated steps, just a smooth path from zero to running a server.
Why Choose UpCloud?
UpCloud is known for its high-performance cloud infrastructure with excellent uptime and top-tier SSD storage called MaxIOPS. It’s like the Ferrari of cloud hosting, powerful, fast, and sleek. Whether you’re a developer, business owner, or hobbyist, UpCloud provides the tools and flexibility to host anything you need.
Benefits of UpCloud
- Super fast servers with MaxIOPS
- Simple and intuitive dashboard
- Flexible pricing
- Global data center locations
- Excellent customer support
Prerequisites Before You Begin
Before diving in, here’s what you’ll need:
- A valid email address
- A strong password
- A credit card (for verification, though there are trial credits)
- Basic knowledge of SSH (we’ll explain it too!)
If you’ve got those ready, let’s get started!
Create an UpCloud Account
- Visit https://upcloud.com
- Log in to your account if you already have one on Upcloud, or click on “Sign Up” to create a new account.
- I’m creating a new account here. Fill up details such as your name, email address. Click on the “Sign up for free” button.
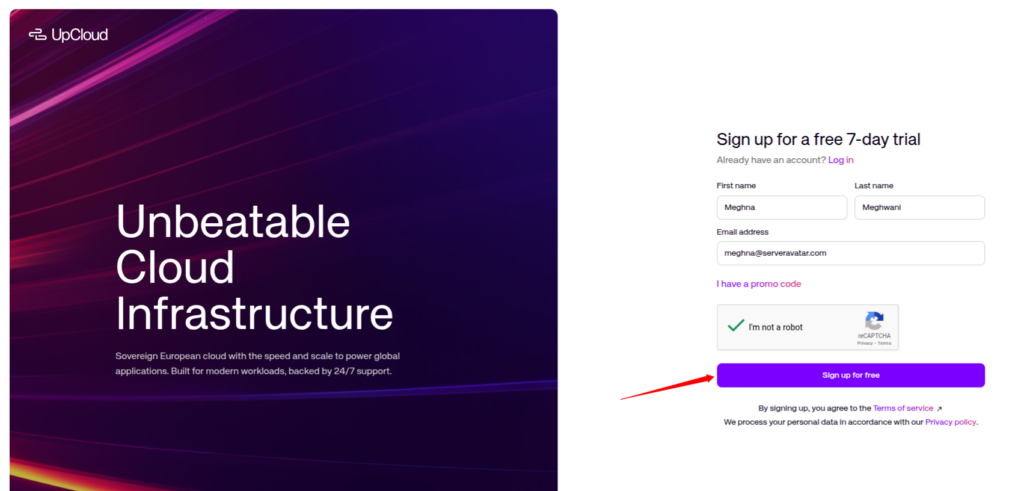
- Verify your email address, fill in the further details, and add payment details. Additionally, you can start your 7-day free trial and get $10 to test and explore the UpCloud platform.
- That’s it! You now have access to the UpCloud control panel.
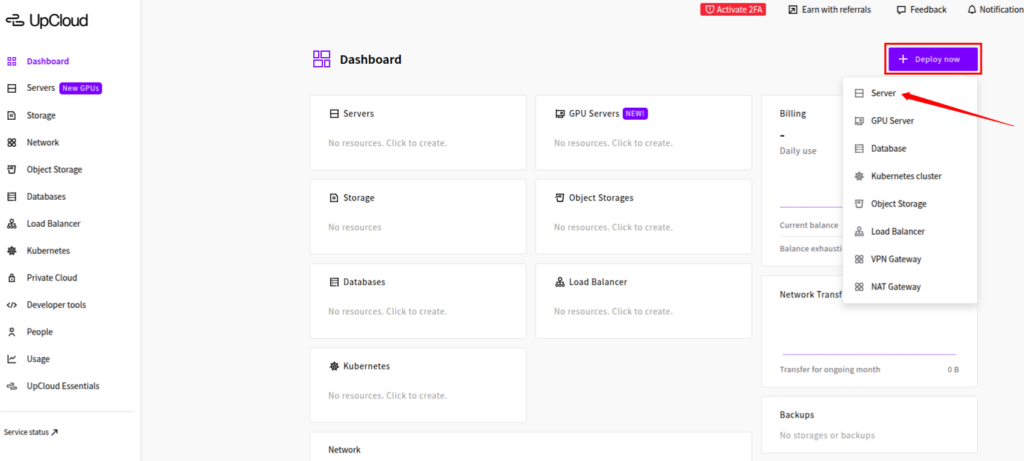
Navigating the UpCloud Dashboard
Once logged in, you’ll see a clean dashboard with:
- A list of your servers called cloud instances (if there is any)
- Backup and storage options
- Account and billing settings
- and many more features.
Take a minute to familiarize yourself with the layout.
Launch Server (Cloud Instance)
Step 1: Server Deployment
- Click the “Deploy now” button and select the “Server” option.
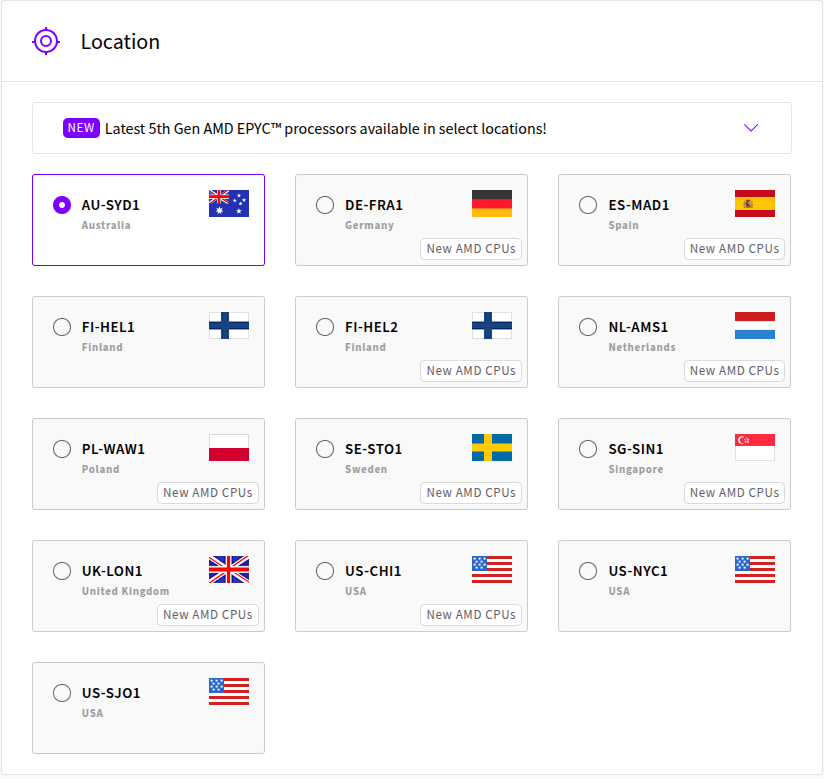
Step 2: Select Location
- Select a data center closest to your target audience for better speed.
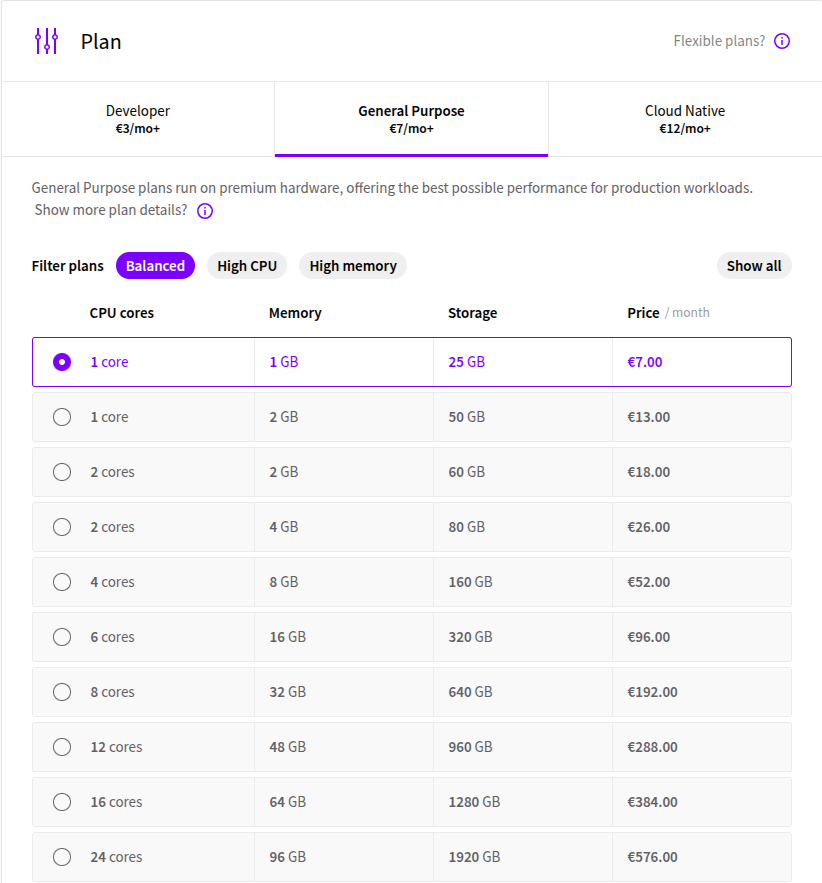
Step 3: Select Plan
- Select a plan from the given options:
– Developer: It is perfect for testing, development and hosting personal projects.
– General Purpose: This plan uses premium hardware and offers the best possible performance for production sites.
– Cloud Native: This plan offers cost-effective compute without bundled storage or IPs. It is perfect for automation.
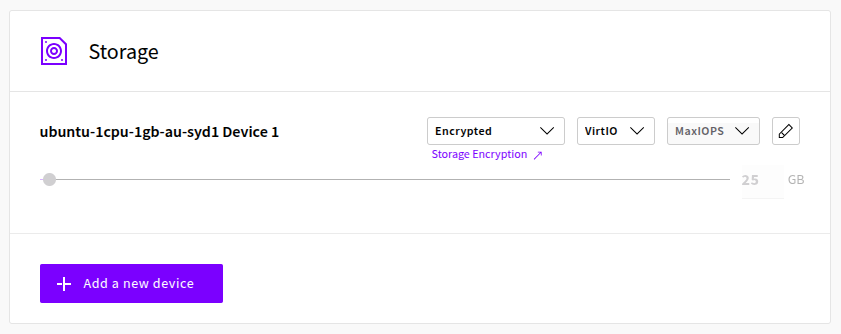
Step 4: Add New Storage Device
- You can see the option of storage. Upcloud automatically configures a storage device based on your selected plan.
- Generally, the device’s storage size is fixed, however, you can change the storage size for each of them, and you can add up to 15 additional storage devices (total will be 16), and each storage device is up to 4 TB by clicking on “Add a new device” button.
Step 5: Automated backups
- You can also enable Automated Backups by clicking the toggle button on the right side. You can choose backup plan from Daily, Weekly, Monthly, or Yearly plans.
- After selecting the required plan, you can set a backup schedule time using the drop-down menu below.

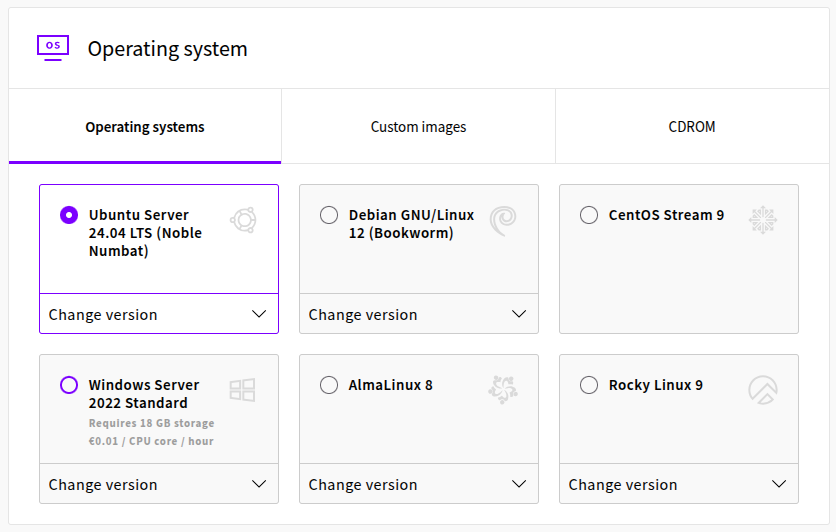
Step 6: Choose an Operating System
- You’ll see a list of Operating System options such as, Ubuntu, Debian, CentOS, Windows Server, AlmaLinux, Rocky Linux.
- Pro Tip: If you’re unsure, select Ubuntu 22.04 LTS or Ubuntu 22.04 LTS, it’s beginner-friendly and widely supported.
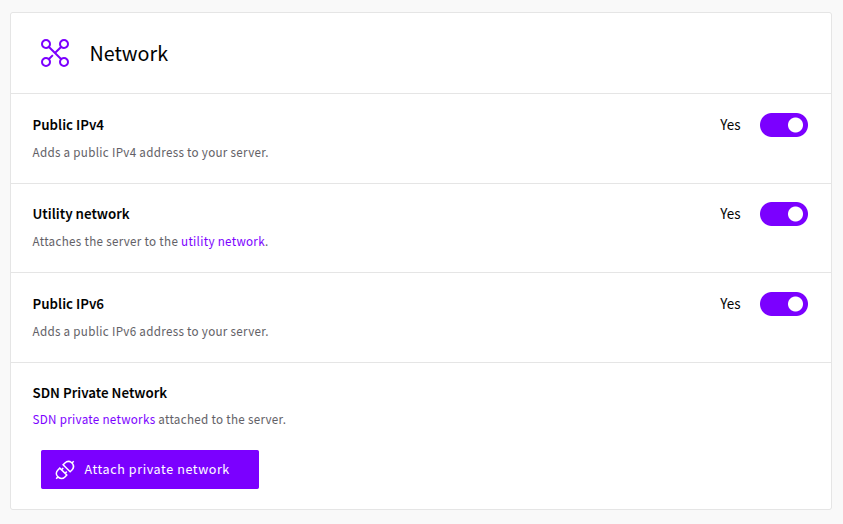
Step 7: Select Network Configuration
- Public IPv4: Enable the toggle button next to this option to add a public IPv4 address to your server.
- Utility network: Enable if you want to attaches the server to the utility network.
- Public IPv6: Enable the toggle button to add public IPv6 address to your server.
- SDN Private Network: Click on the option to attach SDN private networks to your server.
You can customize all the network options your way!
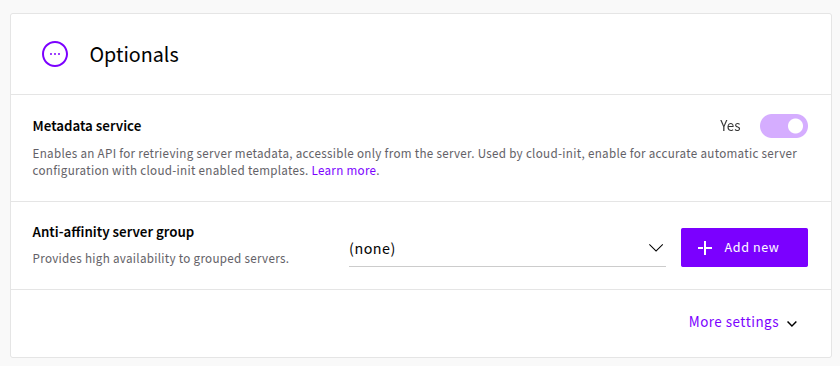
Step 8: Additional Options:
- In this step, you can enable or disable IPv6 support and the metadata service. Also, you can set the desired TimeZone and select between network and display adapters.
- If it suits you, we suggest keeping these options at their default settings.
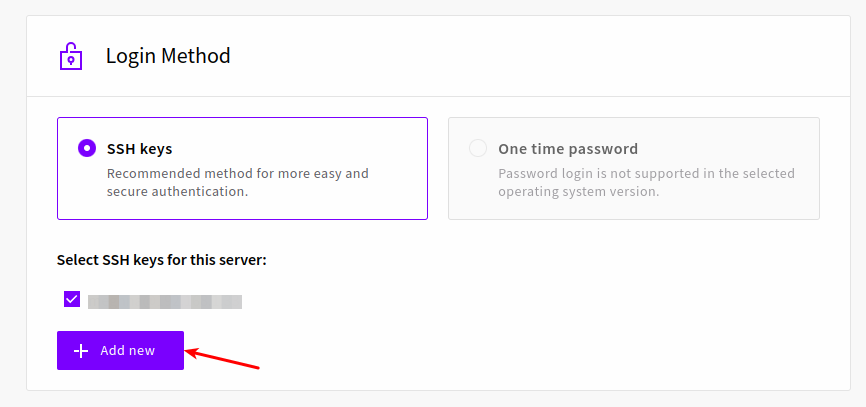
Step 9: Select Login Method
- Now you have to select the Login method. There are two types of login methods:
– Authentication via SSH Keys: If you are using SSH keys for authentication, It is the best option. You can also click on the “Add New” button to import your keys.
– Authentication via One-Time Password: If you do not know what is SSH key, You can go with the One-Time password method. You have to set a new password after the first time you log into this server. Make sure to set a strong password for your root user, which is the most powerful user with all the privileges on Linux OS. You can select the convenient way to have the password.
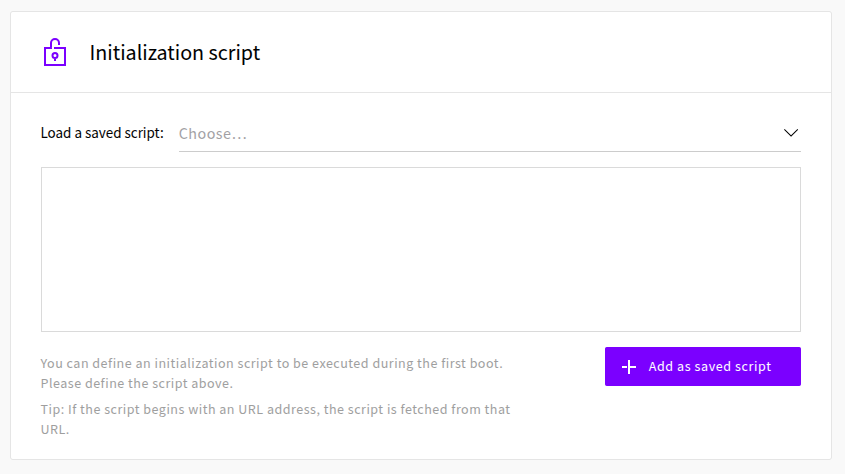
Step 10: Enter Initialization Script
- The Initialization scripts are user-defined automation scripts supported by all Linux public templates. When you select one of your stored scripts, it will appear in the edit field.
- You can make changes to the scripts or write a new one. The server will execute the script during the first bootup.
Step 11: Finalise Details
- In the last step of this process, we have to enter the Host Name, Server Name, and the number of servers you want to deploy. After filling up the details, click on the “Deploy” button to create a server.
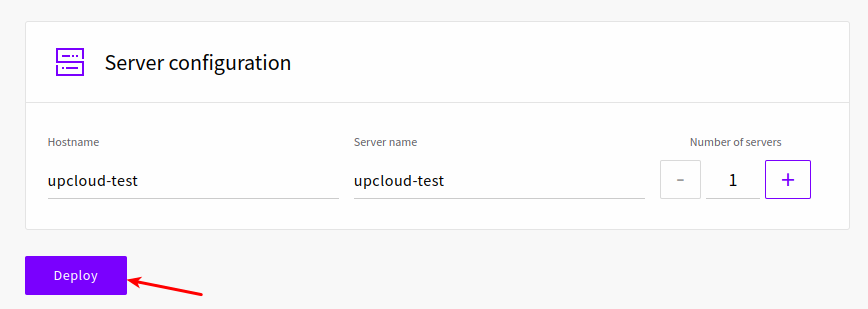
In a few minutes, you will have the Server up and running.

Step 12: Connecting to Your Server
Use an SSH client (like Terminal or PuTTY) to connect your server:
ssh root@your-server-ip
If you used an SSH key, no password is needed. Otherwise, use the root password sent to your email. Enter “Yes” as a confirmation and your server will connected.

Connect Server to ServerAvatar:
You can connect your server to ServerAvatar to manage your server via user friendly dashboard.
Please make sure to enable the Serveravatar port (43210) from the firewall configuration for connecting your server to ServerAvatar.
- ServerAvatar supports multiple tech stacks including Apache, Nginx, OpenLiteSpeed (OLS), and Node Stack.
- You can host PHP-based applications. However, for Node.js applications, ServerAvatar provides a dedicated Node Stack that includes support for MongoDB.
- You can choose between MySQL, MariaDB, or Mongo DB as your database, depending on what your project requires.
- ServerAvatar also offers a One-Click Application Installer, making it easy to deploy popular applications with just a few clicks.
ServerAvatar provides you two methods to connect your server with ServerAvatar. You can connect your UpCloud server easily with ServerAvatar using a custom method of connecting server. Let’s see step by step guide:
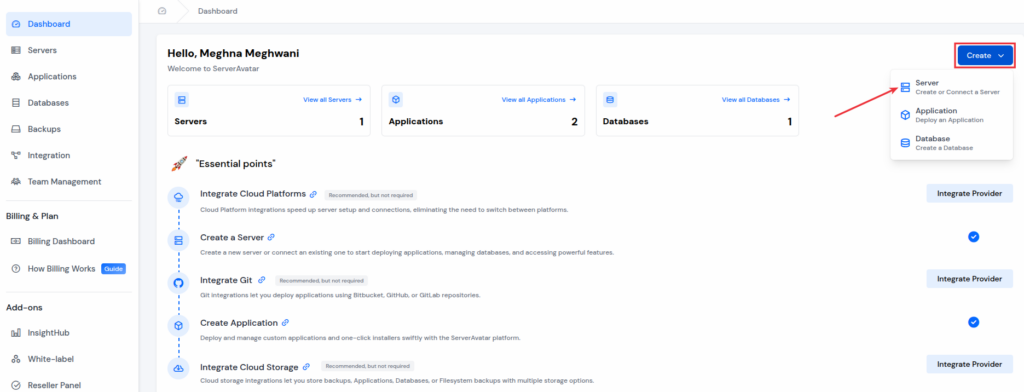
- Login to your ServerAvatar account. Click on the Create >> Server button.
Select Server Type as a “Self Managed Server“, and cloud provider as a “Custom“.
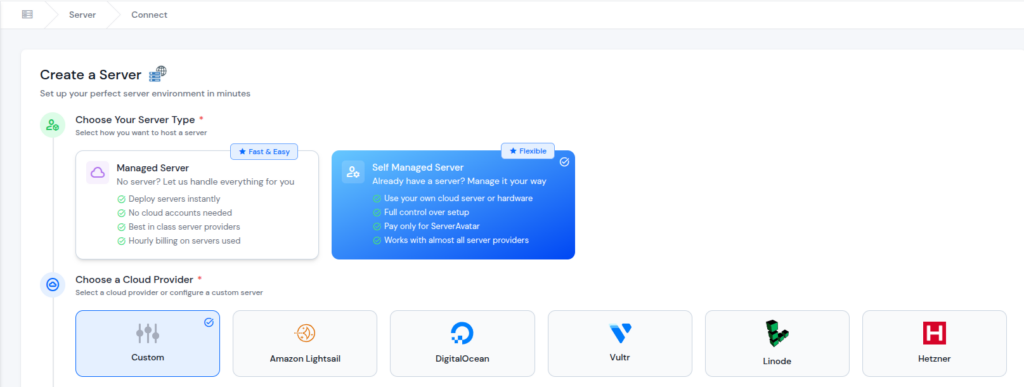
In “Basic Server Details” section. Enter your Server Name.
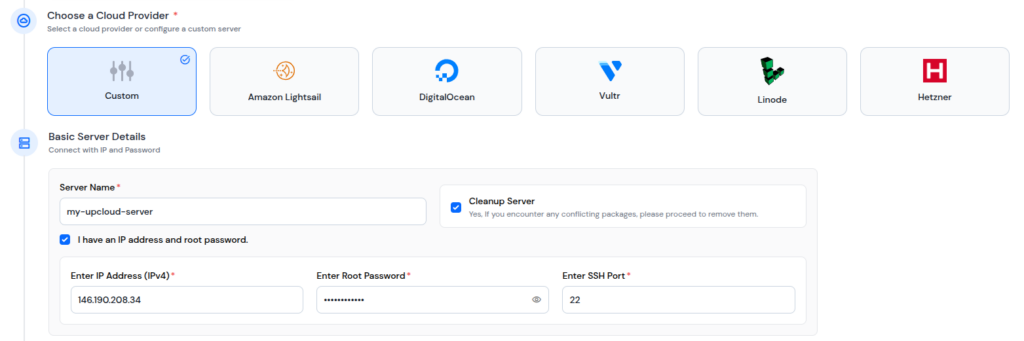
Method 1: Using IP Address and Root Password
If you have IP Address and Root Password of your server you can use custom method using IP address and root password to connect your server with ServerAvatar.
- Select the checkbox of “I have an IP address and root password” as we already have the IP Address and root password of UpCloud server.
- Enter your IP Address, Root Password, and SSH port (by default it is 22) if you have changed.
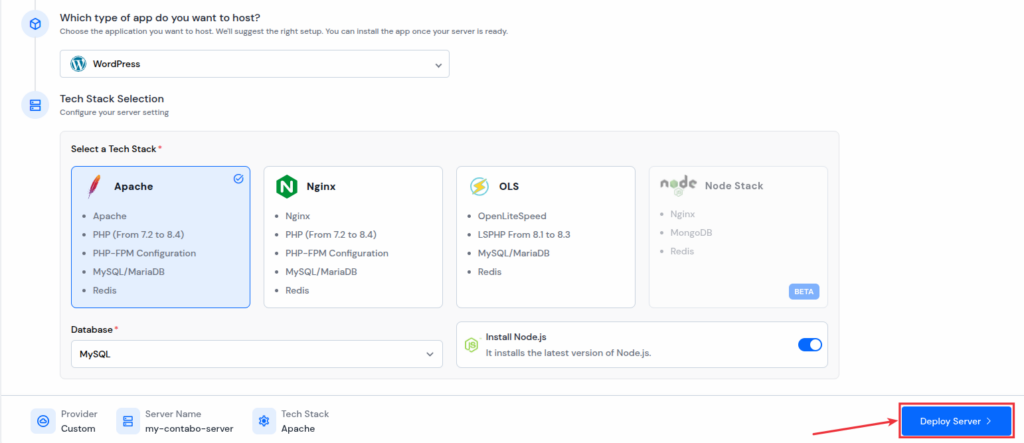
- From the “Select an Application” dropdown list, choose the application you want to host on your server, and ServerAvatar will suggest you the right setup. You can install the application afterwards, once your server is ready.
- Select your preferred “Tech Stack“, and “Database“. Enable the toggle button to “Install Node.js” if you want to install the latest version of Node.js.
- After selecting preferred options, click on the “Deploy Server” button.
Method 2: Without Using IP Address and Root Password
If you don’t have IP Address and Root Password of your server or if you have created your UpCloud server using SSH keys it will not provide you root password. You can directly connect your Server with ServerAvatar by running installation script.
Method 2: Without Using IP Address and Root Password
If you don’t have IP Address and Root Password of your server or if you have created your UpCloud server using SSH keys it will not provide you root password. You can directly connect your Server with ServerAvatar by running installation script.
- In “Basic Server Details” section. Enter your Server Name.
- Please note that do not select the checkbox of I have an IP address and root password.
- From the “Select an Application” dropdown list, choose the application you want to host on your server, and ServerAvatar will suggest you the right setup. You can install the application afterwards, once your server is ready.
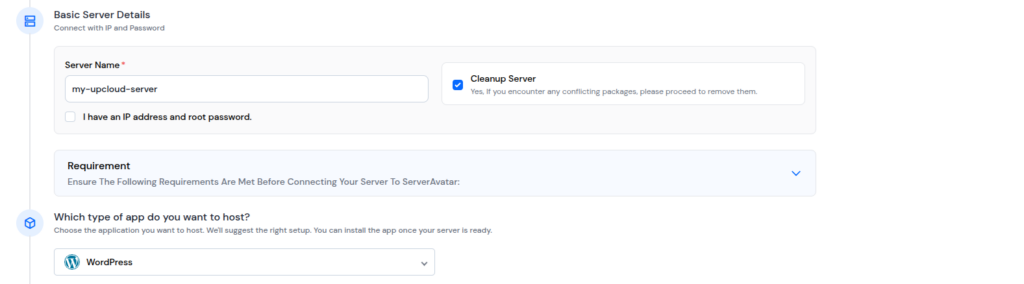
- Select your preferred “Tech Stack“, and “Database“. Enable the toggle button to “Install Node.js” if you want to install the latest version of Node.js.
- After selecting preferred options, click on the “Deploy Server” button.

- You will see an “Installation” script. Copy the script by clicking on “Copy to Clipboard“.
- Please note that root access to server is required to run the installation script.
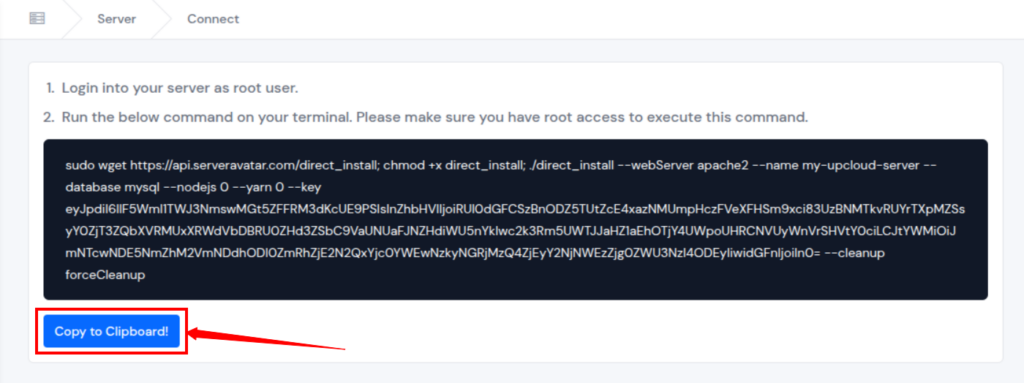
- Let’s login to the server to run the installation script. Open your terminal on Linux and Mac and run the below command:
- IF you are using Windows system, you can connect your server using PuTTY.
ssh root@your-server-ipIf you have used an SSH key as a login method while setting up UpCloud server, no password is needed. Just enter “Yes” as a confirmation and your server will connected.

- Now, let’s run the installation script which we have copied from ServerAvatar Dashboard:
- As you can see, the installation process has been started.
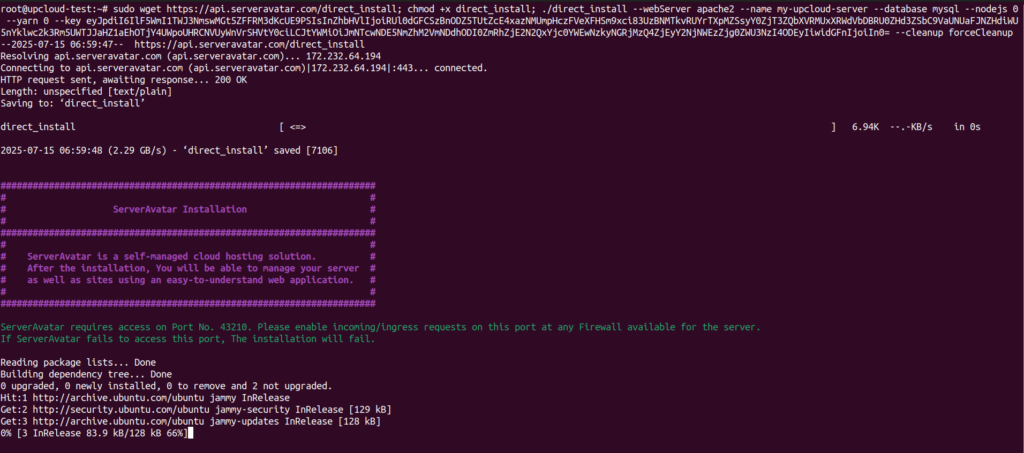
- You will be prompted to keep the default version or change it. The default action is to write “N” for no. However, if you want to change the version, write “Y” for yes.
- You will see the URL to check out the status of your server installation process as you can see in the below image:

- Copy the link and paste it in your browser. You will see the installation process as mentioned in the image below:
- During installation process, you will see real-time updates shows which services are being installed and configured through ServerAvatar. Here’s a breakdown of the installation process:
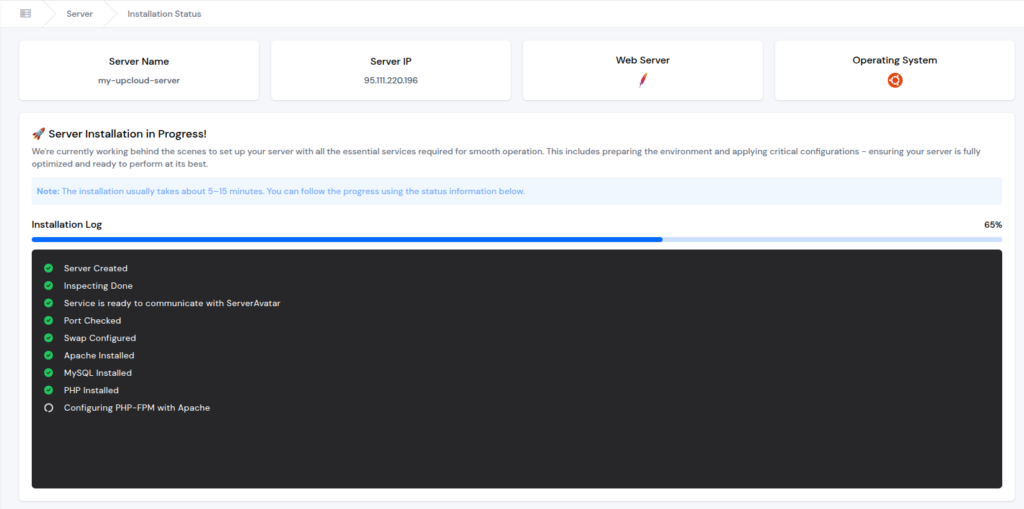
- The server setup process approximately takes 5 to 15 minutes. Once the process completed, your server will be fully configured and ready to host the PHP websites directly from the ServerAvatar panel.
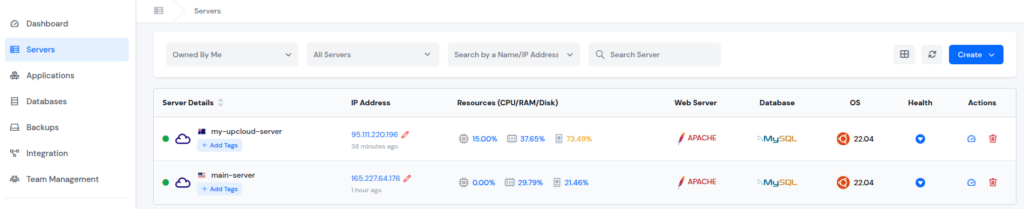
- Once it’s done, you can see the server is connected with ServerAvatar on its dashboard.
Conclusion:
Setting up an UpCloud server might have sounded like a tough job at first, however, as you’ve seen, it’s pretty straightforward process. What might have seemed intimidating at first is now a smooth, step-by-step process you can repeat anytime. With UpCloud’s user-friendly dashboard, powerful performance, and flexible features, UpCloud makes cloud hosting approachable for everyone. Whether you’re a beginner or just looking for a hassle-free setup, this guide proves that launching a cloud server doesn’t have to be rocket science.
FAQs:
1. Can I use UpCloud for free?
Yes! UpCloud offers a trial credit when you sign up. You need to add a payment method, but you won’t be charged during the trial unless you exceed the limits.
2. What is the best OS to choose on UpCloud?
If you’re just starting out, go with Ubuntu 22.04 LTS, or Ubuntu 24.04 LTS. It’s user-friendly and has lots of support online.
3. Do I need to know coding to use UpCloud?
Not at all! UpCloud’s interface is intuitive, and you can find guides (like this one) to help you through.
4. Is my data safe on UpCloud?
Absolutely. UpCloud provides secure infrastructure, DDoS protection, and regular backups to keep your data safe.
5. Can I host WordPress on UpCloud?
Yes, and it’s a popular use case! You can install WordPress manually or use a stack script like LAMP/LEMP to make it faster. Additionally, you can use ServerAvatar to host WordPress on UpCloud easily.