

If you’re looking to deploy Paperclip for your team, a VPS gives you full control over your AI infrastructure. Paperclip is an open-source platform that lets you create AI agents, define goals, and connect LLM providers like Anthropic Claude and OpenAI, all from a clean dashboard. The catch is that the hosted version stores your data in Paperclip’s cloud. For companies with strict data privacy requirements, or teams that simply want complete ownership of their infrastructure, self-hosting is the better choice. In this guide, you’ll learn how to deploy Paperclip on a VPS quickly and securely using ServerAvatar.
This guide walks you through deploying Paperclip on a VPS running Ubuntu, behind a custom domain, with HTTPS, a proper PostgreSQL database, and authentication required for every user.
ServerAvatar handles the heavy lifting on server provisioning, application deployment, and SSL certificate management, so you can focus on the setup itself rather than wrestling with DNS records and firewall rules.
TL;DR
- Paperclip is an open-source AI agent management platform with a web UI
- Self-hosting gives you full data ownership and keeps agent data on your own infrastructure
- ServerAvatar simplifies VPS provisioning, application deployment, and SSL management
- PostgreSQL 17 is required, Paperclip’s Drizzle ORM doesn’t support MySQL or MariaDB
- Paperclip listens on
127.0.0.1:3100only, Apache handles all public traffic through a reverse proxy - A clean install on a fresh Ubuntu VPS takes roughly 15–20 minutes
What is Paperclip?
Paperclip is an open-source platform that gives teams a web-based control panel for AI agents. You can define agents, assign them goals, manage workloads, and connect your own LLM API keys, without having to build your own tooling from scratch.
Explore the hosted version at paperclip.ing, and access the official documentation and GitHub repository to learn more.
Going the self-hosted route changes the picture significantly:
| Feature | Paperclip Cloud | Self-Hosted |
|---|---|---|
| Data storage | Paperclip’s servers | Your VPS |
| Cost | Subscription-based | Your server costs |
| Custom domain | Limited | Full control |
| Authentication | Managed for you | You configure who has access |
| Updates | Automatic | You decide when to update |
| Database | Managed by Paperclip | Self-managed PostgreSQL |
The self-hosted approach makes the most sense when data residency, internal privacy policies, or avoiding another SaaS dependency are driving your decisions. If any of those resonate, keep reading.
Who this guide is for: Teams that need full control over agent management data, companies with compliance requirements, and developers comfortable on the command line. Budget about 15–20 minutes for a clean install on a fresh VPS.
Architecture Overview
Before diving into the steps, it helps to understand how everything connects.
 ┌──────────────────────────────────────────────┐
 │                   Your VPS                   │
 │                                              │
 │                                              │
Internet ─────────────── Apache :443 (SSL) ─────┼──────► Paperclip :3100
(https://paperclip.example.com)   │             │               │
                                  │ Apache :80──┘               │
                                  │                             │
                                  │   PostgreSQL :5432          │
└──────────────────────────────────────────────┘Here’s what each piece does:
- Apache (443) – Terminates SSL, handles Let’s Encrypt certificates, receives all public traffic
- Apache (80) – Catches plain HTTP requests and redirects them to HTTPS
- Paperclip (3100) – The agent management UI that is tied exclusively to localhost, and never directly exposed to the internet
- PostgreSQL (5432) – Stores all agent data, configurations, and user information, also localhost-only
Traffic always flows: Client >> Apache (SSL) >> Paperclip (localhost) >> PostgreSQL (localhost). Nothing is directly reachable from the internet except Apache on ports 80 and 443.
Why this design matters
Paperclip is intentionally designed to sit behind a reverse proxy. It binds to 127.0.0.1:3100, which means it cannot be reached directly from the internet under any misconfiguration. Apache handles all SSL complexity. PostgreSQL is on localhost too, so you don’t need to open firewall rules for the database. “systemd” takes care of restarts if the process crashes or the server reboots.
This layered approach means you get a production-ready setup where each component only communicates with the ones it actually needs to.
Step 1: Create Your Server with ServerAvatar
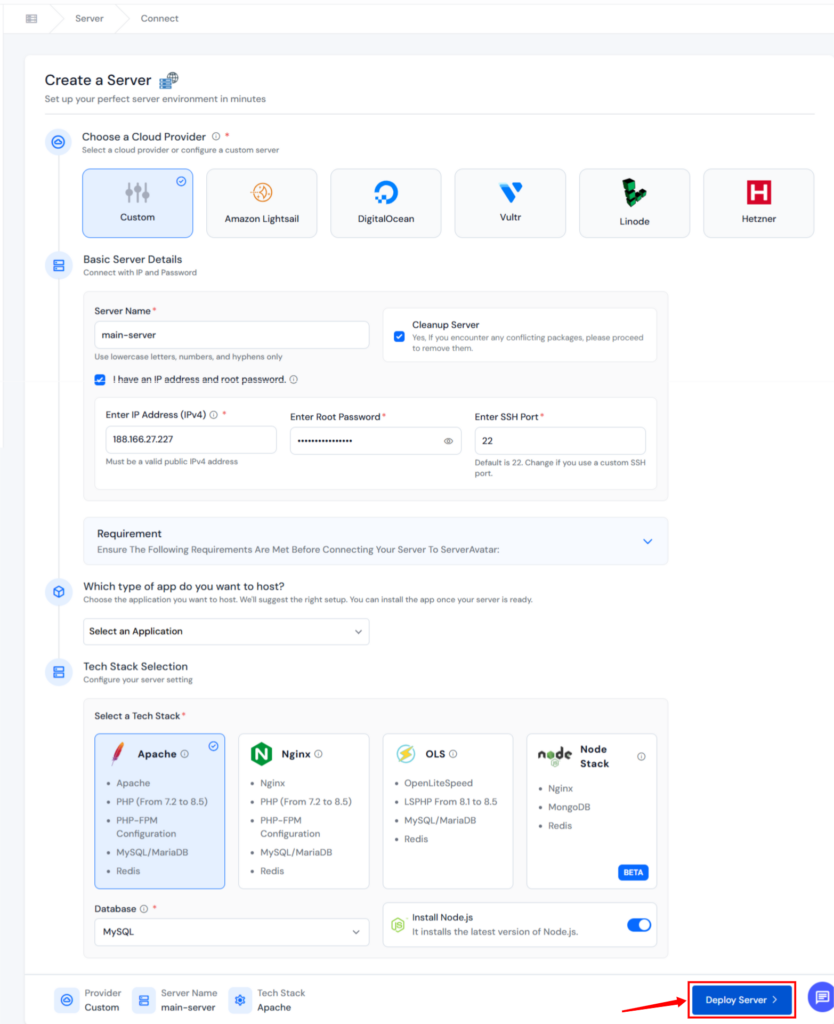
Log into your ServerAvatar account and create a new server. If you already have a server, ServerAvatar makes the process straightforward, you can connect your server from any cloud provider with ServerAvatar using the Direct Method installation guide.
You can also connect your cloud provider account from DigitalOcean, Vultr, Linode, Hetzner, and Amazon Lightsail to directly deploy a server using ServerAvatar.
During the server creation workflow, you’ll see an option to Install Node.js, enable this toggle. Paperclip runs on Node.js, and having ServerAvatar install it during provisioning saves you a manual step afterward.
Step 2: Create the Application in ServerAvatar
After your server is live, create a new application in ServerAvatar.
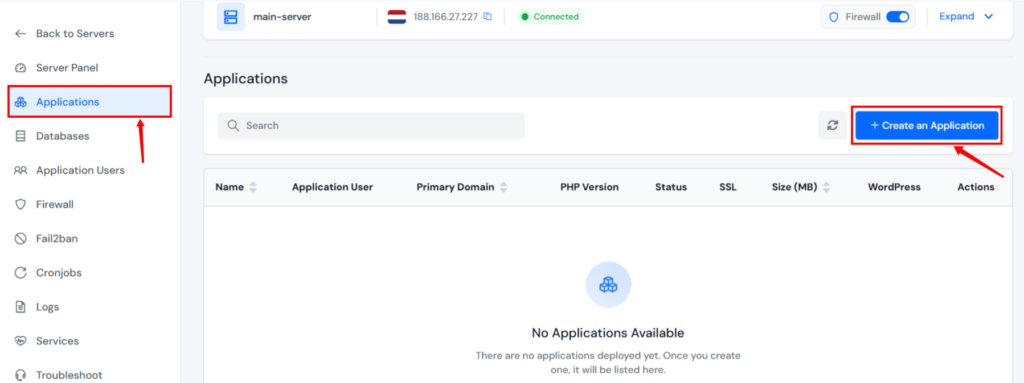
- Open the server panel by clicking on the server dashboard icon.
- Navigate to the Application section from the left sidebar.
- Click on the Create an Application button.
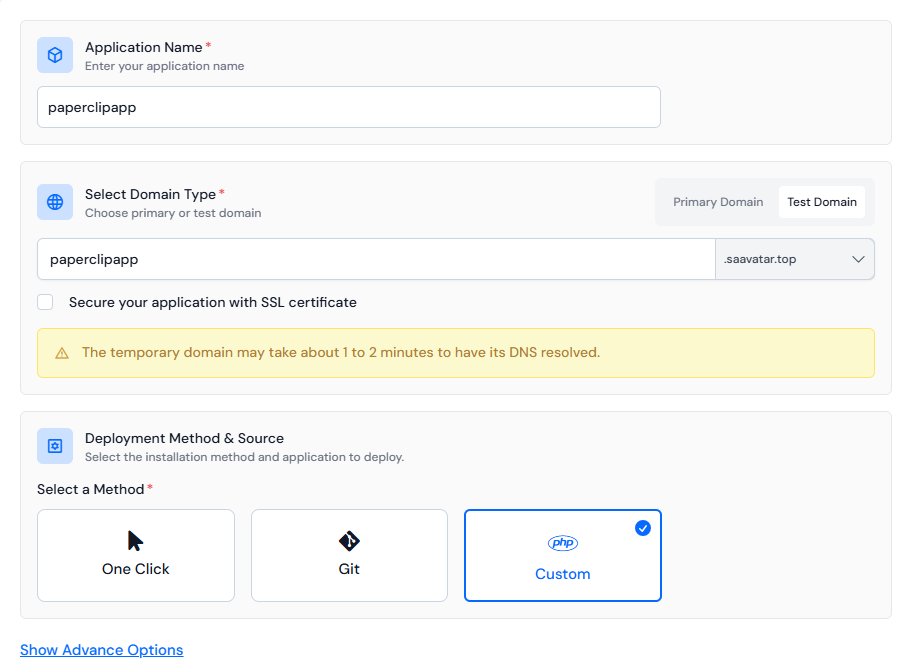
- Enter your application name.
- Select your domain from Primary and Test. ServerAvatar lets you deploy applications on a temporary test domain first, useful for verifying your setup before pointing production traffic at it.
- Enter your domain name.
- Choose Custom PHP Application as the deployment method.
- Click on Show Advance Options. Enter New User and give Username and Password.
- Select your PHP Version as 8.2
- Click on Create Application.
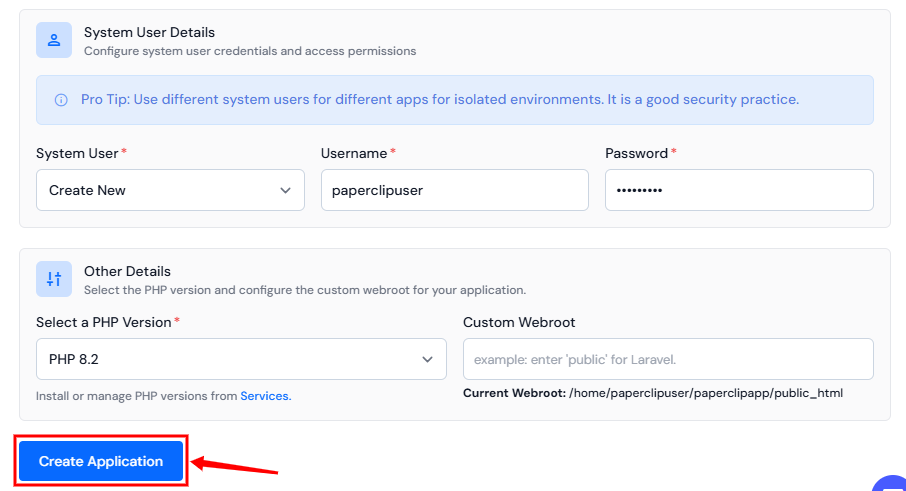
ServerAvatar will create the application structure and set a document root. You’ll deploy Paperclip into this environment. Refer to the custom PHP deployment guide for further details.
Step 3: Enable SSH and Sudo Access for Your Application User
By default, the application user has limited permissions. For Paperclip, you’ll need full SSH and sudo access.
- Go to the Application Users section from the left sidebar. Enable the following toggles:
- SFTP/SSH Access: so you can SSH in as this user
- Sudo Access: so you can install packages and run system-level commands
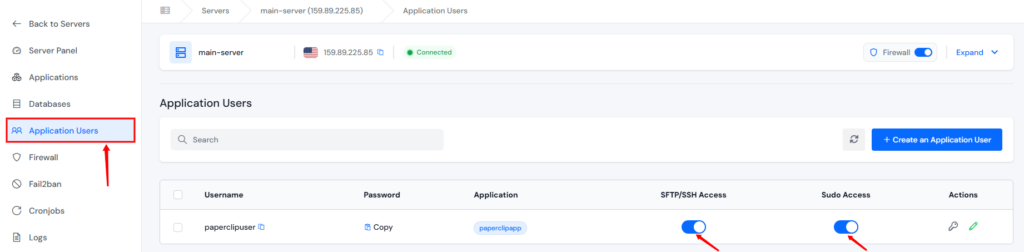
Without sudo access, every apt install command will fail with a permission error, and you’ll be stuck.
Step 4: Install Node.js (If You Skipped It During Server Creation)
If you didn’t enable the Node.js toggle when creating the server, install it now after the server is deployed.
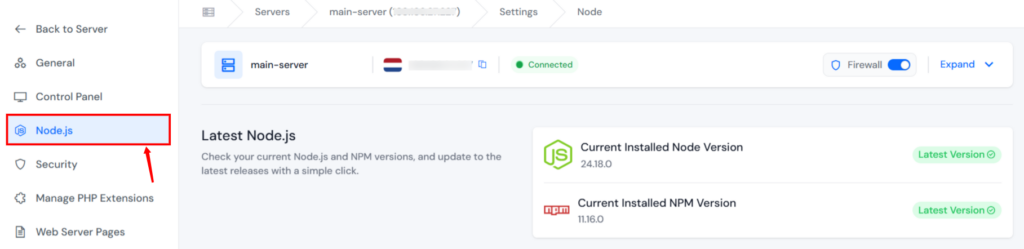
- Navigate to the Settings section from the left sidebar, and click on the Node.js section.
- Click on the Install button to install Node.js; if it is already installed, it shows the installed Node version.
- If you have already installed Node.js while connecting server with ServerAvatar, skip this step.
Step 5: Install SSL Certificate
- Navigate to your application panel by clicking on the dashboard icon next to your application.
- Click on the SSL Certificate section from the left sidebar.
- ServerAvatar provides automatic free SSL with auto-renewal; you can install automatic SSL using the Automatic Installation button.
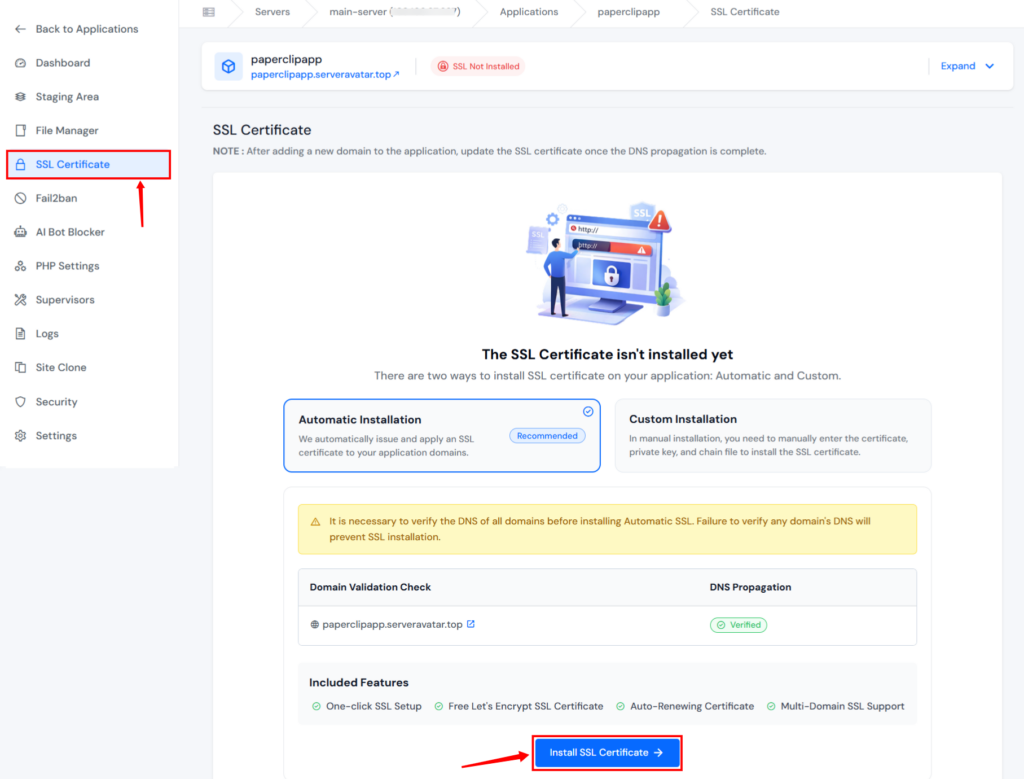
- Enable the toggle button to force HTTP to HTTPS
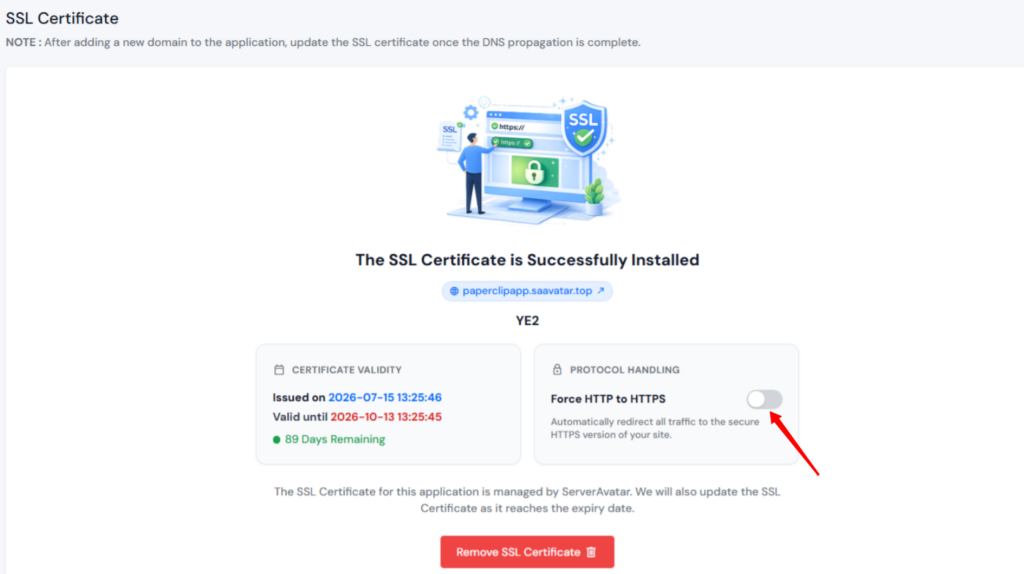
- If you already have an SSL Certificate or if you generated an SSL Certificate from somewhere else, you can add your SSL Certificate using the Custom Installation option.
Step 6: Install PostgreSQL 17
Ubuntu 24.04 ships PostgreSQL 16 by default. Paperclip uses Drizzle ORM, which supports only PostgreSQL, MySQL and MariaDB are not compatible.
- Open Terminal and connect to your server using the application user and password that we set while creating the application.
- Add the official PostgreSQL apt repository
sudo sh -c 'echo "deb http://apt.postgresql.org/pub/repos/apt $(lsb_release -cs)-pgdg main" > /etc/apt/sources.list.d/pgdg.list'
wget -qO- https://www.postgresql.org/media/keys/ACCC4CF8.asc | sudo gpg --dearmor -o /etc/apt/trusted.gpg.d/postgresql.gpg- Install PostgreSQL
sudo apt update
sudo apt install -y postgresql- Start and enable PostgreSQL
<code>sudo systemctl enable --now postgresql</code>- Check the version
<code>psql --version</code>The output should show PostgreSQL version.

Note: If the output shows PostgreSQL 16.x, it usually means your system is using Ubuntu’s default PostgreSQL repository instead of the PostgreSQL (PGDG) repository, or the PGDG repository hasn’t been updated successfully.
Follow these steps to resolve the issue:
- Update the package index
sudo apt update- If you see an error such as “Mirror sync in progress” or “File has unexpected size”, wait 10–30 minutes and run the following commands
sudo apt clean
sudo rm -rf /var/lib/apt/lists/*
sudo apt update- Verify that PostgreSQL 17 is available
apt-cache policy postgresql-17- If a Candidate version is displayed, the repository is working correctly.
- Install PostgreSQL 17
sudo apt install postgresql-17- Confirm the installed version
psql --version- The output should now display PostgreSQL 17.x.
PostgreSQL 17 vs PGlite: Which One to Use?
| Option | Best For | Notes |
|---|---|---|
| PGlite (embedded) | Solo development, evaluation | Single-process, not designed for production workloads |
| PostgreSQL 17 (external) | Production, teams | Full database server with backup and replication support |
Step 7: Create the Paperclip Database and User
Switch to the postgres superuser and create a dedicated database and user for Paperclip
sudo -u postgres psql <<'EOF'
CREATE USER paperclip WITH PASSWORD 'Admin@123';
CREATE DATABASE paperclip OWNER paperclip;
GRANT ALL PRIVILEGES ON DATABASE paperclip TO paperclip;
\q
EOF- Write down your strong password in place of “YourStrongPassword123”. You’ll need it when configuring Paperclip’s connection string. Use a strong, unique password, not the example above.

Step 8: Configure Environment Variables
Paperclip reads its deployment configuration from environment variables. Create an env file that systemd will pass to the Paperclip process:
- Create the file
nano /home/paperclipuser/paperclipapp/public_html/paperclip.env- Add the below-mentioned configuration and save the file
PAPERCLIP_DEPLOYMENT_MODE=authenticated
PAPERCLIP_DEPLOYMENT_EXPOSURE=public
PAPERCLIP_AUTH_PUBLIC_BASE_URL=https://paperclipapp.saavatar.top
PAPERCLIP_ALLOWED_HOSTNAMES=paperclipapp.saavatar.top
DATABASE_URL=postgresql://paperclip:YourStrongPassword123@localhost:5432/paperclip- Set permissions using the commands below
sudo chown paperclipuser:paperclipuser /home/paperclipuser/paperclipapp/public_html/paperclip.env

sudo chmod 600 /home/paperclipuser/paperclipapp/public_html/paperclip.env- Replace “paperclipuser” with your “applicationuser”, “paperclipapp” with your “applicationname”
- Replace the “YourStrongPassword123” with your PostgreSQL password in “DATABASE_URL” field.
- Add your application’s URL in the “PAPERCLIP_AUTH_PUBLIC_BASE_URL”, and “PAPERCLIP_ALLOWED_HOSTNAMES” as mentioned.
Here’s what each variable controls:
| Variable | Value | Purpose |
|---|---|---|
PAPERCLIP_DEPLOYMENT_MODE | authenticated | Login is required, Paperclip isn’t open to everyone |
PAPERCLIP_DEPLOYMENT_EXPOSURE | public | Internet-facing deployment (use private for LAN or Tailscale only) |
PAPERCLIP_AUTH_PUBLIC_BASE_URL | https://paperclip.example.com | Canonical URL for auth redirects, must be set before running the onboard wizard |
PAPERCLIP_ALLOWED_HOSTNAMES | paperclip.example.com | Which hostnames Paperclip accepts |
DATABASE_URL | postgresql://... | Full connection string to PostgreSQL |
Important: If
PAPERCLIP_AUTH_PUBLIC_BASE_URLis not set before the onboard wizard runs, Paperclip will refuse to start in authenticated + public mode with the error:auth.publicBaseUrl is required. Set the env file first, then run the wizard.
Step 9: Initialise Paperclip
Switch to your ServerAvatar application user
sudo -iu paperclipuserGo to application directory
cd /home/paperclipuser/paperclipapp/public_htmlRun Paperclip onboarding
npx paperclipai onboard --yesThis creates a configuration file in the location
/home/paperclipuser/.paperclip/instances/default/config.jsonImportant:
Paperclip stores its configuration in the user’s home directory.
Do not keep the config inside
/home/paperclipuser/paperclipapp/public_html/.paperclipThe correct location is
/home/paperclipuser/.paperclipNote: The exact flags for the onboard command (
--yesfor accepting defaults) are based on the official Paperclip documentation. If you encounter unexpected behavior, runnpx paperclipai onboard --helpto confirm the available options for your version.
The wizard will create an initial configuration using the environment variables from the previous step. You’ll see output similar to:
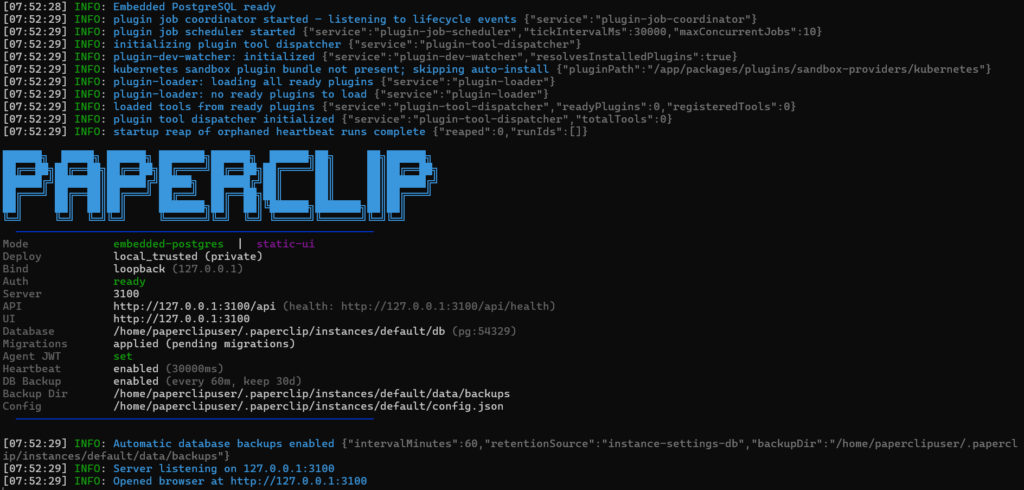
Press Ctrl+C to stop the server. In the next step, we’ll replace the default config with a production-ready one that uses PostgreSQL and enforces authenticated access.
Step 10: Update Paperclip Production Configuration
The onboard wizard generates a config optimized for local development. Update it for production with your PostgreSQL database and strict authentication settings.
Run the command below to edit the configuration file
nano /home/paperclipuser/.paperclip/instances/default/config.jsonReplace the file content with below mentioned configurations. Replace “YourStrongPassword123” with your PostgreSQL password, and add your application URL in “allowedHostnames”, and “publicBaseUrl”
{
  "$meta": {
    "version": 1,
    "updatedAt": "2026-07-14T00:00:00.000Z",
    "source": "configure"
  },
  "database": {
    "mode": "postgres",
    "connectionString": "postgresql://paperclip:YourStrongPassword123@localhost:5432/paperclip",
    "backup": {
      "enabled": true,
      "intervalMinutes": 60,
      "retentionDays": 30,
      "dir": "/home/paperclipuser/.paperclip/instances/default/data/backups"
    }
  },
  "logging": {
    "mode": "file",
    "logDir": "/home/paperclipuser/.paperclip/instances/default/logs"
  },
  "server": {
    "deploymentMode": "authenticated",
    "exposure": "public",
    "bind": "loopback",
    "host": "127.0.0.1",
    "port": 3100,
    "allowedHostnames": [
      "paperclipapp.saavatar.top"
    ],
    "serveUi": true
  },
  "auth": {
    "baseUrlMode": "explicit",
    "publicBaseUrl": "https://paperclipapp.saavatar.top",
    "disableSignUp": false
  },
  "telemetry": {
    "enabled": true
  },
  "storage": {
    "provider": "local_disk",
    "localDisk": {
      "baseDir": "/home/paperclipuser/.paperclip/instances/default/data/storage"
    },
    "s3": {
      "bucket": "paperclip",
      "region": "us-east-1",
      "prefix": "",
      "forcePathStyle": false
    }
  },
  "secrets": {
    "provider": "local_encrypted",
    "strictMode": false,
    "localEncrypted": {
      "keyFilePath": "/home/paperclipuser/.paperclip/instances/default/secrets/master.key"
    }
  }
}Set ownership
chown -R paperclipuser:paperclipuser /home/paperclipuser/.paperclip

chmod -R 700 /home/paperclipuser/.paperclipKey fields and why they matter:
| Field | Value | Why it matters |
|---|---|---|
database.mode | postgres | Switches from embedded PGlite to your real PostgreSQL server |
database.connectionString | postgresql://... | Full path to your PostgreSQL instance |
server.deploymentMode | authenticated | Every user needs to log in, no anonymous access |
server.exposure | public | Internet-facing, not a private LAN deployment |
server.bind | loopback | Only listens on 127.0.0.1, Apache is the only entry point |
server.port | 3100 | Paperclip’s default port |
auth.baseUrlMode | explicit | Uses the explicit publicBaseUrl as the canonical auth URL |
auth.publicBaseUrl | https://paperclip.example.com | The URL your users actually visit |
Step 11: Set Up systemd Service
systemd is what keeps Paperclip running reliably, it auto-starts on boot and restarts the process after crashes.
Create service file
sudo nano /etc/systemd/system/paperclip.serviceAdd mentioned configuration
[Unit]
Description=Paperclip AI Agent Platform
After=network.target postgresql.service

[Service]
Type=simple
User=paperclipuser
Group=paperclipuser
WorkingDirectory=/home/paperclipuser/paperclipapp/public_html
EnvironmentFile=/home/paperclipuser/paperclipapp/public_html/paperclip.env
ExecStart=/usr/bin/npx paperclipai run
Restart=on-failure
RestartSec=5
StandardOutput=journal
StandardError=journal

[Install]
WantedBy=multi-user.targetReload systemd
sudo systemctl daemon-reloadEnable and start
sudo systemctl enable --now paperclipCheck the paperclip application status
sudo systemctl status paperclipExpected
Active: active (running)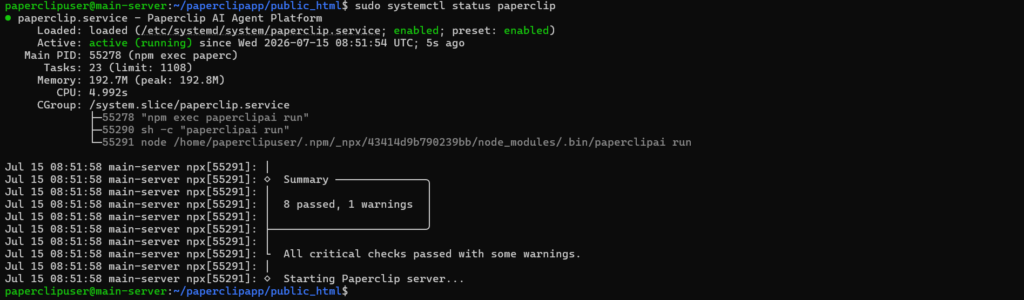
If it fails, something went wrong. Check the logs using below command:
sudo journalctl -u paperclip -n 50 --no-pagerStep 12: Configure Apache as a Reverse Proxy
Now let’s set up Apache. Paperclip is running on localhost port 3100. Apache will accept all public traffic and forward it, handling SSL termination in the process.
Enable Required Apache Modules
sudo a2enmod proxy proxy_http headers proxy_wstunnel rewriteCheck Apache status
sudo apachectl configtestIf apachectl configtest reports a syntax error, fix it before reloading.
Reload apache
sudo systemctl reload apache2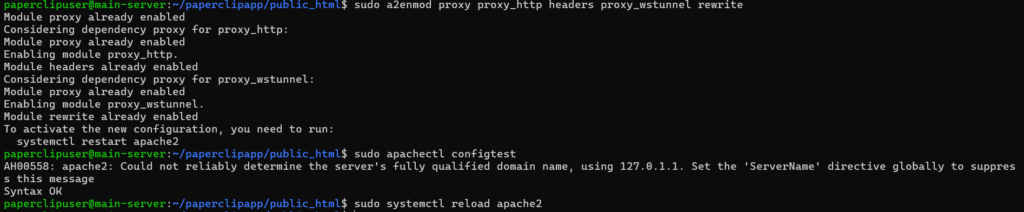
Step 13: Create the HTTPS Virtual Host (Port 443) with SSL
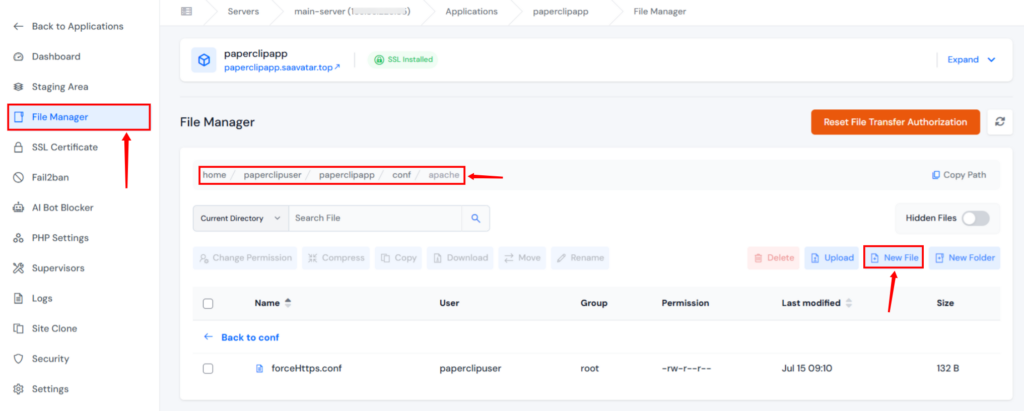
- Navigate to the application panel of your paperclip application in ServerAvatar. Click on the File Manager from the left sidebar.
- Navigate to the “Conf” folder, and then “apache” folder.
- Click on the New File button to create a file.
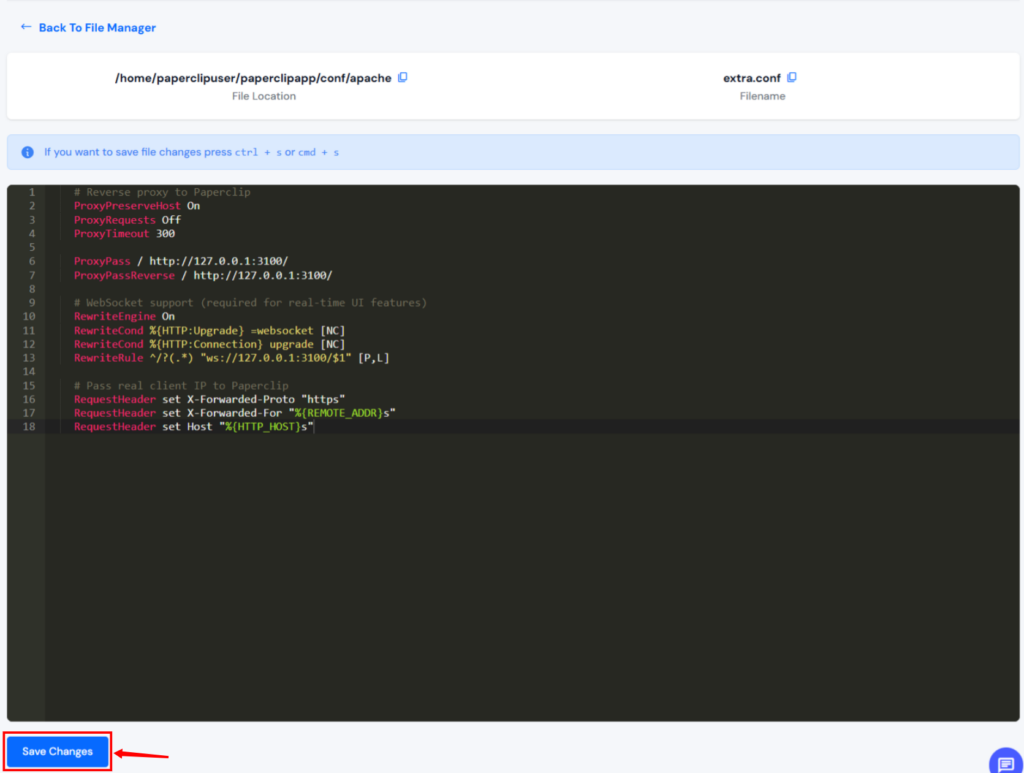
- Enter the file name as “extra.conf”
- Add below mentioned configuration in the file.
    # Reverse proxy to Paperclip
    ProxyPreserveHost On
    ProxyRequests Off
    ProxyTimeout 300

    ProxyPass / http://127.0.0.1:3100/
    ProxyPassReverse / http://127.0.0.1:3100/

    # WebSocket support (required for real-time UI features)
    RewriteEngine On
    RewriteCond %{HTTP:Upgrade} =websocket [NC]
    RewriteCond %{HTTP:Connection} upgrade [NC]
    RewriteRule ^/?(.*) "ws://127.0.0.1:3100/$1" [P,L]

    # Pass real client IP to Paperclip
    RequestHeader set X-Forwarded-Proto "https"
    RequestHeader set X-Forwarded-For "%{REMOTE_ADDR}s"
RequestHeader set Host "%{HTTP_HOST}s"- Click on the Save Changes button.
- Run the mentioned command to test Apache configuration. It will return with “Syntax OK” message.
sudo apachectl configtest
- Reload the Apache service.
sudo systemctl reload apache2Note: If you don’t yet have SSL certificates, you can enable the HTTP vHost first and get certificates later through ServerAvatar’s SSL panel or via certbot. The HTTPS vHost won’t start without valid certificates, but the HTTP redirect will still work.
Step 14: Configure TRUST_PROXY
When Paperclip sits behind a reverse proxy, it needs to trust the X-Forwarded-For header, otherwise, it sees Apache’s IP as the client IP, which breaks rate limiting and authentication.
Add TRUST_PROXY=1 to your environment file
nano /home/paperclipuser/paperclipapp/public_html/paperclip.envAdd the below-mentioned at the end
TRUST_PROXY=1| Value | Meaning |
|---|---|
true | Trust proxy headers unconditionally, safe when only Apache reaches Paperclip |
1 | Trust one proxy hop |
loopback,linklocal | Trust specific source types only |
Restart the service
sudo systemctl restart paperclipStep 15: Create First Admin Account
Paperclip requires an invite link to create the first user.
Let’s generate the admin invite
sudo -iu paperclip

cd /home/paperclipuser/paperclipapp/public_html

npx paperclipai auth bootstrap-ceoNote: The exact command (
bootstrap-ceo) and its behavior are based on the official Paperclip documentation. If the command isn’t recognized in your version, checknpx paperclipai auth --helpfor the correct syntax. Invites are single-use and expire after a set period, generate a new one if the link stops working.
You will see output like
Created bootstrap CEO invite.

Invite URL: https://paperclip.example.com/invite/pcp_bootstrap_...

Expires: 2026-07-15T12:00:00.000Z
Open that URL in your browser and register your admin account.
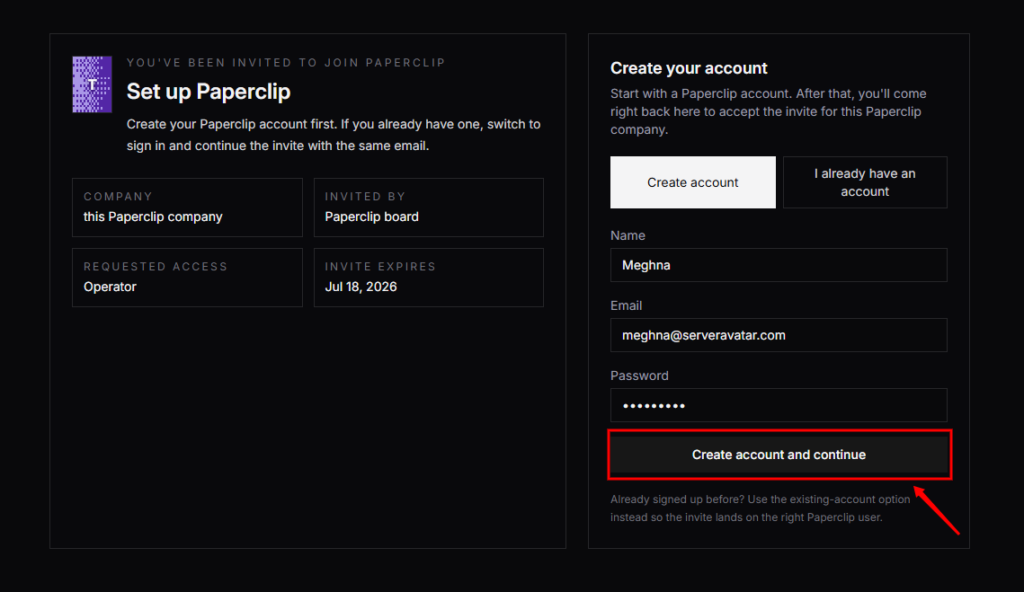
After registration, verify with below command
psql -U paperclip -d paperclip -h localhostRun the below command
SELECT * FROM "user";

SELECT * FROM instance_user_roles;You will see
role = instance_admin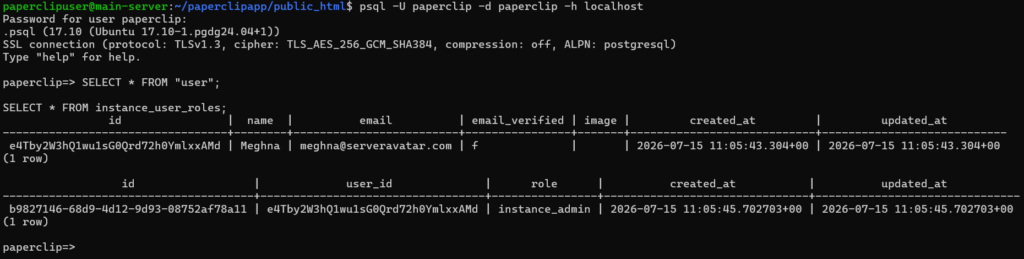
Your Paperclip installation is now production-ready behind ServerAvatar + Apache reverse proxy + PostgreSQL.
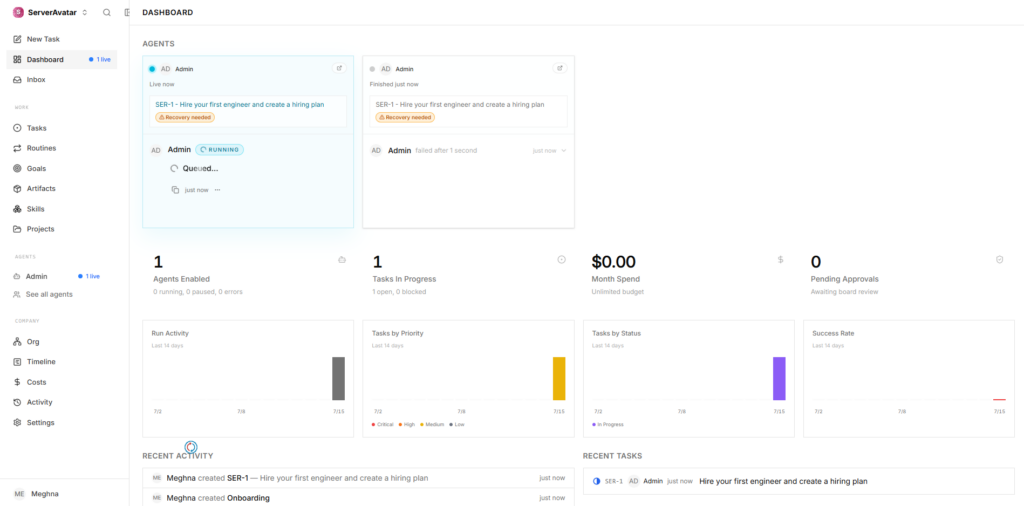
To Verify Everything Works
Run through these checks to confirm every layer is working correctly:
1. Paperclip responds locally
curl -I http://127.0.0.1:3100
# Expected: HTTP/1.1 200 OK2. Apache proxies to Paperclip over HTTPS
curl -Ik https://paperclip.example.com
# Expected: HTTP/2 200 or 307 redirect3. All three services are running
sudo systemctl is-active paperclip   # → active
sudo systemctl is-active apache2    # → active
sudo systemctl is-active postgresql # → active4. PostgreSQL tables were created by migrations
sudo -u postgres psql -h localhost -U paperclip -d paperclip -c "\dt"
# Expected: a list of tables (migrations ran automatically on first startup)All four checks should pass. If Apache returns a 502, double-check that the proxy_http module is enabled and that Paperclip is actually running.
Updating Paperclip
Paperclip releases updates regularly. To update to a new version:
# Update the CLI globally
sudo -iu paperclip
npm install -g paperclipai

# Restart the service
sudo systemctl restart paperclipMigrations run automatically on startup, there’s no manual migration step needed. That said, check the Paperclip GitHub repository release notes before updating in production, particularly around breaking changes to the config schema.
Backup Strategy
Paperclip has a built-in backup feature already configured in your config.json:
"backup": {
    "enabled": true,
    "intervalMinutes": 60,
    "retentionDays": 30,
    "dir": "/home/paperclip/.paperclip/instances/default/data/backups"
}Backups run every hour, are retained for 30 days, and are stored at /home/paperclip/.paperclip/instances/default/data/backups. The built-in backup handles the basics well.
For anything that matters beyond a personal project, layer in additional backup strategies:
- PostgreSQL native dumps: Run
pg_dump paperclip > backup.sqlvia a cron job for point-in-time recovery capability - Off-server copies: Sync the backup directory to remote storage (S3, rsync to another machine), a VPS disk failure wipes local backups just as easily as the data itself
- S3 storage backend: Configure Paperclip’s S3 storage provider in
config.jsonfor durable external storage that survives server-level failures

Common Errors and How to Fix Them
1. “authenticated public deployments require DATABASE_URL”
Cause: The config still has mode: embedded-postgres (the onboard default). Paperclip refuses to use the embedded database for public-facing deployments.
Fix: Update config.json to set database.mode: "postgres" and add your connectionString. Restart Paperclip, migrations run automatically.
2. “auth.publicBaseUrl is required”
Cause: PAPERCLIP_AUTH_PUBLIC_BASE_URL wasn’t set before running the onboard wizard, so Paperclip doesn’t know what URL to redirect to after login.
Fix: In config.json, set auth.baseUrlMode: "explicit" and auth.publicBaseUrl: "https://paperclip.example.com". Restart Paperclip.
3. Server returns 502 via Apache
Cause: Either the proxy_http module isn’t enabled, or Paperclip isn’t running at all.
Fix:
sudo a2enmod proxy_http
sudo systemctl restart apache2
sudo systemctl status paperclipIf Paperclip isn’t running, check logs with sudo journalctl -u paperclip -n 50 --no-pager.
4. Bootstrap invite expired
Cause: Invite links are single-use and expire after a few days.
Fix: Generate a new one:
sudo -iu paperclip
npx paperclipai auth bootstrap-ceo5. Paperclip crashes immediately on start
Cause: Almost always a config validation error or a failed database connection.
Fix: Check the logs:
sudo journalctl -u paperclip -n 50 --no-pagerLook for errors about missing keys, invalid JSON, or connection refused on port 5432.
Service Commands Reference
# Paperclip
sudo systemctl restart paperclip
sudo systemctl stop paperclip
sudo systemctl status paperclip
sudo journalctl -u paperclip -f              # live logs
sudo journalctl -u paperclip -n 50 --no-pager  # last 50 lines

# Apache
sudo systemctl reload apache2
sudo systemctl restart apache2
sudo apachectl configtest                     # validate config before restarting

# PostgreSQL
sudo systemctl restart postgresql
sudo systemctl status postgresql
sudo -u postgres psql                        # interactive SQL shell

# Check which ports are listening
ss -tlnp | grep -E '3100|5432|80|443'File Locations Reference
| File | Path |
|---|---|
| systemd service | /etc/systemd/system/paperclip.service |
| Environment variables | /home/paperclip/paperclip.env |
| Paperclip config | /home/paperclip/.paperclip/instances/default/config.json |
| Secrets master key | /home/paperclip/.paperclip/instances/default/secrets/master.key |
| Paperclip logs | /home/paperclip/.paperclip/instances/default/logs |
| Backups | /home/paperclip/.paperclip/instances/default/data/backups |
| Local storage | /home/paperclip/.paperclip/instances/default/data/storage |
| PostgreSQL data | /var/lib/postgresql/17/main/ |
| Apache HTTP vHost | /etc/apache2/sites-available/paperclip.conf |
| Apache SSL vHost | /etc/apache2/sites-available/paperclip-le-ssl.conf |
| SSL certificates | /etc/letsencrypt/live/paperclip/ |
Uninstalling Paperclip
If you need to tear everything down cleanly:
# Stop and disable the service
sudo systemctl stop paperclip
sudo systemctl disable paperclip
sudo rm /etc/systemd/system/paperclip.service
sudo systemctl daemon-reload

# Drop the database
sudo -u postgres psql -c "DROP DATABASE paperclip;"
sudo -u postgres psql -c "DROP USER paperclip;"

# Remove the Paperclip user
sudo userdel -r paperclip

# Remove Apache configs
sudo a2dissite paperclip.conf
sudo a2dissite paperclip-le-ssl.conf
sudo systemctl reload apache2Conclusion
Deploying Paperclip on your own VPS gives you complete control over your AI agent platform, allowing you to manage data securely while avoiding the limitations of hosted services. With ServerAvatar simplifying server provisioning, SSL management, and application deployment, setting up a production-ready Paperclip instance becomes much more straightforward, even if you’re managing your own infrastructure.
By following this guide, you’ve built a secure and scalable Paperclip deployment powered by PostgreSQL, protected with HTTPS, and configured behind an Apache reverse proxy. As your AI workflows grow, you can confidently maintain, update, and back up your environment while retaining full ownership of your data and deployment. Whether you’re deploying for a personal project or an organization, this self-hosted setup provides a solid foundation for long-term reliability and flexibility.
FAQs
Can I use MySQL or MariaDB instead of PostgreSQL with Paperclip?
No. Paperclip uses Drizzle ORM, which supports only PostgreSQL. MySQL and MariaDB are not compatible with Paperclip’s data layer.
Why does Paperclip bind to localhost instead of all network interfaces?
Paperclip is designed to sit behind a reverse proxy. Binding to 127.0.0.1 means it can’t be reached directly from the internet, all traffic must flow through Apache or another proxy that handles SSL termination. This is a security design, not a limitation.
How do I add more users after setting up the first admin account?
Once your admin account is registered, you can invite additional users from within the Paperclip admin panel. Each invite generates a unique URL that’s single-use and expires after a set period. You can disable public signups entirely by setting disableSignUp: true in config.json.
Does Paperclip support WebSocket connections?
Yes, and they’re required for real-time features in the web UI. The Apache configuration in this guide enables proxy_wstunnel and includes the WebSocket upgrade rewrite rules needed to forward WebSocket connections to Paperclip on port 3100.
How do I migrate from PGlite to PostgreSQL after initial setup?
Update the database section in /home/paperclip/.paperclip/instances/default/config.json, change mode to "postgres" and add your connectionString. Restart Paperclip with sudo systemctl restart paperclip. Migrations run automatically on startup.
Key Takeaways
- Paperclip is an open-source AI agent management platform that runs entirely on your own VPS
- PostgreSQL 17 is required, the embedded PGlite option isn’t suitable for production
- Paperclip listens on
127.0.0.1:3100, Apache handles all public traffic through a reverse proxy, so Paperclip is never directly internet-facing - Environment variables in
/home/paperclip/paperclip.envcontrol deployment mode, auth settings, and the database connection string - The bootstrap invite command (
npx paperclipai auth bootstrap-ceo) creates your first admin account, keep that URL safe and use it promptly - Built-in backups run every hour with 30-day retention; add off-server backups for anything beyond experiments
- ServerAvatar simplifies server provisioning, PHP/Node.js application deployment, and SSL certificate management across major cloud providers
About the Author
Meghna Meghwani is a technical writer focused on Linux, Ubuntu, VPS hosting, server management, WordPress, PHP, Node.js, cloud hosting, and DevOps. She creates beginner-friendly tutorials, practical hosting guides, troubleshooting articles, and server security content designed to help developers and businesses manage applications and servers more efficiently.