
If you have been poking around AWS to host a website or web application, you’ve probably heard of Amazon Lightsail. An Amazon Lightsail Server is AWS’s simplified VPS offering, the short version of EC2 that strips away the most confusing parts while still giving you the reliability of Amazon’s infrastructure.
But here’s the catch: AWS itself isn’t simple. Even with Lightsail being the “easy” entry point, connecting it to a server management panel like ServerAvatar and actually getting a working server takes a few steps. You have to set up IAM permissions, create API credentials, navigate two dashboards, and then figure out what on earth to do during the installation process.
That’s exactly what this guide is for. I have walked through this process a few times, both on Amazon Lightsail and ServerAvatar. The AWS IAM setup is the part that trips most people up. Not because it’s complicated, but because the documentation assumes you already know what IAM is and why you’re creating a separate user instead of using your root account.
Let me walk you through it step-by-step. By the end of this guide, you’ll have a fully configured Amazon Lightsail server managed through ServerAvatar, ready to host your PHP or Node.js application.
TL;DR
| Stage | What to Do |
|---|---|
| Set Up AWS Access | Create an IAM policy that grants the required Amazon Lightsail permissions, then create an IAM user and generate its access keys. |
| Connect AWS to ServerAvatar | Add the generated AWS credentials in ServerAvatar >> Integration >> Cloud Platforms to link your Lightsail account. |
| Deploy Your Server | From the ServerAvatar dashboard, select your AWS account, server name, web server stack, operating system, and preferred region, then start the deployment. |
| Automatic Configuration | ServerAvatar automatically installs and configures the selected server environment, including Nginx, Apache, or OpenLiteSpeed, PHP, PHP-FPM, MySQL, Redis, etc. |
| Ready for Production | The complete setup typically takes around 5–15 minutes, taking you from a newly created Lightsail instance to a configured VPS ready for application deployment. |
What is Amazon Lightsail, and Why Use It with ServerAvatar?
Amazon Lightsail is a simplified cloud hosting service from AWS that makes it easier to launch and manage virtual private servers without dealing with the complexity of a full AWS infrastructure setup. It is well suited for developers, agencies, small businesses, and teams that need a straightforward VPS environment.
Why Choose Amazon Lightsail?
Lightsail provides a simpler way to get started with AWS while still benefiting from its underlying cloud infrastructure.
- Simple VPS deployment: Launch a server with minimal configuration.
- Predictable pricing: Plans include compute, SSD storage, and data transfer.
- Flexible resources: Choose a server size based on your workload.
- AWS infrastructure: Benefit from AWS’s cloud infrastructure and ecosystem.
- Multiple use cases: Suitable for WordPress, PHP applications, APIs, and websites.
Where ServerAvatar Fits In
Lightsail provides the server, but server administration can still require SSH and command-line knowledge. ServerAvatar adds a graphical management layer that simplifies everyday tasks.
With ServerAvatar, you can:
- Deploy and manage multiple websites.
- Install and switch between PHP versions.
- Create and manage databases.
- Configure SSL certificates.
- Manage Nginx, Apache, and OpenLiteSpeed.
- Monitor server performance.
- Manage cron jobs and backups.
- Handle common server tasks from a centralized dashboard.
Why Combine Amazon Lightsail with ServerAvatar?
Using both services brings together the infrastructure capabilities of AWS with a more user-friendly server management experience.
Lightsail provides the VPS and cloud infrastructure. ServerAvatar handles server and website management.
Result: less command-line work and an easier way to manage production websites and applications.
Why Create an IAM User Instead of Using the Root Account?
Using your AWS root account for API access can create unnecessary security risks. The root account has unrestricted access to your AWS environment, so its credentials should be protected and used only when absolutely necessary.
Why Use a Dedicated IAM User?
Create a separate IAM (Identity and Access Management) user for ServerAvatar and grant it only the permissions required to manage your Lightsail resources.
- Limits access: Give the user only the permissions needed for Amazon Lightsail.
- Protects the root account: Avoid exposing root credentials to third-party platforms or applications.
- Reduces security risks: If the IAM credentials are compromised, the potential impact is more limited than exposing root credentials.
- Easy to revoke: You can disable or delete the IAM user’s access without affecting your main AWS account.
- Better team management: Keep ServerAvatar’s credentials separate from those used by other developers or administrators.
- Improves accountability: Dedicated credentials make it easier to identify which access belongs to ServerAvatar.
- Safer third-party integration: ServerAvatar can connect using dedicated credentials instead of your unrestricted AWS root account.
Use the AWS root account for account-level administration, and create a dedicated IAM user with the required Lightsail permissions for ServerAvatar.
How to Connect Amazon Lightsail with ServerAvatar: Step-by-Step Guide
The steps below walk you through the complete process, from creating the IAM user to deploying your Lightsail server through ServerAvatar.
Step 1: Create an IAM Policy on AWS
The first step is to create an IAM policy that defines the permissions ServerAvatar will use to manage your Amazon Lightsail resources.
- Sign in to the AWS Management Console and open the IAM Dashboard.
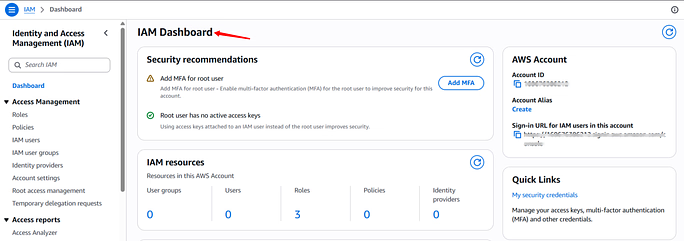
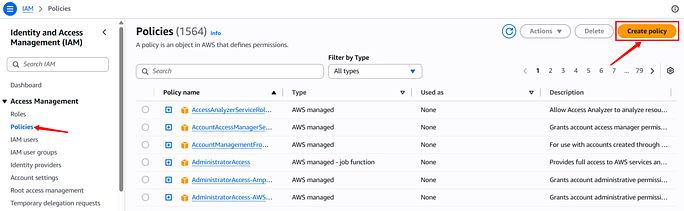
- Select Policies from the left-hand sidebar.
- Click Create policy.
- From the Permission section, select Lightsail as the service.
- Under Actions, choose All Lightsail actions.
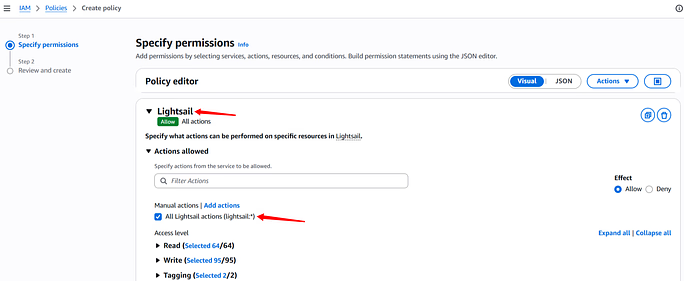
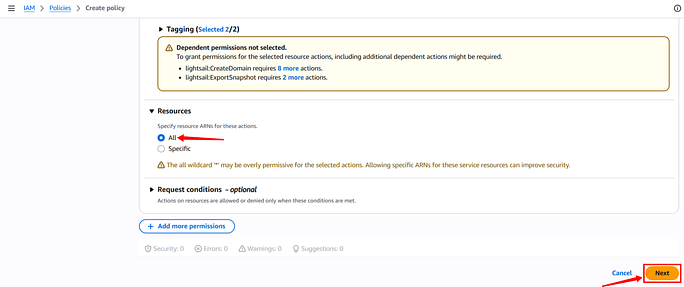
- Under Resources, select All.
- Click the Next button.
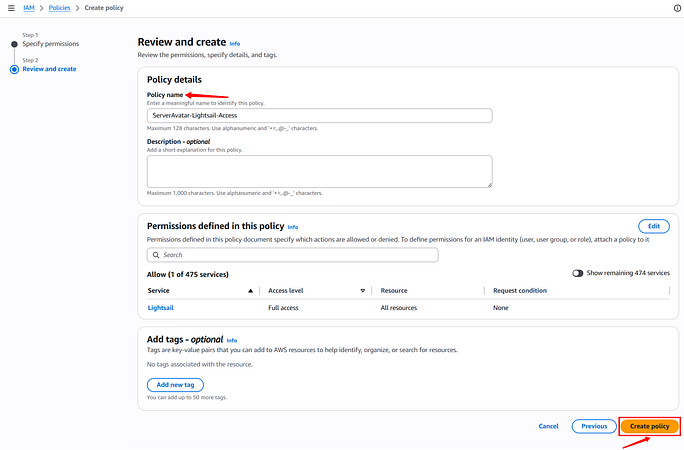
- Continue to the review screen.
- Give the policy a clear name, such as
ServerAvatar-Lightsail-Access - Review the permissions and click Create policy.
Why all Lightsail actions?
ServerAvatar needs different Lightsail permissions during deployment, including creating instances, managing networking, and handling IP-related resources. Restricting permissions too aggressively may cause deployment or management errors.
Step 2: Create an IAM User and Generate Access Keys
After creating the policy, create a dedicated IAM user. This keeps your root account credentials separate and makes the integration easier to manage or revoke later.
Create the IAM User
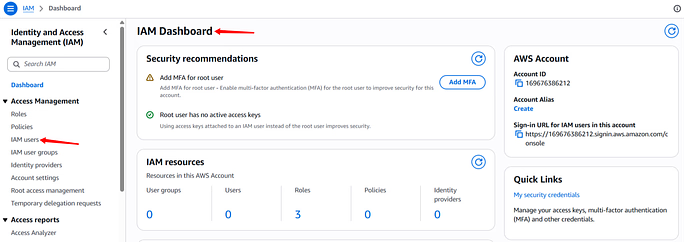
- Open the IAM Dashboard and navigate to the IAM Users section from the left-hand sidebar.
- Click Create user.
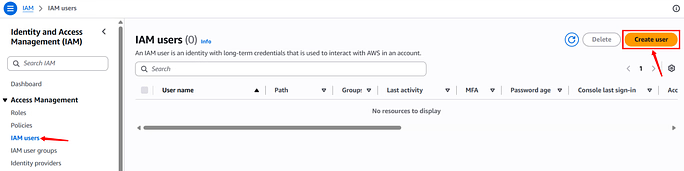
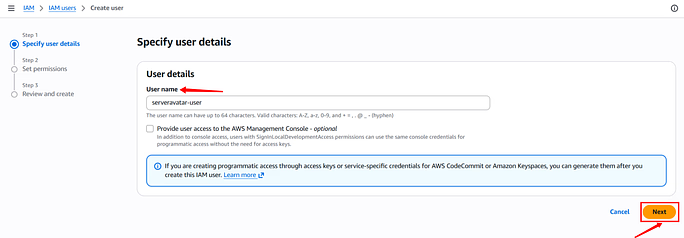
- Enter username, such as
serveravatar-userand click on the Next button.
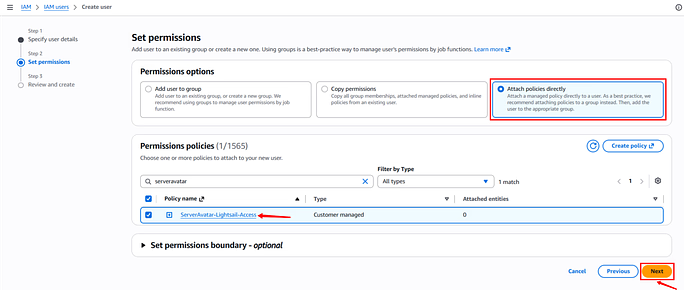
- In the permissions section, select Attach policies directly.
- Find and select the policy that we created before.
- Click on the Next button.
- Review the configuration and click on the Create user button.
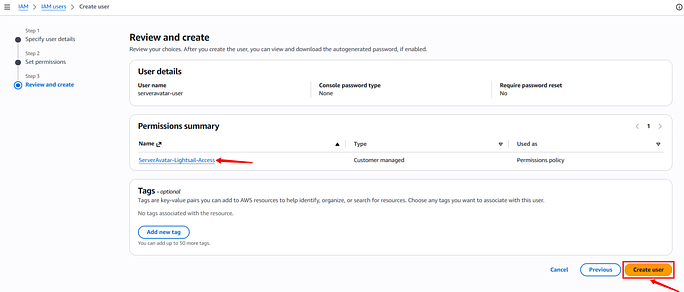
Generate the Access Key
- Once the user has been created, open the newly created IAM user.
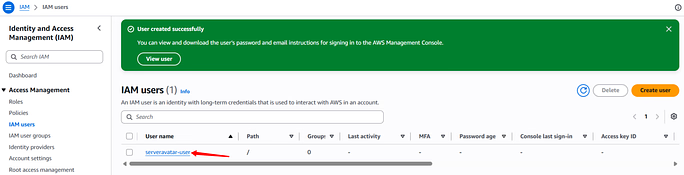
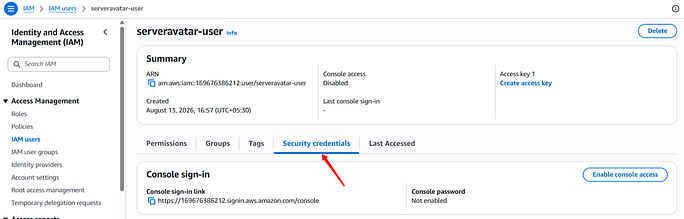
- Go to the Security credentials tab.
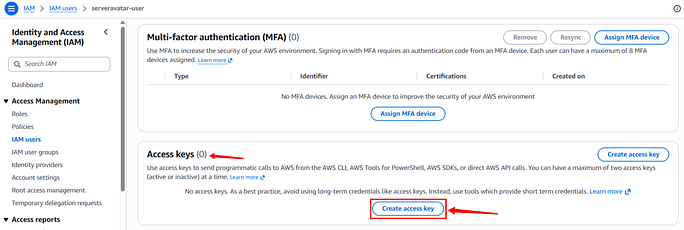
- Find Access keys and click Create access key.
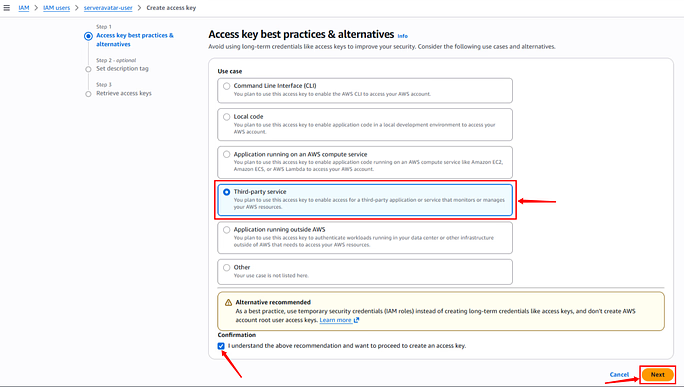
- Select Third-party service as the use case.
- Confirm the required acknowledgment and click on the Next button.
- Add an optional description, such as
ServerAvatar Integration. - Click Create access key.
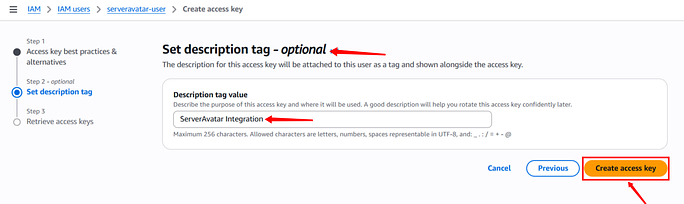
- Save the Access Key ID and Secret Access Key both securely.
- Click on the Done button.
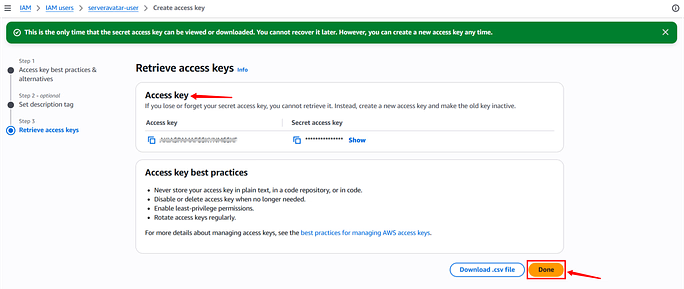
Important: Keep the Secret Access Key secure. AWS displays it when the key is created, so save it in a secure password manager or credential vault. If it is lost, you will need to create a new access key.
Step 3: Connect Amazon Lightsail to ServerAvatar
With your AWS credentials ready, you can now connect the Lightsail account to ServerAvatar.
- Log in to your ServerAvatar dashboard.
- Navigate to the Integration from the sidebar.
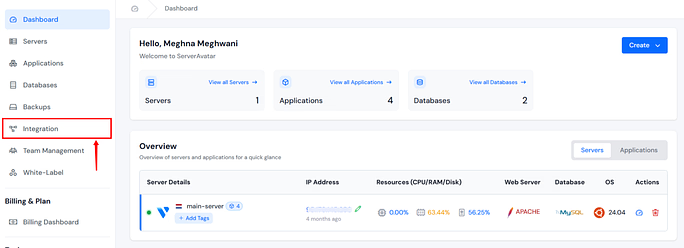
- Go to the Cloud Platforms section.
- Click on the Link Amazon Lightsail button under the Amazon Lightsail section.
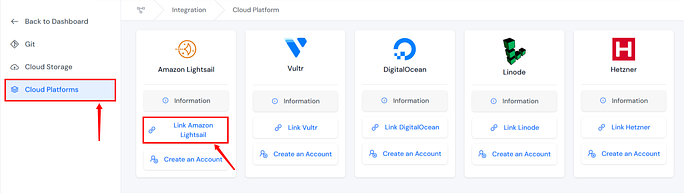
- Enter the Name, Access Key ID, and Secret Access Key
- Click Save.
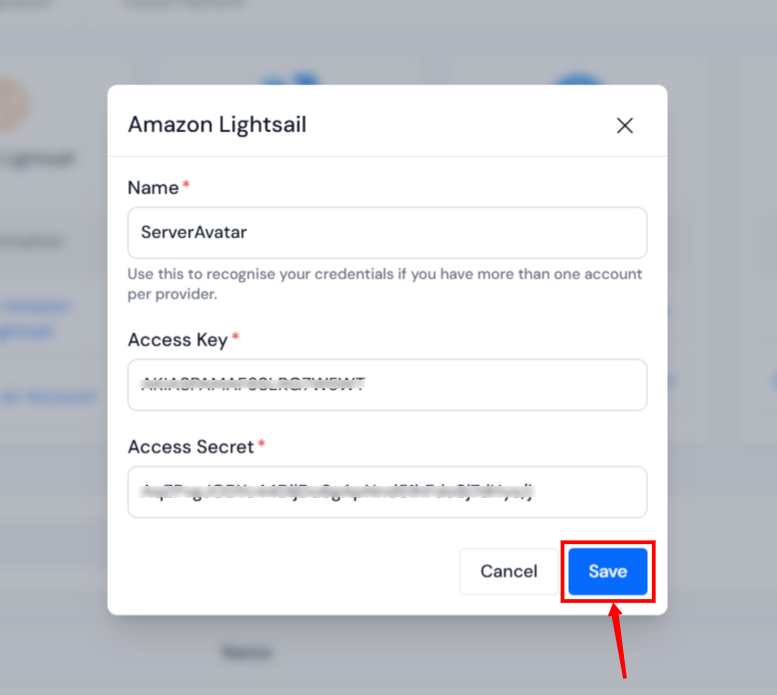
ServerAvatar will verify the credentials and connect your AWS account.
Tip: Use descriptive labels when managing multiple AWS accounts. This makes it easier to select the correct account during deployment.
Step 4: Deploy an Amazon Lightsail Server
Once your AWS account is connected, you can create the Lightsail server directly from ServerAvatar.
Start the Deployment
- In the ServerAvatar dashboard, navigate to the Servers section from the left sidebar.
- Click Create >> Server.
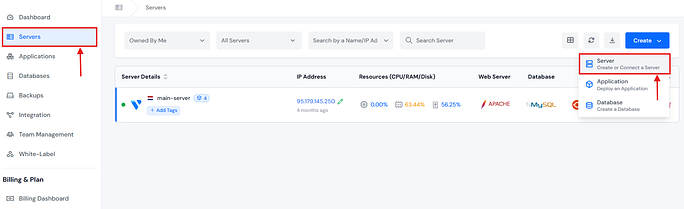
- Select Amazon Lightsail from the Cloud Provider option.
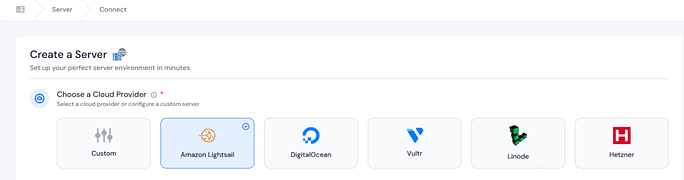
- Select your integrated Amazon Lightsail account and continue to the server configuration.
If your Lightsail account is not already connected, you can use the Link Amazon Lightsail Account option to add it before continuing.
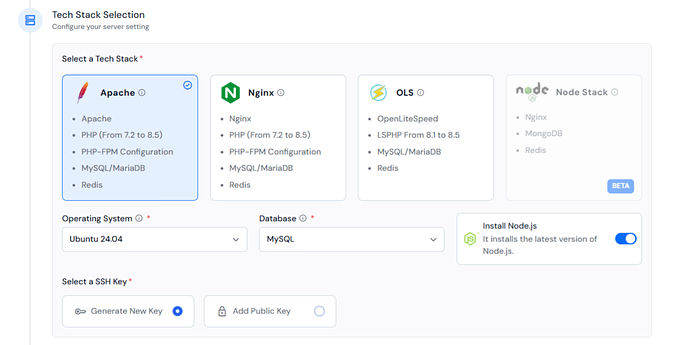
Choose the settings that match your application:
- Server Name: Use a descriptive name that makes the server easy to identify.
- Application Framework: Select the application you want to deploy, and ServerAvatar will suggest the right setup. (optional)
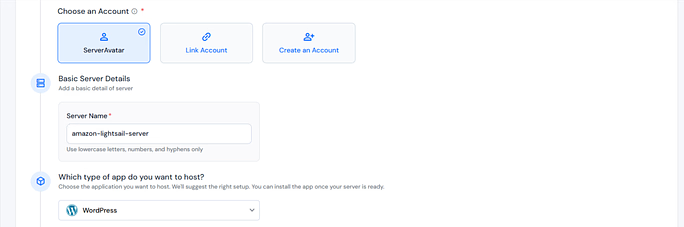
- Tech Stack: Choose Nginx, Apache, or OpenLiteSpeed based on your requirements.
- Operating System: Select one of the available OS images.
- Database: Choose MySQL or MariaDB, or skip database installation if your application does not require one.
- Install Node.js: Enable the Node.js option when your application requires it.
- Install Yarn along with Node: Enable Yarn if your Node.js workflow depends on it. (available in Node Stack only)
ServerAvatar provides options for configuring SSH access:
- Generate a new key: Let ServerAvatar generate an SSH key pair for the server.
- Add a public key: Use an existing SSH public key that you already manage.
If you already maintain SSH keys for your infrastructure, using your existing public key can keep access management centralized.
Select the Server Location and Size
Your Lightsail configuration also determines the server’s performance and network location.
- Region: Select a location close to your primary users to help reduce network latency.
- Server Size: Choose CPU, RAM, storage, and bandwidth based on your application’s expected workload.
- Availability Zone: Select the appropriate zone within your chosen region. For multiple-server environments, distributing workloads can provide additional resilience.
Deploy the Server
After reviewing all settings, click the Deploy Server button.
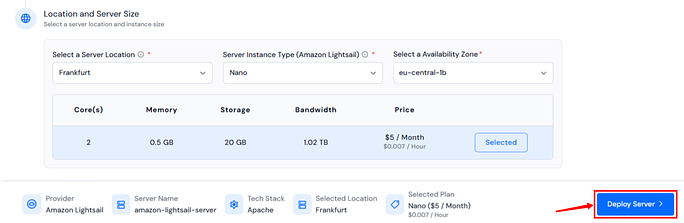
ServerAvatar will communicate with AWS and provision the Lightsail instance. Monitor the installation progress from the deployment screen. Wait for the Installation Complete message.

What ServerAvatar Installs During Deployment
Here’s the part that used to require hours of terminal work, and now happens automatically:
- Web server (Nginx, Apache, or OpenLiteSpeed, depending on your stack selection)
- PHP and all supported versions (7.2 through 8.4)
- PHP-FPM configured and optimized
- MySQL database server
- Redis for object caching
- SWAP memory file (helpful if you run into RAM limits)
- Basic virtual host files ready for your applications
- Git and Composer installed and ready
The entire process typically takes 5 to 15 minutes. You don’t need to do anything, just watch the log and wait for the “Installation Complete” confirmation.
Once done, your server appears in the ServerAvatar dashboard, and you can start creating applications, databases, and SSL certificates from the panel without touching SSH.
Key Takeaways
- Create a dedicated IAM user on AWS with Lightsail permissions, never use your root account for API keys.
- The AWS IAM policy needs all Lightsail actions and all resources selected for full functionality.
- ServerAvatar links to AWS via Integration >> Cloud Platforms, not the server creation wizard.
- During server deployment, you choose the tech stack, OS, database, SSH key, region, and instance size.
- Installation runs automatically and takes 5–15 minutes, Nginx/Apache, PHP, MySQL, Redis, Git, and Composer included.
Conclusion
Setting up an Amazon Lightsail server with ServerAvatar gives you a practical combination of AWS cloud infrastructure and simplified server management. The process starts with creating a dedicated IAM policy and user, connecting your AWS credentials to ServerAvatar, and configuring the server based on your application’s requirements.
Once the deployment begins, ServerAvatar handles much of the server configuration automatically, including the web server, PHP, PHP-FPM, database, Redis, Git, and Composer. In most cases, the setup takes around 5–15 minutes, after which you can manage websites, databases, SSL certificates, and other server tasks through the ServerAvatar dashboard instead of relying entirely on the command line.
FAQs
Why should I use an IAM user instead of the AWS root account?
A dedicated IAM user helps keep your root account credentials protected and allows you to provide ServerAvatar with only the permissions required for Lightsail management.
What permissions does ServerAvatar need for Amazon Lightsail?
The guide uses an IAM policy with All Lightsail actions and All resources selected. These permissions allow ServerAvatar to perform the Lightsail operations required during server deployment and management.
Can I connect my Amazon Lightsail account directly to ServerAvatar?
Yes. After creating the required AWS credentials, you can connect Lightsail from ServerAvatar >> Integration >> Cloud Platforms >> Link Amazon Lightsail by providing the required credentials.
How long does it take to deploy a Lightsail server through ServerAvatar?
The installation typically takes around 5–15 minutes. ServerAvatar automatically configures the selected server environment and displays the installation progress until the setup is complete.
What does ServerAvatar install during the deployment?
Depending on your selected configuration, ServerAvatar can set up Nginx, Apache, or OpenLiteSpeed, PHP, PHP-FPM, MySQL, Redis, SWAP, Git, Composer, and basic virtual host configurations.
About the Author
Meghna Meghwani is a technical writer focused on Linux, Ubuntu, VPS hosting, server management, WordPress, PHP, Node.js, cloud hosting, and DevOps. She creates beginner-friendly tutorials, practical hosting guides, troubleshooting articles, and server security content designed to help developers and businesses manage applications and servers more efficiently.