

Have you ever introduced yourself anywhere with the wrong name? That’s what a wrong hostname feels like to a Linux system. The hostname is like your system’s name tag, it tells the network, administrators, and even some software what your computer is called.
But what if you want to change it?
Maybe you’re renaming a server, organizing your devices, or just want something cooler than “localhost.” Don’t worry, it is easier than you think, and in this guide, we’ll walk you through the steps in very simple way, not in technical gibberish.
What Is a Hostname in Linux?
The hostname is like your computer’s name on a network. It helps users and systems to identify your device. Whether you are setting up a server, working with a Raspberry Pi, or managing devices remotely, a hostname makes things more organized.
Imagine being in a classroom with everyone called “Student.” Confusing, right? That’s what happens when all your machines have the same hostname.
Why Change the Hostname?
There are many reasons you might want to change a hostname:
- Clarity: For example, “web-server-01” is clearer than “ubuntu-machine”.
- Organization: If you’re managing multiple machines, organizing them is the main requirement.
- Branding: For business or client-facing projects, branding is needed.
- Security: Avoid using default hostnames that hackers might recognize.
Temporary vs Permanent Hostname
Let’s say you call your friend “Champ” during a game; however, that’s temporary. But if you legally change your name to “Champ,” that’s permanent.
Linux hostnames work the same way:
- Temporary hostname: Gone after reboot.
- Permanent hostname: Sticks even after restarts.
Check Current Hostname
Before you are going to change anything, let’s find out what your current hostname is.
Let’s open terminal and run the below command:
hostnameOutput:

Or you can use the below command for more details:
hostnamectlOutput:
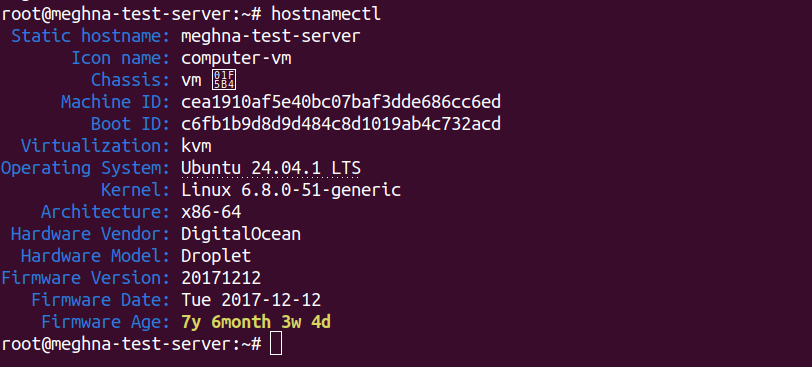
This will show the current hostname along with other system info like kernel and OS.
Change Hostname Using hostnamectl
This is the modern and recommended way to change the hostname on most of the Linux distributions like Ubuntu, Debian, Fedora, CentOS, and RHEL.
sudo hostnamectl set-hostname your-new-hostnameReplace “your-new-hostname” with your desired name that you want to set.
This method will change the hostname for your system permanently and immediately.
Using the ‘hostname’ Command
This is the old method and used if you want to change the hostname temporarily.
sudo hostname your-temporary-hostnameThis will change the hostname, but only until the next reboot. It is basically for testing, but not reliable long-term.
Update /etc/hostname File
This file stores your permanent hostname on older systems or when you are using manual methods.
Steps:
- Open the “hostname” file in a text editor using nano command as given below:
sudo nano /etc/hostname- Replace the existing name with your new hostname.
- Save and exit the file (to exit from file within Nano, press CTRL+X, then Y, then Enter).
Edit /etc/hosts for Compatibility
To make sure that local apps don’t get confused, update the /etc/hosts file too.
sudo nano /etc/hostsFind a line like the below given:
127.0.1.1 old-hostname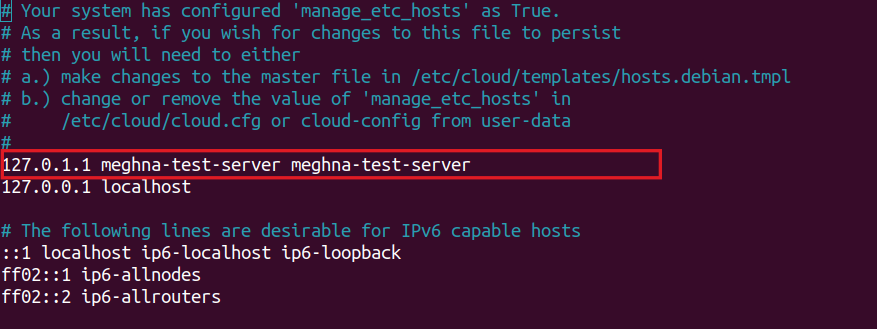
Change it to your new host name as given below:
127.0.1.1 new-hostnameSave and exit the file.
Restart to Apply Changes (If Needed)
If you’ve changed the hostname using the manual method, reboot the system to see the new name take effect.
sudo rebootAfter rebooting your system, run “hostnamectl” again to confirm your changes.
How to Set Hostname During Installation
If you’re installing Linux from scratch such as, Ubuntu, Debian, etc., you usually get the option to name your system.
Choose something meaningful from the start, this can save your time to change the hostname later.
Pro tip: If you’re using ServerAvatar, you can set and manages hostname easily by simple clicks.
Change Hostname using ServerAvatar:
If your server is connected to ServerAvatar, and you are using ServerAvatar to manage your servers. It is super easy and a non-time-consuming process to change the hostname of a server.
In the General Settings section of ServerAvatar, you have several configurable options to customize your server environment to your needs. You have the flexibility to change the host name to your preferred hostname, providing greater flexibility and customization.
Let’s checkout the process step-by-step:
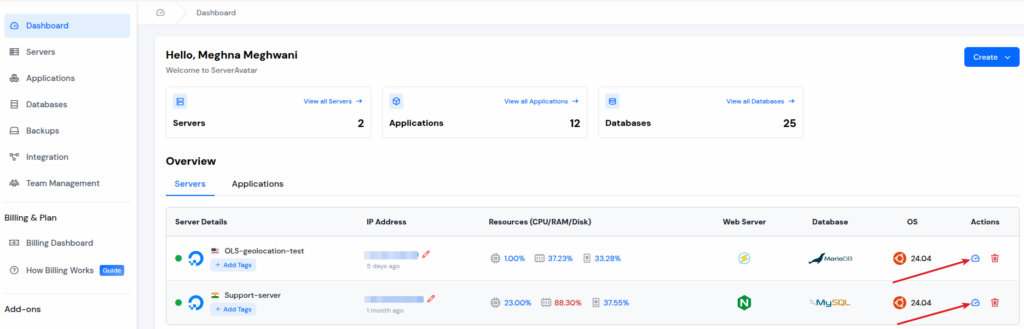
Step 1: Log in to the ServerAvatar Account, and click on the Dashboard button next to the server for which you want to change the hostname for.
Step 2: From the left-hand sidebar of server panel, click on Settings section. You can see the Settings form and the option to change Hostname as shown in the image below.
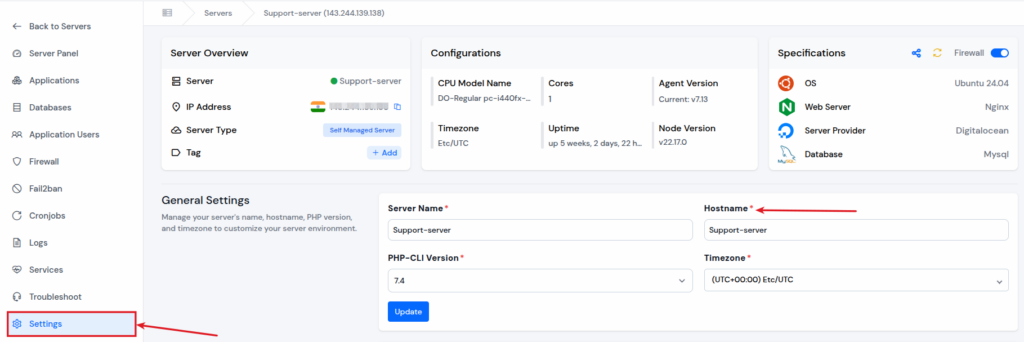
Step 3: Modify and set the Hostname for your server as per your requirements in the General Settings, as per the given image. After making your changes, simply click the Update button to apply the changes.

Best Practices for Setting Hostnames
Here’s a cheat sheet:
- Keep your hostname short and clear
- Use “hyphens” instead of spaces or underscores
- Avoid special characters while setting up hostname
- No uppercase letters, as Linux is case-sensitive
- Good examples: web-01, db-server, backup-node
- Bad examples: My Server, 123!!host

Common Errors and How to Fix Them
1. Error: “hostname: you must be root to change the hostname”
Fix: Use sudo before the command
2. Error: Changes don’t persist after reboot
Fix: Use hostnamectl command or update /etc/hostname file
3. Error: Apps failing after hostname change
Fix: Update /etc/hosts file to reflect the new name
Hostname Rules You Should Know
- Max limit for characters is 63 characters
- Only use letters, numbers, and hyphens
- Must not begin or end with a hyphen
Linux doesn’t stop you from breaking these rules, but your network might.
How ServerAvatar Can Help
If you’re using ServerAvatar, managing hostnames becomes a breeze. ServerAvatar automatically handles:
- Makes the hostname setup easy
- Streamlining server management
- Providing an easy-to-use dashboard
- Managing multiple servers under one dashboard
No need to touch configuration files or command lines manually, just click, type, and save.
If you’re managing multiple cloud servers, ServerAvatar is the smart way to stay organized without getting your hands dirty with command-line stuff.
Conclusion
Changing your Linux hostname isn’t rocket science, it’s more like renaming a folder. Whether you’re doing it for clarity, organization, or branding, Linux gives you the flexibility to make it simple.
Using commands like hostnamectl, or services like ServerAvatar, you can update your system’s hostname in minutes and keep everything tidy and professional.
Frequently Asked Questions (FAQs)
1. Can I change the hostname without restarting Linux?
Yes, using hostnamectl applies changes immediately without needing a reboot.
2. Will changing the hostname break anything?
Not usually, but make sure you update /etc/hosts to prevent local apps from getting confused.
3. How do I know which hostname method my system supports?
Run hostnamectl. If it returns information, your system uses systemd, and hostnamectl is preferred.
4. Is it safe to change the hostname on a server?
Yes, but do it during a maintenance window if it’s a production server as some services may rely on it.
5. What happens if two machines have the same hostname?
It can cause conflicts on the same network. Each hostname should be unique to avoid issues.