Note: This tutorial is for new webmasters who are just getting started. This article will cover everything from the definition of caching to load testing results. You can skip the first section if you already know the meaning of caching.
You know, the internet is growing fast! Google knows about 130 trillion pages on the internet, And it is discovering new pages regularly.
And, around 4.8 billion people are connected with the internet. Each user connected with the internet increases the load on the servers of the websites they are accessing. It is because almost all the websites are now dynamic, it means website stores the data in database and retrieves it whenever the data is needed, It requires CPU and RAM.
So, It is not possible to handle that load if we have to use CPU and RAM to process the same data multiple times.
For example, you published a blog post that went viral. And that page gets more than a thousand pageviews a day. But, as it is a blog post, it is not showing different data every time. It is the same. So, it is not an efficient use of important resources like CPU and RAM to process and display the same data thousands of times.
The solution is Caching! If you are an event blogger or you have a blog with too much traffic, caching can make or break your project. If you are not showing cached data to your users, simply enabling a caching plugin in WordPress will improve the overall performance of the site.
Here are the topics we are going to cover in this guide.
- What is Caching?
- What are the Advantages and Disadvantages of Caching?
- A Simple and Efficient WordPress Caching Setup
- Bonus: Load Testing with Siege
So, Let’s get started with the first topic of this guide.
What is Caching?
When we are talking about caching in WordPress, we are basically talking about full page cache. It makes sense when it comes to blogs.
A page cache is a static HTML page with static content generated when a specific page was loaded for the first time. As your server has to return the same content for the same request, it will simply return a static HTML page from the cache.
Let’s say you just published a blog post. When it receives the first request on that URL, the web browser on the server (Apache or Nginx) will send requests to the PHP processor to process PHP files, and PHP will run MySQL queries to get required data from the database.
Once the page is rendered, it is stored in the storage with the expiry time. After that time, the cache is expired and it is no longer served to the visitors. After the cache expires, it will generate a new cached page and store it in the cache storage.
It saves multiple requests to the PHP processor. It means fewer MySQL queries. Both PHP and MySQL requires comparatively more resources to work as they have CPU and RAM sensitive tasks. Now as both of them has less load due to cache, the available resources can be used to serve more requests.
As a web server has more resources to serve requests, it will result in a server being able to handle lots and lots of requests at once. So, this is how caching works!
Now, let us see the advantages and disadvantages of Caching. The disadvantages of caching are actually easy to handle. Let’s see how.
Advantages and Disadvantages of Caching
Till now, you learned that caching is a pre-generated data that we can serve multiple times without processing the page each and every time. Let’s start with the most important drawback of Caching.
Disadvantage 1: As the cached data has an expiry date, Your website will serve the cached data until the cache is expired. Let’s say you have set 1 hour cache expiry time for page cache on your WordPress. The cached page was generated 10 minutes ago when you published your blog post. Now, you want to update your article but you still have 50 minutes left before the cache expires and the new cache is generated. The solution is simple, just click on the Clear Cache option that every WordPress plugins provide.
Disadvantage 2: Caching is complex. As we are discussing the general caching topic, this drawback is important to mention. As you are using WordPress, you do not have anything to do with this drawback. Basically, caching is complex because it also includes the logic that makes sure that the data is not too old nor it is processed hundreds of times. It increases the complexity of the caching system as well as the code to properly maintain it.
The second drawback is not even present if you are using WordPress. It is because WordPress plugins provide in-built features like Clear cache on update or Clear cache on publish or Clear cache every X minutes. So, WordPress users are lucky when it comes to cache setup.
So, Let’s discuss the advantages of the cache in brief. And then we will see how to set up a simple and efficient caching system on WordPress. It will work best if you have a blog.
Advantage 1: It improves the overall performance of the website. Not only we can handle too much traffic by setting up a caching system, but it also increases the speed of the site. It is because if the cache is present, your server won’t have to process the data again which takes time. It will directly serve the cache which saves time.
There are other advantages like serving more requests with less resources and reusing the same data to serve the same requests. All these advantages originate from the one major advantage mentioned above. That’s what we want to achieve with caching. Now, let’s see how to set up a simple caching plugin on WordPress.
A Simple and Efficient WordPress Caching plugin Setup
In this section, I will show you how to install and configure a simple WordPress caching plugin. It will instantly improve the overall performance of your site even if you have too much load on the server right now.
First of all, log in to the admin panel of your WordPress site. Then, click on the Plugins -> Add New option. If you are using ServerAvatar, follow this tutorial to learn how to install WordPress on your VPS.
On the Add plugins page, you will see a search field. Enter WP Fastest Cache and install the plugin highlighted in the following screenshot.

After installing the plugin, click on the Activate button that you will see on the same card after the plugin installation is complete.
Why Use WP Fastest Cache? If you want, you can also use other popular caching plugins like W3 total cache and WP super cache but those plugins are a little bit complex. If you are configuring the caching system for the first time on your blog, you should go with the simple plugins like the one we are using in this guide. It is powerful as well as easy to use. And at the same time, it also provides important and meaningful features in the free version too!
Once the plugin is activated, WordPress will redirect you to the list of active plugins on your site. But, you will see a new option in the left sidebar of the admin panel with the WP Fastest Cache label. Click on it to navigate to the cache configuration page.
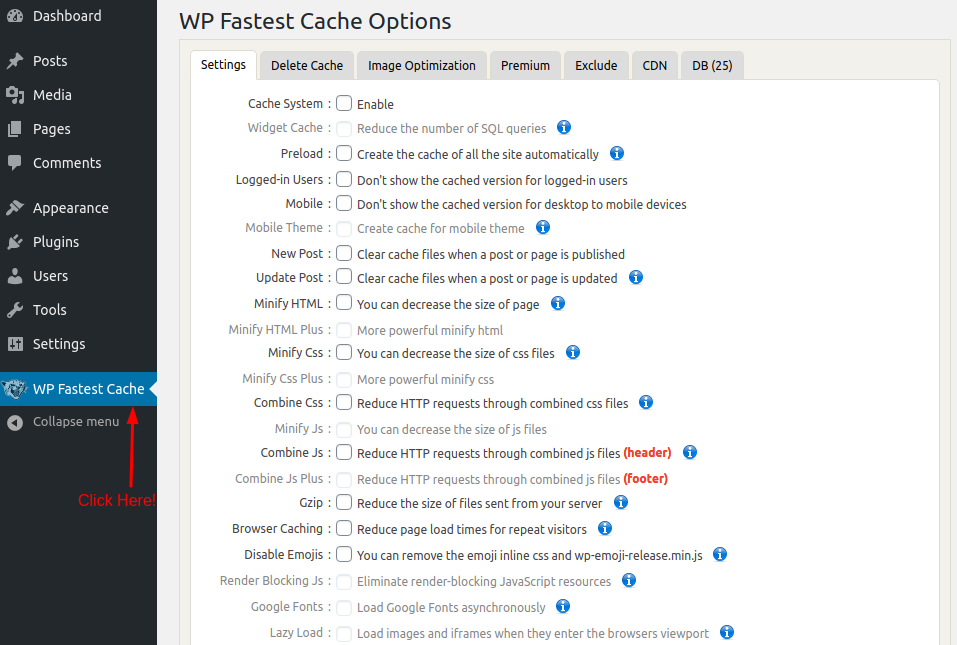
Now, you will see a form just like the above given image. To enable caching, Just select the first checkbox with label Cache System. After that there are many options that allows us to manage the behaviour of caching system.
Let’s understand all the options given in the list in detail. The options with light text are only available in the premium version of this plugin, but I will still explain what they do.
- Preload: Preload is simply an auto-caching thing. It will automatically create a cache of the specified pages after some time interval. You can set any time from 1 minute to 1 hour. It will keep creating a new cache after every X minutes so that users will always see the cached page.
- Logged-in Users: If you do not want to see cached data when you are logged in as an Admin, you can check this checkbox. It is not a good idea to enable cache while you are updating your WordPress site as it will not show the updated page.
- Mobile: Checking this checkbox will make sure that the cached data of a desktop website is not displayed on mobile phones. Check this checkbox if you use different CSS and Javascript for mobile devices.
- Mobile Theme: Enabling this option will allow WordPress to create a separate cache for mobile devices. It will improve the speed and performance of your site on mobile devices.
- New Post: This option is important. It is because whenever you publish a new post, you have to clear the currently cached data so that WordPress can fetch new data from the database that contains your new post. Check this option if you want to automatically clear all the cached data whenever a new post is published. It will show you a pop-up menu that will further allow you to control the cache to be deleted when a new article is published.
- Update Post: This option is the same as the previous one. The only difference is, this one will trigger when a post is updated in your WordPress site.
- Minify HTML: Normally an HTML file contains too much white space that allows a developer to understand the code. But the white space and line breaks are not required to run the website. Eliminating white space allows us to make the page size smaller which results in an improved speed.
- Minify HTML Plus: It is a powerful HTML minifier that is available in the premium version only.
- Minify CSS: Just like HTML files, a typical CSS file also contains white space for formatting. Similar to HTML, formatting is not required to use a file. So, we can decrease the size of CSS files to improve transfer speed.
- Minify CSS Plus: Similar to Minify HTML Plus, this option will extra compress your CSS files but this option is only available in the premium version. But a simple Minifier available in the free version is good enough.
- Combine CSS: If you have multiple CSS files in your page, it is good to combine them so that you can load all the CSS files with just a single request. Every request that goes to the server increases the load time. So, combining the CSS files in one file is good for speed and your server too.
- Minify JS: Just like HTML and CSS, we can minify Javascript files too. Check this option if you want to minify your Javascript files too.
- Combine JS: We can combine multiple javascript files to save some requests. Combining Javascript and CSS files is a good way to speed up your site.
- Combine JS Plus: It is available in premium version and it is the advanced Javascript combine option.
- Gzip: Gzip is a method to compress files to transfer them fast on the network. Enabling Gzip will speed up your site a bit because the file transfers from Server to your browsers are comparatively smaller than non-gzip compression.
- Browser Caching: Have you ever seen the phrase
Leverage browser caching? If so, just enable the Browser caching option to create caching configuration for browsers. It will speed up the site for regular visitors a lot! - Disable Emojis: You should check this option if you do not use Emojis like 😀 frequently on your blog posts. Disabling this option will decrease one javascript file from the main HTML page of the site. It means that disabling this option will save one request to the server per pageview. But, it will not show Emojis. So, If you are using Emojis in WordPress, do not check this option.
- Render Blocking JS: You can either Load javascript files in the head tag or you can load them at before the end of the body tag. Sometimes these javascript files take some time to load. And if they are getting loaded before some content is rendered on the site, it is bad. Check this option to eliminate Render blocking javascript files from your site.
- Lazy Load: Lazy Load is a great concept. Let’s say you have 10 images on the blog post. If all of them are loaded at once, it will take time for a complete page to load. Instead of that, You can use Lazy load. It will load images only when they enter the browser viewport. After enabling Lazy Load, your visitors will feel the improvement in the speed of your site as the browser does not have to load all the image files at once.
And here is the configuration of a typical WordPress website for caching.

Finally, After selecting the options you want to enable, click on the Submit button given at the bottom of the form to save changes.
This configuration alone does the 80% work to optimise your WordPress site. It is important to understand the option available to us more than going after the speed. If you understand the concepts of caching, you can easily optimise any WordPress site.
Now, Let’s see how much difference a single WordPress Caching Plugin can make.
I was going to create a dedicated section to load test the WordPress site with and without a caching plugin. But I realised we already have a similar article with similar test on ServerAvatar blog.
Click on the following link to navigate to that article.
Top 5 Caching Plugins Compared Under the load of 300 Concurrent Visitors
Conclusion: So, caching is important in WordPress if you are planning to get a flood of visitors on your site. This method is the simplest one. If you understand WordPress caching in detail, you can go with more complex and sophisticated plugins like W3 Total Cache or WP Super cache. Otherwise, this set up is enough for any WordPress site.
If you have any questions or queries regarding caching or this article, please let us know in the comment section given below!