

Introduction to Sitemaps
Imagine your website is a house, and a sitemap is the blueprint. It tells search engines exactly where to go, what each room (page) is for, and how everything is connected. Simple, right?
A sitemap is essentially a list of all the important URLs on your website. It helps search engines crawl your site more efficiently, which means better visibility in search results.
Why Your Next.js Website Needs a Sitemap
Let’s be honest – if Google can’t find your pages, neither can your customers. Without a sitemap, your amazing blog posts, product pages, or service descriptions could be floating around in internet limbo.
Benefits of a sitemap in Next.js:
- Better search engine indexing
- Easier discovery of dynamic pages
- Improved SEO performance
If you want to boost your Next.js site’s SEO, a sitemap is not optional – it’s essential.
Understanding the Sitemap Structure
A standard sitemap is just an XML file. Yes, the same format used since the dawn of the internet. Here’s a simple version:
<urlset xmlns="http://www.sitemaps.org/schemas/sitemap/0.9">
  <url>
    <loc>https://example.com/</loc>
    <lastmod>2025-07-21</lastmod>
    <changefreq>daily</changefreq>
    <priority>1.0</priority>
  </url>
</urlset>Each <url> tag contains:
- loc: the actual URL
- lastmod: last modification date
- changefreq: how often the page changes
- priority: importance of the page (0.0 to 1.0)
Static vs Dynamic Sitemaps
Let’s break this down:
- Static Sitemap: Fixed pages like About, Contact, etc.
- Dynamic Sitemap: Pages generated from content (e.g., blog posts, product listings)
If you’re using Next.js’s dynamic routing, you’ll likely need a dynamic sitemap.
Choosing the Right Method in Next.js
You have two main options to create a sitemap in Next.js:
- Using a ready-made package (like next-sitemap)
- Creating your own custom sitemap
If you’re just starting, the first option is much easier. But for full control, the manual method is also worth exploring.
Using a Package: Next-Sitemap
The easiest and most popular way is by using the next-sitemap package. It’s like hiring a tour guide for Google – showing it around your site without you doing all the talking.
Why use next-sitemap?
- Simple configuration
- Supports dynamic and static routes
- Auto-generates
robots.txt
To install:
npm install next-sitemapOr if you’re using Yarn:
yarn add next-sitemapStep-by-Step Setup with Next-Sitemap
Here’s how to get it up and running:
- Create a
next-sitemap.config.jsin your project root:
/** @type {import('next-sitemap').IConfig} */
module.exports = {
  siteUrl: 'https://yourdomain.com',
  generateRobotsTxt: true,
  changefreq: 'daily',
  priority: 0.7,
  sitemapSize: 5000,
};- Update
package.jsonwith a build script:
"scripts": {
  "postbuild": "next-sitemap"
}- Build your project:
npm run buildThat’s it! Your sitemap is now generated under the public/ folder.
Creating a Custom Sitemap Manually
Feeling adventurous? Here’s how to build your own:
- Create a new API route at
pages/api/sitemap.js. - Fetch all your dynamic routes (e.g., blog posts).
- Generate XML content.
- Set headers and return the XML response.
export default async function handler(req, res) {
  const baseUrl = 'https://yourdomain.com';
  const paths = ['/', '/about', '/contact'];

  const sitemap = `<?xml version="1.0" encoding="UTF-8"?>
  <urlset xmlns="http://www.sitemaps.org/schemas/sitemap/0.9">
    ${paths
      .map(path => `<url><loc>${baseUrl}${path}</loc></url>`)
      .join('')}
  </urlset>`;

  res.setHeader('Content-Type', 'text/xml');
  res.write(sitemap);
  res.end();
}Adding Dynamic Routes to Your Sitemap
If your blog or app has dynamic content, like user profiles or product pages, fetch these from your database or CMS:
const dynamicRoutes = await fetchPosts(); // Assume this fetches blog slugs
const urls = dynamicRoutes.map(post => `/blog/${post.slug}`);Include them in your sitemap just like the static ones.
Automating Sitemap Generation
You don’t want to regenerate your sitemap manually every time you add a new page. Use next-sitemap or a custom build script that runs after deployment.
Tip: Use GitHub Actions or Vercel’s post-build hook to auto-generate your sitemap on deployment.

Adding the Sitemap to robots.txt
If you’re serious about SEO, your robots.txt should point to your sitemap:
User-agent: *
Allow: /

Sitemap: https://yourdomain.com/sitemap.xmlIf you’re using next-sitemap, it handles this automatically.
Not sure how to create or edit your robots.txt file? Don’t worry – we’ve got you covered. Check out the free and easy-to-use Robots.txt Generator by ServerAvatar. It helps you create a valid file in seconds, even if you’re not a techie.
Submitting Your Sitemap to Google
Go to Google Search Console -> Select your property -> Sitemaps -> Add your sitemap URL (sitemap.xml) -> Submit.
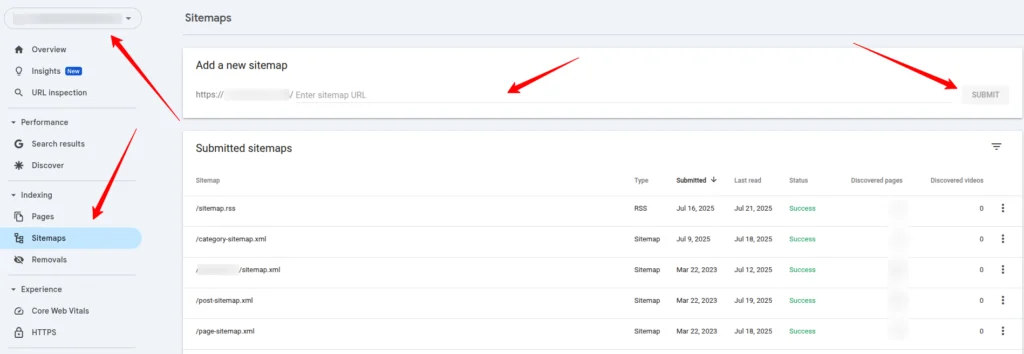
Boom! Google is now officially invited to crawl your site.
Common Mistakes and How to Avoid Them
- Forgetting to update your sitemap after adding new pages
- Incorrect URL formatting
- Missing trailing slashes (if your site uses them)
- Sitemap too large (split into multiple if over 50,000 URLs)
Always test your sitemap using Google’s Sitemap Validator.
Tips for Keeping Your Sitemap Updated
- Use
getStaticPathsorgetServerSidePropsto fetch routes dynamically - Schedule regular rebuilds (weekly or daily)
- Use timestamps in your sitemap to indicate updates
- Remove deleted pages from your sitemap
Think of your sitemap like a daily planner – keep it updated for best results.
Conclusion and Best Practices
Creating a nextjs sitemap doesn’t have to be complicated. Whether you’re building a personal blog or an eCommerce store, a sitemap is your direct line to Google and other search engines.
Here’s a quick recap:
- Use next-sitemap for a hassle-free setup
- Build it manually if you need full control
- Always include dynamic routes
- Submit to search engines and monitor performance
- Keep it updated as your site grows
Remember, your sitemap is like rolling out a red carpet for search engines. Make it smooth, clean, and welcoming.
Frequently Asked Questions
Can I use next-sitemap with dynamic routes in Next.js?
Yes! next-sitemap automatically includes dynamic routes if you configure your project correctly and use getStaticPaths.
Do I need to submit my sitemap manually to Google?
You can, but it’s also detected through robots.txt if configured properly. Submitting manually gives you quicker feedback.
How often should I update my sitemap?
Whenever you add or remove significant content – blogs, products, pages – it’s a good idea to regenerate it.
Is it okay to have multiple sitemaps?
Absolutely. If your site has over 50,000 URLs, you should split them into multiple sitemaps and reference them in a sitemap index.
Can I use next-sitemap on a Vercel-hosted Next.js site?
Yes, and it works great! Just make sure to set up your build and deployment scripts correctly.
Stop Wasting Time on Servers. Start Building Instead.
You didn’t start your project to babysit servers. Let ServerAvatar handle deployment, monitoring, and backups — so you can focus on growth.
Deploy WordPress, Laravel, N8N, and more in minutes. No DevOps required. No command line. No stress.
🚀 Try ServerAvatar Free – No Credit Card NeededTrusted by 10,000+ developers and growing.