Are you looking for a free web tool that helps you securely manage and store all your files and photos effortlessly? Then you came to the right place.
Nextcloud makes it easy for you to sync, share, and collaborate on your files. Unlike Google Drive and other storage provider tools, Nextcloud empowers you to control and flow data directly from your server on your own infrastructure.
As a system admin, you have total control over all the files. Any change from your side will flow across the other using desktop sync clients.
What is Nextcloud files?
Nextcloud files is a safe home for all your essential data. It’s an open-source tool that allows you to sync, share, and manage all the files from one place.
As Nextcloud is a self-hosted software, you can control all your data without any third-party resources and with an end-to-end encrypted technique. You can use built-in rule-based file access control to manage your user’s/employees file data single-handedly.
Nextcloud provides convenient apps to integrate to boost productivity, including Drive, SharePoint, NFS, Object Storage, and many more.
Key Features
- Ideal Collaboration: increase your team productivity by using an easy-to-use interface. You can use several features to make a strong connection with your users.
- Advanced Workspace: Nextcloud enables you and your users to embed text above a folder view so you/users can easily describe what the folder is about and what information the folder contains.
- Lock Files: The file locking feature helps prevent conflicts with users/employees trying to edit the same file simultaneously. Once the file is locked, it can only be operational once the admin thinks to unlock it.
- Advanced Search Results: on the top right of the Nextcloud admin screen, you can effortlessly search the content of the Nextcloud. You can also install other search results to find GitHub issues, Jira tickets, and additional information about Nextcloud.
- Secure File Exchange: Files can be exchanged via a multi-layer encryption technique. Nextcloud uses standard SSL/TLS(Transport Security Layer) encryption for data in transfer.
- Workflow Management: A system administrator can control the flow of data, file permission, user group, and request type to dany, access, retain, or delete the process.
Install and Set up Nextcloud on Ubuntu server
Installing Nextcloud on a server is a straightforward process. Connect your server with ServerAvatar and leave the rest to ServerAvatar.
You can connect a fresh Ubuntu 18.04, 20.04, or 22.04 server with ServerAvatar. It enables you to connect and manage VPS//VM/Cloud Instance/Dedicated or Bare Metal servers. You can also create and manage applications within the server with an easy user interface.
ServerAvatar new users can use a $5 free credit for a quick start. And if you are new to server side, you can also use free credit from server providers.
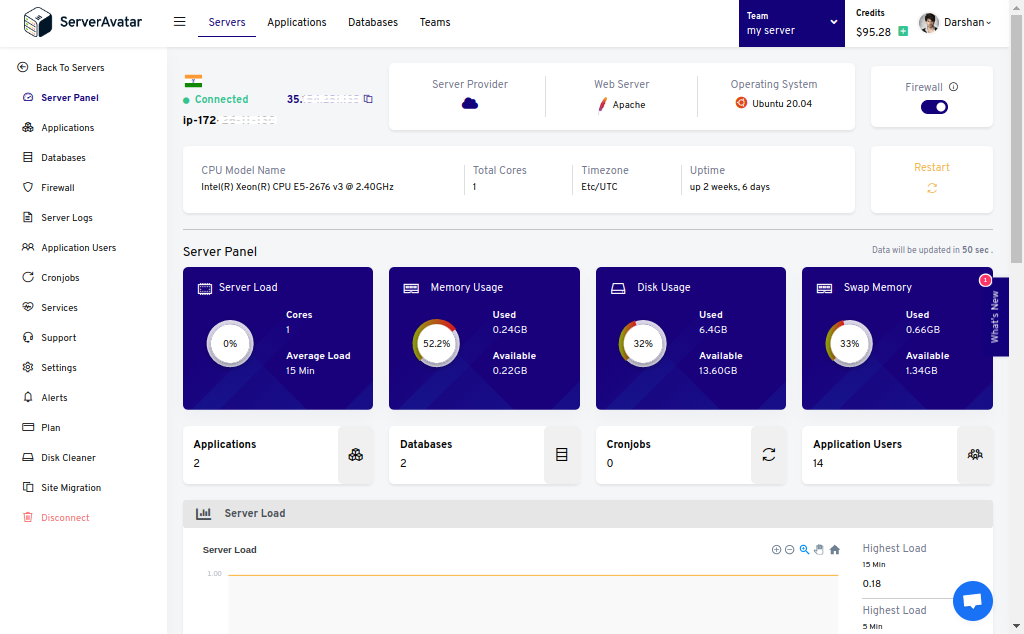
Step 1. Connect a server with ServerAvatar
You can connect your server and use ServerAvatar server panel in minutes. Run the below three commands on your server console as a root user, and it will start inspecting your server and installing the script if it meets the requirements.
wget https://srvr.so/install
chmod +x install
./install
It will ask which web server you would like to configure: Apache, Nginx, or OpenLiteSpeed. Type as per your choice and hit enter.
It takes 3-5 minutes to connect your server with ServerAvatar. Once done, you’ll see the link to claim your server. Open it on your web browser to access the server panel like the image below.
Step 2. Download Nextcloud latest release zip file
You can download the latest release of nextcloud zip file by checking the link below.
https://github.com/nextcloud/server/releases
You can also access the zip under the Community Projects section on the Nextcloud installation page.
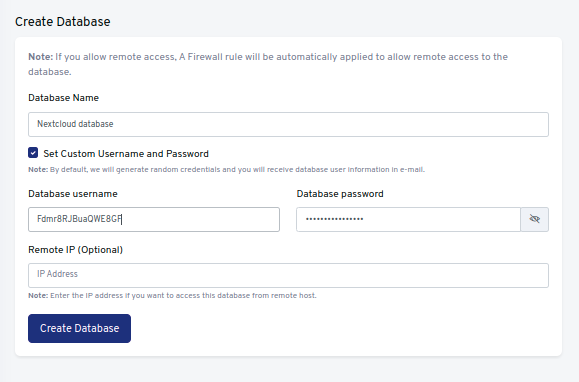
Step 3. Create Nextcloud Database
To create a MySQL database for Nextcloud, click on the Databases tab on the server panel and access the Create button.

Fill up the required information to create a database, as seen in the image below.
Step 4. Create a PHP application
To create an application, click on the Applications tab and access the Create button on the server panel.
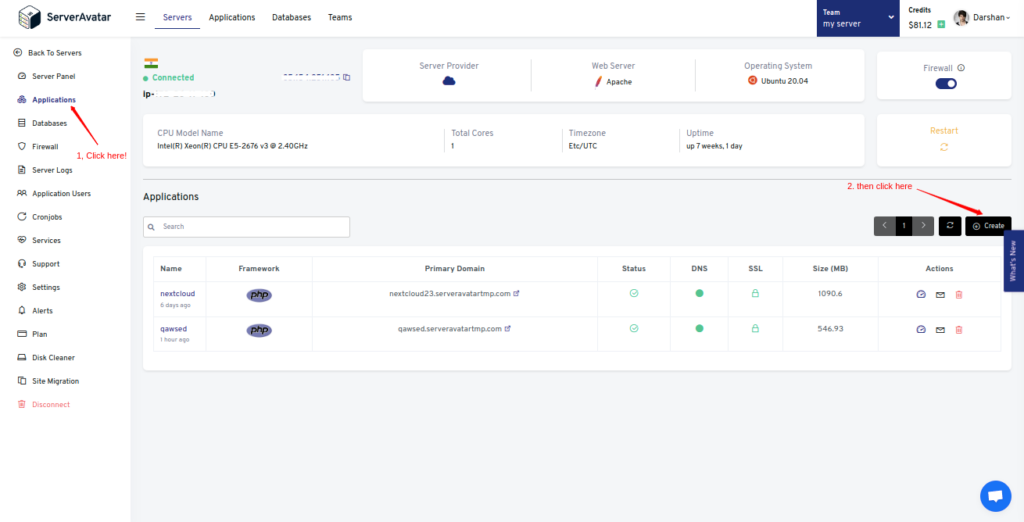
Fill up the information, including the Application Name and Domain Name. You can also look over more application PHP settings by checking Show Advanced Option on the application creation form.
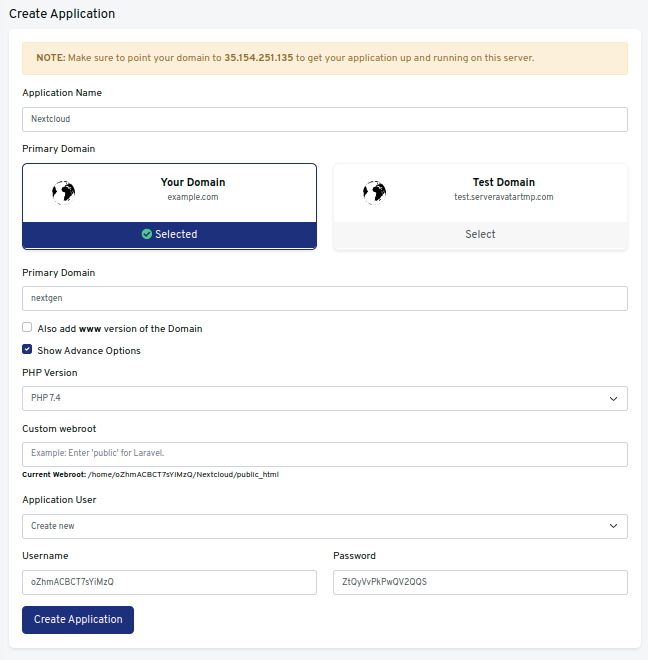
Note that:
If you want to host Nextcloud on your domain, then make sure to point your domain to the current IP address of your server, and for that:
1. Log in to your domain provider site, where you buy your domain. Click here for more info about your domain name.
2. Access DNS Manager to edit your DNS records(contact the support team if you don’t find them)
3. Change the IP address of A Record of your website to the current server’s IP address.
To host nextcloud on your subdomain, for example, nextcloud.yourdomain.com, create a new application with the subdomain as your primary domain and follow the same procedure.
Note that:
For accessing Nextcloud on the subdomain, you need to add your subdomain on A Record that points to the current IP address of your server. To point to an IPV6 address, you would need to use an AAAA record.
Click on the Create Application button after filling up the details.
Step 5. Upload the Nextcloud zip file
ServerAvatar provides a File Manager feature to upload files without using FTP clients.
On the panel, go to File Manager and access the public_html folder to upload the zip file. Before that, Delete the existing index.html file to avoid forbidden errors on the site.
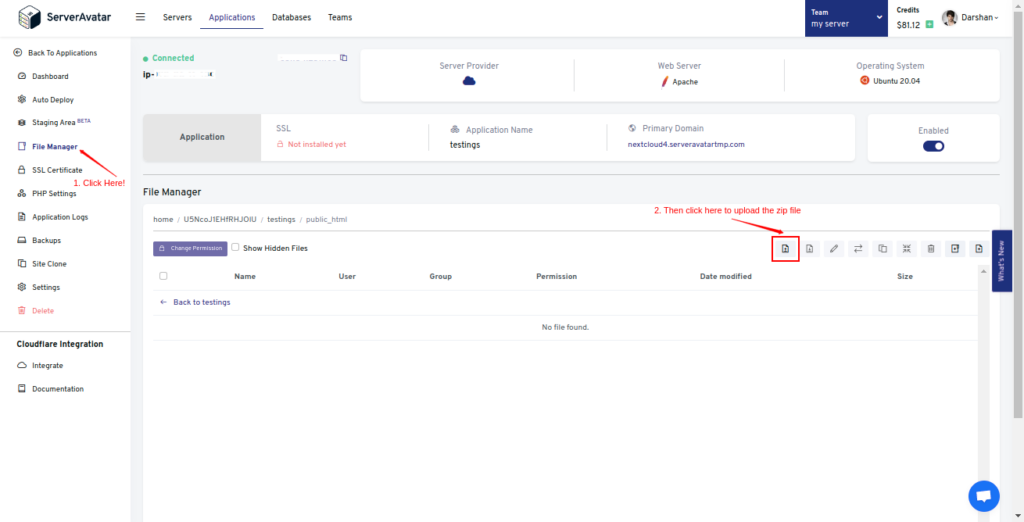
Delete the uploaded zip file after successfully uncompressing it.
Delete the uploaded zip file after successfully uncompressing.
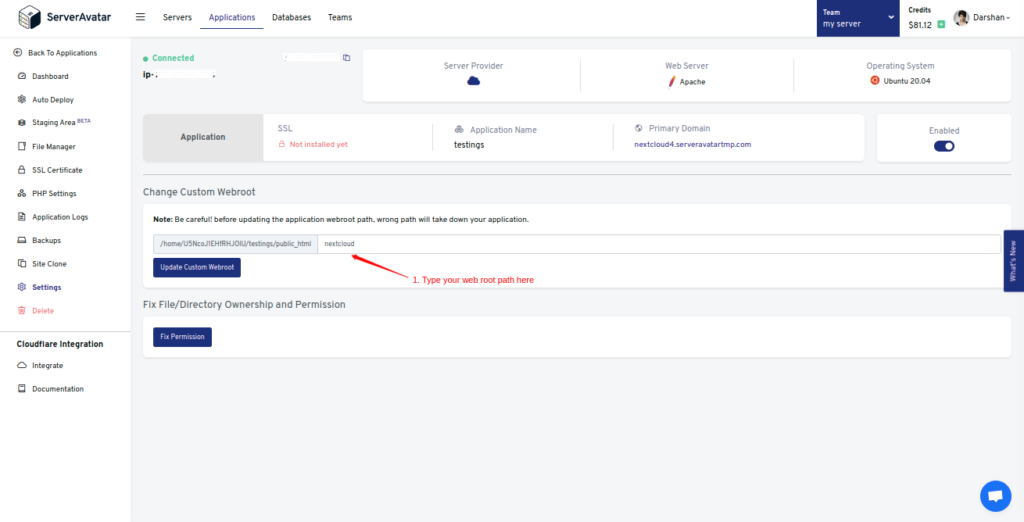
Step 6. Set the Web root of your server
On the application panel, access the Settings tab to change the web root of your server. Type the folder name where the public file occurs(unzipped folder name). Hare, my folder name after unzipping it is ‘nextcloud.’
Step 7. Install SSL Certificate
It is recommended to install an SSL certificate for your site security and performance. To install free SSL for the website, Navigate to SSL Certificate in the application control panel.
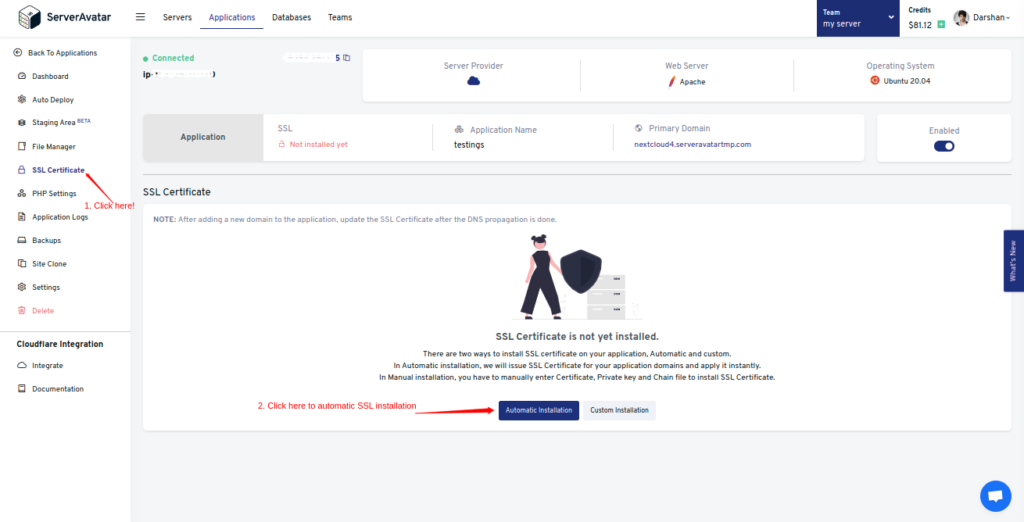
You can also install custom SSL by Clicking on the Custom Installation button.
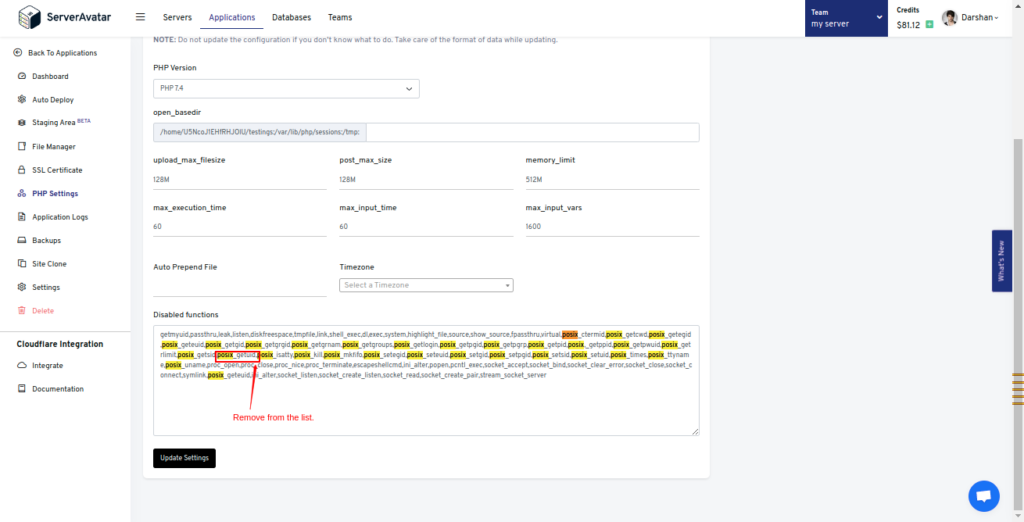
Step 8. Increase memory limit and remove posix_getuid from disabled functions
Nextcloud needs 512 MB of memory to run the PHP script on a server. To raise it, go to the PHP Settings and change the memory_limit field like the image below.
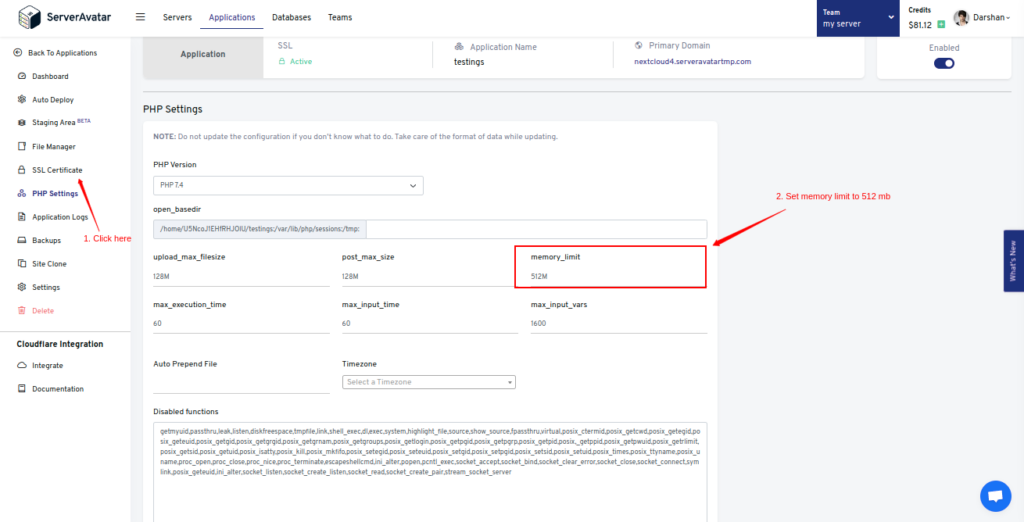
Remove the posix_getuid function under the Disabled Function list.
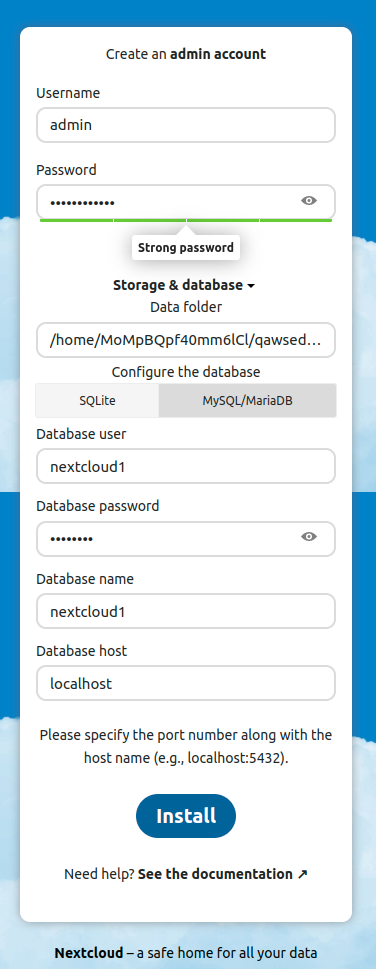
Step 9. Install and Set up Nextcloud
Access the domain/subdomain URL to set up Nextcloud. You can see the initial setup page in the following image.
Type admin credentials and MySQL database details and click on the install button. If you host your database on the same server, leave the Database Host field as it is.
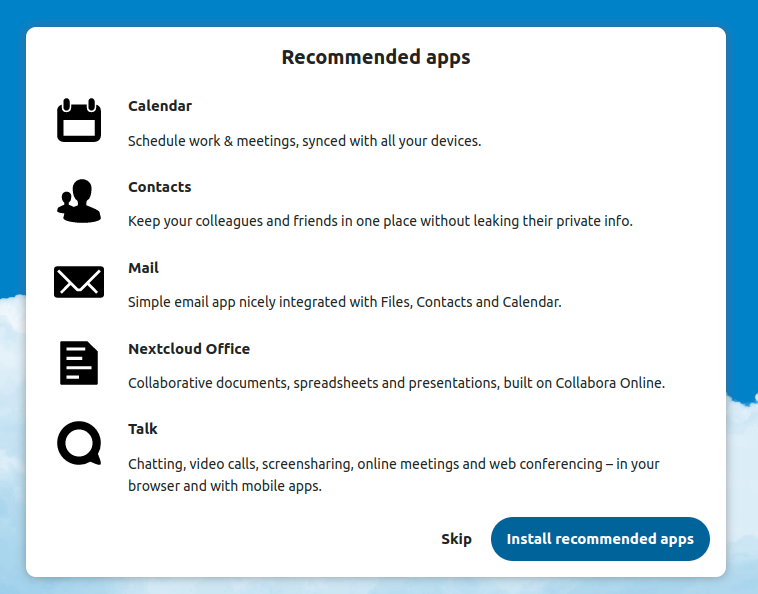
Install recommended apps, including Calendar, Contacts, Mail, and more.
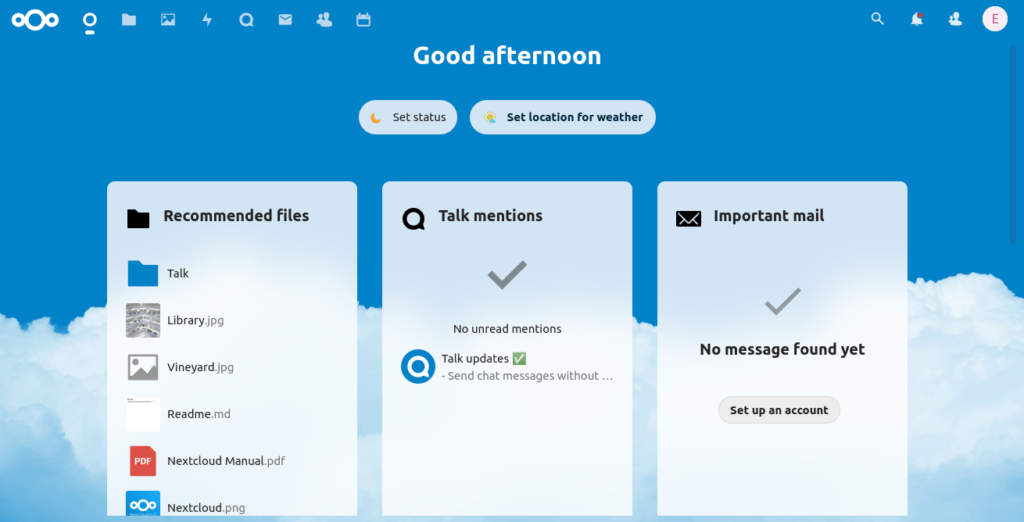
Once all the apps are installed, you’ll see the panel like the image below.
That’s it. You can now use all the features flexibly that suit your business requirements. Check Nextcloud documentation for more details regarding installation.