A business with a powerful and attractive website is more worthwhile than local shops and social media pages. Study shows that 84% of consumers believe that a website makes business more impactful than anything else.
But, having only a website is not enough; you can also take care of customer services so they can stay connected with you and help improve your public image and drive customer loyalty.
UVdesk makes it easier for your customers to get in touch with you. It allows you to manage, organize, and track all customer service reports with easy clicks. And it’s free.
With a few easy steps, let’s dive deep into what UVdesk is and how to install it on a server.
What is UVdesk?
UVdesk is a PHP-based free and open-source CRM(Customer Relationship Management) software that makes it easier for you to deliver the best customer service.
Trusted by more than 20k active customers, UVdesk has expanded to over 40 different countries. Big companies, including Collisgo, and BankSocial, use UVdesk to deliver the best customer support.

It allows you to manage multi-channel support; for example, user comments on the Facebook post will be converted into a ticket to manage directly from your UVdesk dashboard. Likewise, you can provide support on multiple mediums. This makes it different from others.
Using customization, you can make a portal in a way that matches up with the expectations of your users.
UVdesk Key Features
- Highly Flexible: You can use the software dynamically built on the LAMP/LEMP stack.
- Customizable: It is created with the symphony PHP framework to simplify complex things, for example, updating 1000+ rows using Symfony Console Command.
- Branding: you can personalize your help desk by adding your own logo, banner, and other necessary information that matches your users’ expectations.
- Knowledgebase: Allows you to Create folders and set Categories and Articles within it so your users can never be confused.
- Mailbox Configuration: You can configure your supported Email with the UVdesk mailbox to never miss any email related to the business.
- Module Integration: Integrate modules to enhance the functionality of a reliable support system for your users.
- Ticket Formation: You can create custom ticket fields on email for your users to collect extra information about your customers to resolve their issues and queries better.
- Ticket Management: Manage all user-generated queries with considering priority. Also, it allows you to distribute work among teams to deliver instant support.
Install and Set up UVdesk on a Ubuntu server
Installing and setting up UVdesk on a Ubuntu server with ServerAvatar is just a matter of minutes. You can connect a fresh Ubuntu 18.04, 20.04, or 22.04 server with ServerAvatar.
Many cloud hosting providers like DigitalOcean and Vultr give you free credit so you can get started with quickly.
ServerAvatar enables you to connect and manage VPS/VM/Cloud Instance/Dedicated or Bare Metal servers and Applications within it with an easy interface.
You can use a feature-rich control panel to manage multiple servers at a cheaper price than any other management panel.
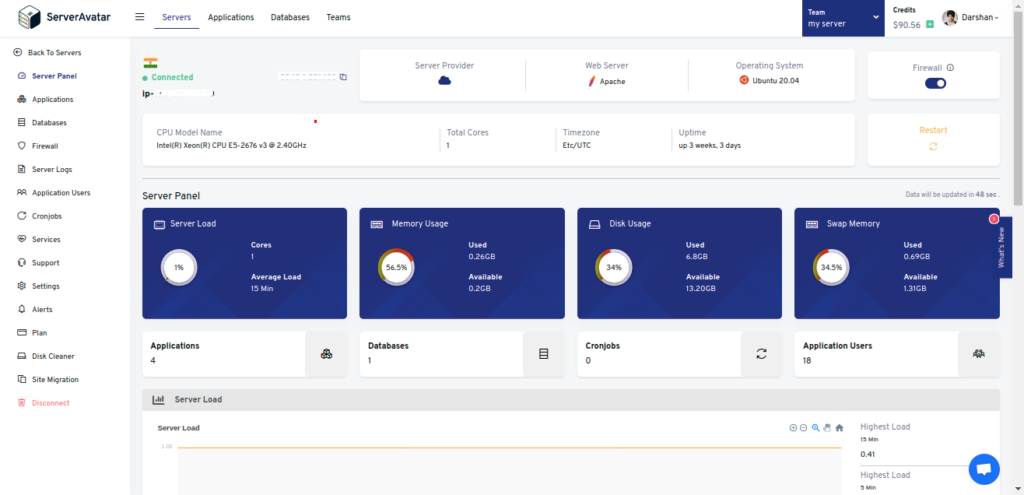
Step 1. Connect a server with ServerAvatar
You can connect a fresh server with ServerAvatar and use the panel within minutes. Just execute the below command on your server console area as a root user to check the configuration and start connecting with ServerAvatar if it meets the requirements.
wget https://srvr.so/install
chmod +x install
./install
It will ask which web server you would like to configure: Apache, Nginx, or OpenLiteSpeed.
Enter Apache or Nginx.
Step 2. Download the latest release of UVdesk
You can download the latest released zip file by clicking on the link below.
https://github.com/uvdesk/community-skeleton/archive/refs/tags/v1.1.1.zip
Check the UVdesk download page from here.
Step 3. Create UVdesk Database
Database information is necessary while installing UVdesk on the server. Once on the server panel, check the Databases option and click on the Create button like the image below.

You will see a form to create a MySQL database. Fill up the required information such as database Name, Username, and Password. Click on Set custom Username and Password if you want to set your Username and Password as per your requirement.
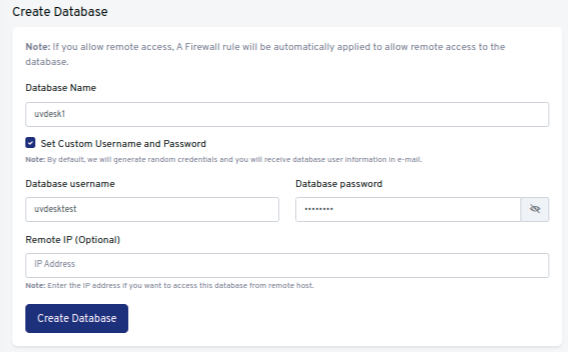
Click on the Create button after filling it up.
Step 4. Create a PHP Application and upload the UVdesk file
Follow the image to create an application.
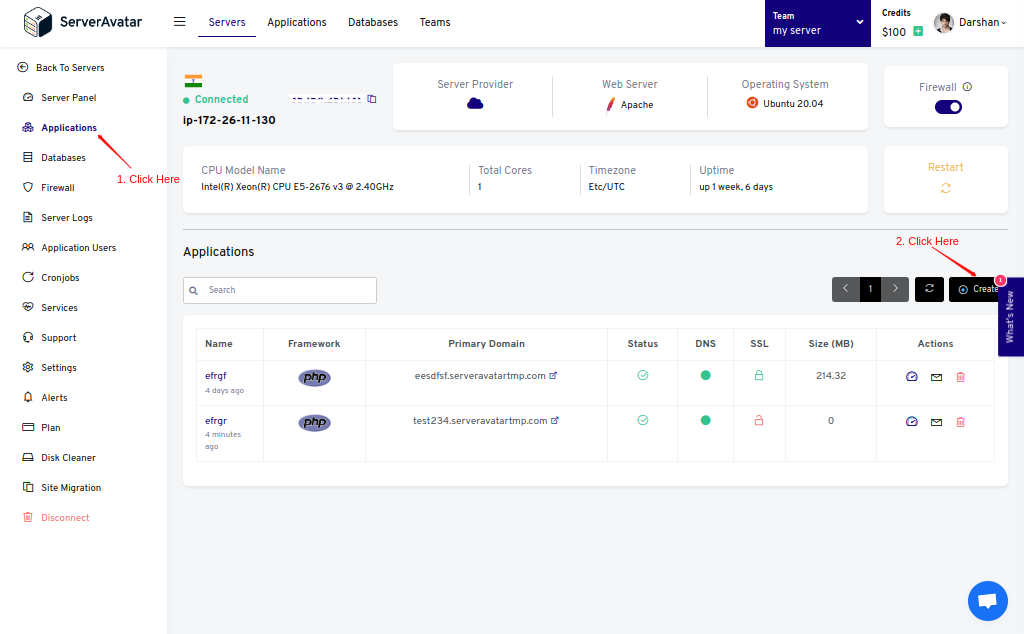
It requires basic application creation information like Application Name and Domain/Subdomain Name.
If you want to host UVdesk Helpdesk on your domain, then make sure to point your domain to the current IP address of your server, and for that:
1. Log in to your hosting provider site, where you buy your domain. Click here for more info about your domain name.
2. Access DNS Manager to edit your DNS records(contact the support team if you don’t find them)
3. Change the IP address of A Record of your website to the current server’s IP address.
To host UVdesk on your subdomain, for example, support.yourdomain.com, create a new application with the subdomain as your primary domain and follow the same procedure.
For accessing UVdesk on the subdomain :-
you need to add your subdomain on A Record that points to the current IP address of your server. To point to an IPV6 address, you would need to use an AAAA record.
It is recommended to host UVdesk on a subdomain, so that users can access support without any trouble.
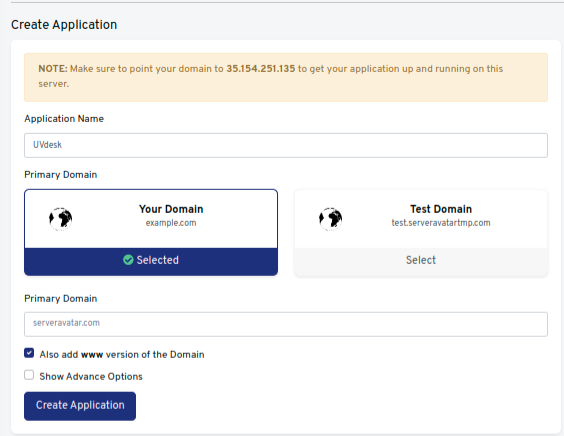
Click on the Create Application after filling it up.
To upload the file, go to File Manager from the panel and access public_html. On the public folder, you need to Remove the Index.html file to avoid forbidden errors on the site.

Unzip/Uncompress the file like the image below.
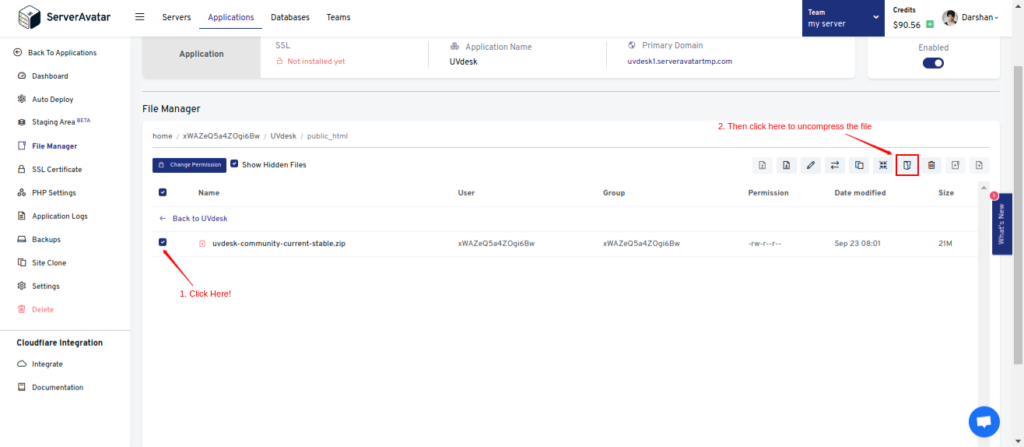
After uncompressing it, you’ll see the UVdesk folder in the public_html directory.
Step 5. Change the Webroot of an application
To access the support page directly on your domain/subdomain rather than with a subdirectory, you need to change the webroot of your application.
To set a new webroot, go to the Settings tab from your application panel and type public under the Change Custom Webroot field.
It allows your users to access support on “Support.example.com” rather than the “Support.example.com/public” URL on a web browser.
Step 6. Install and Setup UVdesk
Installing an SSL Certificate on your application is recommended to avoid the Site Not Secure error.
Enter your domain/subdomain URL on the web browser to access the UVdesk setup page, which looks like the image below.
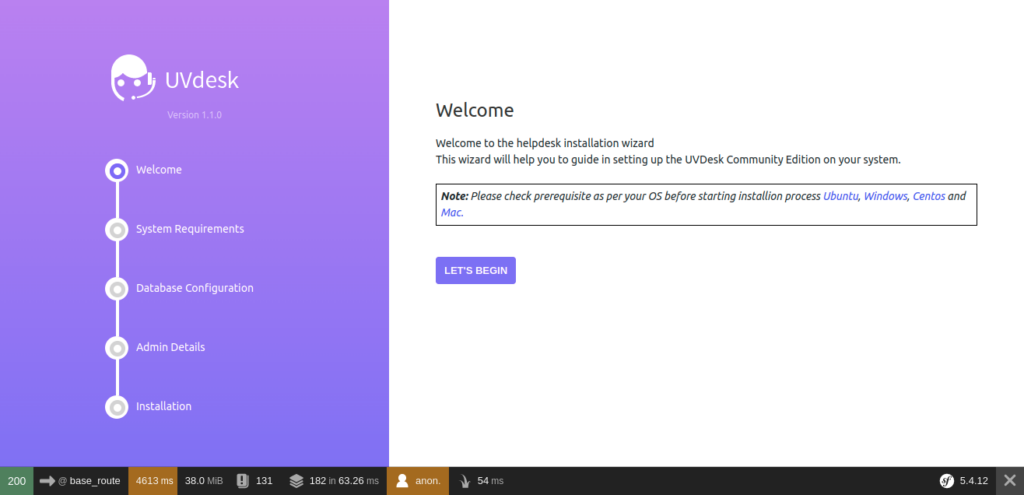
Click on the Let’s Begin to start setting up UVdesk.
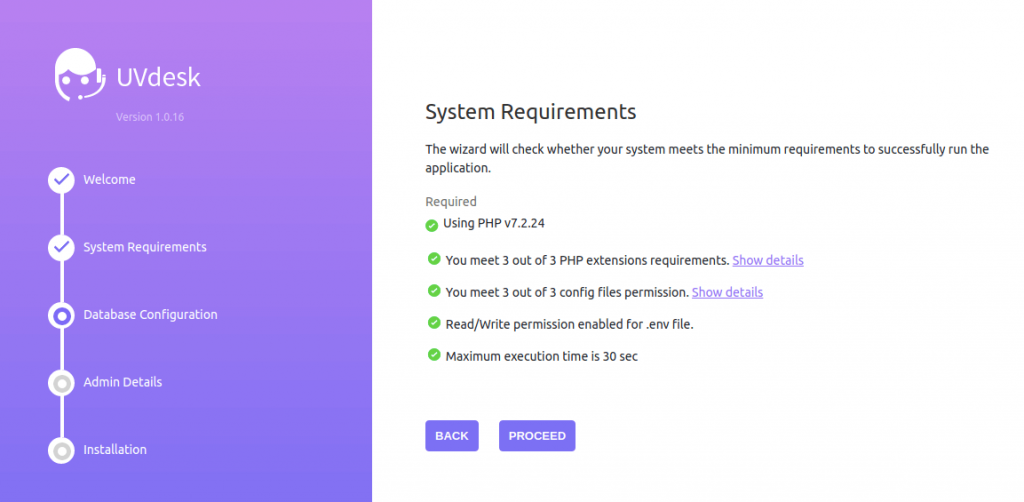
System Requirements
Note that :-
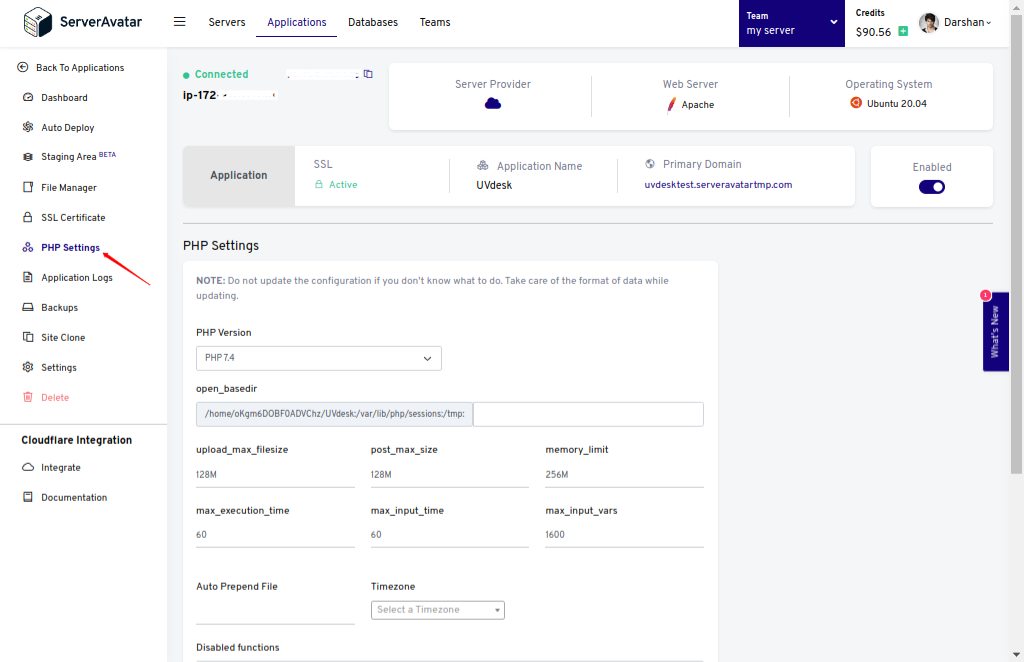
The Mailparser extension does not yet support PHP 7.3 or 7.4. You may see an error on this page. You can proceed to this page. Or You can also Downgrade/Upgrade the PHP version directly from the application panel like the below image.
Database Configuration
Make Sure to Open the 43210 port from the server panel to enable the incoming connection with the server.
Database setup includes:
- Servers: leave this field as it is, as we host UVdesk databases on the same server.
- Port: After creating the port from ServerAvatar, as I mentioned above, type 43210 in this field.
- Username: Your database username that you created in step 3.
- Password: Password of the database.
- Database: Name of the database.
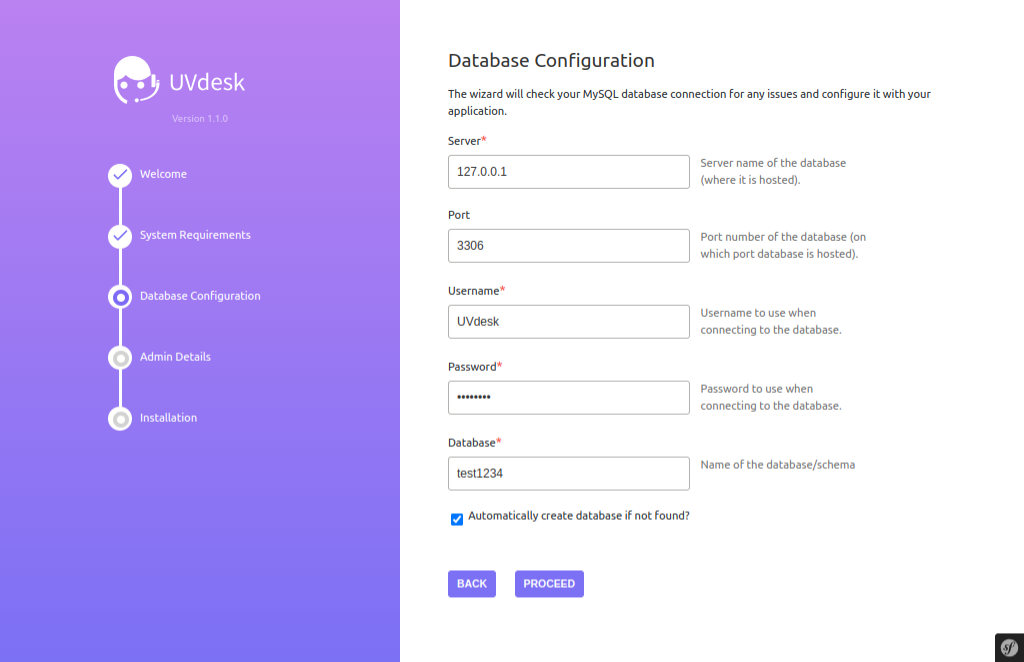
Check this if you fail to connect to the database.
Admin Details
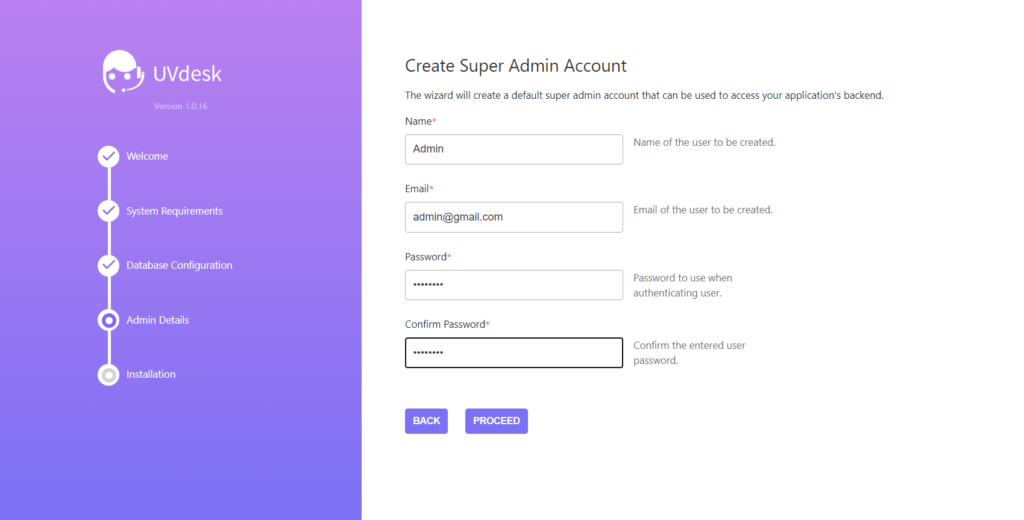
Enter your Name, Email, and Password as a super user to access your applications’ backend. Then, click on Proceed.
UVdesk Final Installation
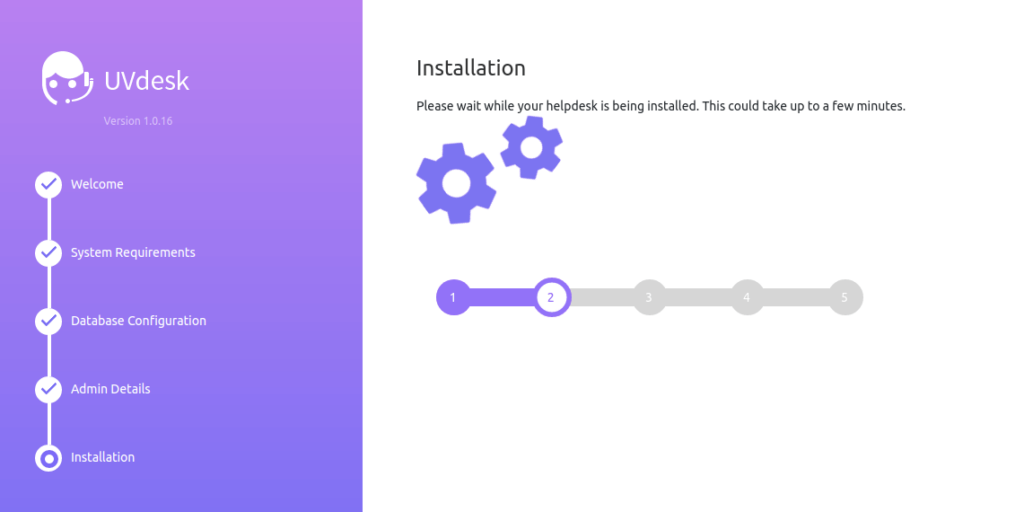
Click the Install Now button, and your UVdesk helpdesk starts installing on your application. It takes 2-3 minutes to complete the installation. Once the process is done, you’ll see the dashboard like the below image.
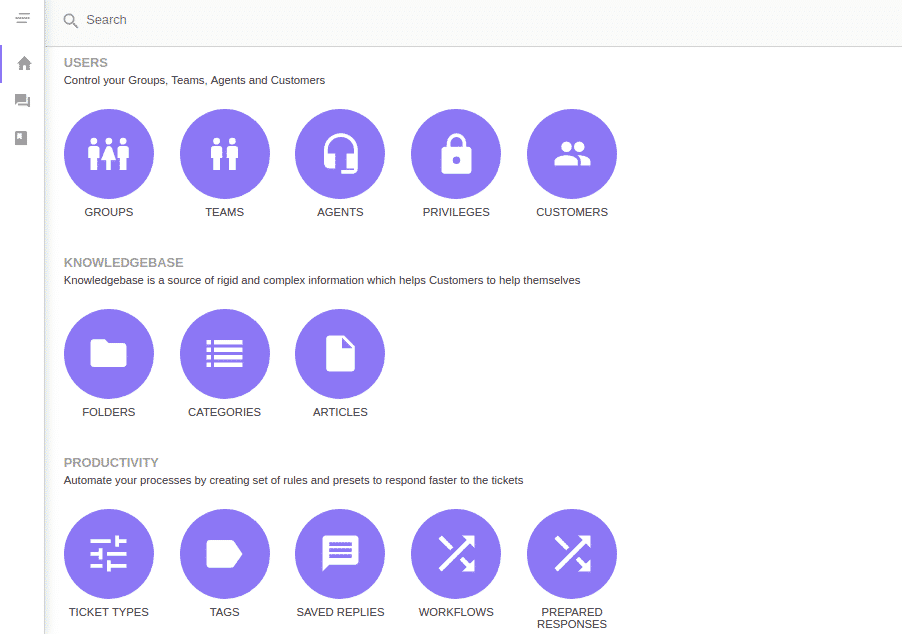
You can create multiple users and agents from the dashboard and give them respective permission to manage the tasks.
A business with a powerful and attractive website is more worthwhile than local shops and social media pages. Study shows that 84% of consumers believe that a website makes business more impactful than anything else.
But, having only a website is not enough; you can also take care of customer services so they can stay connected with you and help improve your public image and drive customer loyalty.
UVdesk makes it easier for your customers to get in touch with you. It allows you to manage, organize, and track all customer service reports with easy clicks. And it’s free.
With a few easy steps, let’s dive deep into what UVdesk is and how to install it on a server.
What is UVdesk?
UVdesk is a PHP-based free and open-source CRM(Customer Relationship Management) software that makes it easier for you to deliver the best customer service.
Trusted by more than 20k active customers, UVdesk has expanded to over 40 different countries. Big companies, including Collisgo, and BankSocial, use UVdesk to deliver the best customer support.
It allows you to manage multi-channel support; for example, user comments on the Facebook post will be converted into a ticket to manage directly from your UVdesk dashboard. Likewise, you can provide support on multiple mediums. This makes it different from others.
Using customization, you can make a portal in a way that matches up with the expectations of your users.
UVdesk Key Features
- Highly Flexible: You can use the software dynamically built on the LAMP/LEMP stack.
- Customizable: It is created with the symphony PHP framework to simplify complex things, for example, updating 1000+ rows using Symfony Console Command.
- Branding: you can personalize your help desk by adding your own logo, banner, and other necessary information that matches your users’ expectations.
- Knowledgebase: Allows you to Create folders and set Categories and Articles within it so your users can never be confused.
- Mailbox Configuration: You can configure your supported Email with the UVdesk mailbox to never miss any email related to the business.
- Module Integration: Integrate modules to enhance the functionality of a reliable support system for your users.
- Ticket Formation: You can create custom ticket fields on email for your users to collect extra information about your customers to resolve their issues and queries better.
- Ticket Management: Manage all user-generated queries with considering priority. Also, it allows you to distribute work among teams to deliver instant support.
Install and Set up UVdesk on a Ubuntu server
Installing and setting up UVdesk on a Ubuntu server with ServerAvatar is just a matter of minutes. You can connect a fresh Ubuntu 18.04, 20.04, or 22.04 server with ServerAvatar.
Many cloud hosting providers like DigitalOcean and Vultr give you free credit so you can get started with quickly.
ServerAvatar enables you to connect and manage VPS/VM/Cloud Instance/Dedicated or Bare Metal servers and Applications within it with an easy interface.
You can use a feature-rich control panel to manage multiple servers at a cheaper price than any other management panel.
Step 1. Connect a server with ServerAvatar
You can connect a fresh server with ServerAvatar and use the panel within minutes. Just execute the below command on your server console area as a root user to check the configuration and start connecting with ServerAvatar if it meets the requirements.
wget https://srvr.so/install
chmod +x install
./install
It will ask which web server you would like to configure: Apache, Nginx, or OpenLiteSpeed.
Enter Apache or Nginx.
Step 2. Download the latest release of UVdesk
You can download the latest released zip file by clicking on the link below.
https://github.com/uvdesk/community-skeleton/archive/refs/tags/v1.1.1.zip
Check the UVdesk download page from here.
Step 3. Create UVdesk Database
Database information is necessary while installing UVdesk on the server. Once on the server panel, check the Databases option and click on the Create button like the image below.
You will see a form to create a MySQL database. Fill up the required information such as database Name, Username, and Password. Click on Set custom Username and Password if you want to set your Username and Password as per your requirement.
Click on the Create button after filling it up.
Step 4. Create a PHP Application and upload the UVdesk file
Follow the image to create an application.
It requires basic application creation information like Application Name and Domain/Subdomain Name.
If you want to host UVdesk Helpdesk on your domain, then make sure to point your domain to the current IP address of your server, and for that:
1. Log in to your hosting provider site, where you buy your domain. Click here for more info about your domain name.
2. Access DNS Manager to edit your DNS records(contact the support team if you don’t find them)
3. Change the IP address of A Record of your website to the current server’s IP address.
To host UVdesk on your subdomain, for example, support.yourdomain.com, create a new application with the subdomain as your primary domain and follow the same procedure.
For accessing UVdesk on the subdomain :-
you need to add your subdomain on A Record that points to the current IP address of your server. To point to an IPV6 address, you would need to use an AAAA record.
It is recommended to host UVdesk on a subdomain, so that users can access support without any trouble.
Click on the Create Application after filling it up.
To upload the file, go to File Manager from the panel and access public_html. On the public folder, you need to Remove the Index.html file to avoid forbidden errors on the site.
Unzip/Uncompress the file like the image below.
After uncompressing it, you’ll see the UVdesk folder in the public_html directory.
Step 5. Change the Webroot of an application
To access the support page directly on your domain/subdomain rather than with a subdirectory, you need to change the webroot of your application.
To set a new webroot, go to the Settings tab from your application panel and type public under the Change Custom Webroot field.
It allows your users to access support on “Support.example.com” rather than the “Support.example.com/public” URL on a web browser.
Step 6. Install and Setup UVdesk
Installing an SSL Certificate on your application is recommended to avoid the Site Not Secure error.
Enter your domain/subdomain URL on the web browser to access the UVdesk setup page, which looks like the image below.
Click on the Let’s Begin to start setting up UVdesk.
System Requirements
Note that :-
The Mailparser extension does not yet support PHP 7.3 or 7.4. You may see an error on this page. You can proceed to this page. Or You can also Downgrade/Upgrade the PHP version directly from the application panel like the below image.
Database Configuration
Make Sure to Open the 43210 port from the server panel to enable the incoming connection with the server.
Database setup includes:
- Servers: leave this field as it is, as we host UVdesk databases on the same server.
- Port: After creating the port from ServerAvatar, as I mentioned above, type 43210 in this field.
- Username: Your database username that you created in step 3.
- Password: Password of the database.
- Database: Name of the database.
Check this if you fail to connect to the database.
Admin Details
Enter your Name, Email, and Password as a super user to access your applications’ backend. Then, click on Proceed.
UVdesk Final Installation
Click the Install Now button, and your UVdesk helpdesk starts installing on your application. It takes 2-3 minutes to complete the installation. Once the process is done, you’ll see the dashboard like the below image.
You can create multiple users and agents from the dashboard and give them respective permission to manage the tasks.