Making books public for reading is an impactful move towards spreading knowledge in the respective field. And considering that fact, BookStack came into the market.
The idea behind launching this tool is to organize and store books and information, which is helpful for freelancers and small business owners.
BookStack provides a WYSIWYG editor and markdown editor; thus, novice developers can also easily use this tool without any prior coding knowledge. As it is free and open-source, you can customize the branding and core functionality per your choice.
Let’s dive deep into what BookStack is and its key features.
What is BookStack?
BookStack is an open-source self-hosted tool that allows you to store and publish books for your users/employees. Not only that, but you can also organize company-related documents for respective departments with appropriate permissions.
You can organize your content into three simple real-world groups: Books, Chapters, and Pages. What makes it different is that you can search books and even chapters and paragraphs(pages) within a book.
The software is available in 42 different languages. And due to this, you can cover a wider range of users worldwide.
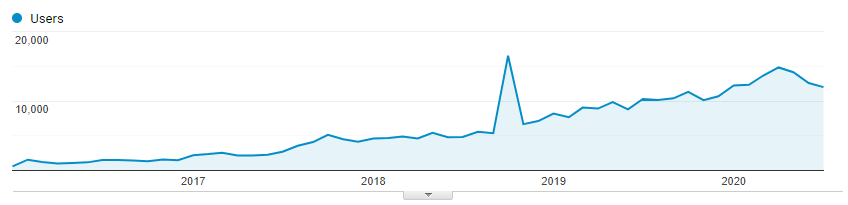
BookStack was officially launched in July 2015. From that time until now, BookStack continuously grew with the tech market.
Key Features
- Easy-to-use interface: The tool provides a simple and easy-to-use interface so you won’t get stuck in any situation. The page editor has a simple WYSIWYG interface, categorized with Books, Chapters, and Pages.
- Searchable Content: The content is fully searchable and can search books, chapters, and pages. Also, you can link to any paragraph of any book or chapter to keep your documents connected.
- Fully configurable: Customization option allows you to change the logo, brand name, primary color, content color, and footer link and even add custom HTML content that suits your company’s needs.
- Built-in Diagram.net: With the built-in diagram.net tool, you can create and add any diagram, such as a flowchart, wireframe, or UML(Unified Modeling Language) diagram, within your documentation.
- Multi-Lingual: BooksStack users can have permission to set the preferred language. BookStack currently supports more than 40 languages.
- Third-party authentication: You can log in via third-party apps, including Google, Github, Twitter, Facebook, Slack, and more. By default, these services are disabled. You can enable it by checking this page.
Install and Setup BookStack on Ubuntu Server
You can install Bookstack on VPS/VM/Cloud Instance/Dedicated or Bare Metal server with ServerAvatar. The installation process is straightforward.
But before that, let’s connect a fresh server with ServerAvatar(you can skip this if you have already connected)
New users can use free trial credit with ServerAvatar for one month. So grab it for a quick start. And, if you are a server-level beginner, you can also use free credit from the server provider’s side.
Step 1. Connect a server with ServerAvatar
You can connect fresh 18.04, 20..04, or 22.04 servers with ServerAvatar. Once you have a server, run the below three commands as a root user on your server console to download and inspect the script and start installing if it meets all requirements.
wget https://srvr.so/install
chmod +x install
./install
Executing these commands will ask you which web server you want to install, whether Apache, Nginx, or OpenLiteSpeed. Type anyone as per your requirement and hit enter.
It will take 4-5 minutes to complete the process. After completing this process, you’ll see the link to claim the server, redirecting to the server panel that looks like the following image.

Step 2. Download the latest release of BookStack
You can download the latest release zip file of BookStack from the GitHub resource. This tool gains 10.3 k stars and 1.4 forks and is active with regular updates.
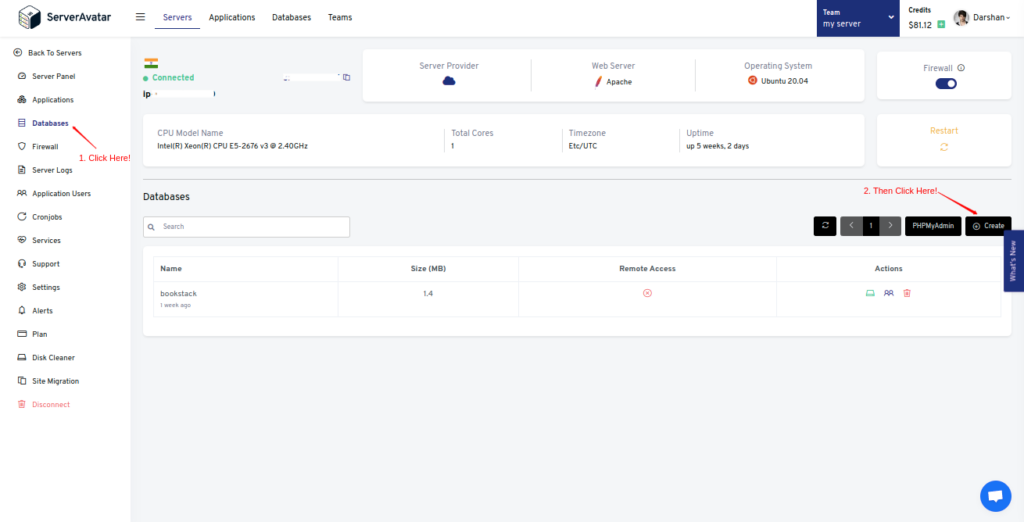
Step 3. Create BookStack Database
Database credential is required during the BookStack setup process. To create a database, just go to the server panel, follow the Database tab and click on the Create button, just like the following image.
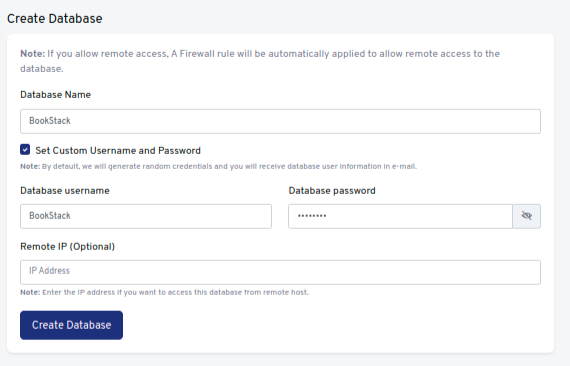
It will ask you for basic database information. Fill it up and click on the Create Database button like the image below.
Step 4. Create a PHP application
On the server panel, click on the Applications to create a PHP application.
Application creation requires information such as Application Name, Domain Name. You can also use Advanced Options to make your site as flexible as possible.
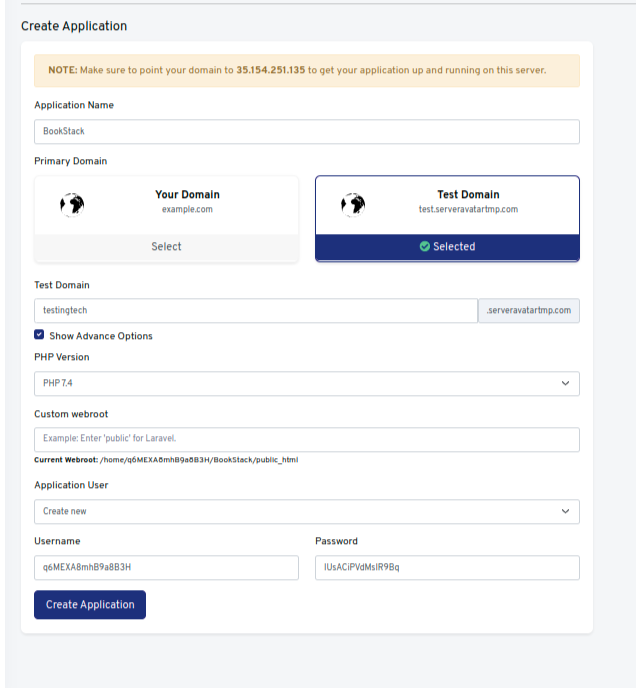
Note that:
If you want to host BookStack on your domain, then make sure to point your domain to the current IP address of your server, and for that:
Log in to your domain provider site, where you buy your domain. Click here for more info about your domain name.
Access DNS Manager to edit your DNS records(contact the support team if you don’t find them)
Change the IP address of A Record of your website to the current server’s IP address.
To host BookStack on your subdomain, for example, bookstack.yourdomain.com, create a new application with the subdomain as your primary domain and follow the same procedure.
For accessing BookStack on the subdomain, you need to add your subdomain on A Record that points to the current IP address of your server. To point to an IPV6 address, you would need to use an AAAA record.
Once you fill up all details and make the necessary changes, click on the Create application button.
Installing an SSL Certificate on your application is recommended to avoid the Site Not Secure error.
Step 5. Upload the Bookstack zip file
ServerAvatar has a built-in file manager feature, so you don’t need FTP clients to upload the file.
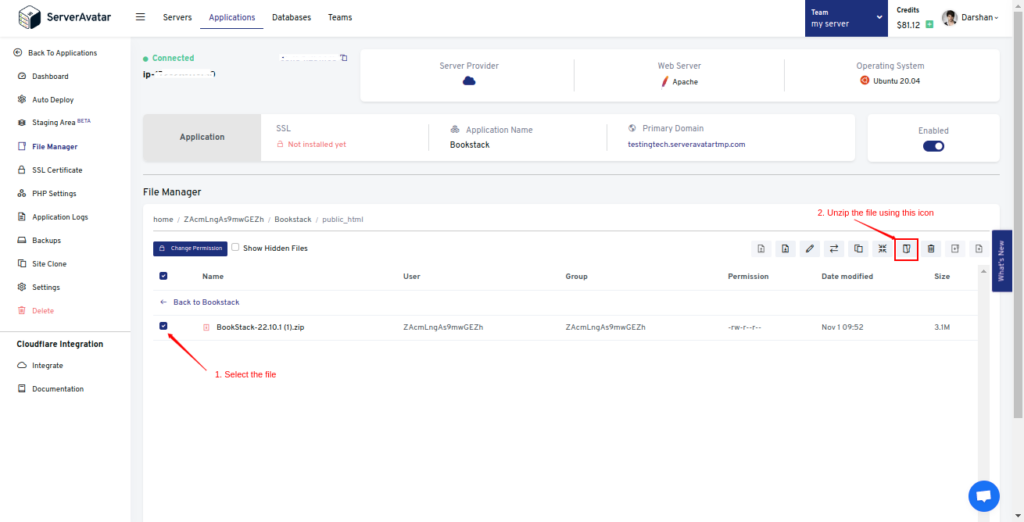
To upload the zip file, go to File Manager from the sidebar of the application panel. And access the public_html directory for doing your project live on your domain/subdomain.
On the public directory, delete the existing index.html file to avoid forbidden errors on the site.

Select the uploaded zip file and unzip it like the image below.
Step 6. Set the web root of your server
The setup of the webroot depends on individuals. This Means BookStack can be hosted without pointing the web root on your server. The URL paths are different in both cases
Setting up a web root is necessary if you want to host BookStack on your domain/subdomain.
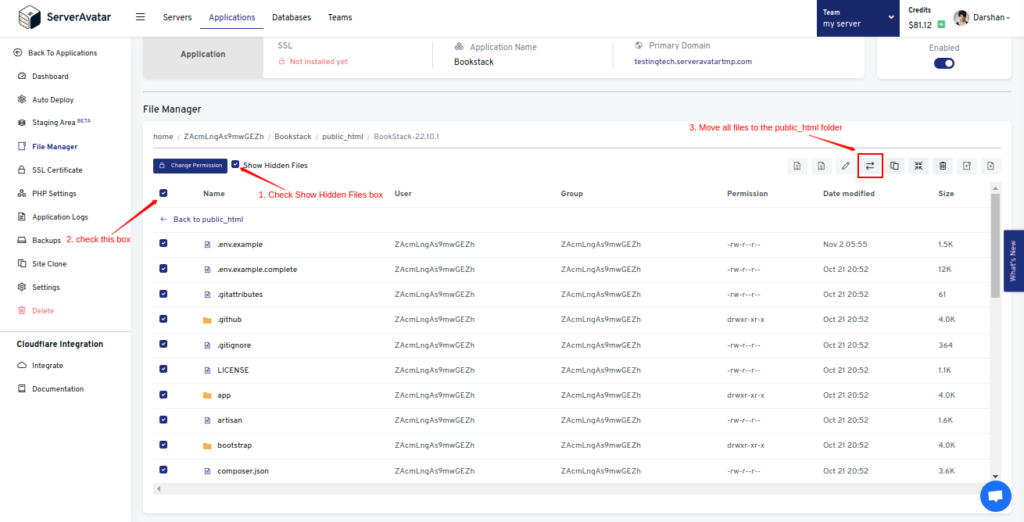
And for that, you need to move all files to the public_html folder.
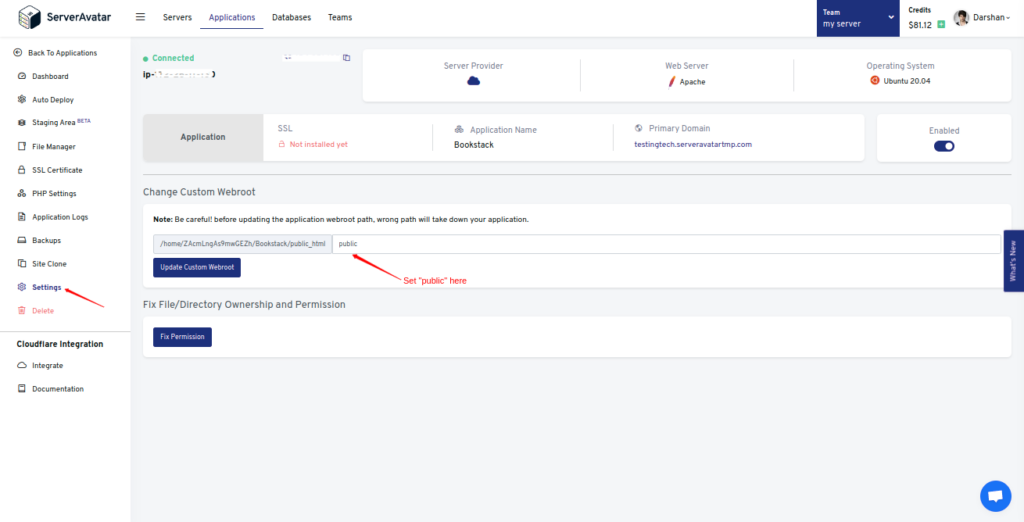
Once all files move to the public_html folder, go to the Settings tab in the application panel and set public in the web root field.
Without setting up a web root, you can access BookStack on URL –
yourdomain.com/unzipped-folder-name/public
Step 7. Rename the .env.example file and fill database and email details
Jump to File Manager>>public_html and check the Show Hidden Files box to see the .env.example file.
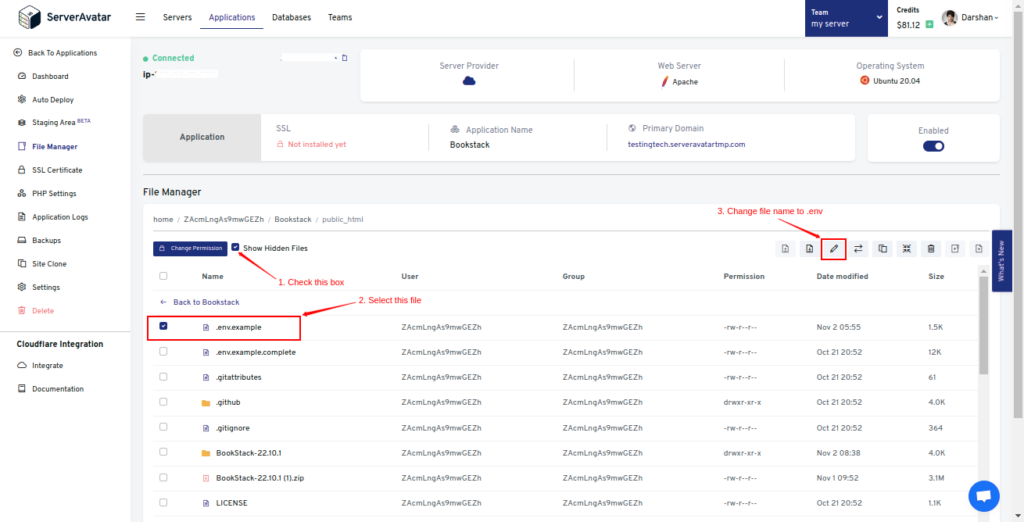
Change the file name from .env.example to .env, as shown in the above image.
Now open the .env file and replace the dummy details with the actual details, which include the following:
- Database Credentials: add the database name, username, and password, which we created in step 3.
- App_URL: if you set web root in the above step then the app URL should be http://yourdoamin.com; otherwise the URL should be http://yourdomain.com/unzipped-foldr-name/public. Installing SSL results changes your URL from HTTP to HTTPs.
- SMTP mail details: This can be optional, or you can change these settings after installing BookStack.
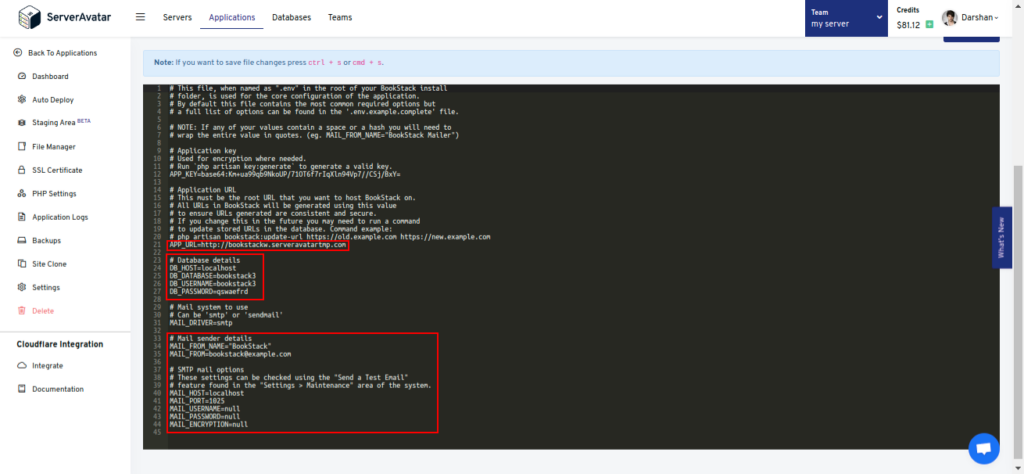
Don’t forget to save the file after making changes.
Step 8. Install and update the composer
ServerAvatar provides SSH credentials for each application on the respective application panel.

Run the below command to log in as a root user on your application.
ssh Username@HostCopy the password from the panel and paste it. Once logged in, navigate to the root directory and run the below two commands one-by-one to install and update the composer.
composer installcomposer updateStep 9. Generate a unique application key and update the database
A unique key is allowed to contain a nullable column. To generate a unique key, run the below command in the root directory.
php artisan key:generateAnd run the below command to update the database.
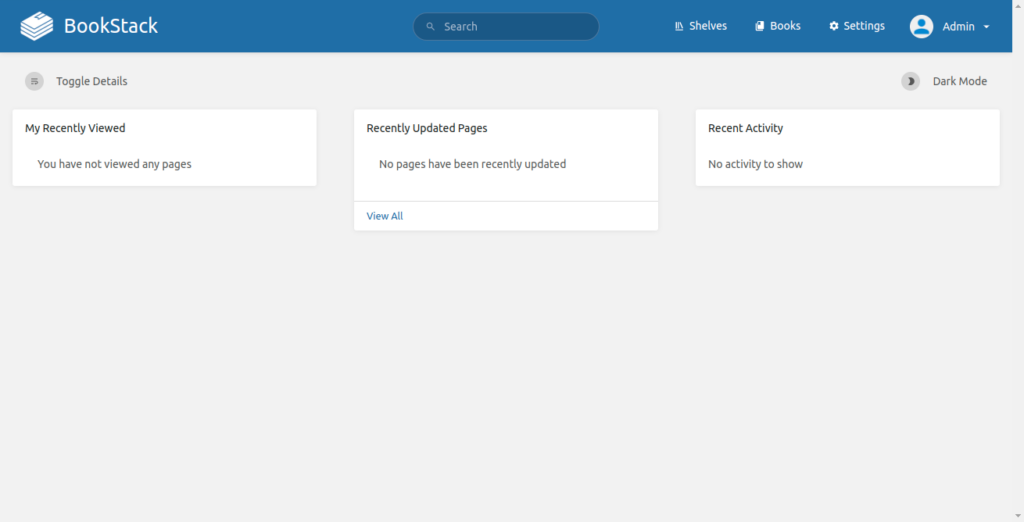
php artisan migrateStep 10. Log in to BookStack
Access the URL on your web browser to log in to BookStack. You can log in using the default admin details admin@admin.com with a password of password.
You can change admin details directly after your first login.
You’ll see the admin screen like the following image upon logging in.
That’s it. Check BookStack Docs for more guidance.