Digitalocean is one of the biggest players in the cloud computing market. It is one in the top 10 cloud hosting providers in the world.
The only reason it is the case is, Digitalocean made cloud hosting easier to understand even for beginners. I am using Digitalocean droplets to host various type of sites on PHP since 2016. We just had one service called “Droplet” when Digitalocean started providing cloud services. And it was smooth!
Right now, Digitalocean provides a lots of cloud services. And it serves lots of customers including many web hosting companies. Many of the customers are just getting started and just know Digitalocean as an easiest cloud hosting platform available.
This is an In-depth guide. And, You can also call it a cheatsheet. In this guide, I will explain everything you need to know to host your sites effectively on Digitalocean. You can skip the topics and jump to the topic you want to read.
First of all, Let’s get started with the basics.
What is Digitalocean?
As we discussed before, Digitalocean is a cloud service provider. Cloud is a broad topic and contains a lot of cloud services. It is the reason why beginners cannot understand the user interface of AWS EC2 as it provides a lot of cloud services.
However, Digitalocean is simple. It provides less number of cloud services than AWS or GCP. And that is the reason why a beginner can get started with Digitalocean without much of a learning curve. If you open Digitalocean website and see the products menu from the main navigation bar, You will find many cloud services.
However, Do not get intimidated by the technical terms. You will only need a “Droplet” to get started. Now, Let’s understand the meaning of a droplet and the use of a droplet.
What is a Droplet?
Droplet is a server in Digitalocean dictionary. Server is any virual machine with public IP address, CPU, RAM, Storage and 24*7 internet connectivity. Many types of servers like VPS, VM, Dedicated, Bare metal are same, except the hardware capabilities.
For your Info
Droplet is a server just like any other virtual server that other services provide. A droplet can be “Dedicated” or “Shared” or maybe “Memory optimised”. The only difference between these 3 types of droplets is the resource availability.
Here are different types of droplets you can create in Digitalocean.
- Basic Droplets: Basic droplets are best for hobby projects or low-priority projects. And they are designed to share computing power. It means that the resources (CPU time) is shared between droplets. You can host your app on the droplet as long as you do not want to use 100% of the CPU all the time.
- General Purpose: General purpose droplets are good enough for most of the sites. You can host a website, API, or anything else in a general purpose droplet. A General Purpose droplet has a dedicated CPUs. So, You can host important or valuable sites on a droplet from this category.
- CPU Optimised: CPU optimised droplets have a 2:1 ratio of memory to CPU. It’s easy to understand. In this category, You will find servers with 1 Dedicated vCPU for every 2 GB RAM. So, You can create a droplet with 2 vCPUs and 4GB RAM. Or a droplet withy 4 vCPUs and 8GB RAM. Use this droplet if your application is CPU intensive.
- Memory Optimised: Memory optimised droplets have high memory and less number of CPUs. You can use a memory optimised droplet to host Queues and Databases.
- Storage Optimised: A storage optimised droplets have high storage capabilities. The smallest droplet in this category has 300GB of storage. However, Many websites are not as big as we believe in GBs. You can host and process databases on this kind of droplets. Imagine having an awesome monitoring system for your business in a storage optimised droplet.
There are two more types of droplets, Basic and Premium. The difference between a basic droplet and a premium droplet is the hardware. Premium droplets are powered by High quality physical CPUs and RAMs. You can create a basic or a premium droplet in any of the above listed categories.
What are the use cases of a Droplet?
Imagine you have a clean dedicated personal computer with a desired operating system. What kind of application can you host on that PC? Any, right?
It’s the same for a droplet. You can host anything from a simple HTML page to a complex management and monitoring systems on a droplet. Are you a python programmer and want to host a Django project? You can do it. Same for PHP, Go, Javascript or a closed services like MySQL, MongoDB, Redis and other similar services. For instance, A server that can instantly support a WordPress site has all the required services installed and configured upon a Droplet with OS.
However, PHP and specifically WordPress dominates the web. About 40% of the websites in top 1 million are WordPress sites. Around 80% sites hosted on droplets via ServerAvatar are WordPress sites, even though we support any PHP script. Javascript is also one of the most popular language of the web.
Digitalocean allows you to perform many actions on your droplets. Imagine what would you do if you need a server with more resources. Migrating is the hard way. But Digitalocean allows you to scale the resources on your server in minutes. You can also temporarily upgrade the server. Which means, You can increase the computing power of your server even for a single surge in requirements.
In this guide, You will learn all the thing you have to learn to efficiently host your websites on a droplet.
Here is the list of topics we are going to cover in this guide. Note that all the topics are explained in detail. Many topics will have multiple sub-topics too. We will get started with the basics and then cover all the actions you can perform on your droplet from Digitalocean.
- How to create a Droplet?
- Monitor Droplet’s Resource Usage
- Reserve an IP Address
- Access the Console
- Turn off or Restart a Droplet
- Create and Manage a Firewall
- Manage Droplet Backups and Snapshots
- Resize a Droplet
- Reset Root Password
- View Droplet History
- Re-install a Droplet
- Destroy a Droplet
- How to host websites on a Digitalocean Droplet?
The 13th topic is very important, do not miss. Let’s get started with the first one.
How to create a DigitalOcean Droplet?
The first and the most important thing to learn is How to create a droplet correctly. There are lots of options in a droplet creation form. It is important to understand each option.
So, We are going to create a droplet first. If you already have a droplet and you know how to create one, You can simply skip this topic of the guide.
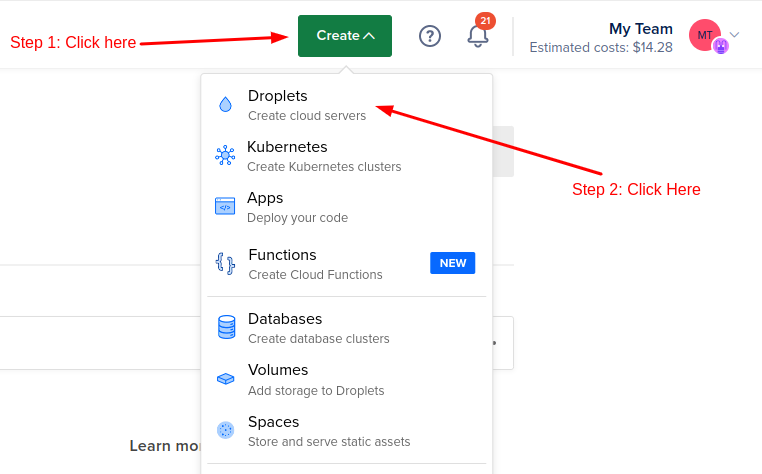
To create a droplet, log in to Digitalocean and click on the Create -> Droplet option from the top-right corner of the page.
Now you will see a Droplet creation wizard with multiple steps. The first step is to select the operating system for your droplet, just like the following image.
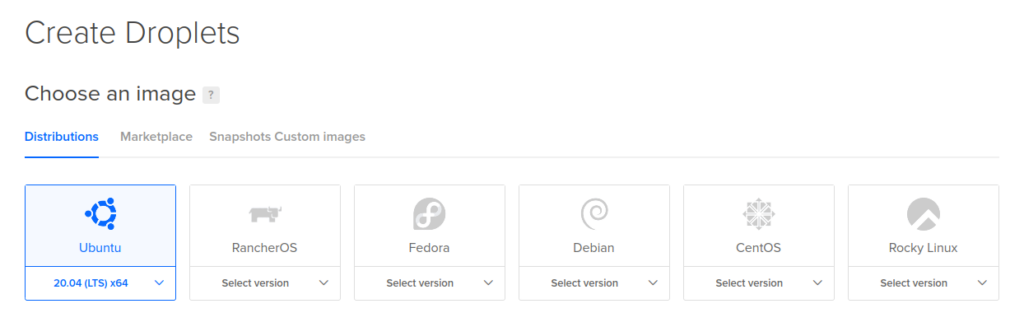
Note: If you are using ServerAvatar to manage sites on your droplet, Select Ubuntu 18.04 x64 or Ubuntu 20.04 x64 as an operating system.
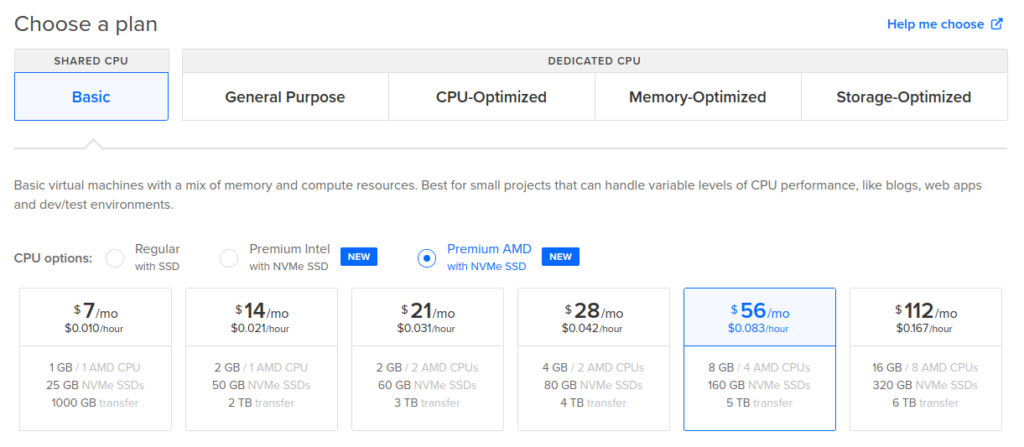
Once you have selected the operating system, you have to select a plan. There are multiple categories of droplets with various sizes. You can refer to the above given list to understand different types of droplets. Select the plan according to your requirements.
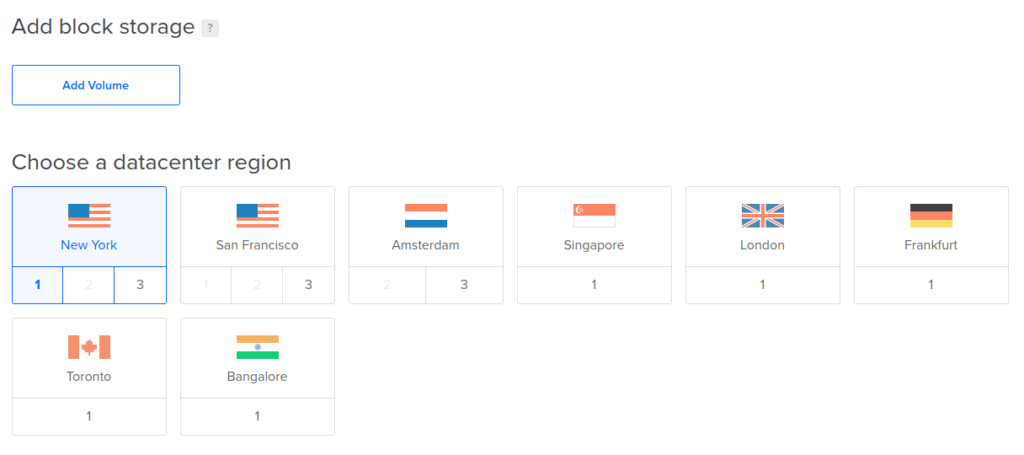
Once done, scroll down a bit to discover two sections with heading Add Block Storage and Droplet Datacenter Region.
If you want to add block storage to your droplet, click on the Add Volume button and select the size of the block storage you want to connect.
Digitalocean has 10+ locations with multiple data centers in some regions. You can select the one that best fits your requirements. The general rule is to select the location close to the location from which you are receiving the most traffic.
For example, If you are receving most of the traffic from India, You should select Bangalore as a data center region. Similar for other locations.
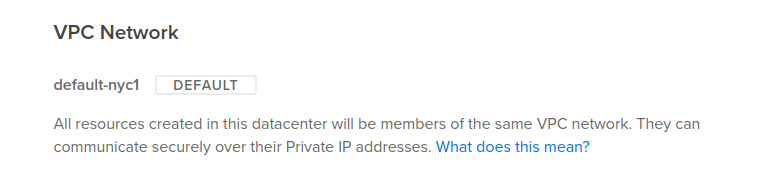
The next option in the droplet creation wizard is to select a VPC network. If you do not know what is it, It simply allows your droplets to communicate via a local area network if your droplets are in the same datacenter. A default VPC network is selected by default, If you do not know what to do or what to select, keep it as it is.
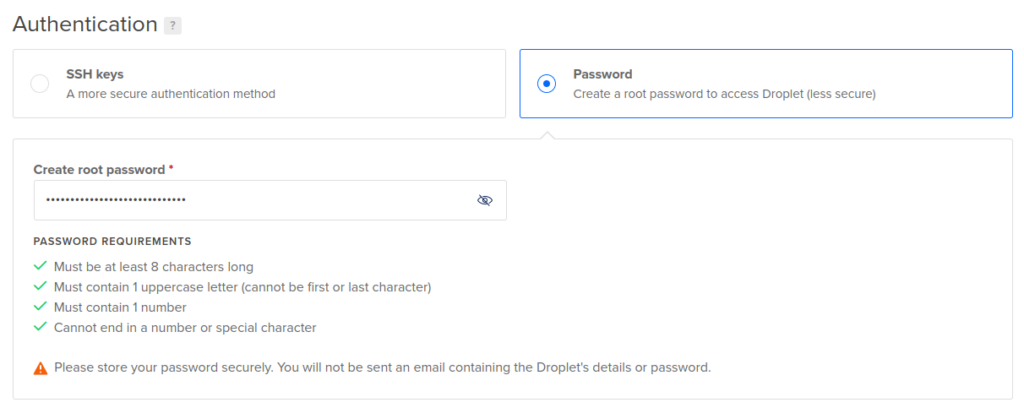
After VPC network, You have to select the authentication method.
As an authentication method, You can either select an SSH key or you can use a password. We recommend you to use an SSH key as it provides highest level of security. However, If you do not know how to work with SSH keys, You can select password authentication and set a very strong password.
For this example, I am using password authentication.
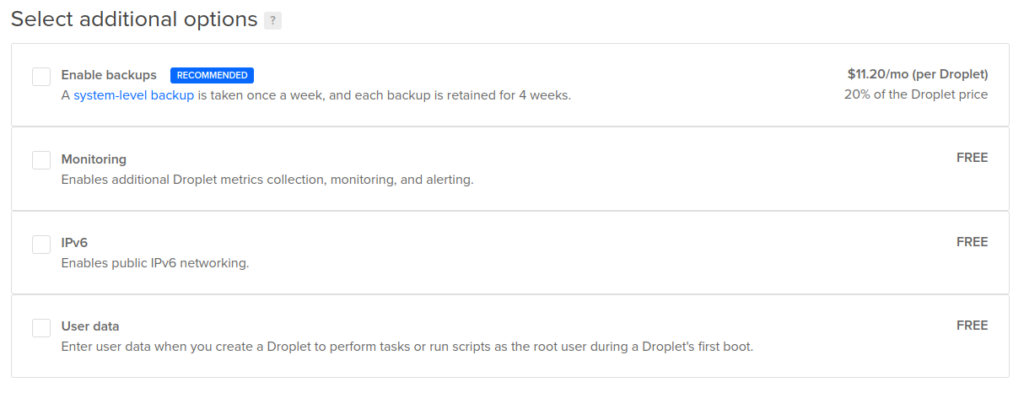
After authentication, You will see a list of additional options just like the following image. None of them are mandatory. You can select the options as per your requirements.
I recommend you to enable Automated Backups if you are going to host important websites on the droplet.
Once you have selected the addtional options, scroll down a bit to find the Finalize and Create section. It is the last section containing 4 different options just like the following image.
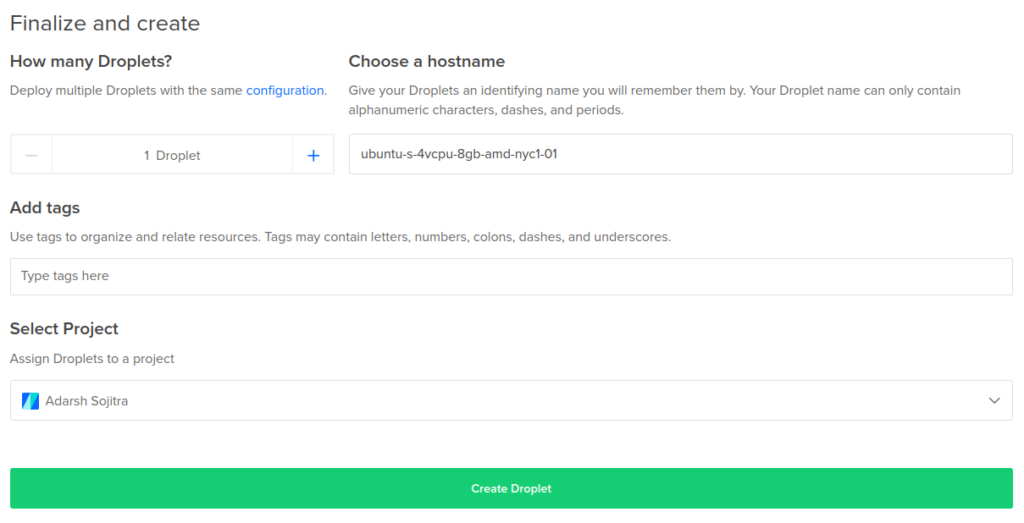
First of all, select the number of droplets you want to create with identical configuration. By default, it is set to 1 droplet. But you can increase the number of droplets if you want to create multiple droplets at once.
The second option is to select the hostname. Hostname is not much important and you can use the hostname for identification. You can set any name you want.
The third option is to add tags to your droplet. Tags help you categorize your droplets if you are managing a lot of droplets in your Digitalocean account.
The last option in the server creation wizard is to select the project. By default, you will have 1 project in your Digitalocean account. You can change the project if you want.
Finally, click on the Create Droplet button given at the bottom of the server creation wizard to start the droplet creation process.
It will take a minute or two for Digitalocean to get your droplet ready. Once it is ready, You can access the Droplet dashboard by clicking on the name of the droplet. So, this is how you can create a new droplet in Digitalocean.
Now let’s understand how to manage and monitor your droplet from Digitalocean.
Monitor Droplet Resources
Once you have a droplet, You have to monitor just how much resources your sites are using. Your droplet has a limited resources. For example, If you are using a smallest CPU optimised droplet, You will have 2 vCPUs, 4GB RAM, 25GB SSD and 4TB bandwidth.
If you have a typical WordPress site on it, and if the traffic is growing, You have to look for the spikes in the CPU usage chart if site becomes slow. So that you can upgrade your droplet or optimise your site to improve the resource usage.
Digitalocean allows you to monitor the CPU usage, Bandwidth usage and Disk operations performed on the droplet.
To access the graphs, You just have to click on the Droplet from the list of droplets given on the Digitalocean dashboard. You will see the charts of the resource usage, Just like the following image.
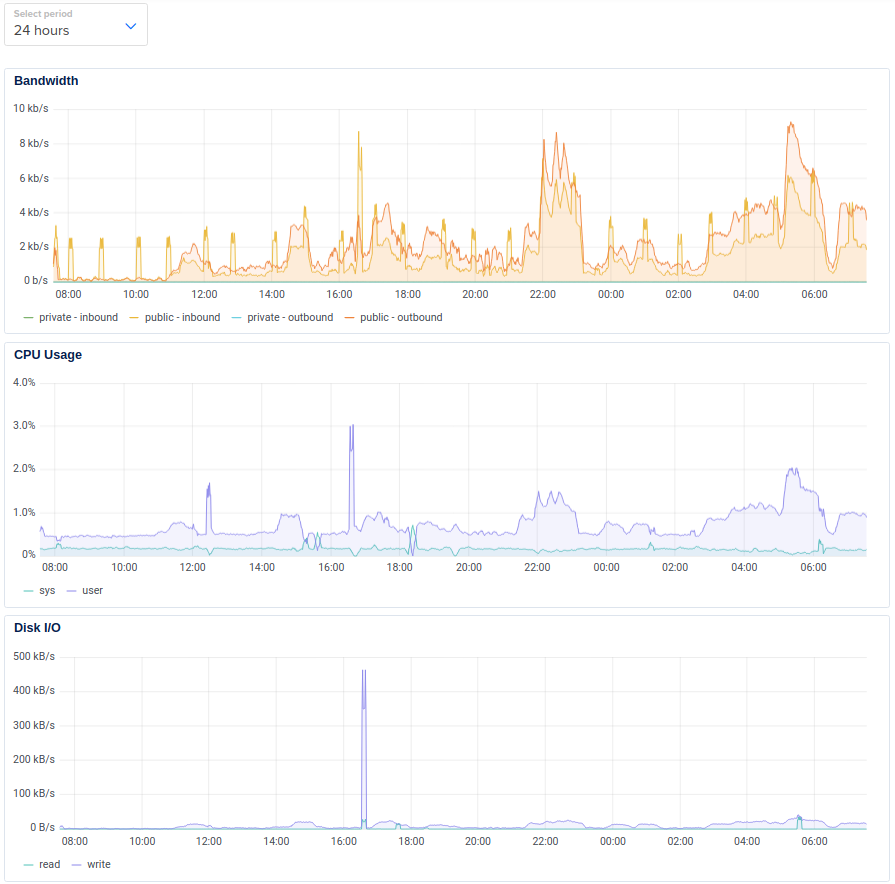
These three charts allow you to monitor everything that can be monitored at physical level. Let me explain each chart in detail.
1. Bandwidth Usage
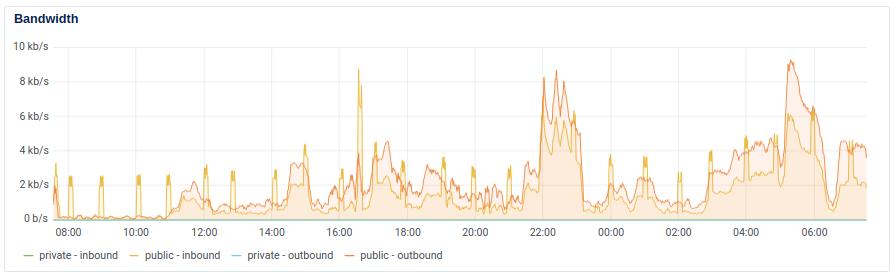
The chart looks like a simple bandwidth usage chart. However, It tracks all different types of network usage metrics.
Your Droplet is connected with 2 types of network all the time. They are:
- Private Network: Private network is the local area network. It allows you to transfer data from your one droplet to another. Usually the data transferred in a private network is totally free of cost. So, You can transfer as much data as you want without using your bandwidth usage quota.
- Public Network: Public network is the internet. Public network is all the data transferred between the droplet and the visitor’s browser. For example, If you have a 1MB homepage, and you receive 1000 visitors in a day, Your bandwidth usage will be 1000MB, which is close to 1GB per day. You get a specific amount of public bandwidth usage for free with a droplet. And you are charged per GB if you exceed the free usage limit.
With each type of network, You have two types of traffic. Inbound and outbound. Here is the detailed explaination.
- Inbound traffic: Inbound traffic is the data your droplet receives. Your droplet can receive data from private network as well as public network. For example, the form submission data will be in-bound public network data.
- Outbound traffic: Outbound traffic is the data that a droplet sends to the browser or a remote server. A droplet can send data to private as well as public network. For example, A javascript file that animates a section of your website.
In the bandwidth monitoring chart, You see 4 metrics. Each one represents the inbound and outbound traffic on both the types of networks.
2. CPU Usage
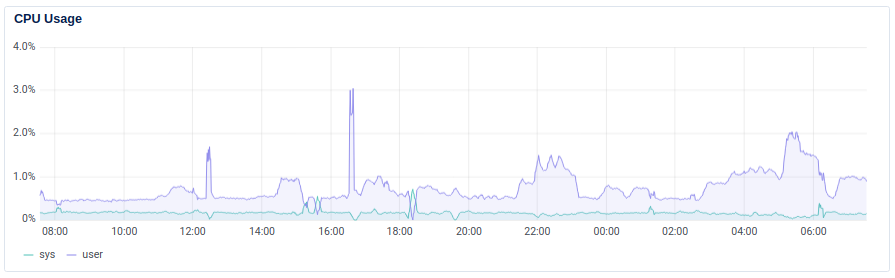
CPU usage is as simple as it sounds. It is the % of CPU your sites, users and system is using on the droplet. With shared CPU, You might or might not be able to use 100% of the CPU all the time. But if you have a dedicated droplet, You will have access to all the computing power your CPU cores has.
This chart shows two lines. The “sys” line shows us the CPU used by the operating system. And the “user” line shows us the CPU used by all the users and other services that are installed after the operating system is installed.
3. Disk I/O
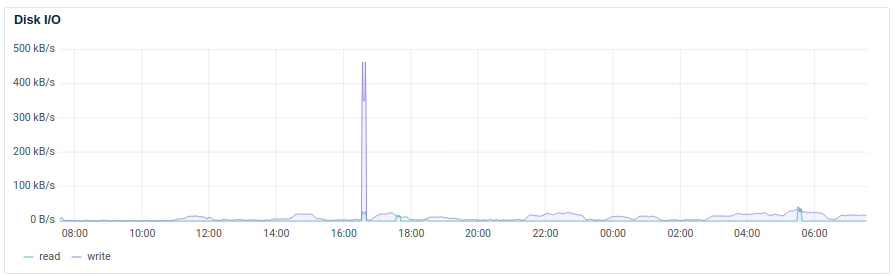
The Disk I/O chart has two metrics. It is related to all the operations happening in the hard drive or the SSD of the server. In any storage device, the two important metrics to monitor are read and write operations.
- Read operation: Read operation reads the data stored previously in the device. For example, opening a file.
- Write operation: Write operation adds or updates the data in the device. For example, Editing a file or creating a new file.
This chart can be helpful to identify many on-going issues. In most cases, You will never have to refer this chart, but it’s good to know why it is there.
Reserve an IP Address
First question, Why do you want to reserve an IP address?
By default, Your domain points to the IP address of your server via DNS. In case if you want to change a droplet for your website, You would have to update the IP address in DNS and wait for the DNS to resolve. However, If you have a reserved IP address, You can connect it with any droplet at any time. So, You do not have to update the IP address anywhere in DNS or any management panel you are using.
If you are a ServerAvatar user, You would not have to update IP address in ServerAvatar if you are using reserved IP address. After one-click migration or clone, You can simply assign a reserved IP address to a new droplet.
Now let’s see how to create and manage Reserved IP address.
First of all, go to the list of Droplets. Then click on the droplet name to open the droplet dashboard.
After that, click on Networking option from the left sidebar.
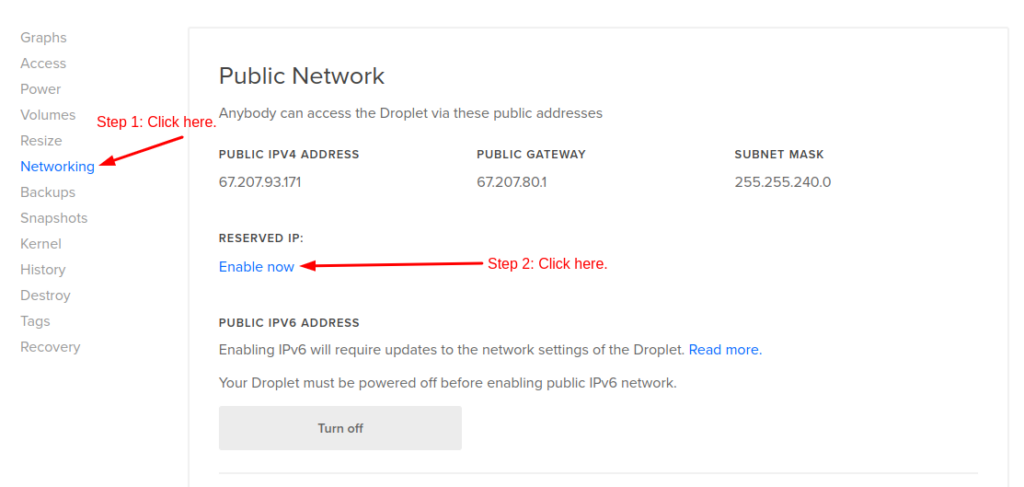
Once you are in the Networking section, You will see Reserved IP option under the Public Network section.
Click on Enable Now link to create a new reserved IP address. It will redirect you to a page where you can reserve an IP address. It will look like the following image.
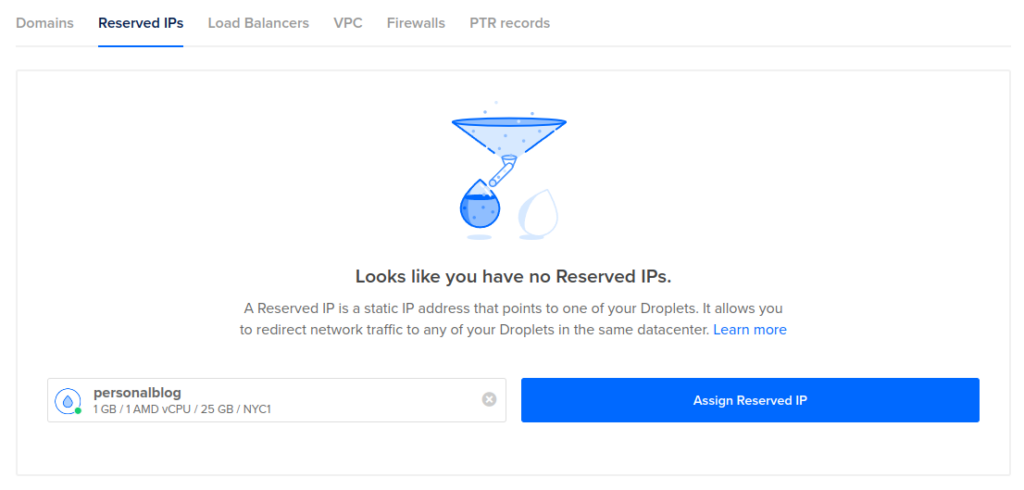
Click on the Assign Reserved IP button to create a new reserved IP address. It will instantly create and assign a reserved IP address to your droplet. The whole process hardly takes 30 seconds. Once the process is done, You will see a screen just like the following image.
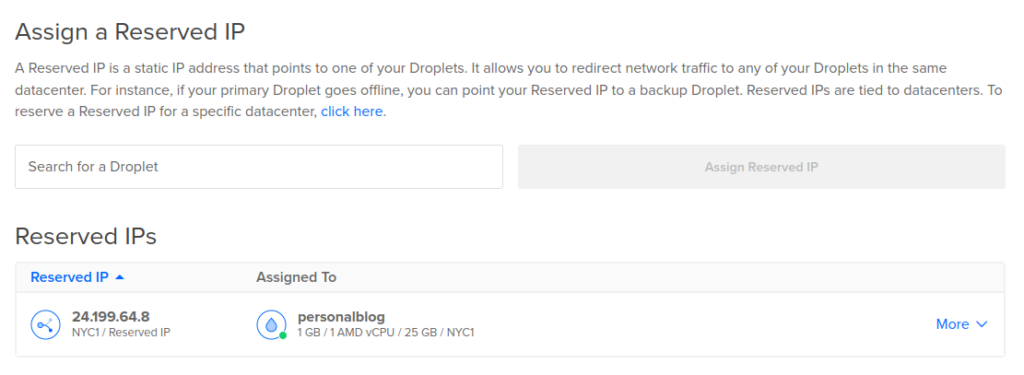
Now the IP address is reserved for your account. You can re-assign, un-assign or delete this IP address whenever you want. We recommend you to use reserved IP address if you want to migrate your site in future to a new server.
Note: Reserved IP addresses are free if they are assigned to a droplet. If a specific reserved IP is not assigned to any droplet, It will incur charges of $5 per month per reserved IP address.
Access the Console
Console is a method to connect and interact with your droplet. When you create a fresh droplet, You either have to configure it with SSH or access the SSH to install any easy to use management panel.
Console creates an SSH connection with your droplet. You can execute the commands to install or configure a package or a software.
If you are not a technical person, It is going to be a steep learning curve. If you do not want to learn whole configuration, management, monitoring in linux, You can use ServerAvatar or any other server management panel.
In any case, To create an SSH connection with your server directly from Digitalocean dashboard, You can follow the below given steps.
First of all, access the list of droplets and click on a droplet to access it’s dashboard.
On the droplet dashboard, You will find Console option in the information panel just like the following image.

Once you click on console, a new window will appear. It will start authentication and start up process. Once fully authenticated, You will be connected with your droplet via SSH.
Alternatively
If you are a Linux or a MacOS user, You can use Terminal app to connect with your droplet via SSH. In case if you are a Windows user, You can download and install Putty software to connect with your server via SSH.
If you want to use ServerAvatar to manage your sites on the droplet, execute the following commands in the console.
wget https://srvr.so/install
chmod +x install
./install
The installation and configuration process will start immediately. It will take around 5-7 minutes for the full installation to complete. Once the installation is complete, You will be able to manage your sites on the droplet using ServerAvatar as a management panel.
Turn off or Restart a Droplet
It is a good practice to re-boot a server after specific updates or after a specific time. Similarly, sometimes we do not need a droplet active, but we do not want to lose the data or configuration, so we power off the droplet temporarily.
You can restart or power off a droplet from the droplet from Digitalocean. Let’s first see how to do that.
Power off a Droplet
If you do not want a droplet temporarily, but you want it to be active in a minute whenever required, the best thing to do is power off a droplet. Another use case is, When you migrate a site from one server to another, You can power off the old droplet temporarily to make sure the migration is successfully done. Once sure, You can delete the droplet.
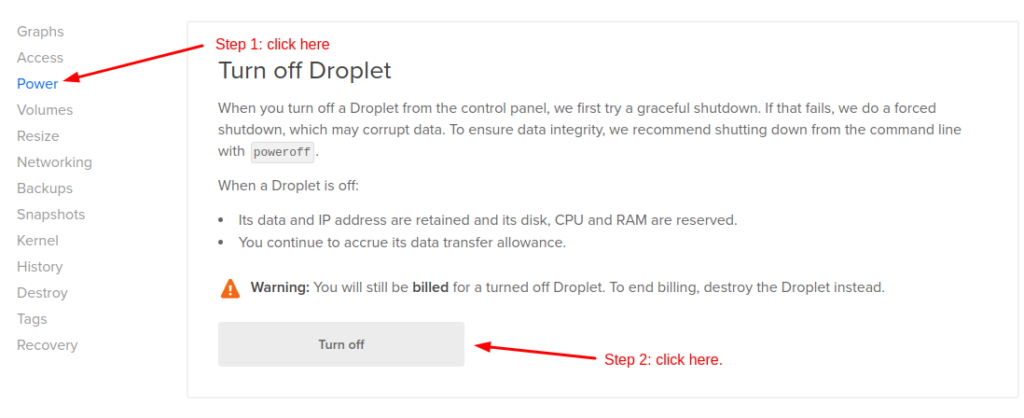
To power off a droplet, Go to the list of droplets and click on the droplet you want to power off. From the list of options available on the left side of the droplet dashboard, click on the Power option.
In that section, the first part is Turn off Droplet with a simple Turn off button. Click on that button to power off the droplet.
Now let’s see how to restart a droplet.
Restart or Reboot a Droplet
To restart or reboot a droplet, Go to the Power section just like the Step 1 given in the above image. Once there, scroll a bit to find Power Cycle option.
It contains a bit of the information and a button to restart your droplet. Just like the following image.
Note: Use this method only when you cannot execute “sudo reboot” from the command line interface. If you are restarting from the ServerAvatar, it will be done safely using the command by default.

Click on the Power Cycle button to start the reboot process. It will take less than a minute for the process to complete.
Create and Manage a Firewall
Firewall at cloud platform is important. Luckily, Digitalocean allows you to create, manage and assign firewall to a specific droplet. We recommend you to create a firewall for all of your droplets. It creates a secure environment for your server by not allowing incoming requests on ports that are not in use.
A Linux server has a 65535 ports used for/by various services to communicate over the internet or with other networks. Sometimes, You do not want to “Accept” the requests on specific ports like MySQL and many other sensitive services.
To solve that, You can create a firewall for your droplet. Once the firewall is ready and attached with the droplet, it will only accept requests on specific ports. The following set of firewall rules is good enough for majority of the websites or apps.
- Allow all Outgoing requests (default)
- Deny all incoming requests (default)
- Allow incoming requests on 22 (SSH)
- Allow incoming requests on 80 (HTTP)
- Allow incoming requests on 443 (HTTPS)
If you want to allow remote connections for MySQL databases hosted on your server, You have to create a new firewall rule to “Allow incoming requests on 3306 (MySQL)”.
Similarly, If you are using ServerAvatar to manage your droplet, You have to “Allow incoming requests on 43210 (ServerAvatar)”.
How to set and edit firewall rules?
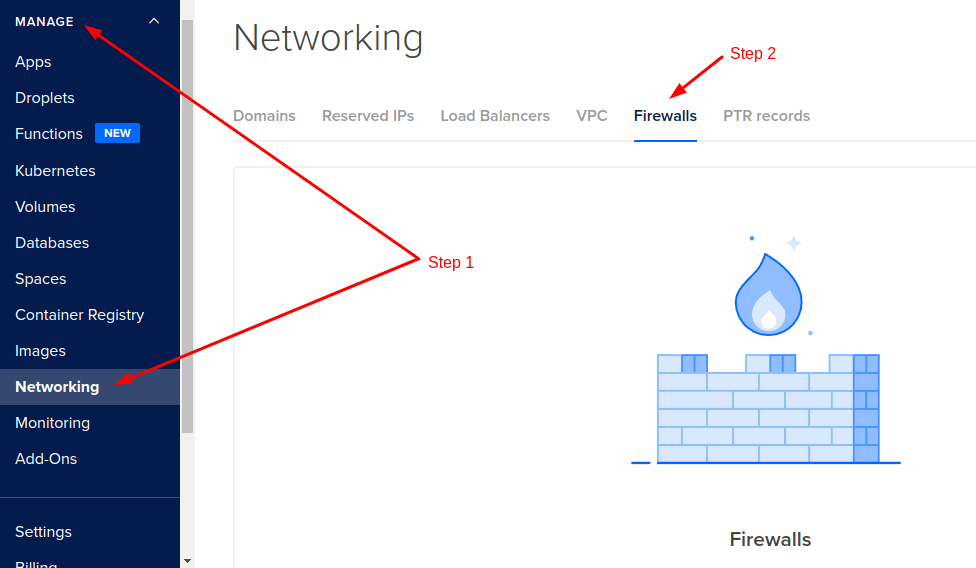
To do that, Log in to your Digitalocean account and click on the “Manage -> Networking” option from the left sidebar.
Now you will see many tabs like the following image. Click on the Firewalls tab to create new firewall or to see the list of active firewalls.
In the Firewalls section, You will find a Create Firewall button. Click on the button to see a firewall creation form just like the following image.
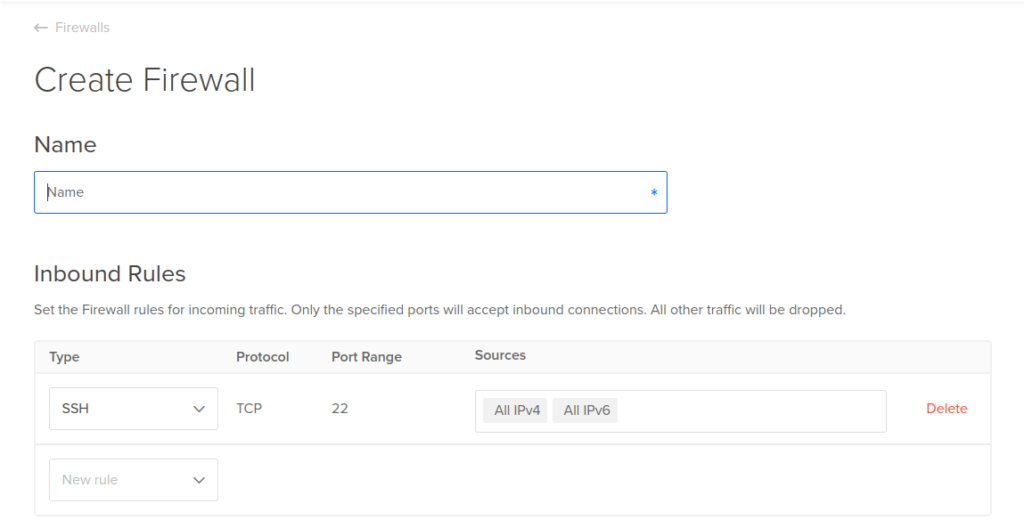
On the firewall creation form, First enter the Name of the firewall (just for identification). Then, scroll down a bit to see two sections called Inbound Rules and Outbound Rules.
- Inbound Rules: These rules affect incoming requests. That is, If someone is trying to access your site or any other service running on your server. By default, All in-bound requests are denied by the server if firewall is enabled.
- Outbound Rules: These rules affect outgoing requests. That is, If your website is requesting data via API from any other application. By default, All outbound requests are allowed on any port.
Note: From the list of 5 firewall rules I mentioned above, the first 3 rules are already set when you go to the firewall creation form. You can edit them if you want. But the first 3 rules are very important for almost all cloud hosting requirements.
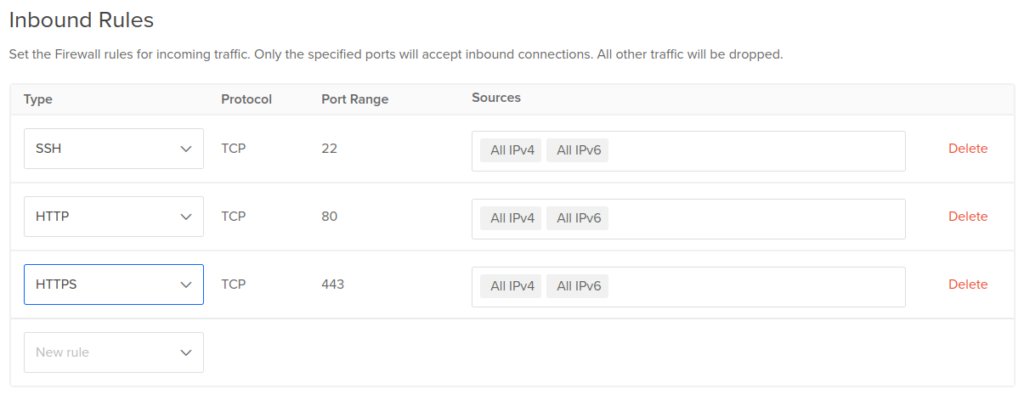
Now we have to create two more rules manually to allow incoming requests on HTTP and HTTPs. For that, find New rule option under the Inbound Rules section of the firewall creation form. From the drop-down, select HTTP and HTTPS.
Once you select HTTP or HTTPS, Digitalocean will fill up other details like Port, Protocol and Sources automatically for default values. Once done for both HTTP and HTTPS, the form should look like the following image.
If you are using ServerAvatar to manage your sites and servers, You have to add one more rule. So, create a new rule with following information.
- Type: Custom
- Protocol: TCP
- Port Range: 43210
- Sources: All IPv4, All IPv6
Once done, You can start ServerAvatar installation on your server. You can execute the commands given on the homepage to start the installation.
In the Outbound Rules section, You just have to confirm if the following rules are present.
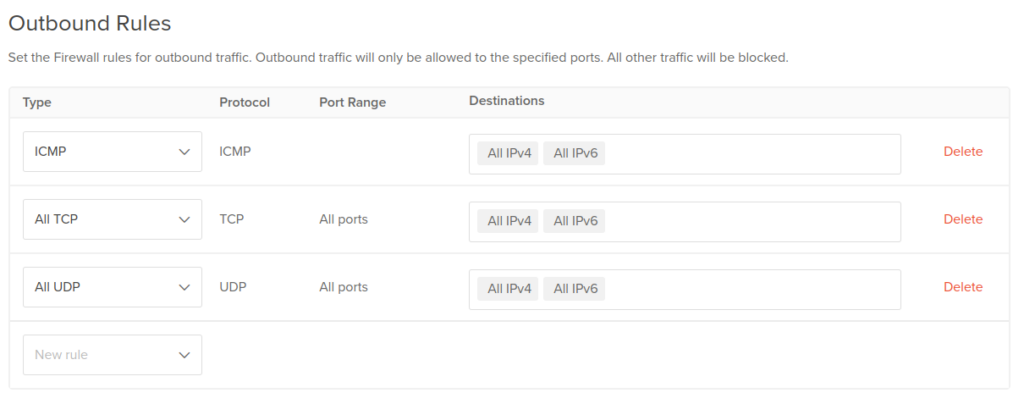
If the rules are present, scroll down a bit to find the Apply to Droplets section. In that section, You will see a dropdown to select droplets. You can apply a single firewall to multiple droplets too. So, You can select 1 or more than 1 droplet.
For this example, I am selecting personalblog droplet. After you have selected the droplets, click on the Create Firewall button to create the firewall and apply it to all the selected droplets.

Once the firewall is created, You can modify rules, droplets or delete it. You can also apply the same firewall to the new droplets you create.
Now, Let’s see how to create and manage backups of your droplet in Digitalocean.
Manage Droplet Backups and Snapshots
Backups are very important and highly recommended. When something goes south, backups save your life. Digitalocean allows you to create and manage backups and snapshots for your droplet to help you restore the droplet to previous version whenever required.
There are two ways you can create and manage Droplet backups. They are:
- Automated Droplet Backups
- Droplet Snapshots
Let’s understand both of them in detail. Let’s first understand Automated Backups.
Automated Droplet Backups
Digitalocean allows you to enable Automated Backups for your droplet. If you enable the option, Digitalocean will create weekly backups for you droplet on automation. You do not have to create backups manually. And it provides weekly backups only.
To enable Automated Droplet Backups, Login to your Digitalocean account and click on the droplet name from the list of droplets available in your account.
From the left sidebar of the Droplet dashboard, click on the Backups option. If automated backups are not enabled, You will see a screen just like the following image.
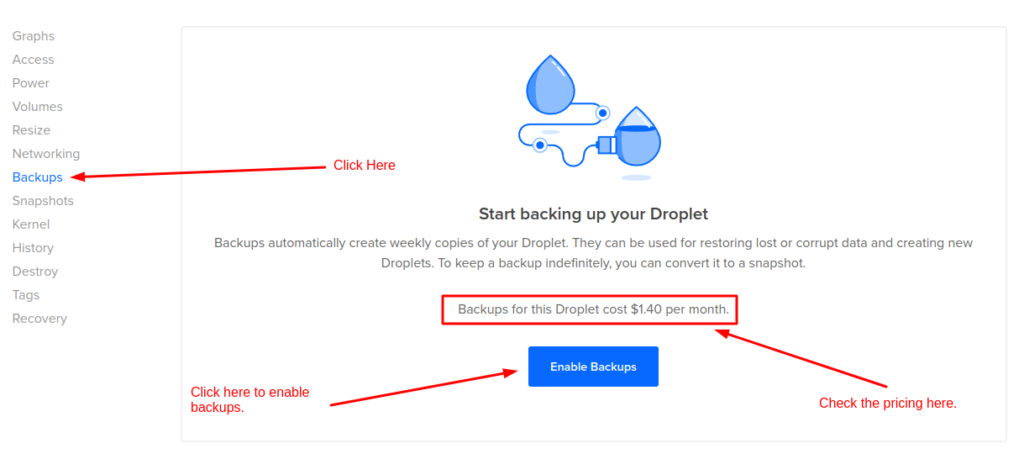
Now, click on the Enable Backups to instantly enable automated backups for your droplet. Once it is enabled, Digitalocean will create and store a backup for your droplet every week. It will also show you the next date and time of the backup.
Before enabling backups, do not forget to refer the pricing. The pricing will vary from droplet to droplet. But usually it is 20% of the value of the droplet.
You can also disable automated backups. If the backup plan is enabled, You will see an option to disable backups and the list of available backups, just like the following image.
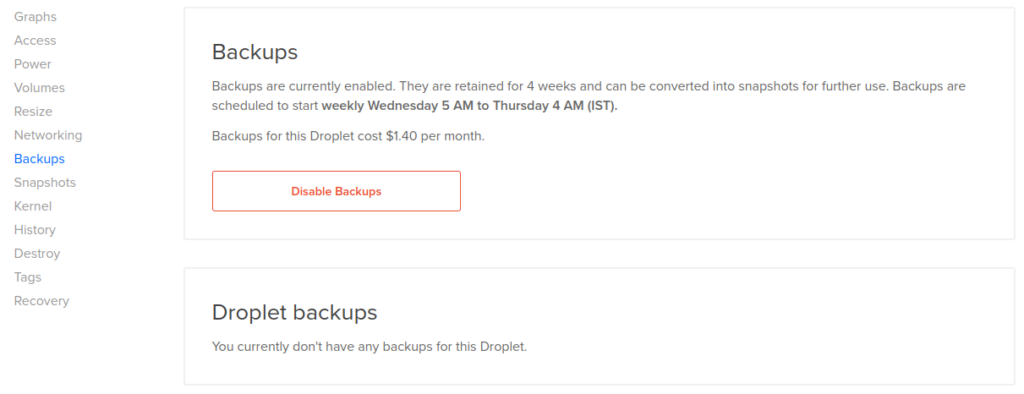
To disable automated backups for your droplet, just click on the Disable Backups button under the Backups section. The automated backup plan will be disabled instantly.
This is the automated backup plan in Digitialocean. However, We can also manually create backups using snapshots option. Let’s see how to do that.
Droplet Snapshots
Snapshots are the instant backups of your droplet. When you start creating a snapshot, Digitalocean will create an exact copy of the full droplet as it was at that time. Unlike automated backups, You can create snapshots any time. And you can create and delete as many snapshots as you want.
To create and manage droplet snapshots, Go to the list of droplets and click on the droplet you want to backup using snapshots.
On the droplet dashboard, find and click on the Snapshots option from the left sidebar. You will see two options in that section. The first option is to create a snapshot of a droplet now and the second one is the list to manage existing snapshots.
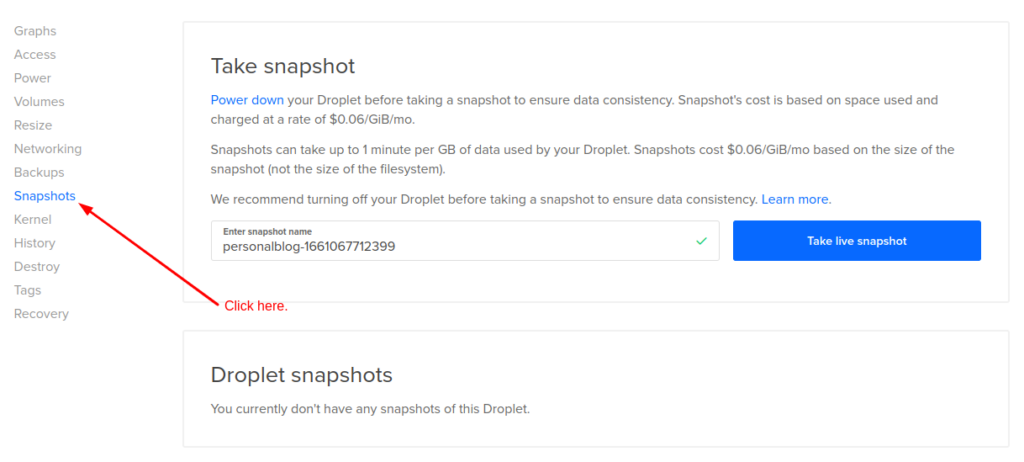
To create a new snapshot, just enter the name of the snapshot for identification and then click on the Take live snapshot button to instantly start the snapshot creation process.
It is a good practice to put your sites in maintenance and power off your droplet before creating a snapshot. The reason is, If the data is updated on the droplet while the snapshot creation process is going on, The result will be inconsistent data when and if you restore a snapshot.
Once the snapshot is ready, You will see it in the second section of the page. Just like the following image.
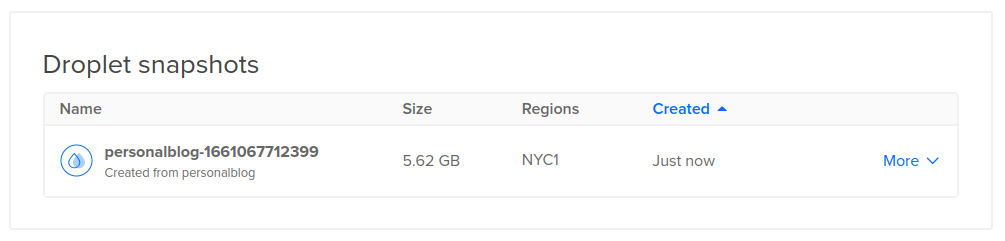
Now you can perform the following operations on a droplet snapshot.
- Rename: This option allows you to rename your snapshots.
- Create Droplet: Create a new droplet from the existing snapshot.
- Add to region: Select the regions where you want the snapshot to create or restore droplets.
- Transfer Snapshot: Transfer the snapshot to the team or via E-mail address to different Digitalocean account.
- Restore Droplet: Restore the same droplet from the snapshot.
So, this is how you can create and manage Snapshots for your Droplets. Snapshots are good when it comes to the website migration and change in location of the Droplet. They also help you create a basic templates for your droplets that you can copy over and over again to save time.
Now let’s see How to upgrade and downgrade Digitalocean Droplets.
Resize a Droplet
When the traffic on your website grows or decreases substantially, You have to upgrade or downgrade your Droplet accordingly. If the traffic rises and the sites are slowing down, you have to upgrade your droplet. If the traffic drops, You have to downgrade. There are lots of scenarios that require you to change the configuration of your droplet.
Digitalocean is a very special cloud platform in this case. It is because Digitalocean allows you to temporarily upgrade your server. Other cloud platforms will only allow you to upgrade your server permanently.
Let’s understand How to upgrade or downgrade a droplet. There are two types of upgrades. They are:
- Temporary Resize (CPU and RAM only)
- Permanent Resize (CPU, RAM and Disk)
We will learn about both of them in detail. Let’s get started with the temporary upgrade or resize.
Temporary Droplet Resize
If your site is going to receive a lot of traffic in upcoming days, You can temporarily resize your droplet so that you can downgrade it again when the traffic is gone. The only catch is, The disk on your server will stay the same. It means, If the disk size of your server was 50GB pre-resize, It will be the same after resize.
To upgrade the CPU and RAM temporarily on your droplet, click on the Droplet name to access the Droplet dashboard and then click on the Resize option from the left sidebar.
Once there, You will see two options just like the following image. By default, The temporary upgrade option will be selected. Remember, CPU and RAM only is the temporary upgrade. If you also want to upgrade disk, The change will be permanent.
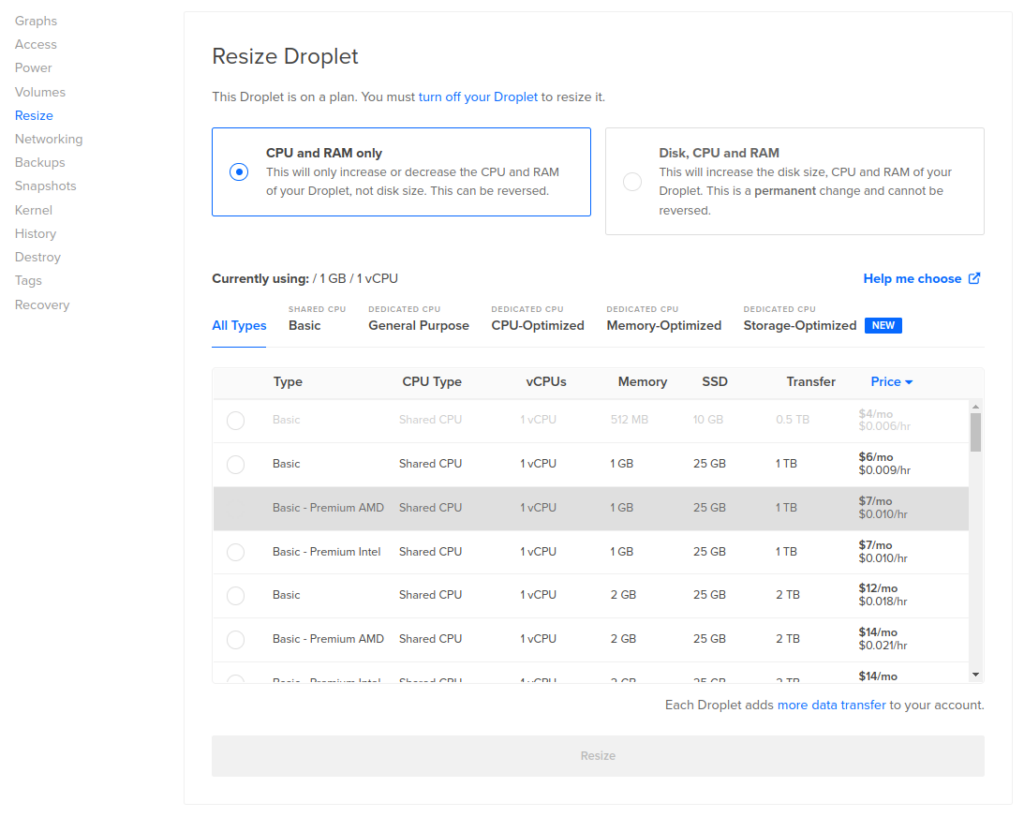
Now select a desired droplet based on your requirements. Finally, click on the Resize button given at the bottom of the form to start the temporary droplet resize. It will take a few minutes to apply changes.
Once the resize process is complete, Your droplet will have more CPU and RAM, but same Disk. You can use the same process to downgrade your droplet. You just have to select the smaller droplet size and click on the Resize button to downgrade your droplet.
Now let’s see how to permanently upgrade the droplet.
Permanent Droplet Resize
Permanent Droplet Resize is easier to understand. It is because you are upgrading your droplet with all it’s resources including the disk. The whole process is same as the temporary upgrade. But you have to select DIsk, CPU and RAM option on the Resize page just like the following image.
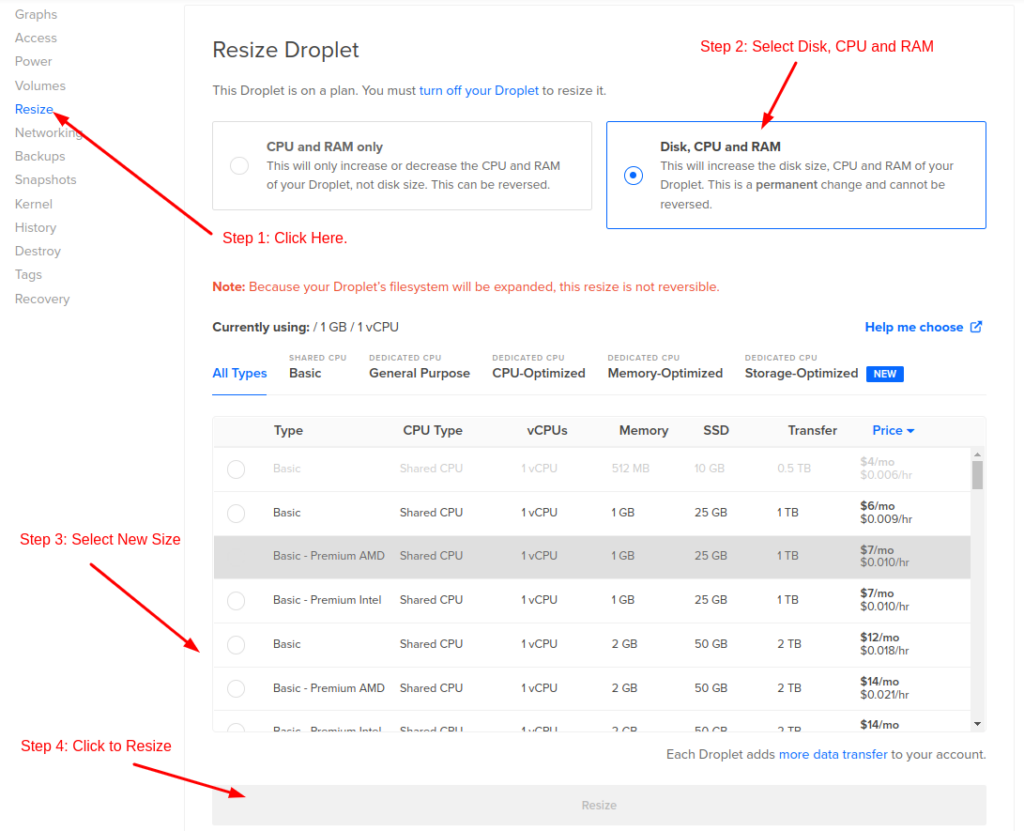
First of all, Go to the Droplet dashboard and click on the Resize option from the left sidebar. Then select Disk, CPU and RAM. Now select the new size of the droplet. Once done, click on the Resize button given at the bottom to start the resize process instantly.
It will take a few minutes for the process to complete. Once done, Your droplet will have new CPU, RAM and Disk including all the other resources.
Only drawback of this method is, You cannot downgrade the droplet once it is permanently resized. If you need more Disk, Permanent upgrade is the way to go. Otherwise, Temporary upgrade is the best!
Reset Root Password of a Droplet
If you are a total beginner, Understand that a root user in Linux is the ultimate system user with all the permissions. There are no restrictions for a root user. If something goes wrong on the server, You most probably have to log in as a root to fix it.
At that time, If you do not remember the root password that you have set while creating a droplet, You have to reset the root password.
You can reset the root password of a droplet from Digitalocean itself. To do that, Log in to your Digitalocean account and from the list of droplets, click on the droplet you want to reset root password for.
From the left sidebar of the Droplet dashboard, click on the Access option. You will see a new page with 3 sections just like the following image.
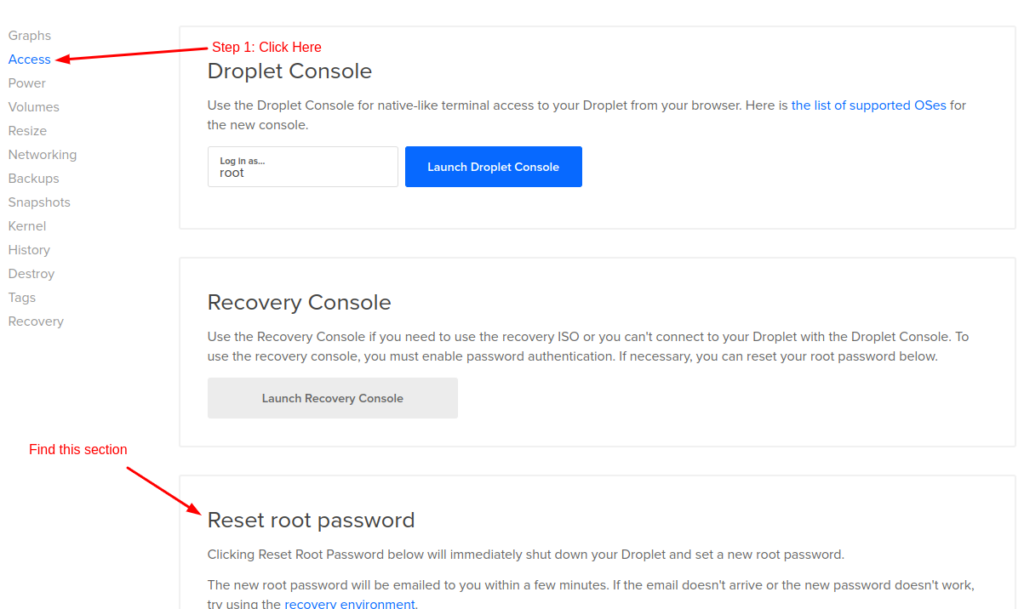
Once you find the Reset root password section, You will find only one button in that section to reset the root password of your droplet.

Click on the button to start the process. It will shut down your droplet temporarily and will set random root password for your droplet.
You will receive the new root password on your registered E-mail address within a few minutes. When you log in to your Droplet for the first time with a new root password, You have to reset the password once.
Note: If you are an experienced developer or a sysadmin, We recommend you to use SSH key over password for authentication. SSH keys are highly secure compared with plain passwords.
View Droplet History
Droplet history will provide you information about the actions happening on the droplet. This is specially helpful if more than one team member is managing the droplet. If multiple team member are managing the server, You can see the operations happening on the server from the Droplet history.
To access droplet history, click on the droplet name from the droplet list. And you will see the full list of all the operations happened on the server, just like the following image.

It is a small feature that tracks all the operations on the droplet. This list is very helpful to identify and correct mistakes in the droplet management. It also shows the execution time of a process if applicable.
Re-install a Droplet
Re-install = Factory Reset.
When you factory reset a phone, All the data is removed and the operating system is installed again along with all the default apps. It’s exactly the same when you re-install a droplet.
Re-install is not a function you will use on regular basis if you are not managing a lot of droplets. But there are some cases where you have to re-install a droplet. For example, If you are initially setting up everything on the droplet and something goes wrong beyond repair. What do you do? Re-install!
Another example, If you are trying out different server management panels, You have to re-install the droplet when you want to change the server management panel.
Why re-install the server when you can uninstall something? Re-install takes a minute or two. Uninstalling a software with a complete purge might take anywhere between 15 to 45 minutes or even more depending on the software.
To re-install a droplet, go to the droplet list in Digitalocean and click on the droplet you want to re-install.
Now, Find the Destroy option from the left sidebar just like the following image. On that page, you will see a Rebuild Droplet section just below the Destroy Droplet section.
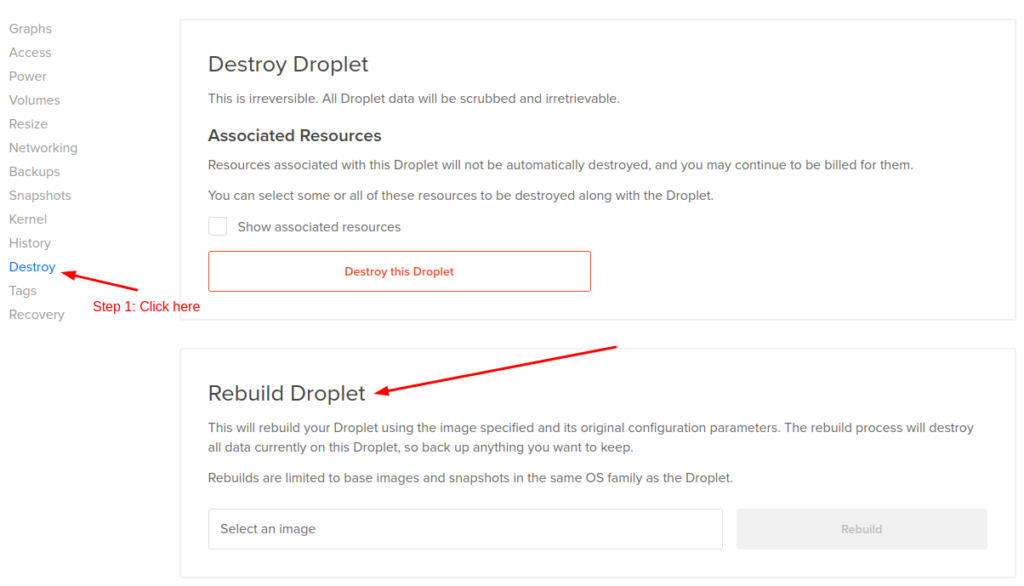
In the Rebuild Droplet section, Click on the Select an image dropdown to select an operating system. You can select any operating system you desire. Once selected, Click on the Rebuild button given on the right side.
The process will start immediately and it might take anywhere between 30 seconds to 3 minutes to complete. Once completed, You will have a brand new droplet with fresh operating system.
Note: Do not re-install/rebuild a droplet if you are hosting websites on that droplet. Or, create a backup before re-installing a droplet. All the sites hosted on a droplet WILL go down. All the data will be wiped once the process is started!
Destroy a Droplet
Destroying a droplet is easiest to understand. If you do not need a specific droplet, You can destroy it. To do that, go to the list of droplets and click on the droplet you want to destroy.
From the left sidebar of the droplet dashboard, click on the Destroy option just like we did while re-installing a droplet. On that page, you will see a section with the title Destroy Droplet. Refer to the following image if you are unable to find the option.
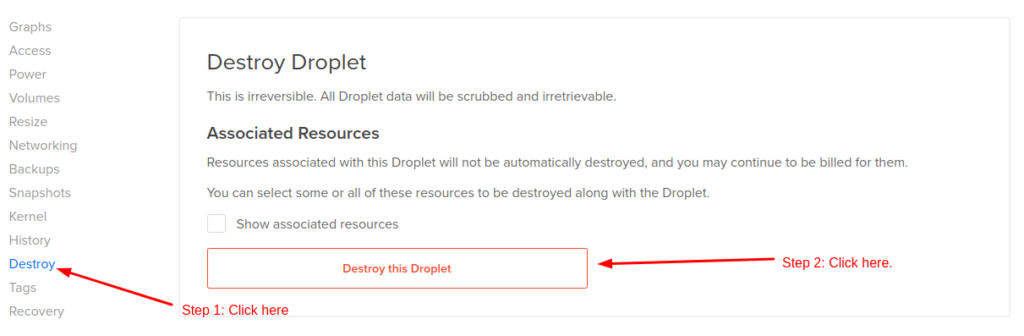
Once you click on the Destroy this Droplet button, It will ask for the confirmation. Enter the name of the droplet to confirm and submit.
The charges of a droplet are calculated on hourly basis. You will be charged for the number of hours you have used the droplet before destroying it.
Now comes the most important and interesting part of this guide.
How to host websites on a Digitalocean Droplet?
If you are still reading, You have read more than 6000 words of content. You saw we explored almost all the options available in the Droplet dashboard. But none of them covers this topic.
It is because Digitalocean allows you to manage servers, not sites. When you create a droplet, You will get a droplet as-is from Digitalocean. You will not find an option to add a new website. It is because managing websites on the droplet is not Digitalocean’s responsibility, it is yours. And it is the same for all the cloud platforms.
So, How do you host your websites on Digitalocean without any technical knowledge of Linux? There are a few ways. They are:
- Hire a system administrator to host and manage websites on a droplet. (Expensive)
- Create a droplet with pre-installed application. (No Management capabilities)
- Use a remote server management panel (Recommended).
We will understand the pros and cons of all the methods.
1. Hire a System administrator
In this case, Just after creating a droplet, You will hire a freelancer and ask them to configure your server and host your websites on it. A good system administrator will charge anywhere between $50-$100 for initial configuration and to host websites.
The problems arise when you want to get help, want to host more sites, solve server errors and perform other tasks at server level. It is because first, they might be slow to respond (We can expect a few hours of delay in response for any human being).
The second issue is, The system administrator might charge you every time you get help from them. As a human is working on your server, It is going to be expensive. Another thing is, You will be sharing root password of your server with a person you have never worked before.
If you still want to go with this method, You can check out gigs on Fiverr or any other freelancing websites.
2. Create DigitalOcean Droplet with Pre-installed Application
This is one way to go. Digitalocean provides pre-installed applications on droplets. At the technical level, imagine you have initially configured a droplet with website on it. Then you take a snapshot of it, and then you create a droplet every time with that snapshot, You will always get a website installed on the server.
To find this option, Click on the Create -> Droplets option from the top-right corner of the dashboard, and in the first section where you select the OS, click on the Marketplace. Once you are there, You will see something like the following image.
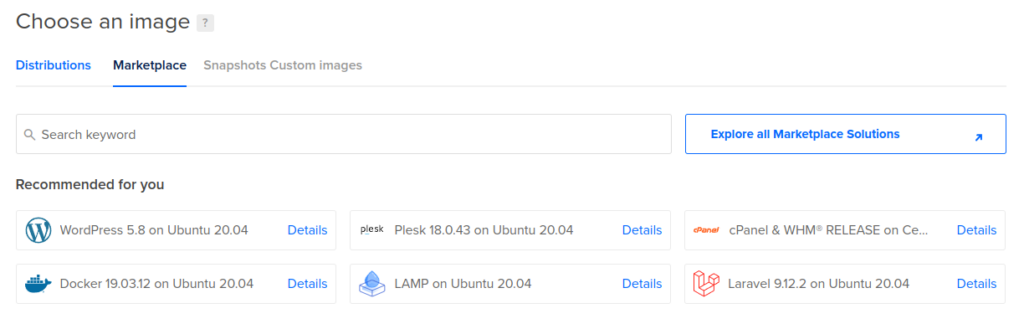
The problem with this set up is, You can only host 1 application on 1 droplet. And the server configuration is basic, in short, not optimised. Here you face one common problem with the first method. If something goes south and server errors arise, You will have to hire a system administrator to sort this out.
The only difference between first and the second method is, in the second method, You do not pay system administrator to initially configure the server. After that, both methods have the same problem.
It’s 2024, And you do not deserve that. To solve all the configuration, learning curve and support problems, We have the 3rd method. Note that this method was not viable before 6 years.
3. Use a remote server management panel
Brace Yourself!
A remote server management panel costs you 90% less than an initial configuration done by a system administrator. And here are some capabilities that any remote server management panel will provide.
- Instant, Automated and Optimised configuration
- Host multiple sites on a single droplet
- Easy-to-use Web Application to manage sites on your server
- No/Negligible learning curve required
- Clone websites, Create Staging Areas, Create Demo Areas
- Migrate sites automaticallly, instantly
- File manager to manage files of your sites
- Get support for server level errors
In short, You do not have to hire a person to host your sites on a Digitalocean droplet. And it is as easy as managing websites on a shared hosting. Here are some screenshots of a ServerAvatar panel, that is, a remote server management panel.
The following is an application management panel. Here you can manage domains for your sites, use Auto Deploy to auto-install applications, manage staging area, files, ssl certificates, PHP settings, backups and a lot of things.

The following is a server management panel. It is where you manage and monitor your server. You can manage things like Applications/sites, Databases, Firewall, Server Alerts, migrations, and lot more.

You can try it by yourself. It is free for 1 month. To get started, create a fresh Digitalocean droplet with Ubuntu 18.04, 20.04, or 22.04 operating system. Then execute the commands given below as a root user to download an inspect script which will check the server configuration and start the installation if the droplet is supported.
wget https://srvr.so/install
chmod +x install
./install
It will ask you if you want to configure your server with Apache, Nginx or OpenLiteSpeed. You can select according to your requirements and hit enter. After that, It will check if server is ready for the installation.
After the installation starts, It will provide you a link to your server management panel. The full initial configuration will be over in 6-7 minutes and you will be able to manage your servers and sites using a panel displayed in the above given images.
Conclusion
Digitalocean is always a recommended cloud platform. It was the first cloud platform we used to test ServerAvatar. And we still use it. Digitalocean made cloud easier to access for beginners. And people loved the cloud platform.
If you are using VPS from any other company and want to migrate somewhere, I recommend Digitalocean. It’s same if you just want to get started with cloud. You will not face a huge learning curve.
Cloud platforms like AWS and GCP are considered highly complicated for beginners or people with small cloud computing requirements. Note that even a thousand dollar bill every month is a small cloud computing requirement.
Anyways, make sure you have not missed the last section of this guide. All of the above is useful if you can manage your sites on your server. Without an easy and fast method, You will face a huge learning curve.
I tried to cover almost everything related to hosting websites on a Digitalocean droplet. However, If you have any questions, feel free to comment. I will keep updating this guide till 2024 ends.