
Managing multiple WordPress sites often means jumping between WordPress admin dashboards, updating plugins one by one, checking theme compatibility, and hoping nothing breaks on a live site. If you need to update WordPress core, plugins, themes, and database files more efficiently, ServerAvatar‘s WordPress Toolkit simplifies that workflow by bringing everything into one centralized dashboard, without logging into wp-admin.
In this guide, I’ll walk you through every tab, show you exactly how to update WordPress safely, and share practical tips I’ve picked up managing WordPress environments for over three years. Whether you handle one site or dozens, you’ll have a cleaner workflow by the end of this.
TL;DR
- WordPress Toolkit lets you update WordPress core, plugins, themes, and your database, all from a single ServerAvatar dashboard
- No need to log into wp-admin to check for or apply updates
- WordPress Core updates show the current version, available updates, and a status badge
- Plugin and theme updates can be applied individually or all at once with “Update All”
- Database updates are handled directly inside the Toolkit to keep your schema synchronized after major releases
- Maintenance Mode toggle protects your live site while you’re working through updates
- The entire workflow happens without ever touching the WordPress admin panel
Why Managing WordPress Updates from One Dashboard Matters?
The WP-Admin Problem
The default WordPress update process isn’t built for scale. Here’s what managing updates the traditional way looks like when you have five sites:
- Log into Site A >> check updates >> update plugins individually >> update theme >> done
- Log into Site B >> repeat…
- Log into Site C >> repeat…
The problem isn’t just the time it takes, it’s the mental overhead of switching contexts, the risk of missing an update on one of your sites, and the fact that wp-admin gives you no unified view of your update status across all sites.
There’s also the issue of updates breaking sites. If you update a plugin and it conflicts with your theme or WordPress version, you often won’t know until your site goes down. And by then, you’re in reactive mode, trying to diagnose and fix the problem rather than preventing it in the first place.
The WordPress Toolkit Advantage
With the WordPress Toolkit inside ServerAvatar, you get:
- Centralized view of all your WordPress update status across every site
- One-click update options for core, plugins, and themes
- Security hardening built in, run it after every update
- Cache management to prevent stale-content issues after updates
- Database management without needing phpMyAdmin
- Staging-ready workflow so you can test before pushing to production
What I appreciate most is that the Toolkit surfaces things you might miss in wp-admin, like whether Debug Mode is still enabled on a live site, or whether your cron jobs are actually running on schedule.
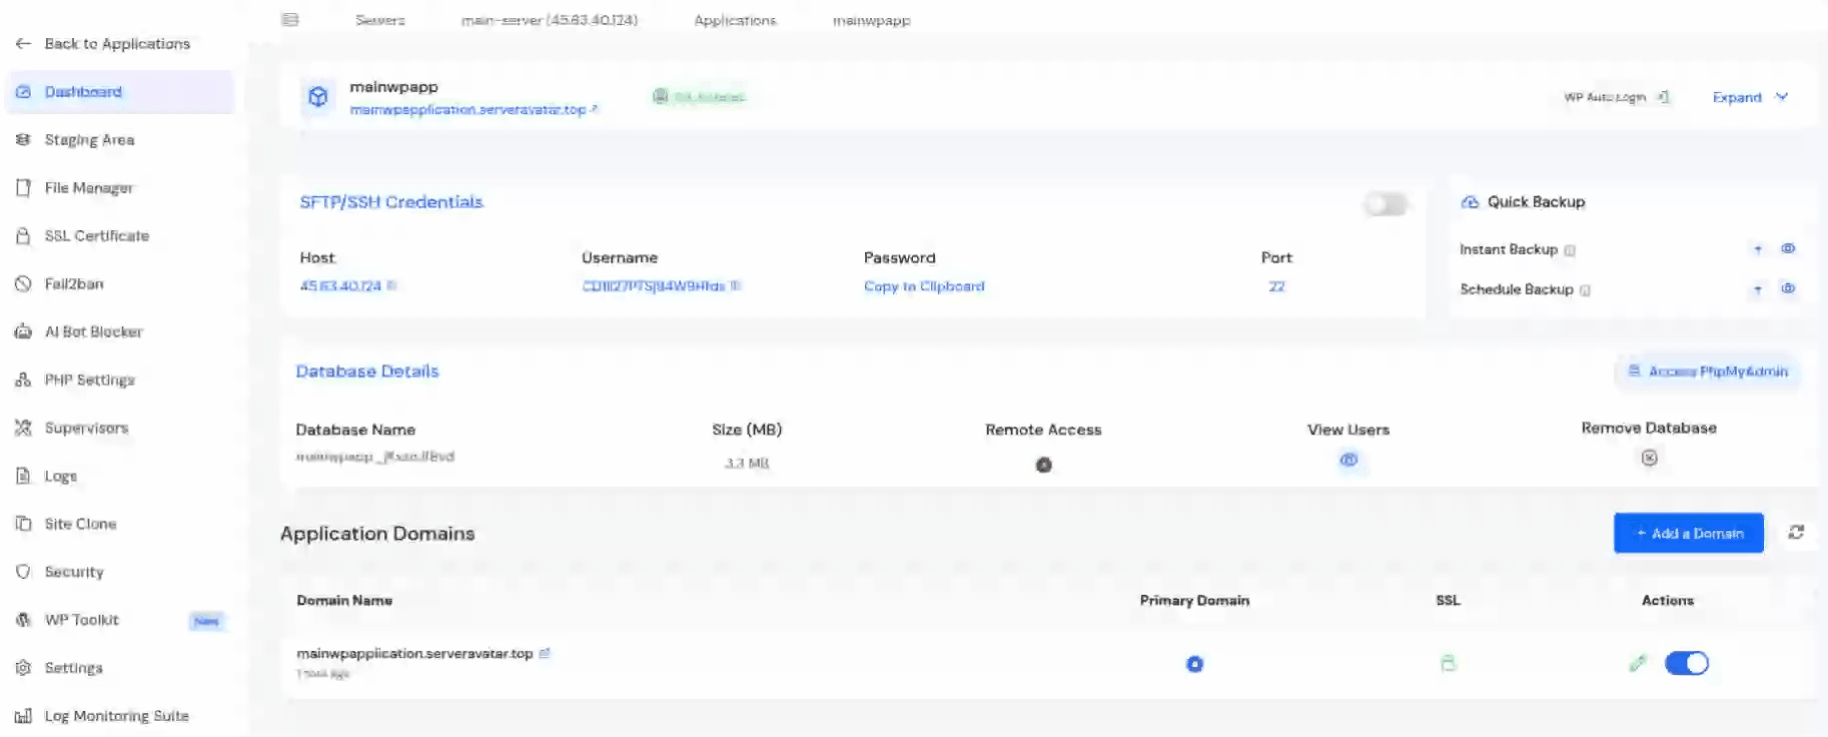
Access the WordPress Updates Section in ServerAvatar
- Once WordPress Toolkit is activated on your ServerAvatar account, you can access it from any WordPress application in your ServerAvatar dashboard.
- Navigate to the Application section from the left sidebar and open your WordPress application panel by clicking on the dashboard icon for your application.
- Navigate to the WordPress Toolkit section. Click the Updates tab
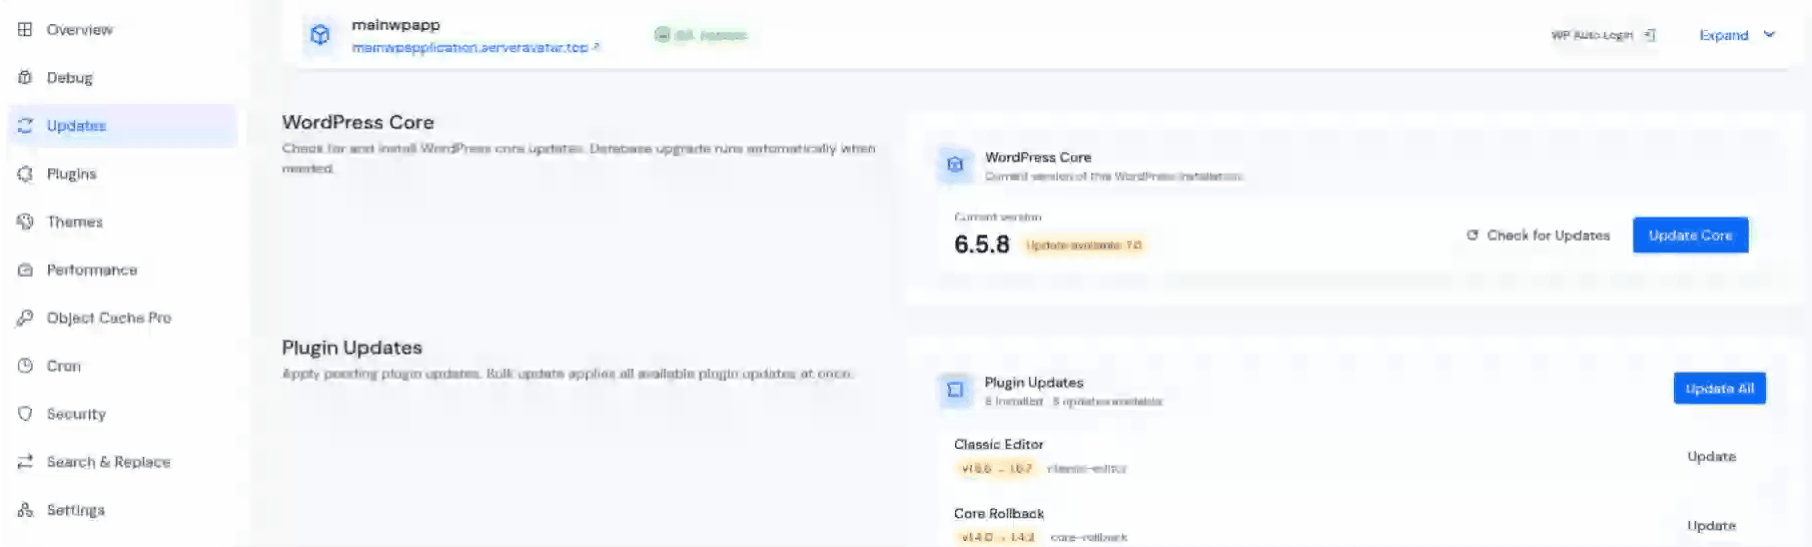
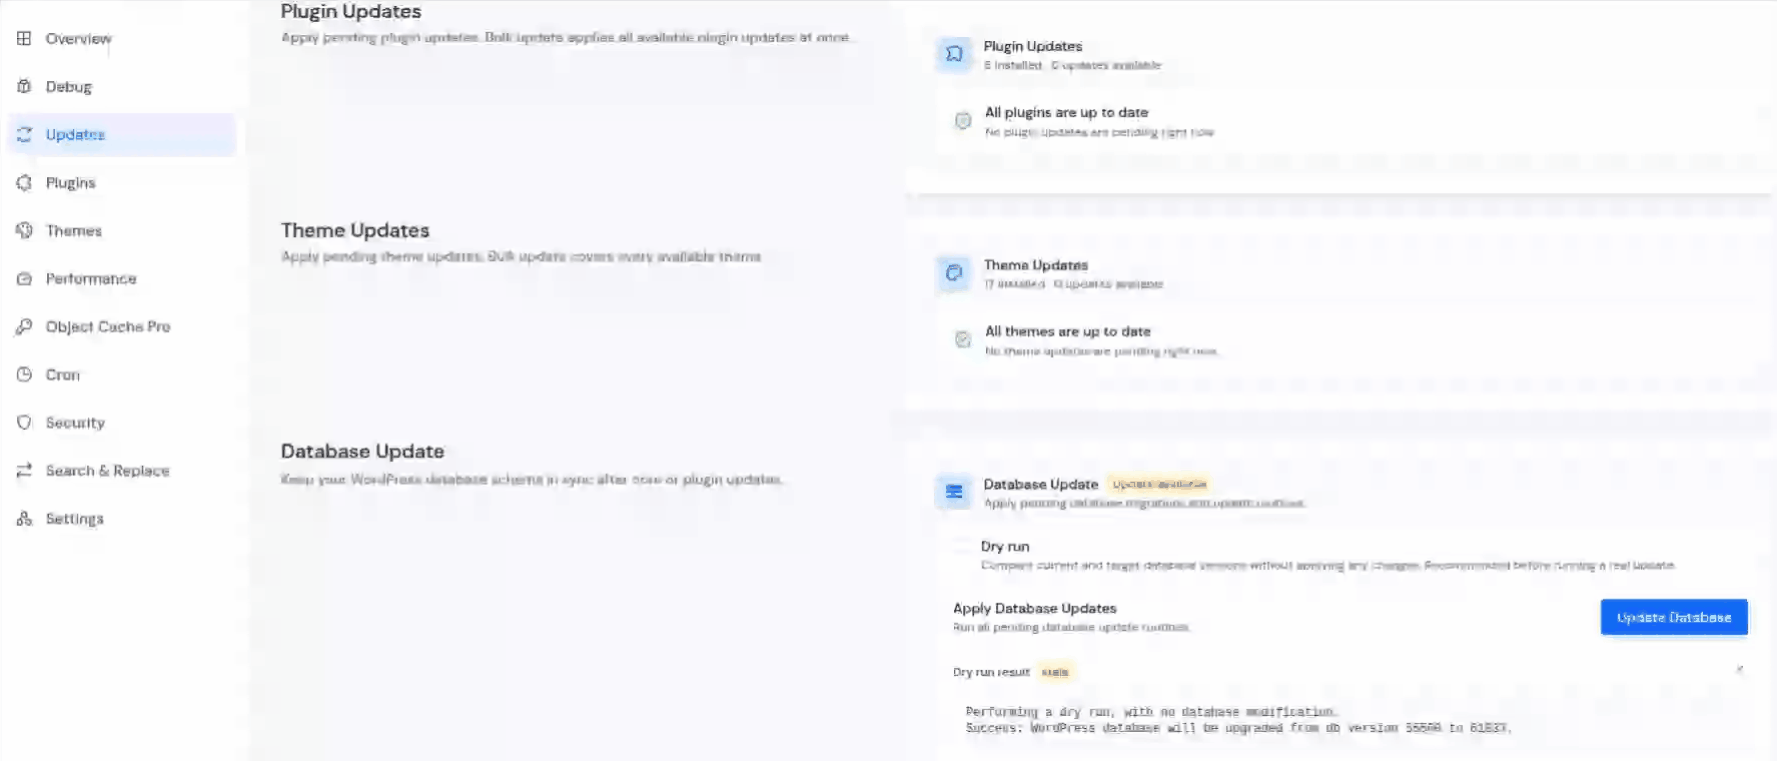
- You’ll land on a page that surfaces every update available across your entire WordPress installation, core, plugins, themes, and database, all at once.
- Each category shows the available updated version.
- The Updates tab gives you a clean, unified view of what’s out of date. You don’t have to guess or dig through wp-admin to find which plugins need attention, it’s all right there.
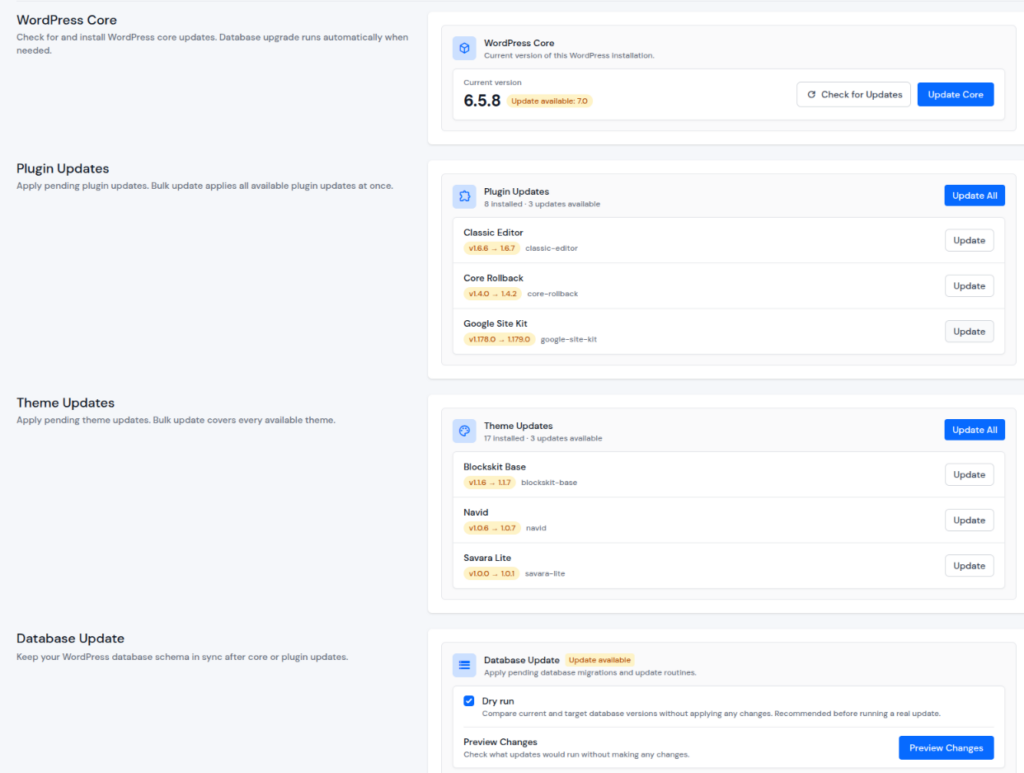
How to Update WordPress Core
The top of the Updates section shows your current WordPress version alongside a status badge that tells you whether an update is available.
What the Core Section Shows
- Current WordPress version: the exact release running on your site right now
- Update status badge: green when you’re current, yellow or red when a new version is available
- Available core updates: any newer WordPress release waiting to be installed
- Check for Updates button: manually refreshes update status if something didn’t pull through
Step-by-Step WordPress Core Update
- Open the Updates section from the left sidebar inside WordPress Toolkit
- Look at the WordPress Core card at the top
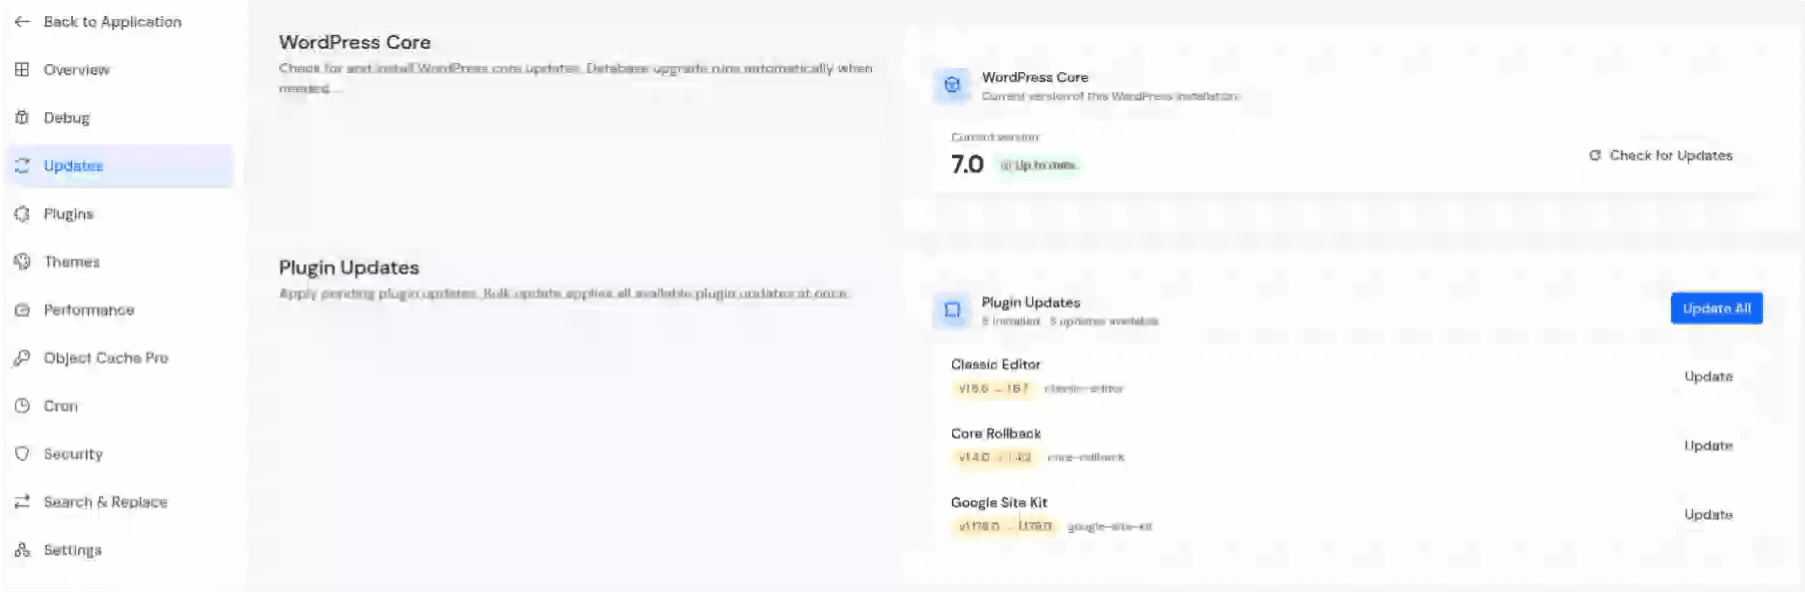
- If an update is available, you’ll see a badge and an Update Core button
- Click Update Core to apply the new WordPress version
- Once complete, the card refreshes to show your new current version
Why You Shouldn’t Ignore Core Updates
WordPress core updates include important security patches, performance improvements, and bug fixes. Keeping WordPress updated helps protect your site from known vulnerabilities and improves overall stability.
One thing to keep in mind: Before applying a core update, it’s a good idea to enable Maintenance Mode from the Overview tab. This keeps visitors from seeing a partially updated or broken page while the update is running.
After the core update finishes, review the Database Update section as well. Major WordPress releases often include database changes that need to be applied separately.
How to Update WordPress Plugins
Plugins are where update neglect hits hardest. A popular plugin might push several updates a month, some for features, others for critical security fixes. If you’re managing multiple client sites, checking each one manually becomes a full-time job.
What the Plugins Section Shows
The Plugins section in the Toolkit gives you a clean inventory of every plugin on your site. At the top, you’ll see:
- Total number of installed plugins
- Number of plugins with pending updates
- Available version upgrades
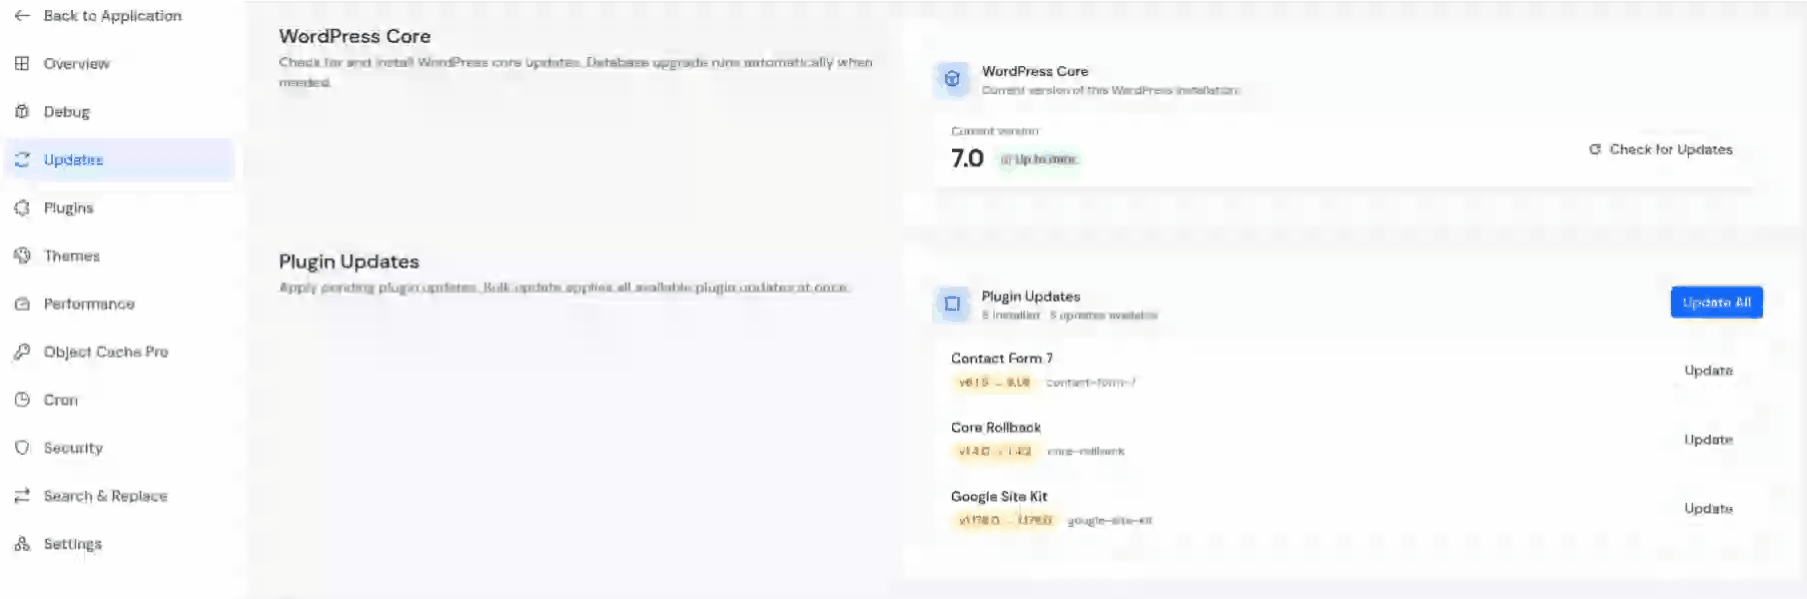
- The plugin is listed with its name, current version, update status, and action buttons.
Updating Plugins: One by One or All at Once
You have two paths here, and both are fast.
Update individually:
- Click the Update button next to the plugin
- The Toolkit pulls the latest version and applies it directly
Update everything at once:
- Hit the Update All button at the top of the Plugins section
- Every plugin with a pending update gets processed in sequence
- You can watch the status update in real time
In a typical WP-Admin workflow, you would navigate to the Plugins screen, tick checkboxes for each outdated plugin, select “Update” from the bulk actions dropdown, and confirm. That’s 4 steps minimum. Here it’s one click.
What to Watch Out For
After updating plugins, take a quick look through your site. Sometimes updates can affect layouts, shortcodes, or plugin settings without showing an obvious error.
If something doesn’t look right, use the Debug tab in WordPress Toolkit to enable logs and check the issue. You can follow our guide on How to Enable Debug Mode, Debug Logs, and Display Errors in WordPress for a full walkthrough.
How to Update WordPress Themes
Themes follow the same pattern as plugins, they need updates too, and for the same reasons: security patches, performance improvements, and compatibility fixes.
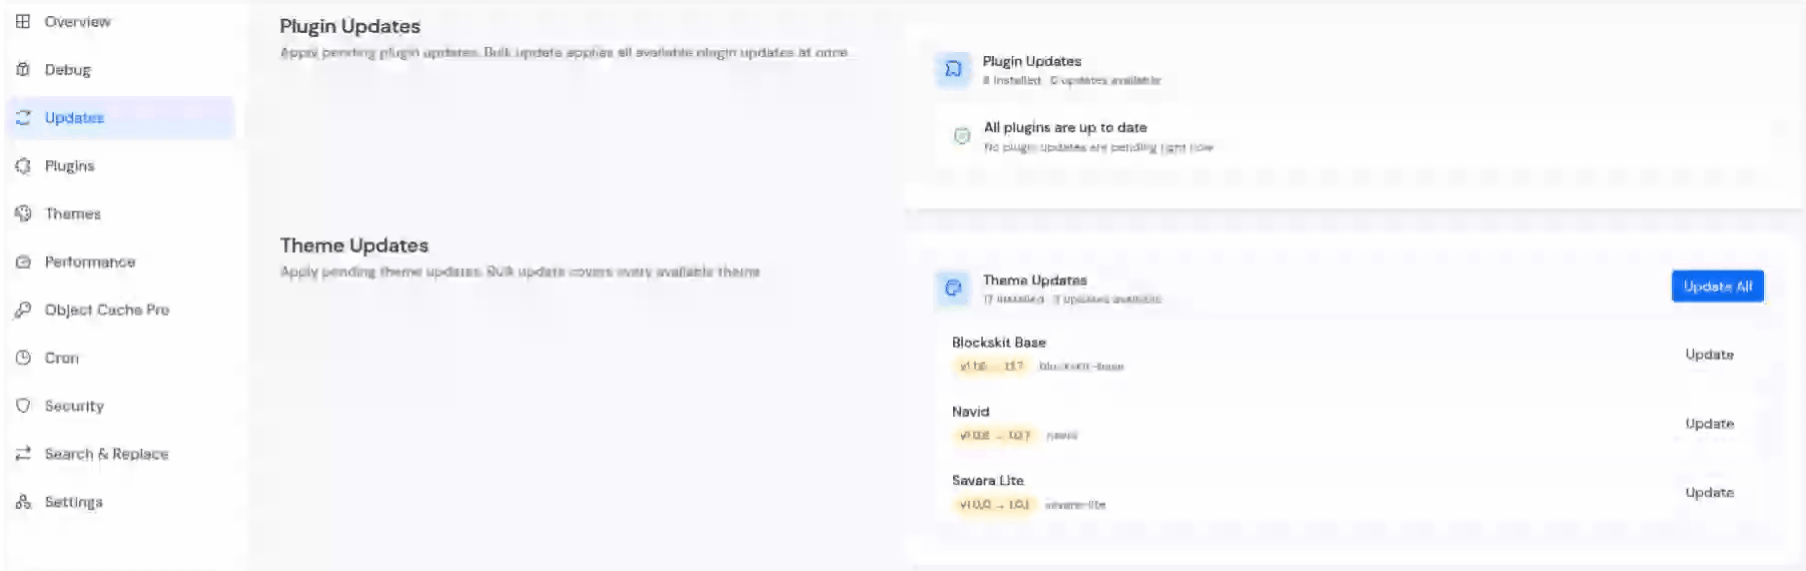
What the Themes Section Shows
- Total number of installed themes, including inactive ones
- Pending updates, themes that have a newer version available
- Available version upgrades, shown next to each theme in the list
This visual layout makes it much easier to identify themes quickly, especially on sites with multiple installed themes.
Updating Themes: One by One or All at Once
Like plugins, you can update themes one at a time or roll through all of them at once.
Update individually
- Locate the theme you want to update, and click the Update button

Update all at once
- Click Update All in the Themes section
- All themes with pending updates are processed together
Note: When updating your active theme, be aware that some theme updates can change how your site looks if the update includes template or style modifications. Always verify the site appearance after applying major theme updates.
How to Update WordPress Database Updates
Database updates are one of those WordPress maintenance tasks that are easy to miss because they usually happen in the background.
But after a core update or certain plugin upgrades, WordPress may need to update database tables, indexes, or internal schema rules before everything works correctly.
That’s why WordPress Toolkit includes a dedicated Database Update panel inside the Updates tab.
What the Database Update Section Shows
Inside this panel, you’ll see:
- Update available status when database changes are pending
- Dry run option to review what would change before applying anything
- Preview Changes button when Dry run is enabled
- Update Database button to apply the pending database updates
The layout is straightforward, so you can quickly check whether an update is available for the WordPress application.
Preview Database Changes Before Updating
Before running database updates on a production site, it’s a good idea to check what WordPress plans to update.
- Select the Dry run checkbox, then click Preview Changes.

This compares your current database version with the required version and shows which update routines would run, without making any actual changes. Preview is useful when:
- WordPress core was recently upgraded
- A plugin introduced database changes
- You’re managing a live client site and want to verify everything first
- You want to catch update requirements before applying them
In real-world WordPress maintenance, this small check can save a lot of troubleshooting later, especially on sites with many plugins or custom functionality.
Apply Database Updates
Once you’ve reviewed the changes, or if you already know the update is safe, disable Dry run and click Update Database.
WordPress Toolkit will apply the pending database updates directly from the ServerAvatar dashboard. No need to:
- log into wp-admin
- open phpMyAdmin
- Run manual SQL commands
- Trigger database upgrades from the admin dashboard
Everything happens from the same Updates page.
Once complete, the Database Update card refreshes and confirms there are no pending database updates left.
Why Database Updates Matter
Skipping database updates doesn’t always break a site immediately. That’s what makes them easy to ignore. But over time, an outdated database schema can cause issues like:
- Plugin settings are not saving correctly
- Admin notices appearing unexpectedly
- New WordPress features are behaving inconsistently
- compatibility issues after core upgrades
- missing data or update errors inside plugins
Keeping the database updated alongside WordPress core, plugins, and themes helps everything stay aligned and reduces the chance of hard-to-diagnose issues later.
Recommended Workflow That Ties It All Together
Here is the workflow of how to use the Updates section. It’s not complicated, but there’s a logical order that makes things smoother.
Step 1: Enable Maintenance Mode
Open the Overview tab inside WordPress Toolkit and toggle on Maintenance Mode. This protects your live site while you’re working through updates.
Step 2: Review what’s available
Open the Updates tab and scan all four cards: Core, Plugins, Themes, Database. Get a full picture before touching anything.
Step 3: Apply core updates first
Start with WordPress core. It’s the foundation, everything else depends on it.
Step 4: Run database updates
Right after a core update, check the Database section and apply any pending migrations before moving on.
Step 5: Update plugins
Apply all plugin updates. Use Update All button to update all the pending plugins, or update individually to review each of them.
Step 6: Update themes
Once plugins are stable, handle theme updates.
Step 7: Verify the site
Briefly open your site publicly and confirm nothing is broken or displaying incorrectly.
Step 8: Disable Maintenance Mode
Go back to the Overview tab and turn Maintenance Mode off. Your site goes live again with everything current.
This sequence isn’t enforced, you can work in any order, but it’s the order that minimizes conflicts and keeps your site stable throughout the process.
WordPress Toolkit vs WP-Admin for WordPress Updates
If you manage only one WordPress site, the default WordPress admin dashboard may feel manageable.
But once you start handling multiple websites, or want faster access to updates, maintenance tools, and troubleshooting, switching between WP-Admin screens quickly becomes repetitive. That’s where WordPress Toolkit creates a smooth workflow.
Here’s a practical comparison:
| Task | WordPress Toolkit in ServerAvatar | WordPress Admin (wp-admin) |
| WordPress core updates | Available from one centralized dashboard | Requires logging into each site |
| Plugin updates | Update individual plugins or use Update All | Requires visiting the Plugins page |
| Theme updates | Update one or all themes from the same page | Requires opening Appearance >> Themes |
| Database updates | Built into the Updates tab | Usually triggered separately after updates |
| Maintenance mode | Available directly from the Toolkit | Requires plugin or manual setup |
| Debugging after update | Debug tools available in the same Toolkit | Requires wp-config.php changes or plugins |
| Multiple site workflow | Easier to manage from one dashboard | Repetitive when managing several sites |
| Overall update visibility | Core, plugins, themes, and database are shown together | Information is spread across multiple sections |
That centralized view is especially helpful after major WordPress releases, where core updates, plugin compatibility, and database changes often need to be reviewed together before a site is considered fully updated.
Common WordPress Update Issues and How to Fix Them
Even with a good workflow, things can go wrong. Here’s how to handle the most common issues I’ve encountered.
1. Update Failed, What to Do
If an update shows as failed in the Toolkit:
- Check your internet connection: If the connection drops mid-update, WordPress may be left in a partial state
- Check disk space: Running out of disk space is a surprisingly common cause of update failures
- Check file permissions: WordPress needs write access to the filesystem to update itself
- Try again: Most transient failures resolve on retry
- Check the Debug tab: Enable Debug Mode and check the debug log for specific error messages
2. Site Breaks After Update, Rollback Steps
If your site goes down or behaves erratically after an update:
- Restore your backup immediately. This is the fastest way to get the site back to a working state
- Deactivate all plugins via phpMyAdmin or file manager (rename the plugins folder to plugins.old)
- Revert to the default WordPress theme by renaming your active theme’s folder
- Investigate the specific cause, check Debug Log for error messages
- Test updates on staging before re-applying to production
The most important thing here is speed, the moment you notice something is wrong, restore from backup before trying to diagnose. You can always investigate after your site is back online.
Conclusion
Managing WordPress updates across four different areas in the wp-admin isn’t hard, it’s just scattered. And scattered routines are the ones that get skipped.
What ServerAvatar’s WordPress Toolkit does with the Updates section is straightforward: it puts everything in one place so updating WordPress core, plugins, themes, and your database stops being a multi-step chore and becomes a single, fast workflow.
If you want a simpler way to manage WordPress across all your sites, without juggling multiple logins or losing track of what’s pending, WordPress Toolkit in ServerAvatar is worth exploring. It handles updates, debugging, security, performance, and more from the same dashboard where you already manage your server and applications.
FAQs
Does WordPress Toolkit automatically update WordPress?
No, WordPress Toolkit gives you full visibility and control over all available updates, but the actual update actions are manual. You choose when to apply each update.
Can I update WordPress plugins without logging into wp-admin?
Yes, you can update plugins and themes independently of WordPress core. However, some plugin updates require a minimum WordPress version to function properly. Checking the core first is the safer approach, especially if you manage multiple sites and want a consistent baseline.
Should I run WordPress database updates after a core update?
Skipping database updates can lead to compatibility issues between WordPress and your database schema. This might cause features to break silently, post saves failing, plugin settings not persisting, or admin errors appearing. It’s best to apply database updates immediately after any core upgrade.
Is WordPress maintenance mode required before updates?
No, you need to enable Maintenance Mode manually from the Overview tab before you start making updates. The Toolkit doesn’t force this for you, but it’s strongly recommended, especially when applying multiple updates at once.
Can I bulk update WordPress plugins and themes in ServerAvatar?
Both options are available. You can update a single plugin by clicking the Update button next to that specific plugin in the list. Alternatively, you can use the Update All button to apply all pending plugin updates in one batch. The same flexibility applies to themes.
Key Takeaways
- WordPress Toolkit’s Updates section brings WordPress core, plugins, themes, and database updates into a single, unified dashboard
- WordPress Core updates show the current version and available releases, with a direct Update button
- Plugin and theme updates can be applied individually or all at once using the Update All button
- Database updates must be run after WordPress core upgrades to keep the schema synchronized
- Enabling Maintenance Mode before running updates protects your live site from displaying broken content during the process
- The entire workflow requires no access to WP-Admin; everything happens inside ServerAvatar
- Checking for and applying all pending updates takes less than five minutes with this centralized approach
Next Steps
If you’re managing WordPress with ServerAvatar, these guides can help you get even more from WordPress Toolkit:
- WordPress Toolkit for WordPress Management in ServerAvatar: Get a complete overview of the Toolkit and explore all WordPress management features available in one place.
- How to Create WordPress Blueprints Easily in ServerAvatar: Save your preferred WordPress setup as a blueprint and launch new sites faster with the same plugins, themes, and settings.
- How to Enable Debug Mode, Debug Logs, and Display Errors in WordPress: Turn on WordPress debugging and review error logs when something breaks after an update.
Explore ServerAvatar’s WordPress Toolkit to manage WordPress core, plugin, theme, and database updates from one dashboard without switching between multiple WordPress admin panels.
About the Author
Meghna Meghwani is a technical writer focused on Linux, Ubuntu, VPS hosting, server management, WordPress, PHP, Node.js, cloud hosting, and DevOps. She writes beginner-friendly tutorials, practical hosting guides, troubleshooting documentation, and server security content based on real-world hosting and application management workflows. Her goal is to make server and WordPress management easier for developers, agencies, and businesses running production websites and applications.