Upgrade Node might sound like a technical chore, but it is actually as easy as updating your phone’s software, once you know where to tap and how to do it. Whether you’re building websites, apps, or scripts, staying updated is the key to better speed, security, and features.
In this beginner’s tutorial, we’ll walk you through everything you need to know about upgrading Node.js on your system, step by step, with no complex technical talks. Think of this as your friendly tour guide through the Node upgrade process. Let’s dive in!
What Is Node.js and Why Upgrade?
Node.js is like the engine of a train for many web applications. It powers everything behind the scenes, from real-time messaging to running backend scripts. But like any engine, it needs regular updates to perform better, fix bugs, and add new capabilities.
Why should you upgrade?
- New features that can save you time
- Security patches update to protect your code
- Performance improvements
- Compatibility with modern packages
How to Check Your Current Node.js Version
Before upgrading, it’s smart to know where you stand. Let’s check out the current version installed on your system, just enter the below command by opening terminal:
node -vYou’ll see your current node version as an output. As you can see in the screenshot below.

Common Reasons People Upgrade Node.js
Still wondering if it is really necessary? Here are a few popular reasons that you should know:
- Outdated tools: New packages needs newer Node versions
- Security risks: Old versions are vulnerable to known threats
- Speed: Updates often include performance improvements
- Better developer experience: New features can simplify your workflow
Think of it like upgrading your car’s engine, it will be smoother, faster, and more secure than previous one.
Tools for Node Version Management
Managing your Node.js versions can be very difficult. However, if you have right tools, it can be very easy with tools. Popular tools includes “NVM” (Node Version Manager), “NPM” (Node Package Manager), and other version managers such as “N”. These tools allow you to switch between different Node versions easily, ensuring your environment is set up for every project you’re working on.
Some popular Node Version Manager tools:
- NVM (Node Version Manager): NVM is ideal for managing multiple Node versions on your system.
- NPM: NPM comes pre-installed with Node. However, it can assist you with managing packages.
- N: N is a simple version manager for Node.js
Preparing for the Update
Upgrading without preparation is like changing tires without parking the car first. Here’s how to get ready:
- Check your dependencies
- Read the changelog on Node.js official site
Methods to update Node.js and NPM:
- Method 1: Using NVM (Node Version Manager)
- Method 2: Use Node.js Installer for Windows & macOS
- Method 3: Upgrade Node.js on Linux
- Method 4: Using Homebrew on macOS
- Method 5: Using ServerAvatar
Method 1: Using NVM (Node Version Manager)
Step 1: Check the current version of NVM by entering below command on terminal:
nvm -vStep 2: Use below command for install and update Node to latest version.
nvm install nodeThe installation process is mentioned in the image below:

This is easiest and safest way for most of the users who want to upgrade node version for system.
Step 3: Set this as your default version by using the below mentioned command:
nvm use node
nvm alias default nodeThat’s it! You have got the newest Node running.
Method 2: Use Node.js Installer for Windows & macOS
Generally, windows does not support NVM. However, follow steps mentioned below to install node.js on Windows or MacOS.
Step 1: Download node.js Installer by navigating to the official website of Node.js.
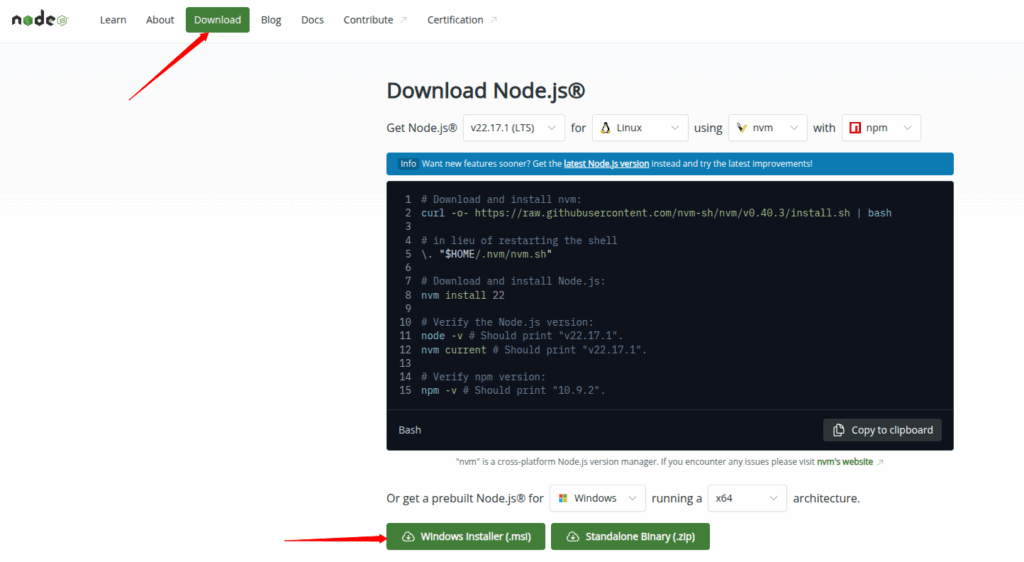
Step 2: Run the installer by opening the installer that is just downloaded, and follow the step-by-step instructions to complete the installation process.

Step 3: Verify Installation.
Now let’s checkout the process to upgrade the NPM using the npm:
Step 4: You can install the latest version of npm by using the below given command:
npm install -g npm@latestStep 5: check out installed npm version by entering below mentioned command:
npm -v
Simple, right?
Method 3: Upgrade Node.js for Linux Systems
Step 1: Linux users can direct use NVM (recommended) or package manager like “apt” for installation and update of node.js.
APT is used for Debian and Ubuntu systems. Run the below command to install node using APT:
sudo apt update
sudo apt install nodejs npm
Step 2: Check the version of node and npm on your system by using the below command:
node -v
npm -vMethod 4: Using Homebrew on macOS
Let’s see the installation on macOS using Homebrew, that is a popular package manager useful for only macOS. Homebrew used for macOS to simplifying the process of managing installations, including Node.js.
Step 1: First, let’s install “Homebrew” from it’s official website: brew.sh, follow the below step-by-step installation process.
Step 2: Let’s update brew using the below command:
brew updateStep 3: Use below mentioned command for installing Node.js:
brew install nodeStep 4: You can use below mentioned command to updating Node.js to latest version:
brew upgrade nodeStep 5: To check out the installed version of node, enter below mentioned command and verify node version easily.
node -vMethod 5: Using ServerAvatar
ServerAvatar is a powerful server management platform that takes the hassles out of managing your servers and applications, especially for developers, startups, and agencies. With a user-friendly control panel, ServerAvatar allows you to manage everything from server provisioning to application deployment, security, backups, and software updates, without needing to use the terminal.
Whether you’re running a Node.js application or a full-stack project, ServerAvatar makes server management tasks like upgrading Node.js as easy as clicking a button. It’s perfect for anyone who wants to focus more on building apps and less on server-side complexity.
ServerAvatar installs node.js by default when deploying server and you can easily change the version of node and npm using ServerAvatar. Just follow the steps below:
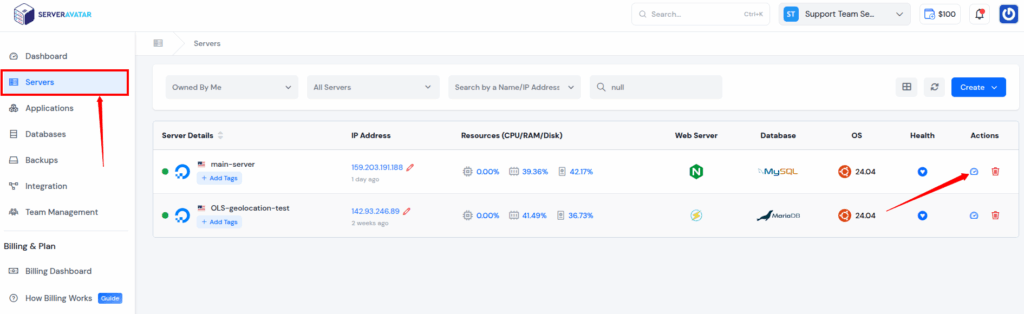
Step 1: Login to your ServerAvatar account and navigate to your Server Panel by clicking on the server dashboard icon.
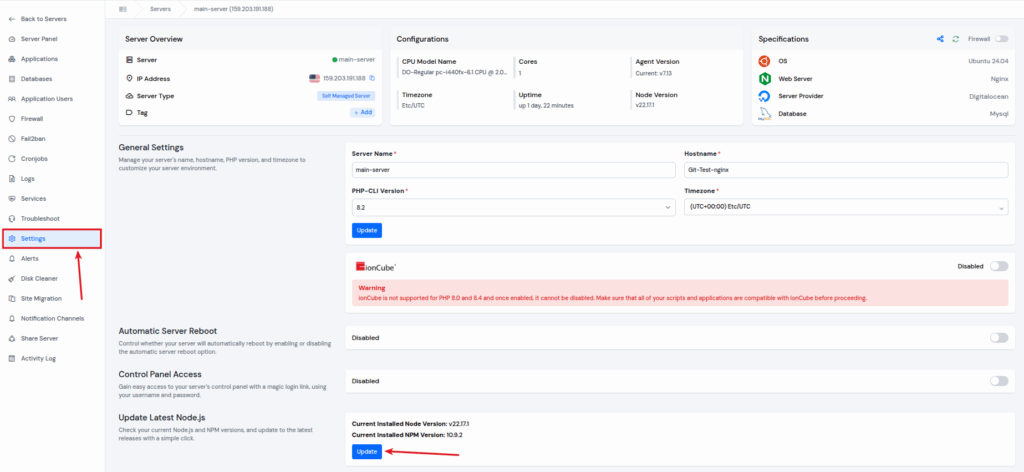
Step 2: Navigate to the “Settings” section from server panel. After scrolling, you will see the section of “Node.js”.
Step 3: You can see your current Node and NPM version, and you can directly update the version by clicking on the “Update” button. (If the node is not installed in your server, you will see the button to install the latest version of node at the place of update.)
Managing Multiple Versions of Node.js
Sometimes, you need different Node versions for different projects. That’s where NVM works. With NVM, you can directly switch between versions like changing browser tabs:
- You can use the below command to install the “nvm” version you want for your project:
nvm install (version)You can use the version you installed for your project easily. Just use the command below:
nvm use (version)For example, if you need version 18 later, you can easily install and switch the versions by using the same commands:
For example:
nvm install 18
nvm use 18Rolling Back to an Older Version
Oops! Something broke after the upgrade? No worries. You can easily roll back to the older version. Simply use NVM to go back. You can follow the commands mentioned below to use older version:
nvm use (version)You can also uninstall the latest version if needed:
nvm uninstall nodeFrequently Asked Questions About Node Upgrades
We’ll explore more in the FAQ section, but here are quick hits:
- Should I always use the latest version? → Not always. Use LTS (Long-Term Support) for stability.
- Can upgrading break my apps? → Rarely, but always test your code after upgrade.
- What is LTS? → It’s like the “stable” version Node recommends for production use.
Final Tips for Smooth Upgrades
- Stick with LTS unless you’re experimenting
- Always backup before upgrading
- Read release notes
- Update dependencies (npm update)
Common Errors and How to Fix Them
1) “nvm: command not found”
>> Make sure NVM is installed and sourced in your terminal config.
2) Permission errors during upgrade
>> Use sudo carefully, or reinstall Node with NVM.
3) App not running after upgrade?
>> Downgrade Node, or reinstall project dependencies:
rm -rf node_modules
npm installConclusion
Upgrading Node.js doesn’t have to be intimidating. With the right tools like NVM and a bit of preparation and knowledge, it becomes a smooth and simple process. Just like updating your phone or refreshing your browser, a Node upgrade ensures your development environment is secure, fast, and ready for modern tools.
Now that you know how to do it, go ahead, give your Node a little upgrade love!
FAQs
1. How do I know if I need to upgrade Node.js?
Check your version using node -v. If it’s outdated compared to the latest LTS version, consider upgrading.
2. Will upgrading Node.js break my project?
Usually not, but it’s smart to test after upgrading. Back up your project before starting.
3. Is it possible to have two versions of Node.js installed?
Yes! Tools like NVM let you switch between multiple versions easily.
4. What’s the difference between Node.js LTS and Current?
LTS is the stable, long-term supported version. “Current” has the newest features but may change more often.
5. How often should I upgrade Node.js?
Stick to upgrading when a new LTS version is released or when a required package needs a newer Node version.