

You have heard that Website Backup is important multiple times. And yet, talking to developers and sysadmins even years into their careers, the story is almost always the same: backups were set up once, never tested, and when something broke, the restore either didn’t work or nobody knew how to trigger it in the first place.
A server update goes wrong. A misconfigured cron job overwrites a database. A client accidentally deletes their WordPress plugin folder. In every one of these cases, the difference between a five-minute restore and a full-day rebuild is whether you actually have a working backup strategy in place.
This guide is about ServerAvatar‘s backup system, but more importantly, it’s about thinking through your disaster recovery approach before you are staring at a broken site at two in the morning.
We will cover the three backup types ServerAvatar offers, how to actually use them in practice, what restore looks like, and the operational habits that make backups reliable rather than just theoretically existent. If you’re running applications on ServerAvatar and haven’t touched the backup system yet, this is the guide that will get you set up properly.
TL;DR
- ServerAvatar offers three distinct backup types: File System, Application, and Database
- Instant Backups are for right-now; Scheduled Backups handle recurring protection automatically
- Archive Backups let you recover backups from applications you have deleted
- Cross-server restore is available, you can pull a backup from one server and spin it up on another
- Cloud storage integration (Google Drive, Amazon S3, S3 Compatible Storage, Wasabi) keeps your backups off-server
- Retention policies determine how long backups live, set these consciously, not at the default
- Test your restores. A backup you haven’t verified is a liability, not an asset
Why Website Backups Should Be Part of Your Disaster Recovery Plan
A backup is simply a copy of your data. Disaster recovery is the larger process of using that copy to recover your website after an incident. That distinction matters.
Imagine a WordPress application loses its database after an unexpected server problem. Having a backup from three months ago technically means the site has a backup, but it may not be sufficient to recover recent orders and customer information.
Similarly, having hundreds of backup files doesn’t help much if:
- The newest backup is incomplete.
- The database wasn’t included.
- Backup copies stored on the same server hosting the website.
- Nobody knows which backup should be restored.
- The restoration process has never been tested.
- Backup retention is too short.
- The backup exists but cannot be accessed during an outage.
A useful disaster recovery strategy therefore needs to answer three questions:
- What needs to be backed up?
- How often should it be backed up?
- How quickly can the website be restored?
These questions form the foundation of a reliable backup plan.
Understanding Backup Types in ServerAvatar
Before you create your first backup, it helps to understand what you’re actually backing up. ServerAvatar separates backups into three types, and choosing the right one depends on your recovery goal.
File System Backup
This captures only the files belonging to your application, your code, uploads, configuration files, everything sitting in the application directory. No database is included.
You’d reach for this when you know your application database is safe but something happened to the files themselves, maybe a deployment went sideways and overwrote the wrong directory, or a malicious script got dropped into your uploads folder.
Application Backup
This is the comprehensive option. It backs up your application files and the associated database together as a unit. If you want one backup that represents the complete state of your site at a given moment, this is the choice.
For most WordPress, Laravel, or Node.js sites in production, Application backup is what you default to.
Database Backup
Some workloads change files frequently but keep databases relatively stable. Others modify the database constantly but rarely touch files. Database-only backup lets you capture just the database on its own schedule, separate from how often you snapshot the file system.
You might run database backups hourly while file system backups run daily. That’s a valid and sensible approach.
Choosing the Right Backup Type
The best backup type depends on what you need to recover:
- Need to restore application files? Use a File System Backup.
- Need files and database together? Use an Application Backup.
- Need to protect frequently changing database data? Use a Database Backup.
- Need different backup schedules for files and databases? Use separate File System and Database Backups.
Understanding Backup File Formats
Server backups can contain different types of data, so the format used for the backup also matters. Common formats include:
.tar– Creates an archive containing multiple files without compression..tar.gz– Creates a compressed archive, reducing the amount of storage required for application files..sql– Stores a database dump as plain SQL statements..sql.gz– Stores a compressed SQL database dump, making it smaller and easier to transfer.
For most website backup scenarios:
- Use
.tar.gzfor application or file backups. - Use
.sql.gzfor database backups.
Why Compression Matters
Compression can make a noticeable difference when you are storing or transferring backups. Compressed backups can:
- Require less disk space
- Reduce storage costs
- Take less time to transfer
- Make remote backup storage more efficient
- Reduce the amount of data that needs to move between your server and backup destination
Combining the right backup type, schedule, and file format helps create a reliable disaster recovery plan, rather than simply storing backups without a clear recovery strategy.
Storage: Where Your Backups Actually Live
Creating a backup is only half the job. You also need to decide where those backup files should be stored and how easily you can access them during recovery.
ServerAvatar lets you store backups using its built-in storage or connect an external cloud storage provider.
ServerAvatar’s Built-In Storage
If you want to start backing up without configuring another storage service, ServerAvatar’s built-in storage provides a straightforward option.
According to the provided ServerAvatar information:
- Backup storage is available directly from ServerAvatar.
- The monthly backup price is $0.07/GB.
- It includes 20 free backups.
- The free backup size can be up to 150 MB.
- You can manage the stored backups from the ServerAvatar dashboard.
Best suited for:
- Getting started with backups
- Smaller websites and applications
- Users who prefer minimal configuration
- Situations where you don’t want to create a separate cloud-storage account
Important: Built-in storage should not be your only consideration for disaster recovery. If your server or hosting infrastructure becomes unavailable, having another copy stored separately can provide an additional recovery option.
External Cloud Storage Providers
You can connect an external storage provider and keep backup copies to your integrated storage. ServerAvatar supports several external storage options, including:
- Amazon S3: Suitable for scalable object storage and production workloads.
- Google Drive: Convenient for teams already using Google’s ecosystem.
- Wasabi: An option for storing larger backup volumes where storage and data-transfer costs matter.
- S3-Compatible Storage: Supports services such as Backblaze B2, DigitalOcean Spaces, MinIO, and other platforms using the S3-compatible API.
Integrating an external storage provider takes a few minutes and you only need to do it once. The setup involves creating credentials with your chosen provider and connecting them in ServerAvatar’s dashboard. Once connected, that storage account becomes available as a destination for any backup you create.
Creating Your First Instant Backup
An Instant Backup is exactly what they sound like, you trigger one right now and ServerAvatar takes a snapshot immediately. This is useful before risky operations like major plugin updates, server config changes, or anything that touches the database.
Steps to Create an Instant Backup
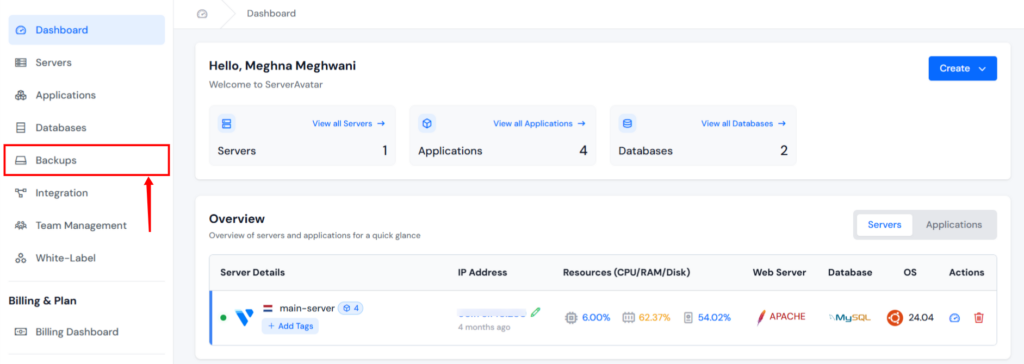
- Navigate to Instant Backups, then click Create.
- Give the backup a descriptive name, something that tells you what this snapshot contains.
- Choose your Backup Type, File System, Application, or Database.
- Select your File Type (.tar or .tar.gz) and Database File Type (.sql or .sql.gz) as applicable.
- Pick the Server and Application (or Database) you want to back up.
- Choose your Storage Provider and the Provider Account to use.
- Set a Retention Period, this controls how long ServerAvatar keeps the backup before auto-deleting it.
- Click Create an Instant Backup.
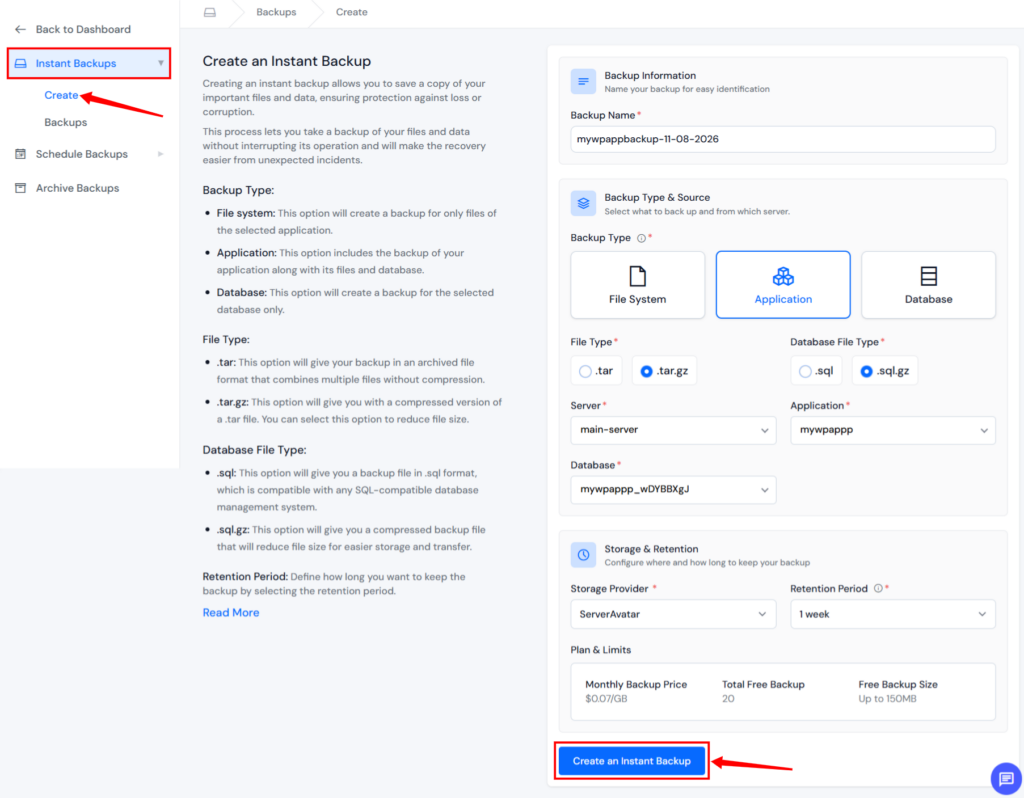
Once the process starts, you can monitor the backup from the Instant Backup >> Backups section. The backup list provides information such as its provider, application, database, status, backup type, price, and creation time.
Use a Consistent Backup Naming Convention
Good naming makes it much easier to identify the correct recovery point later.
Instead of generic names such as:
Backup-1New BackupWebsite Backup
Use names that describe:
- Website or application
- Environment
- Date
- Reason for the backup
For example:
client-site-prod-2026-08-11-before-plugin-update
This becomes especially useful when you’re managing multiple websites, servers, staging environments, or production applications.
Automating Backups with Scheduled Backups
Manual backups are useful before specific changes, but they shouldn’t be your only backup strategy. Scheduled Backups allow ServerAvatar to create backups automatically according to a defined schedule. When creating a scheduled backup, you can configure settings such as:
- Backup type
- Storage provider
- Backup retention
- Backup frequency
- Application or database
- Whether the first backup should start immediately
You can also enable Start Now when you want the first backup to run as soon as the schedule is created.
Steps to Create a Scheduled Backup
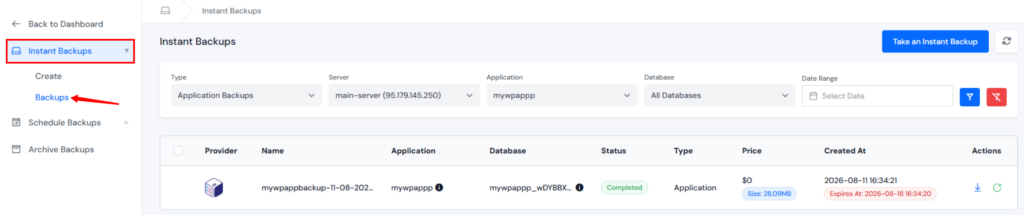
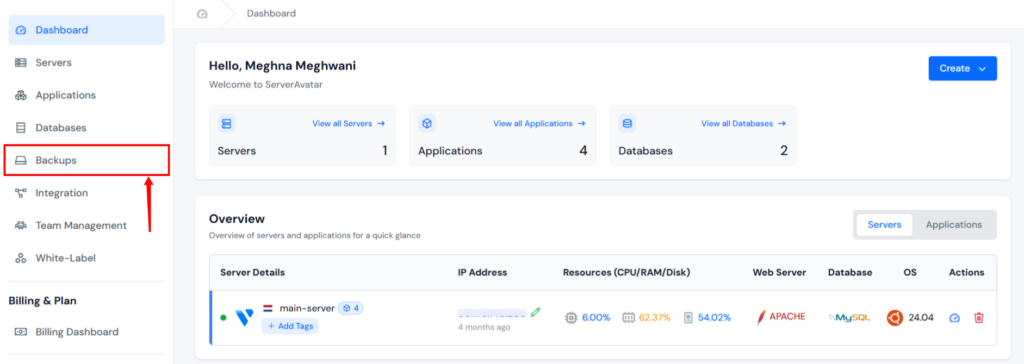
- Log into your ServerAvatar dashboard and open the Backups section from the left sidebar.
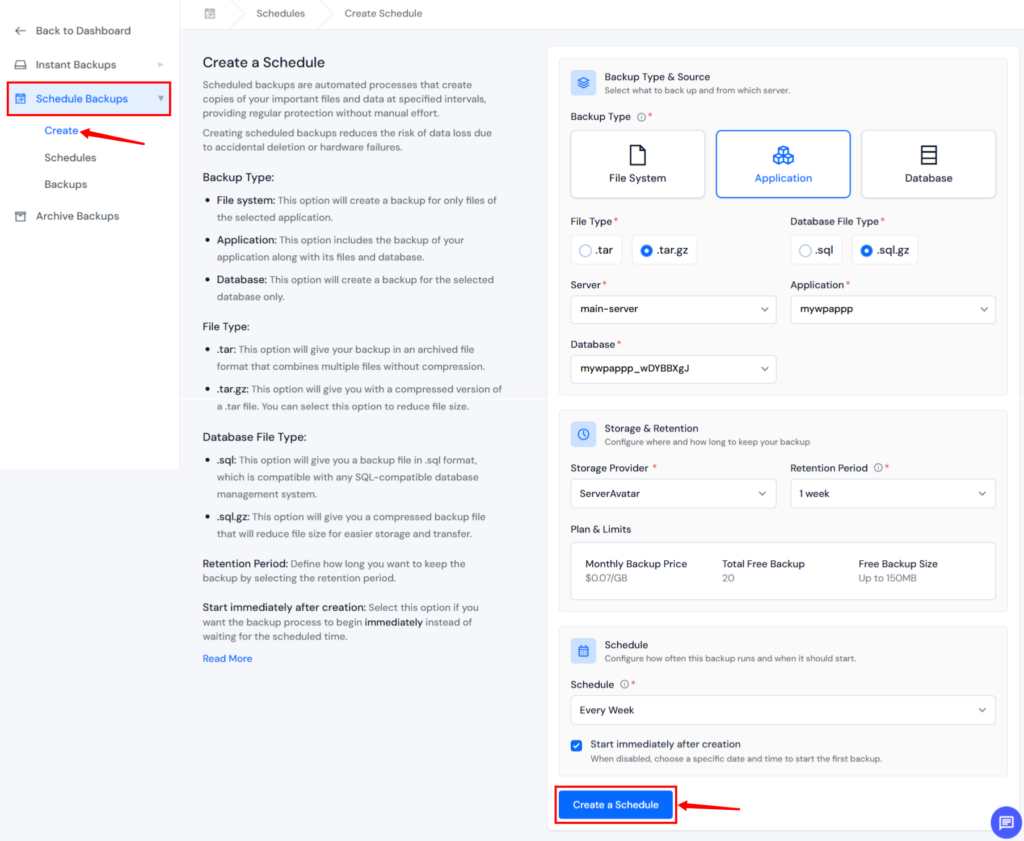
- Navigate to Schedule Backups, then click Create.
- Choose your Backup Type, File System, Application, or Database.
- Select your File Type (.tar or .tar.gz) and Database File Type (.sql or .sql.gz) as applicable.
- Select the Server, Application, and Database you want to back up.
- Choose your Storage Provider and the Provider Account to use.
- Make sure the selected storage destination has enough capacity for your expected backups.
- Specify how frequently ServerAvatar should create the backup. Depending on your requirements, you can configure the schedule for intervals such as Hourly, Daily, Weekly, and Other available scheduling intervals.
- Set the Retention Period to determine how long ServerAvatar should keep each backup.
- If you want the backup process to begin immediately after creating the schedule, select the checkbox “Start immediately after creation“
- Click Create a Schedule.
Managing Scheduled Backup Schedules
After creating a schedule, you can manage it from the Schedule Backups >> Schedules section. The schedules list provides information such as its provider, application, database, schedule, retention period, status, total backups, last backup at, and next backup at.

Actions You Can Perform
You can control an existing schedule directly from the schedule list:
- Pause/Start: Use the Start/Pause Schedule Backup control to temporarily stop or resume the schedule.
- Edit: Modify the existing backup configuration or schedule.
- Delete: Remove the backup schedule when it is no longer required.

Regularly reviewing this list helps you confirm that scheduled backups are running as expected.
Viewing Backups Created by a Schedule
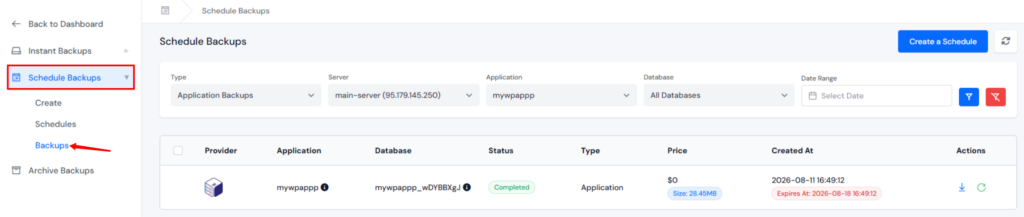
You can also review the individual backups generated through your schedules. From the Schedule Backups >> Schedules section, you can monitor your schedules and access the backups created by them. The scheduled backup list provides information such as its provider, application, database, status, type, price, created at, and actions.
How Often Should You Schedule Backups?
There is no single backup frequency that works for every website. Consider:
- High-traffic stores or applications: More frequent database backups may be appropriate.
- Frequently updated websites: Daily or more frequent backups can reduce potential data loss.
- Low-activity websites: Daily backups may provide sufficient coverage.
- Frequently changing databases: Consider a shorter interval between database backups.
The key question is:
How much recent data could you afford to lose if something goes wrong?
Your answer should guide the backup frequency.
Don’t Ignore Retention
Backup frequency and retention should be planned together. For example:
- Backups every 6 hours + 2-day retention = up to around 8 backup points.
- Backups every 24 hours + 2-day retention = only around 2 backup points.
A longer retention period gives you more historical recovery points, which can be valuable if a problem isn’t discovered immediately.
ServerAvatar’s scheduled backup view also lets you monitor:
- Backup frequency
- Retention period
- Current status
- Total backup count
- Last execution
- Next scheduled run
You can also pause, edit, or delete a backup schedule when needed.
Managing Your Backup List
Once you start using instant and scheduled backups, the Backups section becomes the central place to manage your recovery points. The most useful actions include:
Download: You can pull a backup file down to your local machine at any time. This is useful for offline archives, moving to a different infrastructure, or keeping a personal copy outside your cloud storage.
Restore: The core operation. ServerAvatar lets you restore any completed backup directly to the original server, or to a different server in your account. This cross-server restore capability is one of the more practical features for teams running multiple environments.
Delete: Backups you no longer need should be removed. They consume storage space and keeping unnecessary backups adds cost and clutter. One exception: backups stored on ServerAvatar’s own storage have automatic retention-based deletion and cannot be manually removed.
One habit worth building: review your backup list monthly. Check for failed backups (they’ll show a failed status), verify that schedules are still running on their expected cadence, and confirm that retention periods are set to what you actually intended. This takes five minutes and catches problems before they become crises.
Restoring a Backup Across Servers
One useful recovery scenario is moving a backup from one ServerAvatar-managed server to another. For example, you might:
- Test changes on a staging server.
- Create a backup after confirming everything works.
- Restore that backup to a production server.
The same approach can work in reverse if a production environment fails and you have a clean recovery point on another server.
How to Restore a Backup to Another Server
- Open the Instant or Scheduled Backups list. Locate the backup you want to recover.
- Click the Restore icon.
- Select the option to restore to another server. Choose the destination server.
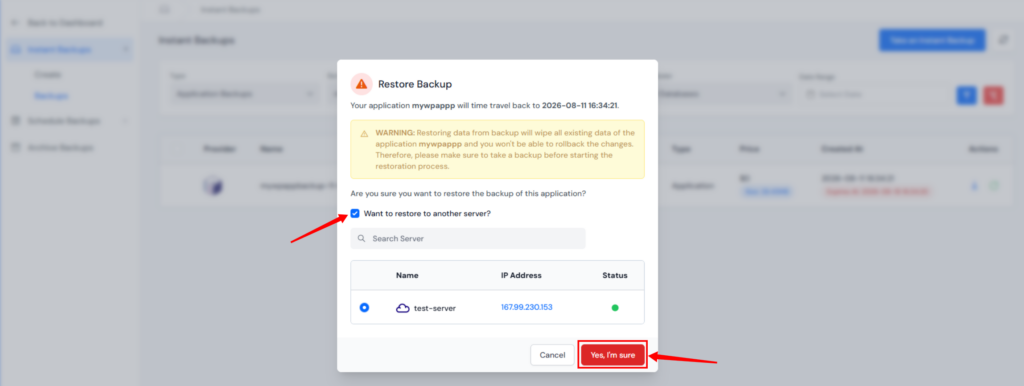
- Review the selected server details. Click Yes, I’m Sure to confirm the restoration.
The ServerAvatar backup cannot be restored to a Node Stack Server from another server.
Archive Backups: Recovering Backups After Deleting an Application
Deleting an application does not necessarily mean that its existing backups are immediately lost. ServerAvatar moves backups associated with deleted applications to the Archive Backups section, where you can access and download them later.
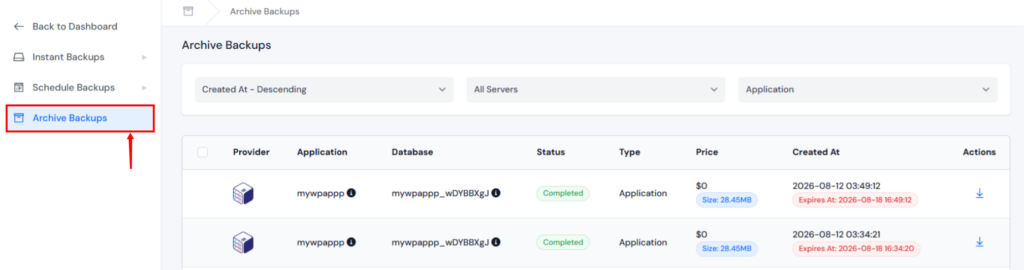
This can be useful when:
- An application was deleted accidentally.
- A completed project needs to be recovered later.
- You need files or database data from an older application.
- The original application dashboard is no longer available.
- You need a backup before rebuilding the application elsewhere.
How Archive Backups Work
When you delete an application:
- The application’s dashboard is no longer available.
- Application-specific backups are moved to Archive Backups.
- The archived backups remain available for recovery or download.
- You can filter archived backups to locate the required recovery point.
- Available backup types include application, file system, and database.
- Archived backups can be downloaded when required.
This makes Archive Backups useful as a recovery location for backups that are no longer associated with an active application.
Manual Restore: Recovering an Application After Losing the Server
Losing access to your server can make a normal backup restoration impossible. If the server has been disconnected or deleted from ServerAvatar, you may need to use the manual restoration process instead.
ServerAvatar’s Manual Backup Restore document allows you to use available backups from Archive Backups to rebuild your application on a new server.
With the required backup files available, you can set up the application on a new server and restore its data manually.

Disaster Recovery Best Practices
Backing up is only half the picture. A disaster recovery strategy that’s actually effective requires habits and decisions beyond just clicking “Create Instant Backup.”
Choose the Right Backup Type for Each Scenario
Store backups on a different provider or at least a different region than your server. A backup sitting on the same disk array as your production server isn’t a backup, it’s a convenience copy.
Keep Backups in a Separate Location
A backup stored only alongside your production environment may not be enough when dealing with a major infrastructure failure. External storage can help protect your backups if the original server becomes unavailable or needs to be rebuilt.
Set a Practical Retention Policy
Retention determines how long your backups live. Set it based on how quickly you can detect a problem. If your team reviews logs weekly, a two-week retention might catch most issues. If you have monthly review cycles, you’ll want longer retention, or you might miss a silent corruption that happened three weeks ago.
Test Your Backups by Performing Restores
This is the one most people skip. Pick a recent backup, restore it to a test environment, and verify the site loads correctly. This catches corrupt backup files, missing database tables, and broken file permissions before you’re in a crisis. If you discover the restore is broken while you’re actually in a crisis, you’ve lost both your original problem and your recovery path.
Document the Recovery Process
For any application that matters, write down the restore steps. Not just “restore from backup”, actually document which backup to use, which server to restore to, and what the expected outcome is. When you’re stressed and working fast at 3 AM, documentation prevents mistakes.
Monitor Backup Health
Set up notifications for failed backups. A failed backup that nobody notices is the same as having no backup. Check your scheduled backup status periodically, not just when you need to restore something.
Keep More Than One Recovery Point
A single recent backup may not always be the best recovery option. A problem can exist for days before someone notices it. Maintaining multiple recovery points gives you more flexibility to choose a known-good version.
Review Your Disaster Recovery Strategy Regularly
Your backup requirements can change as your website grows. Review your strategy whenever you Launch a new application, Move to a different server, Start receiving significantly more traffic, etc.
A backup strategy should evolve with your infrastructure instead of remaining unchanged after the initial setup.
The Goal: A Backup You Can Actually Recover From
The purpose of disaster recovery is not simply to accumulate backup files. The real objective is to have a reliable and repeatable way to restore your application when something goes wrong.
A practical strategy combines:
- The right backup type
- Appropriate backup frequency
- Off-site storage
- Sensible retention
- Regular restore testing
- Recovery documentation
- Backup monitoring
- Multiple recovery points
Together, these practices turn backups into a dependable disaster recovery system rather than simply another scheduled server task.
Key Takeaways
- ServerAvatar offers three backup types, File System, Application, and Database, each suited for different recovery scenarios
- Cloud storage integration (S3, Google Drive, Wasabi, S3-compatible) keeps your backups off-server; ServerAvatar’s built-in storage is also available for simpler setups
- Scheduled backups automate protection on your defined frequency; instant backups handle immediate, on-demand snapshots
- Cross-server restore is available, but Node Stack Servers are excluded from this capability
- Archive Backups preserves snapshots from deleted applications, review and clean it periodically
- Manual restore is the recovery path when a server no longer exists in your dashboard
- Retention and frequency must be designed together as a system, not picked independently
- Test your restores. A backup you haven’t verified is a risk, not an asset
Conclusion
A reliable backup strategy is about more than creating backup files, it is about being able to recover when something goes wrong. ServerAvatar gives you flexible backup types, automated schedules, cloud storage, and multiple restore options to protect your applications.
For stronger disaster recovery, choose the right backup frequency, keep important backups off-server, review retention settings, and regularly test your restores. A backup you can successfully restore is the one that truly protects your website.
FAQs
What types of backups does ServerAvatar provide?
ServerAvatar provides three main backup types:
- File System Backup: Backs up application files.
- Application Backup: Backs up the application files and associated database together.
- Database Backup: Backs up the selected database separately.
The appropriate option depends on what you need to protect and recover.
What is the difference between an Instant Backup and a Scheduled Backup in ServerAvatar?
An Instant Backup is created manually whenever you need an immediate recovery point, such as before a major update or configuration change. A Scheduled Backup runs automatically according to the frequency you configure, making it useful for ongoing protection.
Can ServerAvatar restore a backup to another server?
Yes, ServerAvatar supports restoring a completed backup to another server within your account. This can be useful when migrating an application or recovering an application on alternative infrastructure. However, backups cannot be restored to a Node Stack Server from another server.
What happens to backups when an application is deleted?
Backups associated with a deleted application are moved to Archive Backups. From there, you can locate and download the available Application, File System, or Database backups. This provides a way to access backup data even after the original application is no longer available.
What should I do if the original server is no longer available?
If the server has been disconnected or deleted, you may need to use ServerAvatar’s Manual Restore process. Available backups can be retrieved from Archive Backups and used to rebuild the application on a new server.
About the Author
Meghna Meghwani is a technical writer focused on Linux, Ubuntu, VPS hosting, server management, WordPress, PHP, Node.js, cloud hosting, and DevOps. She creates beginner-friendly tutorials, practical hosting guides, troubleshooting articles, and server security content designed to help developers and businesses manage applications and servers more efficiently.