
Host multiple PHP sites effortlessly on a single server with ServerAvatar’s powerful control panel. ServerAvatar is a cloud control panel that handles server-related tasks needed to host multiple PHP sites, such as setting up EC2 instances, installing Apache, and configuring name servers.
With ServerAvatar, connect your VPS or dedicated server to host multiple PHP sites from one convenient dashboard. Easily control your sites, databases, and SSL certificates without becoming a Linux expert. ServerAvatar handles all backend complexity while you host multiple PHP sites securely and efficiently.
Host multiple PHP sites using popular frameworks like WordPress, Laravel, and CodeIgniter. Each site gets separate PHP versions, isolated user environments, and scalable resources. Host multiple PHP sites without command-line hassles – perfect for developers who want to host multiple PHP sites without sysadmin expertise.
Why Host Multiple PHP Sites on a Single Server?
It’s now a fairly popular thing to do, and particularly common among small agencies and freelancers who are running several projects on one server. Why create a new server for every little project when you can host them all under one roof?
Here’s why it makes sense:
- Cost Effective: It is much cheaper to manage one server for multiple websites than to purchase numerous hosting plans.
- Resource Usage: You don’t have resources of several servers going to waste rather you enhance the efficiency by combining resources at one machine only.
- All in One Place: Central Rainforest Management. Be that managing SSL certificates or upgrading PHP versions, it’s all in one place.
- Fast and Easy: After setup, adding new sites only takes minutes, not hours.
But here’s the catch: hosting multiple sites on one server can be risky without proper isolation. For example, if one site is compromised due to any reason, there are chances that your other sites could be at risk and compromised. That’s where ServerAvatar shines. It offers isolation features like separate system users and database access rules for each website, providing the security and independence of separate hosting environments, all on a single server.
Prerequisites and Requirements
Choosing the Right VPS Hosting Provider
Before jumping into ServerAvatar, choosing the right VPS provider is crucial. Not all VPS are created equal, and your server’s performance heavily depends on your provider. Here are a few recommended hosting providers that work seamlessly with ServerAvatar:
- DigitalOcean: It is popular for its clean and user-friendly interface.
- Vultr: Known for high-speed performance and a wide range of data center locations.
- Linode: A solid choice if you want reliability without breaking the bank.
- Hetzner: A budget-friendly option with excellent hardware.
- AWS Lightsail or EC2: Suitable if you’re already within the AWS ecosystem.
Going with a provider that’s compatible with Ubuntu 20.04, 22.04, or 22.04 LTS is recommended, as ServerAvatar supports these versions best.
Minimum Server Specifications
Although ServerAvatar performs smoothly even on low-capacity servers, make sure to check on its system’s specifications in relation to the number and complexity of websites you intend to host.
Even 1GB of RAM in server is a great for small websites like a WordPress for blog or a landing page. But if you’re working with bigger applications or have high traffic, choose 4 GB+ RAM and multi-core CPUS.
And don’t forget to configure some basic security measures, such as disabling root login, setting up SSH keys, and installing a solid firewall. Although ServerAvatar takes care of a lot of this for you, it will be easier if you have a secure starting point.
Setting Up Your Server with ServerAvatar
Connecting Your VPS to ServerAvatar
Once you’ve got your VPS ready, it’s time to bring it under ServerAvatar’s control. Here’s a quick and simple overview for you to get you started:
This is the most crucial step when you are setting up your PHP website with ServerAvatar, connecting your server to their platform. After this, most of your work is done, and you can easily start deploying your PHP applications.
You can create a new server directly on the DigitalOcean or Vultr cloud platform using ServerAvatar’s Managed Server feature. If you want to connect your own VPS from a custom VPS provider. ServerAvatar supports that too. Additionally, you can integrate your VPS account with ServerAvatar of popular cloud providers like DigitalOcean, Linode, Vultr, Hetzner, and Amazon LightSail.
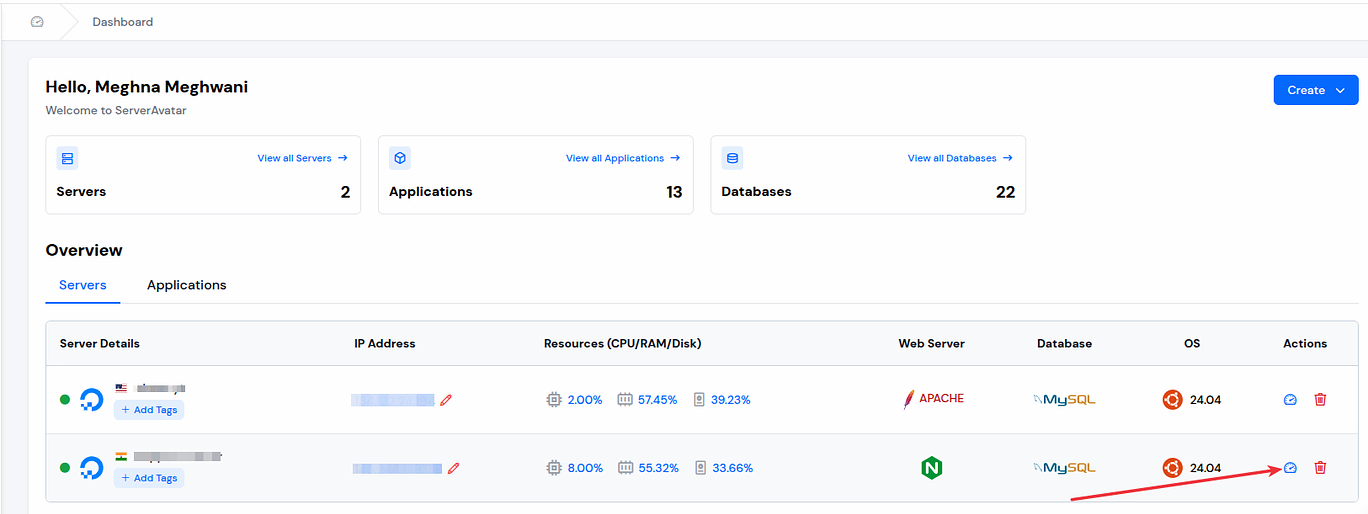
Once the installation is complete (usually within 10–15 minutes), the server will appear in your dashboard, fully functional.
From here, you can add multiple applications for your server. ServerAvatar has effectively takes care of all backend configurations, like installing PHP, web servers, and the Database, so you can now shift focus to building and deploying your websites.
Another feature: ServerAvatar sends an email notification when your server is successfully connected and configured, along with any credentials or notes you may need.
Creating and Hosting Multiple PHP Websites
Now comes the exciting part, adding your PHP websites! ServerAvatar makes this a breeze:
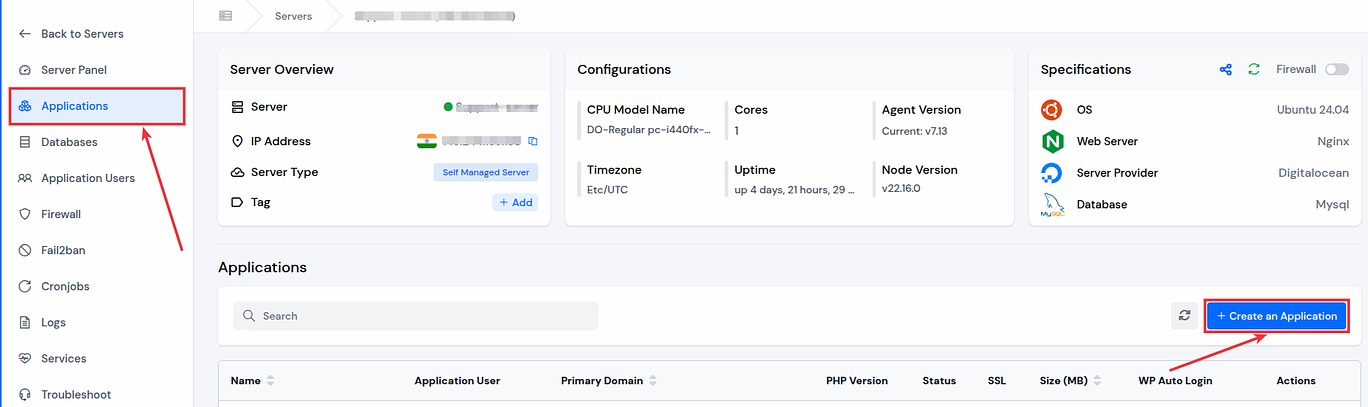
- Select Your Server:
From the ServerAvatar panel, click on the “Server Dashboard” icon for the server on which you want to host your custom PHP application.
- Navigate to the Application Section:
Once you navigate to the ServerAvatar panel, click on the “Applications” button from the left side bar, and click on the “Create an Application” button.
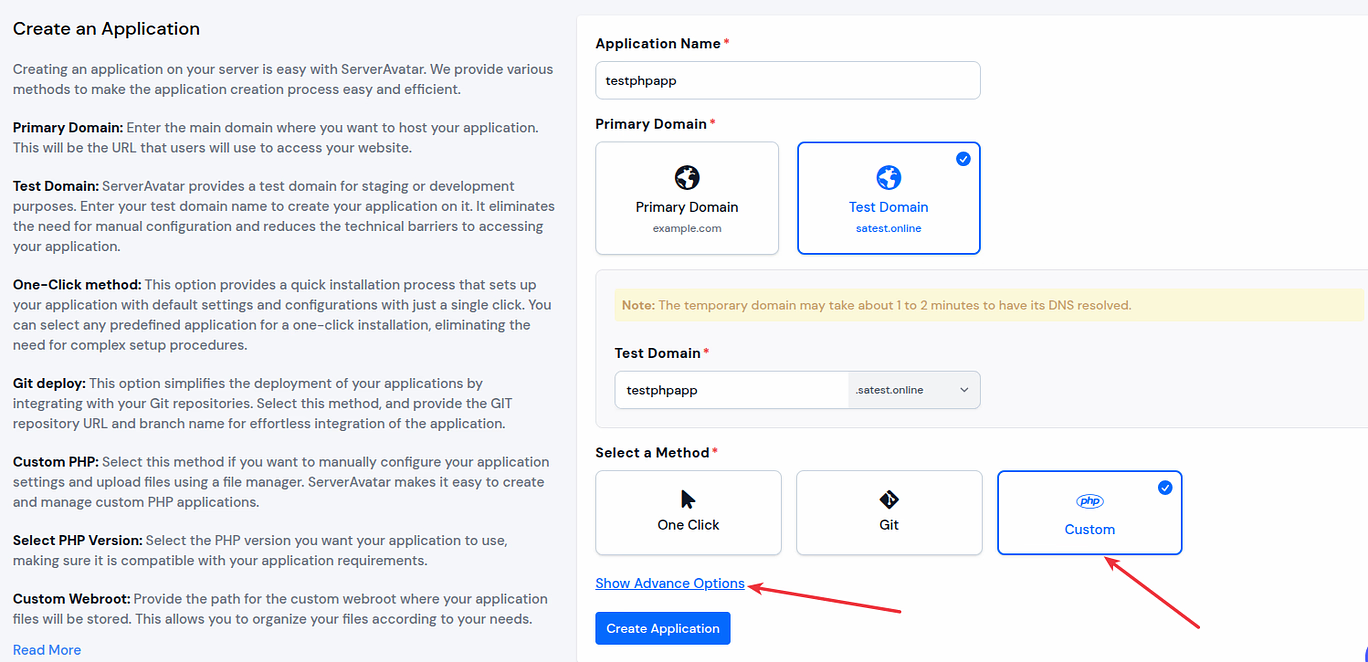
- Fill Out Website Details:
- Application Name: Enter your application name.
- Domain name: Add your domain name.
- Select Method: Select custom PHP as a method
- System User: Select the existing user or create a new user by clicking on the “Show Advanced Option“
- PHP Version: Select the required PHP version for your app from the Advanced option
- Click on the “Create Application” button.
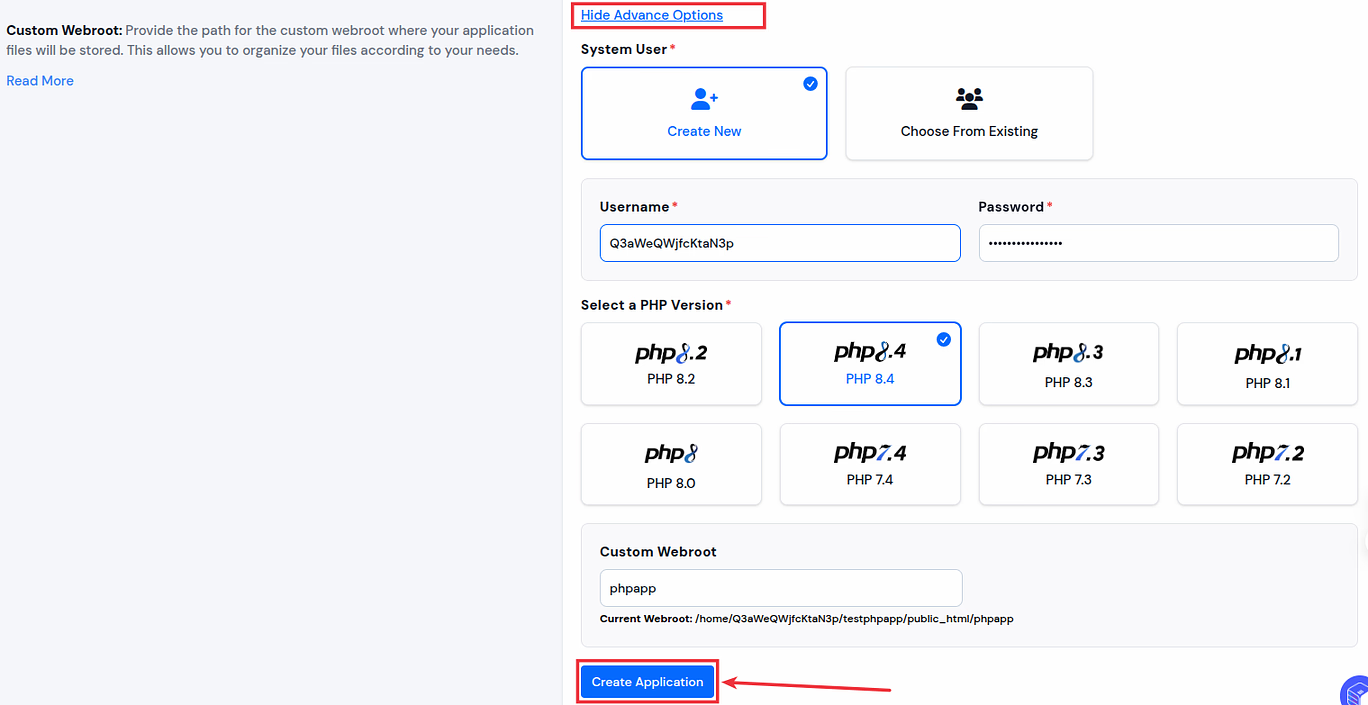
That’s it, ServerAvatar will:
- Create a directory structure
- Assign default permissions
- Configure a virtual host
Each app gets its own public_html folder, isolated from others, and with separate config files. ServerAvatar also allows staging environments for testing new features without affecting your live sites.
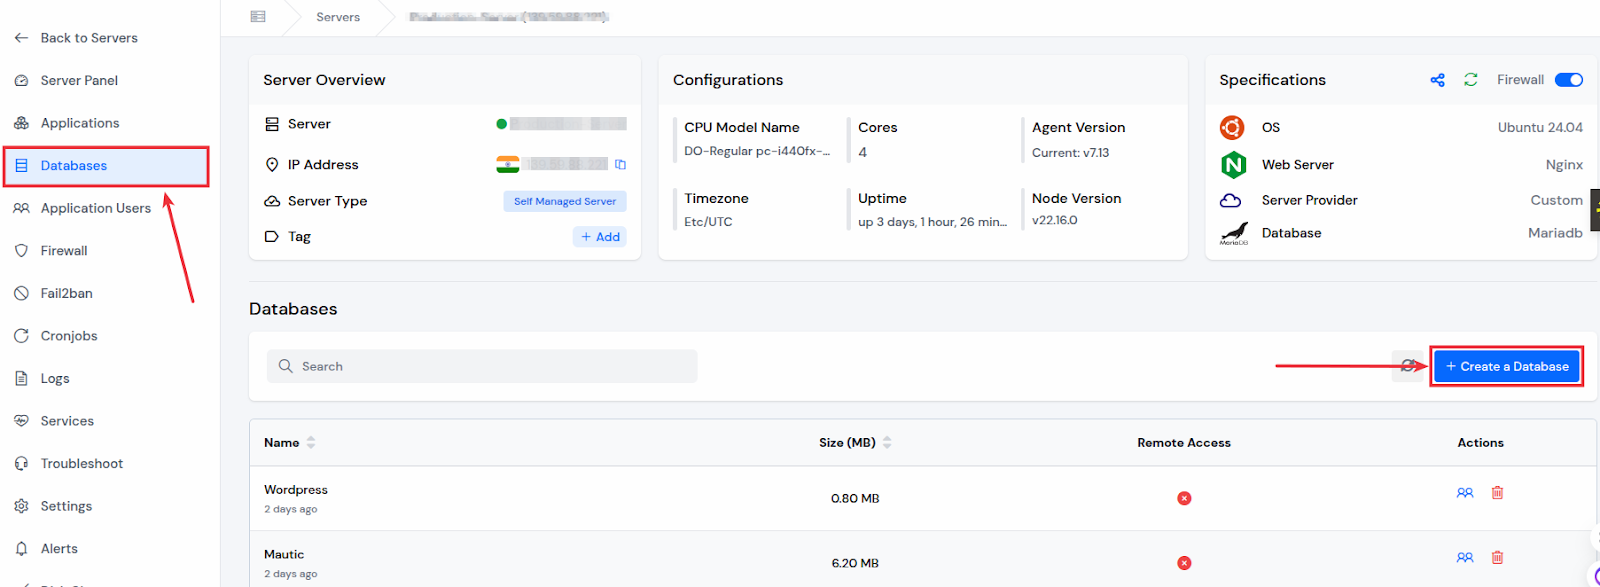
Creating a Database for Your PHP Site
Almost every PHP website needs a database, especially if you’re running a CMS or a framework. ServerAvatar makes this part just as easy.
Create a Database:
- In your server dashboard, click on the database option and create a database by clicking on the “Create a Database” button.
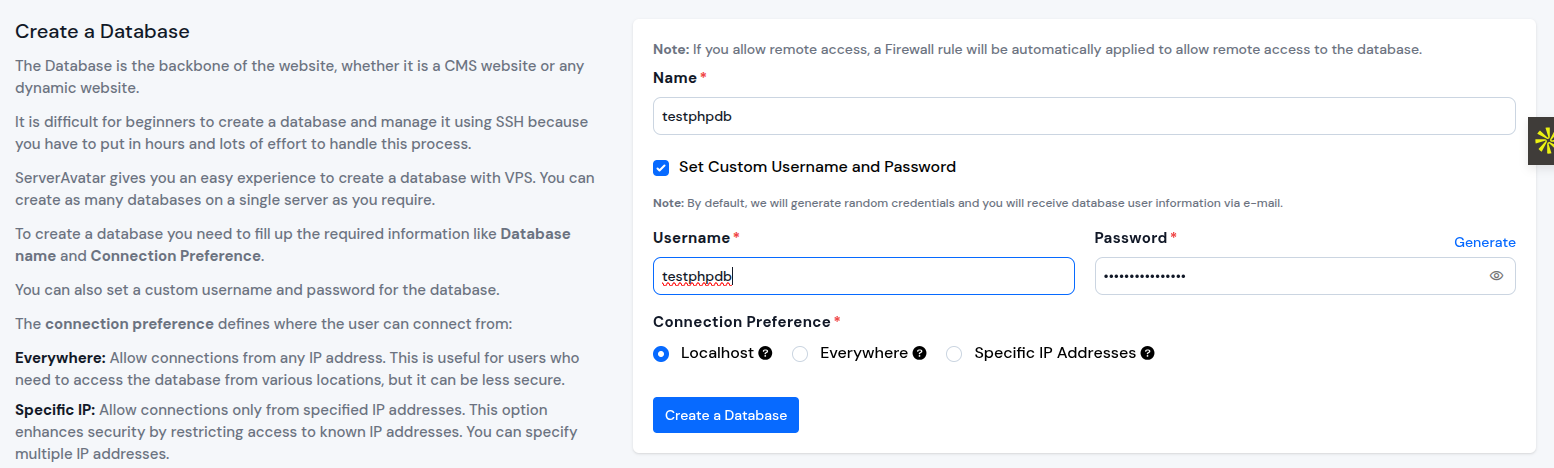
Provide the following details:
- Database name
- Set Custom Username and Password
- Select Connection Preference
Managing SSL Certificates
- Once your PHP application and database are ready, it’s time to install an SSL certificate.
SSL Installation:
- Navigate to the SSL Certificate section.
- Click on the “Automatic Installation” button under the automatic SSL Installation section.
- If you want to install a custom SSL certificate, select the Custom Installation button and enter your SSL Certificate and Private Key to install custom SSL.
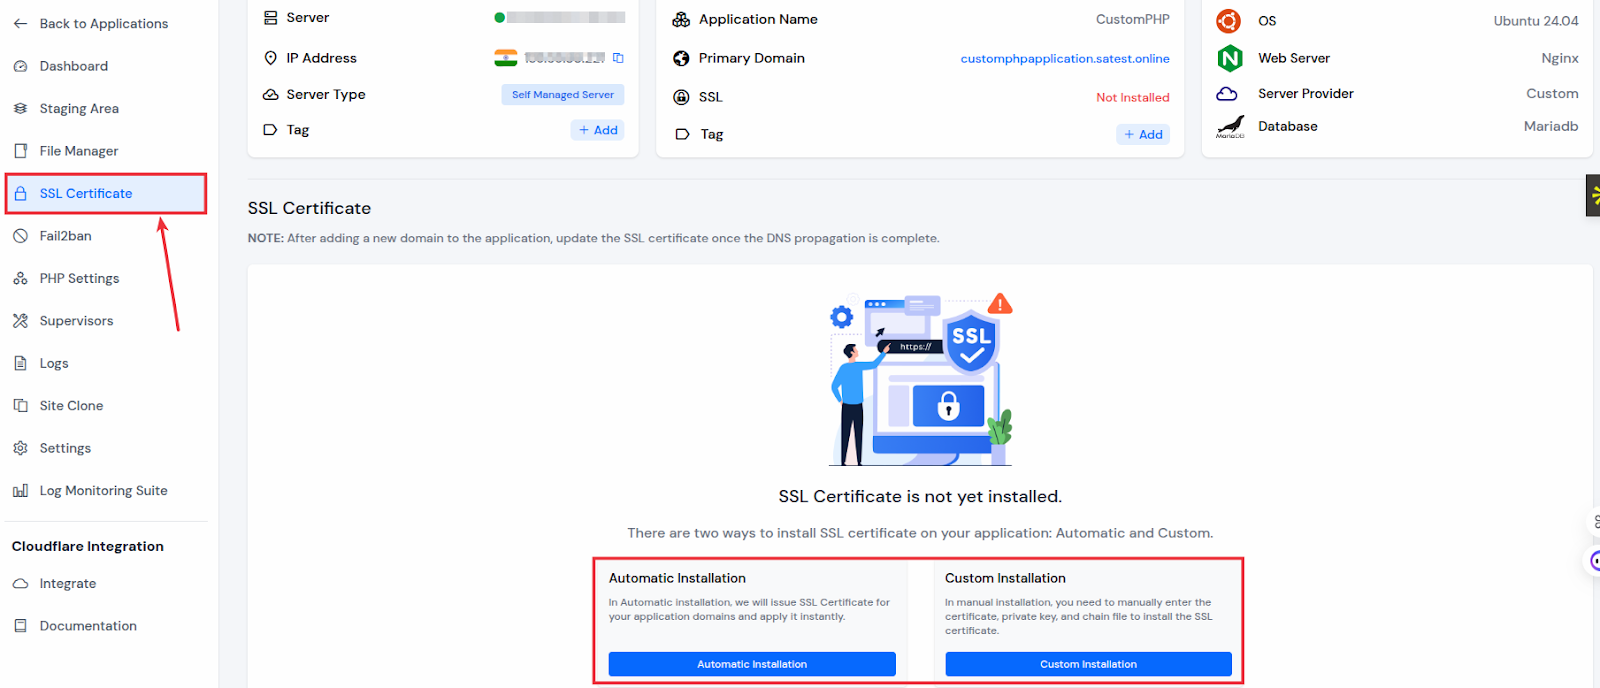
That’s it, ServerAvatar sets up the certificate. Automatic SSL will renew automatically. If you select the automatic installation option, no more manual certificate installations needed, no more expiration headaches. It just works and auto renews.
You can follow the same steps and process as I mentioned here to install other PHP applications on the same server.

Isolating Each PHP Website for Security
Importance of Website Isolation
Let’s be real, hosting multiple websites on a single server can be risky if you don’t take security seriously. If one site gets infected with malware or faces a security breach, it can easily affect the others if they’re not properly isolated. That is the main reason why isolation is mandatory, and not a maybe.
Website isolation means each of your sites operates in its own environment, like apartments in a building. They live under one roof (your server), but each has its own keys, doors, and utilities. If one apartment catches fire, the others stay safe.
ServerAvatar takes care of isolation from previous and assigns each website its own system user so you do not have to worry about issues developed because of the malware in one application. This means:
- Separate file permissions: One site can’t access or modify another’s files.
- Dedicated PHP configurations: Tailor PHP settings for each project.
- Individual logs and stats: Easier debugging and monitoring.
- Access control: Grant SFTP or SSH access to developers per site without risking others.
If you’re hosting client websites or a mix of personal and business projects, isolation is your first line of defense. It also helps with performance tuning and troubleshooting since each site behaves independently.
Using Different PHP Versions per Website
Not all PHP applications are created equal. Some require PHP 7.4, while others run best on PHP 8.1 or higher. If you’re managing several sites, being able to assign different PHP versions is not just helpful, it’s critical.
ServerAvatar supports multiple PHP versions on the same server. Here’s how to leverage this feature:
- During App Setup: Choose the PHP version best suited for your application during the application creation.
- Switch Anytime: Go to the Application Panel >> PHP Settings and switch PHP versions and other PHP settings with a few clicks.
This ensures that legacy projects keep running smoothly while newer apps get the performance boost of modern PHP. It’s like letting each website speak its preferred language without forcing everyone to conform.
This flexibility is a game-changer for agencies and developers juggling diverse client projects. You’re no longer tied down to one version, which means fewer compatibility issues and faster deployments.
User-Level Isolation and SFTP Access
Every time you create a new app in ServerAvatar, you get the option to assign a unique system user. This is for isolating file and directory access. Here’s how this helps:
- Each user has its own home directory.
- Permissions are restricted, so no user can navigate to another site’s files.
- SFTP credentials are unique, letting you share access securely with team members or clients.
Imagine that you have about five client’s websites hosted on your server. You don’t want a developer working on Site A to have access to Site B’s codebase. User-level isolation ensures this boundary is respected.
Want to give a developer temporary access? Simply share the SFTP credentials for that user, and revoke it when done, without affecting anything else on your server.
This setup also helps with compliance and best practices. Many clients today expect a secure infrastructure. Having isolated access and operations per website gives you the edge in professionalism and safety.
Advanced Resource Management and Monitoring
Monitoring Server Health and Usage
Once your server is hosting multiple websites, keeping an eye on performance is non-negotiable. ServerAvatar equips you with real-time and historical metrics that help you understand how your server is performing.
Here’s what you can track:
- CPU Usage
- RAM Usage
- Disk Space
- Bandwidth Consumption
- PHP and MySQL Load
These graphs and data points let you identify trends and bottlenecks. Maybe one website is hogging too many resources, or your memory is hitting limits during traffic spikes.
You can set alerts so that ServerAvatar notifies you when usage crosses a threshold. That way, you’re not caught off guard when your server starts to struggle.
Plus, all of this is available from a clean, intuitive dashboard, no need to SSH into your server and run top or htop every time you want to check performance.
Managing Backups for Multiple Websites
Let’s face it, stuff breaks. Sometimes because of a bad plugin update, other times due to human error. Backups are your parachute, and ServerAvatar makes it easy to automate them.
You can create manual or scheduled backups for each website individually. ServerAvatar supports backup storage options like:
- Local storage
- Amazon S3
- Wasabi
- Google Drive
Each backup includes files and databases. You can restore everything with one click, which is a lifesaver when disaster strikes.
Best practice? Schedule daily backups for active websites and weekly ones for static or less frequently updated sites. ServerAvatar allows for retention policies, so old backups get purged to save space automatically.
Managing Application Logs and Debugging
Accessing Logs via ServerAvatar
When your website hits a snag, be it a 500 error or a slow page load, your first step should always be to check the logs. ServerAvatar makes log access easy and user-friendly.
Here’s where you can find them:
- App Logs: Viewable under the specific app’s dashboard.
- Nginx/Apache Logs: Useful for tracking access logs, redirects, and 404s.
- PHP Logs: Helps with identifying fatal errors, warnings, and deprecations.
Each website’s logs are separated, which is super helpful. There’s no need to sift through thousands of lines trying to find a bug related to just one site.
Migrating Existing Websites to ServerAvatar
Step-by-Step Migration Process
Already have a PHP website hosted somewhere else? No worries. Migrating your website to a ServerAvatar is a straightforward process:
- Backup Your Website: Always take a full backup, files and database.
- Create a New App in ServerAvatar.
- Upload Files via SFTP or Git.
- Import Database via phpMyAdmin or terminal.
- Update Configuration Files (like .env, wp-config.php, or config.php)
- Next, update your domain’s DNS settings to point to your new server’s IP address.
- Test Everything in staging or using a hosts file override before going live.
If needed, ServerAvatar’s support or community can assist you in debugging post-migration issues.
Common Pitfalls to Avoid
- Mismatched PHP versions
- Incorrect file permissions
- Missing .env configurations or database connections
Take it slow, test thoroughly, and your migration will be smooth and painless.
Conclusion
Sharing a server with your PHP websites has never been easier or more secure. If you’re a freelancer with dozens of client projects or an agency about to scale, ServerAvatar is the ideal combination of automation, speed, and security.
From one-click SSL to isolated environments, per-site PHP versions to easy cron job management, things that used to take hours of sysadmin work can be accomplished in just a few clicks with this tool.
No longer managing a handful of servers. No more sacrificing security. With ServerAvatar, you’ll have full control panel power, but you’ll have the flexibility to grow. And do it all while keeping things simple, fast, and under your control.
FAQs
Q1: Are I be able to run Laravel, WordPress and custom php apps in same server using ServerAvatar?
Yes! ServerAvatar is PHP application friendly and supports all kinds of PHP applications and let you manage them independently with unique settings, users and PHP versions.
Q2: Are client websites safely kept with one server?
Yes, as long as you take advantage of ServerAvatar isolation features such as separate system users, access control, and databases.
Q3: How Many Websites Can I Host On A Single Server?
That, would depend on your server’s resources. You can run (very) small to medium websites on a 2gb VPS for around 5–10 websites. Never neglect performance or upgrading when performance dictates.
Q4: What if something were to happen to the one website? Will it affect the others?
No, thanks to isolation, problems on one site (for instance, buggy code or a traffic surge) won’t directly affect the others, unless you’re reaching the limits of your server.