Introduction:-
Remove malware as it poses a serious threat to the functionality, security, and reputation of WordPress websites. It can lead to defacement, traffic loss, unauthorized redirects, data theft, and even blacklisting by search engines like Google. These issues can severely impact search engine rankings, user trust, and overall business performance. That’s why it’s crucial to remove malware quickly and implement strong security measures to prevent future attacks.
Malware typically infiltrates websites through outdated plugins or themes, weak passwords, insecure scripts, or poorly configured servers. Once compromised, a site may become a vector for further attacks, spam distribution, or unauthorized data access.
This comprehensive guide outlines the critical steps required to effectively remove malware from a WordPress website and implement long-term security measures. It includes practical tools, actionable techniques, and highlights how to use the ServerAvatar Panel to efficiently manage and secure your hosting environment. ServerAvatar simplifies server and application management, making it easier to monitor, configure, and protect your WordPress installation from future vulnerabilities.
Understanding Remove Malware From WordPress
Common Types of WordPress Malware
WordPress, being the most popular CMS globally, is a hot target for hackers. Here are some common types of malware that infect WordPress sites:
- Backdoors: These allow hackers to re-enter your site even after you’ve cleaned it.
- Pharma Hacks: Spammy pharmaceutical ads appear in your search results.
- Malicious Redirects: Visitors are redirected to unsafe or spammy websites.
- Drive-by Downloads: Malware is automatically downloaded onto a user’s device.
- Malicious Scripts: JavaScript or PHP code injected into your files to steal data or perform malicious actions.
Recognizing the type of malware helps in deploying the right removal strategy. For example, malicious redirects require checking .htaccess and core files, while pharma hacks often involve a deep dive into database tables.
Signs Your WordPress Site Is Infected
How do you know your site’s infected? Here are the red flags:
- Sudden drops in traffic (Google may have blacklisted your site).
- Unusual pop-ups or ads that you didn’t add.
- New unknown users appearing in your WordPress dashboard.
- Modified or deleted files without your input.
- Slow website performance or frequent crashes.
- Security plugin alerts indicating malicious activity.
Using monitoring tools or panels like ServerAvatar, you can observe server resource usage, error logs, and even get alerts when suspicious activities spike.
How Malware Infects WordPress Websites
Malware can find its way into your site through multiple entry points:
- Outdated Plugins or Themes: These often have vulnerabilities.
- Nulled or Pirated Themes: Usually bundled with hidden malicious scripts.
- Weak Admin Credentials: Easy-to-guess usernames and passwords.
- Unsecured Servers: Hosting on poorly managed servers without firewalls or malware protection.
- Lack of File Permissions: Incorrect CHMOD settings on files and folders.
Using ServerAvatar, you can monitor and control server access and permissions more efficiently. It provides a GUI to manage SSH access, error logs, and update status, all in one place.
Step 1: Backup Your Website
Why Backing Up Is Essential
Before you touch anything, back up your entire site, files and database. Think of this like a seatbelt. If something goes wrong during malware removal, at least you can restore the site to its previous state. Plus, malware can hide in obscure places, so having a working backup lets you compare files side-by-side.
Tools for Creating Backups
Here are some reliable tools to back up your WordPress site:
- UpdraftPlus – One of the most user-friendly and powerful backup plugins.
- BlogVault – Great for real-time backups.
- BackupBuddy – Offers scheduled and on-demand backups.
- ServerAvatar Panel – ServerAvatar allows you to create backups of your databases and file system.
How to Backup a File with ServerAvatar and Plugin (UpdraftPlus)
With ServerAvatar:
- Log in to your ServerAvatar panel.
- Select the site or server you want to back up.
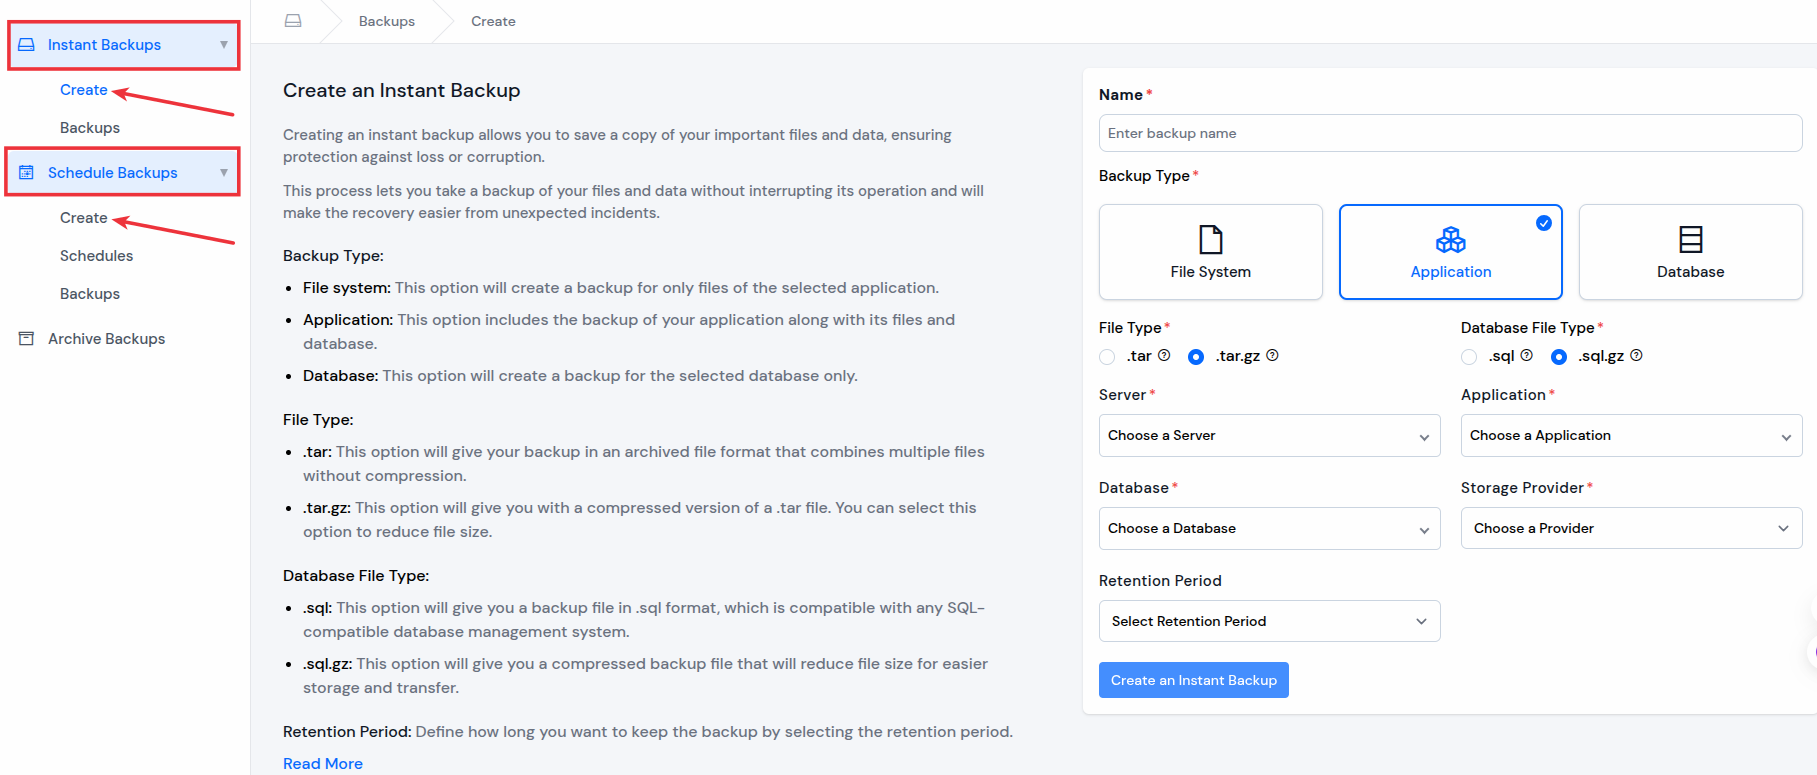
- Navigate to the Backups tab.
- Click “Create New Backup” and schedule future backups with retention settings.
- Easily download or restore from previous versions with one click.
This method ensures your entire environment is backed up, not just the WordPress files, which is vital in case of server-wide malware infection.
With Plugin Installation: (ex:- UpdraftPlus)
- Log into WordPress: Sign in to your WordPress admin dashboard using an account with administrator access.
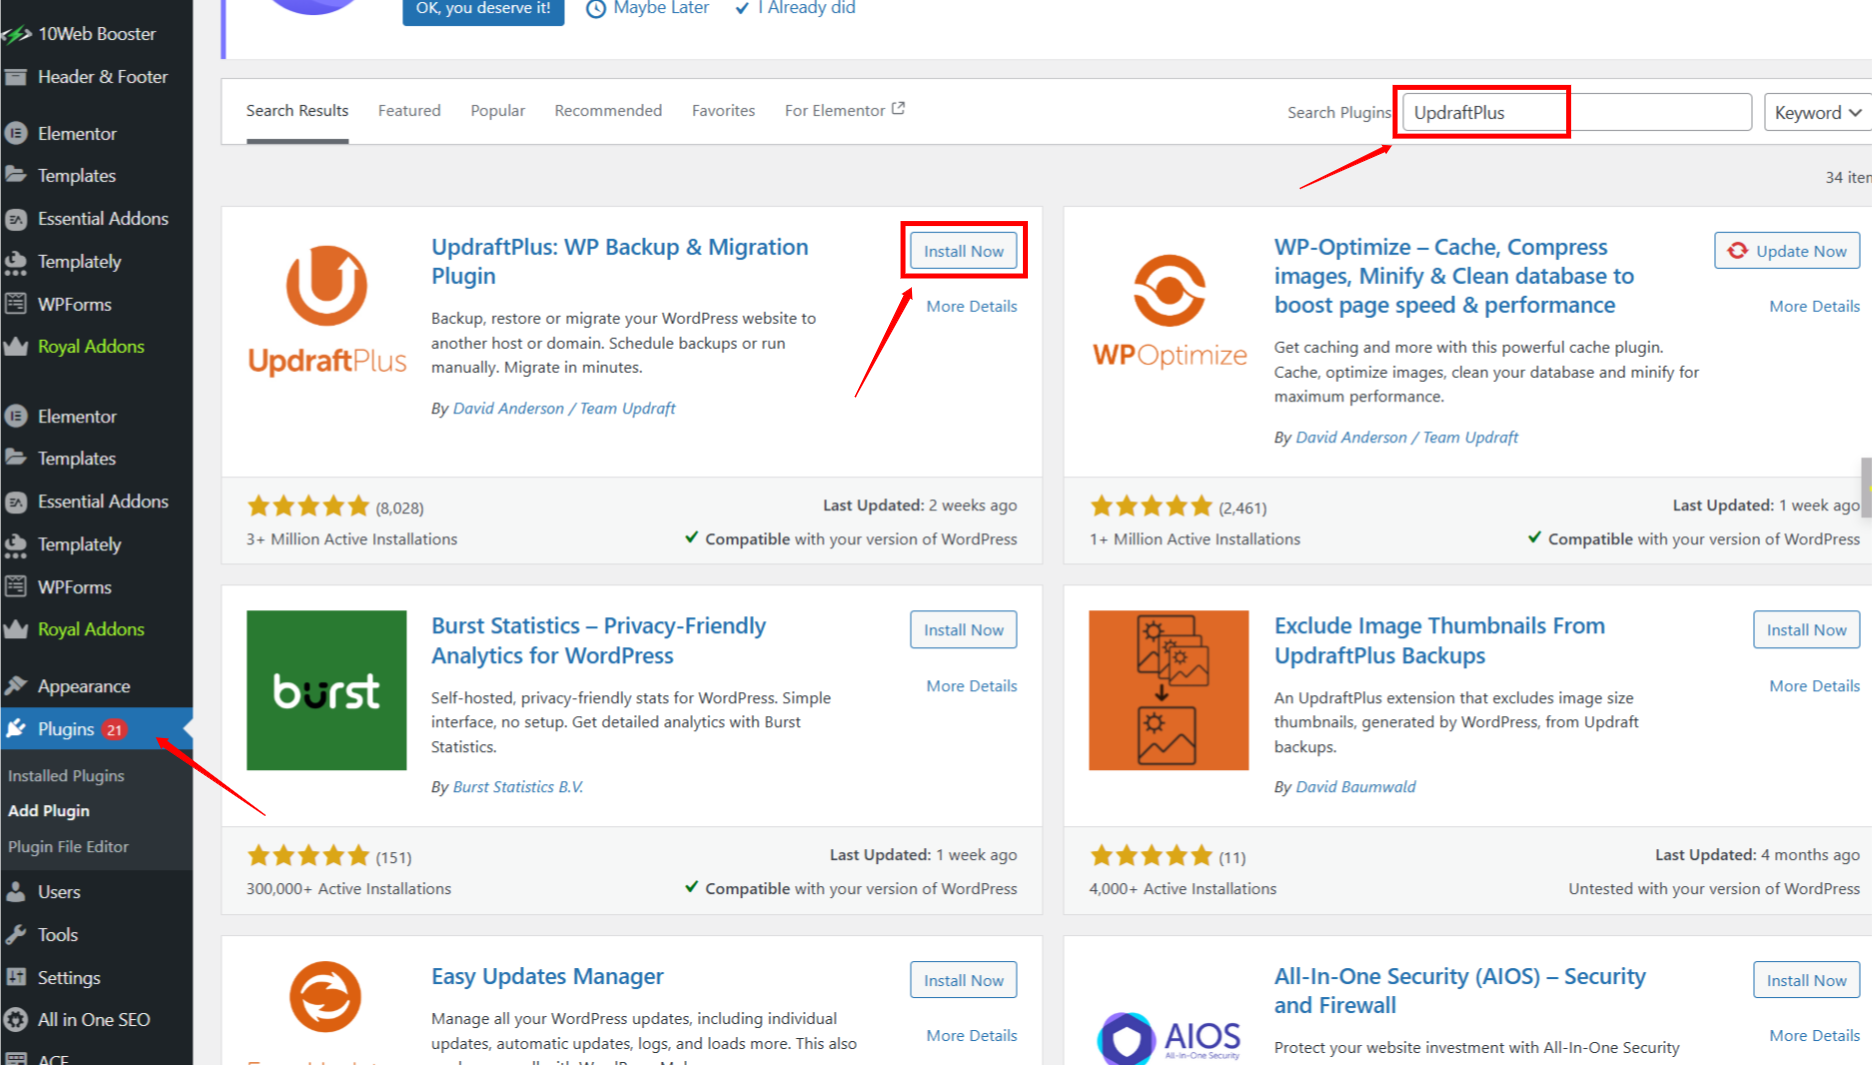
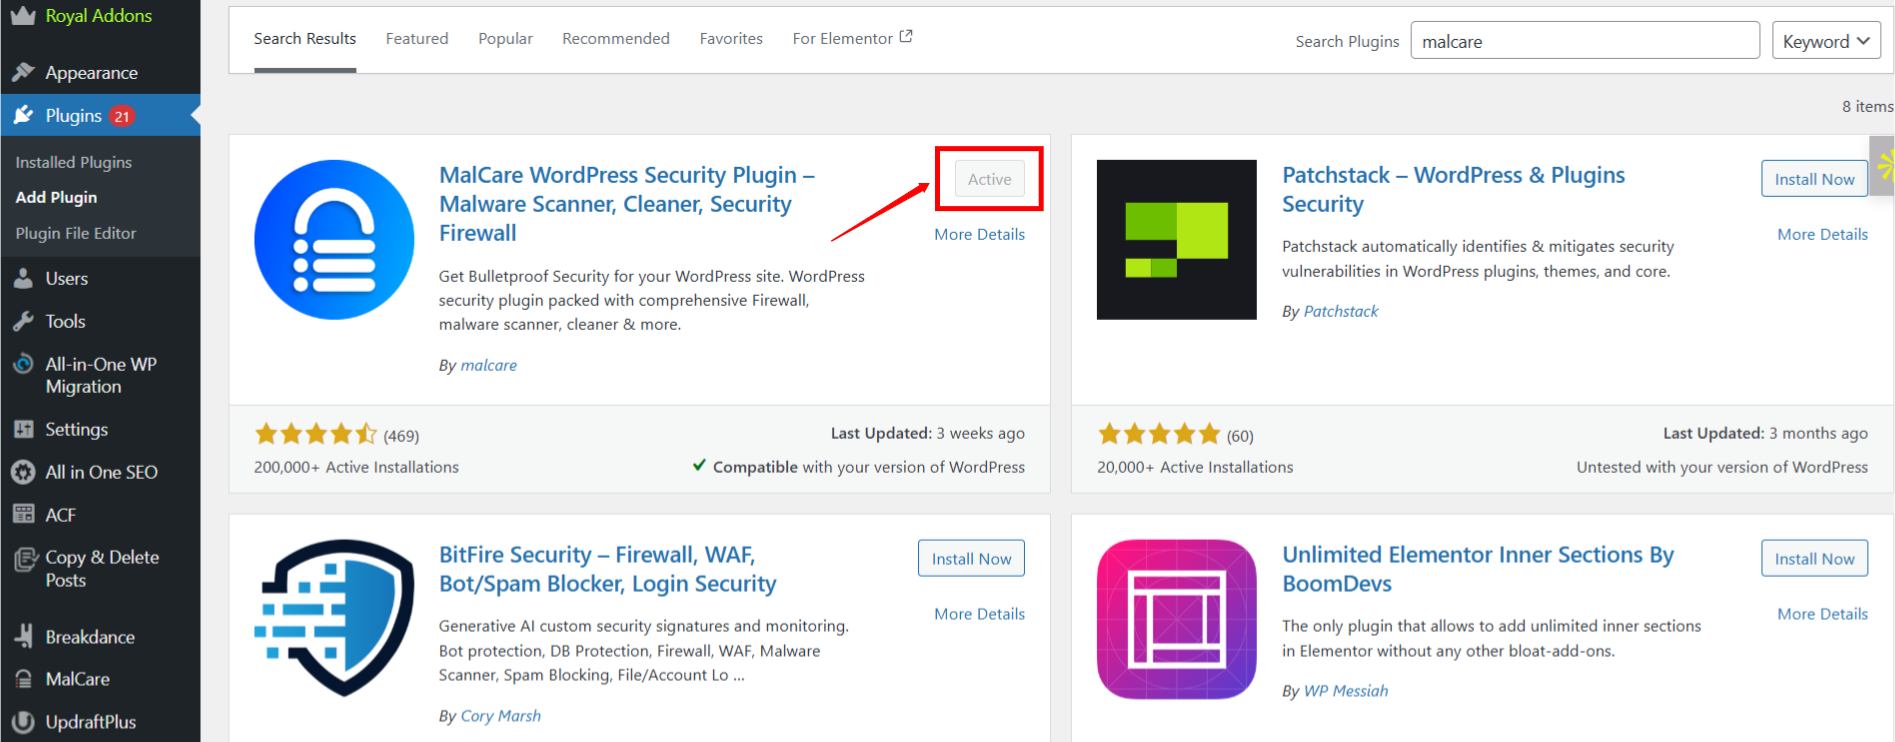
- Go to Plugins Section: From the left-hand menu, click on “Plugins” > “Add New”.
- Search for UpdraftPlus: In the plugin search bar, type “UpdraftPlus” and hit Enter.
- Install and Activate: Find the “UpdraftPlus WordPress Backup Plugin”, then click “Install Now”. Once the installation is complete, click “Activate” to enable the plugin.
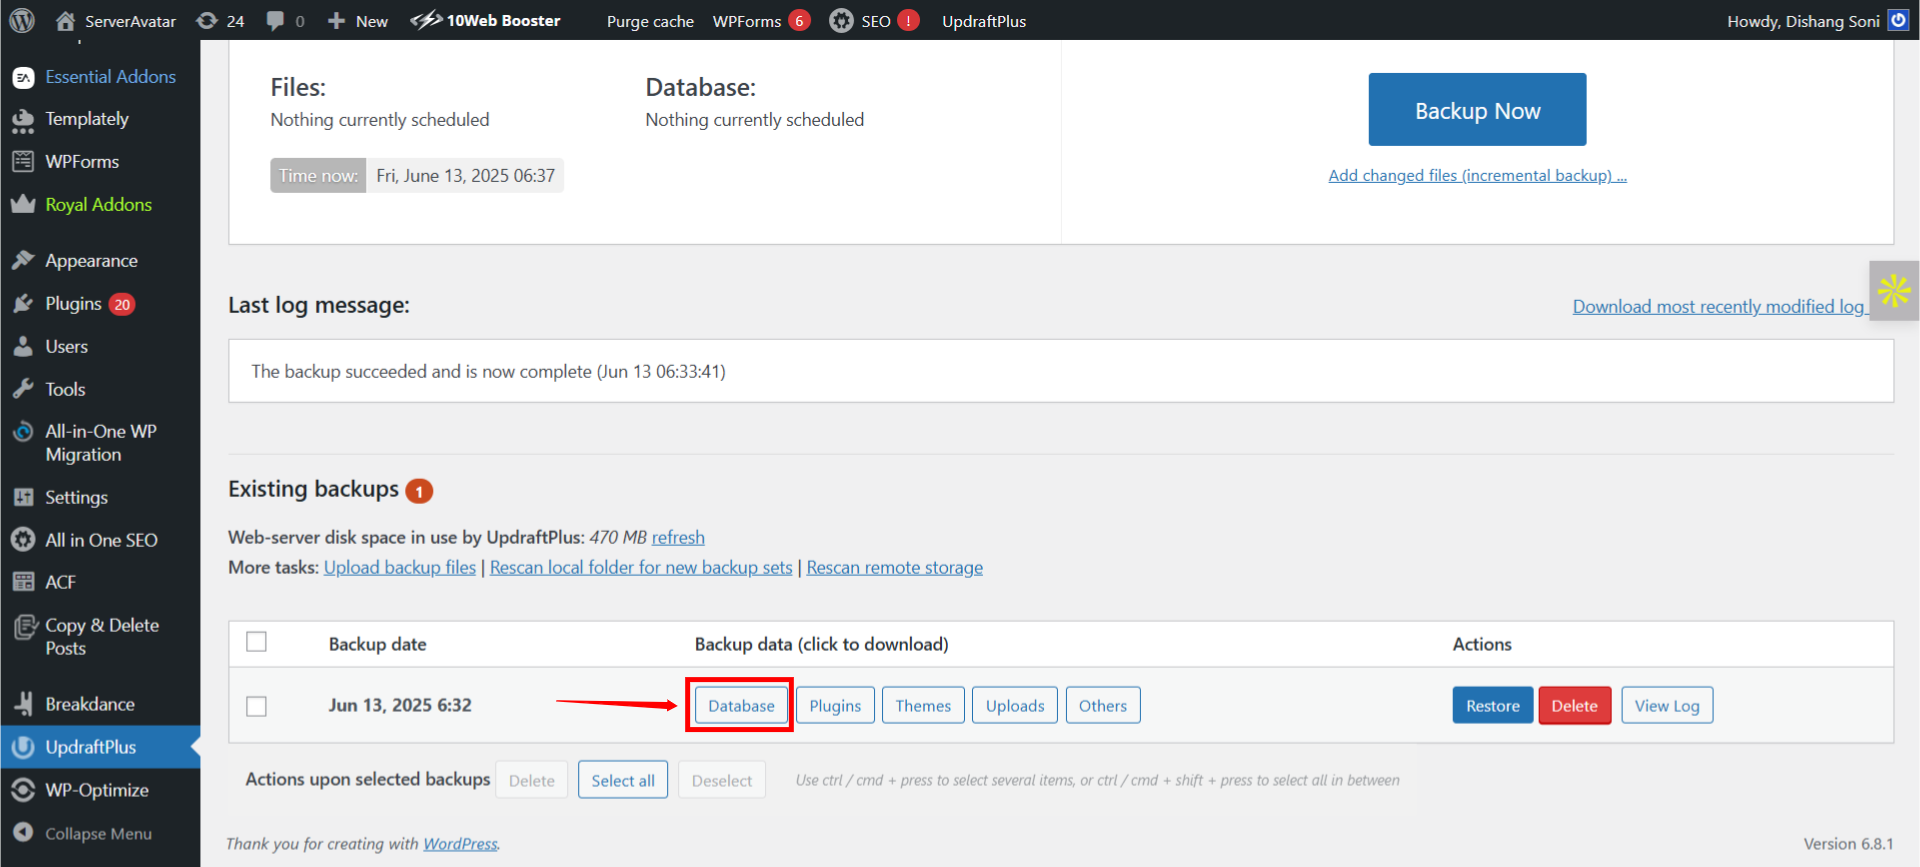
Creating a Backup:
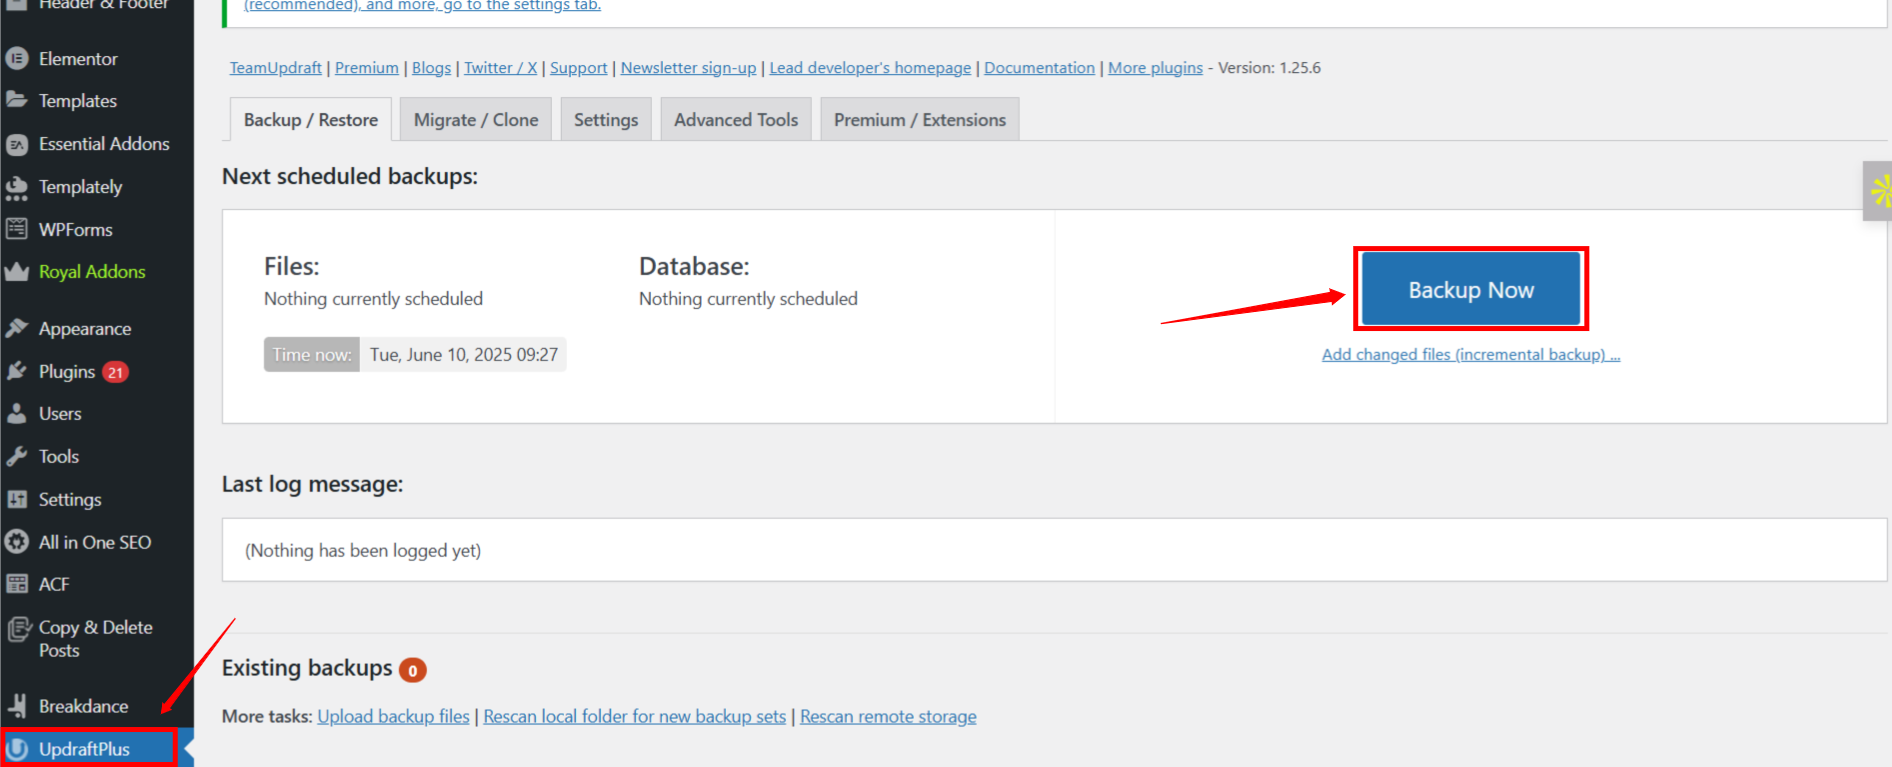
- Open UpdraftPlus Settings: In the dashboard menu, go to “UpdraftPlus” to open the plugin interface.
- Start the Backup Process: Click the “Backup Now” button to begin.
3. Optional Settings: Before starting the backup, you can choose whether to include files, the database, or both.

- Run the Backup: After configuring your options (or using the defaults), click “Backup Now” again to initiate the process.
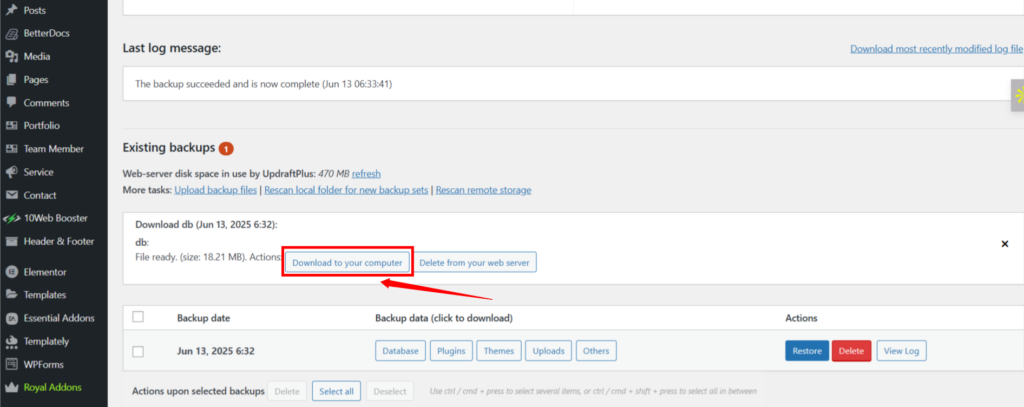
- Download Backup Files (Optional): Once the backup is complete, you’ll have the option to download the files to your computer for extra safety.
Step 2: Put Your Site in Maintenance Mode
Why Use Maintenance Mode
It’s not just a good idea, it’s critical. When you’re cleaning up malware, the last thing you want is visitors browsing a compromised site. Plus, it gives you space to work without risking user data or spreading the infection.
Maintenance mode also signals to Google and users that you’re aware of issues and working on them, preserving some trust during the cleanup process.
Recommended Plugins for Maintenance Mode
Here are the best plugins to quickly activate maintenance mode:
- SeedProd Maintenance Mode – Very easy to set up and visually appealing.
- WP Maintenance Mode – Offers advanced features like countdowns and custom messages.
- LightStart – Lightweight and quick to enable.
Steps to Enable Maintenance Mode:
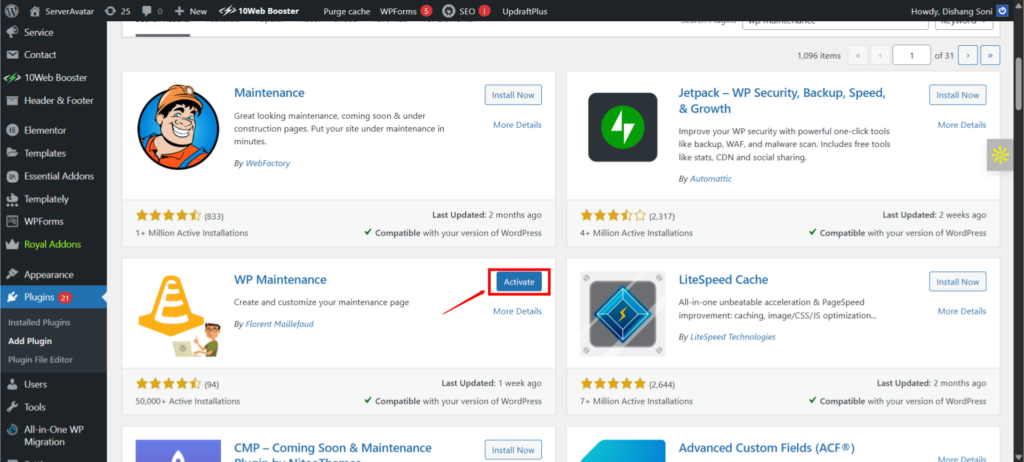
Let’s Take (WP Maintenance Mode)
- Install your chosen plugin.

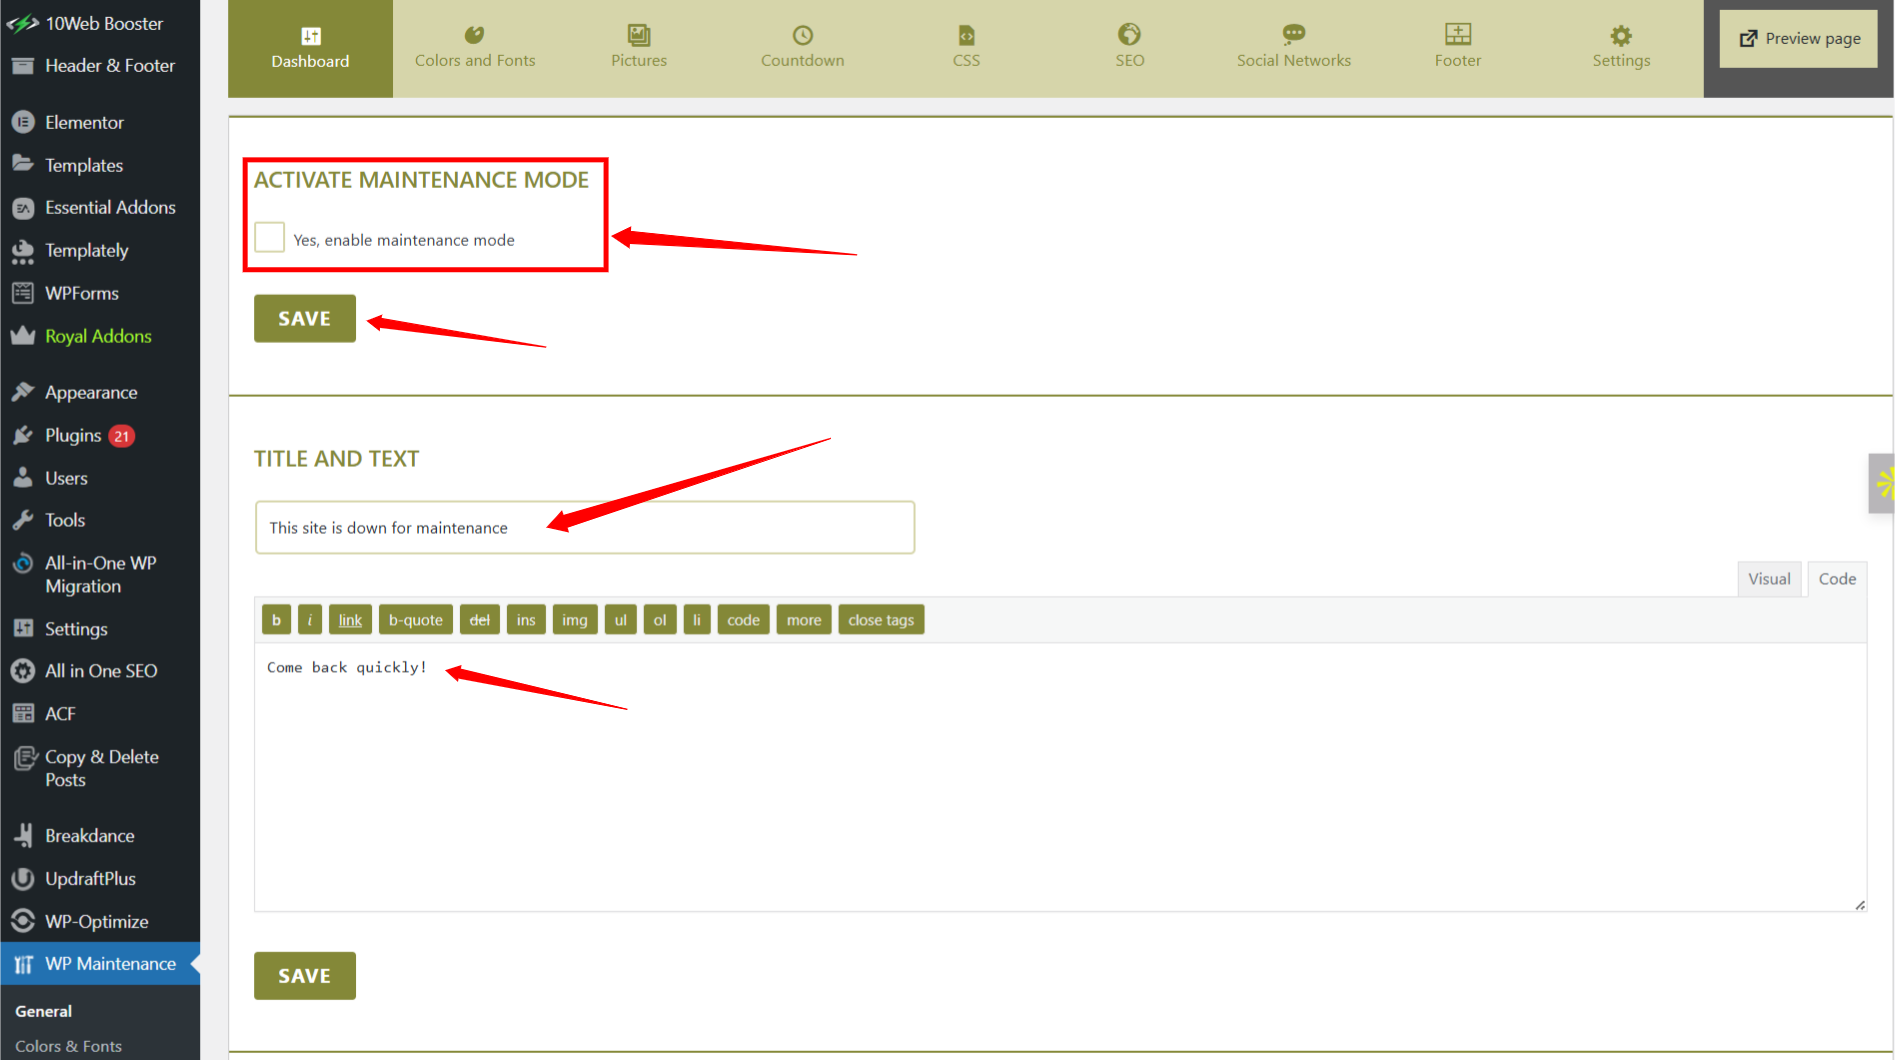
- Go to plugin settings (usually under Settings > Maintenance).
- Enable “Maintenance Mode.
- Customize your message to inform visitors that your site is undergoing maintenance.
- Save changes.
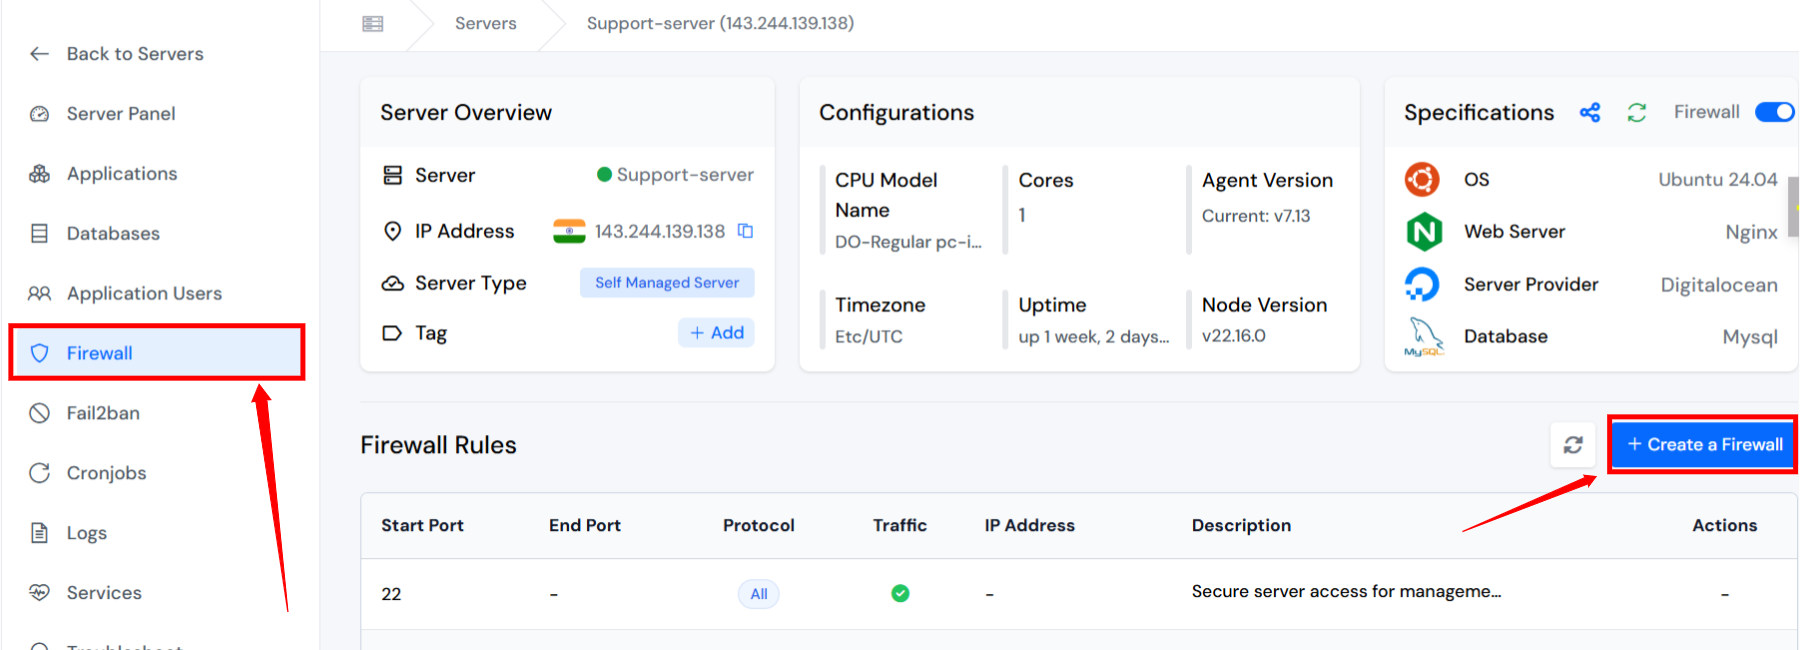
If you’re using ServerAvatar, you can also restrict site access by IP or temporarily disable the server’s public access via the firewall panel. This adds an extra layer of protection during the cleanup process.
If You are Using ServerAvatar:-
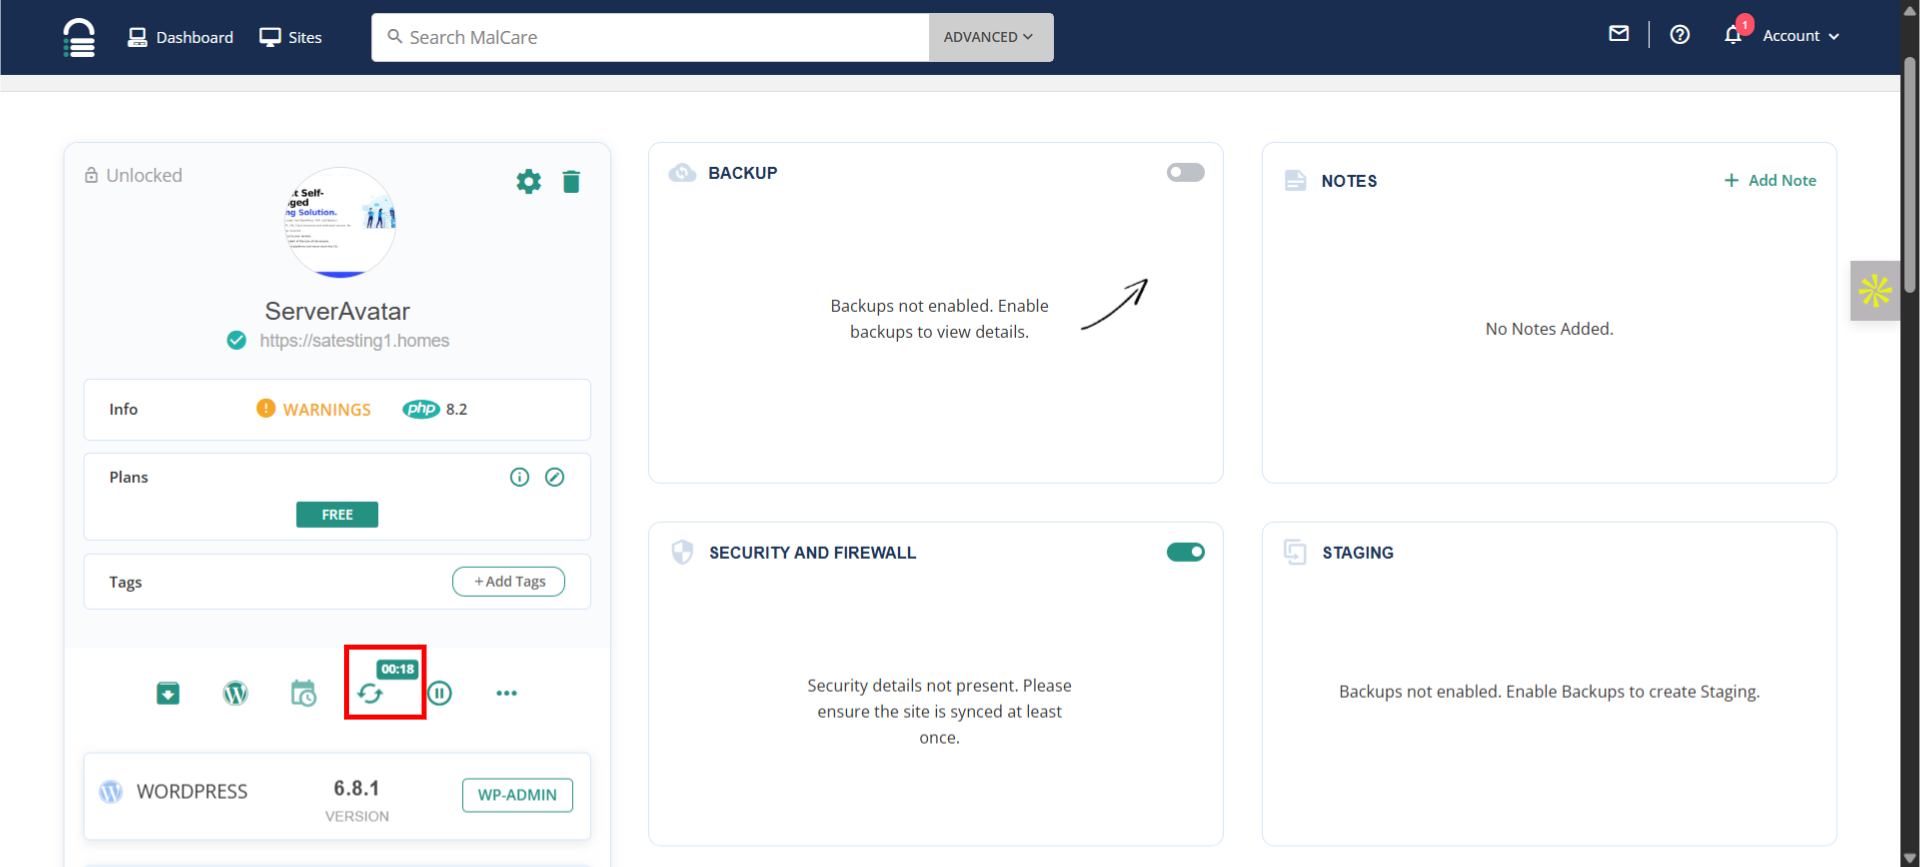
Step 1: Log in to ServerAvatar.
Step 2: Select Your Server
From your ServerAvatar dashboard, click on the server where your WordPress site is hosted.
Step 3: Open Your Application
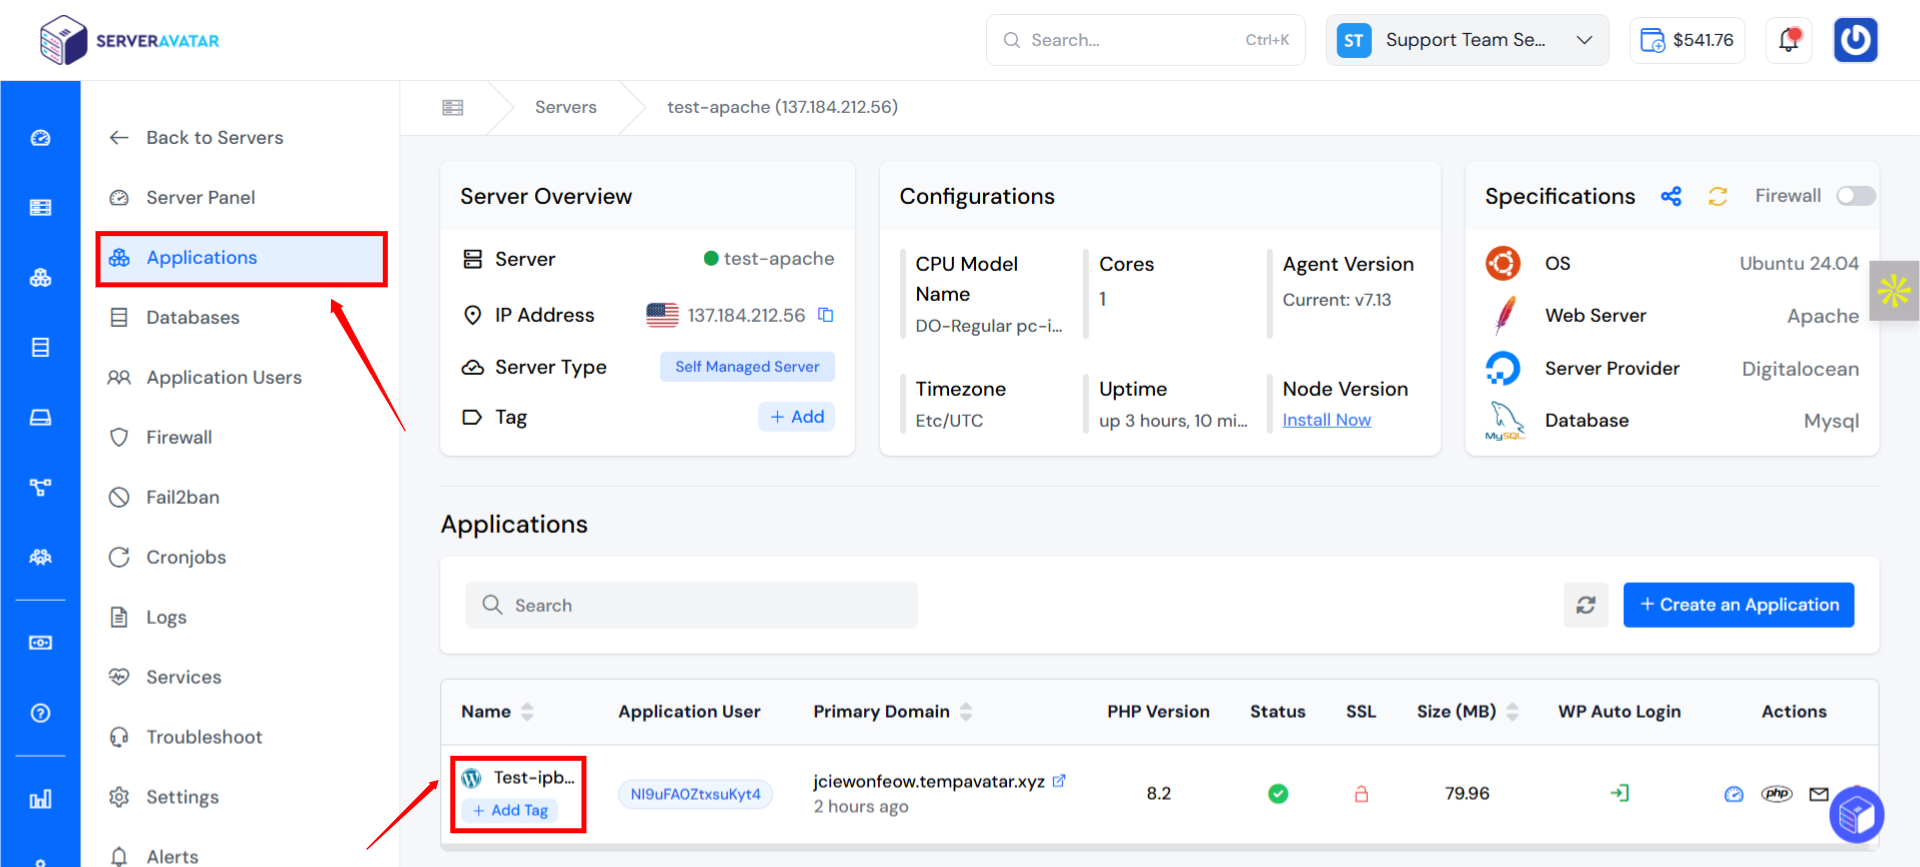
- Select the WordPress site (application) you want to enable maintenance mode for.
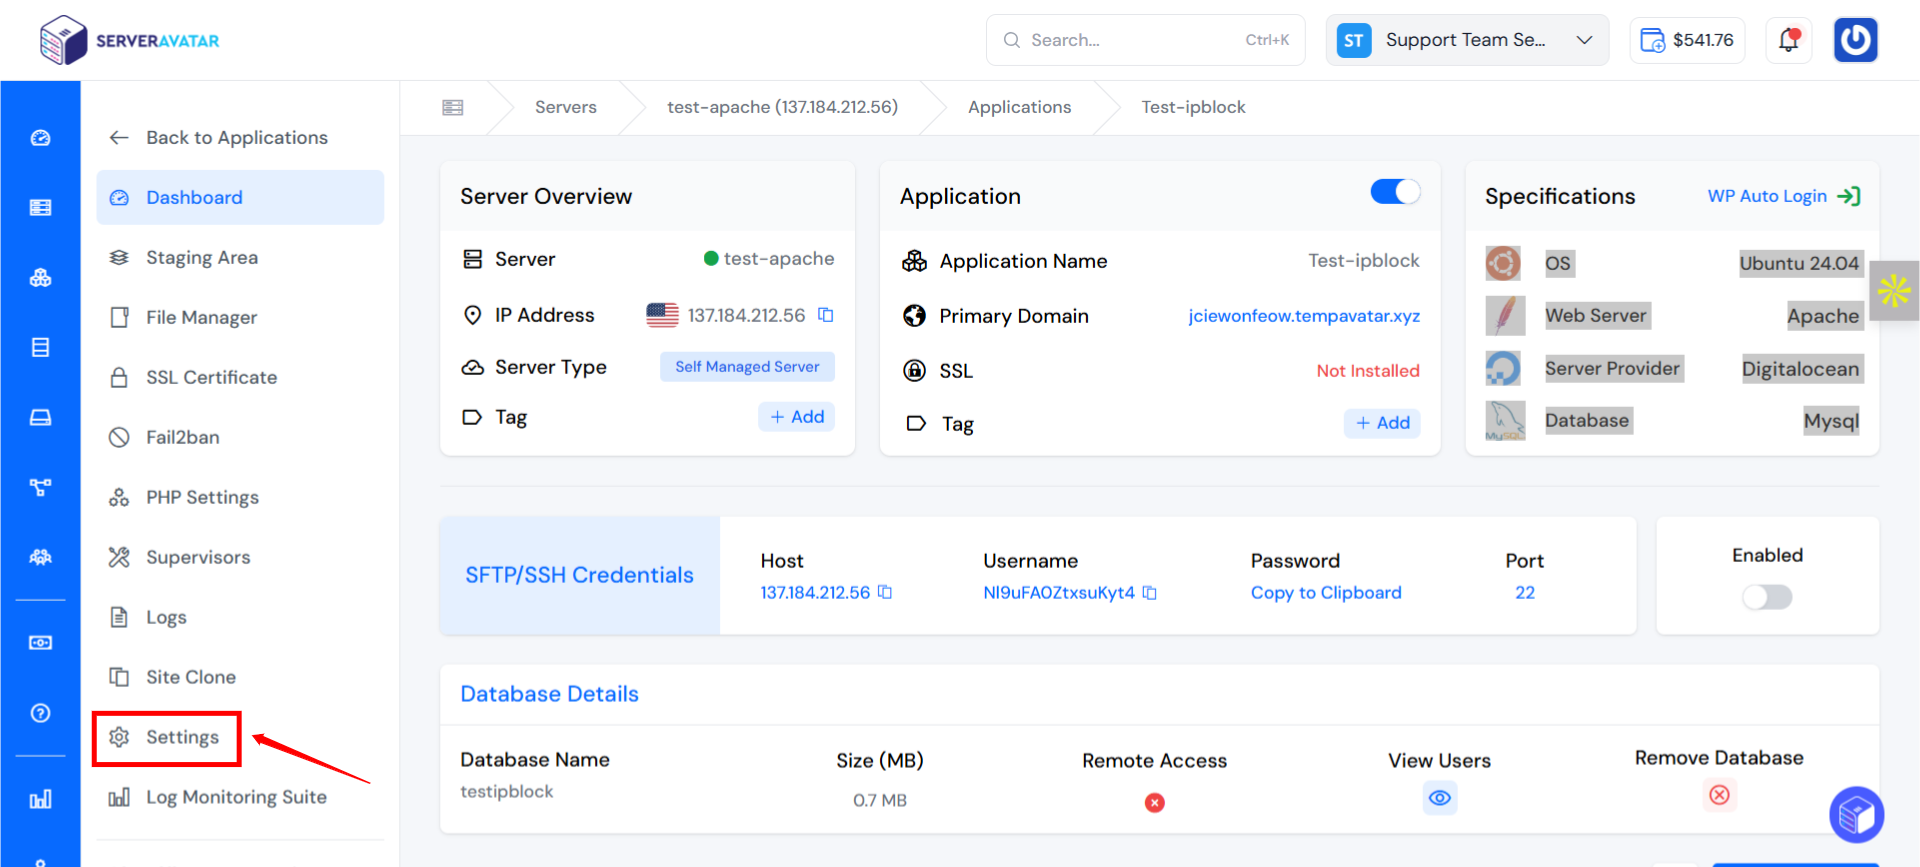
- Click on Settings Option
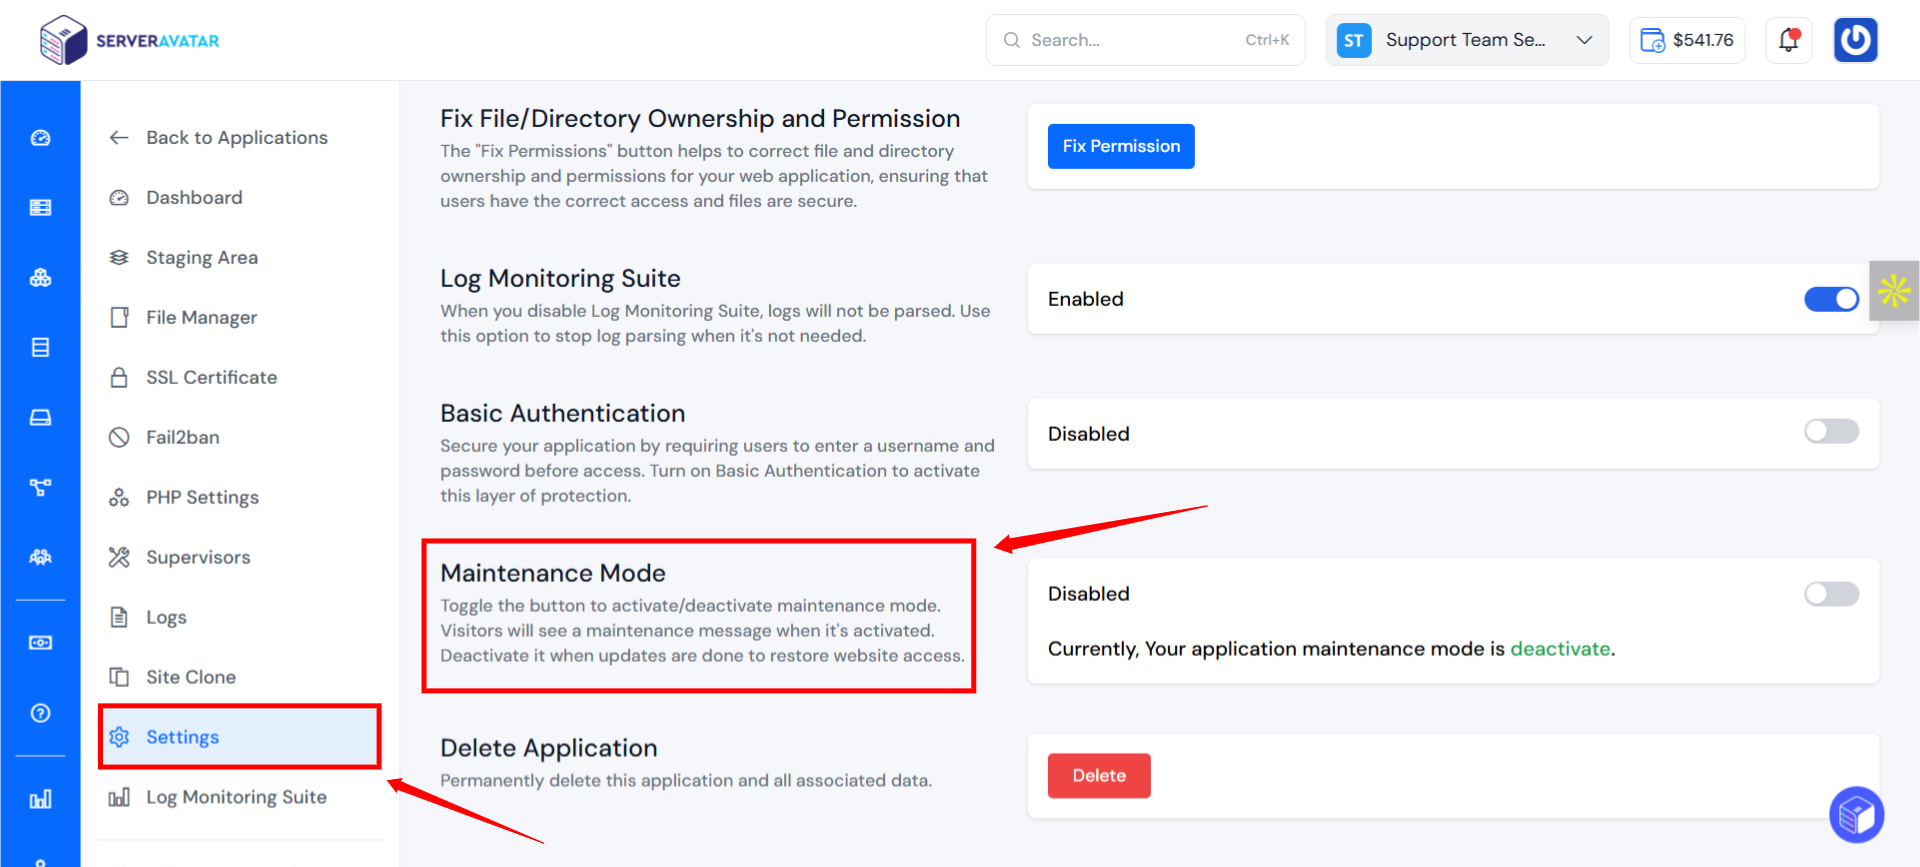
You can see Maintenance Mode. Use the toggle button to turn maintenance mode on or off. When activated, visitors will see a maintenance message. Once your updates are complete, simply turn it off to make the website accessible again.
Step 3: Scan Your Website for Malware
Best Malware Scanners for WordPress
To find out where the malware is hiding, you need to scan your website thoroughly. Here are the top tools for the job:
- Wordfence Security – Offers deep scanning and firewall.
- MalCare – Known for minimal server load during scans.
- Sucuri SiteCheck – Great for quick, external scans.
How to Run a Malware Scan
Let’s take MalCare as an example:
- Install and activate the plugin.
- Navigate to Malcare > Scan.
- Click Start New Scan.
- Let the scan run, it will inspect core files, themes, plugins, and code.
- Review flagged files and paths.
Step 4: Remove the Malware Manually or Automatically
Once malware is detected, the next step is to clean your WordPress site. You have two options: manual removal or using automated tools.
- Manual Cleanup: This involves checking core WordPress files, themes, and plugins for unfamiliar code or suspicious scripts. If you’re comfortable with PHP, look out for base64 encoded strings, eval() functions, or unauthorized admin users.
- Automated Cleanup: Tools like Wordfence, Sucuri, and MalCare make this task easier. These plugins can scan, detect, and remove malware with a few clicks.
If you’re managing your WordPress site via ServerAvatar, you can use the file manager and terminal access from the dashboard to inspect and clean files efficiently. You can also restart services or roll back configurations to stable states directly through the panel, helping minimize downtime during cleanup.
Step 5: Update Everything on Your Website
After cleaning the malware, it’s critical to update everything
- WordPress core
- Themes (especially if you’re using third-party or nulled ones)
- Plugins (outdated ones are prime malware targets)
Running outdated software is one of the biggest vulnerabilities. Hackers exploit known security holes in old versions of plugins or themes.
ServerAvatar allows easy management of your server environment, so updating PHP versions or enabling auto-updates is smooth and secure through the panel. Keeping your stack updated adds another layer of protection.
Step 6: Change All Passwords and Reconfigure Access
Even after malware removal, there’s no telling what credentials may have been compromised. Change:
- WordPress admin passwords
- FTP/SFTP credentials
- MySQL database passwords
- Your hosting control panel login (if applicable)
With ServerAvatar, you can quickly change SSH and database passwords from the panel itself, without needing to dive into server-side configuration files. You can also revoke or regenerate SSH keys for secure access control.
Step 7: Harden Your WordPress Security
Once your site is malware-free, now’s the time to lock it down:
- Disable file editing via wp-config.php
- Limit login attempts
- Use security plugins like Wordfence, iThemes Security, or Sucuri
- Configure proper file permissions (644 for files, 755 for folders)
- Enable 2FA (Two-Factor Authentication)
The platform makes it easy to configure and secure your server. Use the built-in Firewall Setup and Fail2Ban integration in ServerAvatar to limit brute-force attempts and block malicious IPs automatically
Step 8: Monitor Your Website Regularly
Security isn’t a one-time task, it’s an ongoing process. Set up real-time monitoring:
- Use uptime monitoring tools like UptimeRobot or Better Uptime
- Use security plugins to keep scanning your site regularly
- Monitor traffic spikes or unknown admin logins
ServerAvatar’s dashboard provides real-time resource monitoring, letting you track CPU, RAM, and disk usage. Any sudden spike can be a red flag for suspicious activity.
Step 9: Clean Up Google Blacklist Warnings
If your site was blacklisted by Google during the malware attack, it’s essential to request a review:
- Sign in to Google Search Console
- Navigate to “Security Issues”
- Review flagged problems and request a review once cleaned
- Google will lift the warning if the site is malware-free
Google can take 1–3 days to process the review. Make sure everything is clean before requesting.
Step 10: Prevent Future Infections
Now that your site is safe, make sure it stays that way:
- Regularly update all plugins, themes, and core files
- Use strong, unique passwords
- Keep full-site backups (daily or weekly)
- Enable security alerts
- Don’t use nulled plugins or themes
Use ServerAvatar to automate full-site backups to remote destinations like Dropbox or Google Drive. Scheduling backups ensures that even if something goes wrong, you can restore your site with minimal hassle.
Conclusion.
Securing your WordPress site after a malware attack isn’t just about cleanup, it’s about building strong defenses for the future. By carefully removing malware, updating everything, and tightening access, you’re already steps ahead of most site owners. And when you pair WordPress with a smart server management tool like ServerAvatar, you get an added layer of convenience and control.
From server monitoring and backups to secure configurations and access management, ServerAvatar makes it easier than ever to manage your site without being a server expert.