If your website is slow or showing memory errors, it might need more memory to run properly. The PHP memory limit setting controls how much memory your site can use. By increasing it, you can make your website run faster and handle bigger tasks without crashing. In this guide, you’ll learn how to increase the memory limit step by step, in a simple and easy way.
What Is PHP Memory Limit ?
The PHP memory limit sets the maximum amount of memory that a single PHP script is allowed to use. It helps protect your server from crashing if a script gets out of control or is not well-optimized.
By default, this limit is usually set to 128M or 256M, which is enough for simple websites.
But if you’re running a larger application like WordPress, WooCommerce, or anything built with Laravel, you might need to increase it so everything runs smoothly
Why Adjusting Memory Limit Matters
Setting the right memory limit directly affects:
- Website speed and responsiveness
- Ability to run large plugins or import data
- Stability during peak traffic
- Prevention of “Allowed memory size exhausted” fatal errors
Improving it means smoother performance and happier users.
Common Signs Your PHP Memory Limit Is Too Low
You might need to increase the limit if:
- You get “Allowed memory size exhausted” errors
- Plugins or themes fail to install or update
- Backup plugins time out or fail
- Large images or file imports crash
- Website slows down under traffic spikes
Pre-Check: Know Your Current PHP Memory Limit
Before you change anything, it’s important to find out your current PHP memory limit. This helps you understand if you actually need to increase it, and by how much.
The easiest way to check is by using a special PHP function called phpinfo(). This method works for any website, regardless of whether you’re using ServerAvatar, cPanel, or any other platform.
Step-by-Step: Use a phpinfo() Script
Step 1: Create the File
- Navigate to your file manager.
- Go to your root directory of WordPress application. This is usually the same folder that contains your wp-config file
- Create a new file and name it info.php.
- Paste the following code into the file:
<?php
phpinfo();
?>his little script tells your server to display all current PHP settings.
Step 2: Upload the File
Upload the info.php file to the root directory of your website. This is usually the same folder that contains your:
- index.php
- wp-config.php (for WordPress sites)
- or public HTML folder (public_html, htdocs, etc.)
Step 3: Open the File in Your Browser
Now, in your browser’s address bar, visit:
Example:- https://yourdomain.com/info.php
(Replace yourdomain.com with your actual domain name.)
This will load a full PHP configuration page.
Step 5: Delete the File for Security
Important: Once you’ve checked your memory limit, delete the info.php file immediately.
Why? Because this page exposes sensitive information about your server, including version numbers, extensions, and configurations, which could be exploited by attackers.
Method 1: Increase PHP Memory Limit via ServerAvatar
What is ServerAvatar
ServerAvatar is a cloud server management platform that lets you easily host and manage websites or applications on your own VPS or cloud servers, with support for PHP, WordPress, Laravel, and more, no sysadmin skills needed.
If you’re using ServerAvatar this is the easiest method.
Step 1: Log In to ServerAvatar
Head over to ServerAvatar Dashboard and sign in.
Step 2: Select Your Web App
From the dashboard, click on the server, then select your web application.
Step 3: Go to PHP Setting
Find the Web Application Settings tab and go to PHP Settings.
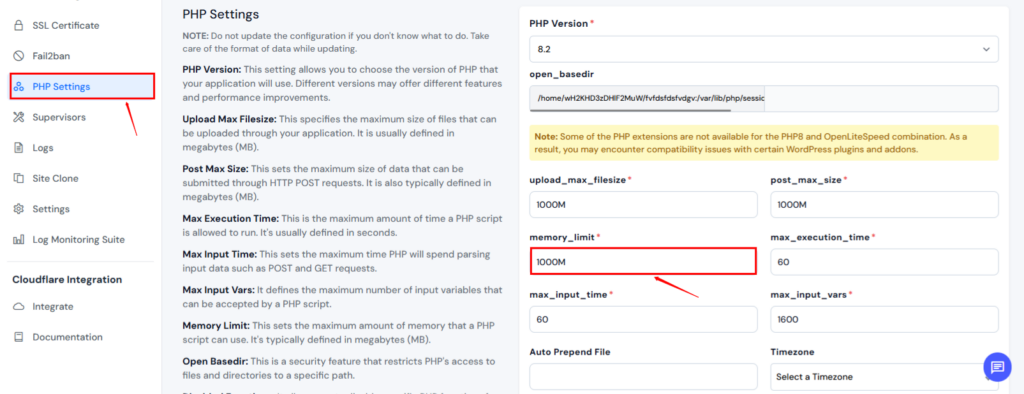
Step 4: Set Your Desired Memory Limit
Update the memory limit field to your preferred value. (e.g., 512M or 1024M)
Step 5: Save and Restart PHP
Click Save Changes, then Restart PHP to apply changes instantly.
Done! Your new memory limit is now active.
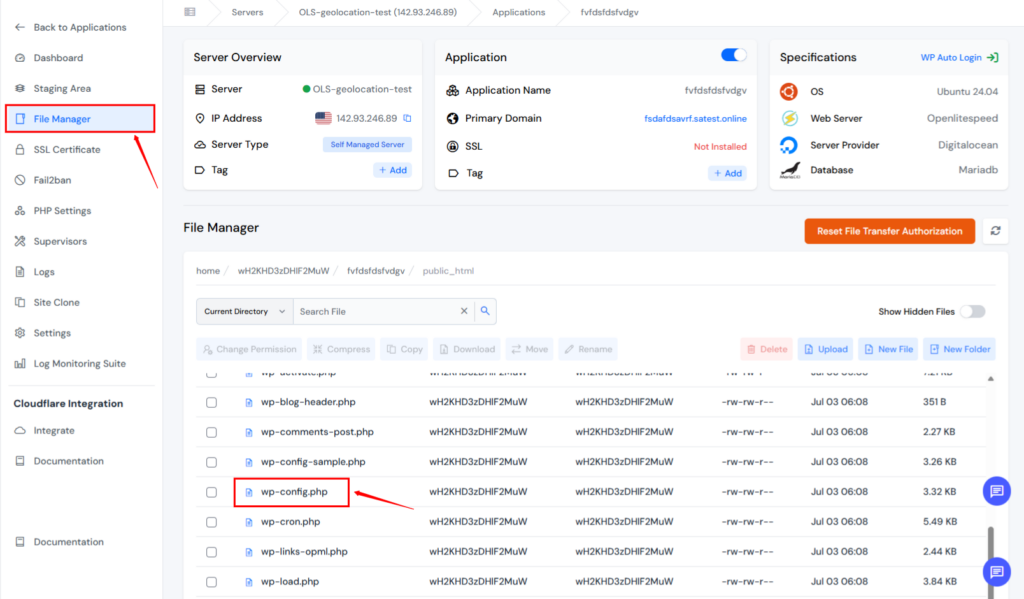
Method 2: Set PHP Memory Limit via wp-config.php
Perfect for WordPress users who don’t have panel access.
Step 1: Access wp-config.php File
Use FTP, File Manager to open wp-config.php, found in your site’s root directory.
Step 2: Add or Update Memory Limit Code
Add this line just before */ That’s all
define('WP_MEMORY_LIMIT', '512M');For admin-side tasks like backups, you can also add:
define('WP_MAX_MEMORY_LIMIT', '1024M');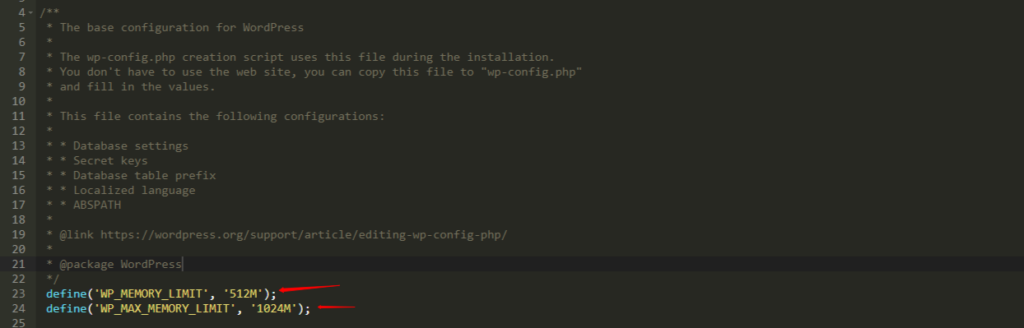
Step 3: Save Changes and Test
Visit your site to confirm things are running smoothly. Use a plugin like Query Monitor to verify new limits.
Recommended Memory Limit Values for Common Use-Cases
| Use Case | Recommended Memory Limit |
| Basic WordPress Site | 128M |
| Medium Blog +Plugins | 256M |
| WooCommerce Store | 512M |
| LMS or Membership Site | 768M |
| Media-Heavy or Large Import Site | 1024M+ |
Method 3: Edit the PHP.ini File
The php.ini file runs every time a PHP application is used. It controls important settings like how big a file you can upload, how much memory a script can use, how long a script can run before it stops, and more.
If you want to increase the memory limit or other limits, you can change the following settings in your php.ini file. Just remember:
- These settings are case sensitive, so type them exactly as shown.
- After making changes, restart your server to apply them.
Here are the settings you can update:
How to Find the php.ini File
Using Command Line (Linux Server)
If you have SSH access:
php --iniLook for the line:
Loaded Configuration File: /etc/php/8.1/apache2/php.iniOnce you know the path, open it using a code editor or terminal.
Example (using nano in terminal):
sudo nano /etc/php/8.1/apache2/php.ini(Make sure to replace the path with your actual PHP version and environment)
memory_limit = 256M
upload_max_filesize = 12M
post_max_size = 13M
file_uploads = On
max_execution_time = 180 Scroll/search in the file (Ctrl+W in nano) for the following lines and update & Save the File:
To apply the changes, restart your server:
For Apache:
sudo systemctl restart apache2For Nginx + PHP-FPM:
sudo systemctl restart php8.1-fpm
sudo systemctl restart nginx(Replace php8.1-fpm with your PHP version)
The max_execution_time setting is the time limit for a script to run. If a script takes longer than this, it will stop automatically.
Method 4: Edit the .htaccess File
Go to your File Manager, then navigate to public_html.
Find the .htaccess file.
The .htaccess file is a hidden file (that’s why its name starts with a dot). If you’re on shared hosting or don’t have access to the php.ini file, you can use the .htaccess file to increase the PHP memory limit instead.
This file serves multiple purposes, and one of them is to control PHP settings.s.
To increase the memory limit and upload size, just add the following lines to your .htaccess file:
php_value memory_limit 256M
php_value upload_max_filesize 12M
php_value post_max_size 13MTips for Maintaining PHP Performance Post-Increase
- Optimize plugins and themes
- Monitor memory usage with tools like New Relic or ServerAvatar Insights
- Use caching (object, page, opcode)
- Keep PHP and WordPress updated
- Disable unused PHP modules
Risks of Setting Memory Limit Too High
- Wastes server RAM
- Encourages bloated code to go unnoticed
- Could affect other applications on shared servers
Debugging Issues After Changing Memory Limit
If things break:
- Revert to previous memory limit
- Check error logs in ServerAvatar or cPanel
- Make sure there’s enough actual RAM on your server
- Restart PHP-FPM or web server (Nginx/Apache)
How to Monitor PHP Memory Usage Continuously
Use any of the following tools:
- ServerAvatar Logs and Monitoring (If you are using ServerAvatar Panel)
- New Relic APM
- WP Server Stats Plugin
- top/htop commands on the server
- Cloud provider dashboards (e.g., DigitalOcean, Vultr)
Conclusion
Optimizing your PHP memory limit is one of the simplest, most powerful ways to boost performance, avoid annoying errors, and support growing traffic.
Whether you’re using ServerAvatar’s cloud panel or editing the wp-config.php file manually, both methods offer control and clarity. Just remember: increase gradually, monitor continuously, and optimize consistently.
FAQ
1. What is the safest PHP memory limit to set?
Start with 256M for blogs, 512M for WooCommerce, and scale based on usage.
2. Will increasing memory limit make my site faster?
Indirectly, yes. It allows PHP to handle more operations, especially under load.
3. Can I use both ServerAvatar and wp-config methods?
Yes, but ServerAvatar’s value usually overrides. Prefer panel-level config for accuracy.
4. Why doesn’t the new limit reflect in phpinfo()?
You may have missed a restart, or the wrong php.ini is being edited.
5. What if I still get memory errors?
Try increasing further, optimizing plugins, or upgrading server RAM.