Learning how to change URL in WordPress might seem scary at first, especially if you’re worried about breaking links, crashing your site, or ruining your SEO. But don’t worry! In this guide, we’ll walk you through how to change the URL in WordPress safely and properly, without causing any damage.
Whether you’re rebranding, moving to HTTPS, switching to a new domain, or updating your site structure, this step-by-step guide will help you change your WordPress URL the right way.
What Is a WordPress URL?
Before jumping into how to change it, let’s first understand what a WordPress URL is.
In WordPress, there are two main URL settings:
- WordPress Address (URL) – This is where your core WordPress files live (like wp-admin, wp-content, etc.).
- Site Address (URL) – This is the main address visitors use to access your website.
In most cases, both URLs are the same, but they can be different if you’re running WordPress in a subdirectory or doing something custom.
Why Would You Want to Change Your WordPress URL?
There are several reasons why you might need to change your WordPress URL:
- Switching from HTTP to HTTPS (for better security)
- Rebranding with a new domain name
- Moving from a subdomain to a main domain (e.g., blog.example.com to example.com)
- Fixing broken settings after a migration or plugin error
- Switching from “www” to non-www or vice versa
No matter the reason, changing the URL must be done carefully to avoid downtime, errors, or SEO issues.
Important Things to Do Before Changing the URL
Before changing your WordPress URL, follow these steps to protect your website.
1. Backup Your Website
Always create a full backup (files + database) before making changes. Use plugins like:
- UpdraftPlus
- All-in-One WP Migration
- Duplicator
If something goes wrong, you can always restore it.
2. Check SSL (if switching to HTTPS)
If you’re moving from HTTP to HTTPS, install an SSL certificate first. Most hosting providers offer free SSL via Let’s Encrypt.
3. Log in as Administrator
Make sure you’re logged into your WordPress dashboard with an admin account. You’ll need full access to make changes.
Method 1: Change WordPress URL from the Admin Dashboard
This is the safest and easiest method if you can log into your WordPress dashboard.
Step-by-Step Guide:
- Log in to your WordPress Admin Dashboard.
- In the left-hand menu, go to:
Settings → General
You will see two important fields:
- WordPress Address (URL):
This is where your WordPress core files live. - Site Address (URL):
This is the public URL of your website that people visit.
- WordPress Address (URL):
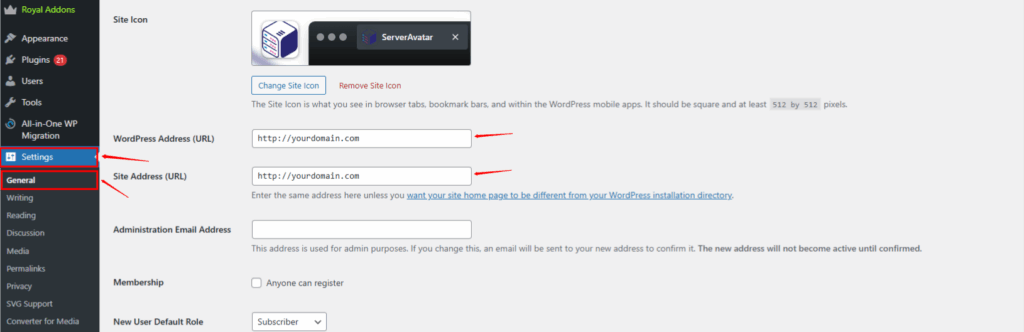
- Update both fields to your new URL.
Example: Change from http://yourdomain.com to Your Required Url - Scroll down and click “Save Changes.”
- WordPress will log you out. You’ll need to log in again using the new URL.
Method 2: Change URL via wp-config.php
What is ServerAvatar
ServerAvatar is a powerful cloud server management platform that helps you easily host and manage PHP-based applications like WordPress, Laravel, and custom PHP sites. It simplifies server setup, deployment, security, and monitoring, so you can focus on building your website or app without dealing with complex server commands.
If you can’t access the WordPress dashboard, you can hardcode the new URL in your configuration file.
If You are using ServerAvatar Follow This Step:-
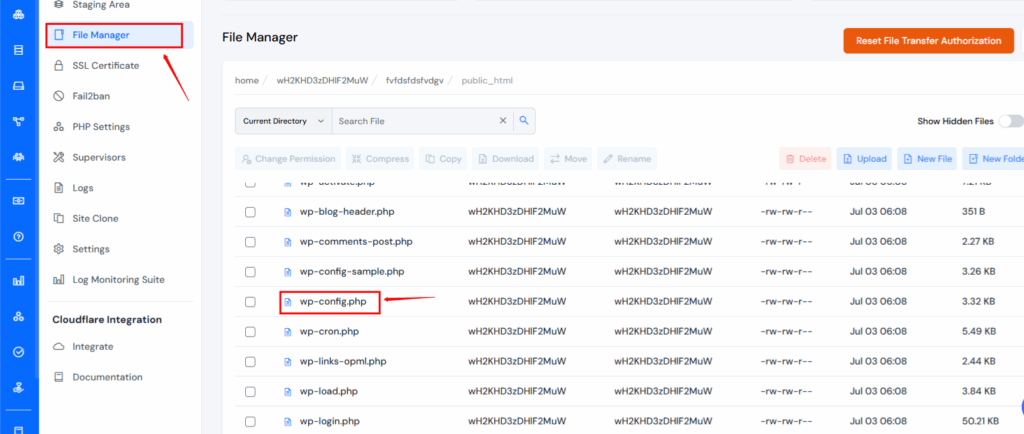
- Log in to ServerAvatar Panel Select your Server And Navigate to your Application
- Click On File Manager and Navigate to the wp-config.php File
3. Add these lines before /* That’s all, stop editing! */:
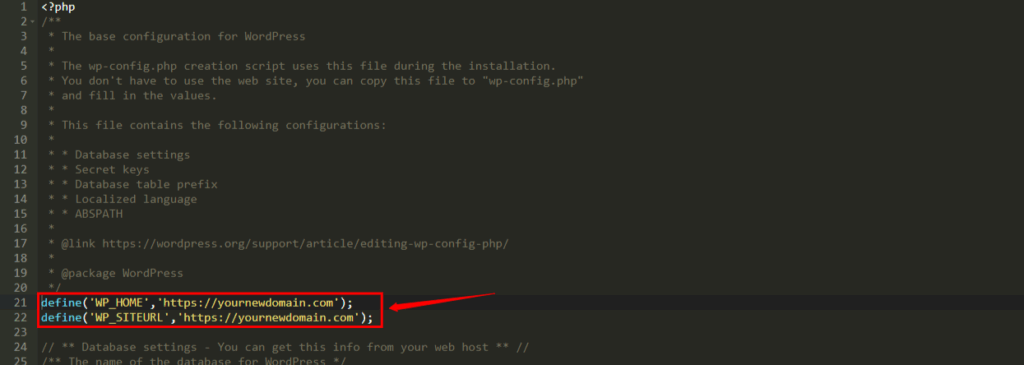
define('WP_HOME','https://yournewdomain.com');
define('WP_SITEURL','https://yournewdomain.com');Save the file and refresh your website.
This method overrides the dashboard settings and is useful when you’re locked out.
Method 3: Change URL Using phpMyAdmin (Database)
If you’re comfortable working with databases or can’t access your WordPress dashboard, you can update your site’s URL directly in the database using phpMyAdmin. This method is powerful but requires extra caution.
Step 1: Log in to Your Hosting panel (like:- ServerAvatar, Cpanel or plesk)
- Log in to Hosting Panel
- Select Your Server and Application
- Navigate to the phpMyAdmin tool.
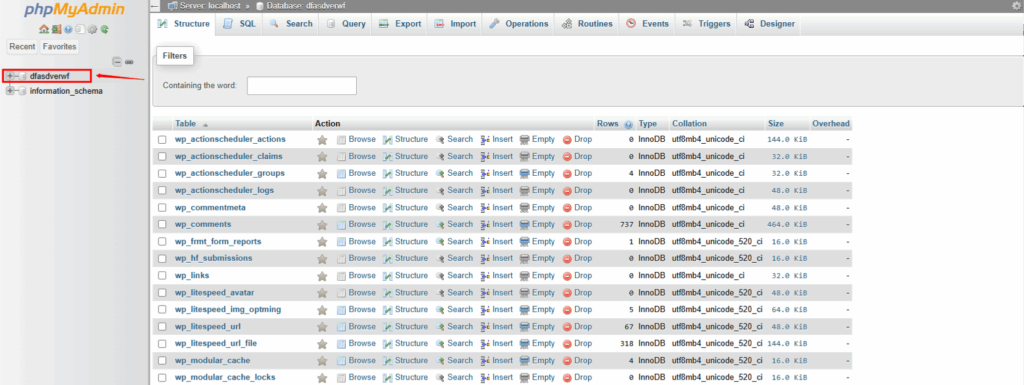
Step 2: Select Your WordPress Database
- In phpMyAdmin, you’ll see a list of databases on the left sidebar.
- Click the name of your WordPress database (if you’re not sure which one, you can find it in the wp-config.php file under DB_NAME).
Step 3: Open the wp_options Table
- Inside the database, look for the table named wp_options (sometimes it may be wpabc_options if you used a custom prefix).
- Click on it to view its contents.
Step 4: Edit siteurl and home
- The first few rows will include two important fields:
- siteurl
- home
- These control the main URL of your WordPress site.
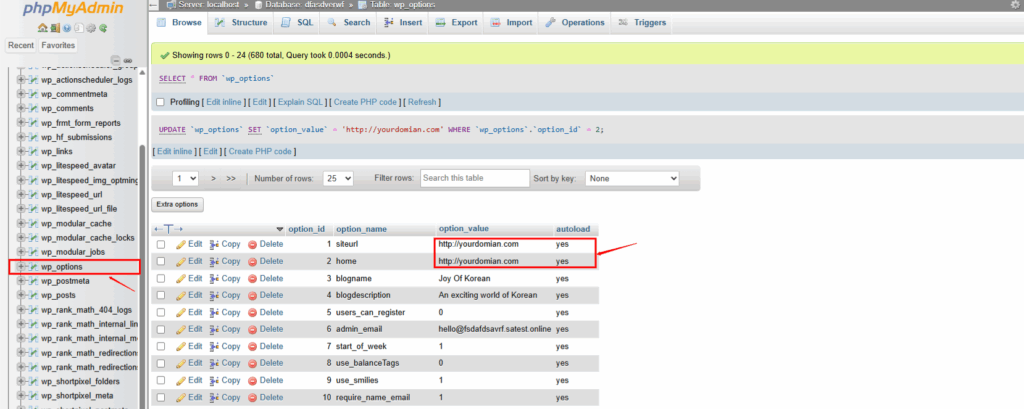
Step 5: Change the URLs
- Click the Edit button next to site url.
- In the option_value field, replace the current URL with your new domain (e.g., https://yournewdomain.com).
- Click Go to save the changes.
- Repeat the same steps for the home row.
Method 4: Change WordPress URL With WP-CLI
Step 1: Connect to Your Server via SSH
Use an SSH client like Terminal (Mac/Linux) or PuTTY (Windows).
ssh username@your-server-ipReplace username and your-server-ip with your actual SSH credentials.
Step 2: Navigate to Your WordPress Directory
Go to the folder where your WordPress site is installed. Common paths include /var/www/html or /home/username/public_html.
Example:-
cd /home/username/public_html.Step 3: Check if WP-CLI is Working
Run the following command to make sure WP-CLI is installed and working:
wp --infoIf it returns WP-CLI version details, you’re good to go.
Step 4: View Your Current Site URL (Optional)
You can check your existing URL with:
wp option get home
wp option get siteurlStep 5: Update the WordPress URLs
Now, run the following commands to update the URLs:
wp option update home 'https://yournewdomain.com'
wp option update siteurl 'https://yournewdomain.com'Replace https://yournewdomain.com with your actual domain name.
Step 6: Clear Cache (if needed)
If you’re using any caching plugin or server-level caching, clear it to reflect changes.
You can also restart PHP or NGINX/Apache if required:
sudo systemctl restart php7.4-fpm
sudo systemctl restart nginxYour WordPress URL has now been updated using WP-CLI. You can visit your new URL to verify that the changes are working correctly.
Update All Internal URLs After Changing Domain
After changing your WordPress URL, some internal links and image paths may still point to the old URL.
Use these plugins to update all URLs in your database:
- Better Search Replace
- Velvet Blues Update URL
- WP Migrate Lite
Search for your old URL and replace it with the new one.
Clear Cache and Refresh Permalinks
After updating the URL, follow these cleanup steps:
- Clear browser cache
- Clear WordPress cache (using caching plugins like LiteSpeed, WP Super Cache, etc.)
- Go to Settings > Permalinks and click Save Changes (even if you don’t change anything)
This ensures that everything loads properly under the new URL.
Set Up 301 Redirects for SEO
If you’re moving to a new domain or changing URLs permanently, you must set up 301 redirects to avoid losing SEO rankings.
Here’s how:
- Add this to your .htaccess file:
apache

RewriteEngine On
RewriteCond %{HTTP_HOST} ^old-domain\.com$ [OR]
RewriteCond %{HTTP_HOST} ^www\.old-domain\.com$
RewriteRule ^(.*)$ "https\:\/\/new-domain\.com\/$1" [R=301,L]Or use a plugin like Redirection for easier setup.
301 redirects tell search engines that your site has moved permanently, and they pass on most of your SEO authority.
Test Everything After the URL Change
After changing your WordPress URL, don’t just walk away—test everything!
- Check if the homepage loads correctly
- Visit a few internal links
- Test login/logout
- Ensure media files (images, videos) load properly
- Use Google Search Console to inspect and re-index your new URL
Tools like Screaming Frog or Ahrefs Site Audit can help check for broken links or issues.
Bonus Tips for Changing URLs in Multisite WordPress
If you’re using WordPress Multisite, changing the URL is a bit different:
- Go to Network Admin > Sites
- Click Edit on the site you want to change
- Change the Site Address (URL)
- Save changes
You’ll still need to update internal links and redirect old URLs manually or with a plugin.
Common Mistakes to Avoid
Changing URLs can go wrong fast if you’re not careful. Avoid these mistakes:
- Forgetting to back up before making changes
- Not setting up 301 redirects, which hurts SEO
- Only changing one of the two URL fields
- Leaving hardcoded URLs in theme or plugin files
- Not updating sitemap and robots.txt
Conclusion: Change URLs Without Breaking a Thing
Changing your WordPress URL doesn’t have to be stressful. With the right steps and a bit of patience, you can update your URL without breaking your website or damaging SEO.
To recap:
- Backup first
- Use the admin dashboard if possible
- Update internal links and clear caches
- Set up redirects for SEO
- Test everything
Whether you’re switching domains, moving to HTTPS, or cleaning up your site structure, following this guide will help you do it smoothly and safely.
Now you’re ready to change your WordPress URL like a pro!