
Protect WordPress from growing cyber threats, it powers over 40% of all websites on the internet. Its popularity makes it a massive target for hackers. Every minute, thousands of bots and attackers probe WordPress sites, looking for weak spots. If you’ve got a WordPress site, security isn’t optional, it’s essential. That’s where tools like Fail2ban and Cloudflare come in.
Fail2ban and Cloudflare act like digital bodyguards. Fail2ban handles things at the server level, protecting you from brute-force login attempts and known attack patterns. Cloudflare, on the other hand, filters traffic before it even reaches your server. Together, they create a formidable shield around your site.
So, why both? Fail2ban is great for blocking repeat offenders and keeping logs tight. Cloudflare’s DDoS protection and firewall rules stop traffic surges and malicious bots early. If one fails, the other still stands. In this guide, we’ll break down exactly how to set them up, step by step.
Understanding the Threat Landscape
If you think your small WordPress blog is safe because it’s not popular, think again. Most attacks are automated. Bots don’t care who you are, they scan IP ranges looking for any vulnerable WordPress site. Let’s explore what threats you’re really up against.
Brute-force login attempts are perhaps the most common. Bots try thousands of username-password combinations until one sticks. Then there’s XML-RPC abuse, where attackers use the WordPress API to flood your site or gain access. And don’t forget DDoS attacks, where your server gets slammed with traffic until it crashes.
Then we have comment spam, malware injection, and theme/plugin vulnerabilities. A single outdated plugin can become a backdoor for attackers. They’ll inject code, deface your site, or steal data. Even worse? You may not even notice until it’s too late.
Here’s the kicker: most of these attacks leave patterns like failed login attempts, 404 errors, malformed POST requests. And that’s exactly what Fail2ban is designed to catch. Cloudflare, meanwhile, keeps most of the garbage traffic from even touching your server.
You can’t stop bots from probing, but you can stop them from succeeding.
What is Fail2ban and How It Works
Fail2ban is like a bouncer for your server. It watches your log files, looking for repeated failed login attempts or suspicious activity. When it spots something shady, it blocks the offending IP address for a set amount of time or permanently.
So how does it work? Fail2ban uses something called jails. Each jail monitors a specific service like SSH, NGINX, or Apache. When a rule is broken, Fail2ban fires up a ban action usually an IPtables rule that blocks the IP address at the firewall level.
You can customize Fail2ban to monitor WordPress-specific logs, like /var/log/auth.log or custom access logs. You can even create custom filters to detect failed logins, spammy behavior, or XML-RPC attacks.
One of the best things about Fail2ban is how lightweight it is. It runs quietly in the background, consuming very little system resources. And since it’s working at the system level, it’s not affected by WordPress plugin bugs or theme issues.
Fail2ban isn’t just a blocker—it’s a logger, tracker, and early warning system rolled into one. Think of it as your site’s immune system, kicking into gear the moment something goes wrong.
What is Cloudflare and How It Secures WordPress
Cloudflare is often thought of as just a CDN (Content Delivery Network), but it’s so much more. It’s also a reverse proxy, firewall, DDoS protection platform, and performance optimizer. When properly configured, Cloudflare can stop a massive chunk of malicious traffic before it even touches your site.
When you route your domain through Cloudflare, it acts as a buffer between your visitors and your server. This allows it to inspect incoming requests, block suspicious behavior, and cache content for faster loading.
For WordPress users, Cloudflare offers:
- WAF (Web Application Firewall) – with specific rules for WordPress
- Rate Limiting – to block brute-force attempts and bots
- Bot Management – identifying and filtering harmful bot traffic
- Under Attack Mode – ideal during a DDoS storm
- Page Rules – to fine-tune how Cloudflare interacts with your pages
And the best part? Most of these tools are available even on the free plan. That makes Cloudflare one of the most accessible and powerful security tools out there.
When you combine Cloudflare with Fail2ban, you get the best of both worlds. Cloudflare filters traffic in the cloud, while Fail2ban keeps your server locked down. Even if something sneaks past Cloudflare, Fail2ban will catch it at the doorstep.
Configuring Fail2ban for WordPress site with ServerAvatar
If you are a user of ServerAvatar or planning to explore it, one of the most crucial features it offers is Fail2ban integration. ServerAvatar provides Fail2ban protection at both the server level and WordPress site level, allowing you to secure your server and website from unauthorized users who attempt random password combinations or launch brute-force attacks. Fail2ban helps prevent such malicious access attempts by automatically banning suspicious IP addresses based on their behavior.
What makes ServerAvatar even more convenient is that setting up Fail2ban is incredibly simple. You don’t need to install anything manually. Fail2ban comes pre-installed when you set up your server through ServerAvatar. There’s no need to log in to the server or edit any configuration files. Everything is managed through the ServerAvatar dashboard, making it accessible even to non-technical users. This ease of use allows anyone to take advantage of enterprise-level security without deep technical knowledge.
If you wish to configure Fail2ban at the server level, you can refer to the official ServerAvatar product documentation, which contains step-by-step instructions for your setup.
To enable Fail2ban for your specific site or application, follow these steps:
Log in to your ServerAvatar account → Navigate to Server Dashboard → Go to Applications → Select your application → Click on Fail2ban from the sidebar.
From there, you’ll have full control over the Fail2ban configuration for your application directly within the dashboard.
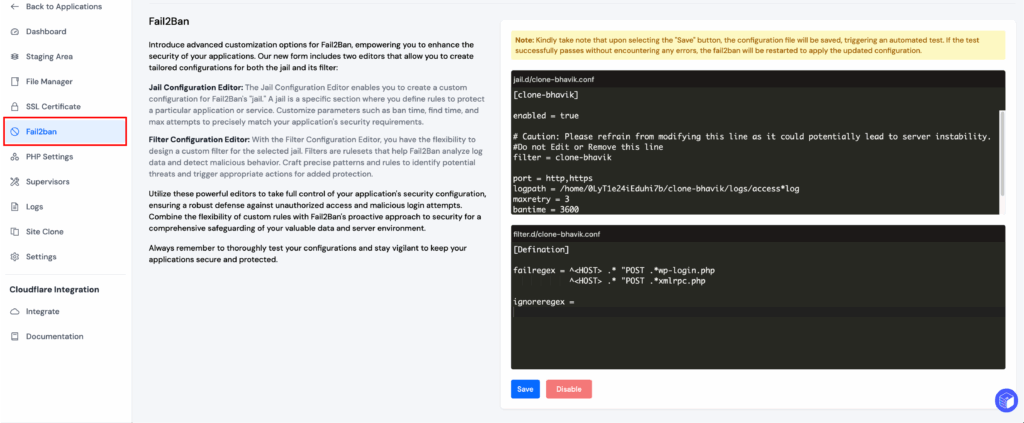
The Fail2Ban page in the application panel allows you to create custom configurations for jails and filters to tailor security settings according to your application’s needs.
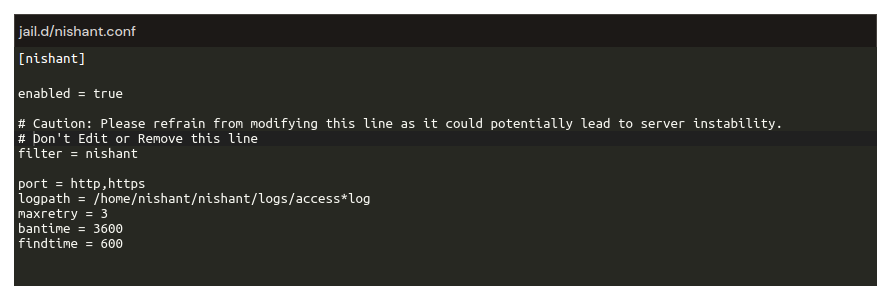
The “Jail Configuration” lets you define specific rules to protect your application. Customize parameters such as ban time, find time, and max attempts to create a robust defense against potential threats.
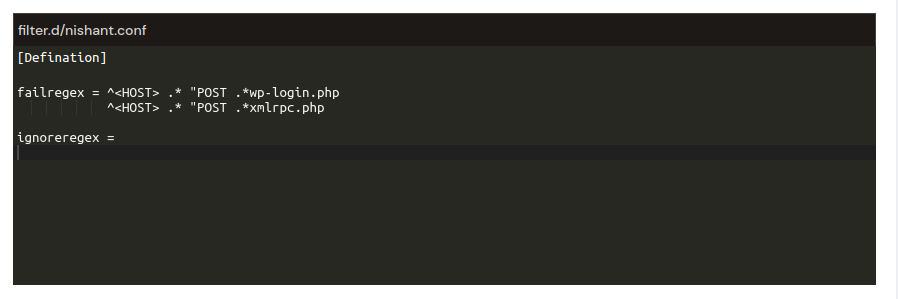
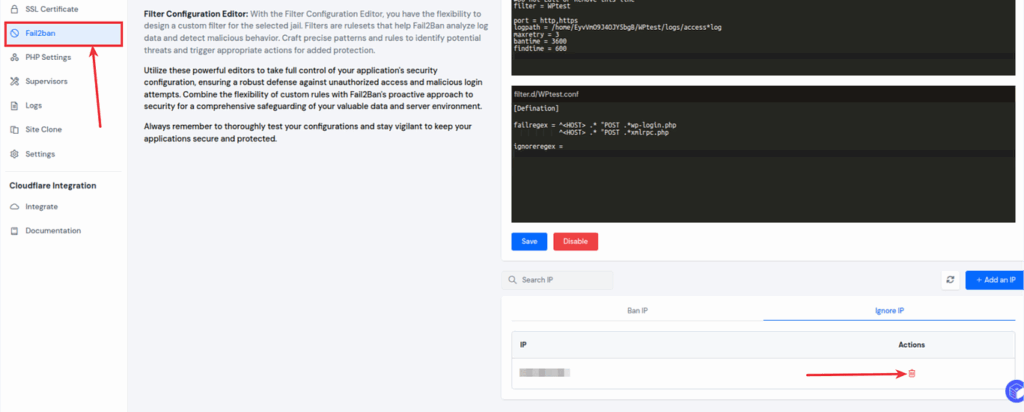
With the “Filter Configuration” you can design custom filters to detect and analyze malicious behavior. Create precise patterns and rules to identify threats and trigger appropriate actions.
After clicking on the Save button, Fail2Ban provides a simple table with two tabs – “Ban IPs” and “Ignore IPs” – to help you manage IP addresses effectively.
The “Ban IP” tab displays a table containing IP addresses that are currently ban from accessing your server. You have the option to remove a ban by clicking the “Delete” button next to the respective IP address.
The “Ignore IP” tab displays a table containing IP addresses that are explicitly ignore by Fail2Ban. Ignore IPs will not be banned. You can remove an IP from the ignore list by clicking the “Delete” button next to the respective IP address.
This is how easy it is to setup fail2ban for your WordPress site with ServerAvatar. l

Setting Up Cloudflare for Maximum Security
Now let’s secure your Cloudflare settings to work seamlessly with WordPress and Fail2ban.
1. Configure DNS Correctly
Ensure your domain is proxied through Cloudflare (orange cloud icon enabled). This allows Cloudflare to intercept and filter all traffic.
2. Enable Web Application Firewall (WAF)
Go to the Security > WAF section and enable:
- WordPress-specific ruleset (if on Pro plan)
- OWASP rules for general threat protection
3. Add Custom Firewall Rules
Create a rule like:
- Field: URI Path
- Operator: contains
- Value: /wp-login.php
- Action: JS Challenge or Block
This slows down bots targeting login pages.
4. Enable Rate Limiting
In Security > Rate Limiting, set:
- URL: /wp-login.php
- Threshold: 10 requests per minute
- Action: Block for 1 hour
This protects against brute-force attacks.
5. Turn On Bot Fight Mode
Under Security > Bots, turn on Bot Fight Mode. It’s free and highly effective against low-level bot traffic.
Best Practices for Long-Term WordPress Security
Security isn’t a one-time project—it’s an ongoing process. Here’s how to maintain and improve your WordPress security long-term.
1. Regularly Update Everything
Keep WordPress core, themes, and plugins updated. Vulnerabilities are constantly discovered and patched. An outdated component is the #1 cause of hacks.
2. Monitor Logs Weekly
Fail2ban logs offer rich insights. Look for patterns—repeated IPs, specific attack vectors—and adjust jails accordingly.
3. Use Strong Passwords and 2FA
Install plugins like WP 2FA to enable two-factor authentication. Make sure admin accounts use strong, unique passwords.
4. Disable XML-RPC
Unless you use apps or Jetpack, disable XML-RPC. It’s a common attack point. You can use:
add_filter('xmlrpc_enabled', '__return_false');Or block access via NGINX or Apache.
5. Limit Login Attempts
Use a plugin—or let Fail2ban do it. Either way, don’t allow infinite retries on login pages.
6. Scan Your Site Regularly
Use tools like:
- Wordfence Scanner
- Sucuri SiteCheck
- WPScan
These tools detect malware, vulnerabilities, and bad file changes.
7. Backups, Backups, Backups
Set automatic backups weekly. Store them offsite—like Google Drive, Dropbox, or Amazon S3. Use plugins like UpdraftPlus or BlogVault.
8. Audit User Accounts
Remove inactive users. Assign correct roles—never give “Editor” or “Admin” to users who don’t need them.
9. Use HTTPS
Ensure your site has a valid SSL certificate. Cloudflare can provide one for free via Flexible SSL.
10. Document Your Security Setup
Keep a record of:
- Fail2ban filters
- Cloudflare rules
- Firewall settings
This will make future audits and troubleshooting much easier.
FAQs
Can Fail2ban and Cloudflare replace a WordPress security plugin?
Not entirely. While they cover a huge part of your security needs, plugins like Wordfence still provide file scanning, malware detection, and 2FA. Use them together for full protection.
How often should I review my Fail2ban logs?
At least once a week. Look for unusual patterns, spikes in bans, or repeated offenses from the same IP blocks.
Will Fail2ban slow down my website?
No. It’s lightweight and runs in the background. In fact, it improves performance by keeping bad bots off your server.
Is Cloudflare enough for WordPress security on its own?
It covers a lot, especially with WAF and DDoS protection. But server-level tools like Fail2ban catch what Cloudflare might miss—especially post-authentication attacks.
What are some alternatives to Fail2ban?
Other tools include ModSecurity, CSF (ConfigServer Security & Firewall), and DenyHosts. Each has pros and cons depending on your server setup.
Conclusion
Securing WordPress is not about a single plugin or tool—it’s about building layers. Fail2ban offers ground-level server protection by blocking bad actors based on log activity. Cloudflare acts as your perimeter wall, filtering traffic and preventing malicious visitors from ever reaching your server.
Together, these tools drastically reduce the attack surface and give you peace of mind. From stopping brute-force logins and XML-RPC abuse to mitigating DDoS attacks and managing bans at scale, Fail2ban and Cloudflare create a defense system that’s flexible, powerful, and reliable.
Security is a journey not a destination. Set up alerts, monitor logs, adjust rules, and stay proactive. A secure WordPress site means more uptime, better performance, and trust from your visitors.