
Thinking about change WordPress domain name? Maybe you’re rebranding or finally scored the perfect domain. But before you make the switch, there’s one big concern—SEO. Mess it up, and you risk losing your hard-earned rankings and traffic.
But don’t worry. In this guide, I’ll walk you through exactly how to change your domain name in WordPress without harming your SEO—step by step, in plain English.
Audit your current SEO performance
Use tools like Google Search Console, Ahrefs, or SEMrush to understand:
- Top-performing pages
- Backlinks
- Keywords
- Traffic sources
This gives you a benchmark to compare post-migration results.
Back Up Your Website Completely
Before making any changes, back up your full website (files + database). This ensures that you can restore your site if anything goes wrong.
- Files
- Themes
- Plugins
- Full database
If you are using ServerAvatar you can back up your site easily.
What is ServeAvatar
ServerAvatar is a powerful cloud server management tool that lets you easily host and manage PHP-based applications like WordPress, Laravel, and custom PHP sites. It allows you to connect and manage your cloud servers (from providers like DigitalOcean, AWS, Vultr, etc.) through a user-friendly dashboard without needing deep Linux knowledge.
Site Backup with the ServerAvatar Method:
- Go to ServerAvatar Dashboard and log in using your credentials.
- navigate to the “Backups” tab in the server menu. Here, you’ll find options to create and manage backups.
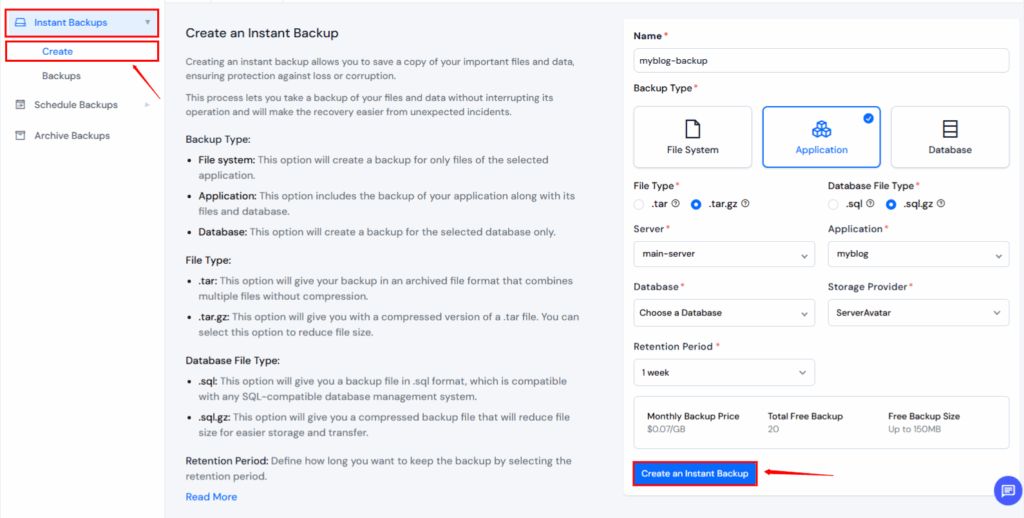
- Click the “Create” button.
- A form will appear where you need to fill in the following details:
- Backup Name: Give your backup a unique and recognizable name.
- Backup Type: Choose what you want to back up: Application Files, Database and File System
- Select Application: Choose the specific Server/Application you want to back up from the list.
- You can select where the backup will be stored: Google Drive or ServerAvatar Storage
Make sure you’ve connected your Google Drive account under the Storage Providers section beforehand if you wish to use it.
You can also use a WordPress plugin like UpdraftPlus if you prefer.
Buy and Set Up Your New Domain Name
Register the new domain
Buy your new domain from a trusted registrar like:
Add it to your hosting/server
In your hosting panel, add the new domain and point it to your existing website’s root directory.
With ServerAvatar
- Go to your ServerAvatar panel and Select Server
- go to the existing application, and under the Domains tab, click “Add Domain”
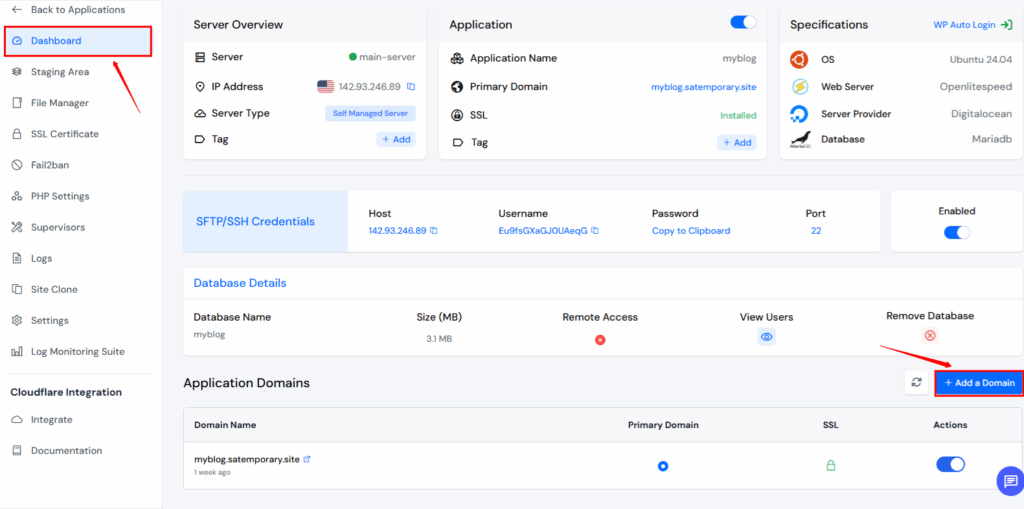
- Enter your new domain
- Update your DNS A Record at your domain registrar to point to your server IP
- Go to SSL Certificate and click on it. Then install the SSL and turn on Force HTTPS with one click using ServerAvatar.

Update WordPress Site URL Settings
When you move your WordPress site to a new domain, you need to tell WordPress about the new address. Here’s how to do it:
Change the Site URL in WordPress Dashboard
- Log in to your WordPress admin panel.
- Go to Settings > General.
- You’ll see two fields: WordPress Address (URL) and Site Address (URL)
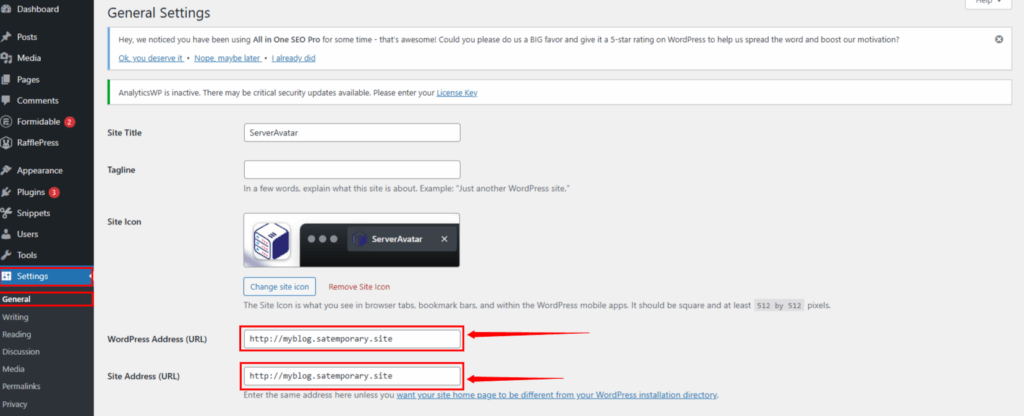
- Change both of them from http://myblog.satemporary.site to your new domain (for example, https://newdomain.com).
- Click Save Changes.
Redirect Old Domain to New Domain (301 Redirects)
Why 301 Redirects are critical for SEO
When you change your domain name, 301 redirects help you keep your SEO rankings.
A 301 redirect tells search engines:
“This page has permanently moved to a new address.”
This redirect passes 90–99% of your SEO value to the new domain, ensuring that you don’t lose your Google rankings or traffic.
Set up 301 redirects via .htaccess (Apache)
If your website runs on Apache, follow these steps:
- Go to the root folder of your old domain (usually public_html).
- Find or create the .htaccess file.
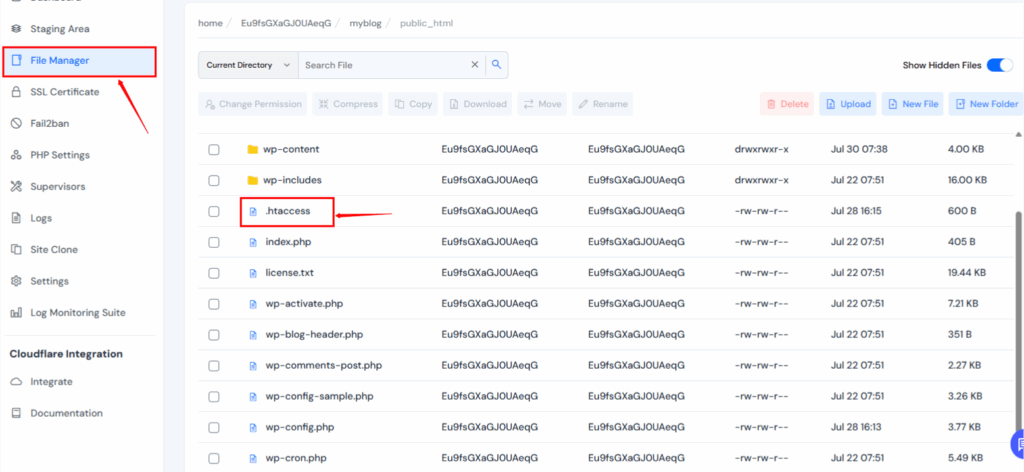
Add the following lines:
RewriteEngine on
RewriteCond %{HTTP_HOST} ^myblog\.satemporary.site [NC,OR]
RewriteCond %{HTTP_HOST} ^www\myblog\.satemporary.site [NC]
RewriteRule ^(.*)$ https://newdomain.com/$1 [L,R=301,NC]NGINX configuration (if applicable)
If you’re using NGINX instead of Apache, add this to your NGINX server block:
<strong>server</strong> {
    listen 80;
    server_name myblog.satemporary.site www.myblog.satemporary.site;
    return 301 https://newdomain.com$request_uri;
}Use Redirection plugin (no coding)
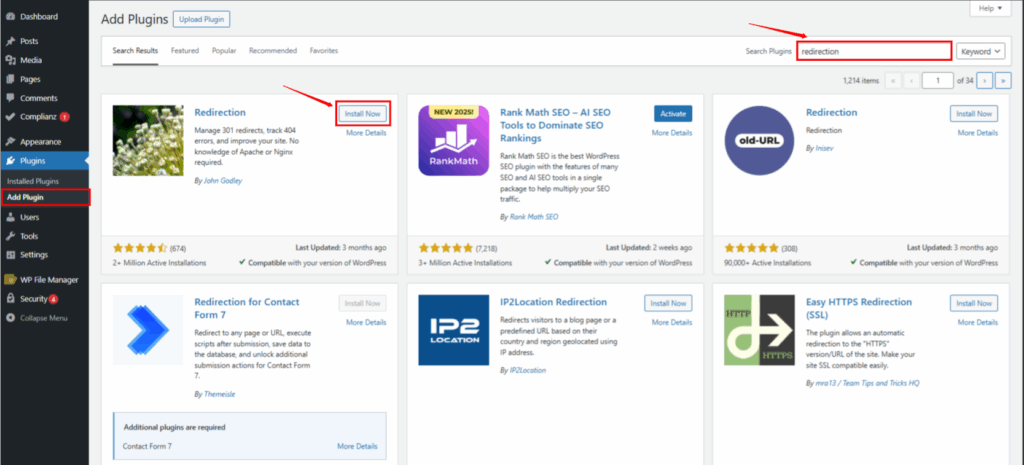
If you’re not comfortable editing code, use a plugin:
- Go to your WordPress dashboard.
- Navigate to Plugins → Add New.
- Search for Redirection and install it.
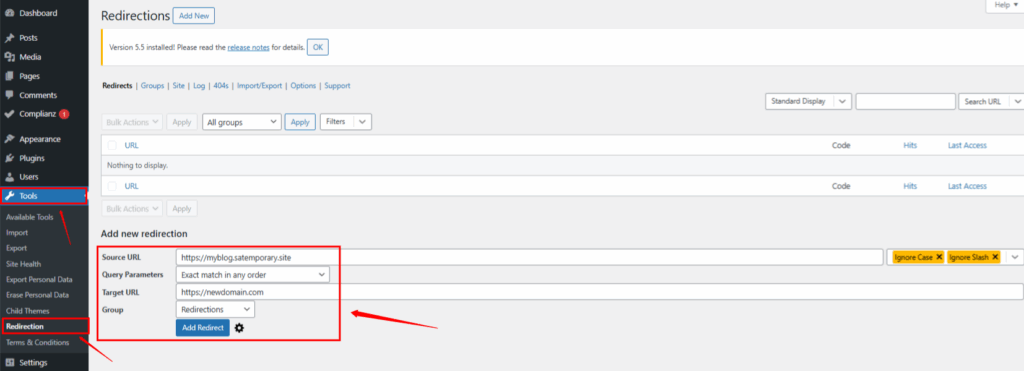
- Go to the Tools section in your WordPress dashboard and click on Redirection.
- In the Redirection panel, enter the old URL in the Source URL field and the new URL in the Target URL field.

Update Internal Links and Media URLs
You’ll notice that your posts, pages, images, menus, and even buttons continue to use your old domain URL after changing your domain name.
Why is this important?
Despite redirecting the old domain to the new one, it’s more beneficial for SEO, speed, and user experience to utilize your new domain throughout your site.
Use a Plugin Like Better Search Replace
This is the easiest and safest way to update your old URLs in the database.
What is Better Search Replace?
Better Search Replace is a free plugin that helps you search for a specific word or URL in your site’s database and replace it with something else, without needing any coding.
Steps to Use Better Search Replace:
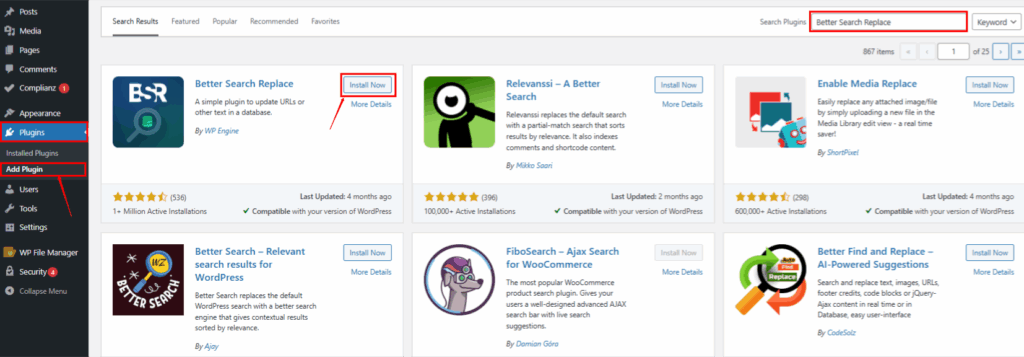
- Install the Plugin
- Go to your WordPress Dashboard
- Click on Plugins > Add New
- Search for Better Search Replace
- Click Install Now, then Activate
- Open the plugin.
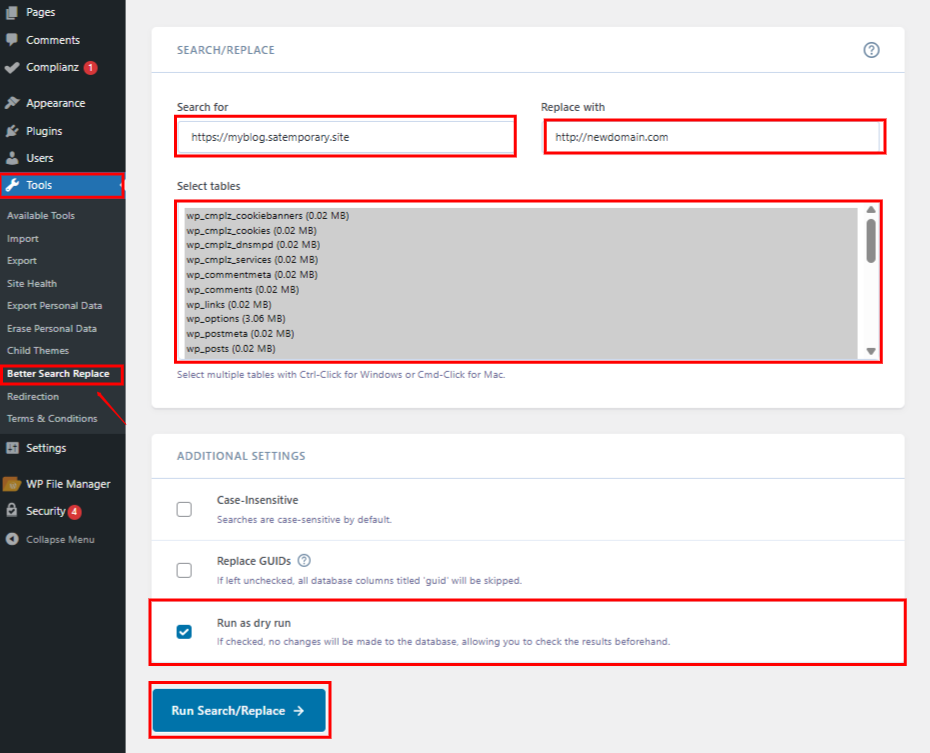
Go to Tools > Better Search Replace - Set the Old and New URLs
In the Search for box, enter your old domain:
https://myblog.satemporary.site/
In the Replace with box, enter your new domain:
https://newdomain.com - Select the Database Tables
You’ll see a list of WordPress tables like wp_posts, wp_postmeta, wp_options, etc. - Select all the tables to make sure everything is updated
- Run a Dry Run First
Check the box that says “Run as dry run?”
This will show you how many changes the plugin will make—without actually making them
Click Run Search/Replace
- Run the Real Update
- Now uncheck the “Run as dry run?” box
- Click Run Search/Replace again
- Wait a few seconds until it’s done
All your links, image URLs, and embedded files should now point to your new domain.
Inform Google About the Domain Change
Use Google Search Console Change of Address Tool
- Add both old and new domains in Google Search Console.
- Go to the old domain’s profile.
- Use the Change of Address tool.
- Verify that 301s are working correctly.
Submit your new sitemap
Generate a new sitemap using plugins like Rank Math or Yoast SEO, and submit it to Search Console.
Monitor crawl errors and indexing
Check Coverage and Crawl Stats regularly in Search Console for any issues.
Update Your Sitemap and Robots.txt
Generate a new sitemap
Use your SEO plugin to regenerate the sitemap under the new domain.
Submit sitemap to Google & Bing
Submit both to:
- Google Search Console
- Bing Webmaster Tools
Update robots.txt
Make sure it includes the correct Sitemap URL pointing to your new domain.
Update Third-Party Tools and Platforms
Google Analytics & Google Tag Manager
Update the property settings in both tools to reflect your new domain.
Social media accounts
Update your:
- Instagram bio
- Twitter/X profile
- Facebook page
- LinkedIn, etc.
Email marketing tools
Change domain references in:
- Email templates
- Signup forms
- Automations
Monitor SEO Rankings Post-Migration
Use SEO tools
Track your rankings, backlinks, and keyword movement with:
- Ahrefs
- SEMrush
- Ubersuggest
- Google Search Console
Monitor traffic and bounce rate
Look for sudden drops or spikes in:
- Organic traffic
- Page views
- Time on site
Common Mistakes to Avoid
- ❌ Not setting up 301 redirects
- ❌ Leaving old URLs in content
- ❌ Forgetting to submit new sitemap
- ❌ Not checking for broken links
- ❌ Ignoring canonical tags
How Long Will SEO Take to Stabilize After Changing Domains?
First 30–90 days
You might see a slight dip. Don’t panic. Google is just re-crawling and re-indexing.
After 90 days
If everything is done right, you should see your rankings and traffic return to normal or even improve.
Tips to Maintain and Boost SEO Post-Migration
Keep publishing quality content
Show Google your new domain is alive and thriving.
Build new backlinks
Reach out to websites linking to your old domain and ask them to update their links.
Promote your new domain
Run social media campaigns or email newsletters to let people know about the change.
FAQs
Will I lose traffic if I change my domain name?
If you follow proper SEO practices like 301 redirects and updating all links, traffic loss is minimal and temporary.
How do I keep backlinks working after a domain change?
Use 301 redirects so old backlinks still point to the right content on the new domain.
Can I do this without any coding knowledge?
Yes, you can use plugins like Redirection, Better Search Replace, and an SEO plugin like Rank Math or Yoast.
What’s the difference between 301 and 302 redirects?
301 is permanent (best for SEO). 302 is temporary (not recommended for domain changes).
How soon should I expect my SEO to return to normal?
Most websites see stable SEO within 1–3 months after switching domains.
Conclusion
Changing your domain name can feel overwhelming and even a little intimidating, especially when you’ve worked hard to build your website’s search engine presence. However, if you follow the right steps methodically and with attention to detail, you can preserve your SEO rankings, and in some cases, even improve them. A domain change can be a powerful opportunity to refresh your brand identity and position your website for long-term growth.
Just remember: implement 301 redirects correctly, update every reference to your domain, and notify Google and other search engines promptly!
Stop Wasting Time on Servers. Start Building Instead.
You didn’t start your project to babysit servers. Let ServerAvatar handle deployment, monitoring, and backups — so you can focus on growth.
Deploy WordPress, Laravel, N8N, and more in minutes. No DevOps required. No command line. No stress.
Trusted by 10,000+ developers and growing.