
If you’ve recently developed an application using Bolt.new AI and want to make it live for users to interact with, one of the easiest ways to get it hosted professionally is by using ServerAvatar. But if the process of server deployment sounds intimidating, don’t worry. Hosting an app is a lot more approachable with tools like ServerAvatar that simplify everything from server provisioning to SSL setup.
So, what exactly are we covering here? This comprehensive guide walks you through the exact steps needed to get your Bolt AI application deployed on a live VPS server using ServerAvatar, even if you’re not a server management expert. Whether you’re using DigitalOcean, Hetzner, Contabo, or any other provider, this tutorial will cover it all.
By the time you’re done with this walkthrough, your AI-powered app will be live, secured, and ready to serve your users 24/7.
What is Bolt.new AI?
Bolt.new is a new framework or platform designed to generate applications quickly using AI-driven workflows and automation. It takes care of repetitive tasks and allows developers to focus more on functionality than setup.
You can think of Bolt AI as the intelligent backend generator – capable of stitching together APIs, UIs, and data logic with AI’s help. Many developers use it to speed up app creation, especially in startups and MVP environments.
However, generating the app is just the first part. Hosting it, managing it, and keeping it available online is the next major challenge – and that’s where ServerAvatar comes in.
Why Use ServerAvatar?
So why not just use traditional cPanel or manually manage your server with SSH?
Here’s why ServerAvatar is a game-changer for developers:
- No server admin experience required – You don’t have to be a DevOps engineer to deploy a production-grade app.
- Automated configurations – From SSL to firewalls, everything is handled with a few clicks.
- Easy monitoring and backup tools – No more dealing with log files via terminal. It’s all in the dashboard.
- No Command Line Needed: If the idea of SSH scares you, ServerAvatar is for you.
For Bolt AI applications that often run with modern stacks like Node.js or Python, ServerAvatar provides a streamlined deployment process that’s faster, more efficient, and far less error-prone than manual server setups.
Step-by-Step Guide to Hosting with ServerAvatar
Prepare Your Bolt AI App for deployment
Once Bolt AI has generated your application. For the smoothest hosting experience, choose to push your app to GitHub. You’ll need a GitHub account (which is free) and once authorized, Bolt AI will create a repository and upload your project files there.
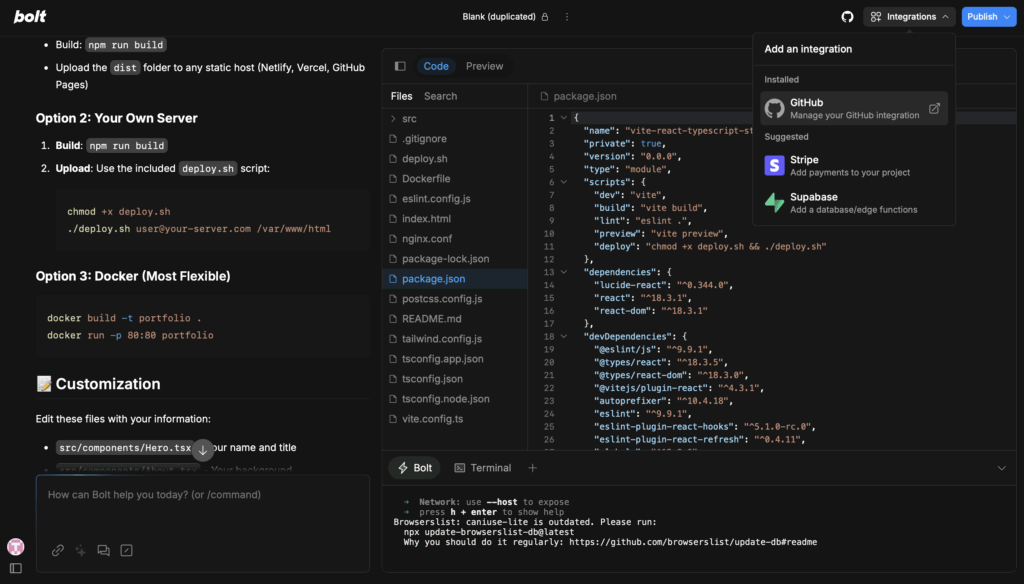
If you choose to download the project instead, you’ll need to manually upload it to a Git repository or connect it using SFTP later on ServerAvatar, which is still possible but takes more effort.
Once it’s in GitHub, your app is ready to be deployed!
Sign Up for ServerAvatar
Before you can deploy anything, you need a ServerAvatar account. The signup process is straightforward and doesn’t require any technical background.
- Visit ServerAvatar.com and click on the “Get Started” or “Sign Up” button.
- Fill in your name, email, and password.
- Verify your email address through the confirmation link sent to your inbox.
- Once logged in, you’ll land on your dashboard, where you can start managing servers.
Why is this important? ServerAvatar becomes your central control panel for all your apps and servers. Whether you’re hosting a single blog or multiple client websites, everything is handled here. You don’t need to remember any Linux commands or hire a developer to make basic changes.
ServerAvatar also offers a free trial, so you can explore most of its features before deciding on a paid plan. Depending on your needs, you can scale later, whether it’s one app or a dozen.
Build a Server
To host your application, you need an actual server, think of it as the “home” where your app lives online. With ServerAvatar, you have two flexible options:
- Build a server based on your preferred configuration.
⚠️ Important: Whether you’re purchasing a server through ServerAvatar or connecting your own, make sure to select the Node.js tech stack. This is the required environment to properly host applications built with the Bolt Application platform.
NOTE: If you are connecting your own server, make sure it meets all the prerequisites specified by ServerAvatar. Read our attached docs on purchase server directly from serverAvatar and connect your server. Only available if you have add-on of Self-Managed Server.
Integrate Your GitHub Account with ServerAvatar
If your application resides on GitHub, it’s essential to integrate your GitHub account with ServerAvatar.
Be sure to link the account that holds your project repository. This integration enables:
- Direct deployment of your application from GitHub
- Easy setup of an advanced CI/CD pipeline offered by ServerAvatar
With this connection in place, you can handle deployments entirely through the ServerAvatar dashboard, no command line required.
Create new Application For Deployment
Once your server is ready and your GitHub account is integrated, the next step is to create an application in ServerAvatar to host your project.
Now, we will crate the application for the n8n. so, that anyone can access it, follow these steps to setup and deploy react app.
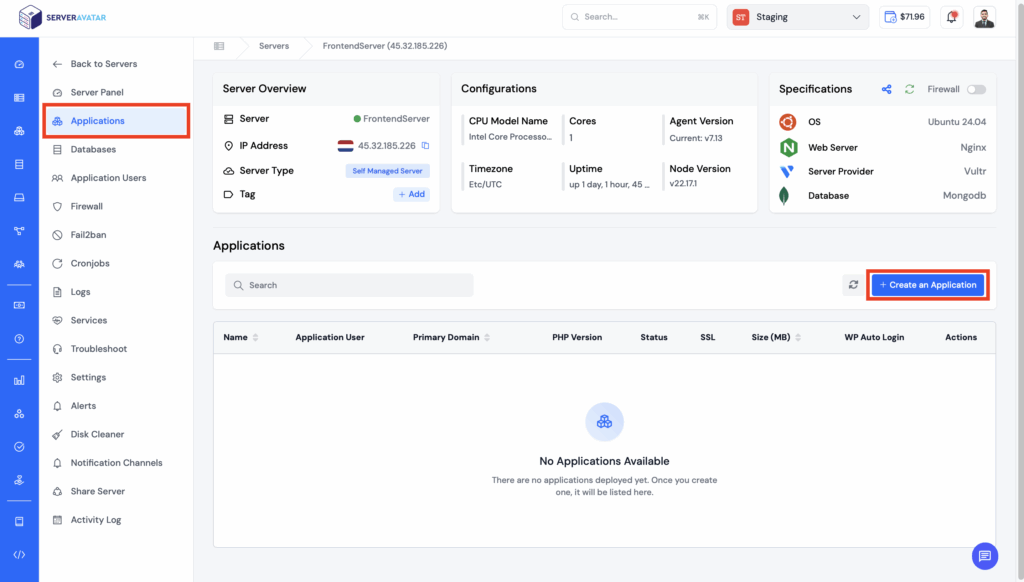
- Navigate to the Applications section from the ServerAvatar dashboard.
- Click on the Create Application button.
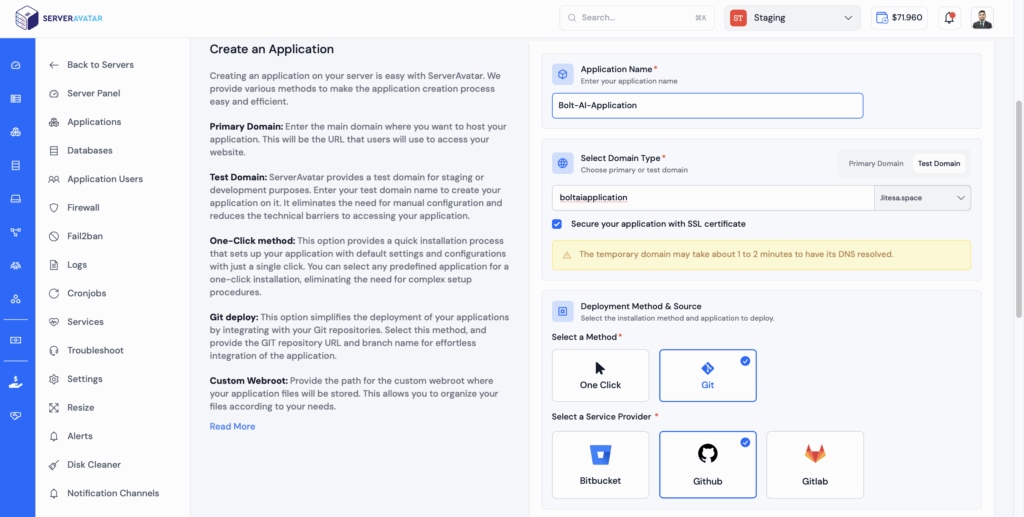
- Enter a name for your application, such as “Bolt-AI-App”.
- Next, choose the domain to host your React application – either a Primary Domain or a Test Domain:
- Primary Domain: The main domain users will use to access your live website.
- Test Domain: A staging/development domain provided by ServerAvatar, requiring no manual setup and ideal for testing.
- Choose the method as the “Git”.
- Select the service provider where your repository is hosted. For this blog post, we’ll use GitHub as the service provider since our React Todo app is stored in a private GitHub repository.
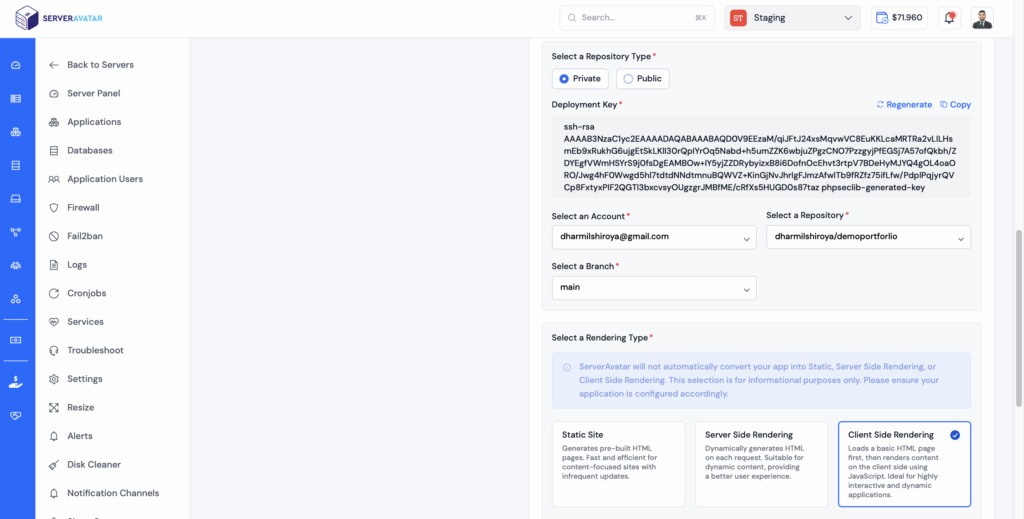
- Since we are working with a private repository, choose “Private” as the repository type. This ensures that ServerAvatar will securely access your code from a private source.
- To allow ServerAvatar to fetch code from your private GitHub repository, you need to generate a deployment key:
- Click on the “Generate/Regenerate” button as shown in the interface.
- A unique public SSH key will be generated.
- Copy this key and go to your GitHub repository.
- Navigate to:
Repository Settings → Deploy Keys → Add Deploy Key. - Paste the generated key, give it a recognizable title (e.g., “ServerAvatar Deploy Key”).
- Click “Add Key” to complete the process.
- Choose the GitHub (or other supported platform) account where your repository is hosted. This account must be connected to ServerAvatar to fetch the repositories list.
- Choose the repository name.
- Choose the branch you want to deploy – usually main or master, or any development/staging branch.
Note: You can always change the branch later if needed after deployment. - Select Client-side Rendering (CSR) as the rendering type, since your application is a standard React app. This means the React code will run entirely on the browser, with no server-side rendering involved.
- Select the packet manager from the NPM and Yarn.
- Provide the package installation command to install the necessary dependencies to run your application using the relevant package manager for your server environment (e.g., ‘npm install’ for Node.js or ‘yarn add’ for Yarn).
- Specify the command to build your application. This is typically used for compiling source code and preparing it for deployment. Example: ‘npm run build’ for Node.js or ‘yarn build’ for Yarn. If no build is required, leave this field empty.
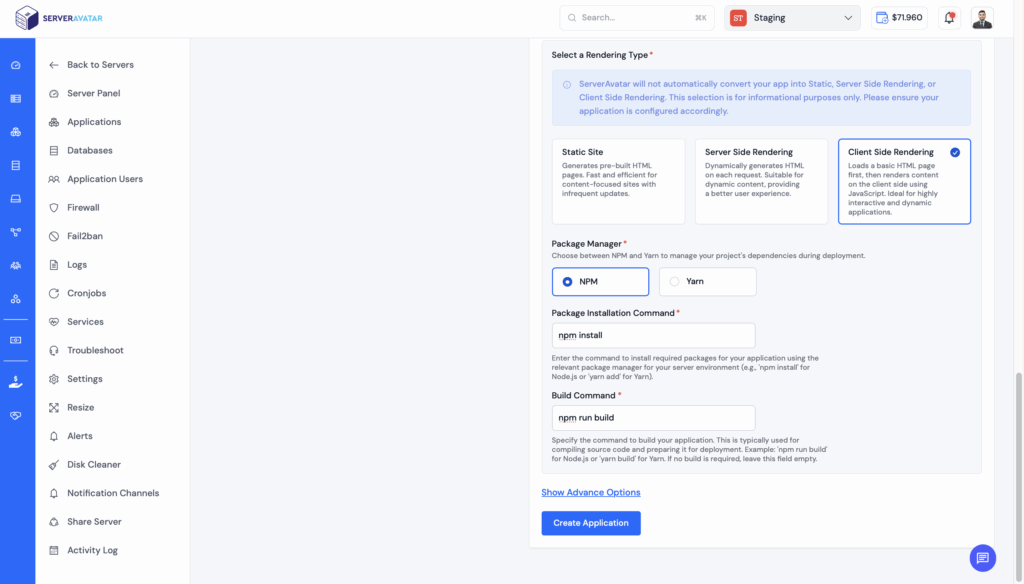
- To configure additional deployment settings, click on the “Show Advanced Options”button. In this section, you can either select an existing system user or create a new one.
Recommendation: It’s best practice to create a dedicated system user for each application you deploy. This improves security, makes application management easier, and isolates user-level access for each app. - Since you are deploying a React application, the index.html file are typically located inside the dis folder.
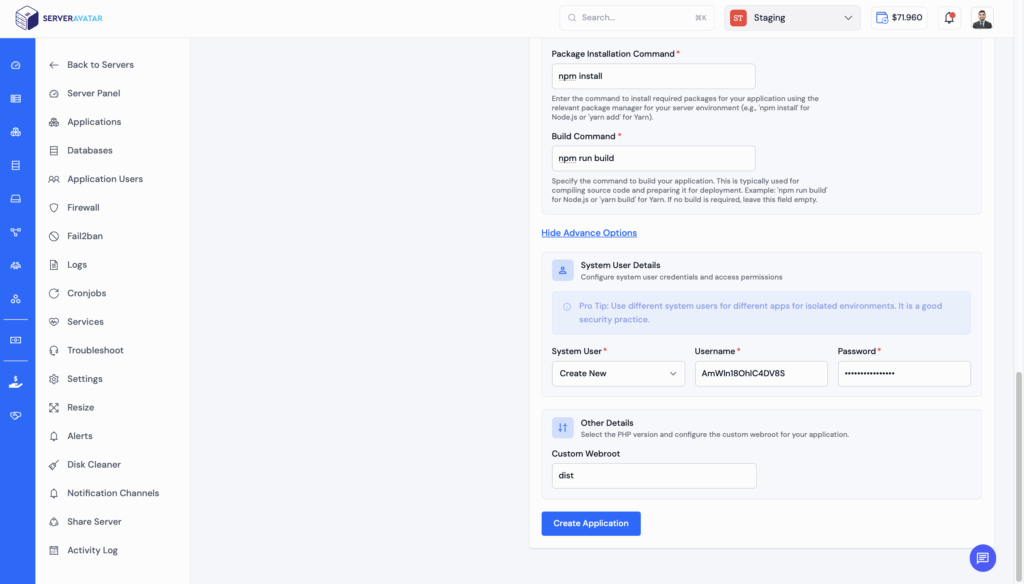
Click on create application once you have successfully provided all information required to create application. It will take few minutes to install all the dependencies and create build file.
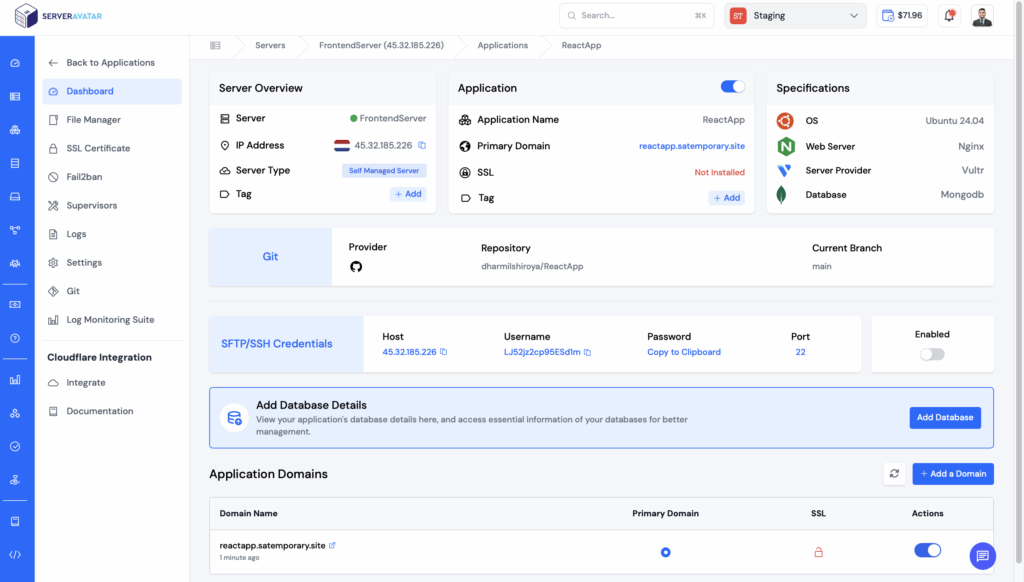
Once the application is successfully hosted your application is deployed successfully. You can check by visiting primary domain.
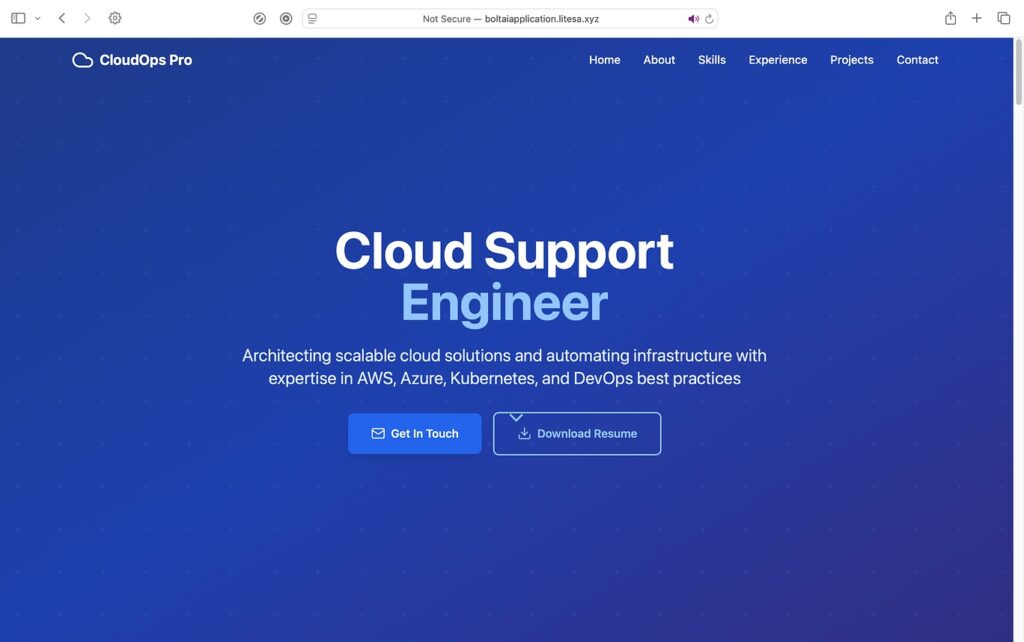
We have successfully hosted vibe coded application. Congratulations🥳.

Build a CI/CD Pipeline with Auto-Pull from GitHub
After setting up your application, you can take advantage of one of ServerAvatar’s most powerful feature is CI/CD pipeline with auto-pull from GitHub.
By enabling this feature, ServerAvatar will automatically pull the latest code from your GitHub repository every time you push changes. This ensures that your application stays up-to-date without any manual intervention.
With CI/CD auto-pull:
- No need to use command-line deployment tools.
- Every push to the main branch (or any selected branch) triggers a fresh deployment.
- You can define post-pull scripts to handle tasks like building your app, running migrations, or restarting services.
This setup not only saves time but also improves reliability and development workflow.
📘 To build and configure your CI/CD pipeline with GitHub auto-pull follow from the step 7.
Congratulations! You’ve now hosted your Bolt AI application on a live server using ServerAvatar and the best part? You did it without using the command line even once! 😎
Everything was handled through a clean and simple user interface that makes deployment easy even if you’re not a developer.
Here’s What You’ve Achieved:
- Hosted your Bolt AI app with just a few clicks
- Connected GitHub and deployed directly from your repository
- Set up a CI/CD pipeline so every time you push code to GitHub, your app updates automatically
- Did it all without touching SSH, FTP, or the terminal
- Managed everything inside the ServerAvatar dashboard
Now, your app is live and accessible from your domain! 🎉
Noticed a “Not Secure” Warning?
When you visit your domain, you might see a “Not Secure” warning in the browser. This is because your domain doesn’t have an SSL certificate yet. It is required to show the secure lock in the address bar.
Good News: ServerAvatar Makes SSL Super Simple
You don’t need to manually generate or install certificates. ServerAvatar offers:
- Auto SSL Installer – Just click a button and ServerAvatar installs the certificate for you.
- Manual Installation Option – If you prefer to use a custom certificate.
📘 You can refer to ServerAvatar’s documentation for step-by-step instructions on installing SSL:
👉 ServerAvatar SSL Setup Docs
Once SSL is installed, your website will show the secure lock and your users will trust the connection is safe.
Secure Your Server with a Firewall
Security is just as important as hosting. ServerAvatar gives you options to enable a firewall that protects your server from unwanted traffic or attacks.
A firewall helps:
- Block suspicious IPs
- Prevent unauthorized access
- Keep your app and data safe
📘 To learn how to enable the firewall, refer to this guide: 👉 ServerAvatar Firewall Setup Docs
FAQ
Q: Do I need technical experience to use ServerAvatar?
No! ServerAvatar is designed for developers of all skill levels. You don’t need server administration experience, SSH knowledge, or command-line expertise. Everything is handled through a visual interface.
Q: What tech stack should I select for Bolt AI apps?
Important: Always select Node.js as your tech stack when setting up the server, as this is required for applications built with the Bolt AI platform.
Q: Can I host multiple applications on one server?
Yes! ServerAvatar allows you to deploy multiple applications on a single server, each with its own configuration and domain.
Q: How do I add SSL to my domain?
ServerAvatar offers:
- Auto SSL Installer: One-click SSL certificate installation
- Manual Installation: For custom certificates
Both options are available in your ServerAvatar dashboard
Q: What’s the difference between Primary Domain and Test Domain?
Primary Domain: Your main production domain that users will access (e.g., yourapp.com)
Test Domain: A staging domain provided by ServerAvatar for testing, requiring no DNS setup
Q: Can I migrate from other hosting platforms?
Yes! ServerAvatar supports migration from various hosting platforms. Additionally, ServerAvatar support team is available 24/7 to provide you with complete guidance and step by step-by-step process with resolution of your issues to migrate to ServerAvatar.
Conclusion
With just a few simple steps, you’ve gone from having an AI-generated app to a live, secure, auto-deploying web application all thanks to ServerAvatar’s powerful and user-friendly interface.
Here’s a quick summary of what made it easy:
- No command-line tools or technical knowledge needed
- Fully visual process with helpful UI
- Integration with GitHub for automated deployments
- Built-in tools for SSL and server security
Whether you’re building a personal project or launching a business app, ServerAvatar gives you complete control without the complexity.
