
Process idle timeout helps you manage your server’s resources efficiently. Ever felt like your server is working overtime even when nobody’s visiting your site? That’s where PHP-FPM’s process_idle_timeout comes in. Think of it like a smart manager who knows when to let workers (processes) go home if there’s nothing left to do. Setting this right can save you server resources and improve performance.
In this guide, we’ll walk you through the process_idle_timeout setting in PHP-FPM. Don’t worry if you’re not a tech expert—we’ll use simple language and give you step-by-step instructions. Whether you’re using a VPS, cloud server.
What is process_idle_timeout in PHP-FPM?
The process_idle_timeout directive in PHP-FPM controls how long an idle process (a process that’s not handling any request) should be kept alive before it’s terminated.
In simple terms, it tells PHP-FPM,
“If a worker is just sitting around doing nothing for X seconds, go ahead and shut it down.”
This helps free up server memory and CPU, especially during low-traffic periods.
Why is process_idle_timeout Important?
Imagine you own a coffee shop. If employees stay after closing hours doing nothing, they still cost you money. Similarly, idle PHP processes consume server resources.
Benefits of configuring this setting:
- Frees up server memory
- Improves overall performance
- Reduces unnecessary background processes
- Lowers risk of timeout errors or system crashes
Understanding How PHP-FPM Works
PHP-FPM (FastCGI Process Manager) handles PHP scripts for web servers like Nginx or Apache. It maintains a pool of worker processes to handle incoming requests.
Each process can:
- Handle one request at a time
- Be reused multiple times
- Sit idle when not in use
This is where process_idle_timeout plays a critical role in deciding how long those idle workers hang around.
Default Behavior of process_idle_timeout
By default, many systems set process_idle_timeout to 10s (10 seconds), or sometimes it’s not explicitly set, which means it never times out.
But depending on your server’s traffic, this value might be too low or too high.
Use Case: When Should You Change It?
Here are a few situations where tweaking this setting is useful:
- You’re running a high-traffic WordPress site
- Your server has limited resources (RAM/CPU)
- You want to reduce unnecessary background tasks
- You’re optimizing server performance during off-peak hours
Pre-requisites Before Configuration
Before you start changing anything, make sure:
- You have SSH access to your server or a panel like ServerAvatar, cPanel, or Plesk.
- You know the PHP version installed (e.g., PHP 8.1, PHP 7.4).
- You can locate the PHP-FPM pool configuration file (usually located in /etc/php/8.x/fpm/pool.d/www.conf).
How to Check Your Current Setting
To see what your current process_idle_timeout value is:
Step 1: Connect to your server via SSH.
Step 2: Run the following command:
grep process_idle_timeout /etc/php/*/fpm/pool.d/www.confThis will display the current timeout value set in your PHP-FPM pool configuration.
Using ServerAvatar (Easiest Method)
ServerAvatar is a platform to simplify the deployment and management of servers and applications. It simplifies the process to deploy and manage PHP and Node.js based web applications on servers. If you’re using ServerAvatar to manage your servers and applications, increasing the“process_idle_timeout” in PHP for your application is incredibly simple and doesn’t require editing PHP configuration files manually.
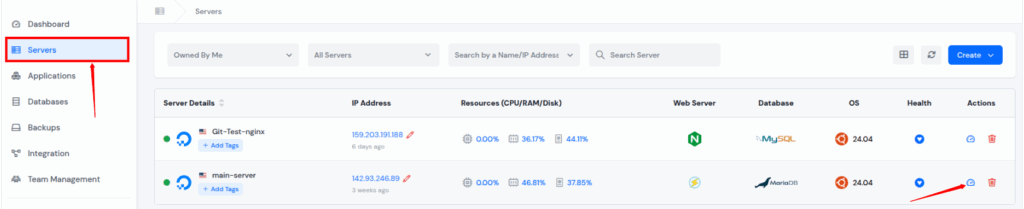
Step 1: Access ServerAvatar Panel
Log in to your ServerAvatar account and navigate to the Server panel by clicking on the Dashboard icon for the server where your application is hosted.
Step 2: Access Application Panel
Go to the Applications section from the left-hand sidebar and select click on the application dashboard icon for the application you want to increase the “process_idle_timeout“.

Step 3: Modify PHP Settings
Click on “PHP Settings” from the left sidebar of application panel. In the PHP Settings section, you will see various configurable options.
Find the setting named process_idle_timeout. Enter your desired value (e.g, 15sec), and Click on “Update Settings” button at the bottom of the section.
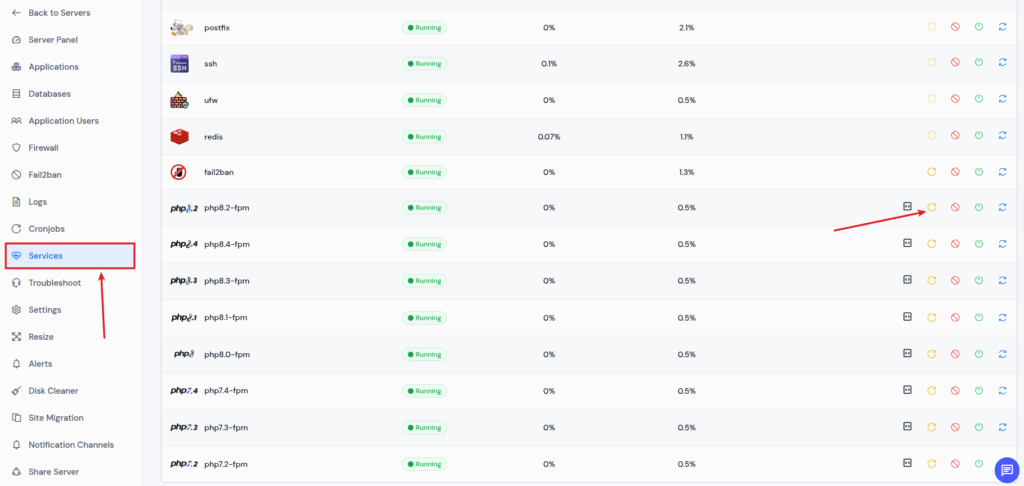
Step 4: Restart the PHP-FPM Service
- Navigate to your appropriate Server Panel >> Services section.
- Restart “php8.2-fpm” service by clicking on the “Reload” icon to apply new settings.
- Restart the php-fpm service of your system’s php version (e.g., php7.4-fpm, php8.2-fpm, etc.)

ServerAvatar will automatically update the PHP configuration, and the change takes effect immediately. This method is very easy and ideal for beginners or anyone who wants a fast, error-free way to manage PHP settings without touching the command line.

Editing PHP-FPM Configuration File
Want to configure it manually? Follow these steps:
Step 1: Connect to your server via SSH.
Step 2: Open the PHP-FPM pool configuration file:
<br><br>sudo nano /etc/php/8.x/fpm/pool.d/www.confReplace 8.x with your actual PHP version.
Step 3: Find this line:
;process_idle_timeout = 10sStep 4: Uncomment it and set your desired timeout, for example:
process_idle_timeout = 15sStep 5: Save the file and exit.
Restarting PHP-FPM to Apply Changes
If you changed the config manually, don’t forget to restart PHP-FPM:
<br>sudo systemctl restart php8.x-fpmAgain, replace 8.x with your PHP version.
Best Practices When Setting process_idle_timeout
Here’s how to make the most out of this setting:
- Low Traffic? Use a smaller timeout (5–10s)
- High Traffic? Increase to 20–30s to avoid frequent respawning
- Test Changes over time and monitor memory and CPU usage
- Avoid Zero unless absolutely required (it may keep processes alive forever)
Common Mistakes to Avoid
Let’s look at what not to do:
- Setting the timeout too low in high-traffic situations (can lead to frequent respawns)
- Forgetting to restart PHP-FPM after editing manually
- Editing the wrong config file
- Not using units (e.g., writing 10 instead of 10s)
Always validate your changes!
How to Monitor PHP-FPM Performance
To ensure your changes are working, use monitoring tools:
- Dashboard: Shows active and idle PHP processes in real-time.
- htop or top: Run via SSH to watch memory/CPU.
- PHP-FPM status page: Enable status endpoint to monitor activity.
Troubleshooting PHP-FPM Issues
If something doesn’t work after your change:
- Check logs: /var/log/php8.x-fpm.log
- Validate config: php-fpm -t
- Undo recent changes if needed
FAQs
1. What is a good value for process_idle_timeout?
A good starting point is 10–15 seconds for low to medium traffic servers. For higher traffic, try 20–30 seconds.
2. What happens if I set process_idle_timeout too low?
Processes may die too quickly, causing new ones to spawn repeatedly, which increases CPU usage.
3. Can I set process_idle_timeout to 0?
Yes, but it’s not recommended unless you want processes to stay alive indefinitely. It may waste memory.
4. Does changing this affect website speed?
Not directly, but it affects how efficiently your server handles traffic, especially during low-load times.
Conclusion
Configuring the process_idle_timeout setting in PHP-FPM might seem technical at first, but it’s actually a straightforward process. By setting the right timeout value, you ensure your server isn’t wasting resources keeping idle PHP processes alive unnecessarily.
Whether you’re optimizing performance, reducing memory usage, or just making sure your server runs more efficiently, adjusting this setting is a small step that makes a big difference.
If you’re manually managing your server, editing the PHP-FPM config file works just fine. It takes care of all the backend processes, so you can focus more on your website or business—and less on server maintenance.
In short: Set it. Save it. Relax. Your server will now perform smarter and more efficiently.