
Setting up an online store can feel like assembling furniture without a manual. You know all the parts are there, but the process can quickly become confusing. If you want to Deploy Bagisto, a Laravel-based eCommerce platform, the good news is that the process does not have to be complicated.
This guide is written for the general public, not just developers. You do not need to be an expert in servers or Laravel to follow along. By the end, you will understand the full deployment flow and feel confident about setting up Bagisto the right way.
What Is Bagisto and Why Use It?
Bagisto is an open-source eCommerce platform built on Laravel, designed for developers and businesses that need full control over their online store. Unlike traditional eCommerce solutions that limit customization, Bagisto offers a clean, modular architecture that makes it easy to extend, scale, and tailor to specific business requirements.
One of Bagisto’s biggest strengths is its developer-first approach. Since it’s built on Laravel, developers can leverage familiar tools like Eloquent ORM, Blade templates, queues, and events to create highly customized shopping experiences. At the same time, Bagisto provides essential eCommerce features out of the box, including product management, multi-channel inventory, localization, customer groups, and an admin dashboard.
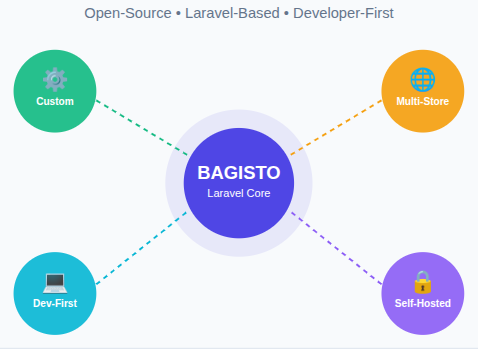
Bagisto is an excellent choice if you:
- Want a self-hosted eCommerce solution with no vendor lock-in
- Need advanced customization beyond what SaaS platforms allow
- Prefer a modern PHP framework with long-term scalability
- Are building multi-store or multi-language eCommerce applications
What Makes ServerAvatar Ideal for Deploying Bagisto?
Deploying a Laravel-based eCommerce platform like Bagisto becomes much easier when the server environment is already optimized for modern PHP applications. This is where ServerAvatar fits naturally into the process.
What is ServerAvatar?
ServerAvatar is a platform to simplify the hosting and management of servers and applications. It simplifies the process of deploying and managing PHP and Node.js based web applications on servers.
Instead of handling multiple tools separately, it brings server, application, database, and file management into a single dashboard. For Bagisto deployments, this means fewer manual steps and a more structured setup from the beginning.
How ServerAvatar Simplifies the Bagisto Deployment Process
Server deployment can often feel overwhelming, especially when multiple configurations are involved. ServerAvatar reduces this complexity by providing a guided and organized workflow.
From creating applications to managing databases and accessing files, every action happens in one place. This allows you to focus on deploying Bagisto rather than worrying about underlying server details. Think of ServerAvatar as a control center that keeps all deployment tools within easy reach.
Creating a Bagisto-Ready Environment with ServerAvatar
A stable environment is essential for any Laravel application. ServerAvatar helps create a Bagisto-ready environment by allowing you to configure PHP versions, system users, and web roots during application creation.
This structured setup ensures that Bagisto runs under the correct conditions from the start. Instead of manually adjusting server settings, ServerAvatar lets you define everything upfront, reducing the chances of configuration errors later.
Prerequisites
Before deploying Bagisto, make sure you have:
- A Linux server that supports PHP and MySQL
- PHP 8.1+
- MySQL or MariaDB
- Apache or Nginx
- Access to a server management panel
- A stable internet connection
The good news is that ServerAvatar fulfills all these requirements out of the box. When you create a server using ServerAvatar, it comes preconfigured with PHP, a web server (Apache or Nginx), a database (MySQL or MariaDB), and essential optimizations already in place. This removes the need for manual server setup and lets you focus entirely on deploying Bagisto rather than managing infrastructure.
Why Proper Deployment Matters
Deploying Bagisto is like laying the foundation of a building. If the base is strong, everything else stands firm. A rushed or incorrect setup can lead to errors, slow performance, or security issues later.
A clean deployment ensures:
- Better performance
- Fewer errors
- Easier updates in the future
Taking time now saves frustration later.
Preparing the Server Environment
Before installing Bagisto, it’s important to have a properly configured server environment. A clean and optimized setup ensures smooth installation, better performance, and fewer issues as your store scales.
With ServerAvatar, this step becomes significantly easier. ServerAvatar offers both managed server and self-managed server installation options, allowing you to pick the level of control that best fits your experience and project requirements.
When you create a server using ServerAvatar, it provides a ready-to-use server environment out of the box. During server deployment, all essential services are automatically installed and configured for you, including:
- A web server
- PHP with required extensions
- A database
- Security and performance optimizations
- Proper directory structure and permissions
This means you don’t need to manually install or fine-tune the web server, PHP, or database. Everything is set up and ready, allowing you to move directly to deploying Bagisto.
Let’s start with the Bagisto deployment process:
Step1: Creating a Database for Bagisto
Every eCommerce store needs a place to store data. Products, orders, and users all live inside a database.
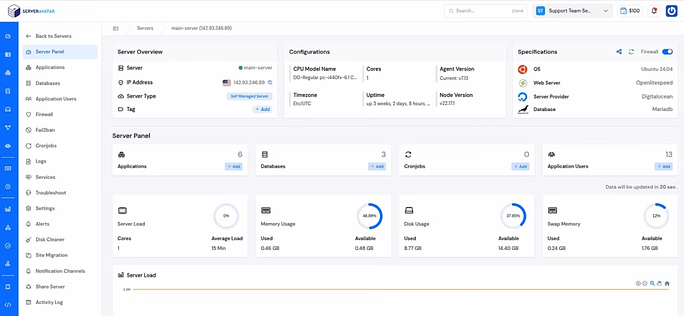
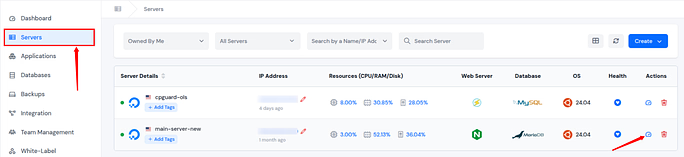
- Navigate to the server panel by clicking on the server dashboard icon.
- Navigate to the Database section from the left sidebar, and click on Create a Database button.
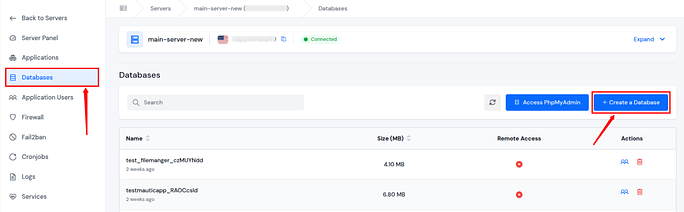
- Enter the required details such as the database name, username, and password. Click on the Create a Database button.
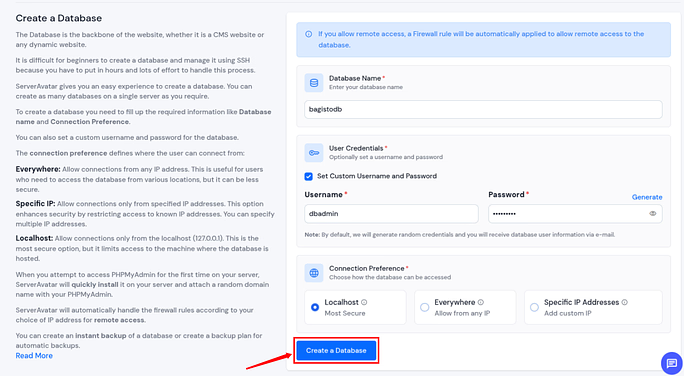
- Keep these details safe. You will need them soon when you deploy Bagisto.
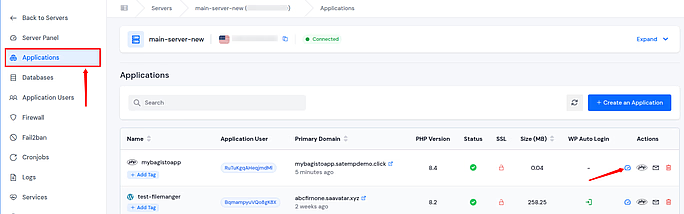
Step2: Setting Up a Bagisto Application
Let’s now create a new application from the ServerAvatar panel.
- Navigate to the Applications section from the left sidebar, and click on Create an Application button.

Enter the required details such as,
- Enter the application name
- Select the domain (choose from the primary domain or the test domain)
- Enter the domain name
- Deployment Method: Custom
After filling out the details, click on the Create Application button
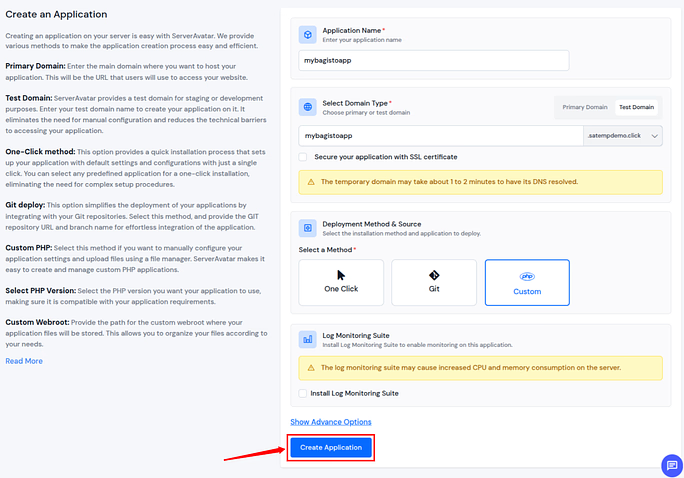
This ensures the application loads correctly in the browser.
Step 3: Delete the default file from the public_html
- Navigate to the application panel by clicking on the application dashboard icon.
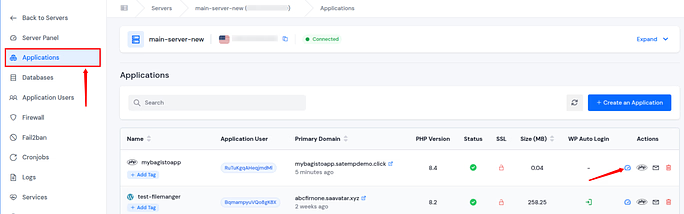
- Go to the File Manager section from the left sidebar, and go to the public_html directory.
- Delete the index.html file by selecting it and clicking on the Delete button.

Step 4: Running Required Commands
- To establish a connection, access the SSH credentials from the application panel dashboard.
- Enable the SFTP/SSH Credentials option, as illustrated in the mentioned image.

- Execute the mentioned command to log in to your application in your terminal.
SSH username@host(IP address)- Replace Username and Host with your actual values. Enter the SSH Password to log in.
- Navigate to the public_html directory in your application directory (by using the ls and cd commands), and run the below commands.
git clone -b master <a href="https://github.com/bagisto/bagisto.git">https://github.com/bagisto/bagisto.git</a> .- It will clone the Bagisto application repository and place all files directly in your current working directory.
Step 5: Connecting the Database with the Bagisto Application
This step links the application with the database that was created earlier.
- Navigate to the application panel by clicking on the application dashboard icon.
- Go to the File Manager section from the left sidebar, and go to the public_html directory.
- Enable the toggle of Show Hidden Files and find .env.example file from the filemanager.
- Select the checkbox next to the .env.example file, and click on rename button.
- Rename the File to .env

- After renaming the file to “.env”, proceed to open it.
- Enter your application URL by copying from the ServerAvatar panel.
- APP_URL: your application domain URL
- Enter the database credentials that we created in the previous step.
- You can access all your database credentials, like database name, username, and password, by accessing the database tab from the ServerAvatar panel.
- Enter the database credentials:
- Database Name: Database name
- Username: Username of the database
- Password: Database password
- After entering credentials, save the file by clicking on the Save Changes button.
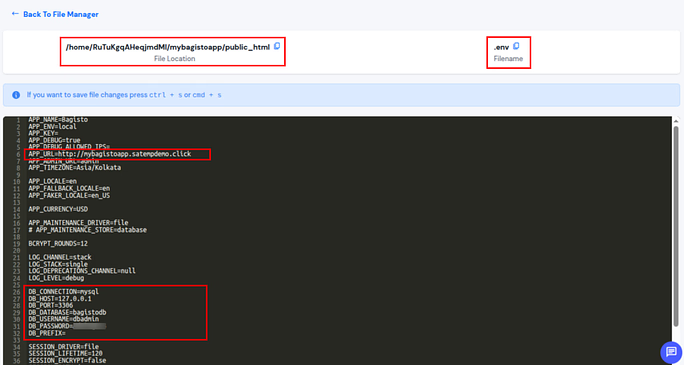
Once saved, Bagisto knows exactly where to store and retrieve data. Without this connection, the store cannot function.
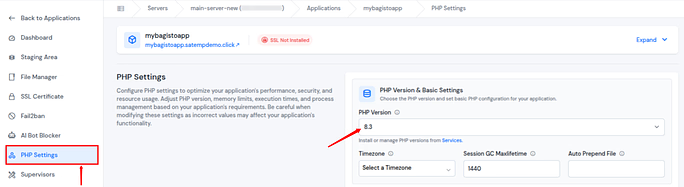
Step 6: Upgrade the PHP-CLI version to 8.3
- Navigate to the application panel by clicking on the application dashboard icon.
- Click on the PHP Settings section from the left sidebar.
- Change the PHP Version to 8.3, as it is required for the Bagisto application.
- Click on the Update Settings button.
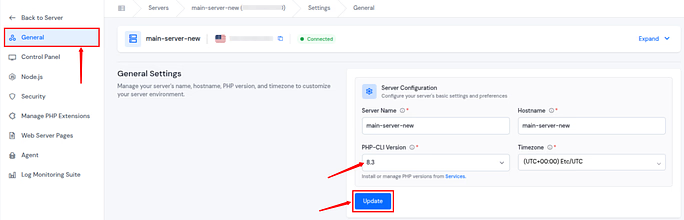
- Let’s now change the PHP-CLI version to 8.3 from the server panel.
- Navigate to the server panel by clicking on the Settings section from the left sidebar, and move to the General section.
- Change the PHP-CLI version to 8.3 and click on the Update button.
Step 7: Install Composer and Bagisto
- To establish a connection, access the SSH credentials from the application panel dashboard.
- Enable the SFTP/SSH Credentials option, as illustrated in the mentioned image.

- Execute the mentioned command to log in to your application in your terminal.
SSH username@host(IP address)- Replace Username and Host with your actual values. Enter the SSH Password to log in.
- Navigate to the public_html directory in your application directory (by using the ls and cd commands), and run the below commands.
composer install
php artisan bagisto:install- It will install Composer and the Bagisto application.
- Enter your application name in the terminal pop-up.

- It will automatically display the application name you previously entered while editing the file.
- Next, select the application time zone from the available options.
- Choose the application locale.
- Set the default currency according to your requirement.
- Select the allowed locales for your channels.
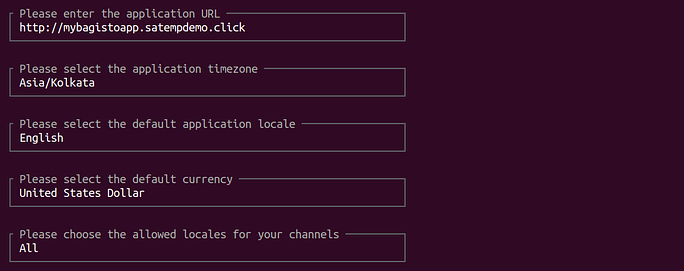
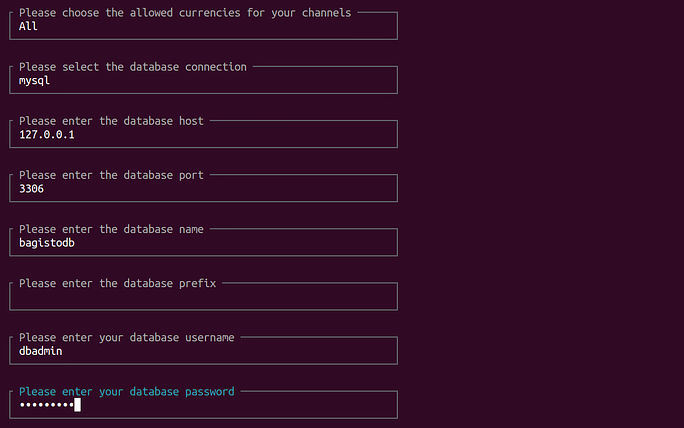
- Then, choose the allowed currencies for your channels.
- Now, all database details, such as the database connection, database host, database name, and username, will be automatically fetched from the information provided earlier while setting up the .env file.
- Enter the Database password.
- Next, provide the name of the application admin user.
- Enter the admin user’s email address.
- Choose whether you want to install sample products after the installation is complete.

- That’s it! Your application has been installed successfully.


Step 8: Set up the webroot directory.
- Navigate to the application panel by clicking on the dashboard icon.

- Navigate to the Settings section from the left sidebar.
- Change Custom Webroot, and enter public in the custom webroot path.
- Click on the Update button.
- Fix the ownership and permission for your application. Click on the Fix Permission button.
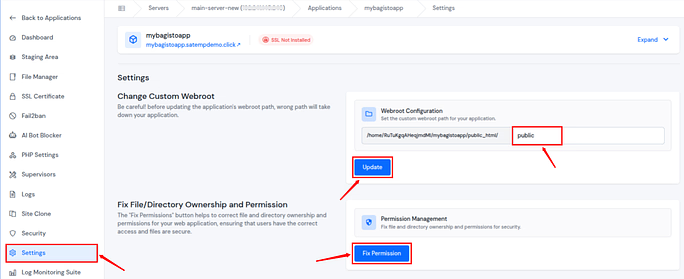
- Once you’ve set the custom webroot and fixed the permissions, you have successfully configured the application.
- Access your application by visiting your application domain and entering ‘/admin‘ at the end of the domain.
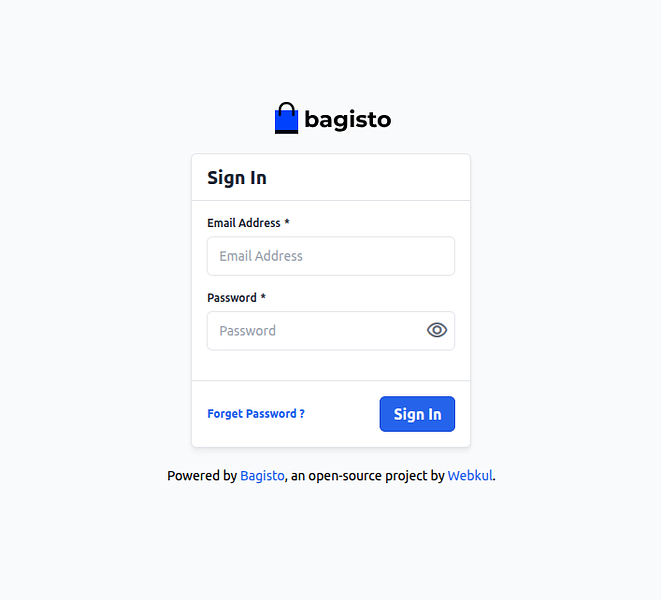
- That’s it! The Bagisto application has been installed successfully.
- Log in using the email address and password you configured during the application setup.
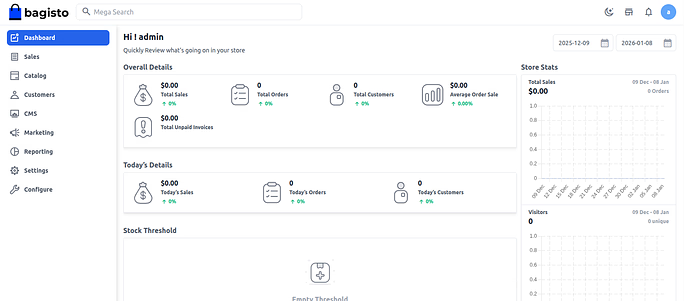
Once logged in, you will be redirected to the Bagisto application dashboard.
Why ServerAvatar Is the Best Choice for Laravel eCommerce Projects
Laravel eCommerce platforms like Bagisto benefit from environments that are flexible yet controlled. ServerAvatar strikes this balance by offering hands-on configuration without unnecessary complexity.
For those deploying Bagisto, ServerAvatar provides a practical foundation, handling server tasks quietly in the background while allowing the application to take center stage.
Common Deployment Mistakes to Avoid
Even a simple deployment can go wrong if you rush. Some common mistakes include:
- Using the wrong PHP version
- Forgetting to update the environment file
- Incorrect database credentials
- Missing the correct web root
Double-checking each step helps avoid unnecessary headaches.
What to Do After Deployment
Once you deploy Bagisto successfully, your work is not over. The next steps include:
- Configuring store settings
- Adding products and categories
- Testing the checkout process
Deployment is just the starting line, not the finish.
Conclusion
Deploying Bagisto does not have to be a complex or intimidating task, even if you are not deeply technical. When broken down into clear steps and supported by the right server environment, the entire process becomes much more approachable. From preparing the server and creating a database to configuring the application and running the final commands, each stage plays an important role in building a stable Laravel eCommerce store.
Using a platform like ServerAvatar helps simplify this journey by taking care of server-level setup and bringing application, database, file, and SSH management into one place. This allows you to focus more on setting up Bagisto itself rather than struggling with infrastructure-related challenges.
FAQs
1. Is Bagisto suitable for beginners?
Yes, Bagisto is beginner-friendly when deployed correctly and supported by clear documentation.
2. Do I need deep Laravel knowledge to deploy Bagisto?
No, basic familiarity is enough to deploy Bagisto successfully.
3. Can Bagisto run on shared hosting?
Bagisto works best on a server environment that supports Laravel requirements.
4. Why is the environment file important during deployment?
It stores essential configuration details that allow Bagisto to function properly.
5. What happens if the database connection fails?
If the database is not connected correctly, Bagisto cannot store or retrieve data, causing errors.