

You’re SSH’d into your Ubuntu server. You run mysql -u root -p, type your password, and hit Enter. The response: Access denied. You try again. Same result. You check your notes, your password manager, that config file you saved somewhere, nothing works. Now you’re locked out of your own database and need to recover your MySQL Root Password.
Sound familiar? You’re not alone. Forgetting the MySQL root password is one of those things that happens to almost every developer or sysadmin at some point. The database is running, the data is there, but you cannot get in.
The good news: resetting it is straightforward, even if it feels intimidating the first time. You don’t need to reinstall anything. You don’t need to lose data. What you need is about 10 minutes, a handful of commands, and a clear sequence of steps.
This guide walks you through every scenario, changing a password you know, resetting one you’ve forgotten, handling the --skip-grant-tables method properly, and updating your applications afterward so nothing breaks. I’ve tested these steps on Ubuntu 22.04 and Ubuntu 24.04, and the process is similar on both versions.
TL;DR
- You can reset a forgotten MySQL root password by starting MySQL with
--skip-grant-tables, then running SQL password commands - You can change an existing password with a single
ALTER USERstatement while normally logged in - Always stop websites/applications pointing to the database before resetting, they will lose connection during the process
- After resetting, update any application config files that store the old MySQL password
- For a server management experience that takes care of these automatically, explore ServerAvatar
- If your server is managed through ServerAvatar, you can update the database root password directly from the panel.
Understanding MySQL Root Access on Ubuntu
Before changing anything, it’s important to know what the MySQL root account actually is and how it differs from the Linux root user.
Before proceeding, make sure your server is actually running MySQL rather than MariaDB. Although the two database systems are closely related, there are important differences in features, compatibility, and administration. See our MariaDB vs MySQL comparison for a detailed breakdown.
MySQL root vs. Linux root: The MySQL root account is a database administrator account, separate from the Linux system root user.
MySQL root is a separate database-level administrator with full control over all databases, users, and permissions on your MySQL instance.
MySQL Authentication on Ubuntu
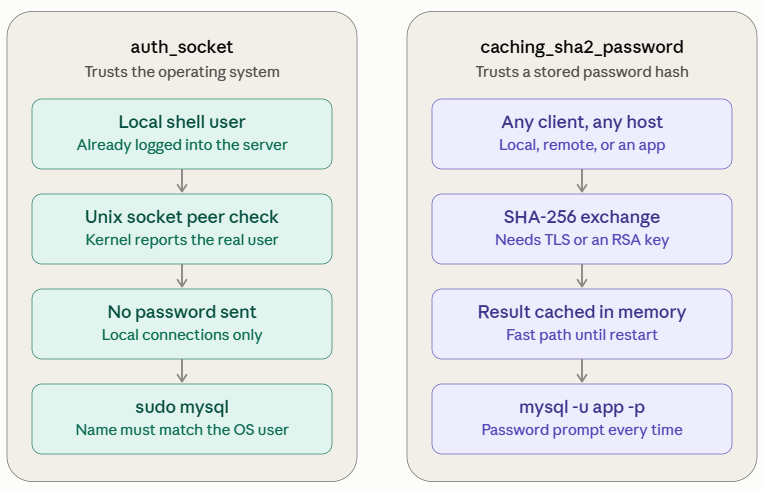
Ubuntu uses a plugin-based authentication system for MySQL. The authentication method configured for the root account determines how you can log in and reset its password. Common authentication methods include:
auth_socket- Links MySQL authentication to your Linux system user.
- You can log in as MySQL
rootonly when you’re already the Linuxrootuser.
mysql_native_password- Uses a stored password hash for authentication.
- A password is required to access the MySQL
rootaccount.
caching_sha2_password- Also relies on a stored password hash.
- Authentication requires the MySQL
rootpassword.
MySQL supports multiple authentication plugins, which determine how credentials are verified when a user connects.
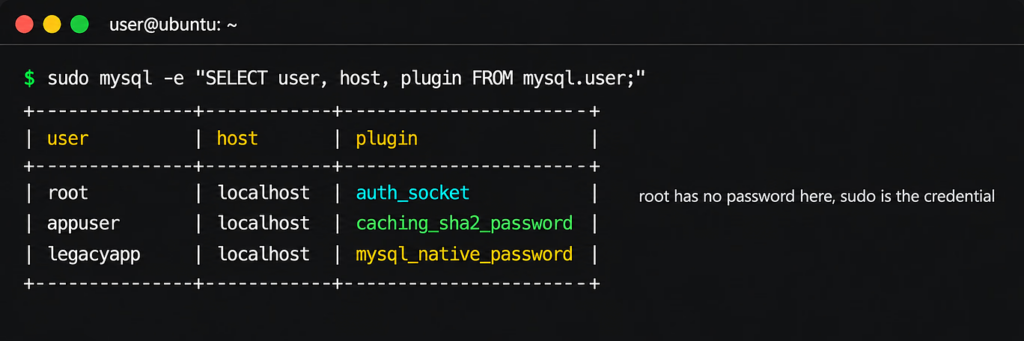
Check the Current Authentication Method
To find out which authentication method your MySQL root account is currently using, run:
SELECT user, host, plugin FROM mysql.user WHERE user = 'root';The result will show the authentication plugin configured for the root user:
auth_socket– You needsudoto log in as MySQL root from Linux.caching_sha2_password– You need the MySQL root password.mysql_native_password– You need the MySQL root password.
Knowing the authentication method is important because it determines how you access MySQL and how you reset the root password.
MySQL Authentication Methods Compared
| Authentication Method | Password Required? | Typical Use | Security / Compatibility | Recommended? |
|---|---|---|---|---|
auth_socket | No for local socket authentication | Local server administration | Ties MySQL access to the operating-system user | Good for local administration |
caching_sha2_password | Yes | Modern MySQL installations | Stronger modern password authentication; default in MySQL 8.x | Yes |
mysql_native_password | Yes | Older applications and MySQL setups | Legacy authentication with broader old-client compatibility | Avoid for new setups |
Changing Your MySQL Password When You Know It
If you can already access MySQL and simply want to replace the current root password, you can change it without stopping or restarting the MySQL server.
1. Log In to MySQL
Open the MySQL prompt as the root user:
sudo mysql -u root2. Change the Root Password
At the MySQL prompt, run:
ALTER USER 'root'@'localhost' IDENTIFIED BY 'YourNewPassword123!';
FLUSH PRIVILEGES;
EXIT;This updates the password and exits the MySQL prompt.
ALTER USER– Changes the password for the MySQLrootaccount.FLUSH PRIVILEGES– Reloads the privilege information so the changes are applied immediately.EXIT– Closes the MySQL session.
Password and Authentication Notes
The exact authentication setup depends on the MySQL authentication plugin:
caching_sha2_password– The default authentication method in MySQL 8.0+ works with the command above.mysql_native_password– Older MySQL installations may use this method, and the sameALTER USERsyntax applies.
Use a strong password for the MySQL root account. Use a long, unique password for the MySQL root account. If password validation is enabled, your server may enforce additional length and complexity requirements.
3. Test the New Password
Immediately verify that the new password works:
mysql -u root -pEnter the new password when prompted.
- Successful login – The password change worked.
- Login fails – Check the configured authentication plugin and verify that you’re using the correct credentials.
When Should You Change the Password?
Common situations include:
- Rotating credentials during a security audit
- Setting up a new server
- Replacing a password that has been shared with team members
- Restricting access to the MySQL root account
Resetting a Forgotten MySQL Root Password
This is the situation where most people need a password reset. If you’ve forgotten your MySQL root password, repeatedly trying different passwords won’t help. The good news is that you can recover access if you still have root access to the Ubuntu server.
The basic idea is straightforward:
- MySQL stores user credentials in its internal
mysql.usertable. - MySQL can be started without loading its privilege system.
- In this mode, password checks are bypassed.
- You can then update the root user’s password and restart MySQL normally.
Ubuntu uses systemd to manage the MySQL service, so the process below relies on systemctl commands.
Step 1: Plan for Downtime
Before starting, remember that applications and websites connected to this MySQL server will temporarily lose database access. This can affect:
- WordPress websites
- Laravel applications
- Other services connected to the database
During the reset, these applications may show database connection errors until MySQL is running normally again. For a smoother reset:
- Perform the work during a maintenance window.
- Choose a period with low traffic.
- Make sure no critical database jobs are running.
- Inform your team about the expected outage if required.
- Create a recent backup if important data has changed recently.
If you’re unsure whether MySQL is currently processing long-running or resource-intensive operations, you can first identify and kill MySQL queries before starting the maintenance process.
Password resets are generally straightforward, but having a backup is essential when modifying authentication settings.
Step 2: Stop the MySQL Service
Connect to your Ubuntu server through SSH and stop the MySQL service with systemd:
If you can’t connect to the server over SSH, troubleshoot and fix the SSH connection refused error before continuing with the MySQL password reset.
sudo systemctl stop mysqlThen confirm that the service has stopped:
sudo systemctl status mysqlThe status should indicate that MySQL is inactive.
systemctl stop mysql– Stops the MySQL service.systemctl status mysql– Shows the current service state.
systemctl provides a quick way to confirm whether the MySQL service is running or stopped.

Step 3: Start MySQL in Safe Mode Without Password Checking
The actual reset begins by starting MySQL with the --skip-grant-tables option. This option starts MySQL without loading its user privilege tables, which means:
- Password authentication is bypassed.
- Users can connect without normal privilege checks.
- The MySQL root account can be accessed without its password.
- The server is temporarily left in a highly open state.
Security note: Starting MySQL with
--skip-grant-tablestemporarily bypasses normal authentication and privilege checks. Keep the recovery session local and ensure network access is disabled while performing the reset.
Start MySQL in safe mode:
sudo mysqld_safe --skip-grant-tables &The & lets the command execute independently in the background while leaving the terminal available for other tasks.
MySQL’s official root password reset documentation also describes the --skip-grant-tables recovery method for regaining administrative access.
Important: Keep this terminal session open until the password reset is finished.
Note for MySQL 8.0+
With MySQL 8.0 or newer,
--skip-grant-tablesmay not behave as expected withmysqld_safe. In that situation, use it together with--skip-networking:sudo mysqld_safe --skip-grant-tables --skip-networking &The
--skip-networkingoption:
- Restricts MySQL to local access.
- Prevents network connections during the reset.
- Adds an extra security layer while password checking is disabled.
Step 4: Connect to MySQL Without a Password
Once MySQL is running without privilege checks, connect as root:
mysql -u rootYou should be taken directly to the MySQL prompt:
mysql>You should not receive a password prompt.
- MySQL prompt appears – The server started correctly in safe mode.
- Password prompt appears – MySQL may not have started with
--skip-grant-tablescorrectly; stop and restart it.

Step 5: Reset the Root Password
Once you’re inside MySQL, you can set a new password for the root account.
For MySQL 8.0 and newer:
FLUSH PRIVILEGES;
ALTER USER 'root'@'localhost' IDENTIFIED BY 'YourStrongNewPassword123!';For MySQL 5.7 and older:
FLUSH PRIVILEGES;
SET PASSWORD FOR 'root'@'localhost' = PASSWORD('YourStrongNewPassword123!');Both approaches replace the existing stored password hash with one generated from your new password.

FLUSH PRIVILEGES– Reloads the grant tables so privilege changes can take effect.ALTER USER– Sets a new password for the root account on newer MySQL versions.SET PASSWORD– Provides the password-reset method used with older MySQL versions.
If MySQL says FLUSH PRIVILEGES cannot run while the grant tables are disabled, the issue is caused by --skip-grant-tables.
In that situation:
- Run the password-change command without
FLUSH PRIVILEGES. - Restart MySQL normally afterward.
Step 6: Stop and Restart MySQL Normally
After setting the new password, leave the MySQL prompt:
EXIT;You can also press Ctrl+D.
Because MySQL was started through mysqld_safe, stop that process with:
sudo pkill mysqldWait a few seconds, then start MySQL normally:
sudo systemctl start mysqlFinally, verify that the service is running:
sudo systemctl status mysqlThe service should now show as active and running, as shown in the image below.

Step 7: Test Your New Password
The final step is to confirm that the new password works:
mysql -u root -pWhen prompted, enter the new password.
- Login succeeds – The password reset is complete.
- Login fails – Recheck the password and MySQL authentication configuration.

What If --skip-grant-tables Doesn’t Work?
In some situations, especially with certain MySQL 8.0 configurations or customized MySQL installations, the --skip-grant-tables method may not work as expected.
You may encounter issues such as:
- MySQL refusing to start.
- MySQL restarting automatically before you can connect.
mysqld_safebehaving differently because of a customized server setup.
In these cases, you can use a temporary systemd override to start MySQL with the required options.
Method: Start MySQL with --skip-grant-tables Using a systemctl Override
Ubuntu’s systemd service configuration for MySQL can be temporarily overridden to include the --skip-grant-tables option.
This approach:
- Keeps MySQL under
systemdmanagement. - Avoids starting
mysqld_safedirectly. - Lets you temporarily add the required startup options.
Step 1: Create a Temporary Override
Open the MySQL service override editor:
sudo systemctl edit mysqlAdd the following configuration:
[Service]
ExecStart=
ExecStart=/usr/sbin/mysqld --skip-grant-tables --skip-networkingThe two ExecStart lines have different purposes:
- First
ExecStart=– Clears the existing startup command. - Second
ExecStart=– Starts MySQL with--skip-grant-tablesand--skip-networking.
Save and exit the editor using Ctrl+O, then Ctrl+X.
Step 2: Reload systemd and Start MySQL
Apply the updated service configuration:
sudo systemctl daemon-reload
sudo systemctl start mysqlStep 3: Connect Without a Password
With MySQL running without normal privilege checks, connect as root:
mysql -u rootYou should be able to access MySQL without entering the root password.
Step 4: Set a New Root Password
From the MySQL prompt, run:
FLUSH PRIVILEGES;
ALTER USER 'root'@'localhost' IDENTIFIED BY 'YourStrongNewPassword123!';This reloads the privilege information and sets the new root password.
Step 5: Remove the Temporary Override
Once the password has been changed, restore the original MySQL service configuration:
sudo systemctl revert mysql
sudo systemctl daemon-reload
sudo systemctl restart mysqlThis removes the temporary override and starts MySQL using its normal configuration.
Step 6: Test the New Password
Finally, verify that the new password works:
mysql -u root -pEnter the new password when prompted.
This systemd override method can be useful when mysqld_safe does not behave as expected, particularly on customized server environments.
Updating Application Configurations After a Password Change
Changing the MySQL password only updates the database account. Any application still using the old password will lose database access until its configuration is updated.
Where to Update the New Password
Common locations include:
- WordPress: Update
DB_PASSWORDinwp-config.php. - Laravel: Update
DB_PASSWORDin the.envfile. - Custom PHP applications: Check
.env,config.php, ordatabase.php. - Other CMS platforms: Look for the database credentials in the application’s settings or configuration panel.
A typical configuration entry may look like:
define('DB_PASSWORD', 'old_password_here');Replace 'old_password_here' with the new MySQL password.
Restart the Relevant Web Service
After updating the application configuration, restart the web server:
sudo systemctl restart nginxOr, if you’re using Apache:
sudo systemctl restart apache2If you’re using another web server, restart the relevant service instead.
Then verify that the application can connect to MySQL correctly.
Tip: If several applications on the same server use the MySQL database:
- Update the database password in all application configuration files.
- Make sure every application has the new credentials.
- Restart the relevant web services after updating the configurations.
This helps prevent partial outages where one application reconnects successfully while another continues using the old password.
When MySQL Doesn’t Need a Password (auth_socket)
Some Ubuntu installations, particularly servers configured through control panels such as RunCloud, ServerAvatar, or similar platforms, may use the auth_socket authentication plugin for the MySQL root account.
With this setup:
- MySQL root authentication is linked to the Linux user.
sudoprivileges are required to access MySQL root.- A MySQL root password is not required for the local login.
mysql -u root -pmay not work as expected.
Access MySQL Root with auth_socket
If your root account uses auth_socket, connect with:
sudo mysql -u rootThen change the password with:
ALTER USER 'root'@'localhost' IDENTIFIED BY 'YourNewPassword123!';
FLUSH PRIVILEGES;Switch to Password-Based Authentication
If you want mysql -u root -p to work using password authentication, change the authentication plugin:
ALTER USER 'root'@'localhost' IDENTIFIED WITH caching_sha2_password BY 'YourNewPassword123!';
FLUSH PRIVILEGES;The important distinction is that auth_socket authenticates the Linux user rather than asking for a MySQL password. Once you understand which authentication method your server uses, the expected login behavior becomes much clearer.
For details about client compatibility and secure connections, see the official MySQL documentation for caching_sha2_password authentication.
Change the MySQL Root Password Using ServerAvatar
If your Ubuntu server is managed through ServerAvatar, you don’t have to manually stop MySQL, start it with --skip-grant-tables, or edit systemd configurations to change the database root password.
ServerAvatar provides a dedicated option in the server panel to update the root password for supported databases.
Steps to Update the Database Root Password
- Log in to your ServerAvatar account.
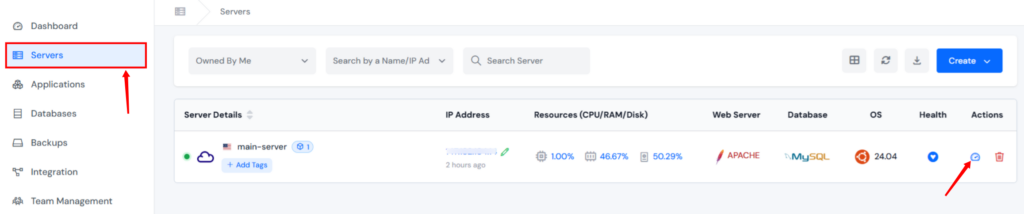
- Navigate to the server panel by clicking on the server dashboard icon.
- From the server’s left sidebar, select Settings.
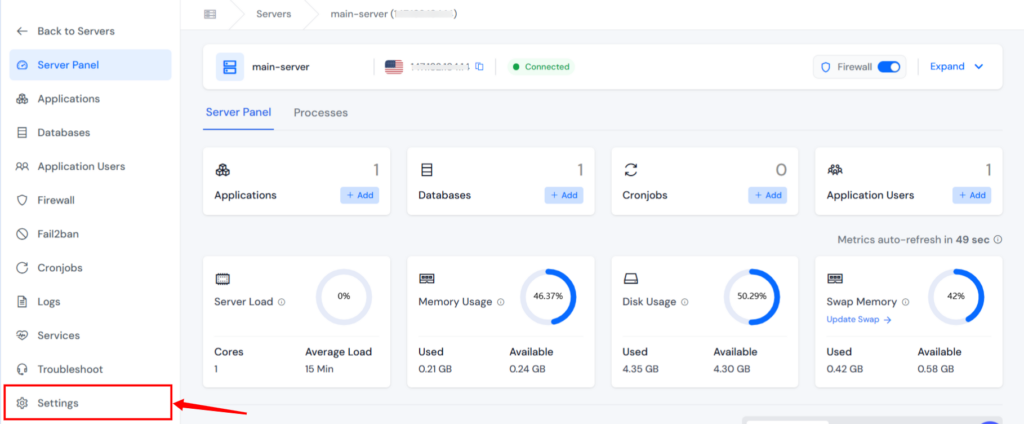
- Navigate to the Security section and find the Update Database Root Password section.
- Enter the New Password and the same password in Confirm Password, and click Update.
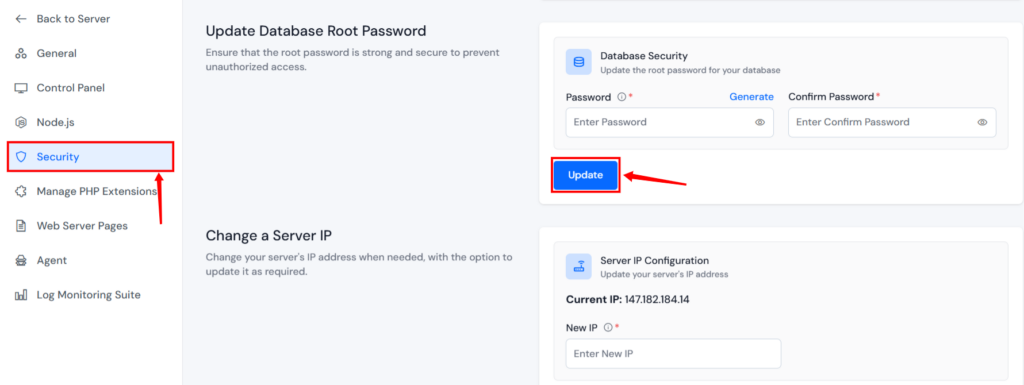
The new database root password takes effect immediately after the update.
Why Use ServerAvatar?
For servers managed through ServerAvatar, the panel-based approach can be more convenient than manually performing a password reset through SSH. It gives you a dedicated interface for updating the database root password without going through the multi-step --skip-grant-tables procedure.
Note: If your application uses the database root credentials, remember to update the corresponding password in your application’s configuration after changing it.
Preventing Future Password Lockouts
Getting locked out of MySQL can be frustrating, but a few practical habits can help prevent it.
1. Store MySQL Credentials Securely
Avoid keeping MySQL passwords in random text files or on your desktop. Instead:
- Use a password manager.
- Use a secure secrets manager such as HashiCorp Vault for server-side credentials.
- For application credentials, environment variables and
.envfiles can be used. - Keep
.envfiles outside the web root whenever possible.
2. Use a Separate MySQL User for Each Application
Avoid using the MySQL root account for every application. Create a dedicated database user for each application and grant only the permissions it requires. This approach:
- Limits the impact if one set of credentials is compromised.
- Makes password rotation easier.
- Prevents applications from having unnecessary root-level access.
3. Document Your Database Setup
Keep a secure private record containing important database details, such as:
- MySQL root credentials
- Server IP address
- Applications connected to each database
- Database and user relationships
Good documentation becomes especially important when the person who originally configured the server is no longer available.
4. Test Your Backups
Having a backup is not enough, you should also confirm that it can actually be restored.
- Periodically test MySQL backups.
- Perform restore tests in a non-production environment.
- Schedule a recurring reminder to test restores at least once every quarter.
A backup that cannot be restored can create a false sense of security.
5. Consider a Managed Database Solution
For business-critical applications, consider using a managed MySQL service or platform to reduce the operational work involved in managing databases. Options include Amazon RDS and Google Cloud SQL. These solutions can reduce the burden of Password rotation, Backups, Access management, and database administration.
You still retain control of your data while reducing the amount of database maintenance you need to handle yourself.
If you prefer managing servers and applications, look over databases, SSL certificates, backups, and services from a single control panel instead of handling every task manually over SSH, ServerAvatar simplifies server management while still giving you control over your infrastructure.

MySQL Root Password Reset Commands: Quick Reference
| Task | Command |
|---|---|
| Check MySQL status | sudo systemctl status mysql |
| Access MySQL with sudo | sudo mysql -u root |
| Log in using a password | mysql -u root -p |
| Stop MySQL | sudo systemctl stop mysql |
| Start MySQL | sudo systemctl start mysql |
| Restart MySQL | sudo systemctl restart mysql |
| Start without grant tables | sudo mysqld_safe --skip-grant-tables --skip-networking & |
| Reload privileges | FLUSH PRIVILEGES; |
| Change root password | ALTER USER 'root'@'localhost' IDENTIFIED BY 'NewPassword'; |
| Check root authentication | SELECT user, host, plugin FROM mysql.user WHERE user = 'root'; |
Key Takeaways
- MySQL
rootis a database administrator account and is separate from the Linuxrootuser. - Check the MySQL authentication plugin before changing or resetting the root password.
- If you know the current password, use
ALTER USERto change it without stopping MySQL. - A forgotten MySQL root password can be reset using
--skip-grant-tableswhen you have Linux root access. - Always plan for downtime before resetting the password because connected applications will temporarily lose database access.
- Use
--skip-networkingwith--skip-grant-tablesto limit network access during the reset process. - Restart MySQL normally after changing the password and verify that the new credentials work.
- Update the MySQL password in every application configuration that uses the changed credentials.
- If your server uses
auth_socket, MySQL root access may rely on Linuxsudoinstead of a MySQL password. - If you manage your server through ServerAvatar, you can update the database root password directly from the ServerAvatar panel.
- Use dedicated MySQL users, secure credential storage, documentation, and tested backups to reduce future access problems.
Conclusion
Changing or resetting the MySQL root password on Ubuntu does not require reinstalling MySQL or risking your database data. If you know the existing password, ALTER USER provides a simple way to update it. If you’ve forgotten it, you can regain access by temporarily starting MySQL without its normal privilege checks, changing the root password, and then returning the service to its standard configuration.
The important part is to handle the process carefully. Plan for application downtime, keep a recent backup, protect the temporary password-free MySQL session, and verify the new credentials before considering the job complete. Afterward, update every application that uses the old password and follow good credential-management practices to make future MySQL lockouts less likely.
FAQs
How do I change the MySQL root password on Ubuntu?
If you can access MySQL, log in with sudo mysql -u root and use the ALTER USER statement to set a new password. You can then test it with mysql -u root -p.
How can I reset a forgotten MySQL root password?
If you’ve forgotten the password but have Linux root access, you can temporarily start MySQL with --skip-grant-tables, connect without a password, set a new root password, and restart MySQL normally.
Will resetting the MySQL root password delete my databases?
No, changing or resetting the MySQL root password does not delete your databases or their data. However, creating a recent backup before making authentication changes is strongly recommended.
Why does mysql -u root -p fail even though MySQL is working?
Your MySQL root account may be configured with the auth_socket authentication plugin. In that case, local root access can use Linux sudo authentication instead of a MySQL password. You can check the configured plugin using the mysql.user table.
Do I need to update my applications after changing the MySQL password?
Yes, Applications that store the old MySQL credentials will no longer be able to connect after the password changes. Update the database password in files such as WordPress’s wp-config.php, Laravel’s .env, or other application configuration files.
What should I do after resetting the MySQL root password?
About the Author
Meghna Meghwani is a technical writer focused on Linux, Ubuntu, VPS hosting, server management, WordPress, PHP, Node.js, cloud hosting, and DevOps. She creates beginner-friendly tutorials, practical hosting guides, troubleshooting articles, and server security content designed to help developers and businesses manage applications and servers more efficiently.