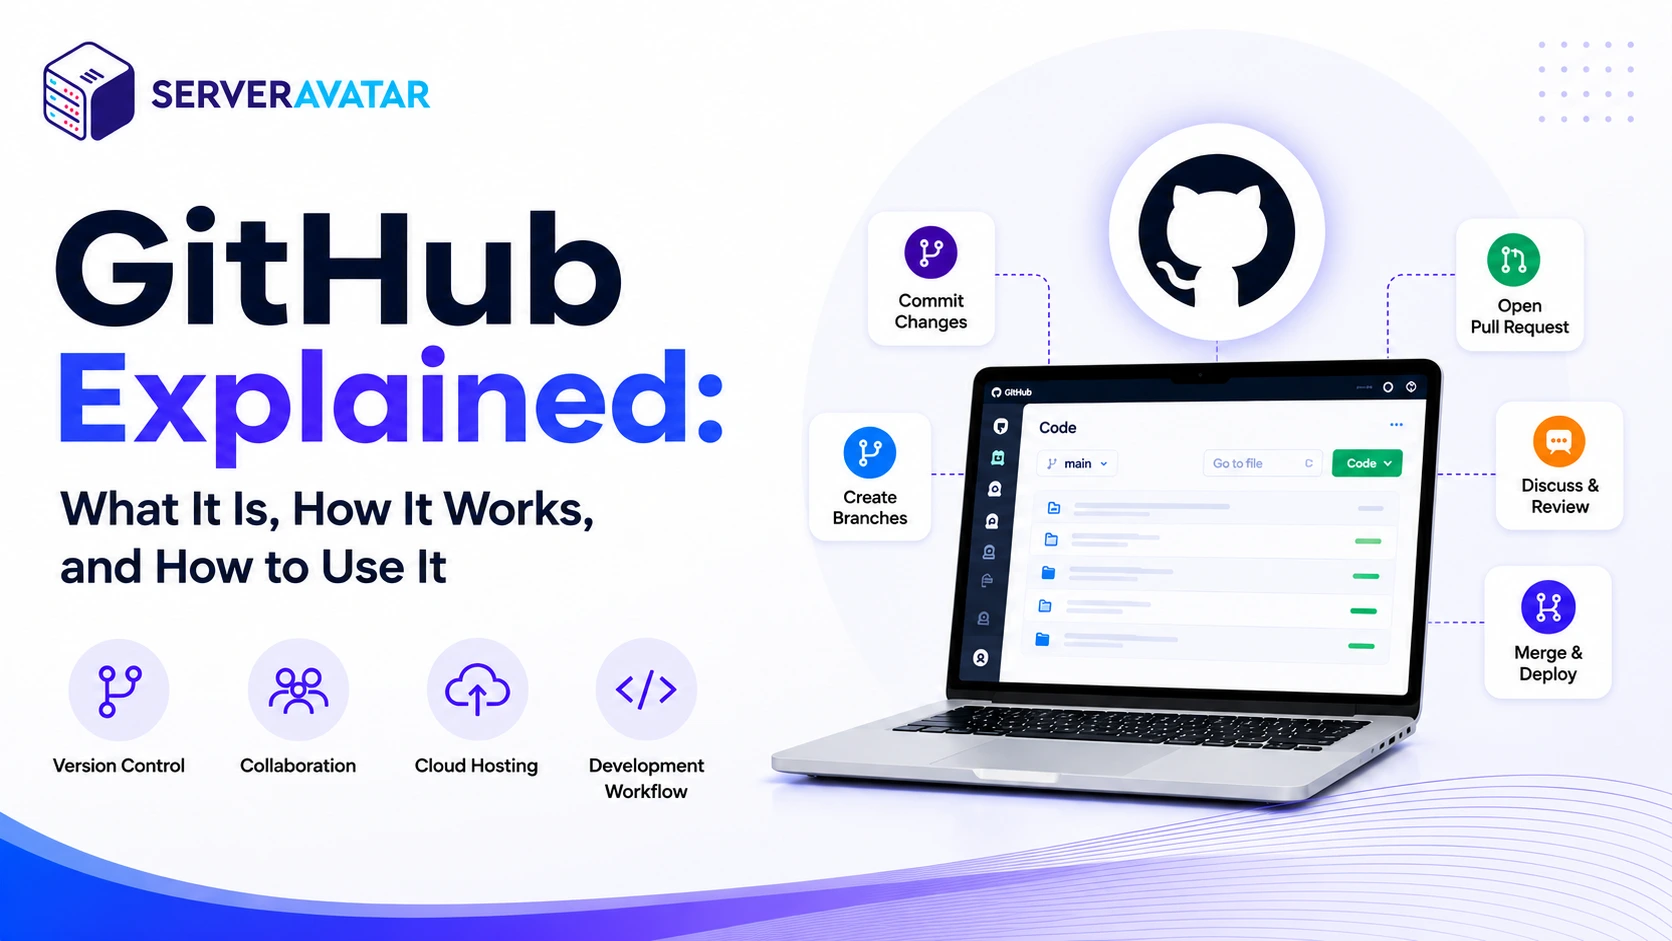

If you’ve ever joined a development team and felt lost when someone said “push to main,” “open a pull request,” or “what branch are you on,” you’re not alone. GitHub is one of those tools that developers take for granted, they assume everyone knows it, but the reality is that most newcomers stumble through it at first.
This guide is for those people: anyone who wants to understand what GitHub actually is, why it matters, and how to put it to work when deploying web applications through a platform like ServerAvatar.
We will cover everything from the raw concept of version control to actually connecting your GitHub account to ServerAvatar and getting your code live on a server without touching a command line. No prior experience needed.
TL;DR
- Git is a distributed version control system that tracks every change made to your project files
- GitHub is a cloud platform that hosts Git repositories and makes collaboration practical
- Branching lets you work on features in isolation; merging combines those changes back in
- Pull requests create a formal review process before code is merged
- ServerAvatar connects directly to GitHub and can clone, deploy, and auto-update your PHP and Node.js applications
- For private repos, you’ll add an SSH key to GitHub; for public repos, a simple HTTPS URL works
- Webhooks let GitHub notify ServerAvatar automatically whenever you push new code
- Deployment scripts let you run framework commands (cache clears, migrations, builds) after every pull
Before understanding GitHub, it helps to understand Git itself.
What Is Git?
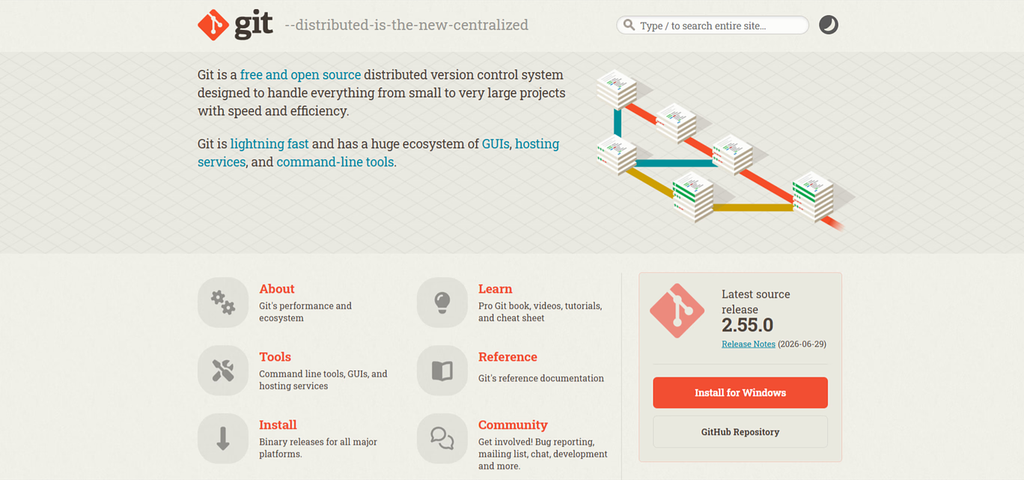
Git is a distributed version control platform introduced by Linus Torvalds in 2005 to help developers efficiently manage and track changes in their code. It records changes made to a project’s files, allowing developers to track, compare, restore, and collaborate on different versions of their code.
What Git Does
- Tracks code changes: Records what was added, modified, or removed.
- Maintains project history: Keeps a detailed record of previous versions and commits.
- Creates restore points: Lets you return to an earlier working version when something breaks.
- Supports experimentation: Developers can work on new features without changing the stable version of the project.
- Works offline: Git runs locally, so you can commit and manage changes without an internet connection.
- Supports collaboration: Multiple developers can work on the same codebase and combine their changes.
- Keeps a complete project copy: Every Git clone contains the repository’s files and history, reducing dependency on a single server.
Git Is Distributed
Git is called a distributed version control system because every developer who clones a repository gets a local copy of the project and its history.
This means developers can:
- Create commits without an internet connection.
- Review previous commits locally.
- Create and switch between branches.
- Compare changes.
- Continue working even when a remote Git server is unavailable.
Once an internet connection is available, local changes can be pushed to a remote repository such as GitHub.
Git Is Not GitHub
Git and GitHub are closely related, but they are different:
- Git is the version control software.
- GitHub is an online platform that hosts Git repositories and provides collaboration tools.
You can use Git without GitHub. GitHub simply makes it easier to store Git repositories remotely and work with other developers.
If Git isn’t installed on your Ubuntu system yet, follow our guide on how to install Git on Ubuntu before using Git commands locally.
What Is GitHub?
GitHub is a web-based platform for hosting Git repositories and collaborating on software projects. It combines Git’s version control capabilities with tools for code review, project management, automation, and team collaboration.
What You Can Do With GitHub
- Host Git repositories online.
- Browse source code through a web interface.
- Review file and code changes between different versions.
- Track bugs and feature requests using Issues.
- Review proposed code changes through Pull Requests.
- Manage project tasks and development workflows.
- Collaborate with other developers on the same project.
- Automate builds, testing, and deployment using GitHub Actions.
- Contribute to open-source projects through forks and pull requests.
- Maintain public or private repositories depending on your project’s requirements.
GitHub as a Collaboration Platform
GitHub goes beyond simply storing source code. It provides a complete environment where developers can:
- Discuss proposed changes.
- Review code before it reaches the main branch.
- Assign tasks to team members.
- Track bugs and feature requests.
- Document project decisions.
- Manage contributions from external developers.
- Maintain a searchable history of project activity.
GitHub is also widely used for open-source development. Developers can publish projects publicly, accept contributions, review community submissions, and maintain documentation in the same repository.
GitHub is not limited to large development teams either. Students, freelancers, solo developers, technical writers, and hobbyists can use repositories to manage personal projects, documentation, portfolios, and websites.
If you’re comparing GitHub with other popular Git hosting platforms, see our GitHub vs Bitbucket vs GitLab comparison guide to understand the key differences.
Git vs. GitHub
Git and GitHub are related, but they are not the same thing.
| Git | GitHub |
|---|---|
| Version control software | Online development and collaboration platform |
| Runs on your computer | Hosted on the web, and Accessed through the web and Git tools |
| Tracks changes and project history | Hosts Git repositories |
| Can work without internet access | Requires an online connection for its cloud-based features |
| Provides branches, commits, and merges | Adds pull requests, issues, code reviews, and collaboration tools |
| Can work without GitHub | Uses Git repositories as its foundation |
GitHub simply provides an online platform that makes sharing and collaborating on Git repositories much easier.
A simple way to think about it is:
Git manages your project’s history. GitHub helps you store, share, and collaborate on that Git project online.
Why Does Version Control Matter for Web Projects?
As a web project grows, managing source code manually becomes increasingly difficult. Version control becomes increasingly valuable as a web project grows.
Imagine maintaining multiple versions of a project using folders such as:
website-v1
website-v2
website-final
website-final-new
website-final-latestIt quickly becomes difficult to determine which version contains the latest changes or how two versions differ.
Git and GitHub provide a structured alternative.
GitHub Helps Solve Common Development Problems
- Track Changes: Every commit provides a record of changes made to the project.
- Restore Previous Versions: If a new change introduces a problem, Git history can help you identify and restore an earlier version.
- Work on Features Safely: Developers can create separate branches for new features without directly modifying stable code.
- Collaborate With Teams: Multiple developers can work on different branches and later combine their changes.
- Review Code Before Deployment: Pull Requests provide a place to inspect and discuss changes before they become part of the main codebase.
- Automate Development Tasks: GitHub Actions can automatically run tests, builds, and other workflows when code changes.
- Simplify Deployment: GitHub repositories can be connected to deployment systems so that new code can be transferred to a server automatically.
A Typical Web Development Workflow
A Git-based workflow might look like this:
- Developer creates or updates code locally.
- Changes are committed to Git.
- The changes are pushed to GitHub.
- Another developer reviews the changes through a Pull Request.
- Approved changes are merged into the main branch.
- The server pulls the updated code.
- Deployment scripts run required commands.
- The updated website or application goes live.
With a platform such as ServerAvatar, this process can be automated further using GitHub webhooks, allowing a Git push to trigger deployment without manually uploading files through FTP or logging into the server.
GitHub Key Concepts
To understand GitHub, you need to understand a few basic concepts: repositories, commits, branches, remote repositories, push, pull, merge, and Pull Requests.
Having a clear understanding of these concepts provides a strong foundation for using GitHub efficiently and effectively.
GitHub Repository
A repository, or repo, is the main storage location for a project on GitHub. A repository can contain:
- Source code
- Configuration files
- Documentation
- Images and other project assets
- Git history
- Branches
- Issues
- Pull Requests
- GitHub Actions workflows
Repositories can be public or private.
Public Repository
Anyone can view a public repository, depending on the repository’s permissions and settings.
Public repositories are commonly used for:
- Open-source projects
- Developer tools
- Libraries
- Documentation
- Public portfolios
Private Repository
A private repository restricts access to authorized users. Private repositories are useful for:
- Commercial applications.
- Client projects.
- Internal tools.
- Proprietary source code.
- Applications that aren’t ready for public release.
Commits
A commit is a recorded set of changes in a Git repository. You can think of a commit as a checkpoint in the project’s development history.
For example:
git add .
git commit -m "Add user authentication"The commit message describes what was changed.
Good Commit Messages
Use clear messages such as:
Add user authentication
Fix checkout validation
Update Laravel dependencies
Improve mobile navigationAvoid unclear messages like:
update
changes
fix
test
newClear commit messages make project history much easier to understand later.
Branches
A branch is a separate development path within a Git repository. It allows you to work on changes without modifying the main codebase immediately.
The primary branch is commonly called:
mainInstead of making changes directly to main, developers can create branches for specific tasks. For example:
main
├── feature-login
├── feature-payment
└── bugfix-headerA developer can work on feature-login while another works on bugfix-sidebar. Their changes remain isolated until they are ready to be reviewed and merged.
Why Use Branches?
- Develop new features independently.
- Fix bugs without disturbing ongoing development.
- Test experimental changes safely.
- Allow multiple developers to work simultaneously.
- Keep production-ready code separate from unfinished work.
Push
After making commits locally, developers can push those changes to GitHub. For example:
git push origin mainThis sends your local commits to the remote GitHub repository. A simplified workflow looks like:
Local Computer
↓
Git Commit
↓
Git Push
↓
GitHub RepositoryPull
A pull retrieves changes from a remote repository and incorporates them into your local project. For example:
git pull origin mainThis is useful when other developers have pushed changes to GitHub and you need those updates on your local machine.
Merging
Merging combines changes from one branch into another. For example:
feature-login → mainWhen the login feature is complete and tested, its branch can be merged into main.
Git automatically combines compatible changes. If two developers modify the same part of a file differently, Git may report a merge conflict, which must be resolved manually.
Pull Requests
A Pull Request (PR) is a formal proposal to merge changes into another branch on GitHub.
A typical pull request workflow includes:
- Developer pushes changes to a branch.
- Developer opens a Pull Request.
- Team members review the code.
- Reviewers leave comments or request changes.
- Developer makes any required updates.
- The Pull Request is approved.
- Changes are merged into the target branch.
Pull Requests provide a useful record of:
- What was changed.
- Why the change was made.
- Who reviewed it.
- What feedback was provided.
- When the change was merged.
Even solo developers can use Pull Requests as an additional checkpoint before introducing significant changes into a stable project.
Key GitHub Features You Should Know
GitHub includes several features that go beyond basic repository hosting.
Repositories
Repositories are where your projects live on GitHub. They provide a central location for:
- Source code.
- Project history.
- Branches.
- Issues.
- Pull Requests.
- Documentation.
- Automation workflows.
Forks
A fork is a copy of someone else’s repository under your own GitHub account. Forks are especially common in open-source development. A typical workflow is:
- Find an open-source repository.
- Fork it.
- Clone your fork locally.
- Make your changes.
- Push your changes.
- Open a Pull Request against the original repository.
This allows you to contribute without needing direct write access to the original project.
Issues
GitHub Issues provide a way to track development tasks and problems. You can use Issues for:
- Bug reports.
- Feature requests.
- Development tasks.
- Questions.
- Improvements.
- Project discussions.
For smaller projects, Issues can also act as a simple project to-do list.
GitHub Actions
GitHub Actions is an integrated automation and CI/CD service within GitHub that enables developers to automate development, testing, and deployment workflows. You can configure workflows to run automatically when specific events occur.
For example:
Code Push
↓
Run Tests
↓
Check Code
↓
Build Application
↓
DeployGitHub Actions can be used for:
- Automated testing.
- Code quality checks.
- Application builds.
- Release automation.
- Scheduled jobs.
- Deployment workflows.
Releases
GitHub Releases allow developers to package and publish specific versions of a project. For example:
v1.0.0
v1.1.0
v1.2.0
v2.0.0Releases are particularly useful for software libraries, applications, and open-source projects.
How to Use GitHub: A Basic Workflow
Now that the core concepts are clear, let’s look at how you would actually use GitHub for a project.
A basic workflow looks like:
Create Repository
↓
Clone Repository
↓
Create / Edit Files
↓
Git Add
↓
Git Commit
↓
Git Push
↓
Pull Request
↓
Code Review
↓
MergeIf you’re using Windows and want to run Git commands from a terminal, learn how to use Git Bash before following the command-line workflow below.
Step 1: Create a GitHub Repository
Create a new repository on GitHub and configure:
- Repository name
- Description
- Public or private visibility
- Optional README
- Optional
.gitignore - License, if required
- Create repository
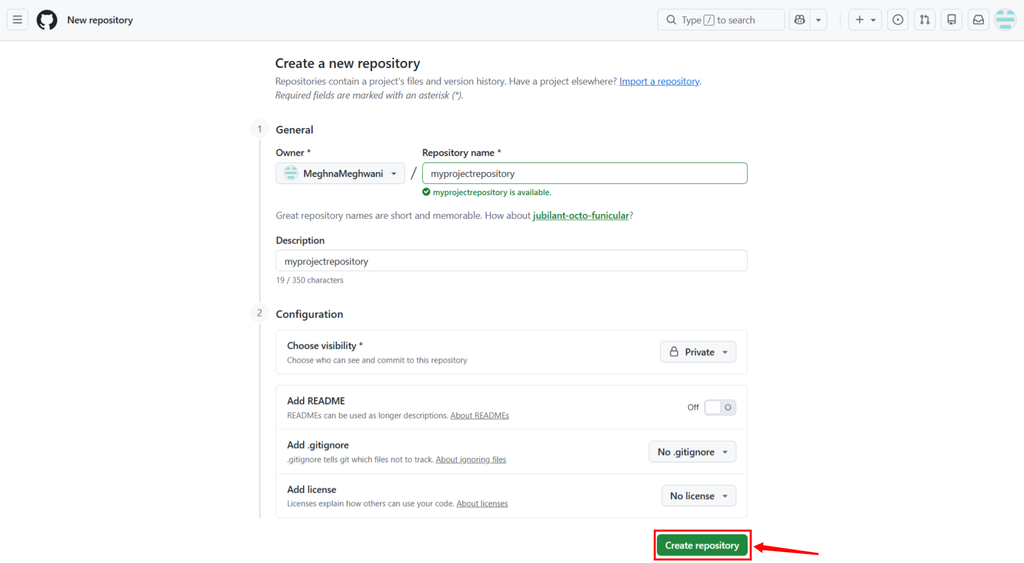
Once created, GitHub provides the repository URL.
Step 2: Clone the Repository
Cloning downloads a copy of the repository to your computer so you can work with the project locally.
For more details, see the official Git documentation on cloning repositories.
For example:
git clone https://github.com/username/project.gitAs mentioned below:

Move into the project directory:
cd projectYou have successfully created a local copy of the GitHub repository on your system.
Step 3: Create or Modify Files
Make your changes locally. For a web application, this might include:
- PHP files
- JavaScript files
- CSS
- HTML
- Configuration files
- Application dependencies
Step 4: Check Your Changes
Before committing, check which files have changed:
git statusYou can also review the actual changes:
git diffThis helps catch accidental modifications before they’re committed.
Step 5: Commit Your Changes
Add the files you want to commit:
git add .Then create a commit:
git commit -m "Add contact form"Your changes are now recorded in the local Git history.
Step 6: Push Changes to GitHub
Send the commit to GitHub:
git push origin mainThe updated code is now available in the remote repository.
You can learn more about working with remote repositories, including
git pushandgit pull, in the official Git documentation on working with remotes.
Step 7: Create a Pull Request
For collaborative projects, you can create a separate branch instead of pushing directly to main. For example:
git checkout -b feature-contact-formAfter making and committing your changes:
git push origin feature-contact-formOnce your changes are ready, you can open a Pull Request on GitHub to propose them for review and merging.
Step 8: Review and Merge
Once the Pull Request is created:
- Review the code.
- Run tests.
- Address comments.
- Make additional commits if required.
- Approve the Pull Request.
- Merge it into the target branch.
After merging, the feature becomes part of the main project codebase.
How GitHub-Based Deployment Works
GitHub can also become part of your application deployment workflow.
Without automation, a developer might need to:
- Push code to GitHub.
- Connect to the server.
- Pull the latest code.
- Install dependencies.
- Run migrations.
- Clear caches.
- Restart services.
Repeating this process manually can become inconvenient. A Git-based deployment workflow can automate many of these steps.
Basic GitHub Deployment Workflow
Developer
↓
Update Code
↓
Git Commit
↓
Push to GitHub
↓
Code Review
↓
Merge
↓
Deployment Trigger
↓
Server
↓
Updated ApplicationWith webhook-based deployment, the process can become:
git push
↓
GitHub
↓
Webhook
↓
Deployment Platform
↓
Pull Latest Code
↓
Run Deployment Commands
↓
Live ApplicationThis reduces the need for manual file uploads and makes deployments more repeatable.
How to Connect GitHub to ServerAvatar
ServerAvatar allows you to connect your GitHub account to deploy your PHP and Node.js applications directly from Git.
You can connect your GitHub repository to an application managed through ServerAvatar and use Git to deploy updates to your server.
Step 1: Connect Your GitHub Account
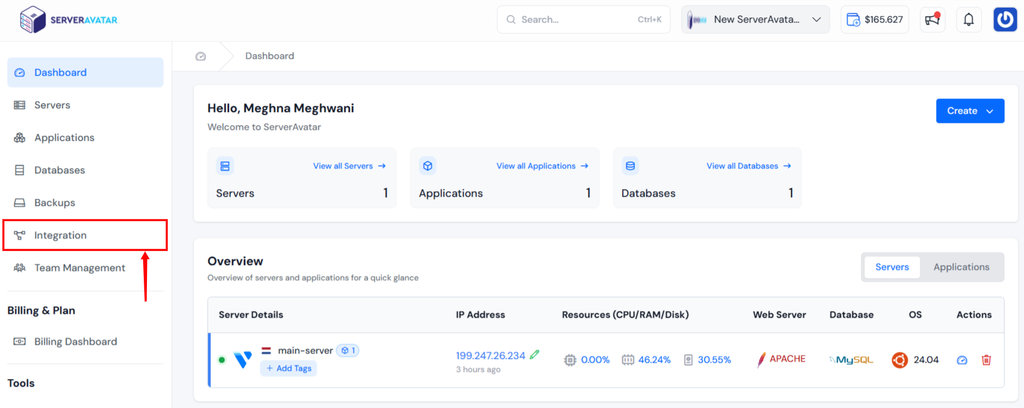
- Log in to your ServerAvatar account.
- Navigate to the Integration from the left-hand sidebar.
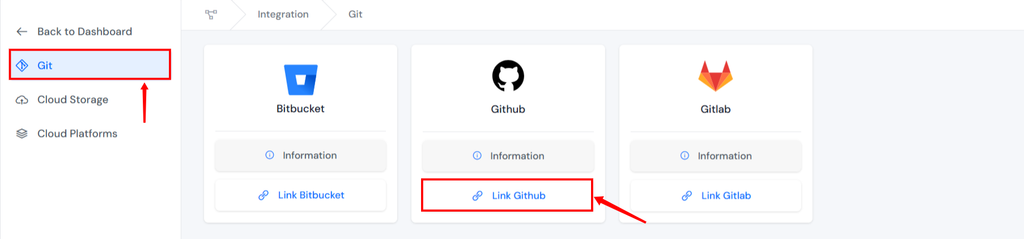
- In the Git section, click on the Link GitHub for GitHub section.
- ServerAvatar redirects you to GitHub’s authorization page.
- Authorize ServerAvatar to access the required repositories.
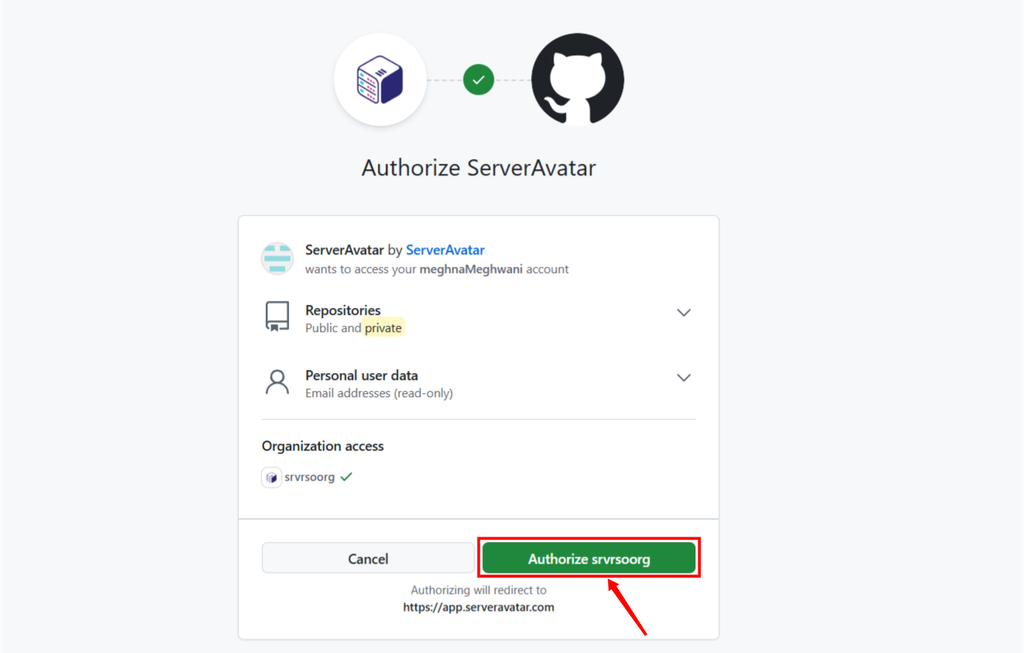
Once authorization is complete, your GitHub account is connected to ServerAvatar.
Step 2: Create an Application
For creating an git application with ServerAvatar after connecting to GitHub:
- Navigate to the server panel by clicking on the server dashboard icon.
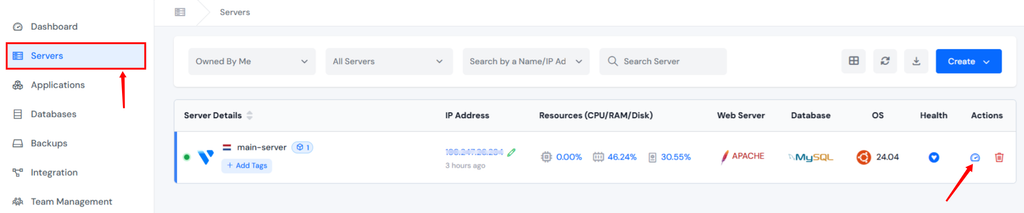
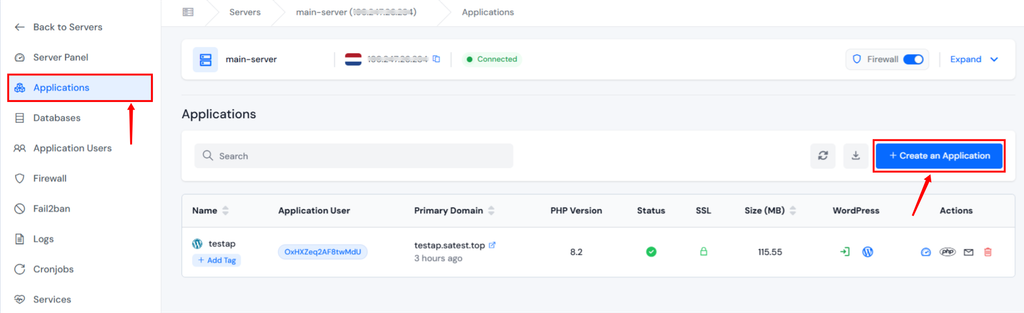
- Go to the Applications section and click Create an Application.
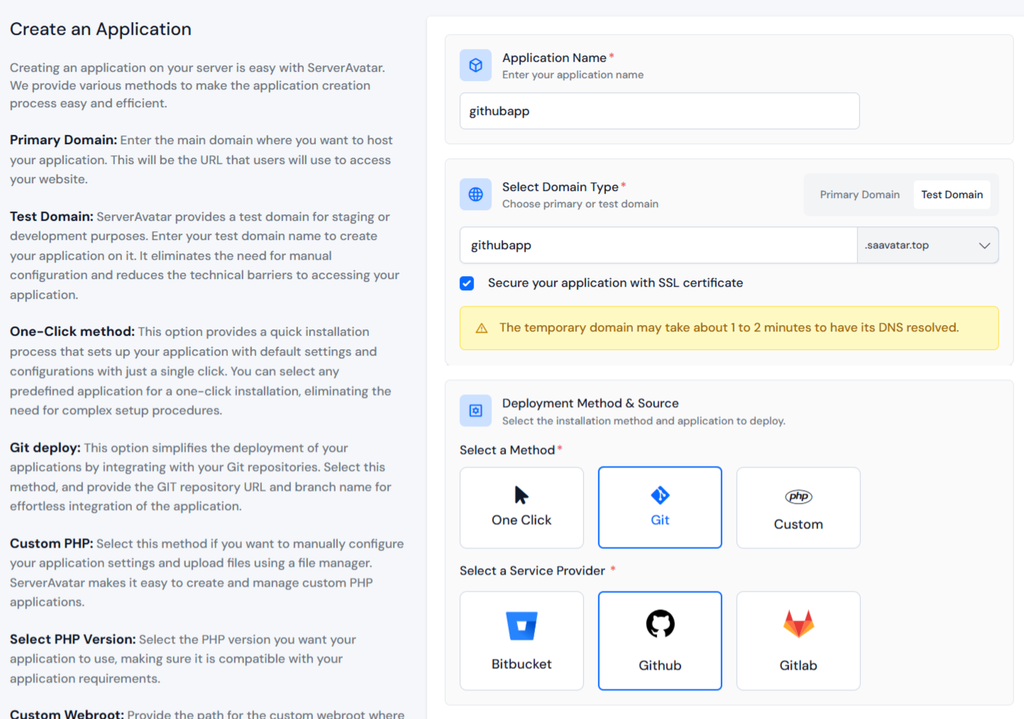
- Enter the required application details such as,
- Application name: Name used to identify the application.
- Domain: Select a primary domain or test domain provided by ServerAvatar.
- Domain Name: Add a domain name for your application
- Deployment method: Select Git.
- Service provider: Select GitHub.
Step 3: Connect Your Repository
The repository setup depends on whether the repository is public or private.
- For a Public Repository
- Enter the repository’s HTTP clone URL.
- Select the branch you want to deploy.
- ServerAvatar can clone the repository directly.
- For a Private Repository
Private repositories require authentication before ServerAvatar can access them. The general process is:
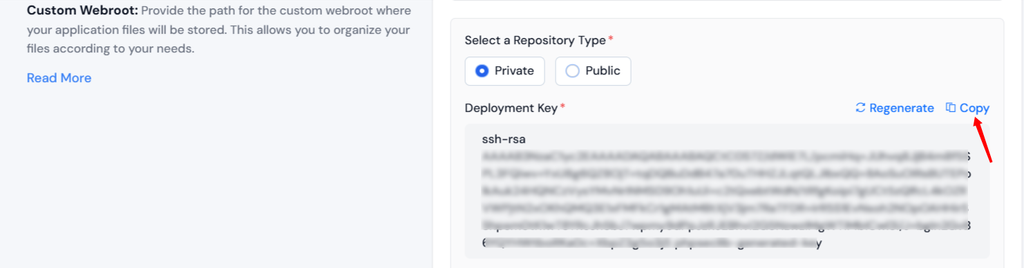
- Generate the SSH key provided during the application setup.
- Copy the public SSH key.
- Open your GitHub account.
- Go to Settings >> SSH and GPG Keys.
- Click New SSH Key.
GitHub’s SSH key documentation explains how SSH keys are used for authentication.
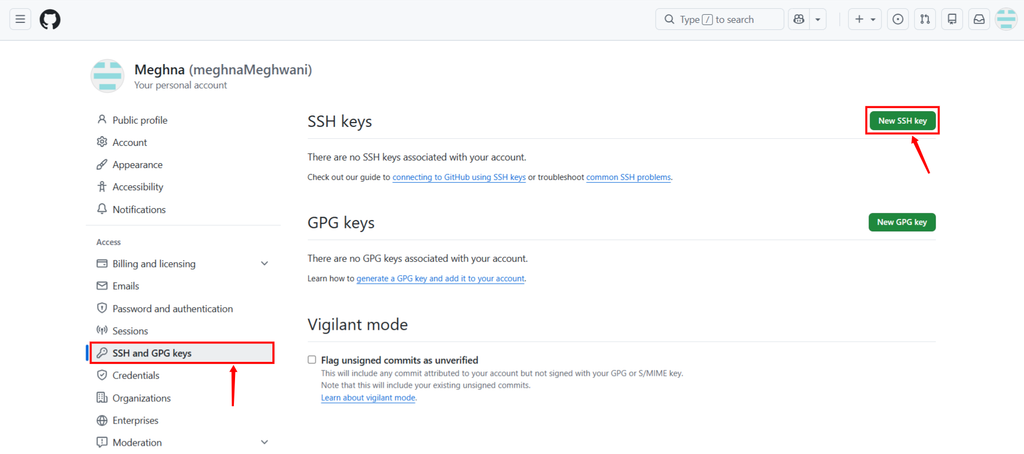
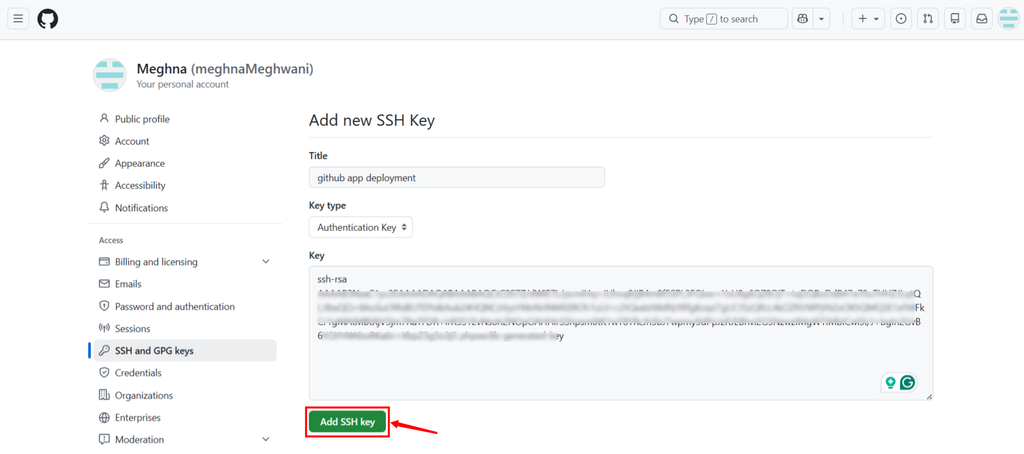
- Paste the key, and click Add SSH key.
- Select the required account, repository, and branch in ServerAvatar.
Add a Deployment Script if required:
- Pulling new code from GitHub doesn’t always complete the deployment. Applications may require additional commands after the repository is updated.
- A deployment script could look like:
cd /home/user/your-app
# Clear application cache
{PHP83} artisan cache:clear
# Run database migrations
{PHP83} artisan migrate --force- You can use deployment scripts for tasks such as:
- Installing dependencies.
- Clearing caches.
- Running database migrations.
- Building frontend assets.
- Restarting application processes.
- Generating optimized production files.
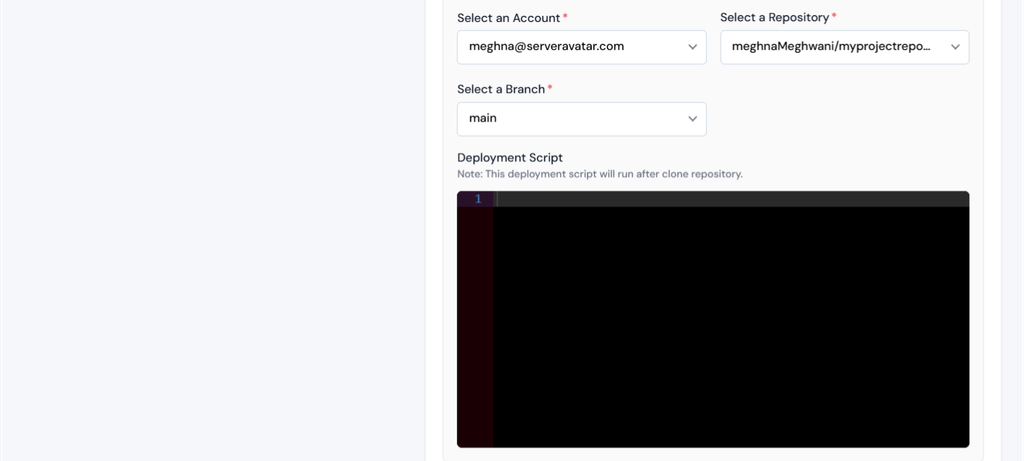
This allows ServerAvatar to authenticate with GitHub without storing your GitHub password.
Step 4: Configure the Webroot
The webroot specifies the directory from which your web server should serve the application.
- Click on Show Advance Options.
- Enter Custom Webroot in the Other Details section.
- Click on the Create Application button.
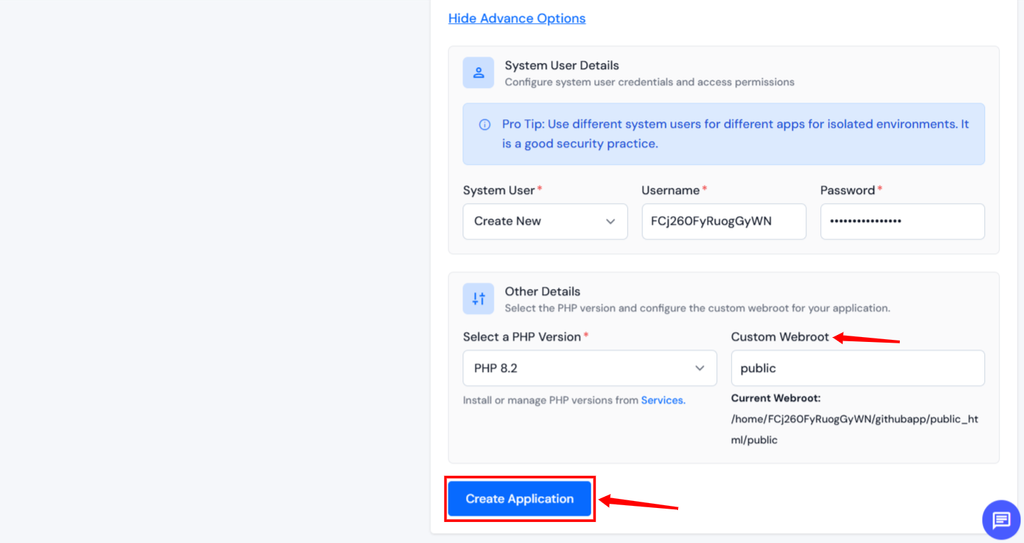
For many PHP applications, the default directory may be:
/public_htmlFrameworks can use a different public directory. For example, Laravel applications commonly use:
/publicWhy Does the Webroot Matter?
A wrong webroot can cause problems such as:
- Application routes not working.
- CSS and JavaScript assets failing to load.
- Incorrect files being served.
- Framework applications not starting correctly.
Make sure the webroot matches the directory structure expected by your application.
The deployment process looks like:
GitHub Repository
↓
Repository Clone
↓
Application Setup
↓
Deployment Script
↓
Live ApplicationStep 7: Pull New GitHub Changes Manually
After the initial deployment, you can update the application when new code is available. ServerAvatar provides a manual Git pull option.
Go to: Application Dashboard >> Git >> Pull Latest Changes
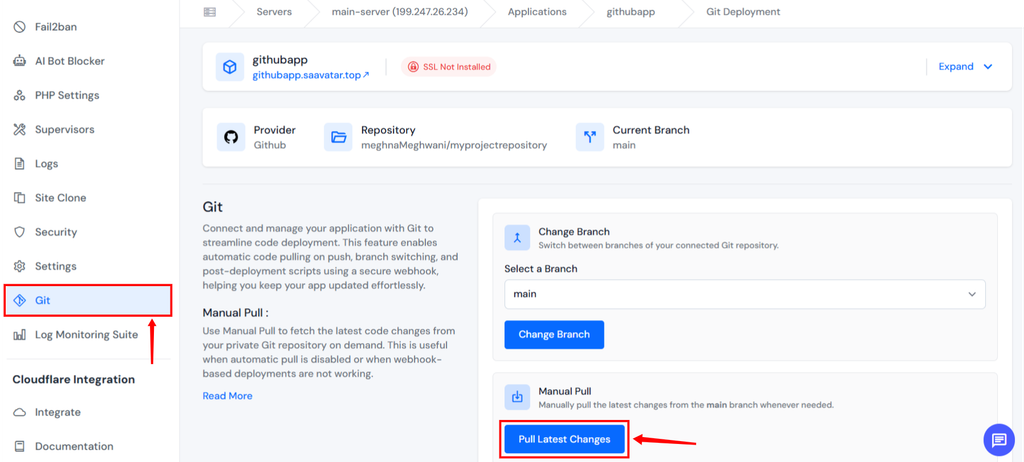
ServerAvatar retrieves the latest code from the configured repository and branch.
If you’ve configured a deployment script, the required commands can run after the pull.
When Should You Use Manual Pull?
Manual deployment is useful when:
- You want control over production releases.
- You need to test changes before deploying.
- You don’t want every Git push to update production.
- Your application doesn’t need continuous deployment.
Step 8: Enable Automatic Deployment With GitHub Webhooks
If you frequently update your application, you can automate deployments using GitHub webhooks.
GitHub’s official webhooks documentation explains how webhooks notify external systems when events occur in a repository.
Enable Auto Pull in ServerAvatar
- Go to: Application Dashboard >> Git >> Enable Auto Pull on Push
- Copy the Webhook URL
Add the Webhook to GitHub
Next, configure the webhook in your repository:
- Open your GitHub repository.
- Go to Settings >> Webhooks.
- Click Add Webhook.
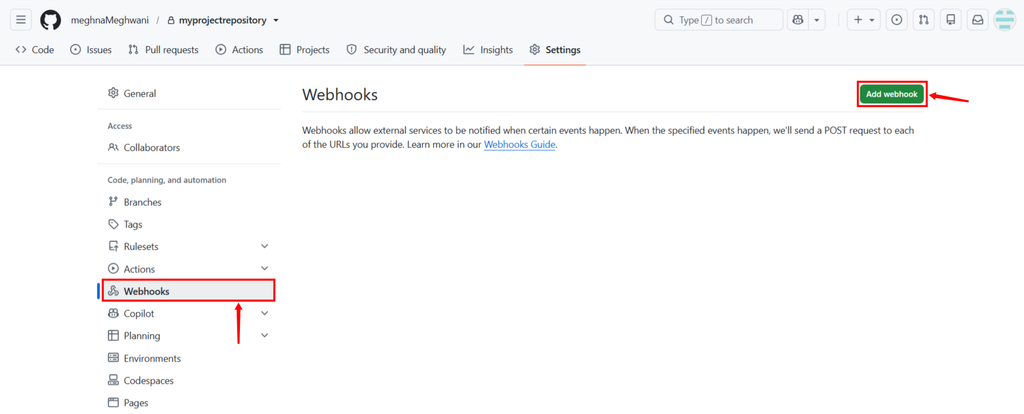
- Paste the ServerAvatar Webhook URL into Payload URL.
- Select application/json as the content type.
- Select the push event.
- Click Add webhook.
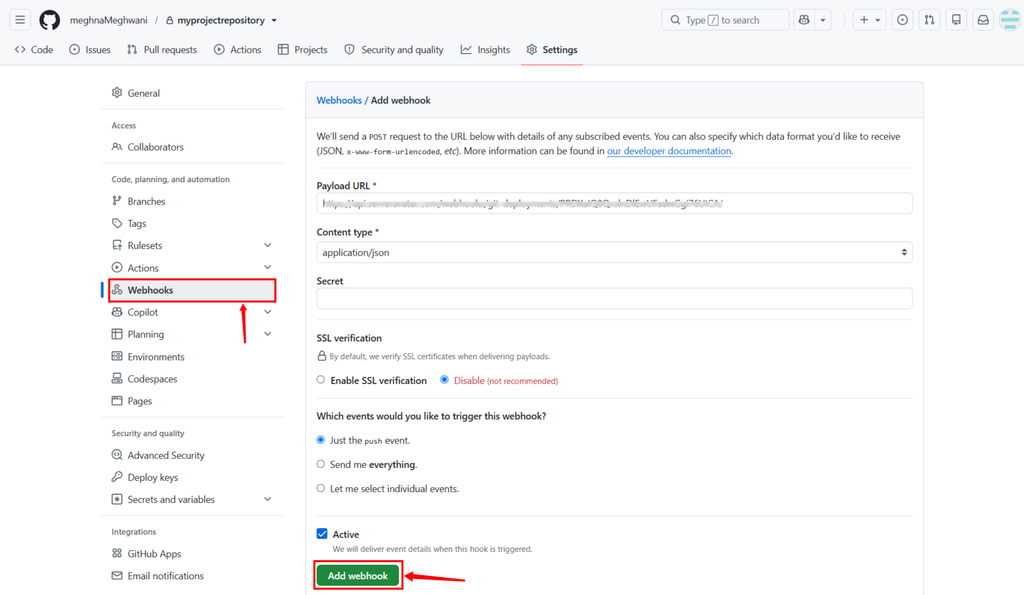
After setup, pushing changes to the configured GitHub branch can trigger ServerAvatar to retrieve the latest code and run the deployment process.
Step 9: Check Webhook Deliveries
If automatic deployment doesn’t happen after a Git push, GitHub provides webhook delivery logs that can help identify the problem.
Go to: GitHub Repository >> Settings >> Webhooks
Select the ServerAvatar webhook and review recent deliveries and check:
- Whether GitHub sent the webhook.
- The response status.
- Delivery details.
- Request information.
- Any returned errors.
This helps determine whether the issue is with the GitHub webhook or the deployment configuration.

Best Practices for Using GitHub
Using GitHub effectively isn’t just about pushing code to a repository. A few practices can make your development and deployment workflow more reliable.
Use Clear Commit Messages
Write commit messages that explain the actual change:
Fix checkout validation
Add user authentication
Update payment API
Improve mobile navigationClear commit messages make the project history easier to understand.
Use Feature Branches
Instead of making every change directly on main, create branches for individual features or fixes. For example:
main
├── feature-login
├── feature-payment
└── bugfix-headerThis keeps development work isolated and makes code review easier.
Review Changes Before Merging
Use Pull Requests to review important changes before merging them into the main branch. This gives teams an opportunity to:
- Identify bugs.
- Discuss implementation choices.
- Improve code quality.
- Run automated tests.
- Catch problems before deployment.
Protect Sensitive Information
Never commit sensitive credentials directly to a repository. Avoid storing:
- Database passwords.
- API keys.
- Access tokens.
- Private keys.
- Production credentials.
Use environment variables and appropriate secret-management methods instead.
Keep Git and Backups Separate
Git is excellent for tracking source-code changes, but it isn’t a complete backup solution. A production application may also contain:
- Databases.
- User uploads.
- Media files.
- Configuration.
- Application data.
Maintain appropriate backups for these resources separately.
Test Before Production Deployment
Before deploying major changes, test them in an appropriate environment. Pay particular attention to:
- Database migrations.
- Dependency upgrades.
- Framework updates.
- PHP or Node.js version changes.
- Authentication changes.
- Major configuration changes.
GitHub and ServerAvatar: Putting It All Together
Once GitHub and ServerAvatar are configured, your workflow can look like this:
Developer
    ↓
Write / Update Code
    ↓
Git Commit
    ↓
Push to GitHub
    ↓
Pull Request
    ↓
Code Review
    ↓
  Merge
    ↓
GitHub Webhook
    ↓
ServerAvatar
    ↓
Pull Latest Code
    ↓
Deployment Script
    ↓
Live ApplicationThis creates a clear path from writing code to deploying it on a live server.
Git manages the project’s version history, GitHub provides repository hosting and collaboration, and ServerAvatar handles the server-side deployment and application management.
Key Takeaways
- GitHub is the world’s largest code-hosting platform, built on top of the Git version control system
- Branching and merging are the core workflows that make collaborative development manageable
- ServerAvatar integrates directly with GitHub, letting you deploy PHP and Node.js apps without manual server access
- Private repositories require SSH key setup; public repositories work with a simple HTTPS URL
- Auto-pull via webhooks keeps your live site in sync with your GitHub repository automatically
- Deployment scripts add intelligence to updates, cache clears, migrations, and builds run automatically after every pull
Conclusion
GitHub can seem intimidating at first. The terminology alone, repositories, branches, forks, pull requests, commits, is enough to make anyone’s head spin. But once you understand the core idea (tracking changes, working in isolation, combining work intentionally), the rest falls into place surprisingly quickly.
What makes GitHub genuinely powerful isn’t just the version control, it’s the ecosystem around it. Issue trackers, code reviews, CI/CD pipelines, and integrations with platforms like ServerAvatar transform it from a code storage locker into a complete development workflow engine.
If you’re running web applications on servers and not using version control yet, you’re doing unnecessary manual work and taking on risk you don’t need to. ServerAvatar’s GitHub integration removes the hardest part of that transition: the server-side setup. Connect your repository, configure your deployment script, and every future update is a single push away.
FAQs
Can I use GitHub without knowing Git?
You can perform some basic GitHub tasks through its web interface, but understanding fundamental Git concepts such as commits, branches, push, pull, and merge will make GitHub much easier to use.
Can GitHub be used for website deployment?
Yes, A GitHub repository can be connected to deployment tools and servers so that application code can be deployed whenever changes are pushed or merged.
Can I deploy a private GitHub repository with ServerAvatar?
Yes, Private repositories can be deployed by configuring the required SSH authentication between GitHub and ServerAvatar.
Is Git a replacement for website backups?
No. Git primarily tracks source-code changes. Production databases, uploaded files, and other application data should be backed up separately.
Is GitHub free?
Yes for public repositories. You can create unlimited public repositories on GitHub’s free plan. Private repositories are also free on personal accounts, though organizations with multiple collaborators may need a paid plan. ServerAvatar works with both free and paid GitHub accounts.
About the Author
Meghna Meghwani is a technical writer focused on Linux, Ubuntu, VPS hosting, server management, WordPress, PHP, Node.js, cloud hosting, and DevOps. She creates beginner-friendly tutorials, practical hosting guides, troubleshooting articles, and server security content designed to help developers and businesses manage applications and servers more efficiently.