If you want to speed up your WordPress website, the first thing you should consider doing is enabling the cache. And there is no denying the fact that the W3 Total Cache is one of the most popular caching plugins for WordPress. This free plugin has over 1 million downloads. Anyways, in order to improve your WordPress Website which is one of the factors which do affect your SEO, then the W3 Total Cache plugin can help you a lot.
Well, you do need to have some good knowledge about how to use the W3 Total Cache and what feature does what. Now, it is not at all difficult to understand more about W3 Total Cache and How to speed up your WordPress Website using W3 Total Cache. But, a lot of people find it quite difficult to understand the W3 Total Cache. No more as here we are with our Complete Guide to W3 Total Cache.
Before we get to the W3 Total Cache features, let us take a look at What actually is caching and how it helps in improving a site’s speed. Should we?
What is Caching?

Now, when a user visits your WordPress website, what happens in the backend is the server your website is hosted on receives a request from the user’s browser. Then, WordPress processes the request and generates static files to fulfill the request and build the webpage in the user’s browser. Now, depending upon certain factors like the theme, plugins you are using, type of content you have. The requests might be a lot which makes the webpage speed slower.
Caching does a great job in this regard by grabbing the static webpage files and storing them on the web server, sending a copy to a content delivery network (CDN), and even storing a copy on the website visitor’s browser. This way, when the visitor accesses the webpage again, the static webpage files are loaded directly from the web server which results in faster loading of the page since the web server didn’t have to process the files again.
Now, let us take a look at How to Install W3 Total Cache on your WordPress Website.
How to Install W3 Total Cache?

In order to install the W3 Total Cache on your WordPress Website, you need to follow these steps carefully:
- First of all, you need to login to your WordPress Dashboard.
- Now, go to Plugins >> Add New from the sidebar.
- Here, search for W3 Total Cache.
- Install the one by Frederick Townes having over 1 million Installs.
- Now, click on Activate button to activate the Plugin.
That’s it! You have successfully installed W3 Total Cache on your WordPress Website. Now, it’s time to get to the real job and speed up your slow WordPress site using the W3 Total Cache.
How to speed up your WordPress Website using W3 Total Cache
Now, there are some settings which do work for most of the people out there and would make your WordPress website faster. Makes some sense? Great! So let us now take a look at options that the W3 Total Cache has to offer and what it does. This way, you’ll get a better understanding of what would work for you. We would also be sharing some settings with you guys.
The very first thing you should do after installing the plugin is to just click on the Compatibility check button to check whether or not the W3 Total Cache is even compatible with your server or not. There is something that the W3 Total Cache requires in order to work properly. For instance, you need a minimum WordPress version 5.3 with PHP version 7.2.5.
Now, let us take a look at the W3 Total Cache options and what they are about. Should we?
General Settings
General

Here, you will find an option for Preview which will create a separate container for site settings and would not save the settings straight off. You can play around with the settings in the Preview Mode and over the top, you would be able to see three different options:
The first one is for Disable which pushes the changes made and disable the preview mode.
The second option is for Deploy which pushes the changes made.
And the third option for Preview which opens your site with the preview settings so that you can take a look at What your site would be like if you save the changes made under preview mode.
Page Cache

The next sub-menu under the General Settings menu is Page Cache. It is indeed the most important option of the W3 Total Cache. You should definitely enable this option to enable caching. Now, there are some methods to cache static copies of your site’s pages and posts:
Disk: Enhanced: If you using a Shared Hosting, then you should go with this method.
Disk: Basic: Shared Server Users should go with this option.
If you are using Dedicated or virtual private server, you can select one of Opcode Caching method.
Opcode: XCache – Similar to APC, this method also caches PHP opcode. It is less common but still used in certain environments.
Opcode: eAccelerator – Another opcode caching method for older PHP environments. While not as commonly used today and largely outdated, it still exists in some legacy server setups. Use this only if your server specifically supports it.
Opcode: WinCache – If you are using a Windows server (IIS), then you should go with this option. It provides excellent performance improvements for PHP applications on Windows.
Opcode: APC (Alternative PHP Cache) – Suitable for VPS or dedicated servers running older versions of PHP. It caches compiled PHP code, making your website faster by reducing PHP execution time.
Redis – A powerful and flexible option, Redis stores cache in memory and supports persistence. It is ideal for handling high-traffic and dynamic websites in multi-server setups. If your server supports Redis, this should be your top choice.
Memcached – Another in-memory caching method great for multi-server environments. It helps reduce database load and speeds up delivery of dynamic content. It doesn’t support data persistence but is simple and effective.
Minify
What is Minification? Let’s say your WordPress theme is using a CSS file that has unwanted tabs and white spaces and the size of the file is 150KB. Now, What minification does, removes all the white space in order to decrease the size of the CSS/JS file. For instance, A file with size 150KB would become a file with size 100KB after minification.
The other benefit of minification is you don’t have to worry about bad people reading your CSS/JS files because they can’t really understand anything as there are no white spaces, all they would see is some random code dumped on the screen.

Now, we would not be going in too much deep about the Minify as it would make this post a lot longer. For beginners, we can say that this option will combine and minimize the size of the HTML, CSS, and JS files of your website. Please do note that this enabling this might result in the visually broken site, so go ahead with precaution.
Opcode Cache

Opcode Cache is one of those behind-the-scenes tools, whenever someone visits your website, your server needs your PHP files and convert them into machine-readable code. This process takes time and resources. But with Opcode Cache (also known as Opcache), the server saves a pre-compiled version of those PHP files in memory — so it doesn’t have to repeat the process again and again.
This means your site runs faster because your server isn’t doing unnecessary work every time someone opens a page.
If your hosting server supports Opcache (and most modern ones do), it will usually be automatically enabled and selected in the dropdown menu. So, in most cases, you don’t have to lift a finger.
Just like with other caching options, once this is active, keep an eye on your website to make sure everything looks and functions as expected. But generally, Opcode Cache improves your site speed, reduces server load, and makes everything run a lot smoother.
Database Cache

Now, if you are hosting your WordPress Website on a shared server, then you should leave this option disabled. This is simply because this utilizes more resources and most of the times, a shared server is not powerful enough to use database caching.
For those of our users who have a VPS or a Dedicated Server and are making things easier with the Server Avatar, you can go ahead and try enabling this option. Once you enable this option, take a look at the site’s speed and if it becomes slower afterward, then disable the Database Caching.
Object Cache

Object Cache is something which is built into the WordPress Core. This caches objects from Object Cache API to minimize the number of complex database queries. It is quite easy to set up. Now, some of you might get benefits from this option while others not so much. How. you ask? Well, for instance, if you have BuddyPress sites, bbPress sites, and so forth. This option would really help you.
On the other hand, if you have a blog or business website from a shared server, then in most of the cases, this option won’t help you at all.
Browser Cache

Now, this is one of the most important features of the W3 Total Cache. Enabling this option is quite simple and is not a difficult job at all. All you gotta do is simply click on the checkbox to turn it on. When this option is enabled, the website resources will be cached by website visitor browsers. That way, when a visitor comes back to your website, it would be a lot faster than before since some of the resources were loaded locally from the browser’s cache.
Purge via WP Cron

When you enable this option, it sets up a WP-Cron job that will automatically clear (or “flush”) all the enabled caches at regular intervals. This helps keep your site running smoothly without you needing to do it manually every time.
Now, if you want to have more control, each cache (like Page Cache, Database Cache, etc.) also has its own advanced settings where you can set up specific purge schedules for just that type of cache.
If you’re someone who prefers using a system-level cron job instead of WordPress’s built-in WP-Cron, you can set it up to run this command whenever you like:wp w3tc flush all
One important thing to note: if you’re using the Always Cached extension, then instead of clearing the page cache, the entries will just be added to a queue for refreshing — not completely removed.
For more detailed instructions or advanced options, you can check the official documentation (link provided on the settings page).
CDN

This is a pretty forward option. If you are using any Content Delivery Network or the CDN, then you should enable and set this option up. Setting up a CDN for your blog is not a difficult job at all. Once you enable this option, a new menu named CDN will be added. In this menu, you can configure caching and CDN at the same time for your WordPress website which might improve your site’s speed a lot.
Reverse Proxy

If you are someone who has installed Varnish on your server. If you are someone who does not have any idea about what is varnish, then you should definitely leave this option. You would need to have the root access for your server and will have to go through some advanced server configuration steps to make this option work.
User Experience
The User Experience (UX) setting is all about making your website feel faster and smoother for your visitors.
When you turn this on, it helps improve how quickly your pages load by reducing the number of server requests and optimizing how your content is delivered. This means your users won’t have to wait around for things to load — everything just feels snappier.
A better experience keeps visitors happy, encourages them to stay longer, and can even improve engagement on your site. In short, enabling this helps make your WordPress website not just faster, but also more enjoyable to use.
Statistics
The Cache Usage Statistics feature gives you a clear picture of how well your website’s caching system is working.
It shows useful data about how the cache is being used and how it’s affecting your site’s performance. By keeping an eye on these stats, you can spot what’s working well and what might need a little tweaking.
This helps you fine-tune your caching settings to make your site faster and more responsive — which means a smoother and better experience for your visitors.
Licensing

The plugin license is like a key that unlocks all the advanced features and tools of the W3 Total Cache plugin.
By activating your license, you get access to powerful optimization options and premium caching features that can help make your WordPress website much faster and more efficient. It also ensures you receive priority support when you need help.
In short, activating the license means better performance, more features, and peace of mind knowing you have expert support available.
Miscellaneous

Here, you can enable a Google PageSpeed widget in the W3TC dashboard. All you need to do is just enter the PageSpeed API and you are good to go. Other options include Verify rewrite rules, Enable file locking, Optimize disk enhanced page and minify disk caching for NFS, and Enable Edge Mode.
Debug

The Debug option is useful when you want to see exactly how each cache is working on your site.
When enabled, it adds detailed information about the caches directly into your page’s source code as HTML comments. This can help you troubleshoot and understand what’s happening behind the scenes.
However, keep in mind that this mode can slow down your site a bit, and the debug info is publicly visible. So it’s best to use it only when needed and turn it off once you’re done testing.
WebP Converter

The WebP Converter tool helps make your website load faster by creating WebP versions of the images in your media library.
WebP is a modern image format that offers better compression than traditional formats like JPEG or PNG, without losing quality. This means your images take up less space and load more quickly, helping your site run faster and improving the user experience.
It’s a simple way to speed things up, especially if your site has a lot of images.
Google Page Cache

The PageSpeed Tool is a handy feature that helps you make your WordPress site faster and more efficient.
It works by using Google’s PageSpeed Insights API to analyze your site’s speed and give you helpful suggestions for improvement. These might include things like minimizing CSS and JavaScript files, optimizing images, or enabling browser caching.
By following these tips, you can speed up your website, reduce load times, and give your visitors a much better browsing experience.
Import/Export Settings

As the name suggests, you can Import/Export Settings using this option. Let’s say you wanna use the same set of settings on some other WordPress Website. All you need to do is simply export the settings and download the settings file. Then, go to other site and import file to use the same set of settings. Also, if you think you have messed up with the settings and wanna rollback to default settings then, you can simply press Restore Default Settings button.
Page cache
General
Configure the General settings according to the settings below. Do note that you should enable SSL option only if you have an SSL installed on your website.

Aliases

Enable aliases when you want to allow to access the WordPress content from the another domain.
Cache Preload

Now, as the name suggests, this option generates a cache file automatically even before a visitor requests the page. This will drastically increase the speed of your WordPress Website.
Purge Policy
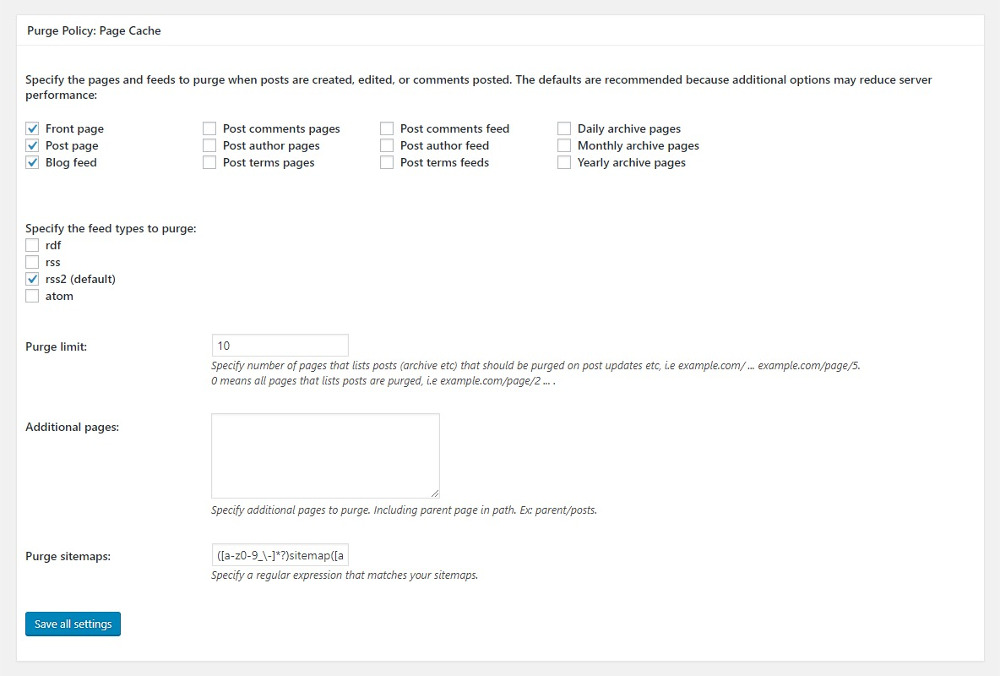
This option lets you select pages are to be purged whenever a new post is published or updated.
REST API

This will allow you to enable the caching for the REST API of the wordpress.
Advanced

Here, you can dig a bit deeper and can exclude some browsers from receiving cached versions, enable the Compatibility mode, create exceptions and more. We won’t really recommend you play with other options rather than enabling the Compatibility mode.
Minify
General

Here, you can Rewrite URL Structure which is also known as “Fancy Links”. Also, you can also enable minify error notifications which would help you in taking a look at errors due to minifying, so you can fix them.
HTML & XML

Now, this would minify (minimize requests) the HTML & XML files of your WordPress website. This option really helps in improving the page speed score and overall page speed of your WordPress Website.
JS And CSS

This option would minify (minimize requests) the JS & CSS files of your WordPress website. This option also helps in improving the page speed score and overall page speed of your WordPress Website.
Advanced

Here, you can set the update interval and when to delete expired cache data. Also, you can exclude specific pages and files from minification.
Browser cache
General
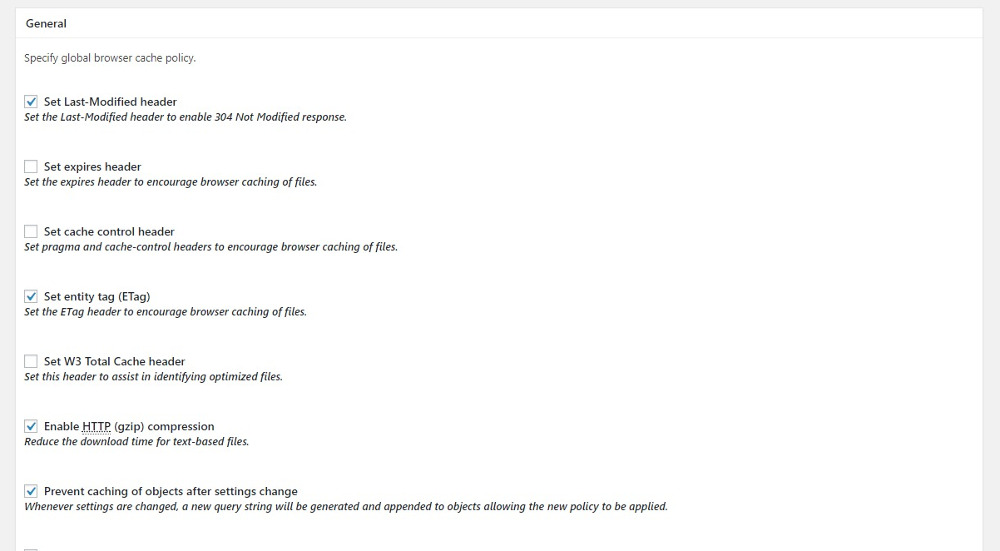
Here, you can set last modifier header, set expires header, set cache control header, enable HTTP Compression, add resources to prevent cache exception and more. We would recommend you to just enable Set Last-Modified Header, and enable gzip compression to compress text files.
User-agent groups
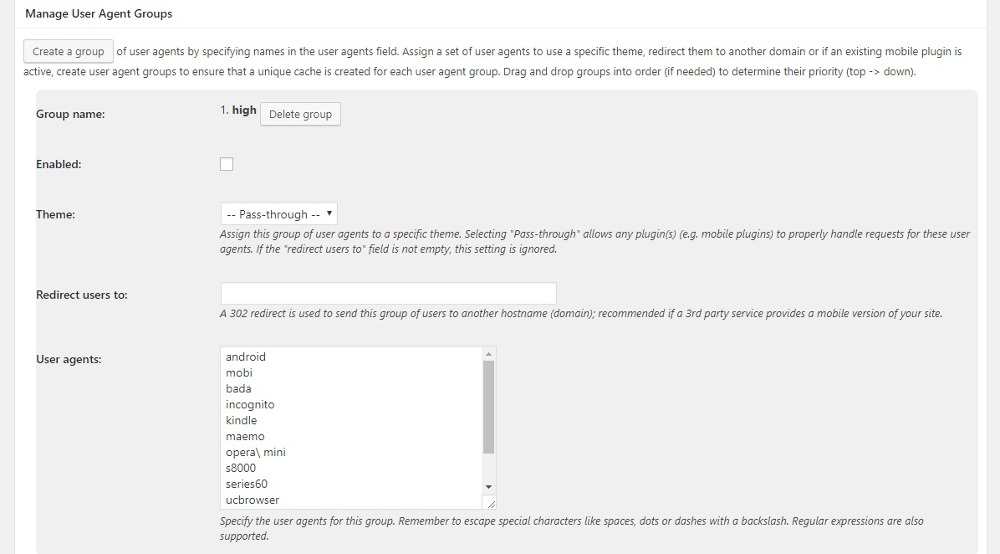
With this, you can create groups. For instance, you can set a particular theme or settings to say, mobile users. You can create as many groups as you can.
Referrer groups
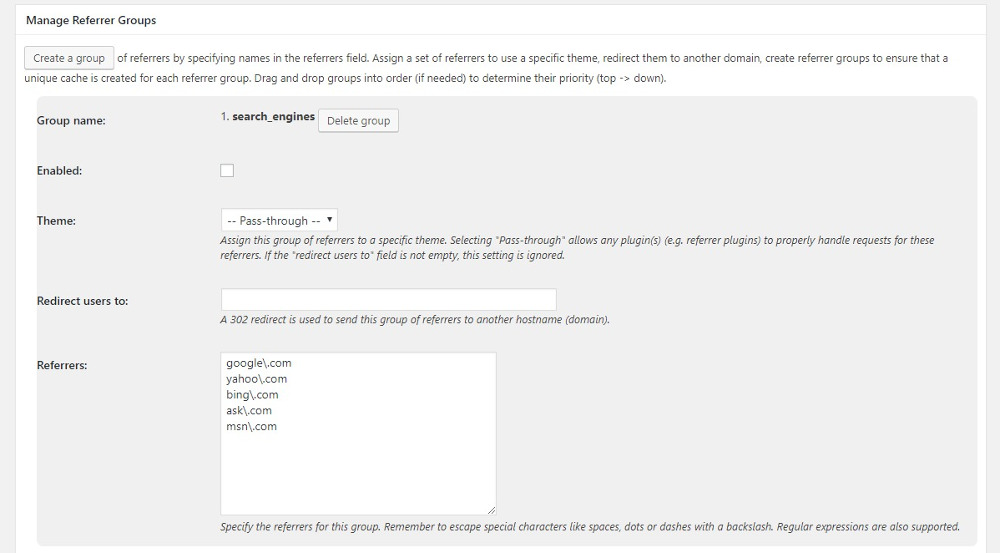
This setting directs the users coming from different sources such as Search Engines like Google or Bing to cached webpages specific to that set of users.
Extensions
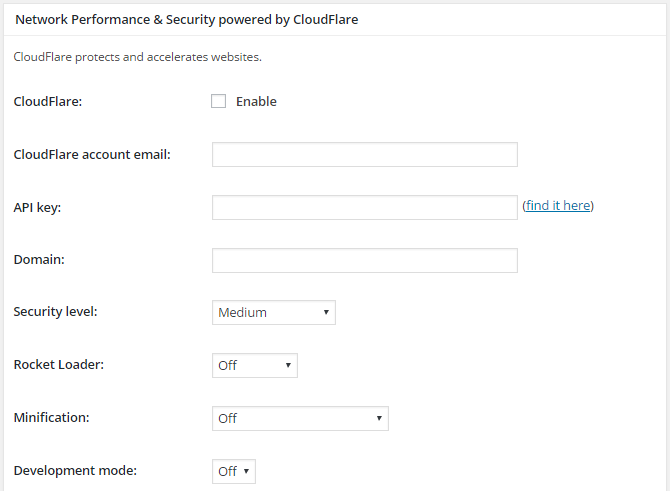
Here, you can manage your extensions. Enabling/ Disabling extensions like Cloudflare, Feedburner, Frameworks can be done from here.
[/lockercat]
Conclusion
A faster WordPress site has immense benefits. Not just it improves the overall user experience, but it also helps you in ranking higher. With that being said, we hope that this guide helped you in improving your WordPress Website’s speed. Let us know your thoughts on W3 Total Cache plugin for WordPress in the comments section down below.