

If you want to add expires headers in WordPress, it’s important to understand how browsers handle your website’s static files. Every time a visitor lands on your WordPress site, their browser downloads images, stylesheets, fonts, scripts, and other assets. If your server doesn’t instruct the browser to store these files locally for a certain period, it has to download them all over again on the next visit. This increases page load times, consumes more bandwidth, and negatively impacts your site’s performance.
The “Add Expires Headers” warning shows up in tools like Google PageSpeed Insights and GTmetrix precisely because it has a measurable impact on page speed. Beyond the audit score, slow-loading assets eat bandwidth, hurt your SEO, and create a poor experience, especially for returning visitors.
This guide walks you through exactly how to fix it. You’ll learn what Expires Headers actually do, how they differ from Cache-Control, which file types should be cached for how long, and most importantly, how to set everything up on your server without breaking your site.
TL;DR
- Expires Headers tell browsers how long to keep cached files before asking the server again
- They directly improve load speed for returning visitors and reduce server bandwidth
- CSS, JS, images, and fonts should be cached for extended periods; HTML should not
- NGINX uses
expiresdirectives insidelocationblocks; Apache usesmod_expiresin .htaccess - Clear your site cache after making changes, and always test before going live
What Are Expires Headers, Exactly?
When a browser requests a file from your server, the server responds with the file along with HTTP headers. These headers are invisible to visitors but carry instructions that browsers follow.
An Expires Header tells the browser: “Keep this file in your local cache until this specific date and time. Don’t bother asking me for it again until then.”
Without it, the browser has no persistent instruction. It may still cache files temporarily based on its internal heuristics, but it will frequently revalidate with your server, adding latency to every page load.
What this looks like in practice: a first-time visitor downloads your entire page design. A returning visitor three days later should theoretically load everything from their local cache. But without Expires Headers, the browser checks with your server anyway, waiting for confirmation that the files haven’t changed. For a text-heavy page with multiple assets, those round-trips add up fast.
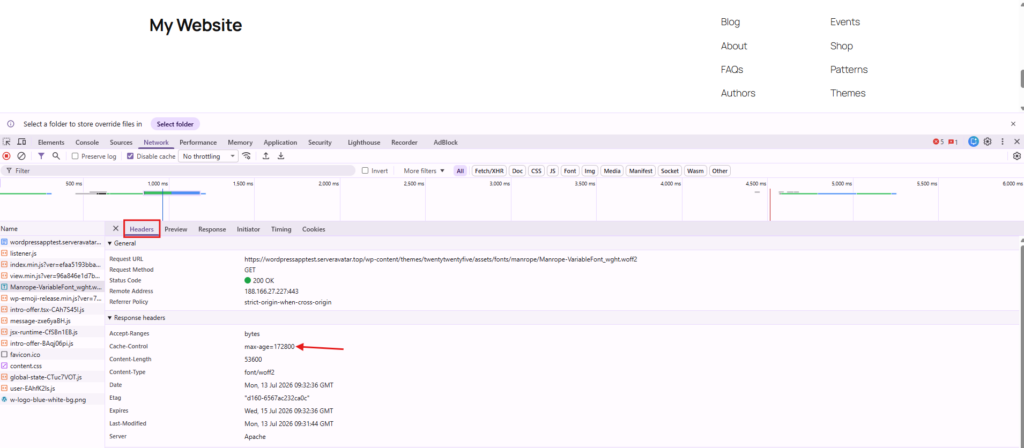
Expires vs. Cache-Control: Why You Need to Know Both
These two get confused constantly, and for good reason, they do essentially the same job. But they go about it differently.
| Feature | Expires | Cache-Control |
|---|---|---|
| Caching method | Uses a fixed date and time when the resource expires. | Uses a relative duration (e.g., max-age) to define how long the resource can be cached. |
| Example | Expires: Tue, 13 Jul 2027 00:00:00 GMT | Cache-Control: max-age=31536000 |
| Standard | Older HTTP caching header. | Modern and recommended HTTP caching header. |
| Flexibility | Requires updating the expiration date manually. | Automatically calculates the cache lifetime based on the response time. |
| Browser support | Supported by all browsers, including older ones. | Supported by all modern browsers. |
| Priority | Ignored if Cache-Control is also present. | Takes precedence over Expires when both headers exist. |
| Recommended usage | Mainly for backward compatibility. | Best choice for modern caching strategies. |
Here’s the practical detail that trips people up: if both headers are present, Cache-Control wins. Browsers prioritize the newer standard and ignore the older Expires date when both exist. Mozilla’s MDN documentation on HTTP caching is a solid reference if you want to go deeper on how these headers interact.
Which One Should You Use?
Most servers today default to Cache-Control because it’s cleaner and more precise. But if you’re manually configuring headers, there’s no harm in setting both, you just need to make sure they don’t contradict each other, or the Expires header becomes meaningless noise.
How Long Should Each File Type Be Cached?
Not every asset on your site deserves the same caching treatment. Getting this right is where a lot of people go wrong, either over-caching things that change often, or under-caching things that never change.
Here’s the logic:
- Files that rarely change, like images, stylesheets, JavaScript, and fonts, are ideal candidates for long-term caching. You set them once, and browsers hold onto them for months. The performance gain is substantial because these are typically the heaviest files on any page.
- Files that change frequently, like your HTML documents, should get short or zero caching. Your HTML is where new content lives. If a visitor’s browser caches your homepage for a year, they’ll never see your latest blog post. It kills content freshness and makes your site feel broken.
- Third-party files, like Google Analytics scripts or Facebook Pixels, are outside your control. You can’t set headers on files you don’t host, so don’t worry about those in your configuration.
General guidelines based on file type:
| File Type | Recommended Cache Duration | Reason |
|---|---|---|
| HTML Pages | 5 minutes – 1 hour | Ensures visitors receive updated content while reducing server load. |
| CSS Files | 1 month – 1 year | Stylesheets change infrequently and can use long-term browser caching. |
| JavaScript (JS) | 1 month – 1 year | Improves page load speed by minimizing repeat downloads. |
| Images (JPG, PNG, WebP, SVG, GIF, ICO) | 6 months – 1 year | Images rarely change and benefit from long cache lifetimes. |
| Fonts (WOFF, WOFF2, TTF, OTF) | 1 year | Font files are typically versioned and ideal for long-term caching. |
| PDF & Documents | 1 month – 1 year | Static documents rarely change after publishing. |
| Audio Files (MP3, WAV, OGG) | 1 year | Large static files benefit significantly from browser caching. |
| Video Files (MP4, WebM, MOV) | 1 year | Reduces bandwidth usage and improves repeat visits. |
| XML Files | 1 hour – 24 hours | Sitemap and feed updates should be reflected relatively quickly. |
| JSON/API Responses | 5 minutes – 1 hour | Frequently updated data should have shorter cache durations. |
| Favicon | 1 week | You want occasional updates to show through |
| Third-party scripts | Not applicable | You can’t control external headers |
The “1 year” figure is common because it’s long enough to genuinely reduce repeat visits while being manageable via cache busting when you actually need to push updates.
If you want a broader view of WordPress performance optimization techniques beyond just caching headers, I’ve covered 12 ways to speed up a WordPress website that work well alongside this setup.
Step 1: Verify Your Current Header Situation
Before changing anything, check what’s already happening on your site. You don’t want to add headers that conflict with existing rules, and some hosts or caching plugins set them automatically.
Here’s a quick way to check manually:
- Open your site in Chrome or Firefox, right-click anywhere, and choose Inspect.
- Switch to the Network tab. Refresh the page. Click on any asset file, an image, a CSS file, anything non-HTML.
- Scroll down in the right panel to Response Headers.
- Look for
Cache-ControlorExpires. - If either is present, your server is already sending caching instructions. If neither is there, nothing is configured.
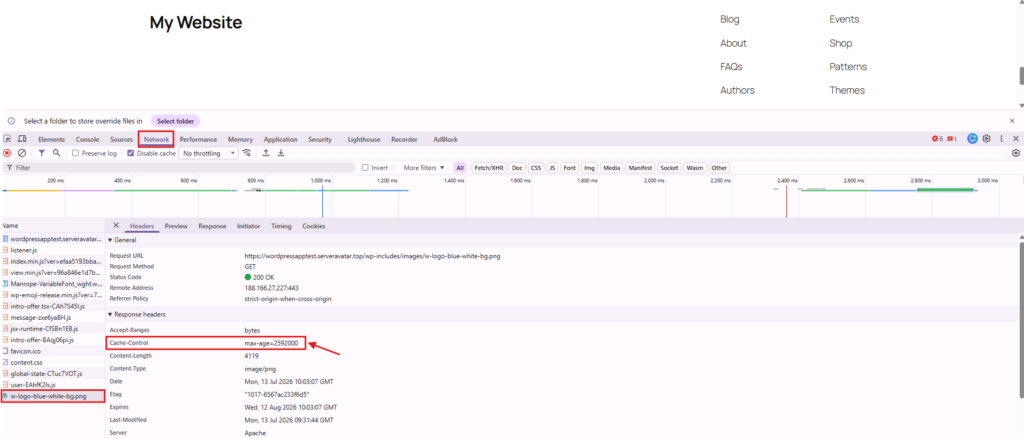
This step takes 30 seconds and prevents you from accidentally doubling up on rules that might conflict.
Step 2: Adding Expires Headers on NGINX
NGINX handles headers through configuration blocks inside your site config. If you’re using a managed hosting platform, this might be abstracted into a dashboard, but if you are on a VPS or unmanaged server, you’ll be editing config files directly.
The key thing to know: NGINX checks its configuration on startup and reload. You write your rules, test them, then reload the service. The reload is non-disruptive, active connections keep using the old config while new ones pick up the changes.
The basic pattern looks like this:
location ~* \.(jpg|jpeg|png|gif|ico|svg|webp|avif)$ {
    expires 365d;
    add_header Cache-Control "public, no-transform";
    access_log off;
}Breaking this down:
location ~* \.(...)$matches file types by extension (case-insensitive)expires 365dsets the expiration to 365 days from nowadd_header Cache-Control "public, no-transform"adds a modern header alongside itaccess_log offis optional, it stops logging requests for these static files, which reduces I/O on busy sites
For CSS and JavaScript:
location ~* \.(css|js)$ {
    expires 365d;
    add_header Cache-Control "public, no-transform";
    access_log off;
}For fonts:
location ~* \.(woff2|woff|ttf|otf|eot)$ {
    expires 365d;
    add_header Cache-Control "public, no-transform";
    access_log off;
}Notice the pattern, you define separate location blocks for each group. This matters because you may want different settings for different file types later on.
Always test before reloading:
sudo nginx -tThis checks your configuration for syntax errors without applying anything.
If it passes, reload with:
sudo service nginx reloadOne thing worth noting: if your site sits behind a reverse proxy or CDN, the CDN might strip or override your server headers. More on that in the troubleshooting section below.
Step 3: Adding Expires Headers on Apache
Apache gives you a more accessible way to manage headers, you can do it through the .htaccess file, which lives in your WordPress root directory. You don’t need root server access for this; file-level access through your host’s File Manager or FTP is enough.
What you need before starting:
- Access to your WordPress root directory (where
wp-config.phplives) - The
mod_expiresmodule enabled on your server (most Apache installs have this) - A backup of your current
.htaccessfile, this is critical
If you’ve never touched .htaccess before, WordPress itself may have already added some rewrite rules in there. That’s fine. Don’t delete those. Add your new configuration above or below them, keeping everything intact.
The basic configuration:
<IfModule mod_expires.c>
    ExpiresActive On
    ExpiresDefault "access plus 1 month"

    # Images
    ExpiresByType image/jpg "access plus 1 year"
    ExpiresByType image/jpeg "access plus 1 year"
    ExpiresByType image/gif "access plus 1 year"
    ExpiresByType image/png "access plus 1 year"
    ExpiresByType image/svg "access plus 1 year"
    ExpiresByType image/webp "access plus 1 year"

    # CSS and JavaScript
    ExpiresByType text/css "access plus 1 year"
    ExpiresByType text/javascript "access plus 1 year"
    ExpiresByType application/javascript "access plus 1 year"
    ExpiresByType application/x-javascript "access plus 1 year"

    # Fonts
    ExpiresByType font/woff2 "access plus 1 year"
    ExpiresByType font/ttf "access plus 1 year"
    ExpiresByType font/otf "access plus 1 year"
    ExpiresByType application/font-woff "access plus 1 year"
    ExpiresByType application/font-woff2 "access plus 1 year"

    # Favicon
    ExpiresByType image/x-icon "access plus 1 week"
</IfModule>Where to put this:
Scroll to the very top of your .htaccess file and paste this block. The <IfModule> wrapper is a safety net, if mod_expires isn’t enabled on your server, Apache simply ignores the block instead of throwing an error.
You can easily do it with ServerAvatar by navigating to your application panel >> file manager and editing .htaccess file as shown in the below image.
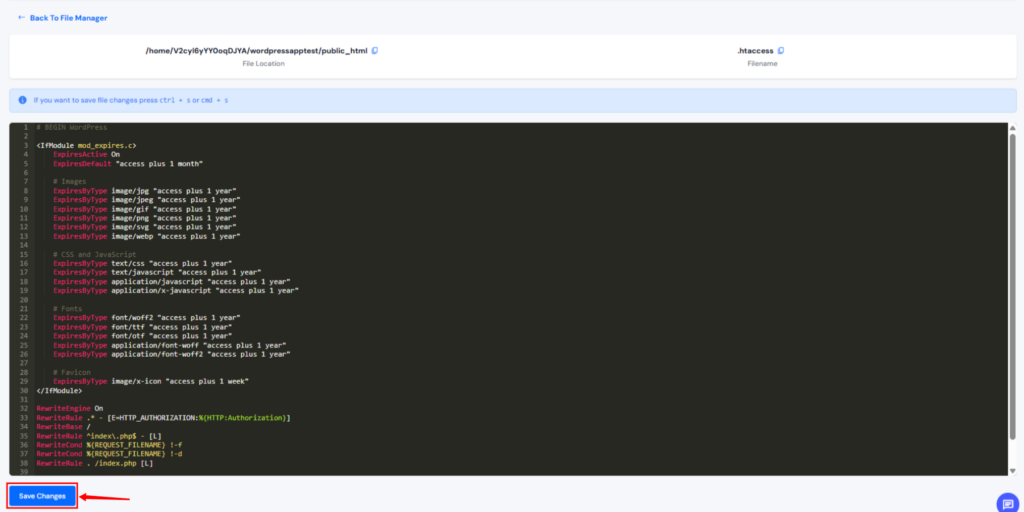
After saving: Visit your site and refresh. If everything loads normally, your headers are live. If you see a “500 Internal Server Error,” delete the block, re-upload your backup .htaccess, and check with your host that mod_expires is enabled.

Troubleshooting Expires Headers That Aren’t Working
You added the code. You reloaded the server. But your browser, or PageSpeed Insights, still shows the warning. Here’s how to systematically track down what’s going wrong.
1. The Headers Simply Aren’t Showing Up
Start with the basics:
- Did you reload the server after making changes? NGINX requires an explicit
reloadorrestart. Changes don’t apply until you do. - Is
mod_expiresactually enabled on Apache? Ask your host, or check with a PHP info page orphpinfo(). - Is a caching plugin overriding your headers? WordPress caching plugins like LiteSpeed Cache, WP Rocket, or W3 Total Cache often set their own headers. Clear the plugin’s cache completely after making server-level changes. You can explore my guide on 12 Best Caching Plugins to Speed Up WordPress website.
- Are you checking the right URL? Some assets might be served from a CDN subdomain or a separate asset domain that has its own header configuration.
2. Cache-Control Is Taking Priority Over Expires
This is expected behavior, not a bug. If you’ve set both headers and they’re contradicting each other, browsers will follow Cache-Control and ignore Expires.
The fix is straightforward: remove the Expires directive and only use Cache-Control, or ensure both headers point to the same expiration window.
For NGINX, you can skip the expires directive and only use add_header Cache-Control:
add_header Cache-Control "max-age=31536000, public";For Apache, use the CacheControl module instead of mod_expires if you want to exclusively use the modern approach.
3. Your CDN Is Stripping or Overwriting Headers
If you’re using Cloudflare, BunnyCDN, or any other CDN, the CDN sits between your server and your visitors. Your server headers reach the CDN, but the CDN then applies its own caching rules before forwarding responses to browsers. Many CDNs have a default behavior of stripping or overriding browser cache settings.
Check your CDN dashboard for a “Browser Cache TTL” or “Cache Rules” section. This is usually where you align the CDN’s behavior with your server’s settings. If your server says one year but your CDN says one hour, the one hour wins.
Some CDNs also strip the Vary: Accept-Encoding header, which can cause issues with compressed and uncompressed versions of the same file being served incorrectly.
4. Files Don’t Update After You Deploy Changes
This is the most common operational headache with long-term caching. You pushed a CSS update, but visitors are still seeing the old design. That’s because their browsers are loading the old cached file and never checking with your server.
The standard solution is called cache busting, changing the file’s URL when its content changes. The browser sees a “new” file and downloads it fresh, bypassing the cache entirely.
The simplest way:
Instead of linking to style.css, you link to style.css?ver=1.0.1. When you update the file, you change the query string to style.css?ver=1.0.2. Modern WordPress themes and page builders handle this automatically using file hashes or version numbers.
If your site isn’t doing this automatically, you’ll need to update the version parameter in your theme’s wp_enqueue_style and wp_enqueue_script calls:
wp_enqueue_style('my-theme', get_template_directory_uri() . '/style.css', array(), '1.0.2');The '1.0.2' is the version parameter, change it each time you update the file.
What About Third-Party Scripts?
Google Analytics, Facebook Pixel, Hotjar, Intercom widgets, all of these load from external servers, not yours. You cannot set Expires Headers on files you don’t host, and these third-party providers set their own caching policies. PageSpeed Insights will often flag these.
The honest answer is: there’s nothing you can do about it. These scripts represent a real but small performance trade-off of using analytics and marketing tools. The standard advice is to be selective about which third-party scripts you include, audit them periodically, and remove any that aren’t actively needed.
Why This Matters Beyond PageSpeed Scores
The audit warning is the symptom. The actual problem is slower page loads and higher bandwidth bills.
On a site with decent traffic, returning visitors loading cached CSS, images, and fonts from their browser instead of your server is the difference between a 400ms page load and a 1.8s one. That gap affects bounce rate, time on site, and conversion rate, metrics that don’t show up in an audit tool but show up in your analytics.
For sites on metered or bandwidth-limited hosting plans, reducing repeat file downloads also reduces bandwidth consumption, which can translate to lower hosting costs.
Conclusion
Adding Expires Headers in WordPress is a simple optimization that can make a noticeable difference in your website’s performance. By instructing browsers to cache static assets such as images, CSS, JavaScript, and fonts, you can reduce page load times, lower server load, and provide a faster browsing experience for returning visitors. When combined with Cache-Control headers and proper cache durations, browser caching becomes an essential part of a well-optimized WordPress website.
Whether your site runs on Apache or NGINX, following the best practices covered in this guide will help you fix the “Add Expires Headers” warning and improve your Core Web Vitals. Remember to test your configuration after making changes, clear any existing caches, and use cache busting whenever you update static files. With the right caching strategy in place, your WordPress site will be faster, more efficient, and better positioned to deliver a great user experience while supporting improved SEO performance.
FAQs
What’s the difference between Expires and Cache-Control headers?
Expires uses a specific calendar date to define when a cached file expires. Cache-Control uses a time duration (max-age) to define how long a file should be cached from the moment it’s downloaded. Cache-Control is the modern standard, and browsers will use it over Expires when both are present.
How long should I cache CSS, JavaScript, and images on WordPress?
One year is the standard recommendation for these file types. They rarely change individually, and any updates are handled through cache busting, adding a version parameter to the file URL so the browser treats it as a new file.
I added the headers but PageSpeed still shows the warning. Why?
Your server may not have reloaded the configuration after the change. Check that NGINX was reloaded or Apache’s .htaccess was saved correctly. Also verify that a CDN or caching plugin isn’t overriding your settings. Finally, ensure you’re testing the correct file types, HTML files typically should not carry long cache durations.
Can I set Expires Headers for Google Fonts?
Only if you host the font files on your own server. Fonts loaded directly from Google’s servers have their own caching policy, which you cannot control. Downloading and self-hosting fonts gives you full control over caching duration.
Should I set both Expires and Cache-Control headers?
You can. There’s no harm in including both, browsers will use Cache-Control and fall back to Expires for older browsers that don’t support the modern standard. Just make sure both headers point to the same or compatible expiration durations to avoid conflicts.
Key Takeaways
- Expires Headers tell browsers to keep local copies of static files, dramatically speeding up return visits
- Cache-Control (max-age) is the modern standard; Expires is the legacy fallback, use both for maximum compatibility
- Cache images, CSS, JS, and fonts for 1 year; keep HTML caching short
- Always use cache busting (version parameters) when updating cached files
- CDNs can override your server’s header settings, check your CDN dashboard
- Clear your site’s caching plugin after making server-level header changes
- Test with browser DevTools, not just audit tools
If managing servers and applications manually isn’t how you want to spend your time, platforms like ServerAvatar handle it.
About the Author
Meghna Meghwani is a technical writer focused on Linux, Ubuntu, VPS hosting, server management, WordPress, PHP, Node.js, cloud hosting, and DevOps. She creates beginner-friendly tutorials, practical hosting guides, troubleshooting articles, and server security content designed to help developers and businesses manage applications and servers more efficiently.