
Imagine visiting a website written in a language you don’t understand. Frustrating, right? Now flip the situation, what if visitors arrive on your website but struggle to read the content because of language barriers? That’s where Google Translate To WordPress becomes incredibly useful. By adding the Google Translate widget to your WordPress website, you can instantly allow visitors to translate your content into their preferred language, making your site more accessible and welcoming to a global audience.
WordPress powers millions of websites across the internet, and many of them attract visitors from different countries and language backgrounds. Adding a translation widget allows readers to instantly convert your content into their preferred language. It’s like placing a universal language switch on your website so anyone can understand your content with a single click.
The best part? You don’t need advanced coding knowledge to add this feature. With just a few simple steps, you can enable automatic translation and make your website accessible to a much wider audience.
In this guide, you’ll learn how to add a Google Translate widget in WordPress, why it matters, and how to configure it properly so visitors can easily switch between languages.
What Is WordPress?
WordPress is the world’s most popular open-source content management system (CMS), used to build websites, blogs, and e-commerce stores. It offers flexibility through themes and plugins, making it suitable for beginners, developers, and businesses of all sizes.
How ServerAvatar Simplifies WordPress Deployment & Management
What is ServerAvatar?
ServerAvatar is a platform to simplify the hosting and management of servers and applications. It simplifies the process of deploying and managing PHP and Node.js based web applications on servers.
ServerAvatar makes WordPress and other popular applications, such as Mautic, N8N, UptimeKuma, etc, deployment effortless with its one-click WordPress application installer, allowing you to launch a fully configured WordPress site in minutes. It removes the complexity of server setup by providing an intuitive dashboard to manage servers, applications, databases, PHP versions, SSL, and performance settings from one place.
ServerAvatar supports multiple cloud providers and gives users full control over their infrastructure while eliminating the need for deep server administration knowledge. You can refer to the ServerAvatar documentation and the detailed blog to install WordPress effortlessly.
Key Benefits of Using ServerAvatar for WordPress
- One-click WordPress installer: Deploy WordPress instantly without manual configuration.
- Unified management panel: Manage servers and WordPress applications from a single dashboard.
- Performance optimization: Easily configure services, PHP, and server resources.
- Redis caching support: ServerAvatar comes with built-in Redis integration that helps speed up WordPress by storing frequently accessed data in memory.
- Enhanced security: Includes firewall, SSL management, and secure access controls.
- Easy scalability: Upgrade server resources as your WordPress site grows.
ServerAvatar is an ideal solution for users who want the power of cloud servers without the operational complexity.
What Is the Google Translate Widget
The Google Translate widget is a small tool that allows visitors to translate website content into multiple languages instantly. Once installed, users can select their preferred language from a dropdown menu or language list.
The widget automatically converts the visible text on the page. Instead of manually translating content into dozens of languages, the widget does the work automatically.
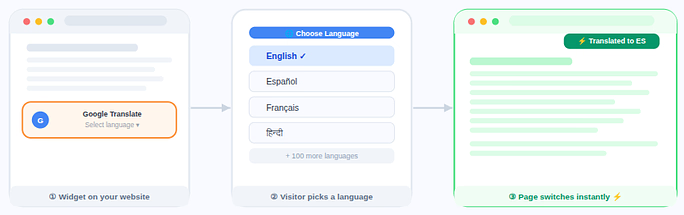
Think of it like a language remote control for your website. Visitors simply choose a language, and the page switches instantly.
Why Add a Translation Widget to WordPress
A website without translation options limits accessibility. Not every visitor speaks the same language, and that can create a barrier to understanding your content.
Adding a translation widget solves this problem by allowing users to read the site in their own language.
Key reasons to add it include:
- Improved accessibility: A translation widget allows visitors to read your website in their preferred language, making the content easier for more people to understand.
- Better user experience: When users can switch languages instantly, they can navigate and read your website more comfortably without confusion.
- Higher engagement: Visitors are more likely to spend time on your site and interact with your content when they can clearly understand it.
- Global reach: Translation tools help your website connect with audiences from different regions without needing separate language versions.
- Simplified content translation: Instead of manually translating every page, the widget automatically converts your content into multiple languages with minimal effort.
Even if your website is written in one language, the widget allows visitors to view it in dozens of other languages without needing separate versions of your content.
How the Google Translate Widget Works
The widget uses automated translation technology to convert webpage text into different languages.
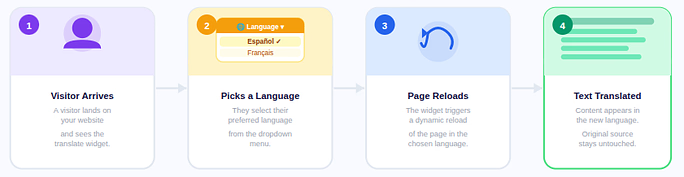
Here’s how the process works:
- A visitor arrives on your website.
- They select a language from the widget.
- The page reloads in the chosen language.
- Text content appears translated.
The translation happens dynamically, meaning the original content stays unchanged while visitors see the translated version.
Benefits of Using Google Translate on a Website
Adding translation functionality provides several advantages.
- Instant Multilingual Support: Instead of creating separate pages for each language, the widget instantly translates content.
- Better User Engagement: Visitors are more likely to stay on a website they can understand.
- Increased Accessibility: The translation tool helps users access content without language limitations.
- Easy Implementation: Adding the widget requires minimal setup and technical knowledge.
- Automatic Language Detection: Some widgets automatically detect a user’s browser language and suggest translation.
Methods to Add Google Translate Widget in WordPress
There are two primary ways to add the widget.
Method 1: Using a WordPress plugin
This is the most beginner-friendly approach and requires no coding knowledge.
Method 2: Adding the Google Translate code manually
This method is suitable for advanced users who want to integrate the translation widget directly into theme files.
Most website owners prefer the plugin method because it simplifies the setup process.
Adding the Widget Using a WordPress Plugin
Plugins make WordPress extremely flexible. They allow you to add new features without coding.
A translation plugin automatically integrates the Google Translate widget into your website.
Steps generally include:
- Installing the plugin
- Activating it
- Adjusting settings
- Placing the widget on your website
Within minutes, your website can support multiple languages.
Step-by-Step Guide to Add Google Translate to WordPress
Adding the Google Translate widget in WordPress is a simple process that usually takes only a few minutes. The steps below walk you through the entire setup so you can enable translation on your website without technical complexity.
Step 1: Log in to Your WordPress Dashboard
- Start by accessing the administrative panel of your WordPress website. This is where all site settings, plugins, and themes are managed.
Step 2: Navigate to the Plugins Section
- Once logged in, navigate to the Plugins section from the left sidebar.
- Go to the Add Plugin section. This allows you to search for and install new plugins that extend your website’s functionality.
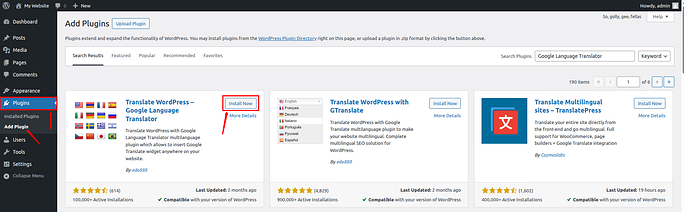
- In the plugin search bar, type Google Language Translator, and click on the Install Now button.
- WordPress will download and install the plugin automatically. The process usually takes only a few seconds.
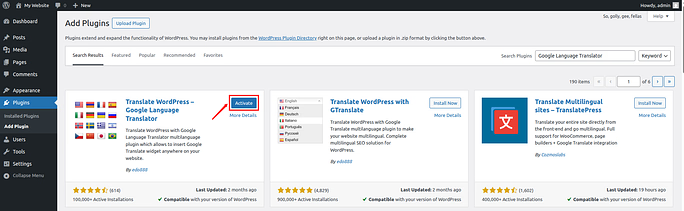
Step 3: Activate the Plugin
- After completing the installation, click on the Activate button to enable the plugin on your website.
- When activated, the plugin will add a new settings section in your WordPress dashboard.
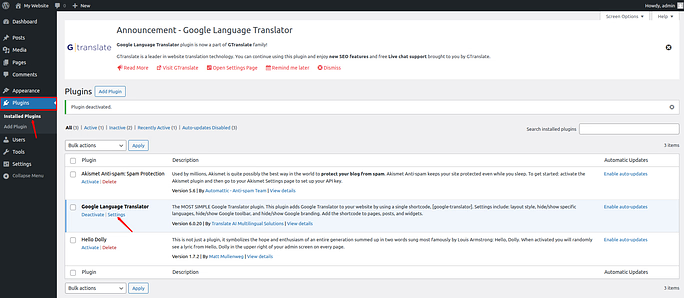
Step 4: Open the Translation Plugin Settings
- Navigate to the Plugins >> Installed Plugins section.
- Click on the Settings for the Google Language Translator plugin.
Step 5: Configure the Plugin Settings
- After opening the plugin settings page, you will see several configuration options available.
- These settings allow you to control how the translation feature behaves on your website and which languages are available to visitors.
- You will also see different sections with checkboxes and dropdown menus for customization.
Enable the Plugin
- First, make sure to select the checkbox to activate the plugin. In most cases, this option is already turned on by default, but it is still recommended to verify it.
- If the box is unchecked, simply enable it to make sure the translation functionality works properly on your website.
- Next, confirm the default language of your website.
- The plugin usually detects the website language automatically, but it is still important to double-check this setting.
- If the wrong language is selected, the translations may not work correctly.
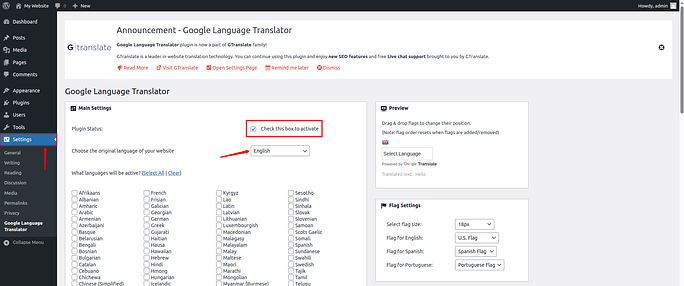
Step 6: Choose the Languages You Want to Offer
- Once the default language is set, scroll down to the section labeled “What Languages Will Be Active?”
- Here you will see a long list of available languages with checkboxes next to each one.
- You will also find two quick options:
- Select All: Enables translation into every available language.
- Clear: Removes all selected languages so you can choose them manually.
- If you want to limit translation to specific languages, simply check the boxes next to the languages you want to enable.
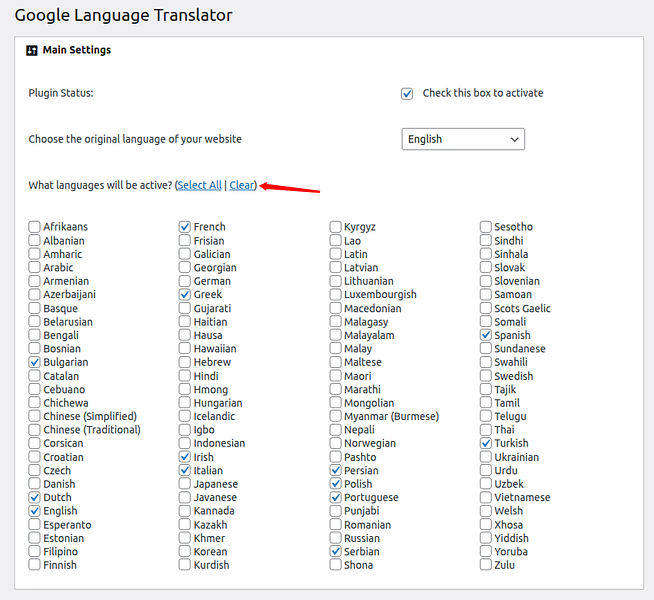
- Selecting only the necessary languages helps keep the translation menu simple and easier for visitors to use.
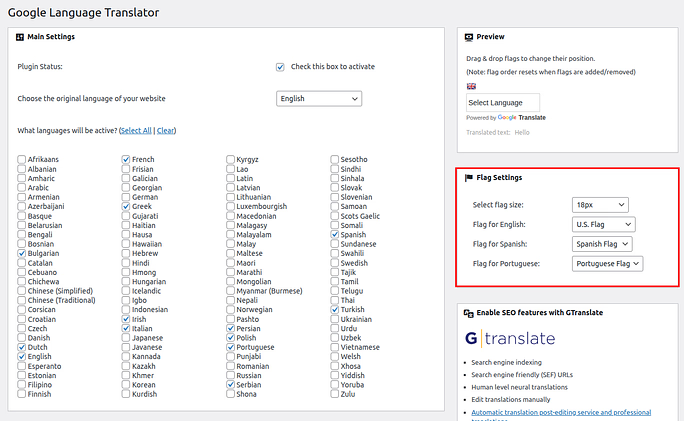
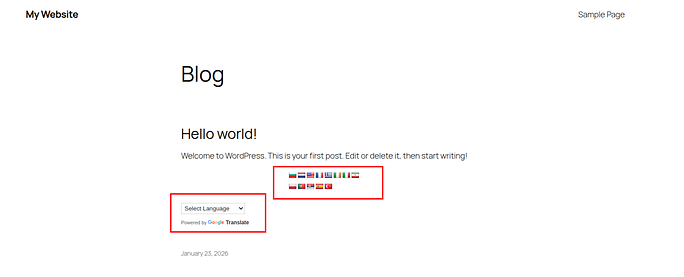
Step 7: Display Language Flags
- Many translation plugins also allow you to display country flags alongside language names.
- Enabling flags makes the translation menu more visual and easier to understand.
- Visitors can quickly identify their preferred language without needing to read the full language name.
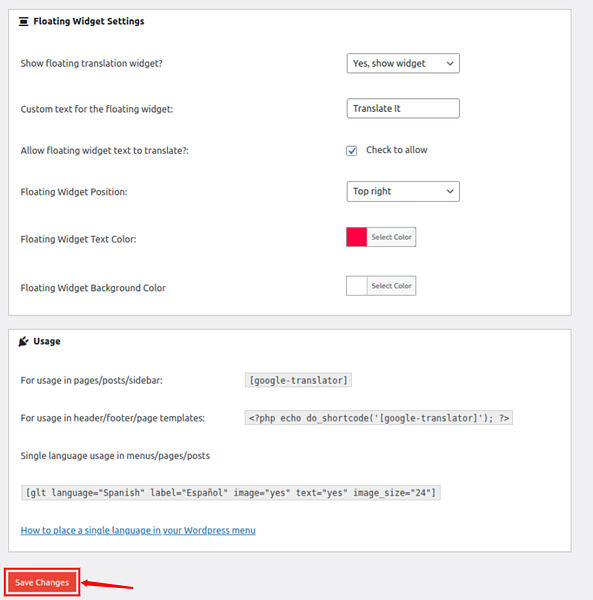
Step 8: Customize the Floating Translation Widget
- Next, the Floating Widget Settings section allows you to control how the translation widget appears on your website.
- You can customize several aspects of the widget, including its style, position, and appearance.
- Some of the available options include:
- Show Floating Translation Widget: Enable or disable the floating translation button that appears on your website.
- Custom Text for the Floating Widget: You can replace the default text with a custom label that suits your website.
- Allow Floating Widget Text to Translate: This option allows the widget text itself to be translated when users switch languages.
- Floating Widget Position: Choose where the widget should appear on your website. Common positions include:
- Top left
- Top center
- Top right
- Bottom corners
- Select the location that is most visible but does not interfere with your website layout.
- Floating Widget Text Color: Change the color of the widget text so it matches your website design.
- Floating Widget Background Color: You can also customize the background color of the widget for better visual consistency.
- After adjusting the settings, scroll down and click Save Changes to apply the configuration.
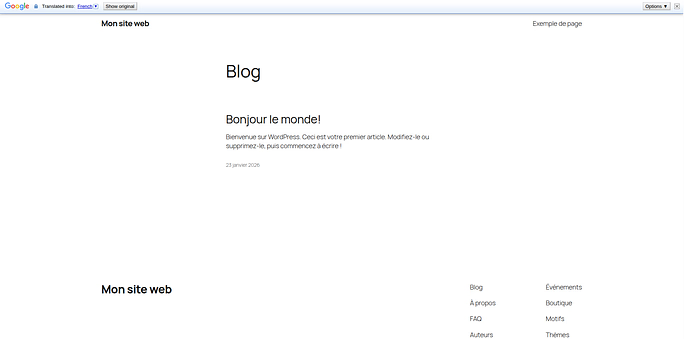
- As you can see, the option is visible on the WordPress website.
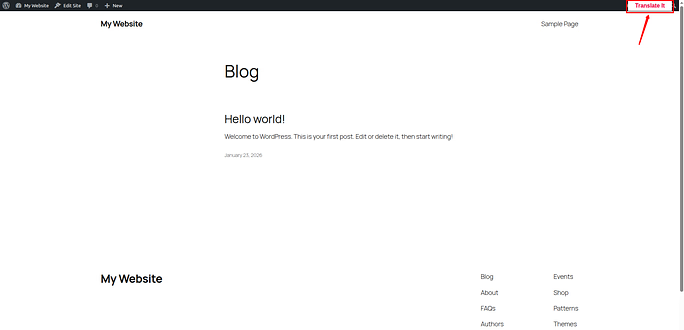
- Switching the website’s language is now simple, just click on it and select your preferred language.
- Below, you can see the website page translated into French language.
Step 9: Add Google Translate to WordPress Navigation or Pages
- The Google Language Translator plugin allows you to place the translation widget in different areas of your WordPress website.
- You can display it in:
- Pages
- Posts
- Sidebars
- Headers
- Footers
- Navigation menus
- This flexibility allows you to position the translation option where visitors can easily find it.
Step 10: Add the Widget Using Shortcode
- One of the easiest ways to add the translation widget is by using a shortcode.
- To do this:
- Open the page or post editor where you want the translation tool to appear.
- Insert the following shortcode in the editor:
[google-translator]- Save or update the page.
- Once the page is published, the Google Translate widget will appear in that location.
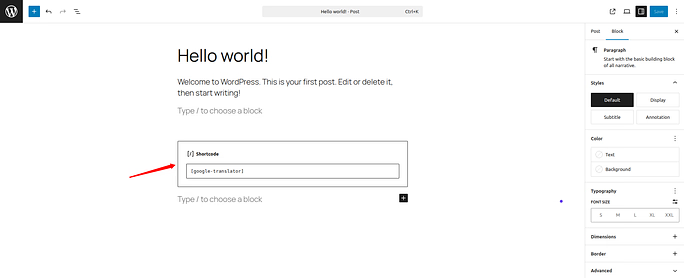
- As you can see, the option is visible on the WordPress website page:
Step 11: Add the Widget Using PHP Code (Optional)
- If you want to place the translation widget inside your website’s header, footer, or template files, you can use PHP code instead of a shortcode.
- Add the following code to the appropriate template file in your theme:
<?php echo do_shortcode('[google-translator]'); ?>- This method is useful when you want the translation widget to appear automatically across multiple pages.
Step 12: Test the Translation Feature
- After completing the setup, it is important to test the translation feature on your website.
- Visit your live website and check whether the Google Translate button appears correctly. Try selecting different languages to confirm that the translation works as expected.
- Testing ensures that visitors can easily switch languages and view your content without issues.
- For important pages, it can also be helpful to review the translated content carefully to ensure that the meaning remains clear and accurate.
Improving User Experience with Translation Widgets
A translation tool should enhance usability, not confuse visitors. To improve the experience:
- Place the widget where visitors expect it: Headers and navigation areas work best.
- Avoid clutter: Keep the design simple.
- Use clear language labels: Visitors should easily recognize their language.
Think of the translation widget like a doorway into your content. If it’s easy to find, visitors will use it without hesitation.
SEO Considerations for Translation Widgets
Translation widgets can improve accessibility but have limited impact on search engine indexing. Here are a few important points:
- Automatic translations are not always indexed: Search engines usually index the original language.
- Quality translations matter: Machine translation may not always capture context perfectly.
- Dedicated translated pages provide better SEO: The widget still helps users access content more easily.
Common Issues and Troubleshooting
Sometimes, translation widgets may not work as expected.
- Widget not appearing: Check widget placement and plugin activation.
- Translation not loading: Clear cache and refresh the page.
- Design conflicts: Some themes may require CSS adjustments.
Most issues can be resolved quickly by checking plugin settings.
Best Practices for Using Translation Widgets
To get the most out of your translation widget, follow these best practices.
- Keep your content clear: Simple sentences translate more accurately.
- Place the widget in a visible location: Visitors should find it quickly.
- Limit excessive customization: Over-designing the widget may reduce usability.
- Test the widget regularly: Ensure translations load correctly.
Alternative Plugins to Google Translate for WordPress
While Google Translate is a popular option, WordPress also offers several other translation plugins that provide additional features and flexibility.
Here are some commonly used alternatives.
1. Weglot
Weglot is a multilingual plugin that automatically translates website content and allows manual editing for better accuracy.
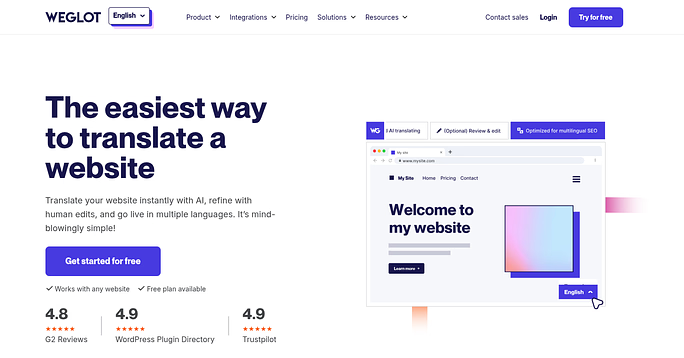
Key features include:
- Automatic translation
- Language switcher widget
- SEO-friendly translated pages
- Easy integration with WordPress
This plugin focuses on delivering a polished multilingual experience.
2. TranslatePress
TranslatePress enables you to translate website directly from front end of the website.
Instead of editing translations in a settings panel, you can click on page elements and translate them visually.
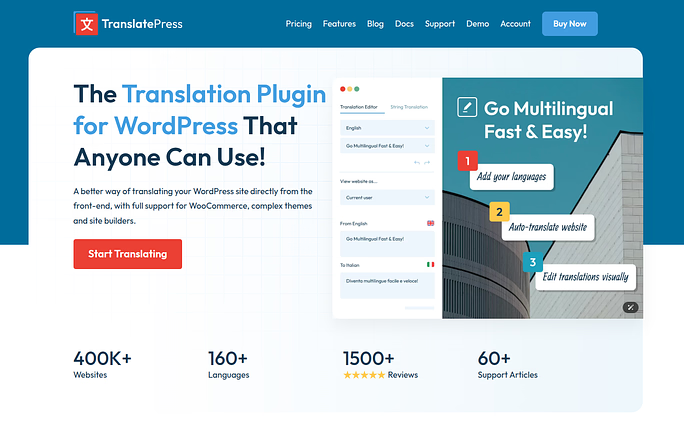
Key Features include:
- Visual translation editor
- Support for multiple languages
- Integration with translation services
- Custom language switchers
This method makes the translation process more interactive.
3. Polylang
Polylang helps create multilingual websites by allowing you to write content in different languages manually.
Unlike automatic translation tools, this plugin focuses on structured multilingual content management.
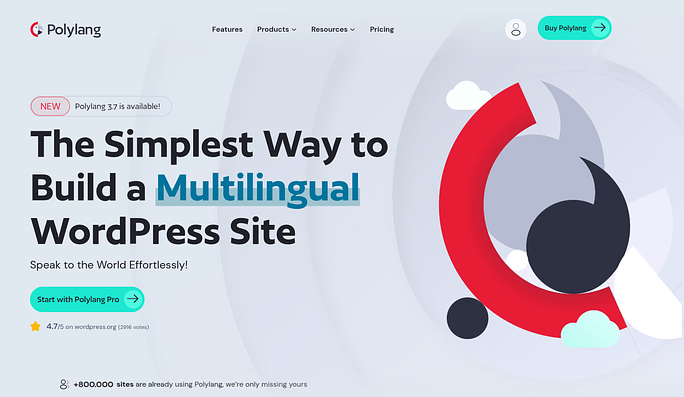
Key Features include:
- Separate language versions of pages
- Language switcher widgets
- Translation management tools
- Compatibility with many WordPress themes
4. GTranslate
GTranslate integrates Google Translate but adds extra customization and multilingual options.
It provides both automatic translation and advanced configuration features.
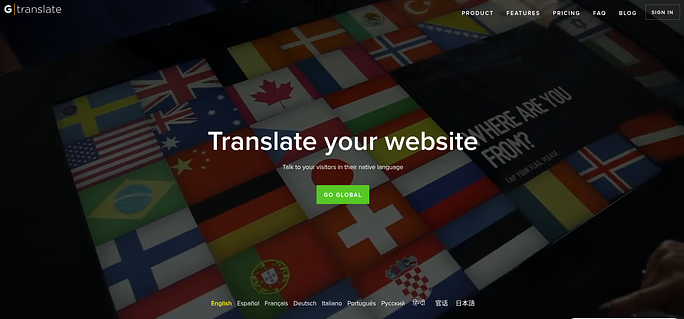
Key Features include:
- Multiple translation styles
- Floating language switcher
- Language flags
- Automatic language detection
Difference Between Google Translate and Other Translation Plugins
Choosing a translation solution depends on how you want your multilingual website to function. Some tools focus on automatic translation, while others allow deeper control over translated content. Here are the key differences:
1. Automatic vs Manual Translation
- Google Translate widgets rely primarily on automatic translation. The content is translated instantly without manual editing.
- Other plugins may allow manual adjustments, giving you more control over translation quality.
2. Content Management
- Google Translate typically translates pages dynamically without creating separate versions of the content.
- Some multilingual plugins create dedicated language versions of pages, making it easier to manage content for different audiences.
3. Customization Options
- Basic translation widgets offer limited design customization.
- Alternative plugins may include:
- Custom language switchers
- Visual translation editors
- Flexible layout settings
- This allows better integration with website design.
4. SEO Capabilities
- Automatic translation widgets usually do not create separate indexed pages for translated content.
- Some multilingual plugins generate search-engine-friendly translated pages, which can improve multilingual SEO.
5. Ease of Setup
- Google Translate widgets are generally easier to install and configure.
- Other translation plugins may require additional setup steps but offer more advanced functionality.

Difference Between Google Translate Widget and Multilingual Website
When building a website that supports multiple languages, you will often come across two different approaches: using a Google Translate widget or creating a multilingual website. While both help users read content in different languages, they work in very different ways.
Understanding the difference can help you decide which option is better for your website.
Google Translate Widget
The Google Translate widget is an automatic translation tool that allows visitors to convert your website content into other languages instantly.
Once the widget is installed, users can simply select a language from the dropdown menu or language list. The page content is then translated automatically without creating separate versions of the page.
Key Characteristics
- Translates content automatically
- No need to create separate language pages
- Quick and easy to install
- Supports many languages instantly
- Works using machine translation
This method is ideal if you want a fast and simple way to make your content understandable for global visitors without spending time managing multiple language versions.
However, because the translation is automatic, it may not always perfectly capture the context of the original content.
Multilingual Website
A multilingual website is a website that provides separate versions of content in multiple languages. Instead of automatically translating pages, each language has its own dedicated content.
This means that every page, post, or section is translated manually or professionally to ensure accuracy.
Key Characteristics
- Separate pages for each language
- More control over translation quality
- Content can be optimized individually for each language
- Better structure for managing multilingual content
- Often supported by multilingual plugins
With this approach, visitors select their preferred language, and the website loads the specific version created for that language.
Quick Difference
Here is a quick comparison to help you understand the distinction between the two approaches.
| Feature | Google Translate Widget | Multilingual Website |
| Translation Type | Automatic machine translation | Manual or professional translation |
| Setup Complexity | Very easy to install | Requires more setup |
| Language Pages | Same page translated dynamically | Separate pages for each language |
| Translation Accuracy | May vary | Usually more accurate |
| Content Control | Limited control | Full control over translated content |
| SEO Potential | Limited | Better multilingual SEO |
Which Option Should You Choose?
The right option depends on your website goals.
If you want a quick and simple solution, the Google Translate widget is a convenient way to allow visitors to translate your website instantly.
On the other hand, if you want complete control over translation quality and multilingual content, building a dedicated multilingual website may be a better long-term solution.
You can think of the difference like this:
A Google Translate widget acts like an instant translator, while a multilingual website works like having separate versions of the same book written in different languages.
Both methods help remove language barriers, but they serve slightly different purposes depending on how you want to manage your website content.
Conclusion
Adding a Google Translate widget to your WordPress website is a simple yet effective way to make your content accessible to visitors from different language backgrounds. Instead of maintaining multiple translated versions of your pages, the widget allows users to instantly view your website in their preferred language with just a click. As shown in this guide, installing and configuring the widget takes only a few steps, especially when using a WordPress plugin. While automatic translation tools provide a quick solution for improving accessibility, websites that require precise language control may choose to build a fully multilingual setup. By implementing translation features on your WordPress site, you remove language barriers, improve user experience, and make your content easier to understand for a global audience.
FAQs
1. What is the Google Translate widget in WordPress?
The Google Translate widget is a tool that allows visitors to translate website content into multiple languages instantly. It provides a language selector that automatically converts page text into the user’s preferred language.
2. Do I need coding knowledge to add the Google Translate widget in WordPress?
You do not need coding skills. Most WordPress users add the Google Translate widget by installing a plugin, configuring a few settings, and placing the widget on their website.
3. Can I choose specific languages for translation?
Many translation plugins allow you to select only the languages you want to offer instead of enabling every available language.
4. Where should I place the Google Translate widget on my website?
The widget is commonly placed in visible areas such as the website header, navigation menu, sidebar, or footer so visitors can easily switch languages.
5. Does the Google Translate widget affect SEO?
Automatic translation widgets usually do not create separate indexed pages for translated content. They mainly improve accessibility and user experience rather than multilingual SEO rankings.