
Have you ever waited forever for a webpage to load, only to be greeted by a frustrating “Maximum execution time of 30 seconds exceeded” error? This common issue is often caused by hitting the max_execution_time limit set in your server’s PHP configuration.
You’re not alone, and there’s a simple fix. This error usually comes up when a PHP script runs longer than it’s allowed to. Think of it like a kitchen timer. If your dish isn’t cooked before the timer goes off, the oven shuts down, no questions asked. In PHP, that timer is called max_execution_time.
Today, we’re going to walk you through what max_execution_time is, why it matters, and most importantly, how to configure it the right way to prevent timeouts, whether you’re on shared hosting, VPS, or running a local server.
What is max_execution_time in PHP?
The max_execution_time is a PHP configuration setting that defines how long a script is allowed to run before it’s terminated. It’s measured in seconds. The default value is usually 30 seconds.
So, if your PHP script takes more than 30 seconds, it will be stopped automatically, often with an error message. This helps prevent poorly written or endless scripts from hogging server resources.
Why Does This Setting Matter?
Imagine you’re downloading a large file or processing a bunch of images on your site. If the server cuts off your script mid-way, it ruins the whole experience for your visitors, and possibly corrupts data.
This setting is crucial for:
- E-commerce sites processing many products
- CMS platforms like WordPress during imports
- APIs fetching or posting bulk data
- Backup scripts handling large files
When Should You Increase max_execution_time?
Here are a few common scenarios where increasing the time limit makes sense:
- Running large database operations
- Importing/exporting data
- Sending mass emails
- Creating backups
- Processing video or images
Tip: If your task consistently runs longer than 30 seconds, optimize your script first, then consider increasing the time.
Default Value and Limitations
Most hosting providers set a default of 30 seconds, but it can range between 0 (unlimited) and 300+ seconds depending on the server.
Quick Look:
- Default: 30 seconds
- 0 = Unlimited (not recommended for production)
- Higher values = Risk of overloading your server
Let’s check out the below mentioned methods to increase the max_execution_time:
Method 1: Using ServerAvatar (Easiest Method)
ServerAvatar is a platform to simplify the deployment and management of servers and applications. It simplifies the process to deploy and manage PHP and Node.js based web applications on servers. If you’re using ServerAvatar to manage your servers and applications, increasing the “max_execution_time” in PHP for your application is incredibly simple and doesn’t require editing PHP configuration files manually.
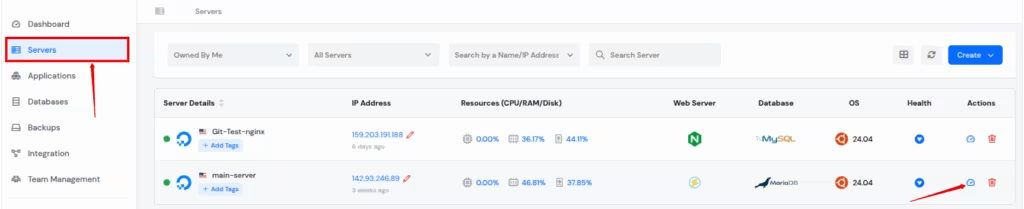
Step 1: Access ServerAvatar Panel
Log in to your ServerAvatar account and navigate to the Server panel by clicking on the Dashboard icon for the server where your application is hosted.
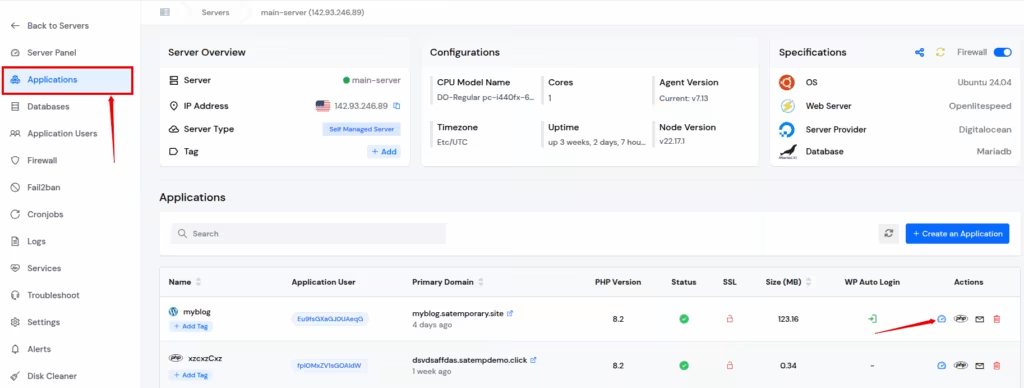
Step 2: Access Application Panel
Go to the Applications section from the left-hand sidebar and select click on the application dashboard icon for the application you want to increase the “max_execution_time“.
Step 3: Modify PHP Settings
Click on “PHP Settings” from the left sidebar of application panel. In the PHP Settings section, you will see various configurable options.
Find the setting named max_execution_time. Enter your desired value (e.g., 64M, 128M, etc.), and Click on “Update Settings” button at the bottom of the section.
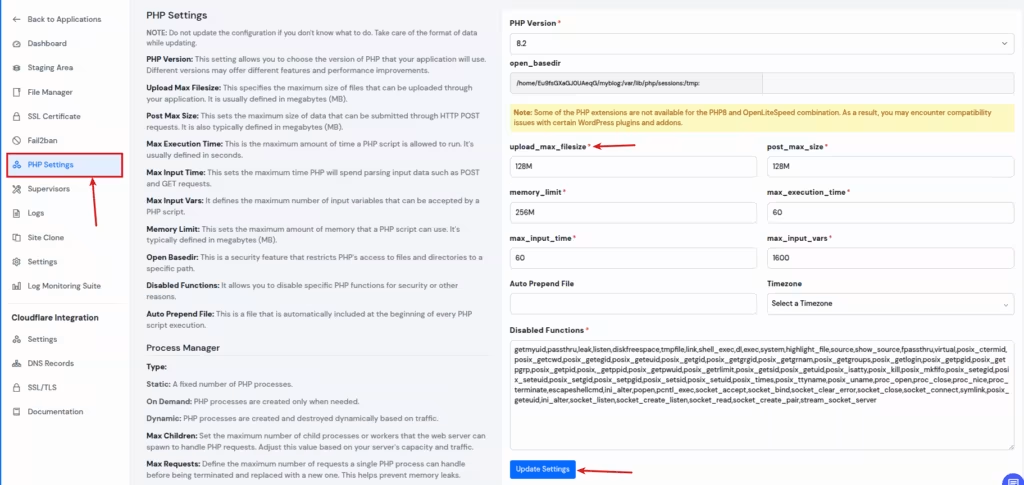
ServerAvatar will automatically update the PHP configuration, and the change takes effect immediately. This method is very easy and ideal for beginners or anyone who wants a fast, error-free way to manage PHP settings without touching the command line

Method 2: Using php.ini
The most global and manual way to increase file upload limits is by modifying the php.ini configuration file. It is main configuration file for PHP. If you manage your own server, this is the most direct way to increase post_max_size.
- Locate the php.ini file by navigating to its directory.
- Open your terminal and run one of the below commands to find the location of your PHP configuration:
php --inior
php -i | grep "Loaded Configuration"- Once you get path of your file, open the file using any text editor.
- For example:
sudo nano /etc/php/8.1/apache2/php.ini- Enter the your installed PHP version at the place of “8.1”
In the editor, press Ctrl + W to search for “max_execution_time” and type:
max_execution_timeChange it to:
max_execution_time = 300- Save the file and restart your web server as restart the web server is must required for the new settings to apply:
- If you’re using Apache:
sudo systemctl restart apache2If you’re using Nginx with PHP-FPM:
sudo systemctl restart php8.1-fpmThings to Keep in Mind Before Changing It
- Don’t set the time too high on a shared server.
- Test the effect using a small script first.
- Combine this setting with other resource controls like memory_limit.
FAQs
1. What is the best value for max_execution_time in PHP?
It depends on your use case. 30-60 seconds is usually enough. For large tasks, 300 seconds might be more suitable.
2. Is setting max_execution_time = 0 safe?
Setting it to 0 means unlimited. It’s okay for development, but risky in production due to server resource abuse.
3. Why isn’t my new max_execution_time working?
It could be overridden by server settings or not restarted properly. Also, some shared hosts restrict manual changes.
4. Can I set max_execution_time per script?
Yes! Use ini_set() inside the script to set the time for that script only.
5. Does max_execution_time include file uploads?
No, it only affects script execution time. Upload time is managed by max_input_time and other related settings.
Conclusion
PHP’s max_execution_time is like a safety net. While it prevents broken scripts from running forever, sometimes it needs a little adjustment to work with more complex tasks. Just like extending a kitchen timer for a roast instead of toast, it gives your scripts the time they need to finish the job.
Configuring max_execution_time in PHP might seem technical at first, but it’s an essential part of building reliable and responsive web applications, especially when dealing with resource-heavy tasks.
But remember: long execution times are a band-aid, not a cure. Always work on optimizing your code first. When used wisely, max_execution_time becomes a valuable tool in your web performance toolbox, not a workaround for inefficiencies.