

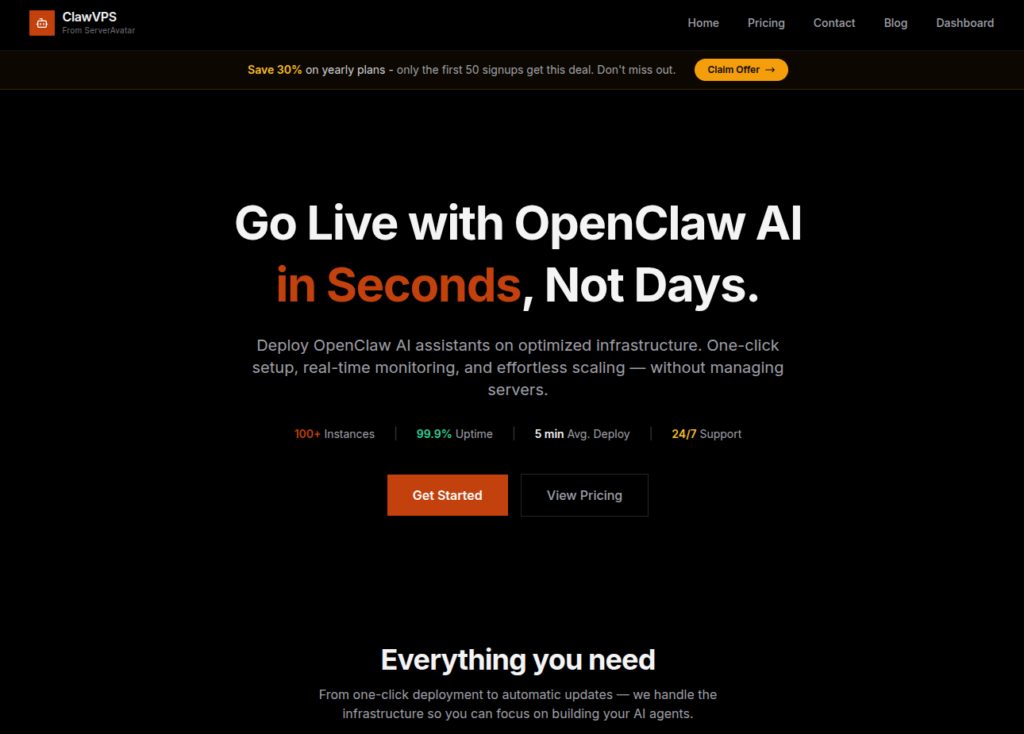
What if launching your own AI assistant was as easy as setting up a social media account? No complicated installations, no complex commands, no confusing configurations, just a few clicks and you’re ready to go. If you’ve ever wanted to deploy OpenClaw AI without the usual technical hurdles, that idea might sound too good to be true, but it’s exactly what we set out to achieve.
Nine years ago, ServerAvatar was built out of a simple frustration, server management was far more complicated than it needed to be. Today, it helps thousands of developers manage servers with ease. But in late 2025, the same problem faced again, this time with AI.
AI was rapidly becoming essential for developers, businesses, and creators. Tools like OpenClaw opened up incredible possibilities for automation and productivity. But deploying AI agents? That started to feel just like server management used to, complex, time-consuming, and filled with technical barriers. That’s where ClawVPS by ServerAvatar comes in, a simple way to launch your OpenClaw AI assistant in minutes, without the usual complexity.
ClawVPS is built to remove the complexity of AI deployment completely. No setup headaches, no technical hurdles, just a simple, fast, and ready-to-use environment for your OpenClaw AI assistant. Let’s explore how you can launch your OpenClaw AI assistant in minutes, without breaking a sweat.
What is ClawVPS by ServerAvatar?
ClawVPS is a next-generation, fully managed VPS platform designed specifically for hosting OpenClaw AI assistants for AI workloads. Unlike traditional VPS providers, where you get a blank server and figure out everything else yourself, ClawVPS ships with OpenClaw pre-installed, SSL configured, and your gateway token pre-generated.
You don’t need to install dependencies, configure environments, deal with complex commands, or worry about compatibility, everything is ready right out of the box.
Key Features
When exploring ClawVPS, the first thing that stands out is how thoughtfully it’s designed for AI users. Instead of giving you a blank server, it provides a ready-to-use environment that removes setup friction and speeds up your workflow.
Here are the core features that make ClawVPS powerful and practical:
- Pre-installed OpenClaw AI for instant usage
- Elevated Mode for running advanced AI operations
- One-click upgrade resources without downtime
- Factory reset option to quickly restart your environment
- Pre-configured browser setup (Chrome) for easy access
- Models & Channels integration for flexible AI workflows
- Free AI credits to help you begin without upfront cost
Advantages
ClawVPS is built to simplify AI deployment, and its benefits clearly reflect that goal. Whether you’re a beginner or someone experienced, these advantages make the platform easy to adopt and efficient to use in real scenarios.
- Fast deployment, launch your AI assistant in minutes
- No technical setup required, making it beginner-friendly
- Saves time by eliminating manual configuration steps
- Optimized specifically for AI workloads
- Flexible scaling to match your growing needs
- Cost-effective with included free credits
- Ideal for both experimentation and production use
Understanding OpenClaw AI Assistant
OpenClaw AI is an intelligent AI agent designed to perform tasks, automate workflows, and assist users in real-time. It is designed to act like a smart digital assistant that can think, respond, and perform tasks on your behalf. It helps reduce manual effort by automating repetitive work and assisting in real-time decisions. In simple terms, it brings AI power closer to everyday users without complexity.
It can handle:
- Task automation: Handles repetitive tasks automatically to save time and effort
- Smart responses: Provides intelligent and context-aware replies instantly
- Workflow execution: Manages and completes multi-step processes efficiently
- AI-powered decision-making: Assists in making faster and smarter decisions
Why Traditional AI Setup is Difficult
Setting up AI the traditional way can feel overwhelming, especially if you’re not from a technical background. It involves multiple steps, tools, and configurations that can easily become confusing. This complexity often discourages people from even trying.
You often need to:
- Configure servers: Requires manual setup and technical knowledge
- Install dependencies: Needs the correct tools and libraries to be installed properly
- Manage GPU/CPU resources: Involves balancing performance and cost
- Handle updates and errors: Ongoing maintenance can be time-consuming
How ClawVPS Simplifies AI Deployment
ClawVPS removes the usual barriers that come with AI setup and makes the process smooth and quick. Instead of dealing with technical steps, you get a ready-to-use environment. It allows you to focus on using AI rather than setting it up.
- Launch a VPS with OpenClaw pre-installed: Start with everything already configured
- Access your AI assistant instantly: No waiting or complex login steps
- Start using it within minutes: Go from setup to usage in very little time
Key Features of ClawVPS
ClawVPS is packed with features that are designed to make AI deployment easy and efficient. These features help users save time, improve performance, and get more value from their AI assistant.
- Pre-installed OpenClaw AI: No setup required, your AI assistant is ready from day one.
- Elevated Mode: Run advanced AI tasks with enhanced permissions and performance.
- Factory Reset: Start fresh anytime with a single click.
- One-Click Scaling: Need more power? Upgrade instantly without downtime.
- Free AI Credits: Get started without worrying about initial costs.
- Browser Setup: Pre-configured Chrome environment for seamless access.
- Models & Channels Integration: Easily manage AI models and communication channels.
- MMR (Persistent Memory): Your AI remembers context, making interactions smarter over time.
What Makes ClawVPS Different?
Most VPS providers give you a blank server. ClawVPS gives you a ready-to-use AI environment. It’s not just hosting, it’s a complete AI solution designed for speed, simplicity, and performance.
Step-by-Step: Launch ClawVPS in Minutes
Getting started with ClawVPS is straightforward and user-friendly. The process is designed so that anyone can launch their AI assistant without technical hurdles. From signup to customization, everything is guided and simple.
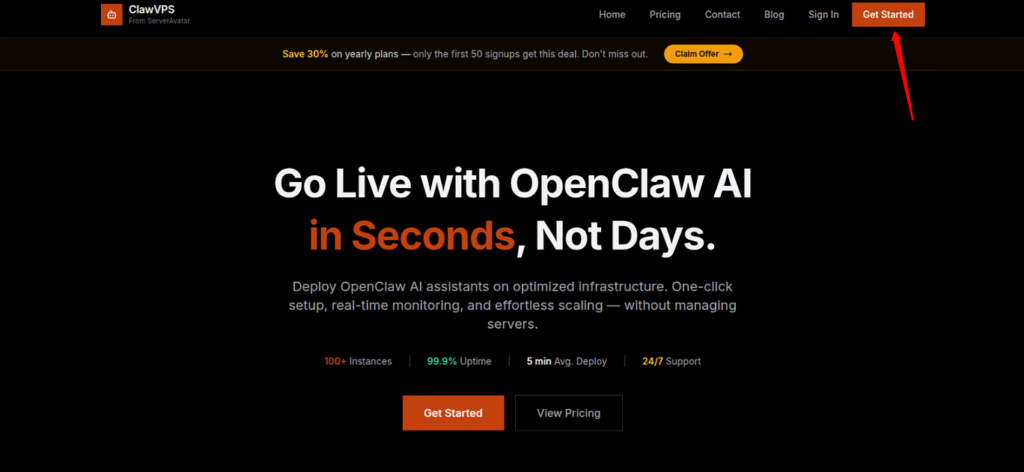
Step 1: Sign Up
- Click on Get Started from top right corner of ClawVPS website.
- Fill in the required details to create an account, such as your name, email address, and password.
- Click on the Create Account button.
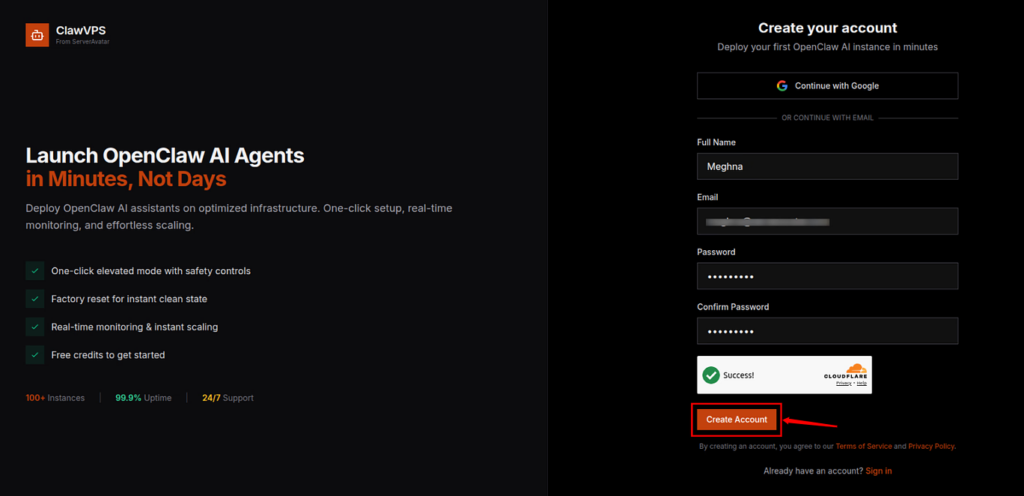
- Once you create an account, verify your email from the verification link in your inbox.
Step 2: Create an instance
- Create your instance with OpenClaw pre-installed. Click on “Create Your First Instance” or “New Instance” option from dashboard.
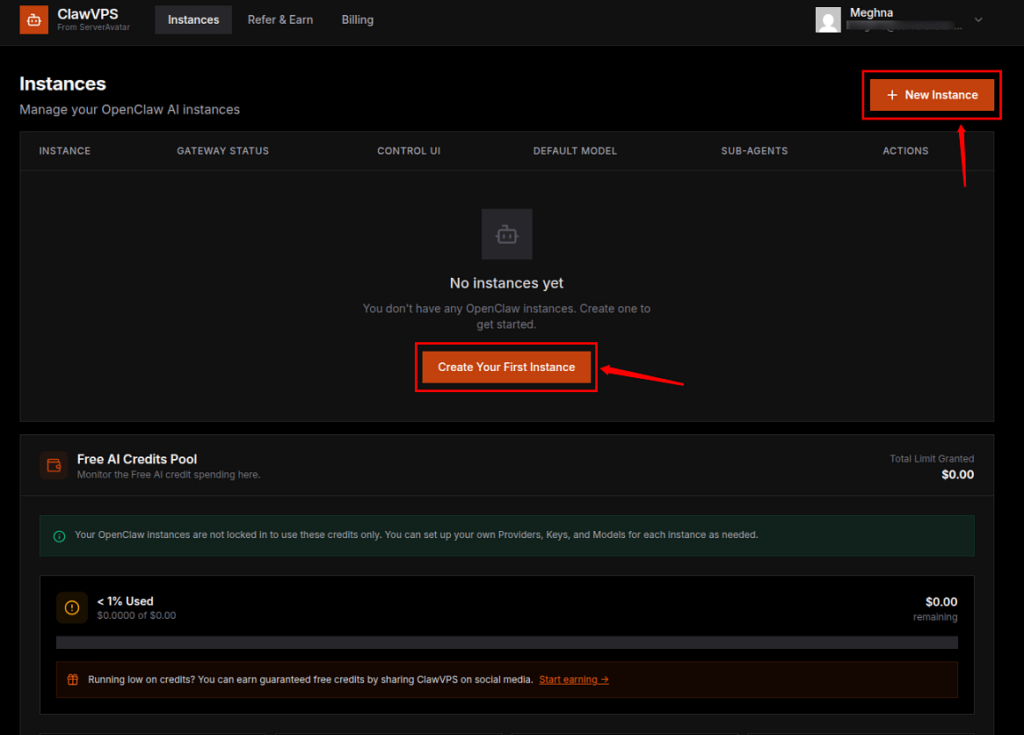
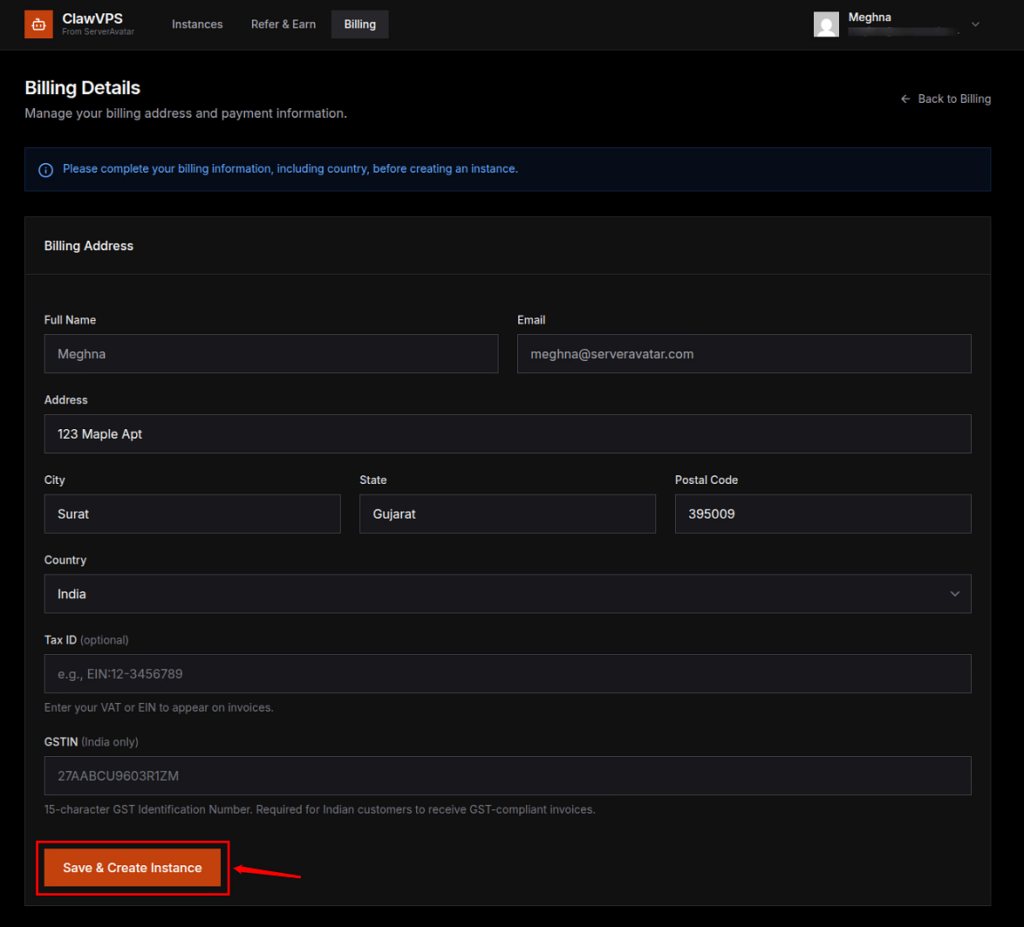
- If you have not set up your Billing Details or you are creating your first instance, it is required to set up the Billing Details first.
- Click on the Save & Create Instance after filling in the details.
Step 3: Choose Your Plan
- Enter your instance name, and select a plan based on your requirements.
- Complete the payment.
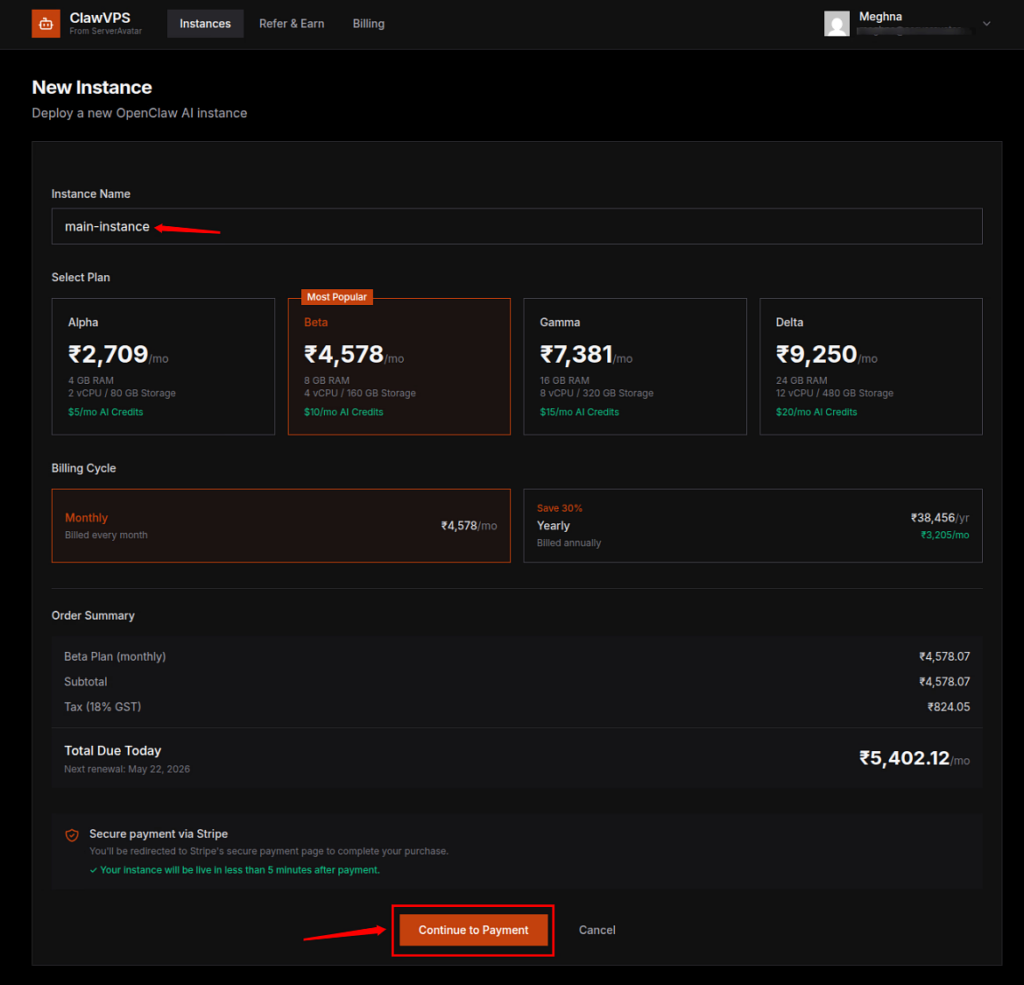
- The process will take some time to complete, as it involves several initial steps such as payment verification, deploying OpenClaw, setting up the domain and DNS, and creating the instance.
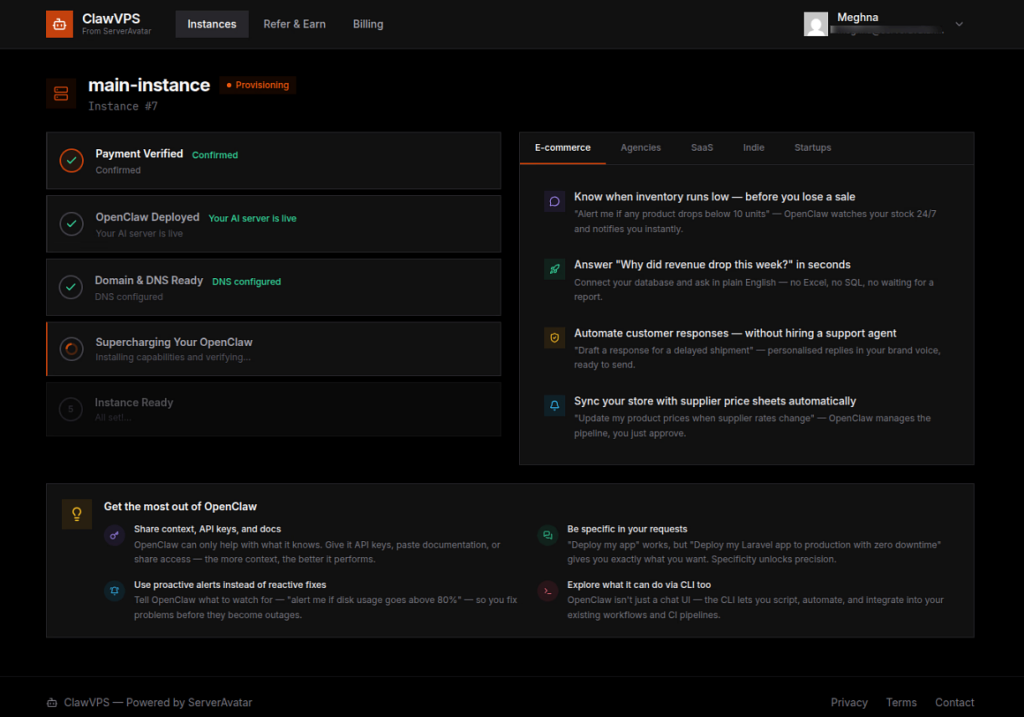
Step 4: Access Dashboard
- You can now seamlessly interact with your AI assistant. The dashboard provides all the key information you need, including gateway details, quick access links, instance information, and server health status.
Step 5: Customize & Scale
- Adjust settings, add nodes, add models, integrate channels and models, upgrade plan anytime directly from the dashboard.
That’s it. No coding required.
Step 6: Connect to OpenClaw Control UI
- To start interacting with your AI assistant, you need to connect your instance to the OpenClaw interface.
- Click on “Open Control UI (Main Chat)” from the dashboard. This will open the chat interface in a new browser tab.
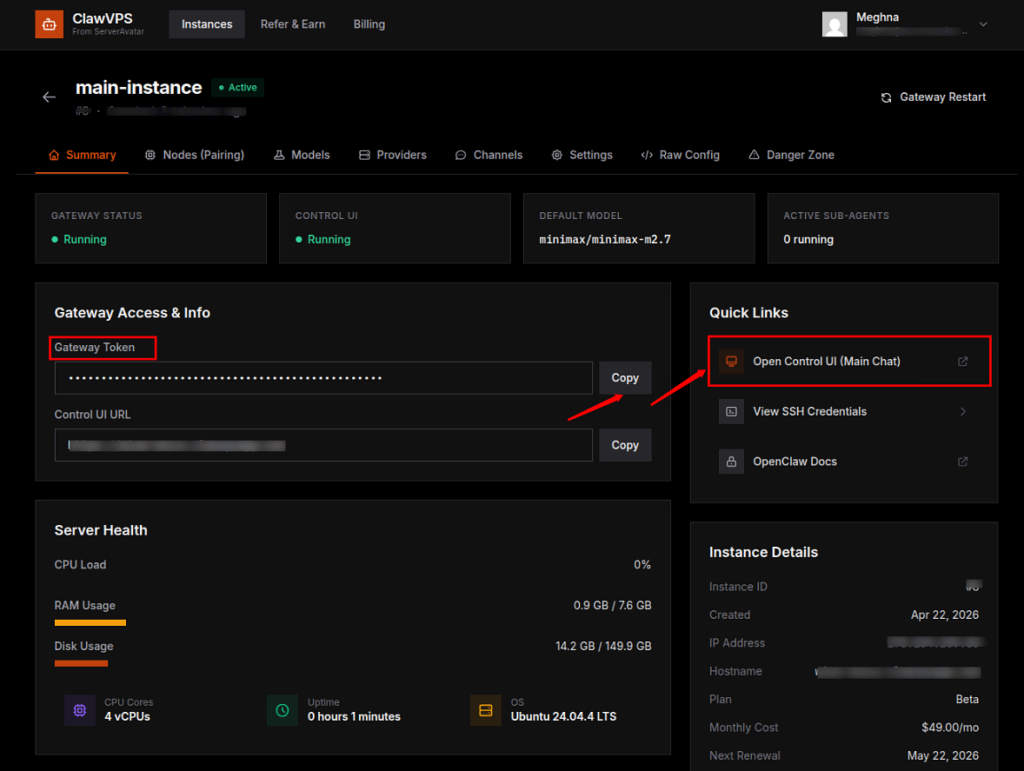
- When opened in browser it will ask for the gateway token, copy the Gateway Token from your ClawVPS dashboard and paste it into the Control UI. Then click Connect to pair your instance.
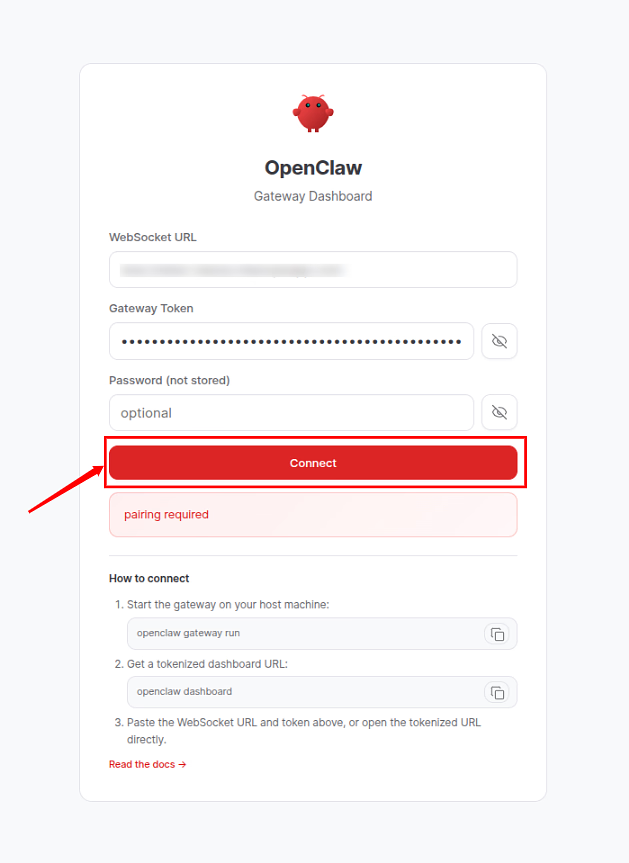
- Once connected, your session will be linked to your gateway securely.
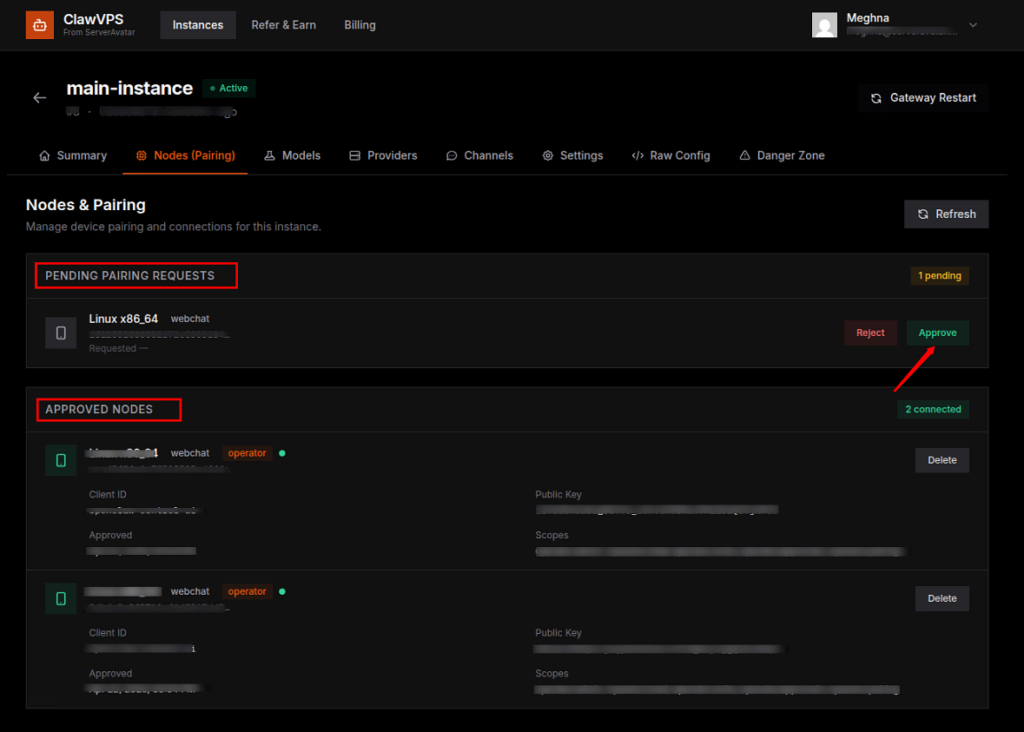
Step 7: Approve Node Pairing
- After clicking on Connect, your device will send a pairing request.
- Go to the Nodes (Pairing) section in your dashboard, where you’ll see the pending request.
- Approve it to authorize your device.
- Once approved, your device will be listed under paired nodes, allowing secure communication between your browser and the AI instance.
- All the approved nodes are listed in the same section.
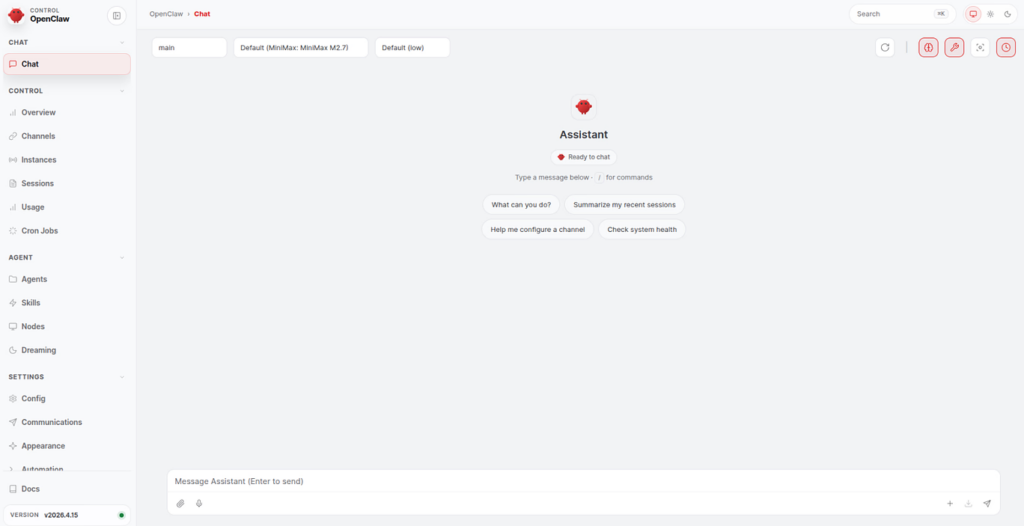
Step 8: Start Chatting with Your AI Assistant
- After successful pairing, the OpenClaw chat interface becomes fully active.
- You can now start interacting with your AI assistant directly from your browser.
- This is your main workspace where conversations, commands, and tasks are executed in real time.
Step 9: Configure Your First AI Model
- ClawVPS makes it easy to get started by providing pre-configured API access and free AI credits with every instance.
- Head to the Models section:
- Add or select your preferred models
- Set a default model for your assistant
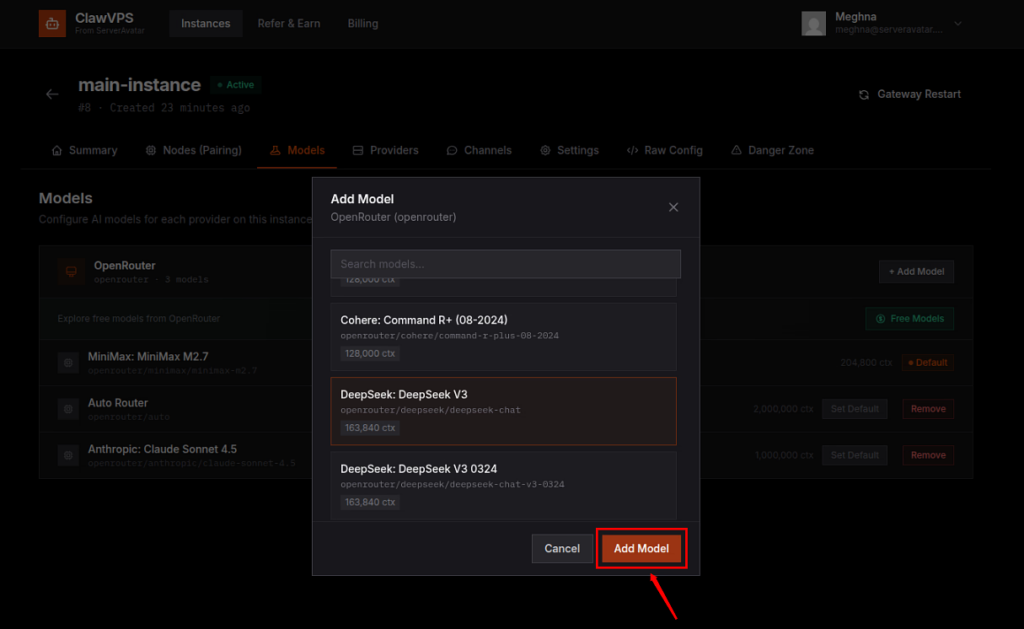
- Once configured, your AI assistant will use your selected model for all interactions.
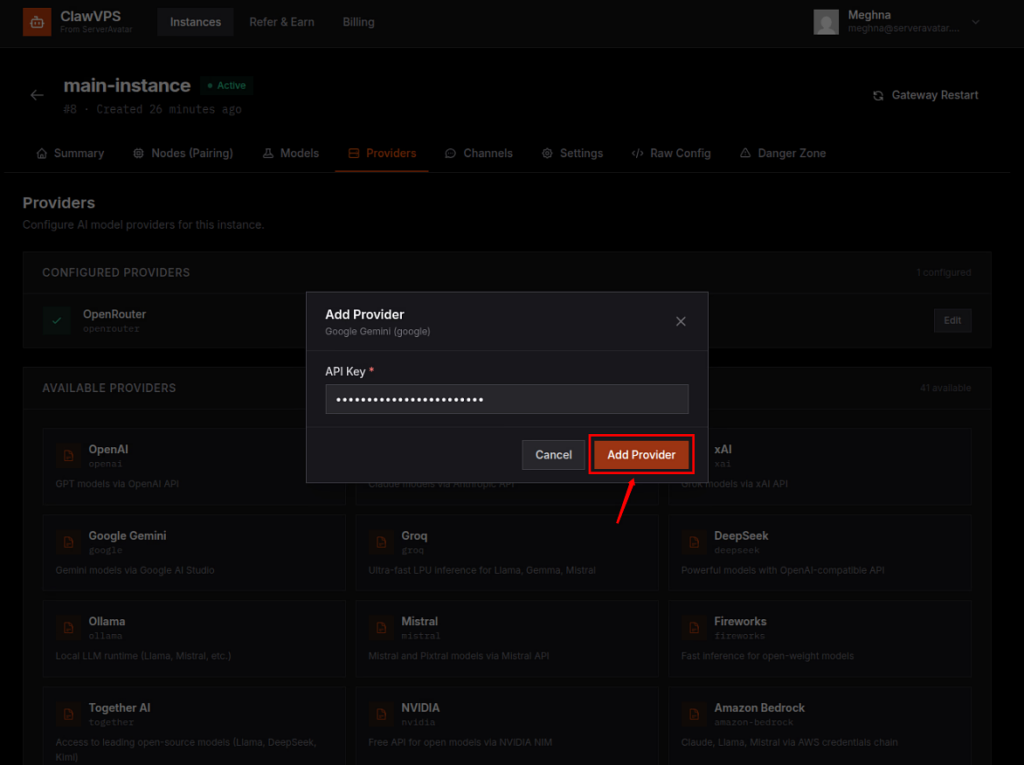
Step 10: Configure Your Providers
- You can also connect your own providers for more flexibility.
- Go to the Providers section
- Add your API keys (such as OpenAI, Anthropic, Google, OpenRouter, etc.)
- Choose from a wide range of supported providers (40+ options available)
- Add your selected provider
Step 11: Connect Messaging Channels
- ClawVPS allows you to extend your AI assistant beyond the browser.
- In the Channels section, you can integrate platforms like:
- Discord
- Telegram
- Slack
- Simply click Connect, follow the setup instructions, and link your account.
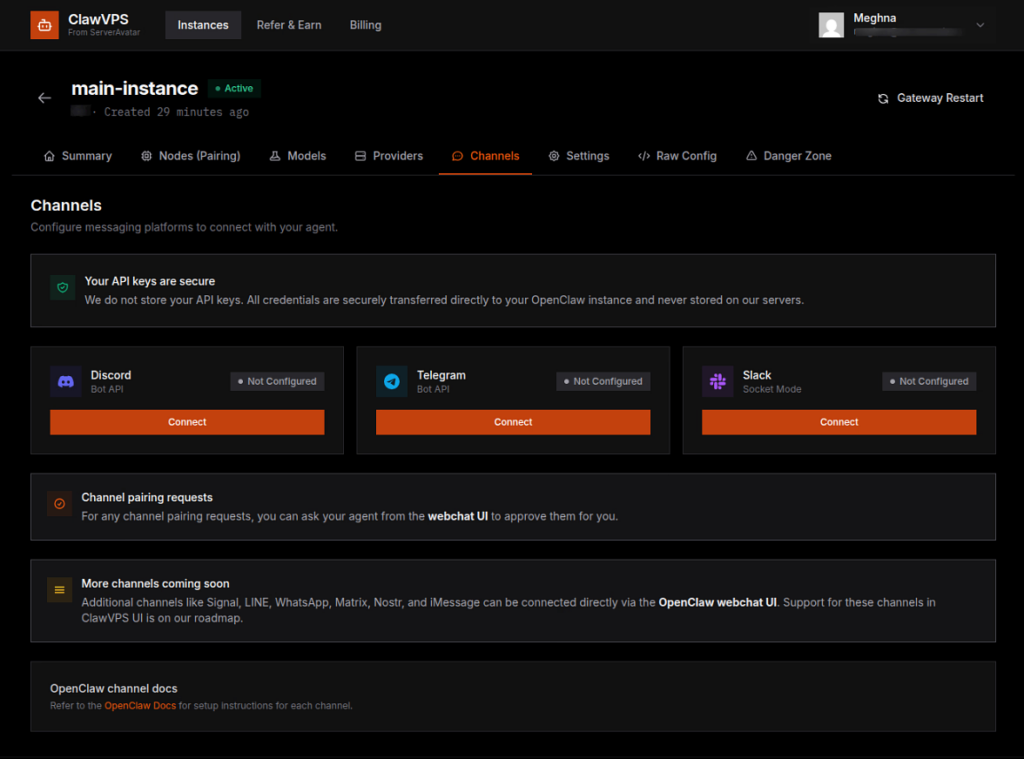
- Once connected, your AI assistant can communicate and respond directly on these platforms, making it accessible wherever your users are.
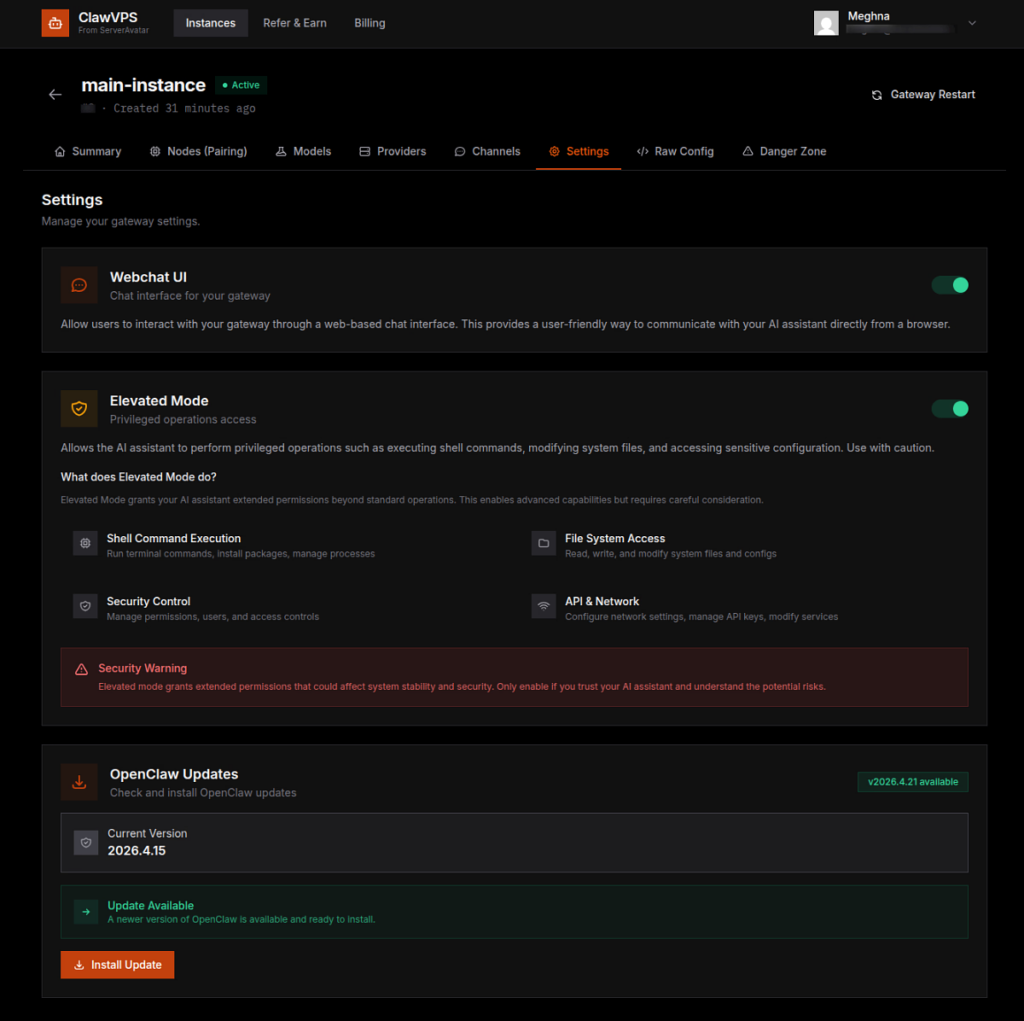
Step 11: Manage Settings and Advanced Features
- The Settings section gives you control over how your AI assistant behaves.
- Here you can:
- Enable or disable the Webchat UI
- Turn on Elevated Mode for advanced capabilities like executing commands, managing files, and accessing system-level operations
- Elevated Mode is powerful, so it should only be enabled when you understand the potential risks and need advanced control.
- Monitor and install OpenClaw updates to keep your instance up to date
Step 12: Use Raw Configuration for Deep Customization
- For advanced users, the Raw Config section provides direct access to your instance configuration in JSON format.
- This allows you to:
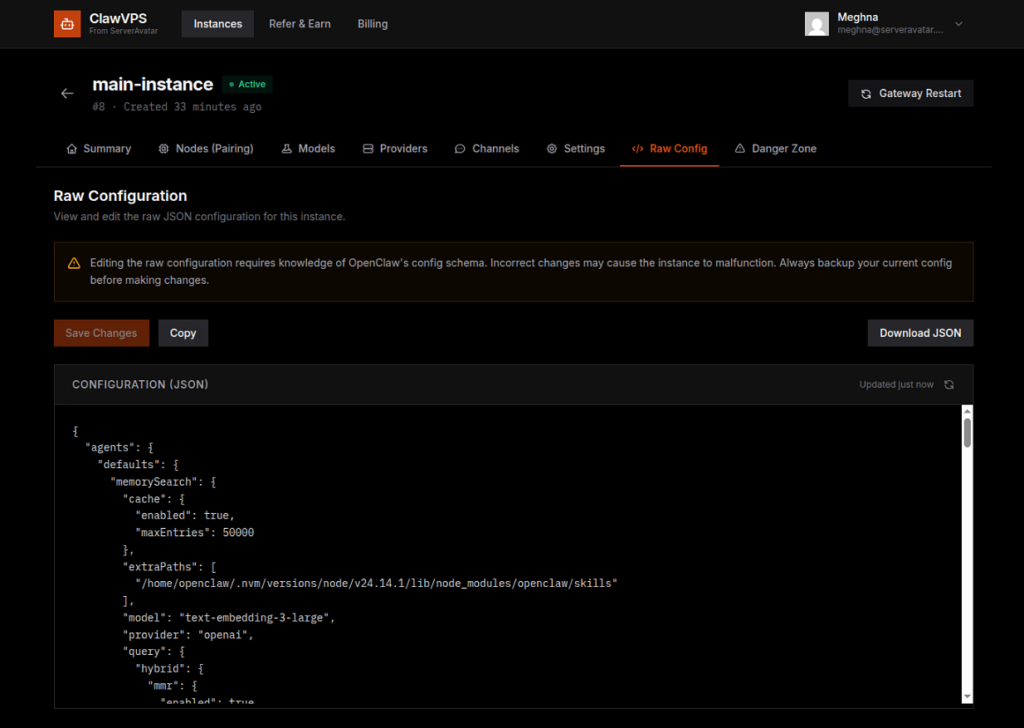
- Since this involves manual editing, it’s recommended to proceed carefully and always keep a backup before making changes.
Step 13: Manage Backups and Factory Reset
- Inside the Danger Zone, you’ll find critical management options for your instance.
- Available Backups: A list of saved configurations is available for quick recovery if needed.
- Restore from Backup: You can restore your gateway using previously saved backups. This replaces your current configuration with a selected backup version.
- Factory Reset: This option completely resets your OpenClaw instance to its original state.
- Important things to know:
- All configurations will be permanently deleted
- Chat history and sessions will be erased
- Stored memory and learned context will be lost
- Custom settings will be reset
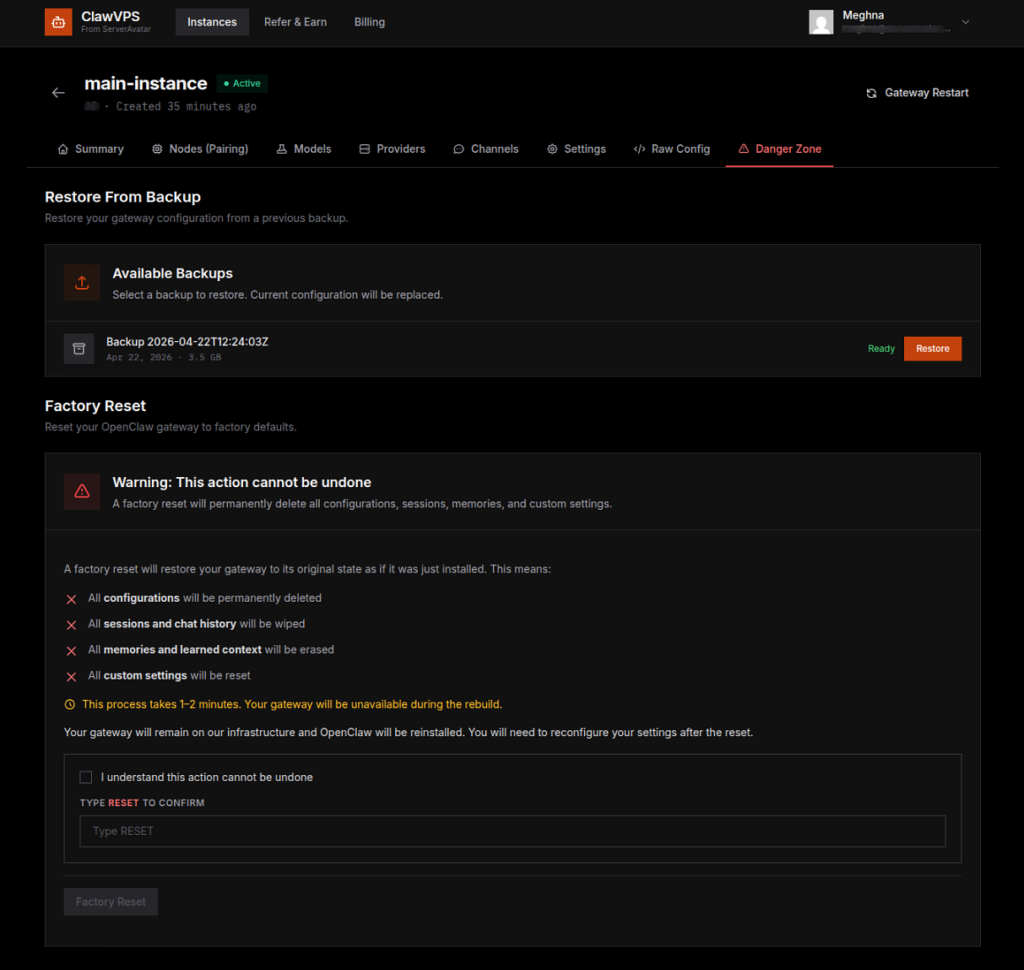
- After the reset, OpenClaw will be reinstalled, and you’ll need to set everything up again from scratch.
Real-World Use Cases of OpenClaw
OpenClaw AI is universal and can be used in many practical scenarios across different industries. Whether you want to automate tasks or build smart applications, it adapts to your needs.
- Automate business workflows: Reduce manual work by handling routine operations
- Build AI-powered chatbots: Creates interactive bots for customer engagement
- Manage customer support: Provides quick and accurate responses to users
- Generate content: Helps create text, ideas, and creative outputs
- Run AI experiments: Allows testing and exploring new AI use cases
It’s like having a multi-tool, but for AI tasks.
Benefits of Using ClawVPS
ClawVPS offers several advantages that make it a practical choice for both beginners and professionals. It focuses on saving time, reducing complexity, and improving overall efficiency.
- Saves Time: No setup means you can focus on using AI instead of configuring it.
- Beginner-Friendly: Even non-technical users can get started
- Cost-Effective: Free credits and optimized infrastructure reduce costs.
- High Performance: Optimized for AI workloads.
- Scalable: Grow your AI assistant as your needs expand.
ClawVPS vs Traditional VPS
Choosing between ClawVPS and a traditional VPS depends on your needs, but the difference is quite noticeable. ClawVPS is built specifically for AI, while traditional VPS requires manual effort.
| Feature | ClawVPS | Traditional VPS |
| AI Pre-installed | Yes | No |
| Setup Time | Minutes | Hours/Days |
| Ease of Use | Beginner-friendly | Technical |
| Scaling | One-click | Manual |
| AI Optimization | Built-in | Requires setup |
The difference is clear, ClawVPS is built for the future.
Performance and Scalability Explained
When working with AI, performance and scalability play a crucial role in delivering smooth results. ClawVPS ensures both by offering optimized infrastructure and flexible resource management.
- Optimized hardware: Designed specifically for AI processing needs
- Fast processing speeds: Ensures quick execution of tasks
- Seamless scaling: Allows easy upgrades without downtime
Security and Reliability
Security and reliability are essential when dealing with AI systems and data. ClawVPS provides a stable and protected environment so users can focus on building without concerns.
- Secure environments: Protects data and system access
- Reliable uptime: Ensures consistent availability
- Safe data handling: Maintains privacy and integrity of information
Who Should Use ClawVPS?
ClawVPS is designed for a wide range of users who want to explore or implement AI without complications. It removes technical barriers and makes AI accessible to everyone.
- Developers: Great for building and testing AI applications
- Startups: Helps launch AI-driven products quickly
- Businesses: Useful for automating workflows and operations
- Content creators: Supports AI-assisted content generation
- Beginners: Ideal for those new to AI
If you’ve ever thought, “I wish AI was easier”, this is for you.
Tips to Get the Most Out of Your AI Assistant
To fully benefit from your AI assistant, it’s important to use it strategically. Small improvements in how you use it can lead to much better results over time.
- Start simple: Begin with basic tasks and expand gradually
- Experiment with models: Find what works best for your needs
- Monitor performance: Track and optimize usage regularly
- Use scaling options: Upgrade resources as your workload grows
Treat your AI assistant like a team member, it gets better with time.
Future of AI Agents with ClawVPS
AI agents are becoming more powerful and accessible with time. Platforms like ClawVPS are playing a key role in making AI easier to deploy and use for everyone.
- AI becomes accessible: More people can use AI without technical barriers
- Instant deployment: Launching AI becomes quick and effortless
- Faster innovation: Enables quicker experimentation and development
Conclusion
Launching an AI assistant no longer needs to be complicated or time-consuming. With ClawVPS by ServerAvatar, what once required deep technical knowledge and hours of setup can now be done in just a few minutes. By combining a fully managed VPS with a pre-configured OpenClaw environment, ClawVPS removes the barriers that used to slow people down. Whether you’re building, automating, or simply exploring AI, it gives you a simple and reliable starting point. As AI continues to grow, platforms like ClawVPS make it easier for anyone to turn ideas into real, working solutions without getting stuck in setup.
FAQs
1. What is ClawVPS used for?
ClawVPS is used to quickly deploy and run OpenClaw AI assistants without needing manual setup or advanced technical knowledge.
2. Do I need coding skills to use ClawVPS?
ClawVPS is designed to be beginner-friendly, so you can launch and use your AI assistant without writing code.
3. How fast can I launch an OpenClaw AI assistant?
You can set up and start using your AI assistant within a few minutes after creating your instance.
4. Can I upgrade my server resources later?
ClawVPS offers one-click scaling, allowing you to increase resources anytime as your requirements grow.
5. Is ClawVPS suitable for businesses and production use?
It is suitable for both individual users and businesses looking to automate workflows, build AI tools, or scale AI-powered applications.