
Have you ever clicked on a link only to land on a blank screen or a slow-loading page? If you run a WordPress website, that’s more than an inconvenience, it’s lost visitors, potential revenue, and search ranking points. This is where stress testing WordPress websites becomes essential. The good news? Most of those scenarios are preventable. The secret is knowing your website’s limits before the traffic actually arrives.
That’s exactly what stress testing does. In this guide, you’ll learn what stress testing means for a WordPress site, why it matters, and exactly how to do it step by step, even if you’ve never run a technical test before. By the end, you’ll know how to identify where your site starts to struggle and what to do about it before a single extra visitor lands on your page.
What Is a Stress Test?
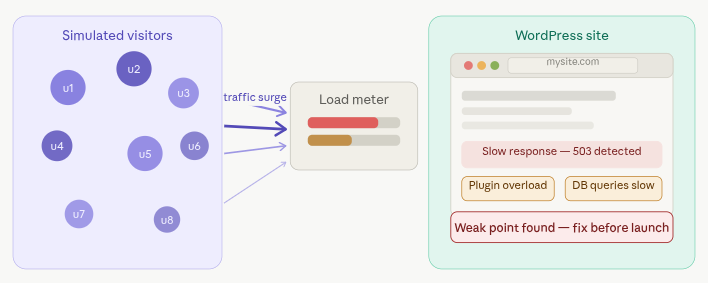
A stress test is a controlled way of sending simulated traffic to your website to see how it holds up under pressure. Think of it like a fire drill for your site, you create a controlled surge of visitors on purpose, watch how your server responds, and use what you find to fix weak spots before they become real problems.
Just like testing a parachute before skydiving, stress testing gives you the data you need to make confident decisions about your hosting, your site configuration, and your scaling strategy.
The goal is simple: find out exactly where your website starts to slow down or break, and then fix those points before they cause real damage.
Why Should You Stress Test a WordPress Website?
Running a stress test on your WordPress site isn’t just for developers or technical teams. Here’s why it matters for anyone running a website:
1. Know Your Server’s Actual Capacity
Your web hosting is the engine that powers your entire website. Stress testing shows you whether that engine can handle the number of visitors you expect, or more. Without this data, you’re essentially guessing. And guessing wrong about server capacity is what leads to crashed pages during your biggest traffic moments.
2. Understand Real User Experience Under Load
A fast website during normal traffic can become painfully slow when things get busy. Stress testing helps you see exactly when that slowdown starts and how severe it gets. You don’t want to find out during a product launch or a flash sale that your site can’t keep up.
3. Make Informed Decisions About Server Scaling
Should you upgrade your hosting plan? Add more RAM? Move to a different server type? Stress testing gives you real performance data to base that decision on, rather than guessing or reacting after a crash.
4. Find and Fix Hidden Resource Bottlenecks
Stress testing often reveals resources that aren’t being used efficiently, or are being pushed beyond their limits in ways that aren’t visible during normal traffic. Once you know where the bottlenecks are, you can optimize accordingly.
5. Prepare for Unexpected Traffic Surges
Going viral, being featured on social media, running a limited-time promotion, these moments send sudden bursts of traffic to your site. Without knowing your site’s limit, you can’t prepare for them. Stress testing lets you know exactly how much your site can handle, and when to scale up before a surge hits.
How to Stress Test a WordPress Website
Now that you know why it matters, let’s get into how to actually do it.
The tool we’ll use here is Loader.io, a free and beginner-friendly online stress testing platform. It lets you simulate hundreds or thousands of virtual visitors hitting your site simultaneously, without needing to write a single line of code.
Here’s the step-by-step process:
Step 1: Create Your Loader.io Account
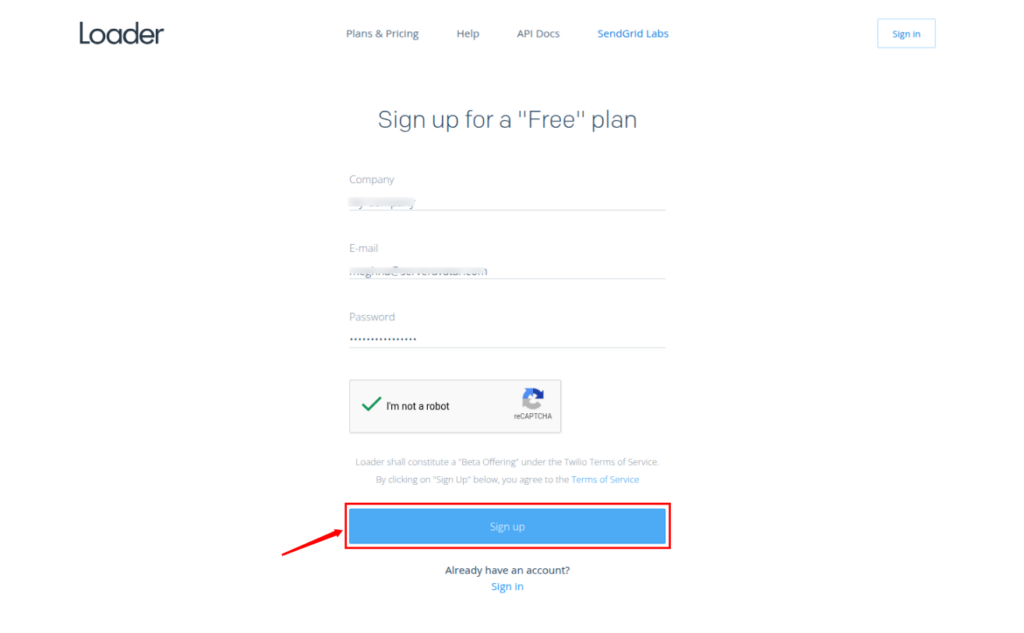
- Start by heading to Loader.io and signing up for a free account.
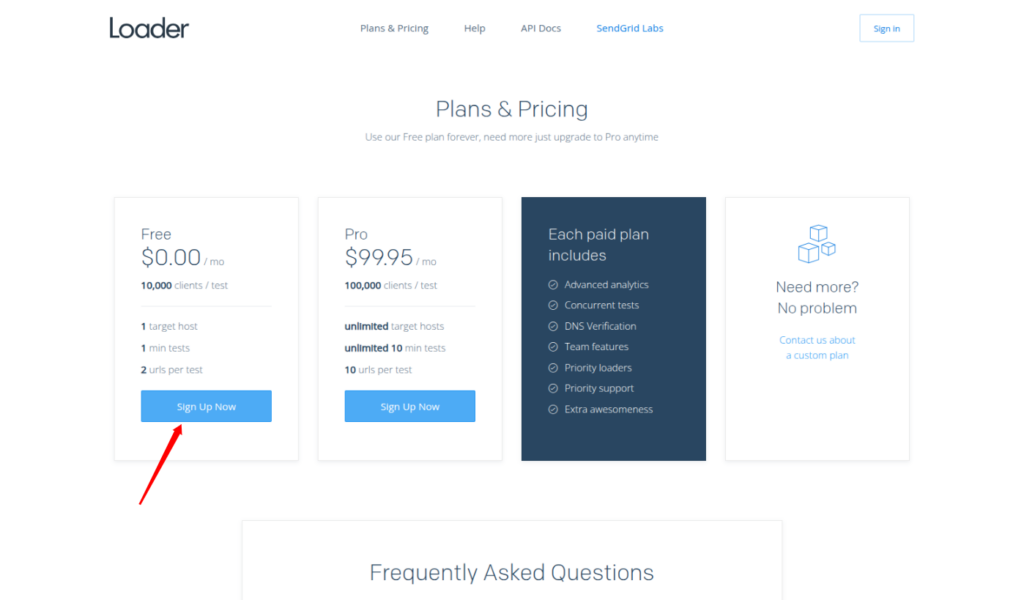
- The process is straightforward; fill in your basic details, verify your email, and you’re in. No credit card is required to get started.
- Once your account is active, log in, and you’ll land on your dashboard. From here, you’ll be able to create new tests, view past results, and manage your targets.
Step 2: Add Your Website and Verify Domain Ownership
- After logging in, click the “New Host” button on your dashboard.
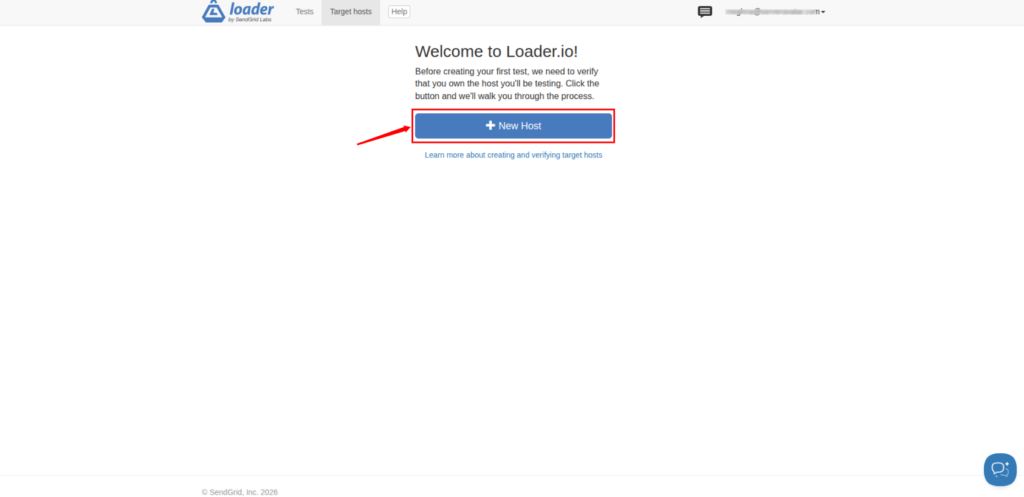
- Enter the full domain name of your WordPress site, for example, yourwebsite.com, and click Next: Verify.

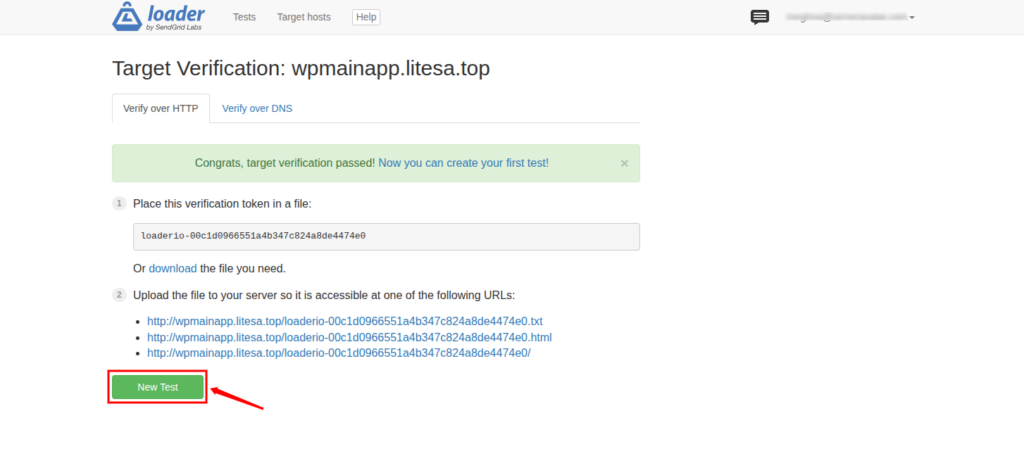
Loader.io needs to confirm that you own or control the domain before it can run tests against it.
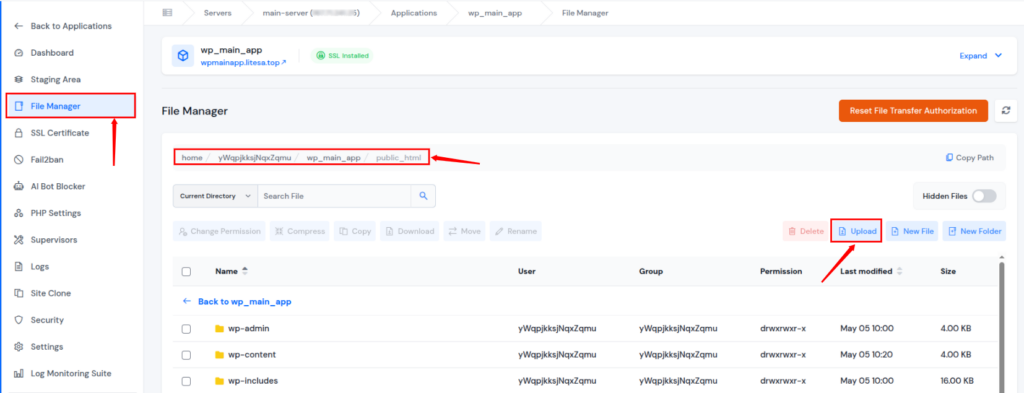
- To do this, it will ask you to download a small verification file and upload it to your website’s root directory.
- Once the file is in place, go back to the Loader.io verification page and click Verify.
How to upload the file:
- If you are using ServerAvatar: Log in to your ServerAvatar panel, open the File Manager, navigate to your domain’s root folder (usually public_html), and upload the file there.
- If you are managing your server manually: Use any SFTP client like FileZilla, connect to your server, navigate to the root directory, and upload the file
If everything checks out, your domain will be confirmed as an approved target host, and you can move to the next step.
Step 3: Create Your First Stress Tests
With your domain verified, it’s time to run the actual tests. The approach that works best is to test in stages, starting light and ramping up gradually. This gives you a clear picture of how your site performs at each level.
Test 1: Low Load Test
Start with a light warm-up test. Set the number of virtual clients to 100 and run the test for 1 minute. This gives you a baseline performance reading for your site under normal to slightly-above-normal conditions.
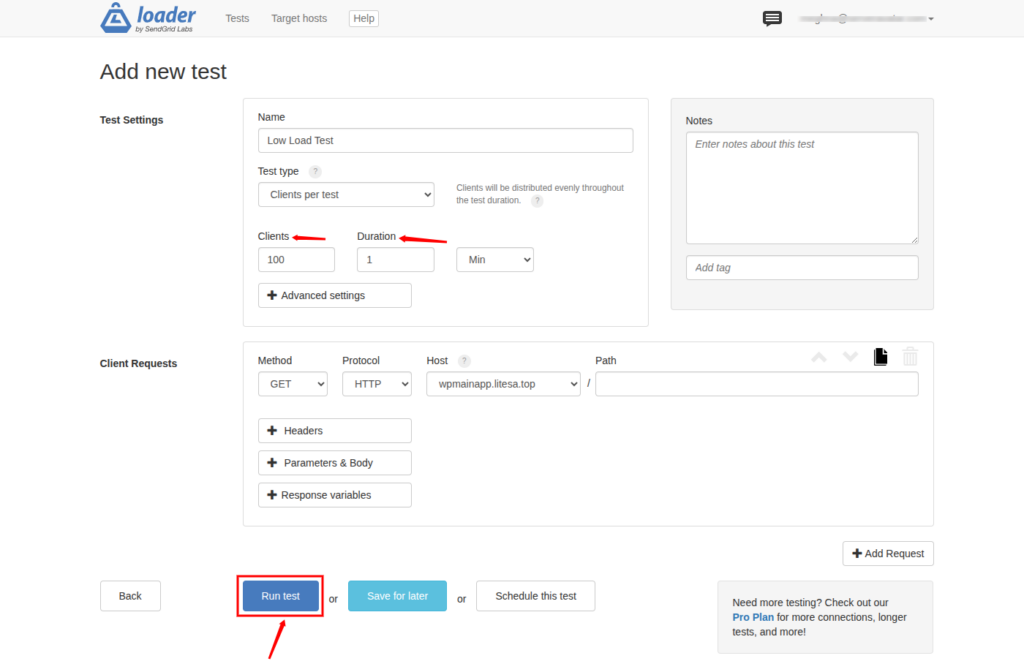
Think about it as you are establishing a performance baseline here, a benchmark to compare everything else against.

Test 2: Medium Load Test
Now increase the pressure. Set the number of clients to 250 and run for 1 minute. This simulates a moderately busy period, like a busy afternoon on your site with several dozen people browsing at the same time.
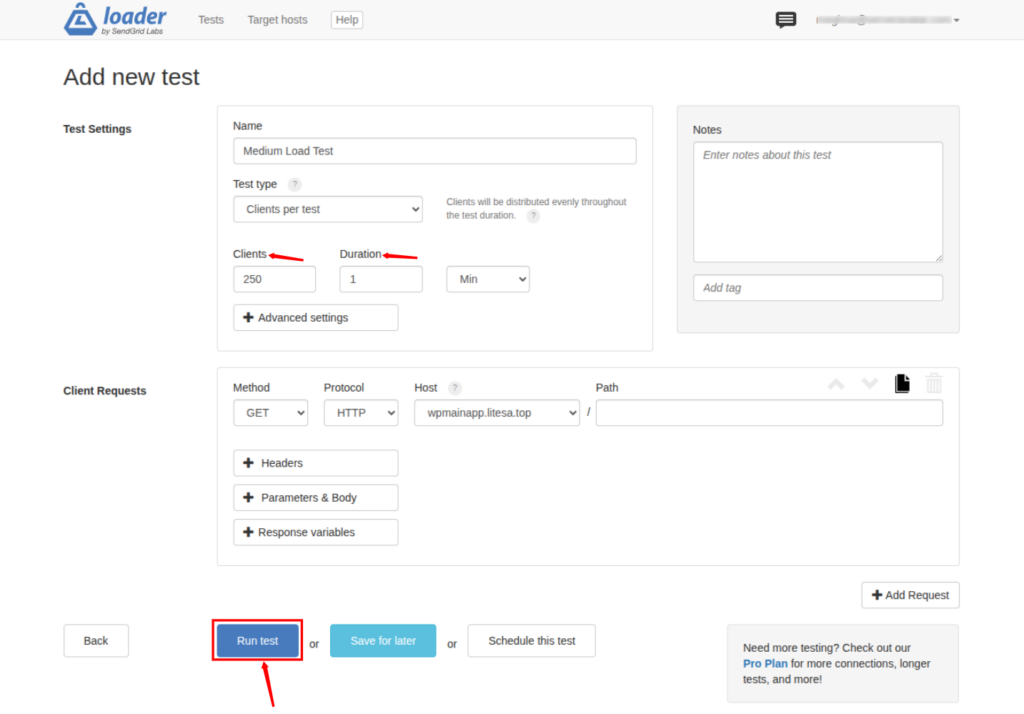
Watch how your site’s response time changes compared to the low-load test. Any significant slowdown at this stage tells you something meaningful about where your site’s second gear starts to strain.
Test 3: High Load Test
Time to push it closer to the limit. Set the clients to 500 to 1,000 and run for 1 minute. This simulates a high-traffic scenario, something like a popular blog post being shared on social media or the peak of a promotional campaign.
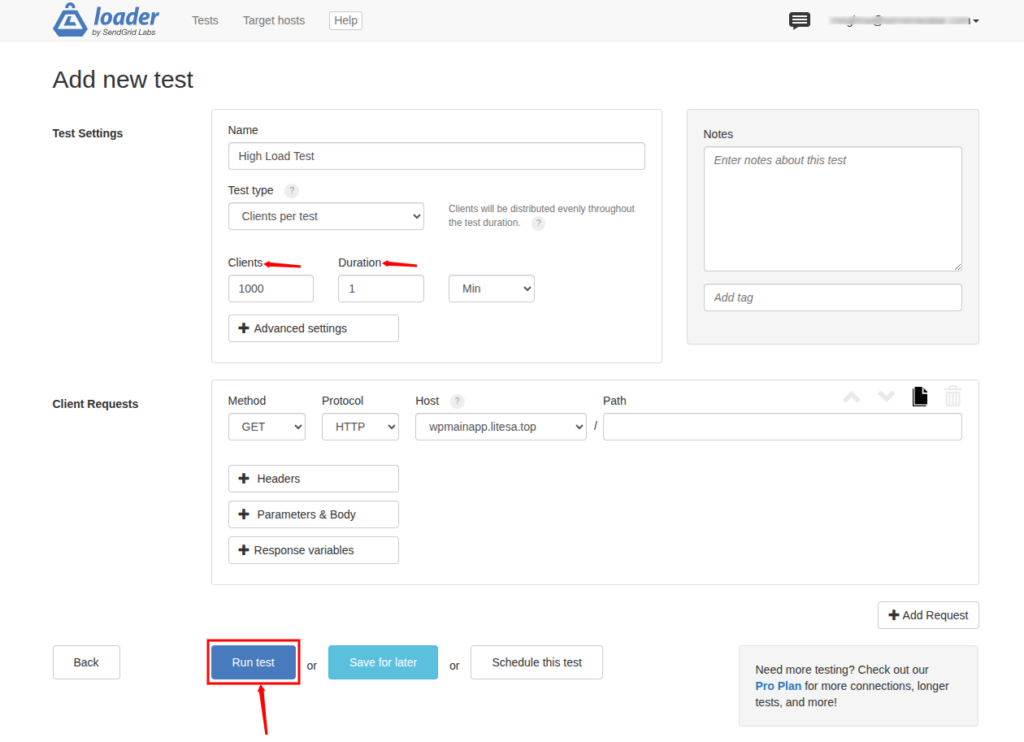
This is where most sites start to show their breaking point. Pay close attention to how your server handles this level of demand.
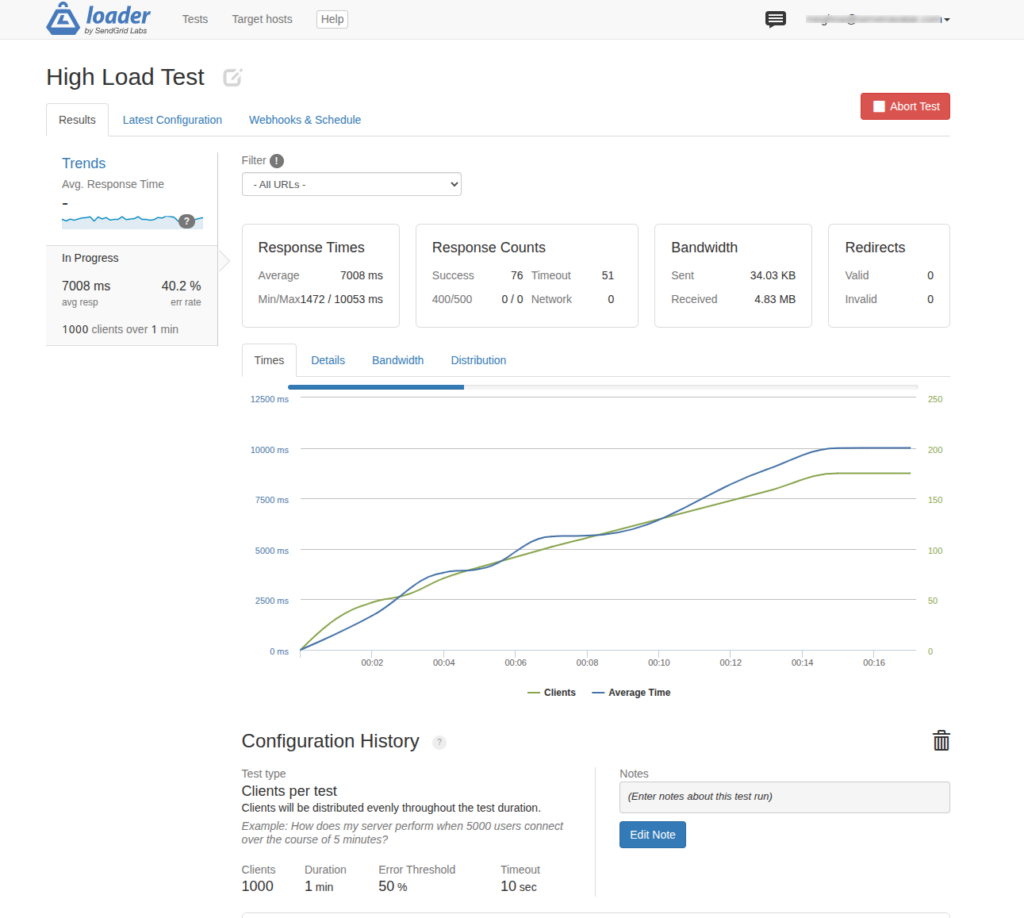
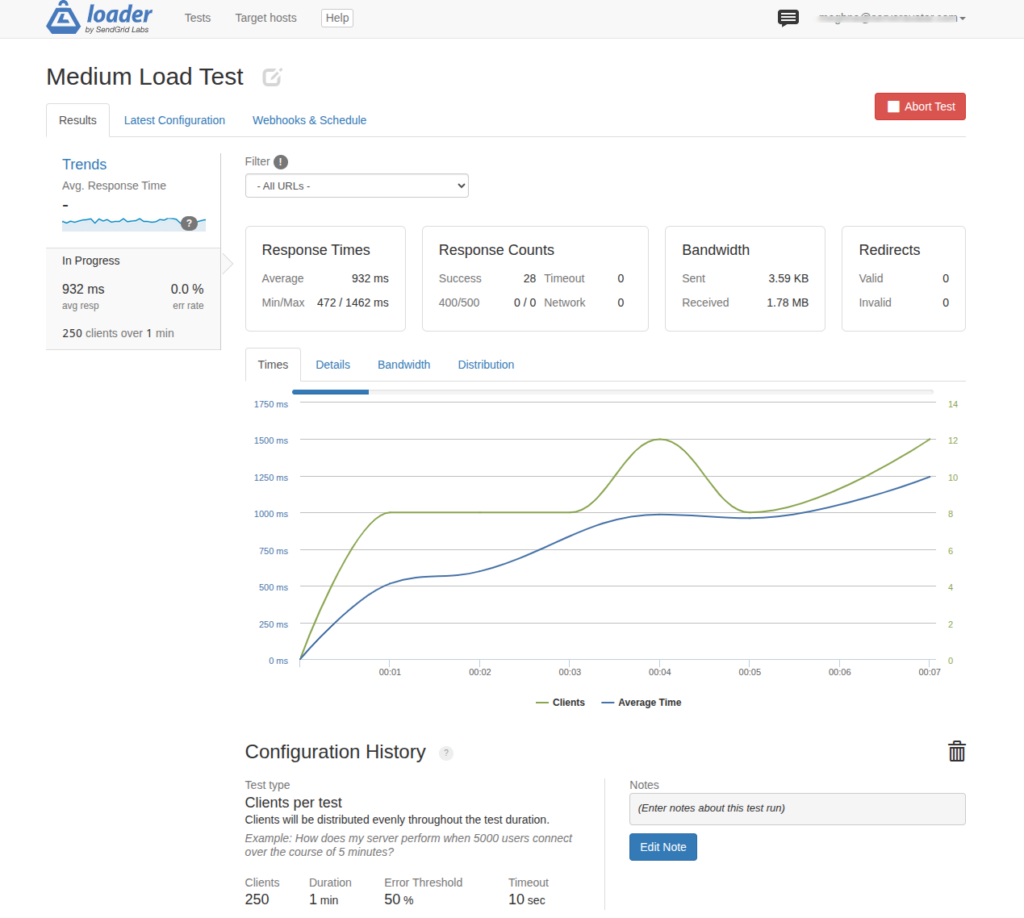
After each test, Loader.io will generate a detailed report. Note the results before moving to the next test; you’ll want to compare them.
How to Read and Understand Your Stress Test Results
Once the tests are complete, you can see the full results on the Loader.io dashboard. Here’s what to focus on and what each metric means:
Response Time
This tells you how quickly your server responded to each request during the test. The lower the response time, the better. You’re looking for consistent, fast responses across all three test levels.
What to look for: If response time jumps significantly from low-load to high-load, your server is working harder to keep up under pressure. A large jump tells you that your current hosting plan has a clear ceiling.
Error Rate
The error rate shows what percentage of total requests resulted in server errors (like 503 or 500 errors) during the test. An error rate above 0% is a red flag, even a small percentage means some visitors are seeing broken pages.
What to look for: If errors start appearing even at the medium-load test, your site is already struggling within a realistic traffic range. A 0% error rate at all levels is the ideal result and tells you your hosting is genuinely reliable.
Throughput
Throughput measures how much data your server transferred during the test, usually shown in megabytes or gigabytes processed per minute. Higher throughput means your server is handling more content delivery efficiently.
What to look for: A healthy site should show consistent throughput even as load increases. If throughput drops significantly under high load, it could mean your server’s resources are being maxed out.
What to Do With This Data
These three metrics together give you a complete picture. High response times with low throughput and rising errors at medium load means it’s time to optimize or upgrade. A clean, low response time with high throughput and zero errors across all three tests means your hosting can handle whatever you throw at it.
Use these insights to make decisions about your hosting plan. If your current plan shows strain at medium load, you know a more powerful plan or a managed WordPress hosting solution with better resources is worth exploring before you hit high traffic.
Tips for Running an Effective WordPress Stress Test
Before you start, keep these tips in mind to make sure your results are useful and accurate:
Start with a clear goal: Know what you’re trying to find out before you run the first test. Are you checking if your current hosting plan is sufficient? Testing a new configuration? Planning for a product launch? Your goal shapes which metrics matter most.
Simulate real-world conditions: Set up your tests to mirror actual visitor behavior as closely as possible. Think about which pages are most likely to be visited during high traffic, and test against those, not just your homepage.
Test in gradual stages: Always start with a low-load baseline before ramping up. Jumping straight to 1,000 clients won’t give you the progressive data you need to understand where your site’s limit actually begins.
Monitor server resources during the test: Keep an eye on your hosting panel while the test is running. High CPU usage, memory exhaustion, or disk I/O saturation during the test will tell you exactly where the bottleneck is occurring on the server side.
Test multiple pages, not just one: Don’t test only your homepage. Run tests against your key pages, product pages, checkout flow, contact form, or your most popular blog posts. Each may perform differently under load.
Run each test multiple times: A single test result isn’t enough to make a decision on. Run the same test three to five times and look at the average. One off result can be misleading.
Use realistic data: If you’re testing authenticated pages or dynamic content, use realistic data that matches your actual user patterns. Testing with unrealistic content can skew results in ways that don’t reflect what real visitors will experience.

Making the Most of Your Results
Stress testing is only as useful as what you do with the data. Once you have your results, here’s how to put them to work:
Identify your site’s breaking point: The load level where response times spike sharply or errors start appearing, is your site’s practical ceiling. Use that number as your guide when planning promotions, email campaigns, or any event that might drive traffic.
Know when to upgrade your hosting: If your site struggles at 250 clients, it will definitely fail at 500. Use the test results to have a factual conversation with your hosting provider about what plan level you actually need.
Optimize before scaling: Sometimes the issue isn’t raw server power, it’s inefficient configuration. High response times can often be improved by enabling caching, optimizing your database, or cleaning up heavy plugins before spending money on a bigger plan.
Plan for scaling ahead of time: Once you know your site’s ceiling, set up an auto-scaling plan or choose a hosting provider with flexible resource allocation so you’re never caught off guard when traffic grows.
Disclosure: ServerAvatar is a server and application hosting and management platform that we recommend for developers and teams managing PHP and Node.js applications, including WordPress sites that need reliable performance and easy management.
Final Thoughts
Stress testing your WordPress website isn’t just a technical exercise, it’s one of the most practical things you can do to protect your site, your visitors, and your peace of mind. You don’t need to be a developer or have technical expertise to do it. Tools like Loader.io make it accessible for anyone willing to spend twenty minutes running a few controlled tests.
The goal is simple: know your limits before your visitors test them for you. Once you know where your site starts to struggle, you can fix those weak points, make smart decisions about your hosting, and be genuinely prepared for whatever traffic comes your way.
If you’re running a WordPress site and want hosting that’s built to handle real demand, with the management features, ServerAvatar offers server and application hosting and management platform for WordPress and all the PHP and nodejs based applications. You can explore the options and get your site set up in minutes.
About the Author
Writes practical guides on web hosting, server management, and getting the most out of your WordPress site, from people who manage hosting infrastructure every day.
FAQs
1. What is the difference between a stress test and a load test?
A stress test pushes your site beyond normal limits to find where it breaks. A load test checks if your site handles expected traffic levels. For most WordPress users, stress testing gives more useful data, it shows your actual ceiling.
2. Do I need technical skills to run a WordPress stress test?
No, Loader.io is beginner-friendly; you don’t need to write code or run terminal commands. If you can sign up for an account and upload a file, you can run the test.
3. Is it safe to stress test my own website?
Yes, you’re sending simulated traffic to your own server. It won’t affect your real visitors. Stop the test anytime by closing the page, that’s the only risk.
4. How many visitors can my WordPress site handle?
There’s no universal number, it depends entirely on your hosting plan, server resources, and site configuration. Stress testing is the only way to find your actual limit. A well-configured managed WordPress host typically handles 50 to 500 concurrent visitors before showing strain.
5. How often should I run a stress test on my WordPress site?
Run a test before any major traffic event, a product launch, viral post, or promotion. Also test after changing hosting plans or adding significant plugins. Quarterly tests are a good baseline for ongoing monitoring.