
File upload functionality is a cornerstone of modern web applications, from simple contact forms with attachments to complex media management systems. However, many PHP developers encounter frustrating limitations when users try to upload larger files, often met with cryptic error messages or silent failures. The culprit? PHP’s default upload_max_filesize setting, which typically restricts uploads to just 2MB.
Whether you’re building a document management system, allowing users to share high-resolution images, or creating a platform for video uploads, understanding how to properly configure PHP’s file upload limits is essential. In this comprehensive guide, we’ll walk through everything you need to know about increasing upload_max_filesize and related settings to handle larger file uploads safely and efficiently.
Understanding PHP File Upload Limits
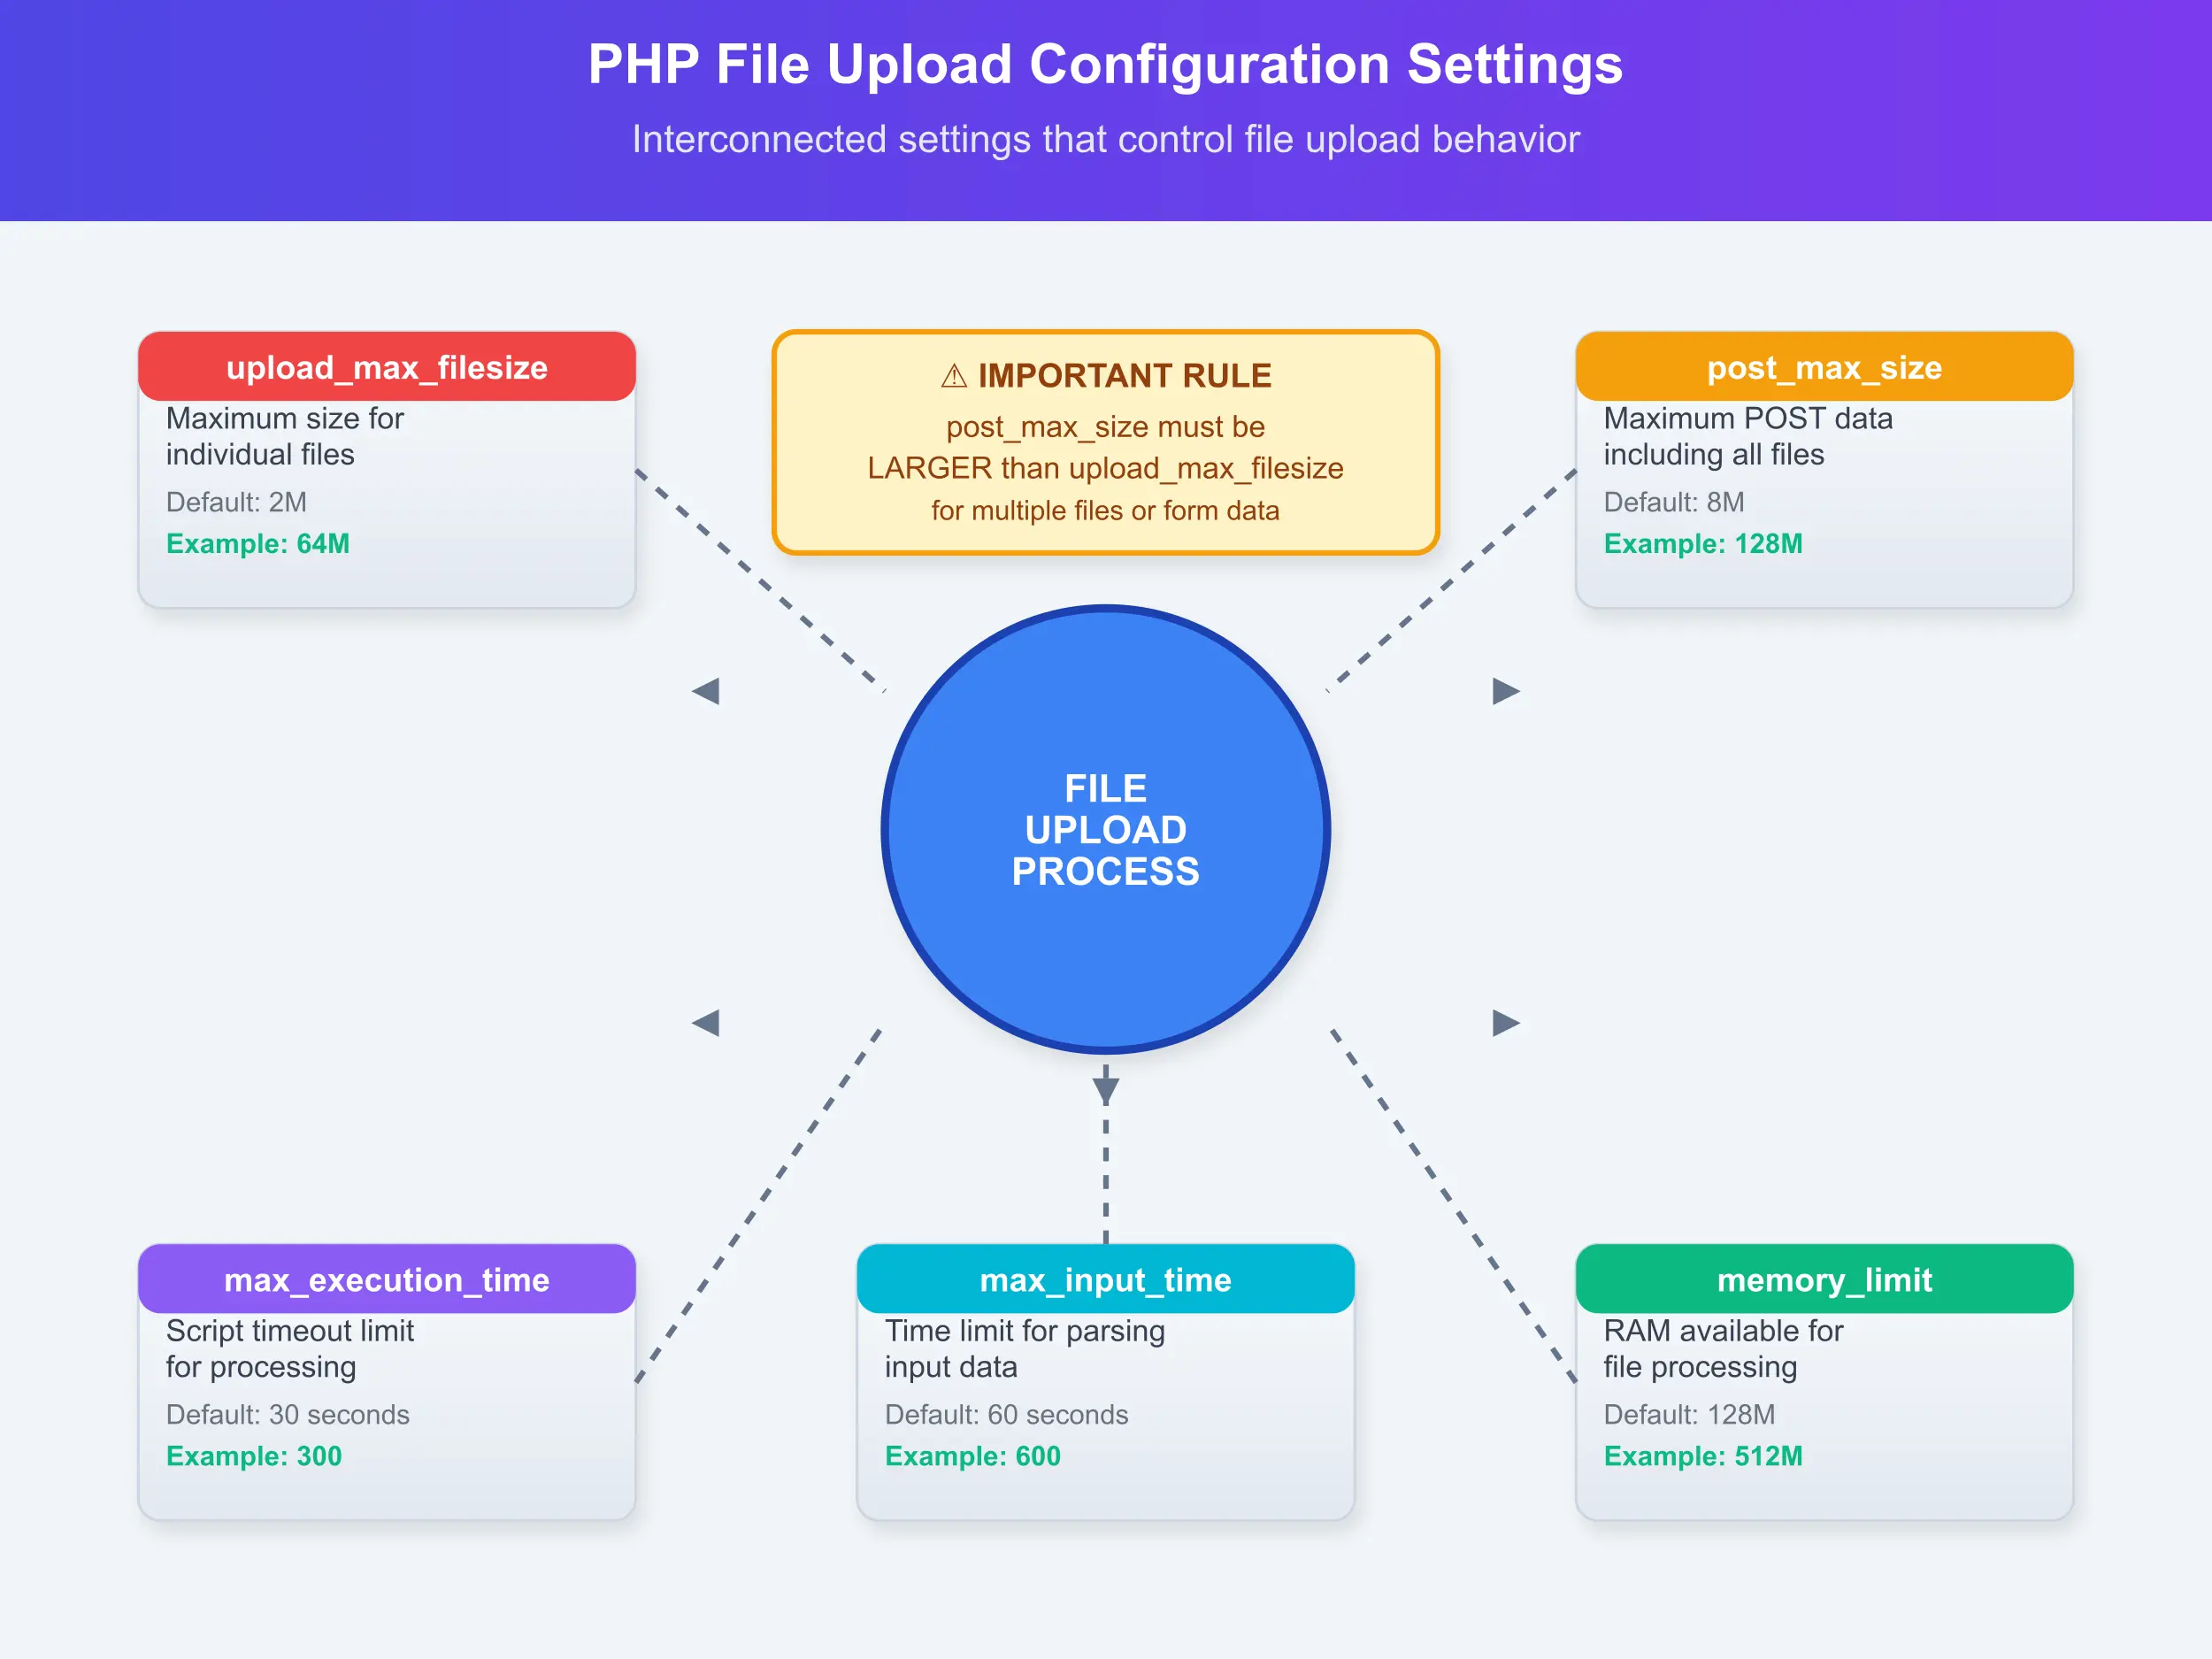
Before diving into the configuration changes, it’s important to understand that PHP uses several interconnected settings to control file uploads. These work together to ensure your server remains stable and secure while processing uploaded files.
The primary settings that affect file uploads are:
upload_max_filesize – This sets the maximum size for individual uploaded files. It’s the setting most developers think of first, but it’s not the only one that matters.
post_max_size – This controls the maximum size of all POST data, including uploaded files. If you’re uploading multiple files or have other form data, this needs to be larger than upload_max_filesize.
max_execution_time – Large file uploads take time to process. This setting determines how long a PHP script can run before timing out.
max_input_time – This specifically controls how long PHP will spend parsing input data, including file uploads.
memory_limit – PHP needs sufficient memory to handle file uploads, especially if your application processes the files after upload.
Let’s checkout different methods mentioned below to increase upload_max_filesize in PHP:
Method 1: Using ServerAvatar
ServerAvatar is a platform to simplify the deployment and management of servers and applications. It simplifies the process to deploy and manage PHP and Node.js based web applications on servers. If you’re using ServerAvatar to manage your servers and applications, increasing the “upload_max_filesize” in PHP for your application is incredibly simple and doesn’t require editing PHP configuration files manually.
Step 1: Access ServerAvatar Panel
Log in to your ServerAvatar account and navigate to the Server panel by clicking on the Dashboard icon for the server where your application is hosted.
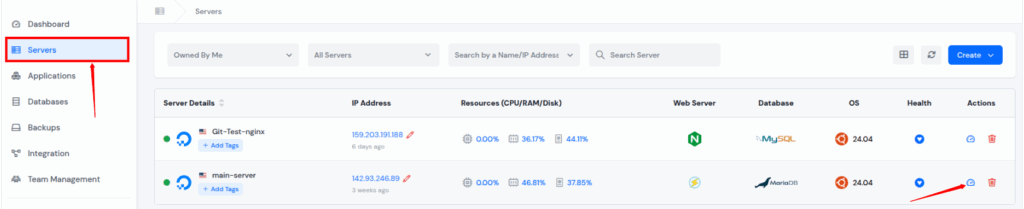
Step 2: Access Application Panel
Go to the Applications section from the left-hand sidebar and select click on the application dashboard icon for the application you want to increase the “upload_max_filesize“.

Step 3: Modify PHP Settings
Click on “PHP Settings” from the left sidebar of application panel. In the PHP Settings section, you will see various configurable options.
Find the setting named upload_max_filesize. Enter your desired value (e.g., 64M, 128M, etc.), and Click on “Update Settings” button at the bottom of the section.
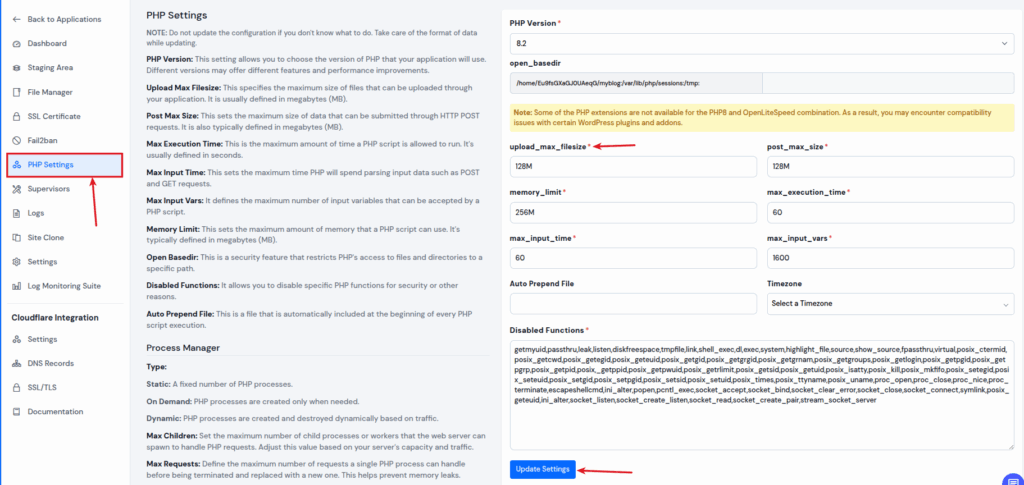
ServerAvatar will automatically update the PHP configuration, and the change takes effect immediately. This method is very easy and ideal for beginners or anyone who wants a fast, error-free way to manage PHP settings without touching the command line.
Method 2: Editing php.ini
The most permanent and reliable way to increase file upload limits is by modifying the php.ini configuration file.
Step 1: Locate your php.ini file
First, you need to find where your php.ini file is located. Create a simple PHP file with this content:
<?php
phpinfo();
?>Upload this file to your web server and access it through your browser. Look for the “Loaded Configuration File” entry, which shows the path to your active php.ini file.
Step 2: Create a backup
Before making any changes, create a backup copy of your php.ini file:
cp /path/to/php.ini /path/to/php.ini.backupStep 3: Edit the configuration
Open the php.ini file in your preferred text editor and locate the following lines. If they don’t exist, add them to the file:
; Maximum allowed size for uploaded files
upload_max_filesize = 64M

; Maximum size of POST data that PHP will accept
post_max_size = 64M

; Maximum execution time of each script, in seconds
max_execution_time = 300

; Maximum amount of time each script may spend parsing request data
max_input_time = 300

; Maximum amount of memory a script may consume
memory_limit = 256MImportant considerations for these values:
- Set post_max_size equal to or larger than upload_max_filesize
- For multiple file uploads, make post_max_size significantly larger
- Adjust execution times based on your server’s upload speed and expected file sizes
- Memory limit should be sufficient for your application’s needs
Step 4: Restart your web server
After saving the changes, restart your web server to apply the new configuration:
# For Apache
sudo systemctl restart apache2
# or
sudo service apache2 restart

# For Nginx with PHP-FPM
sudo systemctl restart nginx
sudo systemctl restart php-fpm
# or
sudo service nginx restart
sudo service php-fpm restartMethod 3: Using .htaccess (Apache Only)
If you don’t have access to the php.ini file or want to apply changes to specific directories, you can use an .htaccess file:
Step 1: Create or edit .htaccess
In your website’s root directory (or the specific directory where you need larger uploads), create or edit the .htaccess file:
php_value upload_max_filesize 64M
php_value post_max_size 64M
php_value max_execution_time 300
php_value max_input_time 300
php_value memory_limit 256MStep 2: Test the configuration
Create a test script to verify your changes are working:
<?php
echo "upload_max_filesize: " . ini_get('upload_max_filesize') . "<br>";
echo "post_max_size: " . ini_get('post_max_size') . "<br>";
echo "max_execution_time: " . ini_get('max_execution_time') . "<br>";
echo "max_input_time: " . ini_get('max_input_time') . "<br>";
echo "memory_limit: " . ini_get('memory_limit') . "<br>";
?>Method 4: Runtime Configuration with ini_set()
For specific scripts that need different limits, you can modify settings at runtime:
<?php
// Set upload limits for this script only
ini_set('upload_max_filesize', '64M');
ini_set('post_max_size', '64M');
ini_set('max_execution_time', 300);
ini_set('max_input_time', 300);
ini_set('memory_limit', '256M');

// Your file upload handling code here
if ($_SERVER['REQUEST_METHOD'] == 'POST' && isset($_FILES['upload'])) {
    $upload_dir = 'uploads/';
    $upload_file = $upload_dir . basename($_FILES['upload']['name']);

    if (move_uploaded_file($_FILES['upload']['tmp_name'], $upload_file)) {
        echo "File uploaded successfully!";
    } else {
        echo "Upload failed!";
    }
}
?>Note: Some hosting providers restrict the use of ini_set() for security reasons, so this method may not always work.
Practical Example: Building a File Upload Form
Here’s a complete example that demonstrates proper file upload handling with error checking:
<!DOCTYPE html>
<html>
<head>
    <title>File Upload Example</title>
    <style>
        .upload-form { max-width: 500px; margin: 50px auto; padding: 20px; border: 1px solid #ddd; }
        .upload-area { border: 2px dashed #ccc; padding: 20px; text-align: center; margin: 20px 0; }
        .error { color: red; margin: 10px 0; }
        .success { color: green; margin: 10px 0; }
    </style>
</head>
<body>
    <div class="upload-form">
        <h2>Large File Upload Test</h2>

        <?php
        if ($_SERVER['REQUEST_METHOD'] == 'POST') {
            $upload_dir = 'uploads/';

            // Create uploads directory if it doesn't exist
            if (!file_exists($upload_dir)) {
                mkdir($upload_dir, 0755, true);
            }

            if (isset($_FILES['file']) && $_FILES['file']['error'] == 0) {
                $file = $_FILES['file'];
                $file_name = basename($file['name']);
                $file_size = $file['size'];
                $file_tmp = $file['tmp_name'];
                $upload_path = $upload_dir . $file_name;

                // Check file size (additional validation)
                $max_size = 64 * 1024 * 1024; // 64MB in bytes
                if ($file_size > $max_size) {
                    echo "<div class='error'>File is too large. Maximum size is 64MB.</div>";
                } else {
                    if (move_uploaded_file($file_tmp, $upload_path)) {
                        echo "<div class='success'>File uploaded successfully!</div>";
                        echo "<div>File name: " . htmlspecialchars($file_name) . "</div>";
                        echo "<div>File size: " . number_format($file_size / 1024 / 1024, 2) . " MB</div>";
                    } else {
                        echo "<div class='error'>Upload failed!</div>";
                    }
                }
            } else {
                // Handle upload errors
                $error_messages = [
                    UPLOAD_ERR_INI_SIZE => 'File exceeds upload_max_filesize directive',
                    UPLOAD_ERR_FORM_SIZE => 'File exceeds MAX_FILE_SIZE directive',
                    UPLOAD_ERR_PARTIAL => 'File was only partially uploaded',
                    UPLOAD_ERR_NO_FILE => 'No file was uploaded',
                    UPLOAD_ERR_NO_TMP_DIR => 'Missing temporary folder',
                    UPLOAD_ERR_CANT_WRITE => 'Failed to write file to disk',
                    UPLOAD_ERR_EXTENSION => 'File upload stopped by extension'
                ];

                $error_code = $_FILES['file']['error'];
                echo "<div class='error'>Upload Error: " . $error_messages[$error_code] . "</div>";
            }
        }

        // Display current PHP settings
        echo "<div style='background: #f5f5f5; padding: 10px; margin: 20px 0; font-size: 12px;'>";
        echo "<strong>Current PHP Settings:</strong><br>";
        echo "upload_max_filesize: " . ini_get('upload_max_filesize') . "<br>";
        echo "post_max_size: " . ini_get('post_max_size') . "<br>";
        echo "max_execution_time: " . ini_get('max_execution_time') . " seconds<br>";
        echo "</div>";
        ?>

        <form action="" method="post" enctype="multipart/form-data">
            <div class="upload-area">
                <input type="file" name="file" required>
                <p>Maximum file size: 64MB</p>
            </div>
            <input type="submit" value="Upload File" style="width: 100%; padding: 10px; background: #007cba; color: white; border: none; cursor: pointer;">
        </form>
    </div>
</body>
</html>
Security Considerations
When increasing file upload limits, security becomes even more critical. Here are essential security practices to implement:
Validate file types rigorously:
<?php
function validateFileType($file) {
    $allowed_types = ['image/jpeg', 'image/png', 'application/pdf', 'text/plain'];
    $file_type = $file['type'];

    // Don't rely solely on MIME type - check file extension too
    $file_extension = strtolower(pathinfo($file['name'], PATHINFO_EXTENSION));
    $allowed_extensions = ['jpg', 'jpeg', 'png', 'pdf', 'txt'];

    return in_array($file_type, $allowed_types) && in_array($file_extension, $allowed_extensions);
}
?>Implement virus scanning for uploaded files if your application handles files from untrusted sources.
Store uploaded files outside the web root whenever possible to prevent direct access.
Use unique file names to prevent conflicts and potential security issues:
<?php
function generateUniqueFileName($original_name) {
    $extension = pathinfo($original_name, PATHINFO_EXTENSION);
    return uniqid('upload_', true) . '.' . $extension;
}
?>Troubleshooting Common Issues
Changes not taking effect: Always restart your web server after modifying php.ini. Some hosting environments may cache configuration settings.\
403 Forbidden errors: Check that your web server has write permissions to the upload directory and that the directory exists.
Timeouts during large uploads: Increase both max_execution_time and max_input_time. Consider implementing client-side progress indicators for better user experience.
Memory limit errors: Large files require adequate memory. Monitor your server’s memory usage and adjust memory_limit accordingly.
Shared hosting limitations: Many shared hosting providers impose strict limits that cannot be overridden. Contact your hosting provider if standard methods don’t work.
Testing Your Configuration
After making changes, thoroughly test your upload functionality:
<?php
function testUploadConfiguration() {
    echo "<h3>PHP Upload Configuration Test</h3>";

    $settings = [
        'upload_max_filesize' => ini_get('upload_max_filesize'),
        'post_max_size' => ini_get('post_max_size'),
        'max_execution_time' => ini_get('max_execution_time'),
        'max_input_time' => ini_get('max_input_time'),
        'memory_limit' => ini_get('memory_limit')
    ];

    foreach ($settings as $setting => $value) {
        echo "<strong>$setting:</strong> $value<br>";
    }

    // Convert sizes to bytes for comparison
    $upload_max = return_bytes(ini_get('upload_max_filesize'));
    $post_max = return_bytes(ini_get('post_max_size'));

    if ($post_max < $upload_max) {
        echo "<div style='color: red; margin-top: 10px;'>";
        echo "⚠️ Warning: post_max_size should be larger than upload_max_filesize";
        echo "</div>";
    }
}

function return_bytes($val) {
    $val = trim($val);
    $last = strtolower($val[strlen($val)-1]);
    $val = (int) $val;
    switch($last) {
        case 'g': $val *= 1024;
        case 'm': $val *= 1024;
        case 'k': $val *= 1024;
    }
    return $val;
}

testUploadConfiguration();
?>Frequently Asked Questions
Q: What’s the maximum file size I can set for uploads?
Theoretically, there’s no hard limit, but practical considerations include server memory, storage space, and processing time. Most applications work well with limits between 64MB and 512MB. For very large files (GB+), consider chunked upload solutions.
Q: Why do my changes to .htaccess not work?
server might be running Nginx instead of Apache, the hosting provider may disable .htaccess overrides for PHP settings, or mod_php might not be installed. Try the php.ini method or contact your hosting provider.
Q: How do I handle multiple file uploads with larger limits?
Multiply your post_max_size by the number of files you expect. For example, if upload_max_filesize is 64M and you allow 5 files, set post_max_size to at least 320M. Also consider the max_file_uploads directive.
Q: Can I increase limits for specific pages only?
Yes, you can use ini_set() at the beginning of specific PHP scripts, create a .htaccess file in specific directories, or use different PHP-FPM pools with different configurations for different parts of your application.
Q: What happens if I set the limits too high?
High limits can lead to memory exhaustion, longer processing times, and potential denial-of-service vulnerabilities. Always balance functionality needs with server resources and implement proper validation and security measures.
Conclusion
Successfully increasing PHP’s upload_max_filesize requires understanding the interconnected nature of PHP’s file upload settings and implementing changes systematically. Whether you’re modifying the php.ini file for server-wide changes or using .htaccess for directory-specific adjustments, the key is ensuring all related settings work together harmoniously.
Remember that larger file uploads come with increased security risks and server resource requirements. Always implement proper validation, consider your server’s capabilities, and test thoroughly in a development environment before deploying changes to production.
The examples and methods outlined in this guide provide a solid foundation for handling larger file uploads in your PHP applications. As your application grows, you may need to consider additional solutions like chunked uploads for very large files or cloud storage integration for better scalability.
By following these best practices and staying mindful of security considerations, you can create robust file upload functionality that meets your users’ needs while maintaining system stability and security.
Stop Wasting Time on Servers. Start Building Instead.
You didn’t start your project to babysit servers. Let ServerAvatar handle deployment, monitoring, and backups — so you can focus on growth.
Deploy WordPress, Laravel, N8N, and more in minutes. No DevOps required. No command line. No stress.
Trusted by 10,000+ developers and growing.