

Have you ever felt stuck trying to Install Git on Ubuntu? You’re not alone! Installing Git is like putting the cornerstone in place before building your dream house: once it’s there, everything else falls into place smoothly. In this guide, we’ll walk you through how to Install Git on Ubuntu in no time – no jargon, no fuss. Ready? Let’s dive in!
Why You Need Git
Git is more than just a version control tool – it’s the backbone of modern collaboration. Whether you’re a solo developer or part of a large team, Git lets you track changes, revert to previous states, and work on multiple features simultaneously without fear of losing work. Think of it as a time machine for your code!
Using ServerAvatar for Git
With ServerAvatar, you don’t have to worry about manually installing or setting up Git on your server. Git is automatically installed when you connect a server through ServerAvatar, saving you time and effort.
ServerAvatar is a platform to simplify the hosting and management of servers and applications. It simplifies the process of deploying and managing PHP and Node.js-based web applications on servers. If you’re using ServerAvatar to host your git sites, you don’t need to worry about manual git installation at all.

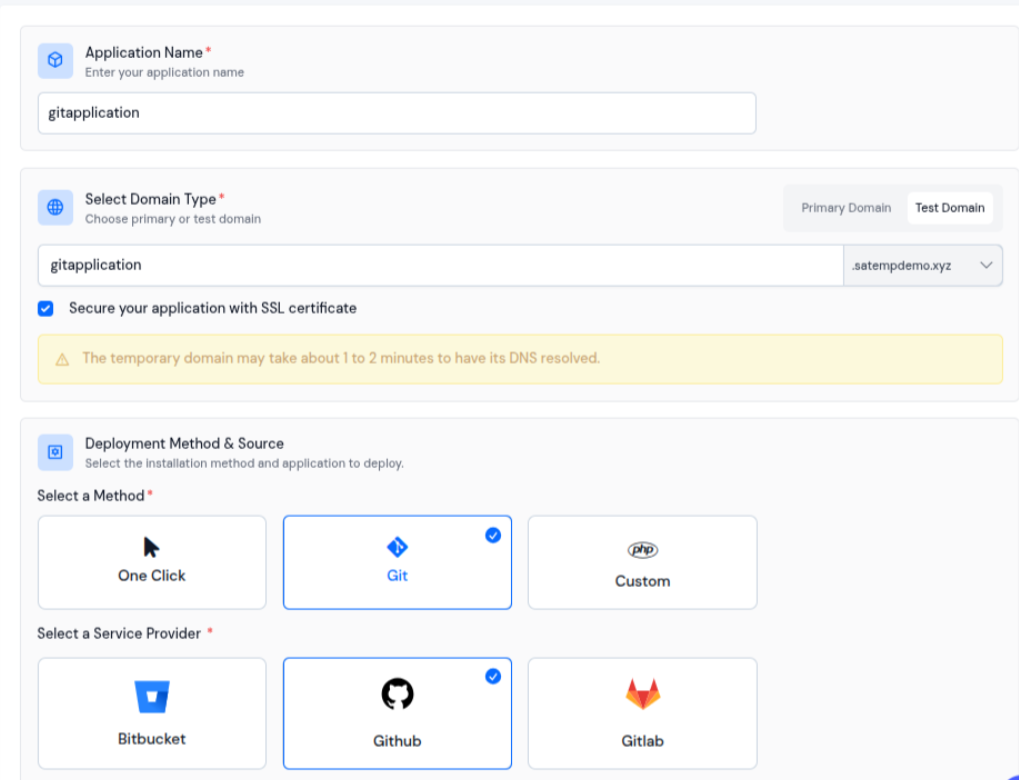
On top of that, ServerAvatar allows you to seamlessly integrate your Git accounts, including GitHub, GitLab, and Bitbucket, so you can easily deploy your applications directly from your repositories.
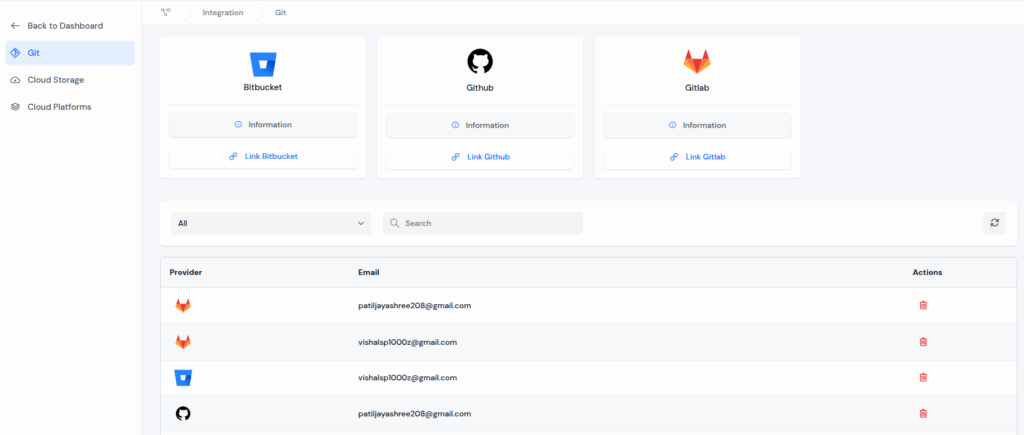
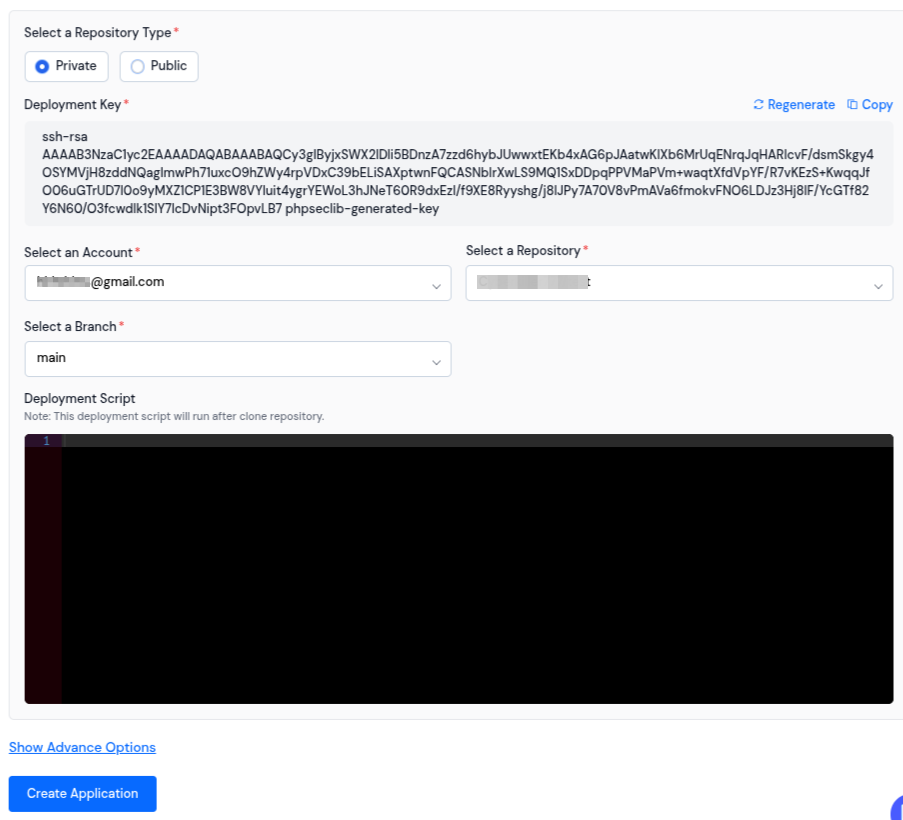
You can install and manage the Git applications with private or public repositories directly from the ServerAvatar dashboard with just a few clicks. This makes version control, deployments, and server management simpler and more efficient.
Installing Git Manually
Prerequisites
Before we begin, let’s check what you need:
- Ubuntu 18.04+ or any later release
- Terminal access with a user having sudo privileges
- An internet connection
That’s it! If you can open a terminal, you’re ready to go.
Update Ubuntu Packages
First things first – let’s make sure your package list is up to date. This ensures you’re installing the latest version of any software.
sudo apt updateTip: Running
sudo apt updateis like refreshing your app store to see the newest app versions available.
Install Git via APT
Now, let’s install Git. A single command is all it takes:
sudo apt install git -yThe -y flag automatically confirms the installation. Easy peasy!
Verify Git Installation
Once the installation completes, you’ll want to confirm it worked. Run:
git --versionYou should see something like git version 2.34.1. If you do, congrats – you’ve successfully installed Git on Ubuntu!
Configure Git User Information
Git needs to know who you are. Set your name and email globally with:
git config --global user.name "Your Name"
git config --global user.email "you@example.com"Why? Every commit is tagged with these details, creating a clear history for you and your collaborators.
Generate SSH Keys for Git
SSH keys allow secure communication with remote repositories:
ssh-keygen -t ed25519 -C "you@example.com"Press Enter to accept defaults. If asked for a passphrase, choose one or leave blank for no passphrase.
Add SSH Key to GitHub/GitLab
Copy your public key to the clipboard:
cat ~/.ssh/id_ed25519.pubThen, log in to your Git hosting service:
- For GitHub, go to Settings > SSH and GPG keys > New SSH key.
- For GitLab, navigate to User Settings > SSH Keys > Add new.
Paste the key and save. Voilà – you’re ready to push and pull!
Basic Git Commands
Getting comfortable with a few commands makes life easier:
git clone <repo_url>– Download a repositorygit status– View changesgit add .– Stage changesgit commit -m "Message"– Commit changesgit push– Upload to remotegit pull– Download updates
Rinse and repeat!
Using Git Bash on Ubuntu
If you prefer a more familiar interface, consider Git Bash. You can Learn more about Git Bash.
Git Bash brings a Unix-like shell to Windows, and it works seamlessly through WSL on Ubuntu. It’s like turning your terminal into a Swiss Army knife!
Keeping Git Up to Date
To update Git in the future:
sudo apt update
sudo apt upgrade git -yStaying current helps you benefit from security patches and new features.

Troubleshooting Common Issues
- Permission denied (publickey): Ensure your SSH key is added correctly.
- Command not found: Verify Git installed with
git --version. - Merge conflicts: Use
git mergetoolor manually resolve conflicts in your editor.
Uninstalling Git
If you ever need to remove Git:
sudo apt remove git --purge -y
sudo apt autoremove -yYour configuration remains in ~/.gitconfig unless you delete it manually.
Best Practices for Git Usage
Branch Often: Create feature branches (git checkout -b feature-name) to isolate work.
Commit Early, Commit Often: Small commits make debugging easier.
Write Clear Messages: A good commit message is like a signpost on your project’s timeline.
Conclusion & Next Steps
Congratulations! You’ve just learned how to install Git on Ubuntu quickly and configure it for daily use. From here, explore branching strategies, dive into advanced workflows, or integrate Git with CI/CD pipelines.
FAQs
How do I update Git on Ubuntu without reinstalling?
Run sudo apt update && sudo apt upgrade git -y to fetch and apply the latest version.
Can I install Git on older Ubuntu versions?
Yes, Git works on Ubuntu 16.04 and later. Use the same apt install git command.
What’s the difference between HTTPS and SSH URLs when cloning?
HTTPS uses your username/password while SSH uses your SSH key for authentication.
How do I change my Git email after commits?
Use git commit --amend --author="New Name <new@example.com>" for the last commit, or filter-branch for multiple.
Why do I get ‘detached HEAD’ and how do I fix it?
It means you’re not on a branch. Use git checkout main (or your branch name) to reattach HEAD.