

Every Laravel project I’ve worked on, whether it’s a client portal, a content management system, or an e-commerce setup, eventually needs one thing: upload image functionality. User avatars, product photos, blog thumbnails, and document attachments all rely on a reliable image upload system. The requirement shows up predictably, yet every time I reach for the documentation, I find myself piecing together bits from half a dozen sources.
Most tutorials cover the happy path. They show you the store() method, they mention enctype="multipart/form-data", and they call it done. But what about the messy parts? What happens when a user uploads a 12MB file and your server chokes? What if the validation rule passes locally but fails on your production VPS because of a misconfigured php.ini? And does your application actually handle filename collisions gracefully, or is it quietly overwriting files?
This guide is the tutorial I wish existed when I first needed to build robust image upload functionality in Laravel. We are going to cover the full picture, from setting up your database schema for image metadata, to building a form with client-side preview, to handling validation edge cases that tutorials skip, to the security considerations that actually matter in production.
TL;DR
- Laravel handles image uploads through its filesystem layer, no extra packages needed for basic uploads
- Store metadata (not just files) in your database: filename, path, MIME type, size, dimensions
- Always validate on the server AND (for UX) on the client, server-side validation is non-negotiable
- The
storage:linkcommand is still essential for serving files from the public web - Production concerns, PHP limits, disk permissions, filename collisions, are where most tutorials fall short
- ServerAvatar’s built-in server management removes the permission and PHP config headaches from your deployment workflow
How Laravel’s File Storage Actually Works
Before we write a single line of code, it helps to understand what actually happens when a file upload reaches a Laravel application. This model will save you hours of debugging later.
When a user submits a multipart form, Laravel wraps the uploaded file in an UploadedFile object. This isn’t just the file data, it carries metadata: original filename, MIME type, file size, temporary path on disk, and more.
Laravel’s official documentation provides a detailed overview of uploaded files, storage disks, and filesystem operations if you want to explore advanced storage features.
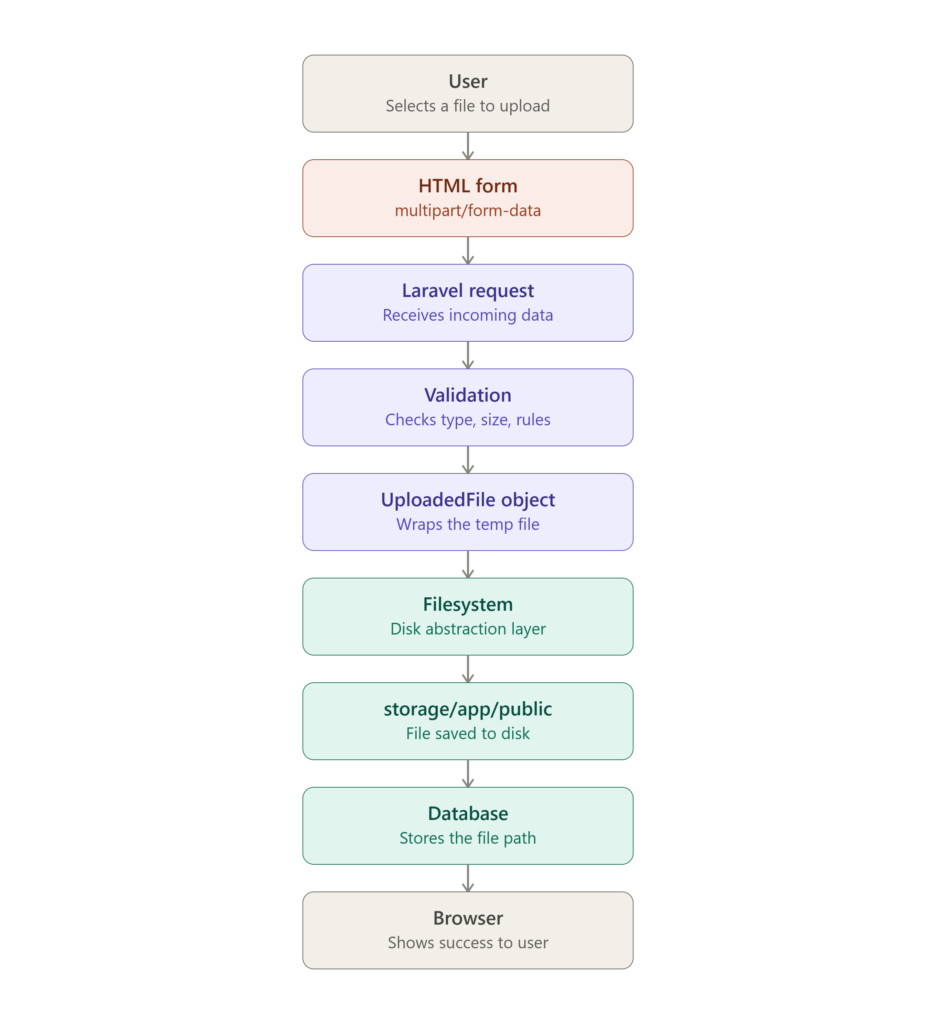
Laravel then hands this object to the filesystem layer, which decides where to put the file based on your config/filesystems.php configuration. The two most relevant disks for image uploads are:
public– Files land instorage/app/public. These are accessible directly from the web, but only if you’ve runphp artisan storage:linkto create a symlink frompublic/storagetostorage/app/public. This is the standard path for user-uploaded content you want publicly served.local– Files land instorage/app. These are not web-accessible by default, which makes them suitable for files you want to control access to, think documents behind a paywall, or images served through a signed URL.
For most image upload use cases, profile photos, product images, gallery uploads, you will use public with the storage:link symlink. I will focus on that path in this guide.
Database Design: Storing Image Metadata the Right Way
Here’s a mistake I see constantly: they store the uploaded image path as a plain string column on the user or product table, and call it a day. This works until you need to display the image’s dimensions, filter by file size, or track which uploads are causing storage bloat.
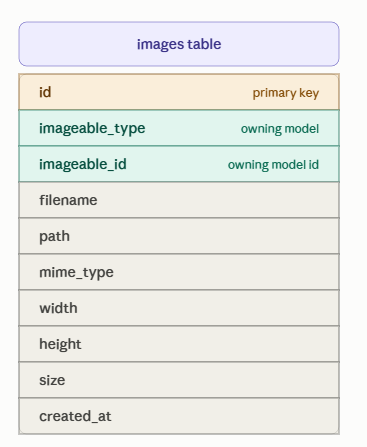
Separate your concerns. Create a dedicated images table and use a polymorphic relationship. This way, any model in your application can have images, a user, a product, a blog post, without cluttering your main tables.
Schema::create('images', function (Blueprint $table) {
    $table->id();
    $table->morphs('imageable'); <em>// adds imageable_type and imageable_id</em>
    $table->string('filename');
    $table->string('path');
    $table->string('mime_type');
    $table->unsignedInteger('size'); <em>// in bytes</em>
    $table->unsignedSmallInteger('width')->nullable();
    $table->unsignedSmallInteger('height')->nullable();
    $table->timestamps();
});Storing image width and height can be useful for generating responsive images, validating aspect ratios, and creating thumbnails. You can easily retrieve these values during upload using PHP’s getimagesize() function.
The corresponding Eloquent model is straightforward:
class Image extends Model
{
    protected $fillable = [
        'filename', 'path', 'mime_type', 'size', 'width', 'height'
    ];

    public function imageable()
    {
        return $this->morphTo();
    }

    public function url(): string
    {
        return asset('storage/' . $this->path . '/' . $this->filename);
    }
}What this gives you that a plain string column doesn’t: you can query images by size, filter by dimensions, eager-load them efficiently, and swap storage backends without touching your application code.
One-Time Server Setup
Before your application can handle uploads, two server-level things need to be in place.
1. Run the storage symlink. If you’ve already done this on your local machine, remember it needs to be run on every server you deploy to, including production.
php artisan storage:linkThis creates a symbolic link at public/storage pointing to storage/app/public. Without it, asset() URLs pointing to storage/ will return 404s in production.
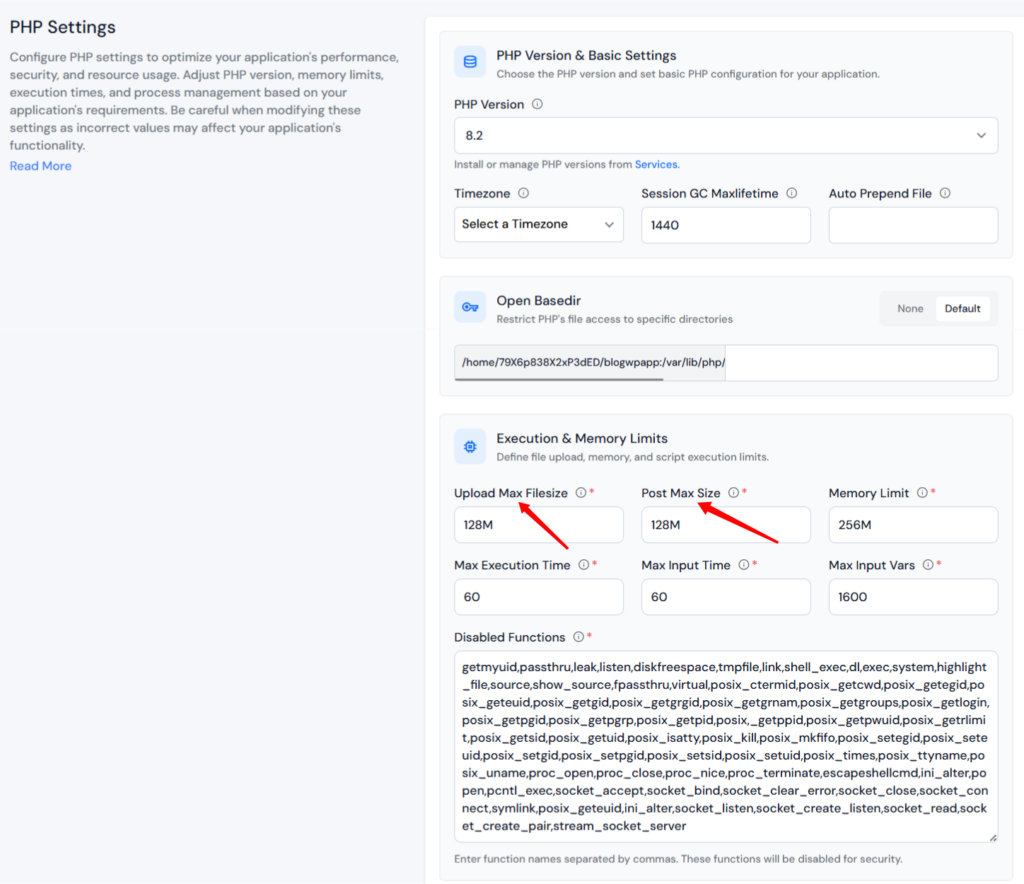
2. Check your PHP upload limits. This is where I’ve seen the most unexpected failures in production. PHP imposes two directives that directly affect file uploads:
upload_max_filesize– maximum size of an individual uploaded filepost_max_size– maximum size of a POST request (must be larger thanupload_max_filesize)
On a typical shared or cloud VPS, these might be set to 8M or even 2M. If your users need to upload 5MB photos, a 2MB limit will silently fail with a generic error.
On ServerAvatar, you can adjust these values directly from the ServerAvatar dashboard without SSHing into the server.
If you’re on a bare VPS, edit /etc/php/{version}/apache2/php.ini or /etc/php/{version}/fpm/php.ini depending on your setup, then restart PHP-FPM or Apache.
A practical tip I follow: set your PHP upload_max_filesize to 10M (or higher), set post_max_size slightly higher (for example 12M), and use Laravel’s max:10240 validation rule. This keeps your server and application limits aligned while ensuring Laravel, not PHP’s POST size limit, handles validation whenever possible.
Create the Laravel Image Upload Form
The HTML form for file uploads is straightforward, but there are a few things worth getting right from the start rather than patching them later.
<form action="{{ route('images.store') }}" method="POST" enctype="multipart/form-data">
    @csrf

    <div>
        <label for="image">Upload Image</label>
        <input type="file" name="image" id="image" accept="image/*">
        @error('image')
            <span>{{ $message }}</span>
        @enderror
    </div>

    <button type="submit">Upload</button>
</form>The accept="image/*" attribute is a client-side hint that narrows the file picker to image types. It’s not a security measure, users can bypass it, but it improves UX by filtering out non-image files before submission. Always pair it with server-side validation.
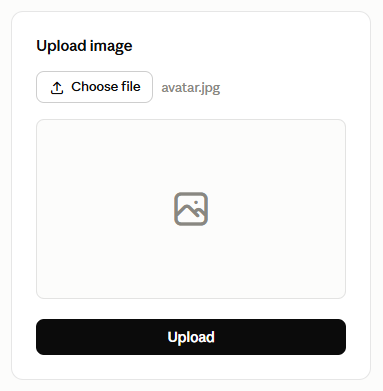
For the UX-conscious developer: Add a JavaScript preview so users can see what they’re uploading before hitting submit. I’ve found this reduces failed uploads significantly because users correct wrong files early rather than after a round-trip.
If you prefer a reactive approach without writing much JavaScript, Laravel Livewire makes it easy to build real-time image previews and uploads with minimal code.
<div>
    <img id="preview" src="" alt="Preview" style="max-width: 300px; display: none;">
</div>

<input type="file" name="image" id="image" accept="image/*" onchange="previewFile()">

<script>
function previewFile() {
    const file = document.querySelector('input[type=file]').files[0];
    const preview = document.getElementById('preview');
    const reader = new FileReader();

    reader.onloadend = function () {
        preview.src = reader.result;
        preview.style.display = 'block';
    }

    if (file) {
        reader.readAsDataURL(file);
    }
}
</script>The FileReader API gives you a data URL that you can assign to an <img> src. This happens entirely in the browser, no server request, no upload. The file isn’t actually uploaded until the form is submitted.
The Controller: Where the Real Work Happens
The controller is responsible for validating the uploaded file, storing it in the configured location, and recording its metadata in the database. Let me walk through each phase.
If you’re building an API instead of a traditional Blade application, our Laravel API Tutorial shows how to return uploaded image paths as JSON responses for frontend or mobile applications.
Validation
Server-side validation is your first and most important line of defense.
Here’s what I validate and why:
public function store(Request $request)
{
    $validated = $request->validate([
        'image' => [
            'required',
            'file',
            'image',
            'mimes:jpeg,png,gif,webp',
            'max:10240', <em>// 10MB in kilobytes</em>
            'dimensions:min_width=100,min_height=100',
        ],
]);Use the array syntax to keep validation rules organized and easy to extend. While the mimes rule checks allowed file types, Laravel’s image rule also verifies that the uploaded file is a valid image. Adding the dimensions rule helps reject extremely small images, such as 1×1 pixel files, by enforcing a minimum width and height.
You can also explore Laravel’s official validation documentation to understand additional rules such as dimensions, image, and custom validation logic.
Storing the File
After validation, store the file:
    $file = $request->file('image');

    <em>// Get image dimensions using PHP's built-in function</em>
    [$width, $height] = getimagesize($file->getRealPath());

    <em>// Generate a unique filename to avoid collisions</em>
    $filename = Str::uuid() . '.' . $file->getClientOriginalExtension();

    <em>// Store the file</em>
    $path = $file->storeAs('images', $filename, 'public');

    <em>// Save metadata to database</em>
    $image = Image::create([
        'filename' => $filename,
        'path'     => 'images',
        'mime_type'=> $file->getMimeType(),
        'size'     => $file->getSize(),
        'width'    => $width,
        'height'   => $height,
    ]);

    return redirect()->back()->with('success', 'Image uploaded successfully.');
}A few things worth highlighting here:
- UUID filenames. The original filename a user uploads (
my-vacation-photo.jpg) is unreliable, it might contain special characters, spaces, or duplicate names across users. Using a UUID (f47ac10b-58cc-4372-a567-0e02b2c3d479.jpg) sidesteps collision issues entirely. You store the original name separately in the database if you need it for display purposes. - The
storeAsmethod. It takes the directory, the filename, and the disk. By passing'public'as the disk, the file lands instorage/app/public/images. Combined with thestorage:linksymlink we created earlier, it’s accessible atyourdomain.com/storage/images/uuid.jpg. - The metadata. Storing width, height, and MIME type in the database is cheap and pays off later. When you need to generate a srcset for responsive images, you already have the dimensions. When you’re debugging why a particular image won’t display, the MIME type gives you a clue.
Displaying Images Correctly
Displaying a stored image is simple in theory:
<img src="{{ $image->url() }}" alt="Uploaded image">But if you’re building anything serious, you’ll want more than a raw <img> tag.
Responsive Images with Srcset
If your application displays images at multiple sizes (thumbnail, medium, full), build a srcset attribute so the browser downloads the right size for the user’s viewport:
<img
    src="{{ $image->url() }}"
    srcset="
        {{ asset('storage/' . $image->path . '/thumb-' . $image->filename) }} 300w,
        {{ asset('storage/' . $image->path . '/medium-' . $image->filename) }} 600w,
        {{ asset('storage/' . $image->path . '/' . $image->filename) }} 1200w
    "
    sizes="(max-width: 300px) 300px, (max-width: 600px) 600px, 1200px"
    alt="{{ $image->filename }}"
>Generating those resized variants is a topic of its own, but the principle is important: don’t make mobile users download a 2400px photograph to display a 300px thumbnail. The bandwidth difference is real, and Google has confirmed page speed (specifically Core Web Vitals like LCP) affects rankings.
If you’re building an admin panel, displaying uploaded images alongside searchable records becomes much easier with Laravel Yajra DataTables.
Cache-Busting
Browsers cache images aggressively. If a user uploads a new avatar and you overwrite the file at the same URL, some visitors will keep seeing the old photo for days. Append a version parameter derived from the model’s updated_at timestamp:
<img src="{{ $image->url() }}?v={{ $image->updated_at->timestamp }}" alt="Avatar">This is a cheap trick that forces the browser to treat the URL as fresh when the timestamp changes. No server round-trip, no caching headers to configure.
Security: What Most Skip
Most cover validation. Very few cover the real security risks. Here’s what actually matters.
1. File Type Validation is Not Enough
Use Laravel’s image validation instead of relying only on file extensions or MIME types, as it verifies the file is a real image. For stronger security, store uploads outside the web root whenever possible and never allow uploaded files to be executed.
Even when using storage/app/public, it’s a good practice to disable PHP execution in the upload directory as an extra layer of protection.
On an Apache server, add this to your .htaccess inside storage/app/public/images:
<FilesMatch "\.php$">
    Deny from all
</FilesMatch>On Nginx, in your site configuration:
location /storage/images/ {
    location ~ \.php$ {
        deny all;
    }
}2. Filename Sanitization
Even with UUID filenames on disk, always sanitize the original filename when you display it or store it alongside the file. The original filename can contain path traversal attempts (../../etc/passwd) or XSS payloads. Use Str::slug() or pathinfo() to extract only the safe parts:
$originalName = pathinfo($file->getClientOriginalName(), PATHINFO_FILENAME);
$sanitizedName = Str::slug($originalName, '-');3. Limit Upload Frequency
If your application allows authenticated uploads, consider rate-limiting the upload endpoint. Laravel makes this trivial with middleware:
Route::post('/images', [ImageController::class, 'store'])
->middleware(['auth', 'throttle:uploads']);The throttle:uploads middleware (configured in app/Providers/RouteServiceProvider.php) limits how many requests an authenticated user can make to upload endpoints in a given time window. This won’t stop a determined abuser, but it raises the cost of abuse significantly.
If your upload endpoint is accessible through an API, make sure it is properly protected using Laravel API Authentication to prevent unauthorized uploads.

Deployment Considerations
When you move from local development to a live server, image upload functionality faces challenges that don’t exist locally.
1. Permissions
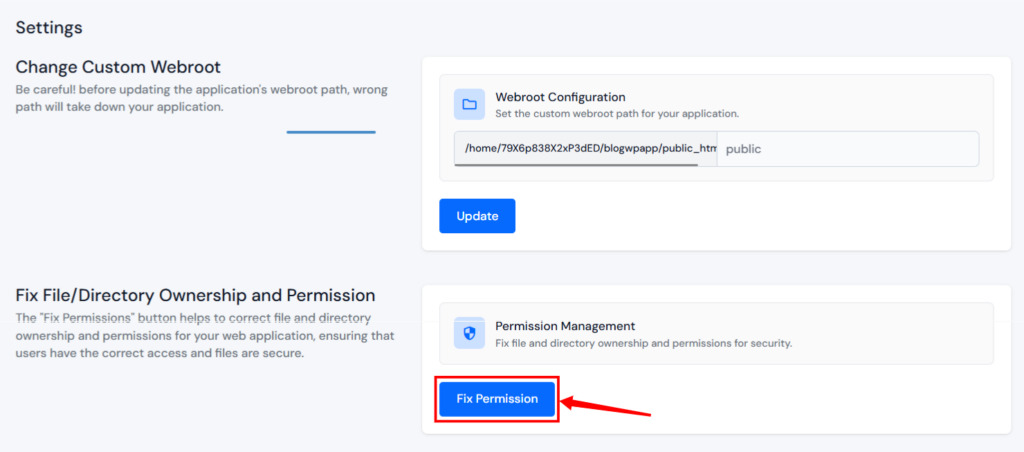
Your web server (typically www-data on Ubuntu/Debian, apache on CentOS/RHEL) needs write access to storage/app/public. On a fresh server, these directories are often owned by root. Running chown -R www-data:www-data storage/ fixes this.
On ServerAvatar, the “Fix Permission” button in the server management panel handles this in one click, I use it every time I make changes in a server.
2. Serving Files in a Load-Balanced Environment
In a load-balanced setup, local storage can cause missing files because uploads exist only on the server that received them. For scalable applications, use a shared storage solution like Amazon S3 or Google Cloud Storage. Laravel’s filesystem abstraction makes switching storage drivers simple, so planning for cloud storage early can save a complex migration later.
3. Monitoring Upload Failures in Production
I’ve learned to treat upload failures as a first-class monitoring concern. A silent failure (the upload appears to succeed from the user’s perspective but the file never reaches storage) is worse than a visible error. Log every failed upload with context:
use Illuminate\Support\Facades\Log;

try {
    <em>// ... upload logic</em>
} catch (\Exception $e) {
    Log::error('Image upload failed', [
        'user_id' => auth()->id(),
        'file_size' => $request->file('image')?->getSize(),
        'error' => $e->getMessage(),
    ]);
    return redirect()->back()->with('error', 'Upload failed. Please try again.');
}This gives you a fighting chance of diagnosing what went wrong when a user reports an issue.
Key Takeaways
- Design your database for images: a dedicated
imagestable with a polymorphic relationship scales better than attaching file paths to every model - Server-side validation is non-negotiable: client-side
accept="image/*"improves UX but provides zero security - Use UUID filenames: they eliminate collision headaches and prevent information leakage from original filenames
- Store metadata: width, height, MIME type, and size are cheap to capture and invaluable to have later
- Don’t skip the security hardening: disable PHP execution in upload directories, sanitize filenames, and rate-limit upload endpoints
- Plan for horizontal scaling early: abstract your storage disk in
config/filesystems.phpso switching to S3 later doesn’t require rewriting your upload logic - Test your error paths: configure PHP limits, test permission errors locally, and log failures in production
Conclusion
A secure, reliable image upload system requires more than just saving files. By combining proper validation, unique filenames, thoughtful storage, and basic security practices, you can build an upload workflow that’s ready for production and easy to maintain.
As your application grows, Laravel’s filesystem abstraction and flexible architecture make it simple to scale from local storage to cloud services with minimal code changes. Planning for these best practices early helps avoid costly changes later.
FAQs
How do I validate image dimensions in Laravel?
Laravel’s validation system has a built-in dimensions rule that lets you specify minimum, maximum, and exact dimension constraints. For example, dimensions:min_width=200,min_height=200,max_width=4000,max_height=4000 ensures uploaded images fall within a usable range. This is useful for avatar uploads where you want to prevent both tiny and excessively large images.
Can I upload images without a database?
Yes, if you only need to store the file and don’t need to track metadata, you can upload directly using $request->file('image')->store('images', 'public') and save the generated path. However, you lose the ability to query images by size, dimensions, or type, and handling filename collisions becomes your responsibility.
How do I display uploaded images in a Blade template?
Use the asset() helper pointing to the storage symlink path. If your file is stored at storage/app/public/images/uuid.jpg, display it with <img src="{{ asset('storage/images/uuid.jpg') }}">. For a cleaner model interface, add a url() method to your Image model that constructs this path automatically.
What is the maximum file size for image uploads in Laravel?
Laravel’s validation max rule accepts kilobytes, so max:5120 means 5MB. However, your PHP configuration (upload_max_filesize and post_max_size) also imposes hard limits at the server level. Set both to consistent values, I recommend at least 10MB at both layers for modern use cases.
How do I handle filename conflicts when uploading?
Laravel’s store() and storeAs() methods generate random filenames automatically. Using storeAs('images', $filename, 'public') with a UUID-based $filename eliminates the risk of two users uploading avatar.jpg and one overwriting the other.
About the Author
Meghna Meghwani is a technical writer focused on Linux, Ubuntu, VPS hosting, server management, WordPress, PHP, Node.js, cloud hosting, and DevOps. She creates beginner-friendly tutorials, practical hosting guides, troubleshooting articles, and server security content designed to help developers and businesses manage applications and servers more efficiently.