

Have you ever wondered how websites send you those confirmation emails or password reset links? Behind the scenes, a process known as Node Mailer Setup is likely powering it, using a powerful tool called Node Mailer working its magic. Think of Node Mailer as your digital postman, it takes your messages and delivers them straight to email inboxes worldwide.
In today’s connected world, email functionality is crucial for any web application. Whether you’re building a contact form, setting up user notifications, or creating an automated marketing system, node mailer is your go-to solution for seamless email delivery.
What is Node Mailer and Why Should You Use It?
Node Mailer is like having a Swiss Army knife for email functionality in your Node.js applications. It’s a powerful, zero-dependency module that makes sending emails as easy as writing a simple function call.
Key Benefits of Using Node Mailer
- Versatility: Works with virtually any email service provider
- Simplicity: Clean, intuitive API that’s beginner-friendly
- Reliability: Battle-tested by millions of developers worldwide
- Feature-rich: Supports HTML emails, attachments, templates, and more
- Security: Built-in support for modern authentication methods
Why choose node mailer over other solutions? Simply put, it strikes the perfect balance between simplicity and power. You’re not locked into any specific email provider, and you can switch between services without rewriting your entire codebase.
Prerequisites and System Requirements
Before we dive into the exciting stuff, let’s make sure you have everything you need. Don’t worry – the requirements are pretty straightforward!
What You’ll Need
- Node.js (version 12 or higher) installed on your system
- npm or yarn package manager
- A text editor or IDE (VS Code, Sublime Text, etc.)
- An email service provider account (Gmail, Outlook, SendGrid, etc.)
- Basic JavaScript knowledge (don’t worry, we’ll keep it simple!)
Checking Your Setup
Run these commands in your terminal to verify everything’s ready:
node --version
npm --versionIf you see version numbers, you’re good to go! If not, head over to nodejs.org and get the latest version installed. If you need to upgrade your Node.js version, check out this comprehensive guide on How to Upgrade Node: Beginner’s Tutorial which covers all the methods for different operating systems.
Installing Node Mailer in Your Project
Installing node mailer is as simple as ordering pizza online – just a few clicks and you’re done!
Step-by-Step Installation
Step 1: Navigate to your project directory
cd your-project-folderStep 2: Install Node Mailer using npm
npm install nodemailerStep 3: Verify the installation
npm list nodemailerAlternative Installation Methods
If you prefer yarn:
yarn add nodemailerFor TypeScript projects, you might also want:
npm install @types/nodemailer --save-devThat’s it! Node mailer is now part of your project’s toolkit. Pretty painless, right?
Setting Up Your First Email Configuration
Now comes the fun part – configuring your email setup. Think of this as programming your digital postman with the right address and credentials.
Basic Configuration Structure
Here’s what a typical node mailer configuration looks like:
const nodemailer = require('nodemailer');

const transporter = nodemailer.createTransporter({
  service: 'gmail',
  auth: {
    user: 'your-email@gmail.com',
    pass: 'your-password'
  }
});Understanding Transporter Options
The transporter is your email delivery vehicle. You can configure it for different services:
- service: The email provider (gmail, outlook, yahoo, etc.)
- host: Custom SMTP server address
- port: Connection port (usually 587 or 465)
- secure: Whether to use TLS encryption
- auth: Your login credentials
Environment Variables for Security
Never hardcode your credentials! Use environment variables instead:
const transporter = nodemailer.createTransporter({
  service: 'gmail',
  auth: {
    user: process.env.EMAIL_USER,
    pass: process.env.EMAIL_PASS
  }
});Creating a Basic Email Sender Function
Ready to send your first email? Let’s build a simple function that’ll have you sending messages faster than you can say “node mailer”!
Your First Email Function
async function sendEmail() {
  const mailOptions = {
    from: 'sender@example.com',
    to: 'recipient@example.com',
    subject: 'Hello from Node Mailer!',
    text: 'This is my first email sent with Node Mailer!'
  };

  try {
    const info = await transporter.sendMail(mailOptions);
    console.log('Email sent:', info.response);
  } catch (error) {
    console.error('Error sending email:', error);
  }
}Understanding Mail Options
Each email needs these essential ingredients:
- from: Sender’s email address
- to: Recipient’s email (can be multiple, separated by commas)
- subject: Email subject line
- text: Plain text message body
- html: HTML formatted message (optional)
Making It Dynamic
Let’s make our function more flexible:
async function sendCustomEmail(to, subject, message) {
  const mailOptions = {
    from: process.env.EMAIL_USER,
    to: to,
    subject: subject,
    text: message
  };

  return await transporter.sendMail(mailOptions);
}Working with Different Email Providers
One of node mailer’s superpowers is its ability to work with virtually any email provider. It’s like having a universal remote for your TV, DVD player, and sound system all in one!
Popular Email Services Configuration
Gmail Setup:
const gmailTransporter = nodemailer.createTransporter({
  service: 'gmail',
  auth: {
    user: 'your-gmail@gmail.com',
    pass: 'your-app-password'
  }
});Outlook/Hotmail Setup:
const outlookTransporter = nodemailer.createTransporter({
  service: 'hotmail',
  auth: {
    user: 'your-email@outlook.com',
    pass: 'your-password'
  }
});Custom SMTP Setup:
const customTransporter = nodemailer.createTransporter({
  host: 'mail.your-domain.com',
  port: 587,
  secure: false,
  auth: {
    user: 'your-username',
    pass: 'your-password'
  }
});Provider-Specific Considerations
Gmail Users: You’ll need to enable “Less secure app access” or use App Passwords for two-factor authentication accounts.
Corporate Email: Check with your IT department for SMTP settings and any firewall restrictions.
Sending HTML Emails with Attachments
Plain text emails are fine, but sometimes you want to add some pizzazz! Node mailer makes sending rich HTML emails and attachments incredibly straightforward.
HTML Email Example
async function sendHTMLEmail() {
  const htmlContent = `
    <h1>Welcome to Our Service!</h1>
    <p>Thank you for signing up. We're excited to have you on board!</p>
    <a href="https://example.com" style="background: #007bff; color: white; padding: 10px; text-decoration: none;">Get Started</a>
  `;

  const mailOptions = {
    from: process.env.EMAIL_USER,
    to: 'user@example.com',
    subject: 'Welcome Aboard!',
    html: htmlContent
  };

  await transporter.sendMail(mailOptions);
}Adding Attachments
const mailOptionsWithAttachments = {
  from: process.env.EMAIL_USER,
  to: 'recipient@example.com',
  subject: 'Documents Attached',
  text: 'Please find the attached documents.',
  attachments: [
    {
      filename: 'report.pdf',
      path: './documents/report.pdf'
    },
    {
      filename: 'data.csv',
      content: 'Name,Email\nJohn,john@example.com'
    }
  ]
};Inline Images and Embedded Content
Want to embed images directly in your emails?
attachments: [
  {
    filename: 'logo.png',
    path: './images/logo.png',
    cid: 'logo' // Same cid value as in the html img src
  }
]

// In your HTML:
// <img src="cid:logo" alt="Company Logo" />Authentication and Security Best Practices
Security isn’t just important – it’s essential! Let’s make sure your node mailer setup is locked down tighter than Fort Knox.
App Passwords vs Regular Passwords
For Gmail users, regular passwords won’t cut it anymore. Here’s how to set up App Passwords:
- Enable 2-factor authentication on your Google account
- Go to Google Account settings
- Navigate to Security > App passwords
- Generate a new app password for your application
- Use this 16-character password in your node mailer config
Environment Variables Best Practices
Create a .env file in your project root:
EMAIL_USER=your-email@gmail.com
EMAIL_PASS=your-app-password
EMAIL_FROM=your-name@company.comInstall the dotenv package:
npm install dotenvLoad it in your application:
require('dotenv').config();OAuth2 Authentication
For enterprise applications, consider OAuth2:
const transporter = nodemailer.createTransporter({
  service: 'gmail',
  auth: {
    type: 'OAuth2',
    user: process.env.EMAIL_USER,
    clientId: process.env.OAUTH_CLIENT_ID,
    clientSecret: process.env.OAUTH_CLIENT_SECRET,
    refreshToken: process.env.OAUTH_REFRESH_TOKEN
  }
});Handling Email Templates and Dynamic Content
Hardcoding email content is like wearing the same outfit every day – it works, but it’s not very exciting! Let’s make your emails dynamic and engaging.
Simple Template System
function createWelcomeEmail(userName, userEmail) {
  return `
    <div style="font-family: Arial, sans-serif; max-width: 600px;">
      <h2>Welcome, ${userName}!</h2>
      <p>We're thrilled to have you join our community.</p>
      <p>Your registered email: <strong>${userEmail}</strong></p>
      <div style="background: #f0f0f0; padding: 20px; margin: 20px 0;">
        <h3>Next Steps:</h3>
        <ul>
          <li>Verify your email address</li>
          <li>Complete your profile</li>
          <li>Explore our features</li>
        </ul>
      </div>
    </div>
  `;
}Using Template Engines
For complex templates, consider using Handlebars or EJS:
npm install handlebarsconst handlebars = require('handlebars');
const fs = require('fs');
// Read template file
const templateSource = fs.readFileSync('./templates/welcome.hbs', 'utf8');
const template = handlebars.compile(templateSource);
// Generate HTML with data
const htmlContent = template({
userName: 'John Doe',
companyName: 'Awesome Corp',
activationLink: 'https://example.com/activate/123'
});Dynamic Content Strategies
Personalization Tips:
- Use the recipient’s name in subject lines
- Include relevant product recommendations
- Add location-based content
- Reference previous interactions

10. Error Handling and Debugging Common Issues
Even the best digital postmen sometimes face challenges. Let’s prepare you for common node mailer hiccups and how to solve them like a pro!
Comprehensive Error Handling
async function robustEmailSender(mailOptions) {
  try {
    const info = await transporter.sendMail(mailOptions);
    console.log('✅ Email sent successfully:', info.messageId);
    return { success: true, messageId: info.messageId };
  } catch (error) {
    console.error('❌ Email sending failed:', error.message);

    // Categorize different types of errors
    if (error.code === 'EAUTH') {
      console.error('Authentication failed. Check your credentials.');
    } else if (error.code === 'ECONNECTION') {
      console.error('Connection failed. Check your internet connection.');
    } else if (error.responseCode === 550) {
      console.error('Recipient email address rejected.');
    }

    return { success: false, error: error.message };
  }
}Common Error Codes and Solutions
EAUTH – Authentication Error
- Double-check your email and password
- Ensure you’re using App Passwords for Gmail
- Verify that “Less secure app access” is enabled
ECONNECTION – Connection Issues
- Check your internet connection
- Verify SMTP server settings
- Try different ports (587, 465, 25)
550 – Mailbox Unavailable
- Recipient email address doesn’t exist
- Email was rejected by the recipient’s server
- Check for typos in the email address
Debugging Tools and Techniques
Enable debug mode for detailed logging:
const transporter = nodemailer.createTransporter({
  service: 'gmail',
  auth: {
    user: process.env.EMAIL_USER,
    pass: process.env.EMAIL_PASS
  },
  debug: true, // Enable debug output
  logger: true // Log to console
});Testing Your Email Functionality
Testing emails can be tricky – you don’t want to spam real users while developing! Here are some smart strategies to test your node mailer setup.
Development Testing Strategies
Use Professional Testing Services:
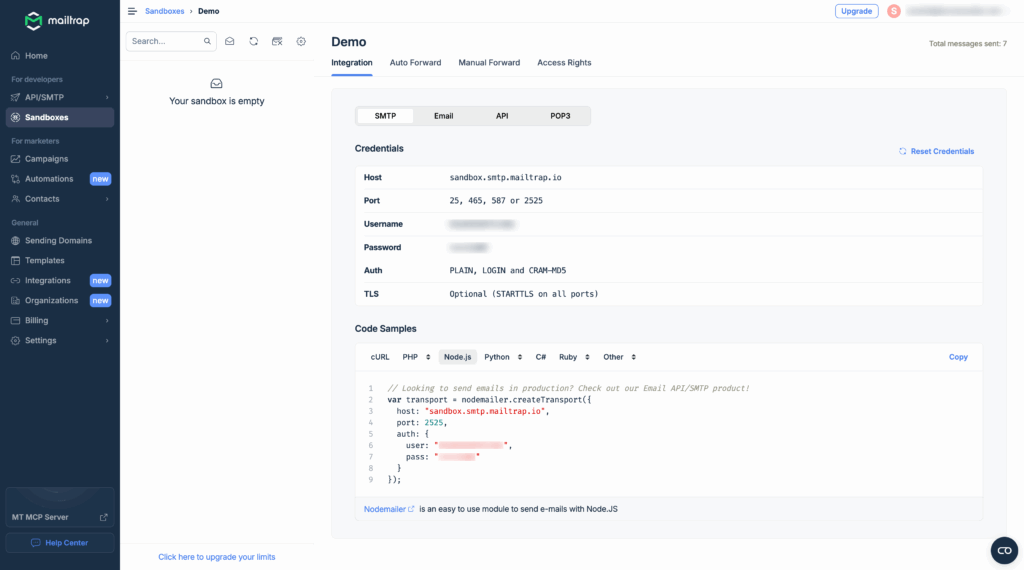
For reliable email testing, consider using Mailtrap – a professional email testing service that captures emails in a sandbox environment:
// Mailtrap configuration for testing
const testTransporter = nodemailer.createTransporter({
  host: 'smtp.mailtrap.io',
  port: 2525,
  auth: {
    user: 'your-mailtrap-username',
    pass: 'your-mailtrap-password'
  }
});Mailtrap provides a safe testing environment where you can inspect HTML/CSS rendering, check spam scores, and validate your email content without sending to real recipients.
Alternative – Use Ethereal Email (Free):
// For development, use Ethereal Email (fake SMTP)
const testTransporter = nodemailer.createTransporter({
  host: 'smtp.ethereal.email',
  port: 587,
  secure: false,
  auth: {
    user: 'ethereal.user@ethereal.email',
    pass: 'ethereal.password'
  }
});Create Your Own Test Account:
async function createTestAccount() {
  const testAccount = await nodemailer.createTestAccount();

  const transporter = nodemailer.createTransporter({
    host: 'smtp.ethereal.email',
    port: 587,
    secure: false,
    auth: {
      user: testAccount.user,
      pass: testAccount.pass
    }
  });

  return transporter;
}Unit Testing with Jest
const nodemailer = require('nodemailer');
const { sendEmail } = require('./emailService');

// Mock nodemailer
jest.mock('nodemailer');

describe('Email Service', () => {
  test('should send email successfully', async () => {
    const mockSendMail = jest.fn().mockResolvedValue({ messageId: '12345' });
    nodemailer.createTransporter.mockReturnValue({ sendMail: mockSendMail });

    const result = await sendEmail('test@example.com', 'Test Subject', 'Test Body');

    expect(mockSendMail).toHaveBeenCalled();
    expect(result.success).toBe(true);
  });
});Integration Testing
Create a dedicated test route for email functionality:
app.post('/test-email', async (req, res) => {
  try {
    const testResult = await sendCustomEmail(
      'test@yourdomain.com',
      'Test Email',
      'This is a test email from the system.'
    );
    res.json({ success: true, messageId: testResult.messageId });
  } catch (error) {
    res.status(500).json({ success: false, error: error.message });
  }
});Advanced Features and Customization
Ready to level up your node mailer game? Let’s explore some advanced features that’ll make your emails stand out from the crowd!
Custom Headers and Metadata
const advancedMailOptions = {
  from: 'noreply@company.com',
  to: 'user@example.com',
  subject: 'Advanced Email Features',
  text: 'This email showcases advanced features.',
  headers: {
    'X-Custom-Header': 'My Custom Value',
    'X-Priority': '1',
    'X-Mailer': 'Node Mailer Advanced'
  },
  messageId: 'custom-message-id@company.com',
  date: new Date('2025-01-15')
};Bulk Email Sending
async function sendBulkEmails(recipients, subject, content) {
  const emailPromises = recipients.map(async (recipient) => {
    const mailOptions = {
      from: process.env.EMAIL_USER,
      to: recipient.email,
      subject: subject,
      html: content.replace('{{name}}', recipient.name)
    };

    return transporter.sendMail(mailOptions);
  });

  try {
    const results = await Promise.allSettled(emailPromises);
    console.log(`Sent ${results.length} emails`);
    return results;
  } catch (error) {
    console.error('Bulk email error:', error);
  }
}Email Scheduling and Queues
For production applications, consider implementing email queues:
const Queue = require('bull');
const emailQueue = new Queue('email processing');

emailQueue.process(async (job) => {
  const { to, subject, content } = job.data;
  return await transporter.sendMail({ to, subject, html: content });
});

// Add email to queue
function scheduleEmail(emailData, delay = 0) {
  emailQueue.add(emailData, { delay });
}Performance Optimization Tips
Want your email system to run faster than a cheetah? Here are some performance optimization strategies for node mailer!
Connection Pooling
const transporter = nodemailer.createTransporter({
  service: 'gmail',
  auth: {
    user: process.env.EMAIL_USER,
    pass: process.env.EMAIL_PASS
  },
  pool: true, // Enable connection pooling
  maxConnections: 5, // Limit concurrent connections
  maxMessages: 100 // Limit messages per connection
});Batch Processing Strategies
async function sendEmailsInBatches(emails, batchSize = 10) {
  const batches = [];

  for (let i = 0; i < emails.length; i += batchSize) {
    batches.push(emails.slice(i, i + batchSize));
  }

  for (const batch of batches) {
    await Promise.all(batch.map(email => transporter.sendMail(email)));
    // Small delay between batches to avoid overwhelming the server
    await new Promise(resolve => setTimeout(resolve, 1000));
  }
}Caching and Reusability
class EmailService {
  constructor() {
    this.transporter = null;
    this.templates = new Map();
  }

  async getTransporter() {
    if (!this.transporter) {
      this.transporter = nodemailer.createTransporter({
        // Your configuration
      });
    }
    return this.transporter;
  }

  getTemplate(templateName) {
    if (!this.templates.has(templateName)) {
      const template = fs.readFileSync(`./templates/${templateName}.hbs`, 'utf8');
      this.templates.set(templateName, handlebars.compile(template));
    }
    return this.templates.get(templateName);
  }
}Monitoring and Analytics
Knowledge is power! Let’s set up monitoring and analytics to track your email performance and identify issues before they become problems.
Basic Email Tracking
const emailStats = {
  sent: 0,
  failed: 0,
  errors: []
};

async function trackEmailSending(mailOptions) {
  try {
    const info = await transporter.sendMail(mailOptions);
    emailStats.sent++;

    // Log successful sends
    console.log(`✅ Email sent to ${mailOptions.to} at ${new Date().toISOString()}`);

    return { success: true, info };
  } catch (error) {
    emailStats.failed++;
    emailStats.errors.push({
      timestamp: new Date().toISOString(),
      recipient: mailOptions.to,
      error: error.message
    });

    return { success: false, error };
  }
}Health Check Endpoints
app.get('/email/health', (req, res) => {
  const healthStatus = {
    status: 'healthy',
    statistics: emailStats,
    lastError: emailStats.errors[emailStats.errors.length - 1],
    uptime: process.uptime()
  };

  res.json(healthStatus);
});Integration with Monitoring Services
const winston = require('winston');

const logger = winston.createLogger({
  level: 'info',
  format: winston.format.json(),
  transports: [
    new winston.transports.File({ filename: 'email-errors.log', level: 'error' }),
    new winston.transports.File({ filename: 'email-combined.log' })
  ]
});

async function monitoredEmailSend(mailOptions) {
  const startTime = Date.now();

  try {
    const result = await transporter.sendMail(mailOptions);
    const duration = Date.now() - startTime;

    logger.info('Email sent successfully', {
      recipient: mailOptions.to,
      subject: mailOptions.subject,
      duration: duration,
      messageId: result.messageId
    });

    return result;
  } catch (error) {
    const duration = Date.now() - startTime;

    logger.error('Email sending failed', {
      recipient: mailOptions.to,
      subject: mailOptions.subject,
      duration: duration,
      error: error.message
    });

    throw error;
  }
}Troubleshooting Common Problems
Even experienced developers run into email issues sometimes. Here’s your troubleshooting toolkit for the most common node mailer problems!
Authentication Problems
Problem: “Invalid login” or “Authentication failed” Solutions:
- Verify email and password are correct
- Use App Passwords for Gmail accounts with 2FA
- Check if “Less secure app access” is enabled
- Ensure your account isn’t temporarily locked
Connection Issues
Problem: “Connection timeout” or “ECONNREFUSED” Solutions:
- Check your internet connection
- Try different SMTP ports (587, 465, 25)
- Disable firewall temporarily to test
- Verify SMTP server address is correct
Email Delivery Problems
Problem: Emails sent but not received Checklist:
- Check spam/junk folders
- Verify recipient email addresses
- Monitor sender reputation
- Review email content for spam triggers
Rate Limiting Issues
Problem: “Too many emails” or rate limit errors Solutions:
// Implement delay between emails
async function sendWithDelay(emails, delayMs = 1000) {
  for (const email of emails) {
    try {
      await transporter.sendMail(email);
      await new Promise(resolve => setTimeout(resolve, delayMs));
    } catch (error) {
      console.error('Email failed:', error.message);
    }
  }
}Memory and Performance Issues
Problem: High memory usage or slow performance Solutions:
- Implement connection pooling
- Use email queues for bulk sending
- Close transporter connections when done
- Monitor and limit concurrent connections
// Proper cleanup
process.on('SIGINT', async () => {
  console.log('Closing email transporter...');
  transporter.close();
  process.exit(0);
});Conclusion
Congratulations! You’ve just mastered the art of email sending with Node Mailer. From basic setup to advanced features, you now have all the tools you need to build robust email functionality into your applications.
Remember, node mailer is more than just a tool – it’s your gateway to better user communication. Whether you’re sending welcome emails, password resets, or marketing campaigns, the techniques you’ve learned will serve you well in your development journey.
The key to success with node mailer is practice and experimentation. Start with simple emails, then gradually incorporate more advanced features as your needs grow. Don’t forget to prioritize security, monitor your email performance, and always test thoroughly before going live.
Frequently Asked Questions
Is Node Mailer free to use and what are the limitations?
Yes, Node Mailer itself is completely free and open-source with no licensing fees. However, you’ll need an email service provider (like Gmail, SendGrid, or your own SMTP server) to actually send emails. Free email providers typically have sending limits – Gmail allows about 500 emails per day for free accounts, while paid services like SendGrid offer higher limits and better deliverability rates.
Can I send emails without exposing my password in the code?
Absolutely! You should never hardcode passwords in your source code. Use environment variables to store sensitive credentials securely. Create a .env file with your credentials, install the dotenv package, and access them using process.env.YOUR_VARIABLE. For production applications, consider using more secure authentication methods like OAuth2 or API keys provided by email service providers.
Why are my emails going to the spam folder and how can I fix it?
Emails often end up in spam due to several factors: poor sender reputation, lack of authentication records (SPF, DKIM), suspicious content, or sending from shared IP addresses. To improve deliverability, use a reputable email service provider, authenticate your domain, avoid spam trigger words, include unsubscribe links, and maintain good sending practices. Consider using dedicated email services like SendGrid or Mailgun for better inbox placement.
How many emails can I send at once with Node Mailer?
The number depends on your email provider’s limits and your node mailer configuration. Gmail free accounts limit you to about 500 emails per day, while business accounts allow up to 2,000. For bulk sending, implement connection pooling, batch processing, and delays between sends to avoid overwhelming servers. Professional email services like SendGrid can handle thousands of emails per hour with proper configuration.
What’s the best way to handle email failures and retry logic?
Implement comprehensive error handling with different strategies for different failure types. For temporary failures (network issues), use exponential backoff retry logic. For permanent failures (invalid email addresses), log the error and don’t retry. Consider using email queues like Bull or Agenda for reliable delivery, and always monitor your email statistics to identify patterns in failures and adjust your sending strategy accordingly.
Stop Wasting Time on Servers. Start Building Instead.
You didn’t start your project to babysit servers. Let ServerAvatar handle deployment, monitoring, and backups — so you can focus on growth.
Deploy WordPress, Laravel, N8N, and more in minutes. No DevOps required. No command line. No stress.
Trusted by 10,000+ developers and growing.