
Have you ever wished you could inject a piece of PHP code into every script on your website, automatically, without touching every single file? That’s exactly what auto_prepend_file does!
Think of it like a welcome message played before every customer support call. You don’t need to repeat it every time, it plays automatically. In PHP, auto_prepend_file does the same. It lets you add essential scripts like security headers, logging tools, or configuration files before anything else loads.
Whether you’re managing a single site or a fleet of them using tools like ServerAvatar, understanding this PHP feature can simplify your workflow significantly.
Let’s dive into the step-by-step usage, benefits, real-world examples, and how ServerAvatar makes it even easier!
What is auto_prepend_file in PHP?
The auto_prepend_file is a PHP directive that tells the PHP interpreter to include a specific file before executing any PHP script.
This means if you set a file in auto_prepend_file, that file will be automatically loaded at the beginning of every script. It’s useful for loading functions, configuration settings, authentication checks, or analytics scripts, without manually adding them to every single file.
Why Use auto_prepend_file?
Let’s say you manage 20 websites. You need to add the same logging function or security header in all PHP files. Instead of editing hundreds of files, wouldn’t it be easier to just set it once and let PHP handle the rest?
That’s the magic of auto_prepend_file.
Use it to:
- Load global functions or constants
- Add security headers
- Integrate custom error handlers
- Enforce authentication rules
- Inject analytics or tracking code
How It Works Behind the Scenes
When a PHP script runs, the interpreter first checks if auto_prepend_file is set. If yes, that file is executed before your actual PHP file.
It’s like a script saying, “Hey, before you run this file, make sure you run this other important stuff first.”
If the file doesn’t exist or causes an error, the main script won’t run.
Setting Up auto_prepend_file via php.ini
If you have access to your server’s php.ini file (the main configuration file for PHP), this is the best and most reliable way to set the auto_prepend_file directive. This method ensures that your specified PHP file is loaded automatically before any other PHP script runs on the server.
Using ServerAvatar
ServerAvatar is a platform to simplify the deployment and management of servers and applications. It simplifies the process to deploy and manage PHP and Node.js based web applications on servers. If you’re using ServerAvatar to manage your servers and applications, “ auto_prepend_file” in PHP for your application is incredibly simple and doesn’t require editing PHP configuration files manually.
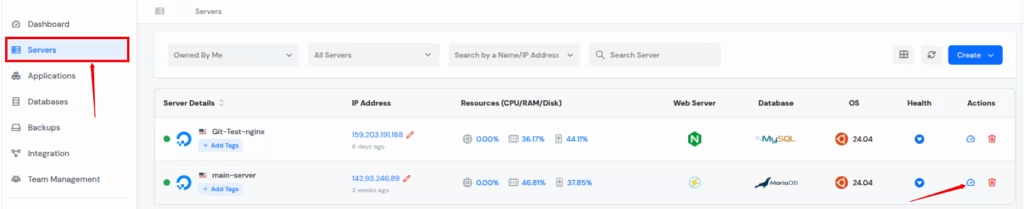
Step 1: Access ServerAvatar Panel
Log in to your ServerAvatar account and navigate to the Server panel by clicking on the Dashboard icon for the server where your application is hosted.
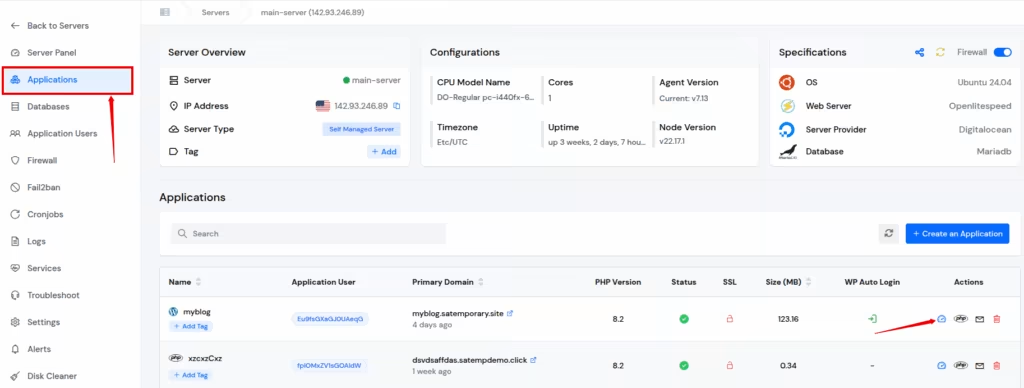
Step 2: Access Application Panel
Go to the Applications section from the left-hand sidebar and select click on the application dashboard icon for the application you want.
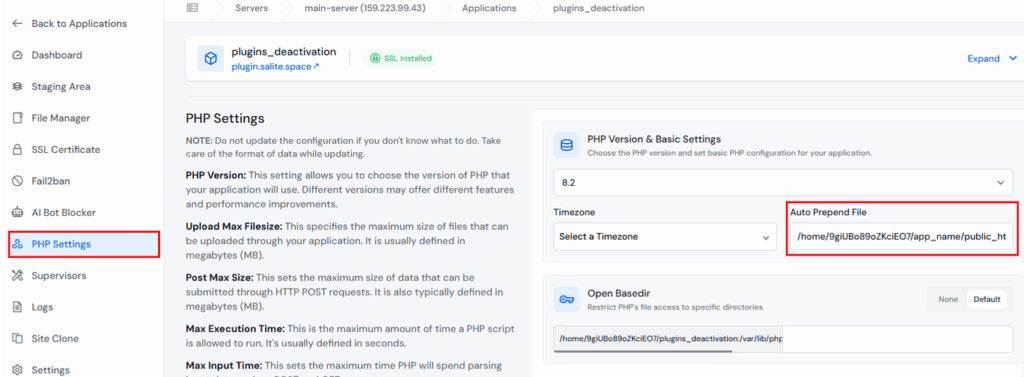
Step 3: Modify PHP Settings
Click on “PHP Settings” from the left sidebar of application panel. In the PHP Settings section, you will see various configurable options.
Find the filed named Auto Prepend File. Enter your File path and Click on “Update Settings” button at the bottom of the section.
Step 4: Restart your Web Server
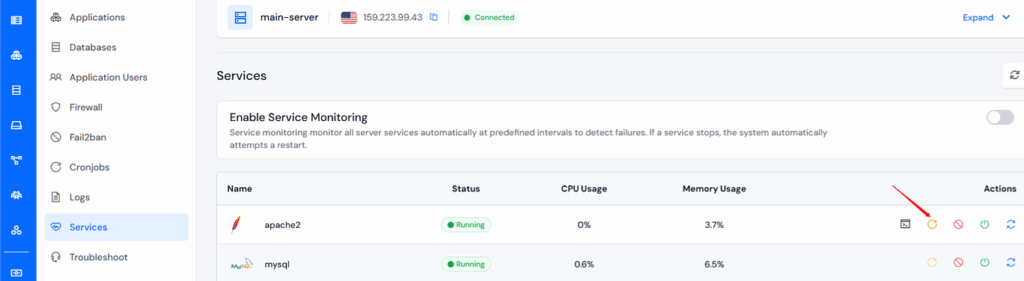
- Navigate to your appropriate Server Panel >> Services section.
- Restart your web server service by clicking on the “Reload” icon to apply new settings.
ServerAvatar will automatically update the PHP configuration, and the change takes effect immediately. This method is very easy and ideal for beginners or anyone who wants a fast, error-free way to manage PHP settings without touching the command line.

Manually Using PHP File
Step 1: Locate Your php.ini File
The php.ini file’s location depends on your server and PHP version. You can find the exact path by creating a simple PHP file and adding the following line:
<?php phpinfo(); ?>- Save this file as info.php and upload it to your server.
- Access it through your browser:
For example, https://yourdomain.com/info.php - Look for the value next to Loaded Configuration File – that’s your php.ini path.
Example path:
/etc/php/8.2/apache2/php.ini (Apache)
/etc/php/8.2/fpm/php.ini (Nginx with PHP-FPM)
Step 2: Open the php.ini File
- Log in to your server using SSH (if you’re using a VPS or cloud server).
- Open the php.ini file using a text editor like nano or vim.
sudo nano /etc/php/8.2/apache2/php.ini
(Replace the path with the one you found in Step 1.)
Step 3: Add the auto_prepend_file Line
Scroll to the bottom of the file (or search using CTRL + W if using nano) and add this line:
auto_prepend_file = "/var/www/yourdomain.com/includes/global.php"
Important Notes:
- The file path must be absolute (full path, not relative).
- Make sure the file exists and is readable by the PHP process.
- This file will now be prepended to every PHP script that runs on your server.
Step 4: Save and Exit
- If you’re using nano, press CTRL + X, then Y, then Enter to save and exit.
- For vim, press Esc, type :wq, and hit Enter.
Step 5: Restart Your Web Server
After making changes to php.ini, you must restart the web server so PHP can apply the new configuration.
For Apache:
sudo service apache2 restartFor Nginx (with PHP-FPM):
sudo service php8.2-fpm restart
sudo service nginx restart(Replace 8.2 with your PHP version.)
Now, every time a PHP script runs, the specified file will automatically be included first. You can test it by adding a simple echo statement in your global.php file:
echo "Prepended file loaded!<br>";Then visit any PHP page on your site and you should see that message at the top – confirming it works!
Conclusion
Auto_prepend_file can help you centralize configuration, enhance security, and minimize redundancy in your PHP applications.
It’s not just a feature – it’s a superpower for developers and sysadmins alike. And when combined with tools like ServerAvatar, it becomes even more efficient and safer to use.
Just remember to test thoroughly, handle errors properly, and keep things clean and modular.
FAQ
1. Can I use multiple files with auto_prepend_file?
No, you can only specify one file. But that file can include or require others.
2. Will auto_prepend_file affect WordPress or Laravel apps?
Yes, it might. Test carefully, especially if you’re modifying headers or session data early in the script lifecycle.
3. Is auto_prepend_file good for shared hosting?
Yes, you can use it via .htaccess, but make sure your host allows overriding PHP values.
4. How do I disable auto_prepend_file temporarily?
Comment out the line in php.ini or .htaccess, restart your server, or remove the path.
5. Does ServerAvatar support editing auto_prepend_file?
Absolutely! ServerAvatar provides an intuitive UI under PHP settings to manage it safely and efficiently.